Embed Size (px)
Citation preview

AurorA DESIGN STANDArDS
December 2011
Stages 22 & 23


AurorA iS deSigned for you to enjoy A better todAy, And better tomorrowSTo ensure Aurora is an engaging, attractive community, Places Victoria has created the Aurora Design Standards to help you and your builder design and construct a home that will offer both a more comfortable lifestyle through innovative design, and positively contribute to Aurora’s overall visual appeal.
By ensuring your new home complements Aurora’s community, streetscapes and your neighbour’s home, you will also help promote sustainable development, and importantly, protect your investment.
All Aurora Design Standards are detailed within this document, as well as being registered on Title and located within your Contract of Sale. They are easy to follow, and rather than be restrictive, are there to encourage interesting and diverse architecture and high quality homes.
Design StandardsIntroduction
3


APProVALSApprovals Process Overview
Assessment Application Checklist
Preliminary Assessment
Final Assessment
Further Conditions

ApprovAlS proceSSthe ApprovAl proceSS includeS two StAgeSof ASSeSSment; preliminAry And finAl.The goal of the preliminary assessment is to provide an indication as to whether your design is likely to comply with the Standards, and if need be, share advice on changes that should be made to ensure your new home does meet the Design Standards. Once your design successfully completes the preliminary assessment, a final submission is made.
Every effort will be made to advise owners of submission outcomes within 10 working days of the submission being received.
In addition to the Design Standards, you must also obtain any relevant planning and building approvals from the Responsible Authority, typically the Local Council.
Aurora Approvals
6

Aurora Approvals
7


Aurora Approvals
9
MAkE AMENDMENTS AS rEquIrED
BuILDEr/DESIGNEr To uNDErTAkE SITE ANALySIS
- rEfEr SuBMISSIoN ChECkLIST
- ALLow APProXIMATELy 10 BuSINESS DAyS for ASSESSMENT
- fINAL APProVAL GrANTED By PLACES VICTorIA (EXCEPT for DuAL oCCuPANCy LoTS AND LoTS uNDEr 300M2, whICh ArE SuBjECT To SEPArATE CouNCIL PLANNING PErMIT APPLICATIoN AND APProVAL).
fINAL ASSESSMENT
BuILDING APProVAL GrANTED By your BuILDING SurVEyorBuILDING PErMIT
ENSurE CoMPLIANCE wITh CouNCIL LoCAL AND By-LAwS, BuILDING PErMIT rEquIrEMENTS AND DESIGN STANDArDS
CoNSTruCT rESIDENCE
APProVAL of PLACES VICTorIA rEquIrED PrIor To uNDErTAkING ThESE workS
EXTENSIoNS/rENoVATIoNS/LANDSCAPING/fENCING/oThEr
rEfErENCES:
- DESIGN STANDArDS- PLANNING AND BuILDING rEGuLATIoNS
DESIGN rESIDENCE
- DISCuSS wITh ThE PLACES VICTorIA rEPrESENTATIVES
- rEfEr SuBMISSIoN ChECkLISTPrELIMINAry ASSESSMENT
PLAC
ES V
ICTo
rIA
ProC
ESS
LAND PurChASE(CoNTrACTS EXChANGED)
kEy STEPS To PLANNING your NEw hoME

Aspect Design Standards
10
Aurora Approvals
11
SuBMISSIoN ChECkLISTAvoid unnecessary delays by ensuring ALL information has been submitted.
All plans must be initialled by the lot owner and builder, and include:
- The lot number and street address;
- The lot owner’s full name and contact number; and
- The builder’s business name and contact number.
PrELIMINAry ASSESSMENT- Site PlAn (A3, 1:200 SCAle)
1. North point
2. Lot boundaries, lot dimensions, lot area
3. Outline of lot specific building envelope
4. Dimensions of the proposed dwelling
5. Site Coverage Calculations:
a. Ground Floor b. First Floor (if applicable) c. Garage d. Porch e. Impervious Surface
6. Dimensions of setbacks from dwelling to boundaries
7. Secluded Private Open Space dimensions and hatched area
8. Original and proposed finished ground levels, including changes in level
9. Driveway and all hard services (concrete, paving and tiling etc)
10. Location of services equipment (meter box, hot-water system, rainwater tank, bin area etc)
11. Location of existing trees and posts
12. Location and details of boundary fencing and return fences
fINAL ASSESSMENTin ADDitiOn tO inFORMAtiOn ReQUiReD FOR PReliMinARY ASSeSSMent - Floor plans (A3, 1:100 scale)
1. Internal layout including rooms, balconies, veranda, decks, windows, openings and dimensions
2. Location of services equipment (meter box, hot-water system, rainwater tank, bin area etc)
- Roof plan and front, sides and rear elevations (A3, 1:100 scale)
1. Elevations indicating proposed building height
2. Roof form and pitch detail
3. Sections
4. Location of services equipment (photovoltaic cells, heating and cooling units, satellite dishes, antennae etc)
- Shadow and overlooking diagrams (two storey dwellings only)
- external materials, colour and finishes
1. Example of proposed materials, colours and finishes for external walls, roof, driveways and fencing.
- energy rating
1. Accredited Energy Rating Report detailing achievement of 6-Star Energy Rating
furThEr CoNDITIoNS1. Places Victoria reserves the right to apply, vary or waive the Design Standards or any aspect of the Design Standards at its absolute discretion.
2. If any damage is caused to the public realm (including footpaths, kerbs, nature strips and planting) during the construction of your dwelling and landscape, the lot owner will be liable for the full cost of the rectification.
3. Any rectification works must be carried out by a contractor approved by Places Victoria. Places Victoria reserves the right to carry out the works itself and invoice the lot owner for the cost of the works.
4. If there is any inconsistency between the Design Standards and any other documentation then the Design Standards prevail unless otherwise specifically notified in writing by Places Victoria.
5. The Design Standards will apply to the lot / dwelling until such time as removed by Places Victoria.
6. All diagrams are indicative only and not to scale.
rESCoDEResCode is the Victorian residential design code and applies to all land zoned for residential use in Victoria. ResCode should be read in conjunction with these Design Standards as ResCode will apply on issues where these Design Standards are silent.

1. Dwelling density
2. Building envelopes and encroachments
3. Site coverage
4. Passive solar design and sun shading
5. Facade design
6. Roof form
7. Garages and driveways
8. external materials, finishes and colour palette
9. Service equipment, sheds, bins, signs and letterboxes
10. energy and water efficiency
11. Fencing
DESIGN STANDArDS

1. DwELLING DENSITy The number of dwellings per lot.
Objective
- To ensure the vision for neighbourhood form and character is achieved.
Standard
1. One dwelling must be constructed per lot.
nOteS:
- Exemptions applicable when the relevant Building Envelope Plan or Planning Permit identifies the lot as appropriate for dual occupancy or multiple dwellings.
- Allocated dual occupancy, multiple dwelling and lots less than 300sqm will require a Town Planning Permit.
2. BuILDING ENVELoPES & ENCroAChMENTS
2.1. BuILDING ENVELoPESBuilding envelopes define the maximum area and height of the dwelling.
Objectives
- To ensure the optimal size and shape of the dwelling.
- To ensure the maximum use of any northern orientation available to the dwelling.
Standard
1. Dwellings must be designed to achieve minimum setbacks as detailed in the relevant Building Envelope Plan.
nOteS:
- Building Envelopes consist of plans and profile diagrams that illustrate the mandatory setbacks from lot boundaries.
- All building envelopes have been sized and located to ensure the optimal developable area is available to construct a dwelling.
- Building Envelope Plans are a legal document and are a restriction on Title.
- Building envelopes indicate the buildable area for a dwelling. Site coverage requirements must be considered when designing the dwelling.
Aurora Design Standards
14

2.2. ENCroAChMENTS Elements of a dwelling which can be constructed outside of the building envelope.
Objective
• To allow appropriate encroachments outside of the building envelope.
Standards
1. The front entry porch including eaves, may encroach up to 1.5m into the front building envelope setback.
2. Eaves may encroach up to 500mm into the side and rear setbacks provided a 500mm gap is retained between the gutter and the boundary and the eave is not over a habitable room window.
3. Acceptable encroachment structures (except for eaves) must not be greater than 3.6m in height from finished ground level.
DeFinitiOnS:
Acceptable encroachment A component of the dwelling that is permitted outside the building envelope.
Front setback acceptable encroachments
• A porch • A verandah • A portico • A pergola • A masonry chimney • A sunblind • A flue or pipe • Decks, steps or landings
AuroraDesign Standards
15

Aurora Design Standards
16

3. SITE CoVErAGEThe percentage of a site that is covered by the dwelling and garage or other impervious materials.
Objectives
- To ensure a portion of the site remains pervious.
Standards
1. A front loaded dwelling must not cover greater than 70% of the lot.
2. A side or rear loaded dwelling must not cover greater than 75% of the lot.
3. Impervious materials must not cover greater than 80% of the lot.
Front Loaded House
Standard 1 - Diagram
Site Coverage
Maximum 70% lot coverage
Maximum 75% lot coverage
Maximum 75% lot coverage
Rear Loaded House Side Loaded House
Standard 2 - DiagramStandard 1 - Front loaded dwelliing
Front Loaded House
Standard 1 - Diagram
Site Coverage
Maximum 70% lot coverage
Maximum 75% lot coverage
Maximum 75% lot coverage
Rear Loaded House Side Loaded House
Standard 2 - Diagram
Front Loaded House
Standard 1 - Diagram
Site Coverage
Maximum 70% lot coverage
Maximum 75% lot coverage
Maximum 75% lot coverage
Rear Loaded House Side Loaded House
Standard 2 - DiagramStandard 2 - Rear & side loaded dwellings
Maximum 70%lot coverage
Maximum 75%lot coverage
Maximum 75%lot coverage
DeFinitiOnS:
impervious materials Materials which are resistant to water. These materials include, but are not limited to, concrete, pavers, tiles, sheds, garages and the dwelling itself.
AuroraDesign Standards
17

4. PASSIVE SoLAr DESIGN AND SuN ShADING
4.1. PASSIVE SoLAr DESIGNUsable external space which directly connects with, and allows sunlight to penetrate, the principal living space.
Objectives
- To connect the principal living space to the secluded private open space.
- To maximise secluded private open space located on the north and east sides of a dwelling.
- To provide north light and winter sun into the principal living spaces.
Standards
All lots
1. Secluded private open space must:
a. have direct access to the principal living spaces;
b. have a minimum area of 25m2; and
c. have a minimum dimension (shortest length) of 3m.
South, east and west facing lots
2. Secluded private open space:
a. must not be located south of the principal living space;
b. must have unroofed north facing principal living space windows with a minimum head height of 2 metres. It is reccomended that North windows achieve the following areas.
i. 3.6m2 glazing area for lots with frontages less than 14 metres.
ii. 5.4m2 glazing area for lots with frontages greater than 14 metres.
North facing lots
3. Secluded private open space may be located to the south of the principal living space where an alternate habitable room with north facing windows is provided.
nOteS:- While there is no passive solar standard for north facing lots with frontages less than 12.5m, it is highly recommended that all dwellings, regardless of lot width or orientation are provided with north facing living spaces.
DeFinitiOnS:
Secluded private open space Useable external space of a minimum area and dimension which directly connects with the principal living space.
Principal living space An internal living space which is commonly used, such the living room, family room and/or dining room.
Habitable rooms
All living rooms and bedrooms, but not kitchens, bathrooms, WC's or circulation space.
Aurora Design Standards
18

Living
NN
N
Living
2b.i
2b.i
3.
Habitableroom
LivingSPOS
Min 25m2
SPOSMin 25m2
SPOSMin 25m2
Standard 1, 2 & 3 - Secluded Private Open Space
* Refer to Building Envelope Plan (BEP) where setbacks are not shown.
4.2. SuN ShADINGStructural elements that shield harsh summer sun from habitable rooms.
Objectives- To minimise harsh summer sun and maximise valuable winter sun.
Standards
All windows
1. Roll down security shutters are not permitted where visible from public areas, such as street frontages, or reserves or parkland.
East and west facing habitable room windows
2. Windows are recommended to be double glazed. This will assist in the reduction of heat gain and external noise reduction.
North facing habitable room windows and glass doors
3. Must have a minimum 450mm eave or fixed top projection. Not required where the window is less than 1.5m from the side boundary.
DeFinitiOnS:
Habitable rooms
All living rooms and bedrooms, but not kitchens, bathrooms, WC's or circulation space.
AuroraDesign Standards
19

5. fACADE DESIGNThe character and form of the front of the dwelling facade.
Objectives
• Toensureacontemporaryapproachtothedesignofadwelling.
• Toensurethedesign,form,architecturaldetailingandscaleofeach dwelling facade contributes to the streetscape.
Standards
1. Façades must be contemporary in style.
2. Façades must not include historic references. (Refer to historic references definition)
3. Dwellings must have a feature front entry point, verandah or porch this is recommended to achieve a minimum of covered area of 3m2 and a suggested minimum entry width of 1.5 metres.
4. Any verandah, porch and pergola designs must be an integral component of the dwelling and roof form.
5. The front façade must not be continuously straight for more than 6.5m.
6. Double storey dwellings must contain architectural details such as balconies and / or protrusions to articulate the front façade.
7. The front façade must not include light weight infill panels above windows.
8. The front façade must have a minimum of 450mm eave and returned to side evelation/s to a minimum of 1.5 metres.
9. Where parapets are used on the front façade, they must be extended along the side elevation for a minimum of 1.5m.
10. Screens and feature walls must be integrated into the dwelling design.
11. Dwellings on corner lots and/or with secondary frontages to public open space must continue front façade design elements for a minimum of 6.5m to the secondary frontage.
12. Dwellings on corner lots or with secondary frontages to public open space must provide habitable room windows to the primary and secondary frontages.
13. Identical façade designs will not be allowed within 3 lots of each other along a streetscape.
nOteS:- An exemption from the provision of a front façade eave may be considered depending on the façade’s architectural detailing. Eave exemptions must conform with the sun-shading standard. (Refer to Section 4.2)
DeFinitiOnS:
Historic references These include but are not limited to fret work, colonial bars on windows, feature colums and period features or styles such as Colonial, Georgian, Victorian or Federation.
Habitable rooms All living rooms and bedrooms, but not kitchens, bathrooms, WCs or circulation space.
Design elements Windows, roof, balconies, verandahs, materials and finishes.
Aurora Design Standards
20

Standard 11-12 - Corner lot width dwelling
Façade Design
Standard 5 - Diagram
Minimum 1.5m
Standard 10 - Diagram
Parapet extendedto side elevation
Primary façade elements continued for minimum 6.6m
VerandahWindows
Roof form
Material Finish
Secondary Frontage
Bedroom
Kitchen
Dining
Living
Habitable Room
Floor Plan
Primary Frontage
Façade Design
Standard 5 - Diagram
Minimum 1.5m
Standard 10 - Diagram
Parapet extendedto side elevation
Primary façade elements continued for minimum 6.6m
VerandahWindows
Roof form
Material Finish
Secondary Frontage
Bedroom
Kitchen
Dining
Living
Habitable Room
Floor Plan
Primary Frontage
Façade Design
Standard 5 - Diagram
Minimum 1.5m
Standard 10 - Diagram
Parapet extendedto side elevation
Primary façade elements continued for minimum 6.6m
VerandahWindows
Roof form
Material Finish
Secondary Frontage
Bedroom
Kitchen
Dining
Living
Habitable Room
Floor Plan
Primary Frontage
Standard 9 - Parapets on the front facade
Material FinishWindows
Verandah
Roof Form
Primary façade elementscontinued for minimum 6.5m
Secondary Frontage
Primary Frontage
FLOORPLAN
Habitable RoomBedroom
Kitchen
Dining
Living
AuroraDesign Standards
21

6. roof forMThe shape and character of a roof.
Objectives
• To achieve consistency in roof form and colour to tie the streetscape together.
• To ensure each roof form reads as a strong, simple element from street level.
Standards
1. Roof forms must be an integral component of the dwelling design.
2. Pitched / Gabled and Hipped roofs must be pitched between 22.5 and 30 degrees.
3. Skillion roofs must be pitched between 10 and 30 degrees.
4. Flat roofs must be screened by a parapet wall.
Parapet
Roof Form
Standard 2-7 - Diagram
Skillion Roof
Gabled / Pitched Roof
Hipped Roof
Flat Roof
Parapet
Standard 9 - Diagram
Flat Roof
22.5 - 30 Degrees
22.5 - 30 Degrees
10 - 30 Degrees
1- 5 Degrees
Flat Roof
Roof Form
Standard 2-7 - Diagram
Skillion Roof
Gabled / Pitched Roof
Hipped Roof
Flat Roof
Parapet
Standard 9 - Diagram
Flat Roof
22.5 - 30 Degrees
22.5 - 30 Degrees
10 - 30 Degrees
1- 5 Degrees
22.5 - 30 Degrees
Standard 2 - Gabled / Pitched Roof
Roof Form
Standard 2-7 - Diagram
Skillion Roof
Gabled / Pitched Roof
Hipped Roof
Flat Roof
Parapet
Standard 9 - Diagram
Flat Roof
22.5 - 30 Degrees
22.5 - 30 Degrees
10 - 30 Degrees
1- 5 Degrees
22.5 - 30 Degrees
Standard 2 - Hipped Roof
Standard 5 - Flat Roof
Roof Form
Standard 2-7 - Diagram
Skillion Roof
Gabled / Pitched Roof
Hipped Roof
Flat Roof
Parapet
Standard 9 - Diagram
Flat Roof
22.5 - 30 Degrees
22.5 - 30 Degrees
10 - 30 Degrees
1- 5 Degrees
Standard 3 - Skillion Roof
10 - 30 Degrees
nOteS:
- Non-conventional roof designs may be considered on design merit.
- Elevations must be provided for consideration of non-conventional roof forms.
Aurora Design Standards
22

Standard 12 - Side loaded lot garages
5.5m
Front Loaded Lot Garages
5.5m
Minimum 1m
Standard 3 - Diagram Standard 5 - Diagram
5.5m
Rear Loaded Lot Garages
2m
Easement
Standard 8 - Diagram
Side Loaded Lot Garages
Standard 9 - Diagram
Garages / Carports
10.5m
Standard 11 - Rear loaded lot garages
5.5m
Front Loaded Lot Garages
5.5m
Minimum 1m
Standard 3 - Diagram Standard 5 - Diagram
5.5m
Rear Loaded Lot Garages
2m
Standard 8 - Diagram
3 m
Side Loaded Lot Garages
Standard 9 - Diagram
Garages / Carports
10.5m
7. GArAGES AND DrIVEwAyS
7.1. GArAGESCovered structure used to accommodate one or more vehicles.
Objectives
• Toensuregaragesdonotdominatethedwelling or the streetscape.
• Toensurethegarageisanintegralcomponentofthe dwelling design.
• Toensurethegarageprovidesanappropriatelevelofaccess.
• Toprovidesuitableparkingfortwoormorevehicles.
Standards
1. Garages with openings perpendicular to the street are not permitted.
2. Garages must be designed as an integral component of the dwelling and roof form.
3. Garages must be setback a minimum 5.5m from the front boundary.
4. Front loaded garages must have a 0-200mm offset to the side boundary OR at least 1m side setback.
5. Where two garages have a common side boundary, both garages must have a zero or at least 1m side setback.
6. Garages must be setback a minimum of 840mm from the front dwelling line. (Front dwelling line is referred to as the porch or entrance).
7. Garages on front loaded lots must not be greater than 6m in width.
8. Front loaded lots less than 10.5m in width are limited to a single garage when single storey.
9. The garage door must be panelled.
10. On lots greater than 12.5m width, garages may be constructed flush with the front building line only when a minimum 1m wide verandah, balcony or similar is provided to the full width of the dwelling.
Rear and side loaded garages
11. Garages on rear loaded lots must have a zero rear boundary setback OR in accordance with the allocated building envelope setback.
12. Garages located on a secondary frontage must be setback a minimum 2m from the side boundary OR in accordance with the allocated building envelope setback.
13. Garages may encroach into 1m side setbacks that do not abut streets or public open space.
nOteS:
- For the purposes of these standards, the term garage also refers to carports.
2m
AuroraDesign Standards
23

5.5m
Front Loaded Lot Garages
5.5m
Minimum 1m
Standard 3 - Diagram Standard 5 - Diagram
5.5m
Rear Loaded Lot Garages
2m
Standard 8 - Diagram
3 m
Side Loaded Lot Garages
Standard 9 - Diagram
Garages / Carports
10.5m
Standard 8 - lots less than 10.5m frontage
5.5m
Front Loaded Lot Garages
5.5m
Minimum 1m
Standard 3 - Diagram Standard 5 - Diagram
5.5m
Rear Loaded Lot Garages
2m
Standard 8 - Diagram
3 m
Side Loaded Lot Garages
Standard 9 - Diagram
Garages / Carports
10.5m
Standard 3 - Front building line setback
5.5m5.5m
Front Loaded Lot Garages
5.5m
Minimum 1m
Standard 3 - Diagram Standard 5 - Diagram
5.5m
Rear Loaded Lot Garages
2m
Standard 8 - Diagram
3 m
Side Loaded Lot Garages
Standard 9 - Diagram
Garages / Carports
10.5m
5.5m
5.5m
Minimum 840mm
Less than 10.5m
Standard 3 - Front loaded garages
5.5m
Front Loaded Lot Garages
5.5m
Minimum 1m
Standard 3 - Diagram Standard 5 - Diagram
5.5m
Rear Loaded Lot Garages
2m
Standard 8 - Diagram
3 m
Side Loaded Lot Garages
Standard 9 - Diagram
Garages / Carports
10.5m
5.5m
DeFinitiOnS:
Front loaded lotsFront loaded lots are defined as those with vehicle access from the primary street frontage (front end of the lot).
Rear loaded lotsRear loaded lots have vehicle access from the rear of the lot via a laneway or side street.
Side loaded lotSide loaded lots have vehicle access from the secondary frontage (side of the lot).
Aurora Design Standards
24

7.2. DrIVEwAySObjectives
• Tominimisetheimpactofdrivewaysonthestreetscape.
Standards
1. A maximum of one crossover per lot.
2 The driveway must not be wider than the garage and the crossover.
3. A minimum 300mm landscape strip must be provided to the side boundary.
4. The construction of driveways must not cut through existing footpaths.
5. Driveways must be constructed prior to occupancy and any applicable landscaping request.
nOteS:
- The locations of crossovers are fixed and must not be altered unless approved by Places Victoria.
- The request for relocation must be submitted to Places Victoria in writing with a site plan prior to consideration.
- The cost of crossover relocation and associated landscaping works will be borne by the lot owner.
- Crossover relocation approvals require the existing crossover to be removed and curb and channel reinstated to match the existing. Associated costs will be borne by the lot owner/building.
Driveways
Standard 2 - Diagram
Width of garage door
Width of crossover at property boundary
Standard 2 - Driveway width
Width of crossover atproperty boundary
Width of garage
AuroraDesign Standards
25

8. EXTErNAL MATErIALS, fINIShES AND CoLour PALETTE
Elements used to give character and form to the elevations of a dwelling.
Objectives
• Toachieveconsistencyintexturesandtonestotiethestreetscape together.
• Toensureeachhousefaçadereflectsandcomplementsthenatural landscape.
• Toensureeachhousefaçadehasanappropriatemixoftexturesand tones.
Standards
1. All external materials and colours must be selected from the External Materials, Colours and Finishes Palette.
2. A minimum of two materials must be used to treat the front façade (and secondary façade where applicable). Full render to a facade would be approved where a minimum of 2 render colours are selected.
3. Approximately 60% of the front facade must be selected from the primary colours/materials; 40% from the secondary;
4. Materials used on the front façade must extend to the side elevation for a minimum of 1.5m.
5. Imitation finishes, such as vinyl brick sheeting, are not permitted.
6. Raw zincalume or hand painted garage doors are not permitted.
7. Roofs must be finished using concrete, slate, terracotta tiles or metal sheeting.
Driveways
8. The driveway must be constructed using exposed aggregate concrete, colour-through concrete, slate or natural stone pavers.
9. The driveway must achieve a matt (non shiny or reflective) finish.
10. The driveway colour must be muted and must complement the primary colour of the house.
11. Plain (uncoloured) concrete or bright coloured driveways are not permitted.
Rainwater tanks
12. The colour of the rainwater tank must be integrated in colour and material with the house.
13. Plastic rainwater tanks in bright or contrasting colours are not permitted.
14. Rainwater tanks must not be visible from street and park frontages.
nOteS: - Garage doors are not considered a primary material.
- Windows should avoid heavy tinting or mirror-like finishes.
DeFinitiOnS:
Solid material
• Rendered or bagged masonry • Rendered or bagged sheeting • Face brick • Natural stone
lightweight materials
• Timber boards • Weatherboards • Cement sheeting panels • Metal cladding such as stainless steel, custom orb,
zinc or copper
Aurora Design Standards
26
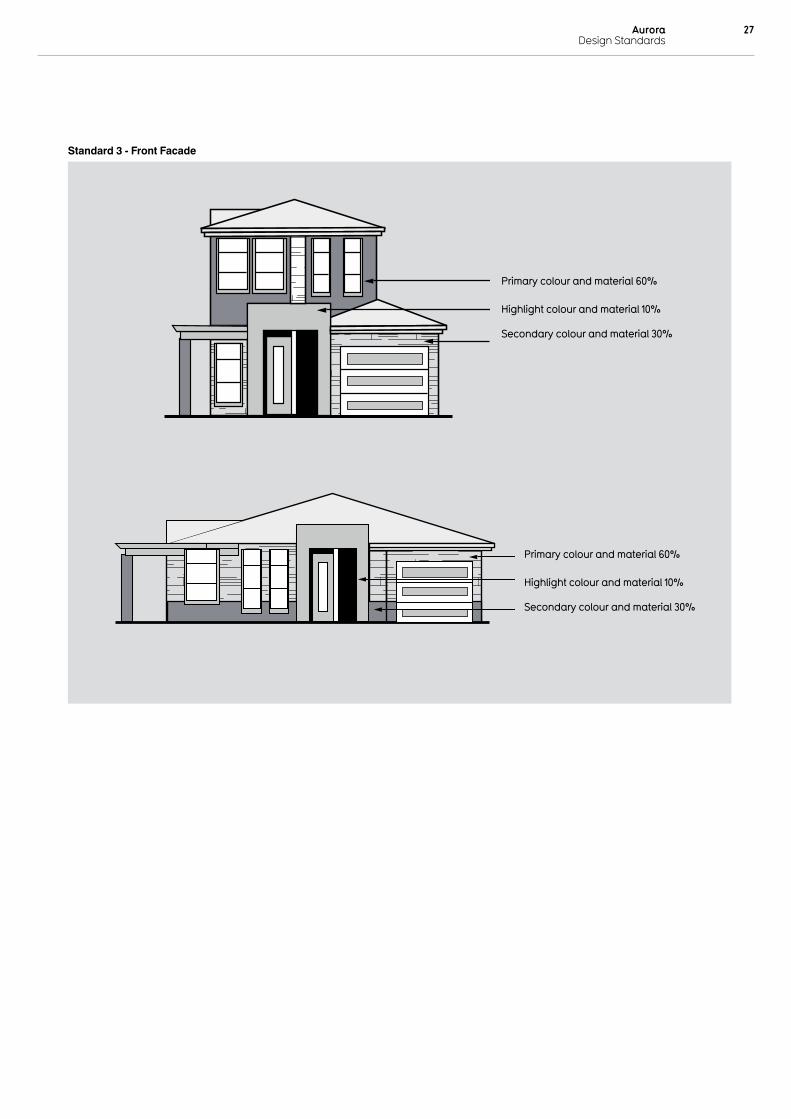
Standard 3 - Front Facade
Primary colour and material 60%
Highlight colour and material 10%
Secondary colour and material 30%
Primary Frontage - Single Storey Home
Primary Colour and Material 60%
Secondary Colour and Material 30%
Highlight Colour and Material 10%
Primary Frontage - Double Storey Home
Primary Colour and Material 60%
Secondary Colour and Material 30%
Highlight Colour and Material 10%
Material and Colour Palette
Standard 1 - Diagram
AuroraDesign Standards
27

EXTErNAL MATErIALS, CoLourS & fINIShES
Roof ColourThe colour of the roof must be selected from the range.
Primary Colours/Materials (60%)The Primary Colours for the facade must be selected from the following range.
Secondary Colours/Materials (40%) The Secondary Colours and Highlight Colours for the facade must be selected from the following range.
Aurora Design Standards
28
Dulux BlueJasmine
Dulux CalfSkin
Dulux NapkinWhite
Dulux PaleGreen Tea
Dulux FairBianca
Dulux FairBianca
Dulux LiliumTwo
TaubmansRouge Royal
TaubmansFirethorn
TaubmansWarm Ochre
Dulux ArmyIssue
Dulux Linseed
Dulux Lexicon
Dulux Silkwort
Dulux Tangent
Dulux BlueJasmine
Dulux BlueRibbon
TaubmansGreen Plaza
TaubmansPesto Green
Dulux ArmyCanvas
Dulux NightWizard
Dulux EgyptianGold
TaubmansWaldorf Green
Dulux Facemark
Dulux Liddell
TaubmansHuntington Green
Dune
Windspray
Gunmetal
Shale Grey
Stormgrey
Mineral
(1)
(1)
(1)
(2)
(2)
(2)
Use Dulux and/or Taubmans Colour Range or similar or equivalent paints from other companies.
Roof • (1) Colorbond • (2) Boral Concrete Tiles

COnDitiOnS:
Alternative materials, colours and finishes may be assessed on merit. Approval will be at the absolute discretion of Places Victoria.
nOteS: - These colours are indicative only and may vary
from the actual paint colours. - Places Victoria recommends that purchasers
inspect actual paint colours prior to making any selection.
- Use Dulux and/ or Taubmans Colour Range or similar, equivalent paints from other companies.
- Garage doors are not considered a primary material.
- Windows should avoid heavy tinting or mirror-like finishes.
DeFinitiOnS:
Primary Material
• Rendered or bagged masonry • Rendered or bagged sheeting • Face brick • Natural stone
Secondary Materials
• Timber boards • Weatherboards • Cement sheeting panels • Metal cladding such as stainless steel, custom
orb, zinc or copper• Rendered or bagged masonry or sheeting (colour
variation required from primary colour selection)
AuroraDesign Standards
29
Dulux BlueJasmine
Dulux CalfSkin
Dulux NapkinWhite
Dulux PaleGreen Tea
Dulux FairBianca
Dulux FairBianca
Dulux LiliumTwo
TaubmansRouge Royal
TaubmansFirethorn
TaubmansWarm Ochre
Dulux ArmyIssue
Dulux Linseed
Dulux Lexicon
Dulux Silkwort
Dulux Tangent
Dulux BlueJasmine
Dulux BlueRibbon
TaubmansGreen Plaza
TaubmansPesto Green
Dulux ArmyCanvas
Dulux NightWizard
Dulux EgyptianGold
TaubmansWaldorf Green
Dulux Facemark
Dulux Liddell
TaubmansHuntington Green
Dune
Windspray
Gunmetal
Shale Grey
Stormgrey
Mineral
(1)
(1)
(1)
(2)
(2)
(2)
Use Dulux and/or Taubmans Colour Range or similar or equivalent paints from other companies.
Roof • (1) Colorbond • (2) Boral Concrete Tiles

9. SErVICE EquIPMENT, ShEDS, BINS, SIGNS AND LETTErBoXES
9.1. SErVICE EquIPMENT, ShEDS, BINS AND SIGNS
Objective
• Toensureserviceequipment,sheds,binsandsignsdonotclutter the appearance of the dwelling and detract from the streetscape.
Standards
1. Switchboards and meter boxes must be: - located in garages; or - if required by authorities, located to the side of the dwelling.
2. Satellite dishes, antennae or external receivers must: - be located to the rear of the dwelling; and - not be in public view.
3. Heating and cooling units must: - be located towards the rear of the dwelling; - not be visible from the street; and - if located on the roof, be positioned below the ridge line to the
middle of the roof and coloured to match the roof.
4. Photovoltaic cells must be located to maximise their efficiency and integrate with the roof form.
5. Garden sheds must: - not be in public view; - not be greater than 2.4m in height; and - match the appearance of the dwelling in form, colour and
materials if it is greater than 10m2.
6. Rubbish bin storage areas must: - not be in public view; and - not be greater than 2.4m in height.
7. Solar hot water systems must not be in public view, excluding corner lots.
8. Washing lines must not be in public view.
9. Other ancillary structures must not be in public view.
10. Dwelling names or home business signs must - not exceed 20cm; and - integrate with the facade design.
nOte:
- Home business signs may require council approval.
DeFinitiOn:
Ancillary Structures
Other structures in addition to the dwelling and garage/ carport.
9.2. LETTErBoXESObjective
• To ensure the form and style of the letter-box complements the design of the dwelling.
Standards
1. Letter-boxes must complement the dwelling in colour, design and material.
Aurora Design Standards
30

10. ENErGy AND wATEr EffICIENCy
10.1. ENErGy rATINGObjective
• Tominimisedwellingenergyconsumptionrequirements.
Standards
1. All dwellings must achieve a minimum 6-Star Energy Rating.
2. An assessment report from an accredited energy rating consultant must be submitted.
10.2. ENErGy METErINGObjective
• Tohelpresidentsunderstandtheamountandcharacteristics of their energy consumption.
Standards
1. It is reccomended that all dwellings include an energy metering device which has an in-home display that demonstrates dwelling energy use and greenhouse gas emissions to the user.
10.3. hEATING AND CooLINGObjectives
• To provide effective heating and cooling to each dwelling.
• To ensure an appropriate level of comfort.
• To minimise heat loss and resource use.
Standards
1. Heating and cooling appliances are encouraged to have a minimum star rating as outlined below:
a. Gas convection heater = 4 Star.
b. Central Ducted = 5 Star.
c. A minimum duct insulation level of R1.5 must be used when ducted heating is desired.
d. Reverse Cycle <2kW = 4 Star cooling and 4 Star heating.
e. Cooling Appliances <2kW = 4 Star.
f. Cooling Appliances 2 - 4kW = 5 Star.
g. Cooling Appliances 4 – 6kW = 4 Star.
h. Cooling Appliances 6 – 7kW = 3.5 Star.
i. An inverter system must be used when a split system air conditioner is desired.
j. A hydronic heating system may be installed. Although this type of heating does not have a star rating, it provides a comfortable radiant heat that is energy efficient.
nOteS:
- The minimum star rating for appliances varies due to their output range.
- To find manufacturers contact details for the appropriate star rated products, please visit: www.energyrating.gov.au
10.6. rECyCLED wATErObjective
• To reduce the amount of potable water consumed by a dwelling.
Standards
1. Connection to Class A recycled water main (commonly known as The Third Pipe) is mandatory.
2. The Third Pipe must be connected to all toilets and front and rear garden irrigation.
10.4. LIGhTINGObjective
• Tominimisedwellingenergyrequirementsforlighting.
Standards
1. External light fittings must not result in excessive light spill.
10.5. wATEr EffICIENCyObjective
• To reduce the amount of potable water consumed by the dwelling.
Standards
1. All water fixtures and fittings must comply with Victorian industry regulations.
AuroraDesign Standards
31

11. fENCING
Objectives
• Toachieveanattractiveandcomplementarystreetscape.
• Toencouragepassivesurveillanceofthestreet.
Fencing types
The type of fencing installed will be determined by the location of the lot and the type of dwelling it can accommodate.
• Interlotfencing
• Returnfencing
• Cornerfencing
• Frontfencing
Fencing types
1. Fencing must comply with the following table as applicable:
Note: Interlot and return fencing must not come forward of the building line
2. All timber fencing must be ACQ (non-arsenic) treated.
3. All fencing must be setback from any retaining walls a minimum distance of 450mm.
4. Fencing visible from the public realm must not be finished in bright primary colours.
location type interlot Corner Return Front
transparency(minimum %)
0% 20% 50% NA
length (minimum %)
Na (1) 70% of lot depth
Na (1) Varies
Height (m)
1.2m maximum
Setback (minimum in metres)
1m behind building line
6.5 behindbuilding line
1m behind building line
0m or 0.5m
Materials (selected list)
Timber Must not be metal
Timber Must not be metal
1.8m average/ 2.0m maximum
INTErLoT fENCINGFencing behind the building line between neighbouring lots.
Standards
1. The fence must be constructed using timber palings.
2. The fence must not be greater than 2m in height.
3. The fence must not be substantially visible from the street.
4. The fence must be set back at least 1m from the front building line.
5. Adjoining lot owners with common boundaries must share the cost of the interlot fence.
REAR BOuN
DARy
interlot Fencing Arrangement and elevation
1950
MAX
SPLAYED TOP TO SHED WATER
125 x 75 POST
75 x 50 RAILS, CUT ALL RAIL ENDS & JOIN TO ACHIEVE FLUSH JOINT
PALINGS
2mm MAX GAP BETWEEN RAIL AND POST
150 x 38 PLINTH
CONCRETE FOOTING
1950
mm
100m
m
ADJACENT LOT SIDE BOUNDARY
BUILDING FOOTPRINT REAR BOUNDARY
ADJACENT LOT SIDE BOUNDARY
FRONT BOUNDARY
INTERLOT FENCING SETBACK 1M BEHIND FRONT BUILDING LINE
1950
MAX
SPLAYED TOP TO SHED WATER
125 x 75 POST
75 x 50 RAILS, CUT ALL RAIL ENDS & JOIN TO ACHIEVE FLUSH JOINT
PALINGS
2mm MAX GAP BETWEEN RAIL AND POST
150 x 38 PLINTH
CONCRETE FOOTING
1950
mm
100m
m
ADJACENT LOT SIDE BOUNDARY
BUILDING FOOTPRINT REAR BOUNDARY
ADJACENT LOT SIDE BOUNDARY
FRONT BOUNDARY
INTERLOT FENCING SETBACK 1M BEHIND FRONT BUILDING LINE
ADjACENT LOT SIDE BOuNDARy
INTERLOT FENCING SETBACK 1M BEHIND
FRONT BuILDING LINE
ADjACENT LOT SIDE BOuNDARy
REAR BOuN
DARy
FRON
T BOuN
DARy
BuILDING FOOTPRINT
2M M
Ax
Aurora Design Standards
32

rETurN fENCINGFencing between the dwelling and the side fencing.
Standards
1. The fence must be constructed using open timber slats.
2. If a gate is included it must complement the return fence by matching in colour and material.
3. The fence must be setback 1m from the front building line.
typical Return Fencing Arrangement and elevation
1950
MAX
ADJACENT LOT SIDE BOUNDARY
BUILDING FOOTPRINT REAR BOUNDARY
ADJACENT LOT SIDE BOUNDARY
RETURN FENCING SETBACK 1M BEHIND THE FRONT
BUILDING LINE
FRONT BOUNDARY
ADJACENT LOT SIDE BOUNDARY
BUILDING FOOTPRINT
REAR BOUNDARY
ADJACENT LOT SIDE BOUNDARY
RETU
RN F
ENCI
NG
FRONT BOUNDARY
RETURN FENCING SETBACK 1M BEHIND THE FRONT BUILDING LINE
ADjACENT LOT SIDE BOuNDARy
RETuRN FENCING SETBACK 1M BEHIND
FRONT BuILDING LINE
ADjACENT LOT SIDE BOuNDARy
REAR BOuN
DARy
FRON
T BOuN
DARy
BuILDING FOOTPRINT
1950
MAX
ADJACENT LOT SIDE BOUNDARY
BUILDING FOOTPRINT REAR BOUNDARY
ADJACENT LOT SIDE BOUNDARY
RETURN FENCING SETBACK 1M BEHIND THE FRONT
BUILDING LINE
FRONT BOUNDARY
ADJACENT LOT SIDE BOUNDARY
BUILDING FOOTPRINT
REAR BOUNDARY
ADJACENT LOT SIDE BOUNDARY
RETU
RN F
ENCI
NG
FRONT BOUNDARY
RETURN FENCING SETBACK 1M BEHIND THE FRONT BUILDING LINE
ADjACENT LOT SIDE BOuNDARy
ADjACENT LOT SIDE BOuNDARy
RETuRN FENCING SETBACK 1M BEHIND FRONT BuILDING LINE RETuRN
FENCIN
G
FRON
T BOuN
DARy
BuILDING FOOTPRINT2M
MAx
typical Corner Fencing Arrangement and elevation
CorNEr fENCINGFencing w lots.
Standards
1. The fence must be constructed using:
a. Rendered or bagged masonry with infill steel pickets OR timber pickets;
b. Timber pickets with masonry;
c. Horizontal or vertical timber pailings with capping and exposed posts must include a minimum of 20% transparency.
2. The preferred construction material must comply with the Material and Colour Palette Standards set out in section 8.
3. The fence must not be greater than 2m in height.
4. The fence must be setback at least 6.5m behind the front building line.
6. The fence must not be longer than 70% of the lot depth.
1950
MAX
ADJACENT LOT SIDE BOUNDARY
BUILDING FOOTPRINT REAR BOUNDARY
ADJACENT LOT SIDE BOUNDARY
RETURN FENCING SETBACK 1M BEHIND THE FRONT
BUILDING LINE
FRONT BOUNDARY
ADJACENT LOT SIDE BOUNDARY
BUILDING FOOTPRINT
REAR BOUNDARY
ADJACENT LOT SIDE BOUNDARY
RETU
RN F
ENCI
NG
FRONT BOUNDARY
RETURN FENCING SETBACK 1M BEHIND THE FRONT BUILDING LINE
ADjACENT LOT SIDE BOuNDARy
- STREET OR OPEN SPACE -
SIDE BOuNDARy6.5M FROM FRONT BuILDING LINE
REAR BOuN
DARy
FRON
T BOuN
DARy
BuILDING FOOTPRINT
1950
MAX
SPLAYED TOP TO SHED WATER
125 x 75 POST
75 x 50 RAILS, CUT ALL RAIL ENDS & JOIN TO ACHIEVE FLUSH JOINT
PALINGS
2mm MAX GAP BETWEEN RAIL AND POST
150 x 38 PLINTH
CONCRETE FOOTING
1950
mm
100m
m
ADJACENT LOT SIDE BOUNDARY
BUILDING FOOTPRINT REAR BOUNDARY
ADJACENT LOT SIDE BOUNDARY
FRONT BOUNDARY
INTERLOT FENCING SETBACK 1M BEHIND FRONT BUILDING LINE
2M M
Ax
AuroraDesign Standards
33

ADJACENT LOT SIDE BOUNDARY
BUILDING FOOTPRINT REAR BOUNDARY
ADJACENT LOT SIDE BOUNDARY
FRO
NT
FEN
CIN
G
FRONT BOUNDARY
1100 MAX
1100 MAX
1100 MAX
1100 MAX
1.2M M
Ax
ADJACENT LOT SIDE BOUNDARY
BUILDING FOOTPRINT REAR BOUNDARY
ADJACENT LOT SIDE BOUNDARY
FRO
NT
FEN
CIN
G
FRONT BOUNDARY
1100 MAX
1100 MAX
1100 MAX
1100 MAX
1.2M M
Ax
ADJACENT LOT SIDE BOUNDARY
BUILDING FOOTPRINT REAR BOUNDARY
ADJACENT LOT SIDE BOUNDARY
FRO
NT
FEN
CIN
G
FRONT BOUNDARY
1100 MAX
1100 MAX
1100 MAX
1100 MAX
1.2M M
Ax
ADJACENT LOT SIDE BOUNDARY
BUILDING FOOTPRINT REAR BOUNDARY
ADJACENT LOT SIDE BOUNDARY
FRO
NT
FEN
CIN
G
FRONT BOUNDARY
1100 MAX
1100 MAX
1100 MAX
1100 MAX
1.2M M
Ax
Masonry with infill Pickets
timber Post with Steel Wiring
timber Pickets
timber Pickets with Masonry
Front Fencing Arrangement and elevations
ADJACENT LOT SIDE BOUNDARY
BUILDING FOOTPRINT REAR BOUNDARY
ADJACENT LOT SIDE BOUNDARY
FRO
NT
FEN
CIN
G
FRONT BOUNDARY
1100 MAX
1100 MAX
1100 MAX
1100 MAX
ADjACENT LOT SIDE BOuNDARy
ADjACENT LOT SIDE BOuNDARy
FRON
T FENCIN
G
FRON
T BOuN
DARy
BuILDING FOOTPRINT
froNT fENCINGLow fencing that defines the front boundary.
Standards
1. Front fencing is only allowed for special condition locations where dwelling frontages face major roads or parkland.
Pickets and Steel Wiring Fences 2. The fence must be constructed using:
a. Rendered or bagged masonry with infill steel pickets OR timber pickets;
b. Timber pickets with masonry;
c. Timber posts with steel wiring;
d. Timber pickets.
3. The preferred construction material must comply with the Material and Colour Palette Standards set out in section 8.
4. The fence must not be greater than 1.2m in height and be set back no more than 500mm from the front boundry.
5. The fence must connect with side boundary fences 1m behind the front building line.
Aurora Design Standards
34

Builder lot no. Street Stage estate
2.0 BUilDinG enVelOPeS & BUilDeR enCROACHMentS (Pg 14, 15)
- Achieve minimum setbacks to dwelling from all boundaries (refer to relevant Building Enevlope Plan)
- Maximum 1.5m encroachment permitted into front setback for Porch (incl eave)
- Maximum 3.6m height allowance permitted for porch encroachment
- Maximum 3.6m wall height permitted on boundary
3.0 Site COVeRAGe (Pg 17)
- Maximum 70% for front loaded dwellings
- Maximum 75% for side or rear loaded dwellings
4.0 PASSiVe SOlAR DeSiGn AnD SUn SHADinG (Pg 18,19)
(4.1) Passive Solar Design – Secluded Private Open Space (SPOS)South, east or West Facing lots Only
- SPOS must be located to North / East or West of an internal living area
- Have direct access from internal living area
- Achieve 3.0m minimum dimension
- Achieve minimum area of 25m2
(SPOS may be covered by alfresco where North Facing Habitable Room Window Objective below is achieved)
north Facing lots Only
- SPOS may be located to East, West or South of an internal living area
- Have direct access from an East or West facing internal living area
- Achieve 3.0m minimum dimension
- Achieve minimum area of 25m2
(4.2) Sun Shading / Window treatment Objectivenorth Facing Habitable Room Windows
- Provide 450mm eave where window achieves greater than 1500mm from boundary
- Two storey dwellings only require eave to upper floor
5.0 FAÇADe DeSiGn (Pg 20)- Contemporary style
- Must not be continuously straight for more than 6.5m (horizontally)
- Eave to full façade including garage - (excludes parapet areas) - (excludes garage where dwelling is two storey)
- Parapets and eaves (where used on facades) are to be returned 1500mm to side elevations
- Portico to achieve minimum dimension of 1.5m and overall area of 3m2
- Sufficiently address corner by extension of main façade to 6.5m to secondary elevation (Corner Lots)
6.0 ROOF FORM (Pg 22)
- Achieve 22.5 – 30 degree pitch for Pitched, Gabled or Hipped Roofs
- Achieve 10 – 30 degree pitch for Skillion Roofs
PLACES VICTorIA DESIGN rEVIEw PANELPreliminary & Final Design/Siting Assessment Checklist
AuroraDesign Standards
35

7.0 GARAGeS and DRiVeWAYS (Pg 23 – 25)
(7.1) Garages
- Garage to achieve minimum 5.5m setback from front boundary
- Garage to achieve minimum 840mm setback behind dwelling (Porch included)
- Garage may be sited at 0 – 150mm or 1000mm from side boundary( Note – 150mm offset not permitted where two garages share a common boundary)
- Side Entry Garage to achieve minimum 2.0m setback from side street boundary (corner lots only)
- 10.5m or less lot width limited to Single Car Garage
- Garage doors must be paneled
- Garages to achieve minimum internal dimensions as follows:- Double (5.5m (w) x 6.0m (d))- Single (3.5m (w) x 6.0m (d))
(7.2) Driveways
- Must not be constructed wider than the crossover at entry
- Achieve 300mm landscape strip between driveway and side boundary
8.0 eXteRnAl MAteRiAlS, FiniSHeS AnD COlOUR PAlette (Pg 26 – 29)
Facades
- Achieve minimum use of 2 separate materials
- Achieve material mix of minimum 60% Primary material and 40% Secondary material(Note – An additional material may be used upto 10% of the façade as highlight)
- Materials must return 1.5m to side elevations
- Roof tiles or Metal Sheeting roofing permitted
Driveways
- Driveway finish to be provided as Matt finish using Exposed Aggregate, Colour-through Concrete, Slate or Natural Stone Pavers
- Driveway colour must compliment primary façade colour
Rainwater tanks
- Must be hidden from public view
- Coloured to match dwelling
• Refer to External Colour Palette (pg 28, 29) for further clarification and definitions
10. eneRGY, WAteR & MAteRiAlS eFFiCienCY
(10.1) energy Rating
- Minimum 6.0 star energy rating achieved
(10.6) Recycled Water
- Dwelling must connect to Class A recycled water main by way of:- External tappings to front and rear of dwelling- Toilets
Aurora Design Standards
36

September 2013Correct at time of print and subject to change without notice.