Embed Size (px)
DESCRIPTION
help
Citation preview

November 30 – December 3, 2004 ◊ Las Vegas, Nevada
Tips and Tricks for Autodesk® Revit®
Christopher Zoog – JRPArch, LLC James J Balding, AIA - WATG
BD33-1L This session is for intermediate to advanced users of Autodesk Revit who want to go beyond the tutorials that ship with the software. We'll explore ways to use Autodesk Revit to streamline tasks in typical residential and commercial projects. Who Should Attend Intermediate to advanced Autodesk Revit users Topics Covered * Best Practice approach to building modeling in Autodesk Revit, using real world examples
About the Speaker: Christopher is an associate with J. Randolph Parry Architects, PC, in Moorestown, New Jersey. Over the past 4 years, he has used Autodesk® Revit® to design and document everything from small retail interiors to large-scale multifamily apartment buildings. He is also a founding member and administrator of the Revit community and forums at augi.com. Chris received a B.S. in Environmental Design from the University of Massachusetts, Amherst, where he focused his studies on the use of computers in building and landscape design. [email protected]
Tips and Tricks for Autodesk Revit
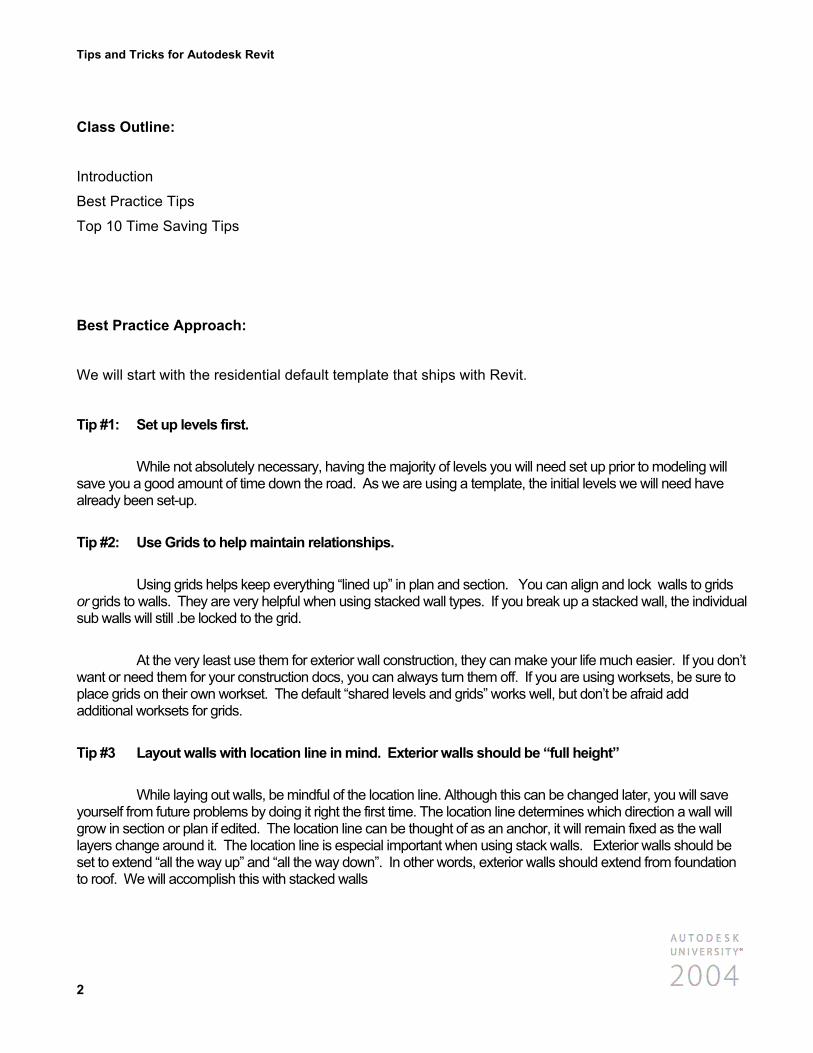
Class Outline:
Introduction
Best Practice Tips
Top 10 Time Saving Tips
Best Practice Approach: We will start with the residential default template that ships with Revit.
Tip #1: Set up levels first.
While not absolutely necessary, having the majority of levels you will need set up prior to modeling will save you a good amount of time down the road. As we are using a template, the initial levels we will need have already been set-up.
Tip #2: Use Grids to help maintain relationships.
Using grids helps keep everything “lined up” in plan and section. You can align and lock walls to grids or grids to walls. They are very helpful when using stacked wall types. If you break up a stacked wall, the individual sub walls will still .be locked to the grid.
At the very least use them for exterior wall construction, they can make your life much easier. If you don’t want or need them for your construction docs, you can always turn them off. If you are using worksets, be sure to place grids on their own workset. The default “shared levels and grids” works well, but don’t be afraid add additional worksets for grids.
Tip #3 Layout walls with location line in mind. Exterior walls should be “full height”
While laying out walls, be mindful of the location line. Although this can be changed later, you will save yourself from future problems by doing it right the first time. The location line determines which direction a wall will grow in section or plan if edited. The location line can be thought of as an anchor, it will remain fixed as the wall layers change around it. The location line is especial important when using stack walls. Exterior walls should be set to extend “all the way up” and “all the way down”. In other words, exterior walls should extend from foundation to roof. We will accomplish this with stacked walls
2
Tips and Tricks for Autodesk Revit
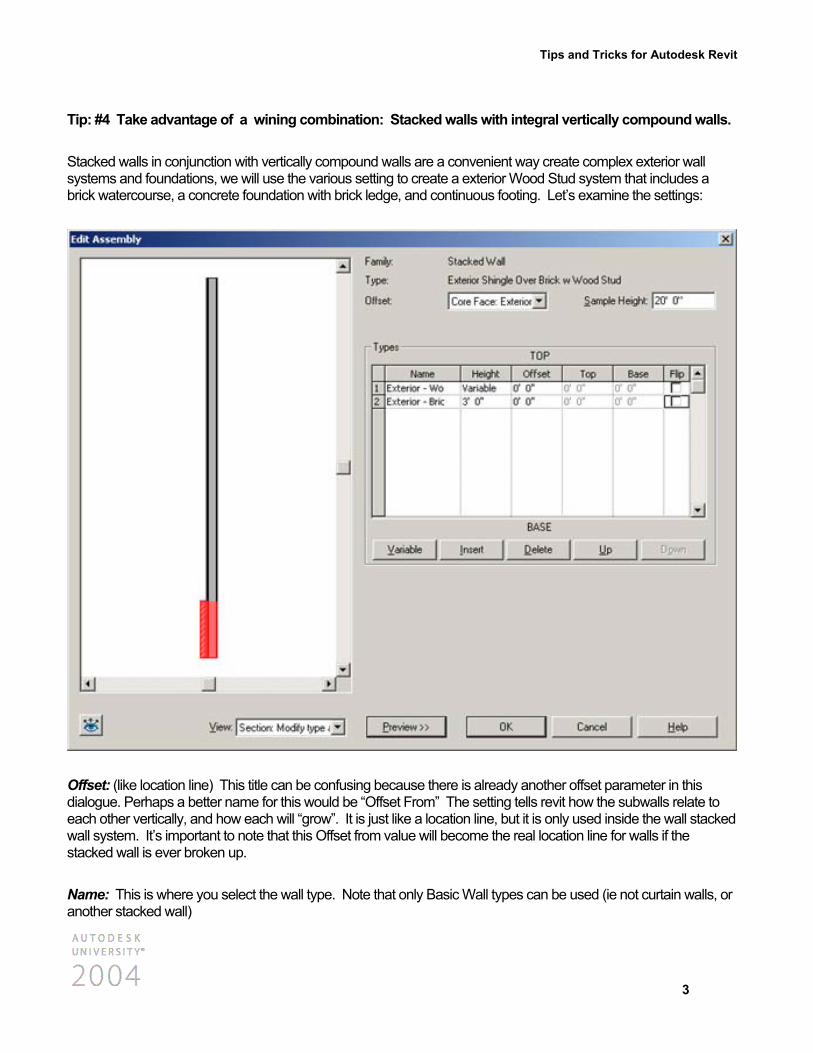
Tip: #4 Take advantage of a wining combination: Stacked walls with integral vertically compound walls.
Stacked walls in conjunction with vertically compound walls are a convenient way create complex exterior wall systems and foundations, we will use the various setting to create a exterior Wood Stud system that includes a brick watercourse, a concrete foundation with brick ledge, and continuous footing. Let’s examine the settings:
Offset: (like location line) This title can be confusing because there is already another offset parameter in this dialogue. Perhaps a better name for this would be “Offset From” The setting tells revit how the subwalls relate to each other vertically, and how each will “grow”. It is just like a location line, but it is only used inside the wall stacked wall system. It’s important to note that this Offset from value will become the real location line for walls if the stacked wall is ever broken up.
Name: This is where you select the wall type. Note that only Basic Wall types can be used (ie not curtain walls, or another stacked wall)
3
Tips and Tricks for Autodesk Revit
Height: Only one subwall in a stacked wall can be “variable” in vertical attachments, (ie unconnected height, up to level X, etc) Typically, this should be subwall that needs the most flexibility. In our case, it will be the siding on wood stud wall, as this wall will eventually be attached to the roof. The other subwalls, brick water course, and foundation, are typically have a “set dimension” in the “real world” and are, therefore, set explicitly.
Offset: This controls how far the wall is offset from the “Offset” parameter at the the top of the dialogue. Positive values offset left and negative offset right (in the preview panel). For example an offset vaule of 4” will shift the wall four inches to the right relative to the reference line (offset)
Top: If the subwall is a vertically compound wall, this value is analogous to the top extension distance in the VCW’s wall settings. Any unlocked layers will move up with positive number and down with a negative number. The wall above will automatically attach its bottom to this wall.
Bottom: If the subwall is a vertically compound wall, this value is analogous to the bottom extension distance in the VCW’s settings. Any unlocked layers will move up with positive number and down with a negative number. The wall below will automatically attach its top to this wall.
Flip: Flips the wall about its reference line (offset)
Creating a foundation system:
Change the stacked wall’s base constraint to T.O. footing, then add a foundation wall to the bottom of the stacked wall assembly, use controls to adjust the height as needed to hit the bearing point. Offset the foundation to create a brick ledge under the watercourse. You can also add a footing with the 24” footing wall type. Adjust its height as needed. Don’t forget to change the stacked wall’s base constraint to B.O. Footing.
Editing the watercourse to reflect real world construction.
By unlocking the brick and air space layers in the VCW we can adjust the “bottom” of the sub wall down to 8” below grade. The Foundation wall automatically adjusts the brickledge.
4
Tips and Tricks for Autodesk Revit
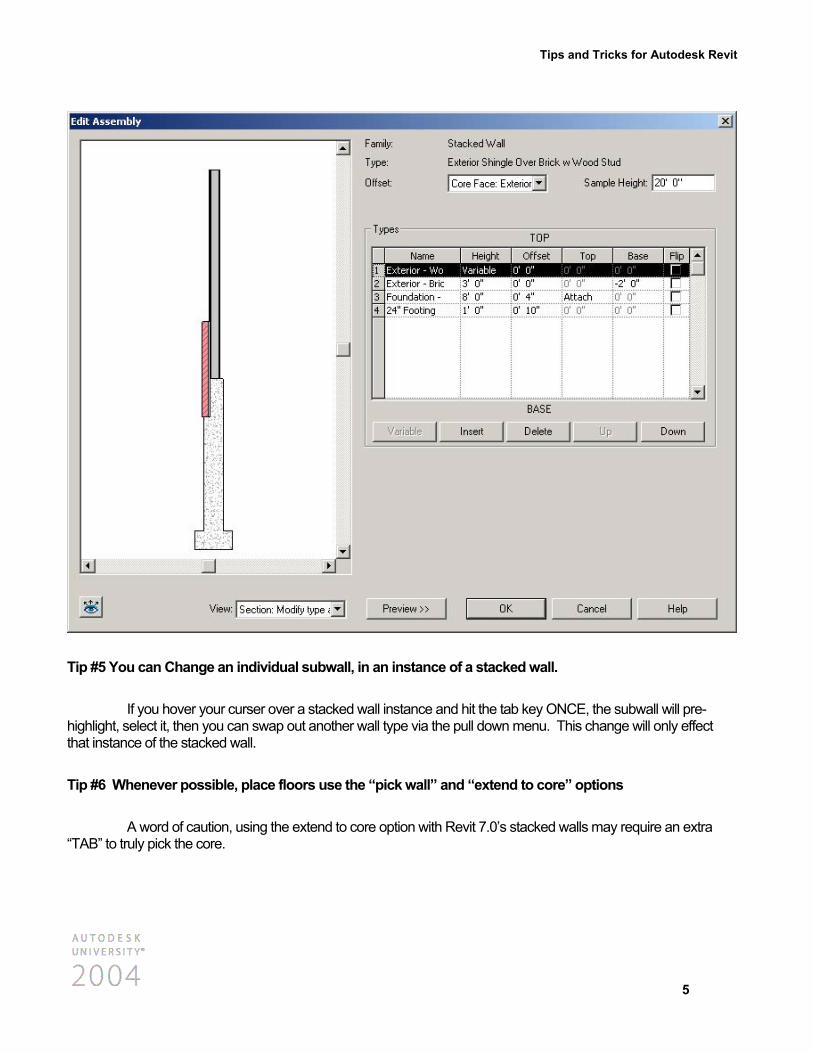
Tip #5 You can Change an individual subwall, in an instance of a stacked wall.
If you hover your curser over a stacked wall instance and hit the tab key ONCE, the subwall will pre-highlight, select it, then you can swap out another wall type via the pull down menu. This change will only effect that instance of the stacked wall.
Tip #6 Whenever possible, place floors use the “pick wall” and “extend to core” options
A word of caution, using the extend to core option with Revit 7.0’s stacked walls may require an extra “TAB” to truly pick the core.
5
Tips and Tricks for Autodesk Revit
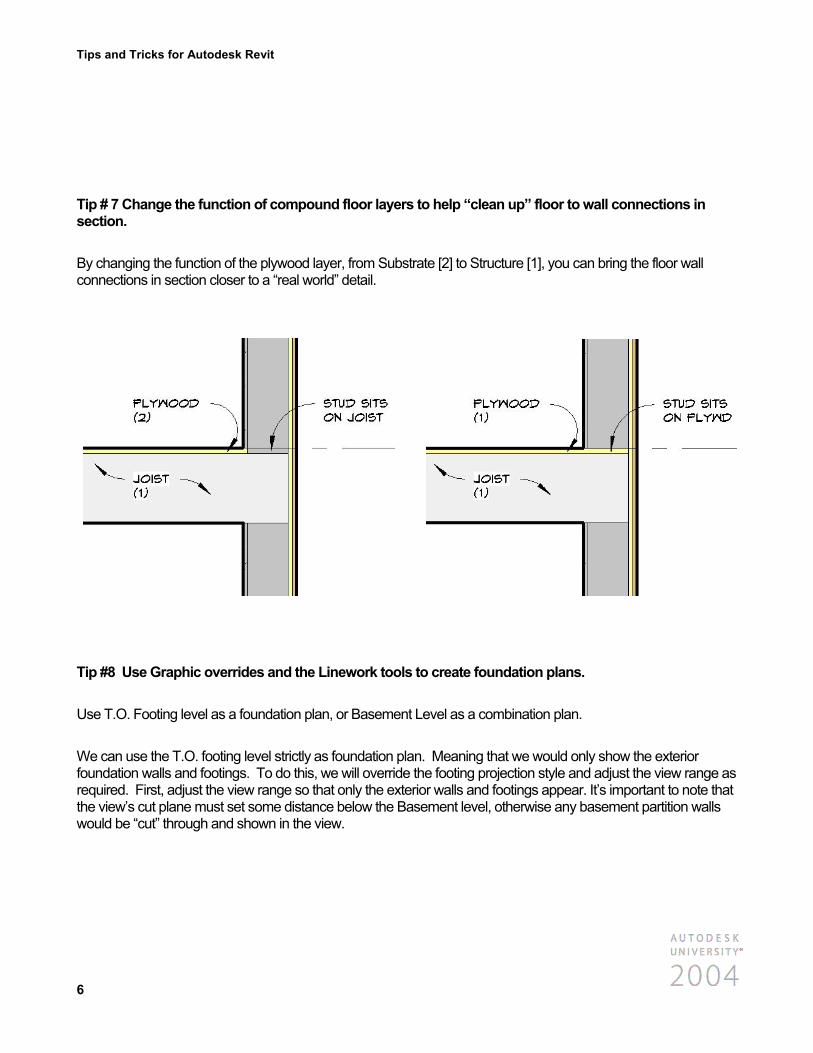
Tip # 7 Change the function of compound floor layers to help “clean up” floor to wall connections in section.
By changing the function of the plywood layer, from Substrate [2] to Structure [1], you can bring the floor wall connections in section closer to a “real world” detail.
Tip #8 Use Graphic overrides and the Linework tools to create foundation plans.
Use T.O. Footing level as a foundation plan, or Basement Level as a combination plan.
We can use the T.O. footing level strictly as foundation plan. Meaning that we would only show the exterior foundation walls and footings. To do this, we will override the footing projection style and adjust the view range as required. First, adjust the view range so that only the exterior walls and footings appear. It’s important to note that the view’s cut plane must set some distance below the Basement level, otherwise any basement partition walls would be “cut” through and shown in the view.
6

Tips and Tricks for Autodesk Revit
Next, override the wall category projection style to create dashed footings
Alternatively, The basement level plan can be set-up to show footings to create a combination plan (showing basement partitions as well as foundation information). Set the view depth to “T.O. Footing”, use the linework tool to make the footings appear hidden. This is useful in residential projects where basement and foundation plans are typically combined.
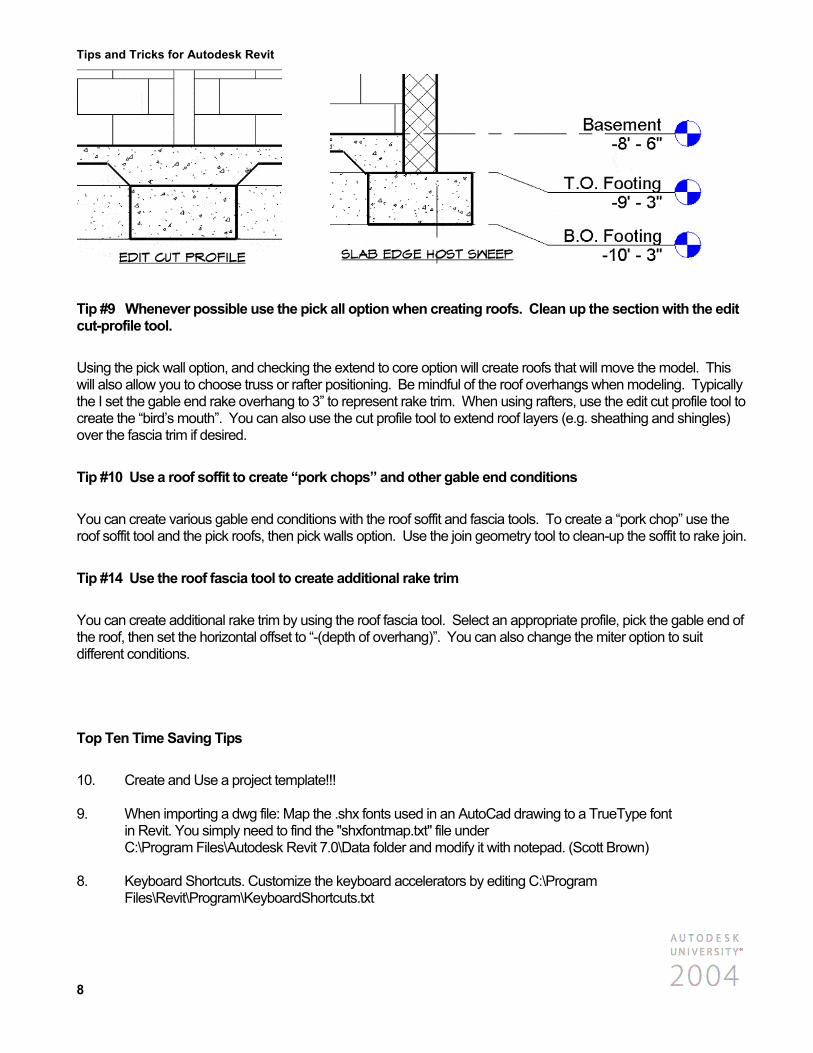
Tip #9 Use a “Floor Slab Edge” Host sweep to create haunch footings, use edit cut profile to create internal haunches
To create a thicken slab at the foundation wall, use a floor slab edge host sweep with an appropriate profile. For internal haunch (e.g. columns, etc) use the edit cut profile tool.
7
Tips and Tricks for Autodesk Revit
Tip #9 Whenever possible use the pick all option when creating roofs. Clean up the section with the edit cut-profile tool.
Using the pick wall option, and checking the extend to core option will create roofs that will move the model. This will also allow you to choose truss or rafter positioning. Be mindful of the roof overhangs when modeling. Typically the I set the gable end rake overhang to 3” to represent rake trim. When using rafters, use the edit cut profile tool to create the “bird’s mouth”. You can also use the cut profile tool to extend roof layers (e.g. sheathing and shingles) over the fascia trim if desired.
Tip #10 Use a roof soffit to create “pork chops” and other gable end conditions
You can create various gable end conditions with the roof soffit and fascia tools. To create a “pork chop” use the roof soffit tool and the pick roofs, then pick walls option. Use the join geometry tool to clean-up the soffit to rake join.
Tip #14 Use the roof fascia tool to create additional rake trim
You can create additional rake trim by using the roof fascia tool. Select an appropriate profile, pick the gable end of the roof, then set the horizontal offset to “-(depth of overhang)”. You can also change the miter option to suit different conditions.
Top Ten Time Saving Tips
10. Create and Use a project template!!! 9. When importing a dwg file: Map the .shx fonts used in an AutoCad drawing to a TrueType font
in Revit. You simply need to find the "shxfontmap.txt" file under C:\Program Files\Autodesk Revit 7.0\Data folder and modify it with notepad. (Scott Brown)
8. Keyboard Shortcuts. Customize the keyboard accelerators by editing C:\Program
Files\Revit\Program\KeyboardShortcuts.txt
8
Tips and Tricks for Autodesk Revit
7. You can achieve multiple deletes at once, by holding down the delete key while selecting objects (Greg Cashen)
6. Use the number Pad to key in distances, there are several ways to express distances: 1.5, 1-6,
1<space>6, and 1’6 all work for 1’-6” (Scott Davis) 5. Select Previous: hit Ctrl and the left arrow key and it will reselect the previous selection set.
4. Use the TAB key to cycle through different selection options 3. Hit the spacebar during placement and after selection of objects to cycle through different placement
options 2. Use the arrow keys to “nudge” elements 1. Press the mouse wheel button to pan, shift + mouse wheel button to spin
Additional Resources for Tips & Tricks:
The Revit Community at AUGI www.augi.com/revit/
RevitCity www.revitcity.com
Revit newsgroup at discussion.autodesk.com
Notes
9