Embed Size (px)
Citation preview
Aud
it –
Han
ds-O
n Ex
erci
ses
Audit Hands-on Exercise
Chapter 3 – Audit Hands-On Exercises
Audit – H
ands-On Exercises
Sadjadi et al.
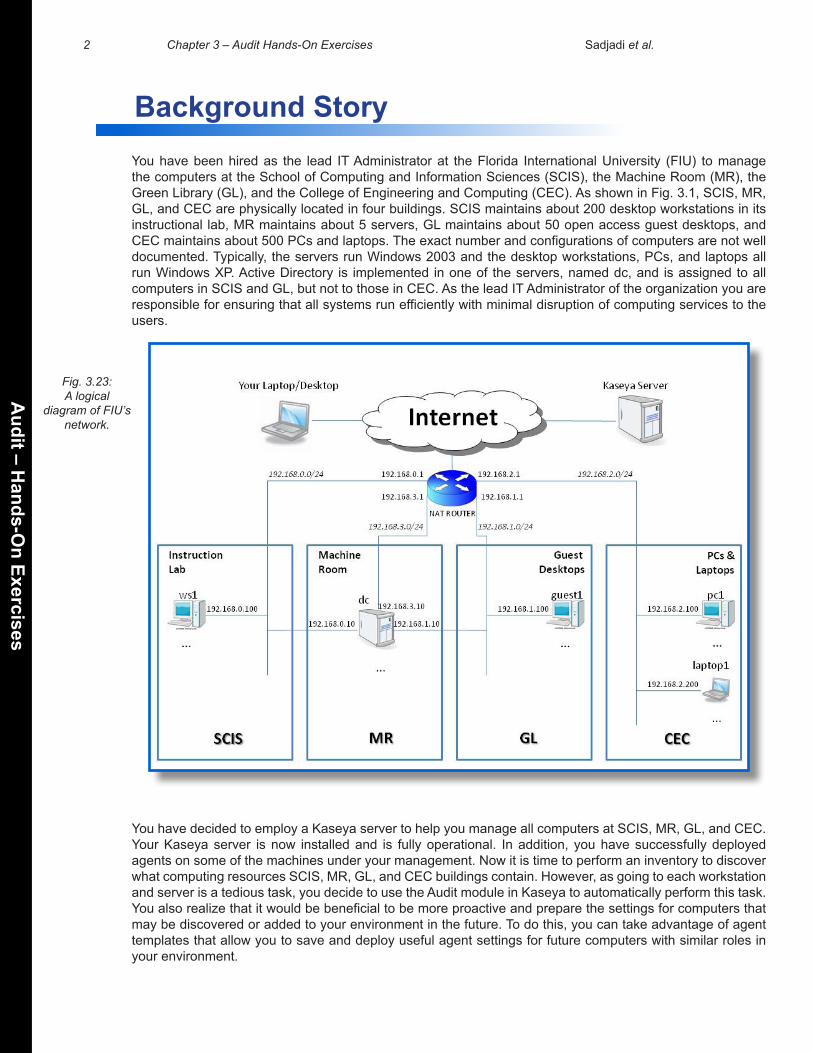
You have been hired as the lead IT Administrator at the Florida International University (FIU) to manage the computers at the School of Computing and Information Sciences (SCIS), the Machine Room (MR), the Green Library (GL), and the College of Engineering and Computing (CEC). As shown in Fig. 3.1, SCIS, MR, GL, and CEC are physically located in four buildings. SCIS maintains about 200 desktop workstations in its instructional lab, MR maintains about 5 servers, GL maintains about 50 open access guest desktops, and CEC maintains about 500 PCs and laptops. The exact number and configurations of computers are not well documented. Typically, the servers run Windows 2003 and the desktop workstations, PCs, and laptops all run Windows XP. Active Directory is implemented in one of the servers, named dc, and is assigned to all computers in SCIS and GL, but not to those in CEC. As the lead IT Administrator of the organization you are responsible for ensuring that all systems run efficiently with minimal disruption of computing services to the users.
You have decided to employ a Kaseya server to help you manage all computers at SCIS, MR, GL, and CEC. Your Kaseya server is now installed and is fully operational. In addition, you have successfully deployed agents on some of the machines under your management. Now it is time to perform an inventory to discover what computing resources SCIS, MR, GL, and CEC buildings contain. However, as going to each workstation and server is a tedious task, you decide to use the Audit module in Kaseya to automatically perform this task. You also realize that it would be beneficial to be more proactive and prepare the settings for computers that may be discovered or added to your environment in the future. To do this, you can take advantage of agent templates that allow you to save and deploy useful agent settings for future computers with similar roles in your environment.
2
Background Story
Fig. 3.23:A logical
diagram of FIU’s network.

3Chapter 3 – Audit Hands-On Exercises
Aud
it –
Han
ds-O
n Ex
erci
ses
Sadjadi et al.
Technical Information
Exercise
Your dedicated virtual environment includes the computers and network devices depicted in Fig. 3.1 and further described below:
• NAT Router: 192.168.0.1 & 192.168.1.1 & 192.168.2.1 & 192.168.3.1
• SCIS: ws1.scis.fiu.edu - 192.168.0.100
• MR: dc.scis.fiu.edu - 192.168.0.10 & 192.168.1.10 & 192.168.3.10
• GL: guest1.gl.fiu.edu - 192.168.1.100
• CEC: pc1.cec.fiu.edu - 192.168.2.100 & laptop1: laptop1.cec.fiu.edu - 192.168.2.200
Note: This virtual environment includes only a limited number of representative servers and workstations physically housed in the four buildings.
Management needs an immediate report of a current inventory of all the computers, their hardware, and software licenses associated with those computers. They also need a weekly report of the inventory on an ongoing basis. You must find a way to schedule an audit for weekly execution. You have also received notification to prepare for about 100 computers being added to the environment under your management in the next few months. These computers should be audited the same way as for the existing managed machines.
Since in the next few months a large number of computers will be added to your environment, it will be best to have some customized agent templates that incorporate the required agent settings for machines with similar roles in your environment. This way, once the new machines arrive, you can use the appropriate agent template to copy corresponding audit settings onto those machines. After some study and interaction with the users of the computers under your management, you realize that even though there are many computers in your organization, they all have one of three possible roles: instructional lab computers, guest computers, and servers. You are able to configure different settings, from different Kaseya modules, for all the current and future agents for computers with similar roles. To keep things organized, it will be best to create a group for the templates.
-Create a machine group under the “FIU-<USERNAME>” organization for templates, called “Templates”.
1. Open the System module. Go to Orgs / Groups / Depts / Staff > Manage.
2. Verify if the Organization “FIU-<USERNAME>” is checked.
Part 1
4 Chapter 3 – Audit Hands-On Exercises
Audit – H
ands-On Exercises
Sadjadi et al.
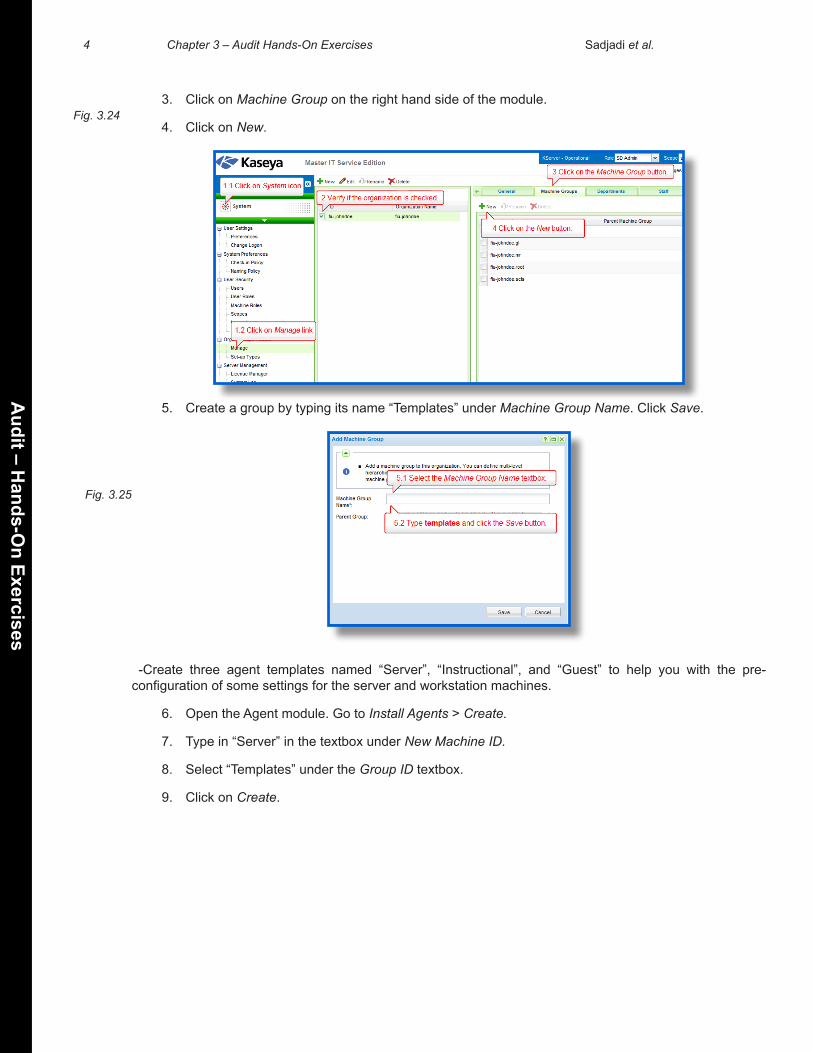
3. Click on Machine Group on the right hand side of the module.
4. Click on New.
5. Create a group by typing its name “Templates” under Machine Group Name. Click Save.
-Create three agent templates named “Server”, “Instructional”, and “Guest” to help you with the pre-configuration of some settings for the server and workstation machines.
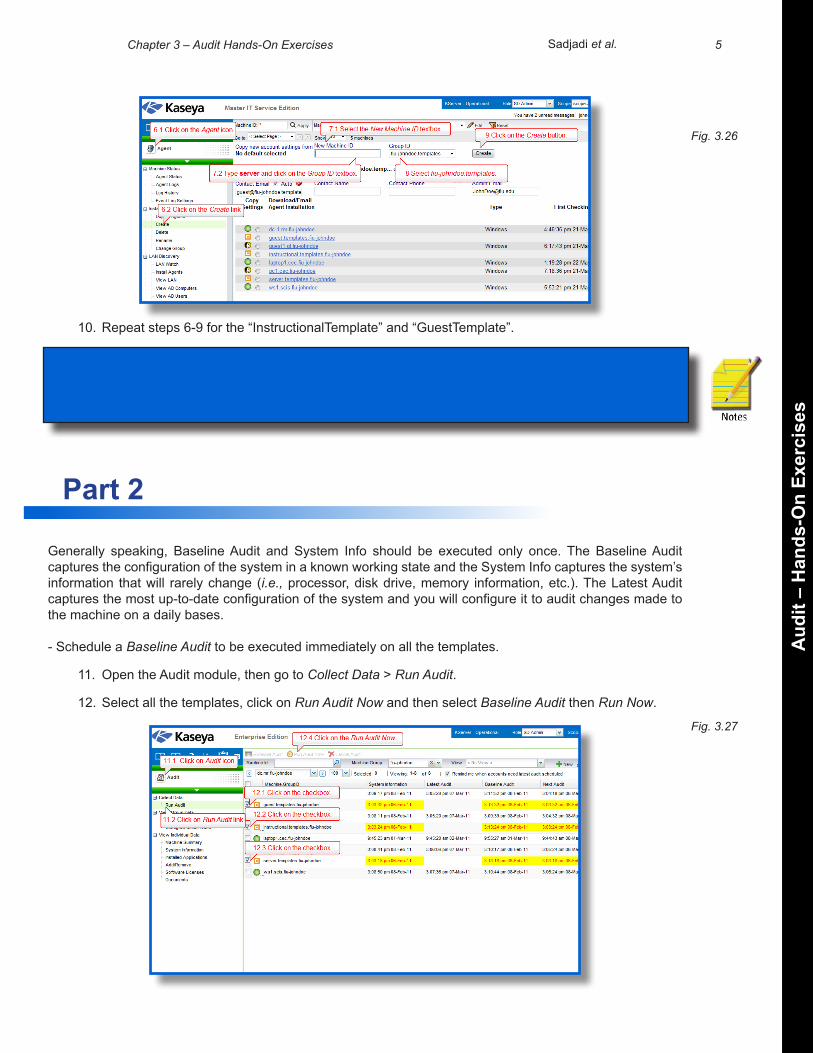
6. Open the Agent module. Go to Install Agents > Create.
7. Type in “Server” in the textbox under New Machine ID.
8. Select “Templates” under the Group ID textbox.
9. Click on Create.
Fig. 3.25
Fig. 3.24
5Chapter 3 – Audit Hands-On Exercises
Aud
it –
Han
ds-O
n Ex
erci
ses
Sadjadi et al.
10. Repeat steps 6-9 for the “InstructionalTemplate” and “GuestTemplate”.
Note: An agent template will have an orange square icon to emphasize the fact that the agent template will never be installed on a computer. Its sole purpose is to provide additional customized settings for agents with similar roles so that such setting can be added to the settings of already deployed agents or be used as part of an agent package.
Generally speaking, Baseline Audit and System Info should be executed only once. The Baseline Audit captures the configuration of the system in a known working state and the System Info captures the system’s information that will rarely change (i.e., processor, disk drive, memory information, etc.). The Latest Audit captures the most up-to-date configuration of the system and you will configure it to audit changes made to the machine on a daily bases.
- Schedule a Baseline Audit to be executed immediately on all the templates.
11. Open the Audit module, then go to Collect Data > Run Audit.
12. Select all the templates, click on Run Audit Now and then select Baseline Audit then Run Now.
Fig. 3.27
Fig. 3.26
Part 2
6 Chapter 3 – Audit Hands-On Exercises
Audit – H
ands-On Exercises
Sadjadi et al.
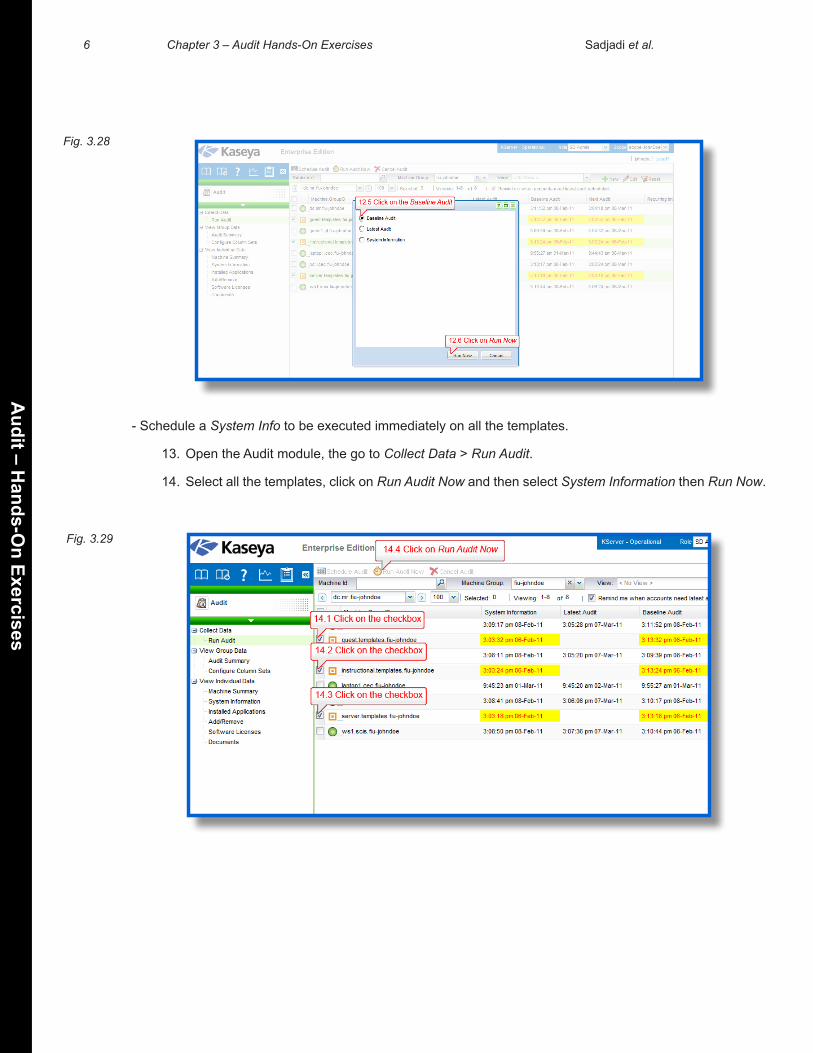
- Schedule a System Info to be executed immediately on all the templates.
13. Open the Audit module, the go to Collect Data > Run Audit.
14. Select all the templates, click on Run Audit Now and then select System Information then Run Now.
Fig. 3.29
Fig. 3.28
7Chapter 3 – Audit Hands-On Exercises
Aud
it –
Han
ds-O
n Ex
erci
ses
Sadjadi et al.
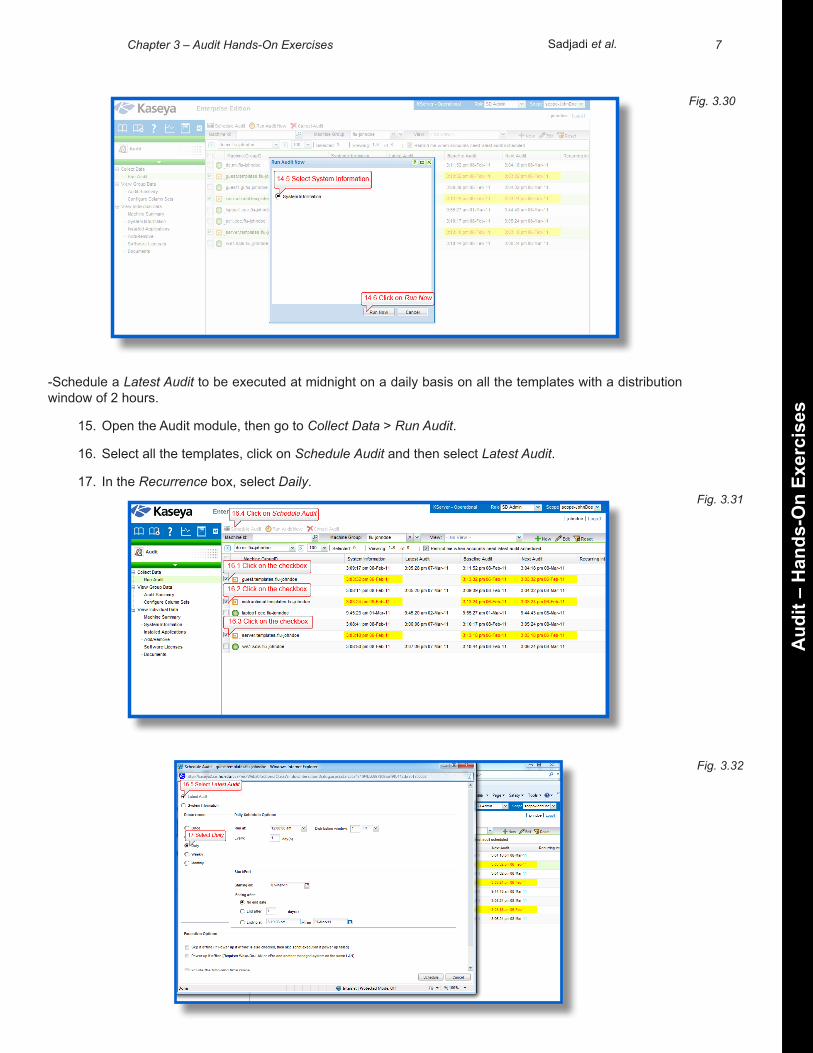
-Schedule a Latest Audit to be executed at midnight on a daily basis on all the templates with a distribution window of 2 hours.
15. Open the Audit module, then go to Collect Data > Run Audit.
16. Select all the templates, click on Schedule Audit and then select Latest Audit.
17. In the Recurrence box, select Daily. Fig. 3.31
Fig. 3.30
Fig. 3.32
8 Chapter 3 – Audit Hands-On Exercises
Audit – H
ands-On Exercises
Sadjadi et al.
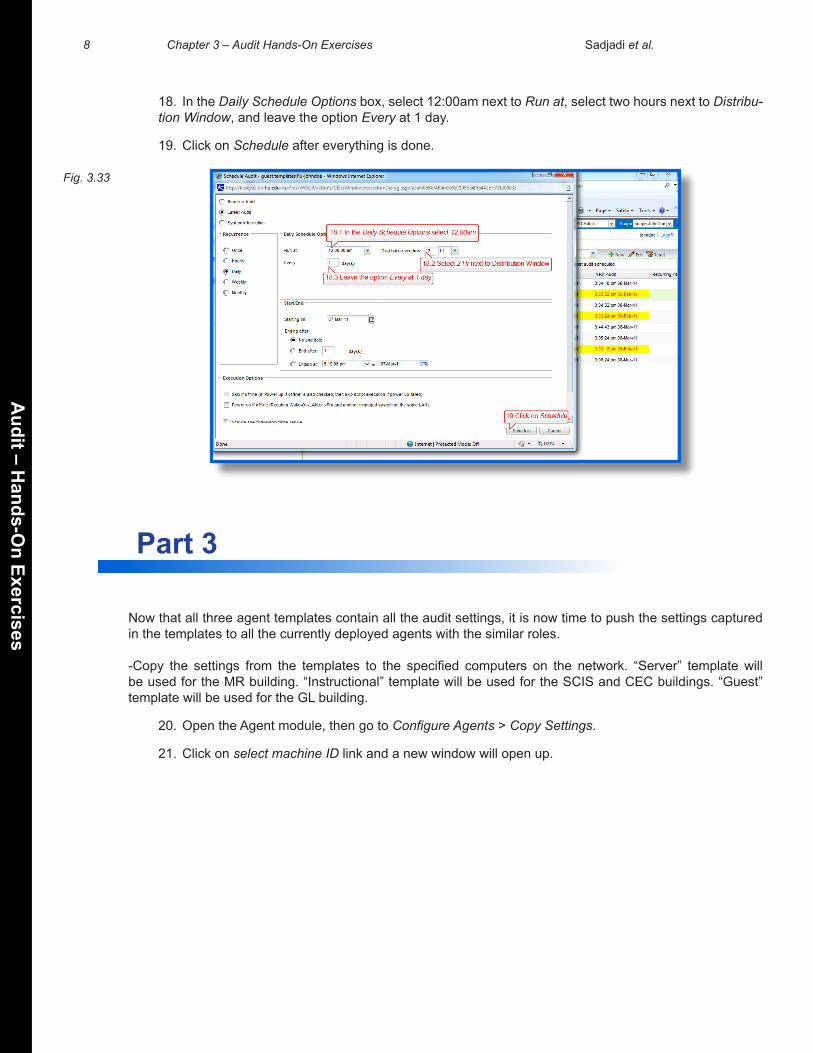
18. In the Daily Schedule Options box, select 12:00am next to Run at, select two hours next to Distribu-tion Window, and leave the option Every at 1 day.
19. Click on Schedule after everything is done.
Now that all three agent templates contain all the audit settings, it is now time to push the settings captured in the templates to all the currently deployed agents with the similar roles.
-Copy the settings from the templates to the specified computers on the network. “Server” template will be used for the MR building. “Instructional” template will be used for the SCIS and CEC buildings. “Guest” template will be used for the GL building.
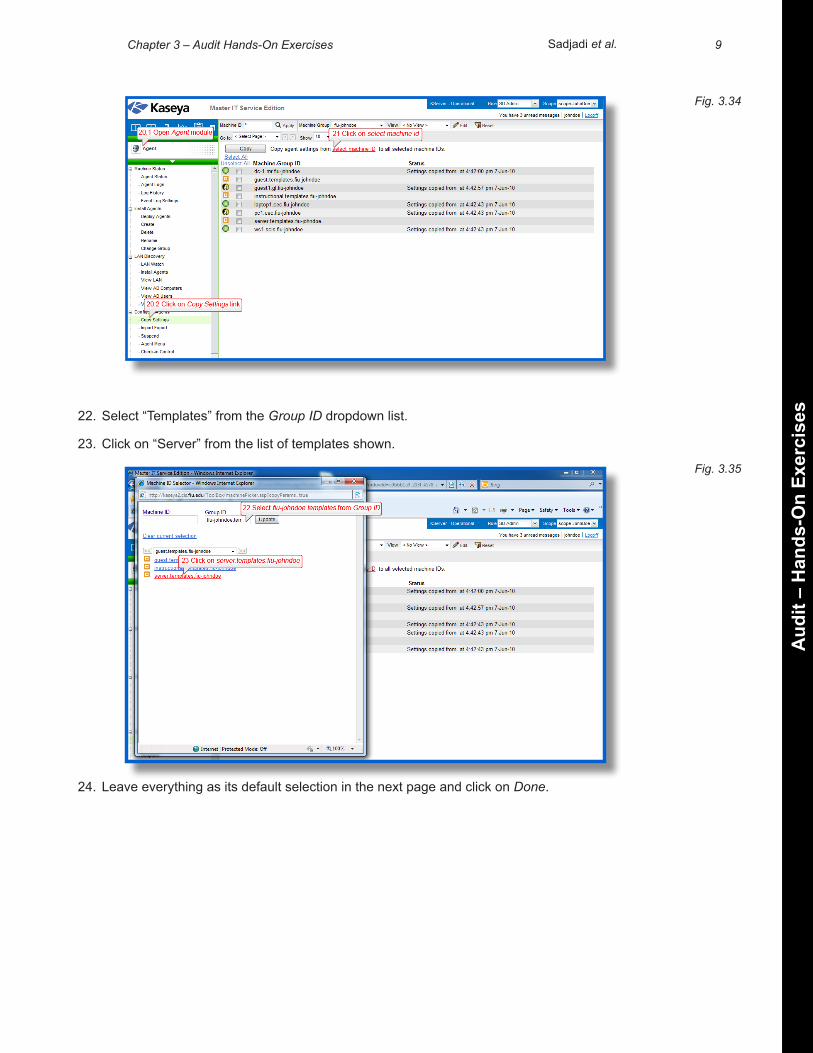
20. Open the Agent module, then go to Configure Agents > Copy Settings.
21. Click on select machine ID link and a new window will open up.
Fig. 3.33
Part 3
9Chapter 3 – Audit Hands-On Exercises
Aud
it –
Han
ds-O
n Ex
erci
ses
Sadjadi et al.
22. Select “Templates” from the Group ID dropdown list.
23. Click on “Server” from the list of templates shown.
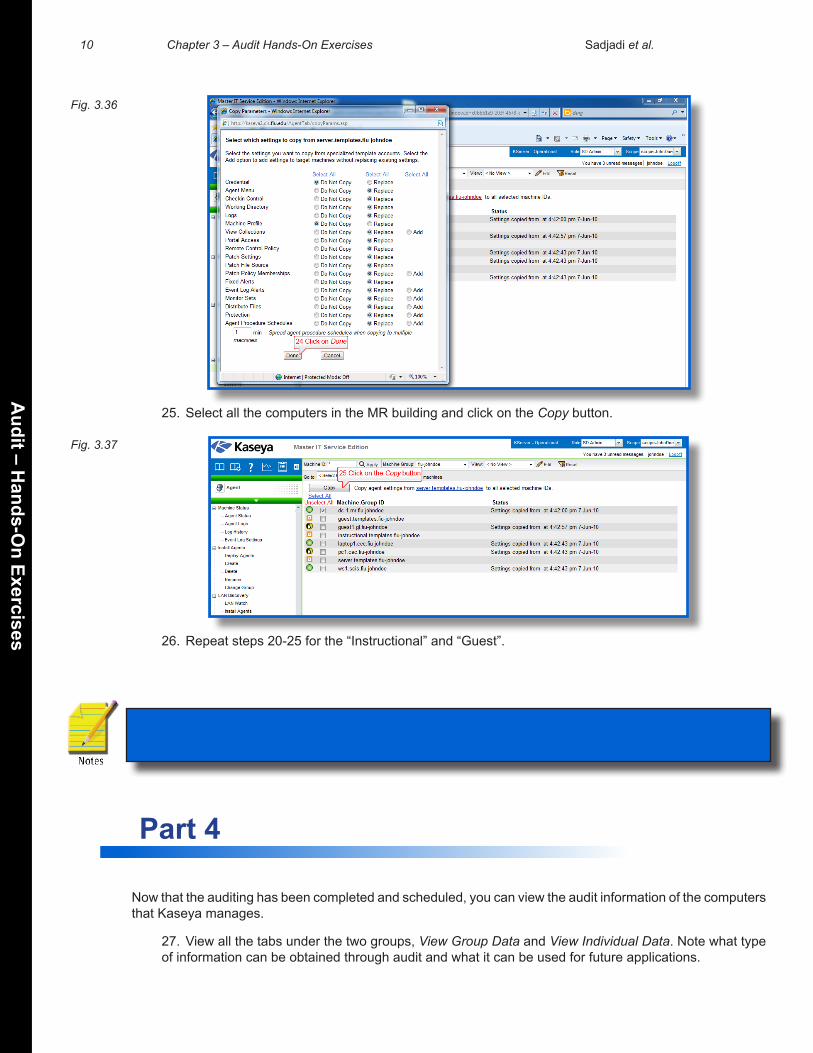
24. Leave everything as its default selection in the next page and click on Done.
Fig. 3.34
Fig. 3.35
10 Chapter 3 – Audit Hands-On Exercises
Audit – H
ands-On Exercises
Sadjadi et al.
25. Select all the computers in the MR building and click on the Copy button.
26. Repeat steps 20-25 for the “Instructional” and “Guest”.
Note: Depending on the network traffic and system resources, Baseline Audit and System Info should execute and send the results to the Kaseya VSA almost immediately. If not, please wait until the results are sent back to the Kaseya VSA.
Now that the auditing has been completed and scheduled, you can view the audit information of the computers that Kaseya manages.
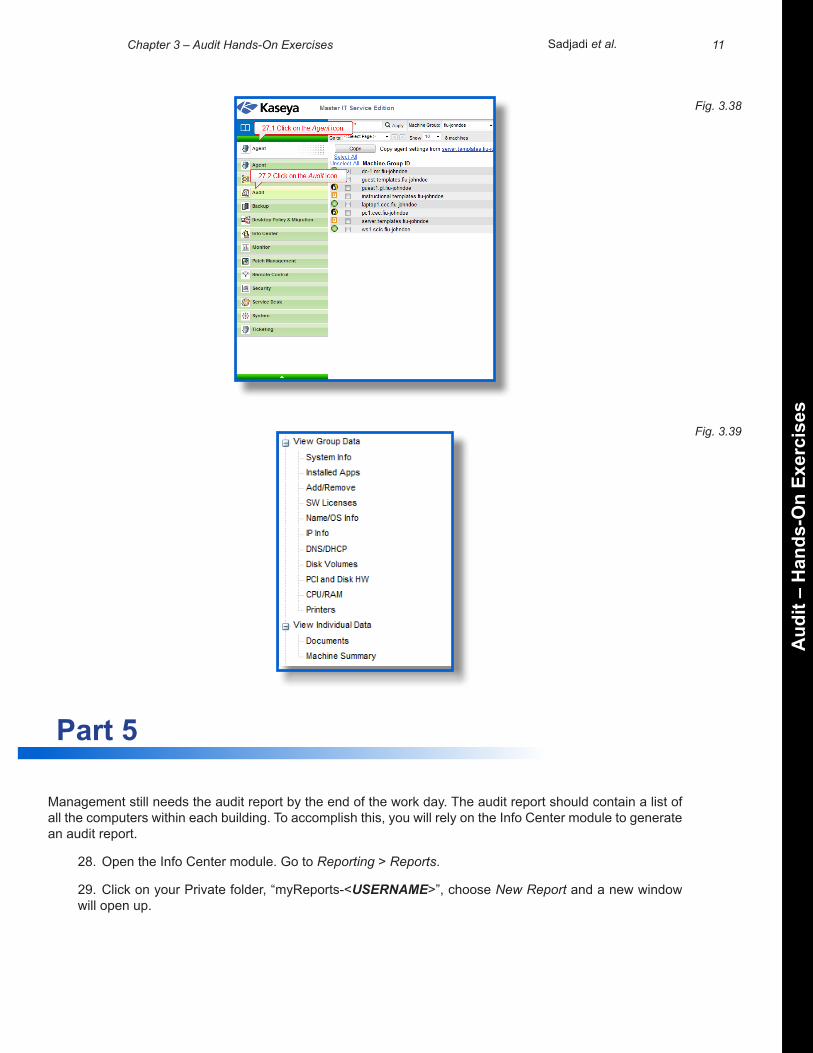
27. View all the tabs under the two groups, View Group Data and View Individual Data. Note what type of information can be obtained through audit and what it can be used for future applications.
Fig. 3.36
Fig. 3.37
Part 4
11Chapter 3 – Audit Hands-On Exercises
Aud
it –
Han
ds-O
n Ex
erci
ses
Sadjadi et al.
Management still needs the audit report by the end of the work day. The audit report should contain a list of all the computers within each building. To accomplish this, you will rely on the Info Center module to generate an audit report.
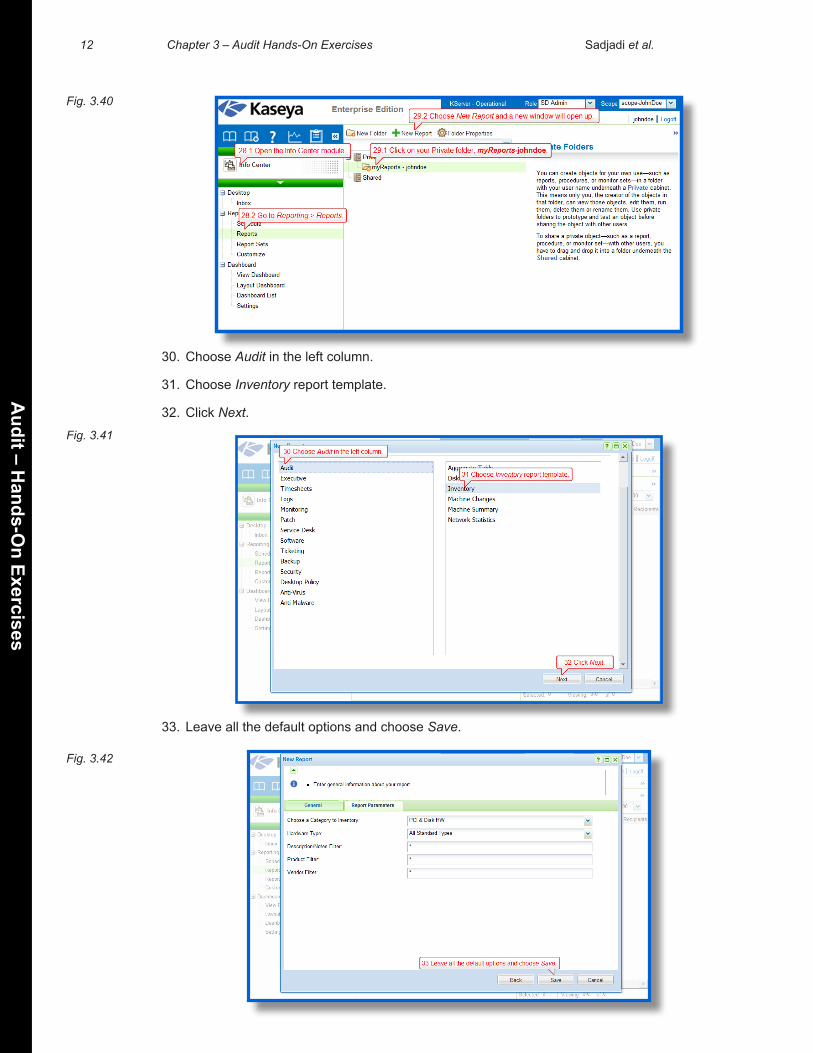
28. Open the Info Center module. Go to Reporting > Reports.
29. Click on your Private folder, “myReports-<USERNAME>”, choose New Report and a new window will open up.
Fig. 3.38
Fig. 3.39
Part 5
12 Chapter 3 – Audit Hands-On Exercises
Audit – H
ands-On Exercises
Sadjadi et al.
30. Choose Audit in the left column.
31. Choose Inventory report template.
32. Click Next.
33. Leave all the default options and choose Save.
Fig. 3.40
Fig. 3.41
Fig. 3.42
13Chapter 3 – Audit Hands-On Exercises
Aud
it –
Han
ds-O
n Ex
erci
ses
Sadjadi et al.
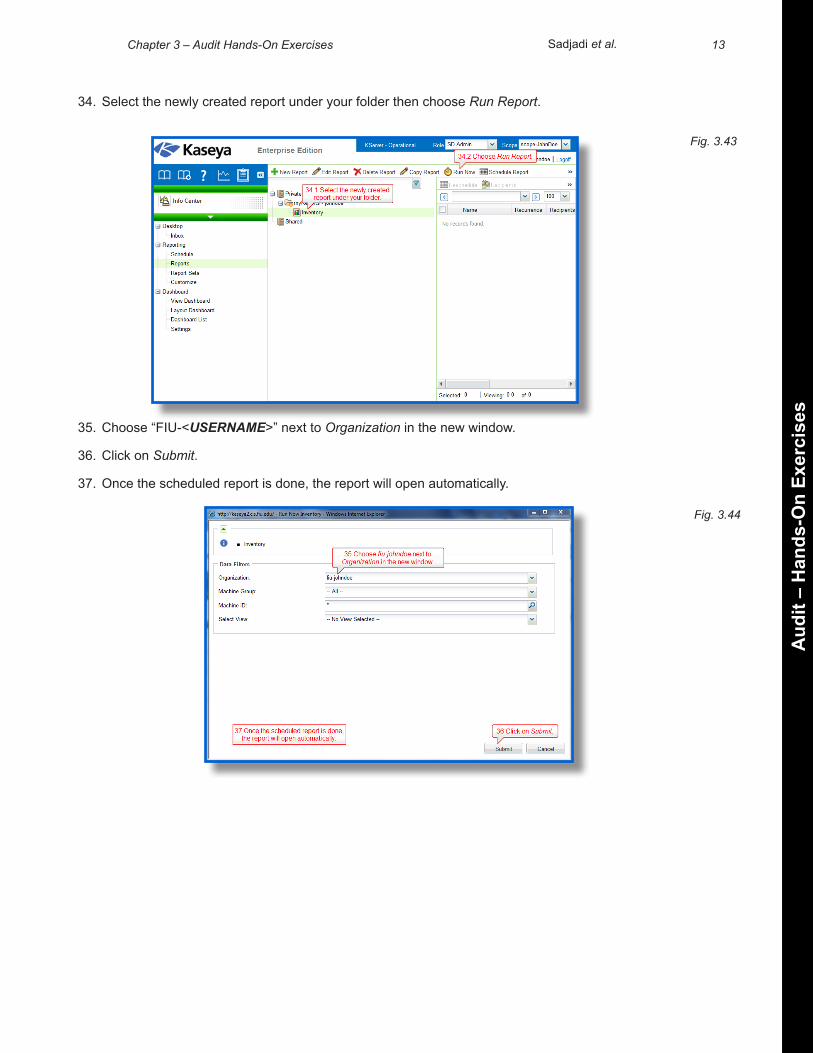
34. Select the newly created report under your folder then choose Run Report.
35. Choose “FIU-<USERNAME>” next to Organization in the new window.
36. Click on Submit.
37. Once the scheduled report is done, the report will open automatically.
Fig. 3.43
Fig. 3.44

14 Chapter 3 – Audit Hands-On Exercises
Audit – H
ands-On Exercises
Sadjadi et al.
38. Click on your Private folder, “myReports-<USERNAME>”, choose New Report and a new window will open up.
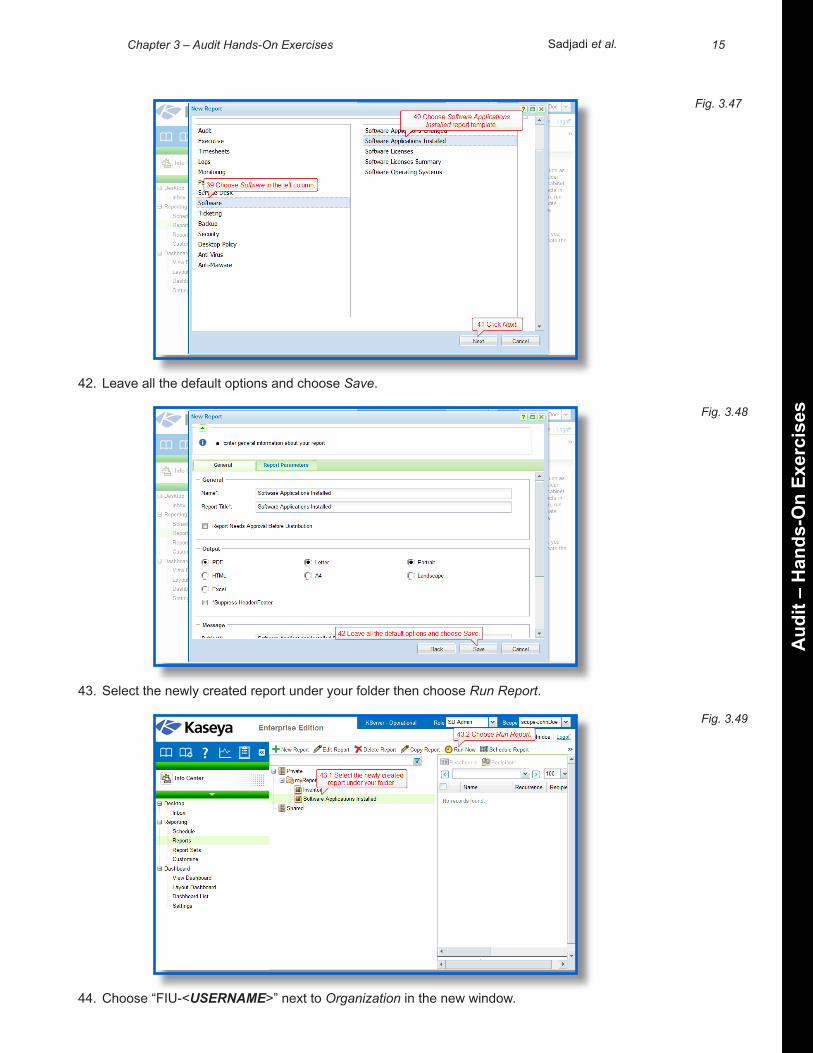
39. Choose Software in the left column.
40. Choose Software Applications Installed report template.
41. Click Next.
Fig. 3.45
Fig. 3.46
15Chapter 3 – Audit Hands-On Exercises
Aud
it –
Han
ds-O
n Ex
erci
ses
Sadjadi et al.
42. Leave all the default options and choose Save.
43. Select the newly created report under your folder then choose Run Report.
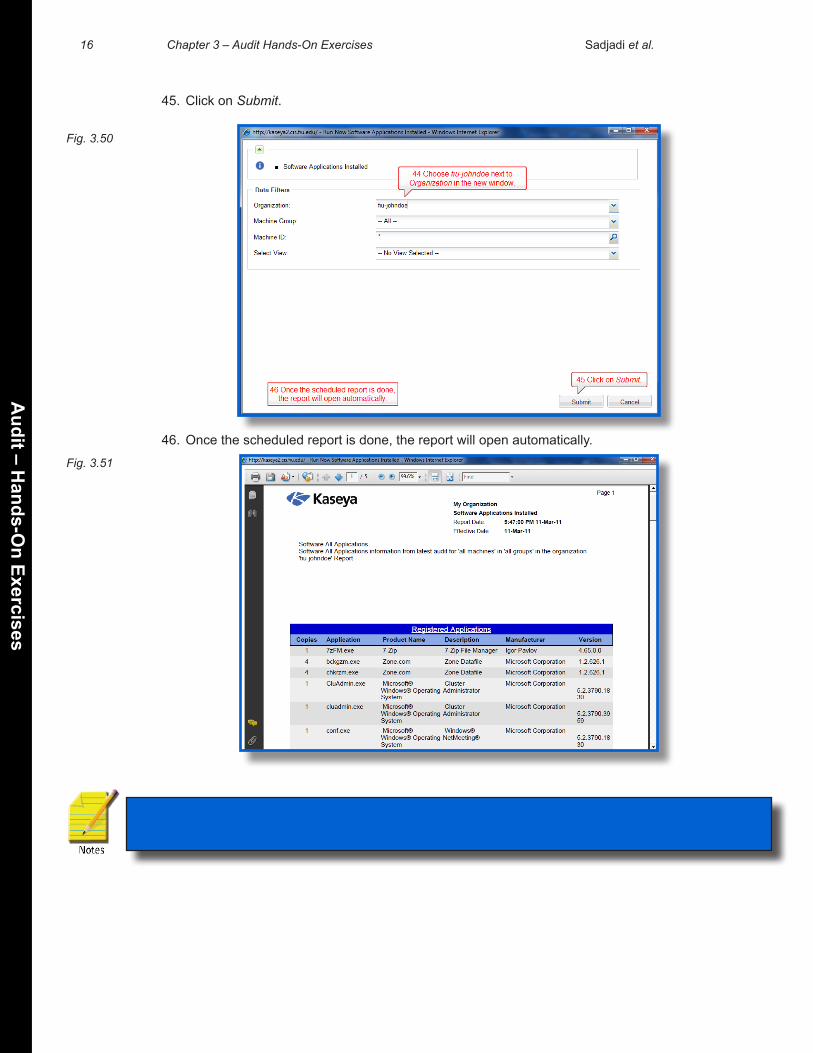
44. Choose “FIU-<USERNAME>” next to Organization in the new window.
Fig. 3.47
Fig. 3.48
Fig. 3.49
16 Chapter 3 – Audit Hands-On Exercises
Audit – H
ands-On Exercises
Sadjadi et al.
45. Click on Submit.
46. Once the scheduled report is done, the report will open automatically.
Note: Use the report to check and see if the audit ran successfully. The report can be printed out for record keeping; however, this is not necessary for this exercise.
Fig. 3.50
Fig. 3.51

17Chapter 3 – Audit Hands-On Exercises
Aud
it –
Han
ds-O
n Ex
erci
ses
Sadjadi et al.