Embed Size (px)
Citation preview
Audio/Visual System User Operations Manual Classroom of the Future
1 of 34

Table of Contents Table of Contents............................................................................................................ 2 Overview ......................................................................................................................... 3
Capabilities: ................................................................................................................. 3 Control System - Touch Panel Logo Page:.................................................................. 4 Mode Selection Page:.................................................................................................. 5 Advanced Mode/Source Selection Page: .................................................................... 6 System Warming Page: ............................................................................................... 7
Main Sources .................................................................................................................. 8 Room Volume.............................................................................................................. 9 Conference Volume................................................................................................... 10 Lighting ...................................................................................................................... 11 Projector/Plasma ....................................................................................................... 12 DVD: .......................................................................................................................... 13 VCR: .......................................................................................................................... 14 Local Channels: ......................................................................................................... 15 Computer Inputs – Room 1120:................................................................................. 16 Computer Inputs – Room 1143:................................................................................. 17 Computer Inputs – Room 1145:................................................................................. 18 Video Inputs – Room 1120: ....................................................................................... 19 Video Inputs – Room 1143: ....................................................................................... 20 Video Inputs – Room 1145: ....................................................................................... 21
Audio Conference ......................................................................................................... 22 Audio Conference Dialing: ......................................................................................... 22
Video Conference ......................................................................................................... 23 Video Conference - Dialing:....................................................................................... 23 Video Conference - Sources:..................................................................................... 24 Video Conference – Sources – Computer Inputs - 1120: .......................................... 25 Video Conference – Sources – Computer Inputs - 1143: .......................................... 26 Video Conference – Sources – Computer Inputs - 1145: .......................................... 27 Video Conference – Sources – Video Inputs - 1120: ................................................. 28 Video Conference – Sources – Video Inputs - 1143: ................................................. 29 Video Conference – Sources – Video Inputs - 1145: ................................................. 30 Video Conference – Sources – Camera Controls: ..................................................... 31 Video Conference – End:........................................................................................... 32 Exit System:............................................................................................................... 33 Questions: ................................................................................................................. 34
2 of 34

Overview
Capabilities: This Classroom of the Future are equipped with the following Source equipment:
• DVD/CD, VCR, Closed Circuit Television, Computer and Video Inputs as well as Audio and Video Conferencing
This space is equipped with the following Destination equipment:
• 2 Projectors and 2 ceiling/wall mounted Screens • 2 Plasmas
3 of 34

Control System - Touch Panel Logo Page: • The touch panel will be blank when the system is powered down. • To activate or turn the control panel on, simply touch the blank screen. • This is the first page you will see. • Touch the panel to start the system and bring you to the Mode selection page.
4 of 34

Mode Selection Page: • When you activate the system, you will be brought to the Mode Selection page
(seen below). • The Mode choices are as follows:
o Basic Mode o Advanced Mode – Includes everything in Basic plus ATC and VTC
capabilities.
5 of 34

Advanced Mode/Source Selection Page: • When you select ADVANCED MODE, the following additional selection page
appears. • From here you will select the advanced source selection page you wish to
access:
6 of 34

System Warming Page: • After you select the mode you want to use the system in, the system will now
power up. • The below screen will appear when you initiate the system from the Mode
Selection page.
7 of 34

Main Sources
• Once the system has warmed up, the following page will appear. • From this page you will have the all the sources available as well as the following
room controls: o Room Volume o Conference Volume o Lighting o Projector/Plasma
• In addition, from the Presentation Sources page, you can also select the Audio Conference Mode as well as the Video Conference Mode.
• Always present in the lower right corner of the page is the Exit System button
8 of 34

Room Volume • When you select the Room Volume button from the right side menu, the following
pop-up will appear on the screen. • From this pop-up you can control the following:
o Program Volume – This allows you to raise, lower or mute the volume for the selected source (DVD, VCR, etc)
o Speech Reinforcement – This allows you to raise, lower or mute volume of the Podium Microphone
o Student Mics – The volume of the microphones found in the audience/student section of the room can only be muted from this screen…you cannot raise or lower the volume of the student mics.
9 of 34

Conference Volume • When you select the Conference Volume button from the right side menu, the
following pop-up will appear on the screen. • From this pop-up you can control the following:
o Audio Conference Volume – This allows you to raise, lower or mute/privacy the outgoing volume while in an audio conference.
o Video Conference Volume - This allows you to raise, lower or mute/privacy the outgoing volume while in a video conference.
10 of 34

Lighting • When you select the Lighting button from the right side menu, the following pop-
up will appear on the screen. • You have 5 lighting choices to choose from:
o All On – Full house lights o Presentation 1 – A preset selection of lights (TBD) o Presentation 2 - A preset selection of lights (TBD) o Video Conference 3 - A preset selection of lights (TBD) o All Off
11 of 34

Projector/Plasma • When you select the Projector/Plasma button from the right side menu, the
following pop-up will appear on the screen. • From here you have the ability to manually turn on and off the projectors and
Plasmas as well as mute the image. (Projectors only) • When you Mute the image, be aware that the audio does not mute, only the
image does. o It is recommended that you do not manually turn on and off the projector
as they will automatically go on and off with the system.
12 of 34

DVD: • When you select the DVD button, the following screen will appear. • The buttons on this screen are a graphical representation of the buttons found on
a typical DVD remote and act as such. • Simply insert the Disc to be played and select the button.
• To go backwards in the current chapter, select the button and so on. • Once you have finished watching a video, select the button, eject the DVD
from the unit and then select another source • In addition to the bottom right you will see the DVD Menu button. • Select this button to view the DVD’s menu options. Use the up/down, left/ right
arrow buttons to navigate through the menu options. • To the left of the sources you will see a small preview window. You can use this
to cue up your video before sending it to a projector. To see a full screen preview of the image just press on the image. Press on the image a second time to reduce it back to this original screen.
• To view the image on a screen or plasma, simply select the Left, Right projector or Front, Rear Plasma button above the sources.
• To control the volume of the selected source select the Room Volume button from the top right corner, and then adjust the Program Volume up or down accordingly. (**See ROOM VOLUME section in this document.)
• To select another source simply select the source button from this screen. • If you are completely finished, select the EXIT SYSTEM button located on the
lower right corner of the screen.
13 of 34
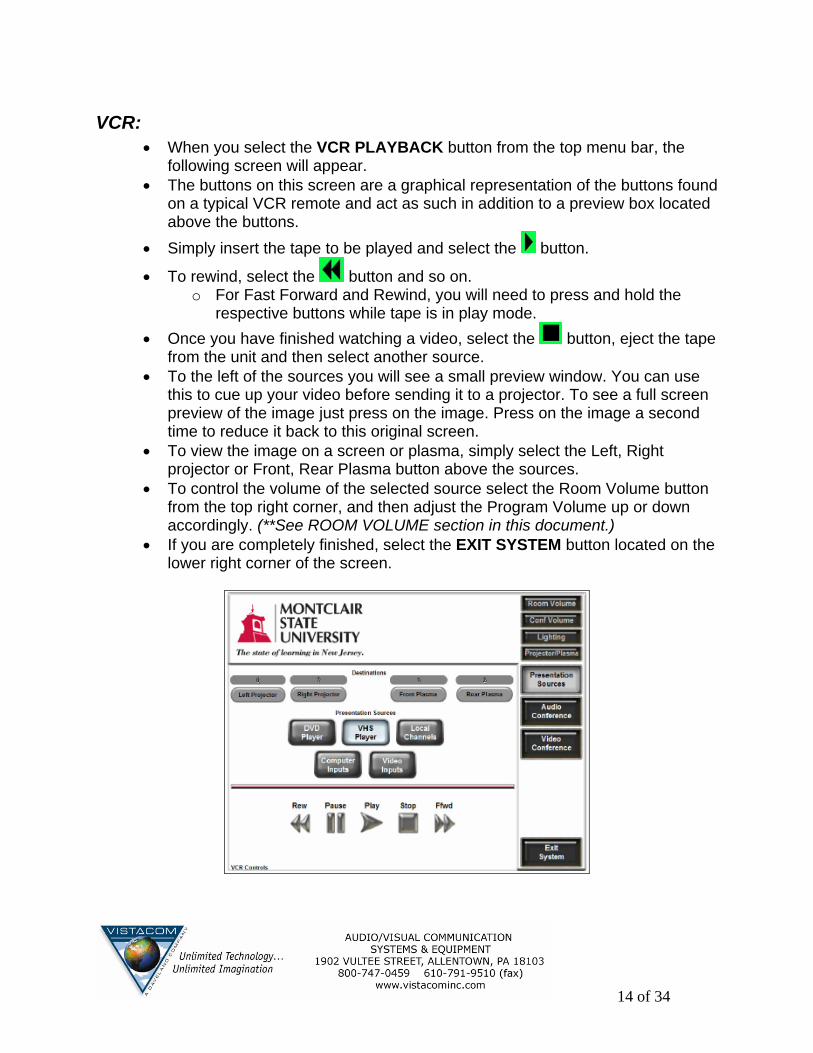
VCR: • When you select the VCR PLAYBACK button from the top menu bar, the
following screen will appear. • The buttons on this screen are a graphical representation of the buttons found
on a typical VCR remote and act as such in addition to a preview box located above the buttons.
• Simply insert the tape to be played and select the button.
• To rewind, select the button and so on. o For Fast Forward and Rewind, you will need to press and hold the
respective buttons while tape is in play mode. • Once you have finished watching a video, select the button, eject the tape
from the unit and then select another source. • To the left of the sources you will see a small preview window. You can use
this to cue up your video before sending it to a projector. To see a full screen preview of the image just press on the image. Press on the image a second time to reduce it back to this original screen.
• To view the image on a screen or plasma, simply select the Left, Right projector or Front, Rear Plasma button above the sources.
• To control the volume of the selected source select the Room Volume button from the top right corner, and then adjust the Program Volume up or down accordingly. (**See ROOM VOLUME section in this document.)
• If you are completely finished, select the EXIT SYSTEM button located on the lower right corner of the screen.
14 of 34

Local Channels: • When you select the LOCAL CHANNELS button this brings up the following
screen. o The channels being broadcast are MSU Content only. These channels will
feature material internal to the college, not regular broadcast television. • The up and down arrow buttons will change the channels one by one. • If you know what channel it is you are seeking, you can simply enter the channel
number using the keypad. • To the left of the sources you will see a small preview window. You can use this
to cue up your video before sending it to a projector. To see a full screen preview of the image just press on the image. Press on the image a second time to reduce it back to this original screen.
• To view the image on a screen or plasma, simply select the Left, Right projector or Front, Rear Plasma button above the sources.
• To control the volume of the selected source select the Room Volume button from the top right corner, and then adjust the Program Volume up or down accordingly. (**See ROOM VOLUME section in this document.)
• If you are completely finished, select the EXIT SYSTEM button located on the lower right corner of the screen.
15 of 34

Computer Inputs – Room 1120: • When you select the COMPUTER INPUTS button in room 1120, the following
screen will appear. • This is a graphical representation of the room and the available inputs. • Select the input button you are using followed by the destination. (Some laptops
may require you do a Fn+F7. Fn+F8 or Fn+F10 in order for the image to be released to the external source, MAC’s should plug in, then boot up for the signal to be received from the Laptop. If you have a MAC and already running, select the key with the apple log next to the space bar + the F7 key to sync to the display source.)
• When you are finished, select the RETURN TO SOURCES button to return to the main page.
• If you are completely finished, select the EXIT SYSTEM button located on the lower right corner of the screen.
16 of 34

Computer Inputs – Room 1143: • When you select the COMPUTER INPUTS button in room 1143, the following
screen will appear. • This is a graphical representation of the room and the available inputs. • Select the input button you are using followed by the destination. (Some laptops
may require you do a Fn+F7. Fn+F8 or Fn+F10 in order for the image to be released to the external source, MAC’s should plug in, then boot up for the signal to be received from the Laptop. If you have a MAC and already running, select the key with the apple log next to the space bar + the F7 key to sync to the display source.)
• When you are finished, select the RETURN TO SOURCES button to return to the main page.
• If you are completely finished, select the EXIT SYSTEM button located on the lower right corner of the screen.
17 of 34

Computer Inputs – Room 1145: • When you select the COMPUTER INPUTS button in room 1145, the following
screen will appear. • This is a graphical representation of the room and the available inputs. • Select the input button you are using followed by the destination. (Some laptops
may require you do a Fn+F7. Fn+F8 or Fn+F10 in order for the image to be released to the external source, MAC’s should plug in, then boot up for the signal to be received from the Laptop. If you have a MAC and already running, select the key with the apple log next to the space bar + the F7 key to sync to the display source.)
• When you are finished, select the RETURN TO SOURCES button to return to the main page.
• If you are completely finished, select the EXIT SYSTEM button located on the lower right corner of the screen.
18 of 34

Video Inputs – Room 1120: • When you select the VIDEO INPUTS button in room 1120, the following screen
will appear. • This is a graphical representation of the room and the available inputs. • Select the input button you are using followed by the destination. • When you are finished, select the RETURN TO SOURCES button to return to the
main page. • If you are completely finished, select the EXIT SYSTEM button located on the
lower right corner of the screen.
19 of 34

Video Inputs – Room 1143: • When you select the VIDEO INPUTS button in room 1143, the following screen
will appear. • This is a graphical representation of the room and the available inputs. • Select the input button you are using followed by the destination. • When you are finished, select the RETURN TO SOURCES button to return to the
main page. • If you are completely finished, select the EXIT SYSTEM button located on the
lower right corner of the screen.
20 of 34

Video Inputs – Room 1145: • When you select the VIDEO INPUTS button in room 1145, the following screen
will appear. • This is a graphical representation of the room and the available inputs. • Select the input button you are using followed by the destination. • When you are finished, select the RETURN TO SOURCES button to return to the
main page. • If you are completely finished, select the EXIT SYSTEM button located on the
lower right corner of the screen.
21 of 34

Audio Conference
Audio Conference Dialing: • When you select the Audio Conference button from the right side menu, the
following screen will appear. • To initiate a call simply enter the number you wish to dial and select the Dial
button. • When you have completed the call, simply hit the Hangup button. • Should you receive a call into the room, the ring will become audible through the
speakers, select Answer. • If you need to clear the number you entered, select the Clear button. • If when you are entering a number and you enter a wrong digit, hit the backspace
button to remove your error and enter the correct number. • To control the outgoing volume for the conference, select the Conference
Volume button from the right side menu. • Once you have completed your call, select another mode of operation using the
buttons on the right. • If you are completely finished, select the EXIT SYSTEM button located on the
lower right corner of the screen.
22 of 34

Video Conference
Video Conference - Dialing: • When you select the Video Conference button from the right side menu, the
following screen will appear with a Polycom Video Conference menu in the preview screen.
• To initiate a call simply enter the number or IP Address you wish to connect to and select the Connect/Disconnect button.
***When conducting a video conference, the near end will always appear on the right projector and the far end on the left projector.
• In addition to manually dialing the call, you may also utilize the Polycom product by dialing a number stored in the directory. (See IT for additional information)
• When you have completed the call, simply hit the Connect/Disconnect button. • If you need to clear the number you entered, select the Delete button. • To control the outgoing volume for the conference, select the Conference
Volume button from the right side menu. • Additional features from this screen are:
o NEAR – Provides control over the room you are dialing from. o FAR – Provides a limited set of controls over the room you have dialed in
to. (Limited to the far ends software and hardware being used. o PIP – Provides Picture In Picture control if you are sending Camera and
source image across to far end. o DIRECTORY – A preset list of numbers/locations stored in the system
(See the IT group for additional information) • Once you have completed your call, select another mode of operation using the
buttons on the right. • If you are completely finished, select the EXIT SYSTEM button located on the
lower right corner of the screen.
23 of 34

Video Conference - Sources: • When you select the Video Conference button from the right side menu,
followed by the Sources button the following screen will appear. • This screen shows you the sources available to share via video conference. • In addition to the standard sources available (DVD, VCR, etc.), you also now
have camera availability from two vantage points o Front Camera **See Camera Controls o Rear Camera **See Camera Controls
24 of 34

Video Conference – Sources – Computer Inputs - 1120: • When you select the COMPUTER INPUTS button in room 1120, the following
screen will appear. • This is a graphical representation of the room and the available inputs. • Select the input button you transmit via VTC. (Some laptops may require you do
a Fn+F7. Fn+F8 or Fn+F10 in order for the image to be released to the external source, MAC’s should plug in, then boot up for the signal to be received from the Laptop. If you have a MAC and already running, select the key with the apple log next to the space bar + the F7 key to sync to the display source.)
• When you are finished, select the RETURN TO SOURCES button to return to the main page.
• If you are completely finished, select the EXIT SYSTEM button located on the lower right corner of the screen.
25 of 34

Video Conference – Sources – Computer Inputs - 1143: • When you select the COMPUTER INPUTS button in room 1143, the following
screen will appear. • This is a graphical representation of the room and the available inputs. • Select the input button you transmit via VTC. (Some laptops may require you do
a Fn+F7. Fn+F8 or Fn+F10 in order for the image to be released to the external source, MAC’s should plug in, then boot up for the signal to be received from the Laptop. If you have a MAC and already running, select the key with the apple log next to the space bar + the F7 key to sync to the display source.)
• When you are finished, select the RETURN TO SOURCES button to return to the main page.
• If you are completely finished, select the EXIT SYSTEM button located on the lower right corner of the screen.
26 of 34

Video Conference – Sources – Computer Inputs - 1145: • When you select the COMPUTER INPUTS button in room 1145, the following
screen will appear. • This is a graphical representation of the room and the available inputs. • Select the input button you transmit via VTC. (Some laptops may require you do
a Fn+F7. Fn+F8 or Fn+F10 in order for the image to be released to the external source, MAC’s should plug in, then boot up for the signal to be received from the Laptop. If you have a MAC and already running, select the key with the apple log next to the space bar + the F7 key to sync to the display source.)
• When you are finished, select the RETURN TO SOURCES button to return to the main page.
• If you are completely finished, select the EXIT SYSTEM button located on the lower right corner of the screen.
27 of 34

Video Conference – Sources – Video Inputs - 1120: • When you select the VIDEO INPUTS button in room 1120, the following screen
will appear. • This is a graphical representation of the room and the available inputs. • Select the input button you wish to transmit via VTC. • When you are finished, select the RETURN TO SOURCES button to return to the
main page. • If you are completely finished, select the EXIT SYSTEM button located on the
lower right corner of the screen.
28 of 34

Video Conference – Sources – Video Inputs - 1143: • When you select the VIDEO INPUTS button in room 1143, the following screen
will appear. • This is a graphical representation of the room and the available inputs. • Select the input button you wish to transmit via VTC. • When you are finished, select the RETURN TO SOURCES button to return to the
main page. • If you are completely finished, select the EXIT SYSTEM button located on the
lower right corner of the screen.
29 of 34

Video Conference – Sources – Video Inputs - 1145: • When you select the VIDEO INPUTS button in room 1145, the following screen
will appear. • This is a graphical representation of the room and the available inputs. • Select the input button you wish to transmit via VTC. • When you are finished, select the RETURN TO SOURCES button to return to the
main page. • If you are completely finished, select the EXIT SYSTEM button located on the
lower right corner of the screen.
30 of 34

Video Conference – Sources – Camera Controls: • When you select the any of the Camera buttons from the Source screen, the
following screen will appear. • The cameras installed are all PTZ (Pan, Tilt, Zoom) cameras. • This screen allows you to control the camera shot for each camera. • Adjust the camera using the four arrow buttons for Pan and Tilt as well as the two
Zoom in and out buttons. • You have the ability to store four camera angles for each camera. To do this,
position the camera to the desired angle and then select the Store button followed by the Preset Number you desire.
• To return to the Dialing menu, select the Dialing button from the right side menu. • To select another camera or source to control, simply select that button of the
desired source.
31 of 34

Video Conference – End: • When you select another mode (Presentation Sources or Audio Conference), you
will see the following page. • This page is to confirm that you in fact wish to exit Video Conference Mode. • If so, select Yes and continue on.
32 of 34

Exit System: • As I have mentioned various times throughout this document, you can shut the
system down at any time by selecting the Exit System button found in the lower right portion of the screen.
• . By selecting this button, the confirmation page below will appear. • Select Yes to complete this task and the SHUT DOWN screen, example at the
bottom of page, will appear.
33 of 34

Questions: If you have any questions on general operations/procedures, please contact your
help desk at extension 7971. Or, if you need additional assistance, please dial 610-791-9081 and ask for our Service Department.
34 of 34

![Untitled-2 [silveroak.edu.in]€¦ · staff members. Audio-Visual Classroom Systems Audio-Visual technology is a powerful tool that enables teachers to present information and complex](https://img.pdfslide.us/doc/110x75/5e9a1d6cc9f8886d2439b6fc/untitled-2-staff-members-audio-visual-classroom-systems-audio-visual-technology.jpg)