Embed Size (px)
Citation preview
AudioSonic MBOX® Product Manual Firmware: 1.0.15 Manual: 2.1A Rev: amoh Magic On Hold 720 Brooker Creek Blvd., Ste 215 Oldsmar, FL 34677 Toll free: 800.584.4653 http://magic-on-hold.com [email protected]

Trusonic, the Trusonic logo, MBOX and the MBOX logo are registered trademarks of Trusonic, Inc. All other trademarks are the properties of their respective owners.
© 2007 by Trusonic, Inc. Reproduction in whole or in party without written permission is prohibited. All rights reserved.
2
CHAPTER 1. GETTING STARTED ...............................................................................5 Using This Guide...............................................................................................5 Understanding the Basics .................................................................................5 Cables and Accessories....................................................................................5 Power Connection .............................................................................................5 Determining Your Service Connection ..............................................................5 Administration Menu..........................................................................................6
Getting to Know the MBOX Menu..................................................................6 How to Enter Letters and Digits .....................................................................6
CHAPTER 2. CONNECTING THE SERVICE ...................................................................8 Installing on a Dialup Connection ......................................................................8
Phone Line.....................................................................................................8 Phone Jack Connection.................................................................................8
Installing an Ethernet Connection......................................................................8 Ethernet Cable...............................................................................................9 Ethernet Connection ......................................................................................9 Dynamic or Static IP Addressing ...................................................................9 Setting Up a DHCP Network..........................................................................9 Setting Up a Static IP Address.......................................................................9 Applying Static Network Settings ...................................................................9 Web Content Filters .....................................................................................10 Amount of Traffic to Expect..........................................................................10
Advanced Network Configuration ....................................................................10 Setting Download Rate Limits......................................................................10 Setting up an HTTP Proxy ...........................................................................10 To apply an HTTP Proxy .............................................................................10 Testing New Proxy Settings.........................................................................10
Powering Up for the First Time........................................................................11 Testing the AudioSonic Media Service Connection.........................................11
CHAPTER 3. SETTING UP YOUR AUDIO ...................................................................12 Connecting Audio Outputs ..............................................................................12 Adjusting Volume Levels .................................................................................12 Using the MBOX as a Music Pass-through Device .........................................12
Using an External Music Source..................................................................12 Using the MBOX as a Music Source............................................................12 Adjusting Volumes for Music Pass-Through ................................................13
CHAPTER 4. TROUBLESHOOTING............................................................................14 Testing Audio Output.......................................................................................14 Debugging an Analog Phone Line...................................................................14
CHAPTER 5. WARRANTY AND SPECIFICATIONS........................................................15 Limited Warranty .............................................................................................15
What Is Covered? ........................................................................................15 What Is Not Covered? .................................................................................15 What Will AudioSonic Do?...........................................................................15 Return Procedure ........................................................................................15
3
4
Restrictions..................................................................................................15 Non-warranty Replacement .........................................................................16 Notice and Change ......................................................................................16
Compliance Information: FCC Part 15 Regulations........................................16 Industry Canada ..............................................................................................16 Canadian Equipment Limitations.....................................................................17 Safety Information ...........................................................................................18
Warning, Cautions, and Notes .....................................................................18 Precautions..................................................................................................18
Changing Dial-Up ISP Information ..................................................................18 Changing the ISP Telephone Numbers .......................................................19 Changing ISP Username and Password .....................................................19 Testing New ISP Settings ............................................................................19
Changing the Default DNS IP..........................................................................20 Changing the Default DNS IP ......................................................................20 Testing New DNS IP Settings ......................................................................20

Chapter 1. Getting Started Welcome! Thank you for purchasing the AudioSonic MBOX. Before operating the player, please read this manual thoroughly and retain it for future reference.
Using This Guide Instructions in this guide describe installation, configuration, troubleshooting, specifications, and compliance information for your MBOX.
The icons used in this manual are described below:
Icon Meaning
Warnings: Advise readers of something that could cause them physical harm.
Cautions: Caution readers against anything that may damage equipment.
Notes: Point out something of special interest or importance to the reader. Failure to read the note will not result in physical harm to the reader, equipment, or data.
Courier font symbolizes messages shown on the LCD display of your MBOX. Words in Italics represent actions you should take
Understanding the Basics Your AudioSonic MBOX is a hardware and service offering. The hardware consists of an MBOX player that should be installed at the on-premise location. The service is an Internet-based music and scheduling delivery system.
Install your MBOX with access to either a telephone line or an Ethernet connection so that it can access the Internet-based portion
of the product offering. The MBOX supports both dialup and Ethernet-based Internet access.
Once installed, the MBOX will dial up or connect via the Ethernet at a specified time or interval to receive programming instructions, return play information, and retrieve new audio content if necessary. In general, connection times take less than 1 minute, but can be longer than an hour depending on the amount of audio content to be updated.
Cables and Accessories Included with the MBOX are the following cables and accessories:
3 foot RCA audio cable with dual RCA jacks
6 foot USA power cable 6 foot 12 volt power supply 25 foot black telephone line Telephone line splitter The contents of the shipment may differ depending on your country and products purchased.
Power Connection Power should not be applied to the player until after you have completed the service connection in , “ Error! Reference source not found.” .
AudioSonic recommends that the MBOX be plugged into a power-conditioned outlet, preferably connected to an uninterruptable powersupply (UPS) unit.
The MBOX is a 24/7/365 device and has no external power switch. Once it is plugged in, it should be left plugged in at all times.
Determining Your Service Connection The MBOX will connect to the Trusonic Internet service via a dialup Internet connection to a local Internet Service Provider or via the Ethernet through a broadband Internet connection.
5
If your location will be using a dialup connection, go to “ Error! Reference source not found.” on page Error! Bookmark not defined..
If your location will be using an Ethernet connection, go to “ Installing an Ethernet Connection” on page 8.
Administration Menu The MBOX comes equipped with a built-in administration menu system which can be used to change configuration values set on the player. There are three levels of the Administration Menu.
Main Menu: This portion of the menu does not require a password to access. From this menu, you will be able to reset the player, turn the internal speaker on and off, view settings, and log into the "Admin Menu"
Admin Menu: In this section, you will be able to modify values such as volume levels, call settings, and network settings.
Advanced Menu: In this section, you will be able to make more advanced configuration changes. AudioSonic does not recommend making any modifications in this section unless instructed to do so by your authorized reseller or a AudioSonic representative.
Getting to Know the MBOX Menu The menu navigation system allows you to change configuration values on the MBOX.
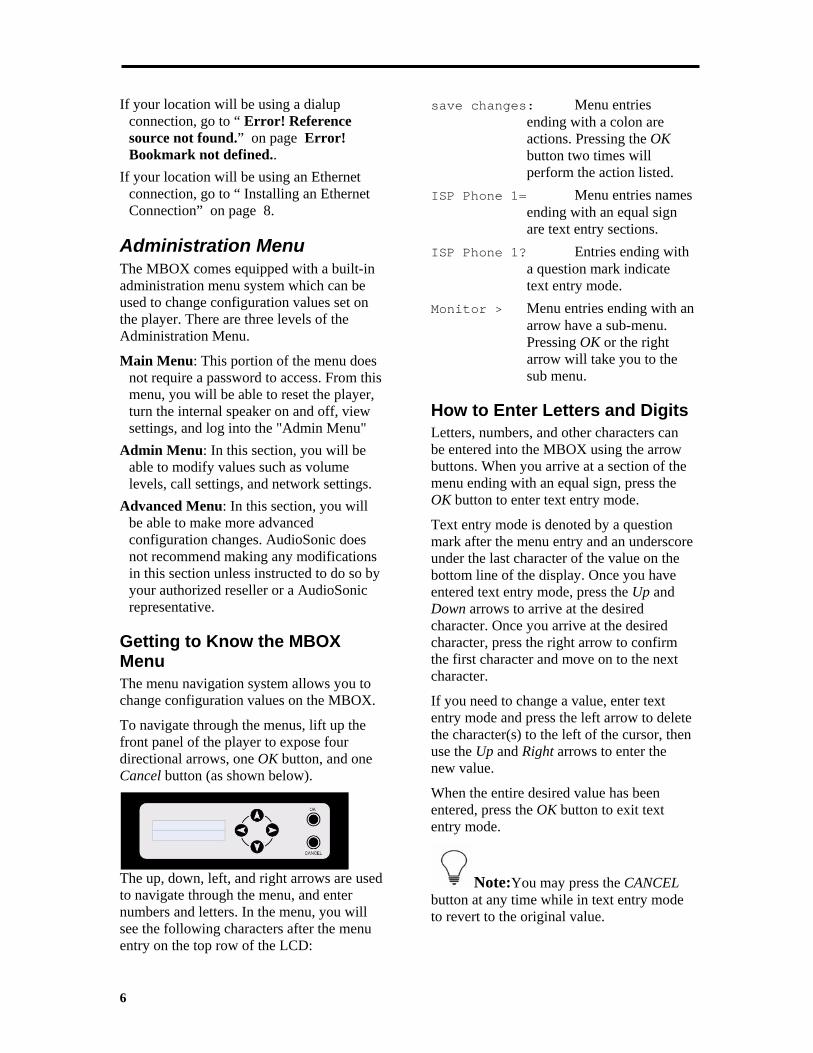
To navigate through the menus, lift up the front panel of the player to expose four directional arrows, one OK button, and one Cancel button (as shown below).
The up, down, left, and right arrows are used to navigate through the menu, and enter numbers and letters. In the menu, you will see the following characters after the menu entry on the top row of the LCD:
save changes: Menu entries ending with a colon are actions. Pressing the OK button two times will perform the action listed.
ISP Phone 1= Menu entries names ending with an equal sign are text entry sections.
ISP Phone 1? Entries ending with a question mark indicate text entry mode.
Monitor > Menu entries ending with an arrow have a sub-menu. Pressing OK or the right arrow will take you to the sub menu.
How to Enter Letters and Digits Letters, numbers, and other characters can be entered into the MBOX using the arrow buttons. When you arrive at a section of the menu ending with an equal sign, press the OK button to enter text entry mode.
Text entry mode is denoted by a question mark after the menu entry and an underscore under the last character of the value on the bottom line of the display. Once you have entered text entry mode, press the Up and Down arrows to arrive at the desired character. Once you arrive at the desired character, press the right arrow to confirm the first character and move on to the next character.
If you need to change a value, enter text entry mode and press the left arrow to delete the character(s) to the left of the cursor, then use the Up and Right arrows to enter the new value.
When the entire desired value has been entered, press the OK button to exit text entry mode.
Note:You may press the CANCEL button at any time while in text entry mode to revert to the original value.
6

7
Note: After entering the desired value, you must "save changes" in order to save the current value to memory. If you do not save changes, the MBOX will revert to the original values the next time the player is reset.
Chapter 2. Connecting the Service
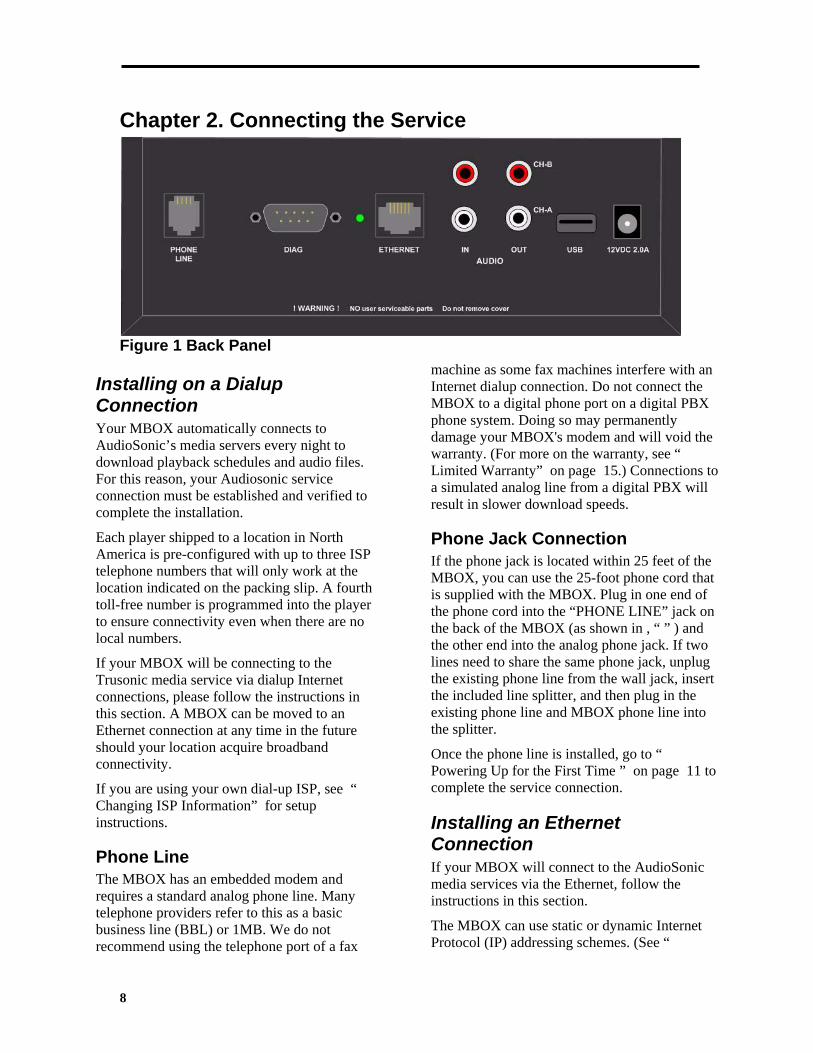
Figure 1 Back Panel
Installing on a Dialup Connection Your MBOX automatically connects to AudioSonic’s media servers every night to download playback schedules and audio files. For this reason, your Audiosonic service connection must be established and verified to complete the installation.
Each player shipped to a location in North America is pre-configured with up to three ISP telephone numbers that will only work at the location indicated on the packing slip. A fourth toll-free number is programmed into the player to ensure connectivity even when there are no local numbers.
If your MBOX will be connecting to the Trusonic media service via dialup Internet connections, please follow the instructions in this section. A MBOX can be moved to an Ethernet connection at any time in the future should your location acquire broadband connectivity.
If you are using your own dial-up ISP, see “ Changing ISP Information” for setup instructions.
Phone Line The MBOX has an embedded modem and requires a standard analog phone line. Many telephone providers refer to this as a basic business line (BBL) or 1MB. We do not recommend using the telephone port of a fax
machine as some fax machines interfere with an Internet dialup connection. Do not connect the MBOX to a digital phone port on a digital PBX phone system. Doing so may permanently damage your MBOX's modem and will void the warranty. (For more on the warranty, see “ Limited Warranty” on page 15.) Connections to a simulated analog line from a digital PBX will result in slower download speeds.
Phone Jack Connection If the phone jack is located within 25 feet of the MBOX, you can use the 25-foot phone cord that is supplied with the MBOX. Plug in one end of the phone cord into the “PHONE LINE” jack on the back of the MBOX (as shown in , “ ” ) and the other end into the analog phone jack. If two lines need to share the same phone jack, unplug the existing phone line from the wall jack, insert the included line splitter, and then plug in the existing phone line and MBOX phone line into the splitter.
Once the phone line is installed, go to “ Powering Up for the First Time ” on page 11 to complete the service connection.
Installing an Ethernet Connection If your MBOX will connect to the AudioSonic media services via the Ethernet, follow the instructions in this section.
The MBOX can use static or dynamic Internet Protocol (IP) addressing schemes. (See “
8

Dynamic or Static IP Addressing” on page 9 for more information.) The MBOX is set up for plug-and-play operation on a network with Dynamic Host Control Protocol (DHCP) servers. Such servers are standard on many broadband network routers from companies such as Linksys, Netgear, and D-Link.
Ethernet Cable An Ethernet cable may or may not have been provided in your MBOX kit depending on how your product was ordered. Any category 5 straight-through (not crossover) Ethernet patch cable will work with the MBOX. Ethernet patch cables are available in a variety of lengths from local hardware and computer specialty stores.
Ethernet Connection Plug in the straight-through Ethernet patch cable into the “ETHERNET” port on the back of the MBOX (see , “ ” on page 8) and connect the other end to an available Ethernet jack on your router or hub.
The MBOX retrieves updates and audio files by using HTTP over port 80. All audio file URLs are encrypted.
Dynamic or Static IP Addressing If your network offers dynamic IP addressing via a DHCP server, no more configuration is required. The DHCP setup is recommended by AudioSonic as the preferred network configuration.
Setting Up a DHCP Network On a DHCP network, the domain name server (DNS) should be automatically set as part of the address assignment exchange. If the DHCP network does not hand out a DNS IP address, 206.173.28.10 will be used as a default. If this default DNS is not suitable, you may switch to another DNS in the Setup menu of your MBOX. (See “ Changing the Default DNS IP” on page 20.)
The MBOX is 'plug-and-play' ready for a DHCP network. The local DHCP server will assign the proper IP address, network address, subnet mask and gateway to the MBOX.
To set up for a DHCP network Run a live Ethernet cable to the ETHERNET port on the back of the MBOX (see , “ ” on page 8).
Once the Ethernet cable is connected, go to “ Powering Up for the First Time ” on page 11 to complete the service connection.
Setting Up a Static IP Address If your network is set up for Static addressing, you should first obtain the following information from your network administrator: Static IP address Subnet Mask Gateway
Applying Static Network Settings Power on the MBOX. See “ Powering Up for
the First Time ” on page 11 Navigate to Network Config in the Admin
Menu Press the right arrow to DHCP Change enabled to disabled Press the down arrow to IP Address
Enter in the Static IP Address (eg. 192.168.0.100)
Press the down arrow to Subnet Mask
Enter the Subnet Mask (eg. 255.255.255.0)
Press the down arrow to Gateway
Enter the Gateway (eg. 192.168.0.1)
Navigate to Save Changes and press OK twice
Note: Failing to save changes will result in lost settings!
9
Web Content Filters If your network is using content filtering software from companies such as Network Appliance and WebSense, it must be configured to allow for the retrieval of URLs ending in “.mp3” via HTTP on port 80 from rcdl.trusonic.com. The MBOX also communicates via HTTP on port 80 to mbox.trusonic.com and mbox2.trusonic.com. Many network filtering packages exclude files with the extension “.mp3” in order to prevent the distribution of music content.
Amount of Traffic to Expect The MBOX is programmed to contact AudioSonic’s servers between 10pm and 4am local time. During the connection, the MBOX will log in via port 80 and transfer its log files and retrieve new playlist information. This exchange usually takes less than 1 minute at 56k and considerably less time on an Ethernet connection.
The media files are 64k mono-encoded so a 3 minute long audio file or song is approximately 1.5 megabytes in size. If a new song is added to a playlist, the song will be downloaded upon the next Nightly connection.
A 3 minute song or 1.5 mb file will take approximately 6 minutes to retrieve on a dial-up connection, and about 4 seconds on an Ethernet connection.
Advanced Network Configuration The MBOX can be configured to a specific download rate so as to not interfere with other network appliances. An HTTP Proxy can also be configured on the player, should the need arise.
Setting Download Rate Limits A download rate limit can be applied to the 10/100 Ethernet connection on the MBOX so as to not interfere with other network activity. The download limit can be configured in the Network section of the Admin menu. All download rates are in Kbps. The default download limit of the MBOX is 150 Kbps (equivalent to a T1).
Setting up an HTTP Proxy The MBOX can be configured to access the service portion of your AudioSonic subscription through your corporations proxy server. The MBOX supports basic proxy authentication as described in RFC’s 1945, 2068 and 2617. Both user-restricted and non user-restricted proxy settings are supported.
To apply an HTTP Proxy Navigate to HTTP Proxy IP in the Network
sub-menu of the Admin Menu
Enter the HTTP Proxy IP (eg. 192.168.0.200) Press the down arrow to HTTP Proxy Port
Enter the HTTP Proxy Port (eg. 3003)
If your proxy does not require a username and password, skip to Step “ Navigate to Save Changes and press OK twice” on page 10“ Navigate to Save Changes and press OK twice” on page 109. Otherwise: Press the down arrow to Proxy Username Enter the Proxy Username
Press the down arrow to Proxy Password
Enter the Proxy Password
Navigate to Save Changes and press OK twice
Note: Failing to save changes will result in lost settings!
Testing New Proxy Settings After making any changes to the Proxy Set-tings, you should test the connection to ensure proper data entry. To test the new Proxy settings Navigate to Test Connection Press the OK button twice
Observe the LCD screen for messages
10
If you do not see CONNECT: SUCCESS on the display after a few minutes, check that the settings are all correct, then consult your network administrator.
Powering Up for the First Time The MBOX will begin playing its scheduled music or advertisements within 30 seconds of applying power. After powering up for the first time, you should run the Test Connection command from the Main Menu to ensure proper connectivity.
Plug in the supplied power cord into an uninterruptable power supply (UPS) or protected wall socket, if available.
Plug the other end into the power receptacle of the MBOX and rotate the power cord holdin clip so that it covers the plug end to ensure that it does not fall out.
Within 30 seconds, the MBOX will begin to play its scheduled audio.
Testing the AudioSonic Media Service Connection Once you have confirmed audio output, and have connected the MBOX to either a telephone line or ethernet cable, you should test whether the MBOX can successfully connect to AudioSonic servers.
If you are connected on a dialup connection, you should first run the Test Modem command from the menu. This test will check the status of the telephone line connected to the MBOX.
If the modem test has returned a success message, or you are connected to Ethernet, then you are ready to test the service connection.
Navigate to Test Connection in the Main Menu
Press the OK button twice to initiate the connection test.
During the connection attempt, you will see MBOX SERVER Connecting... on the display for up to 10 minutes while the MBOX attempts all possible combinations to connect.
If your MBOX successfully connects to AudioSonic, you will see MBOX SERVER SUCCESS on the display.
If your MBOX is unsuccessful at connecting to AudioSonic, Mbox Test Error Connect Failed will be displayed on the LCD. You should then ensure that all necessary cables are connected to the MBOX, then see , “ Error! Reference source not found.” .
11
Chapter 3. Setting Up Your Audio
Connecting Audio Outputs The MBOX supports a maximum of two output zones, A and B. Both Music and Ad can be indipendently configured on both zones. Please refer to the Zone information at the top of the packing slip to determine if your MBOX has been configured for one or two zones. For example, if your player has been configured for the single Zone A, you would connect an RCA cable from CH-A OUT on the MBOX to the amplifier. (See .)
Adjusting Volume Levels To adjust the volume levels of the MBOX Navigate to Zone A or Zone B in the Admin
Menu. See for a full description of the Administration Menu.
Navigate to either Music Volume or Ad Volume
Make any neccessary adjustments to the volume.
Navigate down to Save Changes and press OK twice.
After saving changes, the currently playing song will be cut off and the next song will begin to play with the new volume applied.
If you are happy with the volume levels on Zone A, and wish to apply them to Zone B, navigate to Copy To Zone B= and press OK twice. Once the levels have been copied, navigate to Save Changes: and press OK twice.
Using the MBOX as a Music Pass-through Device The MBOX may be configured as a Music Pass-through device or Message Repeater. Music Pass-through will enable external music sources to pass through the MBOX, and at a given time duck the external music to play an advertisement from the MBOX. There are two options for music pass-through:
Using an external music source This option will enable an external music source to play through the MBOX and at a given time, fade the music down to a specified volume (ducker depth) and play the advertisement or message.
Using the MBOX as a music source This option will enable the MBOX to feed its own music output back into the MBOX and fade the music at a given time to a specified volume (ducker depth) and play the advertisement or message.
Using an External Music Source Any source can be used for the External Music Source of a Pass-Through setup. For example, you could you a looping CD, sattellite stream, etc.
Connect an RCA cable from the external music source to Ch A In on the MBOX,
Run the Ch A Out to the on-premises amplifier.
When an advertisement plays, the external music source will fade down to the ducker depth. After the advertisement has finished, the MBOX will fade the external music source back up to its normal volume.
Using the MBOX as a Music Source The MBOX can feed its own music source from Channel A output into Channel B input, and at any given time the advertisement or message will play on Channel B output, fading the music to the ducker depth.
Plug one end of an RCA cable into Ch A Out, and the other end into Ch B In.
Plug another RCA cable into Ch B Out and connect it to the on premises amplifier. The music from ZoneA will play through Zone B, and at a given time, Zone B will fade to the ducker depth. After the advertisement is finished, the MBOX will fade the music back to its normal volume.
12
Adjusting Volumes for Music Pass-Through In order for Music Pass-Through to function correctly, adjustments must be made to the Ducker Depth, Fade, and Input Volumes.
A Ducker Depth of 0 will result in a music level of 0 when an advertisement plays. Should you like to have light music in the background while an advertisement plays, the Ducker Depth should be set to any value other than 0.
A Fade time of 0 will result in a 0 second fade at the end of the song and the beginning of an advertisement. AudioSonic recommends a fade of 100 for a 1 second fade between the song and ad.
To adjust the volume levels for Music Pass-Through Navigate to Zone A or Zone B in the Admin
Menu. See “ Error! Reference source not found.” on page Error! Bookmark not defined. for a full description of the Administration Menu.
Navigate to Ducker Depth, Fade Time, or Input Volume and make any necessary adjustments.
Navigate to Save Changes and press OK twice.
After saving changes, the currently playing song will stop playing, and the next song will begin to play with the new volume applied.
If you have the desired volume levels on Zone A, and wish to apply the same settings to Zone B, navigate to Copy To Zone B= and press OK twice. Once the levels have been copied, navigate to Save Changes: and press OK twice.
13
Chapter 4. Troubleshooting AudioSonic is dedicated to providing you with quality support and customer service. When you have a question: Use this chapter. Contact your reseller support department to
get help from someone local. Call Customer Service. After checking this
troubleshooting chapter and with your reseller, call AudioSonic Customer Service at 1.800.584.4653.
Testing Audio Output Your MBOX comes equipped with an internal monitor speaker for testing audio output without having to connect RCA cables to the MBOX.
To monitor the output of Channel A or Channel B while a song title is displayed on the LCD screen
Press the down arrow on the front panel to Monitor and then press the Right arrow.
Navigate to Listen to Ch A: (or B) and press OK twice. If you hear output from the internal speaker, there will be output at the appropriate RCA jack.
If you determine that the unit has no output, contact your distributor to see if there is a schedule problem.
Once you are finished with the speaker monitor function, press the down arrow to Mute Speaker and hit the OK button twice.
Debugging an Analog Phone Line If the Test Connection command has returned MBOX TEST ERROR: CONNECT FAILED, try the following troubleshooting steps.
Test Modem The MBOX contains a built-in Modem Test program. With the phone line connected, navigate to Test Modem in the Main Menu, and press OK twice to initiate the test.
The music schedule will be briefly interrupted during the modem test, and any modem tones will be audible via the internal speaker.
The modem test executes the following steps:
The display will show Preparing to test modem
The music schedule will be interrupted as the MBOX will turn off the audio output to the RCA leads.
The display will show Modem: OK if the modem hardware diagnostics are successful.
The internal speaker will be turned on and you will a dial tone or other telephone line signal.
Upon full test success, the display will show Phone line tests good
If the modem test is not successful, please review the following displayed error conditions and recommended actions prior to contacting Customer Service.
Error: Phone line not detected - check the phone line connection to the MBOX and ensure that it is plugged into the port marked Phone line and that it is connected to the telephone jack on the wall and retest.
Error: Phone line in use - some other device is connected to and actively using the phone line. Wait until the line is no longer in use and retest.
Error: Busy tone on phone line - a fast-busy signal has been detected by the modem. Such signals occur, for example, when another telephone is connected to the same line and has remained off-hook without a connected call for a long period of time. Recheck the phone line and devices sharing that phone line and retest.
14
To view and test current ISP telephone numbers Navigate to View Settings in the Main Menu
Press the right arrow once Press the down arrow to ispphone1
From another telephone located in the installation location, dial ispphone1
Repeat for ispphone2, 3, and 4
Chapter 5. Warranty and Specifications
Limited Warranty Products included are the Internet Playback Device (IPD) also known as a MBOX or MBOX and the associated power cable and transformer.
On the first product shipment, the product will have a 12-month (365-day) replacement warranty from the date of shipment.
On replacement products shipped from AudioSonic, the warranty period is the remainder of the original warranty or 90 days, whichever is longer.
What Is Covered? This limited warranty covers defects in materials and workmanship when installed in accordance with this manual.
What Is Not Covered? This limited warranty does not cover:
Software, including, but not limited to, the AudioSonic Client Online Account (COA) and Value Added Reseller (VAR) hosted applications.
Problems that result from: External causes such as accident, abuse,
misuse, or problems with electrical power, including brown-outs and lightning strikes
Servicing not authorized by AudioSonic
Usage that is not in accordance with the product instructions
Problems caused by using accessories, parts, or components not supplied by AudioSonic
Products with missing or altered tags or serial numbers
Products that fail to communicate with Audio-Sonic's central servers due to installation or on-site data networking or telephone issues
What Will AudioSonic Do? During the 395-day or 90-day warranty on a product, AudioSonic will replace the product with a comparable product that is new or refurbished. The replacement product will come with a 90-day warranty that runs concurrently with any other warranties.
Return Procedure Contact our Customer Service department toll free at 1.800.584.4653 and have your product serial number(s) and location information available.
The Customer Service representative will issue you a Return Materials Authorization number (RMA#), which will be used to track your warranty transaction.
AudioSonic will ship a replacement system with a prepaid return label on the next available shipping day. AudioSonic will bill the outbound shipping costs to your account.
Upon receipt of the replacement product return the defective product in the same shipping container using the prepaid return label.
If we determine that the problem is not covered under this warranty, we will attempt to refurbish and repair the returned system and charge time and material costs to your account.
If the unit is damaged outside of this warranty the full current price of the MBOX will be charged to your account.
Restrictions All returns must be postmarked within 30 days of receiving the replacement system or your
15

account will be charged the full current price of the replacement system.
Shipping charges associated with the return process are not refundable.
Returned items must include the Internet Playback Device/MBOX and power cable. Do not return the audio cables, manuals, and other accessory items.
If the external case on the product is opened, modified, or damaged, this product warranty becomes null and void.
Only customers in good standing with the AudioSonic finance department are eligible for this warranty program.
Non-warranty Replacement Non-warranty returns can be repaired or replaced at AudioSonic's option, at a fixed cost to the customer. All non-warranty repairs/replacements carry a 90-day from the date of shipment, parts and labor warranty.
Notice and Change Service and warranty terms and conditions, including out-of-warranty pricing, are subject to change without notice.
Compliance Information: FCC Part 15 Regulations This equipment has been tested and found to comply with the limits for a Class B digital device, pursuant to Part 15 of the FCC rules. These limits are designed to provide reasonable protection against harmful interference in a residential installation. This equipment generates, uses, and can radiate radio frequency energy, and if not installed and used in accordance with the instructions, can cause harmful interference to radio communications. However, there is no guarantee that interference will not occur in a particular installation. If this equipment does cause harmful interference to radio or television reception, which can be determined by turning the equipment off and on, the user is encouraged to try to correct the interference by one or more of the following measures:
Reorient or relocate the receiving antenna. Increase the separation between the equipment
and receiver. Plug the equipment into an outlet on a circuit
different from that to which the receiver is connected.
Consult the dealer or an experienced radio/TV technician for help.
This device complies with Part 15 of the FCC rules. Operation of this device is subject to the following conditions: (1) This device may not cause harmful interference. (2) this device must accept any interference that may cause undesired operation.
Warning: Changes or modifications to this unit not expressly approved by the party responsible for compliance could void the user's authority to operate the equipment.
Industry Canada This Class B digital apparatus meets all requirements of the Canadian Interference-Causing Equipment Regulations.
Cet appareil numérique de la classe B respecte toutes les exigences du Reglement Canadien sur le materiel brouilleur.
FCC Part 68 regulations require that the following information be provided to the customer:
Product: MultiTech Systems modem module
Model: MT5600SMI FCC Registration Number:
AU7-USA-46014-MD-E
This equipment complies with Part 68 of the FCC rules. A label on the side or bottom of this
equipment contains, among other infor-mation, the FCC Registration Number and Ringer Equivalence Number (REN), if applicable, for this equipment.
If required, this information must be given to the telephone company.
16
An FCC-compliant telephone cord and modular plug is provided with this equipment. This equipment is designed to be connected
to the telephone network or premises wiring using a compatible modular jack that is Part 68-compliant. See installation instructions for details.
If your telephone equipment causes harm to the telephone network, the telephone company may discontinue your service temporarily. If possible they will notify you in advance.
If advance notice isn't practical, you will be notified as soon as possible. You will then be advised of your right to file a complaint with the FCC.
Your telephone company may make changes in its facilities, equipment, operations, or procedures that could affect the proper operation of your equipment. If they do, you will be given advance notice to give you an opportunity to maintain an uninterrupted service.
If you experience trouble with this equipment, please contact AT&T Global for repair/warranty information. The telephone company may ask you to disconnect this equipment from the network until the problem has been corrected or until you are sure the equipment is not malfunctioning.
This unit contains no user-serviceable parts. The FCC recommends that the AC outlet for
equipment requiring AC power is provided with an AC surge arrestor.
The REN is used to determine the quantity of devices that may connected to the telephone line. Excessive RENs on the telephone line may result in the devices not ringing in response to an incoming call. In most, but not all areas, the sum of RENs should not exceed five (5.0). To be certain of the number of devices that may be connected to a line, as determined by the total RENs, contact your local telephone company.
The following information may be required when applying to your local telephone company for leased-line facilities: Service Type REN USOC Analog 0.1B RJ-11C
Canadian Equipment Limitations
Note: The Industry Canada Certification label identifies certified equipment. This certification means that the equipment meets certain telecommunications network protective, operational, and safety requirements. The Department of Commerce does not guarantee that the equipment will operate to the user's satisfaction.
Before installing this equipment, users should ensure that it is permissible to be connected to the facilities of the local telecommunications company. The equipment must also be installed using an acceptable method of connection. In some cases, the company's inside wiring associated with a single-line individual service may be extended by means of a certified connector assembly (telephone extension cord). The customer should be aware that compliance with the above conditions may not prevent degradation of service in some situations.
Repairs to certified equipment should be made by an authorized Canadian maintenance facility designated by the supplier. Any repairs or alterations made by the user to this equipment or equipment malfunctions, may give the telecommunications company cause to request that the user disconnect the equipment.
Warning: Users should ensure for their own protection that the electrical ground connections of the power utility, telephone lines, and internal metallic water pipe system, if present, are connected together. This precaution may be particularly important in rural areas.
The load number (LN) assigned to each terminal device denotes the percentage of the total load to be connected to a telephone loop that is used by the device to prevent overloading. The termination on a loop may consist of any combination of devices subject only to the equipment that the total of the LNs of all devices does not exceed 100.
17
The REN assigned to each terminal adaptor is used to determine the total number of devices that may be connected to each circuit. The sum of the RENs from all devices in the circuit should not exceed 5.0.
Safety Information
Warning, Cautions, and Notes Warning: To prevent fire or shock hazard, do not expose the unit to rain or moisture. To avoid electrical shock, do not open the
cabinet. Refer servicing to qualified personnel only.
Caution: Any change or modifications not expressly approved in this manual could void your authority to operate
this equipment.
Note: This equipment has been tested and found to comply with the limits for a Class B digital device, pursuant to
Part 15 of the FCC rules. These limits are designed to provide reasonable protection against harmful interference in a residential installation. This equipment generates, uses, and can radiate radio frequency energy and, if not installed and used in accordance with the instructions, may cause harmful interference to radio communications. However, there is no guarantee that interference will not occur in a particular installation. If this equipment does cause harmful interference to radio or television reception, which can be determined by turning the equipment off and on, the user is encouraged to try to correct the interference by one or more of the following measures:
Reorient or relocate the receiving antenna. Increase the separation between the equipment
into an outlet on a circuit different from that to which the receiver is connected.
Consult your dealer or an experienced radio/TV technician for help.
Precautions On safety To prevent fire or shock hazard, do not place
objects filled with liquids, such as vases, on the apparatus.
Should any solid object or liquid fall into the cabinet, unplug the MBOX and have it checked by qualified personnel before operating it any further.
On placement Place the MBOX in a location with adequate
ventilation to prevent heat build-up in the player.
Do not place the player on a soft surface such a rug that might block the ventilation holes.
Do not place the player in a location near heat sources, or in a place subject to direct sunlight, excessive dust, or mechanical shock.
On temperature Allow the box to come to ambient temperature (between 50 and 120 degrees Celsius) before plugging into an outlet.
On operation If the player is brought directly from a cold to a
warm location, or is placed in a very damp room, moisture may condense on the lenses inside the player. Should this occur, the player may not operate properly. In this case, leave the player turned on for about half an hour until the moisture evaporates.
On adjusting volume Do not turn up the volume when listening to a
section with very low level inputs or no audio signals. If you do, the speakers may be damaged when a peak-level section is played.
On cleaning Clean the cabinet, panel, and controls with a soft
cloth slightly moistened with a mild detergent solution. Do not use any type of abrasive pad, scouring powder, or solvent such as alcohol or benzine.
If you have any questions or problems concerning your player, please consult your AudioSonic representative at 1.800.584.4653.
Changing Dial-Up ISP Information Your MBOX is shipped with a default dial-up ISP user name, password, and local ISP
18
telephone number that will only work from the location indicated during the order process. The default ISP information should not be changed unless:
You are supplying your own dial-up ISP You are instructed to do so by a AudioSonic
representative
Changing the ISP Telephone Numbers Your MBOX can be programmed with up to four dial-up ISP telephone numbers. By default, your MBOX contains up to three local ISP telephone numbers with the fourth number being a toll-free backup telephone number. To change an ISP telephone number: Navigate to the Modem Config section of the
Admin Menu (See “ Error! Reference source not found.” on page Error! Bookmark not defined.).
Press the right arrow to Dialout Prefix If your location requires a dial out prefix such as a 9, enter that here.
Press the down arrow to ISP Phone 1 This is the first ISP number your MBOX will attempt to dial.
Make any necessary adjustments to ISP Phone 1
Repeat for ISP Phone 2, 3, and 4 if necessary
Pres the down arrow to Dialout Suffix If your location requires a dial out security suffix such as 200, enter that here.
Navigate to Save Changes and press the OK button twice
Note: Failing to save changes will result in lost settings!
Changing ISP Username and Password The default ISP username and password will only work with the AudioSonic provided dial-up ISP. If you are providing your own dial-up ISP, the username and password should be changed. To change the ISP Username and Password Navigate to Modem Setup in the Admin Menu Navigate to ISP Username Make any necessary adjustments to
the ISP Username
Navigate to ISP Password
Make any necessary adjustments to the ISP Password
Navigate to Save Changes and press the OK button twice
Note: Failing to save changes will result in lost settings!
Testing New ISP Settings After making any changes to the ISP information, you should test the connection to ensure proper data entry. To test the new ISP settings Navigate to Test Connection Press the OK button twice
Observe the LCD screen for messages
If you do not see CONNECT: SUCCESS on the display after a few minutes, check that the settings are all correct, then consult your dial-up ISP provider.
19
20
Changing the Default DNS IP Your MBOX is shipped with a default DNS IP address of 206.173.28.10 which will only resolve domain names within the Trusonic network.
Changing the Default DNS IP The default DNS IP should not be modified unless: You are instructed to do so by a AudioSonic
representative The default DNS IP is not suitable for your
network To change the default DNS IP Navigate to DNS IP in the Advanced Menu
(See ). Make any necessary adjustments to the DNS IP
Navigate to Save Changes and press OK twice
Note: Failing to save changes will result in lost settings!
Testing New DNS IP Settings After making any changes to the DNS IP Settings, you should test the connection to ensure proper data entry. To test the new DNS IP settings Navigate to Test Connection Press the OK button twice
Observe the LCD screen for messages
If you do not see CONNECT: SUCCESS on the display after a few minutes, check that the settings are all correct, then consult your network administrator.
Figure 2 Main Menu
21
22
Figure 3 Admin Menu