Embed Size (px)
Citation preview
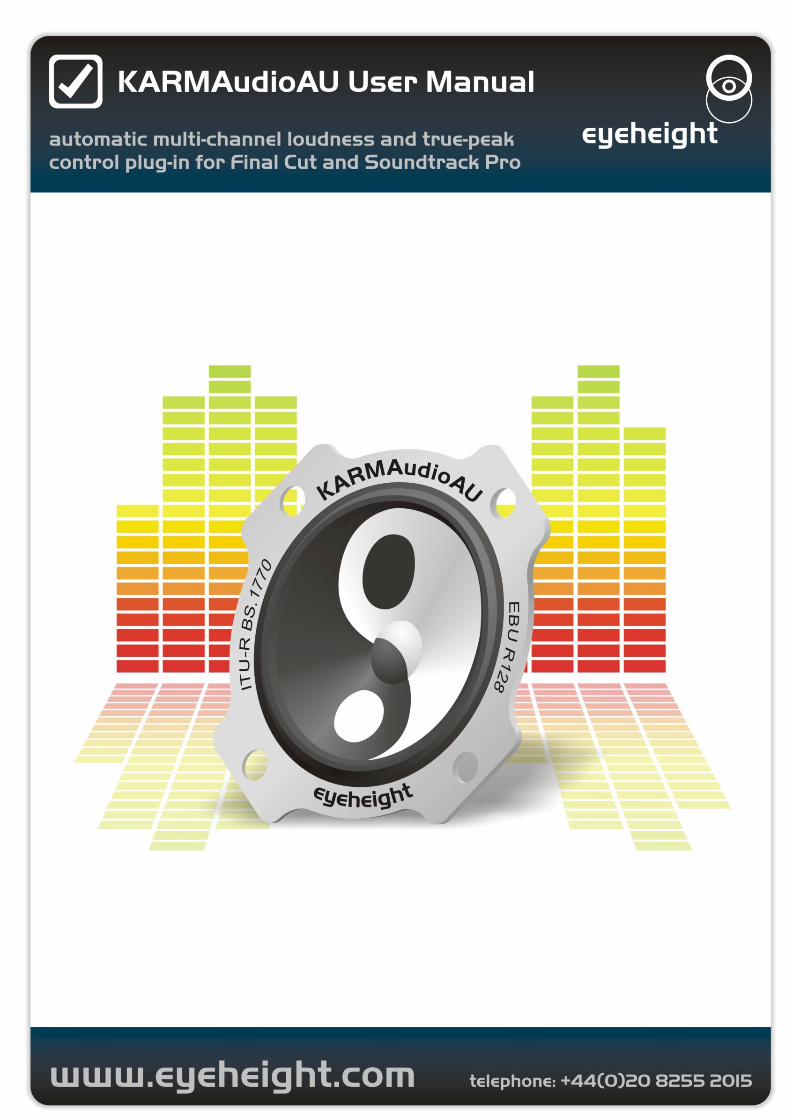
Table of Contents Introduction ................................................................................................................ 4
Installation using USB dongle .................................................................................... 4
Installation using a software license ........................................................................... 4
Understanding Loudness ........................................................................................... 5
Understanding loudness modes ................................................................................. 6
ITU-R BS.1770 (ATSC A/85:2011/2009) .................................................................... 6
EBU R 128-2011 \ ITU-R BS.1770-2 Gated Integrating ............................................. 6
Short-term Peak (UK BCAP rule 4.7) ......................................................................... 6
Understanding true-peak vs peak sample .................................................................. 7
Understanding true-peak correction ........................................................................... 9
Using KARMAudioAU ............................................................................................... 10
Using “Send To → Sountrack Pro Script” in Final Cut .............................................. 14
KARMAudioAU Logging ........................................................................................... 15
Trouble shooting ...................................................................................................... 16
KARMAudioAU filter does not show in Final Cut or Soundtrack Pro .................... 16
“General Error” message ..................................................................................... 16
KARMAudioAU seems to have no effect on audio ............................................... 16
KARMAudioAU just gives silence ........................................................................ 16
Table of Figures Figure 1: Unprocessed audio -3 dBFS peak-program -16 LUFS loudness ................ 5
Figure 2 - Compressed audio -3 dBFS peak-program -11.5 LUFS loudness ............. 5
Figure 3- Peak sample amplitude accurately represents true-peak amplitude ........... 8
Figure 4 - peak sample amplitude does not accurately represent true-peak amplitude ............................................................................................................................ 8
Figure 5 - True-peak correction controls .................................................................... 9
Figure 6 - The effect of true-peak processing ............................................................. 9
Figure 7 - Typical deliverable structure .................................................................... 10
Figure 8 - Sequence->Render->Item........................................................................ 11
Figure 9 - Sequence->Render All->Item ................................................................... 11
Figure 10 - Example content edit sequence ............................................................. 12
Figure 11 - Example wrapping sequence ................................................................. 12
Figure 12 - KARMAudioAU filter settings ................................................................. 13
Figure 13 - KARMAudioAU settings in Soundtrack Pro ............................................ 15
Figure 14 - KARMAudioAU in the Actions list ........................................................... 15
Figure 15 - General Error message .......................................................................... 16
Introduction This manual will guide you through the use of the Eyeheight KARMAudioAU plug-in for Apple Final Cut Studio, Final Cut Express and Soundtrack Pro and provide you with tips on how to get the best out of your use of KARMAudioAU. The KARMAudioAU plug-in is an OS X audio unit plug-in which provides automatic control of subjective loudness and true-peak in line with the algorithms detailed in ITU-R BS.1770. KARMAudioAU also provides support for automatic gating of loudness calculations in accordance with EBU R 128-2011 \ ITU-R BS.1770-2. Using the KARMAudioAU filter for loudness and true-peak correction is a two pass process. In the first pass the current loudness of the audio content is calculated and used to derive a correction gain factor. In the second pass the filter actually executes two sub-passes, the first sub-pass applies the gain factor to rescale the audio to meet the defined loudness requirement. Scaling in this way does not effect the dynamic range or imaging of the audio. In the second sub-pass the filter performs an 8x over-sampling true-peak calculation and applies true-peak correction where needed to ensure the defined true-peak requirement is met. This second pass can result in small reduction in loudness if true-peak correction is needed.
Installation using USB dongle !!IMPORTANT!!
The software comes installed on a USB stick which not only contains the software and some useful utilities but is also the security dongle and must be inserted in a USB port on the machine you wish to run the software on. COPYING ONTO ANOTHER USB STICK WILL NOT TRANSFER THE LICENSE. Always use the USB stick supplied.
NOTE: If you have already evaluated KarmAudioAU using the web demo available on our website (www.eyeheight.com) then you will need to replace the plug-in that you downloaded. Following the instructions below should do this.
The Flash Drive directory on the USB stick contains:
1. AULoudnessMitigation.component, which is the KARMAudio plugin for Final Cut. 2. dpmac32.dylib which is the security library that is needed, together with the dongle, to run the
software. 3. This KARMAudio User Manual.
In order to install KarmAudioAU you need to be logged in as the Administrator and then follow these steps:
4. Using "Finder" copy AULoudnessMitigation.component into the root /Library -> Audio -> Plug-ins -> Components directory. NOTE if you have used the web demo you will need to replace the one currently in this directory.
5. Using "Go" -> Go to Folder enter /usr/lib/ and press the "Go" button. This will find the /usr/lib directory. Copy dpmac32.dylib into this directory.
6. Run Final Cut and KARMAudioAU should appear in Effects -> Audio Filters -> Eyeheight complianceSuiteFC.
Installation using a software license Installation using a software license means that your installation will be tied to the computer with the license. Unlike the USB dongle installation you cannot move this license from computer to computer.
For this installation simply download the KARMAudio plug-in demo on the eyeheight website, www.eyeheight.com and follow the instructions supplied. Running this will install the necessary software but on a limited (demo) license. To purchase the full software license please contact sales at Eyeheight Ltd. A software license can be provided by email. The web demo will run for around 10 minutes after which you will get a "general error" message. You will need to reboot FCP to get it in demo mode again. The full license will, of course, not do this.
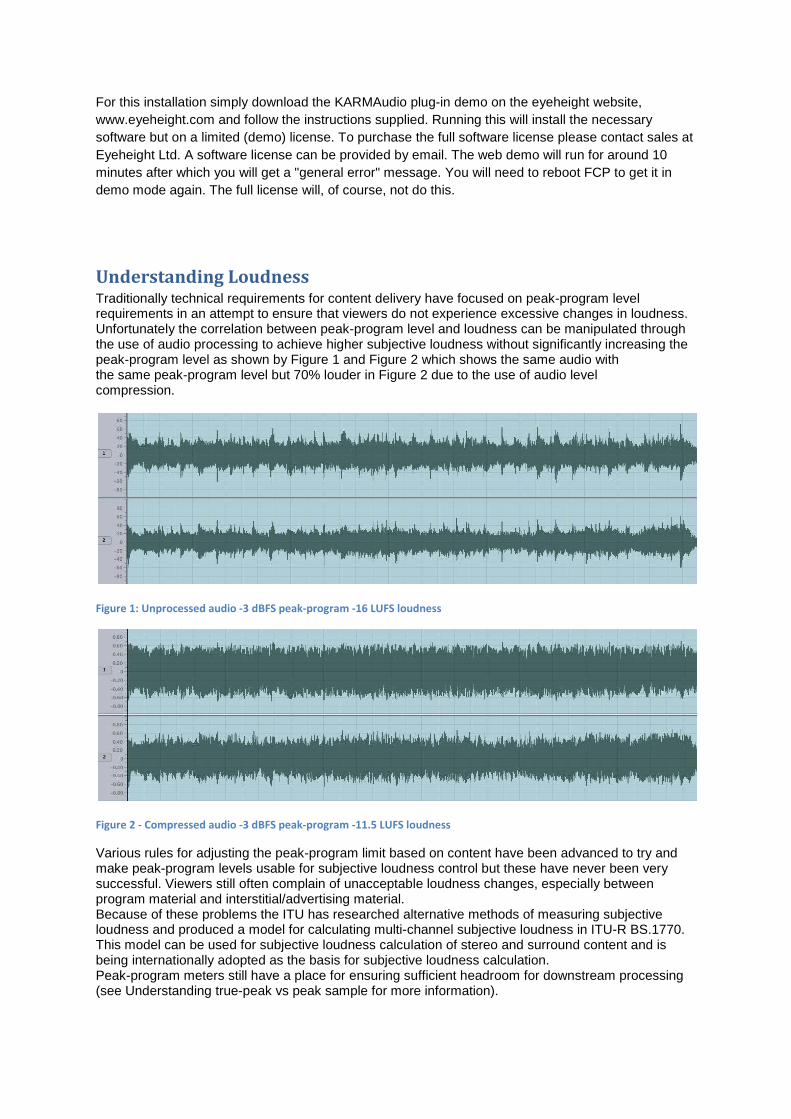
Understanding Loudness Traditionally technical requirements for content delivery have focused on peak-program level requirements in an attempt to ensure that viewers do not experience excessive changes in loudness. Unfortunately the correlation between peak-program level and loudness can be manipulated through the use of audio processing to achieve higher subjective loudness without significantly increasing the peak-program level as shown by Figure 1 and Figure 2 which shows the same audio with the same peak-program level but 70% louder in Figure 2 due to the use of audio level compression.
Figure 1: Unprocessed audio -3 dBFS peak-program -16 LUFS loudness
Figure 2 - Compressed audio -3 dBFS peak-program -11.5 LUFS loudness
Various rules for adjusting the peak-program limit based on content have been advanced to try and make peak-program levels usable for subjective loudness control but these have never been very successful. Viewers still often complain of unacceptable loudness changes, especially between program material and interstitial/advertising material. Because of these problems the ITU has researched alternative methods of measuring subjective loudness and produced a model for calculating multi-channel subjective loudness in ITU-R BS.1770. This model can be used for subjective loudness calculation of stereo and surround content and is being internationally adopted as the basis for subjective loudness calculation. Peak-program meters still have a place for ensuring sufficient headroom for downstream processing (see Understanding true-peak vs peak sample for more information).
Understanding loudness modes KARMAudioAU supports three distinct modes of loudness calculation; ITU-R BS.1770, EBU R 128- 2011 \ ITU-R BS.1770-2 and Short-term Peak. Each mode will typically result in a different loudness correction so it is important to check the end user technical requirements for audio delivery and ensure that the most appropriate mode is selected. A fourth mode: True-peak Limit Only performs no loudness correction but does provide true-peak (PPM level) limiting for applications where loudness control has not yet been adopted.
ITU-R BS.1770 (ATSC A/85:2011/2009) This is the original integrating subjective loudness calculation. The subjective loudness is calculated at each point in the audio content and the resulting loudness values are summed and averaged over the duration of the audio content. N.B. Because the result is based on an average over the duration of the audio content it is important to restrict the filter to the appropriate part of the audio content e.g. any lead in and lead out sections should be excluded from the audio content being processed. This mode ensures that the average loudnesses of individual content items match. This mode is the most appropriate for delivery to end users who specify ATSC recommendation A/85:2011 or A/85:2009 in their technical requirements for audio delivery. In this mode the resulting loudness correction is dependent on the setting of the 'Target LUFS' parameter and the default value is -24 LUFS (equivalent to -24 LKFS of ATSC A/85:2011/2009). The default value for True-peak Clip is -2dBTP as specified in A/85:2011/2009.
EBU R 128-2011 \ ITU-R BS.1770-2 Gated Integrating This mode extends the basic loudness calculation by automatically gating (ignoring) sections of the audio content which are significantly quieter than the running average loudness. This mode can provide improved automatic subjective loudness matching for content which has substantial quiet sections. N.B. Because the result is based on an average over the un-gated duration of the audio content it is important to restrict the filter to the appropriate part of the audio content e.g. any lead in and lead out sections with potential for an instantaneous loudness greater than -70 LUFS should be excluded from the audio content being processed. This mode ensures that the average gated loudnesses of individual content items match. This mode is the most appropriate for delivery to end users who specify EBU R 128-2011 \ ITU-R BS.1770-2 in their technical requirements for audio delivery. In this mode the resulting loudness correction is dependent on the setting of the 'Target LUFS' parameter and the default value is -23 LUFS as specified in EBU R 128-2011 \ ITU-R BS.1770-2. The default value for True-peak Clip is -1dBTP as specified in EBU R 128-2011 \ ITU-R BS.1770-2.
Short-term Peak (UK BCAP rule 4.7) This mode replaces the averaging over the whole audio content with a running average over a short “window”, typically 3-4 seconds. Because this mode uses short term averages it is not necessary to restrict the filter to only the appropriate part of the audio content, as long as the extraneous sections will produce a lower short-term average as is usually the case. This mode ensures that the maximum short-term loudnesses of individual content items match. This mode is the most appropriate mode for delivery to end users who specify maximum loudness over a short window in their technical requirements for audio delivery. In this mode the resulting loudness correction is dependent on the setting of the 'Target LUFS' and 'Short-term Loudness Period (sec)' parameters and the default values are -18 LUFS and 3 seconds. The default value for True-peak Clip is -10dBTP (PPM6). This mode is probably the best fit for the UK BCAP (September 2010) rule 4.7 (previously rule 6.9) - “Advertisements must not be excessively noisy or strident. The maximum subjective loudness of
advertisements must be consistent and in line with the maximum loudness of programmes and junction material.” N.B. This mode may also be most appropriate for end users who do not yet specify loudness requirements but who do specify a peak program level. As a general guide for stereo content, setting a short-term peak loudness limit in LUFS of peak program level – 8 dB will provide sufficient loudness control to enable the true-peak processing to achieve the peak program level requirement without introducing obvious distortion e.g. to achieve a peak program level of PPM6 (-10 dBTP) set the short-term loudness limit to -18 LUFS. True-peak Limit Only This mode bypasses the loudness targeting and just applies the 8x oversampling true-peak correction. As no loudness processing is required this plug-in does not require an analysis pass prior to the normalization pass. This mode is suitable for end users who specify a PPM or dBFS or dBTP limit rather than a loudness limit and where the source audio has already been mixed to approximately meet the delivery requirement. True-peak processing is dependent on the True-peak Clip, True-peak Knee and True-peak Compression Factor. The True-peak Knee should always be set to a lower value than the True-peak Clip. The default values are -10dBTP (PPM6), -11dBTP and 2:1.
The true-peak processing is not a uniformly applied correction, unlike the loudness processing, so it can result in distortion if the input true-peak levels are excessive. When using KARMAudioAU in “True-peak Limit” only mode you should always pre-level the audio using PPM or peak-sample such that... Max meter level < Peak Knee + ((Peak Clip – Peak Knee))*Peak Compression To limit the amount of hard clipping applied by the True-peak correction. When using True-peak correction in combination with loudness processing this pre-levelling is not required. N.B. If you need to comply with the UK BCAP rule 4.7 and choose to do this by true-peak processing only then you should be aware that rule 4.7 also states “If a peak-reading meter is used instead, the maximum level of the advertisements must be at least 6dB less than the maximum level of the programmes to take account of the limited dynamic range exhibited by most advertisements” This would require a True-peak Clip of -16dBTP (PPM4.5).
PPM Limit
Equivalent dBTP limit
4 -18 4.5 -16 5 -14
5.5 -12 6 -10
Table 1 - dBTP equivalent values for PPM levels
Understanding true-peak vs peak sample Digital audio represents an analog audio waveform as a sequence of discrete sample values. The specific values used to represent a signal are dependent on the alignment of the signal and the sampling clock. Figure 3 shows one such alignment instance and it can be seen that the peak-sample amplitude accurately reflects the true-peak amplitude of the signal.
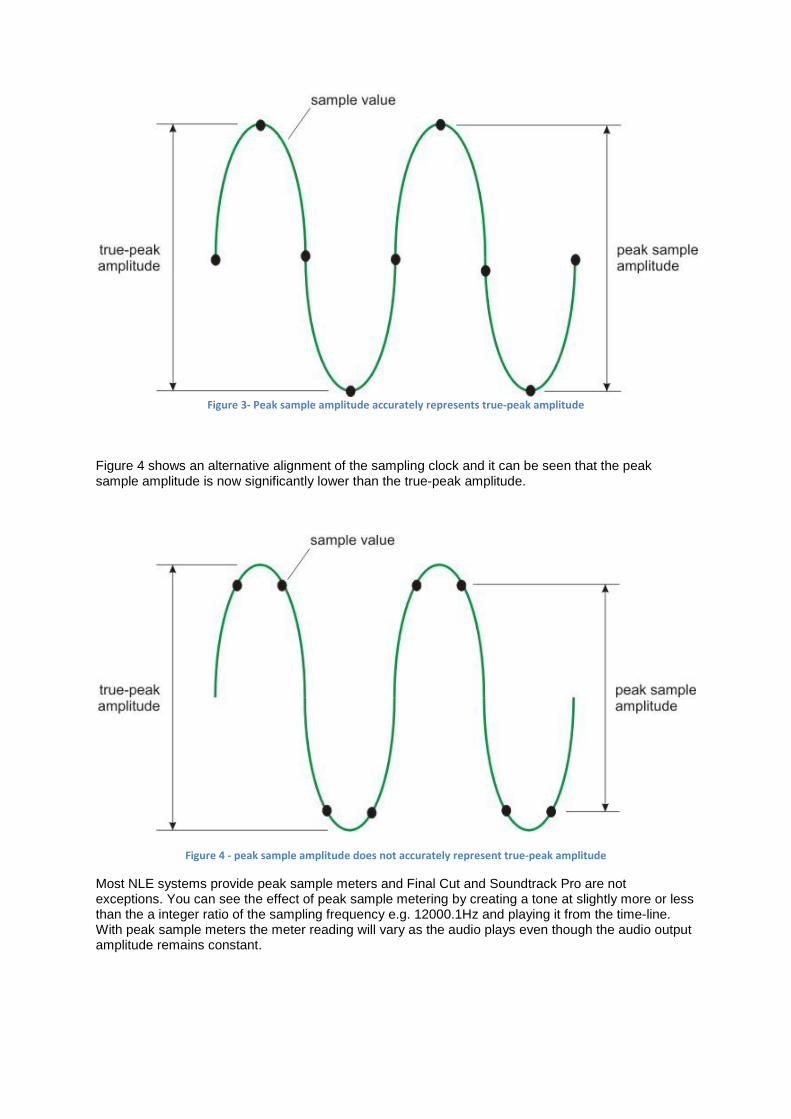
Figure 3- Peak sample amplitude accurately represents true-peak amplitude
Figure 4 shows an alternative alignment of the sampling clock and it can be seen that the peak sample amplitude is now significantly lower than the true-peak amplitude.
Figure 4 - peak sample amplitude does not accurately represent true-peak amplitude
Most NLE systems provide peak sample meters and Final Cut and Soundtrack Pro are not exceptions. You can see the effect of peak sample metering by creating a tone at slightly more or less than the a integer ratio of the sampling frequency e.g. 12000.1Hz and playing it from the time-line. With peak sample meters the meter reading will vary as the audio plays even though the audio output amplitude remains constant.
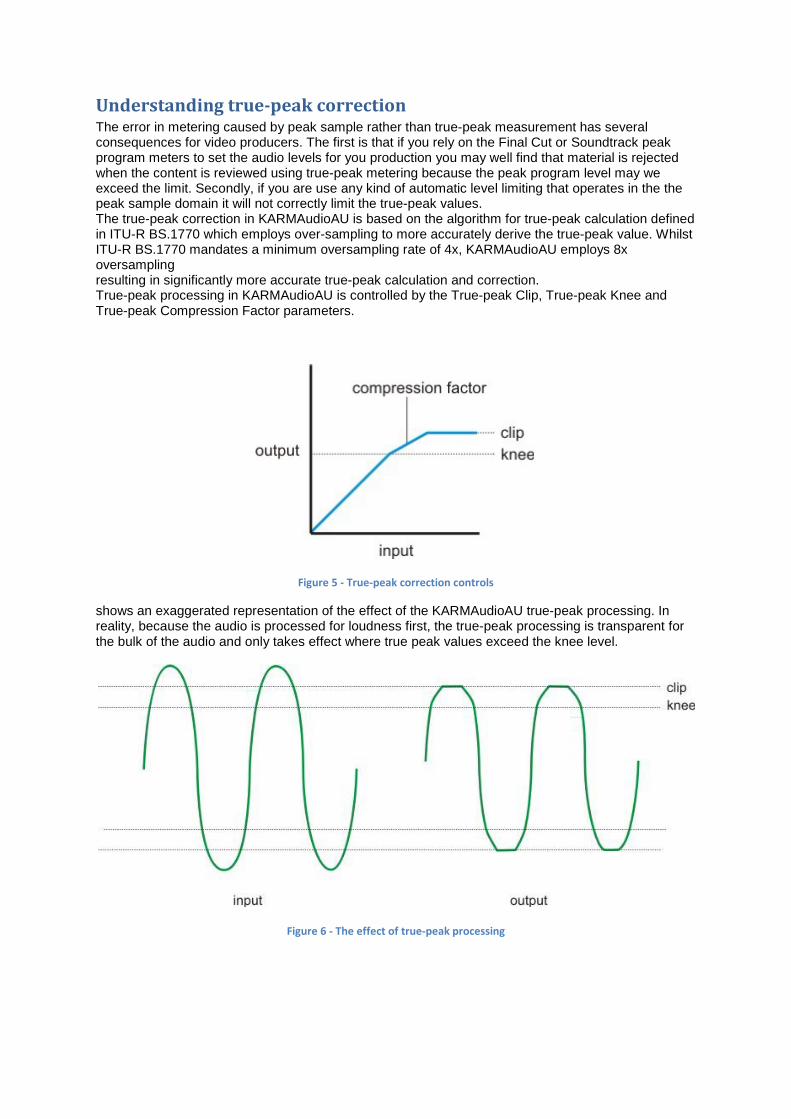
Understanding true-peak correction The error in metering caused by peak sample rather than true-peak measurement has several consequences for video producers. The first is that if you rely on the Final Cut or Soundtrack peak program meters to set the audio levels for you production you may well find that material is rejected when the content is reviewed using true-peak metering because the peak program level may we exceed the limit. Secondly, if you are use any kind of automatic level limiting that operates in the the peak sample domain it will not correctly limit the true-peak values. The true-peak correction in KARMAudioAU is based on the algorithm for true-peak calculation defined in ITU-R BS.1770 which employs over-sampling to more accurately derive the true-peak value. Whilst ITU-R BS.1770 mandates a minimum oversampling rate of 4x, KARMAudioAU employs 8x oversampling resulting in significantly more accurate true-peak calculation and correction. True-peak processing in KARMAudioAU is controlled by the True-peak Clip, True-peak Knee and True-peak Compression Factor parameters.
Figure 5 - True-peak correction controls
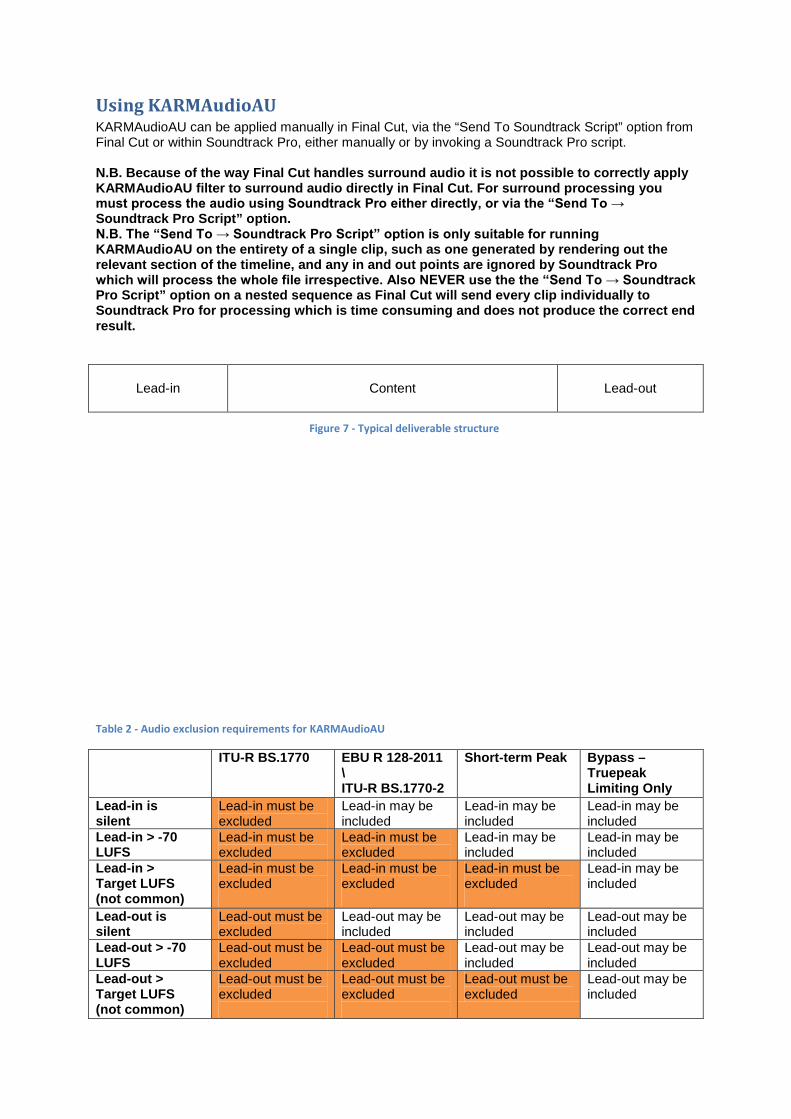
shows an exaggerated representation of the effect of the KARMAudioAU true-peak processing. In reality, because the audio is processed for loudness first, the true-peak processing is transparent for the bulk of the audio and only takes effect where true peak values exceed the knee level.
Figure 6 - The effect of true-peak processing
Using KARMAudioAU KARMAudioAU can be applied manually in Final Cut, via the “Send To Soundtrack Script” option from Final Cut or within Soundtrack Pro, either manually or by invoking a Soundtrack Pro script. N.B. Because of the way Final Cut handles surround audio it is not possible to correctly apply KARMAudioAU filter to surround audio directly in Final Cut. For surround processing you must process the audio using Soundtrack Pro either directly, or via the “Send To → Soundtrack Pro Script” option. N.B. The “Send To → Soundtrack Pro Script” option is only suitable for running KARMAudioAU on the entirety of a single clip, such as one generated by rendering out the relevant section of the timeline, and any in and out points are ignored by Soundtrack Pro which will process the whole file irrespective. Also NEVER use the the “Send To → Soundtrack Pro Script” option on a nested sequence as Final Cut will send every clip individually to Soundtrack Pro for processing which is time consuming and does not produce the correct end result.
Table 2 - Audio exclusion requirements for KARMAudioAU
ITU-R BS.1770 EBU R 128-2011 \ ITU-R BS.1770-2
Short-term Peak Bypass – Truepeak Limiting Only
Lead-in is silent
Lead-in must be excluded
Lead-in may be included
Lead-in may be included
Lead-in may be included
Lead-in > -70 LUFS
Lead-in must be excluded
Lead-in must be excluded
Lead-in may be included
Lead-in may be included
Lead-in > Target LUFS (not common)
Lead-in must be excluded
Lead-in must be excluded
Lead-in must be excluded
Lead-in may be included
Lead-out is silent
Lead-out must be excluded
Lead-out may be included
Lead-out may be included
Lead-out may be included
Lead-out > -70 LUFS
Lead-out must be excluded
Lead-out must be excluded
Lead-out may be included
Lead-out may be included
Lead-out > Target LUFS (not common)
Lead-out must be excluded
Lead-out must be excluded
Lead-out must be excluded
Lead-out may be included
Lead-in
Content
Lead-out
Figure 7 - Typical deliverable structure
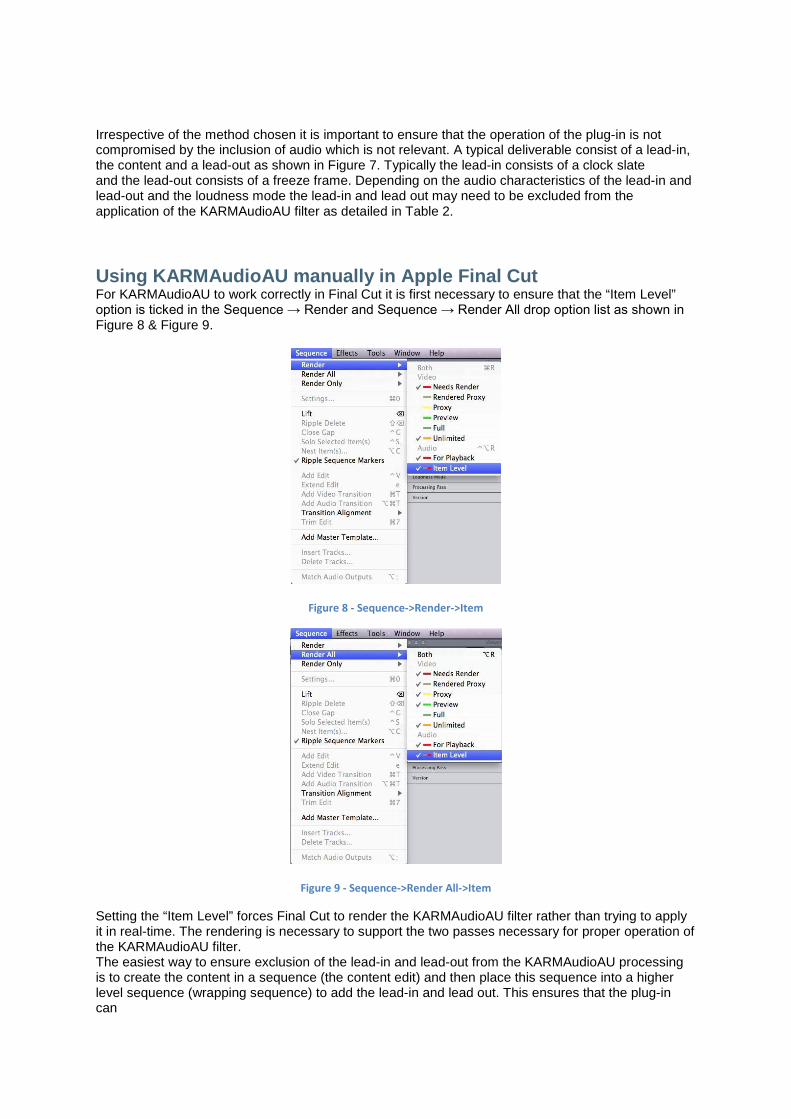
Irrespective of the method chosen it is important to ensure that the operation of the plug-in is not compromised by the inclusion of audio which is not relevant. A typical deliverable consist of a lead-in, the content and a lead-out as shown in Figure 7. Typically the lead-in consists of a clock slate and the lead-out consists of a freeze frame. Depending on the audio characteristics of the lead-in and lead-out and the loudness mode the lead-in and lead out may need to be excluded from the application of the KARMAudioAU filter as detailed in Table 2.
Using KARMAudioAU manually in Apple Final Cut For KARMAudioAU to work correctly in Final Cut it is first necessary to ensure that the “Item Level” option is ticked in the Sequence → Render and Sequence → Render All drop option list as shown in Figure 8 & Figure 9.
Figure 8 - Sequence->Render->Item
Figure 9 - Sequence->Render All->Item
Setting the “Item Level” forces Final Cut to render the KARMAudioAU filter rather than trying to apply it in real-time. The rendering is necessary to support the two passes necessary for proper operation of the KARMAudioAU filter. The easiest way to ensure exclusion of the lead-in and lead-out from the KARMAudioAU processing is to create the content in a sequence (the content edit) and then place this sequence into a higher level sequence (wrapping sequence) to add the lead-in and lead out. This ensures that the plug-in can
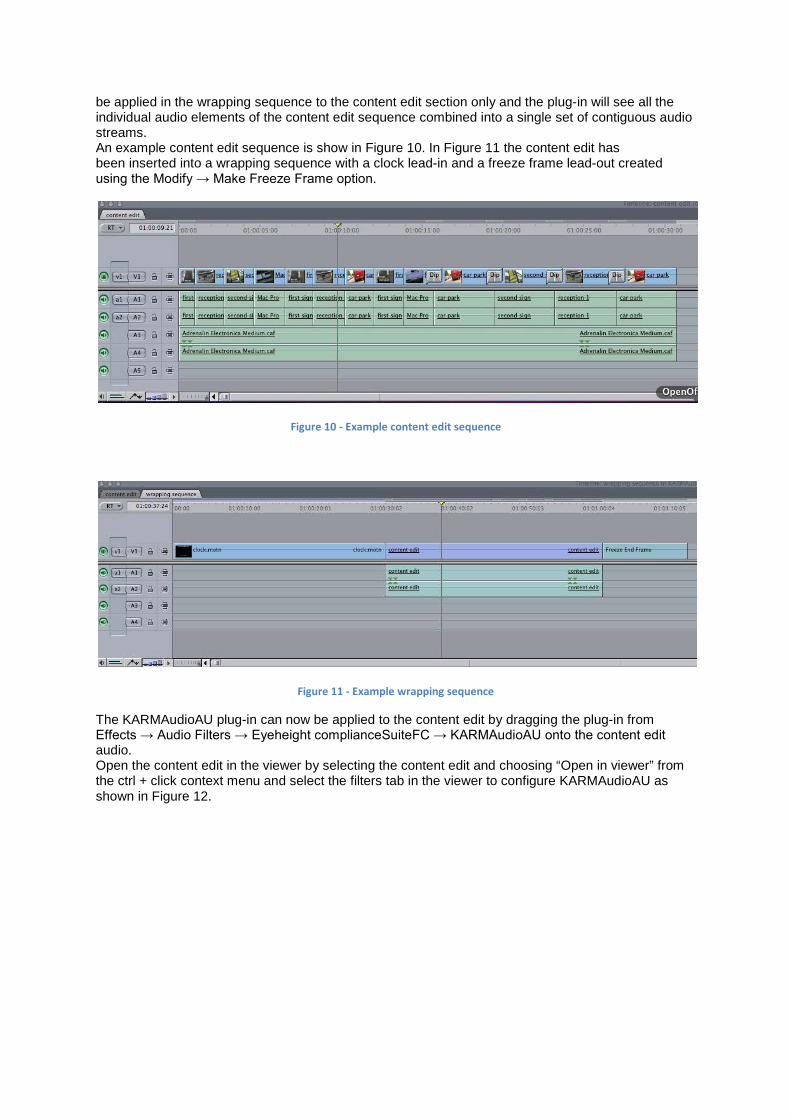
be applied in the wrapping sequence to the content edit section only and the plug-in will see all the individual audio elements of the content edit sequence combined into a single set of contiguous audio streams. An example content edit sequence is show in Figure 10. In Figure 11 the content edit has been inserted into a wrapping sequence with a clock lead-in and a freeze frame lead-out created using the Modify → Make Freeze Frame option.
Figure 10 - Example content edit sequence
Figure 11 - Example wrapping sequence
The KARMAudioAU plug-in can now be applied to the content edit by dragging the plug-in from Effects → Audio Filters → Eyeheight complianceSuiteFC → KARMAudioAU onto the content edit audio. Open the content edit in the viewer by selecting the content edit and choosing “Open in viewer” from the ctrl + click context menu and select the filters tab in the viewer to configure KARMAudioAU as shown in Figure 12.

Figure 12 - KARMAudioAU filter settings
Select the required loudness mode from the loudness mode drop down. The default settings for the chosen loudness mode (see Table 3: Default values for loudness and true-peak processing) will be used unless you select “Custom” from the “Correction Parameters to Use” drop-down. If you do select “Custom”, configure the target loudness, true-peak processing controls and short-term loudness period as required. Force the audio to render using the Sequence → Render All or alt + R to allow KARMAudioAU to analyse the source audio. Switch the “Processing Pass” drop down to “Pass 2 – Normalize” and re-render the audio to have KARMAudioAU automatically perform loudness and true peak correction on the content edit audio.
Loudness Mode
Target LUFS
Short-term Period
True-peak Clip
True-peak Knee
True-peak Compression
ITU-R BS.1770-1 (ATSC A/85:2011/2009)
-24 n/a -2 -4 2:1
EBU R 128-2011 ITU-R BS.1770-2
-23 n/a -1 -3 2:1
Short-term Peak
-18 3 sec -10 -12 2:1
True-peak Limit Only
n/a n/a -10 -12 2:1
Table 3 - Default values for loudness and true-peak processing
Using “Send To → Sountrack Pro Script” in Final Cut KARMAudioAU installs a number of Soundtrack Pro Scripts which provide both processing passes for a range of standard loudness requirements. Using this scripts automates exporting the audio to Soundtrack Pro, applying the KARMAudioAU correction and updating the Final Cut time-line to reference the Soundtrack Pro files rather then the original source audio. This can be a very efficient way to perform some tasks and enables loudness correction of surround audio in ostensibly in Final Cut but there are a number of limitations because of the way Final Cut and Soundtrack Pro work together. N.B. The “Send To → Soundtrack Pro Script” option is only suitable for running KARMAudioAU on the entirety of a single clip, such as one generated by rendering out the relevant section of the timeline, and any in and out points are ignored by Soundtrack Pro which will process the whole file irrespective. Also NEVER use the the “Send To → Soundtrack Pro Script” option on a nested sequence as Final Cut will send every clip individually to Soundtrack Pro for processing which is time consuming and does not produce the correct end result.
In general the work flow for using “Send To → Soundtrack Pro Script” is...
1. Render only the content section (i.e. without lead-in or lead-out) of the time-line to a file (unless Table 2 allows for inclusion of lead-in and/or lead-out).
2. Import the file into a Final Cut project and place it on a time-line. 3. Select the clip in the time-line and choose “Send To → Soundtrack Pro Script → <your
desired script>” from the ctrl + click context menu.
Using “Send To → Soundtrack Pro Audio File Project” in Final Cut This method is also capable of handling surround audio loudness correction. It offers less automation than the “Send To → Soundtrack Pro Script” option but has the advantage that you can export only a section of a file to Soundtrack Pro so you can take a file that has lead-in, content and lead-out and export only the content section to Soundtrack Pro for processing. Once exported to Soundtrack Pro you can select a script from the Soundtrack Pro Scripts menu and once you save the project the Final Cut time-line will be updated to reference the Soundtrack Pro files. The work flow for using “Send To → Soundtrack Pro Audio File Project” is..
1. Place the source file on the time-line. 2. Unless Table 2 allows for inclusion of lead-in and/or lead-out, use the razor tool to isolate the
content section of the file. 3. Select the isolated clip in the time-line and choose “Send To → Soundtrack Pro Audio File
Project” from the ctrl + click context menu. 4. In the “Save” window make sure you select “Send only referenced media” and set the in and
out handles to 0 unless Table 2 allows for the inclusion of lead-in and/or lead out. 5. In Soundtrack Pro choose the appropriate script from the Scripts → KARMAudioAU menu. 6. Save the project in Soundtrack Pro.
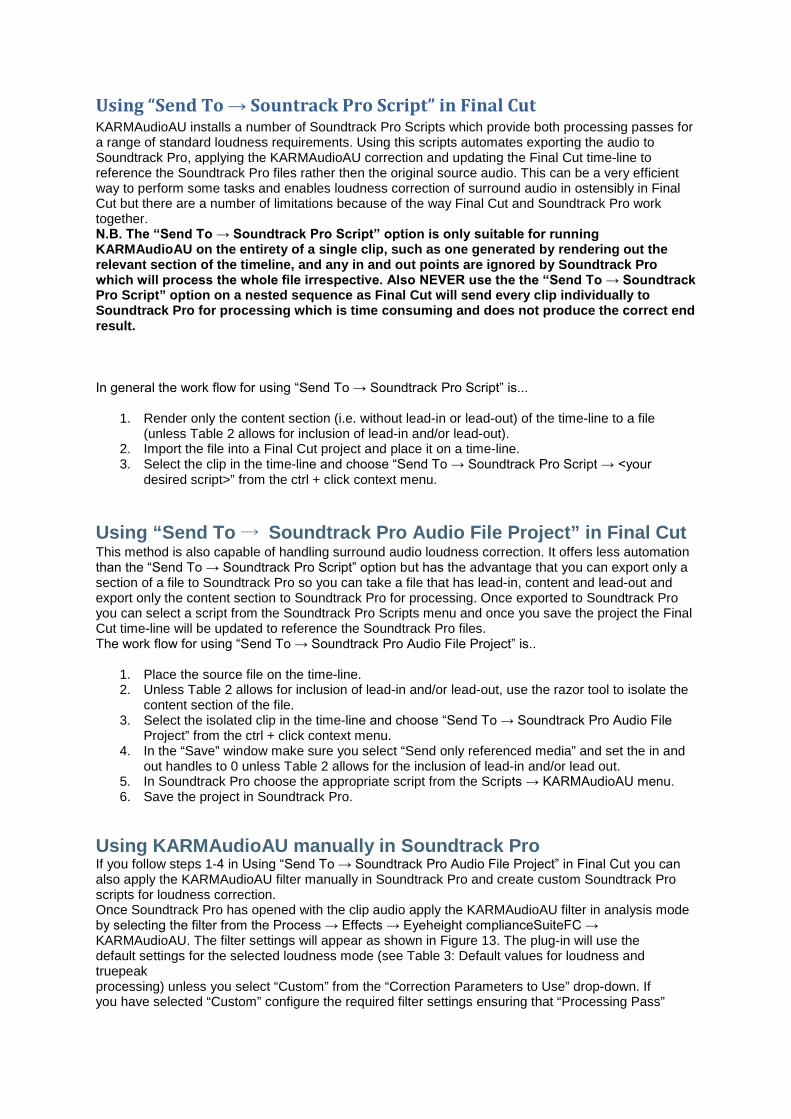
Using KARMAudioAU manually in Soundtrack Pro If you follow steps 1-4 in Using “Send To → Soundtrack Pro Audio File Project” in Final Cut you can also apply the KARMAudioAU filter manually in Soundtrack Pro and create custom Soundtrack Pro scripts for loudness correction. Once Soundtrack Pro has opened with the clip audio apply the KARMAudioAU filter in analysis mode by selecting the filter from the Process → Effects → Eyeheight complianceSuiteFC → KARMAudioAU. The filter settings will appear as shown in Figure 13. The plug-in will use the default settings for the selected loudness mode (see Table 3: Default values for loudness and truepeak processing) unless you select “Custom” from the “Correction Parameters to Use” drop-down. If you have selected “Custom” configure the required filter settings ensuring that “Processing Pass”
remains as “Pass 1 – Analyze” and click apply.
Figure 13 - KARMAudioAU settings in Soundtrack Pro
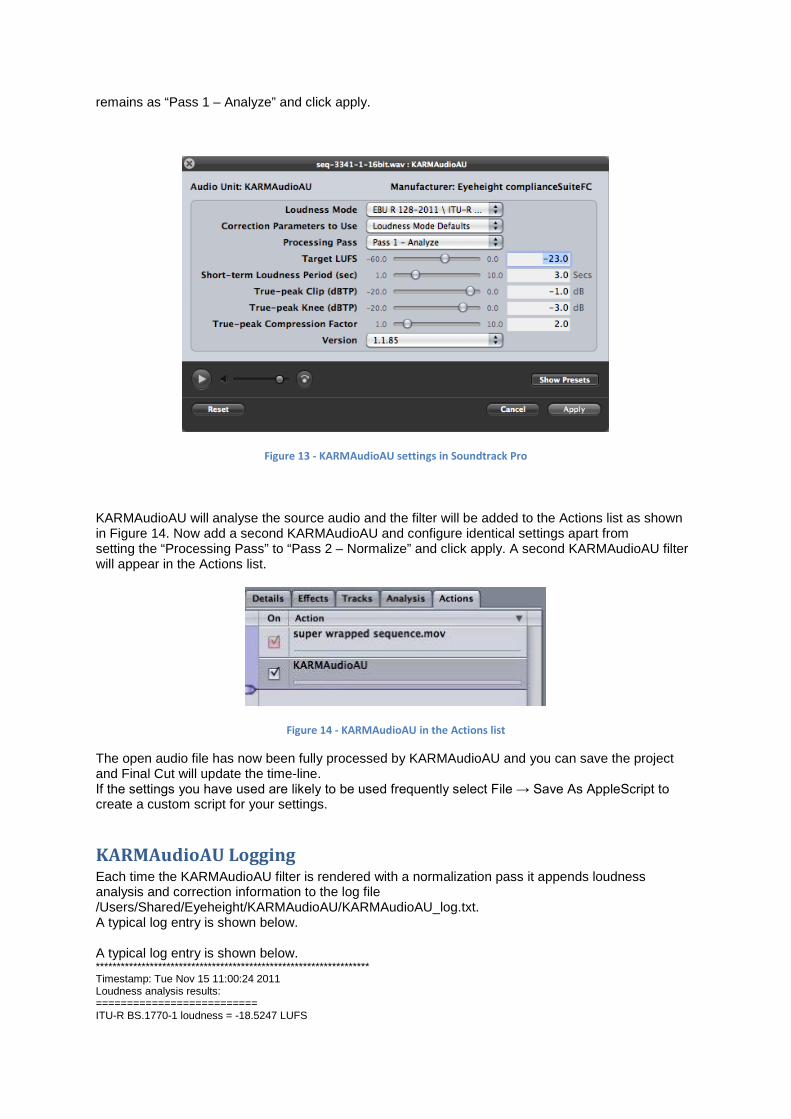
KARMAudioAU will analyse the source audio and the filter will be added to the Actions list as shown in Figure 14. Now add a second KARMAudioAU and configure identical settings apart from setting the “Processing Pass” to “Pass 2 – Normalize” and click apply. A second KARMAudioAU filter will appear in the Actions list.
Figure 14 - KARMAudioAU in the Actions list
The open audio file has now been fully processed by KARMAudioAU and you can save the project and Final Cut will update the time-line. If the settings you have used are likely to be used frequently select File → Save As AppleScript to create a custom script for your settings.
KARMAudioAU Logging Each time the KARMAudioAU filter is rendered with a normalization pass it appends loudness analysis and correction information to the log file /Users/Shared/Eyeheight/KARMAudioAU/KARMAudioAU_log.txt. A typical log entry is shown below. A typical log entry is shown below. ****************************************************************** Timestamp: Tue Nov 15 11:00:24 2011 Loudness analysis results: ========================== ITU-R BS.1770-1 loudness = -18.5247 LUFS
EBU R 128-2011 \ ITU-R BS.1770-2 loudness = -17.8391 LUFS Short-term peak integration window duration = 3 seconds Short-term peak loudness = -16.3286 LUFS Requested results: ================== EBU R 128-2011 \ ITU-R BS.1770-2 loudness of -23 LUFS (Default for Loudness Mode) True-peak limit of -1 dBTP (Default for Loudness Mode) Corrective action taken: ======================== Global gain correction applied = -5.16092 dB KARMAudio true-peak limiting applied with... True-peak limit = -1 dBTP (Default for Loudness Mode) True-peak knee = -2 dBTP (Default for Loudness Mode) True-peak compression ratio = 2:1 (Default for Loudness Mode)
Trouble shooting
KARMAudioAU filter does not show in Final Cut or Soundtrack Pro If no KarmAudioAU filter shows up in FCP, try simply restarting the computer from scratch. If there is still a problem consider updating the apple plug-in manager. One is provided on the USB stick in the utils directory. PluginManager.dmg.
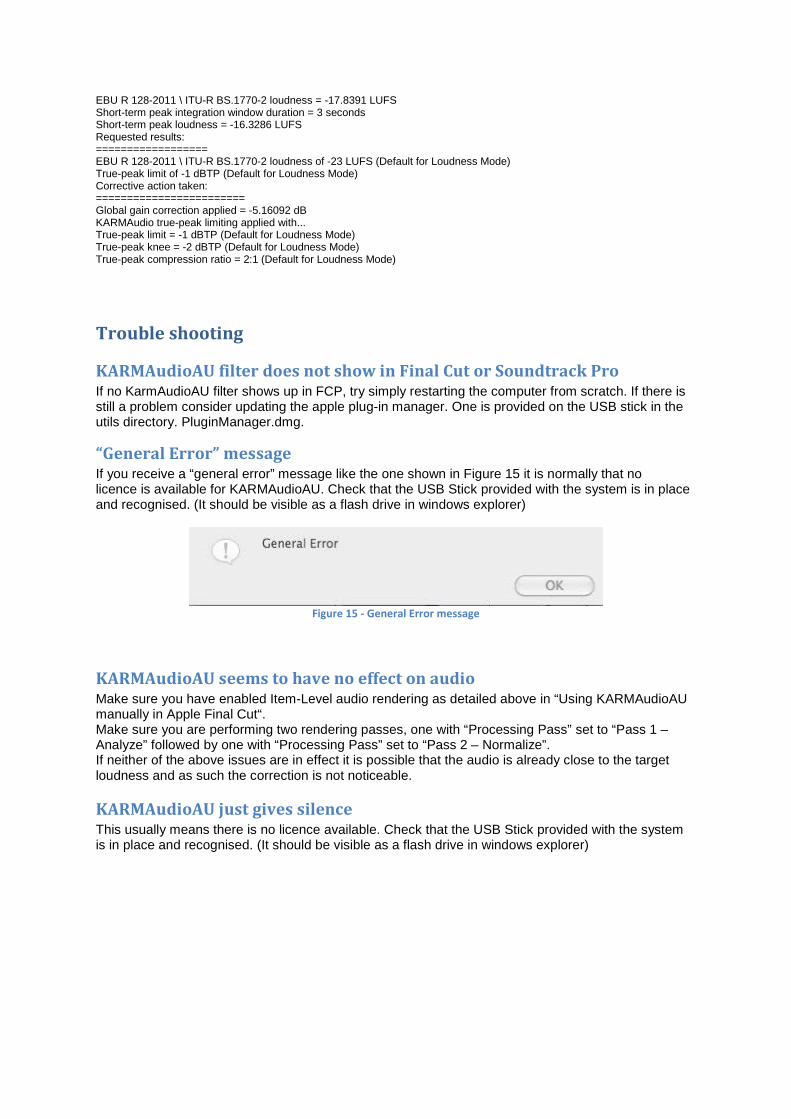
“General Error” message If you receive a “general error” message like the one shown in Figure 15 it is normally that no licence is available for KARMAudioAU. Check that the USB Stick provided with the system is in place and recognised. (It should be visible as a flash drive in windows explorer)
Figure 15 - General Error message
KARMAudioAU seems to have no effect on audio Make sure you have enabled Item-Level audio rendering as detailed above in “Using KARMAudioAU manually in Apple Final Cut“. Make sure you are performing two rendering passes, one with “Processing Pass” set to “Pass 1 – Analyze” followed by one with “Processing Pass” set to “Pass 2 – Normalize”. If neither of the above issues are in effect it is possible that the audio is already close to the target loudness and as such the correction is not noticeable.
KARMAudioAU just gives silence This usually means there is no licence available. Check that the USB Stick provided with the system is in place and recognised. (It should be visible as a flash drive in windows explorer)