Embed Size (px)
Citation preview

Audio Advantage® Amigo User’s Guide Table of Contents
Introducing the Audio Advantage Amigo .....................................................................................1 Getting Started ............................................................................................................................2
Package Contents .................................................................................................................................................... 2 Installation CD.......................................................................................................................................................... 2 Software Suite.......................................................................................................................................................... 3
Voyetra® Demo Software ..........................................................................................................................................................5 Connectors and Controls.............................................................................................................6
Minimum System Requirements .............................................................................................................................. 6 Installing Amigo ...........................................................................................................................7
Installation Procedure............................................................................................................................................... 7 Checking the Driver Installation................................................................................................................................ 9 Optimizing Playback Performance in Windows 2000/XP ......................................................................................... 9 Installing AudioSurgeon LE .................................................................................................................................... 10 Uninstalling the Amigo Driver and Applications...................................................................................................... 10
Checking Amigo after Installation ..............................................................................................11 Step 1: Connect Amigo .......................................................................................................................................... 11 Step 2: Launch the Amigo Control Panel ............................................................................................................... 11 Step 3: Try the Play3D Demo................................................................................................................................. 12
Troubleshooting Tips ..............................................................................................................................................................13 Things You Can Do with Amigo.................................................................................................15
Listening to Music CDs in Windows 2000/XP.........................................................................................................................15 Listening to Your Digital Music Library ...................................................................................................................................15 Modifying the Sound ...............................................................................................................................................................16 Listening to DVDs ...................................................................................................................................................................17 Setting Up Amigo for use with Skype™ or Other Internet Phone Software............................................................................18 Recording Tips........................................................................................................................................................................19
Amigo Control Panel..................................................................................................................20 Speakers Tab .........................................................................................................................................................................20 Equalizer Tab..........................................................................................................................................................................20 Effects Tab..............................................................................................................................................................................20 Mixer Tab................................................................................................................................................................................21
Using the Control Panel Presets ............................................................................................................................ 21 Saving and Restoring Presets ................................................................................................................................................21 Importing and Exporting Presets ............................................................................................................................................21
Control Panel Speakers Tab .....................................................................................................22 Speaker Configurations.......................................................................................................................................... 22
Headphones (stereo) ..............................................................................................................................................................22 2-speakers (Stereo) ................................................................................................................................................................23 Using a Headset with Microphone ..........................................................................................................................................23 Testing the Speaker Configuration .........................................................................................................................................23
Volume Section ...................................................................................................................................................... 24 Control Panel Settings Summary ........................................................................................................................... 24 S/PDIF Digital Output ............................................................................................................................................. 24
Graphic Equalizer Tab...............................................................................................................25 User Defined Presets ............................................................................................................................................. 25
Effects Tab ................................................................................................................................26 Speaker Position .................................................................................................................................................... 26 Environments ......................................................................................................................................................... 26 Sound FX ............................................................................................................................................................... 27
Key Shifter ..............................................................................................................................................................................27 Center Canceller .....................................................................................................................................................................27
Mixer Tab...................................................................................................................................28 Playback Settings................................................................................................................................................... 28 Record Settings...................................................................................................................................................... 29

www.Turtle-Beach.com
Page ii
AudioSurgeon LE.......................................................................................................................30 Viewing and Navigating the Audio File ...................................................................................................................................30 Making a Recording with the Record Wizard..........................................................................................................................31 Editing Audio Files ..................................................................................................................................................................31
AudioSurgeon Controls .......................................................................................................................................... 33 Transport Controls ..................................................................................................................................................................33 File Commands.......................................................................................................................................................................33 Edit Commands ......................................................................................................................................................................33 Status Display and Zoom Controls .........................................................................................................................................34

Audio Advantage Amigo
Page iii
Audio Advantage Amigo - Users Guide Revision 1.2 Documentation copyright © 2005-2008 Voyetra Turtle Beach, Inc. All rights reserved. No part of this publication may be reproduced or transmitted by any means or in any form, without prior written consent from Voyetra Turtle Beach, Inc. (“VTB”). Use of VTB software is subject to the terms and conditions of the End-User Software License Agreement. In no event will VTB be liable for direct, indirect, special, exemplary, incidental or consequential damages resulting from any defect or omission in this manual, even if advised of the possibility of such damages. In the interest of continued product development, VTB reserves the right to make improvements to this manual and the products it describes at any time, without notices or obligation. Audio Advantage, Turtle Beach, the Turtle Beach Logo, Amigo, AudioSurgeon, MusicWrite, Recording Station, Ear Force and Record Producer are trademarks of VTB. Voyetra is a registered trademark of VTB. Dolby and the Double D symbol are registered trademarks of Dolby Labs. Windows and Windows XP Media Center are registered trademarks of Microsoft Corporation. Pentium is a registered trademark of Intel Corporation. All other trademarks are the properties of their respective companies and are hereby acknowledged. Amigo is a product of Voyetra Turtle Beach, Inc. 150 Clearbrook Road, Ste 162, Elmsford, NY 10523 USA www.turtle-beach.com Amigo FAQ and Knowledge Base: Go to the Turtle Beach web site (www.TurtleBeach.com) and click on “Support” then “Knowledge Base”. Scroll down to the “A" section and click on “Amigo”. This will bring up the list of articles and the latest driver releases for Amigo and other products (scroll to the bottom of the page or click on “drivers” at the upper left corner of the page.) E-mail Tech Support: [email protected] Please allow up to 3 business days for a response. Please include your name, product name, and product ID/serial number. Fax Tech Support: 914-345-2266 Fax a description of your problem to the above number, and please be sure to include your name, product name, and product ID/serial number. FCC Declaration of Conformity
PRODUCT NAME Amigo
MODEL NUMBER TBS-1121-01
FCC RULES TESTED TO COMPLY WITH FCC PART 15, CLASS B
OPERATING ENVIRONMENT FOR HOME OR OFFICE USE
FCC COMPLIANCE STATEMENT: This device complies with part 15 of the FCC rules. Operation is subject to the following conditions. (1) This device may not cause harmful interference and (2) This device must accept any interference received including interference that may cause undesired operation.
CAUTION Changes or modifications to this unit not expressly approved by the party responsible for compliance could void the user’s authority to operate the equipment.
PARTY RESPONSIBLE FOR PRODUCT COMPLIANCE Voyetra Turtle Beach, Inc.,150 Clearbrook Road, Ste 162, Elmsford, NY 10523
Tel: (914) 345-2255 Fax: (914) 345-2251
This equipment has been tested and found to comply with the limits for a Class B digital device, pursuant to Part 15 of FCC rules. These limits are designed to provide reasonable protection against harmful interference in a residential installation. This equipment generates, uses and can radiate radio frequency energy and, if not installed and used in accordance with the instructions, may cause harmful interference to radio communications. However, there is no guarantee that interference will not occur in a particular installation. If this equipment does cause harmful interference to radio or television reception, which can be determined by turning the equipment off and on, the user is encouraged to try to correct the interference by one or more of the following measures: (1.) Reorient or relocate the receiving antenna. (2.) Increase the separation between the equipment and receiver. (3.) Connect the equipment into an outlet on a circuit different from that to which the receiver is connected. (4.) Consult the dealer or an experienced radio TV technician for help Hardware Warranty Voyetra Turtle Beach, Inc. ("VTB") warrants to the original end-user purchaser ("Purchaser") that the Turtle Beach Amigo ("Product") will be free of defects in materials and workmanship for a period of ninety (90) Days from the date of purchase by Purchaser ("Warranty Period"). If a defect should occur during the Warranty Period, the Purchaser must obtain a Return Merchandise Authorization ("RMA") from VTB. Purchaser will be responsible for all costs incurred in returning the defective Product to and from an authorized VTB service center, or to the repair facility located at VTB's corporate headquarters. The Product must be returned in a static-proof bag, and in the original packaging. A copy of the dated proof of purchase must be included with the defective Product. The RMA number must be clearly indicated on the outside of the package. Packages without an RMA number will be returned to Sender. In the event of a defect, Purchaser's sole and exclusive remedy and VTB's sole liability are expressly limited to the correction of the defect by adjustment, repair, or replacement of the Product at VTB's sole option and expense. This warranty does not cover, and VTB is not responsible for, damage caused by misuse, neglect, fire, acts of God, or unauthorized modification of the Product or damage resulting from the use of the Product with hardware or software programs not provided or specifically recommended by VTB. Except as specifically provided herein, there are no other warranties expressed or implied, including, but not limited to, any implied warranties of merchantability or fitness for a particular purpose. In no event shall VTB be liable for indirect, incidental, consequential, or other damages including personal injury, lost profits and damages to property arising out of any breach of this warranty or otherwise. All software including operating systems or applications programs are provided on an "As Is" basis without warranty. Some states do not allow the exclusion or limitation of incidental or consequential damages, so the above exclusion or limitation may not apply to you. This warranty gives you specific legal rights. You may also have other rights, which vary from state to state.


Audio Advantage Amigo
Page 1
Introducing the Audio Advantage Amigo The Audio Advantage Amigo is a versatile USB audio peripheral that’s about the size of a “thumb drive”, so it’s easy to carry along with your laptop. With its built-in microphone, digital audio output, built-in amplifier for stereo headphones and headset support for Internet phone applications, Amigo is the one USB audio device that’s a must-have for laptop owners who want to enjoy high-quality audio on the road or at home. Amigo’s unique design connects your laptop or desktop to a wide variety of audio devices with features such as a digital output, a stereo headphone output, a built-in microphone, and support for expanded stereo sound. Whether you’re playing PC games, watching DVD movies, using voice applications, or listening to music, the Audio Advantage Amigo can handle it all. Amigo’s key features include: S/PDIF output lets you drive home theater gear in pure digital format, allowing for
pass-through of Dolby® Digital and DTS® multi-channel DVD sound to external A/V receivers and digital speaker systems.
Enjoy listening to stereo music with a powerful amplified headphone output or with the line output connected to powered speakers.
Use the built-in microphone or connect an external microphone for recording music, lectures, environmental sounds, and more.
Set the overall tone of your sound system with the master 10-band equalizer and save your own custom presets.
Enhance your listening experience with ambiance effects for concert hall realism. Powered by USB bus—no external power supply is required.
www.Turtle-Beach.com
Page 2
Getting Started
Package Contents
Amigo USB audio interface USB Extender
Cable Use this cable when you don’t want to insert the Amigo directly into the USB port.
Optical S/PDIF Adapter
Use this adapter to connect a TOSLINK optical cable to the Headphone/ SPDIF output jack, which provides both analog and digital signal connections.
Protective Cap Use this cap to protect the USB connector on the Amigo when it’s not connected to your PC or laptop.
Installation CD and Quick Start Guide
Use the CD to install the Amigo drivers and software. The Quick Start Guide provides an overview of how to install and use Amigo.
Installation CD The Amigo CD includes the following:
Amigo Drivers Audio drivers for Windows 2000/XP/XP64/Vista
Amigo Control Panel Software
A convenient utility for controlling Amigo’s features.
Software Suite A versatile suite of music software, described in the next section.
Adobe® Acrobat® Reader
A limited version for use with the reference manuals.
PDF Reference Manuals
PDF versions of software reference manuals that can be viewed and printed with the Adobe Acrobat program included on the CD.

Audio Advantage Amigo
Page 3
Software Suite AMIGO CONTROL PANEL
Clicking on the Turtle Beach Palm Tree icon in the System Tray brings up a menu from where you can launch the Amigo Control Panel. You can also launch the Control Panel by clicking Start All Programs Turtle Beach Audio Advantage Amigo Run Audio Advantage Amigo Control Panel. The Amigo Control Panel lets you control all of Amigo’s functions, as described in detail in a later section of this manual.
PLAY 3D DEMO
Clicking on the Turtle Beach Palm Tree icon in the System Tray brings up a menu from where you can launch the Play 3D Demo. You can also launch this program by clicking Start All Programs Turtle Beach Audio Advantage Amigo Demo Files 3D Player Demo. 3DPlay provides a convenient way to hear demos of Amigo’s surround sound effects, including HRTF on stereo headphones and true 5.1 surround-sound on Ear Force headphones or Surround Sound speaker systems.
AUDIOSURGEON™ LE
Launch this program by clicking Start Voyetra AudioSurgeon LE AudioSurgeon LE. This limited edition version of Voyetra’s powerful digital audio editor program lets you record and edit digital audio with the Amigo. It's great for recording and editing music or recordings. For information on how to upgrade to the full version with additional features, visit www.turtlebeach.com.
3D FLYING HELICOPTER GAME
Launch this program by clicking Start All Programs Turtle Beach Audio Advantage Amigo Demo Files Helicopter Demo This program lets you hear 3D sound effects by navigating the helicopter flight pattern that circles around your head.

www.Turtle-Beach.com
Page 4
MULTI-CHANNEL AUDIO DEMO
Launch this program by clicking Start All Programs Turtle Beach Audio Advantage Amigo Demo Files Multi-channel Audio Demo Click on the [Music] and [Sound Effect] menu items to hear music and sounds that demo the audio effects. Press Stop to end the demos. Press [HRTF] to launch the Helicopter Battle Game demo described below.
HELICOPTER BATTLE GAME
Launch this program by clicking on the [HRTF] menu item in the Multi-channel Audio Demo (see above screen). This program lets you hear 3D sound effects by navigating the helicopter flight pattern and firing missiles.
ROCK WAR GAME
Launch this program by clicking Start All Programs Turtle Beach Audio Advantage Amigo Demo Files Rock War Game This interactive game lets you hear 3D sound effects by “blasting” asteroids as they fly by.

Audio Advantage Amigo
Page 5
Voyetra® Demo Software The Installation CD also includes the following demo programs which may be installed from the Amigo Setup screen by clicking Voyetra Products then selecting the program name. From there, click the Install button from the program’s sub menu. After installing, launch the program from the Start All Programs menu.
MusicWrite™ Demo
A powerful notation program that's easy to use! This demo version lets you compose music in a way that’s easy to understand. Select a staff, select the instruments and you’re on your way! It’s never been easier to go from creative inspiration to great sheet music. All of your musical creations can be viewed, printed and played back with ease. With Songwriter you can keep your focus on what’s important—your music! For information on how to upgrade to the full version, visit www.voyetra.com .
Record Producer™ Demo
Compose and edit music with your MIDI keyboard! This demo version turns your MIDI-equipped PC into a desktop music production studio. Record your song using MIDI and digital audio tracks, edit every nuance, then play it back for others to enjoy! Whether you are a keyboard prodigy or can barely play a note, let Record Producer unleash the songwriter within you! For information on how to purchase a USB MIDI interface for connecting your MIDI music keyboard, visit www.TurtleBeach.com.
For the latest updates, as well as user tips, Knowledge Base articles and information on other Turtle Beach and Voyetra products, please visit www.TurtleBeach.com and www.Voyetra.com .

www.Turtle-Beach.com
Page 6
Connectors and Controls
Feature Function Status Light
The status light indicates the following conditions: GREEN: The light will remain on when the unit is powered on. The light will flash when audio is playing, or when the audio driver is being used by a program. RED: The light will turn Red when the audio output is muted (see below).
Volume/Mute Control
This control adjusts the master volume when pushed up or down. To mute the output, push in the control. The status light will turn RED when mute is activated.
S/PDIF & Headphone/ Line Out Jack
This jack operates in two modes: Line/Headphones Output: The analog line-level output can drive external line-level recording devices, powered speakers or stereo headphones. S/PDIF Output: When the included optical adapter is inserted into this jack, it becomes an optical S/PDIF output for playing digital audio. This allows for pass-through of Dolby® Digital and DTS® multi-channel DVD sound to external A/V receivers or digital speaker systems. Settings for the S/PDIF functions are in the Amigo Control Panel Speakers Tab.
Microphone Input
This jack accepts an external mono microphone. Power for an electret microphone is provided on the ring of the jack. When a microphone plug is inserted into the jack, the internal microphone is disabled. A gain boost is accessible from the Mixer tab by clicking the “…” button under the Mic volume slider and placing a check in the “Microphone Boost” option.
Internal Microphone
The internal microphone operates in the same manner as an external microphone. Mic level and boost is accessible in the Amigo Control Panel Mixer Tab. The internal microphone is disabled when a microphone plug is inserted into the microphone input.
Minimum System Requirements Processor Pentium 800 MHz / compatible or higher with one available USB port.
RAM 128 MB System RAM Hard Drive Approximately 100 MB free space is required during the driver / application
installation process. Display 1024x768 High Color (24-bit)
Operating Systems Windows® 2000, XP, XP64, Vista (32 bit only) CD-ROM Drive CD-ROM or DVD-ROM drive required for software installation.
Speakers Powered speakers or headphones. A digital speaker system or home theater A/V receiver with optical TOSLINK inputs is necessary for connecting Amigo’s optical digital output.

Audio Advantage Amigo
Page 7
Installing Amigo
Do not connect Amigo to a USB port until after you’ve run the Setup program on the Installation CD! The install will prompt you when to connect Amigo to the USB port.
Installation Procedure 1. Close any running programs (including anti-virus programs) so they will not interfere
with the installation process. 2. Place the Amigo Installation CD into your CD ROM drive. If the installation menu
does not appear within 30 seconds, click on the My Computer icon, browse to the root directory of the installation CD and run SETUP.EXE.
3. When the installation menu appears, click on Setup Audio Advantage Amigo.
The Amigo Installation Menu lets you install the Amigo Applications and Drivers, AudioSurgeon LE, the Voyetra music programs, software utilities and provides additional information about Turtle Beach and Voyetra products.
4. When the second menu appears, select Install Drivers and Applications. 5. When prompted by the software installation, connect Amigo to a free USB port.
(Power for Amigo is provided by the USB port, so you don’t need an external power adapter.) After Amigo’s green light turns on, click “Yes” to continue.
After inserting the Amigo into the USB Port, if the Windows “Add New Hardware Wizard” screen is displayed, click on the Cancel button to end this process.
6. When the welcome screen appears, click Next to continue. 7. When the End User License Agreement screen appears, if you choose to continue
with the installation select “I accept…” and click Next to continue. 8. When the Setup Type screen appears, select “Complete”, then click Next to
continue. When the next screen appears, click Install to continue.

www.Turtle-Beach.com
Page 8
Windows XP Unsigned Driver Message
Windows Vista Unsigned Driver Message
If a dialog box appears explaining that the software has not passed Windows Logo testing or does not have a Digital Signature, click "Continue Anyway" or "Yes" (depending on the version of Windows you’re running). 9. When the Ready to Install the Program screen appears, click Install to launch the
install process. If you need to make any changes before you install, click the Back button to return to the option you need to modify.
10. Click Finish to complete and exit the installation. When you’re prompted to reboot your computer, click OK.
After your PC reboots… With Amigo still connected to the USB port, you should see a Turtle Beach Palm Tree Logo in the System Tray located at the bottom right of your screen. Note that the icon in the System Tray the will be a Turtle Beach Palm Tree when Amigo is plugged into the USB port and will change to a dual LED when Amigo is unplugged. Click on the Turtle Beach icon to launch a pop-up menu, which includes the following items:
Control Panel: Launches the Amigo Control Panel. Device Status: Indicates if Windows has detected Amigo connected to the USB
port. Updates: Checks the Turtle Beach web site for new drivers or programs that you
may want to download for updating your Amigo. About: Brings up the Amigo Control Panel “About Box”. Demo: Launches the 3DPlay Demo program for checking out the features and to
see if Amigo is operating properly. Click on Start All Programs Turtle Beach Audio Advantage Amigo and you should see a list of programs in the menu. Use these programs to check out the audio features on your newly installed Amigo.
Always reconnect Amigo to the same USB port used during this installation. If you connect it to a different USB port, Windows will recognize it as a new USB device and ask if you’d like to reinstall the Amigo drivers. To use Amigo in the new USB port, click Yes to install the drivers. Otherwise, reinsert Amigo into the USB port used during the original installation.
Product Registration… At this point, please take a minute to register on-line by clicking Start All Programs
Turtle Beach Audio Advantage Amigo Online Registration (your Internet connection must be active during installation). When the registration screen appears, enter the product ID from the back of your Quick Start Guide.

Audio Advantage Amigo
Page 9
Checking the Driver Installation 1. Click on the System icon from the Control panel: Start Control Panel
System. 2. In Windows 2000/XP, click the Hardware Tab, then click Device Manager. In
Vista, click “Device Manager” on the left side of the System window. 3. Click on Sound, Video and Game Controllers to see if Audio Advantage Amigo
Device is listed (as illustrated below.) 4. Right click on Audio Advantage Amigo Device and select Properties from the
menu. 5. The Device Status should say “This device is working properly” as illustrated
below.
Optimizing Playback Performance in Windows 2000/XP For optimum performance, adjust the System Hardware Acceleration and Sample Rate Conversion Quality to Full and Best in the Advanced Audio Properties Window.
1. Click Start Control Panel Sounds and Audio Devices Audio Tab.
2. Make sure that the default device for sound playback and sound recording is set to Audio Advantage Amigo Device.
3. Click the Advanced button in the Sound Playback section to activate the Advanced Audio Properties window.
4. Click the Performance tab. 5. Set the Hardware Acceleration slider to “Full” and the Sample Rate Conversion
Quality slider to “Best”. 6. Click OK to close all of the open windows.

www.Turtle-Beach.com
Page 10
Installing AudioSurgeon LE The AudioSurgeon LE program is installed from the Amigo installation screen as follows: 1. From the first installation menu, select
Setup Audio Advantage Amigo. 2. When the second menu appears, select
Install AudioSurgeon LE. 3. After the installation is completed, run
AudioSurgeon LE by clicking Start Voyetra AudioSurgeon LE AudioSurgeon LE, or by clicking the desktop icon (if you chose to install it.)
Uninstalling the Amigo Driver and Applications The Amigo Driver and Applications may be uninstalled from your hard drive and removed from the Programs menu as follows: 1. Click on Start All Programs Turtle Beach Audio Advantage Amigo
Uninstall Turtle Beach Audio Advantage Amigo. 2. Follow the on-screen instructions. 3. After you’ve uninstalled the programs, shut down your PC, remove Amigo from the
USB port, and reboot your PC.

Audio Advantage Amigo
Page 11
Checking Amigo after Installation
Step 1: Connect Amigo
Connecting Speakers or Headphones You can connect stereo headphones or powered speakers to the Amigo Headphone-S/PDIF Output jack. If you connect powered speakers, set the Speaker Configuration in the Amigo Control Panel Speaker Tab to “2 Speakers”. When using headphones, set the Speaker Configuration to “Headphones”. To mute the sound, press the external volume/mute lever, or click the mute button below the Master Volume slider in the Speakers Tab. The LED will turn red when muted.
Using the Microphone Amigo’s internal microphone can be used to record sounds or to monitor the room while you’re wearing headphones. That way, you can listen to music without disturbing others, and still hear what’s happening around you. You can also connect an external microphone to the Mic Input jack. For instance, if you’re using a headset with a microphone (e.g. when using Internet Phone), connect the microphone from the headset to Amigo’s mic input. The microphone level and sensitivity is set by the Mic volume slider and Mic Options button (“…”) in the Amigo Control Panel Mixer tab.
⇒ AudioSurgeon can be used to record from the mic input and edit the recording. See the later section in this manual for details.
Step 2: Launch the Amigo Control Panel At this point, the Amigo drivers should be installed and Amigo should be connected to either speakers or headphones. Click on the Turtle Beach icon in the System Tray to bring up a menu from where you can launch the Amigo Control Panel. You can also launch the Amigo Control Panel by clicking Start All Programs Turtle Beach Audio Advantage Amigo Run Audio Advantage Amigo Control Panel.
Once the Control Panel is active, do the following:

www.Turtle-Beach.com
Page 12
Check the Mixer Settings 1. To prevent feedback from the internal
microphone being picked up by the external speakers, click on the Mixer tab and mute the microphone, or turn down the volume. If you’re using headphones with the speakers turned off, this won’t be an issue.
2. Next, set the volume levels to a comfortable level. In Windows XP/2000, set the Wave and Master volume levels on the Mixer tab. The Wave slider is what you’ll primarily use to control the playback level of digital music files, DVDs, and other digital audio sources in XP. In Windows Vista, the Wave slider no longer exists, so the Master Volume alone is used to control the overall volume.
Check the Speakers 1. Click the Speakers Tab, then click on the
speaker icons located below the Speaker Configuration pull-down menu to play a test signal indicating which speaker has been clicked.
2. Make sure the speaker you’re hearing corresponds to the icon you clicked. For example, if you clicked the front left speaker icon, you should hear the test signal say “Front Left” in the front left speaker.
⇒ If the test signals are playing on the wrong speakers, or if there is no speaker sound, see the next section on Troubleshooting Tips.
Step 3: Try the Play3D Demo 1. Launch the Play3D Demo either by clicking
Start All Programs Turtle Beach Audio Advantage Amigo Demo Files 3D Player Demo or by clicking on the Turtle Beach icon in the System Tray on the bottom right of your PC Screen and selecting Demo from the menu.
2. Click on the Play button to hear the Sound Source selected in the top group. Each source presents a different type of sound to demonstrate positional audio.
3. Clicking the first button in the Moving Path section lets you move the sound manually, while clicking the other buttons in this group lets you hear the sound move automatically.
4. The Environment buttons let you hear different reverberation settings, which are available in the Environments section on the Amigo Control Panel Effects Tab.
5. To end the demo, click Stop. To shut down the program, click Exit.

Audio Advantage Amigo
Page 13
Troubleshooting Tips
No sound on speakers or headphones Check that the speakers are powered on. Be sure you’re not using passive speakers that
require an amplifier. The Amigo can only drive powered speakers, not passive speakers. If the speakers have a volume control or mute button, check that they are properly set. Make sure the speakers are operating properly. To verify this, connect them to another
audio source, such as an MP3 player or CD player. If none of these solve the problem, check the following: The Master Volume in the Speaker Tab controls the output level. In Windows 2000/XP, the Wave volume in the Mixer Tab controls the level of the
digital audio played by the PC, such as music played with Media Player or the sound of a DVD.
The position of the speaker icons in the Speaker Positions section in the Effects Tab to the right of the Master Volume (if it’s Enabled).
The Mute buttons under the Master Volume and Wave Volume will turn off the volumes when enabled. If the status light on Amigo is RED, it indicates that the Master Volume mute is active. Turn this off either by pressing the volume/mute control on Amigo, or by clicking the mute button under the Master Volume slider in the Control Panel Speakers Tab.
In Windows 2000/XP… Click Start Control Panel Sounds and Audio
Devices Audio and check that the Sound Playback and Sound Recording devices are set to Audio Advantage Amigo Device, as shown in the illustration. If not, select Amigo from the drop down menus and click Apply. If Amigo does not appear in the list, the drivers were not installed properly from the CD, so try uninstalling and reinstalling from the CD.
In Windows Vista…
• If you are using standard PC speaker or headphones, click Start > Control Panel > Sound and check that “Speakers - Audio Advantage Amigo Device” is set as the Default Playback Device, as shown in the illustration. If you are using a TOSLINK cable to connect Amigo to an external digital decoder (such as your home theater 5.1 receiver), then select “Digital Output – Audio Advantage Amigo Device” as the Default Playback Device.
Sound playing from the wrong speakers If you hear sound from the wrong speakers, for example, if you click the Left speaker icon and hear “Left Front” emanating from a different speaker, check the following: Check the Speaker Position in the Effects Tab. When enabled, this lets you change the
position of each speaker by moving the speaker icons. This could cause the sound to emanate from different speakers if the speaker icons are moved from their default positions.
www.Turtle-Beach.com
Page 14
Check that the speakers are connected properly. If you are using a mini to RCA adapter to connect the speakers, try swapping the left and right RCA plugs to correct the problem.
Microphone Feedback from the Internal Microphone Feedback is the ringing noise (often described as squealing, screeching, etc) that is caused by a signal that travels in a loop from the speakers back into the microphone and again to the speakers. Amigo’s internal microphone can cause feedback by amplifying a signal from a speaker connected to Amigo. To correct this, mute the Microphone volume in the Amigo Control Panel Mixer panel, or simply turn the microphone volume down so that it does not amplify the speaker output.

Audio Advantage Amigo
Page 15
Things You Can Do with Amigo Listening to Music CDs in Windows 2000/XP
To listen to an audio CD from your PC’s CD ROM drive: 1. Insert the CD into the CD ROM Tray. Windows will prompt you whether or not you
want to Rip the CD to your hard drive or play the CD with Media Player. Select “Play CD with Media Player”.
2. In Windows XP, the CD volume is controlled by the Wave volume in the Control Panel Mixer Tab. However, if your CD ROM drive uses an analog CD output, then the CD cannot be played using Amigo since the CD audio will not be in digital format.
If there’s no sound when playing a CD Check that the “Enable digital CD audio for this CD-ROM Device” option is enabled in the CD drive’s Properties settings (using Windows XP or 2000). Access this by clicking Start Control Panel System Hardware Tab Device Manager DVD/CD ROM Drives Right click on the name of the CD drive in question Click Properties Select Properties Tab.
Listening to Your Digital Music Library You can use Windows Media Player for listening to your digital music library with Amigo. If you don’t hear any sound when using Windows Media Player to play your music, first check that Media Player’s volume control is turned up. If that’s not the problem, then check that Media Player is configured to play from Amigo by clicking Tools on the Windows Media Player menu. Depending on which version of Windows you have, do the following:
Windows 2000/XP…
Then select Options Devices Speakers Properties. The selection under “Audio device to use” should be set to DirectSound: Audio Advantage Amigo Device. If it isn’t, then select it from the pull-down menu and click Apply OK at the bottom of the window. Close the options window and try Media Player again to see if it corrects the problem. Set the Master Volume on the Speakers Tab to a comfortable level. If it seems like the volume is too low, click the Mixer Tab and adjust the Wave volume in the Playback Mixer. For Windows Vista… If there’s no sound, refer to the previous section “No sound on speakers or headphones” and follow the steps to check that Audio Advantage Amigo is set as the default Playback Device.

www.Turtle-Beach.com
Page 16
Once you hear sound, set the Master Volume on the Amigo Control Panel Speakers Tab to a comfortable level. If it seems like the volume is too low, click the Mixer Tab and adjust the Wave volume in the Playback Mixer (Win 2000/XP only).
Modifying the Sound
Changing Tone with the Master Graphic Equalizer The Master Equalizer, accessed by clicking the Equalizer Tab, lets you control the overall tone of your Amigo sound system. Try moving the sliders to see how they change the tone. Then, click the Equalizer Presets to hear the effect of each one. When you’re done, click the Flat setting or Enable EQ to defeat the tone changes.
Adding Concert Hall Sound with Environments Environments, accessed by clicking the Effects Tab, let you add reverb to the front or surround channels for concert hall effects. To hear what this sounds like, click the Environments Enable button, then click on the pull-down menu and select Living Room from the list. Turn up the Front and Surround sliders to set the effect level. Then click the Large, Medium and Small Environment Size buttons to hear how it changes the intensity of the effect. Try some other environment settings from the pull-down menu to hear how they sound.
Moving the Speaker Positions The Speaker Position, in the Effects Tab, lets you manually or automatically move the position of the speakers. Click one of the Rotate buttons and change the speed slider from slow to fast to hear the effect of sound spinning around. Click Random to hear the sound moving in random positions. The speed control works on this effect as well. Click Manual, then click Reset to return the blue speaker icons to their normal position. Now, click on one of the blue speaker icons and drag it to a different position to note how it sounds. When you’re done, click the Enable button to disable the Speaker Position effect.
Using the Key Shifter to change the pitch of a song The Key Shifter in the Effects Tab lets you change the pitch of a song while it’s playing—without changing the tempo. To try this effect, play a song with Windows Media Player and click the Enable button on the Key Shifter
Audio Advantage Amigo
Page 17
feature to turn it on. Then notice how moving the slider towards the left and right shifts the pitch down and up from the original. When you’re done, click the Enable button again to turn off the effect.
Using the Center Canceller The Center Canceller in the Effects Tab removes the center channel in a song. Since the vocals are typically panned to the center, this effect may be used to reduce vocals in a song. Use Windows Media Player to play a song with voice in the center, click the Enable button in the Center Canceller section, then move the slider to the right side (+) and notice how the center channel is cancelled. When you’re done, click the Enable button again to turn off the effect.
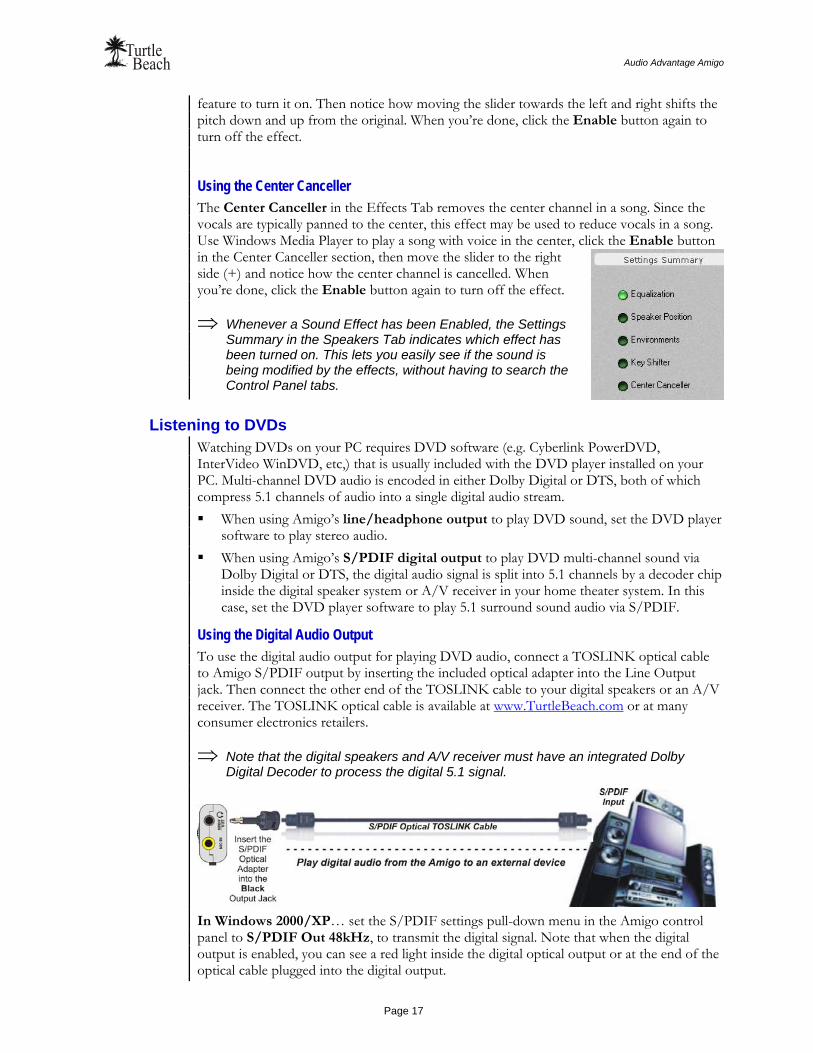
⇒ Whenever a Sound Effect has been Enabled, the Settings Summary in the Speakers Tab indicates which effect has been turned on. This lets you easily see if the sound is being modified by the effects, without having to search the Control Panel tabs.
Listening to DVDs Watching DVDs on your PC requires DVD software (e.g. Cyberlink PowerDVD, InterVideo WinDVD, etc,) that is usually included with the DVD player installed on your PC. Multi-channel DVD audio is encoded in either Dolby Digital or DTS, both of which compress 5.1 channels of audio into a single digital audio stream. When using Amigo’s line/headphone output to play DVD sound, set the DVD player
software to play stereo audio. When using Amigo’s S/PDIF digital output to play DVD multi-channel sound via
Dolby Digital or DTS, the digital audio signal is split into 5.1 channels by a decoder chip inside the digital speaker system or A/V receiver in your home theater system. In this case, set the DVD player software to play 5.1 surround sound audio via S/PDIF.
Using the Digital Audio Output To use the digital audio output for playing DVD audio, connect a TOSLINK optical cable to Amigo S/PDIF output by inserting the included optical adapter into the Line Output jack. Then connect the other end of the TOSLINK cable to your digital speakers or an A/V receiver. The TOSLINK optical cable is available at www.TurtleBeach.com or at many consumer electronics retailers.
⇒ Note that the digital speakers and A/V receiver must have an integrated Dolby Digital Decoder to process the digital 5.1 signal.
In Windows 2000/XP… set the S/PDIF settings pull-down menu in the Amigo control panel to S/PDIF Out 48kHz, to transmit the digital signal. Note that when the digital output is enabled, you can see a red light inside the digital optical output or at the end of the optical cable plugged into the digital output.

www.Turtle-Beach.com
Page 18
In Windows Vista… in addition to setting the Amigo Control Panel’s S/PDIF settings pull-down menu to 48 kHz, you must also set the Digital Output as your default playback device in the Vista Sound Control Panel. Click Start Control Panel Sound and select “Digital Output – Audio Advantage SRM Device” as the Default Playback Device.
Setting Up Amigo for use with Skype™ or Other Internet Phone Software When Amigo is connected to the USB port, it usually will set itself as the "default sound device", which means that it should work automatically with Skype's internet phone software or other similar software. If Skype does not automatically use Amigo after it has been installed, then this can be set manually within the Skype software as follows:
1. Launch the Skype software, then click on "Tools" and select "Options". The Options dialog window will open.
2. In the Options dialog window, click on "Sound Devices" (shown below).
3. In the three drop-down menus available for Sound Devices ("Audio In", "Audio Out",
and "Ringing"), select "Audio Advantage Amigo Device" as the sound device you wish to use for Skype (shown below).
4. Click the 'Save' button to set the changes for Skype and close the Options window.
Note on Skype’s "Ringing" Options If you do not have speakers connected to Amigo and are using only headphones, then it is possible that you may not hear the Skype ring when you are not wearing headphones. For this type of setting, it may be preferable to set Skype’s "Ringing" option to use your system's existing sound card, which is likely to be connected to powered speakers, so that you can easily hear the ring at any time.

Audio Advantage Amigo
Page 19
To do this, open the Options window, select "Sound Devices", and in the drop-down menu for the "Ringing" output, select the desired sound card from the list. Then click "Save" to set the changes and close the Options window.
Recording Tips
Using AudioSurgeon as a Digital Audio Recorder and Editor The AudioSurgeon software, included on the Amigo Installation CD, lets you record and edit sounds using Amigo’s mic input and wave output. You can select the record source in the Amigo Control Panel Mixer Tab, or use AudioSurgeon’s Record Wizard to automatically set the optimum recording level. For details on how to use this versatile program, see the later section in this manual.
Recording Internet Radio Broadcasts To record an Internet Radio broadcast in Windows 2000/XP, select “Stereo Mix” as the recording source in the Amigo Control Panel Mixer Tab. In Vista, this selection is not available. The recording level is set by a combination of the Wave slider and record level. Use AudioSurgeon to record the broadcast as it plays, then use the “File Save” option to save the broadcast as a WAV file on your hard drive. You can then play it with AudioSurgeon, Media Player, or other digital audio player software.
Recording with Microphones You can record external sounds using either the internal microphone or an external microphone. Set the microphone sensitivity by clicking the Microphone Options button (“…”) under the microphone slider in the Mixer Tab. Then select Microphone as the record source and use AudioSurgeon as described above.

www.Turtle-Beach.com
Page 20
Amigo Control Panel The Amigo Control Panel lets you access all of Amigo’s features from one convenient place. You can launch the control panel either by clicking on the Turtle Beach icon located in the Windows system tray or by clicking Start All Programs Turtle Beach Audio Advantage Amigo Run Audio Advantage Amigo Control Panel.
Speakers Tab This tab lets you set the speaker configurations, control speaker volumes and test speaker functions. You can also set the S/PDIF digital audio configurations and view a summary of important control panel settings.
Equalizer Tab This tab activates the 10 band Master Equalizer that lets you modify the frequency response, or tone, of your audio system. You can also select from a group of factory presets or save your own presets.
Effects Tab This tab lets you control speaker positions, add Environments for front and surround speakers and modify the sound with digital effects processing.

Audio Advantage Amigo
Page 21
Mixer Tab This tab lets you control the volume levels for all of the playback and recording sources. In Vista, the Wave and SW Synth sliders are not available. Also, the Stereo Mix is not available as a recording source.
Using the Control Panel Presets
Saving and Restoring Presets The Control Panel settings can be saved as presets for easy recall: 1. Click on the Preset button, then click Save to call up the Save
Preset dialog. 2. Select a category from the Preset Category menu. 3. Type in a name, then press OK. 4. To restore a saved preset, click the Preset button and select the
category name followed by the preset name.
⇒ Preset names will not accept the ampersand ("&") and certain other “special” characters.
Importing and Exporting Presets You can also share presets with other users:. 1. To Export a preset, click Preset Export, then enter a name
in the Save As dialog box. 2. To Import a preset, click Preset Import and select the
preset from the Open dialog box that appears. Note that importing presets will load the new settings will not automatically save the preset. If you want to keep the preset as part of your preset list, click on the Presets button and choose "Save" to save it.
⇒ Whenever a preset has been changed, an asterisk will appear on the right side of the name at the top of the Control Panel, indicating that the preset has been edited from the original version.
www.Turtle-Beach.com
Page 22
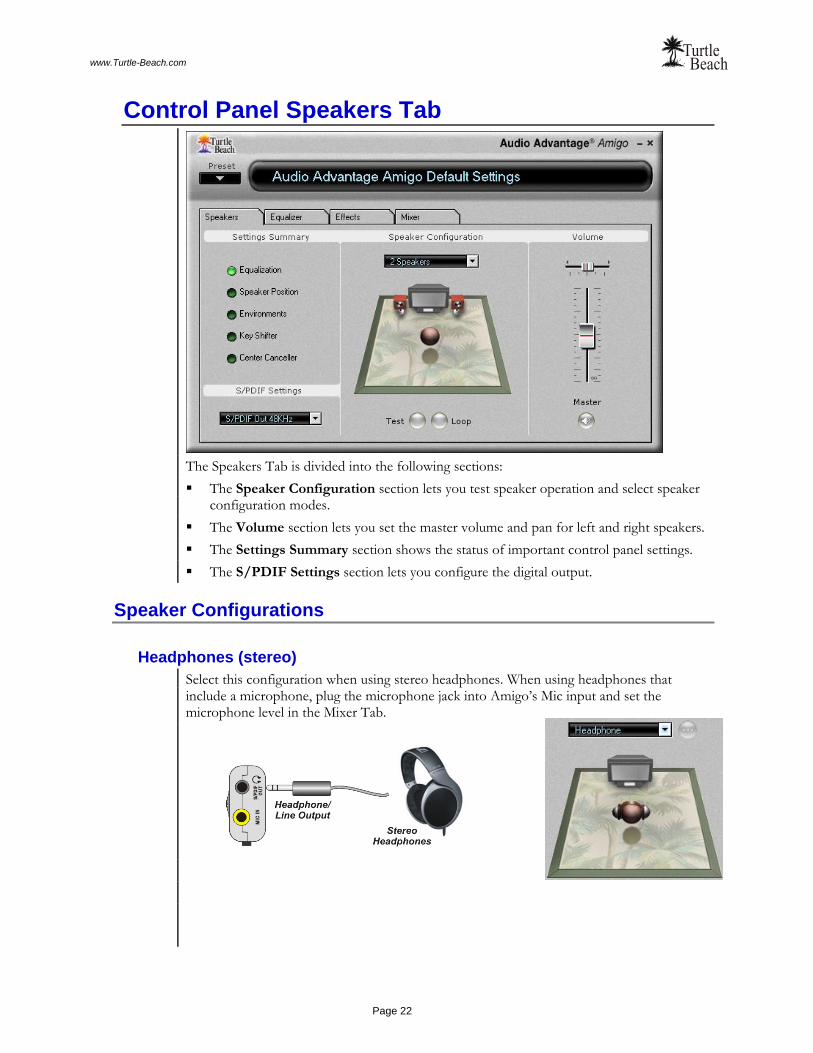
Control Panel Speakers Tab
The Speakers Tab is divided into the following sections: The Speaker Configuration section lets you test speaker operation and select speaker
configuration modes. The Volume section lets you set the master volume and pan for left and right speakers. The Settings Summary section shows the status of important control panel settings. The S/PDIF Settings section lets you configure the digital output.
Speaker Configurations
Headphones (stereo) Select this configuration when using stereo headphones. When using headphones that include a microphone, plug the microphone jack into Amigo’s Mic input and set the microphone level in the Mixer Tab.
Audio Advantage Amigo
Page 23
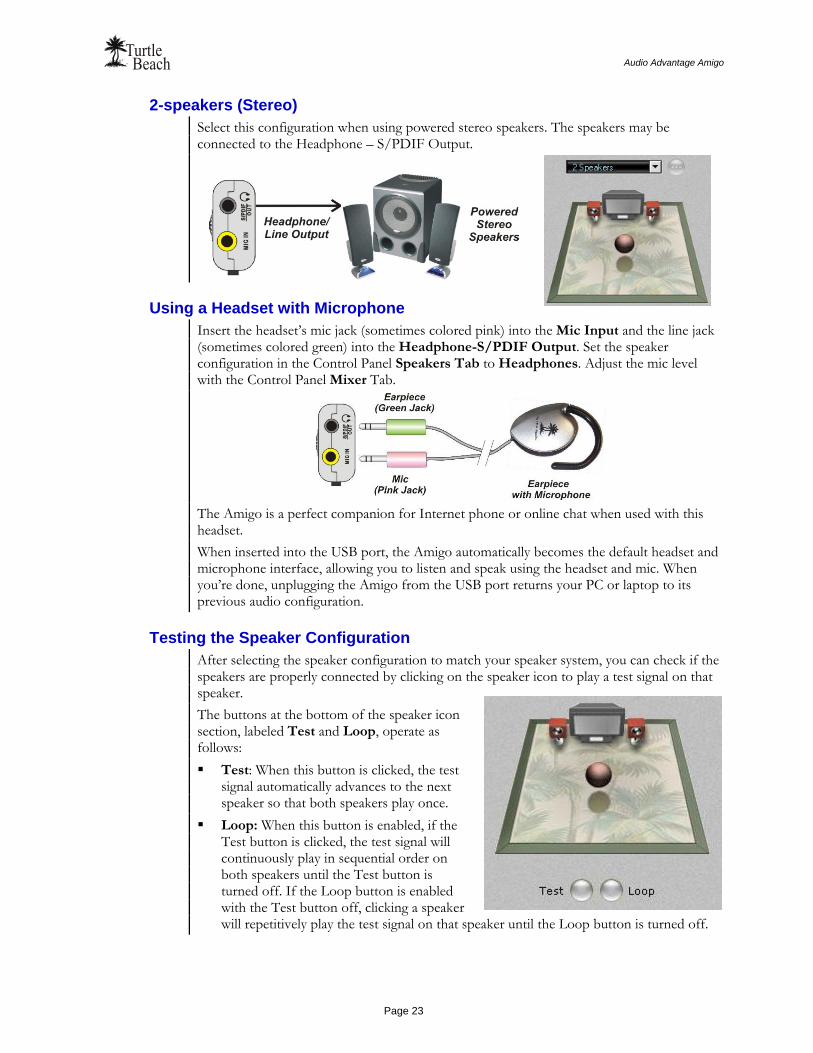
2-speakers (Stereo) Select this configuration when using powered stereo speakers. The speakers may be connected to the Headphone – S/PDIF Output.
Using a Headset with Microphone Insert the headset’s mic jack (sometimes colored pink) into the Mic Input and the line jack (sometimes colored green) into the Headphone-S/PDIF Output. Set the speaker configuration in the Control Panel Speakers Tab to Headphones. Adjust the mic level with the Control Panel Mixer Tab.
The Amigo is a perfect companion for Internet phone or online chat when used with this headset. When inserted into the USB port, the Amigo automatically becomes the default headset and microphone interface, allowing you to listen and speak using the headset and mic. When you’re done, unplugging the Amigo from the USB port returns your PC or laptop to its previous audio configuration.
Testing the Speaker Configuration After selecting the speaker configuration to match your speaker system, you can check if the speakers are properly connected by clicking on the speaker icon to play a test signal on that speaker. The buttons at the bottom of the speaker icon section, labeled Test and Loop, operate as follows: Test: When this button is clicked, the test
signal automatically advances to the next speaker so that both speakers play once.
Loop: When this button is enabled, if the Test button is clicked, the test signal will continuously play in sequential order on both speakers until the Test button is turned off. If the Loop button is enabled with the Test button off, clicking a speaker will repetitively play the test signal on that speaker until the Loop button is turned off.

www.Turtle-Beach.com
Page 24
Volume Section Master Volume: Controls the volume of the speakers or headphones. Pan: Controls left and right balance. Mute: Mutes speakers or headphones.
Control Panel Settings Summary This section summarizes the state of important control panel settings: Equalization: Indicates that the Master Graphic Equalizer is
enabled, therefore the system frequency response may be modified from its “flat” setting by the Equalizer.
Speaker Position: Indicates that the speaker positions in the Speaker Position section of the Effects Tab have been moved.
Environments: Indicates that the Environments in the Effects Tab are enabled.
Key Shifter: Indicates that the Pitch Shifter in the Effects Tab is enabled, therefore the digital audio output may be being altered by this effect.
Center Canceller: Indicates that the Center Canceller effect in the Effects Tab is enabled, which removes audio signals that are panned to the center of a stereo source.
S/PDIF Digital Output The S/PDIF digital output is used to connect Amigo to digital speakers and A/V receivers by inserting the optical adapter. Use a TOSLINK optical cable to connect the adapter to the corresponding optical digital input on the external device. The TOSLINK cable is available at www.TurtleBeach.com or at most consumer electronics retailers.
⇒ When the S/PDIF output is active, a red light will appear inside the S/PDIF Out/Headphone jack, or at the end of the TOSLINK cable.
When using the digital output, select the S/PDIF output mode in the pull-down menu: S/PDIF Out Off: S/PDIF output is turned off, so there is no
digital signal. S/PDIF Out 48kHz: Digital audio is transmitted in S/PDIF format at 48kHz sample
rate. When this setting is selected, a red light will appear in the S/PDIF output jack. In Windows Vista, “Digital Output” should be set as the default in Vista’s “Playback Devices” window by clicking Start Control Panel Sound.

Audio Advantage Amigo
Page 25
Graphic Equalizer Tab
The Graphic Equalizer provides 10 frequency bands that can be used to adjust the overall tone of the audio system. The buttons at the top of the slider bank provide eight equalizer presets. The Flat setting returns the sliders to their zero, or unmodified, positions. The Enable EQ button may be used to turn off the equalization settings, to quickly hear the difference between the equalized and unmodified sound.
User Defined Presets To save a custom arrangement of sliders as a User Defined Preset, click the Add button to activate the Add User Defined EQ Setting dialog box. Then enter a name for the preset and click OK. The preset name will be added to the list in the pull-down menu. To retrieve a preset from the list, click the User Defined button, then select a preset from the pull-down menu. To delete a preset from the list: Select the preset from the list, press the Delete Button and you will be prompted whether or not you would like to delete the current preset. The selected preset will then be removed from the list.

www.Turtle-Beach.com
Page 26
Effects Tab
Speaker Position The Speaker Position section lets you change the position of the speakers by clicking and moving the blue “virtual speaker” icons in the illustration. The buttons function as follows: Enable: The speaker positioning effect is enabled by clicking on this button. Rotate: Clicking either of these two buttons will cause the virtual speaker positions to move in a clockwise or counterclockwise rotation, with a rotation speed set by the slider. Click the Manual button to stop the rotation. Manual: Clicking this button allows you to move the virtual speaker positions manually by clicking and dragging the blue speaker icons to different positions. Random: Clicking this button allows you to move the virtual speaker positions in a random mode with the speed set by the Rotate speed slider. Reset: Clicking this button sets the virtual speakers back to their default position.
Environments Environments are variations of reverberation settings, which enhance normal stereo by creating a deeper surround sound field. Enable: The Environments and Delay effects are enabled by clicking this button. Environments Pull-Down Menu: Click to select from a list of different Environments settings, each with their own characteristic reverberation tones. Environment Size: These three buttons, labeled S (Small), M (Medium) and L (Large) each set a different depth of the environment effect selected from the pull-down menu.
Audio Advantage Amigo
Page 27
Sound FX
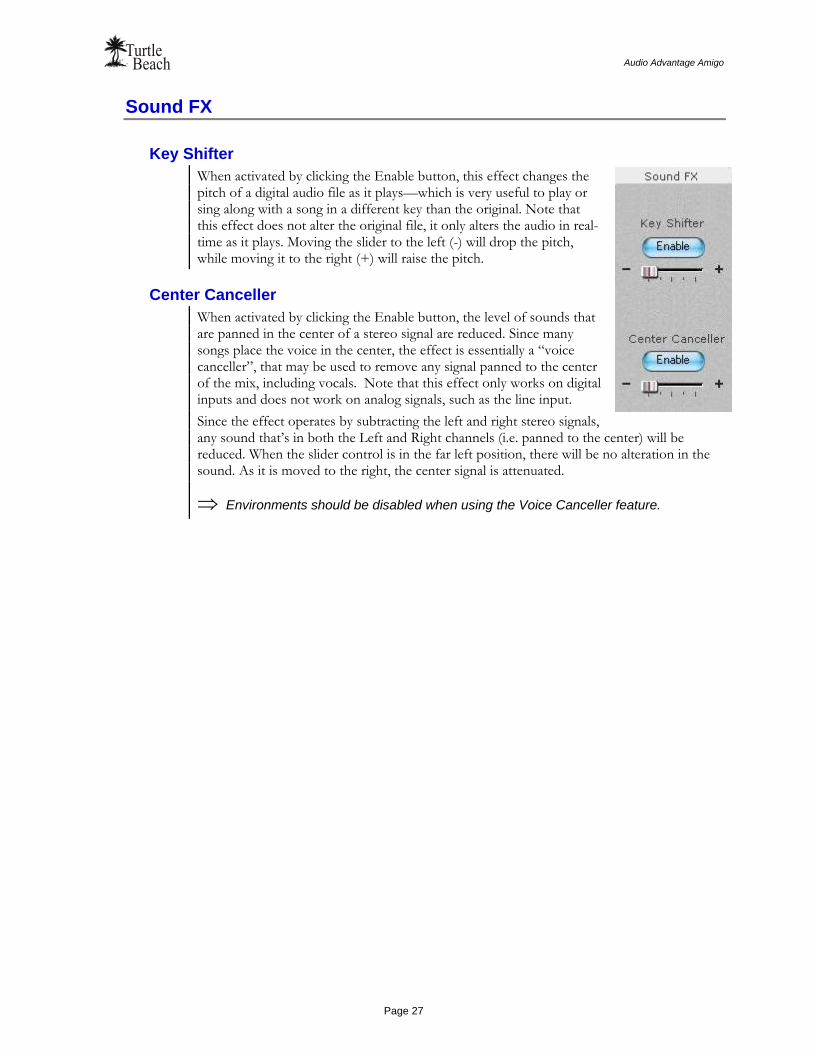
Key Shifter When activated by clicking the Enable button, this effect changes the pitch of a digital audio file as it plays—which is very useful to play or sing along with a song in a different key than the original. Note that this effect does not alter the original file, it only alters the audio in real-time as it plays. Moving the slider to the left (-) will drop the pitch, while moving it to the right (+) will raise the pitch.
Center Canceller When activated by clicking the Enable button, the level of sounds that are panned in the center of a stereo signal are reduced. Since many songs place the voice in the center, the effect is essentially a “voice canceller”, that may be used to remove any signal panned to the center of the mix, including vocals. Note that this effect only works on digital inputs and does not work on analog signals, such as the line input. Since the effect operates by subtracting the left and right stereo signals, any sound that’s in both the Left and Right channels (i.e. panned to the center) will be reduced. When the slider control is in the far left position, there will be no alteration in the sound. As it is moved to the right, the center signal is attenuated.
⇒ Environments should be disabled when using the Voice Canceller feature.
www.Turtle-Beach.com
Page 28
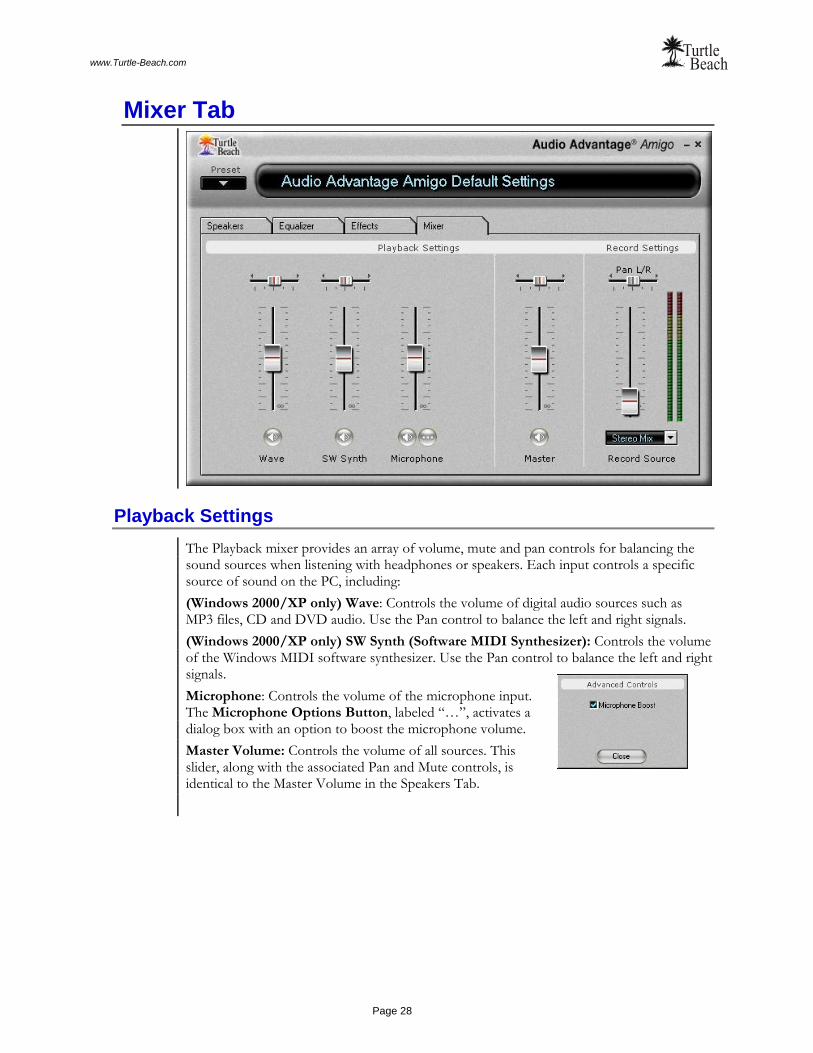
Mixer Tab
Playback Settings The Playback mixer provides an array of volume, mute and pan controls for balancing the sound sources when listening with headphones or speakers. Each input controls a specific source of sound on the PC, including: (Windows 2000/XP only) Wave: Controls the volume of digital audio sources such as MP3 files, CD and DVD audio. Use the Pan control to balance the left and right signals. (Windows 2000/XP only) SW Synth (Software MIDI Synthesizer): Controls the volume of the Windows MIDI software synthesizer. Use the Pan control to balance the left and right signals. Microphone: Controls the volume of the microphone input. The Microphone Options Button, labeled “…”, activates a dialog box with an option to boost the microphone volume. Master Volume: Controls the volume of all sources. This slider, along with the associated Pan and Mute controls, is identical to the Master Volume in the Speakers Tab.
Audio Advantage Amigo
Page 29
Record Settings Audio recording can be accomplished with a program such as Audio Surgeon LE (included on the Amigo installation CD), Windows Recorder (in the Accessories section of the Start All Programs list), or other digital audio recording software. The record source is selected by clicking the Record Source pull-down menu in the Record Settings section of the Mixer tab. After selecting a record source, the recording level may be adjusted with the volume control located above the record source pull-down menu. The VU meter indicates the recording level. When recording, set the recording level so that the VU meters do not enter the red zone, other than during short audio peaks.
⇒ The VU meters will not be active unless you are recording with AudioSurgeon, or another digital audio recording program.
You can select the following inputs as a recording source: (Windows 2000/XP only) Wave: Selects the Wave output as a recording source. Microphone: Selects the mic input as a recording source. If the microphone recording
level is too low, boost the volume by clicking the “…” button below the microphone volume slider in the playback mixer to set the Microphone Boost option .
(Windows 2000/XP only) Stereo Mix: Selects the playback mixer output as a recording source. This may be used to combine audio sources into a single stereo source for recording. For example, the microphone and WAV signals may be mixed together and recorded from this source.
⇒ When selecting Stereo Mix as a recording source, the microphone level remains on full volume and cannot be adjusted or muted.

www.Turtle-Beach.com
Page 30
AudioSurgeon LE
AudioSurgeon is a digital audio recording and editing program that lets you manipulate sound in graphical format, much like a word processor lets you manipulate words on the screen to create a document. You can either load a digital audio file from your PC into AudioSurgeon or record a new file and save it to disc. AudioSurgeon LE is a reduced function version of the Voyetra’s AudioSurgeon, available at www.Voyetra.com.
⇒ If you did not install AudioSurgeon during the Amigo install procedure, please refer to the installation instructions in the earlier section of this manual.
After installation, AudioSurgeon may be launched by clicking Start All Programs Voyetra AudioSurgeon LE.
Viewing and Navigating the Audio File AudioSurgeon’s screen has three sections for working with an audio file: Primary View, Secondary View and File Overview. You can simultaneously view two different sections of the file using the Primary and Secondary View Screens. To activate the Secondary View Screen, click and drag the bar on the left side of the screen. Each view has its own zoom buttons, so you can look at different sections of the file at different resolutions. The File Overview section, at the top of the screen, shows the entire audio file and highlights the areas displayed in the Primary and Secondary View Screens in blue and green. You can navigate the file section displayed in each screen by clicking and dragging these highlighted areas in the File Overview section or by clicking and dragging the thumbs underneath the Primary and Secondary displays. To highlight a range in the Primary or Secondary Views, click and drag over the section with the mouse pointer. You can manipulate any highlighted range in the Primary or Secondary Views with AudioSurgeon’s many transform and editing commands.

Audio Advantage Amigo
Page 31
Making a Recording with the Record Wizard Recording is easy with the Record Wizard. Simply press the Record button, then select “Use the Record Wizard” from the dialog box to launch the Record Wizard dialog. From here you can select the recording source and recording resolution, then lets the Wizard automatically adjust the optimum volume level and start recording. After the file has been recorded, it is loaded into the Primary View window so you can edit and save it.
Editing Audio Files
To Load and Play a File
1. Select File menu Open or click the Open File button. Navigate to the directory where your digital audio files are located and click a file name in the Files list.
2. Double-click the file name or highlight the file name and choose OK. 3. After the file loads into the Primary View, click the Play button or press the Spacebar
to play the file.
⇒ NOTE: If a Range is selected (see below) only the highlighted Range will play, rather than the entire file.
To select a range
1. Click on the desired start point in the display. Drag to the right and at the desired end point, release. The range selected will be highlighted.
2. To adjust the end points, place the mouse cursor at the desired location in the File Display, hold the Shift key and click. The Start or End point, whichever is nearer, jumps to the mouse cursor.
3. To select the entire file, use Edit menu Select All, press Ctrl+A or double-click on the display.
To Play the selected range,
Press the Spacebar or click the Play button and the range will play.
To Zoom in/out on a Range
1. Select a range and click the Zoom In (or Zoom Out) button on the bottom right of the screen. The entire screen will represent the length of the highlighted range, from beginning to end.
2. Select a range in the zoomed view and repeat the procedure to produce successively higher degrees of magnification. Clicking the zoom button without having a range selected increases the magnification by 2. The maximum zoom range is one sample per pixel.
To Insert Silence
1. Click-and-drag in the Graphic File Display to highlight the amount of silence you want to insert.
2. Select Edit menu Insert Silence and silence for the amount selected is inserted. Any data after the insert shifts to the right.

www.Turtle-Beach.com
Page 32
To cut a Section of a File and Place it in the Clipboard
1. Select the range of the file that you wish to remove. 2. Select Edit menu Cut. The selected range is deleted from the file and copied to
AudioSurgeon's Clipboard. If you do not want to remove the selected range, use the Copy command.
3. To Preview the Contents of the Clipboard, select Edit menu Clipboard or click the Play Clipboard button.
Blending Sounds with Mix Paste
Sections of audio can be blended together to create a composite file from different audio clips. For example, you can record a voice-over segment, then record a separate musical segment. Using the Mix Paste command from the Edit menu, these clips can be blended together to create an audio track for your movie or photo slideshow. 1. With two WAV files open, Cut or Copy the data from file “A” into the clipboard. You
can hear this clip by clicking on the Play Clipboard button. 2. Now, in file “B”, click the location where you want to paste the data from the
clipboard. 3. Click the Mix Paste button to combine the clipboard data from file “A” with data from
file “B” at the paste point. 4. Click the Play button to hear the results. If one of the files is too loud, or if clipping
occurs as a result of the merge, you can undo the operation. Then run a Scale transform on one or both of the clips to lower the level.
To Adjust the Volume of the File
1. Select the range you wish to scale or choose Select All from the Edit menu to select the entire file.
2. Choose Scale from the Tools menu or click the Scale button. 3. Using the slider, select the desired scaling factor. 4. Click the Preview button to hear the results of the current settings. 5. Click OK when you are satisfied with the results.
⇒ TIP! Normalizing a file increases its amplitude to its maximum level without distorting the sound. It is recommended that you normalize a file after it’s been recorded to get the strongest output level. Select the range you wish to normalize, then choose Normalize from the Tools menu or click the Normalize button.

Audio Advantage Amigo
Page 33
AudioSurgeon Controls
⇒ The edit controls are greyed out until a range is selected in the graphic display.
⇒ Some of the control functions are disabled in AudioSurgeon LE. These features are only available in the full version of AudioSurgeon. For more information, please visit www.Voyetra.com.
Transport Controls Jump to Beginning/End: Moves the Play Position Pointer to the beginning or end of the file. Stop/Play/Pause: Stop, Play and Pause during playback or recording. Record: Enables Record Standby mode. The red light on the button blinks to indicate that your system is ready to record. Press either the Pause or Play button to begin recording. Current Position: Displays the Current Play Position during recording and playback, in minutes:seconds:hundredths of a second. Level Meters: Indicates the signal levels during recording and playback.
File Commands New: Creates a new audio document for recording. Open: Presents a dialog box to select the file you want to load. Save: Saves the currently loaded file to disk. Properties: Displays the track properties for the file, which will be displayed in Media Player, AudioStation® and other jukebox players.
Edit Commands Undo: Restores the file to the state it was in before the most recent Edit. Redo: Reverses the last change made by Undo. Cut: Removes the selected range and shifts the rest of the file back to fill the gap. The cut data is placed in the Clipboard. Copy: Places a copy of the range in the Clipboard without altering the file. Copy to New File: Copies the highlighted section to a new file. Paste: Inserts the contents of the Clipboard at the start point of the selected range and shifts the data after that point to the right. Mix Paste: Mixes the contents of the Clipboard with the data in the current file, beginning at the Current Play Position. Play Clipboard: Plays the contents of the Clipboard. Select All: Highlights the entire file. Crop: Deletes all data except the selected range. The contents of the Clipboard remain unchanged.

www.Turtle-Beach.com
Page 34
Delete: Deletes the selected range, but does not retain the deleted data in the Clipboard. Clear: Replaces the selected range with an equal interval of silence and places the deleted data in the Clipboard. Insert Silence: Inserts silence in the selected range and moves the rest of the waveform without deleting data.
Status Display and Zoom Controls
Length of Selected Region: Displays the length of the highlighted range. Length of Entire File: Displays the length of the entire file. Sample Rate: Displays the sample rate, in Hertz, of the file. Bit Resolution: Displays the bit resolution of the file. Mono/Stereo: Displays whether the file is stereo or mono. Free Hard Disk Space: Displays the amount of free space on the hard drive used to record audio files. Zoom In/ Out: Zoom In magnifies the selected range. Zoom Out returns to the previous zoom level.

![Amigo Deliverable D4 - CORDIS€¦ · the Amigo Intelligent User Services (Amigo Deliverables D2.1 [3] and D2.3 [4]. Amigo deliverable D2.3 is an introduction to this document. The](https://img.pdfslide.us/doc/110x75/5f023ae57e708231d40338de/amigo-deliverable-d4-cordis-the-amigo-intelligent-user-services-amigo-deliverables.jpg)