Embed Size (px)
Citation preview
USING AUDACITY TO RECORD AUDIO IN YOUR ONLINE COURSE
Audacity Setup and
Recording Guide for
Windows
1
Table of Contents Recording Projects for This Course................................................................................................. 2 What is Audacity?............................................................................................................................ 2 Downloading and Installing Audacity on Your Computer ................................................................ 2 Setting Up Audacity on Your Computer .......................................................................................... 3 Setting Up Audacity for Recording .................................................................................................. 4 Overview of Audacity Features........................................................................................................ 6 Recording Your Online Course Assignments in Audacity ............................................................... 7 Editing Your Recordings: Part 1 ...................................................................................................... 9
Adjusting Individual Audio Track Volumes.................................................................................. 9 Editing Your Recording: Part II ...................................................................................................... 10
Deleting an Audio Track............................................................................................................ 10 Editing Your Recording: Part III ..................................................................................................... 11
Deleting Sections of Your Audio Track ..................................................................................... 11 Editing Your Recording: Part IV..................................................................................................... 12
Moving an Audio Section .......................................................................................................... 12 Moving the entire Audio Track .................................................................................................. 13
2
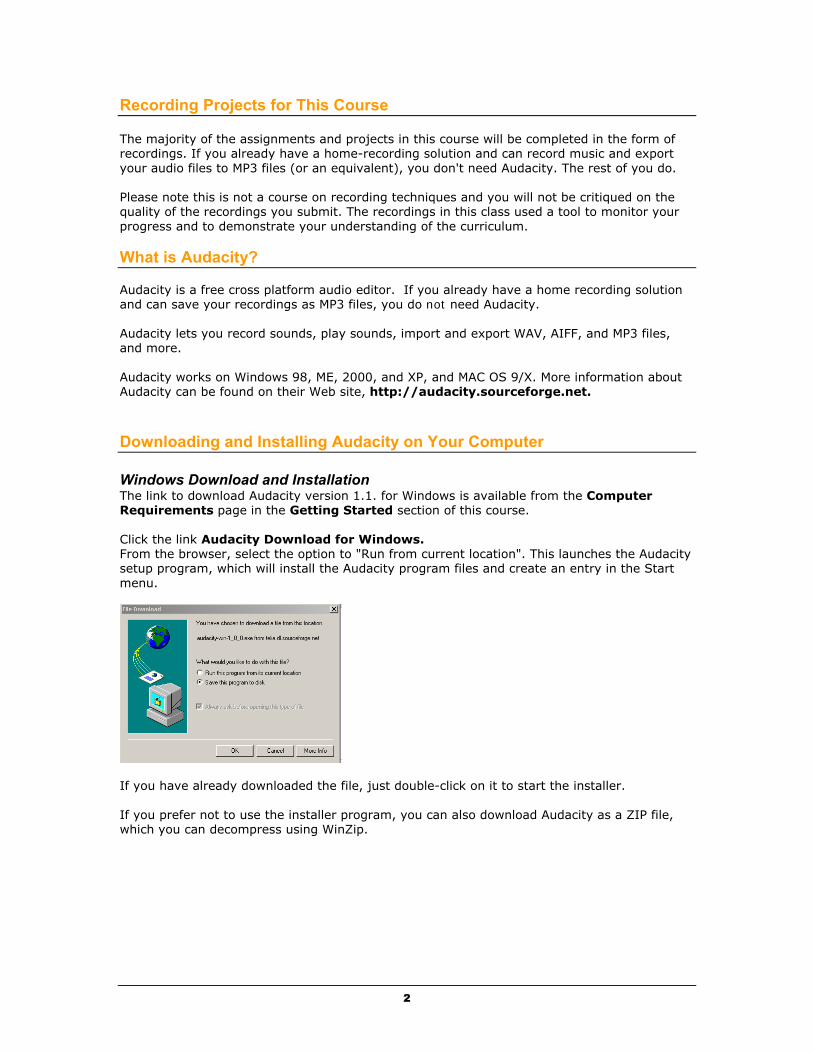
Recording Projects for This Course The majority of the assignments and projects in this course will be completed in the form of recordings. If you already have a home-recording solution and can record music and export your audio files to MP3 files (or an equivalent), you don't need Audacity. The rest of you do. Please note this is not a course on recording techniques and you will not be critiqued on the quality of the recordings you submit. The recordings in this class used a tool to monitor your progress and to demonstrate your understanding of the curriculum. What is Audacity? Audacity is a free cross platform audio editor. If you already have a home recording solution and can save your recordings as MP3 files, you do not need Audacity. Audacity lets you record sounds, play sounds, import and export WAV, AIFF, and MP3 files, and more. Audacity works on Windows 98, ME, 2000, and XP, and MAC OS 9/X. More information about Audacity can be found on their Web site, http://audacity.sourceforge.net. Downloading and Installing Audacity on Your Computer Windows Download and Installation The link to download Audacity version 1.1. for Windows is available from the Computer Requirements page in the Getting Started section of this course. Click the link Audacity Download for Windows. From the browser, select the option to "Run from current location". This launches the Audacity setup program, which will install the Audacity program files and create an entry in the Start menu.
If you have already downloaded the file, just double-click on it to start the installer. If you prefer not to use the installer program, you can also download Audacity as a ZIP file, which you can decompress using WinZip.
3
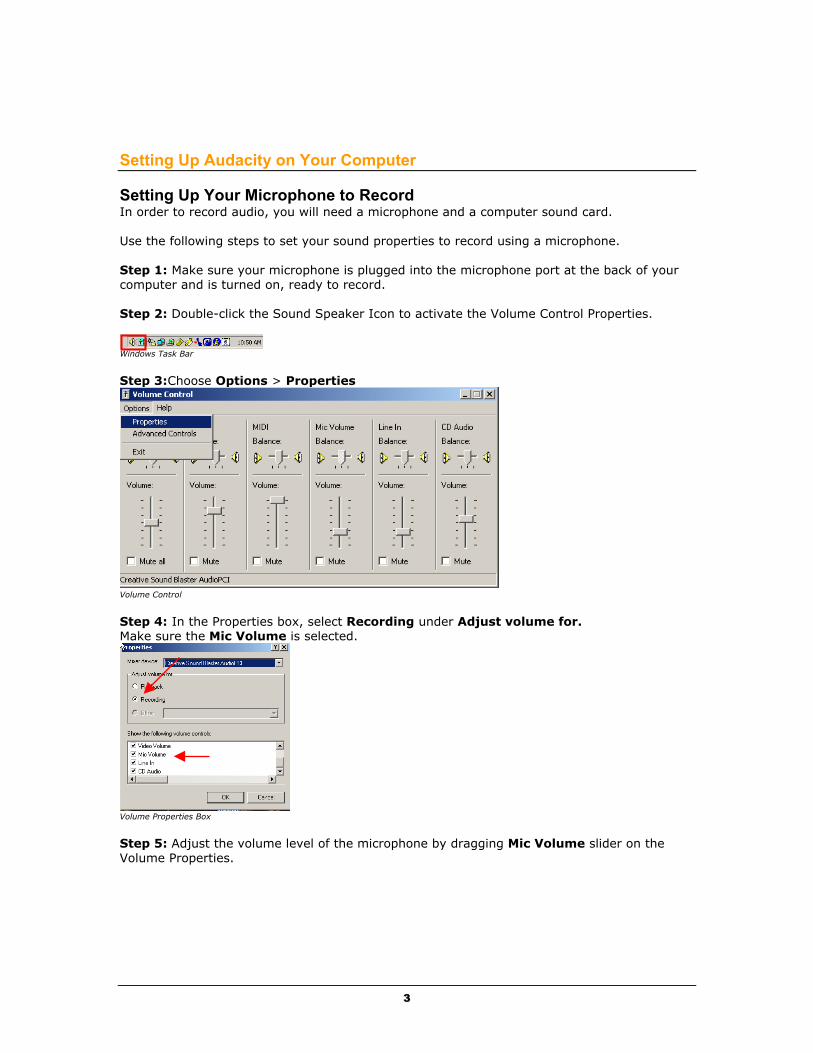
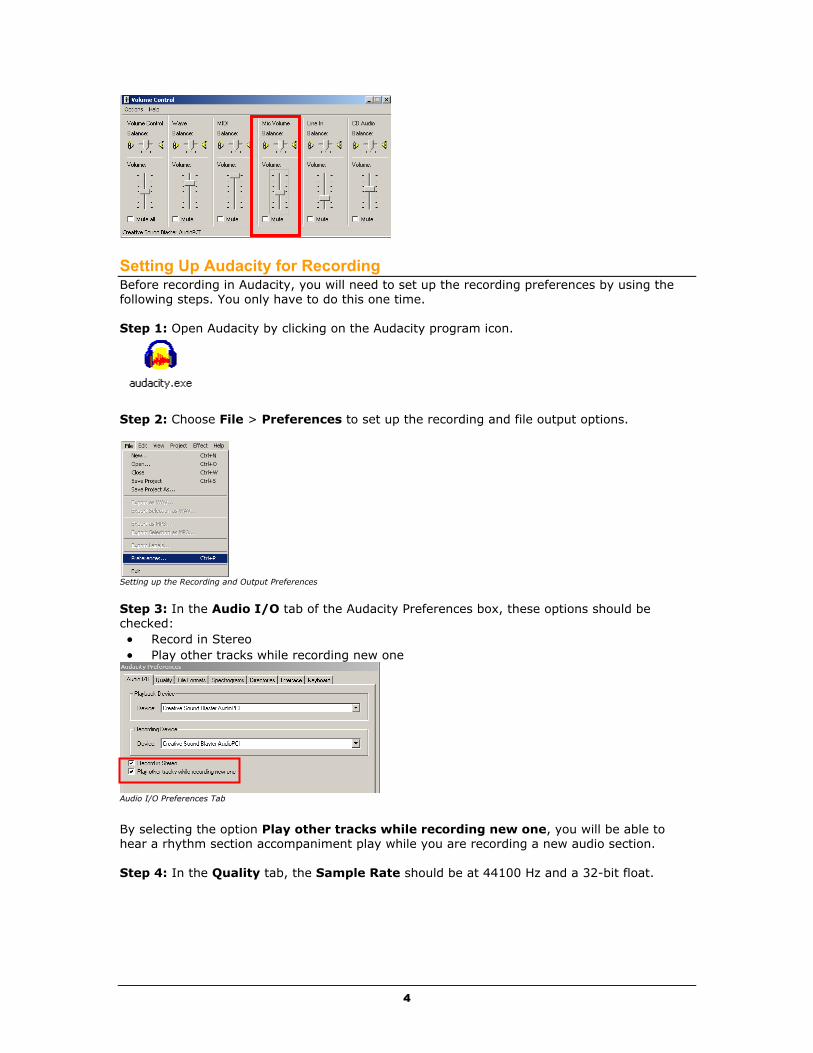
Setting Up Audacity on Your Computer Setting Up Your Microphone to Record In order to record audio, you will need a microphone and a computer sound card. Use the following steps to set your sound properties to record using a microphone. Step 1: Make sure your microphone is plugged into the microphone port at the back of your computer and is turned on, ready to record. Step 2: Double-click the Sound Speaker Icon to activate the Volume Control Properties.
Windows Task Bar
Step 3: Choose Options > Properties
Volume Control
Step 4: In the Properties box, select Recording under Adjust volume for. Make sure the Mic Volume is selected.
Volume Properties Box
Step 5: Adjust the volume level of the microphone by dragging Mic Volume slider on the Volume Properties.
4
Setting Up Audacity for Recording Before recording in Audacity, you will need to set up the recording preferences by using the following steps. You only have to do this one time. Step 1: Open Audacity by clicking on the Audacity program icon.
Step 2: Choose File > Preferences to set up the recording and file output options.
Setting up the Recording and Output Preferences
Step 3: In the Audio I/O tab of the Audacity Preferences box, these options should be checked:
• Record in Stereo • Play other tracks while recording new one
Audio I/O Preferences Tab By selecting the option Play other tracks while recording new one, you will be able to hear a rhythm section accompaniment play while you are recording a new audio section. Step 4: In the Quality tab, the Sample Rate should be at 44100 Hz and a 32-bit float.

5
Step 5: For File Formats, select Use OGG instead of MP3. Ogg Vorbis (OGG) is a variable audio compression format similar to MP3.
Step 6: Click OK at the bottom of the Audacity Preferences box.
6
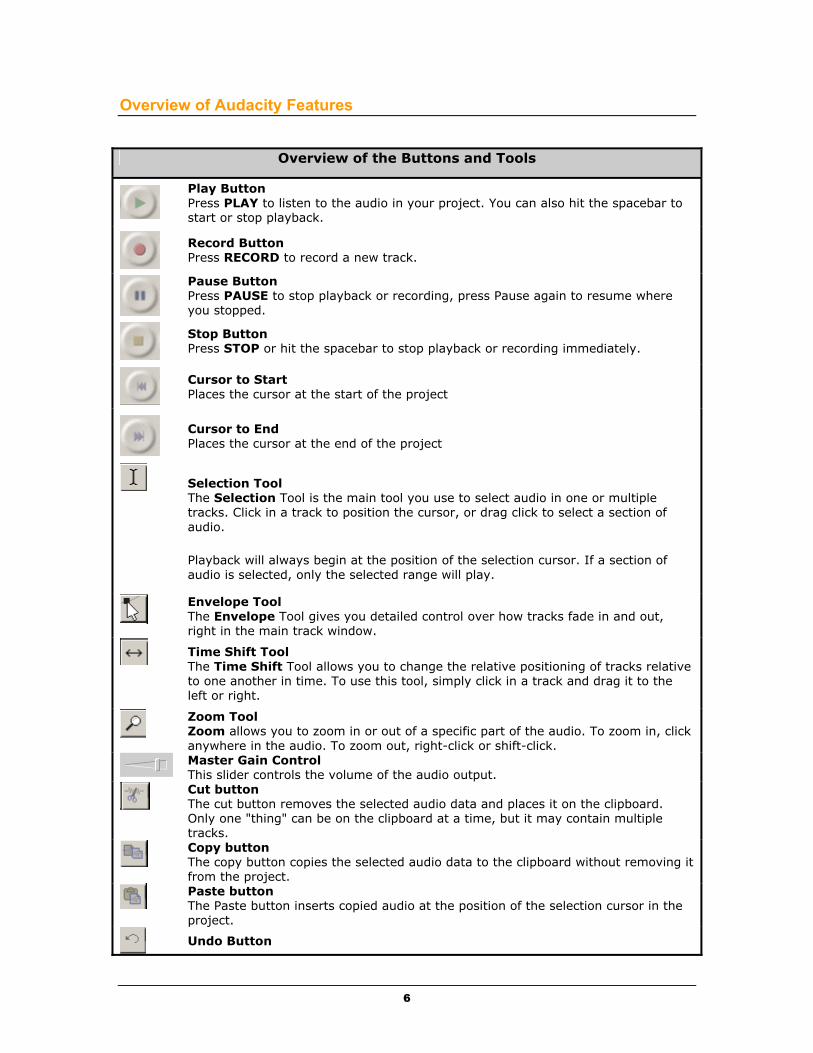
Overview of Audacity Features
Overview of the Buttons and Tools
Play Button Press PLAY to listen to the audio in your project. You can also hit the spacebar to start or stop playback.
Record Button Press RECORD to record a new track.
Pause Button Press PAUSE to stop playback or recording, press Pause again to resume where you stopped.
Stop Button Press STOP or hit the spacebar to stop playback or recording immediately.
Cursor to Start Places the cursor at the start of the project
Cursor to End Places the cursor at the end of the project
Selection Tool The Selection Tool is the main tool you use to select audio in one or multiple tracks. Click in a track to position the cursor, or drag click to select a section of audio.
Playback will always begin at the position of the selection cursor. If a section of audio is selected, only the selected range will play.
Envelope Tool The Envelope Tool gives you detailed control over how tracks fade in and out, right in the main track window.
Time Shift Tool The Time Shift Tool allows you to change the relative positioning of tracks relative to one another in time. To use this tool, simply click in a track and drag it to the left or right.
Zoom Tool Zoom allows you to zoom in or out of a specific part of the audio. To zoom in, click anywhere in the audio. To zoom out, right-click or shift-click.
Master Gain Control This slider controls the volume of the audio output.
Cut button The cut button removes the selected audio data and places it on the clipboard. Only one "thing" can be on the clipboard at a time, but it may contain multiple tracks.
Copy button The copy button copies the selected audio data to the clipboard without removing it from the project.
Paste button The Paste button inserts copied audio at the position of the selection cursor in the project.
Undo Button
7
Undo the last editing operation you performed to your project. Audacity currently supports full-unlimited undo. You can undo every editing operation back to the last time the document was saved.
Redo Redo any editing operations that were just undone. After you perform a new editing operation, including simply resizing a track, you can no longer redo the operations that were undone.
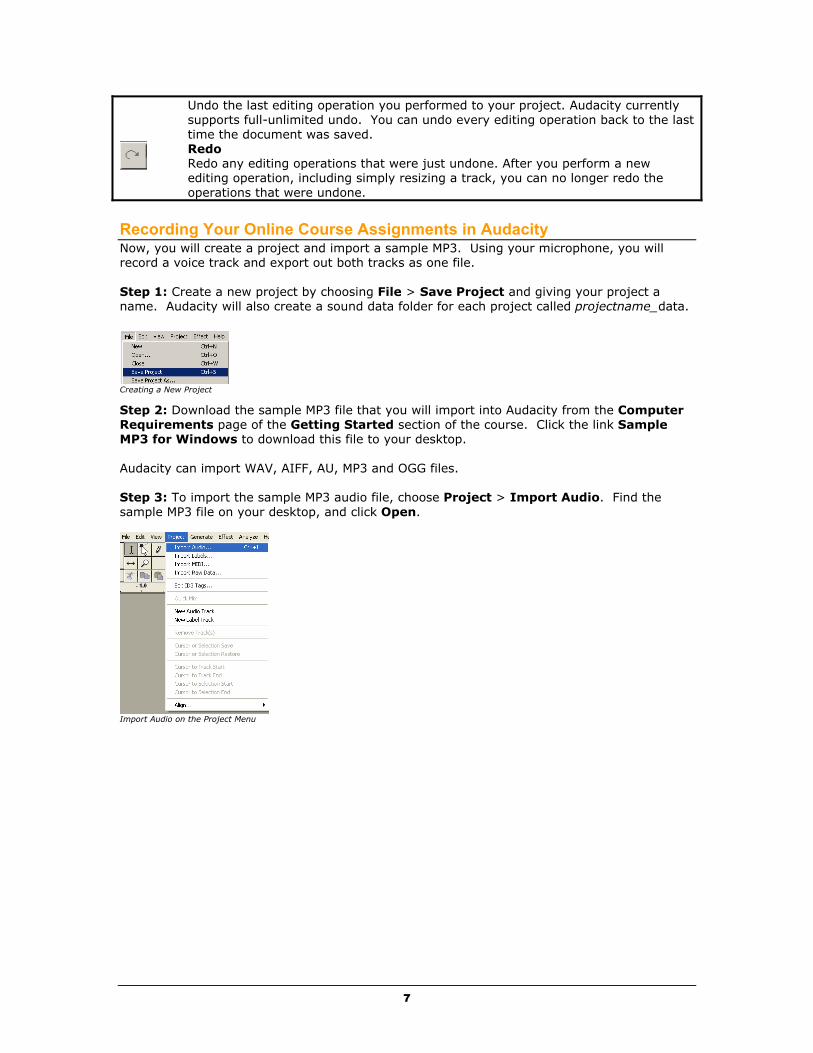
Recording Your Online Course Assignments in Audacity Now, you will create a project and import a sample MP3. Using your microphone, you will record a voice track and export out both tracks as one file. Step 1: Create a new project by choosing File > Save Project and giving your project a name. Audacity will also create a sound data folder for each project called projectname_data.
Creating a New Project
Step 2: Download the sample MP3 file that you will import into Audacity from the Computer Requirements page of the Getting Started section of the course. Click the link Sample MP3 for Windows to download this file to your desktop. Audacity can import WAV, AIFF, AU, MP3 and OGG files. Step 3: To import the sample MP3 audio file, choose Project > Import Audio. Find the sample MP3 file on your desktop, and click Open.
Import Audio on the Project Menu
8
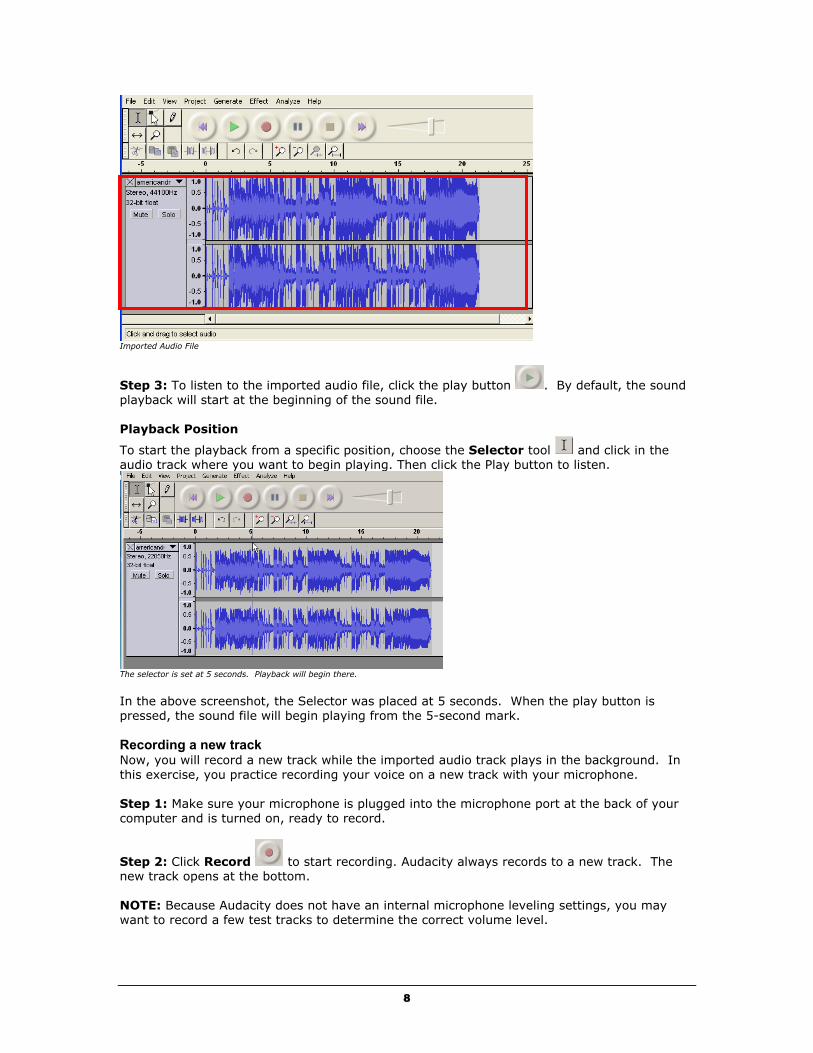
Imported Audio File
Step 3: To listen to the imported audio file, click the play button . By default, the sound playback will start at the beginning of the sound file. Playback Position To start the playback from a specific position, choose the Selector tool and click in the audio track where you want to begin playing. Then click the Play button to listen.
The selector is set at 5 seconds. Playback will begin there.
In the above screenshot, the Selector was placed at 5 seconds. When the play button is pressed, the sound file will begin playing from the 5-second mark. Recording a new track Now, you will record a new track while the imported audio track plays in the background. In this exercise, you practice recording your voice on a new track with your microphone. Step 1: Make sure your microphone is plugged into the microphone port at the back of your computer and is turned on, ready to record.
Step 2: Click Record to start recording. Audacity always records to a new track. The new track opens at the bottom. NOTE: Because Audacity does not have an internal microphone leveling settings, you may want to record a few test tracks to determine the correct volume level.
9
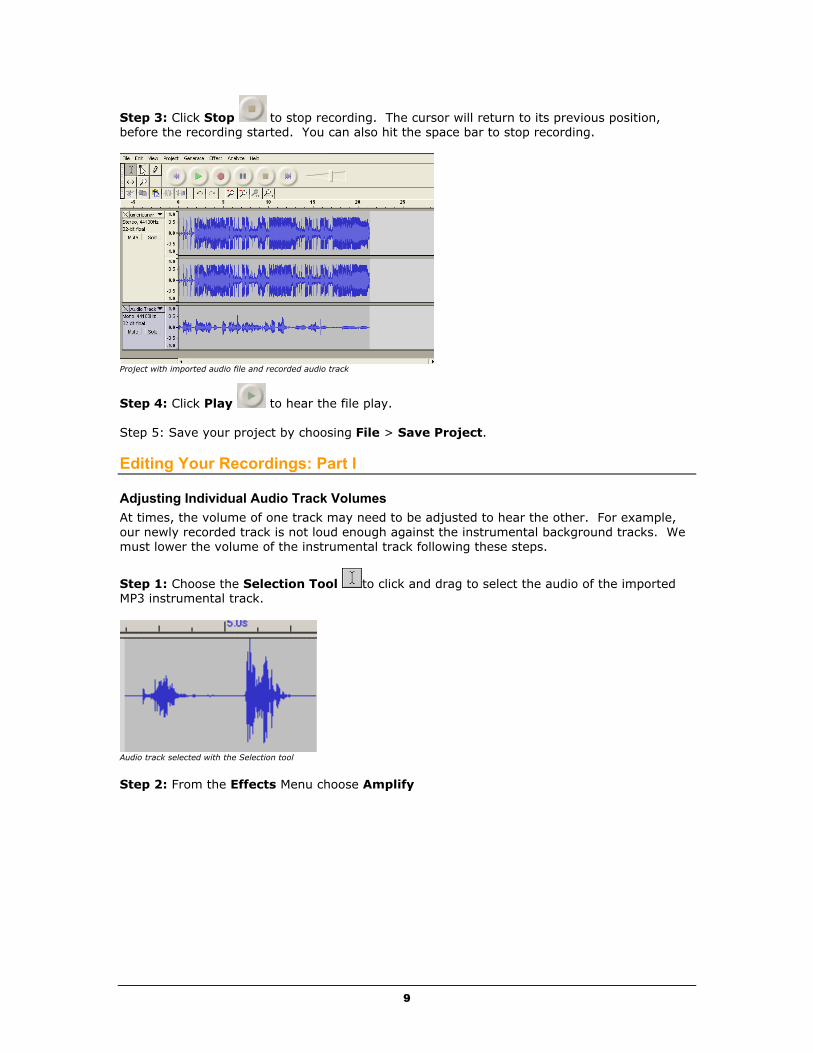
Step 3: Click Stop to stop recording. The cursor will return to its previous position, before the recording started. You can also hit the space bar to stop recording.
Project with imported audio file and recorded audio track
Step 4: Click Play to hear the file play. Step 5: Save your project by choosing File > Save Project. Editing Your Recordings: Part I
Adjusting Individual Audio Track Volumes At times, the volume of one track may need to be adjusted to hear the other. For example, our newly recorded track is not loud enough against the instrumental background tracks. We must lower the volume of the instrumental track following these steps.
Step 1: Choose the Selection Tool to click and drag to select the audio of the imported MP3 instrumental track.
Audio track selected with the Selection tool
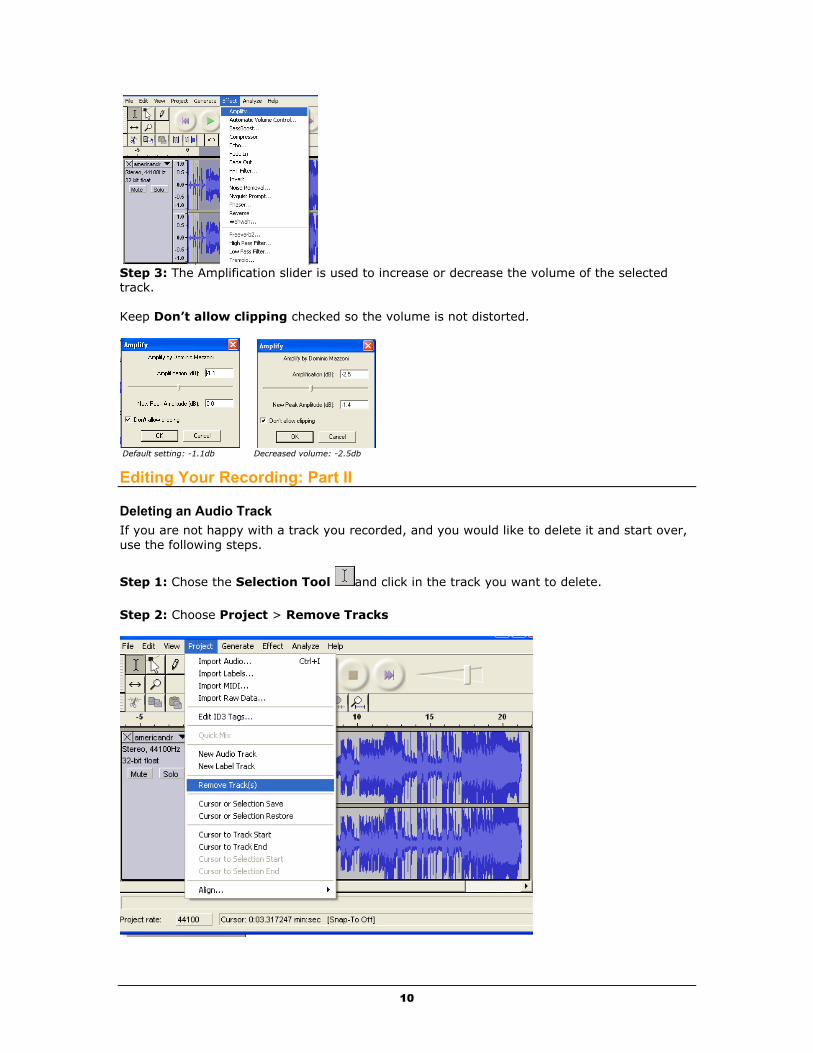
Step 2: From the Effects Menu choose Amplify
10
Step 3: The Amplification slider is used to increase or decrease the volume of the selected track. Keep Don’t allow clipping checked so the volume is not distorted.
Default setting: -1.1db Decreased volume: -2.5db
Editing Your Recording: Part II
Deleting an Audio Track If you are not happy with a track you recorded, and you would like to delete it and start over, use the following steps.
Step 1: Chose the Selection Tool and click in the track you want to delete. Step 2: Choose Project > Remove Tracks
11
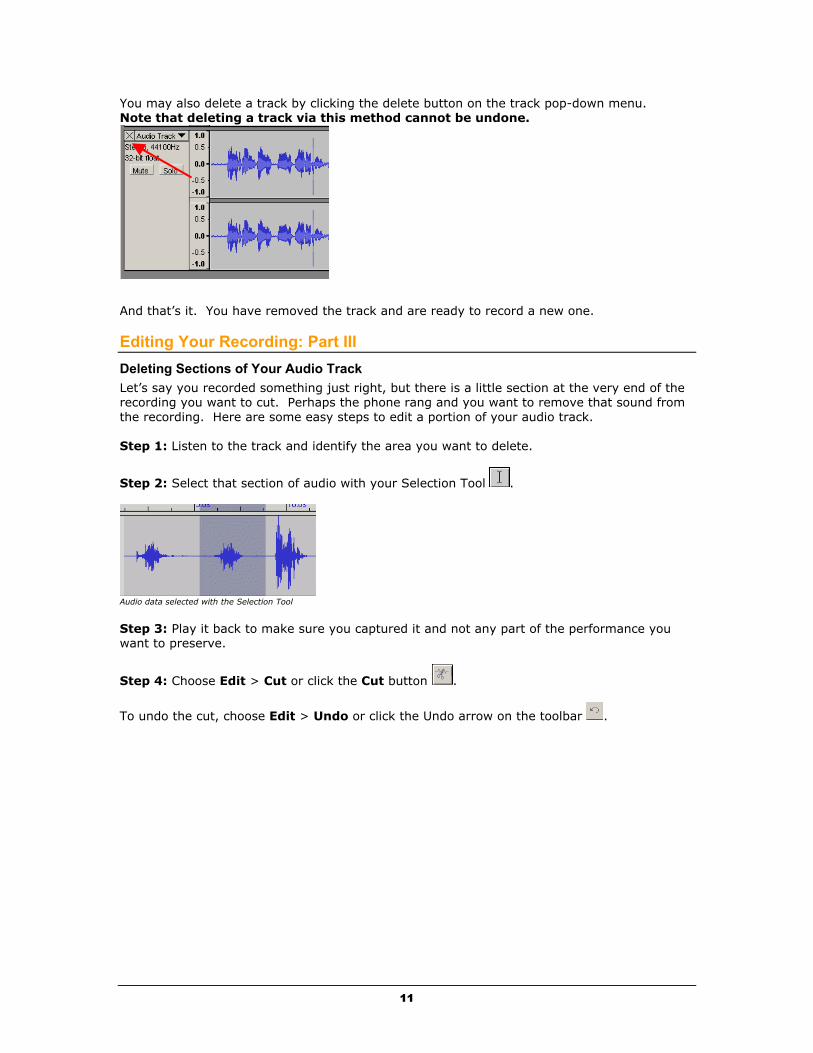
You may also delete a track by clicking the delete button on the track pop-down menu. Note that deleting a track via this method cannot be undone.
And that’s it. You have removed the track and are ready to record a new one. Editing Your Recording: Part III Deleting Sections of Your Audio Track Let’s say you recorded something just right, but there is a little section at the very end of the recording you want to cut. Perhaps the phone rang and you want to remove that sound from the recording. Here are some easy steps to edit a portion of your audio track. Step 1: Listen to the track and identify the area you want to delete.
Step 2: Select that section of audio with your Selection Tool .
Audio data selected with the Selection Tool Step 3: Play it back to make sure you captured it and not any part of the performance you want to preserve.
Step 4: Choose Edit > Cut or click the Cut button .
To undo the cut, choose Edit > Undo or click the Undo arrow on the toolbar .
12
Editing Your Recording: Part IV
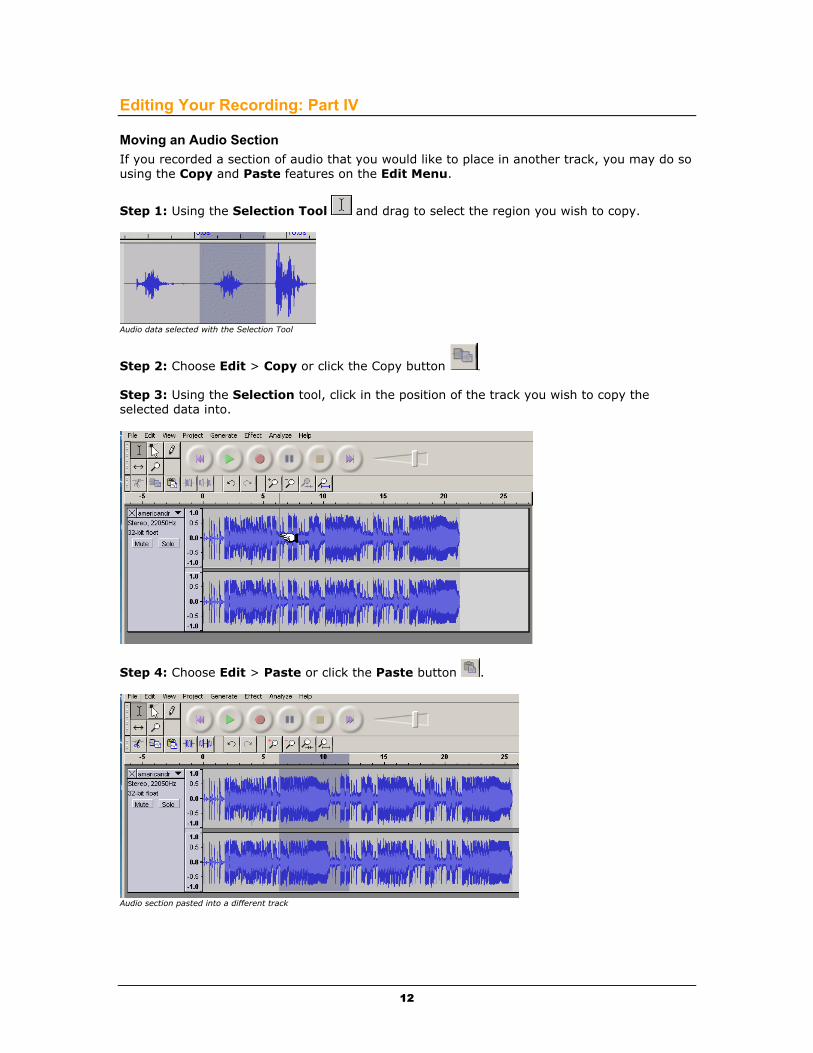
Moving an Audio Section If you recorded a section of audio that you would like to place in another track, you may do so using the Copy and Paste features on the Edit Menu.
Step 1: Using the Selection Tool and drag to select the region you wish to copy.
Audio data selected with the Selection Tool
Step 2: Choose Edit > Copy or click the Copy button . Step 3: Using the Selection tool, click in the position of the track you wish to copy the selected data into.
Step 4: Choose Edit > Paste or click the Paste button .
Audio section pasted into a different track
13
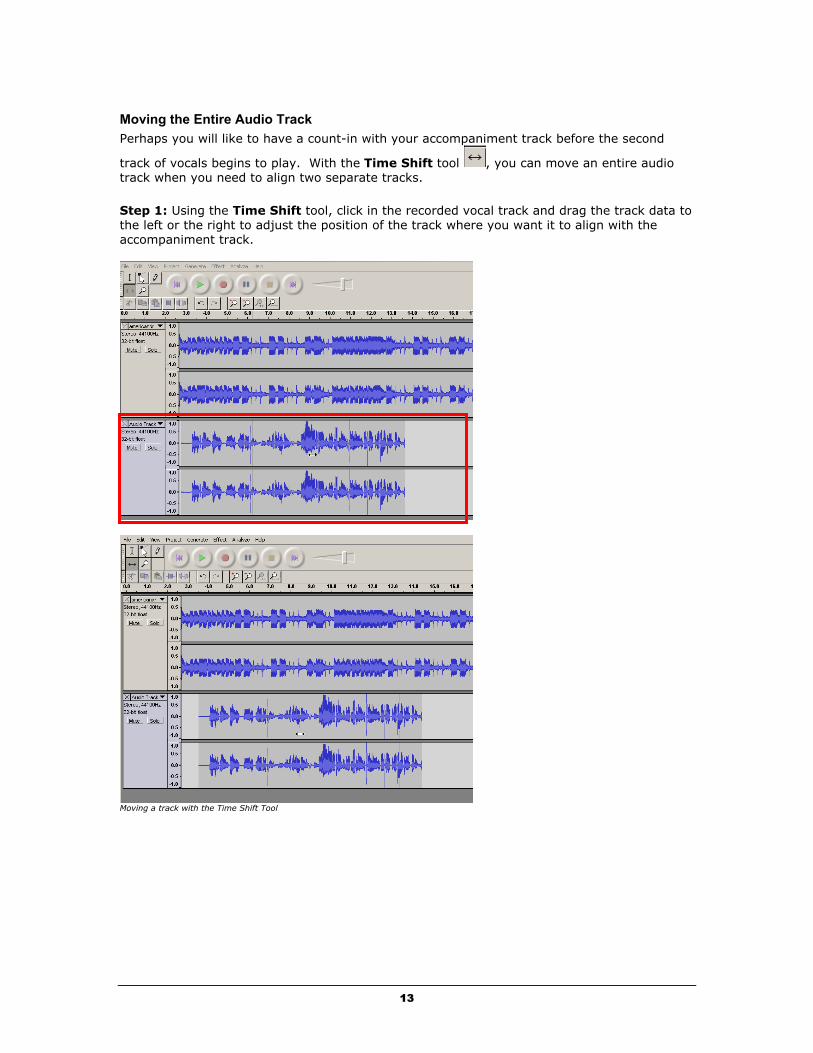
Moving the Entire Audio Track Perhaps you will like to have a count-in with your accompaniment track before the second
track of vocals begins to play. With the Time Shift tool , you can move an entire audio track when you need to align two separate tracks. Step 1: Using the Time Shift tool, click in the recorded vocal track and drag the track data to the left or the right to adjust the position of the track where you want it to align with the accompaniment track.
Moving a track with the Time Shift Tool