Embed Size (px)
Citation preview
ATMdesk/Field
3rd Party Diagnostic Solution for NCR 56xx
58xx (Personas), 53xx (Easypoint)
and 66xx (SelfServ) ATMs
Setup and Handling Manual
Version 8.1
© 2007- 2013 ATMdesk GmbH.
ATMdesk/Field Setup and Handling Manual
© 2007- 2013 ATMdesk GmbH Page 2 of 29
NOTICE
WHILE THE INFORMATION IN THIS PUBLICATION IS BELIEVED TO BE ACCURATE,
ATMDESK MAKES NO WARRANTY OF ANY KIND, EXPRESS OR IMPLIED, WITH REGARD TO THIS MATERIAL INCLUDING, BUT NOT LIMITED TO ANY WARRANTY OF TITLE OR OWNERSHIP, IMPLIED WARRANTY OF MERCHANTABILITY OR WARRANTY OF FITNESS FOR PARTICULAR PURPOSE OR USE. In no event shall ATMdesk be liable for errors contained herein or for indirect, incidental, special, consequential, reliance or cover damages, including loss of profits, revenue, data or use, incurred by any user or any third party.
This document contains information protected by copyright. All Rights Reserved.
No part of this work covered by copyright herein may be reproduced or used in any form or by any means - graphic, electronic, or mechanical, including photocopying, recording, taping, or information storage and retrieval systems - without permission of the copyright owner.
ATMdesk is registered trademark of ATMdesk GmbH. Other product names mentioned herein are used for identification purposes only
and may be trademarks and/or registered trademarks of their respective companies. It is the policy of ATMdesk GmbH to improve products as new technology,
components, software, and firmware become available. Therefore delivery, availability and specifications are subject to change without prior notice.
ATMdesk/Field Setup and Handling Manual
© 2007- 2013 ATMdesk GmbH Page 3 of 29
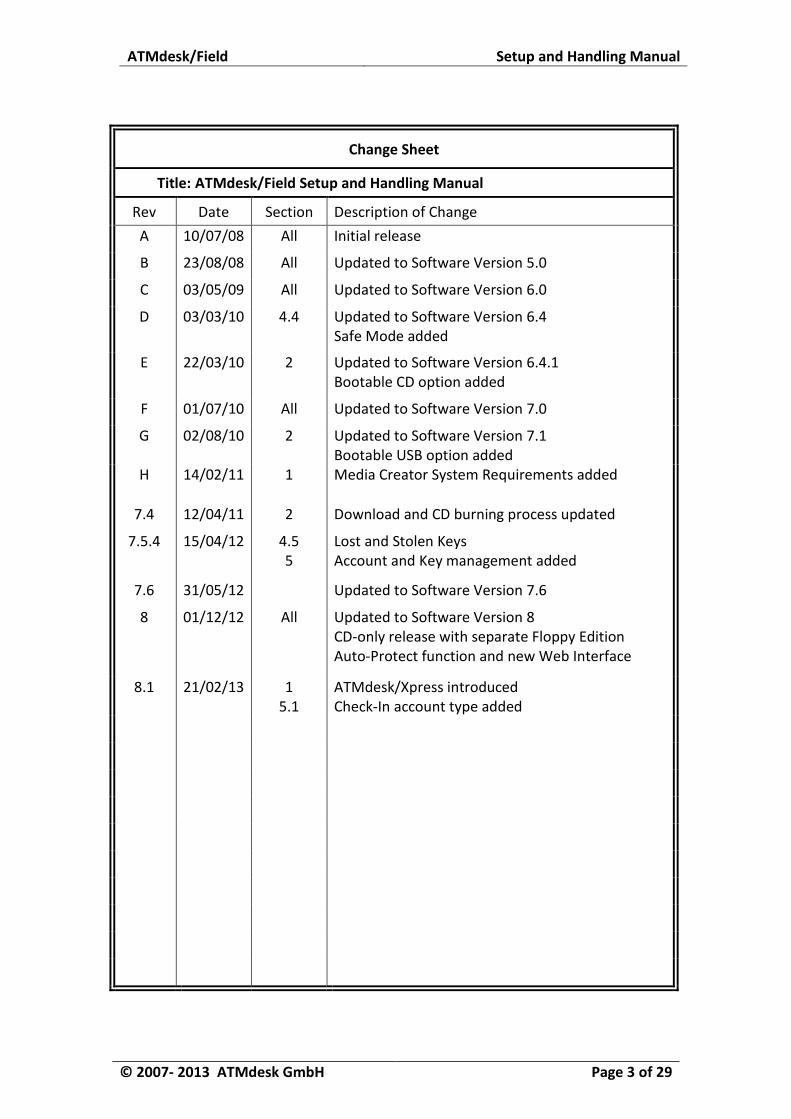
Change Sheet
Title: ATMdesk/Field Setup and Handling Manual
Rev Date Section Description of Change A 10/07/08 All Initial release
B 23/08/08 All Updated to Software Version 5.0
C 03/05/09 All Updated to Software Version 6.0
D 03/03/10 4.4 Updated to Software Version 6.4 Safe Mode added
E 22/03/10 2 Updated to Software Version 6.4.1 Bootable CD option added
F 01/07/10 All Updated to Software Version 7.0
G 02/08/10 2 Updated to Software Version 7.1 Bootable USB option added
H 14/02/11 1 Media Creator System Requirements added
7.4 12/04/11 2 Download and CD burning process updated
7.5.4 15/04/12 4.5 5
Lost and Stolen Keys Account and Key management added
7.6 31/05/12 Updated to Software Version 7.6
8 01/12/12 All Updated to Software Version 8 CD-only release with separate Floppy Edition Auto-Protect function and new Web Interface
8.1 21/02/13 1 5.1
ATMdesk/Xpress introduced Check-In account type added
ATMdesk/Field Setup and Handling Manual
© 2007- 2013 ATMdesk GmbH Page 4 of 29
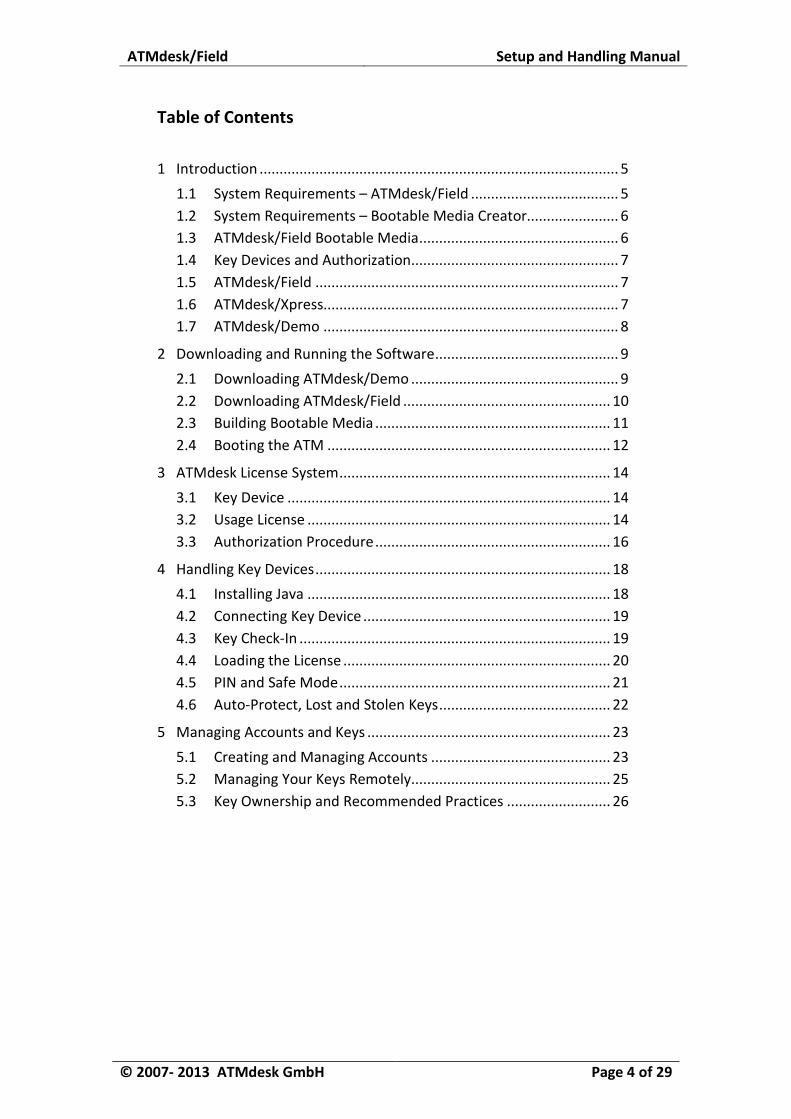
Table of Contents 1 Introduction .......................................................................................... 5
1.1 System Requirements – ATMdesk/Field ..................................... 5 1.2 System Requirements – Bootable Media Creator....................... 6 1.3 ATMdesk/Field Bootable Media .................................................. 6 1.4 Key Devices and Authorization .................................................... 7 1.5 ATMdesk/Field ............................................................................ 7 1.6 ATMdesk/Xpress.......................................................................... 7 1.7 ATMdesk/Demo .......................................................................... 8
2 Downloading and Running the Software .............................................. 9
2.1 Downloading ATMdesk/Demo .................................................... 9 2.2 Downloading ATMdesk/Field .................................................... 10 2.3 Building Bootable Media ........................................................... 11 2.4 Booting the ATM ....................................................................... 12
3 ATMdesk License System .................................................................... 14
3.1 Key Device ................................................................................. 14 3.2 Usage License ............................................................................ 14 3.3 Authorization Procedure ........................................................... 16
4 Handling Key Devices .......................................................................... 18
4.1 Installing Java ............................................................................ 18 4.2 Connecting Key Device .............................................................. 19 4.3 Key Check-In .............................................................................. 19 4.4 Loading the License ................................................................... 20 4.5 PIN and Safe Mode .................................................................... 21 4.6 Auto-Protect, Lost and Stolen Keys ........................................... 22
5 Managing Accounts and Keys ............................................................. 23
5.1 Creating and Managing Accounts ............................................. 23 5.2 Managing Your Keys Remotely .................................................. 25 5.3 Key Ownership and Recommended Practices .......................... 26
ATMdesk/Field Setup and Handling Manual
© 2007- 2013 ATMdesk GmbH Page 5 of 29
1 Introduction
ATMdesk/Field is a standalone Linux-based ATM application booted entirely from a removable media (floppy, CD or USB flash disk). It is designed to test live NCR ATMs in the field or in the workshop.
ATMdesk/Field does not install on the ATM's hard disk and it leaves no traces
within the ATM. It does not depend on the software installed on the ATM's hard disk either1.
ATMdesk/Field uses a hardware key (USB/PS2 Dongle or a Smart Card) to hold
your ATMdesk license. The Key must be present at startup to authorize use of ATMdesk/Field.
ATMdesk/Field further offers the following options: • ATMdesk/Pro is the top-of-the-line product to test all NCR ATMs. • ATMdesk/2 to test 56xx, 58xx (Personas) and 53xx (EasyPoint) ATMs only. • ATMdesk/S to test 66xx (SelfServ) ATMs only.
• ATMdesk/Xpress is a variant of the top-of-the-line ATMdesk/Pro offering
valuable "Confidence Tests" for everyone who does not need or does not want to perform in-depth diagnostics in the field.
Please note that minimum required software version for using with /Xpress license is ATMdesk/Field 8.1.
The actual option is selected on ATM start-up according to the license loaded in
your ATMdesk Key. The software package is the same in all cases.
1.1 System Requirements – ATMdesk/Field
• NCR 56xx/58xx/53xx/66xx ATM with the following PC Cores: o HI3 (ASB motherboard) o LPX (ELSB, Diamond, Trent motherboards) o NLX (PELE, Phantom, PELE2 motherboards) o ATX (PIVAT, Talladega motherboards) o Mini-ITX (Kingsway, Lanier motherboards)
• Processor: Minimum 486SX-25; Recommended Pentium1-90
o NOTE: ATMdesk/Field is not compatible with 386-based motherboards (ISA-TCM PC Core motherboards and original HI3 motherboard).
1 ATMdesk/Field does not depend on the software installed on the ATM's hard disk, but it is mandatory that
a legal NCR Platform Software for this ATM has been installed and booted at least once prior to re-booting the ATM with ATMdesk/Field.
ATMdesk/Field Setup and Handling Manual
© 2007- 2013 ATMdesk GmbH Page 6 of 29
• Memory: Minimum 16MB; Recommended 32MB o NOTE: Running on 8MB of memory is currently not supported. 8MB
systems would require separate ATMdesk edition, which may be implemented upon request.
• Floppy Disk drive or CD-ROM drive or USB port o Booting from FDD or CD or USB must be enabled in ATM BIOS, according
to the type of media you use to boot from.
• PS2 keyboard port or USB port or MCRW with Smart Card Interface o PS2 keyboard port or USB port is used for ATMdesk authorization with
USB/PS2 Key. Smart Card reader is used for authorization with Smart Card Key. At least one of these must be available on the ATM, according to the type of key you use for authorization (see below). This does not apply to ATMdesk/Demo, which does not require a key.
1.2 System Requirements – Bootable Media Creator
ATMdesk/Pro is placed on a bootable media (Floppy, CD or USB flash disk) using a dedicated Media Creator Utility, downloadable from http://www.atmdesk.com. The utility should be run on a PC with the following system requirements:
• Operating System: Windows XP (SP2/SP3), Windows Vista or Windows 7 • Memory: Minimum 256MB • 3.5” Floppy drive, CD-RW drive or USB port, according to media type required
Support for Windows 8 is not yet fully tested; until then Media Creator is not
officially supported under Windows 8. Media Creator will not work under non-Windows systems (e.g. Mac OS or Linux).
1.3 ATMdesk/Field Bootable Media
Starting from Version 8, ATMdesk/Field can be booted from either CD or USB Flash Disk. There’s no option to boot from a Floppy Disk anymore due to disk space limitations.
However, ATMdesk/Field on a Floppy Disk is still supported as ATMdesk/Field
Floppy Edition. Please note that ATMdesk/Field Floppy Edition is a separate downloadable software package.
ATMdesk/Field Floppy Edition has the following limitations: • An older Linux kernel is used. Due to this fact, ATMdesk/Field on a Floppy
cannot be reliably run and is not officially supported on latest PC Cores (beyond Talladega).

ATMdesk/Field Setup and Handling Manual
© 2007- 2013 ATMdesk GmbH Page 7 of 29
• ATM devices whose support was introduced in Version 8 (e.g. Scalable Deposit Module) are not fully (or not at all) supported. Such devices will be still detected by Floppy Edition; they will appear in the menu with clear indication that a CD edition is required.
1.4 Key Devices and Authorization
ATMdesk/Field (except ATMdesk/Demo) requires authorization upon start-up. This is achieved using a Key Device, which can be one of the following:
• Smart Card Key. When prompted, the Smart Card Key should be inserted into ATM’s Card Reader. The ATM must be equipped with Smart Card Reader in order to use ATMdesk Smart Card Key for authorization.
• USB/PS2 Key. When prompted, the Key should be inserted into ATM’s PC Core USB port (if present) or into PS2 keyboard port (via standard USB-PS2 converter for mouse). This type of ATMdesk key can be used on all ATMs since at least PS2 keyboard port is always present.
1.5 ATMdesk/Field
ATMdesk/Field variants are designed to run on particular ATM series: • ATMdesk/2 can be run on NCR 56xx, 58xx and 53xx (SDC-based ATMs). • ATMdesk/S can be run on NCR 66xx SelfServ (USB-based ATMs). • ATMdesk/Pro can be run on all NCR ATMs, both SDC- and USB-based.
The software itself (Floppy, CD or USB flash disk) is the same in all cases. The
difference is in the ATMdesk license loaded to the Key Device. NOTE: “Hybrid” ATMs (ATMs that have both SDC and USB devices, like first-out
66xx or field-upgraded 58xx) can only be tested with ATMdesk/Pro.
1.6 ATMdesk/Xpress
ATMdesk/Xpress is a variant of top-of-the-line ATMdesk/Pro, offering valuable "Confidence Tests" for everyone who does not need or does not want to perform in-depth diagnostics in the field.
Like ATMdesk/Pro, ATMdesk/Xpress can be run on all NCR ATMs, both SDC- and
USB-based. The software itself (Floppy, CD or USB flash disk) is the same as for ATMdesk/Field. The difference is in the ATMdesk license loaded to the Key Device.
ATMdesk/Field Setup and Handling Manual
© 2007- 2013 ATMdesk GmbH Page 8 of 29
1.7 ATMdesk/Demo
ATMdesk/Demo is a function-limited version of ATMdesk/Pro freely available for evaluation purposes. When running ATMdesk/Demo on an ATM, no authorization is required, and therefore no Key Device is necessary.
ATMdesk/Demo fully recognizes all supported ATM devices, however only few
diagnostic tests are fully functional. Some of the tests are not available at all; some other tests, while available, do not display their results (MSTATUS/MDATA). Only first few records of the ATM Error Logs are displayed.
Please note that ATMdesk/Demo is a separate software package, downloadable
from a public location on http://www.atmdesk.com. ATMdesk/Demo is only available to boot from a CD.
ATMdesk/Field Setup and Handling Manual
© 2007- 2013 ATMdesk GmbH Page 9 of 29
2 Downloading and Running the Software
2.1 Downloading ATMdesk/Demo
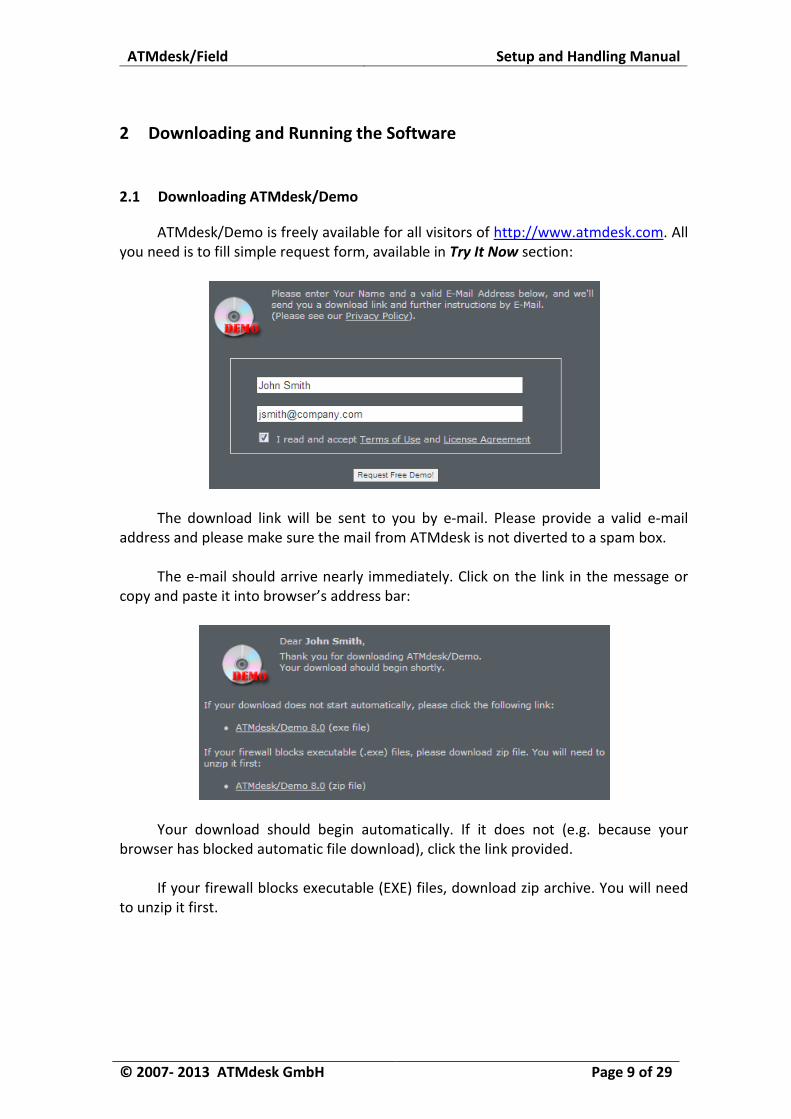
ATMdesk/Demo is freely available for all visitors of http://www.atmdesk.com. All you need is to fill simple request form, available in Try It Now section:
The download link will be sent to you by e-mail. Please provide a valid e-mail
address and please make sure the mail from ATMdesk is not diverted to a spam box. The e-mail should arrive nearly immediately. Click on the link in the message or
copy and paste it into browser’s address bar:
Your download should begin automatically. If it does not (e.g. because your
browser has blocked automatic file download), click the link provided. If your firewall blocks executable (EXE) files, download zip archive. You will need
to unzip it first.

ATMdesk/Field Setup and Handling Manual
© 2007- 2013 ATMdesk GmbH Page 10 of 29
2.2 Downloading ATMdesk/Field
Purchasing customers of ATMdesk/Field are given a Customer Account on http://www.atmdesk.com.
To download your ATMdesk/Field, first login using name and password provided
to you. Your files are available in Download section:
NOTE: We strongly recommend changing default password on your first login. If your firewall blocks executable (EXE) files, download zip archive. You will need
to unzip it first. To download your ATMdesk/Field for Floppy, select Floppy Edition in Download
section:
ATMdesk/Field Setup and Handling Manual
© 2007- 2013 ATMdesk GmbH Page 11 of 29
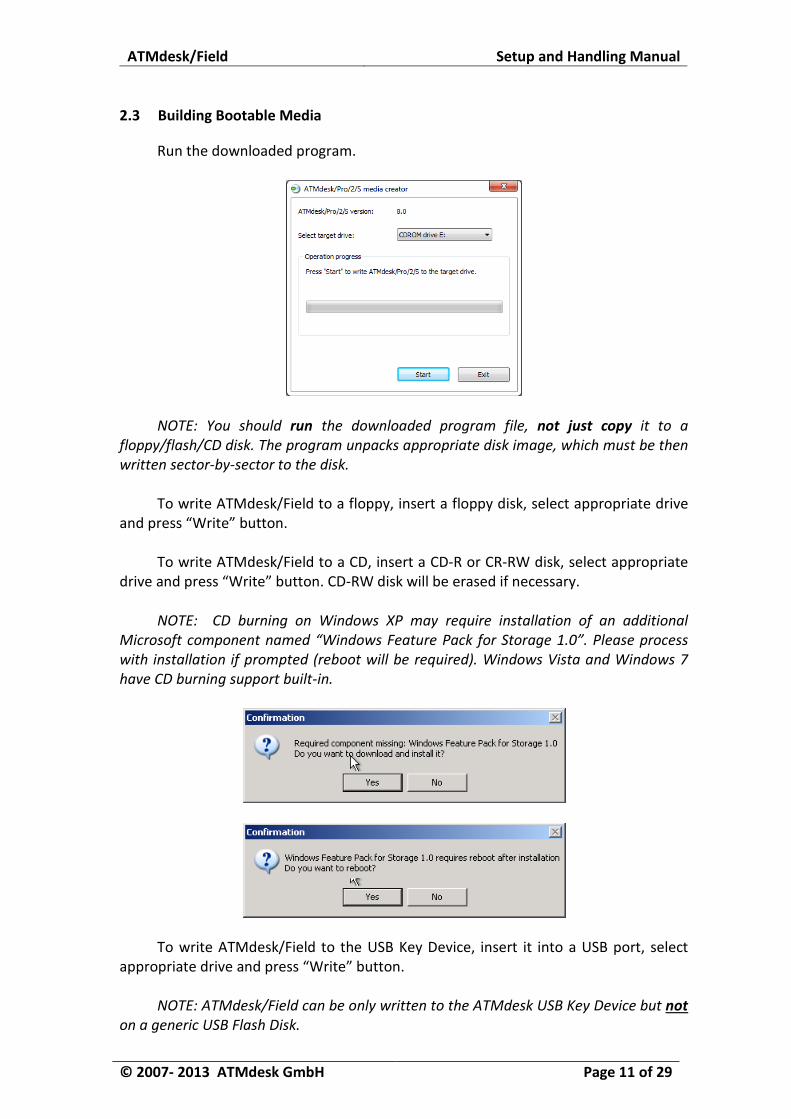
2.3 Building Bootable Media
Run the downloaded program.
NOTE: You should run the downloaded program file, not just copy it to a
floppy/flash/CD disk. The program unpacks appropriate disk image, which must be then written sector-by-sector to the disk.
To write ATMdesk/Field to a floppy, insert a floppy disk, select appropriate drive
and press “Write” button. To write ATMdesk/Field to a CD, insert a CD-R or CR-RW disk, select appropriate
drive and press “Write” button. CD-RW disk will be erased if necessary. NOTE: CD burning on Windows XP may require installation of an additional
Microsoft component named “Windows Feature Pack for Storage 1.0”. Please process with installation if prompted (reboot will be required). Windows Vista and Windows 7 have CD burning support built-in.
To write ATMdesk/Field to the USB Key Device, insert it into a USB port, select
appropriate drive and press “Write” button. NOTE: ATMdesk/Field can be only written to the ATMdesk USB Key Device but not
on a generic USB Flash Disk.
ATMdesk/Field Setup and Handling Manual
© 2007- 2013 ATMdesk GmbH Page 12 of 29
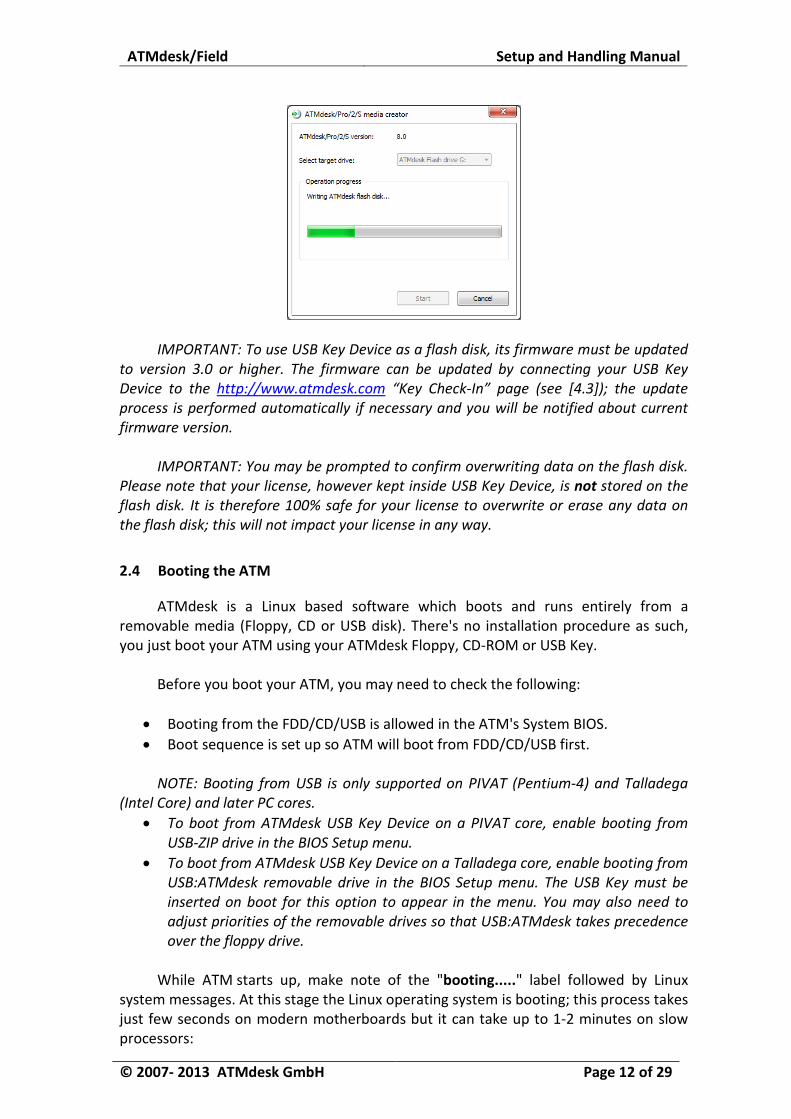
IMPORTANT: To use USB Key Device as a flash disk, its firmware must be updated to version 3.0 or higher. The firmware can be updated by connecting your USB Key Device to the http://www.atmdesk.com “Key Check-In” page (see [4.3]); the update process is performed automatically if necessary and you will be notified about current firmware version.
IMPORTANT: You may be prompted to confirm overwriting data on the flash disk.
Please note that your license, however kept inside USB Key Device, is not stored on the flash disk. It is therefore 100% safe for your license to overwrite or erase any data on the flash disk; this will not impact your license in any way.
2.4 Booting the ATM
ATMdesk is a Linux based software which boots and runs entirely from a removable media (Floppy, CD or USB disk). There's no installation procedure as such, you just boot your ATM using your ATMdesk Floppy, CD-ROM or USB Key.
Before you boot your ATM, you may need to check the following:
• Booting from the FDD/CD/USB is allowed in the ATM's System BIOS. • Boot sequence is set up so ATM will boot from FDD/CD/USB first.
NOTE: Booting from USB is only supported on PIVAT (Pentium-4) and Talladega
(Intel Core) and later PC cores. • To boot from ATMdesk USB Key Device on a PIVAT core, enable booting from
USB-ZIP drive in the BIOS Setup menu. • To boot from ATMdesk USB Key Device on a Talladega core, enable booting from
USB:ATMdesk removable drive in the BIOS Setup menu. The USB Key must be inserted on boot for this option to appear in the menu. You may also need to adjust priorities of the removable drives so that USB:ATMdesk takes precedence over the floppy drive.
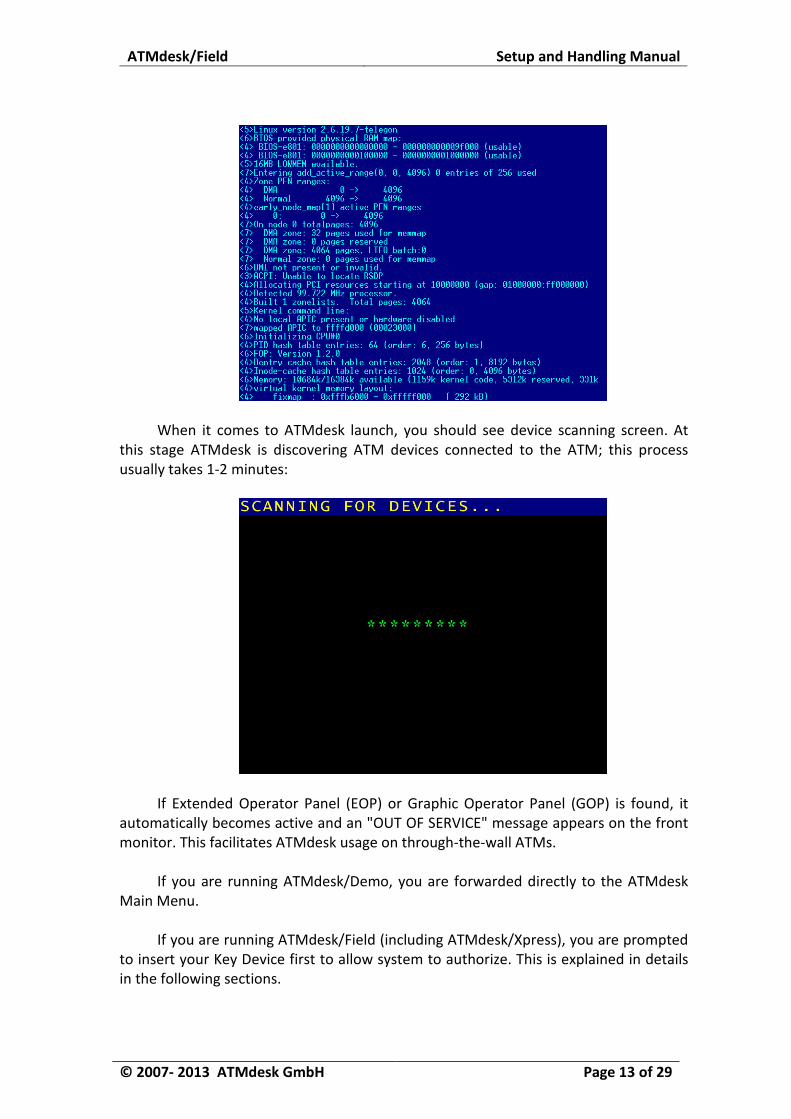
While ATM starts up, make note of the "booting....." label followed by Linux
system messages. At this stage the Linux operating system is booting; this process takes just few seconds on modern motherboards but it can take up to 1-2 minutes on slow processors:
ATMdesk/Field Setup and Handling Manual
© 2007- 2013 ATMdesk GmbH Page 13 of 29
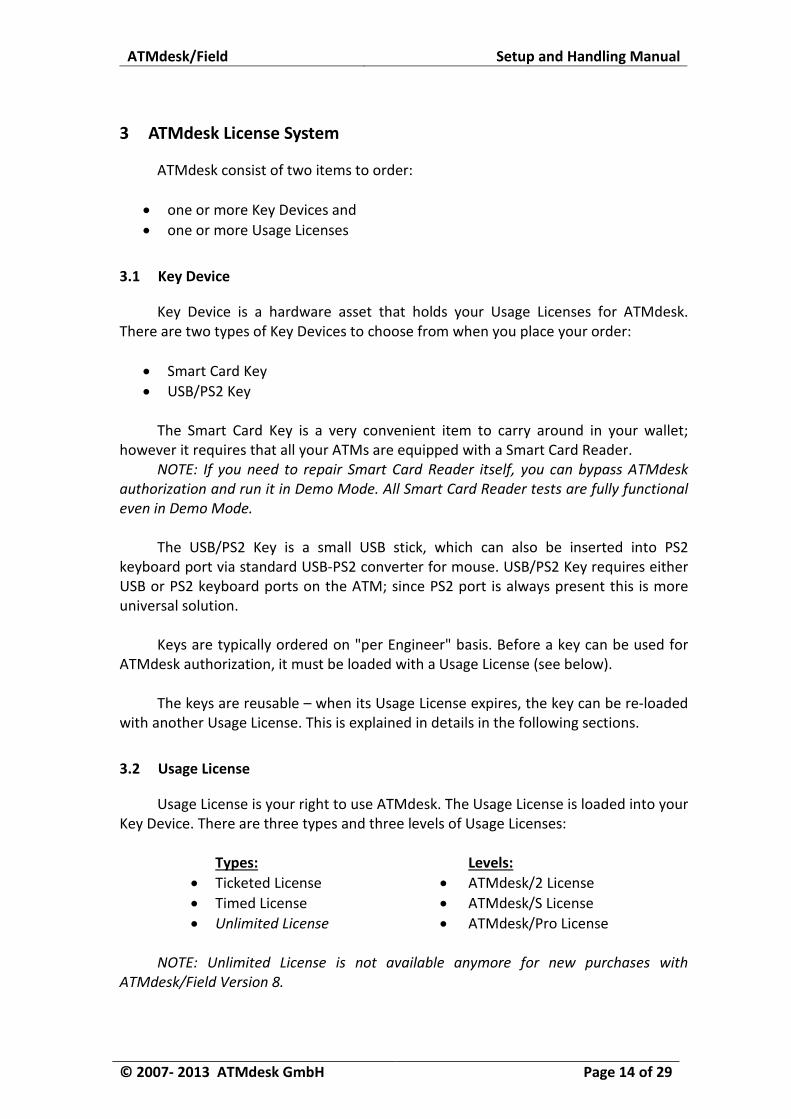
When it comes to ATMdesk launch, you should see device scanning screen. At
this stage ATMdesk is discovering ATM devices connected to the ATM; this process usually takes 1-2 minutes:
If Extended Operator Panel (EOP) or Graphic Operator Panel (GOP) is found, it
automatically becomes active and an "OUT OF SERVICE" message appears on the front monitor. This facilitates ATMdesk usage on through-the-wall ATMs.
If you are running ATMdesk/Demo, you are forwarded directly to the ATMdesk
Main Menu. If you are running ATMdesk/Field (including ATMdesk/Xpress), you are prompted
to insert your Key Device first to allow system to authorize. This is explained in details in the following sections.
ATMdesk/Field Setup and Handling Manual
© 2007- 2013 ATMdesk GmbH Page 14 of 29
3 ATMdesk License System
ATMdesk consist of two items to order:
• one or more Key Devices and • one or more Usage Licenses
3.1 Key Device
Key Device is a hardware asset that holds your Usage Licenses for ATMdesk. There are two types of Key Devices to choose from when you place your order:
• Smart Card Key • USB/PS2 Key
The Smart Card Key is a very convenient item to carry around in your wallet;
however it requires that all your ATMs are equipped with a Smart Card Reader. NOTE: If you need to repair Smart Card Reader itself, you can bypass ATMdesk
authorization and run it in Demo Mode. All Smart Card Reader tests are fully functional even in Demo Mode.
The USB/PS2 Key is a small USB stick, which can also be inserted into PS2
keyboard port via standard USB-PS2 converter for mouse. USB/PS2 Key requires either USB or PS2 keyboard ports on the ATM; since PS2 port is always present this is more universal solution.
Keys are typically ordered on "per Engineer" basis. Before a key can be used for
ATMdesk authorization, it must be loaded with a Usage License (see below).
The keys are reusable – when its Usage License expires, the key can be re-loaded with another Usage License. This is explained in details in the following sections.
3.2 Usage License
Usage License is your right to use ATMdesk. The Usage License is loaded into your Key Device. There are three types and three levels of Usage Licenses:
Types:
• Ticketed License • Timed License • Unlimited License
Levels: • ATMdesk/2 License • ATMdesk/S License • ATMdesk/Pro License
NOTE: Unlimited License is not available anymore for new purchases with ATMdesk/Field Version 8.
ATMdesk/Field Setup and Handling Manual
© 2007- 2013 ATMdesk GmbH Page 15 of 29
There are 6 combinations to choose from when placing your order (e.g. ATMdesk/2 Timed, ATMdesk/Pro Ticketed and so on). Also, Timed License is available in Months, Quarters or Years.
An ATMdesk/2 License allows you to run ATMdesk on NCR 56xx, 58xx and 53xx
(SDC-based ATMs). An ATMdesk/S License allows you to run ATMdesk on NCR 66xx SelfServ (USB-
based ATMs).
An ATMdesk/Field License allows you to run ATMdesk on all NCR ATMs, both SDC- and USB-based.
A Ticketed License is where you “pay-per-use”: it allows for certain number or runs of ATMdesk. One ATMdesk start-up (ATM boot) is counted as one "run" ("ticket"). There’s no limitation on how many ATMs you service, or how long this license is valid.
Example: 50 tickets are purchased. 30 tickets are loaded into one key, and 20
tickets are loaded into another key. The first key is then valid for 30 runs of ATMdesk on any ATM (subjected to /Pro - /2 - /S level). The second key is valid for 20 runs of ATMdesk on any ATM (subjected to /Pro - /2 - /S level). There’s no time limitation for any of these keys, all runs can be used within one day or within ten years.
Once used up, the keys can be loaded again with new Usage License of the same or another type or level.
A Timed License is where you “pay-per-time”: it allows for certain period (in
Months, Quarters or Years) of ATMdesk usage. There’s no limitation on how many ATMs you service, or how many times you use your ATMdesk during this period.
Example: 12 months are purchased. 3 months are loaded into one key, and 9
months are loaded into another key. The first key is then valid for 3 consecutive month of ATMdesk usage on any ATM (subjected to /Pro - /2 - /S level), starting from the day of loading. The second key is valid for 9 consecutive month of ATMdesk usage on any ATM (subjected to /Pro - /2 - /S level), starting from the day of loading. There’s no use limitation for any of these keys, you can run ATMdesk as many times as you need during license validity period.
Once expired, the keys can be loaded again with new Usage License of the same or another type or level.
Please note that a Timed License purchased in Quarters or Years can be only used
in whole Quarters or Years. It is not possible to split e.g. one Quarter into three months and load into 3 different keys. To do so, you need to order 3 Month licenses, not a Quarter license.
ATMdesk/Field Setup and Handling Manual
© 2007- 2013 ATMdesk GmbH Page 16 of 29
3.3 Authorization Procedure
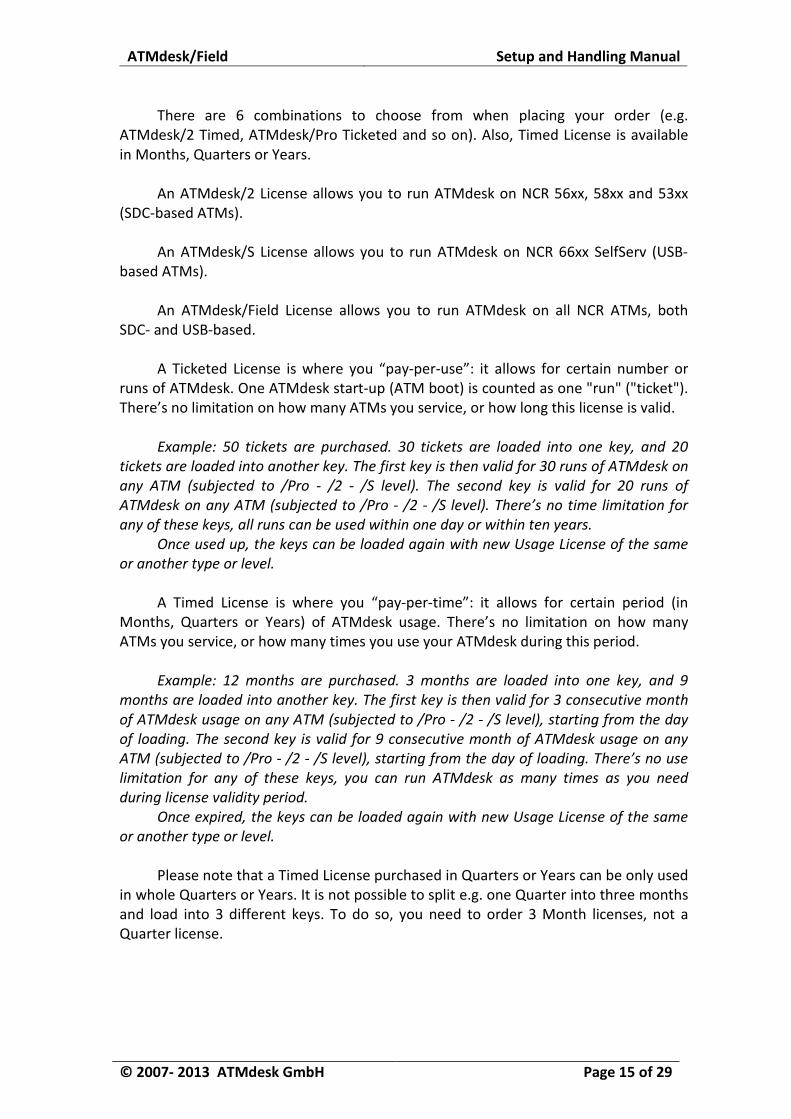
Once ATMdesk completes its initial device scanning process, you are prompted to insert your Key Device:
If you have Smart Card Key, insert it into ATM Card Reader. If you have USB/PS2 Key, insert it into ATM USB port or PS2 keyboard port (using USB-PS2 converter for mouse).
NOTE: When using PS2 port, make sure you insert your key to PS2 keyboard port. The key will not work if inserted into PS2 mouse port.
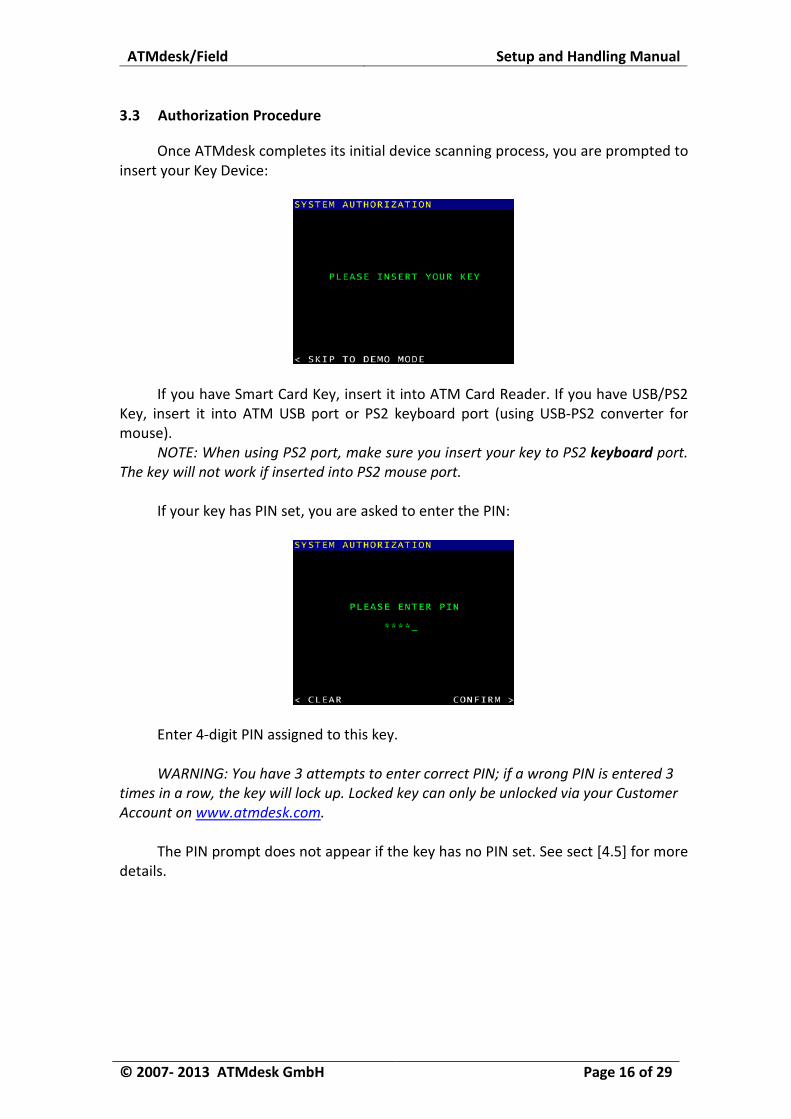
If your key has PIN set, you are asked to enter the PIN:
Enter 4-digit PIN assigned to this key. WARNING: You have 3 attempts to enter correct PIN; if a wrong PIN is entered 3
times in a row, the key will lock up. Locked key can only be unlocked via your Customer Account on www.atmdesk.com.
The PIN prompt does not appear if the key has no PIN set. See sect [4.5] for more
details.
ATMdesk/Field Setup and Handling Manual
© 2007- 2013 ATMdesk GmbH Page 17 of 29
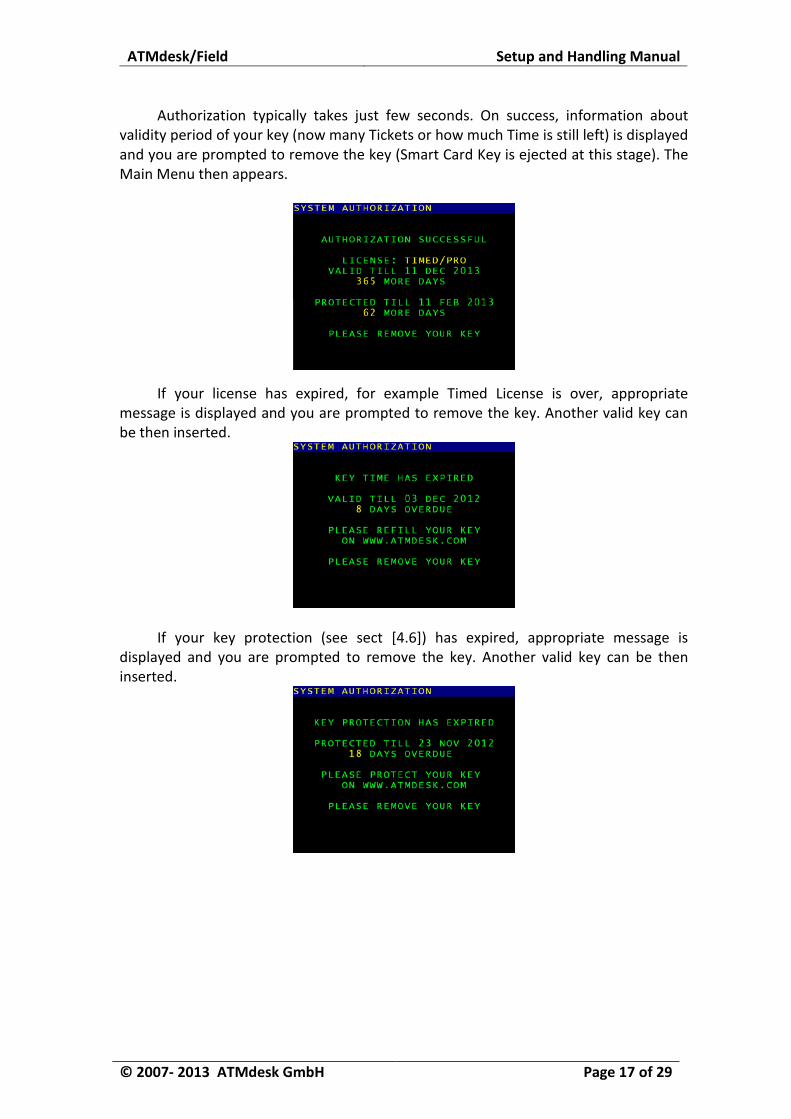
Authorization typically takes just few seconds. On success, information about validity period of your key (now many Tickets or how much Time is still left) is displayed and you are prompted to remove the key (Smart Card Key is ejected at this stage). The Main Menu then appears.
If your license has expired, for example Timed License is over, appropriate message is displayed and you are prompted to remove the key. Another valid key can be then inserted.
If your key protection (see sect [4.6]) has expired, appropriate message is displayed and you are prompted to remove the key. Another valid key can be then inserted.
ATMdesk/Field Setup and Handling Manual
© 2007- 2013 ATMdesk GmbH Page 18 of 29
4 Handling Key Devices
Purchasing customers of ATMdesk/Field are provided with a Customer Account on http://www.atmdesk.com.
Once you login into your Customer Account, you will be able to do the following:
• Download ATMdesk/Field • Refill your expired Key Devices (load new Usage License) • Configure your Key Devices (set PIN and select Protection Period) • Change your name, email address and password
NOTE: We strongly recommend changing default password upon your first login. For large companies the following features are provided (see sect. [5]):
• Create and manage sub-accounts (e.g. for regional managers and engineers) • Manage keys remotely (without need to send expired keys to central office for
renewal).
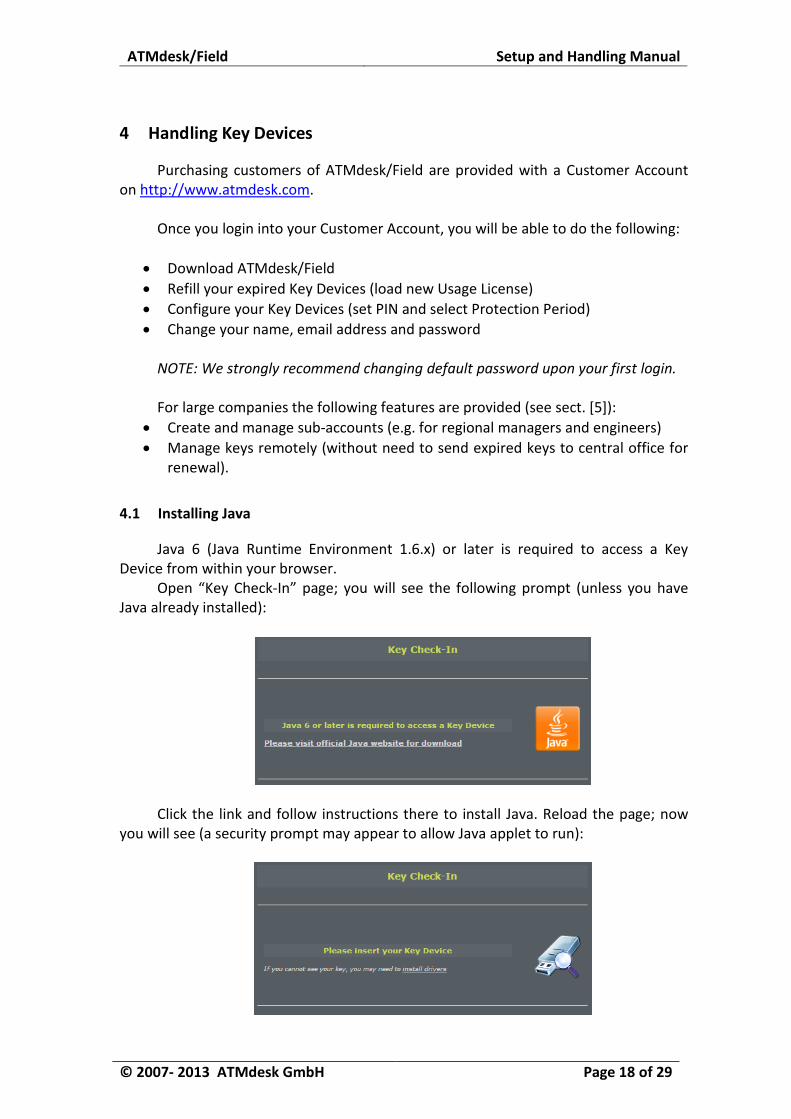
4.1 Installing Java
Java 6 (Java Runtime Environment 1.6.x) or later is required to access a Key Device from within your browser.
Open “Key Check-In” page; you will see the following prompt (unless you have Java already installed):
Click the link and follow instructions there to install Java. Reload the page; now
you will see (a security prompt may appear to allow Java applet to run):
ATMdesk/Field Setup and Handling Manual
© 2007- 2013 ATMdesk GmbH Page 19 of 29
4.2 Connecting Key Device
Your Key Device needs to be connected to your PC before you can handle it from within your browser.
If you have Smart Card Key, you will need a smart card reader for PC (USB or
similar, purchased separately). Install your reader as instructed by the manufacturer; Windows Vista and Window 7 usually find smart card readers automatically; Windows XP and other operating systems may need driver disk supplied with the reader. Then insert your Smart Card Key into the reader.
If you have USB/PS2 Key, you will simply insert it into USB port of your PC.
Windows Vista and Windows 7 will automatically discover your key as a smart card reader; Windows XP may need a driver which can be downloaded from http://www.atmdesk.com website Install Drivers section under Customer Menu.
Windows 7 may also need additional driver for the Smart Card (applied to both
Smart Card Key and USB/PS2 Key), which can be also downloaded from http://www.atmdesk.com website Install Drivers section under Customer Menu.
NOTE: Your USB/PS2 Key must be connected to a USB port of your PC, not the
PS/2 port via USB-PS/2 adapter (even if you have PS/2 port unused). Connecting to PS/2 port is only possible when authorizing your ATMdesk on an ATM.
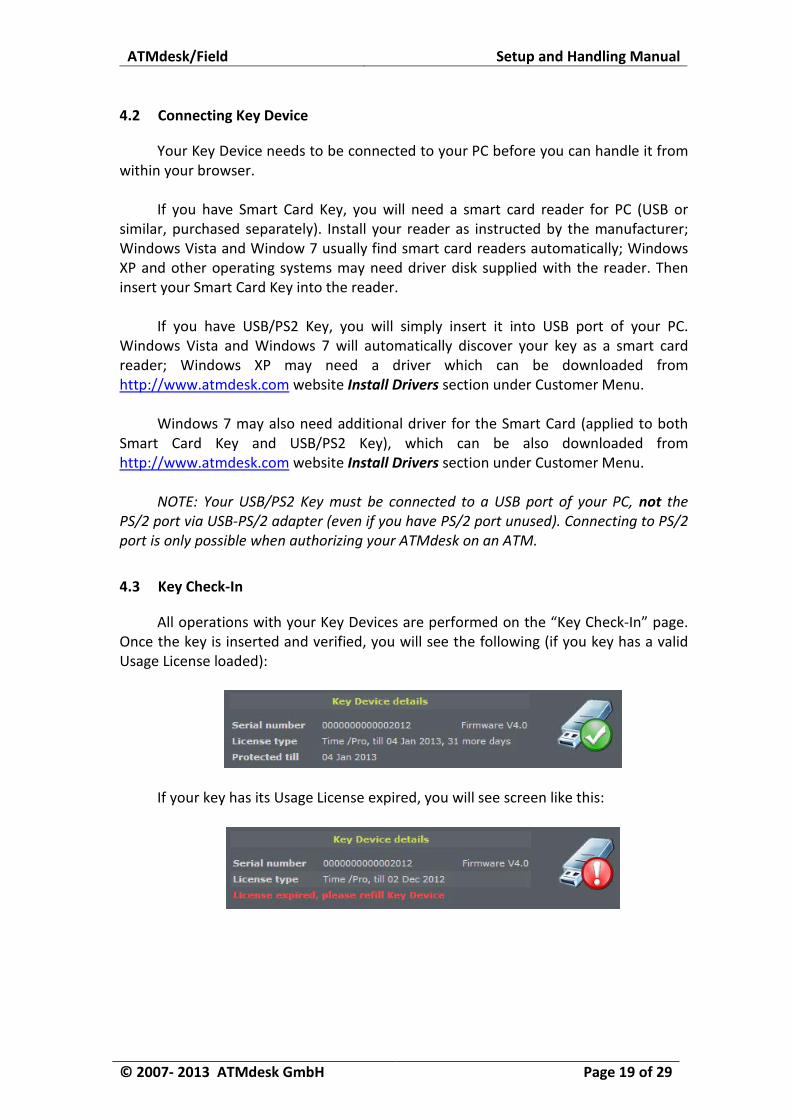
4.3 Key Check-In
All operations with your Key Devices are performed on the “Key Check-In” page. Once the key is inserted and verified, you will see the following (if you key has a valid Usage License loaded):
If your key has its Usage License expired, you will see screen like this:
ATMdesk/Field Setup and Handling Manual
© 2007- 2013 ATMdesk GmbH Page 20 of 29
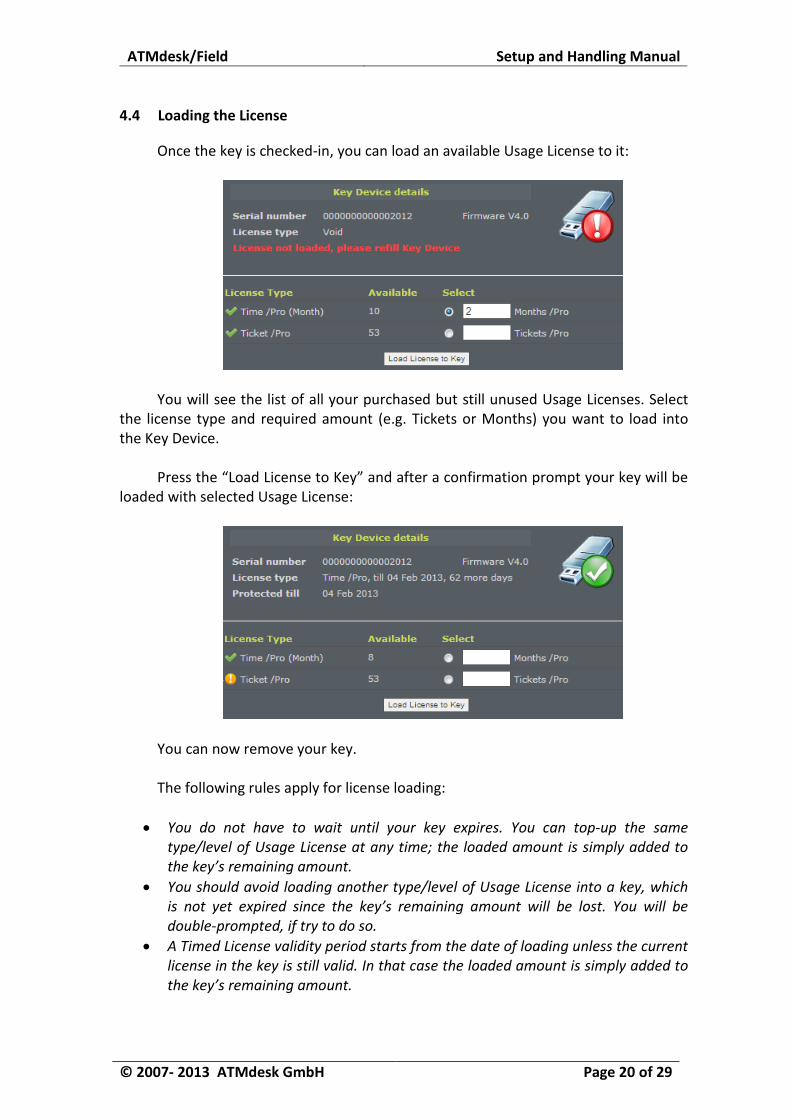
4.4 Loading the License
Once the key is checked-in, you can load an available Usage License to it:
You will see the list of all your purchased but still unused Usage Licenses. Select
the license type and required amount (e.g. Tickets or Months) you want to load into the Key Device.
Press the “Load License to Key” and after a confirmation prompt your key will be
loaded with selected Usage License:
You can now remove your key. The following rules apply for license loading:
• You do not have to wait until your key expires. You can top-up the same type/level of Usage License at any time; the loaded amount is simply added to the key’s remaining amount.
• You should avoid loading another type/level of Usage License into a key, which is not yet expired since the key’s remaining amount will be lost. You will be double-prompted, if try to do so.
• A Timed License validity period starts from the date of loading unless the current license in the key is still valid. In that case the loaded amount is simply added to the key’s remaining amount.

ATMdesk/Field Setup and Handling Manual
© 2007- 2013 ATMdesk GmbH Page 21 of 29
4.5 PIN and Safe Mode
You can configure a PIN for your Key Device. Once a PIN is set, the Key Device can be used to authorize ATMdesk on an ATM only by a person who knows the PIN. You may wish to use PIN feature to decrease theft probability, as the key becomes useless without PIN knowledge and without access to your Customer Account.
You can also configure your Key Device into “Safe Mode”. When Safe Mode key is
used to authorize ATMdesk on an ATM, all tests which dispense bills outside the safe are blocked and cannot be performed, even if a cassette is reinserted. You may wish to use Safe Mode feature to be absolutely sure that no money can ever be dispensed with your ATMdesk.
Select PIN and/or Safe Mode setting you want to apply to the Key Device and
press “Save Configuration”:
NOTE: The Key assigned a PIN allows maximum three PIN entry attempts during
authorization of ATMdesk on an ATM. Once three wrong PINs have been entered in a row (whether during the same
boot, or after reinsertion of the key, or even at another ATM), the Key locks up and cannot be unlocked without logging into your Customer Account.
When checking-in a locked Key, you will be informed that PIN is locked. Simply
select another PIN and press “Save Configuration”, the PIN will become unlocked. You can also change default protection period of 3 months (options are 2 months
and 1 month), however this is rarely necessary. For more details about key Protection please see next section [4.6].
ATMdesk/Field Setup and Handling Manual
© 2007- 2013 ATMdesk GmbH Page 22 of 29
4.6 Auto-Protect, Lost and Stolen Keys
With release of ATMdesk 8 all Key Devices are set to “Auto-Protect” mode. With thousands of engineers all around the globe working with ATMdesk every
day, there is no way to prevent some of the ATMdesk Keys being lost or stolen. If the key held an ATMdesk/Pro Year or Unlimited License, this means significant loss to the company.
The Auto-Protect is your free insurance for your ATMdesk Licenses. Should you
lose your key or should it be stolen, ATMdesk will provide you with a free Replacement License.
For Auto-Protect to work, every key must be checked-in at least once per quarter (3 months). During check-in, the Key protection is automatically prolonged for next 3 months from the day of check-in.
Should your key be lost or stolen during this 3-month protection period, all you have to do is to report key serial number to ATMdesk. A replacement license will be immediately transferred to your account. If you need another key (USB dongle or Smart Card) to load replacement license into, this should be ordered separately at published list price plus shipping.
NOTE: Keys with Ticketed Licenses have limited coverage. This means that there
will be a maximal number (limit) of tickets which are freely replaced under this insurance. The exact rule will be published on www.atmdesk.com. We do not recommend loading tickets significantly more than this limit into any given key at any given time, since they are not covered.
The following rules apply for key protection:
• Only protected Keys will authorize your ATMdesk on an ATM. Once key protection expires, the key must be checked-in under your account to prolong protection for another 3 months.
• Keys with expired protection will not authorize your ATMdesk, even if the license in the key is still valid.
• Keys with expired protection are not covered under ATMdesk License insurance described above.
• You do not have to wait until Key protection expires. You can check-in the key at any time and prolong protection period for next 3 months from that date.
• You should to be able to identify serial number of the lost key in order to claim License insurance. All your keys will be listed under “Manage My Keys”, but there’s no automated way to find out which one is lost. For a possible solution please see next section [5].
• To prolong protection, the key can be checked-in under any of your sub-accounts, not necessarily under your main account. In case of a medium or large company this will save a hassle of collecting all the keys every quarter from remote location just to prolong their protection. For more details please see next section [5].
ATMdesk/Field Setup and Handling Manual
© 2007- 2013 ATMdesk GmbH Page 23 of 29
5 Managing Accounts and Keys
This section is aimed primarily to medium and large organizations with branches and employees located far away from the central office.
However, even smaller companies can benefit from these management features.
5.1 Creating and Managing Accounts
Each ATMdesk Customer Account can create sub-accounts for their own employees; or – in case of ATMdesk Reseller – for their own customers.
There are several distinct types of ATMdesk accounts:
• Manager accounts have all the rights your main account has (in particular, the right to further create their own sub-accounts and the right to manage their own keys). Accounts of this type should be created for company’s regional/local managers in charge of ATMdesk in their area; or – in case of ATMdesk Reseller – for reseller’s own customers.
• Engineer accounts have limited rights and should be created for company’s own
engineers. The primary purpose of these accounts is to allow engineers to check-in their keys and prolong protection without sending keys to a central office every quarter. This type of account also allows downloading ATMdesk software.
• Check-In accounts have the only right to check-in their keys and should be
created for company’s own engineers when particular ATMdesk software version must be used by their employees.
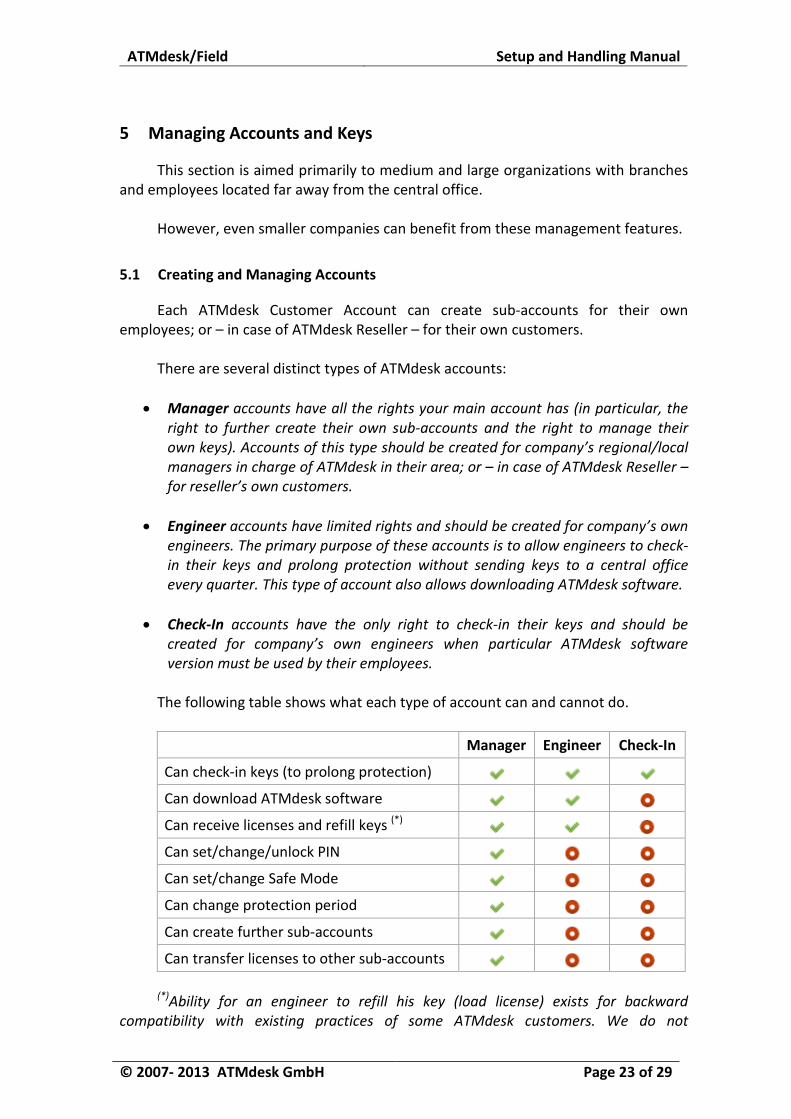
The following table shows what each type of account can and cannot do. Manager Engineer Check-In
Can check-in keys (to prolong protection) Can download ATMdesk software Can receive licenses and refill keys (*) Can set/change/unlock PIN Can set/change Safe Mode Can change protection period Can create further sub-accounts Can transfer licenses to other sub-accounts
(*)Ability for an engineer to refill his key (load license) exists for backward
compatibility with existing practices of some ATMdesk customers. We do not

ATMdesk/Field Setup and Handling Manual
© 2007- 2013 ATMdesk GmbH Page 24 of 29
recommend using this feature, there are more efficient ways to update license in an engineer’s key. For more details please see next section [5.2].
All operations with your accounts are performed on the “Manage My Accounts”
page. Here you can: • View all your accounts • View all your accounts and their sub-accounts • Search for a particular account by name/email or part thereof • Create new accounts
Once you click on an account, you can: • Edit account details (change name, email, reset password, disable account) • Transfer your licenses to/from this account • View account license usage (how many left, where transferred/loaded)
ATMdesk/Field Setup and Handling Manual
© 2007- 2013 ATMdesk GmbH Page 25 of 29
5.2 Managing Your Keys Remotely
Each Manager account (including your main account of course) can manage the keys used by his sub-accounts (engineers or subordinate managers) remotely – that is, without having physical access to the key (“offline” key).
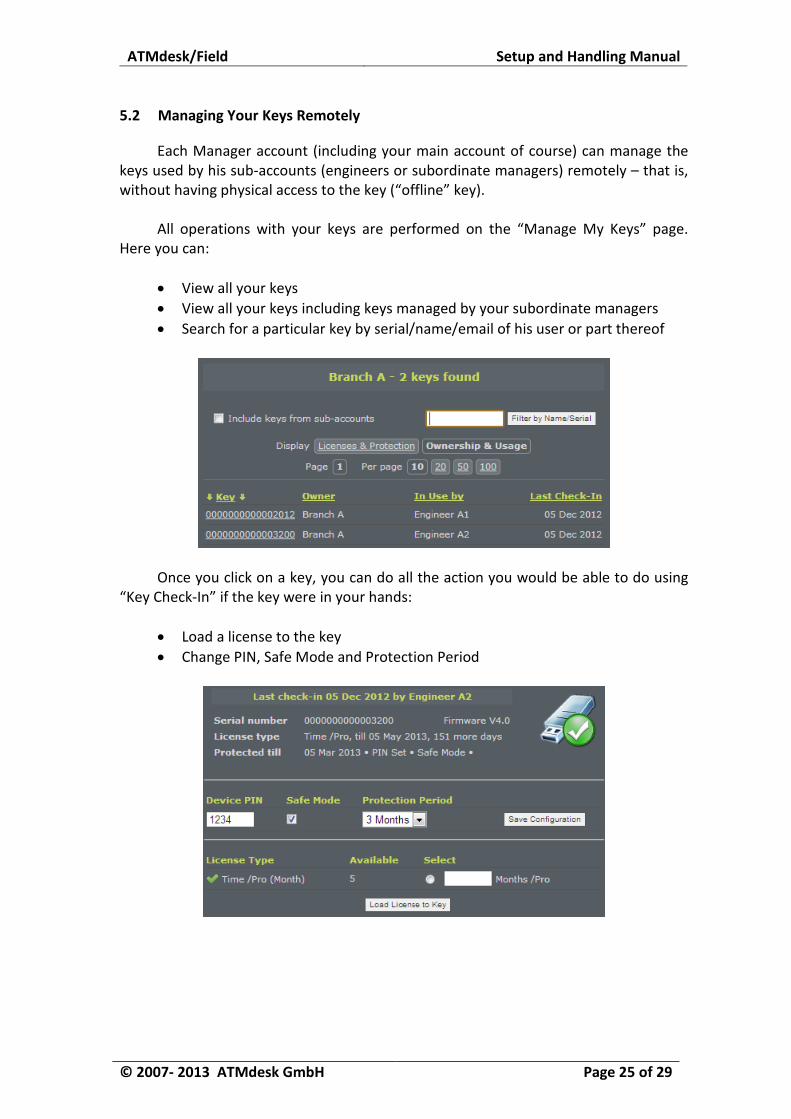
All operations with your keys are performed on the “Manage My Keys” page.
Here you can: • View all your keys • View all your keys including keys managed by your subordinate managers • Search for a particular key by serial/name/email of his user or part thereof
Once you click on a key, you can do all the action you would be able to do using
“Key Check-In” if the key were in your hands: • Load a license to the key • Change PIN, Safe Mode and Protection Period
ATMdesk/Field Setup and Handling Manual
© 2007- 2013 ATMdesk GmbH Page 26 of 29
IMPORTANT NOTE: Despite features offered by “Key Check-In” and “Manage My Keys” may look similar, there is one major difference:
• Key Check-In is where you handle keys you get physically in your hands. All
changes you make (e.g. new license or new PIN) are written back to the key immediately – because key is actually connected to www.atmdesk.com.
• Manage My Keys is where you handle keys you have no physical access to. All changes you make to the key become “pending” until the actual user of the key (typically your engineer account) performs “Key Check-In”.
“Manage My Keys” actually breaks process in two steps: A Manager introduces a
change (e.g. loads new license into a key which expires soon) and then an Engineer gets this change simply by checking-in his key.
The two-step procedure overcomes otherwise unavoidable nightmare of sending
keys forth and back to update license, prolong protection etc. Please remember the simple rule: if you have the key in your hands, you use “Key
Check-In” for all purposes; not “Manage My Keys”. If you do not have the key in your hands, you use “Manage My Keys”.
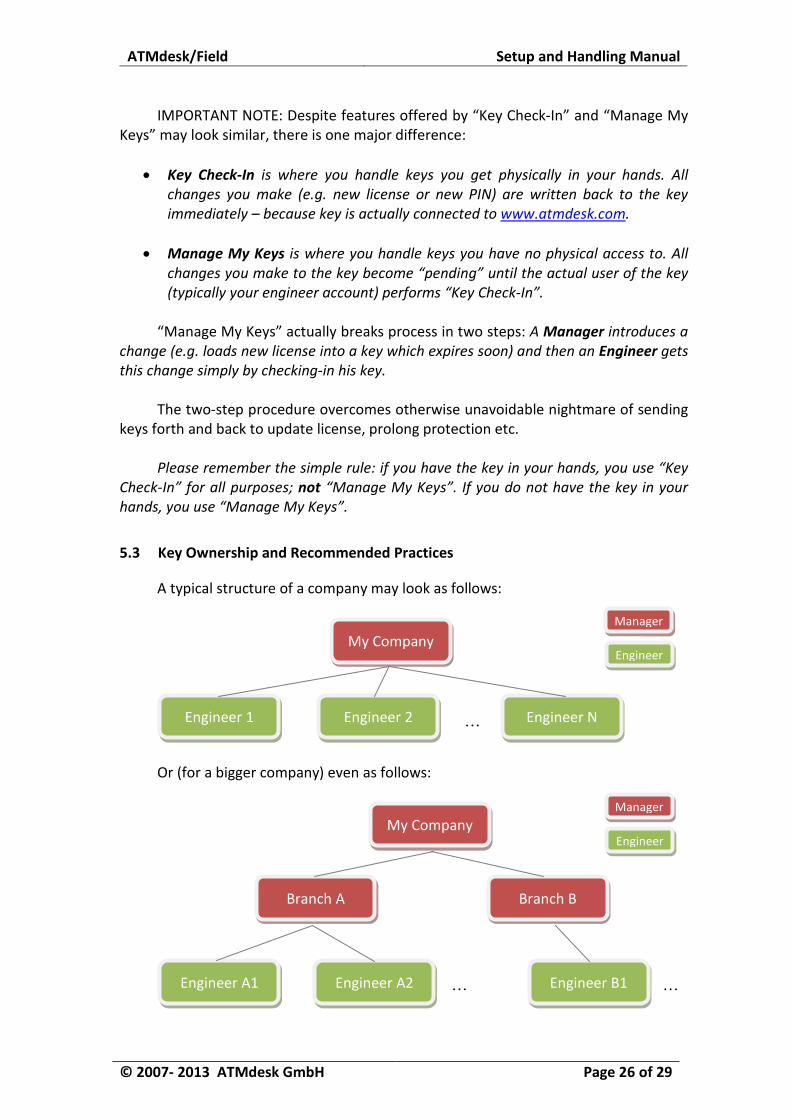
5.3 Key Ownership and Recommended Practices
A typical structure of a company may look as follows:
Or (for a bigger company) even as follows:
My Company
Engineer A1 Engineer A2 Engineer B1 …
Branch A Branch B
…
My Company
Engineer 1 Engineer 2 Engineer N …
Manager
Engineer
Manager
Engineer
ATMdesk/Field Setup and Handling Manual
© 2007- 2013 ATMdesk GmbH Page 27 of 29
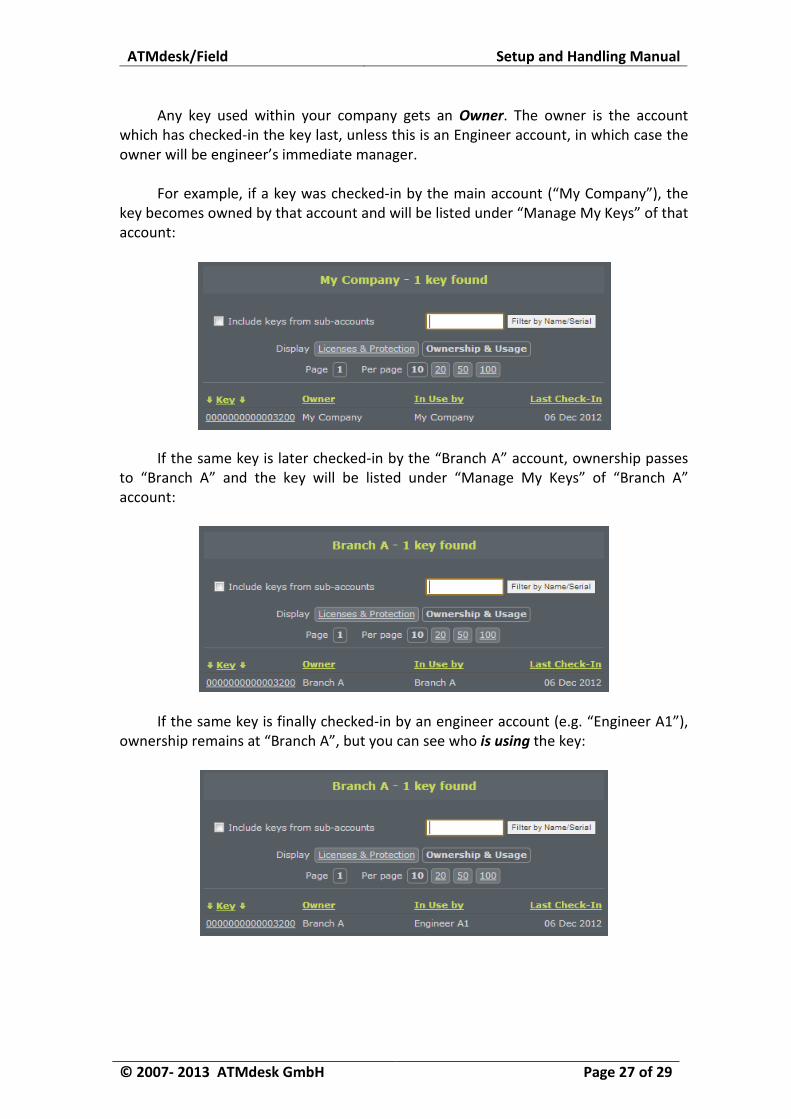
Any key used within your company gets an Owner. The owner is the account which has checked-in the key last, unless this is an Engineer account, in which case the owner will be engineer’s immediate manager.
For example, if a key was checked-in by the main account (“My Company”), the
key becomes owned by that account and will be listed under “Manage My Keys” of that account:
If the same key is later checked-in by the “Branch A” account, ownership passes to “Branch A” and the key will be listed under “Manage My Keys” of “Branch A” account:
If the same key is finally checked-in by an engineer account (e.g. “Engineer A1”),
ownership remains at “Branch A”, but you can see who is using the key:
ATMdesk/Field Setup and Handling Manual
© 2007- 2013 ATMdesk GmbH Page 28 of 29
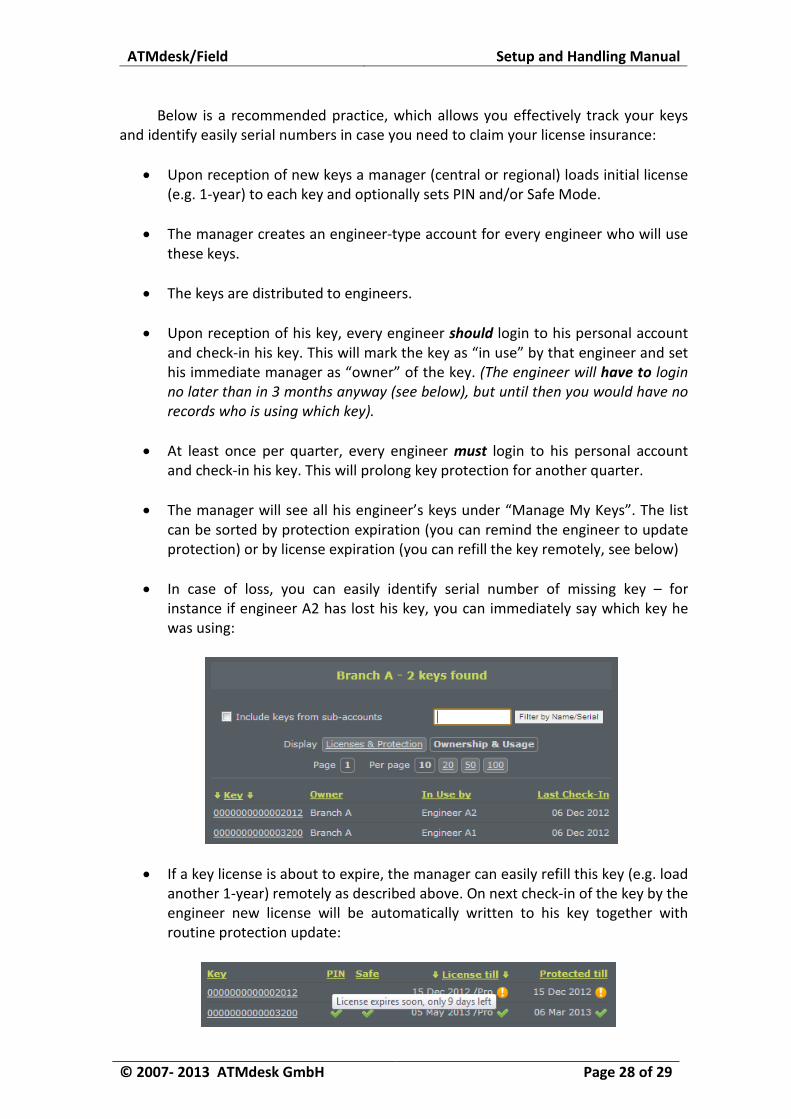
Below is a recommended practice, which allows you effectively track your keys and identify easily serial numbers in case you need to claim your license insurance:
• Upon reception of new keys a manager (central or regional) loads initial license
(e.g. 1-year) to each key and optionally sets PIN and/or Safe Mode.
• The manager creates an engineer-type account for every engineer who will use these keys.
• The keys are distributed to engineers.
• Upon reception of his key, every engineer should login to his personal account
and check-in his key. This will mark the key as “in use” by that engineer and set his immediate manager as “owner” of the key. (The engineer will have to login no later than in 3 months anyway (see below), but until then you would have no records who is using which key).
• At least once per quarter, every engineer must login to his personal account
and check-in his key. This will prolong key protection for another quarter.
• The manager will see all his engineer’s keys under “Manage My Keys”. The list can be sorted by protection expiration (you can remind the engineer to update protection) or by license expiration (you can refill the key remotely, see below)
• In case of loss, you can easily identify serial number of missing key – for
instance if engineer A2 has lost his key, you can immediately say which key he was using:
• If a key license is about to expire, the manager can easily refill this key (e.g. load another 1-year) remotely as described above. On next check-in of the key by the engineer new license will be automatically written to his key together with routine protection update:
ATMdesk/Field Setup and Handling Manual
© 2007- 2013 ATMdesk GmbH Page 29 of 29
Another possible practice, currently adopted by several ATMdesk customers (however more cumbersome) may look as follows:
• Upon reception of new keys they are distributed to engineers without licenses.
• A manager creates an engineer-type account for each engineer and transfers
necessary license (e.g. 1-year) to every engineer’s account.
• Upon reception of his key, every engineer logs in to his personal account to check-in his key and re-fill it (load initial license). This will also mark the key as “in use” by that engineer and set his immediate manager as “owner” of the key. Please note that engineer has no right to set key PIN or Safe Mode, which can only be done by his manager once the key appears in his database.
• Once per quarter (or more frequently if desired), every engineer logs into his
personal account to check-in his key and to prolong key protection for another quarter.
• If a key license is about to expire, the manager can transfer another license (e.g.
load another 1-year) to the engineer account. On next check-in the engineer will have to refill his key (load new license).
Another possible (however not recommended) practice is to share one account
between several engineers (or have a local manager to check-in keys for his engineers). This way you would save on creating engineer accounts but you will be unable to
identify who is using which key in case of key loss, unless key serial numbers are tracked separately.
One-account approach is fine for a small company with just few keys – if a key
goes missing you can simply check-in all remaining keys to identify serial number of missing one. However if you own more than 3-4 keys, especially if they are geographically distributed, this can quickly become unmanageable.
Please always create accounts for users of your keys and let them check-in their
keys under their own accounts – unless you have only few keys in one location!!!