Embed Size (px)
Citation preview

ATLS Level (Grade) Crossings (March 2014) These are a set of 12 UK style level crossings, specifically intended for use with
ATLS. They should be placed in Surveyor like a normal Auran crossing but they
will not work without extra ATLS assets, (eg- Trigger and Traffic Stopper).
The use of ATLS allows the Crossings to be Triggered earlier, thus ensuring extra
time for a more prototypical closing sequence. It also allows tram traffic to cross
the main line. Note that the crossings contain their own built-in ATLS Controller
and ATLS Slave. The ATLS Channel will therefore be set within the crossing!
Many of the latest versions of ATLS are now Trainz Build 2.9, (TS 2009 and up).
Links to earlier versions that will work in TRS 2004, TRS 2006 and TC can be
found on the ATLS page on my website. Note that these earlier versions may
have minor bugs and less features. Some current, unmodified assets remain
Build 2.4. All assets will work up to and including TS12 (SP1). The latest version
allows for game-save and restore. Always use the latest version you can!
See Issue 3 Updates and Important Technical Note regarding the invisible train!
There are basically three types of crossing. Placement in Surveyor differ slightly,
depending on which type of crossing you have chosen. Please select below.
‘Short’ Crossings for ordinary roads ……………………………………… page 2
Crossings for use with AJS Street Kit …………………………………….. page 4
Crossings incorporating tram crossover …………………………………….. page 7
ATLS Set-Up, (all crossings) ................................. page 11
Optional Extras ................................. page 13
Issue 3 Updates ................................. page 14
Saving to a Map ................................. page 15
Credits ................................. page 15
SURVEYOR PLACEMENT...
‘Short’ Crossings for use with ordinary roads. (Kuids 76656:28603, 28604, 28607 & 28608)
Place the crossing in Surveyor and align to your chosen position. When using
normal roads, the height of the level crossing should need no adjustment.
Place two ATLS Traffic Stoppers (kuid2:76656:500017:2) as shown below.
As the attachment points on the Stoppers are set low, you will need to raise the
Stopper to approximately +0.2, depending on the road you are using. TS 2009
or later users will need to hold down 'shift' to obtain the required accuracy.
Now connect the approaching roadway of your choice to the Stopper’s outside
attachment points first. Then connect an invisible road, (eg kuid:122285:1122)
from the Traffic Stopper’s inside attachment points to the Level Crossing.
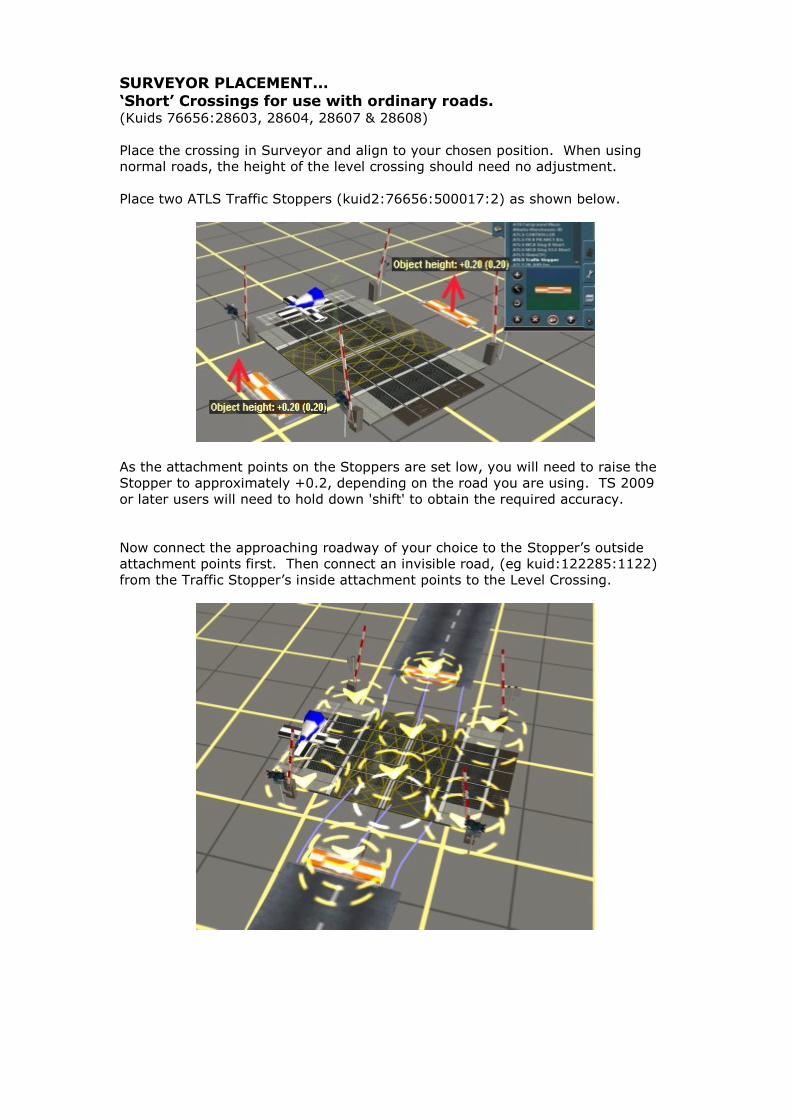
Next, switch to 'Tracks' and connect an invisible track (eg kuid2:122285:1003:1)
from the Traffic Stoppers to the built-in Slave.
Now align the Traffic Stoppers close to the crossing so everything looks neat.
The pavement, (sidewalk) may be deleted by attaching the AJS Spline Eraser,
(kuid2:122285:1002:1) if desired.
Now go to ATLS Set-Up.
SURVEYOR PLACEMENT...
Crossings for use with AJS Street Kit roads. (Kuids 76656:28601, 28602, 28605 & 28606)
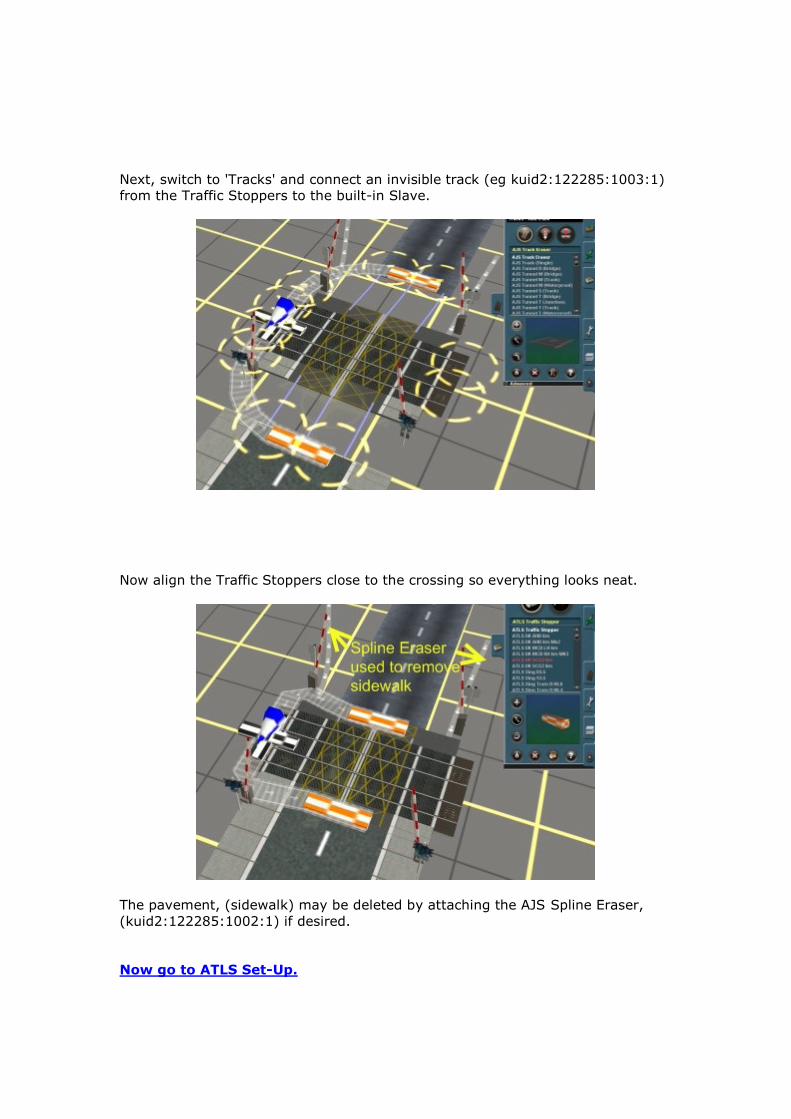
Place the crossing in Surveyor and align to your chosen position. These crossings
are designed for use with AJS Street Kit roads which sit lower than standard
Auran roads. It is therefore necessary to first lower the level crossing to -0.4 in
Surveyor.
This sets the attachment points to -0.4 for roads which is correct for Andi's
assets, (relative to local ground height). Note - It also puts the main line rail
track slightly below ground level but this is a necessary compromise to allow the
lower Street Kit roads to cross.
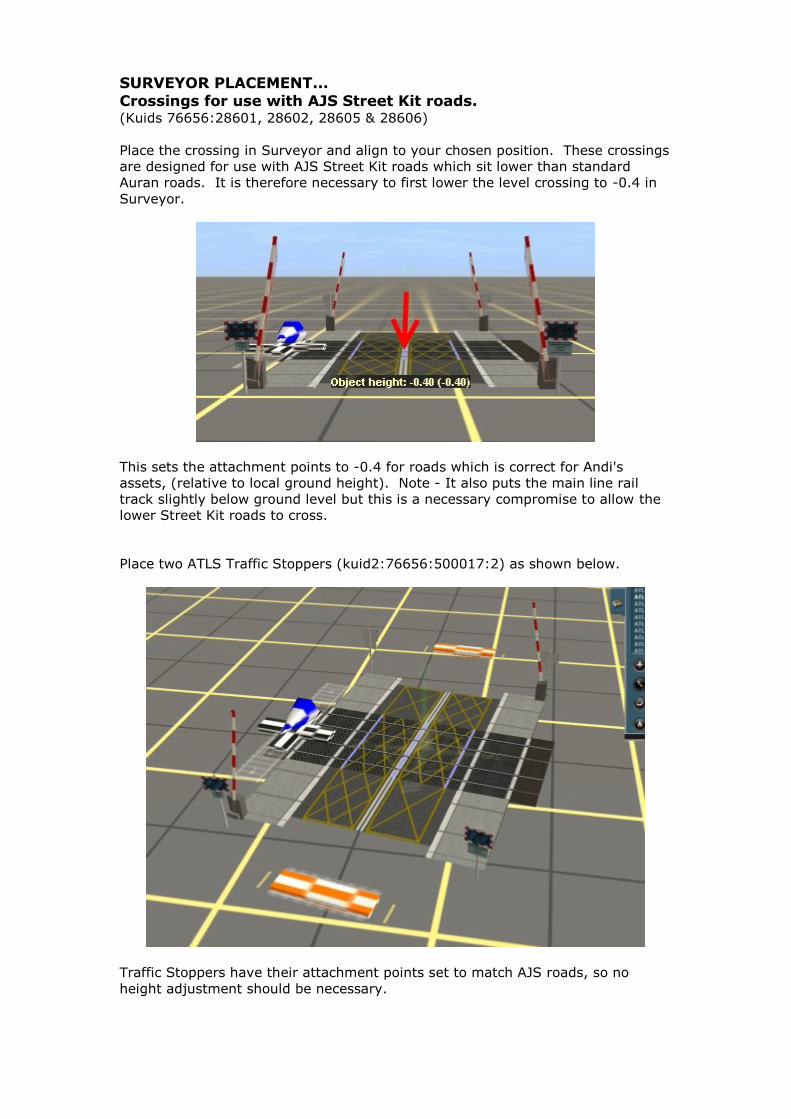
Place two ATLS Traffic Stoppers (kuid2:76656:500017:2) as shown below.
Traffic Stoppers have their attachment points set to match AJS roads, so no
height adjustment should be necessary.
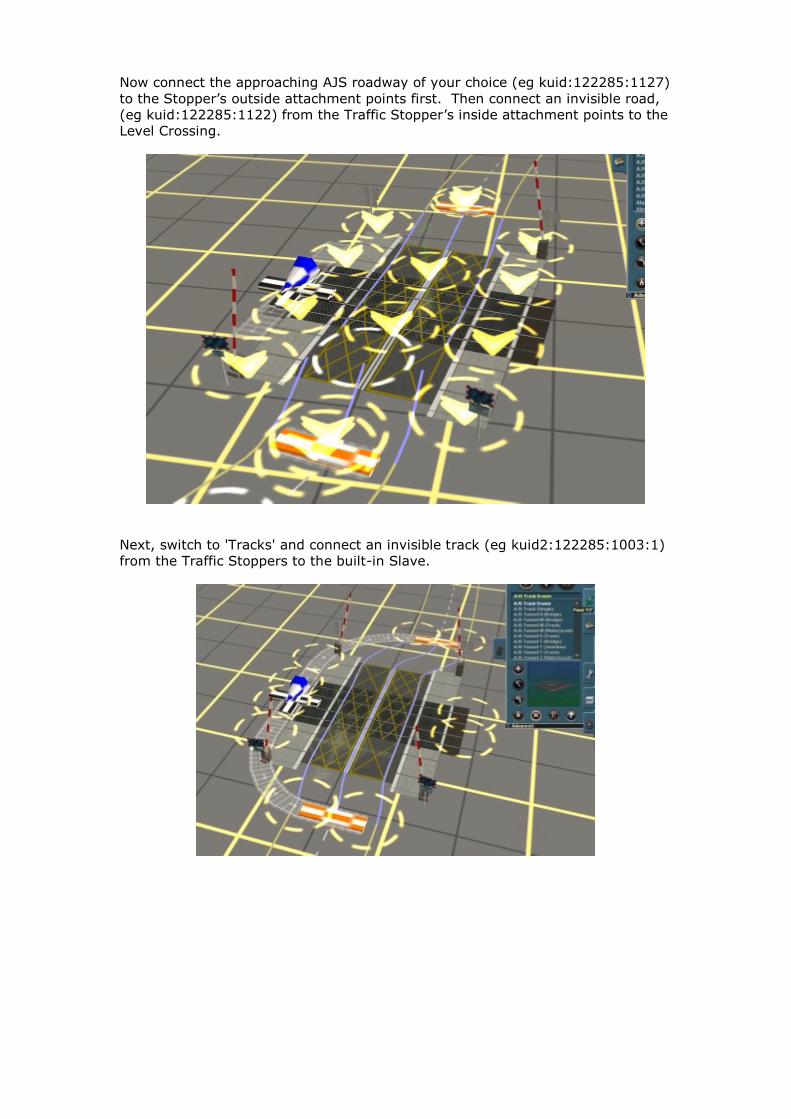
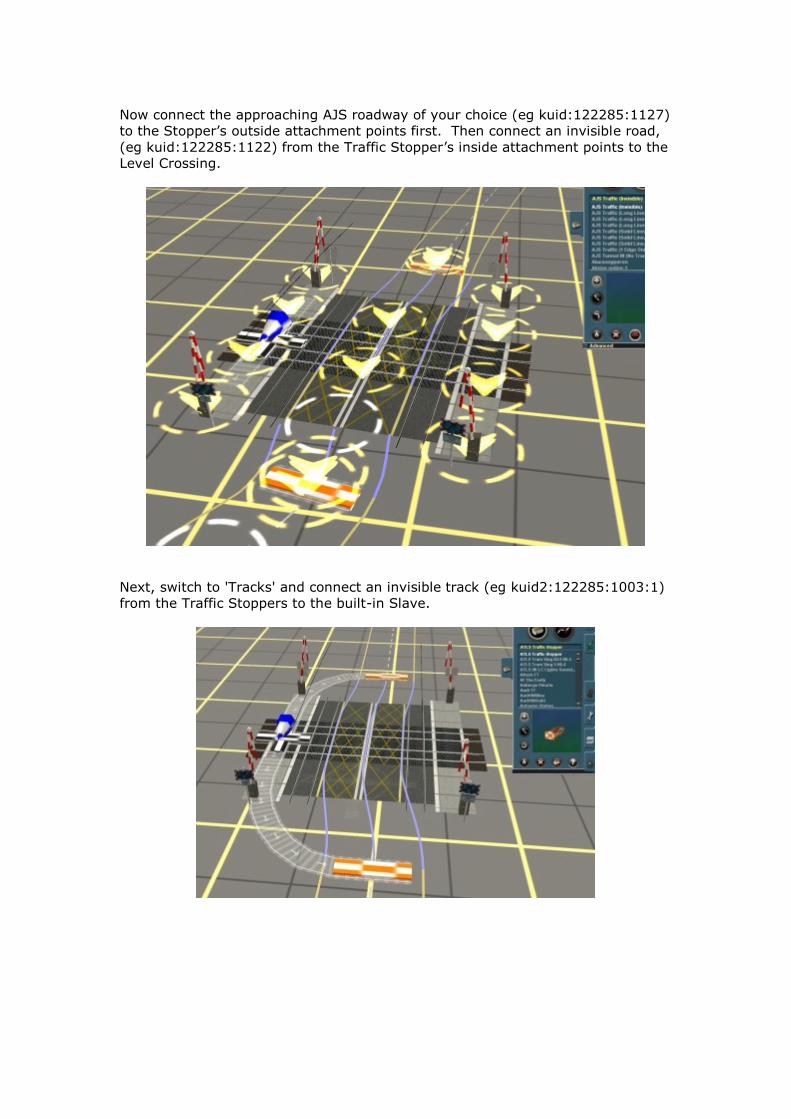
Now connect the approaching AJS roadway of your choice (eg kuid:122285:1127)
to the Stopper’s outside attachment points first. Then connect an invisible road,
(eg kuid:122285:1122) from the Traffic Stopper’s inside attachment points to the
Level Crossing.
Next, switch to 'Tracks' and connect an invisible track (eg kuid2:122285:1003:1)
from the Traffic Stoppers to the built-in Slave.
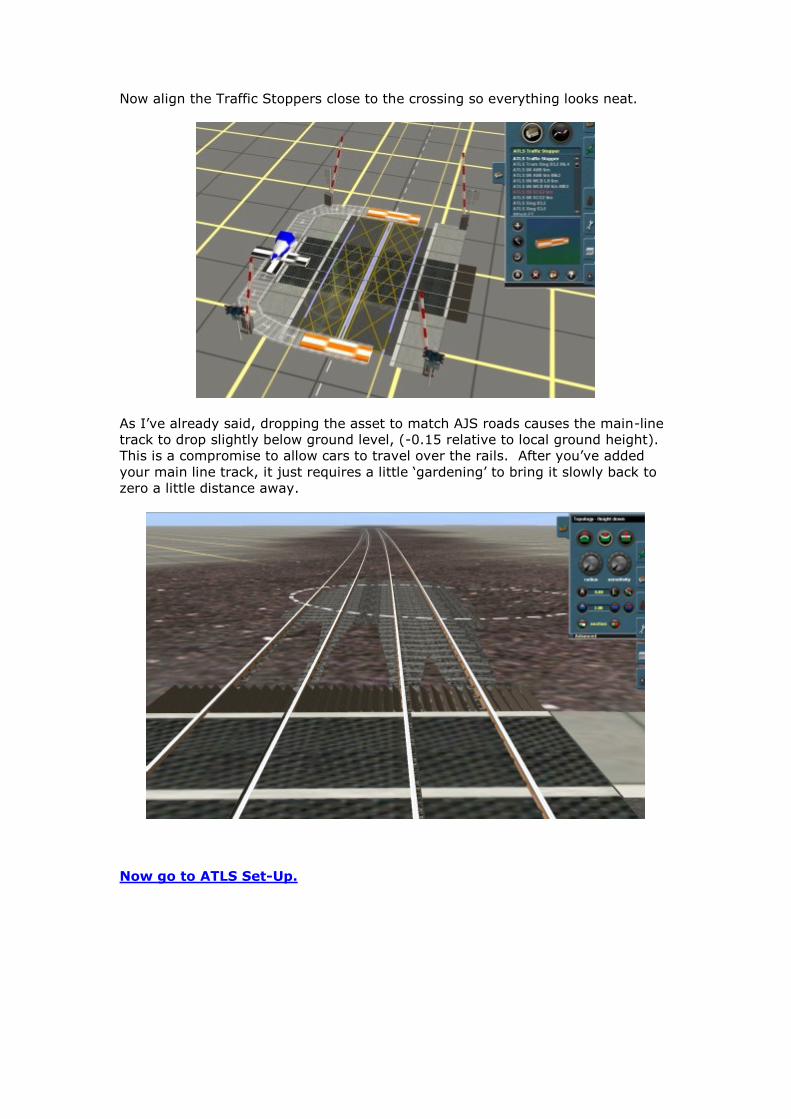
Now align the Traffic Stoppers close to the crossing so everything looks neat.
As I’ve already said, dropping the asset to match AJS roads causes the main-line
track to drop slightly below ground level, (-0.15 relative to local ground height).
This is a compromise to allow cars to travel over the rails. After you’ve added
your main line track, it just requires a little ‘gardening’ to bring it slowly back to
zero a little distance away.
Now go to ATLS Set-Up.

SURVEYOR PLACEMENT... Crossings incorporating a Tram Crossover. (Kuids 76656:28501, 28502, 28503 & 28504)
Place the crossing in Surveyor and align to your chosen position. These crossings
are designed for use with AJS Street Kit roads and Motorman1066 tram track,
(6.4 meter wire height) or AJS tram track, (5.6 meter wire height). (Other tram
track may also connect OK so long as wire height is one of the above). Due to
the lower attachment point settings of both road and tram track it is necessary to
first lower the level crossing to -0.4 in Surveyor.
This sets the attachment points to -0.4 for roads and -0.3 for tram track, (relative
to local ground height). Note - It also puts the main line rail track slightly below
ground level but this is a necessary compromise to allow the lower road traffic
and trams to cross.
Place two ATLS Traffic Stoppers (kuid2:76656:500017:2) as shown below.
Traffic Stoppers have their attachment points set to match AJS roads, so no
height adjustment should be necessary.
Now connect the approaching AJS roadway of your choice (eg kuid:122285:1127)
to the Stopper’s outside attachment points first. Then connect an invisible road,
(eg kuid:122285:1122) from the Traffic Stopper’s inside attachment points to the
Level Crossing.
Next, switch to 'Tracks' and connect an invisible track (eg kuid2:122285:1003:1)
from the Traffic Stoppers to the built-in Slave.
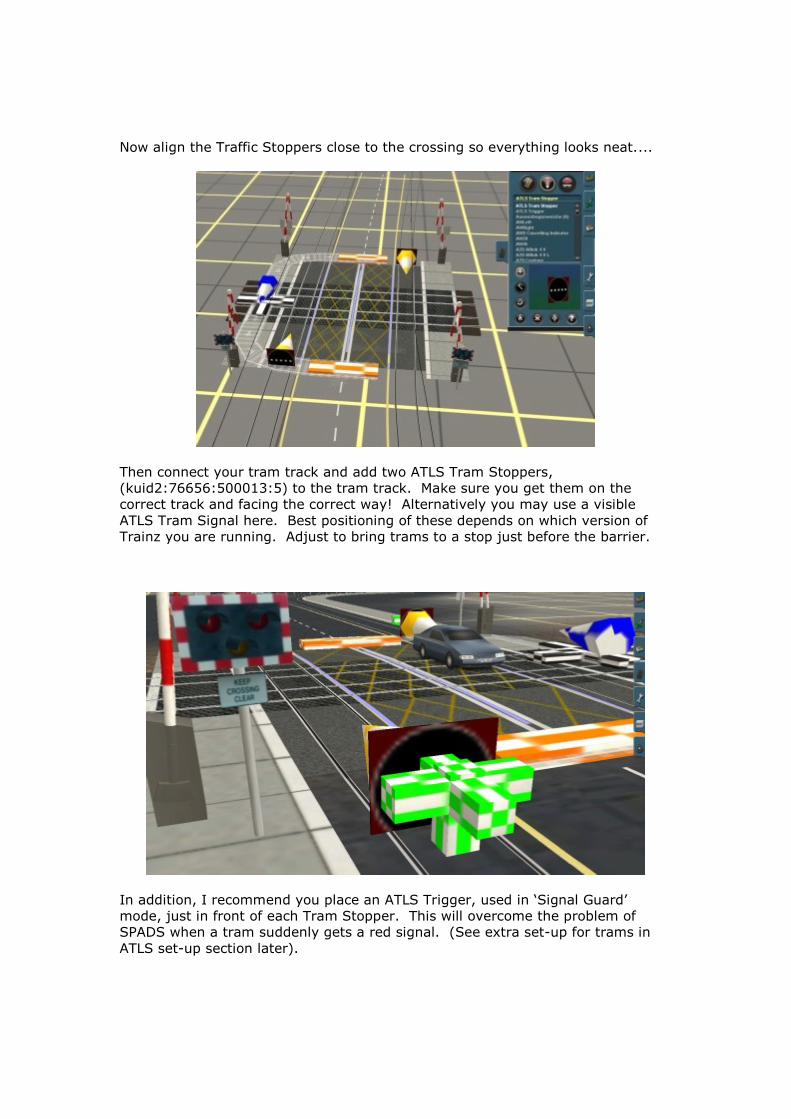
Now align the Traffic Stoppers close to the crossing so everything looks neat....
Then connect your tram track and add two ATLS Tram Stoppers,
(kuid2:76656:500013:5) to the tram track. Make sure you get them on the
correct track and facing the correct way! Alternatively you may use a visible
ATLS Tram Signal here. Best positioning of these depends on which version of
Trainz you are running. Adjust to bring trams to a stop just before the barrier.
In addition, I recommend you place an ATLS Trigger, used in ‘Signal Guard’
mode, just in front of each Tram Stopper. This will overcome the problem of
SPADS when a tram suddenly gets a red signal. (See extra set-up for trams in
ATLS set-up section later).
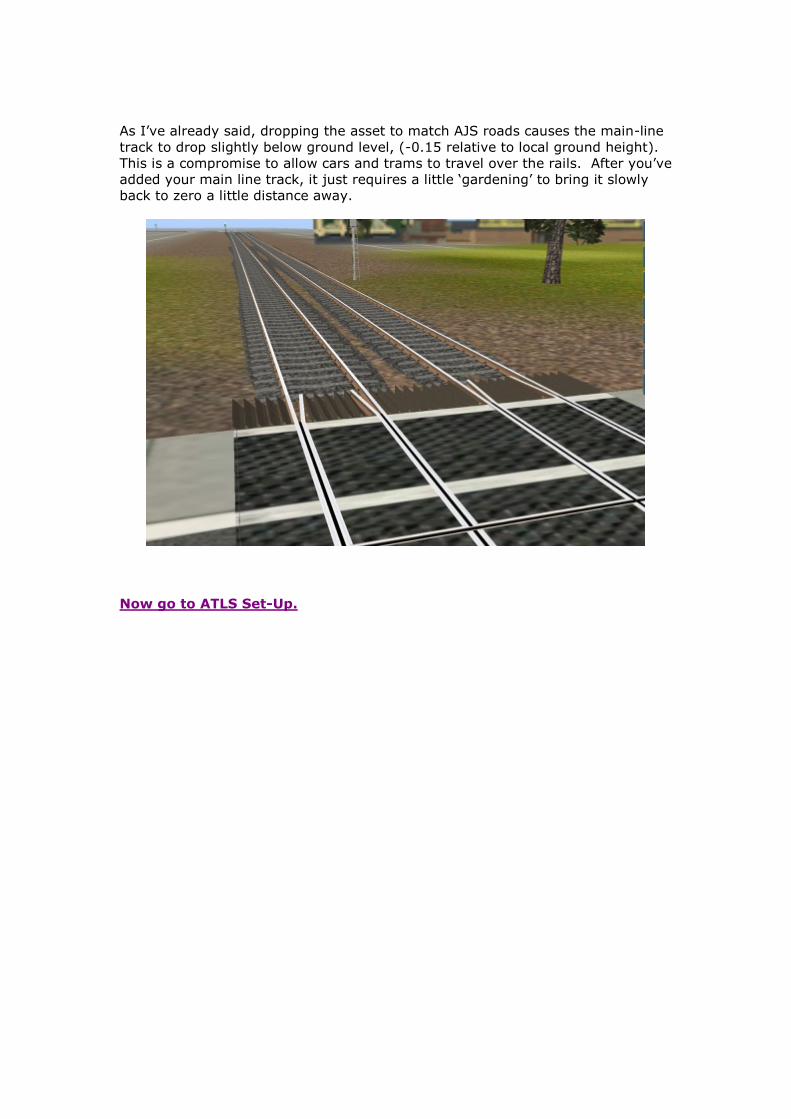
As I’ve already said, dropping the asset to match AJS roads causes the main-line
track to drop slightly below ground level, (-0.15 relative to local ground height).
This is a compromise to allow cars and trams to travel over the rails. After you’ve
added your main line track, it just requires a little ‘gardening’ to bring it slowly
back to zero a little distance away.
Now go to ATLS Set-Up.
ATLS SET-UP
Common to all ATLS Level Crossings.
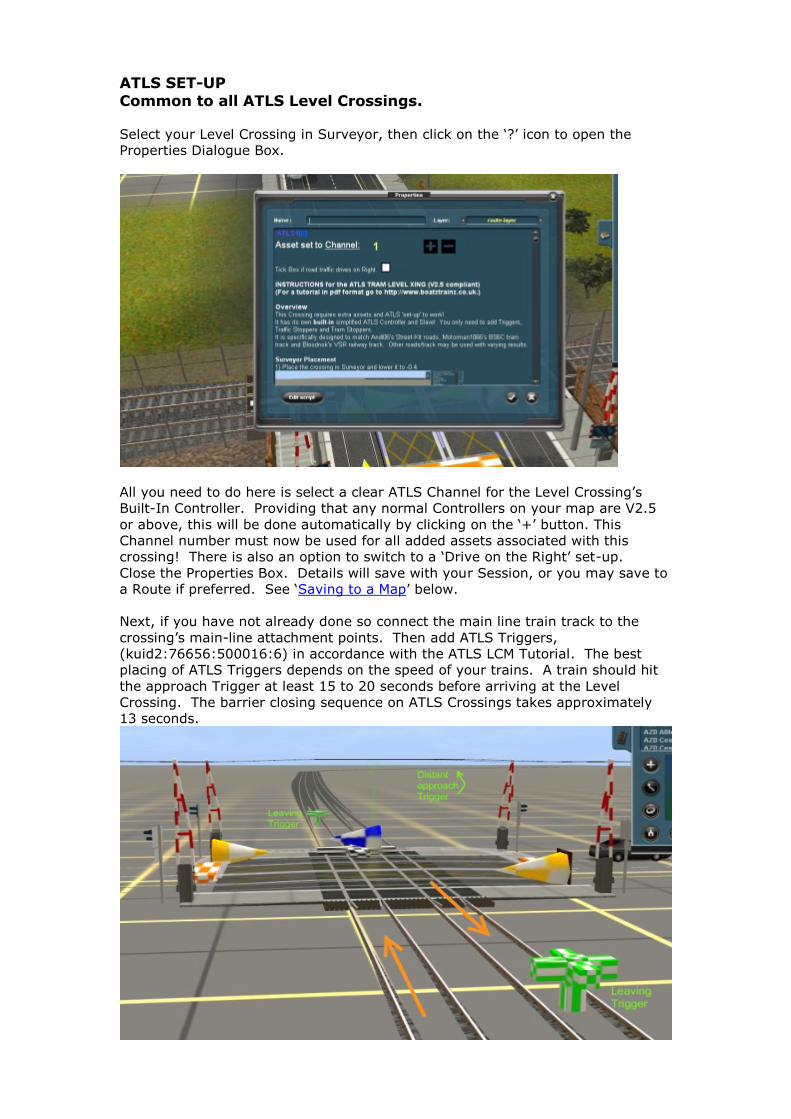
Select your Level Crossing in Surveyor, then click on the ‘?’ icon to open the
Properties Dialogue Box.
All you need to do here is select a clear ATLS Channel for the Level Crossing’s
Built-In Controller. Providing that any normal Controllers on your map are V2.5
or above, this will be done automatically by clicking on the ‘+’ button. This
Channel number must now be used for all added assets associated with this
crossing! There is also an option to switch to a ‘Drive on the Right’ set-up.
Close the Properties Box. Details will save with your Session, or you may save to
a Route if preferred. See ‘Saving to a Map’ below.
Next, if you have not already done so connect the main line train track to the
crossing’s main-line attachment points. Then add ATLS Triggers,
(kuid2:76656:500016:6) in accordance with the ATLS LCM Tutorial. The best
placing of ATLS Triggers depends on the speed of your trains. A train should hit
the approach Trigger at least 15 to 20 seconds before arriving at the Level
Crossing. The barrier closing sequence on ATLS Crossings takes approximately
13 seconds.
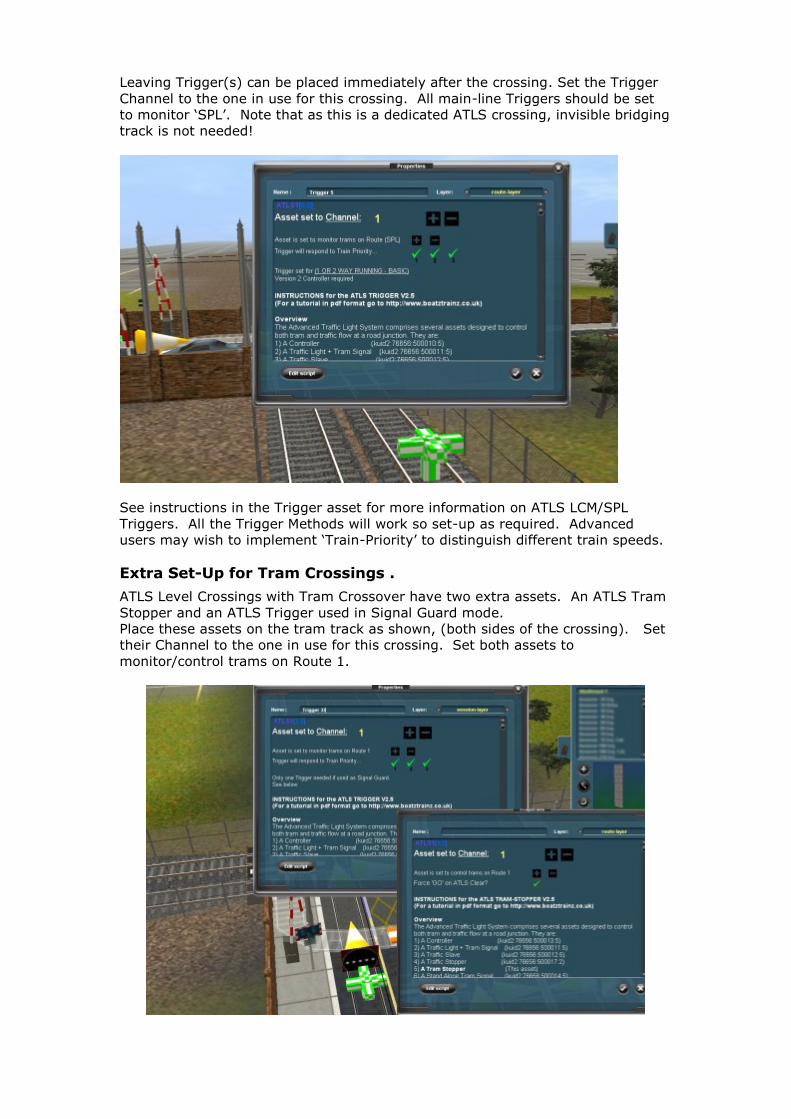
Leaving Trigger(s) can be placed immediately after the crossing. Set the Trigger
Channel to the one in use for this crossing. All main-line Triggers should be set
to monitor ‘SPL’. Note that as this is a dedicated ATLS crossing, invisible bridging
track is not needed!
See instructions in the Trigger asset for more information on ATLS LCM/SPL
Triggers. All the Trigger Methods will work so set-up as required. Advanced
users may wish to implement ‘Train-Priority’ to distinguish different train speeds.
Extra Set-Up for Tram Crossings .
ATLS Level Crossings with Tram Crossover have two extra assets. An ATLS Tram
Stopper and an ATLS Trigger used in Signal Guard mode.
Place these assets on the tram track as shown, (both sides of the crossing). Set
their Channel to the one in use for this crossing. Set both assets to
monitor/control trams on Route 1.
OPTIONAL ASSETS
The assets above will get you working but if you add the following it will make it
work better.
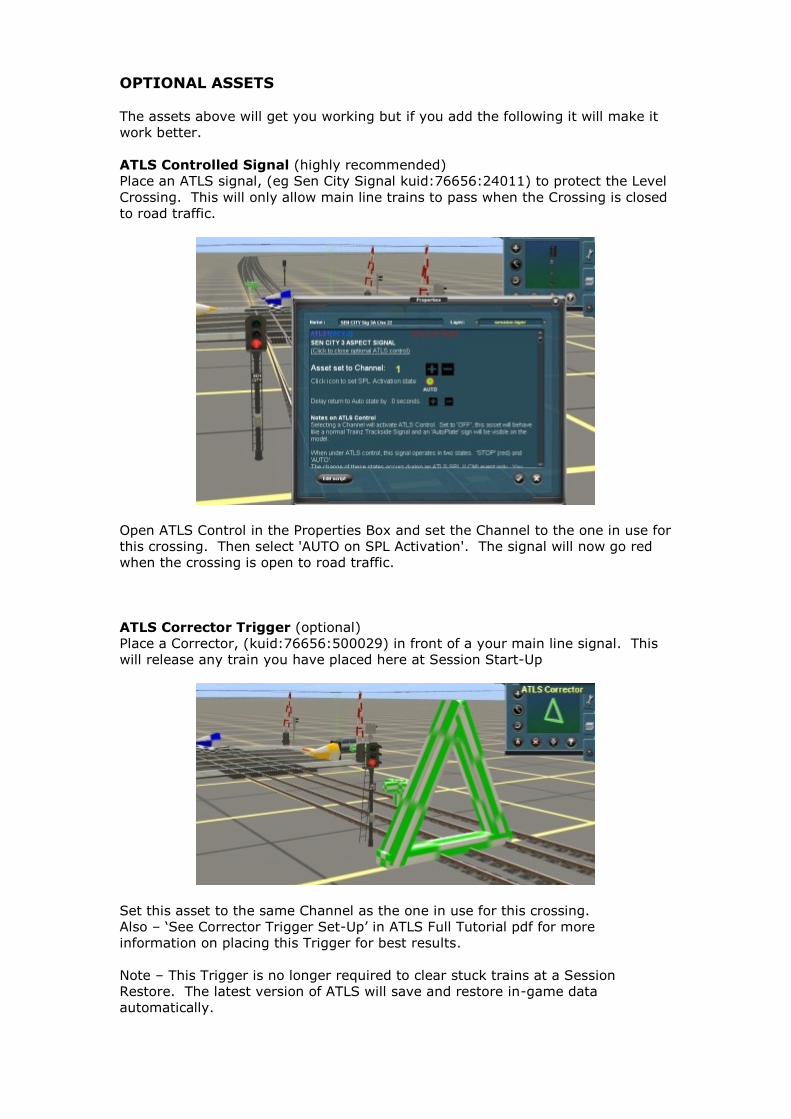
ATLS Controlled Signal (highly recommended)
Place an ATLS signal, (eg Sen City Signal kuid:76656:24011) to protect the Level
Crossing. This will only allow main line trains to pass when the Crossing is closed
to road traffic.
Open ATLS Control in the Properties Box and set the Channel to the one in use for
this crossing. Then select 'AUTO on SPL Activation'. The signal will now go red
when the crossing is open to road traffic.
ATLS Corrector Trigger (optional)
Place a Corrector, (kuid:76656:500029) in front of a your main line signal. This
will release any train you have placed here at Session Start-Up
Set this asset to the same Channel as the one in use for this crossing.
Also – ‘See Corrector Trigger Set-Up’ in ATLS Full Tutorial pdf for more
information on placing this Trigger for best results.
Note – This Trigger is no longer required to clear stuck trains at a Session
Restore. The latest version of ATLS will save and restore in-game data
automatically.
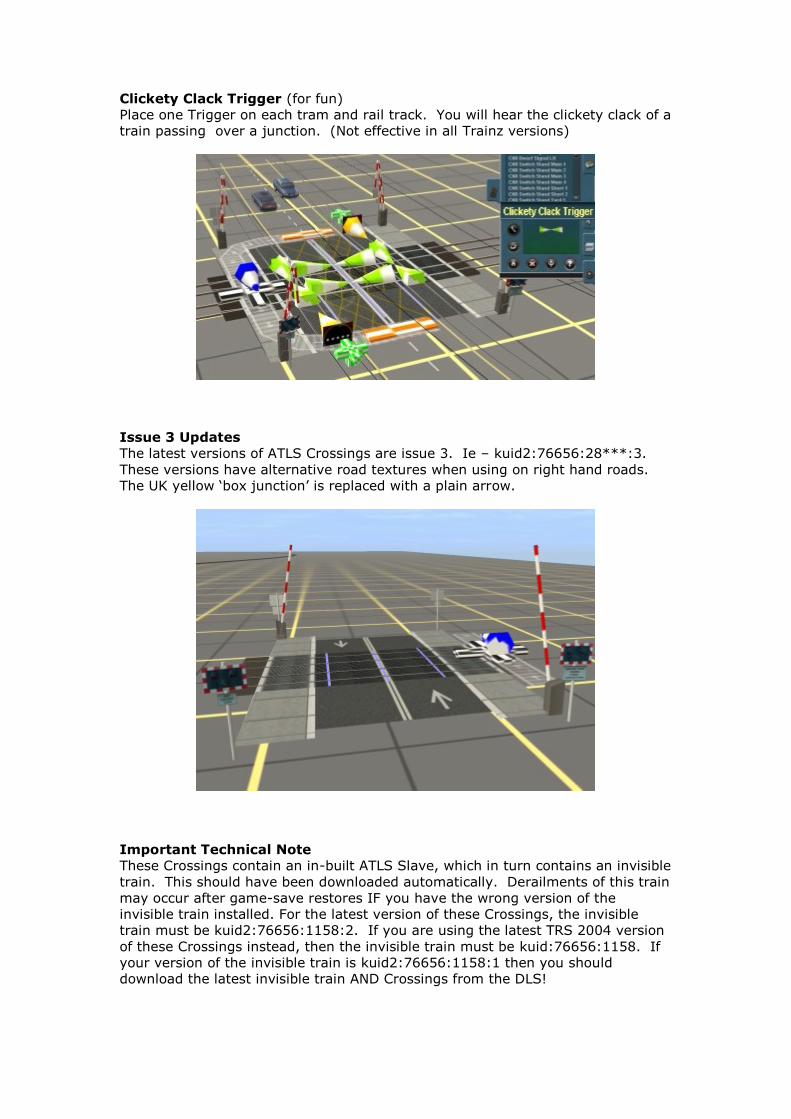
Clickety Clack Trigger (for fun)
Place one Trigger on each tram and rail track. You will hear the clickety clack of a
train passing over a junction. (Not effective in all Trainz versions)
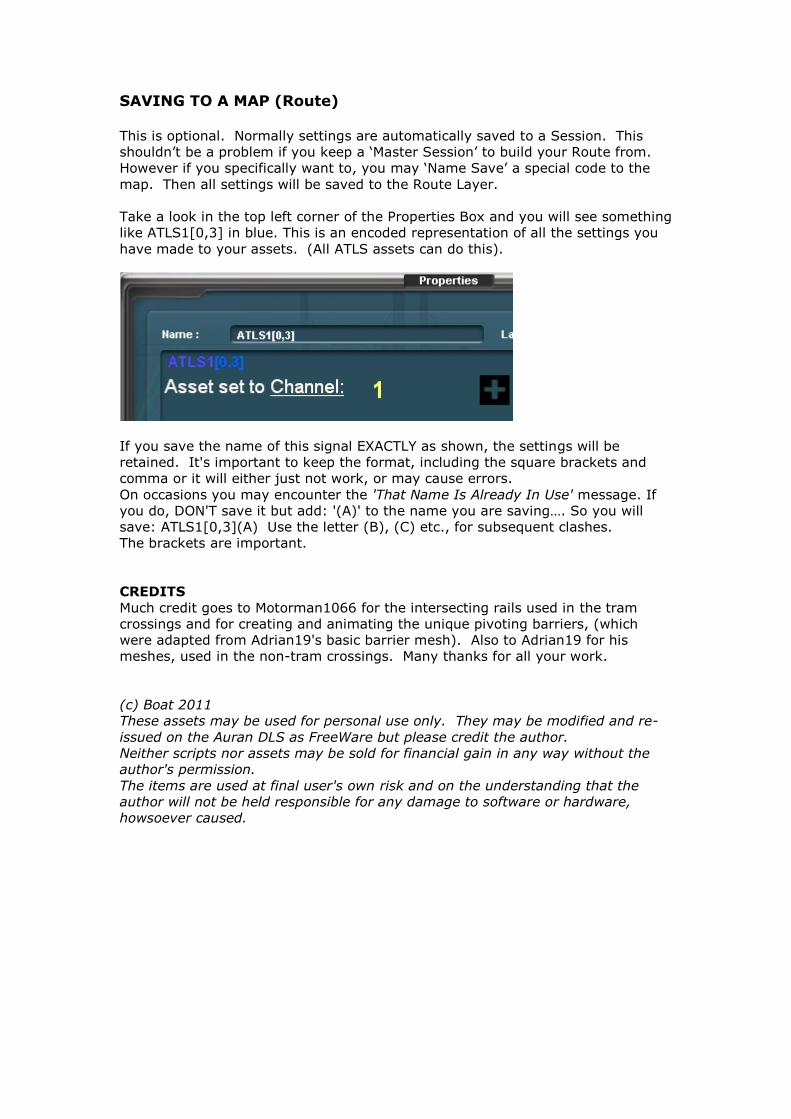
Issue 3 Updates
The latest versions of ATLS Crossings are issue 3. Ie – kuid2:76656:28***:3.
These versions have alternative road textures when using on right hand roads.
The UK yellow ‘box junction’ is replaced with a plain arrow.
Important Technical Note
These Crossings contain an in-built ATLS Slave, which in turn contains an invisible
train. This should have been downloaded automatically. Derailments of this train
may occur after game-save restores IF you have the wrong version of the
invisible train installed. For the latest version of these Crossings, the invisible
train must be kuid2:76656:1158:2. If you are using the latest TRS 2004 version
of these Crossings instead, then the invisible train must be kuid:76656:1158. If
your version of the invisible train is kuid2:76656:1158:1 then you should
download the latest invisible train AND Crossings from the DLS!
SAVING TO A MAP (Route) This is optional. Normally settings are automatically saved to a Session. This
shouldn’t be a problem if you keep a ‘Master Session’ to build your Route from.
However if you specifically want to, you may ‘Name Save’ a special code to the
map. Then all settings will be saved to the Route Layer.
Take a look in the top left corner of the Properties Box and you will see something
like ATLS1[0,3] in blue. This is an encoded representation of all the settings you
have made to your assets. (All ATLS assets can do this).
If you save the name of this signal EXACTLY as shown, the settings will be
retained. It's important to keep the format, including the square brackets and
comma or it will either just not work, or may cause errors.
On occasions you may encounter the 'That Name Is Already In Use' message. If
you do, DON'T save it but add: '(A)' to the name you are saving…. So you will
save: ATLS1[0,3](A) Use the letter (B), (C) etc., for subsequent clashes.
The brackets are important.
CREDITS
Much credit goes to Motorman1066 for the intersecting rails used in the tram
crossings and for creating and animating the unique pivoting barriers, (which
were adapted from Adrian19's basic barrier mesh). Also to Adrian19 for his
meshes, used in the non-tram crossings. Many thanks for all your work.
(c) Boat 2011
These assets may be used for personal use only. They may be modified and re-
issued on the Auran DLS as FreeWare but please credit the author.
Neither scripts nor assets may be sold for financial gain in any way without the
author's permission.
The items are used at final user's own risk and on the understanding that the
author will not be held responsible for any damage to software or hardware,
howsoever caused.