Embed Size (px)
DESCRIPTION
Atlas of Osteopathic TechniquesN.S. Nicholas 1974
Citation preview

Philadelphia College of Osteopathic MedicineDigitalCommons@PCOM
Classic Medical Works Historical Collections
1-1-1974
Atlas of Osteopathic TechniquesNicholas S. Nicholas
Follow this and additional works at: http://digitalcommons.pcom.edu/classic_med_works
This Book is brought to you for free and open access by the Historical Collections at DigitalCommons@PCOM. It has been accepted for inclusion inClassic Medical Works by an authorized administrator of DigitalCommons@PCOM. For more information, please contact [email protected].
Recommended CitationNicholas, Nicholas S., "Atlas of Osteopathic Techniques" (1974). Classic Medical Works. Book 7.http://digitalcommons.pcom.edu/classic_med_works/7


of

RC.O.M.-
d.^-

Digitized by the Internet Archive
in 2011 with funding from
Lyrasis Members and Sloan Foundation
http://www.archive.org/details/atlasofosteopathOOnich
P. C.O.M. LIBRARY
ATLASOF
OSTEOPATHICTECHNIQUES
ATLASOF
OSTEOPATHICTECHNIQUES
N. S. Nicholas, B.S., D.O., F.A.A.O.
y/S^S

m wo
OSTEOPATHIC MEDICINE
Osteopathic Medicine is a complete and comprehensive system
of medical practice which recognizes that the neuro-musculoskeletal
system is of major importance to human life and includes as its
basis the inter-relationships between this major system and the
body's internal environment.
The Osteopathic Physician incorporates evaluation and treat-
ment of the musculoskeletal system as a basis for his approach to
health and disease. This is not to the exclusion of the diagnostic
and therapeutic modalities incorporated by other scientific ap-
proaches to the healing arts.
It should be made clear that the Osteopathic Profession main-
tains its own schools of education, its own system of hospitals, and
produces large numbers of General Practitioners in addition to
training specialists in all fields.
© COPYRIGHT 1974 BYNICHOLAS S. NICHOLAS, B.S., DO., F.A.A.O.
ANDPHILADELPHIA COLLEGE OFOSTEOPATHIC MEDICINEALL RIGHTS RESERVEDSECOND EDITION, 1 980

PREFACE
This textbook of osteopathic techniques has been compiled
with photographic depictions and descriptive narratives to
better illustrate myofascial and osteopathic manipulative
procedures that have been used successfully in the pro-
fession for many years. We are not attempting to teach
osteopathic principles nor their application for various
conditions, but merely to demonstrate the most widely
employed techniques, primarily for use in student teaching
and for reference.
APPRECIATION
I wish to express my sincere thanks and appreciation to the
following for their help and cooperation in the preparation of the
material in the compilation of this atlas of osteopathic manipulative
techniques:
Faculty
David Heilig, D.O., F.A.A.O.
Robert W. England, D.O., F.A.A.O.
Alexander Nicholas, D.O.
Jerome Sulman, D.O.
Marvin E. Blumberg, D.O., F.A.A.O.
Galen D. Young, D.O.
John Sheetz, D.O., M.Sc.(Ost.) F.O.C.O.
Students
Thomas Falone
Michael Saltzburg
Ronald Kludo
Douglas Gilbert
Anthony J. Silvagni,
Pharm.D., M.Sc.
Department of Educational Communications
Donald Hulmes—Graphics
G. Walter Webb—Photography

This volume is respectfully dedicated
to
my dear wife, Marika
and to
my three sonsAlexander, Evan, and George
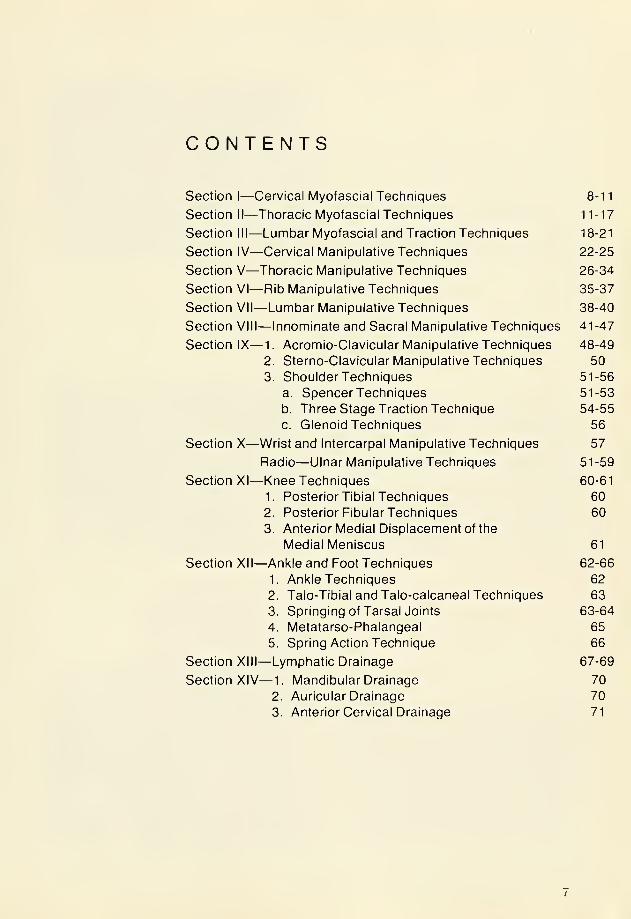
CONTENTS
Section
Section
Section
Section
Section
Section
Section
Section
Section
I—Cervical Myofascial Techniques
II—Thoracic Myofascial Techniques
III—Lumbar Myofascial and Traction Techniques
IV—Cervical Manipulative Techniques
V—Thoracic Manipulative Techniques
VI—Rib Manipulative Techniques
VII—Lumbar Manipulative Techniques
VIM—Innominate and Sacral Manipulative Techniques
IX -1.
2.
3.
Section
Section
Section XII
Section
Section
Acromio-Clavicular Manipulative Techniques
Sterno-Clavicular Manipulative Techniques
Shoulder Techniques
a. Spencer Techniques
b. Three Stage Traction Technique
c. Glenoid Techniques
X—Wrist and Intercarpal Manipulative Techniques
Radio—Ulnar Manipulative Techniques
XI—Knee Techniques
1. Posterior Tibial Techniques
2. Posterior Fibular Techniques
3. Anterior Medial Displacement of the
Medial Meniscus
Ankle and Foot Techniques
1. Ankle Techniques
2. Talo-Tibial and Talo-calcaneal Techniques
3. Springing of Tarsal Joints
4. Metatarso-Phalangeal
5. Spring Action Technique
XIII—Lymphatic Drainage
XIV— 1. Mandibular Drainage
2. Auricular Drainage
3. Anterior Cervical Drainage
8-11
11-17
18-21
22-25
26-34
35-37
38-40
41-47
48-49
50
51-56
51-53
54-55
56
57
51-59
60-61
60
60
61
62-66
62
63
63-64
65
66
67-69
70
70
71

CERVICAL MYOFASCIAL TECHNIQUES
Patient Supine— Head is rotated to the left;
physician at the right side of table; the thenar
eminence of the left hand is placed just below
the mastoid process of the left side. A gentle
springing pressure is exerted downward over
the temporal bone by the right hand in order to
"stretch" the tissues.
This, of course, can be done in the samemanner to the opposite side by reversing the
procedure.
Cupping Chin and Occiput—The patient is in
the supine position; the right hand cups the
chin; the left hand the occiput, with the thumbsin a natural position. There is gradual cephalad
traction produced through both hands, then the
atlanto-occipital, atlanto-axial, and the rest of
the upper cervical segments are put through
their range of motion springing where tension
appears with the release being gradual. Youmay then bring the head up free from the end of
the table so that backward bending into the mid
and lower cervical areas can be added.
Forearm Fulcrum—Patient is supine, the right
forearm is placed under the cervical columnperpendicular to the axis of the body with the
hand resting on the table just below the
patient's head. The patient's head is now rolled
across the physician's right forearm using the
left hand of the physician to direct the head.This is done very gently for the forearm is
considerably less sensitive to pressure than the
hands. The procedure is reversed to work theopposite side.

CERVICAL MYOFASCIAL TECHNIQUES
Bilateral Forearm Fulcrum for Forward Bend-ing— Patient supine— the physician reinforces
the fulcrum arm with the other forearm forming
a V-shaped cradle for the patient's occiput andslowly increases the pressure in forward bending.
Head-Chest Position— The patient is sitting on
a table or stool with the physician facing the
patient. The patient's frontal bone is placed
against the physician's chest and the physician's
hands or index fingers reinforce each other in
the posterior cervical area. The patient is then
drawn toward the physician and a slight
exaggeration of movement is produced forward
and upward with a springing motion.
Modification: Patient's head is turned to the
side and side-bending is produced. Excellent
geriatric technique.
Sitting Traction— The patient is sitting with the
physician standing behind and to the left side of
the patient. The physician's right foot is placed
on the stool behind the patient and the
physician's right elbow is placed on his right
thigh. Now the right hand sustains the occiput
with the thumb and forefinger and the left hand
sustains the forehead. Traction is produced by
gently elevating the right thigh and knee by
lifting the heel of the right foot. Traction is
released by slowly returning the right heel to its
original position.
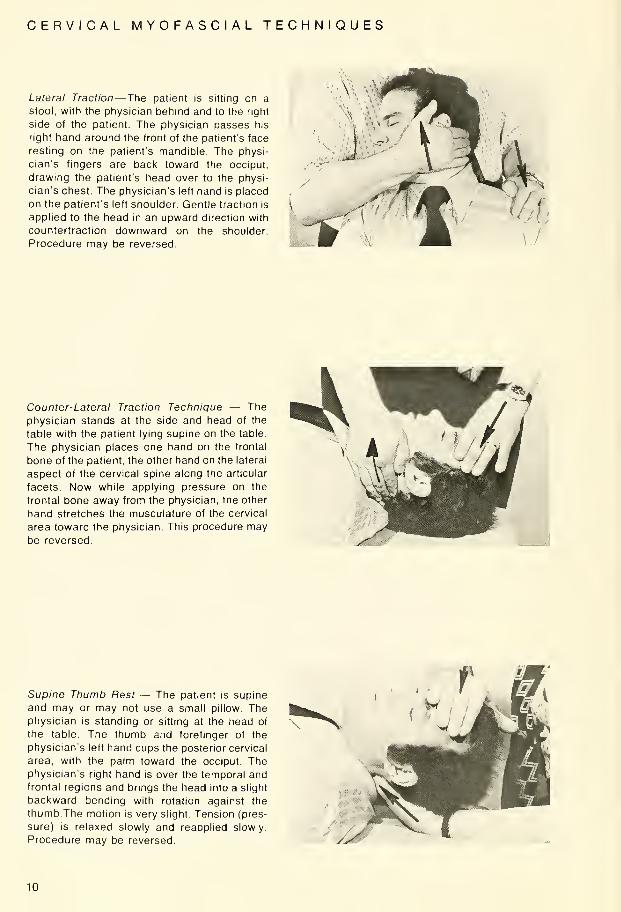
CERVICAL MYOFASCIAL TECHNIQUES
Lateral Traction— The patient is sitting on a
stool, with the physician behind and to the right
side of the patient. The physician passes his
right hand around the front of the patient's face
resting on the patient's mandible. The physi-
cian's fingers are back toward the occiput,
drawing the patient's head over to the physi-
cian's chest. The physician's left hand is placed
on the patient's left shoulder. Gentle traction is
applied to the head in an upward direction with
countertraction downward on the shoulder.
Procedure may be reversed.
Counter-Lateral Traction Technique — The
physician stands at the side and head of the
table with the patient lying supine on the table.
The physician places one hand on the frontal
bone of the patient, the other hand on the lateral
aspect of the cervical spine along the articular
facets. Now while applying pressure on the
frontal bone away from the physician, the other
hand stretches the musculature of the cervical
area toward the physician. This procedure maybe reversed.
Supine Thumb Rest — The patient is supine
and may or may not use a small pillow. Thephysician is standing or sitting at the head of
the table. The thumb and forefinger of the
physician's left hand cups the posterior cervical
area, with the palm toward the occiput. Thephysician's right hand is over the temporal andfrontal regions and brings the head into a slight
backward bending with rotation against the
thumb. The motion is very slight. Tension (pres-
sure) is relaxed slowly and reapplied slowly.
Procedure may be reversed.
10
CERVICAL MYOFASCIAL TECHNIQUES
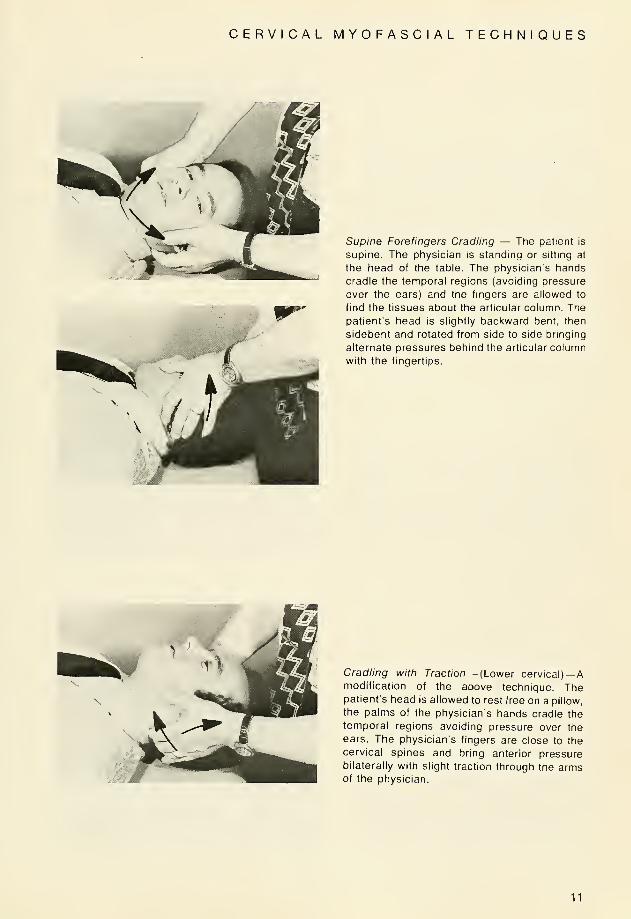
Supine Forefingers Cradling — The patient is
supine. The physician is standing or sitting at
the head of the table. The physician's hands
cradle the temporal regions (avoiding pressure
over the ears) and the fingers are allowed to
find the tissues about the articular column. The
patient's head is slightly backward bent, then
sidebent and rotated from side to side bringing
alternate pressures behind the articular column
with the fingertips.
Cradling with Traction— (Lower cervical)—
A
modification of the above technique. Thepatient's head is allowed to rest free on a pillow,
the palms of the physician's hands cradle the
temporal regions avoiding pressure over the
ears. The physician's fingers are close to the
cervical spines and bring anterior pressurebilaterally with slight traction through the armsof the physician.
11
THORACIC MYOFASCIAL TECHNIQUES
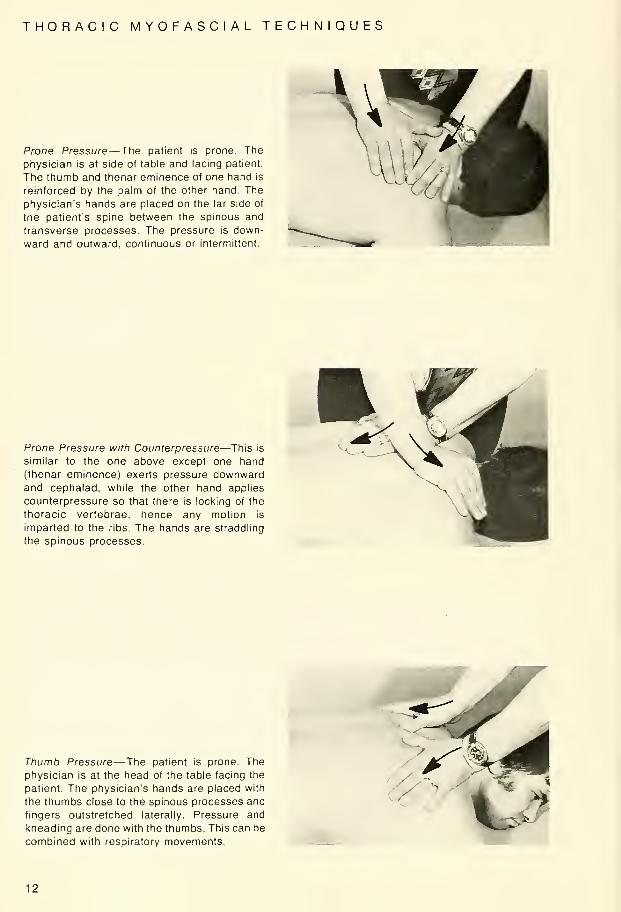
Prone Pressure— The patient is prone. The
physician is at side of table and facing patient.
The thumb and thenar eminence of one hand is
reinforced by the palm of the other hand. The
physician's hands are placed on the far side of
the patient's spine between the spinous and
transverse processes. The pressure is down-
ward and outward, continuous or intermittent.
Prone Pressure with Counterpressure—This is
similar to the one above except one hand
(thenar eminence) exerts pressure downwardand cephalad, while the other hand applies
counterpressure so that there is locking of the
thoracic vertebrae, hence any motion is
imparted to the ribs. The hands are straddling
the spinous processes.
Thumb Pressure— The patient is prone. The
physician is at the head of the table facing the
patient. The physician's hands are placed with
the thumbs close to the spinous processes and
fingers outstretched laterally. Pressure and
kneading are done with the thumbs. This can be
combined with respiratory movements.
12

THORACIC MYOFASCIAL TECHNIQUES
Lateral Recumbent with Shoulder Block— Jr\e
patient is in the right lateral recumbent position,
with the physician facing the patient at the side
of the table. The physician's right forearm is
slipped under the patient's upper left arm andhis fingertips find the area supero-lateral to the
spinous processes. The physician's left handrestrains the shoulder as the fingertips of the
right hand are pulled toward the physician. This
procedure may be reversed.
i
Lateral Recumbent under the Shoulder—The
position is the same as the above technique
except that the physician's left hand slips under
the patient's left upper arm and assumes a
position alongside the right hand. The patient's
shoulder will automatically be restrained by the
physician's left forearm. This procedure may be
reversed.
Interscapular (Far Side) Technique — Thepatient is in the right lateral recumbent position.
The physician is facing the patient at the side of
the table. The physician's arms reach across
the patient and the thumbs are placed in the
rhomboids of the patient's right side. Pressure
and kneading is done with the thumbs and is
continuous or intermittent. This procedure maybe reversed.
13

THORACIC MYOFASCIAL TECHNIQUES
Side Leverage Technique — The patient is
lying on his right side, his left arm straight downalong his side. The physician is sitting on the
edge of the table, the physician's right armlocking the patient's left arm. The physician's
thumb is placed over the spinous process of the
lower of the two in lesion. Patient's head is
cupped with the physician's left hand andbrought gently upwards with sidebending andforward bending. Backward bending can also
be employed with the side bending. This
procedure may be reversed.
r -5S»-
Under-Over Technique and Modification—Thepatient is sitting with his arms crossed in front of
his chest and his thumbs hooked in each of his
ante-cubital fossae. The physician is standing
facing the patient. The physician's hands are
placed under the patient's forearms and over
his shoulders with the physician's fingers con-
tacting the tissues over the transverse
processes of the thoracic vertebrae. Thepatient is drawn toward the physician and
springing is accomplished by an upward
leverage on the forearms and a downwardpressure exerted through the fingertips.
Prone Elbow Support for Upper Thoracic —Thepatient is prone and his elbows are perpen-
dicular to his body. His hands are crossed or his
forearms are placed straight ahead in a parallel
position depending on the degree of flexion of
his head. The physician stands to the left side of
the table facing the patient. The patient's upperthoracics are fixed with the physician's right
hand, (either thumb, thenar eminence, or palm)
just below the area of involvement. The physi-
cian's left hand is placed over the occiput
forward bending the cervical region and then
gently springs downward.
14

THORACIC MYOFASCIAL TECHNIQUES
Prone Elbow Support with Calf Hold (Mid andLower Thoracic)—The patient's position is the
same as the Prone Elbow Support tor UpperThoracic. Now the physician moves to a posi-
tion next to the patient's left thigh. The physi-
cian's right hand holds the patient's left calf. His
left hand straddles the spinous processes
anterior to the affected thoracics with his
fingers in a cephalad direction. Springing is
forward and upward with the left hand.
Patient Sitting — Rib Raising with Extension
(Backward Bending)—The patient's hands are
clasped behind his neck. The physician sup-
ports the patient's elbows with one hand while
his other hand straddles the spinous processes.
The physician elevates the patient's elbows as
backward bending pressure is exerted forward
and upward with his dorsal hand. With the
physician's hand lateral to the spine, specific
rib areas can be reached.
15

THORACIC MYOFASCIAL TECHNIQUES
Thoracic Traction Stretch Technique — The
patient is sitting with his hands clasped behind
his neck. The physician stands behind the
patient with his arms under the patient's axillae
and his hands grasping the patient's wrists or
reinforcing the patient's hands. The physician's
arms and hands simply maintain this position,
while the patient s entire trunk is backward bent
and/or rotated or sidebent.
Sitting Elbow Support Technique — The pa-
tient is seated on a stool facing the table. He
then bends forward placing his elbows on the
treatment table to support his trunk. The physi-
cian is standing to the right side maintaining
forward bending of the head with his right hand,
while springing downward in the thoracic area
with his left hand.
Straddle-Backward Bending Technique — The
patient straddles the table with his armsextended and placed forward so that his hands
grasp the sides of the table. Backward bending
of the patient's trunk is attained by pressure of
the physcian's hand straddling the patient's
spine.
m -
\^>"
16
THORACIC MYOFASCIAL TECHNIQUES
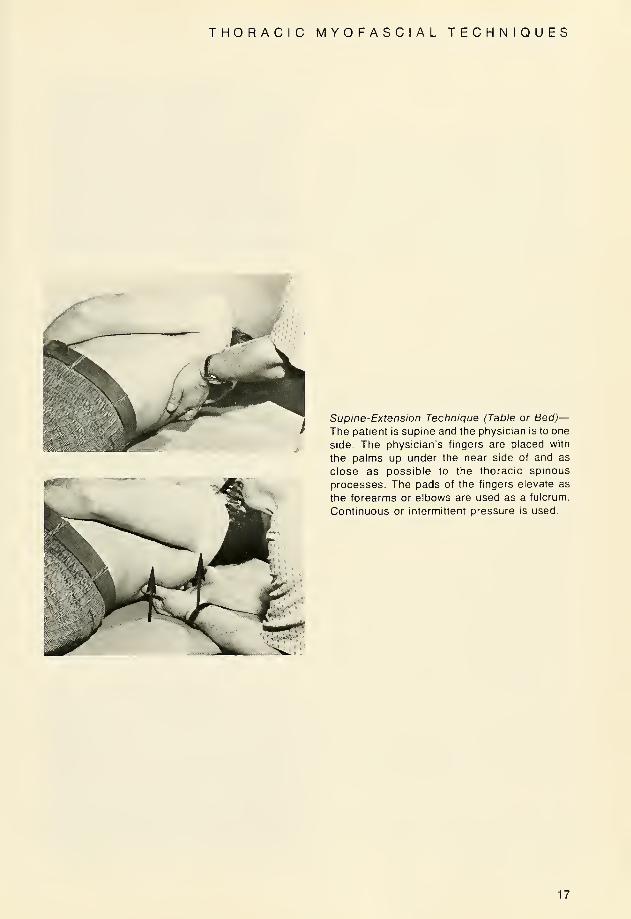
Supine-Extension Technique (Table or Bed)—The patient is supine and the physician is to one
side. The physician's fingers are placed with
the palms up under the near side of and as
close as possible to the thoracic spinous
processes. The pads of the fingers elevate as
the forearms or elbows are used as a fulcrum.
Continuous or intermittent pressure is used.
17
LUMBAR MYOFASCIAL TECHNIQUES
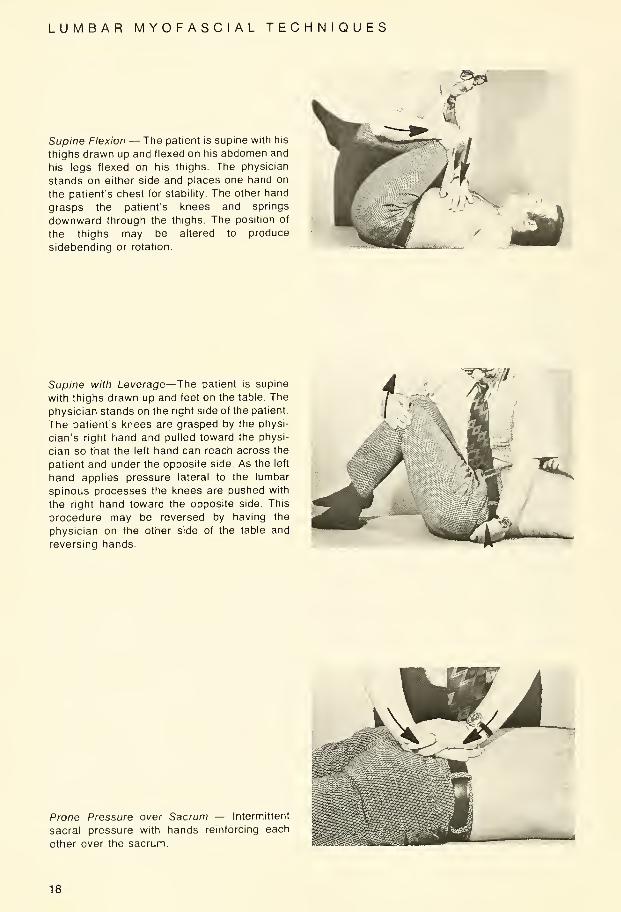
Supine Flexion — The patient is supine with his
thighs drawn up and flexed on his abdomen and
his legs flexed on his thighs. The physician
stands on either side and places one hand on
the patient's chest for stability. The other hand
grasps the patient's knees and springs
downward through the thighs. The position of
the thighs may be altered to produce
sidebending or rotation.
Supine with Leverage—The patient is supine
with thighs drawn up and feet on the table. The
physician stands on the right side of the patient.
The patient's knees are grasped by the physi-
cian's right hand and pulled toward the physi-
cian so that the left hand can reach across the
patient and under the opposite side. As the left
hand applies pressure lateral to the lumbar
spinous processes the knees are pushed with
the right hand toward the opposite side. This
procedure may be reversed by having the
physician on the other side of the table and
reversing hands.
T»T
Prone Pressure over Sacrum — Intermittent
sacral pressure with hands reinforcing each
other over the sacrum.
18

LUMBAR MYOFASCIAL TECHNIQUES
Prone Pressure with Counter-Leverage — Thepatient is prone. The physician is to the left andexerts a deep pressure with his left hand in the
right lumbar area on the right paravertebral
musculature. His right hand is placed under the
right anterior superior iliac spine pulling with
counter-leverage. A counter-springing motion
is also used with this technique. The procedure
is changed to use on the patient's left lumbar
area.
—
^
Prone Pressure with Crossed Hands over
Lumbars and Sacrum—The left hand crosses
and maintains a pressure downward and
caudad on the sacral promontory. Thephysician's right hand straddles the lumbar
spinous processes and pressure is applied
downward and cephalad.
Prone Scissors Techniques—The patient is
prone. The right lower limb remains extended
as it is brought across the popliteal space of the
left lower limb. The physician stands on the left
side of the patient and with his right handmaintains the position of the lower limbs while
the left hand prpduces a springing motion
downward toward the table and laterally in the
lumbar and pelvic areas. This also can bereversed by having physician on the other side
of the table
Modification of the Prone Scissors Technique—Same as preceding, except the physician's right
hand is placed between the patient's knees to
maintain scissors.
19
LUMBAR MYOFASCIAL TECHNIQUES
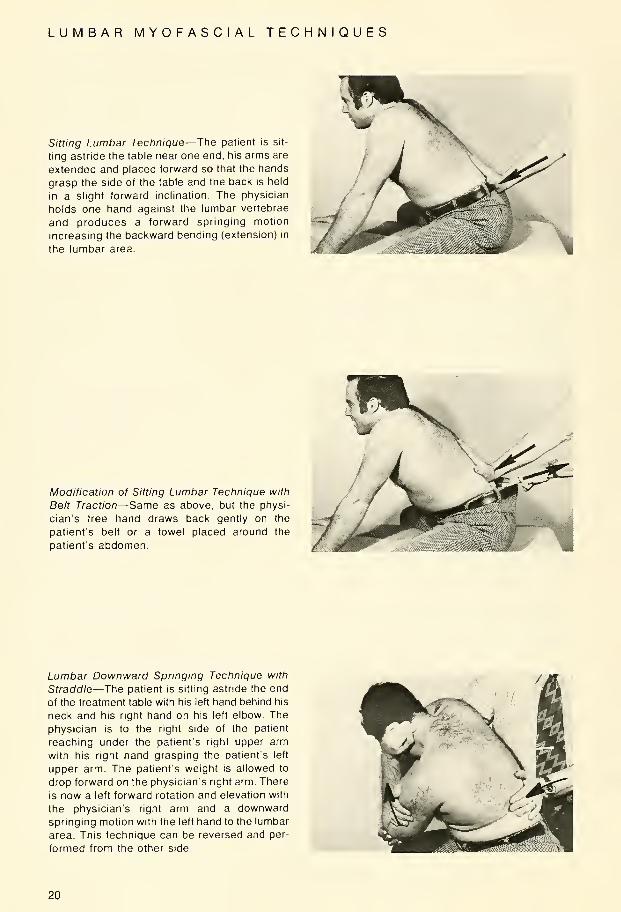
Sitting Lumbar Technique—The patient is sit-
ting astride the table near one end, his arms are
extended and placed forward so that the hands
grasp the side of the table and the back is held
in a slight forward inclination. The physician
holds one hand against the lumbar vertebrae
and produces a forward springing motion
increasing the backward bending (extension) in
the lumbar area.
Modification of Sitting Lumbar Technique with
Belt Traction—Same as above, but the physi-
cian's free hand draws back gently on the
patients belt or a towel placed around the
patient's abdomen.
Lumbar Downward Springing Technique with
Straddle—The patient is sitting astride the end
of the treatment table with his left hand behind his
neck and his right hand on his left elbow. The
physician is to the right side of the patient
reaching under the patient's right upper arm
with his right hand grasping the patient's left
upper arm. The patient's weight is allowed to
drop forward on the physician's right arm. There
is now a left forward rotation and elevation with
the physician's right arm and a downwardspringing motion with the left hand to the lumbar
area. This technique can be reversed and per-
formed from the other side.
20
LUMBAR MYOFASCIAL TECHNIQUES
-^^
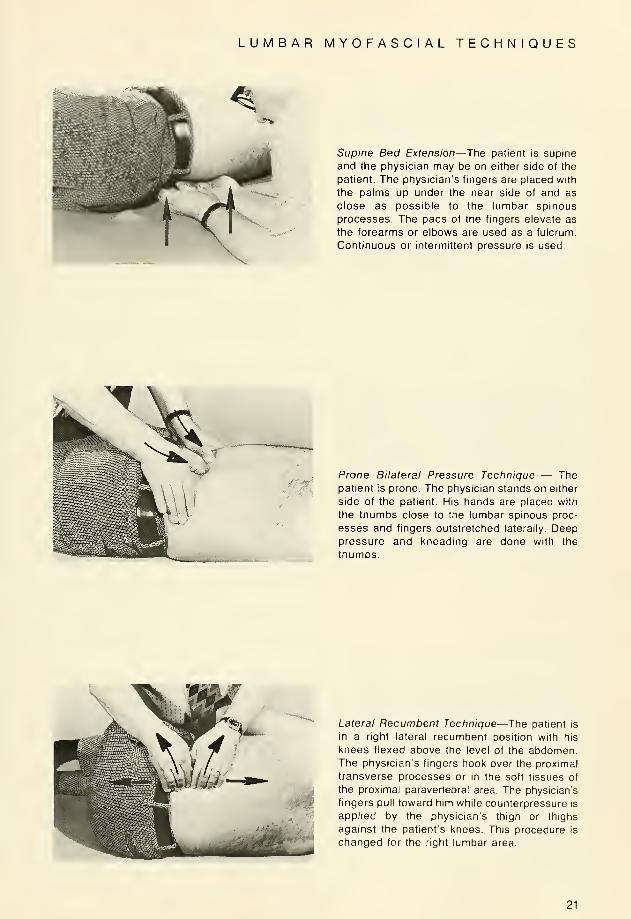
Supine Bed Extension—The patient is supine
and the physician may be on either side of the
patient. The physician's fingers are placed with
the palms up under the near side of and as
close as possible to the lumbar spinous
processes. The pads of the fingers elevate as
the forearms or elbows are used as a fulcrum.
Continuous or intermittent pressure is used.
Prone Bilateral Pressure Technique — Thepatient is prone. The physician stands on either
side of the patient. His hands are placed with
the thumbs close to the lumbar spinous proc-
esses and fingers outstretched laterally. Deeppressure and kneading are done with the
thumbs.
Lateral Recumbent Technique—The patient is
in a right lateral recumbent position with his
knees flexed above the level of the abdomen.The physician's fingers hook over the proximal
transverse processes or in the soft tissues of
the proximal paravertebral area. The physician's
fingers pull toward him while counterpressure is
applied by the physician's thigh or thighs
against the patient's knees. This procedure is
changed for the right lumbar area.
21
CERVICAL MANIPULATIVE TECHNIQUES
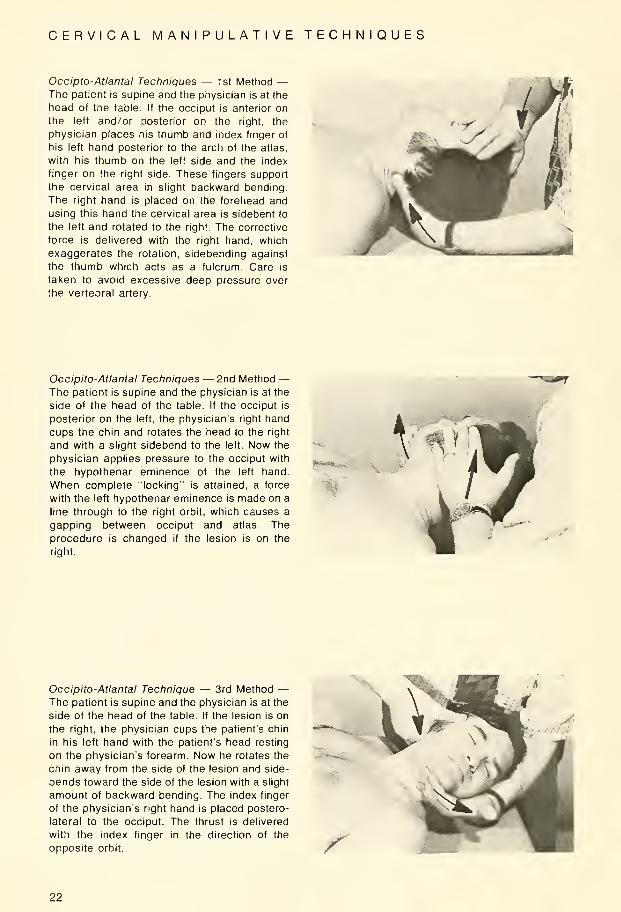
Occipto-Atlantal Techniques — 1st Method —The patient is supine and the physician is at the
head of the table. If the occiput is anterior onthe left and/or posterior on the right, the
physician places his thumb and index finger of
his left hand posterior to the arch of the atlas,
with his thumb on the left side and the index
finger on the right side. These fingers support
the cervJcal area in slight backward bending.
The right hand is placed on the forehead and
using this hand the cervical area is sidebent to
the left and rotated to the right. The corrective
force is delivered with the right hand, which
exaggerates the rotation, sidebending against
the thumb which acts as a fulcrum. Care is
taken to avoid excessive deep pressure over
the vertebral artery.
Occipito-Atlantal Techniques — 2nd Method —The patient is supine and the physician is at the
side of the head of the table. If the occiput is
posterior on the left, the physician's right hand
cups the chin and rotates the head to the right
and with a slight sidebend to the left. Now the
physician applies pressure to the occiput with
the hypothenar eminence of the left hand.
When complete "locking" is attained, a force
with the left hypothenar eminence is made on a
line through to the right orbit, which causes a
gapping between occiput and atlas. The
procedure is changed if the lesion is on the
right.
\
Occipito-Atlantal Technique — 3rd Method —The patient is supine and the physician is at the
side of the head of the table. If the lesion is on
the right, the physician cups the patient's chin
in his left hand with the patient's head resting
on the physician's forearm. Now he rotates the
chin away from the side of the lesion and side-
bends toward the side of the lesion with a slight
amount of backward bending. The index finger
of the physician's right hand is placed postero-
lateral to the occiput. The thrust is delivered
with the index finger in the direction of the
opposite orbit. f22

CERVICAL MANIPULATIVE TECHNIQUES
r
Atlanto-Axial Technique— 1st Method — Thepatient is supine and the physician is at the side
of the head of the table. If the lesion is on the
right, the physician cups the patient's chin in his
left hand with the patient's head resting on the
physician's forearm. The physician's right index
finger is postero-lateral to the posterior arch of
the atlas and the thumb of the same hand is on
the ramus of the mandible. The cervical column
otherwise is in a neutral position. The corrective
force is rotational. This procedure is changed if
the lesion is on the left.
Atlanto-Axial Technique—2nd Method—The
patient is supine and the physician is at the side
of the head of the table. If the lesion is on the
right, the cervical area is rotated to the left, with
the temporal bone resting on the palm of the left
hand. The physician's right hand is placed on
the ramus of the mandible with the fingers
extending downward toward the chin. This hand
is used to suddenly increase the left rotation by
pressing downward toward the table on the
ramus of the mandible. The cervical column is
otherwise kept in a neutral position. This proce-
dure is changed if the lesion is on the left.
Cervical Technique (3rd to 7th Cervicals
Inclusive) — 1st Method — The patient is
supine and the physician is at the side of the
head of the table. If the lesion is on the right, the
physician's left hand cups the chin and rotates
the cervical area to the left and sidebends to the
right. The index finger of the right hand is
placed postero-laterally to the articular processof the upper of the two in lesion. After 'locking'
rotation, there is sidebending with slight
backward bending with the left hand the thrust
being given with the right index finger in an arc
conforming to the plane of the facets at that
point. This procedure is changed if the lesion is
on the left.
23
CERVICAL MANIPULATIVE TECHNIQUES
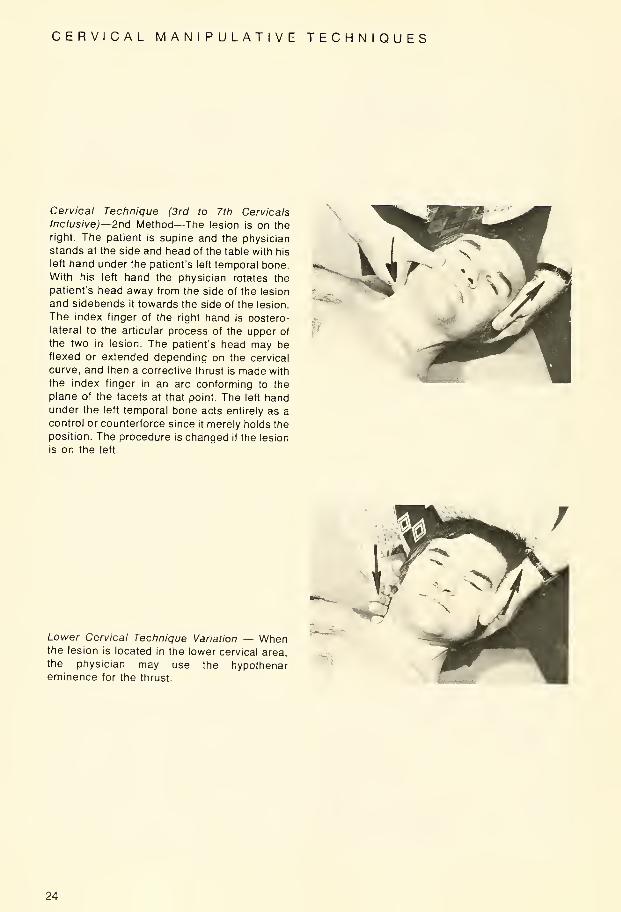
Cervical Technique (3rd to 7th Cervicals
Inclusive)—2nd Method—The lesion is on the
right. The patient is supine and the physician
stands at the side and head of the table with his
left hand under the patient's left temporal bone.
With his left hand the physician rotates the
patient's head away from the side of the lesion
and sidebends it towards the side of the lesion.
The index finger of the right hand is postero-
lateral to the articular process of the upper of
the two in lesion. The patient's head may beflexed or extended depending on the cervical
curve, and then a corrective thrust is made with
the index finger in an arc conforming to the
plane of the facets at that point. The left handunder the left temporal bone acts entirely as a
control or counterforce since it merely holds the
position. The procedure is changed if the lesion
is on the left.
Lower Cervical Technique Variation — Whenthe lesion is located in the lower cervical area,
the physician may use the hypothenareminence for the thrust.
24

CERVICAL MANIPULATIVE TECHNIQUES
>>
A. "Indirect Technique" — Cervical Technique
Variations — The lesion is on the right — Thepatient is supine and the physician is at the
head and side ot the table. The index finger of
the right hand is placed at the articular pillar of
the lower vertebra of the two in lesion. Theindex finger of the left hand is placed on the
articular pillar of the upper vertebra of the two in
lesion. Now the cervical column is rotated to the
left and sidebent to the right and when "rotation
locking" is accomplished, the rotation is
increased by the left hand. The procedure is
changed if the lesion is on the left.
B. Method II — The lesion is on the right —Same as above: The emphasis must be madethat in the "indirect" technique only a holding
force is applied by the finger on the lower of the
two in lesion.
25
THORACIC MANIPULATIVE TECHNIQUES
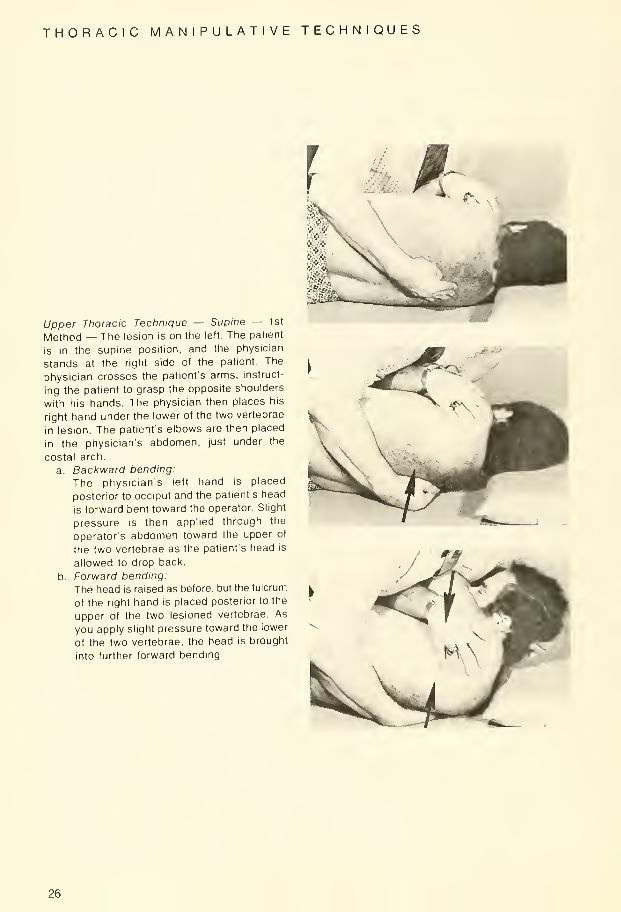
Upper Thoracic Technique — Supine — 1st
Method — The lesion is on the left. The patient
Is in the supine position, and the physician
stands at the right side of the patient. The
physician crosses the patient's arms, instruct-
ing the patient to grasp the opposite shoulders
with his hands. The physician then places his
right hand under the lower of the two vertebrae
in lesion. The patient's elbows are then placed
in the physician's abdomen, just under the
costal arch.
a. Backward bending:
The physician's left hand is placed
posterior to occiput and the patient's head
is forward bent toward the operator. Slight
pressure is then applied through the
operator's abdomen toward the upper of
the two vertebrae as the patient's head is
allowed to drop back.
b. Forward bending:
The head is raised as before, but the fulcrum
of the right hand is placed posterior to the
upper of the two lesioned vertebrae. As
you apply slight pressure toward the lower
of the two vertebrae, the head is brought
into further forward bending.
26

THORACIC MANIPULATIVE TECHNIQUES
Upper Thoracic Technique—2nd Method—Thelesion is on the left. The patient is in a right
lateral recumbent position and the physician is
sitting on the table facing the patient. Thephysician's left hand is placed under the occiput,
and his right thumb contacts the spinous
process of the lower of the two in lesion,
pressing downward toward the table. Thephysician sidebends upward and forward bends
the cervical column and rotates the face toward
and away from him testing resistance. After
selecting the point of least resistance, the
thrust is made in the form of an upward thrust lift
with the left hand while maintaining the down-
ward pressure with the right thumb on the
spinous process. The procedure is changed if
the lesion is on the right.
Upper Thoracic—Sitting and Arms Crossed—The patient is sitting on the table or on a stool.
The physician stands behind the patient and
crosses the patient's arms, grasping the elbows
and pulling them laterally as far as possible to
separate the scapulae. The physician places
his foot on the table and his knee with, or with-
out, a pillow, behind the lower of the two in
lesion. The thrust is made in a forward direction
while drawing the patient backward with the
arms.
27
THORACIC MANIPULATIVE TECHNIQUES
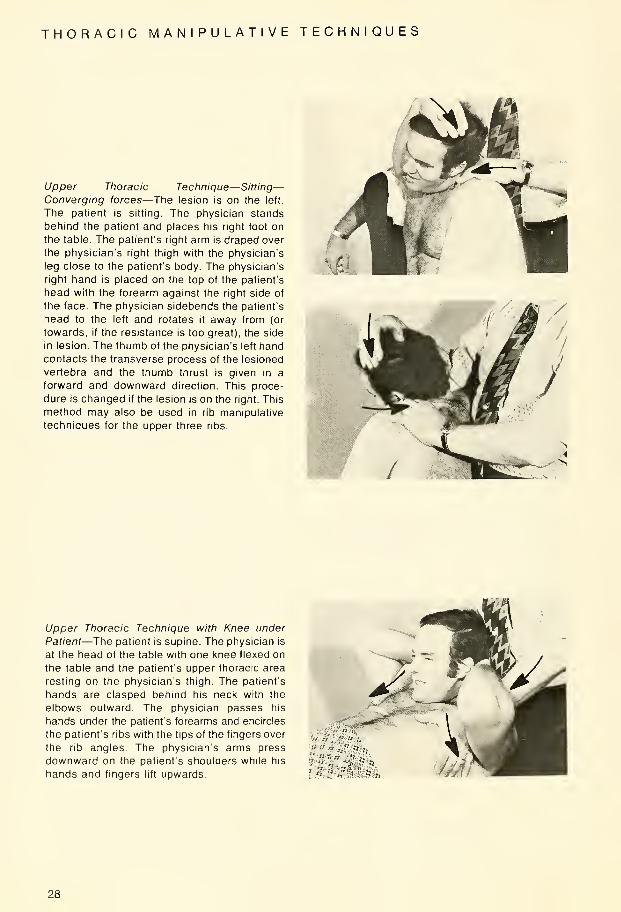
Upper Thoracic Technique—Sitting—Converging forces—The lesion is on the left.
The patient is sitting. The physician stands
behind the patient and places his right foot on
the table. The patient's right arm is draped over
the physician's right thigh with the physician's
leg close to the patient's body. The physician's
right hand is placed on the top of the patient's
head with the forearm against the right side of
the face. The physician sidebends the patient's
head to the left and rotates it away from (or
towards, if the resistance is too great), the side
in lesion. The thumb of the physician's left handcontacts the transverse process of the lesioned
vertebra and the thumb thrust is given in a
forward and downward direction. This proce-
dure is changed if the lesion is on the right. This
method may also be used in rib manipulative
techniques for the upper three ribs.
Upper Thoracic Technique with Knee under
Patient—The patient is supine. The physician is
at the head of the table with one knee flexed on
the table and the patient's upper thoracic area
resting on the physician's thigh. The patient's
hands are clasped behind his neck with the
elbows outward. The physician passes his
hands under the patient's forearms and encircles
the patient's ribs with the tips of the fingers over
the rib angles. The physician's arms press
downward on the patient's shoulders while his
hands and fingers lift upwards
28

THORACIC MANIPULATIVE TECHNIQUES
Upper Thoracic — Prone with Pillows under
Chest — 2 Positions — A. This technique is
used mostly in patients who have hypermobility
and locking is difficult when the primary force is
against the transverse process of the lower
lesioned vertebrae. The patient is prone with
his face turned so that his cheek rests on the
table. The physician stands to the side of the
table towards which the occiput is directed. The
physician's cephalad hand cups the patient's
chin with his forearm resting on the patient's
face, producing an extreme rotation. Use cau-
tion in this maneuver. The physician's thenar
eminence of the other hand delivers a thrust
against the proximal side of the spinous
process.
B. This technique is the same as above except
it is used for individuals who have a relatively
flat thoracic area. Use enough pillows under the
upper chest wall in order to increase the
kyphosis of the patient's upper thoracic area.
The physician is at the head of the table with the
patient's head rotated to the side of the lesion
and sidebent away from the side of the lesion.
The physician's thenar eminence is placed
against the transverse process of the lower of
the two in lesion while the other hand thrusts
the head in an exaggerated sidebent position.
This may be modified by moving out to the
angle of the ribs to become a 'rib' technique.
29

THORACIC MANIPULATIVE TECHNIQUES
Mid-Thoracic Technique—Supine— 1st Method
—
The lesion is on the left. The patient is supine
with his arms crossed over his chest with each
hand grasping the opposite shoulder Thephysician stands on the right side of the table
facing the patient. Using his left hand, the
physician rolls the patient toward him by lifting
the patient's shoulder far enough to place his
right thenar eminence under the lower of the
two lesioned vertebrae. He then places the
patient's elbows in his axilla and delivers a
thrust in a downward (toward the table) and
slightly cephalad direction. This force is directed
toward the upper of the two vertebrae in lesion
to produce backward bending. This procedure
is changed if the lesion is on the right. See also
upper thoracic technique page 26.
30
THORACIC MANIPULATIVE TECHNIQUES
*^*F
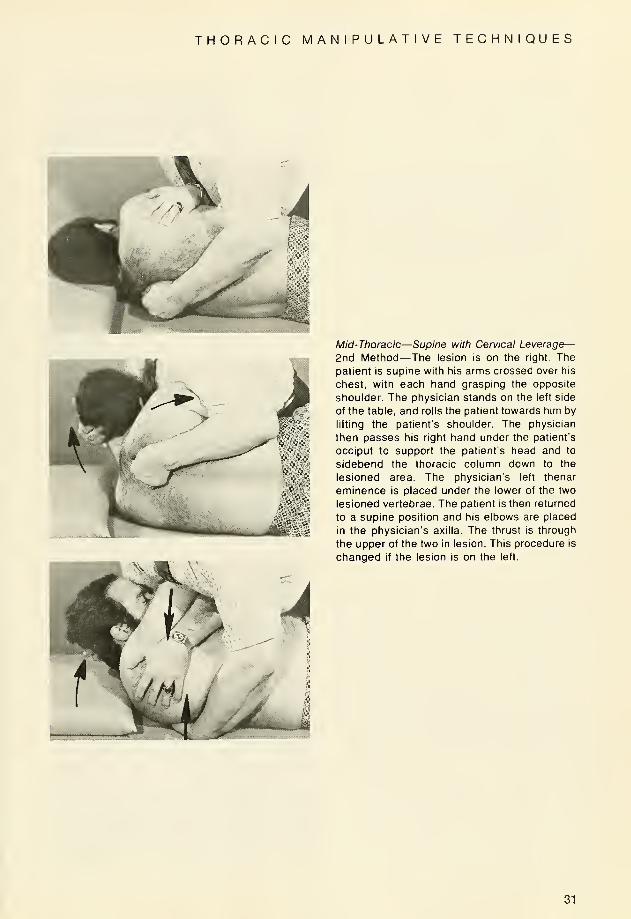
Mid-Thoracic—Supine with Cervical Leverage—2nd Method—The lesion is on the right. The
patient is supine with his arms crossed over his
chest, with each hand grasping the opposite
shoulder. The physician stands on the left side
of the table, and rolls the patient towards him by
lifting the patient's shoulder. The physician
then passes his right hand under the patient's
occiput to support the patient's head and to
sidebend the thoracic column down to the
lesioned area. The physician's left thenar
eminence is placed under the lower of the two
lesioned vertebrae. The patient is then returned
to a supine position and his elbows are placed
in the physician's axilla. The thrust is through
the upper of the two in lesion. This procedure is
changed if the lesion is on the left.
31
THORACIC MANIPULATIVE TECHNIQUES
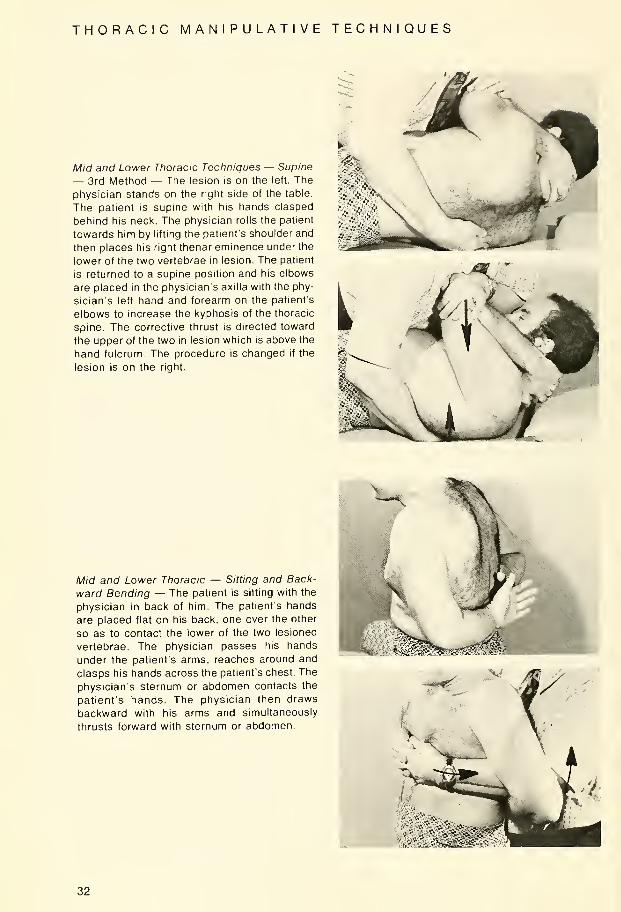
Mid and Lower Thoracic Techniques — Supine
— 3rd Method — The lesion is on the left. The
physician stands on the right side of the table.
The patient is supine with his hands clasped
behind his neck. The physician rolls the patient
towards him by lifting the patient's shoulder and
then places his right thenar eminence under the
lower of the two vertebrae in lesion. The patient
is returned to a supine position and his elbows
are placed in the physician's axilla with the phy-
sician's left hand and forearm on the patient's
elbows to increase the kyphosis of the thoracic
spine. The corrective thrust is directed toward
the upper of the two in lesion which is above the
hand fulcrum. The procedure is changed if the
lesion is on the right.
Mid and Lower Thoracic — Sitting and Back-
ward Bending — The patient is sitting with the
physician in back of him. The patient's hands
are placed flat on his back, one over the other
so as to contact the lower of the two lesioned
vertebrae. The physician passes his hands
under the patient's arms, reaches around and
clasps his hands across the patient's chest. The
physician's sternum or abdomen contacts the
patient's hands. The physician then draws
backward with his arms and simultaneously
thrusts forward with sternum or abdomen.
V.-.•*^%"3&*
32
THORACIC MANIPULATIVE TECHNIQUES
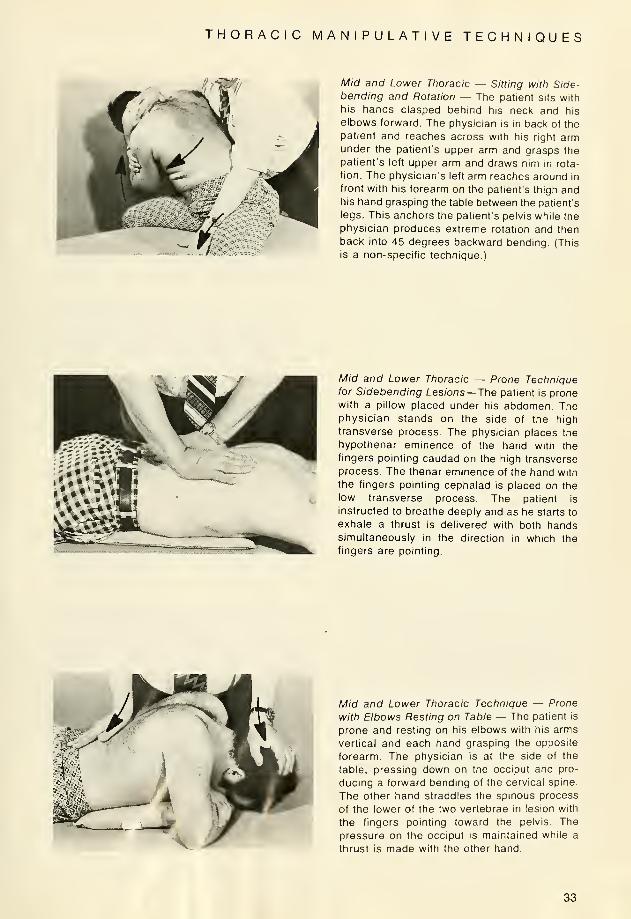
Mid and Lower Thoracic — Sitting with Side-bending and Rotation — The patient sits with
his hands clasped behind his neck and his
elbows forward. The physician is in back of the
patient and reaches across with his right armunder the patient's upper arm and grasps the
patient's left upper arm and draws him in rota-
tion. The physician's left arm reaches around in
front with his forearm on the patient's thigh andhis hand grasping the table between the patient's
legs. This anchors the patient's pelvis while the
physician produces extreme rotation and then
back into 45 degrees backward bending. (This
is a non-specific technique.)
Mid and Lower Thoracic — Prone Techniquefor Sidebendmg Lesions—The patient is pronewith a pillow placed under his abdomen. Thephysician stands on the side of the high
transverse process. The physician places the
hypothenar eminence of the hand with the
fingers pointing caudad on the high transverse
process. The thenar eminence of the hand with
the fingers pointing cephalad is placed on the
low transverse process. The patient is
instructed to breathe deeply and as he starts to
exhale a thrust is delivered with both handssimultaneously in the direction in which the
fingers are pointing.
Mid and Lower Thoracic Technique — Prone
with Elbows Resting on Table — The patient is
prone and resting on his elbows with his arms
vertical and each hand grasping the opposite
forearm. The physician is at the side of the
table, pressing down on the occiput and pro-
ducing a forward bending of the cervical spine.
The other hand straddles the spinous process
of the lower of the two vertebrae in lesion with
the fingers pointing toward the pelvis. The
pressure on the occiput is maintained while a
thrust is made with the other hand.
33

THORACIC MANIPULATIVE TECHNIQUES
* 1 ' >
Mid and Lower Thoracic Technique — Sitting
or Standing with Backward Bending Thrust —The patient is sitting or standing with his hands
clasped behind his neck. The physician passes
his forearms under the patient's arms and
grasps the patient's wrists. The physician's
sternum (or a pillow) is placed posterior to the
lower ot the two vertebrae in lesion. The patient
is instructed to breathe deeply and on exhala-
tion, the physician delivers a thrust in a forward
direction with his sternum against the pillow
while pulling backwards on the patient's arms.
Mid and Lower Thoracic Technique — Sitting
with Patient Facing Physician — The patient is
sitting. The physician faces the patient and
crosses the patient's arms placing the patient's
elbows in his supraclavicular area. The physi-
cian turns the patient's face away from him and
reaches around both sides of the patient con-
tacting the transverse processes of the lower of
the two vertebrae in lesion. The physician steps
backward drawing the patient toward him, plac-
ing the spine in backward bending and thrusts
by pulling the patient toward him with both
hands simultaneously.
34
RIB MANIPULATIVE TECHNIQUES
First Rib Technique—Supine — 1st Method
—
The lesion is on the left. The patient is supine
and the physician is at the patient's head. Thephysician places his right hand on the patient's
head and forward bends and rotates the cervi-
cal spine away from the side of the lesion and
sidebends the cervical spine towards the side of
the lesion. The index finger of the left hand is on
the upper surface of the first rib close to the
cervical column. The thrust is given in a down-
ward slightly medial direction with the index
finger. The procedure is changed if the lesion is
on the right.
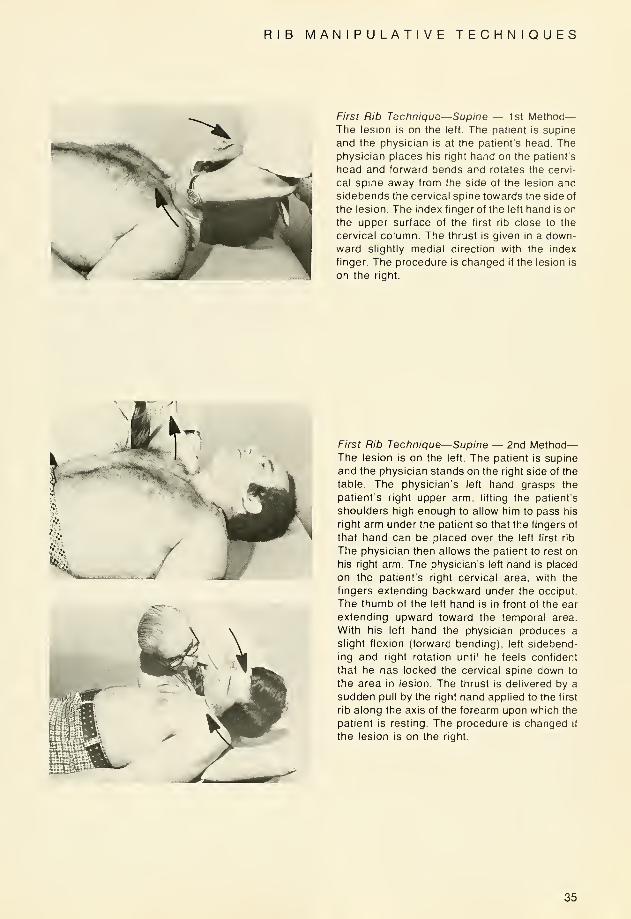
First Rib Technique—Supine — 2nd Method
—
The lesion is on the left. The patient is supine
and the physician stands on the right side of the
table. The physician's left hand grasps the
patient's right upper arm, lifting the patient's
shoulders high enough to allow him to pass his
right arm under the patient so that the fingers of
that hand can be placed over the left first rib.
The physician then allows the patient to rest on
his right arm. The physician's left hand is placed
on the patient's right cervical area, with the
fingers extending backward under the occiput.
The thumb of the left hand is in front of the ear
extending upward toward the temporal area.
With his left hand the physician produces a
slight flexion (forward bending), left sidebend-
ing and right rotation until he feels confident
that he has locked the cervical spine down to
the area in lesion. The thrust is delivered by a
sudden pull by the right hand applied to the first
rib along the axis of the forearm upon which the
patient is resting. The procedure is changed if
the lesion is on the right.
35

RIB MANIPULATIVE TECHNIQUES
Upper Rib Technique (Second through Fourth
Ribs) — Prone — The lesion is on the right. Thepatient is prone and the physician is at the head
of the table. A pillow is placed under the
patient's chest so that his chin and mandible
may act as a fulcrum. The physician then places
his left hand on the patient's right temporal area
and rotates the occiput away from the side
lesioned (right rotation). This rotation is con-
tinued until the patient's right shoulder is seen
to begin to rise from the table. The physician's
right hand is placed on the angle of the rib in
lesion and a thrust in a downward direction is
delivered with the right hand. The procedure is
changed if the lesion is on the left. Note: these
prone techniques are not advised for 1st rib
dysfunctions and are contraindicated in
presence of extensive or painful cervical
involvement.
Fifth Through Twelfth Ribs — Supine — For
these rib lesions, the supine thoracic technique
as previously taught can efficiently be used bymoving your fulcrum lateral to the thoracic
transverse process or the angle of the rib in
lesion. The corrective thrust is then given in a
direction through the vertebra to-which the rib is
attached. This causes a-separational stress at
the costo-transverse articulation and a gliding
motion of the costo-vertebral articulation.
36
RIB MANIPULATIVE TECHNIQUES
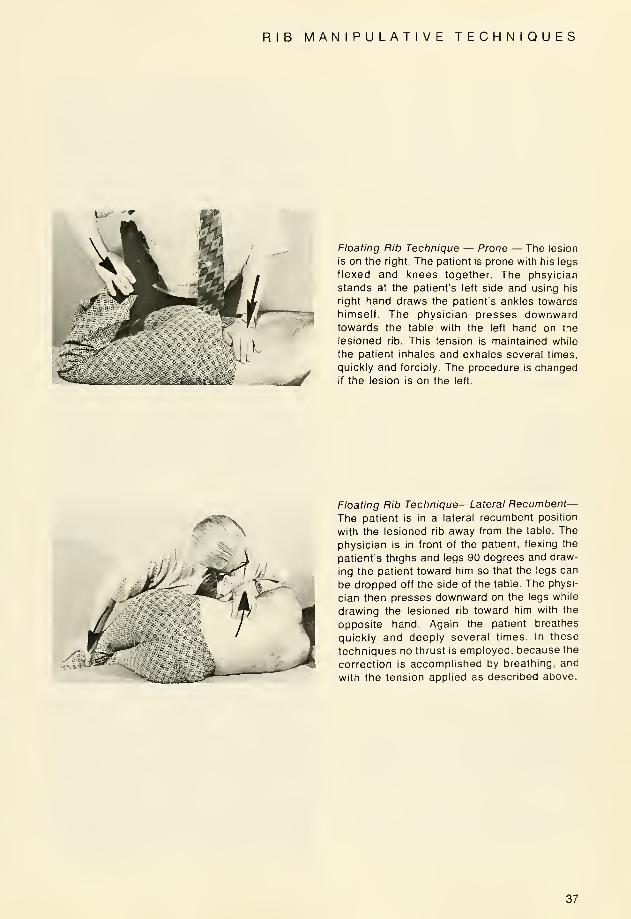
Floating Rib Technique — Prone — The lesion
is on the right. The patient is prone with his legs
flexed and knees together. The phsyician
stands at the patient's left side and using his
right hand draws the patient's ankles towards
himself. The physician presses downwardtowards the table with the left hand on the
lesioned rib. This tension is maintained while
the patient inhales and exhales several times,
quickly and forcibly. The procedure is changedif the lesion is on the left.
Floating Rib Technique—Lateral Recumbent—The patient is in a lateral recumbent position
with the lesioned rib away from the table. The
physician is in front of the patient, flexing the
patient's thighs and legs 90 degrees and draw-
ing the patient toward him so that the legs can
be dropped off the side of the table. The physi-
cian then presses downward on the legs while
drawing the lesioned rib toward him with the
opposite hand. Again the patient breathes
quickly and deeply several times. In these
techniques no thrust is employed, because the
correction is accomplished by breathing, and
with the tension applied as described above.
37
LUMBAR MANIPULATIVE TECHNIQUES
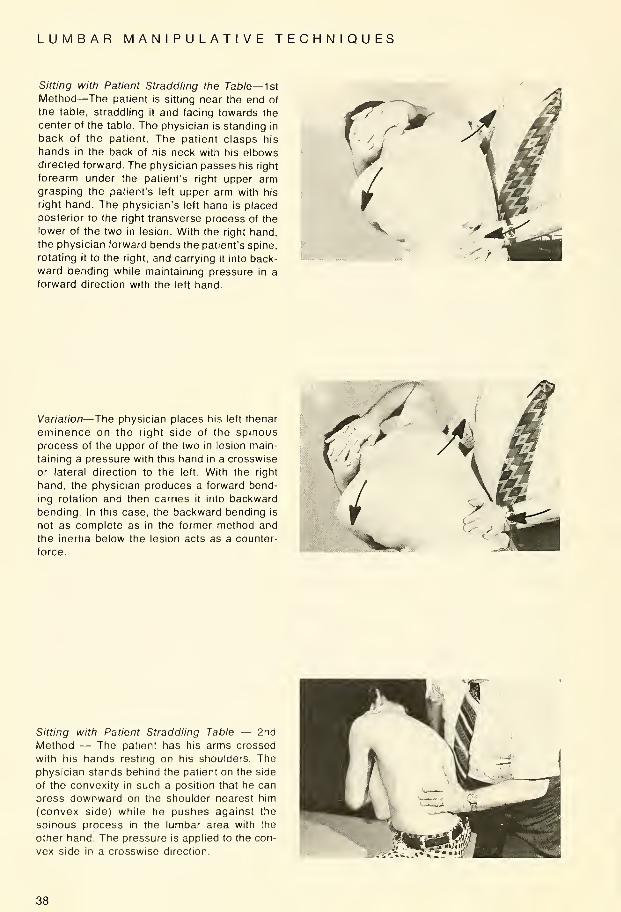
Sitting with Patient Straddling the Table— 1st
Method—The patient is sitting near the end of
the table, straddling it and facing towards the
center of the table. The physician is standing in
back of the patient. The patient clasps his
hands in the back of his neck with his elbowsdirected forward. The physician passes his right
forearm under the patient's right upper armgrasping the patient's left upper arm with his
right hand. The physician's left hand is placed
posterior to the right transverse process of the
lower of the two in lesion. With the right hand,
the physician forward bends the patient's spine,
rotating it to the right, and carrying it into back-
ward bending while maintaining pressure in a
forward direction with the left hand.
Variation—The physician places his left thenar
eminence on the right side of the spinous
process of the upper of the two in lesion main-
taining a pressure with this hand in a crosswise
or lateral direction to the left. With the right
hand, the physician produces a forward bend-
ing rotation and then carries it into backward
bending. In this case, the backward bending is
not as complete as in the former method and
the inertia below the lesion acts as a counter-
force.
Sitting with Patient Straddling Table — 2nd
Method — The patient has his arms crossed
with his hands resting on his shoulders. The
physician stands behind the patient on the side
of the convexity in such a position that he can
press downward on the shoulder nearest him
(convex side) while he pushes against the
spinous process in the lumbar area with the
other hand. The pressure is applied to the con-
vex side in a crosswise direction.
38
LUMBAR MANIPULATIVE TECHNIQUES
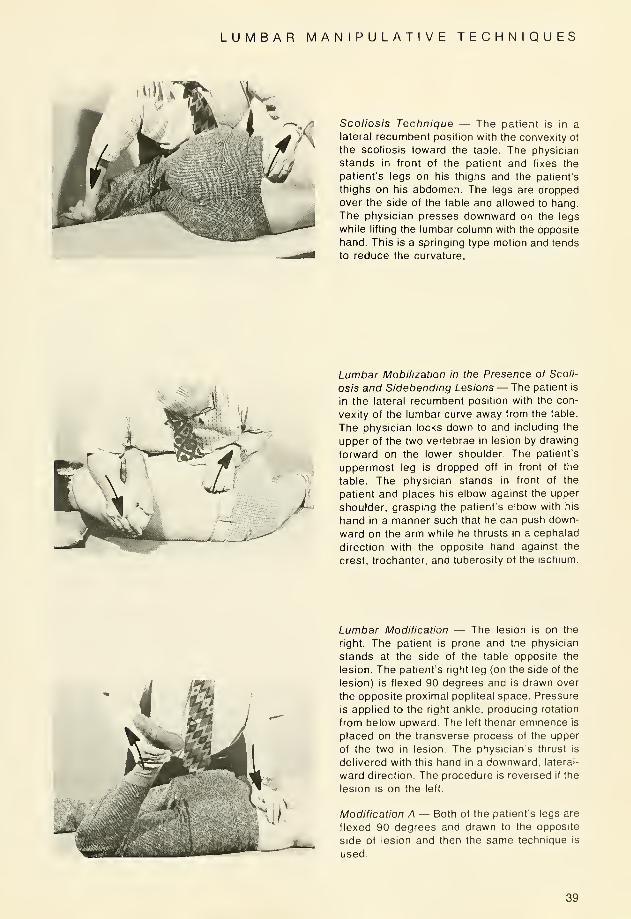
Scoliosis Technique — The patient is in a
lateral recumbent position with the convexity of
the scoliosis toward the table. The physician
stands in front of the patient and fixes the
patient's legs on his thighs and the patient's
thighs on his abdomen. The legs are dropped
over the side of the table and allowed to hang.
The physician presses downward on the legs
while lifting the lumbar column with the opposite
hand. This is a springing type motion and tends
to reduce the curvature.
Lumbar Mobilization in the Presence of Scoli-
osis and Sidebending Lesions — The patient is
in the lateral recumbent position with the con-
vexity of the lumbar curve away from the table.
The physician locks down to and including the
upper of the two vertebrae in lesion by drawing
forward on the lower shoulder. The patient's
uppermost leg is dropped off in front of the
table. The physician stands in front of the
patient and places his elbow against the upper
shoulder, grasping the patient's elbow with his
hand in a manner such that he can push down-
ward on the arm while he thrusts in a cephalad
direction with the opposite hand against the
crest, trochanter, and tuberosity of the ischium.
Lumbar Modification — The lesion is on the
right. The patient is prone and the physician
stands at the side of the table opposite the
lesion. The patient's right leg (on the side of the
lesion) is flexed 90 degrees and is drawn over
the opposite proximal popliteal space. Pressure
is applied to the right ankle, producing rotation
from below upward. The left thenar eminence is
placed on the transverse process of the upper
of the two in lesion. The physician's thrust is
delivered with this hand in a downward, lateral-
ward direction. The procedure is reversed if the
lesion is on the left.
Modification A — Both of the patient's legs are
flexed 90 degrees and drawn to the opposite
side of lesion and then the same technigue is
used.
39

LUMBAR MANIPULATIVE TECHNIQUES
Hip Joint—The patient is in a supine position.
The physician flexes the patient's leg on his
thigh and then the patient's thigh against his
abdomen. The flexed leg is then adducted until
the knee is over the opposite anterior iliac
spine. The physician stands at the side of the
flexed leg facing the table and places his
clasped hands over the knee and delivers a
thrust downward towards the table along the
axis of the femur.
Symphysis Pubis— The patient is in a supine
position. His lower limbs are partly flexed with
his feet resting on the table and his kneesapproximated. The patient is now instructed to
open and separate the knees against the physi-
cian's carefully regulated resistance. This is
repeated several times, gradually increasing
the tension.The reverse resistance can also beemployed. The patient contracting his abductormuscles and bringing his knees together
against the operators resistance.
5wir
40

INNOMINATE AND SACRAL TECHNIQUES
Posterior Iliac (Innominate) (Anterior Sacral)—The lesion is on the left. The patient is in the
right lateral recumbent position with the physi-
cian facing the patient. The physician places
the index finger of his right hand on the left
posterior superior spine of the ilium. With his
left hand he then grasps the patient's right
lower arm and draws the shoulder forward lock-
ing down to and including the lumbo-sacral
articulation. The physician then places his left
hand on the patient's uppermost shoulder. Theright leg of the patient is kept extended and the
left foot of the patient is placed in the right
popliteal area. Maintaining the locking with his
left hand on the uppermost shoulder, the physi-
cian may direct a corrective thrust with either
the hypothenar eminence or with the left fore-
arm in a downward-forward direction high on
the crest of the ilium towards the umbilicus. Theprocedure is changed if the lesion is on the right.
Anterior Iliac (Innominate) (Posterior Sacral—The lesion is on the left. The patient is in the
right lateral recumbent position with the physi-
cian facing the patient. The physician places
the index finger of his right hand on the left
posterior superior iliac spine. With his left handhe then grasps the patient's right lower armdrawing the shoulder forward and locking downto and including the lumbo-sacral articulation.
The physician then places his left hand on the
patient's uppermost shoulder. The right leg is
kept in a flexed position on the table and the left
leg is dropped over the side of the table and
allowed to assume its own position without any
assistance from the physician. The patient's
foot must not be in contact with the floor. Main-
taining the locking with his left hand on the
patient's shoulder, the physician places his
right forearm on the ischial spine and delivers a
corrective thrust through the femur in a
downward-forward direction towards the table
and the physician. The procedure is changed if
the lesion is on the right.
41
INNOMINATE AND SACRAL TECHNIQUES
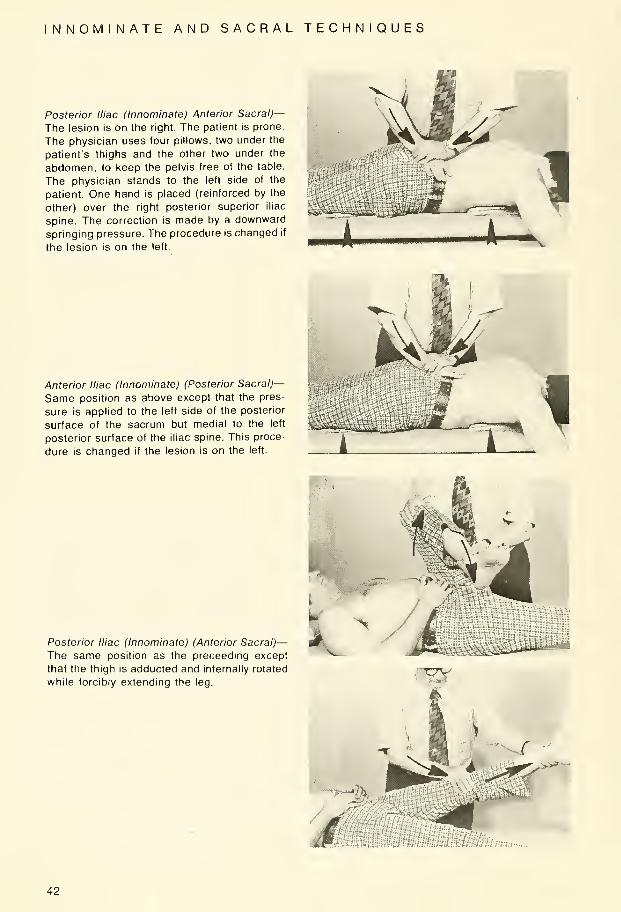
Posterior Iliac (Innominate) Anterior Sacral)—The lesion is on the right. The patient is prone.
The physician uses four pillows, two under the
patient's thighs and the other two under the
abdomen, to keep the pelvis free of the table
The physician stands to the left side of the
patient. One hand is placed (reinforced by the
other) over the right posterior superior iliac
spine. The correction is made by a downward
springing pressure. The procedure is changed if
the lesion is on the left.
Anterior Iliac (Innominate) (Posterior Sacral)—
Same position as above except that the pres-
sure is applied to the left side of the posterior
surface of the sacrum but medial to the left
posterior surface of the iliac spine. This proce-
dure is changed if the lesion is on the left.
Posterior Iliac (Innominate) (Anterior Sacral)—The same position as the preceeding except
that the thigh is adducted and internally rotated
while forcibly extending the leg.r*&
***--
Qk
-::...
42

INNOMINATE AND SACRAL TECHNIQUES
Anterior Iliac (Innominate) (Posterior Sacral)—The lesion is on the left. The patient is supine.
The physician is to the left side of the patient.
He grasps the patient's left leg at the ankle with
his left hand, and places his right hand over the
left patella. Now the physician flexes the
patient's leg and thigh. Corrective procedure is
made with abduction and external rotation of
the thigh, while forcibly extending the leg. Theright leg is used if the lesion is on the right.
*-.' .'}-. KsiLI3lf*tu
Posterior Iliac (Innominate) (Anterior Sacral)—The patient is supine. The lesion is on the right.
The physician flexes both legs and thighs, plac-
ing the patient's knees in his right axilla. Theother hand is placed under the posterior
superior iliac spine on the right side. The physi-
cian rolls over the patient so that the weight of
the pelvis and legs rests on the fulcrum. Thephysician presses downward on the patient's
knees. The procedure is changed if the lesion is
on the left.
Anterior Iliac (Innominate) (Posterior Sacral)—Same as above, except that the fulcrum is
placed under the left side of the base of the
sacrum but medial to the left posterior superior
iliac spine. The procedure is changed if the
lesion is on the left.
43

INNOMINATE AND SACRAL TECHNIQUES
STPost Iliac (Innominate) (Anterior Sacral)—Thelesion is on the left side. The patient is supine
with the left leg and thigh flexed at right angles.
The patient is moved over so that the left ilium
(innominate) is free of the edge of the table. The
physician clasps both his hands over the
patient's left knee. The physician makes a
corrective thrust downward towards the table
on a line with the left femur. The procedure is
changed if the lesion is on the right.
Modification—Anterior Iliac (Innominate) (Pos-
terior Sacral)— The same position as the pre-
ceding except that the left knee is pressed over
until it is above the right anterior superior iliac
spine before the corrective thrust is made. The
procedure is changed if the lesion is on the right.
Post Iliac (Innominate) (Anterior Sacral)—Thelesion is on the left. The patient is prone with
the physician standing on the right side. Thepatient's left leg is drawn over to the right. Thephysician places his left leg between the
patient's knees. The physician now places his
left hand, reinforced by his right hand, over the
left posterior superior iliac spine. The corrective
thrust is in a downward direction toward the
table. A springing type correction may be used
in this position. The procedure is changed if the
lesion is on the right.
\
Modification—Anterior Iliac (Innominate) (Pos-
terior Sacral)—The same position as the pre-
ceding except that the hands are placed over
the left side of the base of the sacrum but
medial to the right posterior superior iliac spine.
The procedure is changed if the lesion is on the
right.
44
INNOMINATE AND SACRAL TECHNIQUES
E^ J * #M v
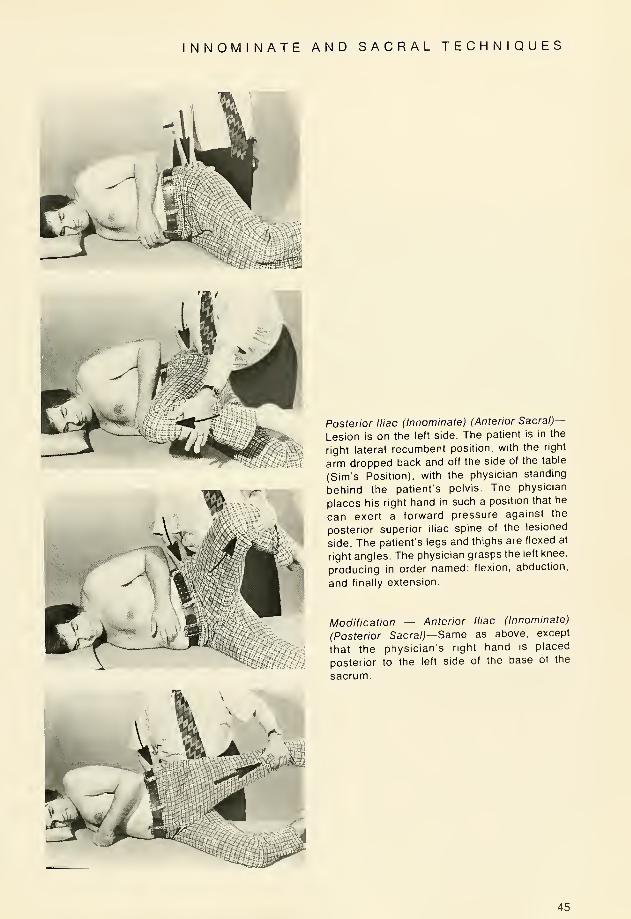
Posterior Iliac (Innominate) (Anterior Sacral)—
Lesion is on the left side. The patient is in the
right lateral recumbent position, with the right
arm dropped back and off the side of the table
(Sim's Position), with the physician standing
behind the patient's pelvis. The physician
places his right hand in such a position that he
can exert a forward pressure against the
posterior superior iliac spine of the lesioned
side. The patient's legs and thighs are flexed at
right angles. The physician grasps the left knee,
producing in order named: flexion, abduction,
and finally extension.
Modification — Anterior Iliac (Innominate)
(Posterior Sacral)—Same as above, except
that the physician's right hand is placed
posterior to the left side of the base of the
sacrum.
45

NNOMINATE AND SACRAL TECHNIQUES
Posterior Iliac (Innominate) (Anterior Sacral)—
Lesion is on the left. The patient is in the right
lateral recumbent position with the right arm
dropped back and off the table (Sim's Position),
with the physician standing behind the patient's
pelvis. The physician's left forearm is passed
under the thigh with the left hand resting on the
anterior superior iliac spine. The right thenar
eminence of the physician is placed posterior to
the posterior superior iliac spine. Now the thigh
is elevated slowly, testing for the point at which
relaxation occurs, this being about 12 to 15
inches. This elevation is maintained while the
thigh is carried into extension meanwhile press-
ing forward with the thenar eminence of the
right hand of the physician.
Modification—Anterior Iliac (Innominate) (Pos-
terior Sacral) — Same as above except the
physician's right hand is placed posterior to the
left side of the base of the sacrum.
46

INNOMINATE AND SACRAL TECHNIQUES
1 Posterior Iliac (Innominate) (Anterior Sacral) —The patient is supine with the physician stand-
ing at the foot of the table. The physician grasps
the ankle on the lesioned side with both hands.
The foot is now elevated about six inches above
the table. The physician applies traction and
instructs the patient to breathe deeply several
times. The corrective force is a sudden traction-
like pull as the patient begins to exhale after a
full inspiration.
M&mmWWp.
£zy/
Modification—Anterior Iliac (Innominate) (Pos-
terior Sacral) — Same as above except that the
foot is held about 18 to 20 inches above the
table.
47
AC R O M I 0-C L A V I C U LAR MANIPULATIVE TECHNIQUES
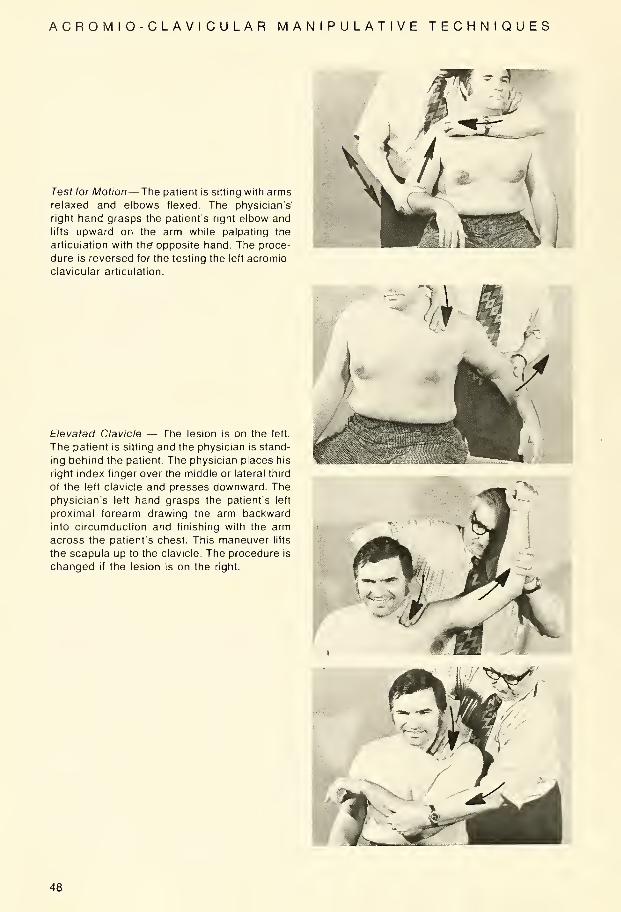
Test for Motion— The patient is sitting with armsrelaxed and elbows flexed. The physician's'
right hand grasps the patient's right elbow and
lifts upward on the arm while palpating the
articulation with the" opposite hand. The proce-
dure is reversed for the testing the left acromio-
clavicular articulation.
Elevated Clavicle — The lesion is on the left.
The patient is sitting and the physician is stand-
ing behind the patient. The physician places his
right index finger over the middle or lateral third
of the left clavicle and presses downward. The
physician's left hand grasps the patient's left
proximal forearm drawing the arm backward
into circumduction and finishing with the arm
across the patient's chest. This maneuver lifts
the scapula up to the clavicle. The procedure is
changed if the lesion is on the right
48

ACRO M I O-CLA VI CU LAR MANIPULATIVE TECHNIQUES
Depressed Clavicle — The lesion is on the left.
The position is same as the preceding tech-
nique with the patient sitting and the physician
standing behind the patient. The physician's
right index finger presses downward on the
medial third of the left clavicle and on the left
scapula. Circumduction begins from an anterior
position, lifting the clavicle up to the scapula.
49
ST E R N 0-C LA VI CU L AR MANIPULATIVE TECHNIQUES
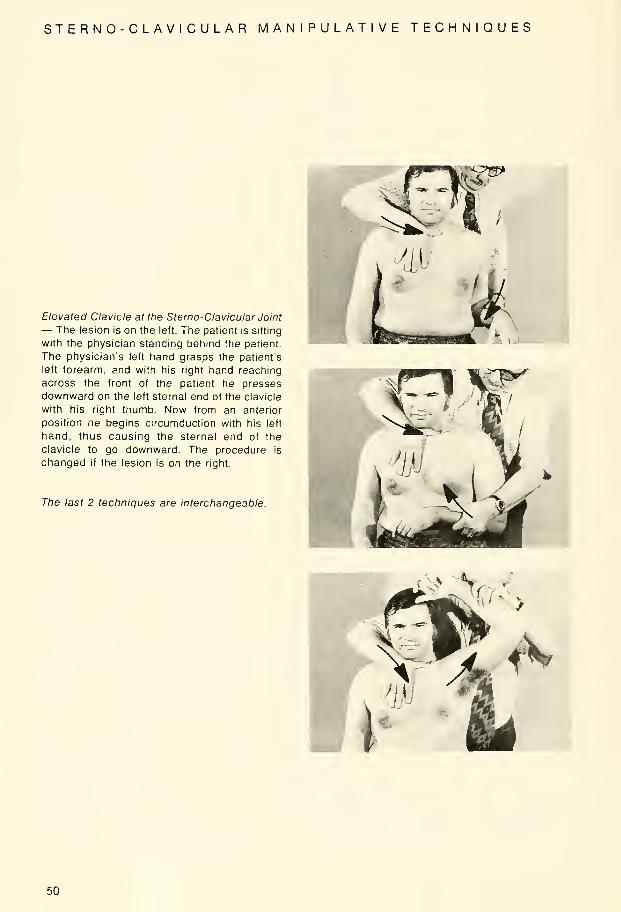
Elevated Clavicle at the Sterno-Clavicular Joint
— The lesion is on the left. The patient is sitting
with the physician standing behind the patient.
The physician's left hand grasps the patient's
left forearm, and with his right hand reaching
across the front of the patient he presses
downward on the left sternal end of the clavicle
with his right thumb. Now from an anterior
position he begins circumduction with his left
hand, thus causing the sternal end of the
clavicle to go downward. The procedure is
changed if the lesion is on the right.
The last 2 techniques are interchangeable.
50

SHOULDER TECHNIQUES
Spencer Techniques— with Variances
A. Position
1. The Spencer Technique is done with the
patient lying on his side with the injured
shoulder up.
2. The patient's back should be approxi-
mately perpendicular to the table and
with the under elbow forward. If the elbow
next to the table is behind or under the
patient, the patient's position is angled
too far forward.
3. The pillow should be in proper height in
relation to the patient's lower shoulder
width, so that the head is supported com-
fortably without too much drag on the
neck and shoulder muscles.
4. The lower knee is drawn up to provide a
firm anchorage for the hips and lower
extremities.
B. Approach1. The patient must be approached accord-
ing to the tenderness and discomfort
present. He should not however behandled so gently that he is constantly
fearful of slipping from the physician's
hands without warning.
C. Treatment— First Stage
1. The physician stands in front of the
patient with the hand nearest the
patient's feet grasping the wrist andlower forearm of the arm to be treated.
2. The other hand of the physician is placed
on top of the patient's shoulder to anchor
the shoulder girdle and localize the
stretching influence on the shoulder joint.
(If this is not done, the shoulder girdle will
ride all over the upper ribs, and there will
be little or no influence on the shoulder
girdle.)
3. The patient's arm is then moved backand forth in a horizontal plane with the
elbow rather sharply flexed. The back-
ward motion of the elbow is carried to the
extreme limit permitted by the capsule of
the shoulder.
4. The amount of firmness manifested in
the stretch will vary with the severity of
the injury and the condition of the tissues.
5. In all of these moves, only gentle pres-
sure is used.
6. Each move is repeated 8 to 10 times for
the first 2 or 3 treatments to determine
the ability of the tissues to react. If the
results warrant it, the effort involved can
be stepped up and the physician can be
sure that the patient will not be frightened
away by unnecessary painful reactions to
the early treatments.
51
SHOULDER TECHNIQUES
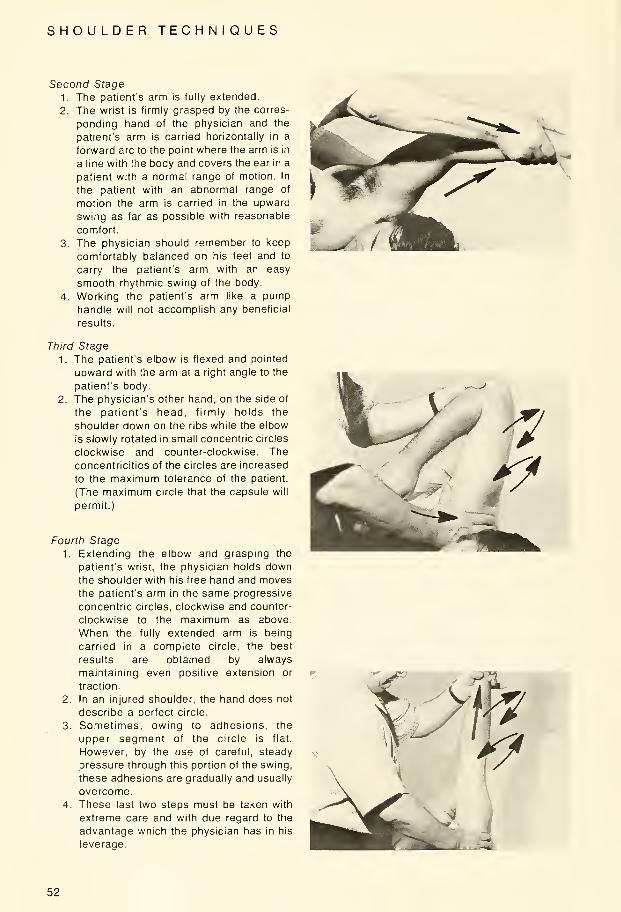
Second Stage
1. The patients arm is fully extended.
2. The wrist Is firmly grasped by the corres-
ponding hand of the physician and the
patient's arm is carried horizontally in a
forward arc to the point where the arm is in
a line with the body and covers the ear in a
patient with a normal range of motion. In
the patient with an abnormal range of
motion the arm is carried in the upward
swing as far as possible with reasonable
comfort.
3. The physician should remember to keep
comfortably balanced on his feet and to
carry the patient's arm with an easy
smooth rhythmic swing of the body
4. Working the patients arm like a pumphandle will not accomplish any beneficial
results.
Third Stage
1. The patient's elbow is flexed and pointed
upward with the arm at a right angle to the
patient's body.
2. The physician's other hand, on the side of
the patient's head, firmly holds the
shoulder down on the ribs while the elbow
is slowly rotated in small concentric circles
clockwise and counter-clockwise. The
concentricities of the circles are increased
to the maximum tolerance of the patient.
(The maximum circle that the capsule will
permit.)
Fourth Stage
1. Extending the elbow and grasping the
patient's wrist, the physician holds downthe shoulder with his free hand and movesthe patient's arm in the same progressive
concentric circles, clockwise and counter-
clockwise to the maximum as above.
When the fully extended arm is being
carried in a complete circle, the best
results are obtained by always
maintaining even positive extension or
traction
2. In an injured shoulder, the hand does not
describe a perfect circle.
3. Sometimes, owing to adhesions, the
upper segment of the circle is flat.
However, by the use of careful, steady
pressure through this portion of the swing,
these adhesions are gradually and usually
overcome.
4. These last two steps must be taken with
extreme care and with due regard to the
advantage which the physician has in his
leverage.
52
SHOULDER TECHNIQUES
f
The fifth and sixth stages must not be used until
the patient's reactions have been tested by the
other four procedures, and the physician is sure
that the patient's progress has reached the
point where the patient will be benefited by
them.
Fifth Stage
1. The physician's hand closest to the
patient's head is placed on top of the
patient's shoulder.
2. The patient's elbow is flexed and the
patient's hand rests just in front of the
physician's elbow on the forearm.
3. Now with a gentle upward pressure exerted
on the patient's elbow, the physician
swings it towards the patient's head,
balancing his weight from one foot to the
other in order to get an easy rhythmic
swing backward and forward.
Sixth Stage
1
.
The patient's hand is placed just in back of
the lower ribs, close to the lumbo-sacral
junction and just far enough to prevent it
from sliding forward when pressure is
applied to the elbow. The elbow is flexed
and pointing directly upward.
2. The physician's hand closest to the
patient's head, holds the shoulder while
the physician's other hand is used to draw
the patient's elbow forward and downwardwith a gentle and firm motion.
3. The elbow is allowed to return to the start-
ing point and then the movements are
repeated.
Seventh Stage
1. This stage may start and end the treat-
ment.
2. The patient's elbow is extended so that
the physician can slide his shoulder (the
one toward the patient's feet) under the
patient's hand, thus supporting the injured
arm. Now both hands grasp the deltoid
area side by side and with a gentle up and
down pumping motion and with traction of
the arm, the physician's hands are
alternately grasped firmly and then
relaxed on the soft tissue around the
patient's shoulder. The patient's arm is
simultaneously raised and lowered by the
motion of the physician's body.
In all of these procedures, the physician should
cultivate the easiest standing postion with the
feet comfortably spaced to allow an easy shift of
weight from one foot to the other. This produces
a smoother rhythmic swing to the manipulation,
and automatically avoids the sharp, quick
movements which give little therapeutic benefit
and may produce unnecessary discomfort for
the patient.
53

SHOULDER TECHNIQUES
Three Stage Traction — Shoulder Girdle
The three stages are described for a patient
with a left shoulder somatic dysfunction. The
procedures are changed for a patient with a
right shoulder lesion.
Stage I—The patient is supine with the physi-
cian seated on a stool at the head of the table.
The physician's left index finger is placed in the
posterior axillary fold and the right index finger
is placed in the anterior axillary fold, with the
physician's right forearm resting across the
upper portion of the patient's chest wall. With
both index fingers, the physician now applies
traction in a cephalad direction in an alternating
traction and release manner for a total time of
approximately 30 seconds.
r"
Stage II— Maintaining the same position as in
stage I, the physician asks the patient to reach
across the chest wall with his right hand and to
grasp his left arm just above the left elbow. Thepatient then applies a lifting force to his left arm
so as to offer resistance as the physician is
applying traction at about a 60 degree vector
force downward with both index fingers in a
traction and release manner as described in
stage I.jMP**'
54

SHOULDER TECHNIQUES
Stage III— The patient is maintained in the
same position as stage II. The physician now
applies steady traction in a cephalad direction
with both index fingers as the patient raises the
arm gradually off the table and simultaneously
pronates and supinates the hand and arm. This
stage is also performed for approximately 30
seconds.
55
SHOULDER TECHNIQUES
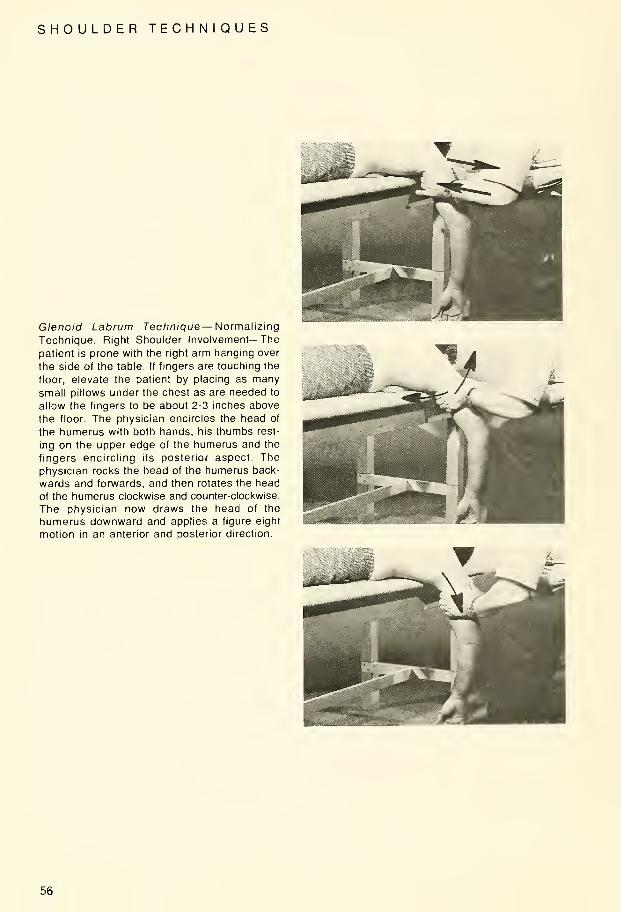
Glenoid Labrum Technique— Normalizing
Technique, Right Shoulder Involvement—The
patient is prone with the right arm hanging over
the side of the table. If fingers are touching the
floor, elevate the patient by placing as manysmall pillows under the chest as are needed to
allow the fingers to be about 2-3 inches above
the floor. The physician encircles the head of
the humerus with both hands, his thumbs rest-
ing on the upper edge of the humerus and the
fingers encircling its posterior aspect Thephysician rocks the head of the humerus back-
wards and forwards, and then rotates the head
of the humerus clockwise and counter-clockwise.
The physician now draws the head of the
humerus downward and applies a figure eight
motion in an anterior and posterior direction.
56

RADIO ULNAR AND WRIST TECHNIQUES
Wrist Joint — The patient is seated and the
physician faces the patient grasping the patient's
hand in his two hands with his fingers under the
palm of the hand on the medial and lateral
sides. The phsyician's thumbs extend over the
dorsum of the hand coming to rest on the distal
end of the radius and ulna. Mobilization is
accomplished by circumduction and carrying
the wrist into forceful dorsi-flexion while
pressing firmly downward with the thumbs.
Intercarpal Articulation— The patient is seated.
The physician stands facing the patient and
grasps the patient's hand in his two hands with
his fingers under the palm of the hand on the
medial and lateral sides. The physician's thumbs
are now placed on the patient's row of carpal
bones. Mobilization is accomplished by
circumduction and carrying the wrist into forceful
dorsiflexion while pressing firmly downward
with the thumbs.
57
RADIO ULNAR AND WRIST TECHNIQUES
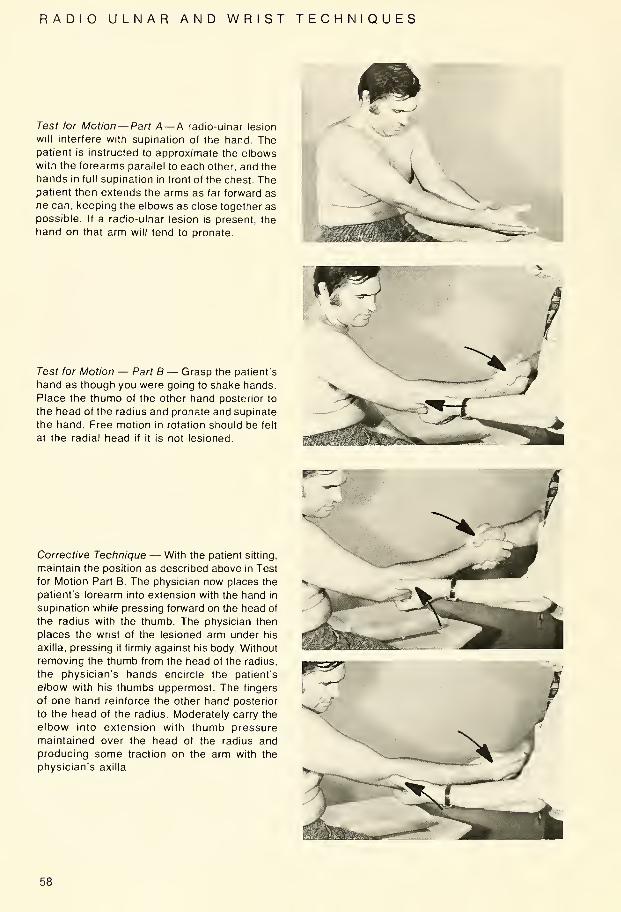
^1 WTest for Motion— Part A— A radio-ulnar lesion
will interfere with supination of the hand. Thepatient is instructed to approximate the elbowswith the forearms parallel to each other, and the
hands in full supination in front of the chest. Thepatient then extends the arms as far forward as
he can, keeping the elbows as close together as
possible. If a radio-ulnar lesion is present, the
hand on that arm will tend to pronate.
Test for Motion — Part B — Grasp the patient's
hand as though you were going to shake hands.
Place the thumb of the other hand posterior to
the head of the radius and pronate and supinate
the hand. Free motion in rotation should be felt
at the radial head if it is not lesioned.
Corrective Technique — With the patient sitting,
maintain the position as described above in Test
for Motion Part B. The physician now places the
patient's forearm into extension with the hand in
supination while pressing forward on the head of
the radius with the thumb. The physician then
places the wrist of the lesioned arm under his
axilla, pressing it firmly against his body. Without
removing the thumb from the head of the radius,
the physician's hands encircle the patient's
elbow with his thumbs uppermost. The fingers
of one hand reinforce the other hand posterior
to the head of the radius. Moderately carry the
elbow into extension with thumb pressure
maintained over the head of the radius andproducing some traction on the arm with the
physician's axilla.
58

RADIO ULNAR AND WRIST TECHNIQUES
Variation — The patient is supine with his
involved arm over the side of the table. The wrist
of the lesioned arm is placed between and
slightly above the slightly flexed physician's
knees. The physician's hands encircle the
patient's elbow with his thumb uppermost. The
fingers of one hand reinforce the other hand
posterior to the head of the radius. The correc-
tion is accomplished by a sudden upward lift
with both hands thus exerting a pressure
posterior to the head of the radius while at the
same instant, traction is applied by the physi-
cian straightening his knees.
Variation — Lesion of the Right Elbow — Thepatient is sitting. The physician places the wrist
of the lesioned arm under his axilla pressing it
firmly against his body. The physician's hands
encircle the patient's elbow with his thumbs
uppermost and the index finger of the left hand
posterior to the head of the patient's radius. Thephysician now carries the elbow gently into ex-
tension, while producing a traction on the arm
using his axilla. The procedure is changed if the
lesion is on the left elbow.
59
KNEE MANIPULATIVE TECHNIQUES
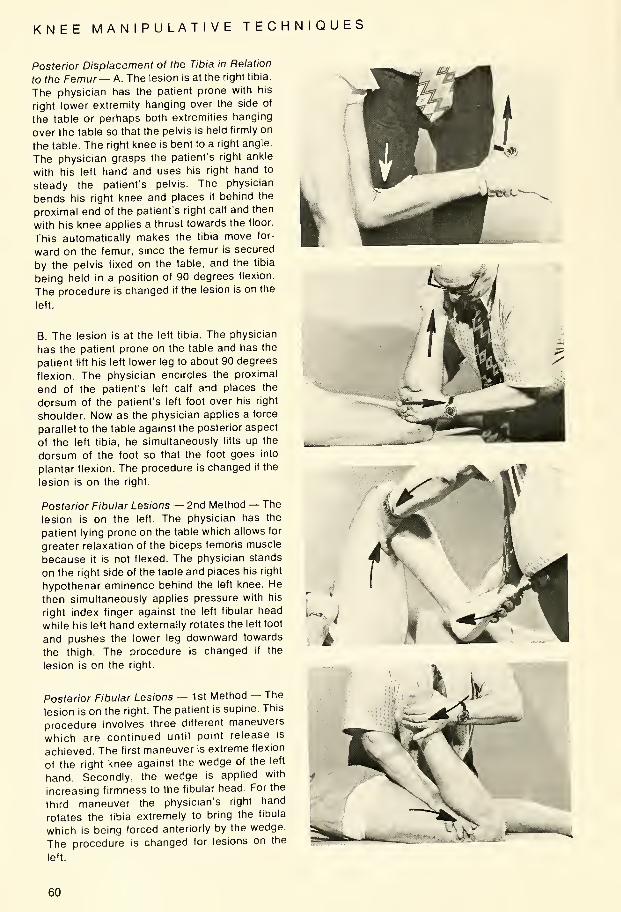
Posterior Displacement of the Tibia in Relation
to the Femur— A. The lesion is at the right tibia.
The physician has the patient prone with his
right lower extremity hanging over the side of
the table or perhaps both extremities hanging
over the table so that the pelvis is held firmly on
the table. The right knee is bent to a right angle
The physician grasps the patient's right ankle
with his left hand and uses his right hand to
steady the patient's pelvis. The physician
bends his right knee and places it behind the
proximal end of the patient's right calf and then
with his knee applies a thrust towards the floor
This automatically makes the tibia move for-
ward on the femur, since the femur is secured
by the pelvis fixed on the table, and the tibia
being held in a position of 90 degrees flexion
The procedure is changed if the lesion is on the
left.
B. The lesion is at the left tibia. The physician
has the patient prone on the table and has the
patient lift his left lower leg to about 90 degrees
flexion. The physician encircles the proximal
end of the patient's left calf and places the
dorsum of the patient's left foot over his right
shoulder. Now as the physician applies a force
parallel to the table against the posterior aspect
of the left tibia, he simultaneously lifts up the
dorsum of the foot so that the foot goes into
plantar flexion. The procedure is changed if the
lesion is on the right.
Posterior Fibular Lesions — 2nd Method — The
lesion is on the left. The physician has the
patient lying prone on the table which allows for
greater relaxation of the biceps femoris muscle
because it is not flexed. The physician stands
on the right side of the table and places his right
hypothenar eminence behind the left knee. He
then simultaneously applies pressure with his
right index finger against the left fibular head
while his left hand externally rotates the left foot
and pushes the lower leg downward towards
the thigh. The procedure is changed if the
lesion is on the right.
Posterior Fibular Lesions — 1 st Method — The
lesion is on the right. The patient is supine. This
procedure involves three different maneuvers
which are continued until point release is
achieved. The first maneuver is extreme flexion
of the right knee against the wedge of the left
hand. Secondly, the wedge is applied with
increasing firmness to the fibular head. For the
third maneuver the physician's right hand
rotates the tibia extremely to bring the fibula
which is being forced anteriorly by the wedge.
The procedure is changed for lesions on the
left.
60
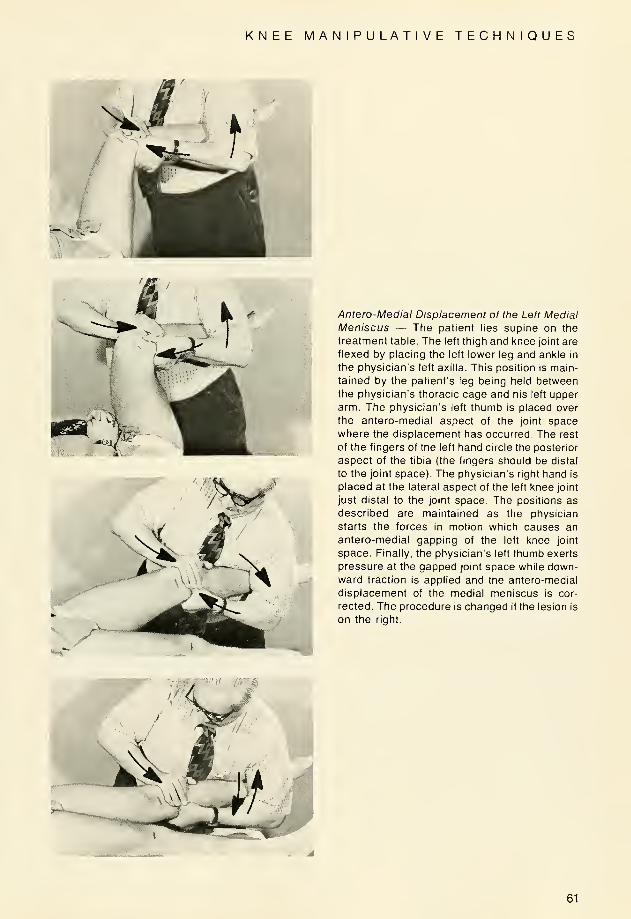
KNEE MANIPULATIVE TECHNIQUES
Antero-Medial Displacement of the Left Medial
Meniscus — The patient lies supine on the
treatment table. The left thigh and knee joint are
flexed by placing the left lower leg and ankle in
the physician's left axilla. This position is main-
tained by the patient's leg being held betweenthe physician's thoracic cage and his left upper
arm. The physician's left thumb is placed over
the antero-medial aspect of the joint space
where the displacement has occurred. The rest
of the fingers of the left hand circle the posterior
aspect of the tibia (the fingers should be distal
to the joint space). The physician's right hand is
placed at the lateral aspect of the left knee joint
just distal to the joint space. The positions as
described are maintained as the physician
starts the forces in motion which causes an
antero-medial gapping of the left knee joint
space. Finally, the physician's left thumb exerts
pressure at the gapped joint space while down-
ward traction is applied and the antero-medial
displacement of the medial meniscus is cor-
rected. The procedure is changed if the lesion is
on the right.
61

ANKLE AND FOOT TECHNIQUES
Ankle Joint — The patient is supine and the
physician stands at the foot of the table. The
physician interfaces his fingers over the dorsum
of the foot, just distal to the ankle joint. The
physician's thumbs are under the sole of the
foot. The separation is in a longitudinal direc-
tion and is accomplished by a mild traction
followed by a sudden pull.
Ankle Joint — Second Method — The patient is
supine and the physician is at the side of the
table. The physician flexes the patient's leg on
the patient's thigh and the thigh on the
abdomen. The patient's knee is directed
enough laterally so that the physician can insert
his elbow into the popliteal space. It is this hand
that is placed across the back of the patient's
heel with the thumb under the medial malleolus
and fingers under the lateral malleolus. The
opposite hand contacts the dorsum of the foot
just below the ankle joint with the thumb on the
medial side and the fingers laterally placed. As
the thigh is forcibly flexed on the abdomen,
pressure is brought to bear in a downward
direction by keeping the wrist stiff. As this trac-
tion on the ankle increases, the opposite hand
also presses in a downward direction, prevent-
ing dorsiflexion of the foot. While maintaining
this traction, the ankle joint is put through its
range of motion, at which time, a correction maybe accomplished.
-j*ee£aMt;Ms • •ivi-S'.,
62

ANKLE AND FOOT TECHNIQUES
Talo-Tibial and Talo-Calcaneal Artculation —The patient sits on a table or chair with his kneeat the end of the table. The physician grasps the
heel with one hand, while the other hand graspsthe dorsum of the foot, well back toward the
ankle. Traction is exerted downward to take all
the slack from the articulation. The articulation
is then put through its normal range of motion,
at which time, a correction may be accomplished.
General Springing of the Tarsal Joints, Left
Foot — The physician grasps the patient's foot
with his left hand and places his fingers acrossthe dorsum of the ankle joint and his thumbunderneath the sustentaculum tali. His right
hand grasps the forepart of the foot with his
fingers over the dorsum of the toes and his
thenar eminence against the ball of the foot.
The physician uses his left hand to produce a
rotary motion in a counter-clockwise direction.
The procedure is changed for the right foot.
63

ANKLE AND FOOT TECHNIQUES
Technique to Produce Motion at the Outer
Tarsal Joints, Left Foot — The patient is sitting.
The physician's left hand grasps the patient's
left foot with his fingers across the dorsum andhis thumb on the plantar surface. The right handgrasps the lateral aspect of the foot with the
3rd, 4th, and 5th fingers curled undernearth the
cuboid bone and the thenar eminence placed
on the dorsal surface of the outer two meta-
tarsal shafts. The physician inverts the patient's
foot slightly and makes a thrust upward andoutward with the fingers of the right hand, anddownward and inward with the thenar eminenceof the same hand. The procedure is changed for
the right foot.
Technique to Produce Motion at the InnerTarsal Joints, Left Foot — The left thumb is
placed across the plantar surface of the foot sothat the webbing between the fingers and thumb is
held firmly against the inner aspect of the 1st
cuneifrom bone with the fingers across thedorsum of the foot. The right hand is placedover the dorsum of the metatarsal shafts withthe thenar eminence on the two medialmetatarsal shafts. The left hand is carried upand laterally as the right hand is carried downand medially. The procedure is changed for theright foot.
64
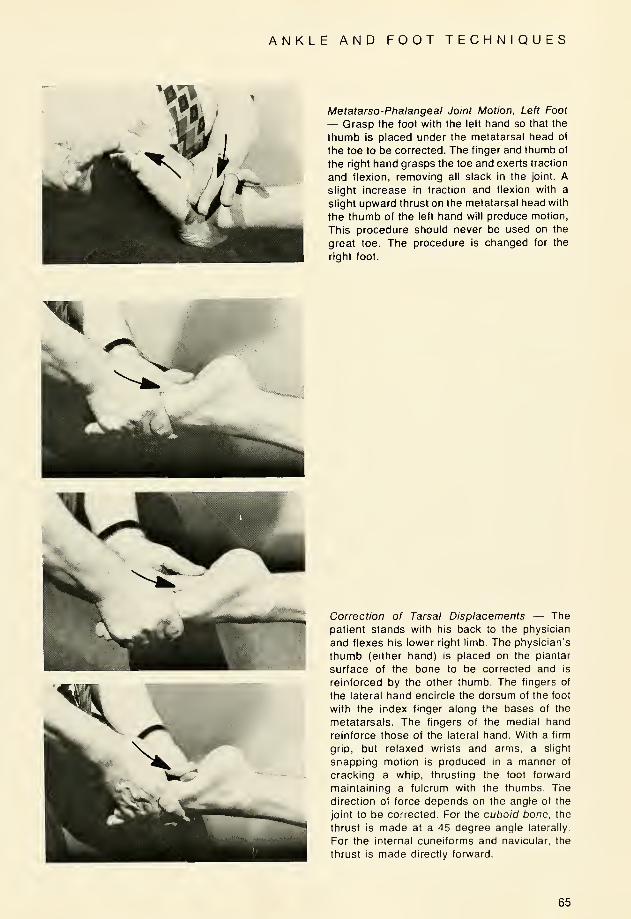
ANKLE AND FOOT TECHNIQUES
Metatarso-Phalangeal Joint Motion, Left Foot
— Grasp the foot with the left hand so that the
thumb is placed under the metatarsal head of
the toe to be corrected. The finger and thumb of
the right hand grasps the toe and exerts traction
and flexion, removing all slack in the joint. Aslight increase in traction and flexion with a
slight upward thrust on the metatarsal head with
the thumb of the left hand will produce motion,
This procedure should never be used on the
great toe. The procedure is changed for the
right foot.
Correction of Tarsal Displacements — The
patient stands with his back to the physician
and flexes his lower right limb. The physician's
thumb (either hand) is placed on the plantar
surface of the bone to be corrected and is
reinforced by the other thumb. The fingers of
the lateral hand encircle the dorsum of the foot
with the index finger along the bases of the
metatarsals. The fingers of the medial hand
reinforce those of the lateral hand. With a firm
grip, but relaxed wrists and arms, a slight
snapping motion is produced in a manner of
cracking a whip, thrusting the foot forward
maintaining a fulcrum with the thumbs. The
direction of force depends on the angle of the
joint to be corrected. For the cuboid bone, the
thrust is made at a 45 degree angle laterally.
For the internal cuneiforms and navicular, the
thrust is made directly forward.
65

ANKLE AND FOOT TECHNIQUES
Spring Action Technique, Left Foot — Thepatient is sitting or lying supine. The physicianplaces the thenar eminence of his right hand onthe lateral aspect of the cuboid bone, the
fingers curling around the heel. The fingers of
the left hand are placed on the dorsum of thetransverse arch with the thumb on the plantar
surface, so that the webbing between the thumband first finger presses against the inner aspectof the navicular and the first cuneiform bones.The physician exerts pressure medially with his
right hand against the cuboid bone and thebase of the 5th metatarsal while a lateral motionis made with the right hand. You may repeat this
squeezing motion several times. The procedureis changed for the right foot.
66

LYMPHATIC DRAINAGE
Classical Maneuvers — The patient is supine
with his knees flexed, feet on the table, andhead rotated to one side. The physician is at the
head of the table with his hands spread over the
upper thorax, fingers directed outward and the
heels of his hands below the clavicles. (Modifi-
cations: The palms may be above the breasts,
cupping the breasts, or the fingers may bepointed inward between the breasts.) A soft
foam rubber pillow may be placed over the
upper chest before applying pressure with the
palms of the hands. The physician's arms are
maintained in as full extension as possible. Thepressure is equally distributed over the entire
surface of both hands and is applied downwardand caudally in a rhythmic manner as explained
below.
Modification—Same position except one handis over the sternum. Same rhythmic pressure.
Modifications of Rhythms—A. A slight pressureis maintained constantly after the patient com-pletely exhales. The pressure is then exag-gerated for short intervals, regardless of therespiratory movement. The patient shouldremain in a relaxed state (100-120 vibrations
per minute for 3-5 minutes).
B. The pressure is applied after completeexhalation and relaxed with inhalation. Thepatient increases his respiratory rate to 18-24cycles per minute.
\^^A>
Modification I — The patient is supine and the
physician is on the right side of the patient. Thepatient's right arm is extended and abducted by
the physician's left arm. The physician's right
hand is placed over the lateral and anterior
chest wall with his fingers upward and toward
the sternum. There is traction applied to the
patient's right arm by the physician's left hand
during inhalation. A gentle pressure is applied
to the patient's chest by the physician's right
hand during exhalation. The patient increases
his respiratory rate to 18-24 cycles per minute.
67
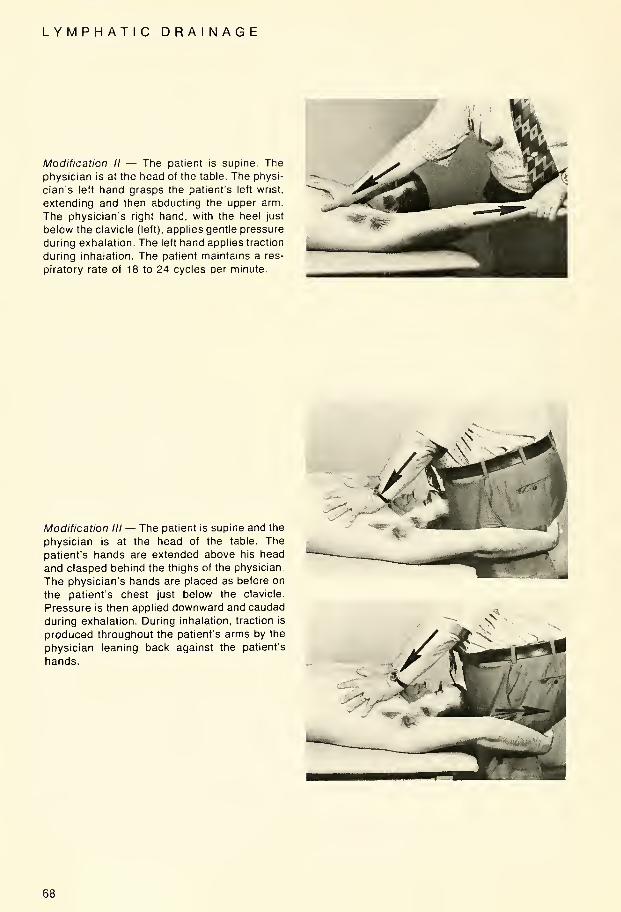
LYMPHATIC DRAINAGE
Modification II — The patient is supine. The
physician is at the head of the table. The physi-
cian's left hand grasps the patient's left wrist,
extending and then abducting the upper arm.
The physician's right hand, with the heel just
below the clavicle (left), applies gentle pressure
during exhalation. The left hand applies traction
during inhalation. The patient maintains a res-
piratory rate of 18 to 24 cycles per minute.
Modification III— The patient is supine and the
physician is at the head of the table. The
patient's hands are extended above his head
and clasped behind the thighs of the physician.
The physician's hands are placed as before on
the patient's chest just below the clavicle.
Pressure is then applied downward and caudad
during exhalation. During inhalation, traction is
produced throughout the patient's arms by the
physician leaning back against the patient's
hands.
68

LYMPHATIC DRAINAGE
Modification IV — Doming the Diaphragm —The patient is supine, and the physician is to
one side facing the patient cephalad. The
hands are placed symmetrically with the fingers
outspread over the lower three of four ribs. The
thumbs are placed under the ribs at about the
junction of the eighth and ninth costal cartilages.
The thumbs produce a bilateral upward and
lateral pressure simultaneously with forced
exhalation.
69

MANDIBULAR DRAINAGE
Mandibular Drainage—(Galbraith's Technique)
(Left Side Drainage)—The patient is supine
and his head rotated to the right. The physician
stands on the patient's right and places his left
forearm under the patient's head and his left
hand on the left shoulder of the patient. The
physician's right hand is placed with his fingers
at the tempero-mandibular joint and the thenar
eminence along the ramus of the mandible.
With the patient's mouth open, the physician
produces a downward, anterior and medial
traction on the patient's mandible. This is done
intermittently and very slowly. The procedure is
changed for right mandibular drainage. There
are other variations to this technique also
AURICULAR DRAINAGE
Auricular Drainage — The patient is placed in a
supine position as described above with the
head again rotated toward the physician. The
physician's fingers (2nd and 3rd) are placed on
each side of the ear and a clockwise and
counter-clockwise motion are used at this area.
70
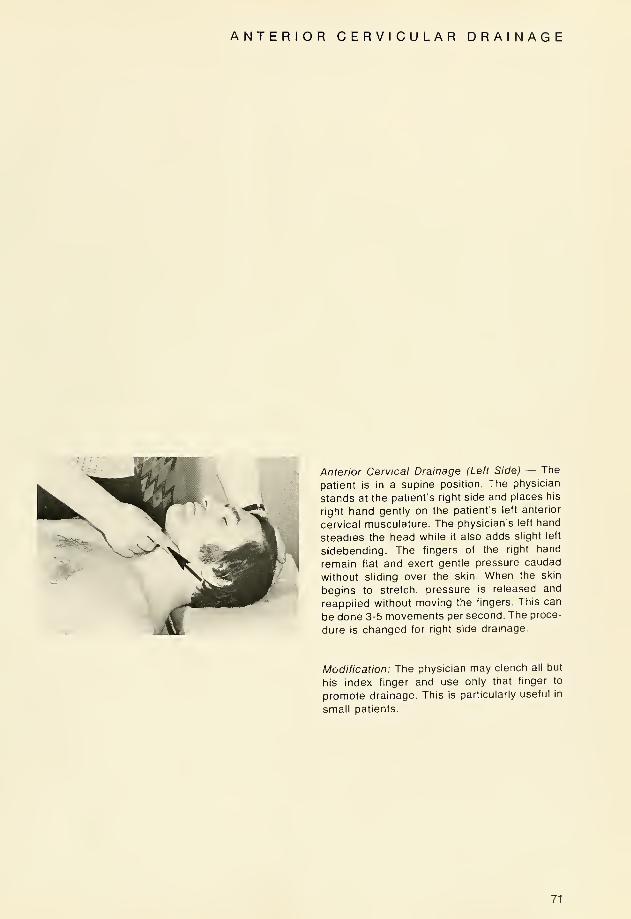
ANTERIOR CERVICULAR DRAINAGE
Anterior Cervical Drainage (Left Side) — The
patient is in a supine position. The physician
stands at the patient's right side and places his
right hand gently on the patient's left anterior
cervical musculature. The physician's left hand
steadies the head while it also adds slight left
sidebending. The fingers of the right hand
remain flat and exert gentle pressure caudad
without sliding over the skin. When the skin
begins to stretch, pressure is released and
reapplied without moving the fingers. This can
be done 3-5 movements per second. The proce-
dure is changed for right side drainage.
Modification: The physician may clench all but
his index finger and use only that finger to
promote drainage. This is particularly useful in
small patients.
71


P. C.O.M. LIBRARY
PHILADELPHIA COLLEGE OF OSTEOPATHIC MEDICINE
3 2243 00024 8615