Embed Size (px)
Citation preview


11830 Westline Industrial DriveSt. Louis, Missouri 63146
ATLAS OF ORTHOPEDIC SURGICAL ISBN 0-7216-9381-4PROCEDURES OF THE DOG AND CAT Copyright © 2005, Elsevier Inc.
All rights reserved. No part of this publication may be reproduced or transmitted in any form or byany means, electronic or mechanical, including photocopying, recording, or any information storageand retrieval system, without permission in writing from the publisher. Permissions may be sought directly from Elsevier’s Health Sciences Rights Department inPhiladelphia, PA, USA: phone: (+1) 215 238 7869, fax: (+1) 215 238 2239, e-mail:[email protected]. You may also complete your request on-line via the Elsevierhomepage (http://www.elsevier.com), by selecting “Customer Support” and then “ObtainingPermissions.”
International Standard Book Number 0-7216-9381-4
Publishing Director: Linda DuncanSenior Editor: Liz FathmanDevelopmental Editor: John DedekePublishing Services Manager: Melissa LastarriaSenior Project Manager: Joy MooreDesign Manager: Bill Drone
Printed in the United States of America
Last digit is the print number: 9 8 7 6 5 4 3 2 1
NOTICE
Veterinary Medicine is an ever-changing field. Standard safety precautions must be followed, butas new research and clinical experience broaden our knowledge, changes in treatment and drugtherapy may become necessary or appropriate. Readers are advised to check the most currentproduct information provided by the manufacturer of each drug to be administered to verify therecommended dose, the method and duration of administration, and contraindications. It is theresponsibility of the treating veterinarian, relying on experience and knowledge of the patient, todetermine dosages and the best treatment for each individual patient. Neither the publisher northe authors assume any liability for any injury and/or damage to persons or property arising fromthis publication.

This book is dedicated to my family,
mentors, colleagues, residents, and students,
all of whom have provided input in my
development as a surgeon and consequently in
the development of this book.
Ann Johnson
I thank Ann Johnson for her generosity and
friendship. This book is dedicated to my
amazing children, George Henry and Sydney,
who generate an abundance of love, happiness,
and true joy in my life.
Dianne Dunning

Preface
Our goal in writing this atlas of orthopedic surgical procedureswas to create a uniquely portable, easy-to-use referenceresource for surgeons in the operating room—an atlas thatdemonstrates a wide range of procedures commonly performedin veterinary surgery. We thank Laura Duprey for helping usreach this goal by providing superb illustrations of the proce-dures.
In our surgical practice at the University of Illinois, westrongly encourage our residents and students to use textbooksin the surgery suite to guide them in each surgical techniqueand to maximize their proficiency. With the constant explosionof surgical techniques and procedures, this guidance is essen-
tial for those who do not have the opportunity to master eachtechnique by performing the procedures on a daily basis.
The techniques selected and described are based on ouryears of experience in training surgical residents, interns, andstudents and in offering continuing education to practicing vet-erinarians. Also included are tips that we have found helpful aswe have performed these procedures in our own practice.
It was a joy to compile this atlas; we hope that it is as illumi-nating to read as it was instructive to write.
Ann Johnson
Dianne Dunning
vii

SHOULDER
CHAPTER 1 Osteochondrosis of the Shoulder via Caudolateral or Caudal ApproachINDICATIONSCandidates include dogs with persistent lameness of theshoulder caused by osteochondrosis that is not responsive toconservative management.
OBJECTIVES• To improve limb function by removal of the entire osteo-
chondrosis flap, curettage of the adjacent diseased cartilage,and forage to provide blood supply to the exposed subchon-dral bone
ANATOMIC CONSIDERATIONSThe shoulder joint is easily located by palpating the acromialprocess of the scapula and the greater tubercle of the humerus.The acromial head of the deltoideus is bordered cranially by the omobrachial vein and caudally by the axillobrachial vein.Muscular branches of the axillary nerve and caudal circumflexvessels are located deep in the caudal aspect of the acromialhead of the deltoideus muscle, superficial to the triceps muscle.
EQUIPMENT• Standard surgical pack, two medium or large Gelpi retractors
(depending on the size of the dog), blunt Hohmann retractor,bone curettes, pin chuck or high-speed wire driver, Kirschnerwires or small Steinmann pin for forage
PREPARATION AND POSITIONINGPrepare the leg circumferentially from dorsal midline to thecarpus. Use a hanging leg preparation with the dog in lateralrecumbency to allow for maximal manipulation of the shoulderjoint during surgery.
PROCEDURECraniolateral Approach:1 Incise the skin and subcuta-neous tissues in a curvilinear fashion from mid-scapula to mid-humerus. Incise the deep fascia between the acromial andspinous portions of the deltoideus muscle (Plate 1A). Further delineate this separation by blunt dissection with Mayo scissors,allowing for cranial retraction of the acromial head and caudalretraction of the spinous portion of the deltoideus muscle. Themuscle branch of the axillary nerve is visualized at this pointand preserved. Place the Gelpi retractors at 90 degrees to eachother to facilitate visualization. Incise the joint capsule parallelto the rim of the glenoid cavity and replace the Gelpi retractorswithin the joint space to facilitate visualization. Internally rotateand adduct the humerus to maximize exposure to the caudalaspect of the femoral head. Place a blunt Hohmann retractorcaudomedial to the femoral head to exteriorize the femoralhead and further facilitate lesion visualization (Plate 1C).
Caudal Approach:2 Incise the skin and subcutaneoustissues in a curvilinear fashion from mid-scapula to mid-humerus. Incise between the caudal border of the spinous head
of the deltoideus and the long and lateral heads of the tricepsmuscle (Plate 1B). Bluntly dissect under the deltoideus muscleto visualize the axillary nerve and caudal circumflex humeralartery and vein. Use Gelpi retractors to craniodorsally retractthe teres minor muscle located deep to the spinous head of thedeltoideus muscle. Elevate and gently retract the axillary nerveoff of the joint capsule. Incise the joint capsule parallel to therim of the glenoid cavity, and replace the Gelpi retractors withinthe joint space to facilitate visualization. Internally rotate andadduct the humerus to maximize exposure to the caudal aspectof the femoral head (Plate 1D).
Curettage: Remove the cartilage flap with thumb orHalstead forceps. Probe the remaining cartilage surroundingthe defect with a curette, and remove any abnormal cartilagenot adherent to the subchondral bone (Plate 1E).
Forage: Using a small Kirschner wire or small Steinmannpin, penetrate the sclerotic subchondral bone in multiple sitesuntil it bleeds (Plate 1F). Explore the caudal cul-de-sac of thejoint for loose or free fragments of cartilage. Lavage the joint,and close the joint capsule and wound in a routine fashion.
CAUTIONSOsteochondrosis is often bilateral (42% to 65%)3; both shouldersshould be evaluated, even if the animal exhibits a unilateral lame-ness. Accurate hemostasis should be used when approaching theshoulder, as hemorrhage will greatly impede joint visualization.
POSTOPERATIVE EVALUATIONNo specific postoperative evaluation is required.
POSTOPERATIVE CAREExercise should be restricted for 3 to 4 weeks to allow softtissue healing and cartilage resurfacing, and then normalactivity should be reintroduced slowly.
EXPECTED OUTCOMEOutcome is good to excellent in most cases.4 Note that degen-erative joint disease may develop despite the surgical removalof an osteochondrosis flap.
References1. Piermattei DL, Johnson KA: Approach to the caudolateral region of
the shoulder joint. In An Atlas of Surgical Approaches to the Bonesand Joints of the Dog and Cat, 4th ed. Philadelphia, WB Saunders,2004.
2. Piermattei DL, Johnson KA: Approach to the caudal region of theshoulder joint. In An Atlas of Surgical Approaches to the Bones andJoints of the Dog and Cat, 4th ed. Philadelphia, WB Saunders, 2004.
3. Whitehair J, Rudd R: Osteochondritis dissecans of the humeral headin dogs. Compend Cont Ed 12:195–203, 1990.
4. Rudd R, Whitehair J, Marogolis J: Results of management of osteo-chondritis dissecans of the humeral head in dogs: 44 cases(1982–1987). J Am Anim Hosp Assoc 26:173–178, 1990.
2 PART ONE • SURGICAL PROCEDURES FOR JOINT DISEASES

CH A P T E R 1 OSTEOCHONDROSIS OF THE SHOULDER 3
PLATE 1
A B
C
D
E F
Triceps brachii muscle:
Long headLateral head
Deltoideus muscle:
Scapular partAcromial part
Caudolateralapproach
Caudalapproach
Deltoideus muscle:
Scapular partAcromial part
Deltoideus muscle
Teres minormuscle
(retractedcraniodorsally)
Glenoid
Jointcapsule

SHOULDER
CHAPTER 2 Infraspinatus ContractureINDICATIONSCandidates are animals with infraspinatus contracture that isnot responsive to rest and management with nonsteroidal anti-inflammatory drugs. These dogs display a characteristic gaitabnormality of external rotation of the shoulder, elbow abduc-tion, and outward rotation of the pes.
OBJECTIVES• To restore normal shoulder joint range of motion and fore-
limb function by releasing the fibrotic infraspinatus muscle
ANATOMIC CONSIDERATIONSThe infraspinatus muscle is one of the cuff muscles of theshoulder joint,1 lying just caudal to the scapular spine. Itstendon lies beneath the acromial head of the deltoideus muscleand crosses the joint craniolaterally, inserting on the lateralaspect of the greater tubercle of the humerus. The teres minortendon inserts just distally to the infraspinatus along the lateralaspect of the greater tubercle of the humerus.
EQUIPMENT• Standard surgical pack, two medium or large Gelpi retractors
(depending on the size of the dog), periosteal elevator, andformalin jar for histopathology
PREPARATION AND POSITIONINGPrepare the leg circumferentially from dorsal midline to thecarpus. Use a hanging leg preparation, with the dog in lateralrecumbency to allow for maximal manipulation of the shoulderjoint during surgery.
PROCEDURE2
Incise the skin and subcutaneous tissue in a curvilinear fashionfrom the mid-scapular spine to the proximal portion of thehumerus. Incise the deep fascia along the cranial border of theacromial head of the deltoideus muscle. Elevate and caudallyretract the muscle with Gelpi retractors (Plate 2A). The infra-
spinous tendon should be visible as it inserts on the greatertubercle of the proximal humerus. Affected tendons will appeargrossly thickened and fibrotic and will become visibly taut andinhibit the range of motion of the shoulder when it is placed inextension or flexion. Isolate the tendon by sharp and blunt dis-section with a scalpel blade and periosteal elevator. Transectthe tendon and any associated fibrotic bands until the shouldermoves freely. Resect a portion of the tendon (approximately1 cm) to prevent recurrence and submit for histopathology(Plate 2B). Closure is routine.
CAUTIONSThere are no specific cautions.
POSTOPERATIVE EVALUATIONOnce released, the shoulder should resume full range of motion.A portion of the affected tendon should be biopsied and sub-mitted for histopathology for disease verification.
POSTOPERATIVE CAREExcessive activity should be restricted for 10 to 14 days to pre-vent seroma formation.
EXPECTED OUTCOMEOutcome is usually excellent, with a full return to functionexpected.3
References1. Vasseur P, Moore D, Brown S: Stability of the canine shoulder joint:
An in vitro analysis. Am J Vet Res 43:352–355, 1982.2. Piermattei DL, Johnson KA: Approach to the craniolateral region of
the shoulder joint by tenotomy of the infraspinatus muscle. In AnAtlas of Surgical Approaches to the Bones and Joints of the Dog andCat, 4th ed. Philadelphia, WB Saunders, 2004.
3. Bennet R: Contracture of the infraspinatus muscle in dogs: A reviewof 12 cases. J Am Anim Hosp Assoc 22:481–487, 1986.
4 PART ONE • SURGICAL PROCEDURES FOR JOINT DISEASES

CH A P T E R 2 INFRASPINATUS CONTRACTURE 5
PLATE 2
Deltoideus muscle:acromial part
Triceps brachii muscle:lateral head
Infraspinatusmuscle
Supraspinatusmuscle
Teres minor muscle
Infraspinatusmuscle
A
B

SHOULDER
CHAPTER 3 Stabilization of Medial Shoulder LuxationINDICATIONSThis procedure is indicated in animals with medial shoulderluxation and instability. Open reduction and stabilization is indi-cated if a traumatic luxation is unstable enough after closedreduction that reluxation occurs, or if the luxation is chronic.Surgery is warranted in animals with congenital luxation orinstability that causes severe or persistent lameness.
OBJECTIVES• To restore normal stability, congruency, mobility, and function
to the shoulder joint without altering regional anatomy1
ANATOMIC CONSIDERATIONSAnatomic landmarks for the scapulohumeral joint are theacromion process of the scapular spine, the greater tubercle,and the acromial head of the deltoid muscle. Anatomic land-marks for positioning the skin incision include the acromion ofthe scapula, the greater tubercle of the humerus, and the pec-toral muscles. The suprascapular nerve is present over the cranial lateral surface of the scapula. The caudal circumflexhumeral artery and axillary nerve are present on the caudolat-eral aspect of the shoulder, and these should be avoided.
EQUIPMENT• Standard surgical pack, two medium or large Gelpi retractors
(depending on the size of the dog), periosteal elevator, twosmall Hohmann retractors, wire driver, intramedullary pins orKirschner wires, mallet, 20-pound nylon* or the appropriate-size nonabsorbable suture material, and a suture anchorsystem†
Alternatively, if a suture anchor system is not available or ifthe animal is not large enough to accommodate the suture
anchor system, a screw and washer combination may be used.Additional instrumentation needed for this technique includes ahigh-speed drill, bone screw and washer, drill bit, tap, depthgauge, and screwdriver.
PREPARATION AND POSITIONINGPrepare the leg circumferentially, from the dorsal midline to thecarpus. Use a hanging leg preparation with the dog in dorsalrecumbency to allow for maximal manipulation of the shoulderjoint during surgery.
PROCEDUREApproach:2 Use an approach to the craniomedial shoulderjoint to expose the luxated joint. If possible, reduce the luxationbefore the approach to reestablish normal anatomic relation-ships. Incise the skin and subcutaneous tissue from the medialaspect of the acromion over the greater tubercle to the medialaspect of the midhumeral diaphysis. Ligate the omobrachialvein if it interferes with the intended approach. Incise the fas-cial border of the brachiocephalicus muscle and retract themuscle medially. Incise the insertions of the superficial anddeep pectoral muscles from the humerus and retract themmedially. Retract the supraspinatus muscle laterally. Transectthe tendon of the coracobrachialis muscle near its origin toexpose the subscapularis muscular tendon. Incise and elevatethe subscapularis muscle tendon at its origin, exposing 0.5 to1.0 cm of the distal scapula. Place one small Hohmann retractorcranial and underneath the supraspinatus muscle and anothercaudally against the caudal scapula for good visualization of themedial glenohumeral joint (Plate 3A). Inspect the joint, andassess the condition of the humeral head and medial labrum ofthe glenoid.
6 PART ONE • SURGICAL PROCEDURES FOR JOINT DISEASES
*Mason Nylon Leader Line, Mason Tackle Company, Otisville, Michigan.†Bone Biter Suture Anchor System, Warsaw, Indiana.
Continued

CH A P T E R 3 STABILIZATION OF MEDIAL SHOULDER LUXATION 7
PLATE 3
Subscapularismuscle
Deep pectoralmuscle
Coracobrachialismuscle
Biceps brachiimuscle
Supraspinatusmuscle
Superficialpectoralmuscle
A

Stabilization with the Suture Anchor System:1,3
Reduce the joint and identify the insertion and origins of themedial glenohumeral ligament in the distal scapula and prox-imal humerus. Drill three holes, one each at the cranial andcaudal components of the ligament origin on the distal scapulaand another at the ligament insertion on the proximal humerus(Plate 3B). Insert suture anchors threaded with fish leader lineor nonabsorbable suture into each of these holes. There shouldbe two independent suture loops for the cranial and caudalcomponents of the medial glenohumeral ligament. Tie thesutures with the limb held at a normal standing angle (approxi-mately 135 degrees of extension) such that the sutures are taut,but not overly tight, avoiding plication of the joint capsule(Plate 3C). Imbricate the capsule and subscapularis tendonwith nonabsorbable mattress sutures. Place the scapulo-humeral joint through a range of motion and evaluate joint sta-bility and mobility. Closure is routine.
Stabilization with a Screw and WasherCombination:1 Reduce the joint and identify the origins andinsertion of the medial glenohumeral ligament in the distalscapula and proximal humerus. Drill, measure, and tap threeholes, one each at the cranial and caudal components of the lig-ament origin on the distal scapula and another at the ligamentinsertion on the proximal humerus. Use a screw and washercombination to prevent subsidence into the soft metaphysealbone and slippage of the ligature. There should be two inde-pendent suture loops for the cranial and caudal components ofthe medial glenohumeral ligament. Tie the sutures with the limbheld at a normal standing angle (approximately 135 degrees ofextension) such that the sutures are taut, but not overly tight,avoiding plication of the joint capsule (Plate 3D). Imbricate thecapsule and subscapularis tendon with nonabsorbable mattresssutures. Place the scapulohumeral joint through a range ofmotion and evaluate joint stability and mobility. Closure is routine.
CAUTIONSBecause the suprascapular nerve lies in close proximity to thefascial attachment between the deep pectoral and supraspinatusmuscles, care must be taken during the approach in order toavoid trauma.
POSTOPERATIVE EVALUATIONJoint stability and range of motion should be evaluated at 2 and4 weeks to assess continued need for external coaptation.
POSTOPERATIVE CAREA Velpeau sling is indicated to protect the repair for 2 to 4 weeks.
EXPECTED OUTCOMEOutcome is good to excellent in most cases. A published caseseries noted minimal gait abnormalities following surgery andrehabilitation, even in the face of degenerative joint disease and joint malformation stemming from congenital shoulder luxation.1
References1. Fitch R, Breshears L, Staatz A, et al: Clinical evaluation of prosthetic
medial glenohumeral ligament repair in the dog (10 cases). VetComp Orthop Traumatol 14:222–228, 2001.
2. Piermattei DL, Johnson KA: Approach to the craniomedial region ofthe shoulder joint. In An Atlas of Surgical Approaches to the Bonesand Joints of the Dog and Cat, 4th ed. Philadelphia, WB Saunders,2004.
3. Ringwood P, Kerwin S, Hosgood G, et al: Medial glenohumeral liga-ment reconstruction for ex-vivo medial glenohumeral luxation in thedog. Vet Comp Orthop Traumatol 14:196–200, 2001.
8 PART ONE • SURGICAL PROCEDURES FOR JOINT DISEASES

CH A P T E R 3 STABILIZATION OF MEDIAL SHOULDER LUXATION 9
PLATE 3
Suture anchor threadedwith two suturesinserted in humerus
Anchor locked beneathcortices
D
C
B

SHOULDER
CHAPTER 4 Stabilization of Lateral Shoulder LuxationINDICATIONSLateral shoulder luxations are usually traumatic in origin andoccur after glenohumeral ligament and infraspinatus tendonrupture. Open reduction and stabilization is indicated if the lux-ation is unstable enough after closed reduction that reluxationoccurs, or if the luxation is chronic.
OBJECTIVES• To restore normal stability, congruency, mobility, and func-
tion to the shoulder joint without altering regional anatomy
ANATOMIC CONSIDERATIONSAnatomic landmarks for the scapulohumeral joint are theacromion process of the scapular spine, the greater tubercle,and the acromial head of the deltoideus muscle. Anatomic land-marks for positioning the skin incision include the acromion ofthe scapula, the greater tubercle of the humerus, and the acro-mial head of the deltoideus muscle.
EQUIPMENT• Standard surgical pack, two medium or large Gelpi retractors
(depending on the size of the dog), periosteal elevator, wiredriver, intramedullary pins or Kirschner wires, mallet, 20- to60-pound nylon,* and a suture anchor system* Alternatively a bone tunnel, screw, and washer combination
may be used, if a suture anchor system is not available or if theanimal is not large enough to accommodate the suture anchorsystem. Additional instrumentation needed for this techniqueincludes a high-speed drill, bone screw and washer, drill bit, tap,depth gauge, and screwdriver.
PREPARATION AND POSITIONINGPrepare the leg circumferentially from the dorsal midline to thecarpus. Use a hanging leg preparation, with the dog in lateralrecumbency, to allow for maximal manipulation of the shoulderjoint during surgery. The animal is positioned in lateral recum-bency with the affected leg draped.
PROCEDUREApproach:1,2 Use an approach to the craniolateral region ofthe shoulder joint to expose the luxated joint. It may be helpfulto reestablish normal anatomic relationships by reducing thejoint before the approach is made. Incise the skin and subcuta-neous tissue in a curvilinear fashion from the mid-scapularspine to the proximal portion of the humerus. Incise the deepfascia along the cranial border of the acromial head of the del-toideus muscle. Elevate and caudally retract the muscle withGelpi retractors. If the infraspinatus tendon is not torn, eitherincise it 5 mm from its origin or perform an osteotomy of theacromial process to facilitate reattachment. Incise the joint cap-sule, inspect the joint, and assess the condition of the humeralhead and lateral labrum of the glenoid (Plate 4A). If the labrumis worn, the prognosis for successful stabilization of theshoulder is poor and arthrodesis should be considered (seeChapter 5). Reduce the joint and identify the origin and inser-tion of the lateral glenohumeral ligament. Primary apposition ofthe torn ligament, if possible, is the method of choice for repair.If greater stability is desired, reinforcement of the repaired ligament with prosthetics may be necessary.
Stabilization with the Suture Anchor System:3
Drill one hole in the distal scapula at the lateral glenohumeralligament origin and a second hole at the ligament insertion onthe proximal humerus. Insert suture anchors threaded withfishing leader line into each of these holes (Plate 4B). Tie thesutures with the limb held at a normal standing angle (approxi-mately 135 degrees of extension) such that the sutures are taut,but not overly tight, avoiding plication of the joint capsule.Imbricate the capsule with nonabsorbable mattress sutures.Reattach the infraspinatus tendon with a three-loop pulley orlocking loop suture pattern. Place the scapulohumeral jointthrough a range of motion and evaluate joint stability andmobility. Closure is routine.
10 PART ONE • SURGICAL PROCEDURES FOR JOINT DISEASES
*Bone Biter Suture Anchor System, Warsaw, Indiana.
Continued

CH A P T E R 4 STABILIZATION OF LATERAL SHOULDER LUXATION 11
PLATE 4
Deltoideus muscle:acromial partInfraspinatus
muscle
Supraspinatusmuscle
Teres minormuscle
Joint capsuleincised
Infraspinatusmuscle
A
Suture anchor threadedwith two suturesinserted in humerus
Anchor locked beneathcortices
B

Stabilization with a Bone Tunnel and Screw andWasher Combination:4 Reduce the joint, and identify theorigin and insertion of the lateral glenohumeral ligament. Drillan oblique bone tunnel through the distal scapula at the originof ligament (Plate 4C). Thread the fishing leader line throughthe bone tunnel. Drill, measure, and tap a bicortical screw holein the ligament insertion on the proximal humerus. Use a screwand washer to prevent subsidence into the soft metaphysealbone and ligature slippage. Tie the sutures in a figure-eight pat-tern, with the limb held at a normal standing angle (approxi-mately 135 degrees of extension) such that the sutures are taut,but not overly tight, avoiding plication of the joint capsule(Plate 4D). Imbricate the capsule with nonabsorbable mattresssutures. Reattach the infraspinatus tendon with a three-looppulley or locking loop suture pattern (Plate 4E). Place thescapulohumeral joint through a range of motion and evaluatejoint stability and mobility. Closure is routine.
CAUTIONSThere is a high potential for concurrent chest trauma with theseinjuries. Patients should be thoroughly evaluated (e.g., withelectrocardiogram, thoracic radiographs, and blood work) andstabilized before initiating surgical repair.
POSTOPERATIVE EVALUATIONThe joint should be radiographed to assess implant positioningand joint congruency. Joint stability and range of motion should
be evaluated at 2 and 4 weeks to assess continued need forexternal coaptation.
POSTOPERATIVE CAREThe limb should be supported in a spica splint for 10 to 14 days.Passive range of motion exercises should be implemented aftersplint removal for the next 2 weeks, with concurrent exerciserestriction. Over the following 2 weeks, the animal should slowlybe returned to normal activity.
EXPECTED OUTCOMEOutcome is usually fair to excellent, depending on the degree oftrauma to the joint.
References1. Piermattei DL, Johnson KA: Approach to the craniolateral region of the
shoulder joint. In An Atlas of Surgical Approaches to the Bones andJoints of the Dog and Cat, 4th ed. Philadelphia, WB Saunders, 2004.
2. Piermattei DL, Johnson KA: Approach to the lateral aspect of thehumeral condyle and epicondyle. In An Atlas of Surgical Approachesto the Bones and Joints of the Dog and Cat, 4th ed. Philadelphia, WBSaunders, 2004.
3. Slocum B, Slocum TD: Suture stabilization for luxations of theshoulder. In Bojrab MJ (ed): Current Techniques in Small AnimalSurgery, 4th ed. Baltimore, Williams & Wilkins, 1998.
4. Engen MH: Surgical treatment of shoulder luxations. In Bojrab MJ(ed): Current Techniques in Small Animal Surgery, 4th ed. Baltimore,Williams & Wilkins, 1998.
12 PART ONE • SURGICAL PROCEDURES FOR JOINT DISEASES

CH A P T E R 4 STABILIZATION OF LATERAL SHOULDER LUXATION 13
PLATE 4
Tendon ofinfraspinatus
muscle
C
D
E

SHOULDER
CHAPTER 5 Shoulder ArthrodesisINDICATIONSThis procedure is used for animals with unreconstructable jointfractures, chronic shoulder luxation, or severe osteoarthritisthat is refractory to medical treatment.1
OBJECTIVES• To fuse the bones of the scapulohumeral joint in a functional
position
ANATOMIC CONSIDERATIONSThe greater tubercle of the humerus and the acromion of thescapula are palpable landmarks. Osteotomy of the acromionallows reflection of a portion of the deltoideus muscle and visu-alization of the joint. Osteotomy of the greater tubercle alsoaids joint exposure and provides a flat surface for the plate. Thesuprascapular nerve and artery course over the scapular notchand under the acromion. The axillary artery and nerve arelocated immediately caudal to the joint, but these are not usu-ally visualized with this approach.
EQUIPMENT• Surgical pack, Senn retractors, Hohmann retractors, Gelpi
retractors, periosteal elevator, oscillating saw, self-centeringplate-holding forceps, high-speed drill and wire driver,Kirschner wires, wire cutter, orthopedic wire, wire twister,plating equipment, and rongeurs
PREPARATION AND POSITIONINGPrepare the forelimb circumferentially from dorsal midline tomid-radius. Position the animal in lateral recumbency with theaffected limb up. Drape the limb out from a hanging position toallow maximal manipulation during surgery. A cancellous bonegraft can be harvested from the ostectomized humeral head.
PROCEDUREApproach: Incise the skin and subcutaneous tissue over thecranial lateral aspect of the shoulder from the distal one third ofthe scapula to the proximal one third of the humerus.Osteotomize the acromion and retract the deltoideus muscledistally and caudally. Osteotomize the greater tubercle and ele-vate the supraspinatus muscle proximally. Incise the infra-spinatus, teres minor, and biceps brachii tendons and the jointcapsule to expose the articular surfaces (Plate 5A).2
Alignment: Predetermine the cranial caudal angle for theshoulder arthrodesis by observing the normal standing angle ofthe shoulder in the individual patient. This angle is commonly110 degrees (Plate 5B).1,2
Stabilization: Remove the articular surface of the scapulawith an oscillating saw directed perpendicular to the spine of thescapula. Flex the shoulder to the predetermined angle and performan ostectomy of the humeral head. The humeral ostectomy shouldparallel the ostectomy surface of scapula when the shoulder isflexed to the appropriate angle (see Plate 5B). Appose the distal
scapular and the proximal humeral ostectomy surfaces, andtemporarily fix them with Kirschner wires (Plate 5C). Use an alu-minum template to determine the cranial contour of the junctionof the spine and body of the scapula and the cranial aspect of theproximal humerus. Use the bending pliers and the torque irons tocontour an appropriately sized bone plate (allowing at least threescrews proximally and distally to the shoulder) to match the alu-minum template. Apply the plate by first placing screws throughthe proximal and distal plate holes. Place a lag screw through theplate and across the ostectomy surfaces (see Plate 5C). Fill theremaining plate holes, directing the proximal screws into the thickbone at the junction of the spine and body of the scapula (Plate5D). Remove the Kirschner wires. Collect cancellous bone fromthe ostectomized humeral head with rongeurs and place it aroundthe ostectomy surfaces. Reattach the biceps brachii tendon to the fascia of the supraspinatus muscle. Attach the greatertubercle to the humerus lateral to the plate with a lag screw (seePlate 5D). Wire the acromion.1,2 Close the wound routinely.
CAUTIONSThe suprascapular nerve and artery must be protected duringthe procedure, and care must be taken not to trap the nerveunder the plate. Medial and lateral angulation of the saw bladeshould be avoided when performing the scapular and humeralarticular ostectomies. Angular and rotational alignment of thelimb should be checked carefully before the plate is secured.
POSTOPERATIVE EVALUATIONThe axial alignment of the limb and the angle of the arthrodesisshould be observed critically. Radiographs for limb alignmentand implant placement should be evaluated.
POSTOPERATIVE CAREA soft padded bandage should be placed around the forelimband over the scapula to control bleeding and swelling. Thearthrodesis site should be protected with a spica splint for 6weeks or until early radiographic evidence of bone bridging isobserved. Radiographs should be repeated at 6-week intervalsuntil bone healing occurs. The animal should be confined, withactivity limited to leash walks until bone healing is complete.Barring complications, the plate should not be removed.
EXPECTED OUTCOMEThe bone should heal in 12 to 18 weeks. Satisfactory function ofthe treated limb can be expected as long as the elbow andcarpus are free of disease.
References1. Johnson KA: Arthrodesis. In Olmstead ML (ed): Small Animal
Orthopedics. St. Louis, Mosby, 1995.2. Piermattei DL, Flo GL: The shoulder joint. In Brinker, Piermattei,
and Flo’s Handbook of Small Animal Orthopedics and FractureRepair, 3rd ed. Philadelphia, WB Saunders, 1997.
14 PART ONE • SURGICAL PROCEDURES FOR JOINT DISEASES

CH A P T E R 5 SHOULDER ARTHRODESIS 15
PLATE 5
B
C D
110º
Infraspinatus muscle
Spinous head ofdeltoideus muscle
Supraspinatus muscle
Joint capsuleincised
Osteotomy site
Tendon of bicepsbrachii muscle cut
Acromial head ofdeltoideus muscle
Teres minor muscle
A

ELBOW
CHAPTER 6 Fragmented Medial CoronoidProcess and Osteochondrosis of the ElbowINDICATIONS1
The ideal candidates for this surgery are dogs with persistentlameness that exhibit minimal degenerative changes to the jointon radiographs. Dogs with severe degenerative joint diseaseand persistent lameness that are not responsive to conservativemanagement and nonsteroidal anti-inflammatory drugs mayalso benefit from joint exploration, loose fragment excision,and osteophyte curettage.
OBJECTIVES• To improve function and limit pain stemming from
osteoarthritis and elbow incongruity
ANATOMIC CONSIDERATIONS2
The elbow joint is exposed through a medial approach. Themedial epicondyle and the pronator teres and flexor carpi radi-alis muscles are key anatomic landmarks for this approach. Themedian nerve, brachial artery, and ulnar nerve are located justproximal to the epicondyle. The median nerve and brachialartery and vein course cranially to the medial epicondyle. Theulnar nerve courses caudally to the medial epicondyle, over theanconeus muscle.
EQUIPMENT• Standard surgical pack, a small Frazier suction tip (size 8 or
10), two baby Gelpi retractors, bone curettes, osteotome andmallet, periosteal elevator, Lempert rongeur, pin chuck orhigh-speed wire driver, Kirschner wires or small Steinmannpin for forage, and an Ochsner forceps
PREPARATION AND POSITIONINGPrepare the limb from shoulder to carpus. Position the dog indorsal recumbency, with the affected limb suspended fordraping. Then release the limb to allow access to the medial sur-face of the elbow.
PROCEDUREApproach:2 Incise the skin from just proximal to the medialepicondyle to the proximal radius. Incise the subcutaneous fatand fascia along the same lines. Identify the separation betweenthe flexor carpi radialis and the superficial digital flexor tendonby counting the muscle bellies from cranial to caudal, startingwith the pronator teres. Separate the muscles via blunt dissec-tion, paying close attention to the muscular branch of the ulnarartery and vein. Expose the joint capsule and incise it parallelto the muscle-splitting incision to expose the coronoid process.Insert the baby Gelpi retractors into the joint to facilitate visu-alization (Plate 6A).
Joint Exploration: Identify the fragmented coronoidprocess and any osteochondrotic or kissing lesions on themedial humeral condyle. Remove the coronoid fragment withrongeurs or osteotome and mallet so that the base of the medialcoronoid process is level with that of the radial head (Plate 6B).
This eliminates excessive forces on the medial coronoidprocess that are present when incongruities in radial and ulnarlength exist.3,4
Osteochondrosis Curettage: Remove the cartilage flapwith thumb or Ochsner forceps. Probe the remaining cartilagesurrounding the defect with a curette, and remove any abnormalcartilage not adherent to the subchondral bone (Plate 6C).
Forage: Using a small Kirschner wire or small Steinmannpin, penetrate the sclerotic subchondral bone in multiple sitesuntil it bleeds. Lavage the joint copiously, and close the jointcapsule and wound in a routine fashion.
CAUTIONSA muscular branch of the recurrent ulnar artery and vein ispresent in the intermuscular septum between the flexor carpiradialis and deep digital flexor muscles. Strict hemostasis ofthese intermuscular vessels is imperative for adequate visuali-zation within the joint.
POSTOPERATIVE EVALUATIONNo specific postoperative evaluation is required.
POSTOPERATIVE CAREThe limb should be bandaged after surgery for 2 to 3 days to pre-vent swelling and to provide soft-tissue support. Exercise shouldbe restricted for 4 weeks (e.g., kennel confinement when not underdirect observation; walks outside on leash only to urinate/defecate;no running, jumping, or playing). Over the following 4 weeks, theanimal should slowly return to normal activity.
EXPECTED OUTCOME1,5
The outcome is usually guarded to good. Multiple clinicalstudies have found that surgical treatment does not halt the pro-gression of degenerative joint disease. Continued nonsteroidalanti-inflammatory therapy may be required in some patients,especially those with advanced degenerative joint disease.
References1. Read R, Armstrong S, Black A, et al: Relationship between physical
signs of elbow dysplasia and radiographic score in growing rot-tweilers. J Am Vet Med Assoc 209:1427–1430, 1996.
2. Piermattei DL, Johnson KA: Approach to the medial aspect of thehumeral condyle and the medial coronoid process of the ulna by anintermuscular incision. In An Atlas of Surgical Approaches to theBones and Joints of the Dog and Cat, 4th ed. Philadelphia, WBSaunders, 2004.
3. Wind AP: Elbow incongruity and developmental elbow diseases inthe dog: Part I. J Am Anim Hosp Assoc 22:711–724, 1986.
4. Wind AP, Packard ME: Elbow incongruity and developmental elbowdiseases in the dog: Part II. J Am Anim Hosp Assoc 22:725–731, 1986.
5. Huibregtse BA, Johnson AL, Muhlbauer MC, et al: The effect of treat-ment of fragmented coronoid process on the development ofosteoarthritis of the elbow. J Am Anim Hosp Assoc 30:190–195, 1994.
16 PART ONE • SURGICAL PROCEDURES FOR JOINT DISEASES

CH A P T E R 6 OSTEOCHONDROSIS OF THE ELBOW 17
PLATE 6
Flexor carpiradialis muscle
Joint capsuleincised
Sharp adduction and internal rotation of humerus
Superficial digitalflexor muscle
Medial coronoidprocess of ulna
(fragmented)
A
B
C

ELBOW
CHAPTER 7 Stabilization of Lateral Elbow Luxation
INDICATIONS1
The indications for open reduction of luxated elbows includeMonteggia fractures; acute luxations that cannot be reduced byclosed manipulation because of instability, bony fragments, orhematomas; failed closed reductions; and chronic luxationswith muscle contracture and capsule fibrosis.
OBJECTIVES• To reestablish normal joint orientation and stability while
preserving functional pain-free range of motion of the elbowjoint
ANATOMIC CONSIDERATIONS2
More than 90% of traumatic elbow luxations are lateral becauseof the large medial epicondylar ridge of the humerus and thedistal slope of the medial epicondyle. A limited lateral approachto the elbow is used. Anatomic landmarks for open reductionare the lateral humeral condyle, the olecranon and anconealprocesses, and the radial head. A deep branch of the radialnerve courses proximally to the cranial border of the extensorcarpi radialis muscle. A superficial branch of the radial nerve islocated between the lateral head of the triceps and thebrachialis muscle, and this must be protected in the proximalportion of the incision.
EQUIPMENT• Standard surgical pack, two medium or large Gelpi retractors
(depending on the size of the dog), periosteal elevator, twosmall Hohmann retractors, wire driver, intramedullary pins orKirschner wires, mallet, and a suture anchor system* If a suture anchor system is not available or if the animal is
not large enough to accommodate the suture anchor system, ascrew and washer combination may be used. Additional instru-mentation needed for this technique includes high-speed drill, bone screw and washer, drill bit, tap, depth gauge, andscrewdriver.
PREPARATION AND POSITIONINGPrepare the leg circumferentially from dorsal midline to thecarpus. Use a hanging leg preparation with the dog in lateral
recumbency to allow for maximal manipulation of the shoulderjoint during surgery. The animal is positioned in lateral recum-bency with the affected leg draped.
PROCEDUREApproach:2,3 Incise the skin and subcutaneous tissue overthe lateral condyle, from the distal humerus to the proximalradius. Incise the deep brachial and antebrachial fascia toexpose the lateral head of the triceps. Continue the incisionthough the deep fascia on the cranial border of the triceps andextend it distally over the extensor muscles of the ante-brachium. Retract the muscles to expose the lateral condyle.Incise the periosteal origin of the anconeal muscle to exposethe caudolateral compartment of the elbow. If additional expo-sure to the joint is necessary to visualize the radial head, a cran-iolateral compartment can be made. Incise the periosteal originof the extensor carpi radialis, and extend this incision distallyalong the intermuscular septum between the extensor carpiradialis and the common digital extensor muscle. Elevate theextensor carpi radialis muscle from the bone and enter the joint(Plate 7A).
Reduction:4,5 Reduce the elbow by hooking the anconealprocess into the lateral condyle and restoring radiohumeraljoint orientation (Plate 7B). First, flex the elbow about 100degrees and inwardly rotate the antebrachium. Next, hook theanconeal process over the lateral condyle and slightly extendthe elbow. While placing lateral to medial pressure over thehead of the radius, reduce the radial head under the humeralcapitulum. Abduct and inwardly rotate the antebrachium andinto the fully reduced position (Plate 7C). Try to protect the car-tilage during reduction. If the muscle contraction and subse-quent overriding are severe, a blunt periosteal elevator can beused to gently lever the radial head into position. If reduction isnot achieved, perform an olecranon osteotomy to eliminate thepull of the triceps muscle. After reduction, flush the joint andassess stability.
18 PART ONE • SURGICAL PROCEDURES FOR JOINT DISEASES
*Bone Biter Suture Anchor System, Warsaw, Indiana.
Continued

CH A P T E R 7 STABILIZATION OF LATERAL ELBOW LUXATION 19
PLATE 7
100°
Medialpressureon olecranon
Anconeal processhooked overlateral epicondyleB C
A
Anconeal muscle
Extensorcarpi
radialismuscle
Deep fascia
Lateralcondyleexposed
Common digitalextensor muscle

Collateral Ligament Repair: Identify the torn lateralcollateral ligament. If possible, primary repair of the torn liga-ment should be attempted. Appose the torn ends of the ligamentwith a locking loop or three-loop pulley suture pattern.Reattach avulsed ligaments with a bone screw and spikedTeflon washer (Plate 7D). If needed, ligamentous repair may besupplemented with suture anchors with either heavy (No. 1 orNo. 2) nonabsorbable suture or two screws and a figure-eightwire (Plate 7E). Check the joint for stability and range ofmotion. If additional stability is necessary, consider medial col-lateral ligament repair.
CAUTIONSThere is a high potential for concurrent chest trauma with theseinjuries. Patients should be thoroughly evaluated (e.g., withelectrocardiogram, thoracic radiographs, and blood work) andstabilized before initiating surgical repair. As soon as the patientis stabilized, reduction, repair, or both should be attempted.
POSTOPERATIVE EVALUATIONThe joint should be radiographed to assess implant positioningand joint congruency. Joint stability and range of motion shouldbe evaluated at 2 and 4 weeks to assess continued need forexternal coaptation.
POSTOPERATIVE CAREThe limb should be supported in a spica splint for 10 to 14 days.Passive range of motion exercises should be implemented after
splint removal for the next two weeks with concurrent exerciserestriction. Over the following 2 weeks, the animal shouldslowly return to normal activity.
EXPECTED OUTCOME1
The usual outcome is fair to excellent. Most dogs have goodlimb function after surgical reduction. Smaller, less active dogshave a better prognosis than do larger, more active dogs.Common complications following surgery included degenera-tive joint disease and decreased range of joint motion.
References1. Schaeffer IGF, Wolvekamp P, Meij BP, et al: Traumatic luxation of
the elbow in 31 dogs. Vet Comp Orthop Traumatol 12:33–39, 1999.2. Piermattei DL, Johnson KA: Approach to the lateral aspect of the
humeral condyle and epicondyle. In An Atlas of Surgical Approachesto the Bones and Joints of the Dog and Cat, 4th ed. Philadelphia, WBSaunders, 2004.
3. Piermattei DL, Johnson KA: Approach to the lateral humeroulnarpart of the elbow joint. In An Atlas of Surgical Approaches to theBones and Joints of the Dog and Cat, 4th ed. Philadelphia, WBSaunders, 2004.
4. Piermattei DL, Johnson KA: Approach to the humeroulnar part ofthe elbow joint by osteotomy of the tuber olecrani. In An Atlas ofSurgical Approaches to the Bones and Joints of the Dog and Cat, 4th ed. Philadelphia, WB Saunders, 2004.
5. Piermattei DL, Flo GL: Brinker, Piermattei, and Flo’s Handbook ofSmall Animal Orthopedics and Fracture Repair, 3rd ed. Philadelphia,WB Saunders, 1997.
20 PART ONE • SURGICAL PROCEDURES FOR JOINT DISEASES

CH A P T E R 7 STABILIZATION OF LATERAL ELBOW LUXATION 21
PLATE 7
Avulsedfragment
ED
ELBOW
CHAPTER 8 Treatment of Ununited AnconealProcess via Removal, Lag-Screw Fixation,and Dynamic Proximal Ulnar Osteotomy
INDICATIONS1–4
Surgery is the treatment of choice for dogs older than 5 monthswith failure to form an osseous union between the anconealprocess and the ulna. Medical therapy alone has been associ-ated with a rapid progression of severe degenerative joint dis-ease (DJD) and lameness. Three surgical treatment optionshave been reported: surgical excision, lag-screw fixation, anddynamic proximal ulnar osteotomy (DPUO). Considerable con-troversy exists regarding the best course of therapy. DPUO isrecommended in dogs with minimal DJD and ununitedanconeal process (UAP) that is tightly adhered to the ulna. Lag-screw fixation of the UAP, followed by concurrent DPUO, is rec-ommended in dogs with minimal DJD and a loose anconealprocess and an incongruent joint as found by evaluation of thejoint via arthrotomy or arthroscopy. Surgical excision is gener-ally reserved as a salvage procedure for dogs with severe DJDand UAP.
OBJECTIVES1,2
• To improve joint congruity, encourage fusion of the anconealprocess, and prevent DJD by DPUO and lag-screw fixation.Surgical excision is considered a salvage procedure aimed ateliminating the irritation caused by the UAP
ANATOMIC CONSIDERATIONS5,6
Exposure of the anconeal process for either lag-screw fixationor excision is made via a caudolateral approach. Anatomic land-marks for the elbow are the lateral humeral condyle, the ole-cranon and anconeal processes, and the radial head. A deepbranch of the radial nerve courses proximally to the cranialborder of the extensor carpi radialis muscle. A superficialbranch of the radial nerve is located between the lateral head ofthe triceps and the brachialis muscle, and this must be pro-tected in the proximal portion of the incision. For a DPUO, acaudal approach to the proximal ulnar diaphysis is used. Thelandmark for ulnar osteotomy is the caudal border of the prox-imal ulna.
EQUIPMENT• Standard surgical pack, a Frazier suction tip, two medium
Gelpi retractors, pointed reduction forceps, periosteal ele-
vator, high-speed wire driver/drill/oscillating saw, aimingdevice, Kirschner wires or small Steinmann pins, platingequipment, bone curettes, osteotome and mallet, Lempertrongeur, and two Hohmann retractors
PREPARATION AND POSITIONINGPrepare the limb from shoulder to carpus. Position the dog indorsal recumbency with the affected limb suspended fordraping. Then release the limb to allow access to the lateral andcaudal surfaces of the elbow.
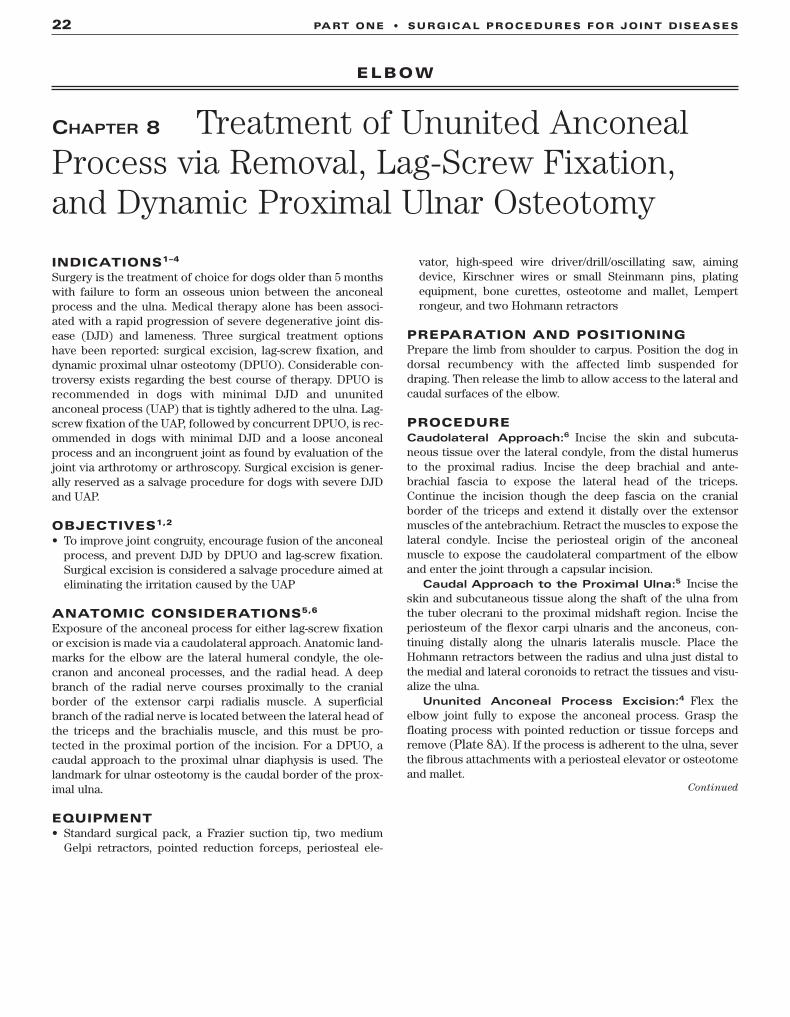
PROCEDURECaudolateral Approach:6 Incise the skin and subcuta-neous tissue over the lateral condyle, from the distal humerusto the proximal radius. Incise the deep brachial and ante-brachial fascia to expose the lateral head of the triceps.Continue the incision though the deep fascia on the cranialborder of the triceps and extend it distally over the extensormuscles of the antebrachium. Retract the muscles to expose thelateral condyle. Incise the periosteal origin of the anconealmuscle to expose the caudolateral compartment of the elbowand enter the joint through a capsular incision.
Caudal Approach to the Proximal Ulna:5 Incise theskin and subcutaneous tissue along the shaft of the ulna fromthe tuber olecrani to the proximal midshaft region. Incise theperiosteum of the flexor carpi ulnaris and the anconeus, con-tinuing distally along the ulnaris lateralis muscle. Place theHohmann retractors between the radius and ulna just distal tothe medial and lateral coronoids to retract the tissues and visu-alize the ulna.
Ununited Anconeal Process Excision:4 Flex theelbow joint fully to expose the anconeal process. Grasp thefloating process with pointed reduction or tissue forceps andremove (Plate 8A). If the process is adherent to the ulna, severthe fibrous attachments with a periosteal elevator or osteotomeand mallet.
22 PART ONE • SURGICAL PROCEDURES FOR JOINT DISEASES
Continued

CH A P T E R 8 TREATMENT OF UNUNITED ANCONEAL PROCESS 23
PLATE 8
Anconeusmuscleretracted
Triceps muscle retractedA

Ununited Anconeal Process Lag-Screw Stabiliza-tion:2,3,7 Reduce and maintain the UAP with the ulna usingpointed reduction forceps (Plate 8B). Insert a Kirschner wireinto the proximal quadrant of the anconeal process, passingperpendicular to the cleavage line and exiting 1 mm to 2 mmbeyond the articular margin. Use this pin as a reference point toguide lag-screw positioning; it will be removed once theanconeal process is secured. Drill the screw hole from thecaudal cortex of the ulna, parallel to the K-wire, and exiting atthe point of the anconeal process (Plate 8C). Alternatively, anaiming device can be used to ensure accurate screw placement(Plate 8D). Secure the anconeal process with either a 2.7-mm or3.5-mm cortical screw placed in lag fashion or a partiallythreaded 4.0 cancellous screw. Insert an additional Kirschnerwire parallel to the screw to ensure rotational stability. Removethe first Kirschner wire that is penetrating the joint. Closure isroutine.
Dynamic Proximal Ulnar Osteotomy:1–3,8 Using anoscillating saw or Gigli wire, cut the bone distal to proximal ata 20- to 30-degree angle to the long axis of the ulna shaft. Whenthe osteotomy is complete, the ulna should separate 2 mm to 4 mm spontaneously. Stabilize the ulna with a small intra-medullary pin (Plate 8E). If not separated, lever the bone endswith a periosteal elevator to release the interosseus ligament.Closure is routine.
CAUTIONSLag-screw fixation for UAP is technically difficult. Correct posi-tioning of the lag screw is imperative. Incorrect drillings canresult in failure because of penetration of the joint as a result ofthe small size of the anconeal process.
POSTOPERATIVE EVALUATIONThe joint should be placed through a thorough range of motionbefore closure. Postoperative radiographs are indicated toverify complete UAP excision, joint congruency, and/or implantand osteotomy position. Radiographs should be repeated every4 to 6 weeks until the UAP is healed.
POSTOPERATIVE CAREAll patients should be placed in a soft padded bandage for 2 to 3 days to prevent seroma formation. Exercise should be
restricted until healing of the UAP is confirmed by radiograph.Exercise should be restricted for 2 to 4 weeks in dogs with sur-gical excision of the UAP.
EXPECTED OUTCOME2,3,8
Surgical excision of the UAP is associated with a variable prog-nosis, with 70% of the patients improving in the immediate post-operative period. However, only 50% of the dogs were free oflameness on long-term follow-up examination, and moderate tosevere DJD can be expected because of the inherent instabilityof the elbow following removal of the anconeal process andbecause of the preexisting joint pathology. The expected out-come is better in dogs with DPUO and/or lag-screw fixation.The reported clinical outcome is good to excellent for these ani-mals, with fusion of the anconeal process and minimal to noprogression of DJD expected.
References1. Turner BM, Abercromby RH, Innes J, et al: Dynamic proximal ulnar
osteotomy for the treatment of ununited anconeal process in 17dogs. Vet Comp Orthop Traumatol 11:76–79, 1998.
2. Meyer-Lindenberg A, Fehr M, Nolte I: Short- and long-term resultsafter surgical treatment of an ununited anconeal process in the dog.Vet Comp Orthop Traumatol 4:101–110, 2001.
3. Krotscheck U, Hulse DA, Bahr A, et al: Ununited anconeal process:Lag-screw fixation with proximal ulnar osteotomy. Vet Comp OrthopTraumatol 13:212–216, 2000.
4. Cross AR, Chambers JN: Ununited anconeal process of the canineelbow. Compend Cont Ed 19:349–362, 1997.
5. Piermattei DL, Johnson KA: Approach to the proximal shaft andtrochlear notch of the ulna. In An Atlas of Surgical Approaches tothe Bones and Joints of the Dog and Cat, 4th ed. Philadelphia, WBSaunders, 2004.
6. Piermattei DL, Johnson KA: Approach to the lateral humeroulnarpart of the elbow joint. In An Atlas of Surgical Approaches to theBones and Joints of the Dog and Cat, 4th ed. Philadelphia, WBSaunders, 2004.
7. Fox SM, Burbidge HM, Bray JC, et al: Ununited anconeal process:Lag-screw fixation. J Am Anim Hosp Assoc 32(1):52–56, 1996.
8. Sjostrom L: Ununited anconeal process in the dog. Vet Clin NorthAm Small Anim Pract 28(1):75–86, 1998.
24 PART ONE • SURGICAL PROCEDURES FOR JOINT DISEASES

CH A P T E R 8 TREATMENT OF UNUNITED ANCONEAL PROCESS 25
PLATE 8
B
C
D
E

ELBOW
CHAPTER 9 Distal Ulnar Ostectomy with Fat GraftINDICATIONS1–3
Distal ulnar ostectomy is indicated as an early corrective sur-gery for premature closure of the distal ulnar physis, before theappearance of severe angular limb deformities. This procedureis most effective in young dogs (median age, 5 months) withless than 25 degrees of carpal valgus or in older animals (medialage, 6.5 months) with less than 13 degrees of valgus.
OBJECTIVES• To prevent or correct angular limb deformity, limb short-
ening, abnormal load transmission, and joint subluxation
ANATOMIC CONSIDERATIONSA caudal approach to the distal ulnar diaphysis is used.Landmarks for the ostectomy are the caudolateral border of the distal third ulna, the tendons of the lateral digital extensor,the ulnaris lateralis, the deep digital flexor muscles, and theabductor pollicis longus muscle.
EQUIPMENT• Standard surgical pack, a Frazier suction tip, one Gelpi
retractor or two Senn retractors, two Hohmann retractors,periosteal elevator, high-speed oscillating saw or Gigli wire,and Lempert rongeur
PREPARATION AND POSITIONINGPrepare the limb from shoulder to just distal to the carpus.Position the dog in dorsal or lateral recumbency, with theaffected limb suspended for draping. Then release the limb toallow access to the caudolateral aspect of the antebrachium.Prepare the caudal abdominal/inguinal region for fat graft harvest.
PROCEDUREApproach:4 Incise the skin and subcutaneous tissue alongthe shaft of the ulna, from the midshaft of the diaphysis to thestyloid process. Incise the antebrachial fascia between theulnaris lateralis and the lateral digital extensor tendons,exposing the periosteal surface of the ulna. Use a periosteal ele-vator to elevate the surround musculature, and place theHohmann retractors between the radius and ulna at the pro-posed osteotomy site.
Distal Ulnar Ostectomy:1,3 Using an oscillating saw orGigli wire, cut the bone perpendicular to the longitudinal axis ofthe ulna (Plate 9A). Remove a 1-cm to 2-cm section of the ulna,and add a fat graft. Close the subcutaneous tissue and skin overthe ostectomy site (Plates 9B and 9C).
Fat Graft Harvest:2,5 Incise the skin and subcutaneoustissue in the cranial inguinal/caudal abdominal region. Harvesta fat graft of sufficient size to fill the defect, and place in the gapcreated by the ostectomy (Plate 9D). Closure is routine.
CAUTIONS2,5
The periosteum must be completely removed with the ostec-tomized bone, because it will form a premature bony union if leftin situ. Hemostasis is imperative to ensure that large blood clotsdo not fill the defect and promote connective tissue replacement.The fat graft should be harvested atraumatically in one piece, andshould be of a size that is adequate to fill the ostectomy site. Thiswill minimize the amount of graft necrosis and shrinkage.
POSTOPERATIVE EVALUATIONPostoperative radiographs are indicated to verify ostectomyposition and the complete removal of periosteum. To monitorostectomy healing, joint congruity, and angular limb deformity,radiographs should be repeated every 4 to 6 weeks until radialbone growth is complete. Once bone growth is complete, cor-rective osteotomies can be performed if necessary.
POSTOPERATIVE CARE2
All patients should be placed in a soft padded bandage for 2 to3 days to prevent seroma formation. Exercise should berestricted for at least 6 to 8 weeks, until the full effect of thedistal ulnar ostectomy is achieved. Excessive movement of theostectomy site inhibits graft vascularization and may result indisplacement and subsequent premature union of the ulna.
EXPECTED OUTCOME6
The outcome is usually good to excellent. Younger dogs with lesssevere angular limb deformities have better functional resultsafter distal ulnar ostectomy than do older dogs with severe angu-lation and joint subluxation. The mean age at surgery of dogs withgood to excellent results is 6.5 months, contrasted to the meanage at surgery of 9.75 months in dogs with fair to poor results.
References1. Shields Henney LH, Gambardella PC: Premature closure of the ulnar
physis in the dog: A retrospective clinical study. J Am Anim HospAssoc 25:573–581, 1989.
2. Vandewater A, Olmstead ML, Stevenson S: Partial ulnar ostectomywith free autogenous fat grafting for treatment of radius curvus inthe dog. Vet Surg 11:92–99, 1982.
3. Shields Henney LH: Partial ulnar ostectomy for treatment of prema-ture closure of the proximal and distal radial physes in the dog. J AmAnim Hosp Assoc 26:183–188, 1990.
4. Piermattei DL, Johnson KA: Approach to the distal shaft and styloidprocess of the ulna. In An Atlas of Surgical Approaches to the Bonesand Joints of the Dog and Cat, 4th ed. Philadelphia, WB Saunders,2004.
5. Craig E: Autogenous fat grafts to prevent recurrence following sur-gical correction of growth deformities of the radius and ulna in thedog. Vet Surg 10:69–76, 1981.
6. Morgan PW, Miller CW: Osteotomy for correction of premature growthplate closure in 24 dogs. Vet Comp Orthop Traumatol 7:129–165, 1994.
26 PART ONE • SURGICAL PROCEDURES FOR JOINT DISEASES

CH A P T E R 9 DISTAL ULNAR OSTECTOMY WITH FAT GRAFT 27
PLATE 9
A
B
DC
Ulnaris lateralismuscle
Fat graft
Lateral digitalextensor muscle

ELBOW
CHAPTER 10 Elbow ArthrodesisINDICATIONSThis procedure is indicated in animals with unreconstructablejoint fractures, chronic elbow luxation or subluxation, or severedegenerative joint disease that is not responsive to medicaltreatment.
OBJECTIVES• To fuse the bones of the humeroradial and humeroulnar
joints in a functional position
ANATOMIC CONSIDERATIONSThe triceps muscle courses in a cranial proximal direction from itsinsertion on the olecranon, and crosses the humerus rather thanrunning parallel to it. The radial nerve lies beneath the lateral headof the triceps near the distal third of the humerus. The ulnar nervecourses over the medial aspect of the elbow, caudal to the medialepicondyle, and an olecranon osteotomy aids joint exposure. Aproximal ulnar ostectomy provides a flat surface for the plate.
EQUIPMENT• Surgical pack, Senn retractors, Hohmann retractors, Gelpi
retractors, periosteal elevator, oscillating saw, bone curette,self-centering plate-holding forceps, high-speed drill, burrs andwire driver, Kirschner wires, wire cutters, plating equipment
PREPARATION AND POSITIONINGPrepare the forelimb circumferentially from dorsal midline tocarpus. Position the animal in lateral recumbency, with theaffected limb elevated. Drape the limb out from a hanging positionto allow maximal manipulation during surgery. A cancellous bonegraft can be harvested from the ipsilateral proximal humerus.
PROCEDUREApproach: Incise the skin and subcutaneous tissue on thecaudal lateral aspect of the elbow from the distal one third ofthe humerus to the proximal one third of the ulna. Elevate theanconeus muscle from the olecranon. Osteotomize the ole-cranon process, and retract the triceps muscle proximally toexpose the caudal surface of the distal humerus. Elevate theflexor carpi ulnaris and deep digital flexor muscles mediallyand the ulnaris lateralis muscle laterally to expose the proximalulna. Reflect the origin of the flexor carpi ulnaris muscle toexpose the trochlear notch. Incise the ulnaris lateralis, lateralcollateral ligament, and joint capsule to expose the articularsurfaces (Plate 10A).
Alignment: Predetermine the cranial caudal angle for theelbow arthrodesis by observing the normal standing angle ofthe elbow in the individual patient (commonly 110 degrees)(Plate 10B).1,2
Stabilization: Remove the articular cartilage of thehumeral condyle, radial head, and trochlear notch with a bonecurette or high-speed burr, following the contours of the bone
ends. Perform an ostectomy of the proximal ulna to create asmooth surface for the plate (see Plate 10B). Temporarily fix thedistal humeral condyle to the trochlear notch with a Kirschnerwire (Plate 10C). Use an aluminum template to determine thecontour of the caudal surfaces of the distal humerus and prox-imal ulna. Use the bending pliers and the torque irons to con-tour an appropriate-size bone plate (allowing at least fourscrews proximally and distally to the elbow) to match the alu-minum template. Apply the plate by first placing screws throughthe proximal and distal plate holes. Place a lag screw throughthe plate and across the lateral portion of the humeral condyleinto the radial head. Place a second lag screw through the plate across the ulna and into the medial portion of the humeral condyle (see Plate 10C). Fill the remaining plate holes.Screws placed through the ulna should penetrate the radius, ifpossible. Remove the temporary Kirschner wire. Reattach theosteotomized portion of the olecranon to the medial epicondylewith a lag screw (Plate 10D).1,2 Collect cancellous bone fromthe proximal humerus and place it around the ostectomy surfaces. Close the wound routinely.
CAUTIONSThe radial and ulnar nerves must be protected. All articular car-tilage must be removed. Angular and rotational alignment of thelimb must be checked carefully before the plate is secured.
POSTOPERATIVE EVALUATIONThe axial alignment of the limb and the angle of the arthrodesisshould be observed critically. Radiographs should be evaluatedfor limb alignment and implant placement.
POSTOPERATIVE CAREA soft padded bandage should be placed to control bleeding andswelling. A lateral splint should be used for 6 weeks or untilearly radiographic evidence of bone bridging is observed.Radiographs should be repeated at 6-week intervals until bonehealing occurs. The animal should be confined and activityshould be limited to leash walks until bone healing is complete.The plate may be removed 6 to 9 months after bone healing if itcauses soft tissue irritation.
EXPECTED OUTCOMEThe bone usually heals in 12 to 18 weeks. Function of the treatedlimb can be awkward, and the animal may have trouble with stairsor with rough terrain.1 Amputation may offer better function.2
References1. Johnson KA: Arthrodesis. In Olmstead ML (ed): Small Animal
Orthopedics. St. Louis, Mosby, 1995.2. Piermattei DL, Flo GL: The elbow joint. In Brinker, Piermattei, and
Flo’s Handbook of Small Animal Orthopedics and Fracture Repair,3rd ed. Philadelphia, WB Saunders, 1997.
28 PART ONE • SURGICAL PROCEDURES FOR JOINT DISEASES

CH A P T E R 10 ELBOW ARTHRODESIS 29
PLATE 10
BA
C D
110…
Lateral collateralligament
Anconeus muscle
Ulnaris lateralis muscle
Flexor carpiulnaris muscle
Joint capsuleincised
Ulnarostectomy
Osteotomy ofthe olecranonprocess

CARPUS
CHAPTER 11 Radial and Ulnar Styloid FracturesINDICATIONSCandidates include dogs with avulsion fractures of one or bothstyloid processes.
OBJECTIVES• To restore normal joint orientation and stability to the ante-
brachial carpal joint
ANATOMIC CONSIDERATIONS1–4
The antebrachial carpal joint is formed by the radius and thestyloid process of the ulna, articulating with the radial and ulnarcarpal bones. This joint contributes to nearly 90% of the move-ment in the carpus and is important to carpal function. Theradial and ulnar styloid processes serve as the origin of the collateral ligaments and also extend down into the joint, serving as a physical buttress against medial lateral instability.Internal fixation is required to restore stability to the ante-brachial carpal joint.
EQUIPMENT• Surgical pack, pointed reduction forceps, Kirschner wires or
small Steinmann pins (for large dogs), pin chuck or high-speed wire driver; plating equipment is required for lag-screwfixation
PREPARATION AND POSITIONINGPrepare the limb circumferentially from the shoulder to thedigits. Position the animal in dorsal recumbency for greaterflexibility, with the affected limb suspended for draping. Thenrelease the limb to allow access to the distal antebrachium.
PROCEDUREApproach: Expose the styloid processes by incising directlyover the processes through the skin and subcutaneous tissue.Continue the incision into the retinacular and antebrachialfascia. Elevate the surrounding tissue as necessary to visualizethe fracture and collateral ligament (Plate 11A [lateral view]).
Reduction:3 Reduce the fractured process by tenting thebone ends, and lever the bone back into position. Maintainreduction with pointed reduction forceps.
Stabilization:1,2,4 Accomplish fixation of the styloidprocess with the pin and tension band wire or lag-screw tech-nique. If the fragments are too small to permit pin insertion, thecollateral ligament may be reattached to the bone with a screwand spiked plastic washer.
Pin and Tension Band Wire Technique:1–4 Dependingon the avulsed fragment size, drive one or two wires into thestyloid process, directing the wires obliquely across the fracture into the far cortex of the radius or ulna. For ulnar avulsions, insert a single K-wire into either the ulna or into thefar cortex of the distal radius (Plate 11B). For radial styloid
avulsions, two pins may be inserted into the far cortex of theradius (Plate 11C). Drill a transverse hole 1 to 2 cm proximal tothe fracture site and pass a figure-eight wire through the holeand around the Kirschner wires. Tighten the wire, bend the pinsover, and cut. Closure is routine.
Lag-Screw Technique: For the radial styloid process,drill a gliding hole (equal to the diameter of the threads on the screw) in the styloid fragment. Place an insert drill sleeveinto the gliding hole and drill a smaller hole (equal to the corediameter of the screw) across the radius. Measure, tap, andselect and place the appropriate-length screw (Plate 11D).Compression of the fracture should occur. When stabilizing theulnar styloid process, treat the styloid process as the fragmentby drilling the gliding hole through the ulna and the tapped holein the radius (Plate 11E). Closure is routine.
CAUTIONS1
It may not be possible to place two pins into the distal ulna insmall dogs; therefore, the ulnar styloid fracture may not becompletely rotationally stable. External coaptation is stronglyrecommended.
POSTOPERATIVE EVALUATIONRadiographs should be evaluated for articular surface reductionand implant placement. Radiographs should be repeated every6 to 8 weeks until the fracture has healed.
POSTOPERATIVE CARE2,4
A Mason Meta splint or fiberglass half-cast is necessary to protect the repair for the first 6 to 8 weeks. Exercise should berestricted until the fracture heals. Implant removal is indicatedif the implants become loose or if they irritate the soft tissuesafter the fracture heals.
EXPECTED OUTCOME3,4
Outcome is fair to excellent in most cases. Carpal stability andalignment depend on adequate reduction and stability of thestyloid process. Mild to moderate degenerative joint diseasemay be expected because of the articular nature of this fracture.
References1. Bruce WJ: Radius and ulna. In Coughlan AR, Miller A (eds): BSAVA
Manual of Small Animal Fracture Repair and Management.Cheltenham, British Small Animal Veterinary Association, 1998.
2. Egger EL: Fractures of the radius and ulna. In Vasseur P, Slatter D(eds): Textbook of Small Animal Surgery, vol. 2, 2nd ed. Philadelphia,WB Saunders, 1993.
3. Miller AS: What is your diagnosis? (Radial carpal dislocation in adog). J Small Anim Pract 34:11, 576, 582–583; 3 ref. 1993.
4. Probst CW: Stabilization of fractures of the radius and ulna. InBojrab MJ (ed): Current Techniques in Small Animal Surgery, 4th ed.Baltimore, Williams & Wilkins, 1998.
30 PART ONE • SURGICAL PROCEDURES FOR JOINT DISEASES

CH A P T E R 11 RADIAL AND ULNAR STYLOID FRACTURES 31
PLATE 11
B
C D E
A
Flexorcarpi ulnaris
Radius
Ulna
V

CARPUS
CHAPTER 12 Pancarpal ArthrodesisINDICATIONSCandidates include dogs with hyperextension of the ante-brachial carpal joint; dogs with severe injury (e.g., fracture, luxation, or shearing injury) of the antebrachial carpal joint that precludes maintaining a long-term, pain-free articulation;or dogs with painful degenerative joint disease that is notresponsive to conservative measures.1,2
OBJECTIVES• To fuse the bones of the antebrachial, middle carpal, and car-
pometacarpal joints in a functional position
ANATOMIC CONSIDERATIONSThe carpus consists of the radius, ulna, proximal (radial, ulnar,and accessory) carpal bones, distal row (II, III, and IV) carpalbones, and the metacarpal bones, forming the antebrachio-carpal, middle carpal, and carpometacarpal joints.
EQUIPMENT• Surgical pack, Senn retractors, Gelpi retractors, Hohmann
retractors, periosteal elevator, self-centering plate-holding for-ceps, bone curette, high-speed drill and burrs, plating equipment
PREPARATION AND POSITIONINGPrepare the forelimb circumferentially from shoulder to digits.Position the animal in lateral recumbency with the affectedlimb up. Drape the limb out from a hanging position to allowmaximal manipulation during surgery. Prepare the ipsilateralproximal shoulder or ilial wing for cancellous bone graft harvest. Consider using a tourniquet to control bleeding.
PROCEDUREApproach: Incise the skin and subcutaneous tissue over thedorsal surface of the joint from the distal third of the radius tothe distal third of the metacarpal bones. Elevate and resect theattachment of the carpal extensor tendons from the metacarpalbones. Elevate and retract the digital extensor tendons laterallyto expose the distal radius, the carpus, and the proximal twothirds of the third metatarsal bone. Incise the joint capsule to enter each joint space and expose the articular surfaces(Plate 12A).
Alignment: The cranial caudal angle for the pancarpalarthrodesis is commonly 10 to 12 degrees1,2 (see Plate 12E).
Stabilization: Flex the carpus and remove the articularcartilage from the antebrachial carpal joint surfaces, the middlejoint surfaces, and the carpometacarpal joint surfaces with abone curette or high-speed burr, following the contours of thebone ends (Plate 12B). Harvest cancellous bone and place thegraft within the prepared joints (Plate 12C). Place an appro-priate-size bone plate (limited by the size of the metacarpalbone), precontoured to 10 to 12 degrees of carpal extension, onthe dorsal surface of the distal radius and third metacarpalbone. (Alternatively, use a hybrid plate that accommodates
larger screws over the radius and smaller screws over themetacarpal bones.3) Position the plate so that one screw willpenetrate the radial carpal bone. Ensure adequate plate holesfor a minimum of three screws in the radius and three screws inthe metacarpal bone. Mark the level of the distal metacarpalplate screw. Remove the plate and center the drill on themetacarpal bone. Secure the plate with three screws in themetacarpal bone, and then reduce the plate to the radius withself-centering forceps. Check plate and joint alignment andattach the plate to the radius, using the loaded drill guide in oneor two holes to compress the antebrachial carpal joint (seePlate 12C). Fill the remaining plate holes (Plate 12D). One platescrew should secure the radial carpal bone (Plate 12E).1
CAUTIONSAll of the articular cartilage should be removed. Angular androtational alignment of the limb should be checked carefullybefore securing the plate to the radius. Tourniquet use shouldbe limited to 60 minutes.
POSTOPERATIVE EVALUATIONThe axial alignment of the limb and the angle of the arthrodesisshould be observed critically. Radiographs for limb alignmentand implant placement should be evaluated.
POSTOPERATIVE CAREA soft, padded bandage should be placed to control bleeding andswelling. Casting should be delayed for 48 to 72 hours if a tourni-quet has been used. A bivalve cast should be used for 6 weeks oruntil early radiographic evidence of bone bridging is observed.Radiographs should be repeated at 6-week intervals until bonehealing occurs. The animal should be confined, with activitylimited to leash walks until bone healing is complete. Implants are generally removed after 6 to 12 months to avoid soft tissueirritation.3
EXPECTED OUTCOMEBone healing is expected in 12 to 18 weeks, and good functionin the treated limb is anticipated. Fatigue fractures of the distalmetacarpal bone may occur; covering more than 50% of themetacarpal bone with the plate may reduce this problem.4
References1. McLaughlin RM: Arthrodesis. In Brinker WO, Olmstead ML, Sumner-
Smith G, et al (eds): Manual of Internal Fixation in Small Animals.New York, Springer-Verlag, 1998.
2. Johnson KA: Arthrodesis. In Olmstead ML (ed): Small AnimalOrthopedics. St. Louis, Mosby, 1995.
3. Li A, Gibson N, Carmichael S, et al: Thirteen pancarpal arthrodesesusing 2.7/3.5 mm hybrid dynamic compression plates. Vet CompOrthop Traumatol 12:102, 1999.
4. Whitelock RG, Dyce J, Houlton JEF: Metacarpal fractures associatedwith pancarpal arthrodesis in dogs. Vet Surg 28:25, 1999.
32 PART ONE • SURGICAL PROCEDURES FOR JOINT DISEASES

CH A P T E R 12 PANCARPAL ARTHRODESIS 33
PLATE 12
C D E
B
A
Radialcarpal bone
Radius
Tendon ofextensor carpi
radialis muscle
Abductor pollicislongus muscle
Tendon ofcommon digitalextensor tendon
10° - 12°carpal extension

CARPUS
CHAPTER 13 Partial Carpal Arthrodesis with a PlateINDICATIONSCandidates include dogs with hyperextension of the middlecarpal and carpometacarpal joints.1
OBJECTIVES• To fuse the bones of the middle carpal and carpometacarpal
joints in a functional position
ANATOMIC CONSIDERATIONSThe carpus consists of the radius, ulna, proximal (radial, ulnarand accessory) carpal bones, distal row (II, III, and IV) carpalbones, and the metacarpal bones, forming the antebrachio-carpal, middle carpal, intercarpal, and carpometacarpal joints.
EQUIPMENT• Surgical pack, Senn retractors, small Hohmann retractors,
Gelpi retractors, periosteal elevator, plate-holding forceps,bone curette, high-speed drill and burrs, plating equipment
PREPARATION AND POSITIONINGPrepare the forelimb circumferentially from shoulder to digits.Position the animal in lateral recumbency with the affectedlimb up. Drape the limb out from a hanging position to allowmaximal manipulation during surgery. Prepare the ipsilateralproximal shoulder or ilial wing for cancellous bone graft harvest. Consider using a tourniquet to control bleeding.
PROCEDUREApproach: Incise the skin and subcutaneous tissue over thedorsal surface of the joint from the distal metaphysis of theradius to the distal third of the metacarpal bones. Elevate andretract the carpal extensor tendons medially and the digitalextensor tendons laterally to expose the distal radius, thecarpus, and the proximal two thirds of the third metatarsalbone. Incise the joint capsule to enter each middle and distaljoint space and expose the articular surfaces (Plate 13A).
Alignment: Align the dorsal surfaces of the radial carpalbone and third metacarpal bone with the plate to produce thecorrect alignment for the arthrodesis.
Stabilization: Flex the carpus and remove the articularcartilage from the middle carpal, intercarpal, and car-pometacarpal joint surfaces with a bone curette or high-speedburr, following the contours of the bone ends (Plate 13B).
Harvest cancellous bone and place the graft within the preparedjoints (Plate 13C). Position a veterinary T plate distally on thedorsal surface of the radial carpal bone and third metacarpalbone. It is imperative that the plate be distal to the articular car-tilage on the radial carpal bone to avoid interference with theradius. Secure the plate to the radial carpal bone. Select screwsthat are slightly shorter than the measured length to avoid inter-ference with palmar soft tissues. Reduce the plate to the thirdmetacarpal bone (see Plate 13C). Starting with the most distalplate hole, fill the remaining plate holes, securing the plate tothe third metacarpal bone (Plate 13D).1
CAUTIONSAll articular cartilage must be removed. The plate must notinterfere with the articular surface of the radial carpal bone orwith the radius when the limb is extended. Tourniquet useshould be limited to 60 minutes.
POSTOPERATIVE EVALUATIONRadiographs should be evaluated for limb alignment andimplant placement.
POSTOPERATIVE CAREA soft, padded bandage should be placed to control bleedingand swelling. Casting should be delayed for 48 to 72 hours if atourniquet has been used. A bivalve cast should be used for6 weeks or until early radiographic evidence of bone bridging isobserved. Radiographs should be repeated at 6-week intervalsuntil bone healing occurs. The animal should be confined, withactivity limited to leash walks until bone healing is complete.Implants may need to be removed after 6 to 12 months to avoidsoft tissue irritation.
EXPECTED OUTCOMEBone healing is expected in 12 to 18 weeks. A decrease in rangeof motion in the antebrachial carpal joint is usually seen. Near-normal function of the treated limb can be expected unlessundiagnosed antebrachial carpal joint injuries are present.
Reference1. Johnson KA: Arthrodesis. In Olmstead ML (ed): Small Animal
Orthopedics. St. Louis, Mosby, 1995.
34 PART ONE • SURGICAL PROCEDURES FOR JOINT DISEASES

CH A P T E R 13 PARTIAL CARPAL ARTHRODESIS WITH A PLATE 35
PLATE 13
C D
A B
Radialcarpal bone Radius
Tendon ofextensor carpi
radialis muscle
Tendon ofcommon digitalextensor tendon

CARPUS
CHAPTER 14 Partial Carpal Arthrodesis with Intramedullary PinsINDICATIONSCandidates have hyperextension of the middle carpal and car-pometacarpal joints.1,2
OBJECTIVES• To fuse the bones of the middle carpal and carpometacarpal
joints in a functional position
ANATOMIC CONSIDERATIONSThe carpus consists of the radius, ulna, proximal (radial, ulnar,and accessory) carpal bones, distal row (II, III, and IV) carpalbones, and the metacarpal bones, forming the antebrachio-carpal, middle carpal, intercarpal, and carpometacarpal joints.
EQUIPMENT• Surgical pack, Senn retractors, Hohmann retractors, Gelpi
retractors, periosteal elevator, bone curette, high-speed drilland burrs, intramedullary pins or Kirschner wires, Jacob pinchuck, pin or wire cutters
PREPARATION AND POSITIONINGPrepare the forelimb circumferentially from shoulder to digits.Position the animal in lateral recumbency with the affectedlimb up. Drape the limb out from a hanging position to allowmaximal manipulation during surgery. Prepare the ipsilateralproximal shoulder or ilial wing for cancellous bone graft har-vest. Consider using a tourniquet to control bleeding.
PROCEDUREApproach: Incise the skin and subcutaneous tissue over thedorsal surface of the joint from the distal third of the radius tothe distal third of the metacarpal bones. Elevate and retract thecarpal extensor tendons medially and the digital extensor ten-dons laterally to expose the distal radius, the carpus, and theproximal two thirds of the third metatarsal bone. Incise thejoint capsule to enter each middle and distal joint space andexpose the articular surfaces (Plate 14A).
Alignment: Flex the antebrachial carpal joint 90 degreesand apply proximal and palmar pressure to the metacarpalbones while placing the intramedullary pins to align the dorsalsurfaces of the radial carpal bone and metacarpal bones cor-rectly for the arthrodesis1 (see Plate 14C).
Stabilization: Flex the carpus and remove the articularcartilage from the middle carpal, intercarpal, and car-pometacarpal joint surfaces with a bone curette or high-speedburr, following the contours of the bone ends (Plate 14B).Harvest cancellous bone and place the graft within the prepared
joints. Create burr slots in the dorsal surface of the distal thirdof the third and fourth metacarpal bones. Drive small inter-medullary pins or Kirschner wires through the slots proximallyinto the base of the bones. Reduce the subluxation and align thecarpus as described previously. Drive the pins into the radialcarpal bone (Plate 14C). Back the pins out a few millimeters,and then cut and bend the ends into hooks. Reseat the pins androtate the hooks flat against the bones (Plate 14D).1,2
CAUTIONSAll articular cartilage must be removed. The slots will have tobe long enough to allow the pins to bend as they are drivenproximally. The carpus must be flexed 90 degrees and pressureplaced on the metacarpal bones to align the carpal bones withthe metacarpal bones while the pins are placed. The pins shouldnot penetrate the radial carpal bone articular surface.Tourniquet use should be limited to 60 minutes.
POSTOPERATIVE EVALUATIONRadiographs should be evaluated for limb alignment andimplant placement.
POSTOPERATIVE CAREA soft, padded bandage should be placed to control bleedingand swelling. Casting should be delayed for 48 to 72 hours if atourniquet has been used. A bivalve cast should be used for 6weeks or until early radiographic evidence of bone bridging isobserved. Radiographs should be repeated at 6-week intervalsuntil bone healing occurs. The animal should be confined, withactivity limited to leash walks until bone healing is complete.Implants are generally removed after healing to avoid softtissue irritation.
EXPECTED OUTCOMEBone healing is expected in 12 to 18 weeks. A decrease in rangeof motion in the antebrachial carpal joint is usually seen.Lameness is eliminated or improved in two thirds of the dogs.2
Hyperextension may persist in some dogs, especially if ante-brachialcarpal injuries have been overlooked.
References1. Johnson KA: Arthrodesis. In Olmstead ML (ed): Small Animal
Orthopedics. St. Louis, Mosby, 1995.2. Willer RL, Johnson KA, Turner TM, et al: Partial carpal arthrodesis
for third-degree carpal sprains: A review of 45 carpi. Vet Surg 92:334, 1990.
36 PART ONE • SURGICAL PROCEDURES FOR JOINT DISEASES

CH A P T E R 14 PARTIAL CARPAL ARTHRODESIS WITH INTRAMEDULLARY PINS 37
PLATE 14
DC
BA
Radialcarpal bone Radius
Tendon ofextensor carpi
radialis muscle
Tendon ofcommon digitalextensor tendon

HIP
CHAPTER 15 Extracapsular Stabilization of Hip Luxation (Suture Anchors or Screw and Washer)
INDICATIONS1
Open reduction and stabilization is indicated in animals withchronic luxations, failed closed reductions, excessive postre-duction instability, intra-articular fractures, concurrent pelvicfractures, or other fractures of the affected limb that preventclosed reduction.
OBJECTIVES• To restore normal stability, congruency, mobility, and func-
tion to the coxofemoral joint
ANATOMIC CONSIDERATIONS2
Osseous anatomic landmarks for the coxofemoral joint are thegreater trochanter of the femur and the ischial tuberosity andilial wing of the pelvis. The curvilinear incision should center onthe cranial edge of the greater tubercle. Distally, it extends cra-nial and parallel to the proximal third of the shaft of the femur.Muscular landmarks include the biceps femoris, the gluteals,and the vastus lateralis. Reduce the hip prior to starting the sur-gical approach to establish normal tissue relationships.
EQUIPMENT• Standard surgical pack, two medium or large Gelpi retractors
(depending on the size of the dog), periosteal elevator, wiredriver, intramedullary pins or Kirschner wires, mallet, 20- to60-pound nylon* and a suture anchor system†
Alternatively, a bone tunnel and screw and washer combina-tion may be used if a suture anchor system is not available or if the animal is not large enough to accommodate the sutureanchor system. Additional instrumentation needed for this tech-nique includes a high-speed drill, bone screw and washer, drillbit, tap, depth gauge, and screwdriver.
PREPARATION AND POSITIONINGPrepare the rear limb circumferentially from dorsal midline tomid-tibia. Position the animal in lateral recumbency with theaffected limb up. Drape the limb out from a hanging position toallow maximal manipulation during surgery.
PROCEDUREApproach: A trochanteric osteotomy is not always necessaryto reduce and stabilize the hip; however, chronic cases maybenefit from the additional exposure of an osteotomy.
Craniolateral Approach:1 Use a craniolateral approachto the coxofemoral joint. Incise the skin and subcutaneoustissue 5 cm proximal to the greater trochanter, curving distallyadjacent to the cranial ridge of the trochanter and extendingdistally from 5 cm over the proximal femur. Incise between thetensor fasciae latae muscle and deep border of the bicepsfemoris muscle and superficial gluteal muscle. Retract thetensor fasciae latae cranially, the biceps caudally, and themiddle gluteal muscle proximally. Incise the deep glutealmuscle close to its attachment on the trochanter for one thirdto one half of its width. Incise the joint capsule (or enlarge thetraumatic tear) parallel to the long axis of the femoral neck,near its proximal ridge. Continue the joint capsule incision lat-erally through the point of origin of the vastus lateralis muscleon the cranial face of the proximal femur. Reflect the vastus lat-eralis distally to expose the hip joint (Plate 15A).
Dorsal Approach with Trochanteric Osteotomy:2
Use a dorsal approach to the coxofemoral joint with anosteotomy of the greater trochanter. Incise the skin over thecranial border of the greater trochanter, from 3 cm to 4 cmproximal to the dorsal ridge of the greater trochanter andcurved 3 cm to 4 cm, following the cranial border of the femur.Incise the superficial leaf of the fascia lata, and carry the inci-sion proximally through the insertion of the tensor fasciae lataemuscle at the greater trochanter and along the cranial border ofthe superficial gluteal muscle. Incise through the insertion ofthe superficial gluteal muscle at the third trochanter. Reflect thesuperficial gluteal muscle proximally and the biceps femoriscaudally to find and visualize the course of the sciatic nerve.Perform an osteotomy of the greater trochanter with anosteotome and mallet or with Gigli wire. Reflect the glutealmuscles and greater trochanter from the joint capsule with aperiosteal elevator, and incise both structures together at thetrochanter fossa. Elevate the gemellus muscle from the cau-dolateral surface of the acetabulum with a periosteal elevator.Use a suture to retract the muscle proximally and caudally.Incise the joint capsule (see Plate 15A).
Explore the hip joint prior to stabilizing the joint to assesscartilage viability and surrounding soft-tissue injury. If the jointintegrity is intact, a number of hip-stabilizing techniques areavailable.
38 PART ONE • SURGICAL PROCEDURES FOR JOINT DISEASES
Continued
*Mason Nylon Leader Line, Mason Tackle Company, Otisville, Michigan.†Bone Biter Suture Anchor System, Warsaw, Indiana.

CH A P T E R 15 EXTRACAPSULAR STABILIZATION OF HIP LUXATION 39
PLATE 15
Middle glutealmuscle retractedproximally
Tensor fasciaelatae muscle
retracted cranially
Deep glutealmuscle
Incision injoint capsule
Vastus lateralismuscle
Biceps femoris muscleretracted caudally
A
Superficial gluteal muscle(retracted proximally)
Gemelli muscles incised
Sciatic nerve
Vastus lateralis muscle
Tensor fasciaelatae muscle
(retracted cranially)
Osteotomy of thegreater trochanter
Osteotomy of thegreater trochanter

Stabilization: To achieve successful reduction and stabi-lization of the coxofemoral joint, the use of one or more of thefollowing techniques may be necessary: Suture anchors, screwsand washers, and wire sutures may be employed for added stability when the capsule cannot be securely closed and imbricated.
Stabilization with Capsular Repair and Imbrication:Luxate the femoral head to visually inspect the cartilage surfacefor damage. Débride any remaining fibrous tissue, hematoma,and fracture fragments from the acetabular socket. Reduce thefemoral head and imbricate the joint capsule with nonab-sorbable monofilament material using an interrupted or cru-ciate pattern (Plate 15B). Place the joint through a range ofmotion. If the joint is stable, joint capsule repair and imbrica-tion alone can constitute the reconstructive procedure.
Stabilization with Screw and Washer:3 Drill twoholes into the craniodorsal aspect of the acetabular rim at the10-o’clock and 1-o’clock positions. Measure, tap, and select twoappropriate-length screws, adding 2 mm to the screw length toaccommodate the washer. Drill, measure, tap, and insert a thirdscrew and washer in the trochanteric fossa, or drill a bonetunnel through the femoral neck in the trochanteric fossa toaccept the suture. Pass heavy, nonabsorbable suture or cerclagewire between the acetabular screws and trochanteric fossa(Plate 15C). Place the joint through a range of motion to ensurestability and function.
Stabilization with the Suture Anchor System:Drill two holes into the craniodorsal aspect of the acetabularrim at the 10-o’clock and 1-o’clock positions. Insert sutureanchors threaded with heavy, nonabsorbable suture into eachof these holes. Drill and insert a third suture anchor thread withthe suture from the acetabular anchors into the trochantericfossa (Plate 15D). Tie the sutures with the hip at a normal angleof flexion and slight abduction and internal rotation. Place thejoint through a range of motion to ensure stability and function.
Closure: Reattach the external rotator muscles as neces-sary. If a trochanteric osteotomy has been performed, reattachthe trochanter in a caudodistal position on the femur to pro-mote joint stability and femoral adduction and internal rotation(Plate 15E1). Stabilize the greater trochanter with twoKirschner wires and a tension band (Plate 15E2). Suture the fas-cial layers, subcutaneous tissue, and skin.
CAUTIONS4
The most common cause of coxofemoral luxation in the dog ismotor vehicular trauma; concurrent injuries should thereforebe ruled out. Open reduction may need to be delayed until theanimal has been adequately stabilized. A femoral head and neckexcision or total hip replacement should be considered if coxo-femoral integrity is questionable.
POSTOPERATIVE EVALUATIONThe joint should be radiographed to assess implant positioningand joint congruency. Joint stability and range of motion shouldbe evaluated at 2 to 3 days to assess hip position.
POSTOPERATIVE CAREAn Ehmer bandage can be used to assist hip reduction in theearly postoperative period. The bandage should be removed 4to 7 days after reduction. Cage confinement may be adequatefor dogs with stable hips. Leash activity is required for an addi-tional 3 weeks, and the animal should gradually be returned tofull activity over a 2-week period. Reexamination is advisable 3 days after removal of the Ehmer bandage and before resump-tion of unsupervised activity.
EXPECTED OUTCOME4
The success rate for maintaining reduction and regaining goodto excellent limb function with closed reduction is about 50%.The rate is lower in patients with poor conformation of the hipjoint secondary to hip dysplasia or previous trauma. Clinicalstudies indicate that the success for surgical intervention fol-lowing failure of closed reduction does not differ from the suc-cess rate for surgical reduction as a primary treatment.Therefore, it is reasonable to attempt closed reduction inpatients with a hip luxation. Regarding maintenance of reduc-tion with good to excellent limb function following open reduc-tion, the success rate is approximately 85% to 90%. The resultsdo not appear to favor any one reconstruction technique. Mildto moderate degenerative joint disease may be expected incases with questionable cartilage viability or obvious cartilagetrauma. If cartilage viability or reduction is questionable, sal-vaging limb function with a femoral head and neck ostectomyor a total hip replacement should be considered. The long-termprognosis with open reduction is good to excellent if the jointintegrity is intact.
References1. Martini FM, Simonazzi B, Bue MD, et al: Extra-articular absorbable
suture stabilization of coxofemoral luxation in dogs. Vet Surg30(5):468–475, 2001.
2. Piermattei DL, Johnson KA: Approach to the craniodorsal aspect ofthe hip joint through a craniolateral incision. In An Atlas of SurgicalApproaches to the Bones and Joints of the Dog and Cat, 4th ed.Philadelphia, WB Saunders, 2004.
3. Braden T, Johnson M: Technique and indications of a prosthetic cap-sule for repair of recurrent and chronic coxofemoral luxations. VetComp Orthop Traumatol 1:26–29, 1988.
4. Bone DL, Walker M, Cantwell HD: Traumatic coxofemoral luxationin dogs: Results of repair. Vet Surg 13(4):263–270, 1984.
40 PART ONE • SURGICAL PROCEDURES FOR JOINT DISEASES

CH A P T E R 15 EXTRACAPSULAR STABILIZATION OF HIP LUXATION 41
PLATE 15
B
C
E1E2
DBone anchor
Reattachmentsite
Anchor locked beneathcortices

HIP
CHAPTER 16 Intracapsular Stabilization of HipLuxation with Modified Toggle PinINDICATIONSOpen reduction and stabilization is indicated in animals withchronic luxations, failed closed reductions, excessive postre-duction instability, intra-articular fractures, concurrent pelvicfractures, or other fractures of the affected limb that preventclosed reduction.
OBJECTIVES• To restore normal stability, congruency, mobility, and func-
tion to the coxofemoral joint
ANATOMIC CONSIDERATIONSOsseous anatomic landmarks for the coxofemoral joint are thegreater trochanter of the femur and ischial tuberosity and the ilialwing of the pelvis. The curvilinear incision should center on cra-nial edge of the greater tubercle. Distally it extends cranial andparallel to the proximal third of the shaft of the femur. Muscularlandmarks include the biceps femoris, the gluteals, and the vastuslateralis. Soft tissue bruising and swelling often distort the nor-mal anatomy. To establish normal tissue relationships, the hipshould be reduced before the surgical approach is begun.
EQUIPMENT• Standard surgical pack, two medium or large Gelpi retractors
(depending on the size of the dog), periosteal elevator, high-speed drill, C-arm aiming device, toggle pin or rod and togglerod insertion device.*
PREPARATION AND POSITIONINGPrepare the rear limb circumferentially from dorsal midline tomid-tibia. Position the animal in lateral recumbency with theaffected limb up. Drape the limb out from a hanging position toallow maximal manipulation during surgery.
PROCEDUREApproach: A trochanteric osteotomy is not always necessaryto reduce and stabilize the hip; however, chronic cases maybenefit from the additional exposure of an osteotomy.
Craniolateral Approach:1 Perform a craniolateralapproach to the coxofemoral joint. Incise the skin and subcuta-neous tissue 5 cm proximal to the greater trochanter, curvingdistally adjacent to the cranial ridge of the trochanter andextending distally from 5 cm over the proximal femur. Incisebetween the tensor fasciae latae muscle and deep border of thebiceps femoris muscle and superficial gluteal muscle. Retractthe tensor fasciae latae cranially, the biceps caudally, and themiddle gluteal muscle proximally. Incise the deep glutealmuscle close to its attachment on the trochanter for one thirdto one half of its width. Incise the joint capsule (or enlarge thetraumatic tear) parallel to the long axis of the femoral neck nearits proximal ridge. Continue the joint capsule incision laterallythrough the point of origin of the vastus lateralis muscle on thecranial face of the proximal femur. Reflect the vastus lateralisdistally to expose the hip joint (Plate 16A).
Dorsal Approach with Trochanteric Osteotomy:2
Use a dorsal approach to the coxofemoral joint with anosteotomy of the greater trochanter. Incise the skin over thecranial border of the greater trochanter, from 3 to 4 cm proximal to the dorsal ridge of the greater trochanter andcurved 3 to 4 cm, following the cranial border of the femur.Incise the superficial leaf of the fascia lata and carry the incision proximally through the insertion of the tensor fasciaelatae muscle at the greater trochanter and along the cranialborder of the superficial gluteal muscle. Incise through theinsertion of the superficial gluteal muscle at the thirdtrochanter. Reflect the superficial gluteal muscle proximallyand the biceps femoris caudally to find and visualize the courseof the sciatic nerve. Perform an osteotomy of the greatertrochanter with an osteotome and mallet or with Gigli wire (seePlate 16A). Reflect the gluteal muscles and greater trochanterfrom the joint capsule with a periosteal elevator. Elevate thegemellus muscle from the caudolateral surface of the acetab-ulum with a periosteal elevator. Use a suture to retract themuscle proximally and caudally (see Plate 16A). Incise the jointcapsule, and explore the hip joint prior to stabilizing the joint toassess cartilage viability and surrounding soft-tissue injury.
42 PART ONE • SURGICAL PROCEDURES FOR JOINT DISEASES
Continued
*Securos Coxofemoral Luxation Management System, Charlton, Massachusetts.

CH A P T E R 16 INTRACAPSULAR STABILIZATION OF HIP LUXATION 43
PLATE 16
Middle glutealmuscle retractedproximally
Tensor fasciaelatae muscle
retracted cranially
Deep glutealmuscle
Incision injoint capsule
Vastus lateralismuscle
Biceps femoris muscleretracted caudally
A
Superficial gluteal muscle(retracted proximally)
Gemelli muscles incised
Sciatic nerve
Vastus lateralis muscle
Tensor fasciaelatae muscle
(retracted cranially)
Osteotomy of thegreater trochanter
Osteotomy of thegreater trochanter

Toggle Pin Stabilization:3 Luxate the femoral head tovisually inspect the cartilage surface for damage. Débride anyremaining fibrous tissue, hematoma, and fracture fragmentsfrom the acetabular socket. Drill the acetabular tunnel into theorigin of the round ligament with a 3.5-mm drill bit (Plate 16B).Drill the femoral tunnel from the lateral subtrochanteric area tothe fovea capitis using a C-arm aiming device and a 2.5-mm drillbit (Plate 16C). Thread four strands of 0 or 1 monofilament nonabsorbable suture material through the toggle pin or rod.Position the toggle device into the acetabular hole and lock itinto position on the medial cortex of the acetabulum (Plate16D). Thread the sutures through the femoral head and neck(Plate 16E). Reduce the femoral head and drill a second trans-verse bone tunnel cranial to caudal in the subtrochantericregion of the femur, slightly proximal to the exit hole of thesuture (Plate 16F1). Pull one pair of the sutures through thesecond femoral tunnel and snugly tie them to the oppositesutures (Plate 16F2).
Capsular Repair and Imbrication: Imbricate the jointcapsule with nonabsorbable monofilament material using aninterrupted or cruciate pattern. Place the joint through a rangeof motion.
Closure: Reattach the external rotator muscles as neces-sary. Reduce and stabilize the greater trochanter with twoKirchner wires and a tension band. Suture the fascial layers, subcutaneous tissue, and skin.
CAUTIONS4
The sciatic nerve courses dorsomedial to the acetabulum; toavoid damaging this nerve, caution must be exercised when performing the trochanteric osteotomy. When implanting toggle pins, passage of suture back through one arm of thetoggle pin in the 3-o’clock and 9-o’clock positions prevents rota-tion and eliminates uncertainty with regard to final orientationafter insertion.
POSTOPERATIVE EVALUATIONThe joint should be radiographed to assess implant positioningand joint congruency. Joint stability and range of motion shouldbe evaluated at 2 to 3 days to assess continued need for assistedweight bearing.
POSTOPERATIVE CAREA belly band sling should be used outside for the first 2 to 3 daysto prevent uncontrolled use of the limb. Exercise should berestricted and the animal should be confined to a kennel for the first 4 to 6 weeks. Then normal activity can be slowly reintroduced.
EXPECTED OUTCOME3
Outcome is usually good to excellent. Mild to moderate degen-erative joint disease and gait abnormalities may be expected incases with questionable cartilage viability or obvious cartilagetrauma. If cartilage viability or reduction is questionable, afemoral head and neck ostectomy or total hip replacementshould be considered to salvage limb function.
References1. Piermattei DL, Johnson KA: Approach to the craniodorsal aspect of
the hip joint through a craniolateral incision. In An Atlas of SurgicalApproaches to the Bones and Joints of the Dog and Cat, 4th ed.Philadelphia, WB Saunders, 2004.
2. Piermattei DL, Johnson KA: Approach to the craniodorsal and cau-dodorsal aspects of the hip joint by osteotomy of the greatertrochanter. In An Atlas of Surgical Approaches to the Bones andJoints of the Dog and Cat, 4th ed. Philadelphia, WB Saunders, 2004.
3. Beckman HP: Use of a modified toggle pin for repair of coxofemoralluxation in dogs with multiple orthopedic injuries (1986–1994). J AmVet Med Assoc 208:81–84, 1996.
4. Flynn MF, Edmiston DN, Roe SC, et al: Biomechanical evaluation ofa toggle pin technique for management of coxofemoral luxation. VetSurg 23(5):311–321, 1994.
44 PART ONE • SURGICAL PROCEDURES FOR JOINT DISEASES

CH A P T E R 16 INTRACAPSULAR STABILIZATION OF HIP LUXATION 45
PLATE 16
Aiming device
Suture passer
B
C
D
EF1 F2

HIP
CHAPTER 17 Femoral Head and NeckOstectomy with Joint Capsule InterpolationINDICATIONS1
Candidates include dogs with recurrent or chronic coxofemoralluxation, intra-articular coxofemoral fractures that are notamenable to reduction and stabilization, degenerative joint dis-ease secondary to hip dysplasia, and avascular necrosis of thefemoral head and neck.
OBJECTIVES1
• To relieve pain and salvage limb function in cases ofirreparable damage to the coxofemoral joint
ANATOMIC CONSIDERATIONOsseous anatomic landmarks for the coxofemoral joint are thegreater trochanter of the femur and ischial tuberosity and theilial wing of the pelvis. The curvilinear incision should center onthe cranial edge of the greater tubercle. Distally it extends cra-nial and parallel to the proximal third of the shaft of the femur.Muscular landmarks include the biceps femoris, the gluteals,and the vastus lateralis. To establish normal tissue relationships,the hip should be reduced before the surgical approach is begun.
EQUIPMENT• Standard surgical pack, two medium or large Gelpi retractors
(depending on the size of the dog), periosteal elevator, oscillat-ing saw, osteotome and mallet or Gigli wire, rongeur, bone file
PREPARATION AND POSITIONINGPrepare the rear limb circumferentially from dorsal midline tomid-tibia. Position the animal in lateral recumbency with theaffected limb up. Drape the limb out from a hanging position toallow maximal manipulation during surgery.
PROCEDUREApproach:2 Use a craniolateral approach to the coxofemoraljoint. Incise the skin and subcutaneous tissue 5 cm proximal tothe greater trochanter, curving distally adjacent to the cranialridge of the trochanter and extending distally from 5 cm overthe proximal femur. Incise between the tensor fasciae lataemuscle and deep border of the biceps femoris muscle andsuperficial gluteal muscle. Retract the tensor fasciae latae cra-nially, the biceps caudally, and the middle gluteal muscle proxi-mally. Incise the deep gluteal muscle close to its attachment onthe trochanter for one third to one half of its width. Incise thejoint capsule parallel to the long axis of the femoral neck nearits proximal ridge. Continue the joint capsule incision laterallythrough the point of origin of the vastus lateralis muscle on thecranial face of the proximal femur. Reflect the vastus lateralisdistally to expose the head and neck of the femur (Plate 17A).
Femoral Head and Neck Excision: Subluxate thefemoral head by placing lateral traction with pointed reductionforceps on the greater trochanter. Sever the round ligament, if itis intact, with Mayo scissors, and fully luxate the hip. Rotate thelimb externally so that the patella is directed at the ceiling and the
femur is parallel to the operating table (Plate 17B). Visualize theosteotomy line from the medial aspect of the great trochanter tothe most proximal aspect of the lesser or second trochanter (Plate17C). Direct the saw blade or osteotome caudally to ensure com-plete excision of the femoral neck and head (Plate 17D). Performthe osteotomy and grasp the head and neck with pointed reduc-tion forceps. Remove the femoral head and neck by severing theremaining medial joint capsule attachments. Palpate theosteotomy for irregularities, and remove any sharp prominenceswith rongeurs or a bone file. Return the leg to normal standingposition, and place it through a range of motion, putting medialpressure on the greater trochanter. If there is excessive crepitus orbone-on-bone contact between the femur and acetabulum, removemore of the femoral neck with rongeur, file, or oscillating saw.Flush the joint and suture the joint capsule over the acetabularfossa. The deep gluteal may also be sutured over the acetabulumif joint capsule coverage is deemed insufficient. Closure is routine.
CAUTIONSProper orientation of the osteotomy is essential to ensure com-plete removal of the femoral head and neck. Soft tissue inter-polation will not compensate for a poor cut.
POSTOPERATIVE EVALUATIONPostoperative radiographs are indicated to evaluate theosteotomy. Limb function and range of motion should be evalu-ated at suture removal and at 6 to 8 weeks.
POSTOPERATIVE CAREExercise and physical therapy after surgery should be encour-aged. Frequent leash walks and passive range-of-motion exer-cise will improve limb function and use.
EXPECTED OUTCOME1
Results of this surgery vary among animals. Factors reported toinfluence limb function include patient temperament, concurrentorthopedic disorders, body weight, chronicity of lameness beforesurgery, preexisting muscle atrophy, extent of surgically inducedtrauma, completeness of excision, and postoperative activity andphysical therapy. Of these factors, body weight has been impli-cated as critical. Dogs that weigh less than 17 kg are reported tohave good to excellent clinical results. Decreased efficacy hasbeen attributed to greater body mass and increased bony con-tact between the femur and acetabulum during weight bearing.
References1. Lewis DD: Femoral head and neck excision and the controversy
concerning adjunctive soft tissue interposition. Compend ContinEduc Pract Vet 14:1463–1473, 1992.
2. Piermattei DL, Johnson KA: Approach to the craniodorsal aspect ofthe hip joint through a craniolateral incision. In An Atlas of SurgicalApproaches to the Bones and Joints of the Dog and Cat, 4th ed.Philadelphia, WB Saunders, 2004.
46 PART ONE • SURGICAL PROCEDURES FOR JOINT DISEASES

CH A P T E R 17 FEMORAL HEAD AND NECK OSTECTOMY 47
PLATE 17
Middle gluteal muscleretracted proximally
Vastus lateralis muscleretracted distally
Maxi driverblade directed caudally
Deep gluteal muscle
Tensor fasciae lataemuscle retracted cranially
Incision in joint capsule
Biceps femoris muscleretracted caudally
Externallyrotated limb
Patella isdirected at ceiling
A
C
D
B

HIP
CHAPTER 18 Triple Pelvic OsteotomyINDICATIONS1
Candidates include immature dogs with coxofemoral laxity andsubluxation with minimal radiographic signs of degenerativejoint disease.
OBJECTIVES2
• To improve joint stability and function by providing greaterdorsal coverage of the femoral head by rotating the dorsalrim of the acetabulum laterally
ANATOMIC CONSIDERATIONSThree separate surgical approaches and osteotomies of thepelvis are necessary to free the acetabular segment for axialrotation and improved dorsal femoral head coverage. The pubicosteotomy is performed first and includes removal of the pubic ramus. Osseus anatomic landmarks include the pelvicsymphysis, the iliopubic eminence, and the ventral aspect of thecoxofemoral joint. Pertinent soft tissue landmarks include theorigin of the pectineus muscle on the iliopectineal eminence,the prepubic tendon, and the adductor and gracilis muscles.Care should be taken to protect the obturator nerve as itcourses through the cranial portion of the obturator foramen.Osseus anatomic landmarks for the ischial osteotomy includethe tuber ischii laterally and the obturator foramen. Muscularlandmarks include the internal obturator and the semitendinousand semimembranosus muscles.
EQUIPMENT• Standard surgical pack, two medium or large Gelpi retractors
(depending on the size of the dog), periosteal elevator, oscil-lating saw, osteotome and mallet, Gigli wire or reciprocatingsaw, rongeur, two Hohmann retractors, Kern bone-holdingforceps, plating equipment, drill, and Canine PelvicOsteotomy plate*
PREPARATION AND POSITIONINGPrepare the entire hindquarter circumferentially to allow accessto the pubis, tuber ischii, and ilium from dorsal and ventral midline to mid-tibia. Place a pursestring suture to prevent fecalcontamination. Position the animal in dorsal recumbency withthe affected limb up. Drape the limb out from a hanging positionto allow maximal manipulation during surgery.
PROCEDUREPubic Ostectomy:3 With the dog in dorsal recumbency,incise the skin and subcutaneous tissues over the pubis, cen-tering on the pectineal muscle as it inserts on the iliopectinealeminence. Elevate the gracilis and adductor muscles from thepubis, and severe the prepubic tendon and pectineus from itscranial aspect. Place two Hohmann retractors ventral to theproposed osteotomy sites to protect the underlying soft tissuesand the obturator nerve (Plate 18A). Using an oscillating saw,Gigli wire, or osteotome and mallet, perform the first osteotomymedial to the iliopubic eminence, and the second osteotomynear the medial limit of the obturator foramen. Remove and pre-serve the segment of bone in a blood-soaked gauze as a corti-cocancellous graft for the ilial osteotomy. Suture the gracilismuscle to the prepubic tendon to prevent inguinal herniation.Closure is routine.
Ischial Osteotomy:3 With the dog in lateral recumbency,incise the skin and subcutaneous tissue sagittally over theischial shelf, midway between midline and the tuber ischii.Elevate the internal obturator, semimembranous, and semi-tendinosus muscles off of the ischial shelf. Perform anosteotomy of the ischium beginning from the most lateralaspect of the obturator foramen with a reciprocating saw orGigli wire (Plate 18B). The osteotomy is not stabilized. Closureis routine.
48 PART ONE • SURGICAL PROCEDURES FOR JOINT DISEASES
Continued
*Canine Pelvic Osteotomy Plate, Slocum Enterprises, Eugene, Oregon.

CH A P T E R 18 TRIPLE PELVIC OSTEOTOMY 49
PLATE 18
B
A
Section ofpubic ramus
to beremoved
Prepubictendon
Pectineusmuscle
Adductormuscle
Gracilismuscle
Ischialosteotomy site
Ischialosteotomy

Ilial Osteotomy and Stabilization:3,4 Incise the skinand subcutaneous tissue from the center of the iliac crest to thegreater trochanter. Following muscle planes, incise the deepgluteal fascia between the tensor fascia latae and the middlegluteal muscle from the ventral iliac spin to the cranial borderof the biceps femoris muscle. Preserving the cranial glutealartery, vein, and nerve, sharply elevate the origin of the middleand deep gluteal muscles cranially and dorsally to expose theilial shaft. Cauterize the iliolumbar vessels as necessary.Continue elevating the soft tissues off of the ilial wing medially,being careful not to injure the sciatic nerve. Palpate the caudalextent of the sacrum and position two large, blunt Hohmannretractors medial to the ilium to protect the sciatic nerve (Plate18C). Perform the osteotomy of the ilial wing with an oscillatingsaw. Be sure the osteotomy is caudal to the sacroiliac joint andperpendicular to a reference pin positioned parallel to the ven-tral third of the ilial wing to the tuber ischii (Plate 18D). Movethe acetabular segment cranially and laterally with Kern bone-holding forceps, and remove the sharp spike of the ilium of thecaudal segment with an oscillating saw or rongeurs. Preservethe bone segment as a corticocancellous graft for the ilialosteotomy. Attach the Canine Pelvic Osteotomy Plate to thecaudal segment 3 mm dorsal to the ventral margin with 3.5-mm cortical screws (Plate 18E). Drill, measure, and tap theplate holes in the following order: 1, 2, and 3. Rotate the acetab-ular segment caudolaterally, and fix the plate to the cranial ilialsegment. Drill, measure, and tap the plate holes in the followingorder: 4, 5, and 6. The small hemi cerclage hole in the caudalhalf of the plate may be left open or filled with a 2.7-mm screw.The hip should now be stable and the Ortolani sign eliminated.If not, the plate can be removed and replaced with another plateof increased angle. Most coxofemoral joints in dogs aresufficiently stable with 20 to 30 degrees of rotation. Joints thatrequire more rotation may not have sufficient acetabular depthto warrant the triple pelvic osteotomy procedure. Lavage, placethe corticocancellous graft along the osteotomy, and suture the deep gluteal to the sartorius fascia. The remainder of theclosure is routine.
CAUTIONS1
Caution should be taken to protect the cranial gluteal, obtu-rator, and sciatic nerves. Premature screw loosening and migra-tion are commonly associated with the cranial portion of theplate. Factors associated with decreased screw migrationinclude increasing the depth of sacral purchase in the first and
second cranial screw and filling the ischial cerclage hole with ascrew or cerclage.
POSTOPERATIVE EVALUATIONPostoperative radiographs are indicated to evaluate osteotomyand implant position and acetabular coverage. Radiographsshould be repeated at 6- to 8-week intervals to evaluate implantposition and acetabular coverage until the ilial union is complete.
POSTOPERATIVE CAREThe animal should be confined to a small area or kennel untilthe ilial union is evident. Activity should be limited to outsideleash walks for urination and defecation. Care should be takento avoid stairs and slippery surfaces.
EXPECTED OUTCOME5,6
Outcome is usually good to excellent. Force plate analysisconfirms that weight-bearing forces improve in operated versusnonoperated hips. Ninety-two percent of the clinical signs asso-ciated with lameness and gait abnormalities resolve with min-imal progression of degenerative joint disease in dogsundergoing this procedure. In a separate clinical study, loco-motor, physical, and owner’s evaluation demonstrate the supe-riority of the triple pelvic osteotomy over medical treatmentand excision arthroplasty.
References1. Simmons S, Johnson AL, Schaeffer DJ: Risk factors for screw
migration after triple pelvic osteotomy. J Am Anim Hosp Assoc37(3):269–273, 2001.
2. Graehler RA, Weigel JP, Pardo AD: The effects of plate type, angle ofilial osteotomy, and degree of axial rotation on the structuralanatomy of the pelvis. Vet Surg 23:13–20, 1994.
3. Slocum B, Slocum TD: Pelvic osteotomy. In Bojrab MJ (ed): CurrentTechniques in Small Animal Surgery, 4th ed. Baltimore, Williams &Wilkins, 1998.
4. Piermattei DL, Johnson KA: Approach to the ilium through a lateralincision. In An Atlas of Surgical Approaches to the Bones and Jointsof the Dog and Cat, 4th ed. Philadelphia, WB Saunders, 2004.
5. Plante J, Dupuis J, Beauregard G, et al: Long-term results of conser-vative treatment, excision arthroplasty and triple pelvic osteotomyfor the treatment of hip dysplasia in the immature dog: Part 1:Radiographic and physical results. Vet Comp Ortho Traum10:101–110, 1997.
6. McLaughin RM, Miller CW, Taves CL, et al: Force plate analysis oftriple pelvic osteotomy for the treatment of canine hip dysplasia. VetSurg 20:291–297, 1991.
50 PART ONE • SURGICAL PROCEDURES FOR JOINT DISEASES

CH A P T E R 18 TRIPLE PELVIC OSTEOTOMY 51
PLATE 18
6 5
4
1
2 3
C
E
D
Cranial glutealartery and vein
Middle glutealmuscle
Deepgluteal muscle
Tensorfasciae
latae muscle
Osteotomyline
Ilialosteotomy
Reference line forilial osteotomy
Shaft ofilium
Rotated segmentof pelvis
Canine pelvicosteotomy plate

STIFLE
CHAPTER 19 Medial Patella Luxation Stabilizedwith Wedge Recession Trochleoplasty,Desmotomy, Tibial Tuberosity Transposition,and Retinacular ImbricationINDICATIONSCandidates include clinically lame animals with Putmann’sgrade II and above patella luxations.
OBJECTIVES• To improve limb function and prevent degenerative joint dis-
ease by anatomic realignment and stabilization of the patellawithin the trochlear groove
ANATOMIC CONSIDERATIONS1,2
The patella is the largest sesamoid bone in the body; it islocated within the tendon of insertion of the quadriceps musclegroup. The quadriceps muscle group, formed by the rectusfemoris, vastus lateralis, vastus medialis, and vastus inter-medius muscles, converges on the patella and continues as thepatellar ligament to insert on the tibial tuberosity. The vastuslateralis and medialis have additional attachments to the patellaby medial and lateral parapatellar fibrocartilages, which aid instifle stability through contact with the ridges of the femoraltrochlear. Originating from the fabella and merging with themedial and lateral parapatellar fibrocartilages are the collagenfibers of the medial and lateral retinacula. The patella articu-lates within the trochlear groove, which is formed by thetrochlear ridges of the medial and lateral condyle. The medialtrochlear ridge is thicker than the lateral in normal dogs. Properanatomic alignment of the extensor mechanism is a straight lineof force; this is necessary for stability of the patella. The patellafunctions in the extensor mechanism of the stifle to provide cranial and rotary stability to the joint and serves as a lever arm, preserving even tension of the extensor mechanism duringextension of the stifle.
EQUIPMENT• Standard surgical pack, small Hohmann retractor, fine-
toothed saw,* bone cutters or osteotome and mallet, Freerperiosteal elevator, Kirschner wires, wire driver
PREPARATION AND POSITIONINGPrepare the leg circumferentially from dorsal midline to belowthe tarsus. Use a hanging leg preparation with the dog in dorsal
recumbency at the end of the surgery table to allow for maximalmanipulation and visualization of the stifle joint during surgery.
PROCEDURE2,3
Lateral Arthrotomy and Medial Desmotomy: Incisethe skin and subcutaneous tissue in a curvilinear fashion on thecraniolateral aspect of the stifle (Plate 19A). The middle third ofthe incision should center on the patellar tendon. Reflect theskin and subcutaneous tissue laterally with blunt dissection.Return the patella to its normal orientation within the trochleargroove, and incise the lateral retinaculum and joint capsulefrom the cupola to the tibial plateau to release the patella andexpose the joint. If the cranial sartorius and vastus medialismuscles inhibit patellar alignment, release the insertions ofthese muscles at the proximal patella. Examine the cruciate ligaments and menisci to check for tears caused by stifle insta-bility, and excise as necessary. Delay closure of the joint untilpatella alignment and stability are assessed.
Wedge Recession Trochleoplasty: With the stifle inflexion and the patella luxated, cut the abaxial and axial mar-gins of the wedge osteotomy using the fine-toothed saw (Plate19B1). Keep the margins of the cut wide enough to accommo-date the width of the patella. Remove the wedge and deepen therecession in the trochlea by removing additional bone fromeither side of the trochlear ridge with a file or an additionalosteotomy, sliced parallel to the original cut. Resect the basilarsurface of the osteochondral wedge with rongeurs to allow thecartilage to seat deeply into the new femoral groove patella(Plate 19B2). Additional trochlear depth can be achieved byrotating the wedge 180 degrees. Replace the patella, andexamine limb alignment and patellar stability. With the stifleand tarsus flexed at 90 degrees, the patella, tibial tuberosity, andtarsus should follow the same linear orientation. After evalu-ating limb alignment, flex and extend the stifle while internallyand externally rotating the pes. If the patella luxates or appearsmalaligned, a desmotomy and tibial tubercle transposition areindicated.
52 PART ONE • SURGICAL PROCEDURES FOR JOINT DISEASES
*X-ACTO Inc., Long Island City, New York.
Continued

CH A P T E R 19 MEDIAL PATELLA LUXATION 53
PLATE 19
A
B1
B2
M L
Bicepsfemorismuscle
Cranialistibialismuscle
Incision in lateralretinaculum
Cranialis tibialismuscle reflected
Wedge resected
Additional wedge resectedon either side
Osteochondralwedge replaced
Patella

Tibial Tubercle Transposition: Incise the lateral retina-culum and joint capsule, extending the parapatellar incision dis-tally to the tibial tubercle. Elevate the cranial tibial muscle fromthe tibia to the level of the long digital extensor tendon. Performa partial osteotomy of the tibial tubercle, preserving the distalperiosteal attachment of the tibial tubercle to serve as a biolog-ical tension band using bone cutters or an osteotome and mallet(Plate 19C1). Rongeur an osseus bed for the tibial tubercle toreside in, and with the stifle and tarsus flexed at 90 degrees,lever the tibial tubercle laterally with a periosteal elevator sothat it is in alignment with the patella and tarsus. Stabilize thetubercle with two divergent Kirschner wires directed caudallyand slightly proximally, engaging but not extending beyond thecaudal cortex of the tibia (Plate 19C2). Reevaluate patellaralignment and stability, and relocate the tuberosity if needed.Cut and bend the Kirschner wires to prevent soft tissue irrita-tion and facilitate removal if migration occurs.
Joint Capsule Closure and Retinacular Imbrication:Excise excessive lateral joint capsule and perform a balancedclosure of the joint capsule and retinaculum. Check patellar sta-bility after each imbricating suture. Imbricate the lateral jointcapsule and lateral patellar tendon. Recheck patellar stability.Close the lateral and medial retinaculum with a vest-over-pantspattern (modified Mayo mattress pattern) (Plate 19D). Aftereach suture is placed, evaluate patellar stability. Closure of themedial joint capsule may not be indicated in higher grades ofpatellar luxation. Allow the medal arthrotomy to separate, anddo not suture the cut edges if medial luxation is severe. Closethe subcutaneous tissue and skin over the arthrotomy and retinacular incisions.
CAUTIONS4
The most common complication associated with surgical repairof patella luxation is recurrence of the luxation. Correction ofthe malalignment of the extensor mechanism via tibial tubercle
transposition is imperative to a successful outcome of the sur-gery. Retinacular imbrication and joint capsule closure shouldbe evaluated after each imbricating suture to ensure a balancedand stable closure.
POSTOPERATIVE EVALUATIONRadiographs should be evaluated for patellar alignment andimplant placement. Radiographs should be repeated every 6 to8 weeks until the osteotomy site is healed.
POSTOPERATIVE CAREThe limb should be placed in a soft, padded bandage for 1 to 2 days. Activity should be restricted to walks on a leash until theosteotomy site is healed. Passive range-of-motion exercisesmay help maintain muscle mass and stifle range of motion.
EXPECTED OUTCOME3
Outcome is usually good to excellent. The prognosis dependson the age of the patient at the time of surgery, the body weightand condition score, and the amount of degenerative joint dis-ease present prior to surgery. Degenerative joint disease pro-gresses despite surgical correction and is positively correlatedwith the animal’s age at surgery.
References1. Roush JK: Canine patellar luxation. Vet Clin North Amer 23:855–875,
1992.2. L’Eplattenier H, Montavon P: Patellar luxation in dogs and cats:
Pathogenesis and diagnosis. Compend Contin Educ Pract Vet24:234–239, 2002.
3. L’Eplattenier H, Montavon P: Patellar luxation in dogs and cats:Management and prevention. Compend Contin Educ Pract Vet24:292–300, 2002.
4. Willauer CC, Vasseur PB: Clinical results of surgical correction ofmedial luxation of the patella in dogs. Vet Surg 16:31–36, 1987.
54 PART ONE • SURGICAL PROCEDURES FOR JOINT DISEASES

CH A P T E R 19 MEDIAL PATELLA LUXATION 55
PLATE 19
C2
D
Cranialis tibialismuscle reflected
C1
Bicepsfemorismuscle
Modified Mayo mattress suture

STIFLE
CHAPTER 20 Deranged Stifle LuxationStabilized with Suture Anchors, Screws, and Suture
INDICATIONS1–4
Surgical stabilization and internal fixation is indicated in ani-mals with gross instability of the stifle resulting from multipleligament injury. The most common structures injured in the luxated stifle are the cranial and caudal cruciate, and either the lateral or medial collateral ligament. Reconstruction of thecollateral and cranial cruciate ligaments and careful repair orremoval of damaged menisci and joint capsule is an effectivetreatment method for medium and large dogs. Reconstructionof the caudal cruciate ligament and postoperative limb supportis not found to be essential.
OBJECTIVES• To restore normal stability, congruency, mobility, and func-
tion to the stifle joint
ANATOMIC CONSIDERATIONS2,4
The stifle joint is primarily stabilized by the cranial and caudalcruciate ligaments, the medial and lateral collateral ligaments,the joint capsule, and menisci. Additional stability may be provided by the patellar tendon, quadriceps, and popliteal musculature.
EQUIPMENT• Standard surgical pack, two medium or large Gelpi retractors
(depending on the size of the dog), periosteal elevator, Jacobchuck and key, intramedullary pins, mallet, 20- to 80-poundfishing leader line,* suture anchor system,† and crimp clampsystem‡
Alternatively, a bone tunnel and screw and washer combina-tion may be used if a suture anchor system is not available or ifthe animal is not large enough to accommodate the sutureanchor system. Additional instrumentation needed for this tech-nique includes a high-speed drill, bone screw and washer, drillbit, tap, depth gauge, screwdriver, and baby Hohmann retractor
and baby Ochsner forceps for joint inspection and cruciate lig-ament débridement.
PREPARATION AND POSITIONINGPrepare the leg circumferentially from dorsal midline to belowthe tarsus. Use a hanging leg preparation with the dog in dorsalrecumbency at the end of the surgery table to allow for maximalmanipulation and visualization of the stifle joint during surgery.
PROCEDUREApproach:5–7 Incise the skin and subcutaneous tissue in acurvilinear fashion on the craniolateral aspect of the stifle. Themiddle third of the incision should center on the patellartendon. Reflect the skin and subcutaneous tissue medially andlaterally with blunt dissection. Perform a medial arthrotomy,and incise the joint capsule from the cupula to the tibial plateauto expose the joint. Luxate the patella, and flex the limb.Examine the cruciate ligaments and menisci to check for tears,and excise/débride as necessary. Lavage and close the joint. Toexpose the medial collateral ligament, sharply incise the fasciaof the caudal belly of the sartorius and elevate its insertion caudally to the level of the ligament (Plate 20A). To expose thelateral collateral ligament, incise the aponeurosis of the bicepsfemoris muscle just cranial to the muscle fibers and elevate thebiceps femoris and attached fascia lata caudally to the level ofthe ligament. Before cranial cruciate repair is begun, stabilizethe collateral ligament(s) to restore normal joint alignment andcongruity.
Collateral Ligament Repair: Inspect the ligament fortears or avulsions. Repair avulsed intact ligaments with a screwand spiked plastic washer§ (Plate 20B1). As a general rule,repair mid-substance tears with a locking loop suture (Plate20B2). Then protect the repaired ligament with screws,washers, and heavy suture; wire placed in a figure-eight suturepattern; or suture anchors (Plate 20B3).
56 PART ONE • SURGICAL PROCEDURES FOR JOINT DISEASES
*The 20-, 40-, 60-, 80-, 100-pound test is available through Mason Tackle Company,Otisville, Michigan.†Innovative Animal Products, Rochester, Minnesota. ‡Securos Veterinary Orthopedics, Charlton, Massachusetts. §Synthes, Monument, Colorado.
Continued

CH A P T E R 20 DERANGED STIFLE LUXATION 57
PLATE 20
Suture anchor threadedwith two suturesinserted in femur
Locking looprepair
Caudal head ofsartorius
muscle reflected
Ruptured medialcollateral ligamentand joint capsule
Anchor locked beneathcortices
A B1
B2 B3

Cranial Cruciate Ligament Repair: To expose the lateral collateral ligament, incise the aponeurosis of the bicepsfemoris muscle just cranial to the muscle fibers, and bluntly ele-vate the biceps femoris and attached fascia lata caudally to thelevel of the ligament. Palpate the fabella and fibular head forproper anatomic orientation of the lateral fabellar suture. Passthe appropriate-size monofilament fishing leader line throughthe eye of a Martin uterine needle, and pass the needle aroundthe cranial half of the fabella from proximal to distal. As a gen-eral rule, use 1 pound of test per pound of body weight. Drill ahole with intramedullary pin and Jacob chuck of sufficient sizeto pass the eye of the needle through the tibial crest from lateralto medial. The hole should be proximal to the most prominentpoint of the tibial tuberosity, in order to estimate the insertionof the cranial cruciate ligament. Pass the suture under the softtissues of the cranial tibia to avoid muscle entrapment and pre-mature loosening of the lateral fabellar suture from tissuenecrosis. Pass the leader line from lateral to medial through thehole in the tibial crest and then under the patellar ligamentimmediately proximal to the tibial tuberosity. Cut the leader linein half to remove the needle, obtaining two sutures to tie. Flexthe stifle to a normal standing angle, hold the tibia caudally androtated externally to remove drawer motion, and tie each sutureindividually. Using the Securos crimp clamp system, slide onesuture end at a time through the surgical crimp clamps and pullthe ends so that the loop becomes taut (Plate 20C). Slide theadditional crimp clamps on each end of the suture, positioningthem 2 mm to 3 mm from the center crimp clamp. Use the crimptool to firmly crimp the clamp on the individual strands. Slidethe slotted tips of the tensioning device over the suture, andsqueeze the arms of the tensioning device one click at a time,palpating for drawer and range of motion (Plate 20D). Once theappropriate amount of tension is obtained, crimp the middleclamp holding the two sutures three times, once in the middleand once on either end (Plates 20E1 and 20E2). Alternatively,use a sliding half hitch or a clamped square knot to stabilize the stifle. Check the stifle for range of motion and cranialdrawer after each suture is tied. Imbricate the lateral fascia covering of the biceps femoris with a vest-over-pants closure.
CAUTIONS3
Preoperative palpation should be performed and stress radio-graphs of the stifle joint should be taken under sedation or gen-eral anesthesia for proper assessment of the suspected injuries.Stifle joint stability should be assessed in all planes with thejoint held in extension, normal standing angle, and 90 degreesflexion while maintaining the tibia in neutral position; however,
in many cases surgical inspection of the stifle is often necessaryfor definitive diagnosis.
POSTOPERATIVE EVALUATIONThe range of motion should be evaluated, and the stifle should be checked for cranial drawer before the patient awakens. The stifle should be radiographed to assess implant positioning andjoint congruency.
POSTOPERATIVE CAREExercise should be restricted to outside leash walks for urina-tion and defecation, and the animal should be confined to akennel for the first 4 to 6 weeks. Then the animal’s activityshould slowly be returned to normal.
EXPECTED OUTCOME3
Because of the traumatic nature of this disease, concomitantinjuries are common and must be addressed prior to surgery;however, they do not justify a worse prognosis in dogs withstifle luxation. Delaying surgery to stabilize the patient is oftennecessary and also does not contribute to any difference in out-come. The long-term prognosis with stifle stabilization is fair togood, despite decreases in range of motion and reductions ofmuscle mass of the affected limb. Mild to moderate degenera-tive joint disease and gait abnormalities may be expected incases with questionable cartilage viability or obvious cartilagetrauma.
References1. Aron DN: Traumatic dislocation of the stifle joint: Treatment of 12
dogs and one cat. J Am Anim Hosp Assoc 22:333–340, 1988.2. Welches CD, Scavelli TD: Transarticular pinning to repair luxation of
the stifle joint in dogs and cats: A retrospective study of 10 cases. JAm Anim Hosp Assoc 26:207–214, 1990.
3. Hulse DA, Shires P: Multiple ligament injury of the stifle joint in thedog. J Am Anim Hosp Assoc 22:105–110, 1986.
4. Bruce WJ: Multiple ligamentous injuries of the canine stifle joint: Astudy of 12 cases. J Small Anim Pract 39:333–340, 1998.
5. Piermattei DL, Johnson KA: Approach to the stifle joint through amedial incision. In An Atlas of Surgical Approaches to the Bones andJoints of the Dog and Cat, 4th ed. Philadelphia, WB Saunders, 2004.
6. Piermattei DL, Johnson KA: Approach to the medial collateral liga-ment and caudomedial part of the stifle joint. In An Atlas of SurgicalApproaches to the Bones and Joints of the Dog and Cat, 4th ed.Philadelphia, WB Saunders, 2004.
7. Piermattei DL, Johnson KA: Approach to the lateral collateral liga-ment and caudolateral part of the stifle joint. In An Atlas of SurgicalApproaches to the Bones and Joints of the Dog and Cat, 4th ed.Philadelphia, WB Saunders, 2004.
58 PART ONE • SURGICAL PROCEDURES FOR JOINT DISEASES

CH A P T E R 20 DERANGED STIFLE LUXATION 59
PLATE 20
CD
E1 E2
Correct Crimp Pattern
Incorrect Crimp Pattern
Crimps too closeto the edge
Lateralcollateralligament
Drill holein tibial
crest
Lateralfabella
Tensioningdevice
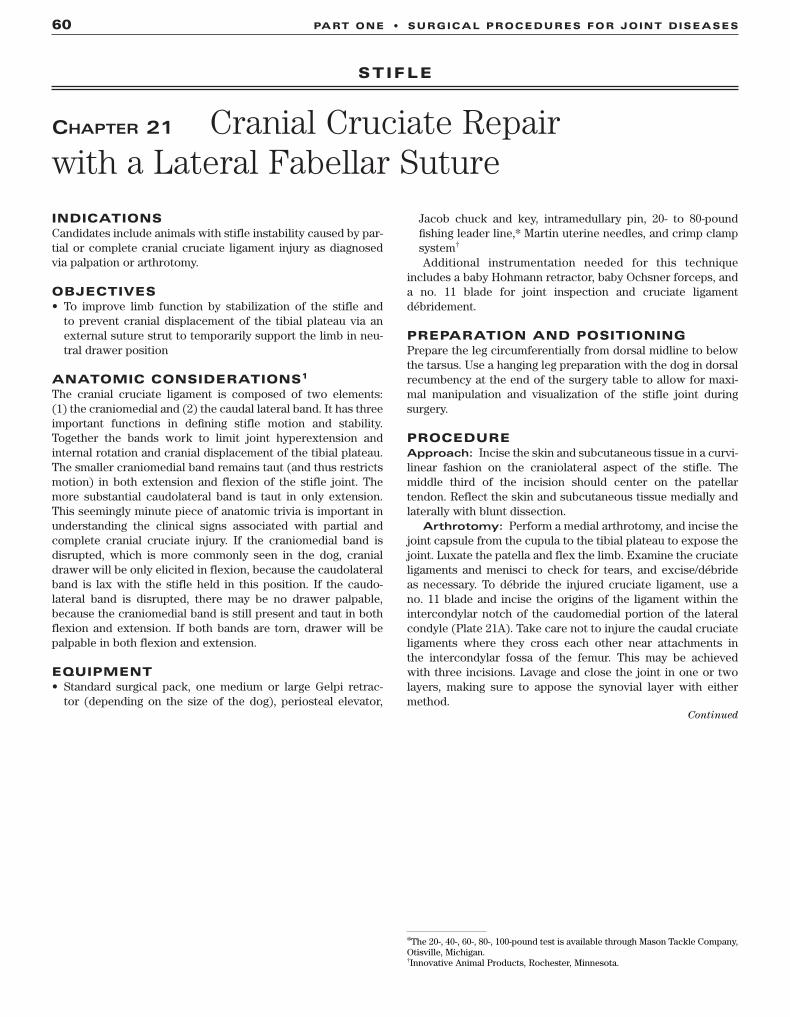
STIFLE
CHAPTER 21 Cranial Cruciate Repair with a Lateral Fabellar Suture
INDICATIONSCandidates include animals with stifle instability caused by par-tial or complete cranial cruciate ligament injury as diagnosedvia palpation or arthrotomy.
OBJECTIVES• To improve limb function by stabilization of the stifle and
to prevent cranial displacement of the tibial plateau via anexternal suture strut to temporarily support the limb in neu-tral drawer position
ANATOMIC CONSIDERATIONS1
The cranial cruciate ligament is composed of two elements: (1) the craniomedial and (2) the caudal lateral band. It has threeimportant functions in defining stifle motion and stability.Together the bands work to limit joint hyperextension andinternal rotation and cranial displacement of the tibial plateau.The smaller craniomedial band remains taut (and thus restrictsmotion) in both extension and flexion of the stifle joint. Themore substantial caudolateral band is taut in only extension.This seemingly minute piece of anatomic trivia is important inunderstanding the clinical signs associated with partial andcomplete cranial cruciate injury. If the craniomedial band is disrupted, which is more commonly seen in the dog, cranialdrawer will be only elicited in flexion, because the caudolateralband is lax with the stifle held in this position. If the caudo-lateral band is disrupted, there may be no drawer palpable,because the craniomedial band is still present and taut in bothflexion and extension. If both bands are torn, drawer will bepalpable in both flexion and extension.
EQUIPMENT• Standard surgical pack, one medium or large Gelpi retrac-
tor (depending on the size of the dog), periosteal elevator,
Jacob chuck and key, intramedullary pin, 20- to 80-poundfishing leader line,* Martin uterine needles, and crimp clampsystem†
Additional instrumentation needed for this techniqueincludes a baby Hohmann retractor, baby Ochsner forceps, anda no. 11 blade for joint inspection and cruciate ligamentdébridement.
PREPARATION AND POSITIONINGPrepare the leg circumferentially from dorsal midline to belowthe tarsus. Use a hanging leg preparation with the dog in dorsalrecumbency at the end of the surgery table to allow for maxi-mal manipulation and visualization of the stifle joint during surgery.
PROCEDUREApproach: Incise the skin and subcutaneous tissue in a curvi-linear fashion on the craniolateral aspect of the stifle. Themiddle third of the incision should center on the patellartendon. Reflect the skin and subcutaneous tissue medially andlaterally with blunt dissection.
Arthrotomy: Perform a medial arthrotomy, and incise thejoint capsule from the cupula to the tibial plateau to expose thejoint. Luxate the patella and flex the limb. Examine the cruciateligaments and menisci to check for tears, and excise/débride as necessary. To débride the injured cruciate ligament, use a no. 11 blade and incise the origins of the ligament within theintercondylar notch of the caudomedial portion of the lateralcondyle (Plate 21A). Take care not to injure the caudal cruciateligaments where they cross each other near attachments in the intercondylar fossa of the femur. This may be achieved with three incisions. Lavage and close the joint in one or twolayers, making sure to appose the synovial layer with eithermethod.
60 PART ONE • SURGICAL PROCEDURES FOR JOINT DISEASES
*The 20-, 40-, 60-, 80-, 100-pound test is available through Mason Tackle Company,Otisville, Michigan.†Innovative Animal Products, Rochester, Minnesota.
Continued

CH A P T E R 21 CRANIAL CRUCIATE REPAIR WITH A LATERAL FABELLAR SUTURE 61
PLATE 21
A
Cranialcruciateligament
Medialmeniscus
Cut 1 Cut 2
Cut 3

Lateral Fabellar Suture:2,3 To expose the lateral collat-eral ligament, incise the aponeurosis of the biceps femorismuscle just cranial to the muscle fibers, and bluntly elevate thebiceps femoris and attached fascia lata caudally to the level ofthe ligament (Plate 21B). Palpate the fabella and fibular head forproper anatomic orientation of the lateral fabellar suture. Passthe appropriate-size monofilament fishing leader line through theeye of a Martin uterine needle, and pass the needle around the cranial half of the fabella from proximal to distal. As a gen-eral rule, use 1 pound of test per pound of body weight. Drill ahole with intramedullary pin and Jacob chuck of sufficient sizeto pass the eye of the needle through the tibial crest from lateralto medial. Make the hole proximal to the most prominent pointof the tibial tuberosity in order to estimate the insertion of thecranial cruciate ligament. Pass the suture under the soft tissuesof the cranial tibia to avoid muscle entrapment and prematureloosening of the lateral fabellar suture from tissue necrosis.Pass the leader line from lateral to medial through the hole inthe tibial crest and then under the patellar ligament immedi-ately proximal to the tibial tuberosity. Cut the leader line in halfto remove the needle, obtaining two sutures to tie. Flex thestifle to a normal standing angle, hold the tibia caudally androtated externally to remove drawer motion, and tie each sutureindividually. Using the Securos‡ crimp clamp system, slide onesuture end at a time through the surgical crimp clamps and pullthe ends so that the loop becomes taut. Slide the additionalcrimp clamps on each individual end of the suture, positioningthem 2 mm to 3 mm from the center crimp clamp (Plate 21C).Use the crimp tool to firmly crimp the clamp on the individualstrands. Slide the slotted tips of the tensioning device over thesuture, and squeeze the arms of the tensioning device one clickat a time, palpating for drawer and range of motion (Plate 21D).Once the appropriate amount of tension is obtained, crimp themiddle clamp holding the two sutures three times, once in themiddle and once on either end (Plate 21E1). Alternatively, use asliding half hitch or a clamped square knot to stabilize the stifle.Check the stifle for range of motion and cranial drawer aftereach suture is tied. Imbricate the lateral fascia covering of thebiceps femoris with a vest-over-pants closure (Plate 21E2) fromthe patella to the tibial crest to cover the sutures and help pre-vent seroma formation (Plate 21E3).
CAUTIONS2,4
Activity should be restricted to short walks on a leash to pre-vent premature breakdown of the stifle stabilization. Risk of earlyfailure may be higher with poor fabella anchorage; therefore,particular attention should be paid to needle position relative tofabella anatomy. Meniscal damage is reported in 45% of cranialcruciate rupture, with the medial meniscus being most commonlyaffected. Careful assessment of both menisci is important becausedamaged menisci should be partially débrided or excised.
POSTOPERATIVE EVALUATION4
The range of motion should be evaluated and the stifle for cra-nial drawer should be checked before the patient awakens. It isnot necessary to radiograph the stifle to assess implant posi-tioning and joint congruency in this repair.
POSTOPERATIVE CAREThe leg should be placed in a soft, padded bandage for 24 hoursto cover the wound and provide support. Exercise should berestricted and the animal should be confined to a kennel for the first 4 to 6 weeks. Then normal activity should slowly bereintroduced.
EXPECTED OUTCOMEOsteoarthritis is a common sequela to cranial cruciate rupture,particularly when meniscal damage is present. However, theprognosis is good to excellent with proper postoperative careand confinement.
References1. Hart RC, Hulse DA, Slater MR: Contribution of periarticular tissue to
stabilization of the canine stifle joint after cranial cruciate ligamentreconstruction. Vet Comp Orthop Traumatol 16:21–25, 2003.
2. Lampman TJ, Lund EM, Lipowitz AJ: Cranial cruciate disease:Current status of diagnosis, surgery, and risk for disease. Vet CompOrthop Traumatol 16:122–126, 2003.
3. Peycke LE, Kerwin SC, Hosgood G, Metcalf JB: Mechanical compar-ison of six loop fixation methods with monofilament nylon leaderline. Vet Comp Orthop Traumatol 15:210–214, 2002.
4. Stork CK, Gibson NR, Owen MR, et al: Radiographic features of a lateral extracapsular wire suture in the canine cranial cruciatedeficient stifle. J Small Anim Pract 42:487–490, 2001.
62 PART ONE • SURGICAL PROCEDURES FOR JOINT DISEASES
‡Securos Veterinary Orthopedics, Charlton, Massachusetts.

CH A P T E R 21 CRANIAL CRUCIATE REPAIR WITH A LATERAL FABELLAR SUTURE 63
PLATE 21
E2
Modified Mayo mattress suture
B C D
E1
E3
Correct Crimp Pattern
Incorrect Crimp Pattern
Crimps too closeto the edge
Lateralcollateralligament
Drill holein tibial
crest
Lateralfabella
Primarycrimp clamp
Secondarycrimp clamp
Tensioningdevice
Secondarycrimp clamp

STIFLE
CHAPTER 22 Cranial Cruciate Repair with Intra-articular Repair
INDICATIONSCandidates include animals with stifle instability caused by par-tial or complete cranial cruciate ligament injury as diagnosedvia palpation or arthrotomy.
OBJECTIVES• To improve limb function and prevent degenerative joint dis-
ease by stabilization of the stifle, and to prevent cranial dis-placement of the tibial plateau by replacing the cranial crucialligament with an autogenous internal graft
ANATOMIC CONSIDERATIONS1
The cranial cruciate ligament is composed of two elements: (1) the craniomedial and (2) the caudal lateral band. It has threeimportant functions in defining stifle motion and stability.Together the bands work to limit joint hyperextension andinternal rotation and cranial displacement of the tibial plateau.The smaller craniomedial band remains taut (and thus restrictsmotion) in both extension and flexion of the stifle joint. Themore substantial caudolateral band is taut in only extension.This seemingly minute piece of anatomic trivia is important inunderstanding the clinical signs associated with partial andcomplete cranial cruciate injury. If the craniomedial band is disrupted, which is more commonly seen in the dog with partialcranial cruciate injury, cranial drawer will be elicited only inflexion, because the caudolateral band is lax with the stifle heldin this position. If the caudolateral band is disrupted, there maybe no palpable drawer at all, because the craniomedial band isstill present and taut in both flexion and extension. If bothbands are torn, drawer will be palpable in both flexion andextension.
EQUIPMENT• Standard surgical pack, one medium or large Gelpi retractor
(depending on the size of the dog), periosteal elevator, drill,drill bit, screws, plastic washers, rongeurs, bone rasp, curette,straight needle and/or cerclage wire
Additional instrumentation needed for this techniqueincludes baby Hohmann retractor, baby Ochsner forceps, and a no. 11 blade for joint inspection and cruciate ligamentdébridement.
PREPARATION AND POSITIONINGPrepare the leg circumferentially from dorsal midline to belowthe tarsus. Use a hanging leg preparation with the dog in dorsalrecumbency at the end of the surgery table to allow for maximalmanipulation and visualization of the stifle joint during surgery.
PROCEDUREApproach: Incise the skin and subcutaneous tissue in a curvi-linear fashion on the craniolateral aspect of the stifle. Centerthe middle third of the incision on the patellar tendon. Reflectthe skin and subcutaneous tissue medially and laterally withblunt dissection.
Arthrotomy and Notchplasty:2,3 Perform a lateralarthrotomy, and incise the joint capsule from the cupula to thetibial plateau to expose the joint, taking care not to damage thelong digital extensor tendon (Plate 22A). Luxate the patella andflex the limb. Examine the cruciate ligaments and menisci tocheck for tears and excise/débride as necessary. To débride theinjured cruciate ligament, use a no. 11 blade, and incise the origins of the ligament within the intercondylar notch of the caudomedial portion of the lateral condyle. Take care not toinjure the caudal cruciate ligaments where they cross eachother near attachments in the intercondylar fossa of the femur.Perform a notchplasty with a bone rasp, curette, or rongeur,removing any osteophytes and widening the lateral wall of theintercondylar notch to allow adequate space to pass the graftand to protect the graft from impingement of the craniolateralwall of the intercondylar fossa (Plate 22B). Lavage the joint andreturn the patella to its original position.
64 PART ONE • SURGICAL PROCEDURES FOR JOINT DISEASES
Continued

CH A P T E R 22 CRANIAL CRUCIATE REPAIR WITH INTRA-ARTICULAR REPAIR 65
PLATE 22
A B
Bicepsfemorismuscle
Fascialata strip
Cranialis tibialismuscle reflected
Tibialtunnel
Notchplasty
Cranial cruciateligament débrided

Intracapsular Graft:1,2,3 Harvest a 10-cm graft from thecraniolateral aspect of the distal fascia lata and lateral third ofthe patellar tendon, using the arthrotomy incision as the caudalborder of the graft. Free the graft and its bony insertion onto thetibial plateau with an osteotome while maintaining its distal fas-cial attachments (see Plate 22A). Create a tibial tunnel with adrill bit large enough to accept the graft from the cranial surfaceof the tibia (see Plate 22B). Alternatively, use a guide wire fol-lowed by a cannulated drill bit to ensure accuracy of the graftplacement. The entry point location of the tunnel is just lateraland distal to the tibial tuberosity, exiting into the joint at thepoint of insertion of the cranial cruciate ligament (Plate 22C).Place one or two stay sutures in the end of the graft using largediameter monofilament suture (0 or 1) or cerclage wire. Threadthe stay suture with a straight needle or loop of cerclage wirethrough the bone tunnel in the tibia from distal to proximal.Place the graft through the intercondylar notch by passingcurved Kelly or Carmalt forceps over the top of the lateralcondyle or by creating a separate femoral tunnel extendingfrom the point of origin of the cranial cruciate to the caudolat-eral aspect of the femoral condyle and passing the straightneedle or looped cerclage wire through the tunnel (Plate 22D).Secure the graft to the distal femur by suturing it to the femo-rofabellar ligament with large (0 to 2) monofilament, with non-absorbable suture, or with a spiked screw and washer with thestifle in standing flexion (Plate 22E). Check the stifle for rangeof motion and cranial drawer after the graft is secured.
CAUTIONS4,5
Placing excessive tension on the graft should be avoided,because it will lead to premature failure of the repair. Normally,2 mm to 3 mm of drawer motion should be detected on palpa-tion. Excessive drawer may then be removed by joint capsuleand fascial imbrication; however, many surgeons at this pointoften reenforce the intracapsular repair with a lateral fabellarsuture (see Chapter 21 for details regarding this procedure).
POSTOPERATIVE EVALUATION5
The range of motion should be evaluated, and the stifle shouldbe checked for cranial drawer before the patient awakens. It isnot necessary to radiograph the stifle to assess implant posi-tioning and joint congruency in this repair.
POSTOPERATIVE CAREThe leg should be placed in a soft, padded bandage for 24 hoursto cover the wound and provide support. Exercise should berestricted and the animal should be confined to a kennel for the first 4 to 6 weeks. Then normal activity should be slowlyreintroduced.
EXPECTED OUTCOMEOsteoarthritis is a common sequela to cranial cruciate rupture,particularly when meniscal damage is present; however, theprognosis is good to excellent with proper postoperative careand confinement.
References1. Hart RC, Hulse DA, Slater MR: Contribution of periarticular tissue to
stabilization of the canine stifle joint after cranial cruciate ligamentreconstruciton. Vet Comp Orthop Traumatol 16:21–25, 2003.
2. Fitch RB, Montgomery RD, Kincaid SA, et al: The effect of inter-condylar notchplasty on the normal canine stifle. Vet Surg24:156–164, 1996.
3. Moore KW, Read RA: Rupture of the cranial cruciate ligament indogs. Part II. Diagnosis and management. Compend Contin EducPract Vet 18(4):381–391, 1996.
4. Lampman TJ, Lund EM, Lipowitz AJ: Cranial cruciate disease:Current status of diagnosis, surgery, and risk for disease. Vet CompOrthop Traumatol 16:122–126, 2003.
5. Stork CK, Gibson NR, Owen MR, et al: Radiographic features of a lat-eral extracapsular wire suture in the canine cranial cruciatedeficient stifle. J Small Anim Pract 42:487–490, 2001.
66 PART ONE • SURGICAL PROCEDURES FOR JOINT DISEASES

CH A P T E R 22 CRANIAL CRUCIATE REPAIR WITH INTRA-ARTICULAR REPAIR 67
PLATE 22
D E
C
Spikedwasher
Lateralfibula
Site ofdrill hole
M L

STIFLE
CHAPTER 23 MeniscectomyINDICATIONSCandidates include animals with meniscal damage caused bystifle instability from chronic partial or complete cranial cru-ciate ligament injury or traumatic luxation.
Dogs with meniscal damage usually experience more painand display more lameness in association with stifle instabilitythan in association with a pure cruciate tear.
OBJECTIVES• To improve limb function and decrease pain associated with
meniscal injury caused by entrapment of the femoral condylebecause of stifle instability
ANATOMIC CONSIDERATIONS1
Dogs and cats have a medial and a lateral menisci that residewithin the stifle joint. The functions of the menisci are complex,but these structures are very important to normal stifle biome-chanics. They are white, C-shaped, discoid, fibrocartilagenousstructures that are wedge-shaped when viewed on cross sec-tion. Each meniscus consists of a body and a cranial and caudalpole. The medial meniscus is stabilized by cranial and caudaltibial ligaments, an intermeniscal ligament, and a strong attach-ment to the medial collateral ligament. The lateral meniscus isless firmly attached via cranial and caudal tibial ligaments, anintermeniscal ligament, and a caudal femoral ligament. Themenisci move slightly while the stifle joint moves through itsranges of motion, but because of the presence of more synovialattachment, the caudal tibial ligament, and the lack of a femoralattachment, the medial meniscus moves less than the lateraland therefore may be more predisposed to injury in a cranialcruciate deficient stifle.2 Once the cranial cruciate ligament isdisrupted, cranial displacement of the tibia acts to wedge theposterior horn of the medial meniscus between the tibial plateauand the femoral condyle.3 Repetitive entrapment between thefemoral condyle and tibial plateau results in meniscal injury
(particularly to the caudal pole), and increases the likelihood ofdegenerative joint disease and stifle dysfunction. The medialmeniscus has been reported to be damaged in 47% to 80% ofcranial cruciate deficient stifles and around 14% of previouslyrepaired cranial cruciate deficient stifles.4,5
EQUIPMENT• Standard surgical pack, one medium or large Gelpi retractor
(depending on the size of the dog), baby Hohmann retractor,baby Ochsner forceps, and a no. 11 or 15 blade for jointinspection and cruciate ligament and meniscal débridementor excision
PREPARATION AND POSITIONINGPrepare the leg circumferentially from dorsal midline to belowthe tarsus. Use a hanging leg preparation with the dog in dorsalrecumbency at the end of the surgery table to allow for maximalmanipulation and visualization of the stifle joint during surgery.
PROCEDUREApproach: Incise the skin and subcutaneous tissue in a curvi-linear fashion on the craniolateral aspect of the stifle. Centerthe middle third of the incision on the patellar tendon. Reflectthe skin and subcutaneous tissue medially and laterally withblunt dissection.
Arthrotomy: Perform a medial arthrotomy, and incise thejoint capsule from the cupula to the tibial plateau to expose thejoint. Luxate the patella and flex the limb. Examine the cruciateligaments and menisci to check for tears and excise/débride asnecessary. To débride the injured cruciate ligament, use a no. 11blade and incise the origins of the ligament within the inter-condylar notch of the caudomedial portion of the lateralcondyle (Plate 23A). Take care not to injure the caudal cruciateligaments where they cross each other near attachments in theintercondylar fossa of the femur.
68 PART ONE • SURGICAL PROCEDURES FOR JOINT DISEASES
Continued

CH A P T E R 23 MENISCECTOMY 69
PLATE 23
A
Cranialcruciateligament
Medialmeniscus
Cut 1 Cut 2
Cut 3
Meniscectomy: Using a baby Hohmann retractor, leverthe tibial plateau forward by placing the tip of the instrumentbehind the tibial plateau while holding the stifle at a normalstanding angle (Plate 23B). Avoid excessive flexion of the joint,because it will close the joint space and limit visualization ofthe menisci. Inspect both the medial and lateral menisci fortears or crushing injury (see Plate 23B). If only the caudal poleis affected, perform a partial meniscectomy. Grasp the damageportion of the meniscus firmly with Ochsner forceps and placecranial traction on the damaged pole. Incise the caudal menis-cotibial ligament to release the caudal pole with a number 11 or15 blade (Plate 23C1). Next release the synovium and collateralattachments (if performing a medial meniscectomy) of the bodyuntil healthy fibrocartilage is reached and cut perpendicularlyacross the body of the meniscus to remove the caudal pole(Plate 23C2). If the entire meniscus is damaged, perform a com-plete meniscotomy. Incise the intermeniscal and cranial tibialattachments of the cranial pole (Plate 23D1). Release the synovium and collateral attachments (if present) while placinglateral traction on the cranial pole of the meniscus with anOchsner forceps. Finally, incise the caudal meniscotibial liga-ment to release the caudal pole and remove the meniscus (Plate 23D2).
Lavage and close the joint in one or two layers, making sureto appose the synovial layer with either method. Stabilize thejoint with either an extracapsular or intercapsular method toprevent further injury.
CAUTIONSMeniscectomy should not be performed unless there ismeniscal pathology present, because either partial or completemeniscectomy results in the progression of degenerative jointdisease.
POSTOPERATIVE EVALUATION6
The range of motion should be evaluated and the stifle shouldbe checked for cranial drawer before the patient awakens. It isnot necessary to radiograph the stifle to assess implant posi-tioning and joint congruency.
POSTOPERATIVE CAREThe leg should be placed in a soft, padded bandage for 24 hoursto cover the wound and provide support. Therapeutic exerciseand rehabilitation should be strongly considered for the first 4to 6 weeks. Then normal activity should be slowly reintroduced.
EXPECTED OUTCOME7,8
A guarded prognosis for full return to function is the generalrule when meniscal damage is present, because degenerativejoint disease is a common sequela. Aggressive postoperativerehabilitation has been shown to improve the function in thecase of dogs with meniscal damage.
References1. Flo GL: Meniscal injuries. Vet Clin North Am Small Anim Pract
23(4):831–843, 1993.2. Arnoczky SP: Pathomechanics of cruciate and meniscal injuries. In
Bojrab MJ: Disease Mechanisms in Small Animal Surgery.Philadelphia, Lea & Febiger, 1993.
3. Aglietti P, Zaccherotti G, De Biase P, et al: A comparison betweenmedial meniscus repair, partial meniscectomy, and normal meniscusin anterior cruciate ligament reconstructed knees. Clin Orthop(307):165–173, 1994.
4. Metelman LA, Schwarz PD, Salman M, Alvis MR: An evaluation ofthree different cranial cruciate ligament surgical stabilization procedures as they relate to postoperative meniscal injuries: A retrospective study of 665 stifles. Vet Comp Orthop Traumatol8(2):118–123, 1995.
5. Timmermann C, Meyer-Lindenberg A, Nolte I: Meniscus injuries indogs with rupture of the cruciate ligament. Dtsch TierarztlWochenschr 105(10):374–377, 1998.
6. Stork CK, Gibson NR, Owen MR, et al: Radiographic features of alateral extracapsular wire suture in the canine cranial cruciatedeficient stifle. J Small Anim Pract 42:487–490, 2001.
7. Innes JF, Bacon D, Lynch C, et al: Long-term outcome of surgery fordogs with cranial cruciate ligament deficiency. Vet Rec147(12):325–328, 2000.
8. Marsolais GS, Dvorak G, Conzemius MG: Effects of postoperativerehabilitation on limb function after cranial cruciate ligament repairin dogs. J Am Vet Med Assoc 220(9):1325–1330, 2002.
70 PART ONE • SURGICAL PROCEDURES FOR JOINT DISEASES

CH A P T E R 23 MENISCECTOMY 71
PLATE 23
B
D1 D2
C1 C2

STIFLE
CHAPTER 24 Stifle ArthrodesisINDICATIONSCandidates include animals with unreconstructable joint frac-tures, stifle luxation, or severe osteoarthritis. Other candidateshave grade 4 patellar luxations that have not responded to conventional treatment.1,2
OBJECTIVES• To fuse the bones of the femoral tibial joint in a functional
position
ANATOMIC CONSIDERATIONSThe landmarks for the incision are the distal femoral diaphysis,the patella, the tibial tuberosity, and the proximal tibial diaphysis. The tibial tuberosity is osteotomized to gain jointexposure and to provide a flat surface for the plate.
EQUIPMENT• Surgical pack, Senn retractors, Hohmann retractors, Gelpi
retractors, periosteal elevator, oscillating saw, self-centeringplate-holding forceps, high-speed drill, wire driver and burrs,Kirschner wires, wire cutters, plating equipment
PREPARATION AND POSITIONINGPrepare the rear limb circumferentially from dorsal midline tothe hock. Position the animal in dorsal recumbency. Drape thelimb out from a hanging position to allow maximal manipulationduring surgery. A cancellous bone graft is not needed because ofthe large cancellous bone contact surfaces at the arthrodesis site.
PROCEDUREApproach: Incise the skin and subcutaneous tissue over thecraniolateral aspect of the stifle, extending from the mid-diaphysisof the femur to the mid-diaphysis of the tibia. Incise the lateralretinaculum, and retract the quadriceps muscle and patella medi-ally to expose the distal femur. Elevate the cranial tibial muscleto expose the proximal tibia. Osteotomize the tibial tuberosity toaid exposure of the joint and to prepare a surface for the plate.Excise the menisci and cruciate ligaments. Preserve the col-lateral ligaments to aid in maintaining alignment (Plate 24A).1
Alignment: Predetermine the cranial caudal angle for thestifle arthrodesis by observing the normal standing angle of thestifle in the individual patient. Consider adding 10 degrees tothe normal angle in large dogs and 5 degrees to the normal anglein small dogs and cats to compensate for the bone loss duringthe procedure. Commonly, the angle is 135 to 140 degrees fordogs and 120 to 124 degrees for cats (Plate 24B).1
Stabilization: To determine the ostectomy angles, placethree Kirschner wires as follows: Place the first Kirschner wireperpendicular to the tibial diaphysis and in the midsaggitalplane. Place the second wire perpendicular to the femoral dia-physis and in the midsaggital plane. Place a third wire into thefemur distal to the second wire and at the complementary angle
of the selected joint angle (see Plate 24B). Resect the articularportion of the tibia parallel to wire 1 and perpendicular to thelong axis of the tibia. Resect the articular surface of the femurparallel to wire 3 and perpendicular to the long axis of thefemur (see Plate 24B). Appose the femoral and tibial ostectomysurfaces and temporarily fix them with Kirschner wires (Plate24C). Ensure that the guiding Kirschner wires are in the sameplane to preserve rotational alignment. Remove the guidingKirschner wires. Resect the trochlear ridges to improve platecontact (see Plate 24B). Apply a plate of appropriate size andcontour, allowing at least four screws in the femur and fourscrews in the tibia. Secure the plate by first placing screwsthrough the most distal and most proximal plate holes (seePlate 24C). If possible, place one or two screws as lag screwsacross the joint. Fill the remaining plate holes. Remove the sta-bilizing Kirschner wires. Attach the tibial tuberosity to themedial surface of the tibia with a lag screw (Plate 24D).1
CAUTIONSAvoid angling the saw blade medially or laterally when per-forming the tibial and femoral articular ostectomies. Checkangular and rotational alignment of the limb carefully beforesecuring the plate.
POSTOPERATIVE EVALUATIONThe axial alignment of the limb and the angle of the arthrodesisshould be critically observed. Radiographs for limb alignmentand implant placement should be evaluated.
POSTOPERATIVE CAREA soft, padded bandage should be placed to control bleedingand swelling. A lateral splint should be used for 6 weeks or untilearly radiographic evidence of bone bridging is observed.Radiographs should be repeated at 6-week intervals until bonehealing occurs. The animal should be confined, with activitylimited to leash walks, until bone healing is complete. The platemay be removed 6 to 9 months after bone healing to avoid stressconcentration at the distal plate end.
EXPECTED OUTCOMEThe bone usually heals in 12 to 18 weeks. For most pet animals,satisfactory function of the treated limb is seen; however, circumduction of the limb and toe knuckling may occur atfaster gaits. Results are best when the correct angle for fusion isachieved. Fracture may occur in the tibia at the end of the plate.
References1. McLaughlin RM: Arthrodesis. In Brinker WO, Olmstead ML, Sumner-
Smith G, et al (eds): Manual of Internal Fixation in Small Animals.New York, Springer-Verlag, 1998.
2. Johnson KA: Arthrodesis. In Olmstead ML (ed): Small AnimalOrthopedics. St. Louis, Mosby, 1995.
72 PART ONE • SURGICAL PROCEDURES FOR JOINT DISEASES

CH A P T E R 24 STIFLE ARTHRODESIS 73
PLATE 24
BA
DC
140°
40°
1
2
3
Patella
Osteotomysite
Lateral collateralligament
Long digitalextensor tendon
Cranial tibial muscleretracted

TARSUS
CHAPTER 25 Achilles Tendon Repair
INDICATIONSCandidates include animals with partial or complete rupture ofthe Achilles or calcanean tendon.
OBJECTIVES• To restore normal weight bearing and limb function and
eliminate the plantigrade stance associated with the injury
ANATOMIC CONSIDERATIONS1–4
The Achilles tendon (AT) is the largest tendon complex in thedog. It consists of the combined tendinous insertion of five sep-arate muscles: (1) the gastrocnemius, (2) the superficial digitalflexor, and (3–5) the combined tendon of the biceps femoris,the semitendinosus, and the gracilis. Tendon injuries may beclassified into three general types. Type 1 involves a completedisruption of the tendon apparatus. On physical examination,the hock may be fully flexed, with no tension placed on theAchilles mechanism. Dogs with this injury have a characteristicplantigrade stance, with the metatarsals and digits lying flat onthe floor. Type 2 involves a lengthened AT system. Three sub-classifications of this category are recognized: (1) type 2a is amusculotendinous rupture; (2) type 2b is an AT rupture with anintact paratenon or tendon sheath; and (3) type 2c is partial ATrupture, with an intact superficial digital flexor tendon. Dogsthat have a type 2c AT injury display a characteristic “crab-like”stance, with a hyperflexed tarsus with contracture of the toes.The superficial digital flexor tendon is placed under consider-able tension with partial disruption of the AT, which pulls on itsinsertions on the palmar surface of the proximal end of themiddle phalanges of digits II, III, IV, and V, contracting the toes.
In type 3 injuries, the AT is intact but inflamed. AT injuries maybe acute or chronic in duration. Type 2 injuries are morecommon than full AT tears (i.e., type 1). Chronic injuries aretechnically more difficult to repair because tendon contractureand fibrosis hamper identification and apposition.
EQUIPMENT• Surgical pack, Gelpi retractors or Senn retractors, pointed
reduction forceps, Kirschner wires or small Steinmann pinsfor large dogs, pin chuck or high-speed wire driver, cerclagewire, snub-nosed wire twisters, wire cutter, heavy-gaugemonofilament nonabsorbable suture for tendon repair,external skeletal fixation set, equipment for casting andbandage material
PREPARATION AND POSITIONINGPrepare the leg circumferentially from dorsal midline to thephalanges. Use a hanging leg preparation, with the dog in dorsalrecumbency at the end of the surgery table to allow for maximalmanipulation and visualization of the stifle joint during surgery.
PROCEDUREApproach:5 With the tarsus extended, incise the skin 3 cm to4 cm proximal to the injury on the caudolateral aspect of thecommon calcanean tendon to the level of the fourth tarsal bone(Plate 25A). Reflect the skin and subcutaneous tissue to exposethe deep fascia. Incise the deep fascia and lateral retinaculumalong the lateral border of the superficial digital tendon,exposing the injured AT apparatus. Extend the incision proxi-mally as needed to expose the injured tendon.
74 PART ONE • SURGICAL PROCEDURES FOR JOINT DISEASES
Continued

CH A P T E R 25 ACHILLES TENDON REPAIR 75
PLATE 25
A
Calcaneus
Tendon ofabductor digitiquinti muscle
Tendon of superficialflexor muscle
Tendon of gastrocnemiusmuscle
Tendon of flexor hallucislongus muscle

Acute Midsubstance Tendon Repair: Identify thethree separate tendons and attempt apposition. Using amonofilament nonabsorbable suture (0 to 1 for large dogs; 2-0 –to 3-0 for cats and small dogs), suture each tendon separatelyusing a three-loop pulley pattern with the tarsus in extension(Plate 25B). Make the first two passes with the needle from near to far, and orient the third and fourth passes 120 degreesfrom the previous two sutures and in the middle. Redirect the final fifth and sixth passes 120 degrees, and place them farto near.
Chronic Midsubstance Tendon Repair: Ideally, thefibrotic scar should be sharply resected until normal tendon isidentified. Most often, however, this is not possible because oftendon retraction and contracture. Resect as much scar tissueas possible to permit apposition of the tendon ends. Becausethe individual tendons will probably be undistinguishable in thefibrotic scar, the AT apparatus is repaired using a single locking-loop pattern.
Avulsed Achilles Tendon Repair:6 Sharply débride theAT using a scalpel blade or Mayo scissors. Using a Jacob chuckor mini-driver, create a bone tunnel from lateral to medial ofsufficient size to pass the suture through. Place the suturethrough the bone tunnel using a straight needle or bent pin(Plate 25C). Secure the tendon to the calcaneus using a locking-loop suture pattern.
Fracture of the Calcaneal Bone: Fracture of the cal-caneus is treated with a tension band wire (Plate 25D). SeeChapter 81 for details.
CAUTIONS1,7
Débridement of the AT should be performed in a stepwisefashion. Excessive resection will prevent apposition of thetendon ends and complicate recovery. Tarsal immobilizationand support is critical to wound healing and to preventing catastrophic failure of the AT repair. External coaptation (i.e.,lateral splints or bivalved casts) or transarticular fixationshould be placed with the tarsus in a slightly extended butweight-bearing position.
POSTOPERATIVE EVALUATION3
Radiographs are not necessary unless a tension band or transar-ticular fixator is placed. Ultrasound can be used to monitortendon healing. Full healing and reorganization of the AT is aslow process that may go on for years.
POSTOPERATIVE CARE7
External coaptation or transarticular fixation is necessary toprotect the repair for the first 6 to 8 weeks. Exercise should berestricted until the tendon heals. Then the animal should slowlybe returned to normal activity.
EXPECTED OUTCOME7
The expectation for return to full athletic ability is guarded;however, most animals will be able to function very well aspets. Tarsal arthrodesis may be employed if, despite repair, painand dysfunction persist.
References1. Moreshead D, Leeds EB: Kirschner-Ehmer apparatus immobilization
following Achilles tendon repair in six dogs. Vet Surg 13(1):11–14,1984.
2. Meutstege FG: The classification of canine Achilles tendon lesions.Vet Comp Orthop Traumatol 6:53–55, 1993.
3. Kramer M, Gerwing M, Michele U, et al: Ultrasonographic examina-tion of injuries to the Achilles tendon in dogs and cats. J Small AnimPract 42:531–535, 2001.
4. Rivers BJ, Walters PA, Kramek B, Wallace L: Sonographic findings in canine common calcaneal tendon injury. Vet Comp OrthopTraumatol 10:45–53, 1997.
5. Piermattei DL, Johnson KA: Approach to the calcaneus. In An Atlasof Surgical Approaches to the Bones and Joints of the Dog and Cat,4th ed. Philadelphia, WB Saunders, 2004.
6. Guerin S, Burbidge H, Firth E, Fox S: Achilles tenorrhaphy in fivedogs: A modified surgical technique and evaluation of a cranial halfcast. Vet Comp Orthop Traumatol 11:205–211, 1998.
7. de Haan JJ, Goring RL, Renburg C, Bertrand S: Modified transartic-ular external skeletal fixation for support of Achilles tenorrhaphy infour dogs. Vet Comp Orthop Traumatol 8:32–35, 1995.
76 PART ONE • SURGICAL PROCEDURES FOR JOINT DISEASES

CH A P T E R 25 ACHILLES TENDON REPAIR 77
PLATE 25
Three-loop pulley repair Locking-loop repair Pin and tension band repair
BMidsubstance
CAvulsion
DFracture of calcaneal bone

TARSUS
CHAPTER 26 Shearing Injury with Tarsal LuxationINDICATIONSCandidates include animals with shearing wounds to the tarsussustained from motor vehicle trauma.
OBJECTIVES• To restore stability to the tarsal joint and salvage joint func-
tion while allowing soft tissue healing to occur
ANATOMIC CONSIDERATIONS1,2
The tarsus is composed of six separate anatomic joints: (1) thetalocrural or tarsocrural joint, (2) the talocalcaneal joint, (3) the talocalcaneocentral joint, (4) the calcaneoquartal joint, (5) the centrodistal joint intertarsal joint, and (6) the tarsometatarsal joint. Functionally, however, the joint can beseparated into four compartments: (1) the talocrural, (2) theproximal intertarsal joint (consisting of the calcaneoquartal andthe talcalcaneocentral joint), (3) the distal intertarsal joint (cen-trodistal joint), and (4) the tarsometatarsal joint. The majorityof movement of the tarsus is at the talocrural joint, between thetibia and talus. Joint stability is provided by the medial and lat-eral collateral ligaments, which are composed of long and shortcomponents originating on the malleoli of the tibia and fibula,respectively. The long component of the medial collateral liga-ment inserts on the proximal portion of the second metatarsus,whereas the short component attaches to the talus. The longcomponent of the lateral collateral inserts on the proximalaspect of the fifth metatarsal, and the short component attachesto the body of the calcaneus. Injury to the medial aspect of the
tarsus is more common than injury to the lateral aspect; how-ever, both have been reported in the literature.
EQUIPMENT• Surgical pack, Gelpi retractors or Senn retractors, pointed
reduction forceps, periosteal elevator, snub-nosed wiretwisters, heavy-gauge monofilament nonabsorbable fishingleader line for collateral ligament repair, high-speed drill,bone screw and washer, drill bit, tap, depth gauge, screw-driver, pin chuck and key, low-speed drill, external skeletalfixation set, equipment for casting and bandage material
PREPARATION AND POSITIONINGPrepare the leg circumferentially from dorsal midline to thephalanges. Use a hanging leg preparation with the dog in dorsalrecumbency at the end of the surgery table to allow for maxi-mal manipulation and visualization of the stifle joint during surgery.
PROCEDUREApproach:3 Center a curvilinear incision over the talocruraljoint along the medial aspect of limb, exposing the distal tibialto the level of the tarsometatarsal joint. Retract the subcuta-neous and crural fascia and expose the medial ridge of the talusby incising the joint capsule cranial to the collateral ligament. Ifthe shearing injury is extensive, removing much of the coveringsoft tissues, much of this approach may be unnecessary (Plate 26A).
78 PART ONE • SURGICAL PROCEDURES FOR JOINT DISEASES
Continued

CH A P T E R 26 SHEARING INJURY WITH TARSAL LUXATION 79
PLATE 26
A
Tendon ofcranial tibialmuscle

Prosthetic Ligament Repair:2 Drill, measure, and tapa bicortical screw hole into the distal aspect of the tibia at thelevel of the medial malleolus, being careful to avoid the jointsurface. Place a screw and washer to prevent subsidence intothe metaphyseal bone and to prevent ligature slippage. Placetwo additional screws and washers in similar fashion into thebody of the talus (aiming distally to avoid the trochlear sulcus)and into the head of the talus, which is located midway betweenthe medial trochlear ridge and the intertarsal articular surface.Depending on the size of the animal, utilize 20- to 60-pound testof monofilament fishing leader line to place two independentsuture loops for the long and short components of the medialcollateral ligament. Tie the sutures independently: tie the shortcomponent with the tarsus held in flexion and the long compo-nent with the tarsus held in extension. The sutures should betaut, but not overly tight, to avoid compromising joint range ofmotion (Plate 26B).
Prosthetic ligament repair for a lateral shearing injury is verysimilar to the medial repair just described (Plate 26C). Theproximal screw and washer is placed in the distal fibula/tibia,taking care to avoid the joint. The distal two screws andwashers are positioned in the base of the coracoid process,midway between the base of the coracoid process and the prox-imal intertarsal joint (Plate 26D).
Transarticular External Skeletal Fixation:2,4 Place atype I or II transarticular external fixator with two pins throughthe tibia (one proximal and one distal), one pin in the calca-neus, and one pin into the metatarsal bones 2 and 3. Position thetarsus in a normal standing angle and immobilize it for 6 to 8 weeks, depending on the severity of soft tissue trauma.
CAUTIONSLavage and wound débridement of the tarsus should be per-formed once the patient is stabilized. Excessive débridementshould be avoided early on, because—given the right conditionsand wound care—the soft tissue coverage, which is a premium,will survive despite extensive damage. The use of sterile wet-to-dry bandages until healthy granulation tissue is present is anexcellent way to improve wound quality without surgicaldébridement.
POSTOPERATIVE EVALUATION4
The wound should be evaluated at least daily for the first 7 to 10 days, until healthy granulation tissue is present or as tissue viability dictates. A nonadherent bandage can then be placedover the wound and the dressing changed less frequently.Radiographs should be repeated every 6 to 8 weeks until thesoft tissues heal to evaluate limb alignment, apposition of thefracture-luxation, and apparatus integrity.
POSTOPERATIVE CARE2,4,5
External coaptation or transarticular fixation is necessary inorder to protect the repair for the first 6 to 8 weeks. Exerciseshould be restricted until the fixator is removed and the soft tis-sues heal. Then the animal should slowly be returned to normalactivity.
EXPECTED OUTCOME6
There is a 75% chance of good to excellent function, despiteprogressive degenerative joint disease and restricted range ofmotion of the tarsal joint. Pantarsal arthrodesis may beemployed if pain and dysfunction persist despite repair.
References1. Benson JA, Boudrieu RA: Severe carpal and tarsal shearing injuries
treated with immediate arthrodesis in seven dogs. J Am Anim HospAssoc 38:370–380, 2002.
2. Harasen GLG: Tarsal shearing injury in the dog. Can Vet J 41:940–943, 2000.
3. Piermattei DL, Johnson KA: Approach to the medial malleolus andtalocrural joint. In An Atlas of Surgical Approaches to the Bones andJoints of the Dog and Cat, 4th ed. Philadelphia, WB Saunders, 2004.
4. Kraus KH, Toombs JP, Ness MG: Transarticular case studies. InExternal Fixation in Small Animal Practice. Blackwell Sciences,Oxford, England, 2003.
5. de Haan JJ, Goring RL, Renberg C, Bertrand S: Modified transartic-ular external skeletal fixation for support of Achilles tenorrhaphy infour dogs. Vet Comp Orthop Traumatol 8:32–35, 1995.
6. Diamond DW, Besso J, Boudrieu RA: Evaluation of joint stabilizationfor treatment of shearing injuries of the tarsus in 20 dogs. J Am AnimHosp Assoc 35:147–153, 1999.
80 PART ONE • SURGICAL PROCEDURES FOR JOINT DISEASES

CH A P T E R 26 SHEARING INJURY WITH TARSAL LUXATION 81
PLATE 26
B
C D

TARSUS
CHAPTER 27 Osteochondrosis of the LateralTrochlear Ridge of the Talus
INDICATIONSCandidates include dogs with persistent lameness and pain ofthe tarsus caused by osteochondrosis (OCD) that is not respon-sive to conservative management.
OBJECTIVES• To improve limb function by removal of the entire OCD flap,
curettage of the adjacent diseased cartilage, and forage toprovide blood supply to the exposed subchondral bone viaforage
ANATOMIC CONSIDERATIONS1–5
The tarsus is the third most common joint to be affected byOCD, with a reported incidence of 9%. Forty-four percent of the tarsal lesions are bilateral, although the typical presentingcomplaint of a dog with tarsal OCD is a unilateral lameness.Seventy-five percent of the OCD lesions of the tarsus occur onthe plantar half of the medial trochlear ridge of the talus, and25% occur on the lateral ridge. Because of the diversity of thelesion location, the surgical approach used to expose the lesionis as important as the surgical débridement and curettage. Bothmedial and lateral approaches have been described. A com-bined dorsomedial and plantaromedial approach exposes allbut 4% of the medial trochlear ridge of the talus. Similarly, acombined dorsolateral and plantarolateral approach exposesthe entire lateral trochlear ridge, with the central 20% of the lat-eral ridge being accessible from either individual approach.
EQUIPMENT• Standard surgical pack, two medium or large Gelpi retractors
(depending on the size of the dog), blunt Hohmann retractor,
bone curettes, pin chuck or high-speed wire driver, Kirschnerwires or small Steinmann pin for forage
PREPARATION AND POSITIONINGPrepare the leg circumferentially from dorsal midline to thephalanges. Use a hanging leg preparation, with the dog in dorsalrecumbency at the end of the surgery table to allow for maximalmanipulation and visualization of the tarsus during surgery.
PROCEDUREDorsolateral Approach:2,4–6 Flex and extend the tarsus toaccurately identify dorsal aspect of the lateral trochlear ridgevia palpation. Center a curvilinear 4-cm to 5-cm incision overthe trochlear ridge from the distal tibia and fibula to the distalintertarsal joint. Retract the skin and subcutaneous tissues witha Gelpi or Senn retractor to improve visualization of the ten-dons of the long digital extensor muscle, the cranial tibialmuscle, the extensor hallucis longus muscle, the dorsal branchof the lateral saphenous vein, and the superficial peroneal nerve(Plate 27A). Retract these structures laterally. Retract the tendons of the peroneus longus, the lateral digital extensor, and the peroneus brevis in a plantar direction. Incise the deepfascia and adherent joint capsule longitudinally along the mid-line of the palpable portion of the lateral trochlear ridge, pre-serving the lateral collateral ligament of the tarsus. If necessary,extend the joint capsular incision into the periosteum at thejunction of the distal tibia and fibula to increase the exposure ofthe trochlea (Plate 27B).
82 PART ONE • SURGICAL PROCEDURES FOR JOINT DISEASES
Continued

CH A P T E R 27 OSTEOCHONDROSIS OF THE LATERAL TROCHLEAR RIDGE OF THE TALUS 83
PLATE 27
Proximal extensorretinaculum
Digital extensorretinaculum
Tendon of cranialtibial muscle
Tendon of longdigital extensor musle
Tendon ofextensor hallucis
longus muscle
Tendon ofperoneus brevis muscle
Tendon of lateraldigital extensor muscle
A
B

Plantarolateral Approach:2,4–6 Flex and extend thetarsus to accurately identify the plantar aspect of the lateraltrochlear ridge of the talus via palpation. Center a curvilinear 4-cm to 5-cm incision over the plantar aspect of the trochlearridge. Retract the skin and subcutaneous tissue with a Gelpi orSenn retractor to improve visualization of the tendons of theperoneus brevis, the lateral digital extensor, and the peroneuslongus muscles (Plate 27C). Retract these structures dorsally.Retract the plantar branch of the lateral saphenous vein, and abranch of the caudal cutaneous sural nerve, in a plantar direc-tion, preserving the lateral collateral ligament. Incise the jointcapsule longitudinally along the center of the palpable portionof the lateral trochlear ridge. If necessary, extend the joint cap-sular incision into the periosteum at the junction of the distaltibia and fibula to increase the exposure of the trochlear ridge(Plate 27D).
Curettage:2–6 Remove the cartilage flap with thumb orHalstead forceps. Probe the remaining cartilage surroundingthe defect with a curette, and remove any abnormal cartilagenot adherent to the subchondral bone (see Plates 27B and 27D).
Forage: Using a small Kirschner wire or small Steinmannpin, penetrate the sclerotic subchondral bone in multiple sitesuntil it bleeds.
CAUTIONS7
Unlike the more common OCD of the medial trochlear ridge,where the lesion is generally located in the proximal region ofthe trochlear, lateral trochlear ridge lesions have been reportedto arise from both proximal and dorsal aspects of the ridge, thusnecessitating a more aggressive surgical exposure. In addition,clinical reports of lateral trochlear ridge OCD lesions describelarge, “shelf-like” lesions that may result in significant malar-ticulation, joint instability, and degenerative joint disease.
POSTOPERATIVE EVALUATIONNo specific postoperative evaluation is required. Note that jointgoniometry should be performed preoperatively to provide abaseline assessment of tarsal range of motion and function.
POSTOPERATIVE CAREThe limb should be bandaged for 2 to 3 days, depending on the degree of swelling. Exercise should be restricted for 4 to
6 weeks until the articular cartilage heals. Passive range-of-motion exercises should be performed two or three times dailyfor 5 to 10 minutes per session to maintain range of motion andto improve cartilage healing. After 4 to 6 weeks, the animalshould slowly be returned to normal activity.
EXPECTED OUTCOME5,6,8
Expected outcome is usually guarded to fair, depending onnumerous factors (e.g., unilateral versus bilateral disease,lesion size, surgical approach, and presence of degenerativejoint disease). Degenerative joint disease develops regardless ofsurgical removal of the flap, but it does not correlate with thedegree of lameness. Nonetheless, owners should be advisedthat nonsteroidal anti-inflammatory drugs may be indicated tocontrol the clinical signs of lameness and pain associated withdegenerative joint disease.
References1. Montgomery RD, Hathcock JJ, Milton JL, Fitch RB: Osteochondrosis
dissecans of the canine tarsal joint. Compend Contin Educ Pract Vet16(7):835–845, 1994.
2. Beale BS, Goring RL, Herrington J, et al: A prospective evaluation of four surgical approaches to the talus of the dog used in the treatment of osteochondritis dissecans. J Am Anim Hosp Assoc27(2):221–229, 1991.
3. Beale BS, Goring RL: Exposure of the medial and lateral trochlearridges of the talus in the dog. Part I: Dorsomedial and plantarome-dial surgical approaches to the medial trochlear ridge. J Am AnimHosp Assoc 26(1):13–18, 1990.
4. Goring RL, Beale BS: Exposure of the medial and lateral trochlearridges of the talus in the dog. Part II: Dorsolateral and plantaro-lateral surgical approaches to the lateral trochlear ridge. J Am AnimHosp Assoc 26(1):19–24, 1990.
5. Fitch R, Beale BS: Osteochondrosis of the canine tibiotarsal joint.Vet Clin North Am Small Anim Pract 28(1):95–113, 1998.
6. Smith M, Vasseur P, Morgan J: Clinical evaluation of dogs after surgical and nonsurgical management of osteochondritis dissecansof the talus. J Am Vet Med Assoc 187(1):31–35, 1985.
7. Wisner ER, Berry CR, Morgan JP, et al: Osteochondrosis of the lateral trochlear ridge of the talus in seven Rottweiler dogs. Vet Surg19(6):435–439, 1990.
8. Diamond DW, Besso J, Boudrieu RA: Evaluation of joint stabilizationfor treatment of shearing injuries of the tarsus in 20 dogs. J Am AnimHosp Assoc 35:147–153, 1999.
84 PART ONE • SURGICAL PROCEDURES FOR JOINT DISEASES

CH A P T E R 27 OSTEOCHONDROSIS OF THE LATERAL TROCHLEAR RIDGE OF THE TALUS 85
PLATE 27
Tendon ofperoneus brevis muscle
Tendon of lateraldigital extensor muscle
Calcaneus
Tendon of abductordigiti quinti muscle
Tendon ofperoneus
longus muscle
Tendon of flexorhallucis longus muscle
C D

TARSUS
CHAPTER 28 Osteochondrosis of the MedialTrochlear Ridge of the Talus
INDICATIONS1
Candidates include dogs with persistent lameness and pain ofthe tarsus caused by osteochondrosis (OCD) of the medialtrochlear ridge that is not responsive to conservative manage-ment. The most common location of OCD of the medialtrochlear ridge is the plantar aspect, which accounts for morethan 80% of all medial trochlear lesions.
OBJECTIVES• To improve limb function by removal of the entire OCD flap,
curettage of the adjacent diseased cartilage, and forage toprovide blood supply to the exposed subchondral bone
ANATOMIC CONSIDERATIONS1–5
Surgical exposure of the tarsus can be achieved through avariety of surgical approaches. The plantaromedial approach isthe most commonly used surgical approach, because it exposes40% of the plantar aspect of the medial trochlear ridge, which isthe most common site of OCD in the tarsus.
EQUIPMENT• Standard surgical pack, two medium or large Gelpi retractors
(depending on the size of the dog), blunt Hohmann retractor,bone curettes, pin chuck or high-speed wire driver, Kirschnerwires or small Steinmann pin for forage
PREPARATION AND POSITIONINGPrepare the leg circumferentially from dorsal midline to thephalanges. Use a hanging leg preparation with the dog in dorsalrecumbency at the end of the surgery table to allow for maximalmanipulation and visualization of the tarsus during surgery.
PROCEDUREDorsomedial Approach:1–6 Flex and extend the tarsus toaccurately identify the dorsal aspect of the medial trochlearridge via palpation. Center a curvilinear 4-cm to 5-cm incisionover the trochlear ridge, from the distal tibia and fibula to thedistal intertarsal joint. Retract the skin and subcutaneous tis-sues with a Gelpi or Senn retractor (Plate 28A). Preserve thedistal extensor retinaculum, and laterally retract the tendon ofthe cranial tibial muscle, the saphenous nerve, the cranial tibialartery and vein, and the dorsal branches of the saphenousartery and vein. Preserve the medial collateral ligament, andlongitudinally incise the deep fascia and adherent joint capsulealong the palpable midportion of the medial trochlear ridge. Ifnecessary, extend the joint capsular incision into the perios-teum at the junction of the distal tibia and fibula to increase theexposure of the trochlea (Plate 28B).
86 PART ONE • SURGICAL PROCEDURES FOR JOINT DISEASES
Continued
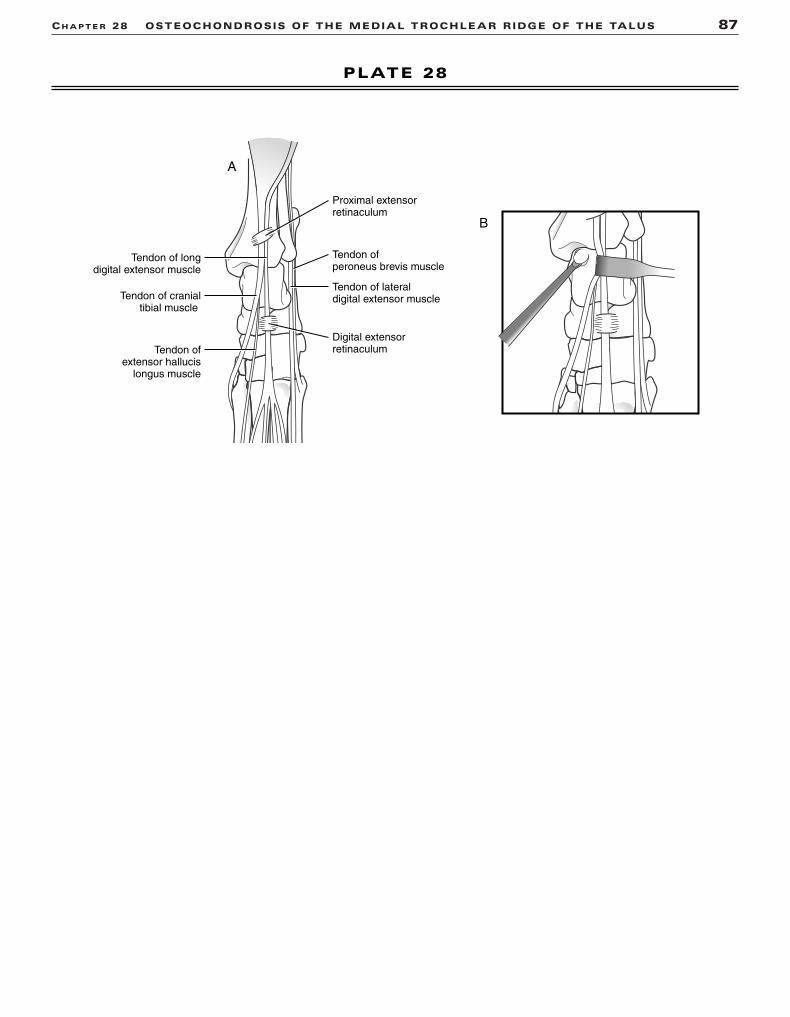
CH A P T E R 28 OSTEOCHONDROSIS OF THE MEDIAL TROCHLEAR RIDGE OF THE TALUS 87
PLATE 28
Proximal extensorretinaculum
Digital extensorretinaculum
Tendon of cranialtibial muscle
Tendon of longdigital extensor muscle
Tendon ofextensor hallucis
longus muscle
Tendon ofperoneus brevis muscle
Tendon of lateraldigital extensor muscle
A
B

Plantaromedial Approach:1,3,5,6 Flex and extend thetarsus to accurately identify the plantar aspect of the medialtrochlear ridge of the talus via palpation. Center a curvilinear 4-cm to 5-cm incision over the plantar aspect of the trochlearridge. Retract the skin and subcutaneous tissue with a Gelpi orSenn retractor to improve visualization of the tendons of themedial head of the deep digital flexor muscle, the distal attach-ment of the caudal tibial muscle, the flexor hallucis longusmuscle, and the medial collateral ligament (Plate 28C). Retractthe medial head of the deep digital flexor muscle and the caudaltibial tendon dorsally; and laterally retract the flexor hallucislongus, the tibial nerve with its superficial branch, the plantarbranches of the medial saphenous vein and saphenous artery,and superficial plantar metatarsal vein. Taking care to preservethe medial collateral ligament, incise the joint capsule longitu-dinally along the center of the palpable portion of the medialtrochlear ridge. If necessary, extend the joint capsular incisioninto the periosteum at the junction of the distal tibia and fibulato increase the exposure of the trochlear ridge (Plate 28D).
Curettage:1,3–6 Remove the cartilage flap with thumb orHalstead forceps. Probe the remaining cartilage surroundingthe defect with a curette, and remove any abnormal cartilagenot adherent to the subchondral bone (see Plates 28B and 28D).
Forage: Using a small Kirschner wire or small Steinmannpin, penetrate the sclerotic subchondral bone in multiple sitesuntil it bleeds.
CAUTIONS1,7,8
Excellent radiographic technique and positioning is necessaryto diagnose OCD lesions within the tarsus. Standard antero-posterior and lateral views of the tarsus provide good visualiza-tion of the plantar aspect of the medial trochlear ridge, but additional views may be necessary to fully evaluate the joint.The dorsolateral-plantaromedial oblique projection providesgood visualization of the medial trochlear ridge; the dorso-medial-plantarolateral oblique projection highlights the lateraltrochlear ridge; and the flexed dorsoplantar projection profilesthe central region of both trochlear ridges. Computed tomog-raphy and magnetic resonance imaging also provide additionalinformation; however, expense and limited access prohibit theirwidespread use. Owners should be advised that the nature ofthe surgical procedure is exploratory and that a negativeexploratory is possible and is necessary to rule out OCD.Arthroscopy has greatly improved tarsal joint access and visu-alization, but it does not completely eliminate the necessity ofarthrotomy because of the difficulty of lesion location and treatment.
POSTOPERATIVE EVALUATIONNo specific postoperative evaluation is required. Note that jointgoniometry should be performed preoperatively in order to
provide a baseline assessment of tarsal range of motion andfunction.
POSTOPERATIVE CAREThe limb should be bandaged for 2 to 3 days, depending on thedegree of swelling. Exercise should be restricted for 4 to 6 weeks, until the articular cartilage heals. Passive range-of-motion exercises should be performed two or three times dailyfor 5 to 10 minutes per session to maintain range of motion andto improve cartilage healing. After 4 to 6 weeks, the animalshould slowly be returned to normal activity.
EXPECTED OUTCOME1,6,9
Expected outcome is guarded to fair. Most dogs seem to benefitfrom early surgical removal of the OCD flap. A decreased suc-cess rate has been reported for dogs older than 12 monthsbecause of the progression of degenerative joint disease.Débridement and curettage should be kept to a minimum toavoid tarsal instability and joint incongruency.
References1. Fitch R, Beale BS: Osteochondrosis of the canine tibiotarsal joint.
Vet Clin North Am Small Anim Pract 28(1):95–113, 1998.2. Montgomery RD, Hathcock JT, Milton JL, Fitch RB: Osteo-
chondrosis dissecans of the canine tarsal joint. Compend ContinEduc Pract Vet 16(7):835–845, 1994.
3. Beale BS, Goring RL, Herrington J, et al: A prospective evaluation offour surgical approaches to the talus of the dog used in the treat-ment of osteochondritis dissecans. J Am Anim Hosp Assoc 27(2):221–229, 1991.
4. Beale BS, Goring RL: Exposure of the medial and lateral trochlearridges of the talus in the dog. Part I: Dorsomedial and plantarome-dial surgical approaches to the medial trochlear ridge. J Am AnimHosp Assoc 26(1):13–18, 1990.
5. Goring RL, Beale BS: Exposure of the medial and lateral trochlearridges of the talus in the dog. Part II: Dorsolateral and plantarolat-eral surgical approaches to the lateral trochlear ridge. J Am AnimHosp Assoc 26(1):19–24, 1990.
6. Smith M, Vasseur P, Morgan J: Clinical evaluation of dogs after sur-gical and nonsurgical management of osteochondritis dissecans ofthe talus. J Am Vet Med Assoc 187(1):31–35, 1985.
7. Wisner ER, Berry CR, Morgan JP, et al: Osteochondrosis of the lat-eral trochlear ridge of the talus in seven rottweiler dogs. Vet Surg19(6):435–439, 1990.
8. Miyabayashi T, Biller DS, Manley PA, et al: Use of a flexed dorso-plantar radiographic view of the talocrural joint to evaluate lame-ness in two dogs. J Am Vet Med Assoc 199(5):598–600, 1991.
9. Diamond DW, Besso J, Boudrieu RA: Evaluation of joint stabilizationfor treatment of shearing injuries of the tarsus in 20 dogs. J Am AnimHosp Assoc 35:147–153, 1999.
88 PART ONE • SURGICAL PROCEDURES FOR JOINT DISEASES

CH A P T E R 28 OSTEOCHONDROSIS OF THE MEDIAL TROCHLEAR RIDGE OF THE TALUS 89
PLATE 28
Tendon of longdigital flexor muscle(deep digital flexor,
medial head)
Tendon of caudaltibial muscle
Medial collateral ligament:Short partLong part
Tendon of flexorhallucis longus muscle
(deep digital flexor,lateral head)
CD

TARSUS
CHAPTER 29 Pantarsal ArthrodesisINDICATIONSCandidates include animals with severe injury (e.g., fracture,luxation, or shearing injury) of the tibial cochlea and condylesof the talus that precludes maintaining a long-term, pain-freearticulation; animals with painful degenerative joint diseasethat is not responsive to conservative measures; and animalswith irreparable Achilles tendon injury and sciatic nerve palsytreated with tendon transfer.1
OBJECTIVES• To fuse the bones of the tarsocrural, intertarsal, and tar-
sometatarsal joints in a functional position
ANATOMIC CONSIDERATIONSThe tarsus consists of the tibia, fibula, proximal tarsal, distaltarsal, and metatarsal bones, forming the tarsocrural, intertarsal,and tarsometatarsal joints. The tarsocrural joint is formed bythe fibula and cochlea of the tibia proximally, and by the talusand calcaneus distally. The intertarsal joints are formed byarticulations between the tarsal bones, and the tarsometatarsaljoints are formed by the articulations between the distal tarsaland metatarsal bones.
EQUIPMENT• Surgical pack, Senn retractors, Hohmann retractors, Gelpi
retractors, periosteal elevator, self-centering plate-holdingforceps, bone curette, high-speed drill and burrs, platingequipment
PREPARATION AND POSITIONINGPrepare the rear limb circumferentially from hip to digits.Position the animal in dorsal recumbency for greater flexi-bility. Drape the limb out from a hanging position to allow maximal manipulation during surgery. Prepare the ipsilateralproximal tibia or proximal humerus for cancellous bone graftharvest.
PROCEDUREApproach: Incise skin and soft tissue over the cranial medialsurface of the joint, from the distal third of the tibia to themiddle of the metatarsal bones. Elevate and retract the cranialtibial and long digital extensor tendons to expose the distaltibia, the tarsus, and the proximal third of the metatarsal bone.If necessary, transect the cranial tibial tendon and the medialcollateral ligament to gain access to the joint. Enter the tarsaljoints to expose the articular surfaces (Plate 29A).1
Alignment: Predetermine the cranial caudal angle for thepantarsal arthrodesis by observing the normal standing angle ofthe tarsus in the individual patient. The angle is commonlybetween 135 and 145 degrees1 (see Plate 29C).
Stabilization: Extend the hock and remove the articularcartilage from the talocrural, intertarsal, and tarsometatarsaljoint surfaces with a bone curette or high-speed burr, followingthe contours of the bone ends (see Plate 29A). Harvest cancel-lous bone, and place the graft within the prepared joints (Plate29B). Place an appropriate-size bone plate, precontoured toprovide the selected joint angle, on the cranial surface of thetibia, the talus, the central tarsal bone, and the third metatarsalbone (see Plates 29B and 29C). Position the acute bend in theplate over the neck of the talus. Ensure adequate plate holes fora minimum of three screws in the tibia and three screws in themetatarsal bone. Mark the level of the distal metatarsal platescrew. Remove the plate, and center the drill on the metatarsalbone. Secure the plate with three screws in the metatarsal bone,check the plate and joint alignment, and secure the plate to thetibia (see Plate 29B). Fill the remaining plate holes. Ensure thatat least two plate screws penetrate the calcaneus to secure thejoint1 (see Plate 29C).
CAUTIONSAll articular cartilage must be removed. Angular and rotationalalignment of the limb should be checked carefully before theplate is secured to the tibia.
POSTOPERATIVE EVALUATIONThe axial alignment of the limb and the angle of the arthrodesisshould be critically observed. Radiographs should be evaluatedfor limb alignment and implant placement.
POSTOPERATIVE CAREA soft, padded bandage should be placed to control bleedingand swelling. A bivalve cast should be used for 6 weeks or untilearly radiographic evidence of bone bridging is observed.Radiographs should be repeated at 6-week intervals until bonehealing occurs. The animal should be confined, with activitylimited to leash walks until bone healing is complete. Implantsare generally removed after 6 to 12 months to avoid soft tissue irritation and the common sequella of implant loosening.2
EXPECTED OUTCOMEBone healing is expected in 12 to 18 weeks. The animal shouldhave acceptable function of the treated limb, as long as stifleand hip remain free of disease.
References1. Johnson KA: Arthrodesis. In Olmstead ML (ed): Small Animal
Orthopedics. St. Louis, Mosby, 1995.2. DeCamp CE, Martinez SA, Johnston SA: Pantarsal arthrodesis in
dogs and a cat: 11 cases (1983–1991). J Am Vet Med Assoc 203:1705, 1993.
90 PART ONE • SURGICAL PROCEDURES FOR JOINT DISEASES

CH A P T E R 29 PANTARSAL ARTHRODESIS 91
PLATE 29
C
B
ACranialtibial muscle
Long digitalextensor tendon
140°
Talus
Tibia
Centraltarsalbone
TARSUS
CHAPTER 30 Proximal Intertarsal or Tarsometatarsal Arthrodesis with a Plate
INDICATIONSCandidates include animals with severe injury (e.g., fracture,luxation, or shearing injury) of the proximal intertarsal or tarsometatarsal joint.1
OBJECTIVES• To fuse the bones of the proximal intertarsal, the tar-
sometatarsal joints, or both in a functional position
ANATOMIC CONSIDERATIONSThe intertarsal joints are formed by articulations between thetarsal bones. The proximal intertarsal joint is a combination ofthe talocalcaneocentral joint, formed by the articulation of thetalus and central tarsal bone with a continuous joint capsulewith the calcaneus, and the calcaneoquartal joint, locatedbetween the calcaneus and the fourth tarsal bone. The tar-sometatarsal joints are formed by the articulations between thedistal tarsal and metatarsal bones.
EQUIPMENT• Surgical pack, Senn retractors, Hohmann retractors, Gelpi
retractors, periosteal elevator, self-centering plate-holdingforceps, bone curette, high-speed drill and burrs, platingequipment
PREPARATION AND POSITIONINGPrepare the rear limb circumferentially from hip to digits.Position the animal in dorsal recumbency for greater flexibility.Drape the limb out from a hanging position to allow maximalmanipulation during surgery. Prepare the ipsilateral proximaltibia or proximal humerus for cancellous bone graft harvest.
PROCEDUREApproach: Incise the skin, subcutaneous tissue, and deepcrural fascia over the lateral surface of the tarsometatarsaljoint. Retract the superficial and deep digital flexor tendonsmedially, and elevate the abductor digiti quinti muscle toexpose the calcaneus, fourth tarsal bone, and the base of thefifth metatarsal bone. Enter the affected joint(s) to expose thearticular surfaces (Plate 30A).
Alignment: There is no angle to the partial tarsalarthrodesis. Use a straight plate to align the bones.
Stabilization: Stress the paw medially, and remove thearticular cartilage from the calcaneoquartal and/or tar-sometatarsal joints with a bone curette or high-speed burr, following the contours of the bone ends. Harvest and place thecancellous bone within the prepared joints. Smooth the base
of the fifth metatarsal bone, and a portion of the fourth tarsalbone, with the oscillating saw to provide a smooth surface for the plate (Plate 30B). Place an appropriate-size and appropriate-contour plate on the lateral surfaces of the calca-neus, the fourth tarsal bone, and the fifth metatarsal bone.Position the plate with three screw holes over the calcaneusand three screw holes over the metatarsal bones. Place a screwthrough the proximal plate hole into the calcaneus. Check theplate position, and place a screw through the distal plate holeinto metatarsal bones 4 and 5. Fill the remaining plate holes.Ensure that the distal screw into the calcaneus also secures thetalus (Plate 30C).1
CAUTIONSAll articular cartilage must be removed. Rotational alignment ofthe limb should be checked carefully before the plate is securedto the metatarsal bones.
POSTOPERATIVE EVALUATIONThe axial alignment of the limb should be critically observed.Radiographs should be evaluated for limb alignment andimplant placement.
POSTOPERATIVE CAREA soft, padded bandage should be placed to control bleedingand swelling. A bivalve cast should be used for 6 weeks or untilearly radiographic evidence of bone bridging is observed.1
Radiographs should be repeated at 6-week intervals until bonehealing occurs. The animal should be confined, with activitylimited to leash walks until bone healing is complete. Implants,which may loosen as a result of movement of the metatarsalbones, should be removed after joint fusion, usually within 6 to12 months after surgery.
EXPECTED OUTCOMEBone healing is usually expected in 12 to 18 weeks, with animalsobtaining near-normal function of the treated limb. Some dogsexhibit lameness, which resolves after implant removal.2
References1. Piermattei DL, Flo GL: Fractures and other orthopedic injuries of
the tarsus, metatarsus and phalanges. In Brinker, Piermattei, andFlo’s Handbook of Small Animal Orthopedics and Fracture Repair,3rd ed. Philadelphia, WB Saunders, 1997.
2. Dyce J, Whitelock RG, Robinson KV, et al: Arthrodesis of the tar-sometatarsal joint using a laterally applied plate in 10 dogs. J SmallAnim Pract 39:19, 1998.
92 PART ONE • SURGICAL PROCEDURES FOR JOINT DISEASES

CH A P T E R 30 PROXIMAL INTERTARSAL OR TARSOMETARSAL ARTHRODESIS WITH A PLATE 93
PLATE 30
Calcaneus
Tendon ofabductor digitiquinti muscle
Tendon of superficialflexor muscle
Peroneuslongus
Peroneusbrevis
Tendon of gastrocnemiusmuscle
Tendon of flexor hallucislongus muscle
Plantar view
A
B
C

TARSUS
CHAPTER 31 Proximal Intertarsal or Tarsometatarsal Arthrodesis with an Intramedullary Pin and Wire
INDICATIONSCandidates include animals with subluxation of the proximalintertarsal or tarsometatarsal joints caused by injury of theplantar tarsal fibrocartilage.1
OBJECTIVES• To fuse the bones of the calcaneoquartal or tarsometatarsal
joints in a functional position
ANATOMIC CONSIDERATIONSThe tarsus consists of the tibia, fibula, and proximal tarsal,distal tarsal, and metatarsal bones forming the tarsocrural,intertarsal, and tarsometatarsal joints. The tarsocrural joint isformed by the fibula and cochlea of the tibia proximally and thetalus and calcaneus distally. The intertarsal joints are formed byarticulations between the tarsal bones. The proximal intertarsaljoint is a combination of the talocalcaneocentral joint, formedby the articulation of the talus and central tarsal bone with acontinuous joint capsule with the calcaneus; and the calcaneo-quartal joint, located between the calcaneus and the fourthtarsal bone. The tarsometatarsal joints are formed by the artic-ulations between the distal tarsal and metatarsal bones.
EQUIPMENT• Surgical pack, Senn retractors, Hohmann retractors, Gelpi
retractors, periosteal elevator, bone curette, high-speed drilland burrs, Jacob pin chuck, intramedullary (IM) pins, ortho-pedic wire, wire twister, wire cutter, pin cutter
PREPARATION AND POSITIONINGPrepare the rear limb circumferentially from hip to digits.Position the animal in lateral recumbency. Drape the limb outfrom a hanging position to allow maximal manipulation duringsurgery. Prepare the ipsilateral proximal tibia or proximalhumerus for cancellous bone graft harvest.
PROCEDUREApproach: Incise the skin, subcutaneous tissue, and deepcrural fascia over the lateral surface of the tarsometatarsaljoint. Retract the superficial and deep digital flexor tendonsmedially, and elevate the abductor digiti quinti muscle toexpose the calcaneus, fourth tarsal bone, and the base of thefifth metatarsal bone. Enter the affected joint(s) to expose thearticular surfaces (Plate 31A).
Alignment: Fuse the proximal intertarsal or tarsometa-tarsal joints in a straight line. Use an IM pin to align the bones.
Stabilization: Remove the articular cartilage from the calcaneoquartal joint, the tarsometatarsal joint, or both
(depending on the joints involved) with a bone curette or high-speed burr, following the contours of the bone ends (see Plate31A). Drill transverse holes in the base of the calcaneus and thefourth tarsal bone (for calcaneoquartal arthrodesis), and placeorthopedic wire through the holes, deep to the superficial dig-ital flexor tendon and crossing at the arthrodesis site (Plate31B). Predrill the calcaneus and place a small IM pin starting atthe tuber calcanei, through the calcaneus and the fourth tarsalbone (see Plate 31B). Harvest and place cancellous bone withinthe prepared joints before tightening the wire. Retract the IMpin 1 cm, cut the pin, and countersink it into the tuber calcanei.Tighten the figure-eight wire (Plate 31C).
Alternatively, to fuse the tarsometatarsal joint, predrill theholes for the figure-eight wire through the calcaneus and themetatarsal bones. Usually only three of the four metatarsalbones will be drilled. Drive the Steinmann pin distally into thebase of the fourth metatarsal bone (Plate 31D).1
CAUTIONSAll articular cartilage should be removed. Avoid irritating flexortendons with the IM pin or wire.
POSTOPERATIVE EVALUATIONThe axial alignment of the limb should be critically observed.Radiographs for limb alignment and implant placement shouldbe evaluated.
POSTOPERATIVE CAREA soft, padded bandage should be placed to control bleedingand swelling. A splint should be used for 6 weeks or until early radiographic evidence of bone bridging is observed.Radiographs should be repeated at 6-week intervals until bonehealing occurs. The animal should be confined, with activitylimited to leash walks until bone healing is complete. Pin migra-tion may occur. Implants should be removed if the soft tissue is irritated.1
EXPECTED OUTCOMEBone healing is usually expected in 12 to 18 weeks. Animalsshould have near-normal function of the treated limb.
Reference1. Piermattei DL, Flo GL: Fractures and other orthopedic injuries of
the tarsus, metatarsus and phalanges. In Brinker, Piermattei, andFlo’s Handbook of Small Animal Orthopedics and Fracture Repair,3rd ed. Philadelphia, WB Saunders, 1997.
94 PART ONE • SURGICAL PROCEDURES FOR JOINT DISEASES

CH A P T E R 31 PROXIMAL ARTHRODESIS WITH AN INTRAMEDULLARY PIN AND WIRE 95
PLATE 31
C D
B
A
Calcaneus
Tendon ofabductor digitiquinti muscle
Tendon of superficialflexor muscle
Peroneuslongus
Peroneusbrevis
Tendon of gastrocnemiusmuscle
Tendon of flexor hallucislongus muscle

AMPUTATIONS
CHAPTER 32 MandibulectomyINDICATIONS1–4
Mandibulectomy is indicated in the management of tumorsinvolving the jaw, and in the treatment of open or infectedmandibular fractures in which surgical repair is not an optionbecause of economic restrictions, osteomyelitis, or severe boneand soft tissue loss. Specifically, a rostral mandibulectomy isindicated for bilateral disease conditions affecting the rostralmandible to the level of the second or third premolars. Rostralhemimandibulectomy is indicated for tumors in the region ofthe lower canine tooth, incisors, or first premolar that have not crossed the symphysis based on clinical and radiographicevaluation.
OBJECTIVES5
• To remove the rostral mandible or rostral hemimandible andprovide the animal with a disease-free, functional, and cos-metic oral cavity
ANATOMIC CONSIDERATIONS2,3,5,6
The oral cavity is a complex structure composed of lips, gin-giva, tongue teeth, palate, and salivary glands and ducts. Thevascular supply to the mouth is provided by the lingual, majorpalatine, mandibular alveolar, and facial arteries, which arebranches of the external and internal carotid arteries. Anatomiclandmarks for the procedure include the incisors, the canineteeth and the second and third premolars, and the mandibularsymphysis. Brisk hemorrhage from the mandibular artery may occur at the osteotomy site; this should be identified and either ligated or controlled with bone wax and electro-cautery.
EQUIPMENT• Standard surgical pack; electrocautery; hemoclips; bone wax
or suture material for vascular ligation; periosteal elevator;Senn or Gelpi retractors; and a saw, Gigli wire, or osteotomefor osteotomy of the mandible
PREPARATION AND POSITIONINGPrepare mandible from the proximal neck to the chin and lat-eral aspect of the face and cheeks. Correct surgical positioningis imperative to provide optimum visualization of the oralcavity. For the rostral mandibulectomy, position the animal indorsal recumbency, with the maxilla taped to the operatingtable to allow maximal exposure to the oral cavity during sur-gery. For a rostral hemimandibulectomy, position the animal inlateral recumbency, with the affected side up.
PROCEDURERostral Mandibulectomy:1–3,6 Sharply incise the buccalmucosa along the rostral aspect of the mandible (Plate 32A1).Elevate the subcutaneous tissue and connective tissue from thebone, exposing the ventral and lateral aspects of the mandible(Plate 32A2). Reflect and retract the tissues caudally and later-ally to the level of the osteotomy. Perform an osteotomy with anoscillating saw, osteotome, or Gigli wire caudal to the canineteeth or first or second molars (Plate 32B). Locate the mandibulararteries within the intramedullary canal, and ligate. If the arteriesretract within the intramedullary canal and cannot be located,use bone wax and electrocautery to staunch the hemorrhage.Incise any remaining connective tissue, remove the rostralmandible, and submit for histopathology and margin evaluation.
96 PART ONE • SURGICAL PROCEDURES FOR JOINT DISEASES
Continued

CH A P T E R 32 MANDIBULECTOMY 97
PLATE 32
A1 A2 B
Periosteal elevatorOscillating bone saw

Rostral Hemimandibulectomy:1–3,6 Sharply incise thebuccal mucosa from the mandibular symphysis to the first orsecond premolar. Elevate the subcutaneous tissue and connec-tive tissue from the bone, exposing the ventral and lateralaspects of the mandible. Reflect and retract the tissues caudallyand laterally to the level of the osteotomy (Plate 32C). Separatethe mandibular symphysis with an osteotome, and perform anosteotomy with an oscillating saw, osteotome, or Gigli wirecaudal to the canine tooth or first or second molar (Plate 32D).Locate the mandibular artery within the intramedullary canal,and ligate. If the arteries retract within the intramedullary canal and cannot be located, use bone wax and electrocauteryto staunch the hemorrhage. Incise any remaining connectivetissue, remove the rostral hemimandible, and submit forhistopathology and margin evaluation.
Closure: Replace the lip over the exposed hemimandible(s)and appose the gingiva and sublingual mucosa with simple con-tinuous or interrupted absorbable suture, taking care to avoidentrapment of the salivary ducts (Plate 32E). It may be neces-sary to remove redundant labial tissue to provide a more cosmetic closure and to prevent excessive drooling (Plates 32Fand 32G).
CAUTIONS1,3,5,6
It may be necessary to modify the surgical incision to obtainadequate surgical margins. Preoperative planning is crucial toensure complete tumor excision. Patients should be thoroughlystaged and assessed (e.g., with presurgical incisional biopsy;skull, intraoral, and thoracic radiographs; fine needle aspirationof the local lymph nodes; blood work; coagulation profile; andelectrocardiogram) prior to surgery. To decrease the inci-dence of postoperative infection, perioperative antibiotics are recommended.
POSTOPERATIVE EVALUATION1,3,5–7
The mandible and associated musculature should be submittedfor histopathology and margin evaluation. Suture removal is notnecessary; however, the oral cavity should be thoroughly exam-ined at 10 to 14 days for postoperative complications. Possiblecomplications include incisional dehiscence, infection, ranulasand sialoceles from iatrogenic salivary duct trauma, subcuta-neous emphysema, mandibular drift and instability, abnormalsalivation with secondary cheilitis and dermatitis, oral pain,local tumor recurrence, and distant metastatic disease. Ownersshould also be asked about any problems with prehension orcosmetic concerns. Patients should be evaluated every 3 monthswith a complete physical and oral examination. Thoracic radiographs are recommended every 3 months in animals with malignant tumors to evaluate for distant metastasis for thefirst year.
POSTOPERATIVE CAREPreemptive multimodal analgesia should be instituted in allpatients for the first 48 to 72 hours. Postoperative antibioticsare recommended for the first 5 to 7 days. The patient should befed moist food formed in individual meatballs to protect the sur-gical incision. Access to chew toys and rawhide bones shouldbe restricted until the incision is healed.
EXPECTED OUTCOME1,6,8,9
In a study evaluating owner satisfaction with partial mandi-bulectomy or maxillectomy for the treatment of oral tumors,85% of owners were satisfied with the results from the surgery.Forty-four percent noted a change in prehension and difficultyin eating, but pain was perceived to be reduced in most animals,and cosmesis was acceptable in all 27 cases. Prognosis in dogswith oral neoplasia varies, depending on the histopathologictype of the tumor, tumor size, the amount of bony involvement,presence of regional and distant metastases, the clinical stageof the disease, and the location of the tumor within the oralcavity. The prognosis is excellent for dogs that undergo partialmandibulectomy for the treatment of mandibular fractures,with owner acceptance of the cosmetic appearance andmandibular function reported as good to excellent.
References1. White R: Mandibulectomy and maxillectomy in the dog: Long-term
survival in 100 cases. J Small Anim Pract 32(2):69–72, 1991.2. Manfra-Marretta S, Schrader S, Matthiesen D: Problems associated
with the management and treatment of jaw fractures. Problems inVet Med 2(1):220–247, 1990.
3. Salisbury S: Problems and complications associated with maxillec-tomy, mandibulectomy, and oronasal fistula repair. Problems in VetMed 3(2):153–169, 1991.
4. Hoelzler M, Holmberg D: Partial mandibulectomy as the treatmentof a comminuted mandibular fracture in a dog. Can Vet J 42(2):143–144, 2001.
5. Matthiesen D, Manfra-Marretta S: Results and complications asso-ciated with partial mandibulectomy and mexillectomy techniques.Problems in Vet Med 2(1):248–275, 1990.
6. White R: The oral cavity. In Hedlund C, Taboada J (eds): ClinicalAtlas of Ear, Nose and Throat Diseases in Small Animals: The Case-Based. Schlutersche, Hannover, Germany, 2002.
7. Kosovsky JK, Matthiesen DT, Marretta SM, et al: Results of partialmandibulectomy for the treatment of oral tumors in 142 dogs. VetSurg 20(6):397–401, 1991.
8. Fox LE, Geoghegan SL, Davis LH, et al: Owner satisfaction with par-tial mandibulectomy or maxillectomy for treatment of oral tumorsin 27 dogs. J Am Anim Hosp Assoc 33(1):25–31, 1997.
9. Lantz G, Salisbury S: Partial mandibulectomy for treatment ofmandibular fractures in dogs: Eight cases (1981–1984). J Am VetMed Assoc 191(2):243–245, 1987.
98 PART ONE • SURGICAL PROCEDURES FOR JOINT DISEASES

CH A P T E R 32 MANDIBULECTOMY 99
PLATE 32
C
D
EF
Redundant labialtissue to be removed
Labialtissue excised
G
Redundant labialtissue to be removed

AMPUTATIONS
CHAPTER 33 Forelimb Amputation with ScapulectomyINDICATIONS1
Forelimb amputation is a salvage procedure indicated for the treatment of neoplasia, osteomyelitis, nonunion fractures,severe trauma with vascular compromise and limb necrosis,paralysis caused by brachial plexus avulsion, and congenitallimb deformities.
OBJECTIVES• To remove the limb and preserve the animal’s quality of life
ANATOMIC CONSIDERATIONS2
Forelimb amputation is most commonly performed by removingthe limb at the scapula. More distal procedures have beendescribed, but they are thought to produce less aestheticallypleasing results in short-haired animals because of the scapularspine and acromial prominence. Anatomic landmarks for theprocedure include the scapula and associated musculature.
EQUIPMENT• Standard surgical pack; electrocautery; hemoclips or ample
suture material for vascular ligation; sterile syringe; 25-gaugeneedle; 1 to 2 mL of 0.5% bupivacaine, not exceeding 1.5 to 2.0 mg/kg of body weight in the dog and 1 mg/kg of bodyweight in the cat, for brachial plexus injection3
PREPARATION AND POSITIONINGPrepare the forelimb circumferentially from dorsal midline tocarpus. Position the animal in lateral recumbency, with theaffected limb up. Drape the limb out from a hanging position toallow maximal manipulation during surgery.
PROCEDUREAmputation:1,4 Incise the skin and subcutaneous tissue in areverse Y incision from the vertebral border of the scapula tothe acromial process, following the scapular spine, and aroundthe forelimb medially (Plate 33A). Reflect the skin, and ligate theaxillobrachial and omobrachial veins proximal to the greatertubercle of the humerus (Plate 33B). Ligate the cephalic veindistal to the cleidobrachialis muscle. Using electrocautery forall the muscle incisions, transect the brachiocephalicus musclethrough the clavicular tendon. Sever the omotransversarius andtrapezius muscles along the cranial and dorsal edge of the spineof the scapula. Sever the latissimus dorsi muscle close to itsinsertion on the humerus (Plate 33C). Rotate the cranial edge ofthe scapula laterally, and sever the insertion of the scalenus,rhomboideus, and serratus ventralis muscles (Plate 33D). Blockand sever the supraspinatus and brachial plexus nerves. Injecteach nerve prior to transection with 0.2 to 0.4 mL bupivacaineuntil a bleb forms under the epineurium proximal to the cut(Plate 33E). Transfix, ligate, and sever the axillary artery (Plate
33F). Ligate and sever the axillary vein. Disarticulate the limbby transecting the pectoral muscles and ligating and dividingthe lateral thoracic vessels.
Closure: Inverting the muscle bellies, place interruptedLembert sutures, with 0 to 2-0 absorbable suture material, in thelateral fascial sheaths of the latissimus dorsi, omotransver-sarius, and trapezius muscles to the pectoral muscle (Plate33G). Eliminate the dead space with 2-0 to 3-0 absorbablesutures in an interrupted cruciate or simple interrupted patternin the subcutaneous tissue. Appose the skin edges with inter-dermal or skin sutures (Plate 33H).
CAUTIONSPatients should be thoroughly assessed before surgery is initiated (e.g., with electrocardiogram, thoracic radiographs,and blood work). Hemodynamically unstable patients should betreated prior to surgery to ensure an uneventful recovery.Whole blood and plasma products should be on hand in theevent that major hemorrhage occurs.
POSTOPERATIVE EVALUATIONIf indicated, the entire limb should be submitted for histo-pathology. Sutures should be removed in 10 to 14 days.
POSTOPERATIVE CAREPostoperative bandaging of the wound for 2 to 3 days may bedesirable to prevent seroma formation. Preemptive multimodalanalgesia should be instituted in all patients for the first 48 to 72 hours. Common parameters to evaluate in the postoperativeamputee are heart rate, pulse quality, respiratory rate, capillaryrefill time, body temperature, electrocardiogram, pulseoximetry, central venous pressure, serial packed cell volume,total protein, serum glucose, and activated clotting times.
EXPECTED OUTCOME1,2,4
The outcome for return to function and quality of life is good toexcellent. Most animals adapt very well to forelimb amputationbut will have a noticeable gait deficit on ambulation.
References1. Daly WR: Amputation of the forelimb. In Bojrab MJ (ed): Current
Techniques in Small Animal Surgery, 4th ed. Baltimore, Williams &Wilkins, 1998.
2. Bone DL, Aberman HM: Forelimb amputation in the dog usinghumeral osteotomy. J Am Anim Hosp Assoc 24:5, 525–529, 1988.
3. Muir WW, Hubbell JAE: Handbook of Veterinary Anesthesia. St. Louis,Mosby, 1989.
4. Harvey CE: Forequarter amputation in the dog and cat. J Am AnimHosp Assoc 10(1):25–28, 1974.
100 PART ONE • SURGICAL PROCEDURES FOR JOINT DISEASES

CH A P T E R 33 FORELIMB AMPUTATION WITH SCAPULECTOMY 101
PLATE 33
ACB
D E
G
H
F
Latissimusdorsi muscle
Omotransversariusmuscle
Trapeziusmuscle
Transfixionsuture Pectoral
muscle
Omotransversariusmuscle
Spine of scapula
Brachiocephalicusmuscle
Deltoideusmuscle
Trapezius muscle
Latissimusdorsi muscle
Long head oftriceps muscle
Lateral head oftriceps muscle
Omobrachialvein
Axillobrachialvein
Cephalicvein
Rhomboideusmuscle
Serratusventralismuscle
Scalenusmuscle
Scalenusmuscle
Deeppectoralmuscle
Axillaryartery
Axillaryvein
Firstrib
Lateralthoracicartery,
vein, andnerve
C7C8 T1
C6

AMPUTATIONS
CHAPTER 34 Forelimb Salvage via Partial and Complete Scapulectomy
INDICATIONS1,2
Partial and total scapulectomy are limb-sparing proceduresmost commonly used in the treatment of neoplasia of the prox-imal scapula or in select cases of degenerative joint disease andpain in the shoulder that are not responsive to conservativemanagement and in which arthrodesis is not an option.
OBJECTIVES• To preserve limb function and, in the cases of cancer, to allow
for local tumor control
ANATOMIC CONSIDERATIONS1
Partial scapulectomy is most commonly performed byremoving the proximal scapula while preserving the scapulo-humeral joint. Complete scapulectomy is indicated for tumorsinvolving the distal part of the scapula, or when more than 90%of the scapula is involved. Anatomic landmarks for the pro-cedure include the scapular spine, neck, acromial process, glenoid cavity, supraglenoid process, and associated muscu-lature.
EQUIPMENT• Standard surgical pack; electrocautery; hemoclips or ample
suture material for vascular ligation; Senn, Army-Navy, and/orGelpi retractors; a saw or osteotome for osteotomy of thescapula; sterile syringe; 25-gauge needle; 1 to 2 mL of 0.5%bupivacaine, not exceeding 1.5 to 2.0 mg/kg of body weight inthe dog and 1 mg/kg of body weight in the cat, for brachialplexus injection3
PREPARATION AND POSITIONINGPrepare the forelimb circumferentially from dorsal midline tocarpus. Position the animal in lateral recumbency with the
affected limb up. Drape the limb out from a hanging position toallow maximal manipulation during surgery.
PROCEDUREComplete Scapulectomy:1 Incise the skin and subcuta-neous tissue from the dorsal border of the scapula to the prox-imal third of the humerus, following the dorsal border of thescapula. Incise along the caudal aspect of the scapula, con-necting the two incisions at the apices (Plate 34A). Hemorrhagemay be controlled with ligatures, hemoclips, and electro-cautery. Without disturbing the pseudocapsule of the tumor,reflect the skin and subcutaneous tissue to expose thesuperficial muscles of the trapezius, omotransversarius, rhom-boideus, and deltoideus (Plate 34B1). Using electrocautery,incise these muscles close to their origins on the scapula,without disturbing the tumor. Retract the scapula laterally, andelevate the serratus ventralis muscle from the medial aspect ofthe scapula, taking care to preserve the brachial plexus andaxillary artery and vein (Plate 34B2). Identify the supra- andsubscapular nerves coming from the brachioplexus bundle, andinject each nerve prior to transection with 0.2 to 0.4 mL bupiva-caine until a bleb forms under the epineurium proximal to thecut. Transect the tendons of the coracobrachialis, teres minor,infraspinatus, supraspinatus, and subscapularis muscles closeto their insertions on the humerus (Plate 34C). Sharply incisethe joint capsule of the shoulder, and transect the teres majormuscle and the long head of the triceps from their insertionsfrom the caudal aspect of the scapula using electrocautery(Plate 34D1). Perform an osteotomy of the supraglenoid tubercle,preserving the attachment of the biceps tendon (see Plate 34D1).The scapula and associated musculature (i.e., infraspinatus,supraspinatus, and subscapularis) may now be removed andsubmitted for histopathology and margin evaluation.
102 PART ONE • SURGICAL PROCEDURES FOR JOINT DISEASES
Continued

CH A P T E R 34 FORELIMB SALVAGE VIA PARTIAL AND COMPLETE SCAPULECTOMY 103
PLATE 34
A
B1
D1
C
B2
Deltoideus muscle
Skinincision
Supraspinatusmuscle
Bicepstendon
Latissimusdorsi muscle
Omotransversarius muscle Trapezius muscle Trapezius muscle
Long head oftriceps muscle
Deltoideus muscle
Tumor
Lateral head oftriceps muscle
Infraspinatus muscle
Teres major muscle
Infraspinatusmuscle (cut)
Long headof triceps muscle(cut)
Teres minor muscle(cut)
Long head oftriceps muscle
Lateral head oftriceps muscle
Serratusventralis muscle(elevated)
Teres minor muscle
Omotransversarius muscle

Closure: Secure the biceps tendon and supraglenoidtubercle to the caudal aspect of the joint capsule using nonab-sorbable monofilament suture in a horizontal mattress pattern.Reattach the triceps muscle to the deltoideus, omotransver-sarius, and trapezius muscles with an interrupted Lembert orhorizontal mattress suture pattern and nonabsorbable suture.Secure the remaining trapezius to the underlying serratus ven-tralis muscle to further eliminate dead space. The subcutaneoustissue and skin closure is routine.
Partial Scapulectomy:1 A partial scapulectomy is per-formed in a manner similar to a complete scapulectomy, withthe exception that the scapulohumeral joint is left intact, andthe osteotomy is at the level of or proximal to the scapularneck. The osteotomy site will vary, depending on the level andsize of the tumor, and only the proximal portion of the scapulais removed (Plate 34D2). Attach the transected muscles of thetrapezius, omotransversarius, serratus ventralis, and rhom-boideus to the distal scapula via holes drilled into the bodyusing nonabsorbable suture in a simple interrupted or hori-zontal mattress pattern. Alternatively, close the remaining mus-culature without bone tunnels by suturing transected musclesof the supraspinatus, infraspinatus, deltoideus, and the longhead of the triceps to the serratus ventralis, omotransversarius,and trapezius muscles. The subcutaneous tissue and skin closure are routine.
CAUTIONSIt may be necessary to modify the surgical incision to obtainadequate surgical margins. Preoperative planning is crucial toensure complete tumor excision. Patients should be thoroughlystaged and assessed before this limb salvage procedure surgeryis initiated (e.g., with thoracic and abdominal radiographs,
presurgical fine needle aspiration or biopsy, blood work, coagu-lation profile, and electrocardiogram).
POSTOPERATIVE EVALUATIONThe scapula and associated musculature should be submittedfor histopathology and margin evaluation. The sutures shouldbe removed in 10 to 14 days. For the first year the patient shouldbe checked every 3 months with a physical examination andthoracic radiographs to evaluate for local recurrence of disease.
POSTOPERATIVE CAREPostoperative bandaging of the wound for 3 to 5 days may bedesirable to prevent seroma formation. Preemptive multimodalanalgesia should be instituted in all patients for the first 48 to 72 hours. Rehabilitation and range-of-motion exercises shouldbe instituted early to prevent joint contraction and loss of function.
EXPECTED OUTCOME1
Postoperative use of the limb is usually fair to excellent. Dogsthat undergo partial scapulectomy are reported to have betterfunction than dogs with total scapulectomy.
References1. Kirpensteijn J, Straw RC, Pardo AD, et al: Partial and total scapulec-
tomy in the dog. J Am Anim Hosp Assoc 30(4):313–319, 1994.2. Trout N, Pavletic M, Kraus K: Partial scapulectomy for management
of sarcomas in three dogs and two cats. J Am Vet Med Assoc207(5):585–587, 1995.
3. Muir WW, Hubbell JAE: Handbook of Veterinary Anesthesia. St.Louis, Mosby, 1989.
104 PART ONE • SURGICAL PROCEDURES FOR JOINT DISEASES

CH A P T E R 34 FORELIMB SALVAGE VIA PARTIAL AND COMPLETE SCAPULECTOMY 105
PLATE 34
D2

AMPUTATIONS
CHAPTER 35 Rear Limb Amputation via Coxofemoral DisarticulationINDICATIONSRear limb amputation is a salvage procedure indicated for the treatmentof neoplasia, osteomyelitis, nonunion fractures, severe trauma with vascular compromise and limb necrosis, paralysis caused by sciatic orfemoral nerve damage, and congenital limb deformities.
OBJECTIVES• To remove the limb and preserve the animal’s quality of life
ANATOMIC CONSIDERATIONSRear limb amputation may be performed via two methods: (1) byremoving the limb at the midshaft femur; or (2) by removal at the coxofemoral joint. More distal procedures have been described, butthese produce a nonfunctional limb that may actually inhibit ambula-tion and that is aesthetically less pleasing. Coxofemoral disarticulationshould be performed in dogs with neoplastic conditions affecting thefemur to ensure adequate surgical margins, and the entire limb shouldbe submitted for histopathology to confirm tumor-free margins andtumor identification. Anatomic landmarks for the procedure include thefemur, the coxofemoral joint, and associated musculature.
EQUIPMENT1
• Standard surgical pack; electrocautery, hemoclips, or ample suturematerial for vascular ligation; Senn, Army-Navy, and/or Gelpi retrac-tors; sterile syringe; 25-gauge needle; 1 to 2 mL of 0.5% bupivacaine,not exceeding 1.5 to 2.0 mg/kg of body weight in the dog and 1 mg/kgof body weight in the cat, for brachial plexus injection
PREPARATION AND POSITIONINGPrepare the rear limb circumferentially from dorsal midline to tarsus.Position the animal in lateral recumbency, with the affected limb up.Drape the limb out from a hanging position to allow maximal manipu-lation during surgery.
PROCEDURECoxofemoral Disarticulation: Incise the skin and subcuta-neous tissue, using a curved incision on the lateral aspect of the leg thatbegins at the flank fold and extends caudodistally to the distal third ofthe femur, and then caudodorsally to the tuber ischii (Plate 35A). Makea similar incision on the medial aspect of the leg, connecting at eitherend. Retract the skin and subcutaneous tissue to expose the muscle bel-lies of the biceps femoris and the tensor fascia latae. Using electro-cautery in the coagulation mode, transect these muscle belly groups atthe level of midshaft femur (Plate 35B). Reflect the muscle bellies prox-imally to expose the sciatic nerve. Block and sever the sciatic nerve,injecting it prior to transection with 0.2 to 0.4 mL bupivacaine until ableb forms under the epineurium proximal to the cut. Using electro-cautery, transect the gluteal muscles at their insertions at the greaterand third trochanters (Plate 35C). Transect the semitendinosus andsemimembranosus at the level of the proximal femur, and reflect prox-imally (see Plate 35C). Transect the external rotator and quadratusfemoris muscles at their insertions in the trochanteric fossa. Workingcranially, transect the rectus femoris muscle close to its origin on the
ilium. On the medial aspect of the leg, isolate, ligate, and divide thefemoral artery and vein in the femoral triangle via placement of a cir-cumferential and transfixation suture proximally and a hemostat or cir-cumferential suture distad (Plate 35D). Identify, block, and sever thefemoral nerve. Transect the pectineus, the cranial belly of the sartorius, the gracilis, and the adductor muscles at the level of the midshaft femur(Plate 35E). Transect the iliopsoas muscle at its insertion on the lessertrochanter, and retract it cranially to fully expose the coxofemoral jointcapsule. Incise the joint capsule and sever the round ligament toremove the limb (Plate 35F).
Closure: Inverting the muscle bellies, suture the lateral fascialsheaths of the muscle bellies in an interrupted Lembert pattern with 0 to 2-0 monofilament absorbable suture (Plate 35G). Eliminate thedead space with 2-0 to 3-0 absorbable sutures in an interrupted cruciateor simple interrupted pattern in the subcutaneous tissue. Appose theskin edges with interdermal or skin sutures (see Plate 35G).
CAUTIONSPreoperative planning will ensure adequate soft tissue coverage andtension-free closure of the surgical wound. Elizabethan collars shouldbe employed in animals that lick or chew at the incision.
POSTOPERATIVE EVALUATIONIf indicated, the entire limb should be submitted for histopathology.Sutures can be removed in 10 to 14 days.
POSTOPERATIVE CAREPreemptive multimodal analgesia should be instituted in all patients forthe first 48 to 72 hours. Common parameters to evaluate in the post-operative amputee are heart rate, pulse quality, respiratory rate, capil-lary refill time, body temperature, electrocardiogram, pulse oximetry,central venous pressure, serial packed cell volume, total protein, serumglucose, and activated clotting times. Activity should be restricted for2 weeks until sutures are removed. It may be necessary to assist ambu-lation with slings or carts in some cases, until the animal adjusts to itsnew center of balance.
EXPECTED OUTCOME2,3
Expectations for a return to function and quality of life are good toexcellent. Most animals adapt well to hind limb amputation, but theywill have a noticeable gait deficit on ambulation, and about one dog inthree has a noticeable change in behavior.
References1. Muir WW, Hubbell JAE: Handbook of Veterinary Anesthesia. St.
Louis, Mosby, 1989.2. Kirpensteijn J, Van Den Bos R, Endenburg N: Adaptation of dogs to
the amputation of a limb and their owners’ satisfaction with the pro-cedure. Vet Rec 144(5):115–118, 1999.
3. Endicott M: Principles of treatment for osteosarcoma. Clin TechSmall Anim Pract 18(2):110–114, 2003.
106 PART ONE • SURGICAL PROCEDURES FOR JOINT DISEASES

CH A P T E R 35 REAR LIMB AMPUTATION VIA COXOFEMORAL DISARTICULATION 107
PLATE 35
B
C
A
D E
GF Medial View
Lateral View
Lateral View
Medial View
Transfixionsuture
Skinincision
Sciaticnerve
Bicepsfemoris muscle
Vastuslateralis muscle
Tensorfascia latae muscle
Gracilis muscle
Ligament ofthe long head
of the femur
Joint capsule
Incision injoint capsule
Gracilismuscle
Adductor muscle
Adductor muscle
Biceps femoris muscle
Sartorius muscle
Adductor muscle
Vastuslateralis muscle
Adductor muscle
Iliopsoas muscle
Rectus femorismuscle
Superficialgluteal muscle
Middlegluteal muscle
Deepgluteal muscle
Pectineus musclePectineus muscle
Iliopsoas muscle
Femoralartery and vein
Sartorius muscle
Gracilis muscleSemimembranosus muscle
Semitendinosus muscle
Sartorius muscle
Gracilis muscle
Semimembranosus muscle
Quadriceps
Semitendinosus muscle

AMPUTATIONS
CHAPTER 36 Midshaft Femur AmputationINDICATIONSRear limb amputation is a salvage procedure indicated for the treatmentof neoplasia, osteomyelitis, nonunion fractures, severe trauma with vascular compromise and limb necrosis, paralysis caused by sciatic orfemoral nerve damage, and congenital limb deformities.
OBJECTIVES• To remove the limb and preserve the animal’s quality of life
ANATOMIC CONSIDERATIONSRear limb amputation may be performed via two methods: (1) removingthe limb at the midshaft femur; or (2) removing it at the coxofemoraljoint. More distal procedures have been described, but these produce anonfunctional limb that may actually inhibit ambulation and that is aesthetically less pleasing. Midshaft femoral amputation is easier to perform than is a coxofemoral disarticulation, and therefore it is themethod preferred by most veterinarians. Anatomic landmarks for the procedure include the femur, the coxofemoral joint, and associatedmusculature.
EQUIPMENT1
• Standard surgical pack; electrocautery, hemoclips, or ample suturematerial for vascular ligation; Senn, Army-Navy, and/or Gelpi retrac-tors; a Gigli wire or saw for midshaft femoral amputation; sterilesyringe; 25-gauge needle; 1 to 2 mL of 0.5% bupivacaine, notexceeding 1.5 to 2.0 mg/kg of body weight in the dog and 1 mg/kg ofbody weight in the cat, for local nerve blockade
PREPARATION AND POSITIONINGPrepare the rear limb circumferentially from dorsal midline to tarsus.Position the animal in lateral recumbency, with the affected limb up.Drape the limb out from a hanging position to allow maximal manipu-lation during surgery.
PROCEDUREMidshaft Femoral Amputation:1 Incise the skin and subcu-taneous tissue, using a curved incision on the lateral aspect of the legthat begins at the flank fold and extends caudodistally to the distal thirdof the femur and then caudodorsally to the tuber ischii (Plate 36A).Make a similar incision on the medial aspect of the leg, connecting ateither end. Retract the skin and subcutaneous tissue to expose themuscle bellies of the biceps femoris, the tensor fascia latae, and thequadriceps (Plate 36B1). Using electrocautery in the coagulation mode,transect these muscle belly groups at the level of the distal third of thefemur (Plate 36B2). Identify, block, and sever the sciatic nerve, injectingit prior to transection with 0.2 to 0.4 mL bupivacaine until a bleb formsunder the epineurium proximal to the cut. At the same level, use elec-trocautery to transect the semitendinosus, semimembranosus, andadductor muscles (Plate 36C). On the medial aspect of the leg, transectthe gracilis and the caudal belly of the sartorius muscles at the level ofthe midshaft femur (Plate 36D). Isolate, ligate, and divide the femoralartery and vein via placement of a circumferential and transfixation
suture proximally, and a hemostat or circumferential suture distad(Plate 36E). Identify, block, and sever the femoral nerve. Transect theremaining pectineus muscle and the cranial belly of the sartoriusmuscle to fully isolate the femoral diaphysis. Elevate any remainingtissue or muscle from the proximal femur at the osteotomy site, and cutthe femur using a saw or Gigli wire to remove the limb (Plate 36F). The level of the osteotomy is located within the proximal third of thefemoral shaft to ensure appropriate soft tissue coverage.
Closure: Inverting the muscle bellies, suture the lateral fascialsheaths of the muscle bellies in an interrupted Lembert pattern with 0 to 2-0 monofilament absorbable suture. Cover the femoral shaft bysuturing the transected muscle bellies of the quadriceps to theadductor. Suture the transected biceps femoris to the gracilis, the semi-tendinosus, and the semimembranosus muscles. Eliminate the deadspace with 2-0 to 3-0 absorbable sutures in an interrupted cruciate orsimple interrupted pattern in the subcutaneous tissue. Appose the skinedges with interdermal or skin sutures.
CAUTIONSPreoperative planning is imperative to ensure adequate soft tissue cov-erage and tension-free closure of the surgical wound. Elizabethan col-lars should be employed in animals that lick or chew at the incision.
POSTOPERATIVE EVALUATIONIf indicated, the entire limb should be submitted for histopathology.Sutures should be removed in 10 to 14 days.
POSTOPERATIVE CAREPreemptive multimodal analgesia should be instituted in all patients forthe first 48 to 72 hours. Common parameters to evaluate in the post-operative amputee are heart rate, pulse quality, respiratory rate, capil-lary refill time, body temperature, electrocardiogram, pulse oximetry,central venous pressure, serial packed cell volume, total protein, serumglucose, and activated clotting times. Activity should be restricted for2 weeks until suture removal. It may be necessary to assist ambulationwith slings or carts, until the animal adjusts to its new center of balance.
EXPECTED OUTCOME2,3
The outcome for return to function and quality of life should be good toexcellent. Most animals adapt well to hind limb amputation, althoughthey will have a noticeable gait deficit on ambulation. About one dog inthree has a noticeable change in behavior.
References1. Muir WW, Hubbell JAE: Handbook of Veterinary Anesthesia. St.
Louis, Mosby, 1989.2. Kirpensteijn J, Van Den Bos R, Endenburg N: Adaptation of dogs to
the amputation of a limb and their owners’ satisfaction with the procedure. Vet Rec 144(5):115–118, 1999.
3. Endicott M: Principles of treatment for osteosarcoma. Clin TechSmall Anim Pract 18(2):110–114, 2003.
108 PART ONE • SURGICAL PROCEDURES FOR JOINT DISEASES

CH A P T E R 36 MIDSHAFT FEMUR AMPUTATION 109
PLATE 36
A
Lateral View
B1
B2
D
F
C
E
Medial View
Transfixionsuture
Skin incision
Quadricepsgroup
Semitendinosus muscle
Biceps femoris muscle
Quadricepsgroup
Adductormuscle
Adductor muscle
Gracilismuscle
Sartorius muscle(caudal part)
Sartorius muscle(cranial part)
Sartorius muscle(cranial part)
Osteotomy site
Pectineus muscle
Femoral vessels
Adductor muscle
Semitendinosus muscle
Semimembranosus muscle
Gracilis muscle
Semimembranosusmuscle
Semitendinosus muscle
Biceps femoris muscle

AMPUTATIONS
CHAPTER 37 Digital AmputationINDICATIONS1–3
Digital amputation is indicated for the treatment of neoplasia,osteomyelitis, nonunion fractures, severe trauma, and severe toe defor-mities that result in lameness or pain. Dewclaw removal is indicated forcosmesis, and as a preventative measure to avoid future injury.Dewclaws should not be removed in working breeds such as the Briardor Great Pyrenees, in which double dewclaws on each hindfoot are abreed standard and requirement. Dewclaws in puppies less than 1 weekof age may be amputated with minimal instrumentation. Once the digitsdevelop, amputation of the dewclaw is more complicated and requiresgeneral anesthesia.
OBJECTIVES• To remove a digit and preserve the foot function and normal weight-
bearing capacity
ANATOMIC CONSIDERATIONSThe primary weight-bearing digits of the paw are the third and fourthdigits. Each digit is composed of three phalangeal bones. Anatomiclandmarks for the procedure include the phalanges of digits 1 through 5and associated tendons and musculature.
EQUIPMENT• Standard surgical pack, electrocautery, bone cutters for proximal
phalangeal amputation, tourniquet to control hemorrhage (optional)
PREPARATION AND POSITIONINGClip and prepare the affected paw from the carpus or tarsus distally.Position the animal in lateral recumbency with the affected limb up.Place a tourniquet on the limb below the elbow or above the tarsus(optional). Drape the limb out from a hanging position to allow maximalmanipulation during surgery.
PROCEDUREDigital Amputation of Digits 3 and 4: Incise the skin andsubcutaneous tissue in a reverse Y incision beginning at the mid-metacarpus of the affected digit, excising the digital pad (Plate 37A1).Disarticulate the phalanges at the metacarpophalangeal joint, or createan osteotomy of the proximal phalanx with bone-cutting forceps. Bevelthe angle of the osteotomy to ensure adequate soft tissue coverage ofthe protruding bone (Plate 37A2). Using the electrocautery and suture,identify and ligate any persistent bleeding vessels. Appose the subcuta-neous tissue and fascia in a simple interrupted pattern with monofila-ment absorbable suture. The remaining closure is routine (Plate 37A3).
Amputation of Digit 1: Incise the skin and subcutaneoustissue from the midshaft metatarsus around the medial or lateral digit(Plate 37B1). Disarticulate the phalanges at the metacarpophalangealjoint, and identify and ligate or cauterize any persistent bleeding vessels(Plate 37B2). Appose the subcutaneous tissue and fascia in a simpleinterrupted pattern with monofilament absorbable suture. The remain-ing closure is routine (Plate 37B3).
Dewclaw Amputation in a Neonate: Crush the tissueof the dewclaw using straight or curved hemostatic forceps at the level
of the appendage’s attachment to the paw (Plate 37C1). Using a scalpelblade, scissors, or digital pressure, remove the digit and suture thewound closed with a simple interrupted or cruciate suture and monofil-ament absorbable suture (optional) (Plate 37C2). Usually, neither band-aging nor suture removal is necessary.
CAUTIONS4
The surgical incision may need to be modified in order to obtain adequate surgical margins in the cases of neoplasia. Preoperative plan-ning is crucial to ensure complete tumor excision. Patients should bethoroughly staged and assessed before this limb salvage procedure surgery is initiated (e.g., with thoracic radiographs, presurgical fineneedle aspiration or biopsy, blood work, coagulation profile, and elec-trocardiogram). Evidence of bone lysis is present in 83% of cases ofmalignant tumors and in 17% of the benign or pyogranulomatousmasses.
POSTOPERATIVE EVALUATIONIf indicated, the digit should be submitted for histopathology and culture and sensitivity. Sutures should be removed in 10 to 14 days.
POSTOPERATIVE CARE5
The foot should be protected with a soft, padded bandage. Elizabethancollars should be employed until the wound is healed in animals thatlick or chew at the bandage or incision. Activity should be restricted for2 weeks, until suture removal.
EXPECTED OUTCOME4,6
The level of amputation depends on the disease; however, pad preser-vation is important in ensuring pain-free ambulation. Up to twonon–weight-bearing digits may be completely amputated withoutaffecting limb function. Amputation of both digits 3 and 4 may result inlameness, and therefore should be avoided if possible. The prognosis indogs with digital neoplasia varies depending on the histopathologictype of the tumor, the presence of regional and distant metastasis, andthe clinical stage of the disease.
References1. Basher A: Foot injuries in dogs and cats. Compend Contin Educ
Pract Vet 16(9):1159–1176, 1994.2. American Kennel Club Staff: Briard. In The Complete Dog Book.
New York, Howell House Book, 1998.3. American Kennel Club Staff: Great Pyrenees. In The Complete Dog
Book. New York, Howell House Book, 1998. 4. Marino DJ, Matthiesen DT, Stefanacci JD, Moroff SD: Evaluation of
dogs with digit masses: 117 cases (1981–1991). J Am Vet Med Assoc207(6):726–728.
5. Swaim S: Management and bandaging of soft tissue injuries of dogand cat feet. J Am Anim Hosp Assoc 21(3):329–340, 1985.
6. O’Brien M, Berg J, Engler S: Treatment by digital amputation of sub-ungual squamous cell carcinoma in dogs. J Am Vet Med Assoc201(5):759–761, 1992.
110 PART ONE • SURGICAL PROCEDURES FOR JOINT DISEASES

CH A P T E R 37 DIGITAL AMPUTATION 111
PLATE 37
Skinincision
2 3 4 5
2 3 4 5
Proximal phalanxBone incision
Metacarpo-phalangeal
joint
Proximal(first)
phalanx
Distalphalanx
Middle phalanx
Distal phalanx
Adult Middle Digit Amputation
Juvenile/Puppy Dewclaw Amputation
Adult Digit 1 Amputation
A1 A2 A3
C1
B1 B2 B3
C2

ADDITIONAL CORRECTIVE OSTEOTOMIES
CHAPTER 38 Oblique Osteotomy Stabilized with a Type II External FixatorINDICATIONSCandidates include animals with either angular or rotational deformityof the radius and ulna1 or tibia and fibula,2 with minimal length discrep-ancy when compared with the contralateral limb.
OBJECTIVES• To realign joint surfaces, reestablish rotational alignment, and pre-
serve length of the affected bone
ANATOMIC CONSIDERATIONSA physical examination is needed to estimate the degree of rotation. Byflexing the carpus and the elbow or the hock and stifle of the affectedlimb, the degree of angulation of the metacarpal or metatarsal bones in relation to the radius and ulna or in relation to the tibia can be measured. The degree of angulation approximates the degree of rota-tion. The osteotomy should be planned at the site of greatest curvaturevisible on the radiographic view that shows the most deformity (usuallythe cranial caudal view) and parallel to the joint surface closest to thedeformed area (usually the distal joint surface) (Plate 38A). Landmarksfor the pin placement and the vital structures to avoid vary with theaffected bone.
EQUIPMENT• Surgical pack, Senn retractors, small Hohmann retractors, periosteal
elevator, oscillating saw, Jacob pin chuck, low-speed power drill, external fixation equipment, pin cutter, bone curette for har-vesting graft
PREPARATION AND POSITIONINGFor the radius, prepare the forelimb circumferentially from above theshoulder to the phalanges. Position the animal in dorsal recumbency,and suspend the affected limb from the ceiling. Drape the limb out inthe hanging position. For the tibia, prepare the affected rear limb cir-cumferentially from midline to foot. Position the animal in dorsalrecumbency, and suspend the affected limb from the ceiling. Drape thelimb out in the hanging position. Prepare the ipsilateral proximalhumerus as a cancellous bone graft donor site for either osteotomy.
PROCEDUREApproach: Position a transfixation pin parallel to the proximal jointsurface in the dorsal plane of the proximal portion of the bone. For theradius, start the pin on the lateral surface of the proximal radius orradial head. Position a transfixation pin parallel to the distal joint sur-face in the dorsal plane of the distal portion of the bone. For the radius,start the pin on the lateral surface of the distal radius, just cranial to theulna. Make a transverse osteotomy of the ulna or fibula at the same levelas the radial or tibial osteotomy. Make an oblique osteotomy of the radius or tibia at the area of greatest curvature (Plate 38B). Theosteotomy should parallel the distal joint surface in both the dorsal andtransverse planes.3
Reduction: Lower the table to allow the animal’s weight to alignthe bone. Use the distal transfixation pin to manipulate the distal bonesegment to align the joint surfaces and derotate the bone. Medial andlateral angular alignment is correct when the proximal and distal joint
surfaces are parallel (Plate 38C). Cranial caudal joint surface relation-ships should mimic the contralateral intact bone. Rotational alignmentis correct if the paw aligns with the radius or tibia when the elbow andcarpus or stifle and hock are flexed.
Stabilization: Stabilize the bone by adding medial and lateralconnecting bars and additional fixation pins to create a type II externalfixation frame3 (see Plate 38C).
CAUTIONSIt is important to avoid major nerves and vessels and joint surfaceswhen placing the fixation pins. Angular and rotational alignment should be monitored during the reduction. Intraoperative radiographsare useful to verify proximal and distal pin placement and joint align-ment during reduction and stabilization.
POSTOPERATIVE EVALUATIONRadiographs should be evaluated for bone alignment and implant place-ment. The joint surfaces should be parallel, and a cranial caudal view ofthe proximal joint should be visible in the same radiograph as a cranialcaudal view of the distal joint. If angular deformity persists, the externalfixator should be manipulated by loosening the clamps distal to theosteotomy and realigning the fixation pins on the connecting bar to correct the deformity (Plate 38D).
POSTOPERATIVE CAREGauze sponges should be packed around the pins; the sponges shouldbe secured with a bandage, which also incorporates the paw, to limitpostoperative swelling. The animal should be confined, with activitylimited to leash walking. External fixator management includes dailypin care and pin packing as needed. Radiographs should be repeated at6-week intervals to evaluate healing. The fixator may be destabilized byremoving selected fixation pins, or one connecting bar of the type II fixator, when early bone bridging is observed. The external fixatorshould be removed when the osteotomy has healed.
EXPECTED OUTCOMEIn most dogs, bone healing is seen in 6 to 12 weeks. Function may becompromised while the external fixator is in place. Good correction ofmedial lateral angular deformities can be achieved with this technique;however, minimal correction is anticipated for cranial caudal bowing orrestoration of large length discrepancies.1
References1. Quinn M, Ehrhart N, Johnson AL: Realignment of the radius in
canine antebrachial growth deformities treated with correctiveosteotomy and bilateral (Type II) external fixation. Vet Surg 29:558,2000.
2. Johnson SG, Hulse DA, Vangundy TE, et al: Corrective osteotomyfor pes varus in the dachshund. Vet Surg 18:373, 1989.
3. Johnson AL, Hulse DA: Management of specific fractures: Radial andulnar growth deformities. In Fossum TW (ed): Small Animal Surgery,2nd ed. St. Louis, Mosby, 2002.
112 PART ONE • SURGICAL PROCEDURES FOR JOINT DISEASES

CH A P T E R 38 OBLIQUE OSTEOTOMY STABILIZED WITH A TYPE I I EXTERNAL FIXATOR 113
PLATE 38
A B
C D
Craniocaudal view Lateral view

ADDITIONAL CORRECTIVE OSTEOTOMIES
CHAPTER 39 Transverse DerotationalOsteotomy Stabilized with a Plate
INDICATIONSCandidates include animals with isolated rotational deformityof a long bone caused by fracture malunion. Concurrent angulardeformity may be corrected by performing an oblique osteotomyat the area of greatest curvature and then realigning the jointsurfaces.1
OBJECTIVES• To reestablish rotational alignment
ANATOMIC CONSIDERATIONSRotation should be estimated from radiographic landmarks forthe humerus and femur. The rotation for the radius or tibia froma physical examination by flexing the carpus and the elbow orthe hock and stifle of the affected limb. The degree of angula-tion of the metacarpal or metatarsal bones should be measuredin relation to the radius and ulna or in relation to the tibia. Thedegree of angulation approximates the degree of rotation.Generally, the osteotomy can be made at the mid-diaphysis.Landmarks for the approach, and vital structures to avoid, varywith the affected bone.
EQUIPMENT• Surgical pack, periosteal elevator, Gelpi retractors, Myerding
or Hohmann retractors, Kern bone-holding forceps, self-centering plate-holding forceps, high-speed drill, Kirschnerwires, plating equipment, bone curette for harvesting graft
PREPARATION AND POSITIONINGPrepare the affected limb circumferentially from midline tofoot. If a cancellous bone graft harvest is anticipated, prepare adonor site as well. Positioning depends on the affected bone.Drape the limb out from a hanging position to allow maximalmanipulation during surgery.
PROCEDUREApproach: Position a Kirschner wire perpendicular to thebone in the transverse plane of the proximal joint. Position a
Kirschner wire perpendicular to the bone in the transverseplane of the distal joint (Plate 39A). The approach depends onthe affected bone. Make the transverse osteotomy at the majorregion of rotation (Plate 39B).
Reduction: Rotate the distal segment until the Kirschnerwires are in the same plane (see Plate 39B).
Stabilization: Apply an appropriately contoured plate tothe bone (Plate 39C). The plate should function as a com-pression plate. Harvest a cancellous bone autograft, and placeit at the osteotomy site.
CAUTIONSRotational alignment and reduction should be maintainedduring implant application. It is important to be sure that theplate is centered on the bone. Irrigation is needed duringdrilling to reduce bone necrosis. All screws should be tightenedafter each screw is placed and at the end of the procedure.
POSTOPERATIVE EVALUATIONRadiographs should be evaluated for bone alignment andimplant placement. For radius and tibia, it is important to checkthe alignment of the metacarpal or metatarsal bones to theradius or tibia to verify rotational correction.
POSTOPERATIVE CAREThe animal should be confined, with activity limited to leashwalking. Radiographs should be repeated at 6-week intervals toevaluate healing. Activity should be increased when bonebridging is observed.
EXPECTED OUTCOMEIn most dogs, bone healing is seen in 12 to 18 weeks. Implantremoval may be necessary if soft tissues are irritated.
Reference1. Johnson AL: Osteotomies. In Olmstead ML (ed): Small Animal
Orthopedics. St. Louis, Mosby, 1995.
114 PART ONE • SURGICAL PROCEDURES FOR JOINT DISEASES

CH A P T E R 39 TRANSVERSE DEROTATIONAL OSTEOTOMY STABILIZED WITH A PLATE 115
PLATE 39
CB
A
Cranial caudal viewof proximal femur
Cranial caudal viewof distal femur

GENERAL PRINCIPLES FOR DIAPHYSEAL FRACTURES
CHAPTER 40 Stabilizing a Transverse or Short Oblique Diaphyseal Fracture with a Compression Plate
INDICATIONSCandidates include animals with transverse or short obliquediaphyseal fractures requiring fixation with implants that will securely hold bone for a long time (12 weeks or more). The procedure is also indicated in large active older dogs, dogs with multiple limb injuries, toy breed dogs with distal radialfractures, and animals for which postoperative comfort isimperative.1
OBJECTIVES• To anatomically reduce and compress the fracture line using
the bone plate as a compression plateThe plate provides rigid fixation and resists axial loading,
bending, and rotational forces at the fracture.
ANATOMIC CONSIDERATIONSLandmarks for the approach, and vital structures to avoid, varywith the affected bone.
EQUIPMENT• Surgical pack, Senn retractors, Gelpi retractors, Hohmann
retractors, periosteal elevator, Kern bone-holding forceps,self-centering plate-holding forceps, high-speed drill, platingequipment, bone curette for harvesting cancellous bone autograft
PREPARATION AND POSITIONINGPrepare the affected limb circumferentially from midline tofoot. If cancellous bone graft harvest is anticipated, prep adonor site as well. Positioning depends on the affected bone.Drape the limb out from a hanging position to allow maximalmanipulation during surgery.
PROCEDUREApproach: The required approach varies with the affectedbone.
Reduction: Reduce the fracture by lifting the bone endsfrom the incision and bringing them into contact. With the boneends in contact, slowly push the bone segments back into thenormal position. Alternatively, use a lever to reduce the frac-ture. With transverse fractures, manual maintenance of reduc-tion is necessary. Alternatively, after the plate is contoured,secure the fracture in reduction with self-centering plate-holding forceps applied to the plate and the bone (Plate 40A).
Stabilization: Contour the plate to match the bone surface. Prestress the plate by bending it an additional amount
to cause the plate to stand away from the fracture surface byabout 2 mm (see Plate 40A). Make sure the plate is long enoughto allow at least 6 cortices secured by screws on both sides ofthe fracture. Compress the fracture line, using the loaded drillguide to insert one or two screws (Plate 40B). Place theremaining screws in a neutral position (Plate 40C). Short,oblique fractures may additionally be compressed with a lagscrew positioned through the plate or outside of the plate (Plate40D).2,3 If indicated, harvest a cancellous bone autograft andplace it at the fracture site. Close the incision routinely.
CAUTIONSReduction should be maintained during implant application. It is important to make sure that the plate is centered on thebone. Irrigatation during drilling is needed to reduce bonenecrosis. It is necessary to drill, measure, tap, and insert eachscrew before moving on to prepare the next screw hole. Allscrews should be tightened after each screw is placed and atthe end of the procedure.
POSTOPERATIVE EVALUATIONRadiographs are necessary to evaluate for fracture reductionand implant placement.
POSTOPERATIVE CAREThe animal should be confined, with activity limited to leashwalking. Radiographs should be repeated at 6-week intervals to monitor healing. Activity should be increased when bonebridging is observed.
EXPECTED OUTCOMEBone healing is usually seen in 12 to 18 weeks. A good return tofunction can be expected. Implant removal may be necessary ifsoft tissues are irritated.
References1. Johnson AL, Hulse DA: Fundamentals of orthopedic surgery and
fracture management: Decision making in fracture management. InFossum TW (ed): Small Animal Surgery, 2nd ed. St. Louis, Mosby, 2002.
2. Schatzker J, Muestage F, Prieur WD: Implants and their application.In Brinker WO, Olmstead ML, Sumner-Smith G, et al (eds): Manualof Internal Fixation in Small Animals. New York, Springer-Verlag,1998.
3. Wittner G, Holz U: Plates. In Ruedi TP, Murphy WM (eds): AOPrinciples of Fracture Management. New York, AO Publishing andThieme, 2000.
118 PART TWO • SURGICAL PROCEDURES FOR FRACTURES

CH A P T E R 40 STABILIZING A DIAPHYSEAL FRACTURE WITH A COMPRESSION PLATE 119
PLATE 40
A
B
C
D

GENERAL PRINCIPLES FOR DIAPHYSEAL FRACTURES
CHAPTER 41 Stabilizing a Transverse or ShortOblique Diaphyseal Fracture with anIntramedullary Pin and External FixatorINDICATIONSThe procedure is indicated for transverse or short oblique diaphysealfractures in animals with anticipated short healing times (6 to 12weeks). It is indicated in smaller dogs and cats that are young, that arehealthy, and that have single limb injuries.1 Owners must be willing andable to assume fixator management.
OBJECTIVES• To anatomically reduce the fracture line and stabilize the bone
The intramedullary (IM) pin resists bending forces at the fracture,whereas the external fixator resists axial loading and rotational forcesat the fracture. IM pins are not indicated in the radius.
ANATOMIC CONSIDERATIONSLandmarks for the approach, and the vital structures to avoid, vary withthe affected bone.
EQUIPMENT• Surgical pack, Senn retractors, Gelpi retractors, Hohmann retractors,
periosteal elevator, Kern bone-holding forceps, Jacob pin chuck, low-speed power drill, IM pins, external fixation equipment, pin cutter,bone curette for harvesting cancellous bone autograft
PREPARATION AND POSITIONINGPrepare the affected limb circumferentially from midline to foot. If can-cellous bone graft harvest is anticipated, prep a donor site as well.Positioning depends on the affected bone. Drape the limb out from ahanging position to allow maximal manipulation during surgery.
PROCEDUREApproach: The approach varies with the affected bone. Incise theskin, and create soft tissue tunnels for fixation pin placement.
Reduction: Place an IM pin (of a size selected to equal 50% ofthe medullary canal at the isthmus) in the proximal segment using a retrograde (humerus or femur) (Plate 41A1) or antegrade (tibia,humerus, or femur) (Plate 41A2) technique.2 Retract the pin within themedullary canal of the proximal segment. Reduce the fracture by liftingthe bone ends from the incision and bringing them into contact. Withthe bone ends in contact, slowly push the bone segments back into thenormal position. Alternatively, use a lever to reduce the fracture. Drivethe IM pin distally to maintain reduction (Plate 41A3).
Stabilization: Seat the IM pin in the distal segment of the bone.Establish rotational alignment, and place external fixation pins throughthe proximal and distal metaphyses of the bone. Predrill the bonebefore placing the threaded fixation pins. Secure the connecting bar to
the pins (Plate 41B). If additional stability is needed, add a fixation pin,placed close to the fracture, to both bone segments (Plate 41C). Cut theIM pin below the level of the skin (see Plate 41B), or leave it long andtie it into the fixator (see Plate 41C).3 Tighten all of the fixation clamps.If indicated, harvest a cancellous bone autograft and place it at the fracture. The incision closure is routine.
CAUTIONSIt is important to pay attention to the direction of the IM pin andexternal fixation pins in the soft tissues to avoid nerves and vessels. It is also necessary to ensure that the IM pin does not interferewith a joint surface.
POSTOPERATIVE EVALUATIONRadiographs should be evaluated for fracture reduction and implantplacement.
POSTOPERATIVE CAREGauze sponges should be packed around the pins, and the spongesshould be secured with a bandage to limit postoperative swelling and to protect the pin tracts. The animal should be confined, with activitylimited to leash walking. External fixator management includes dailypin care and pin packing as needed. Radiographs should be repeated at6-week intervals to monitor healing. The external fixator should beremoved when bone bridging is observed. If the tie-in is used, the proximal fixation pin should be left secured to the IM pin (Plate 41D).The IM pin (and proximal fixation pin) should be removed after the fracture has healed.
EXPECTED OUTCOMEBone healing is usually seen in 6 to 12 weeks. Animals usually experience a good return to function.
References1. Johnson AL, Hulse DA: Fundamentals of orthopedic surgery and
fracture management, decision making in fracture management. InFossum TW (ed): Small Animal Surgery, 2nd ed. St. Louis, Mosby,2002.
2. Johnson AL, Hulse DA: Management of specific fractures, femoraldiaphyseal fractures. In Fossum TW (ed): Small Animal Surgery, 2nded. St. Louis, Mosby, 2002.
3. Aron DN, Dewey C: Experimental and clinical experience with anIM pin external skeletal fixator tie-in configuration. Vet CompOrthop Traumatol 4:86, 1991.
120 PART TWO • SURGICAL PROCEDURES FOR FRACTURES

CH A P T E R 41 STABILIZING A FRACTURE WITH AN IM PIN AND EXTERNAL FIXATOR 121
PLATE 41
B
A1 A2 A3
C D
Retrograde Antegrade
Bridgingcallus

GENERAL PRINCIPLES FOR DIAPHYSEAL FRACTURES
CHAPTER 42 Stabilizing a Transverse or ShortOblique Diaphyseal Fracture with a Type IbExternal Fixator
INDICATIONSThe procedure is indicated for transverse or short oblique radialand tibial diaphyseal fractures in animals with anticipated shortor moderate healing times (6 to 18 weeks).1 A modified type Ibexternal fixator may also be used for humeral fractures. Smoothfixation pins or a combination of threaded and smooth fixationpins can be used for smaller dogs and cats that are young, thatare healthy, and that have single limb injuries and an anticipatedrapid healing time (6 weeks).1 Threaded pins should be used inlarge, active, older dogs and in dogs with multiple limb injurieswhere postoperative load is increased and anticipated healingtimes are longer.1 Owners must be willing and able to assumefixator management.
OBJECTIVES• To anatomically reduce the fracture line and stabilize the bone
The external fixator resists bending, axial loading, and rota-tional forces at the fracture.
ANATOMIC CONSIDERATIONSLandmarks for the approach, and the vital structures to avoid,vary with the affected bone.
EQUIPMENT• Surgical pack, Senn retractors, Gelpi retractors, Hohmann
retractors, periosteal elevator, Kern bone-holding forceps,Jacob pin chuck, low-speed power drill, external fixationequipment, pin cutter, bone curette for harvesting cancellousbone autograft
PREPARATION AND POSITIONINGPrepare the affected limb circumferentially from midline tofoot. For both the radius and the tibia, position the animal indorsal recumbency and suspend the affected limb from theceiling. Drape the limb out in the suspended position. If cancel-lous bone graft harvest is anticipated, prep a donor site (usually,the ipsilateral proximal humerus) as well.
PROCEDUREApproach: Perform a limited open reduction to align thebone segments. Pin location and limited open approaches varywith the affected bone. Incise the skin, and create soft tissuetunnels for fixation pin placement.
Reduction: For the radius and tibia, lower the table to suspend the animal from the ceiling.2 Allow the animal’sweight to fatigue the muscles. Use a lever to reduce the fracture(Plate 42A).
Stabilization: Establish rotational alignment, and placeexternal fixation pins in a cranial-medial to caudal-lateral direc-
tion through the proximal and distal metaphyses of the bone.Predrill the bone before placing threaded fixation pins. Securethe connecting bar to the pins. Add fixation pins, placed 1 cmfrom the fracture, to both bone segments (Plate 42B). Placeadditional pins to fill out the frame (Plate 42C). Repeat the stepsto place a similar frame in a cranial-lateral plane at 90 degreesto the first frame (see Plate 42C). Connect the frames with artic-ulations proximally and distally (Plate 42D).3 Tighten all of thefixation clamps. If indicated, harvest a cancellous bone auto-graft and place it at the fracture. The incision closure is routine.
CAUTIONSIt is important to pay attention to the direction of the fixationpins in the soft tissues to avoid nerves and vessels. It is also necessary to avoid the joint surfaces when placing the fixationpins. Articulations must not interfere with elbow flexion.
POSTOPERATIVE EVALUATIONRadiographs should be evaluated for bone alignment andimplant placement.
POSTOPERATIVE CAREGauze sponges should be packed around the pins, and thesponges should be secured with a bandage that incorporatesthe paw to limit postoperative swelling. The animal should beconfined, with activity limited to leash walking. External fixatormanagement includes daily pin care and pin packing as needed.Radiographs should be repeated at 6-week intervals to monitorhealing. The fixator should be destabilized by removing the cranial frame (converting to a type Ia cranial medial frame)when early bone bridging is observed. The rest of the externalfixator should be removed when the fracture is healed.
EXPECTED OUTCOMEBone healing is usually seen in 12 to 18 weeks. The animal willhave limited function while the external fixator is in place, buta good return to function is expected.
References1. Johnson AL, Hulse DA: Fundamentals of orthopedic surgery and
fracture management, decision making in fracture management. InFossum TW (ed): Small Animal Surgery, 2nd ed. St. Louis, Mosby,2002.
2. Aron DN, Palmer RH, Johnson AL: Biologic strategies and a bal-anced concept for repair of highly comminuted long bone fractures.Compend Cont Educ Pract Vet 17:35, 1995.
3. Lauer SK, Aron DN, Evans MD: Finite element method evaluation:Articulations and diagonals in an 8-pin type 1b external skeletalfixator. Vet Surg 29:28, 2000.
122 PART TWO • SURGICAL PROCEDURES FOR FRACTURES

CH A P T E R 42 STABILIZING A FRACTURE WITH A TYPE IB EXTERNAL FIXATOR 123
PLATE 42
A
B
C
D
Cranialview
Leftforelimb
Cranialview

GENERAL PRINCIPLES FOR DIAPHYSEAL FRACTURES
CHAPTER 43 Stabilizing a Long ObliqueDiaphyseal Fracture with Lag Screws and a Neutralization Plate
INDICATIONSThe procedure is indicated for long oblique diaphyseal fracturesin animals requiring fixation with implants that will securelyhold bone for a longer period (e.g., 12 weeks or longer). It isalso indicated in large, active, older dogs; in dogs with multiplelimb injuries; and in animals for which postoperative comfort isimperative.1
OBJECTIVES• To anatomically reduce and compress the fracture line with
lag screws Application of a bone plate neutralizes the load on the frac-
ture. The plate and screw combination provides rigid fixationand resists axial loading, bending, and rotational forces at thefracture.
ANATOMIC CONSIDERATIONSLandmarks for the approach, and the vital structures to avoid,vary with the affected bone.
EQUIPMENT• Surgical pack, Senn retractors, Gelpi retractors, Hohmann
retractors, periosteal elevator, Kern bone-holding forceps,pointed reduction forceps, self-centering plate-holding for-ceps, high-speed drill, plating equipment, bone curette forharvesting cancellous bone autograft
PREPARATION AND POSITIONINGPrepare the affected limb circumferentially from midline tofoot. If cancellous bone graft harvest is anticipated, prep adonor site as well. Positioning depends on the affected bone.Drape the limb out from a hanging position to allow maximalmanipulation during surgery.
PROCEDUREApproach: The approach varies, depending on the affectedbone.
Reduction: Reduce the fracture by distracting the bonesegments, and approximate the fracture surfaces. Use pointedreduction forceps to manipulate the bone segments into reduc-tion. Maintain reduction with the pointed reduction forceps(Plate 43A).
Stabilization: When the fracture line is perpendicular to the plate surface of the bone, place two or three lag screws across the fracture line. Drill the near cortex with a drill bit equal to the diameter of the screw threads (Plate 43B1). Place a drill insert sleeve, and drill the far cortex with the appropriate drill bit for the screw (Plate 43B2).
Slightly countersink the near cortex (Plate 43B3), measure(Plate 43B4), tap (Plate 43B5), and place the screw (Plate43B6).2 Contour a plate to match the bone surface. The plateshould be long enough to span the bone and allow a minimumof six cortices secured by screws on both sides of the fracture(Plate 43C). Secure the plate with screws placed in a neutralposition.2 Alternatively, when the fracture line is parallel to the plate surface of the bone, secure the reduced segments with cerclage wire. Place the plate and insert the screws whichare crossing the fracture as lag screws (Plate 43D). Remove thecerclage wire before tightening the screws. If indicated, harvesta cancellous bone autograft and place it at the fracture. Theincision closure is routine.
CAUTIONSReduction should be maintained with reduction forceps duringlag screw application. It is important to ensure that the plate iscentered on the bone so the plate holes at the ends of the plateare over bone. Irrigation during drilling is needed to reducebone necrosis. It is necessary to drill, measure, tap, and inserteach screw before moving on to prepare the next screw hole.All screws should be tightened after each screw is placed andagain at the end of the procedure.
POSTOPERATIVE EVALUATIONRadiographs should be evaluated for fracture reduction andimplant placement.
POSTOPERATIVE CAREThe animal should be confined, with activity limited to leashwalking. Radiographs should be repeated at 6-week intervals tomonitor healing. Activity should be increased when bonebridging is observed.
EXPECTED OUTCOMEBone healing is usually seen in 12 to 18 weeks. Animals usuallyexperience a good return to function. Implant removal may benecessary if soft tissues are irritated.
References1. Johnson AL, Hulse DA: Fundamentals of orthopedic surgery and
fracture management, decision making in fracture management. In Fossum TW (ed): Small Animal Surgery, 2nd ed. St. Louis, Mosby, 2002.
2. Schatzker J, Muestage F, Prieur WD: Implants and their application.In Brinker WO, Olmstead ML, Sumner-Smith G, et al (eds): Manual of Internal Fixation in Small Animals. New York, Springer-Verlag, 1998.
124 PART TWO • SURGICAL PROCEDURES FOR FRACTURES

CH A P T E R 43 STABILIZING A FRACTURE WITH LAG SCREWS AND NEUTRALIZATION PLATE 125
PLATE 43
A
C D
B1 B2 B3
B4
B6
B5

GENERAL PRINCIPLES FOR DIAPHYSEAL FRACTURES
CHAPTER 44 Stabilizing a Long ObliqueDiaphyseal Fracture with an IntramedullaryPin and Multiple Cerclage Wires
INDICATIONSThe procedure is indicated for long oblique diaphyseal fracturesin animals with anticipated short healing times (6 to 12 weeks).It is also indicated in smaller dogs and cats that are young, thatare healthy, and that have single limb injuries.1 It is especiallyuseful for immature dogs and cats. Intramedullary (IM) pins arenot indicated in the radius.
OBJECTIVES• To anatomically reduce the fracture line and stabilize the bone
The IM pin resists bending forces at the fracture, whereasthe cerclage wire compresses the fracture to resist axial loadingand rotational forces at the fracture.
ANATOMIC CONSIDERATIONSLandmarks for the approach, and the vital structures to avoid,vary with the affected bone.
EQUIPMENT• Surgical pack, Senn retractors, Gelpi retractors, Hohmann
retractors, periosteal elevator, Kern bone-holding forceps,pointed reduction forceps, Jacob pin chuck, IM pins, ortho-pedic wire (spool or eye cerclage), wire passer, wire tightener(pliers, needle-holder, or loop cerclage wire tightener), wirecutter, pin cutter, bone curette for harvesting cancellous boneautograft
PREPARATION AND POSITIONINGPrepare the affected limb circumferentially from midline tofoot. If cancellous bone graft harvest is anticipated, prep adonor site as well. Positioning depends on affected bone. Drapethe limb out from a hanging position to allow maximal manipu-lation during surgery.
PROCEDUREApproach: The approach varies, depending on the affectedbone.
Reduction: Place an IM pin (sized to equal 60% to 70% ofthe medullary canal at the isthmus) in the proximal segmentusing an antegrade (tibia, humerus, or femur) or retrograde(humerus or femur) technique.2 Retract the pin within themedullary canal of the proximal segment. Reduce the fractureby distracting the bone segments and approximating the frac-ture surfaces. Use pointed reduction forceps to manipulate thebone segments into reduction. Maintain reduction with thepointed reduction forceps (Plate 44A).
Stabilization: Seat the IM pin in the distal segment of thebone (see Plate 44A). Plan to place two or three (or more,depending on the length of the fracture) cerclage wires around
the reduced fracture at intervals of 0.5 cm to 1 cm. Pass a wirepasser around the bone. Feed the plain end of the wire throughthe wire passer, and pull the wire around the bone (Plate 44B).For loop cerclage, tighten the wire by passing the plain end ofthe wire through the eye of the wire (Plate 44C1). Insert thewire into the wire tightener, and crank the wire tight (Plate44C2). Bend the wire over the eye. Retract the wire tightener,and finish bending the wire (Plate 44C3). Cut the wire (Plate44C4).3 For plain orthopedic wire, begin twisting the wire endsby hand (Plate 44D1). Place the wire twisting pliers or needle-holders onto the twist, and tighten the wire by pulling andtwisting (Plate 44D2). When the wire is tight, cut the wire 3 mmfrom the start of the twist (Plate 44D3). Alternatively, cut thewire 5 mm to 7 mm from the twist, and bend it over in the direc-tion of the twist (Plate 44D4).3 Cut the IM pin below the level ofthe skin (Plate 44E). If indicated, harvest a cancellous boneautograft and place it at the fracture. The incision closure isroutine.
CAUTIONSAll wires must be tight. It is important to pay attention to thedirection of the IM pin in the soft tissues to avoid nerves andvessels. The IM pin must not interfere with a joint surface.
POSTOPERATIVE EVALUATIONRadiographs should be taken to evaluate for fracture reductionand implant placement.
POSTOPERATIVE CAREThe animal should be confined, with activity limited to leashwalking. Radiographs should be repeated at 6-week intervals tomonitor healing. The IM pin should be removed after the frac-ture has healed.
EXPECTED OUTCOMEBone healing is usually seen in 6 to 12 weeks. Animals usuallyexperience a good return to function.
References1. Johnson AL, Hulse DA: Fundamentals of orthopedic surgery and
fracture management, decision making in fracture management. InFossum TW (ed): Small Animal Surgery, 2nd ed. St. Louis, Mosby, 2002.
2. Johnson AL, Hulse DA: Management of specific fractures, femoraldiaphyseal fractures. In Fossum TW (ed): Small Animal Surgery, 2nded. St. Louis, Mosby, 2002.
3. Schatzker J, Muestage F, Prieur WD: Implants and their application.In Brinker WO, Olmstead ML, Sumner-Smith G, et al (eds): Manualof Internal Fixation in Small Animals. New York, Springer-Verlag,1998.
126 PART TWO • SURGICAL PROCEDURES FOR FRACTURES

CH A P T E R 44 STABILIZING A FRACTURE WITH AN IM PIN AND CERCLAGE WIRES 127
PLATE 44
Alternatetwist
A B
E
DC
1
1
2
34
2
3 4
Loop cerclage Twist

GENERAL PRINCIPLES FOR DIAPHYSEAL FRACTURES
CHAPTER 45 Stabilizing a ComminutedDiaphyseal Fracture with an IntramedullaryPin and a Bridging Plate
INDICATIONSThe procedure is indicated for comminuted nonreducible (morethan one or two large fragments) humeral, femoral, and tibialdiaphyseal fractures in large, active, older dogs; and in dogswith multiple limb injuries in which postoperative load isincreased and anticipated healing times are longer.1 A plate andintramedullary (IM) pin can be used to stabilize comminutedradial fractures, with the plate stabilizing the radius and the pinsupporting the ulna.
OBJECTIVES• To restore normal bone length and alignment
The IM pin restores axial alignment and protects the platefrom bending forces at the fracture, whereas the plate resistsaxial loading, bending, and rotational forces at the fracture.
ANATOMIC CONSIDERATIONSLandmarks for the approach, and the vital structures to avoid,vary with the affected bone.
EQUIPMENT• Surgical pack, Senn retractors, Gelpi retractors, Hohmann
retractors, periosteal elevator, Kern bone-holding forceps,self-centering plate-holding forceps, Jacob pin chuck, IMpins, plating equipment, high-speed drill, bone curette forharvesting cancellous bone autograft
PREPARATION AND POSITIONINGPrepare the affected limb circumferentially from midline tofoot. If cancellous bone graft harvest is anticipated, prep adonor site as well. Positioning depends on the affected bone.Drape the limb out from a hanging position to allow maximalmanipulation during surgery.
PROCEDUREApproach: The approach varies, depending on the affectedbone. Use an “open but do not disturb the fragments” techniqueto expose the proximal and distal bone segments with minimaldisturbance of the fracture hematoma and bone fragments.2
Reduction and Stabilization: Place an IM pin (sized toequal 40% to 50% of the medullary canal width at the isthmus) inthe proximal segment using an antegrade (tibia, humerus, orfemur) or retrograde (humerus or femur) technique. Drive thepin to the fracture site, and blunt the pin tip. Lift and align thedistal segment, and insert the IM pin. Distract the bone to lengthby advancing the pin while holding the proximal segment withbone-holding forceps (Plate 45A). Contour a plate so that thebend matches a radiographic image of the contralateral intactbone (Plate 45B). Torque the plate to match the proximal and
distal ends of the fractured bone. Restore rotational alignment,and secure the plate to the appropriate bone surface with self-centering plate-holding forceps (Plate 45C). The plate shouldspan the length of the bone, and the screws should secure aminimum of six cortices on either side of the fracture. Placebicortical screws in the metaphyses and unicortical screws inthe diaphysis where the IM pin interferes with screw placement.Cut the pin below the skin.3,4 Harvest cancellous bone graft andplace it at the fracture site (Plate 45D).
CAUTIONSThe plate should be centered on the bone so that the plate holesat the ends of the plate are over bone. Irrigation is neededduring drilling to reduce bone necrosis. All screws should betightened after each screw is placed and at the end of the procedure. The IM pin must not interfere with nerves, vessels,or any joint surface.
POSTOPERATIVE EVALUATIONRadiographs should be taken to evaluate for fracture reductionand implant placement.
POSTOPERATIVE CAREThe animal should be confined, with activity limited to leashwalking. Radiographs should be repeated at 6-week intervals tomonitor healing. Activity should be increased when bonebridging is observed. The IM pin should be removed when earlyfracture bridging is evident.
EXPECTED OUTCOMEThe IM pin may cause morbidity and lameness. Bone healing isusually seen in 12 to 18 weeks. Animals usually experience agood return to function. Plate removal may be necessary if softtissues are irritated.
References1. Johnson AL, Hulse DA: Fundamentals of orthopedic surgery and
fracture management, decision making in fracture management. InFossum TW (ed): Small Animal Surgery, 2nd ed. St. Louis, Mosby,2002.
2. Aron DN, Palmer RH, Johnson AL: Biologic strategies and a bal-anced concept for repair of highly comminuted long bone fractures.Compend Cont Educ Pract Vet 17:35, 1995.
3. Johnson AL, Hulse DA: Fundamentals of orthopedic surgery andfracture management, bone plates and screws. In Fossum TW (ed):Small Animal Surgery, 2nd ed. St. Louis, Mosby, 2002.
4. Johnson AL, Smith CW, Schaeffer DJ: Fragment reconstruction andbone plate fixation compared with bridging plate fixation fortreating highly comminuted femoral fractures in dogs: 35 cases(1987–1997). J Am Vet Med Assoc 213:1157, 1998.
128 PART TWO • SURGICAL PROCEDURES FOR FRACTURES

CH A P T E R 45 STABILIZING A FRACTURE WITH AN IM PIN AND BRIDGING PLATE 129
PLATE 45
Biceps femorismuscle retracted
Adductor magnusmuscle
Vastuslateralismuscle
retracted
Shaftof femur
Vastus intermedius
muscle
Cancellousboneautograft
A
B
DC

GENERAL PRINCIPLES FOR DIAPHYSEAL FRACTURES
CHAPTER 46 Stabilizing a ComminutedDiaphyseal Fracture with a Type II External FixatorINDICATIONSThe procedure is indicated for animals with comminuted nonreducible(more than one or two large fragments) radial and tibial diaphyseal fractures. Smooth fixation pins, or a combination of threaded fixationplus and smooth fixation pins, can be used for animals with rapidhealing times (i.e., 6 to 12 weeks). Threaded pins should be used inlarge, active, older dogs and in dogs with multiple limb injuries in whichpostoperative load is increased and anticipated healing times arelonger.1
OBJECTIVES• To restore normal bone length and alignment
A type II external fixator is applied to bridge the fracture. The fixator resists axial loading, bending, and rotational forces at the fracture.
ANATOMIC CONSIDERATIONSLandmarks for the pin placement, and the vital structures to avoid, varywith the affected bone.
EQUIPMENT• Surgical pack, Senn retractors, small Hohmann retractors, low-speed
power drill, Jacob pin chuck, external fixator equipment
PREPARATION AND POSITIONINGPrepare the affected limb circumferentially from midline to foot. Forboth the radius and the tibia, position the animal in dorsal recumbency,and suspend the affected limb from the ceiling. Drape the limb out inthe hanging position.
PROCEDUREApproach: Perform a closed reduction to preserve the integrity ofthe fracture hematoma and the surrounding soft tissues.2 If necessary,use a limited open reduction to line up major bone segments.3
Pin location and limited open approaches vary depending on theaffected bone. Incise the skin and create soft tissue tunnels for pinplacement.
Reduction: Lower the table to allow the animal’s weight to alignthe fractured bone (Plate 46A).
Stabilization: Place a centrally threaded fixation pin throughthe distal metaphyses. Make sure the pin parallels the distal joint sur-face and is in the medial to lateral plane. Predrill the hole with a drill bit0.1 mm smaller than the selected pin.4 Insert the pin with a hand chuckor low RPM power. Repeat the procedure for the proximal metaphysis(Plate 46B). Align the segments, checking for angular and rotationalalignment, and secure the pins to medial and lateral connecting bars.Fill out the frame with either transfixation pins or unilateral fixationpins, depending on the anatomy of the bone and surrounding soft tissues (Plate 46C). Use a guiding device or additional connecting barand guide clamp to ensure accurate placement of transfixation pins (see Plate 46C).5,6 Be sure that there are at least two pins, or preferably three pins, above and below the fracture (Plate 46D). Tighten all of theclamps.
CAUTIONSIt is important to avoid the joint surfaces and the fracture lines with thefixation pins. Intraoperative radiographs are helpful in evaluating bonealignment and pin location.
POSTOPERATIVE EVALUATIONRadiographs should be evaluated for bone alignment and implant loca-tion. If the fractured bone is reduced in a varus or valgus position (i.e., the proximal and distal joint surfaces are not parallel), then thedistal clamps should be loosened and the distal segment should be repositioned to eliminate the angular deformity. If rotational malalign-ment is present, some correction may be obtained by repositioning thedistal clamps onto the opposite side of the bar.
POSTOPERATIVE CAREGauze sponges should be packed around the pins, and the spongesshould be secured with a bandage that incorporates the paw, to limitpostoperative swelling. The animal should be confined, with activitylimited to leash walking. External fixator management includes dailypin care and pin packing as needed. Radiographs should be repeated at6-week intervals to monitor healing. The fixator should be destabilizedby removing selected fixation pins (or the lateral connecting bar) whenearly bone bridging is observed. If the lateral bar is removed, the associated transfixation pins should be left long enough to exit the skinon the lateral surface of the limb. The pins should be covered to preventinjury to the owner. The external fixator should be removed when thefracture is healed.
EXPECTED OUTCOMEBone healing is usually seen in 12 to 18 weeks. The animal may experi-ence limited function while the external fixator is in place but will even-tually have a good return to function.
References1. Johnson AL, Hulse DA: Fundamentals of orthopedic surgery and frac-
ture management, decision making in fracture management. In FossumTW (ed): Small Animal Surgery, 2nd ed. St. Louis, Mosby, 2002.
2. Aron DN, Palmer RH, Johnson AL: Biologic strategies and a balanced concept for repair of highly comminuted long bone fractures. Compend Cont Educ Pract Vet 17:35, 1995.
3. Lavarty PH, Johnson AL, Toombs JP, et al: Simple and multiple frac-tures of the radius treated with an external fixtor. Vet Comp OrthopTraumatol 15:97, 2002.
4. Clary EM, Roe SC: In vitro biomechanical and histological assess-ment of pilot hole diameter for positive-profile external skeletalfixation pins in canine tibiae. Vet Surg 25:543, 1996.
5. Johnson AL, Seitz SE, Smith CW, et al: Closed reduction and type IIexternal fixation of severely comminuted fractures of the radius andtibia in dogs: 23 cases (1990–1994). J Am Vet Med Assoc 209:1445, 1996.
6. Kraus KH, Wotton HM, Boudrieau RJ, et al: Type II external fixationusing new clamps and positive profile threaded pins for treatment offractures of the radius and tibia in dogs. J Am Vet Med Assoc212:1267, 1998.
130 PART TWO • SURGICAL PROCEDURES FOR FRACTURES

CH A P T E R 46 STABILIZING A FRACTURE WITH A TYPE I I EXTERNAL FIXATOR 131
PLATE 46
C D
B
A

GENERAL PRINCIPLES FOR DIAPHYSEAL FRACTURES
CHAPTER 47 Stabilizing a ComminutedDiaphyseal Fracture with an Interlocking Nail
INDICATIONSThe procedure is indicated in comminuted nonreducible (morethan one or two large fragments) humeral, femoral, and tibialdiaphyseal fractures. It is indicated in dogs that have antici-pated healing times that are short or intermediate, and whenpostoperative comfort is important.1 Interlocking nails are con-traindicated for the radius.
OBJECTIVES• To restore normal bone length and alignment
The interlocking nail restores axial alignment and resistsaxial loading, bending, and rotational forces at the fracture.
ANATOMIC CONSIDERATIONSLandmarks for the approach, and the vital structures to avoid,vary with the affected bone. Pin insertion sites vary with theaffected bone.
EQUIPMENT• Surgical pack, Senn retractors, Gelpi retractors, Hohmann
retractors, periosteal elevator, Kern bone-holding forceps,interlocking nail equipment, bone screws, high-speed drill,bone curette for harvesting cancellous bone autograft
PREPARATION AND POSITIONINGPrepare the affected limb circumferentially from midline tofoot. If a cancellous bone graft harvest is anticipated, prep adonor site as well. Positioning depends on the affected bone.Drape the limb out from a hanging position to allow maximalmanipulation during surgery.
PROCEDUREApproach: The approach varies, depending on the affectedbone. Use an “open but do not disturb the fragments” techniqueto expose the proximal and distal bone segments with minimaldisturbance of the fracture hematoma and bone fragments.2
Reduction and Stabilization: Establish the insertionhole in the proximal bone segment, using a reamer of the appro-priate size to prepare for the nail. The nail diameter and lengthare estimated from preoperative radiographs of the contra-lateral bone (Plate 47A). Attach the nail to the extension pieceand nail driver, and insert it into the proximal bone segment so that it exits at the fracture surface. Align the distal segment,and drive the nail distally within the medullary canal. Stabilize
the proximal bone segment with a bone-holding forceps, andcontinue to drive the nail distally to distract the distal bone segment to length (Plate 47B). Ensure that the proximal portionof the nail is seated within the proximal segment. Remove thenail driver, and attach the jig. Drill, measure, and tap the distalscrew hole, using the jig and associated guides to maintainscrew alignment with the hole in the nail. Insert the screw(Plate 47C). Check rotational alignment, and insert theremaining screws. Remove the extension piece.3 Harvest can-cellous bone graft and place it at the fracture site (Plate 47D).Close the incision routinely.
CAUTIONSIt is important to ensure that the nail does not penetrate thedistal joint. The first screw should be placed in the distal hole ofthe nail to help secure nail and jig alignment. The rotationalalignment must be correct before proximal screws are inserted.Irrigation must be done during drilling to reduce bone necrosis.
POSTOPERATIVE EVALUATIONRadiographs should be taken to evaluate for fracture reductionand implant placement.
POSTOPERATIVE CAREThe animal should be confined, with activity limited to leashwalking. Radiographs should be repeated at 6-week intervals to monitor healing. Activity should be increased when bonebridging is observed.
EXPECTED OUTCOMEBone healing is usually seen in 12 to 18 weeks. Animals shouldexperience a good return to function. Removal of the inter-locking nail may be necessary if soft tissues are irritated.
References1. Johnson AL, Hulse DA: Fundamentals of orthopedic surgery and
fracture management, decision making in fracture management. InFossum TW (ed): Small Animal Surgery, 2nd ed. St. Louis, Mosby, 2002.
2. Aron DN, Palmer RH, Johnson AL: Biologic strategies and a balancedconcept for repair of highly comminuted long bone fractures.Compend Cont Educ Pract Vet 17:35, 1995.
3. Dueland RT, Johnson KA, Roe SC, et al: Interlocking nail treatmentof diaphyseal long-bone fractures in dogs. J Am Vet Med Assoc214:59, 1999.
132 PART TWO • SURGICAL PROCEDURES FOR FRACTURES

CH A P T E R 47 STABILIZING A FRACTURE WITH AN INTERLOCKING NAIL 133
PLATE 47
Biceps femorismuscle retracted
Adductor magnusmuscle
Vastuslateralismuscle
retracted
Shaftof femur
Vastus intermedius
muscle
Reamer Extensionpieceand naildriver
Jig
Cancellousbone autograft
C D
A
B

GENERAL PRINCIPLES FOR DIAPHYSEAL FRACTURES
CHAPTER 48 Cancellous Bone AutograftINDICATIONSAutogenous cancellous bone grafts are used to promote rapidbone formation. Candidates include animals with corticaldefects after fracture repair and adult and elderly animals with fractures, delayed unions, nonunions, osteotomies, jointarthrodesis, or cystic defects. Autogenous cancellous bone alsopromotes bone formation in infected fractures.1
OBJECTIVES• To promote bone formation and bone cell survival by har-
vesting cancellous bone at the end of the procedure andtransferring directly to the recipient site
ANATOMIC CONSIDERATIONSOptimal sites for cancellous bone harvest are the proximalhumeral metaphysis, the wing of the ilium, and the proximaltibial metaphysis. All three sites have minimal soft tissue coverage and are easily accessible. The proximal humerus andiliac wing yield the largest amounts of cancellous bone.
EQUIPMENT• Surgical pack, Gelpi retractors, Senn retractors, Army-Navy
retractors, drill bit or intramedullary pin, osteotome andmallet, rongeur, bone curette, stainless steel cup, syringe
PREPARATION AND POSITIONINGSelect, prepare, and drape the graft donor site so that it is easilyaccessible when the recipient site is draped.
PROCEDUREProximal Humerus: Incise the skin and subcutaneous tissues over the craniolateral aspect of the proximal humerus.Retract the acromial head of the deltoid muscle caudally, andexpose the flat aspect of the craniolateral metaphysis just distalto the greater tubercle. Make a round hole in the bone cortexusing an intramedullary pin or drill bit. Insert a bone curette,and harvest cancellous bone (Plate 48A). Place the cancellousbone in a stainless steel cup. Use a syringe to collect blood fromthe donor site to add to the graft (Plate 48B). The blood will clot and form a moldable composite with the graft, facilitatinghandling. Flush and loosely pack the recipient site with graftmaterial. Close subcutaneous tissues around the graft to hold itin position.
Proximal Tibia: Incise the skin and subcutaneous tissueover the medial surface of the proximal tibia. Harvest can-cellous bone as previously described (Plate 48C). Closure isroutine.
Iliac Wing: Incise the skin over the craniodorsal iliac spine.Incise subcutaneous tissues, and expose the dorsal surface ofthe iliac wing. Elevate the musculature from the lateral surface and medial surfaces of the craniodorsal portion of the iliac wing. Obtain a corticocancellous graft by using anosteotome to remove a cortical wedge from the iliac wing.Harvest cancellous bone from between the inner and outer cor-tical bone of the iliac body with a bone curette (Plate 48D).Macerate the wedge with rongeurs, and place it into the recip-ient site. Closure is routine.
CAUTIONSAvoid open physes in immature animals. Avoid penetrating thearticular surface or other cortical surfaces with the curette.Create round holes in the long bone cortex to minimize stressconcentration and possible fracture. If the recipient site isinfected, or is the site of a tumor, harvest the graft first to avoidcontamination of the donor site. Alternatively, use a separatesurgical team and instrumentation to harvest the graft.
POSTOPERATIVE EVALUATIONWound healing at the donor site should be evaluated when therecipient site procedure is evaluated.
POSTOPERATIVE CARERoutine procedures for caring for a surgical wound should befollowed.
EXPECTED OUTCOMEBone formation should be seen at the recipient site by 12 weeksafter surgery. Complications at the donor site include seromaformation; infection; and, rarely, fracture. Complications at therecipient site (e.g., failure of grafts to stimulate bone formation)are difficult to recognize.
Reference1. Johnson AL, Hulse DA: Fundamentals of orthopedic surgery and
fracture management, bone grafts. In Fossum TW (ed): SmallAnimal Surgery, 2nd ed. St. Louis, Mosby, 2002.
134 PART TWO • SURGICAL PROCEDURES FOR FRACTURES

CH A P T E R 48 CANCELLOUS BONE AUTOGRAFT 135
PLATE 48
A B
C D
Deltoidmuscle
Syringewith blood
Osteotomeblade
Curette

MANDIBLE
CHAPTER 49 Mandibular Symphyseal FracturesINDICATIONSCandidates include animals with mandibular symphyseal frac-tures.
OBJECTIVES• To reduce and stabilize the symphyseal fracture and restore
dental alignment and occlusion
ANATOMIC CONSIDERATIONSRealignment of dental occlusion is important for return to function.
EQUIPMENT• Scalpel blade, 18- to 20-gauge (for dogs) or 20- to 22-gauge
(for cats) orthopedic wire, hypodermic needles sized toaccommodate the orthopedic wire, wire tightener, wire cutter
PREPARATION AND POSITIONINGPrepare the ventral aspect of the mandible for aseptic surgery.Rinse the mouth with an antiseptic. Position the animal indorsal recumbency. It is not necessary to drape the mandiblefor an isolated symphyseal fracture.
PROCEDUREApproach: Make a small incision in the skin overlying theventral aspect of the symphysis.
Reduction: Reduce and hold the symphysis with digitalpressure applied to the mandibular canine teeth (Plate 49A).
Stabilization: Insert the hypodermic needle through theskin incision and along one lateral mandibular surface (underthe subcutaneous tissues). Exit the needle in the oral cavitycaudal to the canine tooth, and thread an 18- or 20-gauge wirethrough the needle (Plate 49B). Remove the needle and reposi-tion it on the opposite side of the mandible. Curve the wire
across and behind the canine teeth, and reinsert it through thehypodermic needle to exit from the skin incision at the originalinsertion point (Plate 49C). Remove the needle. While holdingthe fracture in reduction, tighten the wire (Plate 49D). Leave the ends of the wire exposed through the skin incision, andbend them to decrease the possibility of injury to the owner(Plate 49E).1
CAUTIONSThe incisor alignment should be observed when tightening thewire, and dental occlusion should be checked after the wire istightened.
POSTOPERATIVE EVALUATIONRadiographs should be taken to evaluate symphyseal reductionand implant placement.
POSTOPERATIVE CAREIt is important to clean the wire daily where it is exposed ven-trally. Hard food, chew toys, and tug of war games should beeliminated until the fracture has healed.
EXPECTED OUTCOMESymphyseal union is usually seen in 6 to 12 weeks.Radiographic evidence of bone bridging or callus formation isusually not evident. Once the fracture has stabilized, the wirecan be removed by cutting it with wire scissors where it isexposed behind the canine teeth and extracting it by the twist.
Reference1. Johnson AL, Hulse DA: Management of specific fractures: Maxillary
and mandibular fractures. In Fossum TW (ed): Small AnimalSurgery, 2nd ed. St. Louis, Mosby, 2002.
136 PART TWO • SURGICAL PROCEDURES FOR FRACTURES

CH A P T E R 49 MANDIBULAR SYMPHYSEAL FRACTURES 137
PLATE 49
A
C
B
D
E

MANDIBLE
CHAPTER 50 Transverse and ObliqueMandibular Body FracturesINDICATIONSCandidates include animals with single fracture lines of the mandibularbody that can be anatomically reconstructed.
OBJECTIVES• To restore dental occlusion by anatomic reconstruction of the fracture
Stable internal fixation allows a rapid return to function and minimizes aftercare.
ANATOMIC CONSIDERATIONSThe mandibular body is easily palpated and surgically approachedthrough the skin and subcutaneous tissue. The mandibular alveolarnerve, which is sensory to the teeth of the mandible, passes through themandibular canal along with the mandibular alveolar artery. Thesestructures are often damaged during mandibular fractures, althoughclinical signs are seldom evident. Tooth roots must be avoided whenplacing implants.
EQUIPMENT• Surgical pack, Gelpi retractors, Senn retractors, small Hohmann
retractors, periosteal elevator, baby Kern bone-holding forceps, smallpointed reduction forceps, high-speed Kirschner wire driver or Jacobpin chuck, Kirschner wires, orthopedic wire, wire-tighteners, wirecutters
PREPARATION AND POSITIONINGPrepare the ventral aspect of the mandible for surgery. Rinse the mouthwith an antiseptic. Position the animal in dorsal recumbency, andsecure the maxilla to the table by placing adhesive tape from one tableedge across the maxilla to the opposite table edge. Drape the mandibleout to allow maximal manipulation during surgery by placing one of thedrapes into the mouth to cover the maxilla. A cancellous bone graft is usually not necessary.
PROCEDUREApproach: Incise the skin on the ventral midline between themandibles. Extend the incision from the symphysis to 1 cm to 2 cmcaudal to the angular process of the mandibles. Move this incision ineither direction to expose both mandibles. If only one mandible isinvolved, incise directly over that mandible. Incise the subcutaneoustissue to expose the ventral portions of the mandibles. Elevate soft tissues from both sides of the mandibles to expose the fracture(s).Preserve the digastricus muscle attachments (Plate 50A1).1
Reduction: Reduce the fracture by securing each bone segmentwith Kern bone-holding forceps and then manipulating them intoanatomic alignment. Maintain reduction manually (with transverse fractures) or with pointed reduction forceps (for oblique fractures).Because there is little musculature around the mandibular body, reduc-tion is usually easily accomplished. Anatomic reduction of themandibular cortex will realign the teeth.
Stabilization: For transverse fractures, drill a hole with theKirschner wire. Start on the lateral aspect of the cranial mandibular segment, 0.5 cm to 1 cm from the fracture line and close to the oral edgeof the mandible. Aim the wire to exit on the medial side of the mandible,
slightly closer to the fracture line (see Plate 50A1). Drill a similar holeon the caudal segment at the same level in the bone so the wire will beplaced perpendicular to the fracture. Feed a 12- to 18-inch strand oforthopedic wire through each pair of holes, starting and finishing on thelateral aspect of the mandible. Hold the fracture in reduction, and twistthe wire (Plate 50A2). To ensure the wire contacts the medial cortex,place a forceps between the twist and the lateral mandible, and leverthe wire away from the bone. Finish tightening the wire, cut the excess,and bend the remaining twist into the bone (Plate 50A3). The interfrag-mentary wires applied perpendicular to the fracture line will result incompression at the fracture. Transverse fractures are best stabilizedwith two wires (Plate 50B1); occasionally, however, one wire in the rostral mandible is sufficient (Plate 50B2). Interdental wiring may com-plement the interfragmentary wire (Plate 50B3). For oblique fractures,follow the previous steps, taking care to orient the wire perpendicularto the fracture. Stabilize caudal-to-rostral oblique fracture with twowires placed at right angles to each other (Plate 50C). Stabilize medial-to-lateral oblique fracture with two wires placed perpendicular to eachother in two planes (Plate 50D).2 In both cases, the second wire prevents overriding of the fracture as the wires are tightened.
Evaluate the oral cavity for open wounds. If large wounds arepresent, close the mucosa partially to decrease their size. Do not com-pletely close contaminated wounds; to do so would prevent postopera-tive drainage. Place a Penrose drain if infection is present or likely to bepresent. Suture the subcutaneous tissue over the mandibles. Suture theskin incision.
CAUTIONSTooth roots should be avoided when drilling through the bone. It isimportant to check that interfragmentary wires lie flat against the bonesurface.
POSTOPERATIVE EVALUATIONDental occlusion should be evaluated. Radiographs should be taken toevaluate bone alignment and implant placement.
POSTOPERATIVE CAREOral exercise should be limited, soft foods should be provided, and nochew toys should be allowed. Radiographs should be repeated at 6-week intervals until bone bridging occurs.
EXPECTED OUTCOMEBone healing is usually seen in 6 to 12 weeks. Animals generally expe-rience an excellent return to function if dental occlusion is normal.Intraoral wires are removed after fracture healing, but interfragmentarywires remain in place unless they cause a problem. Damaged teeth mayrequire endodontic care or extraction.
References1. Piermattei DL, Johnson KA: An Atlas of Surgical Approaches to the
Bones and Joints of the Dog and Cat, 4th ed. Philadelphia, WBSaunders, 2004.
2. Rudy RL, Boudrieau RJ: Maxillofacial and mandibular fractures.Sem Vet Med Surg Small Anim 7:3, 1992.
138 PART TWO • SURGICAL PROCEDURES FOR FRACTURES

CH A P T E R 50 TRANSVERSE AND OBLIQUE MANDIBULAR BODY FRACTURES 139
PLATE 50
B1
A1A2 A3
B2
B3
C
D
Branch of facialartery and vein
Myelohyoideusmuscle
Hemimandible
Digastricusmuscle

MANDIBLE
CHAPTER 51 Comminuted Mandibular Body FracturesINDICATIONSCandidates include animals with comminuted fractures of themandibular body that cannot be anatomically reconstructed.
OBJECTIVES• To align major mandibular segments and restore dental occlusion
ANATOMIC CONSIDERATIONSThe mandibular body is easily palpated through the skin and subcuta-neous tissue. The mandibular alveolar nerve, which is sensory to theteeth of the mandible, passes through the mandibular canal along with the mandibular alveolar artery. These structures are commonlydamaged with mandibular fractures, although clinical signs are seldomevident. Tooth roots must be avoided when placing fixation pins.Normal occlusion is assessed by observing the unobstructed interdigi-tation of the mandibular canine teeth between the maxillary incisorsand canine teeth and the mandibular fourth premolar positionedbetween the maxillary third and fourth premolars.
EQUIPMENT• Surgical pack, low-speed power drill, Jacob pin chuck, positive
profile threaded external fixation pins, external fixator equipment,methyl methacrylate acrylic
PREPARATION AND POSITIONINGTo gain an unobstructed view of dental occlusion, place an endotra-cheal tube via a pharyngotomy incision. Insert an index finger into theoral cavity, and locate the pharyngeal area immediately cranial to thehyoid bones. Incise skin, subcutaneous tissues, and mucous membraneto create a passage for the endotracheal tube. Place a forceps throughthe surgically created passage to grasp the endotracheal tube (with connector removed), and reroute it (Plate 51A).1 Prepare the ventralaspect of the mandible for aseptic surgery. Rinse the mouth with anantiseptic. Position the animal in dorsal recumbency, and secure themaxilla to the table by placing adhesive tape from one table edge acrossthe maxilla to the opposite table edge. Drape the mandible out to allowmaximal manipulation during surgery by placing one of the drapes intothe mouth to cover the maxilla and the rest of the drapes securedaround the mandible. A cancellous bone graft is not generally used withclosed reduction.
PROCEDUREApproach: There is no surgical approach to the fracture site forclosed reduction of comminuted fractures, only the approaches for thefixation pin insertion. Incise the skin at each pin insertion site. Dissectthe overlaying soft tissues to gain access to the bone surface.
Reduction: After the fixation pins are placed, use them as ahandle to realign the major bone segments so the dental occlusion isrestored. Maintain the reduction manually or by securing two fixationpins on each side of the mandible with clamps and connecting bars(biphasic splint) (Plate 51B). Remove the clamps and bars after theacrylic is placed.
Stabilization: Insert at least two and, if possible, three fixationpins into each major bone segment by predrilling a pilot hole andplacing the pins with a pin chuck. Bend or notch the free ends of thepins to enhance acrylic purchase. Mix methyl methacrylate acrylic untilit becomes doughy (3 to 4 minutes). Mold the acrylic to form a con-necting column incorporating all of the pins at a distance of 1 cm to2 cm from the skin. Place saline moistened sponges around the fixationpins to dissipate the heat generated by the methyl methacrylate. Checkthe fracture reduction and hold it in position until the acrylic hardens (8 to 10 minutes) (Plate 51C).1
Evaluate the oral cavity for open wounds. If large wounds arepresent, close the mucosa partially to decrease their size. In order to allow postoperative drainage, do not close contaminated woundscompletely.
CAUTIONSTooth roots should be avoided when drilling through the bone.
POSTOPERATIVE EVALUATIONDental occlusion should be evaluated. Radiographs should be evaluatedfor bone alignment and implant placement.
POSTOPERATIVE CAREThe skin and the apparatus should be cleaned daily to avoid food accu-mulation and skin excoriation. Oral exercise and soft foods should belimited, and no chew toys should be allowed. Radiographs should berepeated at 6-week intervals until bone bridging occurs. After the frac-ture has healed, the external fixator should be removed by cutting eachpin to remove the acrylic frame and then removing individual pins.
EXPECTED OUTCOMEBone healing is usually seen in 12 to 18 weeks. Large gaps may benefitfrom cancellous bone autograft if healing appears delayed. Excellentreturn to function is expected if dental occlusion is restored.
Reference1. Egger EL: Skull and mandibular fractures. In Slatter D (ed):
Textbook of Small Animal Surgery, 2nd ed. Philadelphia, WBSaunders, 1993.
140 PART TWO • SURGICAL PROCEDURES FOR FRACTURES

CH A P T E R 51 COMMINUTED MANDIBULAR BODY FRACTURES 141
PLATE 51
CB
A
Thyroid cartilage
Trachea
Point ofincision
Endotracheal tubererouted throughpharyngotomy incision

SCAPULA
CHAPTER 52 Transverse Scapular Body FracturesINDICATIONSCandidates include animals with folding or displaced scapularbody fractures.
OBJECTIVES• To restore normal anatomic contour to the shoulder area and
internally splint the fracture
ANATOMIC CONSIDERATIONSPalpable landmarks are the spine and the acromial process ofthe scapula; and the cranial, dorsal, and caudal borders ofthe scapula. The body and spine of the scapula are easilyapproached with dissection and elevation of muscle. Thesuprascapular nerve runs over the scapular notch and under theacromion process.1
EQUIPMENT• Surgical pack, Senn retractors, Hohmann retractors, Gelpi
retractors, periosteal elevator, pointed reduction forceps,plating equipment, high-speed drill
PREPARATION AND POSITIONINGPrepare the scapular region from dorsal midline to carpus.Position the animal in lateral recumbency with the affectedlimb up. Drape the limb out from a hanging position to allowmaximal manipulation during surgery. A cancellous bone graftis usually not necessary.
PROCEDUREApproach: Incise the skin and subcutaneous tissue thelength of the spine distally to the shoulder joint. Transect theomotransversarius muscle from the spine, and reflect it cranially. Incise trapezius and scapular parts of the deltoideusmuscles from the spine, and reflect them caudally. Incise the supraspinatus and infraspinatus muscular attachments tothe spine, and elevate these muscles from the scapular body(Plate 52A).2
Reduction: Use a periosteal elevator or small Hohmannretractor as a lever to reduce the transverse fracture.Alternatively, secure the spine on the proximal segment and the
distal segment with pointed reduction forceps, and lift the bonesegments out of the soft tissues until the fracture ends areapposed. While maintaining contact, slowly replace the frag-ments into the reduced position. Maintain reduction manually(see Plate 52A).
Stabilization: Lay an appropriately contoured veterinarycuttable plate(s) across the fracture on the cranial portion ofthe body of the scapula, and secure with screws placed throughthe distal and proximal plate holes (Plate 52B). Direct thescrews into the thick bone at the junction of the spine and bodyof the scapula (Plate 52C). Place additional screws in plateholes close to the fracture. Fill additional plate holes withscrews. Alternate plate holes may be filled (see Plate 52B).When additional support is needed, the veterinary cuttableplates can be stacked, an additional plate can be positioned onthe caudal border of the scapula (Plate 52D), or both.
CAUTIONSIt is important to avoid placing screws in the thin bone of thebody of the scapula.
POSTOPERATIVE EVALUATIONRadiographs should be evaluated for reduction and implantposition.
POSTOPERATIVE CAREThe animal should be confined, with activity limited to leashwalking, until the fracture has healed. Radiographs should berepeated at 6-week intervals until the fracture is healed.
EXPECTED OUTCOMEBone healing is usually seen in 12 to 18 weeks. Excellent returnto function is expected.
References1. Jerram RM, Herron MR: Scapular fractures in dogs. Comp Cont
Educ Small Animal 20:1254, 1998.2. Piermattei DL, Johnson KA: An Atlas of Surgical Approaches to the
Bones and Joints of the Dog and Cat, 4th ed. Philadelphia, WBSaunders, 2004.
142 PART TWO • SURGICAL PROCEDURES FOR FRACTURES

CH A P T E R 52 TRANSVERSE SCAPULAR BODY FRACTURES 143
PLATE 52
C
B
A
D
Infraspinatusmuscle
Acromionprocess
Long head oftriceps muscle
Supraspinatusmuscle

SCAPULA
CHAPTER 53 Supraglenoid Tuberosity FracturesINDICATIONSCandidates include animals with avulsion fractures of thesupraglenoid tuberosity.
OBJECTIVES• To restore the articular surface and compress the fracture
with a lag screw or tension band wire
ANATOMIC CONSIDERATIONSThe biceps brachii muscle originates from the supraglenoidtuberosity. The supraglenoid tuberosity is part of the articularsurface of the scapula. The suprascapular nerve runs over thescapular notch and under the acromion process.
EQUIPMENT• Surgical pack, Senn retractors, Hohmann retractors, Gelpi
retractors, periosteal elevator, osteotome and mallet or oscil-lating saw, pointed reduction forceps, Kirschner wires, ortho-pedic wire, high-speed drill and wire driver, bone screws andinstruments for inserting bone screws, metal washer orspiked Teflon washer, wire twister, wire cutter
PREPARATION AND POSITIONINGPrepare the forelimb circumferentially from dorsal midline tocarpus. Position the animal in lateral recumbency. Drape thelimb out from a hanging position to allow maximal manipula-tion during surgery. A cancellous bone graft is not necessary.
PROCEDUREApproach: Incise the skin and subcutaneous tissue from themiddle portion of the scapular spine distally to the shoulderjoint. Incise the attachments of the omotransversarius,trapezius, and scapular head of the deltoideus muscles to thescapula to expose the acromion process. Osteotomize theacromion process, and reflect it distally with the acromial headof the deltoideus muscle. Reflect the supraspinatus muscleaway from the scapular spine and neck. Identify and protect thesuprascapular nerve. Incise the joint capsule to observe thearticular surface during reduction. For additional exposure,osteotomize the greater tubercle and reflect the supraspinatusmuscle proximally (Plate 53A).1
Reduction: Extend the shoulder and reduce the fragment.Maintain reduction with pointed reduction forceps (Plate 53B).
Stabilization: To place a lag screw, drill an appropriate-sized glide hole in the fragment. Place a corresponding drillsleeve in the glide hole and drill, measure, and then tap thethread hole to accept the appropriate screw (see Plate 53B). A cancellous screw is preferred if size permits. A washer may
be used if the bone is soft. To place a tension band wire, starttwo Kirschner wires in the fragment, and drive them across thefracture line to lodge in the main bone segment. Place a trans-verse drill hole in the main bone segment, pass a figure-eightwire through the hole and around the Kirschner wires, andtighten the figure-eight wire. Bend the Kirschner wires androtate the ends over the biceps tendon (Plate 53C).2,3 Forchronic cases, where fracture reduction is impossible, attachthe biceps tendon to the proximal humerus with a bone screwand spiked Teflon washer.3 Reattach the greater tubercle withlag screws (Plate 53D). Repair the acromion osteotomy with atension band wire (Plate 53E).
CAUTIONSArticular reduction should be maintained during implant appli-cation. It is important to avoid injuring or entrapping thesuprascapular nerve.
POSTOPERATIVE EVALUATIONRadiographs should be evaluated for articular surface reductionand implant placement.
POSTOPERATIVE CAREThe forelimb should be in a sling for 2 weeks to prevent weight bearing and to protect the fracture repair.3 The animalshould be confined, with activity limited to leash walking, untilthe fracture has healed. Radiographs should be repeated at 6-week intervals until the fracture(s) is healed. The animalshould be slowly returned to normal activity after the fractureis healed.
EXPECTED OUTCOMEBone healing is usually seen in 6 to 12 weeks. A good return tofunction is expected, although some degree of lameness maypersist.2 Degenerative joint disease may result from articulartrauma, with the severity depending on accuracy and mainte-nance of reduction. Implant removal may be necessary if softtissues are irritated.
References1. Piermattei DL, Johnson KA: An Atlas of Surgical Approaches to the
Bones and Joints of the Dog and Cat, 4th ed. Philadelphia, WBSaunders, 2004.
2. Johnston SA: Articular fractures of the scapula in the dog: A clinicalretrospective study of 26 cases. J Am Anim Hosp Assoc 29:157, 1993.
3. Piermattei DL, Flo GL: Fractures of the scapula. In Brinker,Piermattei, and Flo’s Handbook of Small Animal Orthopedics andFracture Repair, 3rd ed. Philadelphia, WB Saunders, 1997.
144 PART TWO • SURGICAL PROCEDURES FOR FRACTURES

CH A P T E R 53 SUPRAGLENOID TUBEROSITY FRACTURES 145
PLATE 53
Suprascapularnerve
Infraspinatusmuscle
Teres minormuscle
Humeralhead
Glenoid
Osteotomyline
B
A
C
D
E

SCAPULA
CHAPTER 54 Intra-articular and Scapular Neck FracturesINDICATIONSCandidates include animals with T fractures of the scapularneck, or with scapular neck fractures without an intra-articularcomponent.
OBJECTIVES• To achieve anatomic articular surface reduction and rigid
immobilization of the fracture
ANATOMIC CONSIDERATIONSOsteotomy of the acromion process allows reflection of a por-tion of the deltoideus muscle and visualization of the joint. Thesuprascapular nerve and artery course over the scapular notchand under the acromial process, and should be avoided. Theaxillary artery and nerve are located immediately caudal to thejoint, but these are not usually visualized with routineapproaches.1
EQUIPMENT• Surgical pack, Senn retractors, Hohmann retractors, Gelpi
retractors, periosteal elevator, pointed reduction forceps,osteotome and mallet or oscillating saw, plating equipment,high-speed drill and wire driver, Kirschner wires, orthopedicwire, wire twisters, wire cutters
PREPARATION AND POSITIONINGPrepare the forelimb from dorsal midline to carpus. Position theanimal in lateral recumbency, with the affected limb up. Drapethe limb out from a hanging position to allow maximal manipu-lation during surgery. A cancellous bone graft is generally notneeded.
PROCEDUREApproach: Incise the skin and subcutaneous tissue from themiddle portion of the scapular spine distally to the shoulderjoint. Incise the attachments of the omotransversarius, trapezius,and scapular head of the deltoideus muscles to the scapula toexpose the acromion process. Osteotomize the acromion process,and reflect it distally with the acromial head of the deltoideusmuscle. Reflect the supraspinatus and infraspinatus musclesaway from the scapular spine and neck. Identify and protect thesuprascapular nerve. If needed for complete joint exposure,tenotomize the infraspinatus muscle. Incise the joint capsule toobserve the articular surface during reduction (Plate 54A). Foradditional exposure, osteotomize the greater tubercle of thehumerus and reflect the supraspinatus muscle.1 (See surgicalprocedure for supraglenoid tuberosity fracture, Chapter 53.)
Reduction: Reduce the intra-articular fracture anatomi-cally, and maintain reduction with pointed reduction forceps(Plate 54B). After lag screw fixation of the intra-articular fracture, reduce the neck fracture by carefully levering it intoposition. Maintain reduction manually.
Stabilization: Reflect the cranial fragment, and drill aglide hole from the center of the fracture surface to exit proxi-mally to the supraglenoid tuberosity prior to reducing the frac-ture. Reduce the fracture, and secure the reduction withpointed reduction forceps. Place an appropriate-sized drillsleeve in the glide hole and drill, measure, and then tap thethread hole to accept the appropriate screw (see Plate 54B).Reduce the neck fracture, and stabilize it with a small L plate(Plate 54C) or a veterinary cuttable plate or plates (Plate 54D).Close the joint capsule, and re-appose the infraspinatus tendonwith a tendon suture. Repair the acromion osteotomy with atension band wire (Plate 54E).2,3
CAUTIONSArticular reduction should be maintained during implant appli-cation. It is important to avoid injuring or entrapping thesuprascapular nerve.
POSTOPERATIVE EVALUATIONRadiographs should be evaluated for reduction and implantposition.
POSTOPERATIVE CAREThe forelimb should be in a sling for 2 weeks to prevent weightbearing and to protect the fracture repair.3 Physical therapyshould be performed, flexing and extending the shoulder dailyafter the sling is removed, until adequate range of motionreturns. The animal should be confined, with activity limited toleash walking, until the fracture has healed. Radiographs shouldbe repeated at 6-week intervals until the fracture is healed. Theanimal should slowly be returned to normal activity after thefracture is healed.
EXPECTED OUTCOMEBone healing is usually seen in 12 to 18 weeks. Animals shouldexperience a fair return to function, although some degree oflameness may persist.2 Decreased shoulder range of motionoccurs but has a minimal effect on function. Atrophy of theshoulder muscles occurs if the suprascapular nerve is damaged.Degenerative joint disease may result from articular trauma,with the severity depending on accuracy and maintenance ofreduction. Implant removal may be necessary if soft tissues areirritated.
References1. Piermattei DL, Johnson KA: An Atlas of Surgical Approaches to the
Bones and Joints of the Dog and Cat, 4th ed. Philadelphia, WBSaunders, 2004.
2. Johnston SA: Articular fractures of the scapula in the dog: A clinicalretrospective study of 26 cases. J Am Anim Hosp Assoc 29:157, 1993.
3. Piermattei DL, Flo GL: Fractures of the scapula. In Brinker,Piermattei, and Flo’s Handbook of Small Animal Orthopedics andFracture Repair, 3rd ed. Philadelphia, WB Saunders, 1997.
146 PART TWO • SURGICAL PROCEDURES FOR FRACTURES

CH A P T E R 54 INTRA-ARTICULAR AND SCAPULAR NECK FRACTURES 147
PLATE 54
C D
B
E
ASuprascapularnerve
Infraspinatusmuscle
Teres minormuscle
Humeralhead
Glenoid
Deltoideusmuscle

HUMERUS
CHAPTER 55 Proximal Humeral Physeal FracturesINDICATIONSCandidates include animals with Salter I and Salter III fracturesof the proximal humeral physes.
OBJECTIVES• To achieve fracture stabilization and anatomic reduction of
the proximal humeral epiphysis and articular surface
ANATOMIC CONSIDERATIONSProximally, the greater tubercle and acromion process of thescapula are palpable. The cephalic vein courses within the sub-cutaneous tissue along the craniolateral surface of the limb. Theconfiguration of the physis and the cancellous bone surface provide some rotational stability to the fracture.
EQUIPMENT• Surgical pack, Senn retractors, Hohmann retractors, Gelpi
retractors, periosteal elevator, pointed reduction forceps,Kern bone-holding forceps, Kirschner wires or smallSteinmann pins for large dogs, pin chuck or high-speed wiredriver, wire or pin cutter
PREPARATION AND POSITIONINGPrepare the forelimb circumferentially from dorsal midline tocarpus. Position the animal in lateral recumbency, with theaffected limb up. Drape the limb out from a hanging position toallow maximal manipulation during surgery. A cancellous bonegraft is not necessary.
PROCEDUREApproach: Incise the skin and subcutaneous tissue over the craniolateral region of the proximal humerus 2 to 3 cmproximal to the greater tubercle and extending to a point nearthe midshaft of the humerus. Elevate and reflect the brachio-cephalicus muscle from the cranial surface of the bone. Elevatethe deltoideus muscle, and retract it caudally to expose theinsertions of the teres minor and infraspinatus muscles.1 Incisethrough the insertions of these two muscles, and retract themcaudally to expose the lateral surface of the proximal humerus(Plate 55A).
Reduction: Secure the greater tubercle with a pointedreduction forceps, and secure the proximal humeral diaphysiswith a Kern bone-holding forceps. Reduce the epiphyseal segment or segments by manipulating the forceps while gentlylevering the bone into position. Maintain reduction with pointedreduction forceps (Plate 55B).
Stabilization: Starting proximally at the greater tubercle,drive two Kirschner wires or Steinmann pins distally and caudally to cross the fracture line and seat in the caudal metaphysis (see Plate 55B). Stabilize Salter III fractures of the proximal physis by first securing the humeral head to theproximal humerus with two Kirschner wires (Plate 55C) andthen reducing the greater tubercle and securing it to thehumerus with two Kirschner wires or Steinmann pins (Plate55D). Reattach the incised tendons, and close the incision routinely.
CAUTIONSIt is important to avoid damaging the physeal cartilage duringreduction and to avoid penetrating the articular cartilage withthe Kirschner wires. The articular surface should be evaluatedto ensure anatomic alignment.
POSTOPERATIVE EVALUATIONRadiographs should be evaluated for reduction and implantplacement.
POSTOPERATIVE CAREThe animal should be confined, with activity limited to leashwalking. Radiographs should be evaluated in 4 weeks. Implantremoval may be indicated if soft tissue irritation occurs.
EXPECTED OUTCOMERapid bone healing is usually seen, but premature closure of thephysis may occur.
Reference1. Piermattei DL, Johnson KA: An Atlas of Surgical Approaches to the
Bones and Joints of the Dog and Cat, 4th ed. Philadelphia, WBSaunders, 2004.
148 PART TWO • SURGICAL PROCEDURES FOR FRACTURES

CH A P T E R 55 PROXIMAL HUMERAL PHYSEAL FRACTURES 149
PLATE 55
B
C
D
A
Infraspinatus muscle
Teres minor muscle
Supraspinatusmuscle
Deltoideus muscle(acromial part),retracted caudally
Triceps brachiimuscle(lateral head)
Head ofhumerus
HUMERUS
CHAPTER 56 Fractures of the Lateral Portion of the Humeral CondyleINDICATIONSCandidates include animals with Salter IV fracture of the lateralportion of the humeral condyle, or mature animals withcondylar fractures.
OBJECTIVES• To achieve anatomic alignment of the articular surface and
rigid fixation of the fracture to allow for rapid return to elbowfunction, and to minimize development of degenerative jointdisease
ANATOMIC CONSIDERATIONSThe lateral portion of the humeral condyle projects laterallyfrom the humerus and articulates with the radial head. Fracturesoccur when the animal jumps or falls, and forces are transmittedup the radius to the lateral condyle. The triceps muscle coursesin a cranial proximal direction from its insertion on the ole-cranon and crosses the humerus rather than paralleling it. Theradial nerve lies beneath the lateral head of the triceps near thedistal third of the humerus and must be identified and protected.
EQUIPMENT• Surgical pack, Senn retractors, Hohmann retractors, Gelpi
retractors, periosteal elevator, pointed reduction forceps,Kirschner wires, bone screws and instruments for insertionof bone screws, washers, high-speed drill and wire driver,wire cutter
PREPARATION AND POSITIONINGPrepare the forelimb circumferentially from dorsal midline tocarpus. Position the animal in lateral recumbency, with theaffected limb up. Drape the limb out from a hanging position toallow maximal manipulation during surgery. A cancellous bonegraft is not necessary.
PROCEDUREApproach: Incise the skin and subcutaneous tissue beginningover the distal third of the humerus, curving cranial to the lat-eral epicondyle and extending 4 cm to 5 cm distal to the joint.Incise the deep fascia along the cranial border of the lateral triceps muscle, and continue this incision across the joint over the extensors. Incise the intermuscular septum betweenthe extensor carpi radialis and the common digital extensormuscle, and continue the incision proximally through theperiosteal origin of the extensor carpi radialis muscle. Retractthe muscle cranially to expose the joint capsule and underlyinglateral condyle. Incise the joint capsule with an L-shaped inci-sion to visualize the lateral portion of the humeral condyle(Plate 56A).1
Reduction: Reduce the fracture by pushing proximally onthe medial condyle and distracting the lateral fragment distally.
Maintain reduction with pointed reduction forceps across thecondyles and across the metaphyseal portion of the fracture.
Stabilization: Reflect the lateral condyle fragment later-ally, and drill a glide hole from the center of the fracture surfaceto exit cranially and distally to the lateral epicondyle prior toreducing the fracture (Plate 56B). Reduce the fracture, andsecure the reduction with pointed reduction forceps. Place aKirschner wire perpendicular to the fracture surface and par-allel to the glide hole. Place an appropriate-sized drill sleeve inthe glide hole and drill, measure, and then tap the thread hole toaccept the appropriate screw (Plate 56C). Use a washer withthe screw to prevent subsidence of the screw head in soft bone.Place a Kirschner wire across the lateral epicondyloid crest toprovide additional stability for short oblique or tranverse frac-tures (Plate 56D).2 Stabilize long oblique metaphyseal fractureswith an additional lag screw (Plate 56E).
CAUTIONSThe radial nerve should be protected. A washer should be usedin immature dogs. The joint should be inspected to ensureanatomic alignment of the articular surface.
POSTOPERATIVE EVALUATIONRadiographs should be evaluated for fracture reduction andimplant position.
POSTOPERATIVE CAREThe animal should be confined, with activity limited to leashwalking, until the fracture is healed. Physical therapy should beperformed daily, flexing and extending the elbow, until adequaterange of motion returns. Radiographs should be evaluated in 4 to6 weeks and then at 6-week intervals until the fracture is healed.
EXPECTED OUTCOMERapid healing is usually seen in immature dogs, but prematureclosure of the physis may occur; generally this does not cause aclinical problem. Slow healing may be seen in mature dogs,especially spaniels. Animals may experience a decreased elbowrange of motion. Degenerative joint disease may occur, with theseverity depending on accuracy and maintenance of reduction.Implant removal may be necessary if soft tissues are irritated.Refracture may occur in some mature dogs after implantremoval.
References1. Piermattei DL, Johnson KA: An Atlas of Surgical Approaches to the
Bones and Joints of the Dog and Cat, 4th ed. Philadelphia, WBSaunders, 2004.
2. Johnson AL, Hulse DA: Management of specific fractures, humeralfractures. In Fossum TW (ed): Small Animal Surgery, 2nd ed. St.Louis, Mosby, 2002.
150 PART TWO • SURGICAL PROCEDURES FOR FRACTURES

CH A P T E R 56 FRACTURES OF THE LATERAL PORTION OF THE HUMERAL CONDYLE 151
PLATE 56
D
E
C
B
A
Tricepsbrachii muscle
Incision injoint capsule
Extensorcarpi
radialismuscle
Deep fascia
Lateralcondyleexposed
Common digitalextensor muscle

HUMERUS
CHAPTER 57 T or Y Fractures of the Distal HumerusINDICATIONSCandidates include animals with T or Y fractures of the distal humerus.
OBJECTIVES• To achieve anatomic alignment of the articular surface and rigid
fixation of the fracture to allow for rapid return to elbow function,and to minimize development of degenerative joint disease
ANATOMIC CONSIDERATIONSThe radial nerve lies beneath the lateral head of the triceps near thedistal third of the humerus. The median, ulnar, and musculocutaneousnerves course along the cranial edge of the medial head of the tricepsmuscle. The brachial artery and vein accompany the nerves on themedial aspect of the humerus. The medial side of the humerus is flatand straight, making it amenable to plate placement. Fitting a plate tothe lateral side of the humerus requires bending and twisting of theplate to fit the surface. The medial condyle is an extension of thehumeral shaft, allowing an intramedullary (IM) pin to travel from the medial condyle to the greater tubercle.
EQUIPMENT• Surgical pack, Senn retractors, Hohmann retractors, Gelpi retractors,
periosteal elevator, pointed reduction forceps, Kern bone-holdingforceps, high-speed power drill, IM pins and Jacob pin chuck, platingequipment, pin cutter
PREPARATION AND POSITIONINGPrepare the forelimb circumferentially from dorsal midline to carpus.Position the animal in dorsal recumbency, with the affected limb up.Drape the limb out from a hanging position to allow maximal manipu-lation during surgery. The proximal humerus serves as a cancellousbone graft donor site.
PROCEDUREApproach: Incise the skin and subcutaneous tissue beginning overthe distal third of the humerus, curving cranial to the lateral epicondyleand extending 4 cm to 5 cm distal to the joint. Incise the deep fasciaalong the cranial border of the lateral triceps muscle, and continue thisincision across the joint over the extensors. Incise the intermuscularseptum between the extensor carpi radialis and the common digitalextensor muscle, and continue the incision proximally through theperiosteal origin of the extensor carpi radialis muscle. Retract themuscle cranially to expose the joint capsule and underlying lateralcondyle. Incise the joint capsule with an L-shaped incision to visualizethe lateral humeral condyle and the articular surface (Plate 57A1). Toexpose the medial aspect of the fracture, incise the skin and subcuta-neous tissue over the medial surface of the distal humerus. Bluntly dissect the subfascial fat, and retract the nerves and vessels to exposethe humerus (Plate 57A2).1
Reduction: Reduce the articular fracture, and maintain reduc-tion with pointed reduction forceps across the condyles. Inspect thejoint surface to ensure anatomic alignment (Plate 57B). After the lagscrew is placed, reduce the humeral metaphyseal fracture. Place an IMpin up the medial portion of the condyle and across the fracture line tohelp maintain reduction (Plate 57C).
Stabilization: Stabilize the articular fracture with a lag screw.Drill a glide hole in the lateral condylar fragment. Place an appropriate-sized drill sleeve in the glide hole and drill, measure, and then tap thethread hole to accept the appropriate screw (see Plate 57B). Secure thecondyle to the humeral shaft with a plate/rod combination. Start an IMpin into the medial condyle just below the medial epicondyle.Alternatively, retrograde the IM pin from the fracture site to exit belowthe medial epicondyle. Drive the pin proximally across the fracture andup the humeral diaphysis to lodge at the greater tubercle. Place a plateacross the lateral fracture line (see Plate 57C). Cut the pin short at thedistal humerus. Alternatively, stabilize the medial and lateral fracturesby applying one plate to the medial surface of the humerus and a secondplate to the caudolateral epicondyloid crest (Plate 57D). The platesshould function as compression plates if the fractures are transverse.2
CAUTIONSThe radial nerve should be protected on the lateral approach and theneurovascular structures on the medial approach. The joint should beinspected to ensure anatomic alignment of the articular surface. Theelbow should be taken through range of motion to check for screwspenetrating the olecranon fossa.
POSTOPERATIVE EVALUATIONRadiographs should be evaluated for reduction and implant position.
POSTOPERATIVE CAREThe animal should be confined, with activity limited to leash walking,until the fracture is healed. Physical therapy should be performed daily,flexing and extending the elbow, until adequate range of motion returns.Radiographs should be repeated at 6-week intervals until the fracture ishealed.
EXPECTED OUTCOMEBone healing is usually seen in 12 to 18 weeks. Slow healing may beseen in mature dogs, especially spaniels. Animals may experiencedecreased elbow range of motion. Degenerative joint disease mayoccur, with severity depending on accuracy and maintenance of reduc-tion.3,4 The IM pin may interfere with elbow function; it should beremoved after the fracture has bridged with bone. Plate and screwremoval may be necessary if soft tissues are irritated. Refracture mayoccur in some mature dogs after implant removal.
References1. Piermattei DL, Johnson KA: An Atlas of Surgical Approaches to the
Bones and Joints of the Dog and Cat, 4th ed. Philadelphia, WBSaunders, 2004.
2. Johnson AL, Hulse DA: Management of specific fractures: Humeralfractures. In Fossum TW (ed): Small Animal Surgery, 2nd ed. St.Louis, Mosby, 2002.
3. Vannini R, Smeak DD, Olmstead ML: Evaluation of surgical repair of135 distal humeral fractures in dogs and cats. J Am Anim HospAssoc 24:537, 1988.
4. Anderson TJ, Carmicheal S, Miller A: Intercondylar humeral fracturein the dog: A review of 20 cases. J Small Anim Pract 31:437, 1990.
152 PART TWO • SURGICAL PROCEDURES FOR FRACTURES

CH A P T E R 57 T OR Y FRACTURES OF THE DISTAL HUMERUS 153
PLATE 57
C
B
D
A1 A2
Biceps brachiimuscle
Brachiocephalicusmuscle
Pronator teresmuscle
Triceps brachiimuscle(medial head)
Neurovascularbundle
Tricepsbrachiimuscle
Incision injoint capsule
Extensorcarpi
radialismuscle
Deepfascia
Lateralcondyleexposed
Common digitalextensor muscle
Lateralview
Cranialview
Caudalview

HUMERUS
CHAPTER 58 Application of an IntramedullaryPin or Interlocking Nail to the Humerus
INDICATIONSCandidates include animals with single or comminuted humeral diaphyseal fractures.
OBJECTIVES• To achieve anatomic reduction of single fracture lines or
restoration of normal bone alignment for nonreducible com-minuted fractures The intramedullary (IM) pin is used in animals with high
fracture-assessment scores. The IM pin neutralizes bendingforces at the fracture and is combined with cerclage wire forlong oblique fractures and with external fixation for transverseor short oblique fractures to neutralize rotational and axialcompressive forces. The interlocking nail (ILN) neutralizesbending, rotational, and axial compressive forces at the frac-ture; it can be used for animals with medium and low fracture-assessment scores.
ANATOMIC CONSIDERATIONSThe radial nerve lies superficial to the brachialis muscle anddeep to the lateral head of the triceps; it must be identified andprotected during the surgical approach, fracture reduction, and stabilization. The humerus has a cranial curvature thatpositions the long axis of the marrow cavity cranial to theshoulder joint, allowing normograde or retrograde placement ofan IM pin and normograde placement of the ILN. The narrowestpart of the medullary canal, the isthmus, is located within thedistal third of bone, just proximal to the supratrochlearforamen. The medial portion of the humeral condyle is theextension of the medullary canal. In cats, the median nerve andbrachial artery run through the supracondylar foramen.
EQUIPMENT• Surgical pack, Senn retractors, Gelpi retractors, Hohmann
retractors, periosteal elevator, pointed reduction forceps,Kern bone-holding forceps, Jacob pin chuck, IM pins, cer-
clage wire, wire tightener, wire cutter, low-speed drill,external fixator equipment, pin cutter, ILN equipmentincluding high-speed drill, bone curette for harvesting can-cellous graft
PREPARATION AND POSITIONINGPrepare the forelimb circumferentially from dorsal midline tocarpus. Position the animal in lateral recumbency, with theaffected limb up. Drape the limb out from a hanging position toallow maximal manipulation during surgery. Prepare the ipsi-lateral proximal humerus or ilial wing for surgery if harvestingcancellous bone.
PROCEDUREApproach: Incise the skin and subcutaneous tissues laterallyfrom the cranial border of the greater tubercle to the lateral epi-condyle. Incise the brachial fascia along the border of the bra-chiocephalicus muscle and the lateral head of the triceps.Visualize and isolate the radial nerve. Incise through theperiosteal insertion of the superficial pectoral and brachio-cephalicus muscles at their insertion on the humeral shaft.Reflect these two muscles cranially, and the brachialis musclecaudally, to expose the proximal and central humeral shaft.1 Togain further exposure of the distal humeral shaft, encircle thebrachialis muscle and the radial nerve with a Penrose drain;retract them caudally to expose the proximal and mid-diaphysisand cranially to expose the distal diaphysis. Insert the IM pininto the proximal humerus in either a normograde or retrogrademanner (Plate 58A).2 Insert the ILN in a normograde manner,starting at the greater tubercle.3 Use an “open but do not disturbthe fragments” technique to expose the proximal and distalbone segments with minimal disturbance of the fracturehematoma and bone fragments for nonreducible fractures.4
Incise the skin, and create soft tissue tunnels to the bone forfixator pin placement.
154 PART TWO • SURGICAL PROCEDURES FOR FRACTURES
Continued

CH A P T E R 58 APPLICATION OF AN IM PIN OR INTERLOCKING NAIL TO THE HUMERUS 155
PLATE 58
A
Radial nerve
Brachialismuscle
Brachiocephalicusmuscle
Superficialpectoral muscle
Greatertubercle
Deltoideus muscle(acromial part)
Penrosedrain

Reduction: Place an IM pin (sized to equal 70% to 80% ofthe medullary canal at the isthmus) in the proximal segment.Direct the pin toward the caudomedial cortex so it will seat inthe medial portion of the condyle when the fracture is reducedand the pin is driven distally.2 Retract the pin within themedullary canal of the proximal segment (see Plate 58A).Reduce transverse and short oblique fractures by tenting thebone ends and levering the bone back into position. Reducelong oblique fractures by distracting the bone segments andapproximating the fracture surfaces. Use pointed reduction for-ceps to manipulate the bone segments into reduction. Maintainthe reduction manually (for transverse fractures) or with pointedreduction forceps (for oblique fractures). Reduce comminutednonreducible fractures by distracting the distal end with the IM pin or ILN and aligning the major segments of the bone. Be sure to restore length and normal rotational alignment to the bone.
Stabilization: Apply an IM pin and type Ia external fixatorto the lateral surface of the humerus (Plate 58B). In each seg-ment, place a fixation pin in the metaphysis and a fixation pinclose to the fracture. The external fixator can be connected or “tied-in” to the IM pin in order to strengthen the fixa-tion.5 Apply an IM pin and cerclage wire to a long oblique fracture (Plate 58C). Apply an ILN and four screws to thehumerus for treatment of comminuted nonreducible fractures(Plate 58D).
CAUTIONSThe radial nerve should be identified and protected during theprocedure. It is important to avoid the distal joint surface withthe IM pin or ILN. The range of motion of the elbow should bepalpated to detect pin interference in the joint. Rotational align-ment should be monitored during the realignment of com-minuted fractures.
POSTOPERATIVE EVALUATIONRadiographs should be evaluated for bone alignment andimplant placement.
POSTOPERATIVE CAREThe animal should be confined, with activity limited to leashwalking, until the fracture has healed. External fixator manage-ment includes daily pin care and pin packing as needed.Radiographs should be evaluated in 6 weeks. Fixation pinsshould be removed after radiographic signs of bone bridging areobserved. If a tie-in is used, the top fixation pin and its connec-tion to the IM pin should be retained. Radiographs should berepeated at 6-week intervals until the fracture is healed. The IMpin should be removed when the fracture is healed.
EXPECTED OUTCOMEBone healing is usually seen in 12 to 18 weeks (depending onfracture and signalment of the animal).
References1. Piermattei DL, Johnson KA: An Atlas of Surgical Approaches to the
Bones and Joints of the Dog and Cat, 4th ed. Philadelphia, WBSaunders, 2004.
2. Johnson AL, Hulse DA: Management of specific fractures, humeralfractures. In Fossum TW (ed): Small Animal Surgery, 2nd ed. St.Louis, Mosby, 2002.
3. Dueland RT, Johnson KA, Roe SC, et al: Interlocking nail treatmentof diaphyseal long bone fractures in dogs. J AM Vet Med Assoc214:59, 1999.
4. Aron DN, Palmer RH, Johnson AL: Biologic strategies and a bal-anced concept for repair of highly comminuted long bone fractures.Compend Cont Educ Pract Vet 17:35, 1995.
5. Aron DN, Dewey C: Experimental and clinical experience with anIM pin external skeletal fixator tie-in configuration. Vet CompOrthop Traumatol 4:86, 1991.
156 PART TWO • SURGICAL PROCEDURES FOR FRACTURES

CH A P T E R 58 APPLICATION OF AN IM PIN OR INTERLOCKING NAIL TO THE HUMERUS 157
PLATE 58
B
C D

HUMERUS
CHAPTER 59 Application of a Plate to the Humerus
INDICATIONSCandidates include animals with single or comminuted humeraldiaphyseal fractures.
OBJECTIVES• To achieve anatomic reduction and compression of single
fracture lines, or restoration of normal bone alignment, innonreducible comminuted fractures The plate is used as a compression plate for transverse or
short oblique fractures; it is combined with lag screws to com-press long oblique fractures, neutralizing bending, rotational,and axial compressive forces. The plate is used as a bridgingplate for nonreducible comminuted fractures and may be com-bined with an intramedullary (IM) pin to reduce strain on theplate and to extend fatigue life of the fixation.1
ANATOMIC CONSIDERATIONSThe plate may be placed on the cranial, lateral, or medial sur-face of the humerus. The cranial and medial surfaces of thehumerus are relatively flat and amenable to plate placement.Fitting a plate to the lateral side of the humerus requiresbending and twisting of the plate to fit the surface. The radialnerve lies superficial to the brachialis muscle and deep to thelateral head of the triceps; it must be identified and protectedduring the surgical approach, fracture reduction, and stabiliza-tion. In cats, the median nerve and brachial artery run throughthe supracondylar foramen. During the medial approach to thehumerus, care must be taken to isolate and protect the median,musculocutaneous, and ulnar nerves; and the brachial arteryand vein.2 The humerus has a cranial curvature that positionsthe long axis of the marrow cavity cranial to the shoulder joint,allowing normograde or retrograde placement of an IM pin. Themedial portion of the condyle is an extension of the humeralshaft, allowing an IM pin to travel from the medial condyle tothe greater tubercle.
EQUIPMENT• Surgical pack, Senn retractors periosteal elevator, Gelpi
retractors or Hohmann retractors, Penrose drain, pointedreduction forceps, Kern bone-holding forceps, self-center-ing plate-holding forceps, Jacob pin chuck, IM pins, high-
speed drill, plating equipment, bone curette for harvestinggraft
PREPARATION AND POSITIONINGPrepare the forelimb circumferentially from dorsal midline tocarpus. Position the animal in lateral recumbency, with theaffected limb up for the craniolateral approach. Position the animal in dorsal recumbency for the medial approach to thehumerus. Drape the limb out from a hanging position to allowmaximal manipulation during surgery. Prepare the ipsilateralproximal humerus or ilial wing for surgery to harvest cancel-lous bone.
PROCEDUREApproach: Incise the skin and subcutaneous tissues laterallyfrom the cranial border of the greater tubercle to the lateral epi-condyle. Incise the brachial fascia along the border of the bra-chiocephalicus muscle and the lateral head of the triceps.Visualize and protect the radial nerve. Incise through theperiosteal insertion of the superficial pectoral and brachio-cephalicus muscles at their insertions on the humeral shaft.Reflect these two muscles cranially, and the brachialis musclecaudally, to expose the proximal and central, cranial, or lateralhumeral shaft (Plate 59A).2 To gain further exposure of thedistal lateral humeral shaft, encircle the brachialis muscle andthe radial nerve with a Penrose drain and retract them caudally(to expose the proximal and mid-diaphysis) and cranially (toexpose the distal diaphysis).
To expose the medial aspect of the fracture, incise the skinand subcutaneous tissue over the medial surface of thehumerus from the greater tubercle to below the medial epi-condyle. Incise the deep brachial fascia along the caudal borderof the brachiocephalicus muscle and the distal portion of theinsertion of the superficial pectoral muscle. Retract the bicepsbrachii muscle and the nerves and vessels caudally (to exposethe proximal portion of the humerus) and cranially (to exposethe middle and distal portion of the humerus) (Plate 59B).2 Usean “open but do not disturb the fragments” technique to exposethe proximal and distal bone segments with minimal distur-bance of the fracture hematoma and bone fragments for nonre-ducible fractures.3
158 PART TWO • SURGICAL PROCEDURES FOR FRACTURES
Continued

CH A P T E R 59 APPLICATION OF A PLATE TO THE HUMERUS 159
PLATE 59
A B
Radial nerve
Brachialismuscle
Brachiocephalicusmuscle
Superficialpectoral muscle
Greatertubercle
Deltoideus muscle(acromial part)
Penrosedrain
Musculocutaneousnerve(proximal branch)
Musculocutaneousnerve(distal branch)
Brachiocephalicusmuscle
Biceps brachiimuscle(retractedcranially)Triceps
brachiimuscle
Superficialpectoralmuscle

Reduction: Reduce transverse and short oblique fracturesby tenting the bone ends and levering the bone back into posi-tion. Reduce long oblique fractures by distracting the bone seg-ments and approximating the fracture surfaces. Use pointedreduction forceps to manipulate the bone segments into reduc-tion. Maintain the reduction manually (for transverse fractures)or with pointed reduction forceps (for oblique fractures).Reduce comminuted, nonreducible fractures by distracting thedistal or proximal segments with an IM pin (sized to equal 40%to 50% of the medullary canal at the isthmus) and aligning themajor segments of the bone (see Plate 59A). Insert the IM pininto the proximal humerus in either a normograde or retrogrademanner. For distal fractures, start an IM pin into the medialcondyle just below the medial epicondyle. Alternatively, retro-grade the IM pin from the fracture site to exit below the medialepicondyle. Drive the pin proximally across the fracture and upthe humeral diaphysis to lodge at the greater tubercle. Be sureto restore length and normal rotational alignment to the bone.4
Stabilization: Apply an appropriately contoured plate tothe cranial, lateral, or medial surface of the humerus. The platecan function as a compression plate (Plate 59C) when used tocompress transverse or short oblique fractures; a neutralizationplate to support a reconstructed fracture (Plate 59D); or as abridging plate, spanning a nonreducible comminuted fracture(Plate 59E).5
CAUTIONSAll neurovascular structures should be identified and protectedduring the procedure. It is important to avoid the distal jointsurface and olecranon fossa with the IM pin and bone screws.The range of motion of the elbow should be palpated to detectimplant interference in the joint. Rotational alignment shouldbe monitored during the realignment of comminuted fractures.
POSTOPERATIVE EVALUATIONRadiographs should be evaluated for bone alignment andimplant placement.
POSTOPERATIVE CAREThe animal should be confined, with activity limited to leashwalking. Physical therapy may be necessary to restore elbowrange of motion. Radiographs should be evaluated in 6 weeks.The IM pin should be removed after radiographic signs of bonebridging are observed. Radiographs should be repeated at 6-week intervals until the fracture is healed. Plate removal may benecessary after the fracture heals to relieve soft tissue irritation.
EXPECTED OUTCOMEBone healing is usually seen in 12 to 18 weeks (depending onfracture and signalment of the animal).
References1. Hulse D, Hyman W, Nori M, et al: Reduction in plate strain by addi-
tion of an intramedullary pin. Vet Surg 26:451, 1997.2. Piermattei DL, Johnson KA: An Atlas of Surgical Approaches to the
Bones and Joints of the Dog and Cat, 4th ed. Philadelphia, WBSaunders, 2004.
3. Aron DN, Palmer RH, Johnson AL: Biologic strategies and a bal-anced concept for repair of highly comminuted long bone fractures.Compend Cont Educ Pract Vet 17:35, 1995.
4. Johnson AL, Hulse DA: Management of specific fractures, humeralfractures. In Fossum TW (ed): Small Animal Surgery, 2nd ed. St.Louis, Mosby, 2002.
5. Kasa F, Kasa G, Koestlin R, et al: Fractures of the humerus. In Brinker WO, Piermattei D, Flo GL (eds): Handbook of SmallAnimal Orthopedics and Fracture Repair, 3rd ed. Philadelphia, WBSaunders, 1997.
160 PART TWO • SURGICAL PROCEDURES FOR FRACTURES

CH A P T E R 59 APPLICATION OF A PLATE TO THE HUMERUS 161
PLATE 59
EC D

HUMERUS
CHAPTER 60 Application of an External Fixatorto the Humerus
INDICATIONSCandidates include animals with single or comminuted humeraldiaphyseal fractures.
OBJECTIVES• To achieve anatomic reduction of single fracture lines or
restoration of normal bone alignment in comminuted fracturesThe stiffness of the fixator can be increased in animals with
low fracture-assessment scores by adding fixation pins, usingbiplanar frames, and incorporating an intramedullary (IM) pin.1
The fracture and fixator combination, the IM pin and fixatorcombination, or the biplanar fixator alone resists axial loading,bending, and rotational forces at the fracture.
ANATOMIC CONSIDERATIONSThe radial nerve lies superficial to the brachialis muscle anddeep to the lateral head of the triceps; it must be identified andprotected during the surgical approach, fracture reduction, and fixation pin placement. The humerus has a cranial curva-ture that positions the long axis of the marrow cavity cranial tothe shoulder joint, allowing normograde or retrograde place-ment of an IM pin. The narrowest part of the medullary canal,the isthmus, is located within the distal third of bone, just prox-imal to the supratrochlear foramen. The medial portion of thehumeral condyle is the extension of the medullary canal. Incats, the median nerve and brachial artery run through thesupracondylar foramen. The proximity of the thorax prohibitsuse of bilateral frames in the proximal humerus.
EQUIPMENT• Surgical pack, Senn retractors, small Hohmann retractors,
Gelpi retractors, periosteal elevator, Kern bone-holding for-ceps, pointed reduction forceps, Jacob pin chuck, IM pins,low-speed power drill, external fixation equipment, pincutter, bone curette for harvesting graft
PREPARATION AND POSITIONINGPrepare the forelimb circumferentially from dorsal midline tocarpus. Position the animal in lateral recumbency, with theaffected limb up. Drape the limb out from a hanging position
to allow maximal manipulation during surgery. Prepare the ipsilateral proximal humerus or ilial wing for harvesting cancellous bone.
PROCEDUREApproach: Incise the skin and subcutaneous tissues laterallyfrom the cranial border of the greater tubercle to the lateral epicondyle. Incise the brachial fascia along the border of thebrachiocephalicus muscle and the lateral head of the triceps.Visualize and isolate the radial nerve. Incise through theperiosteal insertion of the superficial pectoral and brachio-cephalicus muscles at their insertions on the humeral shaft.Reflect these two muscles cranially, and the brachialis musclecaudally, to expose the proximal and central humeral shaft.2 Togain further exposure of the distal humeral shaft, reflect thebrachialis muscle cranially and the lateral triceps muscle cau-dally. Insert the IM pin into the proximal humerus in either anormograde or retrograde manner (Plate 60A). Use an “openbut do not disturb the fragments” technique to expose the prox-imal and distal bone segments with minimal disturbance of thefracture hematoma and bone fragments, or a closed reductiontechnique for nonreducible fractures.3 Incise the skin andcreate soft tissue tunnels to the bone for fixator pin placement.
Reduction: Place an IM pin (sized to equal 70% to 80% ofthe medullary canal at the isthmus) in the proximal segment.Direct the pin toward the caudal medial cortex so it will seat inthe medial portion of the condyle when the fracture is reducedand the pin is driven distally. Retract the pin within themedullary canal of the proximal segment (see Plate 60A).4
Reduce transverse and short oblique fractures by tenting thebone ends and levering the bone back into position. Reducelong oblique fractures by distracting the bone segments andapproximating the fracture surfaces. Use pointed reduction for-ceps to manipulate the bone segments into reduction. Maintainthe reduction manually (for transverse fractures) or withpointed reduction forceps (for oblique fractures). Reduce com-minuted, nonreducible fractures by distracting the distal endwith the IM pin and aligning the major segments of the bone; oruse the distal fixation pin to distract and align the bone duringclosed reduction. Be sure to restore length and normal rota-tional alignment to the bone.
162 PART TWO • SURGICAL PROCEDURES FOR FRACTURES
Continued
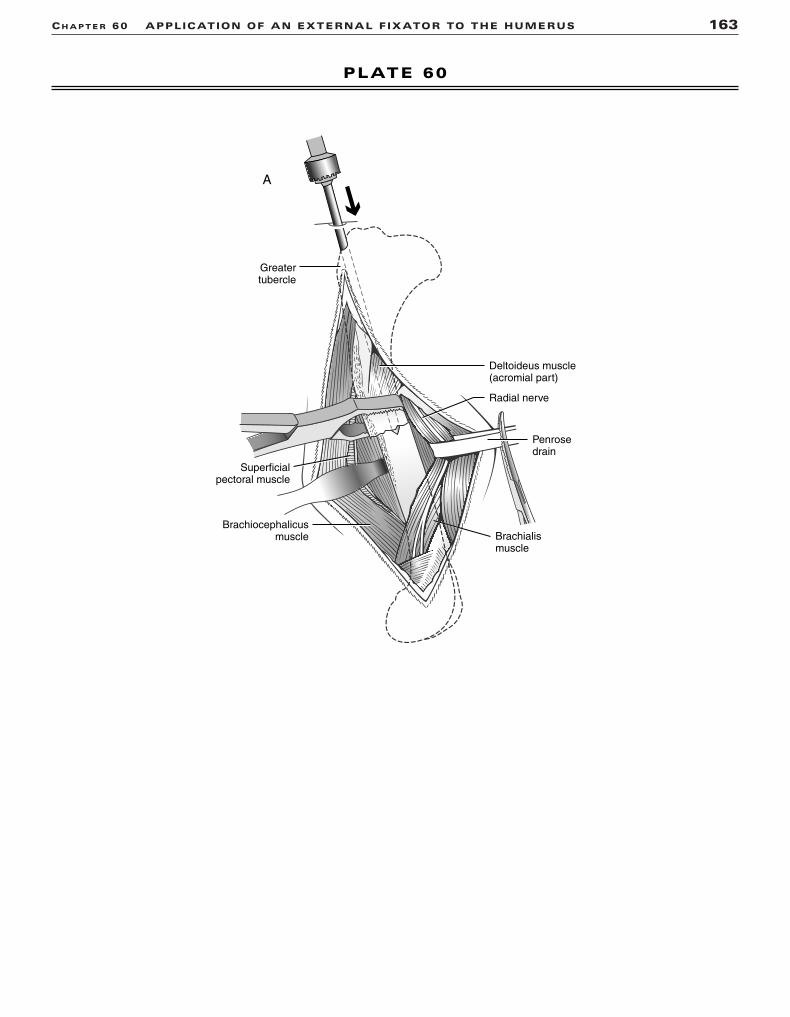
CH A P T E R 60 APPLICATION OF AN EXTERNAL FIXATOR TO THE HUMERUS 163
PLATE 60
A
Radial nerve
Brachialismuscle
Brachiocephalicusmuscle
Superficialpectoral muscle
Greatertubercle
Deltoideus muscle(acromial part)
Penrosedrain

Stabilization: Apply an IM pin and a type Ia externalfixator to the lateral surface of the humerus (Plate 60B). In eachsegment, place a fixation pin in the metaphysis and a fixationpin close to the fracture. The external fixator can be connectedor tied in to the IM pin to strengthen the fixation.5 Long obliquefractures benefit from cerclage wire in addition to the IM pin,the external fixator, or both (Plate 60C). Apply a modified typeIb external fixator to a comminuted nonreducible fracture(Plate 60D). Add an IM pin and tie it into the fixator for addi-tional stability for comminuted fractures.6
CAUTIONSIdentify and protect the radial nerve during the procedure.Avoid major nerves and vessels and joint surfaces with thefixation pins. Avoid penetrating the distal joint surface or ole-cranon fossa with the IM pin. Palpate the range of motion of theelbow to detect pin interference in the joint. Monitor rotationaland angular alignment during the reduction and fixation of com-minuted fractures.
POSTOPERATIVE EVALUATIONRadiographs should be evaluated for bone alignment andimplant placement. Angular malalignments should be correctedby loosening the clamps and realigning the fixation pins on theconnecting bar.
POSTOPERATIVE CAREGauze sponges should be packed around the pins, and thesponges should be secured with a bandage. The animal shouldbe confined, with activity limited to leash walking. Externalfixator management includes daily pin care and pin packing asneeded. Physical therapy should be instituted to restore elbowrange of motion. Radiographs should be repeated at 6-weekintervals to monitor healing. The fixator should be destabilized
by removing the unilateral frame (type Ia and IM pin) or the cra-nial frame (modified type Ib fixator) when bone bridging isobserved. If a tie-in is used, the top fixation pin and its connec-tion to the IM pin should be retained. The IM pin, the remainingexternal fixator, or both should be removed when the fractureis healed.
EXPECTED OUTCOMEBone healing is usually seen in 12 to 18 weeks (depending onfracture and signalment of the animal). The animal may experi-ence limited function while the external fixator is in place, buta good return to function can be expected.
References1. Johnson AL, Hulse DA: Fundamentals of orthopedic surgery and
fracture management, decision making in fracture management. InFossum TW (ed): Small Animal Surgery, 2nd ed. St. Louis, Mosby,2002.
2. Piermattei DL, Johnson KA: An Atlas of Surgical Approaches to theBones and Joints of the Dog and Cat, 4th ed. Philadelphia, WBSaunders, 2004.
3. Aron DN, Palmer RH, Johnson AL: Biologic strategies and a bal-anced concept for repair of highly comminuted long bone fractures.Compend Cont Educ Pract Vet 17:35, 1995.
4. Johnson AL, Hulse DA: Management of specific fractures, humeralfractures. In Fossum TW (ed): Small Animal Surgery, 2nd ed. St.Louis, Mosby, 2002.
5. Aron DN, Dewey C: Experimental and clinical experience with anIM pin external fixator tie-in configuration. Vet Comp OrthopTraumatol 4:86, 1991.
6. Aron DN: External skeletal fixation system application to thehumerus and femur. In Proceedings of the 10th Annual CompleteCourse in External Skeletal Fixation, University of Georgia,127–141, 2002.
164 PART TWO • SURGICAL PROCEDURES FOR FRACTURES

CH A P T E R 60 APPLICATION OF AN EXTERNAL FIXATOR TO THE HUMERUS 165
PLATE 60
B
DC

RADIUS
CHAPTER 61 Application of a Plate to the RadiusINDICATIONSCandidates include animals with single or comminuted radial diaphy-seal fractures or toy breed dogs with distal diaphyseal fractures.
OBJECTIVES• To achieve anatomic reduction and compression of single fracture
lines, or restoration of normal bone alignment, in nonreducible com-minuted fracturesThe plate is used as a compression plate for transverse or short
oblique fractures; it is combined with lag screws to compress longoblique fractures, neutralizing bending, rotational, and axial compres-sive forces. The plate is used as a bridging plate for nonreducible com-minuted fractures.
ANATOMIC CONSIDERATIONSThe flat cranial surface of the radius is ideal for plate placement; how-ever, interference with tendons is possible. The medial surface may beused for plate placement for distal radial fractures. The cephalic veincrosses the medial portion of the distal radius. Limited soft tissue cov-erage and marginal vascular supply contribute to a high percentage ofdelayed unions or nonunions in toy breed dogs.1
EQUIPMENT• Surgical pack, Senn retractors, Hohmann retractors, periosteal
elevator, self-centering plate reduction forceps, pointed reductionforceps, high-speed drill, plating equipment, bone curette for har-vesting graft
PREPARATION AND POSITIONINGPrepare the forelimb circumferentially from above the shoulder to thephalanges. Position the animal in dorsal recumbency. Drape the limbout from a hanging position. Roll the animal slightly to allow access tothe medial surface of the limb. The ipsilateral proximal humerus servesas a cancellous bone graft donor site.
PROCEDUREApproach: Palpate the radius directly under the skin and subcuta-neous tissue on the craniomedial surface of the limb. Incise the skin andsubcutaneous tissue to expose the radial diaphysis. Extend the incisiondistally, and elevate the extensor tendons to expose the cranial surfaceof the radius. Extend the incision proximally by incising between theextensor carpi radialis muscle and the pronator teres muscle. If needed,the insertions of the pronator and supinator muscles are incised on theradius (Plate 61A).2 Limit the exposure to the distal portion of the radiusfor distal radial diaphyseal fractures.
Reduction: Reduce transverse fractures by tenting the boneends dorsally and levering the bone back into position. Short obliquefractures may be better reduced by tenting the bone ends medially andlevering the bone back into position. Distal radial fractures may also bereduced by securing a precontoured plate to the distal segment andreducing the proximal segment to the plate. Maintain reduction bysecuring the plate with plate-holding forceps. Reduce and secure longoblique fractures with pointed reduction forceps. Reduce comminutednonreducible fractures by distracting and aligning the major segmentsof the bone while being careful not to disturb the fragments.
Stabilization: Apply an appropriately contoured plate to thecranial surface of the radius (Plate 61B1). The plate can function as acompression plate when used to compress transverse or short obliquefractures. Alternatively, a veterinary T plate or cuttable plate may beused for distal radial transverse or short oblique fractures (Plate 61B2).Round hole plates act as tension band plates and do not allow com-pression with the plate.3 A plate may also be applied to the medial sur-face of the distal radius (Plate 61B3).4 Plates are used as a neutralizationplate to support a reconstructed fracture (Plate 61C) or as a bridgingplate spanning a nonreducible comminuted fracture (Plate 61D). If addi-tional support is needed, an intramedullary pin may be placed in theulna to support the bridging plate fixation.3
CAUTIONSIn immature dogs, crossing the distal radial physis with the plate orscrews should be avoided. The articular surface should also be avoided.It is important to pay careful attention to bony anatomic landmarks toavoid rotation of the distal segment.
POSTOPERATIVE EVALUATIONRadiographs should be evaluated for fracture reduction or bone align-ment and implant placement.
POSTOPERATIVE CAREThe animal should be confined, with activity limited to leash walking.Radiographs should be evaluated in 6 weeks. The intramedullary pinshould be removed from the ulna after radiographic signs of bonebridging are observed. Radiographs should be repeated at 6-week intervals until the fracture is healed. Plate removal may be necessaryafter the fracture heals to relieve soft tissue irritation or thermal conduction.
EXPECTED OUTCOMEGenerally, bone healing is seen in 6 to 12 weeks; then good function isexpected.5 Delayed union may occur in toy breed dogs.1 Bone resorp-tion or osteopenia may occur under the plate in toy breed dogs whosefractures are stabilized with relatively large, stiff plates.5
References1. Welch JA, Boudrieau RJ, DeJardin LM, et al: The intraosseous blood
supply of the canine radius: Implications for healing of distal frac-tures in small dogs. Vet Surg 26:57, 1997.
2. Piermattei DL, Johnson KA: An Atlas of Surgical Approaches to theBones and Joints of the Dog and Cat, 4th ed. Philadelphia, WBSaunders, 2004.
3. Binnington AG, Miller CW: Fractures of the radius and ulna. InBrinker WO, Piermattei D, Flo GL (eds): Handbook of Small AnimalOrthopedics and Fracture Repair, 3rd ed. Philadelphia, WBSaunders, 1997.
4. Sardinas JC, Montavon PM: Use of a medial bone plate for repair ofradius and ulna fractures in dogs and cats: A report of 22 cases. VetSurg 26:108, 1997.
5. Larsen LJ, Roush JK, McLaughlin RM: Bone plate fixation of distalradius and ulnar fractures in small- and miniature-breed dogs. J AmAnim Hosp Assoc 35:243, 1999.
166 PART TWO • SURGICAL PROCEDURES FOR FRACTURES

CH A P T E R 61 APPLICATION OF A PLATE TO THE RADIUS 167
PLATE 61
B1
A
B3B2
C D
Superficialdigital flexormuscle
Flexor carpiradialis muscle
Pronatorteres muscle
Medianartery
Radialartery
Radius
Supinatormuscle

RADIUS
CHAPTER 62 Application of an External Fixatorto the RadiusINDICATIONSCandidates include animals with single or comminuted radial diaphy-seal fractures.
OBJECTIVES• To achieve anatomic reduction of single fracture lines or restoration
of normal bone alignment for comminuted fracturesThe stiffness of the fixator can be increased for animals with low
fracture-assessment scores by adding fixation pins and using biplanaror bilateral frames.1 The fracture and fixator combination, or the fixatoralone, resists axial loading, bending, and rotational forces at the fracture.
ANATOMIC CONSIDERATIONSThe radius has a flat, wide, cranial surface; narrow medial and lateralsurfaces; and variable cranial bowing of the diaphysis. The proximalradial joint surface parallels the distal radial joint surface when viewedon a cranial caudal radiograph. The proximal third of the bone is com-pletely covered with muscle, whereas the medial aspect of the distaltwo thirds of the radius is covered only by skin and subcutaneoustissue. The cephalic vein crosses the medial portion of the distal radius.In general, fixation pins can be applied on the cranial medial, medial, cranial lateral, and lateral surfaces of the bone.
EQUIPMENT• Surgical pack, Senn retractors, small Hohmann retractors, periosteal
elevator, pointed reduction forceps, Jacob pin chuck, low-speedpower drill, external fixation equipment, pin cutter, bone curette forharvesting cancellous graft
PREPARATION AND POSITIONINGPrepare the affected forelimb circumferentially from midline to foot.Position the animal in dorsal recumbency, and suspend the affectedlimb from the ceiling. Drape the limb out in the hanging position.Prepare the ipsilateral proximal humerus for cancellous bone autograftdonor site if open reduction is used.
PROCEDUREApproach: Perform a limited medial approach to the fracture sitefor reducible fractures (Plate 62A). Use closed reduction techniques fornonreducible fractures (Plate 62B). Incise the skin and create softtissue tunnels to the bone for pin placement.
Reduction: Lower the table to allow the animal’s weight tofatigue the muscles. For transverse fracture lines, lever the fragmentsinto position through the limited surgical approach (see Plate 62A).Maintain the reduction manually. Reduce and maintain long obliquefractures with pointed reduction forceps while lag screws or cerclagewires are applied. For closed reduction of comminuted fractures, usethe proximal and distal transfixation pins to manipulate the bone andalign the joint surfaces. Maintain reduction by securing the connectingbars. Medial and lateral angular alignment is correct when the proximaland distal joint surfaces are parallel (see Plate 62B). Cranial caudal jointsurface relationships should mimic the contralateral intact bone. Checkrotational alignment by flexing the elbow and the carpus after raisingthe table: the paw should align with the radius.
Stabilization: Apply a type Ia external fixator to the cranialmedial surface of the radius (Plate 62C). Place fixation pins in the metaphysis of each segment and close to the fracture line. Place at least
two (or preferably three) fixation pins in each bone segment. Use posi-tive profile, end-threaded pins to increase pin bone interface stability.Apply a type Ib frame by placing a unilateral frame on the cranial medialsurface of the radius and an additional unilateral frame on the craniallateral surface of the radius (Plate 62D1). Connect the biplanar frameswith articulating bars (Plate 62D2). Apply a type II frame by insertingtransfixation pins through the metaphyses and additional fixation pins 1cm to 2 cm from the fracture line. Place additional pins when there isadequate bone. If the cranial curve of the radius precludes the place-ment of transfixation pins, unilateral fixation pins can be applied to thediaphysis of the radius (Plate 62E).2,3
CAUTIONSIt is important to avoid major nerves and vessels and joint surfaces withthe fixation pins. To accommodate the width of the radius and avoidfracturing the bone, it is advisable to consider using smaller fixationpins when they are inserted medially and laterally. Angular and rotational alignment should be monitored during the reduction.Intraoperative radiographs are useful to verify joint alignment duringclosed reductions.
POSTOPERATIVE EVALUATIONRadiographs should be evaluated for fracture reduction or bone align-ment and implant placement. Angular malalignments should be corrected by loosening the clamps and realigning the fixation pins onthe connecting bar.
POSTOPERATIVE CAREGauze sponges should be packed around the pins, and the spongesshould be secured with a bandage that incorporates the paw to limitpostoperative swelling. The animal should be confined, with activitylimited to leash walking. External fixator management includes dailypin care and pin packing as needed. Radiographs should be repeated at6-week intervals to evaluate healing. The fixator should be destabilizedby removing one unilateral frame (type Ib fixator), selected fixation pins(type Ia or type II fixator), or one connecting bar (of the type II fixator)when bone bridging is observed. The external fixator should beremoved when the fracture is healed.
EXPECTED OUTCOMEBone healing is usually seen in 12 to 18 weeks, depending on fractureand signalment of the animal. Animals experience limited functionwhile the external fixator is in place but should have a good return tofunction.3
References1. Johnson AL, Hulse DA: Fundamentals of orthopedic surgery and
fracture management, decision making in fracture management. InFossum TW (ed): Small Animal Surgery, 2nd ed. St. Louis, Mosby, 2002.
2. Johnson AL, Hulse DA: Fundamentals of orthopedic surgery andfracture management, external skeletal fixators. In Fossum TW (ed):Small Animal Surgery, 2nd ed. St. Louis, Mosby, 2002.
3. Johnson AL, Seitz SE, Smith CW, et al: Closed reduction and type IIexternal fixation of severely comminuted fractures of the radius andtibia in dogs: 23 cases (1990–1994). J Am Vet Med Assoc 209:1445,1996.
168 PART TWO • SURGICAL PROCEDURES FOR FRACTURES

CH A P T E R 62 APPLICATION OF AN EXTERNAL FIXATOR TO THE RADIUS 169
PLATE 62
B
C D1
D2
E
A
Cranialview
Leftforelimb
Cranial view

RADIUS
CHAPTER 63 Distal Radial Physeal FracturesINDICATIONSCandidates include animals with Salter I and Salter II fracturesof the distal radial physis.
OBJECTIVES• To stabilize the fracture and achieve anatomic reduction of
the distal radial physis
ANATOMIC CONSIDERATIONSThe cranial medial surface of the distal radius can be easily palpated to serve as a landmark for location of the incision. Thecephalic vein crosses the medial portion of the distal radius.The common and lateral digital extensor tendons lie cranial tothe antebrachial carpal joint and may need to be retracted toexpose the antebrachial carpal joint surface. The extensor carpiradialis tendon lies over the medial aspect of the joint. The ante-brachial carpal joint is supported by the short radial collateralligaments, which arise from the medial styloid process of theradius; by the dorsal radiocarpal ligament, which arises fromthe dorsal surface of the distal radius; and by the short ulnarcollateral and radioulnar ligaments, which arise from the ulnarstyloid process.
EQUIPMENT• Surgical pack, Senn retractors, Hohmann retractors, periosteal
elevator, pointed reduction forceps, Kirschner wires or smallSteinmann pins (for large dogs), pin chuck or high-speed wiredriver, wire cutter or pin cutter
PREPARATION AND POSITIONINGPrepare the forelimb circumferentially from shoulder to thedigits. Position the animal in lateral recumbency, with theaffected limb up or in dorsal recumbency for greater flexibility.Drape the limb out from a hanging position to allow maximalmanipulation during surgery. A cancellous bone graft is notnecessary.
PROCEDUREApproach: Incise skin and subcutaneous tissue dorsally fromdistal radial diaphysis to the proximal metacarpus. Elevate and
retract the extensor tendons laterally as needed for fracturevisualization (Plate 63A).
Reduction: Carefully reduce the physeal fracture to avoidcrushing or injuring the physeal cartilage. Maintain reductionwith pointed reduction forceps or manual pressure (Plate 63B).
Stabilization with Crossed Kirschner Wires: Drivea Kirschner wire from the medial styloid process, across thephysis into the radial metaphyses, and through the lateralcortex. Drive a second wire from the lateral aspect of the distalradial epiphysis, across the fracture into the metaphysis, andthrough the medial cortex avoiding the articular surface (Plate 63C). If possible, bend the pins and cut off the excess.1
CAUTIONSIt is important to avoid damaging the physeal cartilage or articular cartilage.
POSTOPERATIVE EVALUATIONRadiographs should be evaluated for reduction and implantplacement.
POSTOPERATIVE CAREThe animal should be confined, with activity limited to leashwalking. Radiographs should be evaluated in 4 weeks. Implantremoval may be required if irritation occurs.
EXPECTED OUTCOMERapid bone healing is usually seen, but premature closure of thephysis may occur; this will cause radial shortening if the animalis still growing.
Reference1. Johnson AL, Hulse DA: Management of specific fractures, radial and
ulnar physeal fractures. In Fossum TW (ed): Small Animal Surgery,2nd ed. St. Louis, Mosby, 2002.
170 PART TWO • SURGICAL PROCEDURES FOR FRACTURES

CH A P T E R 63 DISTAL RADIAL PHYSEAL FRACTURES 171
PLATE 63
C
B
A
UlnaRadialmetaphysis
Radialdiaphysis
Radialcarpal bone

ULNA
CHAPTER 64 Proximal Ulnar FracturesINDICATIONSTransverse proximal ulnar fractures, including articular fractures, aretreated with either a tension band wire or a plate, depending on the size,activity, and healing potential of the animal. Comminuted reducibleproximal ulnar fractures, including articular fractures and comminutednonreducible ulnar fractures, are treated with reconstruction of thearticular surface and either a neutralization plate or bridging plate. Thetension band wire converts tensile forces to compressive forces at thefracture. The plate provides rigid fixation and resists axial loading,bending, and rotation.
OBJECTIVES• To convert the tensile forces resulting from the pull of the triceps
muscles to compressive forces at the fracture; to achieve anatomicreduction of the articular surface; and to neutralize the forces actingon the fracture or bridge the fracture with a plateIf an associated luxation of the radial head is present (Monteggia
fracture), reduction and stabilization of the radial head are imperative.
ANATOMIC CONSIDERATIONSLandmarks for the approach to the proximal ulna are the olecranon andthe palpable caudal border of the ulna. The articular surface of thetrochlear notch can be exposed surgically by muscle elevation. Theulnar nerve courses over the medial aspect of the elbow, caudal to themedial epicondyle.
EQUIPMENT• Surgical pack, Senn retractors, Gelpi retractors, Hohmann retractors,
periosteal elevator, pointed reduction forceps, high-speed drill and Kirschner wire driver, Kirschner wires, orthopedic wire, wiretighteners, plating equipment, bone curette for harvesting cancel-lous graft
PREPARATION AND POSITIONINGPrepare the forelimb circumferentially from shoulder to carpus.Position the animal in lateral recumbency, with the affected limb up.Drape the limb out from a hanging position to allow maximal manipu-lation during surgery. The ipsilateral proximal humerus can serve as acancellous graft harvest site.
PROCEDUREApproach: Incise the skin and subcutaneous tissue medial to thecaudal border of the ulna, starting at the olecranon and extending dis-tally over the ulnar diaphysis. Elevate the flexor carpi ulnaris and deepdigital flexor muscles medially, and the ulnaris lateralis muscle laterally,to expose the bone surface. Reflect the origin of the flexor carpi ulnarismuscle to expose the trochlear notch and articular surface (Plate 64A).1
Use an “open but do not disturb the fragments” technique to expose theproximal and distal bone segments with minimal disturbance of thefracture hematoma and bone fragments for nonreducible nonarticularfractures.2
Reduction: Extend the elbow to aid reduction. For single frac-tures, secure the proximal fragment with a pointed reduction forcepsand place it into alignment. Oblique fracture reduction may be main-tained with pointed reduction forceps, but in transverse fractures,manual maintenance of reduction is necessary. Be sure the articularsurface is anatomically aligned. Reduce comminuted, nonreducible
fractures by distracting the fracture and aligning the major segments ofthe bone. Be sure to restore length and normal rotational alignment tothe bone.
Stabilization: To stabilize a transverse or short oblique frac-ture, use a tension band wire. Start two Kirschner wires in the proximalfragment, and drive them across the fracture line to lodge in the distalbone segment. Alternatively, retrograde the Kirschner wires beforereducing the fracture. Place a transverse drill hole in the distal bonesegment, pass a figure-eight wire through the hole and around theKirschner wires, and tighten the figure-eight wire. Bend the Kirschnerwires and rotate the ends over the triceps tendon (Plate 64B).Alternatively, apply an appropriately contoured plate to the lateral sur-face of the ulna. Compress the fracture line, using the loaded drill guideto insert one or two screws (Plate 64C). To stabilize a comminutedreducible fracture, reduce the articular fragments anatomically, andcompress the fracture lines with lag screws. Apply an appropriatelycontoured plate to the lateral surface of the ulna (Plate 64D).Comminuted, nonreducible fractures that do not affect the joint surface may be bridged with a plate (Plate 64E). Plates may be appliedto the caudal surface of the ulna, if size permits.3
CAUTIONSArticular reduction should be maintained during implant application. Itis important to avoid penetrating the articular surface with implants.The hard bone of the ulna makes drilling wires difficult. It is necessaryto irrigate during drilling to reduce bone necrosis. Pin placement mustfollow the contour of the proximal ulna.
POSTOPERATIVE EVALUATIONRadiographs should be evaluated for articular surface reduction andimplant placement.
POSTOPERATIVE CAREThe animal should be confined, with activity limited to leash walking.Physical therapy should be performed daily, flexing and extending theelbow until adequate range of motion returns. Radiographs should berepeated at 6-week intervals until the fracture is healed.
EXPECTED OUTCOMEBone healing is usually seen in 6 to 18 weeks, depending on the fractureand signalment of the animal. Animals usually experience a good returnto function. Degenerative joint disease may result from articulartrauma, with severity depending on accuracy and maintenance ofreduction. Pin migration may occur with tension band wires.3 Implantremoval may be necessary if soft tissues are irritated.
References1. Piermattei DL, Johnson KA: An Atlas of Surgical Approaches to the
Bones and Joints of the Dog and Cat, 4th ed. Philadelphia, WBSaunders, 2004.
2. Aron DN, Palmer RH, Johnson AL: Biologic strategies and a balanced concept for repair of highly comminuted long bone frac-tures. Compend Cont Educ Pract Vet 17:35, 1995.
3. Muir P, Johnson KA: Fractures of the proximal ulna in dogs. VetComp Orthop Traumatol 9:88, 1996.
172 PART TWO • SURGICAL PROCEDURES FOR FRACTURES

CH A P T E R 64 PROXIMAL ULNAR FRACTURES 173
PLATE 64
C D
B
A
E
Ulnarislateralismuscle
Flexorcarpi
ulnarismuscle
(ulnar head)
Anconeusmuscle

PELVIS
CHAPTER 65 Sacroiliac LuxationINDICATIONSCandidates include animals with unstable sacroiliac luxations,especially those that cause pelvic canal narrowing.
OBJECTIVES• To restore pelvic canal width and stabilize the sacroiliac joint
ANATOMIC CONSIDERATIONSThe sacroiliac joint has two distinct components: (1) a semilunar,crescent-shaped, synovial joint and (2) a fibrocartilaginous syn-chondrosis. The landmarks of the notch on the lateral surface ofthe sacrum and the crescent-shaped auricular cartilage are usedto position the screw into the body of the sacrum.1 The sacralnerve roots and the sciatic nerve course behind the ilial body.
EQUIPMENT• Surgical pack, Senn retractors, periosteal elevator, Gelpi
retractors, blunt Hohmann retractor, Kern bone-holding forceps, bone screws and instruments for inserting screws,high-speed drill
PREPARATION AND POSITIONINGPrepare the rear limb circumferentially from dorsal midline tomid-tibia and from 10 cm cranial to the iliac crest to the tail headcaudally. Position the animal in lateral recumbency, with theaffected limb up and with the dorsal midline raised 45 degreesfrom the table. A cancellous bone graft is usually unnecessary.
PROCEDUREApproach: Incise the skin and subcutaneous tissue, begin-ning over the dorsal iliac crest and extending caudally parallelto the spine to a point even with the hip joint, to expose the iliaccrest. Incise through the periosteal origin of the middle glutealmuscle on the lateral ridge of the iliac crest and the deep glutealfascia and periosteal origin of the sacrospinalis muscle on themedial ridge of the iliac crest. The incisions merge caudally,where it may be necessary to incise through fibers of thesuperficial gluteal muscle. Reflect the ilium laterally to exposethe sacroiliac joint. Elevate the middle gluteal muscle from thelateral surface of the ilium to further expose the ilium for screwplacement.2 Position a blunt Hohmann retractor between theilium and ventral bony shelf of the sacrum, and reflect the iliumventrally to expose the sacral joint surface (Plate 65A).3
Reduction: Place a Kern bone-holding forceps on the wingof the ilium to manipulate the hemipelvis (see Plate 65C).Reduction is achieved and maintained with the bone screw.
Stabilization: Use the appropriate-sized drill bit to drill athread hole 2 mm cranial and 2 mm proximal to the center ofthe crescent-shaped articular cartilage (Plate 65B). The depthof the thread hole in the sacral body should be such that the screw tip will extend to the midline of the sacral body.4
Determine the proper location of the glide hole in the ilium bypalpating the articular prominence on the medial surface of the
iliac wing or by locating the glide hole in the caudal dorsal quad-rant of the area of the ilium under the straight portion of thedorsal iliac crest (Plate 65C). Drill the glide hole at the prede-termined position with the appropriate-sized drill bit. Advancea cancellous screw of the proper length through the glide holeuntil the tip appears on the medial surface of the ilium. Use theKern bone-holding forceps to manipulate the ilium caudally intoalignment with the articular surface of the sacroiliac joint.Visually guide the screw tip into the prepared thread hole in thesacrum, and then tighten the screw (see Plate 65C). A secondscrew may be added if room permits.5 Large or overweight dogsmay benefit from inserting a transilial bolt (generally a smallend, threaded, Steinmann pin) through the iliac wings, over thedorsal surface of L7. Bend the smooth end, and place a nut onthe threaded end to prevent pin migration (Plate 65D).5
CAUTIONSThe screw must be optimally placed into the sacral body to gainsecure bone purchase and avoid implant failure. It is importantto avoid damaging nerve roots and to avoid screw insertion intothe spinal canal.
POSTOPERATIVE EVALUATIONRadiographs should be evaluated for bone alignment andimplant placement.
POSTOPERATIVE CAREThe animal should be confined, with activity limited to leashwalking, until the fracture/luxation has stabilized. Radiographsshould be evaluated at 6 and 12 weeks after surgery.Radiographic evidence of bone bridging or callus formation atthe sacroiliac joint may or may not be evident.
EXPECTED OUTCOMEBone healing is usually seen in 6 to 12 weeks. Animals shouldexperience an excellent return to function. Implant looseningand migration, with loss of pelvic canal diameter, can occur.6
References1. DeCamp CE, Braden TD: The anatomy of the canine sacrum for lag
screw fixation of the sacroiliac joint. Vet Surg 14:131, 1985.2. Piermattei DL, Johnson KA: An Atlas of Surgical Approaches to the
Bones and Joints of the Dog and Cat, 4th ed. Philadelphia, WBSaunders, 2004.
3. Johnson AL, Hulse DA: Management of specific fractures: Sacroiliacluxations/fractures. In Fossum TW (ed): Small Animal Surgery, 2nded. St. Louis, Mosby, 2002.
4. DeCamp CE: Principles of pelvic fracture management. Sem VetMed Surg Sm Anim 7:63, 1992.
5. Piermattei DL, Flo GL: Fractures of the pelvis. In Brinker, Piermatteiand Flo’s Handbook of Small Animal Orthopedics and FractureRepair, 3rd ed. Philadelphia, WB Saunders, 1997.
6. DeCamp CE, Braden TD: Sacroiliac fracture-separation in the dog: A study of 92 cases. Vet Surg 14:127, 1985.
174 PART TWO • SURGICAL PROCEDURES FOR FRACTURES

CH A P T E R 65 SACROILIAC LUXATION 175
PLATE 65
A
D
B
C
Gluteal surfaceof wing of ilium
Intermediatesacral crest
Hohmann retractor
Middle gluteal muscle

PELVIS
CHAPTER 66 Ilial Body FracturesINDICATIONSCandidates include animals with transverse or oblique dis-placed ilial body fractures.
OBJECTIVES• To achieve anatomic fracture reduction, rigid fracture stabi-
lization, and restoration of pelvic canal width
ANATOMIC CONSIDERATIONSThe iliac wing curves medially to hold the middle and deepgluteal muscles. The bone in the tip of the iliac wing is thinand may not hold implants well. The sacroiliac joint is locatedmedially to the iliac wing. The ilial body is located between thewing of the ilium cranially and the acetabulum caudally. Thecranial gluteal artery vein and nerve lie over the ilial body andare often damaged by the injury. The sciatic nerve is locatedmedial to the ilial body. Reestablishment of ilial integrity isrequired for weight transfer from the limb to axial skeleton.With ilial fractures, the caudal fragment is often displaced medially and cranially to the wing of the ilium.
EQUIPMENT• Surgical pack, Senn retractors, periosteal elevator, Gelpi
retractors, Myerding retractors, blunt Hohmann retractor,Kern bone-holding forceps, pointed reduction forceps, plate-reduction forceps, plating equipment, high-speed drill
PREPARATION AND POSITIONINGPrepare the rear limb circumferentially from dorsal midline tomid-tibia and from 10 cm cranial to the iliac crest to the tailhead caudally. Position the animal in lateral recumbency, withthe affected limb up. Drape the limb out from a hanging positionto allow maximal manipulation during surgery. A cancellousbone graft is usually unnecessary.
PROCEDUREApproach: Incise skin and subcutaneous tissue over the ventral third of the iliac wing from the cranial extent of the iliaccrest to 1 cm to 2 cm beyond the greater trochanter caudally.Incise the fascia to separate the tensor fasciae latae muscle andmiddle gluteal muscle cranially, and the tensor fasciae latae andsuperficial gluteal muscle caudally. Sharply dissect cranially to separate the middle gluteal muscle and long head of thetensor fascia latae muscle. Elevate the deep and middle glutealmuscles from the lateral surface of the ilium. Sharply dissectthe origin of the middle gluteal from the cranial wing of theilium for additional exposure and easier reduction.1 Maintainexposure using Gelpi retractors and by placing a bluntHohmann retractor under the dorsal surface of the proximalbone segment (Plate 66A).
Reduction: Place Kern bone-holding forceps over thecaudal ilial segment, and reposition it lateral to the cranial seg-ment. Contour a plate to fit the normal curvature of the lateralsurface of the bone, using a ventrodorsal radiograph of the contralateral ilium as a guide.2 Attach the plate to the caudalsegment first with bone screws. Use a periosteal elevator as alever to help reduce transverse fractures. Use the Kern forcepsto retract the caudal segment caudally, and use pointed reduc-tion forceps to secure long oblique fractures in reduction.Clamp the cranial portion of the plate to the cranial segment ofthe ilium to obtain lateralization of the caudal ilial segment andto maintain reduction (Plate 66B).
Stabilization: Secure the plate by placing screws in thecranial segment. Screws may penetrate the sacrum for addi-tional bone purchase. Place at least three plate screws in thecranial segment and two or three (space permitting) in thecaudal segment (Plate 66C).2,3
CAUTIONSIt is important to avoid trapping the sciatic nerve during frac-ture reduction and to avoid penetrating deeply into the pelviccanal with drill bits and taps. The plate should be contoured sufficiently to open the pelvic canal.
POSTOPERATIVE EVALUATIONRadiographs should be evaluated for bone alignment andimplant placement.
POSTOPERATIVE CAREThe animal should be confined, with activity limited to leashwalking, until the fracture has healed. Radiographs should berepeated at 6-week intervals until fracture healing is observed.
EXPECTED OUTCOMEBone healing is usually seen in 6 to 12 weeks. Animals shouldexperience an excellent return to function. Generally, plates arenot removed after bone healing unless there are problems withthe implant.
References1. Piermattei DL, Johnson KA: An Atlas of Surgical Approaches to the
Bones and Joints of the Dog and Cat, 4th ed. Philadelphia, WBSaunders, 2004.
2. Johnson AL, Hulse DA: Management of specific fractures: Ilial frac-tures. In Fossum TW (ed): Small Animal Surgery, 2nd ed. St. Louis,Mosby, 2002.
3. Olmstead ML, Matis U: Fractures of the pelvis. In Brinker WO,Piermattei D, Flo GL (eds): Handbook of Small Animal Orthopedicsand Fracture Repair, 3rd ed. Philadelphia, WB Saunders, 1997.
176 PART TWO • SURGICAL PROCEDURES FOR FRACTURES

CH A P T E R 66 ILIAL BODY FRACTURES 177
PLATE 66
A
CB
Middle gluteal muscle
Shaft ofilium
Deep gluteal muscle

PELVIS
CHAPTER 67 Transverse or Short ObliqueAcetabular FracturesINDICATIONSCandidates include animals with transverse or short oblique fracturesthrough the dorsal rim of the acetabulum.
OBJECTIVES• To achieve anatomic articular surface reduction and rigid fixation to
encourage full return to function and minimize development ofdegenerative joint disease
ANATOMIC CONSIDERATIONSThe hip joint is a ball-and-socket joint composed of the femoral headand acetabulum. The normal conformation; surrounding musculature(i.e., gluteals, internal and external rotators, and the iliopsoas muscles);suction-like effect of the synovial fluid; and ligament of the femoralhead act to stabilize the joint. The articular surface is on the dorsolat-eral face of the acetabulum, with the round ligament on the medial face.The fibrous joint capsule originates from the lateral acetabular rim andinserts onto the femoral neck. The sciatic nerve courses dorsomedial tothe acetabulum.
EQUIPMENT• Surgical pack, Senn retractors, periosteal elevator, Gelpi retractors,
Myerding retractors, blunt Hohmann retractor, Kern bone-holdingforceps, pointed reduction forceps, plating equipment, high-speeddrill and K-wire driver, Kirschner wires, orthopedic wire, wire twister,wire cutter
PREPARATION AND POSITIONINGPrepare the rear limb circumferentially from dorsal midline to mid-tibia,and from 10 cm cranial to the iliac crest to the tail head caudally.Position the animal in lateral recumbency, with the affected limb up.Drape the limb out from a hanging position to allow maximal manipu-lation during surgery. A cancellous bone graft is usually unnecessary.
PROCEDUREApproach: Incise the skin and subcutaneous tissue starting 3 cm to4 cm proximal to the dorsal ridge of the greater trochanter and curving3 cm to 4 cm, following the cranial border of the femur. Incise thesuperficial leaf of the fascia lata at the cranial border of the bicepsfemoris muscle, and retract the muscle caudally. Incise the deep leaf ofthe fascia lata, and carry the incision proximally through the insertionof the tensor fasciae latae muscle at the greater trochanter and alongthe cranial border of the superficial gluteal muscle. Incise through theinsertion of the superficial gluteal muscle at the third trochanter.Reflect the superficial gluteal muscle proximally, and the biceps femoriscaudally, to find and visualize the course of the sciatic nerve. Performan osteotomy of the greater trochanter with an osteotome and mallet orwith Gigli wire. Reflect the gluteal muscles and greater trochanter fromthe joint capsule with a periosteal elevator. Pre-place a suture throughthe insertions of the gemelli muscles and tendon of the internal obtu-rator, and incise both structures together at the trochanteric fossa.Elevate the gemelli muscles from the caudolateral surface of theacetabulum with a periosteal elevator. Use the suture to retract themuscles proximally and caudally (Plate 67A). Incise the joint capsule toexpose the articular fracture.1
Reduction: Expose the tuber ischium, and place a Kern bone-holding forceps on it. Use caudal segment control to reduce the frac-
ture.2 In some cases, it is possible to maintain reduction with a pointedreduction forceps or a small Kirschner wire driven across the fracture(Plate 67B). Otherwise, maintain reduction manually. Visualize thealignment of the articular surface by distracting the femoral head fromthe acetabulum.
Stabilization: Position a contoured acetabular plate or recon-struction plate on the dorsal rim of the acetabulum so at least two platescrews secure the caudal fragment and three plate screws secure thecranial fragment3,4 (see Plate 67B). Move the plate to allow three screwspurchase in the caudal segment if the fracture involves the cranialacetabulum. Close the wound by suturing the gemelli and internal obtu-rator tendons to their point of insertion. Reduce and stabilize thegreater trochanter with two Kirschner wires and a tension band wire(Plates 67C and 67D). Suture the fascial layers, subcutaneous tissue,and skin.
CAUTIONSThe sciatic nerve must be protected. It is important to avoid penetratingdeep into the pelvic canal or into the articular surface with drill bits,taps, or screws. Accurate plate contouring is essential for maintainingarticular surface alignment.
POSTOPERATIVE EVALUATIONRadiographs should be evaluated for joint alignment and implant placement.
POSTOPERATIVE CAREThe animal should be confined, with activity limited to leash walking,until the fracture has healed. Radiographs should be repeated at 6-weekintervals until the fracture is healed. Slow leash walking and range-of-motion exercises for the hip should be encouraged.
EXPECTED OUTCOMEBone healing is usually seen in 12 to 18 weeks. Animals should experi-ence a good return to function if anatomic reconstruction is achievedand maintained. Progressive degenerative joint disease may occur ifreduction is not anatomic.5 Plate removal is generally not necessary.Kirschner wires and orthopedic wire may be removed after bonehealing if the implants irritate the soft tissues.
References1. Piermattei DL, Johnson KA: An Atlas of Surgical Approaches to the
Bones and Joints of the Dog and Cat, 4th ed. Philadelphia, WBSaunders, 2004.
2. Johnson AL, Hulse DA: Management of specific fractures:Acetabular fractures. In Fossum TW (ed): Small Animal Surgery, 2nded. St. Louis, Mosby, 2002.
3. Braden TD, Prieur WD: New plate for acetabular fractures:Technique of application and long-term follow-up evaluation. J AmVet Med Assoc 188:1183, 1986.
4. Dyce J, Houlton JEF: Use of reconstruction plates for repair ofacetabular fractures in 16 dogs. J Small Anim Pract 34:547, 1993.
5. Anson LW, DeYoung DJ, Richardson DC, et al: Clinical evaluation ofcanine acetabular fractures stabilized with an acetabular plate. VetSurg 17:220, 1988.
178 PART TWO • SURGICAL PROCEDURES FOR FRACTURES
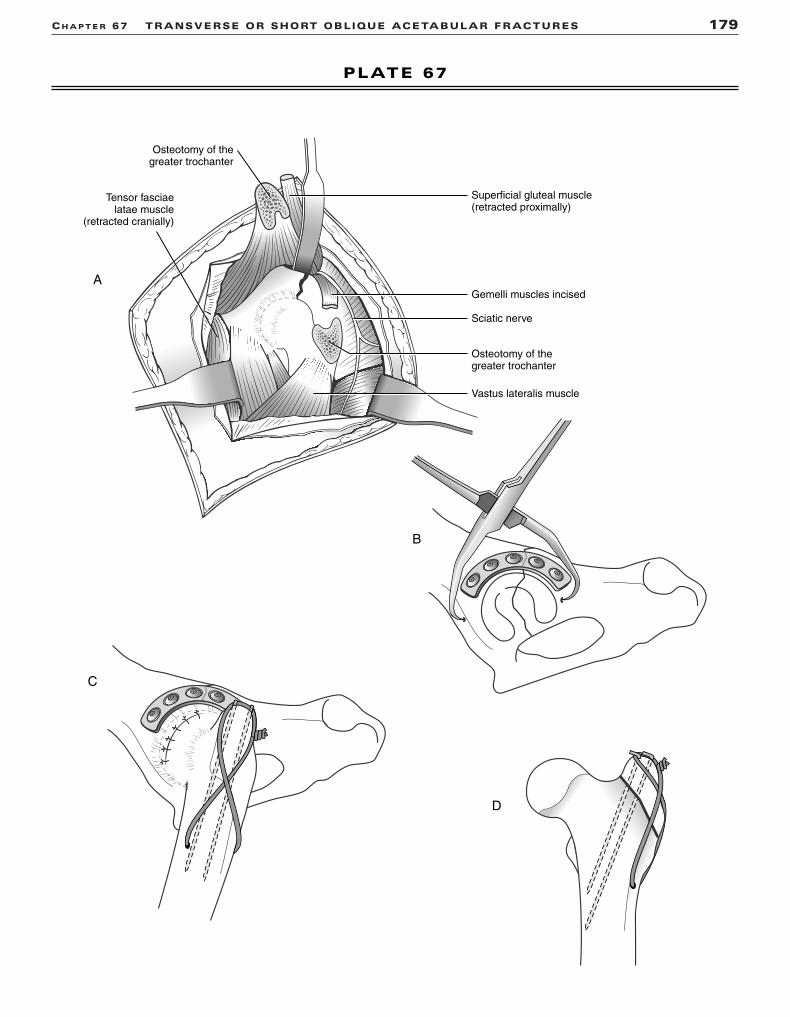
CH A P T E R 67 TRANSVERSE OR SHORT OBLIQUE ACETABULAR FRACTURES 179
PLATE 67
Superficial gluteal muscle(retracted proximally)
Gemelli muscles incised
Sciatic nerve
Vastus lateralis muscle
Tensor fasciaelatae muscle
(retracted cranially)
Osteotomy of thegreater trochanter
Osteotomy of thegreater trochanter
A
B
C
D

FEMUR
CHAPTER 68 Proximal Femoral Physeal FracturesINDICATIONSCandidates include animals with Salter I and Salter II fracturesof the physis. Occasionally this injury is accompanied by atrochanteric physeal fracture.
OBJECTIVES• To achieve anatomic reduction and fracture stabilization
ANATOMIC CONSIDERATIONSThe proximal femoral physis lies between the femoral epiphysisand femoral neck, and provides neck length until maturity. Theblood supply to the femoral epiphysis is a series of cervicalascending vessels lying outside the femoral neck that cross theperiphery of the physis and penetrate the epiphysis. Implantsmust provide stability against rotational and shearing forces.1
EQUIPMENT• Surgical pack, Senn retractors, Gelpi retractors, Myerding
retractors, Hohmann retractors, pointed reduction forceps,periosteal elevator, Kirschner wires, high-speed quick-releasewire driver, wire cutter
PREPARATION AND POSITIONINGPrepare the rear limb circumferentially from dorsal midline tomid-tibia. Position the animal in lateral recumbency, with theaffected limb up. Drape the limb out from a hanging position toallow maximal manipulation during surgery. A cancellous bonegraft is not necessary.
PROCEDUREApproach: Incise the skin and subcutaneous tissue 5 cmproximal to the greater trochanter, curving distally adjacent tothe cranial ridge of the trochanter, and extending distally for5 cm over the proximal femur. Incise between the tensor fasciaelatae muscle and deep border of the biceps femoris muscle and superficial gluteal muscle. Retract the tensor fasciae lataecranially, the biceps caudally, and the middle gluteal muscleproximally. Incise the deep gluteal tendon close to its attach-ment on the trochanter for one third to one half of its width.Reflect the vastus lateralis distally to expose the hip joint.Incise the joint capsule (or enlarge the traumatic tear) parallelto the long axis of the femoral neck near its proximal ridge.Continue the joint capsule incision laterally through the point oforigin of the vastus lateralis muscle on the cranial face of theproximal femur (Plate 68A).2
Reduction: Grasp the proximal femur with a pointedreduction forceps, and retract the femoral neck distally so thatit lies cranial and level with the acetabulum (Plate 68B).Derotate the femur, and slide the fracture surface of the femoralneck caudally into the matching surface of the femoral epiph-ysis. Hold the reduction by pressing against the proximal piecein the acetabulum (Plate 68C).
Stabilization with Three Kirschner Wires: Insert thewires from the lateral aspect of the femur, paralleling thefemoral neck anteversion angle. Place the wires parallel to oneanother and position them in the femoral neck so that they liein a triangle. Drive the wires until the points are just visible atthe fracture surface (see Plate 68B). Reduce the fracture, anddrive the pins into the femoral epiphysis. Estimate the distanceinto the epiphysis, and mark an adjacent pin to provide a guide(see 68C; the distance between the pin chuck and the forcepson the adjacent pin, b, is equal to the distance the pin will bedriven into the epiphysis, a). Drive the remaining wires into thefemoral epiphysis using a similar guiding process. Move thejoint through a normal range of motion after each wire toensure that it has not penetrated the articular surface. Bend thepins at the lateral surface, and cut off the excess (Plate 68D).Closure is routine.
Stabilization of a Trochanteric Physeal Fracturewith a Tension Band Wire: Reduce the trochanter, andsecure it with a pointed reduction forceps. Start two Kirschnerwires in the fragment, and drive them perpendicular to andacross the physis to lodge in the medial cortex of the proximalfemur. Drill a transverse hole in the major bone segment, andpass a figure-eight wire through the hole and around theKirschner wire. Tighten the wire (see Plate 68D).
CAUTIONSIt is important to avoid penetrating the articular surface withthe Kirschner wires.
POSTOPERATIVE EVALUATIONRadiographs should be evaluated for reduction and implantposition. Frog leg and extended hip views may help pin positionvisualization.
POSTOPERATIVE CAREThe animal should be confined, with activity limited to leashwalking for 3 to 4 weeks. Radiographs should be evaluated in 4to 6 weeks.
EXPECTED OUTCOMERapid bone healing is usually seen within 3 to 4 weeks.Premature closure of the physis may result in a misshapenfemoral head. Partial resorption of the femoral neck (applecoring effect) usually occurs, but this rarely causes a problem.
References1. Tillson DM, McLaughlin RM, Roush JK: Fractures of proximal
femoral physis in dogs. Compend Cont Educ Pract Vet 18(11):1164,1996.
2. Piermattei DL, Johnson KA: An Atlas of Surgical Approaches to theBones and Joints of the Dog and Cat, 4th ed. Philadelphia, WBSaunders, 2004.
180 PART TWO • SURGICAL PROCEDURES FOR FRACTURES

CH A P T E R 68 PROXIMAL FEMORAL PHYSEAL FRACTURES 181
PLATE 68
Middle gluteal muscleretracted proximally
Tensor fasciaelatae muscle
retracted cranially
Deep gluteal muscle
Incision in joint capsule
Vastus lateralis muscle
Biceps femoris muscleretracted caudally
A
C
B
D
a
b
Distance a = b

FEMUR
CHAPTER 69 Femoral Neck FracturesINDICATIONSCandidates include animals with transverse and short obliquefemoral neck fractures.
OBJECTIVES• To achieve anatomic reduction and rigid fixation of the
fracture to allow early return to function
ANATOMIC CONSIDERATIONSThe femoral neck/femoral shaft junction in the frontal plane isknown as the angle of inclination. This angle is normally 135degrees and should be approximated when surgical reduction isperformed. The normal angle of anteversion is 15 to 20 degreesand must be considered when inserting screws or pins into thefemoral neck.1
EQUIPMENT• Surgical pack, Senn retractors, Gelpi retractors, Hohmann
retractors, Myerding retractors, periosteal elevator, Kirschnerwires, bone screws and instruments for inserting bone screws,high-speed drill and wire driver, wire cutter
PREPARATION AND POSITIONINGPrepare the rear limb circumferentially from dorsal midline tomid-tibia. Position the animal in lateral recumbency, with theaffected limb up. Drape the limb out from a hanging position toallow maximal manipulation during surgery. Prepare the ipsilat-eral wing of the ilium for cancellous bone graft harvest.
PROCEDUREApproach: Incise the skin and subcutaneous tissue 5 cmproximal to the greater trochanter, curving distally adjacent tothe cranial ridge of the trochanter, and extending distally for5 cm over the proximal femur. Incise between the tensor fasciaelatae muscle and deep border of the biceps femoris muscle andsuperficial gluteal muscle. Retract the tensor fasciae latae cranially, the biceps caudally, and the middle gluteal muscleproximally. Incise the deep gluteal tendon close to its attach-ment on the trochanter for one third to one half of its width.Incise the joint capsule parallel to the long axis of the femoralneck near its proximal ridge. Continue the joint capsule incisionlaterally through the point of origin of the vastus lateralismuscle on the cranial face of the proximal femur. Reflect thevastus lateralis ventrally to visualize the fracture surface (Plate69A).2 A greater trochanteric osteotomy may be required if
visualization is not adequate for anatomic reduction and place-ment of implants.2
Reduction: Place two Kirschner wires so they lie at themost proximal and distal level of the fracture surface. Drive thepins either from medial to lateral beginning at the fracture sur-face or from the lateral surface medially, to exit and lie flush atthe fracture surface (Plate 69B). Reduce the fracture, and drivethe Kirschner wires into the femoral epiphysis to maintainreduction (Plate 69C).
Stabilization: Drill a thread hole through the femoral epiphysis with the appropriate-sized drill bit parallel to and centered between the Kirschner wires (see Plate 69C). Measurethe length of screw needed, and tap the thread hole. Insert apartially threaded cancellous screw, 2 mm shorter than thelength measured, so that all the threads cross the fracture planeand are seated into the femoral head. Leave one or both wiresin place to serve as antirotational devices (Plate 69D). Close theincision routinely.
CAUTIONSIt is important to follow the anteversion angle of the femoralneck with the implants and to avoid penetrating the articularsurface with Kirschner wires and the bone screw.
POSTOPERATIVE EVALUATIONRadiographs should be evaluated for reduction and implantposition. Frog leg and extended hip views may help implantposition visualization.
POSTOPERATIVE CAREThe animal should be confined, with activity limited to leashwalking. Radiographs should be repeated at 6-week intervalsuntil the fracture has healed.
EXPECTED OUTCOMEBone healing is usually seen within 6 to 12 weeks. Instability atthe fracture site can result in delayed union and implant failure.
References1. Johnson AL, Hulse DA: Femoral metaphyseal fractures. In Fossum
TW (ed): Small Animal Surgery, 2nd ed. St. Louis, Mosby, 2002.2. Piermattei DL, Johnson KA: An Atlas of Surgical Approaches to the
Bones and Joints of the Dog and Cat, 4th ed. Philadelphia, WBSaunders, 2004.
182 PART TWO • SURGICAL PROCEDURES FOR FRACTURES

CH A P T E R 69 FEMORAL NECK FRACTURES 183
PLATE 69
Middle gluteal muscleretracted proximally
Tensor fasciaelatae muscle
retracted craniallyDeep glutealmuscle
Vastus lateralismuscle
Biceps femoris muscleretracted caudally
A
B
C
D

FEMUR
CHAPTER 70 Distal Femoral Physeal FracturesINDICATIONSCandidates include animals with Salter I and Salter II fracturesof the distal femoral physis.
OBJECTIVES• To achieve fracture stabilization, and anatomic or slight over-
reduction of the femoral epiphysis
ANATOMIC CONSIDERATIONSThe distal femoral growth plate is shaped like a W and lies atthe joint capsule reflection. A lateral arthrotomy is necessaryfor exposure. The configuration of the growth plate and cancel-lous bone surface provide some rotational stability.
EQUIPMENT• Surgical pack, Senn retractors, Gelpi retractors, blunt
Hohmann retractor, periosteal elevator, Kern bone-holdingforceps, pointed reduction forceps, Steinmann pins andKirschner wires, Jacob pin chuck, wire cutter
PREPARATION AND POSITIONINGPrepare the rear limb circumferentially from dorsal midline totarsus. Position the animal in lateral recumbency, with theaffected limb up. Drape the limb out from a hanging position toallow maximal manipulation during surgery. A cancellous bonegraft is not necessary.
PROCEDUREApproach: Incise skin and subcutaneous tissue on the cra-nial lateral surface, with the incision centered over the palpableend of the femoral metaphysis. Make a parapatellar arthrotomythrough the distal fascia lata and joint capsule, continuing theincision proximally along the caudal border of the vastus later-alis muscle through the intermuscular septum of the fascia lata.Reflect the quadriceps muscles, patella, and patella tendonmedially to expose the articular surface of the femoral condyles(Plate 70A).1
Reduction: Reduce the fracture by levering the condylescranially and distally with a blunt Hohmann retractor placedbetween the fracture fragments. Maintain reduction during pinplacement by placing a Kern bone-holding forceps on the lateralaspect of the distal femoral metaphysis. Place a pointed reduc-tion forceps from the trochlear surface to the jaws of the Kern(Plate 70B).
Stabilization with Crossed Pins: Position two pins toenter the epiphysis at a point cranial to the medial and lateralepicondyles, and drive them proximally to a point where they
are just visible at the fracture surface. Reduce the fracture, anddrive the pins into the femoral metaphysis and through theopposite cortices (Plate 70C).2
Stabilization with an Intramedullary Pin: Insert apin through the articular cartilage, cranial to the origin of thecaudal cruciate ligament, to the level of the fracture surface.Reduce the fracture, and direct the pin in a normograde fashionproximally into the femur to exit at the trochanteric fossa. Thepin should contact the caudal surface of the medullary canalproximal to the fracture. Cut the distal part of the pin, and coun-tersink it below the level of the articular cartilage. Cut theexcess pin off below the skin above the trochanteric fossa.3 Adda cross pin at the fracture to establish rotational stability if nec-essary (Plate 70D). Close the incision routinely.
CAUTIONSThe epiphyseal bone is soft: it is important to avoid excessivebone forceps pressure. To avoid the sciatic nerve, the hipshould be extended and the limb adducted when the intra-medullary pin is driven through the trochanteric fossa.
POSTOPERATIVE EVALUATIONRadiographs should be evaluated for bone alignment andimplant placement.
POSTOPERATIVE CAREThe animal should be confined, with activity limited to leashwalking. Physical therapy and early return to function are necessary to avoid extensor tie down. Radiographs should beevaluated in 4 to 6 weeks.
EXPECTED OUTCOMERapid bone healing is usually seen in 3 to 4 weeks. Prematureclosure of the physis may result in a noticeable shortened leg invery young animals.
References1. Piermattei DL, Johnson KA: An Atlas of Surgical Approaches to the
Bones and Joints of the Dog and Cat, 4th ed. Philadelphia, WBSaunders, 2004.
2. Sukhiani HR, Holmburg DL: Ex vivo biomechanical comparison ofpin fixation techniques for canine distal femoral physeal fractures.Vet Surg 26:398, 1997.
3. Stigen O: Supracondylar femoral fractures in 159 dogs and catstreated using a nomograde intramedullary pinning technique. J smallAnim Pract 40:519, 1999.
184 PART TWO • SURGICAL PROCEDURES FOR FRACTURES

CH A P T E R 70 DISTAL FEMORAL PHYSEAL FRACTURES 185
PLATE 70
Fascia latae and bicepsfemoris muscles retracted
Quadriceps muscles, patella, andpatella tendon reflected medially
Joint capsule incised
Lateral head of thegastrocnemius muscle
Lateralcollateralligament
A
B
C
D

FEMUR
CHAPTER 71 Application of an IntramedullaryPin or Interlocking Nail to the FemurINDICATIONSCandidates include animals with single or comminuted femoraldiaphyseal fractures.
OBJECTIVES• To achieve anatomic reduction of single fracture lines or
restoration of normal bone alignment for nonreducible com-minuted fracturesThe intramedullary (IM) pin is used in animals with high
fracture-assessment scores. The IM pin neutralizes bendingforces at the fracture; it is combined with cerclage wire for longoblique fractures and with external fixation for transverse orshort oblique fractures to neutralize rotational and axial com-pressive forces. The interlocking nail (ILN) neutralizes bending,rotational, and axial compressive forces at the fracture; it canbe used for animals with medium and low fracture-assessmentscores.1
ANATOMIC CONSIDERATIONSThe narrowest part of the medullary canal, the isthmus, islocated within the proximal third of bone, just distal to the thirdtrochanter. The distal femur has a pronounced cranial bow inmost dogs, but it is straight in the cat. Both anatomic featuresconstrain the size of the IM pin or ILN selected. Thetrochanteric fossa is directly in line with the medullary canal,allowing normograde or retrograde placement of an IM pin andnormograde placement of the ILN. The adductor magnusmuscle attaches to the caudal surface of the femur and servesas a guide for rotational alignment. Additionally, the greatertrochanter is 90 degrees to the patella when the rotational align-ment of the femur is correct.
EQUIPMENT• Surgical pack, periosteal elevator, Gelpi retractors, Myerding
or Hohmann retractors, pointed reduction forceps, Kern
bone-holding forceps, Jacob pin chuck, IM pins, cerclagewire, wire tightener, wire cutter, external fixator clamps andconnecting bars (or ILN equipment, including high-speeddrill), bone curette for harvesting graft
PREPARATION AND POSITIONINGPrepare the rear limb circumferentially from dorsal midline totarsus. Position the animal in lateral recumbency, with theaffected limb up. Drape the limb out from a hanging position toallow maximal manipulation during surgery. Prepare the ips-ilateral proximal humerus or ipsilateral ilial wing for surgery forharvesting cancellous bone graft.
PROCEDUREApproach: Incise the skin and subcutaneous tissue on the lateral surface of the thigh, from the greater trochanter to thefemoral condyles. Incise the tensor fascia lata along the cranialborder of the biceps femoris to expose the vastus lateralis andbiceps femoris muscles. Retract the muscles to expose thefemur.2 Insert the IM pin into the proximal femur in either a nor-mograde or retrograde manner. Extend the hip and adduct thelimb when retrograding the IM pin, to avoid injuring the sciaticnerve (Plate 71A).3 Insert the ILN in a normograde manner,starting at the trochanteric fossa. Use an “open but do not disturb the fragments” technique to expose the proximal anddistal bone segments with minimal disturbance of the fracturehematoma and bone fragments for nonreducible fractures.4
Incise the skin, and create soft tissue tunnels to the bone forfixator pin placement.
186 PART TWO • SURGICAL PROCEDURES FOR FRACTURES
Continued

CH A P T E R 71 APPLICATION OF AN IM PIN OR INTERLOCKING NAIL TO THE FEMUR 187
PLATE 71
Biceps femorismuscle retracted
Shaft of the femur
Adductor magnusmuscle
Vastuslateralismuscle
retracted
Vastus intermedius
muscle
A

Reduction: Place an IM pin (sized to equal 70% to 80% ofthe medullary canal at the isthmus) in the proximal segment.Retract the pin within the medullary canal of the proximal seg-ment. Reduce transverse and short oblique fractures by tentingthe bone ends and levering the bone back into position. Reducelong oblique fractures by distracting the bone segments andapproximating the fracture surfaces. Use pointed reduction for-ceps to manipulate the bone segments into reduction. Drive theIM pin distally to seat in the femoral condyle. Maintain thereduction manually for transverse fractures and with pointedreduction forceps for oblique fractures. Reduce comminutednonreducible fractures by distracting the distal end with the IMpin or ILN and aligning the major segments of the bone.
Stabilization: Apply an IM pin and a type Ia externalfixator to the lateral surface of the femur to stabilize a trans-verse or short oblique fracture. Place fixation pins in the meta-physis of each segment and close to the fracture line. Theexternal fixator can be connected or tied in to the IM pin tostrengthen the fixation (Plate 71B). Apply an IM pin and mul-tiple cerclage wires to a long oblique fracture (Plate 71C). Anexternal fixator can be added for additional strength. Apply anILN and four screws to the femur to treat comminuted nonre-ducible fractures (Plate 71D).
CAUTIONSTo avoid penetrating the sciatic nerve when retrograding the IMpin, the limb should be held in a hip extended and adductedposition while the pin exits the trochanteric fossa. It is impor-tant to avoid the femoral head and distal joint surface with theIM pin or ILN. The range of motion of the stifle should be pal-pated to detect pin interference in the joint. Angular and rota-tional alignment should be monitored during the realignment ofcomminuted fractures.
POSTOPERATIVE EVALUATIONRadiographs should be evaluated for bone alignment andimplant placement.
POSTOPERATIVE CAREThe animal should be confined, with activity limited to leashwalking, until the fracture is healed. External fixator manage-ment includes daily pin care and pin packing as needed.Physical therapy is needed to restore stifle range of motion.Radiographs should be evaluated in 6 weeks. Fixator pinsshould be removed after radiographic signs of bone bridging areobserved. If a tie-in is used, the top fixation pin and its connec-tion to the IM pin should be retained. Radiographs should berepeated at 6-week intervals until the fracture is healed. The IMpin should be removed when the fracture has healed.
EXPECTED OUTCOMEBone healing is usually seen in 12 to 18 weeks, depending onfracture and signalment of the animal.
References1. Johnson AL, Hulse DA: Decision making in fracture management.
In Fossum TW (ed): Small Animal Surgery, 2nd ed. St. Louis, Mosby,2002.
2. Piermattei DL, Johnson KA: An Atlas of Surgical Approaches to theBones and Joints of the Dog and Cat, 4th ed. Philadelphia, WBSaunders, 2004.
3. Palmer RH, Aron DN, Purinton PT: Relationship of femoralintramedullary pins to the sciatic nerve and gluteal muscles after retrograde and normograde insertion. Vet Surg 17:65, 1988.
4. Aron DN, Palmer RH, Johnson AL: Biologic strategies and a balanced concept for repair of highly comminuted long bone frac-tures. Compend Cont Educ Pract Vet 17:35, 1995.
188 PART TWO • SURGICAL PROCEDURES FOR FRACTURES

CH A P T E R 71 APPLICATION OF AN IM PIN OR INTERLOCKING NAIL TO THE FEMUR 189
PLATE 71
B
C D

FEMUR
CHAPTER 72 Application of a Plate to the FemurINDICATIONSCandidates include animals with single or comminuted femoral diaphy-seal fractures.
OBJECTIVES• To achieve anatomic reduction and compression of single fracture
lines or restoration of normal bone alignment for nonreducible com-minuted fracturesThe plate is used as a compression plate for transverse or short
oblique fractures, and it is combined with lag screws to compress longoblique fractures. The plate is used as a bridging plate for nonreduciblecomminuted fractures and may be combined with an intramedullary(IM) pin to reduce strain on the plate and to extend fatigue life of thefixation. The plate neutralizes bending, rotational, and axial compres-sive forces.
ANATOMIC CONSIDERATIONSThe plate is placed on the lateral surface of the femur. The trochantericfossa is directly in line with the medullary canal, allowing normogradeor retrograde placement of an IM pin. The adductor magnus muscleattaches to the caudal surface of the femur and serves as a guide forrotational alignment. Additionally, the greater trochanter is 90 degreesto the patella when the rotational alignment of the femur is correct.
EQUIPMENT• Surgical pack, periosteal elevator, Gelpi retractors, Myerding or
Hohmann retractors, pointed reduction forceps, Kern bone-holdingforceps, self-centering plate-holding forceps, Jacob pin chuck, IMpins, high-speed drill, plating equipment, bone curette for harvestinggraft
PREPARATION AND POSITIONINGPrepare the rear limb circumferentially from dorsal midline to tarsus.Position the animal in lateral recumbency, with the affected limb up.Drape the limb out from a hanging position to allow maximal manipu-lation during surgery. Prepare the ipsilateral proximal humerus or ipsi-lateral ilial wing for surgery for harvesting cancellous bone graft.
PROCEDUREApproach: Incise the skin and subcutaneous tissue on the lateral surface of the thigh, from the greater trochanter to the femoralcondyles. Incise the tensor fascia lata along the cranial border of thebiceps femoris to expose the vastus lateralis and biceps femoris mus-cles. Retract the muscles to expose the femur.1 Insert the IM pin into theproximal femur in either a normograde or retrograde manner.2 Use an“open but do not disturb the fragments” technique to expose the prox-imal and distal bone segments with minimal disturbance of the fracturehematoma and bone fragments for nonreducible fractures (Plate 72A).3
Reduction: Reduce transverse and short oblique fractures bytenting the bone ends and levering the bone back into position. Reducelong oblique fractures by distracting the bone segments and approxi-mating the fracture surfaces. Use pointed reduction forceps to manipu-late the bone segments into reduction. Maintain the reduction manuallyfor transverse fractures and with pointed reduction forceps for oblique
fractures. Reduce comminuted nonreducible fractures by distractingthe distal segment with an IM pin (sized to equal 40% to 50% of the medullary canal at the isthmus) and aligning the major segments ofthe bone (see Plate 72A). Be sure to restore length and normal rota-tional alignment to the bone.4 Precontour the plate to the cranial caudalradiographic view of the contralateral femur to prevent angular defor-mities.4
Stabilization: Apply an appropriately contoured plate to the lateral surface of the femur. The plate can function as a compressionplate (Plate 72B) when used to compress transverse or short obliquefratures; as a neutralization plate to support a reconstructed fracture(Plate 72C); or as a bridging plate, spanning a nonreducible commin-uted fracture (Plate 72D).
CAUTIONSTo avoid penetrating the sciatic nerve when retrograding the IM pin, thelimb should be held in a hip extended and adducted position while thepin exits the trochanteric fossa. It is important to avoid the femoralhead and distal joint surface with the IM pin or bone screws. The rangeof motion of the stifle should be palpated to detect implant interferencein the joint. Angular and rotational alignment should be monitoredduring the realignment of comminuted fractures.
POSTOPERATIVE EVALUATIONRadiographs should be evaluated for bone alignment and implant placement.
POSTOPERATIVE CAREThe animal should be confined, with activity limited to leash walking.Physical therapy is needed to restore stifle range of motion.Radiographs should be evaluated in 6 weeks. If left long, the IM pinshould be removed after signs of bone bridging are observed.Radiographs should be repeated at 6-week intervals until the fracture ishealed. Plate removal may be necessary after the fracture heals.
EXPECTED OUTCOMEBone healing is usually seen in 12 to 18 weeks, depending on fractureand signalment of the animal.
References1. Piermattei DL, Johnson KA: An Atlas of Surgical Approaches to the
Bones and Joints of the Dog and Cat, 4th ed. Philadelphia, WBSaunders, 2004.
2. Palmer RH, Aron DN, Purinton PT: Relationship of femoralintramedullary pins to the sciatic nerve and gluteal muscles after ret-rograde and normograde insertion. Vet Surg 17:65, 1988.
3. Aron DN, Palmer RH, Johnson AL: Biologic strategies and a bal-anced concept for repair of highly comminuted long bone fractures.Compend Cont Educ Pract Vet 17:35, 1995.
4. Johnson AL, Smith CW, Schaeffer DJ: Fragment reconstruction andbone plate fixation compared with bridging plate fixation fortreating highly comminuted femoral fractures in dogs: 35 cases(1987–1997). J Am Vet Med Assoc 213:1157, 1998.
190 PART TWO • SURGICAL PROCEDURES FOR FRACTURES

CH A P T E R 72 APPLICATION OF A PLATE TO THE FEMUR 191
PLATE 72
Biceps femorismuscle retracted
Adductor magnusmuscle
Vastuslateralismuscle
retracted
Shaftof femur
Vastus intermedius
muscle
A
B
DC

FEMUR
CHAPTER 73 Application of an External Fixatorto the FemurINDICATIONSCandidates include animals with single or comminuted femoraldiaphyseal fractures.
OBJECTIVES• To achieve anatomic reduction of single fracture lines or
restoration of normal bone alignment for comminuted fracturesThe stiffness of the fixator can be increased for animals with
low fracture-assessment scores by adding fixation pins, incor-porating an intramedullary (IM) pin or using biplanar frames.1
The IM pin and fixator combination resists axial loading,bending, and rotational forces at the fracture.
ANATOMIC CONSIDERATIONSThe narrowest part of the medullary canal, the isthmus, islocated within the proximal third of bone, just distal to the thirdtrochanter. The distal femur has a pronounced cranial bow inmost dogs, but it is straight in the cat. Both anatomic featuresconstrain the size of IM pin selected. The trochanteric fossa isdirectly in line with the medullary canal, allowing normogradeor retrograde placement of an IM pin. The adductor magnusmuscle attaches to the caudal surface of the femur and servesas a guide for rotational alignment. Additionally, the greatertrochanter is 90 degrees to the patella when the femur is in correct rotational alignment. The proximity of the abdomenprohibits use of bilateral frames in the proximal femur.
EQUIPMENT• Surgical pack, Senn retractors, small Hohmann retractors,
Gelpi retractors, Myerding retractors, periosteal elevator,Kern bone-holding forceps, pointed reduction forceps, Jacobpin chuck, IM pins, low-speed power drill, external fixationequipment, pin cutter, bone curette for harvesting graft
PREPARATION AND POSITIONINGPrepare the rear limb circumferentially from dorsal midline totarsus. Position the animal in lateral recumbency, with the
affected limb up. Drape the limb out from a hanging position toallow maximal manipulation during surgery. Prepare the ipsilat-eral proximal humerus or ilial wing for harvesting a cancellousbone graft.
PROCEDUREApproach: Incise the skin and subcutaneous tissue on the lateral surface of the thigh, from the greater trochanter to thefemoral condyles. Incise the tensor fascia lata along the cranialborder of the biceps femoris to expose the vastus lateralis andbiceps femoris muscles.2 Retract the muscles to expose thefemur (Plate 73A). Insert the IM pin into the proximal femur ineither a normograde or retrograde manner. Use an “open but donot disturb the fragments” technique to expose the proximaland distal bone segments with minimal disturbance of the frac-ture hematoma and bone fragments for nonreducible fractures.3
Incise the skin, and create soft tissue tunnels to the bone forfixator pin placement.
Reduction: Place an IM pin (sized to equal 60% to 70% ofthe medullary canal at the isthmus) in the proximal segment.Retract the pin within the medullary canal of the proximal seg-ment. Reduce transverse and short oblique fractures by tentingthe bone ends and levering the bone back into position. Reducelong oblique fractures by distracting the bone segments andapproximating the fracture surfaces. Use pointed reduction for-ceps to manipulate the bone segments into reduction. Drive thepin distally to seat in the femoral condyle. Maintain the reduc-tion manually for transverse fractures and with pointed reduc-tion forceps for oblique fractures. Reduce comminutednonreducible fractures by distracting the distal femur with theIM pin and aligning the major segments of the bone (see Plate73A). Be sure to restore length and normal rotational alignmentto the bone.
192 PART TWO • SURGICAL PROCEDURES FOR FRACTURES
Continued

CH A P T E R 73 APPLICATION OF AN EXTERNAL FIXATOR TO THE FEMUR 193
PLATE 73
Biceps femorismuscle retracted
Adductor magnusmuscle
Vastuslateralismuscle
retracted
Shaftof femur
Vastus intermedius
muscle
A

Stabilization: Apply an IM pin and a type Ia externalfixator to the lateral surface of the femur. Place fixation pins inthe metaphysis of each segment and close to the fracture line.The external fixator can be connected or tied in to the IM pin tostrengthen the fixation (Plate 73B).4 Apply a modified type Ibexternal fixator and an IM pin to a comminuted nonreduciblefracture.5 Place a cancellous bone autograft at the fracture site(Plate 73C). Long oblique fractures benefit from cerclage wireor lag screw fixation in addition to the IM pin and externalfixator (Plate 73D).
CAUTIONSIt is important to avoid major nerves, vessels, and joint surfaceswith the fixation pins and to avoid the distal joint surface withthe IM pin. The range of motion of the stifle should be palpatedto detect pin interference in the joint. Rotational alignmentshould be monitored during the realignment of comminutedfractures.
POSTOPERATIVE EVALUATIONRadiographs should be evaluated for bone alignment andimplant placement. Rotational malalignments should be cor-rected by loosening the clamps and realigning the fixation pinson the connecting bar.
POSTOPERATIVE CAREGauze sponges should be packed around the pins, and thesponges should be secured with a bandage. The animal shouldbe confined, with activity limited to leash walking. Externalfixator management includes daily pin care and pin packing asneeded. Physical therapy is needed to restore stifle range ofmotion. Radiographs should be repeated at 6-week intervals to
monitor healing. The fixator should be destabilized by removingthe unilateral frame (from a type Ia and IM pin combination) orthe cranial frame (from a modified type Ib fixator) when bonebridging is observed. If a tie-in is used, the top fixation pin andits connection to the IM pin should be retained. The IM pin, theremaining external fixator, or both should be removed when thefracture has healed.
EXPECTED OUTCOMEBone healing is usually seen in 12 to 18 weeks, depending onfracture and signalment of the animal. The animal will experi-ence limited function while the external fixator is in place butshould eventually have a good return to function.
References1. Johnson AL, Hulse DA: Fundamentals of orthopedic surgery and
fracture management: Decision making in fracture management. InFossum TW (ed): Small Animal Surgery, 2nd ed. St. Louis, Mosby,2002.
2. Piermattei DL, Johnson KA: An Atlas of Surgical Approaches to theBones and Joints of the Dog and Cat, 4th ed. Philadelphia, WBSaunders, 2004.
3. Aron DN, Palmer RH, Johnson AL: Biologic strategies and a bal-anced concept for repair of highly comminuted long bone fractures.Compend Cont Educ Pract Vet 17:35, 1995.
4. Aron DN, Dewey C: Experimental and clinical experience with anIM pin external skeletal fixator tie-in configuration. Vet CompOrthop Traumatol 4:86, 1991.
5. Aron DN: External skeletal fixation system application to thehumerus and femur. In Proceedings of the 10th Annual CompleteCourse in External Skeletal Fixation, University of Georgia,127–141, 2002.
194 PART TWO • SURGICAL PROCEDURES FOR FRACTURES

CH A P T E R 73 APPLICATION OF AN EXTERNAL FIXATOR TO THE FEMUR 195
PLATE 73
B
Cancellousbone
autograft
DC

TIBIAL FRACTURES
CHAPTER 74 Proximal Tibial Physeal Fracturesand Tibial Tuberosity Fractures
INDICATIONSCandidates include animals with Salter I and Salter II fracturesof the proximal tibial physes.
OBJECTIVES• To achieve anatomic reduction of the proximal tibial physis
and fracture stabilization
ANATOMIC CONSIDERATIONSThe medial aspect of the proximal tibia is covered only withskin, subcutaneous tissue, and crural fascia and can easily bepalpated and approached. The saphenous artery vein and nervelies caudal to the medial surface of the proximal tibia.
EQUIPMENT• Surgical pack, Senn retractors, Hohmann retractors, Gelpi
retractors, periosteal elevator, pointed reduction forceps,Kirschner wires or small Steinmann pins for large dogs,orthopedic wire, wire tightener, pin chuck or high-speed wiredriver, wire cutter or pin cutter
PREPARATION AND POSITIONINGPrepare the rear limb circumferentially from the hip to belowthe hock. Position the animal in dorsal recumbency for greaterflexibility. Drape the limb out from a hanging position to allowmaximal manipulation during surgery. A cancellous bone graftis unnecessary.
PROCEDUREApproach: Incise the skin, subcutaneous tissue, and cruralfascia craniomedially from the distal femur to the proximal diaphysis of the tibia to expose the fracture. Retract the skin laterally to expose the lateral tibial epiphysis. Elevate the fasciaand muscle to expose both medial and lateral surfaces of thefracture (Plate 74A).1
Reduction: Reduce the proximal physeal fracture byextending the stifle and gently levering the epiphysis into position. Maintain reduction using a pointed reduction forceps(Plate 74B). Reduce the avulsed tibial tuberosity by extendingthe limb and putting pressure on the tuberosity. Maintain reduction with a pointed reduction forceps (see Plate 74B).
Stabilization of a Proximal Tibial Physeal Fracture:Drive a Kirschner wire from the lateral surface of the tibial
epiphysis across the physis, into the tibial metaphysis, andthrough the medial cortex. Drive a second wire from the medialtibial epiphysis across the physis, into the metaphysis, andthrough the lateral cortex. Bend the wires to prevent migrationand aid removal (Plate 74C).2
Stabilization of an Avulsion of the Tibial Tuberosity:Drive two Kirschner wires into the tuberosity and across thephysis to lodge in the proximal tibia. Check the repair to see ifstabilization is sufficient to prevent avulsion of the fracture. Ifnot, place a tension band wire by drilling a transverse hole inthe tibial crest and passing a figure-eight wire through the holeand around the Kirschner wires. Tighten the wire (Plate 74D).Most repairs require a tension band wire.1
CAUTIONSIt is important to avoid damaging the physeal cartilage duringreduction and to avoid penetrating the articular cartilage withthe Kirschner wires.
POSTOPERATIVE EVALUATIONRadiographs should be evaluated for reduction and implantplacement.
POSTOPERATIVE CAREThe animal should be confined, with activity limited to leashwalking. Radiographs should be evaluated in 3 to 4 weeks. Thetension band wire should be removed at 3 weeks to allow physeal function. Additional implant removal may be required if soft tissue irritation occurs.
EXPECTED OUTCOMERapid bone healing is usually seen, but premature closure of the physis will probably occur. Premature closure of the tibial tuberosity physis in a very young animal may affect stifleconformation.
References1. Piermattei D, Flo GL: Brinker, Piermattei, and Flo’s Handbook of
Small Animal Orthopedics and Fracture Repair, 3rd ed. Philadelphia,WB Saunders, 1997.
2. Johnson AL, Hulse DA: Management of specific fractures: Tibia andfibular physeal fractures. In Fossum TW (ed): Small Animal Surgery,2nd ed. St. Louis, Mosby, 2002.
196 PART TWO • SURGICAL PROCEDURES FOR FRACTURES

CH A P T E R 74 PROXIMAL TIBIAL PHYSEAL AND TIBIAL TUBEROSITY FRACTURES 197
PLATE 74
B
C
A
D
orCranial tibialmuscle
Patellarligament

TIBIAL FRACTURES
CHAPTER 75 Distal Tibial Physeal FracturesINDICATIONSCandidates include animals with Salter I and Salter II fracturesof the distal tibial physis.
OBJECTIVES• To achieve anatomic reduction of the distal tibial physis and
fracture stabilization
ANATOMIC CONSIDERATIONSThe medial malleolus of the distal tibia and the lateral malleolusof the fibula extend distal to the articulating surfaces of thedistal tibia and talus. The long and short parts of the medial collateral ligaments arise from the medial malleolus of the tibia.The long and short parts of the lateral collateral ligaments arisefrom the lateral malleolus of the fibula. These ligaments areessential for hock stability. Tendons of the cranial tibial andlong digital extensor muscles cross the cranial surface of the distal tibia. The medial saphenous vein crosses the medialsurface of the distal tibia.
EQUIPMENT• Surgical pack, Senn retractors, Hohmann retractors, Gelpi
retractors, periosteal elevator, pointed reduction forceps,Kirschner wires (or small Steinmann pins for large dogs), pinchuck or high-speed wire driver, wire cutter or pin cutter
PREPARATION AND POSITIONINGPrepare the rear limb circumferentially from hip to below thehock. Position the animal in lateral recumbency, with the affectedlimb up or in dorsal recumbency for greater flexibility. Drapethe limb out from a hanging position to allow maximal manipu-lation during surgery. A cancellous bone graft is unnecessary.
PROCEDUREApproach: Incise the skin and subcutaneous tissue on thecranial medial surface from the distal diaphysis to the tarsus toexpose the medial surface of the fracture (Plate 75A).1 Alterna-tively, make a cranial skin incision and retract the extensor ten-dons. This approach allows visualization of the fibula.2
Reduction: Carefully reduce the physeal fracture in orderto avoid crushing or injuring the physeal cartilage. Maintain
reduction with pointed reduction forceps or with manual pressure.
Stabilization with Crossed Kirschner Wires: Drivea Kirschner wire from the medial malleolus, across the physis,into the tibial metaphysis, and through the lateral cortex (Plate75B). Drive a second wire from the medial aspect of the distaltibial metaphysis, across the fracture into the epiphysis, whileavoiding the articular surface (Plate 75C). Alternatively, drivethe second wire from the lateral aspect of the tibial epiphysis orthe fibular malleolus into the tibia.3 In larger dogs, the secondwire may driven from the fibular malleolus across the fibularfracture and into the proximal segment of the fibula (Plate 75D).
CAUTIONSIt is important to avoid damaging either the physeal cartilage orarticular cartilage.
POSTOPERATIVE EVALUATIONRadiographs should be evaluated for reduction and implantplacement.
POSTOPERATIVE CAREA lateral splint should be used to support the fixation.2 Theanimal should be confined, with activity limited to leashwalking. Radiographs should be evaluated in 4 weeks. Implantremoval may be required if soft tissue irritation occurs.
EXPECTED OUTCOMERapid bone healing is usually seen, but premature closure of thephysis will probably occur.
References1. Piermattei DL, Johnson KA: An Atlas of Surgical Approaches to the
Bones and Joints of the Dog and Cat, 4th ed. Philadelphia, WBSaunders, 2004.
2. Piermattei D, Flo GL: Brinker, Piermattei, and Flo’s Handbook ofSmall Animal Orthopedics and Fracture Repair, 3rd ed. Philadelphia,WB Saunders, 1997.
3. Johnson AL, Hulse DA: Management of specific fractures: Tibia andfibular physeal fractures. In Fossum TW (ed): Small Animal Surgery,2nd ed. St. Louis, Mosby, 2002.
198 PART TWO • SURGICAL PROCEDURES FOR FRACTURES

CH A P T E R 75 DISTAL TIBIAL PHYSEAL FRACTURES 199
PLATE 75
B
A
C D
or
Medialcollateralligament
Tendon ofcranial tibialmuscle
Tendon ofcaudal tibial
muscle

TIBIAL FRACTURES
CHAPTER 76 Malleolar FracturesINDICATIONSCandidates include animals with transverse or oblique medialor lateral malleolar fractures.
OBJECTIVES• To achieve anatomic reduction of the malleoli and distal tibial
articular surface, convert the tensile forces resulting from thepull of the collateral ligaments to compressive forces at thefracture, and stabilize the tarsus
ANATOMIC CONSIDERATIONSTendons of the cranial tibial and long digital extensor musclescross the cranial surface of the distal tibia. The medial saphe-nous vein crosses the medial surface of the distal tibia. The longand short parts of the medial collateral ligaments arise from themedial malleolus of the tibia. The long and short parts of the lateral collateral ligaments arise from the lateral malleolus ofthe fibula. These ligaments are essential for hock stability. Themedial malleolus of the distal tibia and the lateral malleolus ofthe fibula extend distal to the articulating surfaces of the distaltibia and talus.
EQUIPMENT• Surgical pack, Senn retractors, Hohmann retractors, Gelpi
retractors, periosteal elevator, pointed reduction forceps,Kirschner wires, orthopedic wire, wire tightener, wire cutter,bone screws and the instruments for screw insertion, high-speed wire driver or drill
PREPARATION AND POSITIONINGPrepare the rear limb circumferentially from hip to below thehock. Position the animal in dorsal recumbency. Drape the limbout from a hanging position to allow maximal manipulationduring surgery. A cancellous bone graft is unnecessary.
PROCEDUREApproach: Incise the skin and subcutaneous tissue on thecranial medial surface from the distal diaphysis to the tarsus toexpose the medial malleolus (Plate 76A).1 Approach the lateralmalleolus via a lateral skin incision over the malleolus, and useblunt and sharp dissection of surrounding tissues to expose thefracture (Plate 76B).1
Reduction: Reduce the fracture (i.e., medial malleolus ofthe tibia or lateral malleolus of the fibula) by securing the fragment with small or mini pointed reduction forceps andplacing it into alignment. In some cases, the fragment may besecured with pointed reduction forceps; in other cases, manualmaintenance of reduction is necessary.
Stabilization: Start two Kirschner wires in the medialmalleolar fragment. Drive the wires across the fracture line tolodge in the tibia. Place a transverse drill hole in the tibia, passa figure-eight wire through the hole and around the Kirschner
wires, and tighten it. Drill a transverse hole in the fibula prox-imal to the fracture, and pass a figure-eight wire through thehole. Drive a Kirschner wire into the lateral malleolar fragment,across the fracture line, and proximally into the fibula. Pass thefigure-eight wire around the Kirschner wire and tighten it (Plate76C). Alternatively, if the fibula is too small to pass a Kirschnerwire proximally, drive the Kirschner wire through the lateralmalleolar fragment and into the tibia.
To apply the lag screw, drill a gliding hole (equal to the diameter of the threads on the screw) in the medial malleolarfragment. Place a drill sleeve into the gliding hole, reduce thefracture, and drill a smaller hole (equal to the core diameter ofthe screw) across the tibia. Measure, tap, select, and place ascrew of the appropriate length. Compression of the fractureshould occur (Plate 76D). To stabilize the fibular malleolus witha screw, treat the fibular malleolus as the fragment by drillingthe gliding hole through the fibula and the tapped hole in thetibia (Plate 76E).2
CAUTIONSArticular reduction should be maintained during implant application. It is important to take care when manipulating and drilling the small malleolar fragments to avoid further fragmentation.
POSTOPERATIVE EVALUATIONRadiographs should be evaluated for articular surface reductionand implant placement.
POSTOPERATIVE CAREThe animal should be confined, with activity limited to leashwalking. A bivalve cast should be used to externally support thetarsus for 4 to 6 weeks.3 The cast should be destabilized ashealing progresses by eliminating the cranial part of the case.Radiographs should be repeated at 6-week intervals.
EXPECTED OUTCOMEBone healing is usually seen in 6 to 12 weeks with animals expe-riencing a good return to function. Degenerative joint diseasemay result from articular trauma, with the severity dependingon accuracy and maintenance of reduction. Implant removalmay be necessary if soft tissues are irritated.
References1. Piermattei DL, Johnson KA: An Atlas of Surgical Approaches to the
Bones and Joints of the Dog and Cat, 4th ed. Philadelphia, WBSaunders, 2004.
2. Johnson AL, Hulse DA: Management of specific fractures: Tibia andfibular metaphyseal and epiphyseal fractures. In Fossum TW (ed):Small Animal Surgery, 2nd ed. St. Louis, Mosby, 2002.
3. Piermattei D, Flo GL: Brinker, Piermattei, and Flo’s Handbook ofSmall Animal Orthopedics and Fracture Repair, 3rd ed. Philadelphia,WB Saunders, 1997.
200 PART TWO • SURGICAL PROCEDURES FOR FRACTURES
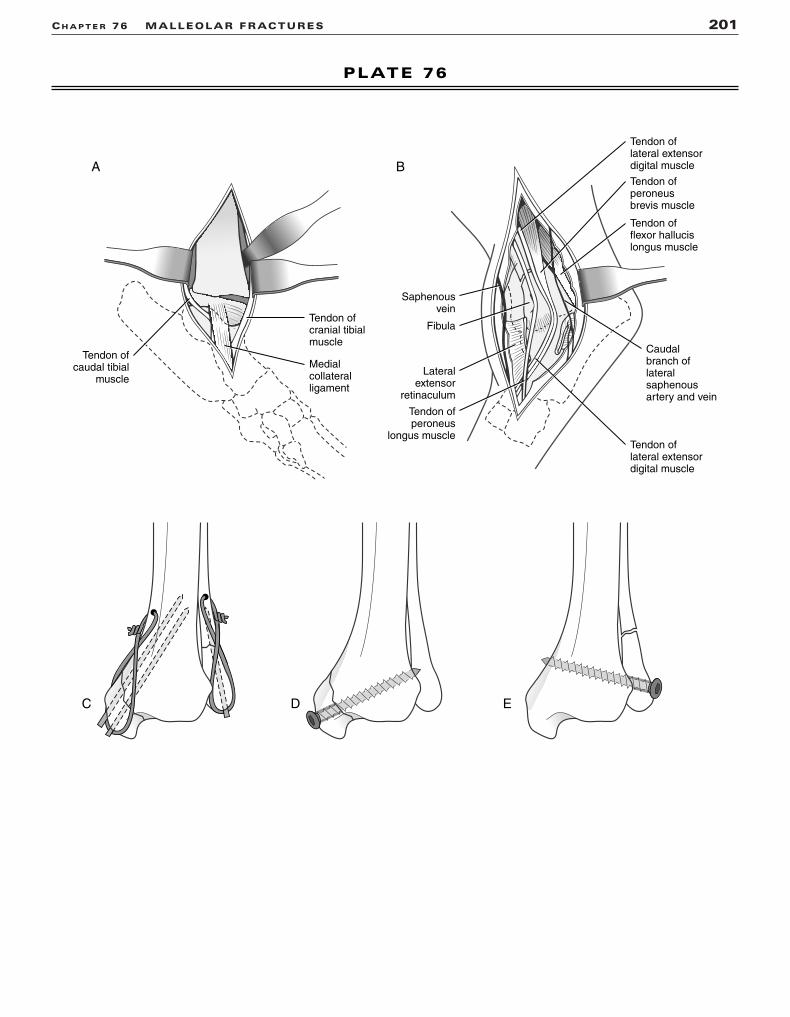
CH A P T E R 76 MALLEOLAR FRACTURES 201
PLATE 76
A B
C D E
Medialcollateralligament
Tendon ofcranial tibialmuscle
Tendon ofcaudal tibial
muscle
Tendon ofperoneusbrevis muscle
Tendon oflateral extensordigital muscle
Tendon oflateral extensordigital muscle
Tendon offlexor hallucislongus muscle
Lateralextensor
retinaculum
Tendon ofperoneus
longus muscle
Saphenousvein
Fibula
Caudalbranch oflateralsaphenousartery and vein

TIBIAL FRACTURES
CHAPTER 77 Application of an IntramedullaryPin or Interlocking Nail to the TibiaINDICATIONSCandidates include animals with single or comminuted tibial diaphysealfractures.
OBJECTIVES• To achieve anatomic reduction of single fracture lines or restoration
of normal bone alignment for nonreducible comminuted fracturesThe intramedullary (IM) pin is used in animals with high fracture-
assessment scores.1 The IM pin neutralizes bending forces at the frac-ture, and is combined with cerclage wire for long oblique fractures andwith external fixation for transverse or short oblique fractures to neu-tralize rotational and axial compressive forces. The interlocking nail(ILN) neutralizes bending, rotational, and axial compressive forces atthe fracture; it can be used for animals with medium and low fracture-assessment scores.1
ANATOMIC CONSIDERATIONSThe tibia has a pronounced S-shaped curve in most dogs. The proximaland distal tibial articular surfaces cover the ends of the long bone,leaving little nonarticular surface to introduce an IM pin or ILN. Thecranial branch of the medial saphenous artery and vein and the saphe-nous nerve cross the medial aspect of the tibia. The medial and lateralmalleoli extend distally to the distal tibial articular surface.
EQUIPMENT• Surgical pack, Senn retractors, Gelpi retractors, Hohmann retractors,
periosteal elevator, pointed reduction forceps, Kern bone-holdingforceps, Jacob pin chuck, IM pins, cerclage wire, wire tightener, wirecutter, external fixator clamps and connecting bars (or ILN equip-ment, including high-speed drill), bone curette for harvesting cancel-lous graft
PREPARATION AND POSITIONINGPrepare the rear limb circumferentially from mid-femur to the pha-langes. Position the animal in dorsal recumbency. Drape the limb outfrom a hanging position. Roll the animal slightly to access the medialaspect of the limb. The ipsi-lateral proximal humerus serves as a can-cellous bone graft donor site.
PROCEDUREApproach: Insert the IM pin or the ILN from a point on the proximalmedial tibial plateau midway between the tibial tuberosity and themedial tibial condyle (Plate 77A).2 Perform a limited medial approachthrough the skin and subcutaneous tissue to the fracture site forreducible fractures (see Plate 77A).3 Use an “open but do not disturb thefragments” technique to expose the proximal and distal bone segmentswith minimal disturbance of the fracture hematoma and bone frag-ments for nonreducible fractures. Incise the skin, and create soft tissuetunnels to the bone for fixator pin placement (Plate 77B).
Reduction: Place an IM pin (sized to equal 60% to 70% of themedullary canal at the isthmus) in the proximal segment.2 Retract thepin within the medullary canal of the proximal segment. Reduce trans-verse and short oblique fractures by tenting the bone ends and leveringthe bone back into position. Reduce long oblique fractures by dis-
tracting the bone segments and approximating the fracture surfaces.Use pointed reduction forceps to manipulate the bone segments intoreduction. Maintain the reduction manually for transverse fractures andwith pointed reduction forceps for oblique fractures. Reduce commin-uted nonreducible fractures by distracting the distal bone end with theIM pin or ILN and aligning the major segments of the bone.
Stabilization: Apply an IM pin and type Ia external fixator tothe cranial medial surface of the tibia to stabilize a transverse fracture(see Plate 77B). The IM pin should be smaller (50–60% of the medullarycanal) to accommodate the fixation pins within the medullary canal.Place fixation pins in the metaphysis of each segment and about 1 cmon either side of the fracture line. Apply an IM pin and cerclage wire toa long oblique fracture (Plate 77C). Apply an ILN and four screws to thetibia for treatment of comminuted nonreducible fractures (Plate 77D).4
CAUTIONSIt is important to avoid the joint surfaces with the IM pin or ILN. Therange of motion of the hock should be palpated to detect pin interfer-ence in the joint. Rotational alignment should be monitored during therealignment of comminuted fractures.
POSTOPERATIVE EVALUATIONRadiographs should be evaluated for fracture reduction or bone align-ment and implant placement.
POSTOPERATIVE CAREThe animal should be confined, with activity limited to leash walking.External fixator management includes daily pin care and pin packing asneeded. Radiographs should be repeated at 6-week intervals. Fixatorpins should be removed after radiographic signs of bone bridging areobserved. Radiographs should continue at 6-week intervals until thefracture has healed. The IM pin should be removed when the fracturehas healed.
EXPECTED OUTCOMEBone healing is usually seen in 12 to 18 weeks, depending on fractureand signalment of the animal.
References1. Johnson AL, Hulse DA: Fundamentals of orthopedic surgery
and fracture management, decision making in fracture management.In Fossum TW (ed): Small Animal Surgery, 2nd ed. St. Louis, Mosby, 2002.
2. Johnson AL, Hulse DA: Management of specific fractures: Tibial andfibular diaphyseal fractures. In Fossum TW (ed): Small AnimalSurgery, 2nd ed. St. Louis, Mosby, 2002.
3. Piermattei DL, Johnson KA: An Atlas of Surgical Approaches to theBones and Joints of the Dog and Cat, 4th ed. Philadelphia, WBSaunders, 2004.
4. Dueland RT, Johnson KA, Roe SC, et al: Interlocking nail treatmentof diaphyseal long bone fractures in dogs. J Am Vet Med Assoc214:59, 1999.
202 PART TWO • SURGICAL PROCEDURES FOR FRACTURES

CH A P T E R 77 APPLICATION OF AN IM PIN OR INTERLOCKING NAIL TO THE TIBIA 203
PLATE 77
Cranial branchof medial saphenousartery and vein
Saphenous nerve
B
A
C D
Shaft of the tibia
M L

TIBIAL FRACTURES
CHAPTER 78 Application of a Plate to the TibiaINDICATIONSCandidates include animals with single or comminuted tibialdiaphyseal fractures.
OBJECTIVES• To achieve anatomic reduction and compression of single
fracture lines or restoration of normal bone alignment fornonreducible comminuted fracturesThe plate is used as a compression plate for transverse or
short oblique fractures, and it is combined with lag screws tocompress long oblique fractures. The plate is used as a bridgingplate for nonreducible comminuted fractures and may be com-bined with an intramedullary pin to reduce strain on the plateand to extend fatique life of the fixation. The plate neutralizesbending, rotational, and axial compressive forces.
ANATOMIC CONSIDERATIONSPlates are generally placed on the medial surface of the tibia.The tibia has an S-shaped curve that must be reproduced whencontouring the plate. The cranial branch of the medial saphe-nous artery and vein and the saphenous nerve cross the medialaspect of the tibia. The medial malleolus extends distally to thedistal tibial articular surface.
EQUIPMENT• Surgical pack, Senn retractors, Gelpi retractors, Hohmann
retractors, periosteal elevator, pointed reduction forceps,self-centering plate-holding forceps, high-speed drill, platingequipment, bone curette for cancellous bone harvest
PREPARATION AND POSITIONINGPrepare the rear limb circumferentially from mid-femur to thephalanges. Position the animal in dorsal recumbency. Drape thelimb out from a hanging position. Roll the animal slightly to allow access to the medial side of the bone. The ipsilateralproximal humerus serves as a cancellous bone graft donor site.
PROCEDUREApproach: Incise the skin and subcutaneous tissue on thecraniomedial surface of the tibia. Incise the crural fascia, andretract the cranial tibial muscle cranially and the flexor musclescaudally to expose the medial surface of the tibia (Plate 78A).2
Use an “open but do not disturb the fragments” technique toexpose the proximal and distal bone segments with minimaldisturbance of the fracture hematoma and bone fragments fornonreducible fractures.3
Reduction: Reduce transverse and short oblique fracturesby tenting the bone ends medially and levering the bone back intoposition. Reduce long oblique fractures by distracting the bonesegments and approximating the fracture surfaces. Use pointedreduction forceps to manipulate the bone segments into reduc-tion. Maintain the reduction manually for transverse fractures and
with pointed reduction forceps for oblique fractures. Reduce com-minuted nonreducible fractures by distracting and aligning themajor segments of the bone. An intramedullary pin can be used toobtain axial alignment and distraction of the distal segment. Besure to restore length and normal rotational alignment to thebone. Precontour the plate to the cranial caudal radiographic viewof the contralateral tibia to prevent angular deformities.
Stabilization: Apply an appropriately contoured plate tothe medial surface of the tibia. The plate can function as a compression plate (Plate 78B) when used to compress trans-verse or short oblique fractures; as a neutralization plate to sup-port a reconstructed fracture (Plate 78C); or as a bridging plate,with or without an intramedullary pin, spanning a nonreduciblecomminuted fracture (Plate 78D).4
CAUTIONSIn immature dogs, it is important to avoid crossing the distaltibial physis with the plate or screws. It is also important toavoid the distal articular surface. Careful attention must be paidto bony anatomic landmarks to avoid rotation of the distal segment. Failure to contour the plate to the normal S shape of the tibia will result in a valgus angulation of the limb.Monocortical screws may be necessary to avoid interferencewith the intramedullary pin.
POSTOPERATIVE EVALUATIONRadiographs should be evaluated for fracture reduction or bonealignment and implant placement.
POSTOPERATIVE CAREThe animal should be confined, with activity limited to leashwalking. Radiographs should be repeated at 6-week intervalsuntil the fracture has healed.
EXPECTED OUTCOMEBone healing is usually seen in 12 to 18 weeks, depending onfracture and signalment of the animal. Plate removal may benecessary after the fracture heals if soft tissue irritation or coldsensitivity occurs.
References1. Johnson AL, Hulse DA: Fundamentals of orthopedic surgery and
fracture management, plates and screws. In Fossum TW (ed): SmallAnimal Surgery, 2nd ed. St. Louis, Mosby, 2002.
2. Piermattei DL, Johnson KA: An Atlas of Surgical Approaches to theBones and Joints of the Dog and Cat, 4th ed. Philadelphia, WBSaunders, 2004.
3. Aron DN, Palmer RH, Johnson AL: Biologic strategies and a bal-anced concept for repair of highly comminuted long bone fractures.Compend Cont Educ Pract Vet 17:35, 1995.
4. Houlton JEF: Fractures of the tibia. In Brinker WO, Olmstead ML,Sumner-Smith G, et al (eds): Manual of Internal Fixation in SmallAnimals. New York, Springer-Verlag, 1998.
204 PART TWO • SURGICAL PROCEDURES FOR FRACTURES

CH A P T E R 78 APPLICATION OF A PLATE TO THE TIBIA 205
PLATE 78
B
A
C D
Shaft of the tibia
Cranial branchof medial saphenousartery and vein
Saphenous nerve

TIBIAL FRACTURES
CHAPTER 79 Application of an External Fixatorto the TibiaINDICATIONSCandidates include animals with single or comminuted tibialdiaphyseal fractures.
OBJECTIVES• To achieve anatomic reduction of single fracture lines or
restoration of normal bone alignment for comminuted fracturesThe stiffness of the fixator can be increased in animals with
low fracture-assessment scores by adding fixation pins and byusing biplanar or bilateral frames.1 The fracture and fixatorcombination, or the fixator alone, resists axial loading, bending,and rotational forces at the fracture.
ANATOMIC CONSIDERATIONSThe tibia has a triangular cross section in the proximal third,with a round cross section over the rest of the bone. The prox-imal tibial joint surface parallels the distal tibial joint surface.The medial aspect of the tibia is covered only by skin and sub-cutaneous tissue. The saphenous artery vein and nerve spiralacross the medial surface of the mid-diaphysis. In general,fixation pins can be applied on the medial, cranial medial, cra-nial lateral, and lateral surfaces of the bone.
EQUIPMENT• Surgical pack, Senn retractors, small Hohmann retractors,
Gelpi retractors, periosteal elevator, Kern bone-holding for-ceps, pointed reduction forceps, Jacob pin chuck, low-speed
power drill, external fixation equipment, pin cutter, bonecurette for harvesting cancellous graft
PREPARATION AND POSITIONINGPrepare the affected rear limb circumferentially from midline tofoot. Position the animal in dorsal recumbency, and suspend theaffected limb from the ceiling.2 Drape the limb out in thehanging position. Prepare the ipsilateral proximal humerus forcancellous bone autograft harvest if open reduction is used.
PROCEDUREApproach: Perform a limited medial approach to the fracturesite for reducible fractures (Plate 79A).3 Use closed reductiontechniques for nonreducible fractures (Plate 79B).4 Incise theskin, and create soft tissue tunnels to the bone for pin placement.
Reduction: Lower the table to allow the animal’s weight tofatigue the muscles. For single fracture lines, lever the frag-ments into position through the limited surgical approach (seePlate 79A). Maintain the reduction manually for transverse frac-tures and with reduction forceps for oblique fractures. Forclosed reduction of comminuted fractures, manipulate theproximal and distal fixation pins to align the joint surfaces.Medial and lateral angular alignment is correct when the proximal and distal joint surfaces are parallel (see Plate 79B).Make sure that cranial caudal joint surfaces are also parallel.Check rotational alignment by flexing the stifle and hock afterraising the table: the paw should align with the tibia. Maintainreduction by securing the connecting bars (see Plate 79B).
206 PART TWO • SURGICAL PROCEDURES FOR FRACTURES
Continued

CH A P T E R 79 APPLICATION OF AN EXTERNAL FIXATOR TO THE TIBIA 207
PLATE 79
B
A
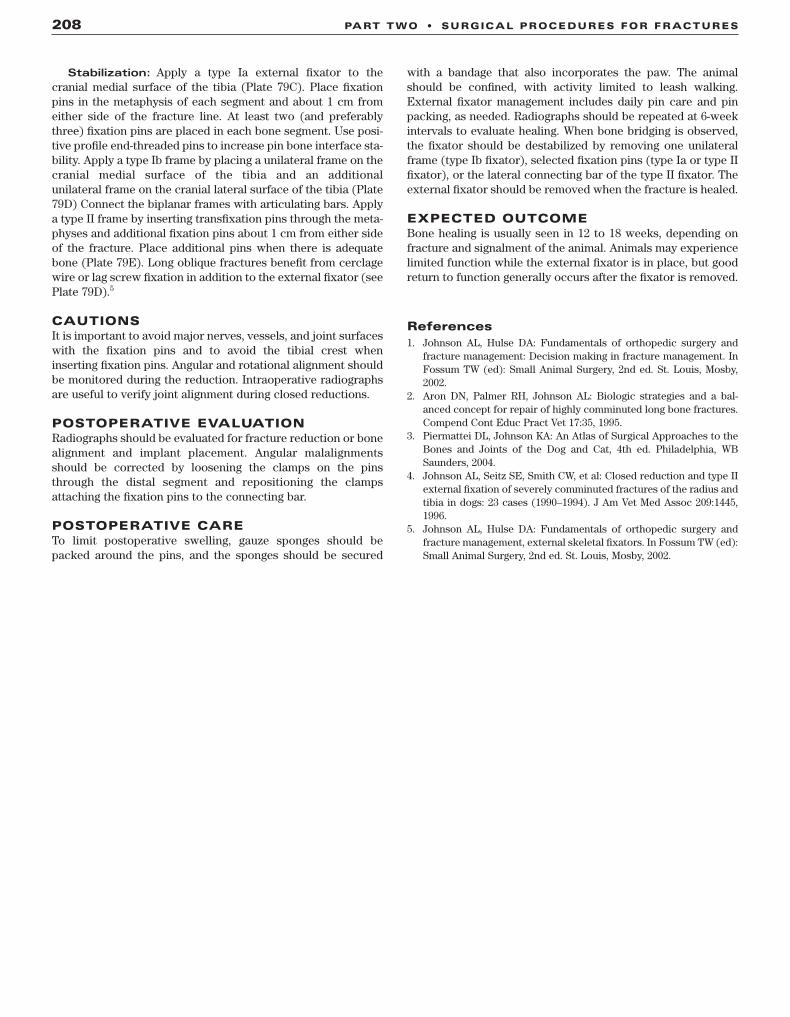
Stabilization: Apply a type Ia external fixator to the cranial medial surface of the tibia (Plate 79C). Place fixationpins in the metaphysis of each segment and about 1 cm fromeither side of the fracture line. At least two (and preferablythree) fixation pins are placed in each bone segment. Use posi-tive profile end-threaded pins to increase pin bone interface sta-bility. Apply a type Ib frame by placing a unilateral frame on thecranial medial surface of the tibia and an additional unilateral frame on the cranial lateral surface of the tibia (Plate79D) Connect the biplanar frames with articulating bars. Applya type II frame by inserting transfixation pins through the meta-physes and additional fixation pins about 1 cm from either sideof the fracture. Place additional pins when there is adequatebone (Plate 79E). Long oblique fractures benefit from cerclagewire or lag screw fixation in addition to the external fixator (seePlate 79D).5
CAUTIONSIt is important to avoid major nerves, vessels, and joint surfaceswith the fixation pins and to avoid the tibial crest wheninserting fixation pins. Angular and rotational alignment shouldbe monitored during the reduction. Intraoperative radiographsare useful to verify joint alignment during closed reductions.
POSTOPERATIVE EVALUATIONRadiographs should be evaluated for fracture reduction or bonealignment and implant placement. Angular malalignmentsshould be corrected by loosening the clamps on the pinsthrough the distal segment and repositioning the clampsattaching the fixation pins to the connecting bar.
POSTOPERATIVE CARETo limit postoperative swelling, gauze sponges should bepacked around the pins, and the sponges should be secured
with a bandage that also incorporates the paw. The animalshould be confined, with activity limited to leash walking.External fixator management includes daily pin care and pinpacking, as needed. Radiographs should be repeated at 6-weekintervals to evaluate healing. When bone bridging is observed,the fixator should be destabilized by removing one unilateralframe (type Ib fixator), selected fixation pins (type Ia or type IIfixator), or the lateral connecting bar of the type II fixator. Theexternal fixator should be removed when the fracture is healed.
EXPECTED OUTCOMEBone healing is usually seen in 12 to 18 weeks, depending onfracture and signalment of the animal. Animals may experiencelimited function while the external fixator is in place, but goodreturn to function generally occurs after the fixator is removed.
References1. Johnson AL, Hulse DA: Fundamentals of orthopedic surgery and
fracture management: Decision making in fracture management. InFossum TW (ed): Small Animal Surgery, 2nd ed. St. Louis, Mosby,2002.
2. Aron DN, Palmer RH, Johnson AL: Biologic strategies and a bal-anced concept for repair of highly comminuted long bone fractures.Compend Cont Educ Pract Vet 17:35, 1995.
3. Piermattei DL, Johnson KA: An Atlas of Surgical Approaches to theBones and Joints of the Dog and Cat, 4th ed. Philadelphia, WBSaunders, 2004.
4. Johnson AL, Seitz SE, Smith CW, et al: Closed reduction and type IIexternal fixation of severely comminuted fractures of the radius andtibia in dogs: 23 cases (1990–1994). J Am Vet Med Assoc 209:1445,1996.
5. Johnson AL, Hulse DA: Fundamentals of orthopedic surgery andfracture management, external skeletal fixators. In Fossum TW (ed):Small Animal Surgery, 2nd ed. St. Louis, Mosby, 2002.
208 PART TWO • SURGICAL PROCEDURES FOR FRACTURES

CH A P T E R 79 APPLICATION OF AN EXTERNAL FIXATOR TO THE TIBIA 209
PLATE 79
C D E
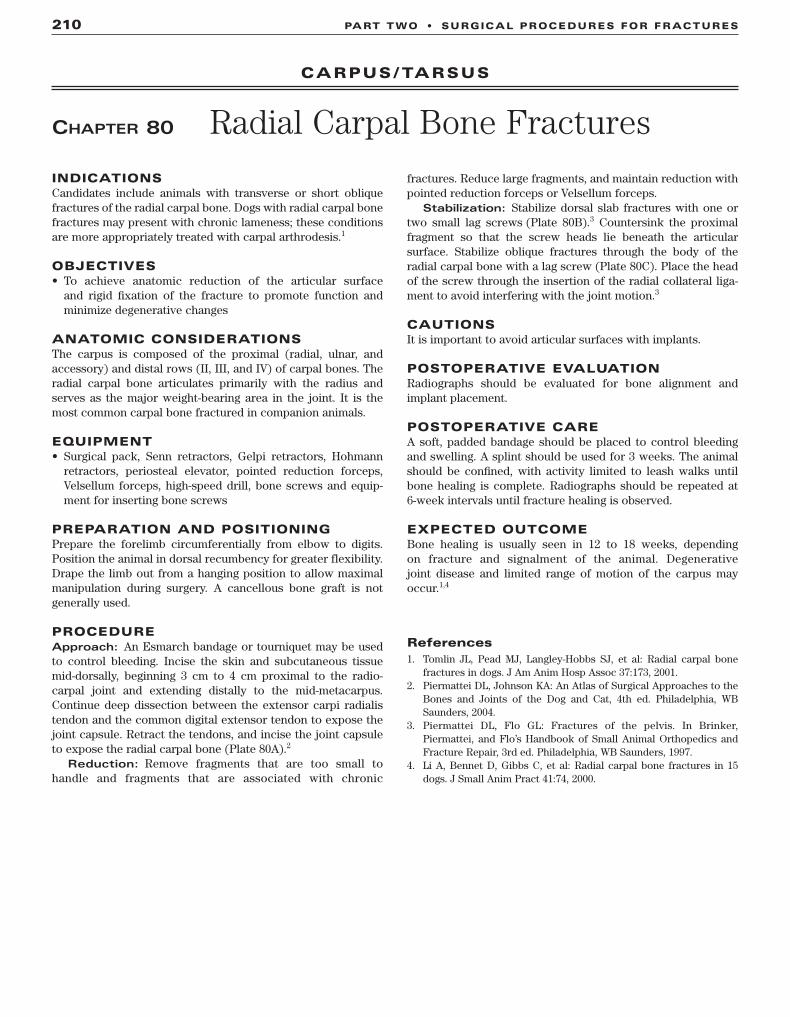
CARPUS/TARSUS
CHAPTER 80 Radial Carpal Bone FracturesINDICATIONSCandidates include animals with transverse or short obliquefractures of the radial carpal bone. Dogs with radial carpal bonefractures may present with chronic lameness; these conditionsare more appropriately treated with carpal arthrodesis.1
OBJECTIVES• To achieve anatomic reduction of the articular surface
and rigid fixation of the fracture to promote function andminimize degenerative changes
ANATOMIC CONSIDERATIONSThe carpus is composed of the proximal (radial, ulnar, andaccessory) and distal rows (II, III, and IV) of carpal bones. Theradial carpal bone articulates primarily with the radius andserves as the major weight-bearing area in the joint. It is themost common carpal bone fractured in companion animals.
EQUIPMENT• Surgical pack, Senn retractors, Gelpi retractors, Hohmann
retractors, periosteal elevator, pointed reduction forceps,Velsellum forceps, high-speed drill, bone screws and equip-ment for inserting bone screws
PREPARATION AND POSITIONINGPrepare the forelimb circumferentially from elbow to digits.Position the animal in dorsal recumbency for greater flexibility.Drape the limb out from a hanging position to allow maximalmanipulation during surgery. A cancellous bone graft is not generally used.
PROCEDUREApproach: An Esmarch bandage or tourniquet may be usedto control bleeding. Incise the skin and subcutaneous tissuemid-dorsally, beginning 3 cm to 4 cm proximal to the radio-carpal joint and extending distally to the mid-metacarpus.Continue deep dissection between the extensor carpi radialistendon and the common digital extensor tendon to expose thejoint capsule. Retract the tendons, and incise the joint capsuleto expose the radial carpal bone (Plate 80A).2
Reduction: Remove fragments that are too small tohandle and fragments that are associated with chronic
fractures. Reduce large fragments, and maintain reduction withpointed reduction forceps or Velsellum forceps.
Stabilization: Stabilize dorsal slab fractures with one ortwo small lag screws (Plate 80B).3 Countersink the proximalfragment so that the screw heads lie beneath the articular surface. Stabilize oblique fractures through the body of theradial carpal bone with a lag screw (Plate 80C). Place the headof the screw through the insertion of the radial collateral liga-ment to avoid interfering with the joint motion.3
CAUTIONSIt is important to avoid articular surfaces with implants.
POSTOPERATIVE EVALUATIONRadiographs should be evaluated for bone alignment andimplant placement.
POSTOPERATIVE CAREA soft, padded bandage should be placed to control bleedingand swelling. A splint should be used for 3 weeks. The animalshould be confined, with activity limited to leash walks untilbone healing is complete. Radiographs should be repeated at 6-week intervals until fracture healing is observed.
EXPECTED OUTCOMEBone healing is usually seen in 12 to 18 weeks, depending on fracture and signalment of the animal. Degenerative joint disease and limited range of motion of the carpus mayoccur.1,4
References1. Tomlin JL, Pead MJ, Langley-Hobbs SJ, et al: Radial carpal bone
fractures in dogs. J Am Anim Hosp Assoc 37:173, 2001.2. Piermattei DL, Johnson KA: An Atlas of Surgical Approaches to the
Bones and Joints of the Dog and Cat, 4th ed. Philadelphia, WBSaunders, 2004.
3. Piermattei DL, Flo GL: Fractures of the pelvis. In Brinker,Piermattei, and Flo’s Handbook of Small Animal Orthopedics andFracture Repair, 3rd ed. Philadelphia, WB Saunders, 1997.
4. Li A, Bennet D, Gibbs C, et al: Radial carpal bone fractures in 15dogs. J Small Anim Pract 41:74, 2000.
210 PART TWO • SURGICAL PROCEDURES FOR FRACTURES

CH A P T E R 80 RADIAL CARPAL BONE FRACTURES 211
PLATE 80
C
A
B
Radialcarpal bone
Radius
Tendon of extensorcarpi radialis muscle
Short radialcollateralligament
Abductor pollicislongus muscle
Tendon of commondigital extensor tendon
Palmar Dorsal

CARPUS/TARSUS
CHAPTER 81 Tarsal FracturesINDICATIONSCandidates include animals with transverse or short obliquefractures of the calcaneus or the neck of the talus.
OBJECTIVES• To achieve anatomic reduction and rigid fixation of the
fracture to promote function and minimize degenerativechanges and to convert tension forces to compressive forcesin calcaneal fractures
ANATOMIC CONSIDERATIONSThe calcaneus articulates with the talus to form a stable joint.Proximally, the Achilles tendon inserts on the tuber calcanei.The medial and lateral trochleas of the talus articulate proxi-mally with the tibia and fibula, and the body articulates distallywith the central tarsal bone.
EQUIPMENT• Surgical pack, Senn retractors, Hohmann retractors, Gelpi
retractors, periosteal elevator, pointed reduction forceps,Kirschner wires, orthopedic wire, wire tighteners, wire cutter, high-speed drill and wire driver, bone screws andinstruments for inserting bone screws
PREPARATION AND POSITIONINGPrepare the rear limb circumferentially from hip to digits.Position the animal in lateral recumbency for calcaneal frac-tures and in dorsal recumbency for greater flexibility with talarfractures. Drape the limb out from a hanging position to allowmaximal manipulation during surgery. A cancellous bone graftis unnecessary.
PROCEDUREApproach: For calcaneal fractures, incise the skin, subcuta-neous tissue, and deep crural fascia along the lateral surface of the calcaneus from just proximal to the tuber calcanei dis-tally to the tarsometatarsal joint. Incise parallel to the lateralaspect of the superficial digital flexor tendon, and retract thetendon medially to expose the caudal surface of the calcaneus(Plate 81A).1 For talar fractures, incise the skin, subcutaneoustissue, and deep fascia from the medial malleolus to the tarsometatarsal joint. Elevate the fascia to expose the bones(Plate 81B).1
Reduction: For the calcaneal fracture, reduce the prox-imal segment by extending the hock and manipulating the frag-ment with pointed reduction forceps. Maintain the reduction bydriving the Kirschner wires. For the talar neck fracture, reducethe distal fragment by manipulating the fragment with thepointed reduction forceps. Maintain reduction manually or with
pointed reduction forceps, holding the talar body to the cal-caneus.
Stabilization: For calcaneal fractures, drill a transversehole in the proximal segment and in the distal segment. Place awire through the proximal hole. Place two Kirschner wiresthrough the proximal bone segment, exiting at the fracture. Itmay be necessary to pre-drill the bone for the Kirschner wires.Reduce the fracture, and drive the Kirschner wires distally.Retract the wires, cut, and countersink them into the calcaneus.Secure the tension band wire (Plate 81C).2 For a talar neck frac-ture, angle a lag screw from the caudal medial surface of thehead of the talus into the trochlea of the talus (Plate 81D). Drillthe glide hole from inside out before reducing the fracture to center the hole and ensure purchase in the trochlea.Alternatively, place a screw from the craniomedial surface ofthe base of the talus into the calcaneus. If the reduction can bemaintained with forceps, the screw may be placed as a positionscrew; otherwise, it may be placed as a lag screw (Plate 81E).2
CAUTIONSIt is important to avoid placing implants where they will interfere with articular surfaces.
POSTOPERATIVE EVALUATIONRadiographs should be evaluated for bone alignment andimplant placement.
POSTOPERATIVE CAREA soft padded bandage should be placed to control bleeding andswelling. A splint should be used for 3 weeks. The animalshould be confined, with activity limited to leash walks, untilbone healing is complete. Radiographs should be repeated at 6-week intervals until fracture healing is observed. If soft tissueirritation occurs, the orthopedic wire used in the tension bandshould be removed after bone healing.
EXPECTED OUTCOMEBone healing is usually seen in 12 to 18 weeks, depending on the fracture and signalment of the animal. Degenerative jointdisease and limited range of motion of the hock may occur.
References1. Piermattei DL, Johnson KA: An Atlas of Surgical Approaches to the
Bones and Joints of the Dog and Cat, 4th ed. Philadelphia, WBSaunders, 2004.
2. Piermattei DL, Flo GL: Fractures and other orthopedic injuries ofthe tarsus, metatarsus and phalanges. In Brinker, Piermattei, andFlo’s Handbook of Small Animal Orthopedics and Fracture Repair,3rd ed. Philadelphia, WB Saunders, 1997.
212 PART TWO • SURGICAL PROCEDURES FOR FRACTURES

CH A P T E R 81 TARSAL FRACTURES 213
PLATE 81
ALateral
BMedial
C D
E
Calcaneus
Talus
Tendon ofabductor digitiquinti muscle
Tendon of superficialflexor muscle
Tendon of gastrocnemiusmuscle
Tendon of flexor hallucislongus muscle
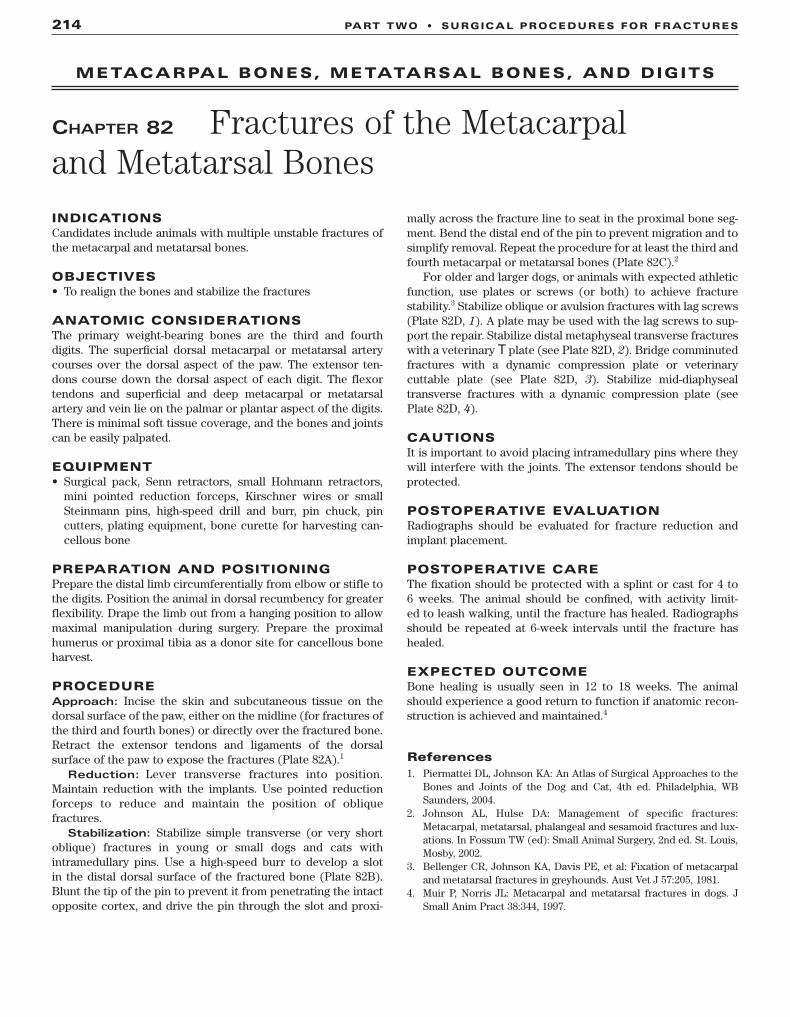
METACARPAL BONES, METATARSAL BONES, AND DIGITS
CHAPTER 82 Fractures of the Metacarpal and Metatarsal BonesINDICATIONSCandidates include animals with multiple unstable fractures ofthe metacarpal and metatarsal bones.
OBJECTIVES• To realign the bones and stabilize the fractures
ANATOMIC CONSIDERATIONSThe primary weight-bearing bones are the third and fourthdigits. The superficial dorsal metacarpal or metatarsal arterycourses over the dorsal aspect of the paw. The extensor ten-dons course down the dorsal aspect of each digit. The flexortendons and superficial and deep metacarpal or metatarsalartery and vein lie on the palmar or plantar aspect of the digits.There is minimal soft tissue coverage, and the bones and jointscan be easily palpated.
EQUIPMENT• Surgical pack, Senn retractors, small Hohmann retractors,
mini pointed reduction forceps, Kirschner wires or smallSteinmann pins, high-speed drill and burr, pin chuck, pin cutters, plating equipment, bone curette for harvesting can-cellous bone
PREPARATION AND POSITIONINGPrepare the distal limb circumferentially from elbow or stifle tothe digits. Position the animal in dorsal recumbency for greaterflexibility. Drape the limb out from a hanging position to allowmaximal manipulation during surgery. Prepare the proximalhumerus or proximal tibia as a donor site for cancellous boneharvest.
PROCEDUREApproach: Incise the skin and subcutaneous tissue on thedorsal surface of the paw, either on the midline (for fractures ofthe third and fourth bones) or directly over the fractured bone.Retract the extensor tendons and ligaments of the dorsal surface of the paw to expose the fractures (Plate 82A).1
Reduction: Lever transverse fractures into position.Maintain reduction with the implants. Use pointed reductionforceps to reduce and maintain the position of oblique fractures.
Stabilization: Stabilize simple transverse (or very shortoblique) fractures in young or small dogs and cats withintramedullary pins. Use a high-speed burr to develop a slot in the distal dorsal surface of the fractured bone (Plate 82B).Blunt the tip of the pin to prevent it from penetrating the intactopposite cortex, and drive the pin through the slot and proxi-
mally across the fracture line to seat in the proximal bone seg-ment. Bend the distal end of the pin to prevent migration and tosimplify removal. Repeat the procedure for at least the third andfourth metacarpal or metatarsal bones (Plate 82C).2
For older and larger dogs, or animals with expected athleticfunction, use plates or screws (or both) to achieve fracture stability.3 Stabilize oblique or avulsion fractures with lag screws(Plate 82D, 1). A plate may be used with the lag screws to sup-port the repair. Stabilize distal metaphyseal transverse fractureswith a veterinary T plate (see Plate 82D, 2). Bridge comminutedfractures with a dynamic compression plate or veterinary cuttable plate (see Plate 82D, 3). Stabilize mid-diaphyseal transverse fractures with a dynamic compression plate (seePlate 82D, 4).
CAUTIONSIt is important to avoid placing intramedullary pins where theywill interfere with the joints. The extensor tendons should beprotected.
POSTOPERATIVE EVALUATIONRadiographs should be evaluated for fracture reduction andimplant placement.
POSTOPERATIVE CAREThe fixation should be protected with a splint or cast for 4 to 6 weeks. The animal should be confined, with activity limit-ed to leash walking, until the fracture has healed. Radiographsshould be repeated at 6-week intervals until the fracture hashealed.
EXPECTED OUTCOMEBone healing is usually seen in 12 to 18 weeks. The animalshould experience a good return to function if anatomic recon-struction is achieved and maintained.4
References1. Piermattei DL, Johnson KA: An Atlas of Surgical Approaches to the
Bones and Joints of the Dog and Cat, 4th ed. Philadelphia, WBSaunders, 2004.
2. Johnson AL, Hulse DA: Management of specific fractures:Metacarpal, metatarsal, phalangeal and sesamoid fractures and lux-ations. In Fossum TW (ed): Small Animal Surgery, 2nd ed. St. Louis,Mosby, 2002.
3. Bellenger CR, Johnson KA, Davis PE, et al: Fixation of metacarpaland metatarsal fractures in greyhounds. Aust Vet J 57:205, 1981.
4. Muir P, Norris JL: Metacarpal and metatarsal fractures in dogs. JSmall Anim Pract 38:344, 1997.
214 PART TWO • SURGICAL PROCEDURES FOR FRACTURES

CH A P T E R 82 FRACTURES OF THE METACARPAL AND METATARSAL BONES 215
PLATE 82
A
B C
D
1
2 3
4
Tendon of commondigital extensor muscle
Palmar Dorsal
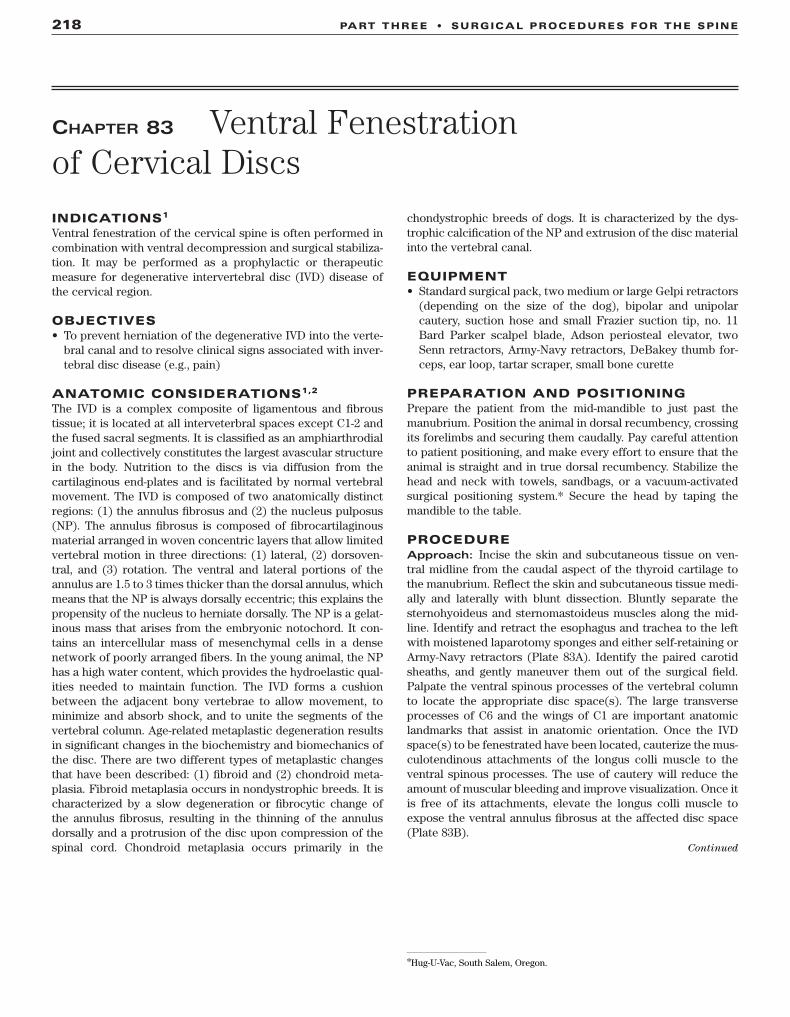
CHAPTER 83 Ventral Fenestration of Cervical Discs
INDICATIONS1
Ventral fenestration of the cervical spine is often performed incombination with ventral decompression and surgical stabiliza-tion. It may be performed as a prophylactic or therapeuticmeasure for degenerative intervertebral disc (IVD) disease ofthe cervical region.
OBJECTIVES• To prevent herniation of the degenerative IVD into the verte-
bral canal and to resolve clinical signs associated with inver-tebral disc disease (e.g., pain)
ANATOMIC CONSIDERATIONS1,2
The IVD is a complex composite of ligamentous and fibroustissue; it is located at all interveterbral spaces except C1-2 andthe fused sacral segments. It is classified as an amphiarthrodialjoint and collectively constitutes the largest avascular structurein the body. Nutrition to the discs is via diffusion from the cartilaginous end-plates and is facilitated by normal vertebralmovement. The IVD is composed of two anatomically distinctregions: (1) the annulus fibrosus and (2) the nucleus pulposus(NP). The annulus fibrosus is composed of fibrocartilaginousmaterial arranged in woven concentric layers that allow limitedvertebral motion in three directions: (1) lateral, (2) dorsoven-tral, and (3) rotation. The ventral and lateral portions of theannulus are 1.5 to 3 times thicker than the dorsal annulus, whichmeans that the NP is always dorsally eccentric; this explains thepropensity of the nucleus to herniate dorsally. The NP is a gelat-inous mass that arises from the embryonic notochord. It con-tains an intercellular mass of mesenchymal cells in a densenetwork of poorly arranged fibers. In the young animal, the NPhas a high water content, which provides the hydroelastic qual-ities needed to maintain function. The IVD forms a cushionbetween the adjacent bony vertebrae to allow movement, tominimize and absorb shock, and to unite the segments of thevertebral column. Age-related metaplastic degeneration resultsin significant changes in the biochemistry and biomechanics ofthe disc. There are two different types of metaplastic changesthat have been described: (1) fibroid and (2) chondroid meta-plasia. Fibroid metaplasia occurs in nondystrophic breeds. It ischaracterized by a slow degeneration or fibrocytic change of the annulus fibrosus, resulting in the thinning of the annulusdorsally and a protrusion of the disc upon compression of thespinal cord. Chondroid metaplasia occurs primarily in the
chondystrophic breeds of dogs. It is characterized by the dys-trophic calcification of the NP and extrusion of the disc materialinto the vertebral canal.
EQUIPMENT• Standard surgical pack, two medium or large Gelpi retractors
(depending on the size of the dog), bipolar and unipolarcautery, suction hose and small Frazier suction tip, no. 11Bard Parker scalpel blade, Adson periosteal elevator, twoSenn retractors, Army-Navy retractors, DeBakey thumb for-ceps, ear loop, tartar scraper, small bone curette
PREPARATION AND POSITIONINGPrepare the patient from the mid-mandible to just past themanubrium. Position the animal in dorsal recumbency, crossingits forelimbs and securing them caudally. Pay careful attentionto patient positioning, and make every effort to ensure that theanimal is straight and in true dorsal recumbency. Stabilize thehead and neck with towels, sandbags, or a vacuum-activatedsurgical positioning system.* Secure the head by taping themandible to the table.
PROCEDUREApproach: Incise the skin and subcutaneous tissue on ven-tral midline from the caudal aspect of the thyroid cartilage tothe manubrium. Reflect the skin and subcutaneous tissue medi-ally and laterally with blunt dissection. Bluntly separate thesternohyoideus and sternomastoideus muscles along the mid-line. Identify and retract the esophagus and trachea to the leftwith moistened laparotomy sponges and either self-retaining orArmy-Navy retractors (Plate 83A). Identify the paired carotidsheaths, and gently maneuver them out of the surgical field.Palpate the ventral spinous processes of the vertebral columnto locate the appropriate disc space(s). The large transverseprocesses of C6 and the wings of C1 are important anatomiclandmarks that assist in anatomic orientation. Once the IVDspace(s) to be fenestrated have been located, cauterize the mus-culotendinous attachments of the longus colli muscle to theventral spinous processes. The use of cautery will reduce theamount of muscular bleeding and improve visualization. Once itis free of its attachments, elevate the longus colli muscle toexpose the ventral annulus fibrosus at the affected disc space(Plate 83B).
218 PART THREE • SURGICAL PROCEDURES FOR THE SPINE
*Hug-U-Vac, South Salem, Oregon.
Continued

CH A P T E R 83 VENTRAL FENESTRATION OF CERVICAL DISCS 219
PLATE 83
Longus colli muscles
Sternohyoideusmuscle
Sternocephalicusmuscle
Trachea
A B
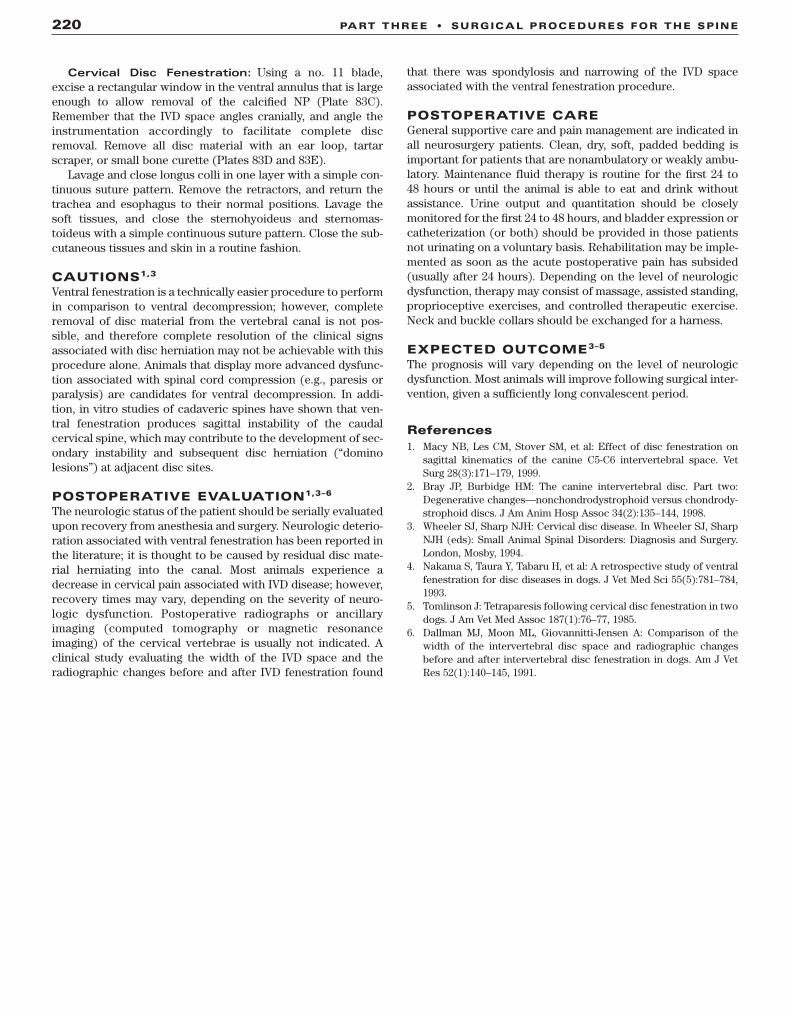
Cervical Disc Fenestration: Using a no. 11 blade,excise a rectangular window in the ventral annulus that is largeenough to allow removal of the calcified NP (Plate 83C).Remember that the IVD space angles cranially, and angle theinstrumentation accordingly to facilitate complete discremoval. Remove all disc material with an ear loop, tartarscraper, or small bone curette (Plates 83D and 83E).
Lavage and close longus colli in one layer with a simple con-tinuous suture pattern. Remove the retractors, and return thetrachea and esophagus to their normal positions. Lavage thesoft tissues, and close the sternohyoideus and sternomas-toideus with a simple continuous suture pattern. Close the sub-cutaneous tissues and skin in a routine fashion.
CAUTIONS1,3
Ventral fenestration is a technically easier procedure to performin comparison to ventral decompression; however, completeremoval of disc material from the vertebral canal is not pos-sible, and therefore complete resolution of the clinical signsassociated with disc herniation may not be achievable with thisprocedure alone. Animals that display more advanced dysfunc-tion associated with spinal cord compression (e.g., paresis orparalysis) are candidates for ventral decompression. In addi-tion, in vitro studies of cadaveric spines have shown that ven-tral fenestration produces sagittal instability of the caudalcervical spine, which may contribute to the development of sec-ondary instability and subsequent disc herniation (“dominolesions”) at adjacent disc sites.
POSTOPERATIVE EVALUATION1,3–6
The neurologic status of the patient should be serially evaluatedupon recovery from anesthesia and surgery. Neurologic deterio-ration associated with ventral fenestration has been reported inthe literature; it is thought to be caused by residual disc mate-rial herniating into the canal. Most animals experience adecrease in cervical pain associated with IVD disease; however,recovery times may vary, depending on the severity of neuro-logic dysfunction. Postoperative radiographs or ancillaryimaging (computed tomography or magnetic resonanceimaging) of the cervical vertebrae is usually not indicated. Aclinical study evaluating the width of the IVD space and theradiographic changes before and after IVD fenestration found
that there was spondylosis and narrowing of the IVD spaceassociated with the ventral fenestration procedure.
POSTOPERATIVE CAREGeneral supportive care and pain management are indicated inall neurosurgery patients. Clean, dry, soft, padded bedding isimportant for patients that are nonambulatory or weakly ambu-latory. Maintenance fluid therapy is routine for the first 24 to 48 hours or until the animal is able to eat and drink withoutassistance. Urine output and quantitation should be closelymonitored for the first 24 to 48 hours, and bladder expression orcatheterization (or both) should be provided in those patientsnot urinating on a voluntary basis. Rehabilitation may be imple-mented as soon as the acute postoperative pain has subsided(usually after 24 hours). Depending on the level of neurologicdysfunction, therapy may consist of massage, assisted standing,proprioceptive exercises, and controlled therapeutic exercise.Neck and buckle collars should be exchanged for a harness.
EXPECTED OUTCOME3–5
The prognosis will vary depending on the level of neurologicdysfunction. Most animals will improve following surgical inter-vention, given a sufficiently long convalescent period.
References1. Macy NB, Les CM, Stover SM, et al: Effect of disc fenestration on
sagittal kinematics of the canine C5-C6 intervertebral space. VetSurg 28(3):171–179, 1999.
2. Bray JP, Burbidge HM: The canine intervertebral disc. Part two:Degenerative changes—nonchondrodystrophoid versus chondrody-strophoid discs. J Am Anim Hosp Assoc 34(2):135–144, 1998.
3. Wheeler SJ, Sharp NJH: Cervical disc disease. In Wheeler SJ, SharpNJH (eds): Small Animal Spinal Disorders: Diagnosis and Surgery.London, Mosby, 1994.
4. Nakama S, Taura Y, Tabaru H, et al: A retrospective study of ventralfenestration for disc diseases in dogs. J Vet Med Sci 55(5):781–784,1993.
5. Tomlinson J: Tetraparesis following cervical disc fenestration in twodogs. J Am Vet Med Assoc 187(1):76–77, 1985.
6. Dallman MJ, Moon ML, Giovannitti-Jensen A: Comparison of thewidth of the intervertebral disc space and radiographic changesbefore and after intervertebral disc fenestration in dogs. Am J VetRes 52(1):140–145, 1991.
220 PART THREE • SURGICAL PROCEDURES FOR THE SPINE

CH A P T E R 83 VENTRAL FENESTRATION OF CERVICAL DISCS 221
PLATE 83
C D
E

CHAPTER 84 Ventral Cervical SlotINDICATIONS1
Ventral decompression of the cervical spine is performed forintervertebral disc (IVD) disease of the cervical spine. It is oftenperformed in combination with ventral fenestration. Surgicalcandidates for a ventral slot are those animals that have exhib-ited multiple bouts of cervical pain, that are unresponsive toprevious conservative treatment, or that are nonambulatorytetraparetic or quadriplegic and that have been diagnosed withextradural compression of the spinal cord via myelography,computed tomography, or magnetic resonance imaging.
OBJECTIVES• To relieve compression of the cervical spine from extruded or
protruded disc material
ANATOMIC CONSIDERATIONS2–4
Cervical spinal cord compression accounts for 15% of thereported cases of IVD in the dog, with 80% occurring in the chon-drodystrophic breeds. The most common site of disc protrusionis C2-C3, followed by C3-4 and C7-T1. Clinical signs associatedwith disc disease can vary from a nerve root signature and neckpain to quadriplegia, depending on the degree and location ofspinal cord compression. Myelography or ancillary imaging ofcomputed tomography and magnetic resonance imaging areimportant for both diagnostic confirmation and neuroanatom-ical localization of the lesion; they also determine lateralizationof the disc extrusion and rule out the presence of multiplelesions.
The midline location of the ventral slot must be precise toavoid the internal vertebral venous plexus. The internal verte-bral venous plexus or sinuses comprise two valveless veins,which reside on the floor of the vertebral canal. These two thin-walled veins converge and diverge at the vertebral midbody andIVD space, respectively. To avoid damage of these vertebralsinuses and instability of the vertebral spine, the dimensions ofthe slot must be no greater than one third the width and lengthof the body of the vertebra, centering the slot slightly cranial tothe IVD space (Plate 84A).
EQUIPMENT• Standard surgical pack, two medium or large Gelpi retractors
(depending on the size of dog), bipolar and unipolar cautery,suction hose and small Frazier suction tip, no. 11 Bard Parker
scalpel blade, Adson periosteal elevator, Senn retractorsand/or Army-Navy retractors, DeBakey thumb forceps,Lempert rongeur, Kerrison rongeur, pneumatic drill systemwith burr guard and a variety of sizes of round and oval burrs,bone wax,* gelfoam,† or Avitene Sheets‡ (MicrofibrillarHemostat).Additional instrumentation that is useful for removing
extruded disc material from the vertebral canal includes a Buckear curette, Ball burnisher, tartar scraper, double-ended curette,Iris spatula, and small bone curette.
PREPARATION AND POSITIONINGPrepare the patient from the mid-mandible to just past themanubrium. Position the animal in dorsal recumbency, crossingits forelimbs and securing them caudally. Pay careful attentionto patient positioning, and make every effort to ensure that theanimal is straight and in true dorsal recumbency. The head andneck can be stabilized with towels, sandbags, or a vacuum-activated surgical positioning system.§ Secure the head bytaping the mandible to the table.
PROCEDUREApproach: Incise the skin and subcutaneous tissue on theventral midline from the caudal aspect of the thyroid cartilage tothe manubrium. Reflect the skin and subcutaneous tissue medi-ally and laterally with blunt dissection. Bluntly separate thesternohyoideus and sternomastoideous muscles along the mid-line. Identify and retract the esophagus and trachea to the leftwith moistened laparotomy sponges and either self-retaining orArmy-Navy retractors (Plate 84B). Identify the paired carotidsheaths, and gently maneuver them out of the surgical field.Palpate the ventral spinous processes of the vertebral columnto locate the appropriate disc space(s). The large transverseprocesses of C6 and the wings of C1 are important landmarksthat assist in anatomical orientation. Once the IVD space(s) hasbeen located, cauterize the musculotendinous attachments ofthe longus colli muscle to the ventral spinous processes. Theuse of cautery will reduce the amount of muscular bleeding andimprove visualization. Once it is free of its attachments, elevateand retract the longus colli muscle to expose the ventralannulus fibrosus at the affected disc space and the adjacent ver-tebral bodies (Plate 84C), and remove the ventral spinousprocess with a rongeur (Plate 84D).
222 PART THREE • SURGICAL PROCEDURES FOR THE SPINE
Continued
*Bone wax, Ethicon, Johnson & Johnson, Somerville, New Jersey. †Gelfoam, Pharmacia and Upjohn, Kalamazoo, Michigan.‡Avitene, Davol, Cranston, Rhode Island. §Hug-U-Vac, South Salem, Oregon.

CH A P T E R 84 VENTRAL CERVICAL SLOT 223
PLATE 84
Longus colli muscles
Slot is centeredslightly cranialto interspace
Slot is 1/3 the widthof the vertebral body
Sternohyoideusmuscle
Sternocephalicusmuscle
Carotid sheath
Trachea
C
B
D
A

Ventral Cervical Slot: Drill the proposed ventral slot sitewith a pneumatic air drill using a burr of appropriate size (Plate84E). Generally, select a burr that is equal to the width of theslot to promote even bone removal. Slowly trickle warm salineover the burr while drilling to prevent heat transfer from theburr to the hemilaminectomy site, and intermittently lavage theentire laminectomy site to remove bone debris and to keep thetissues moist. Once most of the bone has been removed, asmaller bit can be used to remove the edges of inner corticalbone plate. Any bone bleeding may be controlled with bonewax. Once the inner cortex has been removed, use a nerve rootprobe, ear loop, or tartar scraper to palpate the inner bone andperiosteal shelf. When it is thin and pliable, use a probe to pen-etrate the site gently and create a long window to allow aKerrison rongeur to remove any remaining bone in the oblongwindow. If necessary, excise the dorsal longitudinal ligamentwith a no. 11 blade to visualize and decompress the cord.Remove any remaining extruded disc with a Buck ear curette,ball burnisher, or iris scapula (Plate 84F). Avoid damaging thevenous sinuses that circumferentially surround the slot ventralto the cord. If a venous sinus is damaged, control the bleedingwith the gelfoam or Avitene Sheets. Wait 5 minutes for the ces-sation of bleeding before removing the hemostatic devices andreinitiating the exploratory surgery. Once the spinal cord hasbeen fully decompressed, all sinus bleeding should cease.
Closure: Lavage and close the longus colli in one layer witha simple continuous suture pattern. Remove the retractors, andreturn the trachea and esophagus to their normal position.Lavage the soft tissues, and close the sternohyoideus and ster-nomastoideus with a simple continuous suture pattern. Closethe subcutaneous tissues and skin in a routine fashion.
CAUTIONS1,5
Proper anatomic orientation is key to the identification of thecorrect surgical site. Postoperative or intraoperative radio-graphs should be taken if there is any doubt about lesion loca-tion. Severe hemorrhage can occur as a result of ventral sinuslaceration. It is important to cross-match any animal that is acandidate for a coagulopathy before surgery.
POSTOPERATIVE EVALUATION1,5–8
The neurologic status of the patient should be serially evaluatedupon recovery from anesthesia and surgery. Neurologic deteri-oration associated with ventral fenestration has been reportedin the literature and is thought to be due to the herniation ofresidual disc material into the canal. Most animals experience adecrease in cervical pain associated with IVD disease; however,recovery times may vary depending on the severity of the neu-rologic dysfunction and the intraoperative complications.Postoperative radiographs or ancillary imaging (computed
tomography or magnetic resonance imaging) of the cervical ver-tebrae is usually not indicated.
POSTOPERATIVE CAREGeneral supportive care and pain management are indicated inall neurosurgery patients. Clean, dry, soft padded bedding isimportant for patients that are nonambulatory or weakly ambu-latory. Maintenance fluid therapy is routine for the first 24 to 48 hours, until the animal is able to eat and drink without assis-tance. Urine output and quantitation should be closely moni-tored for the first 24 to 48 hours, and bladder expression orcatheterization should be provided for those patients that arenot urinating on a voluntary basis. Rehabilitation may be imple-mented as soon as the acute postoperative pain has subsided(usually after 24 hours). Depending on the level of neurologicdysfunction, therapy may consist of massage, assisted standing,proprioceptive exercises, and controlled therapeutic exercise.Neck and buckle collars should be exchanged for a harness.
EXPECTED OUTCOME5,7
Most patients with cervical IVD have a fair to good prognosis;however, expected outcomes vary depending on the level ofneurologic dysfunction. Most animals improve following sur-gical intervention, given a convalescence period of reasonablelength (6 to 8 weeks). Recurrence of signs associated with IVDhas been reported within the literature and should be discussedwith the owner prior to surgery.
References1. Macy NB, Stover SM, Kass PH: Effect of disk fenestration on sagittal
kinematics of the canine C5-C6 intervertebral space. Vet Surg28:171–179, 1999.
2. Tombs JP: Cervical intervertebral disk disease in dogs. CompendContin Educ Pract Vet 14:1477–1488, 1992.
3. Lemarie RJ, Partington BP, Hosgood G: Vertebral subluxation fol-lowing ventral cervical decompression in the dog. J Am Anim HospAssoc 36(4):348–358, 2000.
4. Bagley RS, Tucker R, Harrington ML: Lateral and foraminal diskextrusion in dogs. Compend Contin Educ Pract Vet 18:795–804,1996.
5. Wheeler SJ, Sharp NJH: Cervical disc disease. In Small AnimalSpinal Disorders. London, Mosby-Wolfe, 1994.
6. Dallman MJ, Giovannitti-Jensen A: Comparison of the width of theintervertebral disk space and radiographic changes before and afterintervertebral disk fenestration in dogs. Am J Vet Res 52(1):140–145,1991.
7. Nakama S, Tabaru H, Yasuda M: A retrospective study of ventral fen-estration for disk diseases in dogs. J Vet Med Sci 55(5):781–784,1993.
8. Tomlinson J: Tetraparesis following cervical disk fenestration in twodogs. J Am Vet Med Assoc 187(1):76–77, 1985.
224 PART THREE • SURGICAL PROCEDURES FOR THE SPINE

CH A P T E R 84 VENTRAL CERVICAL SLOT 225
PLATE 84
Slot is centeredslightly cranialto interspace
E
F

CHAPTER 85 Hemilaminectomy
INDICATIONS1–3
Surgical candidates for a hemilaminectomy are those animalsthat have exhibited multiple bouts of thoracolumbar pain, thatare unresponsive to previous conservative treatment, thatexhibit loss of voluntary motor function, or that have been diagnosed with compression of the spinal cord via myelography,computed tomography, or magnetic resonance imaging.
OBJECTIVES1,4
• To decompress the spinal cord of the thoracolumbar spine Hemilaminectomy is often performed in combination with
lateral fenestration.
ANATOMIC CONSIDERATIONS5
The vertebrae are key components of the axial skeleton; they liealong the midline of the body. Vertebral body anatomy variesdepending on the location in the axial skeleton, but each has abasic structural configuration despite minor differences in mor-phology. Each vertebral bone has a body that lies directlybeneath the spinal cord. Interposed between and connectingeach vertebral body is an intervertebral disc (see Chapter 83 foran in-depth discussion of disc anatomy). The spinal cord is sur-rounded and protected by the lamina and pedicle, which collectively make up the vertebral arch. Dorsal spinousprocesses project from the lamina. In the cranial thoracic ver-tebra, these processes are tall and slant caudally; however, theychange direction and decrease in size at the anticlinal vertebra,usually located at T10. In the lumbar region, the processesbecome more substantial, shorter, and wider. Each vertebraalso has two sets of articular facets located on the dorsal lateralaspect of the vertebral arch, which demarcate the position ofthe intervertebral foramina, where the nerve root exits thespinal canal. In addition to articulating with each other, the tho-racic vertebrae also articulate with a pair of ribs just ventral andcaudal to the intervertebral foramina. Each rib projects in a per-pendicular fashion from the vertebral body. Location of theproximal rib head with the vertebra is an important anatomiclandmark for identification of the proper intervertebral discspace. The articulation of the rib head with the vertebral bodyis easily palpated and distinguished from the transverse processof the lumbar vertebra, which slopes craniolaterally from thevertebral body. A Freer or other small periosteal elevator maybe used to palpate these landmarks to avoid excessive softtissue dissection.
EQUIPMENT• Standard surgical pack, two medium or large Gelpi retractors
(depending on the size of the dog), bipolar and unipolarcautery, suction hose and small Frazier suction tip, no. 11 and
no. 15 Bard Parker scalpel blades, Freer periosteal elevator,Senn retractors, Lempert rongeur, Kerrison rongeur, pneu-matic drill system with burr guard and a variety of sizes ofround and oval burrs, DeBakey thumb forceps, bone wax,*gelfoam,† or Avitene Sheets‡ (Microfibrillar Hemostat). Additional instrumentation that is useful for removing
extruded disc material from the vertebral canal includes a Buckear curette, Ball burnisher, tartar scraper, double-ended curette,Iris spatula, and small bone curette.
PREPARATION AND POSITIONING1,4,6,7
Position the animal in sternal recumbency, and prepare theback from the mid-thoracic region to the lower lumbar area.Support the animal with sandbags on each side of the abdomen,or use a vacuum-activated surgical positioning system.§ Ifneeded, further secure the animal in position with white tape toprevent malposition during surgery. Perfect positioning andalignment assist in the approach and ensure proper orientation;however, some surgeons prefer that the patient be rotatedslightly, with the operated side being most dorsal.
PROCEDUREApproach:1,4,6,7 Incise the skin and subcutaneous tissue ondorsal midline centered from the mid-thoracic vertebra to themid-lumbar region, and suture in two quarter drapes to decreaseskin contamination. The incision location and length will varysomewhat depending on the lesion location(s) and the numberof sites that need to be decompressed. Incise the thoracodorsalfascia and supraspinous ligaments with a no. 15 scalpel blade,extending the incision at least two dorsal spinous processesproximal and distal to the site(s) to be decompressed. In orderto minimize muscular hemorrhage, deviate the incision towardthe side of the hemilaminectomy at each dorsal spinous processand then return the incision back to midline. Elevate the epaxialmusculature (multifidus thoracis and lumborum muscles) awayfrom the dorsal spinous process, pedicle, and lamina to thelevel of the articular facet using an Adson or Freer periostealelevator. Retract the elevated muscles using two Gelpi self-retaining retractors (Plate 85A). Using the bipolar cautery, cau-terize the musculotendinous attachments of the longissimusmuscles originating on the articular facets, avoiding the nerveroot coursing deep and caudoventrally under the facet. Elevateany remaining tissue attached to the exposed facet, lamina, andpedicle, and repeat the procedure, one site cranial and one sitecaudal to the hemilaminectomy, to provide adequate exposure.Reposition the Gelpi retractors to improve visualization, andremove the articular facets with a Lempert rongeur (Plate 85B).
226 PART THREE • SURGICAL PROCEDURES FOR THE SPINE
*Bone wax, Ethicon, Johnson & Johnson, Somerville, New Jersey.†Gelfoam, Pharmacia and Upjohn, Kalamazoo, Michigan.‡Avitene, Davol, Cranston, Rhode Island.§Hug-U-Vac, South Salem, Oregon.
Continued

CH A P T E R 85 HEMILAMINECTOMY 227
PLATE 85
B
A
T13
L1

Hemilaminectomy:1,4,6 Drill the proposed hemilaminec-tomy site with a pneumatic air drill using a burr of appropriatesize. Generally, select a burr that is equal to the width of thehemilaminectomy site to promote even bone removal (Plate85C). Slowly trickle warm saline over the burr while drilling toprevent heat transfer from the burr to the hemilaminectomysite, and intermittently lavage the entire laminectomy site toremove bone debris and to keep the tissues moist. Once most ofthe bone has been removed, a smaller bit can be used to removethe edges of inner cortical bone plate. Any bone bleeding maybe controlled with bone wax. Once the inner cortex has beenremoved, use a nerve root probe, ear loop, or tartar scraper to palpate the inner bone and periosteal shelf. When it is thin andpliable, use a probe to gently penetrate the site and create along window to allow admission of a Kerrison or small Lempertrongeur to remove any remaining bone in the oblong window(see Plate 85C). Remove the extruded disc with a Buck earcurette, ball burnisher, or iris scapula (Plate 85D). Gently passa neural probe under and dorsal to the spinal cord to ensurecomplete decompression. Avoid damaging the venous sinusesventral to the cord. If a venous sinus is damaged, control thebleeding with the gelfoam or Avitene Sheets. Wait 5 minutes forthe cessation of bleeding before removing the hemostaticdevices and reinitiating the exploratory. Once the spinal cordhas been decompressed, gently lavage the hemilaminectomysite, and harvest a fat graft from the subcutaneous region of theback. Place the fat graft over the hemilaminectomy site to pre-vent fibrous scarring and adhesion. Suture the epaxial muscularfascia in a simple continuous pattern with absorbable suture.Close the subcutaneous tissues and skin in a routine fashion.
CAUTIONS8–11
No more than four adjacent continuous hemilaminectomy sites(or, bilaterally, up to two adjacent sites) should be performed toprevent destabilizing the spinal column. Accurate anatomicidentification of the hemilaminectomy site is important for thesuccess of the surgery. Prior to the surgery, a radiograph of asterile needle placed in a dorsal spinous process can be used toassist in vertebral body identification.
POSTOPERATIVE EVALUATIONThe neurologic status of the patient should be serially evaluatedupon recovery from anesthesia and surgery. Urinary continencegenerally returns with the advent of voluntary ambulation.
POSTOPERATIVE CAREGeneral supportive care and pain management are indicated inall neurosurgery patients. Clean, dry, soft, padded bedding isimportant for patients that are nonambulatory or weakly ambu-latory. Maintenance fluid therapy is routine for the first 24 to 48 hours or until the animal is able to eat and drink withoutassistance. Urine output and quantitation should be closelymonitored for the first 24 to 48 hours, and bladder expression orcatheterization (or both) should be provided in those patientsthat are not urinating on a voluntary basis. Rehabilitation maybe implemented as soon as the acute postoperative pain has
subsided (usually after 24 hours). Depending on the level ofneurologic dysfunction, therapy may consist of massage,assisted standing, proprioceptive exercises, and controlledtherapeutic exercise. Most overweight animals also benefitfrom a weight loss program, because excessive weight canimpair neurologic recovery.
EXPECTED OUTCOME1–3,12
Most patients with thoracolumbar intervertebral disc diseasehave good to excellent prognosis; however, expected outcomeswill vary, depending on the level of neurologic dysfunction.Animals with intact pain sensation generally have a greater than90% chance of full recovery. Prognostic indicators for time toambulation after hemilaminectomy include the presence ofpostoperative voluntary motor function. Most animals improvefollowing surgical intervention given a convalescent period ofreasonable length (6 to 8 weeks). Recurrence of signs associ-ated with intervertebral disc disease has been reported withinthe literature and should be discussed with the owner prior tosurgery.
References1. Harari J, Marks S: Surgical treatments for intervertebral disc
disease. Vet Clin North Am Small Anim Pract 22(4):899–915, 1992.2. Kornegay J, Simpson S, Bailey CS, Joseph R: How do I treat?
Degenerative thoracolumbar intervertebral disc disease in smallbreed dogs. Prog Vet Neuro 4(3):81–83, 1993.
3. Coates J: Intervertebral disk disease. Vet Clin North Am Small AnimPract 30(1):77–110, 2000.
4. Seim HI: Dorsal decompressive laminectomy for T-L disk disease.Canine Practice 20(6):6–10, 1995.
5. Wheeler SJ, Sharp NJH: Functional anatomy. In Wheeler SJ, SharpNJH (eds): Small Animal Spinal Disorders: Diagnosis and Surgery.London, Mosby, 1994.
6. Wheeler SJ, Sharp NJH: Thoracolumbar disc disease. In Wheeler SJ,Sharp NJH (eds): Small Animal Spinal Disorders: Diagnosis andSurgery. London, Mosby, 1994.
7. Piermattei DL, Johnson KA: Approach to the thoracolumbar verte-brae through a dorsal incision. In An Atlas of Surgical Approachesto the Bones and Joints of the Dog and Cat, 4th ed. Philadelphia,WB Saunders, 2004.
8. Schulz KS, Waldron DR, Grant JW, et al: Biomechanics of the tho-racolumbar vertebral column of dogs during lateral bending. Am JVet Res 57:1228–1232, 1996.
9. Corse M, Renberg W, Friis E: In vitro evaluation of biomechanicaleffects of multiple hemilaminectomies on the canine lumbar verte-bral column. Am J Vet Res 64(9):1139–1145, 2003.
10. Hill T, Lubbe A, Guthrie A: Lumbar spine stability following hemil-aminectomy, pediculectomy, and fenestration. Vet Comp OrthopTraumatol 13:165–171, 2000.
11. Hosgood G: Wound complications following thoracolumbarlaminectomy in the dog: A retrospective study of 264 procedures.J Am Anim Hosp Assoc 28(1):47–52, 1992.
12. Davis GJ, Brown DC: Prognostic indicators for time to ambulationafter surgical decompression in nonambulatory dogs with acutethoracolumbar disk extrusions: 112 cases. Vet Surg 31(6):513–518,2002.
228 PART THREE • SURGICAL PROCEDURES FOR THE SPINE

CH A P T E R 85 HEMILAMINECTOMY 229
PLATE 85
C
D

CHAPTER 86 Fenestration of Thoracolumbar Discs
INDICATIONS1–3
Dorsolateral fenestration of the thoracolumbar spine may beperformed as a prophylactic or therapeutic measure for degen-erative intervertebral disc disease; however, considerabledebate exists regarding the indications and therapeutic benefitof fenestration. To date, clinical studies have yet to prove itstherapeutic benefit over the hemilaminectomy procedure. Inaddition, thoracolumbar fenestration has not been proven toprevent future herniation of discs. In general, most surgeonselecting to perform this procedure do so in combination with ahemilaminectomy at adjacent intervertebral discs that arecalcified in situ.
OBJECTIVES• To prevent herniation of a degenerative intervertebral disc
into the vertebral canal and to resolve clinical signs associ-ated with intervertebral disc disease (e.g., pain)
ANATOMIC CONSIDERATIONS4,5
A dorsolateral approach (as described here) may be used togain access to intervertebral disc sites from T10 to L5. Discsabove and below these sites are not routinely fenestrated viathis approach because of technical difficulties in the approachcaused by anatomic differences and to avoid inadvertentdamage to the femoral nerve segments. The intervertebral discsite of the thoracic vertebra lies just cranial and ventromedial tothe tubercle of the rib and adjacent to the head of the rib. Theintervertebral disc site of the lumbar vertebra lies just cranial tothe area where the transverse process joins the vertebral body.Retraction of the multifidus thoracis or lumborum and longis-simus dorsi muscles with the blunt end of a Senn retractorreveals the spinal nerve and artery, which lie over the lateralwall of the annulus fibrosus.
EQUIPMENT• Standard surgical pack, two medium or large Gelpi retractors
(depending on the size of the dog), bipolar and unipolarcautery, suction hose and small Frazier suction tip, no. 11Bard Parker scalpel blade, Freer periosteal elevator, Senn
retractors, Lempert rongeur, Kerrison rongeur, DeBakeythumb forceps, bone wax,* gelfoam,† or Avitene Sheets‡
(Microfibrillar Hemostat). Additional instrumentation that is useful for removing in situ
calcified disc material from the vertebral canal includes a Buckear curette, Ball burnisher, tartar scraper, double-ended curette,Iris spatula, and small bone curette.
PREPARATION AND POSITIONINGPosition the animal in sternal recumbency, and prepare theback from the mid-thoracic region to the lower lumbar area.Support the animal with sandbags on each side of the abdomen,or use a vacuum-activated surgical positioning system.§ Ifneeded, further secure the animal in position with white tape toprevent malposition during surgery. Perfect positioning andalignment assist in the approach and ensure proper orientation;however, some surgeons prefer that the patient be rotatedslightly, with the operated side being most dorsal.
PROCEDUREThoracolumbar Fenestration: After performing thehemilaminectomy via a dorsal approach (Plate 86A) (seeChapter 85), locate the intervertebral disc site(s) to be fenes-trated. Craniolaterally retract the spinal nerve and artery,demarcating the intervertebral disc site to reveal the lateralaspect of the annulus fibrosis (Plate 86B). With a no. 11 scalpelblade, resect a rectangular section of the lateral annular wallthat is large enough to allow access to and removal of thecalcified nucleus pulposus (see Plate 86B). With a tartarscraper, buck ear curette, or a neurologic instrument of choice,remove as much of the calcified disc material as possible (Plate86C). To avoid damage to the peridisc neurovascular structures,maintain the neurologic instrument at a perpendicular angle tothe longitudinal and transverse axis of the spine. Lavage andremove the retractors from the epaxial musculature. Suture theepaxial muscular fascia in a simple continuous pattern withabsorbable suture. Close the subcutaneous tissues and skin in aroutine fashion.
230 PART THREE • SURGICAL PROCEDURES FOR THE SPINE
*Bone wax, Ethicon, Johnson & Johnson, Somerville, New Jersey.†Gelfoam, Pharmacia and Upjohn, Kalamazoo, Michigan.‡Avitene, Davol, Cranston, Rhode Island.§Hug-U-Vac, South Salem, Oregon.
Continued

CH A P T E R 86 FENESTRATION OF THORACOLUMBAR DISCS 231
PLATE 86
B
C
A
T13
L1

CAUTIONS5,6
Fenestration of the disc space alone is not an appropriate treat-ment in animals with neurologic deficits (e.g., significant ataxiaor loss motor function) because it does not ameliorate spinalcord compression stemming from disc extrusion. Animals thatdisplay more advanced dysfunction associated with spinal cordcompression (e.g., paresis or paralysis) are candidates fordecompression via hemilaminectomy.
POSTOPERATIVE EVALUATION3,5–8
The neurologic status of the patient should be serially evaluatedupon recovery from anesthesia and surgery. Neurologic deterio-ration associated with thoracolumbar fenestration has beenreported in the literature and is thought to be caused byresidual disc material herniating into the canal. Postoperativeradiographs or ancillary imaging (computed tomography ormagnetic resonance imaging) of the thoracolumbar vertebrae is usually not indicated.
POSTOPERATIVE CAREGeneral supportive care and pain management are indicated inall neurosurgery patients. Clean, dry, soft, padded bedding isimportant for patients that are nonambulatory or weakly ambu-latory. Maintenance fluid therapy is routine for the first 24 to 48 hours or until the animal is able to eat and drink withoutassistance. Urine output and quantitation should be closelymonitored for the first 24 to 48 hours, and bladder expressionand catheterization (or both) should be provided in thosepatients not urinating on a voluntary basis. Rehabilitation maybe implemented as soon as the acute postoperative pain hassubsided (usually after 24 hours). Depending on the level ofneurologic dysfunction, therapy may consist of massage,
assisted standing, proprioceptive exercises, and controlledtherapeutic exercise.
EXPECTED OUTCOME1,6
The prognosis varies depending on the level of neurologic dys-function. Most animals improve following surgical intervention,given an adequate convalescent period.
References1. McKee WM: A comparison of hemilaminectomy (with concomitant
disc fenestration) and dorsal laminectomy for the treatment of tho-racolumbar disc protrusion in dogs. Vet Rec 130(14):296–300, 1992.
2. Hill T, Lubbe A, Guthrie A: Lumbar spine stability following hemil-aminectomy, pediculectomy, and fenestration. Vet Comp OrthopTraumatol 13:165–171, 2000.
3. Dallman MJ, Moon ML, Giovannitti-Jensen A: Comparison of thewidth of the intervertebral disc space and radiographic changesbefore and after intervertebral disc fenestration in dogs. Am J VetRes 52(1):140–145, 1991.
4. Bray JP, Burbidge HM: The canine intervertebral disc. Part two:Degenerative changes—nonchondrodystrophoid versus chondrody-strophoid discs. J Am Anim Hosp Assoc 34(2):135–144, 1998.
5. Macy NB, Les CM, Stover SM, et al: Effect of disc fenestration onsagittal kinematics of the canine C5-C6 intervertebral space. VetSurg 28(3):171–179, 1999.
6. Wheeler SJ, Sharp NJH: Cervical disc disease. In Wheeler SJ, SharpNJH (eds): Small Animal Spinal Disorders: Diagnosis and Surgery.London, Mosby, 1994.
7. Nakama S, Taura Y, Tabaru H, et al: A retrospective study of ventralfenestration for disc diseases in dogs. J Vet Med Sci 55(5):781–784,1993.
8. Tomlinson J: Tetraparesis following cervical disc fenestration in twodogs. J Am Vet Med Assoc 187(1):76–77, 1985.
232 PART THREE • SURGICAL PROCEDURES FOR THE SPINE

CHAPTER 87 Dorsal Laminectomy of L7-S1INDICATIONS1–4
Surgical candidates for a lumbosacral dorsal laminectomy are thoseanimals that have exhibited multiple bouts of lumbosacral pain and that are nonresponsive to conservative treatment of rest and non-steroidal anti-inflammatory drugs or those animals that exhibit loss of voluntary motor function and urinary or fecal incontinence and that,ideally, have been diagnosed with compression of the cauda equina via epidurography, computed tomography, or magnetic resonanceimaging.
OBJECTIVES1–6
• Lumbosacral dorsal laminectomy is performed for exposure to and isindicated for decompression of the cauda equinaLumbosacral dorsal laminectomy is often performed in combination
with foraminotomy to relieve individual nerve root impingement.
ANATOMIC CONSIDERATIONS2
Because of the differential rate of growth between the bony vertebralcolumn and the spinal cord, the spinal cord terminates between L4 andL6 in the dog. At the end of the spinal cord or conus medullaris, thenerve root segments exit, forming the cauda equina, and then courseobliquely and caudally to their respective intervertebral foramina.Specifically, the cauda equina is composed of nerve roots from the sev-enth lumbar, three sacral, and a varying number of caudal spinal seg-ments. Nerve roots affected by degenerative lumbosacral stenosis orcauda equina syndrome include the sciatic nerve (which arises from theL6 to S1–S2 spinal cord segments), the pudendal and pelvic nerves(which arise from the S1-S3 spinal cord segments), the cranial glutealnerves (L6-S1), and the caudal gluteal nerve (L7-S1). The femoral nerve,arising from the L4-L6 spinal cord segments, is usually spared from lum-bosacral entrapment because of its early exit from the spinal canal atthe L6-L7 intervertebral disc space. Degenerative lumbosacral stenosisor cauda equina is a multifactorial disease process, with clinical signsranging from lumbosacral pain, hind end lameness, and paraparesis andataxia of the hind end or tail to fecal and urinary incontinence.Degenerative intervertebral disc disease; congenital lumbosacralstenosis, malformation, or malarticulation; and degenerative changesand hypertrophy of the ligamentum flavum, dorsal longitudinal liga-ment, and articular facet joint capsule have all been associated with this
disease process. Regardless of the point of etiology, the disease iscaused by nerve root entrapment by either hard or soft tissue.
EQUIPMENT• Standard surgical pack, two medium or large Gelpi retractors
(depending on the size of the dog), bipolar and unipolar cautery, suc-tion hose and small Frazier suction tip, no. 11 and no. 15 Bard Parkerscalpel blades, Freer periosteal elevator, Senn retractors, Lempertrongeur, Kerrison rongeur, pneumatic drill system with burr guard anda variety of sizes of round and oval burrs, DeBakey thumb forceps,bone wax,* gelfoam,† or Avitene Sheets‡ (Microfibrillar Hemostat) Additional instrumentation that is useful for removing extruded disc
material from the vertebral canal includes a Buck ear curette, Ball bur-nisher, tartar scraper, double-ended curette, Iris spatula, small bonecurette, and nerve root retractor.
PREPARATION AND POSITIONING7–10
Position the animal in sternal recumbency, and prepare the lower backand sacrum from the mid-lumbar region to the tail head. Elevate thehind end with sandbags, and position the rear limbs forward, with thehips and stifles flexed. Support the animal with sandbags on each sideof the abdomen, or use a vacuum-activated surgical positioning system.§
If needed, further secure the animal in position with white tape to pre-vent malpositioning during surgery. Perfect positioning and alignmentassist in the approach and ensure proper orientation.
PROCEDUREApproach:11–13 Incise the skin and subcutaneous tissue on dorsalmidline from the L5 dorsal spinous process to the first or second caudalvertebrae. Suture two quarter drapes to the subcutaneous tissue todecrease skin contamination. Incise the lumbosacral and gluteal fasciawith a no. 11 scalpel blade, from the L6 dorsal spinous process to thecaudal median sacral crest. Bilaterally elevate the sacrocaudalis dorsalmedialis muscles away from the dorsal spinous process, pedicle, andlamina to the articular facets of L7-S1 and the intermediate sacral crest,using an Adson or Freer periosteal elevator. Retract the elevated muscles using two Gelpi self-retaining retractors (Plate 87A). Excise theinterarcuate ligament between the laminae of L7-S1 with a no. 15 bladeto expose the epidural space and the cauda equina.
234 PART THREE • SURGICAL PROCEDURES FOR THE SPINE
*Bone wax, Ethicon, Johnson & Johnson, Somerville, New Jersey.†Gelfoam, Pharmacia and Upjohn, Kalamazoo, Michigan.‡Avitene, Davol, Cranston, Rhode Island.§Hug-U-Vac, South Salem, Oregon.
Continued
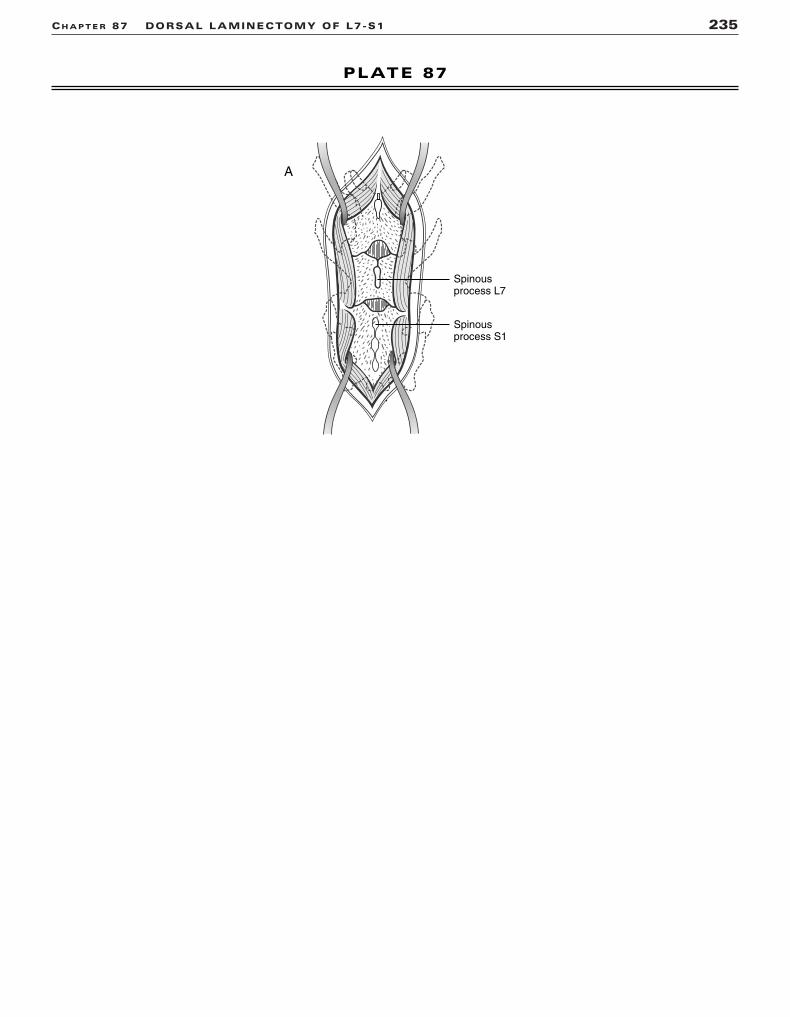
CH A P T E R 87 DORSAL LAMINECTOMY OF L7-S1 235
PLATE 87
A
Spinousprocess L7
Spinousprocess S1

Dorsal Laminectomy of L7-S1:4,12 Remove the dorsalspinous processes of L7 and S1 with a rongeur (Plate 87B). Drill the pro-posed laminectomy site with a pneumatic air drill, using a burr of appro-priate size (Plate 87C). Slowly trickle warm saline over the burr whiledrilling to prevent heat transfer from the burr to the laminectomy site.Intermittently lavage the entire laminectomy site to remove bone debrisand to keep the tissues moist. The laminectomy site should extend fromthe cranial aspect of the dorsal spinous process of L7 to the caudalaspect of S1, preserving the articular facets (Plate 87D). Once most ofthe bone has been removed, a smaller bit can be used to remove theedges of inner cortical bone plate. Control any bone bleeding with bonewax. Once the inner cortex has been removed, use a nerve root probe,ear loop, or tartar scraper to palpate the inner bone and periosteal shelf.When it is thin and pliable, use a probe to gently penetrate the site andcreate a long window to allow admission of a Kerrison or small Lempertrongeur to remove any remaining bone in the oblong window (Plate87E). Inspect each nerve root for entrapment or compression from abulging or extruded intervertebral disc, hypertrophied dorsal longitu-dinal ligament, or stenotic intervertebral foramina or canal. Trace eachnerve root with a nerve root retractor along its path toward its respec-tive intervertebral foramina. Depending on the lesion location, furtherdecompression of a nerve root may be necessary by performing a discectomy (Plate 87F), dorsal longitudinal ligament resection, facetec-tomy, or foraminotomy. Once the nerve root(s) has been decompressed,gently lavage the laminectomy site, and harvest a fat graft from the subcutaneous region of the back. Place the fat graft over the hemilam-inectomy site to prevent fibrous scarring and adhesion. Suture theepaxial muscular fascia in a simple continuous pattern using absorbablesuture. Close the subcutaneous tissues and skin in a routine fashion.
CAUTIONS14–17
Every effort should be made to preserve the articular facets of the lum-bosacral junction to promote lumbosacral stability. An accurate andthorough identification of each nerve root will improve the postopera-tive outcome. However, it is often difficult to identify a compressivelesion because of the anatomic complexity of the area. Owner educa-tion is very important to the success of the surgery, because small butsignificant lesions may be missed by ancillary imaging such as magneticresonance imaging and computed tomography. Therefore, all lumbosacrallaminectomies must be approached as exploratory operations, empha-sizing the diagnostic and therapeutic significance of the surgery.
POSTOPERATIVE EVALUATIONThe neurologic status of the patient should be serially evaluated uponrecovery from anesthesia and surgery. Gentle retraction and manipula-tion of the nerve roots is often necessary to access the compressivelesion; however, peripheral nerve injury stemming from retraction isusually transient and responsive to appropriate supportive care.
POSTOPERATIVE CARENeurosurgery patients require general supportive care and pain man-agement. Clean, dry, soft, padded bedding is needed for nonambulatoryor weakly ambulatory patients. Maintenance fluid therapy is routine forthe first 24 to 48 hours or until the animal can eat and drink unaided.Urine output and quantitation are closely monitored for the first 24 to48 hours, and bladder expression or catheterization (or both) are pro-vided in patients not urinating voluntarily. Rehabilitation may be imple-mented as soon as the acute postoperative pain has subsided (usuallyafter 24 hours). Depending on the level of neurologic dysfunction,therapy may consist of massage, assisted standing, proprioceptive exer-cises, and controlled therapeutic exercise. Activity should be restrictedfor 4 to 6 weeks. Barring extreme paresis or ataxia, normal activity is thenslowly reintroduced. For animals with excessive weight, which canimpair neurological recovery, a weight loss program may be beneficial.
EXPECTED OUTCOME1–6,10,12,18–20
Most animals with degenerative lumbosacral stenosis have good toexcellent prognosis, but expected outcomes vary, depending on thelevel of neurologic dysfunction. Degree of compression at the time of
presentation, as determined by magnetic resonance imaging, has beenfound to be independent of disease severity and thus should not be usedin prognostication. Young animals with mild signs of lumbosacral pain,ataxia, and weakness have a fair to good prognosis for full recovery.Urinary or fecal incontinence and extreme age have been associatedwith poor or guarded recovery. Most animals improve after surgicalintervention, given a reasonable convalescent period (4 to 6 weeks).Recurrence of signs has been reported at a varying rate of 15% to 67%and should be discussed with the owner before surgery.
References1. De Risio L, Sharp NJ, Olby NJ, et al: Predictors of outcome after
dorsal decompressive laminectomy for degenerative lumbosacralstenosis in dogs: 69 cases (1987–1997). J Am Vet Med Assoc219(5):624–628, 2001.
2. De Risio L, Thomas WB, Sharp NJ: Degenerative lumbosacralstenosis. Vet Clin North Am Small Anim Pract 30(1):111–132, 2000.
3. Linn LL, Bartels KE, Rochat MC, et al: Lumbosacral stenosis in 29military working dogs: Epidemiologic findings and outcome aftersurgical intervention (1990–1999). Vet Surg 32(1):21–29, 2003.
4. Danielsson F, Sjostrom L: Surgical treatment of degenerative lum-bosacral stenosis in dogs. Vet Surg 28(2):91–98, 1999.
5. Mayhew PD, Kapatkin AS, Wortman JA, et al: Association of caudaequina compression on magnetic resonance images and clinicalsigns in dogs with degenerative lumbosacral stenosis. J Am AnimHosp Assoc 38(6):555–562, 2002.
6. Jones J, Banfield C, Ward D: Association between postoperativeoutcome and results of magnetic resonance imaging and computedtomography in working dogs with degenerative lumbosacralstenosis. J Am Vet Med Assoc 216(11):1769–1774, 2000.
7. Wheeler SJ, Sharp NJH: Thoracolumbar disc disease. In Wheeler SJ,Sharp NJH (eds): Small Animal Spinal Disorders. London, Mosby 1994.
8. Piermattei DL, Johnson KA: Approach to the thoracolumbar verte-brae through a dorsal incision. In An Atlas of Surgical Approachesto the Bones and Joints of the Dog and Cat, 4th ed. Philadelphia,WB Saunders, 2004.
9. Seim HI: Dorsal decompressive laminectomy for T-L disk disease.Canine Practice 20(6):6–10, 1995.
10. Harari J, Marks S: Surgical treatments for intervertebral disc disease. Vet Clin North Am Small Anim Pract 22(4):899–915, 1992.
11. Piermattei DL, Johnson KA: Approach to the lumbar vertebra 7 andthe sacrum through a dorsal incision. In An Atlas of SurgicalApproaches to the Bones and Joints of the Dog and Cat, 4th ed.Philadelphia, WB Saunders, 2004.
12. Wheeler SJ, Sharp NJH: Lumbosacral disease. In Wheeler SJ, SharpNJH (eds): Small Animal Spinal Disorders. London, Mosby, 1994.
13. Lenehan T, Tarvin G: Surgical treatment of cauda equina compressionsyndrome by laminectomy. In Bojrab MJ (ed): Current Techniquesin Small Animal Surgery, 4th ed. Baltimore, Williams & Wilkins, 1998.
14. Schulz KS, Waldron DR, Grant JW, et al: Biomechanics of the thoracolumbar vertebral column of dogs during lateral bending. AmJ Vet Res 57:1228–1232, 1996.
15. Corse M, Renberg W, Friis E: In vitro evaluation of biomechanicaleffects of multiple hemilaminectomies on the canine lumbar verte-bral column. Am J Vet Res 64(9):1139–1145, 2003.
16. Hill T, Lubbe A, Guthrie A: Lumbar spine stability following hemil-aminectomy, pediculectomy, and fenestration. Vet Comp OrthopTraumatol 13:165–171, 2000.
17. Hosgood G: Wound complications following thoracolumbarlaminectomy in the dog: A retrospective study of 264 procedures.J Am Anim Hosp Assoc 28(1):47–52, 1992.
18. Davis GJ, Brown DC: Prognostic indicators for time to ambulationafter surgical decompression in nonambulatory dogs with acute thora-columbar disk extrusions: 112 cases. Vet Surg 31(6):513–518, 2002.
19. Coates J: Intervertebral disk disease. Vet Clin North Am Small AnimPract 30(1):77–110, 2000.
20. Kornegay J, Simpson S, Bailey CS, Joseph R: How do I treat?Degenerative thoracolumbar intervertebral disc disease in smallbreed dogs. Prog Vet Neuro 4(3):81–83, 1993.
236 PART THREE • SURGICAL PROCEDURES FOR THE SPINE

CH A P T E R 87 DORSAL LAMINECTOMY OF L7-S1 237
PLATE 87
B C
D E F
Spinousprocess L7removed
Completedlaminectomy
Innercortical
layer
Ligamentumflavum

Index
Page numbers followed by p refer to plates.
A
Abductor digiti quinti musclein Achilles tendon repair, 75pin intertarsal or tarsometatarsal arthrodesis
with intramedullary pin and wire, 94, 95pwith plate, 92, 93p
in talus osteochondrosis of lateraltrochlear ridge, 85p
in tarsal fractures, 213pAbductor pollicis longus muscle
in pancarpal arthrodesis, 33pin radial carpal bone fractures, 211p
Acetabulumcontact with femur in ostectomy of
femoral head and neck with jointcapsule interpolation, 46
fractures of, transverse or short oblique,178, 179p
in hip luxation, 38, 40, 44in triple pelvic osteotomy, 48, 50
Achilles tendon repair, 74–76, 75p, 77ppin and tension band method, 76, 77psingle locking-loop method, 76, 77pthree-loop pulley method, 76, 77p
Acromion processin arthrodesis of shoulder, 14in neck of scapula fractures, 146in supraglenoid tuberosity fractures, 144in transverse scapular body fractures, 142,
143pAcrylic external fixation in mandibular body
fractures, 140, 141pAdductor muscles of thigh
in femoral diaphyseal fractures, 129p, 133pand external fixator, 192, 193pand intramedullary pin or interlocking
nail, 186, 187pand plate application, 191p
in rear limb amputationat coxofemoral joint, 106, 107pat midshaft of femur, 108, 109p
in triple pelvic osteotomy, 48, 49pAmputations
avoidance of, via scapulectomy, 102–104,103p
of digit, 110, 111pof forelimb, 100, 101pof mandible, 96–98, 97p, 99pof rear limb
at coxofemoral joint, 106, 107p, 108at midshaft of femur, 106, 108, 109p
Anconeal musclein arthrodesis of elbow, 28, 29pin fracture of proximal ulna, 173p
Anconeal muscle (Continued)
in luxation of elbow, lateral, 18, 19pin ununited anconeal process, 22, 23p
Anconeal processin lateral elbow luxation, 18, 19pununited, 22–24, 23p, 25p
Antebrachial carpal jointin pancarpal arthrodesis, 32in partial carpal arthrodesis with
intramedullary pins, 36in radial and ulnar styloid fractures, 30, 31p
Arthrodesisof carpus, 32, 33p
with intramedullary pins, 36, 37pwith plate, 34, 35p
of elbow, 28, 29pof shoulder, 14, 15pof stifle, 72, 73pof tarsus, 90, 91p
with intramedullary pin and wire, 94, 95pwith plate, 92, 93p
Arthrotomy of stiflein intra-articular repair of cranial cruciate
ligament, 64, 65pin lateral fabellar suture repair of cranial
cruciate ligament, 60, 61pin medial patella luxation, 52, 53pin meniscectomy, 68, 69p
Avulsion fracture of supraglenoid tuberosity,144, 145p
Axillary artery and veinin forelimb amputation with scapulectomy,
100, 101pin forelimb salvage with scapulectomy, 102
Axillary nerve in osteochondrosis ofshoulder, 2
Axillobrachial vein in forelimb amputationwith scapulectomy, 100, 101p
B
Biceps brachii musclein forelimb salvage with scapulectomy,
103p, 104in humeral diaphyseal fractures and plate
application, 158, 159pin humeral distal fractures, T or Y type,
153pin shoulder arthrodesis, 14, 15pin shoulder luxation, medial, 7p
Biceps femoris musclein Achilles tendon repair, 74in femoral diaphyseal fractures, 129p, 133p
and external fixator, 192, 193pand intramedullary pin or interlocking
nail, 186, 187pand plate application, 190, 191p
Biceps femoris muscle (Continued)
in femoral head and neck ostectomy withjoint capsule interpolation, 46, 47p
in femoral neck fractures, 182, 183pin femoral physeal fractures
distal, 185pproximal, 180, 181p
in hip luxationand extracapsular stabilization, 38, 39pand intracapsular stabilization, 42
in rear limb amputationat coxofemoral joint, 106, 107pat midshaft of femur, 108, 109p
in stifle luxation, 56, 58and intra-articular repair of cranial
cruciate ligament, 65pmedial patellar, 53p, 55p
Bone graftin carpal arthrodesis, 32
with intramedullary pins, 36with plate, 34
in diaphyseal fractures, 134, 135pcomminuted, 128, 129p, 132, 133pfemoral, 186, 192, 194, 195plong oblique, 124, 126short oblique or transverse, 118, 120, 122tibial, 202, 204, 205p, 206
in elbow arthrodesis, 28in shoulder arthrodesis, 14in tarsal arthrodesis, 90
with intramedullary pin and wire, 94with plate, 92
in transverse derotational osteotomystabilized with plate, 114
in triple pelvic osteotomy, 48, 50Brachialis muscle in humeral diaphyseal
fracturesand external fixator, 162, 163pand intramedullary pin or interlocking nail,
154, 155pand plate application, 158, 159p
Brachiocephalicus musclein forelimb amputation with scapulectomy,
100, 101pin humeral diaphyseal fractures
and external fixator, 162, 163pand intramedullary pin or interlocking
nail, 154, 155pand plate application, 158, 159p
in humeral distal fractures, T or Y type,153p
Bridging plate in diaphyseal fracturesof femur, 128, 129p, 190, 191pof humerus, 158, 160, 161pof radius, 166, 167pof tibia, 128, 204, 205p
239

C
Calcaneoquartal jointin partial tarsal arthrodesis
with intramedullary pin and wire, 94with plate, 92
in shearing injury with tarsal luxation, 78Calcaneus
in Achilles tendon repair, 75pin talus osteochondrosis of lateral
trochlear ridge, 85pin tarsal arthrodesis, 90
with intramedullary pin and wire, 94, 95pwith plate, 92, 93p
in tarsal fractures, 212, 213pin tarsal shearing injury and luxation, 80
Carotid sheath in ventral cervicaldecompression, 222, 223p
Carpometacarpal jointin pancarpal arthrodesis, 32in partial carpal arthrodesis
with intramedullary pins, 36with plate, 34
Carpus disordersarthrodesis in, 32, 33p
with intramedullary pins, 36, 37pwith plate, 34, 35p
metacarpal fractures, 214, 215pradial carpal bone fractures, 210, 211pradius or ulna styloid process fractures, 30,
31pCephalic vein in forelimb amputation with
scapulectomy, 100, 101pCerclage wires, 126, 127p
in femoral diaphyseal fractures, 126, 186,188, 189p
in humeral diaphyseal fractures, 126external fixator used with, 164, 165pintramedullary pin used with, 126, 156,
157p, 164in mandibular symphyseal fractures, 136,
137pin tibial diaphyseal fractures
external fixator used with, 208, 209pintramedullary pin used with, 126, 202,
203pCervical disc disorders
ventral decompression in, 218, 220,222–224, 223p, 225p
ventral fenestration in, 218–220, 219p,221p, 222
Collateral ligamentslateral
in cranial cruciate ligament repair withlateral fabellar suture, 62, 63p
in elbow arthrodesis, 28, 29pin elbow luxation, lateral, 20, 21pin stifle arthrodesis, 73pin stifle luxation, 56, 58, 59pin tarsal shearing injury and luxation, 78
medialin stifle luxation, 56, 57pin talus osteochondrosis of medial
trochlear ridge, 88, 89pin tarsal shearing injury and luxation, 78,
80in tibial distal physeal fractures, 198, 199pin tibial malleolar fractures, 200, 201p
radial, in radial carpal bone fractures, 210,211p
Compression plate, 118, 119pin femoral diaphyseal fractures, 190, 191pin humeral diaphyseal fractures, 158, 160,
161pin metacarpal and metatarsal fractures,
214, 215pin radial diaphyseal fractures, 166, 167pin tibial diaphyseal fractures, 204, 205p
Condylar fractures of humerus, 150, 151pContracture of infraspinatus muscle, 4, 5pCoracobrachial muscles in medial shoulder
luxation, 6, 7pCoronoid process of ulna, fragmented, 16,
17pCoxofemoral joint
disarticulation in rear limb amputation,106, 107p, 108
in extracapsular stabilization of hipluxation, 38–40, 39p, 41p
in intracapsular stabilization of hipluxation, 42–44, 43p, 45p
in ostectomy of femoral head and neckwith joint capsule interpolation, 46,47p
in triple pelvic osteotomy, 48–50, 49p, 51pCruciate ligaments in stifle luxation, 56, 58,
59pintra-articular repair of, 64–66, 65p, 67plateral fabellar suture in repair of, 60–62,
61p, 63pwith meniscus damage, 68, 69p
D
Deltoideus musclein forelimb amputation with scapulectomy,
101pin forelimb salvage with scapulectomy,
102, 103p, 104in humeral diaphyseal fractures, 155p,
159p, 163pin humeral physeal fractures, proximal,
148, 149pin infraspinatus muscle contracture, 4, 5pin scapular neck fractures, 146, 147pin shoulder arthrodesis, 14, 15pin shoulder luxation, lateral, 10, 11pin shoulder osteochondrosis, 2, 3p
Derotational osteotomy, transverse,stabilized with plate, 114, 115p
Desmotomy in medial patella luxation, 52, 53p
Dewclaw amputation, 110, 111pDiaphyseal fractures. See also specific bones
bone grafts in, 134, 135p. See also Bonegraft, in diaphyseal fractures
comminutedinterlocking nail in, 132, 133pintramedullary pin and bridging plate in,
128, 129ptype II external fixator in, 130, 131p
femoral, 186–194, 187p, 189p, 191p, 193p,195p
humeral, 154–164, 155p, 157p, 159p, 161p,163p, 165p
long obliqueintramedullary pin and cerclage wires in,
126, 127plag screws and neutralization plate in,
124, 125p
Diaphyseal fractures (Continued)
radial, 166–168, 167p, 169pshort oblique or transverse
compression plate in, 118, 119pintramedullary pin and external fixator
in, 120, 121ptype Ib external fixator in, 122, 123p
tibial, 202–208, 203p, 205p, 207p, 209pDigastricus muscle in mandibular body
fractures, 138, 139pDigit amputation, 110, 111pDisarticulation, coxofemoral, in rear limb
amputation, 106, 107p, 108Disc disorders, intervertebral. See
Intervertebral disc disordersDynamic proximal ulnar osteotomy in
ununited anconeal process, 22, 24, 25p
E
Elbow disordersarthrodesis in, 28, 29pdistal ulnar ostectomy, 26, 27phumeral fractures, 150, 151p, 152, 153plateral luxation, 18–20, 19p, 21posteochondrosis and fragmented medial
coronoid process, 16, 17pununited anconeal process, 22–24, 23p,
25pExtensor carpi radialis muscle
in carpal arthrodesis, 33pwith intramedullary pins, 37pwith plate, 35p
in elbow luxation, lateral, 18, 19pin humeral fractures, distal
lateral condylar, 150, 151pT or Y type, 152, 153p
in radial carpal bone fractures, 210, 211pExtensor digital muscles
in carpal arthrodesis, 32, 33pwith intramedullary pins, 36with plate, 34, 35p
in elbow luxation, lateral, 18, 19pin humeral fractures, distal
lateral condylar, 150, 151pT or Y type, 152, 153p
in metacarpal and metatarsal fractures,214, 215p
in radial carpal bone fractures, 210, 211pin stifle arthrodesis, 73pin talus osteochondrosis
of lateral trochlear ridge, 82, 83p, 84, 85pof medial trochlear ridge, 87p
in tibial malleolar fractures, 201pin ulnar ostectomy with fat graft, distal,
26, 27pExtensor hallucis longus muscle in talus
osteochondrosis, 82, 83p, 87pExternal fixation
in comminuted diaphyseal fractures, 130,131p
in femoral diaphyseal fractures, 192–194,193p, 195p
intramedullary pin used with, 120, 186,188, 189p, 192–194, 193p, 195p
in humeral diaphyseal fractures, 120,162–164, 163p, 165p
cerclage wires used with, 164, 165pintramedullary pin used with, 120,
162–164, 165p
240 INDEX

External fixation (Continued)
type Ia external fixator in, 156, 157p,164, 165p
type Ib external fixator in, 164, 165pin mandibular body fractures,
comminuted, 140, 141pin radial diaphyseal fractures, 122, 168, 169pin radial oblique osteotomy, 112, 113pin short oblique or transverse diaphyseal
fracturesintramedullary pin used with, 120, 121ptype Ib external fixator in, 122, 123p
in tarsal shearing injury with luxation, 80, 81p
in tibial diaphyseal fractures, 122, 206–208,207p, 209p
intramedullary pin used with, 120, 202,203p
in tibial oblique osteotomy, 112, 113p
F
Fabella in stifle luxation and instability, 52, 58and lateral suture repair of cranial cruciate
ligament, 60–62, 61p, 63pFacial artery and vein in mandibular body
fractures, 139pFascia lata
graft in cranial cruciate ligament repair,65p, 66
in physeal femoral fractures, distal, 185ptensor muscle of. See Tensor fascia latae
muscleFat graft, distal ulnar ostectomy with, 26, 27pFemoral artery and vein in rear limb
amputationat coxofemoral joint, 106, 107pat midshaft of femur, 108, 109p
Femurcoxofemoral disarticulation in rear limb
amputation, 106, 107pdiaphyseal fractures of
external fixator in, 120, 186, 188, 189p,192–194, 193p, 195p
interlocking nail in, 132, 133p, 186–188,187p, 189p
intramedullary pin in. See Intramedullarypins, in femoral diaphysealfractures
plate application in, 128, 129p, 190, 191pdistal
in arthrodesis of stifle, 72, 73pin deranged stifle luxation, 56, 57pin femoral physeal fractures, 184, 185pin intra-articular cranial cruciate
ligament repair, 64, 65p, 66, 67pin meniscectomy, 68, 70in notchplasty for cranial cruciate
ligament repair, 64, 65pin tibial physeal fractures, 196, 197pin wedge recession trochleoplasty for
medial patella luxation, 52, 53pfractures of, 180–194, 181p, 183p, 185p,
187p, 189p, 191p, 193p, 195pmidshaft level rear limb amputation, 106,
108, 109pproximal
in acetabular fractures, 178, 179pin extracapsular stabilization of hip
luxation, 38–40, 41p
Femur (Continued)
in femoral head and neck ostectomy withjoint capsule interpolation, 46, 47p
in femoral neck fractures, 182, 183pin femoral physeal fractures, 180, 181pin intracapsular stabilization of hip
luxation, 42–44, 43p, 45ptransverse derotational osteotomy
stabilized with plate, 114, 115pFenestration
of cervical discs, ventral, 218–220, 219p,221p, 222
of thoracolumbar discs, 226, 230–232, 231p
Fibula, distalin malleolar fractures, 200, 201pin talus osteochondrosis
of lateral trochlear ridge, 82, 84of medial trochlear ridge, 86, 88
in tarsal arthrodesis, 90with intramedullary pin and wire, 94
in tarsal shearing injury and luxation, 80in tibial physeal fractures, 198, 199p
Flexor carpi radialis musclein elbow osteochondrosis and fragmented
medial coronoid process, 16, 17pin radial fractures
diaphyseal, and plate application, 167pof styloid process, 31p
in ulnar styloid fractures, 31pFlexor carpi ulnaris muscle
in elbow arthrodesis, 28, 29pin ulnar fractures, proximal, 172, 173p
Flexor digital musclesin Achilles tendon repair, 74, 75pin elbow osteochondrosis and fragmented
medial coronoid process, 16, 17pin radial diaphyseal fracture and plate
application, 167pin talus osteochondrosis of medial
trochlear ridge, 88, 89pin tarsal arthrodesis
with intramedullary pin and wire, 94, 95p
with plate, 92, 93pin tarsal fractures, 212, 213p
Flexor hallucis longus musclein Achilles tendon repair, 75pin talus osteochondrosis
of lateral trochlear ridge, 85pof medial trochlear ridge, 88, 89p
in tarsal arthrodesiswith intramedullary pin and wire, 95pwith plate, 93p
in tarsal fractures, 213pin tibial malleolar fractures, 201p
Forage procedurein elbow osteochondrosis, 16in shoulder osteochondrosis, 2
Forelimbamputation with scapulectomy, 100, 101pcarpus disorders, 30–36, 31p, 33p, 35p,
37pdigit amputation, 110, 111pelbow joint disorders, 16–28, 17p, 19p, 21p,
23p, 25p, 27p, 29psalvage with scapulectomy, 102–104, 103pshoulder joint disorders, 2–14, 3p, 5p, 7p,
9p, 11p, 13p, 15p
Fracturesof carpus, 210, 211pof diaphysis. See Diaphyseal fracturesof femur, 180–194, 181p, 183p, 185p, 187p,
189p, 191p, 193p, 195pof humerus, 148–164, 149p, 151p, 153p,
155p, 157p, 159p, 161p, 163p, 165pof mandible, 96–98, 97p, 136–140, 137p,
139p, 141pof metacarpal and metatarsal bones, 214,
215pof pelvis, 174–178, 175p, 177p, 179pof radius, 30, 31p, 166–170, 167p, 169p,
171pof scapula, 142–146, 143p, 145p, 147pof tarsus, 212, 213pof tibia, 196–208, 197p, 199p, 201p, 203p,
205p, 207p, 209pof ulna, 30, 31p, 172, 173p
G
Gastrocnemius musclein Achilles tendon repair, 74, 75pin femoral physeal fractures, distal, 185pin tarsal arthrodesis
with intramedullary pin and wire, 95pwith plate, 93p
in tarsal fractures, 213pGemellus muscle
in acetabular fractures, 178, 179pin extracapsular stabilization of hip
luxation, 38in intracapsular stabilization of hip
luxation, 42, 43pGlenohumeral ligament
in lateral shoulder luxation, 10–12, 11p, 13pin medial shoulder luxation, 6–8, 7p, 9p
Gluteal artery and vein in triple pelvicosteotomy, 50, 51p
Gluteal musclesin acetabular fractures, 178, 179pin femoral head and neck ostectomy with
joint capsule interpolation, 46, 47pin femoral neck fractures, 182, 183pin femoral physeal fractures, proximal,
180, 181pin hip luxation
and extracapsular stabilization, 38, 39pand intracapsular stabilization, 42, 43p
in ilial body fractures, 176, 177pin rear limb amputation with coxofemoral
disarticulation, 107pin sacroiliac luxation, 174, 175pin triple pelvic osteotomy, 50, 51p
Gluteal nerve in triple pelvic osteotomy, 50Gracilis muscle
in rear limb amputationat coxofemoral joint, 106, 107pat midshaft of femur, 108, 109p
in triple pelvic osteotomy, 48, 49pGrafts
of bone. See Bone graftof fascia lata and patellar tendon in cranial
cruciate ligament repair, 65p, 66of fat, distal ulnar ostectomy with, 26, 27p
H
Hemilaminectomy, thoracolumbar, 226–228,227p, 229p, 230
INDEX 241

Hemimandiblein rostral hemimandibulectomy, 96, 98, 99pin transverse and oblique mandibular body
fractures, 139pHip disorders
acetabular fractures, 178, 179pfemoral fractures, 180, 181p, 182, 183pfemoral head and neck ostectomy with
joint capsule interpolation in, 46, 47pluxation and instability
extracapsular stabilization in, 38–40,39p, 41p
intracapsular stabilization in, 42–44, 43p,45p
triple pelvic osteotomy in, 48–50, 49p, 51pHumerus
diaphyseal fractures ofcerclage wires in, 126, 156, 157p, 164,
165pexternal fixation in. See External
fixation, in humeral diaphysealfractures
interlocking nail in, 132, 154–156, 155p,157p
intramedullary pin in. See Intramedullarypins, in humeral diaphysealfractures
plate application in, 128, 158–160, 159p,161p
distalin arthrodesis of elbow, 28, 29pin fragmented medial coronoid process
and osteochondrosis, 16, 17pin intercondylar T or Y type fractures,
152, 153pin lateral condylar fractures, 150, 151pin luxation of elbow, lateral, 18–20, 19p,
21pin ununited anconeal process, 22, 25p
fractures of, 148–164, 149p, 151p, 153p,155p, 157p, 159p, 161p, 163p, 165p
proximalin arthrodesis of shoulder, 14, 15pin bone grafts, as donor site, 134, 135pin forelimb amputation with
scapulectomy, 100in forelimb salvage with scapulectomy,
102in humeral physeal fractures, 148, 149pin lateral shoulder subluxation, 10–12,
11p, 13pin medial shoulder luxation, 6–8, 7p, 9pin osteochondrosis, 2, 3pin scapular neck fractures, 146, 147pin supraglenoid tuberosity fractures, 144,
145p
I
Iliopsoas muscle in rear limb amputationwith coxofemoral disarticulation, 106,107p
Iliumin bone grafts, as donor site, 134, 135pin extracapsular stabilization of hip
luxation, 38in femoral head and neck ostectomy with
joint capsule interpolation, 46in fractures of ilial body, 176, 177p
Ilium (Continued)
in intracapsular stabilization of hipluxation, 42
in sacroiliac luxation, 174, 175pin triple pelvic osteotomy, 50, 51p
Imbricationin hip luxation
and extracapsular stabilization, 40and intracapsular stabilization, 44
in patella luxation, 54Infraspinatus muscle
contracture of, 4, 5pin forelimb salvage with scapulectomy,
102, 103pin humeral physeal fractures, proximal,
148, 149pin scapular body fractures, transverse, 142,
143pin scapular neck fractures, 146, 147pin shoulder arthrodesis, 14, 15pin shoulder luxation, lateral, 10, 11p, 12,
13pin supraglenoid tuberosity fractures, 145p
Instability. See Luxation and instabilityInterlocking nail in diaphyseal fractures
of femur, 132, 133p, 186–188, 187p, 189pof humerus, 132, 154–156, 155p, 157pof tibia, 132, 202, 203p
Intertarsal jointin pantarsal arthrodesis, 90in partial tarsal arthrodesis
with intramedullary pin and wire, 94, 95pwith plate, 92, 93p
in shearing injury with tarsal luxation, 78, 80Intervertebral disc disorders
cervicalventral decompression in, 218, 220,
222–224, 223p, 225pventral fenestration in, 218–220, 219p,
221p, 222lumbosacral laminectomy in, 234–236,
235p, 237pthoracolumbar
fenestration in, 230–232, 231phemilaminectomy in, 226–228, 227p,
229p, 230Intramedullary pins
in carpal arthrodesis, partial, 36, 37pin comminuted diaphyseal fractures, 128,
129pin femoral diaphyseal fractures, 186–188,
187p, 189pcerclage wires used with, 126, 186, 188,
189pexternal fixator used with, 120, 186, 188,
189p, 192–194, 193p, 195pplate used with, 128, 129p, 190, 191p
in femoral physeal fractures, distal, 184,185p
in humeral diaphyseal fractures, 154–156,155p, 157p
cerclage wires used with, 126, 156, 157p,164
external fixator used with, 120, 162–164,163p, 165p
plate used with, 128, 158–160, 159p, 161pin long oblique diaphyseal fractures, 126,
127p
Intramedullary pins (Continued)
in metacarpal and metatarsal fractures,214, 215p
in radial diaphyseal fractures and plateapplication, 166
in short oblique or transverse diaphysealfractures, 120, 121p
in tarsal arthrodesis, partial, 94, 95pin tibial diaphyseal fractures, 202, 203p
cerclage wires used with, 126, 202, 203pexternal fixator used with, 120, 202,
203pplate used with, 128, 204, 205p
Ischiumin extracapsular stabilization of hip
luxation, 38in femoral head and neck ostectomy with
joint capsule interpolation, 46in intracapsular stabilization of hip
luxation, 42in triple pelvic osteotomy, 48, 49p
J
Joint disordersamputations in, 96–110, 97p, 99p, 101p,
103p, 107p, 109p, 111pof carpus, 30–36, 31p, 33p, 35p, 37pof elbow, 16–28, 17p, 19p, 21p, 23p, 25p,
27p, 29pof hip, 38–50, 39p, 41p, 43p, 45p, 47p, 49p,
51pof shoulder, 2–14, 3p, 5p, 7p, 9p, 11p, 13p,
15pof stifle, 52–72, 53p, 55p, 57p, 59p, 61p,
63p, 65p, 67p, 69p, 71p, 73pof tarsus, 74–94, 75p, 77p, 79p, 81p, 83p,
85p, 87p, 89p, 91p, 93p, 95p
K
Kirschner wiresin acetabular fractures, 178, 179pin femoral neck fractures, 182, 183pin femoral physeal fractures, proximal,
180, 181pin hip luxation and extracapsular
stabilization, 40, 41pin humeral condylar fractures, 150, 151pin humeral physeal fractures, proximal,
148, 149pin radial physeal fractures, distal, 170, 171pin radial styloid fractures, 30, 31pin tarsal fractures, 212, 213pin tibial malleolar fractures, 200, 201pin tibial physeal fractures
distal, 198, 199pproximal, 196, 197p
in ulnar styloid fractures, 30, 31p
L
Lag screw fixation, 124, 125pin elbow arthrodesis, 28, 29pin femoral diaphyseal fractures, plate
application with, 190, 191pin humeral fractures, distal
lateral condylar, 150, 151pT or Y type, 152, 153p
in metacarpal and metatarsal fractures,214, 215p
242 INDEX

Lag screw fixation (Continued)
in radial carpal bone fractures, 210, 211pin radial fractures
diaphyseal, plate application with, 166,167p
in styloid process, 30, 31pin sacroiliac luxation, 174, 175pin scapular neck fractures, 146, 147pin shoulder arthrodesis, 14, 15pin supraglenoid tuberosity fractures, 144,
145pin tarsal fractures, 212, 213pin tibial fractures
diaphyseal, plate application with, 204,205p
malleolar, 200, 201pin ulnar fractures
distal, in styloid process, 30, 31pproximal, plate application with, 172,
173pin ununited anconeal process, 22, 24, 25p
Laminectomylumbosacral dorsal, 234–236, 235p, 237pthoracolumbar hemilaminectomy, 226–228,
227p, 229p, 230Latissimus dorsi muscle in forelimb
amputation with scapulectomy, 100, 101pLongus colli muscles
in ventral cervical decompression, 222,223p, 224
in ventral cervical fenestration, 218, 219p,220
Lumbosacral laminectomy, dorsal, 234–236,235p, 237p
Luxation and instabilityof elbow, lateral, 18–20, 19p, 21pof hip
extracapsular stabilization in, 38–40,39p, 41p
intracapsular stabilization in, 42–44, 43p,45p
of sacroiliac joint, 174, 175pof shoulder
lateral, 10–12, 11p, 13pmedial, 6–8, 7p, 9p
of stifleintra-articular repair of cranial cruciate
ligament in, 64–66, 65p, 67plateral fabellar suture repair of cranial
cruciate ligament in, 60–62, 61p, 63pmeniscectomy in, 68–70, 69p, 71psuture anchors, screws, and sutures in,
56–58, 57p, 59pwedge recession trochleoplasty,
desmotomy, tibial tuberositytransposition, and retinacularimbrication in, 52–54, 53p, 55p
of tarsus, in shearing injury, 78–80, 79p,81p
M
Malleolar fractures of tibia or fibula, 200,201p
Mandiblefractures of
comminuted, acrylic external fixation in,140, 141p
mandibulectomy in, 96–98, 97p, 99p
Mandible (Continued)
symphyseal, cerclage wire in, 136, 137ptransverse and oblique, orthopedic wire
in, 138, 139ptumors of, mandibulectomy in, 96–98, 97p,
99pMandibular artery
in fractures of mandibular body, 138, 140in mandibulectomy, 96, 98
Mandibular nerve in mandibular bodyfractures, 138, 140
Mandibulectomy, 96–98, 97p, 99pMaxillectomy, 98Mayo mattress suture, modified, in medial
patella luxation, 54, 55pMedian artery in radial diaphyseal fractures
and plate application, 167pMeniscectomy, 68–70, 69p, 71pMeniscus in stifle luxation and instability, 56,
68–70, 69p, 71pand intra-articular repair of cranial
cruciate ligament, 64, 66and lateral fabellar suture repair of cranial
cruciate ligament, 60, 61p, 62Metacarpal bones
fractures of, 214, 215pin pancarpal arthrodesis, 32in partial carpal arthrodesis
with intramedullary pins, 36with plate, 34
Metacarpophalangeal joint in digitalamputation, 110, 111p
Metatarsal bonesfractures of, 214, 215pin pantarsal arthrodesis, 90in partial tarsal arthrodesis
with intramedullary pin and wire, 94with plate, 92
in shearing injury with tarsal luxation, 80Monteggia fracture, 172Musculocutaneous nerve in humeral
diaphyseal fractures and plateapplication, 158, 159p
Mylohyoideus muscle in mandibular bodyfractures, 139p
N
Nail, interlocking. See Interlocking nail indiaphyseal fractures
Neutralization plate in diaphyseal fractures,124, 125p
of femur, 190, 191pof humerus, 158, 160, 161pof radius, 166, 167pof tibia, 204, 205p
Notchplasty, femoral, in intra-articular repairof cranial cruciate ligament, 64, 65p
O
Oblique osteotomy stabilized with type IIexternal fixator, 112, 113p
Obturator nerve in triple pelvic osteotomy,48, 50
Olecranon of ulnain arthrodesis of elbow, 28, 29pin lateral elbow luxation, 18, 19pin ununited anconeal process, 22–24, 23p,
25p
Omobrachial vein in forelimb amputationwith scapulectomy, 100, 101p
Omotransversarius musclein forelimb amputation with scapulectomy,
100, 101pin forelimb salvage with scapulectomy,
102, 103p, 104Osteochondrosis
of elbow, 16, 17pof shoulder, 2, 3pof talus
in lateral trochlear ridge, 82–84, 83p, 85pin medial trochlear ridge, 86–88, 87p, 89p
P
Pancarpal arthrodesis, 32, 33pPantarsal arthrodesis, 90, 91pPatella
in arthrodesis of stifle, 72, 73pin femoral physeal fractures, 184, 185pmedial luxation of, 52–54, 53p, 55p
Patellar ligament in proximal tibial physealfractures, 197p
Patellar tendonin cranial cruciate ligament repair, 66in femoral physeal fractures, 184, 185pin medial patella luxation, 52, 54
Pectineus musclein rear limb amputation
at coxofemoral joint, 106, 107pat midshaft of femur, 108, 109p
in triple pelvic osteotomy, 48, 49pPectoral muscles
in forelimb amputation with scapulectomy,100, 101p
in humeral diaphyseal fracturesand external fixator, 162, 163pand intramedullary pin or interlocking
nail, 154, 155pand plate application, 158, 159p
in shoulder luxation, medial, 6, 7p, 8Pelvis
in acetabular fractures, 178, 179pin extracapsular stabilization of hip
luxation, 38–40, 39p, 41pin femoral head and neck ostectomy with
joint capsule interpolation, 46, 47pin ilial body fractures, 176, 177pin intracapsular stabilization of hip
luxation, 42–44, 43p, 45pin sacroiliac luxation, 174, 175pin triple osteotomy, 48–50, 49p, 51p
Peroneus musclesin talus osteochondrosis
of lateral trochlear ridge, 82, 83p, 84, 85pof medial trochlear ridge, 87p
in tarsal arthrodesiswith intramedullary pin and wire, 95pwith plate, 93p
in tibial malleolar fractures, 201pPhalangeal bones in digital amputation, 110,
111pPhyseal fractures
of femurdistal, 184, 185pproximal, 180, 181p
of humerus, proximal, 148, 149pof radius, distal, 170, 171p
INDEX 243

Physeal fractures (Continued)
of tibiadistal, 198, 199pproximal, 196, 197p
Pin fixation. See also Intramedullary pinsin Achilles tendon repair with tension band
wire, 76, 77pin femoral physeal fractures, distal,
crossed pins in, 184, 185pin hip luxation, modified toggle pin in,
42–44, 43p, 45pin humeral physeal fractures, proximal,
148, 149pin mandibular body fractures stabilized
with acrylic external fixation, 140,141p
in radial diaphyseal fractures and externalfixator, 168, 169p
in radial styloid fractures and tension bandwire, 30, 31p
in ulnar styloid fractures and tension bandwire, 30, 31p
Plate applicationin acetabular fractures, 178, 179pin carpal arthrodesis
pancarpal, 32, 33ppartial, 34, 35p
in comminuted diaphyseal fractures, 128,129p
in elbow arthrodesis, 28, 29pin femoral diaphyseal fractures, 128, 129p,
190, 191pin humeral fractures
diaphyseal, 128, 158–160, 159p, 161pdistal, T or Y type, 152, 153p
in ilial body fractures, 176, 177pin long oblique diaphyseal fractures, 124,
125pin metacarpal and metatarsal fractures,
214, 215pin radial diaphyseal fractures, 166, 167pin scapular fractures
in body of scapula, transverse, 142, 143p
in neck of scapula, 146, 147pin short oblique or transverse diaphyseal
fractures, 118, 119pin shoulder arthrodesis, 14, 15pin stifle arthrodesis, 72, 73pin tarsal arthrodesis
pantarsal, 90, 91ppartial, 92, 93p
in tibial diaphyseal fractures, 128, 204,205p
in transverse derotational osteotomy, 114,115p
in triple pelvic osteotomy, 50, 51pin ulnar fractures, proximal, 172, 173p
Prepubic tendon in triple pelvic osteotomy,48, 49p
Pronator teres musclein elbow osteochondrosis and fragmented
medial coronoid process, 16in humeral distal fractures, T or Y type,
153pin radial diaphyseal fractures and plate
application, 166, 167pPubis in triple pelvic osteotomy, 48, 49p
Q
Quadriceps musclesin femoral physeal fractures, distal, 184,
185pin rear limb amputation
at coxofemoral joint, 106, 107pat midshaft of femur, 108, 109p
in stifle luxation, 52, 56
R
Radial artery in diaphyseal fractures ofradius and plate application, 167p
Radial carpal bonefractures of, 210, 211pin pancarpal arthrodesis, 32, 33pin partial carpal arthrodesis
with intramedullary pins, 36, 37pwith plate, 34, 35p
in physeal fractures of radius, 171pRadial nerve
in diaphyseal humeral fracturesand external fixator, 162, 163p, 164and intramedullary pin or interlocking
nail, 154, 155p, 156and plate application, 158, 159p
in distal humeral fractures, 150, 152Radius
diaphyseal fractures ofexternal fixator in, 122, 168, 169pplate application in, 166, 167p
distalin pancarpal arthrodesis, 32, 33pin partial carpal arthrodesis with
intramedullary pins, 36, 37pin partial carpal arthrodesis with plate,
34, 35pin physeal fractures, 170, 171pin radial carpal bone fractures, 210, 211pin styloid process fractures, 30, 31p
fractures ofdiaphyseal, 122, 166–168, 167p, 169pphyseal distal, 170, 171pstyloid process, 30, 31p
oblique osteotomy stabilized with type IIexternal fixator, 112, 113p
proximalin arthrodesis of elbow, 28, 29pin lateral elbow luxation, 18–20, 19p, 21pin osteochondrosis of elbow and
fragmented medial coronoidprocess, 16, 17p
in ununited anconeal process, 22, 25pRear limb
coxofemoral disarticulation in amputation,106, 107p, 108
digital amputation, 110, 111phip joint disorders, 38–50, 39p, 41p, 43p,
45p, 47p, 49p, 51pmidshaft femoral amputation, 106, 108,
109pstifle disorders, 52–72, 53p, 55p, 57p, 59p,
61p, 63p, 65p, 67p, 69p, 71p, 73ptarsus disorders, 74–93, 75p, 77p, 79p, 81p,
83p, 85p, 87p, 89p, 91p, 93p, 95pRectus femoris muscle
in medial patella luxation, 52in rear limb amputation with coxofemoral
disarticulation, 106, 107p
Retinaculumextensor
in lateral trochlear ridge of talusosteochondrosis, 83p
in medial trochlear ridge of talusosteochondrosis, 86, 87p
in tibial malleolar fractures, 201plateral, in medial patella luxation, 52, 53p, 54
Rhomboideus musclein forelimb amputation with scapulectomy,
100, 101pin forelimb salvage with scapulectomy,
102, 104Rotational deformity, transverse derotational
osteotomy stabilized with plate in, 114,115p
S
Sacroiliac luxation, 174, 175pSaphenous artery
in tibial diaphyseal fractures, 202, 203pand plate application, 204, 205p
in tibial malleolar fractures, 201pSaphenous nerve in tibial diaphyseal
fractures, 202, 203pand plate application, 204, 205p
Saphenous veinin talus osteochondrosis of lateral
trochlear ridge, 82, 84in tibial diaphyseal fractures, 202, 203p
and plate application, 204, 205pin tibial malleolar fractures, 200, 201p
Sartorius musclein rear limb amputation
at coxofemoral joint, 106, 107pat midshaft of femur, 108, 109p
in stifle luxation, 56, 57pScalenus muscle in forelimb amputation with
scapulectomy, 100, 101pScapula
in arthrodesis of shoulder, 14, 15pin forelimb amputation with scapulectomy,
100, 101pin forelimb salvage with scapulectomy,
102–104, 103pin luxation of shoulder
lateral, 10–12, 11p, 13pmedial, 6–8, 7p, 9p
neck of scapula fractures, 146, 147psupraglenoid tuberosity fractures, 144,
145ptransverse scapular body fractures, 142,
143pScapulectomy
in forelimb amputation, 100, 101pin forelimb salvage, 102–104, 103p
Scapulohumeral jointarthrodesis of, 14in forelimb salvage with partial
scapulectomy, 102, 104in lateral shoulder luxation, 10–12, 11p,
13pin medial shoulder luxation, 6–8, 7p, 9p
Sciatic nervein acetabular fractures, 178, 179pin femoral diaphyseal fractures, 186, 188
and plate application, 190in ilial body fractures, 176
244 INDEX

Sciatic nerve (Continued)
in intracapsular stabilization of hipluxation, 42, 43p, 44
in rear limb amputation with coxofemoraldisarticulation, 107p
in triple pelvic osteotomy, 50Screw, lag. See Lag screw fixationScrew and washer combination
in elbow luxation, lateral, 18, 20, 21pin hip luxation, 40, 41pin humeral condylar fractures, 150in shoulder luxation
lateral, 10, 12, 13pmedial, 6, 8, 9p
in stifle luxation, 56–58, 57pand intra-articular repair of cranial
cruciate ligament, 66, 67pin supraglenoid tuberosity fractures, 144,
145pin tarsal luxation, 78–80, 79p
Semimembranosus muscle in rear limbamputation
at coxofemoral joint, 106, 107pat midshaft of femur, 108, 109p
Semitendinosus muscle in rear limbamputation
at coxofemoral joint, 106, 107pat midshaft of femur, 108, 109p
Serratus ventralis musclein forelimb amputation with scapulectomy,
100, 101pin forelimb salvage with scapulectomy,
102, 103p, 104Shearing injury with tarsal luxation, 78–80,
79p, 81pShoulder disorders
arthrodesis in, 14, 15pcontracture of infraspinatus muscle, 4, 5phumeral physeal fractures, 148, 149plateral luxation, 10–12, 11p, 13pmedial luxation, 6–8, 7p, 9posteochondrosis, 2, 3pscapular fractures, 142–146, 143p, 145p,
147pSpine
cervical disc disordersventral decompression in, 218, 220,
222–224, 223p, 225pventral fenestration in, 218–220, 219p,
221p, 222, 224lumbosacral laminectomy, 234–236, 235p,
237pthoracolumbar disc disorders
fenestration in, 226, 230–232, 231phemilaminectomy in, 226–228, 227p,
229p, 230Sternohyoideus muscle
in ventral cervical decompression, 222,223p, 224
in ventral cervical fenestration, 218, 219p,220
Sternomastoideus musclein ventral cervical decompression, 222,
224in ventral cervical fenestration, 218, 220
Stifle disordersarthrodesis in, 72, 73pfemoral physeal fractures, 184, 185p
Stifle disorders (Continued)
intra-articular repair of cranial cruciateligament in, 64–66, 65p, 67p
lateral fabellar suture repair of cranialcruciate ligament in, 60–62, 61p, 63p
medial patella luxation, 52–54, 53p, 55pmeniscectomy in, 68–70, 69p, 71psuture anchors, screws, and sutures for
stabilization in, 56–58, 57p, 59ptibial physeal fractures, 196, 197p
Styloid process fractures of radius and ulna,30, 31p
Subscapularis musclein forelimb salvage with scapulectomy,
102in medial shoulder luxation, 6, 7p, 8
Supinator muscle in radial diaphysealfractures and plate application, 166,167p
Supraglenoid tuberosity fractures, 144, 145pSuprascapular artery
in scapular neck fractures, 146in shoulder arthrodesis, 14
Suprascapular nervein scapular neck fractures, 146, 147pin shoulder arthrodesis, 14in shoulder luxation, medial, 6, 8in supraglenoid tuberosity fractures, 144,
145pSupraspinatus muscle
in forelimb salvage with scapulectomy,102, 103p
in humeral physeal fractures, proximal,149p
in infraspinatus muscle contracture, 5pin scapular body fractures, transverse, 142,
143pin shoulder arthrodesis, 14, 15pin shoulder luxation
lateral, 11pmedial, 6, 7p, 8
Suture anchor systemin elbow luxation, lateral, 18, 20in hip luxation, 40, 41pin shoulder luxation
lateral, 10, 11pmedial, 6, 8, 9p
in stifle luxation, 56–58, 57p, 59pSymphyseal fracture of mandible, cerclage
wire in, 136, 137p
T
Talocalcaneocentral jointin partial tarsal arthrodesis
with intramedullary pin and wire, 94with plate, 92
in shearing injury with tarsal luxation, 78Talocrural joint in shearing injury with tarsal
luxation, 78Talus
in pantarsal arthrodesis, 90, 91pin partial tarsal arthrodesis with
intramedullary pin and wire, 94in shearing injury with tarsal luxation, 78, 80in tarsal fractures, 212, 213ptrochlear ridge osteochondrosis of
lateral, 82–84, 83p, 85pmedial, 86–88, 87p, 89p
Tarsocrural jointin pantarsal arthrodesis, 90in partial tarsal arthrodesis with
intramedullary pin and wire, 94in shearing injury with tarsal luxation, 78
Tarsometatarsal jointin pantarsal arthrodesis, 90in partial tarsal arthrodesis
with intramedullary pin and wire, 94, 95p
with plate, 92in shearing injury with tarsal luxation, 78
Tarsus disordersAchilles tendon rupture, 74–76, 75p, 77parthrodesis in, 90, 91p
with intramedullary pin and wire, 94, 95p
with plate, 92, 93pfractures, 212, 213p
metatarsal, 214, 215ptibial malleolar, 200, 201ptibial physeal, 198, 199p
osteochondrosisof lateral trochlear ridge of talus, 82–84,
83p, 85pof medial trochlear ridge of talus, 86–88,
87p, 89pshearing injury with luxation, 78–80, 79p,
81pTeeth
occlusion ofin comminuted mandibular body
fractures, 140, 141pin symphyseal mandibular fractures, 136,
137pin transverse and oblique mandibular
body fractures, 138, 139premoval in mandibulectomy, 96, 97p
Tension band wirein acetabular fractures, 178, 179pin Achilles tendon injuries, 76, 77pin femoral physeal fractures, proximal,
180, 181pin hip luxation and extracapsular
stabilization, 40, 41pin radial styloid fractures, 30, 31pin scapular neck fractures, 146, 147pin supraglenoid tuberosity fractures, 144,
145pin tarsal fractures, 212, 213pin ulnar fractures
distal, in styloid process, 30, 31pproximal, 172, 173p
Tensor fascia latae musclein acetabular fractures, 178, 179pin femoral head and neck ostectomy with
joint capsule interpolation, 46, 47pin femoral neck fractures, 182, 183pin femoral physeal fractures, proximal,
180, 181pin hip luxation
and extracapsular stabilization, 38, 39pand intracapsular stabilization, 42, 43p
in rear limb amputation with coxofemoraldisarticulation, 106, 107p
in triple pelvic osteotomy, 50, 51pTeres major muscle in forelimb salvage with
scapulectomy, 102, 103p
INDEX 245

Teres minor musclein forelimb salvage with scapulectomy,
102, 103pin humeral physeal fractures, proximal,
148, 149pin infraspinatus muscle contracture, 4, 5pin scapular neck fractures, 147pin shoulder arthrodesis, 14, 15pin shoulder luxation, lateral, 11pin shoulder osteochondrosis, 2, 3pin supraglenoid tuberosity fractures, 145p
Thoracic artery and vein in forelimbamputation with scapulectomy, 101p
Thoracic nerve in forelimb amputation withscapulectomy, 101p
Thoracolumbar disc disordersfenestration in, 226, 230–232, 231phemilaminectomy in, 226–228, 227p, 229p,
230Tibia
diaphyseal fractures ofcerclage wires in, 126, 202, 203p, 208,
209pexternal fixator in, 120, 122, 202, 203p,
206–208, 207p, 209pinterlocking nail in, 132, 202, 203pintramedullary pin in. See Intramedullary
pins, in tibial diaphyseal fracturesplate application in, 128, 204, 205p
distalin lateral trochlear ridge of talus
osteochondrosis, 82, 84in malleolar fractures, 200, 201pin medial trochlear ridge of talus
osteochondrosis, 86, 88in pantarsal arthrodesis, 90, 91pin partial tarsal arthrodesis with
intramedullary pin and wire, 94in physeal fractures, 198, 199pin shearing injury with tarsal luxation,
78, 80oblique osteotomy stabilized with type II
external fixator, 112, 113pphyseal fractures of
distal, 198, 199pproximal, 196, 197p
proximalin arthrodesis of stifle, 72, 73pin bone grafts, as donor site, 134, 135pin deranged stifle luxation, 56, 57p, 58in intra-articular repair of cranial
cruciate ligament, 64, 65p, 66, 67pin lateral fabellar suture repair of cranial
cruciate ligament, 60, 62, 63pin meniscectomy, 68, 70physeal fractures of, 196, 197ptuberosity fracture, 196, 197ptuberosity transposition in medial
patella luxation, 52, 54, 55pTibial muscles
caudalin medial trochlear ridge of talus
osteochondrosis, 88, 89pin tibial malleolar fractures, 201pin tibial physeal fractures, distal, 199p
cranialin intra-articular cranial cruciate
ligament repair, 65p
Tibial muscles (Continued)
in lateral trochlear ridge of talusosteochondrosis, 82, 83p
in medial patella luxation, 53p, 54, 55pin medial trochlear ridge of talus
osteochondrosis, 86, 87pin stifle arthrodesis, 72, 73pin tarsal arthrodesis, 90, 91pin tarsal shearing injury and luxation,
79pin tibial malleolar fractures, 200, 201pin tibial physeal fractures, 197p, 198,
199pToggle pin, modified, in intracapsular
stabilization of hip luxation, 42–44, 43p,45p
Tracheain cervical disc decompression, 222, 223pin cervical disc fenestration, 219p
Transverse derotational osteotomy stabilizedwith plate, 114, 115p
Trapezius musclein forelimb amputation with scapulectomy,
100, 101pin forelimb salvage with scapulectomy,
102, 103p, 104Triceps brachii muscle
in forelimb amputation with scapulectomy,101p
in forelimb salvage with scapulectomy,102, 103p, 104
in humeral fracturesdiaphyseal, and plate application, 158,
159pdistal, T or Y type, 152, 153plateral condylar, 150, 151pproximal physeal, 149p
in infraspinatus muscle contracture, 5pin scapular body fractures, transverse,
143pin shoulder osteochondrosis, 2, 3pin ununited anconeal process, 22, 23p
Trochanteric fracture of femur, 180, 181pTrochanteric osteotomy of femur
in acetabular fractures, 178, 179pin extracapsular stabilization of hip
luxation, 38in intracapsular stabilization of hip
luxation, 42Trochlear ridge of talus osteochondrosis
lateral, 82–84, 83p, 85pmedial, 86–88, 87p, 89p
Trochleoplasty of femur in medial patellaluxation, 52, 53p
Tuberosity of tibiafracture of, 196, 197ptransposition in medial patella luxation, 52,
54, 55p
U
Ulnadistal
fracture of styloid process, 30, 31pin ostectomy with fat graft, 26, 27pin pancarpal arthrodesis, 32in partial carpal arthrodesis with
intramedullary pins, 36in partial carpal arthrodesis with plate, 34
Ulna (Continued)
fractures ofdistal, in styloid process, 30, 31pproximal, 172, 173p
in physeal fracture of radius, 171pproximal
fractures of, 172, 173pin fragmented medial coronoid process,
16, 17pin luxation of elbow, lateral, 18–20, 19p,
21pin ostectomy for elbow arthrodesis, 28,
29pin ununited anconeal process, 22–24,
23p, 25pUlnar artery and vein, in elbow
osteochondrosis and fragmented medialcoronoid process, 16
Ulnaris lateralis musclein arthrodesis of elbow, 28, 29pin distal ulnar ostectomy with fat graft, 26,
27pin proximal ulnar fractures, 172, 173p
V
Vastus intermedius musclein femoral diaphyseal fractures, 129p,
133p, 187pand external fixator, 193pand plate application, 191p
in patella luxation, medial, 52Vastus lateralis muscle
in femoral diaphyseal fractures, 129p,133p, 186, 187p
and external fixator, 192, 193pand plate application, 190, 191p
in femoral head and neck ostectomy withjoint capsule interpolation, 46, 47p
in femoral neck fractures, 182, 183pin hip luxation
and extracapsular stabilization, 38, 39pand intracapsular stabilization, 42, 43p
in patella luxation, medial, 52in rear limb amputation with coxofemoral
disarticulation, 107pVastus medialis muscle in medial patella
luxation, 52
W
Wedge recession trochleoplasty in medialpatella luxation, 52, 53p
Wire techniques. See also Kirschner wiresin acetabular fractures, 178, 179pin Achilles tendon injuries, 76, 77pin femoral diaphyseal fractures, 126, 186,
188, 189pin femoral physeal fractures, proximal,
180, 181pin hip luxation and extracapsular
stabilization, 40, 41pin humeral diaphyseal fractures, 126
external fixator used with, 164, 165pintramedullary pin used with, 126, 156,
157p, 164in long oblique diaphyseal fractures, 126,
127pin mandibular body fractures, transverse
and oblique, 138, 139p
246 INDEX

Wire techniques (Continued)
in mandibular symphyseal fractures, 136,137p
in radial styloid fractures, 30, 31pin scapular neck fractures, 146, 147pin supraglenoid tuberosity fractures, 144,
145p
Wire techniques (Continued)
in tarsal arthrodesis, partial, 94, 95pin tarsal fractures, 212, 213pin tibial diaphyseal fractures
external fixator used with, 208, 209pintramedullary pin used with, 126, 202,
203p
Wire techniques (Continued)
in tibial malleolar fractures, 200, 201pin tibial physeal fractures, proximal, 196,
197pin ulnar fractures
distal, in styloid process, 30, 31pproximal, 172, 173p
INDEX 247