Embed Size (px)
Citation preview
AT1000 Vacuum Tube Tester Operations Manual
Applies to firmware version 2.0 and later
14 March 2006 TABLE OF CONTENTS 1.0 PRECAUTIONS AND WARNINGS 2.0 FRONT PANEL COMPONENTS 3.0 BASIC OPERATION 4.0 INTERPRETING RESULTS 5.0 TROUBLESHOOTING 6.0 EDITING TEST DATA AND ADDING TUBES 7.0 UPLOADING THE TEST DATA FILE 8.0 THE SYSTEM MENUS 9.0 USING THE CURVE PLOTTING SOFTWARE 10.0 BIASING AND TESTING MODES ============ 1.0 PRECAUTIONS AND WARNINGS WARNING: THE AT1000 VACUUM TUBE TESTER GENERATES AND USES HIGH VOLTAGE. FOLLOW ALL INSTRUCTIONS CAREFULLY. NEVER TOUCH OR REMOVE A TUBE WHILE TESTING OR CURVE PLOTTING IS IN PROGRESS. NEVER TOUCH ANY TUBE PINS, SOCKET CONTACTS, OR PLATE OR GRID CAP METAL PARTS WHILE THE UNIT IS CONNECTED TO A SOURCE OF AC POWER. UNPLUG THE UNIT WHEN NOT IN USE. IF A TUBE SOCKET IS BROKEN, THE METAL CONTACTS INSIDE IT MAY BECOME EXPOSED. IF THIS OCCURS, STOP USING THE UNIT AND HAVE IT REPAIRED BEFORE USING IT AGAIN. DO NOT USE THE UNIT WITH WET OR PRESPIRING HANDS. MOISTURE INCREASES THE RISK OF SHOCK AND ELECTROCUTION. NEVER INSERT ANYTHING EXCEPT A TUBE'S PINS INTO THE TUBE SOCKETS ON THE AT1000. CONTACT WITH HIGH VOLTAGE CAN CAUSE SERIOUS INJURY, CARDIAC ARREST OR DEATH. WARNING: THE AT1000 MUST BE CONNECTED ONLY TO AN AC POWER OUTLET THAT IS PROPERLY GROUNDED. DO NOT ATTEMPT TO DEFEAT THE GROUND CONNECTION BY USING ADAPTERS OR BY REMOVING THE GROUND PIN(S) FROM THE POWER CORD OR INLET. ELECTRICAL SHOCK, ELECTROCUTION, OR FIRE MAY RESULT. REPLACE THE POWER CORD IF IT BECOMES DAMAGED IN ANY WAY. WARNING: KEEP THIS UNIT OUT OF THE REACH OF CHILDREN. OPERATION BY NON- TECHNICAL PERSONNEL MUST BE SUPERVISED CLOSELY BY A PERSON FAMILLIAR WITH THESE OPERATING INSTRUCTIONS, ESPECIALLY THESE WARNINGS, AND WITH HIGH VOLTAGE SAFETY IN GENERAL. DO NOT ALLOW CHILDREN TO OPERATE THIS EQUIPMENT. WARNING: VACUUM TUBES CAN BECOME EXTREMELY HOT DURING TESTING AND CURVE PLOTTING. DO NOT HANDLE HOT TUBES WITH BARE HANDS. ALLOW TUBES TO COOL FOLLOWING OPERATIONS BEFORE REMOVING THEM FROM A TEST SOCKET. USE PROTECTIVE GLOVES IF IT IS NECESSARY TO HANDLE HOT TUBES. NEVER REMOVE A TUBE WHILE POWER IS APPLIED TO IT UNDER TEST, OR DURING A CURVE PLOTTING

OPERATION. SWITCH OFF THE POWER BEFORE INSERTING OR REMOVING A RECTIFIER TUBE (SOCKET H). WARNING: MOST VACUUM TUBES ARE CONSTRUCTED WITH GLASS ENVELOPES. IF ACCIDENTALLY BROKEN, GLASS FRAGMENTS WILL BE SHARP AND CAN CAUSE CUTS OR OTHER INJURY. CLEAN UP BROKEN TUBE PARTS CAREFULLY, USING PROTECTIVE GLOVES. BE AWARE THAT SOME TUBES MAY CONTAIN SMALL AMOUNTS OF HAZARDOUS MATERIALS. IN THIS CASE, CONSULT THE TUBE MANUFACTURER'S MSDS FOR FURTHER INFORMATION. CAREFULLY WRAP BROKEN TUBE FRAGMENTS IN HEAVY PAPER AND DISPOSE OF IN TRASH. DO NOT BREATHE ANY POSSIBLE DUST OR FUMES. A TUBE CONTAINING MERCURY, SUCH AS A MERCURY VAPOR RECTIFIER, PRESENTS A HEALTH HAZARD IF BROKEN. CONTACT LOCAL EMERGENCY AUTHORITIES IF A MERCURY CONTAINING TUBE IS BROKEN. DO NOT ATTEMPT TO CLEAN IT UP YOURSELF WITHOUT THE PROPER EQUIPMENT, PERSONAL PROETCTIVE GEAR, AND PROCEDURES. IF A TUBE GLASS ENVELOPE BREAKS WHILE IT IS PLUGGED INTO THE AT1000, DISCONNECT THE UNIT FROM ITS SOURCE OF AC POWER AS SOON AS POSSIBLE. WAIT AT LEAST 2 MINUTES FOR ALL HIGH VOLTAGE TO BE DISCHARGED (AUTOMATICALLY, BY BLEEDER RESISTORS IN THE UNIT) BEFORE ATTEMPTING TO REMOVE THE REMAINS. BE CAREFUL OF SHARP GLASS AND HOT FRAGMENTS. PLIERS MAY BE USEFUL IN REMOVING BROKEN TUBE BASE FRAGMENTS IN THE CASE OF MINIATURE TUBES. WARNING: THE AT1000 CONTAINS FUSES AND A THERMAL PROTECTIVE DEVICE. DO NOT REPLACE WITH OTHER THAN IDENTICAL COMPONENTS OR BYPASS THESE SAFETY DEVICES. DOING SO WILL VOID YOUR WARRANTY AND MAY RESULT IN FIRE, DAMAGE TO OR LOSS OF PROPERTY, AND PERSONAL INJURY OR DEATH. DO NOT ATTEMPT REPAIR OF THE UNIT YOURSELF. RETURN A DEFECTIVE UNIT TO THE FACTORY FOR REPAIRS. WARNING: DO NOT EXPOSE THE UNIT TO MOISTURE, RAIN OR OTHER LIQUIDS. DOING SO VOIDS YOUR WARRANTY AND MAKES THE UNIT UNSAFE TO OPERATE UNTIL REPAIRED BY THE FACTORY. FIRE, PROPERTY DAMAGE AND PERSONAL INJURY OR DEATH MAY RESULT FROM THE OPERATION OF A UNIT THAT HAS BEEN EXPOSED TO MOISTURE. IF THE UNIT HAS SUFFERED DAMAGE IN SHIPPING, HAS BEEN DROPPED OR OTHERWISE OBVIOUSLY DAMAGED, DO NOT CONNECT IT TO A SOURCE OF AC POWER. RETURN IT TO THE FACTORY FOR INSPECTION AND REPAIR. WARNING: DO NOT OBSTRUCT VENTILLATION OPENINGS. ENSURE THAT THE COOLING FAN IS OPERATING, AND VENTILLATION OPENINGS ARE UNOBSTRUCTED BEFORE BEGINNING OPERATIONS. DO NOT ALLOW ANY FORIEGN SUBSTANCE OR OBJECT TO ENTER ANY OPENINGS. CONTACT WITH HIGH VOLTAGE MAY RESULT, CAUSING DAMAGE OR DESTRUCTION OF PROPERTY, AND POSSIBLE INJURY OR DEATH DUE TO ELECTROCUTION. WARNING: DO NOT INSERT A TUBE UNTIL THE TEST HAS BEEN SET UP (EXCEPTION: RECTIFIERS), AND THEN ONLY INSERT THE TUBE INTO THE CORRECT SOCKET. DO NOT INSERT MORE THAN ONE TUBE AT A TIME. DAMAGE TO THE AT1000 OR THE TUBE(S) MAY RESULT. DO NOT ATTEMPT TO TEST A BROKEN TUBE, OR ONE WHERE THE GETTER FLASH (NORMALLY SILVER IN COLOR) HAS TURNED WHITE. WARNING: THE RECTIFIER TUBE TEST SOCKET, SOCKET H, HAS HIGH VOLTAGE AC WIRED TO PINS 2 AND 4. THIS VOLTAGE IS PRESENT WHENEVER THE UNIT IS SWITCHED ON, EVEN IF A TEST IS NOT IN PROGRESS. IT IS RECOMMENDED THAT THE UNIT BE SWITCHED OFF BEFORE RECTIFIER TUBES ARE INSERTED OR REMOVED FROM SOCKET H. THIS WILL MINIMIZE THE POSSIBILITY OF CONTACT WITH DANGEROUS VOLTAGE, SHOULD THE TUBE BREAK WHILE INSERTING/REMOVING, OR IF FINGERS COME INTO CONTACT WITH LIVE PINS.
CAUTION: INCORRECT TEST SETUP, OR INCORRECT SELECTION OF TUBE TYPE OR TEST SOCKET CAN DAMAGE THE TESTER AND DAMAGE OR DESTROY A TUBE. AMPLITREX AUDIO PRODUCTS ACCEPTS NO RESPONSIBILITY FOR TUBES WHICH MAY BE DAMAGED DURING TESTING. ============= 2.0 FRONT PANEL COMPONENTS TUBE SOCKETS The unit is equipped with 8 high quality tube sockets. Each socket is identified with a letter of the alphabet, A through H. During test setup, the LCD screen tells the user which socket to use. Some users may elect to use socket savers, to prolong the life of the sockets in the AT1000. This is an especially important consideration if large numbers of tubes are to be tested, such as in a manufacturing or large batch matching operation. LCD DISPLAY The backlit LCD display contains four lines of 40 characters, each. By observing the display, the user is guided through mode and tube selections, shown test setup information, instructed which socket to use, and shown the test results. MENU NAVIGATION KEYS AND ENTER KEY Using these five tactile-feedback keys, the user navigates through the menus and makes selections, as guided by the LCD Display. The ENTER key is used to make a selected option active, to confirm an operation, and finally begin the actual test. The left arrow [<] key is used to abort a test, or to go back to a previous menu. The other keys are used to navigate up, down, and left and right in the List of Tube Types, or to navigate through the System Menus. AC INLET AND POWER SWITCH The unit is shipped wired for 115V or 230V, AC 50 or 60 Hz operation. Verify that your unit is wired for the correct voltage before connecting it to a mains source. Connect the supplied AC line cord to the AC inlet on the AT1000, then plug the opposite end into a grounded outlet. In countries other than the United States, the use of an adapter or special power cable may be necessary. Use the power switch to power up the unit, or to shut down after testing operations are concluded. Always switch OFF the power switch when you have completed a tube testing session. Disconnect the AC power cord from the outlet if the unit will not be used again shortly. RS232 SERIAL CONNECTOR This standard 9-pin D connector links the AT1000 to a personal computer serial port. Use a standard, male-to-female cable wired pin-for-pin for this connection. Connect this cable whenever uploading a new Test Data File or performing curve plotting and tube testing with a personal computer. It is also possible with firmware after V1.20 to update the firmware over the serial port. The cable (and a computer) is not needed for normal tube testing.
PLATE AND GRID CAP BANANNA JACKS These jacks are for use when testing tubes that have a plate or grid cap on them. Use the appropriate supplied cap lead (each accommodates a different cap size) when testing tubes with caps. Connect the lead to the appropriate jack (plate or grid) as instructed by the LCD screen. Never touch the metal parts of the plate cap or the banana plug or jack. Handle them only by touching the insulated plastic and ceramic parts. Never connect or disconnect them while a test is in progress, only when instructed to by the LCD display, or when the Test Menu has been exited (heater turns off). ============ 3.0 BASIC OPERATION The AT1000 is very easy to use. Follow these instructions to test a tube. 1) Plug the unit into a source of AC power. Set the Power Switch to ON. The fan will start and the firmware version is displayed momentarily. Then, a list of tube type numbers is displayed. 2) Use the [UP] [DOWN] [LEFT] and [RIGHT] arrow keys to move the cursor, and navigate to the following screens. The [LEFT] and [RIGHT] keys move the cursor along each line, and up or down a line when the extremes of a line are reached. Use the [UP] and [DOWN] arrow keys to go to the previous or next page. The tube types are arranged alphanumerically, with numbers coming before letters. This means a 6550 will be found earlier in the list than a 6AQ5. The European letter prefix tubes like the ECC83 are listed after all the tubes that start with a number. Tubes like the 6CA7/EL34 are listed in both places, under 6CA7 and also EL34. The test setup is identical no matter which one is selected. When the cursor is position on the tube type number you want to test, press the [ENTER] key. 3) A screen is presented which shows some of the basic parameters of the test setup for the selected tube type. Press [ENTER] again to confirm this is the tube you want to test. 4) Next, you will be prompted as to which socket on the AT1000 to insert the tube into. Carefully insert the tube into the indicated socket and press [ENTER] again. If the tube you are testing has a plate or grid cap, another screen will appear advising which banana jack (plate or grid) to plug the cap/lead into. If this is the case, connect the cap lead and then press [ENTER]. It is not possible to test a tube that has two caps. 5) At this point, the test will begin automatically. The heater will be ramped up to its specified voltage, and a timer will count down. During the warmup, the heater-to-cathode leakage is displayed. When the counter reaches zero, the warmup phase ends and B+ is applied to the tube. 6) B+ comes on, and this is indicated on the LCD screen. The tube is biased into conduction in one of two modes. In Auto Bias Mode, the grid voltage is adjusted downward automatically until the specification plate current is achieved. In Fixed Bias Mode, the specification bias voltage is applied to the grid, and the plate current will be whatever results at this bias setting. The user can change the
Bias Mode by using the System Menus (see section 8.0). 7) Once the plate current is flowing, the unit will proceed automatically to test the transconductance (if it is in Timed Test Mode). If the unit is configured for Manual Test Mode, the user is prompted by the LCD display to “Press ENTER to continue”. This allows the user to wait until plate current stablizes, if desired, before continuing with the Transconductance Test. The user can change the unit between Timed and Manual Test Modes by using the System Menus (see section 8.0) A 1 kHz sine wave is applied to the grid of the tube. The AC plate current is measured, and the tube's transconductance is calculated and displayed. If the unit is set for Timed Test Mode, it will measure and average transconductance for 8 seconds, and then move on to the next (gas) test. If the unit is configured for Manual Test Mode, it will prompt the user with the “Press ENTER to continue” message. This is useful if you want to see if the transconductance drifts over time. In Manual Test Mode, the unit will stay in the mode of measuring transconductance and displaying it, until ENTER is pressed. When the transconductance test ends, the 1 kHz test signal is turned off. 8) Next the Gas Test begins. For the gas test, two plate current measurements are made. One is made a fraction of a second after the 1 kHz grid signal is removed. Then, the grid circuit resistance is increased 10X, and a few seconds are allowed to elapse. Finally, the second plate current measurement is made, (which is frequently higher). The difference in these two readings becomes the Gas Test Value, and indicates the effect of the tube's gas contents on its grid electrode. The Gas Test always operates automatically, there is no difference between Timed and Manual Test Modes. 9) After the gas test concludes, B+ is removed from the tube and the Test Results Screen is displayed. If there is more than one section in the tube under test, the other section(s) are tested before the results are shown. Each section of a multiple-section tube is tested as if it was a separate tube, and the results are shown separately for each section. If the unit is set to Manual Test Mode, the ENTER key must again be pressed to move from the Bias Function to the GM test, and again to move from the GM test to the Gas test. This is repeated for each section of the tube as it is tested. 10) Review the results. Use the [UP] and [DOWN] keys to move between the results screens for each tube section. If the tube is only a single-section type, only one screen of results will be displayed no matter if the [UP] and [DOWN] keys are pressed. 11) To test the same tube again, just press [ENTER]. The unit will ask you if you want to re-test the tube. Press [ENTER] once more to repeat all tests. The heater is already on so there is no need to repeat the warmup. After the tests complete, the new results are displayed. Each time the test is repeated, the old results are replaced by the new results. 12) Press the [<] key to exit the test back to the setup screen for the
tube. The heater will now turn off (NOTE: a second press of the [<] key will be necessary in the case of rectifier tubes). Allow the tube to cool, and then carefully remove it from its socket. For rectifier tubes, it is recommended that the POWER switch be turned off before the tube is removed from its socket. Using a circular rocking motion while pulling gently upwards helps to remove a tube without damaging the tube’s pins or the socket. Another of the same type of tube can be placed into the same socket and the test repeated (including heater warmup) by pressing the [ENTER] key. The exception to this is rectifier tubes, which will require selecting the tube type from the list again. 3.1 NOTES ON TESTING a) After the [ENTER] key is pressed in Step 4, no user action is required until the test concludes at Step 10, UNLESS THE UNIT IS SET TO MANUAL TEST MODE. In Manual Test Mode, the user must be careful when testing high power tubes, as the B+ regulators in the unit are subject to overheating. Should they overheat, B+ will be turned off and a message to this effect will be displayed on the LCD. For more information, see section 5.2. b) The user can bypass the remainder of the heater warmup (after the ramp interval) by pressing [ENTER]. Normally, you should allow the complete warmup time to elapse and not use this function. c) During bias adjustment, plate current may over- or under-shoot slightly. This has virtually no effect on test results and is caused by slight instabilities or noise in some tubes. Some tubes will appear to be more stable after they have been run for a while. The Manual Test Mode allows a longer run time for the tube than does the Timed Test Mode. d) Any time B+ is applied to the tube, the AT1000 protects itself by shutting down if a short or overload condition occurs. In this case, the user is notified by a message that a short or overload has been detected. The user can either restart the test or bail out back to the Test Setup menu. If a second attempt at testing a tube causes another short/overload shutdown, the tube should be considered defective and disposed of. In some cases, after the unit is first switched on, the first tube tested might cause a false indication of a tube short. Press ENTER to try again, if this was the case, the second attempt will be successful. The rectifier test does not shut down if there is a short, however, the forward and reverse voltage drops will indicate the defect. e) If the unit’s pass transistor heatsink overheats during operation, a message to this effect will be displayed to the user. Allow the unit to cool before attempting to resume operations. Make sure that the fan is operating and that the ventilation openings are not obstructed. Over- heating will normally not occur except during prolonged, continuous operation above 70 mA iP at plate voltages below 300V. The rectifier test load resistors share the same heatsink, so extended rectifier testing may also cause overheating. ============== 4.0 INTERPRETING RESULTS
After each series of tests concludes, B+ is switched off, heater power is maintained and test results are displayed on the LCD display. If a tube has more than one section, such as the 12AX7 Dual Triode, tests were conducted on both sections of the tube. In the case of a 6T8 tube, there are four sections. Each is tested individually and the results appear on a separate screen. Use the [UP] and [DOWN] arrow keys to review the test results for each section of a multi-section tube. If there is only one section in the tube that was just tested, the [UP] and [DOWN] arrow keys will only show one results screen. If, while in Manual Test Mode and during the Transconductance Test, the ENTER key is pressed before the “Please wait” message disappears, the transconductance result displayed will be zero. To prevent this during Manual Test Mode, wait until the “Please wait” message is replaced with “Press ENTER to continue”. 4.1 TYPES OF RESULTS DISPLAY SCREENS There are four different types of Results Screens. The first one is displayed if the tube (or tube section) is a triode, tetrode or pentode. It shows the following data: a) Top Line: Heater-to-Cathode Leakage. This is shown in microamperes, and is tested by applying -200V to the heater while the cathode is held at ground potential. Current is limited to 1 mA. Normally, a good tube will show zero leakage, but a few microamperes is probably OK. Heater- to-cathode leakage is critical for a preamp tube or a tube used in a cathode follower or in a cascode circuit. It is less critical for a power output tube or one that has its cathode tied to ground in the circuit. b) Second Line: This shows the specification values of grid voltage (in Auto Bias Mode) or plate current (in Fixed Bias Mode) and transconductance (GM), which is displayed in milliamperes-per-volt. Multiply by 1000 to convert mA/V into uMHOs. c) Third Line: This line shows the actual values of grid voltage (in Auto Bias Mode) or plate current (in Fixed Bias Mode) and the transconductance that were measured during the test. See section 10.0 for a description of the difference between Auto Bias and Fixed Bias. In Auto Bias Mode, if the actual grid voltage is less than specification, this means that the emission of electrons from the cathode was weaker than expected and a correspondingly lower grid voltage was required to establish correct plate current. In Fixed Bias Mode, if the actual plate current is less than specification, this also means that the emission is weak. In Auto Bias Mode, if the actual grid voltage was higher than the specification value, this means that the tube has strong emission and can be expected to have a good amount of life remaining. If the actual grid voltage is very low or is zero, the tube is bad and should be replaced.
In Fixed Bias Mode, if actual plate current is greater than specification, this also indicates the tube has strong emission. And if actual plate current is very low or zero, the tube is bad and should be replaced. Some tubes of modern manufacture may show lower than “normal” grid voltage (in Auto Bias Mode) or lower than normal plate current (in Fixed Bias Mode), as some new tubes are not being manufactured to the same standards as they were in the vintage years. The actual measured transconductance is shown on the right side of the third line of the display. This value is determined by actually making the tube amplify a 1 kHz sine wave signal, and then measuring the AC plate current that results. A reading of one milliampere per volt means that with a one volt RMS AC grid signal, a one milliampere RMS AC current was observed in the tube. Transconductance normally reads close to the specification value. If transconductance reads low, this means that tube gain may be less than that expected in its application circuit. If it reads higher than the specification, more gain can be expected in the target circuit. If emission was low (low measured grid voltage or low measured plate current), the transconductance can be expected to possibly (but not always) be low as well. Note that the transconductance and emission values obtained with the triode DC amplifier section of an electron ray tube may read very low. This does not necessarily mean the tube is defective. This is because these parameters are not closely controlled in these types of tubes. d) Fourth Line: This line shows three things. The first two are a simplified interpretation of the quality of emission, and the quality of transconductance. These are displayed as Xlnt (Excellent), Good, Weak and Bad. For quick determination of tube quality, one can rely on just these statements rather than considering the numerical values of the actual measurements. Occasionally, a tube that reads "Weak" in either emission or transconductance will perform adequately in a target circuit. Therefore, "Weak" does not automatically mean that the tube should be discarded. With tubes that operate with small grid voltage, such as 2 volts or less, there can be a “magnification” of the grid voltage range that produces a “good” reading. Therefore, with such tubes, take the transconductance reading into consideration, and do not automatically discard a tube which shows weak emission. Remember, these are quick estimates of tube quality, and the actual numerical measurements should be relied on more than the “good-weak-bad” display. The third item displayed on the fourth line is the result of the Gas Test. During the Gas Test, the grid circuit source impedance is increased 10 times. Plate current is measured before, and then again after the impedance is altered. If there is residual gas inside the tube, the ion current flowing in the gas between the plate or screen and the grid causes the grid to become more positive (less negative). This produces an increase in plate current, this difference is the value that is displayed (in milliamperes). When interpreting Gas Test results, one must take into consideration several things. First, the normal plate current. Second, what is the application of the tube? And third, how much gas-induced current increase was measured.
In the case of a small preamp tube like a 12AX7 or EF86, anything more than 0.1 milliampere of gas current will likely cause problems in the application circuit. Noise may be excessive, and/or the tube may not establish its correct operating point. With a power tube like a 6L6, the interpretation must be different. Power tubes typically show a few milliamperes of gas-induced current increase, even if they are good. This is because in these tubes, plate temperatures are generally much higher and there is more surface area on the plate which naturally outgasses somewhat as it heats up. Also, because these tubes normally operate with several tens of milliamperes, or even over 100 milliamperes, a few mA of Gas current is OK. With power tubes, a gas-induced current increase of less than 10 percent of normal plate current is probably OK in most circuits. When performing repeated tests (hot retest) on a power tube, the re-application of plate current to an already-hot tube sometimes causes even MORE gas-induced current to be measured the second time. If the amount of current increase is more than about 10 percent of the tubes normal plate current, it is likely to produce noise in the circuit as well as a possible "run-away" condition. Whether or not this will happen depends on factors such as grid circuit impedance in the target circuit, and the values of plate voltage and current the tube is being run at. Occasionally, a run-away condition will result while the tube is in the AT1000, and this will cause an overcurrent shutdown and the message "possible excessive gas" to be displayed. These tubes should be discarded as bad. 4.2 DIODE RESULTS SCREEN In the case of tubes that contain diodes or diode sections, such as the 6AL5 and 6T8, the Diode Results screen will be displayed. In addition to the Heater-to-Cathode Leakage measurement that appears on the top line, a reading for forward and reverse current is shown. Normally forward current should be in excess of 900 microamperes and reverse current should be zero. The test current is limited to 1 mA, and this reading may only be seen in a shorted diode, where the forward and reverse currents are almost the same. Also, heater-to-cathode leakage in diode sections is usually very critical, because the cathode is frequently a signal point in the application circuit. Heater-to-cathode leakage in diode sections should always read zero, a reading of a microampere or two (or more) is probably reason for the user to discard the tube as bad. There is no gas test for diode sections. If the tube contains a triode (or pentode or tetrode) section as well, the gas test will run only on the non-diode sections. 4.3 ELECTRON RAY INDICATOR RESULTS SCREEN Electron Ray Indicator tubes, such as the 6E5 and EM84, can be tested on the AT1000. In these cases, a special test is run on the display section of the tube. During the test, the tube's fluorescent screen will light up, and the shadow will be moved as the AT1000 varies the Ray Control Electrode voltage. The user should observe the fluorescent screen on the tube under test, and evaluate the brightness and shadow movement for normal appearance. Note that there is sometimes significant “shadow overlap” as the AT1000 delivers full B+ to the ray control electrode as

would happen in normal operation of the DC amplifier triode section (if so equipped) when it was fully cut off. Once the tests conclude, the Results Screen for the Indicator Section will show the maximum achieved target current in the tube. Target current varies as the shadow moves, because more or less electrons are striking the target. Normal peak target current is a milliampere or two for most tubes. Many Electron Ray Tubes also have a triode section as well, which is used as a DC amplifier in the application circuit. Such triode sections are tested just like any other triode, for emission, transconductance, heater-to-cathode leakage and gas. Some tubes, such as the EMM801 have two separate display sections and two triode DC amplifier sections. All of these are tested independently and the results are shown on separate Results Screens. Note that the transconductance of DC amplifier triode sections in Electron Ray Indicators is usually very low. Sometimes it is as low as 0.05 or 0.1 mA/V. If such a tube is suspect, the user is advised to try it in an application circuit to see if the shadow movement is adequate. Do not rely on the Transconductance "Good-Bad" indication alone for Electron Ray Indicator tubes' triode sections. 4.4 RECTIFIER TUBES In the case of full wave rectifiers, such as the 5U4, 5Y3 and GZ34, a specialized results screen is displayed. It shows the measured forward and reverse voltage during the test, for both sections. The results for both sections are shown on the same screen, and there is no need to move between sections with the up and down arrow key. During the rectifier test, a sinusoidal voltage of 275V RMS (nominal) is applied to each plate, 180 degrees out of phase on each plate. This is how these tubes are generally run in an application circuit. Series load resistors are provided in each plate’s circuit, and the voltage drop between each plate and the cathode is measured. In case a tube is shorted, the load resistors prevent damage to the tester by harmlessly dissipating the reverse-conducted current. Normally, rectifier tubes will read between 10 and 70 volts forward drop, depending on the rating of the tube. Mercury rectifiers read the lowest, and small, high vacuum types such as the 5Y3 read the highest. The appropriate tube data sheet should be consulted to determine the expected forward drop at a peak current of about 100 mA. The reverse voltage drop should be much higher, typically very close to the “Plate V peak” voltage which is displayed right before the tube test is started. This reading is the unloaded AC test voltage peak amplitude, and it should be approximately the same as the reverse (blocking) voltage drop measured during the test. 4.5 MATCHING TUBES Vacuum tubes can be matched for use in balanced circuits, such as push-pull output or fully-differential preamplifier use. Single-section tubes can be matched to each other, and dual section
tubes can have their sections matched as well as establishing a match between tubes. Tube matching generally consists of testing a number of identical tubes, and then grouping them by one or more tested parameters. Tubes can be matched by emission, transconductance, or both. If only one parameter is to be matched, it is recommended that emission is selected. For power output tubes, some amplifiers have DC and AC balance controls. These controls can null out some of the variance in tube parameters. In parallel (SEP) and push-pull parallel power tube operation, close matching is essential for maximum performance. There are generally no separate bias and drive controls when tubes are run in parallel, and if the tubes don't share the AC and DC loads symmetrically, power output and distortion will suffer greatly. Differential audio and instrumentation amplifiers achieve best performance when matched tubes are used. Quite often, miniature dual triodes are employed. These can have their sections matched, or all the tubes in a signal chain can be matched. The circuit topology dictates which is more important, but full matching for this type of equipment guarantees best performance. To match tubes by emission, use the Fixed Bias Mode, and compare the resulting plate currents measured during the test. The closer the values, the better the match. In push-pull power output stages, the emission match should be within 5% if there is no DC balance control or separate bias adjustment for each tube. Even with these adjustments, closely matching the emission of each tube greatly improves performance and long-term reliability. To match tubes by transconductance, first make sure that the emission is within 10% for the tubes. Then compare transconductance readings between tubes for a 5% or better match. For preamplifier tubes, emission and transconductance matching can also improve performance. Particularly in long tail pair phase splitter operation, the tubes or tube sections should be closely matched. If the phase splitter is operating as symmetrically as possible, distortion will be reduced, and drive to the output stage will increase. Sometimes there are driver tubes after the phase splitter but before the output tubes. These tubes should also be matched, so that drive to the outputs remains as symmetrical as possible throughout the signal path. Fully differential preamplifiers often used in the recording industry will be push-pull from input to output transformers. Keeping things balanced throughout the signal path is essential to take advantage of the wide bandwidth, low noise and low distortion this equipment is capable of. 4.6 WARMUP AND OTHER FORMS OF DRIFT In electronics, even vacuum tube electronics, it is nice to keep things consistent and under control. With well-designed circuits, operating the tubes well within maximum ratings, one can expect stable operation.
Occasionally, tubes will exhibit various types of drift. The most common type of drift is caused by the heater-cathode assembly in the tube. It often gets worse as the tube ages. Most often, this form of drift takes place over several minutes or tens of minutes, and starts out as low emission gradually rising as time passes. At some point the upwards emission drift diminishes to zero, and the tube becomes stable. Generally, it is desirable for power tubes to warm up fully in one to two minutes. Smaller tubes can be expected to stabilize in as little as 30 seconds. Directly-heated tubes generally exhibit stable emission in only 15 to 30 seconds. As a tube ages, the cathode oxide coating used in most tubes becomes worn out. It can also be damaged by heater undervoltage, overvoltage, or too much emission current. Not to mention the effects of residual gas and air left in the tube. The effect of this aging and damage is a “slow-to-warmup” tube. These tubes also generally exhibit low ultimate emission, and lower than normal transconductance. Another form of drift manifests by physical distortion of tube electrodes and their spacing, caused by heat or selective electron bombardment. These causes can make emission and/or transconductrance drift up or down as the tube operates. Sometimes the drift is randomly in either direction, even after hours of warmup time. Just like a cheap sheet metal barbeque warps with use, the repetitive heating and cooling of tube electrodes takes its toll. After many years of operation, some tubes end up with severely distorted electrodes which produce various nonlinearities and drift radically during operation. The warping can even get so extreme that short circuits develop between electrodes. Other tubes, often vintage military specification tubes, are conservatively designed and well constructed, and remain stable after many thousands of hours of operation. Equipment that operates its tubes at or near the Absolute Maximum Ratings is more likely to cause heat-damaged tubes over time. Drift can be measured by using the Manual Test Mode, where any such drift is apparent over time. Just be careful with power tubes, as they can cause the AT1000 to overheat in only a few minutes. 5.0 TROUBLESHOOTING Refer to this section of you are having difficulties with the AT1000. 5.1 Tube tests bad, with no or very low emission or transconductance. Try a known good tube in the unit. If a known good tube tests bad, the AT1000 may have a problem requiring repair. 5.2 Test always cuts off showing "possible short" or "excessive gas". Try the test without a tube in the socket. If it shuts down again with errors about shorts or gas, the may have a problem requiring repair. If B+ stays on without the tube, then the tube was defective. 5.3 LCD Backlight comes on but no menus are displayed. Blown fuse inside unit. Contact the factory for instructions.
5.4 LCD Display shows menus, but the backlight does not illuminate and tube testing shows all tubes to be bad. Blown fuse inside the unit. Contact the factory for instructions. 5.5 Unable to upload a new Tube Test Data File. Make sure that you have configured the Uploader Software for the RS232 COM port that you are using. Make sure you are using a known good, pin-for-pin wired serial cable. Make sure that the AT1000 is in the Upload Mode (see Section 6 of this manual). Make sure that the data file is in the correct directory, and that it is not corrupt. You can view a .CSV file using Notepad. 5.6 Unit overheats frequently Make sure that the ventilation openings are not obstructed by objects or dust. Clean if necessary. Make sure that the fan is running when power is applied and the unit is switched on. Continuous re-testing or using in Manual Test Mode for too long, with a high power tube, may eventually cause the unit to overheat. Allow more time between tests, or operate at a lower plate current for burn-in testing. If the problem persists, contact the factory. 6.0 EDITING TEST DATA AND ADDING TUBES The AT1000 is shipped along with a CD-ROM which contains several files. One of these files is TUBEDATA.CSV. This file contains all of the test setup data which the AT1000 uses for testing tubes. TUBEDATA.CSV is a Comma Delimited File. You can open the file with Notepad, or with Microsoft Excel®. If you have Microsoft Excel on your computer, you can view and edit the test data using it. Once you have completed editing, use the FILE-SAVE AS-TYPE-CSV function to save it in the .CSV format. This is the format which is compatible with the AT1000 file uploader program, TUBEDATAUPLOADER.EXE. If you do not have access to Microsoft Excel Spreadsheet, you can still edit and add to the tube test data. Just use Notepad which is supplied with Windows. Make sure to save the file as plain text with the .CSV filename extension. The user is advised to save a copy of the TUBEDATA.CSV file, in a safe place. This way, in case the "working" copy is damaged, lost or becomes corrupted, you can retrieve the original file(s). Editing the files, whether the .XLS file with Excel, or the .CSV file with Notepad, is easy. If you are using Excel, when you open the file you will see an array of rows and columns (a spreadsheet). If you are using Notepad with the .CSV file, you will see rows of data, each comprised of several fields, that are separated by commas.
Each row, whether in Excel or Notepad, contains the test data for one tube, or in the case of multi-section tubes, the test data for one section. These rows are also called Data Records. Note that some of the data in some of the fields contain leading zeros. It is extremely important that the correct number of characters are present in each field (or cell, if using Excel). The only field that can have a variable number of characters in it is the first one in each record, the Tube Type Number. If you are using Excel, make sure that any new rows that you might add are set up for TEXT. Do not configure them for "general" or "numbers". This can cause Excel to delete all of the leading zeros in all of the cells that contain them. You would then have to correct the problem by first setting all the cells to text, and then going in and manually adding the correct number of leading zeros where necessary. This is very tedious and time consuming! The format for each record is as follows: There are 15 fields (or cells, in Excel) in each record (line). The first field is for the tube type number, and can contain a variable number of characters. All of the remaining fields, however, MUST contain a total of 29 characters (excluding the commas if you are working with a text editor). If there is an incorrect count of characters in a data record, the AT1000 will not be able to properly locate the test setup information. This will lead to all kinds of problems such as incorrect voltage and pinout settings, and failure of a test sequence to terminate properly. 6.1 TUBE TYPE NUMBER The far left field (column A, if using Excel) contains the tube type number, as mentioned above. The characters are simply normal alphanumeric characters that you type on the keyboard. For the tube type field, it is recommended that you use only upper case characters and numbers, and that you limit the length to no more than six characters. Otherwise, each line of the LCD display showing the list of tube numbers can become too long, causing wrap-around problems. 6.2 TUBE TYPE CODE The next field (B on Excel) contains a single, upper-case letter which denotes the functional type of tube, such as Diode, Triode, Pentode, etc. The table below shows a cross reference of each tube function to its code letter: TABLE 6.1 TUBE TYPE CODES A Diode G Triode L Tetrode P Beam Tetrode Q Pentode T Pentagrid Converter U Electron Ray Indicator (Indicator Section) Note that the correct Tube Type Code is necessary in order for the AT1000 to execute the proper tests for a particular
tube or section type. --------------------------------------------------------- 6.3 SOCKET CODE The next field (C on Excel) contains a single, upper-case letter which denotes which socket on the AT1000 will be used for the test. The sockets are designated A through H, and a letter will appear in this field that corresponds directly with one of the sockets on the unit. The sockets differ as follows: TABLE 6.3 TUBE SOCKET CODES A 4-pin small base, pins 1 and 4 are heater B 5-pin small base, pins 1 and 5 are heater C 6-pin small base, pins 1 and 6 are heater D Octal socket, pins 2 and 7 are heater E Octal socket, pins 7 and 8 are heater F 9-pin miniature socket, pins 4 and 5 are heater G 7-pin miniature socket, pins 3 and 4 are heater H Octal socket, unassigned at present Note that for each socket, A through G, the pins designated as heater (or filament) are hard-wired and not run-time configurable. All the other pins on each socket are connected to a switch matrix under control of the microprocessor, and can be configured to the specific tube at run-time. If you want to add a tube and it's heater pins are not compatible with one of the configurations listed above, your only option is to fabricate an adapter to test it while connected to one of the provided sockets. Normally, this simply requires re-assigning the heater pins using a tube base plug and a socket to fit the tube. Use very short wires when constructing such an adapter, or else oscillation problems may develop with high gain tubes. --------------------------------------------------------- 6.4 HEATER CODE The next field (D on Excel) contains a single, upper-case letter which denotes the heater (or filament) voltage. it also denotes whether or not a tube has a directly- heated filament, or an indirectly-heated cathode. The table below shows a list of the Heater/Cathode Codes: TABLE 6.2 HEATER-CATHODE CODES Indirectly Heated (Heater-Cathode Tubes, e.g. 6L6, 12AX7) A = 2.5V B = 3.0V C = 5.0V D = 6.3V E = 7.2V
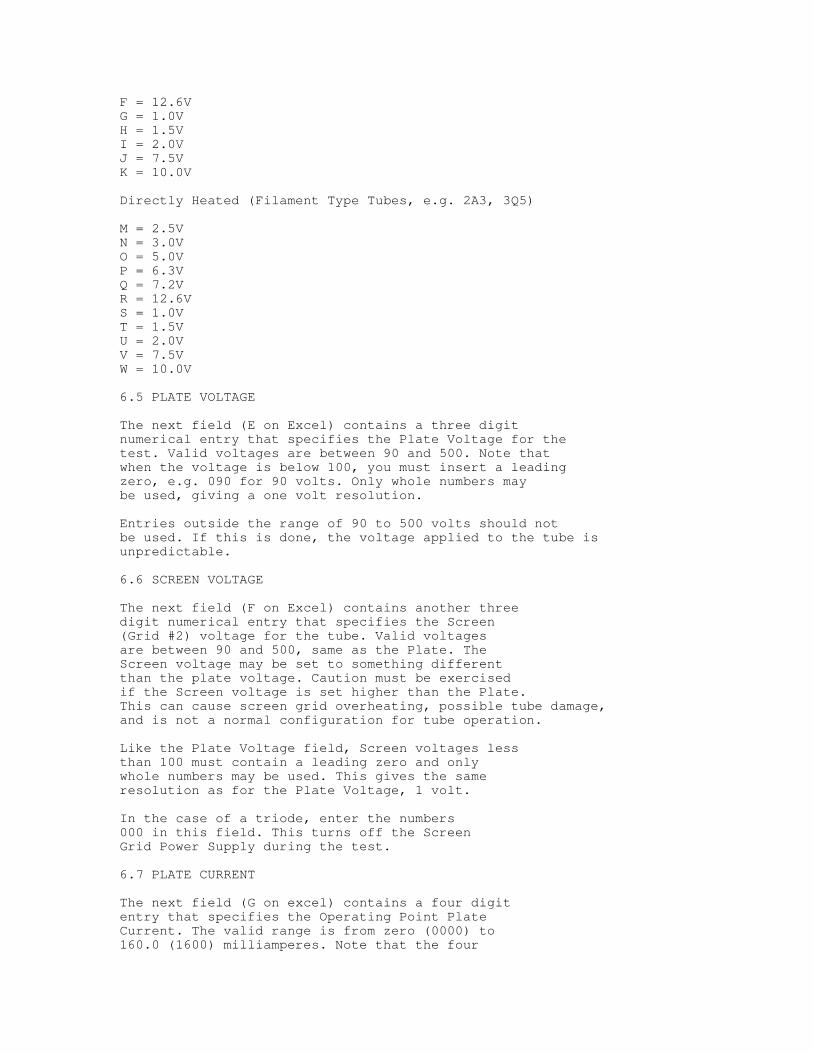
F = 12.6V G = 1.0V H = 1.5V I = 2.0V J = 7.5V K = 10.0V Directly Heated (Filament Type Tubes, e.g. 2A3, 3Q5) M = 2.5V N = 3.0V O = 5.0V P = 6.3V Q = 7.2V R = 12.6V S = 1.0V T = 1.5V U = 2.0V V = 7.5V W = 10.0V 6.5 PLATE VOLTAGE The next field (E on Excel) contains a three digit numerical entry that specifies the Plate Voltage for the test. Valid voltages are between 90 and 500. Note that when the voltage is below 100, you must insert a leading zero, e.g. 090 for 90 volts. Only whole numbers may be used, giving a one volt resolution. Entries outside the range of 90 to 500 volts should not be used. If this is done, the voltage applied to the tube is unpredictable. 6.6 SCREEN VOLTAGE The next field (F on Excel) contains another three digit numerical entry that specifies the Screen (Grid #2) voltage for the tube. Valid voltages are between 90 and 500, same as the Plate. The Screen voltage may be set to something different than the plate voltage. Caution must be exercised if the Screen voltage is set higher than the Plate. This can cause screen grid overheating, possible tube damage, and is not a normal configuration for tube operation. Like the Plate Voltage field, Screen voltages less than 100 must contain a leading zero and only whole numbers may be used. This gives the same resolution as for the Plate Voltage, 1 volt. In the case of a triode, enter the numbers 000 in this field. This turns off the Screen Grid Power Supply during the test. 6.7 PLATE CURRENT The next field (G on excel) contains a four digit entry that specifies the Operating Point Plate Current. The valid range is from zero (0000) to 160.0 (1600) milliamperes. Note that the four
digits correspond to three significant digits and one decimal place when the AT1000 runs a test. The Plate Current resolution is 0.1 mA. For example, to set plate current to 1.2 mA, enter the numbers 0012. To set plate current to 123.5 mA, enter 1235. This entry must contain four digits, and must have leading zeros if necessary. Do not use a decimal point! Do not attempt to set the Plate Current higher than 160.0 mA. Damage to the tube or to the tube tester may result. 6.8 SCREEN CURRENT The next field (H on excel) contains a three digit entry that specifies the Operating Point Screen (Grid #2) Current. The valid range is from zero (000) to 20.0 (200) milliamperes. Note that the three digits correspond to two significant digits and one decimal place when the AT1000 runs a test. The Screen Current resolution is 0.1 mA. For example, to set screen current to 10.5 mA, enter the numbers 105. To set screen current to 0.3 mA, enter 003. This entry must contain three digits, and must have leading zeros if necessary. Do not use a decimal point. Do not attempt to set the Screen Current higher than 20.0 mA. Damage to the tube or to the tube tester may result. In the case of a triode, enter the numbers 000 in this field. 6.9 GRID #1 VOLTAGE The next field (I on excel) contains a three digit entry that specifies the Operating Point Control Grid (Grid #1) Voltage. The valid range is from 0.1 (001) to 99.9 (999) volts. Note that the three digits correspond to two significant digits and one decimal place when the AT1000 runs a test. For example, to set grid #1 voltage to 14.5, enter the numbers 145. To set it to 0.5 V, enter 005. This entry must contain three digits, and must have leading zeros if necessary. Do not use a decimal point. When the AT1000 performs a test, this parameter is used for two things. First, when B+ initially comes on, the grid voltage is set to twice that of the entry, up to 150 volts. Then, in Auto Bias Mode, the unit sets the operating point beginning from there, and decrements (lowers the voltage). In Fixed Bias Mode, the G1 voltage is set to twice the entry value, up to 150 volts. Then, after B+ is applied, the grid voltage is set to the value corresponding to the entry.

This ensures that a tube never has B+ initially applied with too little negative grid bias (and therefore possibly too much plate current). 6.10 TRANSCONDUCTANCE The next field (J on excel) contains a three digit entry that specifies the expected trans- conductance value. The valid range is from 0.1 (001) to 50.0 (500) mA/V. Note that the three digits correspond to two significant digits and one decimal place when the AT1000 runs a test. For example, to set up the test to expect 11.0 mA/V (11,000 uMHOs), enter the numbers 110. For 0.5 mA/V (500 uMHOs), set it to 005. This parameter is used only as the "spec" value for transconductance in the Results Screen. The AT1000 automatically sets the transconductance preamp gain and calculates the actual transconductance during a test. 6.11 TUBE PINS CONFIGURATION The next four fields (K, L, M and N on Excel) contain numerical entries that specify the pin connections for the tube to be tested. The first three fields of these four specify which pin is connected to the Plate, Screen, and Grid #1 electrodes, respectively. Valid numbers are 0 (zero) through the highest pin number on the socket, which was specified earlier. An entry of 0 designates that there is no electrode of that type in the tube. This is most commonly used with a triode tube, which has no screen grid. Two other characters may be entered in the first three of these four pin designation fields. They are * and #. If the Grid #1 electrode is connected to a cap on top of the tube, enter the asterisk * in the Grid Pin Field. If the Plate is connected to a cap on the tube, enter the number symbol # in the Plate Pin Field. The last one of these four Pin Identification fields contains a three digit sequence. This field must always contain three digits. These three digits specify, individually, any pins on the tube that should be connected to Ground. Normally, the cathode of a tube is connected to ground, so the cathode pin number is frequently the first digit of the three digit sequence. In the case of a Pentode tube, sometimes the Suppressor Grid is brought out to a separate pin
instead of being internally connected to the cathode. A good example is the 6CA7/EL34 pentode. In this case, make the pin number that the suppressor grid is connected to the second digit of this three digit sequence. If there is any other pin that should be connected to ground, place that pin number in the third digit position. One example is the octal, metal shell tubes. Usually, Pin 1 is connected to the metal shell (check the data sheet for the tube). So, a 1 should be placed in one of these three digit positions to ensure that the metal envelope is grounded. Make sure to do this with tubes that come in either glass or metal envelopes, like the 6L6 and the 12SQ7. WARNING: NEVER ACCIDENTALLY ASSIGN A METAL SHELL TUBE'S GROUND PIN TO ANYTHING EXCEPT GROUND. DOING SO CREATES AN EXTREME SHOCK AND ELECTROCUTION HAZARD. WHEN WORKING WITH METAL TUBES, ADDING TO OR ALTERING AN EXISTING TEST, ALWAYS DOUBLE CHECK THAT THE METAL SHELL CONNECTION PIN IS SPECIFIED TO BE CONNECTED TO GROUND ONLY. In the case of a Directly Heated tube, such as the 300B, DO NOT connect one of the filament pins (1 and 4, on the 300B) to ground. The AT1000 automatically grounds one side of the filament when testing directly-heated (filament) tubes. It knows whether or not the tube is a directly heated type from the code you entered in Section 6.2, above If no pins need to be connected to ground, such as with the 300B, enter 000 in this field. Remember, there must always be three digits here. If only the cathode needs to be connected to ground, enter zeros for the remaining two digits. 6.12 SECTION IDENTIFICATION FIELD The final field (O on Excel) contains a single digit between 1 and 4. This digit tells the AT1000 information about which section in the tube the line applies to. If the digit is a 1, it is the last, or the only, section inside the tube envelope. If the digit is 2, this is the second section in the tube. 3 and 4 designate the third and fourth sections contained within the same envelope. In the case of tubes with multiple sections, the test for each section takes up one line (called a record) in the test data file. These lines (or records) are always located one above the other. The first field of the lines that comprise the tests for the sections of a multi-section tube is always the same, as it is the Tube Type Number (e.g. 12AX7). With multiple section tubes, several other fields are often duplicated as well. For example, with a 6T8, the Heater Code and the Socket Code is identical for each of the four sections. This is because the tube remains in the same socket, and all the sections share a common heater.
The Section Identification Field must decrement, with each successive section, on each successive line (record). The final section of a multiple section tube is last, and its Section Identification Field is always 1. Tubes with only one section like the 6V6 and 2A3 always have only one line of test data (one record) and always have a Section Identification Field entry of 1. There are several dual-section identical triodes, like the 12AX7, 12BH7, ECC81, etc. These tubes have two lines of test data, and you might notice that all the data except the Pin Identification and the Section Identification Fields are identical. 6.13 THE DIODE TEST Examine one of the two records in the Test Data File for the dual diode tube, 6AL5. After the initial four fields specifying tube number, type, heater and socket, note that all of the plate, screen and control grid voltage and current fields are all filled with zeros. Ditto for the transconductance field. Following that, you will see that the only Pin Identification Fields that do not have zeros are the plate and cathode pins for that section. The Screen and Grid #1 fields have zeros, also. This is the correct way to configure a diode tube section for testing. Simply use the 6AL5 as a template and change the plate and cathode pins to suit your tube. 6.14 THE ELECTRON RAY INDICATOR TEST Refer to the test records for the 6E5 tube. Note that there are two sections in this tube, the display section and the triode DC amplifier. The first section tested is the display section, and it has a type code of U. When setting up to test an electron ray tube's display section, pay particular attention to the fields, as some of them have a re-assigned meaning. The Plate Voltage field becomes the Target Voltage Field. Use the recommended typical target voltage in the tube data sheet for this parameter. The Screen Voltage field becomes the Shadow Control Electrode Maximum Voltage. Normally, it should be set to the same value as the Target Voltage. During test, the AT1000 ramps the Ray Control electrode between zero and this voltage. This will normally cause the Indicator Tube’s shadow to traverse its entire range. The Plate Current Field becomes the Target Current parameter. Enter the expected peak target current here. The Screen Current and the Transconductance fields are filled with zeros. The Grid Voltage field still functions as the Grid Voltage setting for the DC amplifier triode section during the Indicator Section Test. Because the AT1000 will be driving the ray control electrode directly (with its screen voltage supply) it is desirable to bias the triode section completely off. 30 or 40 volts is generally sufficient to accomplish this task. When configuring the pins for the Display Section, enter the Target Pin number in the Plate Pin field. Enter the Ray Control Electrode Pin number in the Screen Pin field. Enter the triode
section's grid pin number in the Grid Pin field. Then enter the cathode pin as one of the ground pins in the Ground Pins field. If the tube has it's ray control electrode internally connected to the plate of its triode, use this pin as the Ray Control Pin. If the tube brings the Ray Control Electrode and the triode plate out on separate pins, leave the triode plate unconnected for the Indicator Test. After configuring a test for an Electron Ray Indicator Display Section, test it and observe the results. You may find that a slight adjustment of the Ray Control Maximum Voltage produces a better display. When setting up to test the triode section of an electron ray indicator, set things up like you would for a normal triode. Leave the Target Electrode Pin unconnected. If the Ray Control Electrode is connected internally to the triode plate, use this pin as the triode plate. If the Ray Control Electrode and the triode plate are brought out on separate pins, leave the Ray Control Electrode Pin unconnected. The transconductance for the triode section of Electron Ray Tubes is rarely mentioned in the data sheet. Normally, these triodes have very low transconductance, and any transconductance at all probably indicates a triode with satisfactory performance. More important is the ability to establish the Operating Point at an acceptable minimum grid voltage. This indicates sufficient emission, and function can be asumned to be normal. Use the value of plate voltage and the series resistor recommendations from the tube's data sheet to determine what plate current to use for the Operating Point. Assume that half of the supply voltage is being dropped across the resistor, and then figure the plate current. Use this value for the Plate Current in the triode section test. Successfully adding an electron ray indicator tube may require some trial and error to optimize the test. The EMM801 is a rare, dual indicator similar to an EM84. It was used as a level indicator in stereo tape recorders. This tube has an additional grid which appears to be intended as a brightness control. However, this "extra" grid also affects the operation of the triode DC amplifier sections. This grid must be connected to ground when the DC amplifier triode sections are being tested to obtain a repeatable plate current. Dealing with these extra electrodes in Electron Ray tubes can be a challenge. The manufacturer's data sheets, even when available, often do not describe the extra electrodes enough to design them into a test. 6.15 PREPARING THE TEST DATA FILE FOR UPLOADING As mentioned at the beginning of this section, the Test Data File can be edited either in .XLS format, using Microsoft Excel, or, it can be edited with a text editor program in its Comma Delimited format, .CSV. You will probably want to insert any new tubes you add into the list while maintaining the alphanumeric format. The AT1000 lists tubes in the order they appear in the Test Data File. There is an alphabetizing function built into Excel, but you must make sure that it uses only the first field (cell) of each line as the determining factor. You must also ensure that the following fields do not get mixed up during the process. However, even if successful, the alphabetizing that Excel performs automatically may not order the
tube types in the most desirable sequence. It is often much easier to just add a new tube in the correct place by using the INSERT ROW function. When directly editing the .CSV file with a text editor, just place the cursor at the far left on the line below where you want to add a new line, and press ENTER on the keyboard. A blank line will then appear. No matter which format was used, the last character on the last line (record) in the file must be the Exclamation Point, ! This is necessary because it tells the the AT1000 that the End of File was reached. By examining the file, in either format, you can see how and where the exclamation point was placed. In Excel, place it inside the last cell in the last record, to the right of the number that is the Section Identifier. When using a text editor on the .CSV file directly, place it the same way, making it the last character in the file. Do not place it in its own cell in Excel, and do not add a comma between the last character and the exclamation point in the .CSV file. If you have used Notepad or another text editor to work on the .CSV file, saving it with the same file extension is all you have to do. If you have edited the file with Excel, you must do a SAVE AS, and save it as a Comma Delimited File with a filename extension of .CSV. 7.0 UPLOADING THE TEST DATA FILE To upload a new or modified Data File to the AT1000, proceed as follows: a) Make sure the Comma Delimited File, TUBEDATA.CSV, is located in the same directory as the TUBEDATAUPLOADER.EXE file is located. b) Connect a male-to-female, pin-for-pin wired, RS232 Serial Cable between the connector labeled "RS232 SERIAL" on the AT1000 and an available serial port on your computer. c) Start the program, TUBEDATAUPLOADER.EXE, on the computer. You can just double-click the filename in Windows Explorer, or create a shortcut on the desktop to start it. d) Switch ON the AT1000 while at the same time holding down the [<] (Left Arrow) key. Wait until the Title/Version Splash Screen displays, and then disappears (screen goes blank). Now release the [<] key. e) The System Menu is then displayed. Use the left or right arrow keys to scroll until “Upload New Tube Data Table” is shown. Then press ENTER. f) Next, a warning screen is displayed. If you choose to proceed, the flash EEPROM in the AT1000 will be erased. Press the [ENTER] key, and a second warning, "Are you sure???" is displayed. Press [ENTER] again, and the words "begin upload now" are displayed. g) On the computer, click the "PORT" drop down-menu item. Then left-click the number of the COM port that you connected the serial cable to in Step b, above. h) Click the "Start Upload" button. The process is completely automatic. Approximately 23 blocks of data will be uploaded. The
messages, “receiving data” and "writing to EEPROM" are alternately displayed on the LCD screen. When all of the blocks have uploaded, the AT1000 LCD display will briefly show the message "done", and then it will reboot. The Status Box in the Uploader software will display "Finished". i) You can now unplug the serial cable and close the Uploader program by clicking "Exit" or the X in upper right hand corner of the Uploader program window. 8.0 THE SYSTEM MENUS The AT1000 provides several different System Menus. These menus are used to select various operating options for the unit. Some of the settings that you can change are stored in non-volatile EEPROM memory, so that the settings are remembered when the unit is disconnected from a source of power. 8.1 ENTERING THE TOP SYSTEM MENU To enter the first (top) System Menu, proceed as follows: 1) Switch OFF the AT1000. Wait at least 10 seconds. 2) Hold down the left arrow [<] key, and while holding it, switch the power switch ON. Continue to hold the left arrow key until the copyright screen disappears. Then release the left arrow key. The top level System Menu is displayed. 8.2 SELECTING A SYSTEM SUB-MENU Use the left and right arrow keys [<] and [>] to scroll through the different selections. The various System sub menus and selections are as follows: Computer Control Mode Change Biasing Mode Upload New Tube Data Firmware Upgrade (BootLoader) Change Test Duration Return to Tube Testing When the desired sub menu or function is displayed, press [ENTER] to select it. Two of the selections, Change Biasing Mode and Change Test Duration, will subsequently lead to sub menus where additional options are available to select. The other selections will cause the unit to enter the displayed mode immediately when ENTER is pressed. 8.3 COMPUTER CONTROL MODE When “Computer Control Mode” is displayed at the top System Menu, and ENTER is pressed, the unit immediately goes into the Remote Control Mode. From this point on, it responds primarily to commands over the RS232 serial port. 8.4 CHANGE BIASING MODE When “Change Biasing Mode” is displayed, and the ENTER key is pressed, a sub menu is displayed. Using the scroll keys, [<] and [>], make a
selection of either Fixed Bias or Auto Bias. When the desired selection is displayed, press ENTER to select it. The unit then returns to the top System Menu. 8.5 UPLOAD NEW TUBE DATA When “Upload New Tube Data” is displayed, and then ENTER is pressed, the unit prepares for the upload of a new tube data file. Refer to Section 7.0 for further information. 8.6 FIRMWARE UPGRADE When “Firmware Upgrade (BootLoader)” is displayed, pressing ENTER caused the unit to enter the Firmware Upgrade Mode. See the separate instructions on the BootLoader for information on how to use it. 8.7 CHANGE TEST DURATION When “Change Test Duration” is displayed, and the ENTER key is pressed, a sub menu is displayed. Using the scroll keys, [<] and [>], make a selection of either Timed (automatic) or Continuous (manual). When the desired selection is displayed, press ENTER to select it. The unit then returns to the top System Menu. 8.8 RETURN TO TUBE TESTING When “Return to Tube Testing” is displayed, pressing ENTER causes the unit to return to stand-alone tube testing operation. This is normally the way that the System Menus are exited after changing either the Biasing Mode or the Test Duration. 9.0 USING THE TUBE TESTING AND CURVE PLOTTING SOFTWARE TubeTest© is the test and curve plotting software which runs on a personal computer and allows extensive tube testing and curve plotting functions. Results can be saved and retrieved, and printed. Test setups can also be saved and recalled. In addition to the heater/cathode leakage, emission, transconductance and gas tests which the AT1000 performs in “stand-alone” mode, the software is able to provide even more information. A user can also obtain plate resistance and Mu, and grid leakage is directly displayed down to .01 uA. Please refer to the separate documentation to install, configure and use TubeTest© with the AT1000. 9.0 BIASING AND TESTING MODES Firmware Version 2.0 and later now offer two different Bias Modes and two different Test Modes. This section will explain these. These two modes of operation are selected from the System Menu. See section 8.0 for instructions on how to use the System Menu and sub menus to change these mode settings. Note that after the Biasing and Testing Modes have been changed, the unit remembers which mode(s) it’s set to, even if AC line power is disconnected. 9.1 BIASING MODES There are two modes of bias adjustment that the AT1000 can use. These are called Auto Bias and Fixed Bias.
The difference between these modes is reflected in what happens after B+ is applied to the tube, but before the Transconductance Test is run. In Auto Bias Mode, the microcontroller inside the AT1000 adjusts the grid bias voltage so that the specified plate current is achieved in the tube. Then it will continue to test Transconductance. When the unit is set to Fixed Bias Mode, however, it operates differently. B+ is applied to the tube and then a fixed bias voltage is applied to the grid. This fixed voltage is obtained from the stored tube test settings, or in the case of remote-controlled testing, it is obtained from settings in the TubeTest© software. In Auto Bias Mode, the bias voltage is adjusted to whatever is necessary to achieve rated plate current. If the emission in the tube is less than “normal” for the type of tube, the grid voltage may end up being somewhat lower than the specification G1 voltage. However, the plate current will be close to specification, and the Transconductance Test is more likely under these circumstances to produce a near-normal reading. If the emission is very low in a tube tested under Auto Bias, the bias voltage might be reduced to zero and rated plate current is never achieved. In Fixed Bias Mode, the bias voltage is set to that indicated by the specification. Plate current will end up being whatever happens to result at this fixed grid voltage. With a weak tube tested under Fixed Bias Mode, the plate current will likely be less than the specified plate current. This will often also be accompanied by a reduced transconductance measurement. 9.2 WHICH BIASING MODE TO USE? This is often a preference of the user. Many application circuits operate using what is often called “auto bias”. In such a circuit, there is a resistance in series with the cathode and ground, and also a resistance that holds the grid at a fixed (usually ground) potential. In such a circuit, the tube bias is somewhat self-adjusting, because as the plate current changes it causes a change in the voltage drop across the cathode resistor. This voltage drop subsequently forms all or at least part of the grid voltage. In a self-controlling feedback loop this formed, a tube will tend to adjust its grid voltage (and subsequently its plate current) should the tube or circuit begin to drift. Other applications, often the power output stage of an audio amplifier, will use “fixed bias”. Often, there is a potentiometer available to actually change this “fixed” bias. Nevertheless, it is still called fixed bias. In such a circuit, drift or aging of the tube will not be compensated for, and the tube’s performance will vary. The AT1000 now offers both means of testing, so as to more faithfully reproduce an actual application circuit and test any particular tube using a similar biasing scheme to what it sees in the actual application. Most vintage tube testers test tubes by using fixed bias. So, if you are trying to compare test results between the AT1000 and other testers, it would be a good idea to choose fixed bias while doing so. The choice between Auto or Fixed Bias also interchanges what you should
look for when evaluating emission test results. In Auto Bias, a good tube will end up with a higher grid voltage than a bad one, even though both might show the same plate current, and even transconductance. In Fixed Bias, a good tube will show a higher plate current than a weak one. Auto Bias: Look at Grid Voltage Result Fixed Bias: Look at Plate Current Result 9.3 TESTING MODES There are two modes of testing now available (with firmware version 2.0 and later). One (the original) mode is called Timed Mode. In Timed Mode, the microcontroller inside the AT1000 performs each test quickly, and runs for a fixed and pre-determined time interval. In Manual, or Continuous Mode, the user has control over how long the tube is run with B+ applied and biased normally, before transconductance testing is started. In this mode the user also has control over how long the transconductance testing itself runs. 9.4 TIMED TEST MODE In Timed Mode, the user only needs to insert a tube into the proper socket and press ENTER. Then the unit does the following:
1) Heater warms up for 60 seconds (cathode type) or 15 seconds (directly-heated type).
2) B+ is applied and then either Fixed or Auto Bias is used to obtain
current flow in the tube.
3) The Transconductance test starts and runs for eight seconds, during which 10 measurements of transconductance are performed, the results are added, and then divided by 10 so as to produce an average.
4) The Gas Test runs.
5) B+ is switched off and the Results Screen is displayed.
9.5 MANUAL TEST MODE In Manual (Continuous) Mode, the user needs to intervene in the test process, by watching the tests proceed, and manually deciding when to advance to the next test using the ENTER key. In Manual Mode, the unit does the following after a tube is inserted into the socket and ENTER is initially pressed:
1) The Heater is warmed up in the same manner as for Timed Mode.
2) B+ is applied and then either Fixed or Auto Bias is used to obtain current flow in the tube.
3) The unit prompts the user to press ENTER when ready. As long as
the user does not press ENTER, plate current (and G2, is so equipped) is actively measured and displayed. This continues indefinitely until ENTER is pressed. This allows the user to wait for a tube to stabilize in plate current before continuing. CAUTION: PROLONGED RUNNING OF A POWER TUBE MAY
CAUSE THE UNIT TO OVERHEAT AND SHUT DOWN.
4) When ready, the user presses ENTER. The Transconductance Test starts, and for a few seconds the statement “Please Wait” is displayed. Following this, another prompt to press ENTER when ready is shown. This allows the user to again for an unstable or drifting reading to stabilize before continuing. As before, the unit will wait indefinitely for the user to press the ENTER key to continues. CAUTION: PROLONGED RUNNING OF A POWER TUBE MAY CAUSE THE UNIT TO OVERHEAT AND SHUT DOWN.
5) The Gas Test runs.
6) B+ is switched off and the Results Screen is displayed.
In the Manual Test Mode, the plate current value is captured just as the user presses ENTER to move to the Transconductance Test. And then, the Transconductance value is captured just when the user presses ENTER to continue to the Gas Test. The most recent set of 10 measurement iterations is then used to determine the average transconductance value.