Embed Size (px)
Citation preview
User guide.
2
E12273First EditionJuly 2017
COPYRIGHT INFORMATION
No part of this manual, including the products and software described in it, may be reproduced, transmitted, transcribed, stored in a retrieval system, or translated into any language in any form or by any means, except documentation kept by the purchaser for backup purposes, without the express written permission of ASUSTeK COMPUTER INC. (“ASUS”).
ASUS PROVIDES THIS MANUAL “AS IS” WITHOUT WARRANTY OF ANY KIND, EITHER EXPRESS OR IMPLIED, INCLUDING BUT NOT LIMITED TO THE IMPLIED WARRANTIES OR CONDITIONS OF MERCHANTABILITY OR FITNESS FOR A PARTICULAR PURPOSE. IN NO EVENT SHALL ASUS, ITS DIRECTORS, OFFICERS, EMPLOYEES OR AGENTS BE LIABLE FOR ANY INDIRECT, SPECIAL, INCIDENTAL, OR CONSEQUENTIAL DAMAGES (INCLUDING DAMAGES FOR LOSS OF PROFITS, LOSS OF BUSINESS, LOSS OF USE OR DATA, INTERRUPTION OF BUSINESS AND THE LIKE), EVEN IF ASUS HAS BEEN ADVISED OF THE POSSIBILITY OF SUCH DAMAGES ARISING FROM ANY DEFECT OR ERROR IN THIS MANUAL OR PRODUCT.
Products and corporate names appearing in this manual may or may not be registered trademarks or copyrights of their respective companies, and are used only for identification or explanation and to the owners’ benefit, without intent to infringe.
SPECIFICATIONS AND INFORMATION CONTAINED IN THIS MANUAL ARE FURNISHED FOR INFORMATIONAL USE ONLY, AND ARE SUBJECT TO CHANGE AT ANY TIME WITHOUT NOTICE, AND SHOULD NOT BE CONSTRUED AS A COMMITMENT BY ASUS. ASUS ASSUMES NO RESPONSIBILITY OR LIABILITY FOR ANY ERRORS OR INACCURACIES THAT MAY APPEAR IN THIS MANUAL, INCLUDING THE PRODUCTS AND SOFTWARE DESCRIBED IN IT.
Copyright © 2017 ASUSTeK COMPUTER INC. All Rights Reserved.
LIMITATION OF LIABILITY
Circumstances may arise where because of a default on ASUS’ part or other liability, you are entitled to recover damages from ASUS. In each such instance, regardless of the basis on which you are entitled to claim damages from ASUS, ASUS is liable for no more than damages for bodily injury (including death) and damage to real property and tangible personal property; or any other actual and direct damages resulted from omission or failure of performing legal duties under this Warranty Statement, up to the listed contract price of each product.
ASUS will only be responsible for or indemnify you for loss, damages or claims based in contract, tort or infringement under this Warranty Statement.
This limit also applies to ASUS’ suppliers and its reseller. It is the maximum for which ASUS, its suppliers, and your reseller are collectively responsible.
UNDER NO CIRCUMSTANCES IS ASUS LIABLE FOR ANY OF THE FOLLOWING: (1) THIRD-PARTY CLAIMS AGAINST YOU FOR DAMAGES; (2) LOSS OF, OR DAMAGE TO, YOUR RECORDS OR DATA; OR (3) SPECIAL, INCIDENTAL, OR INDIRECT DAMAGES OR FOR ANY ECONOMIC CONSEQUENTIAL DAMAGES (INCLUDING LOST PROFITS OR SAVINGS), EVEN IF ASUS, ITS SUPPLIERS OR YOUR RESELLER IS INFORMED OF THEIR POSSIBILITY.
SERVICE AND SUPPORT
Visit our multi-language website at: https://www.asus.com/support/
3
Contents
Conventions used ................................................................................................................................. 6 Care and safety....................................................................................................................................... 6
1 Get your Zen ready! Parts and features......................................................................................................... 8
Installing a memory card.................................................................................................................... 9 Removing a memory card................................................................................................................10 Installing a nano SIM card ................................................................................................................11 Removing a nano SIM card ..............................................................................................................12 Charging your ASUS Tablet..............................................................................................................13
Turning your ASUS Tablet on or off...............................................................................................16 Starting for the first time ...........................................................................................17
Google Account ...................................................................................................................................17 Using the touchscreen................................................................................................18
Launching apps or selecting items...............................................................................................18 Moving through pages or screens ................................................................................................18
Zooming in ............................................................................................................................................19 Zooming out .........................................................................................................................................19
ZenMotion .............................................................................................................................................20
2 There’s no place like Home Zen Home features .....................................................................................................21
Home screen .........................................................................................................................................21 Personalizing your Home screen...............................................................................23
App shortcuts and widgets..............................................................................................................23 Wallpapers .............................................................................................................................................24
Quick settings .......................................................................................................................................26 Setting up the date and time..........................................................................................................27
Setting up your ringtone and alert sounds................................................................................27 System notifications ...........................................................................................................................28
Weather and time .......................................................................................................29 Weather...................................................................................................................................................29
Clock.........................................................................................................................................................31 World Clock............................................................................................................................................31 Alarm clock ............................................................................................................................................32
Stopwatch ..............................................................................................................................................32 Timer ........................................................................................................................................................33
Lock Screen .................................................................................................................34 Customizing your lock screen.........................................................................................................34
Customizing the quick access buttons........................................................................................35
4
3 Keeping in touchManaging contacts .....................................................................................................39
Launching the Contacts app ...........................................................................................................39Contacts Settings ................................................................................................................................39Setting up your profile ......................................................................................................................39Adding contacts ...................................................................................................................................40Marking your favorite contacts ......................................................................................................44Importing contacts .............................................................................................................................45Exporting contacts ..............................................................................................................................45Social networking with your contacts .........................................................................................46Linking your contacts’ info ...............................................................................................................47
4 Your precious momentsCapture moments .......................................................................................................48
Launching the Camera app .............................................................................................................48Camera home screen .........................................................................................................................49Photo Locations ...................................................................................................................................49Camera settings ...................................................................................................................................50Video settings .......................................................................................................................................50Others settings .....................................................................................................................................50Advanced camera features ..............................................................................................................51
Using the Photos app .................................................................................................57Viewing files from your social network or cloud storage ......................................................57Viewing the photo location .............................................................................................................58Sharing files from the Photos ..........................................................................................................59Deleting files from the Photos ........................................................................................................59Editing images ......................................................................................................................................59
5 Work hard, play harderBrowser ........................................................................................................................60
Launching the Chrome app .............................................................................................................60Adding a new tab ................................................................................................................................60Bookmarking pages ...........................................................................................................................60Clearing the browser cache .............................................................................................................61
Email ............................................................................................................................61Setting up email accounts................................................................................................................61Adding email accounts ......................................................................................................................62Setting up a Gmail account .............................................................................................................62
Do It Later ....................................................................................................................63Adding to-do tasks .............................................................................................................................63Prioritizing to-do tasks ......................................................................................................................63Deleting to-do tasks ...........................................................................................................................63
File Manager................................................................................................................64Accessing the internal storage .......................................................................................................64Accessing the external storage device ........................................................................................64Accessing Cloud storage ...................................................................................................................64

5
6 Staying connectedWi-Fi .............................................................................................................................65
Enabling Wi-Fi .......................................................................................................................................65Connecting to a Wi-Fi network .......................................................................................................65Disabling Wi-Fi ......................................................................................................................................66
Bluetooth® ...................................................................................................................66Enabling Bluetooth® ...........................................................................................................................66Pairing your ASUS Tablet to a Bluetooth device .......................................................................67Unpairing your ASUS Tablet from the Bluetooth device .......................................................67
Airplane mode ............................................................................................................68Enabling Airplane mode ...................................................................................................................68Disabling Airplane mode ..................................................................................................................68
Mobile Hotspot and Tethering ...................................................................................69USB Tethering .......................................................................................................................................69Mobile Hotspot ....................................................................................................................................70Bluetooth Tethering ............................................................................................................................71
PlayTo ...........................................................................................................................72Launching PlayTo.................................................................................................................................72
7 Maintain your ZenKeeping your device up-to-date ................................................................................73
Updating your system .......................................................................................................................73Storage ....................................................................................................................................................73Backup and reset .................................................................................................................................73Securing your ASUS Tablet ...............................................................................................................74
Power Saver .................................................................................................................78Setting up Power Saver .....................................................................................................................78Customizing Power Saver .................................................................................................................78
6
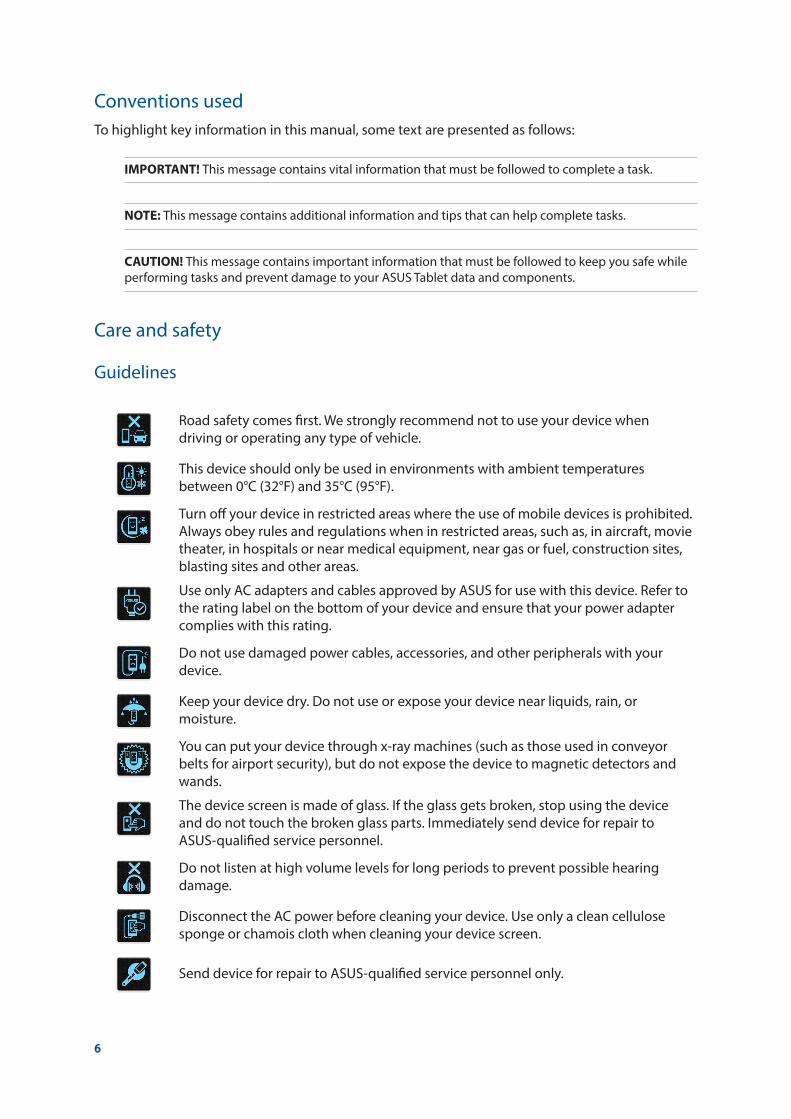
Conventions used To highlight key information in this manual, some text are presented as follows:
IMPORTANT! This message contains vital information that must be followed to complete a task.
NOTE: This message contains additional information and tips that can help complete tasks.
CAUTION! This message contains important information that must be followed to keep you safe while performing tasks and prevent damage to your ASUS Tablet data and components.
Care and safety
Guidelines
Road safety comes first. We strongly recommend not to use your device when driving or operating any type of vehicle.
This device should only be used in environments with ambient temperatures between 0°C (32°F) and 35°C (95°F).
Turn off your device in restricted areas where the use of mobile devices is prohibited. Always obey rules and regulations when in restricted areas, such as, in aircraft, movie theater, in hospitals or near medical equipment, near gas or fuel, construction sites, blasting sites and other areas.
Use only AC adapters and cables approved by ASUS for use with this device. Refer to the rating label on the bottom of your device and ensure that your power adapter complies with this rating.
Do not use damaged power cables, accessories, and other peripherals with your device.
Keep your device dry. Do not use or expose your device near liquids, rain, or moisture.
You can put your device through x-ray machines (such as those used in conveyor belts for airport security), but do not expose the device to magnetic detectors and wands.
The device screen is made of glass. If the glass gets broken, stop using the device and do not touch the broken glass parts. Immediately send device for repair to ASUS-qualified service personnel.
Do not listen at high volume levels for long periods to prevent possible hearing damage.
Disconnect the AC power before cleaning your device. Use only a clean cellulose sponge or chamois cloth when cleaning your device screen.
Send device for repair to ASUS-qualified service personnel only.
7
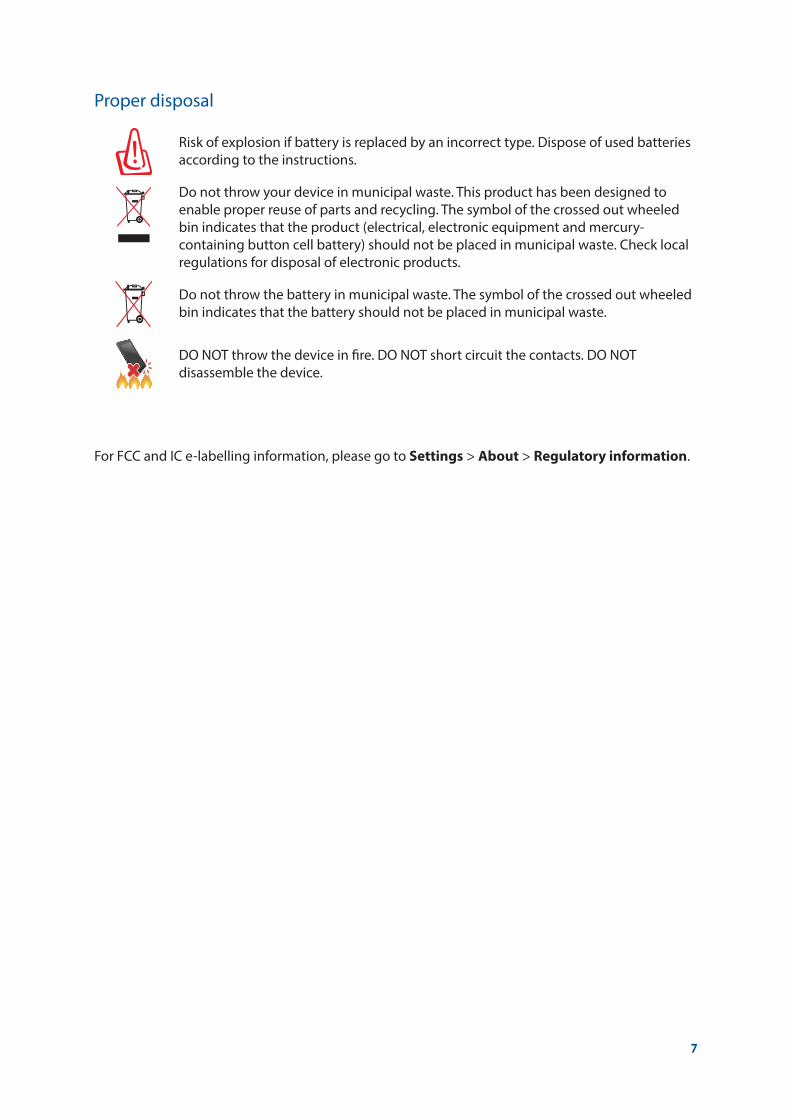
Proper disposal
Risk of explosion if battery is replaced by an incorrect type. Dispose of used batteries according to the instructions.
Do not throw your device in municipal waste. This product has been designed to enable proper reuse of parts and recycling. The symbol of the crossed out wheeled bin indicates that the product (electrical, electronic equipment and mercury-containing button cell battery) should not be placed in municipal waste. Check local regulations for disposal of electronic products.
Do not throw the battery in municipal waste. The symbol of the crossed out wheeled bin indicates that the battery should not be placed in municipal waste.
DO NOT throw the device in fire. DO NOT short circuit the contacts. DO NOT disassemble the device.
For FCC and IC e-labelling information, please go to Settings > About > Regulatory information.
Chapter 1: Get your Zen ready! 8
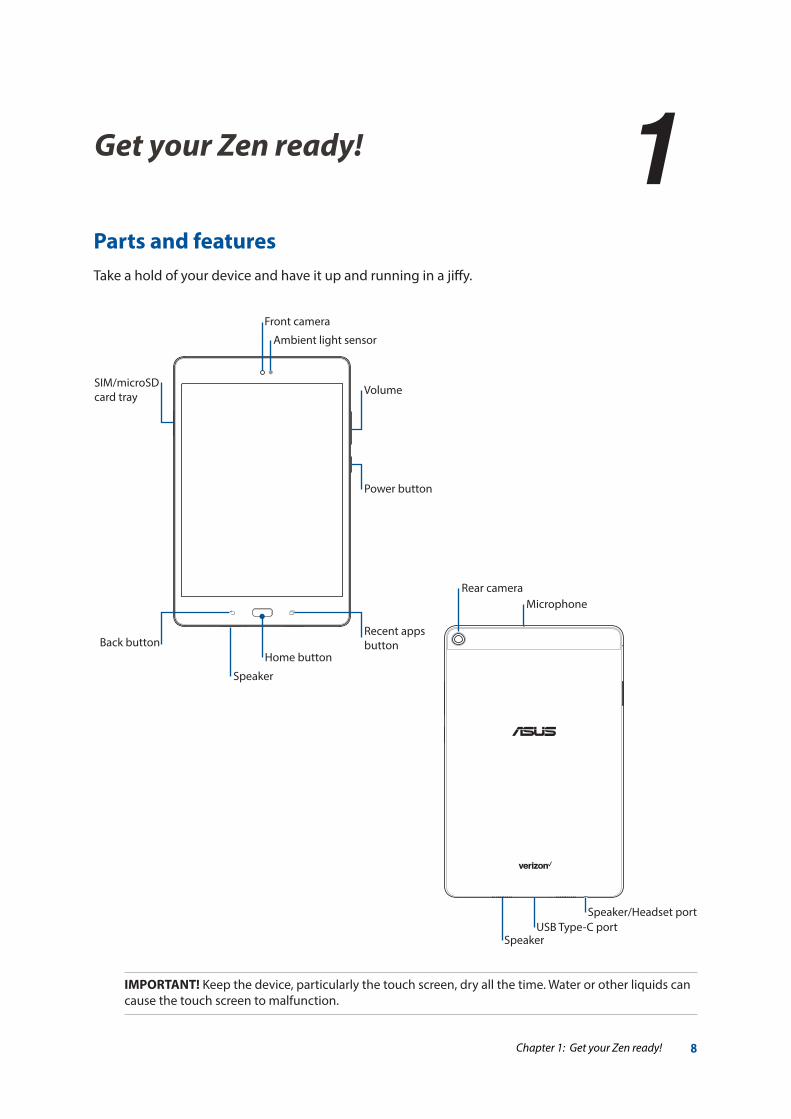
1Get your Zen ready!
Parts and featuresTake a hold of your device and have it up and running in a jiffy.
IMPORTANT! Keep the device, particularly the touch screen, dry all the time. Water or other liquids can cause the touch screen to malfunction.
1 Get your Zen ready!
Front camera
Ambient light sensor
SIM/microSD card tray
Rear camera
Volume
Power button
USB Type-C port
Speaker
Microphone
Speaker
Home button
Recent apps buttonBack button
Speaker/Headset port
Chapter 1: Get your Zen ready! 9
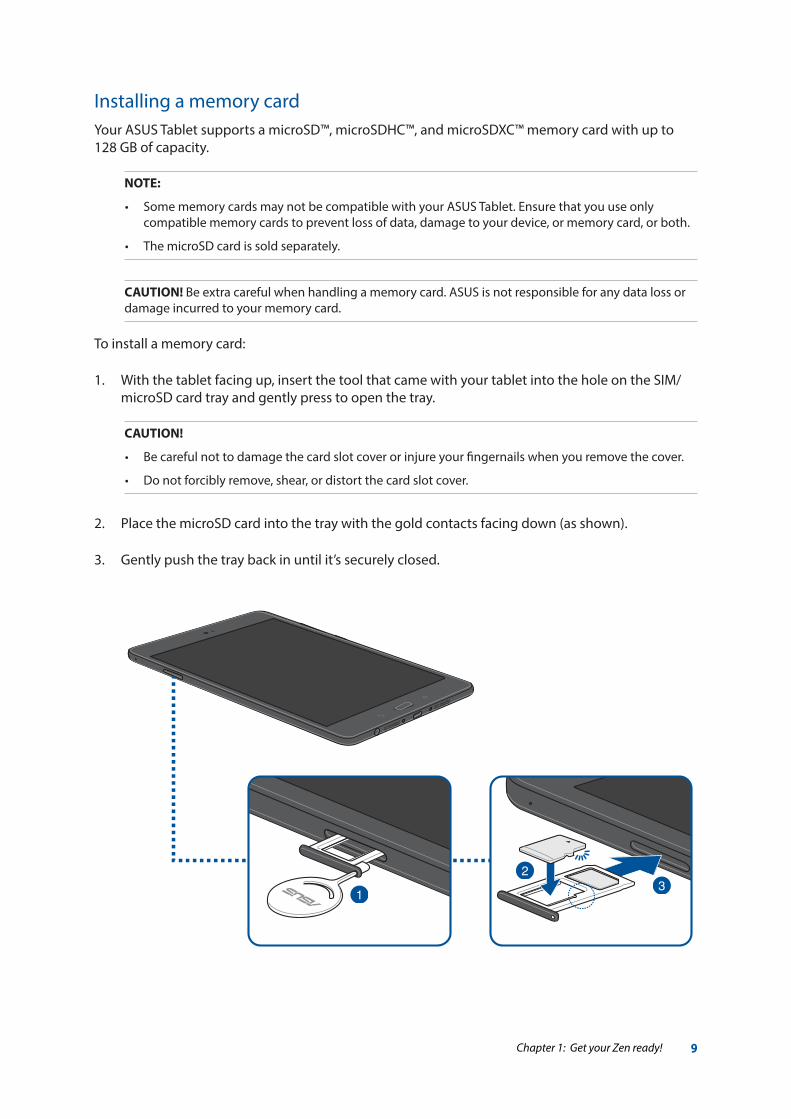
Installing a memory cardYour ASUS Tablet supports a microSD™, microSDHC™, and microSDXC™ memory card with up to 128 GB of capacity.
NOTE:
• SomememorycardsmaynotbecompatiblewithyourASUSTablet.Ensurethatyouuseonlycompatible memory cards to prevent loss of data, damage to your device, or memory card, or both.
• ThemicroSDcardissoldseparately.
CAUTION! Be extra careful when handling a memory card. ASUS is not responsible for any data loss or damage incurred to your memory card.
To install a memory card:
1. With the tablet facing up, insert the tool that came with your tablet into the hole on the SIM/microSD card tray and gently press to open the tray.
CAUTION!
• Becarefulnottodamagethecardslotcoverorinjureyourfingernailswhenyouremovethecover.
• Donotforciblyremove,shear,ordistortthecardslotcover.
2. Place the microSD card into the tray with the gold contacts facing down (as shown).
3. Gently push the tray back in until it’s securely closed.
Chapter 1: Get your Zen ready! 10
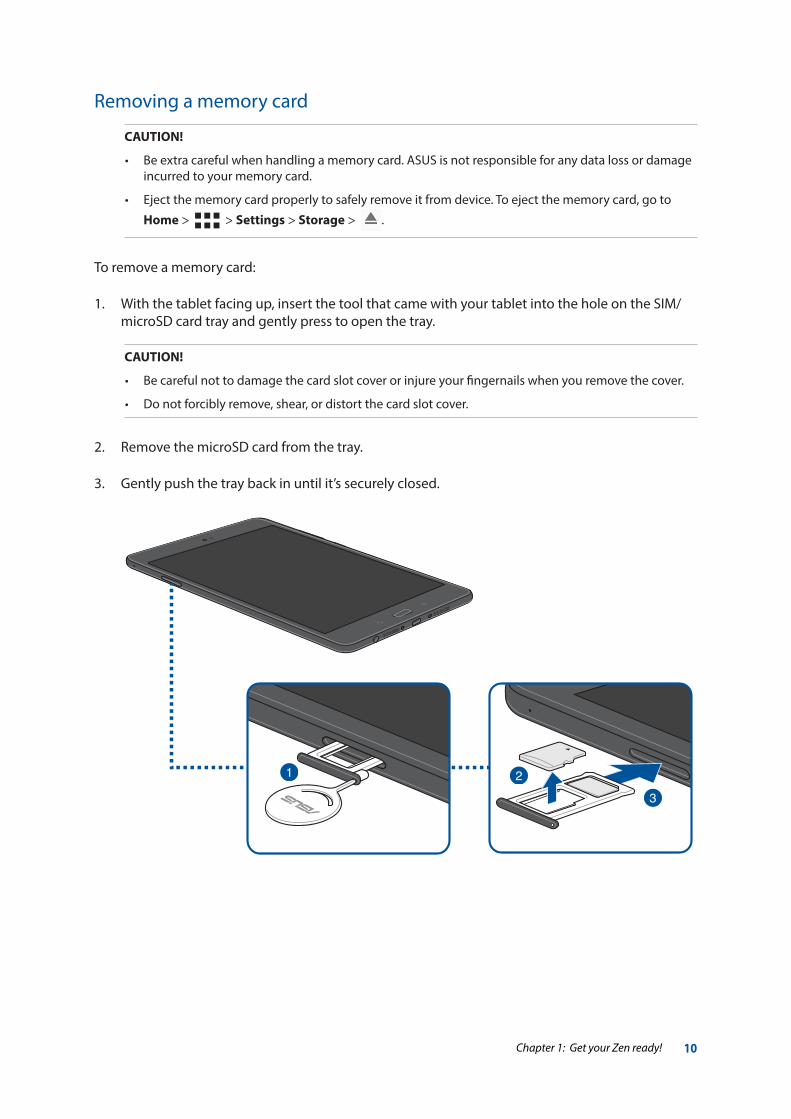
Removing a memory card
CAUTION!
• Beextracarefulwhenhandlingamemorycard.ASUSisnotresponsibleforanydatalossordamageincurred to your memory card.
• Ejectthememorycardproperlytosafelyremoveitfromdevice.Toejectthememorycard,goto
Home > > Settings > Storage > .
To remove a memory card:
1. With the tablet facing up, insert the tool that came with your tablet into the hole on the SIM/microSD card tray and gently press to open the tray.
CAUTION!
• Becarefulnottodamagethecardslotcoverorinjureyourfingernailswhenyouremovethecover.
• Donotforciblyremove,shear,ordistortthecardslotcover.
2. Remove the microSD card from the tray.
3. Gently push the tray back in until it’s securely closed.
Chapter 1: Get your Zen ready! 11
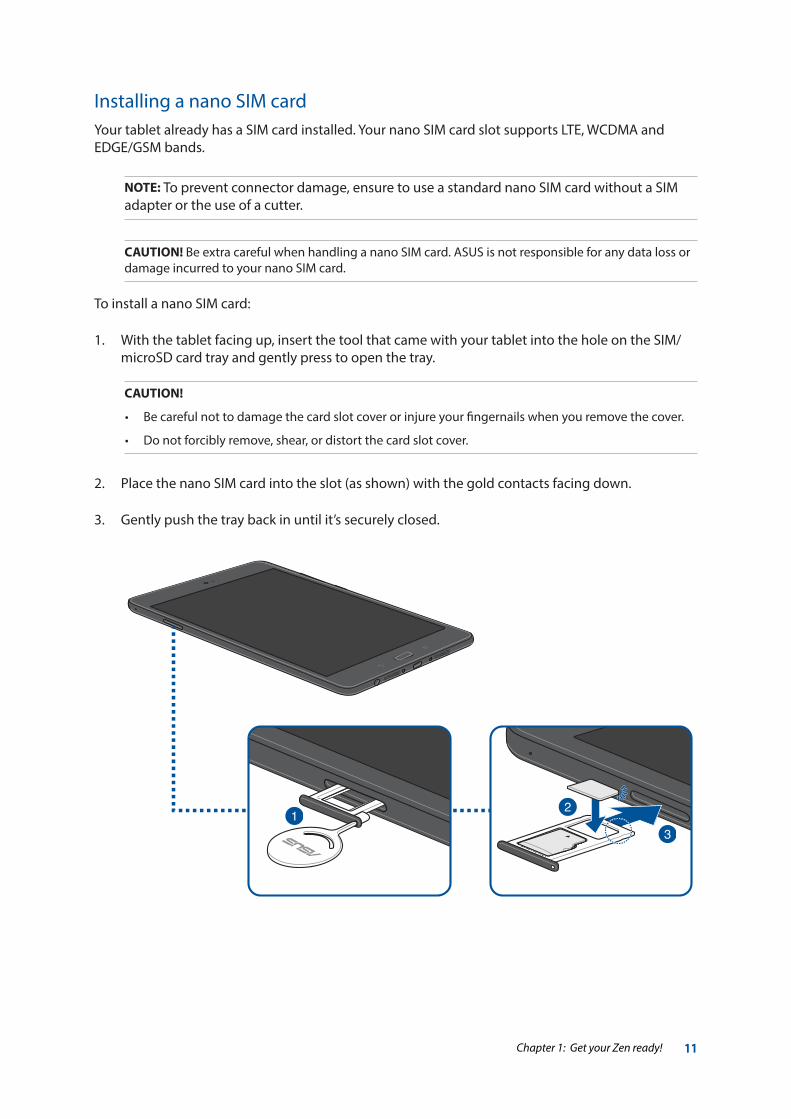
Installing a nano SIM cardYour tablet already has a SIM card installed. Your nano SIM card slot supports LTE, WCDMA and EDGE/GSM bands.
NOTE: To prevent connector damage, ensure to use a standard nano SIM card without a SIM adapter or the use of a cutter.
CAUTION! Be extra careful when handling a nano SIM card. ASUS is not responsible for any data loss or damage incurred to your nano SIM card.
To install a nano SIM card:
1. With the tablet facing up, insert the tool that came with your tablet into the hole on the SIM/microSD card tray and gently press to open the tray.
CAUTION!
• Becarefulnottodamagethecardslotcoverorinjureyourfingernailswhenyouremovethecover.
• Donotforciblyremove,shear,ordistortthecardslotcover.
2. Place the nano SIM card into the slot (as shown) with the gold contacts facing down.
3. Gently push the tray back in until it’s securely closed.
Chapter 1: Get your Zen ready! 12
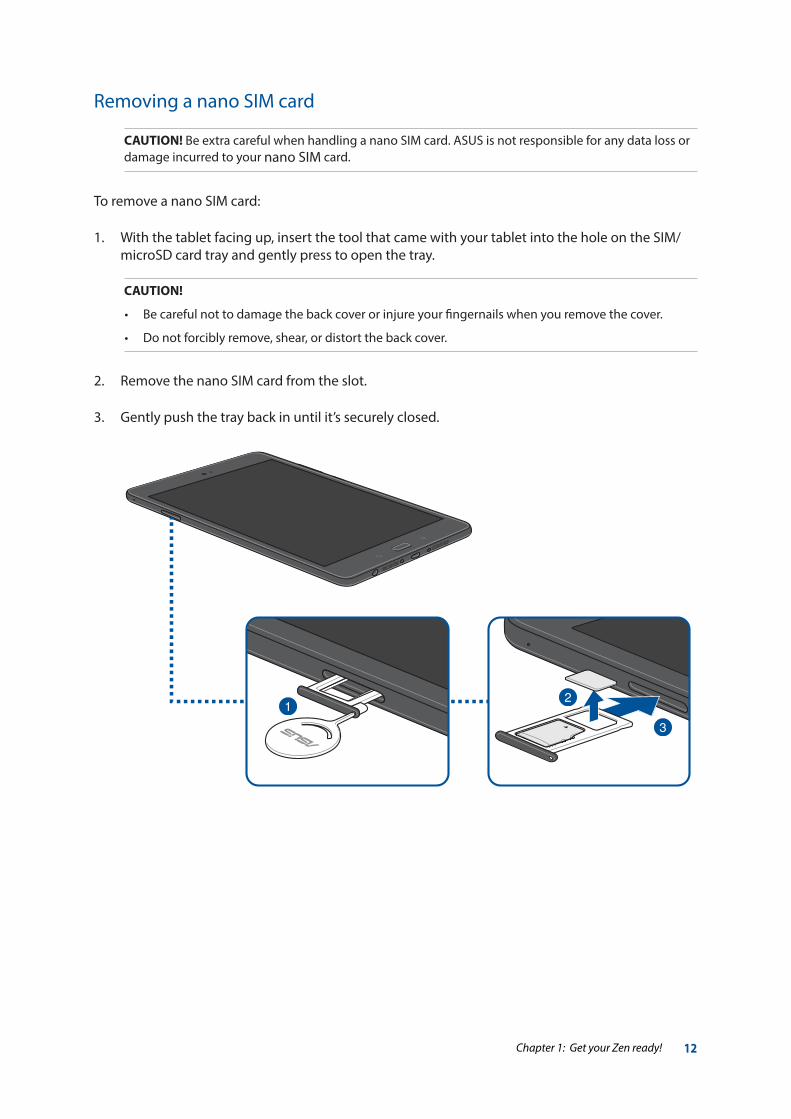
Removing a nano SIM card
CAUTION! Be extra careful when handling a nano SIM card. ASUS is not responsible for any data loss or damage incurred to your nano SIM card.
To remove a nano SIM card:
1. With the tablet facing up, insert the tool that came with your tablet into the hole on the SIM/microSD card tray and gently press to open the tray.
CAUTION!
• Becarefulnottodamagethebackcoverorinjureyourfingernailswhenyouremovethecover.
• Donotforciblyremove,shear,ordistortthebackcover.
2. Remove the nano SIM card from the slot.
3. Gently push the tray back in until it’s securely closed.
Chapter 1: Get your Zen ready! 13
Charging your ASUS TabletYour ASUS Tablet comes partially charged but you must charge it fully before using it for the first time. Read the following important notices and cautions before charging your device.
IMPORTANT!
• UseonlythebundledACpoweradapterandcabletochargeyourASUSTablet.UsingadifferentACpower adapter and cable may damage your device.
• PeelofftheprotectivefilmontheACpoweradapterandcablebeforeusingitwithyourdevice.
• EnsuretoplugtheACpoweradaptertoacompatiblepoweroutlet.YoucanplugtheACpoweradapter to any compatible 100~240 V outlet.
• TheoutputvoltageoftheACpoweradapterforthisdeviceisDC5V,2Aor9V,2A.
• WhenusingyourASUSTabletwhileplugged-intoapoweroutlet,thepoweroutletmustbenearyour device and easily accessible.
• DonotuseorexposeyourASUSTabletnearliquids,rain,ormoisture.
• DonotuseyourASUSTabletnearheatingequipmentorinplaceswherethereislikelihoodofhightemperature.
• KeepyourASUSTabletawayfromsharpobjects.
• DonotplaceobjectsontopofyourASUSTablet.
CAUTION!
• Whilecharging,yourASUSTabletcanbecomewarm.Thisisnormal,however,ifyourdevicebecomesunusually hot, disconnect the cable from your device and send the device, including the AC power adapter and cable to an ASUS-qualified service personnel.
• TopreventanydamagetoyourASUSTablet,ACadapter,orcable.Ensurethatthecable,ACadapter,and your device are connected properly before charging.
Chapter 1: Get your Zen ready! 14
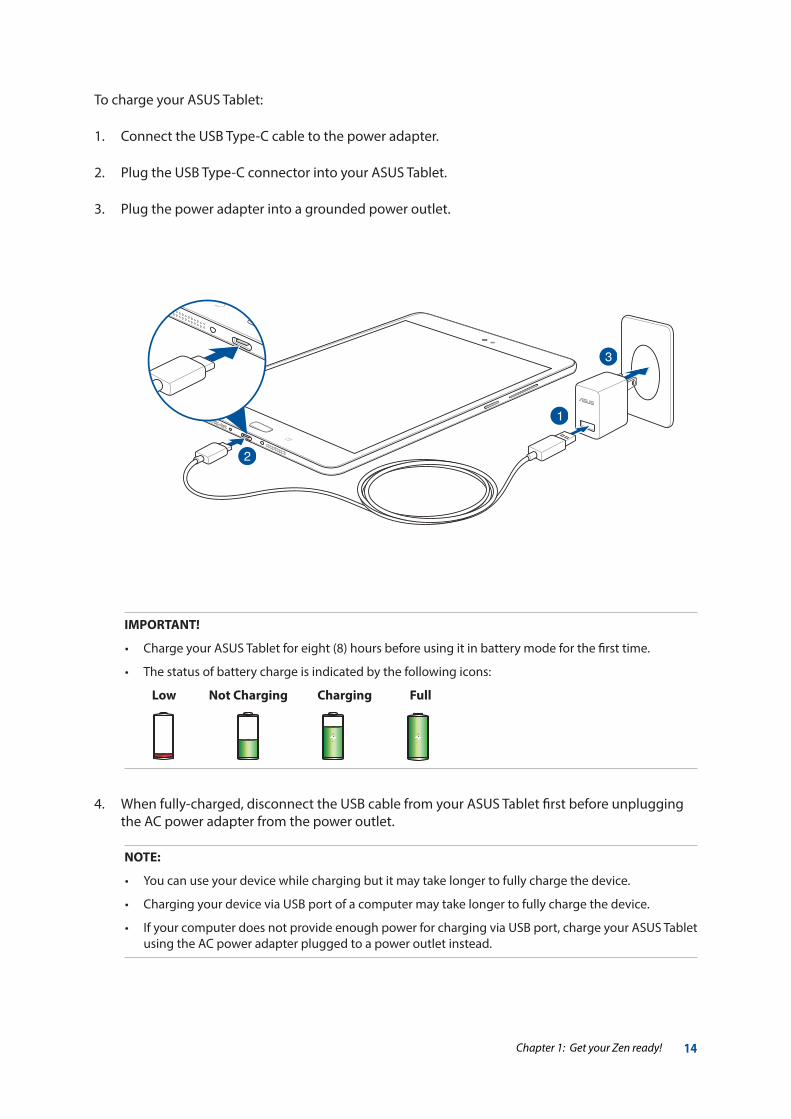
To charge your ASUS Tablet:
1. Connect the USB Type-C cable to the power adapter.
2. Plug the USB Type-C connector into your ASUS Tablet.
3. Plug the power adapter into a grounded power outlet.
IMPORTANT!
• ChargeyourASUSTabletforeight(8)hoursbeforeusingitinbatterymodeforthefirsttime.
• Thestatusofbatterychargeisindicatedbythefollowingicons:
Low Not Charging Charging Full
4. When fully-charged, disconnect the USB cable from your ASUS Tablet first before unplugging the AC power adapter from the power outlet.
NOTE:
• Youcanuseyourdevicewhilechargingbutitmaytakelongertofullychargethedevice.
• ChargingyourdeviceviaUSBportofacomputermaytakelongertofullychargethedevice.
• IfyourcomputerdoesnotprovideenoughpowerforchargingviaUSBport,chargeyourASUSTabletusing the AC power adapter plugged to a power outlet instead.
Chapter 1: Get your Zen ready! 15
Battery power conservation tipsThe battery charge is the lifeline of your ASUS Tablet. Here are some battery power conservation tips that helps preserve the power of your ASUS Tablet’s battery.
– Close all running apps that are not in use.
– When not in use, press the power button to put the device in sleep mode.
– Activate Power Saving in Power Management settings.
– Set audio to Smart Mode.
– Decrease brightness of display.
– Keep the speaker volume to a low level.
– Disable Wi-Fi feature.
– Disable Bluetooth feature.
– Disable PlayTo feature.
– Disable GPS.
– Disable the screen auto-rotate feature.
– Disable all auto-sync features on your device.
Chapter 1: Get your Zen ready! 16
Turning your ASUS Tablet on or off
Power on your deviceTo turn your tablet on, press and hold the Power button.
Power off your deviceTo turn your tablet off, press and hold the Power button. Then tap Power off > OK.
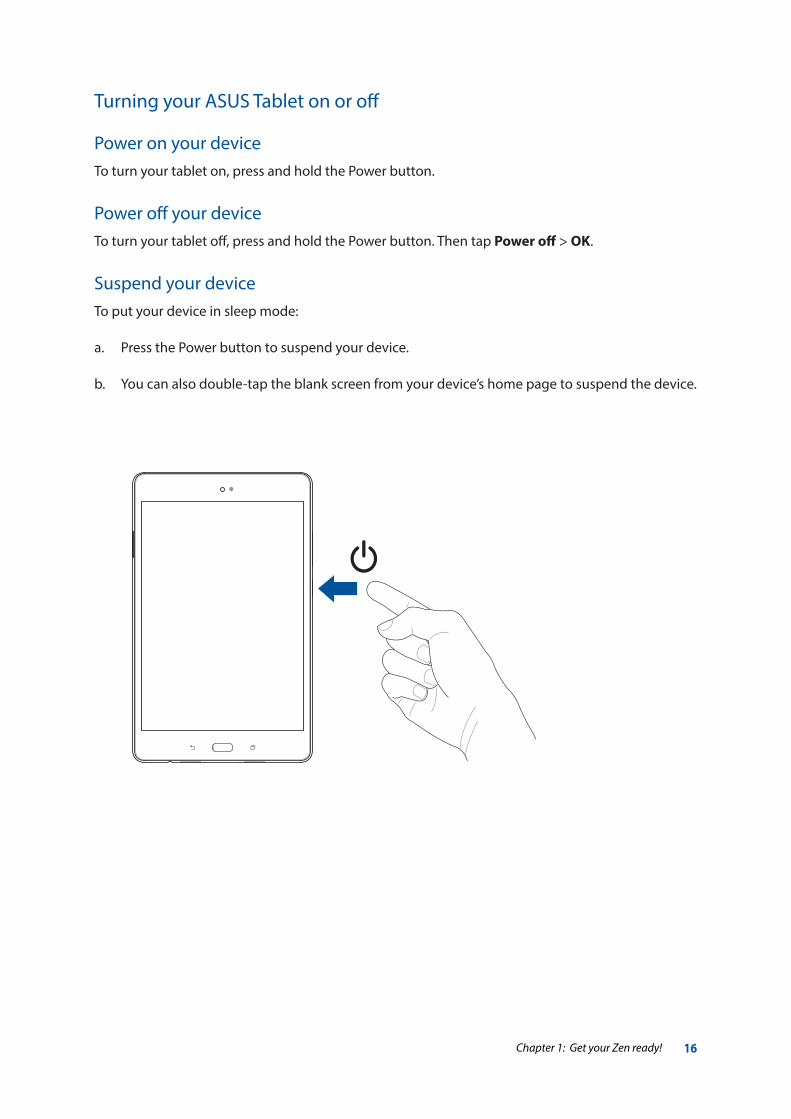
Suspend your deviceTo put your device in sleep mode:
a. Press the Power button to suspend your device.
b. You can also double-tap the blank screen from your device’s home page to suspend the device.
Chapter 1: Get your Zen ready! 17
Starting for the first timeWhen you turn your ASUS Tablet on for the first time, Setup Wizard will guide you through the setup process. Follow the onscreen instructions to select your language, select input methods, set up your mobile network, Wi-Fi, sync accounts, and configure your location services.
Your wireless device can determine its (and your) physical, geographical location (Location Information) and can associate Location Information with other data. Additionally, certain applications, services and programs are capable of accessing, collecting, storing and using Location Information and disclosing Location Information to others. You should use caution when determining whether or not Location Information should be made available to others and you should review any applicable third party privacy policies before providing access. To limit potential unauthorized access to your Location Information, Verizon Wireless phones are preset to E911 only, which will only allow emergency response personnel to locate you if you dial 9-1-1 from your phone. Other wireless devices (such as Broadband Data Cards or devices without a keypad or user interface) may or may not have such limitations and location settings available. By enabling location settings you are permitting third party access to Location Information through software, widgets or peripheral components you choose to download, add or attach to your wireless device or through web access, messaging capabilities or other means and you are authorizing Verizon Wireless to collect, use and disclose your Location Information as appropriate to provide you with any location services that you enabled.
Use your Google account to set up your device. If you do not have a Google account yet, go ahead and create one.
Google Account
Using a Google Account allows you to fully utilize these Android OS features:
• Organizeandseeallyourinformationfromanywhere.
• Automaticallybackupallyourdata.
• LeverageGoogleservicesconvenientlyfromanywhere.
Chapter 1: Get your Zen ready! 18
Using the touchscreenUse these gestures on the touchscreen to launch apps, access some settings, and navigate your ASUS Tablet.
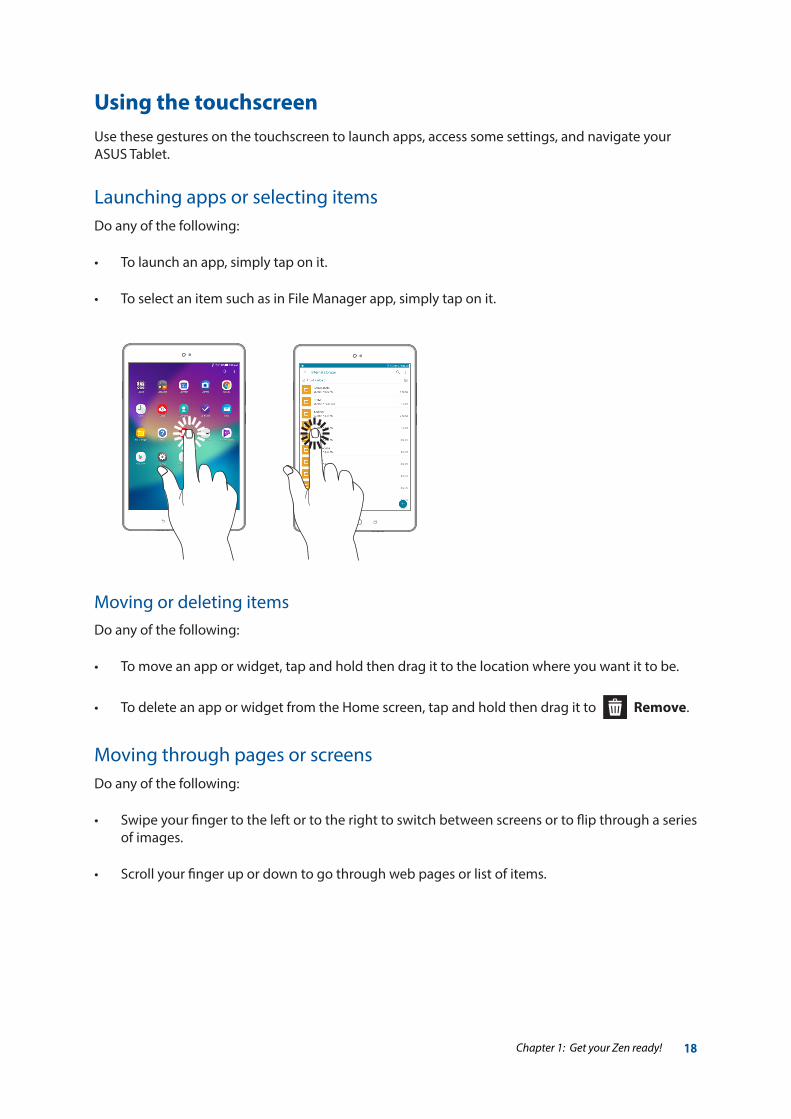
Launching apps or selecting itemsDo any of the following:
• Tolaunchanapp,simplytaponit.
• ToselectanitemsuchasinFileManagerapp,simplytaponit.
Moving or deleting itemsDo any of the following:
• Tomoveanapporwidget,tapandholdthendragittothelocationwhereyouwantittobe.
• TodeleteanapporwidgetfromtheHomescreen,tapandholdthendragitto Remove.
Moving through pages or screensDo any of the following:
• Swipeyourfingertotheleftortotherighttoswitchbetweenscreensortoflipthroughaseriesof images.
• Scrollyourfingerupordowntogothroughwebpagesorlistofitems.
Chapter 1: Get your Zen ready! 19
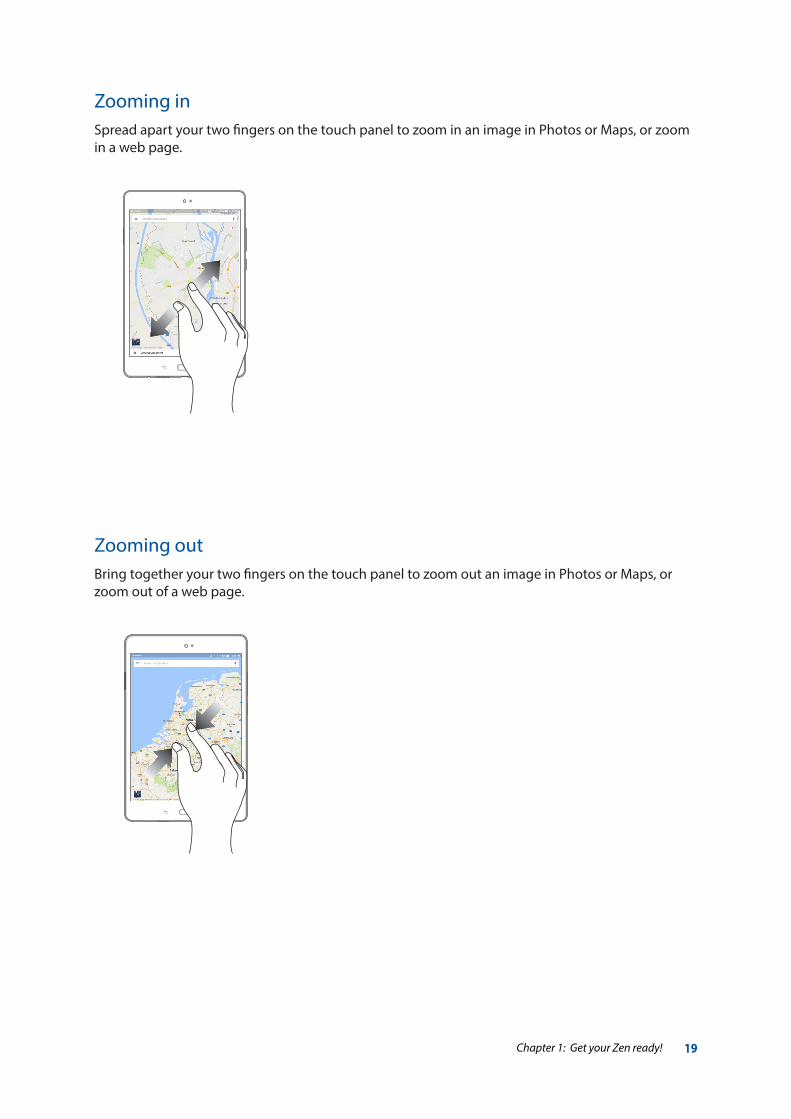
Zooming inSpread apart your two fingers on the touch panel to zoom in an image in Photos or Maps, or zoom in a web page.
Zooming outBring together your two fingers on the touch panel to zoom out an image in Photos or Maps, or zoom out of a web page.
Chapter 1: Get your Zen ready! 20
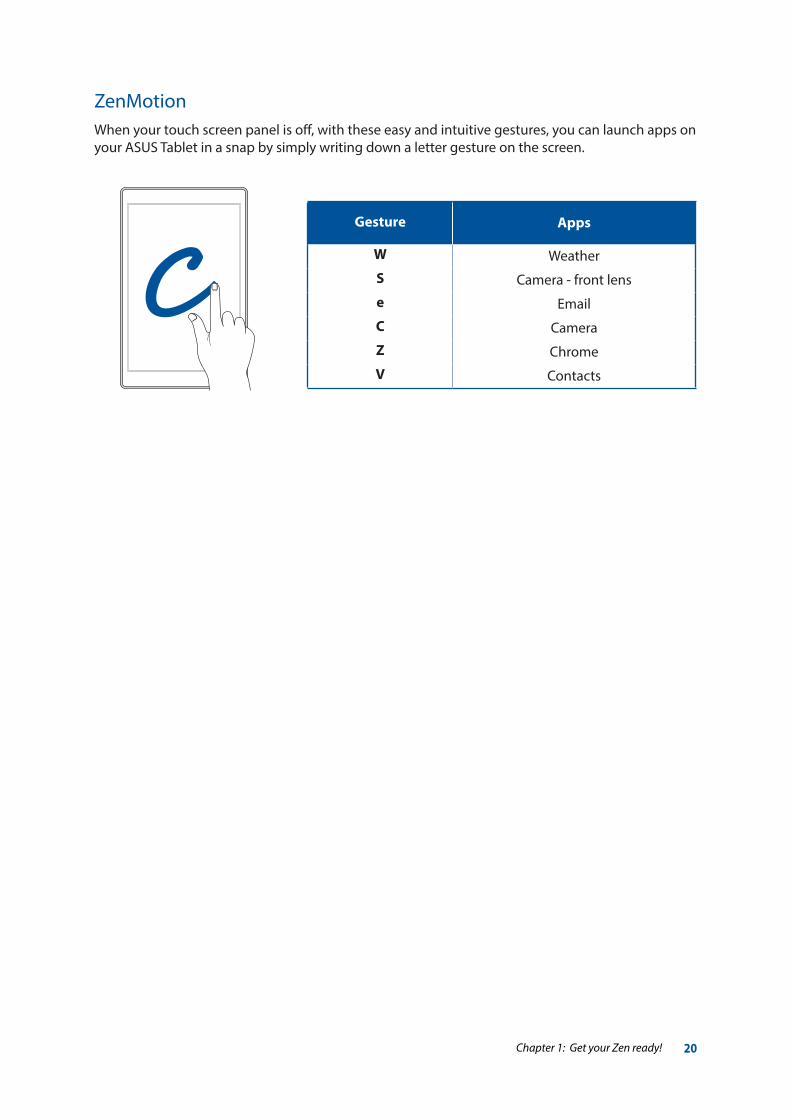
ZenMotionWhen your touch screen panel is off, with these easy and intuitive gestures, you can launch apps on your ASUS Tablet in a snap by simply writing down a letter gesture on the screen.
ZenMotion - need to check the actual model
Gesture Apps
W Weather
S Camera - front lens
e Email
C Camera
Z Chrome
V Contacts
21Chapter 2: There’s no place like Home
ZenMotion - need to check the actual model
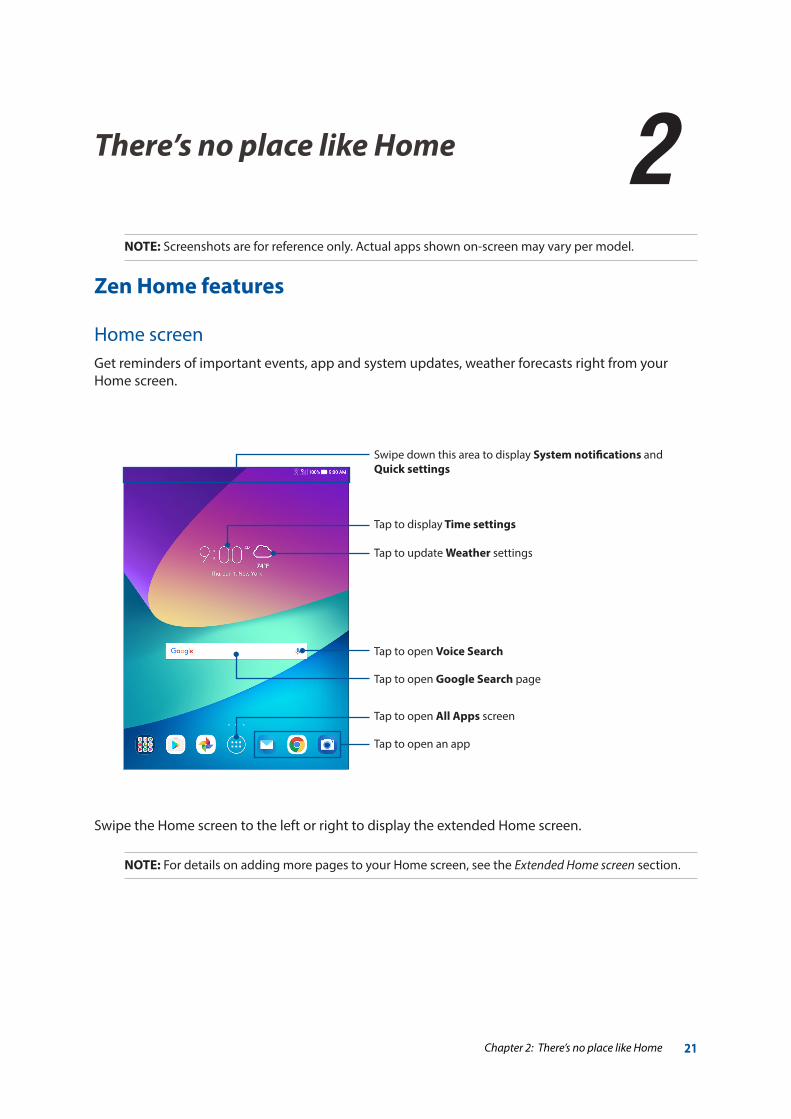
NOTE: Screenshots are for reference only. Actual apps shown on-screen may vary per model.
Zen Home features
Home screenGet reminders of important events, app and system updates, weather forecasts right from your Home screen.
2 There’s no place like Home
2There’s no place like Home
Swipe down this area to display System notifications and Quick settings
Tap to update Weather settings
Tap to display Time settings
Tap to open Google Search page
Tap to open Voice Search
Tap to open an app
Tap to open All Apps screen
Swipe the Home screen to the left or right to display the extended Home screen.
NOTE: For details on adding more pages to your Home screen, see the Extended Home screen section.
22Chapter 2: There’s no place like Home
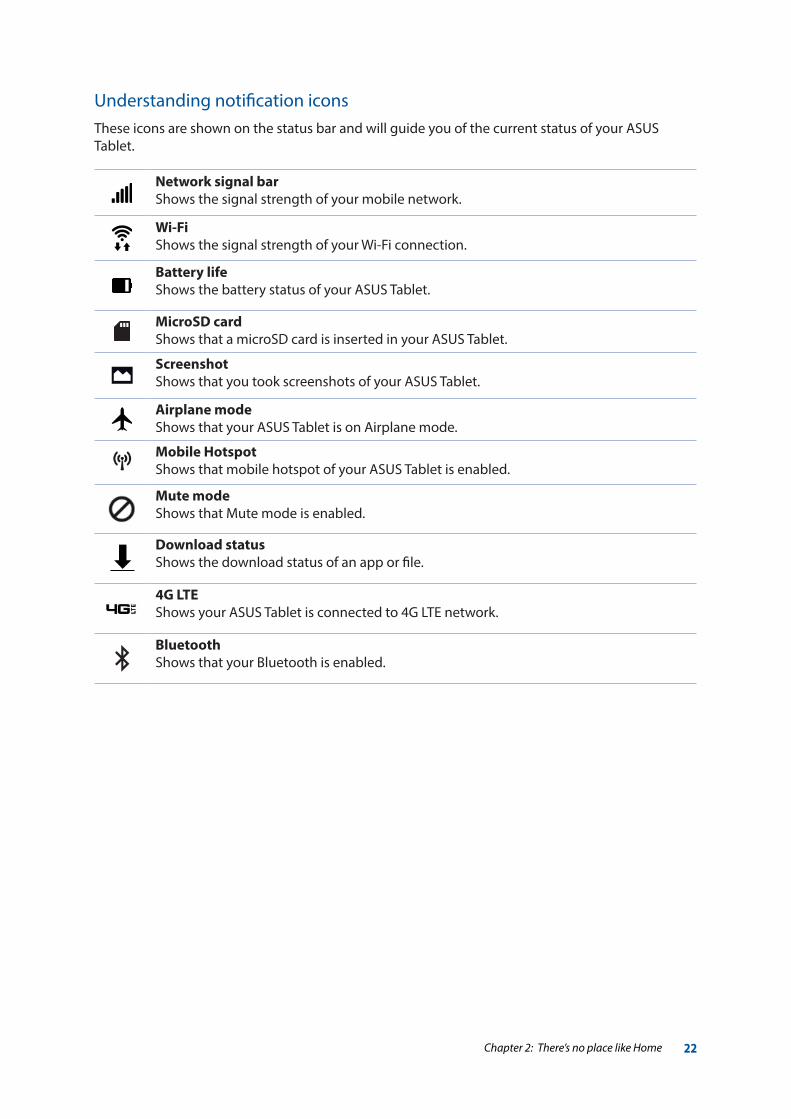
Understanding notification iconsThese icons are shown on the status bar and will guide you of the current status of your ASUS Tablet.
Network signal barShows the signal strength of your mobile network.
Wi-FiShows the signal strength of your Wi-Fi connection.
Battery lifeShows the battery status of your ASUS Tablet.
MicroSD cardShows that a microSD card is inserted in your ASUS Tablet.
ScreenshotShows that you took screenshots of your ASUS Tablet.
Airplane modeShows that your ASUS Tablet is on Airplane mode.
Mobile HotspotShows that mobile hotspot of your ASUS Tablet is enabled.
Mute modeShows that Mute mode is enabled.
Download statusShows the download status of an app or file.
4G LTEShows your ASUS Tablet is connected to 4G LTE network.
BluetoothShows that your Bluetooth is enabled.
23Chapter 2: There’s no place like Home
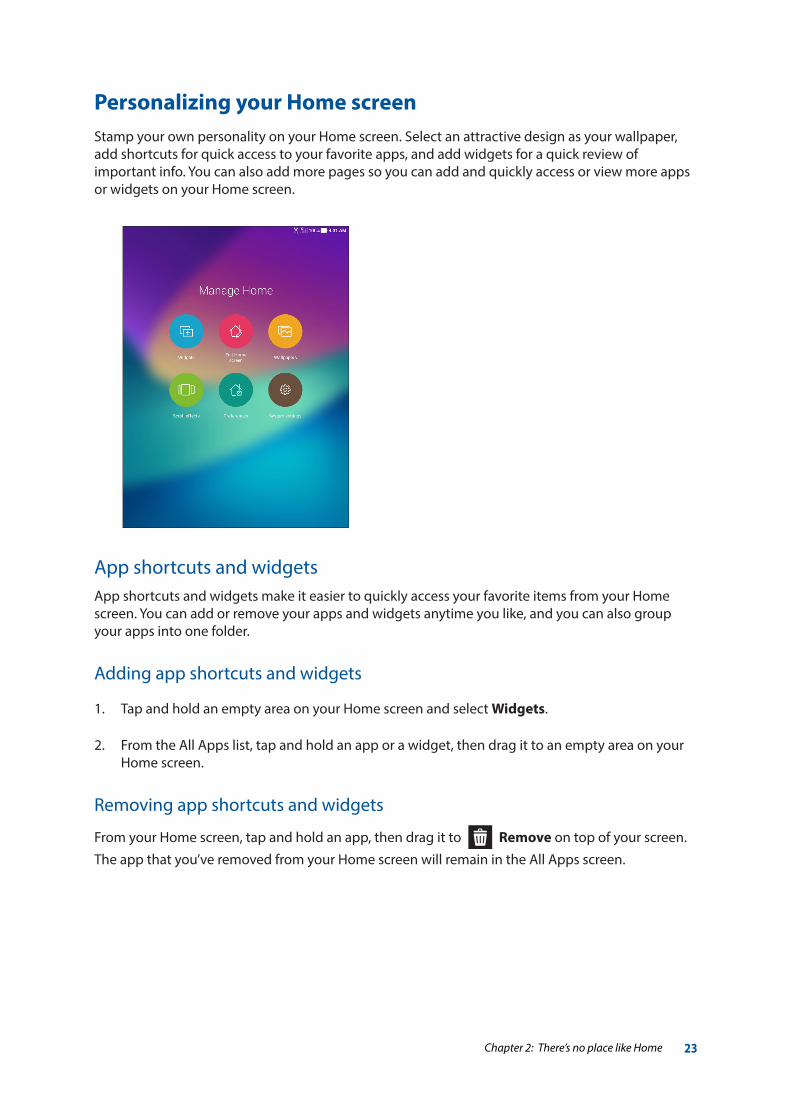
Personalizing your Home screenStamp your own personality on your Home screen. Select an attractive design as your wallpaper, add shortcuts for quick access to your favorite apps, and add widgets for a quick review of important info. You can also add more pages so you can add and quickly access or view more apps or widgets on your Home screen.
App shortcuts and widgetsApp shortcuts and widgets make it easier to quickly access your favorite items from your Home screen. You can add or remove your apps and widgets anytime you like, and you can also group your apps into one folder.
Adding app shortcuts and widgets
1. Tap and hold an empty area on your Home screen and select Widgets.
2. From the All Apps list, tap and hold an app or a widget, then drag it to an empty area on your Home screen.
Removing app shortcuts and widgets
From your Home screen, tap and hold an app, then drag it to Remove on top of your screen.
The app that you’ve removed from your Home screen will remain in the All Apps screen.
24Chapter 2: There’s no place like Home
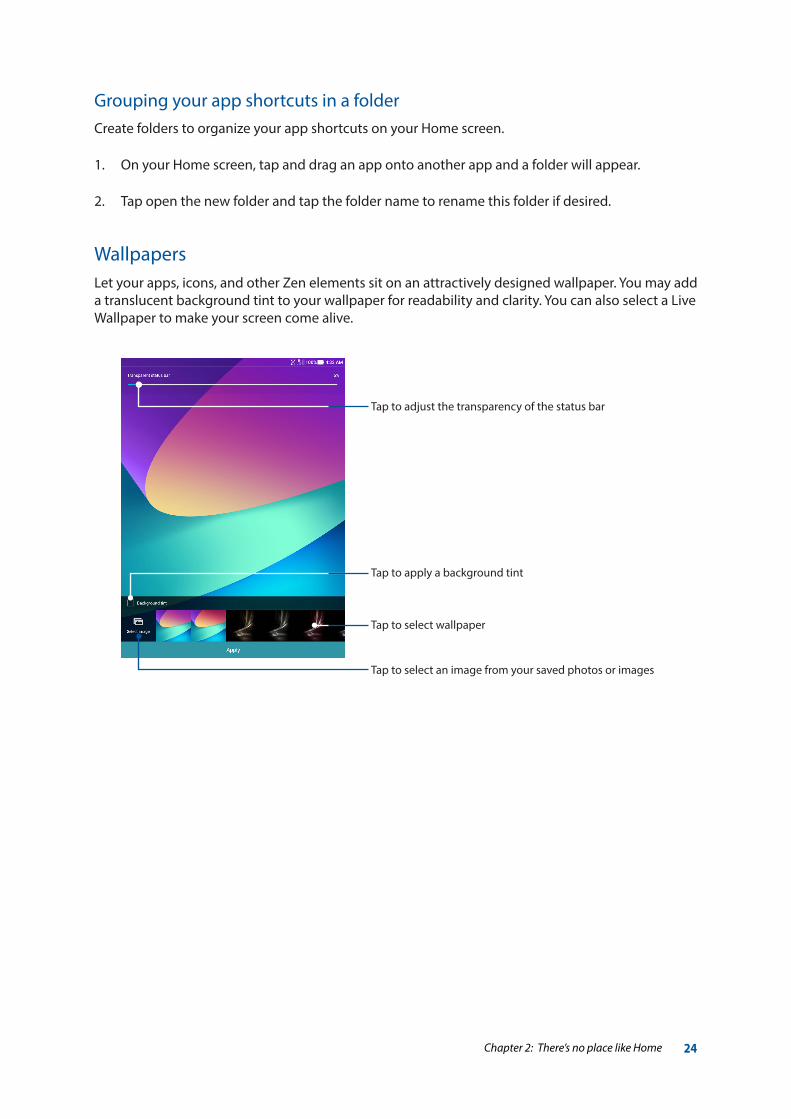
WallpapersLet your apps, icons, and other Zen elements sit on an attractively designed wallpaper. You may add a translucent background tint to your wallpaper for readability and clarity. You can also select a Live Wallpaper to make your screen come alive.
Tap to apply a background tint
Tap to adjust the transparency of the status bar
Tap to select wallpaper
Tap to select an image from your saved photos or images
Grouping your app shortcuts in a folderCreate folders to organize your app shortcuts on your Home screen.
1. On your Home screen, tap and drag an app onto another app and a folder will appear.
2. Tap open the new folder and tap the folder name to rename this folder if desired.
25Chapter 2: There’s no place like Home
Applying wallpaper and background tintTo apply wallpaper and background tint:
1. Tap and hold an empty area on your Home screen and select Wallpapers.
2. Tick Background tint, then adjust the transparency level. If you do not want to add a background tint to your wallpaper, skip to step 4.
3. Tap then select a color.
4. Select a wallpaper, then tap Apply.
NOTE: You can also set up your wallpaper settings from > Settings > Display.
Extending your Home screenYou can add more pages to extend your Home screen and put more app shortcuts and widgets on it.
1. Tap and hold an empty area on your Home screen and select Edit Home screen.
2. Slide to the last page and tap to add a new page. If you wish to delete an extended Home
screen, slide to the page and tap .
26Chapter 2: There’s no place like Home
Vibrate modeShows that Vibrate mode is enabled.
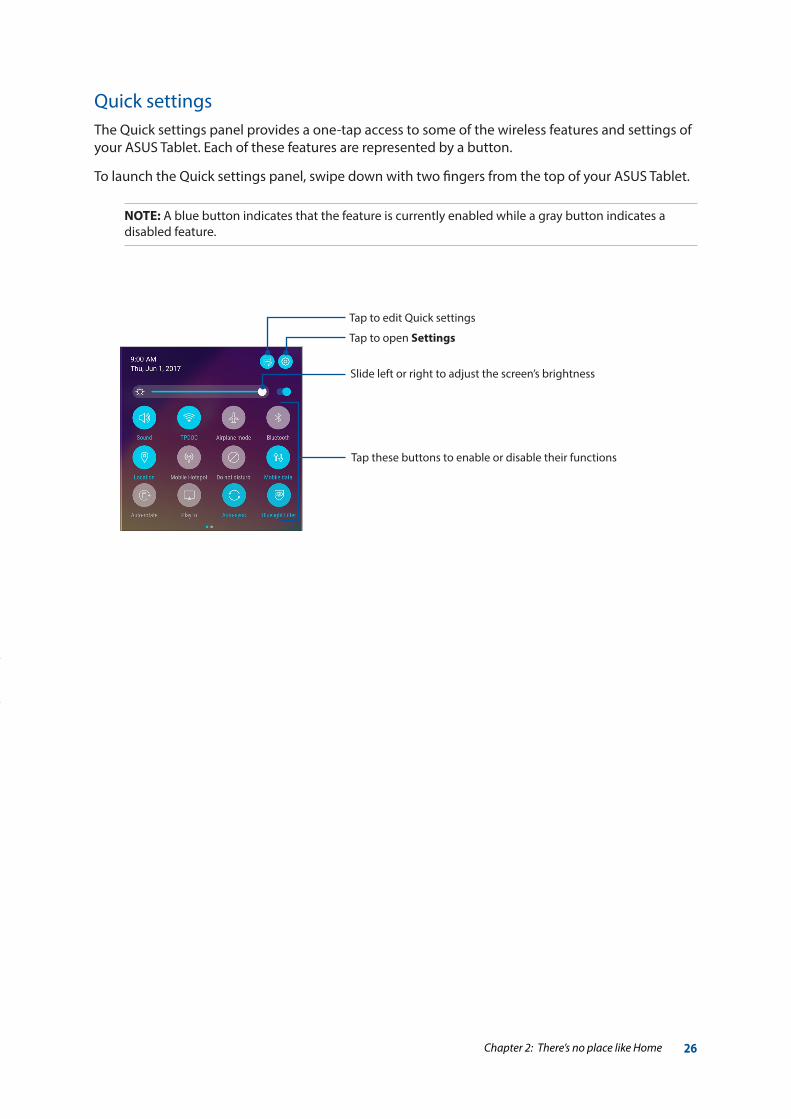
Quick settingsThe Quick settings panel provides a one-tap access to some of the wireless features and settings of your ASUS Tablet. Each of these features are represented by a button.
To launch the Quick settings panel, swipe down with two fingers from the top of your ASUS Tablet.
NOTE: A blue button indicates that the feature is currently enabled while a gray button indicates a disabled feature.
Tap these buttons to enable or disable their functions
Slide left or right to adjust the screen’s brightness
Tap to open Settings
Tap to edit Quick settings
27Chapter 2: There’s no place like Home
Setting up the date and timeBy default, the date and time displayed on your Home screen automatically syncs when you are connected to the Internet.
To change the date and time settings:
1. Launch the Settings screen by doing any of the following:
• Launch Quick settings then tap .
• Tap > Settings.
2. Select Date & time.
3. Click the slider to turn off Automatic date & time.
4. Select the time zone and manually set the date and time.
5. You can opt to use the 24-hour format if desired.
6. Select the date format that you want to display.
NOTE: For more details, see the Clock section.
Setting up your ringtone and alert soundsSet up the sound for your notifications such as emails and event alerts. You can also choose to enable or disable the touch sounds or screen lock sound.
To set up the sound settings:
1. Launch the Settings screen by doing any of the following:
• Launch Quick settings then tap .
• Tap > Settings.
2. Select Sound.
3. Set up your preferred sound settings.
28Chapter 2: There’s no place like Home
Adding or removing buttonsTo add or remove existing buttons from the ASUS Quick settings notification panel:
1. Launch Quick settings then tap .
2. Tap and hold the tile to add or remove the feature from the ASUS Quick settings notification panel.
3. Tap to go back and view the current ASUS Quick settings notification panel.
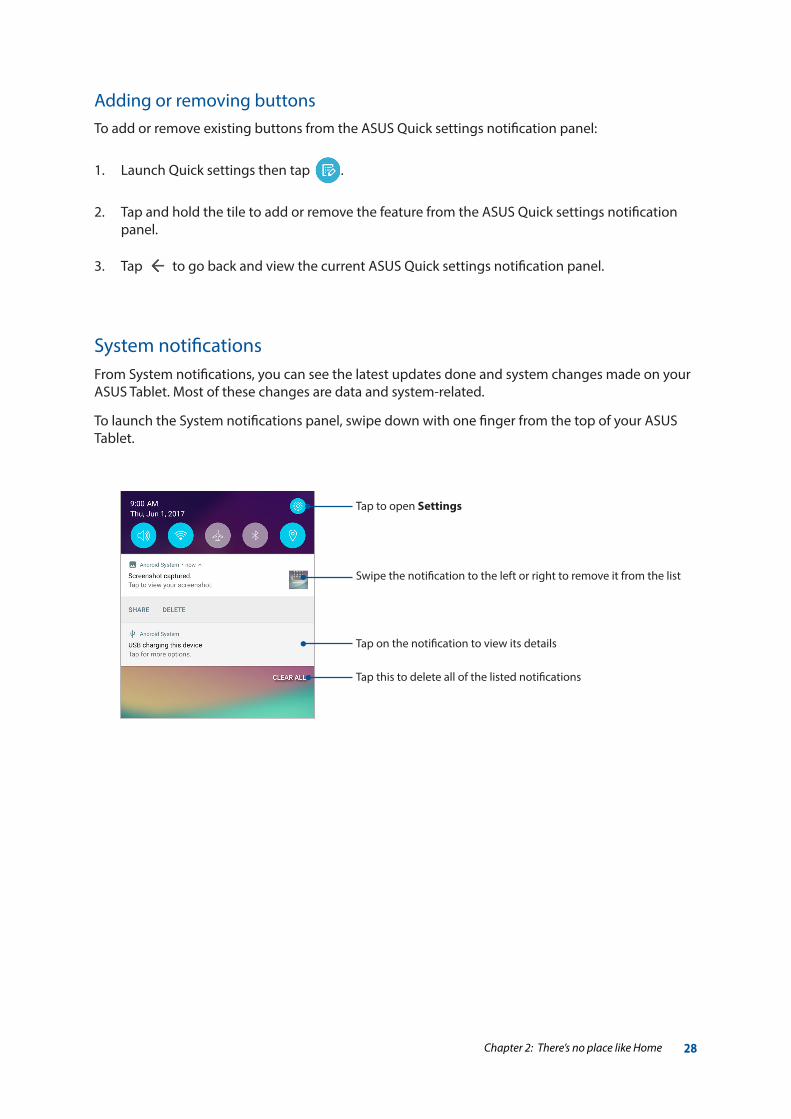
System notificationsFrom System notifications, you can see the latest updates done and system changes made on your ASUS Tablet. Most of these changes are data and system-related.
To launch the System notifications panel, swipe down with one finger from the top of your ASUS Tablet.
Tap this to delete all of the listed notifications
Swipe the notification to the left or right to remove it from the list
Tap on the notification to view its details
Tap to open Settings

29Chapter 2: There’s no place like Home
Weather and time
WeatherGet real-time weather updates straight from your ASUS Tablet using the weather app. Using Weather, you can also check other weather details from around the world.
Launching the Weather appFrom your Home screen, tap the weather icon.
Weather home screenSet up and get your current location’s weather updates as well as other parts of the world.
Tap to search for a city’s weather info
Tap to get the area’s current weather info, refresh the weather info, edit the location list, or configure the weather settings
Swipe up to see other weather information; swipe to the left or right to see the weather information of other cities in your location list
30Chapter 2: There’s no place like Home
Getting the weather updatesGet real-time AccuWeather® updates, every hour or up to 12 hours, for your current location or for other parts of the world. You can make plans for up to seven (7) days with the 7-day weather forecast or dress appropriately based on AccuWeather RealFeel® temperature. You can also get the real-time UV index or air pollution index, letting you take the necessary protective measures against harmful ultra-violet rays or air pollutants.
1. Before getting the weather updates, ensure the following:
• Wi-Fi or mobile network is turned on when you are indoors and GPS is turned on when you are outdoors.
• Turn on the location access from > Settings > Location.
2. From your ASUS Tablet’s home screen, tap the weather icon.
3. Tap > Edit locations then tap .
4. In the search box, enter the city or area whose weather updates you want search for.
5. Wait for a while your ASUS Tablet gets the weather information. The city or area’s weather data will be added to your location list.
31Chapter 2: There’s no place like Home
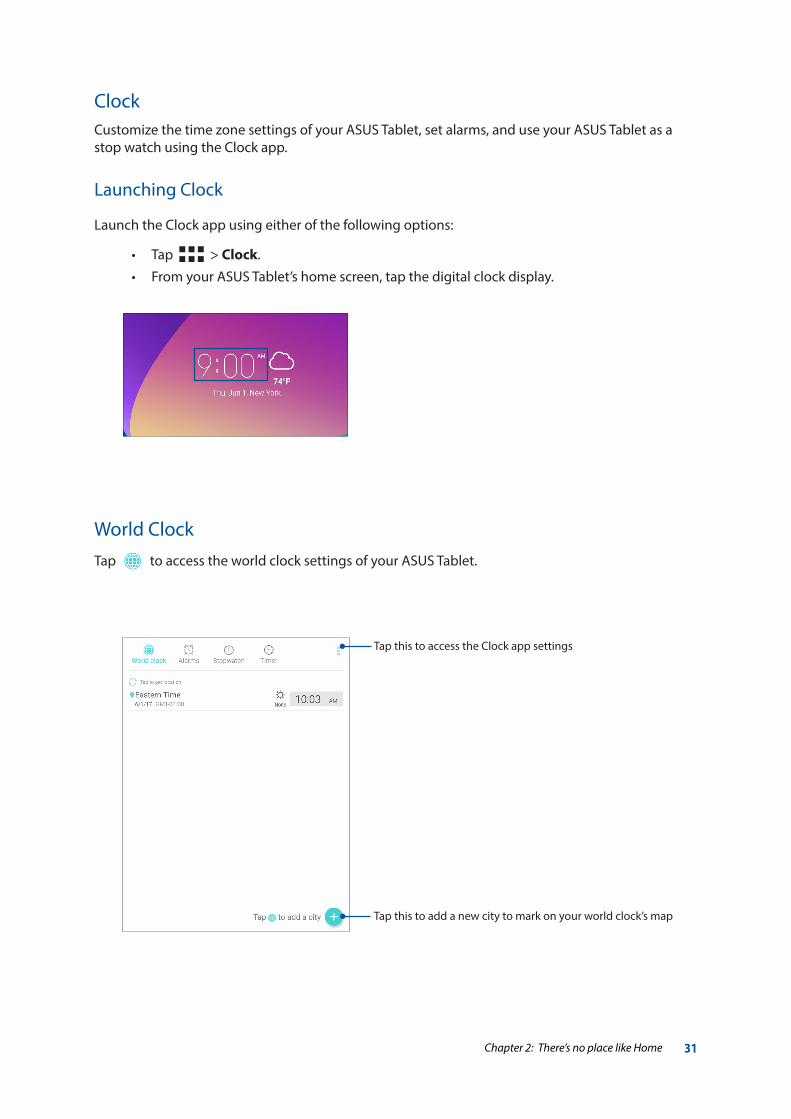
ClockCustomize the time zone settings of your ASUS Tablet, set alarms, and use your ASUS Tablet as a stop watch using the Clock app.
Launching Clock
Launch the Clock app using either of the following options:
• Tap > Clock.
• From your ASUS Tablet’s home screen, tap the digital clock display.
World ClockTap to access the world clock settings of your ASUS Tablet.
Tap this to add a new city to mark on your world clock’s map
Tap this to access the Clock app settings
32Chapter 2: There’s no place like Home
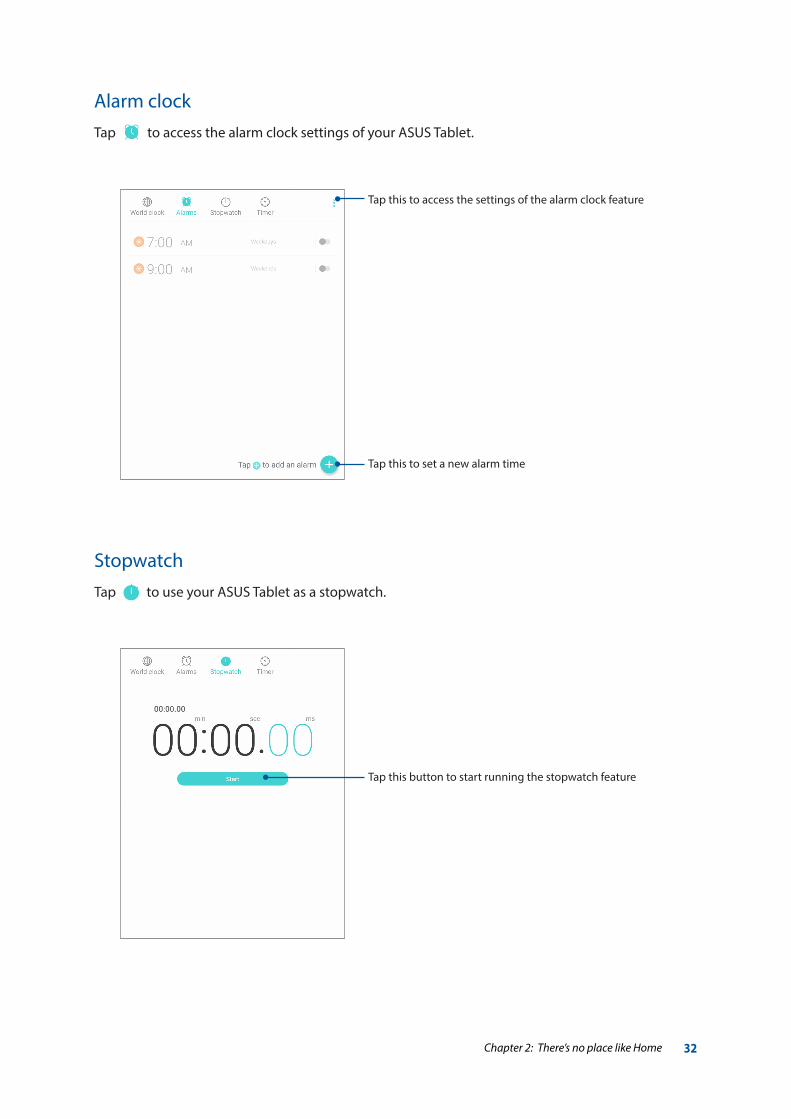
Alarm clockTap to access the alarm clock settings of your ASUS Tablet.
StopwatchTap to use your ASUS Tablet as a stopwatch.
Tap this to set a new alarm time
Tap this to access the settings of the alarm clock feature
Tap this button to start running the stopwatch feature
33Chapter 2: There’s no place like Home
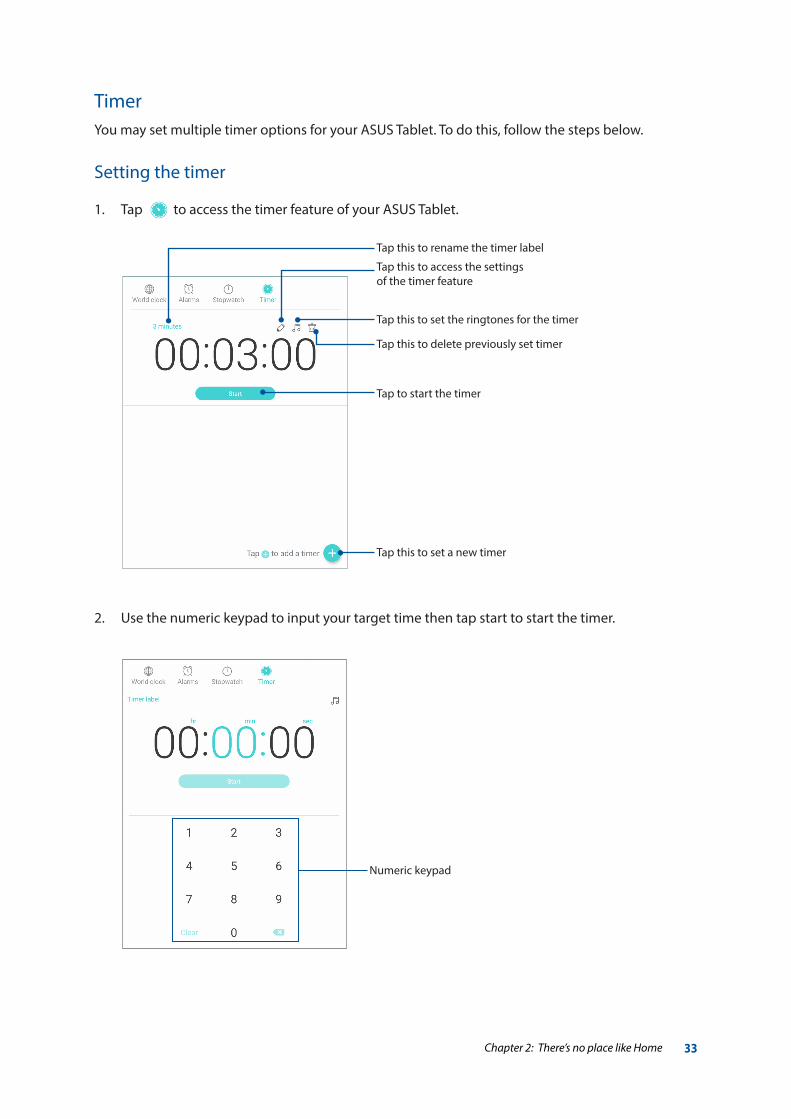
TimerYou may set multiple timer options for your ASUS Tablet. To do this, follow the steps below.
Setting the timer
1. Tap to access the timer feature of your ASUS Tablet.
2. Use the numeric keypad to input your target time then tap start to start the timer.
Numeric keypad
Tap this to rename the timer label
Tap this to set a new timer
Tap this to access the settings of the timer feature
Tap this to set the ringtones for the timer
Tap this to delete previously set timer
Tap to start the timer
34Chapter 2: There’s no place like Home
Lock ScreenBy default, the lock screen appears after turning on your device and while waking it up from suspend mode. From the lock screen, you can proceed to your device’s Android system by swiping on your touch screen panel.
Your device’s lock screen can also be customized to regulate access to your mobile data and apps.
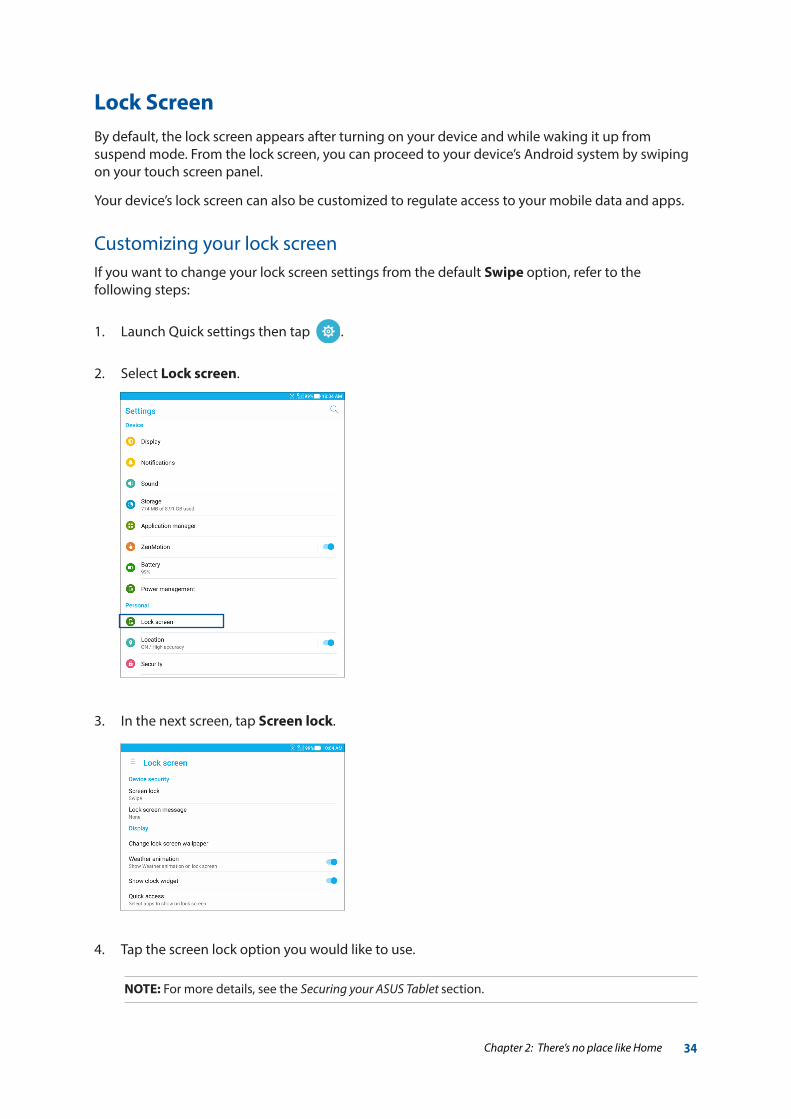
Customizing your lock screenIf you want to change your lock screen settings from the default Swipe option, refer to the following steps:
1. Launch Quick settings then tap .
2. Select Lock screen.
3. In the next screen, tap Screen lock.
4. Tap the screen lock option you would like to use.
NOTE: For more details, see the Securing your ASUS Tablet section.
35Chapter 2: There’s no place like Home
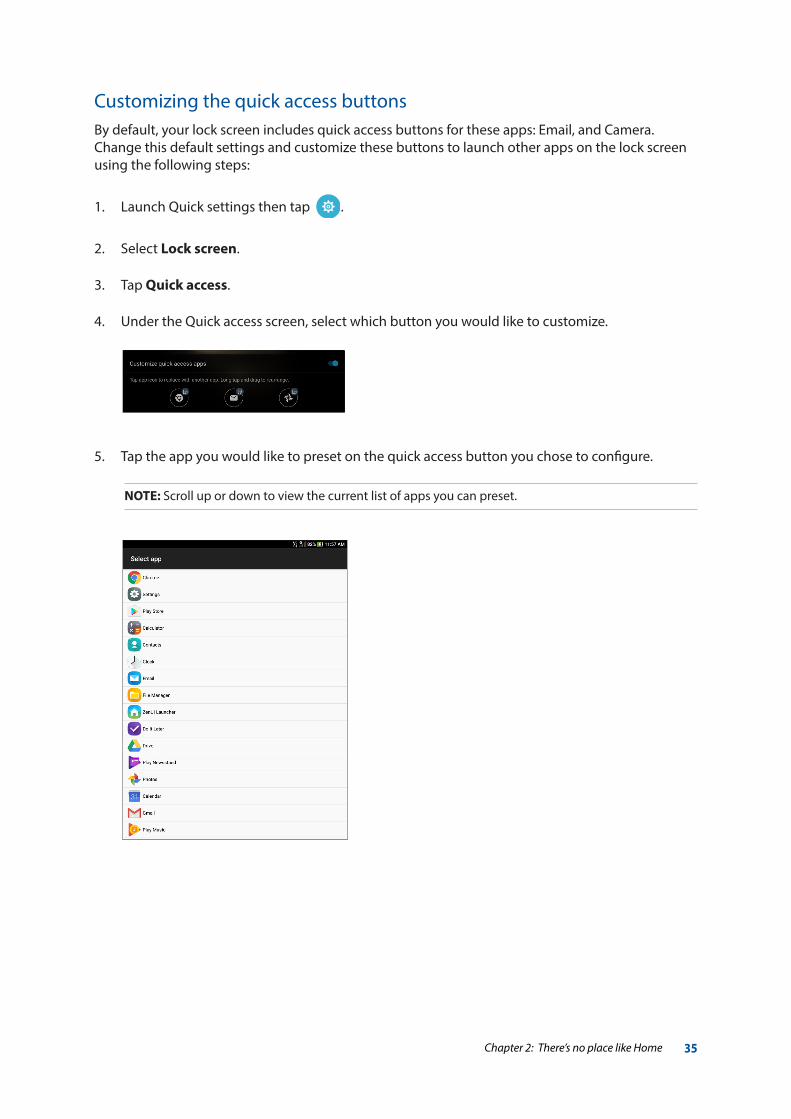
Customizing the quick access buttonsBy default, your lock screen includes quick access buttons for these apps: Email, and Camera. Change this default settings and customize these buttons to launch other apps on the lock screen using the following steps:
1. Launch Quick settings then tap .
2. Select Lock screen.
3. Tap Quick access.
4. Under the Quick access screen, select which button you would like to customize.
5. Tap the app you would like to preset on the quick access button you chose to configure.
NOTE: Scroll up or down to view the current list of apps you can preset.
36Chapter 2: There’s no place like Home
NOTE: Speak clearly and use concise phrases when talking to your ASUS Tablet. It also helps to start your commands with a verb related to the ASUS Tablet feature you want to use.
Voice SearchMake voice commands to your ASUS Tablet then watch it listen and take action using the Voice Search app. Using Voice Search, you can make voice commands to accomplish the following:
• SearchfordataandinformationonlineoronyourASUSTablet
• LaunchappsinsideyourASUSTablet
• Getdirectionsgoingtoalocation
IMPORTANT! Your ASUS Tablet must be connected to the Internet to be able to use this feature.
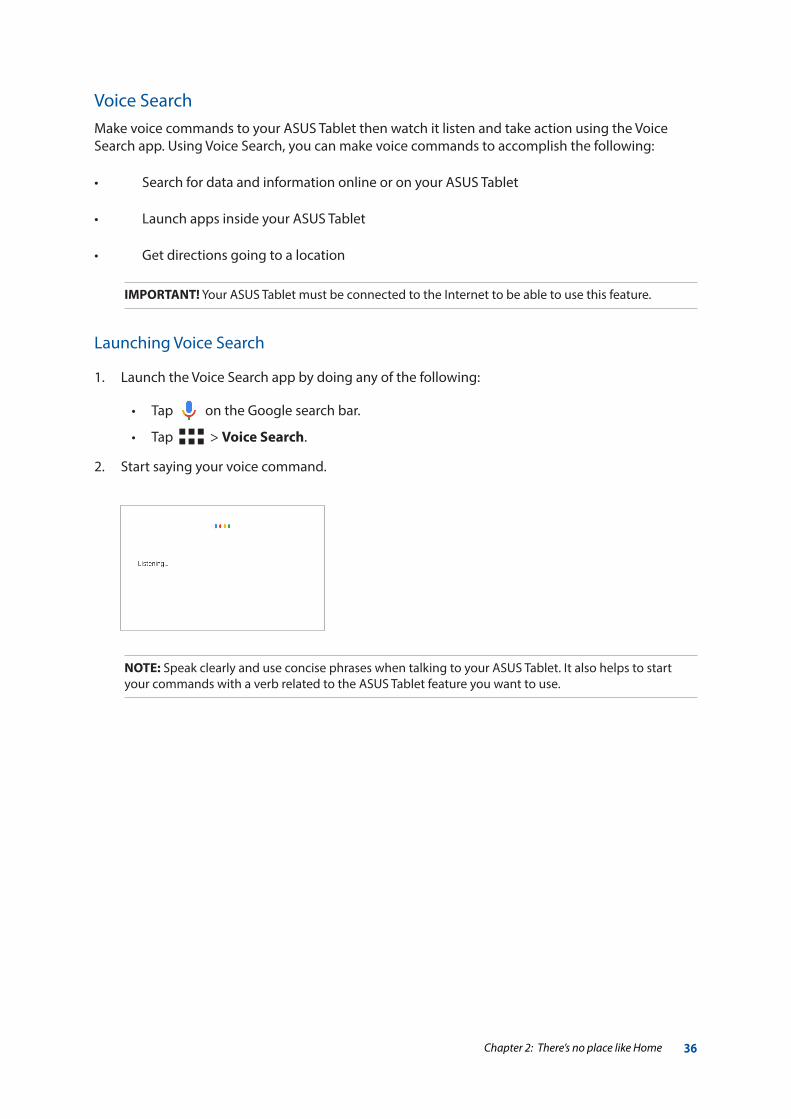
Launching Voice Search
1. Launch the Voice Search app by doing any of the following:
• Tap on the Google search bar.
• Tap > Voice Search.
2. Start saying your voice command.
37Chapter 2: There’s no place like Home
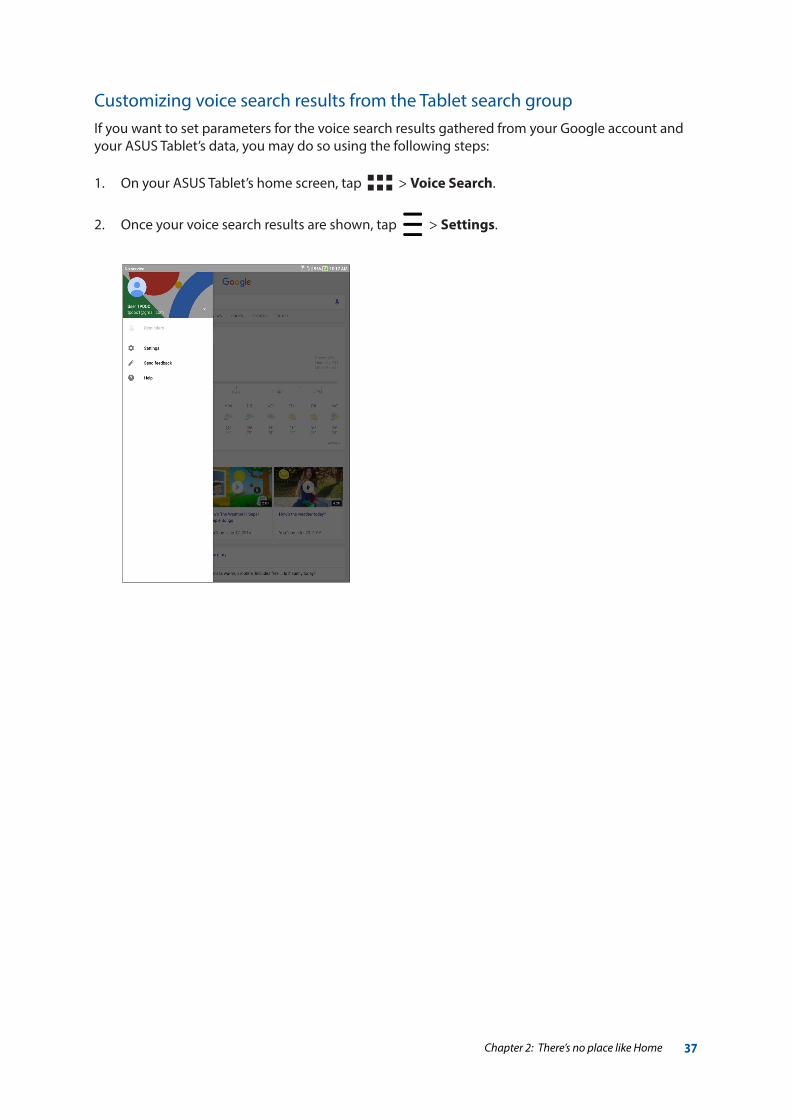
Customizing voice search results from the Tablet search groupIf you want to set parameters for the voice search results gathered from your Google account and your ASUS Tablet’s data, you may do so using the following steps:
1. On your ASUS Tablet’s home screen, tap > Voice Search.
2. Once your voice search results are shown, tap > Settings.
38Chapter 2: There’s no place like Home
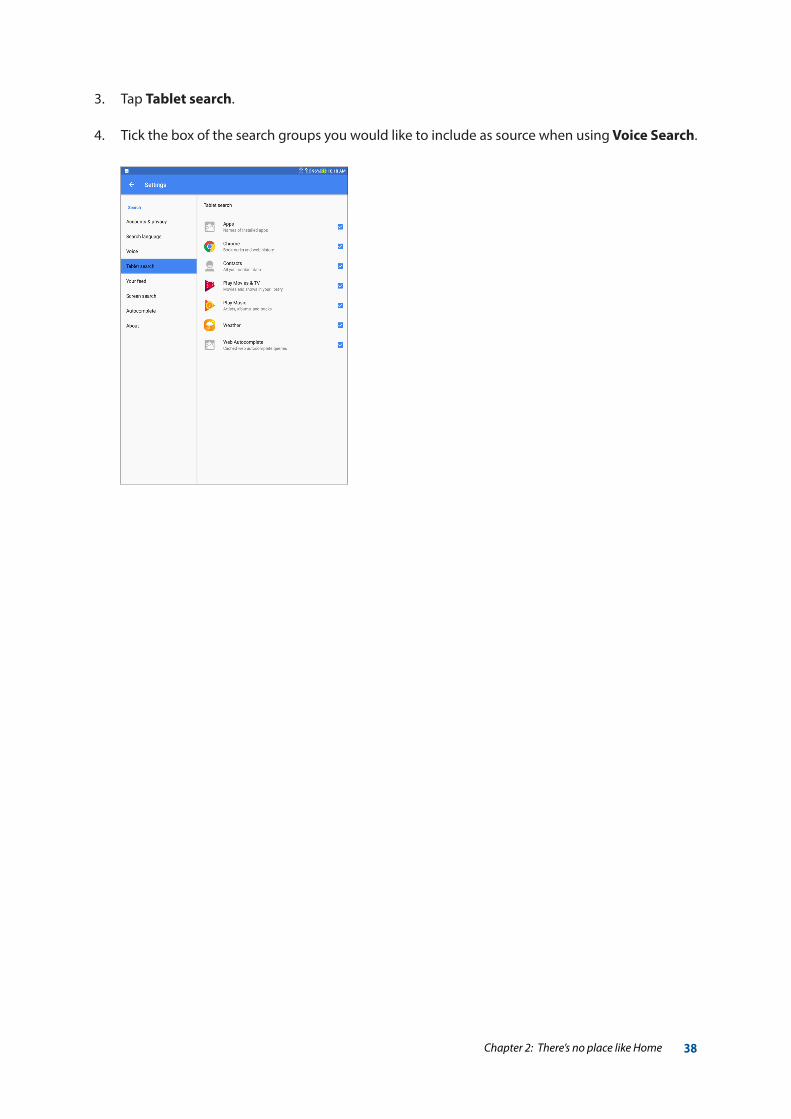
3. Tap Tablet search.
4. Tick the box of the search groups you would like to include as source when using Voice Search.
Chapter 3: Keeping in touch 39
Keeping in touch
3 Keeping in touch
3Managing contactsOrganize your contacts and easily stay in touch with them emails, or social networks. Group your contacts as Favorites to quickly get in touch with them, or group them as VIPs to get notified about any upcoming events.
You can also sync your contacts with your email or social network accounts, link contacts’ info for easy access in one place, or filter the contacts you want to keep in touch with.
Launching the Contacts appFrom your Home screen, tap > Contacts
Contacts SettingsSelect how you would want to display your contacts from the Contacts settings. Such display options include displaying only those contacts with phones, sorting list by first/last name, or viewing contact names as first/last names first.
To set up your Contacts settings, tap > Settings from the Contacts app.
Setting up your profileMake your ASUS Tablet truly your own and set up your profile info.
1. Launch the Contacts app then tap Set up my profile in the Contacts tab.
2. Fill in your info such as name, email address, mobile or home number. To add other info, tap Add another field.
3. When you’ve completed your info, tap Done.
Chapter 3: Keeping in touch 40
Adding contactsAdd contacts to your device, corporate, Google, or other email accounts and fill in more important contact information such as contact numbers, email addresses, special events for VIPs, and more.
1. Launch the Contacts app then tap .
2. Select where you would like to synchronize your new contact with.
NOTE: If you don't have an email account, tap Add account then create one.
3. Fill in the necessary information such as mobile or home number, email address, or group where you want to put the contact in.
4. After filling in the information and you want to add more contact numbers or email addresses, tap Add new.
5. If you want to add other contact information, tap Add another field.
6. When you’ve completed the info, tap .
Chapter 3: Keeping in touch 41
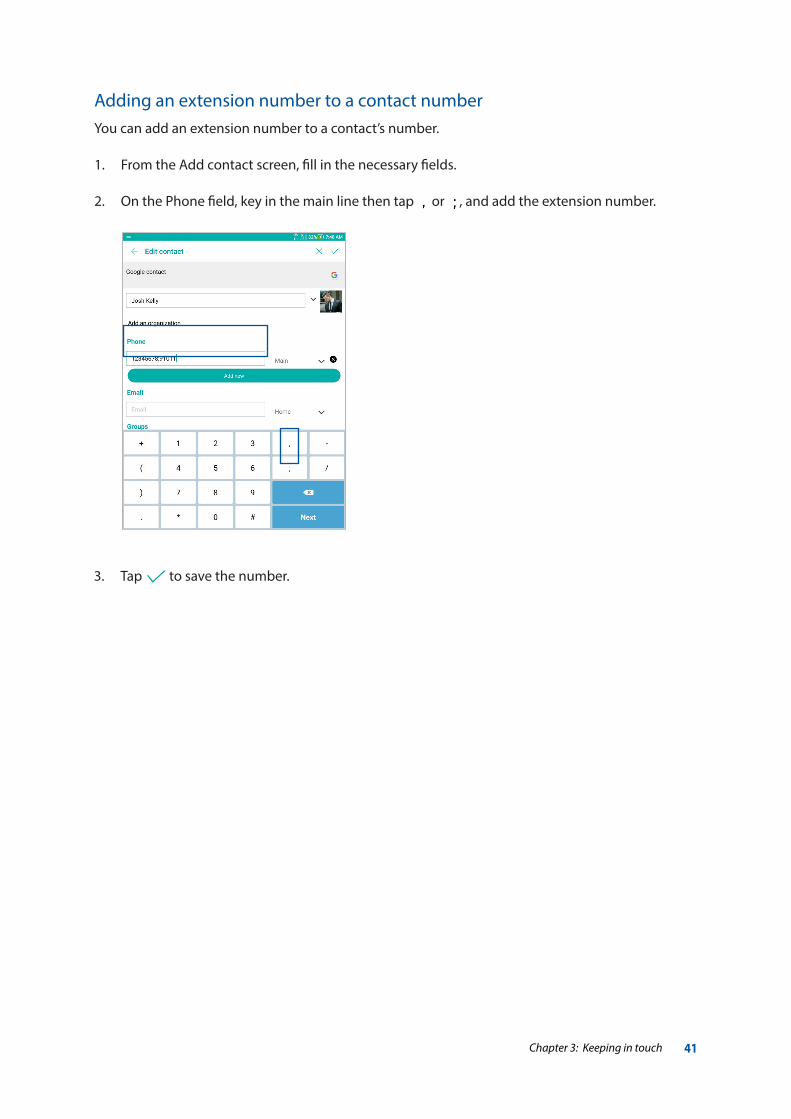
Adding an extension number to a contact numberYou can add an extension number to a contact’s number.
1. From the Add contact screen, fill in the necessary fields.
2. On the Phone field, key in the main line then tap or , and add the extension number.
3. Tap to save the number.
Chapter 3: Keeping in touch 42
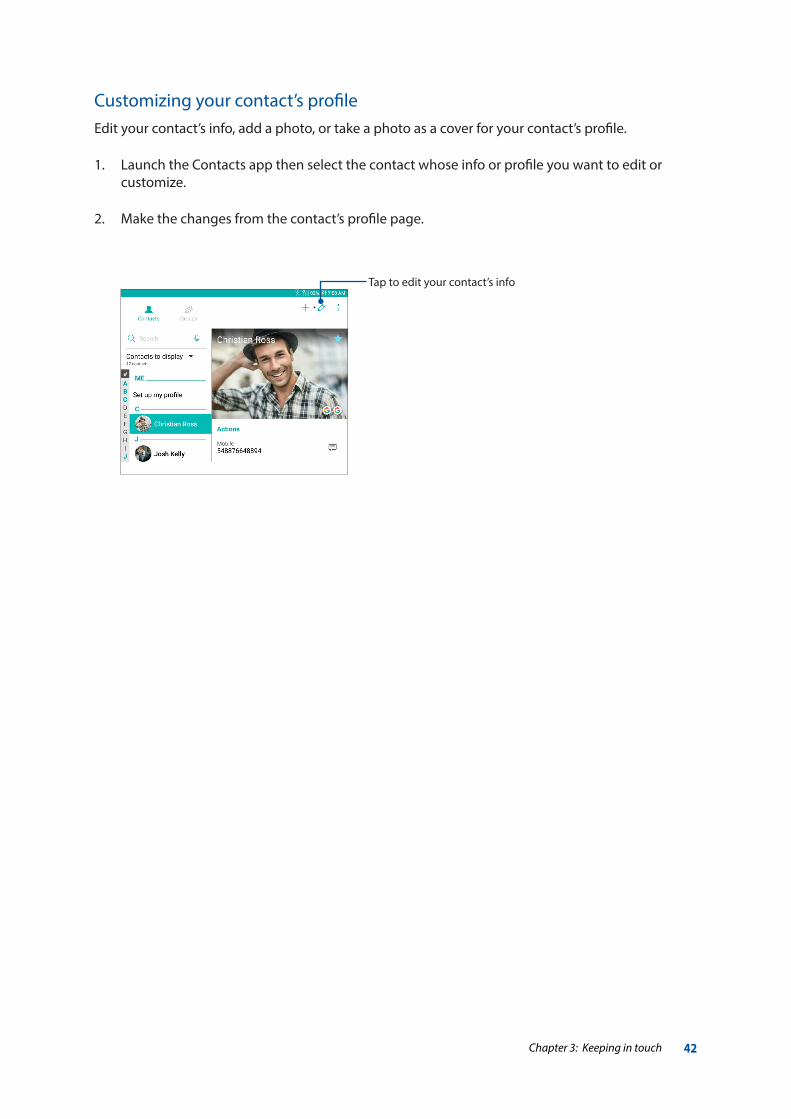
Customizing your contact’s profileEdit your contact’s info, add a photo, or take a photo as a cover for your contact’s profile.
1. Launch the Contacts app then select the contact whose info or profile you want to edit or customize.
2. Make the changes from the contact’s profile page.
Tap to edit your contact’s info
Chapter 3: Keeping in touch 43
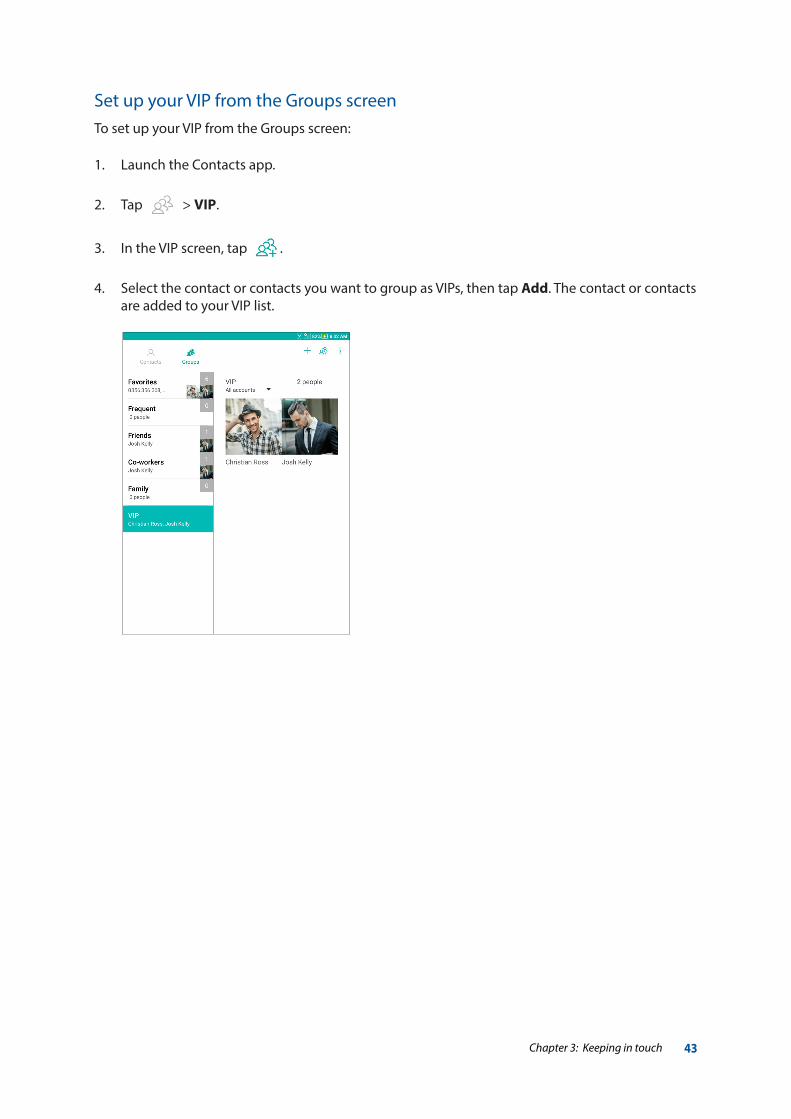
Set up your VIP from the Groups screenTo set up your VIP from the Groups screen:
1. Launch the Contacts app.
2. Tap > VIP.
3. In the VIP screen, tap .
4. Select the contact or contacts you want to group as VIPs, then tap Add. The contact or contacts are added to your VIP list.
Chapter 3: Keeping in touch 44
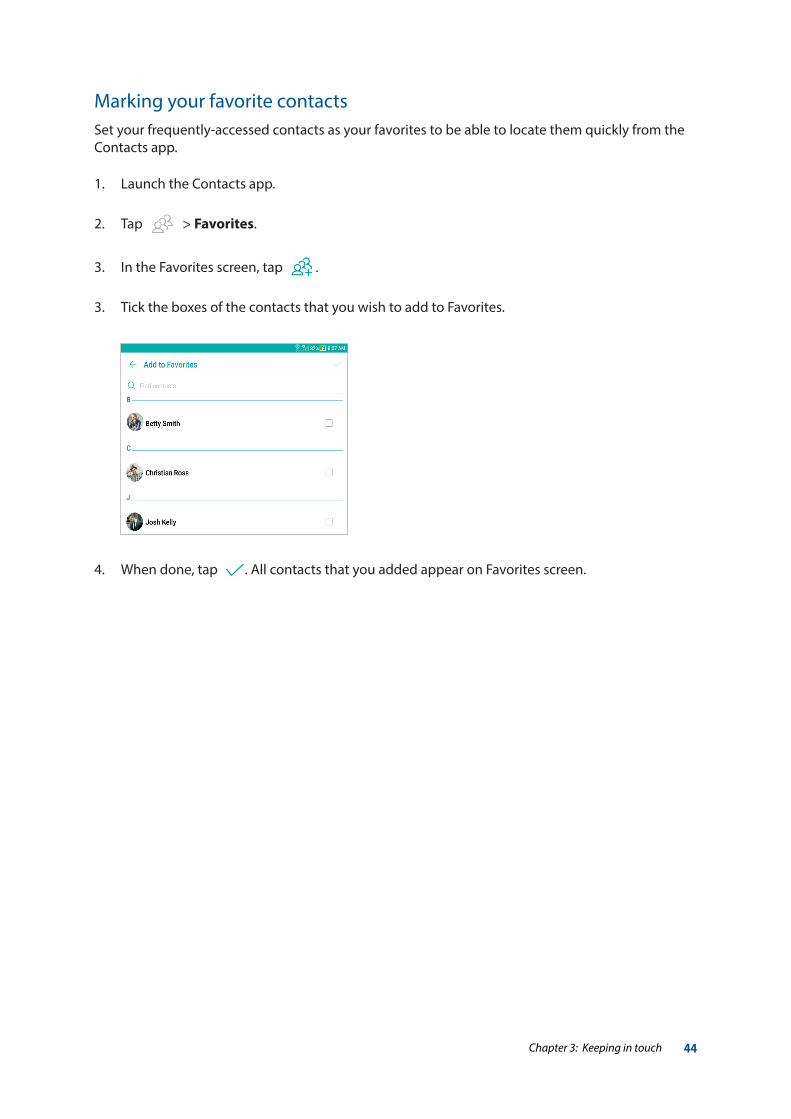
4. When done, tap . All contacts that you added appear on Favorites screen.
Marking your favorite contactsSet your frequently-accessed contacts as your favorites to be able to locate them quickly from the Contacts app.
1. Launch the Contacts app.
2. Tap > Favorites.
3. In the Favorites screen, tap .
3. Tick the boxes of the contacts that you wish to add to Favorites.
Chapter 3: Keeping in touch 45
Importing contactsImport your contacts and their respective data from one contact source to your ASUS Tablet, email account, or a nano SIM card.
1. Launch the Contacts app then tap > Manage contacts.
2. Tap Import/Export then select where you would like to import your contacts from.
3. Tap to select where you would like to save the contacts to.
Exporting contactsExport your contacts to any of the storage accounts in your ASUS Tablet.
1. Launch the Contacts app then tap > Manage contacts.
2. Tap Import/Export then select where you would like to export your contacts to.
3. Tap to select where you would like to export the contacts from:
4. When done, tap OK.
Chapter 3: Keeping in touch 46
Social networking with your contactsIntegrating the social network accounts of your contacts makes it easier for you to view their profiles, news, and social feeds. Stay updated with the activities of your contacts in real time.
IMPORTANT! Before you can integrate social network accounts of your contacts, you need to log in to your social network account and sync its settings.
Syncing your social network accountSync your social network account to add the social network accounts of your contacts to your ASUS Tablet.
1. Do any of the following to launch the Settings app:
• Launch Quick settings then tap .
• Tap > Settings.
2. From the Settings screen, tap your social network account under Accounts section.
3. Tap Contacts to sync the social network accounts of your contacts.
4. Launch the Contacts app to view your contacts list.
5. To view only your contacts with social network accounts, tap Contacts to display then untick the other contact sources, leaving the social network name checked.
6. When done, tap or anywhere on the screen.
Chapter 3: Keeping in touch 47
Linking your contacts’ infoWhen you add social network or email accounts, data from these accounts automatically sync with the Contacts app. In some instances, some contact info may appear in several places or under different name variations or nicknames in the Contacts app. You can manually link and unify all these info and put them under one place or profile.
1. From the Contacts app, tap and hold the contact whose info you want to link, then select Link contact.
2. From the contact’s profile page, tap .
3. Select all the contact profiles that you think should be linked to one profile, then tap . You can now view and retrieve all your contact’s info under one profile.
Chapter 4: Your precious moments 48
Your precious moments 44 Your precious moments
NOTE: Screenshots are for reference only. Actual apps shown on-screen may vary per model.
Capture moments
Launching the Camera appCapture images and record videos using your ASUS Tablet’s Camera app. Refer to any of the steps below to open the Camera app.
From the lock screen
Drag to any direction to unlock and launch the Camera app.
From the home screen
Tap .
Using the volume keyWhile your ASUS Tablet is on sleep mode, double-click the volume key to wake it up and immediately launch the Camera app.
NOTE: Before using the volume key to launch the Camera app, enable this function from Settings > Lock screen, then slide Instant camera to ON.
Chapter 4: Your precious moments 49
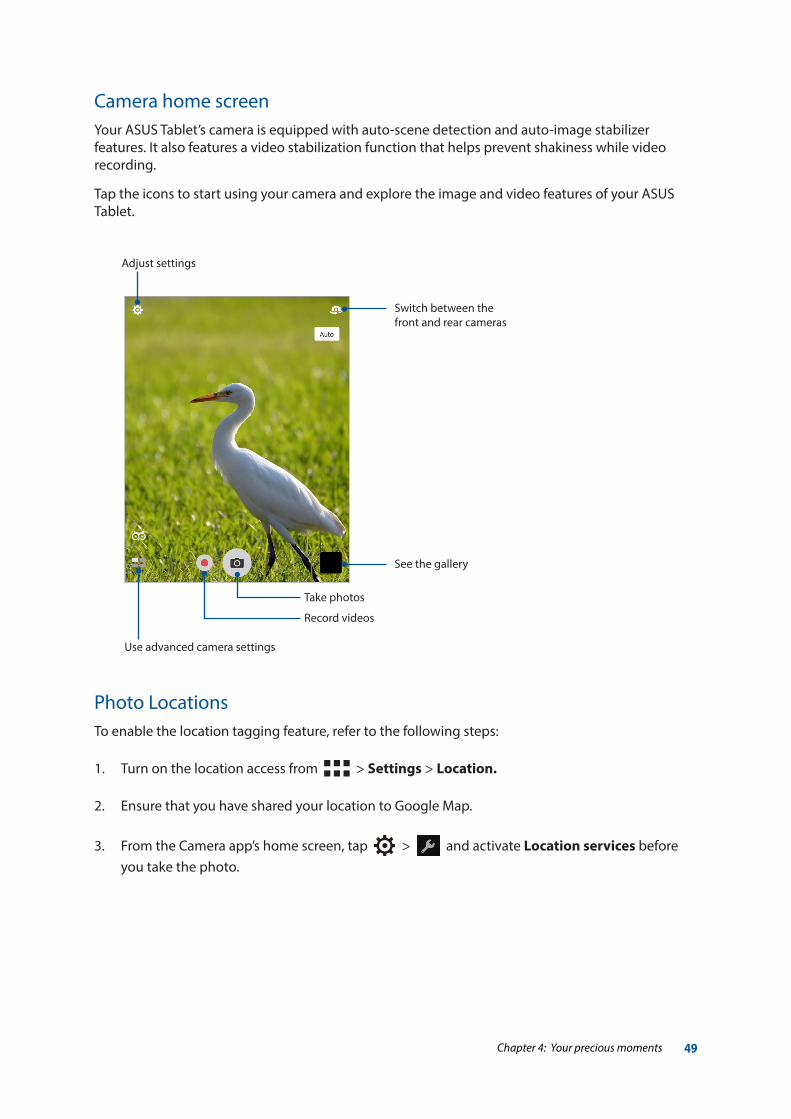
Camera home screenYour ASUS Tablet’s camera is equipped with auto-scene detection and auto-image stabilizer features. It also features a video stabilization function that helps prevent shakiness while video recording.
Tap the icons to start using your camera and explore the image and video features of your ASUS Tablet.
Photo LocationsTo enable the location tagging feature, refer to the following steps:
1. Turn on the location access from > Settings > Location.
2. Ensure that you have shared your location to Google Map.
3. From the Camera app’s home screen, tap > and activate Location services before you take the photo.
Use advanced camera settings
Switch between the front and rear cameras
Adjust settings
Record videos
Take photos
See the gallery

Chapter 4: Your precious moments 50
Camera settingsAdjust the appearance of your captured images by configuring your camera’s settings using the steps below.
IMPORTANT! Apply the settings first before taking images.
1. On the camera’s home screen, tap > .
2. Scroll down and configure the available options.
Video settingsAdjust the appearance of your recorded videos by configuring your camera’s settings using the steps below.
IMPORTANT! Apply the settings first before taking images.
1. On the camera’s home screen, tap > .
2. Scroll down and configure the available options.
Others settingsAdjust advanced settings to customize your camera.
IMPORTANT! Apply the settings first before taking images.
1. On the camera’s home screen, tap > .
2. Scroll down and configure the available options.
Chapter 4: Your precious moments 51
Advanced camera featuresExplore new ways of capturing images or videos and make captured moments extra special using the advanced camera features of your ASUS Tablet.
IMPORTANT! Apply the settings first before taking images. Available features may vary per model.
HDR ProThe High-dynamic-range (HDR) feature allows you to take more detailed images for low-light and highly contrasting scenes. HDR is recommended for use when taking images on brightly lit locations, helping balance out the colors produced on your image.
Capturing HDR Pro photos
1. From the Camera app’s home screen, tap > HDR Pro.
2. Tap to start capturing HDR photos.
BeautificationHave fun during and after taking photos of your family and friends using the Beautification feature of your ASUS Tablet. When enabled, this feature allows you to make live beauty enhancements on your subject’s face before you press the shutter button.
Capturing Beautification photos
1. From the Camera app’s home screen, tap > Beautification.
2. Tap to adjust the Beautification settings to apply to the photo.
3. Tap to start capturing the photo.
NOTE: Drag towards the center of the screen to set a countdown timer.
Chapter 4: Your precious moments 52
Low lightUsing PixelMaster, your camera’s light sensitivity is increased by up to 400% to enhance noise reduction and boost color contrast by up to 200%. Use this mode to transform any subject into a great photo or video—with or without ample natural lighting.
Capturing Low light photos
1. From the Camera app’s home screen, tap > Low light.
NOTE: An owl icon will automatically appear in dim light conditions for you to tap and enable the Low light mode.
2. Tap to start capturing photos.
Capturing Low light videos
1. From the Camera app’s home screen, tap > Low light.
2. Tap to start recording a video.
NightTake well-lit photos even on night time or on low-light situations using the Night feature of your ASUS Tablet.
NOTE: Keep your hands steady before and while the ASUS Tablet is capturing the image to prevent blurry results.
Capturing Night photos
1. From the Camera app’s home screen, tap > Night.
2. Tap to start capturing Night photos.
Chapter 4: Your precious moments 53
Depth of field Take macro shots with a soft background using the Depth of Field. This feature suits close up photos of subjects for a more defined and dramatic result.
Capturing Depth of Field photos
1. From the Camera app’s home screen, tap > Depth of Field.
2. Tap to start capturing photos.
3. Tap or to increase or decrease the background blur.
4. Tap to save the photo.
FilterTake photos using different filters such as Pixelize, Cartoon, Vintage, LOMO or other filters.
NOTE: A filter should be selected before taking the photo.
Capturing Filter photos
1. From the Camera app’s home screen, tap > Filter.
2. Tap and select a filter to apply to the photo.
3. Tap to start capturing photos.
Chapter 4: Your precious moments 54
SelfieTake advantage of your rear camera’s high megapixel specs without worrying about pressing the shutter button. Using face-detection, you can set your ASUS Tablet to detect up to four faces using the rear camera then automatically capture your selfie or group selfie.
Capturing Selfie photos
1. From the Camera app’s home screen, tap > Selfie.
2. Tap to choose how many people should be included in the photo.
3. Use the rear camera to detect faces and wait for your ASUS Tablet to start beeping, counting down until it captures the photo.
4. Tap to save the photo.
PanoramaCapture images from various angles using Panorama. Images captured from a wide angle perspective are automatically stitched together using this feature.
Capturing panoramic photos
1. From the Camera app’s home screen, tap > Panorama.
2. Tap then pan your ASUS Tablet horizontally (to the left or right) or vertically (upward or downward) to capture the scenery.
NOTE: While panning your ASUS Tablet, a timeline of thumbnails appears on the lower part of your screen as it captures the scenery.
3. Tap when finished.
Chapter 4: Your precious moments 55
MiniatureSimulate the tilt-shift effect of DSLR lenses via the Miniature feature. Using this feature allows you to focus on specific areas of your subject, adding a bokeh effect that can be used on both photos and video using your ASUS Tablet.
Capturing Miniature photos
1. From the Camera app’s home screen, tap > Miniature.
2. Tap or to select your focus area, then use your two fingers to adjust the focus area’s
size and position.
3. Tap or to increase or decrease the background blur. Tap or to increase or decrease saturation.
4. Tap to capture Miniature photos.
Time rewindAfter selecting Time Rewind, your shutter starts taking burst shots a few seconds before and after you actually press the shutter button. As a result, you get a timeline of images where you can choose the best image to save on your Photos.
NOTE: The Time Rewind feature can only be used on the rear camera.
Capturing Time Rewind photos
1. From the Camera app’s home screen, tap > Time Rewind.
2. Tap to start capturing photos.
3. The Time Rewind viewer appears onscreen on top of the captured photo. Rotate the button on the viewer to browse through the photos you just took.
NOTE: Tap Best to view the best photo suggestion from the timeline.
4. Tap when finished.
Chapter 4: Your precious moments 56
Slow motionThe slow motion video feature allows you to record videos for slow-motion playback.
Recording slow motion videos
1. From the Camera app’s home screen, tap > Slow motion.
2. Tap to start taking Slow motion videos.
Time lapseThe time lapse video feature of your ASUS Tablet allows you to capture stills for automatic time lapse playback. In effect, events seem to move in a fast-forward manner though they actually occured and were recorded between long intervals.
Recording Time lapse videos
1. From the Camera app’s home screen, tap > Time lapse.
2. Tap then select the time lapse interval.
3. Tap to start taking Time lapse videos.
Selfie PanoramaCapture selfies from various angles using Selfie Panorama. Images captured are automatically stitched together using this feature.
Capturing Selfie Panorama photos
1. From the Camera app’s home screen, switch to the front camera and tap > Selfie Panorama.
2. Tap then pan your ASUS Tablet to the left or right to capture the image.
NOTE: While panning your ASUS Tablet, a timeline of thumbnails appears on your screen as it captures the image.
3. Tap when finished.
Chapter 4: Your precious moments 57
Using the Photos appView images and play videos on your ASUS Tablet using the Photos app.
This app also allows you to edit, share, or delete image and video files stored in your ASUS Tablet. From Photos, you can display images in a slideshow or tap to view the selected image or video file.
From your Home screen, launch the Photos app using either of the following options:
• Tap > Google > Photos.
• From your ASUS Tablet’s home screen, tap .
Viewing files from your social network or cloud storageBy default, your Photos app displays all the media files on your ASUS Tablet by timeline.
To view the media files from other locations accessible via your ASUS Tablet:
1. From the Photos app’s home screen, tap .
2. Tap any of the source locations to view their respective media files.
NOTE:
• YoucandownloadphotostoyourASUSTabletfromyourcloudaccountandusethemasyourwallpaper.
• Fordetailsonusingphotosorimagesasyourwallpaper,seetheWallpapers section.
Chapter 4: Your precious moments 58
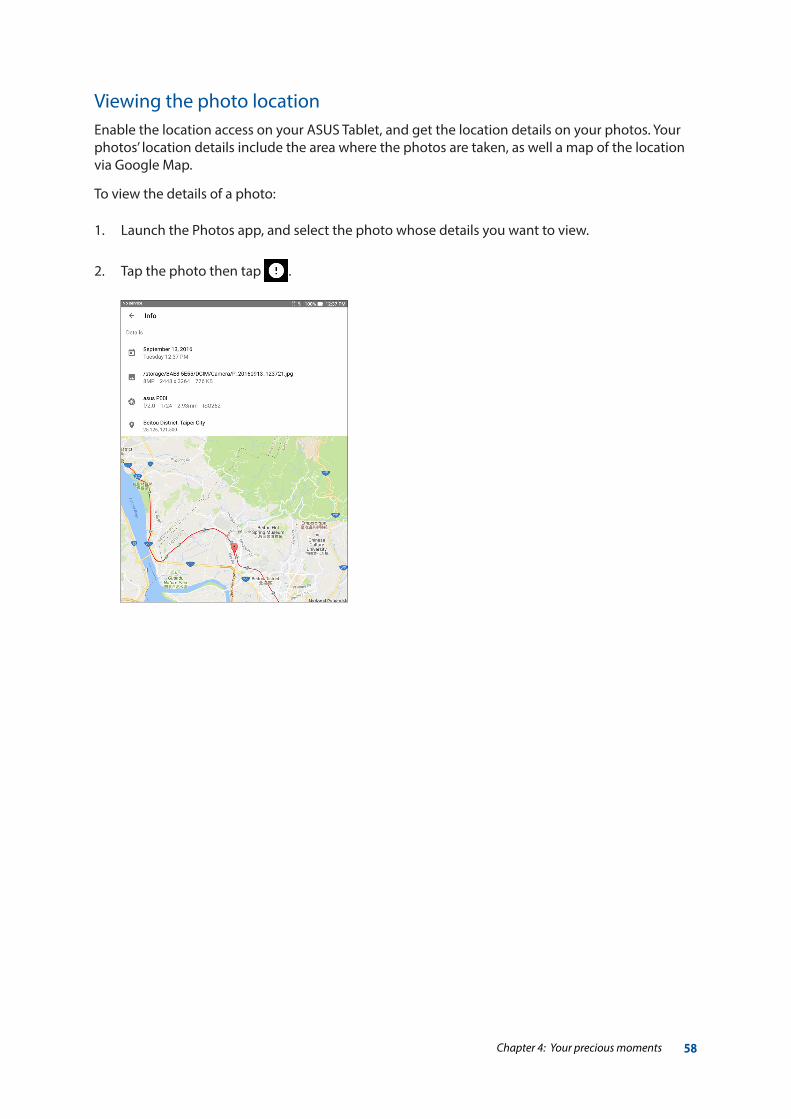
Viewing the photo locationEnable the location access on your ASUS Tablet, and get the location details on your photos. Your photos’ location details include the area where the photos are taken, as well a map of the location via Google Map.
To view the details of a photo:
1. Launch the Photos app, and select the photo whose details you want to view.
2. Tap the photo then tap .
Chapter 4: Your precious moments 59
Sharing files from the Photos
1. From the Photos app’s home screen, tap and hold the files you want to share. A check mark appears on top of the image you select.
2. Tap then select from the list where you want to share the files.
Deleting files from the Photos
1. From the Photos app’s home screen, tap and hold the files you want to delete. A check mark appears on top of the image you select.
2. Tap > Move to trash.
Editing imagesThe Photos app also features its own image editing tools that you can use to enhance images saved on your ASUS Tablet.
1. From the Photos app’s home screen, tap the folder where the files are located.
2. After opening the folder, tap the image you want to edit.
3. Once the image is opened, tap it again to show its functions.
4. Tap to open the image editing toolbar.
5. Tap any of the icons on the editing toolbar to apply changes to the image.
Zooming in/out the thumbnails or imagesFrom the Photos screen or your selected image, spread apart your fingers on the touchscreen panel to zoom in. To zoom out, bring your fingers together on the touchscreen panel.
Chapter 5: Work hard, play harder 60
Work hard, play harder 55 Work hard, play harder
BrowserYour browser’s state-of-the-art Chromium-based engine lets you surf the Internet at a fast loading speed.
IMPORTANT! Before doing any Internet surfing or Internet-related activities, ensure that your ASUS Tablet is connected to a Wi-Fi network. For more details, see the Staying connected section.
Launching the Chrome app
From your Home screen, tap .
Adding a new tabHide the current website and open a new window to continue surfing or browsing another website.
1. From the current page, tap > New tab or tap beside the current tab.
2. Enter the URL address in the URL field and continue enjoying browsing the Internet from your ASUS Tablet.
3. If you want to add another tab, repeat step 1.
NOTE:
• Openingmanywebsitesinyourbrowserslowsdownitsloadingperformance.
• IfInternetconnectionslowsdown,tryclearingthecache.Fordetails,refertosectionClearing the browser cache.
Bookmarking pagesBookmark your favorite pages or websites so you can go back and browse them again.
To bookmark a page:
On the page, tap to bookmark the current page. The next time you open your browser, you
can quickly tap > Bookmarks to see your bookmarked pages.
Chapter 5: Work hard, play harder 61
Clearing the browser cacheClear the browser cache to delete temporary Internet files, websites, and cookies that are temporarily stored in your ASUS Tablet. This helps improve the loading performance of your browser.
1. Launch the browser.
2. Tap > Settings > Privacy > Clear browsing data.
3. Tick the information you would like to clear, and tap CLEAR DATA.
EmailAdd Outlook, Yahoo! Mail, AOL, Verizon.net, Exchange, or other (POP3/IMAP) accounts so you can receive, create, and browse emails right from your device. You can also sync your email contacts from these accounts to your ASUS Tablet.
IMPORTANT! Your ASUS Tablet must be connected to a Wi-Fi or mobile network so you can add an email account or send and receive emails from added accounts. For more details, see the Staying connected section.
Setting up email accountsSet up your existing personal or work email account so you can receive, read, and send emails from your ASUS Tablet.
1. From the Home screen, tap Email to launch the Email app.
2. Tap the mail provider you want to set up.
3. Key in your email address and password and tap Next.
NOTE: Wait while your device automatically checks your incoming and outgoing mail server settings.
4. Configure the Account settings such as inbox checking frequency, sync days, or notification for incoming emails. When done, tap Next.
5. Key in an account name that you want to be displayed in the outgoing messages, then tap Next to log into your inbox.
NOTE: If you want to set up your work account on your ASUS Tablet, ask for the email settings from your network administrator.
Chapter 5: Work hard, play harder 62
Adding email accountsIf you have more than one existing email account, you can add more email accounts so you can receive, read, and send emails right from your ASUS Tablet.
1. From the Home screen, tap Email to launch the Email app.
2. Tap > Settings, then tap to add an email account.
3. Tap the mail provider that you want to add.
4. Follow the succeeding instructions to complete adding another email account.
NOTE: You may also refer to steps 3 to 5 in the Setting up email accounts section to complete this setup process.
Setting up a Gmail accountSet up your Gmail account to get into Google-related services and apps as well as receive, send, and browse emails right from your ASUS Tablet.
1. From the Home screen, tap Google folder then tap Gmail.
2. Tap Add an email address and select Google.
3. Key in your existing Gmail account and tap NEXT, then key in your password and tap NEXT.
NOTE:
• TapOr create a new account if you do not own a Google account.
• Whensigningin,youhavetowaitwhileyourdevicecommunicateswithGoogleserverstosetupyour account.
3. Read the Terms of Service and Privacy Policy, then tap ACCEPT to continue.
4. After configuring Google services for your account, tap NEXT > TAKE ME TO GMAIL to go to your Gmail account.
Chapter 5: Work hard, play harder 63
Do It Later
Adding to-do tasksCreate important to-do tasks to organize your work or social activities in your professional or social life.
1. From the Home screen, tap > Do It Later.
2. Tap then fill in the necessary information.
3. When you’re done, tap Done.
Prioritizing to-do tasksSet the importance level of your to-do tasks so you can prioritize and act on them accordingly.
1. From the Home screen, tap > Do It Later.
2. Tap the task that you want to set as a top priority.
3. Under the Importance field in the task screen, select High.
4. When you’re done, tap Done.
NOTE: High-priority to-do tasks are marked as on your Do It Later list. This allows you to quickly determine which to-do tasks need immediate actions.
Deleting to-do tasksYou can delete any completed, overdue, or unnecessary to-do tasks from the Do It Later app.
1. From the Home screen, tap > Do It Later.
2. Tap the task you want to remove from the list, then tap .
Chapter 5: Work hard, play harder 64
File ManagerUsing File Manager allows you to easily locate and manage your data on the internal storage of your ASUS Tablet and its connected external storage devices.
Accessing the internal storageTo access the internal storage:
1. Tap > File Manager.
2. Tap > Internal storage to view the contents of your ASUS Tablet.
Accessing the external storage deviceTo access the external storage device:
1. Insert the microSD card into your ASUS Tablet.
2. Tap > File Manager.
3. Tap > MicroSD to view the contents of your microSD card.
Accessing Cloud storage
IMPORTANT! Ensure that Wi-Fi or mobile network is enabled on your ASUS Tablet. For more details, see the Staying connected section.
To access files saved on your cloud storage accounts:
1. Tap > File Manager.
2. Tap > Cloud.
Chapter 6: Staying connected 65
Staying connected 6Wi-FiThe Wi-Fi technology of your ASUS Tablet gets you connected to the wireless world. Update your social media accounts, browse the Internet, or exchange data and messages wirelessly from your ASUS Tablet.
Enabling Wi-Fi
1. Launch the Settings screen by doing any of the following:
• Launch Quick settings then tap .
• Tap > Settings.
2. Slide the Wi-Fi switch to the right to turn on the Wi-Fi.
NOTE: You can also enable the Wi-Fi from Quick Settings screen. Refer to section Quick settings on how to launch Quick Settings screen.
Connecting to a Wi-Fi network
1. On the Settings screen, tap Wi-Fi to display all detected Wi-Fi networks.
2. Tap a network name to connect to it. For a secured network, you may be prompted to key in a password or other security credentials.
NOTE:
• YourASUSTabletautomaticallyreconnectstothenetworkthatyouconnectedwithpreviously.
• Turn off the Wi-Fi feature when you’re not using it to help save battery power.
Chapter 6: Staying connected 66
Disabling Wi-FiTo disable Wi-Fi:
1. Launch the Settings screen by doing any of the following:
• Launch Quick settings then tap .
• Tap > Settings.
2. Slide the Wi-Fi switch to the left to turn off the Wi-Fi.
NOTE: You can also disable the Wi-Fi from Quick settings screen. For details on how to launch Quick settings screen, see the Quick settings section.
Bluetooth®Use the Bluetooth feature of your ASUS Tablet to send or receive files and stream multimedia files with other smart devices over short distances. With Bluetooth, you can share your media files with your friends’ smart devices, send data for print with a Bluetooth printer, or play music files with a Bluetooth speaker.
Enabling Bluetooth®
1. Do any of the following to launch the Settings screen:
• Launch Quick settings then tap .
• Tap > Settings.
2. Slide the Bluetooth switch to the right to turn on the Bluetooth.
NOTE: You can also enable the Bluetooth from Quick settings screen. For details on how to launch Quick settings screen, see the Quick settings section.
Chapter 6: Staying connected 67
Pairing your ASUS Tablet to a Bluetooth deviceBefore using the Bluetooth feature of your ASUS Tablet in full scale, you have to pair it first with the Bluetooth device. The ASUS Tablet automatically stores the pairing connection of the Bluetooth device.
1. Turn on the Bluetooth of your ASUS Tablet to make it visible to other Bluetooth devices.
2. On the Settings screen, tap Bluetooth to display all available devices.
IMPORTANT! If the device that you want to pair is not in the list, ensure to enable its Bluetooth feature.
3. In the list of available devices, tap the Bluetooth device that you want to pair with.
4. Ensure that the same pairing code is shown on both devices, then tap Pair.
NOTE: Turn off the Bluetooth feature when you’re not using it to help save battery power.
Unpairing your ASUS Tablet from the Bluetooth device
1. On the Settings screen, tap Bluetooth to display all available and paired devices.
2. In the list of paired devices, tap of the Bluetooth device that you want to unpair, then tap
Forget.

Chapter 6: Staying connected 68
Airplane modeAirplane mode disables wireless communication, allowing you to use your ASUS Tablet safely while in-flight.
Enabling Airplane mode
1. Launch the Settings screen by doing any of the following:
• Launch Quick settings then tap .
• Tap > Settings.
2. Slide the Airplane mode switch to the right to turn on the Airplane mode.
NOTE: You can also enable the Airplane mode from Quick settings screen. For details on how to launch Quick settings screen, see the Quick settings section.
Disabling Airplane mode
1. Launch the Settings screen by doing any of the following:
• Launch Quick settings then tap .
• Tap > Settings.
2. Slide the Airplane mode switch to the left to turn off the Airplane mode.
NOTE: You can also disable the Airplane mode from Quick settings screen. For details on how to launch Quick settings screen, see the Quick settings section.
Chapter 6: Staying connected 69
Mobile Hotspot and TetheringWhen Wi-Fi service is not available, you can use your ASUS Tablet as a modem or turn it into a mobile hotspot to get Internet access on your laptop, tablet, and other mobile devices.
IMPORTANT! Most mobile service providers may require a data plan for you to be able to use the tethering function. Contact your mobile service provider about availing of this data plan.
NOTE:
• InternetaccessviatetheringmaybeslowerthanthestandardWi-Fiormobileconnection.
• OnlyalimitednumberofmobiledevicescantethertoyourASUSTabletforInternetaccess.
• Turn off the tethering feature when you're not using it to help save battery power.
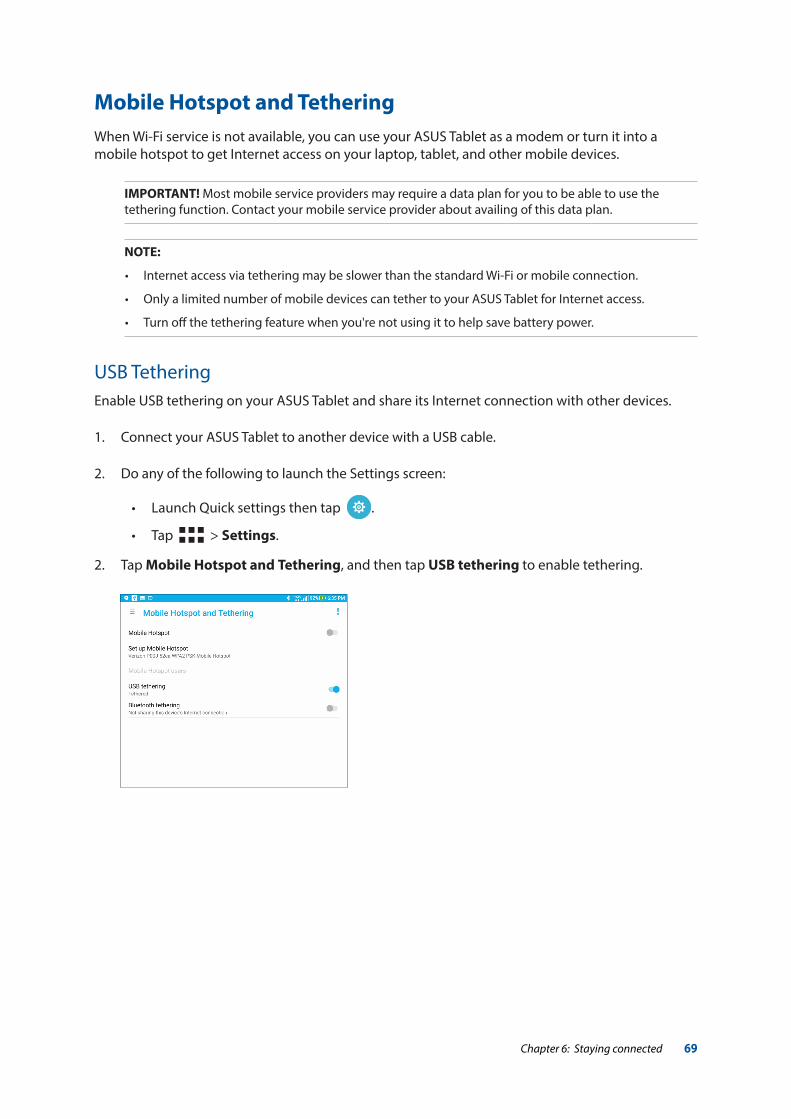
USB TetheringEnable USB tethering on your ASUS Tablet and share its Internet connection with other devices.
1. Connect your ASUS Tablet to another device with a USB cable.
2. Do any of the following to launch the Settings screen:
• Launch Quick settings then tap .
• Tap > Settings.
2. Tap Mobile Hotspot and Tethering, and then tap USB tethering to enable tethering.
Chapter 6: Staying connected 70
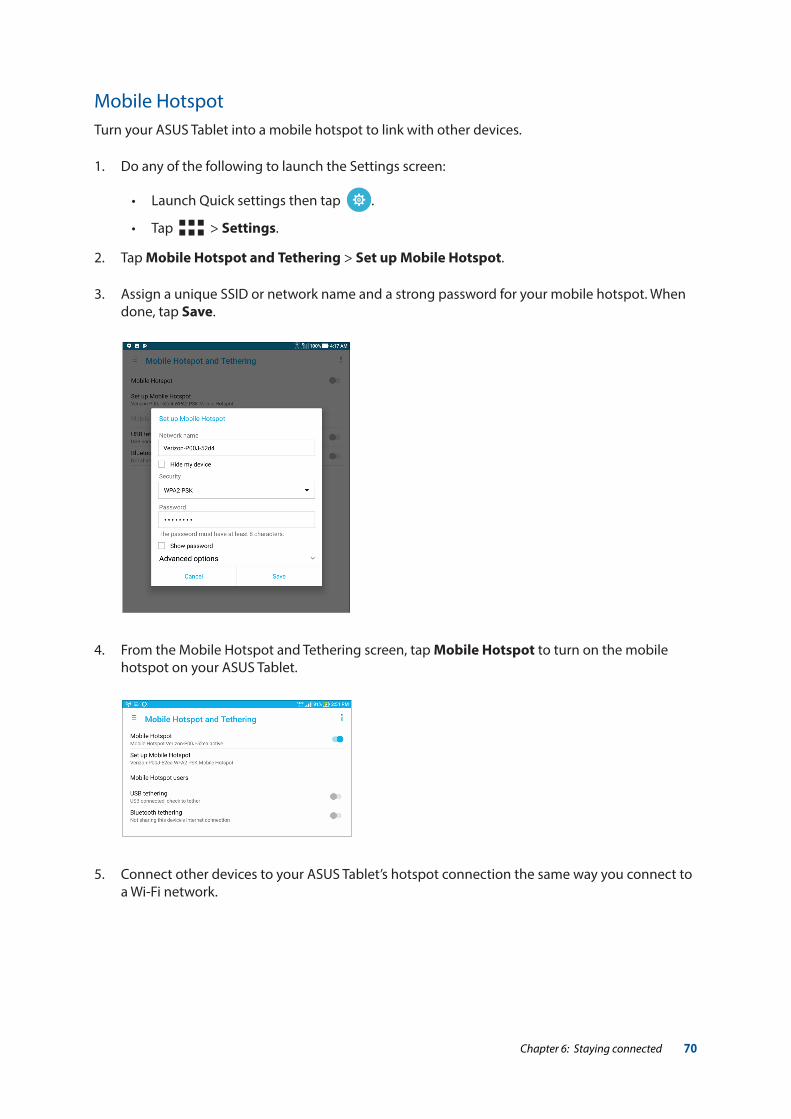
Mobile HotspotTurn your ASUS Tablet into a mobile hotspot to link with other devices.
1. Do any of the following to launch the Settings screen:
• Launch Quick settings then tap .
• Tap > Settings.
2. Tap Mobile Hotspot and Tethering > Set up Mobile Hotspot.
3. Assign a unique SSID or network name and a strong password for your mobile hotspot. When done, tap Save.
4. From the Mobile Hotspot and Tethering screen, tap Mobile Hotspot to turn on the mobile hotspot on your ASUS Tablet.
5. Connect other devices to your ASUS Tablet’s hotspot connection the same way you connect to a Wi-Fi network.
Chapter 6: Staying connected 71
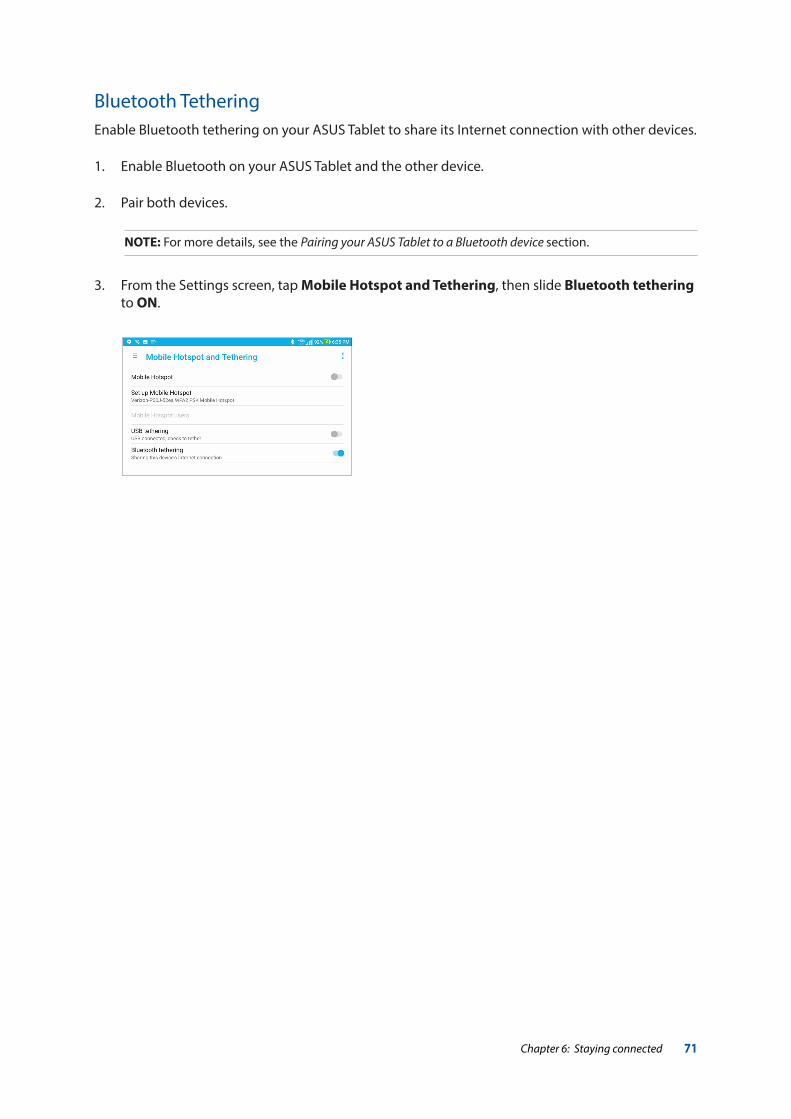
Bluetooth TetheringEnable Bluetooth tethering on your ASUS Tablet to share its Internet connection with other devices.
1. Enable Bluetooth on your ASUS Tablet and the other device.
2. Pair both devices.
NOTE: For more details, see the Pairing your ASUS Tablet to a Bluetooth device section.
3. From the Settings screen, tap Mobile Hotspot and Tethering, then slide Bluetooth tethering to ON.
Chapter 6: Staying connected 72
PlayToPlayTo app lets you screencast your ASUS Tablet to a streaming-supported display. Doing this allows an external display to become a dual monitor or second screen to your ASUS Tablet.
IMPORTANT! Your external display must have Miracast™ or DLNA® technology to support PlayTo app.
Launching PlayToThere are two ways you can use to start using PlayTo from your ASUS Tablet.
From Quick settings
1. Setup the streaming-supported display you want to use with your ASUS Tablet.
2. Launch Quick settings on your ASUS Tablet then tap PlayTo.
3. Refer to the SSID shown on your streaming-supported display and select the same SSID on your ASUS Tablet to start pairing.
Once the connection is made, your streaming-supported display shows the same content currently shown on your ASUS Tablet.
From Settings
1. Tap > Settings.
2. Under Wireless & networks, tap More > PlayTo (Miracast).
3. Refer to the SSID shown on your streaming-supported display and select the same SSID on your ASUS Tablet to start pairing.
Once the connection is made, your streaming-supported display shows the same content currently shown on your ASUS Tablet.
Chapter 7: Maintain your Zen 73
Keeping your device up-to-dateKeep your ASUS Tablet in the loop of Android system updates and upgraded apps and features.
Updating your system
1. Tap > Settings > System update .
2. Tap Check for system update.
NOTE: You can preview the last time your ASUS Tablet’s system was updated in the Last system update section.
StorageYou can store data, apps, or files on your ASUS Tablet (internal storage), on an external storage, or on an online storage. You need an internet connection to transfer or download your files on an online storage. Use the bundled USB cable to copy files to or from the computer to your ASUS Tablet.
Backup and resetBack up data, Wi-Fi passwords, and other settings to Google servers using your ASUS Tablet.
1. Tap then tap Settings > Backup & reset.
2. From the Backup & reset window, you can:
• Back up my data: This feature backs up your data, Wi-Fi passwords, and other settings to Google servers when enabled.
• Backup account: Allows you to specify the account you wish to be associated when you save your backup.
• Automatic restore: This features facilitates restoration of backed up settings and data when you reinstall an app.
• Network settings reset: Erases Wi-Fi, mobile data and Bluetooth settings on tablet. • Factory data reset: Erases all data on tablet. • System settings reset: Return your device to the way it originally behaved if you have
changed any of the system settings.
Maintain your Zen 7
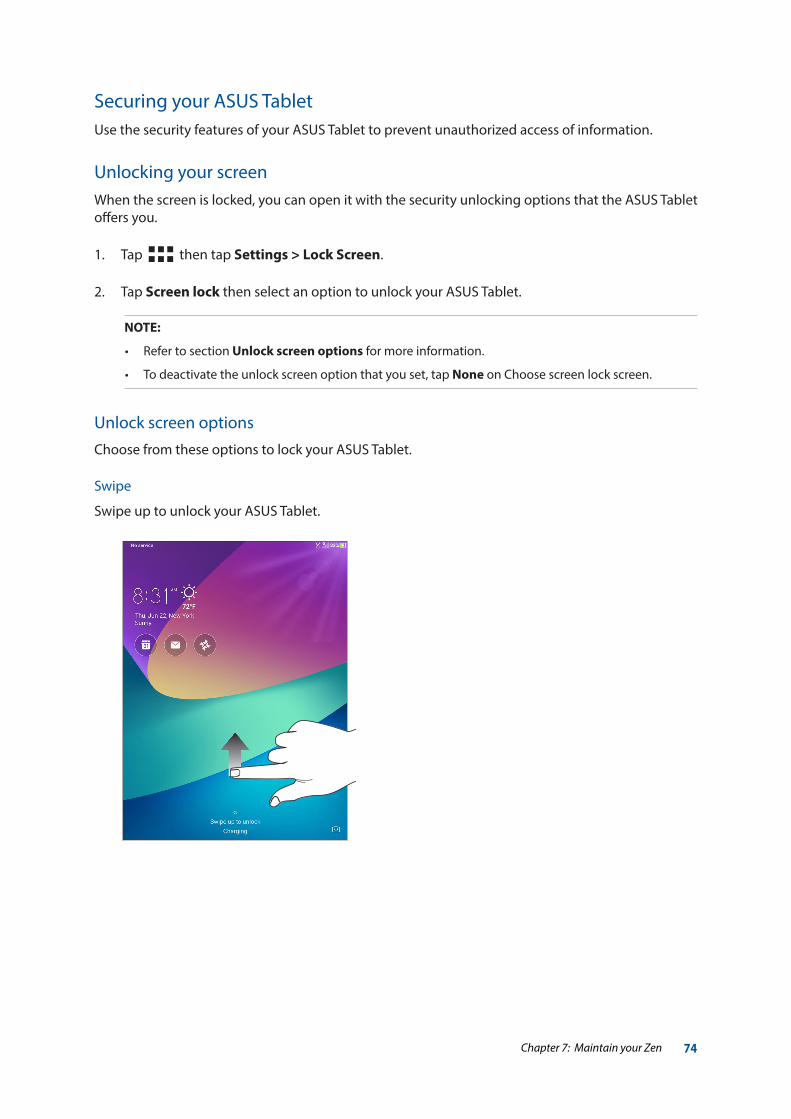
Chapter 7: Maintain your Zen 74
Securing your ASUS TabletUse the security features of your ASUS Tablet to prevent unauthorized access of information.
Unlocking your screenWhen the screen is locked, you can open it with the security unlocking options that the ASUS Tablet offers you.
1. Tap then tap Settings > Lock Screen.
2. Tap Screen lock then select an option to unlock your ASUS Tablet.
NOTE:
• Refertosection Unlock screen options for more information.
• Todeactivatetheunlockscreenoptionthatyouset,tapNone on Choose screen lock screen.
Unlock screen options
Choose from these options to lock your ASUS Tablet.
Swipe
Swipe up to unlock your ASUS Tablet.
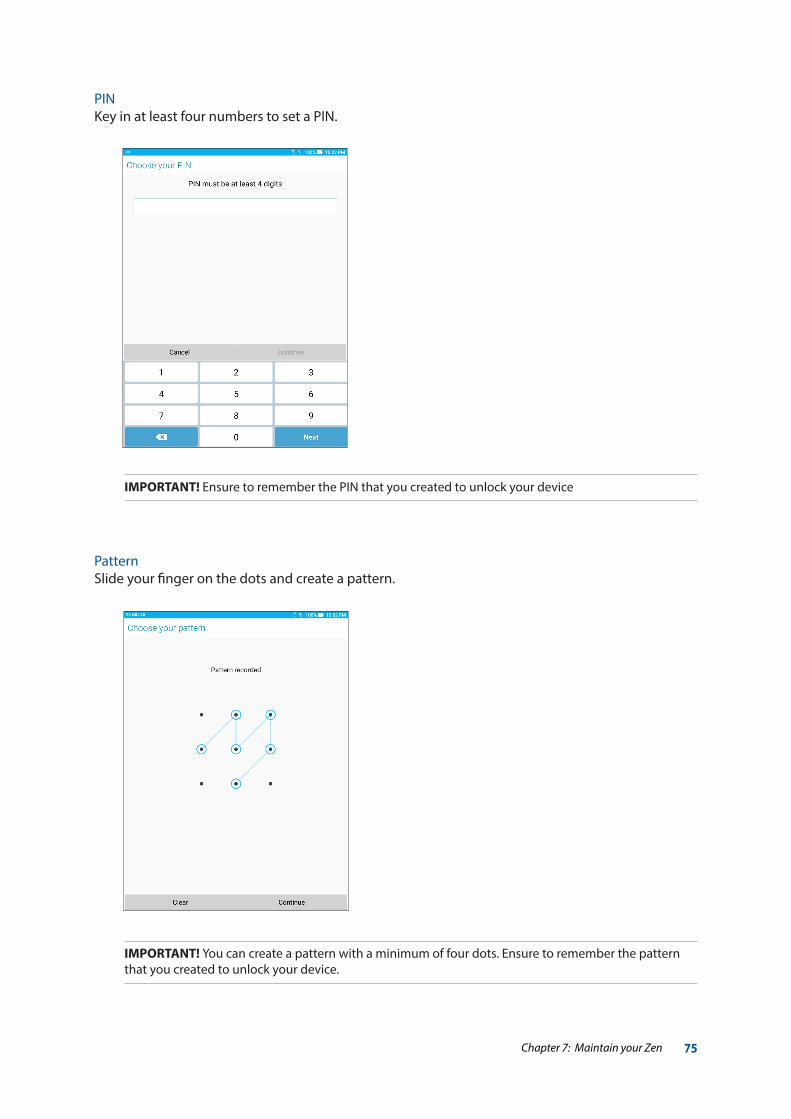
Chapter 7: Maintain your Zen 75
PINKey in at least four numbers to set a PIN.
IMPORTANT! Ensure to remember the PIN that you created to unlock your device
PatternSlide your finger on the dots and create a pattern.
IMPORTANT! You can create a pattern with a minimum of four dots. Ensure to remember the pattern that you created to unlock your device.
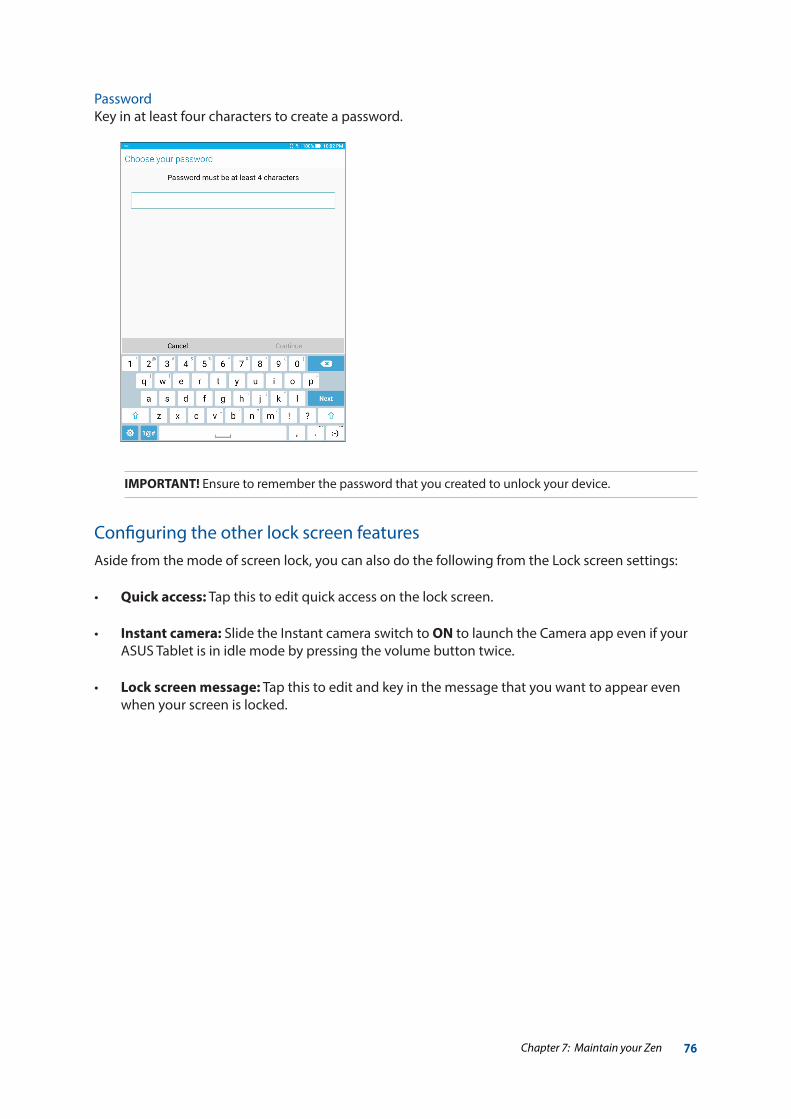
Chapter 7: Maintain your Zen 76
PasswordKey in at least four characters to create a password.
IMPORTANT! Ensure to remember the password that you created to unlock your device.
Configuring the other lock screen featuresAside from the mode of screen lock, you can also do the following from the Lock screen settings:
• Quick access: Tap this to edit quick access on the lock screen.
• Instant camera: Slide the Instant camera switch to ON to launch the Camera app even if your ASUS Tablet is in idle mode by pressing the volume button twice.
• Lock screen message: Tap this to edit and key in the message that you want to appear even when your screen is locked.
Chapter 7: Maintain your Zen 77
Setting your ASUS Tablet identityKnow your ASUS Tablet’s identity such as serial number, IMEI (International Mobile Equipment Identity) number, or model number.
This is important, as when you lose your ASUS Tablet, you can contact your mobile carrier and provide the information to blacklist the unauthorized use of your ASUS Tablet.
To display your ASUS Tablet’s identity:
1. Tap then tap Settings.
2. On the Settings screen, slide down to display other items then tap About tablet. The About tablet screen displays the status, legal information, model number, operating system version, hardware, and software information of your ASUS Tablet.
3. To see the serial number and IMEI information of your ASUS Tablet, tap Status.
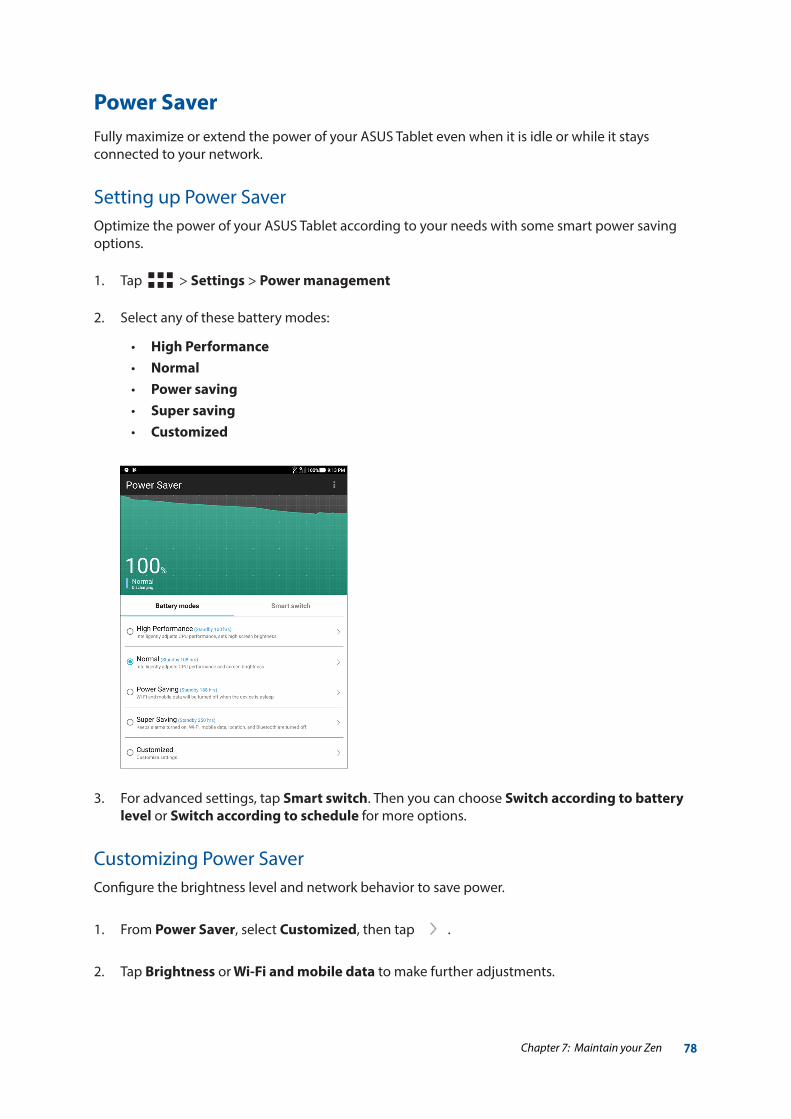
Chapter 7: Maintain your Zen 78
Power SaverFully maximize or extend the power of your ASUS Tablet even when it is idle or while it stays connected to your network.
Setting up Power SaverOptimize the power of your ASUS Tablet according to your needs with some smart power saving options.
1. Tap > Settings > Power management
2. Select any of these battery modes:
• High Performance • Normal • Power saving • Super saving • Customized
3. For advanced settings, tap Smart switch. Then you can choose Switch according to battery level or Switch according to schedule for more options.
Customizing Power SaverConfigure the brightness level and network behavior to save power.
1. From Power Saver, select Customized, then tap .
2. Tap Brightness or Wi-Fi and mobile data to make further adjustments.
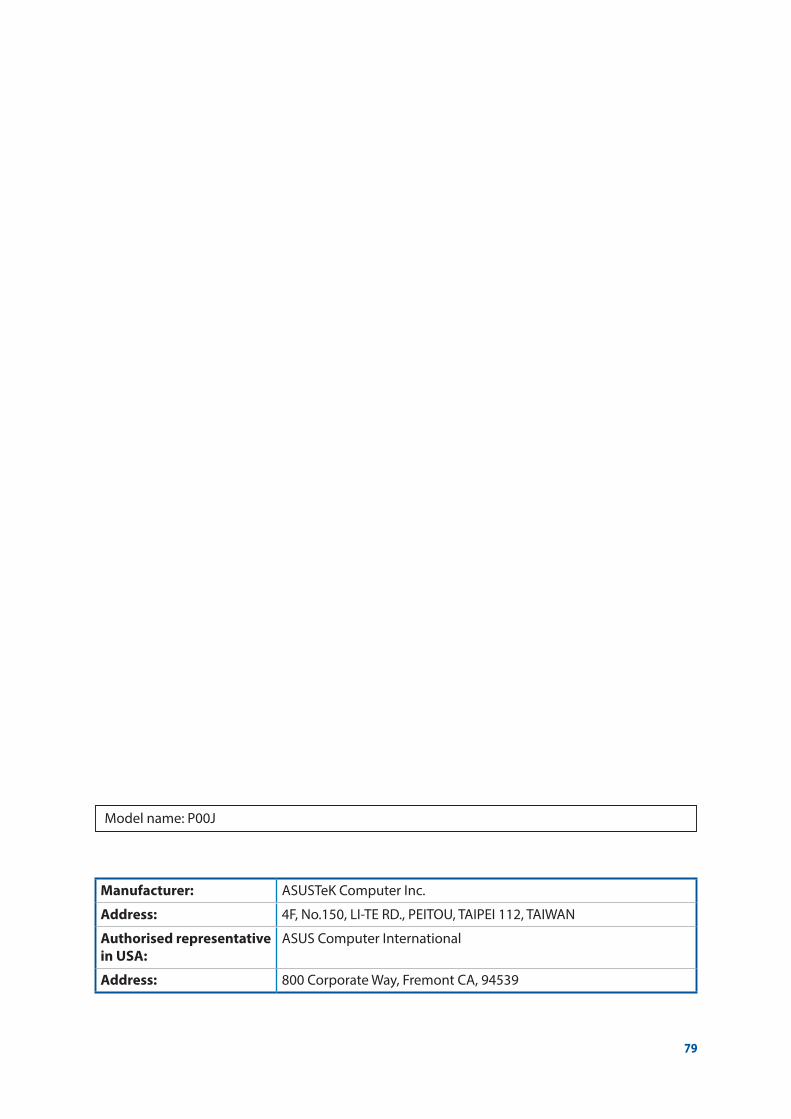
79
Manufacturer: ASUSTeK Computer Inc.
Address: 4F, No.150, LI-TE RD., PEITOU, TAIPEI 112, TAIWAN
Authorised representative in USA:
ASUS Computer International
Address: 800 Corporate Way, Fremont CA, 94539
Model name: P00J