Embed Size (px)
Citation preview
AstraZeneca
Evidence Connect PlatformExternally Sponsored Research
User GuideMarch 2019

2
How to Use This Guide
• This guide is divided into short sections for ease of use
• There are hyperlinks throughout this guide to aid with navigation
• Click the icon in the lower left corner to return to the table of contents
• When logged into Evidence Connect, you can access the Evidence Connect Training Centre by clicking the icon located at the top right-hand-side of the screen
• If you need technical support using Evidence Connect, contact us at:
– Email: [email protected]
3
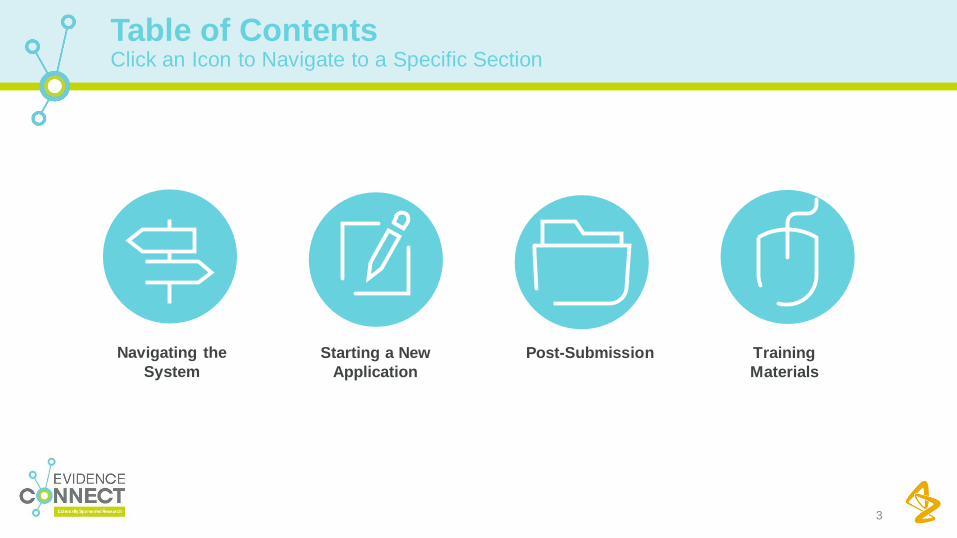
Table of ContentsClick an Icon to Navigate to a Specific Section
Navigating the
System
Starting a New
Application
Post-Submission Training
Materials

Internal AstraZeneca use only. January 2017
Navigating the System
4
• Register for a New Account• Login• Dashboard• Navigation Overview • Global Tools • Global Tools: Bookmarks• Global Tools: Profile • Breadcrumbs • Context Bar • Workbench• Workbench Preview• System Icons
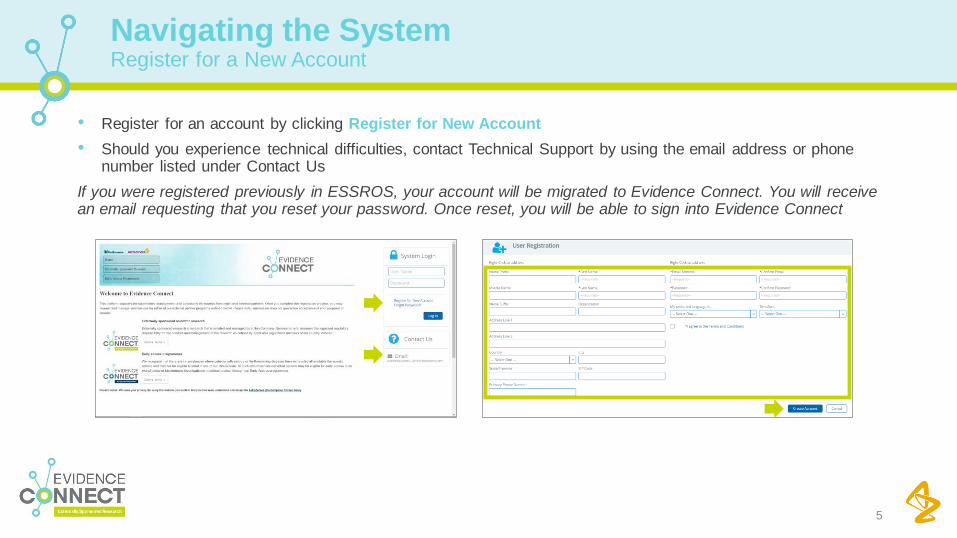
• Register for an account by clicking Register for New Account
• Should you experience technical difficulties, contact Technical Support by using the email address or phone number listed under Contact Us
If you were registered previously in ESSROS, your account will be migrated to Evidence Connect. You will receive an email requesting that you reset your password. Once reset, you will be able to sign into Evidence Connect
5
Register for a New Account
Navigating the System
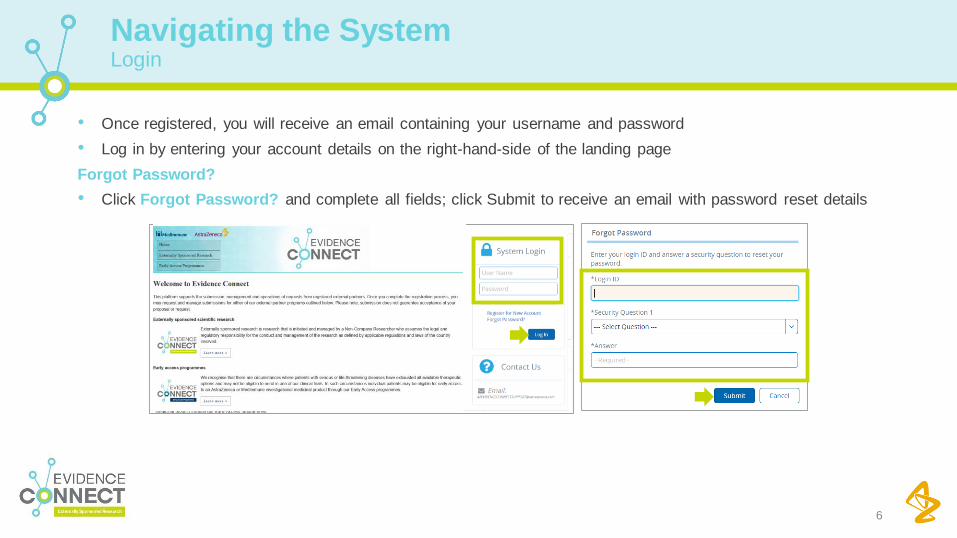
• Once registered, you will receive an email containing your username and password
• Log in by entering your account details on the right-hand-side of the landing page
Forgot Password?
• Click Forgot Password? and complete all fields; click Submit to receive an email with password reset details
6
Login
Navigating the System
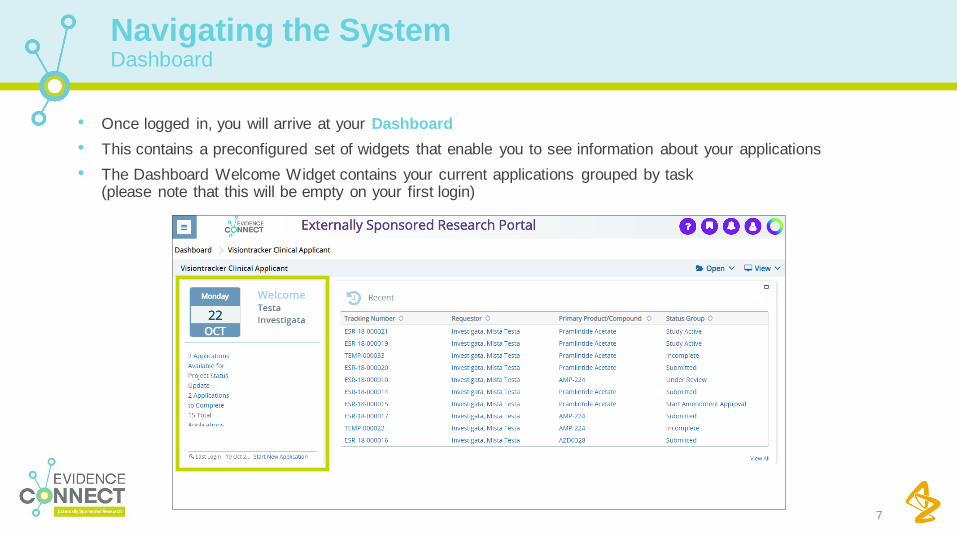
• Once logged in, you will arrive at your Dashboard
• This contains a preconfigured set of widgets that enable you to see information about your applications
• The Dashboard Welcome Widget contains your current applications grouped by task (please note that this will be empty on your first login)
7
Dashboard
Navigating the System
8
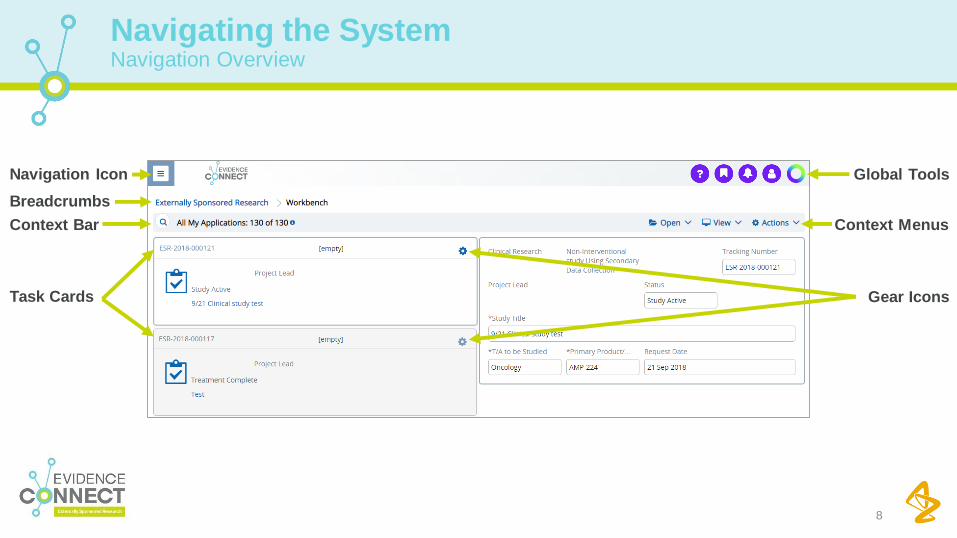
Navigation Overview
Navigating the System
Context Bar Context Menus
Breadcrumbs
Task Cards
Navigation Icon
Gear Icons
Global Tools
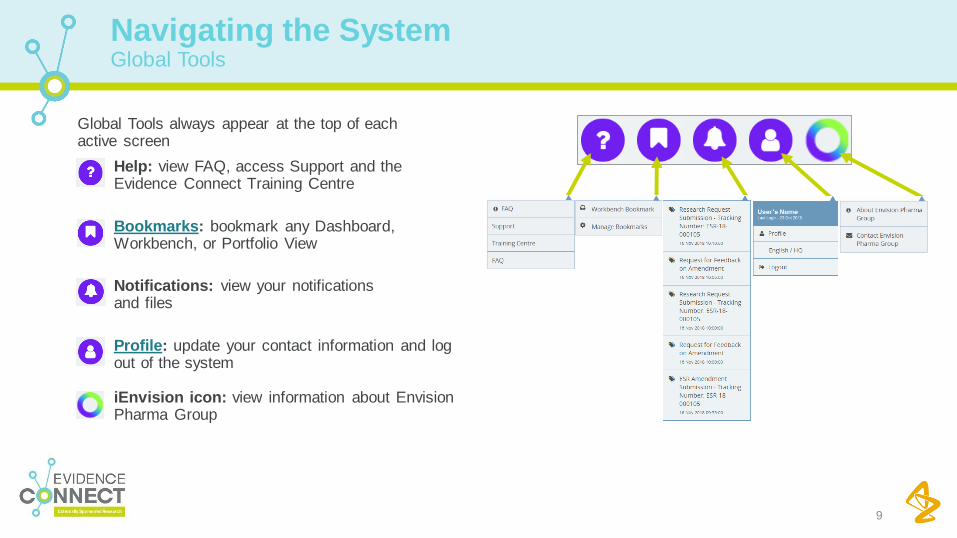
Global Tools always appear at the top of each active screen
• Help: view FAQ, access Support and the Evidence Connect Training Centre
• Bookmarks: bookmark any Dashboard, Workbench, or Portfolio View
• Notifications: view your notifications and files
• Profile: update your contact information and log out of the system
iEnvision icon: view information about Envision Pharma Group
9
Global Tools
Navigating the System

• You can bookmark any Dashboard or Workbench by clicking Bookmark This Page in the View menu
• You may have up to 20 bookmarks
• Clicking Manage Bookmarks allows you to remove, rearrange, and rename bookmarks
10
Global Tools: Bookmarks
Navigating the System

1. To update your profile, click the Profile icon at the top right-hand-side of the screen
2. Profile allows you to:
• Manage your contact information
• Change your password
• Change your security question(s)
3. Your current country/language are displayed
4. Log out of the system by selecting the Logout option
11
Global Tools: Profile
Navigating the System
2
3
4
1
User’s NameLast Login - 23 Oct 2018
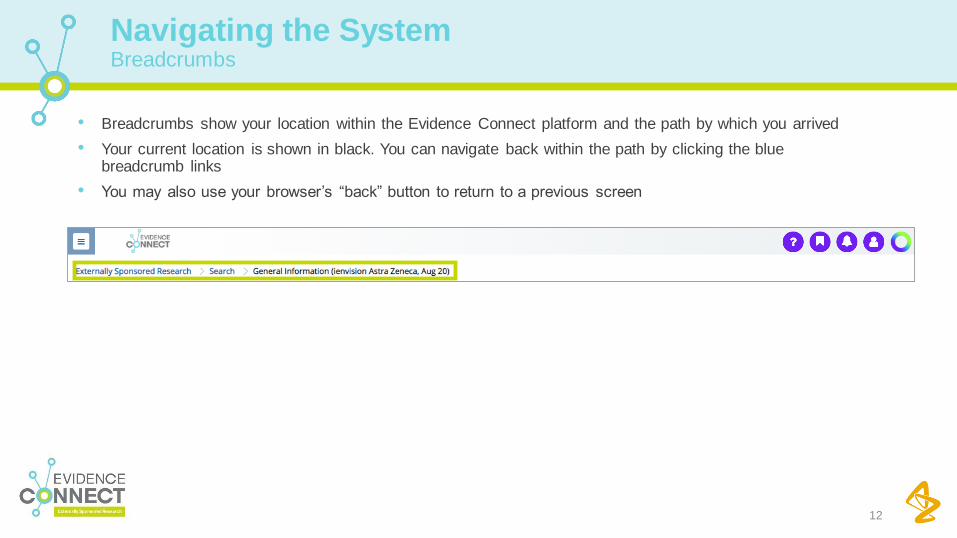
• Breadcrumbs show your location within the Evidence Connect platform and the path by which you arrived
• Your current location is shown in black. You can navigate back within the path by clicking the blue breadcrumb links
• You may also use your browser’s “back” button to return to a previous screen
12
Breadcrumbs
Navigating the System
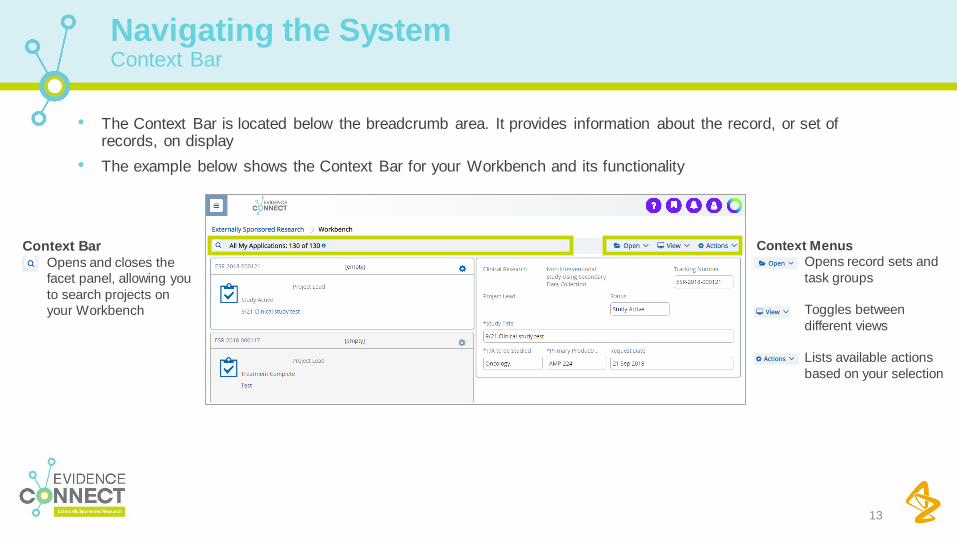
• The Context Bar is located below the breadcrumb area. It provides information about the record, or set of records, on display
• The example below shows the Context Bar for your Workbench and its functionality
13
Context Bar
Navigating the System
Context BarOpens and closes the
facet panel, allowing you
to search projects on
your Workbench
Context Menus
Opens record sets and
task groups
Toggles between
different views
Lists available actions
based on your selection
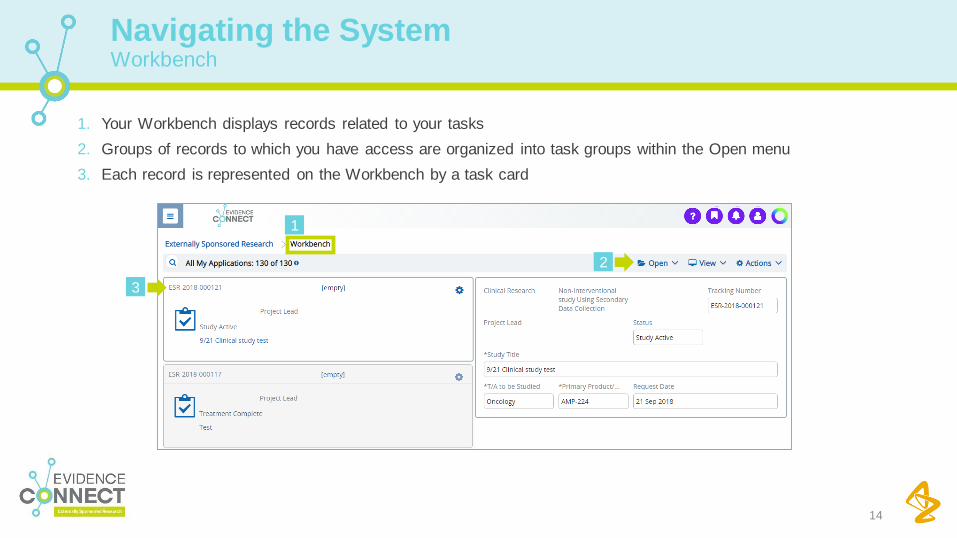
1. Your Workbench displays records related to your tasks
2. Groups of records to which you have access are organized into task groups within the Open menu
3. Each record is represented on the Workbench by a task card
14
Workbench
Navigating the System
1
2
3
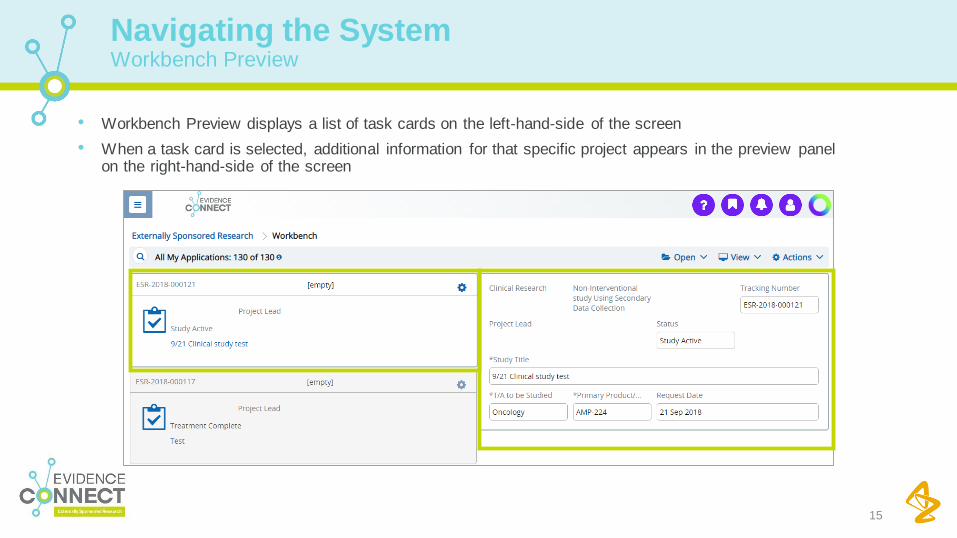
• Workbench Preview displays a list of task cards on the left-hand-side of the screen
• When a task card is selected, additional information for that specific project appears in the preview panelon the right-hand-side of the screen
15
Workbench Preview
Navigating the System
16
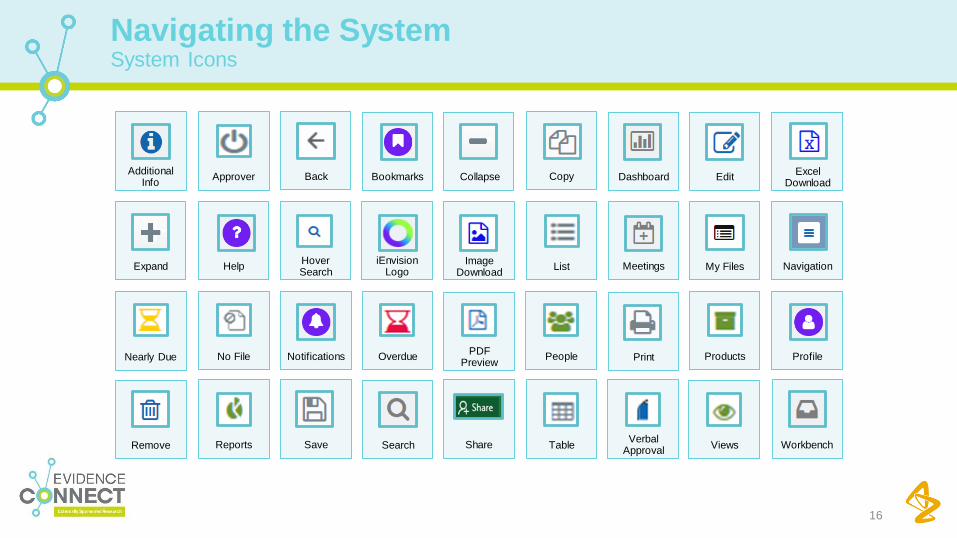
System Icons
Navigating the System
Back Bookmarks
Search
Hover Search
EditDashboard
Workbench
People Products
Views
PDF Preview
No File
Collapse
Navigation
Save
Remove
Meetings
ExcelDownload
Copy
Nearly Due Overdue
Approver
Verbal Approval
Additional Info
ListImage
Download
TableShare
My Files
Reports
iEnvision Logo
ProfileNotifications
HelpExpand
Internal AstraZeneca use only. January 2017
Starting a New Application
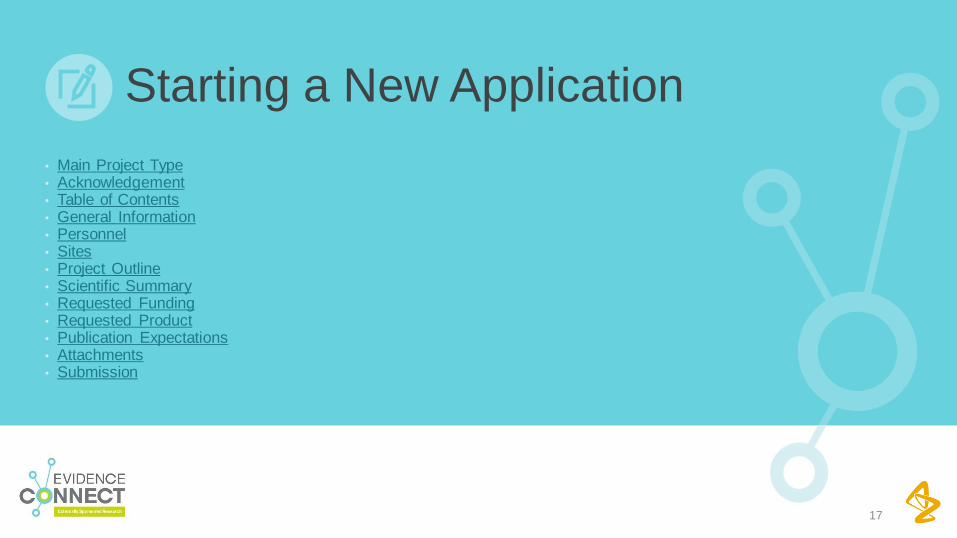
• Main Project Type• Acknowledgement• Table of Contents• General Information • Personnel• Sites • Project Outline• Scientific Summary• Requested Funding • Requested Product • Publication Expectations • Attachments• Submission
17

1. To start a new application, click Start New Application on your Dashboard
2. You will then be prompted to Select Main Project Type from the options provided
18
Main Project Type
Starting a New Application
2
1
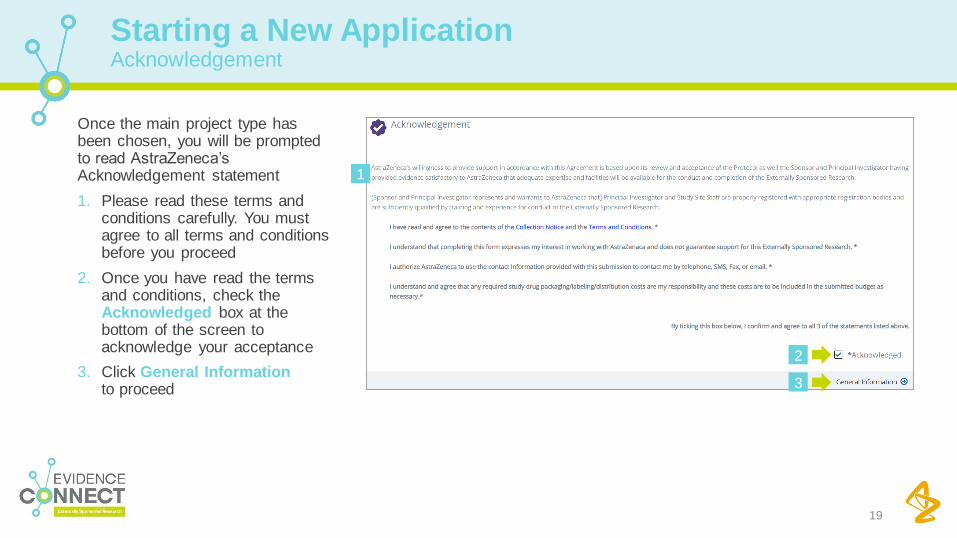
Once the main project type has been chosen, you will be prompted to read AstraZeneca’s Acknowledgement statement
1. Please read these terms and conditions carefully. You must agree to all terms and conditions before you proceed
2. Once you have read the terms and conditions, check the Acknowledged box at the bottom of the screen to acknowledge your acceptance
3. Click General Information to proceed
19
Acknowledgement
Starting a New Application
1
2
3
20
Table of Contents
Starting a New Application
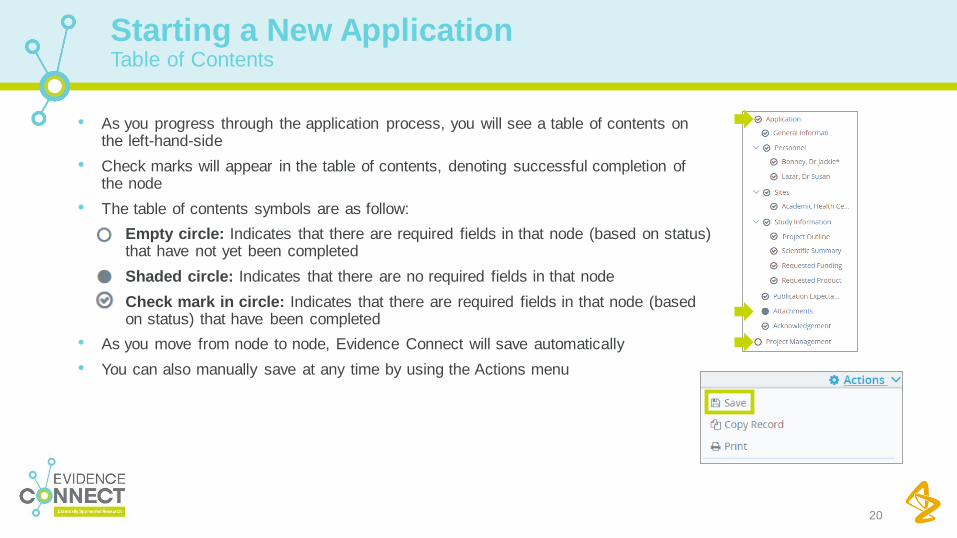
• As you progress through the application process, you will see a table of contents on the left-hand-side
• Check marks will appear in the table of contents, denoting successful completion of the node
• The table of contents symbols are as follow:
• Empty circle: Indicates that there are required fields in that node (based on status) that have not yet been completed
• Shaded circle: Indicates that there are no required fields in that node
• Check mark in circle: Indicates that there are required fields in that node (based on status) that have been completed
• As you move from node to node, Evidence Connect will save automatically
• You can also manually save at any time by using the Actions menu
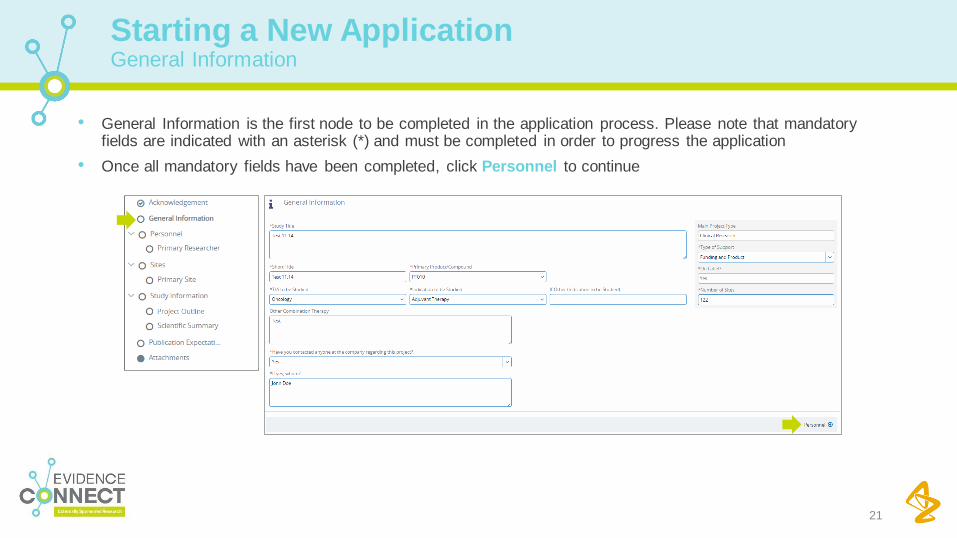
• General Information is the first node to be completed in the application process. Please note that mandatory fields are indicated with an asterisk (*) and must be completed in order to progress the application
• Once all mandatory fields have been completed, click Personnel to continue
21
General Information
Starting a New Application

• The next step is to enter information about the Primary Researcher in the Personnel node
• For US-based Researchers, their license information must be entered into the Research Request Person Licenses (US Only) table
• Upload the Researcher’s CV at the bottom of the screen
• Once all mandatory fields have been completed, click Sites to continue
22
Personnel
Starting a New Application

• In the Sites node, you will be required to fill in the details of your Primary Site
• Additional sites can be added by clicking Add Site at the bottom right-hand-side of the screen
• Once all mandatory fields have been completed, click Project Outline to continue
23
Sites
Starting a New Application

• On the Project Outline node, fill in the appropriate information. Required fields are indicated with an asterisk (*)
• Use the drop-down menus to enter study details
• For Hypothesis and Scientific Basis/Rationale, add text directly into the free text box
• Once the Project Outline node has been completed, click Scientific Summary to continue
24
Project Outline
Starting a New Application
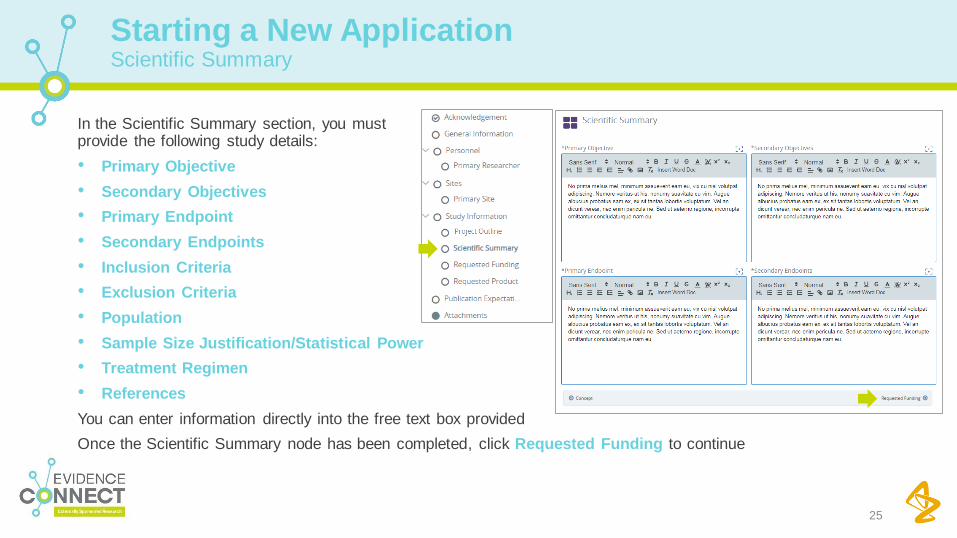
In the Scientific Summary section, you must provide the following study details:
• Primary Objective
• Secondary Objectives
• Primary Endpoint
• Secondary Endpoints
• Inclusion Criteria
• Exclusion Criteria
• Population
• Sample Size Justification/Statistical Power
• Treatment Regimen
• References
You can enter information directly into the free text box provided
Once the Scientific Summary node has been completed, click Requested Funding to continue
25
Scientific Summary
Starting a New Application
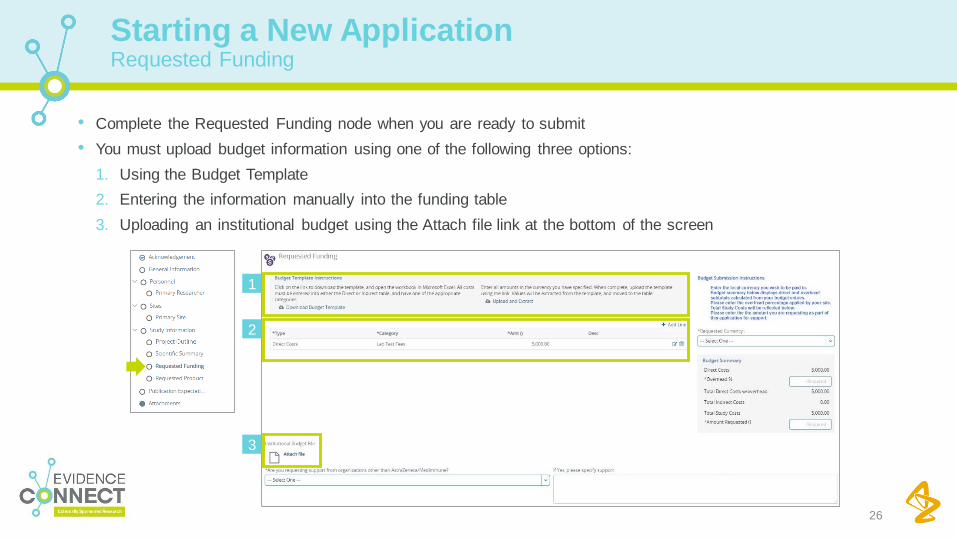
• Complete the Requested Funding node when you are ready to submit
• You must upload budget information using one of the following three options:
1. Using the Budget Template
2. Entering the information manually into the funding table
3. Uploading an institutional budget using the Attach file link at the bottom of the screen
26
Requested Funding
Starting a New Application
1
2
3
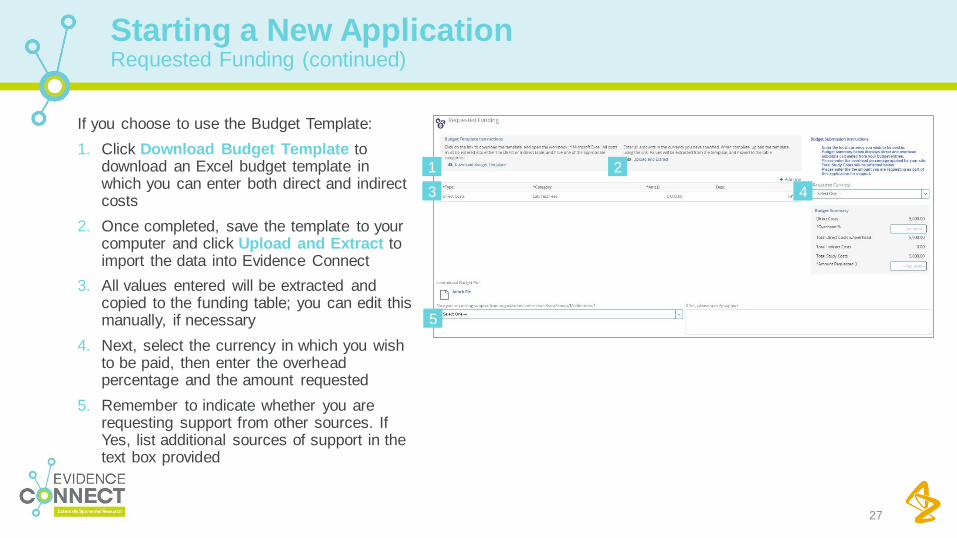
If you choose to use the Budget Template:
1. Click Download Budget Template to download an Excel budget template in which you can enter both direct and indirect costs
2. Once completed, save the template to your computer and click Upload and Extract to import the data into Evidence Connect
3. All values entered will be extracted and copied to the funding table; you can edit this manually, if necessary
4. Next, select the currency in which you wish to be paid, then enter the overhead percentage and the amount requested
5. Remember to indicate whether you are requesting support from other sources. If Yes, list additional sources of support in the text box provided
27
Requested Funding (continued)
Starting a New Application
1 2
3 4
5
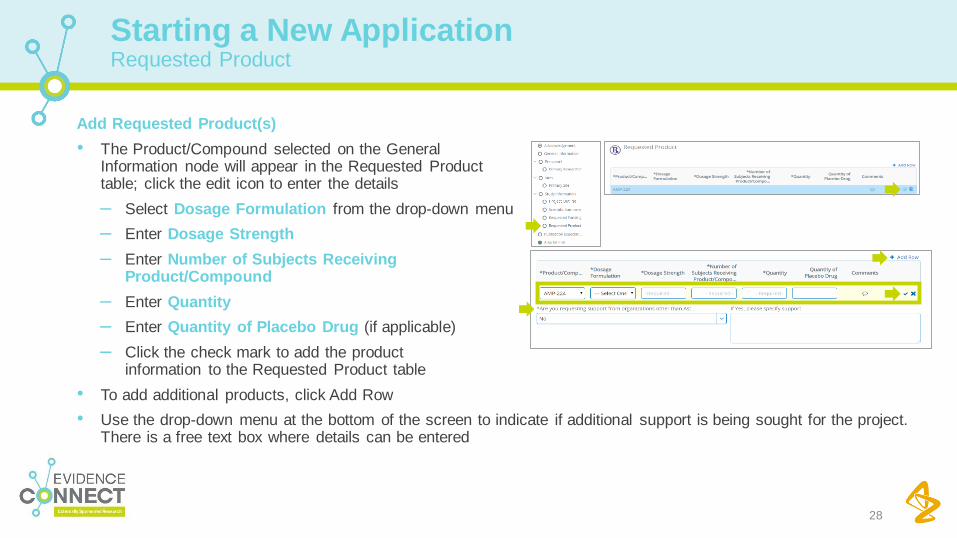
Add Requested Product(s)
• The Product/Compound selected on the GeneralInformation node will appear in the Requested Producttable; click the edit icon to enter the details
– Select Dosage Formulation from the drop-down menu
– Enter Dosage Strength
– Enter Number of Subjects Receiving Product/Compound
– Enter Quantity
– Enter Quantity of Placebo Drug (if applicable)
– Click the check mark to add the product information to the Requested Product table
• To add additional products, click Add Row
• Use the drop-down menu at the bottom of the screen to indicate if additional support is being sought for the project. There is a free text box where details can be entered
28
Requested Product
Starting a New Application
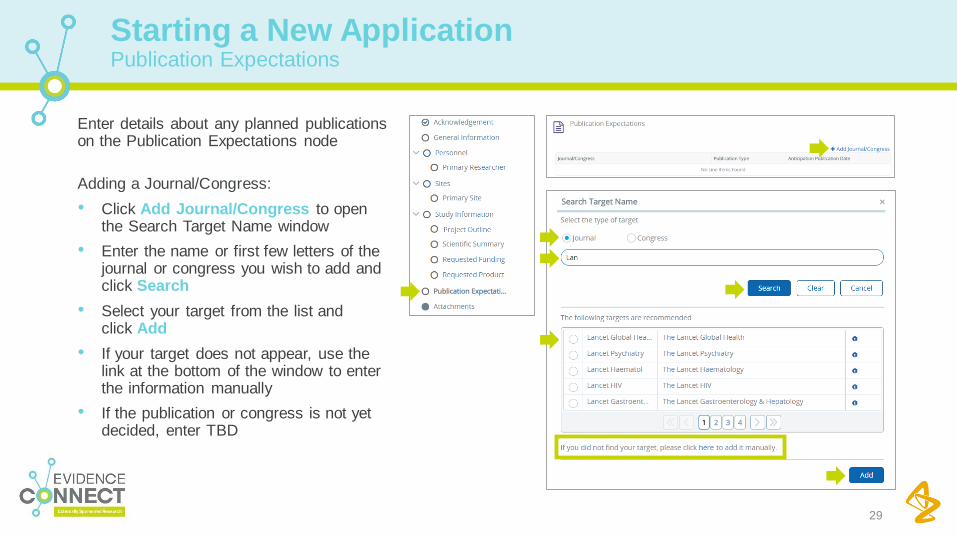
Enter details about any planned publications on the Publication Expectations node
Adding a Journal/Congress:
• Click Add Journal/Congress to open the Search Target Name window
• Enter the name or first few letters of the journal or congress you wish to add and click Search
• Select your target from the list and click Add
• If your target does not appear, use the link at the bottom of the window to enter the information manually
• If the publication or congress is not yet decided, enter TBD
29
Publication Expectations
Starting a New Application
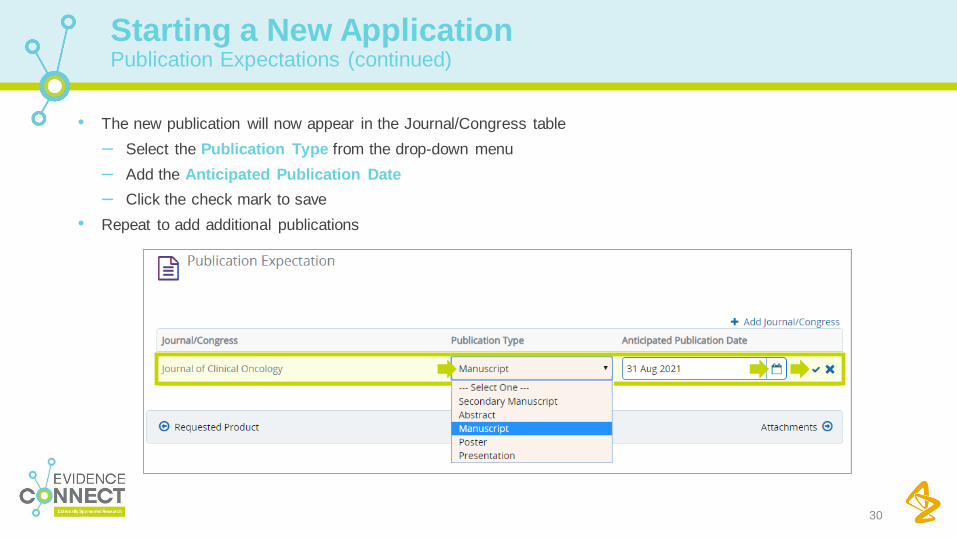
• The new publication will now appear in the Journal/Congress table
– Select the Publication Type from the drop-down menu
– Add the Anticipated Publication Date
– Click the check mark to save
• Repeat to add additional publications
30
Publication Expectations (continued)
Starting a New Application
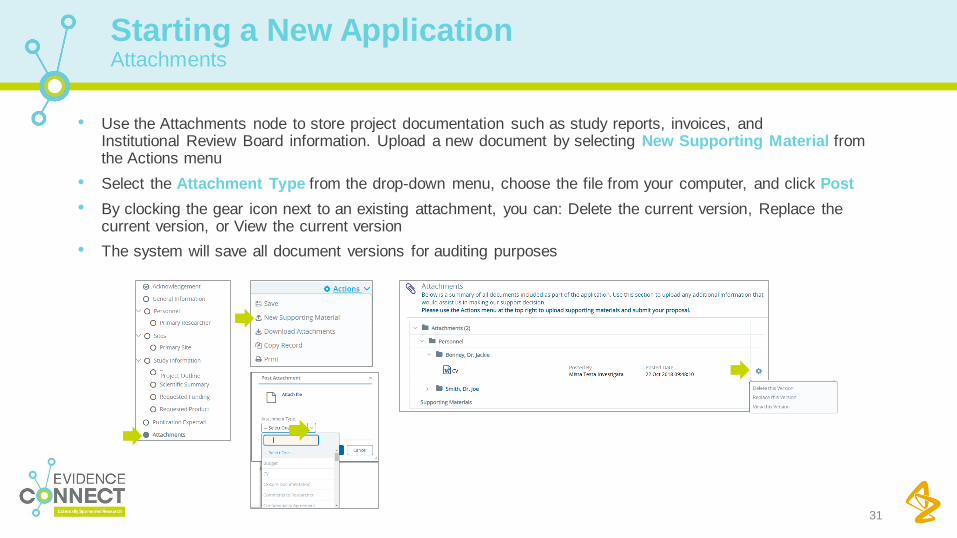
• Use the Attachments node to store project documentation such as study reports, invoices, and Institutional Review Board information. Upload a new document by selecting New Supporting Material from the Actions menu
• Select the Attachment Type from the drop-down menu, choose the file from your computer, and click Post
• By clocking the gear icon next to an existing attachment, you can: Delete the current version, Replace the current version, or View the current version
• The system will save all document versions for auditing purposes
31
Attachments
Starting a New Application
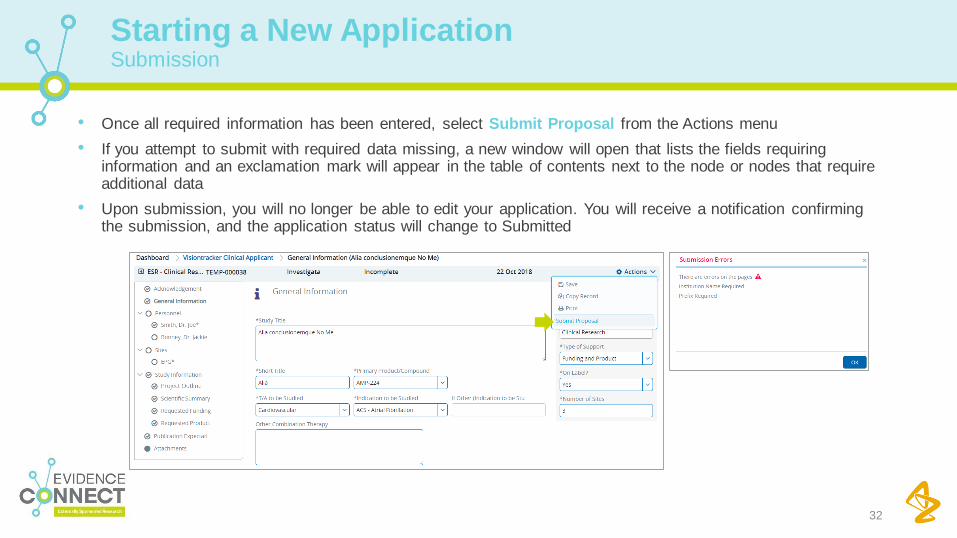
• Once all required information has been entered, select Submit Proposal from the Actions menu
• If you attempt to submit with required data missing, a new window will open that lists the fields requiring information and an exclamation mark will appear in the table of contents next to the node or nodes that require additional data
• Upon submission, you will no longer be able to edit your application. You will receive a notification confirming the submission, and the application status will change to Submitted
32
Submission
Starting a New Application
Internal AstraZeneca use only. January 2017
Post-Submission
• Request for Additional Information • Submit Protocol • Project Status Updates • Milestone Updates• Product Shipment • Regulatory Update • Publication Activity • Amendments • Additional Documentation• Project Closed Status
33
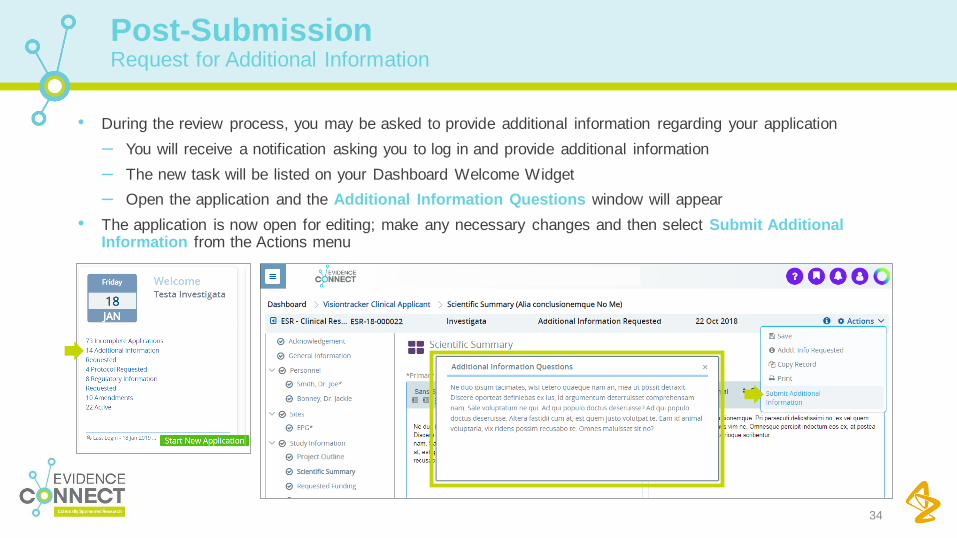
• During the review process, you may be asked to provide additional information regarding your application
– You will receive a notification asking you to log in and provide additional information
– The new task will be listed on your Dashboard Welcome Widget
– Open the application and the Additional Information Questions window will appear
• The application is now open for editing; make any necessary changes and then select Submit Additional Information from the Actions menu
34
Request for Additional Information
Post-Submission
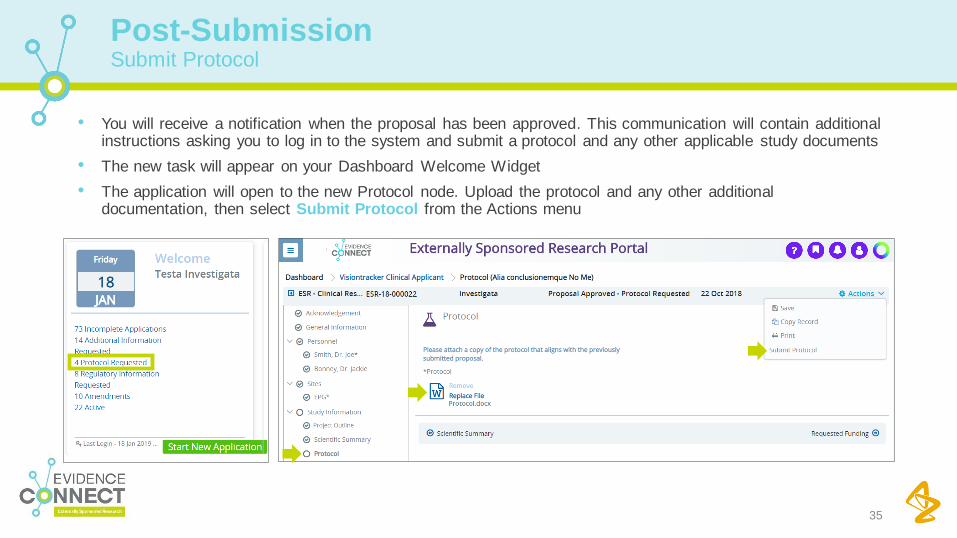
• You will receive a notification when the proposal has been approved. This communication will contain additional instructions asking you to log in to the system and submit a protocol and any other applicable study documents
• The new task will appear on your Dashboard Welcome Widget
• The application will open to the new Protocol node. Upload the protocol and any other additional documentation, then select Submit Protocol from the Actions menu
35
Submit Protocol
Post-Submission
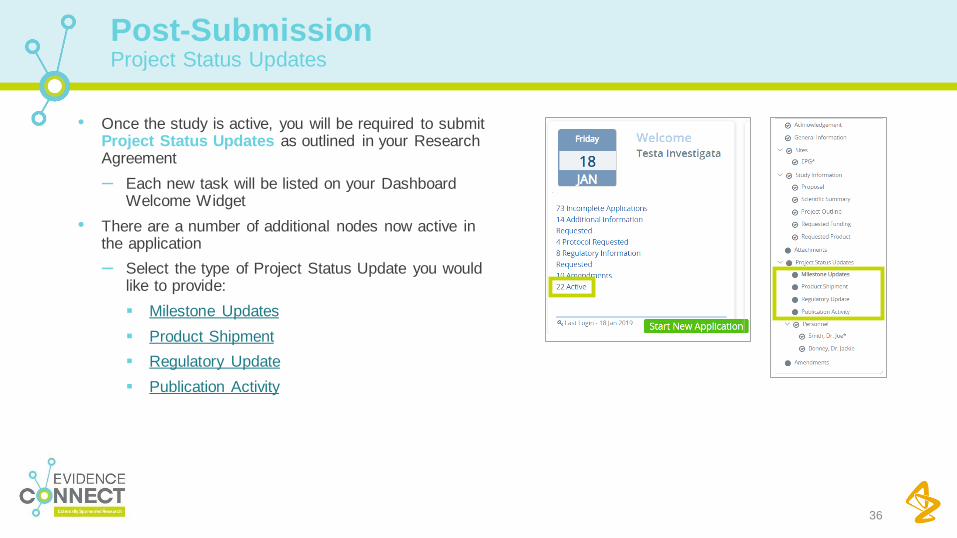
• Once the study is active, you will be required to submit Project Status Updates as outlined in your Research Agreement
– Each new task will be listed on your Dashboard Welcome Widget
• There are a number of additional nodes now active in the application
– Select the type of Project Status Update you would like to provide:
Milestone Updates
Product Shipment
Regulatory Update
Publication Activity
36
Project Status Updates
Post-Submission
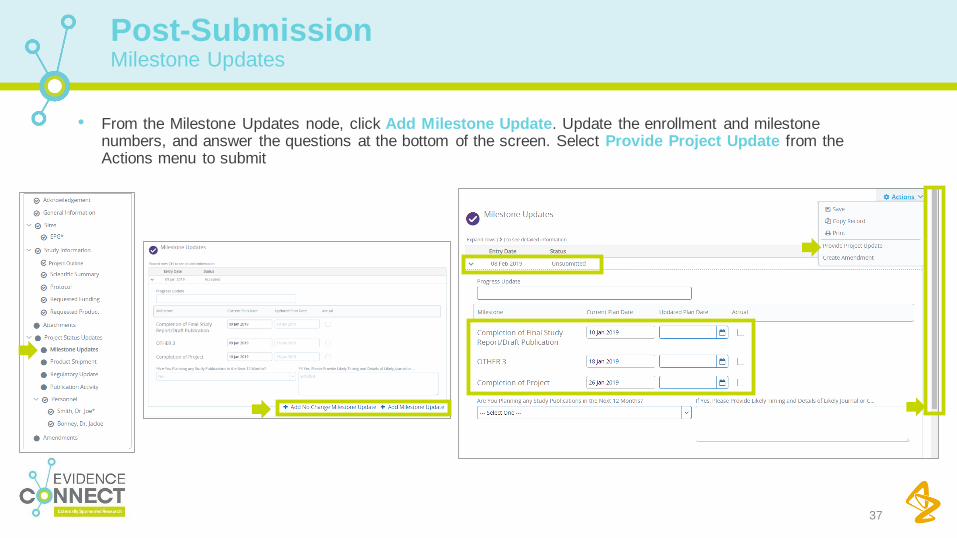
• From the Milestone Updates node, click Add Milestone Update. Update the enrollment and milestone numbers, and answer the questions at the bottom of the screen. Select Provide Project Update from the Actions menu to submit
37
Milestone Updates
Post-Submission
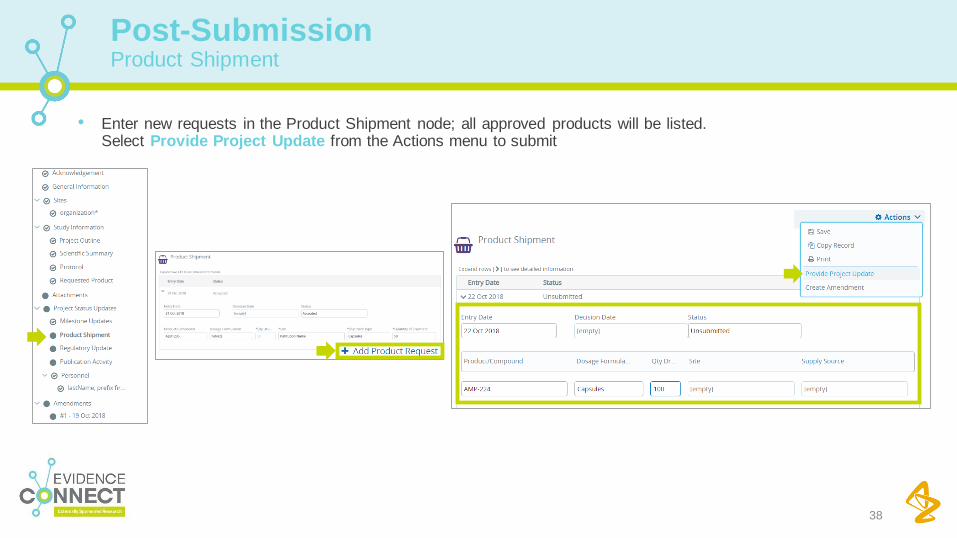
• Enter new requests in the Product Shipment node; all approved products will be listed. Select Provide Project Update from the Actions menu to submit
38
Product Shipment
Post-Submission
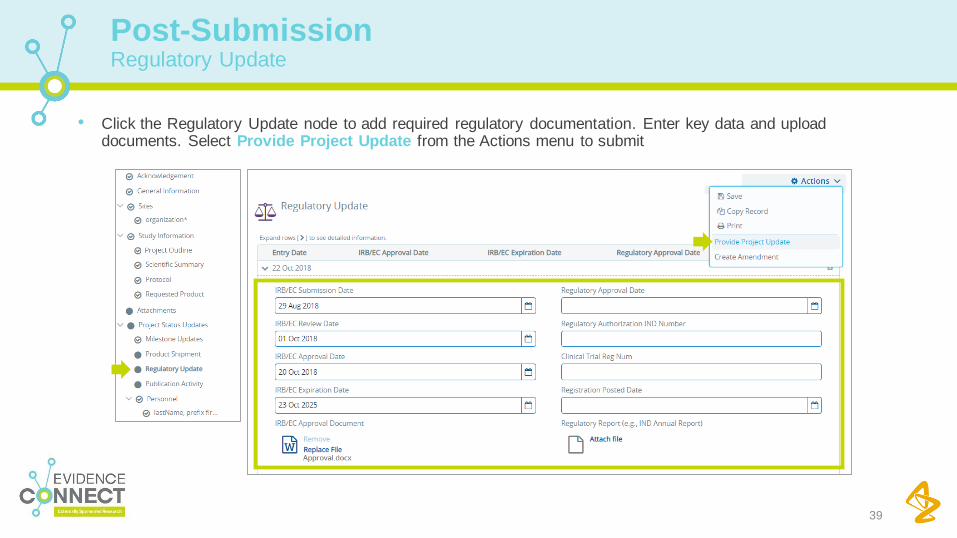
• Click the Regulatory Update node to add required regulatory documentation. Enter key data and upload documents. Select Provide Project Update from the Actions menu to submit
39
Regulatory Update
Post-Submission
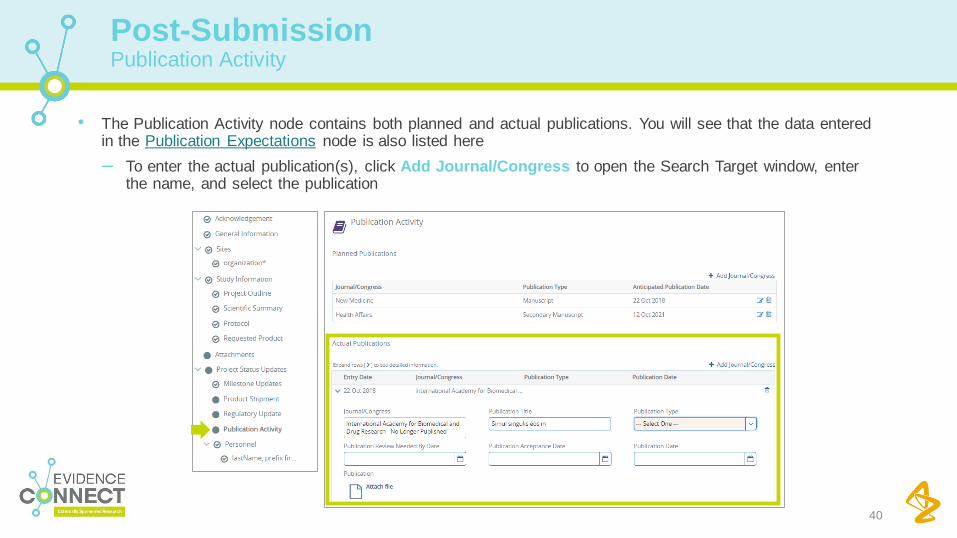
• The Publication Activity node contains both planned and actual publications. You will see that the data entered in the Publication Expectations node is also listed here
– To enter the actual publication(s), click Add Journal/Congress to open the Search Target window, enter the name, and select the publication
40
Publication Activity
Post-Submission
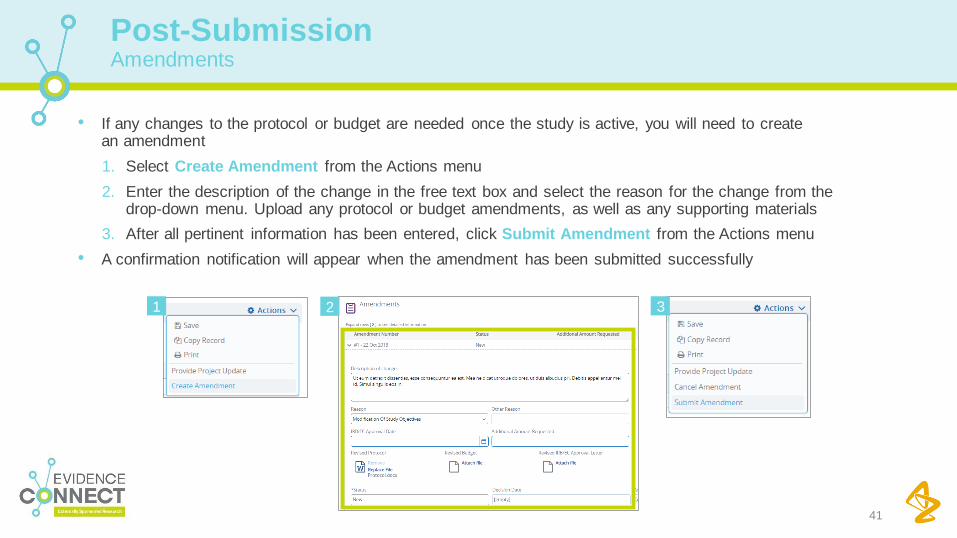
• If any changes to the protocol or budget are needed once the study is active, you will need to create an amendment
1. Select Create Amendment from the Actions menu
2. Enter the description of the change in the free text box and select the reason for the change from the drop-down menu. Upload any protocol or budget amendments, as well as any supporting materials
3. After all pertinent information has been entered, click Submit Amendment from the Actions menu
• A confirmation notification will appear when the amendment has been submitted successfully
41
Amendments
Post-Submission
1 2 3
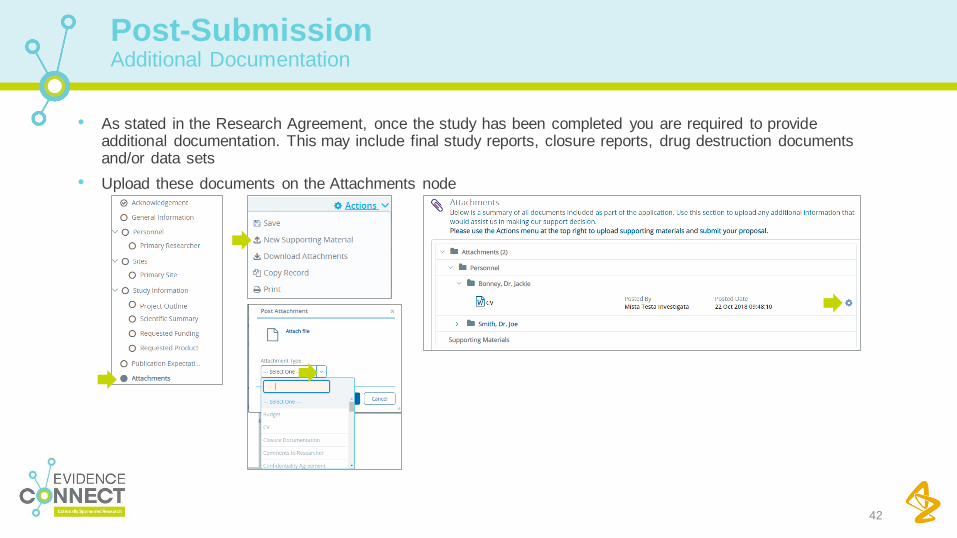
• As stated in the Research Agreement, once the study has been completed you are required to provide additional documentation. This may include final study reports, closure reports, drug destruction documents and/or data sets
• Upload these documents on the Attachments node
42
Additional Documentation
Post-Submission
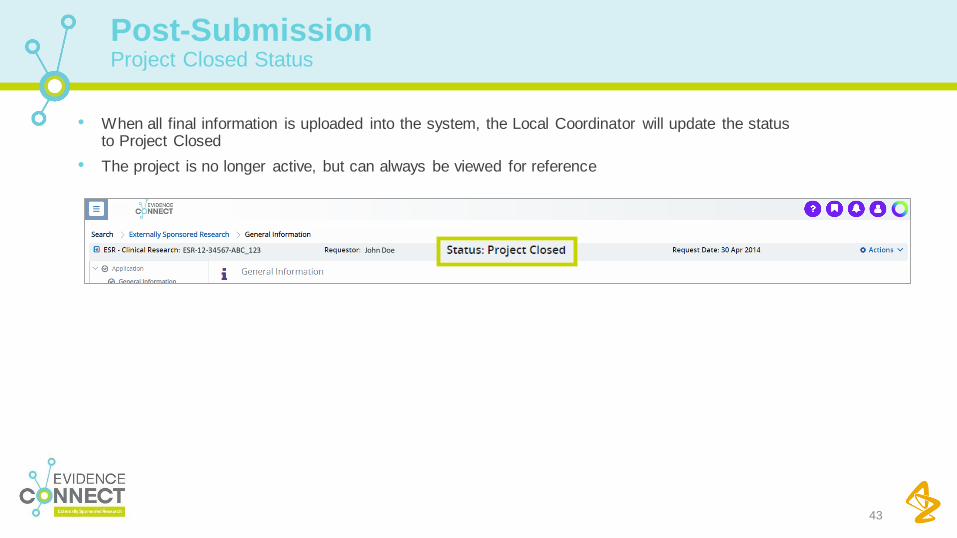
• When all final information is uploaded into the system, the Local Coordinator will update the status to Project Closed
• The project is no longer active, but can always be viewed for reference
43
Project Closed Status
Post-Submission
ESR-12-34567-ABC_123 John Doe
Internal AstraZeneca use only. January 201744
Training Materials
• Evidence Connect Training Centre• Videos
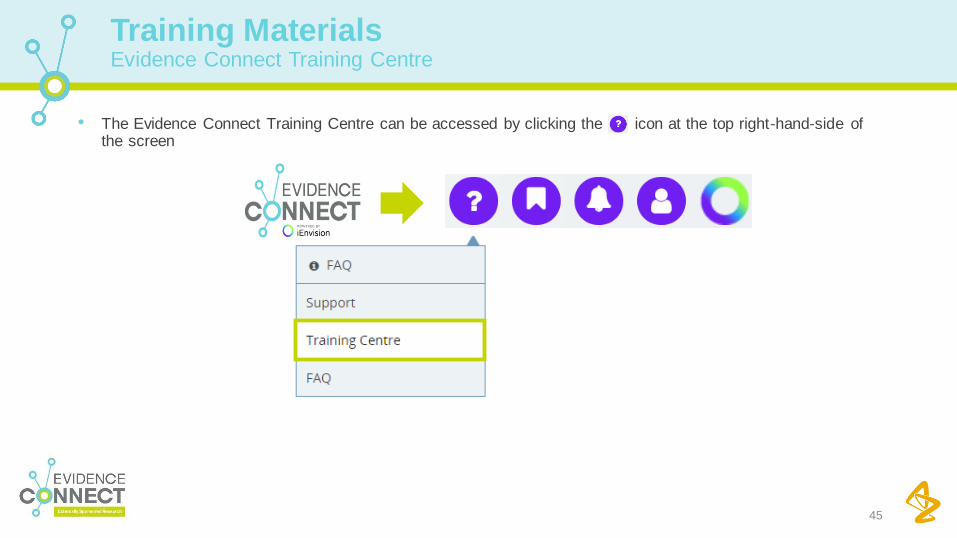
• The Evidence Connect Training Centre can be accessed by clicking the icon at the top right-hand-side of the screen
45
Evidence Connect Training Centre
Training Materials
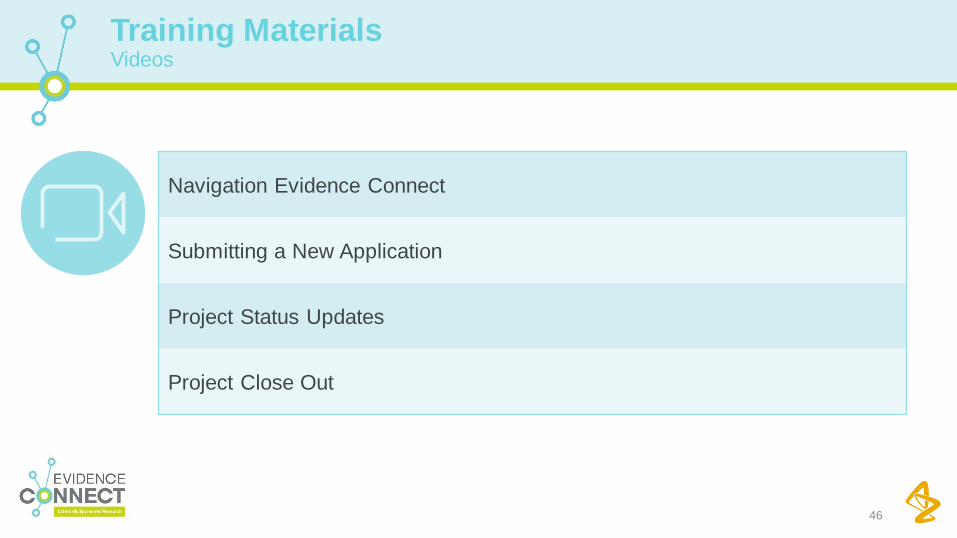
46
Videos
Training Materials
Navigation Evidence Connect
Submitting a New Application
Project Status Updates
Project Close Out