Embed Size (px)
Citation preview

1
Assembly Instructions for Tiger I Turret Adapter
Introduction:
General:
This kit consists of plastic sheets of different thicknesses. All parts need to be carefully
removed from the sheets prior to construction.
Due to the small number of parts in this kit, individual parts are not numbered or marked. All
parts should be easily identifiable by sight.
Quality:
The parts of this kit are carefully constructed for a correct fit. Because of the use of different
chamfers it is necessary to re-work the edges of some parts, particularly those with interior
angles. These are constructed with an angle of 90°. Because of the chamfers used they have
an arc-radius. Chamfer edges should also be removed.
Check the fitting accuracy of all parts before gluing.
About the Manual:
This manual has been created to demonstrate the assembly of this kit with pictures. The first
picture will show the parts needed for that step. The following picture will show the same
parts assembled. Most parts can be assembled in only one way. Whenever there is a need for
instructions they are written below the picture that corresponds to that step.

2
Additional Parts:
The following parts are required to finish this kit:
A standard Heng Long Tiger I.
Recommended Parts:
Recommended parts to be used to complete this kit are shown in the corresponding step. Due
to individual interests this manual does not recommend any particular suppliers or producers.
3
Assembly Instructions
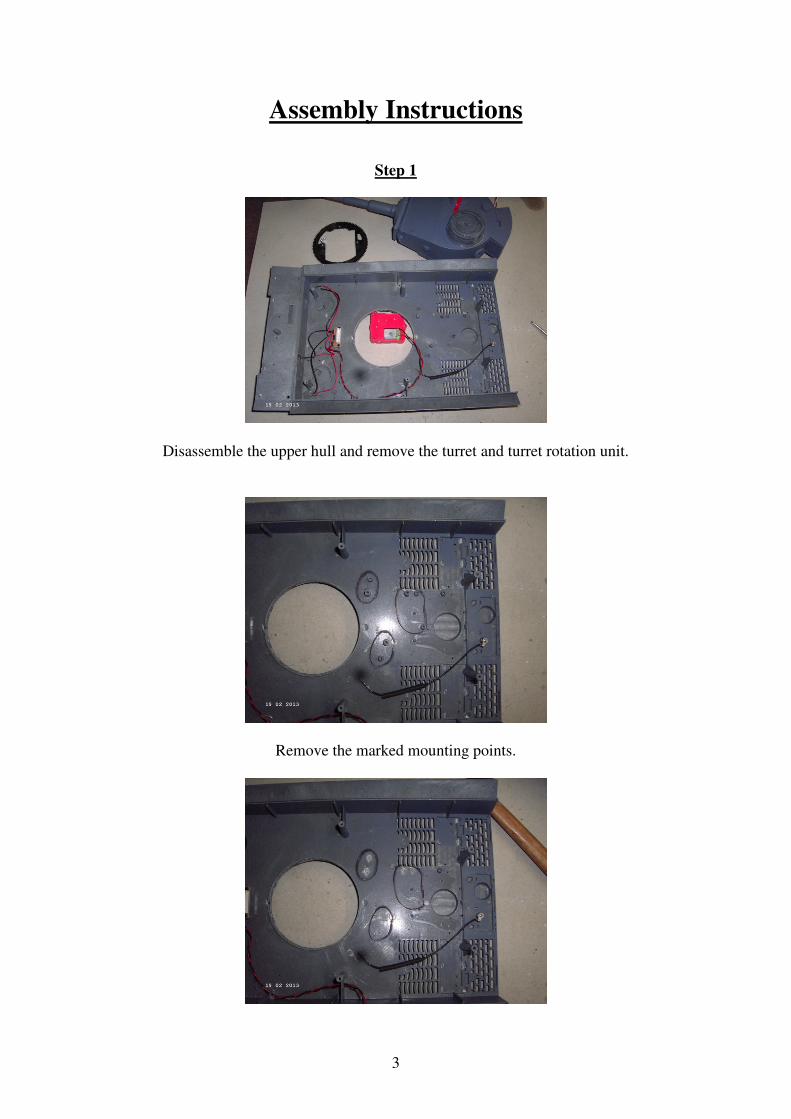
Step 1
Disassemble the upper hull and remove the turret and turret rotation unit.
Remove the marked mounting points.

4
Step 2
Disassemble the turret.
Remove the main gun.

5
Step 3
Glue the front section to the turret.
Glue the turret ring to the turret.

6
Glue the fixing point to the box plate
Screw the box plate to turret.

7
Glue the fixing points to the turret.

8
Step 4

9
Step 5
Mark the centre of the turret rotation ring.
Position the adapter with the cutout slot to the centre mark.

10
Step 6
Glue parts only on the surfaces marked in the above picture.

11
Step 7

12
Step 8
Finish the clips as shown in the above picture. The left clip is before and the right clip is after.
The ring should fit easily with only a little resistance into the adapter, and snap into place.

13
Move the ring with adapter from the underside into the turret ring. Check the gap.
If there is a gap as in the above picture, proceed to the next step. If there is no gap then make
adjustments with 1mm plates
Unclip ring and glue to turret bottom.
Screw inner turret ring to fixing point. The drill holes of the fixing points probably need to be
adjusted.

14
Step 9

15
Install turret rotation unit in box.

16
Glue the box with turret rotation unit to the underside of the hull.