Embed Size (px)
Citation preview

CLOUD COMPUTING TRAINING SERIES
2015
Ronald P. Kessler, Ph.D., M.C.S.E.
Professor, Computer Science & Robotics
Santiago Canyon College
Spring 2015
ASP.NET MVC 5 AZURE Quick Start
1
Getting Started with ASP.NET MVC 5 and Azure
Welcome to my getting started guide for Azure and ASP programming. The purpose of this
document is to help get you up to speed if you need to create a web application that will be
hosted in Azure. As you probably know, Azure is Microsoft’s Cloud computing framework and
by storing your application and databases in the cloud, you can take advantage of many of the
powerful features Azure has to offer.
In this activity, we will create a new web application using your free Azure account. You will
name it and set up your UserID and password. Once that is done, I will show how to create a
SQL database in Azure. The rest of the lesson will be focused on building an ASP application in
C# using Visual Studio 2013 and then publishing the finished project to your Azure site you
created earlier.
The ASP project we will create is an MVC 5 app. MVC stands for Model-View-Controller and is
a popular architecture for building apps that keep the UI code separate from the business code
and also separate from the data store where our database resides. Microsoft calls this approach
“Separation of Concerns”. To me, this feels like the 3-tier architecture design pattern. Our user
interface code only handles getting user input and displaying results. The middle tier is where
we process the user input and that middle layer then communicates with both the UI and the
back-end database.
The MVC pattern works like this. Let’s say a browser from a customer requests a page. That
request is sent to a controller which is a regular class. Our controller then works with another
C# class called the Model. The model has the C# code that will eventually become a table in our
SQL database. If my model class is named “customers” when I create it, then Visual Studio will
create a SQL table called customers. Finally, the controller selects a View to dynamically display
our data back to the web page. Views are the html pages that get returned to the browser.
To summarize, when the browser requests my home page (index) the index controller goes to
work. It handles the interaction between the index model class and the index html page. If the
browser requests my customer page, it is the Customer controller (which we create and name)
that then interacts with the Customer Model (which we create and name) and ultimately tells
the Customer View how to arrange the data and then display it. MVC projects have no toolbox
or drag and drop functionality. Everything is done in code. Most of the code is created by Visual
Studio.
2
Requirements for this lesson
1. Visual Studio 2013 Pro or higher
2. An Azure account. Students can register for free at the Microsoft Dreamspark site.
https://www.dreamspark.com/Product/Product.aspx?productid=99
3. SQL server express 2012 or higher. This should already be installed with VS 2013.
Let’s get started!
Create a New Web Application & Database in Azure
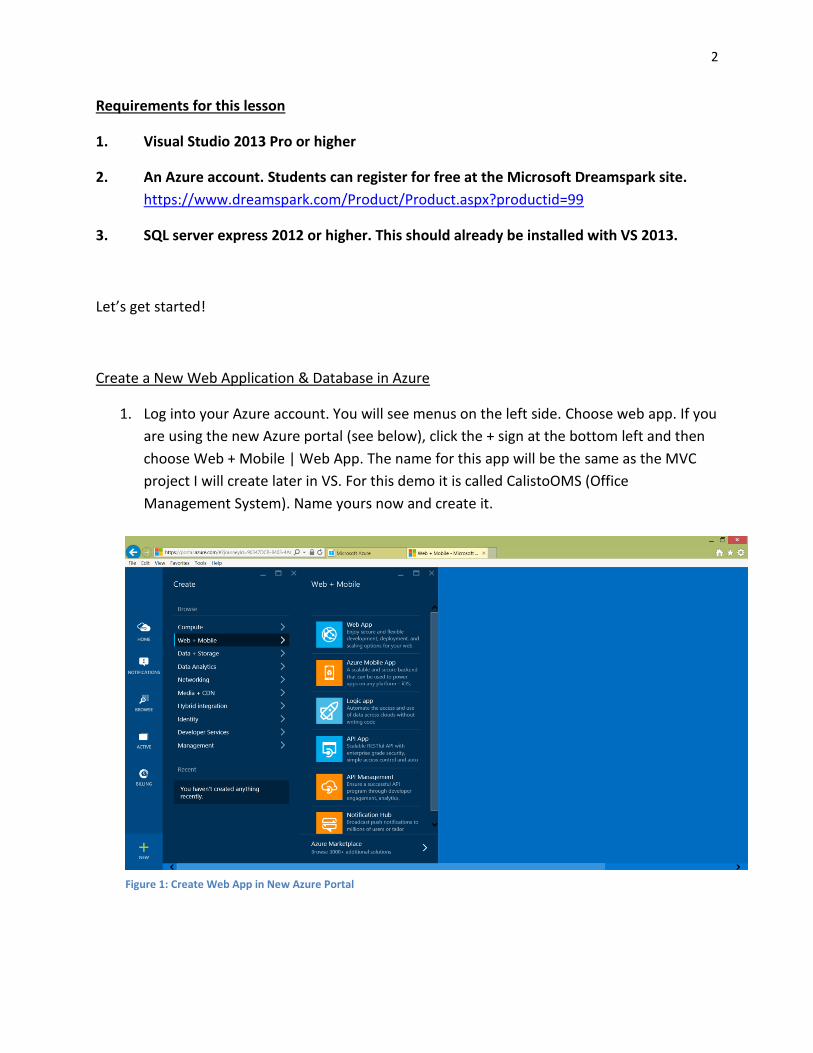
1. Log into your Azure account. You will see menus on the left side. Choose web app. If you
are using the new Azure portal (see below), click the + sign at the bottom left and then
choose Web + Mobile | Web App. The name for this app will be the same as the MVC
project I will create later in VS. For this demo it is called CalistoOMS (Office
Management System). Name yours now and create it.
Figure 1: Create Web App in New Azure Portal
3
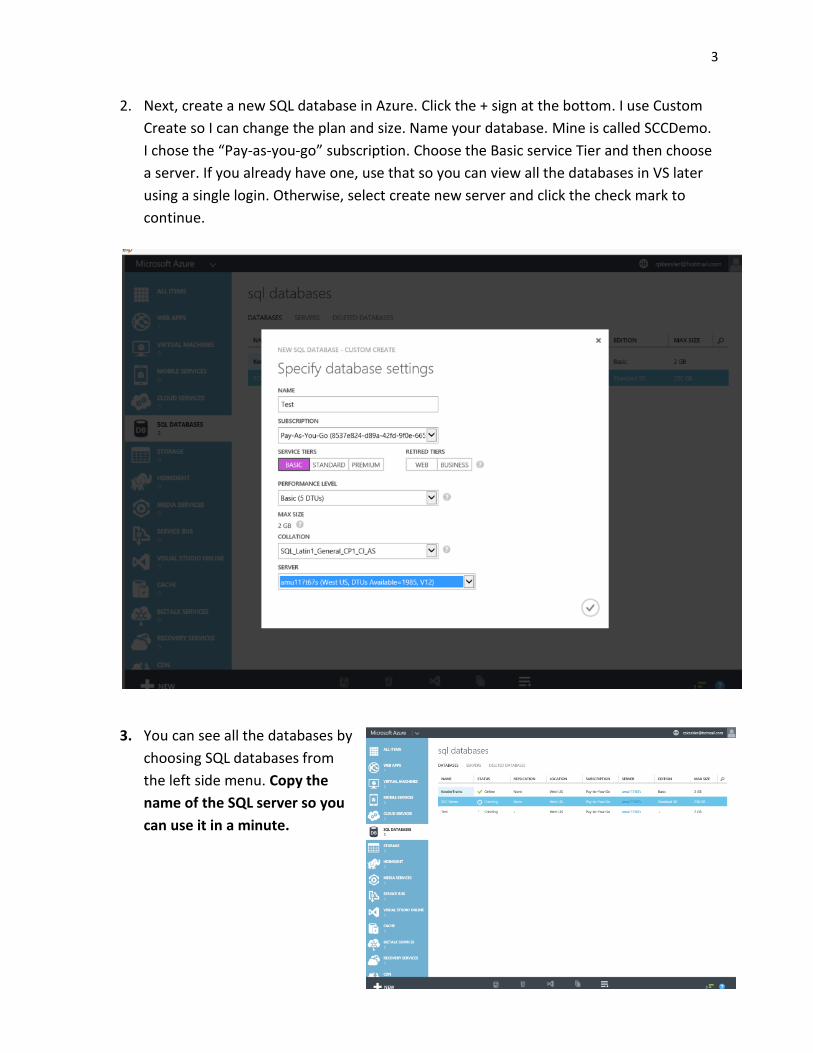
2. Next, create a new SQL database in Azure. Click the + sign at the bottom. I use Custom
Create so I can change the plan and size. Name your database. Mine is called SCCDemo.
I chose the “Pay-as-you-go” subscription. Choose the Basic service Tier and then choose
a server. If you already have one, use that so you can view all the databases in VS later
using a single login. Otherwise, select create new server and click the check mark to
continue.
3. You can see all the databases by
choosing SQL databases from
the left side menu. Copy the
name of the SQL server so you
can use it in a minute.
4
Create a New Cloud Project in Visual Studio
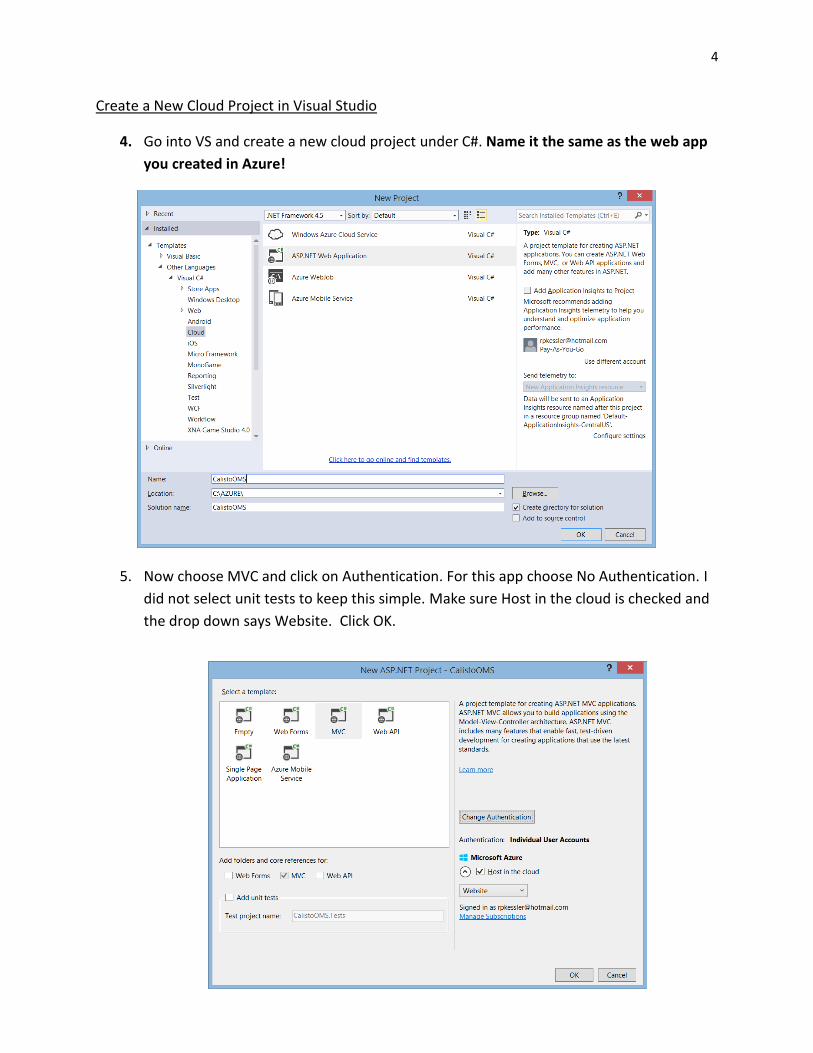
4. Go into VS and create a new cloud project under C#. Name it the same as the web app
you created in Azure!
5. Now choose MVC and click on Authentication. For this app choose No Authentication. I
did not select unit tests to keep this simple. Make sure Host in the cloud is checked and
the drop down says Website. Click OK.
5
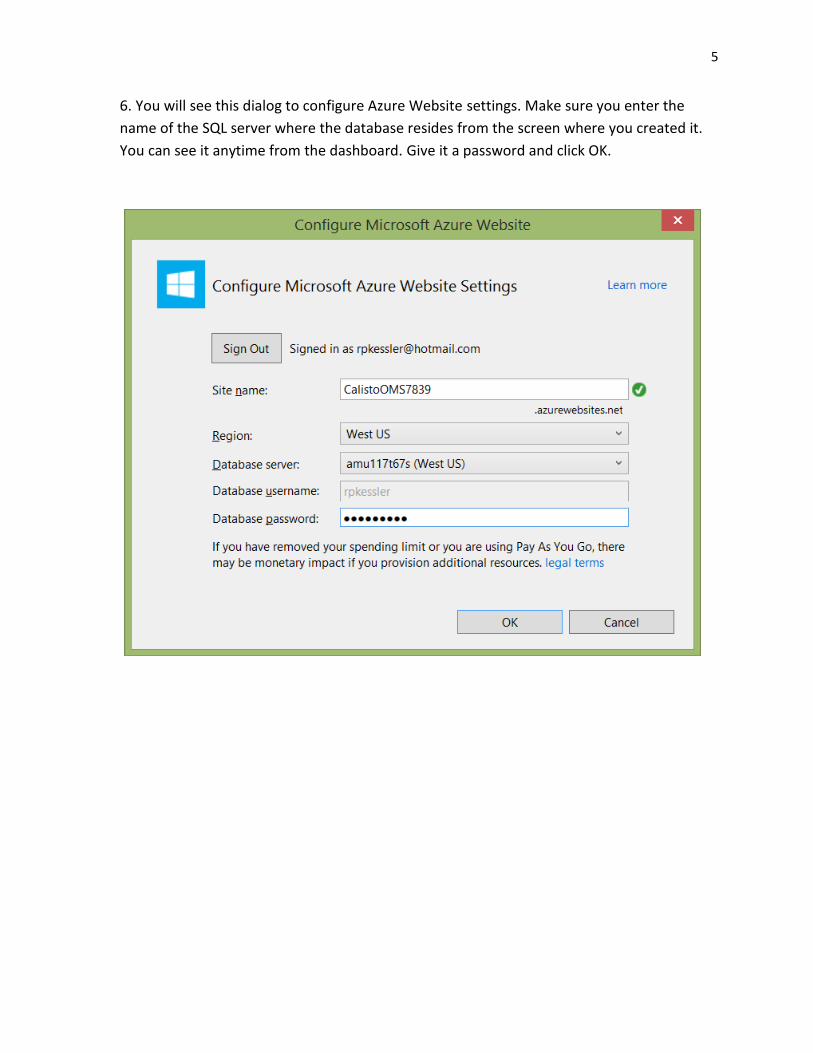
6. You will see this dialog to configure Azure Website settings. Make sure you enter the
name of the SQL server where the database resides from the screen where you created it.
You can see it anytime from the dashboard. Give it a password and click OK.
6
Create A New Database Connection in Visual Studio
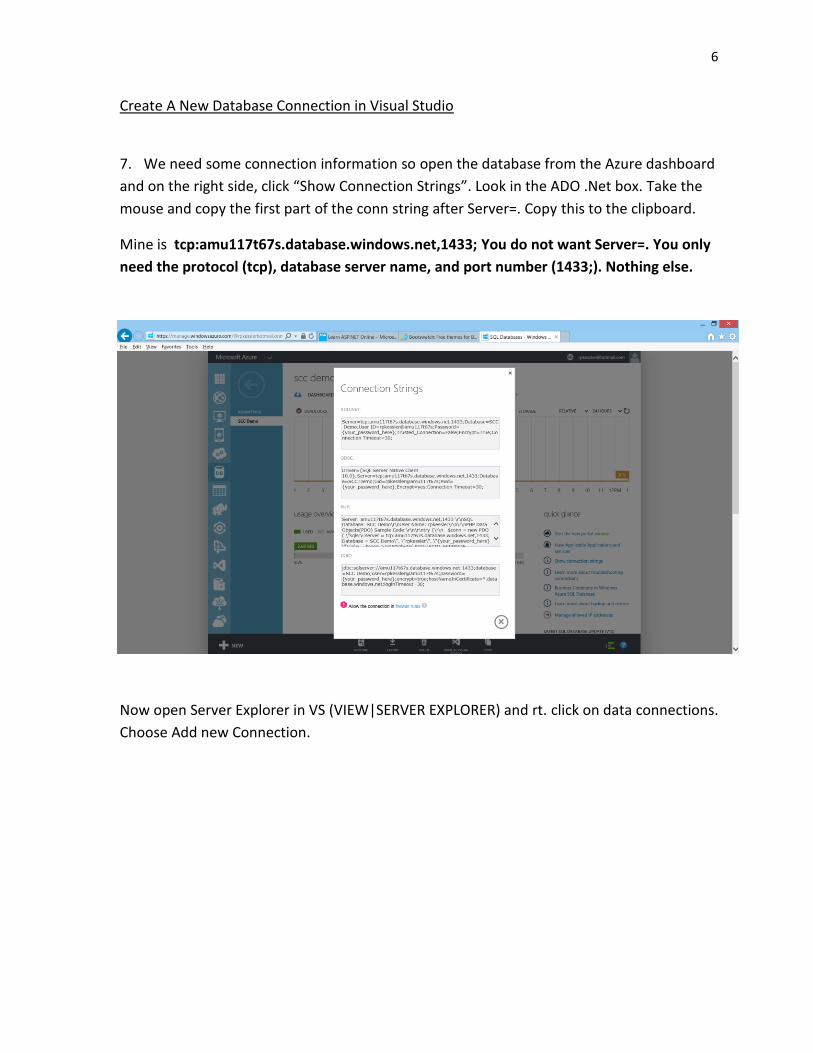
7. We need some connection information so open the database from the Azure dashboard
and on the right side, click “Show Connection Strings”. Look in the ADO .Net box. Take the
mouse and copy the first part of the conn string after Server=. Copy this to the clipboard.
Mine is tcp:amu117t67s.database.windows.net,1433; You do not want Server=. You only
need the protocol (tcp), database server name, and port number (1433;). Nothing else.
Now open Server Explorer in VS (VIEW|SERVER EXPLORER) and rt. click on data connections.
Choose Add new Connection.
7
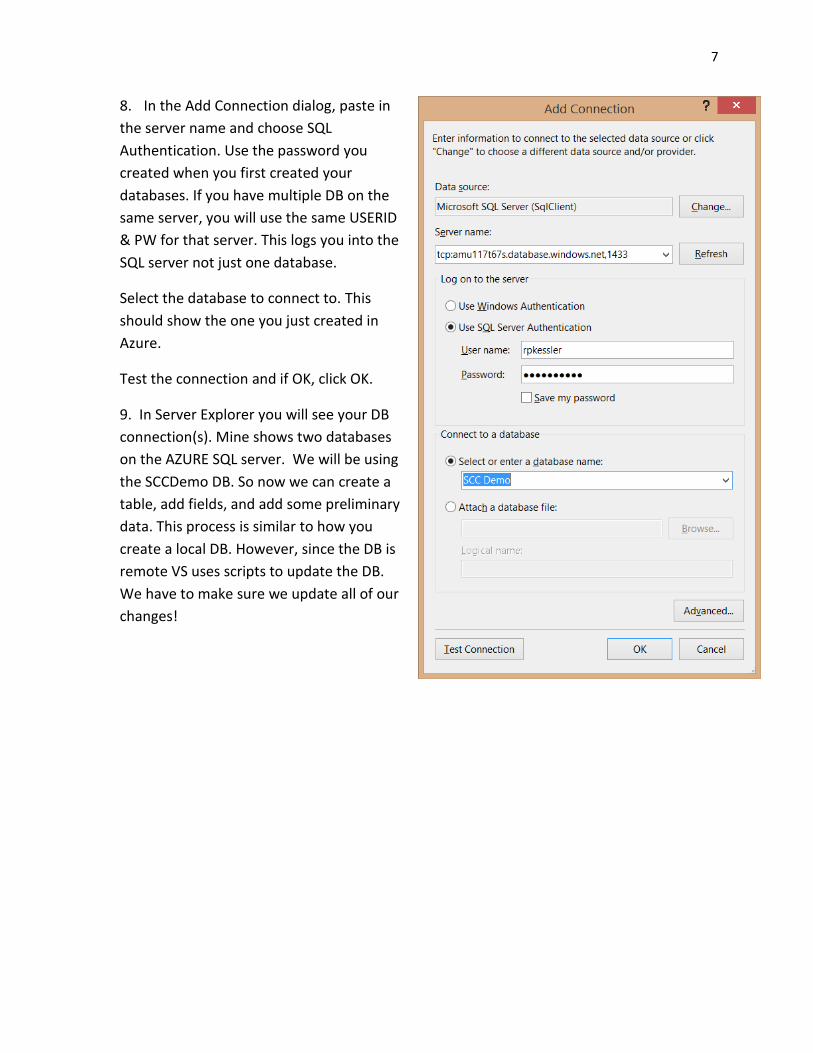
8. In the Add Connection dialog, paste in
the server name and choose SQL
Authentication. Use the password you
created when you first created your
databases. If you have multiple DB on the
same server, you will use the same USERID
& PW for that server. This logs you into the
SQL server not just one database.
Select the database to connect to. This
should show the one you just created in
Azure.
Test the connection and if OK, click OK.
9. In Server Explorer you will see your DB
connection(s). Mine shows two databases
on the AZURE SQL server. We will be using
the SCCDemo DB. So now we can create a
table, add fields, and add some preliminary
data. This process is similar to how you
create a local DB. However, since the DB is
remote VS uses scripts to update the DB.
We have to make sure we update all of our
changes!
8
Creating A New Table and Fields in Our DB
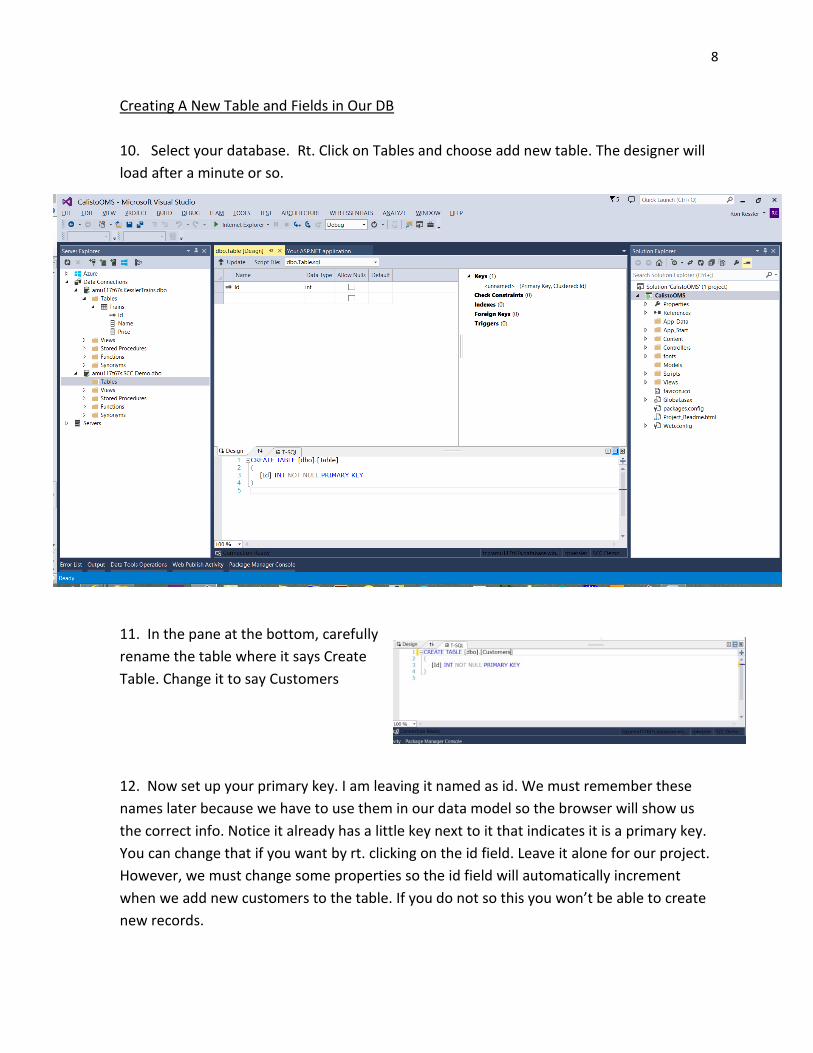
10. Select your database. Rt. Click on Tables and choose add new table. The designer will
load after a minute or so.
11. In the pane at the bottom, carefully
rename the table where it says Create
Table. Change it to say Customers
12. Now set up your primary key. I am leaving it named as id. We must remember these
names later because we have to use them in our data model so the browser will show us
the correct info. Notice it already has a little key next to it that indicates it is a primary key.
You can change that if you want by rt. clicking on the id field. Leave it alone for our project.
However, we must change some properties so the id field will automatically increment
when we add new customers to the table. If you do not so this you won’t be able to create
new records.

9
So, click once on the id field and push F4 to open its properties window. Look at Identity
specification which is set to false. Click on the little + sign and change “Is Identity” to true.
Doing that changes the increment and seed properties to 1 which is what we want. Now our
database table will let us do updates. This would be a good time to save all!!!
13. Next we will create some
fields and then add some
customers into the table to get
us started. Create fields as
shown by typing in a name and
datatype. I also unchecked the
Allow Nulls boxes so we will
have to put all the data in for
each customer or it will not
work. You can allow nulls if you
want.
14. Notice the T-SQL script is
updated. Now we must update
the database. So click on the
update button (red arrow). You
will see a preview dialog so
press “Update Database”. If
there are no errors, your table
will be added. But you will not see it until you refresh the Tables folder under your DB
connection. So rt. Click on it and choose refresh. Now you should see our Customers table!
Expand the node and you will see the fields we created. All we need to do now is add some
customers so we will have some data to start with.
Adding Customer Data
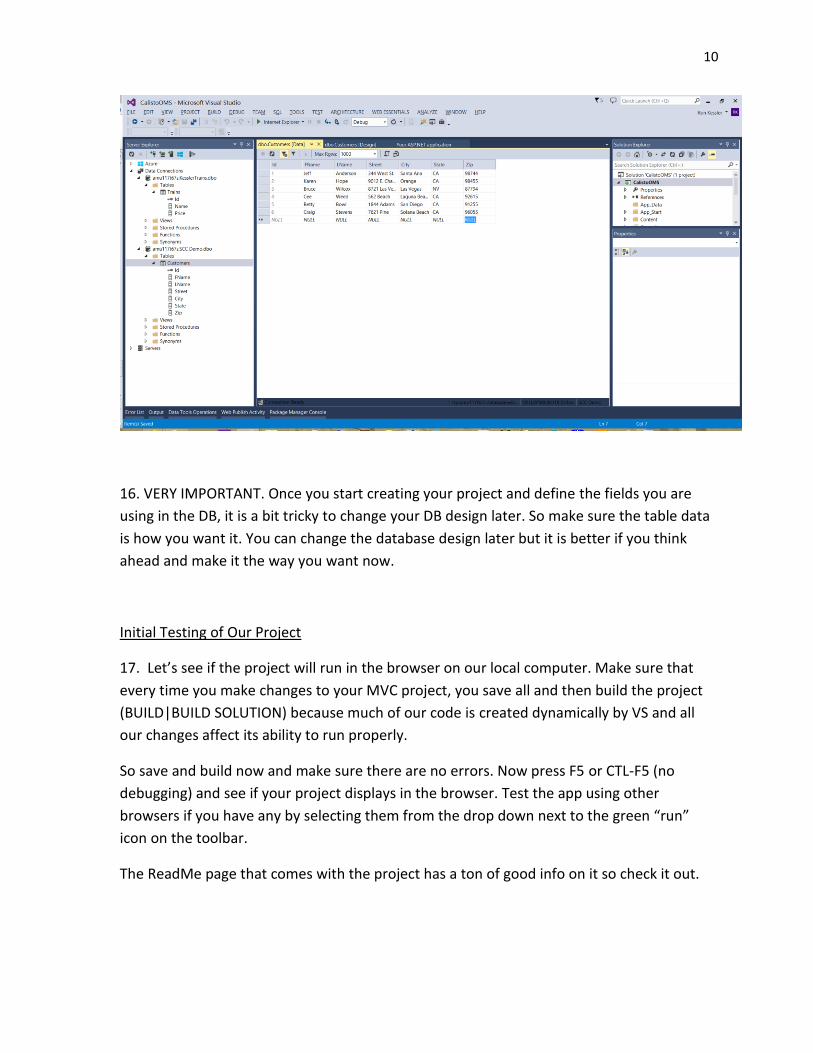
15. Rt. Click on the Customers table in Server Explorer & choose show data. Now you will
have a familiar panel where you can enter customer info. Remember, I am not allowing null
data so I must fill in each field or the record will not be saved. Enter a few customers now.
YOU DO NOT ENTER ANYTHING INTO THE ID FIELD…IT IS INCREMENTED AUTOMATICALLY.
Be sure to save ALL. Close out the tabs for dbo.design and dbo.Customers[Data] to give
yourself some room. You can always return to those screens in Server Explorer.
10
16. VERY IMPORTANT. Once you start creating your project and define the fields you are
using in the DB, it is a bit tricky to change your DB design later. So make sure the table data
is how you want it. You can change the database design later but it is better if you think
ahead and make it the way you want now.
Initial Testing of Our Project
17. Let’s see if the project will run in the browser on our local computer. Make sure that
every time you make changes to your MVC project, you save all and then build the project
(BUILD|BUILD SOLUTION) because much of our code is created dynamically by VS and all
our changes affect its ability to run properly.
So save and build now and make sure there are no errors. Now press F5 or CTL-F5 (no
debugging) and see if your project displays in the browser. Test the app using other
browsers if you have any by selecting them from the drop down next to the green “run”
icon on the toolbar.
The ReadMe page that comes with the project has a ton of good info on it so check it out.
11
Working With ASP.Net MVC 5 Projects
Creating a New Model
1. In order to work with data we must create a model for our DB. Let’s make a new model
called Customers. Make the name match the table in the DB. In solution explorer, rt. click
on the Models folder and choose Add|Class and name it Customers. Notice a model is just
a class. You need to add a namespace so we can do something cool later.
2. Add using System.ComponentModel.DataAnnotations; at the top of your class.
3. Now we need to tell VS about the DB fields we created. It turns out, that we will create
those DB fields in code using regular properties!
4. So add a property for each field. Keep Server Explorer open so you can see the DB field
names we created. Make sure they match!
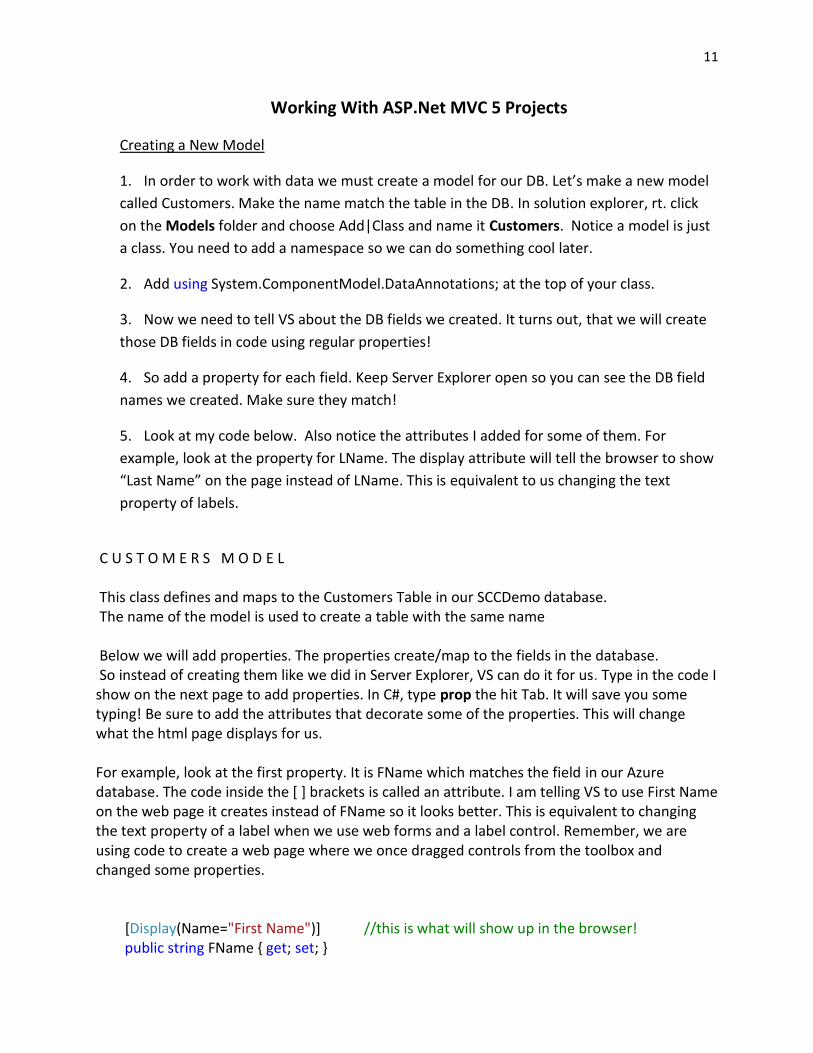
5. Look at my code below. Also notice the attributes I added for some of them. For
example, look at the property for LName. The display attribute will tell the browser to show
“Last Name” on the page instead of LName. This is equivalent to us changing the text
property of labels.
C U S T O M E R S M O D E L This class defines and maps to the Customers Table in our SCCDemo database. The name of the model is used to create a table with the same name Below we will add properties. The properties create/map to the fields in the database. So instead of creating them like we did in Server Explorer, VS can do it for us. Type in the code I show on the next page to add properties. In C#, type prop the hit Tab. It will save you some typing! Be sure to add the attributes that decorate some of the properties. This will change what the html page displays for us. For example, look at the first property. It is FName which matches the field in our Azure database. The code inside the [ ] brackets is called an attribute. I am telling VS to use First Name on the web page it creates instead of FName so it looks better. This is equivalent to changing the text property of a label when we use web forms and a label control. Remember, we are using code to create a web page where we once dragged controls from the toolbox and changed some properties. [Display(Name="First Name")] //this is what will show up in the browser! public string FName { get; set; }
12
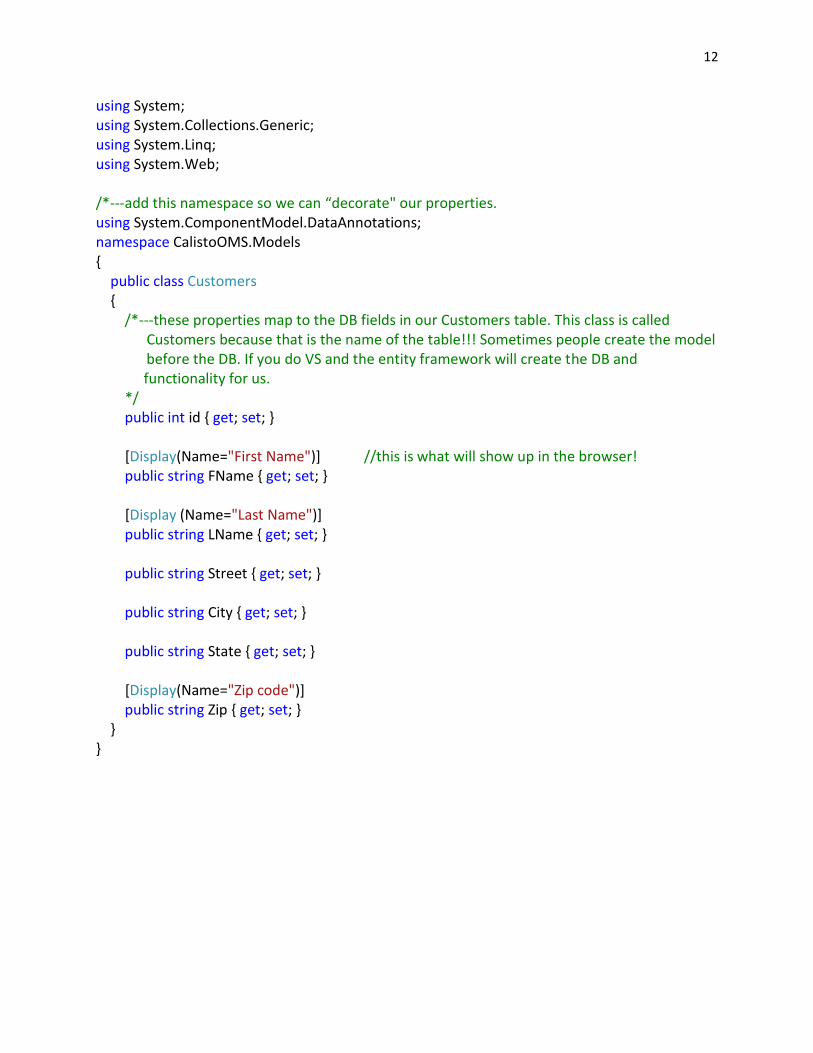
using System; using System.Collections.Generic; using System.Linq; using System.Web; /*---add this namespace so we can “decorate" our properties. using System.ComponentModel.DataAnnotations; namespace CalistoOMS.Models { public class Customers { /*---these properties map to the DB fields in our Customers table. This class is called Customers because that is the name of the table!!! Sometimes people create the model before the DB. If you do VS and the entity framework will create the DB and functionality for us. */ public int id { get; set; } [Display(Name="First Name")] //this is what will show up in the browser! public string FName { get; set; } [Display (Name="Last Name")] public string LName { get; set; } public string Street { get; set; } public string City { get; set; } public string State { get; set; } [Display(Name="Zip code")] public string Zip { get; set; } } }
13
Creating A Controller
Recall that in MVC, M = model, C = controller, and V= View. A model defines the data in
each DB table we have. Using “Code First” programming (as they call it), we code first and
the tables and web pages are created dynamically for us. That is why you do not see any
.aspx pages. In a few moments, I will show you the html pages that are returned to the
browser. But, first things first.
When a client (browser request) wants a web page from the server, we need to process
that request using what is called a controller. As you will see, it too is a class but it is
designed to go look at our data model, grab the data and tell the View how to display it. It
all happens dynamically on the server just like ASP.Net web forms do. All processing is on
the web server so our C# code is hidden from the user. Any client-side processing is done by
JavaScript.
1. Save all your work and Build the project. The controller needs info about the model
before you can create it.
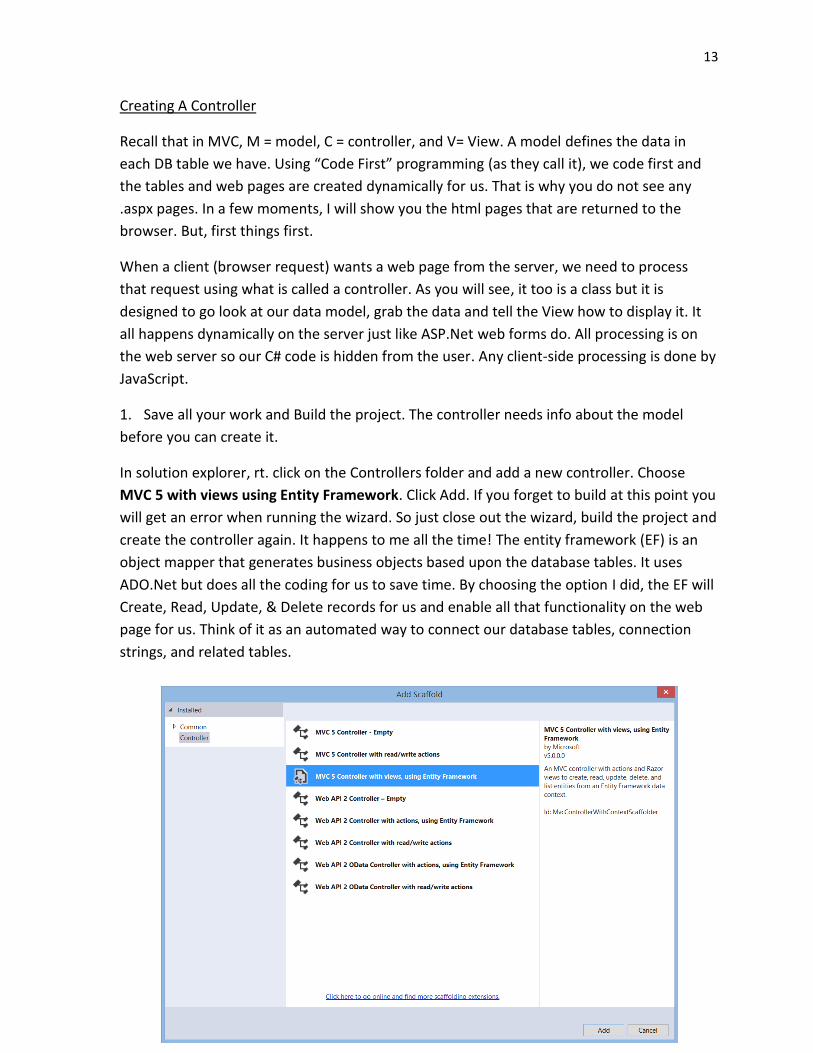
In solution explorer, rt. click on the Controllers folder and add a new controller. Choose
MVC 5 with views using Entity Framework. Click Add. If you forget to build at this point you
will get an error when running the wizard. So just close out the wizard, build the project and
create the controller again. It happens to me all the time! The entity framework (EF) is an
object mapper that generates business objects based upon the database tables. It uses
ADO.Net but does all the coding for us to save time. By choosing the option I did, the EF will
Create, Read, Update, & Delete records for us and enable all that functionality on the web
page for us. Think of it as an automated way to connect our database tables, connection
strings, and related tables.
14
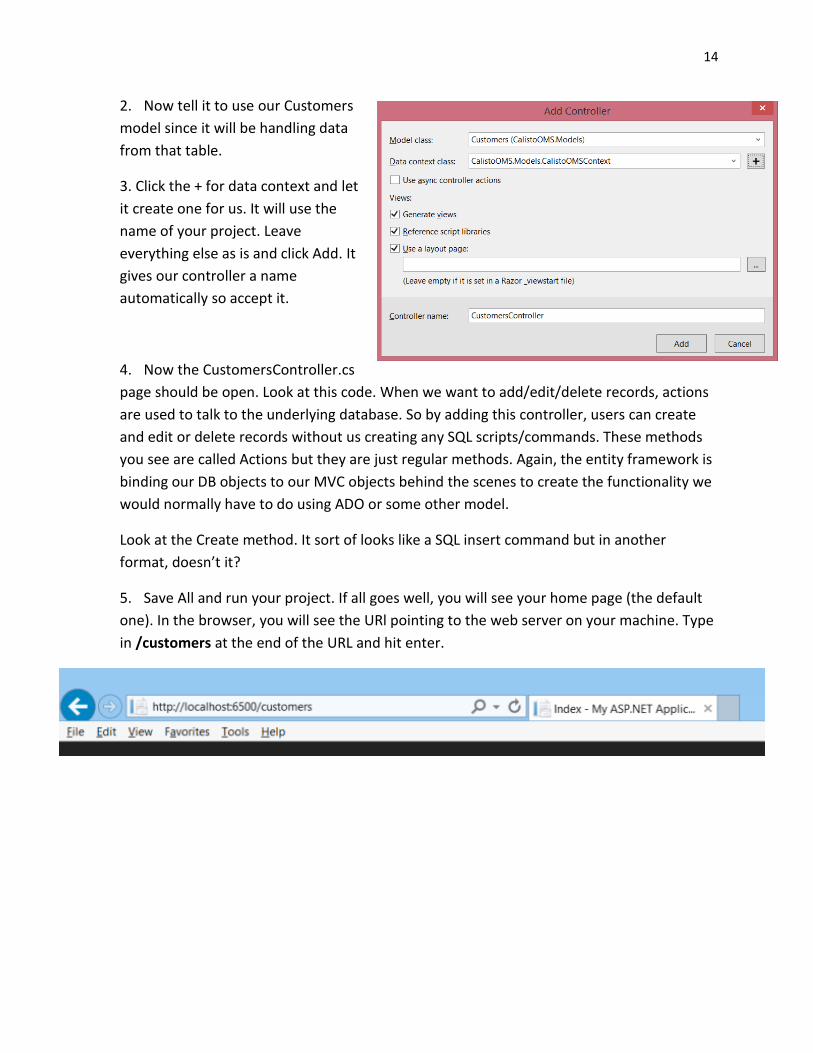
2. Now tell it to use our Customers
model since it will be handling data
from that table.
3. Click the + for data context and let
it create one for us. It will use the
name of your project. Leave
everything else as is and click Add. It
gives our controller a name
automatically so accept it.
4. Now the CustomersController.cs
page should be open. Look at this code. When we want to add/edit/delete records, actions
are used to talk to the underlying database. So by adding this controller, users can create
and edit or delete records without us creating any SQL scripts/commands. These methods
you see are called Actions but they are just regular methods. Again, the entity framework is
binding our DB objects to our MVC objects behind the scenes to create the functionality we
would normally have to do using ADO or some other model.
Look at the Create method. It sort of looks like a SQL insert command but in another
format, doesn’t it?
5. Save All and run your project. If all goes well, you will see your home page (the default
one). In the browser, you will see the URl pointing to the web server on your machine. Type
in /customers at the end of the URL and hit enter.
15
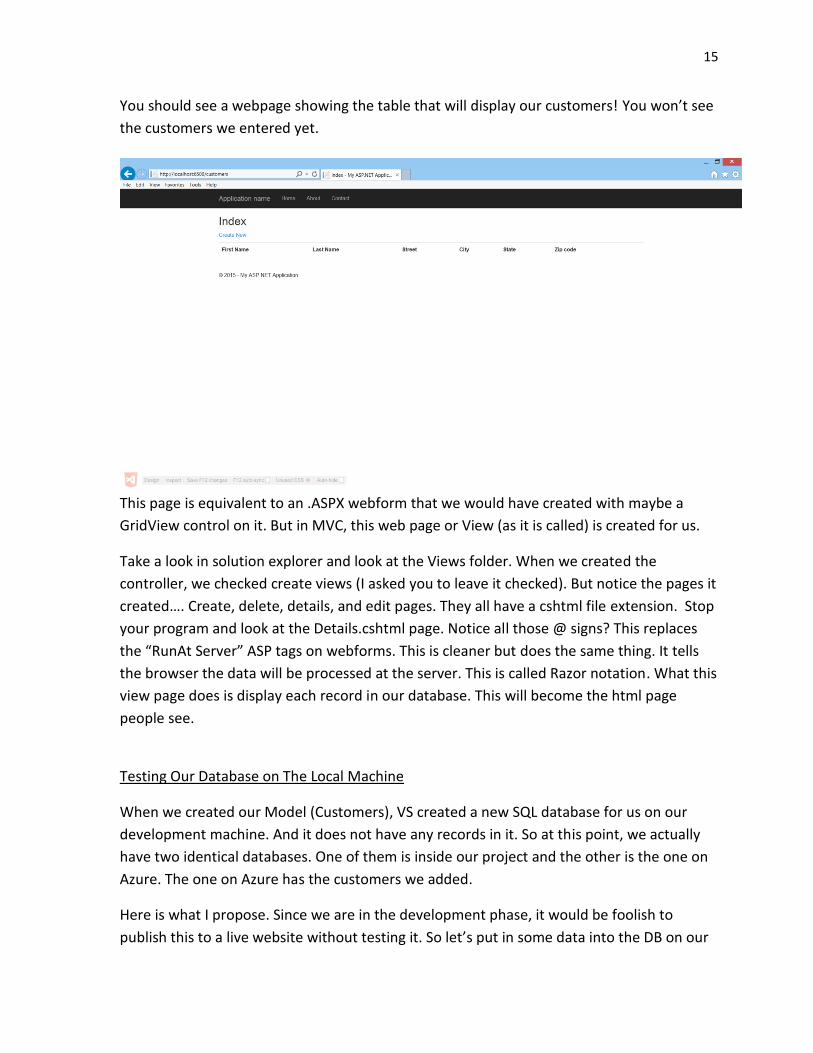
You should see a webpage showing the table that will display our customers! You won’t see
the customers we entered yet.
This page is equivalent to an .ASPX webform that we would have created with maybe a
GridView control on it. But in MVC, this web page or View (as it is called) is created for us.
Take a look in solution explorer and look at the Views folder. When we created the
controller, we checked create views (I asked you to leave it checked). But notice the pages it
created…. Create, delete, details, and edit pages. They all have a cshtml file extension. Stop
your program and look at the Details.cshtml page. Notice all those @ signs? This replaces
the “RunAt Server” ASP tags on webforms. This is cleaner but does the same thing. It tells
the browser the data will be processed at the server. This is called Razor notation. What this
view page does is display each record in our database. This will become the html page
people see.
Testing Our Database on The Local Machine
When we created our Model (Customers), VS created a new SQL database for us on our
development machine. And it does not have any records in it. So at this point, we actually
have two identical databases. One of them is inside our project and the other is the one on
Azure. The one on Azure has the customers we added.
Here is what I propose. Since we are in the development phase, it would be foolish to
publish this to a live website without testing it. So let’s put in some data into the DB on our
16
computer and make sure everything is working OK. Then, we will publish our app to Azure.
When someone runs our app from the web, it will use the database we created with those
initial customers on Azure in what seems hours ago!
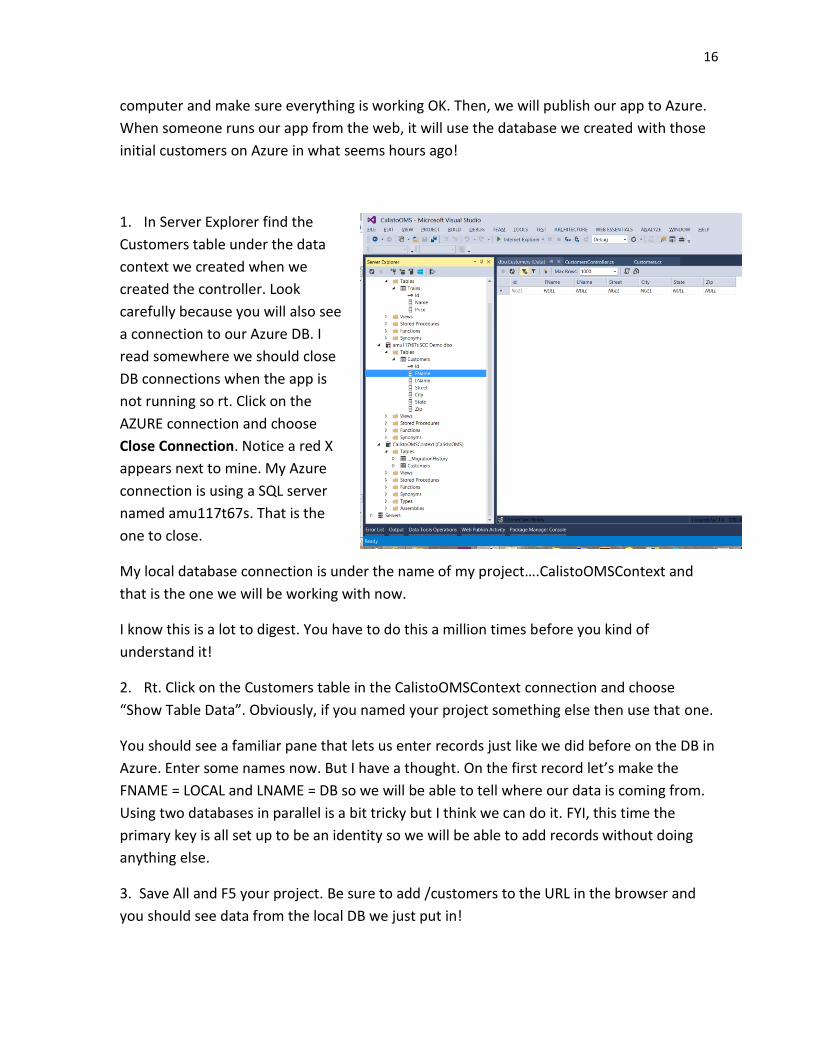
1. In Server Explorer find the
Customers table under the data
context we created when we
created the controller. Look
carefully because you will also see
a connection to our Azure DB. I
read somewhere we should close
DB connections when the app is
not running so rt. Click on the
AZURE connection and choose
Close Connection. Notice a red X
appears next to mine. My Azure
connection is using a SQL server
named amu117t67s. That is the
one to close.
My local database connection is under the name of my project….CalistoOMSContext and
that is the one we will be working with now.
I know this is a lot to digest. You have to do this a million times before you kind of
understand it!
2. Rt. Click on the Customers table in the CalistoOMSContext connection and choose
“Show Table Data”. Obviously, if you named your project something else then use that one.
You should see a familiar pane that lets us enter records just like we did before on the DB in
Azure. Enter some names now. But I have a thought. On the first record let’s make the
FNAME = LOCAL and LNAME = DB so we will be able to tell where our data is coming from.
Using two databases in parallel is a bit tricky but I think we can do it. FYI, this time the
primary key is all set up to be an identity so we will be able to add records without doing
anything else.
3. Save All and F5 your project. Be sure to add /customers to the URL in the browser and
you should see data from the local DB we just put in!
17
Try adding a new customer and notice the labels for each textbox reflect the way I told the
properties in the model to display them using those attributes.
To summarize, we used C# code to do what we could have done using ADO objects from the
toolbox in VS. A DataSource control and GridView would have done the same thing. This
MVC model produces a similar output but it separates our GUI, business logic, and database
components by using the Models, Controllers, and the Views but still processes our logic on
the web server.
18
Publishing Our Project To Azure
For our last trick, let’s see if we can publish this to our Azure web site. We are going to use
Web Deploy. You are probably familiar with it. After it is set up, we can update our project
with one click. This makes it easy to update our site whenever we make changes. So here
we go.
1. Stop your project if it is running. In Server Explorer, close the connection we have been
using (the one with Context in the name).
2. In the toolbar, choose Release instead of Debug.
3. Clean the project. BUILD|CLEAN SOLUTION
4. Build it again. BUILD|BUILD SOLUTION
5. Run it once more and get to the customers View (Type in /customers in the URL as
before)
6. Stop the project. Choose BUILD|PUBLISH.
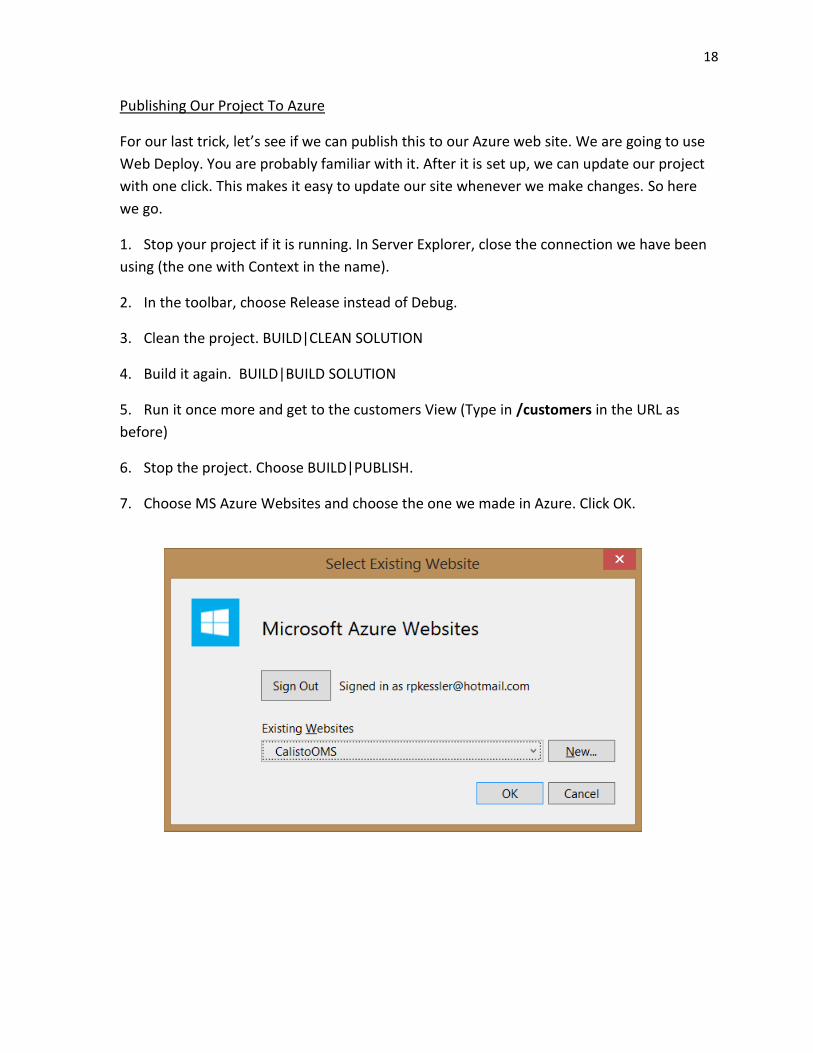
7. Choose MS Azure Websites and choose the one we made in Azure. Click OK.

19
8. Now we validate the connection info. Remember we only have to do this once. The next
time you publish it will jump to the end of this dialog and you can publish with one click.
Validate the connection. I did not change anything so click Next.
20
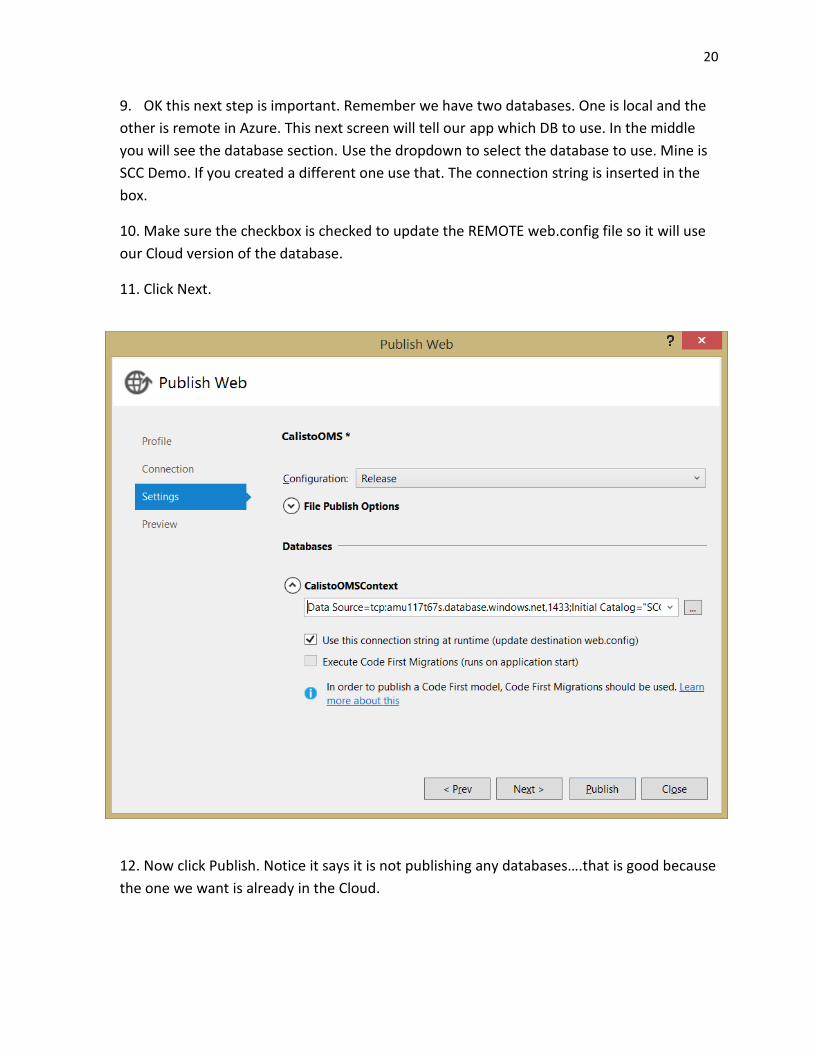
9. OK this next step is important. Remember we have two databases. One is local and the
other is remote in Azure. This next screen will tell our app which DB to use. In the middle
you will see the database section. Use the dropdown to select the database to use. Mine is
SCC Demo. If you created a different one use that. The connection string is inserted in the
box.
10. Make sure the checkbox is checked to update the REMOTE web.config file so it will use
our Cloud version of the database.
11. Click Next.
12. Now click Publish. Notice it says it is not publishing any databases….that is good because
the one we want is already in the Cloud.
21
In a few moments, your browser will open up with your app running! Just go to the URL and
add /customers and you will see your customers. And notice it shows the data from what
we entered when we started this adventure.
Now, if you want to make changes, close the browser, make your edits, save all, build again
and publish again. But this time you can just click publish unless you need to change
something.
Conclusion
We have done a lot of work. I think the features you gain by using this model make it worth
the effort. Keep in mind that we can use both MVC and Web Forms in the same project.
Since MVC and the Entity Framework do a great job of handling security and logins, you
could use those features but still navigate to different pages the way we always have in
regular ASP.
By using Azure, you can monitor your site and see how many users are accessing it and if
you need to, you can spin up another server to handle the load. You can also use Azure to
analyze your data. Companies that use what is called “Big Data” can really benefit from
these analytics and so can we.
Azure is a huge framework and growing all the time. Just take it slow and you may discover
some really cool features you can use. I hope this gives you an idea of what it is like working
with MVC and Azure. In my next lesson, we will change the home page to include our own
information and I will show you how to use bootstrap to change the theme for the site.
If you want to see a good video about Azure, check out Scott Guthrie’s excellent
presentation on the Microsoft Virtual Academy at
http://www.microsoftvirtualacademy.com/training-courses/get-started-with-windows-
azure-today-jump-start
If you need help with SQL databases checkout my SQL training series on Learn2Code.biz or
explore my Santiago Canyon College site at www.rkessler.com for programming lessons.


![02 - [ASP.NET Core] ASP.NET Core MVC](https://img.pdfslide.us/doc/110x75/58ab940f1a28abe3188b5603/02-aspnet-core-aspnet-core-mvc.jpg)