Embed Size (px)
Citation preview
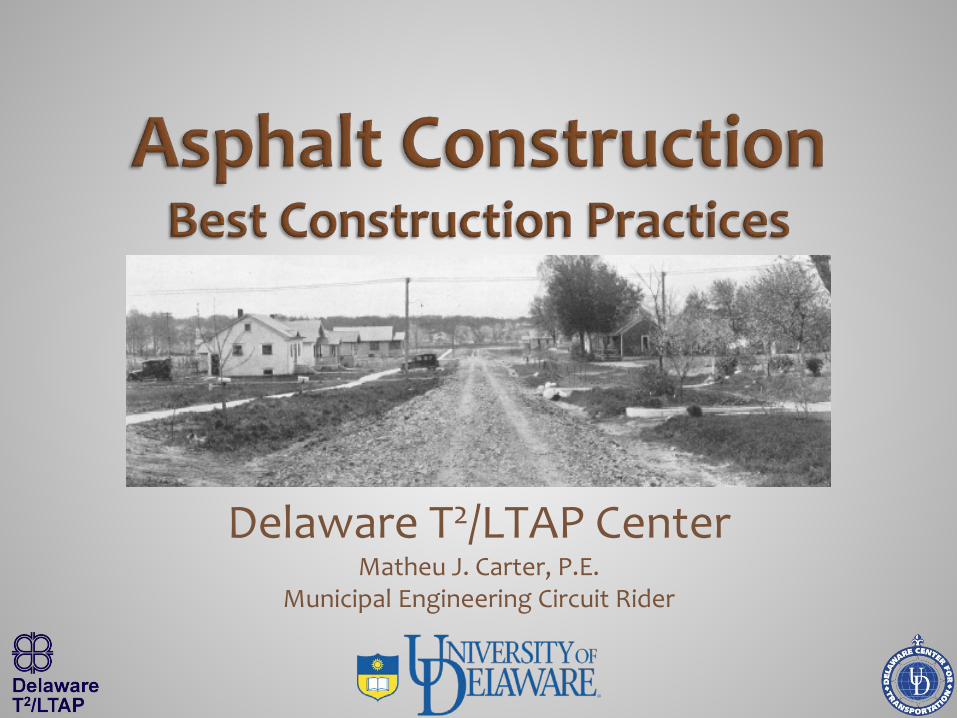
Delaware T2/LTAP Center Matheu J. Carter, P.E.
Municipal Engineering Circuit Rider

T2 Centers or LTAPs located in all 50 states
Funded by FHWA and state DOTs
Mission – promote training, tech transfer, research implementation at local level
Delaware T2 hosted by University of Delaware, part of Delaware Center for Transportation
Delaware T2 funded by FHWA and DelDOT

Today’s Instructor: Matheu J. Carter, P.E. – Municipal Engineering Circuit Rider Restrooms, etc. Standard Reminders: Cell phones, pagers, beepers, walkie-talkies Sidebar conversations

Questions – any time
We’re a small crowd – let’s keep it interactive and informal
Sharing of thoughts or examples – any time
These slides will be posted on our website – see link on your notes

Introduction Pavement Distress Contract management Pre-construction meeting Surface preparation
Materials Transport Placement Compaction Inspection Safety Pavement Preservation

This is a basic course If you’re new to the field, don’t sweat it If you’re a veteran, don’t be afraid to pitch in
No substitute for a full understanding of asphalt surfacing design, construction, and quality control
No substitute for experience

If you take nothing else away, remember words like: Weather Segregation Compaction Temperature Homogeneity Drainage

Properly designed, prepared, constructed, and maintained asphalt surface should last 10-15 years, depending upon a host of variables
Many asphalt surfaces last much longer, but that’s an unrealistic expectation
Failure to insist on quality at each step (i.e., site preparation, materials, transportation, placement, compaction) usually insures premature pavement distress
Disclaimer, caution, warning, plea In order to talk about best construction practices, we must look at real construction examples We will see poor practices in some We will see safety violations We will see all sorts of things to poke at
We should look at those things We should discuss the good, the bad, the ugly
But let’s acknowledge None of us has ever run the perfect job – let he without sin… And some of this will come off “holier than thou”

Ideal conditions
That which promises to deliver optimal performance
Leads to enhanced performance
Top of the game

What limits ability to implement BCPs? Funding Weather Space Right of way Antecedent conditions Degree of control Yours Contractors
Equipment logistics Tack truck

BUT, we’ll use the analogy anyway Would we hire a painter without being specific? Would we paint over a dirty wall board? Over flaky, chipping paint? Over water damaged boards?
Would we use old cheap paint? Old dirty brushes?
Would we store the paint in the cold garage overnight? Use it without stirring?
Would we apply it in one ½” coat? Would we pay for it without inspecting it? Would we pay for it if it wasn’t what we asked for?
No – so let’s not do this with asphalt either

Flexible pavements fail via two basic mechanisms Environmental stresses Temperature Oxidation
Structural issues Subsurface condition Construction Drainage
Our goal - avoid or defer these Understanding how pavements fail will help us construct them better So, we’ll take a few moments to explore some typical distresses
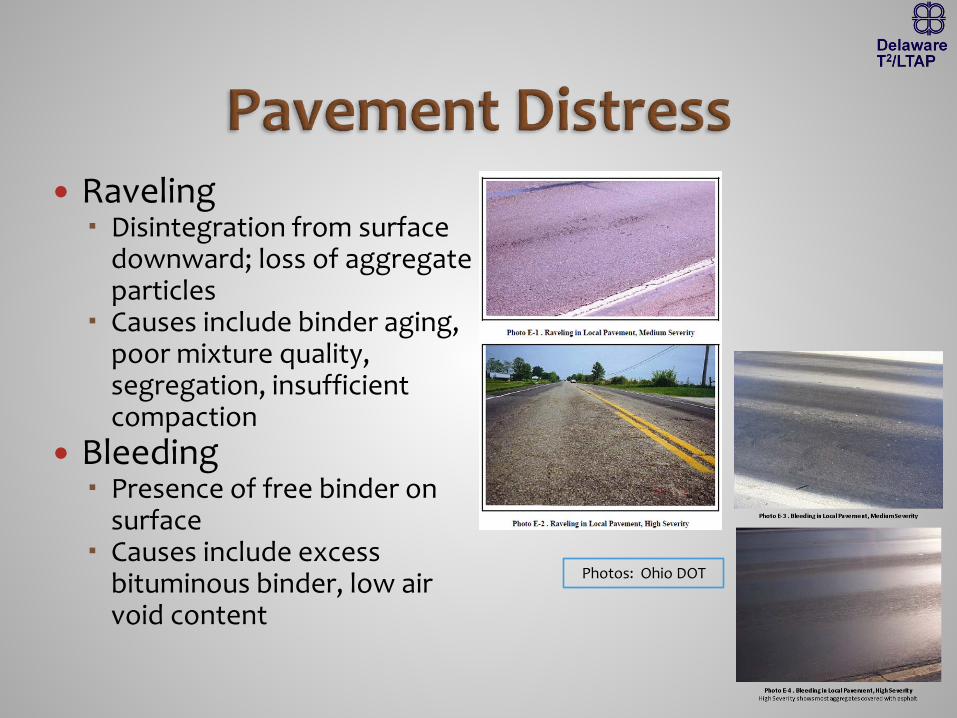
Raveling Disintegration from surface
downward; loss of aggregate particles
Causes include binder aging, poor mixture quality, segregation, insufficient compaction
Bleeding Presence of free binder on
surface Causes include excess
bituminous binder, low air void content
Photos: Ohio DOT

Base failure Deformation in the form of
bumps, dips, lipping, stepping causing pitch, roll, jarring
Causes include base or subgrade failure
Settlement Uniform dip in longitudinal
profile (lateral) Causes include poor base or
subgrade, poor drainage Not load induced
Photos: Ohio DOT

Transverse cracking Cracks at approx. right angles
to pavement centerline Causes include thermal
shrinkage of the binder, age hardening of binder
Wheel track cracking Cracks within/near wheel
tracks, eventually resembling alligator skin
Causes include fatigue failure of the asphalt
Photos: Ohio DOT
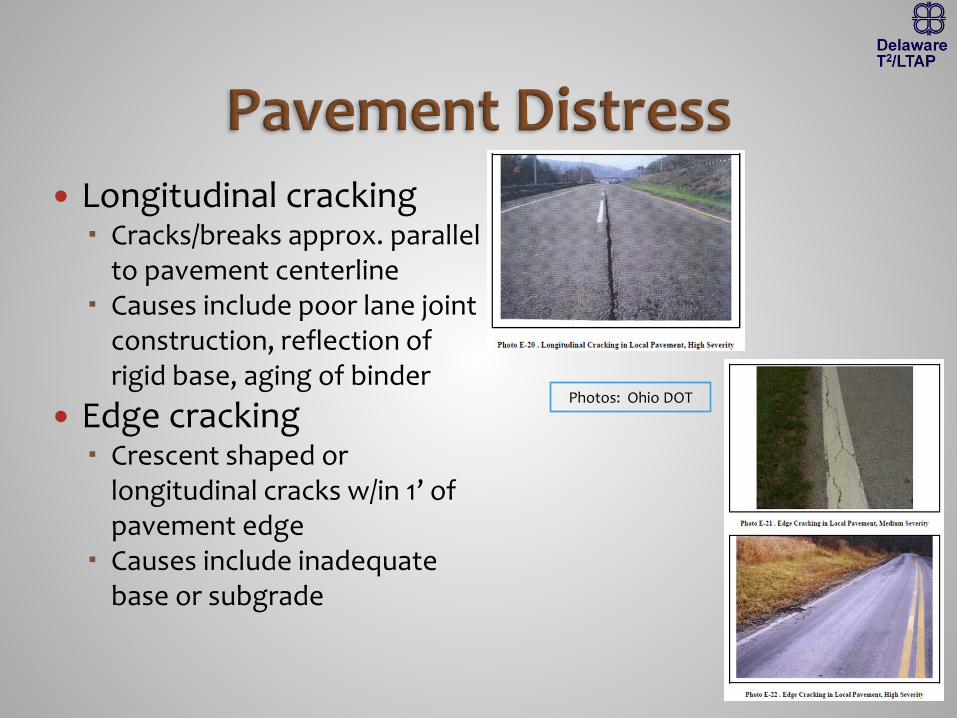
Longitudinal cracking Cracks/breaks approx. parallel
to pavement centerline Causes include poor lane joint
construction, reflection of rigid base, aging of binder
Edge cracking Crescent shaped or
longitudinal cracks w/in 1’ of pavement edge
Causes include inadequate base or subgrade
Photos: Ohio DOT
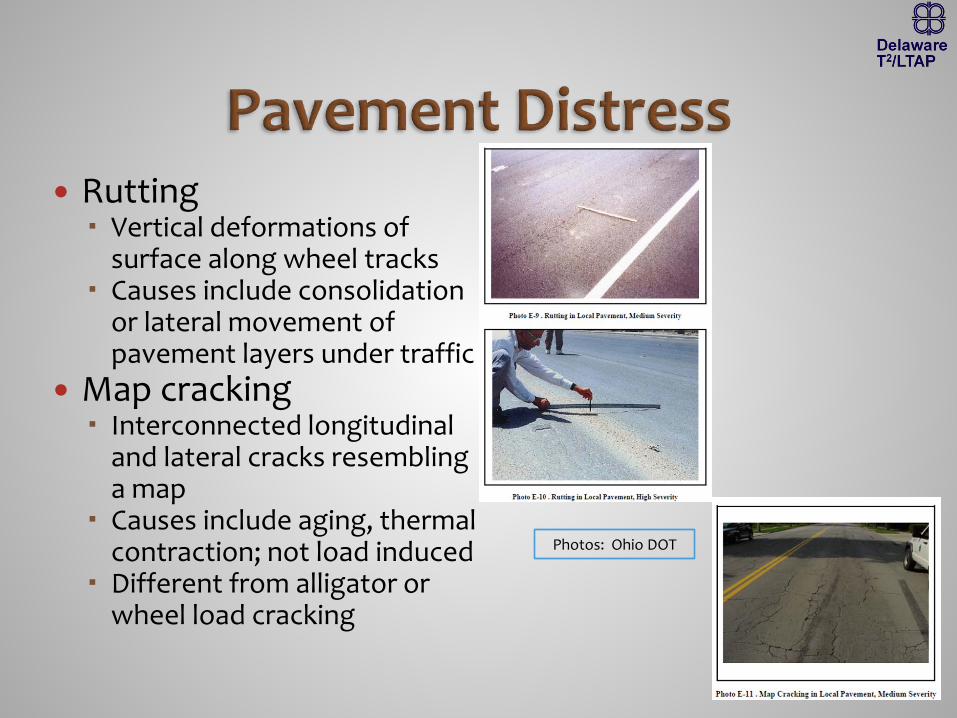
Rutting Vertical deformations of
surface along wheel tracks Causes include consolidation
or lateral movement of pavement layers under traffic
Map cracking Interconnected longitudinal
and lateral cracks resembling a map
Causes include aging, thermal contraction; not load induced
Different from alligator or wheel load cracking
Photos: Ohio DOT

Surface disintegration, debonding, potholes Isolated loss of surface Causes include freeze-thaw,
poor bonding of (thin) layers, weak base or subgrade
Patching Isolated replacement of lost
or deteriorated pavement Reaction to degraded
pavement condition; causes vary
Photos: Ohio DOT

Common themes we just heard Aging Thermal effects Freeze-thaw Subgrade failure Base failure Drainage Mix quality Segregation Compaction
Think about these as we go through various elements of asphalt construction
Goal Minimize claims
But that’s not all, right? Get product that meets our needs Pay price that’s reasonable, fair, transparent
News flash - it is okay for the contractor to do well (make money) Just not rich beyond the pale And your agency must do well too Good contract management – you can have both

The advertised bid, request for proposal, or solicitation (together with any addenda, signed contracts, etc.) are the things you can explicitly enforce Anything not in those documents that you want depends upon the good will of the contractor, your relationship, and to some extent, “best construction practices” and “standards of care” Moral – detailed, well thought out bid documents are your best gateway to the project you wanted

Using DelDOT specifications If you are part of DelDOT, well that’s what you use
If you are with a municipality or other agency, you can use No cost to you Contractors (should) already know them They cover all the ground you could ever imagine But they may cover things you don’t want to pay for Avoid cherry picking – if you want to exclude something, note it in
your contract documents Claims avoidance – one good way to expose yourself is to enforce
your contract documents unevenly http://www.deldot.gov/information/pubs_forms/manuals/standard_specifications/index.shtml

If your bid specifications refer in whole/part to DelDOT specs, make sure you’ve read them; some relevant parts highlighted below
Division 400 et.seq. – bituminous (asphalt) pavements Division 760 – milling Division 823 – hot mix, hot laid bituminous concrete Don’t forget Supplemental, Standard, and Special provisions
If you stumble on some of it, are unsure of parts, are intimidated by the specs, call/email the T2/LTAP Center – that’s why we’re here


In some minds Not every job warrants a 400 page set of contract documents
Specs are less than specific? Now there’s a problem? Time to get creative
DelDOT specs can still be used as a reference for “best construction practices” But you won’t have the leverage of having specifically
referenced them in your bid package

Best relationships are based on: Communication Trust Verification Mutual respect
Preconstruction meeting is one good place to begin building these

All parties should send representative who have decision making authority Owner, contractor, regulators, others
Owner (or owner’s representative) should control the meeting Owner should be firm with expectations, but express a desire for a cooperative relationship This is about the last chance any of the parties have to raise an issue before it’s too late – it’s easier to talk about it now rather than later

Have the right parties there from your side, their side, and others (if appropriate)
Make the first move Establish high expectations and trust in them Then make it clear you intend to verify their quality
What quality job did you solicit? High quality, premium? Average, run of the mill, old college try? Dollar store? Point being – get the job you asked for and will pay for

Preconceived notions? Don’t let them be a secret; now’s the time to tell the contractor
Pet peeves? This is the time
This is where you draw their attention to…stuff Expectations Concerns Problem property owners Utilities Special drainage issues

Even if you haven’t specifically referenced DelDOT specifications (or equivalent) Talk here as if you had This will begin to establish the project’s notion of “best
construction practices” If you get no push back here, you’ll be better leveraged to
enforce these specs later Careful though If you haven’t been specific in your bid package, you don’t get to
push as hard Balance

Areas where underlying materials are weak must be prepared prior to new surface application Would you simply paint over drywall in your house that was
water damaged? Or would you replace the damaged material first?
New asphalt over potholes, excessive cracking, debonding, etc. Probability of premature failure increases
A building is only as good as its foundation

Existing surface may be milled prior to new asphalt or new surface may be placed directly upon existing
Milling is a great opportunity to correct the cross slope (crown) and or drainage issues But if all you tell them is “mill two inches,” they may or may not
Phot
o: W
yom
ing
LTA
P

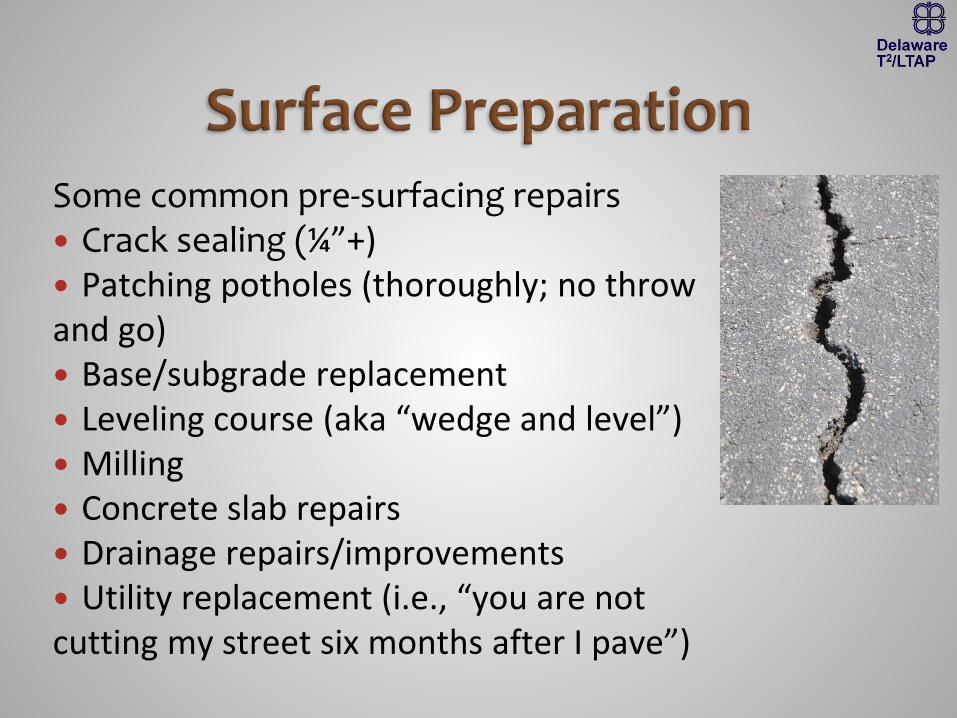
Some common pre-surfacing repairs Crack sealing (¼”+) Patching potholes (thoroughly; no throw and go) Base/subgrade replacement Leveling course (aka “wedge and level”) Milling Concrete slab repairs Drainage repairs/improvements Utility replacement (i.e., “you are not cutting my street six months after I pave”)

Base preparation is often compromised – mistake
Areas of structural failure (alligator cracking, failed utility cuts, large potholes, etc.) may require removal to depths of 8”-16” or even greater to provide sound base
Utilities? Don’t forget to adjust manholes, water valves, storm grates, etc.

Regardless of whether surface is milled, surface must be swept free of dirt, debris, and oils Otherwise, debonding is likely to occur Think how well you could glue two boards together if you first sprinkled the bottom one with sawdust Dust, dirt, oils, etc. all act as bond breakers We don’t like bond breakers

Know what you’ve specified and know what you’re receiving You are the project owner You are writing the checks You are entitled to the project you specified Hot Mix Asphalt vs. Warm Mix Asphalt 9.5 mm, 12.5 mm, 19.0 mm, etc. Superpave vs. Marshall vs. Hveem Superpave Performance Grade specification PG - Performance Grade - i.e., PG 64 -22 64˚C (147 ˚F) – avg 7-day max pavement design temperature (˚C) -22˚C (-8 ˚F) – minimum pavement design temperature (˚C)
Recycled asphalt materials (RAP, RAS)?

DelDOT’s design overview Fall 2013

Binder grades PG 64-22 PG 70-22 PG 76-22
There are others These are what we use in Delaware, for the most part
One is not better than the other A big screwdriver is not better than a small one It’s just more expensive It might be the wrong tool for the job Try using a big screwdriver to fix your glasses

Binder grades PG 64-22 Low/moderate truck volume Speed of trucks is considered “fast” Typical candidates: subdivision streets, local roadways, some
minor arterials, shoulders of mainline roads, etc. PG 70-22 >10,000,000 ESALs High volumes of fast moving trucks Think: Rt 13, Rt 1 (free flowing, non congested areas)
PG 76-22 High volume of slow moving trucks Lots stopping and starting (congested areas, intersections) Candidates: roads near plants with heavy equipment accessing
the roadway, toll plazas, traffic signals

What’s an ESAL? It’s a little complicated, but… Evens out the impact of vehicles in design Equivalent single axle load – ESAL Assume a typical automobile weighs 2,000-7,000 pounds Passenger vehicle, fully loaded, will generate about 0.003 ESALs A fully loaded tractor-trailer will generate up to 3 ESALs
Point being Trucks are a BIG deal Hondas, not our worst worry
Let’s leave it at that

In the future, you may see these: • MP-19 Grades at 64ºC
• PG 64S-22 “Standard” = PG 64-22 • PG 64H-22 “Heavy” = PG 70-22 • PG 64V-22 “Very Heavy” = PG 76-22 • PG 64E-22 “Extreme” = PG 76-22
• Note MP-19 uses “High” & “Heavy” interchangeably • Standard “S” = traffic < 10 million ESALs, > 70 km/h • Heavy “H” = traffic 10-30 million ESALs, 20-70 km/h • Very Heavy “V” = traffic > 30 million ESALs, < 20km/h • Extreme “E” > 30 million ESALs, < 20km/h, toll plazas
• And let’s leave that at that, too

What’s this “gyrations” thing? Think of it as something that simulates compaction In a gyratory compactor, Sample is subjected to a load Sample is inclined at 1.25° Sample rotates at 30 revolutions per minute Result - a sample particle orientation similar to that achieved in the
field after roller compaction
See? Simple.
Source: http://www.pavementinteractive.org/article/Su
perpave-Mix-Design/

Gyrations The properties of the mixes are slightly different to accommodate the needs of the road Only two gyrations used in Delaware 115 is used in areas where the ESALS (not ADT) are between 0
and 300,000 160 is used in areas where the ESALS (not ADT) are > 300,000

Carbonate vs. Non-Carbonate Non- Carbonate stone is more resistant to polishing than carbonate stone
The use of Non-Carbonate stone is beneficial in areas where: The ADT is greater than 8000 vpd AND the speed limit is greater
than 35 mph There are known skidding problems in the area

Mat thickness C mix 9.5mm (standard) Min lift thickness = 1.25” Max lift thickness = 2:
4.75mm Min lift thickness = 0.5” Max lift thickness = 1.25”
12.5 mm Min lift thickness = 1.5” Max lift thickness = 2.5”
Why a minimum thickness?

Mat thickness B mix* Min = 2.25” Max = 4” *When B is being paid for as BCBC, the mix can be placed in lifts
up to 6”
BCBC Min = 3” Max = 6”
Why a maximum thickness?

Material stockpiles • Properly segregated? • Homogenous? • Moisture content?

RAP – Recycled Asphalt Pavement
In Delaware: 1997-2013 average grade is PG 88-16 FHWA-under 20% RAP no need to change grade Over 25% one should use a blending chart
Three DelDOT absolutes PG 70/76-22 - maximum is 10% replacement PG 64-22 - maximum is 20% replacement PG 58/64-28 - maximum is 40% replacement
Point being – you’ll probably get some RAP and that’s okay – but they should be telling you

RAS – Recycled Asphalt Shingles
Shingles, new or old, are far stiffer than RAP New Shingle Waste: PG 115-16 RAS since 2012: PG 142-10 Post Consumer RAS: PG 160-10 [Compare to RAP PG: 88-16]
The finer RAS is ground, the more asphalt released
DelDOT committed to use of RAP and RAS in pavements DelDOT - one of the most liberal policies for RAP/RAS So – locals will likely have RAP/RAS in their asphalt

Asphalt plant • Complex • Nothing arbitrary in
the mix • Lots of QAQC needed

At the batch plant: hot mix on the left and warm mix on the right

Yield Typical compacted unit density – 151.5 #/cubic foot1
Length (feet) x width (feet) x density (#/cf) x compacted thickness (inches) (12 inches/foot) x (2000 #/ton) Example: 1 mile 24’ wide with 2” final thickness of 9.5 mm Type C mix 5280 ft x 24 ft x 151.5 #/cf x 2” = 1599.84 tons (12 inches/foot) x (2000 #/ton) And I care why? Assuming each truck ticket shows 22 tons, you would expect ~73 trucks; if only 70
truckloads were delivered, you may have been shorted on your area or thickness or the compaction may be inadequate
If 78 truckloads were delivered and you’re paying by the ton, they may be putting down a thicker mat to boost their invoice
1: 2008 DelDOT Superpave production summary for most Type B & C mixes assuming 93% compaction

Trucks Sufficient number of trucks Coordinate with plant for continuous supply of material
Truck bed Clean and free of deleterious material (dirt, gravel, debris) Smooth and free of major dents and depressions
Release agent Emulsified oil, soap solution, citrus compounds, etc. No diesel fuel
Material tickets Collect tickets Check job mix for compliance with specifications Use unit weight to determine approximate yield

Paver basics Tractor provides power and carries mix from hopper to screed Material feed system – hopper, slat conveyer, conveyor flow gates,
augers Screed provides initial density and smoothness
Push rollers and truck hitches Truck rests against push rollers – paver pushes truck Truck does not bump paver – paver “picks up” the truck Keep rollers clean and free rolling
Material feed system Transports material to augers Gates regulate amount of material carried to augers Goal – constant head of material in front of screed
Screed Establishes thickness, initial texture and compaction Screed plate should be smooth & not warped Depth of mat is increased as front of screed is pivoted up,
decreased as it is pivoted down; thickness change happens gradually (over five lengths of the tow bar)
Screed vibrates to provide initial compaction Screed extensions can be hydraulic or fixed and can create
changes in slope Screed heater – preheat to ~300˚F prior to paving for a more
uniform mat surface and to prevent mix sticking to screed Screed should not be in contact with mat during preheating
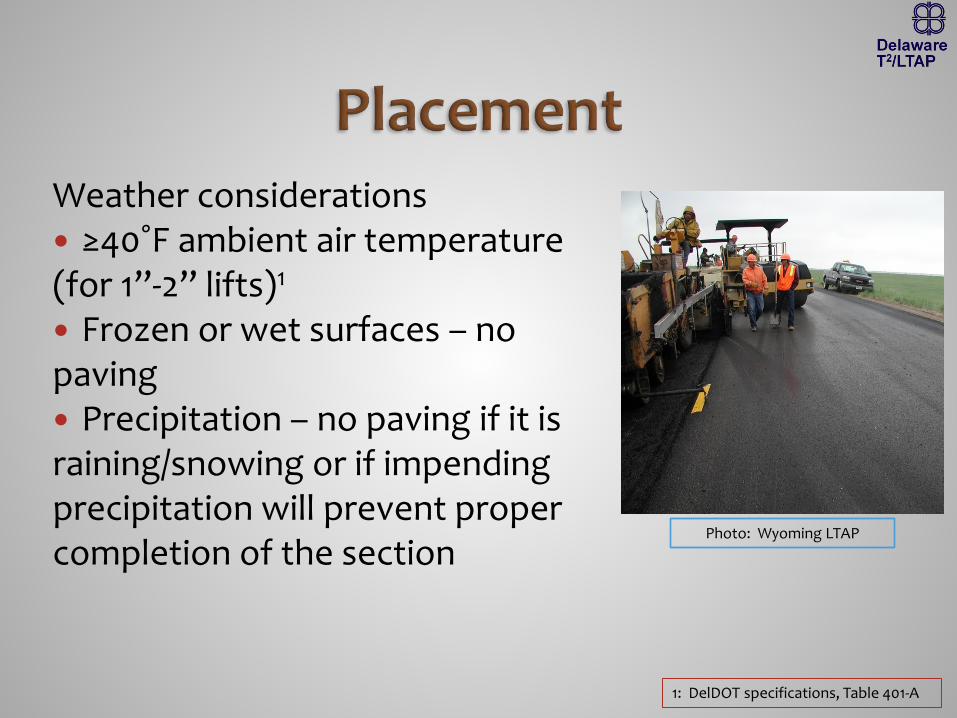
Weather considerations ≥40˚F ambient air temperature (for 1”-2” lifts)1
Frozen or wet surfaces – no paving Precipitation – no paving if it is raining/snowing or if impending precipitation will prevent proper completion of the section
1: DelDOT specifications, Table 401-A
Photo: Wyoming LTAP

Temperature Typically, 50ºF and rising
Sour
ce:
Supp
lem
enta
l Spe
cific
atio
ns to
the
Aug
ust 2
001
Stan
dard
Spe
cific
atio
ns
(Rev
ised
May
6, 2
013)

Tack coat Clean surface first Apply tack uniformly 0.05 to 0.15 gallons/square yard Apply to no more of the surface than will be completed that day Apply to contact surfaces of curbs, gutters, manholes, etc. Emulsion is brown and will turn black when it “breaks”


Relative application rates “401.07 Application of Tack Coat. A tack coat diluted with 50% water
shall be applied on all dry and broom cleaned portland cement concrete and bituminous pavement surfaces. Tack coat shall be applied at a rate of 0.05 to 0.15 gal/yd², at a temperature of 70 to 160 °F. The application rate appropriate for the surface being overlaid shall have prior approval of the Engineer. The tack coat should be a thin, uniform coating sufficient to bond the overlay to the underlying pavement. Tack coat shall be applied using pressurized distributing equipment with a spray bar or other approved distribution system. Tack coat shall be applied in advance of the hot-mix operation, but no further than is anticipated for the current day′s hot-mix operation. All contact surfaces of curbing, gutters, manholes, and other facilities shall be coated with a uniform coat of hot asphalt cement (tack) or other approved bituminous material just before the mixture is placed.” – DelDOT Standard Specifications for Road and Bridge Construction August 2001

Too little Bond won’t be achieved
Too thin Thin is okay, thin is desirable But uniform, complete coverage
Non-uniform You’re not looking to bond some of the pavement
Too thick Can create slip plane Can work up to top course
Application rate – consider existing surface Oxidized? Milled? Fat/flushed? Open-textured or tight/dense?
Applied to clean, dry surface
Photo: FHWA

Relative application rates Rate should vary with the condition of the surface being paved Objective Apply a sufficient quantity of
material Result - thin, uniform coating of
material covering the entire pavement surface
Matching the application rate to the condition of the existing surface is key
Sour
ce:
Flex
ible
Pav
emen
ts O
f Ohi
o; T
echn
ical
Bul
letin
: Pro
per T
ack
Coat
A
pplic
atio
n (1
9Sep
t201
2)
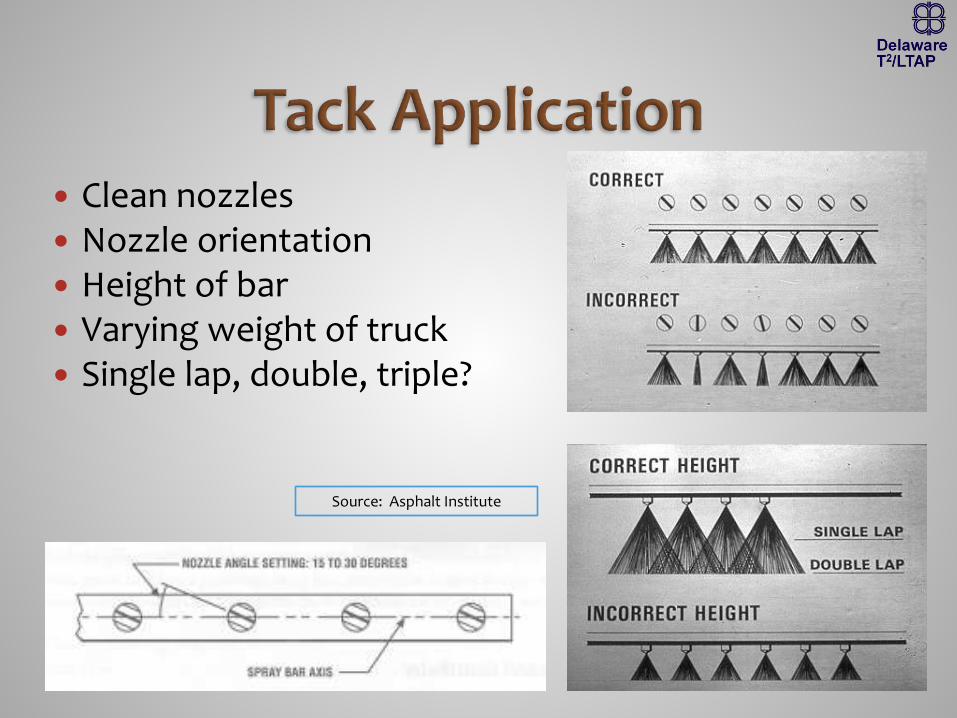
Clean nozzles Nozzle orientation Height of bar Varying weight of truck Single lap, double, triple?
Source: Asphalt Institute

Look closely What do you see? Double overlap? Triple? What about spray bar height?

Don’t forget – tack vertical surfaces Curbs Gutters Cold pavement joints Structures Faces of longitudinal and transverse joints
However: “…it was recommended that if the free edge of the longitudinal
joint was not cut back to a vertical surface, and if the mix along the joint was clean, then a tack coat would not normally be needed. There has been no reported evidence that the use of tack coat significantly increases the durability of the longitudinal joint under traffic.” Guidelines for Using Prime and Tack Coats, FHWA, July 2005.

Paver warmed up, screed preheated, grades and crown are set Material arrives Check load slip – is this what we ordered? Check temperature as truck bed empties into paver hopper
Slat conveyor transports mix to load the augers – keep material about mid height on the augers for uniform distribution Paver starts moving and keeps moving Check the mat – cross slope, mat thickness and texture

Convenient way – use a graduated push rod
Don’t just check the edge – you can walk across the screed platform when it’s not busy – coordinate with these folks

And here it sits. And sits. And sits. If the crew has left the
machine, there’s not going to be another truck for a while.

Keep the paver moving Every time it stops, differentials in temperature and compaction will result in noticeable bumps in the mat When one truck is empty, another truck should be waiting to back up to the paver On smaller jobs, this is harder to accomplish, but no less important If a truck isn’t ready, better to stop with a full hopper of hot material and get moving at paving speed as soon as possible after it arrives (like we saw in last picture)


Keep those augers full… But not too full
Yikes!
This probably looks about right

Transverse joints (beginning and end) Butt joint versus feather joint Saw cut or mill the butt joint edge if necessary to get a clean
edge Tack the edge for good bond Minimize luting and do not broadcast material onto the mat
Longitudinal joints Stagger these if multiple lifts Clean and tack the edge Overlap with second pass just enough to allow proper
compaction and kneading of the joint Minimize luting and do not broadcast material onto the mat
Longitudinal (center) joint Stagger joint
Surface course Base course Sub base material
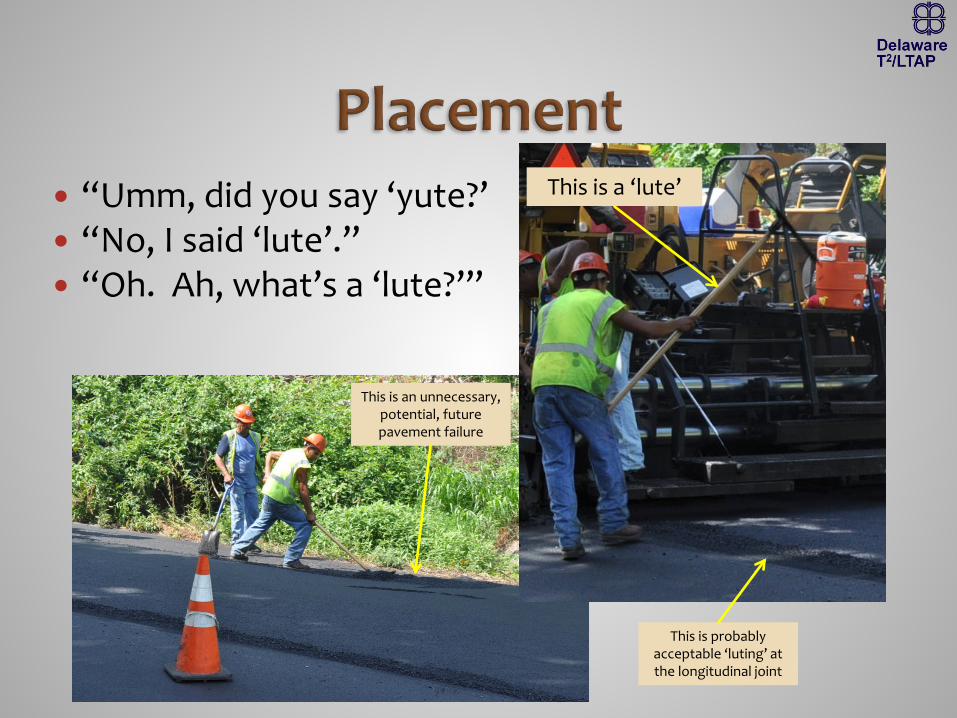
“Umm, did you say ‘yute?’ “No, I said ‘lute’.” “Oh. Ah, what’s a ‘lute?’”
This is a ‘lute’
This is an unnecessary, potential, future pavement failure
This is probably acceptable ‘luting’ at the longitudinal joint

Longitudinal joints – looks like this is reasonably prepared for rolling

Longitudinal joints Joints between lanes are commonly susceptible to moisture damage and other failures Causes of failure Low density at the unconfined edge when the first lane is paved Temperature and environmental forces Insufficient material between passes for roll down to match Residual stress occurring at the wheel path Irregular joint lines
Too little or no overlap, the joint may be starved of material and can result in large voids or very low in-place densities

Making a straight first pass is crucial for a successful longitudinal joint
Versus
Photo: DelDOT
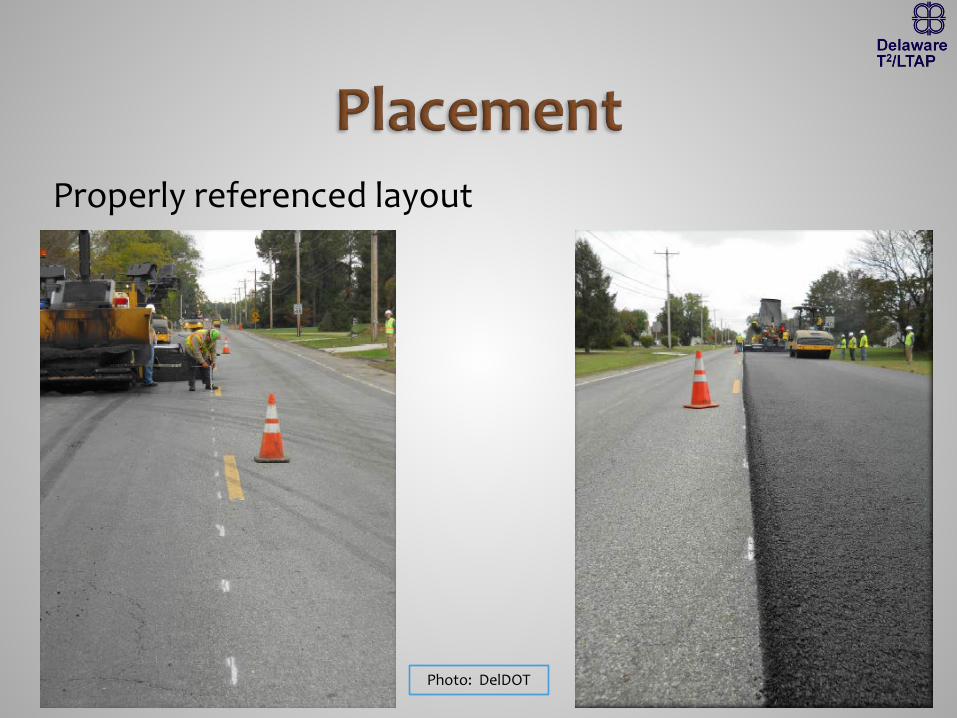
Properly referenced layout
Photo: DelDOT

And not…
Photo: DelDOT

Subsection 401.08 Placing Bituminous Mixtures.
The Contractor is required to carefully plan the placement of the surface course to ensure that the joints in the surface course will correspond with the traffic lanes. Longitudinal joints must be parallel to the centerline. The Contractor must establish and follow reference lines or other approved markings to control the true alignment of the longitudinal joints.

Starter Crack First pass – right lane? Unrestrained edge cooled Crown may break at lane edge Maybe inadequate tack Second pass broke it You can start getting water under the pavement right away (that’s sarcasm)

Let’s watch a little – keep an eye out Loaded augers Idled paver Roller activity Use of lutes Segregation

Segregation – your best shot at early pavement distress and failure Lots of opportunities for it at the batch plant and in truck loading, but you won’t see as much of that, so… At the site: Unloading the truck into the hopper – don’t dribble it in Folding hopper wings – this should be a rarity Slat conveyor/augers running too fast – separates fines Stopping and starting the paver – mat temperature differential Insufficient material on the augers Broadcasting loose material onto the mat (just say no to the
lute) Loose material from the hopper or truck

Segregation “What’s that fella doing?” “Oh, he’s cleaning his truck off in
front of the paver.” “Isn’t that going to cause segregation
and break the bond between the old and new pavement?”
“Why yes…yes it is.” “So that’s where we will have a
premature pavement failure?” “Indeed.”

Origins everywhere In the stockpile As it’s loaded In the batch plant Loading the truck Unloading the truck In the paver Etc.
Larger particles separate from finer
particles…every chance they get
Source: J. Don Brock, Ph.D., P.E., James G. May,
& Greg Renegar, “Segregation: Causes and Cures,” Technical Paper T-
117, ASTEC, 2003

It’s just sloppy
Loose, cold material dropped from the
truck bed
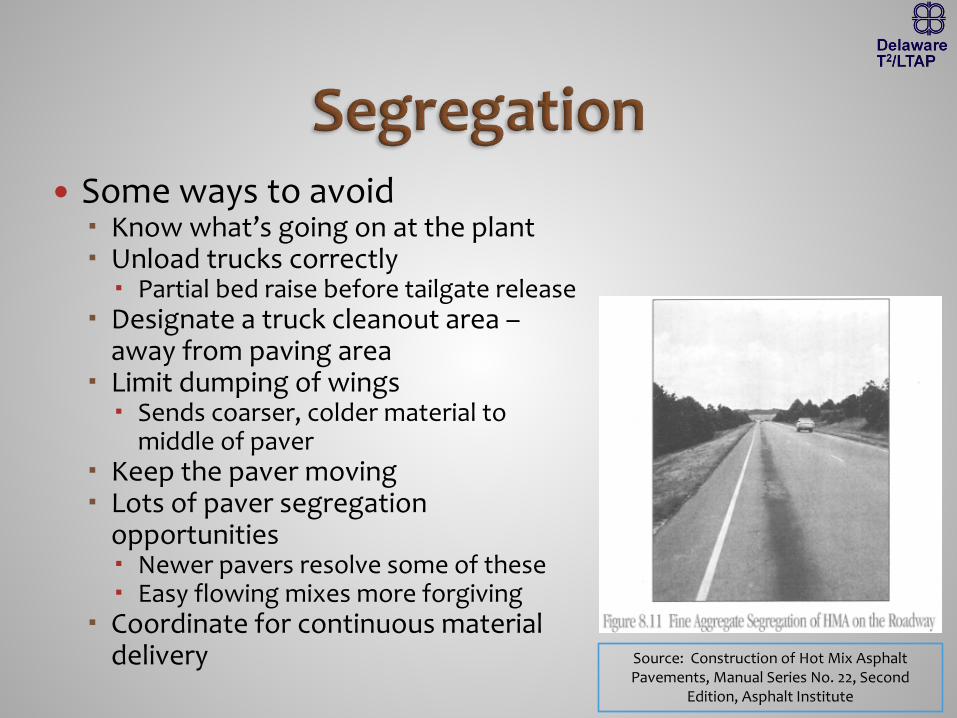
Some ways to avoid Know what’s going on at the plant Unload trucks correctly Partial bed raise before tailgate release
Designate a truck cleanout area – away from paving area
Limit dumping of wings Sends coarser, colder material to
middle of paver Keep the paver moving Lots of paver segregation
opportunities Newer pavers resolve some of these Easy flowing mixes more forgiving
Coordinate for continuous material delivery Source: Construction of Hot Mix Asphalt
Pavements, Manual Series No. 22, Second Edition, Asphalt Institute
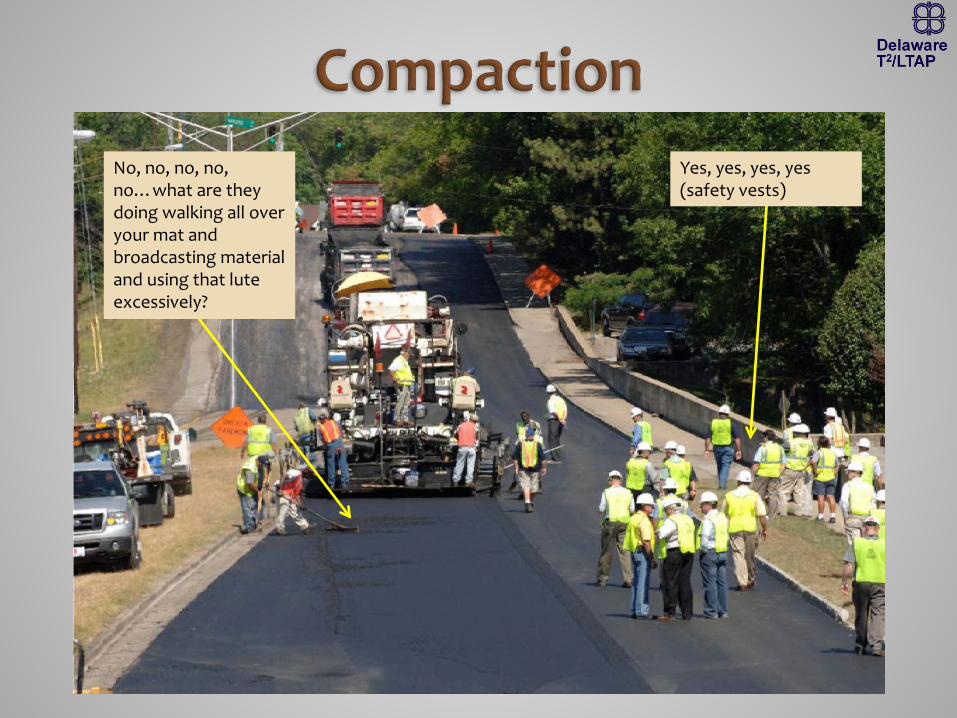
No, no, no, no, no…what are they doing walking all over your mat and broadcasting material and using that lute excessively?
Yes, yes, yes, yes (safety vests)

Keep that first roller right up behind the paver If he isn’t scaring the guy on the paver, he isn’t close enough!

The roller operator can ruin the mat or save it Some keys • # of rollers • Size of rollers • Patterns • Mat temp • Tender zone
management

Impact on longitudinal joint
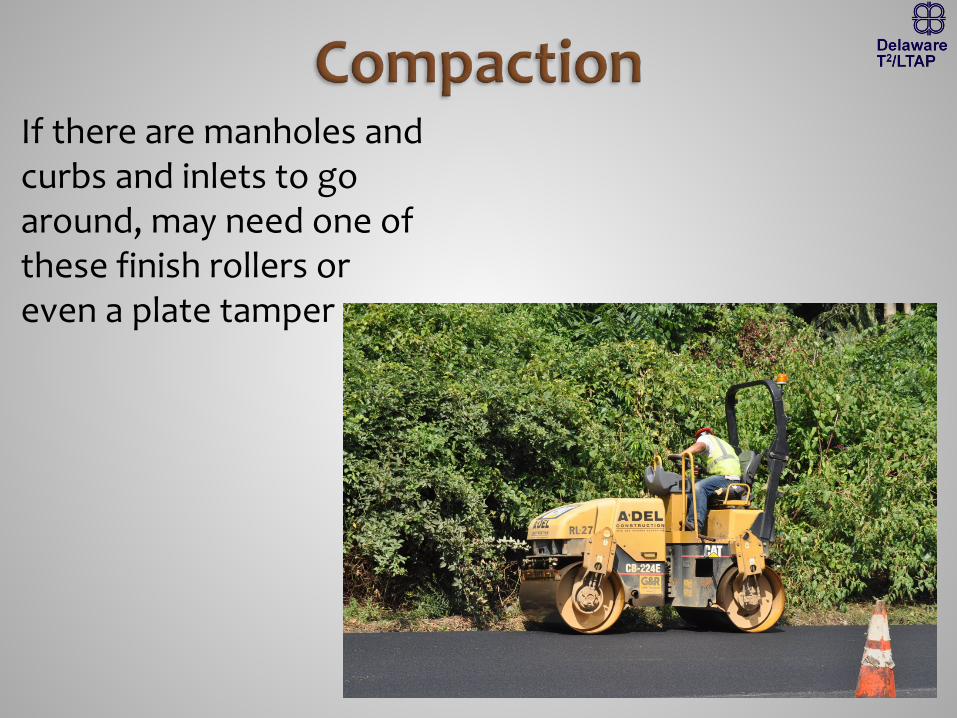
If there are manholes and curbs and inlets to go around, may need one of these finish rollers or even a plate tamper

Compaction is (almost) everything Strength, stability, resistance to rutting, reduction of moisture
penetration, reduction of oxidation, fatigue resistance, reduction of low temperature cracking
Thinner mat allows less time to achieve compaction Lower mix temperature allows less time to achieve compaction Lower air and surface temperature allows less time to achieve compaction Thinner mat under windy conditions allows less time to achieve compaction

Typical hot mix asphalt temperatures: At the plant: 270˚F - 325˚F In truck/hopper at site: 265˚F - 320˚F (lose 5˚F - 25˚F) Placed mat at back of screed: 265˚F - 315˚F Compaction no longer possible: 175˚F - 185˚F
Warm mix asphalt could be 50˚F - 100˚F lower Check temperatures “Stick in” thermometer is better Infrared thermometer will suffice (more convenient)

This is a “safety edge”
Compaction equipment Vibratory rollers Static wheel rollers Pneumatic tired rollers Plate tampers
Right type, size, and number of equipment Used correctly Rolling pattern Number of passes Consistent, low speed Slow stops/starts Gradual directional changes Park only on cold mat

Let’s watch a bit more Little different kind of job Thin lift 4.75 mm PG 64-22 tack

Contractor must: Have proper equipment in good working order Have access to asphalt in sufficient quantities that meets your
specifications Avoid segregation of material at all steps Affect high quality transverse and longitudinal joints Ensure thickness specified (± ¼”) is consistently placed Ensure minimum 90% compaction (base mixes; 92% surface) Provide smooth surface Use best construction practices Protect the surfaces and ensure a good product

Quality Assurance

Inspection techniques and tools Digital camera – shoot tons of pics – the good and the bad Video camera – generally not needed, but if you have one… Daily notes (“diary”) – detailed Talk to the foreman throughout the day, understand what’s
going on, what problems they’re having, and what they’re doing about them
Raise questions If you don’t understand why they’re doing something or how, ask –
better to appear uninitiated than accept a bad job If they’re not performing per your expectations, don’t wait to raise
the issue – do it early, directly, and professionally

Best Safety Practice Part of DelDOT’s practice Unconfined edge ≥ 2”

That’s right – everyone on the job should be briefed on safety and wearing appropriate personal protective equipment Safety briefings ANSI Class 3 safety vests –
everyone who will step foot in the right of way
Hard hats – as appropriate for the equipment and activity on site
Steel toed safety boots – as appropriate for the individual’s activities

VIPs and guests can get hurt too – so no exceptions
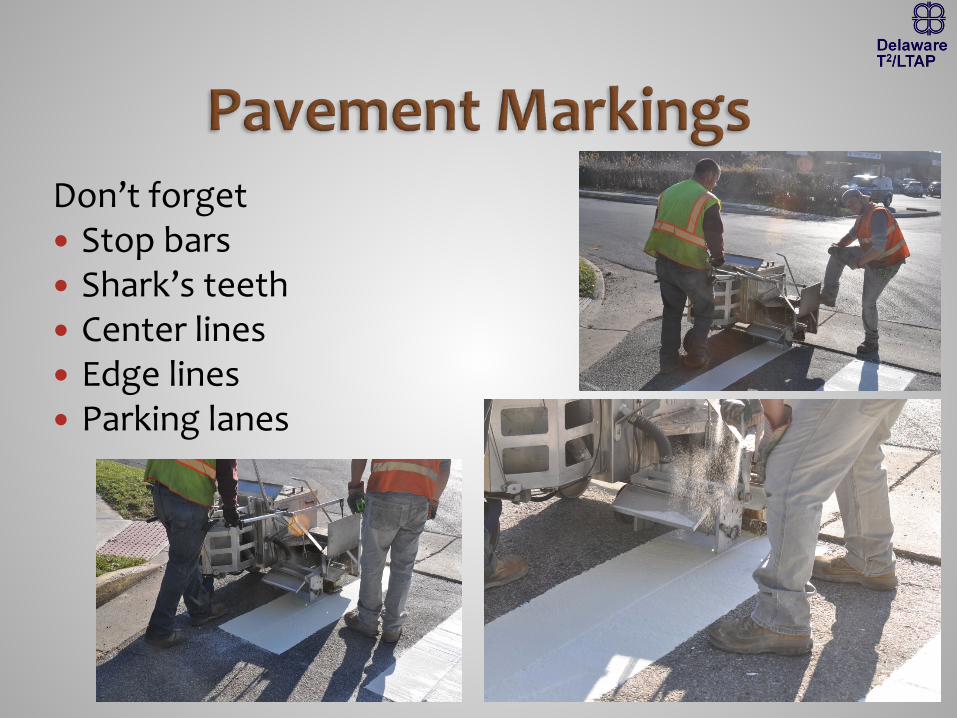
Don’t forget Stop bars Shark’s teeth Center lines Edge lines Parking lanes

A pavement needing reconstruction is not going to get much worse…
Source: Derek Pearson, “Deterioration and Maintenance of Pavements,” Institute of Civil Engineers, 2012
A pavement in fair condition can quickly deteriorate into poor condition

Application of pavement preservation Preventative e.g., Crack sealing
Rehabilitation e.g., Thin lift overlay
Reconstruction e.g., Mill and overlay
Source: Derek Pearson, “Deterioration and Maintenance of Pavements,” Institute of Civil Engineers, 2012

P2 Toolkit Crack seal Fog seal Chip seal Slurry seal Microsurface Thin lift overlay Full depth reclamation Cold in-place recycling Hot in-place recycling Fabrics making a comeback?

Hot-Mix Asphalt Paving Handbook 2000, US Army Corps of Engineers (a bit dated, but good starting point) The Asphalt Handbook, Asphalt Institute Construction of Hot Mix Asphalt Pavements (Manual Series No. 22), Asphalt Institute DelDOT Standard Specifications Delaware T2 Center

Distress Identification Guide (from the Long-Term Pavement Performance System)
Distress Identification Manual (from the Long-Term Pavement Performance System) Big boy version of the
pocket guide http://www.fhwa.dot.gov/publications/resea
rch/infrastructure/pavements/ltpp/reports/03031/03031.pdf

Pavement Preservation Checklist Series
https://www.pavementpreservation.org/fhwa-resources/fhwa-preservation-brochures/
Basic, quick, overviews Crack seal Chip seal Thin lift asphalt Fog seal Microsurfacing Hot in-place recycling Cold in-place recycling Slurry seal Paving fabric interlayer Full depth reclamation

Matt Carter Municipal Engineering Circuit Rider
Delaware T2 Center Delaware Center for Transportation
358 DuPont Hall University of Delaware
Newark, Delaware 19716 (302) 831-7236