Embed Size (px)
Citation preview
Student
2022/03/26 06:16 i ASCENDER Student Overview Guide
ASCENDER Student Overview Guide
Student
2022/03/26 06:16 ii ASCENDER Student Overview Guide
Student
2022/03/26 06:16 iii ASCENDER Student Overview Guide
Table of ContentsASCENDER Student - Overview Guide 1 ...............................................................................................
Login 4 ............................................................................................................................................... Login 4 .......................................................................................................................................... Change Password 5 ...................................................................................................................... Exit Application 8 .......................................................................................................................... Logout 8 ....................................................................................................................................... Incorrect Logout Method 9 ............................................................................................................
Navigation 9 ...................................................................................................................................... Dashboard 10 ............................................................................................................................... Menu and Tabs 15 ........................................................................................................................ Change Application 16 .................................................................................................................. Application Tabs 17 ...................................................................................................................... Software Version 18 ..................................................................................................................... County District 18 ......................................................................................................................... System Alerts 19 .......................................................................................................................... Provide Feedback 19 .................................................................................................................... Online Help 21 .............................................................................................................................. Session Timers 21 ........................................................................................................................
Retrieve & Maintain Data 21 .......................................................................................................... Autosuggest 21 ............................................................................................................................ Student Directory 22 .................................................................................................................... Student Photo 24 .......................................................................................................................... Add a Row 28 ............................................................................................................................... Delete a Row 28 ........................................................................................................................... Colum Sort 29 ............................................................................................................................... Pagination 30 ................................................................................................................................ Ellipsis Icon 32 .............................................................................................................................. Spyglass Icon 33 ........................................................................................................................... Save Changes 33 ..........................................................................................................................
Reports 33 ......................................................................................................................................... Report Menu & Breadcrumb 34 .................................................................................................... Report Parameters 35 .................................................................................................................. Report Preview 38 ........................................................................................................................ User Created Reports & Templates 39 ......................................................................................... Sorting & Filtering Reports 43 ...................................................................................................... Filter 45 ........................................................................................................................................

Student
2022/03/26 06:16 iv ASCENDER Student Overview Guide
Student
2022/03/26 06:16 1 ASCENDER Student Overview Guide
ASCENDER Student - Overview Guide
The ASCENDER Student system is a group of web applications that allow you to interact with thedatabase using an Internet browser such as Firefox, Google Chrome, or Safari (Mac only). As theASCENDER System evolves, the browser versions are updated.
Here are a few tips:
For adequate viewing, be sure to check your screen resolution settings. The recommendedscreen resolution setting is 1280×1024.It is recommended that you clear your Internet browser’s cache each time a release isinstalled or updated.Be sure to access the ASCENDER Browser Settings document for the most current systembrowser settings information. This document can be found in the online Help.If you experience any issues or have questions, please contact your regional EducationService Center
About Release Notes & Known Issues:
As the ASCENDER software programs are modified, release notes are posted atresources.ascendertx.com. An ESC consultant login is required to access the ASCENDER Resourcespage.
If known issues are identified for a particular release or update, a Known Issues document is alsoposted.
System Requirements and Browser Settings:
Periodically ensure that your system and browser settings meet the minimum requirements.
For information about system requirements and recommended browser settings, see ASCENDERRecommended Browser Settings.
A link to this document can also be found in the following places:
Contents tab of the ASCENDER online Help systemSystem login pagesASCENDER Resources
ASCENDER Software Terminology:
System - The group of applications supporting a broad area of LEA or campus management, orspecific group of applications (e.g., Business, Student, State Reporting, OCR, District Administration,

Student
2022/03/26 06:16 2 ASCENDER Student Overview Guide
System Administration).
Application - A particular application within a system (e.g., Attendance, Registration).
Page - Selected from a menu or submenu, a page may have multiple tabs, or it may stand alone. Apage can have fields, buttons, grids, report parameters, and other features allowing you toaccomplish one or more tasks.
Tab - Some pages have multiple tabs allowing you to accomplish tasks that can be logically groupedtogether.
Student
2022/03/26 06:16 3 ASCENDER Student Overview Guide
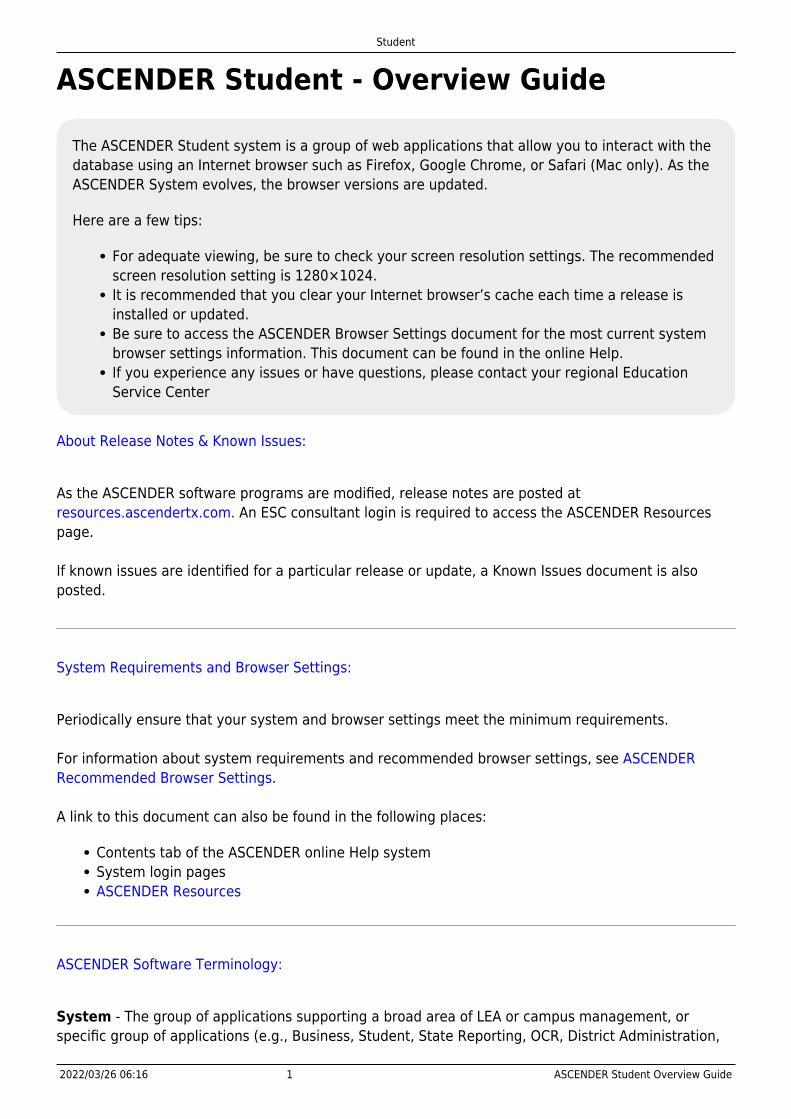
Field - A mechanism for inputting data, such as a text entry box, drop-down list, check box, or radiobutton. Each field has a label, such as Grade Level. Note that in ASCENDER online Help and otherdocumentation, field names are displayed in bold font.
Report Parameters - Fields that allow you to input criteria for running reports.
Grid - A group of records displayed in columns and rows, or empty columns and rows in which to addnew records, such as a table maintenance page.
Student
2022/03/26 06:16 4 ASCENDER Student Overview Guide
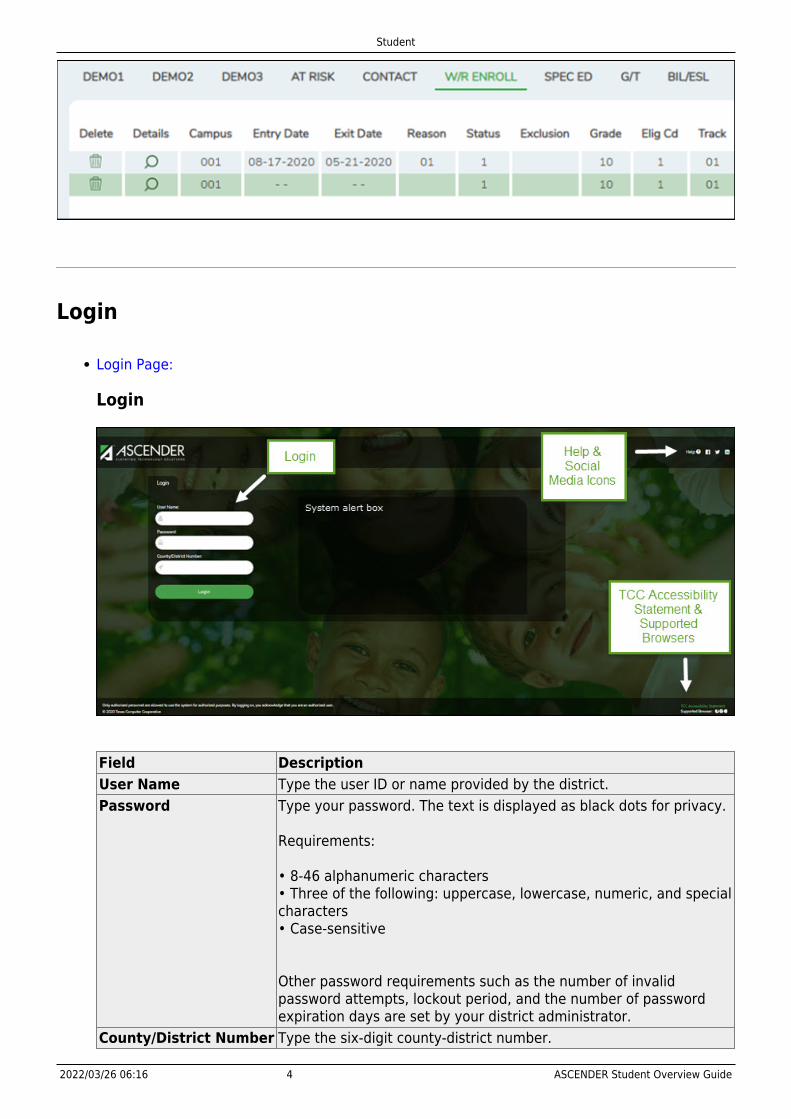
Login
Login Page:
Login
Field DescriptionUser Name Type the user ID or name provided by the district.Password Type your password. The text is displayed as black dots for privacy.
Requirements:
• 8-46 alphanumeric characters• Three of the following: uppercase, lowercase, numeric, and specialcharacters• Case-sensitive
Other password requirements such as the number of invalidpassword attempts, lockout period, and the number of passwordexpiration days are set by your district administrator.
County/District Number Type the six-digit county-district number.
Student
2022/03/26 06:16 5 ASCENDER Student Overview Guide
Browser Requirements The currently supported browsers are listed.Social Media Icons Click to access various social media sites for ASCENDER.
Click Login or press ENTER to complete the login process. The ASCENDER Home page isdisplayed.
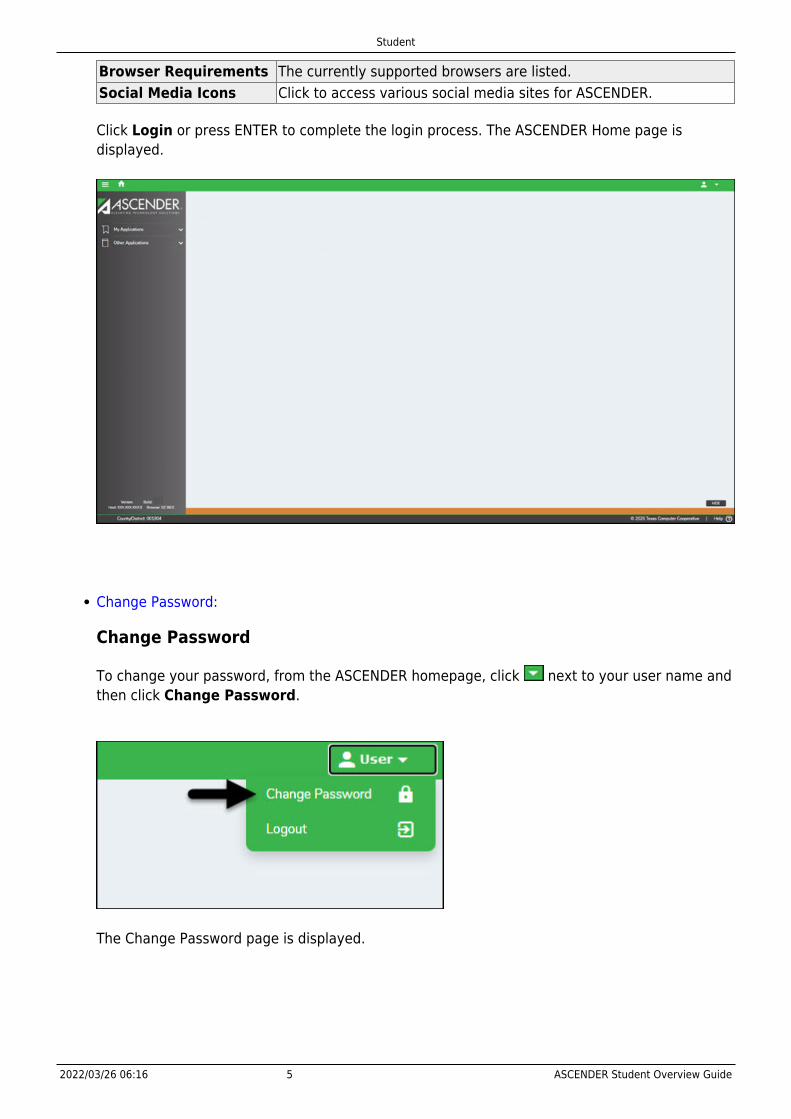
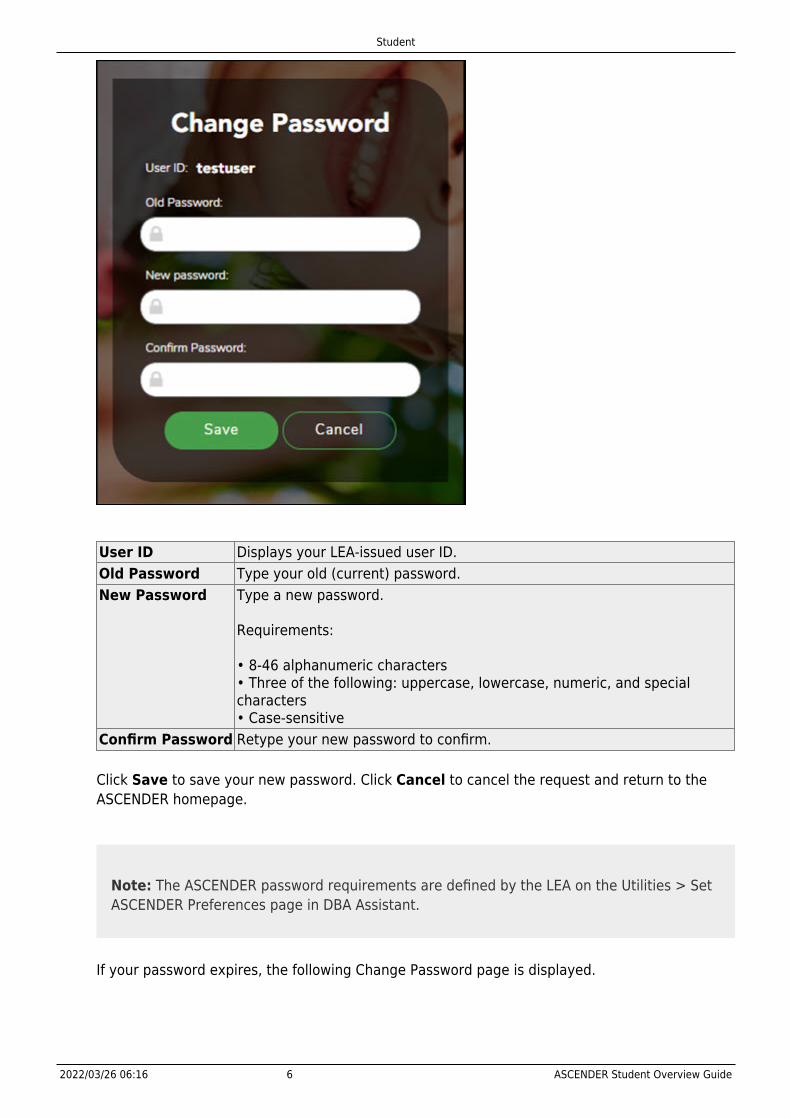
Change Password:
Change Password
To change your password, from the ASCENDER homepage, click next to your user name andthen click Change Password.
The Change Password page is displayed.
Student
2022/03/26 06:16 6 ASCENDER Student Overview Guide
User ID Displays your LEA-issued user ID.Old Password Type your old (current) password.New Password Type a new password.
Requirements:
• 8-46 alphanumeric characters• Three of the following: uppercase, lowercase, numeric, and specialcharacters• Case-sensitive
Confirm Password Retype your new password to confirm.
Click Save to save your new password. Click Cancel to cancel the request and return to theASCENDER homepage.
Note: The ASCENDER password requirements are defined by the LEA on the Utilities > SetASCENDER Preferences page in DBA Assistant.
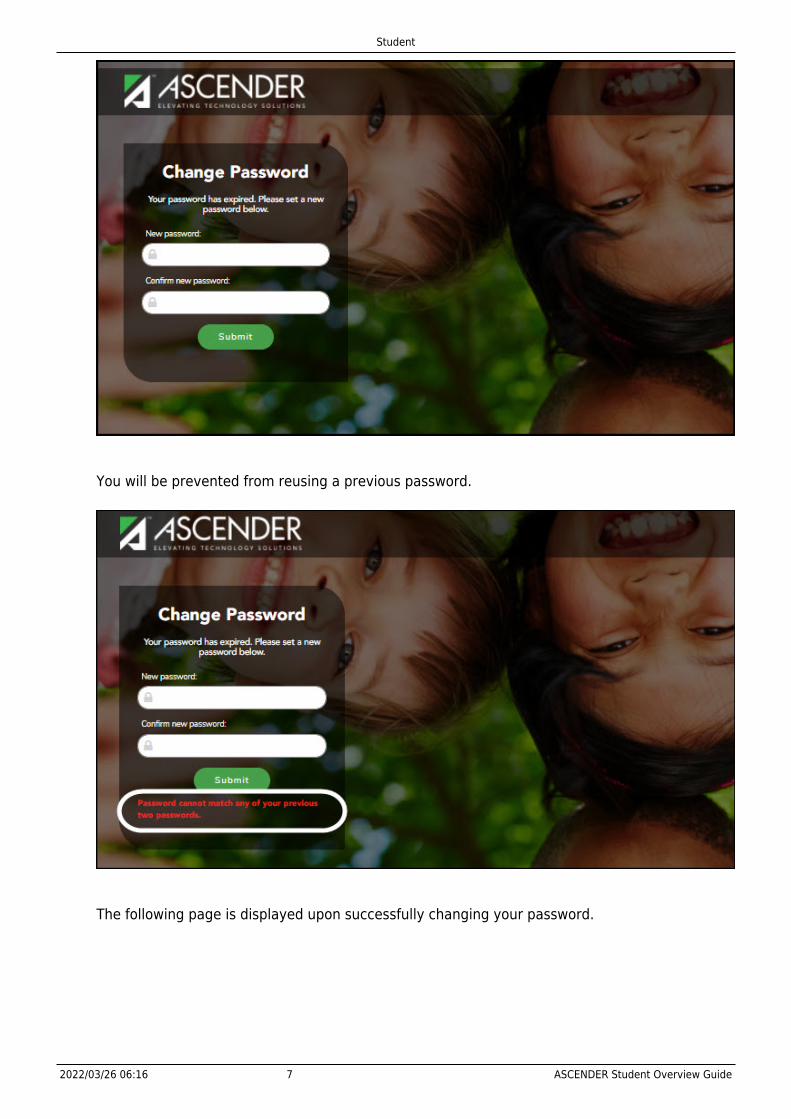
If your password expires, the following Change Password page is displayed.
Student
2022/03/26 06:16 7 ASCENDER Student Overview Guide
You will be prevented from reusing a previous password.
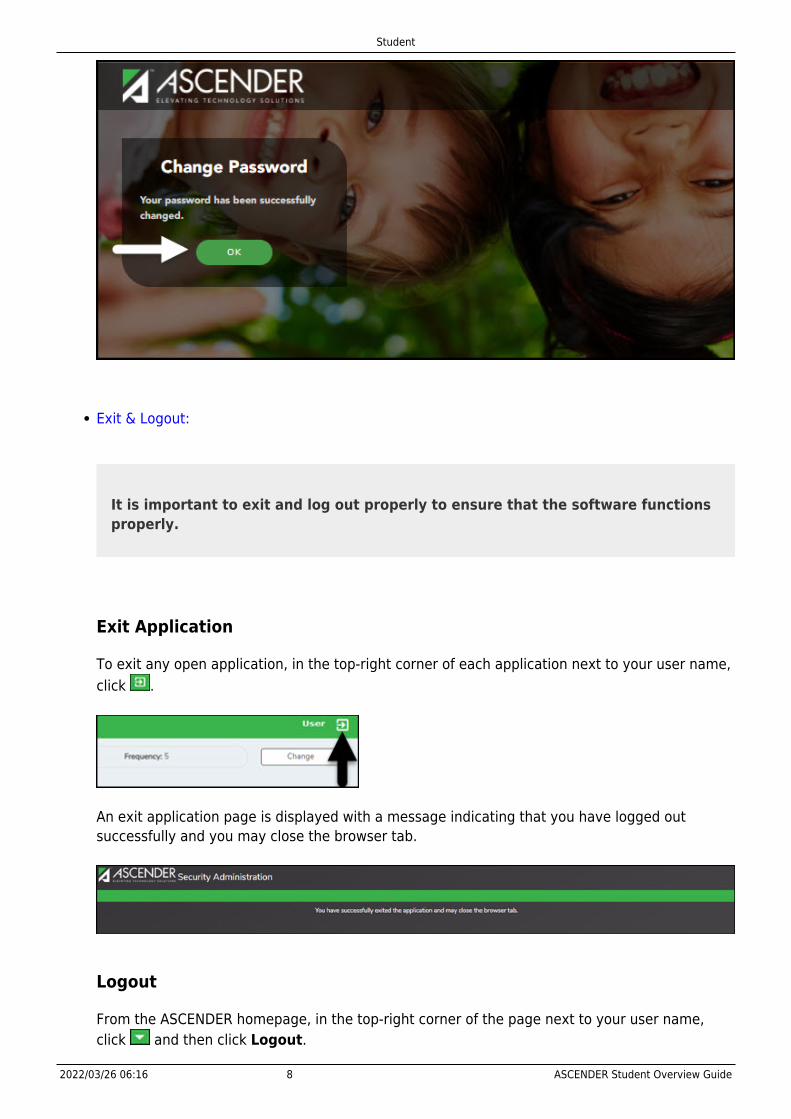
The following page is displayed upon successfully changing your password.
Student
2022/03/26 06:16 8 ASCENDER Student Overview Guide
Exit & Logout:
It is important to exit and log out properly to ensure that the software functionsproperly.
Exit Application
To exit any open application, in the top-right corner of each application next to your user name,click .
An exit application page is displayed with a message indicating that you have logged outsuccessfully and you may close the browser tab.
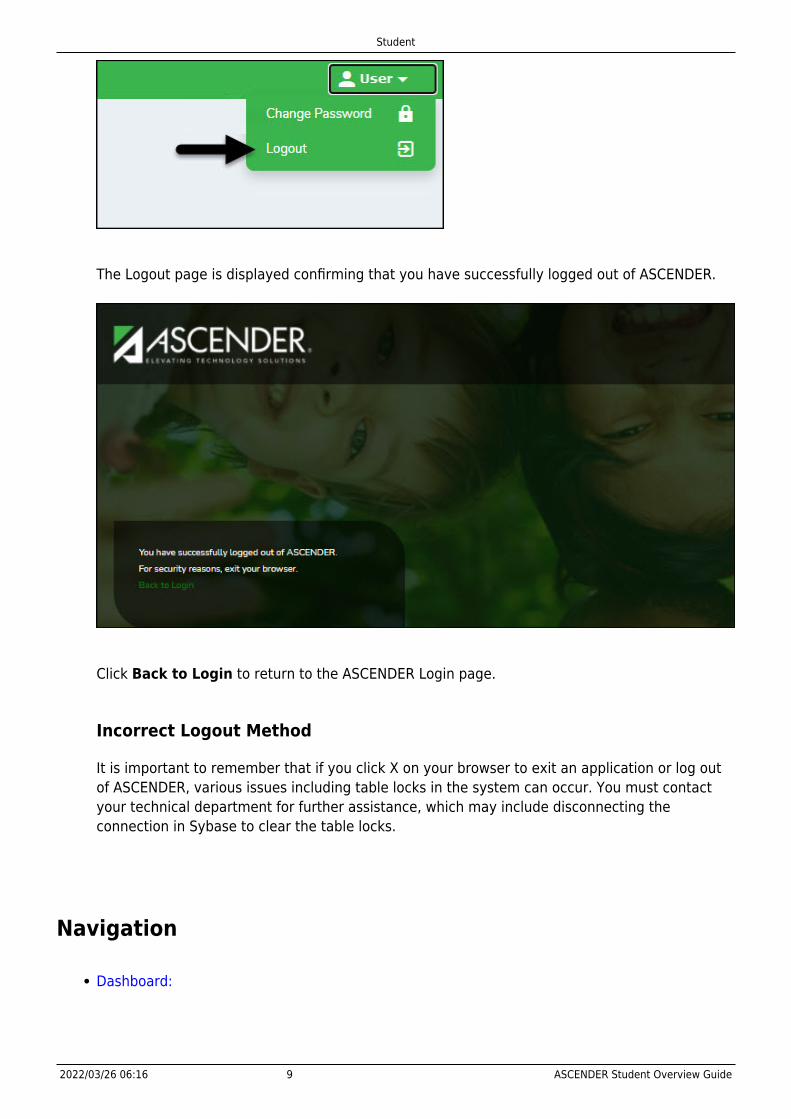
Logout
From the ASCENDER homepage, in the top-right corner of the page next to your user name,click and then click Logout.
Student
2022/03/26 06:16 9 ASCENDER Student Overview Guide
The Logout page is displayed confirming that you have successfully logged out of ASCENDER.
Click Back to Login to return to the ASCENDER Login page.
Incorrect Logout Method
It is important to remember that if you click X on your browser to exit an application or log outof ASCENDER, various issues including table locks in the system can occur. You must contactyour technical department for further assistance, which may include disconnecting theconnection in Sybase to clear the table locks.
Navigation
Dashboard:
Student
2022/03/26 06:16 10 ASCENDER Student Overview Guide
Dashboard
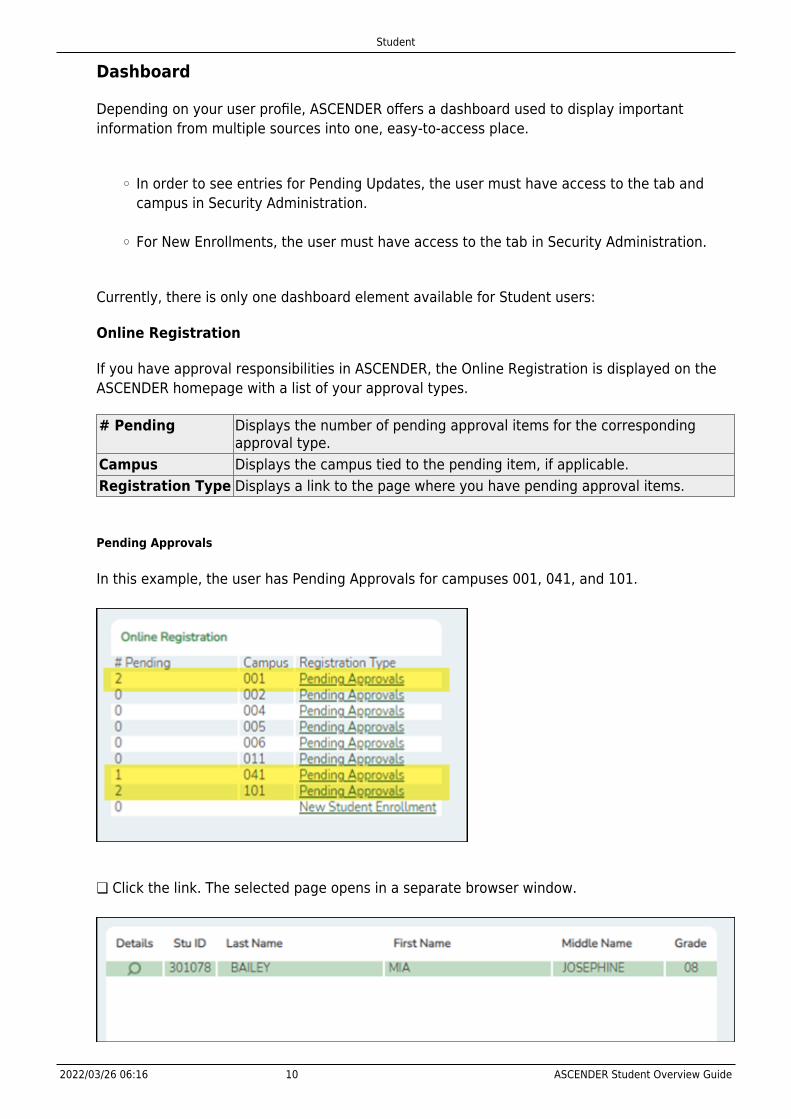
Depending on your user profile, ASCENDER offers a dashboard used to display importantinformation from multiple sources into one, easy-to-access place.
In order to see entries for Pending Updates, the user must have access to the tab andcampus in Security Administration.
For New Enrollments, the user must have access to the tab in Security Administration.
Currently, there is only one dashboard element available for Student users:
Online Registration
If you have approval responsibilities in ASCENDER, the Online Registration is displayed on theASCENDER homepage with a list of your approval types.
# Pending Displays the number of pending approval items for the correspondingapproval type.
Campus Displays the campus tied to the pending item, if applicable.Registration Type Displays a link to the page where you have pending approval items.
Pending Approvals
In this example, the user has Pending Approvals for campuses 001, 041, and 101.
❏ Click the link. The selected page opens in a separate browser window.
Student
2022/03/26 06:16 11 ASCENDER Student Overview Guide
❏ Perform the necessary action to satisfy the pending item.
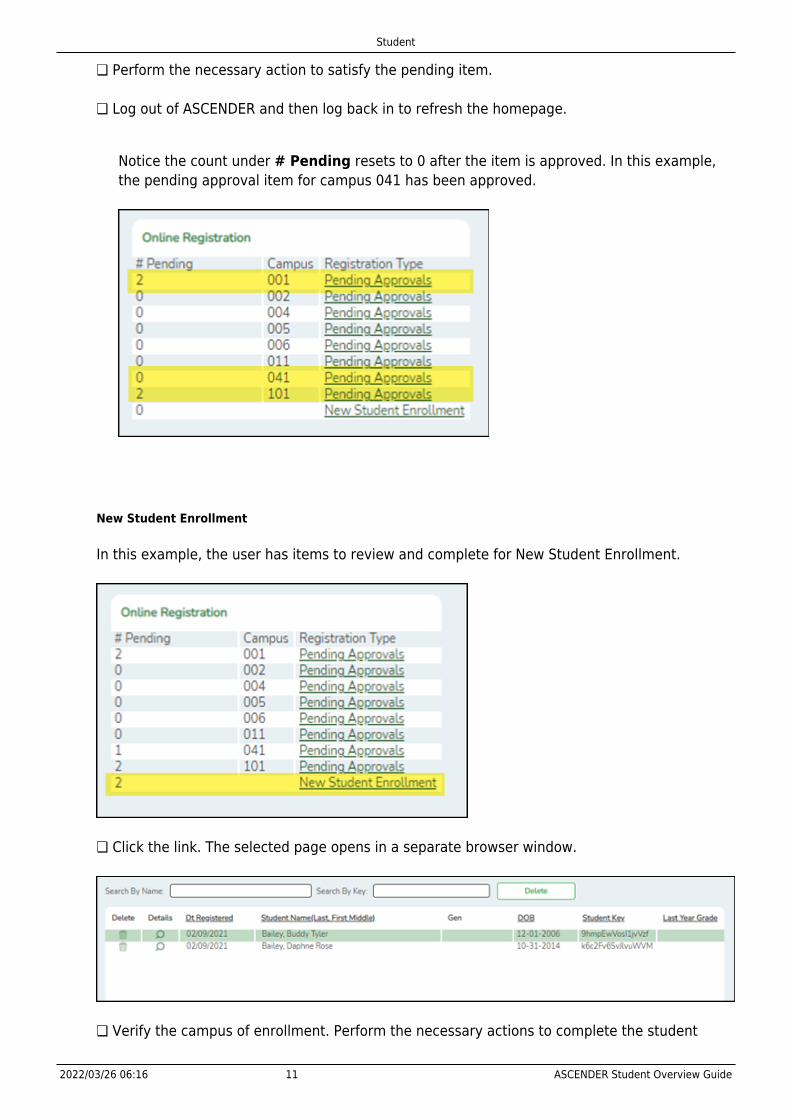
❏ Log out of ASCENDER and then log back in to refresh the homepage.
Notice the count under # Pending resets to 0 after the item is approved. In this example,the pending approval item for campus 041 has been approved.
New Student Enrollment
In this example, the user has items to review and complete for New Student Enrollment.
❏ Click the link. The selected page opens in a separate browser window.
❏ Verify the campus of enrollment. Perform the necessary actions to complete the student

Student
2022/03/26 06:16 12 ASCENDER Student Overview Guide
enrollment.
❏ Log out of ASCENDER and then log back in to refresh the homepage.
Notice the count under # Pending resets to 0 after the item is approved.
Applications:
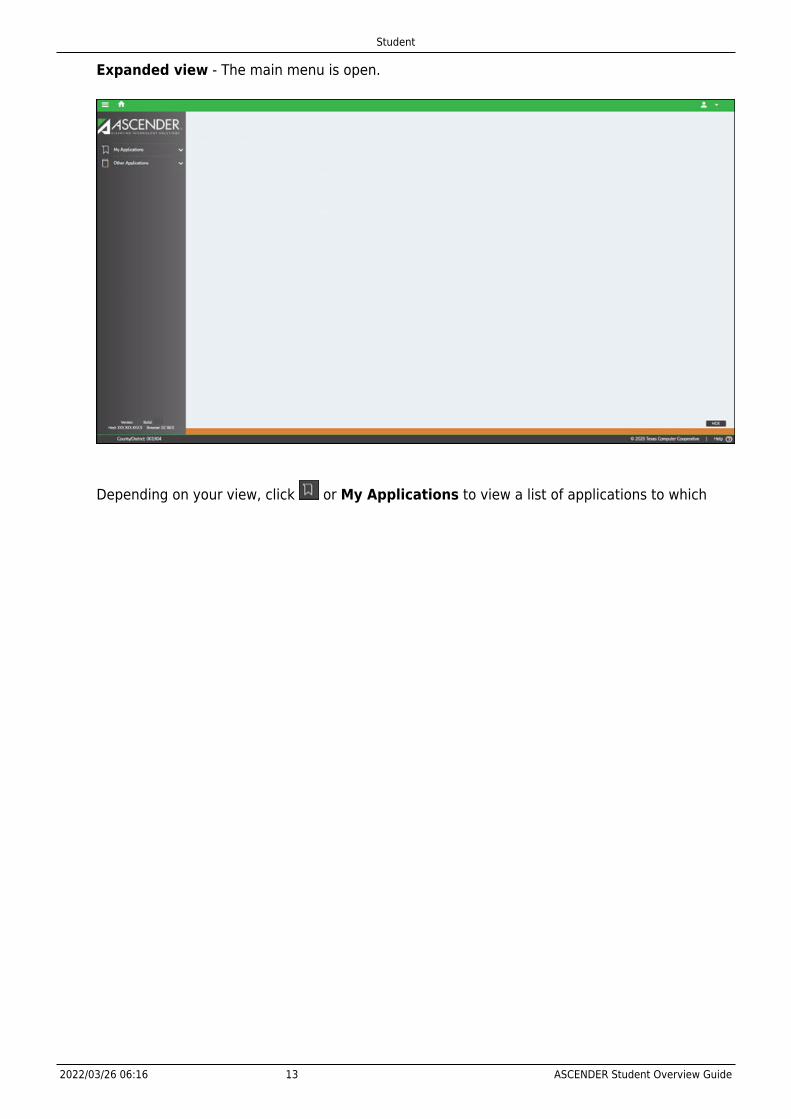
The ASCENDER Home page serves as a personalized dashboard and displays links to allASCENDER applications that are tied to your user profile.The main menu is located on the left side of the page. In the upper-left corner, click ChangeView Icon to collapse the main menu or expand the main menu. This functionality is availableon all pages in all applications. And, on some pages must be used for a more favorable view ofthe actual page.
Collapsed view - The main menu is hidden.
Student
2022/03/26 06:16 13 ASCENDER Student Overview Guide
Expanded view - The main menu is open.
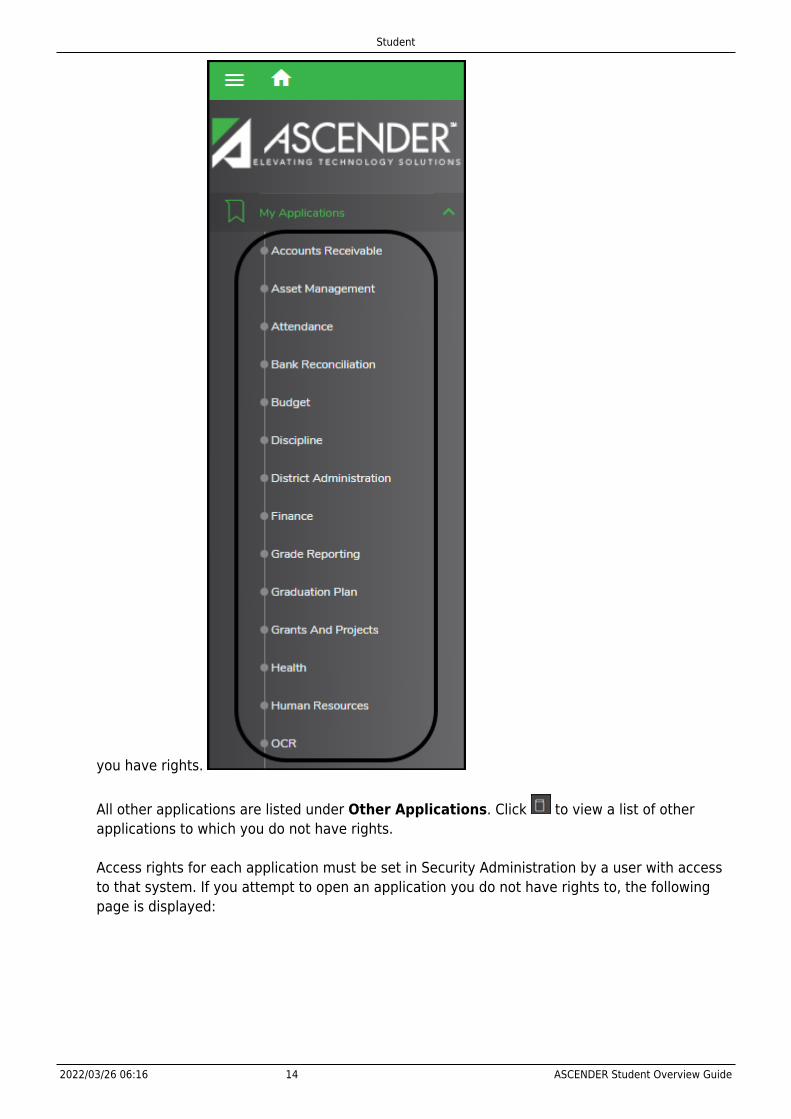
Depending on your view, click or My Applications to view a list of applications to which
Student
2022/03/26 06:16 14 ASCENDER Student Overview Guide
you have rights.
All other applications are listed under Other Applications. Click to view a list of otherapplications to which you do not have rights.
Access rights for each application must be set in Security Administration by a user with accessto that system. If you attempt to open an application you do not have rights to, the followingpage is displayed:
Student
2022/03/26 06:16 15 ASCENDER Student Overview Guide
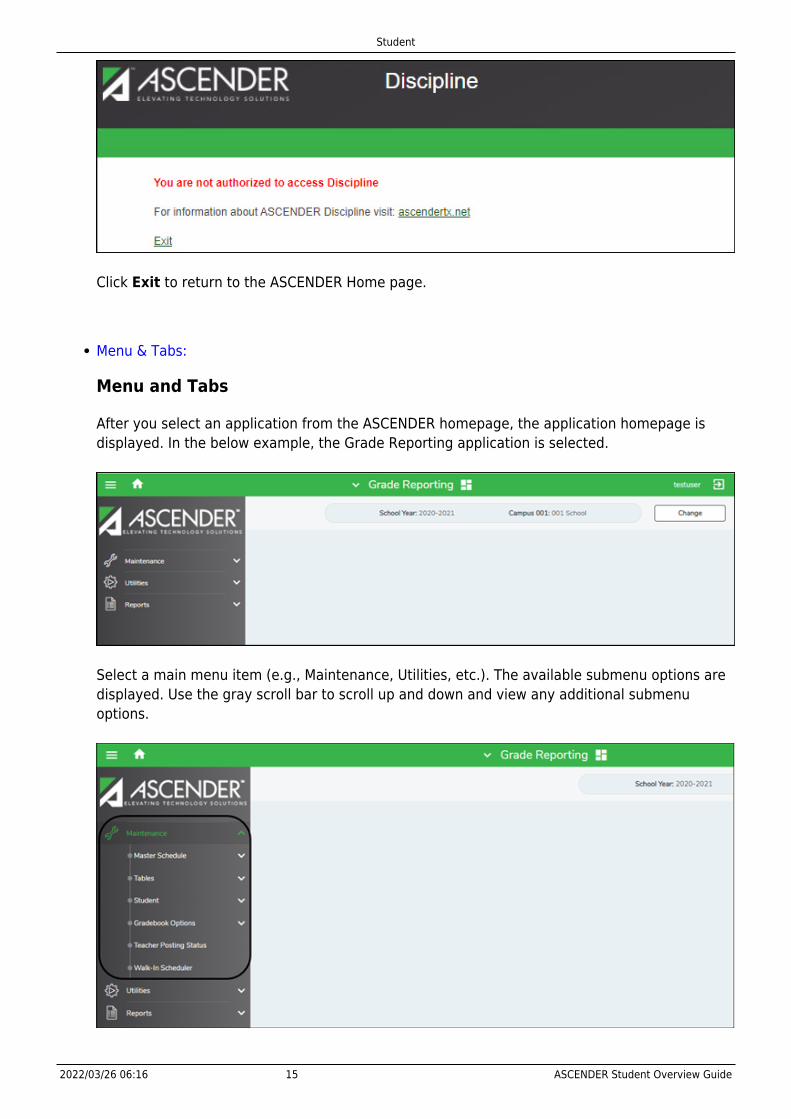
Click Exit to return to the ASCENDER Home page.
Menu & Tabs:
Menu and Tabs
After you select an application from the ASCENDER homepage, the application homepage isdisplayed. In the below example, the Grade Reporting application is selected.
Select a main menu item (e.g., Maintenance, Utilities, etc.). The available submenu options aredisplayed. Use the gray scroll bar to scroll up and down and view any additional submenuoptions.
Student
2022/03/26 06:16 16 ASCENDER Student Overview Guide
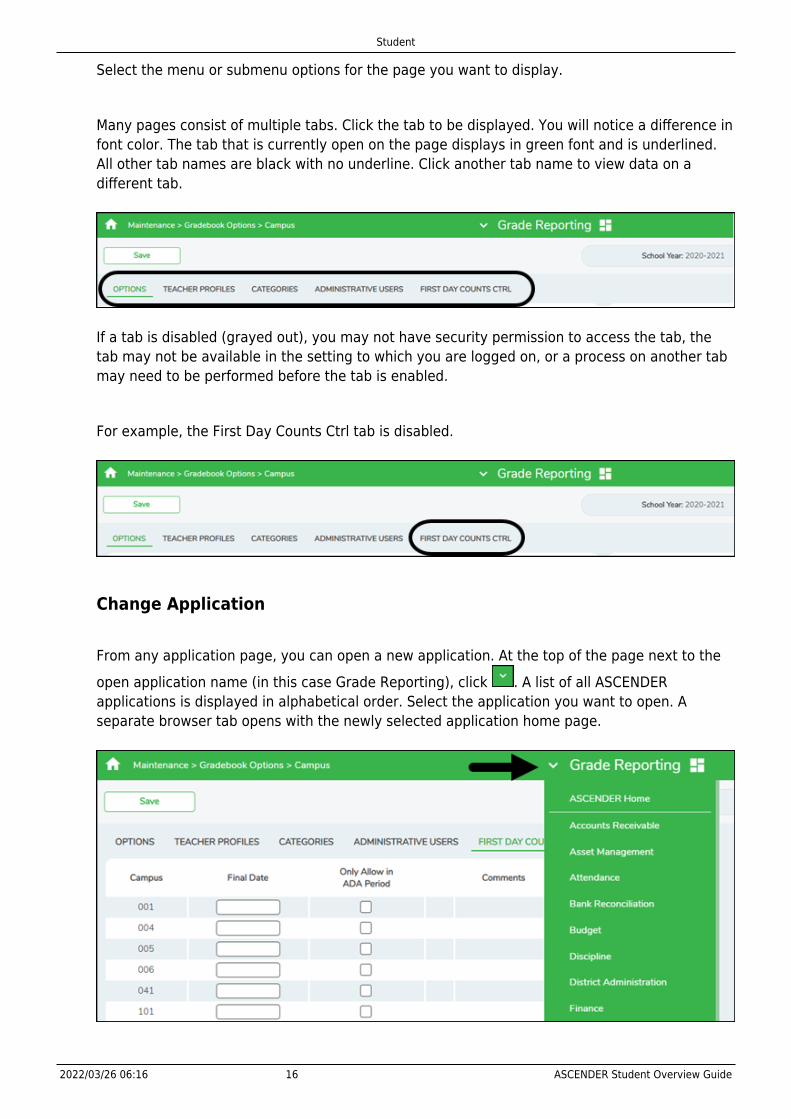
Select the menu or submenu options for the page you want to display.
Many pages consist of multiple tabs. Click the tab to be displayed. You will notice a difference infont color. The tab that is currently open on the page displays in green font and is underlined.All other tab names are black with no underline. Click another tab name to view data on adifferent tab.
If a tab is disabled (grayed out), you may not have security permission to access the tab, thetab may not be available in the setting to which you are logged on, or a process on another tabmay need to be performed before the tab is enabled.
For example, the First Day Counts Ctrl tab is disabled.
Change Application
From any application page, you can open a new application. At the top of the page next to theopen application name (in this case Grade Reporting), click . A list of all ASCENDERapplications is displayed in alphabetical order. Select the application you want to open. Aseparate browser tab opens with the newly selected application home page.
Student
2022/03/26 06:16 17 ASCENDER Student Overview Guide
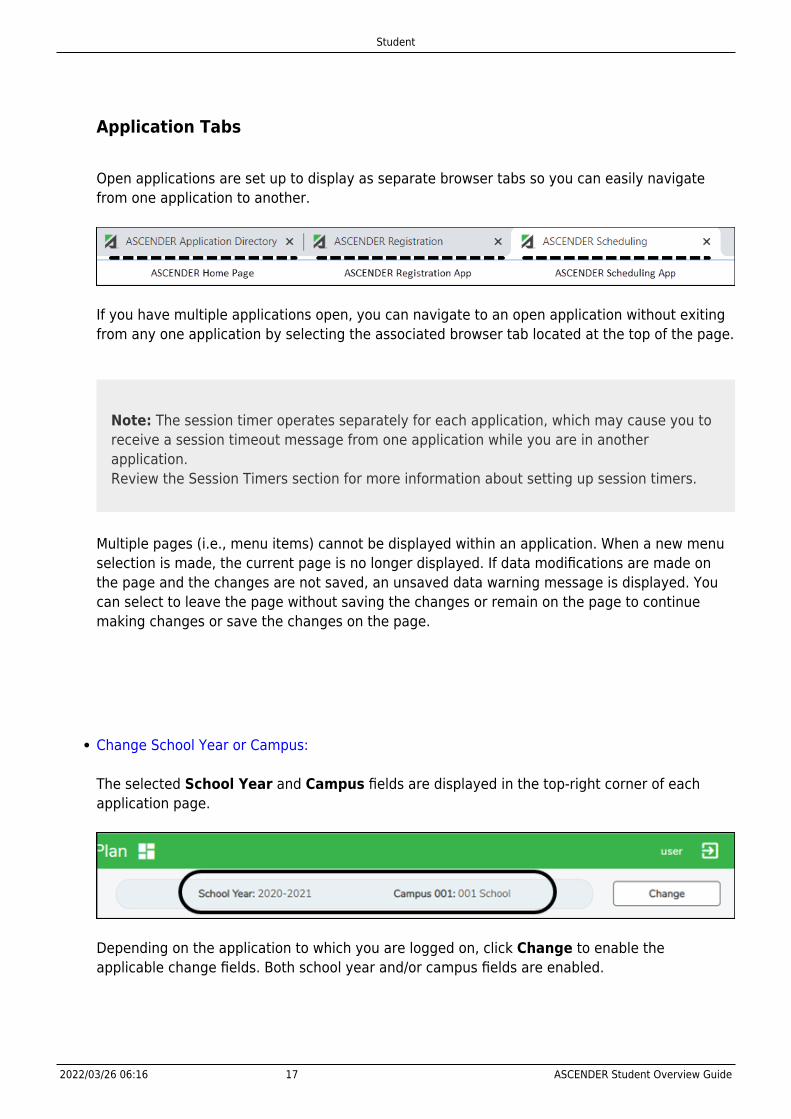
Application Tabs
Open applications are set up to display as separate browser tabs so you can easily navigatefrom one application to another.
If you have multiple applications open, you can navigate to an open application without exitingfrom any one application by selecting the associated browser tab located at the top of the page.
Note: The session timer operates separately for each application, which may cause you toreceive a session timeout message from one application while you are in anotherapplication.Review the Session Timers section for more information about setting up session timers.
Multiple pages (i.e., menu items) cannot be displayed within an application. When a new menuselection is made, the current page is no longer displayed. If data modifications are made onthe page and the changes are not saved, an unsaved data warning message is displayed. Youcan select to leave the page without saving the changes or remain on the page to continuemaking changes or save the changes on the page.
Change School Year or Campus:
The selected School Year and Campus fields are displayed in the top-right corner of eachapplication page.
Depending on the application to which you are logged on, click Change to enable theapplicable change fields. Both school year and/or campus fields are enabled.
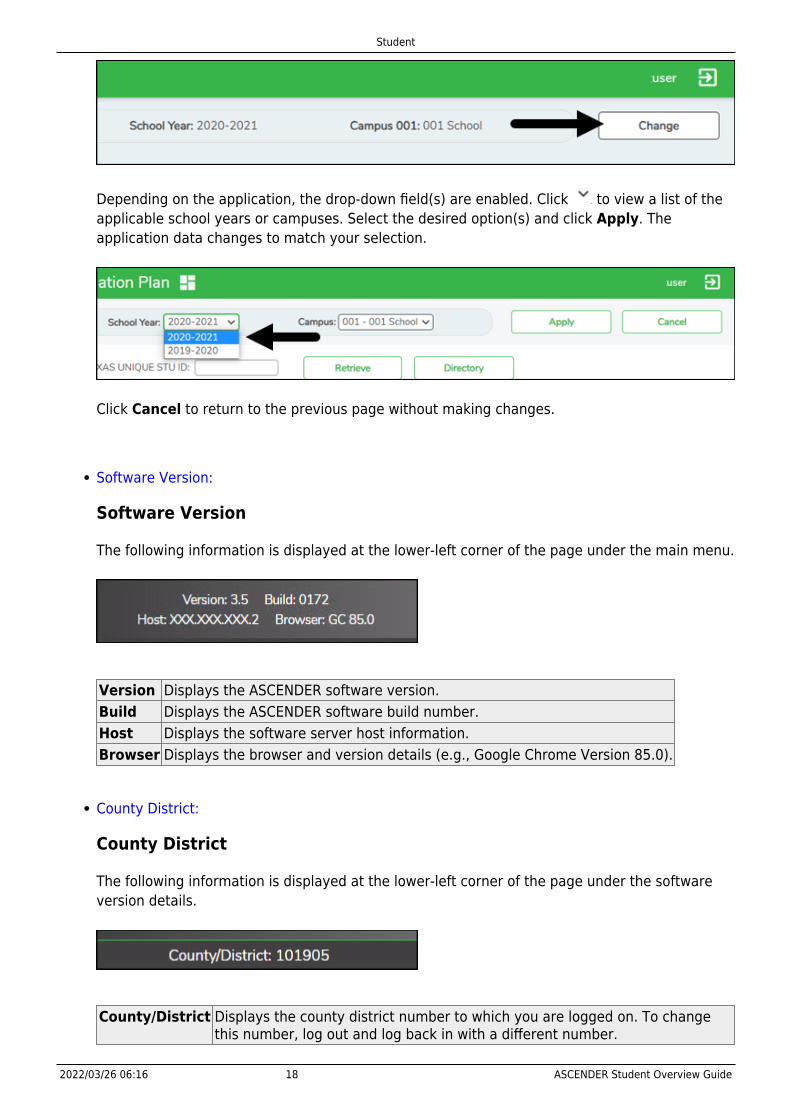
Student
2022/03/26 06:16 18 ASCENDER Student Overview Guide
Depending on the application, the drop-down field(s) are enabled. Click to view a list of theapplicable school years or campuses. Select the desired option(s) and click Apply. Theapplication data changes to match your selection.
Click Cancel to return to the previous page without making changes.
Software Version:
Software Version
The following information is displayed at the lower-left corner of the page under the main menu.
Version Displays the ASCENDER software version.Build Displays the ASCENDER software build number.Host Displays the software server host information.Browser Displays the browser and version details (e.g., Google Chrome Version 85.0).
County District:
County District
The following information is displayed at the lower-left corner of the page under the softwareversion details.
County/District Displays the county district number to which you are logged on. To changethis number, log out and log back in with a different number.
Student
2022/03/26 06:16 19 ASCENDER Student Overview Guide
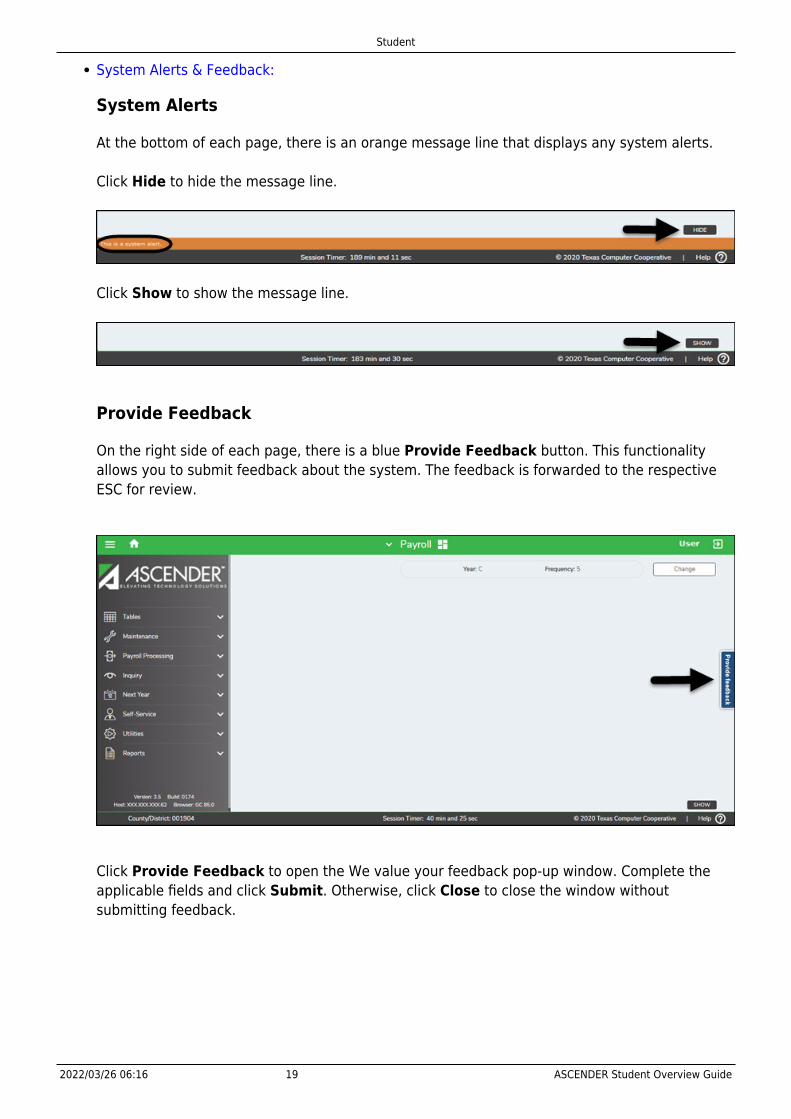
System Alerts & Feedback:
System Alerts
At the bottom of each page, there is an orange message line that displays any system alerts.
Click Hide to hide the message line.
Click Show to show the message line.
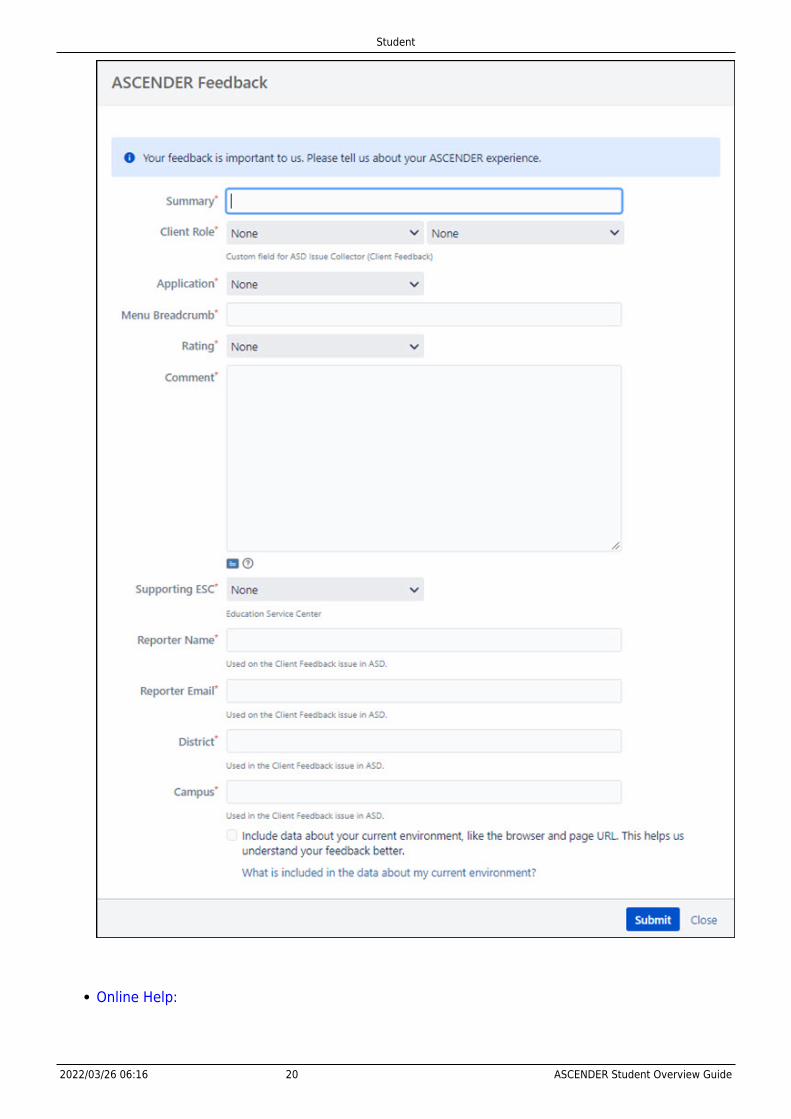
Provide Feedback
On the right side of each page, there is a blue Provide Feedback button. This functionalityallows you to submit feedback about the system. The feedback is forwarded to the respectiveESC for review.
Click Provide Feedback to open the We value your feedback pop-up window. Complete theapplicable fields and click Submit. Otherwise, click Close to close the window withoutsubmitting feedback.
Student
2022/03/26 06:16 20 ASCENDER Student Overview Guide
Online Help:
Student
2022/03/26 06:16 21 ASCENDER Student Overview Guide
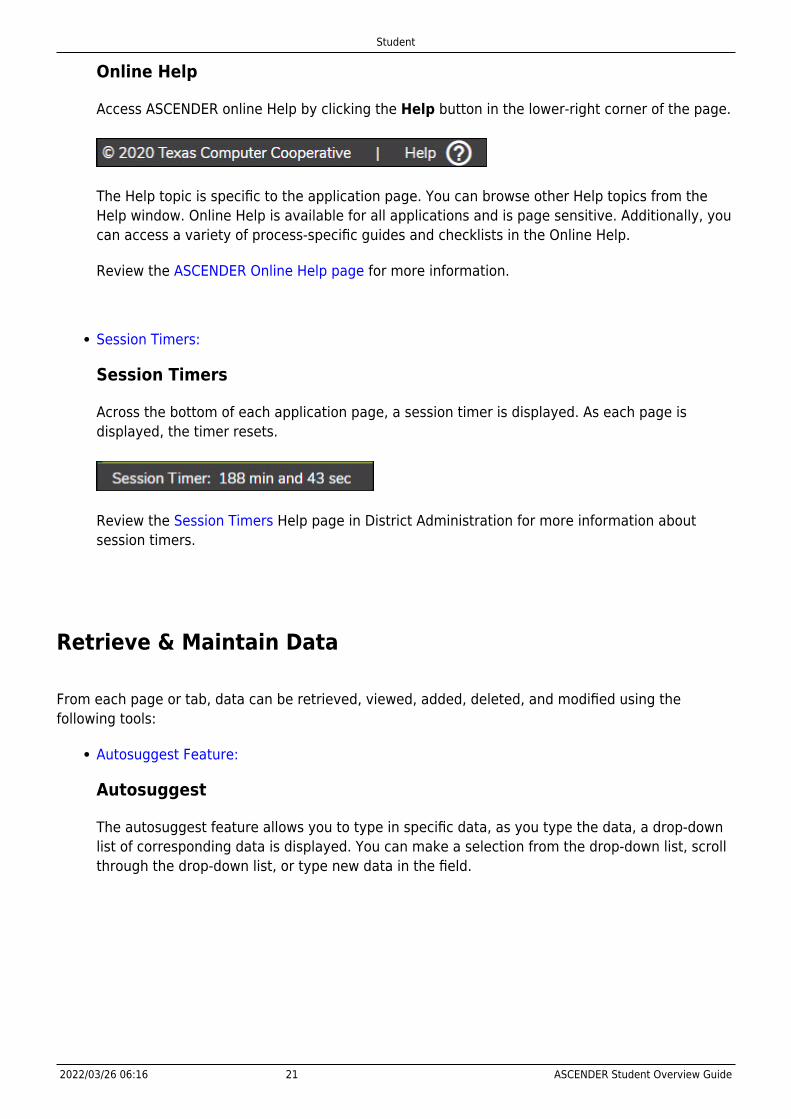
Online Help
Access ASCENDER online Help by clicking the Help button in the lower-right corner of the page.
The Help topic is specific to the application page. You can browse other Help topics from theHelp window. Online Help is available for all applications and is page sensitive. Additionally, youcan access a variety of process-specific guides and checklists in the Online Help.
Review the ASCENDER Online Help page for more information.
Session Timers:
Session Timers
Across the bottom of each application page, a session timer is displayed. As each page isdisplayed, the timer resets.
Review the Session Timers Help page in District Administration for more information aboutsession timers.
Retrieve & Maintain Data
From each page or tab, data can be retrieved, viewed, added, deleted, and modified using thefollowing tools:
Autosuggest Feature:
Autosuggest
The autosuggest feature allows you to type in specific data, as you type the data, a drop-downlist of corresponding data is displayed. You can make a selection from the drop-down list, scrollthrough the drop-down list, or type new data in the field.
Student
2022/03/26 06:16 22 ASCENDER Student Overview Guide
Depending on the field and page, press the SPACEBAR to view a list (in some cases limited) ofavailable options for the field.
Student Directory:
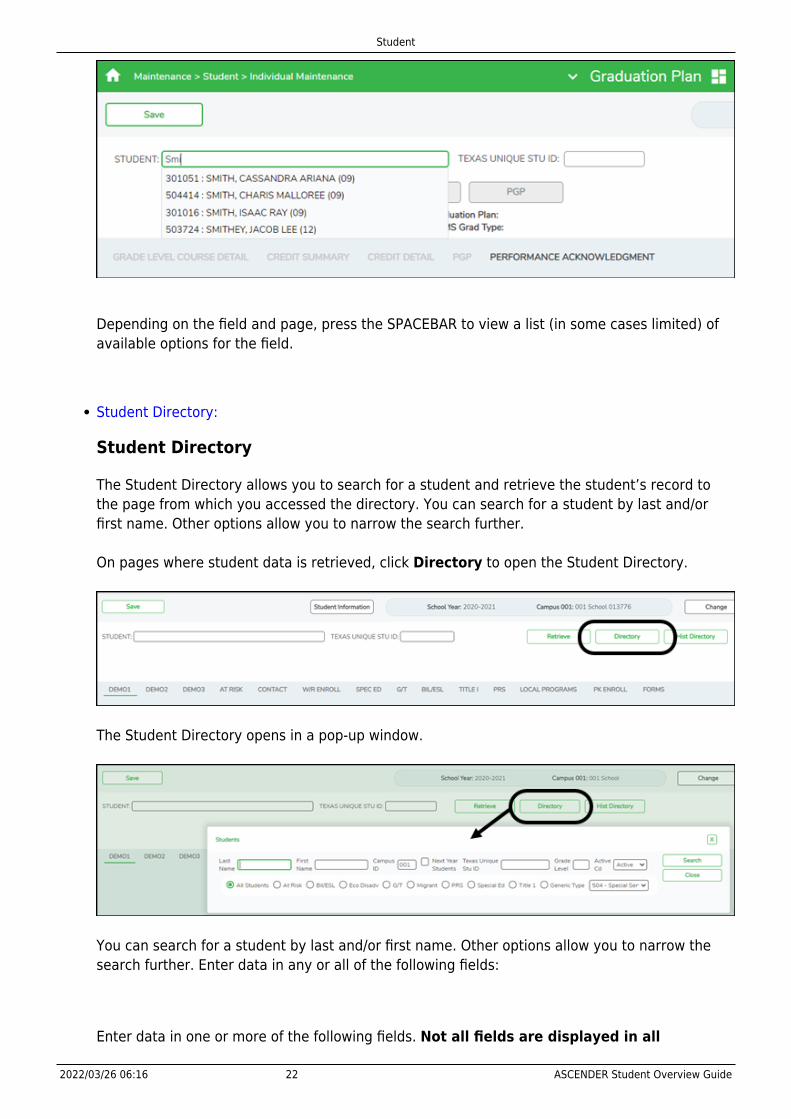
Student Directory
The Student Directory allows you to search for a student and retrieve the student’s record tothe page from which you accessed the directory. You can search for a student by last and/orfirst name. Other options allow you to narrow the search further.
On pages where student data is retrieved, click Directory to open the Student Directory.
The Student Directory opens in a pop-up window.
You can search for a student by last and/or first name. Other options allow you to narrow thesearch further. Enter data in any or all of the following fields:
Enter data in one or more of the following fields. Not all fields are displayed in all
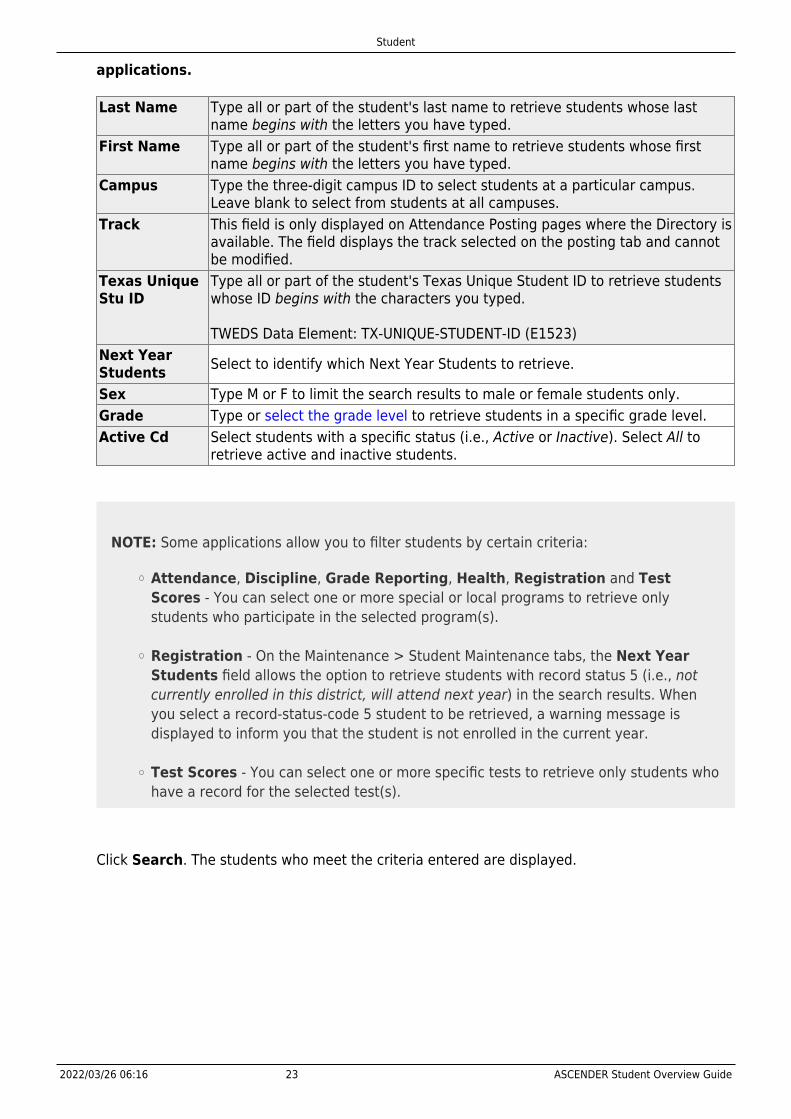
Student
2022/03/26 06:16 23 ASCENDER Student Overview Guide
applications.
Last Name Type all or part of the student's last name to retrieve students whose lastname begins with the letters you have typed.
First Name Type all or part of the student's first name to retrieve students whose firstname begins with the letters you have typed.
Campus Type the three-digit campus ID to select students at a particular campus.Leave blank to select from students at all campuses.
Track This field is only displayed on Attendance Posting pages where the Directory isavailable. The field displays the track selected on the posting tab and cannotbe modified.
Texas UniqueStu ID
Type all or part of the student's Texas Unique Student ID to retrieve studentswhose ID begins with the characters you typed.
TWEDS Data Element: TX-UNIQUE-STUDENT-ID (E1523)Next YearStudents Select to identify which Next Year Students to retrieve.
Sex Type M or F to limit the search results to male or female students only.Grade Type or select the grade level to retrieve students in a specific grade level.Active Cd Select students with a specific status (i.e., Active or Inactive). Select All to
retrieve active and inactive students.
NOTE: Some applications allow you to filter students by certain criteria:
Attendance, Discipline, Grade Reporting, Health, Registration and TestScores - You can select one or more special or local programs to retrieve onlystudents who participate in the selected program(s).
Registration - On the Maintenance > Student Maintenance tabs, the Next YearStudents field allows the option to retrieve students with record status 5 (i.e., notcurrently enrolled in this district, will attend next year) in the search results. Whenyou select a record-status-code 5 student to be retrieved, a warning message isdisplayed to inform you that the student is not enrolled in the current year.
Test Scores - You can select one or more specific tests to retrieve only students whohave a record for the selected test(s).
Click Search. The students who meet the criteria entered are displayed.
Student
2022/03/26 06:16 24 ASCENDER Student Overview Guide
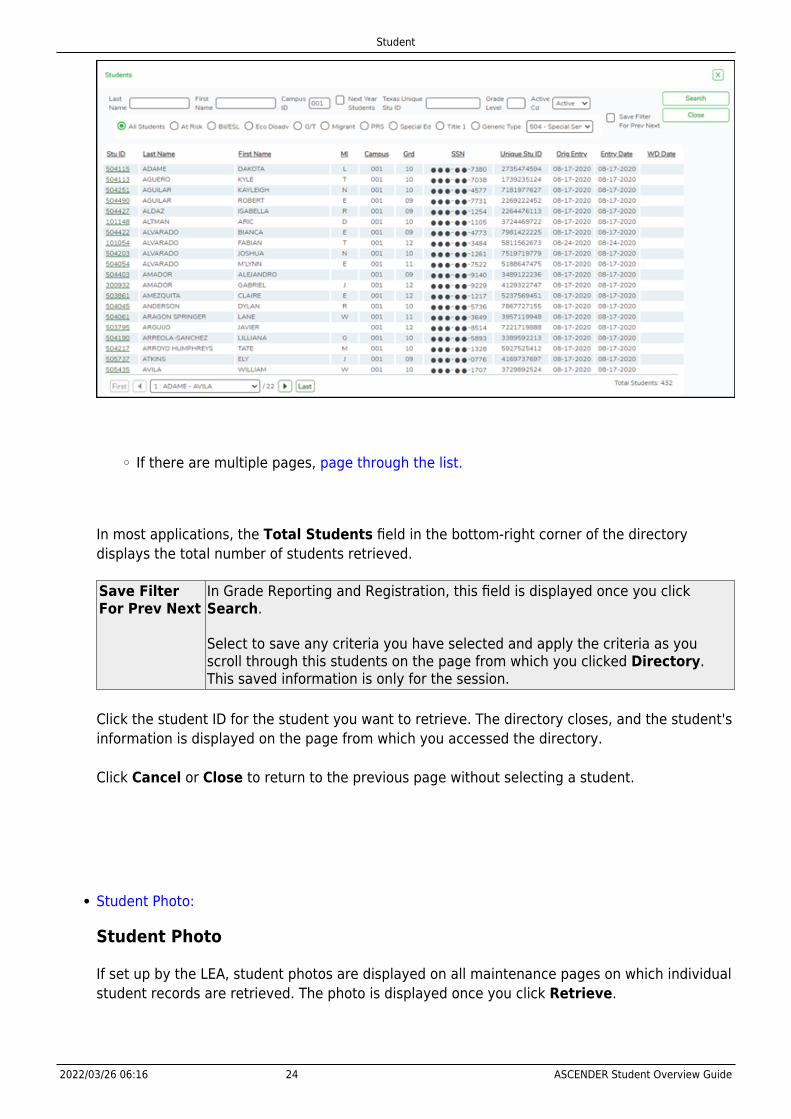
If there are multiple pages, page through the list.
In most applications, the Total Students field in the bottom-right corner of the directorydisplays the total number of students retrieved.
Save FilterFor Prev Next
In Grade Reporting and Registration, this field is displayed once you clickSearch.
Select to save any criteria you have selected and apply the criteria as youscroll through this students on the page from which you clicked Directory.This saved information is only for the session.
Click the student ID for the student you want to retrieve. The directory closes, and the student'sinformation is displayed on the page from which you accessed the directory.
Click Cancel or Close to return to the previous page without selecting a student.
Student Photo:
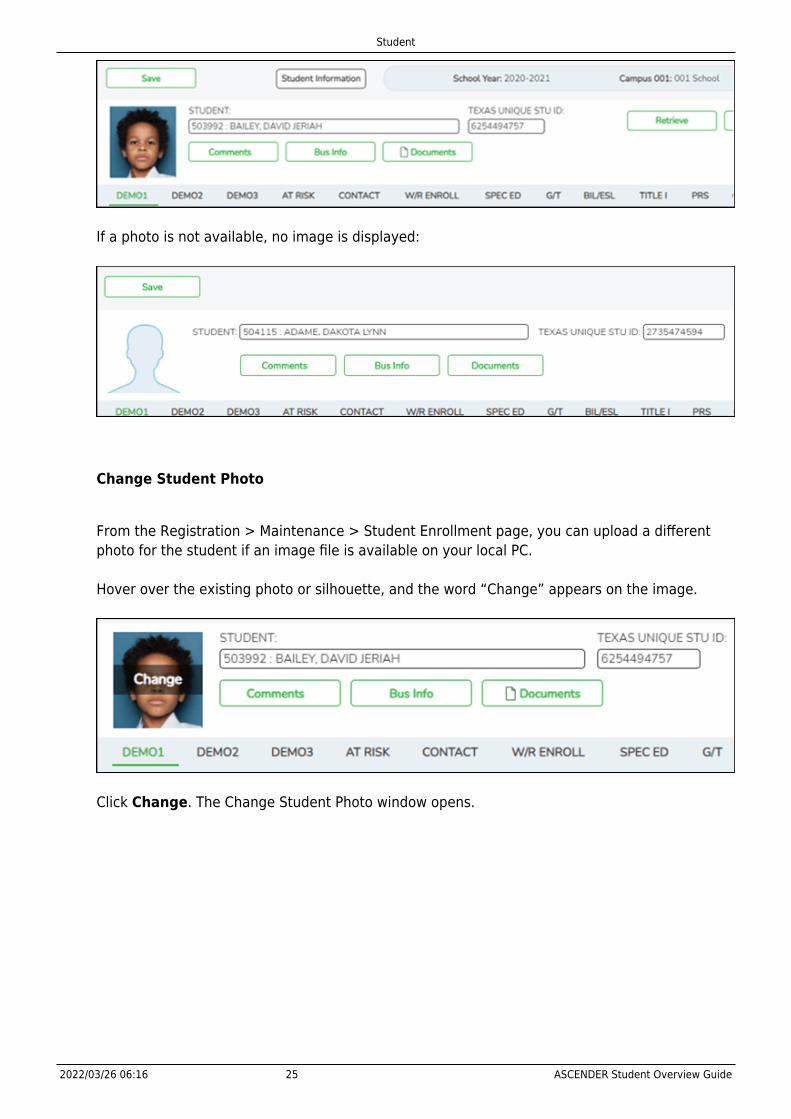
Student Photo
If set up by the LEA, student photos are displayed on all maintenance pages on which individualstudent records are retrieved. The photo is displayed once you click Retrieve.
Student
2022/03/26 06:16 25 ASCENDER Student Overview Guide
If a photo is not available, no image is displayed:
Change Student Photo
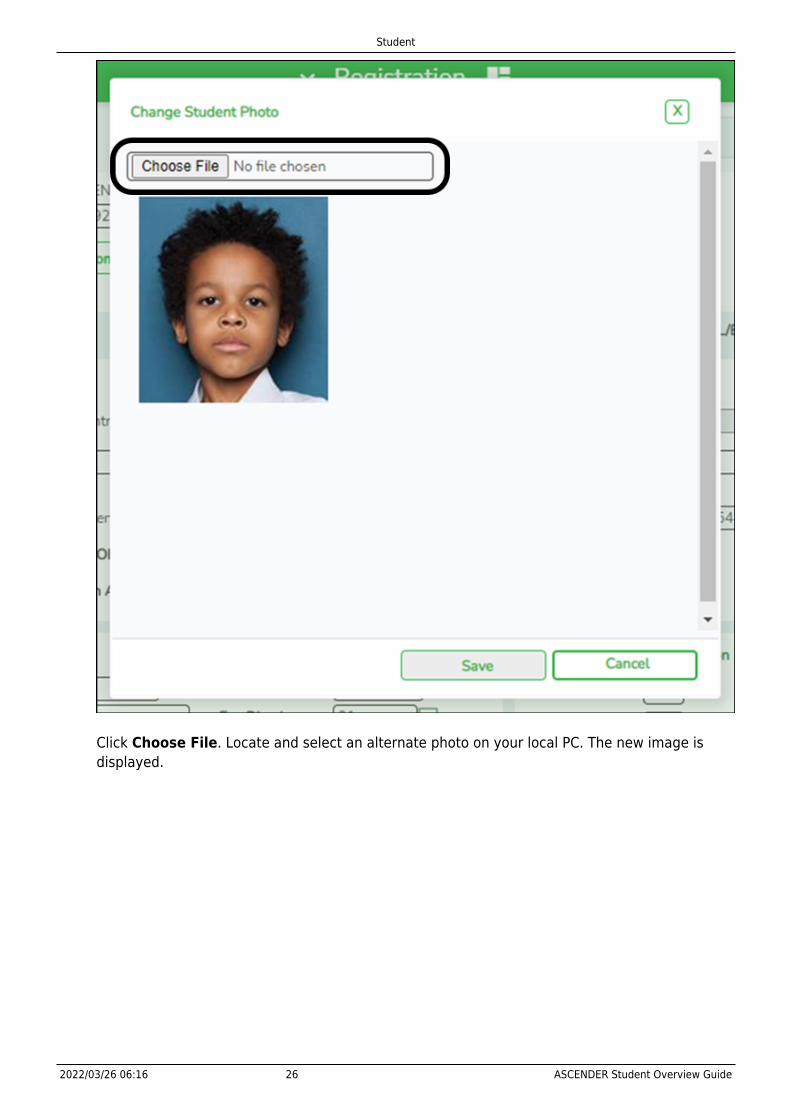
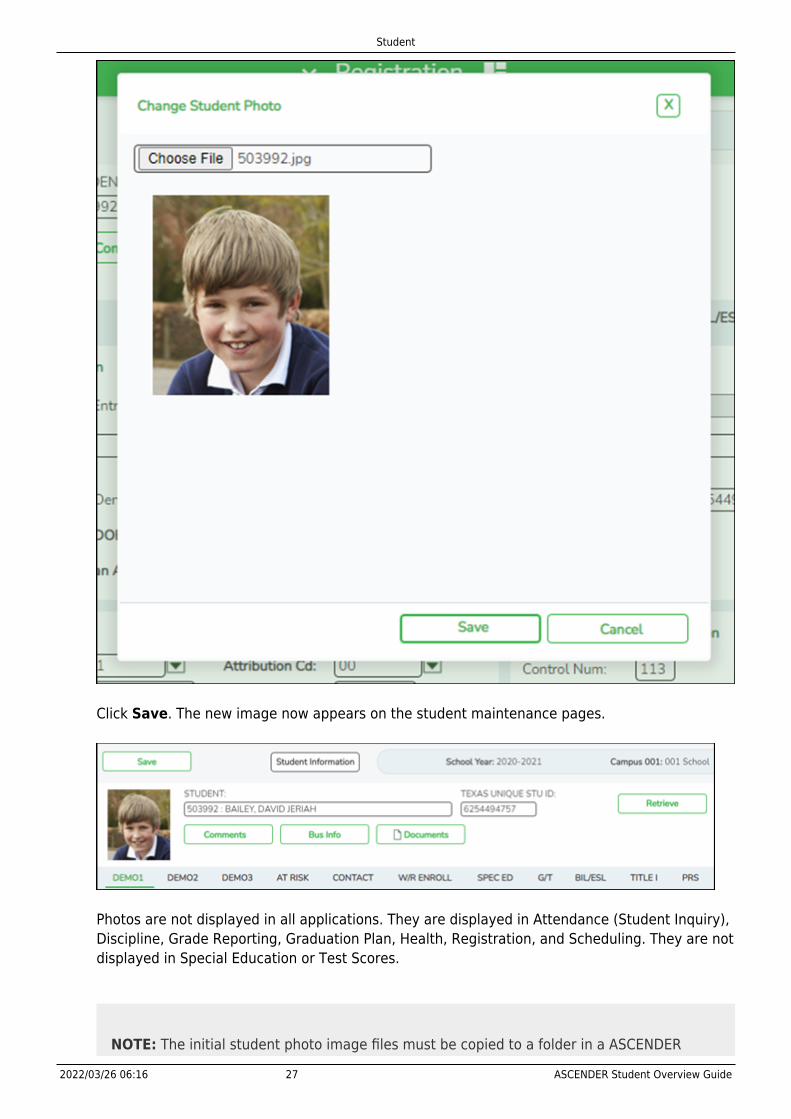
From the Registration > Maintenance > Student Enrollment page, you can upload a differentphoto for the student if an image file is available on your local PC.
Hover over the existing photo or silhouette, and the word “Change” appears on the image.
Click Change. The Change Student Photo window opens.
Student
2022/03/26 06:16 26 ASCENDER Student Overview Guide
Click Choose File. Locate and select an alternate photo on your local PC. The new image isdisplayed.
Student
2022/03/26 06:16 27 ASCENDER Student Overview Guide
Click Save. The new image now appears on the student maintenance pages.
Photos are not displayed in all applications. They are displayed in Attendance (Student Inquiry),Discipline, Grade Reporting, Graduation Plan, Health, Registration, and Scheduling. They are notdisplayed in Special Education or Test Scores.
NOTE: The initial student photo image files must be copied to a folder in a ASCENDER
Student
2022/03/26 06:16 28 ASCENDER Student Overview Guide
directory. (Note that directory will vary by server.) Within the ASCENDER directory, placefiles in a Pictures folder, and in a district folder (e.g., ASCENDERDirectory\Pictures\cccddd\024010.jpg). If a Pictures folder does not exist, or if the districtfolder does not exist, photos will not be enabled on any pages. The ASCENDER GettingStarted Guide (available with ASCENDER technical documents) provides additionalinformation.
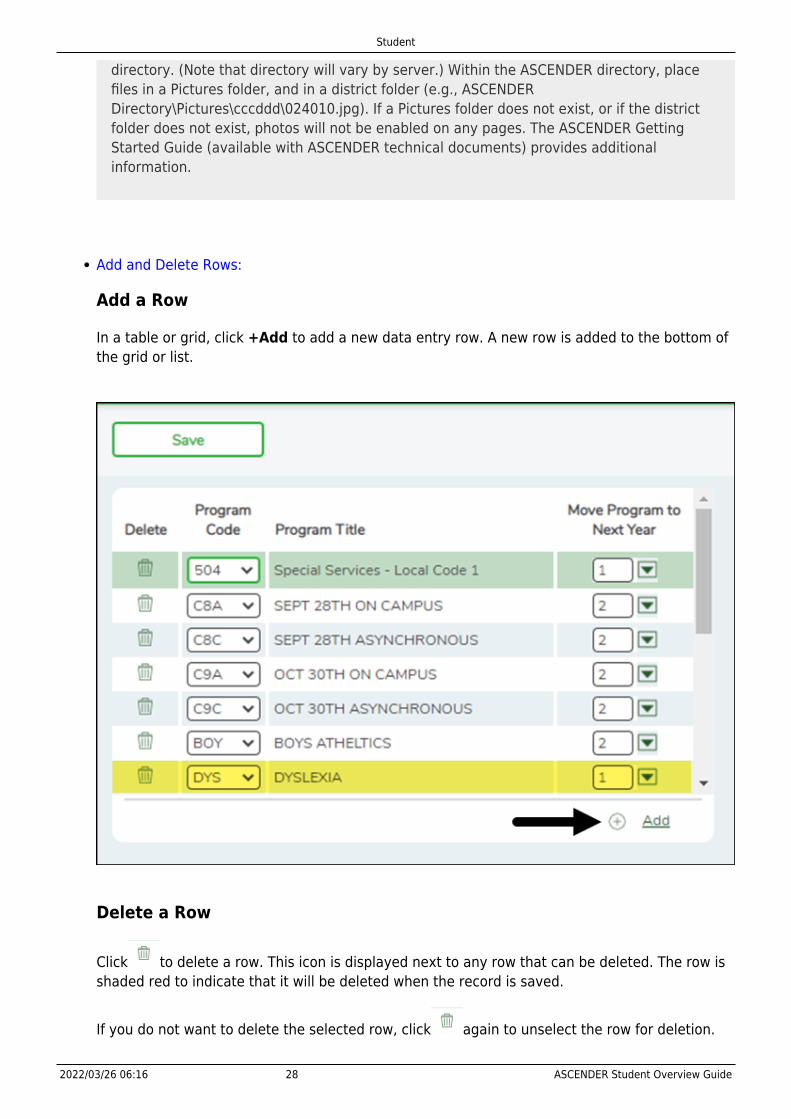
Add and Delete Rows:
Add a Row
In a table or grid, click +Add to add a new data entry row. A new row is added to the bottom ofthe grid or list.
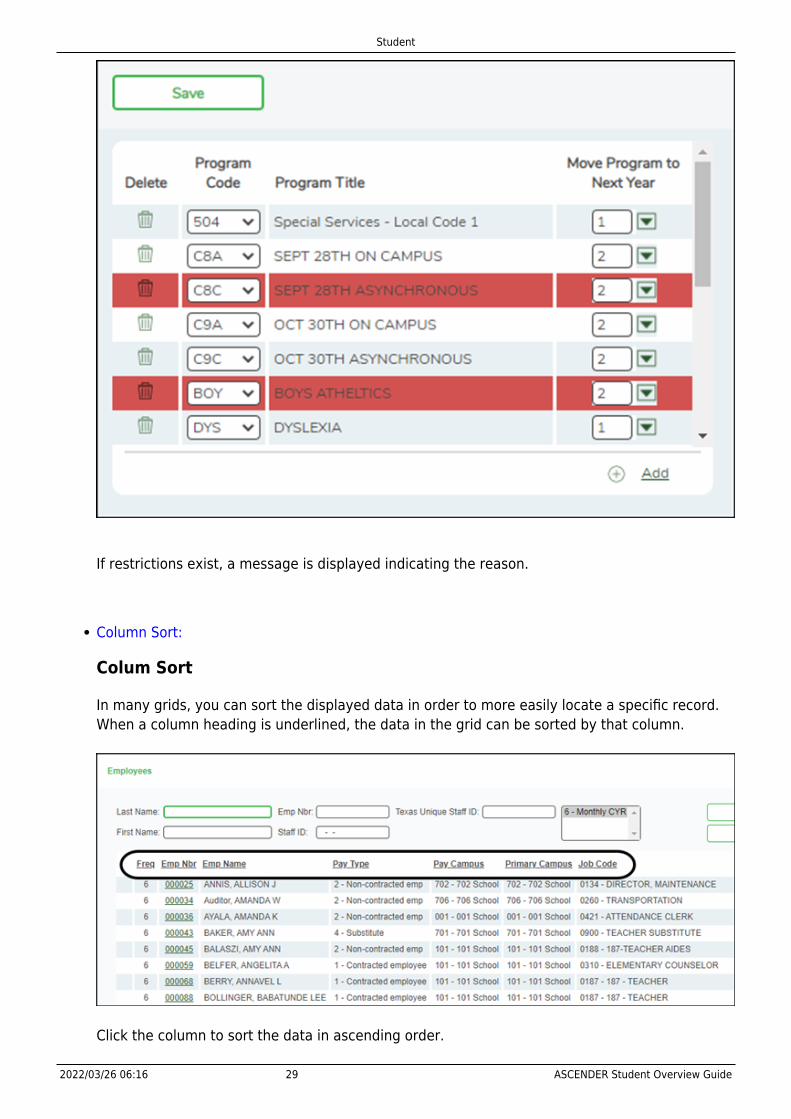
Delete a Row
Click to delete a row. This icon is displayed next to any row that can be deleted. The row isshaded red to indicate that it will be deleted when the record is saved.
If you do not want to delete the selected row, click again to unselect the row for deletion.
Student
2022/03/26 06:16 29 ASCENDER Student Overview Guide
If restrictions exist, a message is displayed indicating the reason.
Column Sort:
Colum Sort
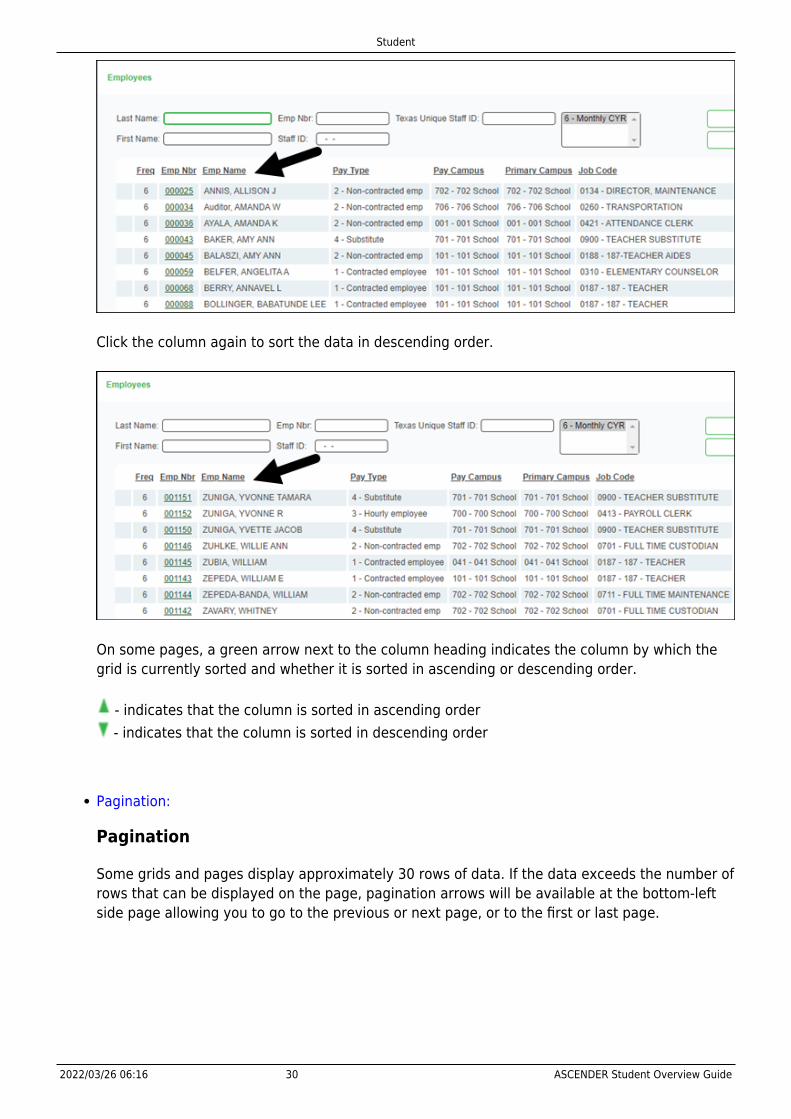
In many grids, you can sort the displayed data in order to more easily locate a specific record.When a column heading is underlined, the data in the grid can be sorted by that column.
Click the column to sort the data in ascending order.
Student
2022/03/26 06:16 30 ASCENDER Student Overview Guide
Click the column again to sort the data in descending order.
On some pages, a green arrow next to the column heading indicates the column by which thegrid is currently sorted and whether it is sorted in ascending or descending order.
- indicates that the column is sorted in ascending order - indicates that the column is sorted in descending order
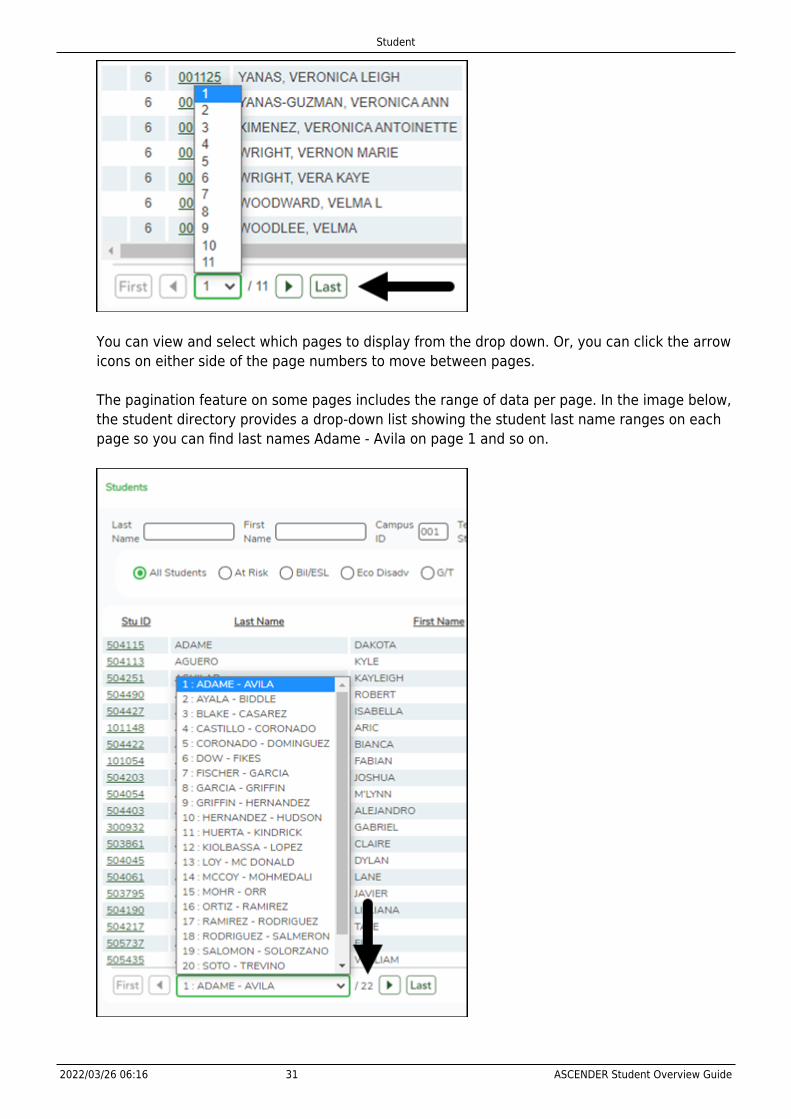
Pagination:
Pagination
Some grids and pages display approximately 30 rows of data. If the data exceeds the number ofrows that can be displayed on the page, pagination arrows will be available at the bottom-leftside page allowing you to go to the previous or next page, or to the first or last page.
Student
2022/03/26 06:16 31 ASCENDER Student Overview Guide
You can view and select which pages to display from the drop down. Or, you can click the arrowicons on either side of the page numbers to move between pages.
The pagination feature on some pages includes the range of data per page. In the image below,the student directory provides a drop-down list showing the student last name ranges on eachpage so you can find last names Adame - Avila on page 1 and so on.
Student
2022/03/26 06:16 32 ASCENDER Student Overview Guide
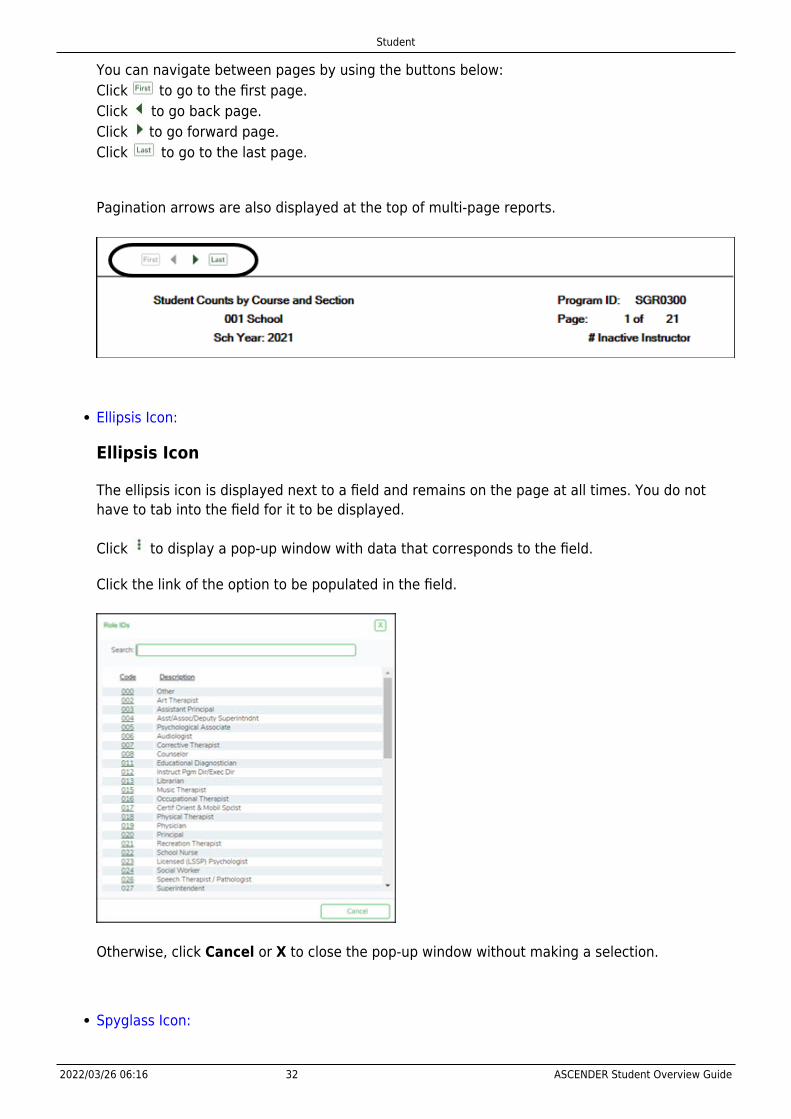
You can navigate between pages by using the buttons below:Click to go to the first page.Click to go back page.Click to go forward page.Click to go to the last page.
Pagination arrows are also displayed at the top of multi-page reports.
Ellipsis Icon:
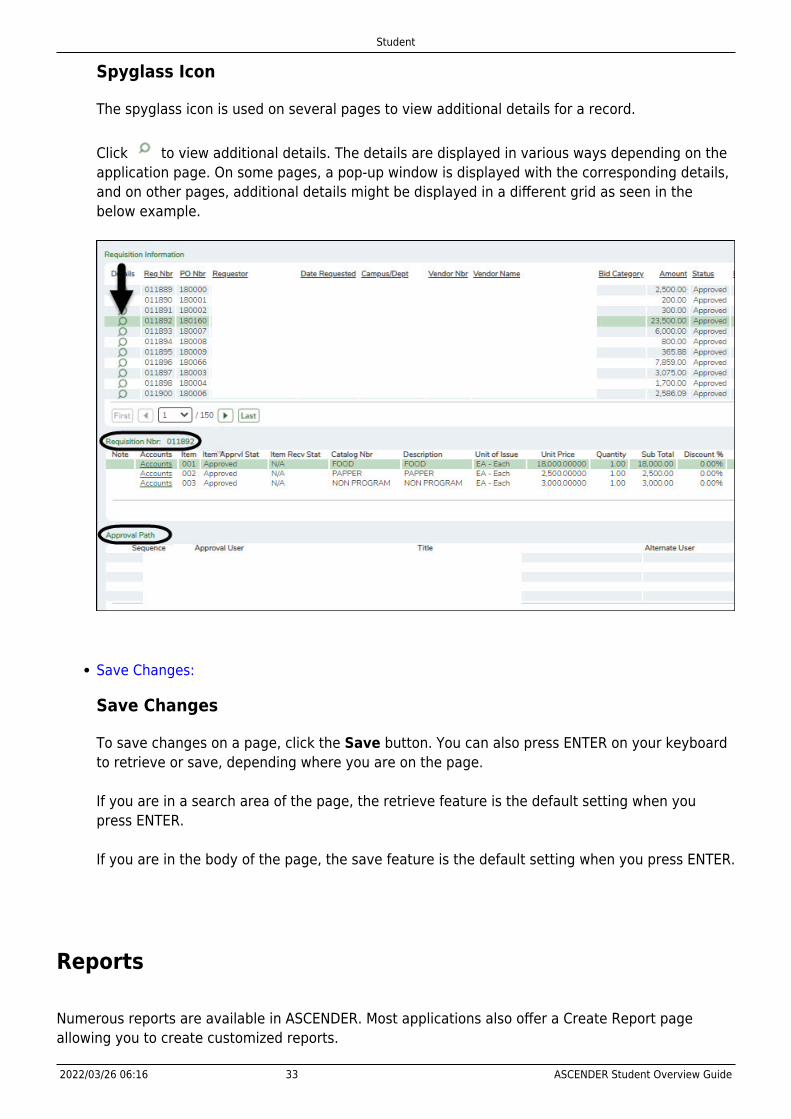
Ellipsis Icon
The ellipsis icon is displayed next to a field and remains on the page at all times. You do nothave to tab into the field for it to be displayed.
Click to display a pop-up window with data that corresponds to the field.
Click the link of the option to be populated in the field.
Otherwise, click Cancel or X to close the pop-up window without making a selection.
Spyglass Icon:
Student
2022/03/26 06:16 33 ASCENDER Student Overview Guide
Spyglass Icon
The spyglass icon is used on several pages to view additional details for a record.
Click to view additional details. The details are displayed in various ways depending on theapplication page. On some pages, a pop-up window is displayed with the corresponding details,and on other pages, additional details might be displayed in a different grid as seen in thebelow example.
Save Changes:
Save Changes
To save changes on a page, click the Save button. You can also press ENTER on your keyboardto retrieve or save, depending where you are on the page.
If you are in a search area of the page, the retrieve feature is the default setting when youpress ENTER.
If you are in the body of the page, the save feature is the default setting when you press ENTER.
Reports
Numerous reports are available in ASCENDER. Most applications also offer a Create Report pageallowing you to create customized reports.
Student
2022/03/26 06:16 34 ASCENDER Student Overview Guide
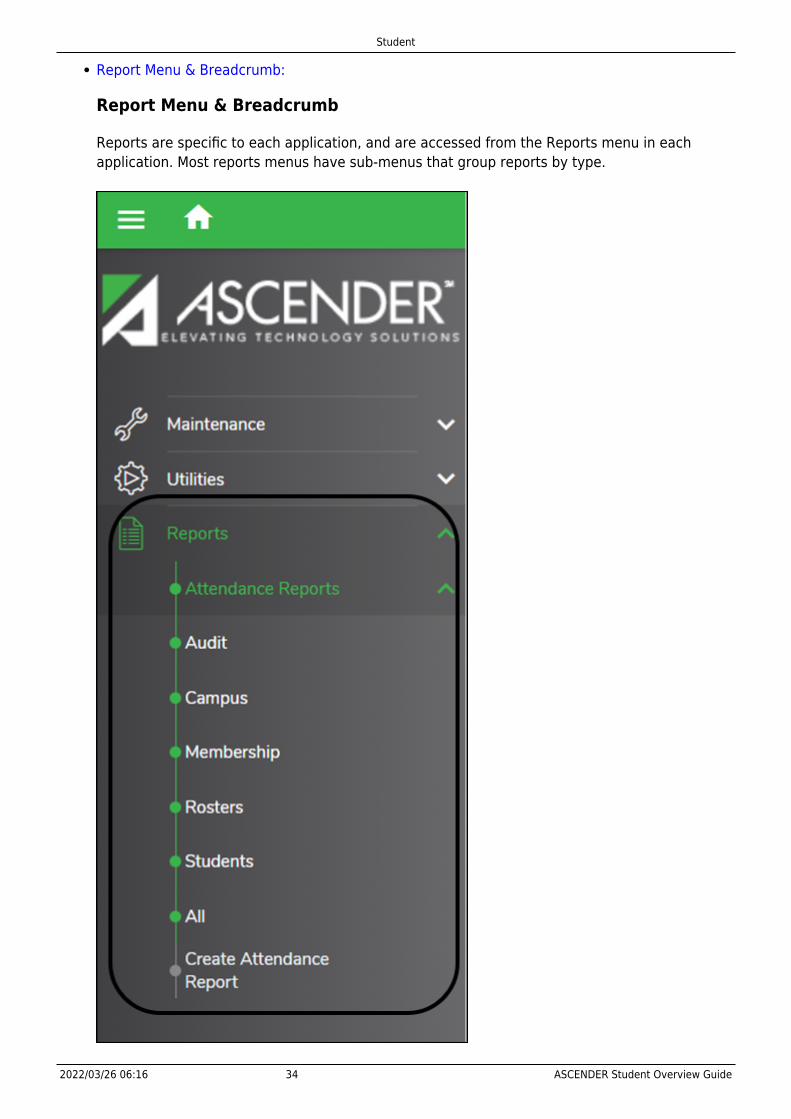
Report Menu & Breadcrumb:
Report Menu & Breadcrumb
Reports are specific to each application, and are accessed from the Reports menu in eachapplication. Most reports menus have sub-menus that group reports by type.
Student
2022/03/26 06:16 35 ASCENDER Student Overview Guide
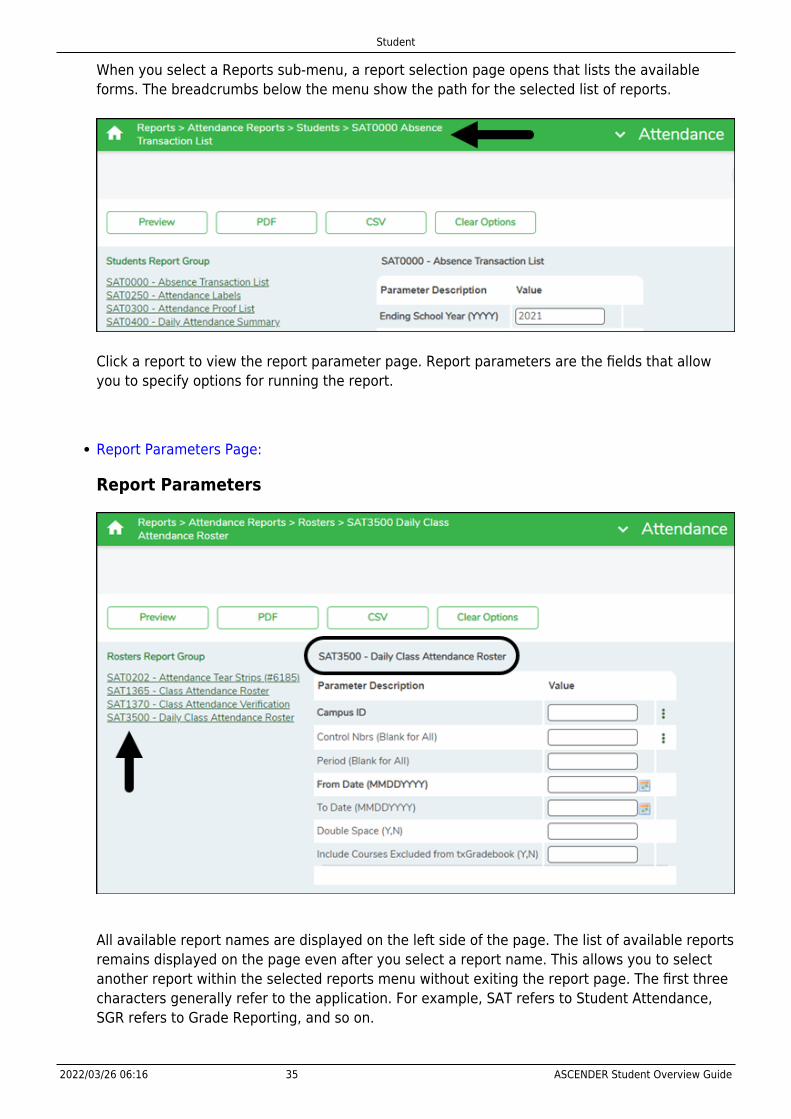
When you select a Reports sub-menu, a report selection page opens that lists the availableforms. The breadcrumbs below the menu show the path for the selected list of reports.
Click a report to view the report parameter page. Report parameters are the fields that allowyou to specify options for running the report.
Report Parameters Page:
Report Parameters
All available report names are displayed on the left side of the page. The list of available reportsremains displayed on the page even after you select a report name. This allows you to selectanother report within the selected reports menu without exiting the report page. The first threecharacters generally refer to the application. For example, SAT refers to Student Attendance,SGR refers to Grade Reporting, and so on.
Student
2022/03/26 06:16 36 ASCENDER Student Overview Guide
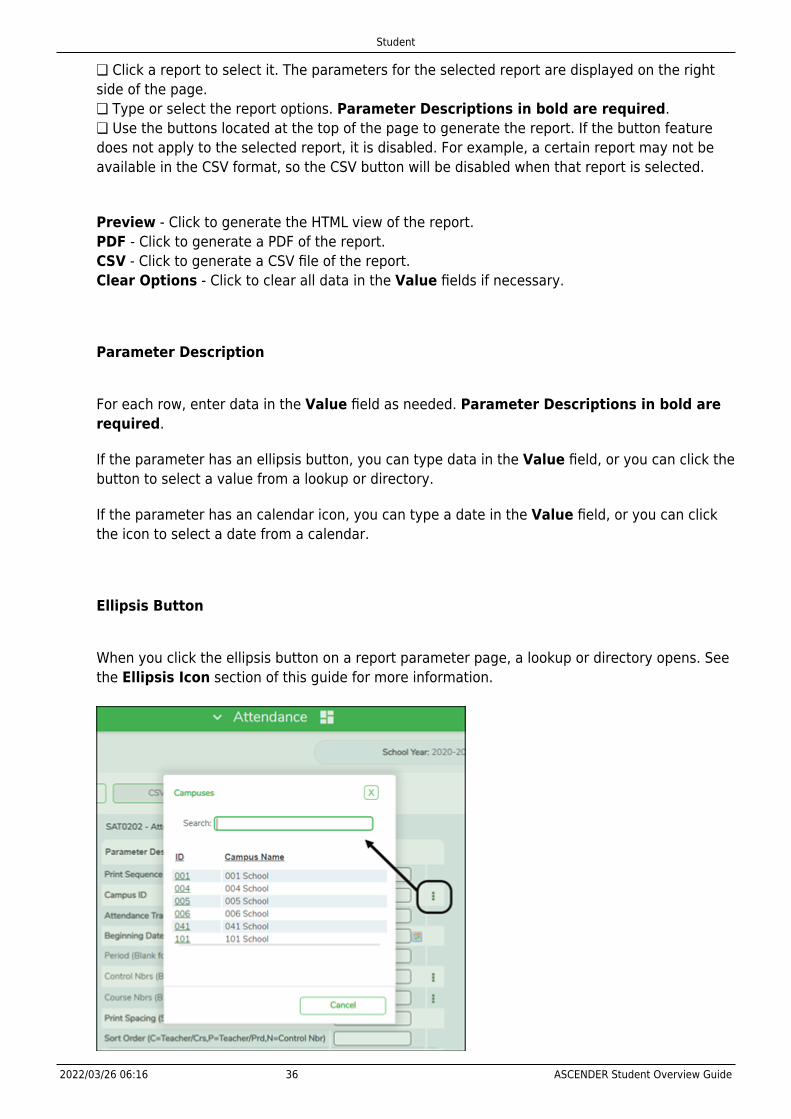
❏ Click a report to select it. The parameters for the selected report are displayed on the rightside of the page.❏ Type or select the report options. Parameter Descriptions in bold are required.❏ Use the buttons located at the top of the page to generate the report. If the button featuredoes not apply to the selected report, it is disabled. For example, a certain report may not beavailable in the CSV format, so the CSV button will be disabled when that report is selected.
Preview - Click to generate the HTML view of the report.PDF - Click to generate a PDF of the report.CSV - Click to generate a CSV file of the report.Clear Options - Click to clear all data in the Value fields if necessary.
Parameter Description
For each row, enter data in the Value field as needed. Parameter Descriptions in bold arerequired.
If the parameter has an ellipsis button, you can type data in the Value field, or you can click thebutton to select a value from a lookup or directory.
If the parameter has an calendar icon, you can type a date in the Value field, or you can clickthe icon to select a date from a calendar.
Ellipsis Button
When you click the ellipsis button on a report parameter page, a lookup or directory opens. Seethe Ellipsis Icon section of this guide for more information.
Student
2022/03/26 06:16 37 ASCENDER Student Overview Guide
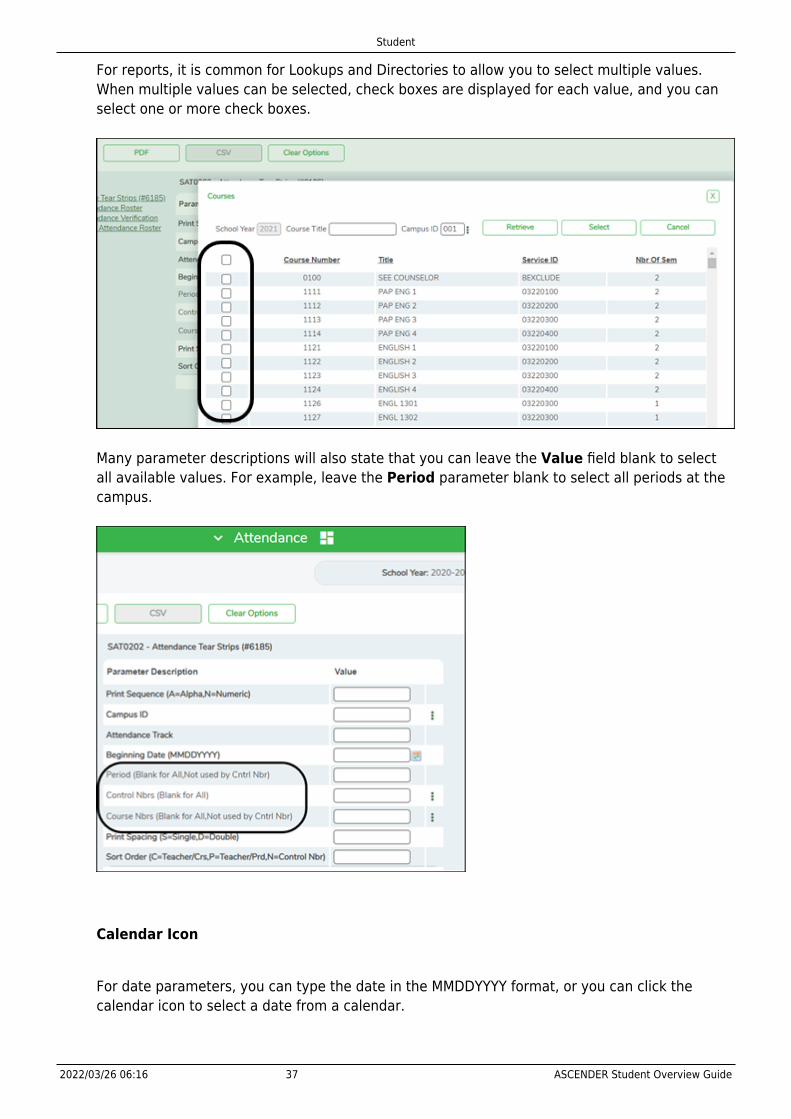
For reports, it is common for Lookups and Directories to allow you to select multiple values.When multiple values can be selected, check boxes are displayed for each value, and you canselect one or more check boxes.
Many parameter descriptions will also state that you can leave the Value field blank to selectall available values. For example, leave the Period parameter blank to select all periods at thecampus.
Calendar Icon
For date parameters, you can type the date in the MMDDYYYY format, or you can click thecalendar icon to select a date from a calendar.
Student
2022/03/26 06:16 38 ASCENDER Student Overview Guide
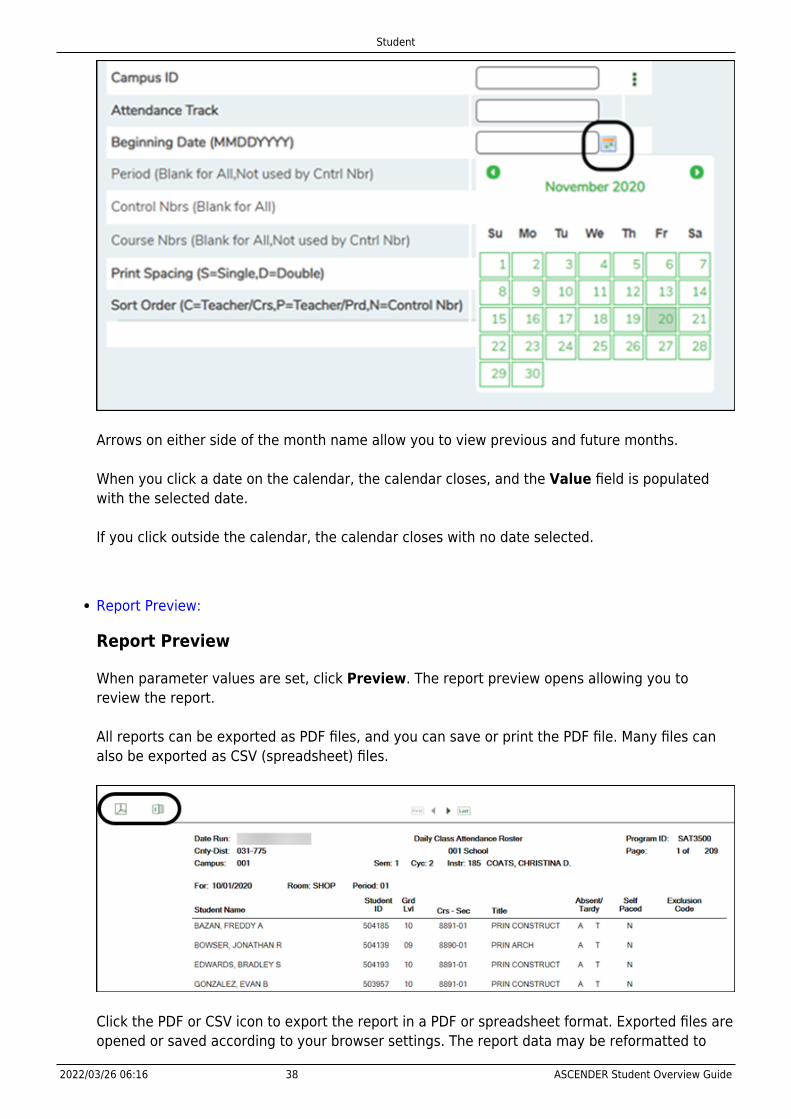
Arrows on either side of the month name allow you to view previous and future months.
When you click a date on the calendar, the calendar closes, and the Value field is populatedwith the selected date.
If you click outside the calendar, the calendar closes with no date selected.
Report Preview:
Report Preview
When parameter values are set, click Preview. The report preview opens allowing you toreview the report.
All reports can be exported as PDF files, and you can save or print the PDF file. Many files canalso be exported as CSV (spreadsheet) files.
Click the PDF or CSV icon to export the report in a PDF or spreadsheet format. Exported files areopened or saved according to your browser settings. The report data may be reformatted to
Student
2022/03/26 06:16 39 ASCENDER Student Overview Guide
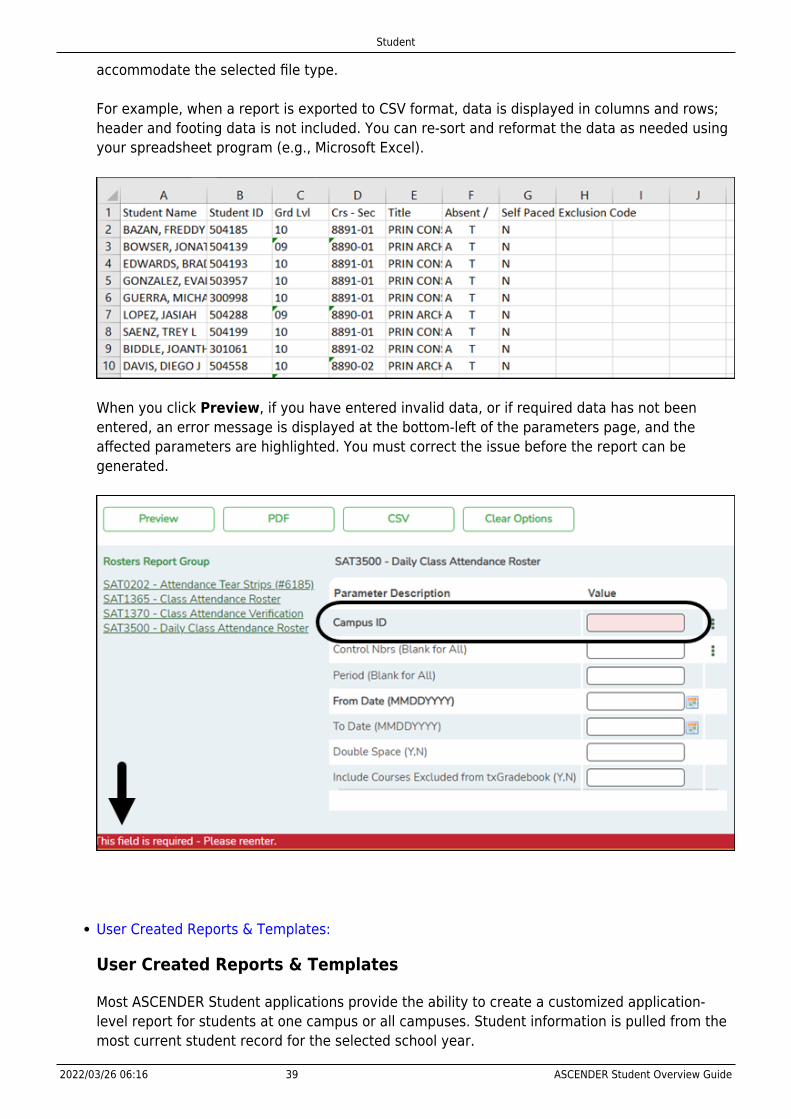
accommodate the selected file type.
For example, when a report is exported to CSV format, data is displayed in columns and rows;header and footing data is not included. You can re-sort and reformat the data as needed usingyour spreadsheet program (e.g., Microsoft Excel).
When you click Preview, if you have entered invalid data, or if required data has not beenentered, an error message is displayed at the bottom-left of the parameters page, and theaffected parameters are highlighted. You must correct the issue before the report can begenerated.
User Created Reports & Templates:
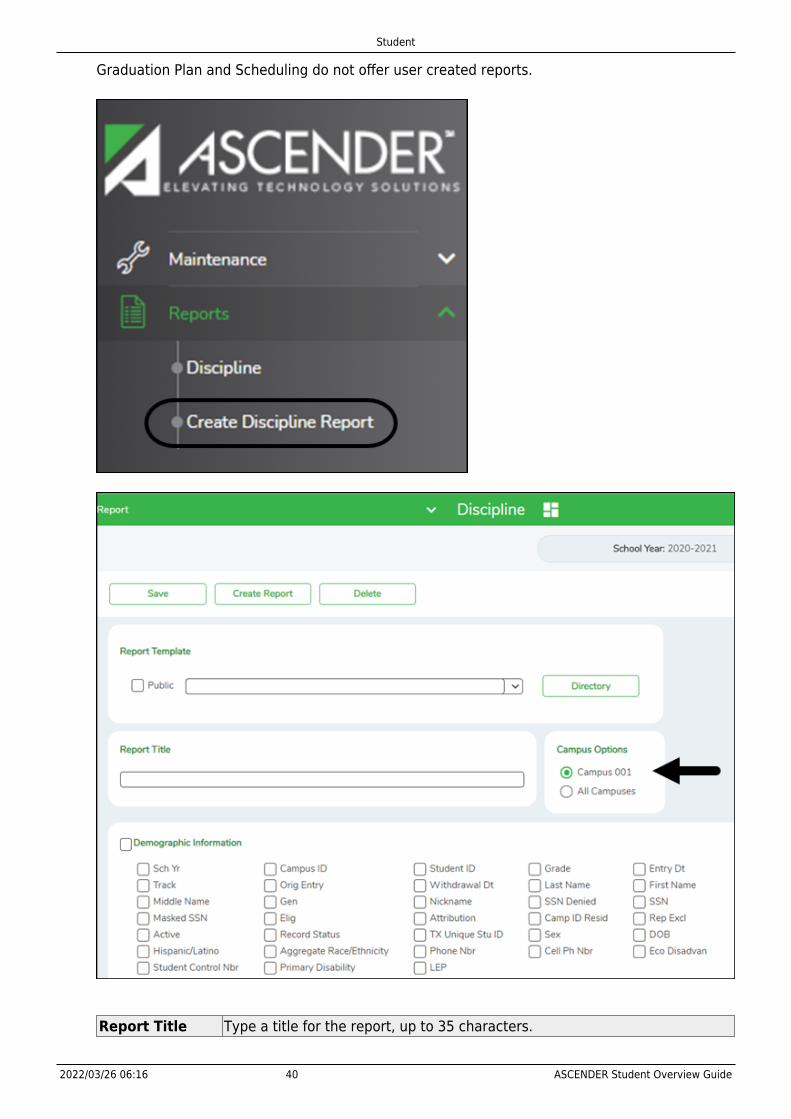
User Created Reports & Templates
Most ASCENDER Student applications provide the ability to create a customized application-level report for students at one campus or all campuses. Student information is pulled from themost current student record for the selected school year.
Student
2022/03/26 06:16 40 ASCENDER Student Overview Guide
Graduation Plan and Scheduling do not offer user created reports.
Report Title Type a title for the report, up to 35 characters.
Student
2022/03/26 06:16 41 ASCENDER Student Overview Guide
Campus Options Select Campus to print information for the campus to which you are loggedon.
Or select All Campuses to print information for all campuses in the districtto which you have access (according to your security settings).
The fields are grouped by student table. Select the fields for which you want to printinformation. You can select an entire group of fields by selecting the group name (e.g.,Demographic Information).
Click Create Report to generate the report. The report displays the selected data. Review,save, or print the report.
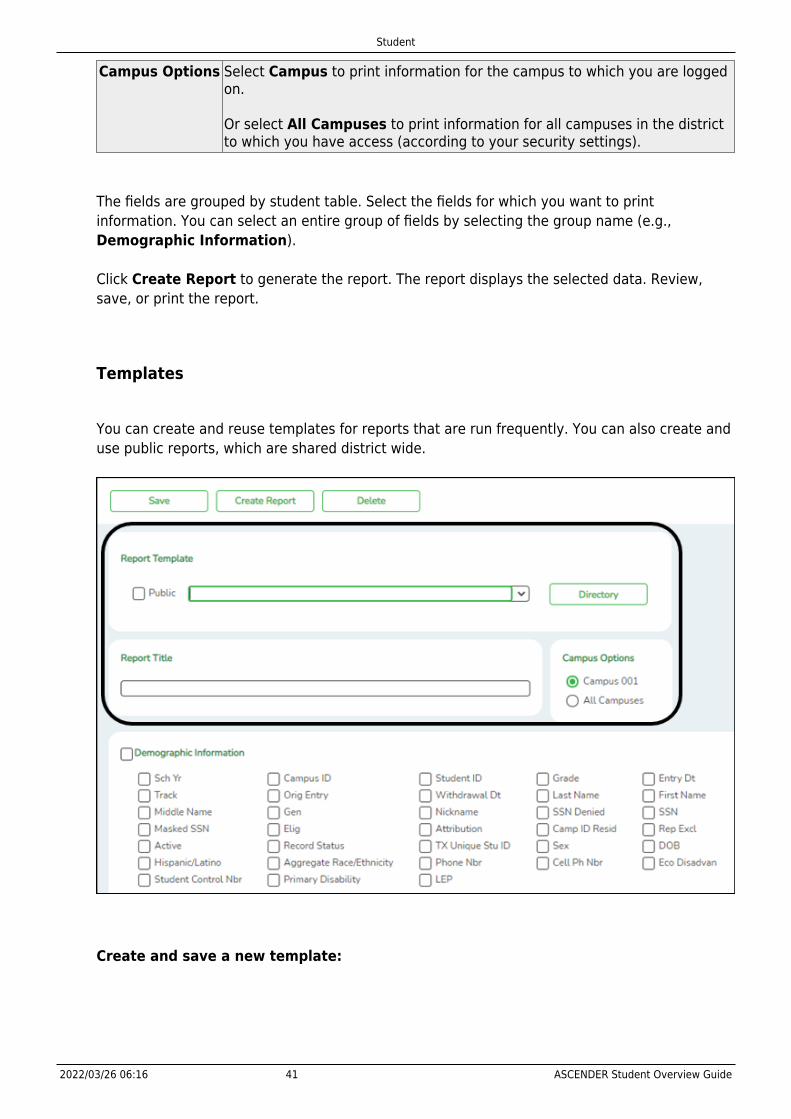
Templates
You can create and reuse templates for reports that are run frequently. You can also create anduse public reports, which are shared district wide.
Create and save a new template:
Student
2022/03/26 06:16 42 ASCENDER Student Overview Guide
Report Template Type the name of a new report template.
Only alphanumeric characters are allowed.
WARNING: If you type a name that is already used, it will overwrite theprevious template.
Public Select to make the report accessible to other users. All users in the districtwho have access to this page will be able to use the template.
Report Title Type a title for the report, up to 35 characters.This title may or may not be the same as the report template name.
Select the fields to be included. You can select individual fields, or you can select an entiregroup of fields by selecting the group name.
Click Save.
Run a report from an existing template:
ReportTemplate
Begin typing all or part of the name of an existing report template, or pressthe space bar to view all the templates. As you begin to type, a drop-down listdisplays report templates with titles that match the letters you have typed.From the drop-down list you can select the template. Only templates youcreated are listed in the drop-down list.
ReportTemplateDirectory
If you do not know the name of the report template, or if you are looking for apublic report template, click Directory to select a report template from thedirectory. From the directory, you can select templates you created as well aspublic templates.
From the directory, you can search for a template by the report title, report template, or user IDof the person who created a template.
ReportTemplate Type all or any part of the report template name.
Report Title Type all or any part of the report title.User ID Type all or any part of the user ID that created the template.
Student
2022/03/26 06:16 43 ASCENDER Student Overview Guide
Public Select to include both private (i.e., your templates) and public (i.e., district-wide) reports in your search results.
NOTE: Any changes you make to a public template will be saved underyour user ID as a private template. If you want to save the template aspublic, you must change the name. Public templates cannot have the samenames.
Click Search. Templates meeting the criteria entered are listed.
When you locate the report template you want to retrieve, click the report template name. Thedirectory closes.
IMPORTANT: Once the template is selected on the Create Report page, press ENTER topopulate the selections.
Click Create Report to generate the report. The report opens in a new window.
Review, save, or print the report as described in the Report Preview section of this guide.
NOTE: You can save a public template as your own, or as a different public template, bysaving the template with a different name. You cannot have two public templates with thesame name.
Sorting & Filtering Reports:
Sorting & Filtering Reports
Some reports can be sorted and/or filtered once they are generated. The Sort/Filter button isdisplayed at the top of the report if the feature is available for the report.
A Reset button will be displayed next to the Sort/Filter button.
Some reports may only have a Sort button. Other reports may only have a Filter button.
Student
2022/03/26 06:16 44 ASCENDER Student Overview Guide
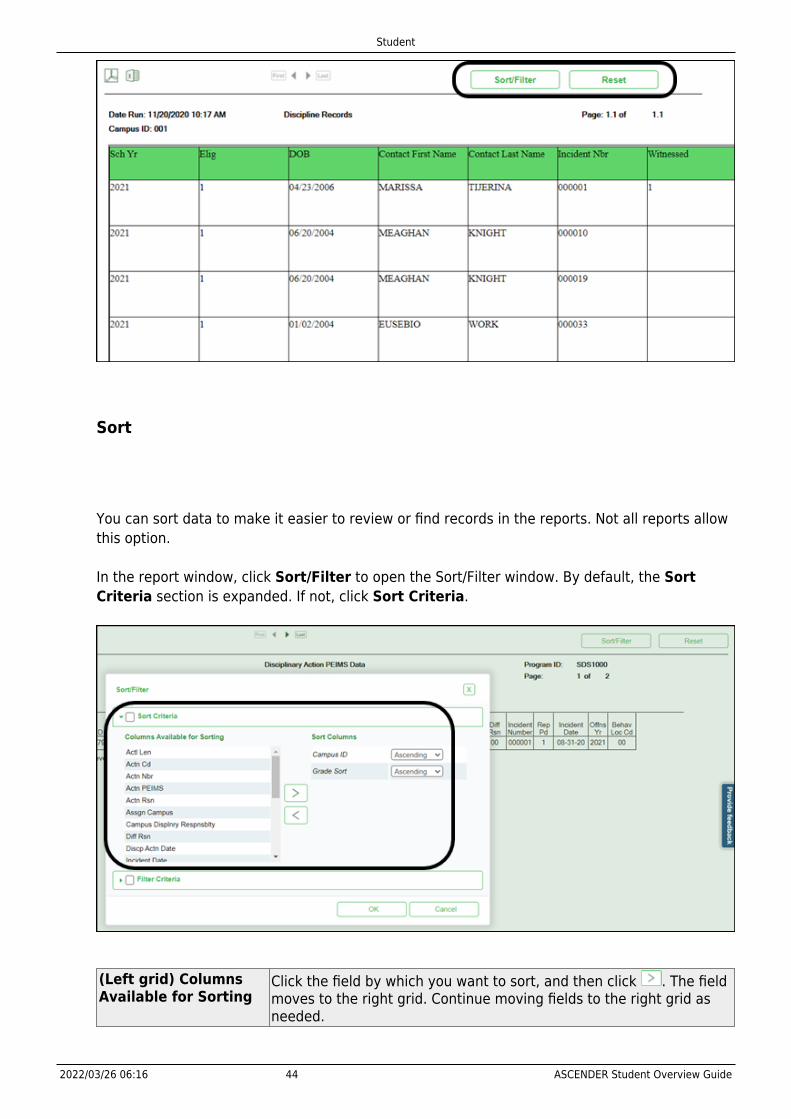
Sort
You can sort data to make it easier to review or find records in the reports. Not all reports allowthis option.
In the report window, click Sort/Filter to open the Sort/Filter window. By default, the SortCriteria section is expanded. If not, click Sort Criteria.
(Left grid) ColumnsAvailable for Sorting
Click the field by which you want to sort, and then click . The fieldmoves to the right grid. Continue moving fields to the right grid asneeded.
Student
2022/03/26 06:16 45 ASCENDER Student Overview Guide
(Right grid) SortColumns
You can rearrange the fields to indicate the order in which you wantthe sort applied. Click a field name, and drag it up or down to a newlocation.
• In the right grid, for each field, indicate if you want that data sortedin ascending (e.g., A-Z, 0-9) or descending (e.g., Z-A, 9-0) order.
• To remove a field from the sort, select the field, and then click to move it back to the left grid.
Select the Sort Criteria check box and click OK to apply the selected sort criteria to the report.
Click Cancel to close the window without re-sorting.
To restore the report to the original view, click Reset on the report page.
Filter
When you want to view only certain data, you may find it useful to filter the report data. Youcan use specific criteria to retrieve only the data that you want. Not all reports allow this option.
From the report window, click Sort/Filter to open the Sort/Filter window. By default, the SortCriteria section is expanded. Click Filter Criteria to expand the Filter Criteria section.
If the report does not allow sorting, the Filter button is displayed instead of the Sort/Filterbutton, and sort criterion fields are not available.
Student
2022/03/26 06:16 46 ASCENDER Student Overview Guide
Click Add Criterion to add new filter criteria. A blank row is added to the grid.
Column Select a field by which to filter the data. The drop down lists the columns thatappear on the report.
Operator Select an operator.
= Equals≠ Not equals› Greater than≥ Greater than or equal to‹ Less than≤ Less than or equal to
Value Type the value by which you want to filter. For example, if you selected a date in theColumn field, type a date to view only data for a specific date.
Note: When filtering report data by date, you must use the following formats:
• If the date is displayed in the MM/DD/YYYY format, the filter value must be in theYYYYMMDD format.• If the date is displayed in the MM/YYYY format, the filter value must be in theYYYYMM format.• If the date is displayed in the MM/YY format, the filter value must be in the YYMMformat.
Add Criterion Add another row.Select the logical connector (AND or OR) in the Logical field. Continueadding rows as needed. The Logical field does not appear until you clickAdd Criterion to add an additional row.
• Using the AND operator limits search results, because the program looksonly for records that contain both criterion.
• Using the OR operator expands search results, because the program looksfor records that contain either one criterion or the other, or both.
Delete Selected Delete selected row.Select the row, and then click the button. The row is deleted from the filtercriteria.
Click OK to apply the selected filter criteria to the report.
Click Cancel to close the dialog box without applying a filter.
NOTE: Some applications allow you to filter by specific data:
In Test Scores, you can filter report data to include only students who are enrolled inspecial programs. When filtering report data for At Risk, PRS, and GT programs, you mustselect 1 (Yes) or 0 (No) in the Value field. For example, if you filter report data for the AtRisk program by selecting Equals in the Operator field and Yes in the Value field, no datais displayed; however, if you select 1 in the Value field, the At Risk data is displayed.
Student
2022/03/26 06:16 47 ASCENDER Student Overview Guide
To restore the report to the original view, click Reset on the report page.

Student
2022/03/26 06:16 48 ASCENDER Student Overview Guide
Back Cover
![Brochure livecore 2015-Officielle - Analog Way › ... › livecore-brochure-2015-bd.pdf · 2015-06-25 · LiveCoreTM series î ì í ñ E Á ] } v Ascender 48 Ascender 32 Ascender](https://img.pdfslide.us/doc/110x75/5f25783fd980204cdb60ea84/brochure-livecore-2015-officielle-analog-way-a-a-livecore-brochure-2015-bdpdf.jpg)