Embed Size (px)
Citation preview

AS3000 Installationand Configuration Guide
IMPAX 6.5.3
Installing and Configuring
the AS3000 Components of the IMPAX Cluster

Copyright information© 2012 Agfa HealthCare N.V., Septestraat 27, B-2640, Mortsel, Belgium. All rights reserved. Noparts of this document may be reproduced, copied, translated, adapted or transmitted in any formor by any means without prior written permission of Agfa HealthCare N.V.
CAUTION!
U.S. Federal law restricts this device to sale by or on the order of a physician.
Trademark creditsAgfa and the Agfa rhombus are trademarks or registered trademarks of Agfa-Gevaert N.V., Belgiumor its affiliates. IMPAX, Connectivity Manager, Audit Manager, WEB1000, IDCV XERO, TalkStation,Heartlab, and HeartStation are trademarks or registered trademarks of Agfa HealthCare N.V. or itsaffiliates. All other trademarks are held by their respective owners and are used in an editorial fashionwith no intention of infringement.
Additional trademark credits
Sun, Sun Microsystems, the Sun Logo, and Solaris are trademarks or registered trademarks of OracleAmerica, Inc. in the United States and other countries.
Oracle is a registered trademark of Oracle Corporation and/or its affiliates.
Note: The IMPAX 6.5.3 software complies with the Council Directive 93/42/EEC Concerning MedicalDevices, as amended by Directive 2007/47/EC.
Agfa HealthCare N.V.
Septestraat 27, 2640 Mortsel, Belgium
www.agfahealthcare.com
Documentation warranty statementCharacteristics of the products described in this publication can be changed at any time withoutnotice.
The information contained in this document is subject to change without notice. Agfa HealthCareN.V. and its affiliates make no warranties or representations, express, implied or statutory, withregard to this material, including, but not limited to, the implied warranties of merchantability andfitness for a particular purpose.
Agfa HealthCare N.V. and its affiliates shall under no circumstances be liable for any damage arisingfrom the use or inability to use any information, apparatus, method or process described in thisdocument. Agfa HealthCare N.V. and its affiliates shall not be liable for errors contained herein orfor incidental or consequential damage in connection with the furnishing, performance, or use ofthis manual.
AS3000 Installation and Configuration Guide—IMPAX 6.5.3 2Agfa Company Confidential—Subject to Non-Disclosure Obligation

The information in this publication is subject to change without notice.
2012 - 9 - 17
Manufacturer’s responsibilityThe manufacturer, installer, or importer will be responsible for the safety, reliability, and performanceof the equipment only if:
• Installation, modifications, adjustments, changes, or repairs are performed by suitably qualifiedservice personnel.
• The electrical installation of the site in which the equipment is used is according to an applicablesafety standard (UL, CSA, or IEC/CDE).
• The equipment is used according to the instructions provided in the operation manuals.
• No software other than that which is distributed with this package or is sanctioned by Agfawill reside on the IMPAX 6.5.3 computers.
External software licenses(Topic number: 7696)
Information about third-party software licenses and copyrights can be found in Externalsoftware licenses (refer to page 140).
Giving feedback on the documentation(Topic number: 122201)
Thank you for taking the time to provide feedback. Your comments will be forwarded to the groupresponsible for this product’s documentation.
If you have a request for changes in the product, please contact your product sales representative orthe product’s technical support channel.
To give feedback on the documentation
1. In an email subject line or body, list which product, version, and publication you arecommenting on.
For example, “IMPAX 6.4 SU01 Client Knowledge Base: Extended”. (You can find thisinformation in the footer of the publications.)
2. Describe the incorrect, unclear, or insufficient information. Or, if you found any sectionsespecially helpful, let us know.
3. Provide topic titles and topic numbers where applicable.
Including your personal contact details is optional.
AS3000 Installation and Configuration Guide—IMPAX 6.5.3 3Agfa Company Confidential—Subject to Non-Disclosure Obligation

4. Send the email to [email protected].
AS3000 Installation and Configuration Guide—IMPAX 6.5.3 4Agfa Company Confidential—Subject to Non-Disclosure Obligation

Contents
Getting started 91
Attention: An archive is necessary to prevent permanent data loss.........................................9Prerequisite knowledge: IMPAX installations.........................................................................10What is IMPAX?.....................................................................................................................10What is Oracle Data Guard?..................................................................................................10What are Solaris zones?........................................................................................................11Running IMPAX in an IPv4/IPv6 hybrid environment.............................................................12Components of the IMPAX cluster.........................................................................................14Types of archives...................................................................................................................17
HSM archives................................................................................................................17PACS Store and Remember.........................................................................................17
Single-cluster configurations..................................................................................................18Multiple IMPAX cluster configurations....................................................................................20Order of cluster installations...................................................................................................21IMPAX AS3000 Server: Supported hardware configurations.................................................22
IMPAX AS3000 Server: Hardware requirements..........................................................23IMPAX AS3000 Server: Database backup requirements..............................................24IMPAX AS3000 Server: External storage requirements................................................25
IMPAX AS3000 Server: Software requirements.....................................................................25Additional IMPAX documentation...........................................................................................26
Opening the IMPAX 6.5.3 Server Knowledge Base......................................................26Opening the IMPAX 6.5.3 Application Server Knowledge Base...................................26Opening the IMPAX 6.5.3 Client Knowledge Base: Extended......................................27
Setting up a Solaris server 282
Physically setting up a Solaris server.....................................................................................28Connecting the UPS...............................................................................................................28Installing Solaris 10................................................................................................................29Disk management strategies..................................................................................................29
Partitioning and configuring local disks.........................................................................29Partitioning recommendations for the database file systems........................................30Recommended disk partitions for image and web caches............................................45
Obtaining Server license keys................................................................................................52Obtaining Server licenses for Solaris stations...............................................................52
Sizing parameters when configuring a zone..........................................................................53
AS3000 Installation and Configuration Guide—IMPAX 6.5.3 5Agfa Company Confidential—Subject to Non-Disclosure Obligation

Creating and configuring a Solaris zone for IMPAX...............................................................56
Creating the Database Server 603
Creating the AS3000 software repository...............................................................................60Determining a password for the AgfaService account...........................................................61Installing Oracle Server for Solaris in a zone.........................................................................62Installing the IMPAX 6.5.3 AS3000 database packages in a zone........................................63Configuring disk arrays for the database filesystems.............................................................66Recommended frequency of database backups....................................................................67
Performing a warm backup of the database..................................................................68Collecting database statistics.................................................................................................68Generating the AS3000 portable password file for the AgfaService user..............................69
Creating the Network Gateway 704
Generating the password file from the Database Server.......................................................70Installing IMPAX 6.5.3 AS3000 Network Gateway software in a zone...................................71Installing the mvf license key on a Solaris server...................................................................72
Creating the Archive Server 735
Generating the password file from the Database Server.......................................................73Installing IMPAX 6.5.3 AS3000 Archive Server software in a zone.......................................74Configuring the mounted location for HSM............................................................................75Installing Server license keys on a new server......................................................................76
Installing the mvf license key on a Solaris server..........................................................76Installing the archive license key on a Solaris server....................................................76
Completing the installation of an IMPAX AS3000 cluster 776
Installing Compressor Scheduler manually on Solaris...........................................................77Starting Compressor manually on Solaris..............................................................................78Installing the IMPAX Server documentation...........................................................................78Installing the Application Server.............................................................................................79Installing and configuring Curator...........................................................................................79Configuring the Audit Record Repository database connection.............................................79Configuring IMPAX 6.5.3 stations...........................................................................................80
Appendix A: Troubleshooting IMPAX 81
Troubleshooting: Oracle installation is interrupted and then fails when retried......................81Troubleshooting: zoneadm install fails with a ZFS legacy mount...........................................82Troubleshooting: Mounting with lofiadm is not working in a Solaris zone..............................83Troubleshooting: Attaching an ISO image using lofiadm is not working in a Solaris zone.....83Troubleshooting: Zone is suspended in the “shutting down” state.........................................84Troubleshooting: The application encountered a problem with the standby database..........84Troubleshooting: Reducing the time needed for a Solaris client to connect to the Oracle standbyserver......................................................................................................................................86
Appendix B: Reference material: Solaris 87
AS3000 Installation and Configuration Guide—IMPAX 6.5.3 6Agfa Company Confidential—Subject to Non-Disclosure Obligation

Summary of Solaris zone features.........................................................................................87Non-global zone states reference..........................................................................................88Accessing the non-global zones.............................................................................................90IMPAX, Solaris zones, and memory.......................................................................................90Increasing the swap size........................................................................................................91Adding a dedicated network connection to a zone.................................................................93Creating a link aggregation (shared NIC) for a zone..............................................................94Removing a link aggregation (shared NIC) from a zone........................................................96Uninstalling a Solaris zone.....................................................................................................97High availability and Solaris zones.........................................................................................97Solaris Live Upgrade: Key concepts......................................................................................98Modifications made automatically by the Solaris armoring installation..................................99
Understanding Solaris armoring..................................................................................100Groups and accounts created for IMPAX....................................................................100
Appendix C: Oracle Data Guard reference material 102
What is Oracle Data Guard?................................................................................................102Oracle Data Guard configuration overview..........................................................................103Installing the Oracle Data Guard package on a Database Server.......................................104Configuring Oracle Data Guard using RMAN.......................................................................104
Running the Oracle Data Guard configuration on the primary server.........................105Copying the primary flash recovery area on a Solaris server.....................................106Restoring the database on the standby server............................................................107Completing the Data Guard configuration...................................................................108
Configuring Oracle Data Guard using cold backup..............................................................108Running the Oracle Data Guard configuration on the primary server.........................109Running the Oracle Data Guard configuration on the standby server........................110Sharing the primary flash recovery area and /dbase partition on a Solaris server......111Copying the primary flash recovery area and /dbase partition on a Solaris server.....112Restoring the database on the standby server............................................................112Completing the Data Guard configuration...................................................................115
Configuring RMAN backups after the Oracle Data Guard configuration..............................116Maintaining Oracle Data Guard............................................................................................117
Synchronizing redo changes from the primary database to the standby database....117Rebooting the standby database server......................................................................118Rebooting the primary database server......................................................................119Resizing Oracle data files............................................................................................120Removing the Oracle Data Guard configuration on the primary and standby servers.120Switching over to the standby server..........................................................................122Failing over to the standby server...............................................................................124Re-creating the temporary file on the standby server.................................................125Reinstating the failed primary database......................................................................126
Tools for monitoring Oracle Data Guard..............................................................................128
Appendix D: Reference material: Archiving and security 129
PACS Store and Remember archiving.................................................................................129Adding a PACS Store and Remember archive...........................................................129Registering PACS Store and Remember archive services in Solaris.........................130
AS3000 Installation and Configuration Guide—IMPAX 6.5.3 7Agfa Company Confidential—Subject to Non-Disclosure Obligation

Testing PACS Store and Remember archiving...........................................................130Generating and importing mvf.portable.psd.........................................................................131
Generating the AS3000 portable password file...........................................................132Importing the portable password file locally to the target server.................................133
Understanding the passkey utility.........................................................................................133Differences between system and portable password files..........................................134Passkey utility reference.............................................................................................134
Appendix E: Manually configuring the connection to the Application Server 137
Appendix F: Integrating the IMPAX Enterprise Solution 138
What is the IMPAX Enterprise Solution?..............................................................................138Integrating into the IMPAX Enterprise Solution....................................................................139
Appendix G: External software licenses 140
Cygwin..................................................................................................................................140Editline 1.2-cstr.....................................................................................................................145ICU License - ICU 1.8.1 and later.........................................................................................145OpenSSL..............................................................................................................................146Oracle Binary Code License Agreement for the Java SE Platform Products and JavaFX...148Oracle® Database................................................................................................................153Xerces C++ Parser, version 1.2...........................................................................................155Zlib........................................................................................................................................155
Glossary.....................................................................................................................................156
Index..........................................................................................................................................159
AS3000 Installation and Configuration Guide—IMPAX 6.5.3 8Agfa Company Confidential—Subject to Non-Disclosure Obligation

1Getting started
Understanding certain key concepts and system requirements helps ensure a successful installation.
Attention: An archive is necessary to preventpermanent data loss(Topic number: 98632)
Data archiving is an essential component of a PACS system. IMPAX Autopilot manages data in thecache and ensures that it does not run out of disk space. As the cache nears capacity, Autopilot deletesimages to make space available for incoming images, usually on a first in, first out basis but ultimatelygoverned by user-defined criteria. In addition to the automated cache management, users with thenecessary permission can delete images from the cache.
For details about Autopilot configuration, see “Autopilot Management” (topic number 9129) in theAdministration Tools component of the IMPAX 6.5.3 Server Knowledge Base. For details aboutpermissions, see “Defining permissions” (topic number 9451) in the Administering IMPAXcomponent of the IMPAX 6.5.3 Client Knowledge Base: Extended.
Under normal circumstances in which an archive is employed, any data deleted from the cache isstored on the archive and no permanent data loss occurs. If, however, an archive is not employed,data deletion results in a permanent loss of the record unless that data has been exported and/orstored elsewhere.
CAUTION!
Although IMPAX can be used without an archive, we strongly recommend using an archiveto prevent data loss. It is the responsibility of any IMPAX customer to recognize and acceptthese conditions. In addition, granting permission to delete an image or study from the cache
AS3000 Installation and Configuration Guide—IMPAX 6.5.3 9Agfa Company Confidential—Subject to Non-Disclosure Obligation

must be carried out with the understanding of the risk it can pose with regard to the permanentloss of patient data.
Prerequisite knowledge: IMPAX installations(Topic number: 7633)
The following procedures require that you have a general knowledge of computer hardware andsoftware concepts, and proficiency in operating and troubleshooting computer software.
What is IMPAX?(Topic number: 6910)
IMPAX is an image archiving and communications system that eliminates the need for film becauseit receives, distributes, archives, and displays images. IMPAX automates the flow of information tointegrate the Radiology department with the rest of the hospital. IMPAX can also integrate remotelocations such as clinics or home offices to the system for offsite viewing of images.
What is Oracle Data Guard?(Topic number: 65374)
Oracle Data Guard enables and automates the management of a disaster recovery solution for Oracledatabases.
In an Oracle Data Guard configuration, two database servers run at the same time. The active oneis called the primary database. The second one is called the standby database. As transactions occurin the primary database, redo data is generated and written to the local redo logs. Data Guardautomatically transfers this redo data to the standby site and applies it to the standby database,synchronizing it with the primary database. If a problem occurs with the primary database, thestandby database can take over as the active database, so that the problem on the primary databasecan be resolved without the site losing access to data.
The Oracle Data Guard broker is a distributed management framework that automates and centralizesthe creation, maintenance, and monitoring of Data Guard configurations. You can perform allmanagement operations using the command-line interface called DGMGRL.
Oracle Data Guard can be used only with Oracle Enterprise Edition, and not with Oracle StandardEdition or Oracle Standard Edition One. Data Guard can be configured such that backups do nottake place, yet the system does not issue an error message.
Agfa provides tools to make the configuration and maintenance easier:
1. A set of scripts to automate the configuration of the Data Guard portion of the Oracle database.
AS3000 Installation and Configuration Guide—IMPAX 6.5.3 10Agfa Company Confidential—Subject to Non-Disclosure Obligation

2. Implementation of Oracle RMAN (Recovery Manager) to perform a daily backup of the existingdatabase once the configuration has been completed. (Note that RMAN can also be used forbackup and recovery exclusive of Oracle Data Guard.)
We recommend three times the database size for backup allocation.
3. A set of tools to monitor the configuration (refer to page 128).
To use Oracle Data Guard, the IMPAXoradg package (AS3000) or MVForadg package (AS300) mustbe installed; see Installing the Oracle Data Guard package on a Database Server (refer to page 104).
What are Solaris zones?(Topic number: 67532)
Important!
Installing IMPAX 6.5.3 alongside IMPAX Data Center 2.0 or later (including any applicableSUs) on the same machine is not a supported configuration at this time.
Solaris zones are a partitioning technology that virtualizes operating system services and providesan isolated and secure environment for running applications. A zone is created within a singleinstance of the Solaris operating system.
When creating a zone, you produce an application execution environment in which processes areisolated from the rest of the system. This isolation prevents processes running in one zone frommonitoring or affecting processes running in other zones. Even a process running with superusercredentials cannot view or affect activity in other zones.
A zone also provides an abstract layer that separates applications from the physical attributes of themachine on which they are deployed; for example, physical device paths.
What is a global zone?Every Solaris system contains a global zone. The global zone is both the default zone for the systemand the zone used for system-wide administrative control. Non-global zones, referred to simply aszones, are created by the global administrator.
The global zone is the only zone from which a non-global zone can be configured, installed, managed,or uninstalled. Only the global zone is bootable from the system hardware. Administration of thesystem infrastructure is possible only in the global zone.
A non-global zone can be administered by a zone administrator. The global administrator assignsthe Zone Management profile to the zone administrator. The privileges of a zone administrator areconfined to a non-global zone. Solaris zones can be created, started, shut down, and reconfiguredjust as any other physical server can. Each non-global zone is managed as a separate machine andcan therefore be started, stopped, and rebooted as any other physical server.
AS3000 Installation and Configuration Guide—IMPAX 6.5.3 11Agfa Company Confidential—Subject to Non-Disclosure Obligation

Note:
Although upgrades in a global zone are allowed, all new installs of IMPAX 6.5.3 Servercomponents (AS3000) should be installed in a Solaris non-global zone, even if it is a singleapplication running on its own server. For more details, see Creating and configuring a Solariszone for IMPAX (refer to page 56) and the subsequent topics on installing IMPAX in a zone.
What is a whole-root zone?The default native zone file system model is called sparse-root. Sparse-root zones optimize physicalmemory and disk space usage by sharing some directories, such as /usr and /lib. Whole-root zonesincrease configuration flexibility but also increase resource usage. They do not use shared file systemsfor /usr, /lib, and a few others. IMPAX 6.5.3 currently makes use of whole-root zones.
IMPAX 6.5.3 supports the following file system types for Solaris zones:
• Zone root file systems: UFS (upgrades of existing Solaris 10 systems) and ZFS (new installs)
• Additional file systems: NFS and UFS
Note:
ZFS cannot be used for non-root file systems that are imported into a zone. For more details,see Troubleshooting: zoneadm install fails with a ZFS legacy mount (refer to page 82).
For more information about Solaris zones, refer to the System Administration Guide: Oracle SolarisContainers-Resource Management and Oracle Solaris Zones(http://download.oracle.com/docs/cd/E18752_01/pdf/817-1592.pdf).
Running IMPAX in an IPv4/IPv6 hybrid environment(Topic number: 135625)
Internet Protocol version 6 (IPv6) is designed to succeed Internet Protocol version 4 (IPv4), currentlydeployed and in use throughout the world. IPv6 was developed to alleviate IPv4 address exhaustionby providing a vastly larger address space, and more efficient mechanisms for routing, security, andmobile computing.
IMPAX supports hardware and operating system platforms that are both IPv4 and IPv6-aware.IMPAX is not IPv6-capable but does provide full functionality using the IPv4 infrastructure in ahybrid IPv4/IPv6 environment.
No special licenses, settings, or configurations are required for IMPAX to function in a hybridIPv4/IPv6 environment. IPv6 devices can communicate amongst themselves on an IPv6-enabledswitch. IPv4 devices can also communicate with other IPv4 devices on this same switch; however,using only this switch, IPv6 devices cannot communicate with IPv4 devices. A Layer 3 device can beused to provide IPv6 to IPv4 translation and routing.
AS3000 Installation and Configuration Guide—IMPAX 6.5.3 12Agfa Company Confidential—Subject to Non-Disclosure Obligation

Supported hardware and operating systemsIMPAX supports hardware and operating system platforms that are both IPv4 and IPv6-aware,including:
• Oracle Solaris and Sun SPARC servers
• x86 HP servers and workstations (and other brands)
• Microsoft Windows XP, Vista, and Windows 7
• Microsoft Windows Server 2008 R2
Considerations and constraints• IMPAX components only listen to the underlying IPv4 stack, which includes hardware, drivers,
OS system calls, and so on. Although IMPAX must run natively in an IPv4 infrastructure, testsassessing IMPAX components in an IPv4/IPv6 environment have resulted in positive outcomes.Testing included the IMPAX Server core and IMPAX workstations (diagnostic andnon-diagnostic).
• IMPAX components do not communicate directly on IPv6, and require at least a hybridIPv4/IPv6 infrastructure.
AS3000 Installation and Configuration Guide—IMPAX 6.5.3 13Agfa Company Confidential—Subject to Non-Disclosure Obligation

• IPv4 and IPv6 network segments must be logically separated, and IPv4 traffic on the IPv4segment (VLAN) must be routed to the IPv6 segment (VLAN). Active networkcomponents—such as routers—are used to handle the translation. Exchanging traffic betweenthe two networks requires special translator gateways or a mechanism to tunnel networkcommunications.
• Until IPv6 is the market default, modalities on an IPv6 network will likely support dual-stackimplementations of IPv4 and IPv6 for the foreseeable future.
• Tunneled IPv4 remote networks are expected to work; for example, a hub and spokeconfiguration (site-to-site/network-to-network).
• Remote IPv6 clients over the Internet do not work; IPv6 must be translated to IPv4 or atunneling protocol must be used.
Components of the IMPAX cluster(Topic number: 7091)
Every IMPAX 6.5.3 installation comprises the following main components:
• Database Server hosting the Oracle or SQL database
The database used by the IMPAX 6.5.3 cluster. It collects, organizes, and manages all patientand study demographic data that is contained in DICOM header files. Installation of a DatabaseServer is covered in this guide.
• Network Gateway
Workflow manager of the IMPAX 6.5.3 cluster. It receives studies from modalities and providesDICOM security and validation. Installation and configuration of a Network Gateway is coveredin this guide.
• Archive Server
DICOM archive used for permanent storage and retrieval of studies. Installation andconfiguration of an Archive Server is covered in this guide.
Although IMPAX can be used without an archive, we highly recommend an archive be usedto prevent data loss. For further information, see Attention: An archive is necessary to preventpermanent data loss (refer to page 9).
• Application Server
Clients connect to one or more Application Server machines, which act much like a proxymachine to handle security, authentication, and communication with the IMPAX 6.5.3 Servercomponents. Installation and configuration details are covered in the IMPAX 6.5.3 ApplicationServer Installation, Upgrade, and Configuration Guide.
• Curator
AS3000 Installation and Configuration Guide—IMPAX 6.5.3 14Agfa Company Confidential—Subject to Non-Disclosure Obligation
Clients can view JPEG compressed or wavelet compressed DICOM images generated by theCurator. Installation and configuration details are covered in the IMPAX 6.5.3 Curator andCD Export Server Installation Guide.
• Clients—Local and remote
Multi-modality diagnostic or clinical display station for viewing images and diagnosing studies.Installation and configuration details are covered in the IMPAX 6.5.3 Client Installation,Upgrade, and Configuration Guide.
The sum of these components is called the cluster. The IMPAX 6.5.3 cluster is the set of componentsthat are controlled by one Oracle or SQL database. The Database Server must be installed first becausethe other stations must connect to the Oracle or SQL database.
AS3000 Installation and Configuration Guide—IMPAX 6.5.3 15Agfa Company Confidential—Subject to Non-Disclosure Obligation

IMPAX clusters also include a Connectivity Manager component. Connectivity Manager is amiddleware component in the integration between hospital information systems and other hospitalimaging departments. Connectivity Manager also provides connectivity to modalities and IMPAX.These systems often speak different languages, or protocols. PACS and modalities typically speakDICOM, while hospital information systems generally speak HL7.
AS3000 Installation and Configuration Guide—IMPAX 6.5.3 16Agfa Company Confidential—Subject to Non-Disclosure Obligation

Types of archives(Topic number: 6917)
Supported archive configurations are:
• HSM (Hierarchical Storage Management)
• PACS Store and Remember
Tip:
For more details on archive functionality, refer to the Archive Server component of the IMPAX6.5.3 Server Knowledge Base.
HSM archives(Topic number: 11577)
The HSM archive system provides long-term data storage and access. Studies archived with HSMare stored to a file system. A mount point and subdirectory to store studies to is specified. The HSMsystem takes care of storing the data.
Before storing or retrieving data, ensure that the mounted location is set up properly and is readyfor storage and retrieval of files.
PACS Store and Remember(Topic number: 6941)
A PACS Store and Remember archive is an IMPAX Server computer that acts as an Archive Server,where the images are stored on a PACS archive external to the IMPAX system. Any IMPAX Servercomputer with a cache that is not currently an Archive Server can be set up as a Store and Rememberarchive. The PACS Store and Remember archive is aware of the studies that exist on the externalarchive, but is not aware of precisely where on the external archive these studies are stored. Theexternal archive takes full responsibility for permanently archiving studies.
PACS Store and Remember archiving works the same way as other archiving. You configure thearchiving based on the station, Autopilot creates STORE jobs based on the archiving settings, andstudies are retrieved using RETRIEVE jobs. A PACS Store and Remember queue is a DRIVE queuethat is managed like any other DRIVE queue in the Administration Tools.
The difference between PACS Store and Remember archiving and media-based archiving is that themvf-scu process handles the archiving, instead of a separate archive process. Also, a STORE job usesa DICOM C-STORE, and a RETRIEVE job uses a DICOM C-MOVE.
AS3000 Installation and Configuration Guide—IMPAX 6.5.3 17Agfa Company Confidential—Subject to Non-Disclosure Obligation

Single-cluster configurations(Topic number: 6916)
The components of a cluster can be distributed in various ways.
A typical institution has a Database Server, one or more Archive Servers, one or more NetworkGateways, one or more Curators, and one or more Application Servers. Clients are spread throughoutthe entire enterprise and through remote connections.
A single IMPAX cluster can service one or more healthcare facilities and, in such an environment,IMPAX can HIS verify against and access reports from multiple Connectivity Managers for multipleRIS domains.
Note:
The Archive and Archive Server are the same thing. The archive station is the archive on itsown machine. Both are part of the IMPAX cluster.
StandaloneIn a standalone configuration, AS300 Server, Application Server, and Client components are installedon the same computer. The standalone station can be used for diagnostic or non-diagnostic purposes.New installations run under Windows 7 with an Oracle for Windows database. Using VMwarePlayer, the AS300 Server and Application Server components run on Windows Server 2008 R2.
For more information, see the IMPAX 6.5.3 Standalone Installation and Configuration Guide or tothe IMPAX 6.5.3 Standalone Upgrade Guide.
Single-serverIn a new installation of a single-server configuration, all AS300 Server, Application Server, andConnectivity Manager components are installed on the same Windows computer with an Oraclefor Windows database using VMware. (Existing installations may be running a SQL Server database.)Clients are installed on other computers.
For more information, see “Installing an IMPAX AS300 single-server” (topic number 67064) in theIMPAX 6.5.3 AS300 Installation and Configuration Guide.
AS3000 Installation and Configuration Guide—IMPAX 6.5.3 18Agfa Company Confidential—Subject to Non-Disclosure Obligation

All-in-oneIn a new installation of an all-in-one server configuration, all AS300 Server and Application Servercomponents are installed on the same Windows computer with an Oracle for Windows database.(Existing installations may be running a SQL Server database.)
Single-hostIn a single-host configuration, the AS300 or AS3000 Server Database, Archive Server, and NetworkGateway components are all installed on one box or station, with the Application Servers, Clients,and Connectivity Manager each installed on separate stations.
In an AS300 single-host configuration, Curator can also be installed on the same station as the Servercomponents; however, in an AS3000 single-host configuration, Curator must be separately installed.The Curator component runs only on the Windows operating system.
AS3000 Installation and Configuration Guide—IMPAX 6.5.3 19Agfa Company Confidential—Subject to Non-Disclosure Obligation

Multi-hostIn a multi-host configuration, each Server component is installed on its own station: the DatabaseServer is installed on a separate computer from the Archive Server. The Network Gateway componentmay either be installed on yet another server, or installed along with the Database Server or ArchiveServer.
By installing the Server components onto separate stations, workflow volume is better managed andsystem performance enhanced.
Mixed-hostIn a mixed-host configuration, an AS3000 Database Server is combined with an AS300(Windows-based) Archive Server, Network Gateway, and Curator server.
Multiple IMPAX cluster configurations(Topic number: 10378)
IMPAX can optionally be run in a multiple IMPAX cluster configuration. This configuration providesa patient-centric view across hospitals within several sites. This view is delivered by extending thescope of study query, study retrieval, and data synchronization from a single hospital site to severalhospital sites that have multiple patient domains (multiple RISs) in one or more IMPAX clusters.
Central to the multiple IMPAX cluster configuration is the MVF-based data center component. Thedata center provides storage for studies through the Archive Server, as well as retrieval of the studydata. Connected to the data center are a collection of hospital groups known as entities, each with alocal PACS infrastructure. Most entities use IMPAX as their PACS system.
AS3000 Installation and Configuration Guide—IMPAX 6.5.3 20Agfa Company Confidential—Subject to Non-Disclosure Obligation

The relationship between the data center and the various clusters is characterized as a hub and spoke.The data center (hub) serves or archives data from the entities, known as spokes.
Order of cluster installations(Topic number: 7763)
The IMPAX cluster has many components and each depends on other components in the cluster.To correctly install and configure components in the cluster, follow this order of installation:
1. Install the Database Server, Archive Server, and Network Gateway.
Install the core Server components and create the portable password file required to installother IMPAX components. Do not configure the AS300 Server components at this time; theApplication Server must be installed before these Server components can be configured. Referto the guide appropriate to your configuration.
Required guide: One of IMPAX 6.5.3 AS3000 Installation and Configuration Guide or IMPAX6.5.3 AS300 Installation and Configuration Guide
2. Install the Application Server.
Install the Business Application services and IMPAX documentation on the Application Server.
Required guide: IMPAX 6.5.3 Application Server Installation, Upgrade, and Configuration Guide
3. Begin configuration of the Application Server.
Create and import an SSL certificate, configure AD LDS, compress web services, set connectionsto the image and audit servers, and set logging levels.
Required guide: IMPAX 6.5.3 Application Server Installation, Upgrade, and Configuration Guide
AS3000 Installation and Configuration Guide—IMPAX 6.5.3 21Agfa Company Confidential—Subject to Non-Disclosure Obligation

4. If you have installed a Windows-based Database Server,Archive Server, or Network Gateway,configure these components.
Configure database backups, image and web caches, and archives (if necessary).
Required guide: IMPAX 6.5.3 AS300 Installation and Configuration Guide
5. Install and configure Curator and the CD Export server.
If the site requires compressed web images, install and configure one or more Curator systemsand set up the web cache. If installing multiple Curators, install and start the master Curatorfirst, then install and start the slave Curators.
If you will be using the CD Export feature in the IMPAX Client, install the CD Export server.
Required guide: IMPAX 6.5.3 Curator and CD Export Server Installation Guide
6. Complete the configuration of the Application Server.
Complete the optional Application Server configuration tasks that are applicable to the site.
Required guide: IMPAX 6.5.3 Application Server Installation, Upgrade, and Configuration Guide
7. Install and configure Clients.
Install and configure the IMPAX Client, the PACS system used to access images.
Required guide: IMPAX 6.5.3 Client Installation, Upgrade, and Configuration Guide
If installing a standalone station (single-host AS300 with Application Server and Client), refer to theIMPAX 6.5.3 Standalone Installation and Configuration Guide.
If installing a single-server (single-host AS300 with Connectivity Manager and Application Server),refer to the IMPAX 6.5.3 AS300 Installation and Configuration Guide.
All documentation is available on the IMPAX Documentation DVD.
IMPAX AS3000 Server: Supported hardwareconfigurations(Topic number: 6689)
The four general categories of servers are:
• Single-host server—Database Server/Archive Server/Network Gateway
• Database Server hosting the Oracle database
• Archive Server or combined Archive Server/Network Gateway
• Network Gateway
Installations are possible where there are two or more Archive Servers or Network Gateways in anIMPAX cluster. Archive Servers and Network Gateways can be Solaris or Windows-based.
The hardware requirements for each of these are outlined in the sections that follow.
AS3000 Installation and Configuration Guide—IMPAX 6.5.3 22Agfa Company Confidential—Subject to Non-Disclosure Obligation

IMPAX AS3000 Server: Hardware requirements(Topic number: 6622)
We recommend the following requirements, at a minimum, for new installations of AS3000 servers.(In an upgrade scenario, certain specifications may not apply.) We also recommend using theDatabase Configurator Tool, an Excel spreadsheet that can determine the size of various Oracledatabase partitions, based on estimated or initial exam volume and anticipated growth for the nextfive years.
The Database Configurator Tool is available on Livelink (node ID 27517010) at the following location:https://livelink.agfa.net/Livelink/livelink.exe/overview/27517010. If you cannot access the tool,contact Agfa Professional Services for assistance.
RequirementsComponent
Solaris 10 8/11 (“U10”), February 2012 patch set or later, as recommended bySun. A valid support contract is required.
Validatedsystems
A valid Oracle hardware maintenance contract is required to run Solaris for morethan the 30 day grace period.
The following Sun servers can be used in any combination as required:
• New installations—T5120, T5220, T5140, T5240, T3-1, T4-1
• Upgrades—T2000, T5120, T5220, T5140, T5240, T3-1, T4-1
When planning upgrades, note all end-of-sales and end-of-support datespublished on Livelink, or contact Agfa Professional Services for assistance.
Servers must have a DVD-ROM drive present for IMPAX installation purposes.
A minimum of eight cores is mandatory.Number of cores
A minimum of 16 GB per server is mandatory.RAM
The minimum RAM for an IMPAX 6.5.3 Database Server (Oracle 11g) is 16 GB.If a global zone and one or more non-global zones are hosted on the same server,the non-global zone in which the database is installed must be allocated aminimum of 16 GB. For large sites, servers may be allocated with up to 128 GBof RAM, with no more than 64 GB of RAM assigned per dedicated database zone.
Note:
Swap size should be sufficient to support an installation of, or an upgradeto, IMPAX 6.5.3: at least 110% of the global zone’s physical RAM. If theserver does not have enough space and if you have the necessaryknowledge of Solaris, rectify this appropriately; for more details, seeIncreasing the swap size (refer to page 91); otherwise, consult your AgfaProfessional Services representative for assistance.
A minimum of three hard drives must be used.Hard drive
AS3000 Installation and Configuration Guide—IMPAX 6.5.3 23Agfa Company Confidential—Subject to Non-Disclosure Obligation

RequirementsComponent
We discourage the use of internal drives for anything other than the operatingsystem (on ZFS).
We recommend having data available on an external disk subsystem and not aninternal drive.
Required:RAID
• ZFS—Three internal disks for the operating system
• RAID 1 + 0 is mandatory for the database (along with ForceDirectIO)—Seethe partitioning recommendations (refer to page 29) in the IMPAX 6.5.3AS3000 Installation and Configuration Guide
• RAID 5 or better for image cache
Database backup is via RMAN. Refer to the IMPAX 6.5.3 Server Knowledge Basefor more details.
Database backup
Not required.Modem
Required—One per cluster is required.DVD-ROM
The AS3000 software repository can be created using ISO files or DVDs; however,installing from a repository is much faster and less error-prone than installingfrom DVD.
Not required.Floppy
Oracle SPARC 1000 Mbps NICs. A 1 gigabit network should be considered theminimum for server interconnections.
Networkinterfaces
Consider segregating network traffic to improve overall throughput.
Direct attached archives are not supported.Jukebox
UPS that meets the region's safety approval standards and the power requirementsof the machines it supports.
Other
IMPAX AS3000 Server: Database backup requirements(Topic number: 10319)
For file system backup, the following are supported:
• Back up to NFS or SAN
For tape backup (upgraded systems only, not new installations), standalone tape drives and changershave not been explicitly validated with IMPAX 6.5.3.
AS3000 Installation and Configuration Guide—IMPAX 6.5.3 24Agfa Company Confidential—Subject to Non-Disclosure Obligation

Important!
Oracle disk-to-tape backup requires that at least one backup be kept on disk.To accommodatedisk-to-tape backups of the Oracle database, ensure that you define a Flashback partition atleast three times the expected size of the database.
Operating systems disks on ZFS should be configured as ZFS mirror disks. Operating systems diskson UFS should be configured as RAID 1, preferably with hardware mirroring; however, on platformsthat do not support hardware mirroring, Solstice DiskSuite is acceptable. For more informationregarding disk management strategies, see Disk management strategies (refer to page 29).
IMPAX AS3000 Server: External storage requirements(Topic number: 10321)
For the most current and complete listing of supported storage products, refer to the IIBU SolutionPlatform Compatibility Matrix (Livelink ID 19535804). If you do not have access to this document,contact Agfa Professional Services.
When planning upgrades, note all end-of-sales and end-of-support dates published on Livelink.
HBAs supported by storage vendor and operating system
IMPAX AS3000 Server: Software requirements(Topic number: 6620)
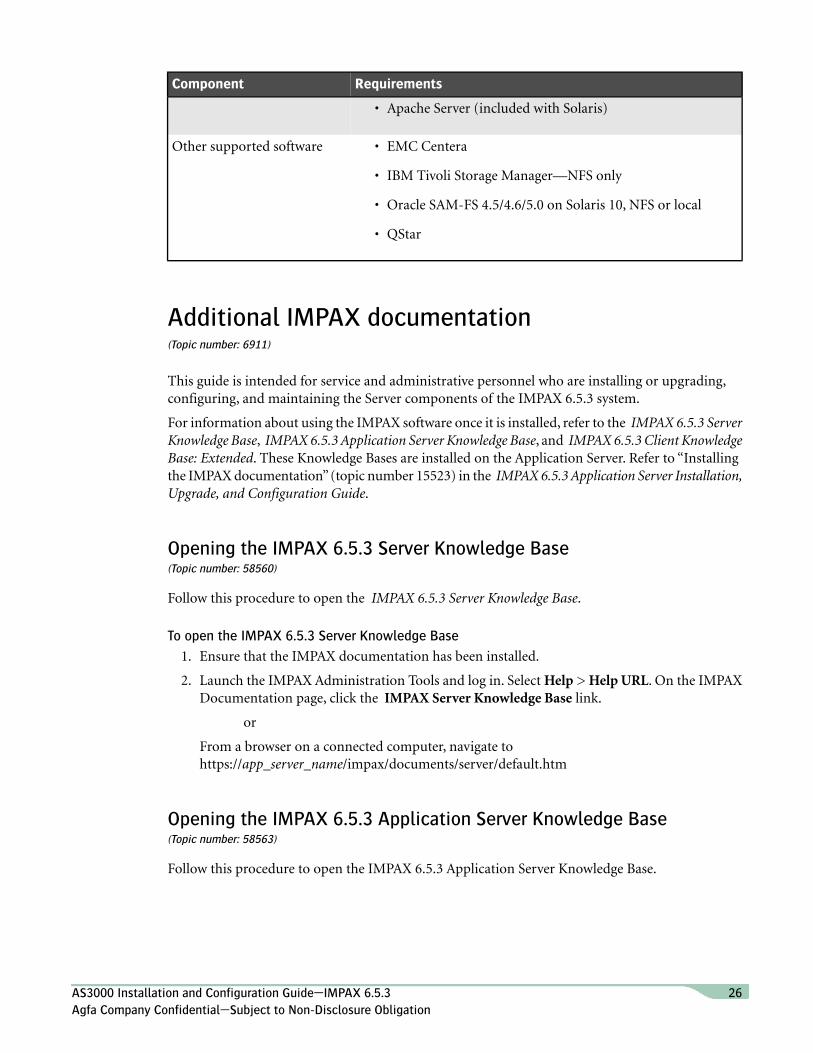
The following software is required for an IMPAX AS3000 cluster:
RequirementsComponent
Solaris™ 10 8/11 (“U10”), February 2012 patch set or later, asrecommended by Sun.
Operating system
A valid Oracle hardware maintenance contract is required to runSolaris for more than the 30 day grace period.
Oracle 11.2.0.2 (April 2011 PSU) Standard Edition One, StandardEdition, or Enterprise Edition (required for Oracle Data Guard)
Database software
(Database Server)
DataDirect Connect 6.1 ODBC drivers (automatically installed)Database software
(Network Gateway, ArchiveServer)
The latest Oracle patches should be used at installation. Refer tohttps://support.oracle.com/CSP/ui/flash.html. A valid supportcontract is required.
Patches
Other software • Java Runtime Environment 1.6.0_31 (included with Solaris)
AS3000 Installation and Configuration Guide—IMPAX 6.5.3 25Agfa Company Confidential—Subject to Non-Disclosure Obligation
RequirementsComponent
• Apache Server (included with Solaris)
Other supported software • EMC Centera
• IBM Tivoli Storage Manager—NFS only
• Oracle SAM-FS 4.5/4.6/5.0 on Solaris 10, NFS or local
• QStar
Additional IMPAX documentation(Topic number: 6911)
This guide is intended for service and administrative personnel who are installing or upgrading,configuring, and maintaining the Server components of the IMPAX 6.5.3 system.
For information about using the IMPAX software once it is installed, refer to the IMPAX 6.5.3 ServerKnowledge Base, IMPAX 6.5.3 Application Server Knowledge Base, and IMPAX 6.5.3 Client KnowledgeBase: Extended. These Knowledge Bases are installed on the Application Server. Refer to “Installingthe IMPAX documentation” (topic number 15523) in the IMPAX 6.5.3 Application Server Installation,Upgrade, and Configuration Guide.
Opening the IMPAX 6.5.3 Server Knowledge Base(Topic number: 58560)
Follow this procedure to open the IMPAX 6.5.3 Server Knowledge Base.
To open the IMPAX 6.5.3 Server Knowledge Base
1. Ensure that the IMPAX documentation has been installed.
2. Launch the IMPAX Administration Tools and log in. Select Help > Help URL. On the IMPAXDocumentation page, click the IMPAX Server Knowledge Base link.
or
From a browser on a connected computer, navigate tohttps://app_server_name/impax/documents/server/default.htm
Opening the IMPAX 6.5.3 Application Server Knowledge Base(Topic number: 58563)
Follow this procedure to open the IMPAX 6.5.3 Application Server Knowledge Base.
AS3000 Installation and Configuration Guide—IMPAX 6.5.3 26Agfa Company Confidential—Subject to Non-Disclosure Obligation

To open the IMPAX 6.5.3 Application Server Knowledge Base
1. Ensure that the IMPAX documentation has been installed.
2. On the Application Server, double-click the AGFA IMPAX Knowledge Base desktop shortcut.Select the IMPAX Application Server Knowledge Base link.
or
From a browser on a connected computer, navigate tohttps://app_server_name/impax/documents/appserver/default.htm
Opening the IMPAX 6.5.3 Client Knowledge Base: Extended(Topic number: 58566)
Follow this procedure to open the IMPAX 6.5.3 Client Knowledge Base: Extended.
To open the IMPAX 6.5.3 Client Knowledge Base: Extended
1. Ensure that the IMPAX documentation has been installed.
2. Launch the IMPAX Client application and log in.
3. Press F1.
AS3000 Installation and Configuration Guide—IMPAX 6.5.3 27Agfa Company Confidential—Subject to Non-Disclosure Obligation

2Setting up aSolaris server
Many of the same steps are required when deploying a Solaris server for IMPAX, regardless of whetherit is to become a single-host server, a Database Server, an Archive Server, or a Network Gateway.
Important!
Installing IMPAX 6.5.3 alongside IMPAX Data Center 2.0 or later on the same machine is nota supported configuration at this time.
Physically setting up a Solaris server(Topic number: 6931)
1.
For details on setting up the hardware, or powering up a new Solaris station, refer to Sun’sinstructions, or see the SPARC Enterprise Server Installation Guides which can be found on theMain IMPAX Knowledge Base Page in the Additional documents section, or contact Agfa ProfessionalServices.
Connecting the UPS(Topic number: 6997)
2.
Each component must be plugged into a UPS. In the event of a system failure or power surge, theUPS protects your system from data corruption.
To connect the UPS
1. Follow the manufacturer’s instructions on installing the UPS and associated software.
AS3000 Installation and Configuration Guide—IMPAX 6.5.3 28Agfa Company Confidential—Subject to Non-Disclosure Obligation

2. If using a whole-room UPS, you can also install a customer-provided shutdown agent. Followthe installation instructions provided with the shutdown agent to install it.
Installing Solaris 10(Topic number: 13038)
3.
If the Solaris 10 operating system is not already installed and configured, complete this procedurenow, by following the Solaris instructions and installing the latest Solaris 10 patches recommendedby Oracle. The required version is Solaris 10 8/11 ("U10"), February 2012 patch set or above. Partitionthe local disks as recommended (refer to page 29).
When selecting the Solaris Software Group, select Entire Group Plus OEM (SUNWCXall). Thiscontains the packages for the Entire Solaris Software Group plus additional hardware drivers,including drivers for hardware not on the system at the time of installation.
Note:
Mirror the root disk using Sun's RAID hardware utility, raidctl. For information on how to usethis utility, or on how to build volumes and mirror the root disk, contact Agfa ProfessionalServices.You can also refer to the SPARC Enterprise Server Installation Guides which canbe found on the Main IMPAX Knowledge Base Page in the Additional documents section.
Disk management strategies(Topic number: 103117)
4.
Disk management strategies allow you to optimize performance by partitioning and configuringdisks appropriately, or by separating the busy parts of the database from each other, assigning themto physically separate drives or volumes. Partition IMPAX disks and database drives as described inPartitioning and configuring local disks (refer to page 29), Partitioning recommendations for thedatabase file systems (refer to page 30), and Recommended disk partitions for image and web caches(refer to page 45).
For information on upgrading Solaris for IMPAX, refer to the Agfa Solaris Live Upgrade Guide, whichcan be found on the Main IMPAX Knowledge Base Page in the Additional documents section, orcontact Agfa Professional Services.
Partitioning and configuring local disks(Topic number: 6938)
This topic describes how to partition 146 GB disk arrays on IMPAX 6.5.3 AS3000 stations. It appliesonly to UFS file systems. If using ZFS root disks, use one zpool with no quotas.
AS3000 Installation and Configuration Guide—IMPAX 6.5.3 29Agfa Company Confidential—Subject to Non-Disclosure Obligation
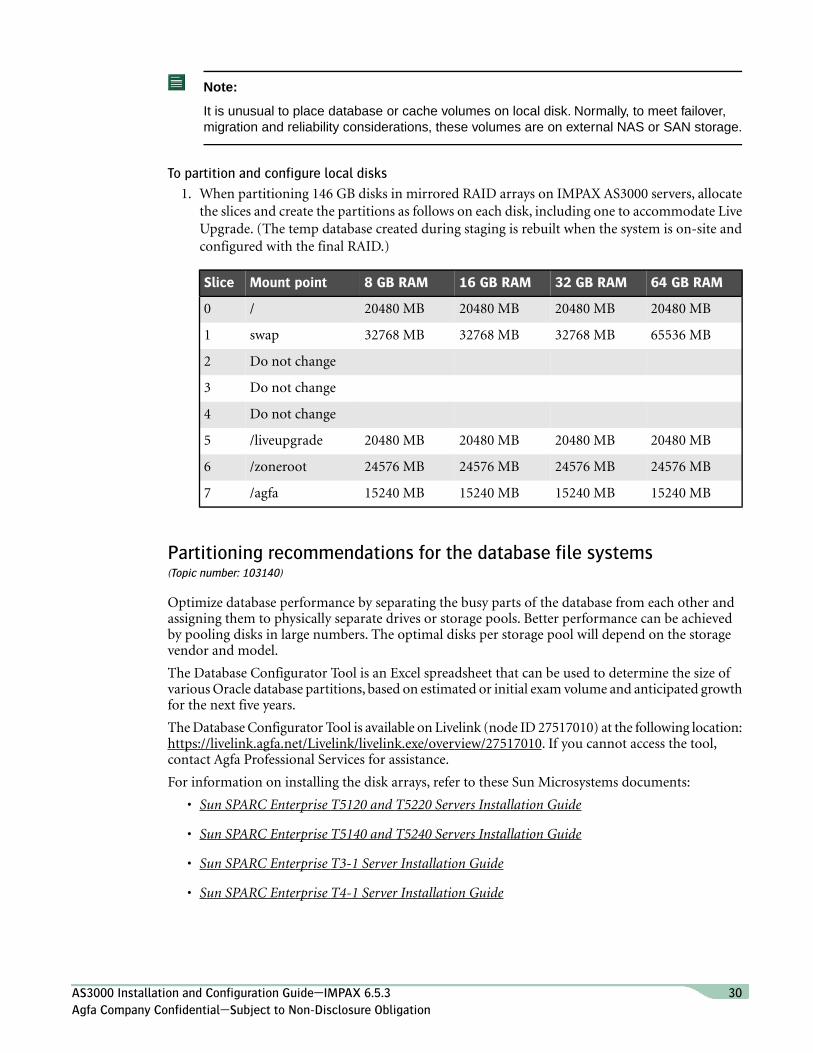
Note:
It is unusual to place database or cache volumes on local disk. Normally, to meet failover,migration and reliability considerations, these volumes are on external NAS or SAN storage.
To partition and configure local disks
1. When partitioning 146 GB disks in mirrored RAID arrays on IMPAX AS3000 servers, allocatethe slices and create the partitions as follows on each disk, including one to accommodate LiveUpgrade. (The temp database created during staging is rebuilt when the system is on-site andconfigured with the final RAID.)
64 GB RAM32 GB RAM16 GB RAM8 GB RAMMount pointSlice
20480 MB20480 MB20480 MB20480 MB/0
65536 MB32768 MB32768 MB32768 MBswap1
Do not change2
Do not change3
Do not change4
20480 MB20480 MB20480 MB20480 MB/liveupgrade5
24576 MB24576 MB24576 MB24576 MB/zoneroot6
15240 MB15240 MB15240 MB15240 MB/agfa7
Partitioning recommendations for the database file systems(Topic number: 103140)
Optimize database performance by separating the busy parts of the database from each other andassigning them to physically separate drives or storage pools. Better performance can be achievedby pooling disks in large numbers. The optimal disks per storage pool will depend on the storagevendor and model.
The Database Configurator Tool is an Excel spreadsheet that can be used to determine the size ofvarious Oracle database partitions, based on estimated or initial exam volume and anticipated growthfor the next five years.
The Database Configurator Tool is available on Livelink (node ID 27517010) at the following location:https://livelink.agfa.net/Livelink/livelink.exe/overview/27517010. If you cannot access the tool,contact Agfa Professional Services for assistance.
For information on installing the disk arrays, refer to these Sun Microsystems documents:
• Sun SPARC Enterprise T5120 and T5220 Servers Installation Guide
• Sun SPARC Enterprise T5140 and T5240 Servers Installation Guide
• Sun SPARC Enterprise T3-1 Server Installation Guide
• Sun SPARC Enterprise T4-1 Server Installation Guide
AS3000 Installation and Configuration Guide—IMPAX 6.5.3 30Agfa Company Confidential—Subject to Non-Disclosure Obligation
• Sun SPARC Enterprise M4000/M5000 Servers Installation Guide
Backup scenariosDetermine your site's backup scenario and then follow the applicable recommendations whenpartitioning the IMPAX database drives. The following four scenarios are defined further:
• Full backup on non-Data Guard system
• Full backup on Data Guard system
• Incremental backup on non-Data Guard system
• Incremental backup on Data Guard system
Each scenario is similar with differences between Data Guard and non-Data Guard systems, andbetween full and incremental backups:
• Data Guard vs. non-Data Guard systems—in non-Data Guard systems, the archive logs arelocated in /dbase/arch. In Data Guard systems they are located in the flashback recovery area/flashback/db_recovery_area/MVFn/archivelog. There is an additional need for flashback logsin Data Guard systems.
• Full vs. incremental backups—an incremental backup stores a level-0 image copy in the datafilesubdirectory in the Flashback Recovery Area; with a full backup, the datafile subdirectory isnot used at all.
Determining whether to use a full or incremental backupA full backup creates a full copy of the database, including all data, control, and parameter files. Anincremental backup, on the other hand, starts with a level-0 backup (which is essentially a full backup)of the database, the first time a backup is done. Then, on subsequent runs, a level-1 differentialbackup is done and only the blocks that have changed since the level-0 backup are copied.
Because the entire database is copied during a full backup, it usually takes longer than an incrementalbackup where only changed blocks are copied. However, during a recovery scenario, it is usuallyquicker to recover with a full backup since it contains everything required. With incremental backups,RMAN needs to first restore the level-0 backup, then each subsequent level-1 backup, one afteranother.
Another difference that should be considered is the disk requirements for each backup type. SinceRMAN needs to determine which blocks have changed and which to back up, incremental backupshave a stricter disk requirement compared to full backups. This ensures that the nightly backup isable to complete within a reasonable time frame. A backup that takes too long to complete will likelycause performance problems elsewhere in IMPAX.
Secondary backupsWe recommend that some form of secondary backup be available.A secondary backup is a mechanismthat will copy the Flash Recovery Area to another location; for example, a third-party enterprisebackup solution. In the event that there is a problem with the Flash Recovery Area itself, this providesanother copy of the database backup to recover from. Oracle Data Guard can also be considered asecondary backup since the standby server is located on another machine.
Be aware of the increased Flash Recovery Area space needed when a secondary backup mechanismis absent. IMPAX requires the following minimum number of backups:
AS3000 Installation and Configuration Guide—IMPAX 6.5.3 31Agfa Company Confidential—Subject to Non-Disclosure Obligation

Incremental backupFull backup
1 copy of level-0Minimum 1 copy ofbackup
With secondary backup
2 copies of level-0Minimum 2 copies ofbackup
Without secondary backup
Full backup on non-Data Guard system
Disk requirementsFile system
RAID 10 on separate volume/mount on FC (FibreChannel) or SAS (serial attached SCSI) drives,15K RPM or better preferred
/dbase/system
• system tablespace
• temp tablespace
• control file 1
RAID 10 on separate volume/mount on FC orSAS drives, 15K RPM or better preferred
/dbase/redo
(optional for four-volume configuration—infour-volume configuration this would be in/dbase/system)
• redo logs
RAID 10 on separate volume/mount on FC orSAS drives, 15K RPM or better preferred
/dbase/rbs
(optional for four-volume configuration—infour-volume configuration this would be in/dbase/system)
• undo tablespace
RAID 10 on separate volume/mount on FC orSAS drives, 15K RPM or better preferred
/dbase/data1
• data1 (volatile data)
• data2 (static data)
• control file 3
RAID 10 on separate volume/mount on FC orSAS drives, 15K RPM or better preferred
/dbase/index1
• index 1 (volatile indexes)
• index 2 (static indexes)
• control file 2
RAID 10 on separate volume/mount on FC orSAS drives, 15K RPM or better preferred
/dbase/arch
• archived transaction logs
AS3000 Installation and Configuration Guide—IMPAX 6.5.3 32Agfa Company Confidential—Subject to Non-Disclosure Obligation
Disk requirementsFile system
This needs to be the fastest possible disk as it isthe most important one, performance-wise
Not used in this configuration/flashback/db_recovery_area/MVF/archivelog
Not used in this configuration/flashback/db_recovery_area/MVF/flashback
RAID 5 or better on SATA drives or better(minimum three drives)
/flashback/db_recovery_area/MVF/autobackup
• auto backup of control files and spfile
RAID 5 or better on SATA drives or better(minimum three drives)
/flashback/db_recovery_area/MVF/backupset
• RMAN backup
One or two drives per arrayHot spares
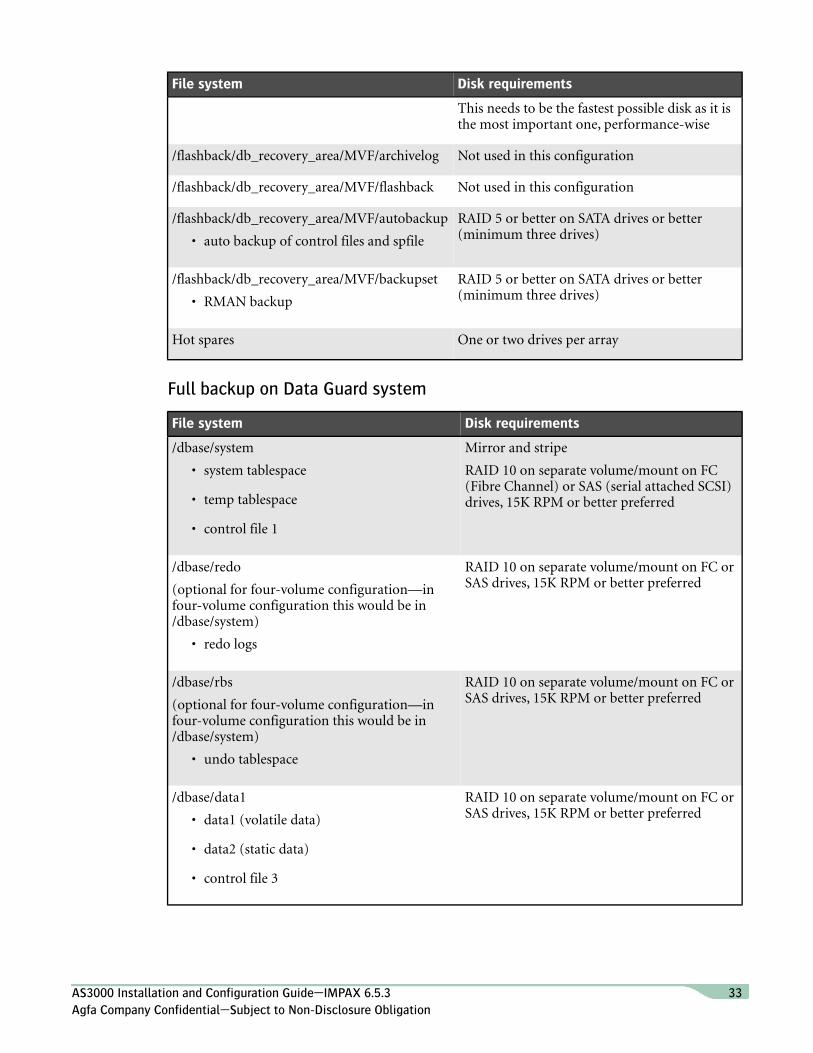
Full backup on Data Guard system
Disk requirementsFile system
Mirror and stripe/dbase/system
RAID 10 on separate volume/mount on FC(Fibre Channel) or SAS (serial attached SCSI)drives, 15K RPM or better preferred
• system tablespace
• temp tablespace
• control file 1
RAID 10 on separate volume/mount on FC orSAS drives, 15K RPM or better preferred
/dbase/redo
(optional for four-volume configuration—infour-volume configuration this would be in/dbase/system)
• redo logs
RAID 10 on separate volume/mount on FC orSAS drives, 15K RPM or better preferred
/dbase/rbs
(optional for four-volume configuration—infour-volume configuration this would be in/dbase/system)
• undo tablespace
RAID 10 on separate volume/mount on FC orSAS drives, 15K RPM or better preferred
/dbase/data1
• data1 (volatile data)
• data2 (static data)
• control file 3
AS3000 Installation and Configuration Guide—IMPAX 6.5.3 33Agfa Company Confidential—Subject to Non-Disclosure Obligation

Disk requirementsFile system
RAID 10 on separate volume/mount on FC orSAS drives, 15K RPM or better preferred
/dbase/index1
• index 1 (volatile indexes)
• index 2 (static indexes)
• control file 2
Not used in this configuration/dbase/arch
RAID 10 on separate volume/mount on FC orSAS drives, 15K RPM or better preferred
/flashback/db_recovery_area/MVFn1/archivelog
• archive logsThis needs to be the fastest possible disk as it isthe most important one, performance-wise
RAID 10 on separate volume/mount on FC orSAS drives, 15K RPM or better preferred
/flashback/db_recovery_area/MVFn/flashback
• flashback logs
RAID 5 on SATA drives or better (minimumthree drives)
/flashback/db_recovery_area/MVFn/autobackup
• auto backup of control files and spfile
RAID 5 on SATA drives or better (minimumthree drives)
/flashback/db_recovery_area/MVFn/backupset
• RMAN backup
One or two drives per arrayHot spares
1 where MVFn is either MVF1 (primary) or MVF2 (standby).
Incremental backup on non-Data Guard system
Disk requirementsFile system
RAID 10 on separate volume/mount on FC (FibreChannel) or SAS (serial attached SCSI) drives,15K RPM or better preferred
/dbase/system
• system tablespace
• temp tablespace
• control file 1
RAID 10 on separate volume/mount on FC orSAS drives, 15K RPM or better preferred
/dbase/redo
(optional for four-volume configuration—infour-volume configuration this would be in/dbase/system)
• redo logs
AS3000 Installation and Configuration Guide—IMPAX 6.5.3 34Agfa Company Confidential—Subject to Non-Disclosure Obligation
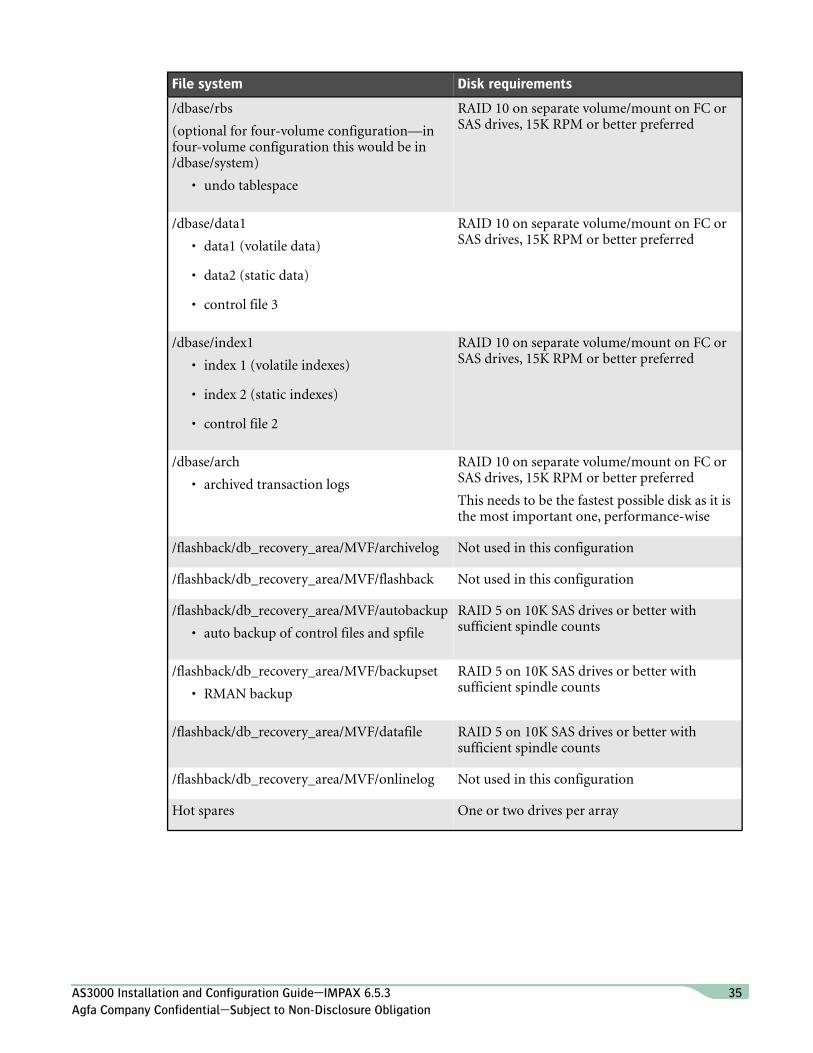
Disk requirementsFile system
RAID 10 on separate volume/mount on FC orSAS drives, 15K RPM or better preferred
/dbase/rbs
(optional for four-volume configuration—infour-volume configuration this would be in/dbase/system)
• undo tablespace
RAID 10 on separate volume/mount on FC orSAS drives, 15K RPM or better preferred
/dbase/data1
• data1 (volatile data)
• data2 (static data)
• control file 3
RAID 10 on separate volume/mount on FC orSAS drives, 15K RPM or better preferred
/dbase/index1
• index 1 (volatile indexes)
• index 2 (static indexes)
• control file 2
RAID 10 on separate volume/mount on FC orSAS drives, 15K RPM or better preferred
/dbase/arch
• archived transaction logsThis needs to be the fastest possible disk as it isthe most important one, performance-wise
Not used in this configuration/flashback/db_recovery_area/MVF/archivelog
Not used in this configuration/flashback/db_recovery_area/MVF/flashback
RAID 5 on 10K SAS drives or better withsufficient spindle counts
/flashback/db_recovery_area/MVF/autobackup
• auto backup of control files and spfile
RAID 5 on 10K SAS drives or better withsufficient spindle counts
/flashback/db_recovery_area/MVF/backupset
• RMAN backup
RAID 5 on 10K SAS drives or better withsufficient spindle counts
/flashback/db_recovery_area/MVF/datafile
Not used in this configuration/flashback/db_recovery_area/MVF/onlinelog
One or two drives per arrayHot spares
AS3000 Installation and Configuration Guide—IMPAX 6.5.3 35Agfa Company Confidential—Subject to Non-Disclosure Obligation

Incremental backup on Data Guard system
Disk requirementsFile system
RAID 10 on separate volume/mount on FC(Fibre Channel) or SAS (serial attached SCSI)drives, 15K RPM or better preferred
/dbase/system
• system tablespace
• temp tablespace
• control file 1
RAID 10 on separate volume/mount on FC orSAS drives, 15K RPM or better preferred
/dbase/redo
(optional for four-volume configuration—infour-volume configuration this would be in/dbase/system)
• redo logs
RAID 10 on separate volume/mount on FC orSAS drives, 15K RPM or better preferred
/dbase/rbs
(optional for four-volume configuration—infour-volume configuration this would be in/dbase/system)
• undo tablespace
RAID 10 on separate volume/mount on FC orSAS drives, 15K RPM or better preferred
/dbase/data1
• data1 (volatile data)
• data2 (static data)
• control file 3
RAID 10 on separate volume/mount on FC orSAS drives, 15K RPM or better preferred
/dbase/index1
• index 1 (volatile indexes)
• index 2 (static indexes)
• control file 2
Not used in this configuration/dbase/arch
RAID 10 on separate volume/mount on FC orSAS drives, 15K RPM or better preferred
/flashback/db_recovery_area/MVFn1/archivelog
• archive logsThis needs to be the fastest possible disk as it isthe most important one, performance-wise
RAID 10 on separate volume/mount on FC orSAS drives, 15K RPM or better preferred
/flashback/db_recovery_area/MVFn/flashback
• flashback logs
AS3000 Installation and Configuration Guide—IMPAX 6.5.3 36Agfa Company Confidential—Subject to Non-Disclosure Obligation

Disk requirementsFile system
RAID 5 on 10K SAS drives or better withsufficient spindle counts
/flashback/db_recovery_area/MVFn/autobackup
• auto backup of control files and spfile
RAID 5 on 10K SAS drives or better withsufficient spindle counts
/flashback/db_recovery_area/MVFn/backupset
• RMAN backup
RAID 5 on 10K SAS drives or better withsufficient spindle counts
/flashback/db_recovery_area/MVFn/datafile
Not used in this configuration/flashback/db_recovery_area/MVFn/onlinelog
One or two drives per arrayHot spares
1 where MVFn is either MVF1 (primary) or MVF2 (standby).
Note:
To ensure component compatibility, follow the support matrix provided by the SAN vendor.This compatibility should include HBAs (host bus adapters), HBA Firmware, HBA Fcode, SANSwitch firmware, and storage enclosure operating system level.
Archive logs and flashback logs: Sizing and disk typesThe amount of space required to store these two types of files depends on the amount of databaseactivity; therefore, it is often difficult to size them. The Database Configurator Tool provides a generalguideline based on the estimated number of images per year but the numbers might need to bealtered depending on the site. In the event of a backup failure, the archive logs are not cleaned upand, if the archive log location is completely full, Oracle will come to a halt.
The use of RAID 10 on FC or 15K RPM SAS drives for the mounts specified in the preceding scenariosis necessary to optimize performance. However, most storage vendors and manufacturers now supplySAS drives in a wide range of speeds and capacities. 15K RPM SAS drives or better are preferred forthose database volumes requiring RAID 10 for performance. It is also necessary to have enoughspindles to spread the workload and achieve sufficient IOPS (input/output operations per second)for the optimal performance of the Oracle database. Make sure that large, slow disks (like 1- or 2-TB7.2K SAS disks) are not utilized for these database volumes. The preference is to use 15K RPM drivesor better for the RAID 10 volumes.
Disk volumes versus disk slicesWhen setting up disk mounts for a new system, it is important to consider the performanceimplications of using disk slices vs. disk volumes. In the following example, each subdirectory in/dbase is mounted to a different slice on the same disk. When mounts are set up this way, huge IObottlenecks are the result as each mount point is pointing to the exact same disk, and the IOPS islimited to that of a single volume. This is no different, performance-wise, than having the entire/dbase directory running off of a single mount point.
# bad example, do not use!
/dev/dsk/c4t6001438002A5405B0000C0000B3B0000d0s3
AS3000 Installation and Configuration Guide—IMPAX 6.5.3 37Agfa Company Confidential—Subject to Non-Disclosure Obligation

/dev/rdsk/c4t6001438002A5405B0000C0000B3B0000d0s3 /dbase/data1 ufs 1 yes
forcedirectio
/dev/dsk/c4t6001438002A5405B0000C0000B3B0000d0s4
/dev/rdsk/c4t6001438002A5405B0000C0000B3B0000d0s4 /dbase/index1 ufs 1 yes
forcedirectio
/dev/dsk/c4t6001438002A5405B0000C0000B3B0000d0s5
/dev/rdsk/c4t6001438002A5405B0000C0000B3B0000d0s5 /dbase/rbs ufs 1 yes
forcedirectio
/dev/dsk/c4t6001438002A5405B0000C0000B3B0000d0s6
/dev/rdsk/c4t6001438002A5405B0000C0000B3B0000d0s6 /dbase/redo ufs 1 yes
forcedirectio
/dev/dsk/c4t6001438002A5405B0000C0000B3B0000d0s7
/dev/rdsk/c4t6001438002A5405B0000C0000B3B0000d0s7 /dbase/system ufs 1 yes
forcedirectio
Instead, as in the following example, you should use a different volume for each mount point, sothat each mount point is pointing to a completely different disk label. This disk partitioning setupaligns with the practice of separating IO workloads for each database partition, and thus separatingdisks and spindle sets for each workload.
# this is a better example
/dev/dsk/c7t6005076307FFC2080000000000001602d0s7
/dev/rdsk/c7t6005076307FFC2080000000000001602d0s7 /dbase/redo ufs 2 yes
forcedirectio
/dev/dsk/c7t6005076307FFC2080000000000001700d0s7
/dev/rdsk/c7t6005076307FFC2080000000000001700d0s7 /dbase/index1 ufs 2 yes
forcedirectio
/dev/dsk/c7t6005076307FFC2080000000000001601d0s7
/dev/rdsk/c7t6005076307FFC2080000000000001601d0s7 /dbase/system ufs 2 yes
forcedirectio
/dev/dsk/c7t6005076307FFC2080000000000001600d0s7
/dev/rdsk/c7t6005076307FFC2080000000000001600d0s7 /dbase/data1 ufs 2 yes
forcedirectio
/dev/dsk/c7t6005076307FFC2080000000000001603d0s7
/dev/rdsk/c7t6005076307FFC2080000000000001603d0s7 /dbase/rbs ufs 2 yes
forcedirectio
CAUTION!
When NFS is used for backups, the network infrastructure must be able to handle the additionaltraffic caused by RMAN backups, especially at larger sites where backups could take manyhours to complete. In some cases, the backup can completely saturate the network causingother parts of IMPAX to slow down. Because of this, direct attached storage or SAN is generallypreferred for use with the Oracle database.
Flash Recovery Area(Topic number: 134443)
After installing Solaris, lay out the file systems for /flashback and /dbase and plan for the variousmounts.
AS3000 Installation and Configuration Guide—IMPAX 6.5.3 38Agfa Company Confidential—Subject to Non-Disclosure Obligation

The flashback directory houses all of the database recovery information including backups, controlfile autobackups, and datafile copies, if applicable. In an Oracle Data Guard implementation, theflashback directory also houses the archived logs and flashback logs in addition to the other databaserecovery information.
In addition to the unified storage location of the recovery-related files, the Flash Recovery Area alsomanages the disk space allocated for recovery files. This management has two components:
1. RMAN configuration that manages the number of complete backups retained within the FlashRecovery Area:
• In IMPAX with Oracle Data Guard, these backups are retained in/flashback/db_recovery_area/MVF1/backupset or/flashback/db_recovery_area/MVF2/backupset.
• In IMPAX without Oracle Data Guard, these backups are retained in/flashback/db_recovery_area/MVF/backupset.
2. Oracle flashback management of the amount of disk space used by all the recovery-related filesin the mount. To use this component, the Flash Recovery Area has to be defined as an operatingsystem directory. A number of server parameters control the Flash Recovery Area, including:
• db_recovery_file_dest—Defines the directory to store the flashback data to (but can beused for archived redo logs and backups as well).
• db_recovery_file_dest_size—Defines the maximum size of the directory, including thesize of any subdirectories that are symbolic links. The Oracle kernel manages the deletionof files no longer required (for example, due to a retention policy).
For more information on locating RMAN backups, see “Determining database backup needs foryour site” (topic number 104914) in the IMPAX 6.5.3 Server Knowledge Base.
Laying out /flashback (single flashback volume configuration)(Topic number: 119984)
This configuration includes the /flashback mounted file system. Use the Database Configurator Toolto determine the optimal size.
The Database Configurator Tool is available on Livelink (node ID 27517010) at the following location:https://livelink.agfa.net/Livelink/livelink.exe/overview/27517010. If you cannot access the tool,contact Agfa Professional Services for assistance.
To lay out /flashback (single flashback volume configuration)
1. Set up the file systems as described in Partitioning recommendations for the database file systems(refer to page 30) and mount /flashback.
2. Add entries into /etc/vfstab for /flashback.
For example:
# sample /etc/vfstab extract (for attached SAN Storage)# The database Data files mounts (RAID 10 FC or SAS)/dev/dsk/emcpower5h /dev/rdsk/emcpower5h /dbase/data1 ufs 2 yes
AS3000 Installation and Configuration Guide—IMPAX 6.5.3 39Agfa Company Confidential—Subject to Non-Disclosure Obligation

nologging,forcedirectio/dev/dsk/emcpower0h /dev/rdsk/emcpower0h /dbase/index1 ufs 2 yes nologging,forcedirectio/dev/dsk/emcpower3h /dev/rdsk/emcpower3h /dbase/system ufs 2 yes nologging,forcedirectio/dev/dsk/emcpower4h /dev/rdsk/emcpower4h /dbase/redo ufs 2 yes nologging,forcedirectio/dev/dsk/emcpower1h /dev/rdsk/emcpower1h /dbase/rbs ufs 2 yes nologging,forcedirectio/dev/dsk/emcpower2h /dev/rdsk/emcpower2h /dbase/arch ufs 2 yes nologging,forcedirectio
## Mount option for /flashback on RAID 10 FC or SAS – same type as all of the /dbase above./dev/dsk/c7t6003000d0s0 /dev/rdsk/c7t6003000d0s0 /flashback ufs2 yes nologging,forcedirectio
## /flashback/db_recovery_area on RAID 5 SATA over NFS# Note: Oracle backup over NFS is only recommended for small to small-medium sites as NFS # mount is not as performant as attached SAN storage
# For NFS we still want a small LUN mounted directly at /flashback# this is to prevent problems with Oracle filling up the root partition # if there is a problem with NFS mount. /dev/dsk/c7t6003000d0s0 /dev/rdsk/c7t6003000d0s0 /flashback ufs2 yes nologging,forcedirectio
# We will then mount NFS under /flashback10.101.44.72:/vol/Ora_backup - /flashback/db_recovery_area nfs - yes rsize=32768,wsize=32768,hard,intr,largefiles,vers=3,proto=tcp
3. To mount /flashback/db_recovery_area, type
mkdir /flashback
mkdir /flashback/db_recovery_area
mount /flashback
mount /flashback/db_recovery_area (if using NFS)
4. During the database installation, set the following parameters for the space in /flashback:
db_recovery_file_dest = /flashback
db_recovery_file_dest_size = size_of_/flashback_file_system
where size_of_/flashback_file_system is the size of /flashback or /flashback/db_recovery_area(if using NFS).
5. After the installation, verify that /flashback and /flashback/db_recovery_area are owned byoracle:dba. If necessary, to change the owner, type
chown –R oracle:dba /flashback
AS3000 Installation and Configuration Guide—IMPAX 6.5.3 40Agfa Company Confidential—Subject to Non-Disclosure Obligation

Laying out /flashback (multiple flashback volumes for Oracle Data Guard, separatevolumes for backups, archive logs, and flashback logs configuration)(Topic number: 119997)
This configuration includes three specific mounted file systems: for backups, flashback logs, andarchive logs. Subdirectories are created inside these file systems and symbolic links are created topoint to these directories.
Disk systemFile system
RAID 5 on SATA drives or better. Incremental backup requires10K SAS drives or better with sufficient spindle counts.
/ora_db_recovery_area (NFS)
or
/flashback (SAN)
RAID 10 FC or SAS disk systems, 15K RPM or better preferred./ora_arch
RAID 10 FC or SAS disk systems, 15K RPM or better preferred./ora_flashbacklog
To lay out /flashback (multiple flashback volumes configuration)
1. Set up the file systems as described in Partitioning recommendations for the database file systems(refer to page 30) and mount all three of the flashback file systems noted previously.
2. Add entries into /etc/vfstab for all of the file systems.
For example:
# sample /etc/vfstab extract (for attached SAN Storage)# The database Data files mounts (RAID 10 FC or SAS)/dev/dsk/emcpower5h /dev/rdsk/emcpower5h /dbase/data1 ufs 2 yes nologging,forcedirectio/dev/dsk/emcpower0h /dev/rdsk/emcpower0h /dbase/index1 ufs 2 yes nologging,forcedirectio/dev/dsk/emcpower3h /dev/rdsk/emcpower3h /dbase/system ufs 2 yes nologging,forcedirectio/dev/dsk/emcpower4h /dev/rdsk/emcpower4h /dbase/redo ufs 2 yes nologging,forcedirectio/dev/dsk/emcpower1h /dev/rdsk/emcpower1h /dbase/rbs ufs 2 yes nologging,forcedirectio
## /ora_arch, /ora_flashbacklog on RAID 10 FC or SAS - same type as all of the /dbase above.#/dev/dsk/c7t6001604d0s7 /dev/rdsk/c7t6001604d0s7 /ora_arch ufs 2 yes nologging,forcedirectio/dev/dsk/c7t6001604d0s6 /dev/rdsk/c7t6001604d0s6 /ora_flashbacklog ufs 2 yes nologging,forcedirectio
## /ora_backup on RAID 5 SATA#/dev/dsk/c7t6003000d0s0 /dev/rdsk/c7t6003000d0s0 /flashback ufs2 yes nologging,forcedirectio
AS3000 Installation and Configuration Guide—IMPAX 6.5.3 41Agfa Company Confidential—Subject to Non-Disclosure Obligation

3. To mount the flashback file systems, type
mkdir /flashback
mkdir /ora_arch
mkdir /ora_flashbacklog
mount /flashback
mount /ora_arch
mount /ora_flashbacklog
4. We recommend that you now install IMPAX and let the IMPAX installer create the correctdirectory structure, directory name, and permissions. During the database installation, set thefollowing parameters for the space in /flashback:
db_recovery_file_dest = /flashback
db_recovery_file_dest_size = size_of_/flashback_file_system
where size_of_/flashback_file_system is the size of /flashback mount + /ora_arch +/ora_flashbacklog.
5. After IMPAX is installed, configure Oracle Data Guard. Verify that the directory tree has beencreated under /flashback.
6. Stop IMPAX and Oracle.
7. Move all files (including subdirectories) in /flashback/db_recovery_area/MVFn/archivelog to/ora_arch
where MVFn is either MVF1 or MVF2.
8. Move all files (including subdirectories) in /db_recovery_area/MVFn/flashback to/ora_flashbacklog.
9. Create symbolic links in /flashback/db_recovery_area/MVFn pointing to ora_arch andora_flashbacklog. Type
ln –s /ora_arch /flashback/db_recovery_area/MVFn/archivelog
ln –s /ora_flashbacklog /flashback/db_recovery_area/MVFn/flashback
10. Verify that the entire /flashback directory and its subdirectories are owned by oracle:dba. Also,verify that /ora_arch and /ora_flashbacklog are owned by oracle:dba. If necessary, to changethe owner, type
chown –R oracle:dba /flashback
chown –R oracle:dba /ora_arch
chown –R oracle:dba /ora_flashbacklog
AS3000 Installation and Configuration Guide—IMPAX 6.5.3 42Agfa Company Confidential—Subject to Non-Disclosure Obligation

To mount the file systems directly at /flashback/db_recovery_area (with NFS)
Note:
Oracle backup over NFS is recommended only for small to small/medium sites since NFSmounts generally do not perform as well as attached SAN storage. When using NFS, ensurethat the network infrastructure allows the backup to complete in a reasonable time frame anddoes not affect network usage for other parts of IMPAX.
1. Set up the file systems as described in Partitioning recommendations for the database file systems(refer to page 30) and mount all three of the flashback file systems noted previously.
2. Add entries into /etc/vfstab for all the file systems.
For example:
# sample /etc/vfstab extract (for NFS to NAS Storage)# The database Data files mounts (RAID 10 FC or SAS)
10.101.44.7:/vol_data1 - /dbase/data1 nfs - yes
forcedirectio,rsize=32768,wsize=32768,hard,intr,largefiles,vers=3,proto=tcp
10.101.44.39:/vol_index1 - /dbase/index1 nfs - yes
forcedirectio,rsize=32768,wsize=32768,hard,intr,largefiles,vers=3,proto=tcp
10.101.44.41:/vol_system - /dbase/system nfs - yes
forcedirectio,rsize=32768,wsize=32768,hard,intr,largefiles,vers=3,proto=tcp
10.101.44.42:/vol_rbs - /dbase/rbs nfs - yes
forcedirectio,rsize=32768,wsize=32768,hard,intr,largefiles,vers=3,proto=tcp
10.101.44.8:/vol_redo - /dbase/redo nfs – yes
forcedirectio,rsize=32768,wsize=32768,hard,intr,largefiles,vers=3,proto=tcp
# /vol_logs on RAID 10 FC or SAS – same type as all of the /dbase above.
10.101.44.41:/vol_logs/arch - /ora_arch nfs – yes
forcedirectio,rsize=32768,wsize=32768,hard,intr,largefiles,vers=3,proto=tcp
10.101.44.41:/vol_logs/flashbacklog - /ora_flashbacklog nfs – yes
forcedirectio,rsize=32768,wsize=32768,hard,intr,largefiles,vers=3,proto=tcp
# /ora_db_recovery_area on RAID 5 SATA#
# For NFS we still want a LUN mounted directly at /flashback# this is to prevent problems with Oracle filling up the root partition # if there is a problem with NFS mount and to prevent problems if # NFS mount runs out of space. Also
AS3000 Installation and Configuration Guide—IMPAX 6.5.3 43Agfa Company Confidential—Subject to Non-Disclosure Obligation

/dev/dsk/c7t6003000d0s0 /dev/rdsk/c7t6003000d0s0 /flashback ufs2 yes nologging,forcedirectio
# this mount is for the db_recovery_area subdirectory under /flashback10.101.44.72:/vol_ db_recovery_area - /ora_ db_recovery_area nfs – yes rsize=32768,wsize=32768,hard,intr,largefiles,vers=3,proto=tcp
3. To mount the flashback file systems, type
mkdir /flashback
mkdir /ora_db_recovery_area
mkdir /ora_arch
mkdir /ora_flashbacklog
mount /flashback
mount /ora_db_recovery_area
mount /ora_arch
mount /ora_flashbacklog
4. We recommend that you now install IMPAX and let the IMPAX installer create the correctdirectory structure, directory name, and permissions. During the database installation, set thefollowing parameters for the space in /flashback:
db_recovery_file_dest = /flashback
db_recovery_file_dest_size = size_of_/flashback_file_system
where size_of_/flashback_file_system is the size of /ora_db_recovery_area + /ora_arch +/ora_flashbacklog.
5. After IMPAX is installed, configure Oracle Data Guard. Verify that the directory tree has beencreated under /flashback.
6. Stop IMPAX and Oracle.
7. Move all files (including subdirectories) in /flashback/db_recovery_area to/ora_db_recovery_area.
8. Create symbolic links in /flashback pointing to /ora_db_recovery_area. Type
ln –s /ora_db_recovery_area /flashback/db_recovery_area
9. Move all files (including subdirectories) in /flashback/db_recovery_area/MVFn/archivelog to/ora_arch
where MVFn is either MVF1 or MVF2.
10. Move all files (including subdirectories) in /flashback/db_recovery_area/MVFn/flashback to/ora_flashbacklog.
11. Create symbolic links in /flashback/db_recovery_area/MVFn pointing to ora_arch andora_flashbacklog. Type
ln –s /ora_arch /flashback/db_recovery_area/MVFn/archivelog
ln –s /ora_flashbacklog /flashback/db_recovery_area/MVFn/flashback
AS3000 Installation and Configuration Guide—IMPAX 6.5.3 44Agfa Company Confidential—Subject to Non-Disclosure Obligation

12. Verify that the entire /flashback directory and its subdirectories are owned by oracle:dba. Also,verify that /ora_arch and /ora_flashbacklog are owned by oracle:dba. If necessary, to changethe owner, type
chown –R oracle:dba /flashback
chown –R oracle:dba /ora_db_recovery_area
chown –R oracle:dba /ora_arch
chown –R oracle:dba /ora_flashbacklog
Recommended disk partitions for image and web caches(Topic number: 134966)
IMPAX supports two types of caches: image and web. The image cache contains what in the IMPAXClient is called original images—the images as they are sent from the acquisition station. The webcache contains copies of the original images that have been compressed with wavelet encoding bythe Curator component.
Image caches are used in both the Network Gateway and the Archive Server. The Archive Servermust have at least one cache it can use. If using the Curator component, it requires at least one webcache. The number of files in the caches depends on how many and what kind of examinations areperformed at the site. Generally, a CR study consists of two image files, each approximately 5 MB,while a typical CT study can easily consist of 500 to 1000 image files, each 256 KB.
Note:
We recommend sufficient capacity to keep new studies online for at least six months to oneyear. Data production during this time can result in millions of image files, so pay carefulattention to the architecture and partitioning of the required disk space for image and webcaches.
It is unusual to place cache volumes on a local disk. Normally, to meet failover, migration,and reliability considerations, these volumes are located on external NAS or SAN storage.
Understanding image storage tieringTypically, IMPAX requires three to four tiers of storage, the properties of which are each different:
• Tier 1—Database. Fast RAID 10 protected storage; typically, FC or SAS drives.
• Tier 2—Short-term image cache. Fast, accessible, online image cache; RAID 5 protected storageat a minimum; FC or SAS technology.
• Tier 3—Long-term image cache.
• Tier 4—Archive. Usually tape or spinning disk and containing the site's historic data production.
Tier 2 and Tier 3 storage are often combined and used to store diagnostic and clinical images, onefile per image (details follow).
For third-party storage integrations, additional specifications can be provided upon request.
AS3000 Installation and Configuration Guide—IMPAX 6.5.3 45Agfa Company Confidential—Subject to Non-Disclosure Obligation

Storage processesWhen sizing and partitioning disks, it is helpful to understand the following storage processes:
The SCP (Service Class Provider) is a DICOM server that receives requests from an SCU. The SCPprocess accepts images for storage from the modalities, and stores them to the identified cachedirectories (first to the highest priority cache with the most free disk space).
The SCU (Service Class User) primarily sends DICOM requests to an SCP. It operates on a job basisand sends images out to external devices including printers, copies images to other locations withina cluster, retrieves images from remote destinations, and stores images to or retrieves images froma PACS Archive, if configured to do so.
Use IMPAX Autopilot to manage when studies are removed from the cache and to control studydeletion:
• Autopilot determines the effective study storage rate by assessing statistics in the database tablesduring a two-week sliding window. For more information, see “Autopilot configuration: Keyconcepts” (topic number 60222) in the IMPAX 6.5.3 Server Knowledge Base.
• Autopilot also collects free disk space statistics at regular intervals; the system calls used forthis are not dependent on any file enumeration (Windows: GetDiskFreeSpace andGetDiskFreeSpaceEx or Solaris: Stats and statfs).
In general, all file-level and image location data is stored in the database and is retrieved assuch. IMPAX processes do not use file enumeration to gather any information regarding filesystems or cache sizes.
• The deletion of objects (images) is a logical deletion: studies are marked for deletion in theIMPAX database and Autopilot collects these objects from its internal deletion candidate cacheand then deletes them. The maximum number of studies deleted in one single Autopilot passis 1000. If more studies need to be deleted, Autopilot will wait for a configurable number ofminutes until its next pass.
• Threshold levels set the aggressiveness of deletion activity. Autopilot monitors how full thecache is, and determines at which threshold level (amber or red) the image cache is at. Thethreshold indicates the number of hours left that the image cache is available for incomingstudies. A web threshold can be set for the web cache when the Curator is used. For moreinformation, see “How are images deleted from cache?” (topic number 9135) and “Configuringcache thresholds” (topic number 9133) in the IMPAX 6.5.3 Server Knowledge Base.
The Curator process is responsible for compressing incoming images into the Mitra Wavelet formatand storing them in the web cache:
• If more than one Curator is installed, the first Curator instance that is started is considered themaster Curator. The master Curator owns the web cache and is responsible for servicing requestsfrom IMPAX. The Autopilot running on the master Curator is responsible for the web cache.Each additional Curator checks for PREPARE jobs in the queue associated with the masterCurator and writes to the web cache owned by the master Curator.
• Every time a new study is placed into the web cache, Curator checks the free disk space statisticsusing the GetDiskFreeSpaceEx call noted previously. For more information, see “Cacheinformation available in the Cache Monitor” (topic number 9111) in the IMPAX 6.5.3 ServerKnowledge Base.
AS3000 Installation and Configuration Guide—IMPAX 6.5.3 46Agfa Company Confidential—Subject to Non-Disclosure Obligation

General disk considerations1. Scalability—Limit the size of cache disks to limit the number of files per cache directory. See
the “Recommended cache partition sizes” section below. Add more cache volumes of thespecified size to satisfy the total required storage capacity.
For NAS, the vendor usually provides a quota mechanism to limit the size of one (CIFS orNFS) share. Ensure that the storage vendor effectively represents the volume that can be usedby IMPAX and correctly reports total disk size and free disk space. The reported free disk space(through IMPAX CLUI or the Administration Tools) represents what Windows Explorer orthe Solaris df command is reporting. Highlight and emphasize this requirement to the storagevendors. Impose a usage quota only and not an inode quota (which imposes limitations onthe number of files and directories that can be created).
2. Performance and manageability—Both IMPAX and the overall system performance decreasesconsiderably as more files reside in the same directory. Maintain cache volumes according tothe specified guidelines; otherwise, side effects, such as Autopilot not functioning optimally,may be the result.
3. NAS access permissions—To allow for correct read and write access, the ImpaxServerUseraccount and ImpaxServerGroup need to be created on the NAS system hosting the cache. Formore information, see “Configuring cache folder permissions for remote caches and NAS”(topic number 7068) in the IMPAX 6.5.3 Server Knowledge Base. The ImpaxServerUser domainuser must have permissions to start services at the booting up of the server, and must haveread/write privileges to the NAS shares.
4. Exporting the NAS shares—Export the NAS shares to the CIFS and NFS clients only asrecommended (that is, the Curator and Network Gateway servers); this prevents unauthorizedsystems from mounting the storage subsystem and accessing the image files.
5. NFS and CIFS versions—By default, Solaris uses NFSv4. For VMware vSphere 4, NFSv3 is thedefault. NAS systems should provide both NFSv4 and NFSv3 protocols. Microsoft WindowsServer 2008 and later uses SMB-2; earlier versions use SMB-1. In terms of performance, NFSis faster than SMB-2 which is faster than SMB-1.
6. File enumeration—Do not enumerate files in the cache directories as this will negatively impactperformance, or allow the perception that the system is hung. For example, in Windows, donot launch Explorer and, in Solaris, do not execute an ls –al command (to display a longlisting of all files in the current directory).
Note that Autopilot and other IMPAX processes do not use file enumeration, but instead usethe database entries to deal with any file-related housekeeping.
7. Anti-virus software—Never run anti-virus software on the image caches. Anti-virus softwarecauses file enumeration activities, which may severely impact system performance.
Storage platform guidelinesIMPAX supports two platforms: x86 Windows (IMPAX AS300) and SPARC Solaris (IMPAX AS3000).Historically, AS300 platforms have been used for small to medium-sized sites while Solaris platformshave been used for larger sites.
For both platforms, the cache volumes can be addressed as Network Attached Storage (NAS) overprotocols such as CIFS (SMB-2 for Windows Server 2008), or as block IO storage: storage areanetwork (SAN), direct-attached storage (DAS), etc.
From a storage perspective, as a best practice, we recommend the following partitioning guidelines.
AS3000 Installation and Configuration Guide—IMPAX 6.5.3 47Agfa Company Confidential—Subject to Non-Disclosure Obligation

Partitioning considerationsWhen partitioning disks, consider the following:
• Read/write response time and number of files per directory—Because read/write performancedegrades as the number of files in a directory increases, limit the size of an IMPAX cachedirectory by limiting the disk or partition size (for SAN or block access in general), or bylimiting the file system size (for NAS).
• Hierarchical vs. non-hierarchical caches—As of IMPAX 6.5, a hierarchical cache structure issupported for image and web caches, permitting larger cache volumes. The old flat cachestructure continues to be supported; only new images arriving in the system or existing imagesretrieved from archive are written to cache using the hierarchical structure.
The default configuration setting for the cache directory structure is YYYYMM, meaning thatone additional cache level is created and a new directory is added monthly:
To further reduce the number of files, the directory structure can be refined as follows:
• 'YYYYMM'—One additional cache level; a new directory is created monthly
• 'YYYYMM/DDHH'—Two levels of hierarchy; a new directory is created each hour
• 'YYYYMM/XXXX'—Two levels of hierarchy; where XXXX is the first four digits of thehex value of the ordinal
For NAS-based caches, use the 'YYYYMM/XXXX' option to restrict the number of files perdirectory to 64,000.
To counteract possible memory restrictions or directory hashing delays, we strongly recommendthat active_priority.pl scripts be implemented in all NAS-based and SAN-based caches.
For more details, refer to “Configuring the hierarchical cache directory structure” (topic number102687) in the IMPAX 6.5.3 Server Knowledge Base.
• Supported number of files—Storage vendors may impose limitations regarding the maximumnumber of files that a system can handle before performance deteriorates. Confirm that anylimitations of a product and its intended storage capacity are appropriate and can be managed.
• Block vs. file access —Take into account any differences due to block access (SAN, DAS, iSCSI)vs. file access (NFS, CIFS).
Recommended cache partition sizesThe following guidelines optimize the capacity planning and performance of image and web caches.
IMPAX 6.4 and earlier or IMPAX 6.5 and later (with hierarchical caches disabled1):
AS3000 Installation and Configuration Guide—IMPAX 6.5.3 48Agfa Company Confidential—Subject to Non-Disclosure Obligation

Comments2File access
(NFS, CIFS on NAS)3
Block access
(SAN, DAS, iSCSI)
Cachetype
Storage vendors may have specificrecommendations for file systems onNAS
Solaris (NFS)
125 GB maximum(approximately500,000 files)
Solaris (UFS)
500 GB maximum(approximately 1.5 to2 million files)
Imagecache
NetApp: no more than 800,000 files(approximately 200 GB) per share(Qtree)
Windows (CIFS)
125 GB maximum
Windows (NTFS)
500 GB maximumEMC Celerra or EMC VNX/VNXe:500,000 files maximum (approximately125 GB) per share
Depends on mix of studies at site
For web cache on IMPAX Curator4: 120GB represents approximately 1 millionfiles
Windows (CIFS)
120 GB maximum
Windows (NTFS)
300 GB maximum
Webcache
HP—iBRIX—with CIFS: 400,000 filesmaximum (approximately 50 GB)
Depends on compression ratio and mixof studies at site
IMPAX 6.5 and later (with hierarchical caches5):
Comments2File access
(NFS, CIFS on NAS)3
Block access
(SAN, DAS, iSCSI)
Cachetype
Storage vendors may have specificrecommendations for file systems
Solaris (NFS)
500 GB recommended,750 GB maximum
Solaris (UFS)
750 GB recommended,
1 TB maximum6
Imagecache
on NAS; confirm maximumnumber of directories and files pershare or per file systemWindows (CIFS)
(SMB-2)Windows (NTFS)
750 GB recommended,1 TB maximum 300 GB maximum
For web cache on IMPAX Curator4Windows (CIFS)(SMB-2)
Windows
500 GB maximum
Webcache
Storage vendors may have specificrecommendations for file systems200 GB maximum
on NAS; confirm maximumnumber of directories and files pershare or per file system
Notes
AS3000 Installation and Configuration Guide—IMPAX 6.5.3 49Agfa Company Confidential—Subject to Non-Disclosure Obligation

• 1 The cache migration tool allows a site to migrate its existing caches from a flat to hierarchicalstructure. For more details, see “Migrating a cache volume from a flat to hierarchical structure”(topic number 102251) in the IMPAX 6.5.3 Server Knowledge Base.
• 2 Storage vendors may impose limitations regarding the maximum number of files that a systemcan handle before performance deteriorates. Confirm that any limitations of a product and itsintended storage capacity are appropriate and can be managed.
• 3 To counteract possible memory restrictions or directory hashing delays, we recommend thatactive_priority.pl scripts be implemented in all NAS-based caches. This reduces the numberof active directories for the images (NAS-wide, not just the caches of a single IMPAX server)and minimizes directory name cache rehashing as images are stored or retrieved.
• 4 On average, uncompressed wavelet files are approximately 10% smaller than DICOM files.If lossy compression is configured, the number of files per GB increases accordingly and cachesizes should be decreased as a result. For example, with 10:1 lossy compression in a web cache,80 GB represents approximately 1 million files.
• 5 For large cache partitions (block or file access), the default directory structure may needrefining to further limit the number of files in a directory. For more details, see “Configuringthe hierarchical cache directory structure” (topic number 102687) in the IMPAX 6.5.3 ServerKnowledge Base.
• 6 File system check utilities (fsck and chkdsk) take longer to complete on larger file systems,and file systems are unavailable during the check.
Access to other NAS storage volumesSome sites may require IMPAX to use storage volumes for other purposes such as backup volumesor log file volumes; most of these storage volumes will also reside on NAS.
Use the following guidelines—largely applicable to a Windows environment only—to correctlyconfigure the volumes from the NAS side, as well as from the server and application side.
• NAS sharing and IP access control lists—NAS volumes are usually shared to dedicated serversor IP addresses. This prevents unintended access of the data. Make sure the “share to” IP addressof the NAS volume uses the correct IP address.
• Storage VLANs—Dedicated storage VLANs or LANs are recommended, eventually assignedto dedicated NICs on the server. If storage (V)LANs are used, in addition to the previousguideline, make sure that the share is shared to the server’s storage IP address.
• Refer to the vendor's guidelines for specific mount options for both database and cache NFSmounts. For example:
rw,bg,vers=3,proto=tcp,hard,intr,rsize=32768,wsize=32768,forcedirectio
• User authentication and access to shares—To access the shares on the IMPAX servers, NTDomain authentication is used (at a minimum) to validate access to shared resources. It ishighly recommended that both storage NAS and IMPAX servers belong to the same domain,and that the system and user credentials accessing the shares match the credentials and ownersof the shares on the storage side.
AS3000 Installation and Configuration Guide—IMPAX 6.5.3 50Agfa Company Confidential—Subject to Non-Disclosure Obligation

• Verifying availability and accessibility of CIFS shares–As soon as a CIFS share is defined, youcan test the access to the share:
a. Log into IMPAX as an Administrator user.
b. At a command prompt, type
net view \\NAS-hostname
A list of available resources on that hostname is displayed.
c. If a System error 5 message appears, use the local userid and password as defined onthe NAS server. Make sure that the connections are persistent across reboots. The netview command should show the available shares. If you need to connect as a domainuser, replace NAS-hostname with the fully-qualified domain name. For example:
net use /Persistent:yes
net use \\NAS-hostname /user:NAS-hostname\administrator password
net view \\NAS-hostname
• Verifying availability and accessibility of NFS shares on Solaris—Type dfshares -F nfs.
VLANs, network switches, and VMware environmentsWhen working with dedicated storage and production VLANs and, potentially, additional VLANs,each VLAN needs to be enabled on the switch port. For Cisco switches, this is called a multi-VLANport where the switch port is assigned to multiple VLANs; for example, to the production VLANand to the storage VLAN.
In VMware environments, a virtual switch should be configured for each VLAN. The followingillustrates two possible approaches.
1. Define all NICs to access all VLANs; VMware manages the traffic; the appropriate Cisco portsare defined as multi-VLAN ports:
2. Define dedicated NICs for dedicated VLANs; the appropriate Cisco ports are defined for thespecific VLAN only:
AS3000 Installation and Configuration Guide—IMPAX 6.5.3 51Agfa Company Confidential—Subject to Non-Disclosure Obligation

Obtaining Server license keys(Topic number: 7637)
5.
IMPAX uses software license keys that are unique to the station on which the software is installed.One license key is required for the Network Gateway and a separate license key must be obtainedfor the Archive Server (even if using PACS Store and Remember archiving).
Obtaining Server licenses for Solaris stations(Topic number: 10701)
To obtain new license keys, if this is required, email [email protected]. To generate the licensekeys, Agfa must know the Ethernet MAC (Media Access Control) address of the server.
To obtain Server licenses for Solaris stations
1. On a Solaris station, confirm that the Ethernet is connected.
2. Log in as the root user and open a terminal window.
3. Type
arp `uname -n`
or
arp $(uname -n)
The MAC addresses for all connections are returned, which is the information Agfa requiresto issue a license.
4. To obtain a license key for the server, copy and send the returned information [email protected], along with a description of the type of component being installed onthat server.
AS3000 Installation and Configuration Guide—IMPAX 6.5.3 52Agfa Company Confidential—Subject to Non-Disclosure Obligation

Sizing parameters when configuring a zone(Topic number: 135483)
6.
Use the following information to determine the correct sizing parameters to specify when configuringa zone. The first table applies to SPARC T3 servers, and the next applies to SPARC T4 servers.
SPARC T3 zones (16 cores, 8 threads per core)
CommentsSwapallocation
in GB 3
Memoryin GB
Numberof CPUsor threads/ (cores)2
Resource
pool 1Zone ID
Number of CPUs: 10% of thetotal number of threads
Total GB+ 10%
10%10%N/AGlobal zone
Number of GB: 10% of totalRAM
SWAP: total of all swaps fornon-global zones + 10%overhead (at least 110% of globalzone's physical RAM)
For Oracle Data Guardconfigurations, use 24 GB (16 GBminimum)
16–241632 / (4)—IMPAX DatabaseServer (x-small)
For Oracle Data Guardconfigurations, use 32 GB (16 GBminimum)
16–3216–3264 / (8)—IMPAX DatabaseServer (small)
For Oracle Data Guardconfigurations, use 32 GB (32 GBminimum)
32–6432–6464 / (8)—IMPAX DatabaseServer (medium)
Oracle MEMORY_TARGET(SGA size) is capped in IMPAX6.5.3 at ~50 GB
64–12864–128128 / (16)—IMPAX DatabaseServer (large)
64 GB is sufficient for a largeDatabase Server but additionalprocesses (Oracle Data Guard,etc.) may require an increase
Unified configuration — one size
fits all 48816 / (2)—IMPAX Network
Gateway
AS3000 Installation and Configuration Guide—IMPAX 6.5.3 53Agfa Company Confidential—Subject to Non-Disclosure Obligation

CommentsSwapallocation
in GB 3
Memoryin GB
Numberof CPUsor threads/ (cores)2
Resource
pool 1Zone ID
Unified configuration — one size
fits all 48816 / (2)—IMPAX Archive
Server (HSM)
Unified configuration — one size
fits all 48816 / (2)—IMPAX Archive
Server (PACSS&R)
Database Server + NetworkGateway + Archive Server (eachin a different zone)
161664 / (8)—IMPAX AIO(all-in-one)
One size fits all
Reserved for test purposes or astraveling server
8832 / (4)ReservedSpare
SPARC T4 zones (8 cores, 8 threads per core)
CommentsSwapallocation
in GB 3
Memoryin GB
Numberof CPUsorthreads /
(cores) 2
Resource
pool 1Zone ID
Number of CPUs: 10% of thetotal number of threads
Total GB+ 10%
10%10%N/AGlobal zone
Number of GB: 10% of totalRAM
SWAP: total of all swaps fornon-global zones + 10%overhead (at least 110% of globalzone's physical RAM)
For Oracle Data Guardconfigurations, use 16 GB (16 GBminimum)
16–241616 / (2)—IMPAX DatabaseServer (x-small)
For Oracle Data Guardconfigurations, use 32 GB (16 GBminimum)
16–3216–3232 / (4)—IMPAX DatabaseServer (small)
For Oracle Data Guardconfigurations, use 64 GB (32 GBminimum)
32–6432–6432 / (4)—IMPAX DatabaseServer (medium)
AS3000 Installation and Configuration Guide—IMPAX 6.5.3 54Agfa Company Confidential—Subject to Non-Disclosure Obligation

CommentsSwapallocation
in GB 3
Memoryin GB
Numberof CPUsorthreads /
(cores) 2
Resource
pool 1Zone ID
Oracle MEMORY_TARGET(SGA size) is capped in IMPAX6.5.3 at ~50 GB
64–12864–12864 / (8)—IMPAX DatabaseServer (large)
64 GB is sufficient for a largeDatabase Server but additionalprocesses (Oracle Data Guard,etc.) may require an increase
Unified configuration — one size
fits all 4888 / (1)—IMPAX Network
Gateway
Unified configuration — one size
fits all 4888 / (1)—IMPAX Archive
Server (HSM)
Unified configuration — one size
fits all 4888 / (1)—IMPAX Archive
Server (PACSS&R)
Database Server + NetworkGateway + Archive Server (eachin a different zone)
161632 / (4)—IMPAX AIO(all-in-one)
One size fits all
Reserved for test purposes or astraveling server
8816 / (2)ReservedSpare
Notes:
1 Resource pools can separate workloads so that consumption of certain resources do not overlap;however, we recommend refraining from their use since they can negatively impact performance.By default, when the first zone is created for IMPAX, the scheduling class is changed from TS(timesharing) to FSS (fair share scheduler) which controls the allocation of available CPU resourcesamong zones, based on their importance.
2psrinfo command provides the number of threads as CPUs. The number of threads per core
depends on the CPU type.
3 The createSolution tool calculates the swap size required for every new zone added. If the serverdoes not have enough space a warning is displayed. If you have sufficient knowledge of Solaris, rectifythis appropriately; otherwise, consult your Agfa Professional Services representative for assistance.Note that if the warning is ignored, an AGFA_UNSUPPORTABLE_SYSTEM flag is created in the /optdirectory.
4 Scale out by adding more Network Gateway zones.
AS3000 Installation and Configuration Guide—IMPAX 6.5.3 55Agfa Company Confidential—Subject to Non-Disclosure Obligation

Creating and configuring a Solaris zone for IMPAX(Topic number: 104630)
7.
Important!
Installing IMPAX 6.5.3 alongside IMPAX Data Center 2.0 or later (including any applicableSUs) on the same machine is not a supported configuration at this time.
Prerequisite notesEnsure that the following is available or complied with:
• A machine name and IP address to assign to the zone. The subnets for the zone and the physicalmachine must be the same.
• The disk info for the /cache and /dbase mount points.
• The network interface to be used for the zone. Run ifconfig –a to determine the availablenetwork interfaces.
• For administrative purposes, we recommend that the zone configuration name, the zone name,and the zone directory be the same.
• IMPAX assumes that a host name is a valid AE title, conforming to expected naming conventionssuch as not including hyphens.
• Only the global administrator in the global zone can perform this procedure.
Adding a dedicated file systemBefore running the createSolution tool, you can add an entry similar to the following in the/etc/vfstab file:
/dev/dsk/c0t1d0s1 /dev/rdsk/c0t1d0s1 /londonzone_cache ufs 2 yes -
When creating a zone called londonzone, the file system is automatically added to the zoneconfiguration file. At the Add a dedicated filesystem for this zone? prompt, you can thentype n; however, if the mount point is not prefixed with the zone name, you must type y, and thenspecify the mount point in response to the next prompt.
For example:
Add a dedicated filesystem for this zone? [n] [y,n,?,q] y
What is a dedicated filesystem for zone mvfnw [q to quit] ? [?,q] /cache
AS3000 Installation and Configuration Guide—IMPAX 6.5.3 56Agfa Company Confidential—Subject to Non-Disclosure Obligation

Creating and configuring a zone
Important!
Install all IMPAX 6.5.3 Server components (AS3000) in a Solaris non-global zone, even if itis a single application running on its own server.
To create and configure a Solaris zone for IMPAX
1. Log into the Database Server machine as the root user.
2. Insert the IMPAX Agfa Zone Tools DVD.
3. To install the Agfa Zone Tools package, type
pkgadd -d ./AGFAzone.pkg
4. At the Select package(s) you wish to process prompt, to select the default of all, pressEnter.
5. At the Do you want to continue with the installation of <AGFAzone>? prompt, typey.
A message indicates when the package has been successfully installed.
Tip:
When running any Agfa Zone Tool, a log is written to stdout and to /var/sadm/tool.logwhere tool is the name of the Agfa Zone Tool. If required, you can pipe or redirect stdoutand stderr.
6. To configure one or more zones, type
/opt/AGFAzone/bin/createSolution
Note:
Run this tool only in the global zone.
The createSolution tool calculates the swap size required for every new zone added. If the serverdoes not have enough space a warning is displayed. If you have sufficient knowledge of Solaris,rectify this appropriately; otherwise, consult your Agfa Professional Services representative forassistance. Note that if the warning is ignored, an AGFA_UNSUPPORTABLE_SYSTEM flag is createdin the /opt directory.
7. Based on the sizing parameters decided upon previously (refer to page 53), respondappropriately to all the prompts.
Your answers are used to construct the configuration file, which is then used to create the zonesand any necessary resource pools.
AS3000 Installation and Configuration Guide—IMPAX 6.5.3 57Agfa Company Confidential—Subject to Non-Disclosure Obligation

Zones types supported by IMPAX
All-in-one (all AS3000 server components—Database Server,Network Gateway, Archive Server—installed on the same server).Also referred to as a single-host configuration.
AIO
Archive ServerAS
IMPAX Data Center Oracle Database ServerIDCDB
IMPAX Oracle Database ServerMVFDB
Data Center Storage Application ServerSAS
Network Gateway (workflow manager)WFM
Network Gateway + Archive ServerWFM + AS
An Agfa Solution Configuration /lib/agfa.cfg constructed successfully messageis displayed after the zone configuration is complete.
8. Review the configuration file and modify it as necessary.
9. To create a zone, type
/opt/AGFAzone/bin/makeZone zone_name
where zone_name is the name of the zone.
Note:
A dedicated-cpu setting cannot be instantiated error means that more CPUresources have been committed than are available. Configure the zone more realistically;or, reconsider the size of the machine. We do not recommend the use of CPU pools.For more details, see Managing CPU by specifying the dedicated-cpu resource.
Using the information provided in the configuration file, a zone is created.
10. Repeat step 9 for each zone you create.
Tip:
To display the current status of all installed zones, type zoneadm list -vi.
11. To log into a zone from a global zone, type
zlogin zone_name for a normal login
or
zlogin -C zone_name for a console login
where zone_name is the name of the zone.
You can use the ssh command to connect to a zone in the same way that you would connectto the global zone. When accessed this way, the non-global zone behaves in essentially the same
AS3000 Installation and Configuration Guide—IMPAX 6.5.3 58Agfa Company Confidential—Subject to Non-Disclosure Obligation

way as a separate physical server. For more details, see Accessing the non-global zones (refer topage 90).
If you must uninstall a zone, see Uninstalling a Solaris zone (refer to page 97); otherwise, proceedwith installing the appropriate IMPAX Server component in the newly created zone.
AS3000 Installation and Configuration Guide—IMPAX 6.5.3 59Agfa Company Confidential—Subject to Non-Disclosure Obligation

3Creating theDatabase Server
You must install IMPAX 6.5.3 AS3000 on the Database Server or single-host AS3000 Server, thenconfigure the IMPAX 6.5.3 AS3000 cluster to connect to Client stations through the ApplicationServer. Ensure that you have first completed all relevant procedures in Setting up a Solaris server(refer to page 28), including creating a Solaris zone.
Creating the AS3000 software repository(Topic number: 9936)
1.
You can optionally install the IMPAX 6.5.3 AS3000 and Oracle for Solaris software from a softwarerepository normally created on the AS3000 Database Server. The AS3000 software repository canbe created using ISO files or DVDs; however, installing from a repository is much faster and lesserror-prone than installing from DVD.
Ensure you have sufficient space available for it on the Oracle Database Server.
If the site uses disks for Oracle database backups, ensure that the disk has sufficient space to easilystore a cold backup.
To create the AS3000 software repository using ISO files
1. On the AS3000 Database Server, to create a directory for the repository, type
mkdir /agfa/repository
where repository is your choice of directory name.
2. Copy the IMPAX 6.5.3 AS3000 Server ISO file to this repository.
3. As the root user, type
# lofiadm –a /agfa/repository/IMPAX 6.5 AS3000 Server.iso
/dev/lofi/1
AS3000 Installation and Configuration Guide—IMPAX 6.5.3 60Agfa Company Confidential—Subject to Non-Disclosure Obligation

# mount –F hsfs /dev/lofi/1 /mnt
# cd /mnt
# cp -r . /agfa/repository
where repository is the directory you created in step 1.
The files are unpacked onto the Database Server into the repository directory.
4. To unmount /mnt, type
umount /mnt
5. If you want to remove the IMPAX 6.5.3 AS3000 Server ISO file, first delete the loopback devicethat locks this file. Type
lofiadm -d /dev/lofi/1
6. Repeat the process to extract and copy the Oracle software to the repository.
To create the AS3000 software repository using DVDs
1. On the AS3000 Database Server, log in as the root user and to create a directory for therepository, type
mkdir /agfa/repository
where repository is your choice of directory name.
2. Insert the IMPAX 6.5.3 AS3000 Server DVD.
3. Change to the /cdrom/cdrom0 directory.
4. To copy and unpack the files from the DVD, type
tar cvf - . | (cd /agfa/repository; tar xf -)
where repository is the directory you created.
5. Remove the IMPAX AS3000 DVD and insert the Oracle for Solaris DVD.
6. Still in the /cdrom/cdrom0 directory, copy and unpack the files from this DVD as well.
tar cvf - . | (cd /agfa/repository; tar xf -)
The files are unpacked onto the Database Server into the repository directory.
Determining a password for the AgfaServiceaccount(Topic number: 7705)
2.
During the IMPAX Server software installation, you are prompted to create a password for theAgfaService account. The password must conform to the following requirements:
• Be at least eight characters long
• Not contain three or more characters from the user’s account name
AS3000 Installation and Configuration Guide—IMPAX 6.5.3 61Agfa Company Confidential—Subject to Non-Disclosure Obligation

• Contain characters from at least three of the following five categories:
• Uppercase (A to Z)
• Lowercase (a to z)
• Digits (0 to 9)
• Non-alphanumeric (for example, !, $, #, or %)
• Unicode
Installing Oracle Server for Solaris in a zone(Topic number: 65304)
3.
Oracle is installed separately from the IMPAX 6.5.3 AS3000 Server software. The Oracle softwareappears on the Oracle for Solaris DVD.
To install Oracle Server for Solaris in a zone
1. Log into the Database Server machine as the root user.
2. Boot and log into the Solaris zone. Type
zoneadm -z zone_name boot
zlogin -C zone_name
where zone_name is the name of the zone where Oracle Server for Solaris is to be installed.
Alternatively, you can use a tool like PuTTY and the ssh command to connect to a zone in thesame way that you would connect to the global zone. (You must ssh to the host name of thenon-global zone, and not to the zone name. Root login with ssh has been enabled on non-globalzones.) When accessed this way, the non-global zone behaves in essentially the same way as aseparate physical server.
3. Change to the directory containing the Oracle install script, mounting the drive first if necessary.
This could be the DVD drive or a software repository.
4. Type
./install-Oracle server
5. At the standard, standard_1 or enterprise install [standard_1] ? prompt, respondappropriately.
• If using Oracle Standard Edition One, press Enter.
• If using Oracle Enterprise Edition, type enterprise and press Enter.
• If using Oracle Standard Edition, type standard and press Enter.
The edition of Oracle installed should be based on the order packet (which includes a copy ofthe sales order). The order packet typically lists all components to be installed on a server for
AS3000 Installation and Configuration Guide—IMPAX 6.5.3 62Agfa Company Confidential—Subject to Non-Disclosure Obligation

a particular site. If the Oracle edition is not specified, consult the Agfa sales team or projectmanager. (Note that if intending to use Oracle Data Guard, Oracle Enterprise Edition isrequired.)
Important!
If performing a forklift upgrade, ensure that you install the same Oracle edition as theexisting production system or else the database migration will fail. For example, if thedatabase on the production system is Oracle Standard Edition, install Oracle StandardEdition when staging the new system. Or, if the database on the production system isOracle Enterprise Edition, install Oracle Enterprise Edition when staging the new system.
6. At the What machine is the repository host [localhost] ? prompt, if it is the localhost,press Enter; otherwise, specify the appropriate IP address.
7. At the Where is the software repository [/iso] ? prompt, if installing from the DVDdrive, press Enter; otherwise, type the software repository directory.
8. At the Temporary work directory [/tmp] ? prompt, to use the /tmp directory, press Enter;otherwise, type the directory to use.
A series of messages appear as Oracle is installed and configured.
9. After the Oracle installation complete message appears, type the following to clear volatilememory (RAM) to disk and reboot:
init 6
Alternatively, in the global zone, you can type zoneadm -z zone_name reboot
where zone_name is the name of the zone you are rebooting.
Note:
We recommend that all Oracle defaults be maintained.
Installing the IMPAX 6.5.3 AS3000 databasepackages in a zone(Topic number: 6963)
4.
After you have created the Solaris zone and installed Oracle Server, you can install the IMPAX AS3000Database Server software. You must install the Database Server before other servers can connectremotely for installing the Network Gateway or Archive Server.
To install the IMPAX 6.5.3 AS3000 database packages in a zone
1. Log into the Database Server machine as the root user.
You can log into the Database Server machine remotely through ssh.
AS3000 Installation and Configuration Guide—IMPAX 6.5.3 63Agfa Company Confidential—Subject to Non-Disclosure Obligation

2. Boot and log into the Solaris zone. Type
zoneadm -z zone_name boot
zlogin -C zone_name
where zone_name is the name of the zone where IMPAX 6.5.3 is to be installed.
3. Change to the DVD drive or the software repository directory—whichever of these containsthe IMPAX install script.
4. Type
./impax_install
5. When prompted, type your name.
6. At the Please enter the fully qualified hostname of the login server prompt,type the hostname of the Application Server.
Tip:
If necessary, you can change this hostname after installation, as described in Manuallyconfiguring the connection to the Application Server (refer to page 137). For details oninstalling the Application Server, refer to the IMPAX 6.5.3 Application Server Installation,Upgrade, and Configuration Guide.
7. At the Do you wish to enable Lossy JPEG compression in cache? prompt, if you wantto enable lossy JPEG compression in the cache, type y. If you do not want to enable lossy JPEGcompression in the cache, type n.
This prompt appears only when installing the Database Server. The IMPAXcmpr packagecontains the Compressor Scheduler process, which is used for scheduling Compressor jobs.The Compressor process is installed on other systems when the IMPAXmvfc package is selectedduring installation. Both processes are installed and started on each server when lossycompression is enabled at IMPAX 6.5.3 AS3000 installation.
We recommend having lossy compression distributed on multiple servers, as described inInstalling Compressor Scheduler manually on Solaris (refer to page 77).
8. At the Please enter a password that conforms to the above rules prompt, create apassword for the AgfaService user that conforms to the rules displayed.
The characters you type are not displayed. Ensure that you type your password carefully. Ifyou have difficulty with this step and are unsure of what password you have typed, break outof the install script (Ctrl + C) and return to step 3.
Note:
In a cluster where the database is running on Solaris, we recommend setting the sameAgfaService password on all Windows boxes when installing IMPAX; however, theportable password file that is created by default does not contain an entry for theAgfaService user.
AS3000 Installation and Configuration Guide—IMPAX 6.5.3 64Agfa Company Confidential—Subject to Non-Disclosure Obligation

To address this, see Generating the AS3000 portable password file for the AgfaServiceuser (refer to page 69).
9. Confirm the password.
10. At the Please enter flashback location prompt, type /flashback.
11. Answer the Please enter flashback recovery location size in gigabytes promptappropriately. See Partitioning recommendations for the database file systems (refer to page 30)for more information.
In the four-volume configuration of /flashback, the/flashback/db_recovery_area/MVF1/archivelogs directory must be large enough to retain atleast a week's worth of archive logs. In the two-volume configuration, this directory and itsfiles are retained in the /flashback volume.
12. If the prompt NOTE: Archive, Gateway and PACS Archive Provider (PAP) serversrequire an image cache: Does this station require an image cache? appears, then,if installing a dedicated Database Server, type n.
or
If installing a single-host server, type y.
This prompt is bypassed if the script finds a /cache directory already on the system.
13. At the Install Gateway packages? prompt, if installing a dedicated Database Server and toprevent installing the Gateway package, type n.
or
If installing a single-host server, to install the Gateway package, type y.
14. At the Install OCR package? prompt, if installing a dedicated Database Server and to preventinstalling the OCR package, type n.
or
If installing a single-host station, to optionally install the OCR package, type y. Otherwise, typen.
15. At the Install an Archive? prompt, if installing a dedicated Database Server and to preventinstalling the Archive package, type n.
or
If installing a single-host server, to install the Archive package, type y.
16. If installing a single-host server, when prompted, specify the type of archiving.
TypeArchive
hsmHierarchical Storage Management
PACSPACS Archiving
If you are using PACS Archiving, it must be configured and registered separately (refer to page129).
AS3000 Installation and Configuration Guide—IMPAX 6.5.3 65Agfa Company Confidential—Subject to Non-Disclosure Obligation

17. At the Install PACS Archive Provider (PAP) package? prompt, if installing a PACSArchive Provider and to optionally install the PAP package, type y. Otherwise, type n. PressEnter.
A PACS Archive Provider (PAP) allows sites to have their studies mirrored at another sitethrough PACS Store and Remember archiving. This mirroring protects against loss of dataand allows studies at one PACS to be viewed at another.
18. When prompted, type any additional system configuration information.
19. When prompted, type any additional comments about the installation process.
The database is constructed.
20. During the installation, the NFS client service is disabled as a function of the hardening process.To enable the NFS Client, type
svcadm enable -r nfs/client
21. To reboot the machine to initiate startup of Oracle and all services, type the following to clearvolatile memory (RAM) to disk and reboot:
init 6
After the system has restarted, you must wait a few minutes while the system is initialized beforelogging in.
Configuring disk arrays for the databasefilesystems(Topic number: 103135)
5.
Important!
UNIX experience is highly recommended. Follow these instructions carefully or you mayrender the machine unbootable. If necessary, contact Agfa Professional Services for assistancebefore proceeding any further.
For logistical reasons, a pre-staged IMPAX Database Server is typically not built with the properdisk arrays. Instead, it is shipped with a dummy database with a single mount point that is too smallfor live use and performs poorly; this should be replaced once the host is on-site and the proper diskarrays are available. Normally, separate arrays are used for the database LUNs and the cache and/orHSM LUNs to reduce disk contention. To utilize the new database LUNs, follow this procedure.
After installing IMPAX, configure the disk arrays for the database filesystems to optimize databaseperformance.
Note:
Ensure that all hardware and firmware are matched appropriately. (Mismatches are a commonproblem for SAN arrays.)
AS3000 Installation and Configuration Guide—IMPAX 6.5.3 66Agfa Company Confidential—Subject to Non-Disclosure Obligation

To configure disk arrays for the database filesystems
1. Check the current firmware version, and update to the latest firmware version, if necessary.
2. To prevent IMPAX from restarting, type
disable_impax
3. Build volumes on the disk arrays as recommended by the appropriate vendor installation guide.
For partitioning recommendations, see Partitioning recommendations for the database file systems(refer to page 30).
4. After the station has rebooted, login as the root user.
5. Instead of deleting the existing /dbase content, you may want to move the shipped databaseto a suitable free area of disk and retain it for reference purposes. (If required, move the dummycache and archive volumes that were shipped by staging as well.)
Type
dbshutmvf
umount /dbase
mkdir /export/dbase.orig
sed 's% /dbase% /dbase.orig%' /etc/vfstab >/tmp/$$
cp /etc/vfstab /etc/vfstab.orig
cp /tmp/$$ /etc/vfstab
mount /dbase.orig
6. Create appropriate RAID volumes for cache volumes, if applicable.
7. To change privileges on dbase directories, type
chmod 777 /dbase /dbase/*
where the directories are system, index1, rbs, data2, redo, arch, and so on.
8. We recommend that you rebuild the database to take advantage of the new, larger volumesthat have been created.
9. To enable IMPAX and reboot, type
enable_impax
init 6
After the system has restarted, wait a few minutes while the system is initialized before logging in.
Recommended frequency of database backups(Topic number: 6935)
6.
Backups of the database are mandatory.Among other information, the database contains the followinginformation:
• Clinical data such as image markups
AS3000 Installation and Configuration Guide—IMPAX 6.5.3 67Agfa Company Confidential—Subject to Non-Disclosure Obligation

• Configuration information for printers, acquisition stations, routing patterns, and preferences,and so on
To guard against information loss due to equipment failure, you must make backup copies of thedatabase and configuration files. Oracle maintains a record of all database transactions in transactionlog files. If you fail to make database backups on a non-Oracle Data Guard server, the /dbase/archdirectory fills up. On a Data Guard server, the flashbackup directory fills up.
Make a backup once each working day. A backup is not necessary for idle days (for example,weekends). For IMPAX AS3000, the best time of day to make the backup is when the system is leastbusy.
Performing a warm backup of the database(Topic number: 15588)
After the IMPAX Database Server is installed, perform a warm backup of the database.
To perform a warm backup of the database
1. Log into the Database Server as the oracle user.
2. If backing up to tape, record the date on the tape jacket and insert the tape into the tape drive.
3. Change to the /usr/mvf directory.
4. To reconfigure the database, type
configure_backup
Note:
You must rerun this command after upgrading from all versions of IMPAX. For moredetails on using this command, refer to “Configuring backups to disk” (topic number8904) or “Configuring backups using Flashbackup on Solaris” (topic number 66399) inthe IMPAX 6.5.3 Server Knowledge Base.
5. Type runbackup.
The backup may take a significant amount of time.
If you need to restore the database from a backup, follow the instructions in the Oracle Servercomponent of the IMPAX 6.5.3 Server Knowledge Base.
Collecting database statistics(Topic number: 7004)
7.
System statistics allow Oracle 11g to efficiently control a system’s CPU performance and utilization.These statistics should be collected during a period of typical workload.
AS3000 Installation and Configuration Guide—IMPAX 6.5.3 68Agfa Company Confidential—Subject to Non-Disclosure Obligation

To collect database statistics
1. Use the automatic optimizer statistics collection and gather_and_lock_stats_job utilities.
For details about these utilities, refer to “Collecting database statistics” (topic number 113178) inthe Oracle Server component of the IMPAX 6.5.3 Server Knowledge Base.
Generating the AS3000 portable password filefor the AgfaService user(Topic number: 131115)
8.
In an AS3000 cluster, we recommend setting the same AgfaService password on all Windows boxeswhen installing IMPAX; however, the portable password file created by default does not contain anentry for the AgfaService user. To create this entry, you must delete the mvf.portable.psd file, set thepasskey password for the AgfaService user, then use the export mode to re-create the portablepassword file.
To generate the AS3000 portable password file for the AgfaService user
1. Log into the AS3000 Database Server as the root user.
2. Change to the /usr/mvf directory.
3. Delete the mvf.portable.psd file from the Database Server.
4. To set the passkey password for the AgfaService user, type
./bin/passkey -M SET -u AgfaService -P password
where password is the AgfaService user password. See Determining a password for the AgfaServiceaccount (refer to page 61).
5. To export the passkey for installing IMPAX on remote machines, type
./bin/passkey -M EXPORT -k temporary_password
where temporary_password is a password to be used to import the portable password file later.
This re-creates the /usr/mvf/mvf.portable.psd password file.
6. To copy the portable password file from the Database Server to the target server, type
scp /usr/mvf/mvf.portable.psd service@[target_host_name]:/usr/mvf/mvf.portable.psd
where target_host_name is the host name of the target server.
The mvf.portable.psd file is copied from the Database Server to the target server.
Delete /usr/mvf/mvf.portable.psd from the Database Server when you are finished copying it to thetarget servers or servers.
For more details, see Understanding the passkey utility (refer to page 133).
AS3000 Installation and Configuration Guide—IMPAX 6.5.3 69Agfa Company Confidential—Subject to Non-Disclosure Obligation

4Creating theNetwork Gateway
Before installing a dedicated AS3000 Network Gateway, ensure that you have completed all relevantprocedures in Setting up a Solaris server (refer to page 28) including creating a Solaris zone. Alsoensure that you have installed the Database Server hosting the Oracle database, as described inCreating the Database Server (refer to page 60).
If installing the Network Gateway on the same Solaris station as the Archive Server, follow theprocedures in Creating the Archive Server (refer to page 73) instead. If setting up an AS300(Windows-based) Network Gateway, refer to the Network Gateway installation instructions in theIMPAX 6.5.3 AS300 Installation and Configuration Guide.
Generating the password file from the DatabaseServer(Topic number: 6978)
1.
When installing IMPAX 6.5.3 AS3000 Network Gateway software, the IMPAX 6.5.3 AS3000installation script requires a portable password file, mvf.portable.psd. This file is automaticallygenerated when you first install the Oracle Database Server. Prudent security managementrecommends this file be deleted once all Network Gateway, Archive Server, Application Server, andCurator machines are installed.
If you know the mvf.portable.psd file has not yet been deleted, you can now proceed with the NetworkGateway installation.
But if you are now installing another new Network Gateway after the mvf.portable.psd file has beendeleted, you must first follow the instructions in Generating and importing mvf.portable.psd (referto page 131).
AS3000 Installation and Configuration Guide—IMPAX 6.5.3 70Agfa Company Confidential—Subject to Non-Disclosure Obligation
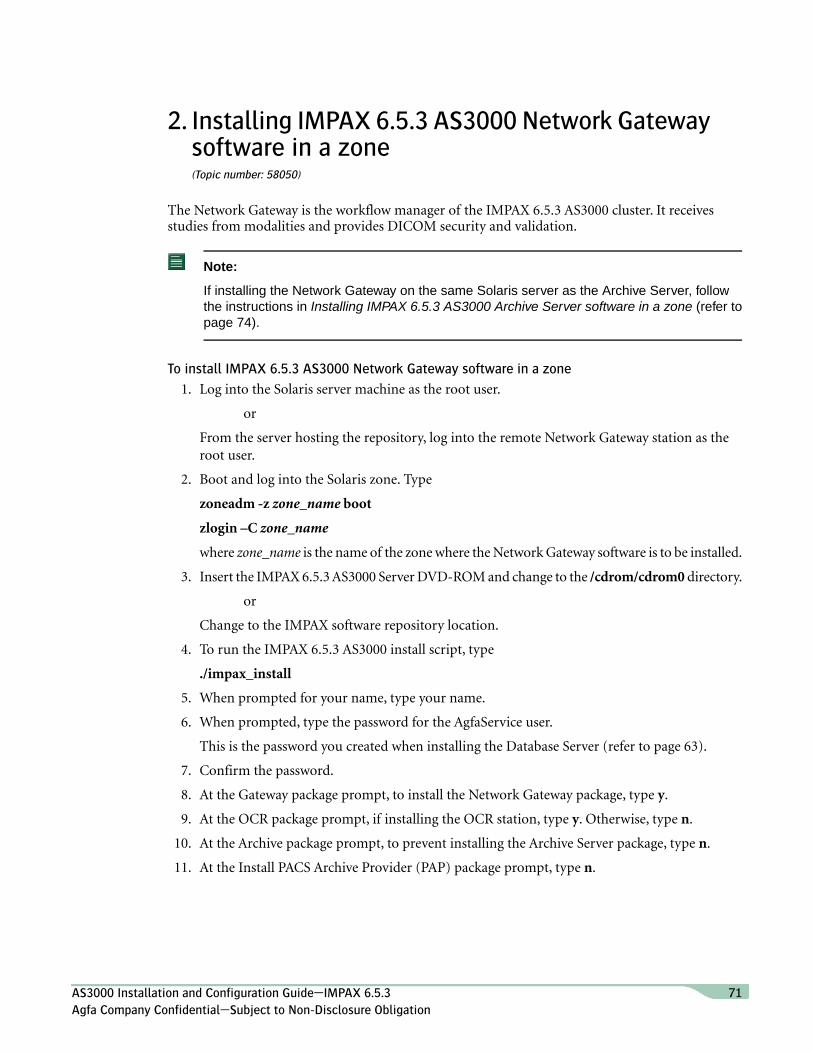
Installing IMPAX 6.5.3 AS3000 Network Gatewaysoftware in a zone(Topic number: 58050)
2.
The Network Gateway is the workflow manager of the IMPAX 6.5.3 AS3000 cluster. It receivesstudies from modalities and provides DICOM security and validation.
Note:
If installing the Network Gateway on the same Solaris server as the Archive Server, followthe instructions in Installing IMPAX 6.5.3 AS3000 Archive Server software in a zone (refer topage 74).
To install IMPAX 6.5.3 AS3000 Network Gateway software in a zone
1. Log into the Solaris server machine as the root user.
or
From the server hosting the repository, log into the remote Network Gateway station as theroot user.
2. Boot and log into the Solaris zone. Type
zoneadm -z zone_name boot
zlogin –C zone_name
where zone_name is the name of the zone where the Network Gateway software is to be installed.
3. Insert the IMPAX 6.5.3 AS3000 Server DVD-ROM and change to the /cdrom/cdrom0 directory.
or
Change to the IMPAX software repository location.
4. To run the IMPAX 6.5.3 AS3000 install script, type
./impax_install
5. When prompted for your name, type your name.
6. When prompted, type the password for the AgfaService user.
This is the password you created when installing the Database Server (refer to page 63).
7. Confirm the password.
8. At the Gateway package prompt, to install the Network Gateway package, type y.
9. At the OCR package prompt, if installing the OCR station, type y. Otherwise, type n.
10. At the Archive package prompt, to prevent installing the Archive Server package, type n.
11. At the Install PACS Archive Provider (PAP) package prompt, type n.
AS3000 Installation and Configuration Guide—IMPAX 6.5.3 71Agfa Company Confidential—Subject to Non-Disclosure Obligation
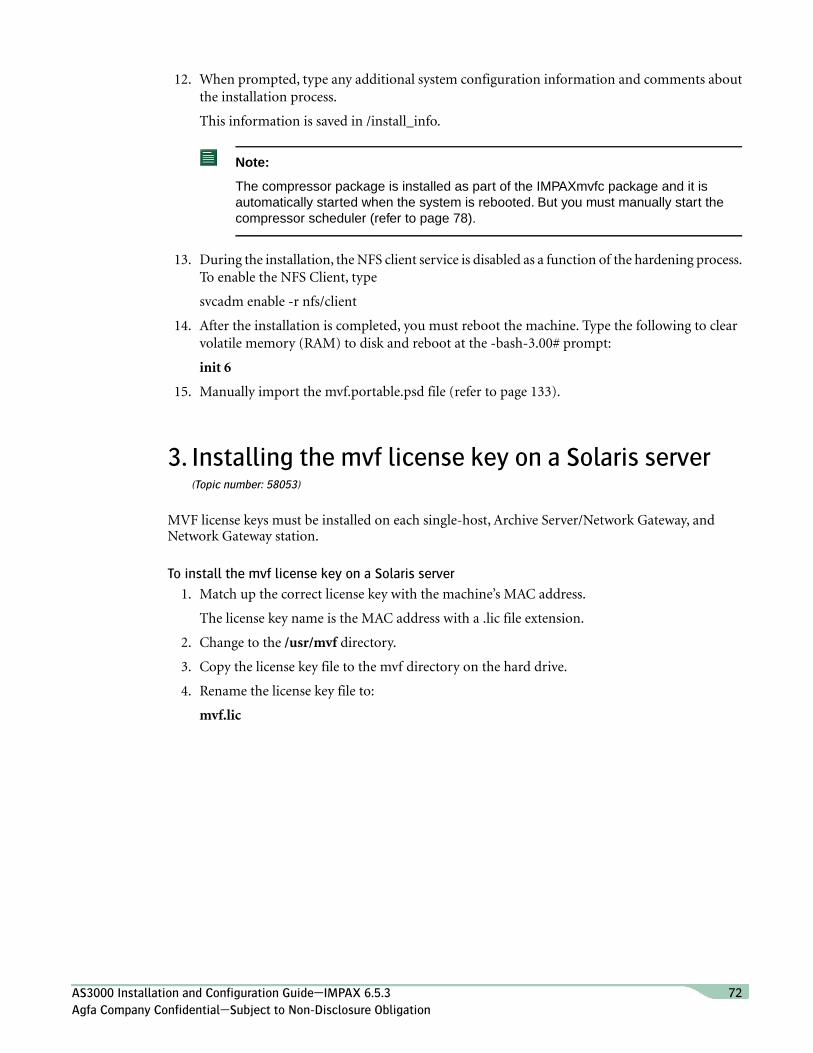
12. When prompted, type any additional system configuration information and comments aboutthe installation process.
This information is saved in /install_info.
Note:
The compressor package is installed as part of the IMPAXmvfc package and it isautomatically started when the system is rebooted. But you must manually start thecompressor scheduler (refer to page 78).
13. During the installation, the NFS client service is disabled as a function of the hardening process.To enable the NFS Client, type
svcadm enable -r nfs/client
14. After the installation is completed, you must reboot the machine. Type the following to clearvolatile memory (RAM) to disk and reboot at the -bash-3.00# prompt:
init 6
15. Manually import the mvf.portable.psd file (refer to page 133).
Installing the mvf license key on a Solaris server(Topic number: 58053)
3.
MVF license keys must be installed on each single-host, Archive Server/Network Gateway, andNetwork Gateway station.
To install the mvf license key on a Solaris server
1. Match up the correct license key with the machine’s MAC address.
The license key name is the MAC address with a .lic file extension.
2. Change to the /usr/mvf directory.
3. Copy the license key file to the mvf directory on the hard drive.
4. Rename the license key file to:
mvf.lic
AS3000 Installation and Configuration Guide—IMPAX 6.5.3 72Agfa Company Confidential—Subject to Non-Disclosure Obligation

5Creating theArchive Server
Before installing a dedicated AS3000 Archive Server or a Network Gateway/Archive Server, ensurethat you have completed all relevant procedures in Setting up a Solaris server (refer to page 28)including creating a Solaris zone. Also ensure that you have installed the Database Server hostingthe Oracle database, as described in Creating the Database Server (refer to page 60).
If setting up an AS300 (Windows-based) Archive Server instead, refer to the Archive Server installationinstructions in the IMPAX 6.5.3 AS300 Installation and Configuration Guide.
Generating the password file from the DatabaseServer(Topic number: 6979)
1.
When installing IMPAX 6.5.3 AS3000 Archive Server software, the IMPAX 6.5.3 AS3000 installationscript requires a portable password file, mvf.portable.psd. This file is automatically generated whenyou first install the Oracle Database Server. Prudent security management recommends this file bedeleted once all Network Gateway, Archive Server, Application Server, and Curator machines areinstalled.
If you know the mvf.portable.psd file has not yet been deleted, you can now proceed with installingthe Archive Server software.
But if you are now installing a new Archive Server after the mvf.portable.psd file has been deleted,you must first follow the instructions in Generating and importing mvf.portable.psd (refer to page131).
AS3000 Installation and Configuration Guide—IMPAX 6.5.3 73Agfa Company Confidential—Subject to Non-Disclosure Obligation

Installing IMPAX 6.5.3 AS3000 Archive Serversoftware in a zone(Topic number: 58065)
2.
The Archive Server is the DICOM archive used for permanent storage and retrieval of studies.
To install IMPAX 6.5.3 AS3000 Archive Server software in a zone
1. Log into the Solaris server machine as the root user.
or
From the server hosting the repository, log into the remote Archive Server station as the rootuser.
2. Boot and log into the Solaris zone. Type
zoneadm -z zone_name boot
zlogin –C zone_name
where zone_name is the name of the zone where the Archive Server software is to be installed.
3. Insert the IMPAX 6.0 AS3000 Server DVD-ROM and change to the /cdrom/cdrom0 directory.
or
Change to the IMPAX software repository location.
4. To run the installation script, type
./impax_install
5. When prompted for your name, type your name.
6. Type the password for the AgfaService user.
This is the password you created when installing the Database Server (refer to page 63).
7. Confirm the password.
8. At the Gateway package prompt, to install an Archive Server only, type n.
To install a combined Archive Server and Network Gateway, type y.
9. When prompted about installing the Archive Server, type y.
10. To install an Archive Server, specify the type of archiving.
TypeArchive
hsmHierarchical Storage Management
PACSPACS Archiving
If using PACS Archiving, it must be configured and registered separately (refer to page 129).
11. At the Install PACS Archive Provider (PAP) package prompt, type n.
AS3000 Installation and Configuration Guide—IMPAX 6.5.3 74Agfa Company Confidential—Subject to Non-Disclosure Obligation

12. When prompted, type any additional system configuration information.
This information is saved in /install_info.
13. When prompted, type any additional comments about the installation process.
This information is saved in /install_info.
14. During the installation, the NFS client service is disabled as a function of the hardening process.To enable the NFS Client, type
svcadm enable -r nfs/client
15. After the installation is completed, you must reboot the machine. Type the following to clearvolatile memory (RAM) to disk and reboot at the -bash-3.00# prompt:
-init 6
Configuring the mounted location for HSM(Topic number: 6999)
3.
The Hierarchical Storage Management (HSM) archive system provides long-term storage of dataand access to data. Studies archived with HSM are stored to a file system. HSM is an archive storageoption and is not installed by default.
Note:
Before configuring the mounted location, you must set up the subdirectory within the mountpoint and set the appropriate permissions.
After the HSM package is installed, a few additional configuration steps are required. Ensure thatthe mounted location is set up and is ready for storage/retrieval of files before the HSM starts tostore/retrieve data to/from the mounted location.
To configure the mounted location for HSM
1. Log in as a service user.
2. To get information about the tool, type
mvf-hsm-archive-add-mp -?
3. To check the mounted location, type
mvf-hsm-archive-add-mp -S
4. To set the mounted location, type
mvf-hsm-archive-add-mp -M mount_point -D dir
AS3000 Installation and Configuration Guide—IMPAX 6.5.3 75Agfa Company Confidential—Subject to Non-Disclosure Obligation

Installing Server license keys on a new server(Topic number: 40455)
4.
If you have not already installed the appropriate license keys on the servers, do so now. MVF licensekeys must be installed on each single-host and Network Gateway station. Archive license keys mustbe installed on each single-host and Archive Server station.
If you do not have license keys, you must obtain them from the Agfa Account Manager. Moreinformation, including details about obtaining the MAC address, is available in Obtaining Serverlicense keys (refer to page 52).
Installing the mvf license key on a Solaris server(Topic number: 58053)
MVF license keys must be installed on each single-host, Archive Server/Network Gateway, andNetwork Gateway station.
To install the mvf license key on a Solaris server
1. Match up the correct license key with the machine’s MAC address.
The license key name is the MAC address with a .lic file extension.
2. Change to the /usr/mvf directory.
3. Copy the license key file to the mvf directory on the hard drive.
4. Rename the license key file to:
mvf.lic
Installing the archive license key on a Solaris server(Topic number: 58056)
Archive license keys must be installed on each single-host, Archive Server/Network Gateway, andArchive Server station.
To install the archive license key on a Solaris server
1. Match up the correct license key with the machine’s MAC address.
The license key name is the MAC address with a .lic file extension.
2. Change to the /usr/mvf directory.
3. Copy the license key file to the mvf directory on the hard drive.
4. Rename the license key file to:
mvfarch.lic
AS3000 Installation and Configuration Guide—IMPAX 6.5.3 76Agfa Company Confidential—Subject to Non-Disclosure Obligation
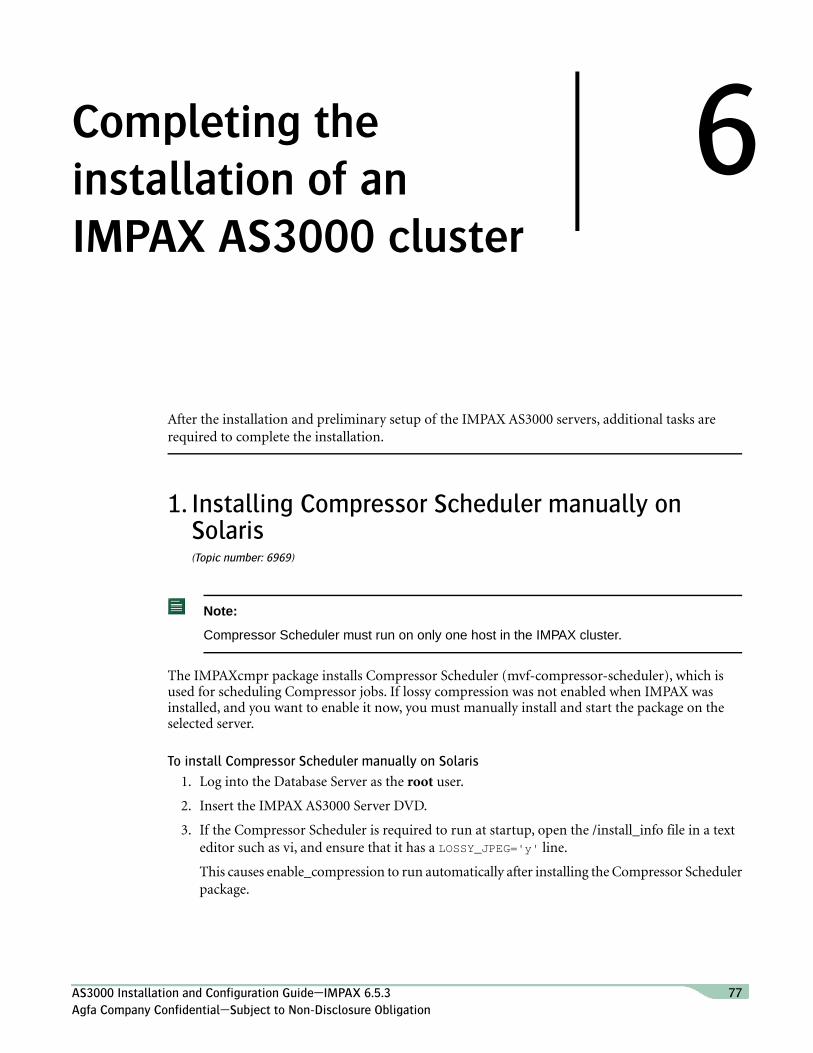
6Completing theinstallation of anIMPAX AS3000 cluster
After the installation and preliminary setup of the IMPAX AS3000 servers, additional tasks arerequired to complete the installation.
Installing Compressor Scheduler manually onSolaris(Topic number: 6969)
1.
Note:
Compressor Scheduler must run on only one host in the IMPAX cluster.
The IMPAXcmpr package installs Compressor Scheduler (mvf-compressor-scheduler), which isused for scheduling Compressor jobs. If lossy compression was not enabled when IMPAX wasinstalled, and you want to enable it now, you must manually install and start the package on theselected server.
To install Compressor Scheduler manually on Solaris
1. Log into the Database Server as the root user.
2. Insert the IMPAX AS3000 Server DVD.
3. If the Compressor Scheduler is required to run at startup, open the /install_info file in a texteditor such as vi, and ensure that it has a LOSSY_JPEG='y' line.
This causes enable_compression to run automatically after installing the Compressor Schedulerpackage.
AS3000 Installation and Configuration Guide—IMPAX 6.5.3 77Agfa Company Confidential—Subject to Non-Disclosure Obligation

4. Change to the /cdrom/cdrom0/IMPAX_R6.5-impax_build_label/`arch -k` directory.
5. To install the Compressor Scheduler package, type
pkgadd -d . IMPAXcmpr
6. If the install_info file was not edited as described in step 3 prior to the installation of the IMPAXcmpr package, type
/usr/mvf/bin/enable_compression
Startup and shutdown files are installed and the mvf-compressor-scheduler service is set up.
Starting Compressor manually on Solaris(Topic number: 6925)
2.
The Compressor files are already installed on those systems with the IMPAXmvfc package (such asNetwork Gateways and Archives); however, Compressor is not actively running and must be manuallystarted.
To start Compressor manually on Solaris
1. Log into the server as root.
2. To start the Compressor, at the terminal window prompt, type
/etc/init.d/IMPAXcomp start
This command installs the startup and shutdown files, and starts the Compressor process,which creates a Compressor Job queue.
3. To ensure that the Compressor is running, type
ps -ef | grep comp
4. Verify that the IMPAXcomp.boot and mvf-compressor processes are running.
If the Compressor Scheduler is installed and running on this system, the IMPAXcompressor.bootand mvf-compressor-scheduler processes may be listed.
5. From Administration Tools > Job Manager, verify that a new MVF_COMPRESSOR queueexists.
Installing the IMPAX Server documentation(Topic number: 6962)
3.
The IMPAX Server documentation is located on the IMPAX Documentation DVD. You install iton an IMPAX Application Server, not on any of the AS300 or AS3000 servers. See “Installing theIMPAX documentation” (topic number 15523) in the IMPAX 6.5.3 Application Server Installation,Upgrade, and Configuration Guide.
AS3000 Installation and Configuration Guide—IMPAX 6.5.3 78Agfa Company Confidential—Subject to Non-Disclosure Obligation

Installing the Application Server(Topic number: 40165)
4.
Before configuring IMPAX Server, install the Application Server software. See the IMPAX 6.5.3Application Server Installation, Upgrade, and Configuration Guide.
Note:
If installing a single-host AS300 (Windows) server, you can optionally install the ApplicationServer software on that same server, creating what is called an all-in-one server.
Installing and configuring Curator(Topic number: 7152)
5.
After installing the Application Server and performing its initial configuration, install and configurethe Curator server, as per the instructions in the IMPAX 6.5.3 Curator and CD Export ServerInstallation Guide.
Configuring the Audit Record Repository databaseconnection(Topic number: 32237)
6.
After installing or upgrading the database and adding an Audit Record Repository, you must updatecertain entries in the database to ensure that auditing functions correctly.
To configure the Audit Record Repository database connection
1. On the IMPAX Database Server, open a command prompt or terminal window.
2. Change to the C:\mvf\bin (AS300) or /usr/mvf/bin (AS3000, logged in as mvf user) directory.
3. Type clui.
4. To check if the entry already exists in the database, type
select * from map_ini where ini_key='ARR_INSTALLED' and ini_section='MAP_EVENT'
5. If the entry exists, to update the entry, type
update map_ini set ini_value='T' where ini_key='ARR_INSTALLED' andini_section='MAP_EVENT'
or
If the key does not exist, to insert it, type
AS3000 Installation and Configuration Guide—IMPAX 6.5.3 79Agfa Company Confidential—Subject to Non-Disclosure Obligation

insert into map_ini (ini_section,ini_key,ini_value) values('MAP_EVENT','ARR_INSTALLED','T')
The Application Server must also be connected to the Audit Record Repository. For details, see“Connecting IMPAX Application Server to Audit Manager” (topic number 11444) in the IMPAX6.5.3 Application Server Installation, Upgrade, and Configuration Guide.
Configuring IMPAX 6.5.3 stations(Topic number: 7002)
7.
After all cluster components are installed, you must configure the capabilities for each station in theIMPAX 6.5.3 Administration Tools. For details and instructions, see the Network Managementsection (topic number 8988) of the Administration Tools component of the IMPAX 6.5.3 ServerKnowledge Base. For instructions on installing IMPAX Client, see the IMPAX 6.5.3 Client Installation,Upgrade, and Configuration Guide.
AS3000 Installation and Configuration Guide—IMPAX 6.5.3 80Agfa Company Confidential—Subject to Non-Disclosure Obligation

ATroubleshooting IMPAX
As you install IMPAX servers, you may encounter various installation and configuration problems.
Troubleshooting: Oracle installation is interruptedand then fails when retried(Topic number: 135285)
IssueThe installation of Oracle is interrupted (for example, by accidentally pressing Ctrl+C). Theinstallation then fails when it is retried.
DetailsWhen rerunning the installation, an error similar to the following occurs.
On Windows:
2011-09-29 19:03:24: Error: Problems installing Oracle11.2.0.2.0, exiting
2011-09-29 19:03:24: Error: Oracle installation failed, exiting
On Solaris:
2011-09-29.09:55 ERROR: Problems installing Oracle11.2.0.2.0 server
2011-09-29.09:55 Error: Oracle removed, exiting.
SolutionOn Windows, the error indicates that the installation has been partly completed and the followingcleanup is necessary:
1. If the OracleMTSRecovery service is available and running, stop it.
2. Delete the following directories:
AS3000 Installation and Configuration Guide—IMPAX 6.5.3 81Agfa Company Confidential—Subject to Non-Disclosure Obligation

• C:\oracle\product\11.2.0
• C:\oracle\112020
• C:\oracle\checkpoints
• C:\oracle\diag
3. Delete the HKLM\SoFTWARE\Oracle\key_oraDb11g_home1 registry entry.
4. Rerun the installation.
On Solaris, the error indicates that Oracle has already been cleaned up and that the installation canbe attempted again.
Note:
If the Oracle installation is interrupted during the patch set update as indicated by a messagesimilar to 2011-09-30.15:47 Applying Patch Set Update #2 (estimated 10 minutes),rerun the installation.
Troubleshooting: zoneadm install fails with a ZFSlegacy mount(Topic number: 132459)
IssueI am trying to add a ZFS file system to a zone using add fs and specifying mountpoint=legacy butthe installation fails.
DetailsIf a non-global zone is initially configured with a ZFS file system to be mounted with the add fssubcommand and specifies mountpoint=legacy, the subsequent zone installation fails. The followingerror message is displayed:
ERROR: No such file or directory:
cannot mount /path/root/usr/local> in non-global zone to install:
the source block device or directory /local> cannot be accessed
Note:
This is a known issue (6449301) documented in the Solaris 10 5/09 Release Notes and maybe fixed with the next update.
SolutionAdd access to a ZFS file system after installing the non-global zone.
AS3000 Installation and Configuration Guide—IMPAX 6.5.3 82Agfa Company Confidential—Subject to Non-Disclosure Obligation

Troubleshooting: Mounting with lofiadm is notworking in a Solaris zone(Topic number: 108300)
IssueI am trying to mount an ISO image with lofiadm in a Solaris zone but it is not working.
DetailsWhen trying to mount an ISO image with lofiadm in a Solaris zone, the following error appears:
lofiadm -a /nfs_mnt/software/AGFA/IMPAX6.5/sunOracleInstall.iso /dev/lofi/1
bash-3.00# mount -F hsfs -o ro /dev/lofi/1 /oracle_mnt
mount: I/O error
mount: cannot mount /dev/lofi/1
bash-3.00# ls -l /dev/*lofi/*
brw------- 1 root sys 147, 1 Jan 21 17:33 /dev/lofi/1
crw------- 1 root sys 147, 1 Jan 21 17:33 /dev/rlofi/1
SolutionIf you copy the iso file to a local disk in the zone, lofiadm then works properly; it does not work ifthe file is on an NFS mount.
Troubleshooting: Attaching an ISO image usinglofiadm is not working in a Solaris zone(Topic number: 130131)
IssueAfter attaching an ISO image using the lofiadm command, I cannot attach another ISO image in thesame Solaris zone or from another zone.
DetailsAlthough a lofi mount may be referencing a file that is only present in one of the non-global zones,it is globally available to all zones. This is a known Solaris issue.
SolutionIf you manually detach the ISO and do not leave it connected, you can then attach another ISOimage using lofiadm.
For example:
AS3000 Installation and Configuration Guide—IMPAX 6.5.3 83Agfa Company Confidential—Subject to Non-Disclosure Obligation

lofiadm -d /dev/lofi/1
umount -f mount_point
Troubleshooting: Zone is suspended in the “shuttingdown” state(Topic number: 131310)
IssueThe zone is suspended and cannot be used. The zoneadm -z zonename shutdown command hasbeen issued but the zone has not quite shut down, and is stuck in the "shutting down" state.
DetailsSometimes, processes do not end as expected. Also, shutting down a non-global zone with an activemount of a lofi device can suspend the zone in the “shutting down” state. To avoid this situation,do not shut down a non-global zone without first unmounting any lofi devices.
Solution1. To check what processes are still running, type ps -fz zonename.
2. If any processes other than zsched are running, kill -9 them.
The zone should shut down.
3. If the zone does not shut down, there is a known issue for which, currently, Oracle does nothave a fix: 6272846—“User orders zone death; NFS client thumbs nose”.
Reconstructing the zone after cleaning it up is the only known option.
Troubleshooting: The application encountered aproblem with the standby database(Topic number: 66656)
IssueThe following error message appears in the Exception Viewer:
The application encountered a problem with the Standby database
DetailsThis message applies only when using an Oracle Data Guard configuration, with a primary andstandby database. It indicates that the archive gap between the primary and standby databases exceeds20.
AS3000 Installation and Configuration Guide—IMPAX 6.5.3 84Agfa Company Confidential—Subject to Non-Disclosure Obligation

SolutionPerform diagnostics such as the following.
1. To verify that the listener.ora files on both the primary and standby servers are correct, loginto the primary server as the oracle user on Solaris and the AgfaService user on Windows.
Change to the /usr/mvf (Solaris) or C:\mvf\bin (Windows) directory and type the following
tnsping MVF
tnsping MVF1
tnsping MVF2
2. Ensure that the standby server is up and running.
3. To ensure that the private listener is running on the standby, type
lsnrctl status
4. Look for errors in the following logs, on both the primary and standby servers:
/usr/mvf/data/logs/oracle/bdump/alert_MVF.log and arcMVF.log (Solaris)
C:\mvf\data\logs\oracle\bdump (Windows)
5. To ensure that Oracle is running on the standby server, type
psg ora
6. To confirm that the redo log has been set on both the primary and standby server, execute thefollowing command in sqlplus on the primary server, then repeat it on the standby server.Ensure that the list matches between the two servers.
select * from v$logfile
7. Ensure that the last line of the redo log contains the standby log files; for example,/usr/mvf/data/dbase/redo/redo_stdby07.log (Solaris) or d:\data\dbase\redo\redo_stdby07.log(Windows).
8. To check that the log files are being received and applied on the standby server, in sqlplus,execute the command
select sequence#,applied from v$archived_log order by sequence#;
9. To force a log switch on the primary server, execute the command
alter system switch logfile;
10. Check again to ensure that the log files are being received and applied on the standby server.Execute the command
select sequence#,applied from v$archived_log order by sequence#;
Ensure that one additional entry appears in the list.
11. To check the configuration, on the primary server, open the Data Guard manager:
dgmgrl sys/stayout@mvf1
show configuration;
AS3000 Installation and Configuration Guide—IMPAX 6.5.3 85Agfa Company Confidential—Subject to Non-Disclosure Obligation

Troubleshooting: Reducing the time needed for aSolaris client to connect to the Oracle standbyserver(Topic number: 111472)
IssueAfter Oracle Data Guard has failed over to the standby server, there is a long delay before Solarisclients such as Network Gateways can connect to the standby database. This delay can be up to threeminutes long. During this time, IMPAX essentially ceases to function.
DetailsThe delay is caused by the TCP/IP settings.You can significantly reduce this time interval by changingthe TCP/IP values on the Oracle database’s Solaris clients.
Solution
Important!
This solution applies to Solaris servers only. This procedure is not necessary on Windowsclients in a mixed-host cluster.
On each of the Oracle database's Solaris clients, change the TCP/IP values as follows:
1. Log in to one of the Oracle database's Solaris clients and open a command prompt.
2. To view the current TCP settings, type
ndd -get /dev/tcp tcp_ip_abort_cinterval
ndd -get /dev/tcp tcp_ip_abort_interval
ndd -get /dev/tcp tcp_keepalive_interval
3. Record these values in case you have to reset them.
4. To change the current TCP settings, type
ndd -set /dev/tcp tcp_ip_abort_cinterval 10000
ndd -set /dev/tcp tcp_ip_abort_interval 60000
ndd -set /dev/tcp tcp_keepalive_interval 240000
After modifying the TCP/IP values, the client connects to the standby Oracle database much fasterthan before.
AS3000 Installation and Configuration Guide—IMPAX 6.5.3 86Agfa Company Confidential—Subject to Non-Disclosure Obligation

BReference material:Solaris
For more information about Solaris zones, refer to the System Administration Guide: Oracle SolarisContainers-Resource Management and Oracle Solaris Zones(http://download.oracle.com/docs/cd/E18752_01/pdf/817-1592.pdf).
For information on upgrading Solaris for IMPAX, refer to the Agfa Solaris Live Upgrade Guide, whichcan be found on the Main IMPAX Knowledge Base Page in the Additional documents section, orcontact Agfa Professional Services.
CAUTION!
Solaris zones should not be modified without sufficient expertise and understanding of theconsequences. If necessary, consult your Agfa Professional Services representative forassistance.
Summary of Solaris zone features(Topic number: 131300)
The following lists summarize the characteristics of global and non-global zones.
Global zone• Is assigned ID 0 by the system
• Provides the single instance of the Solaris kernel that is bootable and running on the system
• Contains a complete installation of the Solaris system software packages
• Can contain additional software packages or additional software, directories, files, and otherdata not installed through packages
AS3000 Installation and Configuration Guide—IMPAX 6.5.3 87Agfa Company Confidential—Subject to Non-Disclosure Obligation

• Provides a complete and consistent product database that contains information about allsoftware components installed in the global zone
• Holds configuration information specific to the global zone only, such as the global zone hostname and file system table
• Is the only zone that is aware of all devices and all file systems
• Is the only zone with knowledge of non-global zone existence and configuration
• Is the only zone from which a non-global zone can be configured, installed, managed, oruninstalled
Non-global zone• Is assigned a zone ID by the system when the zone is booted
• Shares operation under the Solaris kernel booted from the global zone
• Contains an installed subset of the complete Solaris operating system software packages
• Contains Solaris software packages shared from the global zone
• Can contain additional installed software packages not shared from the global zone
• Can contain additional software, directories, files, and other data created on the non-globalzone that are not installed through packages or shared from the global zone
• Has a complete and consistent product database that contains information about all softwarecomponents installed on the zone, whether present on the non-global zone or shared read-onlyfrom the global zone
• Is not aware of the existence of any other zones
• Cannot install, manage, or uninstall other zones, including itself
• Has configuration information specific to that non-global zone only, such as the non-globalzone host name and file system table
• Can have its own time zone setting
Non-global zone states reference(Topic number: 131189)
A non-global zone can be in one of the following six states.
DescriptionState
The zone’s configuration is complete and committed to stable storage. However,those elements of the zone’s application environment that must be specifiedafter initial boot are not yet present.
Configured
AS3000 Installation and Configuration Guide—IMPAX 6.5.3 88Agfa Company Confidential—Subject to Non-Disclosure Obligation

DescriptionState
During an install or uninstall operation, zoneadm sets the state of the targetzone to incomplete. Upon successful completion of the operation, the state isset to the correct state.
Incomplete
The zone’s configuration is instantiated on the system. The zoneadm commandis used to verify that the configuration can be successfully used on the designated
Installed
Solaris system. Packages are installed under the zone’s root path. In this state,the zone has no associated virtual platform.
The virtual platform for the zone is established. The kernel creates the zschedprocess, network interfaces are set up and made available to the zone, file systems
Ready
are mounted, and devices are configured. A unique zone ID is assigned by thesystem. At this stage, no processes associated with the zone have been started.
User processes associated with the zone application environment are running.The zone enters the running state as soon as the first user process associatedwith the application environment (init) is created.
Running
These states are transitional states that are visible while the zone is being halted.However, a zone that cannot shut down for any reason stops in one of thesestates.
Shutting downand Down
You can use the zoneadm command to manage and monitor certain transitions between these states.
Applicable zoneadm commandsCurrent zone state
zoneadm -z zone_name attachConfigured
zoneadm -z zone_name verify
zoneadm -z zone_name install
zoneadm -z zone_name clone
zoneadm -z zone_name uninstallIncomplete
zoneadm -z zone_name ready (optional)Installed
zoneadm -z zone_name boot
zoneadm -z zone_name uninstall—uninstalls the configuration of thespecified zone from the system.
zoneadm -z zone_name move path
zoneadm -z zone_name detach
zoneadm -z zone_name bootReady
zoneadm halt—and system reboot return a zone in the ready state to theinstalled state.
zlogin options zone_nameRunning
zoneadm -z zone_name reboot
zoneadm -z zone_name halt—returns a ready zone to the installed state.
AS3000 Installation and Configuration Guide—IMPAX 6.5.3 89Agfa Company Confidential—Subject to Non-Disclosure Obligation

Applicable zoneadm commandsCurrent zone state
zoneadm halt—and system reboot return a zone in the running state to theinstalled state.
The zonecfg command can be used to create and modify the configuration of a zone; however, itshould not be used without sufficient expertise and understanding of the consequences. Consultyour Agfa Professional Services representative for assistance.
Accessing the non-global zones(Topic number: 130104)
Logging into the global zone is no different from logging into a Solaris server that does not have anyzones. Use the standard login commands and methods.
To perform many IMPAX tasks, however, you must log into the non-global zones. You can log intoa non-global zone from the global zone, using the zlogin command.
Note:
Use the ssh command to connect to a zone in the same way that you would connect to theglobal zone. (You must ssh to the host name of the non-global zone, and not to the zonename. Root login with ssh has been enabled on non-global zones.) When accessed this way,the non-global zone behaves in essentially the same way as a separate physical server.
To access a non-global zone
1. From the global zone, type
zlogin zone_name for a normal login
or
zlogin -C zone_name for a console login
where zone_name is the name of the zone.
For example, zlogin sarnia_z1.
You are logged in as the root user automatically.
2. You can then switch to the appropriate user, such as impax.
3. To exit the zlogin session, type ~. (tilde period).
IMPAX, Solaris zones, and memory(Topic number: 131318)
Using IMPAX with Solaris zones may require certain memory allocations to optimize performance.
AS3000 Installation and Configuration Guide—IMPAX 6.5.3 90Agfa Company Confidential—Subject to Non-Disclosure Obligation

Memory overcommitIf the started zones use more memory than is physically available, performance may be significantlyaffected; for example, a slight overcommit will moderately impact a Network Gateway server, butdramatically impact a Database Server.
Memory undercommitAllocating insufficient memory to a zone can result in measurable reductions in performance.
On a Database Server, the reduction in memory size is matched by a reduction in database-managedmemory (for example, SGA and PGA sizes in Oracle). This is well understood by Agfa ProfessionalServices, who have developed best practices in sizing the host appropriately.
On a Network Gateway, NFS inode caching can typically cause the most critical performance problem.NFS is managed by the kernel and is therefore managed by the global zone. If NFS inode cachestarvation is indicated, allocating more memory to the global zone may be a solution.
Some Archive Server archiving mechanisms require much more memory than others, due to designdecisions associated with implementation. It may be useful to increase the memory allocation forthe zone in these situations.
ZFS memory reservationIMPAX 6.5.3 supports ZFS for zone root file systems. ZFS is not supported for additional file systemsand cannot be used for non-root file systems that are imported into a zone.
By default, ZFS uses all but 1 GB of memory for its ZIL (ZFS Intent Log) cache, then slowly gives itup to the application. This may slow down the system for the first few minutes after it is booted.
If this initial slowness is unacceptable, the ZIL cache can be forced smaller using an entry in/etc/system. For more information, refer to the ZFS Evil Tuning Guide(http://www.solarisinternals.com/wiki/index.php/ZFS_Evil_Tuning_Guide).
Increasing the swap size(Topic number: 140797)
Swap size should be sufficient to support an installation of, or an upgrade to, IMPAX 6.5.3. If IMPAXis installed in the global zone, the swap size should be 110% of the physical RAM. If IMPAX isinstalled in a non-global zone, the swap size should be 110% of the allocated RAM. If the server doesnot have enough space and if you have the necessary knowledge of Solaris, rectify this appropriately;otherwise, consult your Agfa Professional Services representative for assistance.
If you need to increase the swap size, determine beforehand the appropriate size and name for thenew swap file. You can add multiple swap files in multiple locations, as necessary.
If the Agfa Zone Tools package is used to create the IMPAX Database Server, and the zones areconfigured with the recommended default values, the swap size should already be sufficient.
Note:
Add swap files in the global zone.
AS3000 Installation and Configuration Guide—IMPAX 6.5.3 91Agfa Company Confidential—Subject to Non-Disclosure Obligation

To check the available memory and swap space
1. Log into the Database Server global zone as the root user.
2. To check the physical RAM, type
prtconf | grep Memory
The memory size is output in megabytes. To convert this to gigabytes, divide by 1024. Theavailable swap space must be a minimum of 110% of physical RAM.
3. To check the swap space, type
df -h swap
The size in GB is listed. In the following example, it is 16G.
Filesystem size used avail capacity Mounted onswap 16G 48K 16G 1% /var/run
To add a swap file in a UFS file system
1. Log into the Database Server global zone as the root user.
2. To increase the swap size, type
mkfile #g swapfile_path_and_name
where # is the number of GB to increase the size by and swapfile_path_and_name is the locationand name of the swap file.
For example, mkfile 5g /swapfile1
3. To add swap space to this Solaris instance, type
swap -a swapfile_path_and_name
For example, swap -a /swapfile1
Note:
This addition of space is not permanent and, on reboot, is lost.
4. To permanently add the swap file, update the /etc/vfstab file.
For example, to use vi to add the swap file to the /etc/vfstab file, type
vi /etc/vfstab
…
/swapfile1 - - swap - no -
…
5. To list the available swap files, type
swap -l
AS3000 Installation and Configuration Guide—IMPAX 6.5.3 92Agfa Company Confidential—Subject to Non-Disclosure Obligation

To add a swap file to the global zone in a ZFS file system
Note:
Zone attributes in the /lib/agfa.cfg file are used only when a zone is created by the makeZonescript. Once the zone is created, changes to the zone’s configuration can only be done usingthe Solaris zonecfg command.
If the swap space has been reduced to less than 110% of the RAM allocated to the zone,then additional swap space must be added using zonecfg and the zone rebooted.This shouldbe done only if you have the necessary knowledge of Solaris; otherwise, consult your AgfaProfessional Services representative for assistance.
1. Log into the Database Server global zone as the root user.
2. To add more swap space, type
zfs create -V #g rpool/swapfile_name
where # is the number of GB to increase the size by and swapfile_name is the name of the swapfile.
For example, zfs create -V 5g rpool/swapfile1
3. To permanently add the swap file, update the /etc/vfstab file. Type
swap -a /dev/zvol/dsk/rpool/swapfile_name
For example, swap -a /dev/zvol/dsk/rpool/swapfile1
Adding a dedicated network connection to a zone(Topic number: 130126)
It may be necessary to change a server’s virtual zone configuration to stop sharing the global zone’snetwork interface and to use a specified dedicated network communication instead. Use theAddDedicatedNetworkToZone tool, which can be found in the /opt/AGFAzone/bin directory, toadd a dedicated network connection to a zone.
Note:
If the added interface does not have the same IP address and network configuration that thezone previously used, the interface defaults to an IP address of 0.0.0.0. This address mustbe manually updated within the zone.
To add a dedicated network connection to a zone
1. Log into the global zone of the server to configure as the root user.
2. Type AddDedicatedNetworkToZone zone_name if
where zone_name is the name of the zone to configure and if identifies the ethernet interfaceto add to the zone.
AS3000 Installation and Configuration Guide—IMPAX 6.5.3 93Agfa Company Confidential—Subject to Non-Disclosure Obligation

To display help for the command, use the -h or -? parameter.
3. Reboot the zone to apply the network configuration changes.
The following example changes the sarniaz2 zone to use the bge1 adapter.
./AddDedicatedNetworkToZone sarniaz2 bge1
Creating a link aggregation (shared NIC) for a zone(Topic number: 131196)
Link aggregation—also referred to as NIC teaming—means using multiple network cables or portsin parallel to increase the link speed beyond the limits of any one single cable or port, and to increasethe redundancy for higher availability.
Link aggregation only works on full-duplex, point-to-point links that operate at identical speeds.Ensure that the interfaces in your aggregation conform to this requirement.
Note:
If using a switch in your aggregation topology, ensure that you have configured the ports tobe used as an aggregation and, if the switch supports LACP, have configured LACP in eitheractive mode or passive mode.
If necessary, consult your Agfa Professional Services representative for assistance.
To create a link aggregation (shared NIC) for a zone
1. Log into the global zone as the root user.
2. To determine which interfaces are installed on the system, type
dladm show-link
3. To determine which interfaces have been plumbed, type
ifconfig -a
4. To create an aggregation, type
dladm create-aggr -d interface key
where
• interface is the device name of the interface to become part of the aggregation.
• key is the number that identifies the aggregation. The lowest possible key number is 1.
For example, type dladm create-aggr -d e1000g1 -d e1000g2 1.
A data-link is created by default, and is given a name that is the concatenation of aggr and thekey value of the aggregation; for example, aggr1.
5. To modify the aggregation, type
AS3000 Installation and Configuration Guide—IMPAX 6.5.3 94Agfa Company Confidential—Subject to Non-Disclosure Obligation
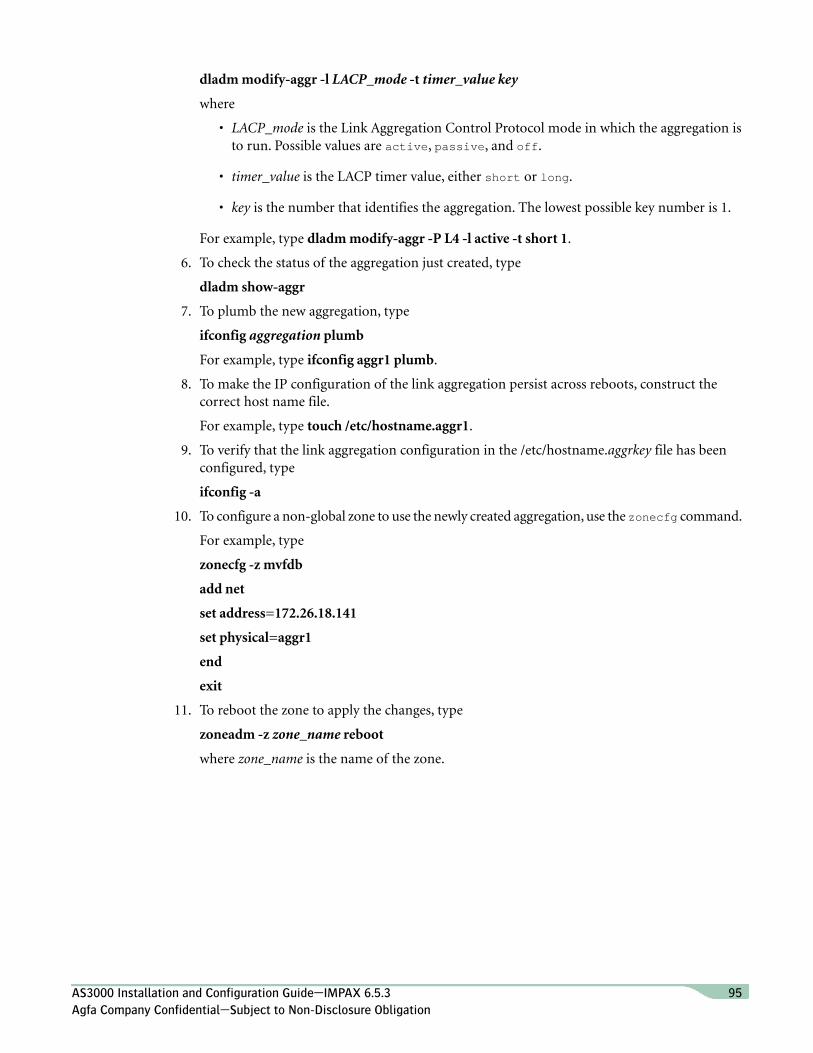
dladm modify-aggr -l LACP_mode -t timer_value key
where
• LACP_mode is the Link Aggregation Control Protocol mode in which the aggregation isto run. Possible values are active, passive, and off.
• timer_value is the LACP timer value, either short or long.
• key is the number that identifies the aggregation. The lowest possible key number is 1.
For example, type dladm modify-aggr -P L4 -l active -t short 1.
6. To check the status of the aggregation just created, type
dladm show-aggr
7. To plumb the new aggregation, type
ifconfig aggregation plumb
For example, type ifconfig aggr1 plumb.
8. To make the IP configuration of the link aggregation persist across reboots, construct thecorrect host name file.
For example, type touch /etc/hostname.aggr1.
9. To verify that the link aggregation configuration in the /etc/hostname.aggrkey file has beenconfigured, type
ifconfig -a
10. To configure a non-global zone to use the newly created aggregation, use the zonecfg command.
For example, type
zonecfg -z mvfdb
add net
set address=172.26.18.141
set physical=aggr1
end
exit
11. To reboot the zone to apply the changes, type
zoneadm -z zone_name reboot
where zone_name is the name of the zone.
AS3000 Installation and Configuration Guide—IMPAX 6.5.3 95Agfa Company Confidential—Subject to Non-Disclosure Obligation

Removing a link aggregation (shared NIC) from azone(Topic number: 131211)
Link aggregation—also referred to as NIC teaming—means using multiple network cables or portsin parallel to increase the link speed beyond the limits of any one single cable or port, and to increasethe redundancy for higher availability.
To remove a link aggregation (shared NIC) from a zone
1. Log into the global zone as the root user.
2. To view any aggregations, type
dladm show-aggr
3. To remove the aggregation from a zone, use the zonecfg command.
For example, type
zonecfg -z nwg
remove net physical=aggr1
commit
exit
4. To shut down certain processes to safely handle a reboot (for example, Oracle), type
zlogin -z zone_name shutdown -g0 -y -i6
where zone_name is the name of the zone.
5. To reboot the zone to apply the changes, type
zoneadm -z zone_name reboot
In the global zone, you can remove an interface from an aggregation or delete the aggregation entirely.
To remove an interface from an aggregation
1. Type dladm remove-aggr -d interface key
where
• interface is the device name of the interface to be removed from the aggregation.
• key is the number that identifies the aggregation. The lowest key number is 1.
For example, type dladm remove-aggr -d e1000g1 1.
To delete an aggregation entirely
1. Type dladm delete-aggr key
For example, type dladm delete-aggr 1.
AS3000 Installation and Configuration Guide—IMPAX 6.5.3 96Agfa Company Confidential—Subject to Non-Disclosure Obligation

Uninstalling a Solaris zone(Topic number: 106071)
CAUTION!
The action of removing all of the files in the zone’s root file system is irreversible.
It may be necessary to uninstall a Solaris zone. To do so, use the delZone tool, located in the/opt/AGFAzone/bin directory.
Note:
The autoboot property setting determines whether the zone is automatically booted whenthe global zone is booted. The zones service, svc:/system/zones:default, must also beenabled. If the zone is not uninstalled and autoboot is set to true, the zone starts upautomatically when the global zone is rebooted. To set this property from the global zone,use the zonecfg command, type set autoboot=true or set autoboot=false, then reboot thezone.
To uninstall a Solaris zone
1. Log into the global zone as the root user.
2. To display the current status of all installed zones, type
zoneadm list -vi
3. To uninstall a zone, type
/opt/AGFAzone/bin/delZone zone_name
where zone_name is the name of the zone.
4. To verify that the zone is no longer listed, list the zones again.
High availability and Solaris zones(Topic number: 131313)
Zones can be migrated between hosts.
For more information, refer to the System Administration Guide: Oracle Solaris Containers-ResourceManagement and Oracle Solaris Zones(http://download.oracle.com/docs/cd/E18752_01/pdf/817-1592.pdf).
AS3000 Installation and Configuration Guide—IMPAX 6.5.3 97Agfa Company Confidential—Subject to Non-Disclosure Obligation

CAUTION!
Solaris zones should not be migrated without sufficient understanding of the processes. Werecommend consulting your Agfa Professional Services representative for assistance.
Solaris Live Upgrade: Key concepts(Topic number: 97408)
Solaris Live Upgrade is a way to upgrade an operating system that substantially reduces the downtimeusually associated with this type of upgrade. This procedure involves creating a duplicate of yourcurrent boot environment, then upgrading the duplicate while the original boot environmentcontinues to run.
Note:
To enable upgrades, Solaris Live Upgrade has specific partitioning requirements. FromIMPAX 6.5 on Solaris 10 onward, these partitioning requirements have been met, facilitatingupgrades with Live Upgrade to subsequent versions or updates. However, because of thesepartitioning requirements, Live Upgrades of any previous IMPAX systems on Solaris are notsupported.
For more information on upgrading Solaris for IMPAX 6.5 onward, refer to the Agfa SolarisLive Upgrade Guide, which can be found on the Main IMPAX Knowledge Base Page in theAdditional documents section, or contact Agfa Professional Services.
Key Benefits• Minimal system downtime—Solaris Live Upgrade enables system administrators to upgrade
or patch the Solaris operating system with minimal system downtime and therefore minimalimpact on those who rely on IMPAX. Administrators can upgrade the operating system, installpatches, and perform routine system maintenance without shutting down the system for anysignificant amount of time.
• Minimal risk when upgrading—The system administrator can revert to the former bootenvironment if the new boot environment does not work as expected. Reverting to the oldboot environment is accomplished simply by rebooting the system.
• Solaris Live Upgrade 2.0 integration with Web Start Flash technology enables systemadministrators to install a complete pre-tested, pre-configured system image rapidly on a newinactive boot environment while the production boot environment is fully operational.
Separate boot environmentThe system administrator installs the latest release of the operating system in a separate, inactiveboot environment that is located on a separate partition on the local disk. For details on how topartition disks, see Disk management strategies (refer to page 29). When the upgrade process iscomplete, the administrator reboots the system to run the updated operating system using the new
AS3000 Installation and Configuration Guide—IMPAX 6.5.3 98Agfa Company Confidential—Subject to Non-Disclosure Obligation

boot environment. If the new boot environment does not work as expected, the administrator canrevert to the previous boot environment by rebooting the system.
Guidelines for using Live Upgrade with Solaris zonesWhen using Live Upgrade on a system with zones installed, avoid zone state transitions duringlucreate and lumount operations.
• When you use the lucreate command to produce an alternate boot environment (ABE), if agiven zone is not running, then the zone cannot be booted until the lucreate has completed.
• When you use the lucreate command to produce an ABE, if a given zone is running, do nothalt or reboot the zone until the lucreate has completed.
• When an ABE is mounted by lumount, you cannot boot zones or reboot them, although zonesrunning before the lumount operation can continue to run.
Modifications made automatically by the Solarisarmoring installation(Topic number: 6954)
Solaris armoring installation makes the following modifications to a standard Solaris install:
• Removes all unnecessary services from /etc/inetd.conf
• Disables ftp, telnet rsh access (to be replaced by scp and ssh)
• Turns off a number of unnecessary services in the rc scripts
• Locks down .rhosts, .netrc, and hosts.equiv files (rsh no longer functions, replaced by ssh)
• Enables sulogging, tcpdlogging, inetlogging, and login log, which improve the system’s IDScapabilities
• Modifies the /etc/default/inetinit sets TCP_STRONG_ISS = 2
• Randomizes all initial sequence number for all TCP connections, guarding against IP spoofingand hijacking
• Secures the kernel parameters for /dev/ip by restricting IP querying
• Modifies /etc/system to help protect against buffer overflow attacks
AS3000 Installation and Configuration Guide—IMPAX 6.5.3 99Agfa Company Confidential—Subject to Non-Disclosure Obligation

Understanding Solaris armoring(Topic number: 6915)
Solaris armoring disables non-essential system services and modifies system parameters to improvethe security of the system. Solaris armoring is installed automatically as part of the Solaris 10installation.
To turn on services disabled by the armoring, do not turn the service back on temporarily; it will bedisabled again at the next boot. Instead, modify the appropriate Solaris Security Toolkit (JASS)driver, create, remove and install the JASS package, and then re-configure the JASS application.
For example, to re-enable the NFS client services and allow the use of a NAS device, do the following:
1. As the root user, change to the /opt/SUNWjass/Drivers directory.
2. In the hardening.driver file, move the ##AGFA comment from the end of thedisable-nfs-client.fin line to the beginning.
3. To create the Solaris package stream, change to the /opt/SUNWjass directory and type
make-jass-pkg
4. To remove the custom package, type
pkgrm JASScustm
5. To install the package, type
pkgadd -d /opt/SUNWjass/JASScustm.pkg
6. To disable the display of information for novice Solaris Security Toolkit users, type
JASS_NOVICE_USER=0
7. Type
export JASS_NOVICE_USER
8. To configure the JASS application, change to the /opt/SUNWjass/bin directory and type
jass-execute hardening.driver 2>&1 | tee -a /var/sadm/JASScustm.log
Groups and accounts created for IMPAX(Topic number: 6976)
Certain operating system groups and accounts are created for IMPAX when it is installed.
Operating system groups created for IMPAXDuring the IMPAX installation, the following operating system groups are created:
DescriptionGroup
Group created for database activitiesdba
Created for IMPAX activitiesmitra
AS3000 Installation and Configuration Guide—IMPAX 6.5.3 100Agfa Company Confidential—Subject to Non-Disclosure Obligation

Operating system account created for IMPAXDuring the IMPAX installation, the following operating system account is created, with a securepassword:
DescriptionAccount
Account for administrative IMPAX accessmvf
Accounts created for IMPAX
DescriptionAccount
Administrator account for the Oracle database, with a secure passwordoracle
User account created when optional MVFocr package is installedocr_train
AS3000 Installation and Configuration Guide—IMPAX 6.5.3 101Agfa Company Confidential—Subject to Non-Disclosure Obligation

COracle Data Guardreference material
Oracle Data Guard enables and automates the management of a disaster recovery solution for Oracledatabases.
What is Oracle Data Guard?(Topic number: 65374)
Oracle Data Guard enables and automates the management of a disaster recovery solution for Oracledatabases.
In an Oracle Data Guard configuration, two database servers run at the same time. The active oneis called the primary database. The second one is called the standby database. As transactions occurin the primary database, redo data is generated and written to the local redo logs. Data Guardautomatically transfers this redo data to the standby site and applies it to the standby database,synchronizing it with the primary database. If a problem occurs with the primary database, thestandby database can take over as the active database, so that the problem on the primary databasecan be resolved without the site losing access to data.
The Oracle Data Guard broker is a distributed management framework that automates and centralizesthe creation, maintenance, and monitoring of Data Guard configurations. You can perform allmanagement operations using the command-line interface called DGMGRL.
Oracle Data Guard can be used only with Oracle Enterprise Edition, and not with Oracle StandardEdition or Oracle Standard Edition One. Data Guard can be configured such that backups do nottake place, yet the system does not issue an error message.
Agfa provides tools to make the configuration and maintenance easier:
1. A set of scripts to automate the configuration of the Data Guard portion of the Oracle database.
AS3000 Installation and Configuration Guide—IMPAX 6.5.3 102Agfa Company Confidential—Subject to Non-Disclosure Obligation

2. Implementation of Oracle RMAN (Recovery Manager) to perform a daily backup of the existingdatabase once the configuration has been completed. (Note that RMAN can also be used forbackup and recovery exclusive of Oracle Data Guard.)
We recommend three times the database size for backup allocation.
3. A set of tools to monitor the configuration (refer to page 128).
To use Oracle Data Guard, the IMPAXoradg package (AS3000) or MVForadg package (AS300) mustbe installed; see Installing the Oracle Data Guard package on a Database Server (refer to page 104).
Oracle Data Guard configuration overview(Topic number: 66674)
Oracle Data Guard is Oracle’s high-availability solution. In an Oracle Data Guard configuration,two database servers run at the same time. The active one is called the primary database. The secondone is called the standby database.
Important!
On AS3000 machines, do not have the Data Guard fail over to another Solaris zone on thesame machine; failover should be to another physical machine so that if a hardware problemoccurs, it does not affect both the primary and standby databases.
The main tasks in setting up an Oracle Data Guard configuration are as follows.
1. Install the IMPAX Database Server following the procedures in the appropriate installationguide: IMPAX 6.5.3 AS300 Installation and Configuration Guide or IMPAX 6.5.3 AS3000Installation and Configuration Guide.
This is the primary database.
2. On AS3000 machines, install the IMPAXoradg package as described in Installing the OracleData Guard package on a Database Server (refer to page 104). When installing an AS300, selectthe optional MVForadg component.
3. Back up the database on the primary database, then restore it onto the standby server, usingone of the following methods:
• RMAN backup and restore (refer to page 104)
• Cold backup and restore (refer to page 108)
This initially configures the standby server.
4. To ensure that the database servers are backed up and that any archive logs no longer requiredare cleaned up, configure RMAN backups (refer to page 116) on the primary and standbyservers.
AS3000 Installation and Configuration Guide—IMPAX 6.5.3 103Agfa Company Confidential—Subject to Non-Disclosure Obligation

Installing the Oracle Data Guard package on aDatabase Server(Topic number: 66583)
To use Oracle Data Guard, first install the IMPAXoradg package (AS3000) or the MVForadg package(AS300). On the IMPAX AS3000, you must install the IMPAXoradg package separately.
To install the IMPAXoradg package on an AS3000 Database Server
1. Log into the Database Server as the root user.
2. Change to the IMPAX software repository directory.
3. Change to the IMPAX_R6.5-impax_build_label directory.
4. Run the following command:
pkgadd -d ./IMPAXoradg.pkg
To install the MVForadg package on an AS300 Database Server
1. When installing the AS300, select the MVForadg as one of the optional packages.
Note:
If you did not install MVForadg at installation time, rerun the IMPAX software installerand select the MVForadg package. Installation instructions are available in the IMPAX6.5.3 AS300 Installation and Configuration Guide.
Configuring Oracle Data Guard using RMAN(Topic number: 125069)
To configure Oracle Data Guard, you must back up the primary database and restore it onto thestandby database server.You can do this either by using RMAN, as described in this topic, or througha cold backup and restore (refer to page 108). Large sites may find the cold backup and restoreapproach is faster than using RMAN.
Note:
We recommend that three times the database size be available for backup allocation.
To configure Oracle Data Guard using RMAN
1. Stop IMPAX and the Application Server.
AS3000 Installation and Configuration Guide—IMPAX 6.5.3 104Agfa Company Confidential—Subject to Non-Disclosure Obligation

2. Run the Oracle Data Guard configuration on the primary server and start the public listener(refer to page 105).
3. For Solaris servers only: Copy the primary flash recovery area (refer to page 106).
4. Restore the database on the standby server (refer to page 107).
5. Complete the Data Guard configuration on the primary server (refer to page 108).
6. Start IMPAX and the Application Server.
Running the Oracle Data Guard configuration on the primary server(Topic number: 125049)
When backing up and restoring the primary database using RMAN, you must first run the OracleData Guard configuration on the primary server.
To run the Oracle Data Guard configuration on the primary server
1. Log into the primary server.
On Solaris, log in as the root user. On Windows, log in as the AgfaService user.
2. Change to the /usr/mvf/bin (Solaris) or C:\mvf\bin (Windows) directory.
3. If on Solaris, type
./setup_dg
4. If on Windows, to open an elevated command prompt, select Start, right-click CommandPrompt, then select Run as administrator.
5. If on Windows, type
bash setup_dg
6. Respond appropriately to the prompts that follow.
The location of the Flashback partition is typically /flashback (Solaris) or E:\data\flashback(Windows). This must be the same location on both the primary and standby servers.
The size of the Flash Recovery Area in GB should be a value as prescribed by the DatabaseConfigurator Tool. Do not include the space for the backups in this amount if backups are ontheir own file system. Normally, no more than two times the database size is required if backupsare separated.
7. Change to the /opt/oracle/current/dbs (Solaris) orC:\oracle\product\11.2.0\db_1\db_1\database (Windows) directory.
8. If on Solaris, log in as the oracle user and type
mv orapw orapw.pre_dg
orapwd file=orapw password=stayout entries=40 ignorecase=y
An Oracle password file is created.
9. If on Windows, type
mv PWDMVF.ora PWDMVF.ora.pre_dg
AS3000 Installation and Configuration Guide—IMPAX 6.5.3 105Agfa Company Confidential—Subject to Non-Disclosure Obligation

orapwd file=PWDMVF.ora password=stayout entries=40 ignorecase=y
An Oracle password file is created.
10. To ensure that the scripts can log into SQLPlus as the sys or dbadmin user, in a commandprompt, type
sqlplus / as sysdba (Solaris) or sqlplus dbadmin/password_for_dbadmin as sysdba (Windows)
alter user sys identified by stayout;
grant sysdba to dbadmin;
11. To switch to the current log file and shutdown the database, type
sqlplus / as sysdba (Solaris) or sqlplus dbadmin/password_for_dbadmin as sysdba (Windows)
alter system switch logfile;
shutdown immediate;
exit;
After the Data Guard configuration is run on the primary server, start the public listener.
To start the public listener
1. Log in as the oracle (Solaris) or AgfaService (Windows) user.
2. Type lsnrctl start listener_public.
Next, if using Solaris servers, share the Flashback area (refer to page 106); otherwise, go directly torestoring the database on the standby server (refer to page 107).
Copying the primary flash recovery area on a Solaris server(Topic number: 125477)
Note:
This task is not required on Windows servers.
The standard Solaris NFS server is implemented in the kernel, and cannot be used for exports withinnon-global zones; therefore, use SCP to transfer the necessary files to the standby server.
To copy the primary flash recovery area on a Solaris server
1. Log into the standby server as the oracle user.
2. Change to the flash recovery area directory.
For example, type cd /dbase/flashback/db_recovery_area.
3. Type
scp -r oracle@primary_server:/flash_recovery_area_path/db_recovery_area/*
Next, restore the database on the standby server (refer to page 107).
AS3000 Installation and Configuration Guide—IMPAX 6.5.3 106Agfa Company Confidential—Subject to Non-Disclosure Obligation

Restoring the database on the standby server(Topic number: 125059)
For both Solaris and Windows servers, restore the database on the standby server.
To restore the database on the standby server
1. Log into the standby server as the oracle (Solaris) or AgfaService (Windows) user.
2. Change to the /opt/oracle/current/dbs (Solaris) orC:\oracle\product\11.2.0\db_1\db_1\database (Windows) directory.
3. Copy the Oracle password file, orapw, from the primary server to the standby server. Type
scp -r oracle@primary_server:/opt/oracle/current/dbs/orapw /opt/oracle/current/dbs/
4. To ensure that the scripts can log into SQLPlus as the sys or dbadmin user, type
sqlplus / as sysdba (Solaris) or sqlplus dbadmin/password_for_dbadmin as sysdba (Windows)
alter user sys identified by stayout;
grant sysdba to dbadmin;
exit
5. On Solaris, to mount the partition locally, log in as the root user and type
mkdir /mnt1
mount primary_server_name:path_to_flashback_recovery_area_on_primary_server /mnt1
Note:
If the database volumes are mounted using NFS, complete this procedure from the NAShosting the NFS share to the primary server.
6. Copy all flashback recovery files from the primary server to the standby server.
On Solaris, change to the mnt1 directory and use the cp -rp */complete_path_to_standby_database_flashback_area/ command.
On Windows, use standard file copy and paste functionality.
7. Change to the /usr/mvf/bin (Solaris) or C:\mvf\bin (Windows) directory.
8. If on Solaris, type
./setup_dg
9. If on Windows, to open an elevated command prompt, select Start, right-click CommandPrompt, then select Run as administrator.
10. If on Windows, type
bash setup_dg
11. Enter the Flashback and host name information as prompted.
AS3000 Installation and Configuration Guide—IMPAX 6.5.3 107Agfa Company Confidential—Subject to Non-Disclosure Obligation

12. When asked if you want to do the RMAN restore, type y.
Finally, to link the two servers, complete the Data Guard configuration (refer to page 108).
Completing the Data Guard configuration(Topic number: 125469)
Linking the two servers completes the Oracle Data Guard configuration.
To complete the Data Guard configuration
1. Log into the primary server as the root (Solaris) or AgfaService (Windows) user.
2. Change to the /usr/mvf/bin (Solaris) or C:\mvf\bin (Windows) directory.
3. If on Solaris, type
./setup_dg
4. If on Windows, do the following:
a. Select Start, right-click Command Prompt, then select Run as administrator.
b. Type bash setup_dg.
5. At the prompt, About to enable log_archive_dest_1 on Primary. Has Data Guardbeen configured on the Standby? [y/n], type y.
6. On any Windows stations, navigate to C:\Program Files\oracle\network\admin and in thetnsnames.ora file, under ADDRESS_LIST, add the following line:
(ADDRESS = (PROTOCOL = TCP)(HOST = standby_server)(PORT = 1521))
7. If on Solaris, copy the /usr/mvf/odbc32v52/odbc.ini file to any Solaris Oracle Client stations.
8. To free up disk space, clean up the RMAN backup created by the Data Guard configurationby typing:
rman target /
delete backup;
Next you must configure RMAN backups (refer to page 116) on the primary and standby servers.
Configuring Oracle Data Guard using cold backup(Topic number: 124225)
In configuring Oracle Data Guard, the second task is to back up and restore the primary database.You can do this either by using RMAN (refer to page 104) or through a cold backup and restore, asdescribed in the following topics. Large sites may find the cold backup and restore approach is fasterthan using RMAN.
AS3000 Installation and Configuration Guide—IMPAX 6.5.3 108Agfa Company Confidential—Subject to Non-Disclosure Obligation

Note:
We recommend that three times the database size be available for backup allocation.
To configure Oracle Data Guard using cold backup
1. Run the Oracle Data Guard configuration on the primary server (refer to page 109).
2. Start the public listener (refer to page 110).
3. Run the Oracle Data Guard configuration on the standby server (refer to page 110).
4. For Solaris servers only: Share the primary Flashback and database areas (refer to page 112).
5. Restore the database on the standby server (refer to page 112).
6. Complete the Data Guard configuration by linking the two servers (refer to page 115).
Running the Oracle Data Guard configuration on the primary server(Topic number: 124026)
When backing up and restoring the primary database through a cold backup and restore, first runthe Oracle Data Guard configuration on the primary server.
To run the Oracle Data Guard configuration on the primary server
1. Log into the primary server.
On Solaris, log in as the root user. On Windows, log in as the AgfaService user.
2. Change to the /usr/mvf/bin (Solaris) or C:\mvf\bin (Windows) directory.
3. If on Solaris, type
./setup_dg
4. If on Windows, to open an elevated command prompt, select Start, right-click CommandPrompt, then select Run as administrator.
5. If on Windows, type
bash setup_dg
6. Respond appropriately to the prompts that follow.
The location of the Flashback partition is typically /flashback (Solaris) or E:\data\flashback(Windows).
The size of the Flash Recovery Area in GB should be a value as prescribed for the /flashbackarea by the Database Configurator Tool. Do not include the space for the backups in thisamount if backups are on their own file system. Normally, no more than two times the databasesize is required if backups are separated.
7. When asked if you want to continue with the RMAN backup, type n.
8. When the message The first part of Data Guard setup on Primary has beencompleted appears, change to the /opt/oracle/current/dbs (Solaris) orC:\oracle\product\11.2.0\db_1\db_1\database (Windows) directory.
AS3000 Installation and Configuration Guide—IMPAX 6.5.3 109Agfa Company Confidential—Subject to Non-Disclosure Obligation

9. If on Solaris, log in as the oracle user and type
mv orapw orapw.pre_dg
orapwd file=orapw password=stayout entries=40 ignorecase=y
This creates an Oracle password file.
10. If on Windows, type
mv PWDMVF.ora PWDMVF.ora.pre_dg
orapwd file=PWDMVF.ora password=stayout entries=40 ignorecase=y
This creates an Oracle password file.
11. To ensure that the scripts can log into SQLPlus as the sys or dbadmin user, in a commandprompt, type
sqlplus / as sysdba (Solaris) or sqlplus dbadmin/password_for_dbadmin as sysdba (Windows)
alter user sys identified by stayout;
grant sysdba to dbadmin;
12. To switch to the current log file and shutdown the database, type
sqlplus / as sysdba (Solaris) or sqlplus dbadmin/password_for_dbadmin as sysdba (Windows)
alter system switch logfile;
shutdown immediate;
exit;
Next, you must run the Oracle Data Guard configuration on the standby server (refer to page 110).
Running the Oracle Data Guard configuration on the standby server(Topic number: 123967)
After the Data Guard configuration is run on the primary server and before running the configurationon the standby server, start the listener.
To start the public listener
1. Log in as the oracle (Solaris) or AgfaService (Windows) user.
2. Type lsnrctl start listener_public.
After the listener service is started, run the Oracle Data Guard configuration on the standby server.
To run the Oracle Data Guard configuration on the standby server
1. On the standby server, log in as user root (Solaris) or AgfaService (Windows).
2. Change to the /usr/mvf/bin (Solaris) or C:\mvf\bin (Windows) directory.
3. If on Solaris, type
./setup_dg
4. If on Windows, do the following:
AS3000 Installation and Configuration Guide—IMPAX 6.5.3 110Agfa Company Confidential—Subject to Non-Disclosure Obligation

a. Select Start, right-click Command Prompt, then select Run as administrator.
b. Type bash setup_dg.
5. When prompted, provide the Flashback area and host name information requested.
6. When asked if you want to do the RMAN restore, type n.
7. When asked about the manual restore, start up a separate prompt on the standby server andperform the procedures that follow to restore the database on the standby server in the newcommand prompt.
For the time being, leave the existing prompt alone.
Next, if using Solaris servers, share the primary Flashback Recovery Area and primary /dbase partition(refer to page 112); otherwise, if using Windows servers, restore the database on the standby server(refer to page 112).
Sharing the primary flash recovery area and /dbase partition on aSolaris server(Topic number: 135475)
Important!
This task is not required on Windows servers.
If the database volumes are mounted using NFS, complete this procedure from the NAS hosting theNFS share to the primary server.
To share the primary flash recovery area and /dbase partition on a Solaris server
1. Copy the contents of the Flashback directory from the primary to the standby server.
2. Open the /etc/dfs/dfstab file in a text editor.
3. Add the following line:
share -F nfs -o rw,anon=0 flash_recovery_area_path
4. Save and close the file.
5. If the system is armored, type
svcadm enable network/nfs/server
6. Type shareall.
7. Log in as the mvf user.
8. To confirm that the directory is shared, type dfshares.
Next, copy the primary flash recovery area and /dbase partition (refer to page 112).
AS3000 Installation and Configuration Guide—IMPAX 6.5.3 111Agfa Company Confidential—Subject to Non-Disclosure Obligation

Copying the primary flash recovery area and /dbase partition on aSolaris server(Topic number: 123990)
Important!
This task is not required on Windows servers.
The standard Solaris NFS server is implemented in the kernel, and cannot be used for exports withinnon-global zones; therefore, use SCP to transfer the necessary files to the standby server.
To copy the primary flash recovery area and /dbase partition on a Solaris server
1. Log into the standby server as the oracle user.
2. Change to the flash recovery area directory.
For example, type
cd /dbase/flashback/db_recovery_area
3. Type
scp -r oracle@primary_server:/flash_recovery_area_path/db_recovery_area/*
4. Change to the /dbase directory and copy its contents.
For example, type
scp -r oracle@primary_server:/dbase/data1/* /dbase/data1
Next, restore the database on the standby server (refer to page 112).
Restoring the database on the standby server(Topic number: 124004)
For both Solaris and Windows servers, you must restore the database on the standby server.
To restore the database on the standby server
1. On the primary server, log in as the oracle (Solaris) or AgfaService (Windows) user.
2. To shut down the primary server, type
sqlplus / as sysdba (Solaris) or sqlplus dbadmin/password_for_dbadmin as sysdba (Windows)
shutdown immediate;
exit;
3. On the standby server, log in as the oracle (Solaris) or AgfaService (Windows) user.
4. Change to the /opt/oracle/current/dbs (Solaris) orC:\oracle\product\11.2.0\db_1\db_1\database (Windows) directory
AS3000 Installation and Configuration Guide—IMPAX 6.5.3 112Agfa Company Confidential—Subject to Non-Disclosure Obligation

5. If on Solaris, type
mv orapw orapw.pre_dg
6. If on Windows, type
mv PWDMVF.ora PWDMVF.ora.pre_dg
7. Copy the orapw file from the primary server.
8. To ensure that the scripts can log into SQLPlus as the sys or dbadmin user, type
sqlplus / as sysdba (Solaris) or sqlplus dbadmin/password_for_dbadmin as sysdba (Windows)
alter user sys identified by stayout;
grant sysdba to dbadmin;
9. To shut down the standby database, type
sqlplus / as sysdba (Solaris) or sqlplus dbadmin/password_for_dbadmin as sysdba (Windows)
shutdown immediate;
exit;
10. On Solaris, to mount the partition locally, log in as the root user and type
mount primary_server_name:path_to_flashback_recovery_area_on_primary_server /mnt1
mount primary_server_name:/dbase /mnt2
11. Clean up the existing data files and redo log files from the standby server by deleting (or move)these files. In doing so, ensure that the /dbase directory structure and any symlinks remainuntouched.
/dbase/data1/*.ctl/dbase/redo/*.ctl/dbase/system/*.ctl
/dbase/data1/*.dbf/dbase/redo/*.dbf/dbase/system/*.dbf
/dbase/data2/*.ctl/dbase/index1/*.ctl/dbase/system/*.log
/dbase/data2/*.dbf/dbase/index1/*.dbf/dbase/rbs/*.ctl
/dbase/arch/*.dbf/dbase/index2/*.dbf/dbase/rbs/*.dbf
12. Copy the necessary data files and redo log files from the primary server to the standby server.
Tip:
On Solaris, use the cp -rp command for each. On Windows, use standard file copy andpaste functionality.
AdditionallyTarget directoryMount pointSlice
—flashback/db_recovery_areastandby_control_file.ctl
flashback/db_recovery_area
AS3000 Installation and Configuration Guide—IMPAX 6.5.3 113Agfa Company Confidential—Subject to Non-Disclosure Obligation

AdditionallyTarget directoryMount pointSlice
If you havedata2/data3/data4
/dbase/data1 (Solaris)
or
All files with*.dbf extensions
/mnt2/data1
directories that are notD:\data\dbase\data1 (Windows) symlinks of data1, also
copy to thosedirectories.
If you haveindex2/index3/index4
/dbase/index1 (Solaris)
or
All files with*.dbf extensions
/mnt2/index1
directories that are notD:\data\dbase\index1 (Windows) symlinks of index1,
also copy to thosedirectories.
If you have rbs/redodirectories that are not
/dbase/system (Solaris)
or
All files with*.dbf extensions
/mnt2/system
symlinks of system,D:\data\dbase\system (Windows) also copy to those
directories.
Ensure theredo_standby*.log files
/dbase/system (Solaris)
or
All redo0*.logfiles
/mnt2/system
are not copied. NoteD:\data\dbase\system (Windows) that the redo log files
could be in the redodirectory.
—/dbase/flashback/db_recovery_areaAll files/mnt1/*
13. Copy any additional data or index files from the primary to the standby server, but do notcopy the control files or the standby redo log files.
14. On the standby server, restore the standby control file in RMAN.
a. Log in as user oracle (Solaris) or AgfaService (Windows).
b. Type
rman target /
startup nomount;
restore standby controlfile from 'flashback/db_recovery_areadirectory/standby_control_file.ctl';
shutdown abort;
startup mount;
exit
15. Change to the /usr/mvf/bin (Solaris) or C:\mvf\bin (Windows) directory.
AS3000 Installation and Configuration Guide—IMPAX 6.5.3 114Agfa Company Confidential—Subject to Non-Disclosure Obligation

16. On the standby server, switch back to the command prompt where setup_dg was running. Atthe manual restore prompt, type y to continue with Data Guard configuration.
Finally, to link the two servers, complete the Data Guard configuration (refer to page 115).
Completing the Data Guard configuration(Topic number: 124015)
To link the two servers, complete the Oracle Data Guard configuration.
To complete the Data Guard configuration
1. Log into the primary server as the oracle (Solaris) or AgfaService (Windows) user.
2. If the primary database is not started, to start it up, type
sqlplus / as sysdba (Solaris) or sqlplus dbadmin/password_for_dbadmin as sysdba (Windows)
startup;
exit;
3. Change to the /usr/mvf/bin (Solaris) or C:\mvf\bin (Windows) directory.
4. To continue the Oracle Data Guard configuration, log in as root (Solaris) or AgfaService user(Windows).
5. If on Solaris, type
./setup_dg
6. If on Windows, do the following:
a. Select Start, right-click Command Prompt, then select Run as administrator.
b. Type
bash setup_dg
7. At the prompt, About to enable log_archive_dest_1 on Primary. Has Data Guardbeen configured on the Standby?, type y.
8. On any Windows stations, navigate to C:\Program Files\oracle\network\admin and in thetnsnames.ora file, under ADDRESS_LIST, add the following line for the standby server:
(ADDRESS = (PROTOCOL = TCP)(HOST = standby_server)(PORT = 1521))
For example:
MVF.WORLD = (DESCRIPTION = (ADDRESS_LIST = (ADDRESS = (PROTOCOL = TCP)(HOST = existing_server)(PORT = 1521)) (ADDRESS = (PROTOCOL = TCP)(HOST = standby_server)(PORT = 1521)) ) (CONNECT_DATA = (SID = MVF) ) )
AS3000 Installation and Configuration Guide—IMPAX 6.5.3 115Agfa Company Confidential—Subject to Non-Disclosure Obligation

9. On Solaris systems, manually copy the /export/mvf/odbc32v52/odbc.ini file from the primaryserver to the same location on the Network Gateway and Archive servers.
Before configuring RMAN backups (refer to page 116) on the primary and standby servers, removeall shares and mount points.
Configuring RMAN backups after the Oracle DataGuard configuration(Topic number: 66586)
Perform this task after you have backed up the database on the primary server and restored it onthe standby server as part of the Oracle Guard configuration.
Configuring RMAN to perform a disk backup at this point cleans up the archive logs.
To configure RMAN backups after the Oracle Data Guard configuration
1. Log into the primary server.
On Solaris, log in as the oracle user. On Windows, log in as the AgfaService user.
2. In a command prompt, change to the /usr/mvf/bin (Solaris) or the C:\mvf\bin (Windows)directory.
3. Run the configure_backup command.
4. To create a standby control file on the primary server, type
sqlplus / as sysdba (Solaris) or sqlplus dbadmin/password_for_dbadmin as sysdba (Windows)
alter database create standby controlfile as '/opt/oracle/standby_control_file.ctl';
5. Copy the control file, standby_control_file.ctl, from the primary to the standby server.
On Solaris, use the following command:
scp /opt/oracle/standby_control_file.ctl service@host_name_of_standby_server/usr/mvf
On Windows, use standard copy and paste functionality to copy the file over.
6. Log into the standby server as the oracle (Solaris) or AgfaService (Windows) user.
7. Run the configure_backup command on this server as well.
8. To shut down the standby server, type
sqlplus / as sysdba (Solaris) or sqlplus dbadmin/password_for_dbadmin as sysdba (Windows)
shutdown immediate;
9. To import the standby control files from the primary server to the standby server, first renamethem with a .orig extension on the standby server; for example, change control03.ctl tocontrol03.ctl.orig. The files to rename are:
a. /usr/mvf/data/dbase/data2/control03.ctl (Solaris) or E:\data\dbase\data2\control03.ctl(Windows)
AS3000 Installation and Configuration Guide—IMPAX 6.5.3 116Agfa Company Confidential—Subject to Non-Disclosure Obligation

b. /usr/mvf/data/dbase/index2/control02.ctl (Solaris) or E:\data\dbase\index2\control02.ctl(Windows)
c. /usr/mvf/data/dbase/system/control01.ctl (Solaris) or E:\data\dbase\system\control01.ctl(Windows)
10. Now copy the standby control files from the primary server to the standby server. The files tocopy are the same as those listed in the previous step.
11. To start and mount the standby server and turn on flashback, type
sqlplus / as sysdba (Solaris) or sqlplus dbadmin/password_for_dbadmin as sysdba (Windows)
startup mount
alter database recover managed standby database cancel;
alter database flashback on;
alter database recover managed standby database using current logfile disconnect fromsession;
Maintaining Oracle Data Guard(Topic number: 67248)
Data Guard is Oracle’s high-availability solution, using primary and standby database servers. Oncethis solution is configured, ongoing maintenance is required to ensure system availability.
Synchronizing redo changes from the primary database to the standbydatabase(Topic number: 67142)
Changing the size and number of the online redo log files is sometimes done to tune the database.You can add or drop online redo log file groups or members to the primary database without affectingthe standby database. Similarly, you can drop log file groups or members from the primary databasewithout affecting the standby database. However, these changes can affect the performance of thestandby database after switchover.
For example, the primary database has 10 redo log files and the standby database has 2 online redolog files. When you switch over to the standby database so that it functions as the new primarydatabase, the new primary database is forced to archive more frequently than the original primarydatabase.
We strongly recommend that if you add or drop online redo log files from the primary database,you synchronize the changes on the standby database.
To synchronize redo changes from the primary database to the standby database
1. If Redo Apply is running, you must cancel it before you can change the log files. In sqlplus onthe standby server, execute the command
alter database recover managed standby database cancel;
AS3000 Installation and Configuration Guide—IMPAX 6.5.3 117Agfa Company Confidential—Subject to Non-Disclosure Obligation

2. If the STANDBY_FILE_MANAGEMENT initialization parameter is set to AUTO, to changethe value to MANUAL, execute the command
alter system set standby_file_management = manual;
3. To add or drop an online redo log file, execute the command
connect internal
4. To check the existing redo log groups, execute the command
select * from v$log;
5. To determine the location and the file names of the current redo log files, execute the command
select * from v$logfile;
6. To add a new online redo log file, execute the command
alter database add logfile 'usr/mvf/data/dbase/redo/redo#.log' size 25000K; (Solaris) or alterdatabase add logfile 'd:\data\dbase\redo\redo#.log' size 25000K; (Windows)
Where # is the number of the next redo log group. For example, if the select * from v$logfile;command returns redo03, you would create redo04.
7. To add more redo log files, repeat steps 5 and 6.
8. To switch to the current log file, execute the command
alter system switch logfile;
9. If the redo log needs to be dropped, execute the commands
alter database drop logfile group #;
select * from v$log;
Where # specifies the log group to drop, for example, alter database drop logfile group 1;drops the redo01.log file.
10. To restore the STANDBY_FILE_MANAGEMENT initialization parameter and the Redo Applyoptions to their original states, execute the commands
alter database recover managed standby database using current logfile disconnect fromsession;
alter system set standby_file_management = auto;
Rebooting the standby database server(Topic number: 67099)
If you have to do any type of servicing of the standby server, you can reboot the server afterward.
To reboot the standby database server
1. Log into the standby server.
On Solaris, log in as the root user. On Windows, log in as the AgfaService user.
2. To prevent IMPAX from starting after a reboot, in a command prompt, type
AS3000 Installation and Configuration Guide—IMPAX 6.5.3 118Agfa Company Confidential—Subject to Non-Disclosure Obligation

# disable_impax
3. If running on Windows, ensure all the IMPAX services are set to Manual startup.
4. Change to the /usr/mvf/bin (Solaris) or C:\mvf\bin (Windows) directory.
5. To reboot the standby server, type
$ sqlplus / as sysbda
alter database recover managed standby database cancel;
shutdown immediate;
6. Change to the root directory.
7. Reboot the Windows server or on Solaris, type # init 6.
8. After the standby server reboots, change to the /usr/mvf/bin (Solaris) or C:\mvf\bin (Windows)directory.
9. To start the Oracle Managed Recovery Process, type
$ sqlplus / as sysbda
startup mount;
alter database recover managed standby database using current logfile disconnect fromsession;
exit;
10. To start the private listener, type
lsnrctl start listener
Rebooting the primary database server(Topic number: 67102)
If you have to do any type of servicing of the primary server, you can reboot the server afterward.
To reboot the primary database server
1. On Solaris, to reboot the primary server, log in as the root user and type init 6.
or
On Windows, reboot the server.
2. After the reboot, verify that the public listener is started. On Solaris, type psg tns.
or
On Windows, check that the OracleohomeTNSListener_listener_public service is started.
3. Start the public listener if not already started. On Solaris, type lsnrctl start listener_public.
or
On Windows, start the OracleohomeTNSListener_listener_public service.
AS3000 Installation and Configuration Guide—IMPAX 6.5.3 119Agfa Company Confidential—Subject to Non-Disclosure Obligation

Resizing Oracle data files(Topic number: 67133)
You must run the monitor_add or monitor_resize command to increase or resize the Oracle datafiles before propagating the file changes to the standby database.
To resize Oracle data files
1. Log into the primary server, log into sqlplus as the sys user.
2. Execute the command
alter system switch log file;
Removing the Oracle Data Guard configuration on the primary andstandby servers(Topic number: 67105)
If you want to uninstall Oracle Data Guard or completely reconfigure it, you can remove the OracleData Guard configuration on the primary and standby servers.
To remove the Oracle Data Guard configuration on the primary and standby servers
1. Log into the primary server.
On Solaris, log in as the oracle user. On Windows, log in as the AgfaService user.
2. In a command prompt, to run Data Guard manager, type
dgmgrl sys/stayout@MVF1
3. In Data Guard manager, to remove the Data Guard configuration, type
remove configuration
4. If on Solaris, to remove the Data Guard configuration files from the primary server, type
cd /opt/oracle/current/dbs
rm dr*.dat
5. If on Windows, to remove the Data Guard configuration files from the primary server, deletethe dr*.dat file from C:\oracle\product\11.2.0\db_1\db_1\database.
6. If on Solaris, to save all the edited Data Guard files, type
cd /opt/oracle/current/dbs
cp initMVF.ora initMVF.ora.dg_save
cp spfileMVF.ora spfileMVF.ora.dg_save
cd /var/opt/oracle
cp tnsnames.ora tnsnames.ora.dg_save
cp listener.ora listener.ora.dg_save
AS3000 Installation and Configuration Guide—IMPAX 6.5.3 120Agfa Company Confidential—Subject to Non-Disclosure Obligation

7. If on Windows, to save all the edited Data Guard files, type
cd C:\oracle\product\11.2.0\db_1\db_1\database
cp initMVF.ora initMVF.ora.dg_save
cp spfileMVF.ora spfileMVF.ora.dg_save
cd C:\oracle\product\11.2.0\db_1\db_1\network\ADMIN
cp tnsnames.ora tnsnames.ora.dg_save
cp listener.ora listener.ora.dg_save
8. To turn off flashback, type
sqlplus / as sysdba
alter database flashback off;
9. To turn off force logging, type
alter database no force logging;
10. Halt all the job queues.
11. Stop IMPAX and IIS on the core servers.
12. To shut down the database, type
sqlplus / as sysdba (Solaris) or sqlplus dbadmin/password_for_dbadmin as sysdba (Windows)
shutdown immediate;
13. If on Solaris, to revert the edited files (listener.ora, tnsnames.ora, spfile.ora) to the originalfiles, copy the original initMVF.ora, tnsnames.ora and listener.ora files back to their respectivelocations. Type
cd /opt/oracle/current/dbs
cp -rp initMVF.ora.pre_dg initMVF.ora
cd /var/opt/oracle
cp -rp tnsnames.ora.pre_dg tnsnames.ora
cp -rp listener.ora.pre_dg listener.ora
14. If on Windows, to revert the edited files to the original files, type
cd C:\oracle\product\11.2.0\db_1\db_1\database
cp -rp initMVF.ora.pre_dg initMVF.ora
cd C:\oracle\product\11.2.0\db_1\db_1\network\ADMIN
cp -rp tnsnames.ora.pre_dg tnsnames.ora
cp -rp listener.ora.pre_dg listener.ora
15. To create the spfile from the pfile, type
sqlplus / as sysdba
create spfile from pfile;
16. To start the database, type
AS3000 Installation and Configuration Guide—IMPAX 6.5.3 121Agfa Company Confidential—Subject to Non-Disclosure Obligation

startup;
17. If on Solaris, modify crontab and remove references to Oracle Data Guard, by commentingthe 15 20 * * * /usr/mvf/bin/check_if_primary_db && /usr/mvf/bin/check_standby crontabentry out by adding a # to the beginning of the line.
18. If on Windows, modify the Task Scheduler and remove references to Oracle Data Guard, bydisabling or deleting the CheckStandby task in Task Scheduler.
19. Repeat the previous steps on the standby server.
20. On the core servers, restart IMPAX and IIS.
21. Restart all the job queues.
22. To ensure that IMPAX starts successfully, test the primary database server.
23. Test the IMPAX Client connectivity.
Switching over to the standby server(Topic number: 67114)
If you want to service the primary server, you can switchover to the standby server.
The public listener on the current standby server has not been set. To avoid IMPAX Client connectivityproblems, you must stop listener_public on the primary server when the primary database goesdown. You can then switch over to the standby server, run the standby database, and reinstate theformer primary server. During this time, the IMPAX Client can still connect to the database, whichis running on the standby Oracle Data Guard host.
To switch over to the standby server
1. Stop the public listener on the primary server. On Solaris, as the oracle user, type lsnrctl stoplistener_public.
or
On Windows, stop the public_listener service.
2. Stop IMPAX on the primary server. On Solaris, as the root user, type stop_impax.
or
On Windows, type stopall.
3. To launch the Data Guard manager on the primary server and perform the switchover, as theoracle user, type
dgmgrl sys/stayout@mvf1
show configuration
switchover to 'MVF2'
show configuration
exit
4. Start the public listener on the standby server, which has been promoted to the primary server.On Solaris, as the oracle user, type lsnrctl start listener_public.
AS3000 Installation and Configuration Guide—IMPAX 6.5.3 122Agfa Company Confidential—Subject to Non-Disclosure Obligation

or
On Windows, start the public_listener service.
5. To query for the ae_ref and the ae_title, in CLUI, type
ae query
6. To determine the signal translator service refs, in CLUI, type
select map_service.service_ref from map_service inner join map_ae on map_ae.ae_ref =map_service.ae_ref inner join map_implements on map_service.service_ref =map_implements.service_ref inner join map_process on map_implements.process_ref =map_process.process_ref where map_process.process_title='MVF_SIGNAL_TRANSLATOR'and map_ae.ae_title='AE_title_of_failed_primary_server'
Two service refs are returned.
7. For each service ref, in CLUI, type
service delete service_ref
8. To set the new primary Task Scheduler, in CLUI, type
update map_ini set ini_value='AE_title_of_new_primary_server' whereini_section='MVF_TASK_SCHEDULER' and ini_key='PRIMARY_SERVER'
update mvf_ts_config set ae_ref='AE_title_of_new_primary_server' whereae_ref='AE_title_of_failed_server'
9. Start IMPAX on the new primary server. On Solaris, as the root user, type start_impax.
or
On Windows, type startall.
10. As the root user, restart the MVF Task Scheduler on the remaining IMPAX servers such as theArchives, Network Gateways, and Curators.
On Solaris, restart the MVF Task Scheduler by killing the process or restarting IMPAX. OnWindows, restart the Mitra System Task Scheduler service.
Note:
If this is the first time that the standby database is opened after a switchover, you mustre-create the temporary file on the standby server (refer to page 125).
The IMPAX Clients can now connect to the new primary database. After the switchover, the Clientmay continue to experience connectivity problems, specifically in the Image area, but should beresolved on its own a few minutes after switchover as IMPAX re-establishes the connection to thenewly promoted database server.
AS3000 Installation and Configuration Guide—IMPAX 6.5.3 123Agfa Company Confidential—Subject to Non-Disclosure Obligation

Failing over to the standby server(Topic number: 67117)
If the primary server is unavailable, you can fail over to the standby server to ensure maximumavailability.
To fail over to the standby server
1. If you can connect to the primary server, stop the public listener. On Solaris, as the oracle user,type lsnrctl stop listener_public.
or
On Windows, stop the public_listener service.
If you cannot connect to the primary server, skip to step 3.
2. Stop IMPAX as the root user on the primary server. On Solaris, type stop_impax.
or
On Windows, type stopall.
3. To launch the Data Guard manager on the standby server and perform the failover, as theoracle user on Solaris or the AgfaService user on Windows, type
dgmgrl sys/stayout@mvf2
show configuration
failover to 'MVF2'
show configuration
MVF2 is now the primary server.
4. Start the public listener on the standby server, which has been promoted to the primary server.On Solaris, as the oracle user, type lsnrctl start listener_public.
or
On Windows, start the public_listener service.
5. To query for the ae_ref and the ae_title, in CLUI, type
ae query
6. To determine the signal translator service refs, in CLUI, type
select map_service.service_ref from map_service inner join map_ae on map_ae.ae_ref =map_service.ae_ref inner join map_implements on map_service.service_ref =map_implements.service_ref inner join map_process on map_implements.process_ref =map_process.process_ref where map_process.process_title='MVF_SIGNAL_TRANSLATOR'and map_ae.ae_title='AE_title_of_failed_primary_server'
Two service refs are returned.
7. For each service ref, in CLUI, type
service delete service_ref
AS3000 Installation and Configuration Guide—IMPAX 6.5.3 124Agfa Company Confidential—Subject to Non-Disclosure Obligation
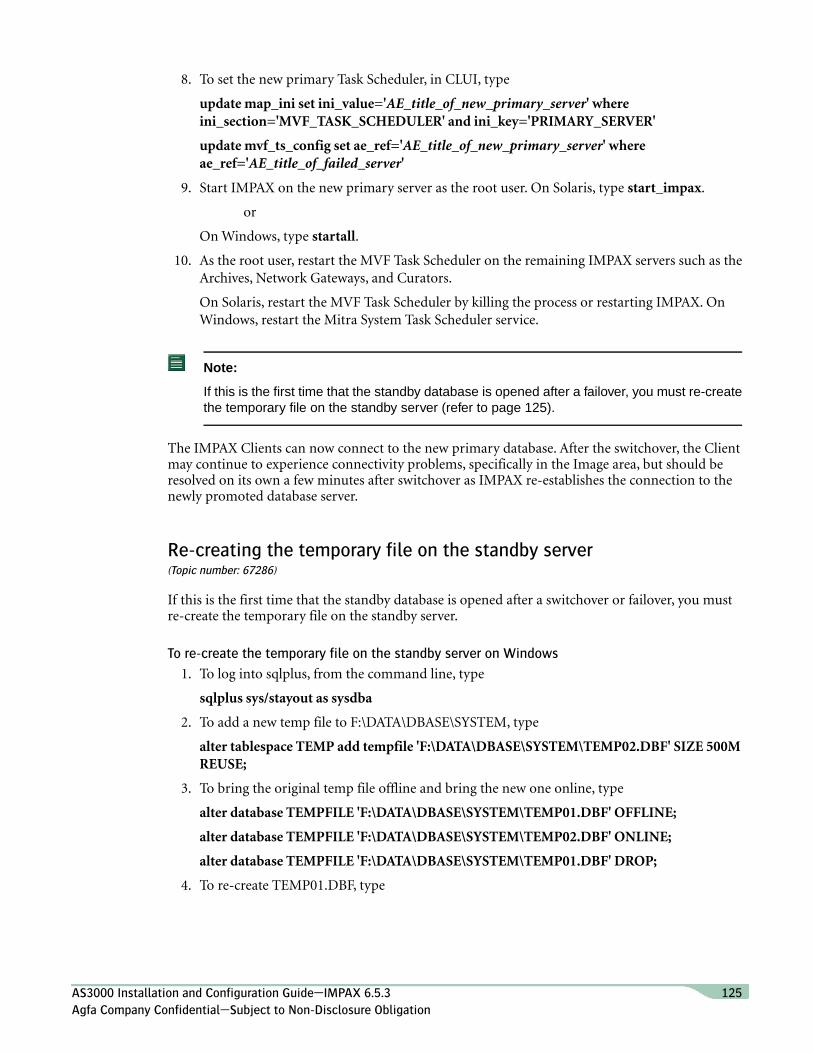
8. To set the new primary Task Scheduler, in CLUI, type
update map_ini set ini_value='AE_title_of_new_primary_server' whereini_section='MVF_TASK_SCHEDULER' and ini_key='PRIMARY_SERVER'
update mvf_ts_config set ae_ref='AE_title_of_new_primary_server' whereae_ref='AE_title_of_failed_server'
9. Start IMPAX on the new primary server as the root user. On Solaris, type start_impax.
or
On Windows, type startall.
10. As the root user, restart the MVF Task Scheduler on the remaining IMPAX servers such as theArchives, Network Gateways, and Curators.
On Solaris, restart the MVF Task Scheduler by killing the process or restarting IMPAX. OnWindows, restart the Mitra System Task Scheduler service.
Note:
If this is the first time that the standby database is opened after a failover, you must re-createthe temporary file on the standby server (refer to page 125).
The IMPAX Clients can now connect to the new primary database. After the switchover, the Clientmay continue to experience connectivity problems, specifically in the Image area, but should beresolved on its own a few minutes after switchover as IMPAX re-establishes the connection to thenewly promoted database server.
Re-creating the temporary file on the standby server(Topic number: 67286)
If this is the first time that the standby database is opened after a switchover or failover, you mustre-create the temporary file on the standby server.
To re-create the temporary file on the standby server on Windows
1. To log into sqlplus, from the command line, type
sqlplus sys/stayout as sysdba
2. To add a new temp file to F:\DATA\DBASE\SYSTEM, type
alter tablespace TEMP add tempfile 'F:\DATA\DBASE\SYSTEM\TEMP02.DBF' SIZE 500MREUSE;
3. To bring the original temp file offline and bring the new one online, type
alter database TEMPFILE 'F:\DATA\DBASE\SYSTEM\TEMP01.DBF' OFFLINE;
alter database TEMPFILE 'F:\DATA\DBASE\SYSTEM\TEMP02.DBF' ONLINE;
alter database TEMPFILE 'F:\DATA\DBASE\SYSTEM\TEMP01.DBF' DROP;
4. To re-create TEMP01.DBF, type
AS3000 Installation and Configuration Guide—IMPAX 6.5.3 125Agfa Company Confidential—Subject to Non-Disclosure Obligation

alter tablespace TEMP add tempfile 'F:\DATA\DBASE\SYSTEM\TEMP01.DBF' SIZE 500MREUSE;
5. To bring TEMP01.DBF online and to drop TEMP02.DBF, type
alter database TEMPFILE 'F:\DATA\DBASE\SYSTEM\TEMP02.DBF' OFFLINE;
alter database TEMPFILE 'F:\DATA\DBASE\SYSTEM\TEMP01.DBF' ONLINE;
alter database TEMPFILE 'F:\DATA\DBASE\SYSTEM\TEMP02.DBF' DROP;
To re-create the temporary file on the standby server on Solaris
1. To log into sqlplus, from the command line, type
sqlplus sys/stayout as sysdba
2. To add a new temp file to F:\DATA\DBASE\SYSTEM, type
alter tablespace TEMP add tempfile '/usr/mvf/data/dbase/system/temp02.dbf ' SIZE 500MREUSE;
3. To bring the original temp file offline and bring the new one online, type
alter database TEMPFILE '/usr/mvf/data/dbase/system/temp01.dbf ' OFFLINE;
alter database TEMPFILE '/usr/mvf/data/dbase/system/temp02.dbf ' ONLINE;
alter database TEMPFILE '/usr/mvf/data/dbase/system/temp01.dbf ' DROP;
4. To re-create TEMP01.DBF, type
alter tablespace TEMP add tempfile '/usr/mvf/data/dbase/system/temp01.dbf ' SIZE 500MREUSE;
5. To bring TEMP01.DBF online and to drop TEMP02.DBF, type
alter database TEMPFILE '/usr/mvf/data/dbase/system/temp02.dbf ' OFFLINE;
alter database TEMPFILE '/usr/mvf/data/dbase/system/temp01.dbf ' ONLINE;
alter database TEMPFILE '/usr/mvf/data/dbase/system/temp02.dbf ' DROP;
Reinstating the failed primary database(Topic number: 67120)
Once the failed primary server has been repaired, you can reinstate it as the primary database.
To reinstate the failed primary database
1. After the primary database has been repaired, to restart the database, as the oracle user onSolaris or the AgfaService user on Windows, type
sqlplus / as sysdba (Solaris) or sqlplus dbadmin/password_for_dbadmin as sysdba (Windows)
startup mount;
quit
AS3000 Installation and Configuration Guide—IMPAX 6.5.3 126Agfa Company Confidential—Subject to Non-Disclosure Obligation

2. To launch the Data Guard manager, on the primary server as the oracle user on Solaris or theAgfaService user on Windows, type
dgmgrl sys/stayout@mvf2
3. To perform the switchover, type
show configuration
reinstate database 'MVF1'
show configuration
exit
4. To launch the Data Guard manager on the repaired primary, as the Oracle user, type
dgmgrl sys/stayout@mvf2
5. To make MVF1 the primary server, type
switchover to 'MVF1'
exit
6. Stop the public listener on the new standby server.
On Solaris, as the oracle user, type lsnrctl stop listener_public.
or
On Windows, stop the public_listener service.
7. Stop IMPAX on the new standby server.
On Solaris, type stop_impax.
or
On Windows, type stopall.
8. To query for the ae_ref and the ae_title, in CLUI, type
ae query
9. To determine the signal translator service refs, in CLUI, type
select map_service.service_ref from map_service inner join map_ae on map_ae.ae_ref =map_service.ae_ref inner join map_implements on map_service.service_ref =map_implements.service_ref inner join map_process on map_implements.process_ref =map_process.process_ref where map_process.process_title='MVF_SIGNAL_TRANSLATOR'and map_ae.ae_title='AE_Title_of_ failed_primary_server'
Two service refs are returned.
10. For each service ref, in CLUI, type
service delete service_ref
11. To set the new primary Task Scheduler, in CLUI, type
update map_ini set ini_value='AE_title_of_new_primary_server' whereini_section='MVF_TASK_SCHEDULER' and ini_key='PRIMARY_SERVER'
AS3000 Installation and Configuration Guide—IMPAX 6.5.3 127Agfa Company Confidential—Subject to Non-Disclosure Obligation

update mvf_ts_config set ae_ref='AE_reference_of_new_primary_server' whereae_ref='AE_reference_of_old_primary_server'
12. Start the public listener on the new primary server.
On Solaris, as the oracle user, type lsnrctl start listener_public.
or
On Windows, start the public_listener service.
13. Start IMPAX on the new primary server.
On Solaris, as the root user, type start_impax.
or
On Windows, type startall.
Tools for monitoring Oracle Data Guard(Topic number: 66589)
Oracle Data Guard is a high-availability solution that uses two database servers—the active, primaryserver, and a standby server that can take over should any problems occur on the primary server.The following tools are available for monitoring an Oracle Data Guard configuration.
DescriptionScript
Used to sanity check an existing Data Guard configuration to see if theinit parameters are set as expected. Run this script manually, as necessary.It works only on the primary server.
check_dg_configuration
Note:
On Windows 2008, run check_dg_configuration from an elevatedcommand prompt.
Configured through crontab (AS3000) or Scheduled Tasks (AS300) torun daily at 3:45 and 20:15 to detect any archive gaps between the primary
check_standby
and standby servers. If the gap exceeds 20, an exception is sent. Thisscript works only on the primary server.
Tip:
To run these scripts on Windows, precede them with bash; for example bashcheck_dg_configuration.
AS3000 Installation and Configuration Guide—IMPAX 6.5.3 128Agfa Company Confidential—Subject to Non-Disclosure Obligation

DReference material:Archiving and security
Various reference materials may be useful during the installation procedure.
PACS Store and Remember archiving(Topic number: 6939)
If you do not have a physical archive, or want to use PACS Store and Remember archiving in additionto your media archive, you can set up the PACS Store and Remember archive in the AdministrationTools and register the services with IMPAX.
Adding a PACS Store and Remember archive(Topic number: 9215)
To configure an external PACS archive as a PACS Store and Remember archive, set up the externalPACS archive in Network Management in the IMPAX Administration Tools.
To add a PACS Store and Remember archive
1. Launch and log into the IMPAX Administration Tools.
2. On the Setup tab, click Network Management.
3. To set up a new destination, click New.
4. Type the AE title of the external PACS archive.
5. Type an alias for the archive.
6. Type the host name or IP address of the archive.
7. Click Save.
AS3000 Installation and Configuration Guide—IMPAX 6.5.3 129Agfa Company Confidential—Subject to Non-Disclosure Obligation

8. Switch to the Capabilities tab.
9. From the list at the bottom of the manager, select the added external PACS archive.
10. Under Station Type, select PACS.
11. Under Server is Allowed to, select Query/Retrieve from Station.
12. If using different AE titles on the external PACS archive for store and retrieve jobs, repeatsteps 3 to 11 for the retrieve AE title.
13. Click Save.
Next, you must register the PACS Store and Remember archive services.
Registering PACS Store and Remember archive services in Solaris(Topic number: 9214)
Designate the server that will perform the PACS Store and Remember archiving.
Often this is the server running the Network Gateway software.
To register PACS Store and Remember archive services in Solaris
1. Log into the IMPAX server as the mvf user.
2. To register the server as a PACS Store and Remember archive, in a terminal window, type
install_pacs -a AE_title_PACS_Store_and_Remember_archive -pAE_title_external_PACS_archive [-r AE_title_external_PACS_archive_retrieval]
The AE title used here must match the AE title used when defining the external PACS archivein Network Management (refer to page 129). The AE title is case-sensitive.
If the AE title for store jobs is the same as the AE title for retrieve jobs on the external PACSarchive, the -r AE_title_external_PACS_archive_retrieval parameter is optional.
3. To restart the mvf-scu processes, launch CLUI and type
signal kill 0 MVF_SCU
4. Test the PACS Store and Remember archive functionality (refer to page 130).
Testing PACS Store and Remember archiving(Topic number: 9213)
Test the PACS Store and Remember archive to ensure that the services were registered properly.
To test that the archive was set up correctly
1. On Solaris, check that the external archive is listed in the /etc/hosts file.
2. To confirm that the external archive can be accessed, ping the external archive using the hostname or IP address.
AS3000 Installation and Configuration Guide—IMPAX 6.5.3 130Agfa Company Confidential—Subject to Non-Disclosure Obligation

To test store and retrieve functionality
1. Launch and log into the IMPAX Administration Tools.
2. On the Daily tab, click Job Manager.
3. Ensure that a PACS Archive queue exists.
4. On the Daily tab, click Study Manager.
5. Search for and select a study to store to the PACS Store and Remember archive.
6. To test the store functionality, click Store to Archive.
7. If you are using more than one archive, from the Archive list, select the PACS Store andRemember archive and click OK.
8. Ensure that the study is stored to the PACS Store and Remember archive.
9. To delete the study from the local cache so that you can test the retrieve functionality, fromthe Location list, select Cached.
10. Search for and select the study you stored to the PACS Store and Remember archive.
11. Click Delete from Cache.
12. Confirm that you want to delete the selected study from cache.
13. To test the retrieve functionality, from the Location list, select Archived.
14. Search for and select the study in the PACS Store and Remember archive.
If the study is stored in more than one location, ensure that you select the copy in the PACSStore and Remember archive.
15. Click Retrieve.
Generating and importing mvf.portable.psd(Topic number: 6980)
System security is enforced by having credentials for IMPAX internal processes contained withinencrypted password files that must be distributed to all machines in the cluster.
When installing IMPAX on the Database Server, the impax_install script uses a passkey utility tosave the AgfaService password to a password file at /usr/mvf/mvf.psd. Next the utility creates aportable version of this password file at /usr/mvf/mvf.portable.psd.
When installing IMPAX Network Gateway or Archive Server software, the IMPAX installation scriptimports mvf.portable.psd, re-encrypts it using a machine specific key, and creates the file/usr/mvf/mvf.psd on the target server.
In some cases the mvf.portable.psd file is not available on the Database Server. This does not preventany of the initial Network Gateway or Archive Server installs, but you must manually generate andimport the password key to the target server.
AS3000 Installation and Configuration Guide—IMPAX 6.5.3 131Agfa Company Confidential—Subject to Non-Disclosure Obligation

In other cases following initial installations, prudent security management recommends that themvf.portable.psd file be deleted from the Database Server once all Network Gateway and ArchiveServer machines are installed. Therefore, if at some later point you install a new Network Gatewayor Archive Server, you must manually generate and import the password key to the target server.
Whenever the import of mvf.portable.psd to the target server fails during an AS3000 installation,you see the following log message indicating the required password file is not on the Database Server:
The AgfaService ID password file failed to import properly. You will need to import the password file manually.
The AS3000 Network Gateway or Archive Server installation completed successfully (unless otherlog messages indicate otherwise), but you must manually generate and import the password key tothe target server.
Generating the AS3000 portable password file(Topic number: 58083)
You may need to generate the portable password file to install new servers or to troubleshoot whenpassword file import fails during installation.
To generate the AS3000 portable password file
1. Log into the AS3000 Database Server machine as the root user.
2. Change to the /usr/mvf directory.
3. To export the passkey for installing IMPAX on remote machines, type
./bin/passkey -M EXPORT -k temporary_password
where temporary_password is a password to be used to import the portable password file later.
This creates the /usr/mvf/mvf.portable.psd password file.
4. On the target server, open a Cygwin command window to download the portable passwordfile from the Database Server.
a. Ensure the C:\temp directory exists on the target server. If the C:\temp directory doesnot exist, create one.
b. Double-click the Cygwin.bat file located in the C:\cygwin\ directory.
c. On the Cygwin command window, type
scp service@<Database server hostname>:/usr/mvf/mvf.portable.psd /cygdrive/c/temp
d. If prompted to add the Database Server's RSA key fingerprint to the list of known hosts,click Yes.
The portable password file is downloaded to the C:\temp directory on the target server.
Important!
You should know the service user's password on the Database Server beforedownloading the portable password file.
AS3000 Installation and Configuration Guide—IMPAX 6.5.3 132Agfa Company Confidential—Subject to Non-Disclosure Obligation

Delete /usr/mvf/mvf.portable.psd from the Database Server when you finish downloading it to thetarget servers or servers.
Importing the portable password file locally to the target server(Topic number: 58086)
Once generated, you can import the password file onto the server that needs it.
To import the portable password file locally to the target server
1. Log into the target Network Gateway or Archive Server as the root user.
2. To import the portable password file, type
/usr/mvf/bin/passkey -M IMPORT -k temporary_password
where temporary_password is the password you gave when exporting the portable passwordfile.
This reads the mvf.portable.psd file, re-encrypts it using a machine specific key, and createsthe local /usr/mvf/mvf.psd file.
3. To restrict permissions on the newly created mvf.psd file, type
chmod 640 /usr/mvf/mvf.psd
4. Delete /usr/mvf/mvf.portable.psd from the target server.
CAUTION!
The mvf.portable.psd file contains sensitive information. To maintain the security of thesystem, the portable password file should be deleted from both the Database Serverand the target servers.
Understanding the passkey utility(Topic number: 9302)
System security is enforced by having credentials for IMPAX internal processes contained withinencrypted password files that must be distributed to all server machines in the cluster.
IMPAX 6.5.3 sets up various user accounts for the IMPAX services. These accounts are set up witha random alphanumeric password, different for each installation. The passwords are encrypted witha key specific to the machine, and stored locally in a password file. The file cannot be copied toanother system and decrypted.
To facilitate sharing information among servers, a passkey utility is used to export the password keyinto a portable format that can then be copied to another machine and imported. This portable fileis encrypted during the export and secured with a password; the portable file is imported into anothersystem by using the same password.
AS3000 Installation and Configuration Guide—IMPAX 6.5.3 133Agfa Company Confidential—Subject to Non-Disclosure Obligation

Differences between system and portable password files(Topic number: 6936)
Two files contain IMPAX password information:
• System password file
This file is encrypted with a key specific to the machine and unknown to the user, called thesystem key. This file is not transferable between machines and can be decrypted only on thesystem where it was created. It is located under the mvf directory and is named mvf.psd bydefault.
Note:
If the mvf.psd file already exists, do not remove it; otherwise, IMPAX services cannotstart.
• Portable password file
This file is encrypted with a key specified by the user, thus having a much weaker type ofencryption. It is created upon user request, and should be deleted when no longer required.This key can be used to transfer passwords between systems during the installation of IMPAX.
Passkey utility reference(Topic number: 6937)
To facilitate sharing information among servers, a passkey utility is used to export the password keyinto a portable format that can then be copied to another machine and imported. This portable fileis encrypted during the export and secured with a password; the portable file is imported into anothersystem by using the same password.
The passkey utility is in the /usr/mvf/bin directory on Solaris and the C:\mvf\bin directory onWindows. The command can be used in various modes, specified by the -M option. The -p and -roptions allow you to specify non-default file names for the system password file and portable passwordfile.
The command syntax is as follows:
passkey -M mode, arguments [-p file_name] [-r file_name]
where:
DescriptionArguments-M mode
This mode validates the user key against a portablepassword file.
-k user_key
specifies the user key to check
CHECKKEY
AS3000 Installation and Configuration Guide—IMPAX 6.5.3 134Agfa Company Confidential—Subject to Non-Disclosure Obligation
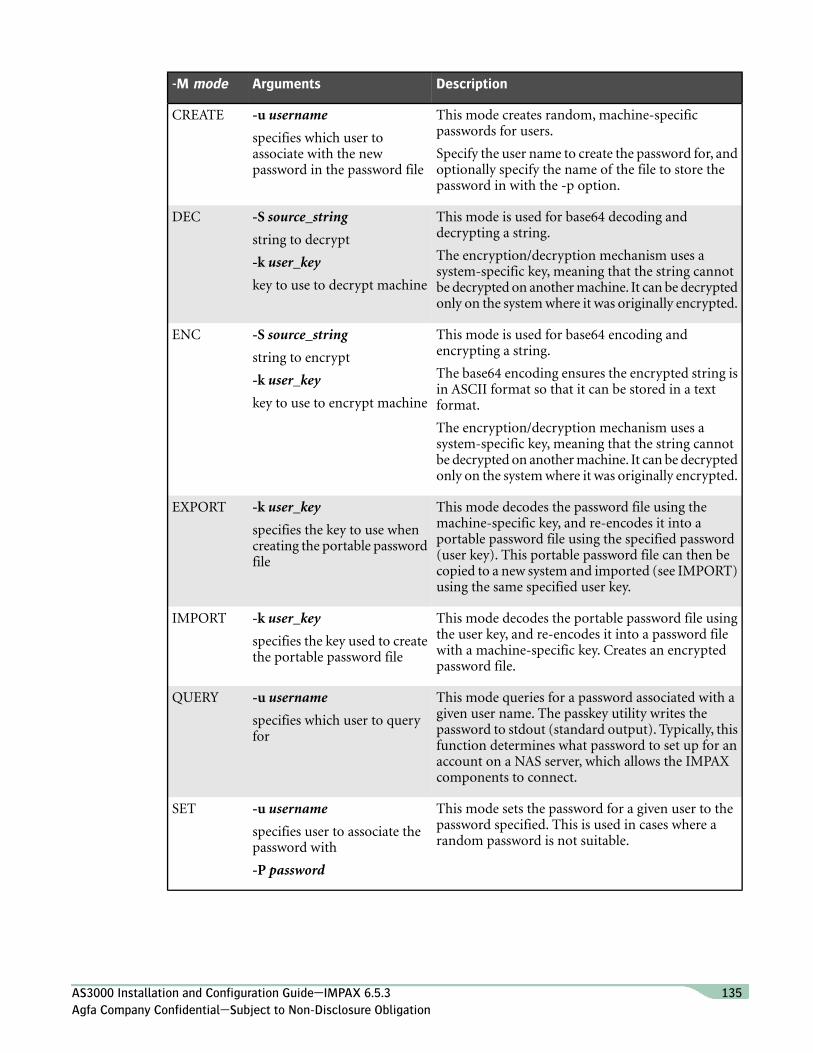
DescriptionArguments-M mode
This mode creates random, machine-specificpasswords for users.
-u username
specifies which user toassociate with the newpassword in the password file
CREATE
Specify the user name to create the password for, andoptionally specify the name of the file to store thepassword in with the -p option.
This mode is used for base64 decoding anddecrypting a string.
-S source_string
string to decrypt
DEC
The encryption/decryption mechanism uses asystem-specific key, meaning that the string cannot
-k user_key
key to use to decrypt machine be decrypted on another machine. It can be decryptedonly on the system where it was originally encrypted.
This mode is used for base64 encoding andencrypting a string.
-S source_string
string to encrypt
ENC
The base64 encoding ensures the encrypted string isin ASCII format so that it can be stored in a textformat.
-k user_key
key to use to encrypt machine
The encryption/decryption mechanism uses asystem-specific key, meaning that the string cannotbe decrypted on another machine. It can be decryptedonly on the system where it was originally encrypted.
This mode decodes the password file using themachine-specific key, and re-encodes it into a
-k user_key
specifies the key to use whencreating the portable passwordfile
EXPORT
portable password file using the specified password(user key). This portable password file can then becopied to a new system and imported (see IMPORT)using the same specified user key.
This mode decodes the portable password file usingthe user key, and re-encodes it into a password file
-k user_key
specifies the key used to createthe portable password file
IMPORT
with a machine-specific key. Creates an encryptedpassword file.
This mode queries for a password associated with agiven user name. The passkey utility writes the
-u username
specifies which user to queryfor
QUERY
password to stdout (standard output). Typically, thisfunction determines what password to set up for anaccount on a NAS server, which allows the IMPAXcomponents to connect.
This mode sets the password for a given user to thepassword specified. This is used in cases where arandom password is not suitable.
-u username
specifies user to associate thepassword with
SET
-P password
AS3000 Installation and Configuration Guide—IMPAX 6.5.3 135Agfa Company Confidential—Subject to Non-Disclosure Obligation

DescriptionArguments-M mode
specifies password to associatewith user
This mode can be used to test a specific passwordagainst strong password rules. A strong passwordmust:
-u username
username to use in strongpassword validation
VALIDATE
• Be at least eight characters long-P password
• Not contain three or more characters from theuser’s account name
validates password againststrong password encryptionrules (used by Solaris installer)
• Contain characters from at least three of thefollowing five categories:
• Uppercase (A to Z)
• Lowercase (a to z)
• Digits (0 to 9)
• Non-alphanumeric (for example, !, $, #,or %); avoid commas
• Unicode
-p file_name—optionally specifies a system password file name other than the default C:\mvf\mvf.psd(AS300) or usr/mvf/mvf.psd (AS3000)
-r file_name—optionally specifies a portable password file name other than the defaultC:\mvf\mvf.portable.psd (AS300) or usr/mvf/mvf.portable.psd (AS3000)
CAUTION!
The mvf.portable.psd file contains sensitive information.To maintain the security of the system,the portable password file should be deleted from both the Database Server and the targetserver locations after all new Network Gateway, Archive Server, Application Server, andCurator components are installed.
AS3000 Installation and Configuration Guide—IMPAX 6.5.3 136Agfa Company Confidential—Subject to Non-Disclosure Obligation
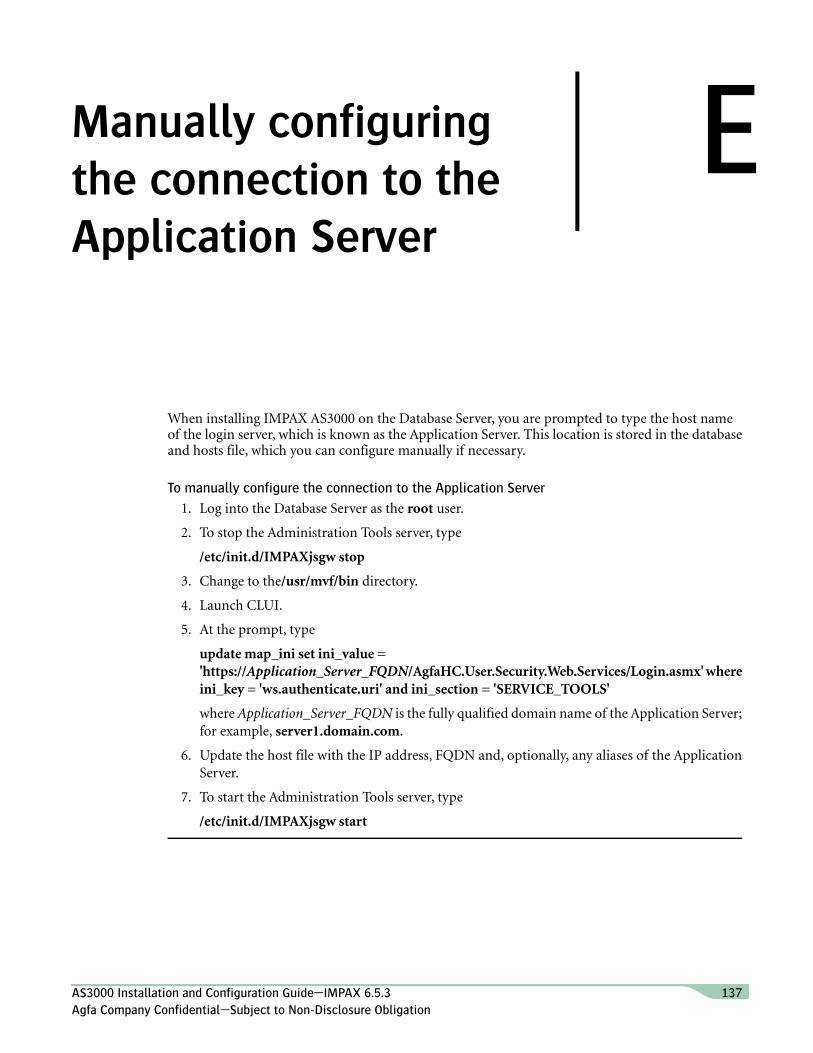
EManually configuringthe connection to theApplication Server
When installing IMPAX AS3000 on the Database Server, you are prompted to type the host nameof the login server, which is known as the Application Server. This location is stored in the databaseand hosts file, which you can configure manually if necessary.
To manually configure the connection to the Application Server
1. Log into the Database Server as the root user.
2. To stop the Administration Tools server, type
/etc/init.d/IMPAXjsgw stop
3. Change to the/usr/mvf/bin directory.
4. Launch CLUI.
5. At the prompt, type
update map_ini set ini_value ='https://Application_Server_FQDN/AgfaHC.User.Security.Web.Services/Login.asmx' whereini_key = 'ws.authenticate.uri' and ini_section = 'SERVICE_TOOLS'
where Application_Server_FQDN is the fully qualified domain name of the Application Server;for example, server1.domain.com.
6. Update the host file with the IP address, FQDN and, optionally, any aliases of the ApplicationServer.
7. To start the Administration Tools server, type
/etc/init.d/IMPAXjsgw start
AS3000 Installation and Configuration Guide—IMPAX 6.5.3 137Agfa Company Confidential—Subject to Non-Disclosure Obligation

FIntegrating the IMPAXEnterprise Solution
The IMPAX Enterprise Solution offers a fully integrated RIS, PACS, and Reporting solution.
What is the IMPAX Enterprise Solution?(Topic number: 56712)
The IMPAX Enterprise Solution is an integrated offering designed to meet the needs of large healthcareorganizations. The IMPAX Enterprise Solution:
• Leverages the diversity and depth of the Agfa IMPAX product portfolio
• Forms an integrated solution for large-scale healthcare institutions with multi-disciplinary andmulti-departmental needs
• Delivers consistent and predictable workflow and outcomes, employing workflow-awareadaptability and scalability
Key modules in the IMPAX Enterprise SolutionThe foundations of the IMPAX Enterprise Solution are the key modules in a fully integrated offering:
• PACS
• RIS
• Reporting
AS3000 Installation and Configuration Guide—IMPAX 6.5.3 138Agfa Company Confidential—Subject to Non-Disclosure Obligation

Integrating into the IMPAX Enterprise Solution(Topic number: 56715)
As part of the IMPAX Enterprise Solution, this product must be configured to fully support anintegrated RIS-PACS-Reporting solution. For details about planning and implementing aRIS-PACS-Reporting integration, contact your local Agfa representative.
AS3000 Installation and Configuration Guide—IMPAX 6.5.3 139Agfa Company Confidential—Subject to Non-Disclosure Obligation

GExternalsoftware licenses
Some of the software provided utilizes or includes software components licensed by third parties,who require disclosure of the following information about their copyright interests and/or licensingterms.
Cygwin(Topic number: 121758)
Copyright 1998, 1999, 2000, 2001, 2002, 2003, 2004, 2005, 2006, 2007, 2008, 2009, 2010 Red Hat,Inc.
This program is free software; you can redistribute it and/or modify it under the terms of the GNUGeneral Public License (GPL) as published by the Free Software Foundation version 2 of the License.
This program is distributed in the hope that it will be useful, but WITHOUT ANY WARRANTY;without even the implied warranty of MERCHANTABILITY or FITNESS FOR A PARTICULARPURPOSE. See the GNU General Public License for more details.
You should have received a copy of the GNU General Public License along with this program; if not,write to the Free Software Foundation, Inc., 59 Temple Place - Suite 330, Boston, MA 02111-1307,USA.
GNU GENERAL PUBLIC LICENSE
Version 2, June 1991
Copyright (C) 1989, 1991 Free Software Foundation, Inc., 675 Mass Ave, Cambridge, MA 02139,USA. Everyone is permitted to copy and distribute verbatim copies of this license document, butchanging it is not allowed.
Preamble
AS3000 Installation and Configuration Guide—IMPAX 6.5.3 140Agfa Company Confidential—Subject to Non-Disclosure Obligation

The licenses for most software are designed to take away your freedom to share and change it. Bycontrast, the GNU General Public License is intended to guarantee your freedom to share and changefree software--to make sure the software is free for all its users. This General Public License appliesto most of the Free Software Foundation's software and to any other program whose authors committo using it. (Some other Free Software Foundation software is covered by the GNU Library GeneralPublic License instead.) You can apply it to your programs, too.
When we speak of free software, we are referring to freedom, not price. Our General Public Licensesare designed to make sure that you have the freedom to distribute copies of free software (and chargefor this service if you wish), that you receive source code or can get it if you want it, that you canchange the software or use pieces of it in new free programs; and that you know you can do thesethings.
To protect your rights, we need to make restrictions that forbid anyone to deny you these rights orto ask you to surrender the rights. These restrictions translate to certain responsibilities for you ifyou distribute copies of the software, or if you modify it.
For example, if you distribute copies of such a program, whether gratis or for a fee, you must givethe recipients all the rights that you have. You must make sure that they, too, receive or can get thesource code. And you must show them these terms so they know their rights.
We protect your rights with two steps: (1) copyright the software, and (2) offer you this license whichgives you legal permission to copy, distribute and/or modify the software.
Also, for each author's protection and ours, we want to make certain that everyone understands thatthere is no warranty for this free software. If the software is modified by someone else and passedon, we want its recipients to know that what they have is not the original, so that any problemsintroduced by others will not reflect on the original authors' reputations.
Finally, any free program is threatened constantly by software patents. We wish to avoid the dangerthat redistributors of a free program will individually obtain patent licenses, in effect making theprogram proprietary. To prevent this, we have made it clear that any patent must be licensed foreveryone's free use or not licensed at all.
The precise terms and conditions for copying, distribution and modification follow.
GNU GENERAL PUBLIC LICENSE
TERMS AND CONDITIONS FOR COPYING, DISTRIBUTION AND MODIFICATION
1. This License applies to any program or other work which contains a notice placed by thecopyright holder saying it may be distributed under the terms of this General Public License.The "Program", below, refers to any such program or work, and a "work based on the Program"means either the Program or any derivative work under copyright law: that is to say, a workcontaining the Program or a portion of it, either verbatim or with modifications and/ortranslated into another language. (Hereinafter, translation is included without limitation inthe term "modification".) Each licensee is addressed as "you".
Activities other than copying, distribution and modification are not covered by this License;they are outside its scope. The act of running the Program is not restricted, and the outputfrom the Program is covered only if its contents constitute a work based on the Program(independent of having been made by running the Program). Whether that is true dependson what the Program does.
AS3000 Installation and Configuration Guide—IMPAX 6.5.3 141Agfa Company Confidential—Subject to Non-Disclosure Obligation

2. You may copy and distribute verbatim copies of the Program's source code as you receive it,in any medium, provided that you conspicuously and appropriately publish on each copy anappropriate copyright notice and disclaimer of warranty; keep intact all the notices that referto this License and to the absence of any warranty; and give any other recipients of the Programa copy of this License along with the Program.
You may charge a fee for the physical act of transferring a copy, and you may at your optionoffer warranty protection in exchange for a fee.
3. You may modify your copy or copies of the Program or any portion of it, thus forming a workbased on the Program, and copy and distribute such modifications or work under the termsof Section 1 above, provided that you also meet all of these conditions:
a. You must cause the modified files to carry prominent notices stating that you changedthe files and the date of any change.
b. You must cause any work that you distribute or publish, that in whole or in part containsor is derived from the Program or any part thereof, to be licensed as a whole at no chargeto all third parties under the terms of this License.
c. If the modified program normally reads commands interactively when run, you mustcause it, when started running for such interactive use in the most ordinary way, to printor display an announcement including an appropriate copyright notice and a notice thatthere is no warranty (or else, saying that you provide a warranty) and that users mayredistribute the program under these conditions, and telling the user how to view a copyof this License. (Exception: if the Program itself is interactive but does not normally printsuch an announcement, your work based on the Program is not required to print anannouncement.)
These requirements apply to the modified work as a whole. If identifiable sections of that workare not derived from the Program, and can be reasonably considered independent and separateworks in themselves, then this License, and its terms, do not apply to those sections when youdistribute them as separate works. But when you distribute the same sections as part of a wholewhich is a work based on the Program, the distribution of the whole must be on the terms ofthis License, whose permissions for other licensees extend to the entire whole, and thus to eachand every part regardless of who wrote it.
Thus, it is not the intent of this section to claim rights or contest your rights to work writtenentirely by you; rather, the intent is to exercise the right to control the distribution of derivativeor collective works based on the Program.
In addition, mere aggregation of another work not based on the Program with the Program(or with a work based on the Program) on a volume of a storage or distribution medium doesnot bring the other work under the scope of this License.
4. You may copy and distribute the Program (or a work based on it, under Section 2) in objectcode or executable form under the terms of Sections 1 and 2 above provided that you also doone of the following:
a. Accompany it with the complete corresponding machine-readable source code, whichmust be distributed under the terms of Sections 1 and 2 above on a medium customarilyused for software interchange; or,
AS3000 Installation and Configuration Guide—IMPAX 6.5.3 142Agfa Company Confidential—Subject to Non-Disclosure Obligation

b. Accompany it with a written offer, valid for at least three years, to give any third party,for a charge no more than your cost of physically performing source distribution, acomplete machine-readable copy of the corresponding source code, to be distributedunder the terms of Sections 1 and 2 above on a medium customarily used for softwareinterchange; or,
c. Accompany it with the information you received as to the offer to distribute correspondingsource code. (This alternative is allowed only for noncommercial distribution and onlyif you received the program in object code or executable form with such an offer, in accordwith Subsection b above.)
The source code for a work means the preferred form of the work for making modificationsto it. For an executable work, complete source code means all the source code for allmodules it contains, plus any associated interface definition files, plus the scripts used tocontrol compilation and installation of the executable. However, as a special exception,the source code distributed need not include anything that is normally distributed (ineither source or binary form) with the major components (compiler, kernel, and so on)of the operating system on which the executable runs, unless that component itselfaccompanies the executable.
If distribution of executable or object code is made by offering access to copy from adesignated place, then offering equivalent access to copy the source code from the sameplace counts as distribution of the source code, even though third parties are not compelledto copy the source along with the object code.
5. You may not copy, modify, sublicense, or distribute the Program except as expressly providedunder this License. Any attempt otherwise to copy, modify, sublicense or distribute the Programis void, and will automatically terminate your rights under this License. However, parties whohave received copies, or rights, from you under this License will not have their licensesterminated so long as such parties remain in full compliance.
6. You are not required to accept this License, since you have not signed it. However, nothingelse grants you permission to modify or distribute the Program or its derivative works. Theseactions are prohibited by law if you do not accept this License. Therefore, by modifying ordistributing the Program (or any work based on the Program), you indicate your acceptanceof this License to do so, and all its terms and conditions for copying, distributing or modifyingthe Program or works based on it.
7. Each time you redistribute the Program (or any work based on the Program), the recipientautomatically receives a license from the original licensor to copy, distribute or modify theProgram subject to these terms and conditions. You may not impose any further restrictionson the recipients' exercise of the rights granted herein. You are not responsible for enforcingcompliance by third parties to this License.
8. If, as a consequence of a court judgment or allegation of patent infringement or for any otherreason (not limited to patent issues), conditions are imposed on you (whether by court order,agreement or otherwise) that contradict the conditions of this License, they do not excuse youfrom the conditions of this License. If you cannot distribute so as to satisfy simultaneouslyyour obligations under this License and any other pertinent obligations, then as a consequenceyou may not distribute the Program at all. For example, if a patent license would not permitroyalty-free redistribution of the Program by all those who receive copies directly or indirectly
AS3000 Installation and Configuration Guide—IMPAX 6.5.3 143Agfa Company Confidential—Subject to Non-Disclosure Obligation

through you, then the only way you could satisfy both it and this License would be to refrainentirely from distribution of the Program.
If any portion of this section is held invalid or unenforceable under any particular circumstance,the balance of the section is intended to apply and the section as a whole is intended to applyin other circumstances.
It is not the purpose of this section to induce you to infringe any patents or other propertyright claims or to contest validity of any such claims; this section has the sole purpose ofprotecting the integrity of the free software distribution system, which is implemented by publiclicense practices. Many people have made generous contributions to the wide range of softwaredistributed through that system in reliance on consistent application of that system; it is up tothe author/donor to decide if he or she is willing to distribute software through any othersystem and a licensee cannot impose that choice.
This section is intended to make thoroughly clear what is believed to be a consequence of therest of this License.
9. If the distribution and/or use of the Program is restricted in certain countries either by patentsor by copyrighted interfaces, the original copyright holder who places the Program under thisLicense may add an explicit geographical distribution limitation excluding those countries, sothat distribution is permitted only in or among countries not thus excluded. In such case, thisLicense incorporates the limitation as if written in the body of this License.
10. The Free Software Foundation may publish revised and/or new versions of the General PublicLicense from time to time. Such new versions will be similar in spirit to the present version,but may differ in detail to address new problems or concerns.
Each version is given a distinguishing version number. If the Program specifies a version numberof this License which applies to it and "any later version", you have the option of following theterms and conditions either of that version or of any later version published by the Free SoftwareFoundation. If the Program does not specify a version number of this License, you may chooseany version ever published by the Free Software Foundation.
11. If you wish to incorporate parts of the Program into other free programs whose distributionconditions are different, write to the author to ask for permission. For software which iscopyrighted by the Free Software Foundation, write to the Free Software Foundation; wesometimes make exceptions for this. Our decision will be guided by the two goals of preservingthe free status of all derivatives of our free software and of promoting the sharing and reuse ofsoftware generally.
NO WARRANTY
1. BECAUSE THE PROGRAM IS LICENSED FREE OF CHARGE, THERE IS NO WARRANTYFOR THE PROGRAM, TO THE EXTENT PERMITTED BY APPLICABLE LAW. EXCEPTWHEN OTHERWISE STATED IN WRITING THE COPYRIGHT HOLDERS AND/OR OTHERPARTIES PROVIDE THE PROGRAM "AS IS" WITHOUT WARRANTY OF ANY KIND,EITHER EXPRESSED OR IMPLIED, INCLUDING, BUT NOT LIMITED TO, THE IMPLIEDWARRANTIES OF MERCHANTABILITY AND FITNESS FOR A PARTICULAR PURPOSE.THE ENTIRE RISK AS TO THE QUALITY AND PERFORMANCE OF THE PROGRAM ISWITH YOU. SHOULD THE PROGRAM PROVE DEFECTIVE, YOU ASSUME THE COSTOF ALL NECESSARY SERVICING, REPAIR OR CORRECTION
AS3000 Installation and Configuration Guide—IMPAX 6.5.3 144Agfa Company Confidential—Subject to Non-Disclosure Obligation

2. IN NO EVENT UNLESS REQUIRED BY APPLICABLE LAW OR AGREED TO IN WRITINGWILL ANY COPYRIGHT HOLDER, OR ANY OTHER PARTY WHO MAY MODIFY AND/ORREDISTRIBUTE THE PROGRAM AS PERMITTED ABOVE, BE LIABLE TO YOU FORDAMAGES, INCLUDING ANY GENERAL, SPECIAL, INCIDENTAL OR CONSEQUENTIALDAMAGES ARISING OUT OF THE USE OR INABILITY TO USE THE PROGRAM(INCLUDING BUT NOT LIMITED TO LOSS OF DATA OR DATA BEING RENDEREDINACCURATE OR LOSSES SUSTAINED BY YOU OR THIRD PARTIES OR A FAILURE OFTHE PROGRAM TO OPERATE WITH ANY OTHER PROGRAMS), EVEN IF SUCH HOLDEROR OTHER PARTY HAS BEEN ADVISED OF THE POSSIBILITY OF SUCH DAMAGES.
END OF TERMS AND CONDITIONS
Editline 1.2-cstr(Topic number: 121768)
Copyright 1992 Simmule Turner and Rich Salz. All rights reserved. This software is not subject toany license of the American Telephone and Telegraph Company or of the Regents of the Universityof California. Permission is granted to anyone to use this software for any purpose on any computersystem, and to alter it and redistribute it freely, subject to the following restrictions: 1. The authorsare not responsible for the consequences of use of this software, no matter how awful, even if theyarise from flaws in it. 2. The origin of this software must not be misrepresented, either by explicitclaim or by omission. Since few users ever read sources, credits must appear in the documentation.3. Altered versions must be plainly marked as such, and must not be misrepresented as being theoriginal software. Since few users ever read sources, credits must appear in the documentation. 4.This notice may not be removed or altered.
ICU License - ICU 1.8.1 and later(Topic number: 13533)
COPYRIGHT AND PERMISSION NOTICE
Copyright © 1995-2003 International Business Machines Corporation and others.
All rights reserved.
Permission is hereby granted, free of charge, to any person obtaining a copy of this software andassociated documentation files (the “Software”), to deal in the Software without restriction, includingwithout limitation the rights to use, copy, modify, merge, publish, distribute, and/or sell copies ofthe Software, and to permit persons to whom the Software is furnished to do so, provided that theabove copyright notice(s) and this permission notice appear in all copies of the Software and thatboth the above copyright notice(s) and this permission notice appear in supporting documentation.
THE SOFTWARE IS PROVIDED “AS IS”, WITHOUT WARRANTY OF ANY KIND, EXPRESS ORIMPLIED, INCLUDING BUT NOT LIMITED TO THE WARRANTIES OF MERCHANTABILITY,FITNESS FOR A PARTICULAR PURPOSE AND NONINFRINGEMENT OF THIRD PARTY
AS3000 Installation and Configuration Guide—IMPAX 6.5.3 145Agfa Company Confidential—Subject to Non-Disclosure Obligation

RIGHTS. IN NO EVENT SHALL THE COPYRIGHT HOLDER OR HOLDERS INCLUDED INTHIS NOTICE BE LIABLE FOR ANY CLAIM, OR ANY SPECIAL INDIRECT OR CONSEQUENTIALDAMAGES, OR ANY DAMAGES WHATSOEVER RESULTING FROM LOSS OF USE, DATA ORPROFITS, WHETHER IN AN ACTION OF CONTRACT, NEGLIGENCE OR OTHER TORTIOUSACTION, ARISING OUT OF OR IN CONNECTION WITH THE USE OR PERFORMANCE OFTHIS SOFTWARE.
Except as contained in this notice, the name of a copyright holder shall not be used in advertisingor otherwise to promote the sale, use or other dealings in this Software without prior writtenauthorization of the copyright holder.
All trademarks and registered trademarks mentioned herein are the property of their respectiveowners.
OpenSSL(Topic number: 121771)
This is a copy of the current LICENSE file inside the CVS repository.
LICENSE ISSUES
============
The OpenSSL toolkit stays under a dual license, i.e. both the conditions of the OpenSSL License andthe original SSLeay license apply to the toolkit. See below for the actual license texts. Actually bothlicenses are BSD-style Open Source licenses. In case of any license issues related to OpenSSL pleasecontact [email protected].
OpenSSL License
====================================================================
Copyright ©) 1998-2008 The OpenSSL Project. All rights reserved.
Redistribution and use in source and binary forms, with or without modification, are permittedprovided that the following conditions are met:
1. Redistributions of source code must retain the above copyright notice, this list of conditionsand the following disclaimer.
2. Redistributions in binary form must reproduce the above copyright notice, this list of conditionsand the following disclaimer in the documentation and/or other materials provided with thedistribution.
3. All advertising materials mentioning features or use of this software must display the followingacknowledgment: "This product includes software developed by the OpenSSL Project for usein the OpenSSL Toolkit. (http://www.openssl.org/)"
4. The names “OpenSSL Toolkit” and “OpenSSL Project” must not be used to endorse or promoteproducts derived from this software without prior written permission. For written permission,please contact [email protected].
5. Products derived from this software may not be called “OpenSSL” nor may “OpenSSL” appearin their names without prior written permission of the OpenSSL Project.
AS3000 Installation and Configuration Guide—IMPAX 6.5.3 146Agfa Company Confidential—Subject to Non-Disclosure Obligation

6. Redistributions of any form whatsoever must retain the following acknowledgment: "Thisproduct includes software developed by the OpenSSL Project for use in the OpenSSL Toolkit(http://www.openssl.org/)"
THIS SOFTWARE IS PROVIDED BY THE OpenSSL PROJECT “AS IS”' AND ANY EXPRESSEDOR IMPLIED WARRANTIES, INCLUDING, BUT NOT LIMITED TO, THE IMPLIEDWARRANTIES OF MERCHANTABILITY AND FITNESS FOR A PARTICULAR PURPOSE AREDISCLAIMED. IN NO EVENT SHALL THE OpenSSL PROJECT OR ITS CONTRIBUTORS BELIABLE FOR ANY DIRECT, INDIRECT, INCIDENTAL, SPECIAL, EXEMPLARY, ORCONSEQUENTIAL DAMAGES (INCLUDING, BUT NOT LIMITED TO, PROCUREMENT OFSUBSTITUTE GOODS OR SERVICES; LOSS OF USE, DATA, OR PROFITS; OR BUSINESSINTERRUPTION) HOWEVER CAUSED AND ON ANY THEORY OF LIABILITY, WHETHERIN CONTRACT, STRICT LIABILITY, OR TORT (INCLUDING NEGLIGENCE OR OTHERWISE)ARISING IN ANY WAY OUT OF THE USE OF THIS SOFTWARE, EVEN IF ADVISED OF THEPOSSIBILITY OF SUCH DAMAGE.
====================================================================
This product includes cryptographic software written by Eric Young ([email protected]). Thisproduct includes software written by Tim Hudson ([email protected]).
/
Original SSLeay License
-----------------------
/ Copyright ©) 1995-1998 Eric Young ([email protected])
All rights reserved.
This package is an SSL implementation written by Eric Young ([email protected]). Theimplementation was written so as to conform with Netscapes SSL.
This library is free for commercial and non-commercial use as long as the following conditions areaheared to. The following conditions apply to all code found in this distribution, be it the RC4, RSA,lhash, DES, etc., code; not just the SSL code. The SSL documentation included with this distributionis covered by the same copyright terms except that the holder is Tim Hudson ([email protected]).
Copyright remains Eric Young's, and as such any Copyright notices in the code are not to be removed.If this package is used in a product, Eric Young should be given attribution as the author of the partsof the library used. This can be in the form of a textual message at program startup or indocumentation (online or textual) provided with the package.
Redistribution and use in source and binary forms, with or without modification, are permittedprovided that the following conditions are met:
1. Redistributions of source code must retain the copyright notice, this list of conditions and thefollowing disclaimer.
2. Redistributions in binary form must reproduce the above copyright notice, this list of conditionsand the following disclaimer in the documentation and/or other materials provided with thedistribution.
3. All advertising materials mentioning features or use of this software must display the followingacknowledgment: "This product includes cryptographic software written by Eric Young
AS3000 Installation and Configuration Guide—IMPAX 6.5.3 147Agfa Company Confidential—Subject to Non-Disclosure Obligation

([email protected])" The word 'cryptographic' can be left out if the routines from the librarybeing used are not cryptographic related :-).
4. If you include any Windows specific code (or a derivative thereof) from the apps directory(application code) you must include an acknowledgment: “This product includes softwarewritten by Tim Hudson ([email protected])”
THIS SOFTWARE IS PROVIDED BY ERIC YOUNG “AS IS'” AND ANY EXPRESS OR IMPLIEDWARRANTIES, INCLUDING, BUT NOT LIMITED TO, THE IMPLIED WARRANTIES OFMERCHANTABILITY AND FITNESS FOR A PARTICULAR PURPOSE ARE DISCLAIMED. INNO EVENT SHALL THE AUTHOR OR CONTRIBUTORS BE LIABLE FOR ANY DIRECT,INDIRECT, INCIDENTAL, SPECIAL, EXEMPLARY, OR CONSEQUENTIAL DAMAGES(INCLUDING, BUT NOT LIMITED TO, PROCUREMENT OF SUBSTITUTE GOODS ORSERVICES; LOSS OF USE, DATA, OR PROFITS; OR BUSINESS INTERRUPTION) HOWEVERCAUSED AND ON ANY THEORY OF LIABILITY, WHETHER IN CONTRACT, STRICTLIABILITY, OR TORT (INCLUDING NEGLIGENCE OR OTHERWISE) ARISING IN ANY WAYOUT OF THE USE OF THIS SOFTWARE, EVEN IF ADVISED OF THE POSSIBILITY OF SUCHDAMAGE.
The license and distribution terms for any publically available version or derivative of this codecannot be changed. i.e. this code cannot simply be copied and put under another distribution license[including the GNU Public license.]
/
Oracle Binary Code License Agreement for the JavaSE Platform Products and JavaFX(Topic number: 136087)
ORACLE AMERICA, INC. ("ORACLE"), FOR AND ON BEHALF OF ITSELF AND ITSSUBSIDIARIES AND AFFILIATES UNDER COMMON CONTROL, IS WILLING TO LICENSETHE SOFTWARE TO YOU ONLY UPON THE CONDITION THAT YOU ACCEPT ALL OF THETERMS CONTAINED IN THIS BINARY CODE LICENSE AGREEMENT AND SUPPLEMENTALLICENSE TERMS (COLLECTIVELY "AGREEMENT"). PLEASE READ THE AGREEMENTCAREFULLY. BY SELECTING THE "ACCEPT LICENSE AGREEMENT" (OR THE EQUIVALENT)BUTTON AND/OR BY USING THE SOFTWARE YOU ACKNOWLEDGE THAT YOU HAVEREAD THE TERMS AND AGREE TO THEM. IF YOU ARE AGREEING TO THESE TERMS ONBEHALF OF A COMPANY OR OTHER LEGAL ENTITY, YOU REPRESENT THAT YOU HAVETHE LEGAL AUTHORITY TO BIND THE LEGAL ENTITY TO THESE TERMS. IF YOU DO NOTHAVE SUCH AUTHORITY, OR IF YOU DO NOT WISH TO BE BOUND BY THE TERMS, THENSELECT THE "DECLINE LICENSE AGREEMENT" (OR THE EQUIVALENT) BUTTON ANDYOU MUST NOT USE THE SOFTWARE ON THIS SITE OR ANY OTHER MEDIA ON WHICHTHE SOFTWARE IS CONTAINED.
1. DEFINITIONS. "Software" means the software identified above in binary form that you selectedfor download, install or use (in the version You selected for download, install or use) from Oracleor its authorized licensees, any other machine readable materials (including, but not limited to,
AS3000 Installation and Configuration Guide—IMPAX 6.5.3 148Agfa Company Confidential—Subject to Non-Disclosure Obligation

libraries, source files, header files, and data files), any updates or error corrections provided byOracle, and any user manuals, programming guides and other documentation provided to you byOracle under this Agreement. "General Purpose Desktop Computers and Servers" means computers,including desktop and laptop computers, or servers, used for general computing functions underend user control (such as but not specifically limited to email, general purpose Internet browsing,and office suite productivity tools). The use of Software in systems and solutions that providededicated functionality (other than as mentioned above) or designed for use in embedded orfunction-specific software applications, for example but not limited to: Software embedded in orbundled with industrial control systems, wireless mobile telephones, wireless handheld devices,netbooks, kiosks, TV/STB, Blu-ray Disc devices, telematics and network control switching equipment,printers and storage management systems, and other related systems are excluded from this definitionand not licensed under this Agreement. "Programs" means (a) Java technology applets and applicationsintended to run on the Java Platform, Standard Edition platform on Java-enabled General PurposeDesktop Computers and Servers; and (b) JavaFX technology applications intended to run on theJavaFX Runtime on JavaFX-enabled General Purpose Desktop Computers and Servers.“CommercialFeatures” means those features identified in Table 1-1 (Commercial Features In Java SE ProductEditions) of the Java SE documentation accessible athttp://www.oracle.com/technetwork/java/javase/documentation/index.html.“README File” meansthe README file for the Software accessible athttp://www.oracle.com/technetwork/java/javase/documentation/index.html.
2. LICENSE TO USE. Subject to the terms and conditions of this Agreement including, but notlimited to, the Java Technology Restrictions of the Supplemental License Terms, Oracle grants youa non-exclusive, non-transferable, limited license without license fees to reproduce and use internallythe Software complete and unmodified for the sole purpose of running Programs. THE LICENSESET FORTH IN THIS SECTION 2 DOES NOT EXTEND TO THE COMMERCIAL FEATURES.YOUR RIGHTS AND OBLIGATIONS RELATED TO THE COMMERCIAL FEATURES ARE ASSET FORTH IN THE SUPPLEMENTAL TERMS ALONG WITH ADDITIONAL LICENSES FORDEVELOPERS AND PUBLISHERS.
3. RESTRICTIONS. Software is copyrighted. Title to Software and all associated intellectual propertyrights is retained by Oracle and/or its licensors. Unless enforcement is prohibited by applicable law,you may not modify, decompile, or reverse engineer Software. You acknowledge that the Softwareis developed for general use in a variety of information management applications; it is not developedor intended for use in any inherently dangerous applications, including applications that may createa risk of personal injury. If you use the Software in dangerous applications, then you shall beresponsible to take all appropriate fail-safe, backup, redundancy, and other measures to ensure itssafe use. Oracle disclaims any express or implied warranty of fitness for such uses. No right, title orinterest in or to any trademark, service mark, logo or trade name of Oracle or its licensors is grantedunder this Agreement. Additional restrictions for developers and/or publishers licenses are set forthin the Supplemental License Terms.
4. DISCLAIMER OF WARRANTY. THE SOFTWARE IS PROVIDED "AS IS" WITHOUTWARRANTY OF ANY KIND. ORACLE FURTHER DISCLAIMS ALL WARRANTIES, EXPRESSAND IMPLIED, INCLUDING WITHOUT LIMITATION, ANY IMPLIED WARRANTIES OFMERCHANTABILITY, FITNESS FOR A PARTICULAR PURPOSE OR NONINFRINGEMENT.
5. LIMITATION OF LIABILITY. IN NO EVENT SHALL ORACLE BE LIABLE FOR ANY INDIRECT,INCIDENTAL, SPECIAL, PUNITIVE OR CONSEQUENTIAL DAMAGES, OR DAMAGES FORLOSS OF PROFITS, REVENUE, DATA OR DATA USE, INCURRED BY YOU OR ANY THIRD
AS3000 Installation and Configuration Guide—IMPAX 6.5.3 149Agfa Company Confidential—Subject to Non-Disclosure Obligation

PARTY, WHETHER IN AN ACTION IN CONTRACT OR TORT, EVEN IF ORACLE HAS BEENADVISED OF THE POSSIBILITY OF SUCH DAMAGES. ORACLE'S ENTIRE LIABILITY FORDAMAGES HEREUNDER SHALL IN NO EVENT EXCEED ONE THOUSAND DOLLARS (U.S.$1,000).
6. TERMINATION. This Agreement is effective until terminated. You may terminate this Agreementat any time by destroying all copies of Software. This Agreement will terminate immediately withoutnotice from Oracle if you fail to comply with any provision of this Agreement. Either party mayterminate this Agreement immediately should any Software become, or in either party's opinion belikely to become, the subject of a claim of infringement of any intellectual property right. Upontermination, you must destroy all copies of Software.
7. EXPORT REGULATIONS. You agree that U.S. export control laws and other applicable exportand import laws govern your use of the Software, including technical data; additional informationcan be found on Oracle's Global Trade Compliance web site (http://www.oracle.com/products/export).You agree that neither the Software nor any direct product thereof will be exported, directly, orindirectly, in violation of these laws, or will be used for any purpose prohibited by these laws including,without limitation, nuclear, chemical, or biological weapons proliferation.
8. TRADEMARKS AND LOGOS.You acknowledge and agree as between you and Oracle that Oracleowns the ORACLE and JAVA trademarks and all ORACLE- and JAVA-related trademarks, servicemarks, logos and other brand designations ("Oracle Marks"), and you agree to comply with theThird Party Usage Guidelines for Oracle Trademarks currently located athttp://www.oracle.com/us/legal/third-party-trademarks/index.html. Any use you make of the OracleMarks inures to Oracle's benefit.
9. U.S. GOVERNMENT LICENSE RIGHTS. If Software is being acquired by or on behalf of the U.S.Government or by a U.S. Government prime contractor or subcontractor (at any tier), then theGovernment's rights in Software and accompanying documentation shall be only those set forth inthis Agreement.
10. GOVERNING LAW. This agreement is governed by the substantive and procedural laws ofCalifornia. You and Oracle agree to submit to the exclusive jurisdiction of, and venue in, the courtsof San Francisco, or Santa Clara counties in California in any dispute arising out of or relating tothis agreement.
11. SEVERABILITY. If any provision of this Agreement is held to be unenforceable, this Agreementwill remain in effect with the provision omitted, unless omission would frustrate the intent of theparties, in which case this Agreement will immediately terminate.
12. INTEGRATION. This Agreement is the entire agreement between you and Oracle relating to itssubject matter. It supersedes all prior or contemporaneous oral or written communications, proposals,representations and warranties and prevails over any conflicting or additional terms of any quote,order, acknowledgment, or other communication between the parties relating to its subject matterduring the term of this Agreement. No modification of this Agreement will be binding, unless inwriting and signed by an authorized representative of each party.
SUPPLEMENTAL LICENSE TERMS
These Supplemental License Terms add to or modify the terms of the Binary Code License Agreement.Capitalized terms not defined in these Supplemental Terms shall have the same meanings ascribedto them in the Binary Code License Agreement. These Supplemental Terms shall supersede any
AS3000 Installation and Configuration Guide—IMPAX 6.5.3 150Agfa Company Confidential—Subject to Non-Disclosure Obligation
inconsistent or conflicting terms in the Binary Code License Agreement, or in any license containedwithin the Software.
A. COMMERCIAL FEATURES. You may not use the Commercial Features for running Programs,Java applets or applications in your internal business operations or for any commercial or productionpurpose, or for any purpose other than as set forth in Sections B, C, D and E of these SupplementalTerms. If You want to use the Commercial Features for any purpose other than as permitted in thisAgreement, You must obtain a separate license from Oracle.
B. SOFTWARE INTERNAL USE FOR DEVELOPMENT LICENSE GRANT. Subject to the termsand conditions of this Agreement and restrictions and exceptions set forth in the README Fileincorporated herein by reference, including, but not limited to the Java Technology Restrictions ofthese Supplemental Terms, Oracle grants you a non-exclusive, non-transferable, limited licensewithout fees to reproduce internally and use internally the Software complete and unmodified forthe purpose of designing, developing, and testing your Programs.
C. LICENSE TO DISTRIBUTE SOFTWARE. Subject to the terms and conditions of this Agreementand restrictions and exceptions set forth in the README File, including, but not limited to the JavaTechnology Restrictions and Limitations on Redistribution of these Supplemental Terms, Oraclegrants you a non-exclusive, non-transferable, limited license without fees to reproduce and distributethe Software, provided that (i) you distribute the Software complete and unmodified and onlybundled as part of, and for the sole purpose of running, your Programs, (ii) the Programs addsignificant and primary functionality to the Software, (iii) you do not distribute additional softwareintended to replace any component(s) of the Software, (iv) you do not remove or alter any proprietarylegends or notices contained in the Software, (v) you only distribute the Software subject to a licenseagreement that: (a) is a complete, unmodified reproduction of this Agreement; or (b) protectsOracle's interests consistent with the terms contained in this Agreement and that includes the noticeset forth in Section H, and (vi) you agree to defend and indemnify Oracle and its licensors from andagainst any damages, costs, liabilities, settlement amounts and/or expenses (including attorneys'fees) incurred in connection with any claim, lawsuit or action by any third party that arises or resultsfrom the use or distribution of any and all Programs and/or Software. The license set forth in thisSection C does not extend to the Software identified in Section G.
D. LICENSE TO DISTRIBUTE REDISTRIBUTABLES. Subject to the terms and conditions of thisAgreement and restrictions and exceptions set forth in the README File, including but not limitedto the Java Technology Restrictions and Limitations on Redistribution of these Supplemental Terms,Oracle grants you a non-exclusive, non-transferable, limited license without fees to reproduce anddistribute those files specifically identified as redistributable in the README File ("Redistributables")provided that: (i) you distribute the Redistributables complete and unmodified, and only bundledas part of Programs, (ii) the Programs add significant and primary functionality to theRedistributables, (iii) you do not distribute additional software intended to supersede anycomponent(s) of the Redistributables (unless otherwise specified in the applicable README File),(iv) you do not remove or alter any proprietary legends or notices contained in or on theRedistributables, (v) you only distribute the Redistributables pursuant to a license agreement that:(a) is a complete, unmodified reproduction of this Agreement; or (b) protects Oracle's interestsconsistent with the terms contained in the Agreement and includes the notice set forth in SectionH, (vi) you agree to defend and indemnify Oracle and its licensors from and against any damages,costs, liabilities, settlement amounts and/or expenses (including attorneys' fees) incurred in connectionwith any claim, lawsuit or action by any third party that arises or results from the use or distribution
AS3000 Installation and Configuration Guide—IMPAX 6.5.3 151Agfa Company Confidential—Subject to Non-Disclosure Obligation

of any and all Programs and/or Software. The license set forth in this Section D does not extend tothe Software identified in Section G.
E. DISTRIBUTION BY PUBLISHERS. This section pertains to your distribution of the JavaTM SEDevelopment Kit Software (“JDK”) with your printed book or magazine (as those terms are commonlyused in the industry) relating to Java technology ("Publication"). Subject to and conditioned uponyour compliance with the restrictions and obligations contained in the Agreement, Oracle herebygrants to you a non-exclusive, nontransferable limited right to reproduce complete and unmodifiedcopies of the JDK on electronic media (the "Media") for the sole purpose of inclusion and distributionwith your Publication(s), subject to the following terms: (i) You may not distribute the JDK on astand-alone basis; it must be distributed with your Publication(s); (ii) You are responsible fordownloading the JDK from the applicable Oracle web site; (iii) You must refer to the JDK as JavaTMSE Development Kit; (iv) The JDK must be reproduced in its entirety and without any modificationwhatsoever (including with respect to all proprietary notices) and distributed with your Publicationsubject to a license agreement that is a complete, unmodified reproduction of this Agreement; (v)The Media label shall include the following information: Copyright 2011, Oracle America, Inc. Allrights reserved. Use is subject to license terms. ORACLE and JAVA trademarks and all ORACLE-and JAVA-related trademarks, service marks, logos and other brand designations are trademarks orregistered trademarks of Oracle in the U.S. and other countries. This information must be placedon the Media label in such a manner as to only apply to the JDK; (vi) You must clearly identify theJDK as Oracle's product on the Media holder or Media label, and you may not state or imply thatOracle is responsible for any third-party software contained on the Media; (vii) You may not includeany third party software on the Media which is intended to be a replacement or substitute for theJDK; (viii) You agree to defend and indemnify Oracle and its licensors from and against any damages,costs, liabilities, settlement amounts and/or expenses (including attorneys' fees) incurred in connectionwith any claim, lawsuit or action by any third party that arises or results from the use or distributionof the JDK and/or the Publication; ; and (ix) You shall provide Oracle with a written notice for eachPublication; such notice shall include the following information: (1) title of Publication, (2) author(s),(3) date of Publication, and (4) ISBN or ISSN numbers. Such notice shall be sent to Oracle America,Inc., 500 Oracle Parkway, Redwood Shores, California 94065 U.S.A , Attention: General Counsel.
F. JAVA TECHNOLOGY RESTRICTIONS. You may not create, modify, or change the behavior of,or authorize your licensees to create, modify, or change the behavior of, classes, interfaces, orsubpackages that are in any way identified as "java", "javax", "sun", “oracle” or similar conventionas specified by Oracle in any naming convention designation.
G. LIMITATIONS ON REDISTRIBUTION. You may not redistribute or otherwise transfer: (a)JavaFX Runtime, (b) JavaFX Development Kit, or (c) any and all patches, bug fixes and updatesmade available by Oracle through Oracle Premier Support, including those made available underOracle's Java SE Support program.
H. COMMERCIAL FEATURES NOTICE. For purpose of complying with Supplemental TermSection C.(v)(b) and D.(v)(b), your license agreement shall include the following notice, where thenotice is displayed in a manner that anyone using the Software will see the notice:
Use of the Commercial Features for any commercial or production purpose requires a separate licensefrom Oracle. “Commercial Features” means those features identified Table 1-1 (Commercial FeaturesIn Java SE Product Editions) of the Java SE documentation accessible athttp://www.oracle.com/technetwork/java/javase/documentation/index.html
AS3000 Installation and Configuration Guide—IMPAX 6.5.3 152Agfa Company Confidential—Subject to Non-Disclosure Obligation
I. SOURCE CODE. Software may contain source code that, unless expressly licensed for otherpurposes, is provided solely for reference purposes pursuant to the terms of this Agreement. Sourcecode may not be redistributed unless expressly provided for in this Agreement.
J. THIRD PARTY CODE. Additional copyright notices and license terms applicable to portions ofthe Software are set forth in the THIRDPARTYLICENSEREADME file accessible athttp://www.oracle.com/technetwork/java/javase/documentation/index.html. In addition to anyterms and conditions of any third party opensource/freeware license identified in theTHIRDPARTYLICENSEREADME file, the disclaimer of warranty and limitation of liability provisionsin paragraphs 4 and 5 of the Binary Code License Agreement shall apply to all Software in thisdistribution.
K. TERMINATION FOR INFRINGEMENT. Either party may terminate this Agreement immediatelyshould any Software become, or in either party's opinion be likely to become, the subject of a claimof infringement of any intellectual property right.
L. INSTALLATION AND AUTO-UPDATE. The Software's installation and auto-update processestransmit a limited amount of data to Oracle (or its service provider) about those specific processesto help Oracle understand and optimize them. Oracle does not associate the data with personallyidentifiable information. You can find more information about the data Oracle collects as a resultof your Software download athttp://www.oracle.com/technetwork/java/javase/documentation/index.html.
For inquiries please contact: Oracle America, Inc., 500 Oracle Parkway, Redwood Shores, California94065, USA.
Last updated September 23, 2011
Use of the Commercial Features for any commercial or production purpose requires a separatelicense from Oracle. “Commercial Features” means those features identified Table 1-1 (CommercialFeatures In Java SE Product Editions) of the Java SE documentation accessible athttp://www.oracle.com/technetwork/java/javase/documentation/index.html.
Oracle® Database(Topic number: 148001)
Oracle Legal Notices
Copyright Notice
Copyright © 1994-2012, Oracle and/or its affiliates. All rights reserved.
Trademark Notice
Oracle and Java are registered trademarks of Oracle and/or its affiliates. Other names may betrademarks of their respective owners.
Intel and Intel Xeon are trademarks or registered trademarks of Intel Corporation. All SPARCtrademarks are used under license and are trademarks or registered trademarks of SPARCInternational, Inc. AMD, Opteron, the AMD logo, and the AMD Opteron logo are trademarks orregistered trademarks of Advanced Micro Devices. UNIX is a registered trademark of The OpenGroup.
AS3000 Installation and Configuration Guide—IMPAX 6.5.3 153Agfa Company Confidential—Subject to Non-Disclosure Obligation

License Restrictions Warranty/Consequential Damages Disclaimer
This software and related documentation are provided under a license agreement containingrestrictions on use and disclosure and are protected by intellectual property laws. Except as expresslypermitted in your license agreement or allowed by law, you may not use, copy, reproduce, translate,broadcast, modify, license, transmit, distribute, exhibit, perform, publish, or display any part, in anyform, or by any means. Reverse engineering, disassembly, or decompilation of this software, unlessrequired by law for interoperability, is prohibited.
Warranty Disclaimer
The information contained herein is subject to change without notice and is not warranted to beerror-free. If you find any errors, please report them to us in writing.
Restricted Rights Notice
If this is software or related documentation that is delivered to the U.S. Government or anyonelicensing it on behalf of the U.S. Government, the following notice is applicable:
U.S. GOVERNMENT RIGHTS Programs, software, databases, and related documentation andtechnical data delivered to U.S. Government customers are "commercial computer software" or"commercial technical data" pursuant to the applicable Federal Acquisition Regulation andagency-specific supplemental regulations. As such, the use, duplication, disclosure, modification,and adaptation shall be subject to the restrictions and license terms set forth in the applicableGovernment contract, and, to the extent applicable by the terms of the Government contract, theadditional rights set forth in FAR 52.227-19, Commercial Computer Software License (December2007). Oracle America, Inc., 500 Oracle Parkway, Redwood City, CA 94065.
Hazardous Applications Notice
This software or hardware is developed for general use in a variety of information managementapplications. It is not developed or intended for use in any inherently dangerous applications,including applications that may create a risk of personal injury. If you use this software or hardwarein dangerous applications, then you shall be responsible to take all appropriate fail-safe, backup,redundancy, and other measures to ensure its safe use. Oracle Corporation and its affiliates disclaimany liability for any damages caused by use of this software or hardware in dangerous applications.
Third-Party Content, Products, and Services Disclaimer
This software or hardware and documentation may provide access to or information on content,products, and services from third parties. Oracle Corporation and its affiliates are not responsiblefor and expressly disclaim all warranties of any kind with respect to third-party content, products,and services. Oracle Corporation and its affiliates will not be responsible for any loss, costs, ordamages incurred due to your access to or use of third-party content, products, or services.
Alpha and Beta Draft Documentation Notice
If this document is in prerelease status:
This documentation is in prerelease status and is intended for demonstration and preliminary useonly. It may not be specific to the hardware on which you are using the software. Oracle Corporationand its affiliates are not responsible for and expressly disclaim all warranties of any kind with respectto this documentation and will not be responsible for any loss, costs, or damages incurred due tothe use of this documentation.
AS3000 Installation and Configuration Guide—IMPAX 6.5.3 154Agfa Company Confidential—Subject to Non-Disclosure Obligation

Xerces C++ Parser, version 1.2(Topic number: 121761)
This product includes software developed by The Apache Software Foundation(http://www.apache.org/). Please read the LICENSE files present in the Help > About dialog of theIMPAX Client.
Zlib(Topic number: 7595)
zlib.h -- interface of the 'zlib' general purpose compression library version 1.2.2, October 3rd, 2004
Copyright (C) 1995-2004 Jean-loup Gailly and Mark Adler
This software is provided 'as-is', without any express or implied warranty. In no event will the authorsbe held liable for any damages arising from the use of this software.
Permission is granted to anyone to use this software for any purpose, including commercialapplications, and to alter it and redistribute it freely, subject to the following restrictions:
1. The origin of this software must not be misrepresented; you must not claim that you wrotethe original software. If you use this software in a product, an acknowledgment in the productdocumentation would be appreciated but is not required.
2. Altered source versions must be plainly marked as such, and must not be misrepresented asbeing the original software.
3. This notice may not be removed or altered from any source distribution.
Jean-loup Gailly [email protected]
Mark Adler [email protected]
AS3000 Installation and Configuration Guide—IMPAX 6.5.3 155Agfa Company Confidential—Subject to Non-Disclosure Obligation

Aall-in-one configuration
A configuration in which the Database,Archive Server, Network Gateway, and CuratorServer components are all installed on a singleWindows server, along with the ApplicationServer software.
Application Server
Intermediary server between IMPAX Clientand IMPAX Server machines. LDAP,Documentation, and other Business Servicesreside on the Application Server.
CC-MOVE
An operation that allows an application entityto instruct another application entity totransfer stored SOP Instances to the originalapplication entity or to a third applicationentity, using the C-STORE operation.
Connectivity Manager
A middleware component in the integrationbetween hospital information systems andother hospital imaging departments.Connectivity Manager also providesconnectivity to each modality and the PACS.
C-STORE
The mechanism used to transfer SOP Instancesbetween application entities.
DDICOM
Digital Imaging and Communications inMedicine. The standard communicationprotocol used by a PACS, HIS, or modality toexchange information or images with othersystems.
FFibre Channel
Fibre Channel (or FC) is a gigabit-speednetwork technology primarily used for storagenetworking. It was primarily used in thesupercomputer field, but has now become thestandard connection type for storage areanetworks (SAN) in enterprise storage. Despiteits name, Fibre Channel signaling can run onboth twisted pair copper wire and fiber-opticcables.
fully qualified domain name (FQDN)
The full name of a system, consisting of itslocal host name and its domain name,including a top-level domain. For example,venera is a host name and venera.isi.edu is afully qualified domain name. A fully qualifieddomain name should be sufficient todetermine a unique Internet address for anyhost on the Internet. This process, called nameresolution, uses the Domain Name System(DNS).
Glossary
AS3000 Installation and Configuration Guide—IMPAX 6.5.3 156Agfa Company Confidential—Subject to Non-Disclosure Obligation

Hhigh availability
With a high-availability solution, a site isprotected against system downtimes, eitherplanned or unplanned. Redundant servers areput in place that can take over functionalityshould the primary server become unavailable.
HIS verification
An option that forces the PACS to verify allincoming images from an acquisition stationor modality against specific criteria, such asthe patient ID and accession number. ThePACS sends a message through the RISGateway to verify the criteria against what iscontained in the HIS. If the criteria match,then the images can be stored permanently.
IIOPS
Input/Output Operations Per Second is acommon performance measurement used tobenchmark computer storage devices like harddisk drives, solid state drives, and storage areanetworks.
The specific number of IOPS possible in anysystem configuration will vary greatly,depending upon the balance of read and writeoperations, the mix of sequential and randomaccess patterns, the number of worker threadsand queue depth, as well as the data blocksizes. Other factors can also include the systemsetup, storage drivers, OS backgroundoperations, and so on.
Mmaster Curator
When using multiple Curators, thefirst Curator that runs, which owns the jobqueue.
multiple IMPAX cluster configuration
In a multiple IMPAX cluster configuration,an IMPAX cluster is linked to one or moreother IMPAX or external PACS clusters, suchthat patient and study data can be shared andsynchronized between them.
NNAS
Network Attached Storage. A storage deviceattached directly to a Storage Area Network(SAN) or other direct network connection.
PPACS
A Picture Archive and CommunicationSystems (PACS) makes it possible toelectronically store, manage, distribute, andview images.
PACS Store and Remember archive
An IMPAX server computer set up with thePACS Store and Remember archivingfunctionality. This server usually has NetworkGateway functionality.
RRIS
Radiology Information System. Responsiblefor scheduling exams and for reportmanagement in the Radiology department.
SSCU
Service Class User. Primarily sends DICOMrequests to an SCP.
single-host configuration
A configuration in which the Database,Archive Server, and Network Gateway servercomponents are all installed on a single server.
AS3000 Installation and Configuration Guide—IMPAX 6.5.3 157Agfa Company Confidential—Subject to Non-Disclosure Obligation

single-server configuration
An IMPAX single server is a Windows serverthat runs the AS300 Server software in asingle-host configuration along with theApplication Server and Connectivity Managersoftware.
slave Curator
When using multiple Curators, the secondaryCurators. Though the master Curator ownsthe job queue, PREPARE jobs are associatedwith the Curator that started the job.
SSL
Secure Sockets Layer. A protocol fromNetscape Communications Corporation,which is designed to provide securecommunications on the Internet.
standalone station
Windows server on which the IMPAX Client,AS300, and Application Server software areinstalled. The standalone does not have its owninstallation program. To create a standalone,the AS300, Application Server, and Clientinstallation programs are each run separately.
Store and Remember archiving
Also called PACS Store and Rememberarchiving. A configuration in which an IMPAXsystem is set up as a PACS Store andRemember Archive, and used for archivingstudies to an archive external to the IMPAXsystem.
Vvolume
A volume refers to the division of data on themedia. For example, if a tape has two sides,each side is referred to as a separate volume.
Wwarm backup
Descriptive of a backup process in which thedatabase does not have to be shut down.Compared with cold backups, warm backupsare faster and keep the database accessiblewhile the backup is being performed.
web cache
Images that have been compressed by Curatorare stored in the web cache. These images arecompressed using Mitra Wavelet compressionto reduce their size for access over lowbandwidth.
AS3000 Installation and Configuration Guide—IMPAX 6.5.3 158Agfa Company Confidential—Subject to Non-Disclosure Obligation

Aaccounts
created by installation.........................100AddDedicatedNetworkToZone
running..................................................93adding
Audit Record Repository.......................79network connection to zone.................93PACS Store and Remember archive.....129swap files................................................91
addresses, MAC............................................52Administration Tools
setting up PACS Store and Rememberarchive..................................................129
Adobe Reader...............................................25AE titles
external PACS archive.........................129AgfaService user.................................100, 131
creating account....................................61setting password....................................69
Agfa Zone Tools...........................................56aggregations
deleting..................................................96all-in-one configuration........................18, 79allocating slices.............................................29Application Servers......................................14
installing................................................79manually configuring connection to...137order of installation..............................21
archiveHSM.......................................................17PACS Store and Remember..................17types.......................................................17
Archive Server.........................................14, 73cluster distribution................................18generating portable password file........73importing portable password file.......133
installing................................................74installing licenses...................................76installing on single-host server.............63installing separately...............................80requirements..........................................23
archiving studiesgap between primary and standbyserver......................................................84
armoringpackage, understanding......................100
ARRSee Audit Record Repository
Audit Record Repositoryconfiguring database connection.........79
autoboot property........................................97automating
information flow...................................10
Bbacking up
cold Oracle backup.............................108database.................................................68RMAN backup....................................104system files.............................................24
brokerOracle Data Guard........................10, 102
Ccaches
disk partitions for..................................45CD exporting................................................21cleaning up
failed Oracle installation.......................81Clients...........................................................14
order of installation..............................21cluster
Index
AS3000 Installation and Configuration Guide—IMPAX 6.5.3 159Agfa Company Confidential—Subject to Non-Disclosure Obligation

description of components...................14distributing components in..................18
clustersorder of component installation..........21
cold backups...............................................108linking Data Guard servers.................115
comparingpassword files.......................................134
compressing images.....................................77installation options...............................63
Compressorpackage installation...............................77starting manually..................................78
configurations supported............................22configuring
cluster.....................................................21IMPAX...................................................10
configuring archivesHSM.......................................................75PACS Store and Remember................129
configuring databasedisk arrays..............................................66Oracle Data Guard..............................116Sun Disk Arrays.....................................30
connectingApplication Servers to database..........137Audit Record Repository to database....79to UPS....................................................28
control files.................................................116copying
flash recovery area...............................112primary flash recovery area................106
copyright information...........................2, 140createSolution tool.......................................56creating
database backup....................................68passwords.............................................134software repository................................60
credentials.............................69, 131, 132, 133Curator
cluster distribution................................18defined...................................................14installing and configuring.....................79order of installation..............................21
Cygwin software license.............................140
Ddatabase
backing up.......................................67, 68collecting statistics.................................68configuring Audit Record Repositoryconnection.............................................79installing Oracle Server.........................62partitioning recommendations............30reinstalling Oracle.................................81synchronizing redo changes................117
database backupsOracle, cold..........................................108Oracle, RMAN.....................................104
Database Configurator Tool........................30Database Server............................................14
backup requirements............................24cluster distribution................................18installing................................................60installing Oracle Server.........................62partitioning............................................66requirements..........................................23
data center....................................................20Data Guard
See Oracle Data Guarddata loss
preventing................................................9dbase partition
copying.........................................106, 112sharing.................................................111
decrypting password files..........................134deleting
password files.......................................134delZone tool.................................................97directories
software repository................................60disk management.........................................29disks
partitioning............................................66partitioning caches................................45space requirements, AS3000 servers.....23
documentation.............................................26giving feedback........................................3installing................................................78warranty statement.................................2
driversinstalling................................................29
AS3000 Installation and Configuration Guide—IMPAX 6.5.3 160Agfa Company Confidential—Subject to Non-Disclosure Obligation

EEditline software license............................145email
documentation feedback........................3licenses...................................................52
enabling lossy compression.........................63encrypting password files..........................134Enterprise Edition Oracle............................62errors
standby database...................................84exporting
password files.......................................134external PACS archive................................129external software
licenses.................................................140external storage requirements.....................25
Ffailed database
reinstating............................................126failing over to standby server.....................124Flashback area
copying primary..........................106, 112sharing primary...................................111specifying size of..........................105, 109
flashback management................................38Flashback Recovery Area
configuring......................................39, 41Flashback technology
space available.....................................128Flash Recovery Area.....................................30
concepts.................................................38folders
passkey utility......................................134
Ggathering statistics........................................68getting started.................................................9global zone....................................................11
adding swap files...................................91features...................................................87logging into............................................90
groupscreated on installation.........................100
Hhardware drivers...........................................29hardware requirements
AS3000 servers.................................22, 23storage for AS3000 servers....................25
high availabilityof zones..................................................97
HSM archives...............................................17configuring............................................75
HSM archivinginstalling................................................74
hub and spoke..............................................20hybrid IPv4/IPv6 environment...................12
IICU software license..................................145image caches
partitioning............................................45imaging.........................................................10IMPAX Enterprise Solution.......................138
concepts...............................................139IMPAXoradg package................................104importing
password file................................133, 134increasing swap space..................................91installing
See specific componentsintegrating departments..............................10interfaces
removing from aggregation..................96Internet protocols........................................12IP querying...................................................99IPv4/IPv6 hybrid environment...................12ISO image
attaching in a zone................................83isolating applications...................................11
JJASS drivers
configuring..........................................100Java SE Platform software license..............148jobs
Compressor...........................................78JPEG compression..................................63, 77
AS3000 Installation and Configuration Guide—IMPAX 6.5.3 161Agfa Company Confidential—Subject to Non-Disclosure Obligation

KKnowledge Bases..........................................26
installing IMPAX...................................78opening............................................26, 27server......................................................26
LLAG...............................................................94legacy mountpoint failure...........................82libraries
types.......................................................17licenses
copying license files...............................52external software.................................140installing keys..................................72, 76obtaining keys........................................52
link aggregationcreating..................................................94removing................................................96
link bundling................................................94listener
starting.................................................110Live Upgrade
minimum patch requirements.............29partitioning for......................................29
local diskspartitioning............................................29
locationsApplication Servers.............................137
lofiadmin a Solaris zone.....................................83
lofi mountscorrupting zones...................................84
logginginstallation activity..............................131system activity.......................................99
logging innon-global zones...................................90
lossy compression........................................63enabling.................................................77
lost datapreventing................................................9
MMAC addresses.......................................72, 76
obtaining................................................52macro enterprise..........................................20makeZone tool.............................................56manufacturer’s responsibility........................2memory
allocating for zones...............................90requirements, AS3000 servers...............23
migrating zones............................................97mixed-host configuration............................18monitoring
Oracle Data Guard..............................128mounting
HSM archives........................................75moving zones...............................................97multiple cluster configurations...................18MVF
installing license key........................72, 76user password......................................100
mvf.portable.psd........................................134Archive Server........................................73Database Server.....................................63for AgfaService user...............................69generating and importing...........131, 132Network Gateway..................................70
mvf.psd.................................................63, 131
NNAS. See Network Attached Storage...........17network considerations...............................12Network Gateway...................................14, 70
generating portable password file........70importing portable password file.......133installing................................................71installing licenses.............................72, 76installing on single-host server.............63
Network Gateway/Archive Serverinstalling................................................73installing archive licenses......................76requirements..........................................23
new primary database server.....................126new servers...................................................76new station...................................................28NFS
configuration.......................................100starting server........................................60
NFS inode caching.......................................90
AS3000 Installation and Configuration Guide—IMPAX 6.5.3 162Agfa Company Confidential—Subject to Non-Disclosure Obligation

NICadding to zone.......................................93teaming..................................................94
non-global zones..........................................90features...................................................87states.......................................................88
Oobtaining license keys..................................52ocr_train user.............................................100OCR package................................................71opening
Knowledge Bases.............................26, 27OpenSSL software license..........................146operating system
requirements..........................................25upgrading..............................................98virtualized..............................................11
Oracleinstallation interrupted.........................81installing Solaris Server.........................62resizing data files.................................120slow to connect......................................86
Oracle Database software license..............153Oracle Data Guard...............................10, 102
cold backups........................................108completing configuration of.......108, 115configuration overview.......................103configuring primary server.........105, 109configuring RMAN backups...............116configuring standby server.................110failing over to standby server..............124installing package................................104maintaining.........................................117monitoring..........................................128rebooting primary server....................119rebooting standby server.....................118reference...............................................102removing..............................................120restoring standby server..............107, 112RMAN backups...................................104switching over to standby server........122synchronizing redo changes................117troubleshooting.....................................84
oracle user...................................................100orphaned processes......................................84
overviewsData Guard configuration..................103
Ppackages, AS3000
installing Data Guard..........................104PACS
integrated with RIS andReporting.....................................138, 139
PACS Archivinginstalling................................................74
PACS Store and Remember archives....17, 129installing................................................63registering services in Solaris..............130setting up in Administration Tools.....129testing...................................................130
partitioning disks...................................45, 66AS3000 stations.....................................29recommendations.................................30
partitionssharing.................................................111Solaris zones..........................................11
passkeys...............................................133, 134passkey utility
command syntax.................................131Database Server.....................................63
passwords...................................................100AgfaService account..............................61generating files.......................69, 131, 132importing file.......................................133portable file................................63, 70, 73system and portable............................134utility reference....................................134
patchesSolaris.....................................................25
platform requirements.................................25ports
external PACS archive.........................129powering up new station.............................28prerequisites.................................................10preventing data loss.......................................9primary database server.......................10, 102
archive gap with standby server............84backing up...................................105, 109cold backup of.....................................108linking to standby server.............108, 115
AS3000 Installation and Configuration Guide—IMPAX 6.5.3 163Agfa Company Confidential—Subject to Non-Disclosure Obligation

monitoring..........................................128rebooting.............................................119reinstating............................................126removing Oracle Data Guard.............120resizing Oracle data files.....................120RMAN backup of................................104switching to standby...........................122synchronizing redo changes tostandby.................................................117
protectinghardware................................................28system....................................................99
Qqueues
Compressor Job.....................................78
RRAM requirements
AS3000 servers.......................................23rebooting
primary database server......................119standby database server......................118
reconfiguringdatabase.................................................68
recovery fileslocation..................................................38size..........................................................38
re-creatingtemporary file on standby server........125
redo logssynchronizing......................................117
registered trademarks....................................2registering
Solaris PACS Store and Remember archiveservices.................................................130
remote access............................10, 90, 99, 100removing
Oracle Data Guard..............................120services...................................................99
reporting solutionintegrated with PACS and RIS............139
repository, software......................................60resizing
Oracle...................................................120resource pools..............................................53
restoringstandby server..............................107, 112
restoring files................................................67RIS
integrated with PACS andReporting.....................................138, 139
RMAN backups......................10, 38, 102, 104configuring after Data Guard.............116linking Data Guard servers.................108
SSCP
using.....................................................106security
maintaining.........................................100portable passwords..............131, 133, 134
separate boot environment..........................98Server components......................................26servers...........................................................28
hardware requirements.........................22powering up...........................................28software requirements...........................25
servicesremoving................................................99
sharingpartitions and recovery area...............111
sharing software repository.........................60single-host servers........................................18
database partitioning............................66installing................................................60installing licenses...................................76requirements..........................................23
single-serverconfiguration.........................................18
sizeincreasing swap.....................................91
sizing zones...................................................53slices
allocating...............................................29software group for Solaris............................29software repository......................................60software requirements
AS3000 servers.......................................25Solaris
armoring..............................................100configuring server.................................28
AS3000 Installation and Configuration Guide—IMPAX 6.5.3 164Agfa Company Confidential—Subject to Non-Disclosure Obligation

installing................................................29Live Upgrade
partitioning for...............................29Oracle Server installation......................62patches...................................................25registering PACS Store and Rememberarchive services....................................130
Solaris Live Upgradebenefits...................................................98
Solaris zones.................................................11creating..................................................56sizing parameters for.............................53suspended..............................................84uninstalling............................................97using lofiadm.........................................83
sparse-root zones.........................................11ssh
using to connect to zone.......................62ssh command...............................................90standalone IMPAX...........................14, 18, 21Standard Edition Oracle..............................62standby control file....................................116standby database server..........10, 84, 102, 128
configuring Oracle Data Guard..........110failing over to.......................................124linking to primary server............108, 115rebooting.............................................118re-creating temporary file...................125removing Oracle Data Guard.............120restoring database........................107, 112slow connection.....................................86switching to.........................................122synchronizing redo changes................117
startingCompressor...........................................78listener..................................................110NFS client............................................100NFS server..............................................60
stationsnumber of..............................................18setting up new.......................................28
storage requirements....................................25strong passwords........................................134suggestions for documentation.....................3summary
Data Guard configuration..................103swap requirements, AS3000 servers............23
swap sizecalculating..............................................53increasing...............................................91
synchronizingredo changes from primary to standbydatabase...............................................117
system filesbacking up.............................................24password files.......................................134
Ttapes for backup...........................................67
requirements..........................................24TCP/IP values
modifying..............................................86TCP connections..........................................99teaming NICs...............................................94telnet
See remote accesstemporary file on standby server
re-creating............................................125testing
PACS Store and Rememberarchiving..............................................130
topics in guides and Knowledge Basesgiving feedback on..................................3
trademarks......................................................2troubleshooting............................................81trunking........................................................94tunneling protocols......................................12
UUPS installation...........................................28users
accounts...............................................100AgfaService............................................61
utilitiespasskey.................................................134
Vvalidating
password strength...............................134virtual operating system..............................11
AS3000 Installation and Configuration Guide—IMPAX 6.5.3 165Agfa Company Confidential—Subject to Non-Disclosure Obligation

Wwarm backups..............................................68warranty statements.......................................2web caches
partitioning............................................45Web Start Flash............................................98whole-root zones..........................................11Windows-based servers...............................18
XXerces C++ Parser software license...........155
ZZFS Intent Log cache...................................90ZFS legacy mount
troubleshooting.....................................82Zlib software license...................................155zlogin command..........................................90zoneadm command.....................................88zonecfg command........................................88zoneroot
partition.................................................29zones, Solaris................................................11
adding ZFS file system..........................82allocating memory................................90configuring............................................56logging into............................................90removing................................................97sizing parameters for.............................53
AS3000 Installation and Configuration Guide—IMPAX 6.5.3 166Agfa Company Confidential—Subject to Non-Disclosure Obligation