Embed Size (px)
Citation preview
Nature InspiredArts and CraftsNational Tree Day - Nature Inspired Arts and Crafts
*C999999**C999999*
A4 DUSTJACKET (A4)
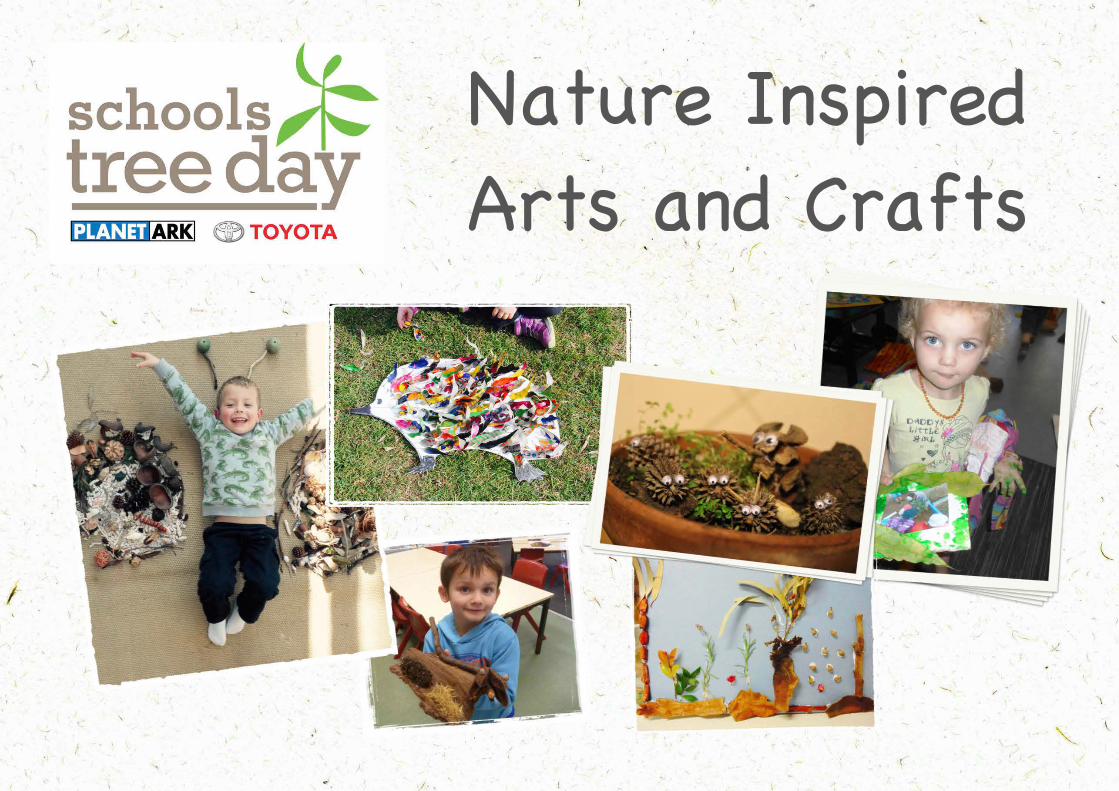
Every year thousands of schools and pre-schools get involvedin Planet Ark's Schools Tree Day. They plant new trees, lookafter established gardens, learn about the environment andget in contact with nature.
All of this lovely natureness is made possible though thesupport of: the teachers and students at schools andpreschools across the country; staff and volunteers at councilsand landcare groups; wonderful celebrity ambassadorsincluding Costa Giordianis, Adam Goodes and dirtgirl; categorysponsor Bunnings Warehouse; and, long-time major sponsor,Toyota Australia.
For Schools Tree Day 2015 we asked for tree-mendous naturebased art and craft ideas to inspire kids and teachers. We'rehappy to say we were swamped with amazing suggestions of howto combine imagination with leaves, rocks and sticks to makewonderful artwork.
All the entries showed the inspirational power of contact withnature. The entries were judged on a combination of creativity,photo quality, clear instructions and use of natural materials. Itwas too much of a challenge to narrow it down to the top ten, sowe included sixteen winners in this book and have uploaded alleligible entries to TreeDay.PlanetArk.org
Congratulations and thank you to all the teachers and studentswho went outside to get inspired.
Nature Inspired Art and Craft
1
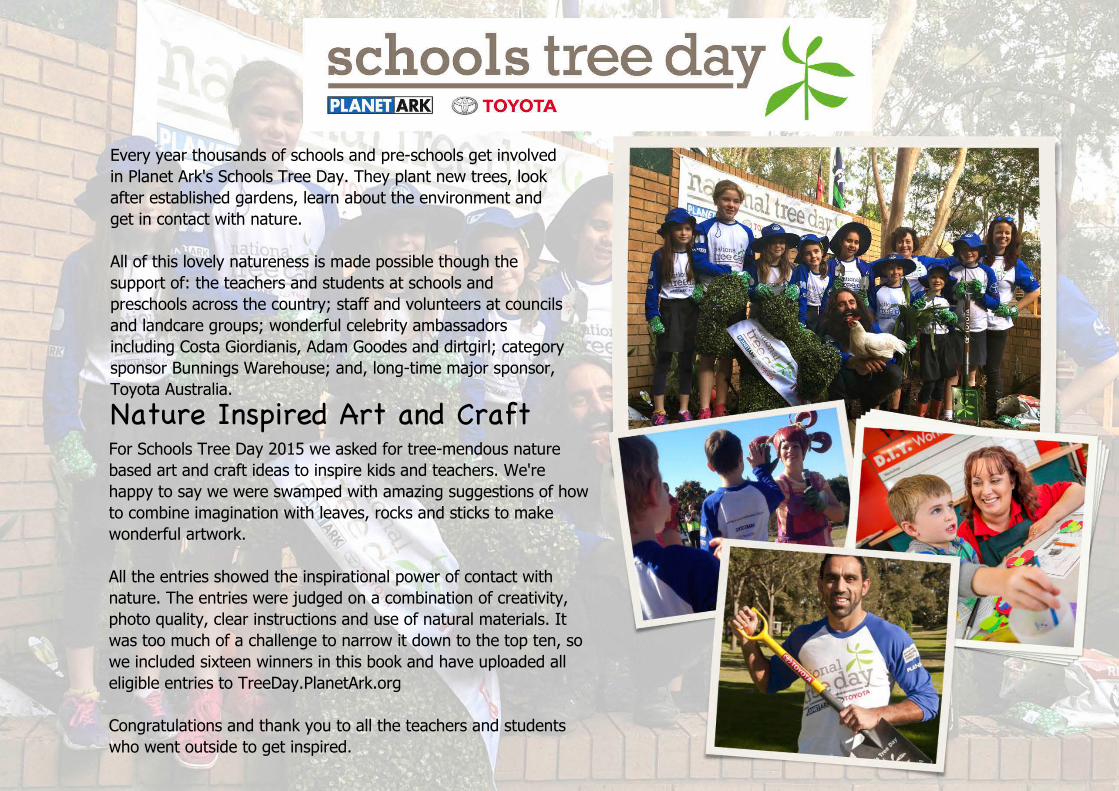
Teacher: Juliet Coyle. Group: Kakadu Kids.
Plunkett Street Public School - Nature Creatures
The students were asked to startcollecting things they found in theenvironment that could be used forcraft.
Over the holidays, four bags of'goodies' were collected, includingsticks, pine cones and seed pods.
Students were shown examples ofcraft made from nature. They werethen given free choice of whichcreature to create.
With the help of our SLSO, a hot gluegun was used to stick the creaturestogether. We are all soooo excitedwith the results!
2
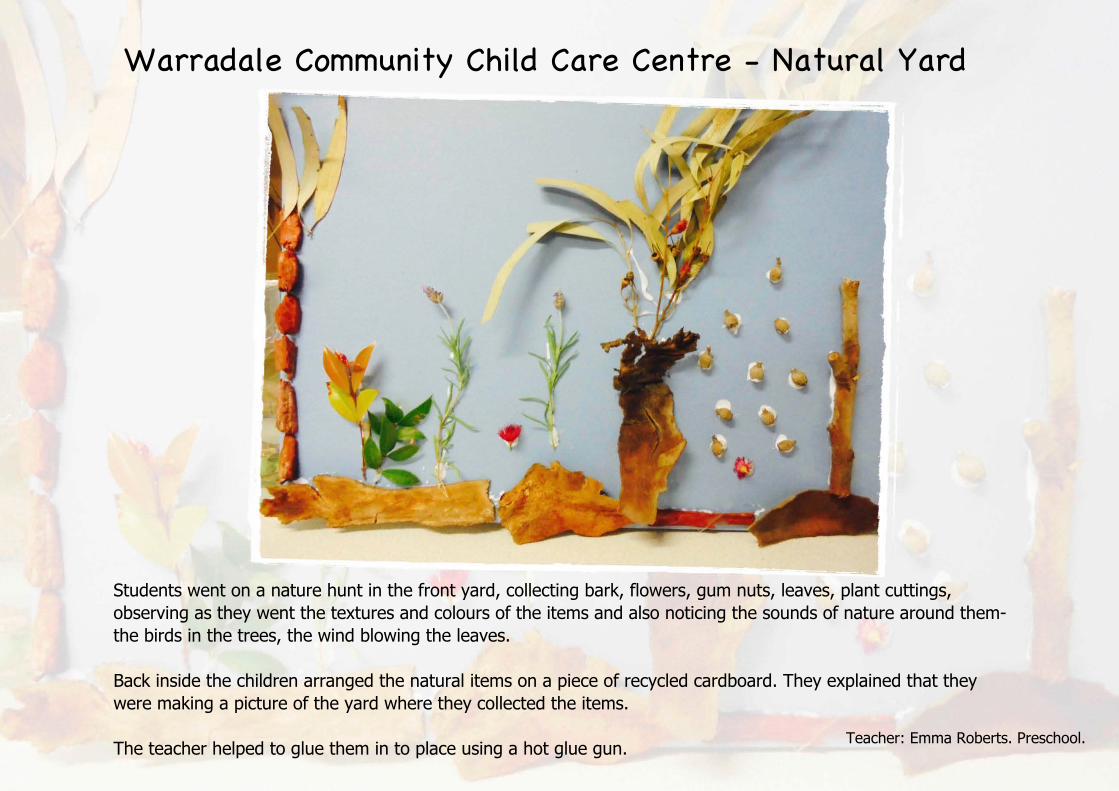
Warradale Community Child Care Centre - Natural Yard
Students went on a nature hunt in the front yard, collecting bark, flowers, gum nuts, leaves, plant cuttings,observing as they went the textures and colours of the items and also noticing the sounds of nature around them-the birds in the trees, the wind blowing the leaves.
Back inside the children arranged the natural items on a piece of recycled cardboard. They explained that theywere making a picture of the yard where they collected the items.
The teacher helped to glue them in to place using a hot glue gun.Teacher: Emma Roberts. Preschool.
3
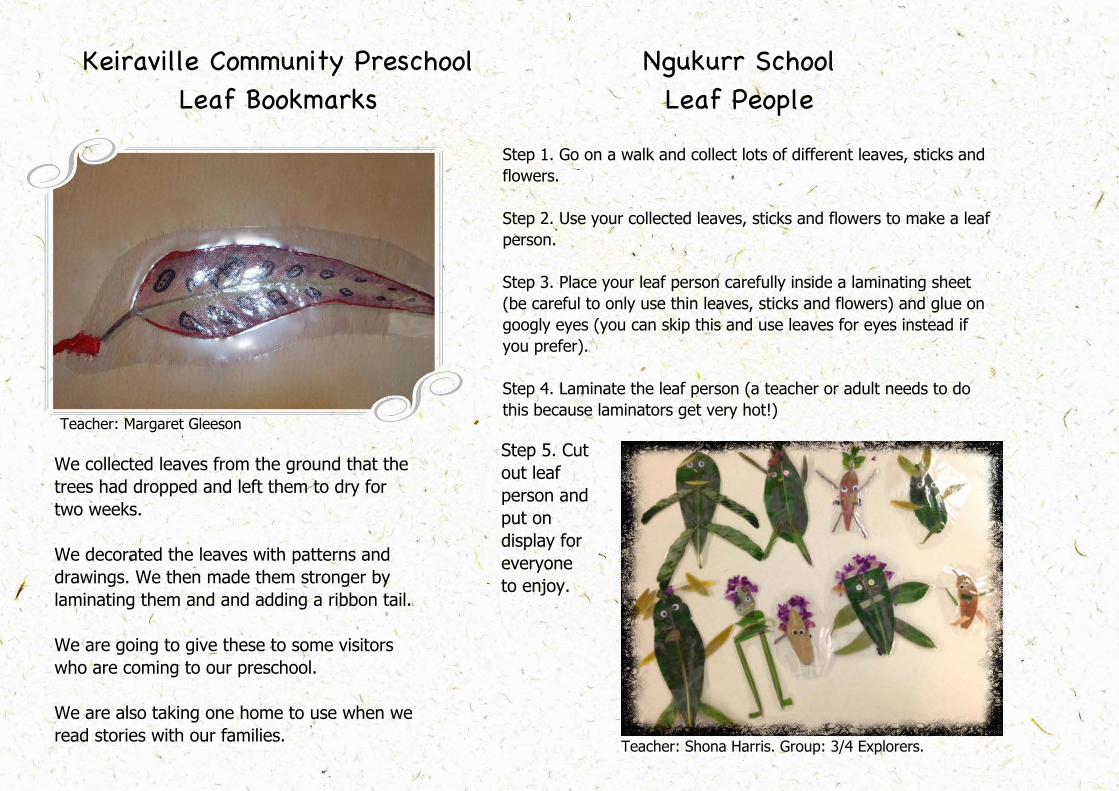
Teacher: Shona Harris. Group: 3/4 Explorers.
Keiraville Community PreschoolLeaf Bookmarks
We collected leaves from the ground that thetrees had dropped and left them to dry fortwo weeks.
We decorated the leaves with patterns anddrawings. We then made them stronger bylaminating them and and adding a ribbon tail.
We are going to give these to some visitorswho are coming to our preschool.
We are also taking one home to use when weread stories with our families.
Step 1. Go on a walk and collect lots of different leaves, sticks andflowers.
Step 2. Use your collected leaves, sticks and flowers to make a leafperson.
Step 3. Place your leaf person carefully inside a laminating sheet(be careful to only use thin leaves, sticks and flowers) and glue ongoogly eyes (you can skip this and use leaves for eyes instead ifyou prefer).
Step 4. Laminate the leaf person (a teacher or adult needs to dothis because laminators get very hot!)
Step 5. Cutout leafperson andput ondisplay foreveryoneto enjoy.
Ngukurr SchoolLeaf People
Teacher: Margaret Gleeson
4
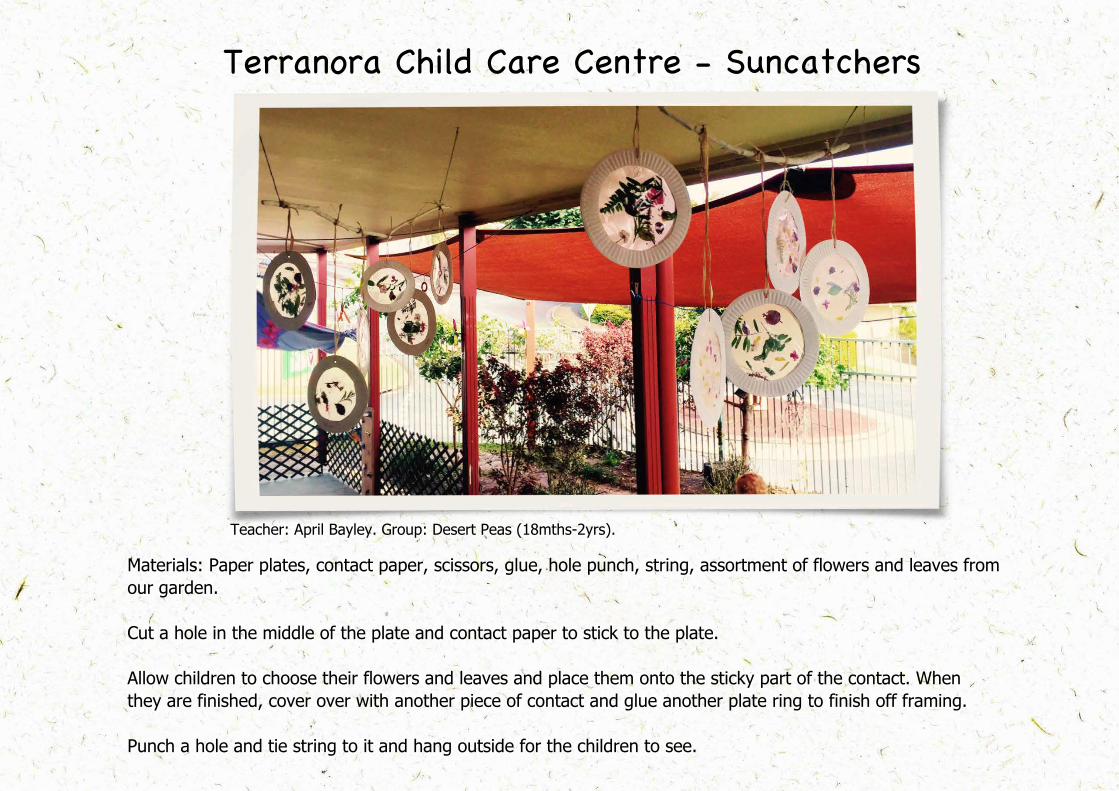
Terranora Child Care Centre - Suncatchers
Materials: Paper plates, contact paper, scissors, glue, hole punch, string, assortment of flowers and leaves fromour garden.
Cut a hole in the middle of the plate and contact paper to stick to the plate.
Allow children to choose their flowers and leaves and place them onto the sticky part of the contact. Whenthey are finished, cover over with another piece of contact and glue another plate ring to finish off framing.
Punch a hole and tie string to it and hang outside for the children to see.
Teacher: April Bayley. Group: Desert Peas (18mths-2yrs).
5
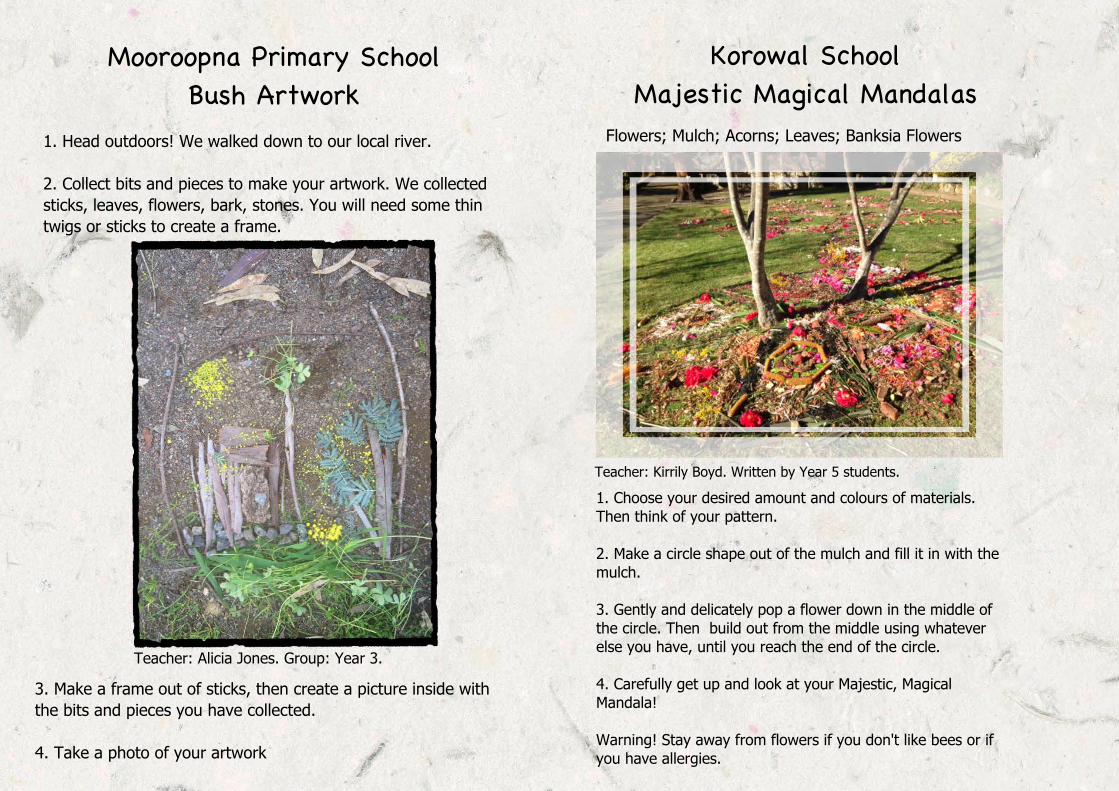
3. Make a frame out of sticks, then create a picture inside withthe bits and pieces you have collected.
4. Take a photo of your artwork
Mooroopna Primary SchoolBush Artwork
1. Head outdoors! We walked down to our local river.
2. Collect bits and pieces to make your artwork. We collectedsticks, leaves, flowers, bark, stones. You will need some thintwigs or sticks to create a frame.
1. Choose your desired amount and colours of materials.Then think of your pattern.
2. Make a circle shape out of the mulch and fill it in with themulch.
3. Gently and delicately pop a flower down in the middle ofthe circle. Then build out from the middle using whateverelse you have, until you reach the end of the circle.
4. Carefully get up and look at your Majestic, MagicalMandala!
Warning! Stay away from flowers if you don't like bees or ifyou have allergies.
Korowal SchoolMajestic Magical Mandalas
Flowers; Mulch; Acorns; Leaves; Banksia Flowers
Teacher: Alicia Jones. Group: Year 3.
Teacher: Kirrily Boyd. Written by Year 5 students.
6
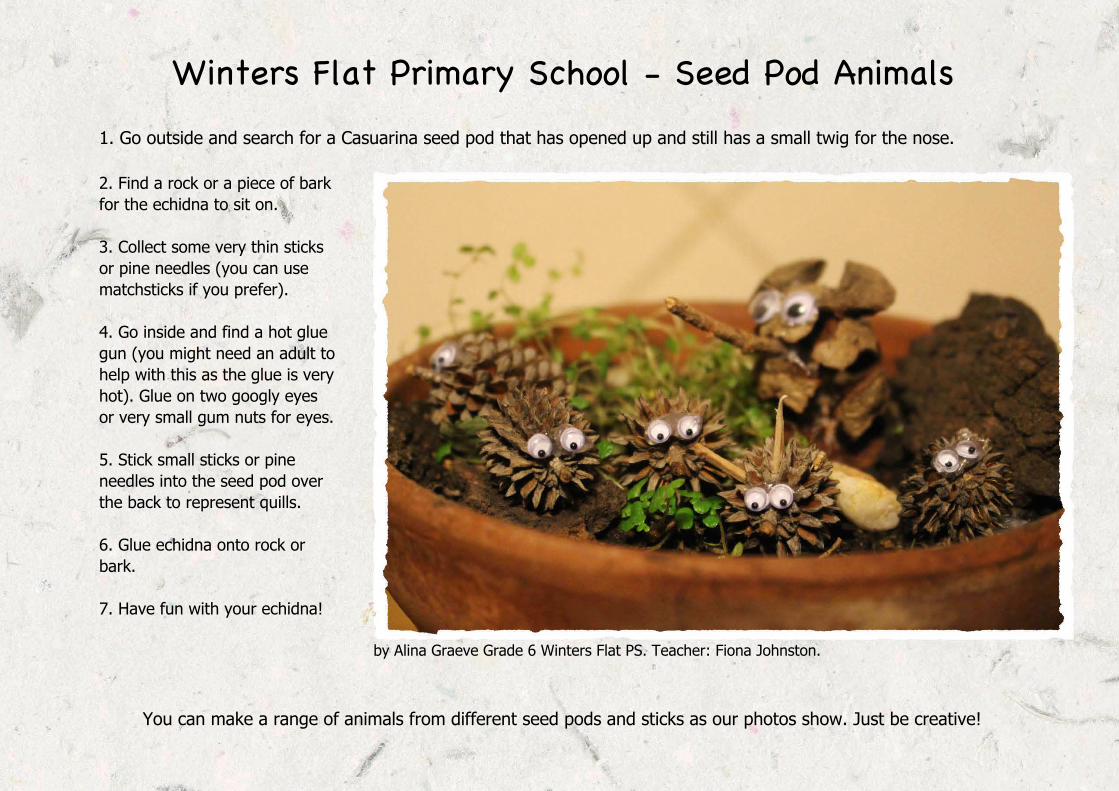
by Alina Graeve Grade 6 Winters Flat PS. Teacher: Fiona Johnston.
Winters Flat Primary School - Seed Pod Animals
2. Find a rock or a piece of barkfor the echidna to sit on.
3. Collect some very thin sticksor pine needles (you can usematchsticks if you prefer).
4. Go inside and find a hot gluegun (you might need an adult tohelp with this as the glue is veryhot). Glue on two googly eyesor very small gum nuts for eyes.
5. Stick small sticks or pineneedles into the seed pod overthe back to represent quills.
6. Glue echidna onto rock orbark.
7. Have fun with your echidna!
You can make a range of animals from different seed pods and sticks as our photos show. Just be creative!
1. Go outside and search for a Casuarina seed pod that has opened up and still has a small twig for the nose.
7
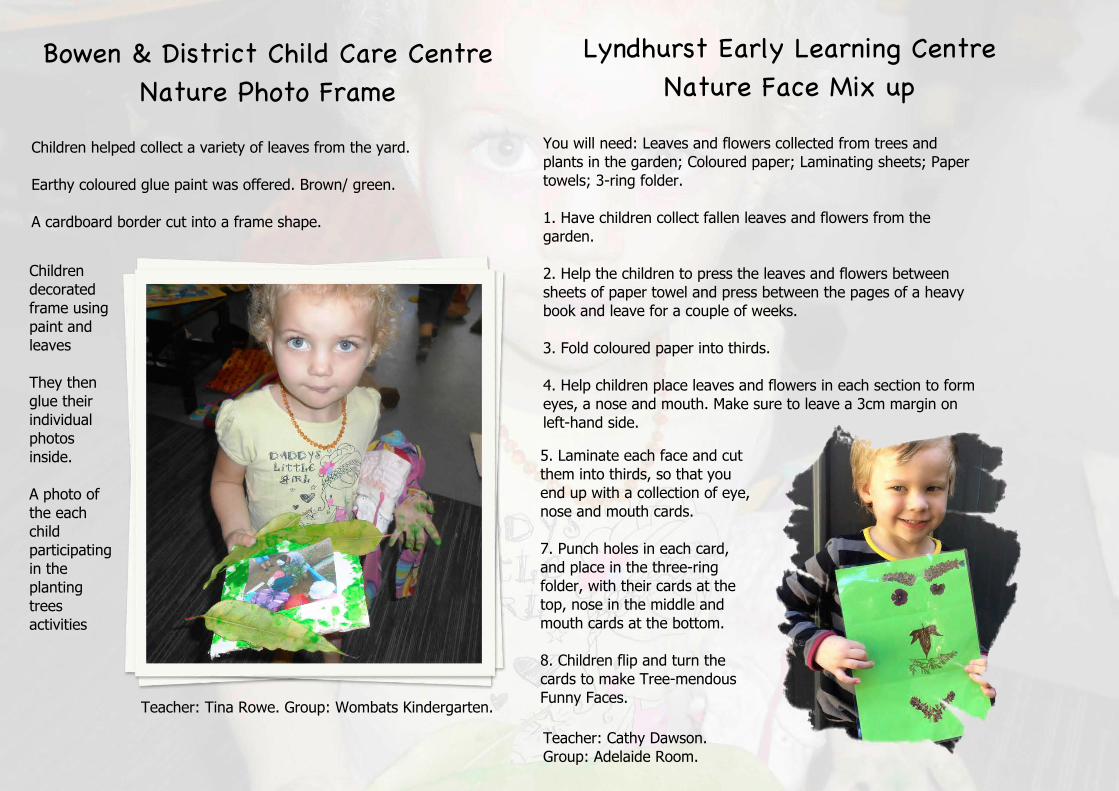
Bowen & District Child Care CentreNature Photo Frame
Children helped collect a variety of leaves from the yard.
Earthy coloured glue paint was offered. Brown/ green.
A cardboard border cut into a frame shape.
You will need: Leaves and flowers collected from trees andplants in the garden; Coloured paper; Laminating sheets; Papertowels; 3-ring folder.
1. Have children collect fallen leaves and flowers from thegarden.
2. Help the children to press the leaves and flowers betweensheets of paper towel and press between the pages of a heavybook and leave for a couple of weeks.
3. Fold coloured paper into thirds.
4. Help children place leaves and flowers in each section to formeyes, a nose and mouth. Make sure to leave a 3cm margin onleft-hand side.
Childrendecoratedframe usingpaint andleaves
They thenglue theirindividualphotosinside.
A photo ofthe eachchildparticipatingin theplantingtreesactivities
Lyndhurst Early Learning CentreNature Face Mix up
5. Laminate each face and cutthem into thirds, so that youend up with a collection of eye,nose and mouth cards.
7. Punch holes in each card,and place in the three-ringfolder, with their cards at thetop, nose in the middle andmouth cards at the bottom.
8. Children flip and turn thecards to make Tree-mendousFunny Faces.
Teacher: Tina Rowe. Group: Wombats Kindergarten.
Teacher: Cathy Dawson.Group: Adelaide Room.
8
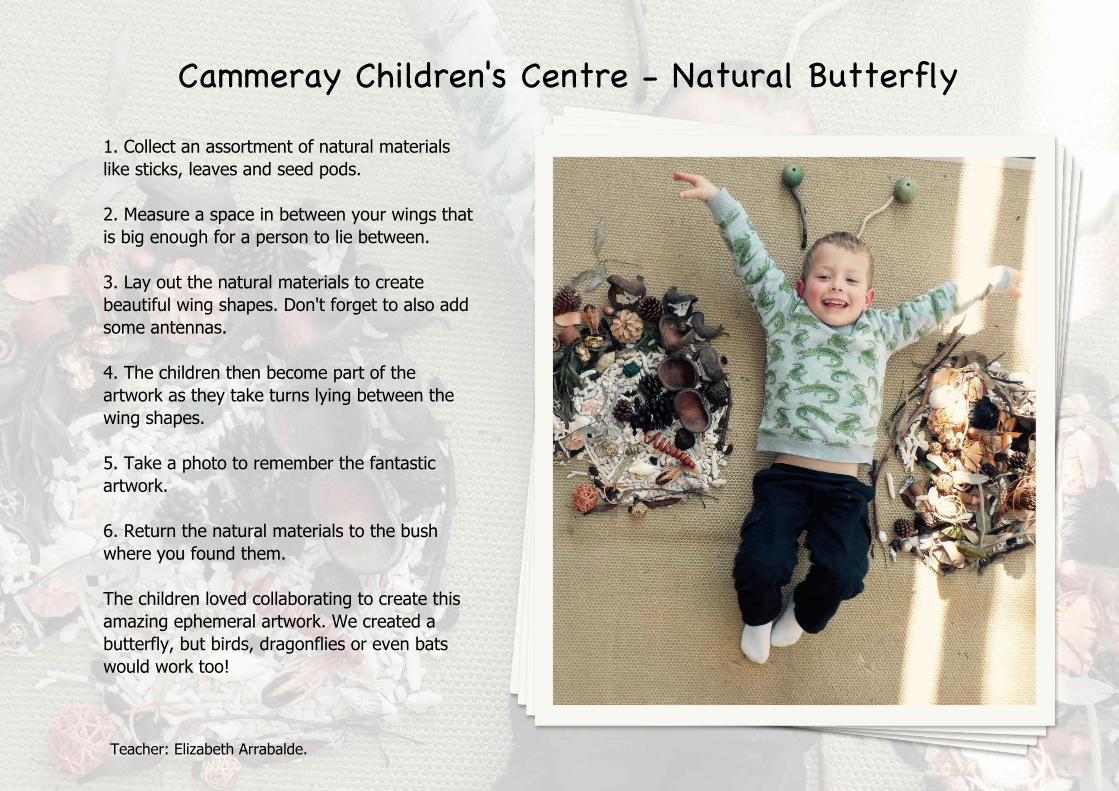
Cammeray Children's Centre - Natural Butterfly
1. Collect an assortment of natural materialslike sticks, leaves and seed pods.
2. Measure a space in between your wings thatis big enough for a person to lie between.
3. Lay out the natural materials to createbeautiful wing shapes. Don't forget to also addsome antennas.
4. The children then become part of theartwork as they take turns lying between thewing shapes.
5. Take a photo to remember the fantasticartwork.
6. Return the natural materials to the bushwhere you found them.
The children loved collaborating to create thisamazing ephemeral artwork. We created abutterfly, but birds, dragonflies or even batswould work too!
Teacher: Elizabeth Arrabalde.
9
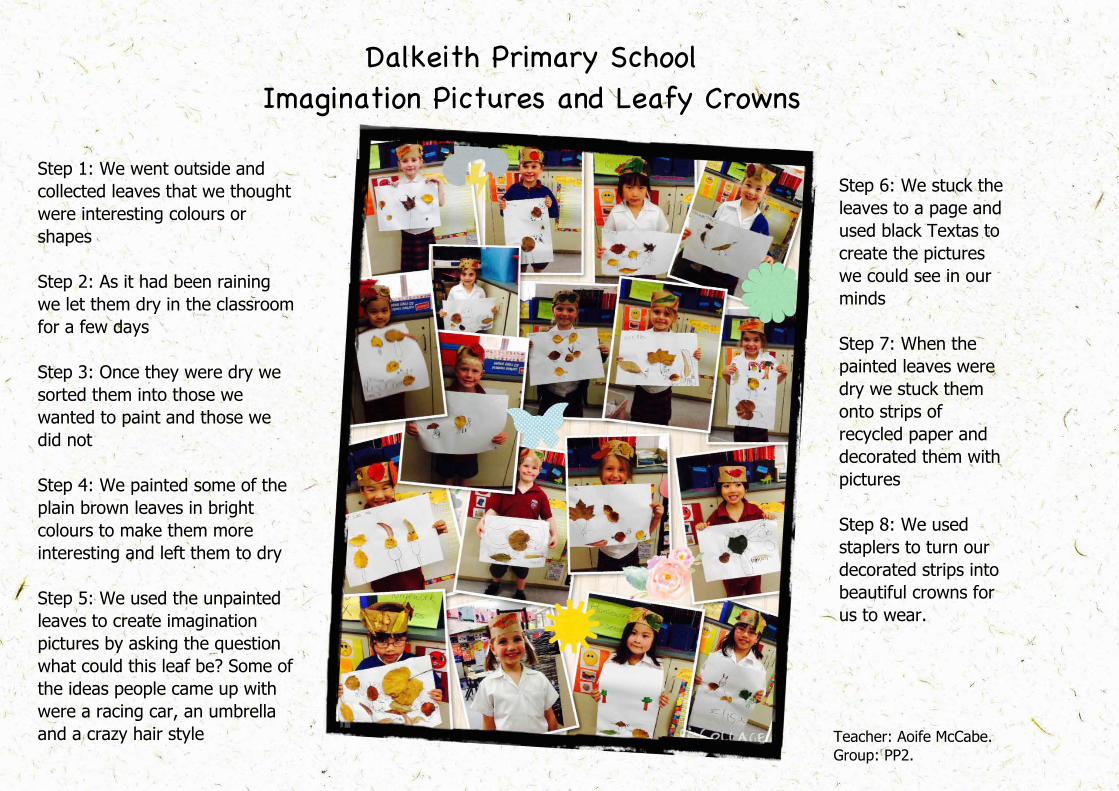
Dalkeith Primary SchoolImagination Pictures and Leafy Crowns
Step 1: We went outside andcollected leaves that we thoughtwere interesting colours orshapes
Step 2: As it had been rainingwe let them dry in the classroomfor a few days
Step 3: Once they were dry wesorted them into those wewanted to paint and those wedid not
Step 4: We painted some of theplain brown leaves in brightcolours to make them moreinteresting and left them to dry
Step 5: We used the unpaintedleaves to create imaginationpictures by asking the questionwhat could this leaf be? Some ofthe ideas people came up withwere a racing car, an umbrellaand a crazy hair style
Step 6: We stuck theleaves to a page andused black Textas tocreate the pictureswe could see in ourminds
Step 7: When thepainted leaves weredry we stuck themonto strips ofrecycled paper anddecorated them withpictures
Step 8: We usedstaplers to turn ourdecorated strips intobeautiful crowns forus to wear.
Teacher: Aoife McCabe.Group: PP2.
10
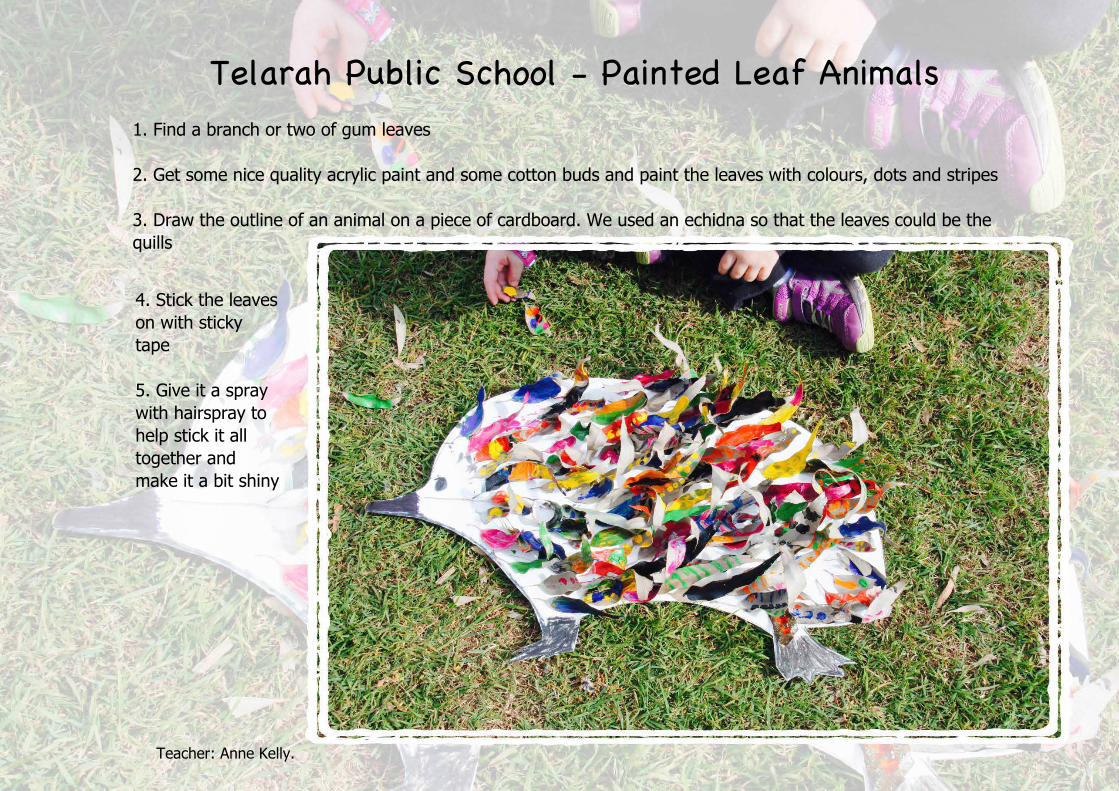
Telarah Public School - Painted Leaf Animals1. Find a branch or two of gum leaves
2. Get some nice quality acrylic paint and some cotton buds and paint the leaves with colours, dots and stripes
3. Draw the outline of an animal on a piece of cardboard. We used an echidna so that the leaves could be thequills
4. Stick the leaveson with stickytape
5. Give it a spraywith hairspray tohelp stick it alltogether andmake it a bit shiny
Teacher: Anne Kelly.
11
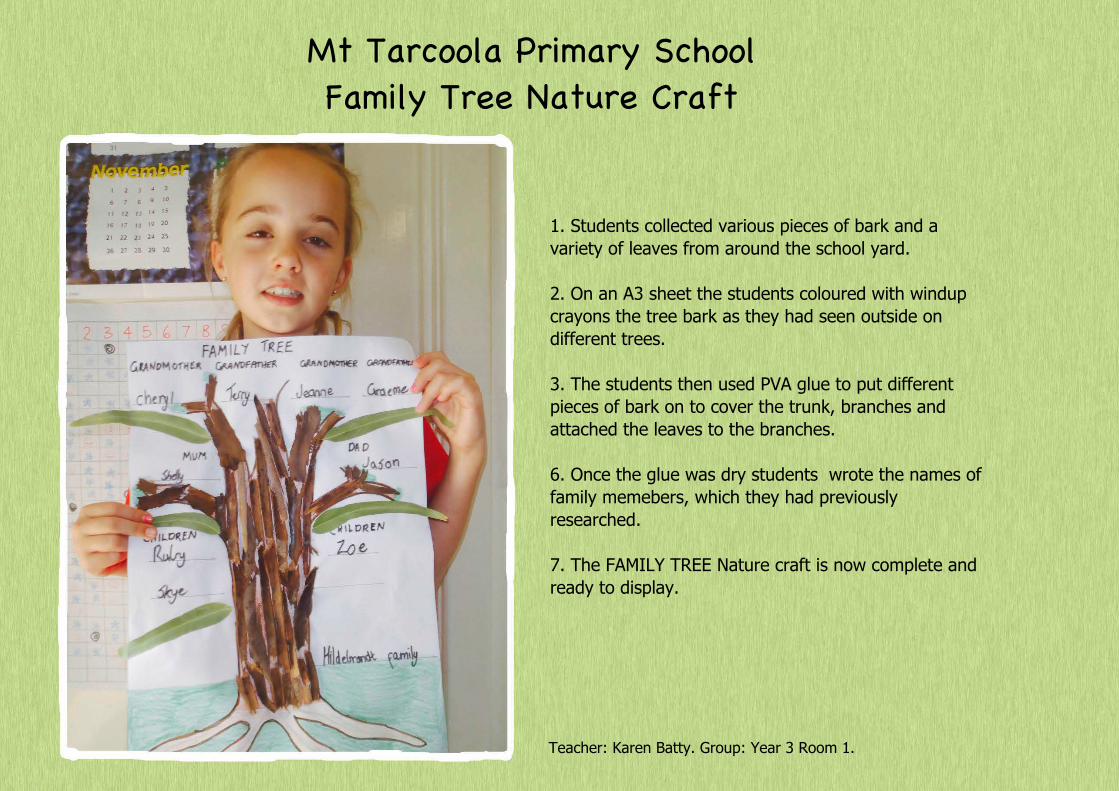
Mt Tarcoola Primary SchoolFamily Tree Nature Craft
1. Students collected various pieces of bark and avariety of leaves from around the school yard.
2. On an A3 sheet the students coloured with windupcrayons the tree bark as they had seen outside ondifferent trees.
3. The students then used PVA glue to put differentpieces of bark on to cover the trunk, branches andattached the leaves to the branches.
6. Once the glue was dry students wrote the names offamily memebers, which they had previouslyresearched.
7. The FAMILY TREE Nature craft is now complete andready to display.
Teacher: Karen Batty. Group: Year 3 Room 1.
12
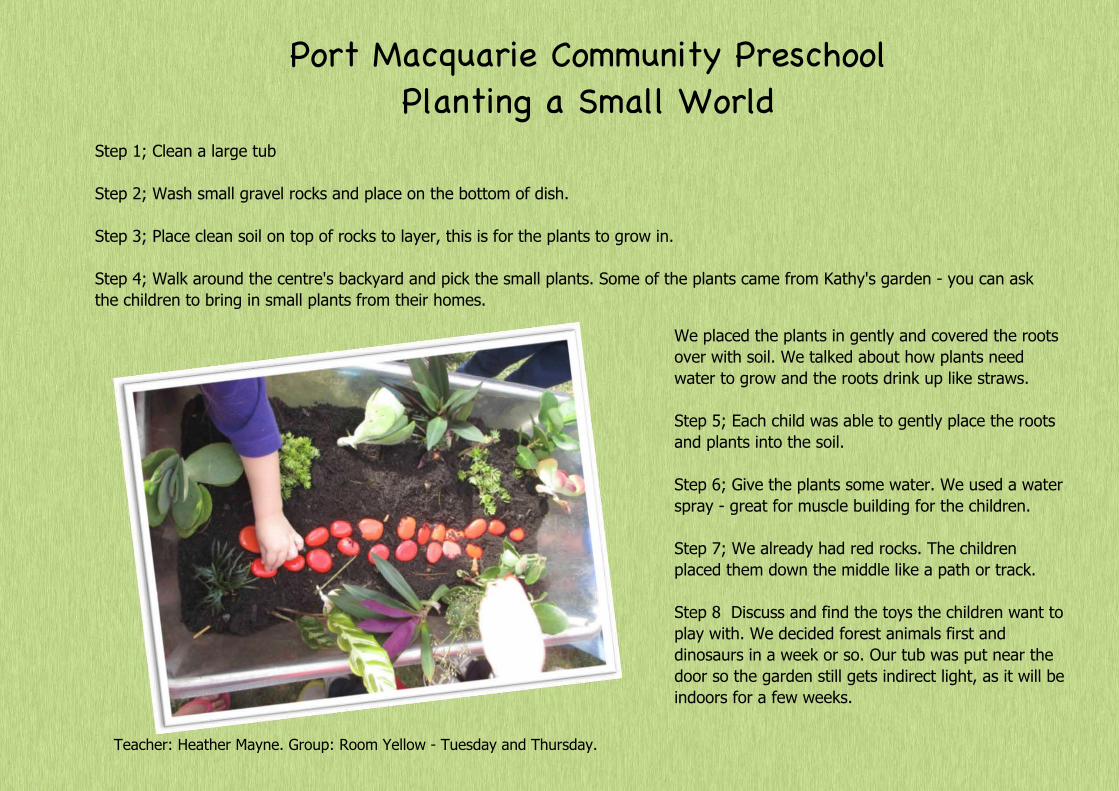
Teacher: Heather Mayne. Group: Room Yellow - Tuesday and Thursday.
Step 1; Clean a large tub
Step 2; Wash small gravel rocks and place on the bottom of dish.
Step 3; Place clean soil on top of rocks to layer, this is for the plants to grow in.
Step 4; Walk around the centre's backyard and pick the small plants. Some of the plants came from Kathy's garden - you can askthe children to bring in small plants from their homes.
Port Macquarie Community PreschoolPlanting a Small World
We placed the plants in gently and covered the rootsover with soil. We talked about how plants needwater to grow and the roots drink up like straws.
Step 5; Each child was able to gently place the rootsand plants into the soil.
Step 6; Give the plants some water. We used a waterspray - great for muscle building for the children.
Step 7; We already had red rocks. The childrenplaced them down the middle like a path or track.
Step 8 Discuss and find the toys the children want toplay with. We decided forest animals first anddinosaurs in a week or so. Our tub was put near thedoor so the garden still gets indirect light, as it will beindoors for a few weeks.
13
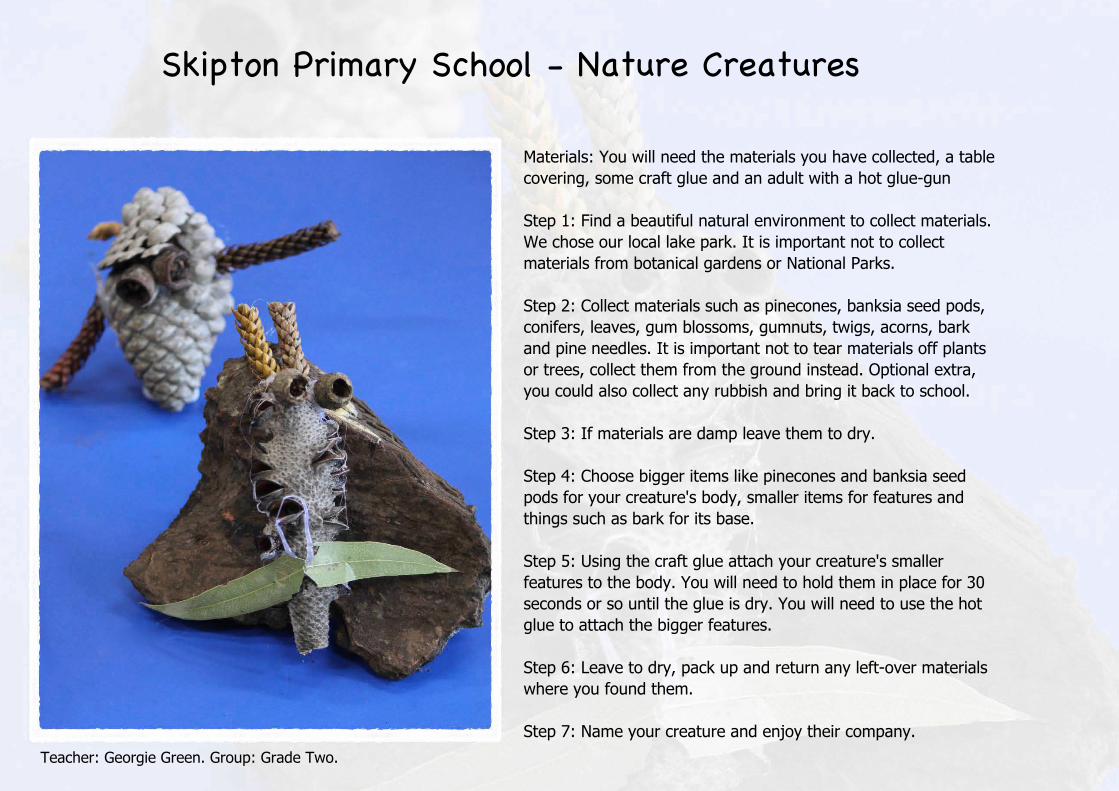
Skipton Primary School - Nature Creatures
Materials: You will need the materials you have collected, a tablecovering, some craft glue and an adult with a hot glue-gun
Step 1: Find a beautiful natural environment to collect materials.We chose our local lake park. It is important not to collectmaterials from botanical gardens or National Parks.
Step 2: Collect materials such as pinecones, banksia seed pods,conifers, leaves, gum blossoms, gumnuts, twigs, acorns, barkand pine needles. It is important not to tear materials off plantsor trees, collect them from the ground instead. Optional extra,you could also collect any rubbish and bring it back to school.
Step 3: If materials are damp leave them to dry.
Step 4: Choose bigger items like pinecones and banksia seedpods for your creature's body, smaller items for features andthings such as bark for its base.
Step 5: Using the craft glue attach your creature's smallerfeatures to the body. You will need to hold them in place for 30seconds or so until the glue is dry. You will need to use the hotglue to attach the bigger features.
Step 6: Leave to dry, pack up and return any left-over materialswhere you found them.
Step 7: Name your creature and enjoy their company.
Teacher: Georgie Green. Group: Grade Two.
14