Embed Size (px)
Citation preview
Artlantis Studio 2 Tutorial 1 /17
Artlantis Tutorial
Artlantis product-line Visit the Artlantis website at http://www.artlantis.com for product information and availability.
Trademarks
Artlantis® is a trademark of Abvent. All other trademarks are the property of their respective holders.
Artlantis Studio 2 Tutorial 2 /17
INTRODUCTION
Artlantis is a family of unique software applications developed especially for architects and
designers, ideal for quickly and easily creating high quality 3D renderings (Artlantis Render). In
addition to high resolution rendering for still images, Artlantis Studio is the right tool for creating
QuickTime® VR Panoramas, Objects and animations. Artlantis interfaces directly with ArchiCAD™,
VectorWorks™, SketchUp™ Pro, and Arc+™. With the recent addition of the DWF, OBJ and FBX
import formats and updated DXF, DWG and 3DS plug-ins, Artlantis seamlessly interacts with all the
leading CAD software as well. Themed collections of materials, parametric textures, and objects
available on CD-ROMs and online round out the innovative product line (Artlantis Media). A
recognized leader in preview window technology, Artlantis is the rendering software used by over
167,000 architects, designers and urban design professionals in more than 80 countries. For more
information about Artlantis, please visit www.artlantis.com.
This tutorial helps you to discover the main functions of Artlantis.
In the present ARTLANTIS folder you can find:
- A folder entitled Tutorial containing:
- Tutorial.atl file (Artlantis Studio 2 file with the final settings)
- Tutorial_START.atl
- Three folders containing the various Artlantis Media
- A folder entitled Postcards
- A folder with examples
To begin, please open: Tutorial_START.atl.
Artlantis Studio 2 Tutorial 3 /17
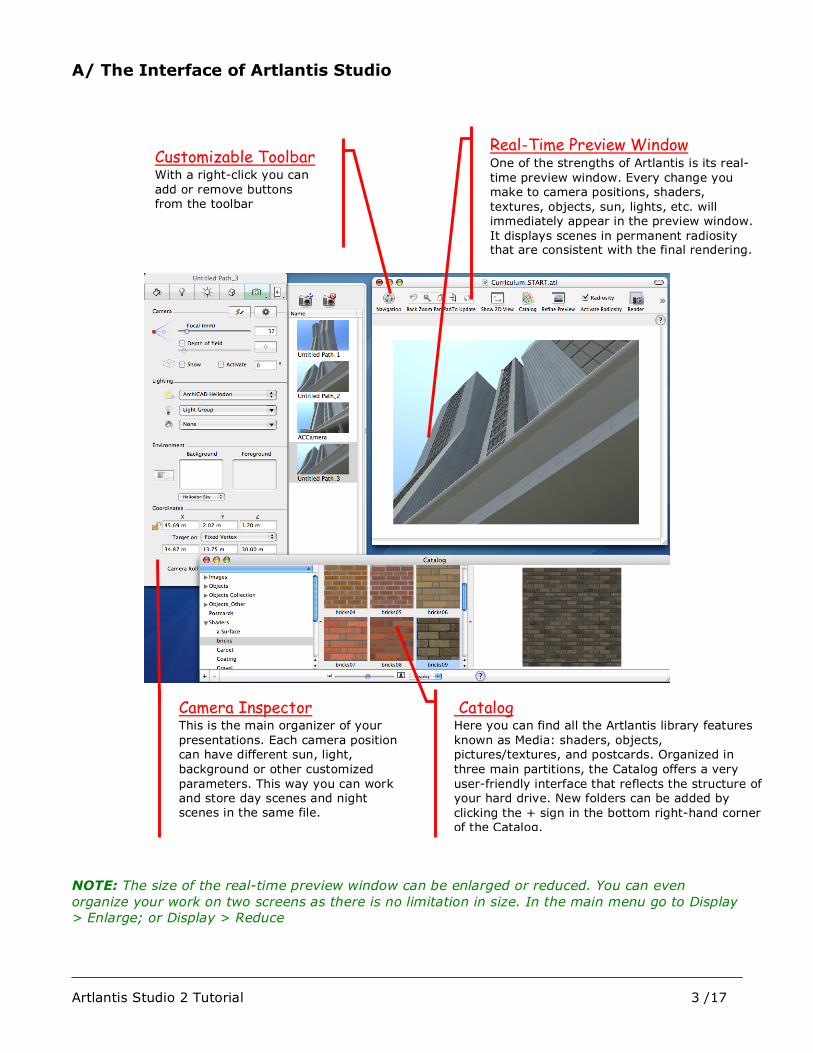
A/ The Interface of Artlantis Studio
NOTE: The size of the real-time preview window can be enlarged or reduced. You can even
organize your work on two screens as there is no limitation in size. In the main menu go to Display
> Enlarge; or Display > Reduce
Real-Time Preview Window One of the strengths of Artlantis is its real-
time preview window. Every change you
make to camera positions, shaders,
textures, objects, sun, lights, etc. will
immediately appear in the preview window.
It displays scenes in permanent radiosity that are consistent with the final rendering.
Customizable Toolbar With a right-click you can
add or remove buttons
from the toolbar
Catalog Here you can find all the Artlantis library features
known as Media: shaders, objects,
pictures/textures, and postcards. Organized in
three main partitions, the Catalog offers a very
user-friendly interface that reflects the structure of
your hard drive. New folders can be added by
clicking the + sign in the bottom right-hand corner
of the Catalog.
To open it, go to Windows/Catalog menu.
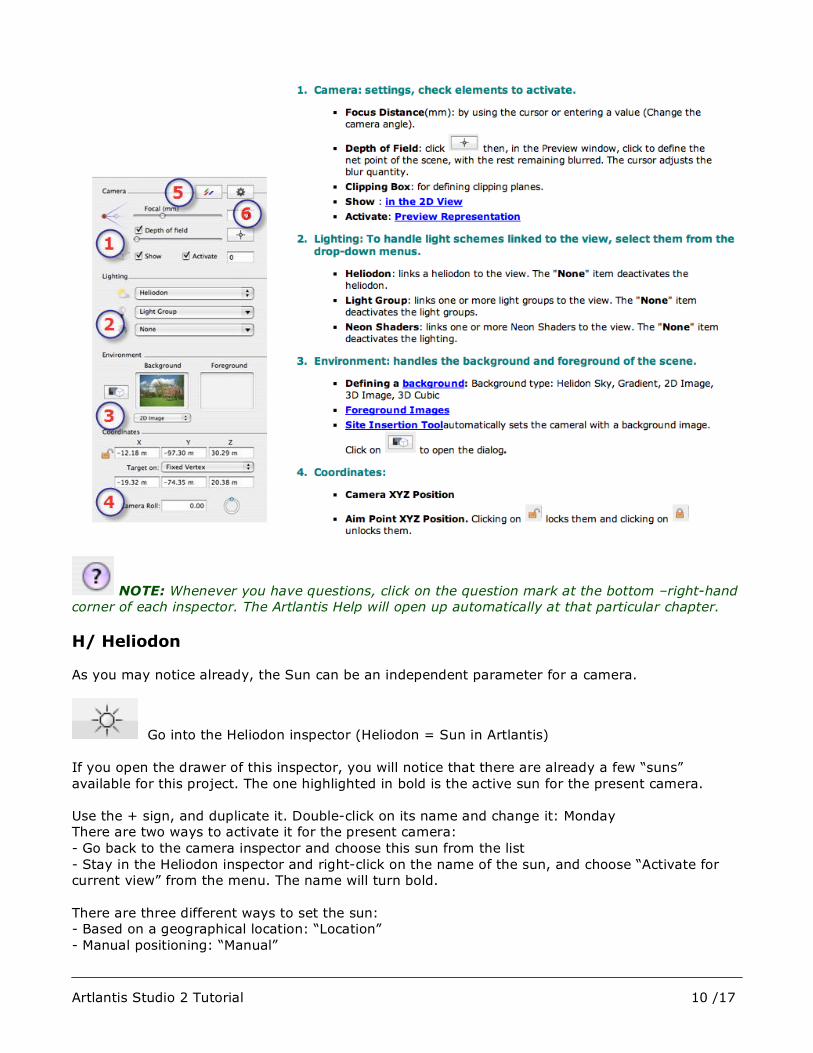
Camera Inspector This is the main organizer of your
presentations. Each camera position
can have different sun, light,
background or other customized
parameters. This way you can work
and store day scenes and night
scenes in the same file.
Artlantis Studio 2 Tutorial 4 /17
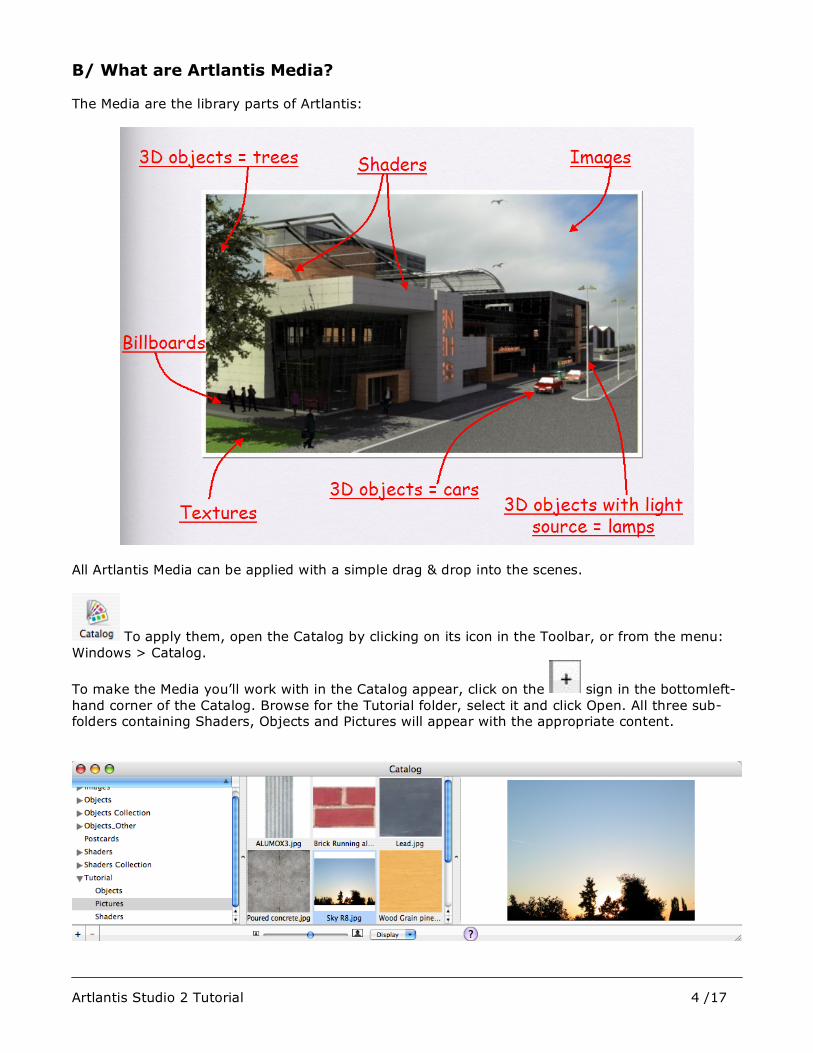
B/ What are Artlantis Media?
The Media are the library parts of Artlantis:
All Artlantis Media can be applied with a simple drag & drop into the scenes.
To apply them, open the Catalog by clicking on its icon in the Toolbar, or from the menu:
Windows > Catalog.
To make the Media you’ll work with in the Catalog appear, click on the sign in the bottomleft-
hand corner of the Catalog. Browse for the Tutorial folder, select it and click Open. All three sub-
folders containing Shaders, Objects and Pictures will appear with the appropriate content.
Artlantis Studio 2 Tutorial 5 /17
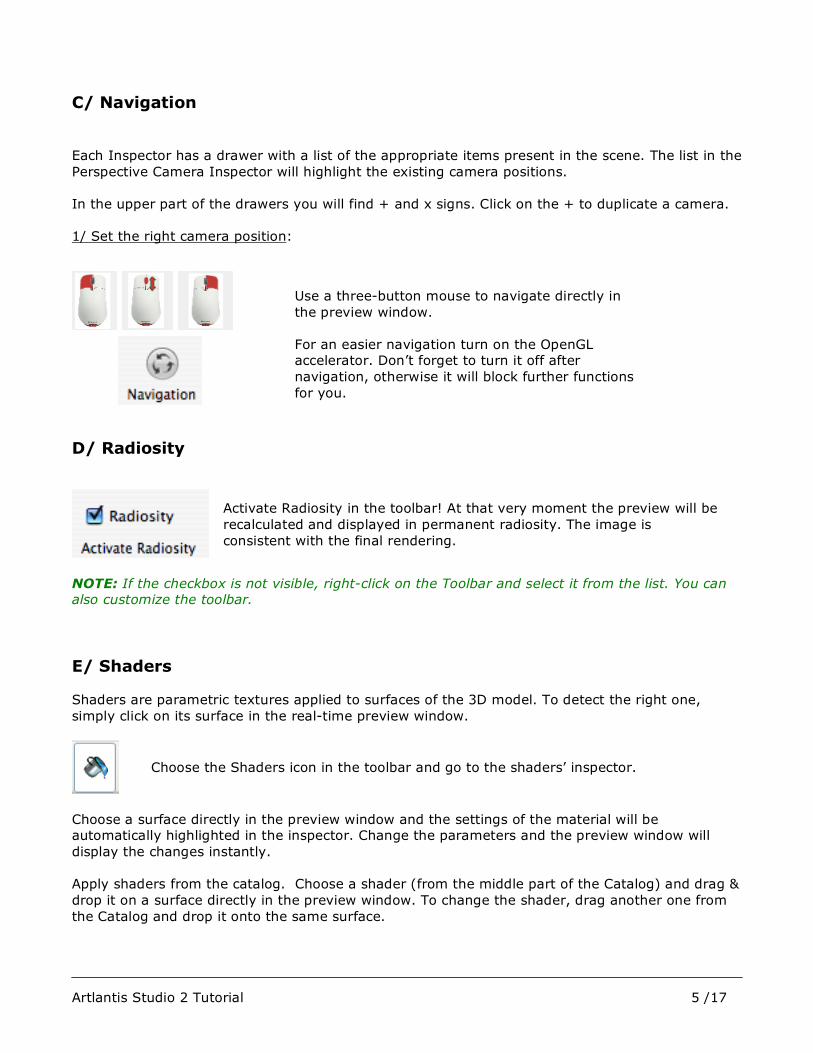
C/ Navigation
Each Inspector has a drawer with a list of the appropriate items present in the scene. The list in the
Perspective Camera Inspector will highlight the existing camera positions.
In the upper part of the drawers you will find + and x signs. Click on the + to duplicate a camera.
1/ Set the right camera position:
D/ Radiosity
Activate Radiosity in the toolbar! At that very moment the preview will be
recalculated and displayed in permanent radiosity. The image is
consistent with the final rendering.
NOTE: If the checkbox is not visible, right-click on the Toolbar and select it from the list. You can
also customize the toolbar.
E/ Shaders
Shaders are parametric textures applied to surfaces of the 3D model. To detect the right one,
simply click on its surface in the real-time preview window.
Choose the Shaders icon in the toolbar and go to the shaders’ inspector.
Choose a surface directly in the preview window and the settings of the material will be
automatically highlighted in the inspector. Change the parameters and the preview window will
display the changes instantly.
Apply shaders from the catalog. Choose a shader (from the middle part of the Catalog) and drag &
drop it on a surface directly in the preview window. To change the shader, drag another one from
the Catalog and drop it onto the same surface.
Use a three-button mouse to navigate directly in
the preview window.
For an easier navigation turn on the OpenGL
accelerator. Don’t forget to turn it off after
navigation, otherwise it will block further functions
for you.
Artlantis Studio 2 Tutorial 6 /17
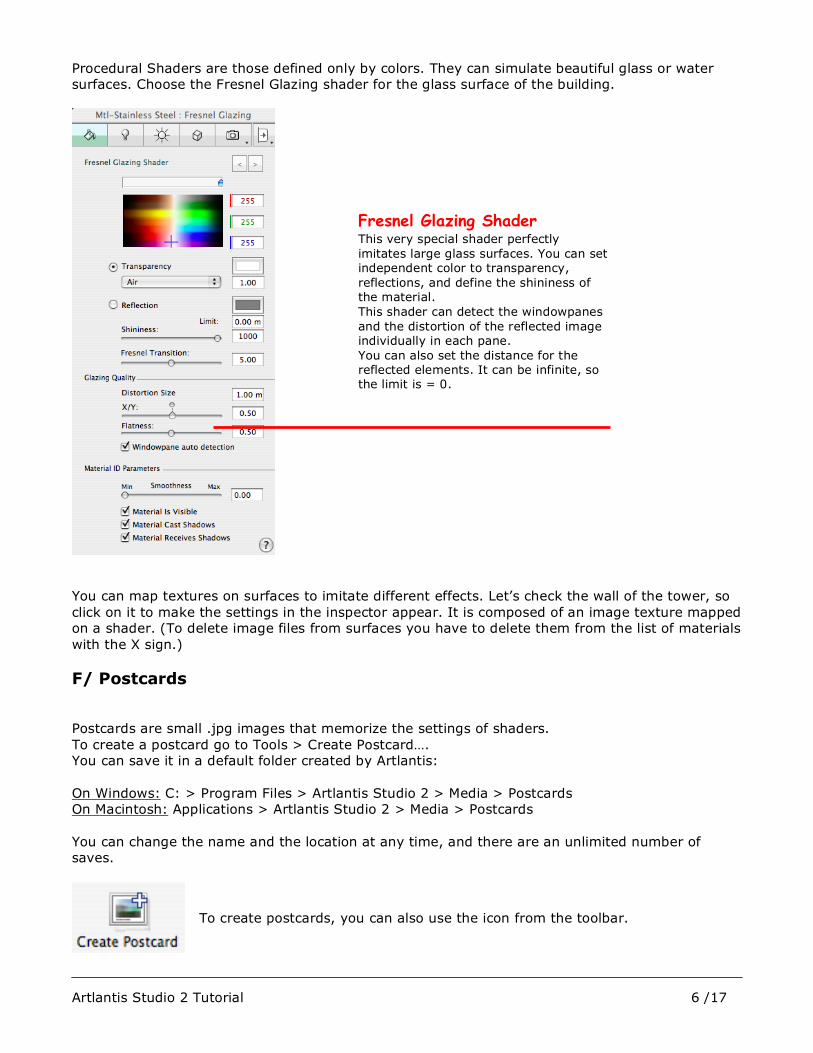
Procedural Shaders are those defined only by colors. They can simulate beautiful glass or water
surfaces. Choose the Fresnel Glazing shader for the glass surface of the building.
You can map textures on surfaces to imitate different effects. Let’s check the wall of the tower, so
click on it to make the settings in the inspector appear. It is composed of an image texture mapped
on a shader. (To delete image files from surfaces you have to delete them from the list of materials
with the X sign.)
F/ Postcards
Postcards are small .jpg images that memorize the settings of shaders.
To create a postcard go to Tools > Create Postcard….
You can save it in a default folder created by Artlantis:
On Windows: C: > Program Files > Artlantis Studio 2 > Media > Postcards
On Macintosh: Applications > Artlantis Studio 2 > Media > Postcards
You can change the name and the location at any time, and there are an unlimited number of
saves.
To create postcards, you can also use the icon from the toolbar.
Fresnel Glazing Shader This very special shader perfectly
imitates large glass surfaces. You can set
independent color to transparency,
reflections, and define the shininess of
the material.
This shader can detect the windowpanes
and the distortion of the reflected image
individually in each pane.
You can also set the distance for the
reflected elements. It can be infinite, so
the limit is = 0.
Artlantis Studio 2 Tutorial 7 /17
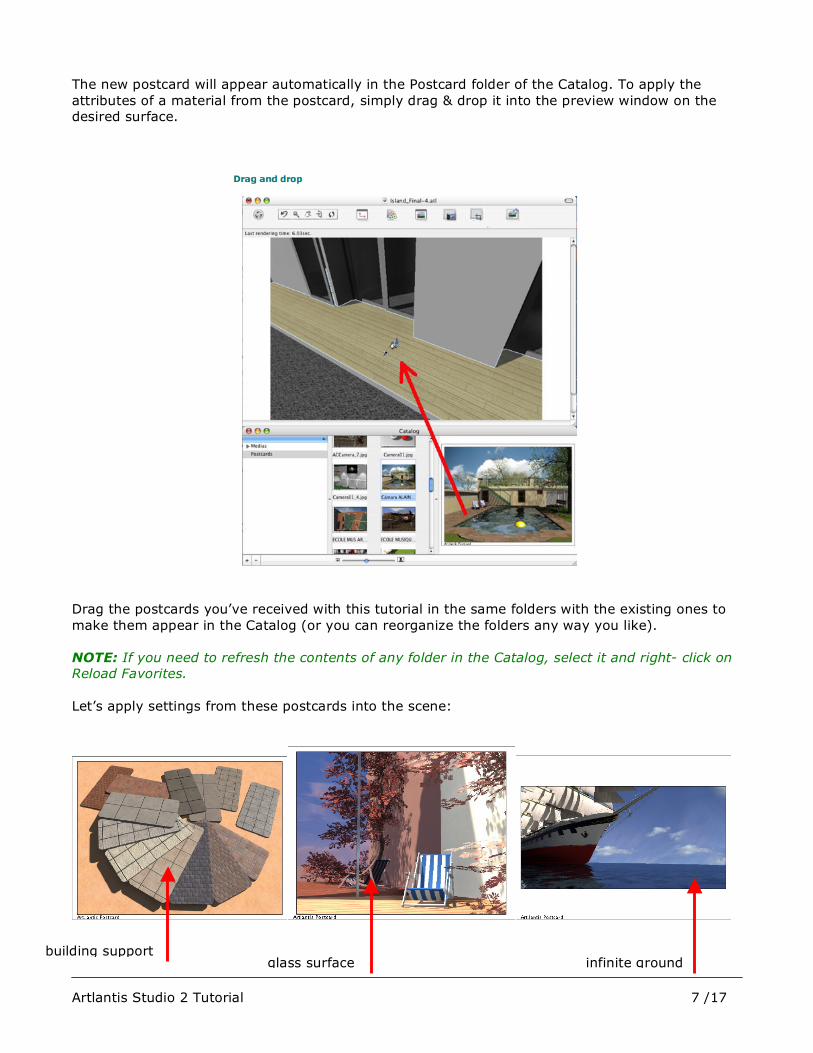
The new postcard will appear automatically in the Postcard folder of the Catalog. To apply the
attributes of a material from the postcard, simply drag & drop it into the preview window on the
desired surface.
Drag the postcards you’ve received with this tutorial in the same folders with the existing ones to
make them appear in the Catalog (or you can reorganize the folders any way you like).
NOTE: If you need to refresh the contents of any folder in the Catalog, select it and right- click on
Reload Favorites.
Let’s apply settings from these postcards into the scene:
building support glass surface infinite ground
Artlantis Studio 2 Tutorial 8 /17
NOTE: These postcards are independent of your projects; you can use them at any time. You can
even send them to your colleagues, store them on a server, and share them with others. They will
remember the stored information until you re-save or edit them.
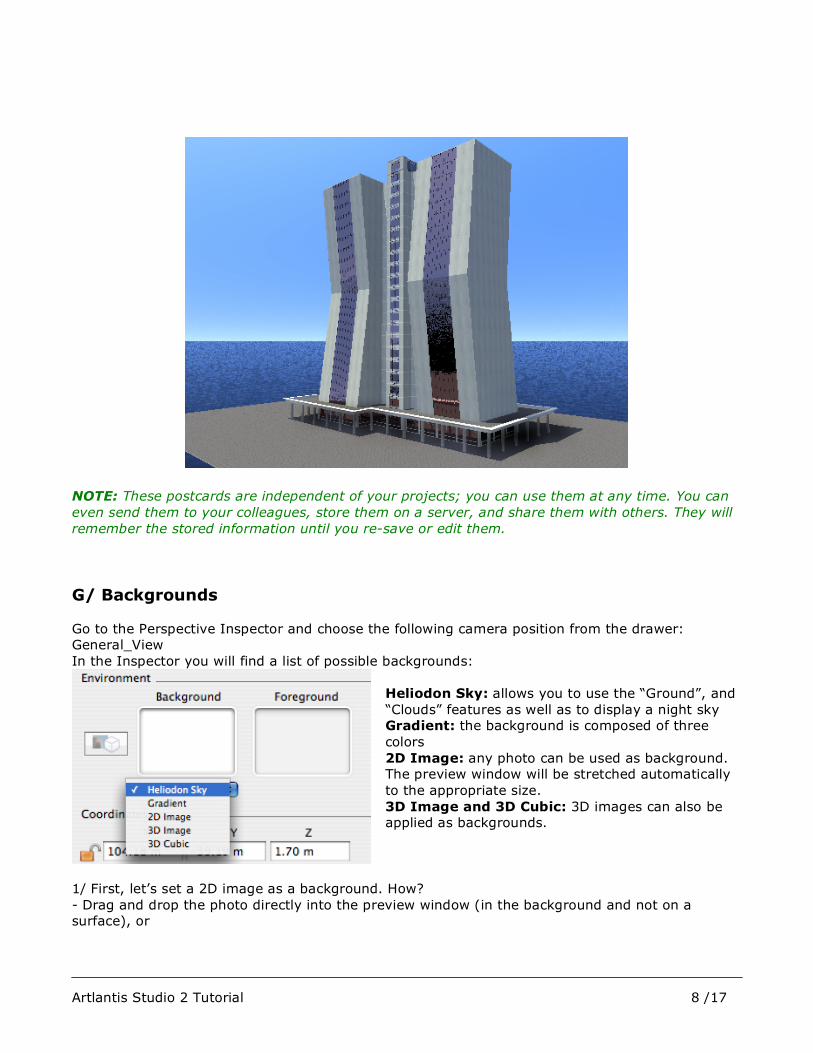
G/ Backgrounds
Go to the Perspective Inspector and choose the following camera position from the drawer:
General_View
In the Inspector you will find a list of possible backgrounds:
Heliodon Sky: allows you to use the “Ground”, and
“Clouds” features as well as to display a night sky
Gradient: the background is composed of three
colors
2D Image: any photo can be used as background.
The preview window will be stretched automatically
to the appropriate size.
3D Image and 3D Cubic: 3D images can also be
applied as backgrounds.
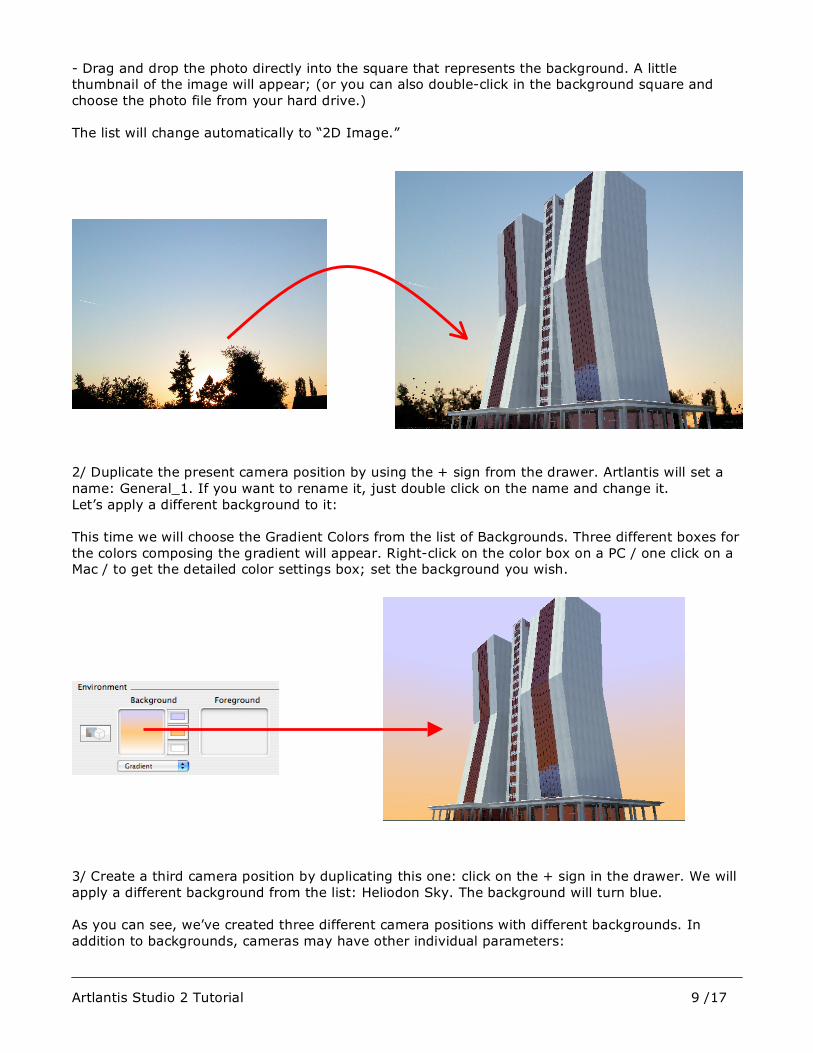
1/ First, let’s set a 2D image as a background. How?
- Drag and drop the photo directly into the preview window (in the background and not on a
surface), or
Artlantis Studio 2 Tutorial 9 /17
- Drag and drop the photo directly into the square that represents the background. A little
thumbnail of the image will appear; (or you can also double-click in the background square and
choose the photo file from your hard drive.)
The list will change automatically to “2D Image.”
2/ Duplicate the present camera position by using the + sign from the drawer. Artlantis will set a
name: General_1. If you want to rename it, just double click on the name and change it.
Let’s apply a different background to it:
This time we will choose the Gradient Colors from the list of Backgrounds. Three different boxes for
the colors composing the gradient will appear. Right-click on the color box on a PC / one click on a
Mac / to get the detailed color settings box; set the background you wish.
3/ Create a third camera position by duplicating this one: click on the + sign in the drawer. We will
apply a different background from the list: Heliodon Sky. The background will turn blue.
As you can see, we’ve created three different camera positions with different backgrounds. In
addition to backgrounds, cameras may have other individual parameters:
Artlantis Studio 2 Tutorial 10 /17
NOTE: Whenever you have questions, click on the question mark at the bottom –right-hand
corner of each inspector. The Artlantis Help will open up automatically at that particular chapter.
H/ Heliodon
As you may notice already, the Sun can be an independent parameter for a camera.
Go into the Heliodon inspector (Heliodon = Sun in Artlantis)
If you open the drawer of this inspector, you will notice that there are already a few “suns”
available for this project. The one highlighted in bold is the active sun for the present camera.
Use the + sign, and duplicate it. Double-click on its name and change it: Monday
There are two ways to activate it for the present camera:
- Go back to the camera inspector and choose this sun from the list
- Stay in the Heliodon inspector and right-click on the name of the sun, and choose “Activate for
current view” from the menu. The name will turn bold.
There are three different ways to set the sun:
- Based on a geographical location: “Location”
- Manual positioning: “Manual”
Artlantis Studio 2 Tutorial 11 /17
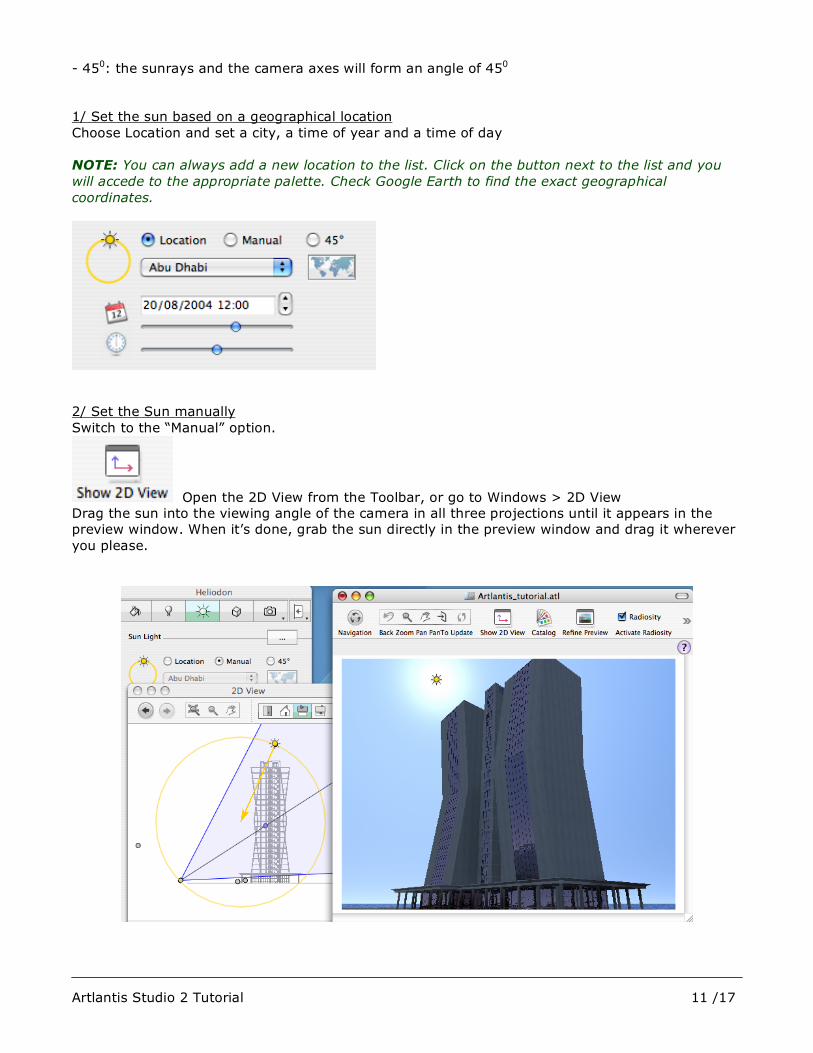
- 450: the sunrays and the camera axes will form an angle of 450
1/ Set the sun based on a geographical location
Choose Location and set a city, a time of year and a time of day
NOTE: You can always add a new location to the list. Click on the button next to the list and you
will accede to the appropriate palette. Check Google Earth to find the exact geographical
coordinates.
2/ Set the Sun manually
Switch to the “Manual” option.
Open the 2D View from the Toolbar, or go to Windows > 2D View
Drag the sun into the viewing angle of the camera in all three projections until it appears in the
preview window. When it’s done, grab the sun directly in the preview window and drag it wherever
you please.

Artlantis Studio 2 Tutorial 12 /17
Activate Clouds:
With the dice you can reorganize the repartition of the
clouds in the sky. Checking “Clouds Mask Sun” option:
when clouds are in front of the sun, shadows will disappear
from the scene, the same as in reality.
The sky you are simulating is a background of 3600!
Add additional effects you can find in the palette that you
can open from the Heliodon Inspector:
I/ 3D Objects
- Go back to the Perspective inspector of still cameras and change view to Ground_level.
Artlantis Studio 2 Tutorial 13 /17
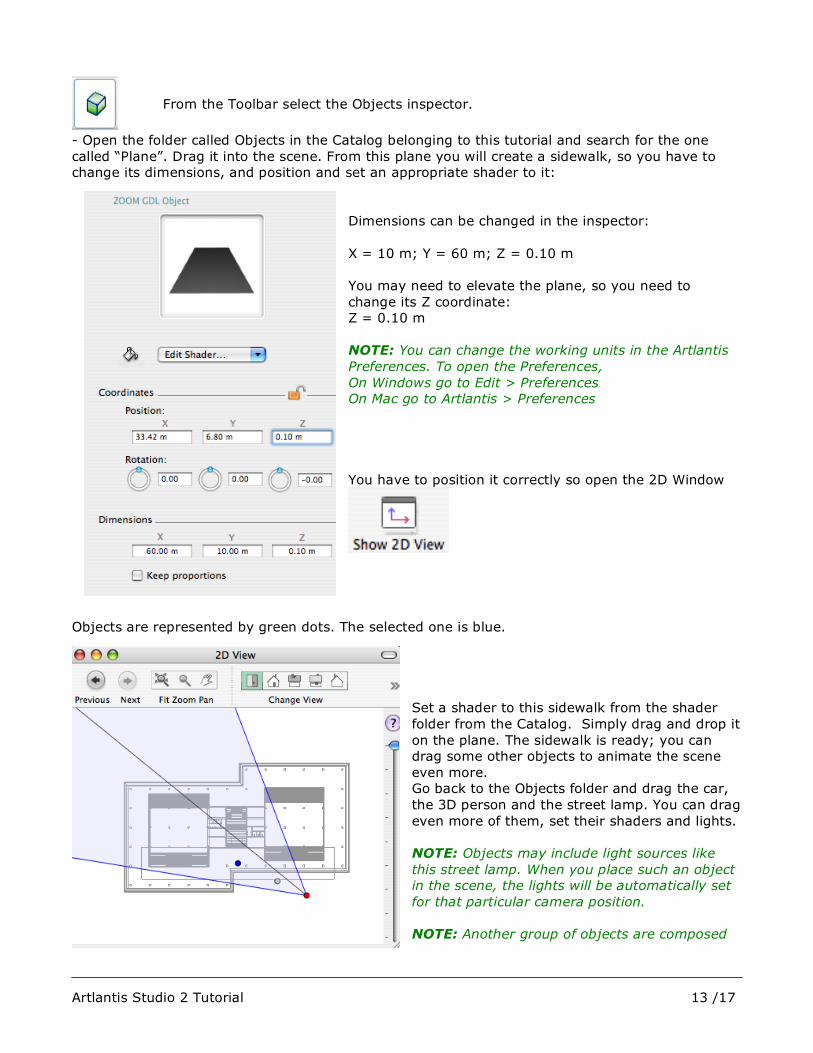
From the Toolbar select the Objects inspector.
- Open the folder called Objects in the Catalog belonging to this tutorial and search for the one
called “Plane”. Drag it into the scene. From this plane you will create a sidewalk, so you have to
change its dimensions, and position and set an appropriate shader to it:
Dimensions can be changed in the inspector:
X = 10 m; Y = 60 m; Z = 0.10 m
You may need to elevate the plane, so you need to
change its Z coordinate:
Z = 0.10 m
NOTE: You can change the working units in the Artlantis
Preferences. To open the Preferences,
On Windows go to Edit > Preferences
On Mac go to Artlantis > Preferences
You have to position it correctly so open the 2D Window
Objects are represented by green dots. The selected one is blue.
Set a shader to this sidewalk from the shader
folder from the Catalog. Simply drag and drop it
on the plane. The sidewalk is ready; you can
drag some other objects to animate the scene
even more.
Go back to the Objects folder and drag the car,
the 3D person and the street lamp. You can drag
even more of them, set their shaders and lights.
NOTE: Objects may include light sources like
this street lamp. When you place such an object
in the scene, the lights will be automatically set
for that particular camera position.
NOTE: Another group of objects are composed
Artlantis Studio 2 Tutorial 14 /17
of 3D plants. These plants can behave in four different ways depending on the time of year.
NOTE: In the 2D window you can duplicate objects.
= Drag a copy of an object
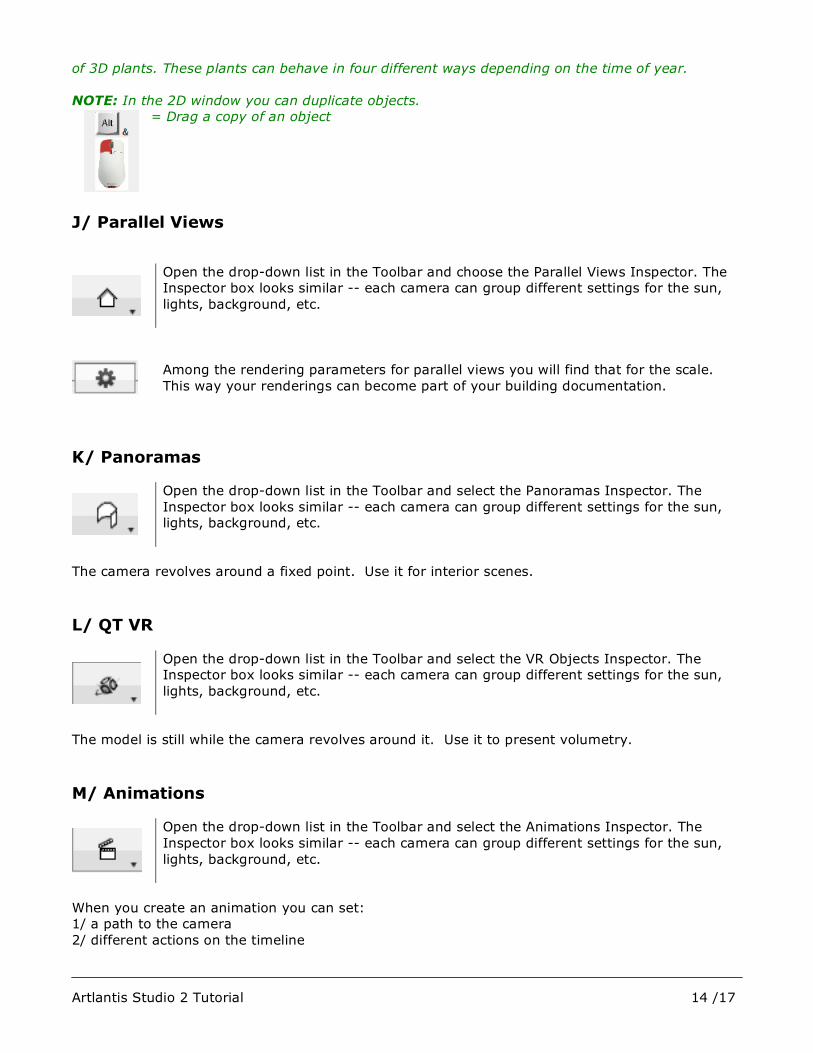
J/ Parallel Views
Open the drop-down list in the Toolbar and choose the Parallel Views Inspector. The
Inspector box looks similar -- each camera can group different settings for the sun,
lights, background, etc.
Among the rendering parameters for parallel views you will find that for the scale.
This way your renderings can become part of your building documentation.
K/ Panoramas
Open the drop-down list in the Toolbar and select the Panoramas Inspector. The
Inspector box looks similar -- each camera can group different settings for the sun,
lights, background, etc.
The camera revolves around a fixed point. Use it for interior scenes.
L/ QT VR
Open the drop-down list in the Toolbar and select the VR Objects Inspector. The
Inspector box looks similar -- each camera can group different settings for the sun,
lights, background, etc.
The model is still while the camera revolves around it. Use it to present volumetry.
M/ Animations
Open the drop-down list in the Toolbar and select the Animations Inspector. The
Inspector box looks similar -- each camera can group different settings for the sun,
lights, background, etc.
When you create an animation you can set:
1/ a path to the camera
2/ different actions on the timeline
Artlantis Studio 2 Tutorial 15 /17
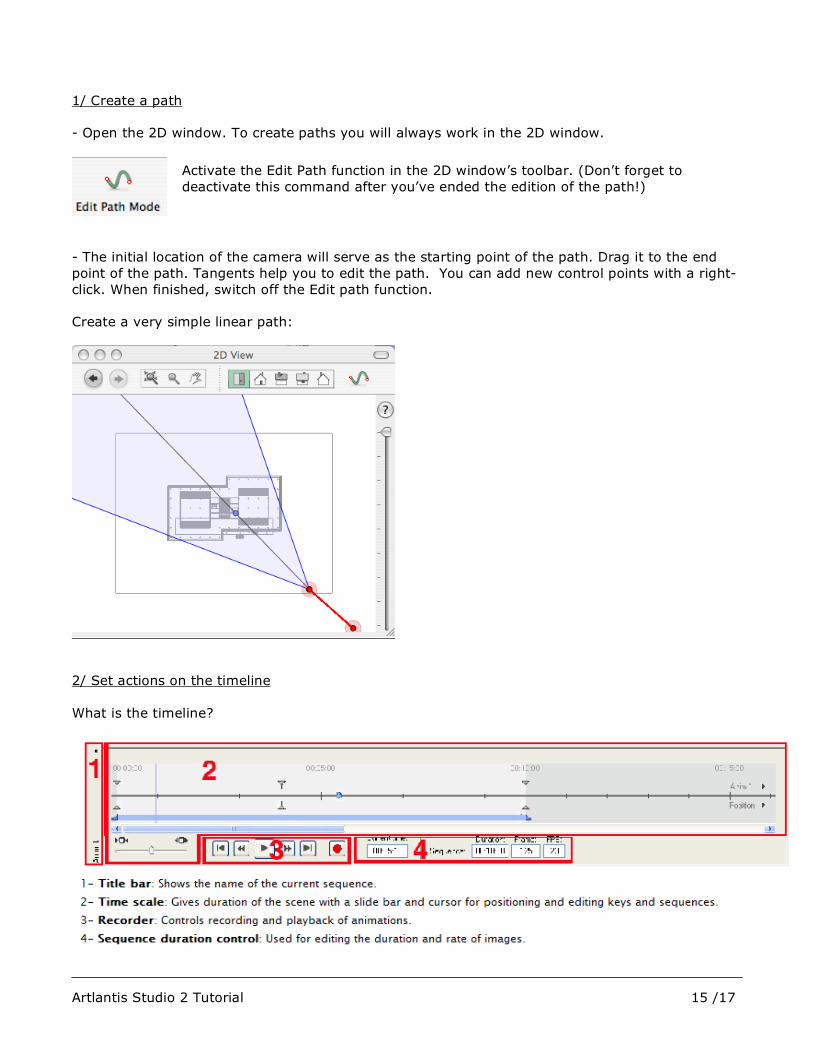
1/ Create a path
- Open the 2D window. To create paths you will always work in the 2D window.
Activate the Edit Path function in the 2D window’s toolbar. (Don’t forget to
deactivate this command after you’ve ended the edition of the path!)
- The initial location of the camera will serve as the starting point of the path. Drag it to the end
point of the path. Tangents help you to edit the path. You can add new control points with a right-
click. When finished, switch off the Edit path function.
Create a very simple linear path:
2/ Set actions on the timeline
What is the timeline?
Artlantis Studio 2 Tutorial 16 /17
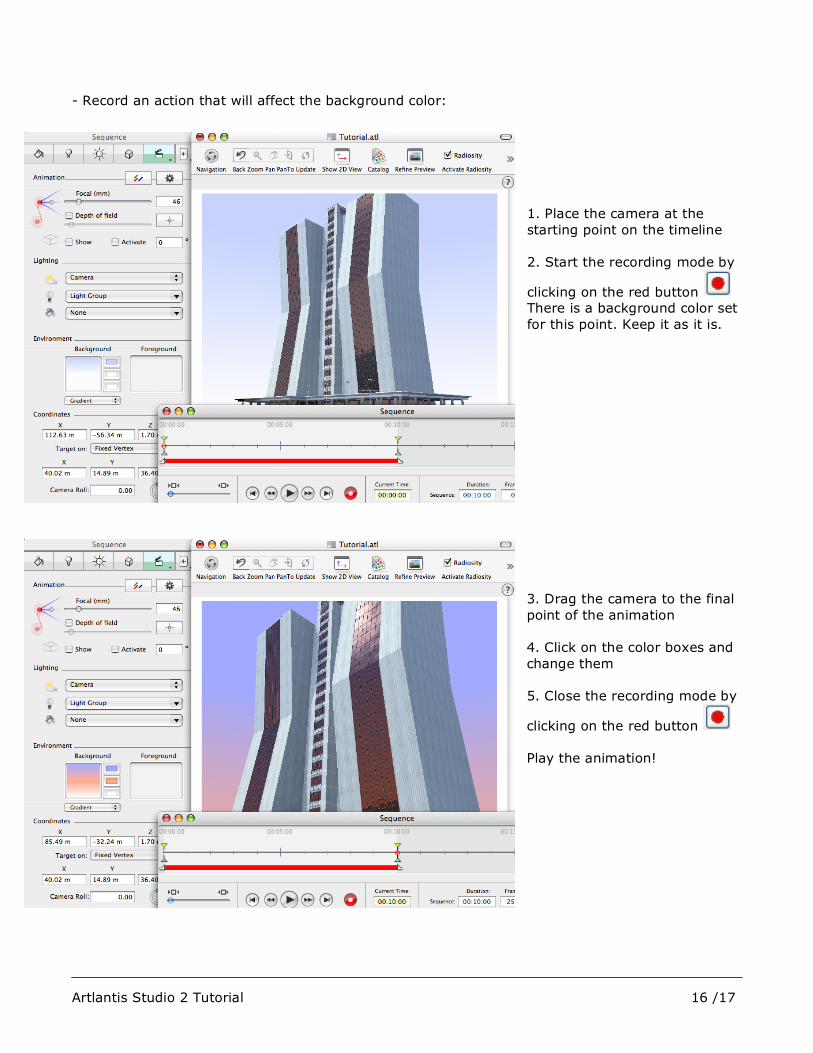
- Record an action that will affect the background color:
1. Place the camera at the
starting point on the timeline
2. Start the recording mode by
clicking on the red button
There is a background color set
for this point. Keep it as it is.
3. Drag the camera to the final
point of the animation
4. Click on the color boxes and
change them
5. Close the recording mode by
clicking on the red button
Play the animation!
Artlantis Studio 2 Tutorial 17 /17
NOTE: To set actions means to define the events linked to different positions of the camera on the
timeline. Artlantis will calculate the steps in-between automatically.
You can animate almost everything in Artlantis, as you can see on the list below:
Camera: Position, target, focal, rotation, depth of field, ambient, atmosphere
Objects: Position, orientation, rotation
Shaders: Color, shiningness, reflection, individual parameters, animated texture mapping
Lights: Position, orientation, color, intensity, off and on, effects
Heliodon: Sun study for a day or a year, intensity and color of the sun, intensity and color of the sky
illumination, effects
Background
Clipping Box
Post Process: Image settings, Exposure, Grain, Edge and Pastel
CONCLUSION For more details consult our website: www.artlantis.com
Visit our user gallery and share your renderings with us!
Chat with users on our forums, share your experiences and learn even more!
We all wish you great success with Artlantis.
Team Abvent