Embed Size (px)
Citation preview
8/3/2019 Armado Transmision D6G
http://slidepdf.com/reader/full/armado-transmision-d6g 1/23
Shutdown SIS
Previous Screen
Product: TRACK-TYPE TRACTOR
Model: D6E TRACK-TYPE TRACTOR 2MJ
Configuration: D6G Track-Type Tractor Power Shift 2MJ02654-UP (MACHINE)
POWERED BY 3306 Engine
DDiissaasssseemmbbllyy aanndd AAsssseemmbbllyyDD66GG TTrraacckk--TTyyppee TTrraaccttoorr PPoowweerr TTrraaiinnMMeeddiiaa NNuummbbeerr --SSEENNRR11772277--0022 PPuubblliiccaattiioonn DDaattee --0011--0055--22000055 DDaattee UUppddaatteedd --1166--0055--22000055
i02606943
Transmission and Transfer Gears - Assemble
SMCS - 3002-016
S/N - 2MJ2654-UP
Assembly Procedure
Table 1
Required Toolings
Tool Part Number Part Description Qty
A 1P-2420 Repair Stand 1
E FT-0833 Clamp 2
H 1P-7407 Eyebolt 3
J 1P-7405 Eyebolt 3
K -Forcing Screws
1/2 inch - 13 NC
3
L -Forcing Screws
1/2 inch - 13 NC3
M -Screw
6 - 401
N1P-0532 Handle 1
1P-0516 Drive Plate 1
P 1P-0531 Handle 1
D6G Track-Type Tractor Power Shift 2MJ02654-UP (MAC... https://sis.cat.com/sisweb/sisweb/techdoc/techdoc_print_page...
1 of 23 17/11/11 14:49
8/3/2019 Armado Transmision D6G
http://slidepdf.com/reader/full/armado-transmision-d6g 2/23
1P-0493 Drive Plate 1
R1P-0463 Drive Plate 1
1P-0529 Handle 1
S FT-0834 Nozzle 1
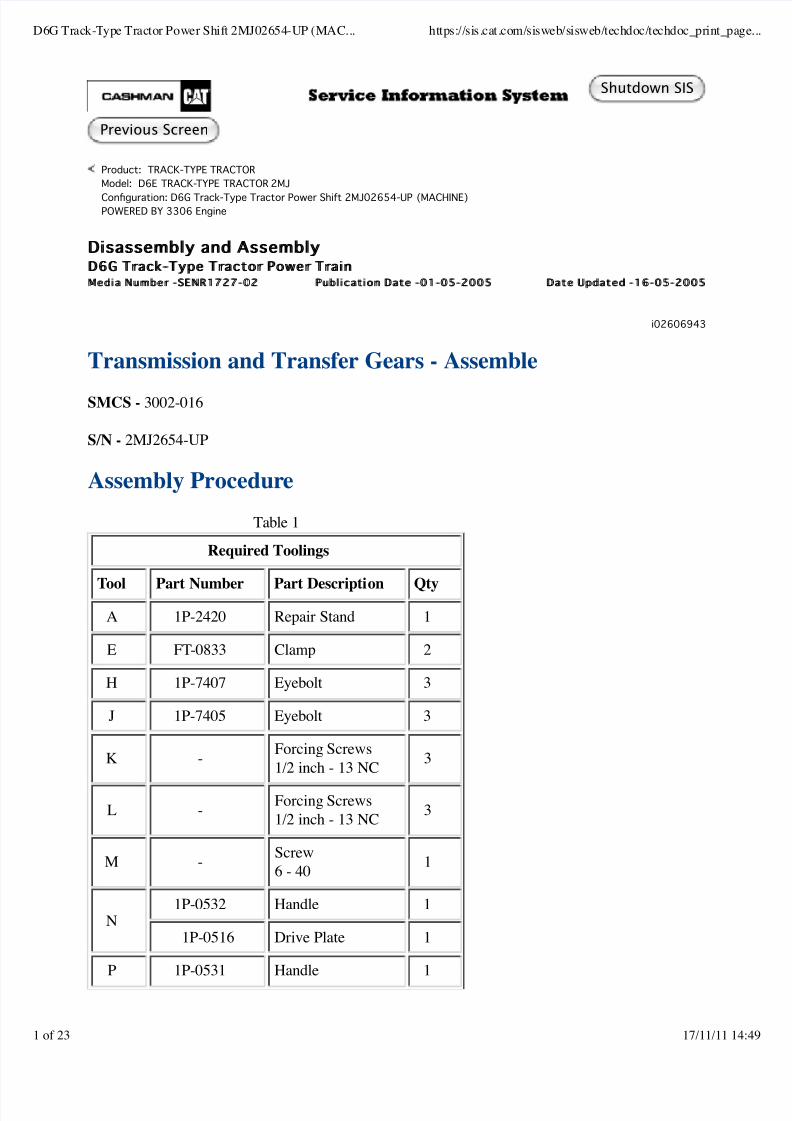
Illustration 1 g01305241
Lower the temperature of race (2). Install race (2) by using Tooling (N). Make sure that the
hole in the race is in alignment with the hole in the case. Install the dowel and the plug that
holds the race in position in the case.
1.
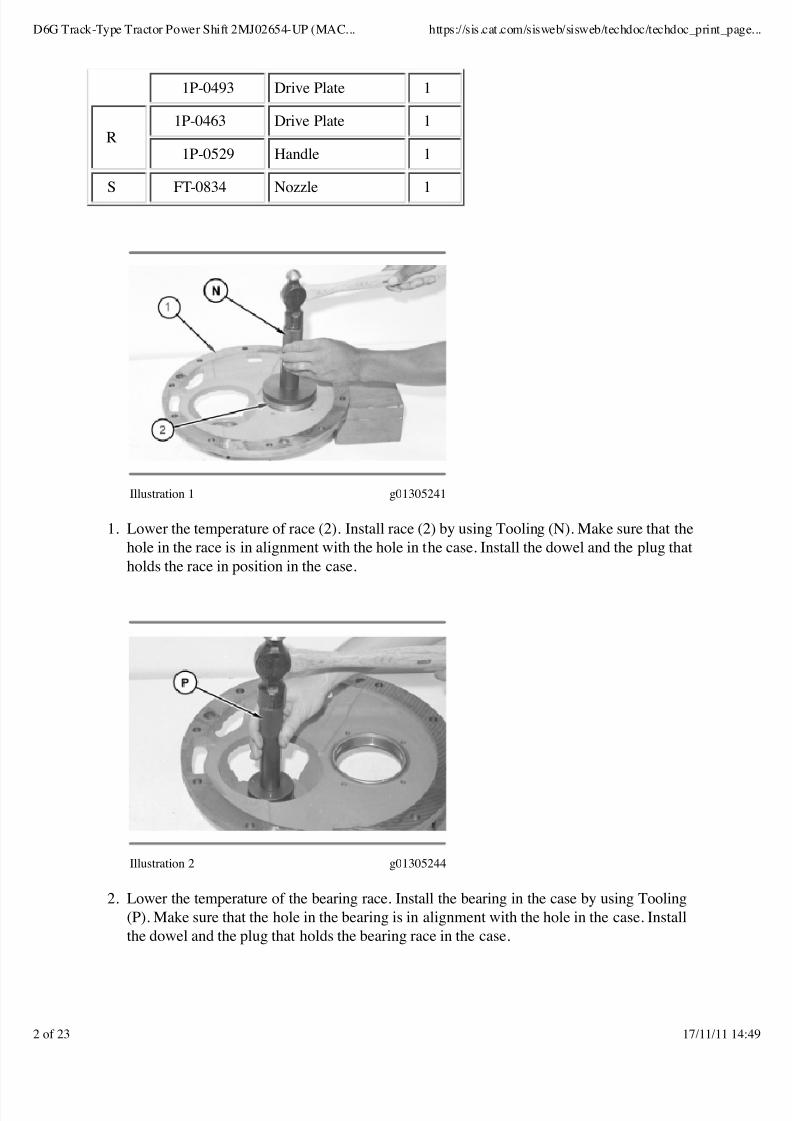
Illustration 2 g01305244
Lower the temperature of the bearing race. Install the bearing in the case by using Tooling
(P). Make sure that the hole in the bearing is in alignment with the hole in the case. Install
the dowel and the plug that holds the bearing race in the case.
2.
D6G Track-Type Tractor Power Shift 2MJ02654-UP (MAC... https://sis.cat.com/sisweb/sisweb/techdoc/techdoc_print_page...
2 of 23 17/11/11 14:49
8/3/2019 Armado Transmision D6G
http://slidepdf.com/reader/full/armado-transmision-d6g 3/23
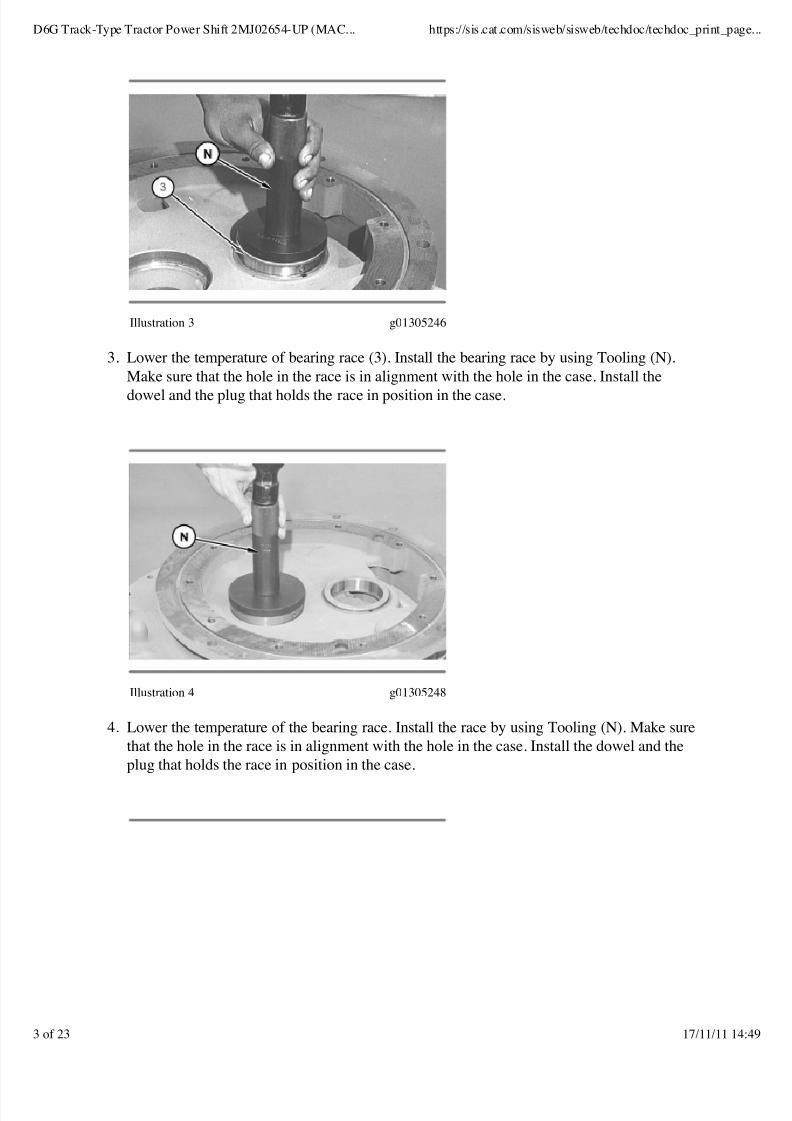
Illustration 3 g01305246
Lower the temperature of bearing race (3). Install the bearing race by using Tooling (N).
Make sure that the hole in the race is in alignment with the hole in the case. Install the
dowel and the plug that holds the race in position in the case.
3.
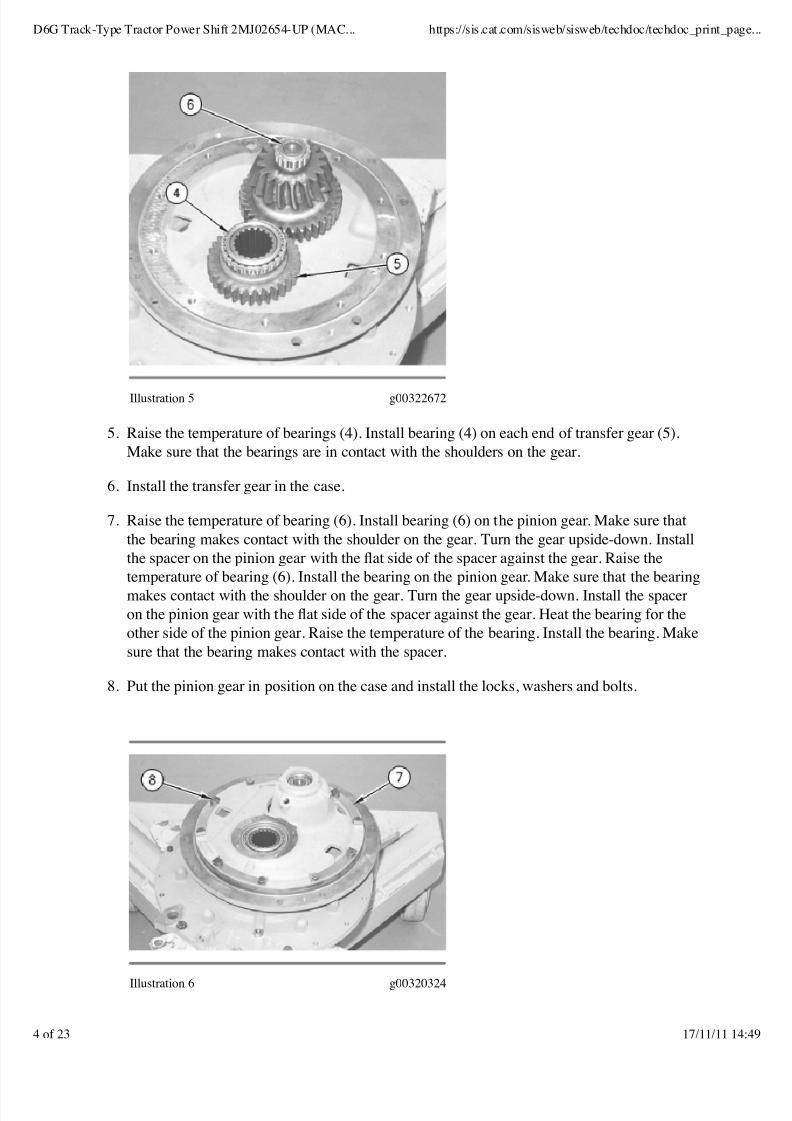
Illustration 4 g01305248
Lower the temperature of the bearing race. Install the race by using Tooling (N). Make sure
that the hole in the race is in alignment with the hole in the case. Install the dowel and the
plug that holds the race in position in the case.
4.
D6G Track-Type Tractor Power Shift 2MJ02654-UP (MAC... https://sis.cat.com/sisweb/sisweb/techdoc/techdoc_print_page...
3 of 23 17/11/11 14:49
8/3/2019 Armado Transmision D6G
http://slidepdf.com/reader/full/armado-transmision-d6g 4/23
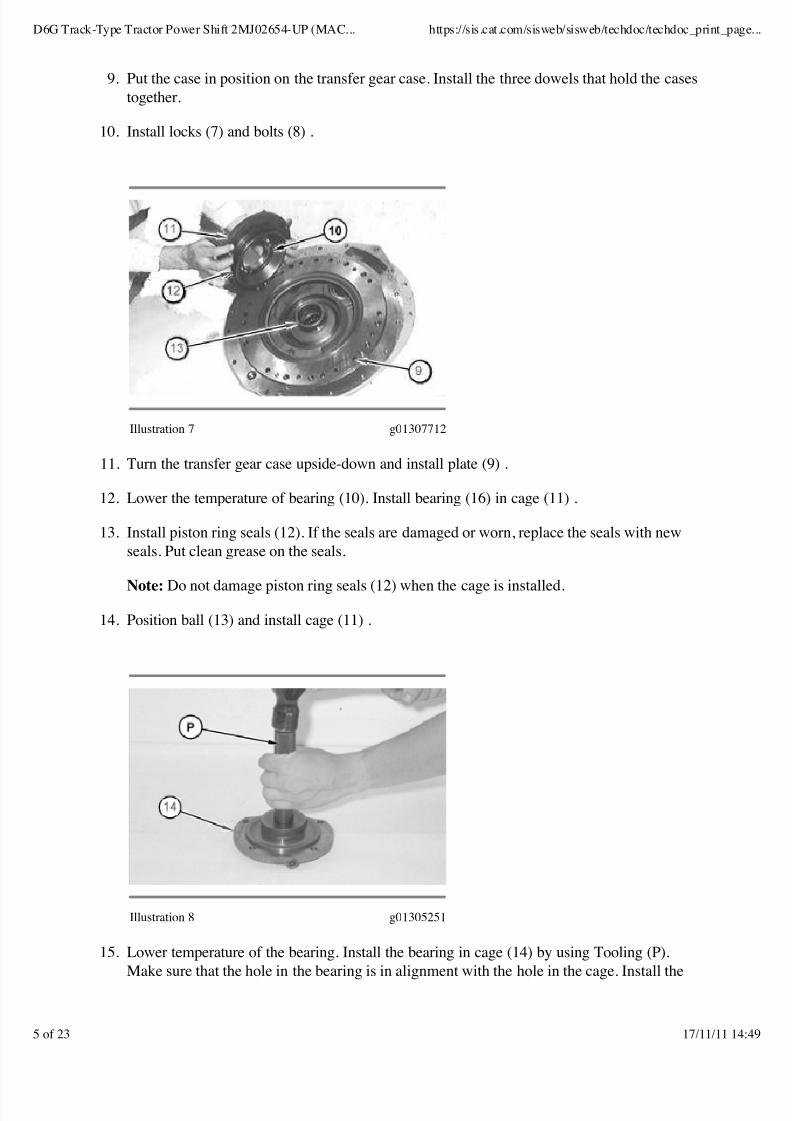
Illustration 5 g00322672
Raise the temperature of bearings (4). Install bearing (4) on each end of transfer gear (5).
Make sure that the bearings are in contact with the shoulders on the gear.
5.
Install the transfer gear in the case.6.
Raise the temperature of bearing (6). Install bearing (6) on the pinion gear. Make sure that
the bearing makes contact with the shoulder on the gear. Turn the gear upside-down. Install
the spacer on the pinion gear with the flat side of the spacer against the gear. Raise the
temperature of bearing (6). Install the bearing on the pinion gear. Make sure that the bearingmakes contact with the shoulder on the gear. Turn the gear upside-down. Install the spacer
on the pinion gear with the flat side of the spacer against the gear. Heat the bearing for the
other side of the pinion gear. Raise the temperature of the bearing. Install the bearing. Make
sure that the bearing makes contact with the spacer.
7.
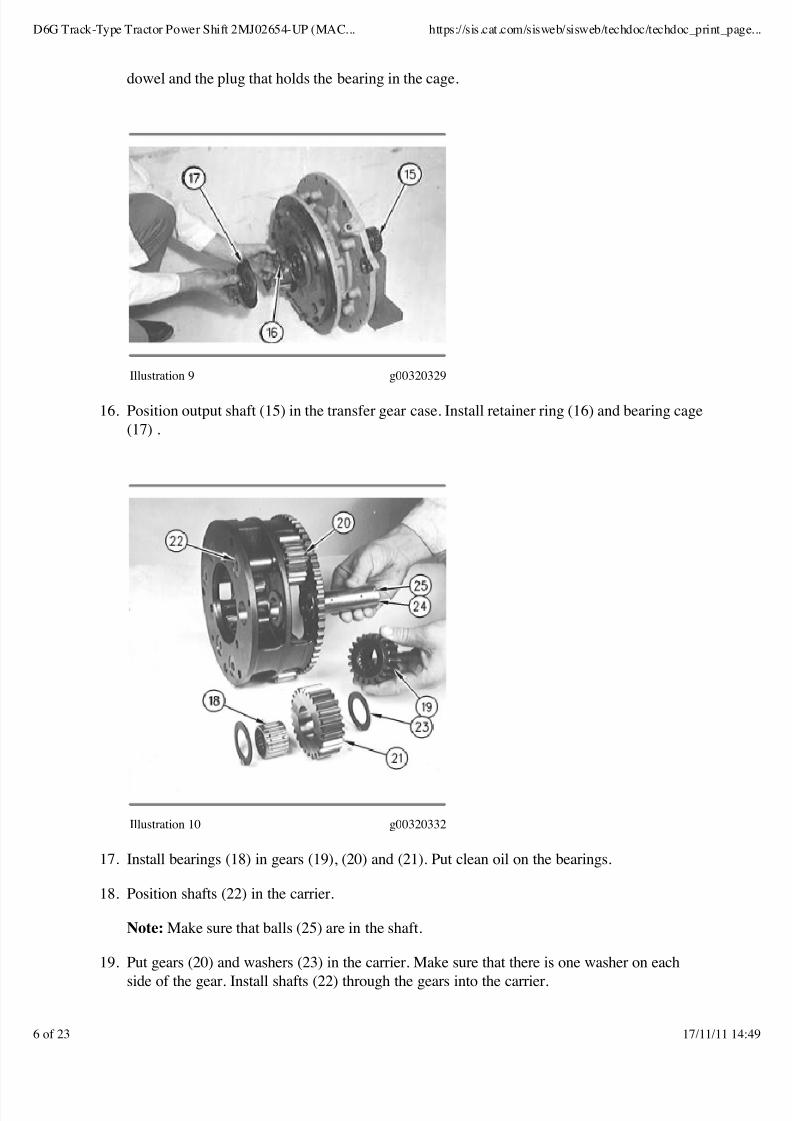
Put the pinion gear in position on the case and install the locks, washers and bolts.8.
Illustration 6 g00320324
D6G Track-Type Tractor Power Shift 2MJ02654-UP (MAC... https://sis.cat.com/sisweb/sisweb/techdoc/techdoc_print_page...
4 of 23 17/11/11 14:49
8/3/2019 Armado Transmision D6G
http://slidepdf.com/reader/full/armado-transmision-d6g 5/23
8/3/2019 Armado Transmision D6G
http://slidepdf.com/reader/full/armado-transmision-d6g 6/23

8/3/2019 Armado Transmision D6G
http://slidepdf.com/reader/full/armado-transmision-d6g 7/23
Position shafts (24) in the carrier.20.
Put gears (19), gears (21) and washers (23) in position in the carrier. Make sure that there is
a washer on each side of the gear. Install shafts (24) through the gears and into the carrier.
21.
Illustration 11 g01305255
Install Tooling (J) and a suitable lifting device in the No. 2 carrier. The weight of the No. 2
carrier is approximately 23 kg (50 lb). Put the No. 2 carrier in position on the output shaft.
22.
Install the bolts and locks that hold the No. 2 carrier to the transfer gear case.23.
Position the transfer gear case on Tooling (C). Fasten the transfer gear case to Tooling (C)
for assembly of the transmission.
24.
Illustration 12 g00320363
Install the ring seals on piston (26) and in the clutch housing. If the ring seals are damaged
or worn replace the seal with a new seal. Put clean oil on the rings.
25.
NOTICE
D6G Track-Type Tractor Power Shift 2MJ02654-UP (MAC... https://sis.cat.com/sisweb/sisweb/techdoc/techdoc_print_page...
7 of 23 17/11/11 14:49
8/3/2019 Armado Transmision D6G
http://slidepdf.com/reader/full/armado-transmision-d6g 8/23
Do not damage the rings when the piston is installed.
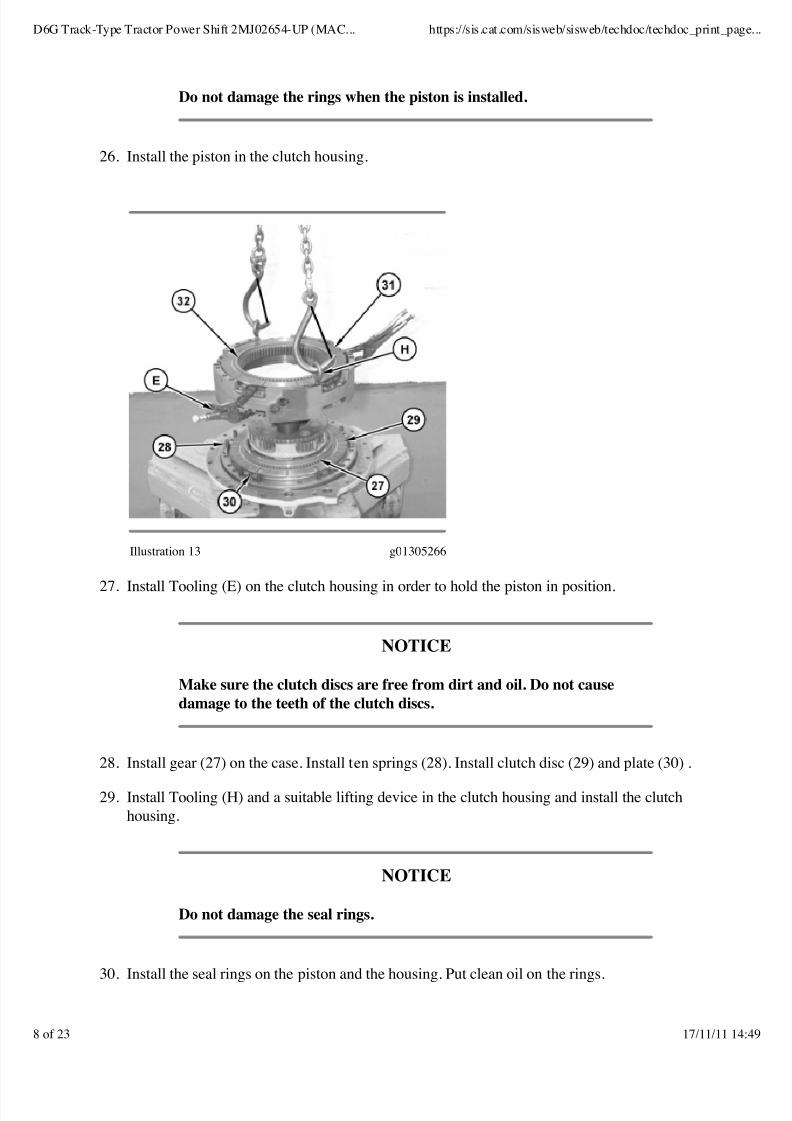
Install the piston in the clutch housing.26.
Illustration 13 g01305266
Install Tooling (E) on the clutch housing in order to hold the piston in position.27.
NOTICE
Make sure the clutch discs are free from dirt and oil. Do not cause
damage to the teeth of the clutch discs.
Install gear (27) on the case. Install ten springs (28). Install clutch disc (29) and plate (30) .28.
Install Tooling (H) and a suitable lifting device in the clutch housing and install the clutch
housing.
29.
NOTICE
Do not damage the seal rings.
Install the seal rings on the piston and the housing. Put clean oil on the rings.30.
D6G Track-Type Tractor Power Shift 2MJ02654-UP (MAC... https://sis.cat.com/sisweb/sisweb/techdoc/techdoc_print_page...
8 of 23 17/11/11 14:49
8/3/2019 Armado Transmision D6G
http://slidepdf.com/reader/full/armado-transmision-d6g 9/23
NOTICE
Make sure the clutch discs are free from dirt and oil.
Install the piston in the housing. Install clutch disc (31), the plate and ring gear (32) in the
housing. Remove Tooling (D) .
31.
Install the seal rings on the piston and the No. 3 clutch housing. Put clean oil on the rings.
Install the piston in the housing.
32.
NOTICE
Do not damage the seal rings when the piston is installed.
NOTICE
Make sure the clutch discs are free of dirt and oil. Do not cause damage
to the teeth of the clutch discs.
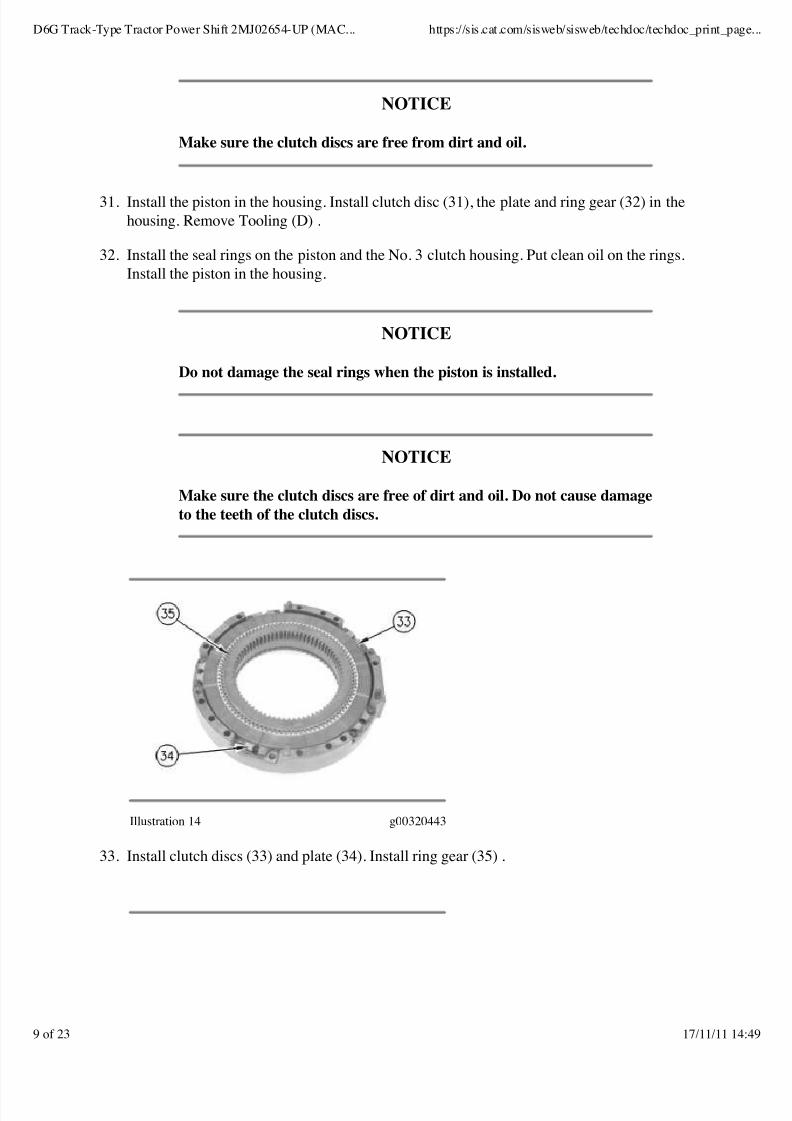
Illustration 14 g00320443
Install clutch discs (33) and plate (34). Install ring gear (35) .33.
D6G Track-Type Tractor Power Shift 2MJ02654-UP (MAC... https://sis.cat.com/sisweb/sisweb/techdoc/techdoc_print_page...
9 of 23 17/11/11 14:49
8/3/2019 Armado Transmision D6G
http://slidepdf.com/reader/full/armado-transmision-d6g 10/23
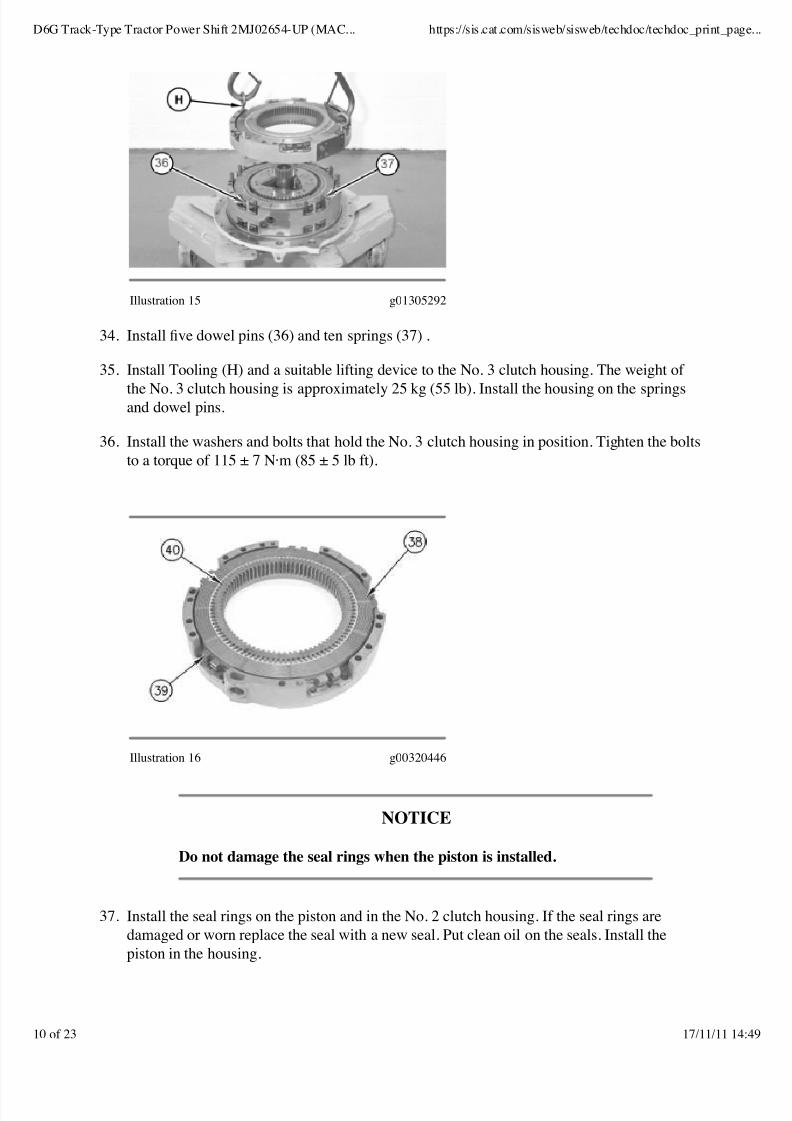
Illustration 15 g01305292
Install five dowel pins (36) and ten springs (37) .34.
Install Tooling (H) and a suitable lifting device to the No. 3 clutch housing. The weight of
the No. 3 clutch housing is approximately 25 kg (55 lb). Install the housing on the springsand dowel pins.
35.
Install the washers and bolts that hold the No. 3 clutch housing in position. Tighten the bolts
to a torque of 115 ± 7 N·m (85 ± 5 lb ft).
36.
Illustration 16 g00320446
NOTICE
Do not damage the seal rings when the piston is installed.
Install the seal rings on the piston and in the No. 2 clutch housing. If the seal rings are
damaged or worn replace the seal with a new seal. Put clean oil on the seals. Install the
piston in the housing.
37.
D6G Track-Type Tractor Power Shift 2MJ02654-UP (MAC... https://sis.cat.com/sisweb/sisweb/techdoc/techdoc_print_page...
10 of 23 17/11/11 14:49
8/3/2019 Armado Transmision D6G
http://slidepdf.com/reader/full/armado-transmision-d6g 11/23
NOTICE
Make sure the clutch discs are free of dirt and oil. Do not damage the
teeth of the clutch discs.
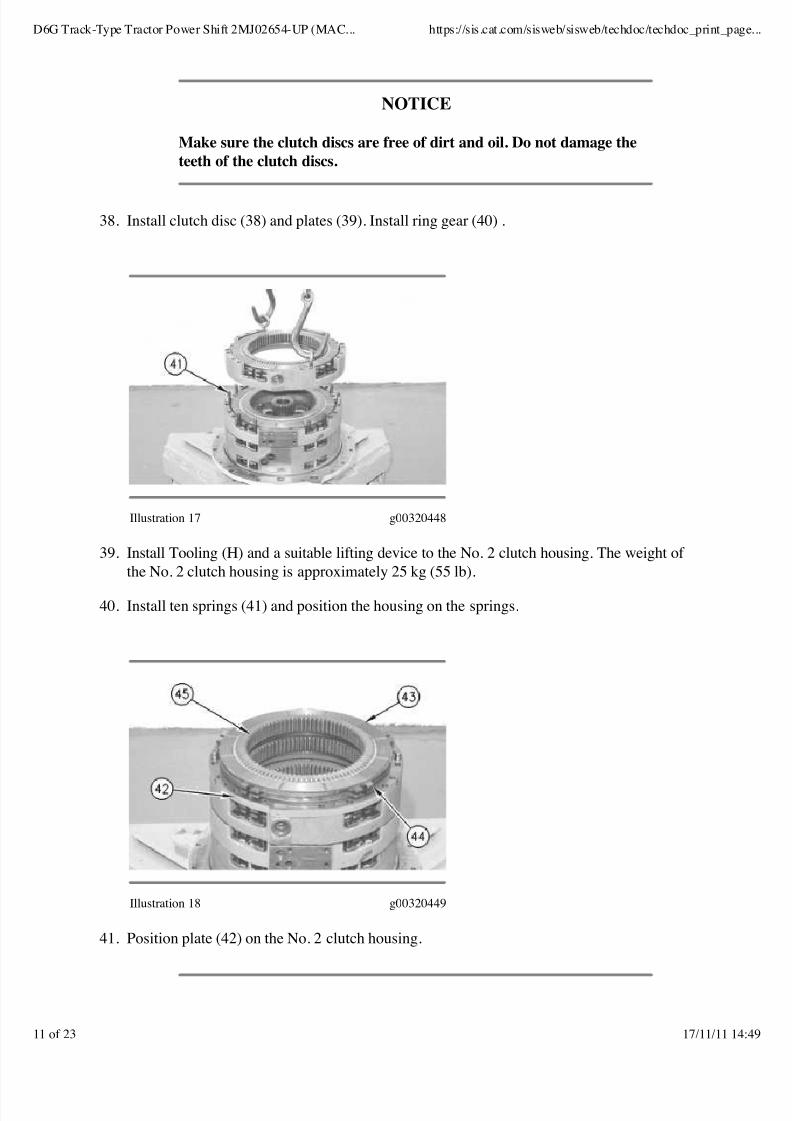
Install clutch disc (38) and plates (39). Install ring gear (40) .38.
Illustration 17 g00320448
Install Tooling (H) and a suitable lifting device to the No. 2 clutch housing. The weight of
the No. 2 clutch housing is approximately 25 kg (55 lb).
39.
Install ten springs (41) and position the housing on the springs.40.
Illustration 18 g00320449
Position plate (42) on the No. 2 clutch housing.41.
D6G Track-Type Tractor Power Shift 2MJ02654-UP (MAC... https://sis.cat.com/sisweb/sisweb/techdoc/techdoc_print_page...
11 of 23 17/11/11 14:49
8/3/2019 Armado Transmision D6G
http://slidepdf.com/reader/full/armado-transmision-d6g 12/23
NOTICE
Make sure the clutch discs are free from dirt and oil. Do not cause
damage to the teeth of the clutch discs.
Install clutch discs (43) and plate (44). Install ring gear (45) .42.
Lower the temperature of the needle bearing for the No. 1 carrier. Install the needle bearing
in the carrier.
43.
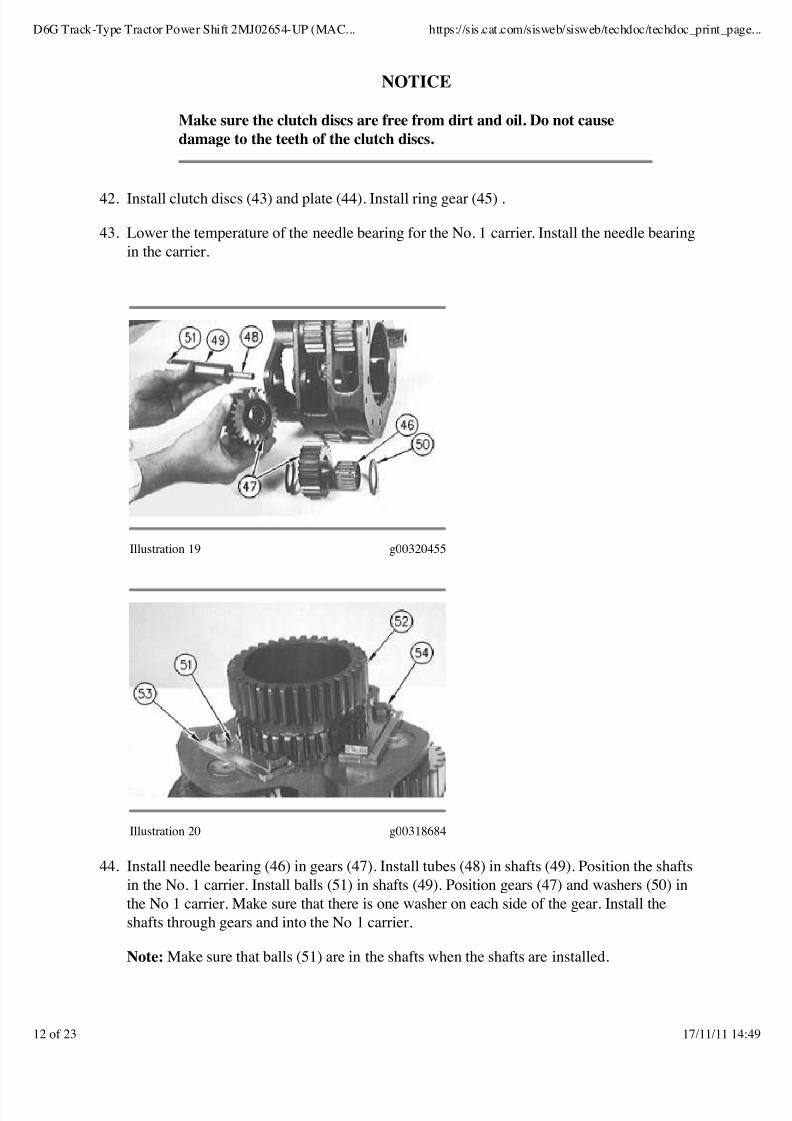
Illustration 19 g00320455
Illustration 20 g00318684
Install needle bearing (46) in gears (47). Install tubes (48) in shafts (49). Position the shafts
in the No. 1 carrier. Install balls (51) in shafts (49). Position gears (47) and washers (50) in
the No 1 carrier. Make sure that there is one washer on each side of the gear. Install the
shafts through gears and into the No 1 carrier.
44.
Note: Make sure that balls (51) are in the shafts when the shafts are installed.
D6G Track-Type Tractor Power Shift 2MJ02654-UP (MAC... https://sis.cat.com/sisweb/sisweb/techdoc/techdoc_print_page...
12 of 23 17/11/11 14:49
8/3/2019 Armado Transmision D6G
http://slidepdf.com/reader/full/armado-transmision-d6g 13/23
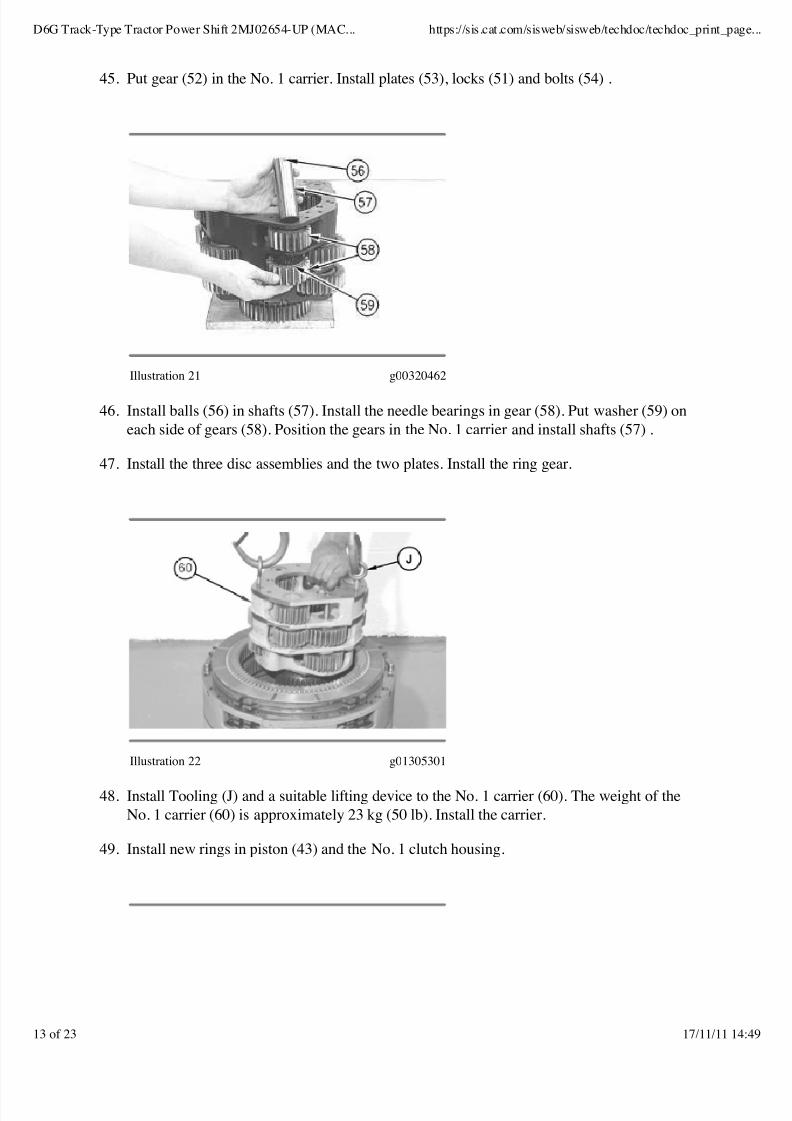
Put gear (52) in the No. 1 carrier. Install plates (53), locks (51) and bolts (54) .45.
Illustration 21 g00320462
Install balls (56) in shafts (57). Install the needle bearings in gear (58). Put washer (59) on
each side of gears (58). Position the gears in the No. 1 carrier and install shafts (57) .
46.
Install the three disc assemblies and the two plates. Install the ring gear.47.
Illustration 22 g01305301
Install Tooling (J) and a suitable lifting device to the No. 1 carrier (60). The weight of the
No. 1 carrier (60) is approximately 23 kg (50 lb). Install the carrier.
48.
Install new rings in piston (43) and the No. 1 clutch housing.49.
D6G Track-Type Tractor Power Shift 2MJ02654-UP (MAC... https://sis.cat.com/sisweb/sisweb/techdoc/techdoc_print_page...
13 of 23 17/11/11 14:49

8/3/2019 Armado Transmision D6G
http://slidepdf.com/reader/full/armado-transmision-d6g 14/23
Illustration 23 g00320486
Put a small amount of clean oil on the rings. Install the piston (43) in the No. 1 clutch
housing.
50.
NOTICE
Do not damage the rings when the piston is installed in the clutch
housing.
Illustration 24 g01305306
Install five dowel pins (62) and ten springs (63) .51.
Use Tooling (E) to hold the piston in No. 1 clutch housing.52.
Install Tooling (H) and a suitable lifting device to the No. 1 clutch housing. The weight of
the No. 1 clutch housing and the piston is approximately 25 kg (55 lb). Install the No. 1
clutch housing in the correct position.
53.
D6G Track-Type Tractor Power Shift 2MJ02654-UP (MAC... https://sis.cat.com/sisweb/sisweb/techdoc/techdoc_print_page...
14 of 23 17/11/11 14:49

8/3/2019 Armado Transmision D6G
http://slidepdf.com/reader/full/armado-transmision-d6g 15/23
Illustration 25 g00320490
Install three bolts (64) at equal distance on No. 1 clutch housing. Tighten the bolts to a
torque of 115 ± 7 N·m (85 ± 5 lb ft).
54.
Install the other six bolts. Tighten the bolts to a torque of 115 ± 7 N·m (85 ± 5 lb ft).55.
Illustration 26 g00320491
Raise the temperature of race (65). Install race (65) on the shaft. Install the ring seal (66) on
the race.
56.
D6G Track-Type Tractor Power Shift 2MJ02654-UP (MAC... https://sis.cat.com/sisweb/sisweb/techdoc/techdoc_print_page...
15 of 23 17/11/11 14:49
8/3/2019 Armado Transmision D6G
http://slidepdf.com/reader/full/armado-transmision-d6g 16/23
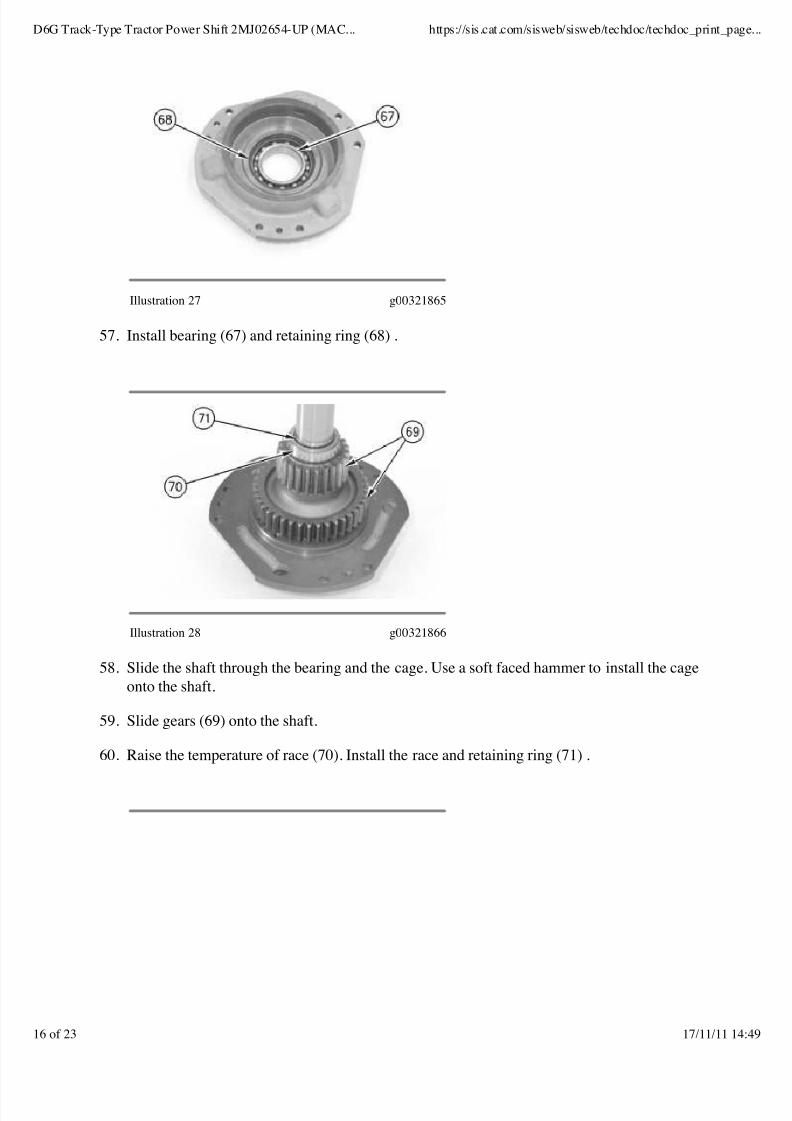
Illustration 27 g00321865
Install bearing (67) and retaining ring (68) .57.
Illustration 28 g00321866
Slide the shaft through the bearing and the cage. Use a soft faced hammer to install the cage
onto the shaft.
58.
Slide gears (69) onto the shaft.59.
Raise the temperature of race (70). Install the race and retaining ring (71) .60.
D6G Track-Type Tractor Power Shift 2MJ02654-UP (MAC... https://sis.cat.com/sisweb/sisweb/techdoc/techdoc_print_page...
16 of 23 17/11/11 14:49

8/3/2019 Armado Transmision D6G
http://slidepdf.com/reader/full/armado-transmision-d6g 17/23
Illustration 29 g00321408
Install spacer (72) and bearing (73). Install the two rings that hold the bearing and the spacer
in position.
61.
Illustration 30 g00321465
Install seal (74). If the seal is damaged or worn replace the seal with a new seal. Put a small
amount of clean oil on the seal. Position the cage on the shaft.
62.
D6G Track-Type Tractor Power Shift 2MJ02654-UP (MAC... https://sis.cat.com/sisweb/sisweb/techdoc/techdoc_print_page...
17 of 23 17/11/11 14:49

8/3/2019 Armado Transmision D6G
http://slidepdf.com/reader/full/armado-transmision-d6g 18/23
Illustration 31 g00321469
Install retainer ring (75) that holds the cage in position.63.
Put clean SAE 10 oil on the lip seal. Install the lip seal with the lip toward the inside of the
cage. Make sure that the seal makes contact with the shoulder in the cage.
64.
Illustration 32 g00321523
Install flange (76), washer (77), the lock and bolts (78). Tighten the bolts to a torque of 55 ±
7 N·m (41 ± 5 lb ft).
65.
Illustration 33 g01305309
Install Tooling (J) and a suitable lifting device to the bearing cage. The weight of the
bearing cage and the input shaft is approximately 27 kg (60 lb). Install the bearing cage and
the shaft.
66.
D6G Track-Type Tractor Power Shift 2MJ02654-UP (MAC... https://sis.cat.com/sisweb/sisweb/techdoc/techdoc_print_page...
18 of 23 17/11/11 14:49
8/3/2019 Armado Transmision D6G
http://slidepdf.com/reader/full/armado-transmision-d6g 19/23
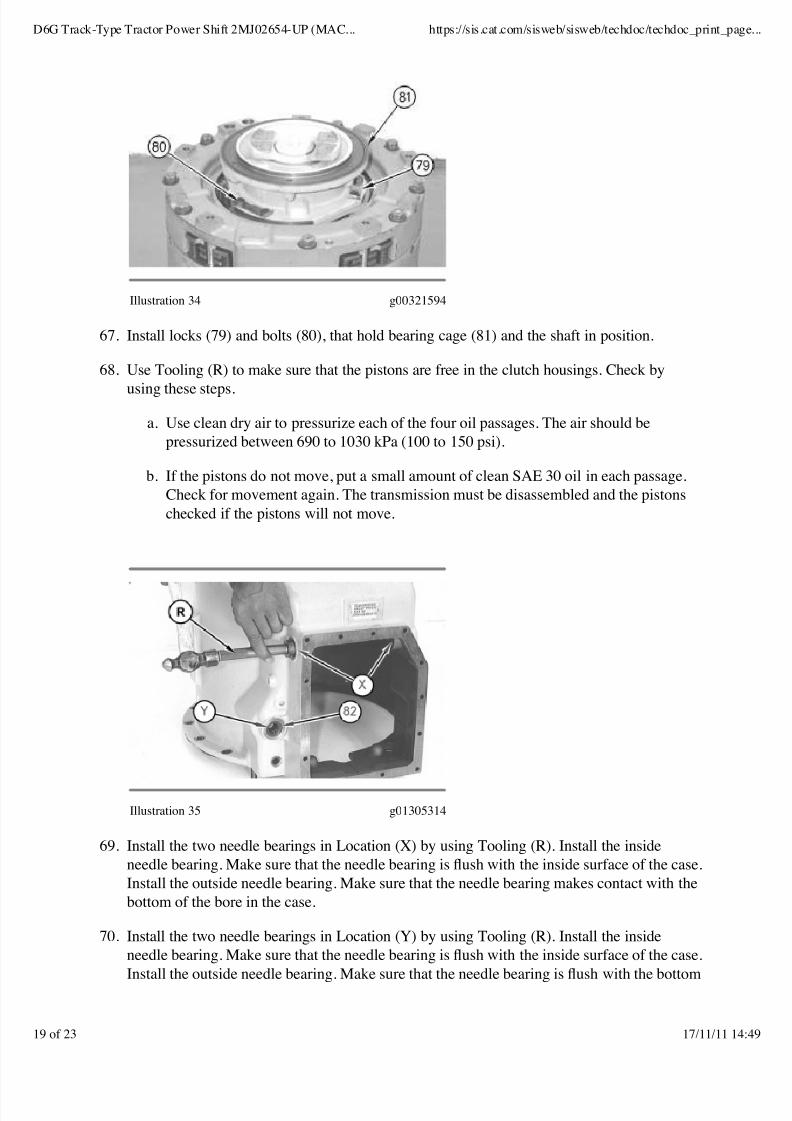
Illustration 34 g00321594
Install locks (79) and bolts (80), that hold bearing cage (81) and the shaft in position.67.
Use Tooling (R) to make sure that the pistons are free in the clutch housings. Check by
using these steps.
Use clean dry air to pressurize each of the four oil passages. The air should be
pressurized between 690 to 1030 kPa (100 to 150 psi).
a.
If the pistons do not move, put a small amount of clean SAE 30 oil in each passage.
Check for movement again. The transmission must be disassembled and the pistons
checked if the pistons will not move.
b.
68.
Illustration 35 g01305314
Install the two needle bearings in Location (X) by using Tooling (R). Install the inside
needle bearing. Make sure that the needle bearing is flush with the inside surface of the case.
Install the outside needle bearing. Make sure that the needle bearing makes contact with the
bottom of the bore in the case.
69.
Install the two needle bearings in Location (Y) by using Tooling (R). Install the inside
needle bearing. Make sure that the needle bearing is flush with the inside surface of the case.
Install the outside needle bearing. Make sure that the needle bearing is flush with the bottom
70.
D6G Track-Type Tractor Power Shift 2MJ02654-UP (MAC... https://sis.cat.com/sisweb/sisweb/techdoc/techdoc_print_page...
19 of 23 17/11/11 14:49

8/3/2019 Armado Transmision D6G
http://slidepdf.com/reader/full/armado-transmision-d6g 20/23
of the counterbore in the case.
Install seal (82) by using Tooling (R). Make sure that the lip is toward the inside of the case
and that the seal makes contact with the bottom of the counterbore. Put clean oil on the lip
of the seal.
71.
Illustration 36 g00321598
Install one lever (83) and shaft (84). Install one lever (85) and spring (86) .72.
Illustration 37 g00321623
Slide shaft (87) into the case. Slide levers (88) onto the shaft.73.
D6G Track-Type Tractor Power Shift 2MJ02654-UP (MAC... https://sis.cat.com/sisweb/sisweb/techdoc/techdoc_print_page...
20 of 23 17/11/11 14:49

8/3/2019 Armado Transmision D6G
http://slidepdf.com/reader/full/armado-transmision-d6g 21/23
Illustration 38 g00321626
Install the bolts and nuts (90). Tighten the bolts to a torque of 35 ± 4 N·m (26 ± 3 lb ft).74.
Install spring (89) .75.
Illustration 39 g01305317
Install two Tooling (H) and a suitable lifting device to transmission case (91). The weight of
transmission case (91) is approximately 63 kg (140 lb). Install case (91) .
76.
Install the bolts that hold transmission case (91) .77.
D6G Track-Type Tractor Power Shift 2MJ02654-UP (MAC... https://sis.cat.com/sisweb/sisweb/techdoc/techdoc_print_page...
21 of 23 17/11/11 14:49
8/3/2019 Armado Transmision D6G
http://slidepdf.com/reader/full/armado-transmision-d6g 22/23
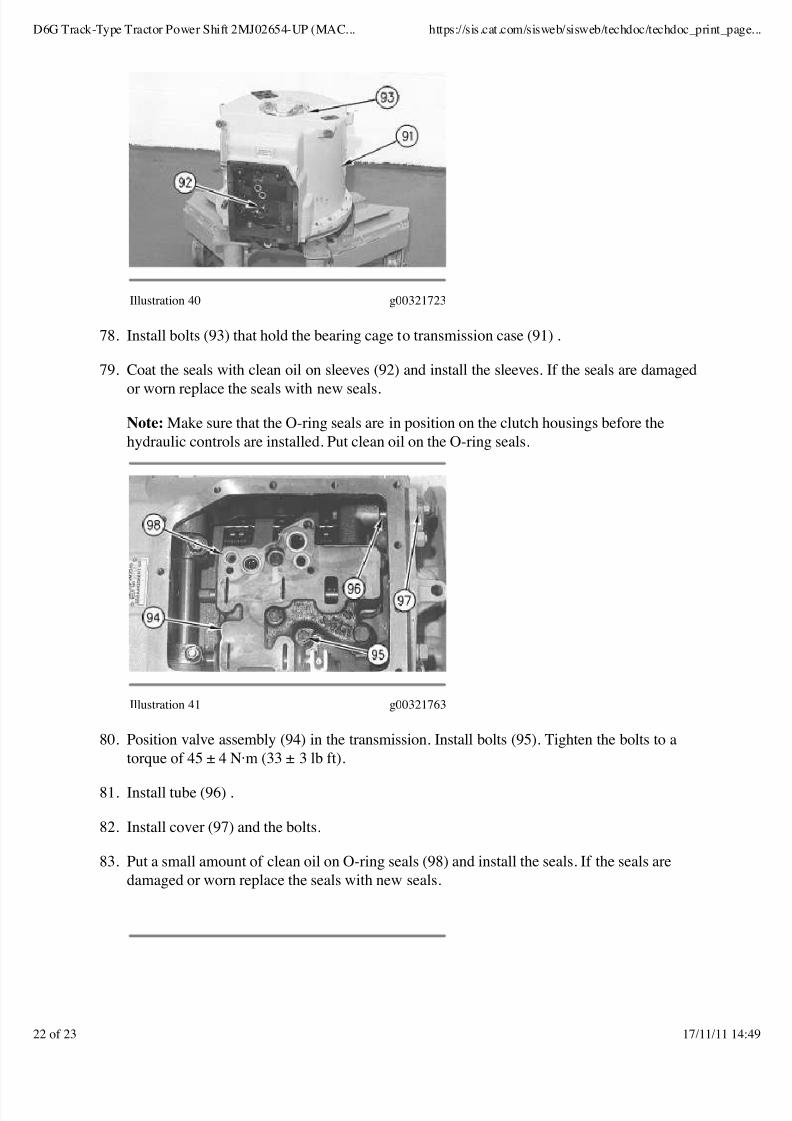
Illustration 40 g00321723
Install bolts (93) that hold the bearing cage to transmission case (91) .78.
Coat the seals with clean oil on sleeves (92) and install the sleeves. If the seals are damaged
or worn replace the seals with new seals.
79.
Note: Make sure that the O-ring seals are in position on the clutch housings before the
hydraulic controls are installed. Put clean oil on the O-ring seals.
Illustration 41 g00321763
Position valve assembly (94) in the transmission. Install bolts (95). Tighten the bolts to a
torque of 45 ± 4 N·m (33 ± 3 lb ft).
80.
Install tube (96) .81.
Install cover (97) and the bolts.82.
Put a small amount of clean oil on O-ring seals (98) and install the seals. If the seals are
damaged or worn replace the seals with new seals.
83.
D6G Track-Type Tractor Power Shift 2MJ02654-UP (MAC... https://sis.cat.com/sisweb/sisweb/techdoc/techdoc_print_page...
22 of 23 17/11/11 14:49

8/3/2019 Armado Transmision D6G
http://slidepdf.com/reader/full/armado-transmision-d6g 23/23
Illustration 42 g00321766
Install pressure control valve (99) .84.
Install three bolts (100). Tighten the bolts to a torque of 45 ± 4 N·m (33 ± 3 lb ft).85.
Illustration 43 g00324583
Install the gasket, cover (101), bolts and washers. If the gasket is damaged or worn replace
the gasket with a new gasket.
86.
End By: Install the transmission and transfer gears. Refer to Disassembly and Assembly,
"Transmission and Transfer Gears - Install".
Copyright 1993 - 2011 Caterpillar Inc.
All Rights Reserved.
Private Network For SIS Licensees.
Thu Nov 17 2011 14:49:00 GMT-0500 (PET)
D6G Track-Type Tractor Power Shift 2MJ02654-UP (MAC... https://sis.cat.com/sisweb/sisweb/techdoc/techdoc_print_page...