Embed Size (px)
Citation preview
INTRODUCTION TO THE BASICS OF ARMA III
GUIDE FOR NEW PLAYERS
by Scream
UPDATED TO GAME VERSION 1.50
Arma 3 is an open world tactical shooter video game created by Bohemia Interactive for Microsoft Windows. For additional informations on Bohemia Interactive check the website www.bistudio.com For additional informations and media on Arma 3 check the official website www.arma3.com All the images shown in this guide are either found on the internet or screenshots taken directly in -game by the author.
-INDEX VERY IMPORTANT…………………………………………………………………………………………………….. THE AUTHOR…………………………………………………………………………………………………………….. HOW TO USE THIS GUIDE………………………………………………………………………………………… PRACTISE MAKES PERFECT…………………………………............................................................. UPDATE 1.24: BOOTCAMP…………………………………………………………………………………………. INTRODUCTION –WHAT, WHERE, WHO, WHEN: ARMA III………………………………… STRATIS AND ALTIS: TERRAINS……………………………………………………………………………………………………….. FACTIONS……………………………………………………………………………………………………………………………………………. THE EAST WIND: ARMA III CAMPAIGN………………………………………………………………………………………….. PART I – MOVING & LOOKING………………………………………………………………………………… THE BLESSING OF STANCE ADJUST……………………………………………………………………………………………….. SORROUNDING AWARENESS BY FREE LOOK………………………………………………………………………………. MOVE AND FIGHT: COMBAT PACE…………………………………………………………………………………………………. THERE IS ZOOMING AND ZOOMING………………………………………………………………………………………………. FATIGUE MANAGEMENT……………………………………………………………………………………………………………………. PART II – GEARS…………………………………………………………………………………………………………. UNIFORMS, VESTS AND BACKPACKS……………………………………………………………………………………………… HEADGEARS……………………………………………………………………………………………………………………………………….. WEAPONS……………………………………………………………………………………………………………………………………………. REARMING………………………………………………………………………………………………………………………………………….. ORIENTING & COMMUNICATIONS…………………………………………………………………………………………………… PART III – WEAPONS & SHOOTING………………………………………………………………………… CHOOSE YOUR WEAPON…………………………………………………………………………………………………………………. SELECT YOUR FIREMOD……………………………………………………………………………………………………………………. USE THE CROSSHAIR…………………………………………………………………………………………………………………………. EVER HEARD OF ZEROING………………………………………………………………………………………………………………. MAKE IT EASIER: OPTICS…………………………………………………………………………………………………………………… SILENCE WITH SUPPRESSOR……………………………………………………………………………………………………………. SIDE RAIL: FLASHLIGHT AND INFRA-RED LASER…………………………………………………………………………. THE AMMO YOU USE…………………………………………………………………………………………………………………………. GRENADES AND CHEMLIGHTS……………………………………………………………………………………………………….. ROCKETS AND MISSILES: LAUNCHERS…………………………………………………………………………………………… MINES AND EXPLOSIVES: ORDINANCES……………………………………………………………………………………….. STATIC WEAPONS……………………………………………………………………………………………………………………………… WEAPON STABILIZATION…………………………………………………………………………………………………………………… PART IV – VEHICLES………………………………………………………………………………………………….. VEHICLES INFO………………………………………………………………………………………………………………………………….. LIGHT VEHICLES: CARS……………………………………………………………………………………………………………………… ARMORED VEHICLES…………………………………………………………………………………………………………………………… HELICOPTERS AND JETS: AIR…………………………………………………………………………………………………………….. UAV & UGV: AUTONOMOUS……………………………………………………………………………………………………………..
1 1 2 2 3 5 5 6 8
10 10 11 11 12 12
13 13 14 14 15 15
19 19 19 19 20 20 21 21 22 22 23 24 24 25
26 26 26 27 29 30
REPAIR, RESUPPLY, HEAL: SUPPORTS…………………………………………………………………………………………….. BY SEA AND UNDER: SHIPS………………………………………………………………………………………………………………. PART V – SQUAD MANAGEMENT…………………………………………………………………………….. SQUAD INFO……………………………………………………………………………………………………………………………………….. SELECTING THE SOLDIERS………………………………………………………………………………………………………………… GIVING ORDERS………………………………………………………………………………………………………………………………….. QUICK COMMANDS…………………………………………………………………………………………………………………………….. PART VI – EDITOR BASICS………………………………………………………………………………………….. EDITOR INTERFACE: MISSION EDITING…………………………………………………………………………………………… EDITOR INTERFACE: MISSION MAKING……………………………………………………………………………………………. EDITING MOD I: UNITS……………………………………………………………………………………………………………………….. EDITING MOD II: GROUPS………………………………………………………………………………………………………………….. EDITING MOD III: TRIGGERS……………………………………………………………………………………………………………….. EDITING MOD IV: WAYPOINTS…………………………………………………………………………………………………………. EDITING MOD V: SYNCHRONIZING………………………………………………………………………………………………….. EDITING MOD VI: MARKERS……………………………………………………………………………………………………………….. EDITING MOD VII: MODULES…………………………………………………………………………………………………………….. HOW TO SET A BASIC RESPAWN……………………………………………………………………………………………………….. STEAM WORKSHOP……………………………………………………………………………………………………………………………. PART VII – ADVANCED EDITING………………………………………………………………………………… MISSION INFORMATIONS ON LOADING SCREEN………………………………………………………………………….. ADVANCED TRIGGER CONDITIONS…………………………………………………………………………………………………. UNIT INITIALIZATION…………………………………………………………………………………………………………………………… UNIT CUSTOM LOADOUT…………………………………………………………………………………………………………………… CUSTOMIZED AMMO BOX AND VEHICLE CARGO…………………………………………………………………………. HOW TO USE ANIMATIONS………………………………………………………………………………………………………………… REFERENCES………………………………………………………………………………………………………………………………………… DOWNLOADABLE CONTENT…………………………………………………………………………………… KARTS……………………………………………………………………………………………………………………………………………………. HELICOPTERS……………………………………………………………………………………………………………………………………… MARKSMEN………………………………………………………………………………………………………………………………………….. APPENDIX A – WOUNDING & MEDICAL SYSTEM…………………………………………………… APPENDIX B – UAV CONTROLS………………………………………………………………………………. APPENDIX C – ARTILLERY COMPUTER…………………………………………………………………… APPENDIX D – ZEUS DLC…………………………………………………………………………………………… APPENDIX E – ADDONS & MODS………………………………………………………………………………. CREDITS………………………………………………………………………………………………………………………….
30 31
32 32 33 33 35
36 36 37 38 39 40 42 44 44 45 50 51
53 53 54 56 58 61 62 63
64 64 65 66
68 70 72 74 76
79

VERY IMPORTANT This ‘short’ guide covers the core features of the Arma III game and present an overview of its content; it is intended for players who are new to the game and the ARMA universe. All you find in this pages is written by a player for other players. After reading this any new player should be able to perform all the basic action allowed in Arma virtual battlefield and have a basic knowledge of the game’s elements. If you are not a beginner or you are looking for a detailed guide on all the aspects of combined-arms warfare you should stop reading here. There are other guides, and better done, with plenty of details on both the game and the ways to be a very efficient –yet virtual- soldier. One above all, check the Arma 3 Tactical Guide on the Store of Bohemia Interactive at store.bistudio.com. THE AUTHOR Again this is important: I am an Arma player, Arma 2 and Arma 3 as well as OFP, and I have NOT participated in the game creation nor in its development. I have NO military training nor experience with any kind of weapon or military tactics in real life. I just played a lot of Arma, in SP and COOP, PvP and vs AI, with friends and with strangers, and learned what you are – hopefully – going to read. I am sure my knowledge covers all the game’s basic aspects and I am always willing to learn more. As you may imagine Scream is not my real name – thank you Mom&Dad. It is the nickname I use in the Arma series’ games.
Everything in war is simple, but the simplest thing is difficult Carl Von Clausewitz
1
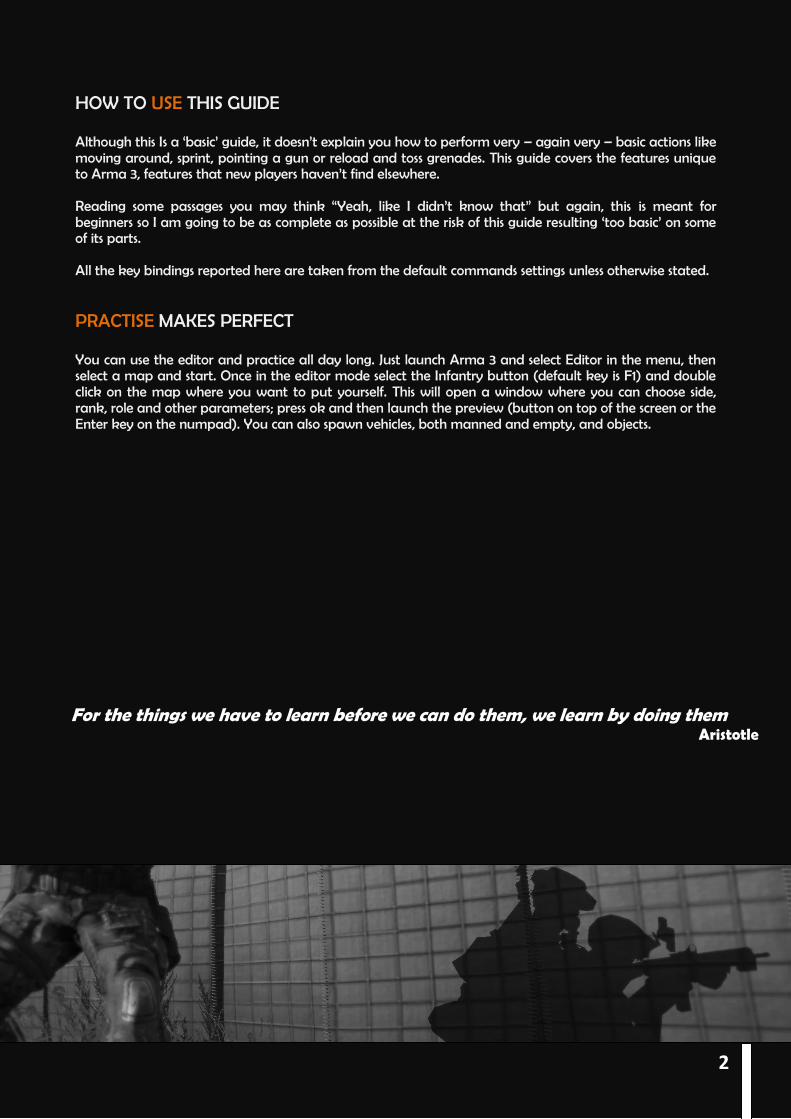
HOW TO USE THIS GUIDE Although this Is a ‘basic’ guide, it doesn’t explain you how to perform very – again very – basic actions like moving around, sprint, pointing a gun or reload and toss grenades. This guide covers the features unique to Arma 3, features that new players haven’t find elsewhere. Reading some passages you may think “Yeah, like I didn’t know that” but again, this is meant for beginners so I am going to be as complete as possible at the risk of this guide resulting ‘too basic’ on some of its parts. All the key bindings reported here are taken from the default commands settings unless otherwise stated. PRACTISE MAKES PERFECT You can use the editor and practice all day long. Just launch Arma 3 and select Editor in the menu, then select a map and start. Once in the editor mode select the Infantry button (default key is F1) and double click on the map where you want to put yourself. This will open a window where you can choose side, rank, role and other parameters; press ok and then launch the preview (button on top of the screen or the Enter key on the numpad). You can also spawn vehicles, both manned and empty, and objects.
2
For the things we have to learn before we can do them, we learn by doing them Aristotle
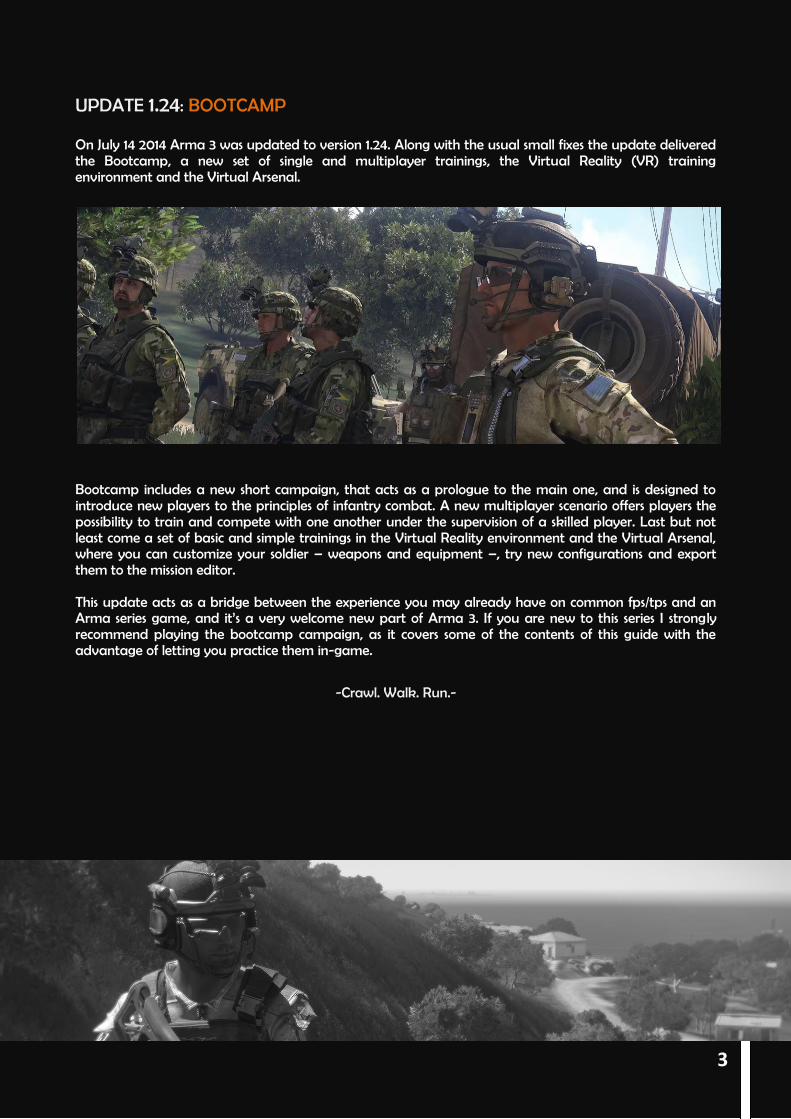
UPDATE 1.24: BOOTCAMP On July 14 2014 Arma 3 was updated to version 1.24. Along with the usual small fixes the update delivered the Bootcamp, a new set of single and multiplayer trainings, the Virtual Reality (VR) training environment and the Virtual Arsenal.
Bootcamp includes a new short campaign, that acts as a prologue to the main one, and is designed to introduce new players to the principles of infantry combat. A new multiplayer scenario offers players the possibility to train and compete with one another under the supervision of a skilled player. Last but not least come a set of basic and simple trainings in the Virtual Reality environment and the Virtual Arsenal, where you can customize your soldier – weapons and equipment –, try new configurations and export them to the mission editor. This update acts as a bridge between the experience you may already have on common fps/tps and an Arma series game, and it’s a very welcome new part of Arma 3. If you are new to this series I strongly recommend playing the bootcamp campaign, as it covers some of the contents of this guide with the advantage of letting you practice them in-game.
-Crawl. Walk. Run.-
3

4
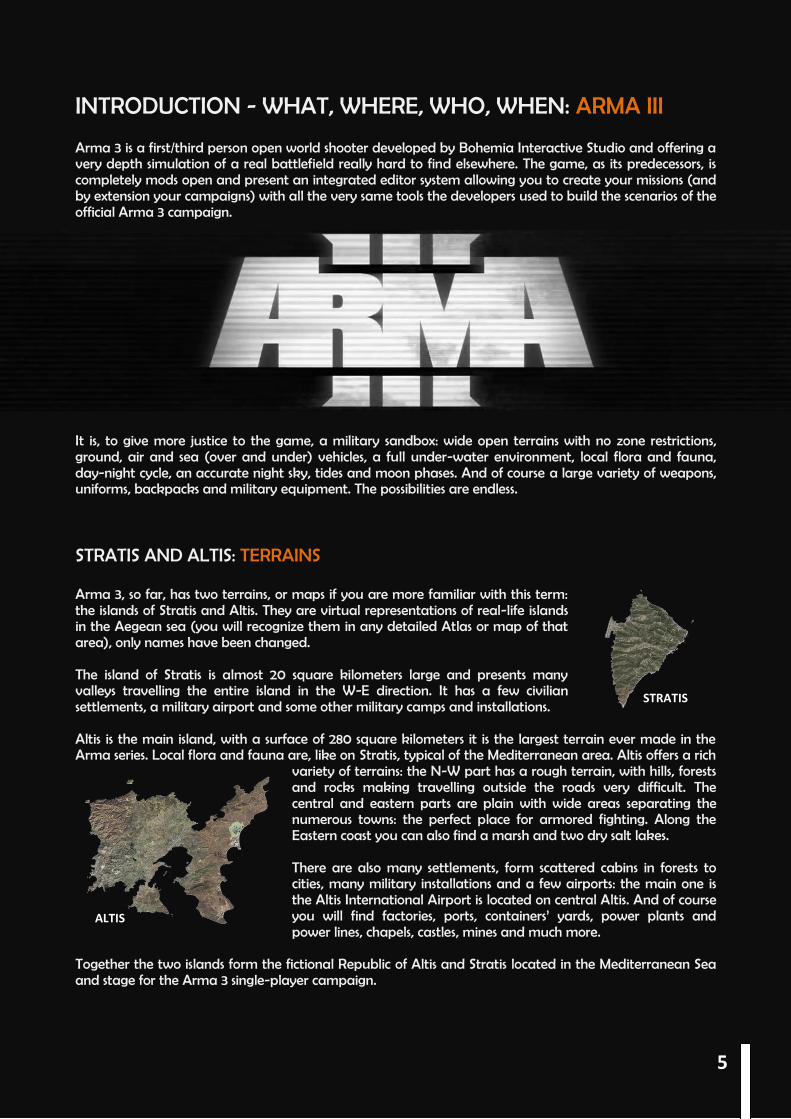
INTRODUCTION - WHAT, WHERE, WHO, WHEN: ARMA III Arma 3 is a first/third person open world shooter developed by Bohemia Interactive Studio and offering a very depth simulation of a real battlefield really hard to find elsewhere. The game, as its predecessors, is completely mods open and present an integrated editor system allowing you to create your missions (and by extension your campaigns) with all the very same tools the developers used to build the scenarios of the official Arma 3 campaign.
It is, to give more justice to the game, a military sandbox: wide open terrains with no zone restrictions, ground, air and sea (over and under) vehicles, a full under-water environment, local flora and fauna, day-night cycle, an accurate night sky, tides and moon phases. And of course a large variety of weapons, uniforms, backpacks and military equipment. The possibilities are endless. STRATIS AND ALTIS: TERRAINS Arma 3, so far, has two terrains, or maps if you are more familiar with this term: the islands of Stratis and Altis. They are virtual representations of real-life islands in the Aegean sea (you will recognize them in any detailed Atlas or map of that area), only names have been changed. The island of Stratis is almost 20 square kilometers large and presents many valleys travelling the entire island in the W-E direction. It has a few civilian settlements, a military airport and some other military camps and installations. Altis is the main island, with a surface of 280 square kilometers it is the largest terrain ever made in the Arma series. Local flora and fauna are, like on Stratis, typical of the Mediterranean area. Altis offers a rich
variety of terrains: the N-W part has a rough terrain, with hills, forests and rocks making travelling outside the roads very difficult. The central and eastern parts are plain with wide areas separating the numerous towns: the perfect place for armored fighting. Along the Eastern coast you can also find a marsh and two dry salt lakes. There are also many settlements, form scattered cabins in forests to cities, many military installations and a few airports: the main one is the Altis International Airport is located on central Altis. And of course you will find factories, ports, containers’ yards, power plants and power lines, chapels, castles, mines and much more.
Together the two islands form the fictional Republic of Altis and Stratis located in the Mediterranean Sea and stage for the Arma 3 single-player campaign.
STRATIS
ALTIS
5

FACTIONS There’s a total of five factions in Arma III: three are regular armies, one is a guerrilla group and the last is Altis civilians. Each faction has its own uniform/clothes, vehicles and weapons (except for guerrillas). NORTH ATLANTIC TREATY ORGANISATION: NATO
NATO is a defensive alliance formed after the second world war by western block powers and still effective today. The main power in the NATO ranks are the USA followed by the EU states, UK and Canada. It has partnerships with Australia, New Zealand, Japan, Turkey, South Korea, eastern Europe and African countries.
In Arma 3 the NATO faction has a dark earth distinctive coloration for uniforms and vehicles that nicely blends with the surrounding environment absolving the purpose of camouflaging. NATO soldiers are well trained and equipped, their vests and helmets are designed to offer the maximum level of protection with the downside of a reduced mobility/speed.
CANTON PROTOCOL STRATEGIC ALLIANCE TREATY: CSAT
CSAT is a fictional alliance with no counterpart in real life: in Arma 3 it is formed by emerging countries in Middle and Far East and Africa with the goals of expanding influence, sustain growth and mutual military assistance. The troops of CSAT are of Middle-East look – mainly Iranians.
6

In Arma 3 the CSAT faction has a hexagon mimetic pattern with brown-red coloration for uniforms and vehicles; another distinctive peculiarity are the helmets with their unusual shape. As pertaining to regular armies CSAT soldiers are well trained and equipped: they represent the main opponent to NATO forces. CSAT vests and helmets provide limited protection but high mobility and the same concept applies for vehicles. Also, CSAT uniform provides little protection to the entire body (while NATO uniforms are for mimetic purpose only).
ALTIS ARMED FORCES: AAF
AAF is the regular army of the fictional Republic of Altis and Stratis, created in 2030 and, officially, operating under NATO surveillance. According to names and faces the main ethnic group in the AAF is Greek.
In Arma 3 the AAF faction has a digital green-beige mimetic pattern for uniforms and vehicles, thus the nickname ‘greenbacks’. AAF soldiers appear to be slightly less trained then the soldiers in the two main factions and with less assets; AAF weakness resides mainly in the lack of experience of commanders. They have little artillery, but they have access to helicopters, jets, tanks, armored vehicles and boats. Their vests and helmets offer a medium level of protection and mobility: they are not too protected or fast, but they are not too exposed or slow as well.
FREEDOM AND INDEPENDENCE ARMY: FIA
FIA is a guerrilla group active in the Republic of Altis and Stratis. FIA was created in response to the political and military turn of the Republic Government into a dictatorship (or close to one).
7
The FIA faction employs weapons and equipment taken from the enemy or smuggled in the country by arm dealers. FIA members have no uniform and little vehicles: mainly civilian pickups with a machinegun mounted on the back. Many FIA members are former AAF soldiers so they have military training.
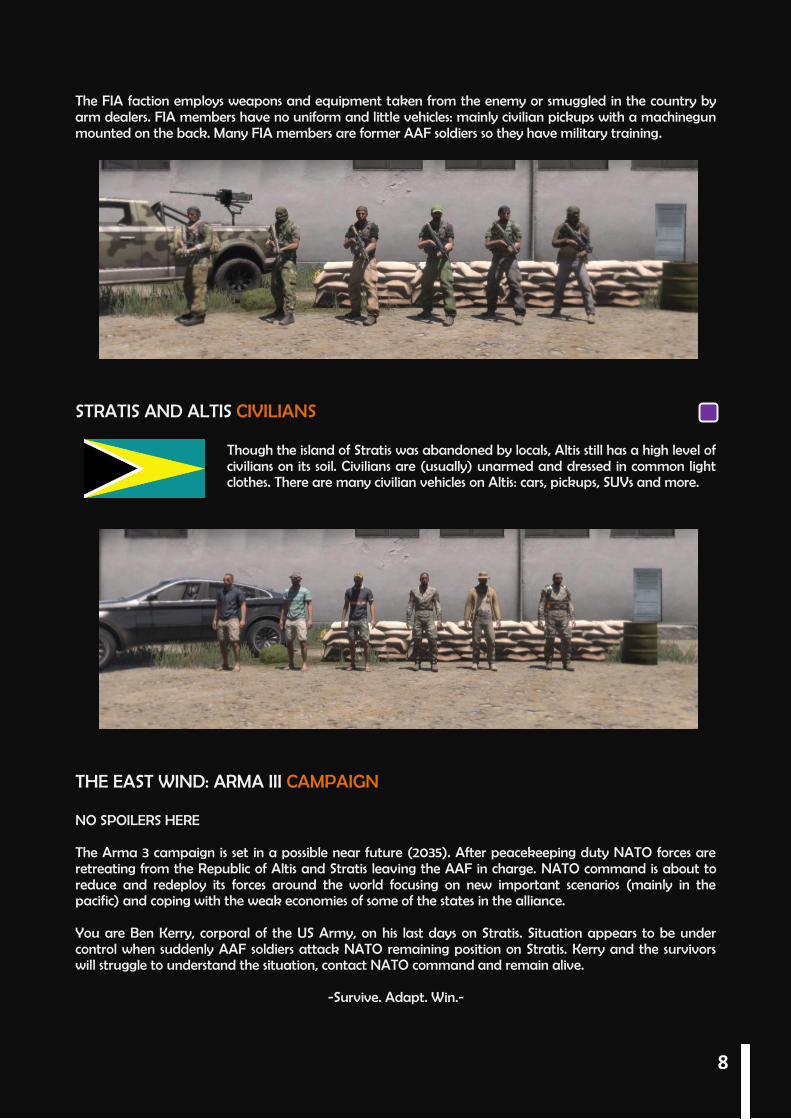
STRATIS AND ALTIS CIVILIANS
Though the island of Stratis was abandoned by locals, Altis still has a high level of civilians on its soil. Civilians are (usually) unarmed and dressed in common light clothes. There are many civilian vehicles on Altis: cars, pickups, SUVs and more.
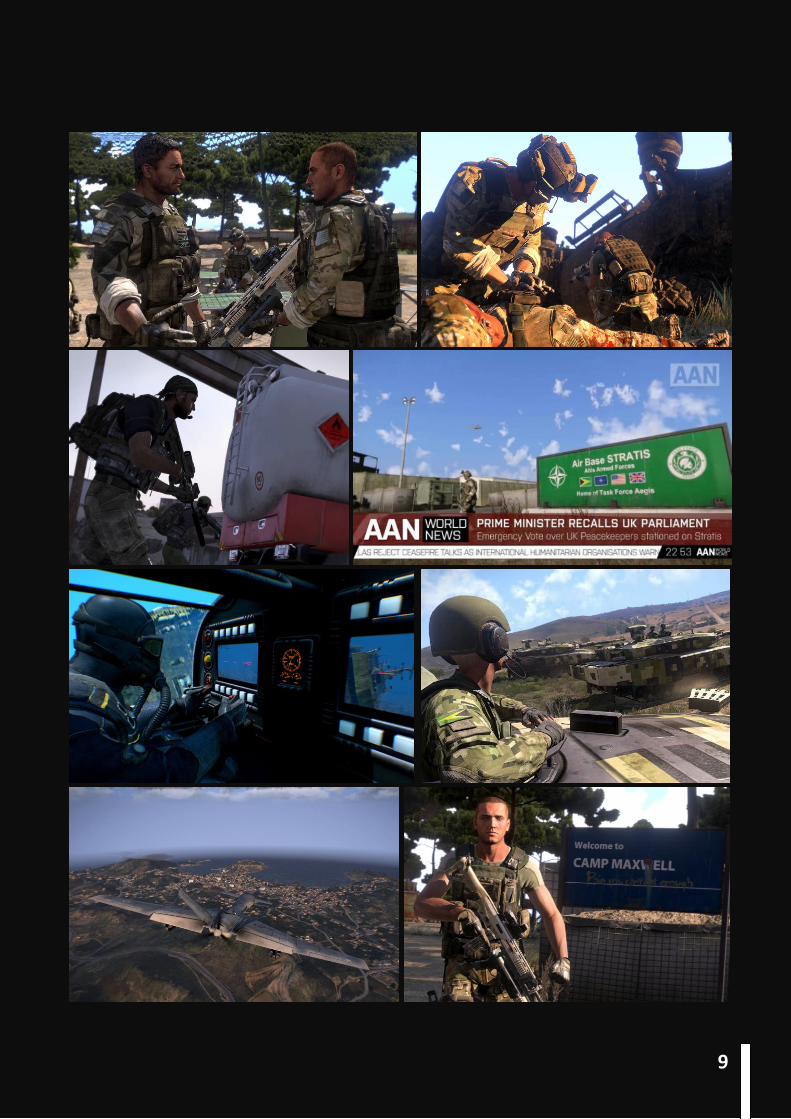
THE EAST WIND: ARMA III CAMPAIGN NO SPOILERS HERE The Arma 3 campaign is set in a possible near future (2035). After peacekeeping duty NATO forces are retreating from the Republic of Altis and Stratis leaving the AAF in charge. NATO command is about to reduce and redeploy its forces around the world focusing on new important scenarios (mainly in the pacific) and coping with the weak economies of some of the states in the alliance. You are Ben Kerry, corporal of the US Army, on his last days on Stratis. Situation appears to be under control when suddenly AAF soldiers attack NATO remaining position on Stratis. Kerry and the survivors will struggle to understand the situation, contact NATO command and remain alive.
-Survive. Adapt. Win.-
8
9

PART I - MOVING & LOOKING Arma 3 presents a series of features you would hardly find elsewhere, designed to guarantee the player a higher degree of immersion and a lot more possibilities then the ones offered by other shooters. THE BLESSING OF STANCE ADJUST
LEFT CTRL + W/S/A/D Almost every shooter allows you to position in three different stances: standing, kneel and prone. Problem is when you seek for cover behind a vehicle, a wall or any object and no stance actually serves the purpose of keeping you as covered as possible while allowing you to attack what is on the other side of it. Here’s a very easy – yet common – example: you enter a building and get in position at a window, so if you stand up you are able to shoot outside but you expose all your torso, as well as your head, to enemy fire. If you crouch only the top of your head is exposed but you are not able to return fire anymore. Only solutions are standing on one side of the window (reducing your fire window) or continue to alternate standing and kneel stances. The stance adjust feature allows you to have intermediate stances between the above mentioned as well as other firing positions unique to Arma 3. To cycle the stances simply hold left ctrl while pressing W or S to change your height or while pressing A or D to set you horizontal position; notice you can combine the horizontal stance adjust with a normal lean (Q and E keys) except when in one of the prone stances. When in first person your current stance will be displayed by an indicator next to the weapon and ammo informations. The three basic stances are each represented by an icon, the adjusted stances are indicated by an arrow on one side of the icon. So for example couched icon plus lower arrow means low-crouched stance; crouched icon plus right arrow means right-leaned crouched stance.
10
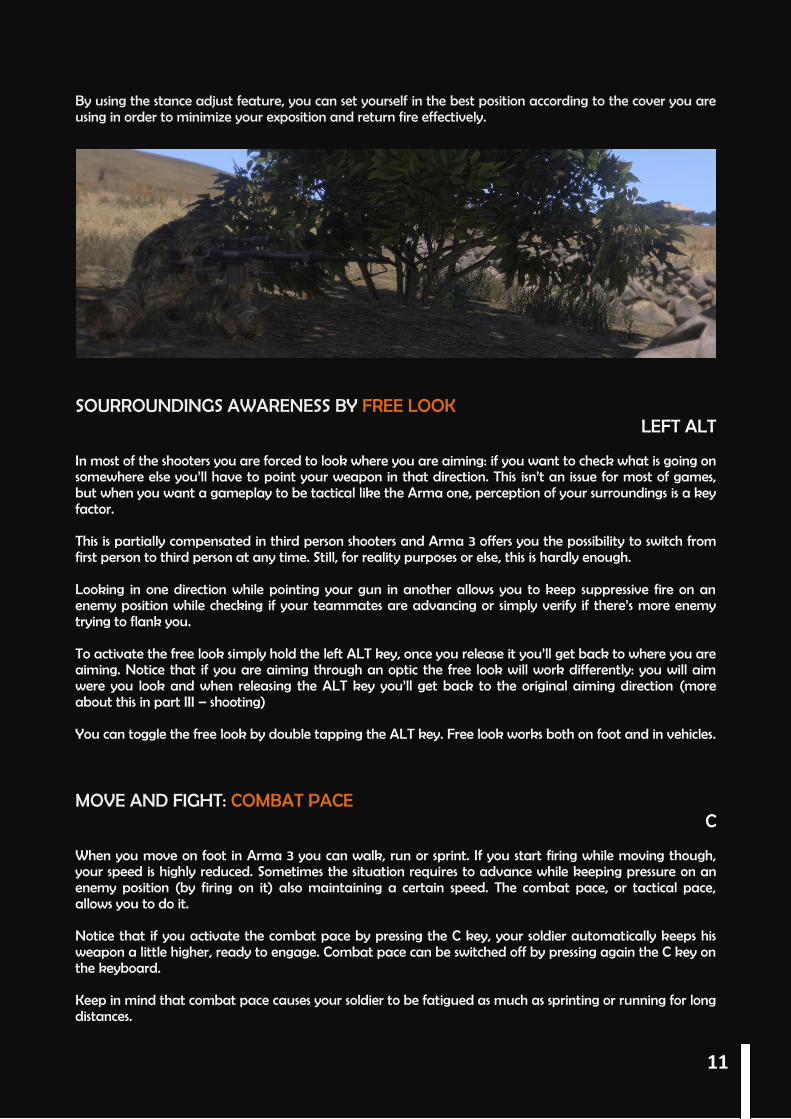
By using the stance adjust feature, you can set yourself in the best position according to the cover you are using in order to minimize your exposition and return fire effectively.
SOURROUNDINGS AWARENESS BY FREE LOOK
LEFT ALT In most of the shooters you are forced to look where you are aiming: if you want to check what is going on somewhere else you’ll have to point your weapon in that direction. This isn’t an issue for most of games, but when you want a gameplay to be tactical like the Arma one, perception of your surroundings is a key factor. This is partially compensated in third person shooters and Arma 3 offers you the possibility to switch from first person to third person at any time. Still, for reality purposes or else, this is hardly enough. Looking in one direction while pointing your gun in another allows you to keep suppressive fire on an enemy position while checking if your teammates are advancing or simply verify if there’s more enemy trying to flank you. To activate the free look simply hold the left ALT key, once you release it you’ll get back to where you are aiming. Notice that if you are aiming through an optic the free look will work differently: you will aim were you look and when releasing the ALT key you’ll get back to the original aiming direction (more about this in part III – shooting) You can toggle the free look by double tapping the ALT key. Free look works both on foot and in vehicles. MOVE AND FIGHT: COMBAT PACE
C When you move on foot in Arma 3 you can walk, run or sprint. If you start firing while moving though, your speed is highly reduced. Sometimes the situation requires to advance while keeping pressure on an enemy position (by firing on it) also maintaining a certain speed. The combat pace, or tactical pace, allows you to do it. Notice that if you activate the combat pace by pressing the C key, your soldier automatically keeps his weapon a little higher, ready to engage. Combat pace can be switched off by pressing again the C key on the keyboard. Keep in mind that combat pace causes your soldier to be fatigued as much as sprinting or running for long distances.
11

THERE IS ZOOMING AND ZOOMING RMB
The action of zooming is usually bind to the usage of an optic or a binocular. Arma 3 offers both this items, along with laser designators and rangefinders, but you can perform a slight zoom even without a weapon. This action is performed via the right mouse button – or RMB for short, by pressing it your soldier will hold his breath. This can be done for a short time (your soldier will then recover from the lack of air) and causes fatigue but gives you some advantages. If you hold RMB while aiming through an optic that has a fixed zoom capability you will gain a bonus in stability for you weapon (and your aim) but you won’t increase the zoom level. When you release the RMB or when your soldier runs out of air the effect ends and your aim will sway for a bit while you recover. If you hold RMB while aiming with an adjustable zoom optic you will zoom in to max zoom level. To normally adjust the zoom level with these optics use the + and – keys on your numpad. If you hold RMB while aiming with an optic that has no zoom, like an holographic optic, or when you are not looking through an optic, you will gain a little zoom and a stability bonus. When you release the RMB or when your soldier runs out of air the effect ends and your aim will sway for a bit while you recover. If you just press the RMB once you will switch between fire from side and fire using the optic. FATIGUE MANAGEMENT All the most physical demanding actions cause your soldier to be fatigued. When the fatigue reaches a certain level you are prevented from sprinting and holding breath, affecting your moving capability and shooting accuracy. The more you are fatigued, the slower your movements are, the rate of slowdown varies according to action performed, weight carried and circumstances. Managing your fatigue is one of the keys to remain effective in a firefight and higher your overall chances of surviving in a mission. Keep in mind your stance influences the fatigue you accumulate: avoid running while crouched if you can, and be aware that both walking and standing still help restoring fatigue, but standing still is the best way. Manage your load according to circumstances: the more weight you’re carrying, the harder resting is. A heavy load does not influence your speed, but causes slowdown to take place much sooner. Of course the terrain you’re travelling on affects your fatigue level. The higher the slope, the more exhausted you’ll become by ascending it.
12
PART II – GEARS There’s a variety of uniforms, vests, backpacks, headgears, goggles and of course weapons and ammo in Arma 3. In order to keep under control and have rapid access to what you carry the game presents a well-crafted inventory system. UNIFORMS, VESTS AND BACKPACKS
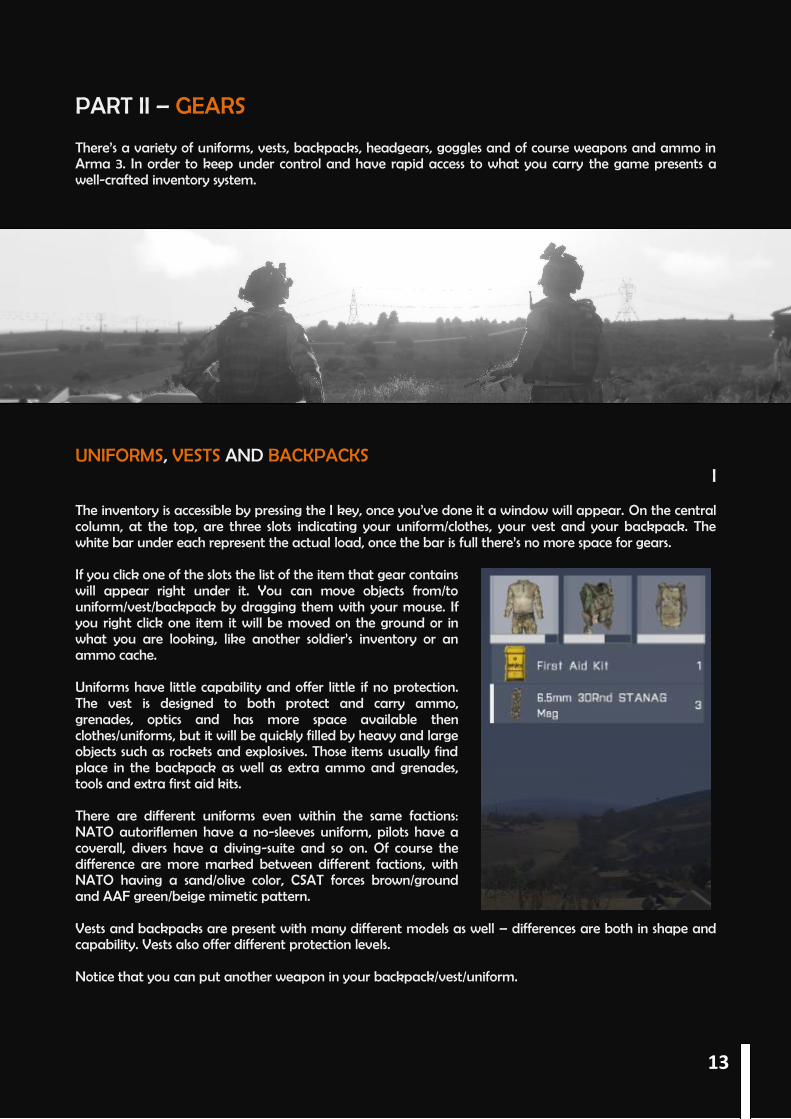
I The inventory is accessible by pressing the I key, once you’ve done it a window will appear. On the central column, at the top, are three slots indicating your uniform/clothes, your vest and your backpack. The white bar under each represent the actual load, once the bar is full there’s no more space for gears. If you click one of the slots the list of the item that gear contains will appear right under it. You can move objects from/to uniform/vest/backpack by dragging them with your mouse. If you right click one item it will be moved on the ground or in what you are looking, like another soldier’s inventory or an ammo cache. Uniforms have little capability and offer little if no protection. The vest is designed to both protect and carry ammo, grenades, optics and has more space available then clothes/uniforms, but it will be quickly filled by heavy and large objects such as rockets and explosives. Those items usually find place in the backpack as well as extra ammo and grenades, tools and extra first aid kits. There are different uniforms even within the same factions: NATO autoriflemen have a no-sleeves uniform, pilots have a coverall, divers have a diving-suite and so on. Of course the difference are more marked between different factions, with NATO having a sand/olive color, CSAT forces brown/ground and AAF green/beige mimetic pattern. Vests and backpacks are present with many different models as well – differences are both in shape and capability. Vests also offer different protection levels. Notice that you can put another weapon in your backpack/vest/uniform.
13
HEADGEARS I
On the top right of the inventory window are four slots for head-related items. First on the left is the helmet/cap; there are different type of helmets, they all offer head protection but some have a few accessories like a camera, which is useful in some mods that allow you to see what other group members via their helmet cameras. Boonies, caps and civilian hats offer very little protection. Second slot is for goggles/glasses. They have an esthetic only impact on the game. Only the tactical glasses are equipped with a small screen that can display informations and feeds from other soldiers’ helmet cameras. Third slot is for Night Vision Goggles, NVGs for short: they are really useful in night scenarios. They can be turned on and off by pressing the N key. Last slot is for binoculars or rangefinders/laser designators. A rangefinder is basically a binocular with a laser for measuring distances. A laser designator is used to designate targets for artillery or CAS. WEAPONS
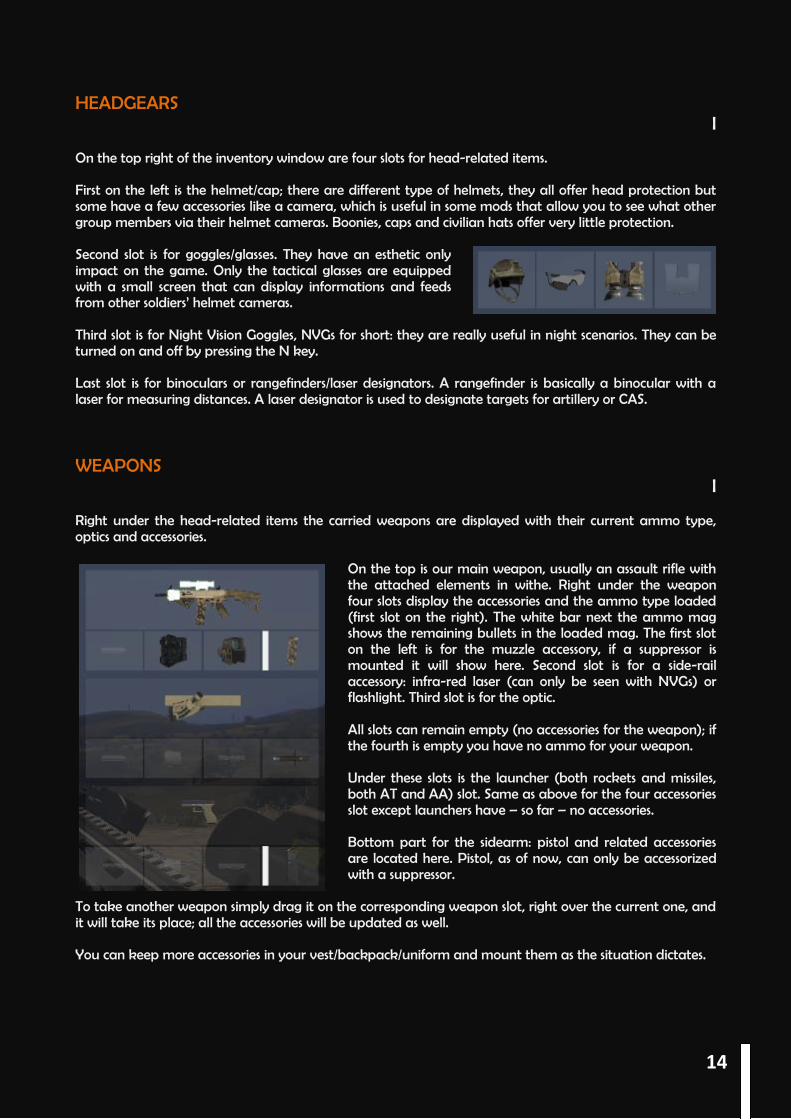
I Right under the head-related items the carried weapons are displayed with their current ammo type, optics and accessories.
On the top is our main weapon, usually an assault rifle with the attached elements in withe. Right under the weapon four slots display the accessories and the ammo type loaded (first slot on the right). The white bar next the ammo mag shows the remaining bullets in the loaded mag. The first slot on the left is for the muzzle accessory, if a suppressor is mounted it will show here. Second slot is for a side-rail accessory: infra-red laser (can only be seen with NVGs) or flashlight. Third slot is for the optic. All slots can remain empty (no accessories for the weapon); if the fourth is empty you have no ammo for your weapon. Under these slots is the launcher (both rockets and missiles, both AT and AA) slot. Same as above for the four accessories slot except launchers have – so far – no accessories. Bottom part for the sidearm: pistol and related accessories are located here. Pistol, as of now, can only be accessorized with a suppressor.
To take another weapon simply drag it on the corresponding weapon slot, right over the current one, and it will take its place; all the accessories will be updated as well. You can keep more accessories in your vest/backpack/uniform and mount them as the situation dictates.
14
REARMING I, MOUSE SCROLL
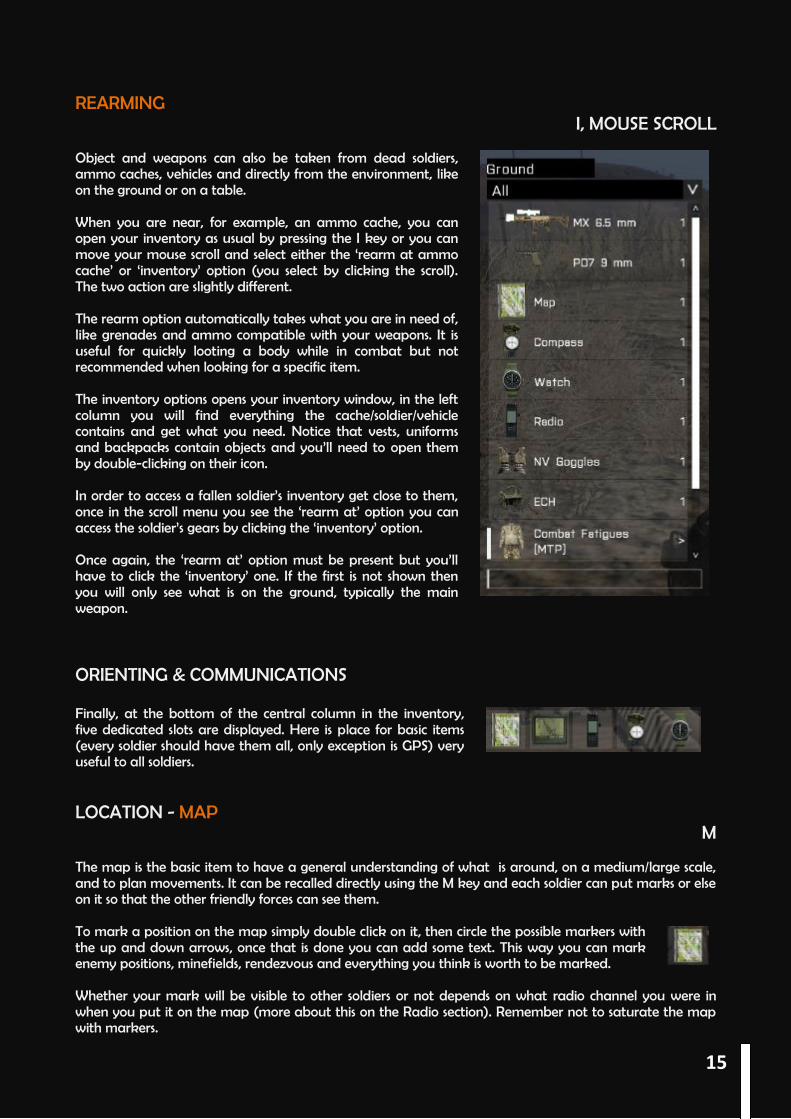
Object and weapons can also be taken from dead soldiers, ammo caches, vehicles and directly from the environment, like on the ground or on a table. When you are near, for example, an ammo cache, you can open your inventory as usual by pressing the I key or you can move your mouse scroll and select either the ‘rearm at ammo cache’ or ‘inventory’ option (you select by clicking the scroll). The two action are slightly different. The rearm option automatically takes what you are in need of, like grenades and ammo compatible with your weapons. It is useful for quickly looting a body while in combat but not recommended when looking for a specific item. The inventory options opens your inventory window, in the left column you will find everything the cache/soldier/vehicle contains and get what you need. Notice that vests, uniforms and backpacks contain objects and you’ll need to open them by double-clicking on their icon. In order to access a fallen soldier’s inventory get close to them, once in the scroll menu you see the ‘rearm at’ option you can access the soldier’s gears by clicking the ‘inventory’ option. Once again, the ‘rearm at’ option must be present but you’ll have to click the ‘inventory’ one. If the first is not shown then you will only see what is on the ground, typically the main weapon. ORIENTING & COMMUNICATIONS Finally, at the bottom of the central column in the inventory, five dedicated slots are displayed. Here is place for basic items (every soldier should have them all, only exception is GPS) very useful to all soldiers. LOCATION - MAP
M The map is the basic item to have a general understanding of what is around, on a medium/large scale, and to plan movements. It can be recalled directly using the M key and each soldier can put marks or else on it so that the other friendly forces can see them. To mark a position on the map simply double click on it, then circle the possible markers with the up and down arrows, once that is done you can add some text. This way you can mark enemy positions, minefields, rendezvous and everything you think is worth to be marked. Whether your mark will be visible to other soldiers or not depends on what radio channel you were in when you put it on the map (more about this on the Radio section). Remember not to saturate the map with markers.
15

The map presents a grid, useful to determine coordinates and value distances. The smaller grid presents squares with a side of 100 meters, zooming out the side becomes 1 km and the largest grid has a square side of 10 km. Each square of the small grid is linked to a particular coordinate. Coordinates are two values, each represented by three numbers, for axis X and Y (in this order). When you hoover on a position with your cursor the grid coordinates will appear on the screen, along with altitude on sea level.
POSITION – GPS
RIGHT CTRL + M Second slot is for the GPS. You can display it by holding right CTRL and pressing M; it will show you a small portion of the map keeping your current position always centered. The GPS is very useful for helicopters and jet pilots to know exactly where they are and their immediate surroundings. Notice that the GPS screen shows all the marks on the map. COMMS – RADIO
CAPS LOCK Having a radio allows you to communicate with every other player that has one himself. It serves the purposes of sharing intel, asking informations, coordinate soldiers and groups and many more. To talk through the radio simply hold the Caps lock key while speaking into your microphone, you can double-tap the key to keep the channel open.
16

The radio has multiple channels - frequencies – each one has a different purpose as it will reach a particular group of soldiers. You can cycle the radio channels by using the , and . keys. Different channels allow the radio traffic to be distributed via multiple ways so that more people are able to communicate at the same time.
GLOBAL CHANNEL allows you to talk to every player in the game, friendly or enemy.
SIDE CHANNEL reaches every soldier in your faction, for example all NATO soldiers if you are in NATO faction.
COMMAND CHANNEL connects all the squad leaders in one faction, it is used to pass information and coordinate, as well as pass orders and intel through the command chain.
GROUP CHANNEL allows you to talk to all the soldiers in your group, from the squad leader to the last grunt. All communications in a squad should be sent through this channel.
VEHICLE CHANNEL connects passengers and crew of a vehicle, it’s like talking while you are in a car, only the other passengers can hear you.
DIRECT CHANNEL is like talking with your radio switched off. Only the people in your vicinity can hear you - enemies included!
Note that when you are talking, on whatever channel, the people in your immediate vicinity can hear you, just like when you talk to the telephone. A game chat is also present, you call it with the – key, then you type the message and press Enter. The chat is linked to the radio channel you are using, so you may/ may not reach every player. Finally, when you put a mark on the map its visibility will be given by the radio channel you are using when you put it down. So if you are in Group Channel and put a marker on the map indicating a minefield only the soldiers in your group will see it. DIRECTION – COMPASS
K The compass shows you the cardinal points, which is useful to navigate the map and follow a pre-determined route. It also has two rings of numbers in the outer part. Here you’ll learn how to use the inner circle of numbers. You can call the compass by holding the K key or double-tap it to keep it on screen. When you spot an enemy, or you want to point out an enemy shooter, or just want to give a rough direction to your teammates you describe to them where you are looking at (“top of the hill, behind that group of rocks”). Sometimes this isn’t sufficient: there may be too little references. The compass is a helpful tool in situation like this. Hold it while pointing it at where you want to and report the number you read in the inner circle to your squad like this “Enemy shooter, bearing 120”. If the squad is close enough to you, every member will have the 120 bearing in the same direction and they will look exactly where you are. Of course the best method is to combine the two above: “Enemy shooters, 200 meters, top of the hill bearing 85”.
17
TIME – WATCH O
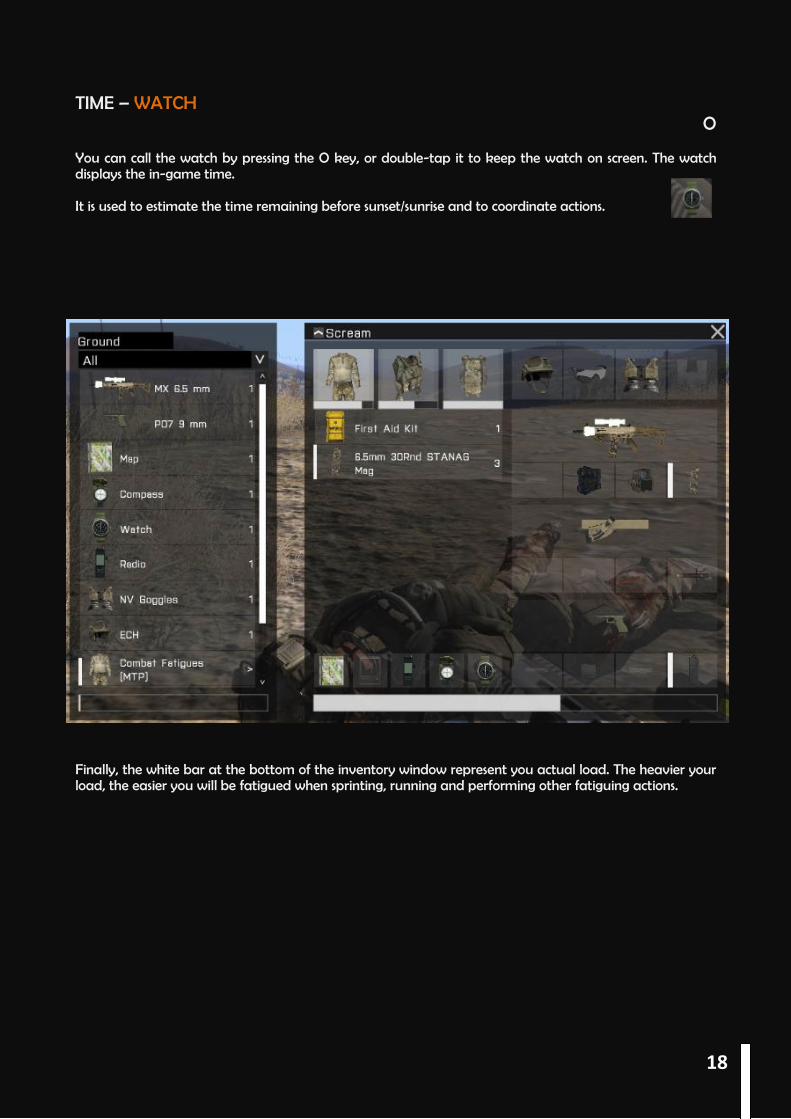
You can call the watch by pressing the O key, or double-tap it to keep the watch on screen. The watch displays the in-game time. It is used to estimate the time remaining before sunset/sunrise and to coordinate actions.
Finally, the white bar at the bottom of the inventory window represent you actual load. The heavier your load, the easier you will be fatigued when sprinting, running and performing other fatiguing actions.
18
PART III – WEAPONS & SHOOTING Peace is rarely an option in Arma 3, and you are equipped with a complete arsenal: assault rifles, pistols, launchers, grenades, mines, explosives and so on. This part will focus on how to effectively manage a firearm in Arma 3. CHOOSE YOUR WEAPON
Ò, SCROLL MENU You can carry up to three weapons: a rifle or LMG, a launcher and a pistol. To select what weapon to equip use the mouse scroll, on the left side of the screen a list of your carried weapons will be displayed, along with possible actions. Weapons are listed by their name. You can also use the ò key to switch between rifle and sidearm. Your current weapon appears on the top right of the weapon/ammo window. SELECT YOUR FIREMOD
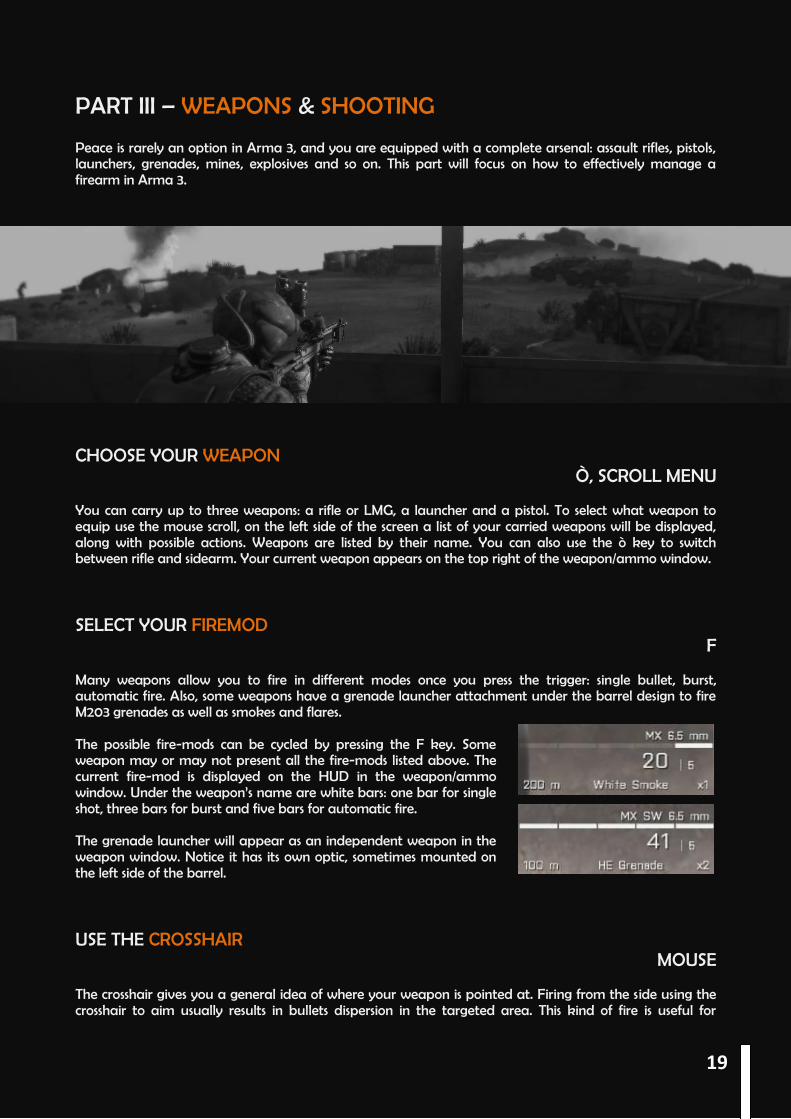
F Many weapons allow you to fire in different modes once you press the trigger: single bullet, burst, automatic fire. Also, some weapons have a grenade launcher attachment under the barrel design to fire M203 grenades as well as smokes and flares. The possible fire-mods can be cycled by pressing the F key. Some weapon may or may not present all the fire-mods listed above. The current fire-mod is displayed on the HUD in the weapon/ammo window. Under the weapon’s name are white bars: one bar for single shot, three bars for burst and five bars for automatic fire. The grenade launcher will appear as an independent weapon in the weapon window. Notice it has its own optic, sometimes mounted on the left side of the barrel. USE THE CROSSHAIR
MOUSE The crosshair gives you a general idea of where your weapon is pointed at. Firing from the side using the crosshair to aim usually results in bullets dispersion in the targeted area. This kind of fire is useful for
19

suppression or when in close quarters. It can also be used to return fire while seeking for cover by shooting some rounds in the general direction of the enemy. The crosshair presents a few useful features. When firing repeatedly in a short period the crosshair enlarges itself indicating your shots to be less accurate due to the weapon’s recoil. The same effect is present while moving. Your stance influences you precision: shooting from a crouched or prone position results in more accurate fire. Since the optics are mounted on top of the barrel sometimes you can see the target through it but your muzzle is pointing at your cover and when you shoot the bullets hit the cover. The crosshair position itself on where the bullets will impact thus giving you the ability to know if you are going to hit the target or you need to raise the weapon or adjust your stance. EVER HEARD OF ZEROING?
PAGUP, PAGDOWN All bullets are influenced by gravity when flying, meaning the longer they travel, the more they drop. When firing, especially from great distances, this effect must be taken in consideration, and adjustments need to be made in order to balance it. On the bottom left of your weapon/ammo window is a value in meters: this is the distance at which your shots will impact where you aim. This value is known as zeroing. So if you aim at the head of a target distant 300 meters and your weapon has a 200 meters zeroing, your bullet will impact lower than the head, probably in the chest. With the same target at 100 meters your bullet will fly over his head. All weapons have a fixed zeroing, usually 200 or 300 meters. Some optics present a reticule that allows you to compensate for bullet drop (see optics for details), like the MRCO and RCO. Sniper optics, as well as vehicle turrets optics, have adjustable zeroing. To increase and decrease the zeroing use the PagUp and PagDown keys. MAKE IT EASIER: OPTICS
RMB,CTRL+RMB Optics absolve the purpose of delivering a more precise fire and offer an overall increased capability of scouting. They came in different models and magnifying power; some also have night or thermal vision modes.
Some optics actually present two distinguished optics: take the RCO as an example (Rifle Combat Optic: standard NATO optic for rifleman). The optic closer to the barrel has a fixed zoom and a reticule to adjust your aim according to target’s distance, the upper optic, right on top of the first, has no zoom and only presents a red dot to help you aim. To switch between the two optics hold right CTRL and press the RMB. The reticule is employed in making vertical adjustments to compensate bullet dropping: the center of the main cross is used for targets at 300 meters (standard assault rifle zeroing), every 100 more meters you have to use one of the lines below, some of them present a number (number x 100 = distance of target). The longer the bullet has to travel, the higher you aim to compensate gravity fall. Lines are progressively shorter, indeed they represent the distance shoulder to shoulder of a target at the corresponding distance, thus giving you a chance to evaluate distances, tough the enemy soldier has to face your direction.
20

Sniper rifles have powerful optics, like the SOS optic. It has an adjustable zoom (+ and – keys on the numpad) up to x70 magnification and the rifle itself has multiple zeroing levels, allowing precise shooting from 300 to 2700 meters. Even when using an optic, your aim will sway making a precise shot harder; this effect can’t be eliminated but it can be greatly reduced. Stance influences your aim, better to be prone or crouched when firing. If you hold RMB you will hold your breath and gain a temporary boost in precision, but you will need a little recovery time if you don’t breath for too long and your aim will sway in recovery.
Optics count as accessories, meaning they are carried and attached to weapons in the inventory (see part II – Inventory). You can of course carry different optics and switch between them as the situation dictates. SILENCE WITH SUPPRESSORS
I When you are playing stealthy a suppressor can really come in handy. You can mount it on your weapon and take it off at any moment in the inventory. A suppressor provides a marked reduction either in your shooting noise and your muzzle flash (the flash originating from your weapon when firing), thus reducing the chances of being spotted or heard when firing by enemy soldiers. Be aware that within a certain distance enemy will still be activated (start behaving aware of enemy presence) or alarmed by your shots. Even when firing from a distance your muzzle flash can be spotted (the suppressor reduces it, doesn’t eliminate it). Also when a suppressor is equipped, the bullet carries less energy when shot, so you will deal less damage to your target. SIDE RAIL: FLASHLIGHT AND INFRA-RED LASER
L A flashlight can be attached to the side of your rifle barrel and turned on by pressing the L key. It illuminates the area where your rifle is pointed and results useful at night when NVGs aren’t available or in dark environments like the inside of a building. On the downside a soldier with a lit flashlight is very easy to spot in the dark, even from great distances. It is recommended to use the flashlight inside buildings and reduce its usage as much as possible in the open. The infra-red laser is also turned on, when equipped, by the L key, but it can be seen only when using NVGs, so careful: both you and enemies with NVGs can see it. It projects a laser in the direction you are aiming, allowing you to mark targets quickly for your teammates and point a precise spot. The laser is useful within a certain range, beyond that it disperses and can’t be seen. Be aware that even though you can use only one side barrel accessory at a time, you can carry the other in your inventory and put it on when needed.
21
THE AMMO YOU USE
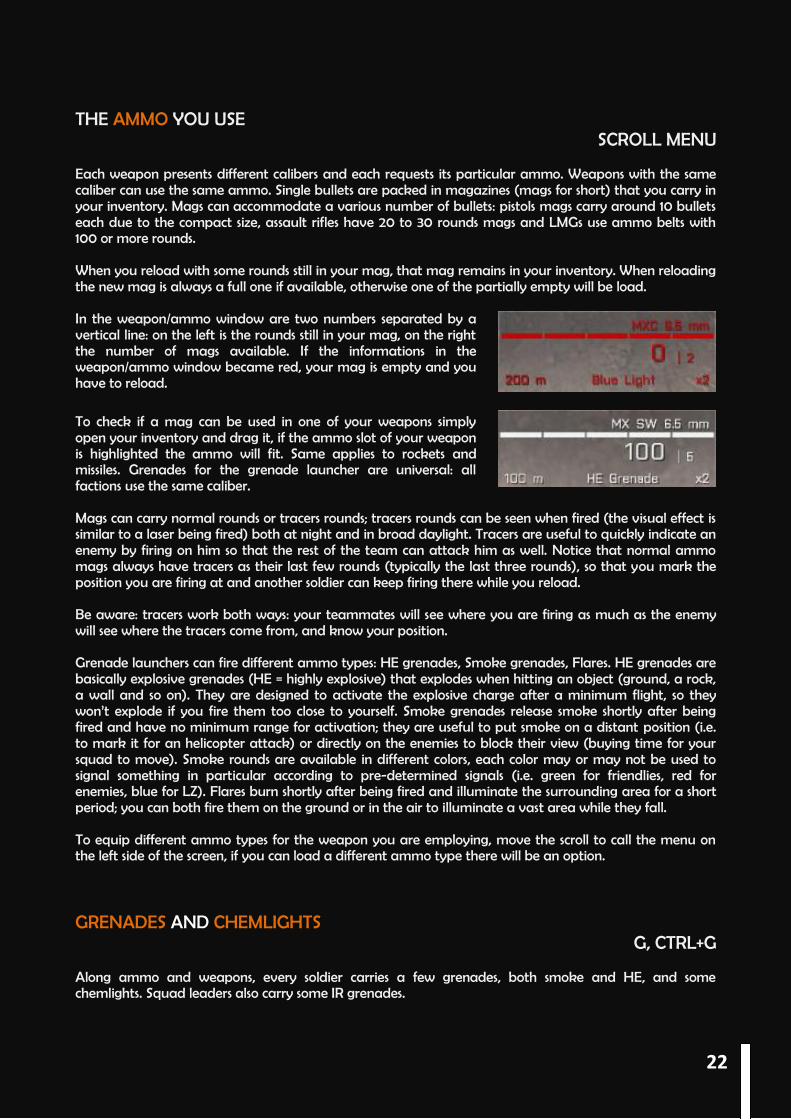
SCROLL MENU Each weapon presents different calibers and each requests its particular ammo. Weapons with the same caliber can use the same ammo. Single bullets are packed in magazines (mags for short) that you carry in your inventory. Mags can accommodate a various number of bullets: pistols mags carry around 10 bullets each due to the compact size, assault rifles have 20 to 30 rounds mags and LMGs use ammo belts with 100 or more rounds. When you reload with some rounds still in your mag, that mag remains in your inventory. When reloading the new mag is always a full one if available, otherwise one of the partially empty will be load. In the weapon/ammo window are two numbers separated by a vertical line: on the left is the rounds still in your mag, on the right the number of mags available. If the informations in the weapon/ammo window became red, your mag is empty and you have to reload.
To check if a mag can be used in one of your weapons simply open your inventory and drag it, if the ammo slot of your weapon is highlighted the ammo will fit. Same applies to rockets and missiles. Grenades for the grenade launcher are universal: all factions use the same caliber. Mags can carry normal rounds or tracers rounds; tracers rounds can be seen when fired (the visual effect is similar to a laser being fired) both at night and in broad daylight. Tracers are useful to quickly indicate an enemy by firing on him so that the rest of the team can attack him as well. Notice that normal ammo mags always have tracers as their last few rounds (typically the last three rounds), so that you mark the position you are firing at and another soldier can keep firing there while you reload. Be aware: tracers work both ways: your teammates will see where you are firing as much as the enemy will see where the tracers come from, and know your position. Grenade launchers can fire different ammo types: HE grenades, Smoke grenades, Flares. HE grenades are basically explosive grenades (HE = highly explosive) that explodes when hitting an object (ground, a rock, a wall and so on). They are designed to activate the explosive charge after a minimum flight, so they won’t explode if you fire them too close to yourself. Smoke grenades release smoke shortly after being fired and have no minimum range for activation; they are useful to put smoke on a distant position (i.e. to mark it for an helicopter attack) or directly on the enemies to block their view (buying time for your squad to move). Smoke rounds are available in different colors, each color may or may not be used to signal something in particular according to pre-determined signals (i.e. green for friendlies, red for enemies, blue for LZ). Flares burn shortly after being fired and illuminate the surrounding area for a short period; you can both fire them on the ground or in the air to illuminate a vast area while they fall. To equip different ammo types for the weapon you are employing, move the scroll to call the menu on the left side of the screen, if you can load a different ammo type there will be an option. GRENADES AND CHEMLIGHTS
G, CTRL+G Along ammo and weapons, every soldier carries a few grenades, both smoke and HE, and some chemlights. Squad leaders also carry some IR grenades.
22

HE grenades are the explosive grenades you can find in all shooters and they work in the same way. There is a smaller version, the mini HE, which takes less space in your inventory but also deals less damage and in a reduced radius. Smoke grenades release smoke after being tossed, they are used for multiple purpose: cover movements, mark spots, break line of sight of the enemy. There are multiple colors for smoke. Chemlights are tossed to illuminate the environment in a short radius for some minutes. There are multiple colors for chemlights. Once a chemlight is tossed it can’t be picked up or turned off (it is on until the chemical reaction in it is finished). Finally, IR grenades are basically an Infra-Red strobe that can be tossed: neither exploding nor emitting smoke, they are visible to all players using NVGs and are used to mark positions, especially in situations of technological advantage. (i.e. you can toss it on a rooftop where enemies without NVGs are in cover and request CAS using the strobe as a marker; they have no NVGs, so they won’t see it). The throw weapon currently selected is displayed in the weapon/ammo window on the bottom right along with the amount available. To cycle your grenades and chemlights, both in type and color, hold left CTRL and press G. To toss one, press the G key. ROKETS AND MISSILES: LAUNCHERS
SCROLL MENU Arma 3 offers the player a variety of rocket and missile launchers, either anti-tank (AT) and anti-air (AA). Launchers have a dedicated slot in the inventory and they are carried on the back, so they are visible to other units and players. Remember: you can use a launchers only when standing or crouched; if you switch to the launcher while prone you will automatically crouch. Same applies for reloading.
Missile launchers have guidance capability, meaning that after the missile is fired you can guide its trajectory by aiming at where you want it to go (useful for distant moving targets). Rocket launchers can’t guide the rockets and the operator relies on the optic for an accurate shot: same as for rifles, optic reticule used to compensate gravity drop.
23
AA missile launchers, as well as the AT models, have locking capability: aim at a target vehicle or air, the hold the RMB until a white diamond appears on the target, when it does appear the target is locked and the missile will automatically follow it. Keep in mind that all air and armored vehicles have countermeasures designed to avoid locking, or at least make it harder. Finally, some launchers can fire anti-infantry rockets, designed to strike enemy troops concentrations. MINES AND EXPLOSIVES: ORDINANCES
SCROLL MENU You can carry a variety of mines and explosives with you and place them at your discretion. To do so simply call the scroll menu and select the ordinance you want to use and select it by pressing the scroll: a quick animation will be played and the mine/explosive charge will be put on the ground in front of you. All mines, despite the differences in shape, size and weight, work in the same way: once triggered they explode dealing damages to surrounding units. Some mines are triggered when a unit gets close enough to them, others have a tripwire activation. There are AP, AT and sea mines. Once you place a mine or detect one placed by enemies a small red triangle will appear on the mine’s position: the entire squad will be aware of the threat. Also the mine will be visible on the map. To disarm a mine you’ll have to carry a toolbox (standard equipment for explosive specialist). Approach the mine prone and slowly to prevent its activation, once you are close enough the disarming action will appear in the side menu. If you are not an explosive expert take in account a small failure possibility in disarming the mine. Grenades, rockets and artillery rounds exploding near a mine can trigger its detonation. Explosives charges are more powerful than mines, they can be remotely detonate within a certain range by the soldier who placed it. Also, a timer can be set on the charge itself so that it will go off forty seconds after the activation. STATIC WEAPONS
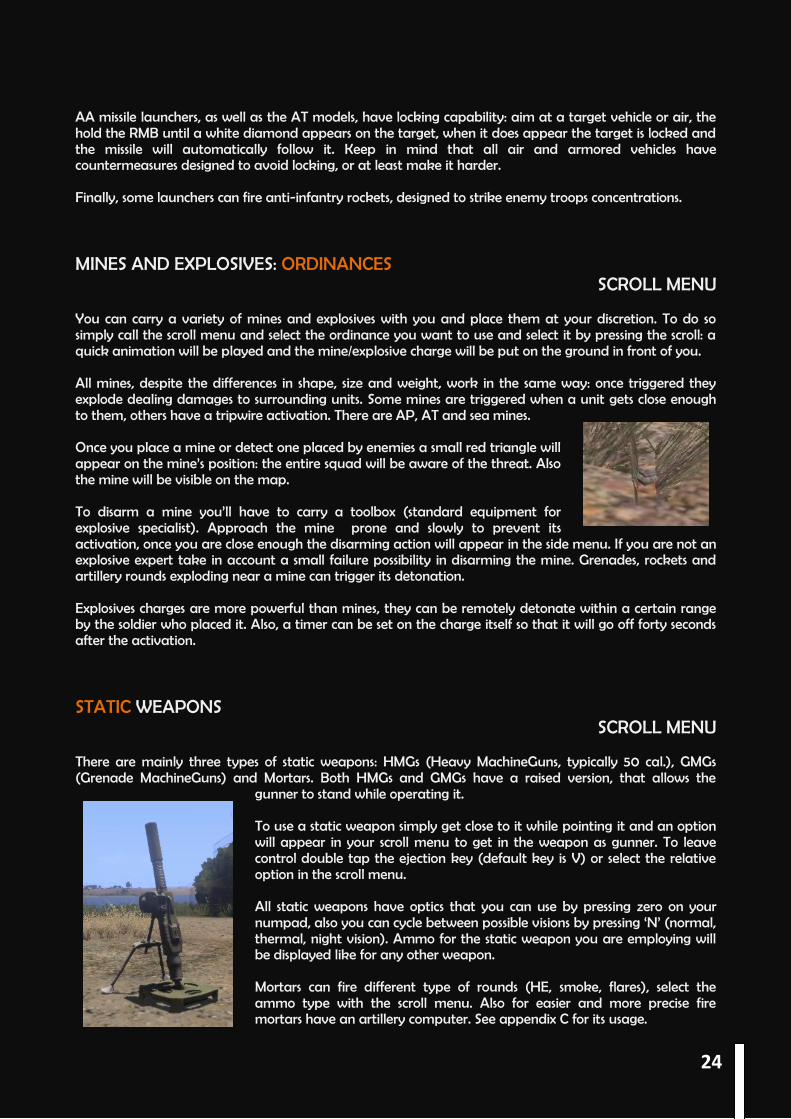
SCROLL MENU There are mainly three types of static weapons: HMGs (Heavy MachineGuns, typically 50 cal.), GMGs (Grenade MachineGuns) and Mortars. Both HMGs and GMGs have a raised version, that allows the
gunner to stand while operating it. To use a static weapon simply get close to it while pointing it and an option will appear in your scroll menu to get in the weapon as gunner. To leave control double tap the ejection key (default key is V) or select the relative option in the scroll menu. All static weapons have optics that you can use by pressing zero on your numpad, also you can cycle between possible visions by pressing ‘N’ (normal, thermal, night vision). Ammo for the static weapon you are employing will be displayed like for any other weapon. Mortars can fire different type of rounds (HE, smoke, flares), select the ammo type with the scroll menu. Also for easier and more precise fire mortars have an artillery computer. See appendix C for its usage.
24
WEAPON STABILIZATION C
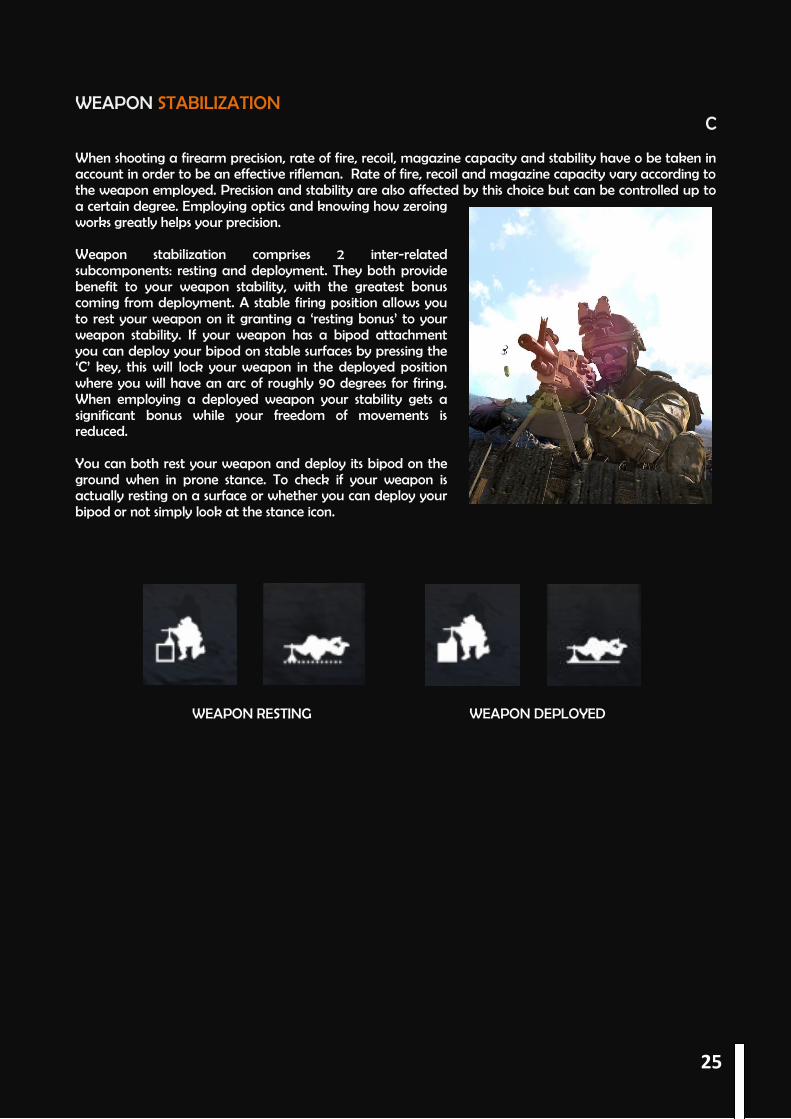
When shooting a firearm precision, rate of fire, recoil, magazine capacity and stability have o be taken in account in order to be an effective rifleman. Rate of fire, recoil and magazine capacity vary according to the weapon employed. Precision and stability are also affected by this choice but can be controlled up to a certain degree. Employing optics and knowing how zeroing works greatly helps your precision. Weapon stabilization comprises 2 inter-related subcomponents: resting and deployment. They both provide benefit to your weapon stability, with the greatest bonus coming from deployment. A stable firing position allows you to rest your weapon on it granting a ‘resting bonus’ to your weapon stability. If your weapon has a bipod attachment you can deploy your bipod on stable surfaces by pressing the ‘C’ key, this will lock your weapon in the deployed position where you will have an arc of roughly 90 degrees for firing. When employing a deployed weapon your stability gets a significant bonus while your freedom of movements is reduced. You can both rest your weapon and deploy its bipod on the ground when in prone stance. To check if your weapon is actually resting on a surface or whether you can deploy your bipod or not simply look at the stance icon.
25
WEAPON RESTING WEAPON DEPLOYED
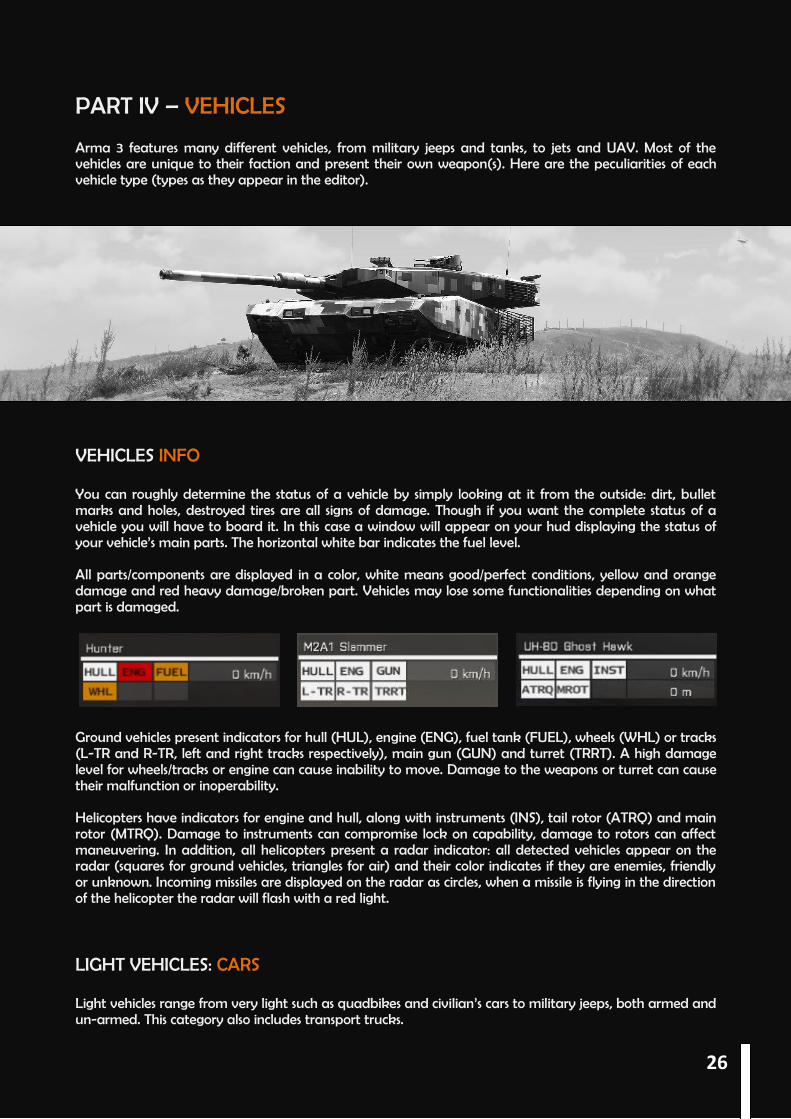
PART IV – VEHICLES Arma 3 features many different vehicles, from military jeeps and tanks, to jets and UAV. Most of the vehicles are unique to their faction and present their own weapon(s). Here are the peculiarities of each vehicle type (types as they appear in the editor). VEHICLES INFO You can roughly determine the status of a vehicle by simply looking at it from the outside: dirt, bullet marks and holes, destroyed tires are all signs of damage. Though if you want the complete status of a vehicle you will have to board it. In this case a window will appear on your hud displaying the status of your vehicle’s main parts. The horizontal white bar indicates the fuel level. All parts/components are displayed in a color, white means good/perfect conditions, yellow and orange damage and red heavy damage/broken part. Vehicles may lose some functionalities depending on what part is damaged.
Ground vehicles present indicators for hull (HUL), engine (ENG), fuel tank (FUEL), wheels (WHL) or tracks (L-TR and R-TR, left and right tracks respectively), main gun (GUN) and turret (TRRT). A high damage level for wheels/tracks or engine can cause inability to move. Damage to the weapons or turret can cause their malfunction or inoperability. Helicopters have indicators for engine and hull, along with instruments (INS), tail rotor (ATRQ) and main rotor (MTRQ). Damage to instruments can compromise lock on capability, damage to rotors can affect maneuvering. In addition, all helicopters present a radar indicator: all detected vehicles appear on the radar (squares for ground vehicles, triangles for air) and their color indicates if they are enemies, friendly or unknown. Incoming missiles are displayed on the radar as circles, when a missile is flying in the direction of the helicopter the radar will flash with a red light. LIGHT VEHICLES: CARS Light vehicles range from very light such as quadbikes and civilian’s cars to military jeeps, both armed and un-armed. This category also includes transport trucks.
26
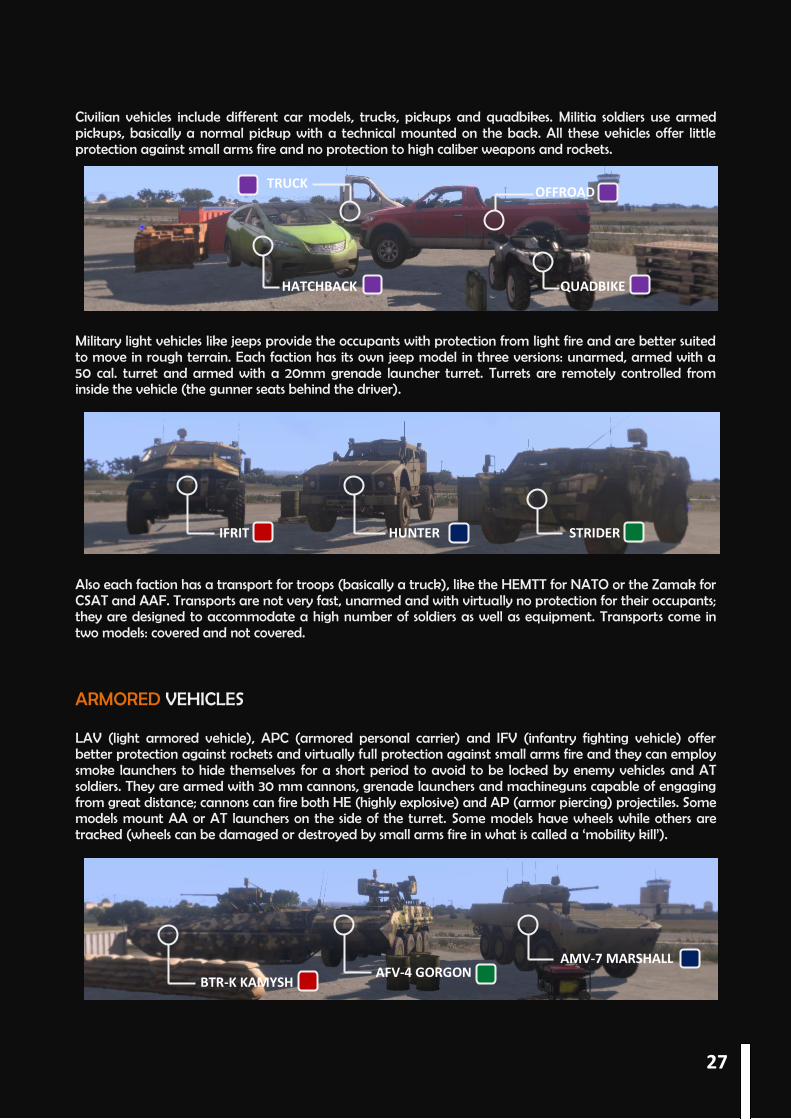
Civilian vehicles include different car models, trucks, pickups and quadbikes. Militia soldiers use armed pickups, basically a normal pickup with a technical mounted on the back. All these vehicles offer little protection against small arms fire and no protection to high caliber weapons and rockets.
Military light vehicles like jeeps provide the occupants with protection from light fire and are better suited to move in rough terrain. Each faction has its own jeep model in three versions: unarmed, armed with a 50 cal. turret and armed with a 20mm grenade launcher turret. Turrets are remotely controlled from inside the vehicle (the gunner seats behind the driver).
Also each faction has a transport for troops (basically a truck), like the HEMTT for NATO or the Zamak for CSAT and AAF. Transports are not very fast, unarmed and with virtually no protection for their occupants; they are designed to accommodate a high number of soldiers as well as equipment. Transports come in two models: covered and not covered. ARMORED VEHICLES LAV (light armored vehicle), APC (armored personal carrier) and IFV (infantry fighting vehicle) offer better protection against rockets and virtually full protection against small arms fire and they can employ smoke launchers to hide themselves for a short period to avoid to be locked by enemy vehicles and AT soldiers. They are armed with 30 mm cannons, grenade launchers and machineguns capable of engaging from great distance; cannons can fire both HE (highly explosive) and AP (armor piercing) projectiles. Some models mount AA or AT launchers on the side of the turret. Some models have wheels while others are tracked (wheels can be damaged or destroyed by small arms fire in what is called a ‘mobility kill’).
STRIDER HUNTER IFRIT
BTR-K KAMYSH AFV-4 GORGON
AMV-7 MARSHALL
HATCHBACK QUADBIKE
OFFROAD TRUCK
27

All these vehicles have a three men crew: a driver driving the vehicle, a gunner operating the guns and a commander acting as a coordinator. Some vehicles allow the crewmen to open the hatches and look outside, when turned out they have better visibility but they are exposed to enemy fire. Each of the three main faction has an MBT (main battle tank). All tanks are well armored and heavy vehicles and have powerful offensive means: these include the main cannon (HE and AP projectiles), a coaxial machinegun or sometimes an independent turret with a heavy machinegun. Their armor is strong on the front, thinner on the sides and top and even thinner on their back (weakest part in all tanks). They can employ smoke launchers like the light armored vehicles.
Tanks have a three men crew with the same roles as above. Some models, like the T-100 Varsuk (CSAT) have the commander in control of the machinegun which is mounted on an independent turret on top of the tank’s turret and remotely controlled from inside the vehicle. Others have the machinegun installed coaxial to the main gun and operated by the gunner. Finally, the NATO Slammer tank can also transport up to eight infantrymen.
Armored vehicles also include AAA (anti-air artillery) vehicles specifically designed to destroy enemy air assets. They are armed with a four barrel heavy machinegun with a very high rate of fire and AA missiles with lock on capability. These vehicles can be employed with devastating effects against ground targets and buildings as well.
The last armored vehicles are the self-propelled artillery vehicles and missile launcher vehicles. They are employed at great distances to engage enemy troops concentrations or hard targets and they can fire a variety of munitions with devastating effect. They act as support units called to fire by first line troops. All artillery vehicle allows you to fire via the artillery computer (just like mortars), see appendix C about it.
T-100 VARSUK M2A1 SLAMMER MBT52 KUMA
ZSU-39 TIGRIS IFV-6a CHEETAH
M4 SCORCHER 2S9 SOCHOR M5 SANDSTORM
28
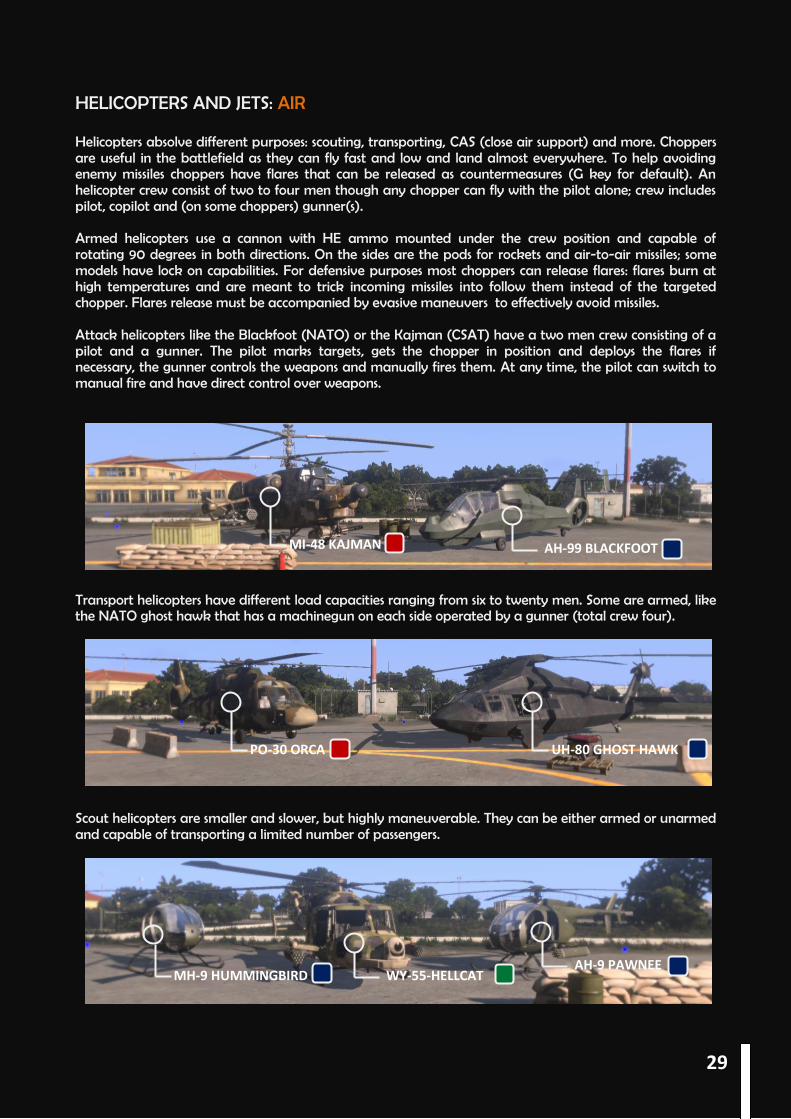
HELICOPTERS AND JETS: AIR Helicopters absolve different purposes: scouting, transporting, CAS (close air support) and more. Choppers are useful in the battlefield as they can fly fast and low and land almost everywhere. To help avoiding enemy missiles choppers have flares that can be released as countermeasures (G key for default). An helicopter crew consist of two to four men though any chopper can fly with the pilot alone; crew includes pilot, copilot and (on some choppers) gunner(s). Armed helicopters use a cannon with HE ammo mounted under the crew position and capable of rotating 90 degrees in both directions. On the sides are the pods for rockets and air-to-air missiles; some models have lock on capabilities. For defensive purposes most choppers can release flares: flares burn at high temperatures and are meant to trick incoming missiles into follow them instead of the targeted chopper. Flares release must be accompanied by evasive maneuvers to effectively avoid missiles. Attack helicopters like the Blackfoot (NATO) or the Kajman (CSAT) have a two men crew consisting of a pilot and a gunner. The pilot marks targets, gets the chopper in position and deploys the flares if necessary, the gunner controls the weapons and manually fires them. At any time, the pilot can switch to manual fire and have direct control over weapons.
Transport helicopters have different load capacities ranging from six to twenty men. Some are armed, like the NATO ghost hawk that has a machinegun on each side operated by a gunner (total crew four).
Scout helicopters are smaller and slower, but highly maneuverable. They can be either armed or unarmed and capable of transporting a limited number of passengers.
MI-48 KAJMAN AH-99 BLACKFOOT
AH-9 PAWNEE WY-55-HELLCAT MH-9 HUMMINGBIRD
PO-30 ORCA UH-80 GHOST HAWK
29
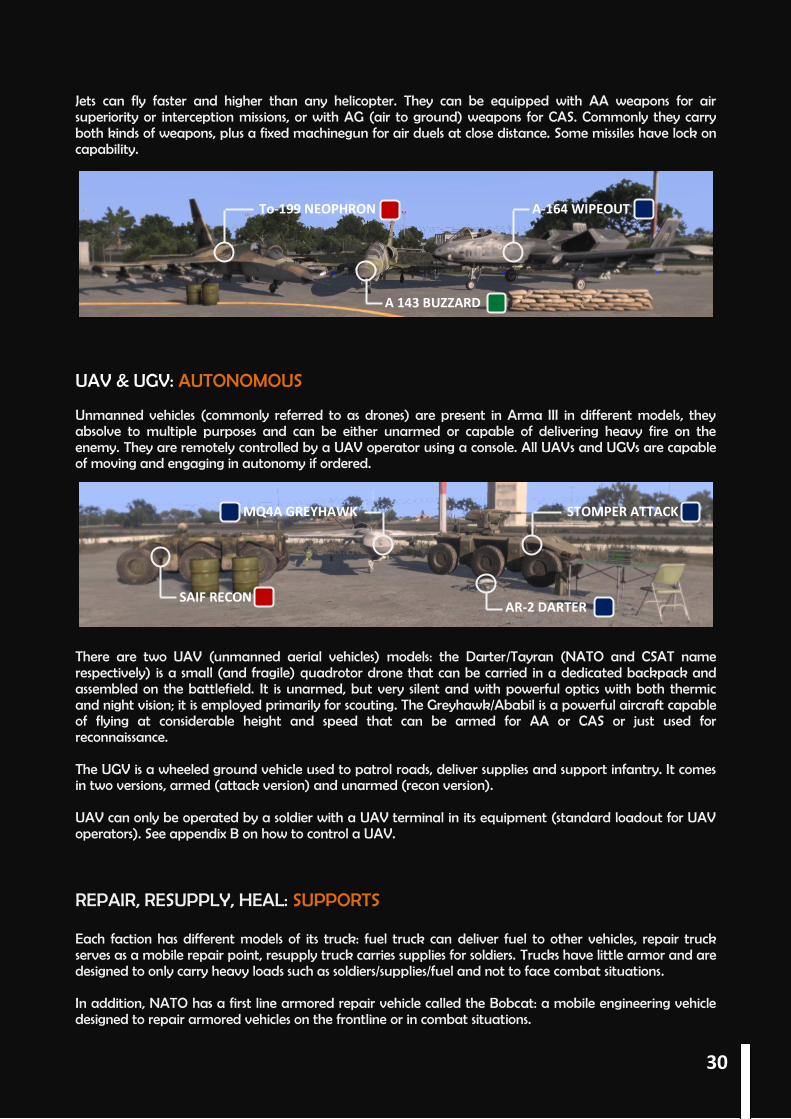
Jets can fly faster and higher than any helicopter. They can be equipped with AA weapons for air superiority or interception missions, or with AG (air to ground) weapons for CAS. Commonly they carry both kinds of weapons, plus a fixed machinegun for air duels at close distance. Some missiles have lock on capability.
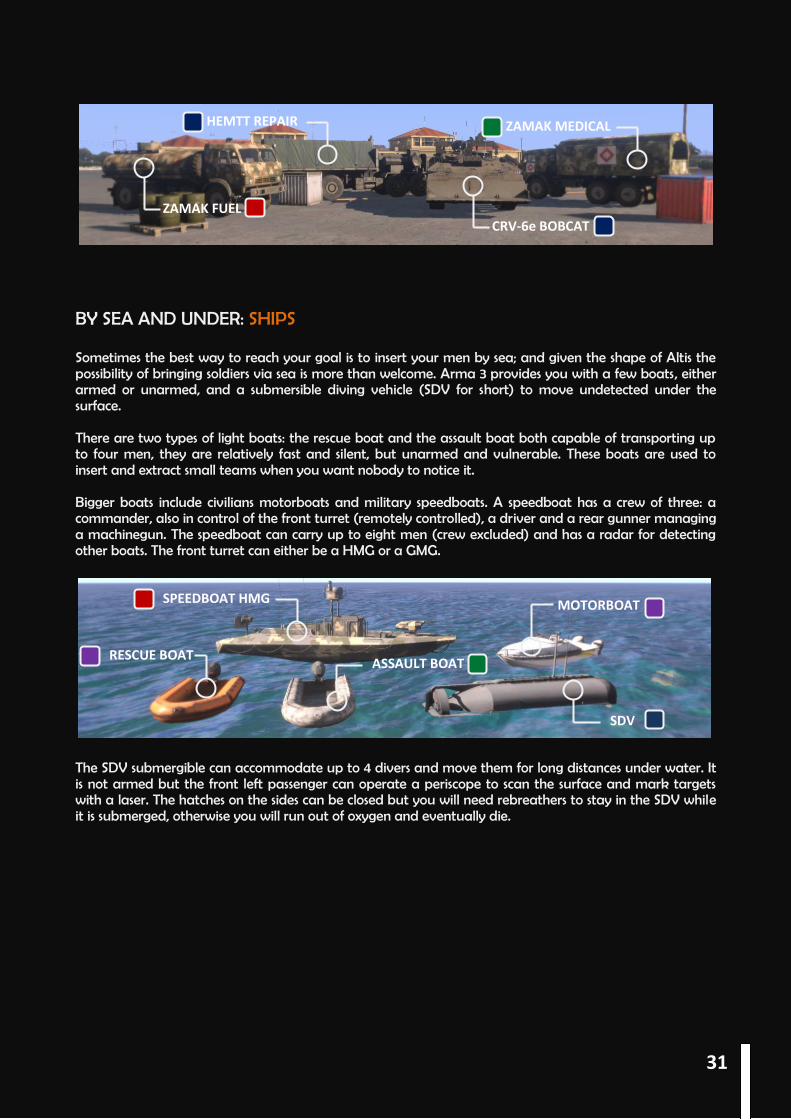
UAV & UGV: AUTONOMOUS Unmanned vehicles (commonly referred to as drones) are present in Arma III in different models, they absolve to multiple purposes and can be either unarmed or capable of delivering heavy fire on the enemy. They are remotely controlled by a UAV operator using a console. All UAVs and UGVs are capable of moving and engaging in autonomy if ordered.
There are two UAV (unmanned aerial vehicles) models: the Darter/Tayran (NATO and CSAT name respectively) is a small (and fragile) quadrotor drone that can be carried in a dedicated backpack and assembled on the battlefield. It is unarmed, but very silent and with powerful optics with both thermic and night vision; it is employed primarily for scouting. The Greyhawk/Ababil is a powerful aircraft capable of flying at considerable height and speed that can be armed for AA or CAS or just used for reconnaissance. The UGV is a wheeled ground vehicle used to patrol roads, deliver supplies and support infantry. It comes in two versions, armed (attack version) and unarmed (recon version). UAV can only be operated by a soldier with a UAV terminal in its equipment (standard loadout for UAV operators). See appendix B on how to control a UAV. REPAIR, RESUPPLY, HEAL: SUPPORTS Each faction has different models of its truck: fuel truck can deliver fuel to other vehicles, repair truck serves as a mobile repair point, resupply truck carries supplies for soldiers. Trucks have little armor and are designed to only carry heavy loads such as soldiers/supplies/fuel and not to face combat situations. In addition, NATO has a first line armored repair vehicle called the Bobcat: a mobile engineering vehicle designed to repair armored vehicles on the frontline or in combat situations.
SAIF RECON AR-2 DARTER
MQ4A GREYHAWK STOMPER ATTACK
A-164 WIPEOUT
A 143 BUZZARD
To-199 NEOPHRON
30
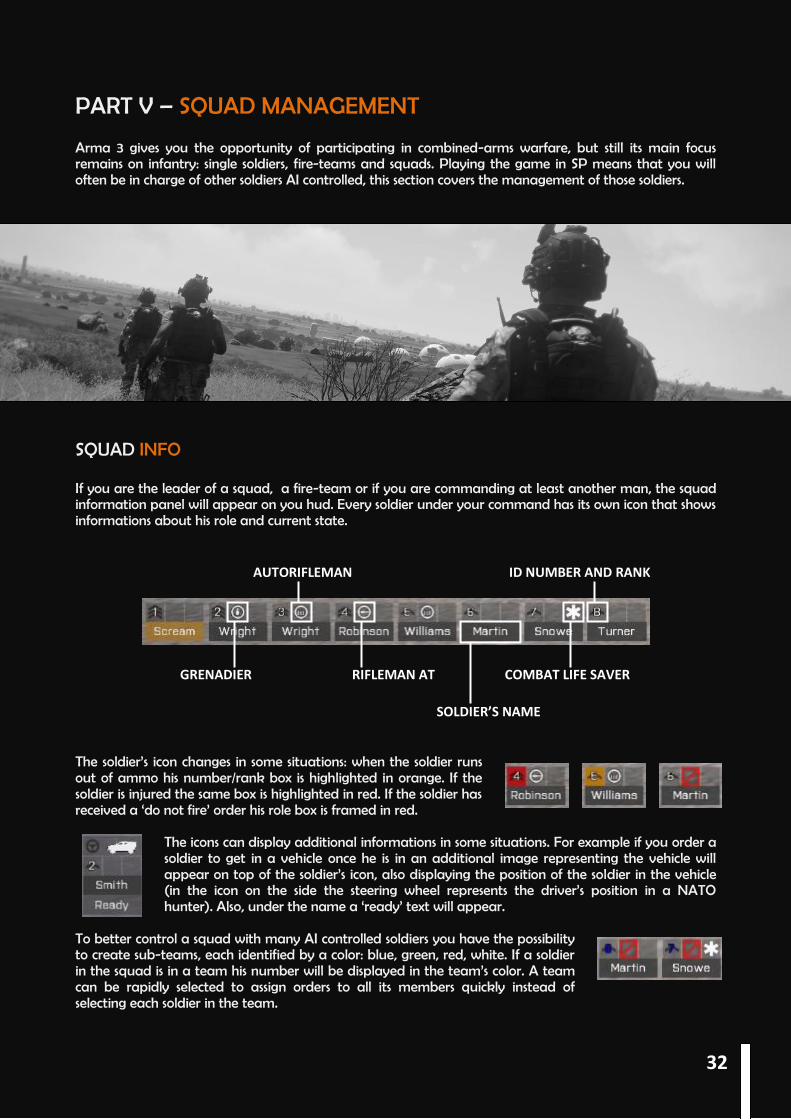
BY SEA AND UNDER: SHIPS Sometimes the best way to reach your goal is to insert your men by sea; and given the shape of Altis the possibility of bringing soldiers via sea is more than welcome. Arma 3 provides you with a few boats, either armed or unarmed, and a submersible diving vehicle (SDV for short) to move undetected under the surface. There are two types of light boats: the rescue boat and the assault boat both capable of transporting up to four men, they are relatively fast and silent, but unarmed and vulnerable. These boats are used to insert and extract small teams when you want nobody to notice it. Bigger boats include civilians motorboats and military speedboats. A speedboat has a crew of three: a commander, also in control of the front turret (remotely controlled), a driver and a rear gunner managing a machinegun. The speedboat can carry up to eight men (crew excluded) and has a radar for detecting other boats. The front turret can either be a HMG or a GMG.
The SDV submergible can accommodate up to 4 divers and move them for long distances under water. It is not armed but the front left passenger can operate a periscope to scan the surface and mark targets with a laser. The hatches on the sides can be closed but you will need rebreathers to stay in the SDV while it is submerged, otherwise you will run out of oxygen and eventually die.
ZAMAK FUEL CRV-6e BOBCAT
HEMTT REPAIR ZAMAK MEDICAL
SPEEDBOAT HMG
SDV
MOTORBOAT
RESCUE BOAT ASSAULT BOAT
31
PART V – SQUAD MANAGEMENT Arma 3 gives you the opportunity of participating in combined-arms warfare, but still its main focus remains on infantry: single soldiers, fire-teams and squads. Playing the game in SP means that you will often be in charge of other soldiers AI controlled, this section covers the management of those soldiers.
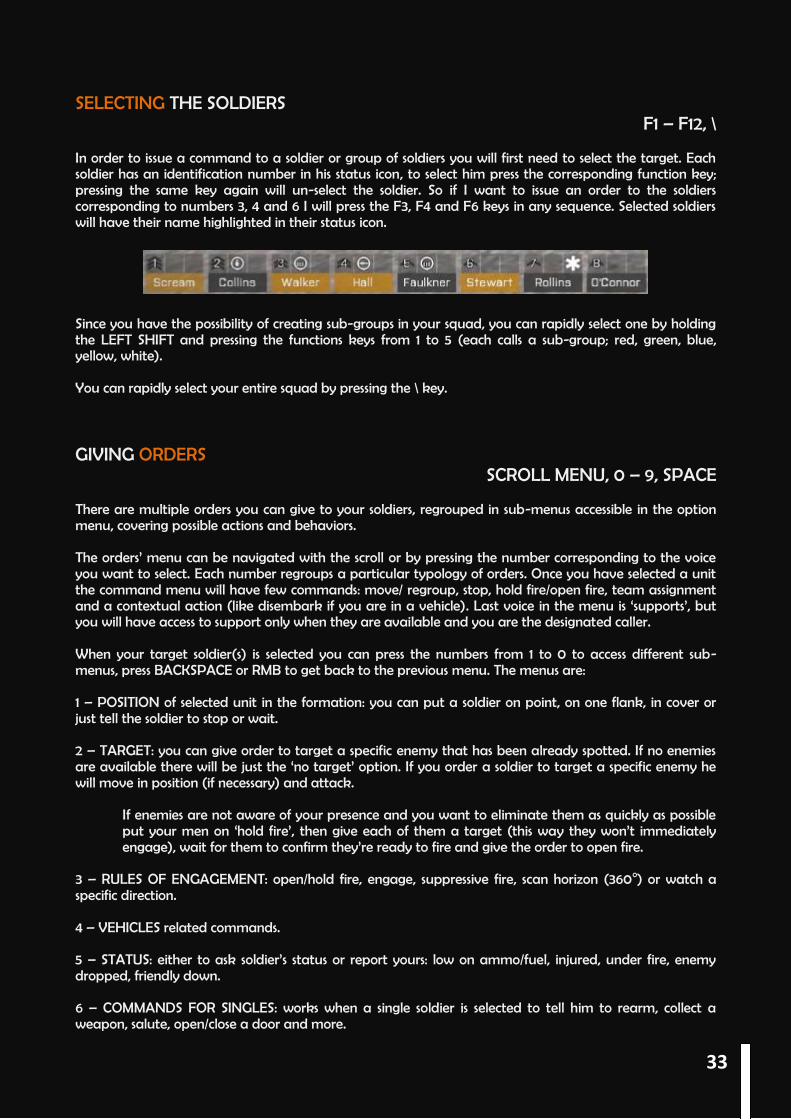
SQUAD INFO If you are the leader of a squad, a fire-team or if you are commanding at least another man, the squad information panel will appear on you hud. Every soldier under your command has its own icon that shows informations about his role and current state. The soldier’s icon changes in some situations: when the soldier runs out of ammo his number/rank box is highlighted in orange. If the soldier is injured the same box is highlighted in red. If the soldier has received a ‘do not fire’ order his role box is framed in red.
The icons can display additional informations in some situations. For example if you order a soldier to get in a vehicle once he is in an additional image representing the vehicle will appear on top of the soldier’s icon, also displaying the position of the soldier in the vehicle (in the icon on the side the steering wheel represents the driver’s position in a NATO hunter). Also, under the name a ‘ready’ text will appear.
To better control a squad with many AI controlled soldiers you have the possibility to create sub-teams, each identified by a color: blue, green, red, white. If a soldier in the squad is in a team his number will be displayed in the team’s color. A team can be rapidly selected to assign orders to all its members quickly instead of selecting each soldier in the team.
SOLDIER’S NAME
GRENADIER COMBAT LIFE SAVER
AUTORIFLEMAN
RIFLEMAN AT
ID NUMBER AND RANK
32
SELECTING THE SOLDIERS F1 – F12, \
In order to issue a command to a soldier or group of soldiers you will first need to select the target. Each soldier has an identification number in his status icon, to select him press the corresponding function key; pressing the same key again will un-select the soldier. So if I want to issue an order to the soldiers corresponding to numbers 3, 4 and 6 I will press the F3, F4 and F6 keys in any sequence. Selected soldiers will have their name highlighted in their status icon.
Since you have the possibility of creating sub-groups in your squad, you can rapidly select one by holding the LEFT SHIFT and pressing the functions keys from 1 to 5 (each calls a sub-group; red, green, blue, yellow, white). You can rapidly select your entire squad by pressing the \ key. GIVING ORDERS
SCROLL MENU, 0 – 9, SPACE There are multiple orders you can give to your soldiers, regrouped in sub-menus accessible in the option menu, covering possible actions and behaviors. The orders’ menu can be navigated with the scroll or by pressing the number corresponding to the voice you want to select. Each number regroups a particular typology of orders. Once you have selected a unit the command menu will have few commands: move/ regroup, stop, hold fire/open fire, team assignment and a contextual action (like disembark if you are in a vehicle). Last voice in the menu is ‘supports’, but you will have access to support only when they are available and you are the designated caller. When your target soldier(s) is selected you can press the numbers from 1 to 0 to access different sub-menus, press BACKSPACE or RMB to get back to the previous menu. The menus are: 1 – POSITION of selected unit in the formation: you can put a soldier on point, on one flank, in cover or just tell the soldier to stop or wait. 2 – TARGET: you can give order to target a specific enemy that has been already spotted. If no enemies are available there will be just the ‘no target’ option. If you order a soldier to target a specific enemy he will move in position (if necessary) and attack.
If enemies are not aware of your presence and you want to eliminate them as quickly as possible put your men on ‘hold fire’, then give each of them a target (this way they won’t immediately engage), wait for them to confirm they’re ready to fire and give the order to open fire.
3 – RULES OF ENGAGEMENT: open/hold fire, engage, suppressive fire, scan horizon (360o) or watch a specific direction. 4 – VEHICLES related commands. 5 – STATUS: either to ask soldier’s status or report yours: low on ammo/fuel, injured, under fire, enemy dropped, friendly down. 6 – COMMANDS FOR SINGLES: works when a single soldier is selected to tell him to rearm, collect a weapon, salute, open/close a door and more.
33
EXAMPLE
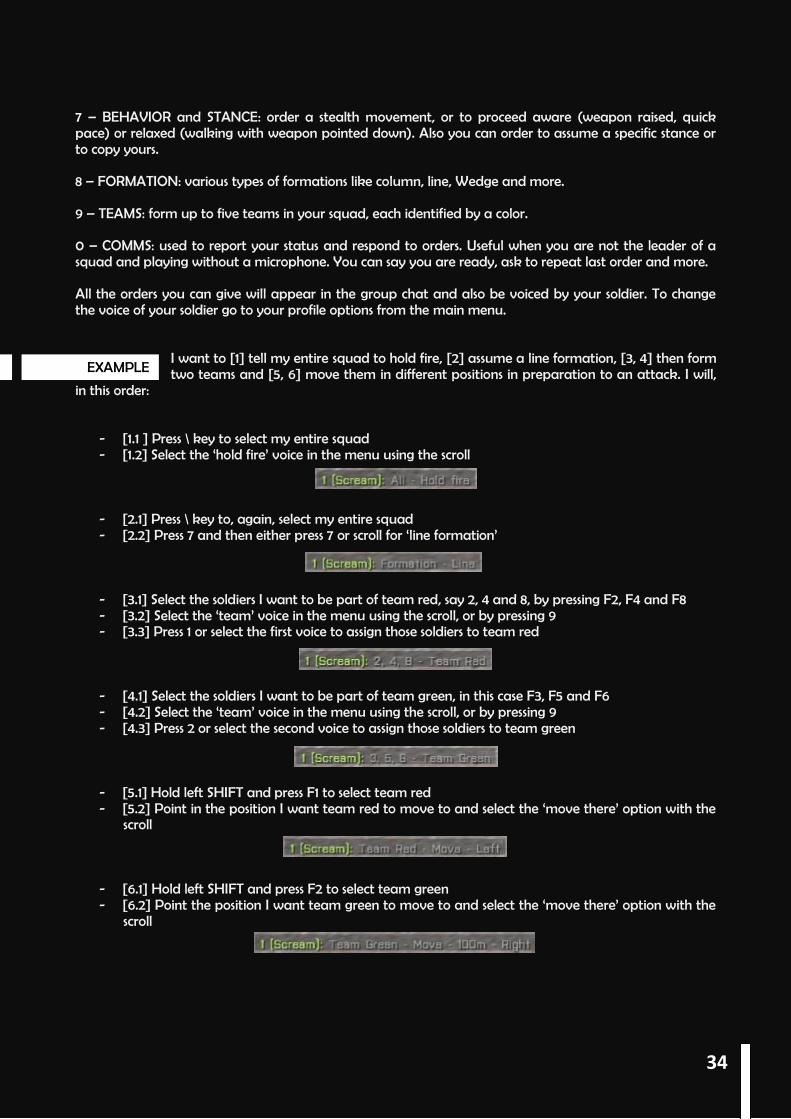
7 – BEHAVIOR and STANCE: order a stealth movement, or to proceed aware (weapon raised, quick pace) or relaxed (walking with weapon pointed down). Also you can order to assume a specific stance or to copy yours. 8 – FORMATION: various types of formations like column, line, Wedge and more. 9 – TEAMS: form up to five teams in your squad, each identified by a color. 0 – COMMS: used to report your status and respond to orders. Useful when you are not the leader of a squad and playing without a microphone. You can say you are ready, ask to repeat last order and more. All the orders you can give will appear in the group chat and also be voiced by your soldier. To change the voice of your soldier go to your profile options from the main menu.
I want to [1] tell my entire squad to hold fire, [2] assume a line formation, [3, 4] then form two teams and [5, 6] move them in different positions in preparation to an attack. I will,
in this order:
- [1.1 ] Press \ key to select my entire squad - [1.2] Select the ‘hold fire’ voice in the menu using the scroll
- [2.1] Press \ key to, again, select my entire squad - [2.2] Press 7 and then either press 7 or scroll for ‘line formation’
- [3.1] Select the soldiers I want to be part of team red, say 2, 4 and 8, by pressing F2, F4 and F8 - [3.2] Select the ‘team’ voice in the menu using the scroll, or by pressing 9 - [3.3] Press 1 or select the first voice to assign those soldiers to team red
- [4.1] Select the soldiers I want to be part of team green, in this case F3, F5 and F6 - [4.2] Select the ‘team’ voice in the menu using the scroll, or by pressing 9 - [4.3] Press 2 or select the second voice to assign those soldiers to team green
- [5.1] Hold left SHIFT and press F1 to select team red - [5.2] Point in the position I want team red to move to and select the ‘move there’ option with the
scroll
- [6.1] Hold left SHIFT and press F2 to select team green - [6.2] Point the position I want team green to move to and select the ‘move there’ option with the
scroll
34
QUICK COMMANDS SPACE, SCROLL
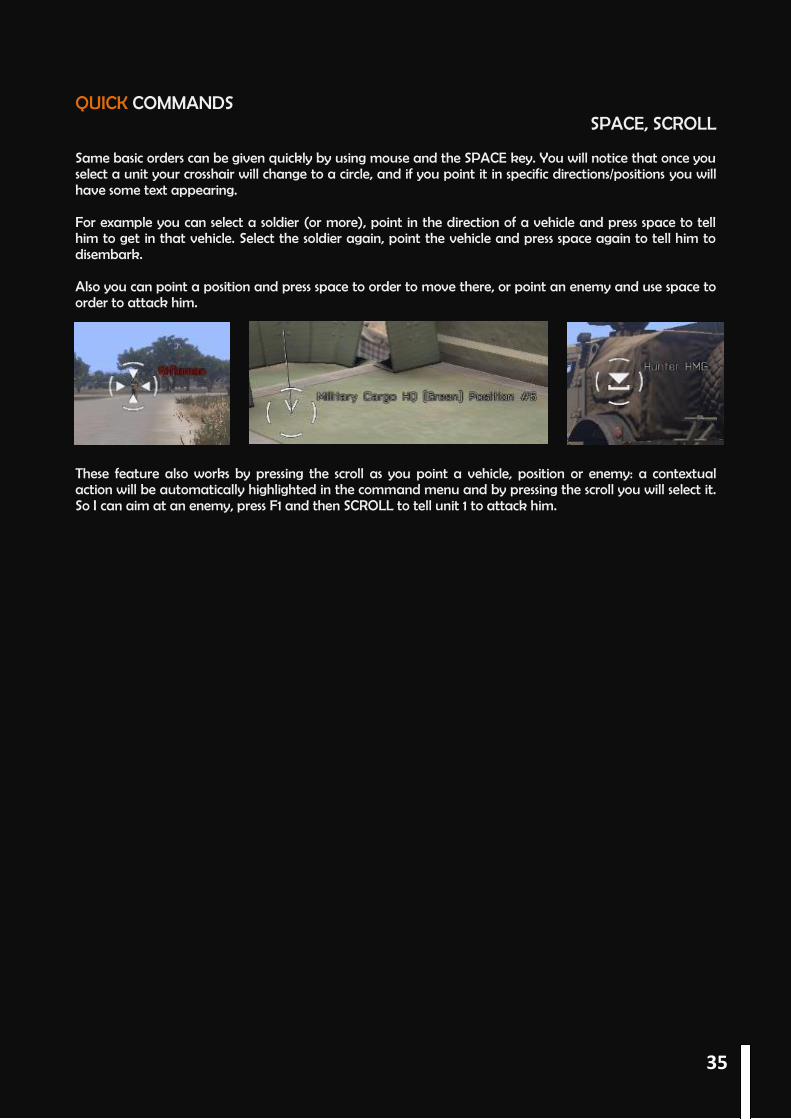
Same basic orders can be given quickly by using mouse and the SPACE key. You will notice that once you select a unit your crosshair will change to a circle, and if you point it in specific directions/positions you will have some text appearing. For example you can select a soldier (or more), point in the direction of a vehicle and press space to tell him to get in that vehicle. Select the soldier again, point the vehicle and press space again to tell him to disembark. Also you can point a position and press space to order to move there, or point an enemy and use space to order to attack him.
These feature also works by pressing the scroll as you point a vehicle, position or enemy: a contextual action will be automatically highlighted in the command menu and by pressing the scroll you will select it. So I can aim at an enemy, press F1 and then SCROLL to tell unit 1 to attack him.
35
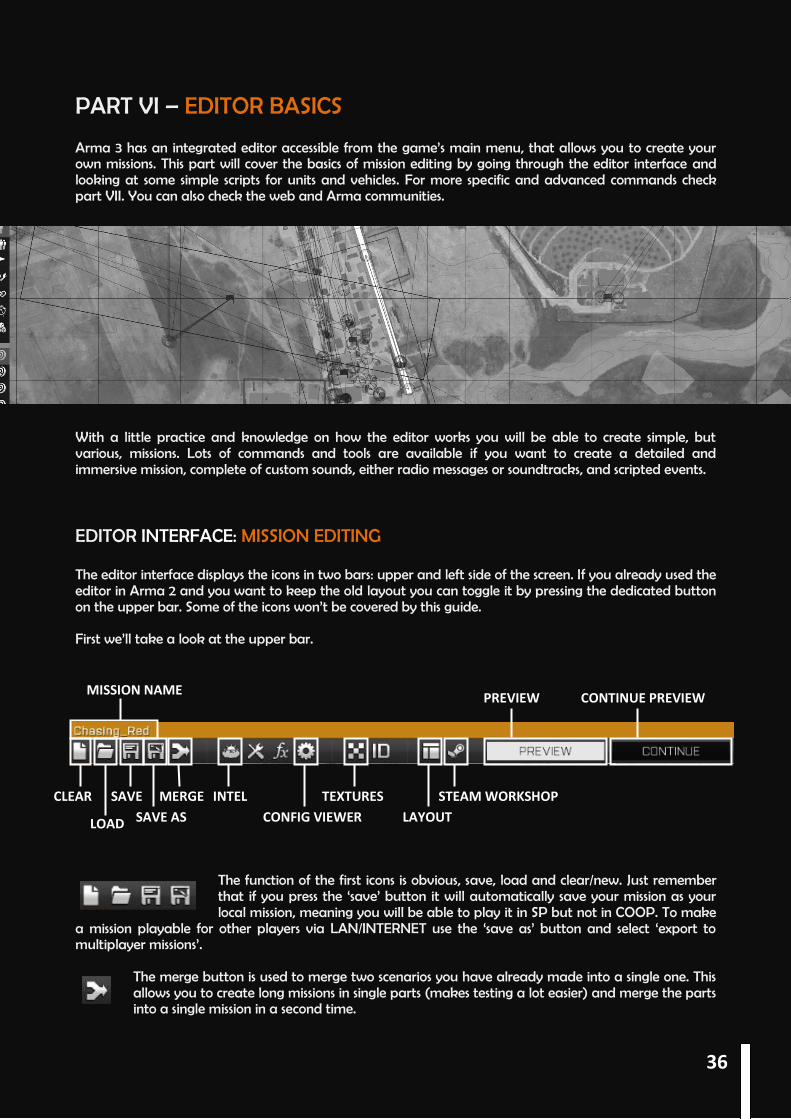
PART VI – EDITOR BASICS Arma 3 has an integrated editor accessible from the game’s main menu, that allows you to create your own missions. This part will cover the basics of mission editing by going through the editor interface and looking at some simple scripts for units and vehicles. For more specific and advanced commands check part VII. You can also check the web and Arma communities. With a little practice and knowledge on how the editor works you will be able to create simple, but various, missions. Lots of commands and tools are available if you want to create a detailed and immersive mission, complete of custom sounds, either radio messages or soundtracks, and scripted events. EDITOR INTERFACE: MISSION EDITING The editor interface displays the icons in two bars: upper and left side of the screen. If you already used the editor in Arma 2 and you want to keep the old layout you can toggle it by pressing the dedicated button on the upper bar. Some of the icons won’t be covered by this guide. First we’ll take a look at the upper bar.
The function of the first icons is obvious, save, load and clear/new. Just remember that if you press the ‘save’ button it will automatically save your mission as your local mission, meaning you will be able to play it in SP but not in COOP. To make
a mission playable for other players via LAN/INTERNET use the ‘save as’ button and select ‘export to multiplayer missions’.
The merge button is used to merge two scenarios you have already made into a single one. This allows you to create long missions in single parts (makes testing a lot easier) and merge the parts into a single mission in a second time.
MISSION NAME
CLEAR
LOAD
SAVE
SAVE AS
MERGE INTEL
CONFIG VIEWER
TEXTURES
LAYOUT
STEAM WORKSHOP
PREVIEW CONTINUE PREVIEW
36

The Intel button brings up a panel where you can set a short description of the mission and select date, time and weather for the mission. Notice that you can both set the weather conditions at mission start and the forecasted weather as well; the weather is modified by acting on the horizontal bars or entering values from 0 to 100. You can set fog, wind (both in strength and
direction), rain, lightning, waves. Or just set a general overcast and let the system handle the details accordingly. Also you can set the time after which the weather will change (minimum 30 minutes) and who independents (AAF faction) are friendly to (assuming NATO and CSAT are always on opposite sides).
The Config Viewer brings up a detailed menu containing informations on every single object in the game. It is useful to find the name of a specific object (in the game logic), for example when you want a unit to start with a specific weapon you will pick its name in here and use it in a specific command line in the soldier’s initialization. See Basic Scripting for how to do it. The Textures button toggles the satellite vision and the map vision of the terrain. You can use it at any moment. This button can also be found in the map carried by soldiers. The Layout button toggles the two layouts for the editor’s icons: the second layout is the one you could find in Arma 2. The button on the left is used to publish the game on the Steam Workshop. You can do the same using the ‘save as’ button. See the Steam Workshop section for details.
The Preview icon launches a preview of the scenario as it is at the moment. The preview will be available only if you have positioned a unit set as ‘player’. In the preview you control the soldier set as ‘player’ (there can be only one at a time) but you can switch between soldiers set as ‘playable’ or use the free camera. Very useful to move around the AO when still in the developing stage of the mission and check if everything is in place and working. More on that in the next paragraphs. After launching the preview you can press ESC and get back to the editing. If you want to get back to the preview though you can use the Continue button. Note that it will bring you back to where you left the previous preview, so all changes made to the scenario won’t be displayed. If you want to see the changes you’ll have to launch the preview again. EDITOR INTERFACE: MISSION MAKING The left sidebar contains all the tools used to actually build a mission, we’ll go through the bar icon by icon. In making a mission, it is important to plan ahead of actually making the mission; make sure you have a general idea of the mission and its execution: where do the players start? Where are the objectives? How does the mission end? Sometimes a little scheme may really come in handy.
37
EDITING MOD I: UNITS F1
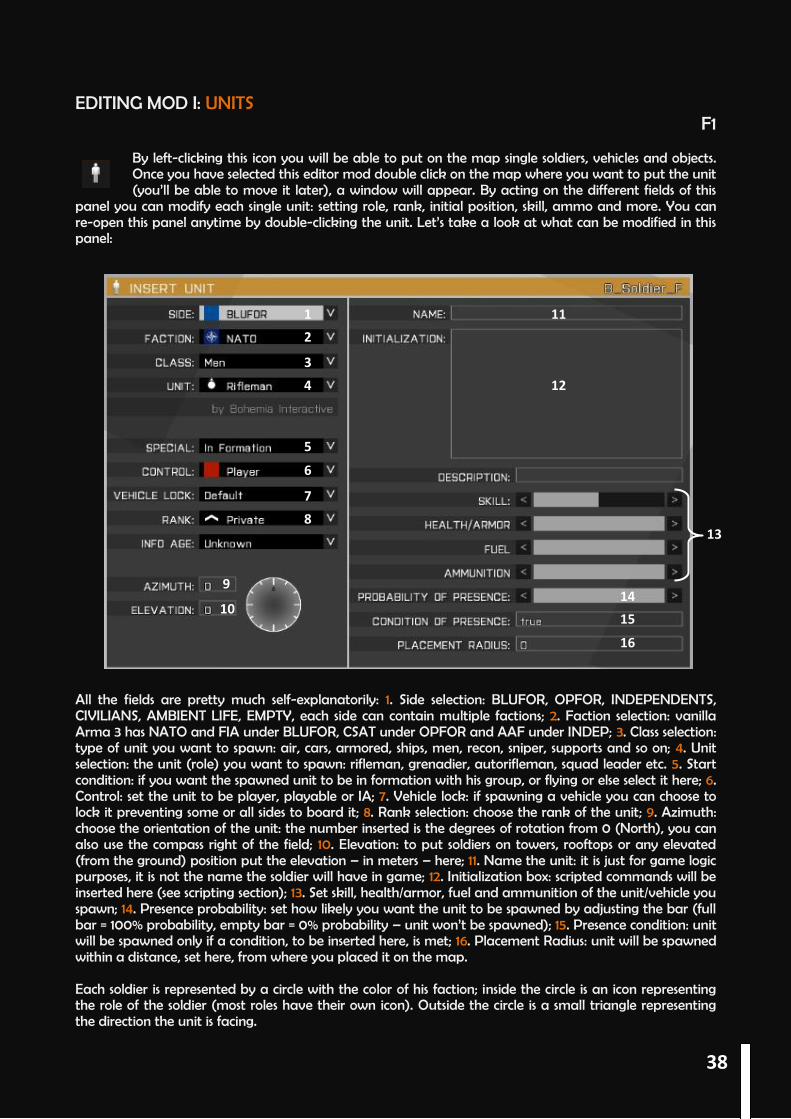
By left-clicking this icon you will be able to put on the map single soldiers, vehicles and objects. Once you have selected this editor mod double click on the map where you want to put the unit (you’ll be able to move it later), a window will appear. By acting on the different fields of this
panel you can modify each single unit: setting role, rank, initial position, skill, ammo and more. You can re-open this panel anytime by double-clicking the unit. Let’s take a look at what can be modified in this panel:
All the fields are pretty much self-explanatorily: 1. Side selection: BLUFOR, OPFOR, INDEPENDENTS, CIVILIANS, AMBIENT LIFE, EMPTY, each side can contain multiple factions; 2. Faction selection: vanilla Arma 3 has NATO and FIA under BLUFOR, CSAT under OPFOR and AAF under INDEP; 3. Class selection: type of unit you want to spawn: air, cars, armored, ships, men, recon, sniper, supports and so on; 4. Unit selection: the unit (role) you want to spawn: rifleman, grenadier, autorifleman, squad leader etc. 5. Start condition: if you want the spawned unit to be in formation with his group, or flying or else select it here; 6. Control: set the unit to be player, playable or IA; 7. Vehicle lock: if spawning a vehicle you can choose to lock it preventing some or all sides to board it; 8. Rank selection: choose the rank of the unit; 9. Azimuth: choose the orientation of the unit: the number inserted is the degrees of rotation from 0 (North), you can also use the compass right of the field; 10. Elevation: to put soldiers on towers, rooftops or any elevated (from the ground) position put the elevation – in meters – here; 11. Name the unit: it is just for game logic purposes, it is not the name the soldier will have in game; 12. Initialization box: scripted commands will be inserted here (see scripting section); 13. Set skill, health/armor, fuel and ammunition of the unit/vehicle you spawn; 14. Presence probability: set how likely you want the unit to be spawned by adjusting the bar (full bar = 100% probability, empty bar = 0% probability – unit won’t be spawned); 15. Presence condition: unit will be spawned only if a condition, to be inserted here, is met; 16. Placement Radius: unit will be spawned within a distance, set here, from where you placed it on the map. Each soldier is represented by a circle with the color of his faction; inside the circle is an icon representing the role of the soldier (most roles have their own icon). Outside the circle is a small triangle representing the direction the unit is facing.
1
3
2
4
5
6
7
8
9
10
11
12
15
13
14
16
38
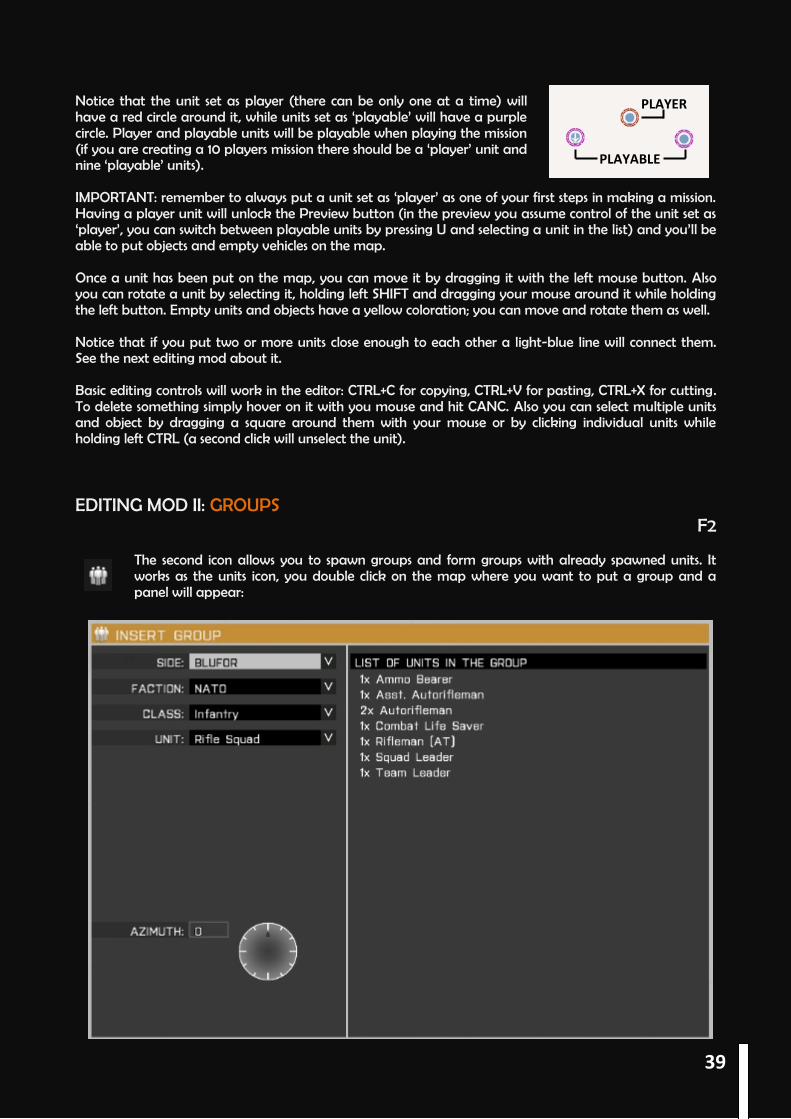
Notice that the unit set as player (there can be only one at a time) will have a red circle around it, while units set as ‘playable’ will have a purple circle. Player and playable units will be playable when playing the mission (if you are creating a 10 players mission there should be a ‘player’ unit and nine ‘playable’ units). IMPORTANT: remember to always put a unit set as ‘player’ as one of your first steps in making a mission. Having a player unit will unlock the Preview button (in the preview you assume control of the unit set as ‘player’, you can switch between playable units by pressing U and selecting a unit in the list) and you’ll be able to put objects and empty vehicles on the map. Once a unit has been put on the map, you can move it by dragging it with the left mouse button. Also you can rotate a unit by selecting it, holding left SHIFT and dragging your mouse around it while holding the left button. Empty units and objects have a yellow coloration; you can move and rotate them as well. Notice that if you put two or more units close enough to each other a light-blue line will connect them. See the next editing mod about it. Basic editing controls will work in the editor: CTRL+C for copying, CTRL+V for pasting, CTRL+X for cutting. To delete something simply hover on it with you mouse and hit CANC. Also you can select multiple units and object by dragging a square around them with your mouse or by clicking individual units while holding left CTRL (a second click will unselect the unit). EDITING MOD II: GROUPS
F2
The second icon allows you to spawn groups and form groups with already spawned units. It works as the units icon, you double click on the map where you want to put a group and a panel will appear:
PLAYER
PLAYABLE
39
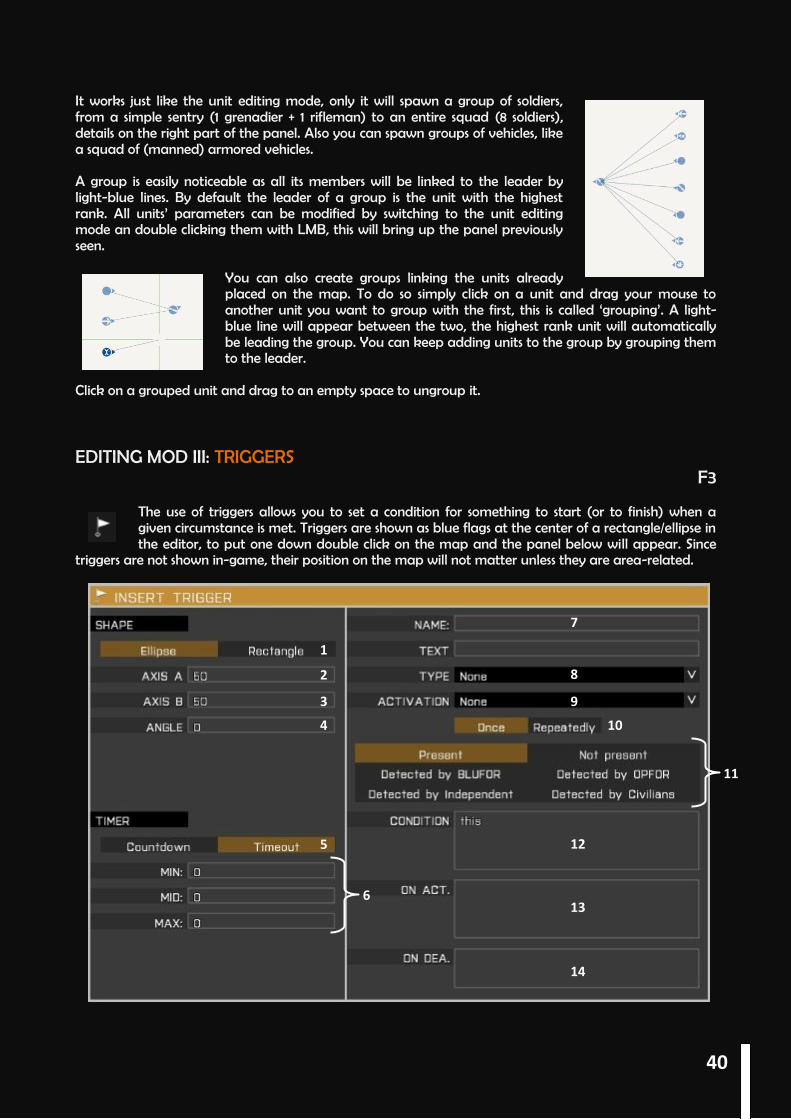
It works just like the unit editing mode, only it will spawn a group of soldiers, from a simple sentry (1 grenadier + 1 rifleman) to an entire squad (8 soldiers), details on the right part of the panel. Also you can spawn groups of vehicles, like a squad of (manned) armored vehicles. A group is easily noticeable as all its members will be linked to the leader by light-blue lines. By default the leader of a group is the unit with the highest rank. All units’ parameters can be modified by switching to the unit editing mode an double clicking them with LMB, this will bring up the panel previously seen.
You can also create groups linking the units already placed on the map. To do so simply click on a unit and drag your mouse to another unit you want to group with the first, this is called ‘grouping’. A light-blue line will appear between the two, the highest rank unit will automatically be leading the group. You can keep adding units to the group by grouping them to the leader.
Click on a grouped unit and drag to an empty space to ungroup it. EDITING MOD III: TRIGGERS
F3
The use of triggers allows you to set a condition for something to start (or to finish) when a given circumstance is met. Triggers are shown as blue flags at the center of a rectangle/ellipse in the editor, to put one down double click on the map and the panel below will appear. Since
triggers are not shown in-game, their position on the map will not matter unless they are area-related.
1
2
3
4
7
5
10
6
8
9
11
12
13
14
40
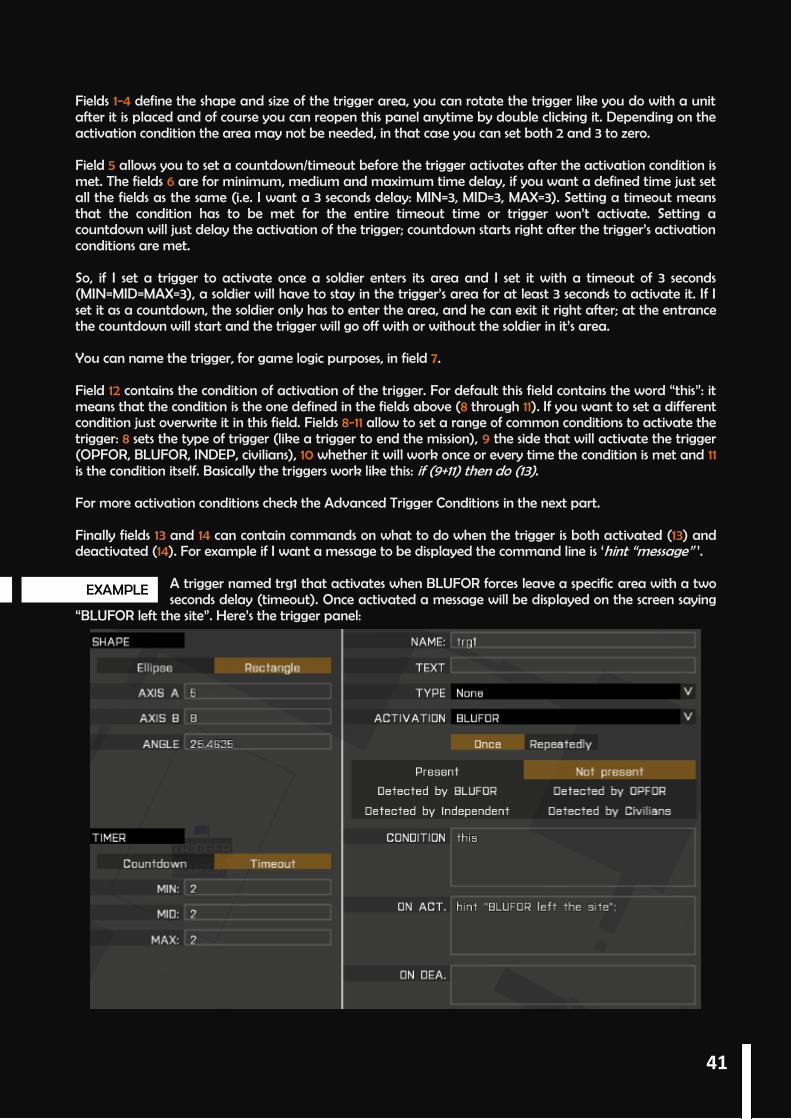
EXAMPLE
Fields 1-4 define the shape and size of the trigger area, you can rotate the trigger like you do with a unit after it is placed and of course you can reopen this panel anytime by double clicking it. Depending on the activation condition the area may not be needed, in that case you can set both 2 and 3 to zero. Field 5 allows you to set a countdown/timeout before the trigger activates after the activation condition is met. The fields 6 are for minimum, medium and maximum time delay, if you want a defined time just set all the fields as the same (i.e. I want a 3 seconds delay: MIN=3, MID=3, MAX=3). Setting a timeout means that the condition has to be met for the entire timeout time or trigger won’t activate. Setting a countdown will just delay the activation of the trigger; countdown starts right after the trigger’s activation conditions are met. So, if I set a trigger to activate once a soldier enters its area and I set it with a timeout of 3 seconds (MIN=MID=MAX=3), a soldier will have to stay in the trigger’s area for at least 3 seconds to activate it. If I set it as a countdown, the soldier only has to enter the area, and he can exit it right after; at the entrance the countdown will start and the trigger will go off with or without the soldier in it’s area. You can name the trigger, for game logic purposes, in field 7. Field 12 contains the condition of activation of the trigger. For default this field contains the word “this”: it means that the condition is the one defined in the fields above (8 through 11). If you want to set a different condition just overwrite it in this field. Fields 8-11 allow to set a range of common conditions to activate the trigger: 8 sets the type of trigger (like a trigger to end the mission), 9 the side that will activate the trigger (OPFOR, BLUFOR, INDEP, civilians), 10 whether it will work once or every time the condition is met and 11 is the condition itself. Basically the triggers work like this: if (9+11) then do (13). For more activation conditions check the Advanced Trigger Conditions in the next part. Finally fields 13 and 14 can contain commands on what to do when the trigger is both activated (13) and deactivated (14). For example if I want a message to be displayed the command line is ‘hint “message” ’.
A trigger named trg1 that activates when BLUFOR forces leave a specific area with a two seconds delay (timeout). Once activated a message will be displayed on the screen saying
“BLUFOR left the site”. Here’s the trigger panel:
41
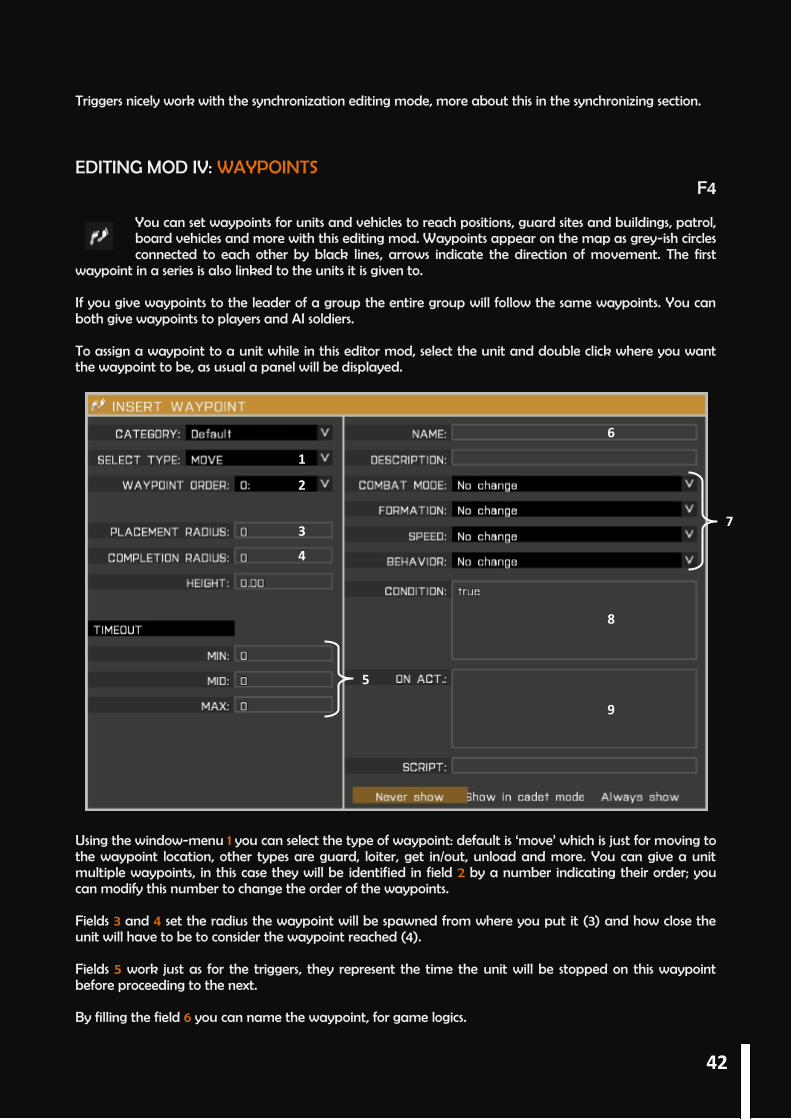
Triggers nicely work with the synchronization editing mode, more about this in the synchronizing section. EDITING MOD IV: WAYPOINTS
F4
You can set waypoints for units and vehicles to reach positions, guard sites and buildings, patrol, board vehicles and more with this editing mod. Waypoints appear on the map as grey-ish circles connected to each other by black lines, arrows indicate the direction of movement. The first
waypoint in a series is also linked to the units it is given to. If you give waypoints to the leader of a group the entire group will follow the same waypoints. You can both give waypoints to players and AI soldiers. To assign a waypoint to a unit while in this editor mod, select the unit and double click where you want the waypoint to be, as usual a panel will be displayed.
Using the window-menu 1 you can select the type of waypoint: default is ‘move’ which is just for moving to the waypoint location, other types are guard, loiter, get in/out, unload and more. You can give a unit multiple waypoints, in this case they will be identified in field 2 by a number indicating their order; you can modify this number to change the order of the waypoints. Fields 3 and 4 set the radius the waypoint will be spawned from where you put it (3) and how close the unit will have to be to consider the waypoint reached (4). Fields 5 work just as for the triggers, they represent the time the unit will be stopped on this waypoint before proceeding to the next. By filling the field 6 you can name the waypoint, for game logics.
1
2
3
4
6
7
8
9
5
42
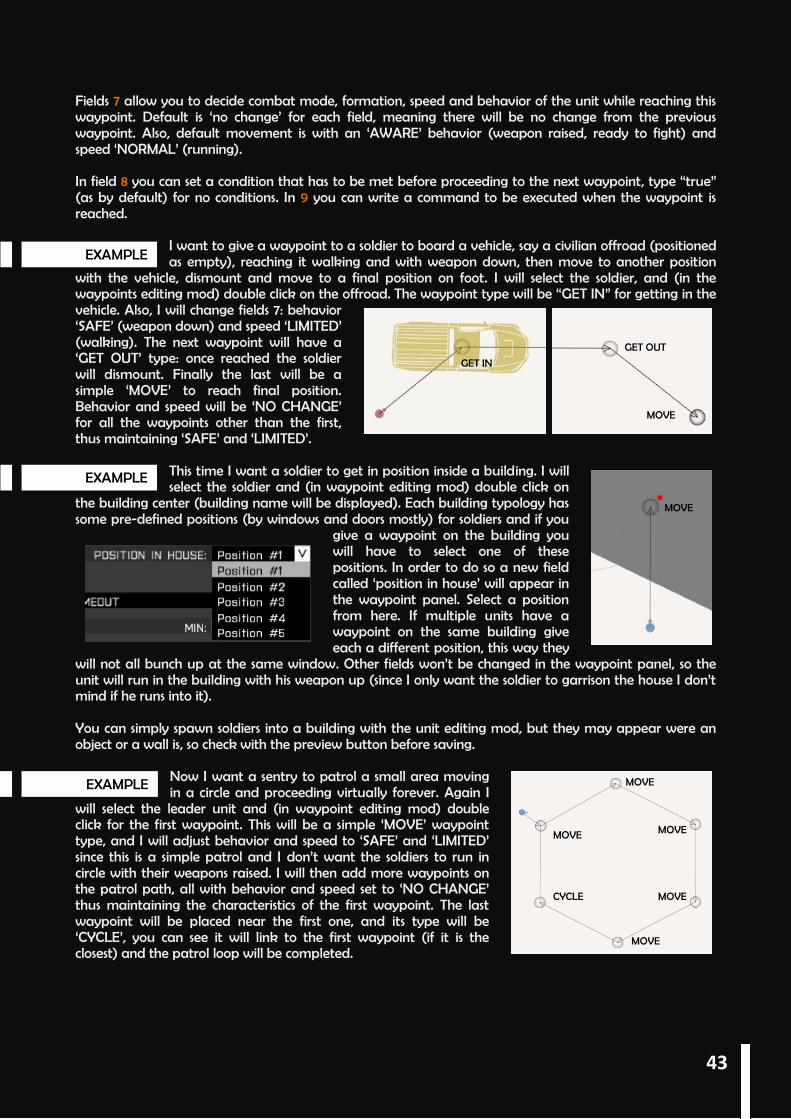
EXAMPLE
EXAMPLE
EXAMPLE
Fields 7 allow you to decide combat mode, formation, speed and behavior of the unit while reaching this waypoint. Default is ‘no change’ for each field, meaning there will be no change from the previous waypoint. Also, default movement is with an ‘AWARE’ behavior (weapon raised, ready to fight) and speed ‘NORMAL’ (running). In field 8 you can set a condition that has to be met before proceeding to the next waypoint, type “true” (as by default) for no conditions. In 9 you can write a command to be executed when the waypoint is reached.
I want to give a waypoint to a soldier to board a vehicle, say a civilian offroad (positioned as empty), reaching it walking and with weapon down, then move to another position
with the vehicle, dismount and move to a final position on foot. I will select the soldier, and (in the waypoints editing mod) double click on the offroad. The waypoint type will be “GET IN” for getting in the vehicle. Also, I will change fields 7: behavior ‘SAFE’ (weapon down) and speed ‘LIMITED’ (walking). The next waypoint will have a ‘GET OUT’ type: once reached the soldier will dismount. Finally the last will be a simple ‘MOVE’ to reach final position. Behavior and speed will be ‘NO CHANGE’ for all the waypoints other than the first, thus maintaining ‘SAFE’ and ‘LIMITED’.
This time I want a soldier to get in position inside a building. I will select the soldier and (in waypoint editing mod) double click on
the building center (building name will be displayed). Each building typology has some pre-defined positions (by windows and doors mostly) for soldiers and if you
give a waypoint on the building you will have to select one of these positions. In order to do so a new field called ‘position in house’ will appear in the waypoint panel. Select a position from here. If multiple units have a waypoint on the same building give each a different position, this way they
will not all bunch up at the same window. Other fields won’t be changed in the waypoint panel, so the unit will run in the building with his weapon up (since I only want the soldier to garrison the house I don’t mind if he runs into it). You can simply spawn soldiers into a building with the unit editing mod, but they may appear were an object or a wall is, so check with the preview button before saving.
Now I want a sentry to patrol a small area moving in a circle and proceeding virtually forever. Again I
will select the leader unit and (in waypoint editing mod) double click for the first waypoint. This will be a simple ‘MOVE’ waypoint type, and I will adjust behavior and speed to ‘SAFE’ and ‘LIMITED’ since this is a simple patrol and I don’t want the soldiers to run in circle with their weapons raised. I will then add more waypoints on the patrol path, all with behavior and speed set to ‘NO CHANGE’ thus maintaining the characteristics of the first waypoint. The last waypoint will be placed near the first one, and its type will be ‘CYCLE’, you can see it will link to the first waypoint (if it is the closest) and the patrol loop will be completed.
GET IN
GET OUT
MOVE
MOVE
MOVE
MOVE
MOVE
MOVE
MOVE
CYCLE
43
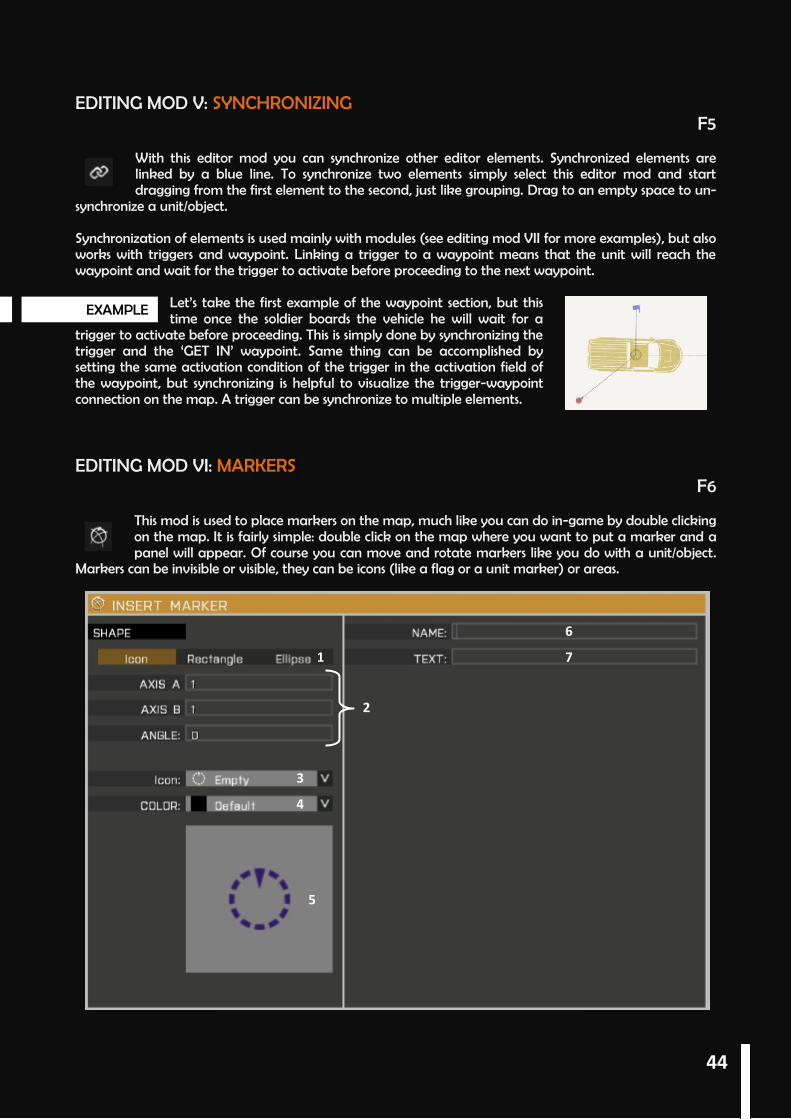
EXAMPLE
EDITING MOD V: SYNCHRONIZING F5
With this editor mod you can synchronize other editor elements. Synchronized elements are linked by a blue line. To synchronize two elements simply select this editor mod and start dragging from the first element to the second, just like grouping. Drag to an empty space to un-
synchronize a unit/object. Synchronization of elements is used mainly with modules (see editing mod VII for more examples), but also works with triggers and waypoint. Linking a trigger to a waypoint means that the unit will reach the waypoint and wait for the trigger to activate before proceeding to the next waypoint.
Let’s take the first example of the waypoint section, but this time once the soldier boards the vehicle he will wait for a
trigger to activate before proceeding. This is simply done by synchronizing the trigger and the ‘GET IN’ waypoint. Same thing can be accomplished by setting the same activation condition of the trigger in the activation field of the waypoint, but synchronizing is helpful to visualize the trigger-waypoint connection on the map. A trigger can be synchronize to multiple elements. EDITING MOD VI: MARKERS
F6
This mod is used to place markers on the map, much like you can do in-game by double clicking on the map. It is fairly simple: double click on the map where you want to put a marker and a panel will appear. Of course you can move and rotate markers like you do with a unit/object.
Markers can be invisible or visible, they can be icons (like a flag or a unit marker) or areas.
1
2
3
4
5
6
7
44

You can select whether your marker will be an icon or an area (rectangle or ellipse) in 1. Size and angle of rotation of the marker are defined in 2. The window menu 3 is for selecting the icon you want, if you keep the default ‘empty’ selection the marker will not be visible in game. If you selected an area marker in 1 this menu will let you decide how to fill it (diagonals, solid and more). Coloration of the icon is set with menu 4. A preview of the marker will be displayed in the square below (5). Field 6 will contain the marker’s name, for game logics purpose. Each marker must have a name. In field 7 you can write some text that will be displayed near the marker (and with the same color). Before actually playing a mission the players will see the map and all the markers you placed. This way you can display some information in a simple visual way, like units’ positions, planned movements, camps, locations’ names and more).
EDITING MOD VII: MODULES
F7
Modules are used for a large variety of purposes, they are an easy way to realize things that would be more complicated if made in other ways. Also, they allow you to set tasks, callsigns, effects, garrison an area, create a briefing and more.
To place a module select this editing mod and double click on the map, on the top left of the panel select the category of the module and right under it the module itself. Parameters of the module will be displayed in the right part of the panel, and they vary according to the module you have selected. Since it is hard to give a generic explanation on ho modules works, we will see some of them and how they work. Notice that most of the modules are self-explanatorily, for more information on a module’s function and usage, click the ‘SHOW INFO’ icon on the bottom right of the module’s panel. All modules are displayed on the map (in the editor) as blue circles. If you place two module close enough to each
45

EXAMPLE
other, they will be automatically grouped. Un-group them with the group editing mod by dragging from one module to an empty area. MODULES: EFFECTS
Under the category EFFECTS you can find some easy-to-use modules that to set smoke, fire, chemlights and other effects in your mission. Simply put the module where you want the effect to be. If you want the effect to take place at some point in your mission you can synchronize it to a trigger: the effect will start when the trigger is activated. Some parameters can be selected in the right part of the module panel, like color of smoke, tracers and chemlights, placement radius and probability of presence
One easy and nice effect to recreate in night missions is smoke accompanied by a chemlight
to ensure the smoke is visible. This combination can be used to mark a landing spot for a chopper to extract the players. For this effect simply put a ‘SMOKE GRENADE’ module, setting the color you like (white in the example picture), and a ‘CHEMLIGHT’ module, again selecting a color (blue). Place a player unit and launch the preview to see the effect yourself. Again, you can synchronize both the modules to a trigger to trigger them when you want. MODULES: SUPPORTS Using modules you can give a unit the ability to call for supports via his scroll menu. A support can be artillery/mortar fire, a helicopter/aircraft executing a CAS (Close Air Support) mission, a supply drop or a helicopter transportation. Creating a support requires two modules, both can be found under category ‘SUPPORTS’: the ‘SUPPORT REQUESTER’ module must be placed and synchronized to the unit(s) who will request the support. The ‘SUPPORT PROVIDER’ module must be placed and synchronize to the unit delivering the support (or the leader of the group of units delivering the support). Of course you have to link the appropriate support module depending on what type of unit will deliver the support. Finally you have to synchronize the requester’s module to the provider’s module. When you place a provider module for artillery, in the right part of the panel you can set how many rounds of each ammo available the requester will be able to call. The requester will decide type and quantity of ordinance to be fired, and he will be able to call for supports as long as there’s ammo left. Some support provider modules are virtual, meaning you will not need to place the support unit. A unit can be synchronize with multiple supports, thus being able to call all the synchronize supports. Remember, helicopters will take some time to get from their position to where the requester requires CAS/transportation, and artillery rounds will take some times to travel in the air before impact. Also artillery cannot attack enemies or positions too close to itself.
CHEMILGHT
SMOKE GRENADE
PLAYER
46
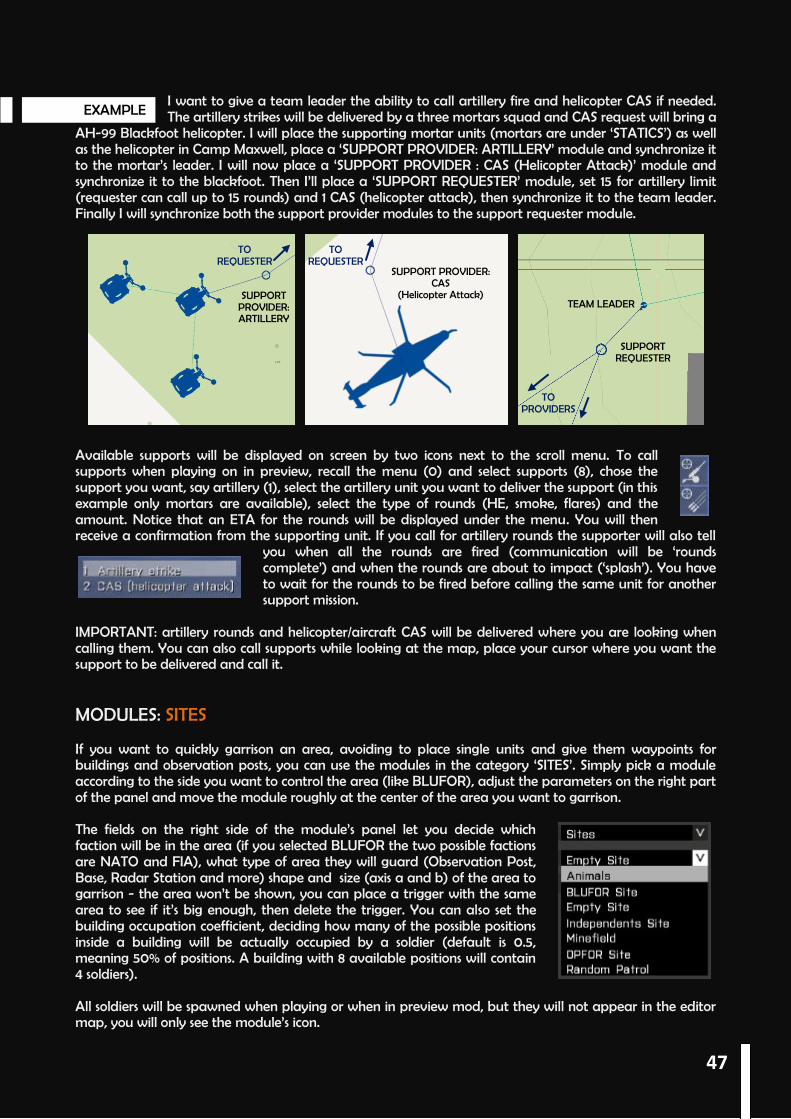
EXAMPLE
I want to give a team leader the ability to call artillery fire and helicopter CAS if needed. The artillery strikes will be delivered by a three mortars squad and CAS request will bring a
AH-99 Blackfoot helicopter. I will place the supporting mortar units (mortars are under ‘STATICS’) as well as the helicopter in Camp Maxwell, place a ‘SUPPORT PROVIDER: ARTILLERY’ module and synchronize it to the mortar’s leader. I will now place a ‘SUPPORT PROVIDER : CAS (Helicopter Attack)’ module and synchronize it to the blackfoot. Then I’ll place a ‘SUPPORT REQUESTER’ module, set 15 for artillery limit (requester can call up to 15 rounds) and 1 CAS (helicopter attack), then synchronize it to the team leader. Finally I will synchronize both the support provider modules to the support requester module.
Available supports will be displayed on screen by two icons next to the scroll menu. To call supports when playing on in preview, recall the menu (0) and select supports (8), chose the support you want, say artillery (1), select the artillery unit you want to deliver the support (in this example only mortars are available), select the type of rounds (HE, smoke, flares) and the amount. Notice that an ETA for the rounds will be displayed under the menu. You will then receive a confirmation from the supporting unit. If you call for artillery rounds the supporter will also tell
you when all the rounds are fired (communication will be ‘rounds complete’) and when the rounds are about to impact (‘splash’). You have to wait for the rounds to be fired before calling the same unit for another support mission.
IMPORTANT: artillery rounds and helicopter/aircraft CAS will be delivered where you are looking when calling them. You can also call supports while looking at the map, place your cursor where you want the support to be delivered and call it. MODULES: SITES If you want to quickly garrison an area, avoiding to place single units and give them waypoints for buildings and observation posts, you can use the modules in the category ‘SITES’. Simply pick a module according to the side you want to control the area (like BLUFOR), adjust the parameters on the right part of the panel and move the module roughly at the center of the area you want to garrison. The fields on the right side of the module’s panel let you decide which faction will be in the area (if you selected BLUFOR the two possible factions are NATO and FIA), what type of area they will guard (Observation Post, Base, Radar Station and more) shape and size (axis a and b) of the area to garrison - the area won’t be shown, you can place a trigger with the same area to see if it’s big enough, then delete the trigger. You can also set the building occupation coefficient, deciding how many of the possible positions inside a building will be actually occupied by a soldier (default is 0.5, meaning 50% of positions. A building with 8 available positions will contain 4 soldiers). All soldiers will be spawned when playing or when in preview mod, but they will not appear in the editor map, you will only see the module’s icon.
SUPPORT PROVIDER: CAS
(Helicopter Attack) SUPPORT PROVIDER: ARTILLERY
SUPPORT REQUESTER
TO PROVIDERS
TO REQUESTER
TO REQUESTER
TEAM LEADER
47
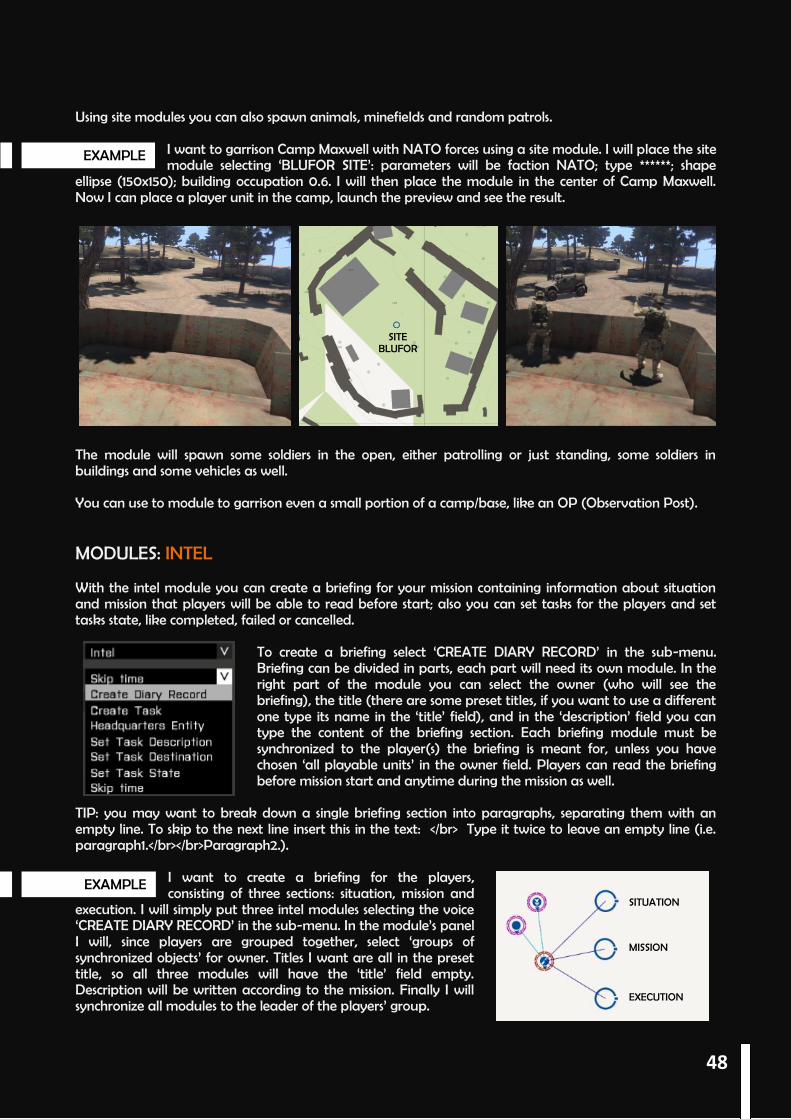
EXAMPLE
EXAMPLE
Using site modules you can also spawn animals, minefields and random patrols.
I want to garrison Camp Maxwell with NATO forces using a site module. I will place the site module selecting ‘BLUFOR SITE’: parameters will be faction NATO; type ******; shape
ellipse (150x150); building occupation 0.6. I will then place the module in the center of Camp Maxwell. Now I can place a player unit in the camp, launch the preview and see the result.
The module will spawn some soldiers in the open, either patrolling or just standing, some soldiers in buildings and some vehicles as well. You can use to module to garrison even a small portion of a camp/base, like an OP (Observation Post). MODULES: INTEL With the intel module you can create a briefing for your mission containing information about situation and mission that players will be able to read before start; also you can set tasks for the players and set tasks state, like completed, failed or cancelled.
To create a briefing select ‘CREATE DIARY RECORD’ in the sub-menu. Briefing can be divided in parts, each part will need its own module. In the right part of the module you can select the owner (who will see the briefing), the title (there are some preset titles, if you want to use a different one type its name in the ‘title’ field), and in the ‘description’ field you can type the content of the briefing section. Each briefing module must be synchronized to the player(s) the briefing is meant for, unless you have chosen ‘all playable units’ in the owner field. Players can read the briefing before mission start and anytime during the mission as well.
TIP: you may want to break down a single briefing section into paragraphs, separating them with an empty line. To skip to the next line insert this in the text: </br> Type it twice to leave an empty line (i.e. paragraph1.</br></br>Paragraph2.).
I want to create a briefing for the players, consisting of three sections: situation, mission and
execution. I will simply put three intel modules selecting the voice ‘CREATE DIARY RECORD’ in the sub-menu. In the module’s panel I will, since players are grouped together, select ‘groups of synchronized objects’ for owner. Titles I want are all in the preset title, so all three modules will have the ‘title’ field empty. Description will be written according to the mission. Finally I will synchronize all modules to the leader of the players’ group.
SITE BLUFOR
SITUATION
MISSION
EXECUTION
48
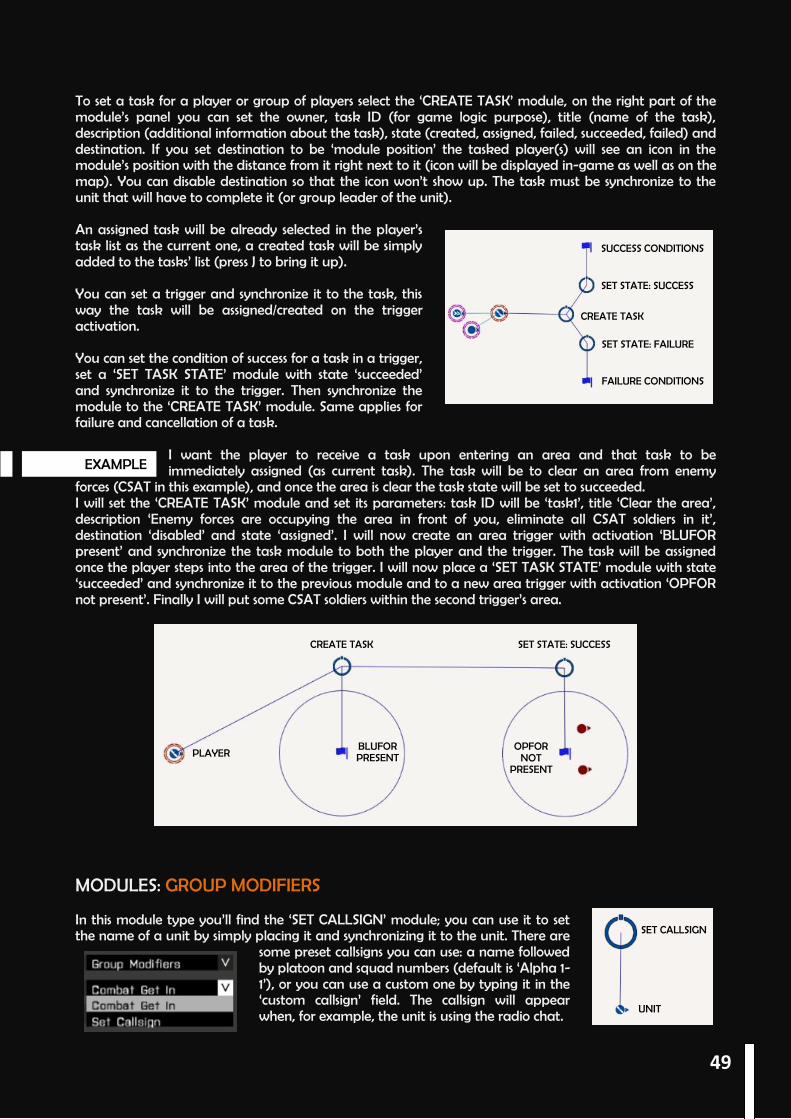
EXAMPLE
To set a task for a player or group of players select the ‘CREATE TASK’ module, on the right part of the module’s panel you can set the owner, task ID (for game logic purpose), title (name of the task), description (additional information about the task), state (created, assigned, failed, succeeded, failed) and destination. If you set destination to be ‘module position’ the tasked player(s) will see an icon in the module’s position with the distance from it right next to it (icon will be displayed in-game as well as on the map). You can disable destination so that the icon won’t show up. The task must be synchronize to the unit that will have to complete it (or group leader of the unit). An assigned task will be already selected in the player’s task list as the current one, a created task will be simply added to the tasks’ list (press J to bring it up). You can set a trigger and synchronize it to the task, this way the task will be assigned/created on the trigger activation. You can set the condition of success for a task in a trigger, set a ‘SET TASK STATE’ module with state ‘succeeded’ and synchronize it to the trigger. Then synchronize the module to the ‘CREATE TASK’ module. Same applies for failure and cancellation of a task.
I want the player to receive a task upon entering an area and that task to be immediately assigned (as current task). The task will be to clear an area from enemy
forces (CSAT in this example), and once the area is clear the task state will be set to succeeded. I will set the ‘CREATE TASK’ module and set its parameters: task ID will be ‘task1’, title ‘Clear the area’, description ‘Enemy forces are occupying the area in front of you, eliminate all CSAT soldiers in it’, destination ‘disabled’ and state ‘assigned’. I will now create an area trigger with activation ‘BLUFOR present’ and synchronize the task module to both the player and the trigger. The task will be assigned once the player steps into the area of the trigger. I will now place a ‘SET TASK STATE’ module with state ‘succeeded’ and synchronize it to the previous module and to a new area trigger with activation ‘OPFOR not present’. Finally I will put some CSAT soldiers within the second trigger’s area. MODULES: GROUP MODIFIERS In this module type you’ll find the ‘SET CALLSIGN’ module; you can use it to set the name of a unit by simply placing it and synchronizing it to the unit. There are
some preset callsigns you can use: a name followed by platoon and squad numbers (default is ‘Alpha 1-1’), or you can use a custom one by typing it in the ‘custom callsign’ field. The callsign will appear when, for example, the unit is using the radio chat.
SUCCESS CONDITIONS
SET STATE: SUCCESS
SET STATE: FAILURE
FAILURE CONDITIONS
CREATE TASK
CREATE TASK SET STATE: SUCCESS
BLUFOR PRESENT
OPFOR NOT
PRESENT
PLAYER
SET CALLSIGN
UNIT
49
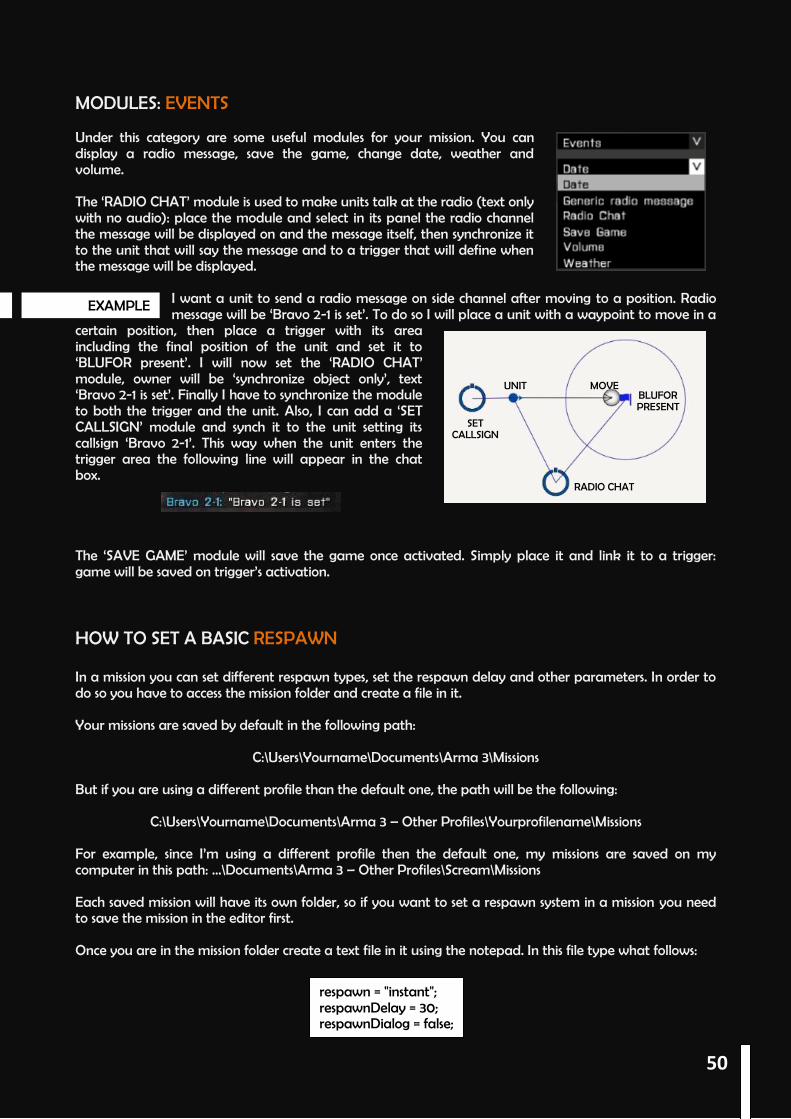
EXAMPLE
MODULES: EVENTS Under this category are some useful modules for your mission. You can display a radio message, save the game, change date, weather and volume. The ‘RADIO CHAT’ module is used to make units talk at the radio (text only with no audio): place the module and select in its panel the radio channel the message will be displayed on and the message itself, then synchronize it to the unit that will say the message and to a trigger that will define when the message will be displayed.
I want a unit to send a radio message on side channel after moving to a position. Radio message will be ‘Bravo 2-1 is set’. To do so I will place a unit with a waypoint to move in a
certain position, then place a trigger with its area including the final position of the unit and set it to ‘BLUFOR present’. I will now set the ‘RADIO CHAT’ module, owner will be ‘synchronize object only’, text ‘Bravo 2-1 is set’. Finally I have to synchronize the module to both the trigger and the unit. Also, I can add a ‘SET CALLSIGN’ module and synch it to the unit setting its callsign ‘Bravo 2-1’. This way when the unit enters the trigger area the following line will appear in the chat box. The ‘SAVE GAME’ module will save the game once activated. Simply place it and link it to a trigger: game will be saved on trigger’s activation. HOW TO SET A BASIC RESPAWN In a mission you can set different respawn types, set the respawn delay and other parameters. In order to do so you have to access the mission folder and create a file in it. Your missions are saved by default in the following path:
C:\Users\Yourname\Documents\Arma 3\Missions But if you are using a different profile than the default one, the path will be the following:
C:\Users\Yourname\Documents\Arma 3 – Other Profiles\Yourprofilename\Missions For example, since I’m using a different profile then the default one, my missions are saved on my computer in this path: …\Documents\Arma 3 – Other Profiles\Scream\Missions Each saved mission will have its own folder, so if you want to set a respawn system in a mission you need to save the mission in the editor first. Once you are in the mission folder create a text file in it using the notepad. In this file type what follows:
SET CALLSIGN
BLUFOR PRESENT
RADIO CHAT
MOVE UNIT
respawn = "instant"; respawnDelay = 30; respawnDialog = false;
50
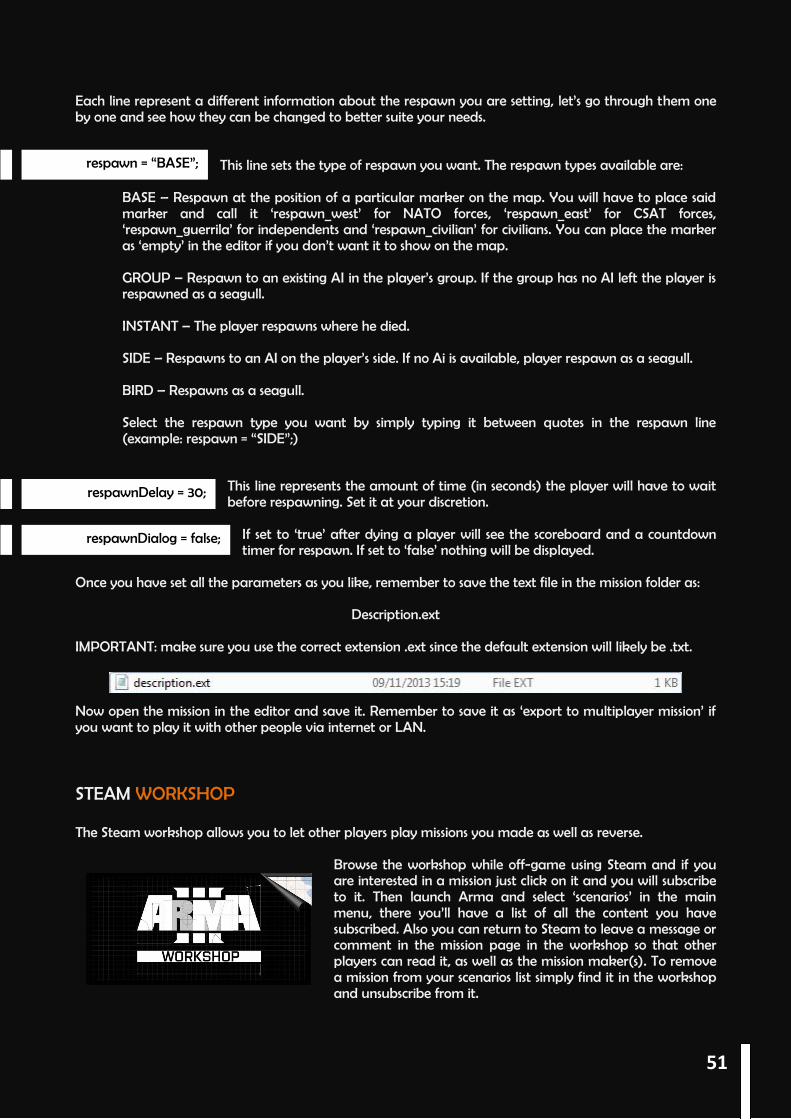
respawn = “BASE”;
respawnDelay = 30;
respawnDialog = false;
Each line represent a different information about the respawn you are setting, let’s go through them one by one and see how they can be changed to better suite your needs.
This line sets the type of respawn you want. The respawn types available are:
BASE – Respawn at the position of a particular marker on the map. You will have to place said marker and call it ‘respawn_west’ for NATO forces, ‘respawn_east’ for CSAT forces, ‘respawn_guerrila’ for independents and ‘respawn_civilian’ for civilians. You can place the marker as ‘empty’ in the editor if you don’t want it to show on the map. GROUP – Respawn to an existing AI in the player’s group. If the group has no AI left the player is respawned as a seagull. INSTANT – The player respawns where he died. SIDE – Respawns to an AI on the player’s side. If no Ai is available, player respawn as a seagull. BIRD – Respawns as a seagull. Select the respawn type you want by simply typing it between quotes in the respawn line (example: respawn = “SIDE”;)
.
This line represents the amount of time (in seconds) the player will have to wait before respawning. Set it at your discretion.
If set to ‘true’ after dying a player will see the scoreboard and a countdown timer for respawn. If set to ‘false’ nothing will be displayed.
Once you have set all the parameters as you like, remember to save the text file in the mission folder as:
Description.ext IMPORTANT: make sure you use the correct extension .ext since the default extension will likely be .txt. Now open the mission in the editor and save it. Remember to save it as ‘export to multiplayer mission’ if you want to play it with other people via internet or LAN. STEAM WORKSHOP The Steam workshop allows you to let other players play missions you made as well as reverse.
Browse the workshop while off-game using Steam and if you are interested in a mission just click on it and you will subscribe to it. Then launch Arma and select ‘scenarios’ in the main menu, there you’ll have a list of all the content you have subscribed. Also you can return to Steam to leave a message or comment in the mission page in the workshop so that other players can read it, as well as the mission maker(s). To remove a mission from your scenarios list simply find it in the workshop and unsubscribe from it.
51
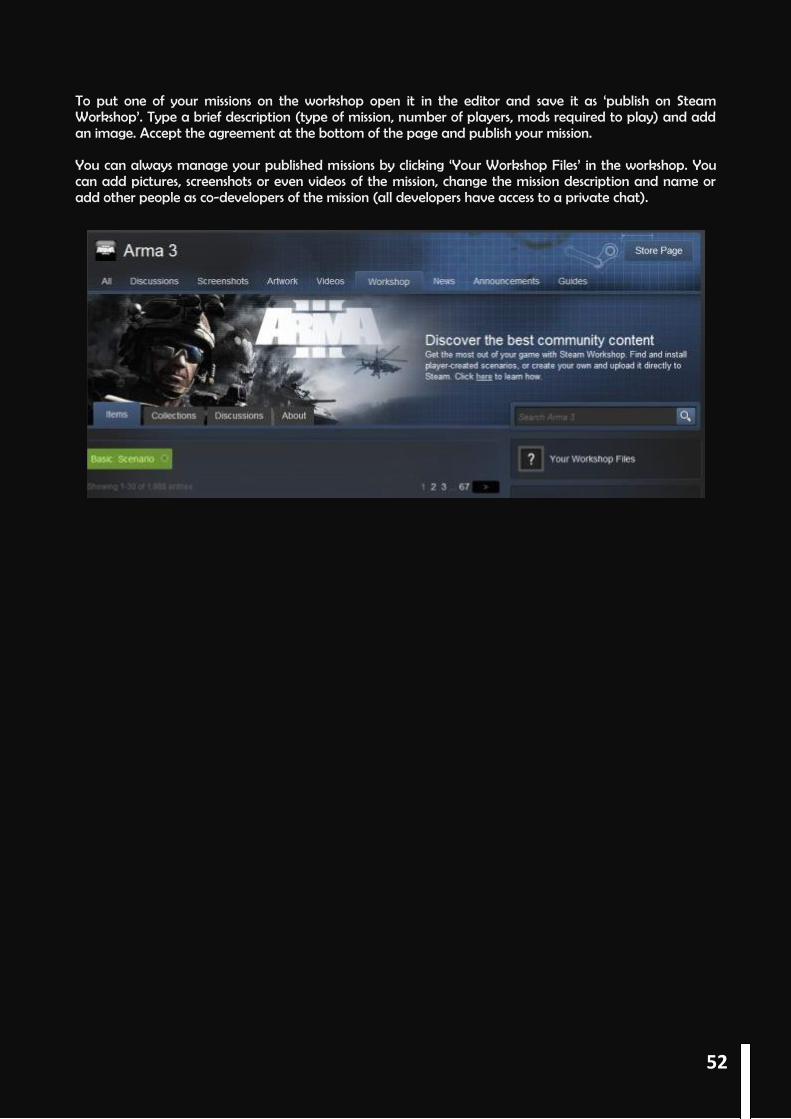
To put one of your missions on the workshop open it in the editor and save it as ‘publish on Steam Workshop’. Type a brief description (type of mission, number of players, mods required to play) and add an image. Accept the agreement at the bottom of the page and publish your mission. You can always manage your published missions by clicking ‘Your Workshop Files’ in the workshop. You can add pictures, screenshots or even videos of the mission, change the mission description and name or add other people as co-developers of the mission (all developers have access to a private chat).
52

author = "Author’s name"; OnLoadName = "Mission name"; OnLoadMission = "Text below load screen"; loadScreen = "Pics\Intropic.JPG";
class Header { gameType = missiontype; minPlayers = 1; maxPlayers = 5; };
PART VII – ADVANCED EDITING There are many commands you can use to improve your mission and create exactly what you have in mind. This part will go through some of this commands, I recommend to read this after becoming well acquainted with the editor’s basics (part VI). MISSION INFORMATIONS ON LOADING SCREEN You will notice that while loading a mission you made a loading screen with a picture if Altis will be displayed; on top of the picture you will see the lines ‘Unknown mission’ by ‘Unknown community author’. These lines can be changed adding the actual mission and author’s names, plus an extra line under the picture, and of course you can change the default picture with an image of your choice (like a screenshot from the mission itself). In order to do so go to the mission folder, open the Description.ext file and type the following lines in it: Then change the lines between quotes according to your mission. The command ‘loadScreen’ has between quotes the path where the picture to load is located (in this example a folder named ‘Pics’ contains the
picture called ‘Intropic.JPG’), this folder must be located inside the mission folder, otherwise it will not be found. The folder of this example mission will contain the files listed in the left image. Also, only some picture types will work (JPG works fine). Once you have done save the Description.ext file, launch Arma 3, open the map in the editor and save it again.
You can also display the mission type (singleplayer, cooperative, adversarial and so on) in the loading screen, and set the number of players the mission allows (both minimum and maximum) that you will see when selecting the mission if you host a game. To set these parameters go to your mission folder and again open the Description.ext file. Type in it the following lines:
53
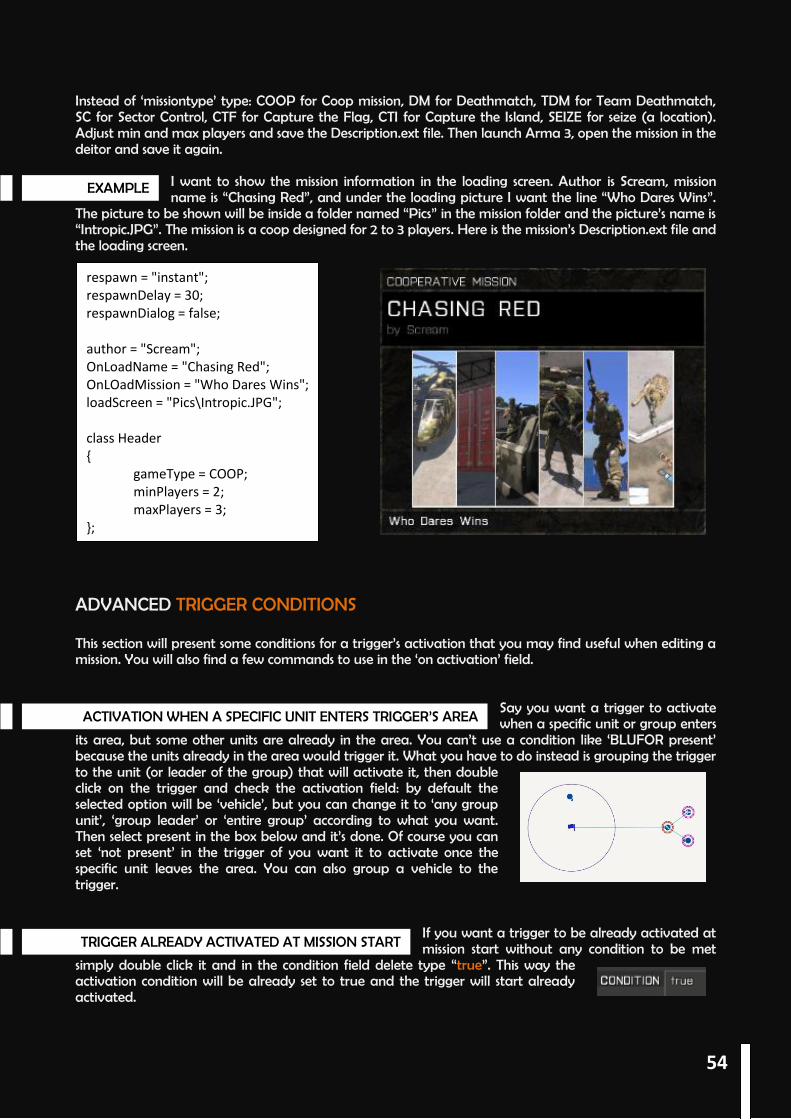
EXAMPLE
respawn = "instant"; respawnDelay = 30; respawnDialog = false; author = "Scream"; OnLoadName = "Chasing Red"; OnLOadMission = "Who Dares Wins"; loadScreen = "Pics\Intropic.JPG"; class Header { gameType = COOP; minPlayers = 2; maxPlayers = 3; };
ACTIVATION WHEN A SPECIFIC UNIT ENTERS TRIGGER’S AREA
TRIGGER ALREADY ACTIVATED AT MISSION START
Instead of ‘missiontype’ type: COOP for Coop mission, DM for Deathmatch, TDM for Team Deathmatch, SC for Sector Control, CTF for Capture the Flag, CTI for Capture the Island, SEIZE for seize (a location). Adjust min and max players and save the Description.ext file. Then launch Arma 3, open the mission in the deitor and save it again.
I want to show the mission information in the loading screen. Author is Scream, mission name is “Chasing Red”, and under the loading picture I want the line “Who Dares Wins”.
The picture to be shown will be inside a folder named “Pics” in the mission folder and the picture’s name is “Intropic.JPG”. The mission is a coop designed for 2 to 3 players. Here is the mission’s Description.ext file and the loading screen.
ADVANCED TRIGGER CONDITIONS This section will present some conditions for a trigger’s activation that you may find useful when editing a mission. You will also find a few commands to use in the ‘on activation’ field.
Say you want a trigger to activate when a specific unit or group enters
its area, but some other units are already in the area. You can’t use a condition like ‘BLUFOR present’ because the units already in the area would trigger it. What you have to do instead is grouping the trigger to the unit (or leader of the group) that will activate it, then double click on the trigger and check the activation field: by default the selected option will be ‘vehicle’, but you can change it to ‘any group unit’, ‘group leader’ or ‘entire group’ according to what you want. Then select present in the box below and it’s done. Of course you can set ‘not present’ in the trigger of you want it to activate once the specific unit leaves the area. You can also group a vehicle to the trigger.
If you want a trigger to be already activated at mission start without any condition to be met
simply double click it and in the condition field delete type “true”. This way the activation condition will be already set to true and the trigger will start already activated.
54
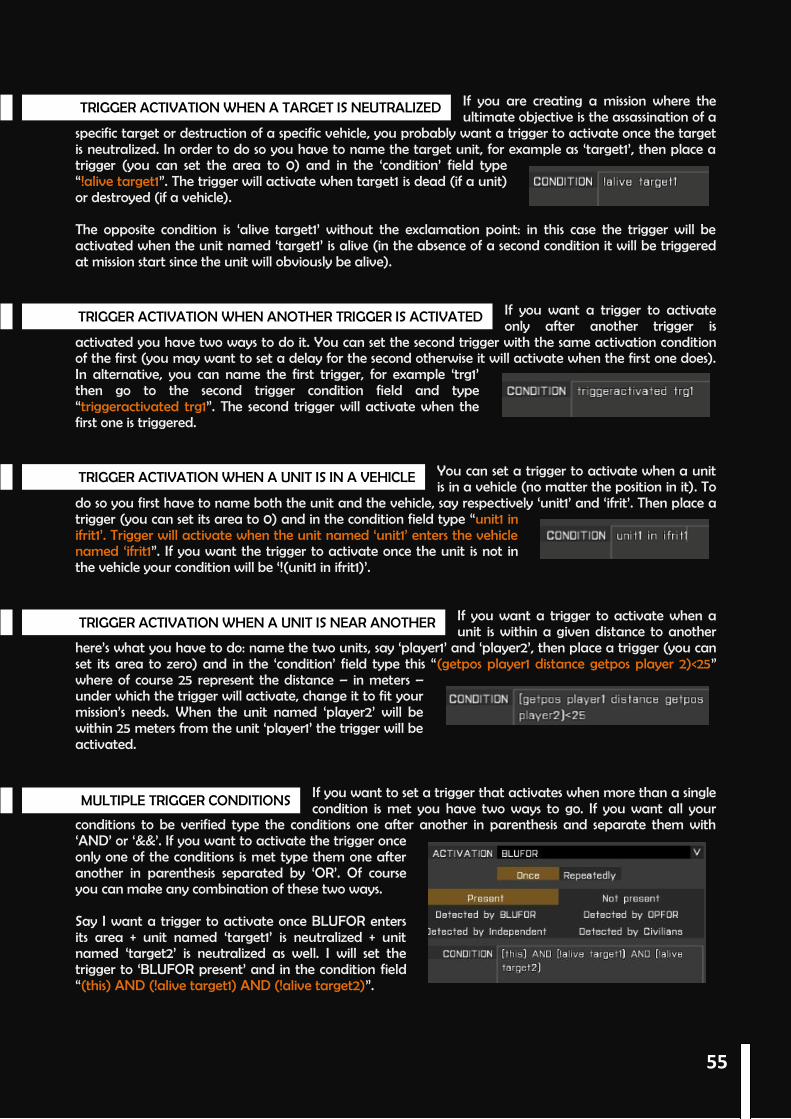
TRIGGER ACTIVATION WHEN A TARGET IS NEUTRALIZED
TRIGGER ACTIVATION WHEN ANOTHER TRIGGER IS ACTIVATED
TRIGGER ACTIVATION WHEN A UNIT IS IN A VEHICLE
MULTIPLE TRIGGER CONDITIONS
TRIGGER ACTIVATION WHEN A UNIT IS NEAR ANOTHER
If you are creating a mission where the ultimate objective is the assassination of a
specific target or destruction of a specific vehicle, you probably want a trigger to activate once the target is neutralized. In order to do so you have to name the target unit, for example as ‘target1’, then place a trigger (you can set the area to 0) and in the ‘condition’ field type “!alive target1”. The trigger will activate when target1 is dead (if a unit) or destroyed (if a vehicle). The opposite condition is ‘alive target1’ without the exclamation point: in this case the trigger will be activated when the unit named ‘target1’ is alive (in the absence of a second condition it will be triggered at mission start since the unit will obviously be alive).
If you want a trigger to activate only after another trigger is
activated you have two ways to do it. You can set the second trigger with the same activation condition of the first (you may want to set a delay for the second otherwise it will activate when the first one does). In alternative, you can name the first trigger, for example ‘trg1’ then go to the second trigger condition field and type “triggeractivated trg1”. The second trigger will activate when the first one is triggered.
You can set a trigger to activate when a unit is in a vehicle (no matter the position in it). To
do so you first have to name both the unit and the vehicle, say respectively ‘unit1’ and ‘ifrit’. Then place a trigger (you can set its area to 0) and in the condition field type “unit1 in ifrit1’. Trigger will activate when the unit named ‘unit1’ enters the vehicle named ‘ifrit1”. If you want the trigger to activate once the unit is not in the vehicle your condition will be ‘!(unit1 in ifrit1)’.
If you want a trigger to activate when a unit is within a given distance to another
here’s what you have to do: name the two units, say ‘player1’ and ‘player2’, then place a trigger (you can set its area to zero) and in the ‘condition’ field type this “(getpos player1 distance getpos player 2)<25” where of course 25 represent the distance – in meters – under which the trigger will activate, change it to fit your mission’s needs. When the unit named ‘player2’ will be within 25 meters from the unit ‘player1’ the trigger will be activated.
If you want to set a trigger that activates when more than a single condition is met you have two ways to go. If you want all your
conditions to be verified type the conditions one after another in parenthesis and separate them with ‘AND’ or ‘&&’. If you want to activate the trigger once only one of the conditions is met type them one after another in parenthesis separated by ‘OR’. Of course you can make any combination of these two ways. Say I want a trigger to activate once BLUFOR enters its area + unit named ‘target1’ is neutralized + unit named ‘target2’ is neutralized as well. I will set the trigger to ‘BLUFOR present’ and in the condition field “(this) AND (!alive target1) AND (!alive target2)”.
55
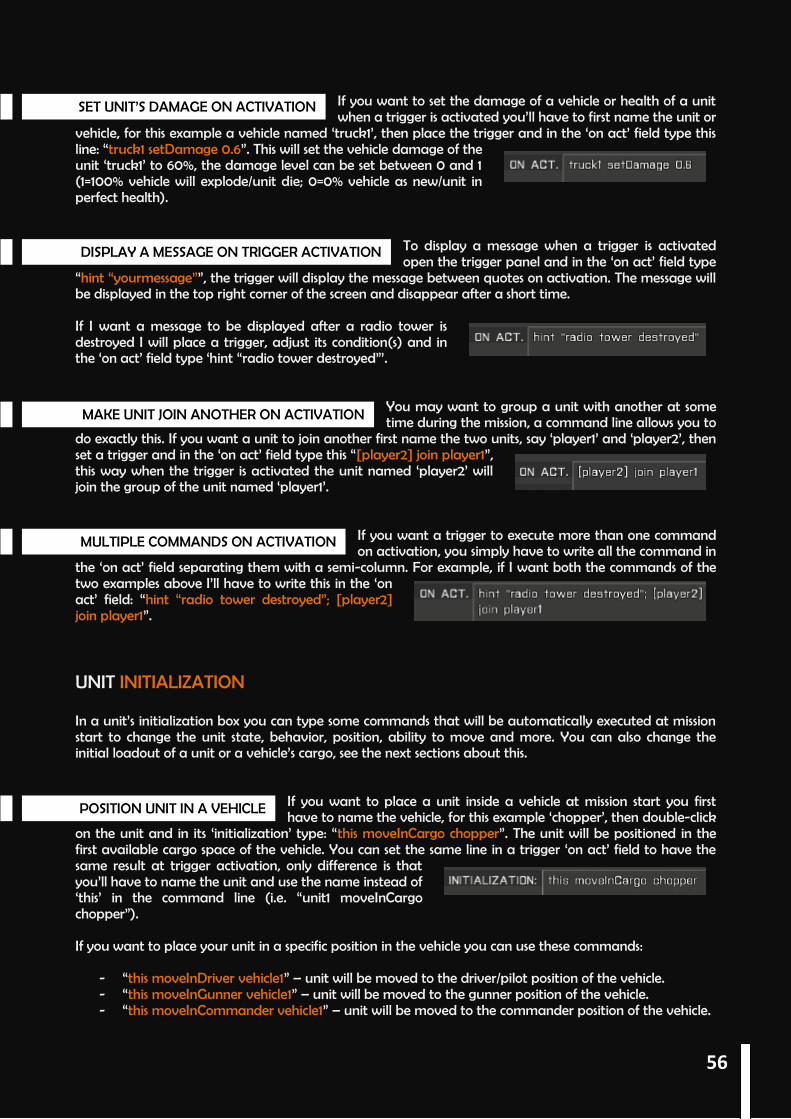
DISPLAY A MESSAGE ON TRIGGER ACTIVATION
MAKE UNIT JOIN ANOTHER ON ACTIVATION
MULTIPLE COMMANDS ON ACTIVATION
SET UNIT’S DAMAGE ON ACTIVATION
POSITION UNIT IN A VEHICLE
If you want to set the damage of a vehicle or health of a unit when a trigger is activated you’ll have to first name the unit or
vehicle, for this example a vehicle named ‘truck1’, then place the trigger and in the ‘on act’ field type this line: “truck1 setDamage 0.6”. This will set the vehicle damage of the unit ‘truck1’ to 60%, the damage level can be set between 0 and 1 (1=100% vehicle will explode/unit die; 0=0% vehicle as new/unit in perfect health).
To display a message when a trigger is activated open the trigger panel and in the ‘on act’ field type
“hint “yourmessage””, the trigger will display the message between quotes on activation. The message will be displayed in the top right corner of the screen and disappear after a short time. If I want a message to be displayed after a radio tower is destroyed I will place a trigger, adjust its condition(s) and in the ‘on act’ field type ‘hint “radio tower destroyed”’.
You may want to group a unit with another at some time during the mission, a command line allows you to
do exactly this. If you want a unit to join another first name the two units, say ‘player1’ and ‘player2’, then set a trigger and in the ‘on act’ field type this “[player2] join player1”, this way when the trigger is activated the unit named ‘player2’ will join the group of the unit named ‘player1’.
If you want a trigger to execute more than one command on activation, you simply have to write all the command in
the ‘on act’ field separating them with a semi-column. For example, if I want both the commands of the two examples above I’ll have to write this in the ‘on act’ field: “hint “radio tower destroyed”; [player2] join player1”. UNIT INITIALIZATION In a unit’s initialization box you can type some commands that will be automatically executed at mission start to change the unit state, behavior, position, ability to move and more. You can also change the initial loadout of a unit or a vehicle’s cargo, see the next sections about this.
If you want to place a unit inside a vehicle at mission start you first have to name the vehicle, for this example ‘chopper’, then double-click
on the unit and in its ‘initialization’ type: “this moveInCargo chopper”. The unit will be positioned in the first available cargo space of the vehicle. You can set the same line in a trigger ‘on act’ field to have the same result at trigger activation, only difference is that you’ll have to name the unit and use the name instead of ‘this’ in the command line (i.e. “unit1 moveInCargo chopper”). If you want to place your unit in a specific position in the vehicle you can use these commands:
- “this moveInDriver vehicle1” – unit will be moved to the driver/pilot position of the vehicle. - “this moveInGunner vehicle1” – unit will be moved to the gunner position of the vehicle. - “this moveInCommander vehicle1” – unit will be moved to the commander position of the vehicle.
56
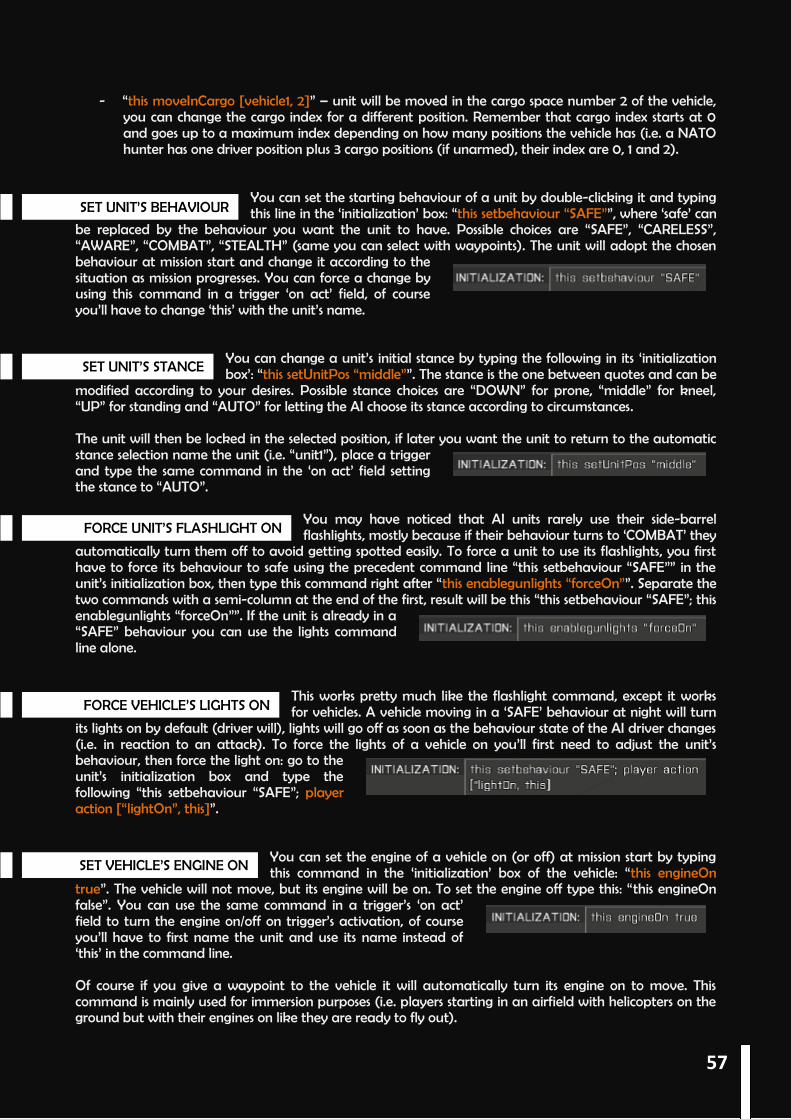
SET UNIT’S BEHAVIOUR
FORCE UNIT’S FLASHLIGHT ON
FORCE VEHICLE’S LIGHTS ON
SET VEHICLE’S ENGINE ON
SET UNIT’S STANCE
- “this moveInCargo [vehicle1, 2]” – unit will be moved in the cargo space number 2 of the vehicle, you can change the cargo index for a different position. Remember that cargo index starts at 0 and goes up to a maximum index depending on how many positions the vehicle has (i.e. a NATO hunter has one driver position plus 3 cargo positions (if unarmed), their index are 0, 1 and 2).
You can set the starting behaviour of a unit by double-clicking it and typing this line in the ‘initialization’ box: “this setbehaviour “SAFE””, where ‘safe’ can
be replaced by the behaviour you want the unit to have. Possible choices are “SAFE”, “CARELESS”, “AWARE”, “COMBAT”, “STEALTH” (same you can select with waypoints). The unit will adopt the chosen behaviour at mission start and change it according to the situation as mission progresses. You can force a change by using this command in a trigger ‘on act’ field, of course you’ll have to change ‘this’ with the unit’s name.
You can change a unit’s initial stance by typing the following in its ‘initialization box’: “this setUnitPos “middle””. The stance is the one between quotes and can be
modified according to your desires. Possible stance choices are “DOWN” for prone, “middle” for kneel, “UP” for standing and “AUTO” for letting the AI choose its stance according to circumstances. The unit will then be locked in the selected position, if later you want the unit to return to the automatic stance selection name the unit (i.e. “unit1”), place a trigger and type the same command in the ‘on act’ field setting the stance to “AUTO”.
You may have noticed that AI units rarely use their side-barrel flashlights, mostly because if their behaviour turns to ‘COMBAT’ they
automatically turn them off to avoid getting spotted easily. To force a unit to use its flashlights, you first have to force its behaviour to safe using the precedent command line “this setbehaviour “SAFE”” in the unit’s initialization box, then type this command right after “this enablegunlights “forceOn””. Separate the two commands with a semi-column at the end of the first, result will be this “this setbehaviour “SAFE”; this enablegunlights “forceOn””. If the unit is already in a “SAFE” behaviour you can use the lights command line alone.
This works pretty much like the flashlight command, except it works for vehicles. A vehicle moving in a ‘SAFE’ behaviour at night will turn
its lights on by default (driver will), lights will go off as soon as the behaviour state of the AI driver changes (i.e. in reaction to an attack). To force the lights of a vehicle on you’ll first need to adjust the unit’s behaviour, then force the light on: go to the unit’s initialization box and type the following “this setbehaviour “SAFE”; player action [“lightOn”, this]”.
You can set the engine of a vehicle on (or off) at mission start by typing this command in the ‘initialization’ box of the vehicle: “this engineOn
true”. The vehicle will not move, but its engine will be on. To set the engine off type this: “this engineOn false”. You can use the same command in a trigger’s ‘on act’ field to turn the engine on/off on trigger’s activation, of course you’ll have to first name the unit and use its name instead of ‘this’ in the command line. Of course if you give a waypoint to the vehicle it will automatically turn its engine on to move. This command is mainly used for immersion purposes (i.e. players starting in an airfield with helicopters on the ground but with their engines on like they are ready to fly out).
57
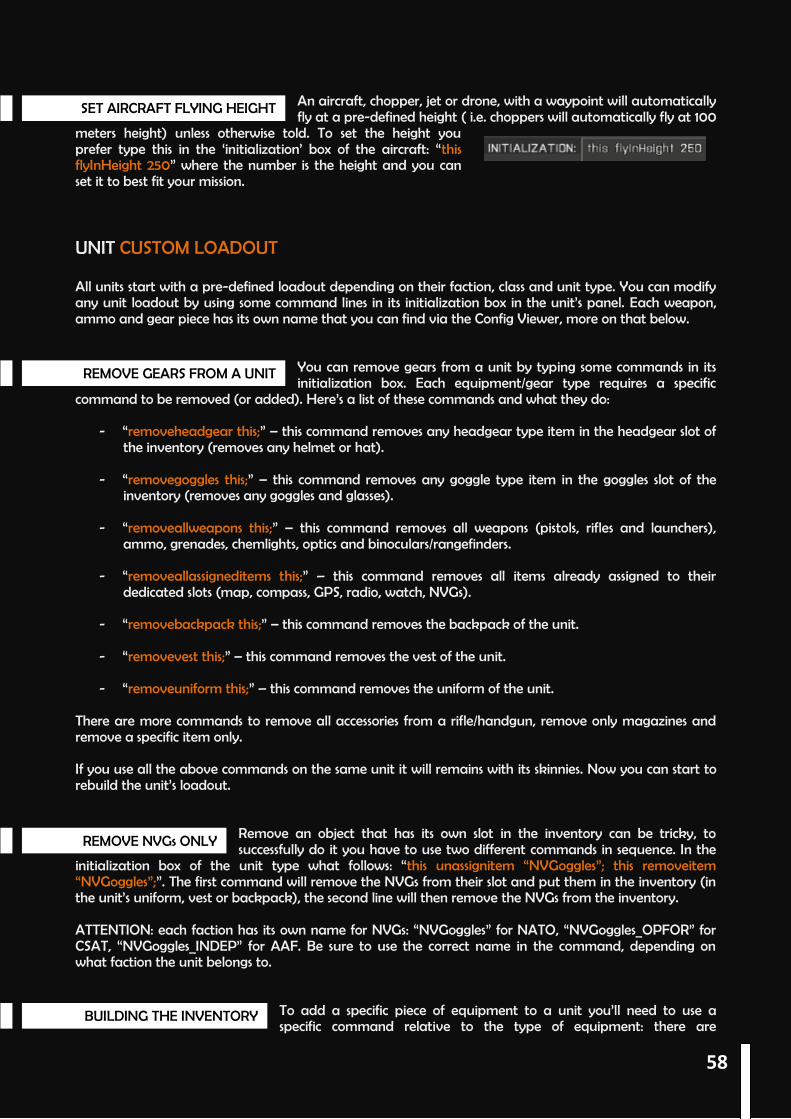
SET AIRCRAFT FLYING HEIGHT
REMOVE GEARS FROM A UNIT
BUILDING THE INVENTORY
REMOVE NVGs ONLY
An aircraft, chopper, jet or drone, with a waypoint will automatically fly at a pre-defined height ( i.e. choppers will automatically fly at 100
meters height) unless otherwise told. To set the height you prefer type this in the ‘initialization’ box of the aircraft: “this flyInHeight 250” where the number is the height and you can set it to best fit your mission. UNIT CUSTOM LOADOUT All units start with a pre-defined loadout depending on their faction, class and unit type. You can modify any unit loadout by using some command lines in its initialization box in the unit’s panel. Each weapon, ammo and gear piece has its own name that you can find via the Config Viewer, more on that below.
You can remove gears from a unit by typing some commands in its initialization box. Each equipment/gear type requires a specific
command to be removed (or added). Here’s a list of these commands and what they do:
- “removeheadgear this;” – this command removes any headgear type item in the headgear slot of the inventory (removes any helmet or hat).
- “removegoggles this;” – this command removes any goggle type item in the goggles slot of the
inventory (removes any goggles and glasses).
- “removeallweapons this;” – this command removes all weapons (pistols, rifles and launchers), ammo, grenades, chemlights, optics and binoculars/rangefinders.
- “removeallassigneditems this;” – this command removes all items already assigned to their dedicated slots (map, compass, GPS, radio, watch, NVGs).
- “removebackpack this;” – this command removes the backpack of the unit.
- “removevest this;” – this command removes the vest of the unit.
- “removeuniform this;” – this command removes the uniform of the unit. There are more commands to remove all accessories from a rifle/handgun, remove only magazines and remove a specific item only. If you use all the above commands on the same unit it will remains with its skinnies. Now you can start to rebuild the unit’s loadout.
Remove an object that has its own slot in the inventory can be tricky, to successfully do it you have to use two different commands in sequence. In the
initialization box of the unit type what follows: “this unassignitem “NVGoggles”; this removeitem “NVGoggles”;”. The first command will remove the NVGs from their slot and put them in the inventory (in the unit’s uniform, vest or backpack), the second line will then remove the NVGs from the inventory. ATTENTION: each faction has its own name for NVGs: “NVGoggles” for NATO, “NVGoggles_OPFOR” for CSAT, “NVGoggles_INDEP” for AAF. Be sure to use the correct name in the command, depending on what faction the unit belongs to.
To add a specific piece of equipment to a unit you’ll need to use a specific command relative to the type of equipment: there are
58

FIND GEARS' NAMES
ADD GEARS TO A UNIT
commands to add weapons, ammo, items, uniforms, vests, backpacks. Also, you will need the name of the equipment in the game logic, to insert it in the command line.
To find the name of the equipment you want to add to the inventory click on the Config Viewer icon in the horizontal upper bar of the
editor menu. It will open a panel that can, at any time, be closed by pressing the ESC key. Browse the list on the left part to find what you are looking for, in particular: UNIFORMS, VESTS, HEADGEARS, WEAPONS, NVGs, OPTICS, ACCESSORIES and ITEMS (binocular, compass, map etc) can be found under CfgWeapons. MAGAZINES, MINES, CHEMLIGHTS, GRENADES and EXPLOSIVES can be found under CfgMagazines. BACKPACKS and PARACHUTES can be found under CfgVehicles. If you double click on the Cfg voice you will open the list of all the elements stored by their name. Rifles names start with ‘arifle_’, pistols names by ‘hgun_’, SMGs by ‘SMG_’, LMGs by ‘LMG_’, sniper rifles by ‘srifle_’, launchers by ‘launch_’, optics by ‘optic_’, accessories by ‘acc_’. Uniforms names start with ‘U_’, headgears by ‘H_’, vests by ‘V_’, backpacks by ‘B_’. Magazines names start with their capacity. If you want to know the in-game name of an element, select it and in the right part look for the line ‘displayName’, the name after it is the one you’d see if looking at the element in you inventory. For example under CfgWeapons there’s an item named “srifle_DMR_01_ARCO_pointer_F”. In the right part of the panel there’s the line ‘displayName = “Rahim 7.62 mm”;’ therefore the in-game name of this weapon is the Rahim. The name found under the CfgWeapons list also provides some information:
srifle_DMR_01_ARCO_pointer_F This particular rifle is a sniper rifle designed to be employed by a marksman and it will already be equipped with an ARCO optic and a laser pointer. Of course I can use the non-accessorized version of this rifle (“srifle_DMR_01_F”) and add the accessories I want later.
Once you have the names of all you want to add to the unit’s inventory you will use them in some commands that are to be typed in the unit’s
initialization box. The commands are:
- “this forceadduniform “uniformname”;” – this command will add the uniform in quotes to the unit. (“adduniform” command will only work with uniforms from the unit’s side).
- “this addvest “vestname”;” – this command will add the vest in quotes to the unit.
- “this addbackpack “backpackname”;” – this will add the backpack in quotes to the unit.
- “this addheadgear “headgearname”;” – this will add the headgear in quotes to the unit.
- “this addgoggles “gogglesname”;” – this will add the goggles in quotes to the unit.
- “this additem “itemname”;” this will add the item in quotes to the unit.
- “this assignitem “itemname”;” this will assign the item in quotes to its slot in the inventory.
SNIPER RIFLE DESIGNATED MARKSMAN RIFLE
ARCO OPTIC INFRA RED LASER POINTER
59

CUSTOM LOADOUT EXAMPLE
- “this addmagazine “magazinename”;” – this will add the magazine/grenade/chemlight/explosive
in quotes to the unit.
- “this addweapon “weaponname”;” – this will add the weapon in quotes to the unit.
- “this addprimaryweaponitem “accessoryname”;” – this will add the accessory/optic in quotes to the primary weapon of the unit.
- “this addmagazinecargoglobal “magazinename”;” – this will add the mag in quotes to the unit’s backpack (the command ‘addmagazinecargo’ doesn’t work in multiplayer).
- “this additemcargoglobal “itemname”;” – this will add the item in quotes to the unit’s backpack. Remember to add uniforms and vests first: this way there will be place for the following items. Notice that if you add a weapon to a unit the weapon will have no magazine unless the unit is already carrying a mag that fits in that weapon (both for ammo load and ammo caliber). When you add a weapon the unit (or the game) will automatically load it with the first mag available – if it fits. If you add the weapon and a magazine after it the unit will start with an empty weapon and a magazine in its inventory (and it will have to reload the weapon at mission start). Avoid this by adding a magazine for the weapon first, and then the weapon itself (and after that all the other magazines you want the unit to carry, or you can add all the magazines first and then the rifle). The parachute takes the backpack slot: you can add only one or the other.
For this example I will take a CSAT rifleman, remove all its gears, then dress and equip him like a guerrilla soldier. I will give him the outfit of
a FIA soldier, a vest, a bandana, shades, a FAK, a Katiba rifle with GL, an ARCO optic and some mags and grenades (for the GL), an ACPC pistol with three mags, two frags and a smoke grenade (white). I will then add map, compass, watch and radio and assign them to their slots. Finally I will give the unit a backpack and put two satchels charges in it. This is what I will type in the unit’s initialization box: removegoggles this; removeheadgear this; removeallweapons this; removeallassigneditems this; removebackpack this; removevest this; removeuniform this; this adduniform “U_IG_Guerrilla2_3”; this addvest “V_BandollierB_oli”; this addheadgear “H_bandanna_khk”; this addgoggles “G_shades_black”; this additem “FirstAidKit”; this addmagazine “30Rnd_65x39_caseless_green”; this addmagazine “1Rnd_HE_Grenade_Shell”; this addweapon “arifle_Katiba_GL_F”; this addprimaryweaponitem “optic_arco”; this addmagazine “30Rnd_65x39_caseless_green”; this addmagazine “30Rnd_65x39_caseless_green”; this addmagazine “30Rnd_65x39_caseless_green”; this addmagazine “30Rnd_65x39_caseless_green”; this addmagazine “1Rnd_HE_Grenade_Shell”; this addmagazine “1Rnd_HE_Grenade_Shell”;
this addmagazine “9Rnd_45ACP_Mag”; this addweapon “hgun_ACPC2_F”; this addmagazine “9Rnd_45ACP_Mag”; this addmagazine “9Rnd_45ACP_Mag”; this addmagazine “HandGrenade”; this addmagazine “HandGrenade”; this addmagazine “SmokeShell”; this additem “itemMap”; this additem “itemCompass”; this additem “itemWatch”; this additem “itemRadio”; this assignitem “itemMap”; this assignitem “itemCompass”; this assignitem “itemWatch”; this assignitem “itemRadio”; this addbackpack “B_TacticalPack_blk”; (unitbackpack this) addMagazineCargoGlobal [“SatchelCharge_Remote_Mag”, 2];
60
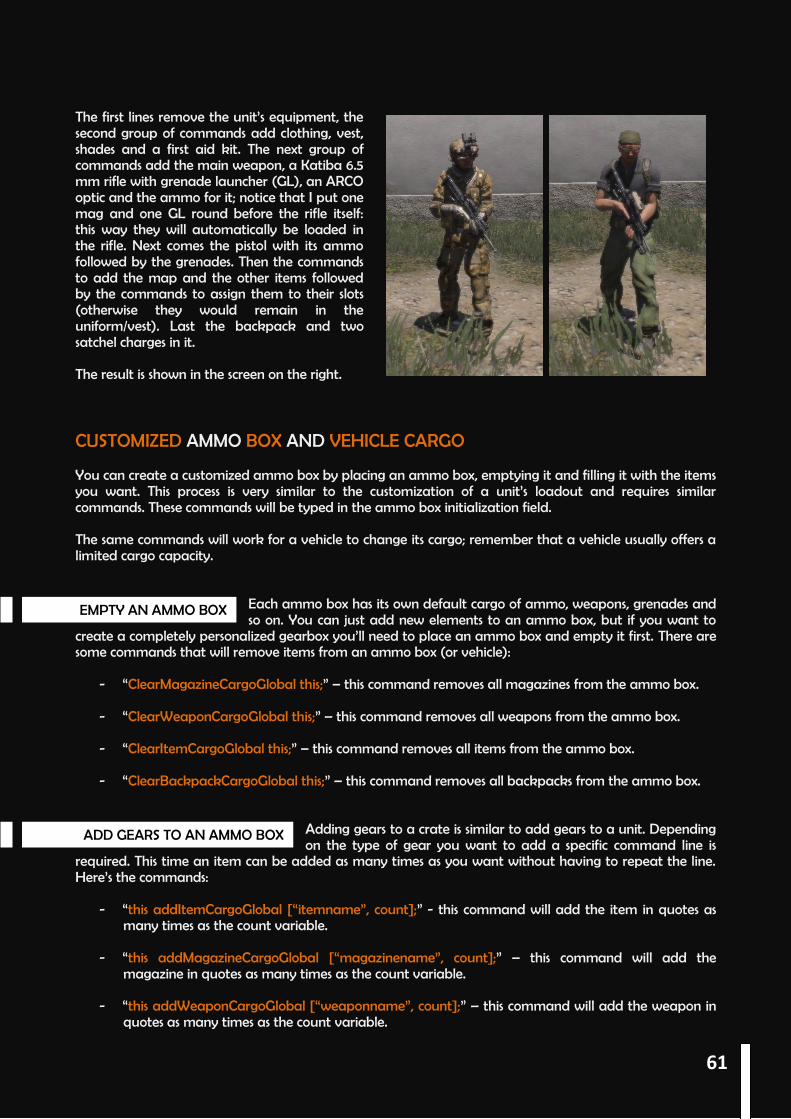
EMPTY AN AMMO BOX
ADD GEARS TO AN AMMO BOX
The first lines remove the unit’s equipment, the second group of commands add clothing, vest, shades and a first aid kit. The next group of commands add the main weapon, a Katiba 6.5 mm rifle with grenade launcher (GL), an ARCO optic and the ammo for it; notice that I put one mag and one GL round before the rifle itself: this way they will automatically be loaded in the rifle. Next comes the pistol with its ammo followed by the grenades. Then the commands to add the map and the other items followed by the commands to assign them to their slots (otherwise they would remain in the uniform/vest). Last the backpack and two satchel charges in it. The result is shown in the screen on the right. CUSTOMIZED AMMO BOX AND VEHICLE CARGO You can create a customized ammo box by placing an ammo box, emptying it and filling it with the items you want. This process is very similar to the customization of a unit’s loadout and requires similar commands. These commands will be typed in the ammo box initialization field. The same commands will work for a vehicle to change its cargo; remember that a vehicle usually offers a limited cargo capacity.
Each ammo box has its own default cargo of ammo, weapons, grenades and so on. You can just add new elements to an ammo box, but if you want to
create a completely personalized gearbox you’ll need to place an ammo box and empty it first. There are some commands that will remove items from an ammo box (or vehicle):
- “ClearMagazineCargoGlobal this;” – this command removes all magazines from the ammo box.
- “ClearWeaponCargoGlobal this;” – this command removes all weapons from the ammo box.
- “ClearItemCargoGlobal this;” – this command removes all items from the ammo box.
- “ClearBackpackCargoGlobal this;” – this command removes all backpacks from the ammo box.
Adding gears to a crate is similar to add gears to a unit. Depending on the type of gear you want to add a specific command line is
required. This time an item can be added as many times as you want without having to repeat the line. Here’s the commands:
- “this addItemCargoGlobal [“itemname”, count];” - this command will add the item in quotes as many times as the count variable.
- “this addMagazineCargoGlobal [“magazinename”, count];” – this command will add the
magazine in quotes as many times as the count variable.
- “this addWeaponCargoGlobal [“weaponname”, count];” – this command will add the weapon in quotes as many times as the count variable.
61

CUSTOM AMMO BOX EXAMPLE
FIND AN ANIMATION’S NAME
MAKE UNIT PERFORM AN ANIMATION
- “this addBackpackCargoGlobal [“backpackname”, count];” – this command will add the
backpack in quotes as many times as the count variable. Remember that if you use non global commands (i.e. “this addItemCargo”) the gears you add will not be synchronized for multiplayer games and players other than the host may not be able to get them.
For this example I will place a ‘support’ ammo box (faction doesn’t matter), empty it and then add some gears to it. I will place ten
First aid Kits, 5 ARCO optics, 5 EBR marksman rifles, 30 mags of ammo for the rifles, 10 frag grenades and 10 smoke grenade (green). This is what I will type in the ammo box initialization field: ClearMagazineCargoGlobal this; ClearWeaponCargoGlobal this; ClearBackpackCargoGlobal this; this addItemCargoGlobal [“FirstAidKit”, 10]; this addItemCargoGlobal [“optic_arco”, 5]; HOW TO USE ANIMATIONS When making a mission you may want to set some ‘cinematic’ scenes, to enhance immersion and create some pleasure for the eyes. There are many different animations in Arma 3 and they can all be used when editing a mission.
Each animation in the game has its own name, much like gears. In order to use an animation you will first need to know its name to later
use it in a command line. The animation list is accompanied by a preview of the selected animation, this way you can browse the animations and see what they actually do (or make the soldier do) before picking the one that best suits your needs. To see the animations simply place a ‘player’ unit in the editor and launch the preview. Then press ESC and click on ‘animations’ at the bottom of the screen, the ‘animations viewer’ will open. Now you can select an animation on the left and see it performed in a virtual space by your soldier on the right. You can browse the animation in the left panel by selecting the stance of the type of animation, unit’s stance, weapon held etc. Once you found the animation you are looking for select it and press left CTRL+C to copy it and later past it in the command line.
Now that you have the name of the animations you want a unit to play, name that unit, say ‘unit1’ and place a trigger.
Set the activation conditions and in the ‘ON ACT’ field type “unit1 switchmove “animationname”;”. It is possible though that the unit will interrupt the animation, or not play it at all (i.e. if attacked by an enemy). To force the unit to play the animation add this line to the ‘ON ACT’ field of the trigger: “unit1 disableAI “ANIM”;”, this will prevent the unit from interrupting the animation (it basically tell the unit not to change animation). IMPORTANT: some animations are already in a loop, so the unit will play them over and over, but others animations only last for a limited time. If the unit received the disableAI “ANIM” command it will freeze at the end of those animations. To make a unit get back to its normal behaviour place a second trigger to start when the animation ends and type in its ‘ON ACT’ field “unit1 enableAI “ANIM”;”. This will allow the unit to play other animations, like the normal ones (walk, shoot, run and so on).
this addWeaponCargoGlobal [“srifle_EBR_F”, 5]; this addMagazineCargoGlobal [“20Rnd_762x51_Mag”, 30]; this addMagazineCargoGlobal [“HandGrenade”, 10]; this addMagazineCargoGlobal [“SmokeShell_green”, 10];
62
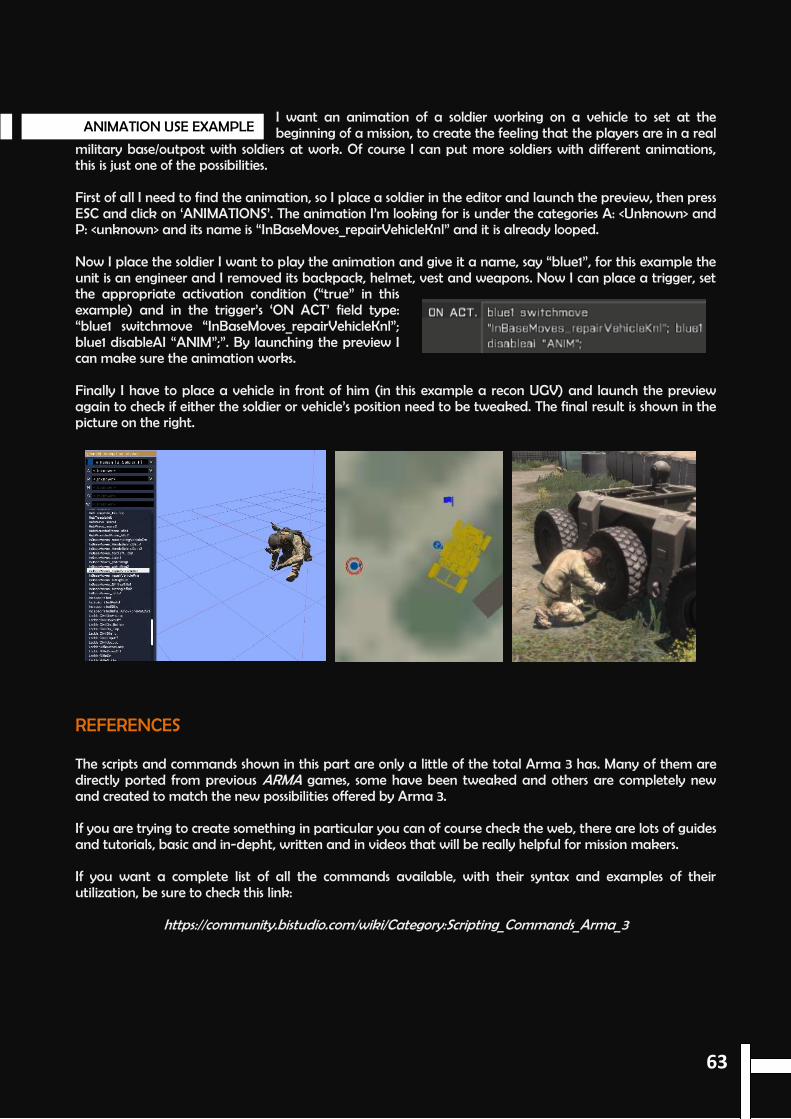
ANIMATION USE EXAMPLE
I want an animation of a soldier working on a vehicle to set at the beginning of a mission, to create the feeling that the players are in a real
military base/outpost with soldiers at work. Of course I can put more soldiers with different animations, this is just one of the possibilities. First of all I need to find the animation, so I place a soldier in the editor and launch the preview, then press ESC and click on ‘ANIMATIONS’. The animation I’m looking for is under the categories A: <Unknown> and P: <unknown> and its name is “InBaseMoves_repairVehicleKnl” and it is already looped. Now I place the soldier I want to play the animation and give it a name, say “blue1”, for this example the unit is an engineer and I removed its backpack, helmet, vest and weapons. Now I can place a trigger, set the appropriate activation condition (“true” in this example) and in the trigger’s ‘ON ACT’ field type: “blue1 switchmove “InBaseMoves_repairVehicleKnl”; blue1 disableAI “ANIM”;”. By launching the preview I can make sure the animation works. Finally I have to place a vehicle in front of him (in this example a recon UGV) and launch the preview again to check if either the soldier or vehicle’s position need to be tweaked. The final result is shown in the picture on the right.
REFERENCES The scripts and commands shown in this part are only a little of the total Arma 3 has. Many of them are directly ported from previous ARMA games, some have been tweaked and others are completely new and created to match the new possibilities offered by Arma 3. If you are trying to create something in particular you can of course check the web, there are lots of guides and tutorials, basic and in-depht, written and in videos that will be really helpful for mission makers. If you want a complete list of all the commands available, with their syntax and examples of their utilization, be sure to check this link:
https://community.bistudio.com/wiki/Category:Scripting_Commands_Arma_3
63
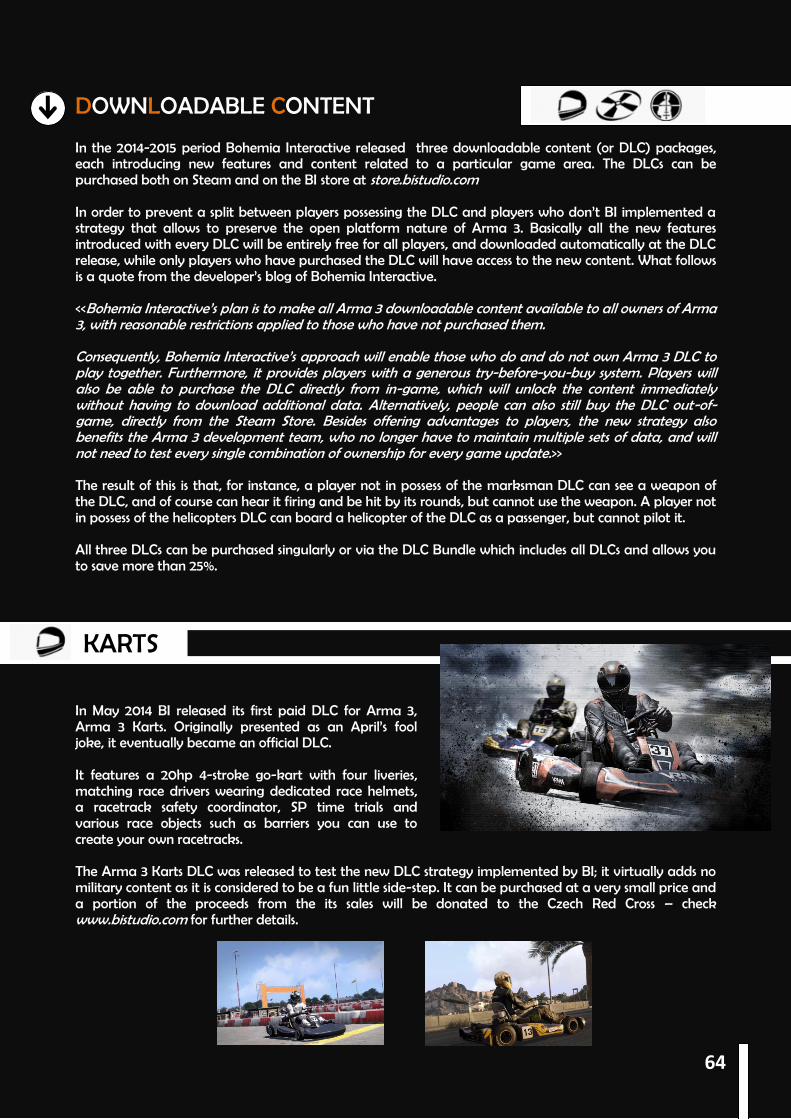
DOWNLOADABLE CONTENT In the 2014-2015 period Bohemia Interactive released three downloadable content (or DLC) packages, each introducing new features and content related to a particular game area. The DLCs can be purchased both on Steam and on the BI store at store.bistudio.com In order to prevent a split between players possessing the DLC and players who don’t BI implemented a strategy that allows to preserve the open platform nature of Arma 3. Basically all the new features introduced with every DLC will be entirely free for all players, and downloaded automatically at the DLC release, while only players who have purchased the DLC will have access to the new content. What follows is a quote from the developer’s blog of Bohemia Interactive. <<Bohemia Interactive’s plan is to make all Arma 3 downloadable content available to all owners of Arma 3, with reasonable restrictions applied to those who have not purchased them. Consequently, Bohemia Interactive’s approach will enable those who do and do not own Arma 3 DLC to play together. Furthermore, it provides players with a generous try-before-you-buy system. Players will also be able to purchase the DLC directly from in-game, which will unlock the content immediately without having to download additional data. Alternatively, people can also still buy the DLC out-of-game, directly from the Steam Store. Besides offering advantages to players, the new strategy also benefits the Arma 3 development team, who no longer have to maintain multiple sets of data, and will not need to test every single combination of ownership for every game update.>> The result of this is that, for instance, a player not in possess of the marksman DLC can see a weapon of the DLC, and of course can hear it firing and be hit by its rounds, but cannot use the weapon. A player not in possess of the helicopters DLC can board a helicopter of the DLC as a passenger, but cannot pilot it. All three DLCs can be purchased singularly or via the DLC Bundle which includes all DLCs and allows you to save more than 25%. In May 2014 BI released its first paid DLC for Arma 3, Arma 3 Karts. Originally presented as an April’s fool joke, it eventually became an official DLC. It features a 20hp 4-stroke go-kart with four liveries, matching race drivers wearing dedicated race helmets, a racetrack safety coordinator, SP time trials and various race objects such as barriers you can use to create your own racetracks. The Arma 3 Karts DLC was released to test the new DLC strategy implemented by BI; it virtually adds no military content as it is considered to be a fun little side-step. It can be purchased at a very small price and a portion of the proceeds from the its sales will be donated to the Czech Red Cross – check www.bistudio.com for further details.
KARTS
64
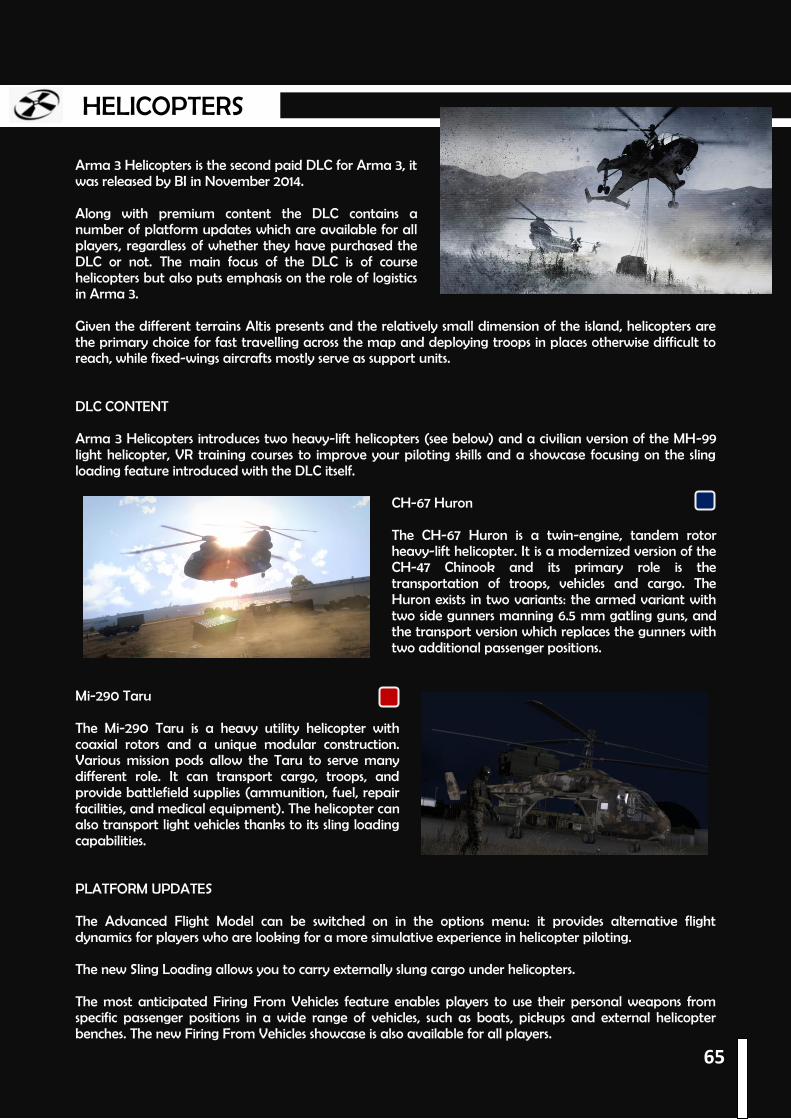
Arma 3 Helicopters is the second paid DLC for Arma 3, it was released by BI in November 2014. Along with premium content the DLC contains a number of platform updates which are available for all players, regardless of whether they have purchased the DLC or not. The main focus of the DLC is of course helicopters but also puts emphasis on the role of logistics in Arma 3. Given the different terrains Altis presents and the relatively small dimension of the island, helicopters are the primary choice for fast travelling across the map and deploying troops in places otherwise difficult to reach, while fixed-wings aircrafts mostly serve as support units. DLC CONTENT Arma 3 Helicopters introduces two heavy-lift helicopters (see below) and a civilian version of the MH-99 light helicopter, VR training courses to improve your piloting skills and a showcase focusing on the sling loading feature introduced with the DLC itself.
CH-67 Huron The CH-67 Huron is a twin-engine, tandem rotor heavy-lift helicopter. It is a modernized version of the CH-47 Chinook and its primary role is the transportation of troops, vehicles and cargo. The Huron exists in two variants: the armed variant with two side gunners manning 6.5 mm gatling guns, and the transport version which replaces the gunners with two additional passenger positions.
Mi-290 Taru The Mi-290 Taru is a heavy utility helicopter with coaxial rotors and a unique modular construction. Various mission pods allow the Taru to serve many different role. It can transport cargo, troops, and provide battlefield supplies (ammunition, fuel, repair facilities, and medical equipment). The helicopter can also transport light vehicles thanks to its sling loading capabilities. PLATFORM UPDATES The Advanced Flight Model can be switched on in the options menu: it provides alternative flight dynamics for players who are looking for a more simulative experience in helicopter piloting. The new Sling Loading allows you to carry externally slung cargo under helicopters. The most anticipated Firing From Vehicles feature enables players to use their personal weapons from specific passenger positions in a wide range of vehicles, such as boats, pickups and external helicopter benches. The new Firing From Vehicles showcase is also available for all players.
HELICOPTERS
65

Arma 3 Marksmen is the third paid DLC for Arma 3 released by BI in April 2015. As for the Helicopters DLC, Arma 3 Marksmen contains features available for every Arma 3 player and new content only usable by owners of the DLC. The focus of the DLC is marksmanship and the additional content provides players with new possibilities in choosing and handling a weapon. On a broader level this DLC refines the shooting mechanics making efficiency and efficacy in shooting a weapon easier to learn and more rewarding to master, and underlines the core infantry experience and ranged engagements Arma 3 offers. Most of this refinement is achieved via the free platform updates. DLC CONTENT Arma 3 Marksmen provides players with 7 new weapons, 5 marksmen rifles and 2 medium machine guns, complemented by new attachments, ghillie suits, protective vests, laser designators. New content includes new firing drills and the Marksmen showcase. The weapons range in bullet caliber and stopping power, as well as maximum range and precision. Most of them are available in different colors. You can try all the Arma 3 Marksmen weapons in the Virtual Reality environment, even without owning the DLC. PLATFORM UPDATES Weapon Handling overhauls the simulation of recoil and introduces the basic concept of stabilization: resting or deploying a firearm on a stable surface. The overall goal is making weapon usage more fluent and natural. The new Suppression Mechanics translates in the fact that concentrated fire in the immediate vicinity of an enemy degrades their ability to move and return fire. The degree of this degrade depends on the weapon(s) used for suppression and the skill of the suppressed I.A. All audio samples for weapons have been enhanced and upgraded. Sound frequency is now attenuated depending on distance and the sound of a firing weapon slightly vary according to the shooter’s location. The new multiplayer scenario, End Game, sees two sides competing to secure schematics in a three-phases operation. New multiplayer systems allows dynamic groups usage, set shared objectives and revive downed team-mates. The Virtual Garage completes the Virtual Arsenal and enables players to try all Arma 3 vehicles (including DLC premium content).
MARKSMEN
66
67
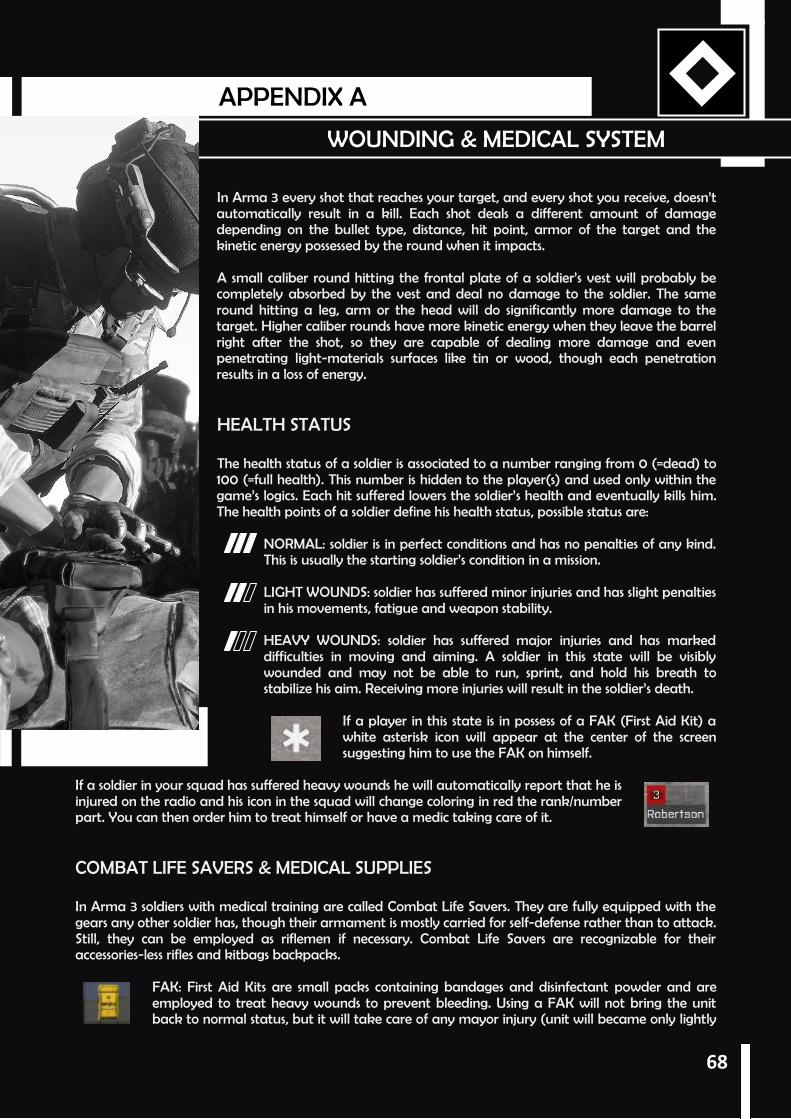
In Arma 3 every shot that reaches your target, and every shot you receive, doesn’t automatically result in a kill. Each shot deals a different amount of damage depending on the bullet type, distance, hit point, armor of the target and the kinetic energy possessed by the round when it impacts. A small caliber round hitting the frontal plate of a soldier’s vest will probably be completely absorbed by the vest and deal no damage to the soldier. The same round hitting a leg, arm or the head will do significantly more damage to the target. Higher caliber rounds have more kinetic energy when they leave the barrel right after the shot, so they are capable of dealing more damage and even penetrating light-materials surfaces like tin or wood, though each penetration results in a loss of energy. HEALTH STATUS The health status of a soldier is associated to a number ranging from 0 (=dead) to 100 (=full health). This number is hidden to the player(s) and used only within the game’s logics. Each hit suffered lowers the soldier’s health and eventually kills him. The health points of a soldier define his health status, possible status are:
NORMAL: soldier is in perfect conditions and has no penalties of any kind. This is usually the starting soldier’s condition in a mission. LIGHT WOUNDS: soldier has suffered minor injuries and has slight penalties in his movements, fatigue and weapon stability. HEAVY WOUNDS: soldier has suffered major injuries and has marked difficulties in moving and aiming. A soldier in this state will be visibly wounded and may not be able to run, sprint, and hold his breath to stabilize his aim. Receiving more injuries will result in the soldier’s death.
If a player in this state is in possess of a FAK (First Aid Kit) a white asterisk icon will appear at the center of the screen suggesting him to use the FAK on himself.
If a soldier in your squad has suffered heavy wounds he will automatically report that he is injured on the radio and his icon in the squad will change coloring in red the rank/number part. You can then order him to treat himself or have a medic taking care of it. COMBAT LIFE SAVERS & MEDICAL SUPPLIES In Arma 3 soldiers with medical training are called Combat Life Savers. They are fully equipped with the gears any other soldier has, though their armament is mostly carried for self-defense rather than to attack. Still, they can be employed as riflemen if necessary. Combat Life Savers are recognizable for their accessories-less rifles and kitbags backpacks.
FAK: First Aid Kits are small packs containing bandages and disinfectant powder and are employed to treat heavy wounds to prevent bleeding. Using a FAK will not bring the unit back to normal status, but it will take care of any mayor injury (unit will became only lightly
WOUNDING & MEDICAL SYSTEM
APPENDIX A
68
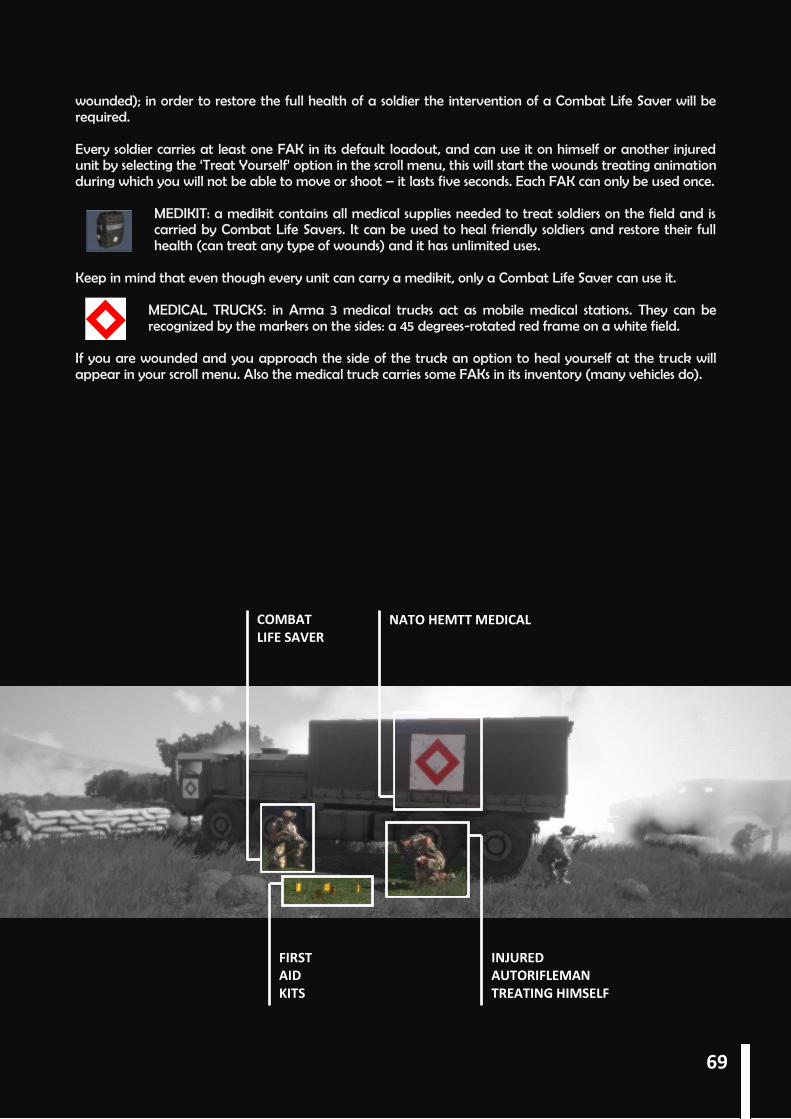
wounded); in order to restore the full health of a soldier the intervention of a Combat Life Saver will be required. Every soldier carries at least one FAK in its default loadout, and can use it on himself or another injured unit by selecting the ‘Treat Yourself’ option in the scroll menu, this will start the wounds treating animation during which you will not be able to move or shoot – it lasts five seconds. Each FAK can only be used once.
MEDIKIT: a medikit contains all medical supplies needed to treat soldiers on the field and is carried by Combat Life Savers. It can be used to heal friendly soldiers and restore their full health (can treat any type of wounds) and it has unlimited uses.
Keep in mind that even though every unit can carry a medikit, only a Combat Life Saver can use it. MEDICAL TRUCKS: in Arma 3 medical trucks act as mobile medical stations. They can be recognized by the markers on the sides: a 45 degrees-rotated red frame on a white field.
If you are wounded and you approach the side of the truck an option to heal yourself at the truck will appear in your scroll menu. Also the medical truck carries some FAKs in its inventory (many vehicles do).
COMBAT LIFE SAVER
NATO HEMTT MEDICAL
FIRST AID KITS
INJURED AUTORIFLEMAN TREATING HIMSELF
69
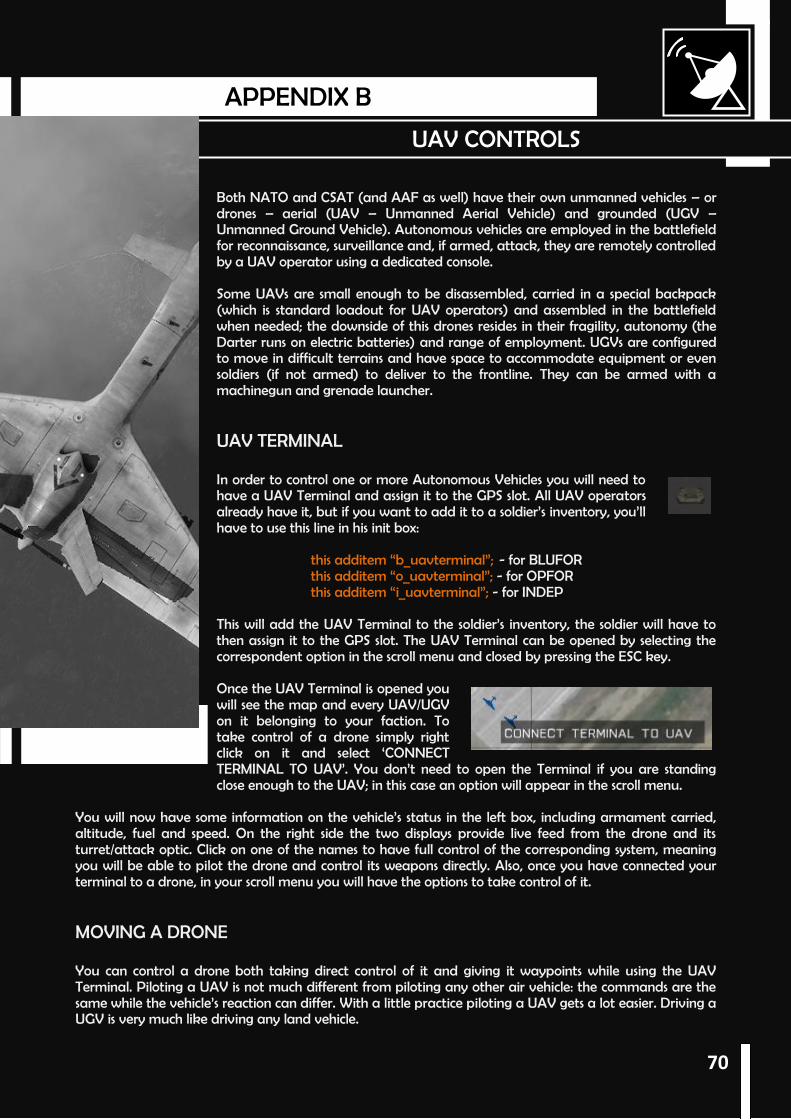
Both NATO and CSAT (and AAF as well) have their own unmanned vehicles – or drones – aerial (UAV – Unmanned Aerial Vehicle) and grounded (UGV – Unmanned Ground Vehicle). Autonomous vehicles are employed in the battlefield for reconnaissance, surveillance and, if armed, attack, they are remotely controlled by a UAV operator using a dedicated console. Some UAVs are small enough to be disassembled, carried in a special backpack (which is standard loadout for UAV operators) and assembled in the battlefield when needed; the downside of this drones resides in their fragility, autonomy (the Darter runs on electric batteries) and range of employment. UGVs are configured to move in difficult terrains and have space to accommodate equipment or even soldiers (if not armed) to deliver to the frontline. They can be armed with a machinegun and grenade launcher. UAV TERMINAL In order to control one or more Autonomous Vehicles you will need to have a UAV Terminal and assign it to the GPS slot. All UAV operators already have it, but if you want to add it to a soldier’s inventory, you’ll have to use this line in his init box:
this additem “b_uavterminal”; - for BLUFOR this additem “o_uavterminal”; - for OPFOR this additem “i_uavterminal”; - for INDEP
This will add the UAV Terminal to the soldier’s inventory, the soldier will have to then assign it to the GPS slot. The UAV Terminal can be opened by selecting the correspondent option in the scroll menu and closed by pressing the ESC key. Once the UAV Terminal is opened you will see the map and every UAV/UGV on it belonging to your faction. To take control of a drone simply right click on it and select ‘CONNECT TERMINAL TO UAV’. You don’t need to open the Terminal if you are standing close enough to the UAV; in this case an option will appear in the scroll menu.
You will now have some information on the vehicle’s status in the left box, including armament carried, altitude, fuel and speed. On the right side the two displays provide live feed from the drone and its turret/attack optic. Click on one of the names to have full control of the corresponding system, meaning you will be able to pilot the drone and control its weapons directly. Also, once you have connected your terminal to a drone, in your scroll menu you will have the options to take control of it.
MOVING A DRONE You can control a drone both taking direct control of it and giving it waypoints while using the UAV Terminal. Piloting a UAV is not much different from piloting any other air vehicle: the commands are the same while the vehicle’s reaction can differ. With a little practice piloting a UAV gets a lot easier. Driving a UGV is very much like driving any land vehicle.
UAV CONTROLS
APPENDIX B
70
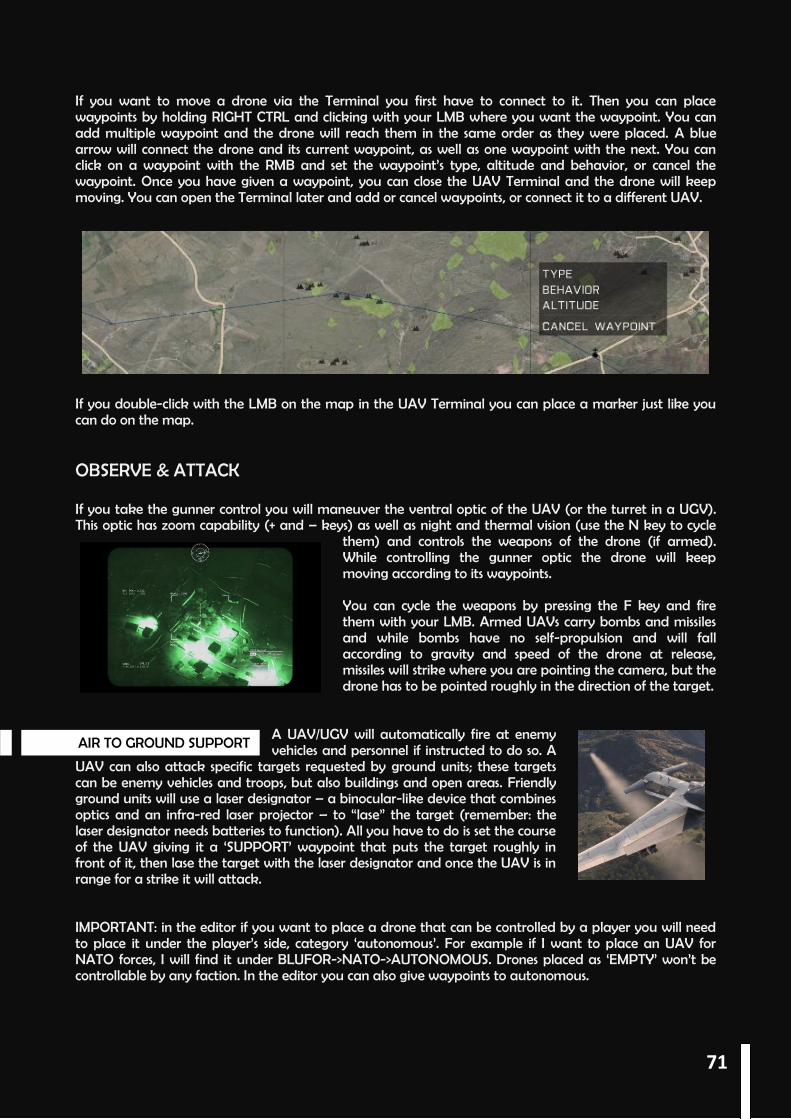
AIR TO GROUND SUPPORT
If you want to move a drone via the Terminal you first have to connect to it. Then you can place waypoints by holding RIGHT CTRL and clicking with your LMB where you want the waypoint. You can add multiple waypoint and the drone will reach them in the same order as they were placed. A blue arrow will connect the drone and its current waypoint, as well as one waypoint with the next. You can click on a waypoint with the RMB and set the waypoint’s type, altitude and behavior, or cancel the waypoint. Once you have given a waypoint, you can close the UAV Terminal and the drone will keep moving. You can open the Terminal later and add or cancel waypoints, or connect it to a different UAV.
If you double-click with the LMB on the map in the UAV Terminal you can place a marker just like you can do on the map. OBSERVE & ATTACK If you take the gunner control you will maneuver the ventral optic of the UAV (or the turret in a UGV). This optic has zoom capability (+ and – keys) as well as night and thermal vision (use the N key to cycle
them) and controls the weapons of the drone (if armed). While controlling the gunner optic the drone will keep moving according to its waypoints. You can cycle the weapons by pressing the F key and fire them with your LMB. Armed UAVs carry bombs and missiles and while bombs have no self-propulsion and will fall according to gravity and speed of the drone at release, missiles will strike where you are pointing the camera, but the drone has to be pointed roughly in the direction of the target.
A UAV/UGV will automatically fire at enemy vehicles and personnel if instructed to do so. A
UAV can also attack specific targets requested by ground units; these targets can be enemy vehicles and troops, but also buildings and open areas. Friendly ground units will use a laser designator – a binocular-like device that combines optics and an infra-red laser projector – to “lase” the target (remember: the laser designator needs batteries to function). All you have to do is set the course of the UAV giving it a ‘SUPPORT’ waypoint that puts the target roughly in front of it, then lase the target with the laser designator and once the UAV is in range for a strike it will attack. IMPORTANT: in the editor if you want to place a drone that can be controlled by a player you will need to place it under the player’s side, category ‘autonomous’. For example if I want to place an UAV for NATO forces, I will find it under BLUFOR->NATO->AUTONOMOUS. Drones placed as ‘EMPTY’ won’t be controllable by any faction. In the editor you can also give waypoints to autonomous.
71

Arma 3 features vehicles and static weapons capable of delivering artillery fire and missiles strikes at great distances (virtually from one side of Altis to the other). NATO Scorcher and CSAT Sochor are both examples of Self-Propelled-Artillery, artillery vehicles employing howitzers cannons, while the NATO Sandstorm launches missiles. Mortars are static weapons employed by infantry and they can be carried disassembled in the battlefield and assembled when needed. The small size of both the mortar and its rounds makes it less effective than the artillery vehicles; still, mortars can be employed with devastating effects on light targets. Cannons and missiles of artillery vehicles and mortars can be fired by aiming through their optics, but this is only useful when the target area is in sight, otherwise the gunner will have to make some calculations (set the elevation of the main gun given the distance of the target) and basically blind fire. To deliver precise fire and avoid these calculations, all artilleries have an artillery computer built in where you can set the target area, chose the ammo type and track the rounds you fire while travelling to their objective. ARTILLERY COMPUTER LAYOUT: MAP You can open the artillery computer by selecting it in the scroll menu while acting as gunner in an artillery vehicle/mortar. Most of the screen will display the map with the artillery you are manning circled in red (much like a player unit in the editor). Two blue circles centered on your position will appear, they visually indicate the minimum and maximum distance at which you can fire your rounds, the number next to each circle is its radius in meters. You can select a target by left-clicking on its position; make sure that your target is between the two circles. Once you have selected your target a blue cross will appear on it along with some information: the number on the top right is the distance of the target, on the bottom right is the ETA - Estimated Time of Arrival – of your rounds (the time the round(s) will take to travel in the air before impacting) and on the bottom left the number of rounds you will fire before having to load another round.
ARTILLERY COMPUTER LAYOUT: INFORMATIONS The panel on the right shows more detailed information that are to be taken in consideration before firing. At the top of the panel is the weapon/vehicle you are employing and right under it is the fire button, left-clicking on it will fire the weapon; the button will then be disabled until a now round is loaded, this takes different times according to the weapons you are using (i.e. reload time for the M4 Scorcher is approximately 8 seconds).
Under ‘MODE’ you can select the fire mode and the minimum/maximum target’s distance between close, medium and far, the computer will then adjust the weapon’s elevation; this way you can hit a distant target as
well as a close one. Each mode will of course change the circles on the map and the ETA of the rounds.
ARTILLEY COMPUTER
APPENDIX C
72
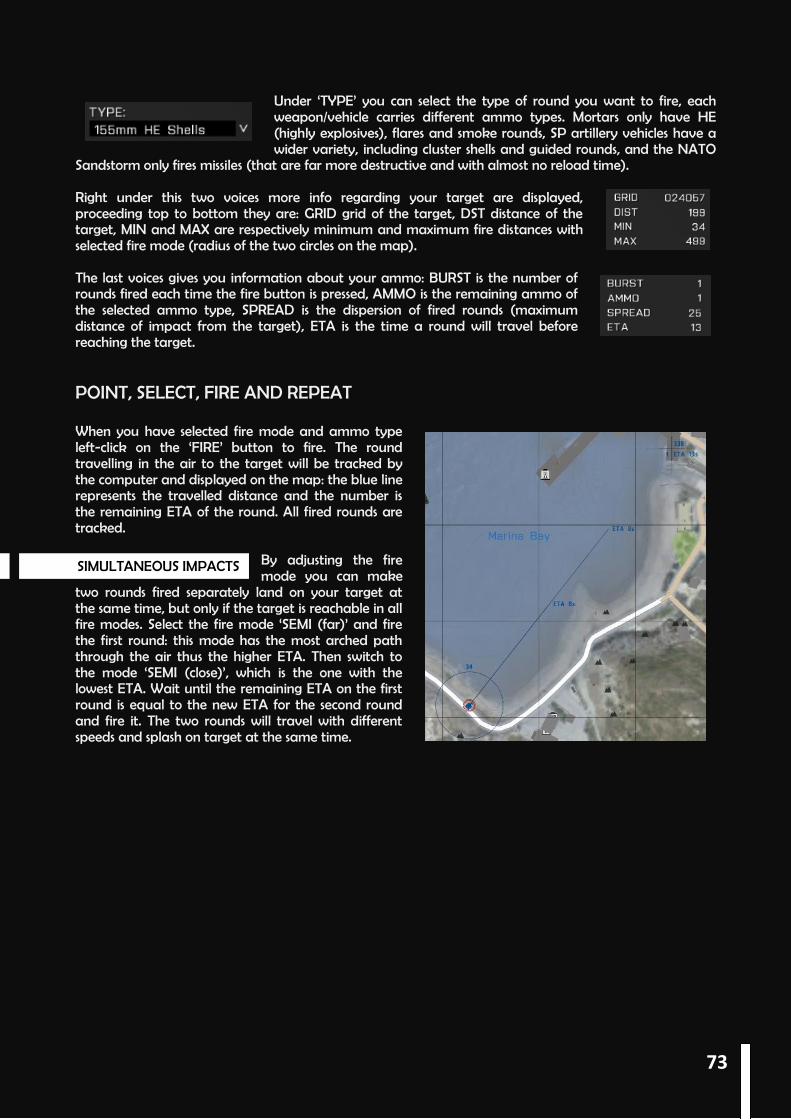
SIMULTANEOUS IMPACTS
Under ‘TYPE’ you can select the type of round you want to fire, each weapon/vehicle carries different ammo types. Mortars only have HE (highly explosives), flares and smoke rounds, SP artillery vehicles have a wider variety, including cluster shells and guided rounds, and the NATO
Sandstorm only fires missiles (that are far more destructive and with almost no reload time). Right under this two voices more info regarding your target are displayed, proceeding top to bottom they are: GRID grid of the target, DST distance of the target, MIN and MAX are respectively minimum and maximum fire distances with selected fire mode (radius of the two circles on the map). The last voices gives you information about your ammo: BURST is the number of rounds fired each time the fire button is pressed, AMMO is the remaining ammo of the selected ammo type, SPREAD is the dispersion of fired rounds (maximum distance of impact from the target), ETA is the time a round will travel before reaching the target. POINT, SELECT, FIRE AND REPEAT When you have selected fire mode and ammo type left-click on the ‘FIRE’ button to fire. The round travelling in the air to the target will be tracked by the computer and displayed on the map: the blue line represents the travelled distance and the number is the remaining ETA of the round. All fired rounds are tracked.
By adjusting the fire mode you can make
two rounds fired separately land on your target at the same time, but only if the target is reachable in all fire modes. Select the fire mode ‘SEMI (far)’ and fire the first round: this mode has the most arched path through the air thus the higher ETA. Then switch to the mode ‘SEMI (close)’, which is the one with the lowest ETA. Wait until the remaining ETA on the first round is equal to the new ETA for the second round and fire it. The two rounds will travel with different speeds and splash on target at the same time.
73
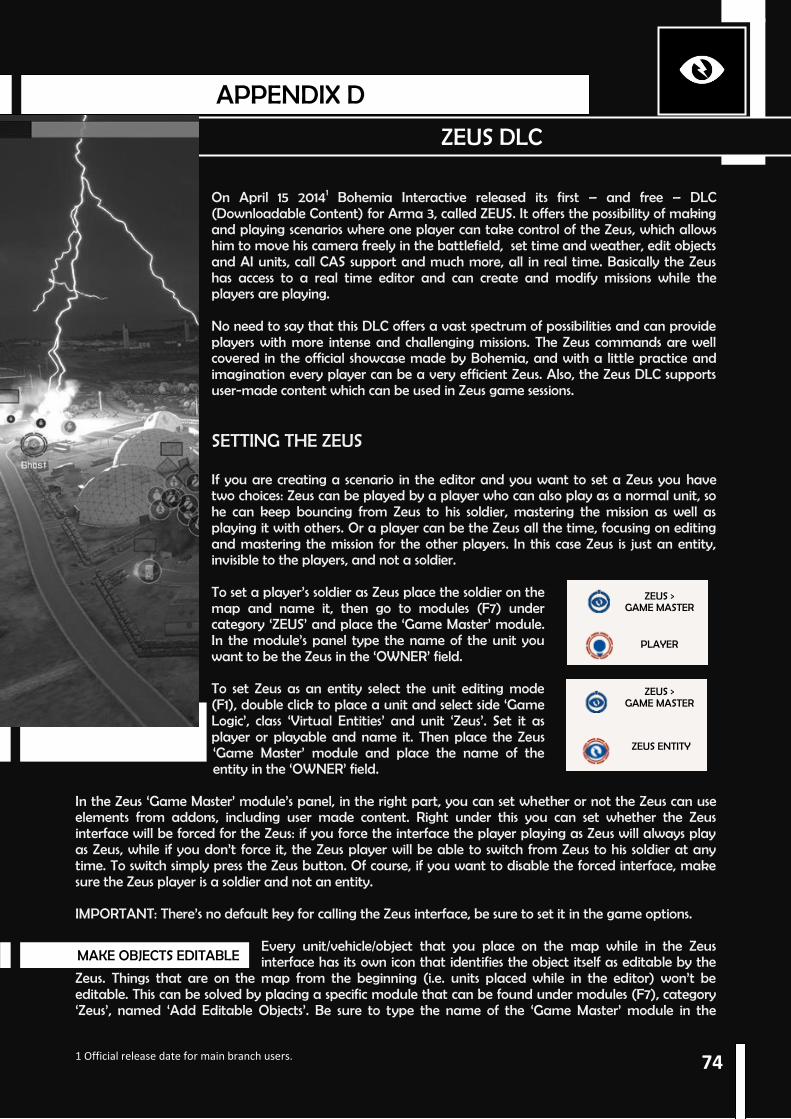
MAKE OBJECTS EDITABLE
On April 15 20141 Bohemia Interactive released its first – and free – DLC (Downloadable Content) for Arma 3, called ZEUS. It offers the possibility of making and playing scenarios where one player can take control of the Zeus, which allows him to move his camera freely in the battlefield, set time and weather, edit objects and AI units, call CAS support and much more, all in real time. Basically the Zeus has access to a real time editor and can create and modify missions while the players are playing. No need to say that this DLC offers a vast spectrum of possibilities and can provide players with more intense and challenging missions. The Zeus commands are well covered in the official showcase made by Bohemia, and with a little practice and imagination every player can be a very efficient Zeus. Also, the Zeus DLC supports user-made content which can be used in Zeus game sessions. SETTING THE ZEUS If you are creating a scenario in the editor and you want to set a Zeus you have two choices: Zeus can be played by a player who can also play as a normal unit, so he can keep bouncing from Zeus to his soldier, mastering the mission as well as playing it with others. Or a player can be the Zeus all the time, focusing on editing and mastering the mission for the other players. In this case Zeus is just an entity, invisible to the players, and not a soldier. To set a player’s soldier as Zeus place the soldier on the map and name it, then go to modules (F7) under category ‘ZEUS’ and place the ‘Game Master’ module. In the module’s panel type the name of the unit you want to be the Zeus in the ‘OWNER’ field. To set Zeus as an entity select the unit editing mode (F1), double click to place a unit and select side ‘Game Logic’, class ‘Virtual Entities’ and unit ‘Zeus’. Set it as player or playable and name it. Then place the Zeus ‘Game Master’ module and place the name of the entity in the ‘OWNER’ field.
In the Zeus ‘Game Master’ module’s panel, in the right part, you can set whether or not the Zeus can use elements from addons, including user made content. Right under this you can set whether the Zeus interface will be forced for the Zeus: if you force the interface the player playing as Zeus will always play as Zeus, while if you don’t force it, the Zeus player will be able to switch from Zeus to his soldier at any time. To switch simply press the Zeus button. Of course, if you want to disable the forced interface, make sure the Zeus player is a soldier and not an entity. IMPORTANT: There’s no default key for calling the Zeus interface, be sure to set it in the game options.
Every unit/vehicle/object that you place on the map while in the Zeus interface has its own icon that identifies the object itself as editable by the
Zeus. Things that are on the map from the beginning (i.e. units placed while in the editor) won’t be editable. This can be solved by placing a specific module that can be found under modules (F7), category ‘Zeus’, named ‘Add Editable Objects’. Be sure to type the name of the ‘Game Master’ module in the
ZEUS DLC
APPENDIX D
ZEUS > GAME MASTER
PLAYER
ZEUS > GAME MASTER
ZEUS ENTITY
74 1 Official release date for main branch users.

UNITS AND OBJECTS MANAGEMENT
‘Assigned Zeus’ field (NOT the name of the player being Zeus, but the name of the Game Master module). Then simply sync all object you want to be editable to the module. THE POWER OF ZEUS When you are in the Zeus’ interface you can move around the map freely: use the arrows keys, ‘Q’ and ‘Z’ for height and click and drag your RMB to turn the camera. You can also toggle night vision by pressing the N key. On the top center of the screen you have your compass and clock, that you can toggle by respectively press the ‘K’ and ‘O’ key. On the left side you have the ‘EDIT’ panel, where you can see a list of all the units, vehicles etc. that you can edit; every time you place a new object the list will be automatically updated. You can select units either from the map directly, or by clicking on their name in the edit list. On the right side is the ‘CREATE’ panel, to be used for placing units. At its top you can select units, groups, modules, markers and recent commands; they basically work like in the editor only you place objects on the map in real time.
Under ‘modules’ you can find effects like flares, smoke, chemlights, tracers. You can also place fire support like artillery and CAS, and set weather and time by placing their respective
icons on the map and double click on them to operate a change. You can also set a respawn zone (and later move it), create tasks and set their state (check ‘objectives’). And finally, under category ‘zeus’ you can find the zeus’ remote control which allows you to take control of any unit by selecting the module and clicking the unit’s icon, and zeus’ lightning that will strike where you click killing units and destroying vehicles. To release control of a unit select the ‘release UAV control’ option in the scroll menu.
To select a unit/object click with your LMB on his icon; select the squad’s icon to select all its members or click and drag to select
multiple units. Click and drag a unit to move it. To group/ungroup a unit select the group icon in the ‘create’ panel, hold left CTRL and drag a line from the unit. You can rotate a unit/object by selecting it and holding left SHIFT while dragging your mouse around it. To adjust its height hold left ALT and drag you mouse. Double click on a unit/vehicle to see and adjust its status, behaviour, ammo, fuel, health, formation and more. You can’t edit players. To give a waypoint to a selected unit right click where you want it to move; you can add multiple waypoints by holding left CTRL. To create a cycle waypoint hold the left ALT key. You can edit every waypoint by double clicking on it. A waypoint positioned on a vehicle will automatically be set as a ‘get in’ waypoint; to rapidly order units out of it press the ‘G’ key (all occupants will get out). You can delete every object, waypoint and module by selecting it and pressing DELETE. Destroyed vehicles and dead units will have a grey icon, deleting them may help reducing the load on your machine, especially when playing in MP.
ADD EDITABLE OBJECTS
ADD EDITABLE OBJECTS
75

IN-GAME ACTIVATION
The Arma series has a wide and active community and among its members are many talented modders and content creators. The Arma 3 alpha was released in March 2013 and since then the list of user made content has become long and it gets longer every day. User made content consists of units, weapons, vehicles, missions, scripts, mods and even terrains and factions. Some are completely new, some are ported from Arma 2 and some are modifications of the assets in Arma 3. Mods, addons and scripts made by the community are completely free and can be used in MP missions, provided that all the players have the same addons unless otherwise stated. Also, many addons are regularly updated by their creators, especially after the initial release; be sure to download the latest version. IMPORTANT: user made content is usually safe and tested by the author and/or other players, but it is not official content. There’s usually a disclaimer stating that the author takes no responsibilities for any problems with your game/computer related to the usage of the content you downloaded. INSTALLING ADDONS AND MODS Once you have downloaded a mod/addon extract its content somewhere easy to find - just for the time of installation you may leave the folder(s) on the desktop. Sometimes you will find folders with pictures and short guides on the addon itself. Make sure you find the folder containing the actual addon/mod. Now you have to rename the folder of the addon/mod, you can use the name that you want but be sure to add “@” (without quotes) at the beginning of the name. You can keep the original name and add the “@” at its beginning.
Now place the renamed folder in the Arma 3 game directory. Usually in this path:
32 bits - C:\Program Files\Steam\steamapps\common\Arma 3 64 bits - C:\Program Files (x86)\Steam\steamapps\common\Arma 3
Some Mods come with an extra folder named “userconfig”, which contains values and parameters the user can modify to better fit the mod to his needs. You now have two ways to activate the addon/mod in order to have its content in-game:
This is maybe the easiest way. Simply launch the game, in the main menu select CONFIGURE, then EXPANSIONS and you will have a list
of all the addons/mods in your game folder. Select the mod and press ‘ENABLE’, you will then be asked to restart your game. Once you have restarted Arma 3 the addon/mod will be functional. By using the Expansions panel you can unable and disable all your mods and addons when you need to, then just restart the game to apply your changes.
ADDONS & MODS
APPENDIX E
76
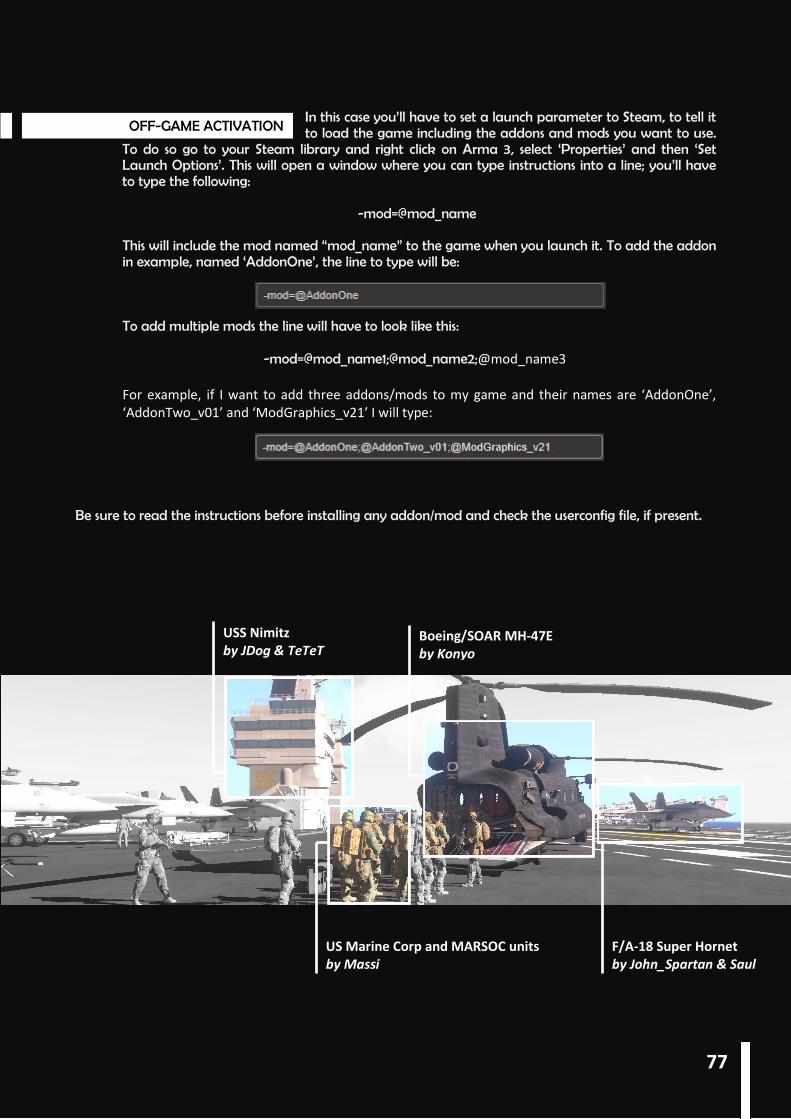
OFF-GAME ACTIVATION
In this case you’ll have to set a launch parameter to Steam, to tell it to load the game including the addons and mods you want to use.
To do so go to your Steam library and right click on Arma 3, select ‘Properties’ and then ‘Set Launch Options’. This will open a window where you can type instructions into a line; you’ll have to type the following:
-mod=@mod_name
This will include the mod named “mod_name” to the game when you launch it. To add the addon in example, named ‘AddonOne’, the line to type will be: To add multiple mods the line will have to look like this:
-mod=@mod_name1;@mod_name2;@mod_name3 For example, if I want to add three addons/mods to my game and their names are ‘AddonOne’, ‘AddonTwo_v01’ and ‘ModGraphics_v21’ I will type:
Be sure to read the instructions before installing any addon/mod and check the userconfig file, if present.
77
US Marine Corp and MARSOC units by Massi
USS Nimitz by JDog & TeTeT
Boeing/SOAR MH-47E by Konyo
F/A-18 Super Hornet by John_Spartan & Saul
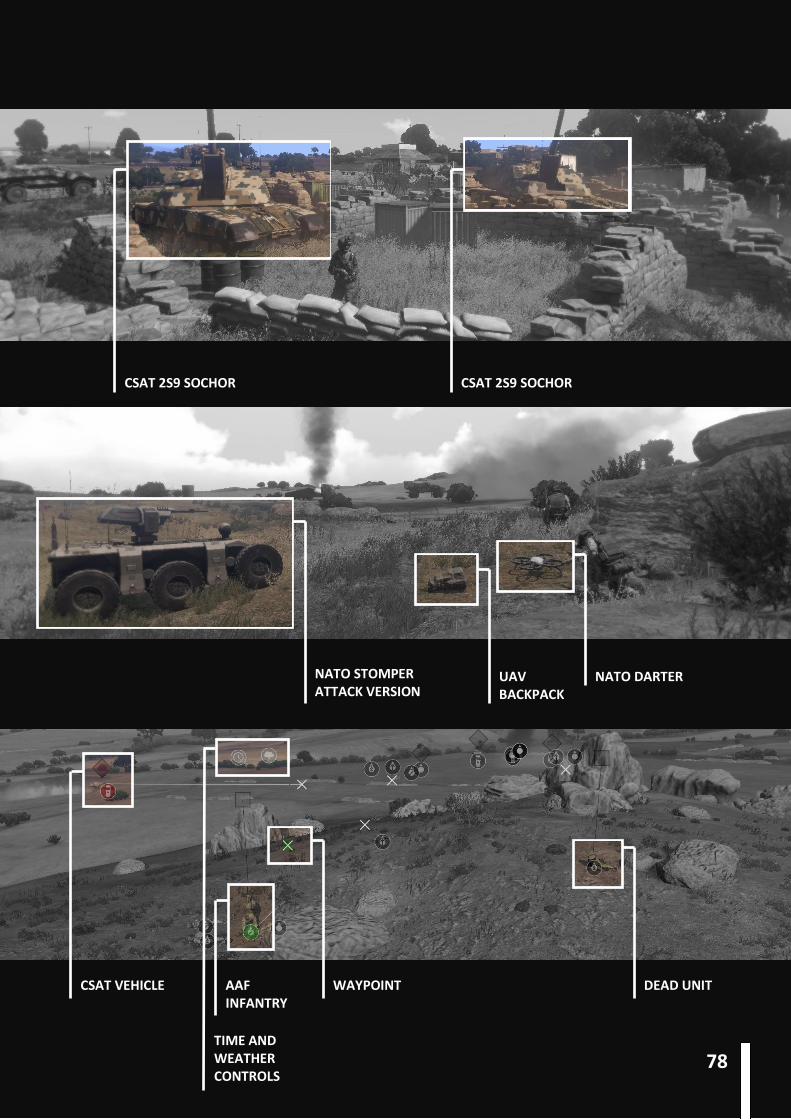
CSAT 2S9 SOCHOR
CSAT 2S9 SOCHOR
NATO STOMPER ATTACK VERSION
NATO DARTER
UAV BACKPACK
DEAD UNIT
WAYPOINT
AAF INFANTRY
CSAT VEHICLE
TIME AND WEATHER CONTROLS
78

-CREDITS Big thanks to Lord Rankine and Kikko for the time they dedicated to read the first draft, the suggestions they made and their final approval. Also thanks to all the players I played with on the internet, both in Arma 2 and Arma 3, for they made me discover the potential of the ARMA series. And of course thanks to Bohemia Interactive for making such a great game and for their continued efforts in supporting and expanding it.
79