Embed Size (px)
Citation preview

Arizona A05 – Smoke Control
Area Exempt
Operation and Installation Manual
Version 1 – 15/03/2019 - AZA05
PLEASE RETAIN FOR FUTURE REFERENCE

Page 2 of 22
The Clean Air Act 1993 and Smoke Control Areas
Under the Clean Air Act local authorities may declare the whole or part of the
district of the authority to be a smoke control area. It is an offence to emit
smoke from a chimney of a building, from a furnace or from any fixed boiler if
located in a designated smoke control area. It is also an offence to acquire an
"unauthorised fuel" for use within a smoke control area unless it is used in an
"exempt" appliance ("exempted" from the controls which generally apply in
the smoke control area).
In England appliances are exempted by publication on a list by the Secretary
of State in accordance with changes made to sections 20 and 21 of the Clean
Air Act 1993 by section 15 of the Deregulation Act 2015. In Scotland
appliances are exempted by publication on a list by Scottish Ministers under
section 50 of the Regulatory Reform (Scotland) Act 2014. Similarly, In
Northern Ireland appliances are exempted by publication on a list by the
Department of Agriculture, Environment and Rural Affairs under Section 16
of the Environmental Better regulation Act (Northern Ireland) 2016. In Wales
appliances are exempted by regulations made by Welsh Ministers.
Further information on the requirements of the Clean Air Act can be found
here: https://www.gov.uk/smoke-control-area-rules
Your local authority is responsible for implementing the Clean Air Act 1993
including designation and supervision of smoke control areas and you can
contact them for details of Clean Air Act requirements.
The Arizona A05 stove has been recommended as suitable for use in smoke
control areas.
Page 3 of 22
Welcome to Arizona
Congratulations on purchasing your very own Arizona stove.
We’re sure you can’t wait to get started, but please, read this manual
thoroughly. You’ll learn the ins and outs of using your stove and we promise
you, you’ll hit the ground running.
We’d like to thank you for supporting Arizona, a brand which strives to
produce reliable, eco-friendly stoves at an affordable price.

Page 4 of 22
IMPORTANT
It is important that this manual is read by the installer before installation. The
householder should familiarise themselves with the manual before using the
appliance. Incorrect installation of this stove can be dangerous. The installation
should be carried out by a trained competent person and in accordance with local
and national building regulations.
For practical guidance in respect to the installation of your stove, required ventilation, hearth
construction, flue construction and compliance with building regulations please refer to:
Oftec Information on Relevant Building Regulations:
https://www.oftec.org.uk/consumers/heating-installation-work-and-building-regulations
Hetas Information on Relevant Building Regulations. Links to your specific local building
regulations are also accessible through here.
https://www.hetas.co.uk/consumer/regulations/
Approved Document J of the Building regulations 2010 (England and Wales)
http://www.planningportal.gov.uk/buildingregulations/approveddocuments/partj/approved
The Communities and Local Government website: www.communities.gov.uk
The Planning Portal website (England and Wales): www.planningportal.co.uk
If you are the person undertaking the building work, you can seek assistance from the relevant
local authority building control service or from your approved inspector.
Please note that, depending on which part of the UK or Ireland the stove is being fitted, you
may be responsible for ensuring that the work carried out complies with building regulations.
The building owner may also have a responsibility for ensuring compliance of building
regulation requirements.

Page 5 of 22
1) INSTALLATION INSTRUCTIONS
APPLIANCE LOCATION
The appliance must be located at specific distances from its surroundings.
This is to prevent damage to products & furnishings within the vicinity of the
appliance. Adequate space should be provided for servicing the appliance.
There must be a minimum clearance of 150mm each side of the appliance,
with 300mm clearance above the stove to provide sufficient space for heat to
dissipate to room space.
Distance to
combustibles.
Front Side Back Hearth Temp.
Arizona A05 110cm 60cm 40cm > 100°C
VENTILATION
Your stove requires ventilation to supply it with air for combustion.
Ventilation is also required to ensure the proper operation of flues and
chimneys to ensure that the products of combustion are safely dispersed to
the outside air. Please ensure the stove has sufficient ventilation for
operation.
Extraction fans lower the pressure in a building which can cause spillage of
combustion products from an open-flued appliance. This can occur even if
the appliance and the fan are in different rooms. If mechanical extraction is
Page 6 of 22
unavoidable in the same room as your stove, then seek specialist advice to
ensure safe operation of the appliance.
A competent installer should be aware of specific ventilation parameters.
Building control guidance for heat producing appliance ventilation can be
found at: https://www.hetas.co.uk/19223/ .
For local building regulations, please see page 3.
FLUE / CHIMNEY
It is important that the flue or chimney to which this appliance is to be
connected has been checked by a competent person to ensure its suitability
and that it will work safely. The chimney or flue and installation should
comply with local and national building regulations.
Sufficient operating draft is required for the product to function optimally.
The following considerations should be taken into account to ensure safe
operation of the appliance.
The flue must be:
• Suitable for use with solid fuel burning appliances (Min. rating of T400).
• In good condition and provide a draft of 10-20 Pa.
• Free from any internal obstructions.
• At least 4.5 metres from the top of the stove outlet to the top of the chimney.
• Independent from a shared flue system of any type.
• Larger or equal in diameter than the appliance flue collar size. Provision should be made to ensure the chimney can be swept in the entirety
of its length. For local building regulations, please see page 3.

Page 7 of 22
If using single wall flue, please ensure there is a clearance of at least 3 times the diameter of the flue pipe from any combustible material (e.g. 150mm pipe = 450mm minimum clearance to wooden beam).
HEARTH CONSTRUCTION
Hearths should be constructed of suitably robust materials and to
appropriate dimensions such that, in normal use, they prevent combustion
appliances setting fire to the building fabric and furnishings and they limit the
risk of people being accidently burnt.
The hearth should be able to support the weight of the stove and its chimney
if the chimney is not independently supported.
For local building regulations, please see page 3.

Page 8 of 22
2) OPERATION INSTRUCTIONS
Lighting the stove
1. Open the door and ensure the air wash on the top of the door is
opened fully.
2. On first lighting, we recommend using 2 - 3 firelighters along with
wood kindling built in a pyramid above the firelighters to obtain a
good fire bed. Ignite the firelighters then close the stove door and
allow the firelighters and wood kindling to ignite to the point where
the embers are glowing.
3. Add your fuel of choice and control the stove as advised. Burn small
loads initially in your new appliance before full fires are used, to
allow paint & fitting cement to cure.
Controlling Stove
Burning wood:
• Air-wash control lever – Use the air-wash control lever, the higher of
the two controls located at the bottom of the stove, to control fire.
• Primary air control lever – The lower of the two controls at the
bottom of the stove, should be closed as wood does not need air
from below to burn effectively.
• Avoid overloading your appliance as this may cause damage to the
product and cause unstable burn conditions. See max fuel load stated
in ‘Refuelling Wood’ section for more info.
Page 9 of 22
Burning coal:
• The Air-wash lever – This lever should be opened enough to ensure
the glass is clean. It’s the higher of the two controls located at the
bottom of the stove.
• Primary air control lever – Stove should be mainly controlled using
this lever, the lower of the two controls at the bottom of the stove.
• Avoid prolonged periods of slow burning which may cause build-up
of creosote with certain fuels. Using a flue temperature gauge can
help achieve the optimum temperature for clean combustion. Ensure
you use the suitable fuel for the appliance.
Recommended Fuels
• Split and dried logs properly seasoned with less than 20% moisture content. No larger than 30cm by 10cm.
• Anthracite (Medium) smokeless fuel.
• Eco Logs.
• Briquettes
Note that only Authorised fuels can be used in a Smoke Control Area, details of Authorised fuels can be found at https://smokecontrol.defra.gov.uk/fuels.php
Fuel to Avoid
Use of incorrect fuels can invalidate the warranty of your appliance.
• Petroleum Coke
• Household waste
• Wood with a moisture content above 20%
• Household coal or bituminous coal
Page 10 of 22
• Waste timber that has been painted or treated e.g. railway sleepers
Refuelling Wood
1. Refuel when a layer of hot embers has been formed in the fire bed.
2. Spread the embers out over the fire bed with a poker.
3. While the embers are still glowing, add 1 or 2 logs to the fire.
4. Open the top air control fully to ignite the new fuel.
5. Once new logs have ignited, adjust the air control to give the desired
combustion. If there are too few embers, use suitable kindling prior
to the fuel load to prevent excessive smoke.
Max fuel load – 1.9kg (The maximum amount of fuel specified in this manual
should not be exceeded, overloading can cause excess smoke)
Refuelling Coal
1. De-ash the fire bed.
2. Fully open the bottom air intake.
3. When the new fuel is fully lit adjust the bottom air intake to give the
desired combustion.
Refuelling on a low fire bed
If there is insufficient burning material in the fire bed to light a new fuel
charge, excessive smoke emission can occur. Refuelling must be carried out
onto a sufficient quantity of glowing embers and ash that the new fuel charge
will ignite in a reasonable period. If there are too few embers in the fire bed,
add suitable kindling to prevent excessive smoke.
Page 11 of 22
Weather Conditions
Weather conditions can affect the performance of the stove. Strong winds
combined with close buildings or trees can cause the stove to smoke. Heavy
rain may lower the temperature of the flue making it difficult to light or slow
to heat up.
Operation with door left open
Operation with the door open can cause excess smoke. The appliance must
not be operated with the appliance door left open except as directed in the
instructions.
Dampers left open
Operation with the air controls or appliance dampers open can cause excess
smoke. The appliance must not be operated with air controls, appliance
dampers or door left open except as directed in the instructions.
Page 12 of 22
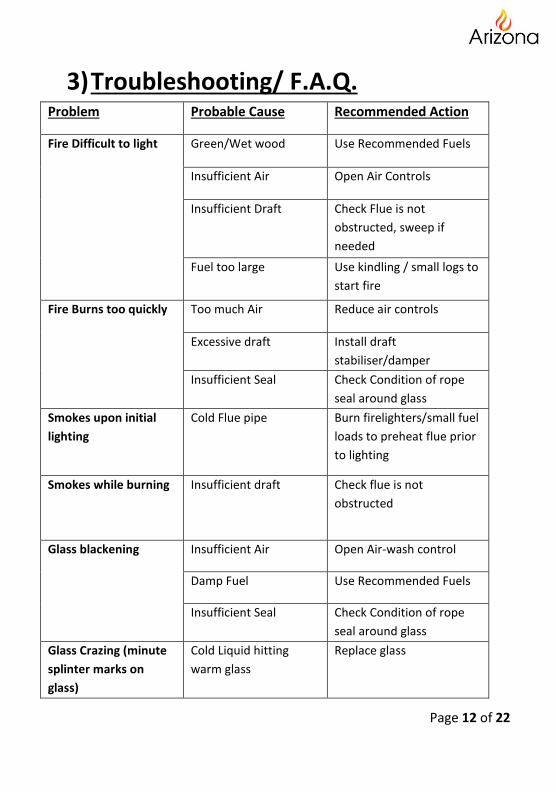
3) Troubleshooting/ F.A.Q. Problem Probable Cause Recommended Action
Fire Difficult to light Green/Wet wood Use Recommended Fuels
Insufficient Air Open Air Controls
Insufficient Draft Check Flue is not
obstructed, sweep if
needed
Fuel too large Use kindling / small logs to
start fire
Fire Burns too quickly Too much Air Reduce air controls
Excessive draft Install draft
stabiliser/damper
Insufficient Seal Check Condition of rope
seal around glass
Smokes upon initial
lighting
Cold Flue pipe Burn firelighters/small fuel
loads to preheat flue prior
to lighting
Smokes while burning Insufficient draft Check flue is not
obstructed
Glass blackening Insufficient Air Open Air-wash control
Damp Fuel Use Recommended Fuels
Insufficient Seal Check Condition of rope
seal around glass
Glass Crazing (minute
splinter marks on
glass)
Cold Liquid hitting
warm glass
Replace glass
Page 13 of 22
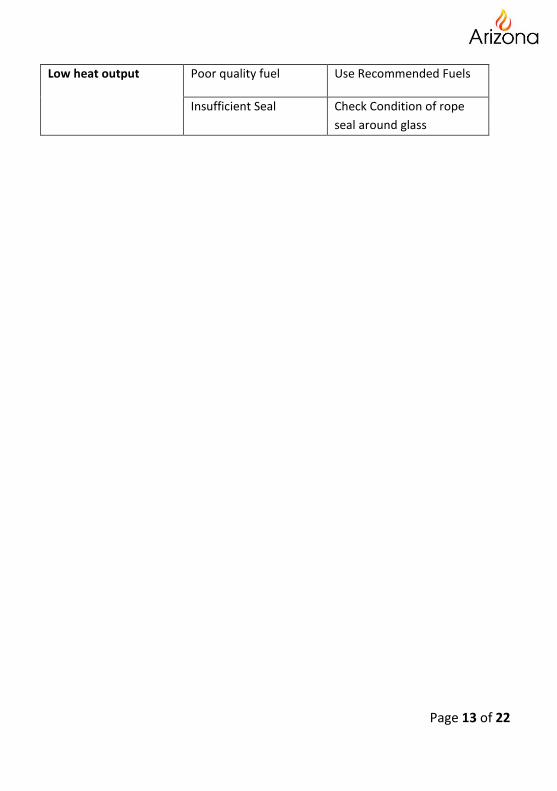
Low heat output Poor quality fuel Use Recommended Fuels
Insufficient Seal Check Condition of rope
seal around glass
Page 14 of 22
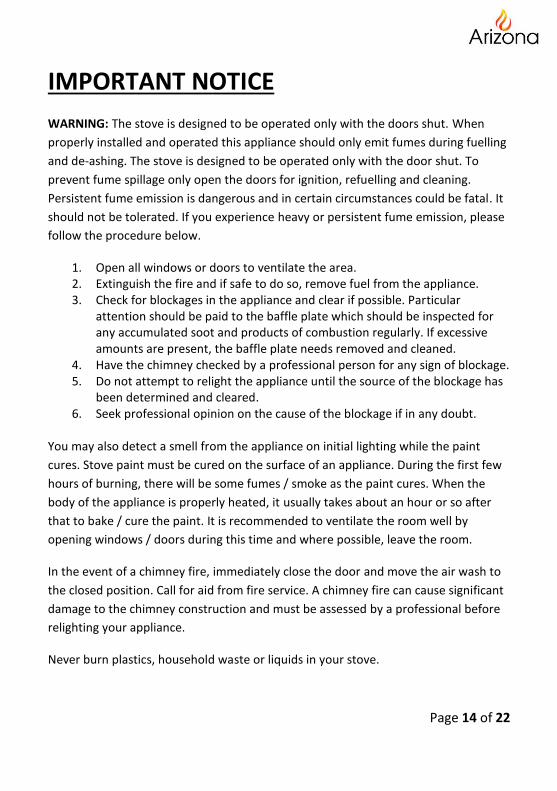
IMPORTANT NOTICE
WARNING: The stove is designed to be operated only with the doors shut. When
properly installed and operated this appliance should only emit fumes during fuelling
and de-ashing. The stove is designed to be operated only with the door shut. To
prevent fume spillage only open the doors for ignition, refuelling and cleaning.
Persistent fume emission is dangerous and in certain circumstances could be fatal. It
should not be tolerated. If you experience heavy or persistent fume emission, please
follow the procedure below.
1. Open all windows or doors to ventilate the area. 2. Extinguish the fire and if safe to do so, remove fuel from the appliance. 3. Check for blockages in the appliance and clear if possible. Particular
attention should be paid to the baffle plate which should be inspected for any accumulated soot and products of combustion regularly. If excessive amounts are present, the baffle plate needs removed and cleaned.
4. Have the chimney checked by a professional person for any sign of blockage. 5. Do not attempt to relight the appliance until the source of the blockage has
been determined and cleared. 6. Seek professional opinion on the cause of the blockage if in any doubt.
You may also detect a smell from the appliance on initial lighting while the paint
cures. Stove paint must be cured on the surface of an appliance. During the first few
hours of burning, there will be some fumes / smoke as the paint cures. When the
body of the appliance is properly heated, it usually takes about an hour or so after
that to bake / cure the paint. It is recommended to ventilate the room well by
opening windows / doors during this time and where possible, leave the room.
In the event of a chimney fire, immediately close the door and move the air wash to
the closed position. Call for aid from fire service. A chimney fire can cause significant
damage to the chimney construction and must be assessed by a professional before
relighting your appliance.
Never burn plastics, household waste or liquids in your stove.

Page 15 of 22
4) MAINTENANCE
De-ashing
The appliance should be de-ashed at least once every 24 hours depending on
fuel type and heating load. Use a brush or cloth to filter the ash through the
grate into the ash pan for removal. It is important that the level of ash in the
ash pan is not allowed to build up to where it is touching the bottom grate.
This will cause the grate to burn out prematurely.
Baffle plate
Particular attention should be paid to the baffle plate, which should be
regularly inspected for any accumulated soot and products of combustion. If
a medium to excessive amount is present, the baffle plate needs removed
and cleaned.
Glass Cleaning
We recommend that the glass should be allowed to cool, then use a damp
cloth to clean it. Abrasive cleaners should be avoided, as they tend to scrape
the glass making it more and more difficult to keep clean. Use of a stove glass
cleaner (available from your retailer) is recommended for stubborn stains.
Door
• Check that the seal around the door is air tight.
• Replace rope seal if necessary.

Page 16 of 22
Paintwork
• If paintwork needs repaired, contact your retailer directly. The paint used on your product is specialised high temperature resistant paint and ordinary paint will not suffice.
• Never perform any paint repair when unit is hot.
Flue / Chimney cleaning
Please ensure that Flue is swept as instructed. Blockages or build-ups within
the flue can cause loss of performance, damage to the product and harm to
the surroundings and users as a result. Depending on the fuel source used,
it’s recommended that the stove is cleaned:
• Anthracite – Clean at least once a year.
• Wood – Clean before and after the heating season. If used
excessively, clean during the heating season as well.
Page 17 of 22
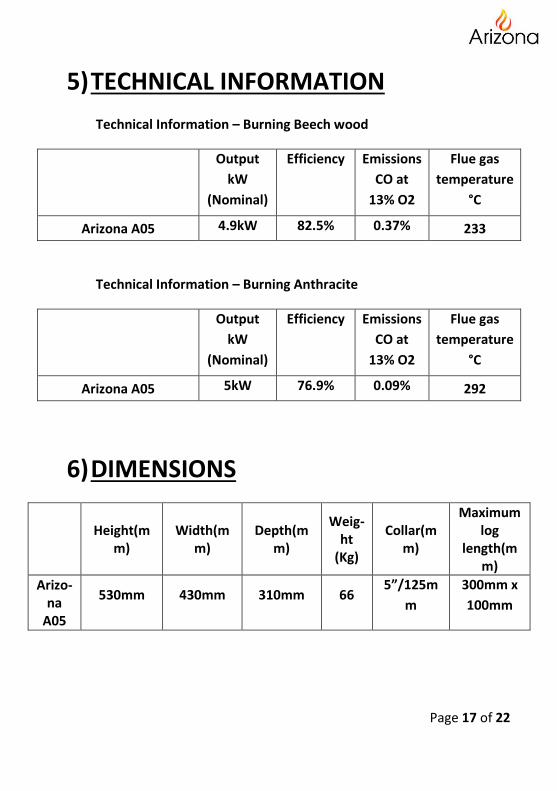
5) TECHNICAL INFORMATION
Technical Information – Burning Beech wood
Output
kW
(Nominal)
Efficiency Emissions
CO at
13% O2
Flue gas
temperature
°C
Arizona A05 4.9kW 82.5% 0.37% 233
Technical Information – Burning Anthracite
Output
kW
(Nominal)
Efficiency Emissions
CO at
13% O2
Flue gas
temperature
°C
Arizona A05 5kW 76.9% 0.09% 292
6) DIMENSIONS
Height(mm)
Width(mm)
Depth(mm)
Weig-ht
(Kg)
Collar(mm)
Maximum log
length(mm)
Arizo-na
A05
530mm 430mm 310mm 66 5”/125m
m
300mm x
100mm

Page 18 of 22
7) PRODUCT DRAWINGS

Page 19 of 22
PRODUCT DRAWINGS
Page 20 of 22
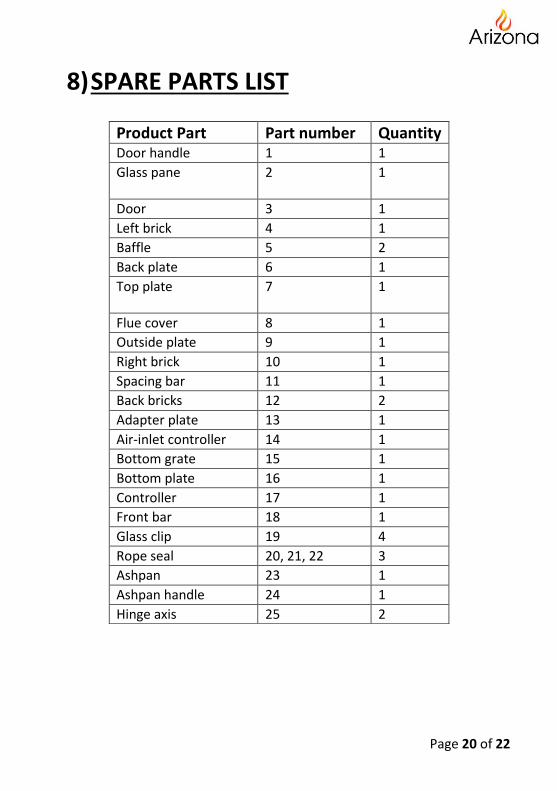
8) SPARE PARTS LIST
Product Part Part number Quantity Door handle 1 1
Glass pane 2 1
Door 3 1
Left brick 4 1
Baffle 5 2
Back plate 6 1
Top plate 7 1
Flue cover 8 1
Outside plate 9 1
Right brick 10 1
Spacing bar 11 1
Back bricks 12 2
Adapter plate 13 1
Air-inlet controller 14 1
Bottom grate 15 1
Bottom plate 16 1
Controller 17 1
Front bar 18 1
Glass clip 19 4
Rope seal 20, 21, 22 3
Ashpan 23 1
Ashpan handle 24 1
Hinge axis 25 2

Page 21 of 22
9) WARRANTY
5 Years – Your warranty covers replacement of the stove body if it is found to
be defective within 5 years of purchase. Labour and shipping costs are not
covered.
1 Year – Bottom grate, baffle plate riddling bars, front bars, ashpan and
handle.
Not Covered
• Glass, rope seals, baffle plate and vermiculite bricks.
• Defects or faults caused by local conditions such as draught problems
and chimney defects.
• Damage caused by over firing.
• Damage resulting from the use of unsuitable fuel.
Unauthorised modifications, misuse, neglect, abuse, excessive wear and tear
and the use of non-original replacement parts will invalidate the warranty of
the stove
Should you require any further information, or wish to view our other products
available please view at www.arizonastoves.com
All rights reserved. Material contained in this publication may not be reproduced in
whole or in part, without prior permission in writing from Micon Distribution Ltd
Imported and Distributed by Micon Distribution Ltd.
1a Hallstown Road, Ballinderry Upper, Lisburn BT28 2NE
Arizona Brand exclusively owned by Micon
Page 22 of 22
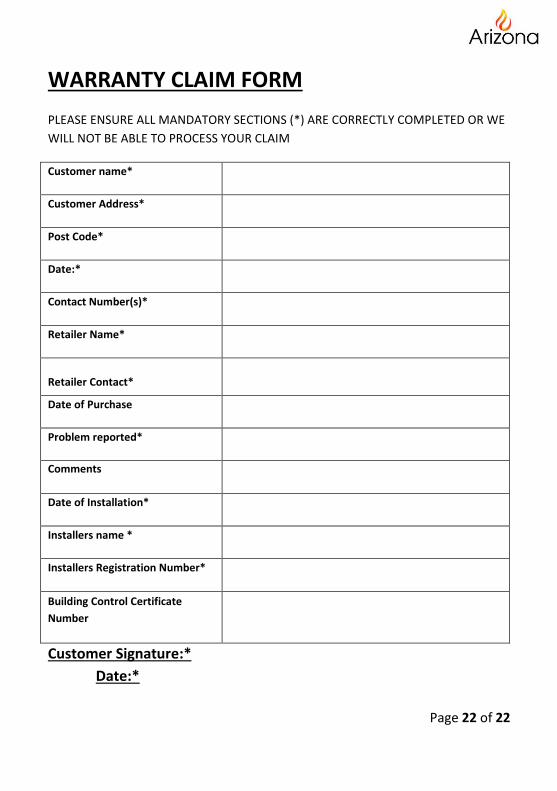
WARRANTY CLAIM FORM
PLEASE ENSURE ALL MANDATORY SECTIONS (*) ARE CORRECTLY COMPLETED OR WE
WILL NOT BE ABLE TO PROCESS YOUR CLAIM
Customer name*
Customer Address*
Post Code*
Date:*
Contact Number(s)*
Retailer Name*
Retailer Contact*
Date of Purchase
Problem reported*
Comments
Date of Installation*
Installers name *
Installers Registration Number*
Building Control Certificate
Number
Customer Signature:*
Date:*
![-134- US4665322 [A05] Nishimu Electronics Uninterruptible polyphase AC power supply US4665322 [A05] Nishimu Electronics Uninterruptible polyphase AC power](https://img.pdfslide.us/doc/110x75/56649e1b5503460f94b0991a/-134-us4665322-a05-nishimu-electronics-uninterruptible-polyphase-ac-power.jpg)


![5602 Traveller - [A05] Trillion Credit Squadron](https://img.pdfslide.us/doc/110x75/577c80d51a28abe054aa5976/5602-traveller-a05-trillion-credit-squadron.jpg)