Embed Size (px)
Citation preview
REV. 26/09/14PN: 110-073
115-
014
(3/4
IN.)
x12
x2
x4
115-
010
x2x2
105-
005
x2
115-
018
(2 1
/2 in
.)
x2
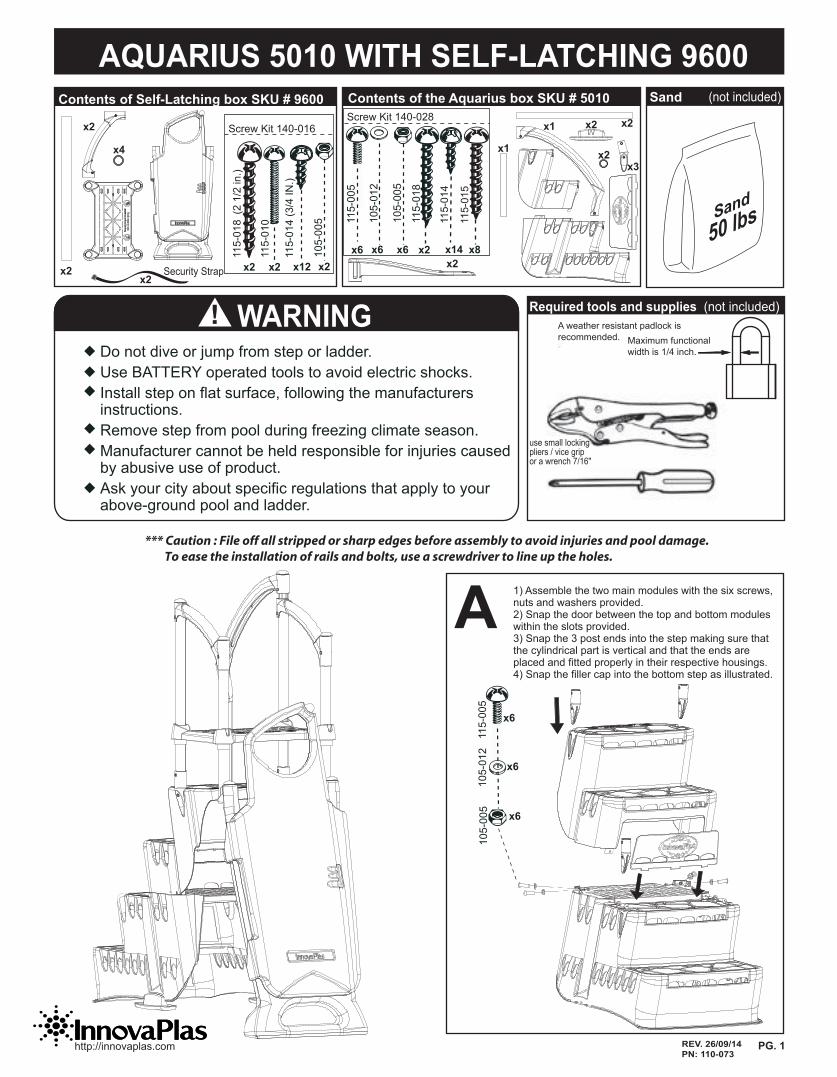
A
115-
005
105-
005
105-
012
x6
x6
x6
PG. 1
x2
50 lbsx6
105-
005
x6 x6 x2
115-
005
115-
018
105-
012
x2x2x1
x3x2
115-
015
115-
014
x14 x8
x1
Screw Kit 140-028
x2
Screw Kit 140-016
AQUARIUS 5010 WITH SELF-LATCHING 9600
Required tools and supplies (not included)
Contents of Self-Latching box SKU # 9600
WARNINGDo not dive or jump from step or ladder.Use BATTERY operated tools to avoid electric shocks.Install step on flat surface, following the manufacturers instructions.Remove step from pool during freezing climate season.Manufacturer cannot be held responsible for injuries caused by abusive use of product. Ask your city about specific regulations that apply to your above-ground pool and ladder.
use small locking pliers / vice grip or a wrench 7/16''
Sand
(not included)Sand
A weather resistant padlock is recommended. Maximum functional
width is 1/4 inch.
1) Assemble the two main modules with the six screws, nuts and washers provided.2) Snap the door between the top and bottom modules within the slots provided.3) Snap the 3 post ends into the step making sure that the cylindrical part is vertical and that the ends are placed and fitted properly in their respective housings.4) Snap the filler cap into the bottom step as illustrated.
Contents of the Aquarius box SKU # 5010
Security Strap
http://innovaplas.com
*** Caution : File off all stripped or sharp edges before assembly to avoid injuries and pool damage. To ease the installation of rails and bolts, use a screwdriver to line up the holes.

E
115-
010
x2
x8
115-
014
(3/4
IN.)F
105-
005
x2
B C50 lbs
D
x2
115-
018
(2 1
/2 in
.)
x2
PG. 2
G
x14
115-
014
50 lbs
1) Insert the 2 posts into the rear holes of the step.
2) Force the posts to a vertical position flush with the rear surface and secure in place with the bolts and nuts provided.
3) Insert the post covers.
1) Slide the Self Latching posts through the platform and small handrails.
2) Secure the platform using the screws provided.
3) Secure the small handrails to the posts with the screws provided.
WARNING
LOCK THE DOOR TO THESTEP WITH A PADLOCKWHEN THE POOL IS NOTIN USE TO PREVENTDROWNING ANDUNAUTHORIZED ENTRY.
1) snaps the 2 feet to th bottom of the step.
2) Insert the three posts into the post ends and secure them in place with the screws provided.
3) Insert the platform over the 2 rear posts.
4) Insert the small and large handrails as illustrated. Secure the large handrails with the screws provided. Place the small handrails at the base of the large and secure them in place with the screws provided.
Sand
1) Install the four post covers.
2) Insert a bag of sand onto surface provided at the rear of the step.
1) Slowly submerge the Step in the pool. Make sure you do not damage the liner in the process.
Security strap
2) Once the step is in the pool secure the platform to the top seat (see illustration) using the two straps provided.
OPTIONAL:Once the pool step has been completely assembled and secured to the pool, attach the 2 screws supplied through the platform to the top seat of your pool to provide a more rigid assembly.
35 inch post
REV. 26/09/14PN: 110-076
1 Year on the Self-Latching system
1 year on the hardware
MANUFACTURERWARRANTY
850 de l’Industrie, St-Jérome (Québec), Canada J7Y4B8