Embed Size (px)
Citation preview
AQUALAND GRAPHVer.2
INSTRUCTION MANUAL
Preface
Thank you for purchasing the communication unit and Aqualand Graph. Aqualand Graph isdesigned to transfer dive profile data stored on Hyper Aqualand (Watch) into a personalcomputer via the communication unit. The data transferred into the personal computer can beeasily controlled and converted into graphic data. It can manage both character data enteredand diving record as a journal and allows still-frame image/moving image data corresponding toeach journal to be pasted on a journal. Moreover, AQUALAND GRAPH can be used to print outthose data, which is very useful in storing diving records.We hope that your copy of Aqualand Graph will let you enjoy your sports life all the more.
• All rights to both this manual and software are reserved by CITIZEN WATCH CO., LTD.(JAPAN)
• No part of this document may be reproduced in any form, in whole or in part, without theexpress written permission of CITIZEN WATCH CO., LTD. (JAPAN)
• The contents of this manual are subject to change without prior notice due to anyimprovements and updates made.
• Windows 98, Windows Me, Windows 2000 and Windows XP are the registered trademarks ofthe Microsoft Corporation, USA.
• The company names and trade names used in this manual are generally the registeredtrademarks or trademarks of respective holders.
2
Notes on Usage
Communication Unit
The communication unit is comprised of precision electronic components and parts. Pleaseexercise care when handling the unit.
• Store and operate the unit in a location where the temperature is between 5˚C and 40˚C (41˚Fand 104˚F) and the humidity is between 20 and 80% (with no dew condensation).Furthermore, be sure to avoid locations where sharp changes in temperature are likely tooccur.
• Do not subject the unit to shock or vibration. Please pay special attention to not store the unitin locations where it may be subject to shock or vibration.
• Keep the unit away from any location where it may be exposed to direct sunlight or a largeamount of dust. Particularly, please pay special attention to not leave the unit in any vehicle.
• Do not disassemble or modify the unit at any time as this may damage the unit.
• Care should be taken to not splash water on or dampen the unit and ensure that the watch(Hyper Aqualand) is not wet when setting it.
• When cleaning the unit, wipe it off with a soft slightly damp cloth using water or a neutraldetergent. Never use benzene or thinner when cleaning the unit.
• Avoid using the unit near a radio or television set. Operating the communication unit near suchdevices may result in difficulties when receiving data.
• CITIZEN WATCH CO., LTD. and CITIZEN TRADING CO., LTD. shall not be responsible forany losses or lost profits, caused by repairs, difficulties with the unit or software, or any similarclaims from anyone.
AQUALAND GRAPH
• CITIZEN WATCH CO., LTD. and CITIZEN TRADING CO., LTD. shall not be responsible forany losses, erased programs or data, lost profits or claims from anyone resulting from the useof this software.
• CITIZEN has checked the operation of various personal computers on which “AQUALANDGRAPH” operates. “AQUALAND GRAPH” will be applicable to your own personal computer,but, should any trouble arise, please contact our Service Center.
3
Preface ................................................................. 21. System Configuration ...................................... 5
1.1. AQUALAND GRAPH Product Configuration ... 51.2. System Requirements .............................. 5
2. Communication Unit ....................................... 72.1. Name and Function of Each Part ............ 72.2. Connecting the Watch and Computer ..... 7
3. Installing AQUALAND GRAPH ...................... 9
4. Startup and Ending AQUALAND GRAPH ..... 104.1. Startup of AQUALAND GRAPH ............. 104.2. Ending of AQUALAND GRAPH .............. 10
5. Main Window .................................................. 115.1. Change Log Display Data ....................... 135.2. Menus ..................................................... 145.3. Tool Bar .................................................. 15
6. Settings .......................................................... 166.1. General ................................................... 16
6.1.1. File Locations ................................... 166.1.2. Units ................................................. 176.1.3. Units when Creating a New Log
(Unit : Depth) .................................... 176.1.4. Album Thumbnails ............................ 176.1.5. Serial Port ......................................... 176.1.6. Select Folder .................................... 18
6.2. Customized Items ................................... 196.2.1. Items ................................................. 206.2.2. Contents ........................................... 206.2.3. Initial definition .................................. 20
6.3. Fixed Items ............................................. 216.3.1. Diver ................................................. 216.3.2. Weather ............................................ 226.3.3. Tank Material .................................... 236.3.4. Diving Service (D. Service) .............. 246.3.5. Dive Style ......................................... 256.3.6. Water Conditions (Water Cond.) ...... 266.3.7. Diving Suit / Inner Wear ................... 276.3.8. Equipment ........................................ 28
6.4. Dive Locations ........................................ 296.4.1. Location ............................................ 306.4.2. Dive Site ........................................... 30
7. Transfer .......................................................... 317.1 Connecting the Communication Unit ....... 327.2 Transfer ................................................... 32
8. Add Log Data ................................................. 338.1. Create New Log ...................................... 368.2. Edit ......................................................... 378.3. Delete ..................................................... 378.4. Edit Album .............................................. 38
8.4.1. Add Image ........................................ 398.4.2. Delete Image .................................... 398.4.3. Change Thumbnails ......................... 398.4.4. Import Log ........................................ 408.4.5. Export Log ........................................ 40
9. Diving List ....................................................... 419.1. Sort ......................................................... 419.2. Select Log Item ....................................... 419.3. Search .................................................... 429.4. Print Log List ........................................... 43
10. Display Graph .............................................. 4410.1. Panel Settings ...................................... 4510.2. Set Line Type ....................................... 4610.3. Print Graph ........................................... 47
11. Print Log ....................................................... 4811.1. Print ...................................................... 4811.2. Print Preview ........................................ 49
12. Create HTML Document .............................. 5012.1. Set Background .................................... 5112.2. Save HTML File .................................... 51
13. Trip Summary ............................................... 5213.1. Register Trip Summary ......................... 5213.2. Customize ............................................. 5413.3. Trip Summary Display .......................... 5513.4. Edit Trip Summary ................................ 5613.5. Delete Log ............................................ 5713.6. List of Trip Summaries .......................... 57
14. Limiting Values ............................................. 5814.1. No.of Registrations ............................... 5814.2. No. of Entered Characters .................... 5914.3. Entered Values ..................................... 60
15. Communication Unit Specifications .............. 61
AQUALAND GRAPH
CONTENTS
4
1. System Configuration
1.1. AQUALAND GRAPH Product Configuration
1AQUALAND GRAPH INSTALL MANUAL ........................... 1
2Communication unit ............................................................ 1
3AQUALAND GRAPH CD-ROM .......................................... 1
1.2. System Requirements
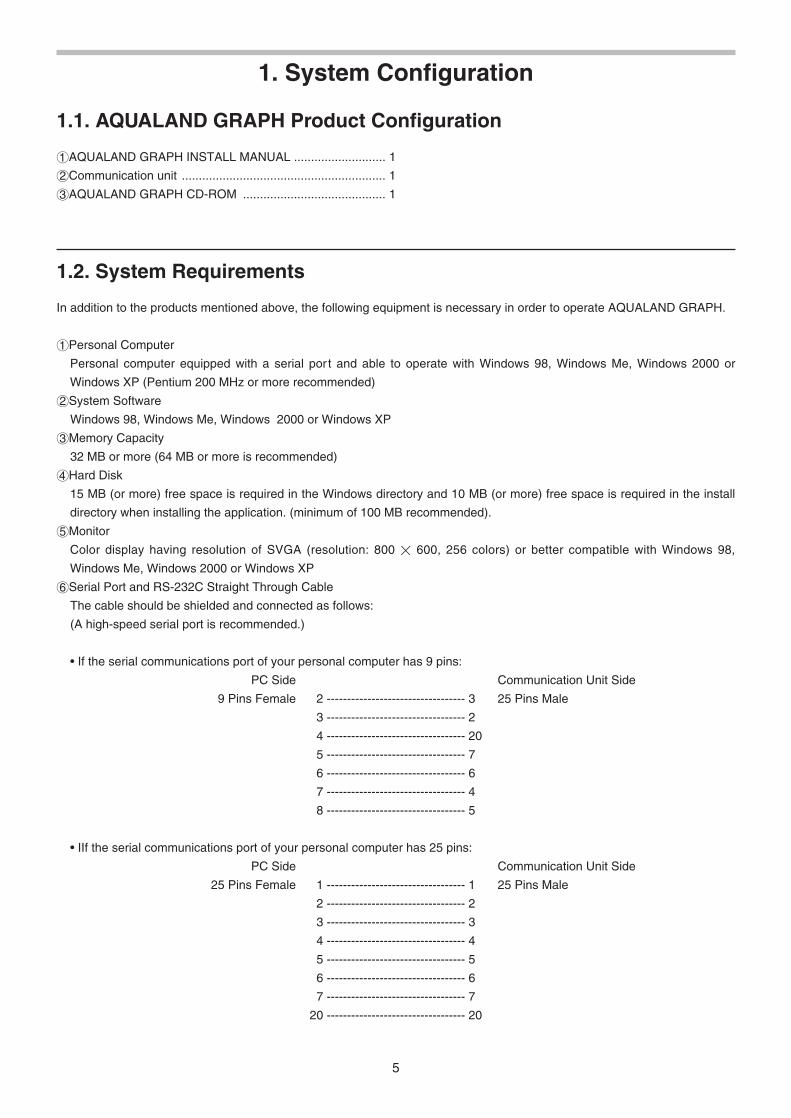
In addition to the products mentioned above, the following equipment is necessary in order to operate AQUALAND GRAPH.
1Personal Computer
Personal computer equipped with a serial por t and able to operate with Windows 98, Windows Me, Windows 2000 or
Windows XP (Pentium 200 MHz or more recommended)
2System Software
Windows 98, Windows Me, Windows 2000 or Windows XP
3Memory Capacity
32 MB or more (64 MB or more is recommended)
4Hard Disk
15 MB (or more) free space is required in the Windows directory and 10 MB (or more) free space is required in the install
directory when installing the application. (minimum of 100 MB recommended).
5Monitor
Color display having resolution of SVGA (resolution: 800 M 600, 256 colors) or better compatible with Windows 98,
Windows Me, Windows 2000 or Windows XP
6Serial Port and RS-232C Straight Through Cable
The cable should be shielded and connected as follows:
(A high-speed serial port is recommended.)
• If the serial communications port of your personal computer has 9 pins:
PC Side Communication Unit Side
9 Pins Female 2 ---------------------------------- 3 25 Pins Male
3 ---------------------------------- 2
04 ---------------------------------- 20
5 ---------------------------------- 7
6 ---------------------------------- 6
7 ---------------------------------- 4
8 ---------------------------------- 5
• IIf the serial communications port of your personal computer has 25 pins:
PC Side Communication Unit Side
25 Pins Female 1 ---------------------------------- 1 25 Pins Male
2 ---------------------------------- 2
3 ---------------------------------- 3
4 ---------------------------------- 4
5 ---------------------------------- 5
6 ---------------------------------- 6
7 ---------------------------------- 7
20 ---------------------------------- 20
5
7Disk Drive
A CD-ROM disk drive (Required during installation).
8Hyper Aqualand (Watch)
9Printer
A printer supported by the Windows system software running on your personal computer
0Web Browser
A Web browser is required for HTML preview of journal and others. It must be linked with the HTML files when relating
files.
6
2. Communication Unit
The communication unit is used to transfer data (log data / profile data) stored in the watch to your personal computer.
There are two different product sizes, the CMUT-01, with no stand for the communication unit, and the CMUT-03, which
comes with a stand.
2.1. Name and Function of Each Part
• RS-232C Connector
Used to connect the communication unit with the subject computer via the serial adapter cable.
• Connection Pins
Used to connect the transfer terminal of the watch. There are three pins; the center pin is put in contact with the transfer pin
of the watch, while the other two pins are put in contact with the watch case.
• Fixing Claw
Used to keep the watch pressed against the connection pins.
• Detachable stand: for use with the CMUT-03
This is attached to the main body of the communications unit.
The stand should always be used with the CMUT-03 communications unit.
Attachment method: The stand is attached by sliding it horizontally over the metal fixtures on the underside of the main
communications unit.
2.2. Connecting the Watch and Computer
• How to Connect:
Follow the steps below to connect the watch to your personal computer.
1Make sure that the power supply to the personal computer is turned off.
2Connect the serial communication port of your personal computer to the connector of the communication unit using the
RS-232C serial adapter cable.
3Turn on the power to your personal computer and start up the AQUALAND GRAPH system.
4Set the watch to the transfer mode, and then recall the data. (Refer to the User’s Manual for Watch)
5Insert the watch so that the transfer pin comes into contact with the center of the three connector pins.
Then, push the watch down into the holder (refer to Figure 2 below).
7
RS-232C connector
<CMUT-01> <CMUT-03>
<Figure 1>
RS-232C connector
Fixing claw Connection pins Fixing claw Connection pins
Detachable stand
• How to Disconnect:
Take hold of the band portion of the watch and raise it from the side opposite to the connector pins (fixing claw side) until it
is separated from the fixing claw. Quit AQUALAND GRAPH operation and turn off the power supply to your personal
computer before disconnecting the serial adapter cable.
For users who use the CMUT-01 type communication unit bymetal-band watch
Precautions for data transmission
Hold the watch and the communication unit with your fingers as shown in the illustration below during data transmission. Be
sure to hold it in place until the Aqualand Graph has finished receiving data.
When a metal-band model Hyper Aqualand is set onto the communication unit, the wristband touching the unit base may lift
the watch slightly from the unit during data transmission. This may cause the terminals to lose contact, and data may not be
transmitted correctly.
8
<Figure 2>

3. Installing AQUALAND GRAPH
Install Aqualand Graph according to the procedure described below.
(1) Turn on the power of the PC and confirm that operating system (OS) has started up.
* When using Windows 2000 or Windows XP, it is necessary to login to Windows as an “Administrator”.
(2) Place the CD-ROM provided in the CD-ROM drive of the PC. The AQUALAND GRAPH installation menu is displayed
automatically.
If the installation menu is not displayed, double-click on "install.exe" contained on the CD-ROM inserted into the CD-ROM
drive to display the installation menu.
(3) Click on "Install AQUALAND GRAPH 2 V21". Installation begins and the next screen shown is displayed.
(4) Confirm the contents and then click on "NEXT" to display the next screen.
(5) If you want to change the directory where the applications are installed, click on "Browse" and change to the desired
directory. Confirm the contents and click on "NEXT" to install the applications. The next screen is then displayed.
(6) Click on "Finish" to complete the installation procedure.
9

4. Startup and Ending AQUALAND GRAPH
4.1. Startup of AQUALAND GRAPH
Select “Program” and then “AqualandGraph 2 V21” from the “Start” button in the task bar.
4.2. Ending of AQUALAND GRAPH
Either click on the [X] button in the upper right hand corner of the <Main Window> or select the [File (F)] menu and then
select [End (X)] in the pull-down menu.
10
5. Main Window
This is the window that is displayed first when [AQUALAND GRAPH] is started up.
The <Main Window> is composed of the following three areas.
You can move to another window by either clicking a button in the tool bar of this menu with the mouse or selecting a menu.
A help message is displayed when the mouse cursor is positioned at any of the buttons in the tool bar.
Log Display Area
11
Log Display AreaThis area displays log data on the left side of the main window.Logs cannot be edited in this area.
This area displays images on the right side of the window.This is displayed by switching from the diving list.
This area displays diving data in line units on the right side of the window.This is displayed by switching from the album display.
Album Display Area
Diving List
12
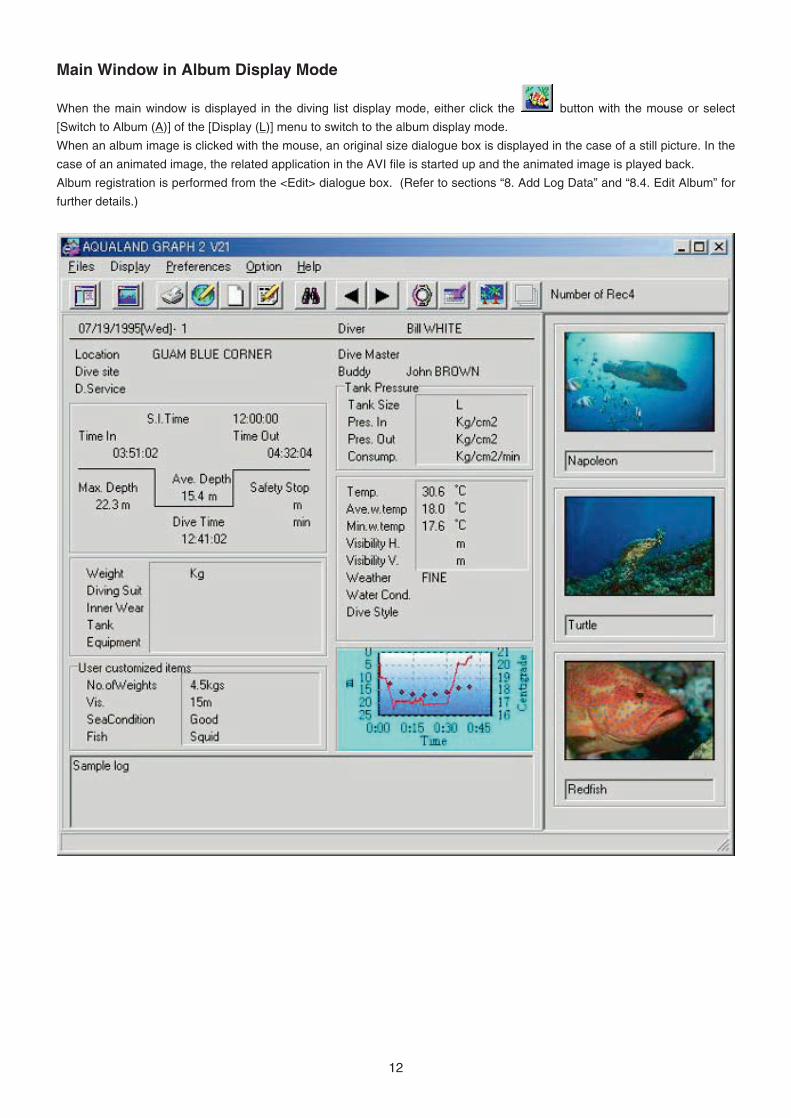
Main Window in Album Display Mode
When the main window is displayed in the diving list display mode, either click the button with the mouse or select
[Switch to Album (A)] of the [Display (L)] menu to switch to the album display mode.
When an album image is clicked with the mouse, an original size dialogue box is displayed in the case of a still picture. In the
case of an animated image, the related application in the AVI file is started up and the animated image is played back.
Album registration is performed from the <Edit> dialogue box. (Refer to sections “8. Add Log Data” and “8.4. Edit Album” for
further details.)
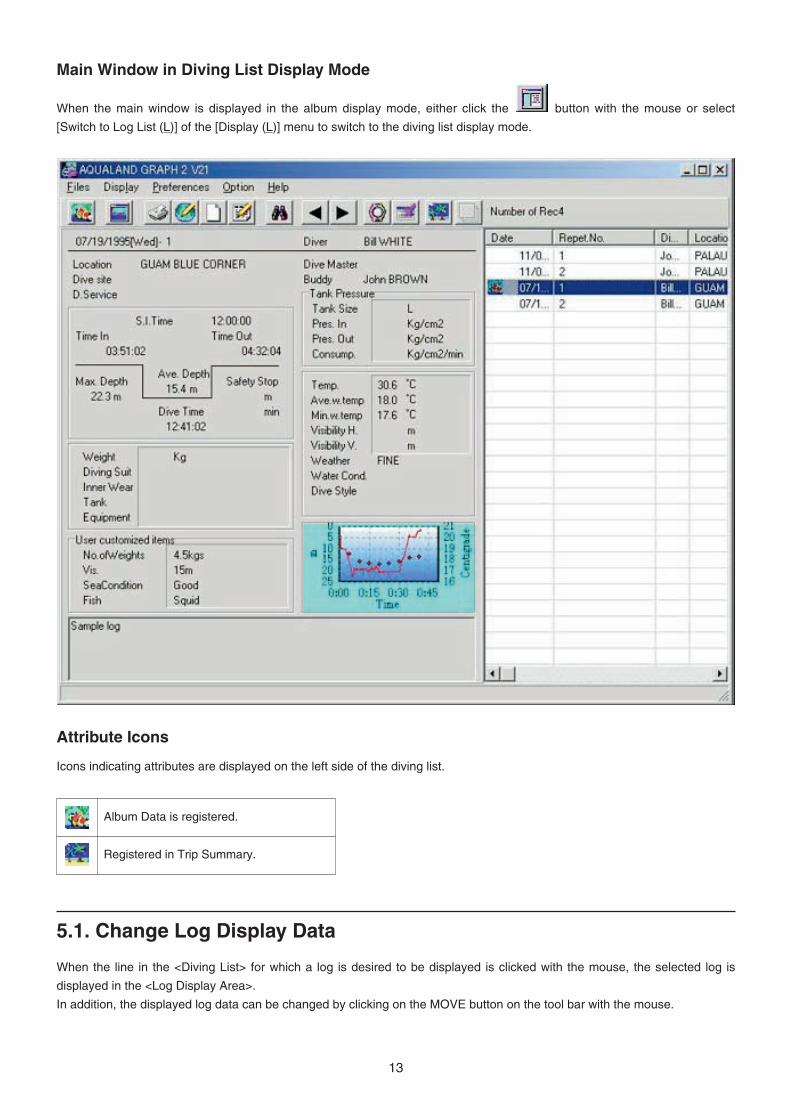
Attribute Icons
Icons indicating attributes are displayed on the left side of the diving list.
13
5.1. Change Log Display Data
When the line in the <Diving List> for which a log is desired to be displayed is clicked with the mouse, the selected log is
displayed in the <Log Display Area>.
In addition, the displayed log data can be changed by clicking on the MOVE button on the tool bar with the mouse.
Album Data is registered.
Registered in Trip Summary.
Main Window in Diving List Display Mode
When the main window is displayed in the album display mode, either click the button with the mouse or select
[Switch to Log List (L)] of the [Display (L)] menu to switch to the diving list display mode.
5.2. Menus
Files (F)
14
Create New Log (N) Creates a new log without transferring data from the watch.
Edit (E) Edits the log that is currently displayed.
Delete (D) Deletes data selected in the <Diving List>.
Create HTML Document (H) Creates a web page of data selected in the <Diving List>.
Print (P) Prints data selected in the <Diving List>.
Print Log List (L) Prints the entire <Diving List>.
Trip Summary (T)This function is enabled in the Album Display Mode.Data selected in the <Diving List> is registered in the <Trip Summary>.
List of Trip Summaries (S)This function is enabled in the Album Display Mode.A list of registered <Trip Summaries> is displayed.
Exit (X) Ends AQUALAND GRAPH.
Display (L)
Search (S) Extracts data desired to be displayed from the <Diving List>.
Select Log Item (I) Selects a log item desired to be displayed from the <Diving List>.
Graph (G) Displays a graph of data selected in the <Diving List>.
Switch to Album (A)Window is displayed in the Diving List Display Mode.Switches window to the Album Display Mode.
Switch to Log List (L)Window is displayed in the Album Display Mode.Switches window to the Diving List Display Mode.
Album Thumbnails (T) Selects whether thumbnail images are to be displayed in the <Album Display Area>.
Preferences (P)
General (G) Registers information required for operating AQUALAND GRAPH.
Customized Items (C) Registers customized user settings that are written into a log.
Fixed Items (F) Registers the diver, weather and other fixed items that are written into a log.
Dive Locations (L) Registers locations that are written into a log.
15
Option (O)
Transfer (T) Transfers data from the watch.
Export Log (E) Exports all or a portion of diving data.
Import Log (I)Loads exported data.DOS, Ver. 1, Ver. 2.0 and Ver. 2.1 log data are also imported.
Help (H)
Help Topics (H) Displays help topics.
About Aqualand Graph (A) Displays the version of AQUALAND GRAPH.
5.3. Tool Bar
Album Display ButtonDisplayed in the Diving List Display Mode.[Switch to Album (A)] of the [Display (L)] menu.
Diving List Display ButtonDisplayed in the Album Display Mode.[Switch to Log List (L)] of the [Display (L)] menu.
Graph Button [Graph (G)] of the [Display (L)] menu.
Print Button [Print (P)] of the [Files (F)] menu.
Create HTML Document Button [Create HTML Document (H)] of the [Files (F)] menu.
Create New Log Button [Create New Log (N)] of the [Files (F)] menu.
Edit Button [Edit (E)] of the [Files (F)] menu.
Search Button [Search (S)] of the [Display (L)] menu.
Back ButtonMoves back to the previous data of the <Diving List> displaying the currentlog and displays the log.
Next ButtonMoves ahead to the next data of the <Diving List> displaying the currentlog and displays the log.
Transfer Button [Transfer (T)] of the [Option (O)] menu.
Export Log Button [Export Log (E)] of the [Option (O)] menu.
Trip Summary ButtonThis function is enabled in the Album Display Mode.[Trip Summary (T)] of the [Files (F)] menu.
List of Trip Summaries ButtonThis function is enabled in the Album Display Mode.[List of Trip Summary (S)] of the [Files (F)] menu.
6. Settings
6.1. General
Settings for information required for operating AQUALAND GRAPH are registered.
The <General> dialogue box is displayed when [General (G)] is selected from the [Preferences (P)] menu of the <Main Window>.
16
Registration is finalized when the button is clicked with the mouse, after which the program returns to the
<Main Window>. Since finalized registration contents are stored in memory by AQUALAND GRAPH, it is not necessary to
register them each time it is started up.
Changes are canceled by either clicking the button or clicking the button in the upper right corner of the
dialogue box with the mouse, after which the program returns to the <Main Window>.
6.1.1. File Locations
Designate a folder for saving transferred data. A maximum of 9999 sets of data can be stored in a single data save folder. In the
case of storing 9999 sets of data consisting of a single dive having a duration of 1 hour, roughly 400 MB of disc space are required.
During installation, a data save folder named "LOG" is created below the folder in which AQUALAND GRAPH is installed.
When the button is clicked with the mouse, the <Select Folder> dialogue box is displayed. Specify a save folder
in this dialogue box when desiring to change the data save folder. (refer to section “6.1.6. Select Folder” for further details).

17
6.1.3. Units when Creating a New Log (Unit : Depth)
Specify the units for depth to be used when creating a new log with Create New Log.
Meter Meters are used for the units of depth, and °C are used for the units of temperature.
Feet Feet are used for the units of depth and °F are used for the units of temperature.
6.1.2. Units
Set the units to be used in the logs. Units can be entered using up to 10 letters or numbers. Registered data is not changed
even if the units are changed.
Weight Enter the units to be displayed for weight.
Capacity Enter the units to be displayed for tank size.
Pressure Enter the units to be displayed for Pres. In and for Pres. Out of the tank.
Air Consum. Enter the units to be displayed for consumption by the tank.
6.1.4. Album Thumbnails
Set the album display mode of the <Album Display Area> of the <Main Window>.
If <Album Thumbnails> is checked, images and comments are displayed. If the check is removed, only comments are
displayed without displaying images.
6.1.5. Serial Port
Select a serial port.
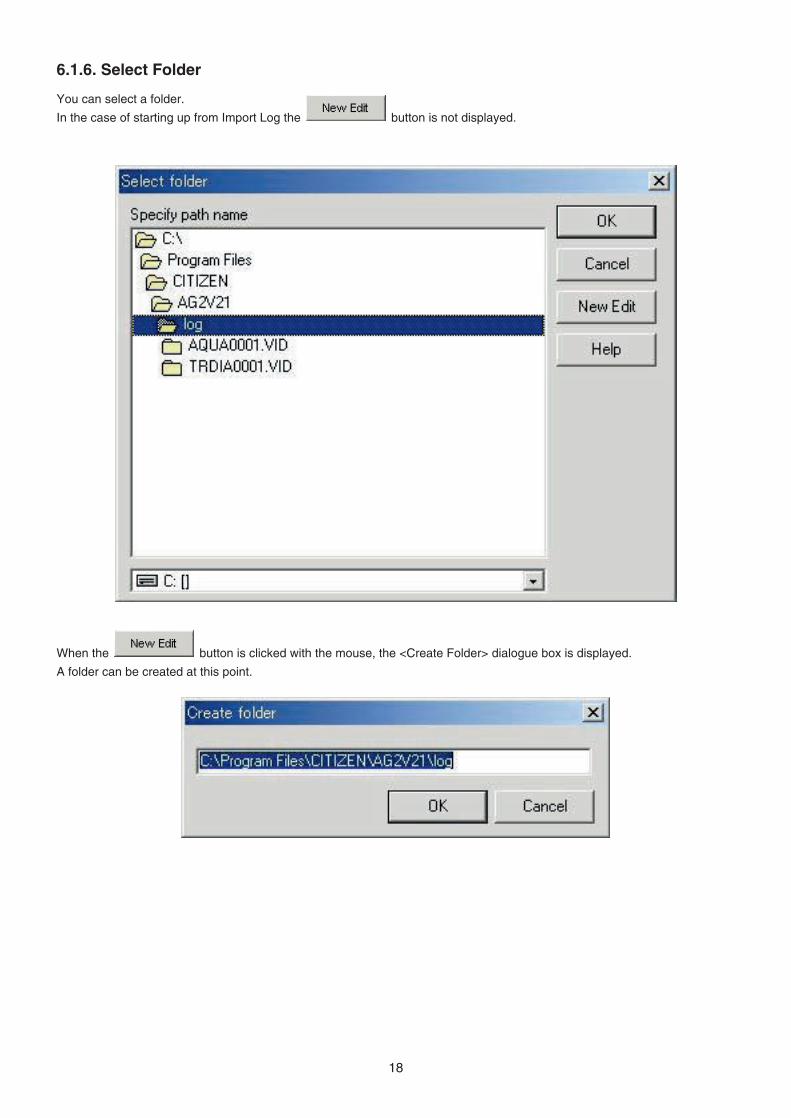
6.1.6. Select Folder
You can select a folder.
In the case of starting up from Import Log the button is not displayed.
18
When the button is clicked with the mouse, the <Create Folder> dialogue box is displayed.
A folder can be created at this point.
6.2. Customized Items
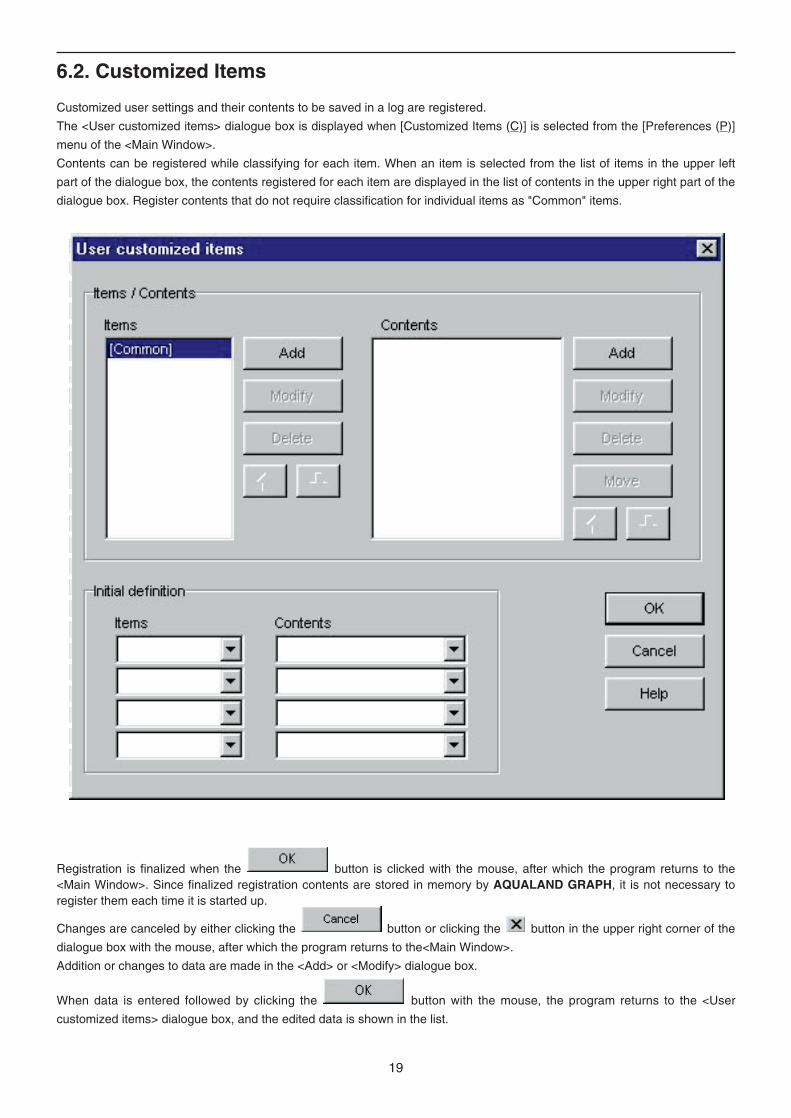
Customized user settings and their contents to be saved in a log are registered.
The <User customized items> dialogue box is displayed when [Customized Items (C)] is selected from the [Preferences (P)]
menu of the <Main Window>.
Contents can be registered while classifying for each item. When an item is selected from the list of items in the upper left
part of the dialogue box, the contents registered for each item are displayed in the list of contents in the upper right part of the
dialogue box. Register contents that do not require classification for individual items as "Common" items.
19
Registration is finalized when the button is clicked with the mouse, after which the program returns to the<Main Window>. Since finalized registration contents are stored in memory by AQUALAND GRAPH, it is not necessary toregister them each time it is started up.
Changes are canceled by either clicking the button or clicking the button in the upper right corner of the
dialogue box with the mouse, after which the program returns to the<Main Window>.
Addition or changes to data are made in the <Add> or <Modify> dialogue box.
When data is entered followed by clicking the button with the mouse, the program returns to the <User
customized items> dialogue box, and the edited data is shown in the list.
6.2.1. Items
Items can be entered using up to 12 letters or numbers. A maximum of 1000 contents can be registered.
20
Displays the <Add> dialogue box and adds new items. A check for duplicated data is not performed.Although items can be added in the form of "Common" items, they are distinguished from the "Common"items provided by AQUALAND GRAPH.
Displays the <Modify> dialogue box and changes the names of selected items. A check for duplicated datais not performed. Information relating to the contents is retained even if the name of an item is changed."Common" items cannot be changed.
Deletes a selected item. The contents registered for that item are also deleted. "Common" items cannot bedeleted.
Moves the display position of a selected item up by one. "Common" items cannot be moved.
Moves the display position of a selected item down by one. "Common" items cannot be moved.
Displays the <Add> dialogue box and adds contents. A check for duplicated data is not performed.
Displays the <Modify> dialogue box and changes selected contents. A check for duplicated data is notperformed.
Deletes selected contents.
Moves selected contents to a different item.
Moves the display position of selected contents up by one.
Moves the display position of selected contents down by one.
* "Common" items save item contents in the case of loading a user environment from a DOS version or Ver. 1. In addition,
contents registered for "Common" can be referred to regardless of the item selected during log entry.
6.2.2. Contents
Contents can be entered using up to 20 letters or numbers. A maximum of 1000 contens can be registered.
6.2.3. Initial definition
Data that is initially displayed for Customized Items during log editing is registered. Items and contents can be selected from
a list by clicking on the button with the mouse. They can also be entered from the keyboard.
21
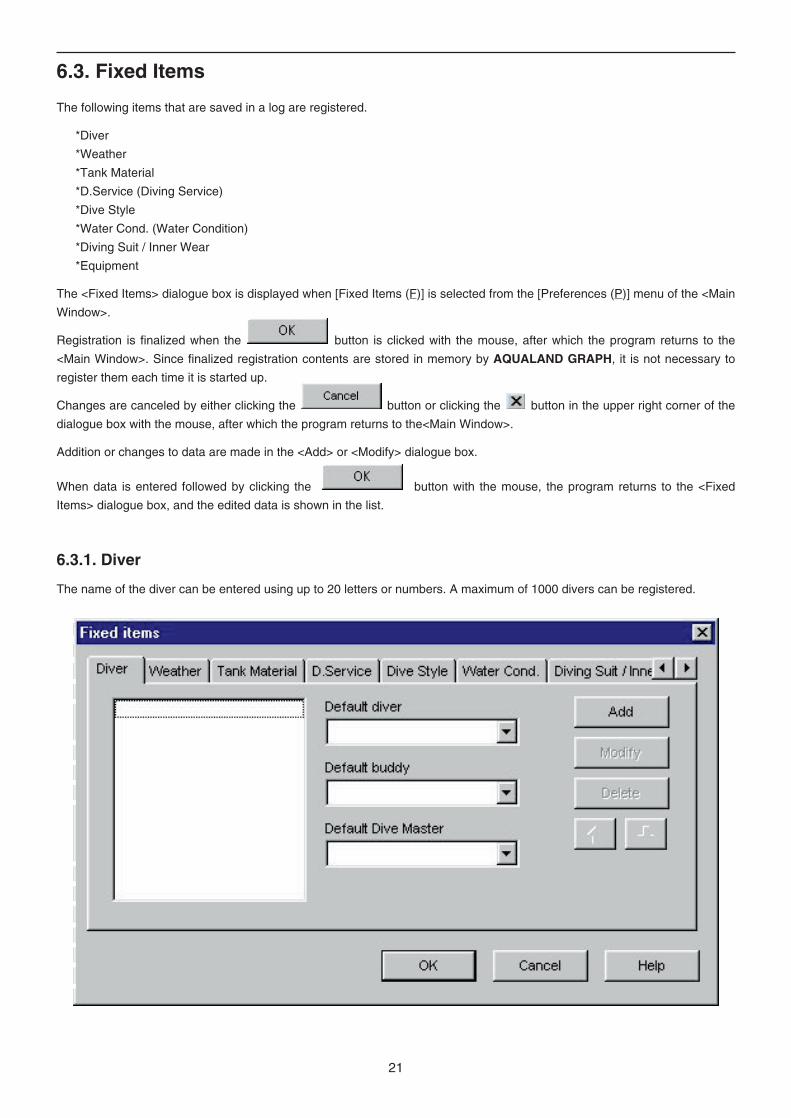
6.3. Fixed Items
The following items that are saved in a log are registered.
*Diver
*Weather
*Tank Material
*D.Service (Diving Service)
*Dive Style
*Water Cond. (Water Condition)
*Diving Suit / Inner Wear
*Equipment
The <Fixed Items> dialogue box is displayed when [Fixed Items (F)] is selected from the [Preferences (P)] menu of the <Main
Window>.
Registration is finalized when the button is clicked with the mouse, after which the program returns to the
<Main Window>. Since finalized registration contents are stored in memory by AQUALAND GRAPH, it is not necessary to
register them each time it is started up.
Changes are canceled by either clicking the button or clicking the button in the upper right corner of the
dialogue box with the mouse, after which the program returns to the<Main Window>.
Addition or changes to data are made in the <Add> or <Modify> dialogue box.
When data is entered followed by clicking the button with the mouse, the program returns to the <Fixed
Items> dialogue box, and the edited data is shown in the list.
6.3.1. Diver
The name of the diver can be entered using up to 20 letters or numbers. A maximum of 1000 divers can be registered.
22
Displays the <Add> dialogue box and adds new items. A check for duplicated data is not performed.
Displays the <Modify> dialogue box and changes selected items. A check for duplicated data is notperformed.
Deletes a selected item.
Moves the display position of a selected item up by one.
Moves the display position of a selected item down by one.
Default diverRegisters the data to be initially displayed for "Diver" in the <Edit> dialogue box.A diver can be selected from the diver list by clicking the button with the mouse. A diver namecan also be entered from the keyboard.
Default buddyRegisters the data to be initially displayed for "Buddy" in the <Edit> dialogue box.A buddy can be selected from the diver list by clicking the button with the mouse. A buddy namecan also be entered from the keyboard.
Default dive masterRegisters the data to be initially displayed for "Dive Master" in the <Edit> dialogue box.A dive master can be selected from the diver list by clicking the button with the mouse.A dive maste can also be entered from the keyboard.
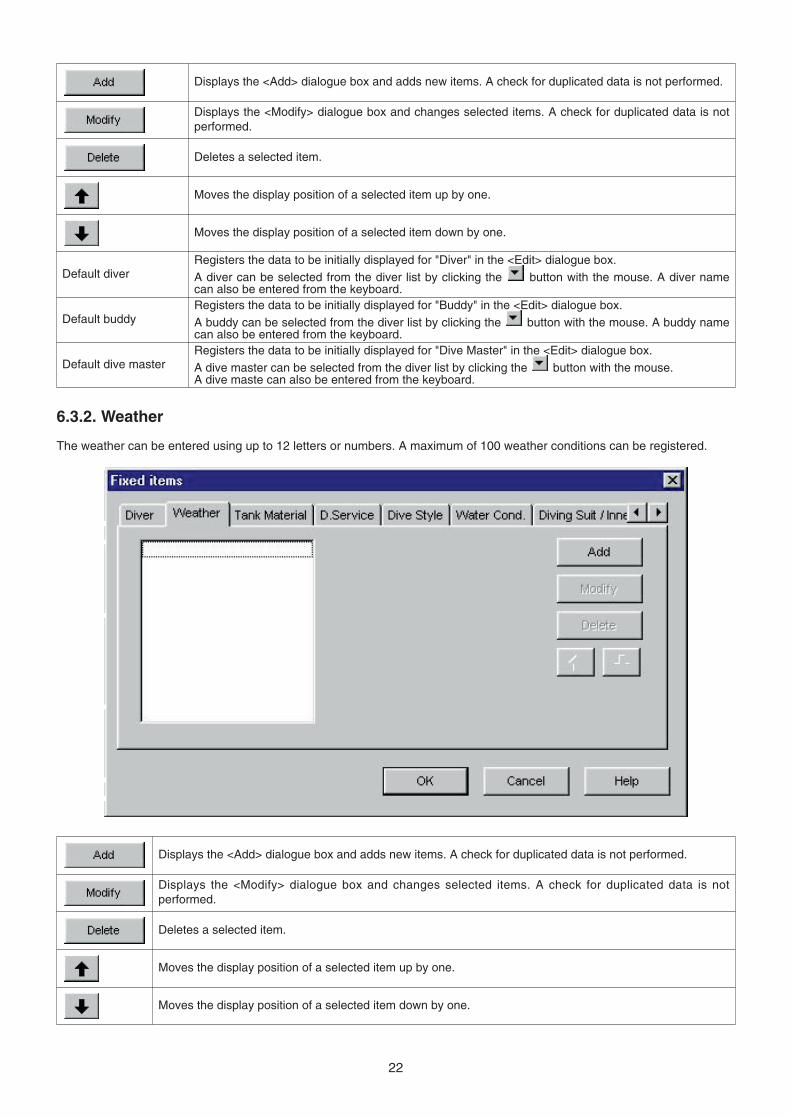
6.3.2. Weather
The weather can be entered using up to 12 letters or numbers. A maximum of 100 weather conditions can be registered.
Displays the <Add> dialogue box and adds new items. A check for duplicated data is not performed.
Displays the <Modify> dialogue box and changes selected items. A check for duplicated data is notperformed.
Deletes a selected item.
Moves the display position of a selected item up by one.
Moves the display position of a selected item down by one.
23
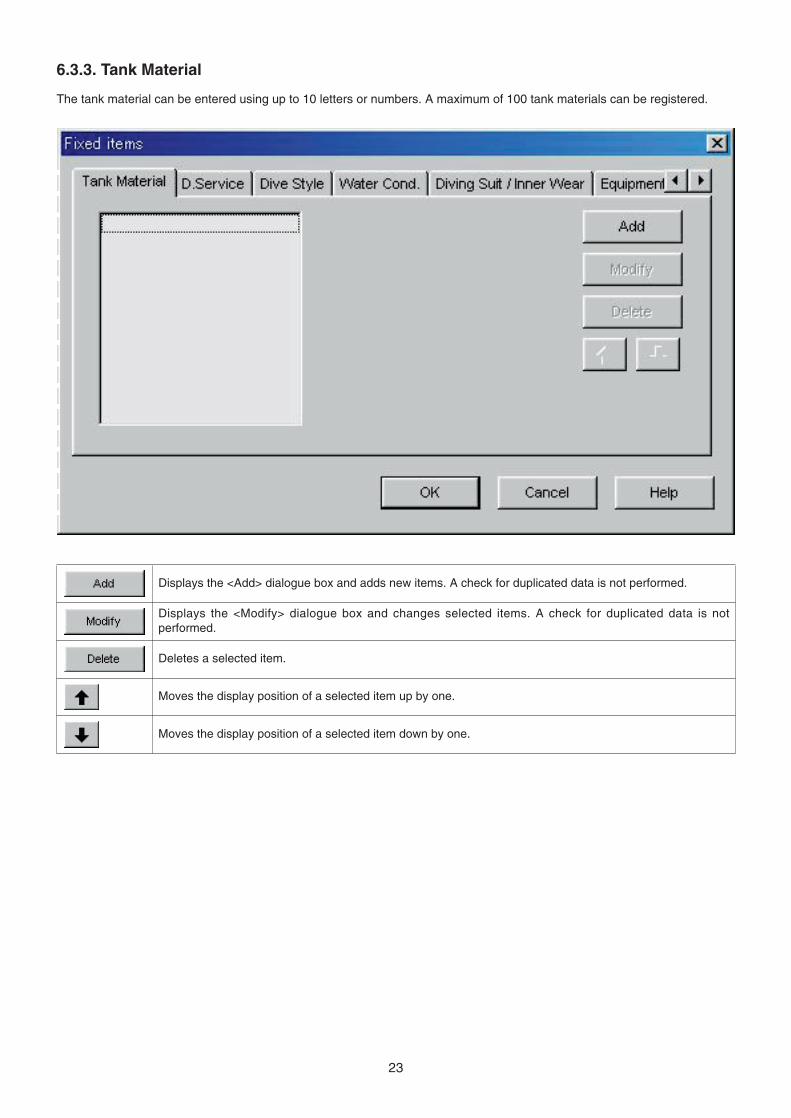
6.3.3. Tank Material
The tank material can be entered using up to 10 letters or numbers. A maximum of 100 tank materials can be registered.
Displays the <Add> dialogue box and adds new items. A check for duplicated data is not performed.
Displays the <Modify> dialogue box and changes selected items. A check for duplicated data is notperformed.
Deletes a selected item.
Moves the display position of a selected item up by one.
Moves the display position of a selected item down by one.
24
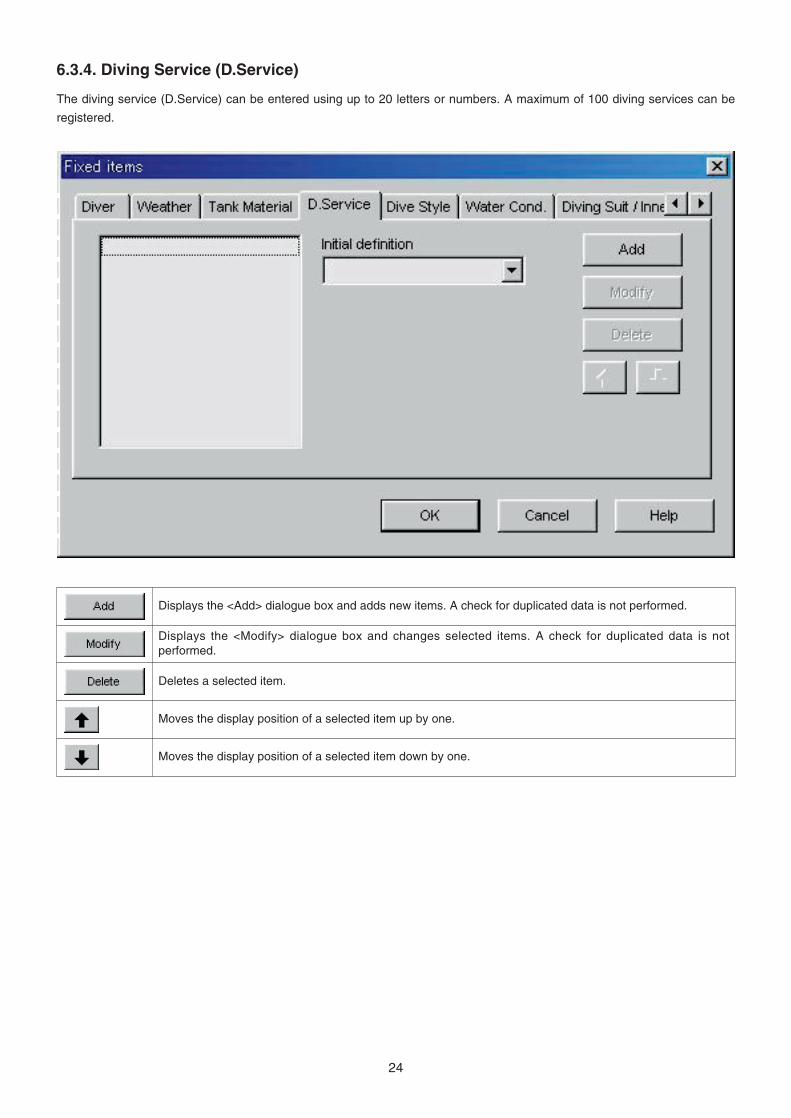
6.3.4. Diving Service (D.Service)
The diving service (D.Service) can be entered using up to 20 letters or numbers. A maximum of 100 diving services can be
registered.
Displays the <Add> dialogue box and adds new items. A check for duplicated data is not performed.
Displays the <Modify> dialogue box and changes selected items. A check for duplicated data is notperformed.
Deletes a selected item.
Moves the display position of a selected item up by one.
Moves the display position of a selected item down by one.
25
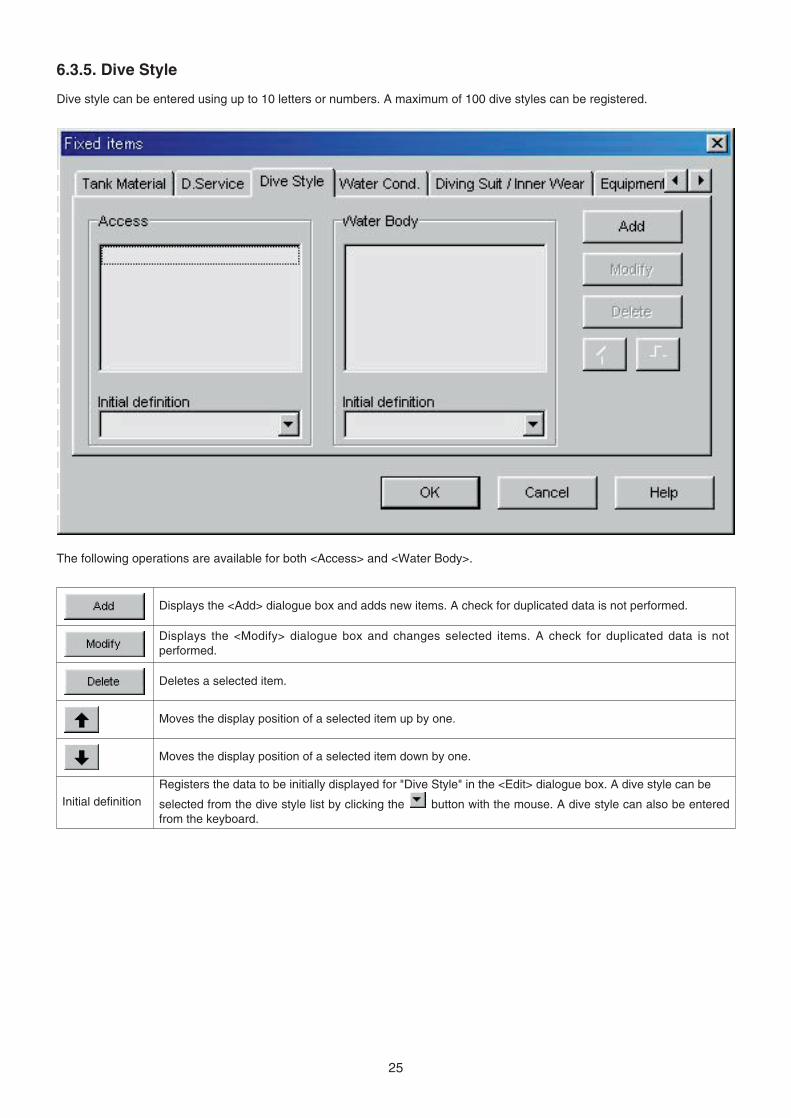
6.3.5. Dive Style
Dive style can be entered using up to 10 letters or numbers. A maximum of 100 dive styles can be registered.
The following operations are available for both <Access> and <Water Body>.
Displays the <Add> dialogue box and adds new items. A check for duplicated data is not performed.
Displays the <Modify> dialogue box and changes selected items. A check for duplicated data is notperformed.
Deletes a selected item.
Moves the display position of a selected item up by one.
Moves the display position of a selected item down by one.
Registers the data to be initially displayed for "Dive Style" in the <Edit> dialogue box. A dive style can be
selected from the dive style list by clicking the button with the mouse. A dive style can also be enteredfrom the keyboard.
Initial definition

26
6.3.6. Water Conditions (Water Cond.)
Water conditions (Water Cond.) can be entered using up to 10 letters or numbers. A maximum of 100 water conditions can
be registered.
Displays the <Add> dialogue box and adds new items. A check for duplicated data is not performed.
Displays the <Modify> dialogue box and changes selected items. A check for duplicated data is notperformed.
Deletes a selected item.
Moves the display position of a selected item up by one.
Moves the display position of a selected item down by one.
27
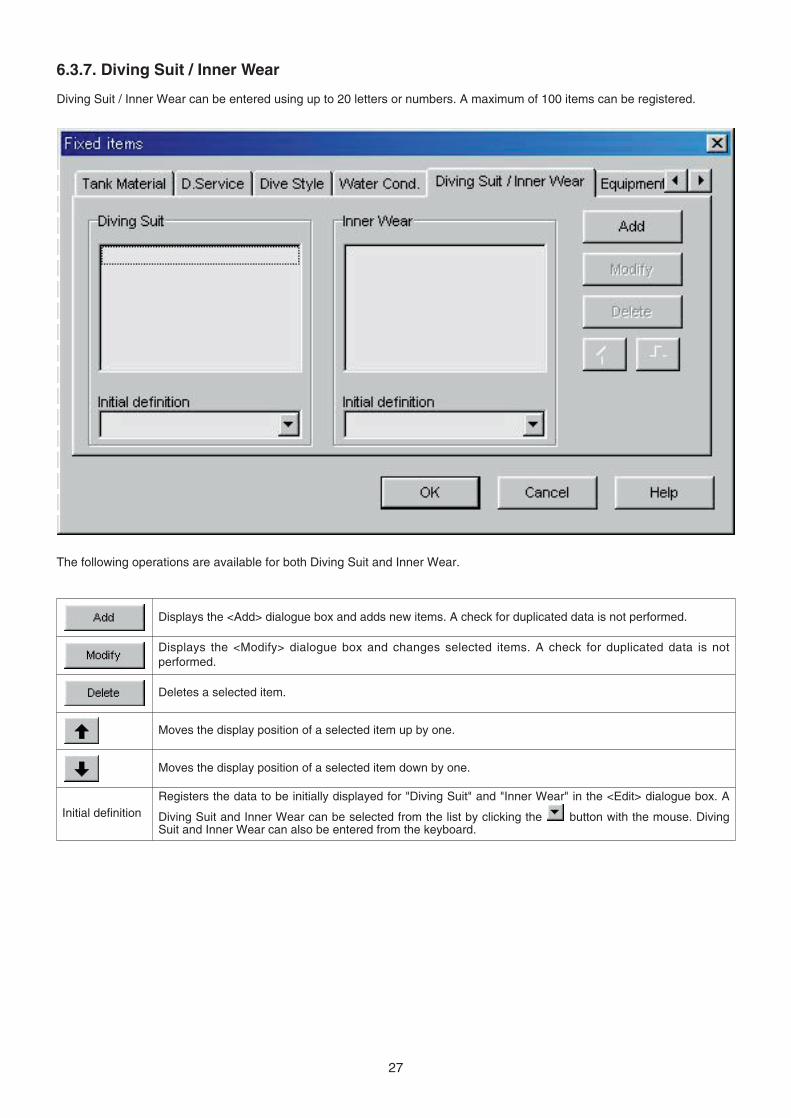
6.3.7. Diving Suit / Inner Wear
Diving Suit / Inner Wear can be entered using up to 20 letters or numbers. A maximum of 100 items can be registered.
Displays the <Add> dialogue box and adds new items. A check for duplicated data is not performed.
Displays the <Modify> dialogue box and changes selected items. A check for duplicated data is notperformed.
Deletes a selected item.
Moves the display position of a selected item up by one.
Moves the display position of a selected item down by one.
Registers the data to be initially displayed for "Diving Suit" and "Inner Wear" in the <Edit> dialogue box. A
Diving Suit and Inner Wear can be selected from the list by clicking the button with the mouse. DivingSuit and Inner Wear can also be entered from the keyboard.
Initial definition
The following operations are available for both Diving Suit and Inner Wear.
28
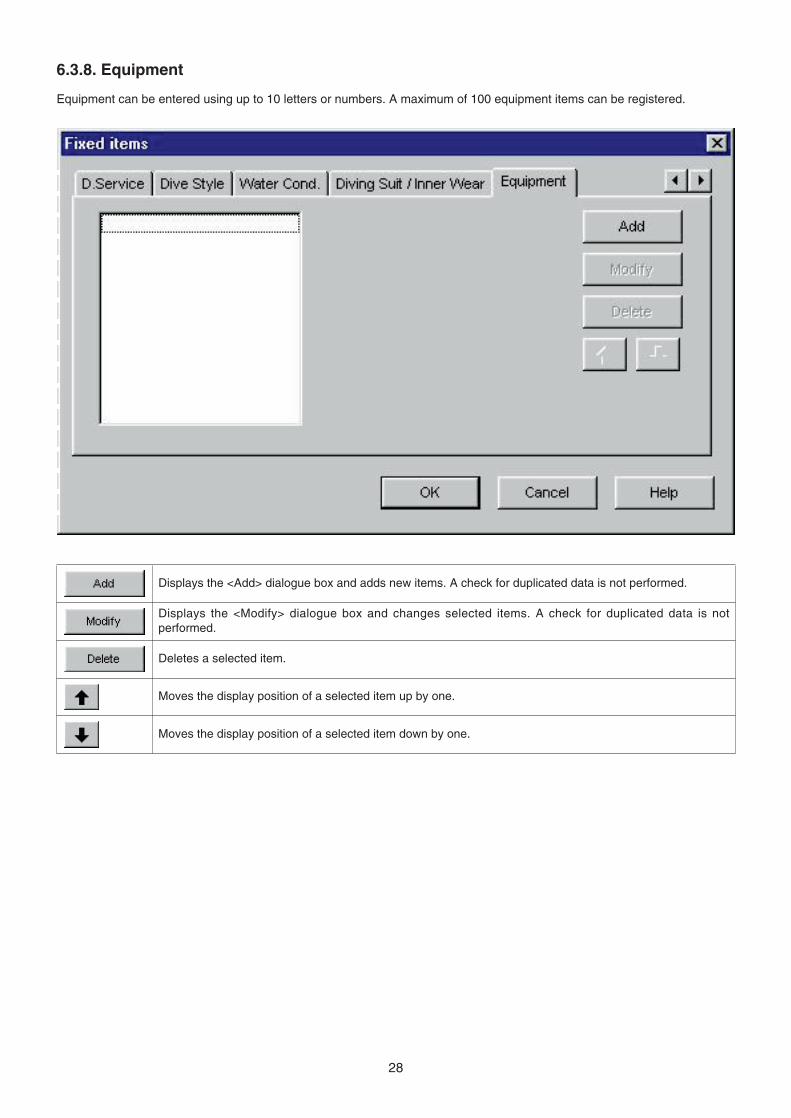
6.3.8. Equipment
Equipment can be entered using up to 10 letters or numbers. A maximum of 100 equipment items can be registered.
Displays the <Add> dialogue box and adds new items. A check for duplicated data is not performed.
Displays the <Modify> dialogue box and changes selected items. A check for duplicated data is notperformed.
Deletes a selected item.
Moves the display position of a selected item up by one.
Moves the display position of a selected item down by one.
29
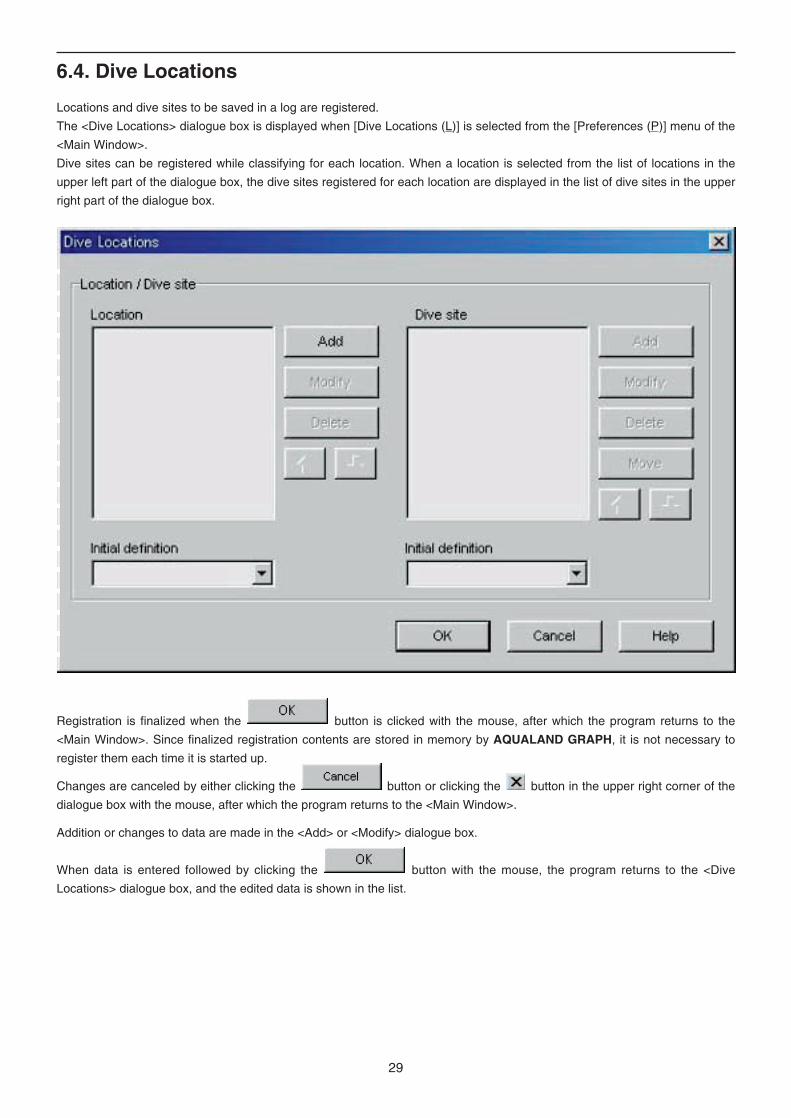
6.4. Dive Locations
Locations and dive sites to be saved in a log are registered.
The <Dive Locations> dialogue box is displayed when [Dive Locations (L)] is selected from the [Preferences (P)] menu of the
<Main Window>.
Dive sites can be registered while classifying for each location. When a location is selected from the list of locations in the
upper left part of the dialogue box, the dive sites registered for each location are displayed in the list of dive sites in the upper
right part of the dialogue box.
Registration is finalized when the button is clicked with the mouse, after which the program returns to the
<Main Window>. Since finalized registration contents are stored in memory by AQUALAND GRAPH, it is not necessary to
register them each time it is started up.
Changes are canceled by either clicking the button or clicking the button in the upper right corner of the
dialogue box with the mouse, after which the program returns to the <Main Window>.
Addition or changes to data are made in the <Add> or <Modify> dialogue box.
When data is entered followed by clicking the button with the mouse, the program returns to the <Dive
Locations> dialogue box, and the edited data is shown in the list.
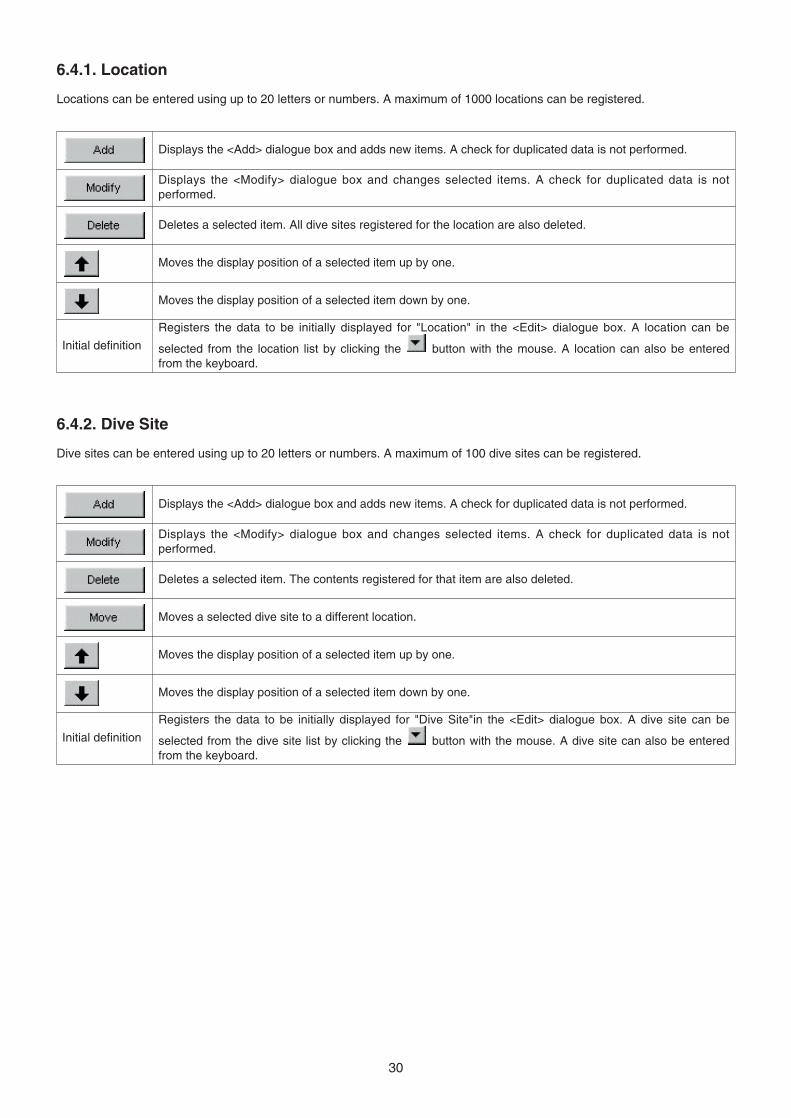
6.4.2. Dive Site
Dive sites can be entered using up to 20 letters or numbers. A maximum of 100 dive sites can be registered.
30
6.4.1. Location
Locations can be entered using up to 20 letters or numbers. A maximum of 1000 locations can be registered.
Displays the <Add> dialogue box and adds new items. A check for duplicated data is not performed.
Displays the <Modify> dialogue box and changes selected items. A check for duplicated data is notperformed.
Deletes a selected item. All dive sites registered for the location are also deleted.
Moves the display position of a selected item up by one.
Moves the display position of a selected item down by one.
Registers the data to be initially displayed for "Location" in the <Edit> dialogue box. A location can be
selected from the location list by clicking the button with the mouse. A location can also be enteredfrom the keyboard.
Initial definition
Displays the <Add> dialogue box and adds new items. A check for duplicated data is not performed.
Displays the <Modify> dialogue box and changes selected items. A check for duplicated data is notperformed.
Deletes a selected item. The contents registered for that item are also deleted.
Moves the display position of a selected item up by one.
Moves the display position of a selected item down by one.
Registers the data to be initially displayed for "Dive Site"in the <Edit> dialogue box. A dive site can be
selected from the dive site list by clicking the button with the mouse. A dive site can also be enteredfrom the keyboard.
Initial definition
Moves a selected dive site to a different location.
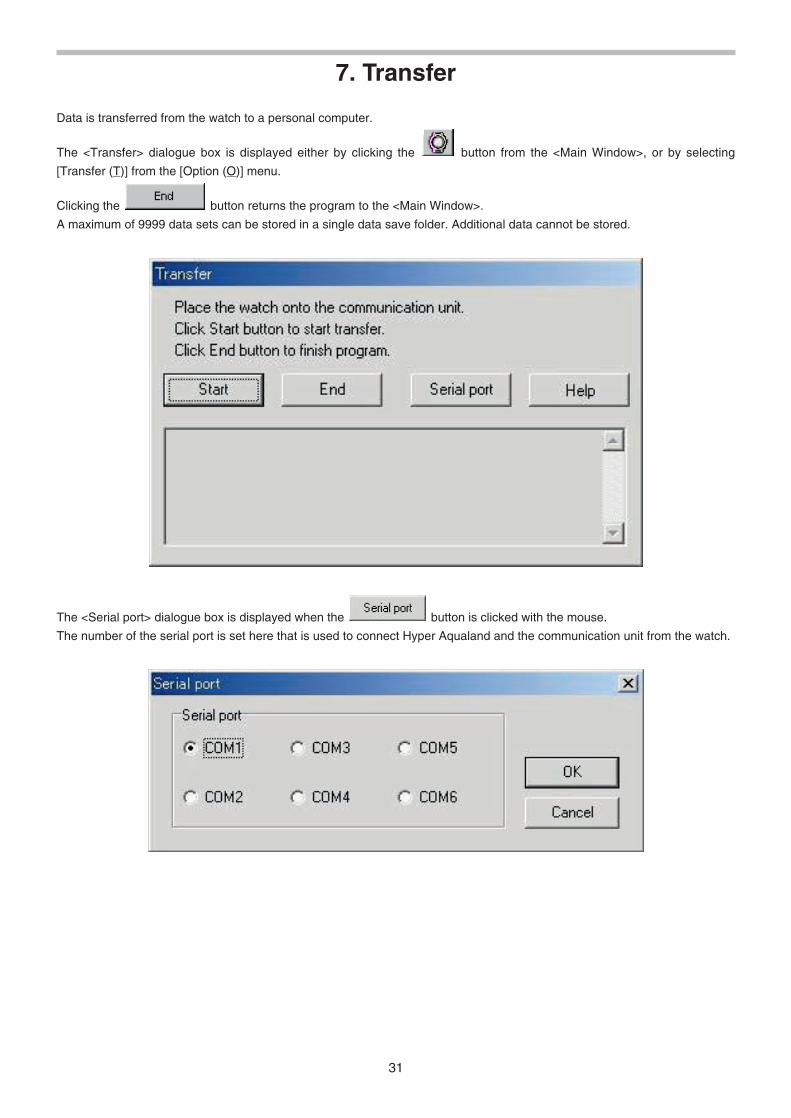
7. Transfer
Data is transferred from the watch to a personal computer.
The <Transfer> dialogue box is displayed either by clicking the button from the <Main Window>, or by selecting
[Transfer (T)] from the [Option (O)] menu.
Clicking the button returns the program to the <Main Window>.
A maximum of 9999 data sets can be stored in a single data save folder. Additional data cannot be stored.
31
The <Serial port> dialogue box is displayed when the button is clicked with the mouse.
The number of the serial port is set here that is used to connect Hyper Aqualand and the communication unit from the watch.
32
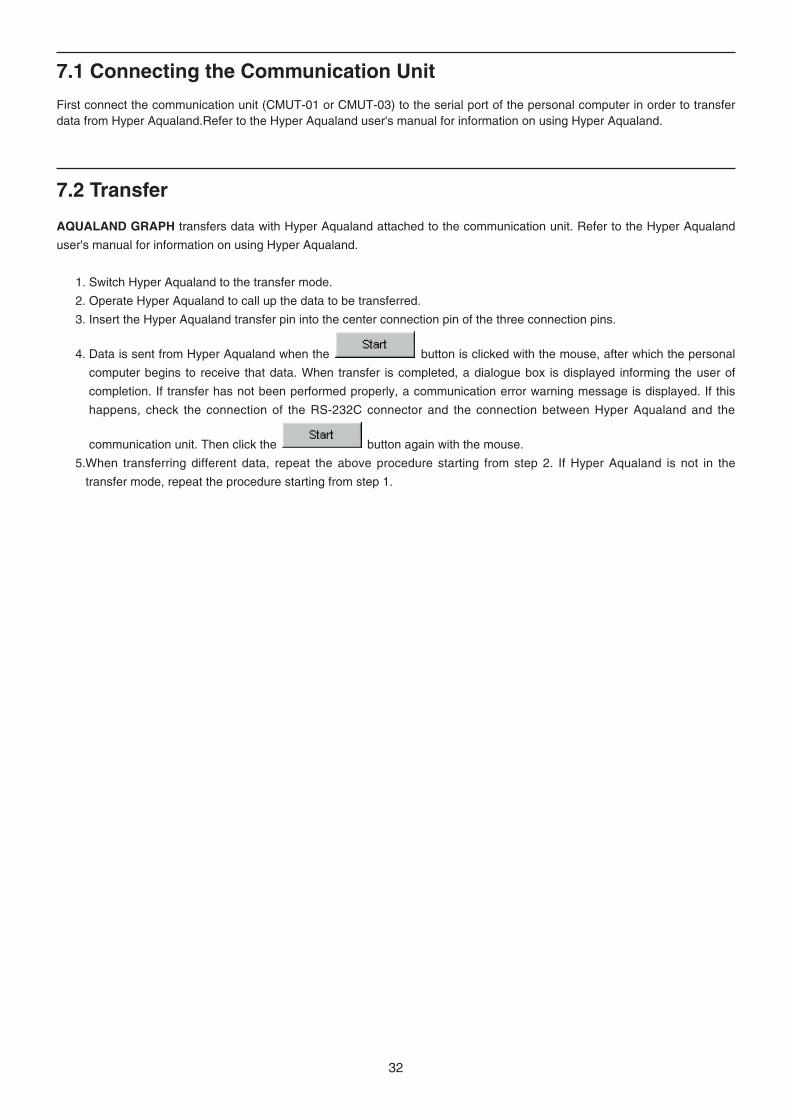
7.1 Connecting the Communication Unit
First connect the communication unit (CMUT-01 or CMUT-03) to the serial port of the personal computer in order to transferdata from Hyper Aqualand.Refer to the Hyper Aqualand user's manual for information on using Hyper Aqualand.
7.2 Transfer
AQUALAND GRAPH transfers data with Hyper Aqualand attached to the communication unit. Refer to the Hyper Aqualand
user's manual for information on using Hyper Aqualand.
1. Switch Hyper Aqualand to the transfer mode.
2. Operate Hyper Aqualand to call up the data to be transferred.
3. Insert the Hyper Aqualand transfer pin into the center connection pin of the three connection pins.
4. Data is sent from Hyper Aqualand when the button is clicked with the mouse, after which the personal
computer begins to receive that data. When transfer is completed, a dialogue box is displayed informing the user of
completion. If transfer has not been performed properly, a communication error warning message is displayed. If this
happens, check the connection of the RS-232C connector and the connection between Hyper Aqualand and the
communication unit. Then click the button again with the mouse.
5.When transferring different data, repeat the above procedure starting from step 2. If Hyper Aqualand is not in the
transfer mode, repeat the procedure starting from step 1.
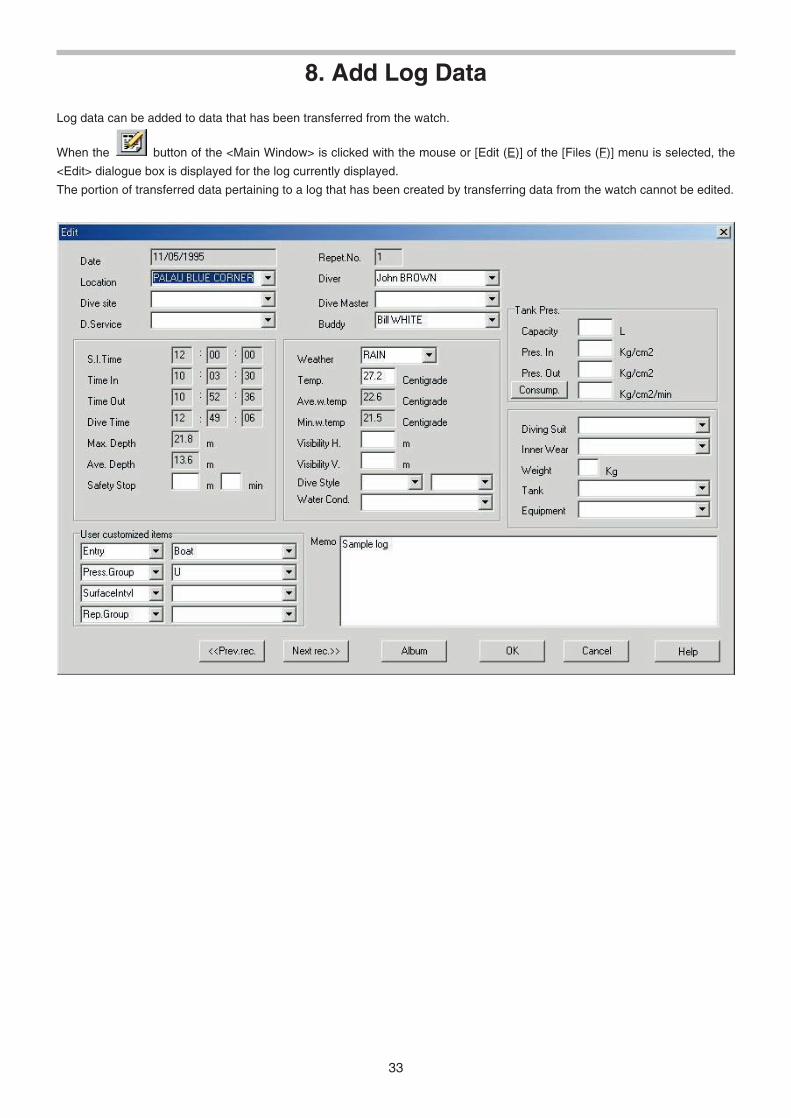
8. Add Log Data
Log data can be added to data that has been transferred from the watch.
When the button of the <Main Window> is clicked with the mouse or [Edit (E)] of the [Files (F)] menu is selected, the
<Edit> dialogue box is displayed for the log currently displayed.
The portion of transferred data pertaining to a log that has been created by transferring data from the watch cannot be edited.
33
34
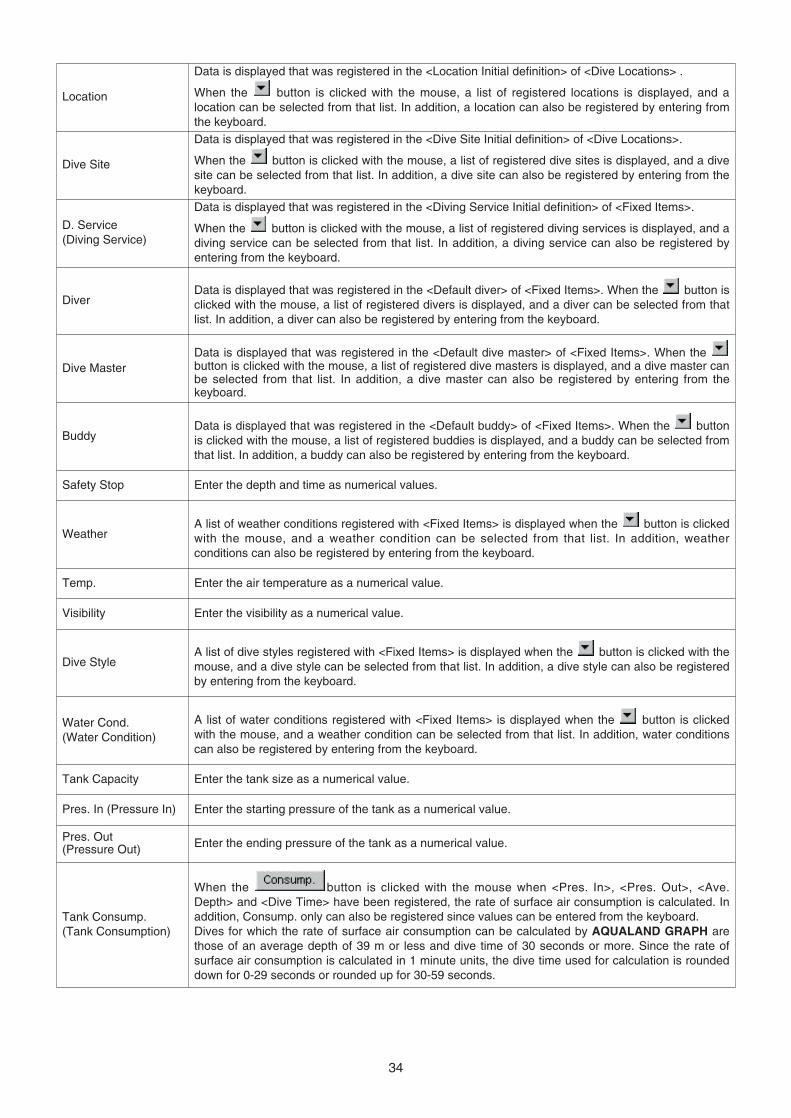
Location
Data is displayed that was registered in the <Location Initial definition> of <Dive Locations> .
When the button is clicked with the mouse, a list of registered locations is displayed, and alocation can be selected from that list. In addition, a location can also be registered by entering fromthe keyboard.
Dive Site
Data is displayed that was registered in the <Dive Site Initial definition> of <Dive Locations>.
When the button is clicked with the mouse, a list of registered dive sites is displayed, and a divesite can be selected from that list. In addition, a dive site can also be registered by entering from thekeyboard.
D. Service (Diving Service)
Data is displayed that was registered in the <Diving Service Initial definition> of <Fixed Items>.
When the button is clicked with the mouse, a list of registered diving services is displayed, and adiving service can be selected from that list. In addition, a diving service can also be registered byentering from the keyboard.
DiverData is displayed that was registered in the <Default diver> of <Fixed Items>. When the button isclicked with the mouse, a list of registered divers is displayed, and a diver can be selected from thatlist. In addition, a diver can also be registered by entering from the keyboard.
Dive MasterData is displayed that was registered in the <Default dive master> of <Fixed Items>. When the button is clicked with the mouse, a list of registered dive masters is displayed, and a dive master canbe selected from that list. In addition, a dive master can also be registered by entering from thekeyboard.
BuddyData is displayed that was registered in the <Default buddy> of <Fixed Items>. When the buttonis clicked with the mouse, a list of registered buddies is displayed, and a buddy can be selected fromthat list. In addition, a buddy can also be registered by entering from the keyboard.
Safety Stop Enter the depth and time as numerical values.
WeatherA list of weather conditions registered with <Fixed Items> is displayed when the button is clickedwith the mouse, and a weather condition can be selected from that list. In addition, weatherconditions can also be registered by entering from the keyboard.
Temp. Enter the air temperature as a numerical value.
Visibility Enter the visibility as a numerical value.
Dive StyleA list of dive styles registered with <Fixed Items> is displayed when the button is clicked with themouse, and a dive style can be selected from that list. In addition, a dive style can also be registeredby entering from the keyboard.
Water Cond.(Water Condition)
A list of water conditions registered with <Fixed Items> is displayed when the button is clickedwith the mouse, and a weather condition can be selected from that list. In addition, water conditionscan also be registered by entering from the keyboard.
Tank Capacity Enter the tank size as a numerical value.
Pres. In (Pressure In) Enter the starting pressure of the tank as a numerical value.
Pres. Out (Pressure Out) Enter the ending pressure of the tank as a numerical value.
Tank Consump.(Tank Consumption)
When the button is clicked with the mouse when <Pres. In>, <Pres. Out>, <Ave.Depth> and <Dive Time> have been registered, the rate of surface air consumption is calculated. Inaddition, Consump. only can also be registered since values can be entered from the keyboard.Dives for which the rate of surface air consumption can be calculated by AQUALAND GRAPH arethose of an average depth of 39 m or less and dive time of 30 seconds or more. Since the rate ofsurface air consumption is calculated in 1 minute units, the dive time used for calculation is roundeddown for 0-29 seconds or rounded up for 30-59 seconds.
35
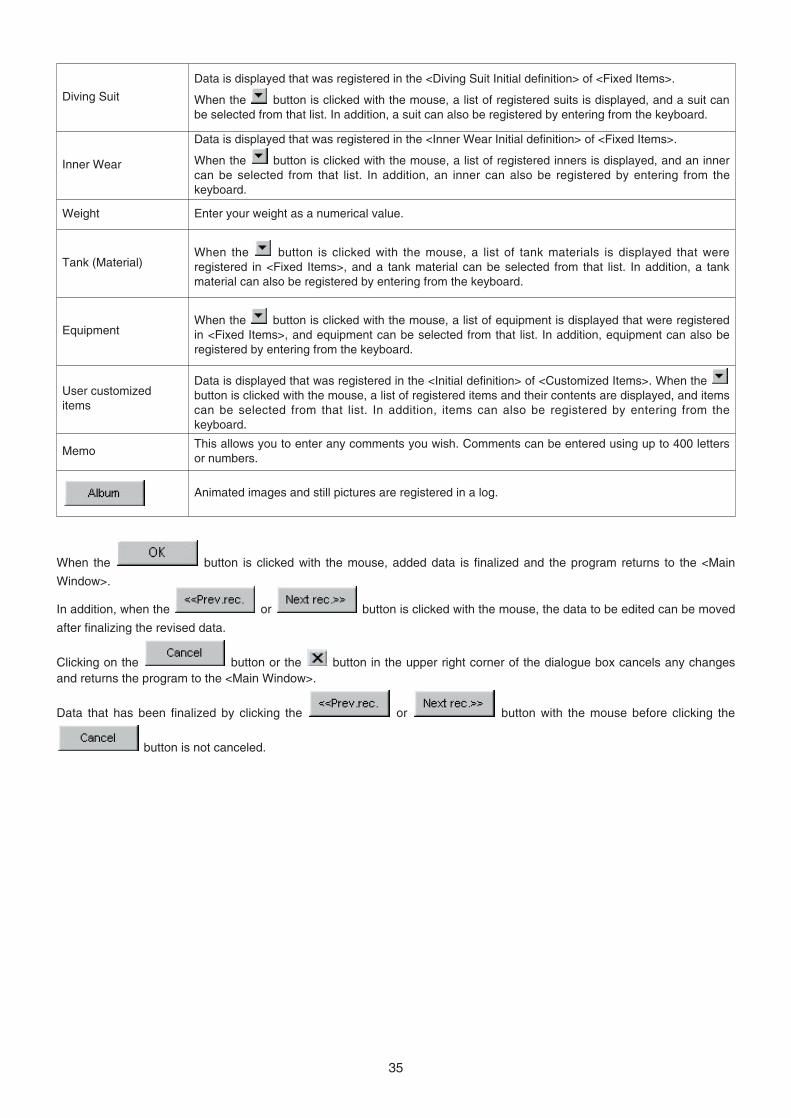
When the button is clicked with the mouse, added data is finalized and the program returns to the <Main
Window>.
In addition, when the or button is clicked with the mouse, the data to be edited can be moved
after finalizing the revised data.
Clicking on the button or the button in the upper right corner of the dialogue box cancels any changesand returns the program to the <Main Window>.
Data that has been finalized by clicking the or button with the mouse before clicking the
button is not canceled.
Diving Suit
Data is displayed that was registered in the <Diving Suit Initial definition> of <Fixed Items>.
When the button is clicked with the mouse, a list of registered suits is displayed, and a suit canbe selected from that list. In addition, a suit can also be registered by entering from the keyboard.
Inner Wear
Data is displayed that was registered in the <Inner Wear Initial definition> of <Fixed Items>.
When the button is clicked with the mouse, a list of registered inners is displayed, and an innercan be selected from that list. In addition, an inner can also be registered by entering from thekeyboard.
Weight Enter your weight as a numerical value.
Tank (Material)When the button is clicked with the mouse, a list of tank materials is displayed that wereregistered in <Fixed Items>, and a tank material can be selected from that list. In addition, a tankmaterial can also be registered by entering from the keyboard.
EquipmentWhen the button is clicked with the mouse, a list of equipment is displayed that were registeredin <Fixed Items>, and equipment can be selected from that list. In addition, equipment can also beregistered by entering from the keyboard.
User customizeditems
Data is displayed that was registered in the <Initial definition> of <Customized Items>. When the button is clicked with the mouse, a list of registered items and their contents are displayed, and itemscan be selected from that list. In addition, items can also be registered by entering from thekeyboard.
MemoThis allows you to enter any comments you wish. Comments can be entered using up to 400 lettersor numbers.
Animated images and still pictures are registered in a log.
36
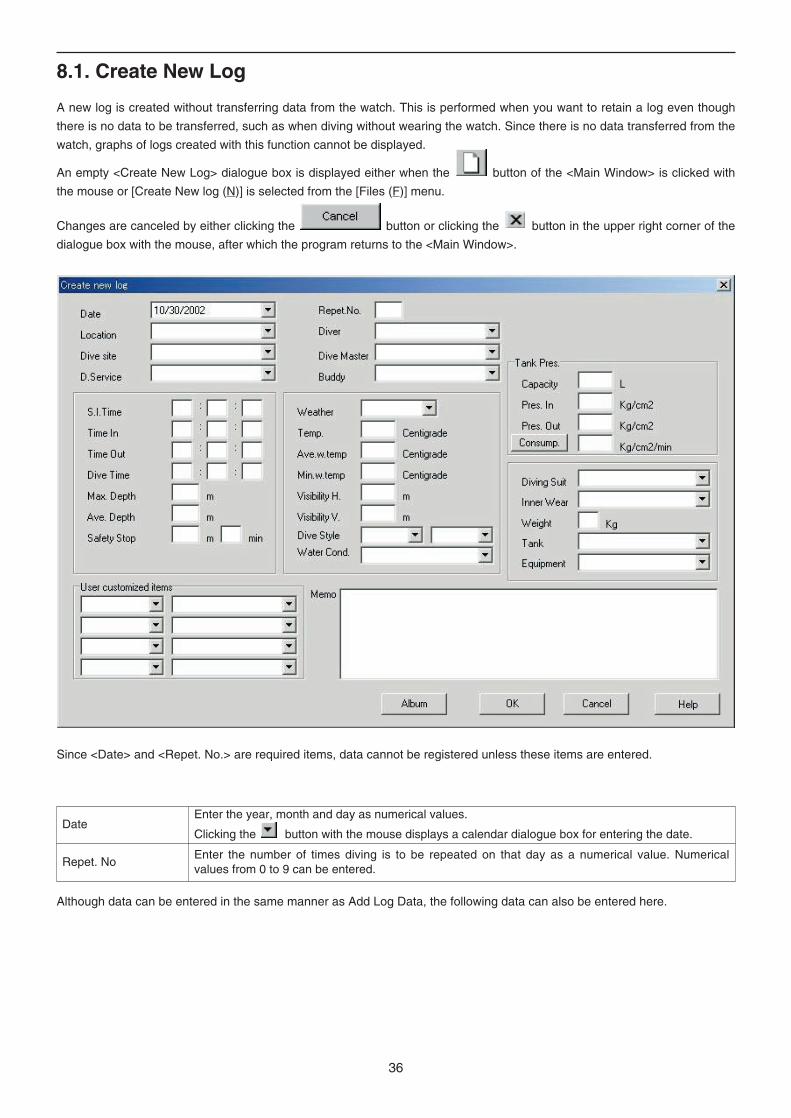
8.1. Create New Log
A new log is created without transferring data from the watch. This is performed when you want to retain a log even though
there is no data to be transferred, such as when diving without wearing the watch. Since there is no data transferred from the
watch, graphs of logs created with this function cannot be displayed.
An empty <Create New Log> dialogue box is displayed either when the button of the <Main Window> is clicked with
the mouse or [Create New log (N)] is selected from the [Files (F)] menu.
Changes are canceled by either clicking the button or clicking the button in the upper right corner of the
dialogue box with the mouse, after which the program returns to the <Main Window>.
Since <Date> and <Repet. No.> are required items, data cannot be registered unless these items are entered.
Although data can be entered in the same manner as Add Log Data, the following data can also be entered here.
Repet. NoEnter the number of times diving is to be repeated on that day as a numerical value. Numericalvalues from 0 to 9 can be entered.
DateEnter the year, month and day as numerical values.
Clicking the button with the mouse displays a calendar dialogue box for entering the date.
37
Ave. Depth Enter the average depth as a numerical value.
Max. Depth Enter the maximum depth as a numerical value.
Ave. w. temp Enter the average water temperature as a numerical value.
Min.w. Temp Enter the minimum water temperature as a numerical value.
S.I.Time Enter the surface interval time in hours, minutes and seconds (HH:MM:SS).
Time In Enter the dive starting time in hours, minutes and seconds (HH:MM:SS).
Time Out Enter the dive ending time in hours, minutes and seconds (HH:MM:SS).
Dive Time Enter the duration of the dive in hours, minutes and seconds (HH:MM:SS).
Data is registered by entering the required data and pressing the button.
When registration is completed, a dialogue box is displayed asking whether or not an additional new log is to be created.
The program returns to the <Main Window> if the button is clicked with the mouse.
If the button is clicked with the mouse, the program returns to the <Create New Log> dialogue box.
The data previously entered in the <Create New Log> dialogue box is displayed at this time.
8.2. Edit
The currently selected log is edited.
The <Edit> dialogue box of the log that is currently selected is displayed when the button of the <Main Window> is
clicked with the mouse or when [Edit (E)] is selected from the [Files (F)] menu.
Although the basic procedure is the same as that for Add Log Data, the portion of the data that has been transferred for a log
that has been created by transferring data from the watch cannot be edited.
8.3. Delete
Log data that you want to delete is selected from the Diving List after switching the <Main Window> to the Diving List.
The selected log data is deleted by selecting [Delete (D)] from the [Files (F)] menu.
8.4. Edit Album
Still pictures and animated images are registered.
When the button is clicked with the mouse, image registration is finalized and the program returns to the
<Main Window>. Registered images are displayed in the Album Display Area of the <Main Window> as thumbnails.
Registration is canceled by either clicking the button or clicking the button in the upper right corner of the
dialogue box with the mouse, after which the program returns to the <Main Window>.
38
Add a new image to a location selected by clicking with the mouse.
Delete an image selected by clicking with the mouse.
Capture an image and select an image for thumbnail display as desired from animated images selectedby clicking with the mouse.
8.4.1. Add Image
Select a location at which you want to add an image by clicking with the mouse. The image is added at the selected location.
When the button is clicked with the mouse, a dialogue box for selecting a file is displayed. Select the image
file you want to register.
Files of still pictures that can be registered are JPEG / BMP files.
Files of animated images that can be registered are AVI files that can be played back with your personal computer.
A dialogue box for changing the thumbnails is displayed when an animated image file has been added. (refer to section
“8.4.3. Change Thumbnails” for further details)
8.4.2. Delete Image
Select an image you want to delete by clicking with the mouse.
The selected image is deleted when the button is clicked with the mouse.
8.4.3. Change Thumbnails
Images of animated image files for thumbnail display can be designated by capturing an arbitrary image among the animated
images.
The displayed image is designated as a thumbnail image when the button is clicked with the mouse.
Thumbnails are left unchanged by either clicking the button or the button in the upper right corner of the
dialogue box.
39
Begins playback of an animated image.
Returns to the beginning of an animated image.
Pauses an animated image during playback.
Click on and with the mouse to resume playback.
40
8.4.4. Import Log
Log data is imported.
The <Select Folder> dialogue box is displayed when [Import Log (I)] is selected from the [Option (O)] menu of the <Main
Window>. (refer to section “6.1.6. Select Folder” for further details).
Both exported data and data from an older version can be imported.
* Data is loaded when a folder is designated in which exported data of AQUALAND GRAPH Ver. 2.0 or Ver. 2.1 has
been saved.
* Data is loaded when a folder is designated in which AQUALAND GRAPH Ver. 2.0 or Ver. 2.1 log data has been saved.
* Data is loaded when a folder is designated in which data of AQUALAND GRAPH for Windows Ver.1 has been saved.
Original data is not deleted.
* Data is loaded when a folder is designated in which DOS data has been saved.
8.4.5. Export Log
AQUALAND GRAPH data is exported.
The <Export Log> dialogue box is displayed when the diving data you want to export is selected from the <Diving List> of the
<Main Window>, and either the button is clicked with the mouse or [Export Log (E)] is selected from the [Option (O)]
menu.
Log OnlyOnly a log is exported.
The <Save As> dialogue box is displayed when the button is clicked with the mouse.
Log and Divingrecord
A log and diving data are exported.
The <Select Folder> dialogue box is displayed when the button is clicked with themouse. (refer to section “6.1.6. Select Folder” for further details).
Log, Diving recordand album record
All data including album data are exported.
The <Select Folder> dialogue box is displayed when the button is clicked with themouse.(refer to section “6.1.6. Select Folder” for further details).Image files managed in the album are also copied to the designated file.
Files exported with "Log Only" cannot be imported with AQUALAND GRAPH. In order to import files with AQUALAND
GRAPH, export files with "Log and Diving record" or "Log, Diving record and album record".
9. Diving List
Switch the display if the <Main Window> is in the Album Display Mode.
9.1. Sort
When any of the items displayed in the <Diving List> are clicked with the mouse, data is sorted using that item as the key.
The order of sorting is changed back and forth between ascending order and descending order each time the mouse is
clicked.
9.2. Select Log Item
The <Select Log Item> dialogue box is displayed when [Select Log Item (I)] is selected from the [Display (L)] menu of the
<Main Window>.
Items to be displayed in the <Diving List> can then be selected.
The items displayed in the list of items on the right side of the display are the items that are actually displayed.
41
Registration is finalized when the button is clicked with the mouse, after which the program returns to the
<Main Window>. Since finalized registration contents are stored in memory by AQUALAND GRAPH, it is not necessary to
register them each time it is started up.
Changes are canceled by either clicking the button or clicking the button in the upper right corner of the
dialogue box with the mouse, after which the program returns to the <Main Window>.
42
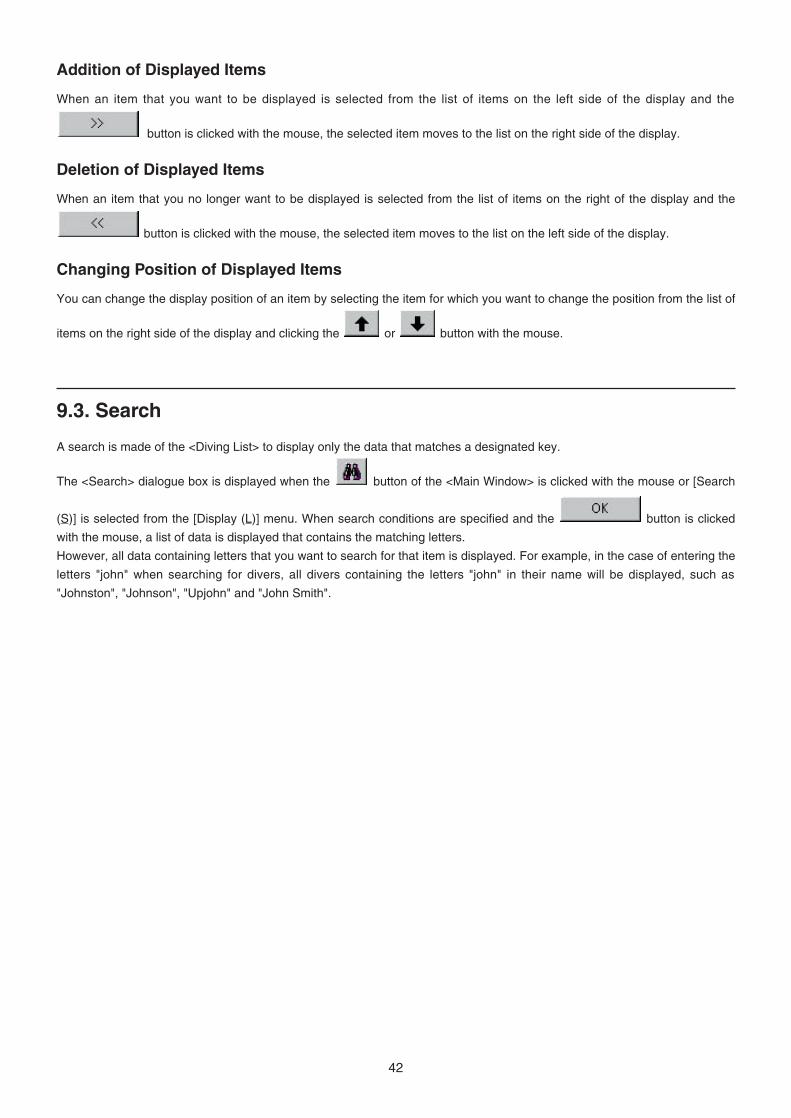
Addition of Displayed Items
When an item that you want to be displayed is selected from the list of items on the left side of the display and the
button is clicked with the mouse, the selected item moves to the list on the right side of the display.
Deletion of Displayed Items
When an item that you no longer want to be displayed is selected from the list of items on the right of the display and the
button is clicked with the mouse, the selected item moves to the list on the left side of the display.
Changing Position of Displayed Items
You can change the display position of an item by selecting the item for which you want to change the position from the list of
items on the right side of the display and clicking the or button with the mouse.
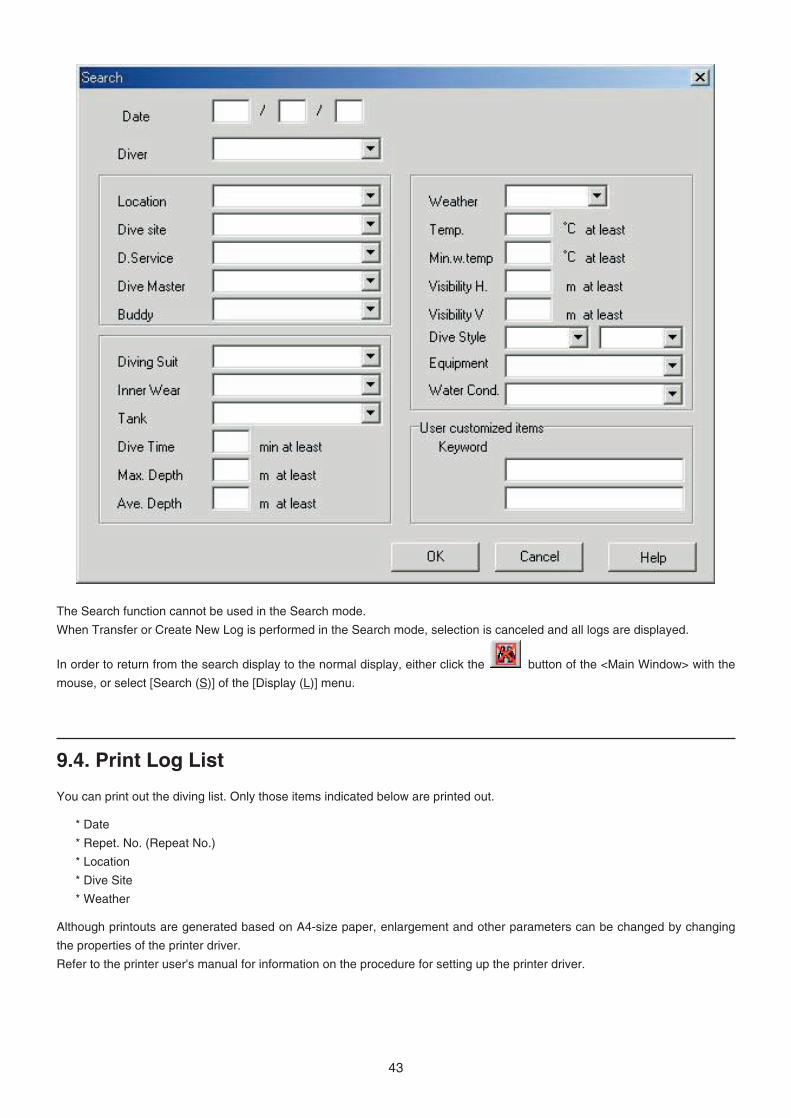
9.3. Search
A search is made of the <Diving List> to display only the data that matches a designated key.
The <Search> dialogue box is displayed when the button of the <Main Window> is clicked with the mouse or [Search
(S)] is selected from the [Display (L)] menu. When search conditions are specified and the button is clicked
with the mouse, a list of data is displayed that contains the matching letters.
However, all data containing letters that you want to search for that item is displayed. For example, in the case of entering the
letters "john" when searching for divers, all divers containing the letters "john" in their name will be displayed, such as
"Johnston", "Johnson", "Upjohn" and "John Smith".
43
The Search function cannot be used in the Search mode.
When Transfer or Create New Log is performed in the Search mode, selection is canceled and all logs are displayed.
In order to return from the search display to the normal display, either click the button of the <Main Window> with the
mouse, or select [Search (S)] of the [Display (L)] menu.
9.4. Print Log List
You can print out the diving list. Only those items indicated below are printed out.
* Date
* Repet. No. (Repeat No.)
* Location
* Dive Site
* Weather
Although printouts are generated based on A4-size paper, enlargement and other parameters can be changed by changing
the properties of the printer driver.
Refer to the printer user's manual for information on the procedure for setting up the printer driver.
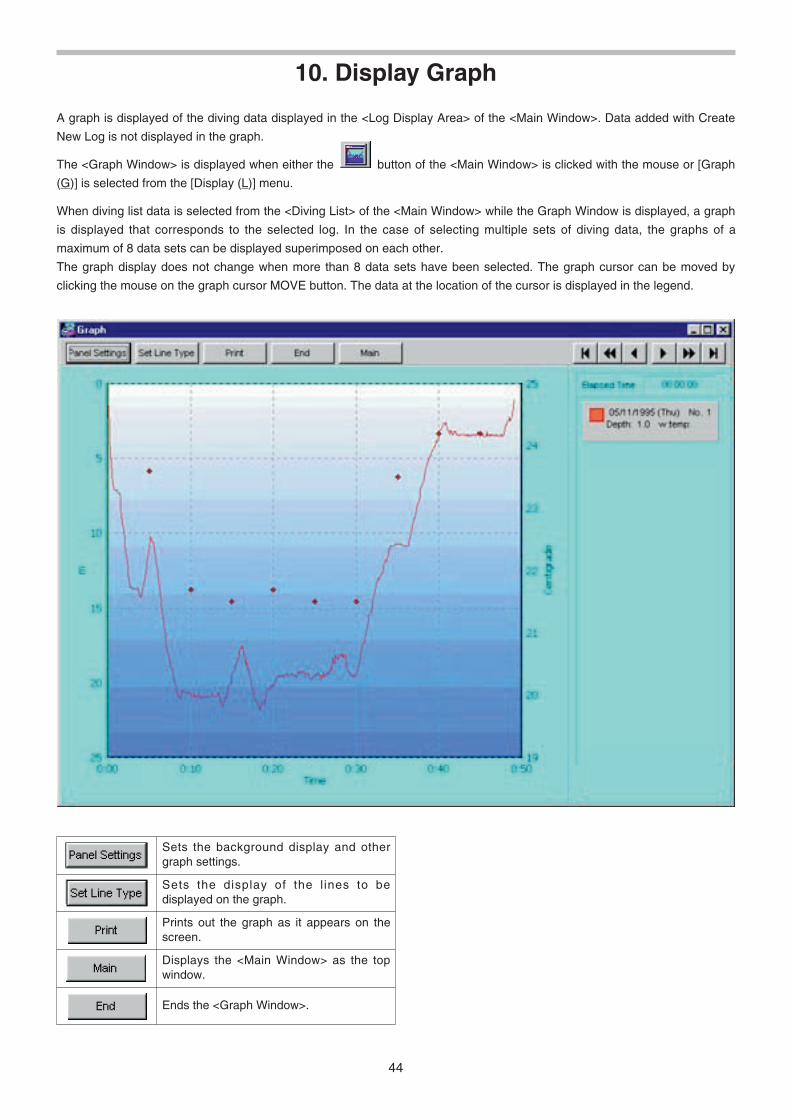
10. Display Graph
A graph is displayed of the diving data displayed in the <Log Display Area> of the <Main Window>. Data added with Create
New Log is not displayed in the graph.
The <Graph Window> is displayed when either the button of the <Main Window> is clicked with the mouse or [Graph
(G)] is selected from the [Display (L)] menu.
When diving list data is selected from the <Diving List> of the <Main Window> while the Graph Window is displayed, a graph
is displayed that corresponds to the selected log. In the case of selecting multiple sets of diving data, the graphs of a
maximum of 8 data sets can be displayed superimposed on each other.
The graph display does not change when more than 8 data sets have been selected. The graph cursor can be moved by
clicking the mouse on the graph cursor MOVE button. The data at the location of the cursor is displayed in the legend.
44
Ends the <Graph Window>.
Displays the <Main Window> as the topwindow.
Prints out the graph as it appears on thescreen.
Sets the display of the l ines to bedisplayed on the graph.
Sets the background display and othergraph settings.
45
Moves the graph cursor to the next data in 5minute units.
Moves the graph cursor to the last data set.
Moves the graph cursor to the next data set.
Moves the graph cursor to the previous dataset.
Moves the graph cursor to the previous datain 5 minute units.
Moves the graph cursor to the first data set.
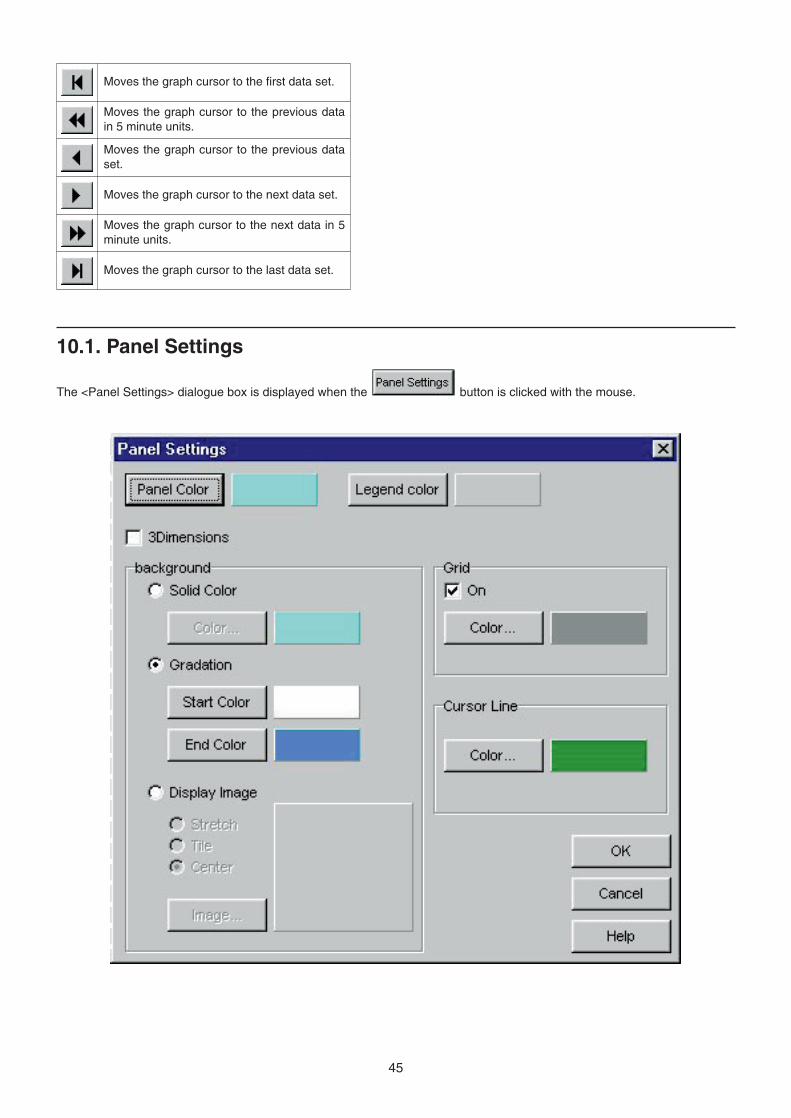
10.1. Panel Settings
The <Panel Settings> dialogue box is displayed when the button is clicked with the mouse.
46
Sets the color outside the graph.
Sets the color of the legend.
Switches between 2D and 3D display.3 Dimensions
Solid Color Sets the background color of the display.
Gradation Set the starting color and ending color of the gradation. The background is then displayed with color gradation.
Display Image
Designate a still picture file to be used for the display. That still picture is then displayed for the background.Either JPEG or BMP files can be selected.
The size of the still picture is adjusted to fit within the graph.User original files cannot be adjusted.Stretch
Still pictures of user original files are displayed in rows if they are smaller than thebackground area.Tile
Still pictures of user original files are displayed in the center in their original size.Center
Background
Grid (Lines)
On Sets whether grid lines are displayed or not displayed.
Sets the color of the grid lines.
Cursor (Lines)
Sets the color of the cursor lines.
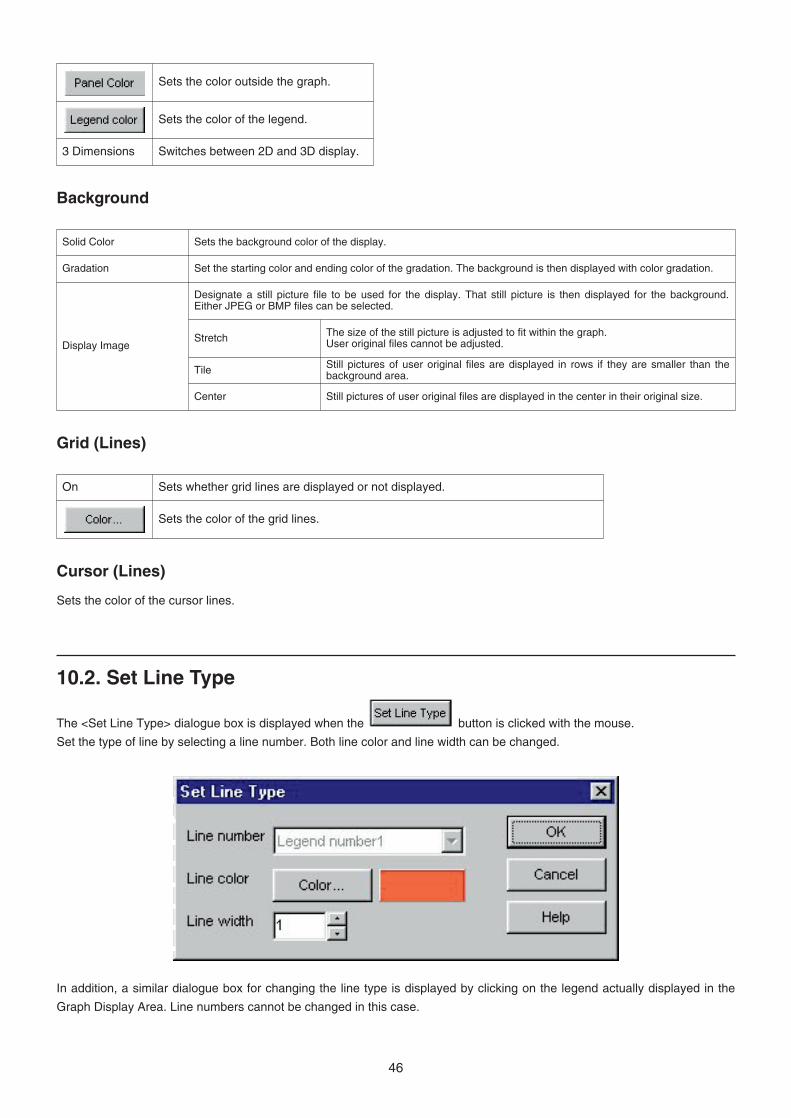
10.2. Set Line Type
The <Set Line Type> dialogue box is displayed when the button is clicked with the mouse.
Set the type of line by selecting a line number. Both line color and line width can be changed.
In addition, a similar dialogue box for changing the line type is displayed by clicking on the legend actually displayed in the
Graph Display Area. Line numbers cannot be changed in this case.
47
10.3. Print Graph
The graph is printed out as it appears on the screen when the button is clicked with the mouse.
Although printouts are generated based on A4-size paper, enlargement and other parameters can be changed by changing
the properties of the printer driver. Refer to the printer user's manual for information on the procedure for setting up the
printer driver.
11. Print Log
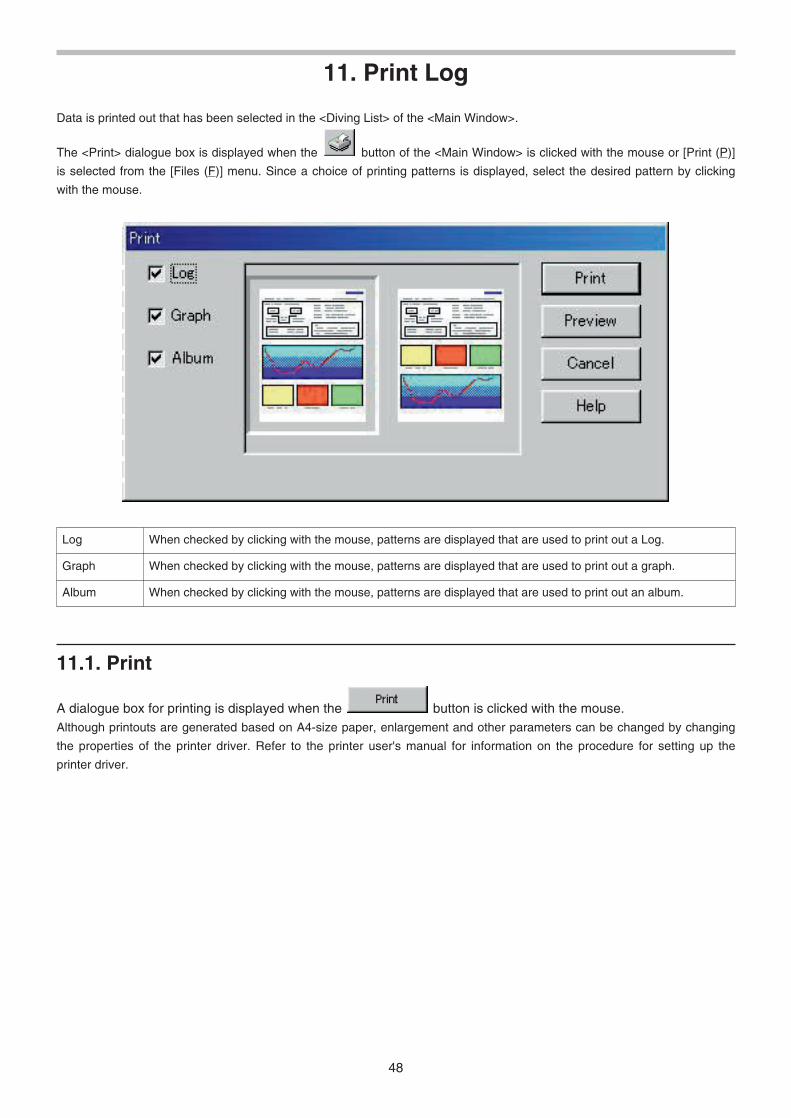
Data is printed out that has been selected in the <Diving List> of the <Main Window>.
The <Print> dialogue box is displayed when the button of the <Main Window> is clicked with the mouse or [Print (P)]
is selected from the [Files (F)] menu. Since a choice of printing patterns is displayed, select the desired pattern by clicking
with the mouse.
48
Log When checked by clicking with the mouse, patterns are displayed that are used to print out a Log.
Graph When checked by clicking with the mouse, patterns are displayed that are used to print out a graph.
Album When checked by clicking with the mouse, patterns are displayed that are used to print out an album.
11.1. Print
A dialogue box for printing is displayed when the button is clicked with the mouse.Although printouts are generated based on A4-size paper, enlargement and other parameters can be changed by changing
the properties of the printer driver. Refer to the printer user's manual for information on the procedure for setting up the
printer driver.
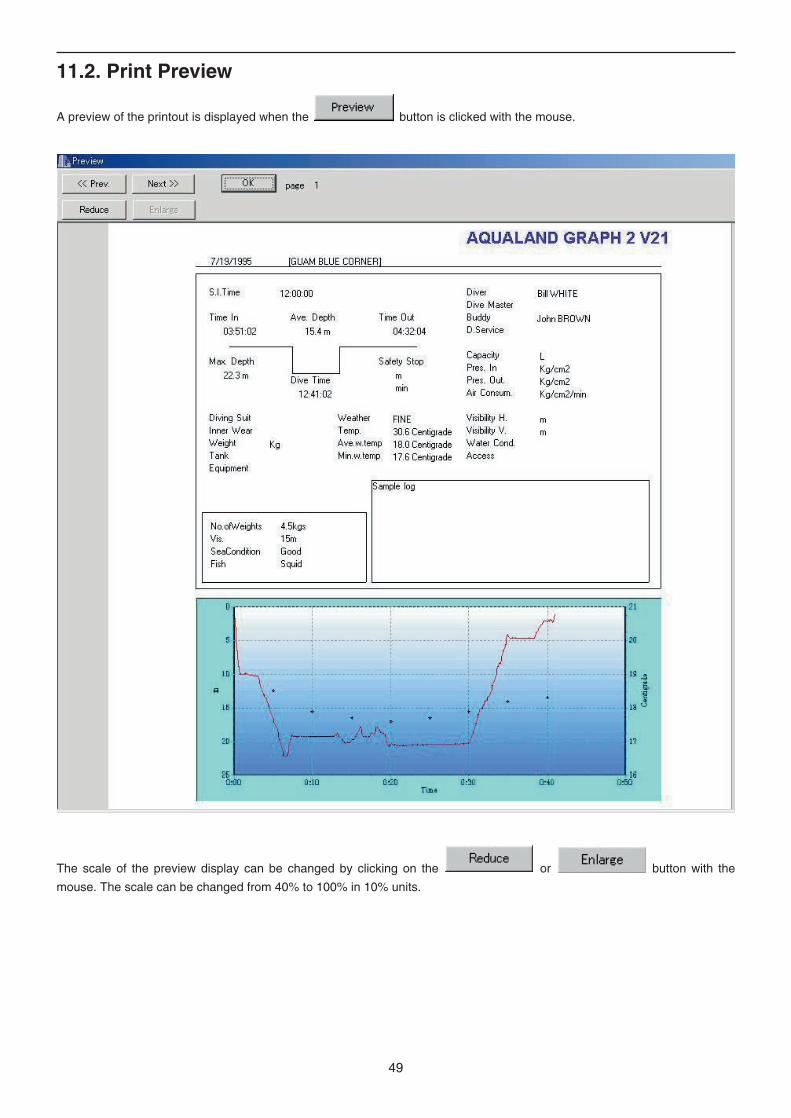
11.2. Print Preview
A preview of the printout is displayed when the button is clicked with the mouse.
49
The scale of the preview display can be changed by clicking on the or button with the
mouse. The scale can be changed from 40% to 100% in 10% units.
12. Create HTML Document
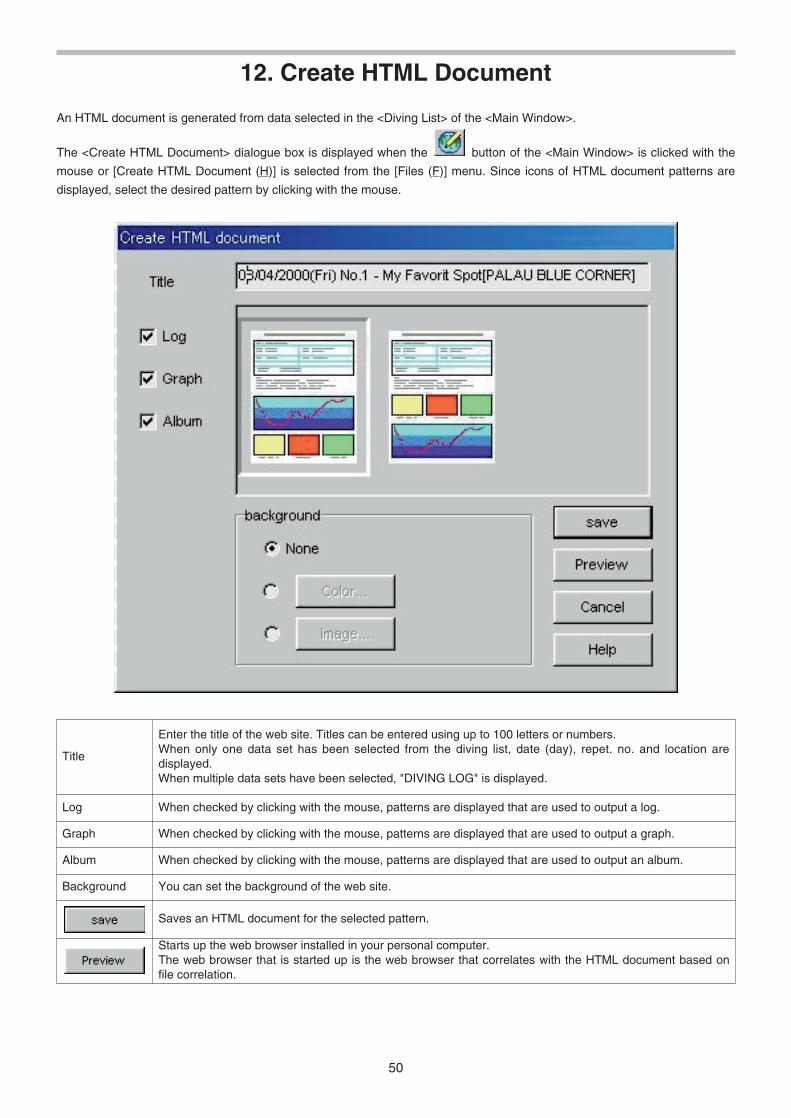
An HTML document is generated from data selected in the <Diving List> of the <Main Window>.
The <Create HTML Document> dialogue box is displayed when the button of the <Main Window> is clicked with the
mouse or [Create HTML Document (H)] is selected from the [Files (F)] menu. Since icons of HTML document patterns are
displayed, select the desired pattern by clicking with the mouse.
50
Title
Enter the title of the web site. Titles can be entered using up to 100 letters or numbers.When only one data set has been selected from the diving list, date (day), repet. no. and location aredisplayed.When multiple data sets have been selected, "DIVING LOG" is displayed.
Log When checked by clicking with the mouse, patterns are displayed that are used to output a log.
Graph When checked by clicking with the mouse, patterns are displayed that are used to output a graph.
Album When checked by clicking with the mouse, patterns are displayed that are used to output an album.
Background You can set the background of the web site.
Saves an HTML document for the selected pattern.
Starts up the web browser installed in your personal computer.The web browser that is started up is the web browser that correlates with the HTML document based onfile correlation.
12.1. Set Background
A background can be set for a web site.
51
None A background is not set.
Color ... A dialogue box is displayed for selecting the background color. The selected color becomesthe background color.
Image ...A dialogue box is displayed for selecting a still picture file. The selected still picture becomesthe background. Either JPEG or BMP files can be selected.
12.2. Save HTML File
The <Save As> dialogue box is displayed.
Select a folder to which the file is to be saved, and designate a name for the HTML file. An HTML document is created in the
selected folder and related image files are copied to that folder.
Image file names are assigned automatically so as not to be duplicated within a folder.
13. Trip Summary
Multiple sets of log data can be managed collectively in the form of trip summaries.
Log data can only be registered in a single trip summary.
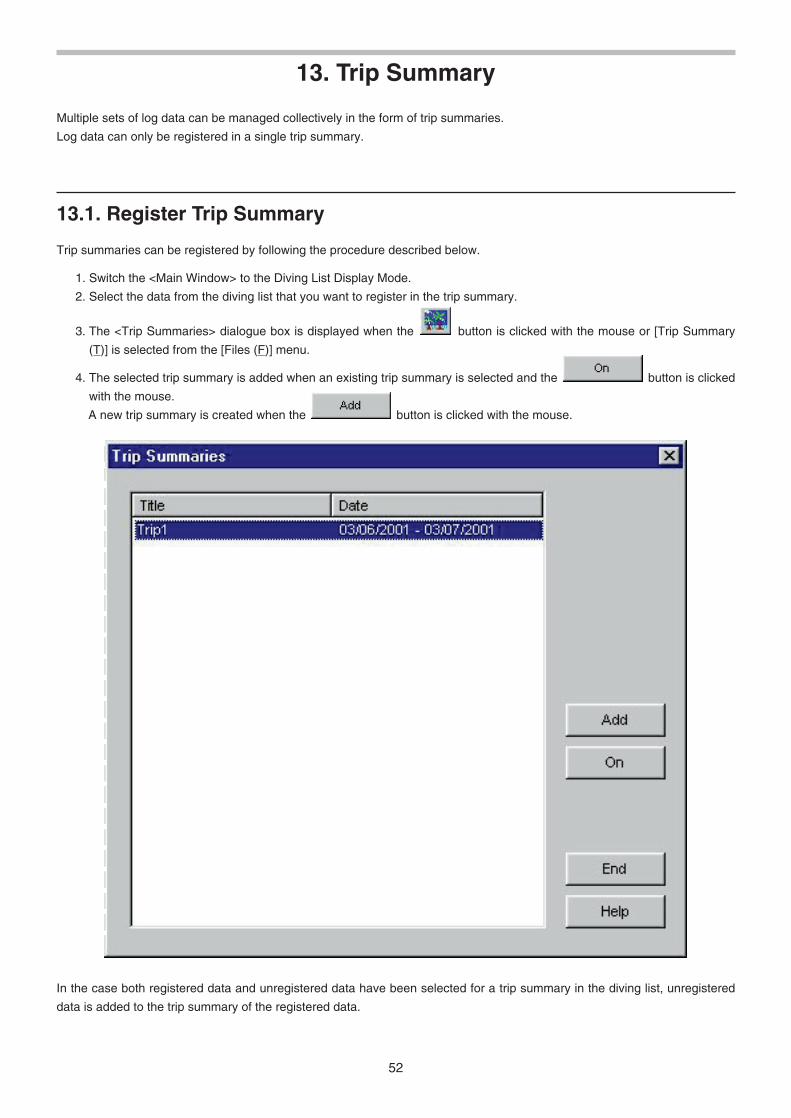
13.1. Register Trip Summary
Trip summaries can be registered by following the procedure described below.
1. Switch the <Main Window> to the Diving List Display Mode.
2. Select the data from the diving list that you want to register in the trip summary.
3. The <Trip Summaries> dialogue box is displayed when the button is clicked with the mouse or [Trip Summary
(T)] is selected from the [Files (F)] menu.
4. The selected trip summary is added when an existing trip summary is selected and the button is clicked
with the mouse.
A new trip summary is created when the button is clicked with the mouse.
52
In the case both registered data and unregistered data have been selected for a trip summary in the diving list, unregistered
data is added to the trip summary of the registered data.
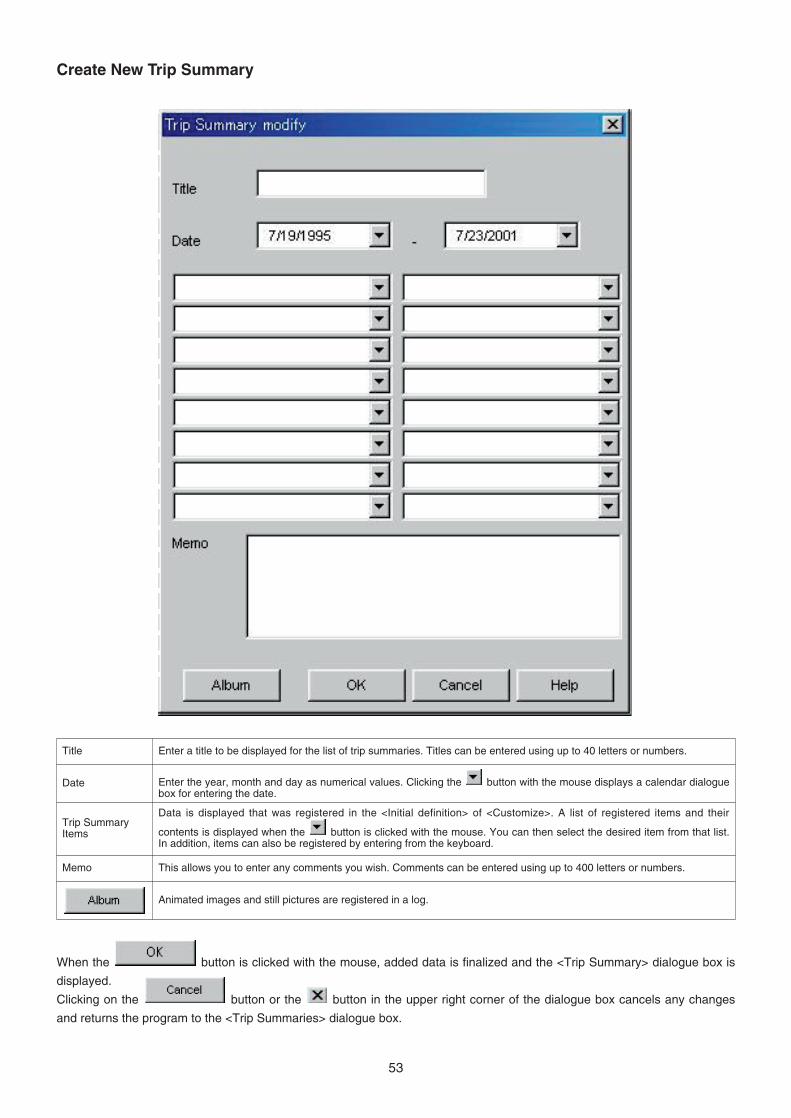
Create New Trip Summary
53
Title Enter a title to be displayed for the list of trip summaries. Titles can be entered using up to 40 letters or numbers.
Date Enter the year, month and day as numerical values. Clicking the button with the mouse displays a calendar dialoguebox for entering the date.
Trip SummaryItems
Data is displayed that was registered in the <Initial definition> of <Customize>. A list of registered items and their
contents is displayed when the button is clicked with the mouse. You can then select the desired item from that list.In addition, items can also be registered by entering from the keyboard.
Memo This allows you to enter any comments you wish. Comments can be entered using up to 400 letters or numbers.
Animated images and still pictures are registered in a log.
When the button is clicked with the mouse, added data is finalized and the <Trip Summary> dialogue box is
displayed.
Clicking on the button or the button in the upper right corner of the dialogue box cancels any changes
and returns the program to the <Trip Summaries> dialogue box.
13.2. Customize
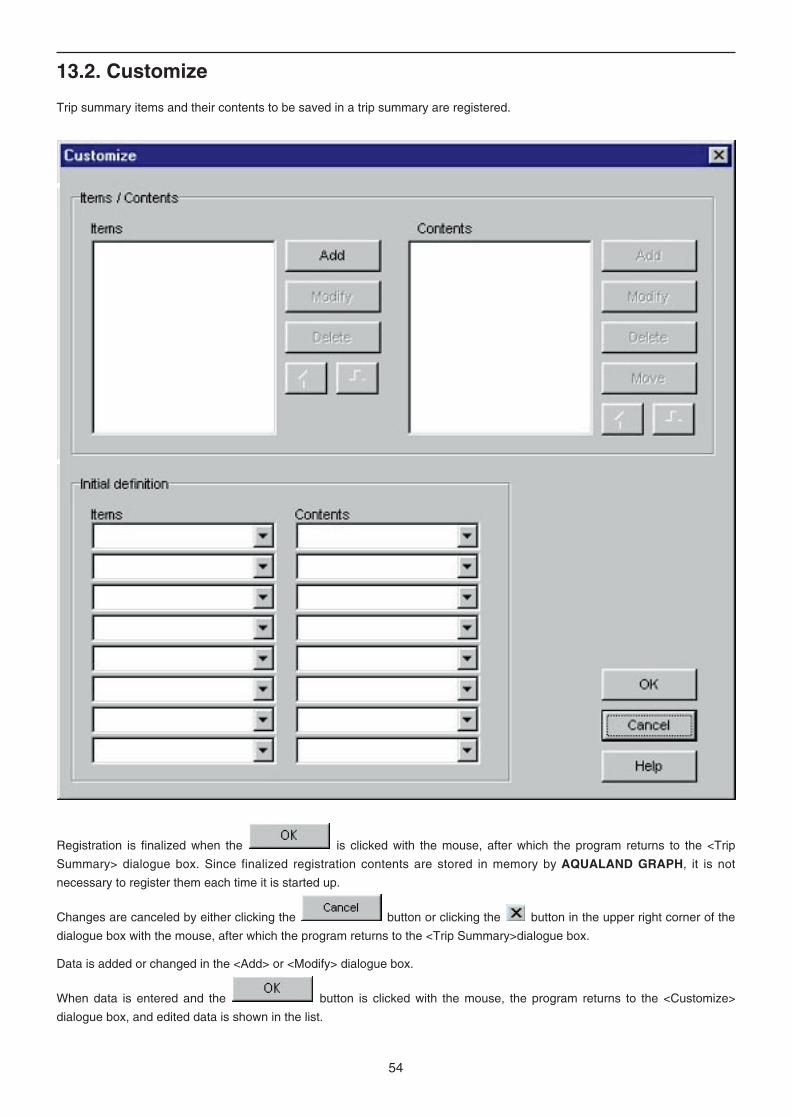
Trip summary items and their contents to be saved in a trip summary are registered.
54
Registration is finalized when the is clicked with the mouse, after which the program returns to the <Trip
Summary> dialogue box. Since finalized registration contents are stored in memory by AQUALAND GRAPH, it is not
necessary to register them each time it is started up.
Changes are canceled by either clicking the button or clicking the button in the upper right corner of the
dialogue box with the mouse, after which the program returns to the <Trip Summary>dialogue box.
Data is added or changed in the <Add> or <Modify> dialogue box.
When data is entered and the button is clicked with the mouse, the program returns to the <Customize>
dialogue box, and edited data is shown in the list.
Contents
Contents can be entered using up to 20 letters or numbers. A maximum of 100 contents can be registered.
55
Displays the <Add> dialogue box and adds contents. A check for duplicated data is not performed.
Displays the <Modify> dialogue box and changes the selected contents. A check for duplicated data is notperformed.
Moves selected contents to a different item.
Moves the display position of selected contents up by one.
Moves the display position of a selected contents down by one.
Deletes selected contents.
Displays the <Add> dialogue box and adds new items. A check for duplicated data is not performed.
Displays the <Modify> dialogue box and changes the names of selected items. A check for duplicated datais not performed. Information relating to the contents is retained even if the name of an item is changed.
Deletes a selected item. The contents registered for that item are also deleted.
Moves the display position of a selected item up by one.
Moves the display position of a selected item down by one.
Items
Items can be entered using up to 20 letters or numbers. A maximum of 100 items can be registered.
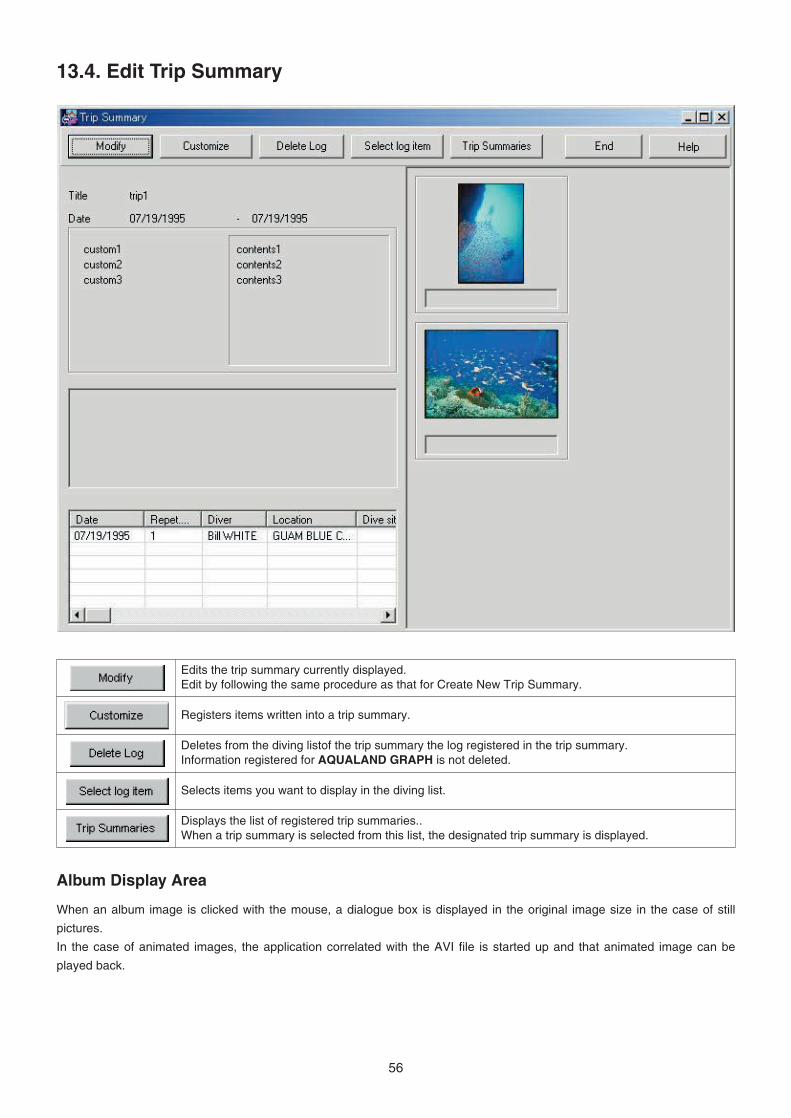
13.3 Trip Summary Display
This is the main window for trip summaries.
Trip summaries are displayed with the following procedure in the case a log has already been registered for a trip summary.
is displayed on the left end of the <Diving List> for those logs that are registered in a trip summary.
1. Switch the <Main Window> to the Diving List Display Mode.
2. Select registered trip summary data from the diving list.
3. The <Trip Summary> dialogue box is displayed when either the is clicked with the mouse or [Trip Summary (T)]
is selected from the [Files (F)] menu.
56
Edits the trip summary currently displayed.Edit by following the same procedure as that for Create New Trip Summary.
Registers items written into a trip summary.
Deletes from the diving listof the trip summary the log registered in the trip summary.Information registered for AQUALAND GRAPH is not deleted.
Selects items you want to display in the diving list.
Displays the list of registered trip summaries..When a trip summary is selected from this list, the designated trip summary is displayed.
Album Display Area
When an album image is clicked with the mouse, a dialogue box is displayed in the original image size in the case of still
pictures.
In the case of animated images, the application correlated with the AVI file is started up and that animated image can be
played back.
13.4. Edit Trip Summary
13.5. Delete Log
A log registered in a trip summary is deleted from the diving list of that trip summary.
The log you want to delete is selected from the diving list of the trip summary. When the button is clicked
with the mouse, the selected log is deleted from the diving list.
Information registered for AQUALAND GRAPH is not deleted.
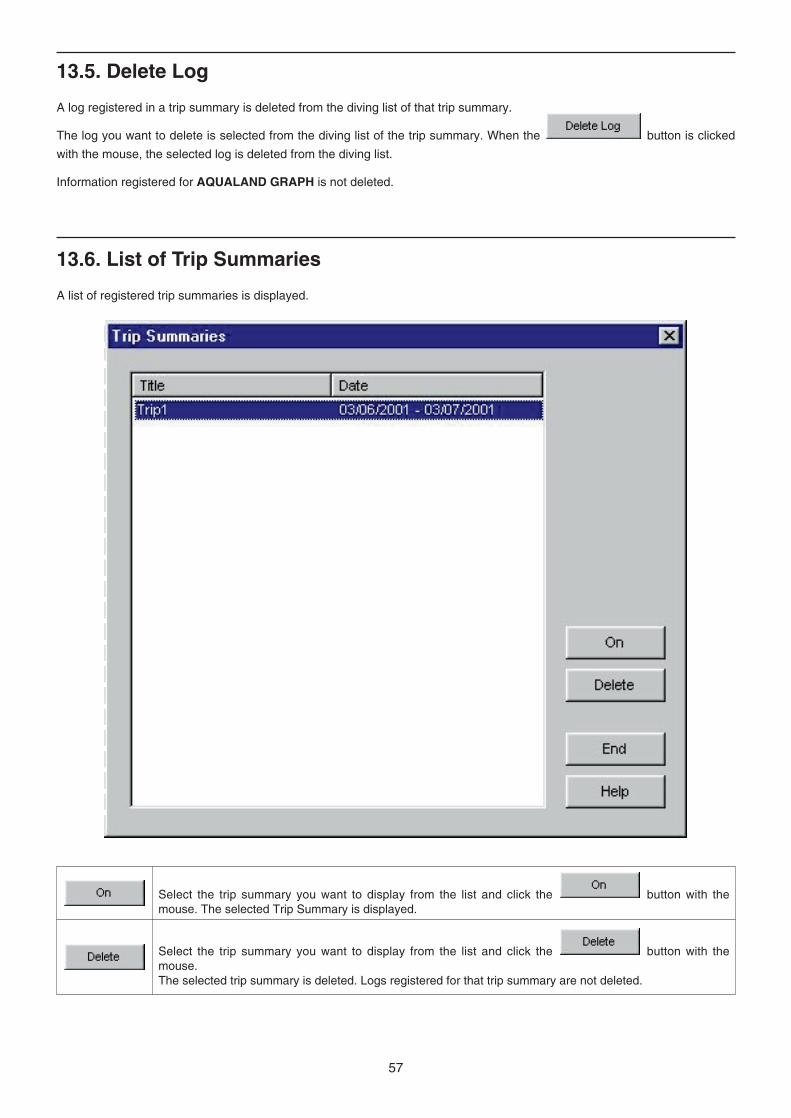
13.6. List of Trip Summaries
A list of registered trip summaries is displayed.
57
Select the trip summary you want to display from the list and click the button with themouse. The selected Trip Summary is displayed.
Select the trip summary you want to display from the list and click the button with themouse. The selected trip summary is deleted. Logs registered for that trip summary are not deleted.
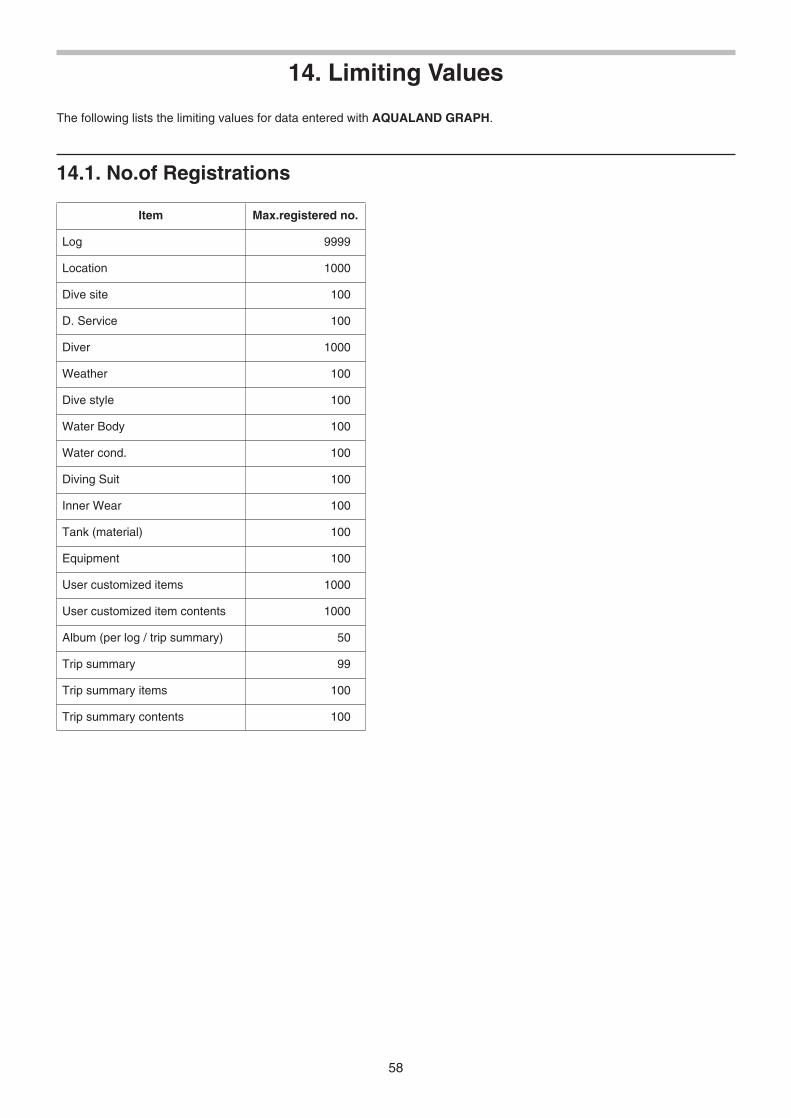
14. Limiting Values
The following lists the limiting values for data entered with AQUALAND GRAPH.
58
Item Max.registered no.
Log 9999
1000
100
100
1000
100
100
100
100
100
100
100
100
1000
1000
50
99
100
100
Location
Dive site
D. Service
Diver
Weather
Dive style
Water Body
Water cond.
Diving Suit
Inner Wear
Tank (material)
Equipment
User customized items
User customized item contents
Album (per log / trip summary)
Trip summary
Trip summary items
Trip summary contents
14.1. No.of Registrations

59
14.2. No. of Entered Characters
Item Max.no.of characters
Weight 10 letters or numbers
Capacity (Tank) 10 letters or numbers
Pressure 10 letters or numbers
Air consum. 10 letters or numbers
Location 20 letters or numbers
Dive site 20 letters or numbers
D. Service 20 letters or numbers
Diver 20 letters or numbers
Dive master 20 letters or numbers
Buddy 20 letters or numbers
Weather 12 letters or numbers
Dive style 10 letters or numbers
Water Body 10 letters or numbers
Water cond. 10 letters or numbers
Diving Suit 20 letters or numbers
Inner Wear 20 letters or numbers
Tank (material) 10 letters or numbers
Equipment 10 letters or numbers
User customizeditems 12 letters or numbers
User customizeditem contents 20 letters or numbers
Memo 400 letters or numbers
Album comment 20 letters or numbers
HTML document title 100 letters or numbers
Trip summary title 40 letters or numbers
Trip summary items 20 letters or numbers
Trip summarycontents 20 letters or numbers
Trip summary memo 400 letters or numbers
Note: All characters may not be displayed depending on their size, even if the number of characters entered is less than the maximum numberof characters allowed.
60
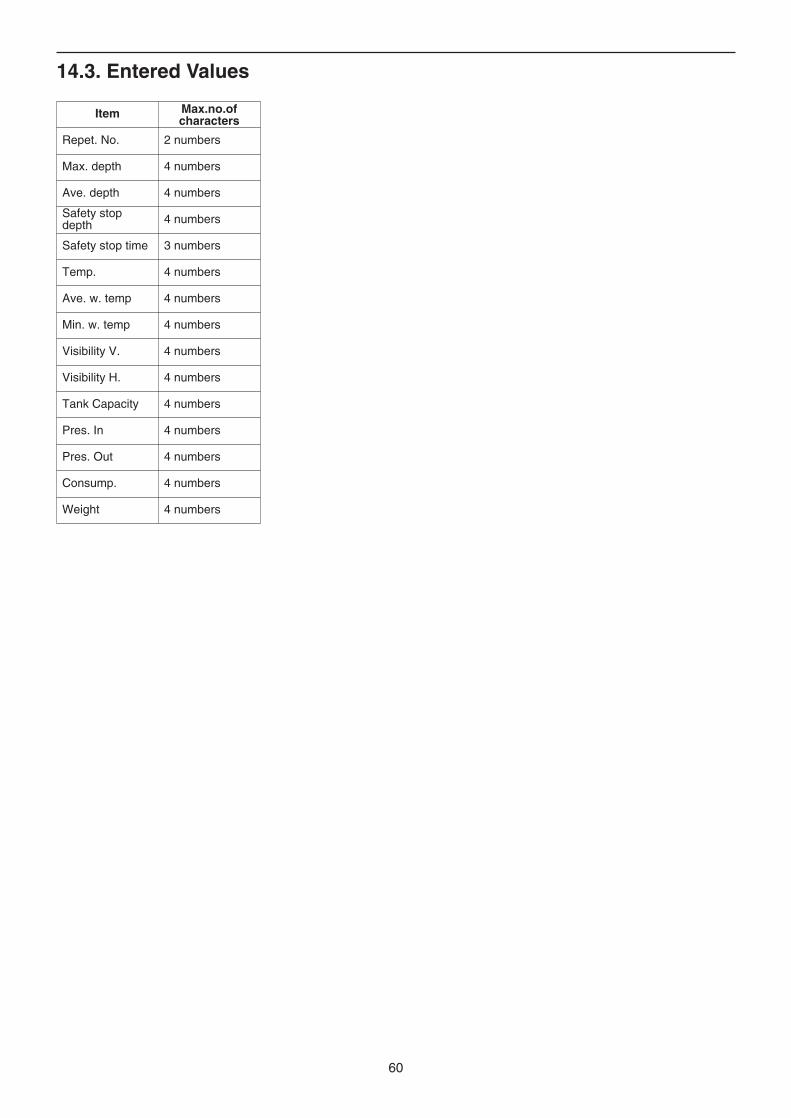
14.3. Entered Values
Item Max.no.ofcharacters
Repet. No. 2 numbers
Max. depth 4 numbers
Ave. depth 4 numbers
Safety stopdepth 4 numbers
Safety stop time 3 numbers
Temp. 4 numbers
Ave. w. temp 4 numbers
Min. w. temp 4 numbers
Visibility V. 4 numbers
Visibility H. 4 numbers
Tank Capacity 4 numbers
Pres. In 4 numbers
Pres. Out 4 numbers
Consump. 4 numbers
Weight 4 numbers
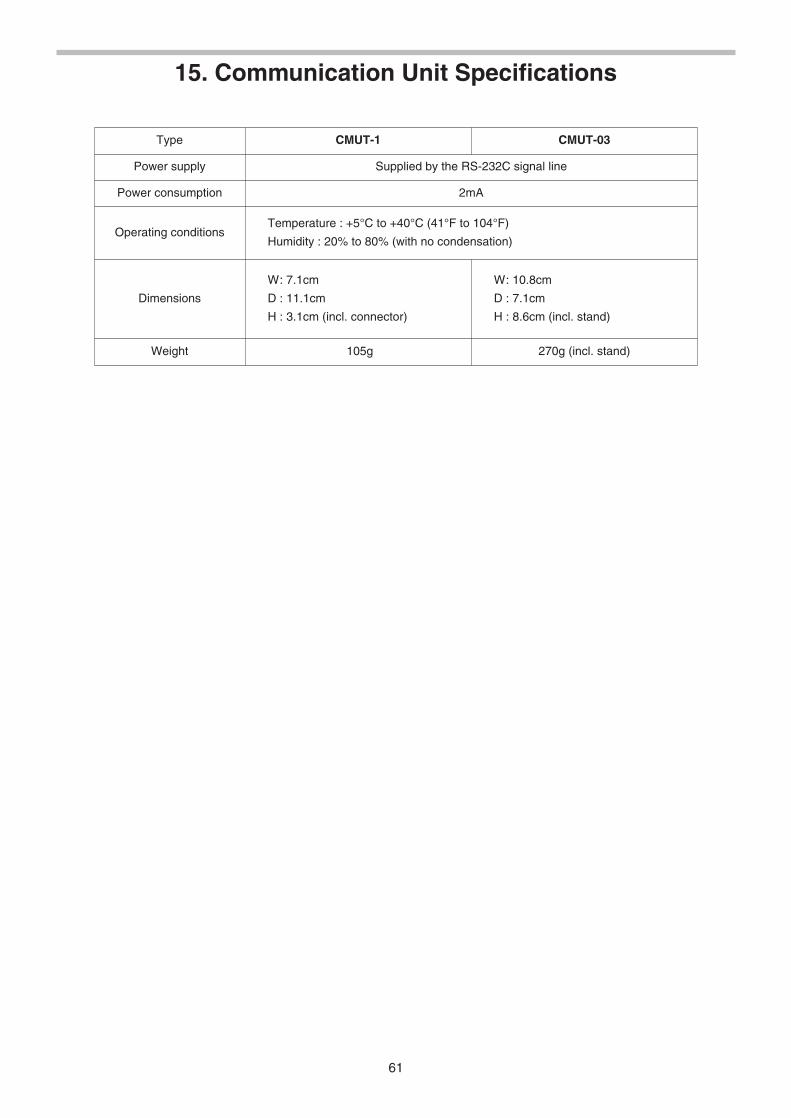
15. Communication Unit Specifications
61
Type CMUT-1 CMUT-03
Power supply Supplied by the RS-232C signal line
Power consumption 2mA
Operating conditionsTemperature : +5°C to +40°C (41°F to 104°F)
Humidity : 20% to 80% (with no condensation)
Dimensions
W: 7.1cm
D : 11.1cm
H : 3.1cm (incl. connector)
W: 10.8cm
D : 7.1cm
H : 8.6cm (incl. stand)
Weight 105g 270g (incl. stand)