Embed Size (px)
Citation preview

APSCN VPN Instructions for VPN Setup on Windows and MAC OS

1 | P a g e
Updated 8/18/2015 – Windows 10 and Windows 8/8.1
Table of Contents APSCN VPN Settings for Windows 10 ............................................................................................................... 2
1 . Creating a VPN Connection ...................................................................................................................... 2
2. Disconnecting the VPN ............................................................................................................................ 6
3. Connecting to an existing VPN Connection ................................................................................................ 7
APSCN VPN Settings for Windows 8/8.1 ........................................................................................................... 8
1 . Creating a VPN Connection ...................................................................................................................... 8
2. Disconnecting the VPN .......................................................................................................................... 12
3. Connecting to an existing VPN Connection .............................................................................................. 13
APSCN VPN Settings for Windows 7 ............................................................................................................... 14
1 . Creating a VPN Connection .................................................................................................................... 14
2. Disconnecting the VPN .......................................................................................................................... 18
3. Connecting to an existing VPN Connection .............................................................................................. 19
APSCN VPN Settings for Windows XP ............................................................................................................. 20
1. Creating a VPN Connection .................................................................................................................... 20
2. Disconnecting the VPN .......................................................................................................................... 25
3. Connecting to an existing VPN Connection ............................................................................................. 25
APSCN VPN Settings for MAC OS .................................................................................................................... 27
1. Creating a VPN Connection .................................................................................................................... 27
2. Disconnecting the VPN .......................................................................................................................... 21
3. Connecting to an existing VPN Connection ............................................................................................. 21

2 | P a g e
APSCN VPN Settings for Windows 10
1. Creating a VPN Connection From the “Cortona Search Box” type Network and Sharing Center
Click on “Network and Sharing Center”
In the Network and Sharing Center window, Click the “Set up
a new connection or network” link
In the “Setup Up a Connection or Network” window, click
“Connect to a workplace” to highlight the
option.
Click “Next”

3 | P a g e
In the “Connect to a Workplace” window; “How do you want to
connect?” Click the “Use my Internet Connection (VPN)” link
In the box next to “Internet address:” enter: vpn.apscn.k12.ar.us
In the box next to “Destination name:” enter the name you want
for the VPN Connection, for example: APSCN VPN
Click “Create”
Click the “Internet Access” button in the lower right corner of
your monitor, and you will see the APSCN VPN Connection
listed in Networks

4 | P a g e
Before connecting to the APSCN VPN, go
back to the “Network and Sharing
Center” and click on “Change adapter
settings
Right click on the VPN Connection you setup and click on Properties. *Note* The connection should be greyed out and named either “APSCN VPN” or whatever name chosen during setup
Under Properties Click on the Security Tab make the following configuration changes. Data encryption: Require encryption (disconnect if server declines) Authentication: Allow these protocols EAP-MSCHAPv2……… Check boxes: Challenge Handshake Authentication Protocol (CHAP) Click OK

5 | P a g e
Under the Network Connections, click on
APSCN VPN
You will see the VPN connection you setup.
Click on “APSCN VPN” and click Connect
In the Sign In box” enter APSCN\yourusername and
password
Click “Ok”
If the connection is successful, you should see your VPN show up as Connected
6 | P a g e
2. Disconnecting the VPN
When you are finished accessing APSCN / ADE services, for example eSchool, TAC, APSCN PLUS, etc., disconnect from the VPN connection. To disconnect click the “Internet Access” button in the lower right corner of your monitor.
When you click on the “Internet access” button, a
window will pop up with your current connections.
You should see the word “Connected” below the
“APSCN VPN Connection”.
Click the connection
After clicking the connection, the network settings window will display. Click the “Disconnect” button

7 | P a g e
3. Connecting to an existing VPN Connection
To use the VPN connection in the future, click the “Internet Access” button in
the lower right corner of your monitor.
Click the “APSCN VPN Connection” link
Under the Network Connections, click on APSCN VPN You will see the VPN connection you setup. Click on "APSCN VPN" and click Connect

8 | P a g e
APSCN VPN Settings for Windows 8/8.1
1. Creating a VPN Connection
From the “Start Screen” type Network and Sharing Center
Click on “Network and Sharing Center”
In the Network and Sharing Center window, Click the “Set up
a new connection or network” link
In the “Setup Up a Connection or Network” window,
click “Connect to a workplace” to highlight the option.
Click “Next”
9 | P a g e
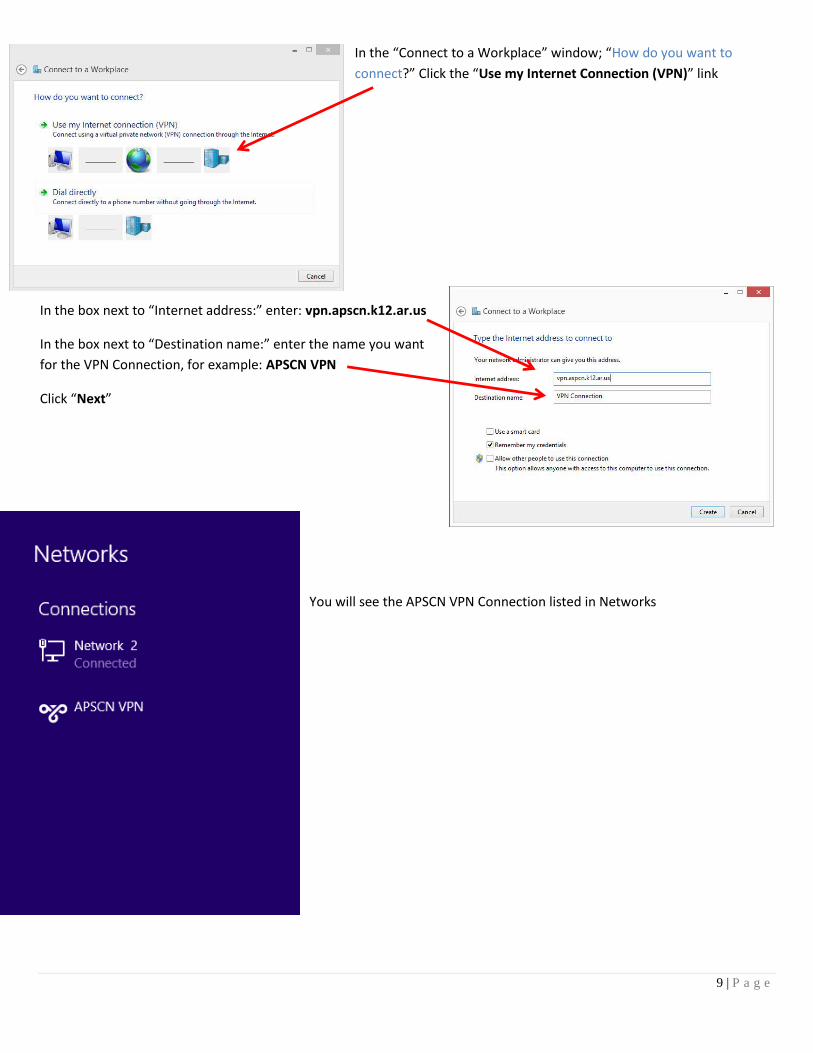
In the “Connect to a Workplace” window; “How do you want to
connect?” Click the “Use my Internet Connection (VPN)” link
In the box next to “Internet address:” enter: vpn.apscn.k12.ar.us
In the box next to “Destination name:” enter the name you want
for the VPN Connection, for example: APSCN VPN
Click “Next”
You will see the APSCN VPN Connection listed in Networks

10 | P a g e
Before connecting to the APSCN VPN, go
back to the “Network and Sharing
Center” and click on “Change adapter
settings
Right click on the VPN Connection you setup and click on Properties. *Note* The connection should be greyed out and named either “APSCN VPN” or whatever name chosen during setup
Under Properties Click on the Security Tab make the following configuration changes. Data encryption: Require encryption (disconnect if server declines) Authentication: Allow these protocols EAP-MSCHAPv2……… Check boxes: Challenge Handshake Authentication Protocol (CHAP) Click OK

11 | P a g e
Under “Networks”, highlight the “VPN
Connection”.
Click on Connect
Under “Network sign-in” enter APSCN\yourusername and password
Click “Ok”
If the connection is successful, you should see your VPN show up as Connected

12 | P a g e
2. Disconnecting the VPN
When you are finished accessing APSCN / ADE services, for example eSchool, TAC, APSCN PLUS, etc., disconnect from the VPN connection. To disconnect click the “Internet Access” button in the lower right corner of your monitor.
When you click on the “Internet access” button, a
window will pop up with your current connections. You
should see the word “Connected” next to the “APSCN
VPN Connection”.
Click the connection
After clicking the connection, the window will expand. Click the “Disconnect” button

13 | P a g e
3. Connecting to an existing VPN Connection
To use the VPN connection in the future, click the “Internet Access” button
in the lower right corner of your monitor.
Click the “APSCN VPN Connection” link.
The “APSCN VPN Connection” will expand. Click “Connect”.

14 | P a g e
APSCN VPN Settings for Windows 7
1 . Creating a VPN Connection
Click the “Start Button” in the toolbar.
Click “Control Panel”
In the “Control Panel” window, click the “Network and Internet” link:
In the “Network and Internet” window, Click “Network and Sharing Center.”

15 | P a g e
In the Network and Sharing Center window, Click the “Set up a new connection or network” link.
In the “Set Up a Connection or Network” window, click “Connect to a workplace” to highlight the option.
Click “Next”
In the “Connect to a Workplace” window: “Do you want to
use a connection that you already have?” – click the radio
button next to “No, create a new connection”

16 | P a g e
In the “Connect to a Workplace”
window; “How do you want to connect?”
– Click the “Use my Internet Connection
(VPN)” link.
In the box next to “Internet address:” enter:
vpn.apscn.k12.ar.us
In the box next to “Destination name:” enter the name you want for the VPN Connection, for example: APSCN VPN Click “Next”

17 | P a g e
In the next window enter your username, password and domain information. For security purposes, it is best NOT to check “Remember this password”. In the box next to “Domain (optional)”, enter APSCN
Click “Connect.”
If the connection is successful, you should see the window, “You are connected” Click “Close”

18 | P a g e
2. Disconnecting the VPN
When you are finished accessing APSCN / ADE services, for example eSchool, TAC, APSCN PLUS, etc., disconnect from the VPN connection.
To disconnect click the “Internet Access” button in the lower right corner of your monitor.
When you click on the “Internet access” button, a window will pop up with
your current connections. You should see the word “Connected” next to
the “APSCN VPN Connection”.
Click the connection
After clicking the connection, the window will expand. Click the
“Disconnect” button.

19 | P a g e
3. Connecting to an existing VPN Connection
To use the VPN connection in the future, click the “Internet Access” button in
the lower right corner of your monitor.
Click the “APSCN VPN Connection” link.
The “APSCN VPN Connection” will expand. Click
“Connect”.

20 | P a g e
APSCN VPN Settings for Windows XP
1. Creating a VPN Connection
Click the Start Button in the toolbar:
In the pop-up box, click “Control Panel”
In the “Conrol Panel” window, double-click “Network
Connection”
In the “Network Connections” window, under
“Network Tasks” in the left pane
Click “Create a new connection” link

21 | P a g e
In the “Network Connection Type” box, click the radio button next to: “Connect to the network at my workplace”
Click “Next”
The “Welcome to the New Connection Wizard” box will pop
up. Click “Next”
In the “Network Connection”, “How do you want to connect to the network at your workplace?” Click the radio button next to “Virtual Private Network connection.”
Click “Next”
22 | P a g e
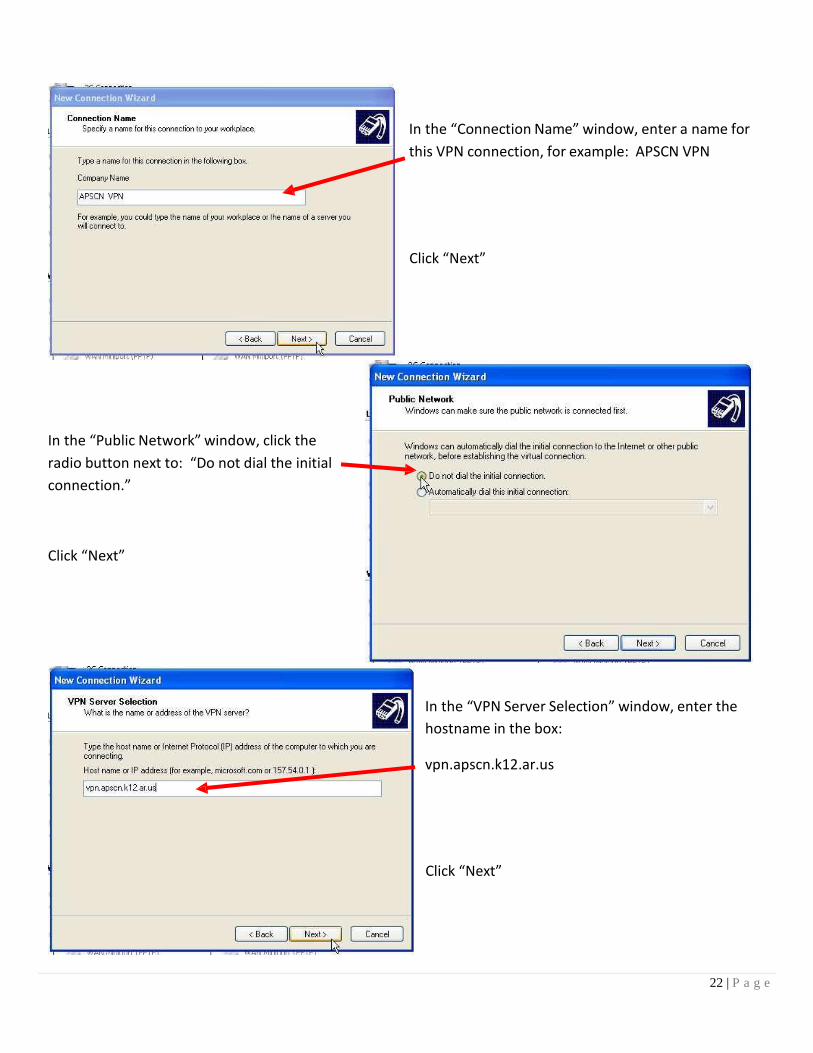
In the “Connection Name” window, enter a name for
this VPN connection, for example: APSCN VPN
Click “Next”
In the “Public Network” window, click the
radio button next to: “Do not dial the initial
connection.”
Click “Next”
In the “VPN Server Selection” window, enter the
hostname in the box:
vpn.apscn.k12.ar.us
Click “Next”

23 | P a g e
In the “Smart Cards” window, click the radio button
next to: “Do not use my smart card.”
Click “Next”
For security purposes, check “My use only”
Click “Next”
If you want a copy of the APSCN VPN connection
on your desktop, click the box next to “Add a
shortcut to this connection to my desktop”
Click “Finish”

24 | P a g e
In the Connect APSCN VPN window enter your User
name, and password.
In the box next to “User name:” enter:
APSCN\0000your_username (NOTE: you must
enter APSCN\ before your username.)
Enter your password
It is advisable to not click “Save this user name and
password for the following users:” for security
reasons.
Click “Connect”
After the VPN connection is established, there will be a pop-up on
the toolbar, close to the system time that signifies you are
connected.
25 | P a g e
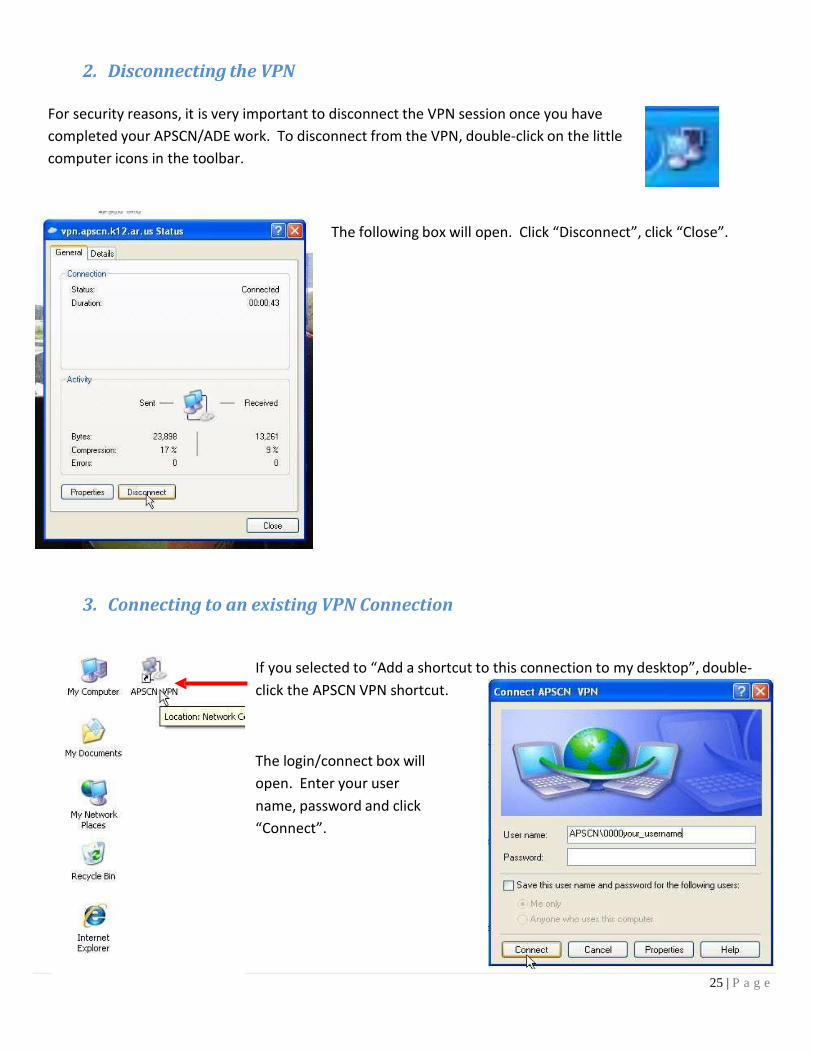
2. Disconnecting the VPN
For security reasons, it is very important to disconnect the VPN session once you have
completed your APSCN/ADE work. To disconnect from the VPN, double-click on the little
computer icons in the toolbar.
The following box will open. Click “Disconnect”, click “Close”.
3. Connecting to an existing VPN Connection
If you selected to “Add a shortcut to this connection to my desktop”, double-
click the APSCN VPN shortcut.
The login/connect box will
open. Enter your user
name, password and click
“Connect”.

26 | P a g e
If you did not select the “Add a
shortcut to this connection to my
desktop”, go to:
“Start” button “Settings”
“APSCN VPN” should be listed in
the pop-up window. Click the
“APSCN VPN” link.
The login/connect box will open. Enter your user name,
password and click “Connect”.
27 | P a g e
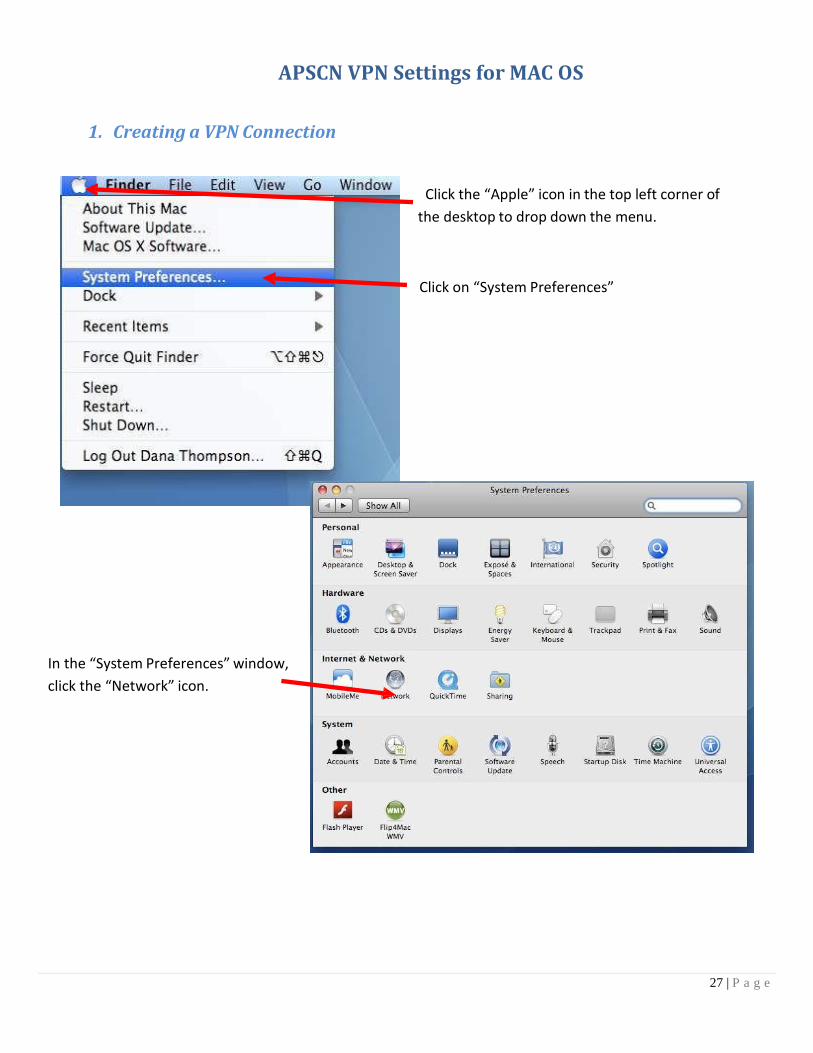
APSCN VPN Settings for MAC OS
1. Creating a VPN Connection
Click the “Apple” icon in the top left corner of
the desktop to drop down the menu.
Click on “System Preferences”
In the “System Preferences” window,
click the “Network” icon.

28 | P a g e
In the “Network” window: Click to
highlight either the “Ethernet” or
“AirPort” connection.
Click the + in the lower left corner.
The “Select the interface and enter a name for
the new service.” Box will pop up at the top.
Click the drop-down arrow next to the “Interface”
box.
A list will open of interface types.
Click “VPN”

29 | P a g e
Click the drop-down arrow next to the
“VPN Type” box.
Click “PPTP”
In the box next to “Service
Name”, type in “APSCN VPN”.
Click “Create”
After clicking “Create”, you will
be returned to the “Network”
window. The “APSCN VPN”
connection created should be
listed in the box. If it is not
already highlighted, click to
highlight it.

30 | P a g e
Enter vpn.apscn.k12.ar.us in the
box next to “Server Address”
Enter APSCN\your username in the
“Account Name:” box. For
example: APSCN\0000dogood
Leave the “Encryption” setting for
“Automatic”
Click “Authentication Settings”
button
The “User Authentication” window will drop
down.
Ensure the radio button next to “Password” is
selected.
For security reasons do NOT enter your password
in the box.
Click “OK”
Click “Advanced”

31 | P a g e
Click the box to “Send all traffic over
VPN connection.
Click “OK”
Click the “Connect” button
The password prompt box will open. Enter your
password.
Click “OK”

20 | P a g e
Once the connection is successful, you
should see “Connected” next to “Status:”
You can close the Network window once
the connection is established.
You are now ready to work on
APSCN/eSchool applications.
When you have completed working in
APSCN tools, be sure to disconnect your
APSCN VPN

21 | P a g e
2. Disconnecting the VPN
For security reasons, it is very important to disconnect the VPN session once you have completed your
APSCN/ADE work.
To disconnect from the VPN, click the little Network icon on the top toolbar.
A list of connections will drop-down.
Click “Disconnect APSCN VPN”
3. Connecting to an existing VPN Connection
Click the little Network icon on the top toolbar.
A list of available VPN connection will drop down.
Click “Connect APSCN VPN”