Embed Size (px)
Citation preview
Page 1
Visual Reset Document
SAMSUNG CONFIDENTIAL AND PROPRIETARY. THIS CONTENT IS FOR SAMSUNG INTERNAL USAGE ONLY AND IS NOT FOR EXTERNAL USAGE AND/OR DISTRIBUTION.
April 2017
Walmart Installation Guide: Galaxy S8 Reset
Tools Provided by Installer• StrippedScrewRepairTool,Philipheadscrewdriver,Universalremotecontrol(Brand
PillarOnly),NeedleNosePliersUpon Arrival at Store
1. Installersaretobringonlyitemsneededforthatlocation(includingreportingdevice).• NOTE: Iftheybringanyextradevices,otherthandevicesneededtocompletethe
reset,theywillnotbeabletoleavewiththem.Check-in Process
2. Sign-inatCustomerService.• Installershouldaskforamemberofmanagement,StoreManager,Co-Manager
or Assistant Manager and provide the Letter of Authorization (LOA) beforeproceeding.
• LOAsarebeingsentto installersbyemail.Print the LOA and bring it with youtoall installations. IfyoudonotbringtheLOA,thestorewillnotallowyoutocompletetheresetandyouwillberequiredtoreturnatyourcompany’sexpense.
• TheElectronics/MobileClubManageronDuty,AssetProtection(AP),storeorCo-Managerwillprovidealarmkeystodeactivatethesecurityalarm(EndcapandRacetrackOnly).However,thesealarmkeysare notnecessaryfortheinstalltocontinue.• Ifanyoftheexistingstoresecurityisnotpresent, install all other components
from the reset kit and take all necessary pictures.FileanR&MreportwhenfillingouttheBigSkysurvey.DoNOTleaveanyunsecureddeviceswiththestore.
• StoresDO NOT requiresecuritykeysforresetcompletion.3. ManagerRefusalProcess
• Important:Ifyouhaveamanagerondutythatrefusetoallowyoutoinstallthedevices,THEYMUSTsigntheManagerRefusalSign-offformbeforeyouleavethestore.
• InformthememberofmanagementthatSamsungisprovidingtheMockdevicesandWirelessChargingPadatnocosttothestore.
• TheinstalleristhenrequiredtoalerttheirPMtoreceiveareturnlabelfortheentirekitandshipitoutwithin24hoursofamanagerrefusal.Ifthisdoesnottakeplace,a$500feewillbeapplied.
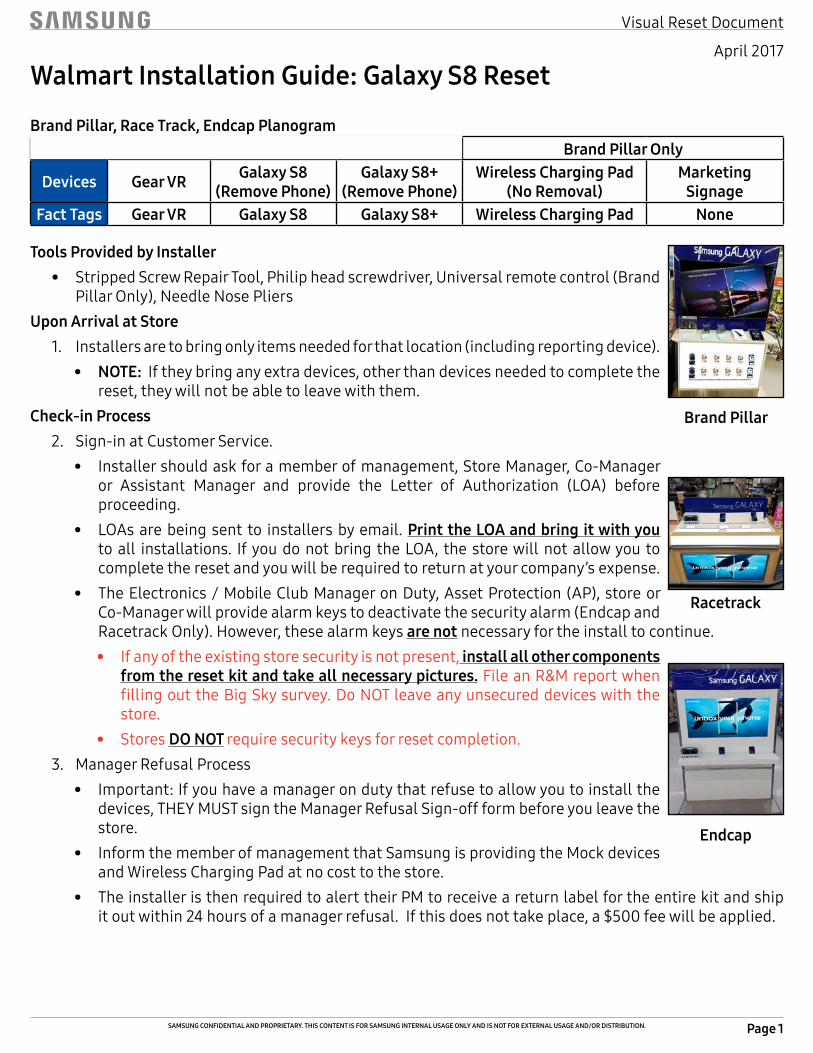
Brand Pillar, Race Track, Endcap PlanogramBrand Pillar Only
Devices Gear VR Galaxy S8(Remove Phone)
Galaxy S8+(Remove Phone)
Wireless Charging Pad (No Removal)
Marketing Signage
Fact Tags Gear VR Galaxy S8 Galaxy S8+ Wireless Charging Pad None
Brand Pillar
Racetrack
Endcap
Page 2
Visual Reset Document
SAMSUNG CONFIDENTIAL AND PROPRIETARY. THIS CONTENT IS FOR SAMSUNG INTERNAL USAGE ONLY AND IS NOT FOR EXTERNAL USAGE AND/OR DISTRIBUTION.
April 2017Walmart Installation Guide: Galaxy S8 ResetInstallation Overview
1. IftheMODrefusestheinstallordoesnothaverequiredsecurity,completeManagerRefusal(separatefromthisdocument).SkipdowntoStep10.
2. Openthefixturetoaccessthesecurity.ReferencePage6.3. Replacethesizzlevideo(BrandPillarOnly).ReferencePages6-8.4. ReplacetwooftheexistingdevicesandarrangeperPOG.
• DiscardanyS-PenSecurity• BrandPillar(Page9),EndcapandRacetrack(Page10)Important:EnsurePOGonPage1issetcorrectlyoryouwillberequiredtoreturnatyourcompany’sexpensetocorrect.
5. LeavetheVRdisplayboxinplaceunlessitisinthewrongPOGposition.ReferencePage10.6. InstallnewWirelessChargingPadandHolder(BrandPillarOnly).ReferencePage11.7. Updatethemarketing.Discardoldmarketing.
• BrandPillar(Page11),Endcap(Page11),Racetrack(Page12)8. Closefixture.ReplacetheAccessoryPanel(Page13,BrandPillarOnly)andanyremovedaccessories.9. Confirmremovedphonedevicetype,LDUvsCarrier(Page13).AllLIVEphonedevicesmustberemoved
fromthefixtureandreplacedwiththeprovidedMocks.• IfLDUPhone,returntoGroupOusingsuppliedreturnpackaging.• IfCarrierPhoneorWearable(watchorVR),returntoMOD.
10.CompletetheManagerSignOffForm(separatefromthisdocument).11. PackagereturnmaterialinReturnBox.ReferencePage5forfulllistofReturns.
Important: Itisrequiredforthisinstalltousetheenclosedshippingreturnboxwithpremadelabeltoshipthenecessaryitemsback.Ifthiskitisnotreturneda$500feewillbeapplied.ReferencePage5forlistofitemstoreturn.
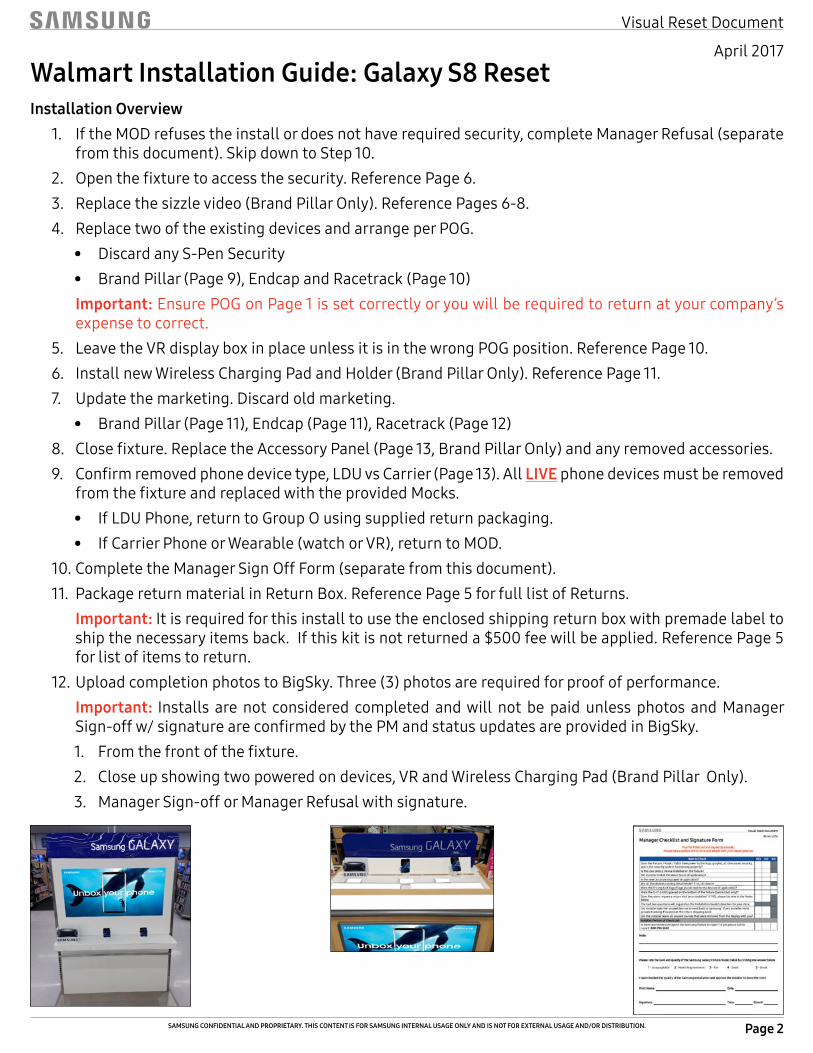
12.UploadcompletionphotostoBigSky.Three(3)photosarerequiredforproofofperformance.Important: Installs arenot consideredcompletedandwillnotbepaidunlessphotosandManagerSign-offw/signatureareconfirmedbythePMandstatusupdatesareprovidedinBigSky.1. Fromthefrontofthefixture.2. Closeupshowingtwopoweredondevices,VRandWirelessChargingPad(BrandPillarOnly).3. ManagerSign-offorManagerRefusalwithsignature.
Page 3
Visual Reset Document
SAMSUNG CONFIDENTIAL AND PROPRIETARY. THIS CONTENT IS FOR SAMSUNG INTERNAL USAGE ONLY AND IS NOT FOR EXTERNAL USAGE AND/OR DISTRIBUTION.
April 2017Walmart Installation Guide: Galaxy S8 ResetKit Photos
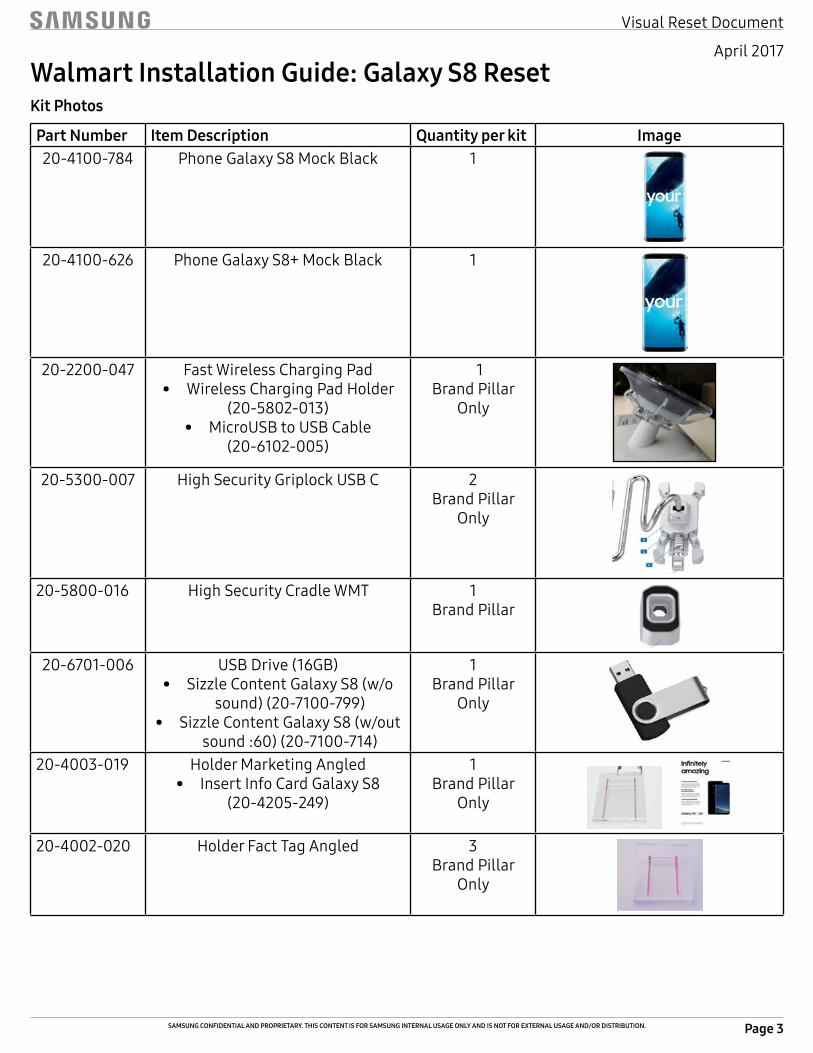
Part Number Item Description Quantity per kit Image20-4100-784 PhoneGalaxyS8MockBlack 1
20-4100-626 PhoneGalaxyS8+MockBlack 1
20-2200-047 FastWirelessChargingPad
• WirelessChargingPadHolder(20-5802-013)
• MicroUSBtoUSBCable(20-6102-005)
1BrandPillar
Only
20-5300-007 HighSecurityGriplockUSBC 2
BrandPillarOnly
20-5800-016 HighSecurityCradleWMT 1
BrandPillar
20-6701-006 USBDrive(16GB)• SizzleContentGalaxyS8(w/o
sound)(20-7100-799)• SizzleContentGalaxyS8(w/out
sound:60)(20-7100-714)
1BrandPillar
Only
20-4003-019 HolderMarketingAngled• InsertInfoCardGalaxyS8
(20-4205-249)
1BrandPillar
Only
20-4002-020 HolderFactTagAngled 3BrandPillar
Only
Page 4
Visual Reset Document
SAMSUNG CONFIDENTIAL AND PROPRIETARY. THIS CONTENT IS FOR SAMSUNG INTERNAL USAGE ONLY AND IS NOT FOR EXTERNAL USAGE AND/OR DISTRIBUTION.
April 2017
Walmart Installation Guide: Galaxy S8 Reset
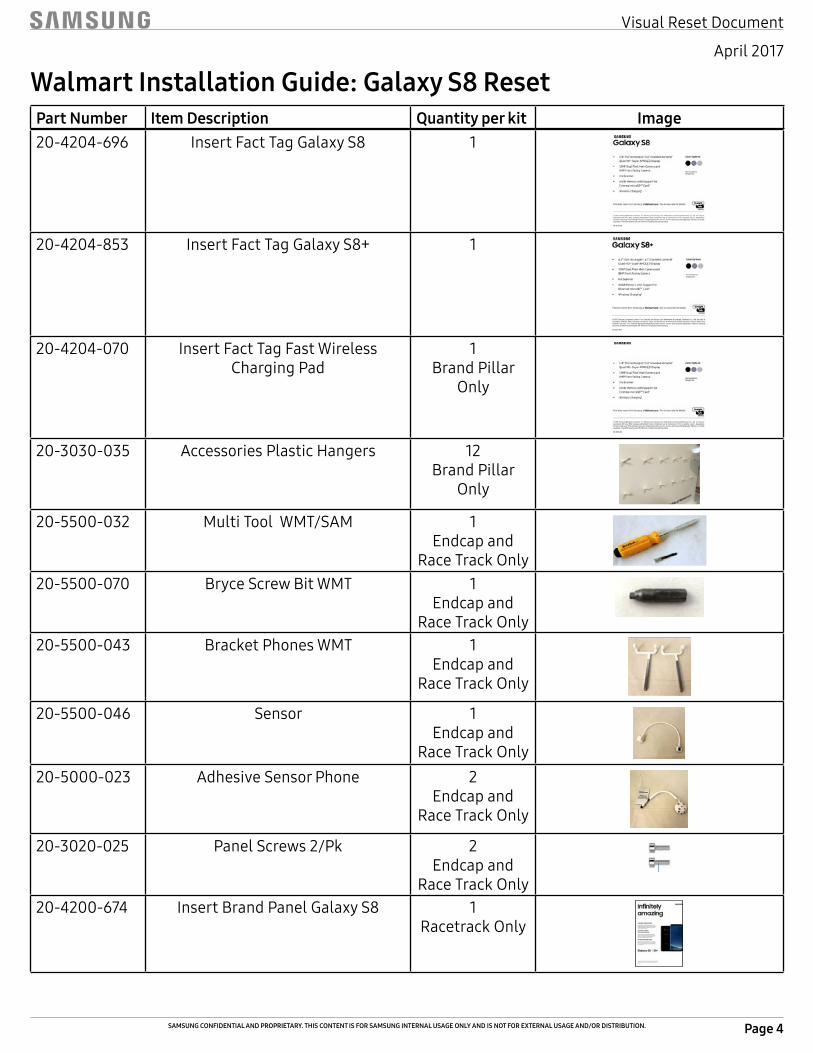
20-4204-696 InsertFactTagGalaxyS8 1
20-4204-853 InsertFactTagGalaxyS8+ 1
20-4204-070 InsertFactTagFastWirelessChargingPad
1BrandPillar
Only
20-3030-035 AccessoriesPlasticHangers 12BrandPillar
Only
20-5500-032 MultiToolWMT/SAM 1Endcapand
RaceTrackOnly20-5500-070 BryceScrewBitWMT 1
EndcapandRaceTrackOnly
20-5500-043 BracketPhonesWMT 1Endcapand
RaceTrackOnly
20-5500-046 Sensor 1Endcapand
RaceTrackOnly20-5000-023 AdhesiveSensorPhone 2
EndcapandRaceTrackOnly
20-3020-025 PanelScrews2/Pk 2Endcapand
RaceTrackOnly20-4200-674 InsertBrandPanelGalaxyS8 1
RacetrackOnly
Part Number Item Description Quantity per kit Image
Page 5
Visual Reset Document
SAMSUNG CONFIDENTIAL AND PROPRIETARY. THIS CONTENT IS FOR SAMSUNG INTERNAL USAGE ONLY AND IS NOT FOR EXTERNAL USAGE AND/OR DISTRIBUTION.
April 2017
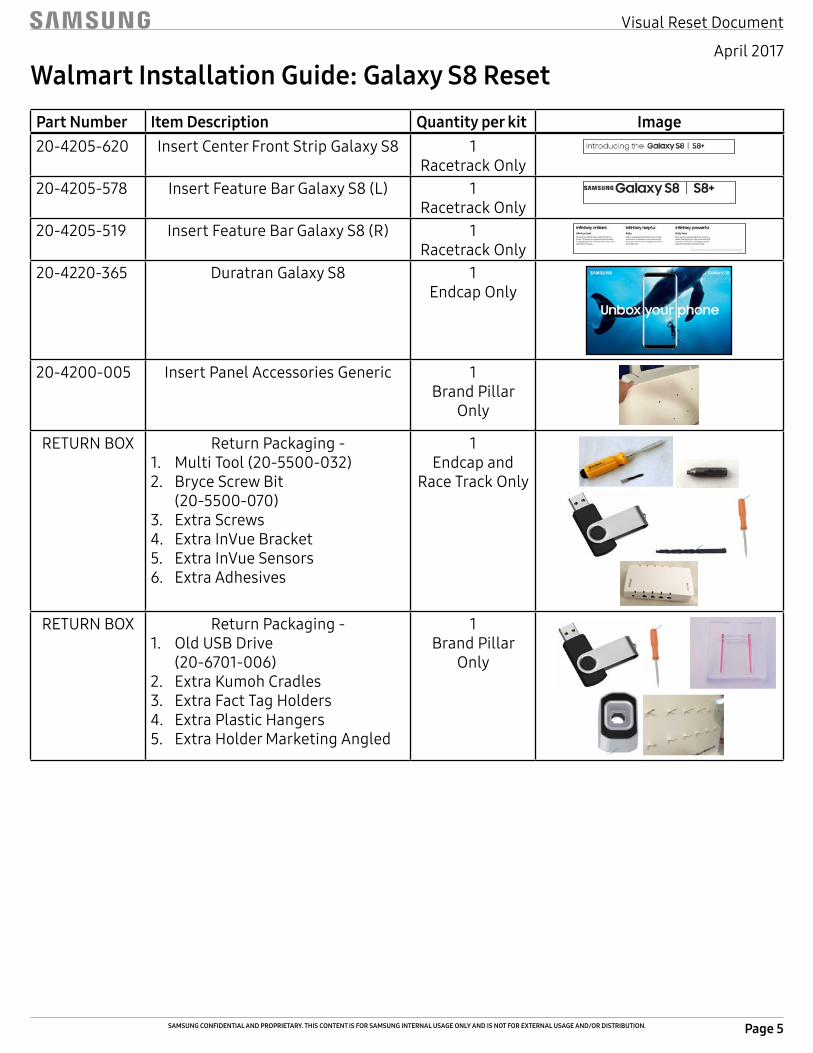
20-4205-620 InsertCenterFrontStripGalaxyS8 1RacetrackOnly
20-4205-578 InsertFeatureBarGalaxyS8(L) 1RacetrackOnly
20-4205-519 InsertFeatureBarGalaxyS8(R) 1RacetrackOnly
20-4220-365 DuratranGalaxyS8 1EndcapOnly
20-4200-005 InsertPanelAccessoriesGeneric 1BrandPillar
Only
RETURNBOX ReturnPackaging-1. MultiTool(20-5500-032)2. BryceScrewBit
(20-5500-070)3. ExtraScrews4. ExtraInVueBracket5. ExtraInVueSensors6. ExtraAdhesives
1Endcapand
RaceTrackOnly
RETURNBOX ReturnPackaging-1. OldUSBDrive
(20-6701-006)2. ExtraKumohCradles3. ExtraFactTagHolders4. ExtraPlasticHangers5. ExtraHolderMarketingAngled
1BrandPillar
Only
Walmart Installation Guide: Galaxy S8 ResetPart Number Item Description Quantity per kit Image
Page 6
Visual Reset Document
SAMSUNG CONFIDENTIAL AND PROPRIETARY. THIS CONTENT IS FOR SAMSUNG INTERNAL USAGE ONLY AND IS NOT FOR EXTERNAL USAGE AND/OR DISTRIBUTION.
April 2017
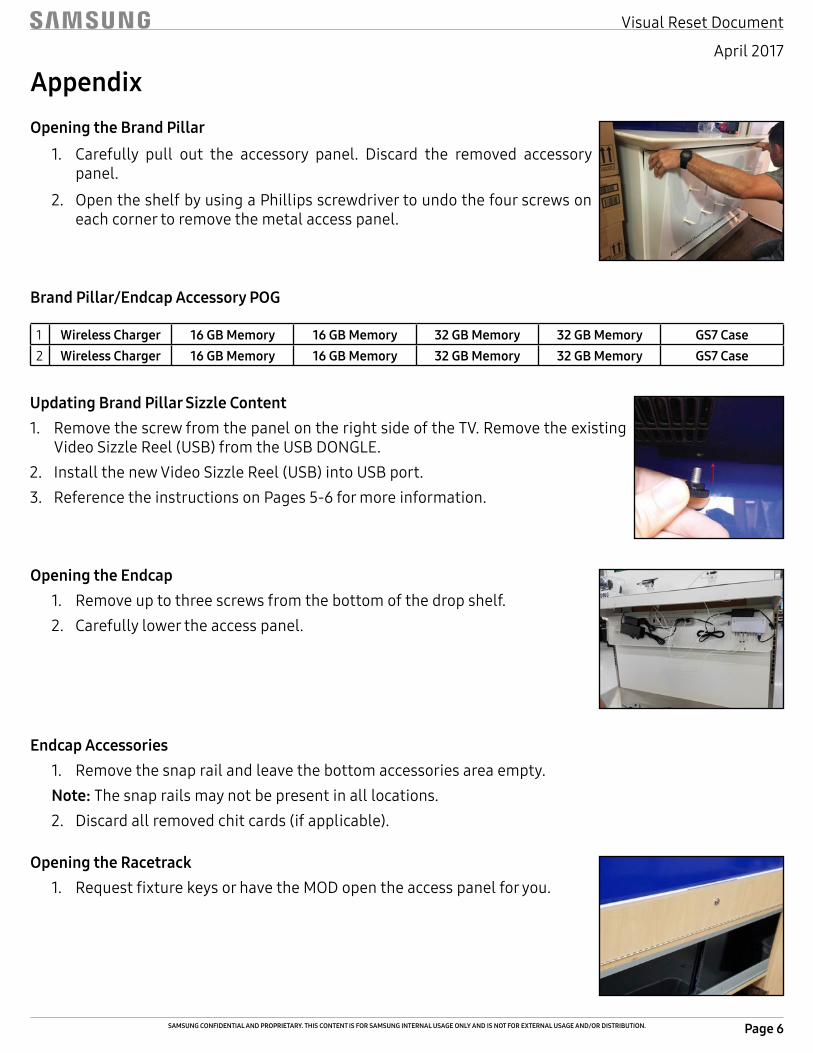
AppendixOpening the Brand Pillar
1. Carefully pull out the accessory panel. Discard the removed accessorypanel.
2. OpentheshelfbyusingaPhillipsscrewdrivertoundothefourscrewsoneachcornertoremovethemetalaccesspanel.
Opening the Endcap1. Removeuptothreescrewsfromthebottomofthedropshelf.2. Carefullylowertheaccesspanel.
Opening the Racetrack1. RequestfixturekeysorhavetheMODopentheaccesspanelforyou.
Brand Pillar/Endcap Accessory POG
1 Wireless Charger 16 GB Memory 16 GB Memory 32 GB Memory 32 GB Memory GS7 Case2 Wireless Charger 16 GB Memory 16 GB Memory 32 GB Memory 32 GB Memory GS7 Case
Endcap Accessories1. Removethesnaprailandleavethebottomaccessoriesareaempty.Note:Thesnaprailsmaynotbepresentinalllocations.2. Discardallremovedchitcards(ifapplicable).
Updating Brand Pillar Sizzle Content1. RemovethescrewfromthepanelontherightsideoftheTV.Removetheexisting
VideoSizzleReel(USB)fromtheUSBDONGLE.2. InstallthenewVideoSizzleReel(USB)intoUSBport.3. ReferencetheinstructionsonPages5-6formoreinformation.
Page 7
Visual Reset Document
SAMSUNG CONFIDENTIAL AND PROPRIETARY. THIS CONTENT IS FOR SAMSUNG INTERNAL USAGE ONLY AND IS NOT FOR EXTERNAL USAGE AND/OR DISTRIBUTION.
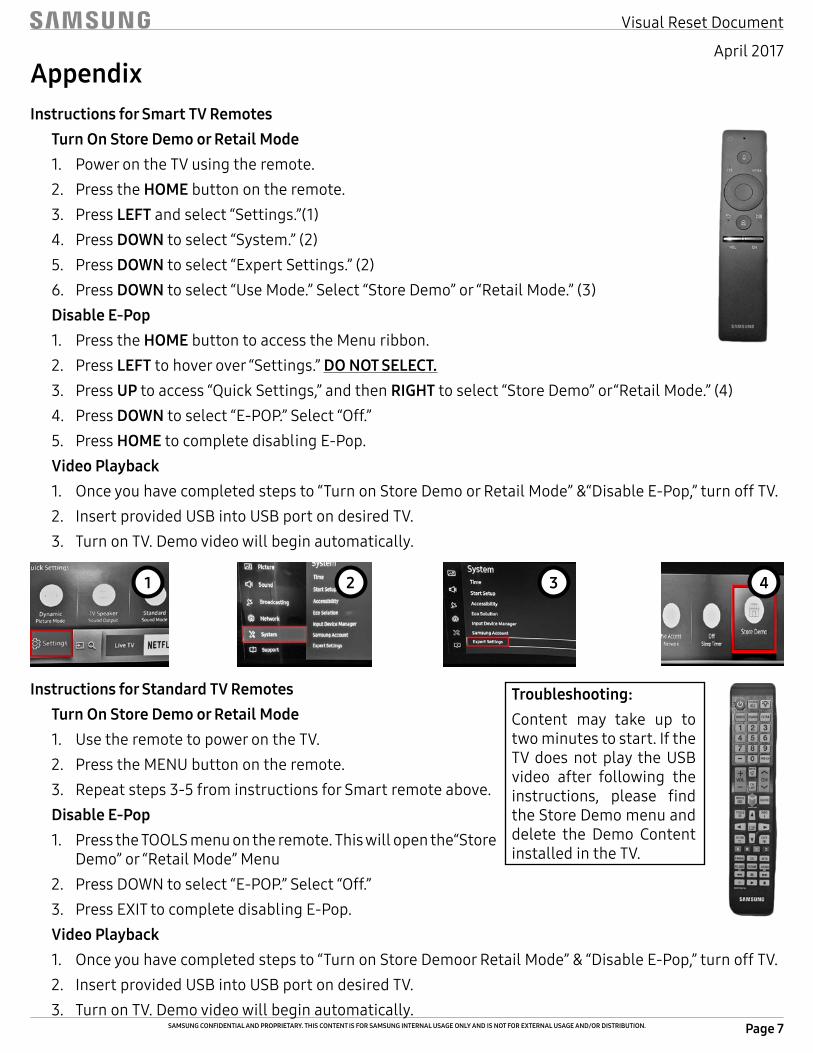
April 2017AppendixInstructions for Smart TV Remotes
Turn On Store Demo or Retail Mode1. PowerontheTVusingtheremote.2. PresstheHOMEbuttonontheremote.3. PressLEFTandselect“Settings.”(1)4. PressDOWNtoselect“System.”(2)5. PressDOWNtoselect“ExpertSettings.”(2)6. PressDOWNtoselect“UseMode.”Select“StoreDemo”or“RetailMode.”(3)Disable E-Pop1. PresstheHOMEbuttontoaccesstheMenuribbon.2. PressLEFTtohoverover“Settings.”DO NOT SELECT.3. PressUPtoaccess“QuickSettings,”andthenRIGHTtoselect“StoreDemo”or“RetailMode.”(4)4. PressDOWNtoselect“E-POP.”Select“Off.”5. PressHOMEtocompletedisablingE-Pop.Video Playback1. Onceyouhavecompletedstepsto“TurnonStoreDemoorRetailMode”&“DisableE-Pop,”turnoffTV.2. InsertprovidedUSBintoUSBportondesiredTV.3. TurnonTV.Demovideowillbeginautomatically.
1 2 3 4
Instructions for Standard TV RemotesTurn On Store Demo or Retail Mode1. UsetheremotetopowerontheTV.2. PresstheMENUbuttonontheremote.3. Repeatsteps3-5frominstructionsforSmartremoteabove.Disable E-Pop1. PresstheTOOLSmenuontheremote.Thiswillopenthe“Store
Demo”or“RetailMode”Menu2. PressDOWNtoselect“E-POP.”Select“Off.”3. PressEXITtocompletedisablingE-Pop.Video Playback1. Onceyouhavecompletedstepsto“TurnonStoreDemoorRetailMode”&“DisableE-Pop,”turnoffTV.2. InsertprovidedUSBintoUSBportondesiredTV.3. TurnonTV.Demovideowillbeginautomatically.
Troubleshooting:Content may take up totwominutestostart.IftheTVdoesnotplay theUSBvideo after following theinstructions, please findtheStoreDemomenuanddelete the Demo ContentinstalledintheTV.
Page 8
Visual Reset Document
SAMSUNG CONFIDENTIAL AND PROPRIETARY. THIS CONTENT IS FOR SAMSUNG INTERNAL USAGE ONLY AND IS NOT FOR EXTERNAL USAGE AND/OR DISTRIBUTION.
April 2017
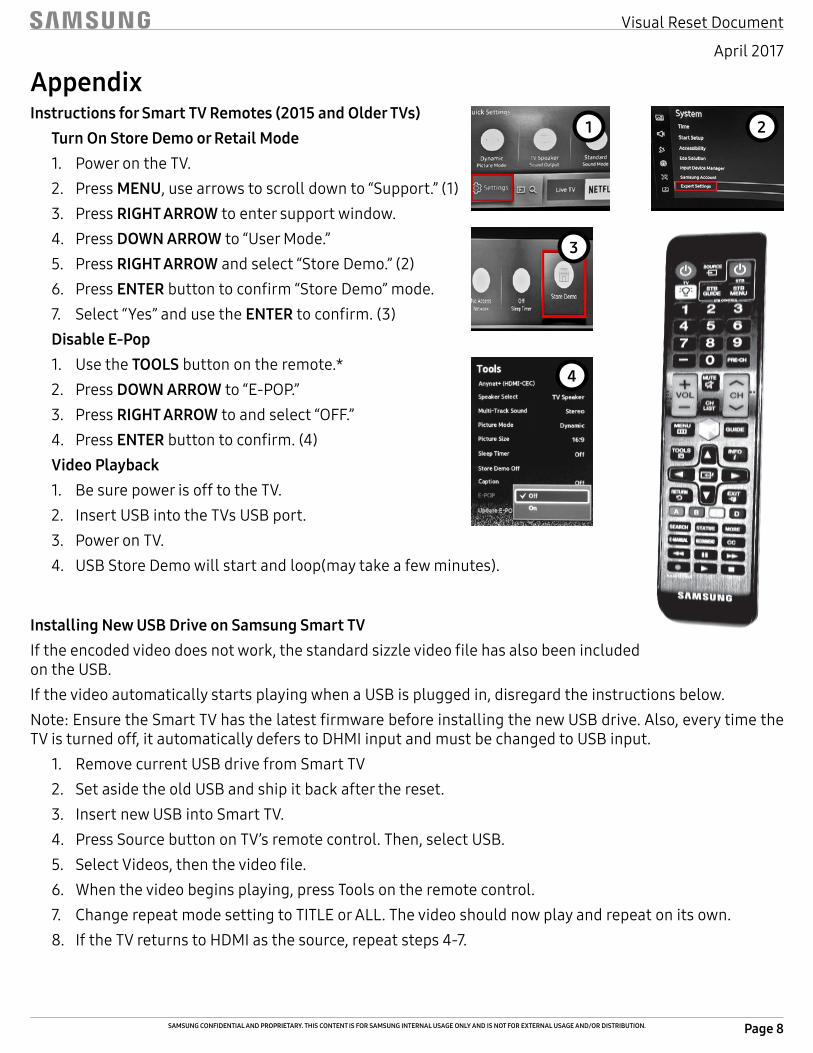
AppendixInstructions for Smart TV Remotes (2015 and Older TVs)
Turn On Store Demo or Retail Mode1. PowerontheTV.2. PressMENU,usearrowstoscrolldownto“Support.”(1)3. PressRIGHT ARROWtoentersupportwindow.4. PressDOWN ARROWto“UserMode.”5. PressRIGHT ARROWandselect“StoreDemo.”(2)6. PressENTERbuttontoconfirm“StoreDemo”mode.7. Select“Yes”andusetheENTERtoconfirm.(3)Disable E-Pop1. UsetheTOOLSbuttonontheremote.*2. PressDOWN ARROWto“E-POP.”3. PressRIGHT ARROWtoandselect“OFF.”4. PressENTERbuttontoconfirm.(4)Video Playback1. BesurepowerisofftotheTV.2. InsertUSBintotheTVsUSBport.3. PoweronTV.4. USBStoreDemowillstartandloop(maytakeafewminutes).
1 2
3
4
Installing New USB Drive on Samsung Smart TVIftheencodedvideodoesnotwork,thestandardsizzlevideofilehasalsobeenincludedontheUSB.IfthevideoautomaticallystartsplayingwhenaUSBispluggedin,disregardtheinstructionsbelow.Note:EnsuretheSmartTVhasthelatestfirmwarebeforeinstallingthenewUSBdrive.Also,everytimetheTVisturnedoff,itautomaticallydeferstoDHMIinputandmustbechangedtoUSBinput.
1. RemovecurrentUSBdrivefromSmartTV2. SetasidetheoldUSBandshipitbackafterthereset.3. InsertnewUSBintoSmartTV.4. PressSourcebuttononTV’sremotecontrol.Then,selectUSB.5. SelectVideos,thenthevideofile.6. Whenthevideobeginsplaying,pressToolsontheremotecontrol.7. ChangerepeatmodesettingtoTITLEorALL.Thevideoshouldnowplayandrepeatonitsown.8. IftheTVreturnstoHDMIasthesource,repeatsteps4-7.
Page 9
Visual Reset Document
SAMSUNG CONFIDENTIAL AND PROPRIETARY. THIS CONTENT IS FOR SAMSUNG INTERNAL USAGE ONLY AND IS NOT FOR EXTERNAL USAGE AND/OR DISTRIBUTION.
April 2017
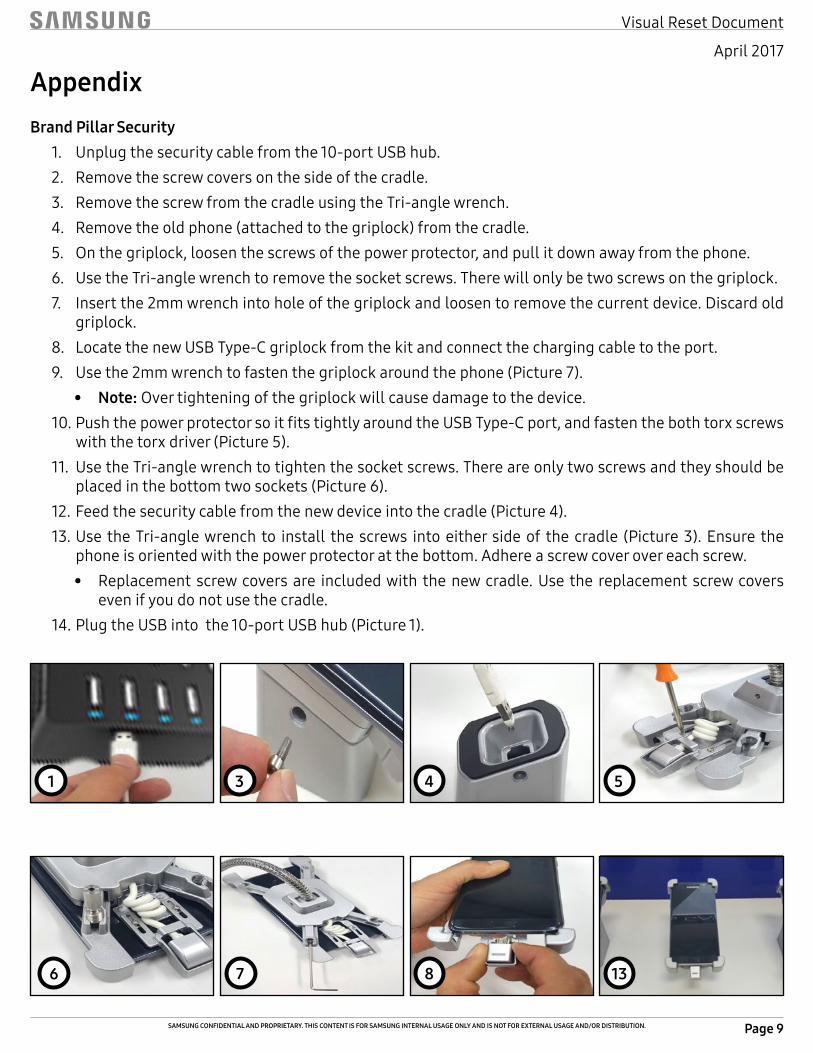
AppendixBrand Pillar Security
1. Unplugthesecuritycablefromthe10-portUSBhub.2. Removethescrewcoversonthesideofthecradle.3. RemovethescrewfromthecradleusingtheTri-anglewrench.4. Removetheoldphone(attachedtothegriplock)fromthecradle.5. Onthegriplock,loosenthescrewsofthepowerprotector,andpullitdownawayfromthephone.6. UsetheTri-anglewrenchtoremovethesocketscrews.Therewillonlybetwoscrewsonthegriplock.7. Insertthe2mmwrenchintoholeofthegriplockandloosentoremovethecurrentdevice.Discardold
griplock.8. LocatethenewUSBType-Cgriplockfromthekitandconnectthechargingcabletotheport.9. Usethe2mmwrenchtofastenthegriplockaroundthephone(Picture7).
• Note:Overtighteningofthegriplockwillcausedamagetothedevice.10.PushthepowerprotectorsoitfitstightlyaroundtheUSBType-Cport,andfastenthebothtorxscrews
withthetorxdriver(Picture5).11. UsetheTri-anglewrenchtotightenthesocketscrews.Thereareonlytwoscrewsandtheyshouldbe
placedinthebottomtwosockets(Picture6).12.Feedthesecuritycablefromthenewdeviceintothecradle(Picture4).13.UsetheTri-anglewrenchto install thescrews intoeithersideofthecradle (Picture3).Ensurethe
phoneisorientedwiththepowerprotectoratthebottom.Adhereascrewcoverovereachscrew.• Replacementscrewcoversare includedwiththenewcradle.Usethereplacementscrewcovers
evenifyoudonotusethecradle.14.PlugtheUSBintothe10-portUSBhub(Picture1).
1 3 4 5
137 86
Page 10
Visual Reset Document
SAMSUNG CONFIDENTIAL AND PROPRIETARY. THIS CONTENT IS FOR SAMSUNG INTERNAL USAGE ONLY AND IS NOT FOR EXTERNAL USAGE AND/OR DISTRIBUTION.
April 2017
AppendixEndcap/Racetrack Security
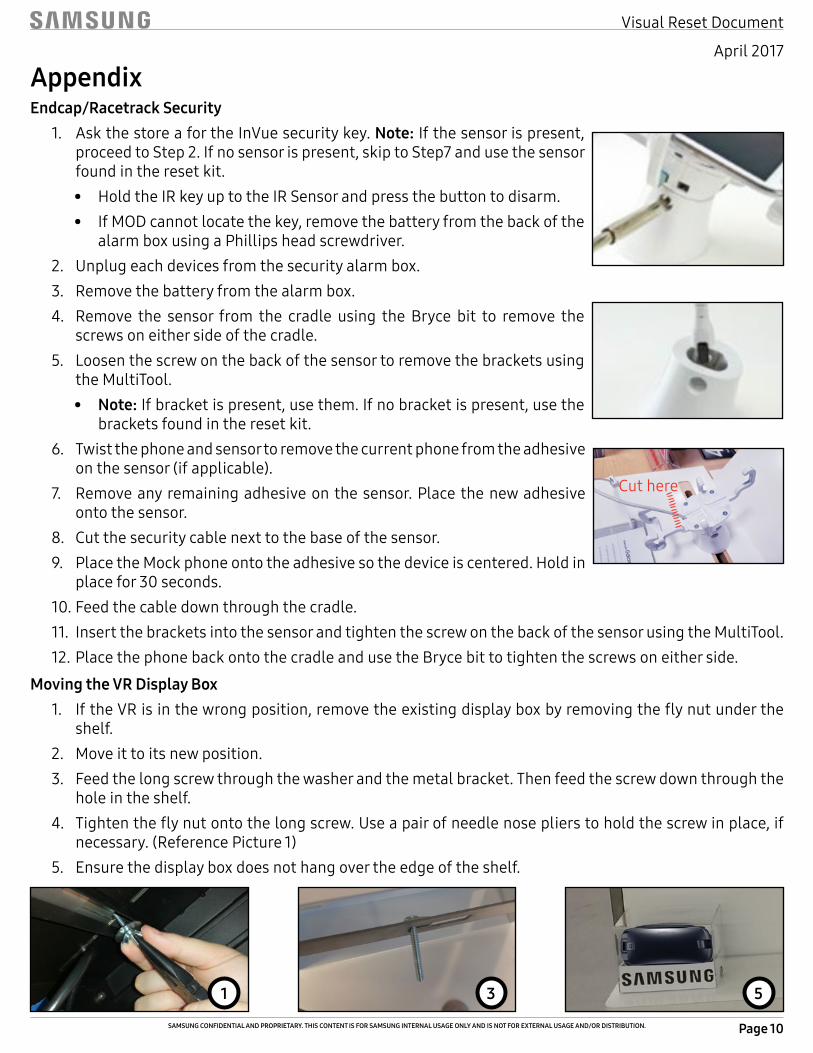
1. AskthestoreafortheInVuesecuritykey.Note:Ifthesensorispresent,proceedtoStep2.Ifnosensorispresent,skiptoStep7andusethesensorfoundintheresetkit.• HoldtheIRkeyuptotheIRSensorandpressthebuttontodisarm.• IfMODcannotlocatethekey,removethebatteryfromthebackofthe
alarmboxusingaPhillipsheadscrewdriver.2. Unplugeachdevicesfromthesecurityalarmbox.3. Removethebatteryfromthealarmbox.4. Remove the sensor from the cradle using the Bryce bit to remove the
screwsoneithersideofthecradle.5. Loosenthescrewonthebackofthesensortoremovethebracketsusing
theMultiTool.• Note:Ifbracketispresent,usethem.Ifnobracketispresent,usethe
bracketsfoundintheresetkit.6. Twistthephoneandsensortoremovethecurrentphonefromtheadhesive
onthesensor(ifapplicable).7. Removeanyremainingadhesiveonthesensor.Placethenewadhesive
ontothesensor.8. Cutthesecuritycablenexttothebaseofthesensor.9. PlacetheMockphoneontotheadhesivesothedeviceiscentered.Holdin
placefor30seconds.10.Feedthecabledownthroughthecradle.11. InsertthebracketsintothesensorandtightenthescrewonthebackofthesensorusingtheMultiTool.12.PlacethephonebackontothecradleandusetheBrycebittotightenthescrewsoneitherside.
Cuthere
Moving the VR Display Box1. IftheVRisinthewrongposition,removetheexistingdisplayboxbyremovingtheflynutunderthe
shelf.2. Moveittoitsnewposition.3. Feedthelongscrewthroughthewasherandthemetalbracket.Thenfeedthescrewdownthroughthe
holeintheshelf.4. Tightentheflynutontothelongscrew.Useapairofneedlenoseplierstoholdthescrewinplace,if
necessary.(ReferencePicture1)5. Ensurethedisplayboxdoesnothangovertheedgeoftheshelf.
531
Page 11
Visual Reset Document
SAMSUNG CONFIDENTIAL AND PROPRIETARY. THIS CONTENT IS FOR SAMSUNG INTERNAL USAGE ONLY AND IS NOT FOR EXTERNAL USAGE AND/OR DISTRIBUTION.
April 2017Appendix
Endcap Fact Tags1. RemoveanycurrentFactTagsfromtheacrylicholders2. InsertthenewFactTagsnexttothecorrespondingdevice.Note:ThetopoftheFactTagmayhangovertheedgeoftheholder.
Brand Pillar Marketing Inserts/Fact Tags1. Storeswillbereceiving3extraFactTagholdersand1extra8.5”x11”Marketing
Holder.Iftheseitemsarepresentatthestore,returnanyunusedextraacrylics.2. Removethecurrentmarketingfromtheacrylicholdersonthefixture.3. Insertthenewmarketingintotheacrylicholders.
Endcap Duratran1. Liftupontheexistingduratran.2. Carefullypullouttheexistingduratranatthebottommiddle.3. Slideonesideoftheexistingduratranoutandremovethecreative.4. Slidethenewduratranin,leftsidefirst.5. Pushtherightsideoftheduratran.6. Carefullyaligntheduratraninthechannelonthebottomoftheframeand
pushin.
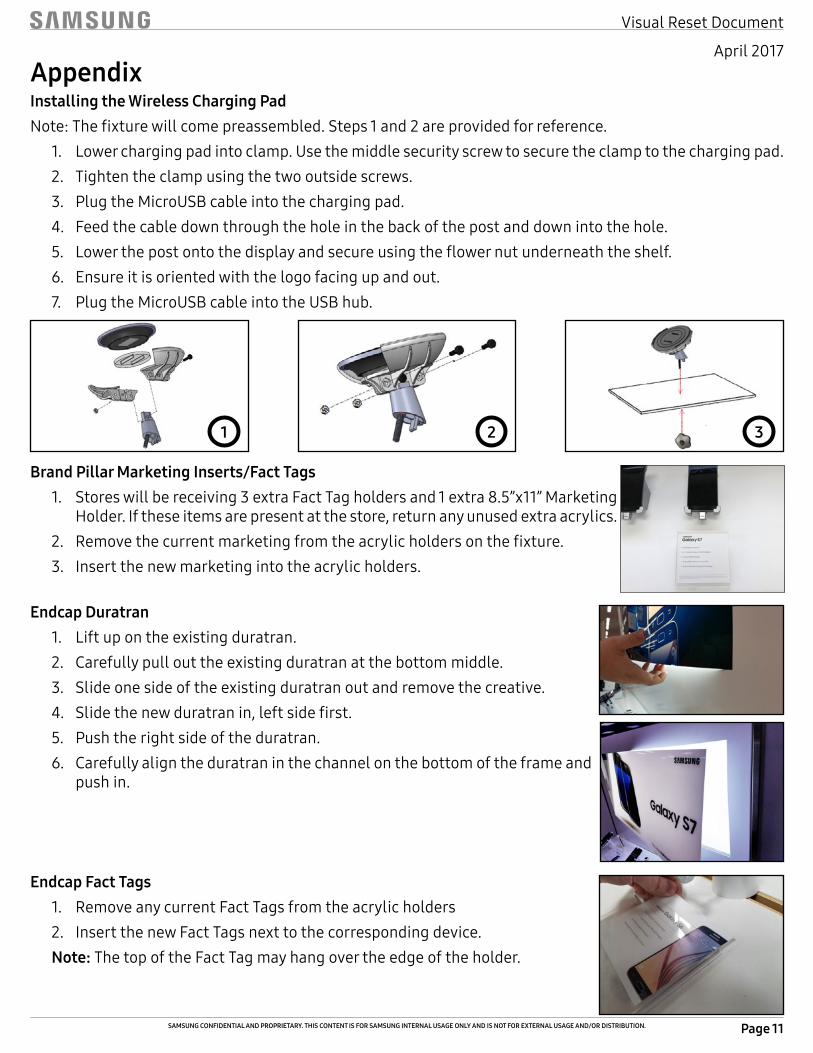
Installing the Wireless Charging PadNote:Thefixturewillcomepreassembled.Steps1and2areprovidedforreference.
1. Lowerchargingpadintoclamp.Usethemiddlesecurityscrewtosecuretheclamptothechargingpad.2. Tightentheclampusingthetwooutsidescrews.3. PlugtheMicroUSBcableintothechargingpad.4. Feedthecabledownthroughtheholeinthebackofthepostanddownintothehole.5. Lowerthepostontothedisplayandsecureusingtheflowernutunderneaththeshelf.6. Ensureitisorientedwiththelogofacingupandout.7. PlugtheMicroUSBcableintotheUSBhub.
1 32
Page 12
Visual Reset Document
SAMSUNG CONFIDENTIAL AND PROPRIETARY. THIS CONTENT IS FOR SAMSUNG INTERNAL USAGE ONLY AND IS NOT FOR EXTERNAL USAGE AND/OR DISTRIBUTION.
April 2017
Appendix
Racetrack
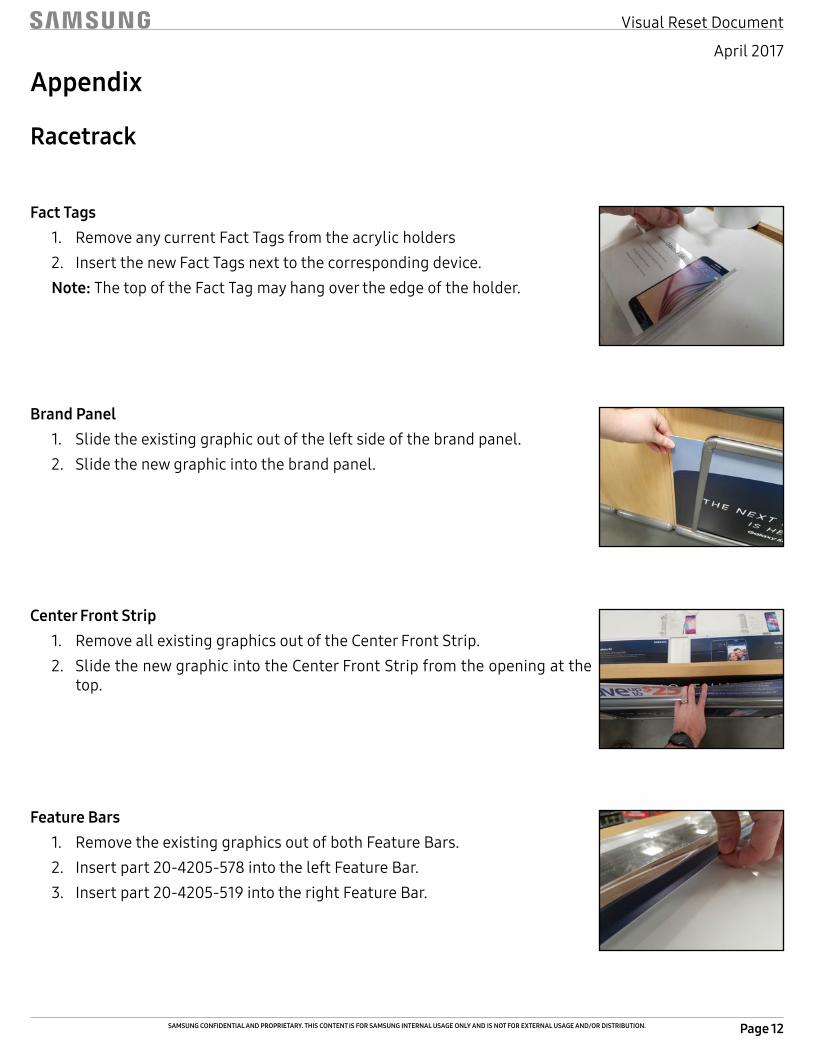
Feature Bars1. RemovetheexistinggraphicsoutofbothFeatureBars.2. Insertpart20-4205-578intotheleftFeatureBar.3. Insertpart20-4205-519intotherightFeatureBar.
Center Front Strip1. RemoveallexistinggraphicsoutoftheCenterFrontStrip.2. SlidethenewgraphicintotheCenterFrontStripfromtheopeningatthe
top.
Brand Panel1. Slidetheexistinggraphicoutoftheleftsideofthebrandpanel.2. Slidethenewgraphicintothebrandpanel.
Fact Tags1. RemoveanycurrentFactTagsfromtheacrylicholders2. InsertthenewFactTagsnexttothecorrespondingdevice.Note:ThetopoftheFactTagmayhangovertheedgeoftheholder.
Page 13
Visual Reset Document
SAMSUNG CONFIDENTIAL AND PROPRIETARY. THIS CONTENT IS FOR SAMSUNG INTERNAL USAGE ONLY AND IS NOT FOR EXTERNAL USAGE AND/OR DISTRIBUTION.
April 2017
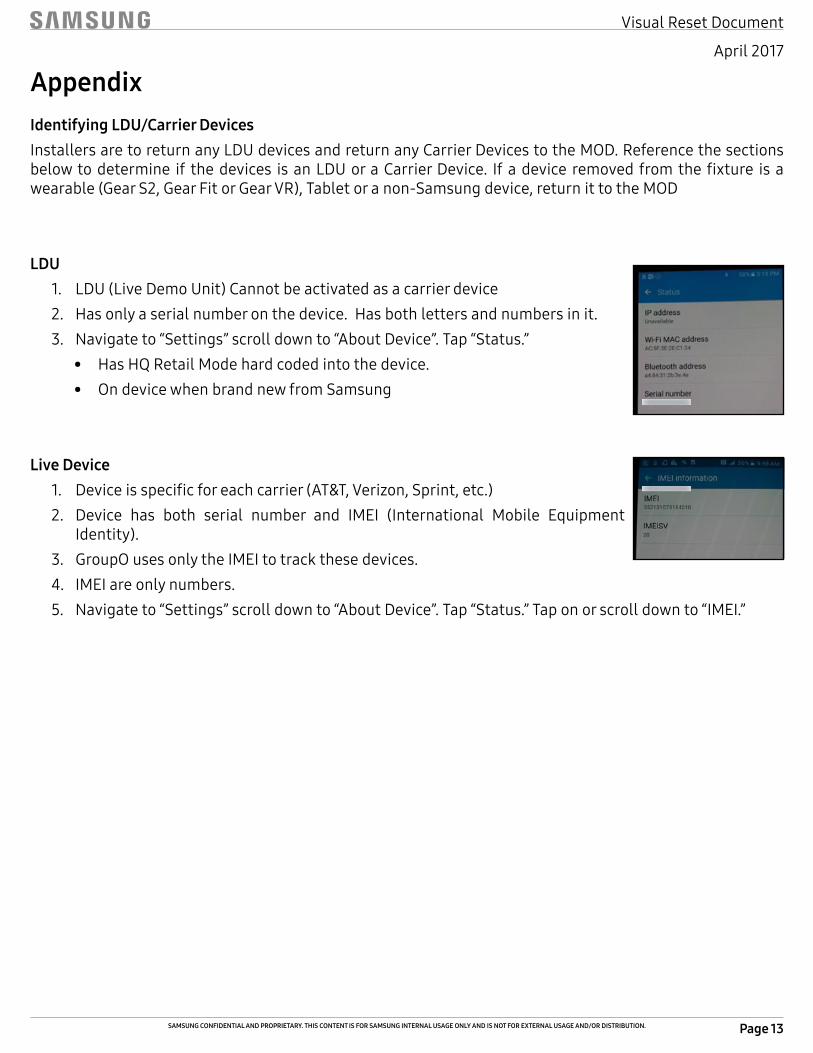
AppendixIdentifying LDU/Carrier DevicesInstallersaretoreturnanyLDUdevicesandreturnanyCarrierDevicestotheMOD.Referencethesectionsbelowtodetermine if thedevices isanLDUoraCarrierDevice. Ifadeviceremovedfromthefixture isawearable(GearS2,GearFitorGearVR),Tabletoranon-Samsungdevice,returnittotheMOD
LDU1. LDU(LiveDemoUnit)Cannotbeactivatedasacarrierdevice2. Hasonlyaserialnumberonthedevice.Hasbothlettersandnumbersinit.3. Navigateto“Settings”scrolldownto“AboutDevice”.Tap“Status.”
• HasHQRetailModehardcodedintothedevice.• OndevicewhenbrandnewfromSamsung
Live Device1. Deviceisspecificforeachcarrier(AT&T,Verizon,Sprint,etc.)2. Device has both serial number and IMEI (International Mobile Equipment
Identity).3. GroupOusesonlytheIMEItotrackthesedevices.4. IMEIareonlynumbers.5. Navigateto“Settings”scrolldownto“AboutDevice”.Tap“Status.”Taponorscrolldownto“IMEI.”

Page 14
Visual Reset Document
SAMSUNG CONFIDENTIAL AND PROPRIETARY. THIS CONTENT IS FOR SAMSUNG INTERNAL USAGE ONLY AND IS NOT FOR EXTERNAL USAGE AND/OR DISTRIBUTION.
April 2017
AppendixInstalling the new Accessory Insert1. LocatetheKitpackage.2. Carefullycutthetapeandopenthepackage.3. Removetheinsert.4. Foldtheminorflapsinsideaspictured.5. Flipoverandfoldtheotherendminorflaps.6. Pleasenote:ThetopoftheInserthastwoslots.7. Locatethetwobagsofpeghooks.(12total)8. InsertthePegHooksasshownwiththeendup.9. Insertwilllooklikethiswhencomplete.10.CarefullyplacetheInsertinsidethefixture.(tightfit)11. Ensuretheedgesoftheaccessoryinsertareflushwiththeedgeofthefixture.12.ViewofSamsungInsertinstalled.LoadproductperPOG.
1 2 3 4
5 6 7 8
9 10 11 12