Embed Size (px)
Citation preview
Updated 06-OCT-2011
Appoint, Change and Terminate (ACT) Documentation Additional Assignment
The ADDITIONAL ASSIGNMENT ACT document is used when an existing UAB employee or trainee is given an assignment in addition to their regular primary assignment duties. Primary Organization -- Every UAB employee is affiliated with a primary organization which is the organization responsible for the employee’s primary assignment. If an additional assignment is approved for an employee, the secondary organization must contact the primary organization and request an ADDITIONAL ASSIGNMENT document be created for the employee. The primary organization’s HR Officer must be given the name of the person to whom the document is to be reassigned to, and the effective date of the document. Secondary Organization -- The secondary organization is the organization that will be responsible for the secondary assignment and for payment of the secondary assignment. Once the ADDITIONAL ASSIGNMENT ACT document is created by the primary organization and reassigned, the secondary organization must complete the document and submit for approval. Approval notifications will be delivered to all level one approvers on the secondary organization workflow approval path. A 24-hour hold notification will be delivered to the notify person for the primary organization. Instructions for completing each form on the ADDITIONAL ASSIGNMENT ACT document can be accessed by clicking on each section heading below, or by scrolling to the referenced page number.
Creating an Additional Assignment (Primary Organization) .............................. 2
Creating an Additional Assignment (Secondary Organization) ........................ 5
Entering Person Data Information ............................................................................. 6
Entering Address and Phone Information............................................................... 8
Entering Assignment Information ........................................................................... 10
Entering Salary Information ...................................................................................... 12
Entering Element Entries ........................................................................................... 15
Entering Labor Source Information ........................................................................ 18
Entering General Ledger (GL) Information ............................................................ 18
Entering Grant (GA) Funding Sources .................................................................... 20
Appoint, Change and Terminate (ACT) Documentation Additional Assignment
Updated 09-APR-2011 2
Creating an Additional Assignment (Primary Organization)
UAB HR Officer → HR Transactions → ACT → Find Window
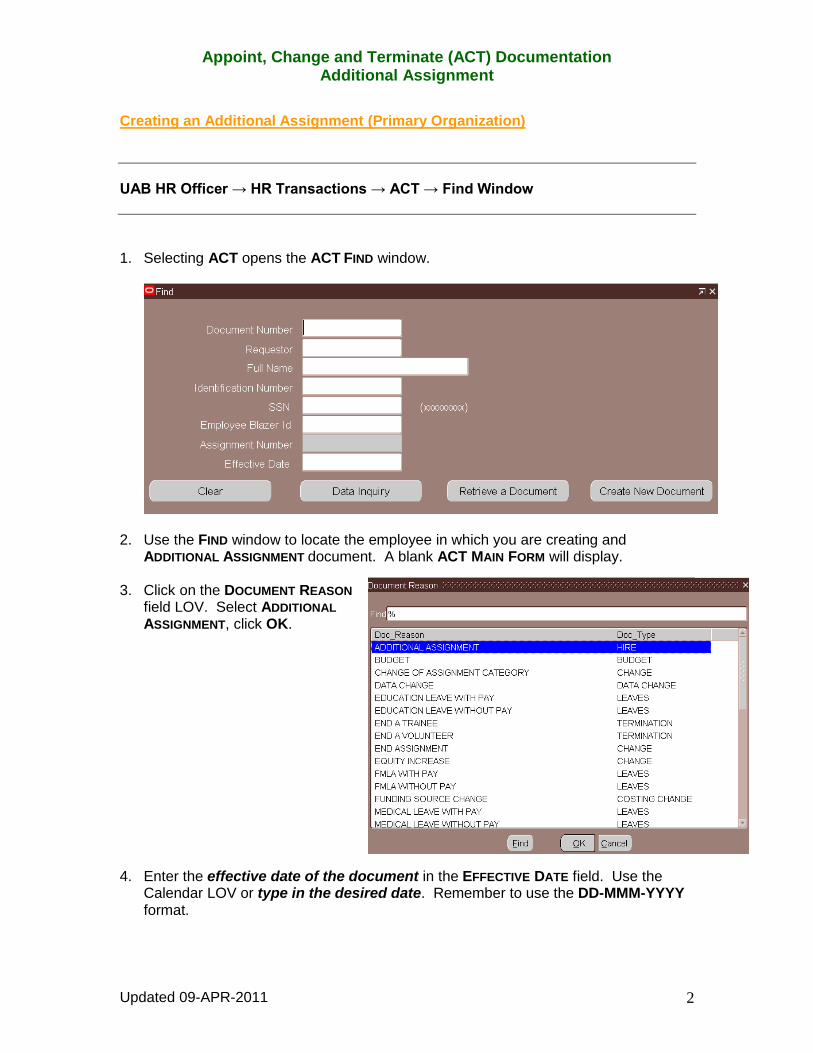
1. Selecting ACT opens the ACT FIND window.
2. Use the FIND window to locate the employee in which you are creating and ADDITIONAL ASSIGNMENT document. A blank ACT MAIN FORM will display.
3. Click on the DOCUMENT REASON
field LOV. Select ADDITIONAL ASSIGNMENT, click OK.
4. Enter the effective date of the document in the EFFECTIVE DATE field. Use the Calendar LOV or type in the desired date. Remember to use the DD-MMM-YYYY format.
Appoint, Change and Terminate (ACT) Documentation Additional Assignment
Updated 09-APR-2011 3
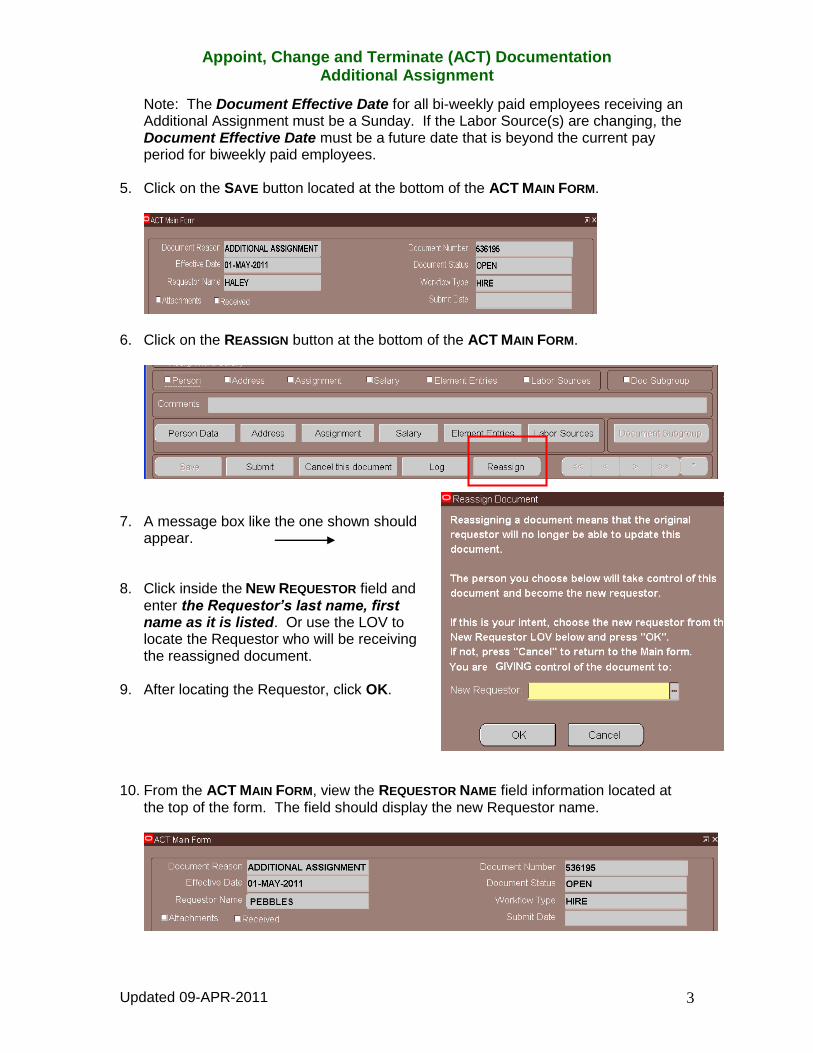
Note: The Document Effective Date for all bi-weekly paid employees receiving an Additional Assignment must be a Sunday. If the Labor Source(s) are changing, the Document Effective Date must be a future date that is beyond the current pay period for biweekly paid employees.
5. Click on the SAVE button located at the bottom of the ACT MAIN FORM.
6. Click on the REASSIGN button at the bottom of the ACT MAIN FORM.
7. A message box like the one shown should
appear.
8. Click inside the NEW REQUESTOR field and
enter the Requestor’s last name, first name as it is listed. Or use the LOV to locate the Requestor who will be receiving the reassigned document.
9. After locating the Requestor, click OK.
10. From the ACT MAIN FORM, view the REQUESTOR NAME field information located at
the top of the form. The field should display the new Requestor name.

Appoint, Change and Terminate (ACT) Documentation Additional Assignment
Updated 09-APR-2011 4
Notify the new Requestor that you have reassigned the document and give them the document number so that the document can be quickly found. The Primary Organization’s portion of the ADDITIONAL ASSIGNMENT document is COMPLETE. Note: The original requestor will not have access to the document once it has been reassigned to the new requestor.
Appoint, Change and Terminate (ACT) Documentation Additional Assignment
Updated 09-APR-2011 5
Creating an Additional Assignment (Secondary Organization)
UAB HR Officer → HR Transactions → ACT → Find Window
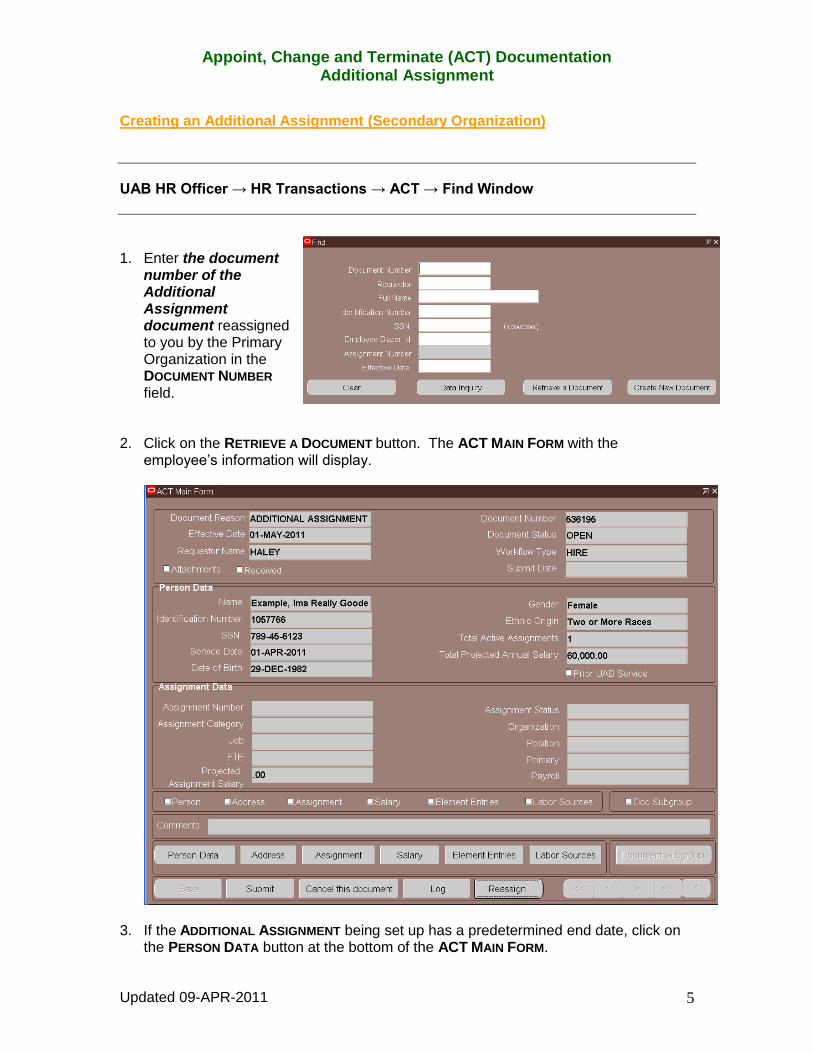
1. Enter the document number of the Additional Assignment document reassigned to you by the Primary Organization in the DOCUMENT NUMBER field.
2. Click on the RETRIEVE A DOCUMENT button. The ACT MAIN FORM with the
employee’s information will display.
3. If the ADDITIONAL ASSIGNMENT being set up has a predetermined end date, click on
the PERSON DATA button at the bottom of the ACT MAIN FORM.
Appoint, Change and Terminate (ACT) Documentation Additional Assignment
Updated 06-OCT-2011
Entering Person Data Information The only tabs on the PERSON DATA form available for entry are the TERMINATION tab and the SCHOOLS AND COLLEGES tab. The ADDRESS button on the PERSON DATA form will available if adding a Campus Secondary or Tertiary address or additional phone information.
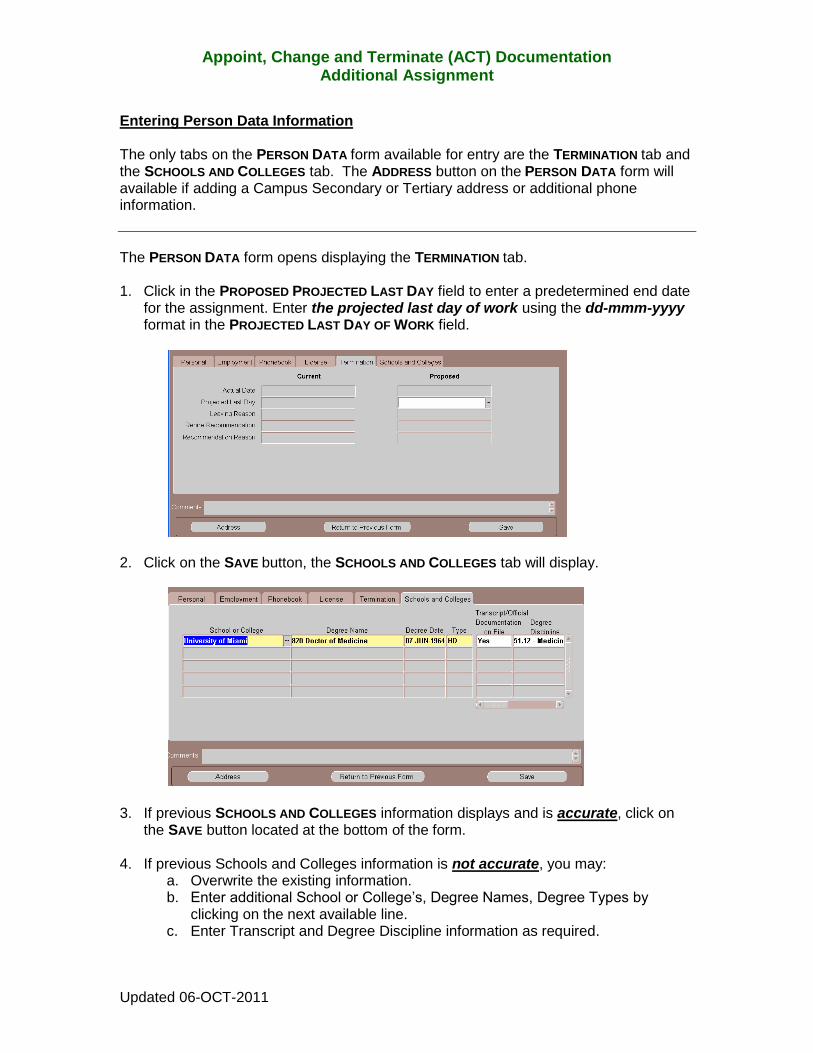
The PERSON DATA form opens displaying the TERMINATION tab. 1. Click in the PROPOSED PROJECTED LAST DAY field to enter a predetermined end date
for the assignment. Enter the projected last day of work using the dd-mmm-yyyy format in the PROJECTED LAST DAY OF WORK field.
2. Click on the SAVE button, the SCHOOLS AND COLLEGES tab will display.
3. If previous SCHOOLS AND COLLEGES information displays and is accurate, click on the SAVE button located at the bottom of the form.
4. If previous Schools and Colleges information is not accurate, you may:
a. Overwrite the existing information. b. Enter additional School or College’s, Degree Names, Degree Types by
clicking on the next available line. c. Enter Transcript and Degree Discipline information as required.
Appoint, Change and Terminate (ACT) Documentation Additional Assignment
Updated 09-APR-2011 7
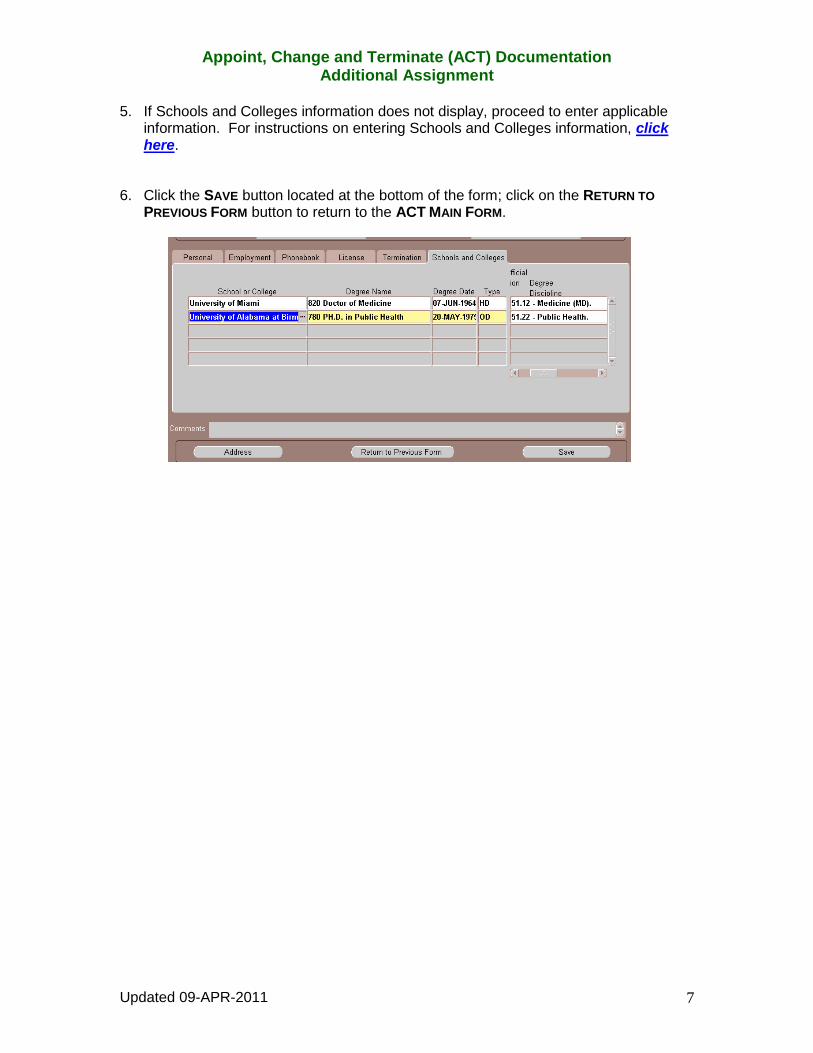
5. If Schools and Colleges information does not display, proceed to enter applicable information. For instructions on entering Schools and Colleges information, click here.
6. Click the SAVE button located at the bottom of the form; click on the RETURN TO
PREVIOUS FORM button to return to the ACT MAIN FORM.
Appoint, Change and Terminate (ACT) Documentation Additional Assignment
Updated 09-APR-2011 8
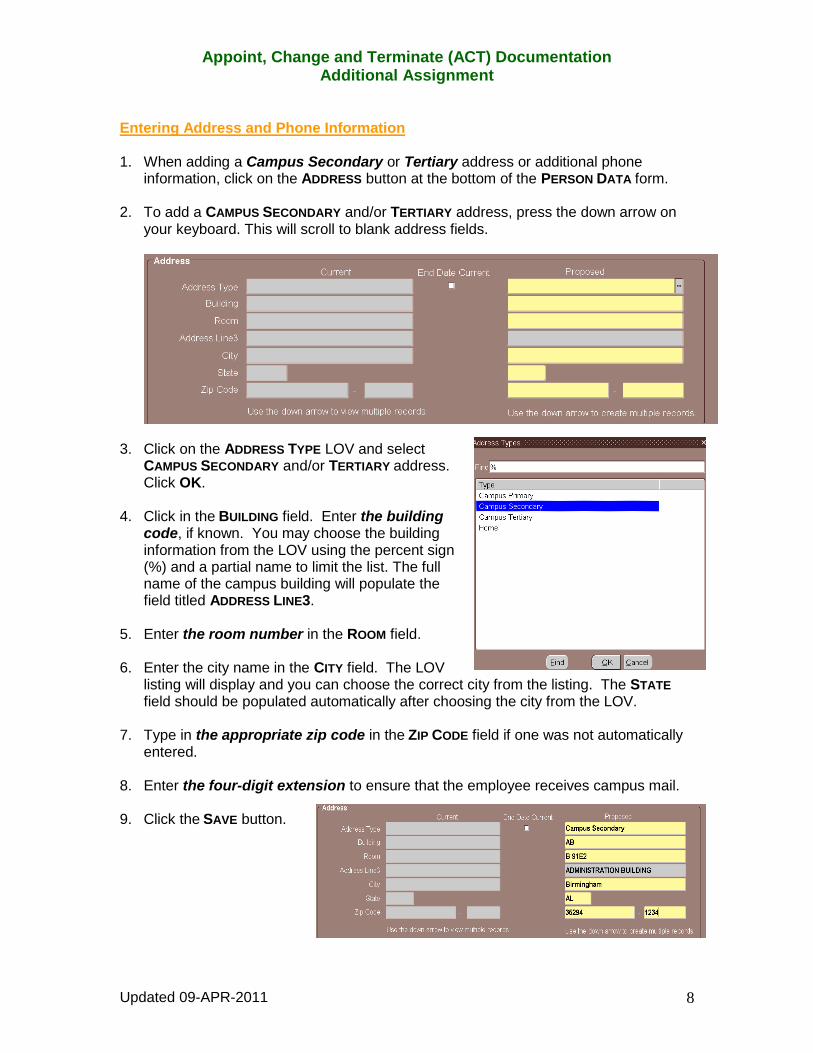
Entering Address and Phone Information 1. When adding a Campus Secondary or Tertiary address or additional phone
information, click on the ADDRESS button at the bottom of the PERSON DATA form. 2. To add a CAMPUS SECONDARY and/or TERTIARY address, press the down arrow on
your keyboard. This will scroll to blank address fields.
3. Click on the ADDRESS TYPE LOV and select
CAMPUS SECONDARY and/or TERTIARY address. Click OK.
4. Click in the BUILDING field. Enter the building
code, if known. You may choose the building information from the LOV using the percent sign (%) and a partial name to limit the list. The full name of the campus building will populate the field titled ADDRESS LINE3.
5. Enter the room number in the ROOM field. 6. Enter the city name in the CITY field. The LOV
listing will display and you can choose the correct city from the listing. The STATE field should be populated automatically after choosing the city from the LOV.
7. Type in the appropriate zip code in the ZIP CODE field if one was not automatically
entered. 8. Enter the four-digit extension to ensure that the employee receives campus mail. 9. Click the SAVE button.
Appoint, Change and Terminate (ACT) Documentation Additional Assignment
Updated 09-APR-2011 9
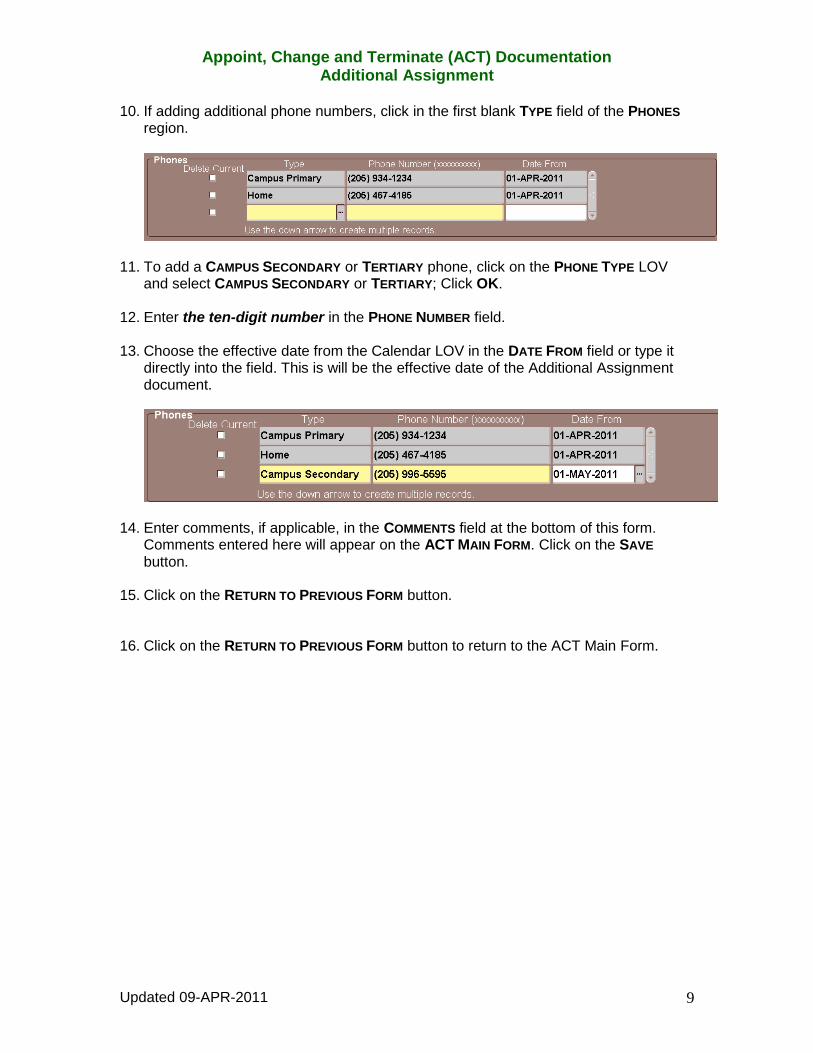
10. If adding additional phone numbers, click in the first blank TYPE field of the PHONES region.
11. To add a CAMPUS SECONDARY or TERTIARY phone, click on the PHONE TYPE LOV and select CAMPUS SECONDARY or TERTIARY; Click OK.
12. Enter the ten-digit number in the PHONE NUMBER field. 13. Choose the effective date from the Calendar LOV in the DATE FROM field or type it
directly into the field. This is will be the effective date of the Additional Assignment document.
14. Enter comments, if applicable, in the COMMENTS field at the bottom of this form.
Comments entered here will appear on the ACT MAIN FORM. Click on the SAVE button.
15. Click on the RETURN TO PREVIOUS FORM button.
16. Click on the RETURN TO PREVIOUS FORM button to return to the ACT Main Form.
Appoint, Change and Terminate (ACT) Documentation Additional Assignment
Updated 09-APR-2011 10
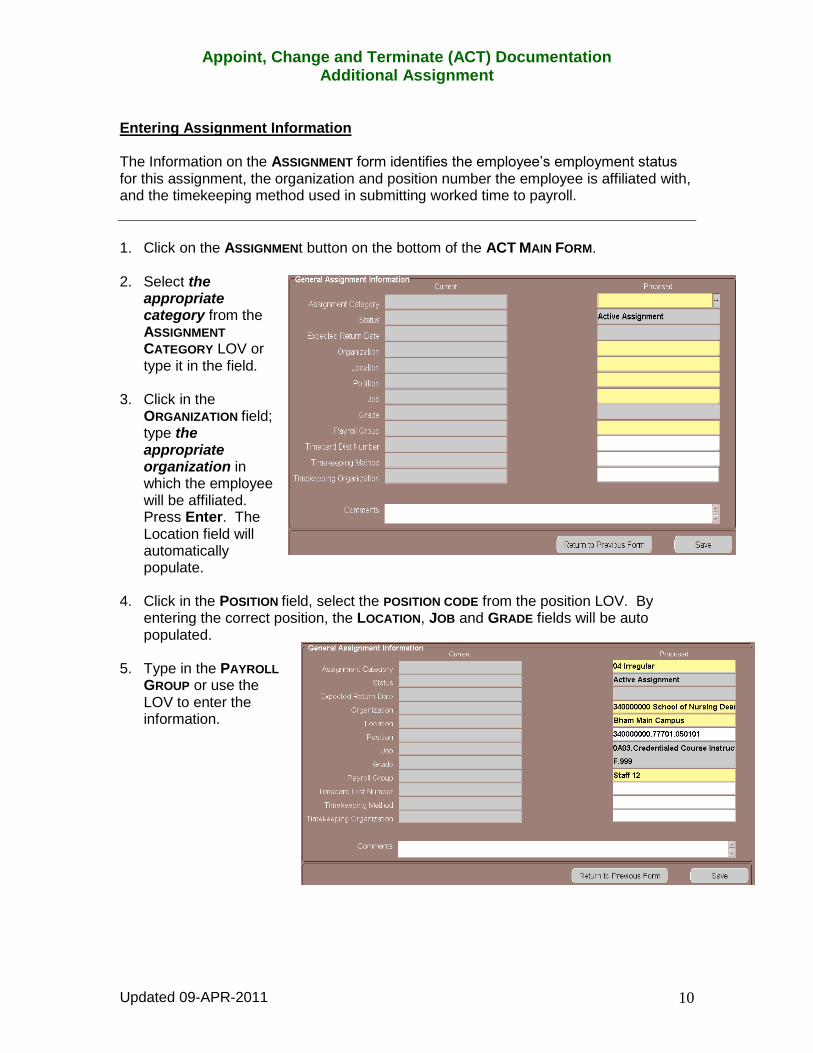
Entering Assignment Information The Information on the ASSIGNMENT form identifies the employee’s employment status for this assignment, the organization and position number the employee is affiliated with, and the timekeeping method used in submitting worked time to payroll.
1. Click on the ASSIGNMENt button on the bottom of the ACT MAIN FORM.
2. Select the
appropriate category from the ASSIGNMENT
CATEGORY LOV or type it in the field.
3. Click in the
ORGANIZATION field; type the appropriate organization in which the employee will be affiliated. Press Enter. The Location field will automatically populate.
4. Click in the POSITION field, select the POSITION CODE from the position LOV. By
entering the correct position, the LOCATION, JOB and GRADE fields will be auto populated.
5. Type in the PAYROLL
GROUP or use the LOV to enter the information.
Appoint, Change and Terminate (ACT) Documentation Additional Assignment
Updated 09-APR-2011 11
6. If this is a biweekly assignment, enter the employee’s timekeeping information.
a. If the organization has designated several timekeeper approvers, the Workflow Officer for the organization may have assigned Timecard Distribution Numbers to each timekeeper. If timekeepers have these numbers, enter the timecard distribution number of the person to whom this employee’s timesheet should be distributed to in the TIMECARD DIST NUMBER field.
b. Enter TAMS (Hospital employees), DB (Design Build employees) or TEL (Time Entry, and Labor for the rest of the campus) in the TIMEKEEPING METHOD FIELD or use the LOV to enter the information.
c. If the timekeeping organization is different from the appointing organization, enter the organization in the TIMEKEEPING ORGANIZATION field or select it from the LOV.
7. If this is a monthly assignment, leave the above three fields blank. 8. Enter comments, if applicable, in the COMMENTS field at the bottom of this form.
Comments entered here will appear on the ACT MAIN FORM.
9. Click the SAVE button at the bottom of the form. 10. Click on the SALARY button located at the bottom of the ASSIGNMENT form.
Appoint, Change and Terminate (ACT) Documentation Additional Assignment
Updated 06-OCT-2011
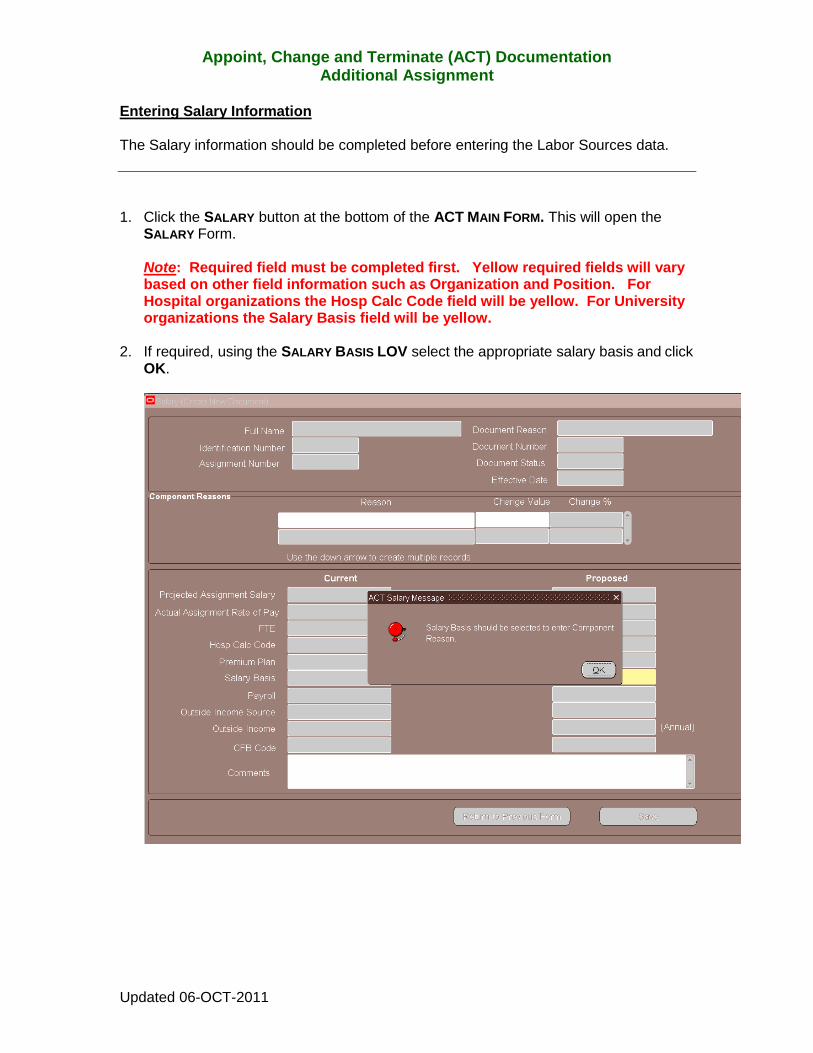
Entering Salary Information The Salary information should be completed before entering the Labor Sources data.
1. Click the SALARY button at the bottom of the ACT MAIN FORM. This will open the
SALARY Form.
Note: Required field must be completed first. Yellow required fields will vary based on other field information such as Organization and Position. For Hospital organizations the Hosp Calc Code field will be yellow. For University organizations the Salary Basis field will be yellow.
2. If required, using the SALARY BASIS LOV select the appropriate salary basis and click OK.
Appoint, Change and Terminate (ACT) Documentation Additional Assignment
Updated 09-APR-2011 13
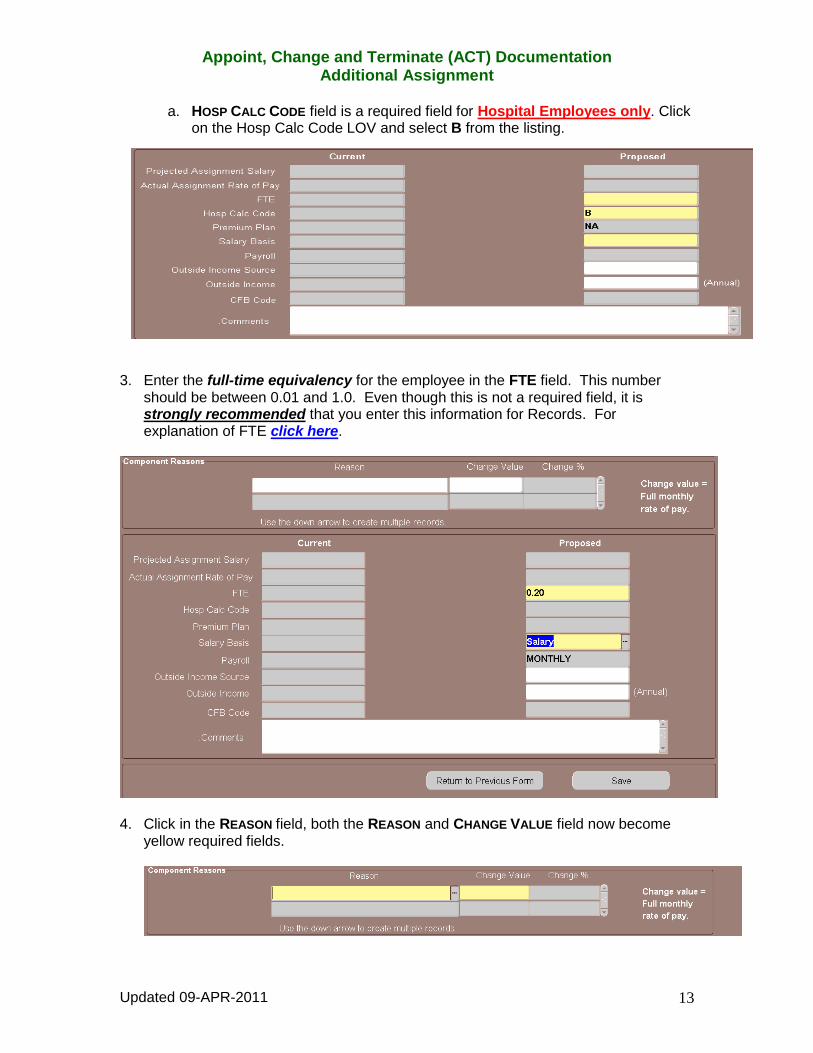
a. HOSP CALC CODE field is a required field for Hospital Employees only. Click on the Hosp Calc Code LOV and select B from the listing.
3. Enter the full-time equivalency for the employee in the FTE field. This number
should be between 0.01 and 1.0. Even though this is not a required field, it is strongly recommended that you enter this information for Records. For explanation of FTE click here.
4. Click in the REASON field, both the REASON and CHANGE VALUE field now become
yellow required fields.

Appoint, Change and Terminate (ACT) Documentation Additional Assignment
Updated 09-APR-2011 14
5. Select the appropriate reason from the LOV or type the information in the REASON field. If you selected:
a. Additional Assignment: Used when the employee working an Additional
Assignment is to be paid through the normal Bi-weekly or Monthly Payroll.
Click in the CHANGE VALUE field; enter either the hourly rate (for a bi-weekly paid employee) or the monthly rate (for a salaried employee). When you enter this information, the PROPOSED ASSIGNMENT SALARY and the ASSIGNMENT RATE OF PAY fields will automatically be entered. Then continue with number 5.
b. No Recurring Pay: Used when the employee working an Additional
Assignment is to be paid using a nonrecurring element.
6. Click on the SAVE button at the bottom of the SALARY form.
7. Click RETURN TO PREVIOUS button to return to the ACT MAIN FORM. 8. Click on the ELEMENT ENTRIES button at the bottom of the ACT MAIN FORM.
For instructions on completing the ELEMENT ENTRY FORM, click here. 9. If the employee is receiving funds from either the VA or Eye Foundation, use the
LOV in the OUTSIDE INCOME SOURCE field; select the appropriate, if applicable. Click OK.
Note: There are only two outside income sources -- VA and Eye Foundation. 10. Enter the amount of income provided by this source in the OUTSIDE INCOME field,
if applicable. This should be an annual amount. 11. Enter comments, if applicable, in the COMMENTS field at the bottom of this form.
Comments entered here will appear on the ACT MAIN FORM.
12. Click the SAVE button; then click RETURN TO PREVIOUS FORM button. This returns you to the ASSIGNMENT form.
Appoint, Change and Terminate (ACT) Documentation Additional Assignment
Updated 09-APR-2011 15
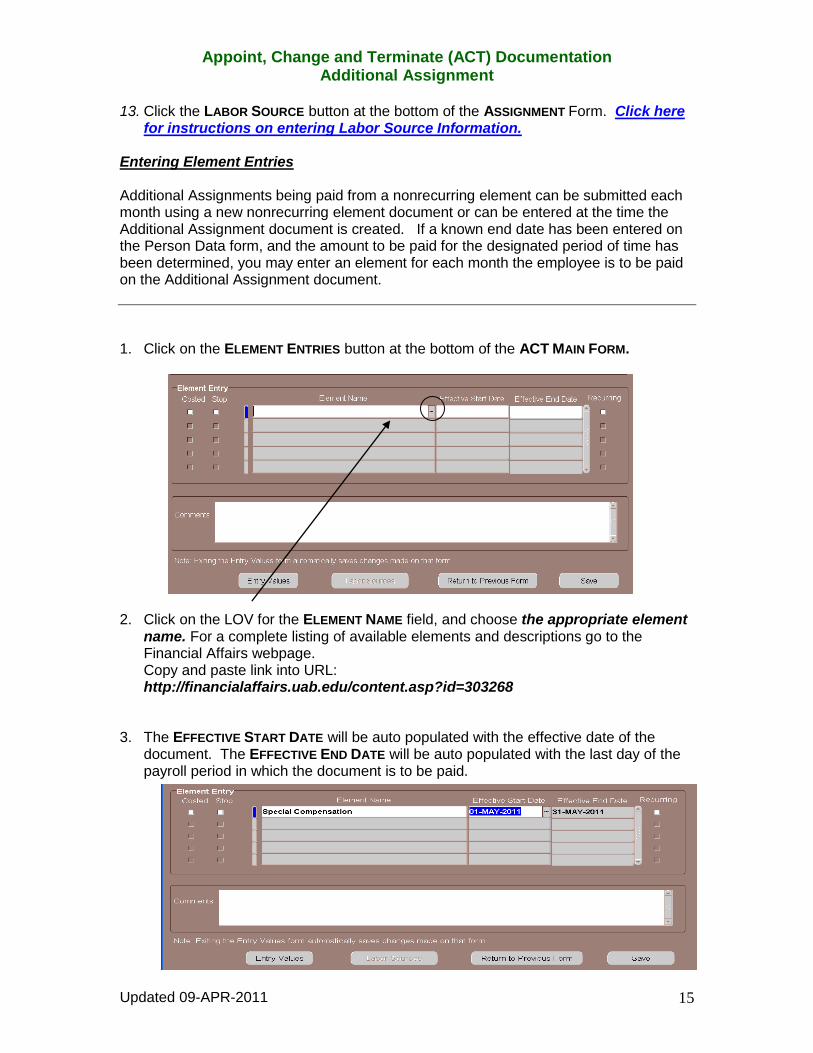
13. Click the LABOR SOURCE button at the bottom of the ASSIGNMENT Form. Click here for instructions on entering Labor Source Information.
Entering Element Entries Additional Assignments being paid from a nonrecurring element can be submitted each month using a new nonrecurring element document or can be entered at the time the Additional Assignment document is created. If a known end date has been entered on the Person Data form, and the amount to be paid for the designated period of time has been determined, you may enter an element for each month the employee is to be paid on the Additional Assignment document.
1. Click on the ELEMENT ENTRIES button at the bottom of the ACT MAIN FORM.
2. Click on the LOV for the ELEMENT NAME field, and choose the appropriate element
name. For a complete listing of available elements and descriptions go to the Financial Affairs webpage. Copy and paste link into URL: http://financialaffairs.uab.edu/content.asp?id=303268
3. The EFFECTIVE START DATE will be auto populated with the effective date of the
document. The EFFECTIVE END DATE will be auto populated with the last day of the payroll period in which the document is to be paid.
Appoint, Change and Terminate (ACT) Documentation Additional Assignment
Updated 09-APR-2011 16
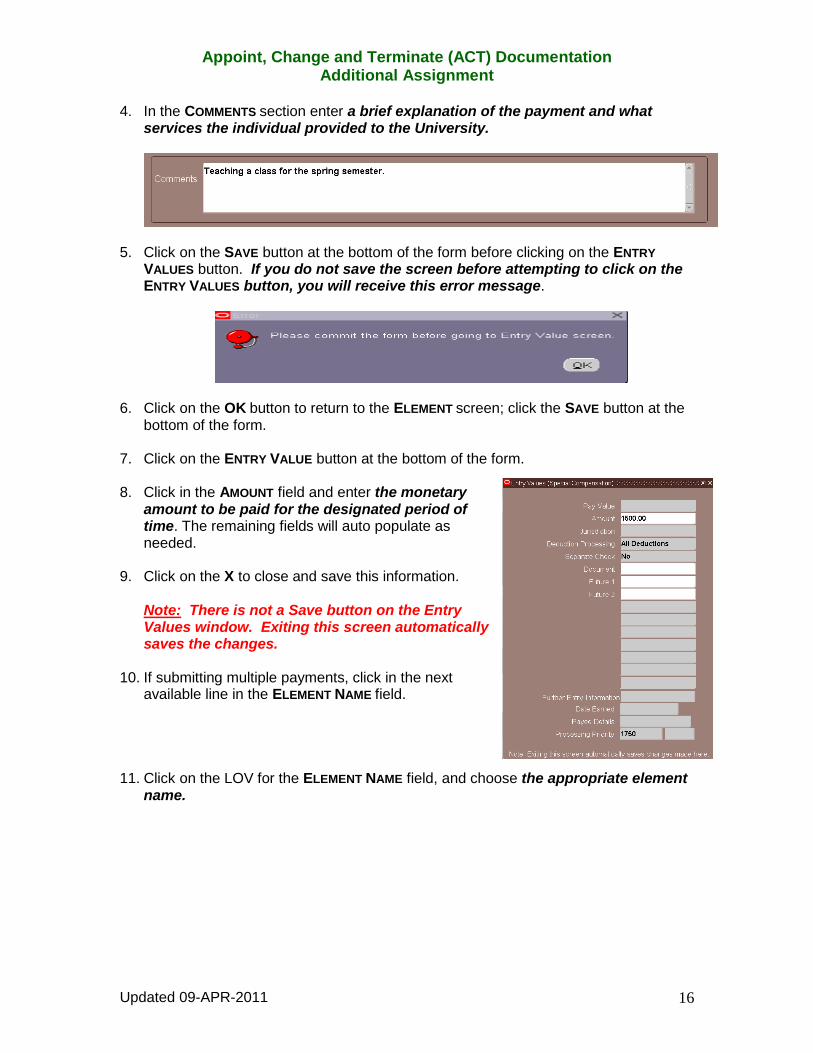
4. In the COMMENTS section enter a brief explanation of the payment and what services the individual provided to the University.
5. Click on the SAVE button at the bottom of the form before clicking on the ENTRY
VALUES button. If you do not save the screen before attempting to click on the ENTRY VALUES button, you will receive this error message.
6. Click on the OK button to return to the ELEMENT screen; click the SAVE button at the bottom of the form.
7. Click on the ENTRY VALUE button at the bottom of the form. 8. Click in the AMOUNT field and enter the monetary
amount to be paid for the designated period of time. The remaining fields will auto populate as needed.
9. Click on the X to close and save this information.
Note: There is not a Save button on the Entry Values window. Exiting this screen automatically saves the changes.
10. If submitting multiple payments, click in the next
available line in the ELEMENT NAME field. 11. Click on the LOV for the ELEMENT NAME field, and choose the appropriate element
name.
Appoint, Change and Terminate (ACT) Documentation Additional Assignment
Updated 09-APR-2011 17
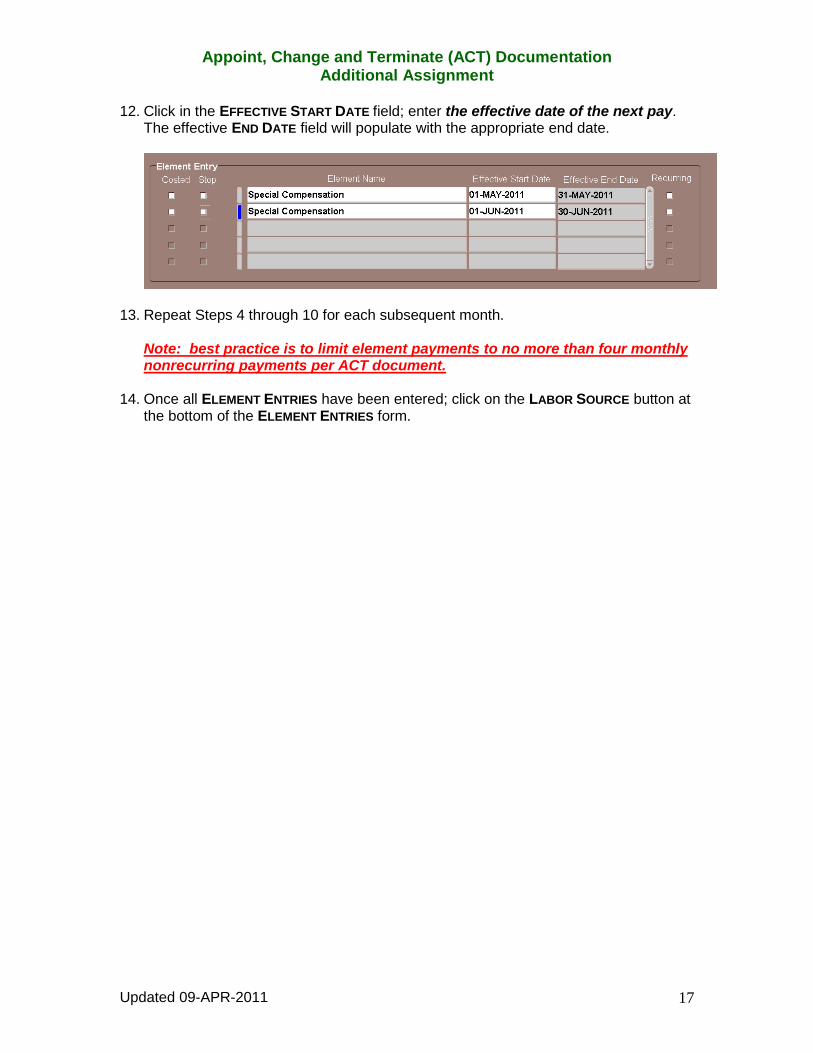
12. Click in the EFFECTIVE START DATE field; enter the effective date of the next pay. The effective END DATE field will populate with the appropriate end date.
13. Repeat Steps 4 through 10 for each subsequent month. Note: best practice is to limit element payments to no more than four monthly nonrecurring payments per ACT document.
14. Once all ELEMENT ENTRIES have been entered; click on the LABOR SOURCE button at the bottom of the ELEMENT ENTRIES form.
Appoint, Change and Terminate (ACT) Documentation Additional Assignment
Updated 09-APR-2011 18
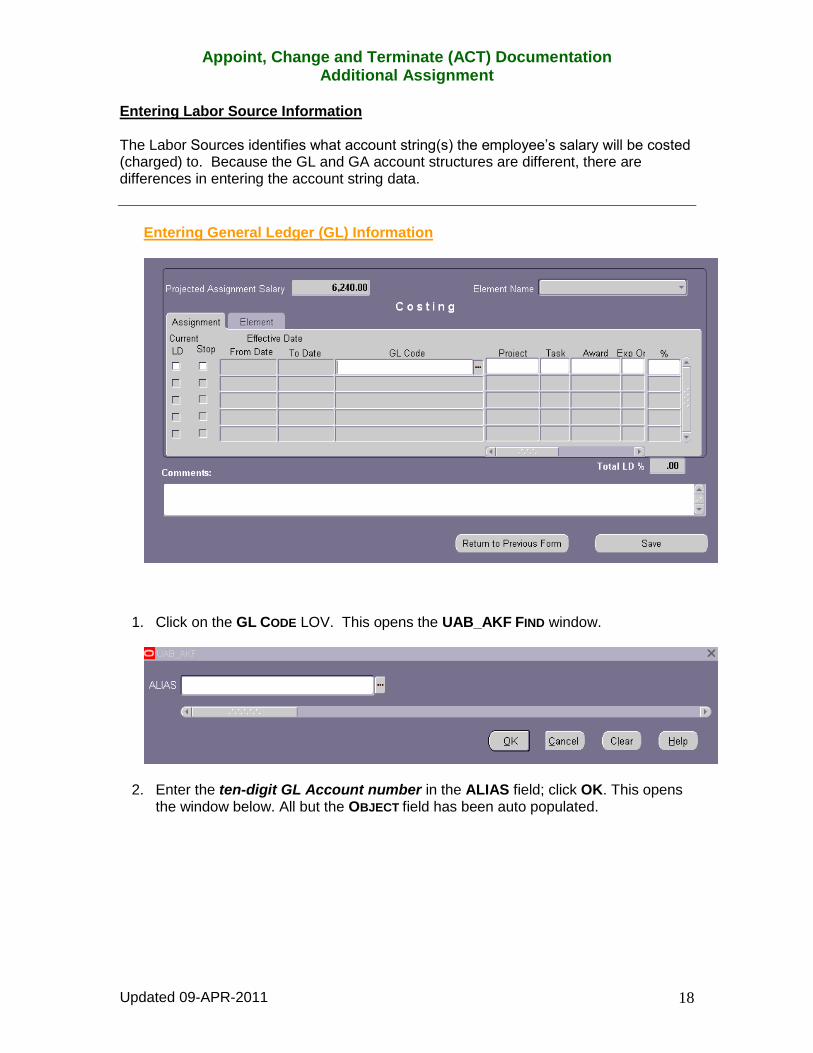
Entering Labor Source Information The Labor Sources identifies what account string(s) the employee’s salary will be costed (charged) to. Because the GL and GA account structures are different, there are differences in entering the account string data.
Entering General Ledger (GL) Information
1. Click on the GL CODE LOV. This opens the UAB_AKF FIND window.
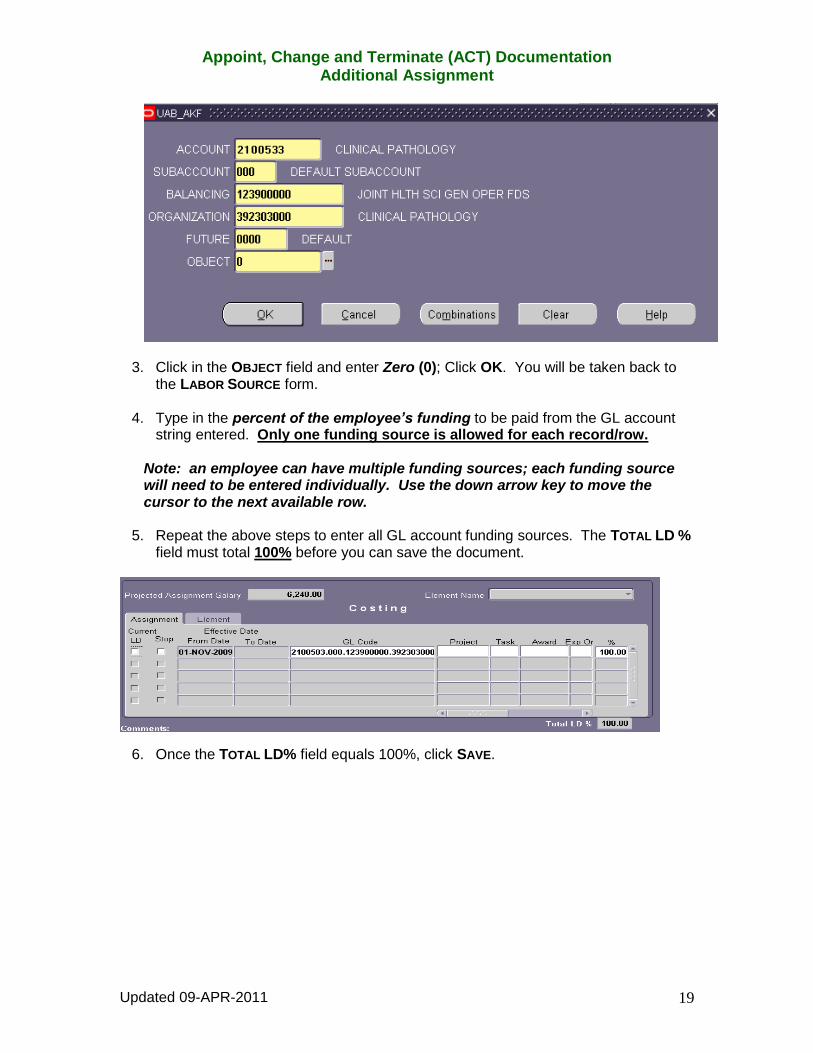
2. Enter the ten-digit GL Account number in the ALIAS field; click OK. This opens the window below. All but the OBJECT field has been auto populated.
Appoint, Change and Terminate (ACT) Documentation Additional Assignment
Updated 09-APR-2011 19
3. Click in the OBJECT field and enter Zero (0); Click OK. You will be taken back to the LABOR SOURCE form.
4. Type in the percent of the employee’s funding to be paid from the GL account
string entered. Only one funding source is allowed for each record/row.
Note: an employee can have multiple funding sources; each funding source will need to be entered individually. Use the down arrow key to move the cursor to the next available row.
5. Repeat the above steps to enter all GL account funding sources. The TOTAL LD %
field must total 100% before you can save the document.
6. Once the TOTAL LD% field equals 100%, click SAVE.

Appoint, Change and Terminate (ACT) Documentation Additional Assignment
Updated 09-APR-2011 20
Entering Grant (GA) Funding Sources
7. Click one time in the PROJECT field of the next available row.
Type the project number in the PROJECT field or choose the Project number from
the LOV. Press the TAB key or click in the next TASK field. Type the task number in the TASK field or choose the Task number from the LOV.
TAB to the AWARD field or click in the AWARD field. Type the award number in the AWARD field or choose the Award number from the
LOV. TAB to or click in the next field.
Type in the organization number or choose the Expenditure Organization number from the LOV.
Note: For the hospital, this will be 70. For the university, this will be 10.
8. Type in the percent of the employee’s effort to be charged to the project number in the % field.
9. Enter comments, if applicable, in the COMMENTS field at the bottom of this form.
Comments here will appear on the ACT MAIN FORM.
Note: TOTAL LD% must equal 100% before you can save the document.

Appoint, Change and Terminate (ACT) Documentation Additional Assignment
Updated 09-APR-2011 21
10. Click the SAVE button, then click on the RETURN TO PREVIOUS FORM button. This
will return you to back to the ACT MAIN FORM window.
11. Click in the checkbox next to ATTACHMENTS if necessary. 12. Click the SUBMIT button at the bottom of the ACT MAIN FORM.
Return to Top


![AARP MASSACHUSETTS RETIREMENT SECURITY SURVEY · 0 Yes (TERMINATE) 100 No 0 Don’t know (TERMINATE) 0 Refused (TERMINATE) Q1. [ALL] As you think about your finances in the future,](https://img.pdfslide.us/doc/110x75/5e2172967bc52a4a3b67ce71/aarp-massachusetts-retirement-security-survey-0-yes-terminate-100-no-0-donat.jpg)