Embed Size (px)
Citation preview

Applications ManagerVersion 8.0
Installation Guide
UC4 Software, Inc.

Applications Manager Version 8.0Applications Manager 8.0 Installation GuideBy Jack IretonDocument number: AM80INST-032009UC4 Software, Inc. 2009All Rights Reserved. Printed in USA
Restricted Rights LegendUse, duplication, or disclosure of the Programs is subject to restrictions stated in your contract with UC4 Software, Inc. Use, duplication, or disclosure of the Programs by Government is subject to restrictions for commercial computer software and the Programs shall be deemed to be licensed with Restricted Rights under Federal Law.The information contained in this document is subject to change without notice. UC4 Software, Inc. does not warrant that this documentation is error-free.If you find errors in this document, please contact Applications Manager Documentation.Applications Manager is an unregistered trademark of UC4 Software, Inc.All other product names and services identified throughout this book are trademarks or registered trademarks of their respective companies.

Applications Manager Version 8.0 Installation Guide iii
Contents
About This Guide.....................................................................................................viWhere to Go for More Information .......................................................................viii
Section I: Applications Manager Master Installation for UNIX and Windows1. Applications Manager Installation for UNIX and Windows...............................3
1.1 Introduction to Installing Applications Manager for UNIX and Windows.................................. 41.2 Creating the UNIX Account (UNIX Only) ................................................................................. 81.3 Assigning Rights and Permissions to the Windows User (Windows Only)............................ 101.4 Creating the Database Account............................................................................................. 141.5 Preparing the Installation Files .............................................................................................. 18
1.5.1 Mounting a CD-ROM File System on HP UNIX .......................................................... 201.6 System Information Required for the Installation................................................................... 241.7 Running the Installation Script............................................................................................... 281.8 Starting and Stopping the Applications Manager Processes in UNIX ................................... 301.9 Starting and Stopping the Applications Manager Processes in Windows ............................. 321.10 Starting the Applications Manager Client and Logging In.................................................... 341.11 Verifying the Installation ...................................................................................................... 38
2. Applications Manager Installation—Advanced Topics ...................................412.1 Introduction to Applications Manager Installation—Advanced Topics................................... 422.2 Configuring the Applications Manager Client ........................................................................ 442.3 Function of the Operating System User ................................................................................ 462.4 Configuring Applications Manager for Oracle RAC ............................................................... 482.5 Installing Multiple Automation Engines on One Host............................................................. 522.6 Configuration for Machines with Multiple IP Addresses ........................................................ 542.7 Automation Engine, Agent, and Client Firewall Connections ................................................ 562.8 Overview of Firewall Settings ................................................................................................ 582.9 Configuring Agents to Validate Multiple Automation Engine Configurations ......................... 602.10 Using Custom SSL Certificates for Connection Authentication ........................................... 622.11 Uninstalling Applications Manager ...................................................................................... 64
Section II: Applications Manager Remote Agent Installation3. Installing a UNIX Remote Agent ........................................................................69
3.1 Introduction to Installing a UNIX Remote Agent .................................................................... 703.2 Defining the UNIX Remote Agent in Applications Manager .................................................. 72

iv Contents
3.3 Installing the Remote Agent ...................................................................................................74
4. Installing a Windows Remote Agent.................................................................774.1 Introduction to Installing a Windows Remote Agent...............................................................784.2 Defining the Windows Remote Agent in Applications Manager .............................................804.3 Creating the Windows User....................................................................................................844.4 Running the Installation Program...........................................................................................86
5. Installing an OpenVMS Remote Agent .............................................................895.1 Introduction to Installing an OpenVMS Remote Agent...........................................................905.2 Defining the OpenVMS Remote Agent in Applications Manager ...........................................925.3 Creating the Applications Manager Account on the OpenVMS System.................................945.4 Running the Installation Program...........................................................................................985.5 Relinking Executables..........................................................................................................1005.6 Defining OpenVMS Symbols................................................................................................1025.7 Editing the System Startup File ............................................................................................104
6. Installing an OS/400 Remote Agent ................................................................1076.1 Introduction to Installing an OS/400 Remote Agent .............................................................1086.2 Defining an Applications Manager User for the OS/400 Agent ............................................1126.3 Defining the OS/400 Agent in Applications Manager ...........................................................1146.4 Defining the Default AS/400 Task Parameters.....................................................................1166.5 Importing the OS/400 Objects into the Automation Engine..................................................1186.6 Installing the Remote Agent .................................................................................................1206.7 Internationalization ...............................................................................................................1246.8 Starting and Stopping the OS/400 Agent .............................................................................1266.9 Verifying the Installation .......................................................................................................1286.10 Uninstalling the OS/400 Agent ...........................................................................................130
7. Creating a ZOS Remote Agent ........................................................................1337.1 Introduction to Installing an ZOS Remote Agent ..................................................................1347.2 Defining an Applications Manager User for the ZOS Agent .................................................1367.3 Defining the Operations Manager and ZOS Logins .............................................................1387.4 Defining the ZOS Agent in Applications Manager ................................................................1407.5 Specifying the ZOS Default Task Parameters......................................................................142
Section III: Applications Manager Upgrades8. Upgrading Applications Manager ...................................................................147
8.1 Introduction to Upgrading Applications Manager .................................................................1488.2 Changes in Behavior ............................................................................................................1508.3 Upgrading an Automation Engine and Local Agent .............................................................1528.4 Upgrading Remote Agents ...................................................................................................1548.5 Verifying the Upgrade ..........................................................................................................156
Index ......................................................................................................................159

Applications Manager Version 8.0 Installation Guide v

vi About this Guide
About This GuideThis manual documents the installation procedure for Applications Manager.
The Installation Guide documents the installation procedures for Applications Manager.
Text ConventionsThe following text conventions are used throughout this guide:
• User interface field names, menu items, and window names are written in bold.• File names and text within scripts are written in a bold arial font.• Variable text is written <within brackets>. In the example below <run ID number>
represents the actual run ID number of a requested job. If you submit a large process flow, the message will read, ‘Task submission in progress: Run ID = <run ID number>’ until all components of the process flow have been placed into the Backlog.
Cross-Reference ConventionsCross-references to topics within a manual list the topic name and number as shown in the following example: For information on task details in the Backlog, see topic 4.7 Viewing and Editing Task Details.Cross-references to topics in other Applications Manager manuals list the manual name as shown in the following example: For information on external predecessors, see topic 5.5 Working with External Predecessors in the Development Guide.

Applications Manager Version 8.0 Installation Guide vii
Unique FormatThe manual is written as a series of topics, with all but a few topics presented on two facing pages. Illustrations are always displayed within the topic. These features make it easy to find where a topic starts and ends, and eliminate flipping pages to find an illustration.
In some rare cases a topic cannot fit onto two pages. To draw attention to these exceptions, we have included a continuation symbol...
...in the lower right corner of the second page.Each topic begins with a heading followed by a summary paragraph set off by horizontal rules. The summary paragraph states the key concepts presented in the topic. If a topic has a subtopic, the subtopic is also presented on two facing pages. The topic heading is carried over to the subtopics, and is displayed in smaller letters above the subtopic heading.To get a quick overview of a chapter, read the summary paragraph for each topic and look at the figures and figure captions.

viii Where to Go for More Information
Where to Go for More InformationThe most up-to-date Applications Manager documentation is available in the online manuals. You can access the manuals from the Help menu in the Applications Manager client. PDF manuals are also available, but may not be as current. The knowledge base on the UC4 Support site provides write-ups to address problems and frequently asked questions. Additionally, support technicians are available based on your support contract.
Online ManualsComplete online versions of the Applications Manager manuals are accessible by selecting Applications Manager Manual from the Help menu on the Applications Manager desktop or by clicking the Help button in various client windows. If you select Help while defining an object, Applications Manager opens the corresponding help topic. Occasionally new functionality is added to an Applications Manager version and bugs are fixed throughout each version's life cycle. The most recent edits to the manuals are included in the online help of each build.
PDFs on the Support SitePDF files for Applications Manager, Operations Manager and Rapid Automation agents are available on the UC4 Support site:
http://support.uc4.com
PDF files are usually only generated when an application is first released. For the most up to date information, see the online help that ships with the application.
Knowledge BaseThe knowledge base provides write-ups to address problems and frequently asked questions. It is searchable by error message, category, and text. The knowledge base is located on the UC4 Support site.
Applications Manager User ForumThe Applications Manager User Forum is a place where you can network with other Applications Manager users to trade tricks, tips and best practices. Check on the latest product developments, find out about new service offerings, and make new friends and connections. The forum is located on the UC4 Support site.

Where to Go for More Information ix
Contacting UC4 SupportIf you encounter problems with Applications Manager, you can solve most problems using:
• The instructions provided in the Applications Manager manuals.• The knowledge base available at the UC4 Support site.
You can access the UC4 Support site from the Applications Manager desktop by going to the Help menu and selecting Applications Manager Support.
If you are unable to resolve a problem, contact UC4 Technical Support. Except for emergencies, we suggest opening a support call from the UC4 Support site. All support calls received via the Web are reviewed within one business day.UC4 Technical Support via phone is available from 6:00 A.M. to 5:00 P.M. Pacific Standard Time, Monday through Friday. Emergency (24 x 7) technical support is available. Contact your UC4 Account Manager if you are interested in purchasing emergency support.You can contact UC4 Technical Support at:
Before you call UC4 Technical Support, please have the following information available:• Version number of Applications Manager you are running• Operating system on which Applications Manager is running (e.g. Sun, Hewlett-Packard)• Operating system host name• Operating system login information for the Applications Manager account(s)• Database login information for the Applications Manager account(s)• Problem reference number if you are making a follow-up call on a previous problem
If you are calling UC4 Technical Support for the first time, please be prepared to provide your name, company name, location, and phone number.The UC4 Technical Support representative will give you a problem identification (PID) number. Please write down the number. If you call again about the same problem, the number will allow the representative to more quickly access the history of the problem.
United States EuropeWeb: http://support.uc4.com Web: http://support.uc4.comTelephone: 1-877-277-9679 Telephone: +43 (2233) 7788-22Email: [email protected] Email: [email protected]: 425-562-9350 Fax: +43 (2233) 7788-99

x Where to Go for More Information

Section IApplications Manager Master Installation for UNIX and Windows
Chapter 1: Applications Manager Installation for UNIX and Windows ............................... 3Chapter 2: Applications Manager Installation—Advanced Topics.................................... 41


1Applications Manager Installation for UNIX and Windows 1.
1.1 Introduction to Installing Applications Manager for UNIX and Windows .................... 41.2 Creating the UNIX Account (UNIX Only) .................................................................... 81.3 Assigning Rights and Permissions to the Windows User (Windows Only) .............. 101.4 Creating the Database Account ............................................................................... 141.5 Preparing the Installation Files ................................................................................. 18
1.5.1 Mounting a CD-ROM File System on HP UNIX .............................................. 201.6 System Information Required for the Installation ..................................................... 241.7 Running the Installation Script .................................................................................. 281.8 Starting and Stopping the Applications Manager Processes in UNIX ...................... 301.9 Starting and Stopping the Applications Manager Processes in Windows ................ 321.10 Starting the Applications Manager Client and Logging In ...................................... 341.11 Verifying the Installation ......................................................................................... 38

4 Chapter 1: Applications Manager Installation for UNIX and Windows
1.1 Introduction to Installing Applications Manager for UNIX and Windows
The basic Applications Manager install creates an automation engine and local agent on the host computer.
This chapter covers the installation procedures for both UNIX and Windows. The Applications Manager installation program installs the following:
• An Applications Manager automation engine and its local agent• An RMI (Remote Method Invocation) server• An Apache Web server• The Java 1.4.2 run-time environment
Minimum InstallationWhen you install Applications Manager, you must install at least one automation engine and its local agent on the host computer. If you wish, you also can install remote agents on other machines. If the situation warrants, you can install multiple automation engines and local agents on the same host.
General System RequirementsTo install Applications Manager, you will need the following:
• An Applications Manager build for your operating system. For a list of the platforms supported, see the Release Notes.
• Oracle 8i (8.1.7 or higher recommended), or Oracle 9i (9.2.0.3 or higher recommended), or Oracle 10g.
• 300 MB disk space on the host system.• For a small system, 100 megabytes for Oracle database table storage, 50 megabytes for
database indexes.• 512 MB RAM minimum for the Applications Manager host system. If Oracle is running
on the same host, memory requirements will go up accordingly. • 256 MB RAM minimum for the Applications Manager client. 512 MB recommended.
Java RequirementIn order to install an Applications Manager automation engine, you must have some version of Java pre-installed. If you do not have any version of Java installed, you can install it from the Applications Manager CD by running the following from the v7 subdirectory: For UNIX platforms:
sh jinstall.sh
For Windows:
jre142_4.exe

Applications Manager Version 8.0 Installation Guide 5
Applications Manager is optimized to work with the Java 1.4.2 run-time environment. Applications Manager does not support earlier versions of Java. If you are running an earlier version of Java, Applications Manager will install 1.4.2 during the Applications Manager install process.
Linux SystemsIn this guide, Linux is considered a variant of UNIX, and therefore is not referred to separately in this manual. All information presented about UNIX also applies to Linux.
Apache Web ServerApplications Manager ships with the Apache Web server. You also can use equivalent Web servers. Applications Manager does not support Microsoft’s Internet Information Services (IIS), but Applications Manager can be configured to work with IIS by allowing JAR and ZIP files to be served.
SSLThe SSL that ships with Applications Manager for use with Java 1.4.2 is the global (exportable) version. If you want the domestic version, which has stronger encryption, or want to find out about the difference, go to http://java.sun.com/products/jsse/index-103.html.If you want to run with the domestic package, download and unzip the domestic package installation files, then replace the jar files jcert.jar, jsse.jar, and jnet.jar in the classes directory with the ones from the download. The classes directory can be found in the following Applications Manager directories:
UNIX: $AW_HOME/UWClient/web/classesWindows: %AW_HOME%\web\classes
HP-UX SystemsIf you are installing Applications Manager on an HP-UX system, the HP-UX Runtime Environment for the Java™ 2 Platform must be installed on your system prior to running the Applications Manager installation. The installation must be performed by the HP UNIX administrator with root access. For all other platforms, the Java 2 Platform is installed by the Applications Manager installation script.
Report Storage RequirementsYou will need 300 MB of free disk space on the host before proceeding. There must also be enough disk space to hold all the output (reports and system listings) from jobs for the retention period specified. If you will be creating many large reports, you will need more storage space. The Applications Manager administrator should monitor the file system to ensure there is adequate space available.

6 Chapter 1: Applications Manager Installation for UNIX and Windows
Specifying Ports for Firewalls or Other PurposesIf you have a firewall in place, you will want to specify ports for your Applications Manager processes. During the installation, you will be asked if you have a firewall in place. If you answer yes, you will be able to specify the port value(s) at that time. If you are not sure which ports to use, consult your network administrator before installing. For more information on firewall configuration and port assignments, see topic 2.8 Overview of Firewall Settings.
Major StepsThe major steps in the installation process are:
• Create the UNIX account or Windows user.• Create the Oracle database account.• Prepare the installation files.• Run the installation script.• Start the supporting servers.• Start the automation engine and agent processes.• Verify the installation.
Each step is described in detail in this chapter.

Applications Manager Version 8.0 Installation Guide 7

8 Chapter 1: Applications Manager Installation for UNIX and Windows
1.2 Creating the UNIX Account (UNIX Only)Before installing Applications Manager, create a KORN or BOURNE shell UNIX account.
If you are installing Applications Manager on a UNIX system, the first step in the installation process is to create a KORN or BOURNE shell UNIX account.
ProcedureTo create a UNIX account for Applications Manager:
1. Create a UNIX operating system account on the appropriate host.The default shell for the account must be either KORN or BOURNE shell. The C shell (csh) and BASH shells (Linux) currently are not supported. The account name can be any valid UNIX name. In this manual, we represent the UNIX login name as am. You must be logged into the Applications Manager UNIX account when you perform the install.
2. Pick or create a directory into which you will install Applications Manager.It is usual practice to set the home directory for the Applications Manager UNIX account (in .profile) to the install directory for Applications Manager. In this manual, we typically represent the install directory as /home/users/am.
3. If you will be installing an automation engine and local agent, ensure that the environment allows Applications Manager access to the database it will use for its repository by modifying the .profile file for the Applications Manager UNIX account.
When the Database Is on a Different Machine than the Automation EngineIf the database is on a different machine than the Applications Manager automation engine, you must set the TWO_TASK variable. To set TWO_TASK, add the following line to the $AW_HOME/site/sosite file where <Oracle Sid> is the actual name of your Oracle Sid:
TWO_TASK=<Oracle Sid>; export TWO_TASK

Applications Manager Version 8.0 Installation Guide 9

10 Chapter 1: Applications Manager Installation for UNIX and Windows
1.3 Assigning Rights and Permissions to the Windows User (Windows Only)
The Windows WatchWorx service runs as a Windows service and should run as a specific Windows user—typically Administrator.
If you are installing Applications Manager on a Windows system, the first step is to assign rights and permissions to a Windows user. The Windows user will be used to run the Applications Manager Windows WatchWorx service. WatchWorx monitors all Applications Manager processes and restarts them if they are terminated unexpectedly.We recommend that the WatchWorx service run as a specific Windows user—typically the Administrator user. Whichever user the service runs as, that user must have certain advanced user rights and permissions. Administrator is the default user when installing this service.
Setting Rights and PermissionsThe table below notes the rights and permissions required for the Administrator, Applications Manager (custom-built), and the domain user.
Instructions for setting the rights and permissions for Windows XP, Windows 2000, and most older Windows operating systems follow.
Permissions for Windows XPTo set the rights and permissions in Windows XP:
1. Navigate as follows: Start>Settings>Control Panel>Administrative Tools>Local Security Policy>Local Policies>User Rights Assignment.
2. Select a policy from the right panel, right-click, and select Properties.3. Click Add User or Group.4. Enter the user name.
The user name cannot include spaces.5. Click OK.
User Rights and PermissionsAdministrator (recommended) or Applications Manager
• Advanced User Right: log on as a service• File access permissions to run the programs you wish to
run with this automation engine and local agent
Domain/User • Advanced User Right: Act as part of the operating system• Advanced User Right: Log on as a service• File access permissions to run the programs you wish to
run with this automation engine and local agent• Must belong to the domain/administrator group
Applications Manager Version 8.0 Installation Guide 11
Permissions for Windows 2000To set the rights and permissions in Windows 2000:
1. Navigate as follows: Start>Settings>Control Panel>Administrative Tools>Local Security Policy>Local Policies>User Rights Assignment.
2. Select a policy from the right panel, right-click, and select Security.3. Click Add.4. Click OK.
Permissions for Older Windows Operating SystemsTo set the rights and permission in most older Windows operating systems:
1. Navigate as follows: Start>Programs>Administrative Tools>User Manager.2. Select a user, open the Policies menu, and choose User Rights.3. Select the Show Advanced User Rights option in the lower left corner of the User
Rights dialog box.4. Select a right and click Add.5. Select the user you want to add.
Remember, you must log out and log in again after changing any user rights. Otherwise, the changes will not take effect. You should determine which user(s) the Applications Manager services are going to run as before proceeding with the installation. You will perform the installation as Administrator.
Special CircumstancesOccasionally, certain Windows host configurations do not allow the Applications Manager WatchWorx service to be installed using a specific user/password. If you are unable to install the Applications Manager service as a specific user on your Windows host, Applications Manager recommends that you do the following:
1. Install the Windows Automation Engine/Agent, but leave the Windows User and Password fields blank. By default Applications Manager installs into the Administrator Account.
2. After you complete the installation, do one of the following:• In NT, go to Control Panel>Services.• In Windows 2000 and XP, go to Control Panel>Administrative Tools>Services.
3. Locate the following service: AWW-<agent name>.4. Select the service and click Startup.
Windows displays the Service dialog.5. Ensure that the Startup Type option is set to ‘Automatic’. 6. Change the Log On As from ‘System Account’ to ‘This Account.’ Enter the Windows user
account and the password.7. Be sure to update the service with an appropriate Windows user name and password.

12 Chapter 1: Applications Manager Installation for UNIX and Windows
When the Database Is on a Different Machine than the Automation EngineIf the database is on a different machine than the Applications Manager automation engine, you must set the TWO_TASK variable. To set TWO_TASK, add the following line to the %AW_HOME%\site\sosite.bat file where <Oracle Sid> is the actual name of your Oracle Sid:
TWO_TASK=<Oracle Sid>

Applications Manager Version 8.0 Installation Guide 13

14 Chapter 1: Applications Manager Installation for UNIX and Windows
1.4 Creating the Database AccountBefore installing Applications Manager, create an Oracle database account for the Applications Manager repository.
After creating the UNIX account or Windows user, the next step is to create the database account. In Applications Manager 8.0, Oracle 8i (8.1.7 or higher recommended), Oracle 9i (9.2.0.3 or higher recommended), and 10g databases are supported. If you are using Oracle RAC, see 2.4 Configuring Applications Manager for Oracle RAC.
RequirementsWhen you create the database, set the following parameters:
• Shared_pool_size: 20 megabytes minimum• Database table storage and indexes: 150 megabytes minimum• Processes: 100 or greater
Rule-Based Optimization (Oracle 8i and 9i)Applications Manager is designed to take advantage of rule-based optimization. It is recommended the database be started using rule-based optimization to enhance the performance of Applications Manager. In high load scenarios, the database must run in rule-based mode.
ProcedureTo create an Oracle account for Applications Manager:
1. Log into the database where you will be creating the Oracle account for Applications Manager and issue the following command:
grant connect, resource to <am> identified by <password>;
2. To give the Applications Manager account the privileges required to create tables, views, indexes, procedures, triggers and sequences, issue the following commands:
alter user <am> default tablespace <tspace>;alter user <am> temporary tablespace <tmpspace>;
In the commands above, replace <am>, <tspace>, and <tmpspace> with appropriate values for your system. Warning! If you do not set the default and temporary tablespaces for the Applications Manager account, all the Applications Manager database objects will be created in the system tablespace.

Applications Manager Version 8.0 Installation Guide 15
3. To prevent the Applications Manager installation script from prompting for the Oracle sys password, you can grant the appropriate privilege to a system table ahead of time. Make the following grants from the Oracle sys account:
grant select on v_$session to <am>;grant select on v_$lock to <am>;grant select on v_$locked_object to <am>;grant create view to <am>;grant create procedure to <am>;grant create trigger to <am>;grant create table to <am>;grant create database link to <am>;ALTER SYSTEM FLUSH SHARED_POOL;grant execute on dbms_sql to <am>;grant execute on dbms_pipe to <am>;grant execute on dbms_lock to <am>;grant execute on dbms_output to <am>;grant alter session to <am>;grant create synonym to <am>;grant select on v_$sqltext to <am>;grant select on v_$sqltext_with_newlines to <am>;
Note: If you have multiple automation engines running in the same database, and you try to install a new automation engine in the same database, you may have trouble granting access to dbms_pipe. If you have trouble, try stopping the other automation engines.
(Re)granting Access After Rebuilding the Oracle DatabaseIf you rebuild the Oracle database where Applications Manager is installed any time after an initial Applications Manager installation, you must (re)grant select execute access to the Oracle system table (SYS.V_$SESSION) and execute to the procedures dbms_pipe, dbms_lock, and dbms_application_info. To do this, you must run the sysdba.sql script located in the Applications Manager sql directory.To run the script, log into SQL*Plus using the Applications Manager login and password, then type ‘start sys’. The script will prompt you for the sys Oracle password then grant select access to the SYS.V_$SESSION system table and the procedures. You can also regrant access by executing the SQL statements shown above in Step 3.
Dropping the Database PipeIf you must drop an Oracle user, you must first drop the database pipe by running the following SQL*Plus script logged in as that particular Oracle user (otherwise you will have to stop and restart the database before you can reinstall):
declare ret number;begindbms_pipe.purge('<user name>PIPE_MASTER');ret:=dbms_pipe.remove_pipe('<user name>PIPE_MASTER');end;

16 Chapter 1: Applications Manager Installation for UNIX and Windows
Where <user name> is the name of the Oracle user and is not SYS or SYSTEM.Then login as sys or system and execute the following statement:
ALTER SYSTEM FLUSH SHARED_POOL
To drop the user, log into Oracle as SYS and issue the following command:drop user <user name> cascade

Applications Manager Version 8.0 Installation Guide 17

18 Chapter 1: Applications Manager Installation for UNIX and Windows
1.5 Preparing the Installation FilesBefore installing Applications Manager, prepare the installation files. You can install directly from the CD-ROM, or you can transfer the installation files from the distribution media to a temporary installation directory.
After creating the database account, the next step is to prepare the installation files. You can run the install directly from the CD-ROM, or transfer the files to an installation directory. Windows Systems: If you are installing on a Windows operating system, you cannot have spaces in your installation directory name. You can either copy your install files to a directory without spaces in the name, or use a short name. For example, the short name for Documents and Settings is DOCUME~1.
Installing Directly from CD-ROMIn Windows, no special preparation is needed to install Applications Manager from the CD-ROM.In UNIX, to install Applications Manager directly from the CD-ROM, you must make the CD_ROM available by mounting it as /cdrom. You must be able to read from the CD-ROM as the Applications Manager UNIX user.HP UNIX Systems: If you are installing Applications Manager on an HP UNIX system, there are special procedures you must follow for mounting the CD-ROM. For more information, see topic 1.5.1 Mounting a CD-ROM File System on HP UNIX.
Copying Files from the CD-ROM to a UNIX HostIf you prefer to install Applications Manager from a directory on a UNIX host machine, you can copy the files from the CD-ROM to a temporary installation directory.To copy the files from the CD-ROM to a UNIX host installation directory:
1. Mount the CD-ROM.2. Change to the directory into which you would like to transfer the installation files. 3. Issue the following command:
cp -r /<cdrom_path>/<am_dir>
where <cdrom_path> is the path to the CD-ROM device (e.g. /cdrom) and <am_dir> is the directory on the CD-ROM containing the files you want to transfer (e.g. v71.hp or v71.sol).
When the transfer is complete, you can move the files to another directory or host (if necessary).
Transferring UNIX Files from a Windows SystemTo transfer files to a UNIX machine without a CD-ROM drive, copy the files from a CD-ROM on a Windows system using FTP.
1. Insert the Applications Manager CD-ROM in the Windows system CD-ROM drive.2. FTP all the files on the CD-ROM to a UNIX staging directory (using binary mode).

Applications Manager Version 8.0 Installation Guide 19
3. After transferring the installation files to the staging directory, verify that all the Applications Manager files are owned by the Applications Manager UNIX user and have appropriate group ownership. If the files have incorrect ownership, the installation will fail. Use the chown and chgrp commands to modify the ownership if necessary.

20 Chapter 1: Applications Manager Installation for UNIX and Windows
1.5 Preparing the Installation Files1.5.1 Mounting a CD-ROM File System on HP UNIX
If you will be installing Applications Manager directly from a CD-ROM on an HP UNIX system, you must follow special procedures for mounting the CD-ROM.
On an HP UNIX system, you must follow special procedures for mounting a CD-ROM if you will be installing Applications Manager directly from the CD-ROM. The procedures are:
• Check networking• Check PFS daemons• Check NFS• Check patches
PFS allows access to the following CD-ROM file systems:• pfs-iso9660 to mount a device as iso9660• pfs-hsfs to mount a device as hsfs • pfs-rrip to mount a device as rrip • pfs-nfs to mount an exported PFS file system
Check NetworkingRunning a PFS on HP-UX requires that a network loopback be configured in addition to networking in general. For HP-UX 10.x systems, you configure this through the file /etc/rc.config.d/netconf. The entry should read:
LOOPBACK_ADDRESS=127.0.0.1
PFS requires that the system name lookup resolves correctly. To check this, substitute the applicable host name and IP address of the system in the following commands:
nslookup hostname (should return the IP address)
nslookup IP_address (should return the hostname)
Check PFS DaemonsThe following PFS daemons must be started to allow network access on the server and client:
• pfs_mountd is responsible for maintaining local and remote mounts. It spawns pfs_mountd.rpc.
• pfsd needs to be running on all systems designated as PFS servers. It spawns pfsd.rpc.• pfsd [nservers] starts the daemons that handle client file system requests. Nservers is
the number of file system server daemons to start. This number should be based on the load expected on the system and is defined by the number of mounted file systems.
You can check to make sure the daemons are running by issuing the following command:
ps -ef|grep x= appropriate daemon name

Applications Manager Version 8.0 Installation Guide 21
Check NFSNFS must be running on the system for PFS to run, even if the system is standalone.To check if PFS is running, use this command:
rpcinfo -p
Look for NFS and MOUNTD in the last column. If you do not find them, then make sure the following variables are set in the /etc/rc.config.d/nfsconf file:
NFS_CLIENT=1NFS_SERVER=1NUM_NFSD=4START_MOUNTD=1
If you modified nfsconf, issue the following two commands to restart the nfs server:
/sbin/init.d/nfs.server start
/sbin/init.d/nfs.client start
Check PatchesInstall all applicable patches.
Command SyntaxIf you use the /etc/pfs_fstab file, you limit the pfs command to looking only for the type of format that is listed in the pfs_fstab file.The example below lets pfs determine the format and translate it to lowercase, with no revision numbers or special characters.
pfs_mount -o xlat=unix /dev/rdsk/c0t4d0 /cdrom
The /etc/pfs_fstab file, if used, contains entries for CDROM file systems and disk images to mount using the pfs_mount (1M ) command. Pfs_fstab works like /etc/fstab. The fields are:
• filesystem• directory• type• options• freq (Interval in days between dumps. Should be zero.)• pass (The FSCK pass in which the partition is checked. Should be zero.)
An example command is shown below:
/dev/rdsk/c0t4d0 /cdrom pfs-iso9660 ro,suid 0 0
In the above example, /dev/rdsk/c0t4d0 is the device, and /cdrom is the mount point.

22 Chapter 1: Applications Manager Installation for UNIX and Windows
Examples of pfs_mount commands are shown below:
pfs_mount -t iso9660 -x unix /dev/rdsk/c0t4d0 /cdrom
pfs_mount /dev/rdsk/c1t2d0 /bal
Note: There is a known problem with pfs_mount giving the following error messages.
pfs_mount : not owner
pfs_mount : giving up on /cdrom
The problem is caused by a limitation of the rpc libraries which pfs uses. The number of groups root can concurrently be a member of is limited to eight. The workaround is to remove some root entries from the /etc/group file. This problem is resolved by installing the appropriate PFS patch.

Applications Manager Version 8.0 Installation Guide 23

24 Chapter 1: Applications Manager Installation for UNIX and Windows
1.6 System Information Required for the InstallationThe Applications Manager installation requires some detailed information about your system.
Applications Manager is a complex product that draws on many elements of your system to work correctly. To complete the installation successfully, you will need to provide a variety of system information. The information required is detailed in the table below.Applications Manager makes every attempt to analyze your system and present default values. These values are displayed in brackets [ ] next to each question in the UNIX installation, and in the fields in the Windows installation.
Parameter Default Value
Description
Install Apache now? Y If you do not already have the Apache Web server installed, you can do so during the Applications Manager install.
Install Automation Engine’s agent?
Y You would only answer N in special failover configurations.
Automation Engine name
none Before you choose a name: When choosing a name for the Applications Manager automation engine and local agent, do not use any of the following reserved words: ALL, APPWORX, AWCOMM, AGENTSERVICE, AWAPI, RMI, RMISERVER, AGENT, and MASTER. The name can be up to 30 characters in length.
Automation Engine IP address or DNS name
none The IP address.
Applications Manager Oracle login name, password, and connect string (if used)
none This is the login name, password, and connect string (if used) to the Applications Manager Oracle database account you set up.
Oracle SID none This is the Oracle system identifier. Check with your DBA for the correct value.
Full path to SQL*Plus
none For Windows installations only. Points Applications Manager at the correct database if there are multiple databases on the same machine.
Full path to SQL*Loader
none For Windows installations only. Points Applications Manager at the correct database if there are multiple databases on the same machine.
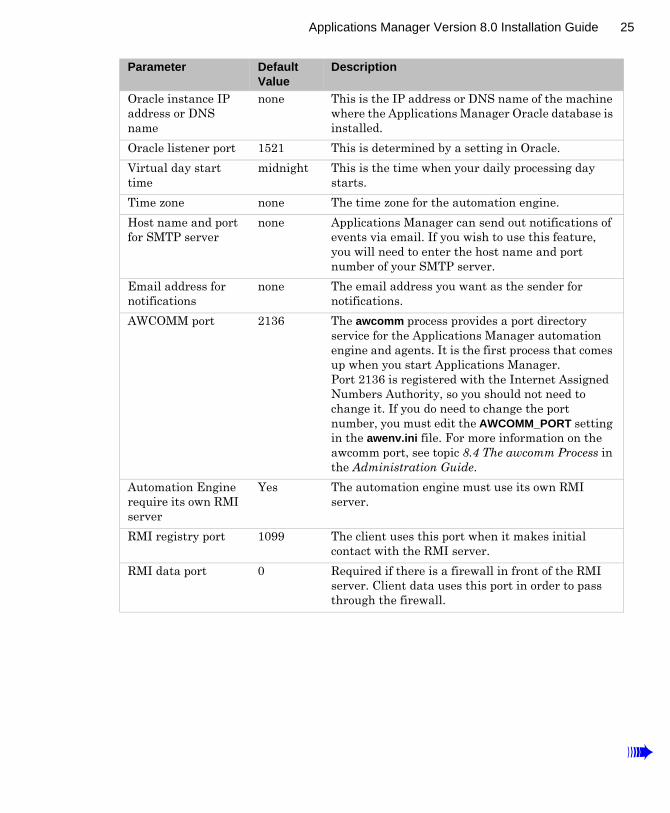
Applications Manager Version 8.0 Installation Guide 25
Oracle instance IP address or DNS name
none This is the IP address or DNS name of the machine where the Applications Manager Oracle database is installed.
Oracle listener port 1521 This is determined by a setting in Oracle.Virtual day start time
midnight This is the time when your daily processing day starts.
Time zone none The time zone for the automation engine.Host name and port for SMTP server
none Applications Manager can send out notifications of events via email. If you wish to use this feature, you will need to enter the host name and port number of your SMTP server.
Email address for notifications
none The email address you want as the sender for notifications.
AWCOMM port 2136 The awcomm process provides a port directory service for the Applications Manager automation engine and agents. It is the first process that comes up when you start Applications Manager.Port 2136 is registered with the Internet Assigned Numbers Authority, so you should not need to change it. If you do need to change the port number, you must edit the AWCOMM_PORT setting in the awenv.ini file. For more information on the awcomm port, see topic 8.4 The awcomm Process in the Administration Guide.
Automation Engine require its own RMI server
Yes The automation engine must use its own RMI server.
RMI registry port 1099 The client uses this port when it makes initial contact with the RMI server.
RMI data port 0 Required if there is a firewall in front of the RMI server. Client data uses this port in order to pass through the firewall.
Parameter Default Value
Description

26 Chapter 1: Applications Manager Installation for UNIX and Windows
Additional Required Information if a Firewall Is Installed on the Automation Engine MachineThe following information is needed if a firewall is installed on the automation engine machine. After specifying ports for the automation engine machine, you need to open the ports for inbound and outbound communication. For more information, see topic 2.8 Overview of Firewall Settings.
Installation Option for the Applications Manager Web Service SolutionsThere are two Applications Manager Web service solution add-on products you can purchase with Applications Manager. To use them you need:
• A valid product key that includes the Web service support you wish to use.• To install Web service components as part of the install/upgrade.
During the install you will be asked if you want to install the Web service components. Make sure you install them if you have purchased the Web services solution. For information on the Applications Manager Web services solution, see chapter 17: Working with Web Services in the Development Guide.
Parameter DescriptionRMI Server Port The return port the agents’ AgentService process uses to
communicate to the automation engine. This lets TCP/IP pick random ports each time the processes are started. This is the typical situation when a firewall is not in place.This port is only ever specified in the automation engine’s awenv.ini file.
RMI Data Port The listener for the RMI server. Needs to be specified when a firewall is on the automation engine machine.
Client RMI Port Needs to be specified when a firewall is on the automation engine machine.Applications Manager will use the specified port number for the RMI server. If 0 is specified in the ClientRMIPortNumber line, no firewall settings are configured and the ports are chosen randomly.

Applications Manager Version 8.0 Installation Guide 27

28 Chapter 1: Applications Manager Installation for UNIX and Windows
1.7 Running the Installation ScriptThe installation script installs Java; the Apache Web server; the RMI server; and the Applications Manager database, automation engine, and local agent.
After preparing the installation files, the next step is to run the installation script. The installation script installs the RMI server and the Applications Manager database, automation engine, and local agent. It also gives you the option of installing the Java 1.4.2 run-time environment and Apache Web server.In a typical installation, you install one automation engine and one local agent on a host. Under certain circumstances, you may want to install two or more agents on the same host. For a description of how to run multiple agents on one host, see topic 2.5 Installing Multiple Automation Engines on One Host.
Automation Engine and Local Agent NamesWhen choosing a name for the Applications Manager automation engine and local agent, do not use any of the following names: ALL, AWCOMM, AGENTSERVICE, RMI, RMISERVER, AGENT, MASTER. These are Applications Manager process names, and if used, can cause problems with start and stop commands issued by Applications Manager.
Applications Manager Client URLDuring the installation, you will be given the URL used to connect to the Applications Manager client server. Be sure to write down this URL for future reference. It also is available in the aw_install.log file located in the Applications Manager install directory. Search for the text ‘URL for future reference’.
Running the UNIX Installation ScriptIn UNIX, when you run the installation script, Applications Manager displays the default information for prompts in brackets [ ]. You can accept the default by pressing the Enter key at the prompt, or type in a response and press the Enter key.To run the installation script:
1. Log into the Applications Manager UNIX account and, if necessary, change to the directory where you want Applications Manager installed.You must be logged into the Applications Manager UNIX account or be logged in as the appropriate Windows user, and be in the Applications Manager directory for the installation procedure to work correctly. Moving the files after the installation is complete requires some effort. It is best to install into the correct directory the first time.In UNIX, if you transferred files to a staging directory, verify that all the Applications Manager files are owned by the Applications Manager UNIX login and group. If they are not, the installation will fail. Use the chown and chgrp commands to modify the ownership if necessary.

Applications Manager Version 8.0 Installation Guide 29
2. From the directory in which you want Applications Manager installed, run CDINST.SH from the CD-ROM or the staging installation directory on the host.Be sure to set permissions for the CDINST.SH file.
3. Follow the on-screen prompts.4. When presented with the menu of installation options, choose:
01 Initial install/upgrade from prior version
5. Follow the on-screen instructions.
Running the Windows Installation ScriptTo run the Windows installation script, run setup.bat on the installation disk and follow the on-screen prompts.
Next StepYou have run the installation script. If you entered an IP address for the host machine, the next step is to start the Applications Manager processes. See the appropriate topic for your platform:
1.8 Starting and Stopping the Applications Manager Processes in UNIX1.9 Starting and Stopping the Applications Manager Processes in Windows

30 Chapter 1: Applications Manager Installation for UNIX and Windows
1.8 Starting and Stopping the Applications Manager Processes in UNIX
The Applications Manager processes must be running for communication to occur between the Applications Manager automation engine, agents, and Applications Manager clients. To start the processes, issue the startso command from the Applications Manager UNIX command line.
The AgentService process runs on all agents. Normally additional process called RmiServer and awcomm are run on the automation engine machine. To ensure secure communications between the automation engine and the various processes, all messages are encrypted.To see the status of the Applications Manager process, you can issue an awstat command.
Establishing the Proper EnvironmentBefore starting or stopping the processes, you must establish the proper environment by logging out of UNIX and logging back in, or issuing the following command from the home directory of the Applications Manager UNIX user:
. .profile
The following lines have been added to $HOME/.profile during the installation process:
AW_HOME=/home/<am>;export AW_HOME. /home/<am>/site/sosite
Starting and Stopping the Apache Process
To start and stop the Apache Web server, issue the apachectl stop and apachectl start commands.
Starting and Stopping Processes with startso and stopsoThe startso and stopso commands are used to start and stop Applications Manager processes. You can issue them by themselves or with parameters. It is generally recommended that you start and stop processes with the basic startso and stopso commands, or if monitoring processes with WatchWorx, with the startso watchworx and stopso watchworx commands. Additional parameters that can be used with the startso and stopso commands are described in topic 8.2 Starting and Stopping Automation Engine and Agent Processes in the Administration Guide.

Applications Manager Version 8.0 Installation Guide 31
Starting Processes, but not Backlog TasksIf you are starting Applications Manager as part of a boot sequence, you may want to start Applications Manager processes, but not allow the automation engine to execute tasks until you have had a chance to view the contents of the Backlog. You can set this up with the following series of commands.
startsostopso master
In this series of commands, the startso command starts the awcomm, AgentService, and RmiServer processes on the automation engine. The stopso master command puts the automation engine into a Stopped status, but doesn’t stop any processes, because those elements are performed on threads of the RmiServer process.
Accommodating More than One awcomm ProcessIf there will be more than one awcomm process running on a host, you must set a different port number for each process. For information on sharing processes between multiple agents on the same host, see topic 2.5 Installing Multiple Automation Engines on One Host.

32 Chapter 1: Applications Manager Installation for UNIX and Windows
1.9 Starting and Stopping the Applications Manager Processes in Windows
Before you can open the Applications Manager client and process tasks, you must start the Applications Manager processes. You can start the processes from the Start menu or the command line.
The startso and stopso commands are used to start and stop Applications Manager processes in UNIX and Windows. In Windows, you can also start and stop processes from the Windows Start menu. You can issue the startso and stopso commands by themselves or with parameters. Before starting or stopping processes, you must set the environment. You can issue these commands on automation engine or agent machines.To see the status of the Applications Manager process, you can issue an awstat command.
Starting and Stopping the Applications Manager Processes from the Start MenuTo start the processes from the Start menu: open the Start menu on the Windows desktop, choose Programs, point to Applications Manager NT, and click Start Applications Manager Processes. This command also starts the RMI server which contains the Applications Manager automation engine.To stop the processes from the Start menu: open the Start menu on the Windows desktop, choose Programs, point to Applications Manager NT, and click Stop Applications Manager Processes.
Starting and Stopping Individual Processes from the Start MenuTo start or stop an individual process from the Start menu: open the Start menu on the Windows desktop, choose Programs, point to Applications Manager NT, and click the appropriate command for the automation engine or agent.
Establishing the Proper EnvironmentBefore issuing commands from the DOS prompt, establish the appropriate environment for Applications Manager by executing the %AW_HOME%\site\sosite.bat file.To start the processes from the DOS prompt, issue the startso command. The startso command will start all applicable Applications Manager processes for the current environment. If an automation engine and local agent are installed, startso will start both automation engine and agent processes. If only a remote agent is installed, startso will start only the agent process.To stop the processes from the DOS prompt, issue the stopso command. The stopso command will stop all applicable Applications Manager processes for the current environment. If an automation engine and local agent are installed, stopso will stop both automation engine and agent processes. If only a remote agent is installed, stopso will stop only the agent process.

Applications Manager Version 8.0 Installation Guide 33
Starting the Apache Web ServerIn Windows, Apache runs as a service, and automatically starts when you start Applications Manager processes from the Start menu.
Starting and Stopping Processes with startso and stopsoThe startso and stopso commands are used to start and stop Applications Manager processes. You can issue them by themselves or with parameters. It is generally recommended that you start and stop processes with the basic startso and stopso commands, or if monitoring processes with WatchWorx, with the startso watchworx and stopso watchworx commands. Additional parameters that can be used with the startso and stopso commands are described in topic 8.2 Starting and Stopping Automation Engine and Agent Processes in the Administration Guide.
Starting Processes, but not Backlog TasksIf you are starting Applications Manager as part of a boot sequence, you may want to start Applications Manager processes, but not allow the automation engine to execute tasks until you have had a chance to view the contents of the Backlog. You can set this up with the following series of commands.
startsostopso master
In this series of commands, the startso command starts the awcomm, AgentService, and RmiServer processes on the automation engine. The stopso master command doesn’t stop any actual processes, because those elements are performed on threads of the RmiServer process.

34 Chapter 1: Applications Manager Installation for UNIX and Windows
1.10 Starting the Applications Manager Client and Logging InTo start the Applications Manager client, open the appropriate Web URL. To log in, enter your Applications Manager user name, password, and (optionally) select a host.
After completing the installation, the next step is to start the Applications Manager client. You can run the Applications Manager client as a Web Start application or as a Web-based Java plug-in application. We recommend using the Web Start application.
Starting the Applications Manager ClientTo start the Applications Manager client:
1. Open your browser and enter the URL set during the installation. The screen shown in Figure A is displayed.The default format for the URL is http://<automation engine IP address>:<Apache Web Server port number>/<automation engine name>/Intro.html. For example, if the automation engine IP address is 200.2.2.123, the port number is 5050, and the automation engine name is PROD1, the URL would look like the following:
http://200.2.2.123:5050/PROD1/Intro.html
Figure A. Introduction screen

Applications Manager Version 8.0 Installation Guide 35
2. From this page you can launch the Applications Manager client in one of a few ways as described in the table below.
Remember that the Java2 runtime engine must be installed for the client to work. The Applications Manager client may ask to install Java on your client machine.
3. Applications Manager provides a signed security certificate with its Java Plug-in Applications Manager client product. By granting this certificate when you first launch the client, you can bypass the need to set up an individual Java security policy file for each user. This certificate guarantees that the Applications Manager applet code is tamper-free.When you first launch the Applications Manager client, a Java Plug-in Security Warning screen is displayed. You are asked to either GRANT or DENY a signed certificate provided by UC4 Software, Inc., asserting that the client application code is safe to download to your system.It also allows the user to access clipboard functionality. If you choose to deny the certificate, you will have to modify the policy file permissions for each of your client users. Notice that the user may grant the certificate for the current session only, or choose to grant it always. If the certificate is granted always, the user will not have to go through this security check when launching an Applications Manager client session.After you close this dialog, Applications Manager displays the login window shown in Figure B.
To open the Applications Manager client using:
Click the following link:
Java WebStart without support for loading Rapid Automation solutions or running Web Service solutions.
Start the Applications Manager Client under the Java WebStart section.
Java WebStart with support for loading Rapid Automation solutions and running Web Service solutions.
Start the Applications Manager Client (fully featured) under the Java WebStart section.
The Java Plug-in without support for loading Rapid Automation solutions or running Web Service solutions.
Start the Applications Manager Client under the Java Plug-in section.

36 Chapter 1: Applications Manager Installation for UNIX and Windows
4. Complete the fields and click OK.• The default user name and password is SQLOPER/s0pass, where “0” is zero.• There should be only one automation engine available in the Automation Engine
drop-down list.• If necessary, select the appropriate language.
Launching Applications Manager from the Command Line
If you are running on a console or through an X-Windows enabled terminal, you can type appworxj (or in Motif, startso client) to launch Applications Manager. When you launch the client from the command line, you won’t be able to use hyperlinks in task notes.
Accessing the Client Through a FirewallIf you will be accessing the Applications Manager client through a corporate firewall, you must open the appropriate ports, and specify those ports in the Options.properties file on the host machine. For details, see topic 2.2 Configuring the Applications Manager Client.
Figure B. The Login window

Applications Manager Version 8.0 Installation Guide 37

38 Chapter 1: Applications Manager Installation for UNIX and Windows
1.11 Verifying the InstallationVerify your installation by running the TEST_JOB job and examining its output files.
After completing the installation, and starting the Applications Manager automation engine and agent processes/services, you should verify that Applications Manager is installed correctly and ready to start processing tasks. A good test is to run a job.
ProcedureTo begin the verification:
1. Launch the Applications Manager client and log in as user SQLOPER.2. From the Activities menu, select Requests.
Applications Manager displays the Requests window shown in Figure A.
3. Select TEST_JOB from the list and click Request. To quickly find TEST_JOB, type the letter ‘t’ in the Search field.The Submit window appears as shown in Figure B. TEST_JOB requires one prompt value—a number of seconds to sleep. It has a default value of 5 (seconds) which will work for now.
4. To run TEST_JOB, click Submit & Close.
Figure A. The Requests window with TEST_JOB selected.

Applications Manager Version 8.0 Installation Guide 39
5. To monitor the task, open the Activities menu and select Explorer. The TEST_JOB should complete successfully with a status of FINISHED. The TEST_JOB will then leave the Backlog and a record will be displayed in History.
Verification CompleteIf TEST_JOB finished, then Applications Manager has been installed correctly. Verification is complete. If you have special considerations in your environment, you may want to look in chapter 2: Applications Manager Installation—Advanced Topics for additional information.If TEST_JOB did not run, or did not complete with a status of FINISHED, contact UC4 Support.
Figure B. Submit TEST_JOB
Figure C. TEST_JOB in History on the Explorer window.

40 Chapter 1: Applications Manager Installation for UNIX and Windows
2Applications Manager Installation—Advanced Topics 2.
2.1 Introduction to Applications Manager Installation—Advanced Topics ...................... 422.2 Configuring the Applications Manager Client ........................................................... 442.3 Function of the Operating System User ................................................................... 462.4 Configuring Applications Manager for Oracle RAC .................................................. 482.5 Installing Multiple Automation Engines on One Host ............................................... 522.6 Configuration for Machines with Multiple IP Addresses ........................................... 542.7 Automation Engine, Agent, and Client Firewall Connections ................................... 562.8 Overview of Firewall Settings ................................................................................... 582.9 Configuring Agents to Validate Multiple Automation Engine Configurations ............ 602.10 Using Custom SSL Certificates for Connection Authentication .............................. 622.11 Uninstalling Applications Manager ......................................................................... 64

42 Chapter 2: Applications Manager Installation—Advanced Topics
2.1 Introduction to Applications Manager Installation—Advanced Topics
This chapter covers advanced Applications Manager installation topics.
This chapter covers advanced installation topics for both UNIX and Windows. You may find these topics useful for configuring Applications Manager to meet your specific system requirements.
Copying and Moving Applications Manager InstancesChapter 11: Copying and Moving Applications Manager Instances in the Administration Guide gives instructions for the scenarios that customers deal with most frequently when copying and moving Applications Manager instances. It includes topics on the following:
• Copying or moving an Applications Manager automation engine and database to the same machine or a different machine
• Moving an Applications Manager automation engine to another machine• Moving an Applications Manager database to another machine

Applications Manager Version 8.0 Installation Guide 43

44 Chapter 2: Applications Manager Installation—Advanced Topics
2.2 Configuring the Applications Manager ClientThe Java-based client is the graphical user interface to Applications Manager. After running the installation script, you can configure the client.
After running the installation script, the next step (optional) is to configure the Applications Manager client. The Applications Manager client brings operations functionality to a Web browser interface. When you install Applications Manager on a server, you make the Applications Manager client available to all users via a URL address designated by the Applications Manager administrator. The browser interface simplifies distribution and maintenance by eliminating the need to install software on each user’s machine.After installing the Applications Manager client, you can customize settings for the client using two properties files:
• Options.properties• DatabaseNameMap.properties
The location for the Options.properties file is:
UNIX: $AW_HOME/web/classesWindows: %AW_HOME%\web\classes
The location for the DatabaseNameMap.properties file is:
UNIX: $AW_HOME/web/classes/com/appworx/utilWindows: %AW_HOME%\web\classes\com\appworx\util
Changes made in these files apply to all users accessing Applications Manager.
Options.propertiesThe Options.properties configuration file controls how the Applications Manager clients interact with the automation engine, and other features such as the image used for the splash screen. The file includes host, database, and login information. The file is self-documenting. However, if you have questions about altering the file, contact UC4 Technical Support.
Accessing the Client through a FirewallIf you will be accessing the Applications Manager client through a corporate firewall, you must open the appropriate ports, and modify the Options.properties file on the host machine. For details, see topic 2.8 Overview of Firewall Settings.

Applications Manager Version 8.0 Installation Guide 45

46 Chapter 2: Applications Manager Installation—Advanced Topics
2.3 Function of the Operating System UserApplications Manager automatically creates an operating system user for validating backend processes. DO NOT delete this user.
As part of the installation process, Applications Manager creates an operating system user based on the information you provided. Applications Manager uses the operating system user to verify backend processes. DO NOT delete this user.If you view the Users Selector window, you will see the OS user listed. In Figure A, the OS user is SOPORT.
When Applications Manager creates the OS user, it does not assign it a password, because you should not have to log into Applications Manager as the OS user.If you must log into Applications Manager as the OS user, go to the Users window, select the OS user, and create a password as shown in Figure B.
Figure A. Operating system user is created automatically during installation.
Figure B. A sample Applications Manager OS user

Applications Manager Version 8.0 Installation Guide 47
Awexe Range for the OS UserThe numbers entered in the Awexe range field correlate to a range of options listed in the awserver_sql.dat file located in the data directory. Users will have access to the functions assigned to them from the command line. The OS user should have 1000-9999 set in this field. For more information on the awexe ranges, see topic 3.2 Defining Users in the Administration Guide.

48 Chapter 2: Applications Manager Installation—Advanced Topics
2.4 Configuring Applications Manager for Oracle RACThis topic describes how to configure Applications Manager to work with Oracle RAC. This method has been tested with an Oracle RAC running on 10.0.3.
If you will be using Applications Manager with Oracle RAC, you must have the 6.0.7 Oracle RAC patch, or be running Oracle 6.0.7 or higher. There are three main steps for configuring Oracle RAC:
1. Configure the Applications Manager processes to use SQL*Net.2. Configure the tnsnames.ora file for the Applications Manager C stack.3. Configure the Applications Manager RMI Server.
Before Applying the PatchBefore applying the 6.0.7 Oracle RAC patch, you should back up the following files:
bin/CLASSPATH/web/classes/AppWorxLang.jar/web/classes/UserWorx.jar
Configuring the Applications Manager Processes to Use SQL*NetThe Applications Manager C AgentService processes connect to the Oracle database on the Applications Manager automation engine machine and handle all database transactions issued by agents. In an Oracle RAC environment, these processes need to be configured to run through SQL*Net. This can be accomplished by doing one of the following:
• Enter the Oracle RAC database connect string when prompted for the Oracle login by the Applications Manager installation program.
• Before running the Applications Manager installation program, set the variable TWO_TASK to the Oracle RAC connect string in the environment, and after the installation is complete, add the TWO_TASK variable to the sosite file. The sosite file is located in the site directory in the Applications Manager home directory.
Configuring the tnsnames.ora File for the Applications Manager C StackThe TNS Name definition for the Oracle RAC should have all the parameters set for the database instances to which Applications Manager can connect. An example of a tnsnames.ora file is shown below where the TNS name for Oracle RAC is ORCLFAILOVER:
ORCLFAILOVER = (DESCRIPTION_LIST = (FAILOVER = TRUE) (LOAD_BALANCE = FALSE) (DESCRIPTION = (ADDRESS = (PROTOCOL = TCP) (HOST = vip-linux1)

Applications Manager Version 8.0 Installation Guide 49
(PORT = 1521)) (CONNECT_DATA = (SERVER = DEDICATED) (SERVICE_NAME = awrac.am.com) (INSTANCE_NAME = awrac1) ) ) (DESCRIPTION = (ADDRESS = (PROTOCOL = TCP) (HOST = vip-linux2) (PORT = 1521)) (CONNECT_DATA = (SERVER = DEDICATED) (SERVICE_NAME = awrac.am.com) (INSTANCE_NAME = awrac2) ) ) )
Configuring the RMI ServerThe RMI server is the process that serves information to the Java client and runs the Applications Manager automation engine process. It connects to Oracle instances through JDBC over SQL*Net. To configure this for Oracle RAC, you need to add an entry into the Options.properties file. The location for the Options.properties file is:
UNIX: $AW_HOME/web/classesWindows: %AW_HOME%\web\classes
The entry is “OracleRAC” and it is nearly identical in content to the tnsnames.ora entry. It should contain all the information for the database instances that Applications Manager can connect to. Here is an example of the same connection above as it would appear in Options.properties:
OracleRAC= (DESCRIPTION = \ (ADDRESS = (PROTOCOL = TCP) \ (HOST = vip-linux1) \ (PORT = 1521)) \ (ADDRESS = (PROTOCOL = TCP) \ (HOST = vip-linux2) \ (PORT = 1521)) \ (LOAD_BALANCE = FALSE)\ (FAILOVER = TRUE) \ (CONNECT_DATA = (SERVER = DEDICATED)\ (SERVICE_NAME = awrac.am.com) ) )
Note that the slashes at the end of each line are required so the entry is interpreted by the RMI Server as one continuous line.Also, setting the OracleRAC line will override the DB_IP, DB_PORT, and DB_SID in the awenv.ini file.

50 Chapter 2: Applications Manager Installation—Advanced Topics
Notes on BehaviorAt this time we recommend using Applications Manager only in a FAILOVER configuration for Oracle RAC. Load balancing configuration should be avoided.Our processes 'sleep' and 'wake up' on Oracle DMBS pipes. Pipes are instance-specific, so if Applications Manager processes are balanced across instances, then wake-ups issued by one process may not reach the target process. The automation engine and agent sleep times can be reduced, but this is not ideal because of performance issues.
Expected Failover BehaviorWhen a failover happens (one instance goes down), the Applications Manager processes should connect to the new Oracle instance fairly quickly. Because some of the database processes might have been issuing a database transaction at the time of the failure, it is possible to lose a transaction or two during this switch. This could result in a task going into a DIED status or a node going into BUSY status.We have not seen this in our testing, but it is a possibility. Our processes will retry most statements if they get a failure on the first try.If these types of errors do happen, it is expected behavior and not critical. For died tasks, check the task output to see that the process was finished (it should have been). Agents that go into a BUSY status should go back to a RUNNING status at the end of the sleep cycle after the Applications Manager stack has reconnected.

Applications Manager Version 8.0 Installation Guide 51

52 Chapter 2: Applications Manager Installation—Advanced Topics
2.5 Installing Multiple Automation Engines on One HostUC4 Software, Inc. does not recommend running multiple Applications Manager automation engines on the same host. If you must resort to this configuration, you must set a number of parameters.
If you want to install multiple Applications Manager automation engines on the same machine, run the install script once for each automation engine. The automation engines can use the same awcomm process, but they should use separate Applications Manager RMI servers. The advantage to separate RMI servers is that you can shut down one instance and its RMI server without affecting the other instances. For example, you could shut down a development instance without impacting a production instance.Each automation engine should be assigned different ports for the following:
• Apache server• RMI registry• RMI data port
Note: When installing multiple automation engines on one host, you will need to pay careful attention to your environment. For example, on UNIX you need to consider how you call sosite. When sosite is called in the UNIX user's .profile script, that means the wrong sosite might be invoked. Different situations call for different solutions, but consider running automation engines under different OS users or invoking the sosite file manually, not in .profile.
The awcomm ProcessThe awcomm process provides a port directory service for the automation engine machine. You need only one awcomm process, even if you are running different Applications Manager instances and versions. This is possible because you can shut down an Applications Manager instance without shutting down the awcomm process.The default setting for the awcomm port is 2136. To change the awcomm port, edit the AWCOMM_PORT line in the [default] section of the awenv.ini file in the site directory.
Apache PortThe default setting for the Apache port is 5050. The files you need to edit to change the port are listed below. The httpd.conf file in the following directory:
UNIX: $AW_HOME/apache/confWindows: %AW_HOME%\apache\conf
All jnlp files in the following directory:
UNIX: $AW_HOME/UWClient/webWindows: %AW_HOME%\Apache\htdocs\web
The Options.properties file in the following directory:
UNIX: $AW_HOME/web/classes

Applications Manager Version 8.0 Installation Guide 53
Windows: %AW_HOME%\web\classes
The sosite (sosite.bat for Windows) file in the following directory:
UNIX: $AW_HOME/siteWindows: %AW_HOME\site
RMI Registry PortThe default setting for the RMIRegistryPortNumber is 1099. The file you need to edit to change the port is listed below.The Options.properties file in the following directory:
UNIX: $AW_HOME/web/classesWindows: %AW_HOME%\web\classes
RMIDataPortNumber PortThe default setting for the RMIDataPortNumber is 0. The actual port used will be a randomly chosen open port. You can keep this at 0 for all your automation engines, if you want (as long as you don't have a firewall). The file you need to edit to change the port is listed below. The Options.properties file in the following directory:
UNIX: $AW_HOME/web/classesWindows: %AW_HOME%\web\classes

54 Chapter 2: Applications Manager Installation—Advanced Topics
2.6 Configuration for Machines with Multiple IP AddressesDescriptions and examples of settings for machines with multiple IP addresses are below.
Applications Manager needs to be configured to work on networks with machines that have multiple IP addresses. This topic covers the IP addresses used by each process, how Applications Manager determines what they are, and how to set them manually.
Process IP OverviewRMI server process: The RMI server process is a Java process that runs on the automation engine machine. The RMI server IP address is the only IP that is specifically set during the install. This setting, RMIHostID, is specified in the Options.properties file.The location for the Options.properties file is:
UNIX: $AW_HOME/web/classesWindows: %AW_HOME%\web\classes
RMI server process: The automation engine process runs as a thread under the Java process that also runs the RMI server. By default it will use the same IP address that the RMI server uses, which is the RMIHostID setting.To set this to a different IP address, you can set the variable RmiServerIP in the awenv.ini file located in the site directory. This IP address will be used as the return IP when the automation engine threads talk to remote agent services or the local agent service.Agent service process: The agent service process is a Java process that runs on every agent. The agent service by default uses the IP address returned by the gethostbyname function. You can see what this is by executing the gethost program in the c directory on the agent. This will be the return IP address that the automation engine machine will use to communicate back to on the agent. It will also be used for validation and should match the IP address that is set in the client's agent manager when creating the entry for the remote agent.If gethost does not return the correct IP, it needs to be set manually. To set this manually to a different IP address you can set the variable AgentIP in the awenv.ini file.awapi process: Each agent has an awapi process that connects to the local agent service process. In order for it to connect successfully, the awapi process must be validated by the agent server process. To do this, it compares the Applications Manager OS user and IP address that the awapi process starts under to the OS user and IP address that were set when creating the agent object.The awapi process will also use the IP address returned by the gethostbyname function, which you can determine by executing the gethost program in the c directory on the agent. This cannot be changed. However, if this does not match what is in the agent definition, you can create a file named remote_rmi.dat in the data directory on the agent to allow the agent service to validate the awapi. This file should contain one line with the values:
<Agent name> <agent IP address in its definition> <Applications Manager user>

Applications Manager Version 8.0 Installation Guide 55
So, for example, it would look like this if the IP address in the agent definition is set to '200.1.1.1':
QATEST 200.1.1.1 qauser
Sample ConfigurationHere is an example of the settings for a network with multiple IP addresses:Automation engine machine:
• Automation engine name: MSTR_TEST• IP addresses: 200.1.1.1, 200.1.1.2• IP address for clients to access: 200.1.1.1• IP address used for communicating to agents and that agents will communicate to:
200.1.1.2• IP Address returned by gethost: 200.1.1.2
Remote agent machine:• Agent name: RA_TEST• Applications Manager user: awuser• IP addresses: 200.1.1.3, 200.1.1.4• IP address set in the agent definition: 200.1.1.3• IP address returned by gethost: 127.0.0.1
Automation engine settings:
The Options.properties file will have the following setting:
RMIHostID=200.1.1.1
The awenv.ini file will have the following additional setting:
[default]RMIServerIP=200.1.1.2
Remote agent settings:
The awenv.ini file will have the following additional setting:
[default]AgentIP=200.1.1.3

56 Chapter 2: Applications Manager Installation—Advanced Topics
2.7 Automation Engine, Agent, and Client Firewall Connections
When firewalls are in place, ports must be specified in the awenv.ini files for the automation engine and all remote agents. RMI server ports must also be specified in the Options.properties file. The necessary ports must also be open in the firewalls.
Port settings are described for automation engine/agent communications and RMI server client communications. A diagram for both follows.
Specifying Automation Engine/Agent PortsThere are three critical ports for communication between the automation engine and agent.
1. MasterServerPort: Set in the automation engine’s awenv.ini file and used by the RMI server Java process.
2. AgentClientPort: Set in each remote agent’s awenv.ini file and in the automation engine’s awenv.ini file for the local agent. Used by the agent service process on each remote agent, and by the agent service process for the local agent on the automation engine.
3. AWCOMM_PORT: Set in the automation engine and remote agents’ awenv.ini file. The awcomm process provides a port directory service for the Applications Manager automation engine and agents. The AWCOMM_PORT number must be the same on the RMI server/automation engine and all remote agents.
Automation Engine/Agent Ports That Must Be Open in FirewallsOn the automation engine machine the following ports need to be opened:
• AWCOMM_PORT• MasterServerPort
On the remote agent machine the following ports need to be opened:• AWCOMM_PORT (outbound)• AgentClientPort (inbound)
Specifying Client/RMI Server PortsThe RMIRegistryPortNumber and RMIDataPortNumber settings are specified in the Options.properties file on the automation engine machine. The location for the Options.properties file is:
UNIX: $AW_HOME/web/classesWindows: %AW_HOME%\web\classes
Client/RMI Server Ports That Must Be Open in FirewallsPorts for RMIRegistryPortNumber and RMIDataPortNumber need to be opened on the automation engine and client machines.

Applications Manager Version 8.0 Installation Guide 57
Process Communication DiagramThe diagram in Figure A shows the settings used for communications between Applications Manager processes on an automation engine/local agent, remote agent, and Applications Manager client.
Connections with Continuous ActivityThe following connections have continuous activity:
• AgentClientPort <-> MasterServerPort: Activity will occur every 60 seconds with the default sleep time of 60. This can be increased or decreased.
• AgentClientPort <-> AWCOMM_PORT: Activity will occur when the agent first connects to the automation engine machine, then this socket is closed.
• RmiRegistryPortNumber <-> Applications Manager client: Activity will occur when the client first logs in, then this connection is closed. Activity will occur on the entry of data and during the refresh process. This connection is dependent on auto-refresh being on if no interaction is taking place.
Figure A. Process communication diagram
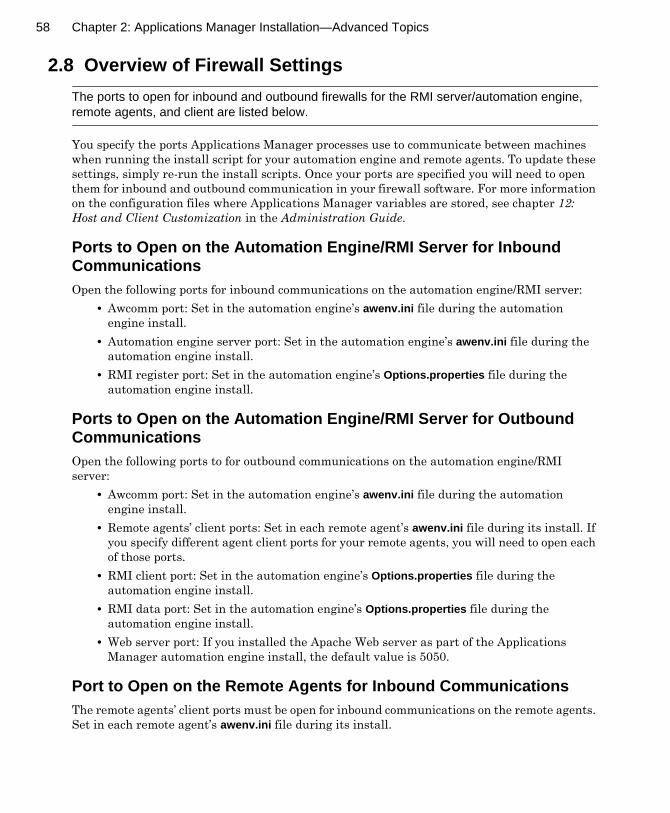
58 Chapter 2: Applications Manager Installation—Advanced Topics
2.8 Overview of Firewall SettingsThe ports to open for inbound and outbound firewalls for the RMI server/automation engine, remote agents, and client are listed below.
You specify the ports Applications Manager processes use to communicate between machines when running the install script for your automation engine and remote agents. To update these settings, simply re-run the install scripts. Once your ports are specified you will need to open them for inbound and outbound communication in your firewall software. For more information on the configuration files where Applications Manager variables are stored, see chapter 12: Host and Client Customization in the Administration Guide.
Ports to Open on the Automation Engine/RMI Server for Inbound CommunicationsOpen the following ports for inbound communications on the automation engine/RMI server:
• Awcomm port: Set in the automation engine’s awenv.ini file during the automation engine install.
• Automation engine server port: Set in the automation engine’s awenv.ini file during the automation engine install.
• RMI register port: Set in the automation engine’s Options.properties file during the automation engine install.
Ports to Open on the Automation Engine/RMI Server for Outbound CommunicationsOpen the following ports to for outbound communications on the automation engine/RMI server:
• Awcomm port: Set in the automation engine’s awenv.ini file during the automation engine install.
• Remote agents’ client ports: Set in each remote agent’s awenv.ini file during its install. If you specify different agent client ports for your remote agents, you will need to open each of those ports.
• RMI client port: Set in the automation engine’s Options.properties file during the automation engine install.
• RMI data port: Set in the automation engine’s Options.properties file during the automation engine install.
• Web server port: If you installed the Apache Web server as part of the Applications Manager automation engine install, the default value is 5050.
Port to Open on the Remote Agents for Inbound CommunicationsThe remote agents’ client ports must be open for inbound communications on the remote agents. Set in each remote agent’s awenv.ini file during its install.

Applications Manager Version 8.0 Installation Guide 59
Ports to Open on the Remote Agents for Outbound CommunicationsOpen the following ports for outbound communications on the remote agents:
• Awcomm port: Set in the automation engine’s awenv.ini file during the automation engine install.
• Automation engine server port: Set in the automation engine’s awenv.ini file during the automation engine install.
Ports to Open on the Clients for Inbound CommunicationsOpen the following ports for inbound communications on the Applications Manager clients:
• RMI client port: Set in the automation engine’s Options.properties file during the automation engine install.
• Web server port: If you installed the Apache Web server as part of the Applications Manager automation engine install, the default value is 5050.
Ports to Open on the Clients for Outbound CommunicationsOpen the following ports for outbound communications on the Applications Manager clients:
• RMI registry port: Set in the automation engine’s Options.properties file during the automation engine install.
• RMI data port: Set in the automation engine’s Options.properties file during the automation engine install.
Applications Manager clients inside the corporate environment bypass the firewall. They communicate directly with the host using the host’s name.

60 Chapter 2: Applications Manager Installation—Advanced Topics
2.9 Configuring Agents to Validate Multiple Automation Engine Configurations
You can configure a remote agent to recognize more than one IP address for the automation engine with the MASTER_IP_ADDRESS and ALT_MASTER_IP_ADDRESS lines in the remote agent’s awenv.ini file.
There may be times when you need to configure a remote agent to recognize more than one IP address for the automation engine. For example:
• You are working with a clustered machine.• The Applications Manager automation engine runs on an IP address, but is recognized as
having another IP address.• For failover, you may need to list the IP addresses of multiple automation engines,
agents, and/or clusters that are used by a remote agent.When the automation engine communicates with the remote agent, the incoming IP address is validated. To validate the automation engine’s IP address, the remote agent checks its awenv.ini file in the site directory for the IP address listed on the MASTER_IP_ADDRESS line. If that IP address does not validate, the agent checks the IP address listed on the ALT_MASTER_IP_ADDRESS line (if present). Sample code from the awenv.ini is shown below:
MASTER_IP_ADDRESS=400.3.2.45ALT_MASTER_IP_ADDRESS=444.3.2.66

Applications Manager Version 8.0 Installation Guide 61

62 Chapter 2: Applications Manager Installation—Advanced Topics
2.10 Using Custom SSL Certificates for Connection Authentication
You can use a custom SSL certificate for connection authentication by creating user_keystore and user_keystore_config files on the automation engine and client machines. You can encrypt the password in the user_keystore_config file.
By default Java SSL uses an internal certificate for SSL authentication. With Applications Manager, you can supply your own certificate. Using your own certificate prevents unauthorized connections to the automation engine and agents.To supply your own SSL certificate:
1. Create the following files in the data directory on the automation engine machine:
2. Optionally encrypt the password in user_keystore_config by running the following:
Java -DAW_HOME=${AW_HOME} -cp AppWorx.jar com.appworx.util.EncryptKeystoreFile password
3. Put copies of the user_keystore and user_keystore_config files in the C:\Documents and Settings\<user name>\.AppWorx\ folder on each user’s client machine where <user name> is the actual user’s name.
File Descriptionuser_keystore The keystore with the certificate.user_keystore_config The password for the keystore.

Applications Manager Version 8.0 Installation Guide 63

64 Chapter 2: Applications Manager Installation—Advanced Topics
2.11 Uninstalling Applications ManagerTo uninstall Applications Manager, remove the Applications Manager home directory and drop the Oracle user with the cascade option.
The following instructions can be used to uninstall an Applications Manager UNIX automation engine and local agent, or a remote agent. If you are uninstalling a remote agent do not drop the Oracle user.
To uninstall Applications Manager, you must:• Stop all Applications Manager processes.• Remove the AW_HOME directory and all the files it contains.• Drop the Oracle user with the cascade option.
Stopping All Applications Manager ProcessesTo stop the Applications Manager backend stack and RMI server, you will first need to set the correct environment by going to the Applications Manager site directory and issuing the following command:
UNIX: . sosite
Windows: sosite
Next, issue the following commands:
stopso allstopso awcomm
Removing the AW_HOME Directory in UNIXWhen you installed Applications Manager, you designated a home directory. You must remove this directory and all sub directories and files.To remove the directory:
1. Navigate to the parent directory of the Applications Manager home directory.2. Issue the following command:
rm -r $AW_HOME
Where $AW_HOME is the Applications Manager home directory.
Removing the WatchWorx Service in WindowsThe WatchWorx service monitors Applications Manager processes and restarts them if they stop. You should remove the service before you remove the Applications Manager directory. To remove the WatchWorx service on a Windows system, run the Applications Manager installation script awinstall and choose option 6.

Applications Manager Version 8.0 Installation Guide 65
Removing the AW_HOME Directory in WindowsWhen you installed Applications Manager, you designated a home directory. You must remove this directory and all sub directories and files.To remove the directory:
1. Using Windows Explorer, navigate to the parent directory of the Applications Manager home directory.
2. Delete the directory.
Dropping the Oracle UserWhen you installed Applications Manager, you created an Applications Manager Oracle user, usually ‘am’ or something similar. You must drop the user and all tables associated with the user.If it becomes necessary to drop an Applications Manager Oracle user, you must first run the following SQL*Plus script logged in as that particular Oracle user (otherwise you will have to stop and restart the database before you can reinstall):
declare ret number;begindbms_pipe.purge('<user name>PIPE_MASTER');ret:=dbms_pipe.remove_pipe(<user name>||'pipe_master1');end;/
Where <user name> is the name of the Oracle user and is not SYS or SYSTEM.To drop the user, log into Oracle as SYS and issue the following command:
drop user <user name> cascade

66 Chapter 2: Applications Manager Installation—Advanced Topics

Section IIApplications Manager Remote Agent Installation
Chapter 3: Installing a UNIX Remote Agent..................................................................... 69Chapter 4: Installing a Windows Remote Agent............................................................... 77Chapter 5: Installing an OpenVMS Remote Agent........................................................... 89Chapter 6: Installing an OS/400 Remote Agent ............................................................. 107Chapter 7: Creating a ZOS Remote Agent..................................................................... 133


3Installing a UNIX Remote Agent 3.
3.1 Introduction to Installing a UNIX Remote Agent ....................................................... 703.2 Defining the UNIX Remote Agent in Applications Manager ..................................... 723.3 Installing the Remote Agent ..................................................................................... 74

70 Chapter 3: Installing a UNIX Remote Agent
3.1 Introduction to Installing a UNIX Remote AgentRemote agents allow you to run tasks on servers other than the server where the Applications Manager automation engine is installed.
If you want to run UNIX tasks on a server other than the server where the Applications Manager automation engine is installed, you must install an Applications Manager remote agent on the other server. You can have as many remote agents as needed, subject to the number of licenses purchased or being evaluated on a trial basis.
StepsThe basic steps for installing a UNIX remote agent are:
1. Define the remote agent in Applications Manager.2. Install the Applications Manager remote agent software.3. Verify the installation.
Before You BeginBefore you begin the installation, you need the following information:
• Applications Manager remote agent UNIX account login and password• Network IP address for the remote agent host• Network IP address for the automation engine host• Agent name for the automation engine that will control the remote agent• A name (up to 100 characters) for the Applications Manager remote agent
Note: When selecting a name for the agent, do not use any of the following names: ALL, AWCOMM, AGENTSERVICE, RMI, RMISERVER, AGENT, or MASTER. These are Applications Manager process names, and if used, can cause problems with start and stop commands issued by Applications Manager.An Applications Manager remote agent does not require a separate database account. All Applications Manager data is stored in the repository used by the automation engine.Warning! Do not run the remote agent install script using a directory containing an automation engine. Doing so will damage the automation engine. When you run the automation engine install script, it automatically creates a local agent for the automation engine. If you wish to install a remote agent on a host with an existing automation engine (have multiple agents on the same UNIX host), see topic 2.5 Installing Multiple Automation Engines on One Host.

Applications Manager Version 8.0 Installation Guide 71
Accessing the Remote Agent Through a FirewallWhen running the remote agent install script, you will be asked if you have a firewall installed. If you answer yes, you will be able to specify values for the following ports:
• Agent Server Port• Agent Client Port• Stack Server Port• Stack Client Port
It is a good idea to specify the same port numbers on each remote agent to minimize the number of ports you have to keep open on the automation engine’s firewall. After specifying port numbers for the remote agent (as well as for the automation engine), you must open the appropriate ports in your firewall software on the automation engine/RMI server, agent, and client. If you need to change your firewall ports, you can do so by re-running the install script. For more information on the ports you need to open for inbound and outbound firewalls, see topic 2.8 Overview of Firewall Settings.

72 Chapter 3: Installing a UNIX Remote Agent
3.2 Defining the UNIX Remote Agent in Applications ManagerYou can add remote agents by adding an agent object in Applications Manager and running an install script. Remote agents are used to run tasks on a machine that does not include the Applications Manager automation engine.
The first step to install a remote agent is to define the agent in Applications Manager. If you do not define the agent in Applications Manager, the install script will fail.
Adding Remote AgentsTo add a remote agent object:
1. Open the Object Admin menu, and choose Agents.Applications Manager displays the Agents Selector window shown in Figure A.
2. On the Agents Selector window, click the New button. Applications Manager opens the Select agent type window.
3. Select STANDARD and click OK.4. Fill in the fields and click OK to save.
Some important fields to know about when you define a remote agent are described in Table A. For a description of all fields on the Agents window, click the Help button. Applications Manager opens the Applications Manager Help window to topic 4.2 Defining Remote Agents in the Administration Guide.
Defining Multiple Agents on the Same InstanceTo define multiple agents on the same instance, simply create additional agent objects with the same IP address and User. You will only need to run the agent install the first time.
Figure A. Add agents with the Select Agent Type and Agents windows.
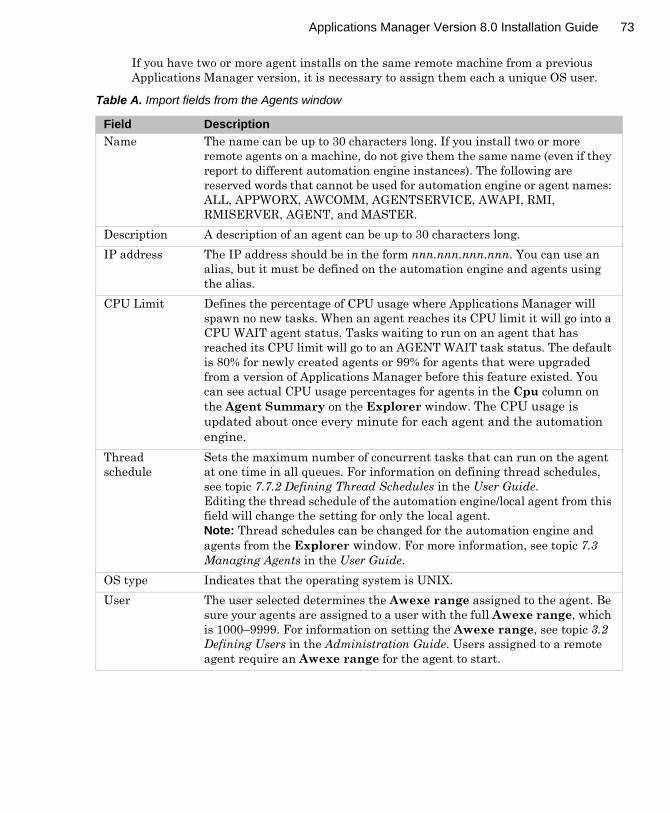
Applications Manager Version 8.0 Installation Guide 73
If you have two or more agent installs on the same remote machine from a previous Applications Manager version, it is necessary to assign them each a unique OS user.
Table A. Import fields from the Agents window
Field DescriptionName The name can be up to 30 characters long. If you install two or more
remote agents on a machine, do not give them the same name (even if they report to different automation engine instances). The following are reserved words that cannot be used for automation engine or agent names: ALL, APPWORX, AWCOMM, AGENTSERVICE, AWAPI, RMI, RMISERVER, AGENT, and MASTER.
Description A description of an agent can be up to 30 characters long.IP address The IP address should be in the form nnn.nnn.nnn.nnn. You can use an
alias, but it must be defined on the automation engine and agents using the alias.
CPU Limit Defines the percentage of CPU usage where Applications Manager will spawn no new tasks. When an agent reaches its CPU limit it will go into a CPU WAIT agent status. Tasks waiting to run on an agent that has reached its CPU limit will go to an AGENT WAIT task status. The default is 80% for newly created agents or 99% for agents that were upgraded from a version of Applications Manager before this feature existed. You can see actual CPU usage percentages for agents in the Cpu column on the Agent Summary on the Explorer window. The CPU usage is updated about once every minute for each agent and the automation engine.
Thread schedule
Sets the maximum number of concurrent tasks that can run on the agent at one time in all queues. For information on defining thread schedules, see topic 7.7.2 Defining Thread Schedules in the User Guide.Editing the thread schedule of the automation engine/local agent from this field will change the setting for only the local agent. Note: Thread schedules can be changed for the automation engine and agents from the Explorer window. For more information, see topic 7.3 Managing Agents in the User Guide.
OS type Indicates that the operating system is UNIX.User The user selected determines the Awexe range assigned to the agent. Be
sure your agents are assigned to a user with the full Awexe range, which is 1000–9999. For information on setting the Awexe range, see topic 3.2 Defining Users in the Administration Guide. Users assigned to a remote agent require an Awexe range for the agent to start.

74 Chapter 3: Installing a UNIX Remote Agent
3.3 Installing the Remote AgentThe second step is to install the remote agent by running the CDINST.SH script.
After defining the remote agent in Applications Manager, the next step is to install the remote agent by running the CDINST.SH script on the remote host.
Run the Install ScriptYou can run CDINST.SH (CD-installation) directly from CD-ROM or, if you transferred the installation files to a staging directory, you can run the script from the staging directory.The installation script creates the required directories and moves the programs into the proper directories. During the installation process, Applications Manager displays default values in brackets [ ]. The values will be different for each system. You can accept the default values by pressing the Enter key at the prompt, or override the default values by typing in a response and pressing the Enter key.
ProcedureTo install an Applications Manager UNIX remote agent:
1. Log into the Applications Manager UNIX account on the remote host, and if necessary, change to the directory where you want the Applications Manager remote agent installed.You must be logged into the Applications Manager UNIX account and be in the Applications Manager directory for the installation procedure to work correctly. Moving the files after the installation is complete requires some effort. It is best to install into the correct directory in the first place.If you transferred files to a staging directory, verify that all the Applications Manager files are owned by the Applications Manager UNIX login and group. If they are not, the installation will fail. Use the chown and chgrp commands to modify the ownership if necessary.
2. From the directory in which you want the agent installed, run CDINST.SH from the CD-ROM or from the staging installation directory on the host.Be sure to set permissions for the CDINST.SH file.Note: After completing the initial install, you can run agentinstall and bypass cdinst by typing:
sh agentinstall
The agentinstall program can be used to modify the current agent-related parameters for the Applications Manager installation.
3. Follow the onscreen prompts.

Applications Manager Version 8.0 Installation Guide 75
4. After completing the installation script, enter the command as shown below to establish the proper environment, or log out of UNIX and back in.
. .profile
The following lines have been added to $AW_HOME/.profile during the installation process:
AW_HOME=/apps/appworx_a;export AW_HOME. /apps/appworx_a/site/sosite
Note: Assign Applications Manager environment variables in sosite, not in .profile.5. Start the Applications Manager processes using the startso command on the remote
agent.
Verifying the InstallationAfter you complete the installation, start the Applications Manager network listener, obtain the authorization key, and start the Applications Manager automation engine and agent processes/services, you should verify that the Applications Manager remote agent is installed correctly and ready to start processing tasks. A good test is to run an Applications Manager job, such as TEST_JOB on the remote agent and view its output files.For detailed instructions on running the TEST_JOB, see topic 1.11 Verifying the Installation.
Installation CompleteYou have verified the remote agent. This is the last step in the installation procedure.

76 Chapter 3: Installing a UNIX Remote Agent

4Installing a Windows Remote Agent 4.
4.1 Introduction to Installing a Windows Remote Agent ................................................. 784.2 Defining the Windows Remote Agent in Applications Manager ............................... 804.3 Creating the Windows User ...................................................................................... 844.4 Running the Installation Program ............................................................................. 86

78 Chapter 4: Installing a Windows Remote Agent
4.1 Introduction to Installing a Windows Remote AgentRemote agents allow you to run tasks on servers other than the server where the Applications Manager automation engines is installed.
If you want Applications Manager to run tasks on an NT, Windows 2000, or Windows XP server other than the Applications Manager automation engine server, you must install an Applications Manager remote agent on the server. You can have as many remote agents as needed, subject to the number of licenses purchased or being evaluated on a trial basis.In this chapter, the term “Windows” is used to represent NT, Windows 2000, and Windows XP systems.
StepsThe basic steps for installing an Windows remote agent are:
1. Define the remote agent in Applications Manager.2. Create the Windows user.3. Install the Applications Manager remote agent software.4. Verify the installation.
Windows System RequirementsThe Applications Manager Windows system requirements are described in the table below. You should make sure you have the necessary free disk space before proceeding.
* There must be enough disk space to hold all the output (reports and system listings) for the retention period of the job.
Accessing the Remote Agent Through a FirewallWhen running the remote agent install script, you will be asked if you have a firewall installed. If you answer yes, you will be able to specify values for the following ports:
• Agent Server Port• Agent Client Port• Stack Server Port• Stack Client Port
It is a good idea to specify the same port numbers on each remote agent to minimize the number of ports you have to keep open on the automation engine’s firewall.
Component Min. Disk Space Required
Recommended Disk Space
Installation files and temporary files created during installation
80 MB 110 MB
Operations files 10+ MB Varies*

Applications Manager Version 8.0 Installation Guide 79
After specifying port numbers for the remote agent (as well as for the automation engine), you must open the appropriate ports in your firewall software on the automation engine/RMI server, agent, and client. If you need to change your firewall ports, you can do so by re-running the install script. For more information on the ports you need to open for inbound and outbound firewalls, see topic 2.8 Overview of Firewall Settings.

80 Chapter 4: Installing a Windows Remote Agent
4.2 Defining the Windows Remote Agent in Applications Manager
You can add remote agents by adding an agent object in Applications Manager and running an install script. Remote agents are used to run tasks on a machine that does not include the Applications Manager automation engine.
The first step to installing a remote agent is to define the agent in Applications Manager. If you do not define the agent in Applications Manager, the install script will fail.
Adding Remote AgentsTo add a remote agent object:
1. Open the Object Admin menu, and choose Agents.Applications Manager displays the Agents Selector window shown in Figure A.
2. On the Agents Selector window, click the New button. Applications Manager opens the Select agent type window.
3. Select STANDARD and click OK.4. Fill in the fields and click OK to save.
Some important fields to know about when defining a new remote agent are described in Table A. For a description of all fields on the Agents window, click the Help button. Applications Manager opens the Applications Manager Help window to topic 4.2 Defining Remote Agents in the Administration Guide.
Figure A. Add agents with the Select agent type and Agents windows.

Applications Manager Version 8.0 Installation Guide 81
Table A. Noted Agents window fields
Field DescriptionName The name can be up to 30 characters long. If you install two or more
remote agents on a machine, do not give them the same name (even if they report to different automation engine instances). The following are reserved words that cannot be used for automation engine or agent names; ALL, APPWORX, AWCOMM, AGENTSERVICE, AWAPI, RMI, RMISERVER, AGENT, and MASTER.
Description A description of an agent can be up to 30 characters long.IP address The IP address should be in the form nnn.nnn.nnn.nnn. You can use
an alias, but it must be defined on the automation engine and agents using the alias.
CPU Limit Defines the percentage of CPU usage where Applications Manager will spawn no new tasks. When an agent reaches its CPU limit it will go into a CPU WAIT agent status. Tasks waiting to run on an agent that has reached its CPU limit will go to a AGENT WAIT task status. The default is 80% for newly created agents or 99% for agents that were upgraded from a version of Applications Manager before this feature existed. You can see actual CPU usage percentages for agents in the Cpu column on the Agent Summary on the Explorer window. The CPU usage is updated about once every minute for each agent and the automation engine.
Thread schedule
Sets the maximum number of concurrent tasks that can run on the agent at one time in all queues. For information on defining thread schedules, see topic 7.7.2 Defining Thread Schedules in the User Guide.Editing the thread schedule of the automation engine/local agent from this field will change the setting for only the local agent. Note: Thread schedules can be changed for the automation engine and agents from the Explorer window. For more information, see topic 7.3 Managing Agents in the User Guide.
OS type Indicates that the operating system is Windows.User The user selected determines the Awexe range assigned to the agent.
Be sure your agents are assigned to a user with the full Awexe range, which is 1000–9999. For information on setting the Awexe range, see topic 3.2 Defining Users in the Administration Guide. Users assigned to a remote agent require an Awexe range for the agent to start.

82 Chapter 4: Installing a Windows Remote Agent
Defining Multiple Agents on the Same InstanceTo define multiple agents on the same instance, simply create additional agent objects with the same IP address and User. You will only need to run the agent install the first time. If you have two or more agent installs on the same remote machine from a previous Applications Manager version, it is necessary to assign them each a unique OS user.

Applications Manager Version 8.0 Installation Guide 83

84 Chapter 4: Installing a Windows Remote Agent
4.3 Creating the Windows UserThe Windows agent runs as a Windows service and should run as the local Windows Administrator account.
After adding the remote agent, the next step is to create the Windows user. The Applications Manager Windows WatchWorx service runs as Windows service. We recommend that each service run as a specific Windows user—typically the Administrator user. Whichever user the services run as, that user must have certain advanced user rights and permissions. Administrator is the default user when installing this service.
Required PermissionsThe table below identifies the rights and permissions required for the Administrator, custom-built user (or custom Applications Manager), and the domain user.
To set the rights and permissions in Windows 2000:1. Navigate as follows: Control Panel>Administrative Tools>Local Security Policy>Local
Policies>User Rights Assignment.2. Select a policy from the right panel and click Add.3. Select a user and click Add.4. Click OK.
To set the rights and permission in NT:1. Navigate as follows: Start>Programs>Administrative Tools>User Manager.2. Select a user, open the Policies menu, and choose User Rights.3. Select the Show Advanced User Rights option in the lower left corner of the User Rights
dialog box.4. Select a right and click Add.5. Select the user you want to add.
Remember, you must log out and log in again after changing any user rights, or the changes will not take effect. You should determine which user(s) the Applications Manager services will run as before proceeding with the installation. You will perform the installation as Administrator.
User Rights and PermissionsAdministrator (recommended) or Applications Manager
• Advanced User Right: act as part of the operating system• Advanced User Right: log on as a service• File access permissions to run the programs you wish to
run with this automation engine and local agent.Domain/User • Advanced User Right: Act as part of the operating system
• Advanced User Right: Log on as a service• File access permissions to run the programs you wish to
run with this automation engine and local agent.• Must belong to the domain/administrator group.

Applications Manager Version 8.0 Installation Guide 85
Special CircumstancesOccasionally, certain Windows host configurations do not allow the Applications Manager services to be installed to a specific User/Password. If you are unable to install the Applications Manager services as a specific user on your Windows host, Applications Manager recommends that you do the following:
1. Install NT remote agent and Network Listener Services; however, leave the NT User and Password fields blank. By default Applications Manager installs into the System user Account.
2. After you complete the installation, do one of the following:• In NT, go to Control Panel>Services.• In Windows 2000 and XP, go to Control Panel>Administrative Tools>Services.
3. Locate the following service: AWW-agent name.4. Select the service and click Startup.
Windows displays the Service dialog.5. Ensure that the ‘Startup Type’ option is set to ‘Automatic.’ 6. Change the ‘Log On As’ from ‘System Account’ to ‘This Account.’ Enter the Windows user
account, and the password.7. Be sure to update the service with an appropriate Windows user name and password.

86 Chapter 4: Installing a Windows Remote Agent
4.4 Running the Installation ProgramTo install an Windows remote agent, run the installation program ntinstall.exe. After completing the installation, you will have one remote agent installed on the host.
After defining the remote agent in Agent Manager and adding the operating system user in Login Manager, you are ready to install the remote agent.
Before You BeginBefore you begin the installation, you need the following information:
• The logon name and password for each user under which you are going to run an Applications Manager service
• The network IP address for the remote agent host• The network IP address for the automation engine host• The name for the automation engine that will control the remote agent• A name (up to 100 characters) for the Applications Manager remote agent
An Applications Manager remote agent does not require a separate database account. All Applications Manager data is stored in the repository used by the automation engine.Warning! Do not run the remote agent install program using a directory containing an automation engine. Doing so will damage the automation engine. When you run the automation engine install, it automatically creates a local agent for the automation engine.
Install ProgramThe cdinstall.bat program installs the Windows remote agent. You should run the program as Administrator. The remote agent install program:
• Installs the Applications Manager files in the appropriate directories. • Sets up and updates the database tables, Windows services, and other Applications
Manager–specific files.
ProcedureTo install an Applications Manager Windows remote agent:
1. While logged in as Administrator, run the cdinstall.bat program.Note the program may autostart when you insert the CD in the drive.
2. Follow the on-screen prompts.3. If required, assign Applications Manager environment variables in envvar.bat.
For example, you may need to define Oracle Applications environment variables.
Verifying the InstallationAfter you complete the installation, start the Applications Manager network listener, obtain the authorization key, and start the Applications Manager automation engine and agent processes/services, you should verify that the Applications Manager remote agent is installed correctly

Applications Manager Version 8.0 Installation Guide 87
and ready to start processing tasks. A good test is to run an Applications Manager job, such as TEST_JOB on the remote agent and view its output files.For detailed instructions on running the TEST_JOB, see topic 1.11 Verifying the Installation.

88 Chapter 4: Installing a Windows Remote Agent

5Installing an OpenVMS Remote Agent 5.
5.1 Introduction to Installing an OpenVMS Remote Agent ............................................. 905.2 Defining the OpenVMS Remote Agent in Applications Manager ............................. 925.3 Creating the Applications Manager Account on the OpenVMS System ................... 945.4 Running the Installation Program ............................................................................. 985.5 Relinking Executables ............................................................................................ 1005.6 Defining OpenVMS Symbols .................................................................................. 1025.7 Editing the System Startup File .............................................................................. 104

90 Chapter 5: Installing an OpenVMS Remote Agent
5.1 Introduction to Installing an OpenVMS Remote AgentRemote agents allow you to run tasks on servers other than the server where the Applications Manager automation engine is installed.
If you want Applications Manager to run tasks on an OpenVMS server, you must install an Applications Manager remote agent on the server. You can have as many remote agents as needed, subject to the number of licenses purchased or being evaluated on a trial basis.
StepsThe basic steps for installing an OpenVMS remote agent are:
1. Define the remote agent in Applications Manager.2. Create the Applications Manager account on the OpenVMS system.3. Transfer the installation files and run the Applications Manager installation program.4. Start the Applications Manager agent.5. Verify the installation.
Each of these steps is covered in detail in this chapter.
VMS Versions SupportedThe Applications Manager OpenVMS remote agent can be installed on Alpha machines running OpenVMS, versions 7.2 and above. For versions prior to 7.3, executables must be relinked.
VMS System RequirementsThe Applications Manager VMS system requirements are described in the table below. You should make sure you have the necessary free disk space before proceeding.
There must be enough disk space to hold all the output (reports and system listings) for the retention period specified for the jobs.
SURUN Not Supported for the VMS AgentAs of the publication date of this manual, the VMS agent did not support SURUN. SURUN is an Applications Manager program that allows Applications Manager to run tasks under different user logins.
Component Min. Disk Space Required
Recommended Disk Space
Installation files and temporary files created during installation
90 MB180,000 blocks
130 MB260,000 blocks

Applications Manager Version 8.0 Installation Guide 91
Accessing the Remote Agent through a FirewallWhen running the remote agent install script, you will be asked if you have a firewall installed. If you answer yes, you will be able to specify values for the following ports:
• Agent Server Port• Agent Client Port• Stack Server Port• Stack Client Port
It is a good idea to specify the same port numbers on each remote agent to minimize the number of ports you have to keep open on the automation engine’s firewall. After specifying port numbers for the remote agent (as well as for the automation engine), you will need to open the appropriate ports in your firewall software on the automation engine/RMI server, agent, and client. If you need to change your firewall ports, you can do so by re-running the install script. For more information on the ports you need to open for inbound and outbound firewalls, see topic 2.8 Overview of Firewall Settings.

92 Chapter 5: Installing an OpenVMS Remote Agent
5.2 Defining the OpenVMS Remote Agent in Applications Manager
Before running the install script, you must define the remote agent object in Applications Manager.
The first step to installing a remote agent is to define the agent in Applications Manager. If you do not define the agent in Applications Manager, the install script will fail.
Adding Remote AgentsTo add a remote agent object:
1. Open the Object Admin menu, and choose Agents.Applications Manager displays the Agents Selector window shown in Figure A.
2. On the Agents Selector window, click the New button. Applications Manager opens the Select agent type window.
3. Select STANDARD and click OK.4. Fill in the fields and click OK to save.
Some important fields to know about when defining a new remote agent are described in Table A. For a description of all fields on the Agents window, click the Help button. Applications Manager opens the Applications Manager Help window to topic 4.2 Defining Remote Agents in the Administration Guide.
Figure A. Add agents with the Select agent type and Agents windows.

Applications Manager Version 8.0 Installation Guide 93
Table A. Noted Agents window fields
Defining Multiple Agents on the Same InstanceTo define multiple agents on the same instance, simply create additional agent objects with the same IP address and User. You will only need to run the agent install the first time.
Field DescriptionName The name can be up to 30 characters long. If you install two or more
remote agents on a machine, do not give them the same name (even if they report to different automation engine instances). The following are reserved words that cannot be used for automation engine or agent names; ALL, APPWORX, AWCOMM, AGENTSERVICE, AWAPI, RMI, RMISERVER, AGENT, and MASTER.
Description A description of an agent can be up to 30 characters long.IP address The IP address should be in the form nnn.nnn.nnn.nnn. You can use
an alias, but it must be defined on the automation engine and agents using the alias.
CPU Limit Defines the percentage of CPU usage at which Applications Manager will spawn no new tasks. When an agent reaches its CPU limit it will go into a CPU WAIT agent status. Tasks waiting to run on an agent that has reached its CPU limit will go to an AGENT WAIT task status. The default is 80% for newly created agents or 99% for agents that were upgraded from a version of Applications Manager before this feature existed. You can see actual CPU usage percentages for agents in the Cpu column on the Agent Summary on the Explorer window. The CPU usage is updated about once every minute for each agent and the automation engine.
Thread schedule
Sets the maximum number of concurrent tasks that can run on the agent at one time in all queues. For information on defining thread schedules, see topic 7.7.2 Defining Thread Schedules in the User Guide.Editing the thread schedule of the automation engine/local agent from this field will change the setting for only the local agent. Note: Thread schedules can be changed for the automation engine and agents from the Explorer window. For more information, see topic 7.3 Managing Agents in the User Guide.
OS type Indicates that the operating system is VMS.User The user selected determines the Awexe range assigned to the agent.
Be sure your agents are assigned to a user with the full Awexe range, which is 1000-9999. For information on setting the Awexe range, see topic 3.2 Defining Users in the Administration Guide. Users assigned to a remote agent require an Awexe range for the agent to start.

94 Chapter 5: Installing an OpenVMS Remote Agent
5.3 Creating the Applications Manager Account on the OpenVMS System
After defining the remote agent in Applications Manager, the next step is to create the Applications Manager account on the OpenVMS system.
After adding the remote agent in Applications Manager, the next step is to create the Applications Manager account on the OpenVMS system.
Running the Authorization UtilityTo run the authorize utility:
1. Log into the OpenVMS system as the SYSTEM user.2. If the logical SYS$SYSTEM is not defined, set the default to the directory where the UAF
is stored:
$ SET DEFAULT SYS$SYSTEM
3. Invoke the authorize command:
$ MCR AUTHORIZE
Terminology and Process QuotasIn the steps that follow, three values are referenced and represented as follows:
User name: <user>Directory name: <dir>Disk name: <disk>
You will need to replace the bracketed terms with the names you are using for your system.When defining the Applications Manager user account for VMS, many of the quotas need to be increased from their defaults to run Java 1.4.HP recommends setting the following UAF limits and system parameters to get the best Java performance on VMS:
channelcnt = 4096 *astlm = 300biolm = 150bytlm = 2000000rec_bytlm = 400000 *diolm = 150enqlm = 4000fillm = 4096pgflquo = 8200000prclm = 10tqelm = 100wsextent = 16384wsmax = 16384 *
Applications Manager Version 8.0 Installation Guide 95
wsdef = 2048wsquo = 4096
* These parameters should be configured by the system administrator using AUTOGEN. They are not configurable at the user account level and they take effect system wide. For more information, see the HP OpenVMS System Management Utilities Reference Manual.Please see the following HP Documentation for more information on configuring the OpenVMS operating system for Java 1.4:
User GuideSoftware Development Kit (SDK) v 1.4.xfor the OpenVMS Operating Systemfor the Java Platform
http://h18012.www1.hp.com/java/documentation/1.4.2/ovms/docs/user_guide.html
Adding the Applications Manager AccountTo add the Applications Manager account:
1. First select a unique UIC with a unique GROUP for this account. To review the UIC currently in use, use the following command:
SHOW */BRIEF
2. Determine the target directory.3. Select a secure password.4. Enter the following command:
UAF> add testvms/device=dka100 -/uic=[300,203] -/directory=[vmsuser] -/password=xxxxrowappxxx -/priv=(tmpmbx, netmbx, shmem, cmkrnl, sysnam, readall, share) -/defprv=(tmpmbx, netmbx, shmem, cmkrnl, sysnam, readall, share) -/astlm=300 -/biolm=150 -/bytlm=2000000 -/diolm=150 –/enqlm=4000 -/fillm=4096 - /pgflquo=8200000 -/prclm=150 -/tqelm=100 -/wsdef=2048 -/wsquo=4096 -/wsextent=16384 -/flags=nodisuser
5. Note: The default value for PRCLM above is set to 50 to accommodate the Applications Manager processes created for each task. A value of 50 will support approximately 10

96 Chapter 5: Installing an OpenVMS Remote Agent
concurrent tasks. If you need to run more than 10 concurrent tasks, you will need to increase the value.The CMKRNL and SYSNAM privileges are needed for the following reasons:
• CMKRNL: required for netstat to run. It is used by the following Applications Manager processes: AWSTAT, STARTSO, AGENTINSTALL, and STARTOPER.
• SYSNAM: required for creating the Applications Manager system logicals.6. Check the account for a DISUSER flag by entering the following command:
UAF> SHOW <user>
If the flag is there, enter the following command:
UAF> MODIFY <user>/FLAGS=NODISUSER
7. After completing the above edits, exit UAF by issuing the following command:
UAF> EXIT
8. If you are using the HP TCP/IP stack, and you do not want to grant CMKRNL to the Applications Manager account, install the NETSTAT image with privileges by adding the following line to the system startup script:
$install Add Sys$System:TCPIP$NetStat.Exe /Priv=CMKRNL
9. Create the Applications Manager directory by issuing the following command:
$ CREATE/DIRECTORY <disk>:[<dir>] /OWNER=<user UIC>
Checking Quotas (Optional)You can optionally use the command shown below to check if your quotas are too low and need to be adjusted. This script is installed as part of the Java 1.4.2 install required for Applications Manager 7.x. This command is run by the install.
$ @sys$common:[java$142.com]java$check_environment.com
The ASTLM quota for your process is too lowActual: 250; recommended minimum: 300 The BYTLM quota for your process is too lowActual: 399616; recommended minimum: 400000 The ENQLM quota for your process is too lowActual: 2000; recommended minimum: 4000 The CHANNELCNT SYSGEN parameter value for your system is too lowActual: 256; recommended minimum: 4096Warning: Java may not start or work properly until all quotas are set to at least their recommended minimum values.

Applications Manager Version 8.0 Installation Guide 97
98 Chapter 5: Installing an OpenVMS Remote Agent
5.4 Running the Installation ProgramTo install the remote agent, transfer the installation files to the Applications Manager directory and run the installation program agentinstall.com.
After defining the remote agent and creating the Applications Manager account, you are ready to install the remote agent.
Before You BeginBefore you begin the installation, you need the following information:
• The network IP address for the remote agent host• The network IP address for the automation engine host• The name for the automation engine that will control the remote agent• A name (up to 30 characters) for the Applications Manager remote agent
An Applications Manager remote agent does not require a separate database account. All Applications Manager data is stored in the database used by the automation engine.
Install ProgramThe agentinstall.com program installs the OpenVMS remote agent. The remote agent install program:
• Installs the Applications Manager files in the appropriate directories.• Sets up and updates the database tables and other Applications Manager–specific files.
ProcedureTo install an Applications Manager OpenVMS remote agent:
1. Make sure the Applications Manager automation engine processes are running.2. Login to the Applications Manager account on the OpenVMS machine.3. FTP the following installation files from the product CD to the OpenVMS machine:
AxUnzip.jar (binary)AWjars.zip (binary)AWutil.zip (binary)AWVFILES.zip (binary)AWFILES.zip (binary)LB_vms.zip (binary)CDINST.com (ASCII XFR)

Applications Manager Version 8.0 Installation Guide 99
4. To run the installation, issue @CDINST.com.Note: After completing the initial install, you can run agentinstall.com and bypass CDINST.com by typing:
@<disk>:[<dir>.BIN]AGENTINSTALL.COM
The agentinstall.com program can be used to modify the current agent-related parameters for the Applications Manager installation.
5. Make sure the following automation engine processes are running:• AWCOMM_<port number>• AWSVC_<agent name>
6. To run jobs in Applications Manager, you must set the correct environment by adding an entry to the login.com file that executes the sosite.com file. For example:
@[.site]sosite.com
Verifying the InstallationAfter completing the installation, you should verify that the Applications Manager remote agent is installed correctly and ready to start processing tasks. A good test is to run an Applications Manager job, such as TEST_JOB, on the remote agent and view its output files.For detailed instructions on running the TEST_JOB, see topic 1.11 Verifying the Installation.You have now installed the Applications Manager OpenVMS remote agent.Note: If you are running on an OpenVMS system earlier than version 7.3, you may need to relink the Applications Manager executables. For information on relinking the executables, see topic 5.5 Relinking Executables.

100 Chapter 5: Installing an OpenVMS Remote Agent
5.5 Relinking ExecutablesIn OpenVMS systems earlier than version 7.3, you many need to relink the Applications Manager executables.
If you are running on an OpenVMS system earlier than version 7.3, you may need to relink the Applications Manager executables for the Applications Manager OpenVMS agent before it will function correctly. Call UC4 Technical Support for assistance.
ProcedureIf UC4 Technical Support determines that you need to relink the executables, you will be asked to do the following:
1. Transfer the relink file BUILD_vms.zip from the product CD to the VMS machine using binary FTP.
2. Issue the following command from the Applications Manager account command line:
$ set def sys$login$ set file /attributes=(RFM:STMLF,RAT:CR) BUILD_vms.zip$ java –jar AxUnzip.jar –v BUILD_vms.zip$ set def [.build]$ set file /attributes=(RFM:VAR,RAT:CR) *.obj$ @lall
3. Move the *.exe files to the C directory where the original executables are installed.

Applications Manager Version 8.0 Installation Guide 101
102 Chapter 5: Installing an OpenVMS Remote Agent
5.6 Defining OpenVMS SymbolsApplications Manager defines several symbols in the SQLOPER.COM file. You can define additional symbols in the sosite file.
As you define Applications Manager libraries used in job definitions, you may want to use OpenVMS symbols to define paths. Applications Manager ships with several symbols already defined in the sqloper.com file. You can define additional symbols in the sosite file.
Predefined SymbolsApplications Manager ships with the following symbols defined in the sqloper.com file located in the /bin directory:
AW_Exec_Path :== 'AW_Home_Stripped'.Exec]AW_Bin_Path :== 'AW_Home_Stripped'.Bin]AW_Sql_Path :== 'AW_Home_Stripped'.Sql]
Defining Additional SymbolsIf you want to define additional symbols, you add entries to the sosite file in the /site directory. This directory is not overwritten when you perform an upgrade, so the additional symbol definitions will be preserved.

Applications Manager Version 8.0 Installation Guide 103

104 Chapter 5: Installing an OpenVMS Remote Agent
5.7 Editing the System Startup FileTo start the Applications Manager OpenVMS remote agent as part of a boot sequence, add STARTSO to the Startup command file.
If you want the Applications Manager OpenVMS remote agent to start as part of the machine boot sequence, add the following two lines to the Startup command file:
$ @appworx_disk:[<Applications Manager directory>.bin]SOSITE.COM
$ submit/user=<Applications Manager VMS user>/print - appworx_disk:[<Applications Manager directory>.bin]STARTSO.com
Applications Manager wants the TCP/IP network and the batch queues to be up and running before starting the remote agent. To ensure this happens, add the lines near the bottom of the command file.
Startup and PrivilegesIf, during startup, you want to install only images and define logicals, you can supply the STARTUP parameter to SOSITE. Do this when you:
• Do not want to grant CMKRNL and SYSNAM to the ‘am’ account (or whatever account you have selected to use for the product).
• Are not going to run STARTSO afterwards.The parameter STARTUP can be abbreviated to START or shorter. This parameter short circuits a lot of the product startup in order to only install images and define logicals. Use this ONLY if you are NOT going to run SOSTART afterwards. Do this only when you do not want to grant CMKRNL and SYSNAM to the ‘am’ account (or whatever account you have selected to use for the product).
Modifying sositeIf you need to accommodate special site configurations, you can modify the sosite.com file. An example is account-specific Oracle startup information. The sosite.com file is located in the Applications Manager site directory.

Applications Manager Version 8.0 Installation Guide 105

106 Chapter 5: Installing an OpenVMS Remote Agent

6Installing an OS/400 Remote Agent 6.
6.1 Introduction to Installing an OS/400 Remote Agent ............................................... 1086.2 Defining an Applications Manager User for the OS/400 Agent .............................. 1126.3 Defining the OS/400 Agent in Applications Manager ............................................. 1146.4 Defining the Default AS/400 Task Parameters ....................................................... 1166.5 Importing the OS/400 Objects into the Automation Engine .................................... 1186.6 Installing the Remote Agent ................................................................................... 1206.7 Internationalization ................................................................................................. 1246.8 Starting and Stopping the OS/400 Agent ............................................................... 1266.9 Verifying the Installation ......................................................................................... 1286.10 Uninstalling the OS/400 Agent ............................................................................. 130

108 Chapter 6: Installing an OS/400 Remote Agent
6.1 Introduction to Installing an OS/400 Remote AgentRemote agents allow you to run tasks on servers other than the server where the Applications Manager automation engine is installed.
If you want to run tasks on an OS/400 machine, you must install an Applications Manager OS/400 remote agent on that machine. The Applications Manager OS/400 remote agent is a full-functioning agent that can launch tasks on an OS/400 machine, track the tasks and their status, and capture the standard out files and any report output.
System RequirementsTo install an OS/400 remote agent, the OS/400 machine must meet the following requirements::
Before You BeginBefore you begin the OS/400 remote agent installation, you will need the following information:
• The QSECOFR user (or a user with equivalent privileges)• Network IP address for the OS/400 machine• Network IP address for the Applications Manager automation engine machine• Agent name for the Applications Manager automation engine that will control the remote
agent• A name (up to 30 characters) for the Applications Manager remote agent
Note: When selecting a name for the agent, do not use any of the following names: ALL, AWCOMM, AGENTSERVICE, RMI, RMISERVER, AGENT, MASTER. These are Applications Manager process names, and if used, can cause problems with start and stop commands issued by Applications Manager.
Required Add-onsFor the OS/400 remote agent to work correctly, you must have the following add-ons installed on the OS/400 operating system. The names and option numbers are the same for V5R2 and V5R3. IBM refers to these as “Standard Set Products.”
• 5722JV1 *BASE — Developer Kit for Java• 5722JV1 Option 6 — Java Developer Kit 1.4• 5722JC1 *BASE — Toolbox for Java• 5722TC1 *BASE — TCP/IP Connectivity Utilities for iSeries• 5722SS1 option 12 — OS/400 Host Servers• 5722SS1 option 13 — System Openness Includes• 5722SS1 option 30 — Qshell• 5722SS1 option 31 — Domain Name System
• OS/400 operating system version V5R2M0 and above • 64 MB ram• 20 MB free disk space • CD-ROM drive

Applications Manager Version 8.0 Installation Guide 109
• 5722AC3 — Cryptographic Access Provider 128-bit for iSeriesNote: All add-ons should be installed before the PTFs patches listed below are applied.
Required PTF GroupsFor the OS/400 remote agent to work correctly, you must have the following, or newer, PTF (patch) groups installed that match your OS/400 operating system.V5R2 PTF Groups
• SF99519 Level 102 - 520 Group Hiper• SF99502 Level 14 - 520 DB2 UDB for ISeries• SF99169 Level 18 - 520 Java PTF Group
V5R3 PTF Groups• SF99529 Level 63 - 530 Group Hiper• SF99503 Level 6 - 530 DB2 UDB for ISeries• SF99269 Level 7 - 530 Java
OS/400 patches may be obtained from the following sites:
http://www-912.ibm.com/s_dir/sline003.NSF/GroupPTFshttp://www-912.ibm.com/s_dir/slkbase.nsf/recommendedfixeshttp://www.ibm.com/servers/eserver/support/iseries/index.html
Specifying the Java VersionYou must specify the Java version on the OS/400 agent machine. From qsh under /qibm/userdata/java400 touch the SystemDefault.properties file if it does not already exists. Then go to wrklnk and edit that file, add just the following line:
java.version=1.4
110 Chapter 6: Installing an OS/400 Remote Agent
Accessing the Remote Agent through a FirewallWhen running the remote agent install script, you will be asked if you have a firewall installed. If you answer yes, you will be able to specify values for the following ports:
It is a good idea to specify the same port numbers on each remote agent to minimize the number of ports you have to keep open on the automation engine’s firewall.After specifying port numbers for the remote agent (as well as for the automation engine), you must open the appropriate ports in your firewall software on the automation engine/RMI server, agent, and client. If you need to change your firewall ports, you can do so by re-running the install script. For more information on the ports you need to open for inbound and outbound firewalls, see topic 2.8 Overview of Firewall Settings.
• Agent Server Port • Agent Client Port • Stack Server Port • Stack Client Port

Applications Manager Version 8.0 Installation Guide 111

112 Chapter 6: Installing an OS/400 Remote Agent
6.2 Defining an Applications Manager User for the OS/400 Agent
The first step is to define an Applications Manager user that you will assign to the OS/400 agent.
In the next step, you will define the OS/400 agent in Applications Manager. One of the required fields will be an Applications Manager user. You must define an Applications Manager user before you can define the agent. Important! The user must be the same as the user you will assign to the agent.
ProcedureTo define an Applications Manager user for the OS/400 agent:
1. In Applications Manager, open the Users Selector window and click New.Applications Manager displays the Users window shown in Figure A.
2. Complete the fields shown in Figure A using the descriptions presented in Table A.
Table A. Applications Manager Users window field descriptions for an OS/400 user
Field DescriptionUser Name Important! This must be the name you will assign to the
OS/400 agent when you run the installation program.First Name This can be left blank or you can make it as descriptive as 30
characters will allow.Last Name This can be any text.Active Leave this box checked.LDAP Authentication Leave this box unchecked.
Figure A. Define the Applications Manager user that will be assigned to the OS/400 agent.

Applications Manager Version 8.0 Installation Guide 113
3. Do not change any of the options in the User defaults box.4. Do not assign any options on the Options tab.5. To save the agent information and close the window, click OK.
Running Tasks Under a Different User IDIf you want to run OS/400 tasks under a different user ID than the one you used to install the OS/400 agent, you must define a matching Applications Manager user ID. For example, assume you installed the OS/400 agent under user ID PRODCPM. You want to run programs under user ID PRODTEST. You would simply create a user named ID PRODTEST.
Password This password is never used, but it’s a required field, so you have to put something in it. You might as well enter your favorite color.
Expire interval Leave this set to ‘0’.Awexe Range Leave this set to ‘1000-9999’.
Field Description

114 Chapter 6: Installing an OS/400 Remote Agent
6.3 Defining the OS/400 Agent in Applications ManagerYou can add remote agents by adding an agent object in Applications Manager and running an install script. Remote agents are used to run tasks on a machine that does not include the Applications Manager automation engine.
The first step in installing a remote agent is to define the agent in Applications Manager. If you do not define the agent in Applications Manager, the install script will fail.
Adding Remote AgentsTo add a remote agent object:
1. Open the Object Admin menu, and choose Agents.Applications Manager displays the Agents Selector window shown in Figure A.
2. On the Agents Selector window, click the New button. Applications Manager opens the Select agent type window.
3. Select STANDARD and click OK.4. Fill in the fields and click OK to save.
Some important fields to know about when defining a new remote agent are described in Table A. For a description of all fields on the Agents window, click the Help button. Applications Manager opens the Applications Manager Help window to topic 4.2 Defining Remote Agents in the Administration Guide.
Figure A. Add agents with the Select agent type and Agents windows.

Applications Manager Version 8.0 Installation Guide 115
Table A. Noted Agents window fields
Defining Multiple Agents on the Same InstanceTo define multiple agents on the same instance, simply create additional agent objects with the same IP address and User. You will only need to run the agent install the first time.
Field DescriptionName Name of the agent. The name can be up to 30 characters long. This must
be the same name as the Applications Manager user you created in the previous step, and it will be the same name you use when you install the OS/400 agent on the remote host. The following are reserved words that cannot be used for automation engine or agent names: ALL, APPWORX, AWCOMM, AGENTSERVICE, AWAPI, RMI, RMISERVER, AGENT, and MASTER.
Description A description of an agent can be up to 30 characters long.IP address The IP address should be in the form nnn.nnn.nnn.nnn. You can use an
alias, but it must be defined on the automation engine and agents using the alias.
CPU Limit Defines the percentage of CPU usage at which Applications Manager will spawn no new tasks. When an agent reaches its CPU limit it will go into a CPU WAIT agent status. Tasks waiting to run on an agent that has reached its CPU limit will go to an AGENT WAIT task status. The default is 80% for newly created agents or 99% for agents that were upgraded from a version of Applications Manager before this feature existed. You can see actual CPU usage percentages for agents in the Cpu column on the Agent Summary on the Explorer window. The CPU usage is updated about once every minute for each agent and the automation engine.
Thread schedule
Sets the maximum number of concurrent tasks that can run on the agent at one time in all queues. For information on defining thread schedules, see topic 7.7.2 Defining Thread Schedules in the User Guide.Editing the thread schedule of the automation engine/local agent from this field will change the setting for only the local agent. Note: Thread schedules can be changed for the automation engine and agents from the Explorer window. For more information, see topic 7.3 Managing Agents in the User Guide.
OS type Indicates that the operating system is OS/400.User Select the user with the same name you entered for the agent name above.
This will be the Applications Manager user you created in the previous step.

116 Chapter 6: Installing an OS/400 Remote Agent
6.4 Defining the Default AS/400 Task ParametersAfter defining the AS/400 agent, you define the default AS/400 task parameters on the OS400 tab of the Agents window.
To define the default parameters used in the submit task process, select the OS400 tab for the AS/400 agent and complete the fields. The OS400 tab is shown in Figure A.
The fields on the OS400 tab match the standard OS/400 fields. For a description of the fields, see the OS/400 documentation. Note you can enter Applications Manager substitution variables and replacement values in the fields.
Figure A. Default parameters used in the submit task process

Applications Manager Version 8.0 Installation Guide 117

118 Chapter 6: Installing an OS/400 Remote Agent
6.5 Importing the OS/400 Objects into the Automation EngineBefore you can create OS/400 jobs in Applications Manager you must import the OS/400 objects.
To run tasks on an Applications Manager OS/400 remote agent, you will need to create jobs using one of the OS/400 program types. To make these program types available, you must import them into the Applications Manager automation engine.There are two program types that ship with Applications Manager:
• AWOS400PGM for running OS/400 programs• AWOS400CMD for running OS/400 commands
For more information on these program types and creating OS/400 jobs, see topic 2.13 Using OS/400 Program Types in the Development Guide.
ProcedureTo import the OS/400 objects:
1. Open the Activities menu and select Import.Applications Manager displays the Import window shown in Figure A.
2. Open the File menu and select Open Import File.Applications Manager displays the Files window shown in Figure B.
Figure A. Import window
Figure B. The Files window

Applications Manager Version 8.0 Installation Guide 119
3. Select Os400 and click OK.Applications Manager maps the DBA user group object as shown in Figure C.
4. To complete the import, click Import.5. When the import task completes running, go to the Program Types Selector window
and click Refresh. Make sure the import was successful by checking for the AWOS400PGM and AWOS400CMD program types.
Figure C. DBA is mapped

120 Chapter 6: Installing an OS/400 Remote Agent
6.6 Installing the Remote AgentThe next step is to install the remote agent by running the CDINST.SH script.
After defining the remote agent in Applications Manager, the next step is to install the remote agent on the OS/400 machine. You can install the agent from the product CD, or you can generate an image file on the OS/400 machine and install the product from the image file.
ProcedureTo install the OS/400 remote agent:
1. Sign on as QSECOFR.The installation must be run as the QSECOFR user (or a user with equivalent privileges).
2. Load the CD and issue the following command:
LODRUN OPT01*OPT
Applications Manager displays the message below.
Restoring installation library AW_INST
When the restore is complete, the screen in Figure A is displayed.
3. Enter the exact agent name you used earlier when defining the OS/400 remote agent object in the Applications Manager GUI. Then press Enter.Applications Manager displays the Agent Information screen shown in Figure B.
Figure A. Enter the name of the OS/400 remote agent

Applications Manager Version 8.0 Installation Guide 121
4. Enter the remote agent information. The fields are described in the table below.
Field DescriptionApplications Manager Agent name
This is the name you entered in the previous step.You must change it at this point to match the remote agent object created earlier.
Applications Manager Agent Home Directory
The directory where the Applications Manager agent software will be installed.
Applications Manager Automation Engine name
The automation engine that will control the OS/400 remote agent. By default, the remote agent can only report to one automation engine.
Applications Manager Automation Engine IP Address
The IP address of the automation engine. This is required for proper communications between the remote agent and the automation engine.
Applications Manager Communication Port number
Identifies the port number for communicating with the Applications Manager awcomm process. Awcomm provides the port directory service for an automation engine and its agents.
Applications Manager Agent/Automation Engine Port number
Incoming port for messages from the automation engine to the agent manager. Initially, you should be able to accept the default values.
Applications Manager Agent/Client Port number
Used when the automation engine and/or agent are behind a firewall. Initially, you should be able to accept the default values.
Figure B. Enter information for the OS/400 remote agent

122 Chapter 6: Installing an OS/400 Remote Agent
5. After entering the agent information, press Enter.Applications Manager displays the following status message:
Installing Programs into Library OS400. Please wait...
If the default printer PRT01 is not defined to the system, you will receive an error message about an invalid printer definition. Accept the message and continue the installation. This will not cause the installation to fail. The OS/400 operating system will correctly identify another printer to use.When the programs have been installed, Applications Manager displays the following prompt:
Do you want to run the Applications Manager OS/400 agent after installation [Y/N]?
6. Enter “Y” or “N” and press Enter.Applications Manager completes the installation and displays a message similar to the following:
Installation of Applications Manager Version 8.0 Completed at 14:41F3 to Exit; Enter to Continue
7. Press F3.
Installing the OS/400 Agent from an Image FileInstead of installing the OS/400 agent from the CD, you can install it from an image file placed in an OS/400 directory. You can generate an image file from the product CD. For updates, you may be requested by UC4 Technical Support to download an image file from the Applications Manager FTP site.To install the agent from an image file:
1. Download the image file from the Applications Manager FTP site, or create an image file <XXX> from the installation CD in an OS/400 directory (link) <YYY> by issuing the following command:
AW_INS/AWRUNLOD FROMDEV(OPT01) DIR('/<YYY>')
where <YYY> is the name of the directory.2. Run the installation by issuing the following command:
AW_INS/AWLODRUN FROMFILE(<XXX>) FROMDIR('/<YYY>')
Next StepYou have completed installing the OS/400 remote agent. The next step is to determine if internationalization is an issue.

Applications Manager Version 8.0 Installation Guide 123

124 Chapter 6: Installing an OS/400 Remote Agent
6.7 InternationalizationIf you are running the remote agent on a machine that does not use U.S. English EBCDIC, you must set two parameters in the agent’s awenv.ini file.
The OS/400 agent is configured to run on machines that use the U.S. English EBCDIC (Extended Binary-Coded Decimal Interchange Code). EBCDIC is a group of coded character sets used on mainframes that consist of 8-bit coded characters. For Applications Manager to capture the output files for a task, Applications Manager must know the name of the files. On OS/400 systems using U.S. English EBCDIC, the default file names are known. On systems using an EBCDIC other than U.S. English, you must specify the text string that identifies the file names. You do this by setting two variables in the agent’s awenv.ini file:
• SpoolFileScanString• As400DefaultSpoolFileName
The awenv.ini file is located in the site sub-directory under the main installation directory.These two properties are used when parsing the output of the internal WRKTASK command issued by Applications Manager to obtain the spool files for a finished task. Sample output from the WRKTASK command is shown below:
The two variables are used to identify the “File” text string in the first column of the sixth line and the name of the spool file presented below “File.”
SpoolFileScanStringThis variable tells Applications Manager what text string to search for instead of the default “File.”
SpoolFileScanString=<text string>
As400DefaultSpoolFileNameThis variable tells Applications Manager the name of the spool file.
As400DefaultSpoolFileName=<spool file name>

Applications Manager Version 8.0 Installation Guide 125

126 Chapter 6: Installing an OS/400 Remote Agent
6.8 Starting and Stopping the OS/400 AgentYou can start and stop an OS/400 agent from the Applications Manager Explorer or from the OS/400 command line.
You can start and stop an OS/400 agent from the Applications Manager Explorer or from the OS/400 command line. You start and stop the agent from Explorer as you would any other agent. For details, see topic 7.3 Managing Agents in the User Guide.This topic describes how to start and stop the OS/400 agent from the OS/400 command line. In the commands below, <agent_name> is the name assigned to the OS/400 agent when it was installed.
Starting the OS/400 AgentTo start the OS/400 agent from the command line, issue the following command:
<agent_name>/startso
Note: It may take a few minutes to start the Applications Manager processes if you are running on a small OS/400 machine.
Agent Subsystems/Tasks When you first start the OS/400 agent, a number of tasks will execute. After the agent has started, which may take several minutes, there will be three tasks that remain and run constantly. The tasks are listed below:
Subsystem/Job Type Function StatusAM ASJ TIMW QP0ZSPWP BCI PGM-QJVATJAVA JVAW QP0ZSPWP BCI PGM-AWAPI DEQW
If you do not see these three tasks, the agent is not functioning correctly. Check your logs or contact UC4 Technical Support.
Stopping the OS/400 AgentTo stop the OS/400 agent from the command line, issue the following command:
<agent_name>/stopso
Next StepYou have determined if internationalization is an issue. The next step is to verify the installation.

Applications Manager Version 8.0 Installation Guide 127

128 Chapter 6: Installing an OS/400 Remote Agent
6.9 Verifying the InstallationVerify your installation by running the TEST_JOB job.
After completing the installation, you should verify that the Applications Manager OS/400 agent is installed correctly and ready to start processing tasks. A good test is to run a job and view its output files.
ProcedureTo begin the verification:
1. Make sure there is a copy of the test_modul program in the OS/400 Applications Manager library on the remote agent.
2. Launch Applications Manager and log in as user SQLOPER or other user that has edit access to TEST_JOB.
3. From the Object Admin menu, choose Jobs.Applications Manager displays the Jobs Selector window shown in Figure A.
4. Select TEST_JOB and click Copy.5. Enter a name for the job such as TEST_JOB_AS400 and click OK.
Applications Manager displays the Jobs window with the information for TEST_ JOB_AS400 displayed (see Figure B).
Figure A. Copy TEST_JOB from the Jobs Selector window.

Applications Manager Version 8.0 Installation Guide 129
6. Open the Agent/Group list box, choose the agent you just installed, and click OK.7. Define a library that points to the AS400 agent main library.8. Change the name of the program from test_module to test_modul.9. Open the Requests window, run the copy of TEST_JOB, and check that it finishes
correctly.
Figure B. The copied TEST_JOB

130 Chapter 6: Installing an OS/400 Remote Agent
6.10 Uninstalling the OS/400 AgentTo uninstall the OS/400 agent, issue the AWUNIST command.
You can uninstall the OS/400 agent from the command line by issuing the <library name>/AWUNINST <agent name> command on one line. For example, if an agent is named OS400RA the command would be:
OS400RA/AWUNINST OS400RA
Note: The library name is always the same as the agent name.The uninstall program does the following:
• Deletes the OS/400 Library agent name.• Deletes the OS/400 User Profile agent name.• Removes the directory and sub directories /agent name.

Applications Manager Version 8.0 Installation Guide 131

132 Chapter 6: Installing an OS/400 Remote Agent

7Creating a ZOS Remote Agent 7.
7.1 Introduction to Installing an ZOS Remote Agent .................................................... 1347.2 Defining an Applications Manager User for the ZOS Agent ................................... 1367.3 Defining the Operations Manager and ZOS Logins ............................................... 1387.4 Defining the ZOS Agent in Applications Manager .................................................. 1407.5 Specifying the ZOS Default Task Parameters ........................................................ 142

134 Chapter 7: Creating a ZOS Remote Agent
7.1 Introduction to Installing an ZOS Remote AgentRemote agents allow you to run tasks on servers other than the server where the Applications Manager automation engine is installed.
If you want to run tasks on an ZOS machine, you must have a UC4 Operations Manager server installed and an Operations Manager executor on the ZOS machine. You then create the following objects in the Applications Manager client:
• A user for the ZOS agent.• A login to the ZOS agent. • A login to Operations Manager. • The ZOS remote agent.
Applications Manager JCL FilesThe typerunscan.jcl and listpds.jcl. files are included in the Applications Manager data directory. They are used to implement the Applications Manager ZOS solution. They should work out of the box with default ZOS settings, but can be updated if customizations have been made on your system.

Applications Manager Version 8.0 Installation Guide 135

136 Chapter 7: Creating a ZOS Remote Agent
7.2 Defining an Applications Manager User for the ZOS AgentThe first step is to define an Applications Manager user that you will assign to the ZOS agent.
For the first step, you will define the ZOS agent in Applications Manager. One of the required fields will be an Applications Manager user. You must define an Applications Manager user before you can define the agent.
ProcedureTo define an Applications Manager user for the ZOS agent:
1. In Applications Manager, open the Users selector window and click New.Applications Manager displays the Users window shown in Figure A.
2. Complete the fields shown in Figure A using the descriptions presented in Table A.
Table A. Applications Manager Users window field descriptions for a ZOS user
Field DescriptionUser Name The name of this object.First Name This can be left blank or you can make it as descriptive as 30
characters will allow.Last Name This can be any text.Active Leave this box checked.LDAP Authentication Leave this box unchecked.Password This password is never used, but it’s a required field, so you
have to put something in it. You might as well enter your favorite color.
Expire interval Leave this set to ‘0’.
Figure A. Define the Applications Manager user that will be assigned to the ZOS agent.
Applications Manager Version 8.0 Installation Guide 137
3. Do not change any of the options in the User defaults box.4. Do not assign any options on the Options tab.5. To save the agent information and close the window, click OK.
Next StepYou have completed defining the Applications Manager user. The next step is to define the Applications Manager ZOS agent.
Awexe Range Leave this set to ‘1000-9999’.Field Description

138 Chapter 7: Creating a ZOS Remote Agent
7.3 Defining the Operations Manager and ZOS LoginsYou will need to create login objects for both Operations Manager and ZOS.
You must create two Applications Manager host logins, one for Operations Manager and the other for ZOS.
Note: If the same login name is needed for multiple logins, append a unique identifier to the end of the login name prefaced by an '@'. (e.g.: 200.4.2.123@ZOS).
ProcedureTo create the host logins:
1. From the Logins selector window, click New.For information on using selector windows, see topic 1.5 Adding, Editing, and Deleting Applications Manager Objects in the Development Guide.Applications Manager opens the Select Login Type window.
2. Select the OPER MANAGER login type and click OK.Applications Manager opens the Logins window shown in Figure A.
3. Complete the fields using the information in Table A.4. Save the Operations Manager login. 5. On the Logins selector window, click New again.6. Select the ZOS login type and click OK.7. Complete the fields using the information in Table A.
Note: The fields for Operations Manager and ZOS logins are the same.8. Save the ZOS login.
Figure A. The Login window for an Operations Manager login

Applications Manager Version 8.0 Installation Guide 139
Table A. The Logins window fields for the Operations Manager and ZOS logins:
Field DescriptionName Enter the host login name. If you need to create two or more logins with the
same name, you can append an ‘@’ character followed by any number of characters (up to 32 total) to the end of a login name. The ‘@’ and characters after it will be stripped off before the name is passed to a job. For example, if two hosts (zos1 and zos2) both use the same login name, add ‘@zos1’ and ‘@zos2 to the login names in order to distinguish them from one another.
Type Identifies the login type you selected on the Select Login Type window. In this case OPER MANAGER or ZOS.
Password Enter the host password. Host IP Enter the machine name or IP address of the host.Encrypted Applications Manager automatically encrypts the password and checks the
Encrypted field when you click OK. You cannot change the Encrypted setting.

140 Chapter 7: Creating a ZOS Remote Agent
7.4 Defining the ZOS Agent in Applications ManagerYou add a ZOS remote agents object in Applications Manager. Remote agents are used to run tasks on a machine that does not include the Applications Manager automation engine.
The next step is to define the ZOS agent in Applications Manager.
Adding Remote AgentsTo add a remote agent object:
1. Open the Object Admin menu, and choose Agents.Applications Manager displays the Agents selector window shown in Figure A.
2. On the Agents selector window, click the New button. Applications Manager opens the Select agent type window.
3. Select STANDARD to define an Applications Manager remote agent and click OK.4. Fill in the fields and click OK to save.
Some important fields to know about when defining a new remote agent are described in Table A. For a description of all fields on the Agents window, click the Help button. Applications Manager opens the Applications Manager Help window to topic 4.2 Defining Remote Agents in the Administration Guide.
Next StepYou have defined the remote agent in Applications Manager. The next step is to define the parameters on the ZOS tab for the agent.
Figure A. Add agents with the Select agent type and Agents windows.

Applications Manager Version 8.0 Installation Guide 141
Table A. Noted Agents window fields
Field DescriptionName Name of the agent. The name can be up to 30 characters long. This
must be the same name as the Applications Manager user you created in the previous step, and it will be the same name you use when you install the ZOS agent on the remote host. The following are reserved words that cannot be used for automation engine or agent names; ALL, APPWORX, AWCOMM, AGENTSERVICE, AWAPI, RMI, RMISERVER, AGENT, and MASTER.
Description A description of an agent can be up to 30 characters long.AgentService IP Addressed
The IP address for an existing Applications Manager agent. In most cases this setting should match what is specified for the automation engine/local agent object.
CPU Limit Defines the percentage of CPU usage at which Applications Manager will spawn no new tasks. When an agent reaches its CPU limit it will go into a CPU WAIT agent status. Tasks waiting to run on an agent that has reached its CPU limit will go to an AGENT WAIT task status. The default is 80% for newly created agents or 99% for agents that were upgraded from a version of Applications Manager before this feature existed. You can see actual CPU usage percentages for agents in the Cpu column on the Agent Summary on the Explorer window. The CPU usage is updated about once every minute for each agent and the automation engine.
Thread Schedule
Sets the maximum number of concurrent tasks that can run on the agent at one time in all queues. For information on defining thread schedules, see topic 7.7.2 Defining Thread Schedules in the User Guide.Editing the thread schedule of the automation engine/local agent from this field will change the setting for only the local agent. Note: Thread schedules can be changed for the automation engine and agents from the Explorer window. For more information, see topic 7.3 Managing Agents in the User Guide.
OS Type Indicates that the operating system is ZOS.Output Directory
When you view output for the ZOS tasks, a copy of the output file is saved to this directory.
User Select the user with the same name you entered for the agent name above. This will be the Applications Manager user you created in the previous step.
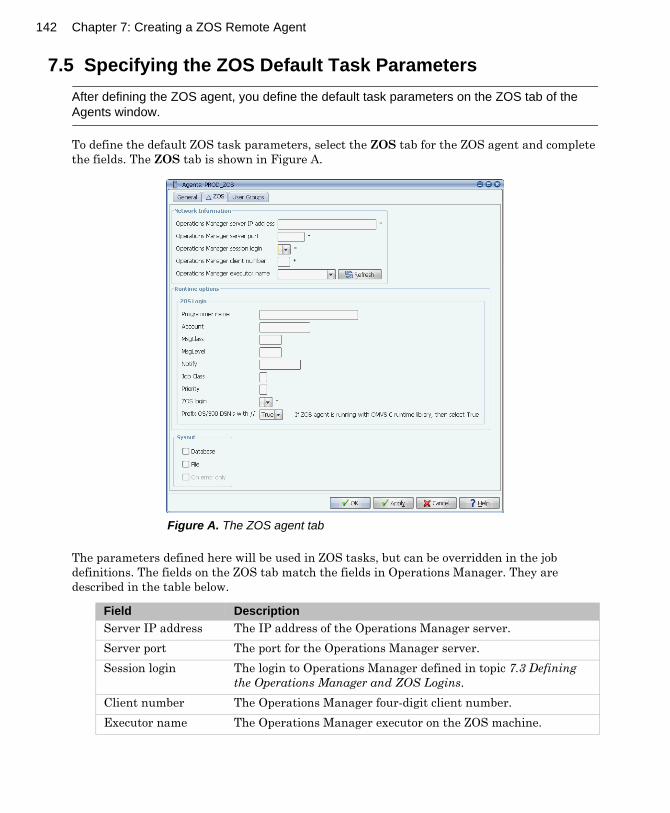
142 Chapter 7: Creating a ZOS Remote Agent
7.5 Specifying the ZOS Default Task ParametersAfter defining the ZOS agent, you define the default task parameters on the ZOS tab of the Agents window.
To define the default ZOS task parameters, select the ZOS tab for the ZOS agent and complete the fields. The ZOS tab is shown in Figure A.
The parameters defined here will be used in ZOS tasks, but can be overridden in the job definitions. The fields on the ZOS tab match the fields in Operations Manager. They are described in the table below.
Field DescriptionServer IP address The IP address of the Operations Manager server.Server port The port for the Operations Manager server.Session login The login to Operations Manager defined in topic 7.3 Defining
the Operations Manager and ZOS Logins.Client number The Operations Manager four-digit client number.Executor name The Operations Manager executor on the ZOS machine.
Figure A. The ZOS agent tab
Applications Manager Version 8.0 Installation Guide 143
Programmer name Identifies the programer who is the job’s owner or its group. The name is recorded in the job card of the job.
Account Accounting Information on the job.MsgClass Assignment of the job log's message class.MsgLevel Trace option for the job log. Possibly a numerical value for
command and message separated by a comma.Permitted formats: • <command number>,<message number>• ,<message number>• <command number>Permitted values for outputting commands:• 0 - Output only commands.• 1 - All job commands, JES2 or JES3 control commands,
procedure commands and all IEF653I messages.• 2 - Only all job commands (JCL) and the JES2 or JES3 control
commands.Permitted value for outputting messages:• 0 - Only JCL messages. For cancels, also JES control
commands and operator messages. For SMS errors, also the corresponding messages.
• 1 - All JCL, JES, operator and SMS messages.Notify Specification of a notify on OS/390. Job Class Specification of the Job class in which the Job should run.Priority Specification of the Job's priority. A value between 0 and 15 may
be entered for priority.ZOS Login The login to the ZOS machine defined in topic 7.3 Defining the
Operations Manager and ZOS Logins. This login will be used by default in all ZOS jobs, unless overridden.
Prefix OS/390 DSN's with //
If ZOS agent is running with OMVS C runtime library, then select True
Database The SYSOUT protocol is managed by Operations Manager.It consists of the JES statistics and the complete Job output, as long as the Job output is not excluded by an entry in the INI file.After the Job execution, the SYSOUT protocol is transferred to the Operations Manager database via FileTransfer.
File The SYSOUT protocol is managed by Operations Manager. After the Job execution, the SYSOUT protocol is available as a file in the target system.
On error only In case of Job interruption, the SYSOUT protocol is saved in the Operations Manager database and/or a file in the target system. This is only available when "Database" and/or "File" have been selected.
Field Description

144 Chapter 7: Creating a ZOS Remote Agent

Section IIIApplications Manager Upgrades
Chapter 8: Upgrading Applications Manager ................................................................. 147


8Upgrading Applications Manager 8.
8.1 Introduction to Upgrading Applications Manager ................................................... 1488.2 Changes in Behavior .............................................................................................. 1508.3 Upgrading an Automation Engine and Local Agent ............................................... 1528.4 Upgrading Remote Agents ..................................................................................... 1548.5 Verifying the Upgrade ............................................................................................. 156

148 Chapter 8: Upgrading Applications Manager
8.1 Introduction to Upgrading Applications ManagerWhen you upgrade an automation engine and its local agent, you must also upgrade all remote agents controlled by that automation engine to ensure that the automation engine and all its agents are the same version.
To upgrade a UNIX or Windows automation engine, you run the Applications Manager installation script. The script upgrades the automation engine and its local agent to a new version of Applications Manager. If you are upgrading a host with multiple agents, the Applications Manager communication processes (aw*) will not be replaced unless they are assigned write access.To upgrade a remote agent, you run the remote agent install script awagentinstall. The script upgrades your remote agent to a new version of Applications Manager.
Linux SupportIn this guide, Linux is considered a variant of UNIX, and therefore is not referred to separately. All information presented about UNIX also applies to Linux.
Granting Execute Privileges for New Oracle FeaturesThe Applications Manager user account must be granted execute privileges on packages and related objects. These grants must be made before the upgrade will complete.If upgrading from v5.1x, enter the following commands:
grant select on v_$lock to <am>;grant select on v_$locked_object to <am>;grant create table to <am>;ALTER SYSTEM FLUSH SHARED_POOL;grant execute on dbms_sql to <am>;grant alter session to <am>;grant select on v_$sqltext to <am>;grant select on v_$sqltext_with_newlines to <am>;grant select on v_$sqltext to <am>;grant select on v_$sqltext_with_newlines to <am>;
If upgrading from v6.0.x, enter the following commands:
grant select on v_$locked_object to <am>;grant create table to <am>;grant select on v_$lock to <am>;grant alter session to <am>;grant select on v_$sqltext to <am>;grant select on v_$sqltext_with_newlines to <am>;grant select on v_$sqltext to <am>;grant select on v_$sqltext_with_newlines to <am>;

Applications Manager Version 8.0 Installation Guide 149
Rule-Based OptimizationApplications Manager is designed to take advantage of rule-based optimization. It is recommended the database be started using rule-based optimization to enhance the performance of Applications Manager. In high load scenarios, the database must run in rule-based mode.
Changes in BehaviorChanges in behavior are described in topic 8.2 Changes in Behavior.
Default Objects OverwrittenIf you have modified any of the Applications Manager default objects or scripts, they will be overwritten during the upgrade. For example, you may have modified a program type, or modified a program type script in the exec directory.If you modified a default object, you will need to redefine it after the upgrade. Long term, you should consider creating unique program types that will not be overwritten.If you modified a script, you can copy the script to a different directory, run the upgrade, then copy the script back to the original directory. As with the default objects, you should consider creating uniquely named scripts that will not be overwritten.
ProceduresThe upgrade procedures are covered in the following topics:
8.3 Upgrading an Automation Engine and Local Agent8.4 Upgrading Remote Agents

150 Chapter 8: Upgrading Applications Manager
8.2 Changes in BehaviorWhen upgrading, be sure to read the changes below as well as the release notes included on your Applications Manager product installation CD.
New TerminologyThe terminology used in Applications Manager and Operations Manager has been combined for v8.0 of the UC4 Workload Automation Suite. Several terms have been updated in the user interface and documentation. Terminology changes are listed below.
Updated Import of Jobs and Process Flows That Ship with Applications ManagerSeveral of the jobs and process flows have been renamed to match the terminology for v8.0 of the UC4 Workload Automation Suite. No legacy objects are deleted as part of the import, so you may have duplicate objects with old and new names.
Setting Server DebugDebug for the RmiServer and AgentService processes can be turned on by selecting Server from the Debug menu on the About Applications Manager window or in the awenv.ini file by selecting true or false for the Debug option. For more information, see 10.4.3 Setting Server Debug in the Administration Guide.
Changes Added to Version 7.1New Formats for Prompts on the Submit Window
Prompts are now displayed in different formats on the Submit window when users make ad hoc requests. Prompt formats include radio buttons, check boxes, Select buttons, and more. Prompt formats are selected when you define a prompt’s data type. You also have the ability to add ToolTips to prompt descriptions. For more information on prompts and data types, see chapter 6: Adding Prompts to Jobs and Process Flows in the Development Guide.
Old Terminology New TerminologyMaster Automation engineModule JobChain Process flowJob TaskJob ID Run IDNote DocumentationOperator log CommentRole User groupRole authorities User authorities

Applications Manager Version 8.0 Installation Guide 151
Select Objects Can No Longer Be Updated and/or Deleted
A number of objects supplied by Applications Manager can no longer be updated and/or can no longer be deleted. Objects you cannot update include several reports, as well as data types used by the Oracle Applications and PeopleSoft extensions. Objects you cannot delete include the SYSTEM process flow and SQLOPER user.

152 Chapter 8: Upgrading Applications Manager
8.3 Upgrading an Automation Engine and Local AgentTo upgrade an automation engine and its local agent, run the automation engine install script. The script upgrades your automation engine and its inherent local agent to a new version of Applications Manager.
This procedure describes how to upgrade an Applications Manager automation engine and its local agent. When you upgrade an automation engine and its local agent, you must also upgrade all remote agents controlled by that automation engine to ensure that the automation engine and all its agents are the same version. For information on upgrading a remote agents, see topic 8.4 Upgrading Remote Agents.
Before You BeginBefore you begin the upgrade, stop the Applications Manager processes and back up the Applications Manager database account.Make sure you have the following information before proceeding:
• The Applications Manager UNIX account login and password or the Applications Manager Windows administrator login.
• The Applications Manager database login and password
Installation Option for the Applications Manager Web Service SolutionsThere are two Applications Manager Web Service solution add-on products you can purchase with Applications Manager. To use them you need:
• A valid product key that includes the Web service support you wish to use. • To install Web service components as part of the install/upgrade.
During the install you will be asked if you want to install the Web service components. Make sure you install them if you have purchased the Web services solution. For information on the Applications Manager Web services solution, see chapter 17: Working with Web Services in the Development Guide.
ProcedureTo upgrade an Applications Manager automation engine and local agent:
1. Stop all Applications Manager processes, including awcomm. You can kill all Applications Manager processes by issuing the following commands:
stopso allstopso awcomm
2. Log into the Applications Manager account, and if necessary, change to the directory where Applications Manager is installed.In UNIX, you must be logged into the Applications Manager UNIX account and be in the Applications Manager directory for the installation procedure to work correctly. If you transferred files to a staging directory, verify that all the Applications Manager files are

Applications Manager Version 8.0 Installation Guide 153
owned by the Applications Manager UNIX login and group before running the install script. If they are not, the upgrade will fail. Use the chown and chgrp commands to modify the ownership if necessary.
3. From the directory in which you want Applications Manager installed, run the installation script. In UNIX, the script is CDINST.SH. In Windows, it is cdinstall.bat.
4. Follow the onscreen prompts.5. When presented with the menu of upgrade options, choose:
Initial Install/Upgrade from prior version.
6. Follow the onscreen prompts.Note that the required information for an install/upgrade may have changed since you first installed Applications Manager. For more information on the current requirements, see topic 1.6 System Information Required for the Installation.
UNIX SystemsFor UNIX systems, you should complete the following steps:
1. After completing the install and exiting the script, enter the following command to establish the proper environment, or log out of UNIX and back in:
. .profile
2. If you are using surun, make sure you move the surun file to the SURUN directory. From the Applications Manager user account $AW_HOME/c directory, type:
mv c/surun c/SURUNchmod 4711 c/SURUNchown root c/SURUN
For more information, see chapter 14: SURUN - Running UNIX Tasks Under Other Host Logins in the Development Guide.
3. Restart your Applications Manager processes.
Next StepYou have completed upgrading the Applications Manager automation engine and local agent. The next step is to upgrade any Applications Manager remote agents as described in topic 8.4 Upgrading Remote Agents. If you do not have remote agents, skip to topic 8.5 Verifying the Upgrade.

154 Chapter 8: Upgrading Applications Manager
8.4 Upgrading Remote AgentsTo upgrade a remote agent, run the remote agent install script. The script upgrades your remote agent to a new version of Applications Manager.
This procedure describes how to upgrade an Applications Manager remote agent on a single host. When you upgrade an automation engine and its local agent, you must also upgrade all remote agents controlled by that automation engine to ensure that the automation engine and all its agents are the same version.
Before You BeginBefore you begin the upgrade, delete all tasks from the Backlog and stop the Applications Manager processes. You can do this by issuing the stopso command from the command line prompt.For UNIX, make sure you know the Applications Manager remote agent UNIX account login and password before you begin.Warning! Do not run the remote agent install script using a directory containing an automation engine. Doing so will damage the automation engine. When you run the automation engine install script, it automatically creates a local agent for the automation engine. To install a remote agent on a host with an existing automation engine (have multiple agents on the same host), see topic 2.5 Installing Multiple Automation Engines on One Host.
Running the Upgrade ScriptThe upgrade script for the remote agent is CDINST.SH for UNIX and cdinstall.bat for Windows. You can upgrade directly from CD-ROM or, if you transferred the installation files to a staging directory, you can run the upgrade from the directory.In UNIX, Applications Manager displays default values in brackets [ ]. You can accept a default by pressing ENTER at a prompt.In Windows, Applications Manager displays a series of screens that prompt for information.Note: Java is not automatically upgraded for Windows remote agent upgrades, because there are system-wide effects. Java upgrades on Windows remote agent machine must be done manually.

Applications Manager Version 8.0 Installation Guide 155
ProcedureTo upgrade an Applications Manager remote agent:
1. Log into the Applications Manager account on the remote agent machine, and if necessary, change to the directory where Applications Manager is installed.In UNIX, you must be logged into the Applications Manager UNIX account and be in the Applications Manager directory for the installation procedure to work correctly. If you transferred files to a staging directory prior to running the install script, verify that all the Applications Manager files are owned by the Applications Manager UNIX login and group. If they are not, the installation will fail. Use the chown and chgrp commands to modify the ownership if necessary.In Windows, you must be logged in as Administrator.
2. From the directory in which you want the agent installed, run the installation script:
UNIX: CDINST.SH
Windows: cdinstall.bat
Be sure to set permissions for the CDINST.SH file.If you need to re-run the installation, you can run the agentinstall file and skip the file transfer steps.
3. Follow the onscreen prompts.4. When presented with the menu of upgrade options, choose:
Initial Install/Upgrade from prior version.
5. Continue to follow the onscreen prompts.
UNIX SystemsFor UNIX systems, you should complete the following steps:
1. After completing the install and exiting the script, enter the following command to establish the proper environment, or log out of UNIX and back in:
. .profile
2. If you are using surun, make sure you move the surun file to the SURUN directory. From the Applications Manager user account $AW_HOME/c directory, type:
mv c/surun c/SURUNchmod 4711 c/SURUNchown root c/SURUN
For more information, see chapter 14: SURUN - Running UNIX Tasks Under Other Host Logins in the Development Guide.
3. Restart your Applications Manager processes.
Next StepYou have upgraded the remote agent. The next step is to verify the upgrade.

156 Chapter 8: Upgrading Applications Manager
8.5 Verifying the UpgradeThe last step is to verify the upgrade of the automation engine and its local agent, as well as any remote agents.
After completing the upgrade, you should verify that Applications Manager is installed correctly and ready to start processing tasks. A good test is to run a job and view its output files.
ProcedureTo verify the installation:
1. Start the Applications Manager automation engine and agent processes.2. Run the TEST_JOB and monitor the progress of TEST_JOB in the Backlog.
The TEST_JOB should complete successfully with status FINISHED.3. View the output.
Verifying the Remote Agent UpgradesIf you upgraded one or more remote agents, run through the above process using test jobs designated to run on the remote agents. Make sure the test_module program is located on the remote agent machine.
Verification CompleteIf TEST_JOB finished and you can view the output file, then Applications Manager has been upgraded correctly. Verification is complete.

Applications Manager Version 8.0 Installation Guide 157

158 Chapter 8: Upgrading Applications Manager

Applications Manager Version 8.0 Installation Guide 159
Index
-A-Apache server, starting 30Apache Web Server 5Applications Manager
uninstalling 64Applications Manager UNIX account,
creating 8AS/400 agent
default parameters 116starting and stopping from the command
line 116system requirements 108
automation enginecreating a database account under Oracle
14installing from cd rom 18transferring files from cdrom (UNIX) 18
automation engine and local agent, installing 28
AWOS400CMD program type 118AWOS400PGM program type 118
-C-cdrom
installing directly from 18transferring files from 18
CD-ROM, mounting on an HP_UNIX system 20
changes in behavior 150creating
an Applications Manager account on the OpenVMS system 94
an Applications Manager Windows user 84Applications Manager UNIX account 8
-F-files, transferring from cd rom 18
-G-grant for sys after database rebuild 15
-H-HP TCP/IP stack 96HP-UNIX, mounting a CD-ROM 20
-I-IIS 5installation
verifying Applications ManagerOpenVMS
remote agent 99UNIX
remote agent 75upgrade 156
Windowsremote agent 86
installinga UNIX remote agent 74an automation engine and local agent 28an OpenVMS remote agent 98an Windows remote agent 86multiple nodes on one host 52
Internet Information Services 5-J-
Java run-time environment 4-L-
Linux, support for 5logging into Applications Manager 34login.com file entry 99
-M-master
creating an Applications Manager OPenVMS account 94
creating an Applications Manager Windows user 84
master and local agent, upgrading 152Microsoft Internet Information Services 5

160 Index
mounting a CD-ROM on an HP-UNIX system 20
multiple nodes, installing on one host 52
-O-OpenVMS account, creating 94OpenVMS agent
defining symbols 102OpenVMS Applications Manager account,
creating 94OpenVMS remote agent
installing 90Oracle
creating a database account 14rule-based optimization for the database
149Oracle system requirements 14OS user
assigning an awexe range 47function of 46
OS/400 objects, importing 118
-P-primary instance, installing multiple
nodes on one host 52procedure
creating an Oracle account 14installing
a Windows remote agent 98installing a UNIX remote agent 74installing a Windows remote agent 86installing an automation engine and local
agent 28transferring UNIX files from cdrom 18upgrading a remote agent 155upgrading a UNIX master and local agent
152verifying a UNIX remote agent installation
128verifying the installation 38verifying the installation (UNIX) 156
-R-remote agent
installingOpenVMS 98UNIX 74
Windows 86upgrading 154
remote agent, OpenVMS 90rule-based optimization for Oracle
database 149
-S-servers
starting the Apache server 30SSL, using a custom SSL certificate for
connection authentication 62starting
Apache server 30starting the Applications Manager client
and logging in to Applications Manager 34
symbols, defining for OpenVMS agents 102system requirements
OpenVMS 90Oracle 14UNIX 5Windows 78
-T-transferring files from cdrom in UNIX 18
-U-uninstalling Applications Manager 64UNIX account, creating 8UNIX system requirements 5upgrading
master and local agent 152remote agent 154
URL, available in the Options.properties file 28
-V-V_$SESSION table 15verifying the installation 38
UNIXremote agent 75
VMSremote agent 99
Windowsmaster and local agent 156remote agent 86
VMS agent, see OpenVMS agent 90

Applications Manager Version 8.0 Installation Guide 161
-W-warning
do not install a remote agent into an automation engine directory 70
do not install a remote agent into an automation engine directory (remote agent) 86
do not install a remote agent into an automation engine directory (UNIX, upgrade) 154
set the default tablespace before install 14Windows system requirements (remote
agent) 78, 90Windows user, creating 84
-Z-ZOS agent
parameters 142

162 Index