Embed Size (px)
Citation preview
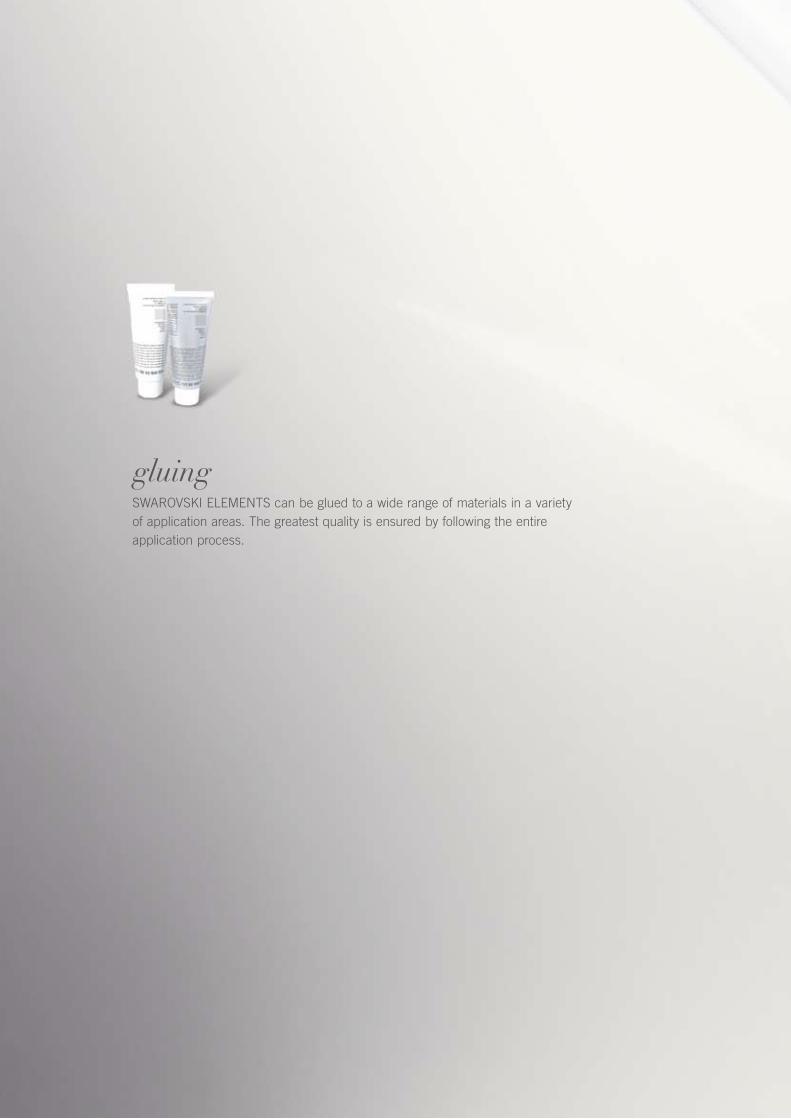
gluingSWAROVSKI ELEMENTS can be glued to a wide range of materials in a variety of application areas. The greatest quality is ensured by following the entire application process.

43 Application techniques 43
GLU
ING
44 Application techniques
GLU
ING
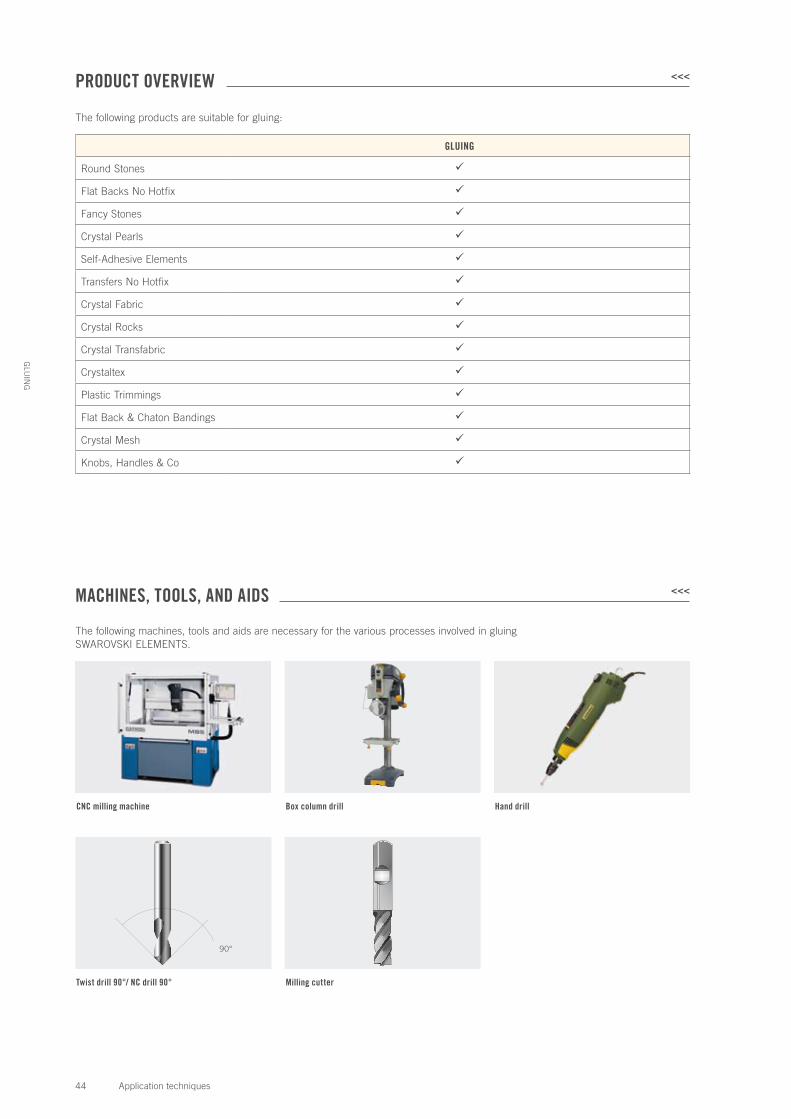
PRODUCT OVERVIEW <<<
90°
Twist drill 90°/ NC drill 90°
The following machines, tools and aids are necessary for the various processes involved in gluing SWAROVSKI ELEMENTS.
MACHINES, TOOLS, AND AIDS <<<
CNC milling machine
Milling cutter
Hand drillBox column drill
The following products are suitable for gluing:
GLUING
Round Stones
Flat Backs No Hotfix
Fancy Stones
Crystal Pearls
Self-Adhesive Elements
Transfers No Hotfix
Crystal Fabric
Crystal Rocks
Crystal Transfabric
Crystaltex
Plastic Trimmings
Flat Back & Chaton Bandings
Crystal Mesh
Knobs, Handles & Co

45 Application techniques
GLU
ING
Plasma cleanerCorona
Isopropyl alcohol/AcetoneTest pen Art. 9030/000
Precision balance Gloves Protective eyewear
Dispensing robot Fluid dispenser
Cou
rtes
y of
I&
J Fi
snar
Inc.
Dispensing gun
Dispensing syringes with dispensing tips
Blow torch
46 Application techniques
GLU
ING
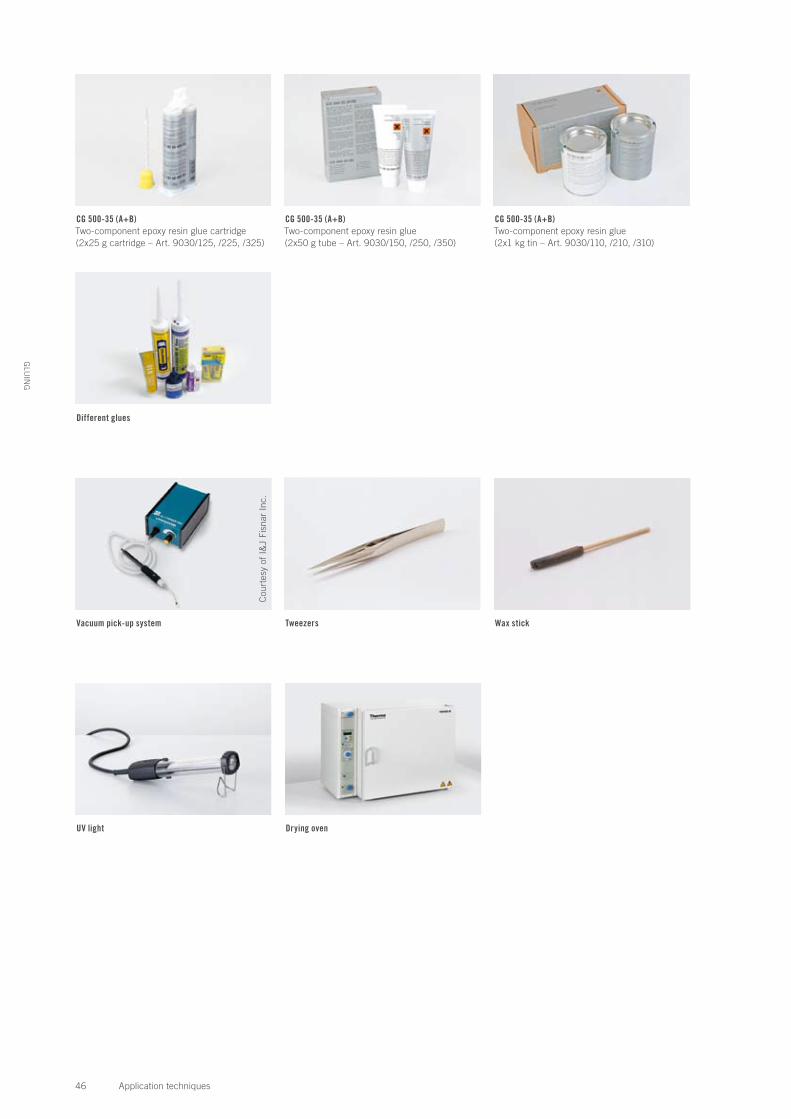
Different glues
UV light Drying oven
Wax stickTweezersVacuum pick-up system
Cou
rtes
y of
I&
J Fi
snar
Inc.
CG 500-35 (A+B) Two-component epoxy resin glue(2x1 kg tin – Art. 9030/110, /210, /310)
CG 500-35 (A+B) Two-component epoxy resin glue(2x50 g tube – Art. 9030/150, /250, /350)
CG 500-35 (A+B)Two-component epoxy resin glue cartridge (2x25 g cartridge – Art. 9030/125, /225, /325)

47 Application techniques
GLU
ING
This list provides an overview of select suppliers worldwide.
MACHINES / TOOLS / AIDS SUPPLIER KONTAKT
90° NC drill/milling cutter Hahn & Kolb www.hahn-kolb.de
Hoffmann Group www.hoffmanngroup.de
Dixi www.dixi.ch
Reich www.reich.at
Wedco www.wedco.at
Test pen Swarovski Art. 9030/000 www.swarovski-elements.com/business
Fluid dispenser (with/without vacuum suction)Vacuum pick-up system
I & J Fisnar, Inc. www.ijfisnar.com
Epoxy & Equipment Technology PTE., Ltd. www.eetdispensing.com
Hottemp (M) SDN. BHD. www.hottemp.com.my
PT.SKT International www.sktisolution.com
Dispensing syringe/dispensing gun I & J Fisnar, Inc. www.ijfisnar.com
DELO Industrie Klebstoffe www.delo.de
CG 500-35Two-component epoxy resin glue
Swarovski2x25 g cartridge:European version: Art. 9030/125American version: Art. 9030/225Asian version: Art. 9030/325
www.swarovski-elements.com/business
2x50 g tube:European version: Art. 9030/150American version: Art. 9030/250Asian version: Art. 9030/350
2x1 kg box:European version: Art. 9030/110American version: Art. 9030/210Asian version: Art. 9030/310
Araldite 2011 Two-component epoxy resin glue
Huntsman International LLC. www.huntsman.com/advanced_materials
UHU Plus endfest 300 Two-component epoxy resin glue
UHU GmbH & Co. KG www.uhu.com
Araldite 2028 Two-component polyurethane glue
Huntsman International LLC. www.huntsman.com/advanced_materials
Scotch Weld DP610 Two-component polyurethane glue
3M www.3m.com
Instant adhesive cyanacrylate glue UHU GmbH & Co. KG www.uhu.com
Cyanacrylate glue Cyberbond Europe GmbH www.cyberbond.eu.com
Photobond GB 368 UV glue DELO Industrie Klebstoffe www.delo.de
Photobond GB 345 UV glue DELO Industrie Klebstoffe www.delo.de
Elastosil N2199 Silicone glue Wacker Chemie AG www.wacker.com
Konstruvit Dispersions glue Geistlich Ligamenta AG www.geistlich.com
Chrisanne Dispersions glue Chrisanne www.chrisanne.com
Bostik 1475 Contact glue Bostik www.bostik.com
Araldite AV 170 Huntsman International LLC. www.huntsman.com/advanced_materials
UV light Dr. Hönle AG www.hoenle.de
Waldmann GmbH www.waldmann.com
Heraeus Holding GmbH www.heraeus.com
Drying oven Heraeus Holding GmbH www.heraeus.com
VWR International www.vwr.com
SUPPLIERS <<<
48 Application techniques
GLU
ING
Many SWAROVSKI ELEMENTS require cavities in order to be applied to materials. A properly produced cavity in combination with a suitable gluing system ensures a stylish, long-lasting application. The cavity makes it easy to glue properly and ensures a higher protection of the crystal against mechanical and chemical stress.
There are several different production methods and cavity types. Always take into consideration the requirements and base material of the finished product when choosing the appropriate cavity, pre-treatment method and right kind of glue.
Production methods
Drilling is when materials are machined using a power drill and drilling tool.
Milling is when materials are machined using a milling machine and milling cutter. Milling machines can be fitted with appropriate tools depending on the materials, e.g. for working with metal and plastic, wood or natural stone. Modern CNC machining centers offer the greatest precision and can be used to produce cavities of every shape necessary. Please note that when machining natural stone, ceramic or glass, for example, special diamond-tipped tools must be used.
Water jet cutting allows materials to be separated via a high-pressure jet of water. Economic reasons make water jet cutting machines ideal for certain crystal shapes that are integrated into flat materials. Please note that only end-to-end cavities can be produced in this way. In addition, materials which swell through water cannot be worked with. Absorbent materials must be fully dried before gluing the crystal.
Casting: To reproduce cavities, particularly in the jewelry sector, the cavities can be made when the metal component is cast. When following this process, the cavities must be cut into the original model. To prevent the bottom of the cavity being rounded off, which would result in the crystal sitting too high, it is recommended that an additional indentation is made when producing the original model.
Further instructions on jewelry production can be found on p. 38.
Cavity types
Depending on the SWAROVSKI ELEMENTS used, various cavity types can be made using the different production methods.
SWAROVSKI ELEMENTS PRODUCTION METHOD CAVITY TYPE
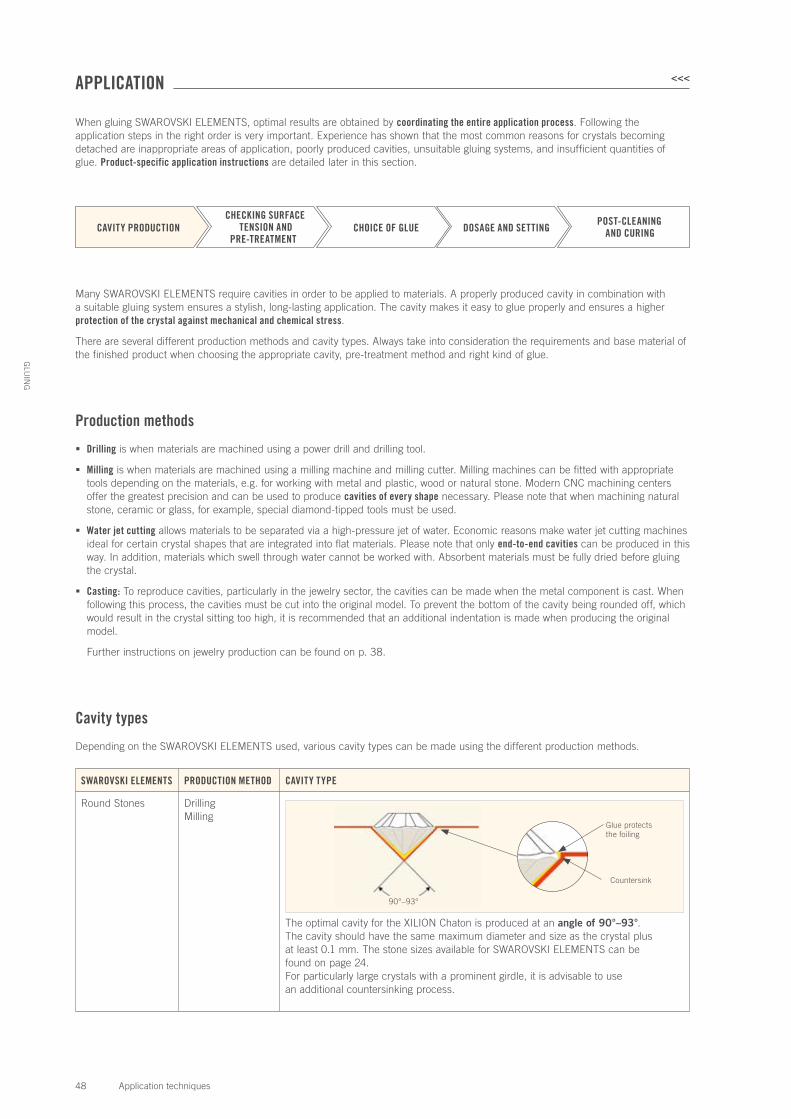
Round Stones DrillingMilling
90°–93°
Countersink
Glue protects the foiling
The optimal cavity for the XILION Chaton is produced at an angle of 90°–93°. The cavity should have the same maximum diameter and size as the crystal plus at least 0.1 mm. The stone sizes available for SWAROVSKI ELEMENTS can be found on page 24.For particularly large crystals with a prominent girdle, it is advisable to use an additional countersinking process.
APPLICATION <<<
When gluing SWAROVSKI ELEMENTS, optimal results are obtained by coordinating the entire application process. Following the application steps in the right order is very important. Experience has shown that the most common reasons for crystals becoming detached are inappropriate areas of application, poorly produced cavities, unsuitable gluing systems, and insufficient quantities of glue. Product-specific application instructions are detailed later in this section.
CAVITY PRODUCTION CHECKING SURFACE
TENSION AND PRE-TREATMENT
CHOICE OF GLUE DOSAGE AND SETTING POST-CLEANING
AND CURING
49 Application techniques
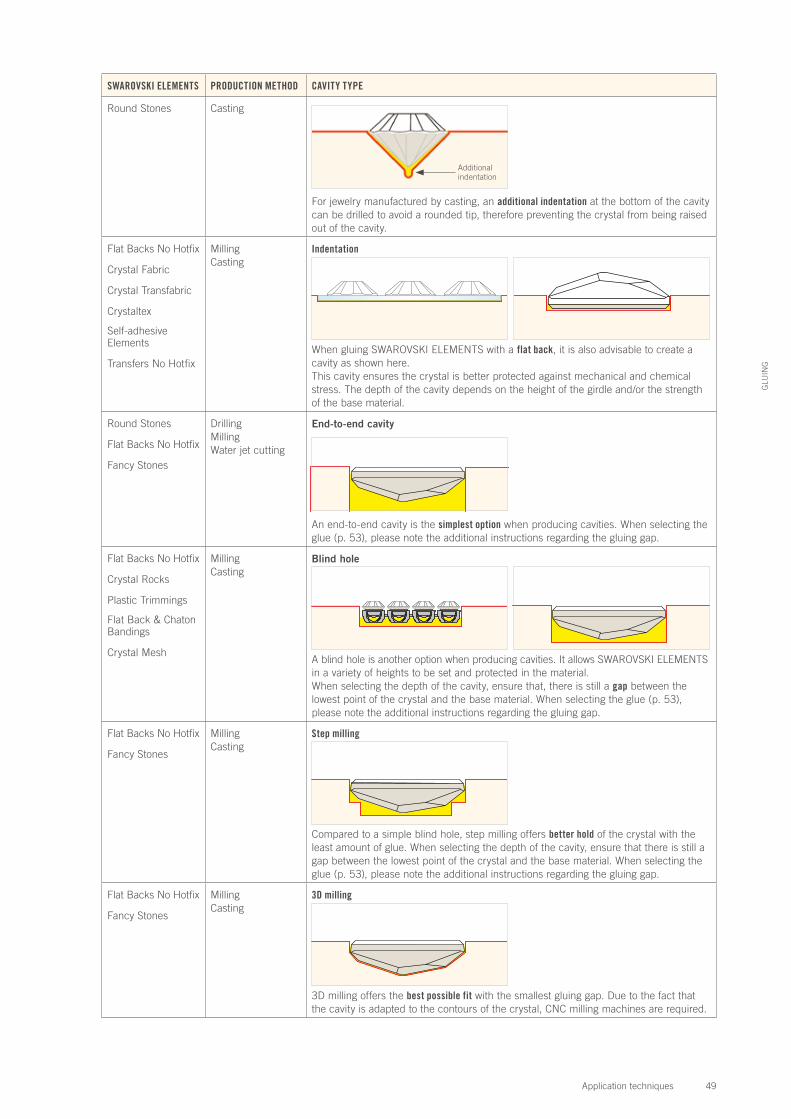
SWAROVSKI ELEMENTS PRODUCTION METHOD CAVITY TYPE
Round Stones Casting
Additional indentation
For jewelry manufactured by casting, an additional indentation at the bottom of the cavity can be drilled to avoid a rounded tip, therefore preventing the crystal from being raised out of the cavity.
Flat Backs No Hotfix
Crystal Fabric
Crystal Transfabric
Crystaltex
Self-adhesive Elements
Transfers No Hotfix
MillingCasting
Indentation
When gluing SWAROVSKI ELEMENTS with a flat back, it is also advisable to create a cavity as shown here. This cavity ensures the crystal is better protected against mechanical and chemical stress. The depth of the cavity depends on the height of the girdle and/or the strength of the base material.
Round Stones
Flat Backs No Hotfix
Fancy Stones
DrillingMillingWater jet cutting
End-to-end cavity
An end-to-end cavity is the simplest option when producing cavities. When selecting the glue (p. 53), please note the additional instructions regarding the gluing gap.
Flat Backs No Hotfix
Crystal Rocks
Plastic Trimmings
Flat Back & Chaton Bandings
Crystal Mesh
MillingCasting
Blind hole
A blind hole is another option when producing cavities. It allows SWAROVSKI ELEMENTS in a variety of heights to be set and protected in the material.When selecting the depth of the cavity, ensure that, there is still a gap between the lowest point of the crystal and the base material. When selecting the glue (p. 53), please note the additional instructions regarding the gluing gap.
Flat Backs No Hotfix
Fancy Stones
MillingCasting
Step milling
Compared to a simple blind hole, step milling offers better hold of the crystal with the least amount of glue. When selecting the depth of the cavity, ensure that there is still a gap between the lowest point of the crystal and the base material. When selecting the glue (p. 53), please note the additional instructions regarding the gluing gap.
Flat Backs No Hotfix
Fancy Stones
MillingCasting
3D milling
3D milling offers the best possible fit with the smallest gluing gap. Due to the fact that the cavity is adapted to the contours of the crystal, CNC milling machines are required.
GLU
ING

50 Application techniques
GLU
ING
Production tolerances for cavities
When producing cavities, the dimensions should be based on the main dimensions, including the maximum tolerance for the crystal components used, and the production tolerance. These dimensions can be requested from your Swarovski sales organization.
Incorrect cavities
Glue Flat Back
Cavity
Maximum level of tolerance (+0.10 mm; +0.15 mm)
Angle too small
Gap too great
Crystal too large/cavity too small Angle too large
Cavity with uneven surfaceRounded cavity
51 Application techniques
GLU
ING
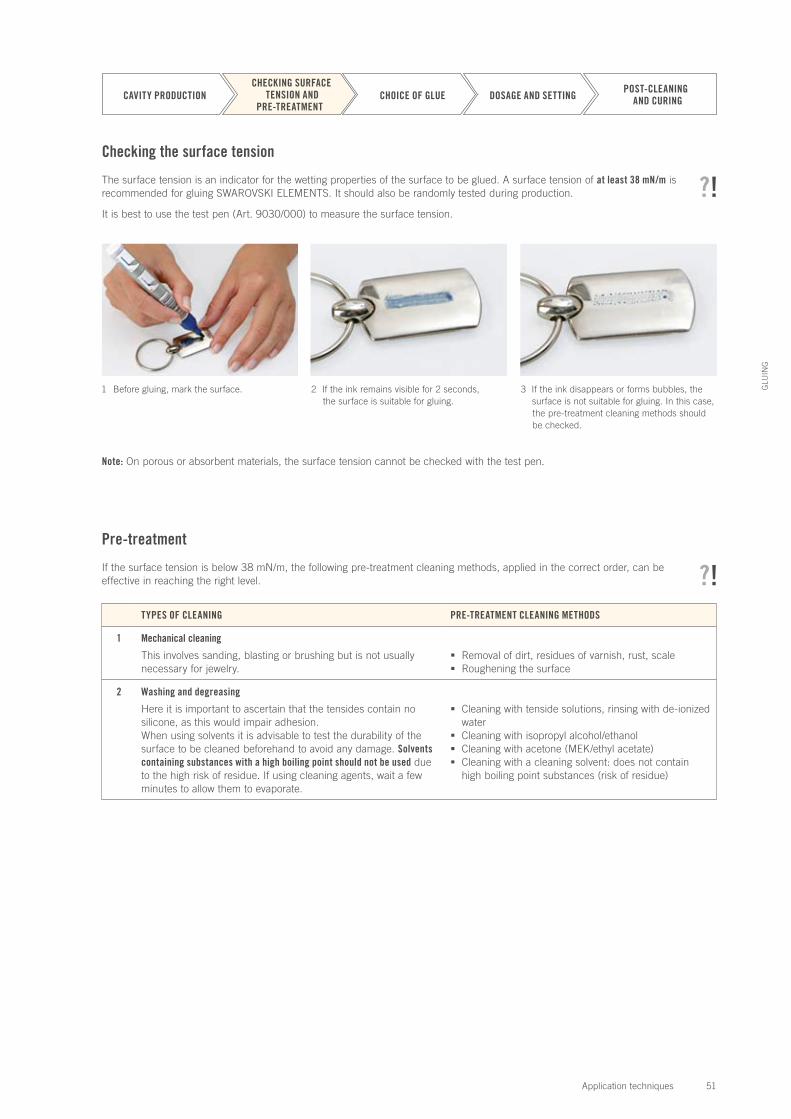
1 Before gluing, mark the surface. 2 If the ink remains visible for 2 seconds, the surface is suitable for gluing.
3 If the ink disappears or forms bubbles, the surface is not suitable for gluing. In this case, the pre-treatment cleaning methods should be checked.
Checking the surface tension
The surface tension is an indicator for the wetting properties of the surface to be glued. A surface tension of at least 38 mN/m is recommended for gluing SWAROVSKI ELEMENTS. It should also be randomly tested during production.
It is best to use the test pen (Art. 9030/000) to measure the surface tension.
CAVITY PRODUCTION CHECKING SURFACE
TENSION AND PRE-TREATMENT
CHOICE OF GLUE DOSAGE AND SETTING POST-CLEANING
AND CURING
Note: On porous or absorbent materials, the surface tension cannot be checked with the test pen.
Pre-treatment
If the surface tension is below 38 mN/m, the following pre-treatment cleaning methods, applied in the correct order, can be effective in reaching the right level.
TYPES OF CLEANING PRE-TREATMENT CLEANING METHODS
1 Mechanical cleaning
This involves sanding, blasting or brushing but is not usually necessary for jewelry.
Removal of dirt, residues of varnish, rust, scaleRoughening the surface
2 Washing and degreasing
Here it is important to ascertain that the tensides contain no silicone, as this would impair adhesion.When using solvents it is advisable to test the durability of the surface to be cleaned beforehand to avoid any damage. Solvents containing substances with a high boiling point should not be used due to the high risk of residue. If using cleaning agents, wait a few minutes to allow them to evaporate.
Cleaning with tenside solutions, rinsing with de-ionized water
Cleaning with isopropyl alcohol/ethanolCleaning with acetone (MEK/ethyl acetate)Cleaning with a cleaning solvent: does not contain
high boiling point substances (risk of residue)
52 Application techniques
GLU
ING
TYPES OF CLEANING PRE-TREATMENT CLEANING METHODS
3 Physical cleaning and activation
These cleaning methods can be applied if mechanical cleaning or washing and degreasing are either not possible or have not resulted in a surface tension of > 38 mN/m. Therefore the pre-treatment cleaning method used should be done on a case-by-case basis.
Flame treatment via a blow torchThe surface to be treated is exposed to the flame of
a torch very briefly. When using special gas mixtures, surface silication can also be carried out, so as to apply a more adhesive coating.
Corona treatmentAn electric corona discharge is briefly applied to the
surface.
Plasma treatmentPlasma treatment offers precise cleaning and activates
the surface via an ionized gas.
4 Chemical cleaning and primers
Applying a primer improves adhesion and helps to prevent corrosion.
Applying small amounts of solvent and activating the surface.
Applying a primer.
The selection of the best gluing system is the next stage in ensuring a long-lasting application. When selecting the most suitable glue, the following factors should be considered:
The type of cavities/the resulting gluing gap
The size of the crystals/gluing surface
The gluing properties and finish required
The type of base material
The type of cavities/the resulting gluing gap
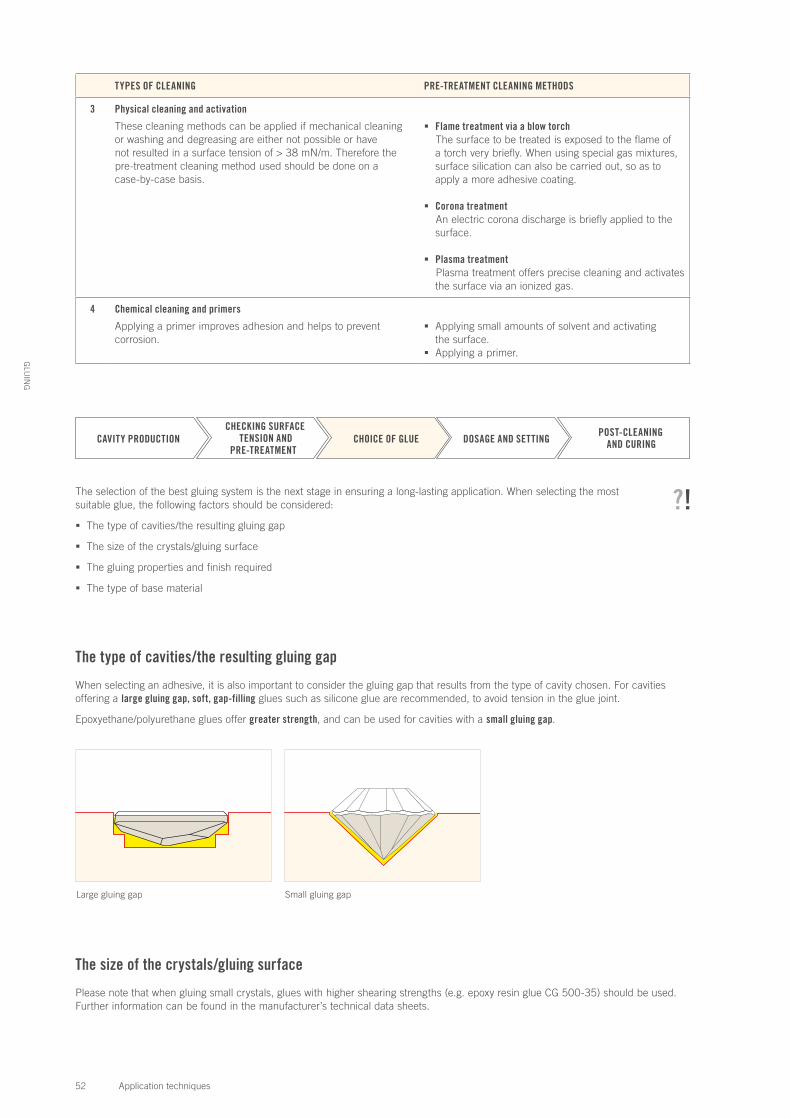
When selecting an adhesive, it is also important to consider the gluing gap that results from the type of cavity chosen. For cavities offering a large gluing gap, soft, gap-filling glues such as silicone glue are recommended, to avoid tension in the glue joint.
Epoxyethane/polyurethane glues offer greater strength, and can be used for cavities with a small gluing gap.
CAVITY PRODUCTION CHECKING SURFACE
TENSION AND PRE-TREATMENT
CHOICE OF GLUE DOSAGE AND SETTING POST-CLEANING
AND CURING
Large gluing gap Small gluing gap
The size of the crystals/gluing surface
Please note that when gluing small crystals, glues with higher shearing strengths (e.g. epoxy resin glue CG 500-35) should be used. Further information can be found in the manufacturer’s technical data sheets.

53 Application techniques
GLU
ING
The type of base material
The following table provides a selection of commonly known and globally available adhesives that are suitable for different uses and materials. It should also serve as a guide to find the optimal glue for the chosen application.
TWO-COMPONENT EPOXY RESIN GLUES
POLYURETHANE GLUES
CYANACRYLATE GLUES
UV GLUES
SILICONE GLUES
DISPERSION & CONTACT GLUES
ONE-COMPONENT SYSTEMS
CG 5
00-3
5
UHU
Plus
end
fest
300
Aral
dite
201
1
Aral
dite
202
8
Scot
ch W
eld
DP 6
10
UHU
Seku
nden
kleb
er
Cybe
rbon
d 29
99
Phot
obon
d GB
368
Phot
obon
d GB
345
Elas
tosi
l N21
99
Kons
truv
it
Chri
sann
e
Bost
ik 1
475
Aral
dite
AV
170
INOR
GANI
C M
ATER
IALS
Crystal
Glass
Ceramics
Stone
MET
ALS
Aluminum
Brass
Silver
Steel
GLUA
BLE
SYNT
HETI
C M
ATER
IALS
PC
PS
PVC/ABS
Rubber
ORGA
NIC
MAT
ERIA
LS
Paper
Cork
Wood
Textiles
The foiling (shown in black) is torn from the crystal because of excessive glue shrinkage (shown in yellow).
The gluing properties and finish required
When selecting glues, it is important to consider properties such as pot life, viscosity, color, curing time, ease of dosing and shrinkage. Further information can be found in the manufacturer’s technical data sheets.
Adhesives tend to shrink during curing. There will be a greater amount of shrinkage if the wrong glue has been chosen, it is hardened under the wrong conditions or if there is an incorrectly sized cavity (too much space around the crystal). The tension thus created can damage the foiling and the crystals may even detach. Glues that are very hard after curing and shrink considerably are not suitable for SWAROVSKI ELEMENTS with foiling.
54 Application techniques
CG 500-35 Two-component epoxy resin glue
High-performance gluing system for both foiled and unfoiled SWAROVSKI ELEMENTS, exclusively distributed by Swarovski for professional use within the jewelry segment and other industries such as accessories, interiors, and electronics.
Main advantages of CG 500-35
Ideal mechanical resistance
Ideal chemical resistance
Future-oriented solution
Diverse areas of application
Ideal mechanical resistance
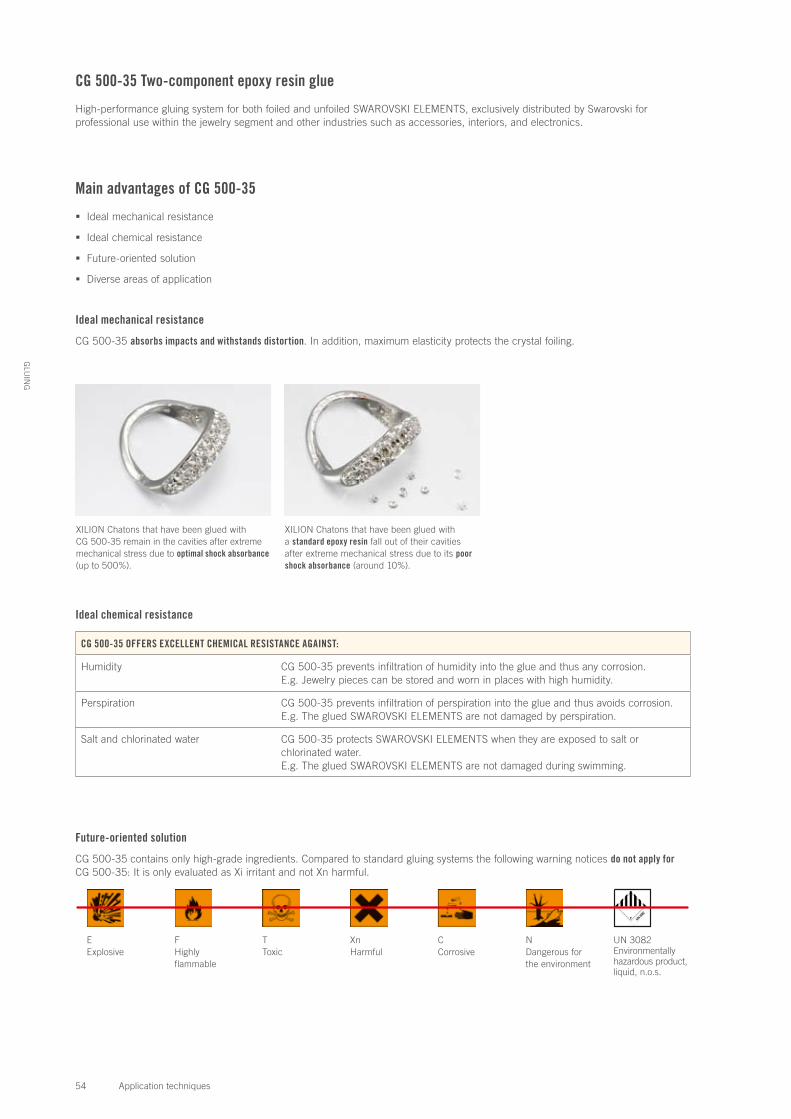
CG 500-35 absorbs impacts and withstands distortion. In addition, maximum elasticity protects the crystal foiling.
GLU
ING
XILION Chatons that have been glued with CG 500-35 remain in the cavities after extreme mechanical stress due to optimal shock absorbance (up to 500%).
XILION Chatons that have been glued with a standard epoxy resin fall out of their cavities after extreme mechanical stress due to its poor shock absorbance (around 10%).
Ideal chemical resistance
CG 500-35 OFFERS EXCELLENT CHEMICAL RESISTANCE AGAINST:
Humidity CG 500-35 prevents infiltration of humidity into the glue and thus any corrosion.E.g. Jewelry pieces can be stored and worn in places with high humidity.
Perspiration CG 500-35 prevents infiltration of perspiration into the glue and thus avoids corrosion.E.g. The glued SWAROVSKI ELEMENTS are not damaged by perspiration.
Salt and chlorinated water CG 500-35 protects SWAROVSKI ELEMENTS when they are exposed to salt or chlorinated water.E.g. The glued SWAROVSKI ELEMENTS are not damaged during swimming.
Future-oriented solution
CG 500-35 contains only high-grade ingredients. Compared to standard gluing systems the following warning notices do not apply for CG 500-35: It is only evaluated as Xi irritant and not Xn harmful.
EExplosive
FHighly flammable
TToxic
XnHarmful
CCorrosive
NDangerous for the environment
UN 3082Environmentally hazardous product, liquid, n.o.s.
55 Application techniques
GLU
ING
CG 500-35 technical data
Mixture ratio (A : B) 1 : 1 (or proportion of weight)
Pot life at room temperature (23°C/73.4°F) – quantity applied 1 g 15 min.
Complete curing time at room temperature (23°C/73.4°F) 24 h
Complete curing time in oven (40°C/104°F) 12 h
Complete curing time in oven (70°C/158°F) 2 h
Complete curing time in oven (100°C/212°F) 1 h
Handling time at room temperature (23°C/73.4°F) 3 h
Elasticity 500%
Viscosity (mixed) 20000 +/- 5000 mPa*s
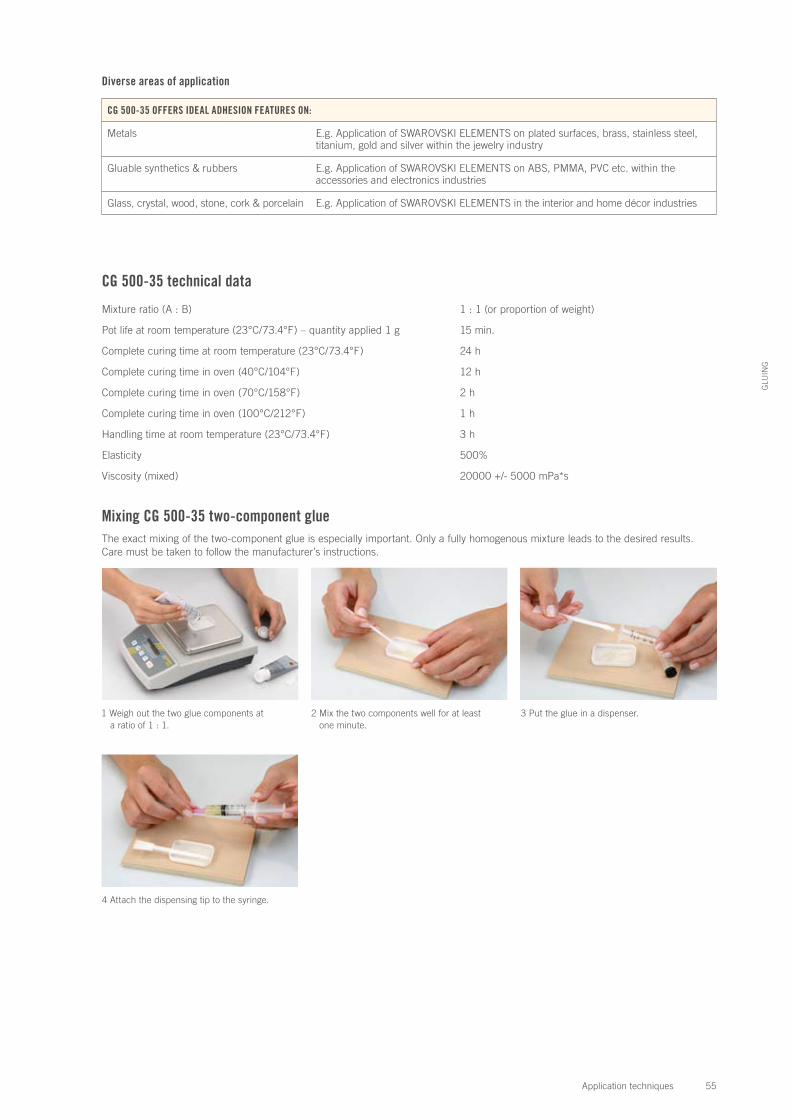
Mixing CG 500-35 two-component glueThe exact mixing of the two-component glue is especially important. Only a fully homogenous mixture leads to the desired results. Care must be taken to follow the manufacturer’s instructions.
1 Weigh out the two glue components at a ratio of 1 : 1.
2 Mix the two components well for at least one minute.
3 Put the glue in a dispenser.
4 Attach the dispensing tip to the syringe.
Diverse areas of application
CG 500-35 OFFERS IDEAL ADHESION FEATURES ON:
Metals E.g. Application of SWAROVSKI ELEMENTS on plated surfaces, brass, stainless steel, titanium, gold and silver within the jewelry industry
Gluable synthetics & rubbers E.g. Application of SWAROVSKI ELEMENTS on ABS, PMMA, PVC etc. within the accessories and electronics industries
Glass, crystal, wood, stone, cork & porcelain E.g. Application of SWAROVSKI ELEMENTS in the interior and home décor industries
56 Application techniques
GLU
ING
Too much glueToo little glue
Dosage
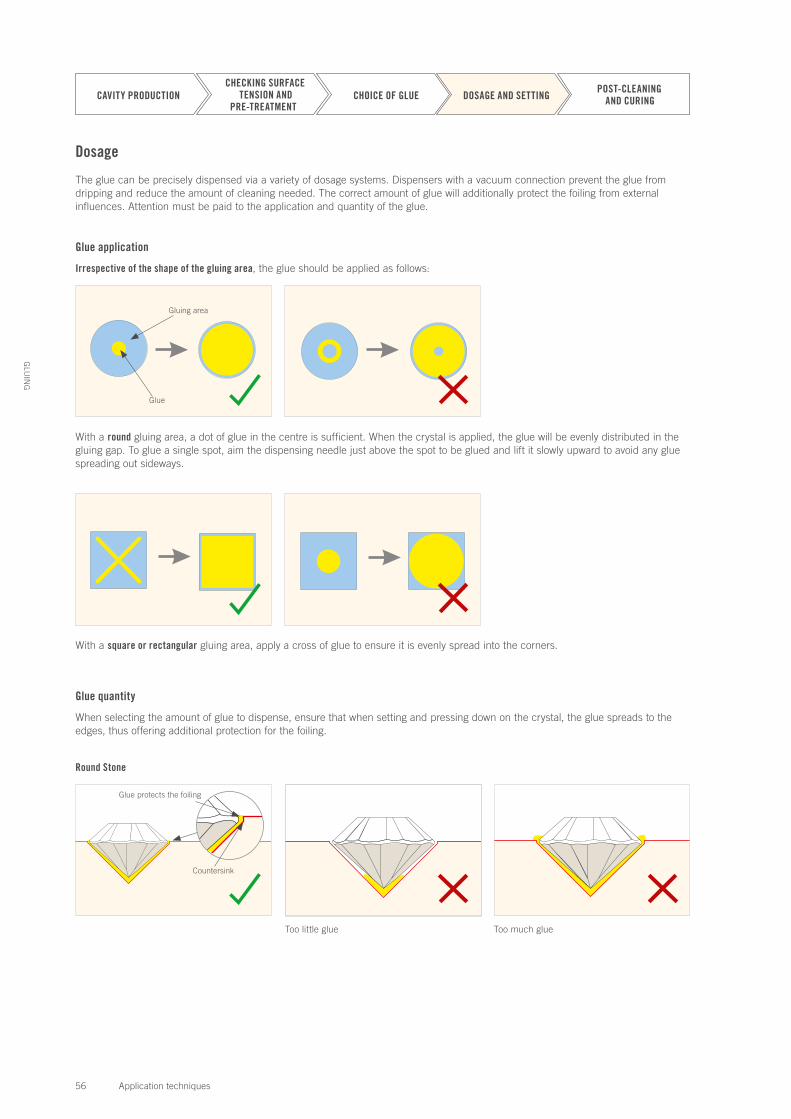
The glue can be precisely dispensed via a variety of dosage systems. Dispensers with a vacuum connection prevent the glue from dripping and reduce the amount of cleaning needed. The correct amount of glue will additionally protect the foiling from external influences. Attention must be paid to the application and quantity of the glue.
Glue application
Irrespective of the shape of the gluing area, the glue should be applied as follows:
CAVITY PRODUCTION CHECKING SURFACE
TENSION AND PRE-TREATMENT
CHOICE OF GLUE DOSAGE AND SETTING POST-CLEANING
AND CURING
With a round gluing area, a dot of glue in the centre is sufficient. When the crystal is applied, the glue will be evenly distributed in the gluing gap. To glue a single spot, aim the dispensing needle just above the spot to be glued and lift it slowly upward to avoid any glue spreading out sideways.
Gluing area
Glue
With a square or rectangular gluing area, apply a cross of glue to ensure it is evenly spread into the corners.
Countersink
Glue protects the foiling
Glue quantity
When selecting the amount of glue to dispense, ensure that when setting and pressing down on the crystal, the glue spreads to the edges, thus offering additional protection for the foiling.
Round Stone

57 Application techniques
GLU
ING
Fancy Stone
Too little glue Too much glue
Glue does not fill the gluing gap
To prevent the crystal from sinking or tipping during the hardening process, a small plasticine ball can be used to fix it in place.
Setting
Once the glue has been dispensed the SWAROVSKI ELEMENTS are positioned. Pick up the crystals e.g. with a wax stick, tweezers or a vacuum pick-up system, apply them to the gluing position and press down gently. The use of a silicone wax stick is not recommended as this can impair the adhesion and the brilliance of the crystal.
When working with cavities with large gluing gaps, the following aids assist in ensuring the optimum positioning:
A cross (or similar) prevents the crystal from tipping over; press the crystal down flat on the material using the cross (or similar).
Glue protects the foiling Glue discharge

58 Application techniques
GLU
ING
Post-cleaning
Excess glue that escapes during setting can be carefully removed using a cotton wipe that has been soaked in a solvent, e.g. isopropyl alcohol. It must be removed while the glue is hardening, as dried glue cannot be fully removed. Remember to follow the glue manufacturer’s instructions, as well as considering the resistance of the base material.
Curing
The curing time of the glue depends mainly on the temperature, or on the humidity in the case of silicone glues. Please note the glue manufacturer’s instructions. To minimize shrinking and tension during hardening, we recommend a maximum curing temperature of 50°C (122°F), with the exception of two-component epoxy resin glue CG 500-35. CG 500-35 can be cured at a maximum temperature of 100°C (212°F), without any changes to its properties.
CAVITY PRODUCTION CHECKING SURFACE
TENSION AND PRE-TREATMENT
CHOICE OF GLUE DOSAGE AND SETTING POST-CLEANING
AND CURING
OVERVIEW OF THE APPLICATION PROCESSES <<<
4 Carefully place the crystal in the cavity and press it down gently; post-clean and cure.
1 The surface must be correctly pre-treated before gluing (e.g. cleaning, degreasing, sanding).
2 The glue should be applied with a dispenser. 3 Pick up the crystal with the wax stick, for example.
59 Application techniques
GLU
ING
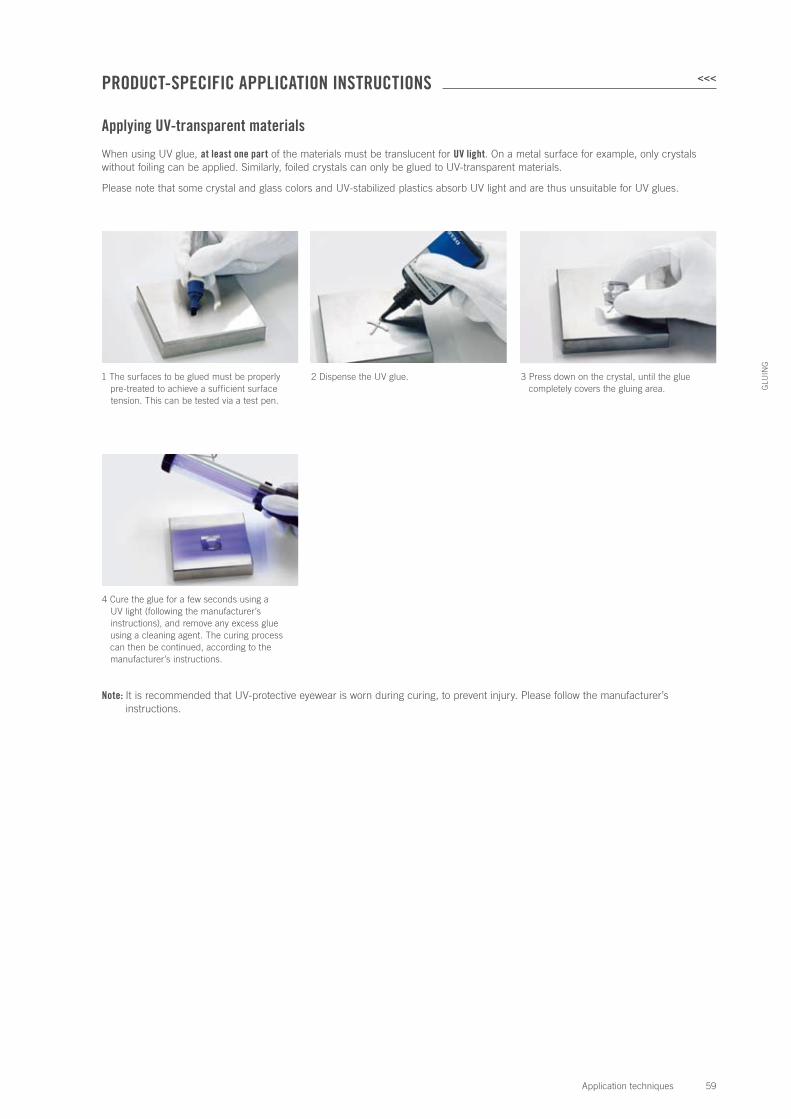
1 The surfaces to be glued must be properly pre-treated to achieve a sufficient surface tension. This can be tested via a test pen.
2 Dispense the UV glue. 3 Press down on the crystal, until the glue completely covers the gluing area.
PRODUCT-SPECIFIC APPLICATION INSTRUCTIONS <<<
Applying UV-transparent materials
When using UV glue, at least one part of the materials must be translucent for UV light. On a metal surface for example, only crystals without foiling can be applied. Similarly, foiled crystals can only be glued to UV-transparent materials.
Please note that some crystal and glass colors and UV-stabilized plastics absorb UV light and are thus unsuitable for UV glues.
4 Cure the glue for a few seconds using a UV light (following the manufacturer’s instructions), and remove any excess glue using a cleaning agent. The curing process can then be continued, according to the manufacturer’s instructions.
Note: It is recommended that UV-protective eyewear is worn during curing, to prevent injury. Please follow the manufacturer’s instructions.
60 Application techniques
GLU
ING
Applying Self-Adhesive Elements
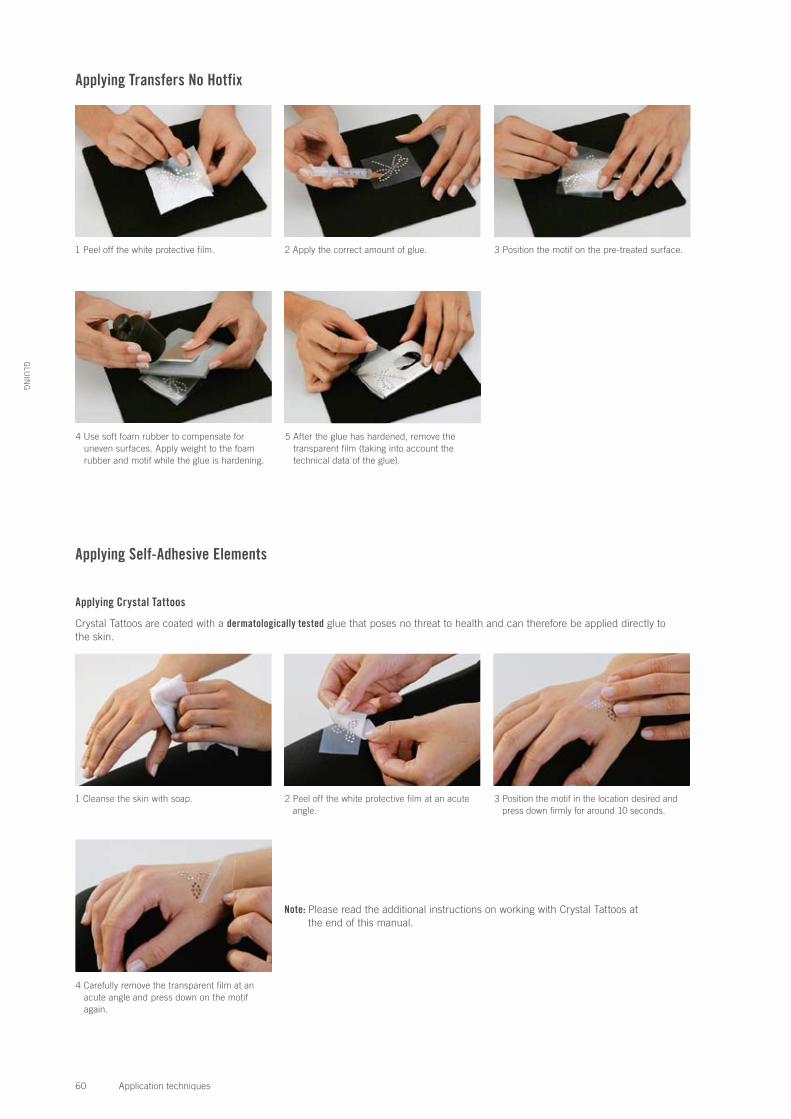
Applying Crystal Tattoos
Crystal Tattoos are coated with a dermatologically tested glue that poses no threat to health and can therefore be applied directly to the skin.
1 Cleanse the skin with soap. 2 Peel off the white protective film at an acute angle.
3 Position the motif in the location desired and press down firmly for around 10 seconds.
4 Carefully remove the transparent film at an acute angle and press down on the motif again.
4 Use soft foam rubber to compensate for uneven surfaces. Apply weight to the foam rubber and motif while the glue is hardening.
5 After the glue has hardened, remove the transparent film (taking into account the technical data of the glue).
Applying Transfers No Hotfix
1 Peel off the white protective film. 2 Apply the correct amount of glue. 3 Position the motif on the pre-treated surface.
Note: Please read the additional instructions on working with Crystal Tattoos at the end of this manual.
61 Application techniques
GLU
ING
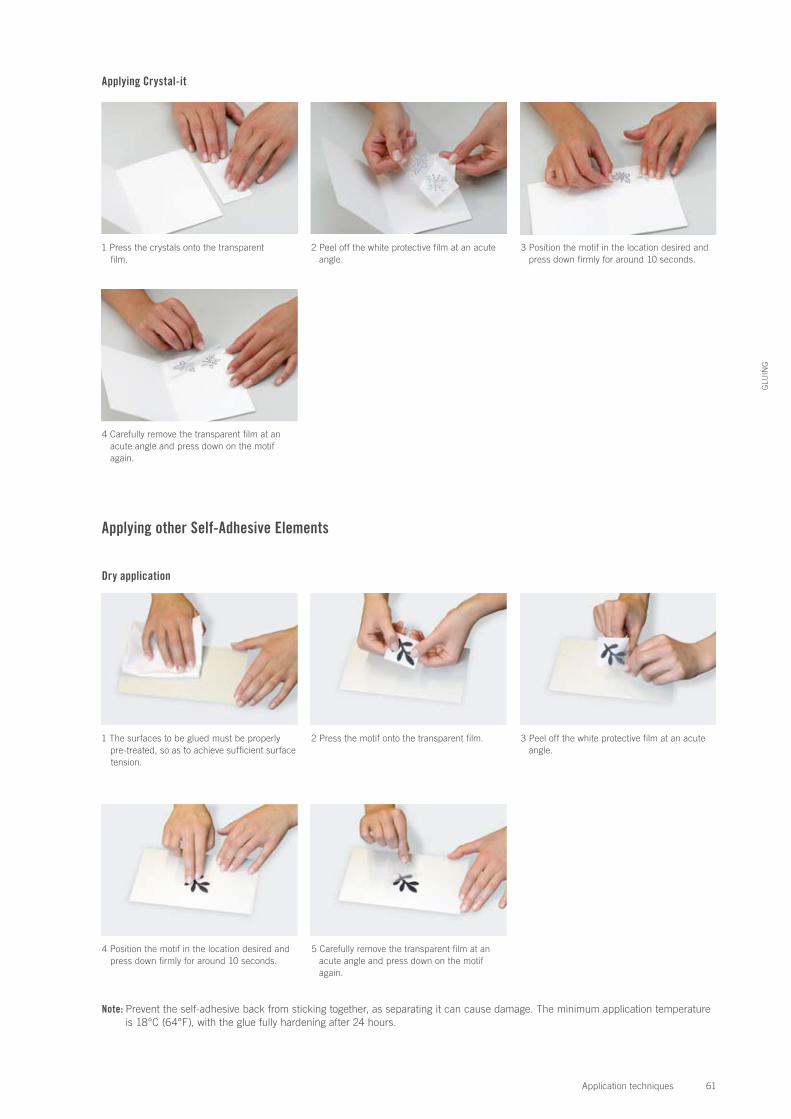
1 Press the crystals onto the transparent film.
2 Peel off the white protective film at an acute angle.
3 Position the motif in the location desired and press down firmly for around 10 seconds.
4 Carefully remove the transparent film at an acute angle and press down on the motif again.
Applying Crystal-it
Applying other Self-Adhesive Elements
Dry application
1 The surfaces to be glued must be properly pre-treated, so as to achieve sufficient surface tension.
2 Press the motif onto the transparent film. 3 Peel off the white protective film at an acute angle.
4 Position the motif in the location desired and press down firmly for around 10 seconds.
5 Carefully remove the transparent film at an acute angle and press down on the motif again.
Note: Prevent the self-adhesive back from sticking together, as separating it can cause damage. The minimum application temperature is 18°C (64°F), with the glue fully hardening after 24 hours.
62 Application techniques
GLU
ING
When applying Crystal Fabric-it and Crystaltex-it Bandings, remove the white protective film during application in the pre-produced cavity.
For applications on surfaces subject to high mechanical stresses, it is recommended that a cavity is produced.
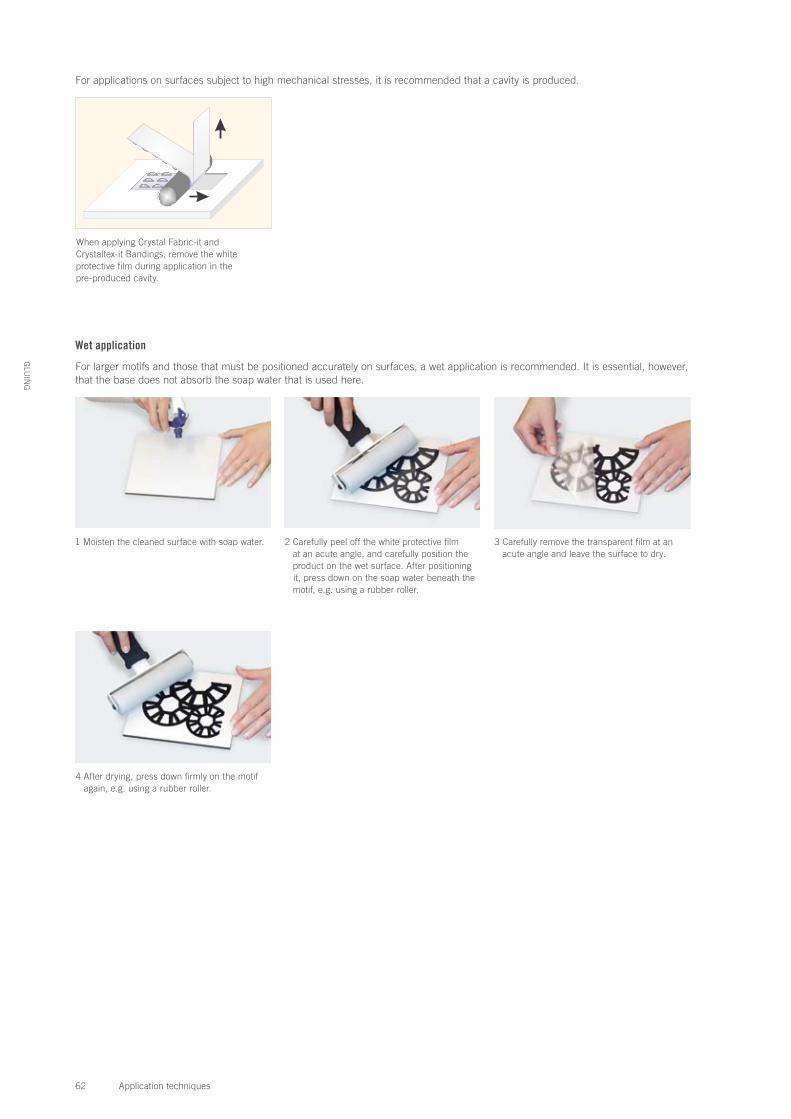
Wet application
For larger motifs and those that must be positioned accurately on surfaces, a wet application is recommended. It is essential, however, that the base does not absorb the soap water that is used here.
1 Moisten the cleaned surface with soap water. 2 Carefully peel off the white protective film at an acute angle, and carefully position the product on the wet surface. After positioning it, press down on the soap water beneath the motif, e.g. using a rubber roller.
3 Carefully remove the transparent film at an acute angle and leave the surface to dry.
4 After drying, press down firmly on the motif again, e.g. using a rubber roller.
63 Application techniques
GLU
ING
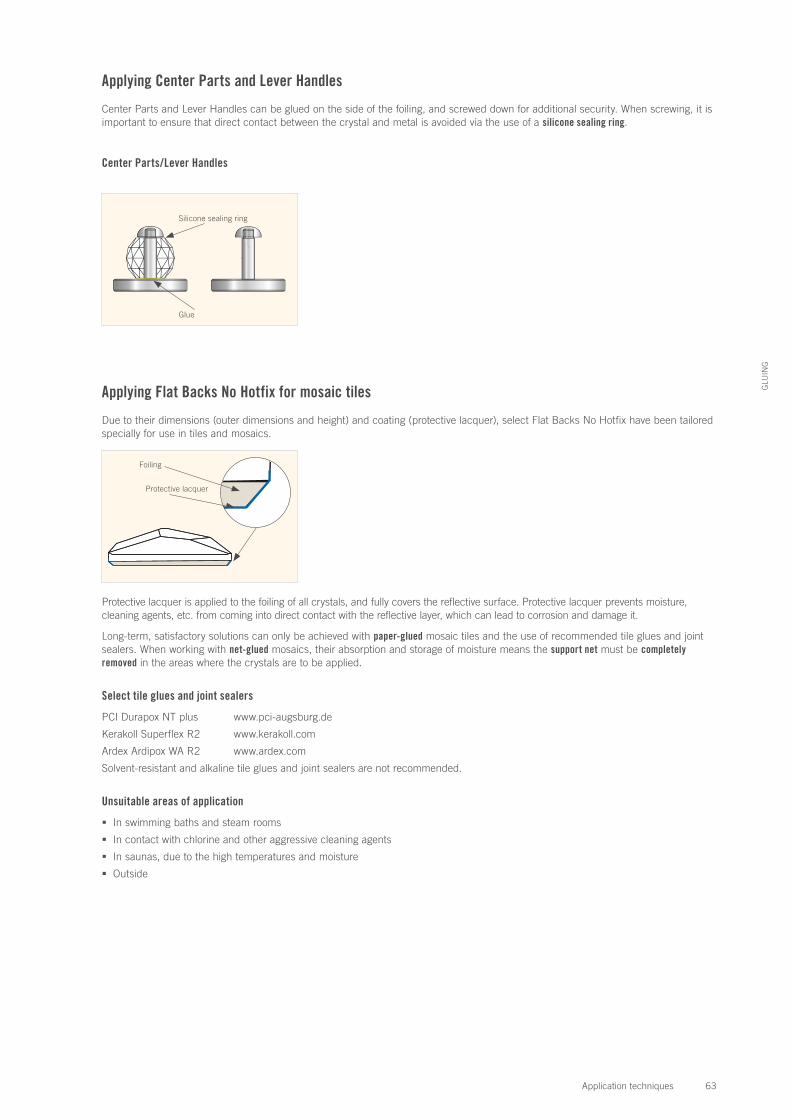
Applying Center Parts and Lever Handles
Center Parts and Lever Handles can be glued on the side of the foiling, and screwed down for additional security. When screwing, it is important to ensure that direct contact between the crystal and metal is avoided via the use of a silicone sealing ring.
Center Parts/Lever Handles
Silicone sealing ring
Glue
Protective lacquer is applied to the foiling of all crystals, and fully covers the reflective surface. Protective lacquer prevents moisture, cleaning agents, etc. from coming into direct contact with the reflective layer, which can lead to corrosion and damage it.
Long-term, satisfactory solutions can only be achieved with paper-glued mosaic tiles and the use of recommended tile glues and joint sealers. When working with net-glued mosaics, their absorption and storage of moisture means the support net must be completely removed in the areas where the crystals are to be applied.
Select tile glues and joint sealers
PCI Durapox NT plus www.pci-augsburg.de
Kerakoll Superflex R2 www.kerakoll.com
Ardex Ardipox WA R2 www.ardex.com
Solvent-resistant and alkaline tile glues and joint sealers are not recommended.
Unsuitable areas of application
In swimming baths and steam rooms
In contact with chlorine and other aggressive cleaning agents
In saunas, due to the high temperatures and moisture
Outside
Applying Flat Backs No Hotfix for mosaic tiles
Due to their dimensions (outer dimensions and height) and coating (protective lacquer), select Flat Backs No Hotfix have been tailored specially for use in tiles and mosaics.
Protective lacquer
Foiling
64 Application techniques
GLU
ING
Net
Paper
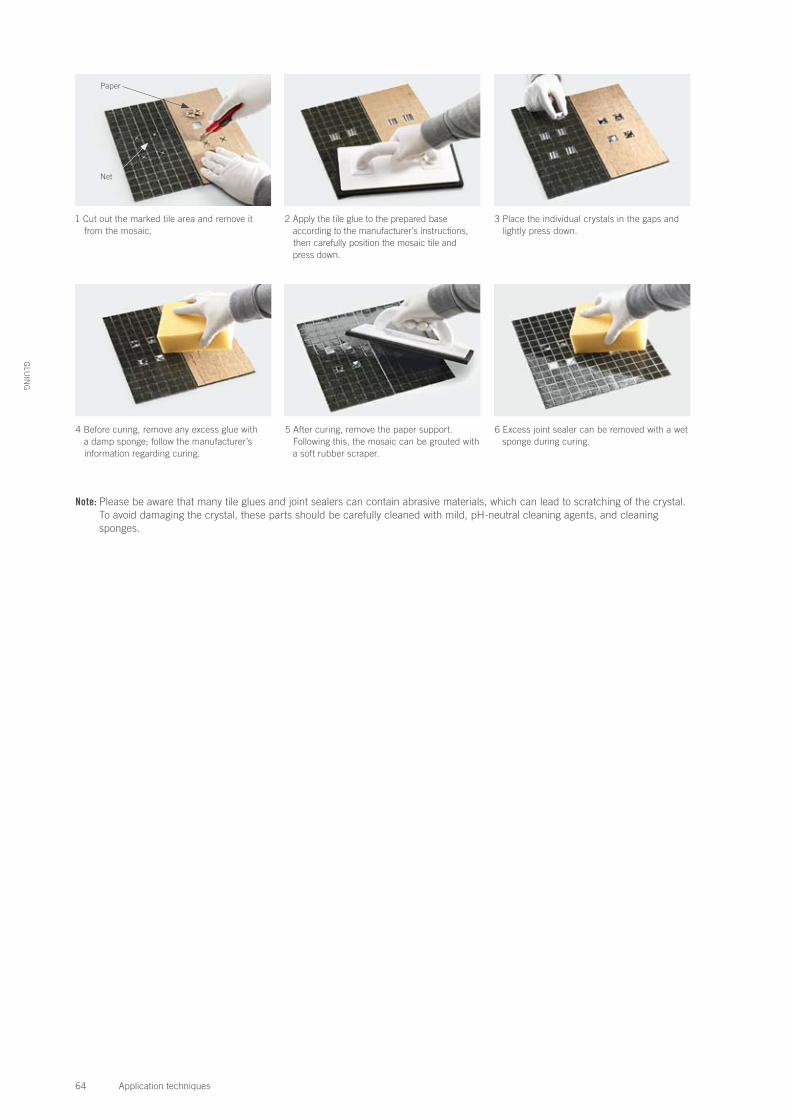
1 Cut out the marked tile area and remove it from the mosaic.
2 Apply the tile glue to the prepared base according to the manufacturer’s instructions, then carefully position the mosaic tile and press down.
3 Place the individual crystals in the gaps and lightly press down.
4 Before curing, remove any excess glue with a damp sponge; follow the manufacturer’s information regarding curing.
5 After curing, remove the paper support. Following this, the mosaic can be grouted with a soft rubber scraper.
6 Excess joint sealer can be removed with a wet sponge during curing.
Note: Please be aware that many tile glues and joint sealers can contain abrasive materials, which can lead to scratching of the crystal. To avoid damaging the crystal, these parts should be carefully cleaned with mild, pH-neutral cleaning agents, and cleaning sponges.
65 Application techniques
GLU
ING
Applications on silver jewelry
Without protection, silver jewelry can turn yellow or black with time due to chemical reactions. To slow or stop these reactions the surface of silver jewelry is often covered with a temporary (wax-based) or permanent protective coat (varnish-based). Tarnishing on the surface of the metal often results in a decline in the surface tension to under the recommended 38 mN/m.
TARNISHING PREVENTION SYSTEMS
Temporary protection against tarnishing: Permanent protection against tarnishing:
Wax-based Varnish-based
Low surface tension Surface tension depends on varnish
Recommendation: Protect the rest of the piece after gluing Recommendation: Use a tarnishing protection system with sufficient surface tension
Remove the temporary tarnishing protection
Please note that all SWAROVSKI ELEMENTS in plated silver and all elements in the Metal Trimmings product group (gold 081, silver 082 and gun metal 086) are supplied with temporary wax-based tarnishing protection. As such, these elements do not offer the right properties for gluing. This tarnishing protection can be removed prior to gluing via flame treatment (e.g. a blow torch), however, it must be reapplied once the process is complete. The exception here is Crystal Mesh in silver, which is coated with a transparent lacquer and thus is ideal for gluing.
Temporary tarnishing protection can also be removed via alkaline baths.
USEFUL INFORMATION <<<
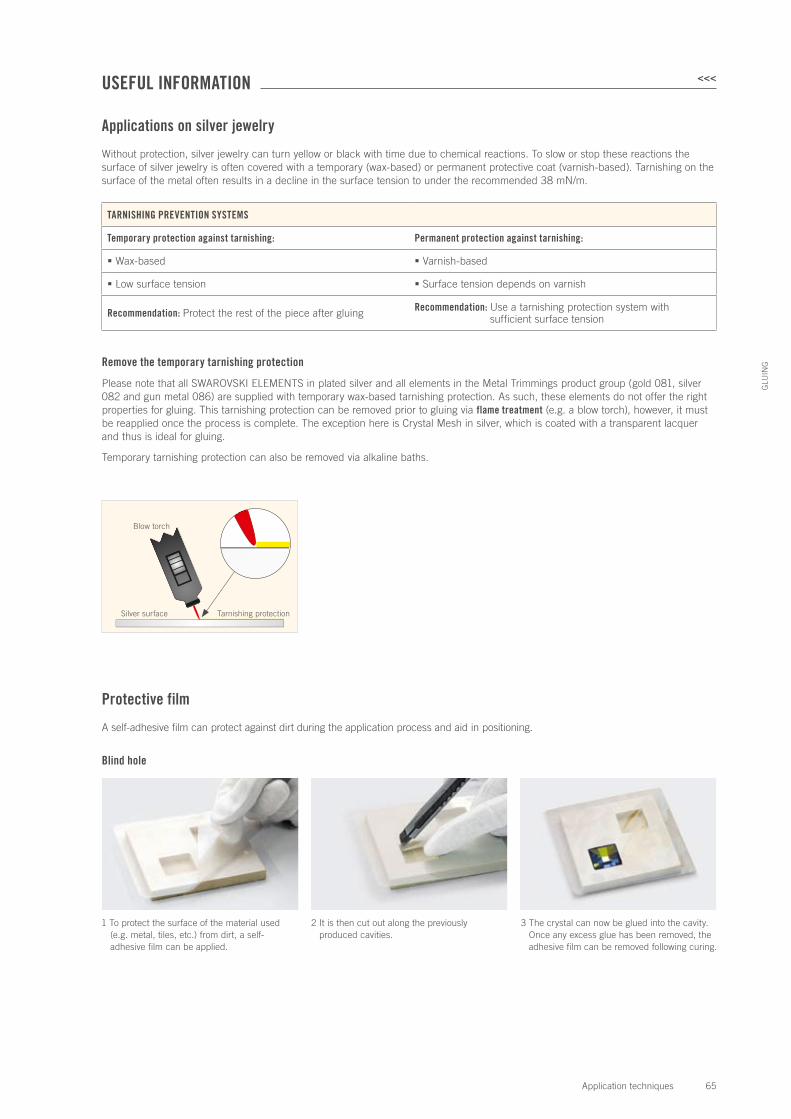
1 To protect the surface of the material used (e.g. metal, tiles, etc.) from dirt, a self-adhesive film can be applied.
2 It is then cut out along the previously produced cavities.
3 The crystal can now be glued into the cavity. Once any excess glue has been removed, the adhesive film can be removed following curing.
Protective film
A self-adhesive film can protect against dirt during the application process and aid in positioning.
Blind hole
Silver surface Tarnishing protection
Blow torch
66 Application techniques
GLU
ING
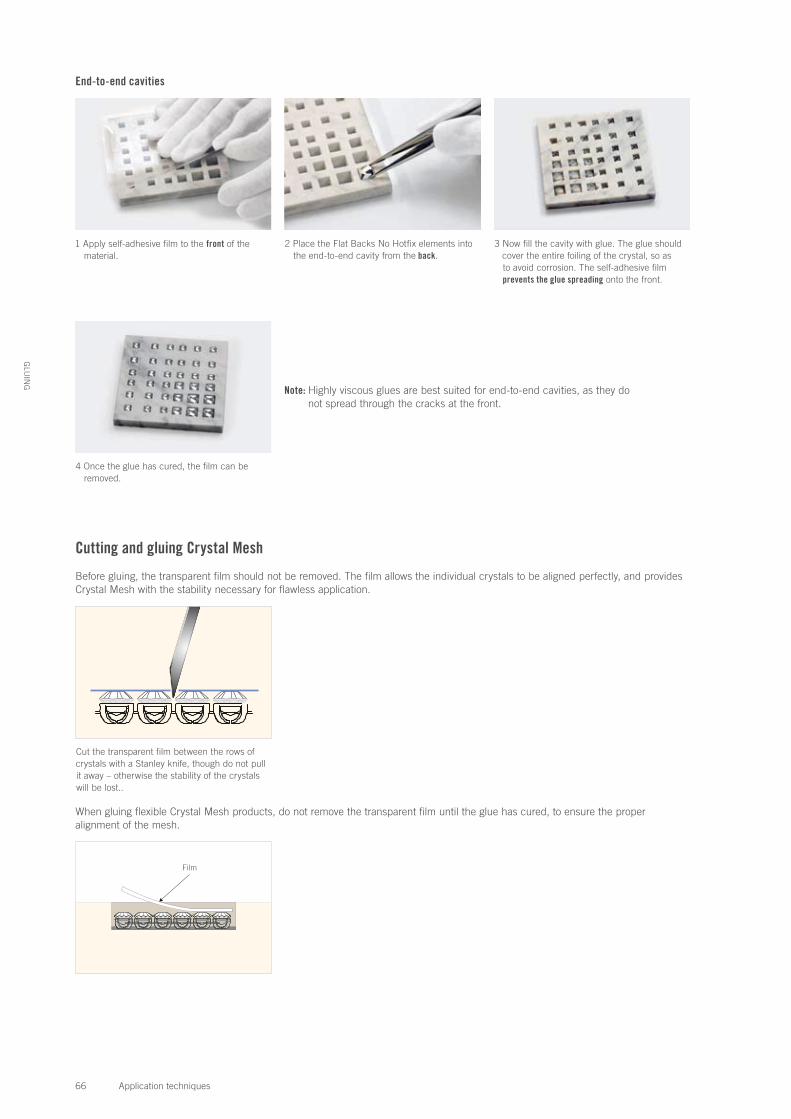
End-to-end cavities
1 Apply self-adhesive film to the front of the material.
2 Place the Flat Backs No Hotfix elements into the end-to-end cavity from the back.
3 Now fill the cavity with glue. The glue should cover the entire foiling of the crystal, so as to avoid corrosion. The self-adhesive film prevents the glue spreading onto the front.
4 Once the glue has cured, the film can be removed.
Cutting and gluing Crystal Mesh
Before gluing, the transparent film should not be removed. The film allows the individual crystals to be aligned perfectly, and provides Crystal Mesh with the stability necessary for flawless application.
When gluing flexible Crystal Mesh products, do not remove the transparent film until the glue has cured, to ensure the proper alignment of the mesh.
Film
Note: Highly viscous glues are best suited for end-to-end cavities, as they do not spread through the cracks at the front.
Cut the transparent film between the rows of crystals with a Stanley knife, though do not pull it away – otherwise the stability of the crystals will be lost..
67 Application techniques
GLU
ING
Applications on plastics
There are many types of synthetic materials. The following table contains information regarding the adhesive qualities of a selection of plastics.
PLASTICS USUAL COMMERCIAL NAME ADHESIVE QUALITIES
ABS Abselex, Lacqran, Tynrene good
ASA Luran S, Geloy good
CA Ultraphan, Saxetat, Thodialite good
EP Araldite, Ferropox, Duroxyn good
PA Degamid, Nylon, Perlon very difficult
PC Polycarbafil, Lexan, Andoran good
PE Geberit, Hostalen G, Ferrozell difficult
PET Cardura, Atlas, Eralyt difficult
PF Formanyl, Holoplast, Kerit good
PIB Parapol, Oppanol, Vistanex good
PMMA Plexiglass, Resartglass good
POM Delrin, Kematal, Ertacetal difficult
PP Moplefan, Proplex, Verelite difficult
PS Hostyrene, Styropor, Noblen good
PTFE Teflon, Gaflon, Ferrotron very difficult
PVC Marcoproplat, Ravinil, Sumilit good
SAN Litac, Tuf-Flex, Vestoran good
SILICONE Silopren, Contiduct, Corotex difficult
UP Celipal, Sirester, Vestopal good
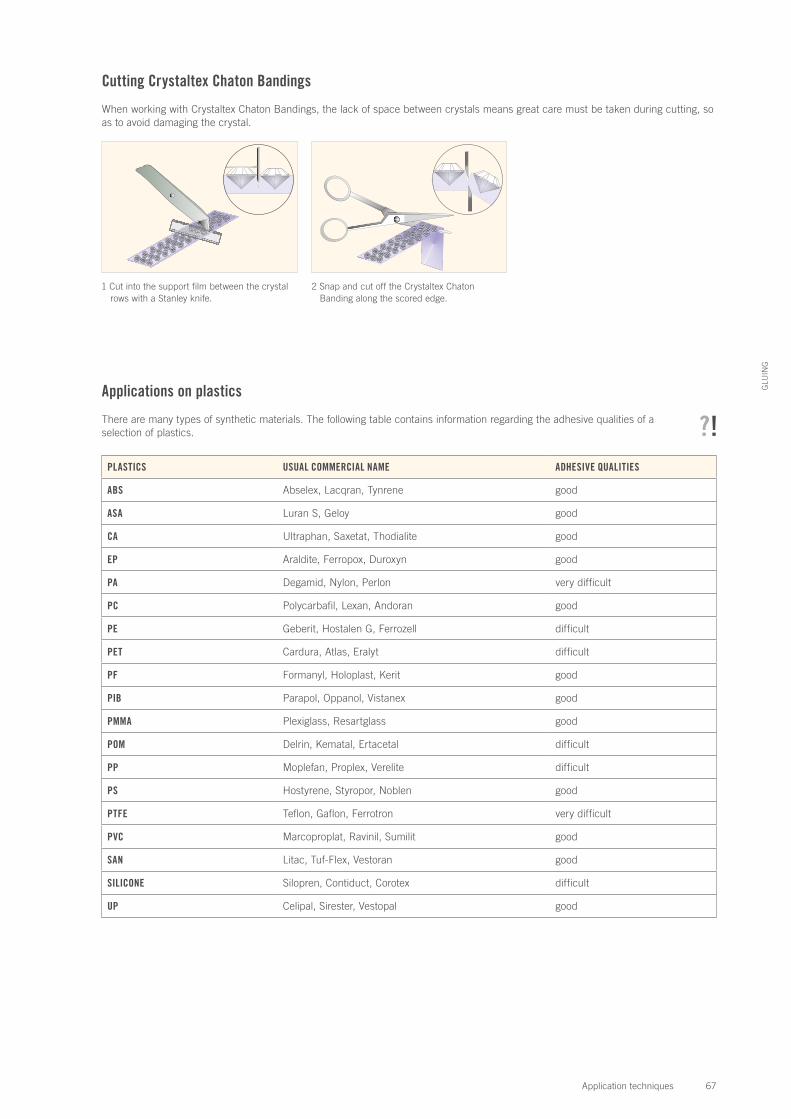
Cutting Crystaltex Chaton Bandings
When working with Crystaltex Chaton Bandings, the lack of space between crystals means great care must be taken during cutting, so as to avoid damaging the crystal.
1 Cut into the support film between the crystal rows with a Stanley knife.
2 Snap and cut off the Crystaltex Chaton Banding along the scored edge.
68 Application techniques
GLU
ING
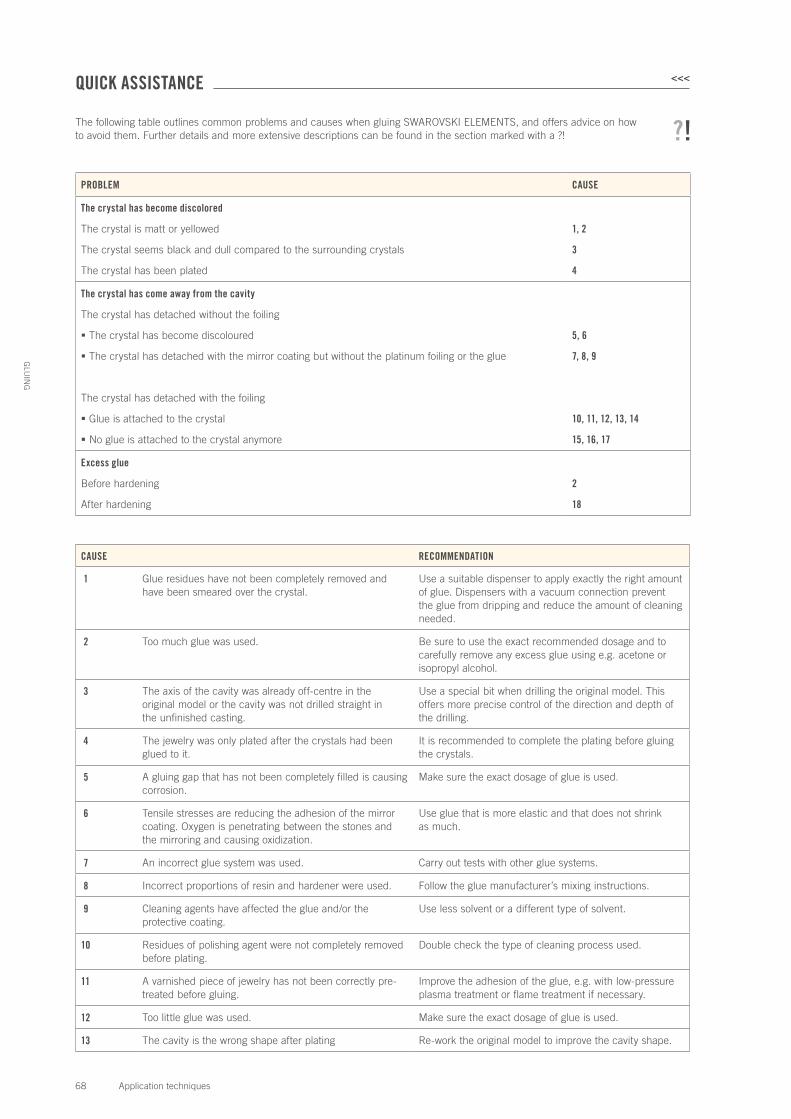
The following table outlines common problems and causes when gluing SWAROVSKI ELEMENTS, and offers advice on how to avoid them. Further details and more extensive descriptions can be found in the section marked with a ?!
PROBLEM CAUSE
The crystal has become discolored
The crystal is matt or yellowed
The crystal seems black and dull compared to the surrounding crystals
The crystal has been plated
1, 2
3
4
The crystal has come away from the cavity
The crystal has detached without the foiling
The crystal has become discoloured
The crystal has detached with the mirror coating but without the platinum foiling or the glue
The crystal has detached with the foiling
Glue is attached to the crystal
No glue is attached to the crystal anymore
5, 6
7, 8, 9
10, 11, 12, 13, 14
15, 16, 17
Excess glue
Before hardening
After hardening
2
18
CAUSE RECOMMENDATION
1 Glue residues have not been completely removed and have been smeared over the crystal.
Use a suitable dispenser to apply exactly the right amount of glue. Dispensers with a vacuum connection prevent the glue from dripping and reduce the amount of cleaning needed.
2 Too much glue was used. Be sure to use the exact recommended dosage and to carefully remove any excess glue using e.g. acetone or isopropyl alcohol.
3 The axis of the cavity was already off-centre in the original model or the cavity was not drilled straight in the unfinished casting.
Use a special bit when drilling the original model. This offers more precise control of the direction and depth of the drilling.
4 The jewelry was only plated after the crystals had been glued to it.
It is recommended to complete the plating before gluing the crystals.
5 A gluing gap that has not been completely filled is causing corrosion.
Make sure the exact dosage of glue is used.
6 Tensile stresses are reducing the adhesion of the mirror coating. Oxygen is penetrating between the stones and the mirroring and causing oxidization.
Use glue that is more elastic and that does not shrink as much.
7 An incorrect glue system was used. Carry out tests with other glue systems.
8 Incorrect proportions of resin and hardener were used. Follow the glue manufacturer’s mixing instructions.
9 Cleaning agents have affected the glue and/or the protective coating.
Use less solvent or a different type of solvent.
10 Residues of polishing agent were not completely removed before plating.
Double check the type of cleaning process used.
11 A varnished piece of jewelry has not been correctly pre-treated before gluing.
Improve the adhesion of the glue, e.g. with low-pressure plasma treatment or flame treatment if necessary.
12 Too little glue was used. Make sure the exact dosage of glue is used.
13 The cavity is the wrong shape after plating Re-work the original model to improve the cavity shape.
QUICK ASSISTANCE <<<

69 Application techniques
GLU
ING
CAUSE RECOMMENDATION
14 Electrolyte residues have not been completely removed. Double check the type of cleaning process used.
15 The specified processing time was exceeded and as a result the glue has already hardened.
Reduce the processing time.
16 Too little glue was used Make sure the exact dosage of glue is used.
17 General glue problems Follow the manufacturer’s instructions. Check the conditions under which the glue is stored. Excess solvent could have corroded the glue and/or the foiling.
18 The jewelry piece was put under stress before the glue had hardened.
Make sure the glue has hardened before e.g. transporting the jewelry.