Embed Size (px)
Citation preview

Rotork Actuators on Black Liquor
Recovery Boilers
A Guide and Recommendations for Setting up Rotork Valve Actuators on Rapid Drain Valves and Feed Water Stop Valves on Black Liquor Recovery Boilers

Contents Page # 1. Rotork Supply History 3 2. Clarification on Applications 4 3. Decision table for power interruption IQ Mk1 & IQ Mk2 6 4. Battery Change out procedures IQMk1 and IQMk2 7 5. Matrix of Features 9 6. Settings, Wiring Connections, and Wiring Diagrams for
Subsection 1 – 1400 Series 10 Subsection 2 – 1600 Series with optional local stop override 15 Subsection 3 – IQ Mk1 with optional local stop override 19 Subsection 4 – IQ Mk. 2 23
7. Installation & Maintenance instructions. (available in CD only)
1400/1600 Series - Publication E270E http://www.rotork.com/docSearch.E270E IQ Mk 1 Publication E170E Mark 1 http://www.rotork.com/docSearch.E170E IQ Mk 2 Publication E170E2 http://www.rotork.com/docSearch.E170E2

Section 1 Introduction and Rotork Supply History Rotork has been supplying Electric motor operators on Black Liquor recovery boilers for over four decades. Over this period of time our products have under gone improvements in design that have increased reliability as well as flexibility of application. These design improvements have followed the general migration of industrial equipment from hardwire technology to printed circuit and microprocessor technology. Rotork has undertaken this process incrementally and cautiously over the years. Originally the 1400 series wiring on our A range actuator was entirely hardwired. In the early 1980’s we introduced the 1600 series A range that incorporated some solid state controls and enhanced features such as automatic phase correction and enhance versatility of control. Many of these features were then complemented with the introduction of the IQ series in the early 1990’s. The main advance was the introduction of non-intrusive control setting. This enabled the settings of the actuator to be confirmed or adjusted without a removal of electrical covers. The benefit being that no dirt or moisture could contaminate the internals of the actuator degrading its inherent reliability. A further refinement of the IQ, designated IQ Mk. 2 was introduced in 2000. This actuator includes as standard a data logger so operational history can be downloaded to monitor performance and facilitate asset management features such as preventive or predictive maintenance. With these changes in our products have come some changes in the methods of installation and set up. The requirements for Black Liquor recovery boilers are quite specific as defined in BLRBAC good practice. We have revisited these requirements and combined this with our experience to come up with the attached recommendations for wiring hook up and settings on our actuators. We hope that this document will act as a definitive reference manual for the application of Rotork actuators on Black Liquor recovery boiler valves. Glossary ESP – Emergency shutdown procedure – As referenced in BLRBAC recommended good practice. ESD – Emergency shut down – As referenced in Rotork literature.

Section 2 Clarification of Application of the IQ Mk. 1 and Mk. 2 There have been several questions regarding the Rotork ESD connections used for the ESP function and the battery functions of the Rotork IQ units. Below are some answers to most frequently asked questions. Battery
1. Why does Rotork use a battery in its IQ actuators? An LCD display is used to give position and other information locally at the actuator. There needs to be some form of back up power to provide this display should the main AC power be lost. Additionally, the remote indication in the control room needs to be updated should the actuator be operated manually during loss of main power. The battery provides back up power for the LCD and the remote position indicating relays. There is a position processor in the IQ actuator that provides incremental position indication between fully open and fully closed. This position processor will also be updated by the battery should the valve be manually operated during a power outage. For these three reasons it is important to have the battery to provide power on loss of main AC power.
2. Will the actuator operate after a power interruption?
If power is interrupted to the actuator there will be no effect on its operation. However, if power is lost and the battery is low then again there will be no impact on the actuator provided the correct settings are made. This means that the “power loss inhibit” needs to be disabled per setting instructions attached. See also the decision table in section 3.
3. Will the settings be lost in the actuator on power down with a low battery?
No. The actuator settings are in non-volatile RAM. With a complete lack of power the settings remain the same and do not default to the original factory defaults. On power up the required settings will be reactivated. If the actuator is moved while it is powered down then only the end of travel switch settings will need to be reset. See also the decision table in section 3.
4. Will the settings be lost if the battery is changed with power down?
No. Settings will not be lost and end of travel position will not be affected providing the actuator is not moved during battery change out.
5. Can the battery condition be detected and monitored on both Mk. 1 and Mk. 2 IQ’s? The battery condition can be checked locally on the actuator indicator display. The battery low condition can be monitored remotely as well. See Section 4, Matrix of features, for relevant pages of instruction literature.
6. How often do the batteries need to be changed?
The shelf life of a battery is seven years. Recommendation is that batteries be changed every three to five years.
7. Does anything need to be done to the actuator after a power outage?
Usually nothing needs to be done to the actuator after a power outage. Whether the battery is present or not. Assuming that the actuator has been set up with the power loss inhibit disabled. See the decision table in section 3.
ESD Terminals for ESP Operation
1. Why does Rotork have separate terminals for ESD? These terminals are a way of ensuring that under emergency conditions (ESP) the actuator will go to the desired position. All models except 1400 series A range have dedicated ESD terminals. The 1400 series A range can be wired to provide ESD function. See Section 5 Subsection 1.

2. Will the actuator operate the valve during a ESP if the local selector is in the stop or local
position? All actuators can be wired for ESD/ESP. However for A Range 1600 series & IQ Mk1 if the local stop is selected the ESD will be disabled. The local stop position can be detected by the monitor relay which is standard for those models. This monitor relay can be connected to an alarm, indicating the non availability of the actuator. Alternatively the actuator can be modified by adding a PC board that will allow the bypass function. This is a factory service modification.
3. Can the ESD override external interlocks? The 1400 series A range hookup will bypass interlocks. The IQ Mk. 2 can be programmed so that the ESD overrides external interlocks. The IQ Mk. 1 & 1600 series A range would need external field wiring to achieve this function.
4. Stall Timer what is it? The “stall timer” is present on IQ MKI and MKII. If the motor is energized but yet the actuator does not move (jammed valve or other cause) then the stall timer will normally de-energize the motor to prevent damage. This stall timer can be bypassed by setting it to a maximum t8ime to ensure the greatest effort has been applied to a rapid drain valve to open it.

Section 3 Decision Table
IQ MK1 and MK2 Decision Table For Remedial Action in the Event of Power Interruption
Has the 3 Phase Power Supply to the Actuator been
interrupted?
Is the battery low Indicator showing “Low Battery”?
Has the “Power
Loss Inhibit” been disabled?
All actuator settings will be retained and unit will not be disabled for PSD
Has the actuator been used to
move the valve manually?
1. Change out battery per Section 4. 2. Set power loss initiated to disable,
see publications E170EMk1 Page 41 and E170E2Mk2 page 62.
3. Reset actuator limits – see publications E170EMk1 Page 24 and E170E2Mk2 page 27.
No
Yes
No
No
No
Yes or Not Sure
Yes
Yes or Not Sure
Change out battery per Section4.

Battery Change Out Procedure for IQ Mk1 Actuators
96

Battery Change Out Procedure for IQ mk2 Actuators Use an 8mm Allen key to remove the sealing plug, ensuring the ‘‘O’’ ring seal remains on the plug. Disconnect the battery wiring loom from the battery terminals. Using the black pull strap, lift the battery out of the rubber sealing pocket.
Fig. 10 Battery Types For European hazardous area certified actuators (ATEX) use an Ultralife U9VL lithium manganese dioxide battery only. For FM and CSA certified enclosures use an Ultralife U9VL lithium manganese dioxide battery. Equivalent, UL recognised, batteries may be used. For watertight (WT) actuator enclosures use an Ultralife U9VL lithium manganese dioxide battery or any equivalent 9V battery. If in doubt regarding the correct battery type, contact Rotork. Fitting Replacement Battery Fit the pull strap around the replacement battery and insert into the rubber sealing pocket. Reconnect the battery wiring loom to the battery terminals. Refit the battery sealing plug ensuring ‘‘O’’ ring is in good condition and correctly fitted. Hand tighten sealing plug using an 8mm Allen key.

Section 4 Matrix of Features
Rapid drain valve setup recomendations
Rotork Actuator Model 1400 1600 IQ Mk 1 IQ Mk 2
ESD dedicated terminals for an ESPYes with Hook up
Must be wired to provide ESD funtion. Section 6.1 Yes Yes Yes
Does the ESD override external interlocks during an ESP
Yes with Hook up
Must be wired to overide interlock funtion. Section 6.1 Caution
This must be done by external wiring Caution
This must be done by external wiring Select
See publication E170E2 Page 35
Power interuption must not inhibit motion N/A N/A SelectSee publication E170E Mark1 Page 42 Select
See publication E170E2 Page 62
Local battery indication N/A N/A Yes See publication E170E Mark1 Page 50 Yes
See publication E170E2 Page 6
Remote battery indication N/A N/A Yes See publication E170E Mark1 Page 29 Yes
See publication E170E2 Page 32
Settings retained on total power down Yes Yes Yes See section 3 Yes See section 3
Local stop must not inhibit ESPYes with Hook up
Must be wired to override local stop. Section 6.1
Factory service modification
modify by adding PC board. Also "Local stop" can be indicated by Monitor relay.
Factory service modification
Factory service can modify by adding PC board. Also "Local stop" can be indicated by Monitor relay. Select
See publication E170E2 Page35
Password protection available on settings No No Yes See publication E170E Mark1 Page 15 Yes
See publication E170E2 Page 18
Bypass torque switch in open directionYes with set up
See setup section 6.1 Yes with set up See setup section 6.2 Select See setup section 6.3 Select See setup section 6.4
Disable "stalled motor" time out protection N/A N/A
Factory service modification
Factory service can modify by reprograming with service tool.
Factory service modification
Factory service can modify by reprograming with service tool.
Bypass thermostat for ESPYes with Hook up
Must be wired to override thermstat. Section 6.1 Yes with Hook up
Must be wired to override thermstat. Section 6.2 Select
See publication E170E Mark1 Page 30 Select
See publication E170E2 Page34

Operating ManualRecommended Settings: E270E
Section/Page
Direction To Close As builtClose Action Section 5.13 / Page 10Open Action Section 5.13 / Page 10Torque Valve Closing Section 5.14 / Page 10Torque Valve Opening Section 5.14 / Page 10Close Limit Section 5.12 / Page 7-10Open Limit Section 5.14 / Page 7-10
Indication Contact CAS1 As builtIndication Contact OAS1 As builtIndication Contact CAS2 As builtIndication Contact OAS2 As built
ESD EnabledESD ActionESD Contact TypeESD Bypass ThermostatESD Override InterlocksESD Override Local StopMaintained Local ControlsExternal InterlocksTorque Switch Bypass
Additional Indication Contacts CPT (Position Transmitter)Folomatic (Positioner)Bus System InterfaceInterrupter Timer
Primary Settings:
Enabled
75% Rated Torque
By hookup reference WS18336By hookup reference WS18336
By ApplicationBy Application
Control Mode Settings:
Make at Full ShutMake at Full OpenBreak at Full Shut
Override OnMaintained
EnabledCloseESD on Applied SignalBypass Enabled
Physical SettingPhysical SettingPhysical Setting
Feed Water Stop Valve Settings - 1400
ClockTorqueLimitBy Application
Hookup Drawing: WS18336Wiring Diagram: 1410-40
Physical SettingPhysical SettingPhysical Setting
Override On
By hookup reference WS18336By hookup reference WS18336By hookup reference WS18336By hookup reference WS18336
Break at Full Open
Indications Settings:
Standard Diagram FunctionBy hookup reference WS18336
None
NoneNone
Enabled
Options:
Torque Latch in Anti-clock direction.
NoneNone

Operating ManualRecommended Settings: E270E
Section/Page
Direction To Close As builtClose Action Section 5.13 / Page 10Open Action Section 5.13 / Page 10Torque Valve Closing Section 5.14 / Page 10Torque Valve Opening Section 5.14 / Page 10Close Limit Section 5.12 / Page 7-10Open Limit Section 5.14 / Page 7-10
Indication Contact CAS1 As builtIndication Contact OAS1 As builtIndication Contact CAS2 As builtIndication Contact OAS2 As built
ESD EnabledESD ActionESD Contact TypeESD Bypass ThermostatESD Override InterlocksESD Override Local StopMaintained Local ControlsExternal InterlocksTorque Switch Bypass
Additional Indication Contacts CPT (Position Transmitter)Folomatic (Positioner)Bus System InterfaceInterrupter Timer
Standard Diagram FunctionBy hookup reference WS18337
None
NoneNone
Enabled
Options:
Torque Latch in Anti-clock direction.
NoneNone
Physical SettingPhysical SettingPhysical Setting
Override On
By hookup reference WS18337By hookup reference WS18337By hookup reference WS18337By hookup reference WS18337
Break at Full Open
Indications Settings:
Physical SettingPhysical SettingPhysical Setting
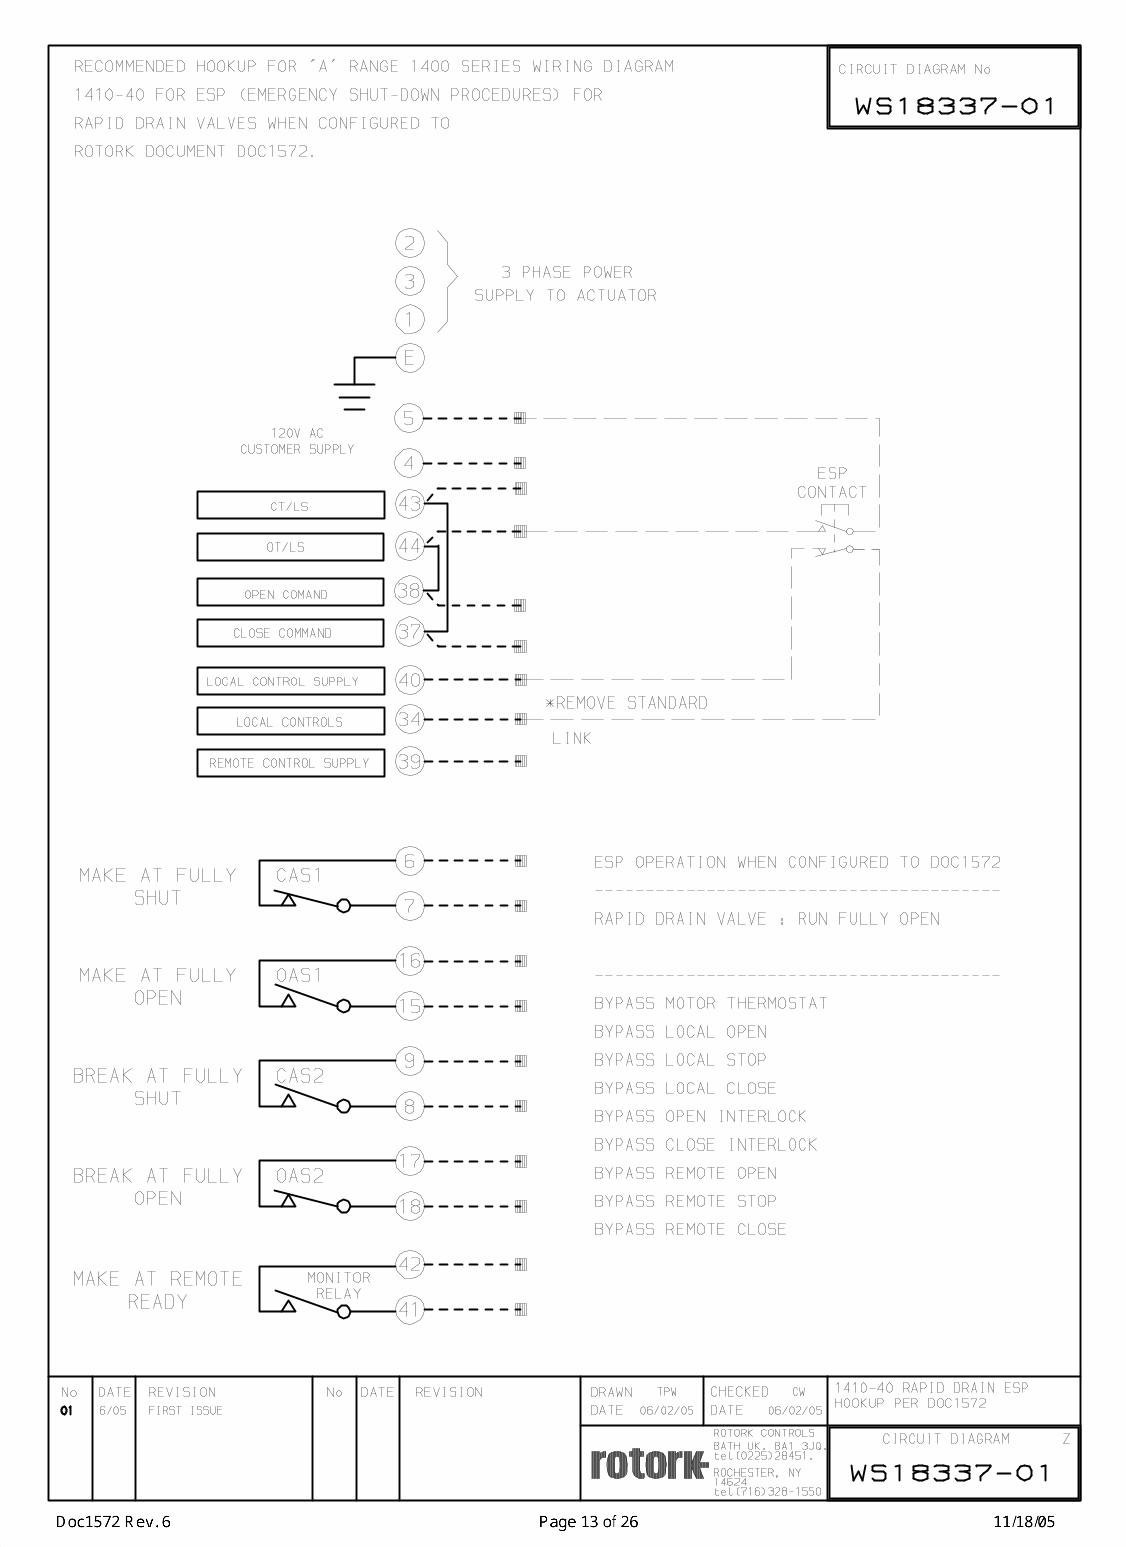
Rapid Drain Valve Settings - 1400
ClockTorqueLimitBy Application
Hookup Drawing: WS18337Wiring Diagram: 1410-40
Break at Full Shut
Override OnMaintained
EnabledOpenESD on Applied SignalBypass Enabled
Primary Settings:
Enabled
Boost / Motor Stall
By hookup reference WS18337By hookup reference WS18337
By ApplicationBy Application
Control Mode Settings:
Make at Full ShutMake at Full Open


Operating ManualRecommended Settings: E270E
Section/Page
Direction To Close AE4/2 / Page 10 SW1.5 OnClose Action Section 5.13 / Page 10Open Action Section 5.13 / Page 10Torque Valve Closing Section 5.14 / Page 10Torque Valve Opening Section 5.14 / Page 10Close Limit Section 5.12 / Page 7-10Open Limit Section 5.14 / Page 7-10
Indication Contact CAS1 As builtIndication Contact OAS1 As builtIndication Contact CAS2 As builtIndication Contact OAS2 As built
ESD Enabled AE4/2 / Page 10 SW1.7 OnESD Action AE4/2 / Page 10 SW1.3 OnESD Contact Type ESD Bypass Thermostat AE4/2 / Page 10 SW1.8 OnESD Override InterlocksESD Override Local StopMaintained Local Controls AE4/2 / Page 10 SW1.4 On
SW2.3 OnSW2.4 OnSW2.1 OffSW2.2 Off
Stall Time AE4/2 / Page 10 SW1.6 OffSlall Timer AE4/2 / Page 10 SW2.5 OnTorque Switch Bypass
Additional Indication Contacts CPT (Position Transmitter)Folomatic (Positioner)Remote Control SourceBus System Interface
SW1.1 OffSW1.2 Off
External Interlocks Enabled AE4/2 / Page 10
75% Rated TorqueBy ApplicationBy Application
Indications Settings:
Make at Full OpenBreak at Full ShutBreak at Full Open
Wiring Diagram: WD18392
Primary Settings:
Make at Full Shut
Physical SettingPhysical SettingPhysical Setting
Close ESD on Applied SignalBypass Enabled
Control Mode Settings:Enabled
Two Wire Priority Close Priority AE4/2 / Page 10
Override OnOverride OnMaintained
Feed Water Stop Valve Settings - 1600mk5
Physical SettingPhysical SettingPhysical Setting
ClockTorqueLimitBy Application
Local Stop Bypass during ESP
Hookup Drawing: WS18393
Interrupter Timer None
Setting Not AvailableEnabled through special Wiring Diagram (additional PC Board)
None
Max Time
Enabled
Options:
Torque Latch in Anti-clock direction.
None
AE4/2 / Page 10
Enabled
NoneNoneNone

Operating ManualRecommended Settings: E270E
Section/Page
Direction To Close AE4/2 / Page 10 SW1.5 OnClose Action Section 5.13 / Page 10Open Action Section 5.13 / Page 10Torque Valve Closing Section 5.14 / Page 10Torque Valve Opening Section 5.14 / Page 10Close Limit Section 5.12 / Page 7-10Open Limit Section 5.14 / Page 7-10
Indication Contact CAS1 As builtIndication Contact OAS1 As builtIndication Contact CAS2 As builtIndication Contact OAS2 As built
ESD Enabled AE4/2 / Page 10 SW1.7 OnESD Action AE4/2 / Page 10 SW1.3 OffESD Contact Type ESD Bypass Thermostat AE4/2 / Page 10 SW1.8 OnESD Override InterlocksESD Override Local StopMaintained Local Controls AE4/2 / Page 10 SW1.4 On
SW2.3 OnSW2.4 OnSW2.1 OffSW2.2 Off
Stall Time AE4/2 / Page 10 SW1.6 OffSlall Timer AE4/2 / Page 10 SW2.5 OnTorque Switch Bypass
Additional Indication Contacts CPT (Position Transmitter)Folomatic (Positioner)Remote Control SourceBus System Interface
SW1.1 OffSW1.2 Off
AE4/2 / Page 10
Enabled
Interrupter Timer None
NoneNone
Physical SettingPhysical SettingPhysical Setting
Override On
Break at Full Open
Indications Settings:
Setting Not Available
Make at Full ShutMake at Full OpenBreak at Full Shut
Rapid Drain Valve Settings - 1600mk5
Physical SettingPhysical SettingPhysical Setting
ClockTorqueLimitBy Application
Local Stop Bypass during ESP
Hookup Drawing: WS18393
Two Wire Priority Close Priority AE4/2 / Page 10
None
Max Time
Enabled
Options:
Torque Latch in Anti-clock direction.
NoneNone
Maintained
EnabledOpenESD on Applied SignalBypass Enabled
Override On
Wiring Diagram: WD18392
Primary Settings:
External Interlocks Enabled AE4/2 / Page 10
Boost / Motor Stall
Enabled through special Wiring Diagram (additional PC Board)
By ApplicationBy Application
Control Mode Settings:


Operating ManualRecommended Settings: E170E Screen Setting
Section/Page
Direction To Close Section 8/ Page 19 C1 CClose Action Section 8/ Page 20 C2 CtOpen Action Section 8/ Page 21 C3 OLTorque Valve Closing Section 8/ Page 22 tC % RatedTorque Valve Opening Section 8/ Page 23 tO 75Close Limit Section 8/ Page 24 LCOpen Limit Section 8/ Page 24 LO
Indication Contact 1 Section 9.2/ Page 28 R1 CL / noIndication Contact 2 Section 9.2/ Page 28 R2 OP / noIndication Contact 3 Section 9.2/ Page 28 R3 CL / ncIndication Contact 4 Section 9.2/ Page 28 R4 OP / nc
ESD Enabled Section 9.3/ Page 29 A1 onESD Action Section 9.3/ Page 29 A2 CLESD Contact Type Section 9.3/ Page 29 A3 noESD Bypass Thermostat Section 9.3/ Page 30 A4 onESD Override InterlocksESD Override Local StopMaintained Local Controls Section 9.3/ Page 30 A5 on
A6 OFA7 OF
External Interlocks Section 9.3/ Page 31 A8 onDisplay Invert Section 9.3/ Page 31 A9 OFTorque Switch Bypass
Additional Indication Contacts CPT (Position Transmitter) Section 9.8/ Page 38 OI OFFolomatic (Positioner) Section 9.4/ Page 32 OF OFRemote Control SourceBus System Interface Section 9.5/ Page 35 OP OFInterrupter Timer Section 9.6/ Page 39 OJ OFSetting Tool – Local Control Section 9.7/ Page 41 Or OFPower Loss Inhibit. Section 9.9/ Page 42 OS OF
Default program setting not available.
Local Stop Bypass during ESP
NoneNoneNoneNone
EnabledDisabled
Feed Water Stop Valve Settings - IQ
Setting Not AvailableEnabled through special Wiring Diagram (additional PC Board)
Two Wire Priority Close Priority Section 9.3/ Page 30
EnabledClose ESD on Applied SignalBypass Enabled
NoneNoneDisabledDisabled
Make at Full OpenBreak at Full ShutBreak at Full Open
Enabled
Override OnOverride OnMaintained
TorqueLimitBy Application
Make at Full Shut
Options:
Hookup Drawing: WS18395Wiring Diagram: WD18394
Primary Settings:
Indications Settings:
75% Rated TorqueBy ApplicationBy Application
Control Mode Settings:
Clock

Operating ManualRecommended Settings: E170E Screen Setting
Section/Page
Direction To Close Section 8/ Page 19 C1 CClose Action Section 8/ Page 20 C2 CtOpen Action Section 8/ Page 21 C3 OLTorque Valve Closing Section 8/ Page 22 tC % RatedTorque Valve Opening Section 8/ Page 23 tO bbClose Limit Section 8/ Page 24 LCOpen Limit Section 8/ Page 24 LO
Indication Contact 1 Section 9.2/ Page 28 R1 CL / noIndication Contact 2 Section 9.2/ Page 28 R2 OP / noIndication Contact 3 Section 9.2/ Page 28 R3 CL / ncIndication Contact 4 Section 9.2/ Page 28 R4 OP / nc
ESD Enabled Section 9.3/ Page 29 A1 onESD Action Section 9.3/ Page 29 A2 OPESD Contact Type Section 9.3/ Page 29 A3 noESD Bypass Thermostat Section 9.3/ Page 30 A4 onESD Override InterlocksESD Override Local StopMaintained Local Controls Section 9.3/ Page 30 A5 on
A6 OFA7 OF
External Interlocks Section 9.3/ Page 31 A8 onDisplay Invert Section 9.3/ Page 31 A9 OFTorque Switch Bypass
Additional Indication Contacts CPT (Position Transmitter) Section 9.8/ Page 38 OI OFFolomatic (Positioner) Section 9.4/ Page 32 OF OFRemote Control SourceBus System Interface Section 9.5/ Page 35 OP OFInterrupter Timer Section 9.6/ Page 39 OJ OFSetting Tool – Local Control Section 9.7/ Page 41 Or OFPower Loss Inhibit. Section 9.9/ Page 42 OS OF
Rapid Drain Valve Settings - IQ
Options:
Hookup Drawing: WS18395Wiring Diagram: WD18394
Primary Settings:
Indications Settings:
Boost / Motor StallBy ApplicationBy Application
Control Mode Settings:
ClockTorqueLimitBy Application
Make at Full ShutMake at Full OpenBreak at Full ShutBreak at Full Open
Override OnOverride OnMaintained
EnabledOpenESD on Applied SignalBypass Enabled
NoneNoneNone
EnabledDisabledEnabled
NoneNoneDisabledDisabled
Default program setting not available.
Local Stop Bypass during ESP
Setting Not AvailableEnabled through special Wiring Diagram (additional PC Board)
Two Wire Priority Close Priority Section 9.3/ Page 30
None


Operating ManualRecommended Settings: E170E2 Screen Setting
Section/Page
Direction To Close Section 8/ Page 22 C1 CClose Action Section 8/ Page 23 C2 CtOpen Action Section 8/ Page 24 C3 OLTorque Valve Closing Section 8/ Page 25 tC % RatedTorque Valve Opening Section 8/ Page 26 tO 75Close Limit Section 8/ Page 27 LCOpen Limit Section 8/ Page 27 LO
Indication Contact 1 Section 9.2/ Page 32,33 R1 CL / noIndication Contact 2 Section 9.2/ Page 32,33 R2 OP / noIndication Contact 3 Section 9.2/ Page 32,33 R3 CL / ncIndication Contact 4 Section 9.2/ Page 32,33 R4 OP / nc
ESD EnabledESD Action Section 9.3/ Page 34 A1 CLESD Contact Type Section 9.3/ Page 34 A2 noESD Bypass Thermostat Section 9.3/ Page 34 A3 onESD Override Interlocks Section 9.3/ Page 35 A4 onESD Override Local Stop Section 9.3/ Page 35 A5 onMaintained Local Controls Section 9.3/ Page 35 A6 onTwo Wire Priority Section 9.3/ Page 35 A7 CLExternal Interlocks Section 9.3/ Page 36 A8 onDisplay InvertConditional Control Section 9.3/ Page 36 A9 OFTorque Switch Bypass Unseating Section 9.3/ Page 36 At on
Additional Indication Contacts Section 9.4/ Page 37 OE OFCPT (Position Transmitter) Section 9.5/ Page 38 OI OFFolomatic (Positioner) Section 9.6/ Page 39 OF OFRemote Control Source Section 9.7/ Page 42 Od rEBus System Interface Section 9.8/ Page 43 OP OFInterrupter Timer Section 9.13/ Page 60 OJ OFSetting Tool – Local Control Section 9.14/ Page 62 Or OFPower Loss Inhibit. Section 9.15/ Page 62 OS OF
Display can be physically inverted.
Hookup Drawing: WS18333Wiring Diagram: 3000-001
Primary Settings:
Indications Settings:
Control Mode Settings:
Make at Full ShutMake at Full OpenBreak at Full ShutBreak at Full Open
Feed Water Stop Valve Settings - IQmk2
75% Rated TorqueBy ApplicationBy Application
ClockTorqueLimitBy Application
EnabledClose ESD on Applied SignalBypass EnabledOverride OnOverride OnMaintainedClose PriorityEnabledDisabledDisabledEnabled
NoneNoneNone
Options:
Disabled
NoneNoneNoneDisabled

Operating ManualRecommended Settings: E170E2 Screen Setting
Section/Page
Direction To Close Section 8/ Page 22 C1 CClose Action Section 8/ Page 23 C2 CtOpen Action Section 8/ Page 24 C3 OLTorque Valve Closing Section 8/ Page 25 tC % RatedTorque Valve Opening Section 8/ Page 26 tO bbClose Limit Section 8/ Page 27 LCOpen Limit Section 8/ Page 27 LO
Indication Contact 1 Section 9.2/ Page 32,33 R1 CL / noIndication Contact 2 Section 9.2/ Page 32,33 R2 OP / noIndication Contact 3 Section 9.2/ Page 32,33 R3 CL / ncIndication Contact 4 Section 9.2/ Page 32,33 R4 OP / nc
ESD EnabledESD Action Section 9.3/ Page 34 A1 OPESD Contact Type Section 9.3/ Page 34 A2 noESD Bypass Thermostat Section 9.3/ Page 34 A3 onESD Override Interlocks Section 9.3/ Page 35 A4 onESD Override Local Stop Section 9.3/ Page 35 A5 onMaintained Local Controls Section 9.3/ Page 35 A6 onTwo Wire Priority Section 9.3/ Page 35 A7 CLExternal Interlocks Section 9.3/ Page 36 A8 onDisplay InvertConditional Control Section 9.3/ Page 36 A9 OFTorque Switch Bypass Unseating Section 9.3/ Page 36 At on
Additional Indication Contacts Section 9.4/ Page 37 OE OFCPT (Position Transmitter) Section 9.5/ Page 38 OI OFFolomatic (Positioner) Section 9.6/ Page 39 OF OFRemote Control Source Section 9.7/ Page 42 Od rEBus System Interface Section 9.8/ Page 43 OP OFInterrupter Timer Section 9.13/ Page 60 OJ OFSetting Tool – Local Control Section 9.14/ Page 62 Or OFPower Loss Inhibit. Section 9.15/ Page 62 OS OF
NoneNoneDisabledDisabled
NoneNoneNoneNone
EnabledDisabledDisabledEnabled
Override OnOverride OnMaintainedClose Priority
EnabledOpenESD on Applied SignalBypass Enabled
Control Mode Settings:
ClockTorqueLimitBy Application
Make at Full ShutMake at Full OpenBreak at Full ShutBreak at Full Open
Options:
Display can be physically inverted.
Rapid Drain Valve Settings - IQmk2
Hookup Drawing: WS18333Wiring Diagram: 3000-001
Primary Settings:
Indications Settings:
Boost / Motor StallBy ApplicationBy Application