Embed Size (px)
Citation preview
PG; Reviewed:
SPOC 7/25/2017
Solution & Interoperability Test Lab Application Notes
©2017 Avaya Inc. All Rights Reserved.
1 of 33
GTHOSP_IPOR10
Avaya Solution & Interoperability Test Lab
Application Notes for configuring GT-HOSP / HOTELIUM
1.0.1.5 from GT2F with Avaya IP Office IP500 V2
Standalone R10.0 - Issue 1.0
Abstract
These Application Notes describe the configuration steps required for call accounting and
billing functionality of the GT-HOSP / HOTELIUM from GT2F to successfully interoperate
with Avaya IP Office IP500 V2 R10.0.
Readers should pay particular attention to Section 2, in particular the scope of testing as
outlined in Section 2.1, as well as observations noted in Section 2.2 to ensure that their own
use cases are adequately covered by this scope and results.
Information in these Application Notes has been obtained through DevConnect compliance
testing and additional technical discussions. Testing was conducted via the DevConnect
Program at the Avaya Solution and Interoperability Test Lab.
PG; Reviewed:
SPOC 7/25/2017
Solution & Interoperability Test Lab Application Notes
©2017 Avaya Inc. All Rights Reserved.
2 of 33
GTHOSP_IPOR10
1. Introduction These Application Notes describe the compliance tested configuration of GT-HOSP /
HOTELIUM from GT2F to interoperate with Avaya IP Office IP500 V2 Standalone R10.0.
GT-HOSP is a graphical hospitality user interface. It is commonly used in hotels to provide a
way to control usage of room facilities and bill the calls. GT-HOSP uses XML based
communication for hospitality control of the IP Office. Hospitality features are translated into a
set of XML commands which are passed by a secure IP port to the IP Office.
GT-HOSP provides the following features with the IP Office:
Check-In (Used to make changes to the user rights on IP Office)
DDI Allocation (Allocate an IP Office hunt group to the user)
Update Name (A facility that updates the display name of the user on IP Office)
Room Transfer (Moves the rights and name display from one IP Office user to another)
DND (Do not Disturb)
Telephone Service Class (User rights to allow the blocking of outgoing calls)
Check-out (Similar to check-in)
Room Status (Allows the cleaners apply short codes to update the room status)
Prepayment (Allows the addition of Credit to a client’s bill)
SMDR - Call billing (Call Detail Records from IP Office)
Note: GT-HOSP / HOTELIUM will be referred to as GT-HOSP throughout the remainder of
these Application Notes.
Note: These Application Notes focus on two modules/connections to IP Office. The SMDR
connection for call billing and the XML connection to show the ability of GT-HOSP to change
User Rights on IP Office extensions.
Note: IP Office CDR is called Station Message Detail Reporting (SMDR), so CDR may be
referred to as CDR or SMDR throughout the remainder of this document as they both refer to
call detail records.
2. General Test Approach and Test Results The general test approach was to configure the GT-HOSP to communicate with the IP Office as
implemented on a customer’s premises. Testing focused on two complementing modules of GT-
HOSP verifying that Station Message Detail Reports (SMDR) are collected by the GT-HOSP
and received in the format as generated by the IP Office, in addition customers were checked
in/out to verify that GT-HOSP was able to make the necessary changes to user rights on the
phone sets in question. Various call scenarios were preformed to simulate real call types as
would be observed on a customer’s premises. See Figure 1 for a network diagram. The
interoperability compliance test included both feature functionality and serviceability tests.
PG; Reviewed:
SPOC 7/25/2017
Solution & Interoperability Test Lab Application Notes
©2017 Avaya Inc. All Rights Reserved.
3 of 33
GTHOSP_IPOR10
DevConnect Compliance Testing is conducted jointly by Avaya and DevConnect members. The
jointly-defined test plan focuses on exercising APIs and/or standards-based interfaces pertinent
to the interoperability of the tested products and their functionalities. DevConnect Compliance
Testing is not intended to substitute full product performance or feature testing performed by
DevConnect members, nor is it to be construed as an endorsement by Avaya of the suitability or
completeness of a DevConnect member’s solution.
Avaya recommends our customers implement Avaya solutions using appropriate security and
encryption capabilities enabled by our products. The testing referenced in this DevConnect
Application Note included the enablement of supported encryption capabilities in the Avaya
products. Readers should consult the appropriate Avaya product documentation for further
information regarding security and encryption capabilities supported by those Avaya products.
Support for these security and encryption capabilities in any non-Avaya solution component is
the responsibility of each individual vendor. Readers should consult the appropriate vendor-
supplied product documentation for more information regarding those products.
2.1. Interoperability Compliance Testing
The interoperability compliance testing included feature and serviceability testing. The feature
testing evaluated the ability of GT-HOSP to carry out hospitality functions through XML based
communication with IP Office. The serviceability testing introduced failure scenarios to see if
GT-HOSP could resume after a link failure with IP Office. The Hospitality testing included:
Check-in/Check-out
DDI update/Name update
Telephone Service Class
Room Status
Room Transfer
DND
Prepayment
Link Failure/Recovery
The SMDR test cases included:
Local internal call handling
Handling of Incoming calls
Handling of Outgoing Calls
Call Forwarding on Busy/No Answer/Unconditional
Transfers – Blind and Supervised
Conference Calls
Account Codes/Authorization Codes
Call Park
2.2. Test Results
PG; Reviewed:
SPOC 7/25/2017
Solution & Interoperability Test Lab Application Notes
©2017 Avaya Inc. All Rights Reserved.
4 of 33
GTHOSP_IPOR10
Tests were performed to insure full interoperability between GT2F GT-HOSP / HOTELIUM and
IP Office. The tests were all functional in nature and performance testing was not included. All
the test cases passed successfully except for the following issues which were noted.
Observations for SMDR:
1. Sending Short Code for SMDR - This is an issue with the SMDR data not displaying the
short code when inputted from H323 phones. This is displayed when inputted from a SIP
phone.
2. Call Park – When a SIP phone parks the call, there is an ‘extra’ record produced. This
record resembles that like a call to a number with DND.
3. Conference Call - On IP Office R9, the field party 2 was filled with V<1>conf#channel#
On IP Office R10 the same kind of call shows V83896083. According to the last SMDR
documentation, the format is still described with V<1>conf#channel#. Either there is a
bug or the documentation needs to be updated. This was reported to the IP Office R&D
team.
4. AUTH Code & Account Code –The fields seem to be swapped in the Rel 10.0 docs. This
was reported to the IP Office R&D team.
Observations for Hospitality:
1. Short Code for Room Status – When the short code plus the digits are dialled the phone
returns a “number busy” which would lead to the person dialling thinking that it was not
accepted. GT2F is looking at implementing a more user friendly design in a future
release.
2. LAN Disconnect – When the LAN is disconnected the user can still check in/check out
people but the phones are not actually being checked in/out.
2.3. Support
Support from Avaya is available by visiting the website http://support.avaya.com and a list of
product documentation can be found in Section 9 of these Application Notes. Technical support
for the GT2F GT-HOSP / HOTELIUM product can be obtained as follows.
Phone: +33 8 92 140 150 (French Customers)
+33 4 66 62 94 65 – Choice number 2 (International Customers)
E-mail: [email protected]
PG; Reviewed:
SPOC 7/25/2017
Solution & Interoperability Test Lab Application Notes
©2017 Avaya Inc. All Rights Reserved.
5 of 33
GTHOSP_IPOR10
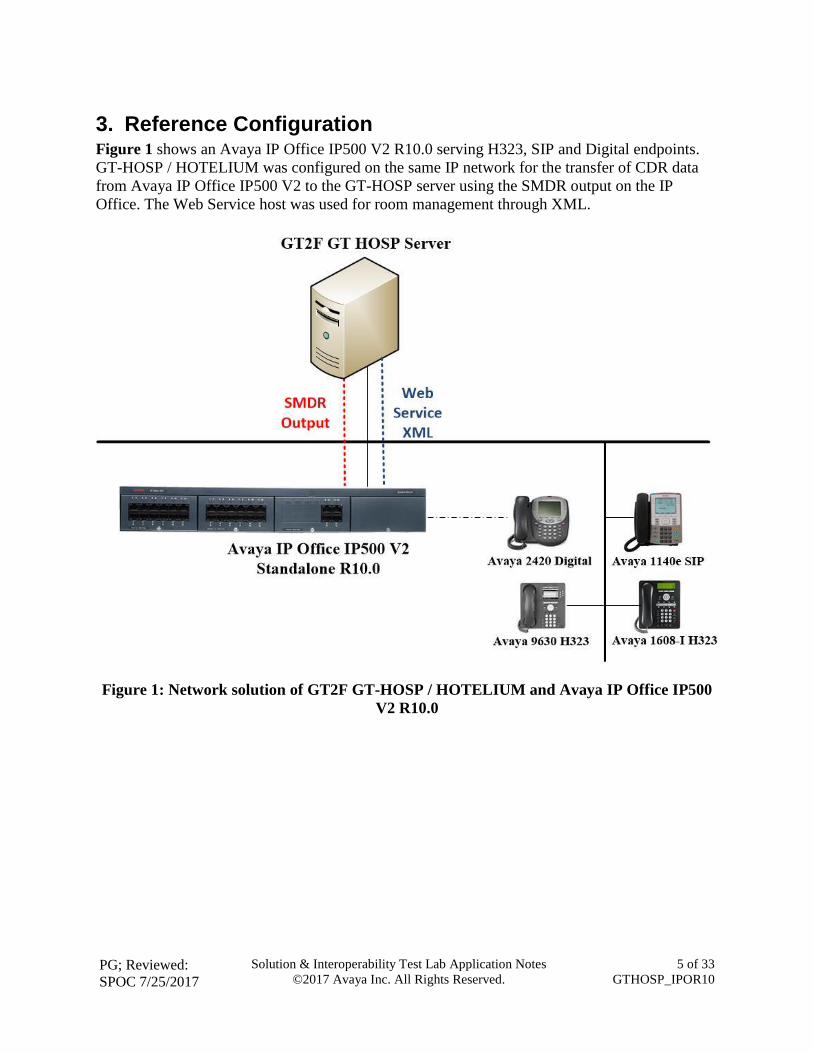
3. Reference Configuration Figure 1 shows an Avaya IP Office IP500 V2 R10.0 serving H323, SIP and Digital endpoints.
GT-HOSP / HOTELIUM was configured on the same IP network for the transfer of CDR data
from Avaya IP Office IP500 V2 to the GT-HOSP server using the SMDR output on the IP
Office. The Web Service host was used for room management through XML.
Figure 1: Network solution of GT2F GT-HOSP / HOTELIUM and Avaya IP Office IP500
V2 R10.0
PG; Reviewed:
SPOC 7/25/2017
Solution & Interoperability Test Lab Application Notes
©2017 Avaya Inc. All Rights Reserved.
6 of 33
GTHOSP_IPOR10
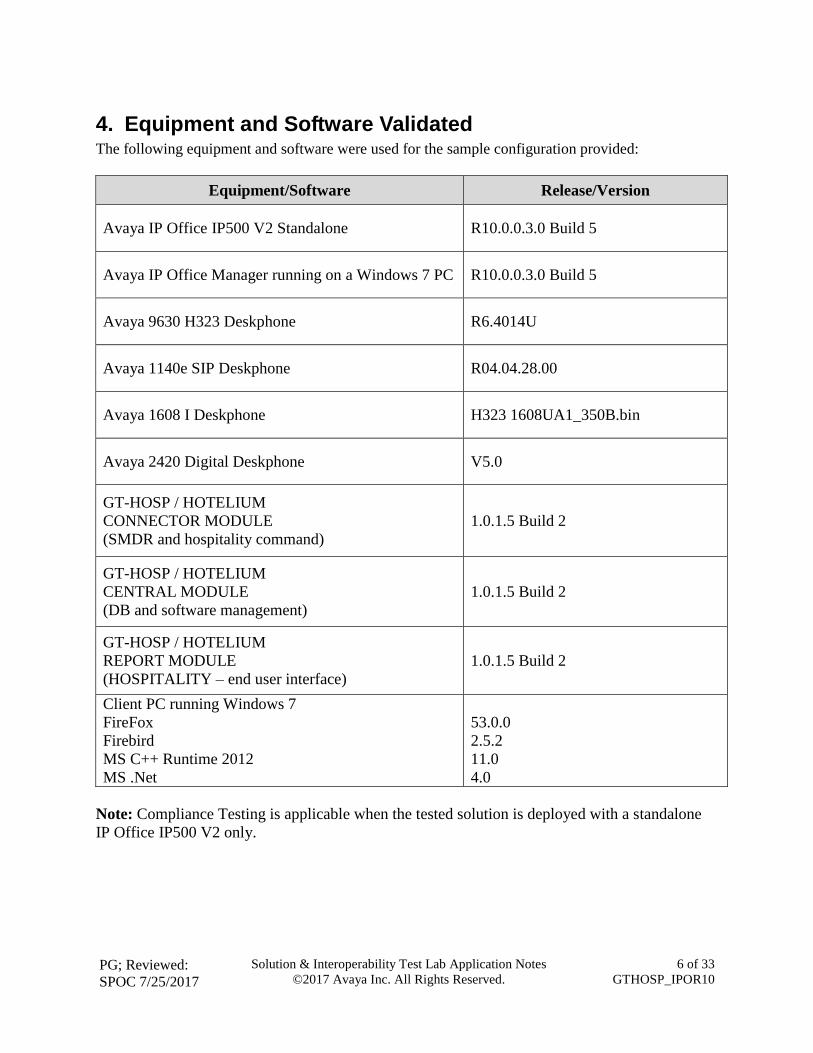
4. Equipment and Software Validated The following equipment and software were used for the sample configuration provided:
Equipment/Software Release/Version
Avaya IP Office IP500 V2 Standalone R10.0.0.3.0 Build 5
Avaya IP Office Manager running on a Windows 7 PC R10.0.0.3.0 Build 5
Avaya 9630 H323 Deskphone R6.4014U
Avaya 1140e SIP Deskphone R04.04.28.00
Avaya 1608 I Deskphone H323 1608UA1_350B.bin
Avaya 2420 Digital Deskphone V5.0
GT-HOSP / HOTELIUM
CONNECTOR MODULE
(SMDR and hospitality command)
1.0.1.5 Build 2
GT-HOSP / HOTELIUM
CENTRAL MODULE
(DB and software management)
1.0.1.5 Build 2
GT-HOSP / HOTELIUM
REPORT MODULE
(HOSPITALITY – end user interface)
1.0.1.5 Build 2
Client PC running Windows 7
FireFox
Firebird
MS C++ Runtime 2012
MS .Net
53.0.0
2.5.2
11.0
4.0
Note: Compliance Testing is applicable when the tested solution is deployed with a standalone
IP Office IP500 V2 only.
PG; Reviewed:
SPOC 7/25/2017
Solution & Interoperability Test Lab Application Notes
©2017 Avaya Inc. All Rights Reserved.
7 of 33
GTHOSP_IPOR10
5. Avaya IP Office Configuration Configuration and verification operations on the Avaya IP Office illustrated in this section were
all performed using Avaya IP Office Manager. The information provided in this section
describes the configuration of the Avaya IP Office for this solution. It is implied a working
system is already in place. For all other provisioning information such as initial installation and
configuration, please refer to the product documentation in Section 9. The configuration
operations described in this section can be summarized as follows:
Launch Avaya IP Office Manager.
Display LAN Configuration.
SMDR Configuration.
Check IP Office Security.
Create Virtual User.
Modify User Rights.
Create DDI Hunt Group.
Add Incoming Call Route.
Create Short Codes.
Update Existing Users.
Save Configuration.
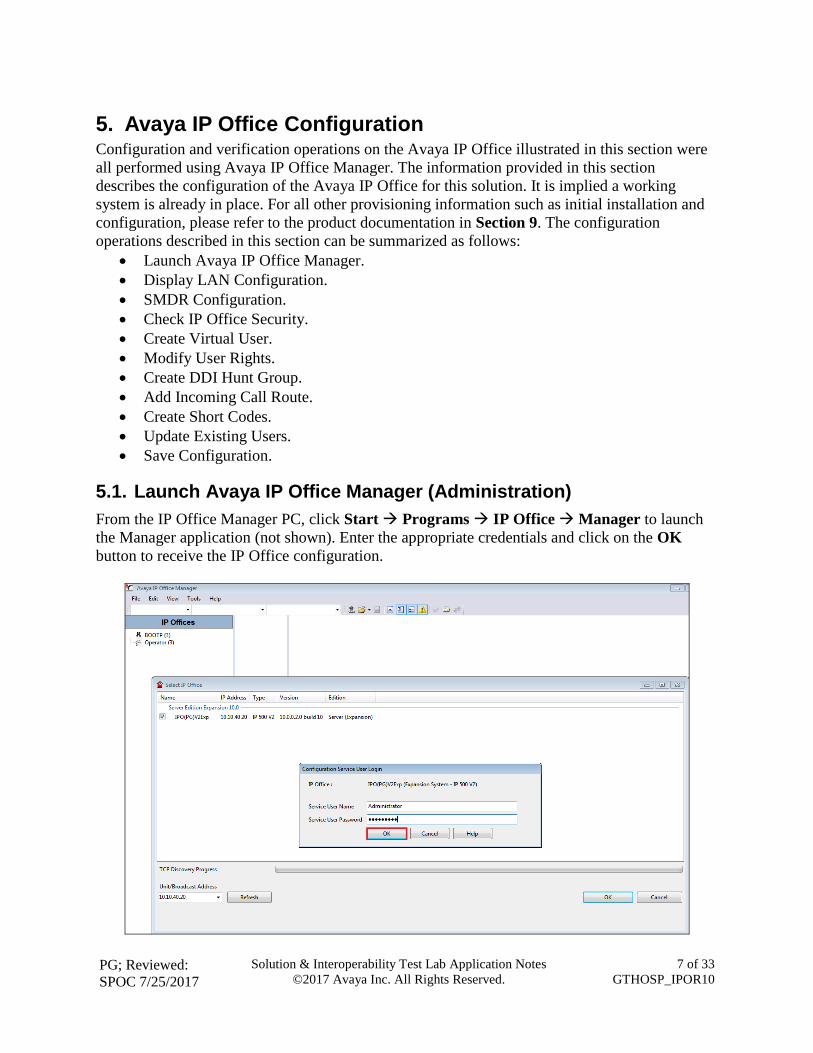
5.1. Launch Avaya IP Office Manager (Administration)
From the IP Office Manager PC, click Start Programs IP Office Manager to launch
the Manager application (not shown). Enter the appropriate credentials and click on the OK
button to receive the IP Office configuration.
PG; Reviewed:
SPOC 7/25/2017
Solution & Interoperability Test Lab Application Notes
©2017 Avaya Inc. All Rights Reserved.
8 of 33
GTHOSP_IPOR10
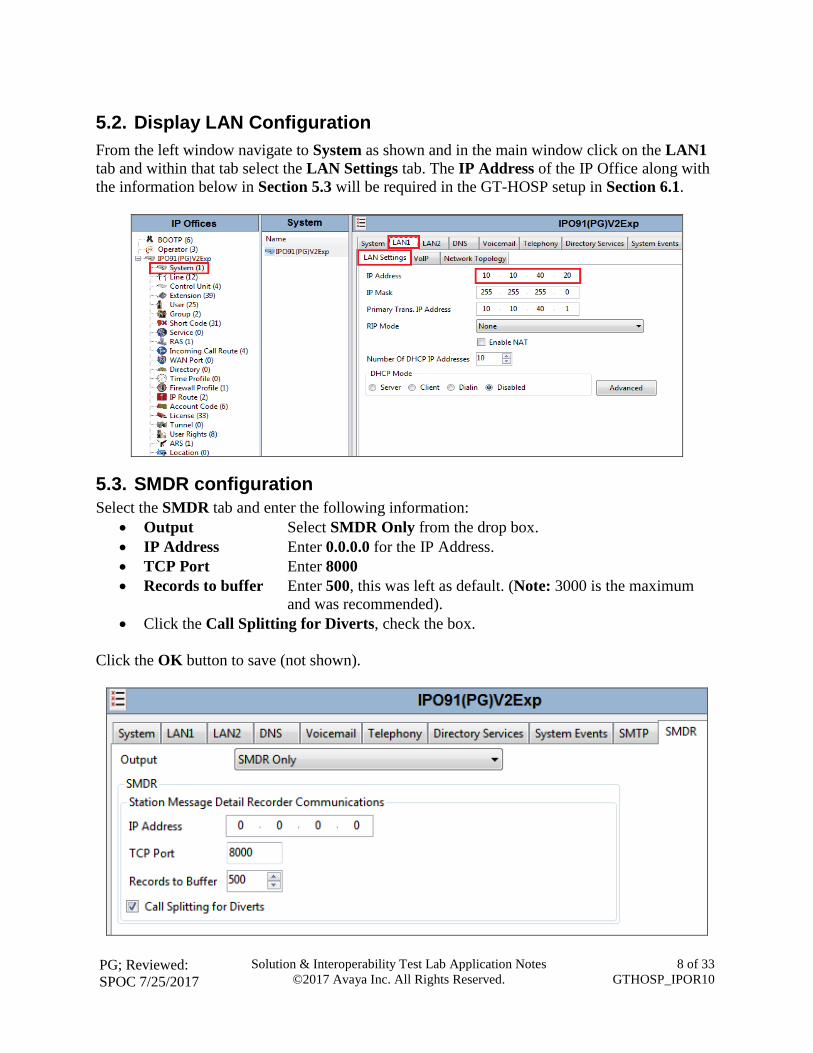
5.2. Display LAN Configuration
From the left window navigate to System as shown and in the main window click on the LAN1
tab and within that tab select the LAN Settings tab. The IP Address of the IP Office along with
the information below in Section 5.3 will be required in the GT-HOSP setup in Section 6.1.
5.3. SMDR configuration
Select the SMDR tab and enter the following information:
Output Select SMDR Only from the drop box.
IP Address Enter 0.0.0.0 for the IP Address.
TCP Port Enter 8000
Records to buffer Enter 500, this was left as default. (Note: 3000 is the maximum
and was recommended).
Click the Call Splitting for Diverts, check the box.
Click the OK button to save (not shown).

PG; Reviewed:
SPOC 7/25/2017
Solution & Interoperability Test Lab Application Notes
©2017 Avaya Inc. All Rights Reserved.
9 of 33
GTHOSP_IPOR10
5.4. Check Avaya IP Office Security
Open IP Office Security navigating to File Advanced Security Settings.
Navigate to Services in the left window and Configuration in the middle window and make the
necessary changes to the Service Port or Service Security Level as shown below.
PG; Reviewed:
SPOC 7/25/2017
Solution & Interoperability Test Lab Application Notes
©2017 Avaya Inc. All Rights Reserved.
10 of 33
GTHOSP_IPOR10
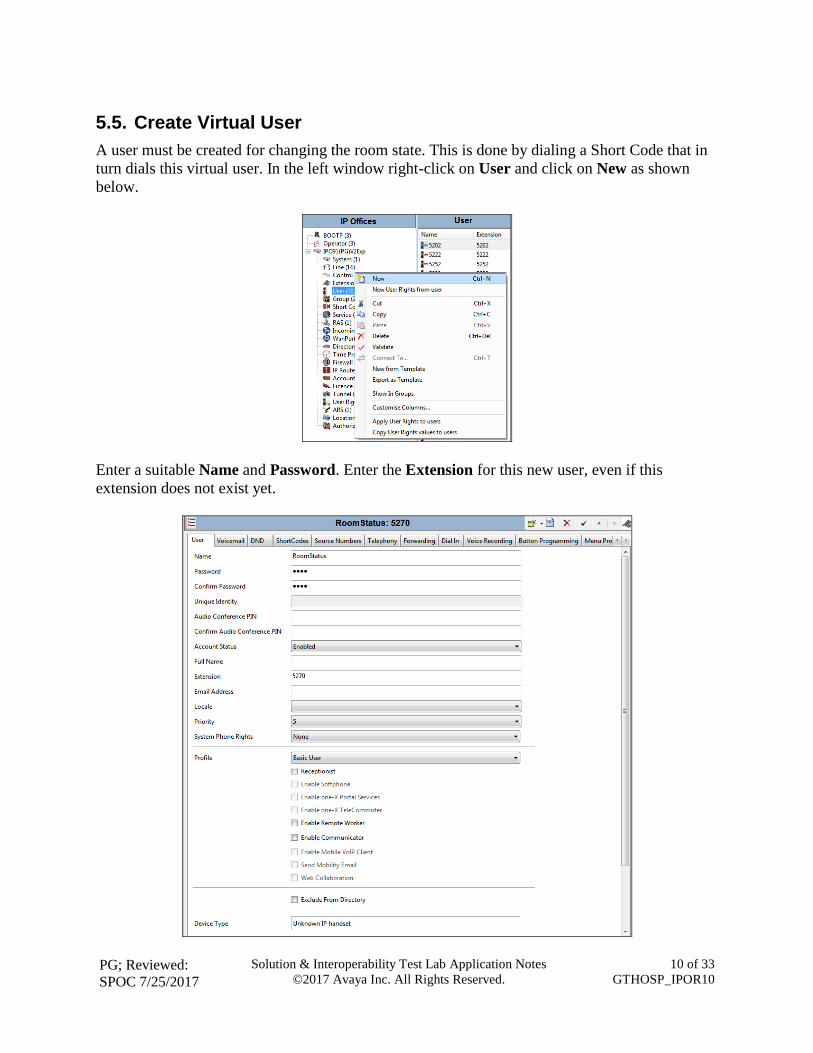
5.5. Create Virtual User
A user must be created for changing the room state. This is done by dialing a Short Code that in
turn dials this virtual user. In the left window right-click on User and click on New as shown
below.
Enter a suitable Name and Password. Enter the Extension for this new user, even if this
extension does not exist yet.
PG; Reviewed:
SPOC 7/25/2017
Solution & Interoperability Test Lab Application Notes
©2017 Avaya Inc. All Rights Reserved.
11 of 33
GTHOSP_IPOR10
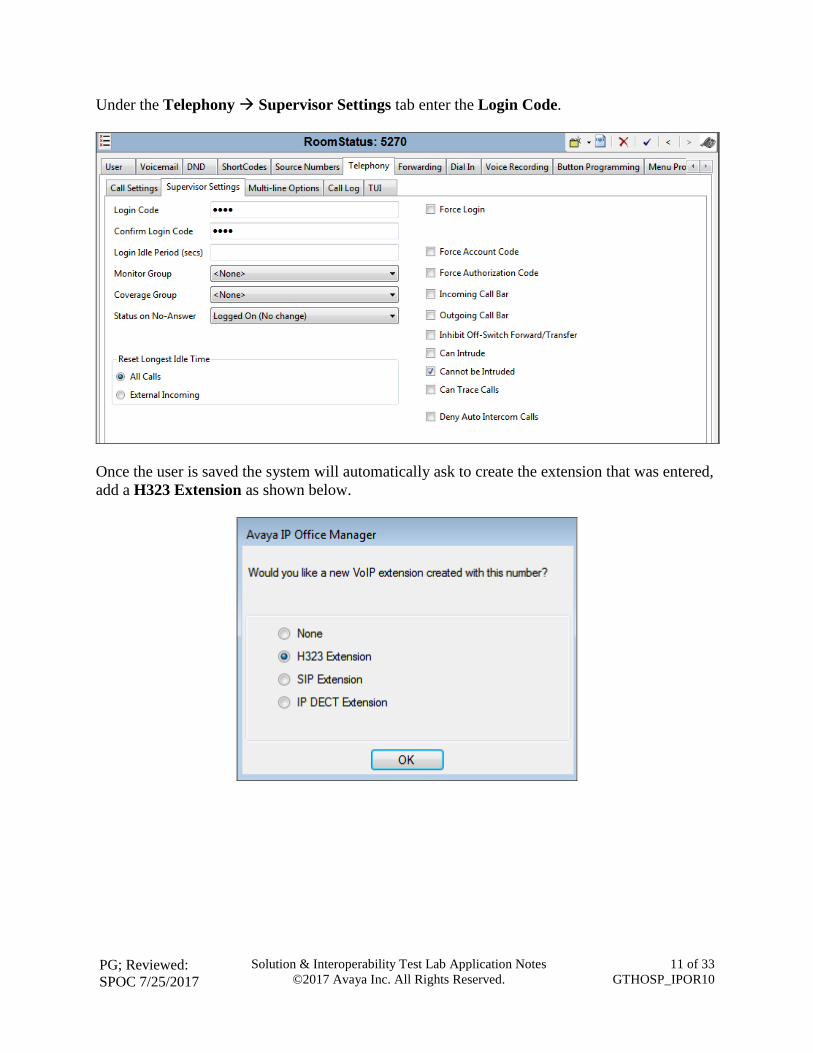
Under the Telephony Supervisor Settings tab enter the Login Code.
Once the user is saved the system will automatically ask to create the extension that was entered,
add a H323 Extension as shown below.
PG; Reviewed:
SPOC 7/25/2017
Solution & Interoperability Test Lab Application Notes
©2017 Avaya Inc. All Rights Reserved.
12 of 33
GTHOSP_IPOR10
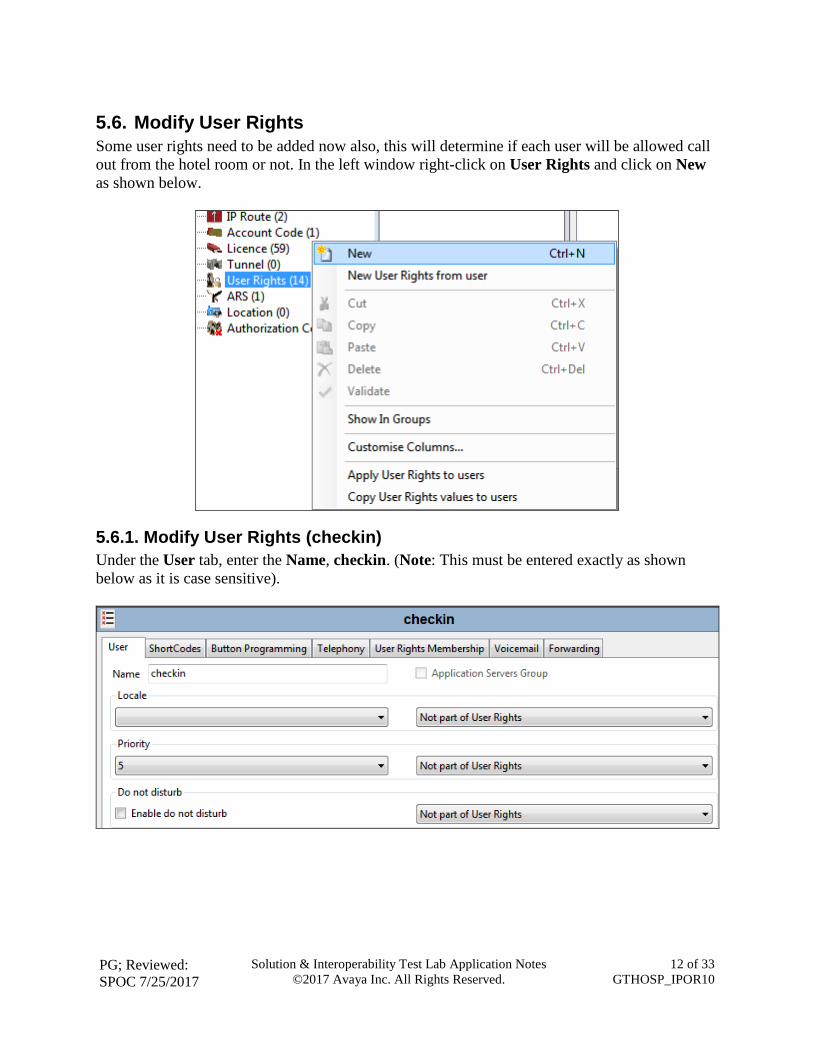
5.6. Modify User Rights
Some user rights need to be added now also, this will determine if each user will be allowed call
out from the hotel room or not. In the left window right-click on User Rights and click on New
as shown below.
5.6.1. Modify User Rights (checkin)
Under the User tab, enter the Name, checkin. (Note: This must be entered exactly as shown
below as it is case sensitive).

PG; Reviewed:
SPOC 7/25/2017
Solution & Interoperability Test Lab Application Notes
©2017 Avaya Inc. All Rights Reserved.
13 of 33
GTHOSP_IPOR10
Click on the Telephony Supervisor Settings tab. In the Outgoing call bar section uncheck
the Enable outgoing call bar check box and select Apply User rights value from the dropdown
box. Defaults were used for the remaining fields and tabs. Click on the OK button (not shown) to
save.
5.6.2. Modify User Rights (checkout / locked)
Under the User tab, enter the Name, checkout. (Note: This must be entered exactly as shown
below as it is case sensitive).
PG; Reviewed:
SPOC 7/25/2017
Solution & Interoperability Test Lab Application Notes
©2017 Avaya Inc. All Rights Reserved.
14 of 33
GTHOSP_IPOR10
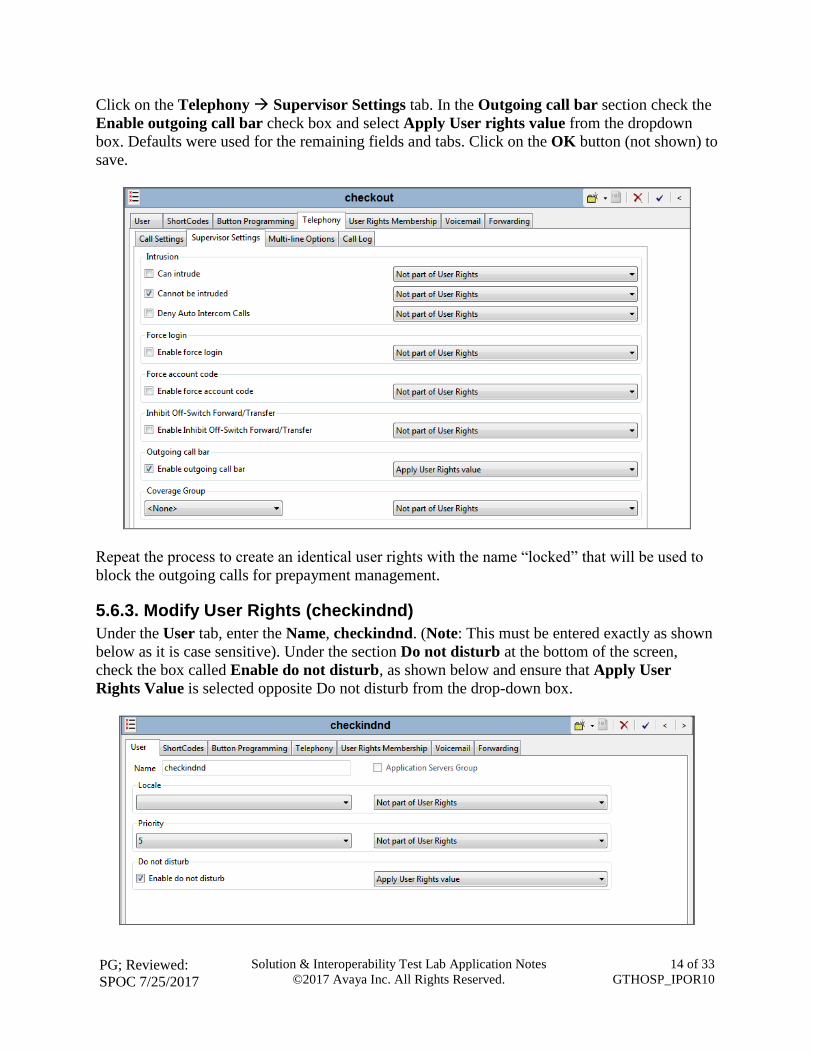
Click on the Telephony Supervisor Settings tab. In the Outgoing call bar section check the
Enable outgoing call bar check box and select Apply User rights value from the dropdown
box. Defaults were used for the remaining fields and tabs. Click on the OK button (not shown) to
save.
Repeat the process to create an identical user rights with the name “locked” that will be used to
block the outgoing calls for prepayment management.
5.6.3. Modify User Rights (checkindnd)
Under the User tab, enter the Name, checkindnd. (Note: This must be entered exactly as shown
below as it is case sensitive). Under the section Do not disturb at the bottom of the screen,
check the box called Enable do not disturb, as shown below and ensure that Apply User
Rights Value is selected opposite Do not disturb from the drop-down box.
PG; Reviewed:
SPOC 7/25/2017
Solution & Interoperability Test Lab Application Notes
©2017 Avaya Inc. All Rights Reserved.
15 of 33
GTHOSP_IPOR10
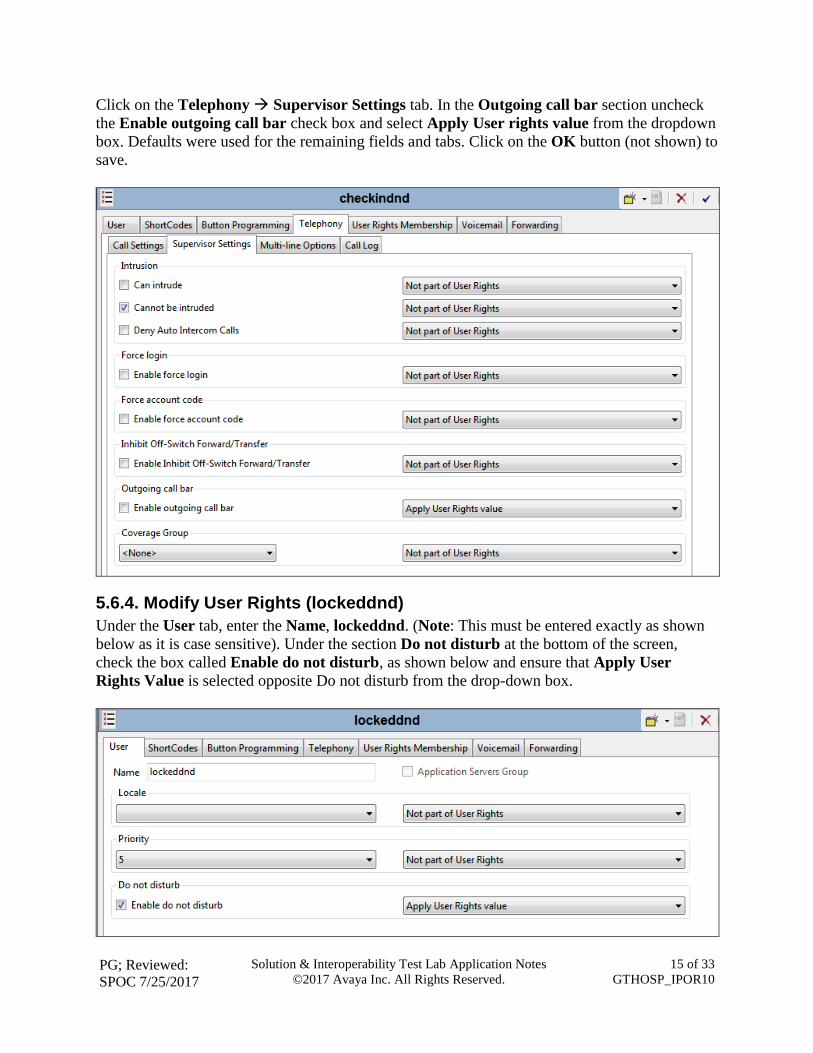
Click on the Telephony Supervisor Settings tab. In the Outgoing call bar section uncheck
the Enable outgoing call bar check box and select Apply User rights value from the dropdown
box. Defaults were used for the remaining fields and tabs. Click on the OK button (not shown) to
save.
5.6.4. Modify User Rights (lockeddnd)
Under the User tab, enter the Name, lockeddnd. (Note: This must be entered exactly as shown
below as it is case sensitive). Under the section Do not disturb at the bottom of the screen,
check the box called Enable do not disturb, as shown below and ensure that Apply User
Rights Value is selected opposite Do not disturb from the drop-down box.
PG; Reviewed:
SPOC 7/25/2017
Solution & Interoperability Test Lab Application Notes
©2017 Avaya Inc. All Rights Reserved.
16 of 33
GTHOSP_IPOR10
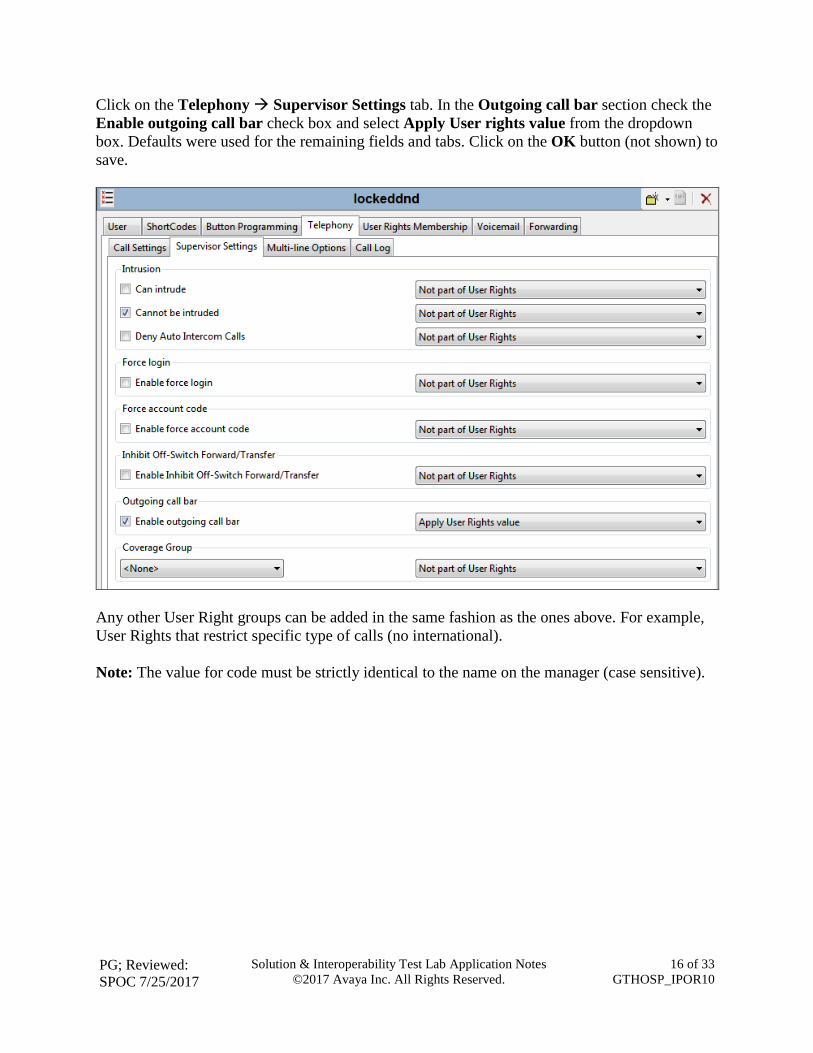
Click on the Telephony Supervisor Settings tab. In the Outgoing call bar section check the
Enable outgoing call bar check box and select Apply User rights value from the dropdown
box. Defaults were used for the remaining fields and tabs. Click on the OK button (not shown) to
save.
Any other User Right groups can be added in the same fashion as the ones above. For example,
User Rights that restrict specific type of calls (no international).
Note: The value for code must be strictly identical to the name on the manager (case sensitive).
PG; Reviewed:
SPOC 7/25/2017
Solution & Interoperability Test Lab Application Notes
©2017 Avaya Inc. All Rights Reserved.
17 of 33
GTHOSP_IPOR10
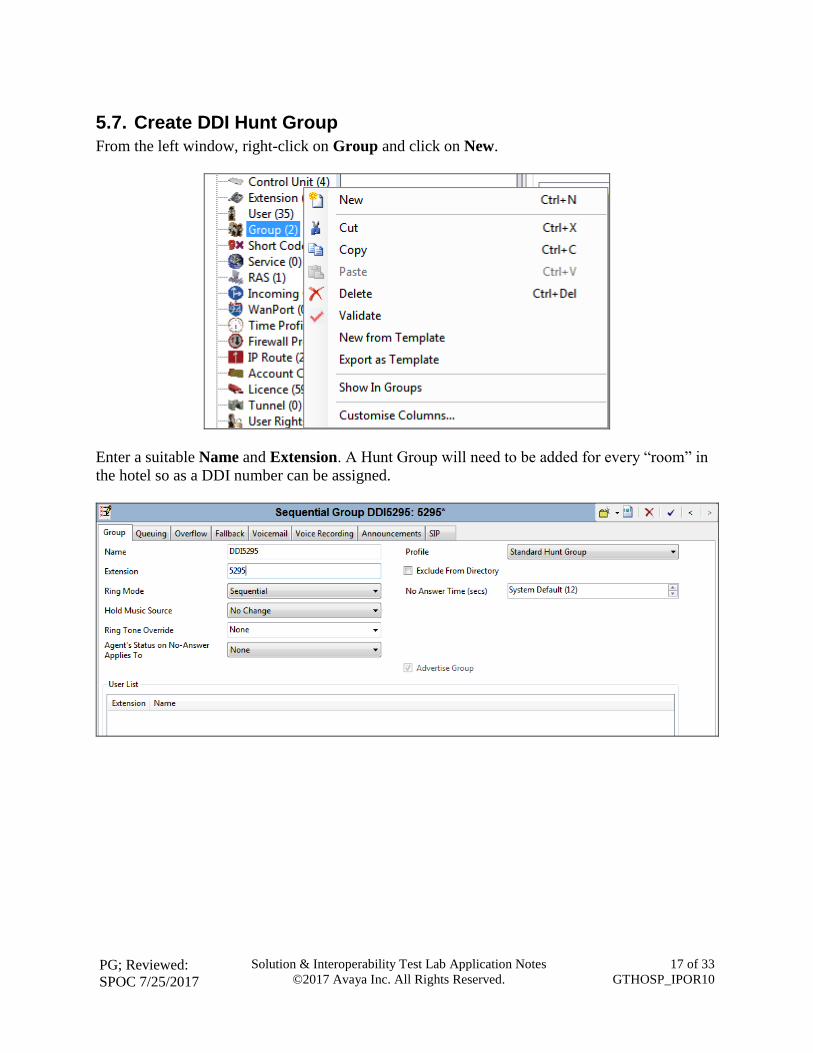
5.7. Create DDI Hunt Group
From the left window, right-click on Group and click on New.
Enter a suitable Name and Extension. A Hunt Group will need to be added for every “room” in
the hotel so as a DDI number can be assigned.
PG; Reviewed:
SPOC 7/25/2017
Solution & Interoperability Test Lab Application Notes
©2017 Avaya Inc. All Rights Reserved.
18 of 33
GTHOSP_IPOR10
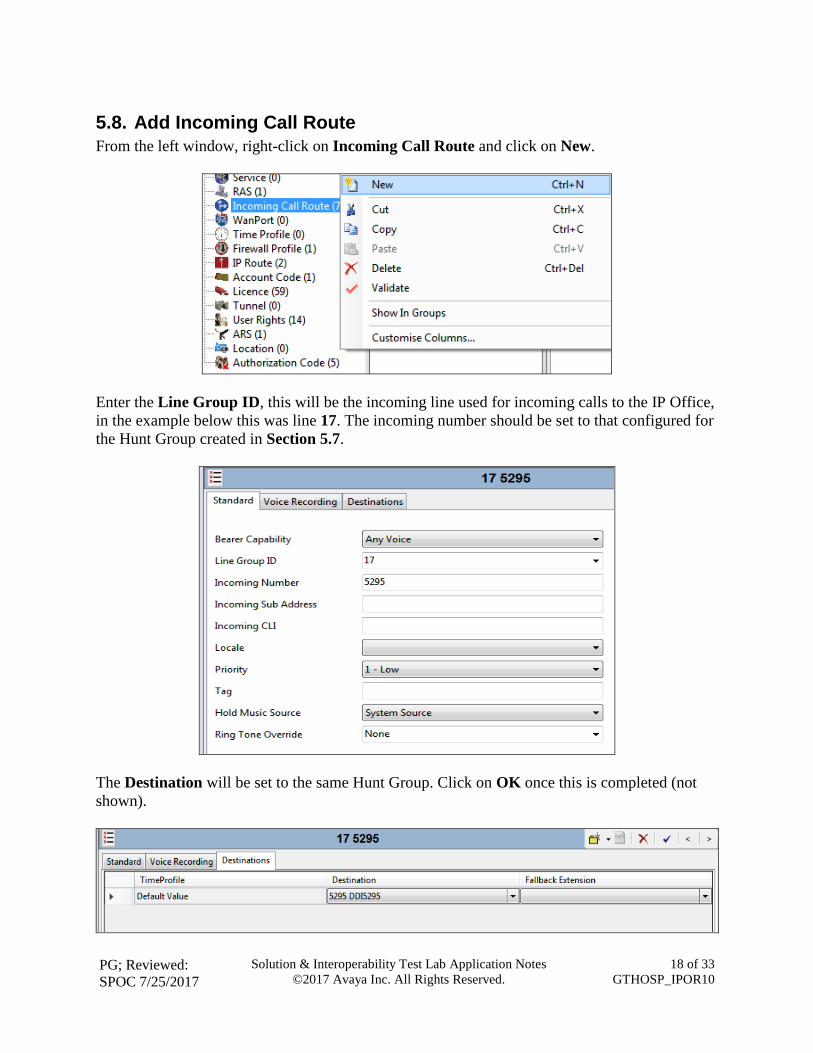
5.8. Add Incoming Call Route
From the left window, right-click on Incoming Call Route and click on New.
Enter the Line Group ID, this will be the incoming line used for incoming calls to the IP Office,
in the example below this was line 17. The incoming number should be set to that configured for
the Hunt Group created in Section 5.7.
The Destination will be set to the same Hunt Group. Click on OK once this is completed (not
shown).
PG; Reviewed:
SPOC 7/25/2017
Solution & Interoperability Test Lab Application Notes
©2017 Avaya Inc. All Rights Reserved.
19 of 33
GTHOSP_IPOR10
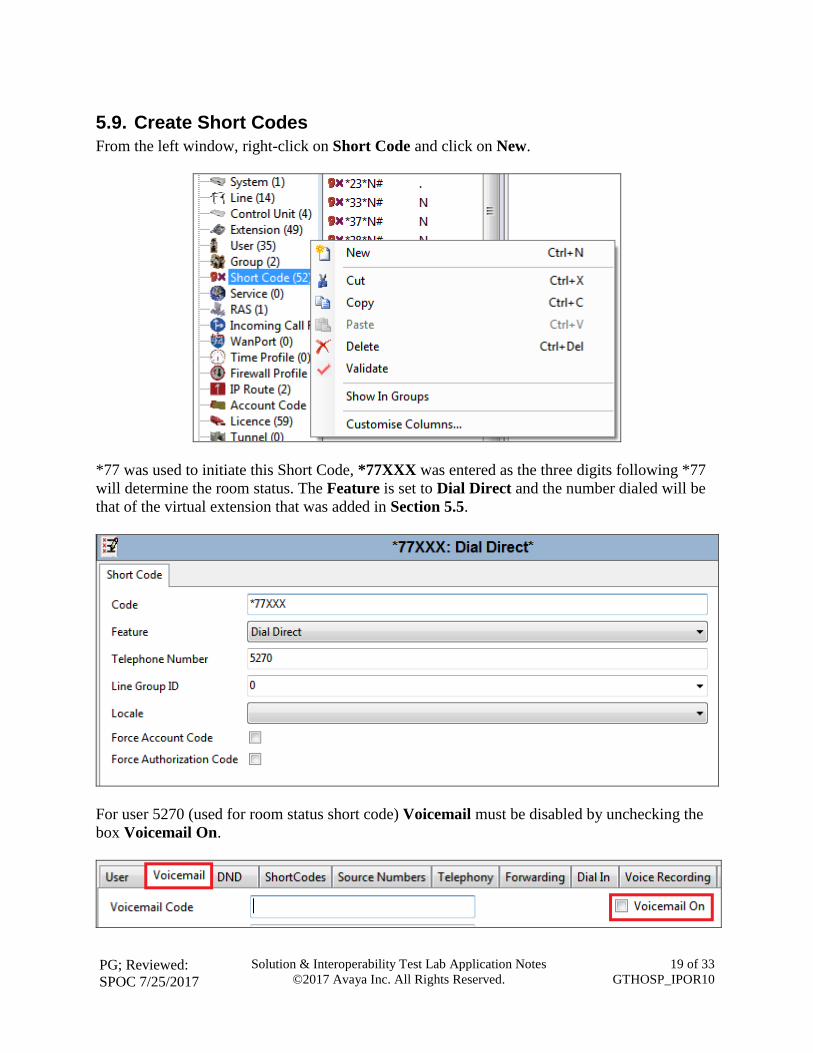
5.9. Create Short Codes
From the left window, right-click on Short Code and click on New.
*77 was used to initiate this Short Code, *77XXX was entered as the three digits following *77
will determine the room status. The Feature is set to Dial Direct and the number dialed will be
that of the virtual extension that was added in Section 5.5.
For user 5270 (used for room status short code) Voicemail must be disabled by unchecking the
box Voicemail On.
PG; Reviewed:
SPOC 7/25/2017
Solution & Interoperability Test Lab Application Notes
©2017 Avaya Inc. All Rights Reserved.
20 of 33
GTHOSP_IPOR10
5.10. Update Existing Users
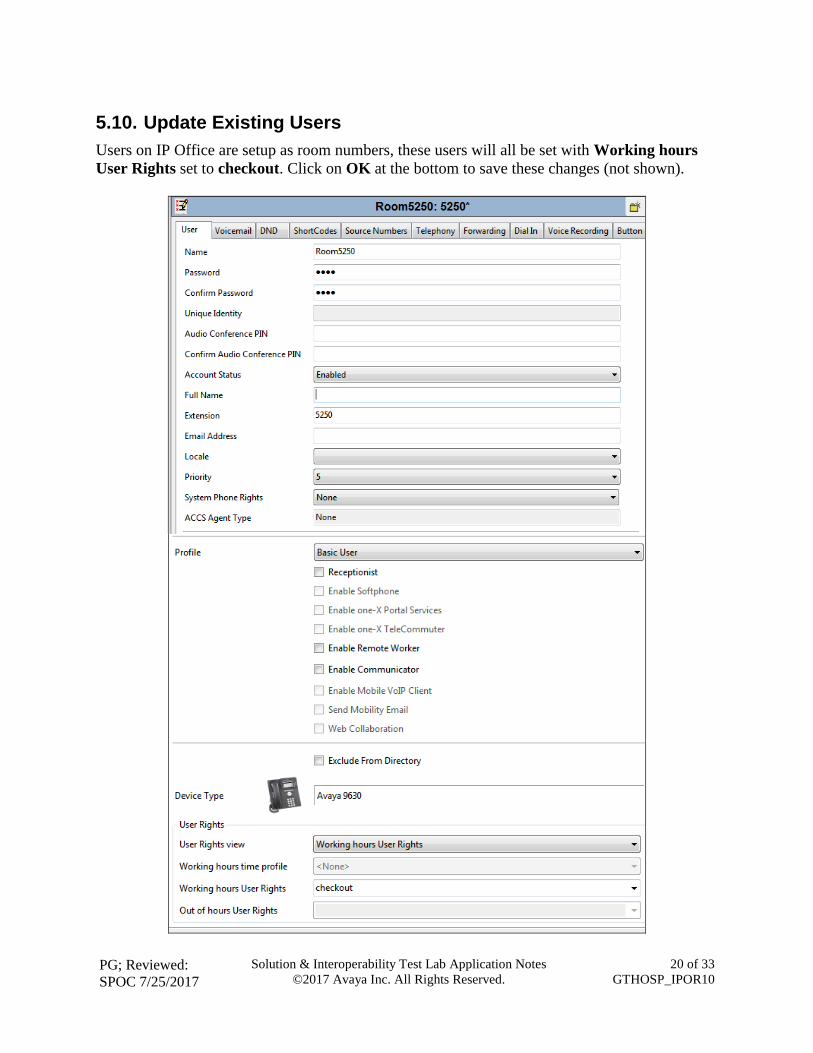
Users on IP Office are setup as room numbers, these users will all be set with Working hours
User Rights set to checkout. Click on OK at the bottom to save these changes (not shown).
PG; Reviewed:
SPOC 7/25/2017
Solution & Interoperability Test Lab Application Notes
©2017 Avaya Inc. All Rights Reserved.
21 of 33
GTHOSP_IPOR10
5.11. Save Configuration
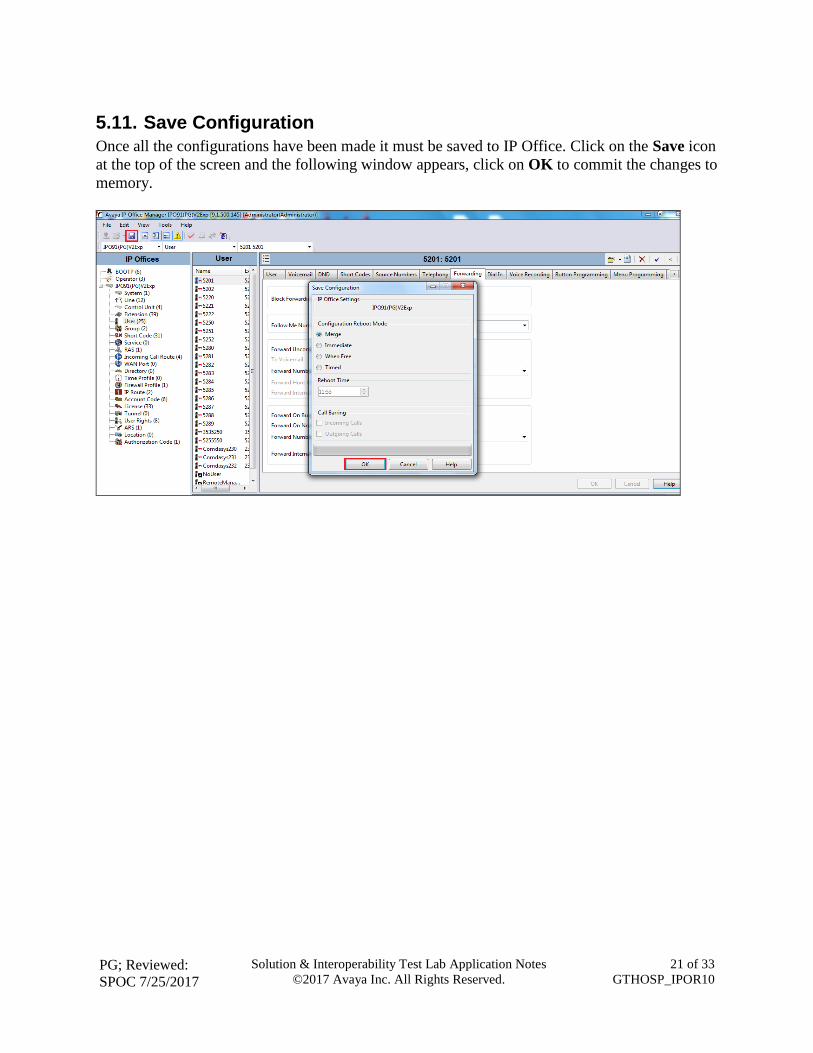
Once all the configurations have been made it must be saved to IP Office. Click on the Save icon
at the top of the screen and the following window appears, click on OK to commit the changes to
memory.
PG; Reviewed:
SPOC 7/25/2017
Solution & Interoperability Test Lab Application Notes
©2017 Avaya Inc. All Rights Reserved.
22 of 33
GTHOSP_IPOR10
6. Configure GT-HOSP This section describes the steps preformed to configure GT-HOSP to connect to IP Office. It is
implied that the GT-HOSP server software is already installed and has the appropriate licences.
It is also implied that a ‘Site’ is configured, an ‘Operator’ is imported, and ‘Tariffs’ are set.
Also the service for XML commands connection must have been already installed. Refer to the
product help guide provided with the software to install it.
For all other provisioning information such as initial installation and configuration, please refer
to the product documentation in Section 9. The configuration operations described in this section
can be summarized as follows:
Logging in to GT-HOSP Server.
GT Connector Configuration.
Advanced Settings.
Links Setup.
Register the GT Connector.
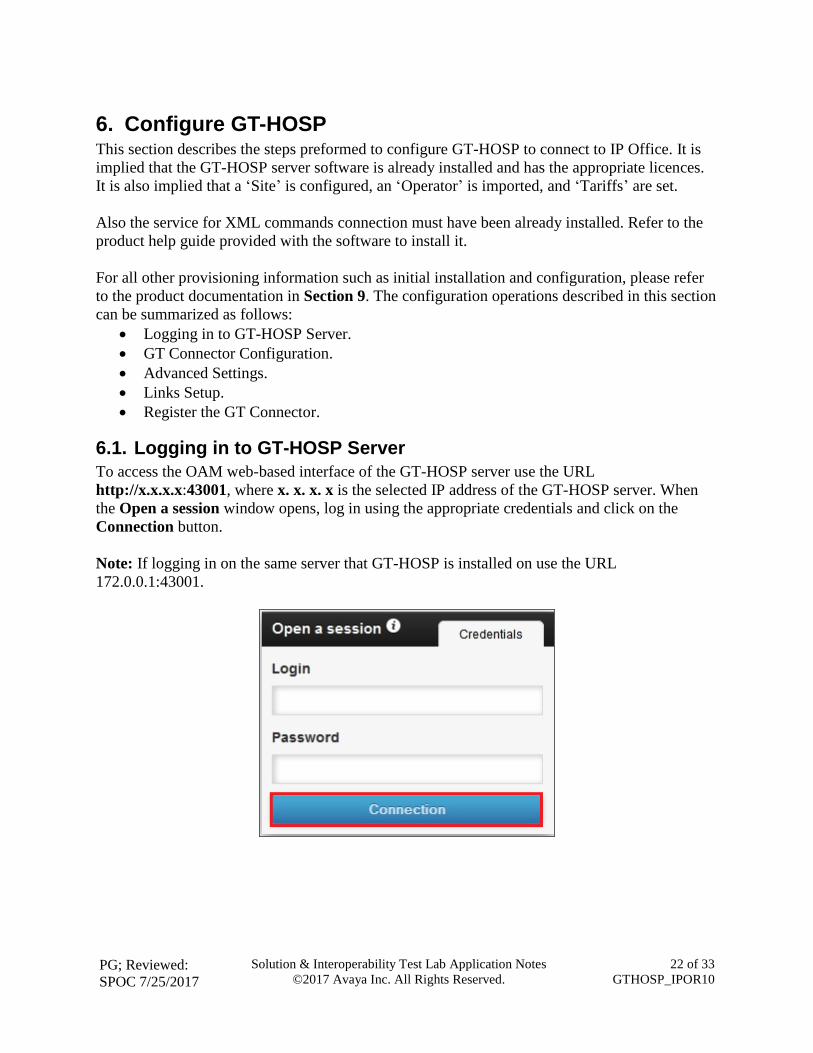
6.1. Logging in to GT-HOSP Server
To access the OAM web-based interface of the GT-HOSP server use the URL
http://x.x.x.x:43001, where x. x. x. x is the selected IP address of the GT-HOSP server. When
the Open a session window opens, log in using the appropriate credentials and click on the
Connection button.
Note: If logging in on the same server that GT-HOSP is installed on use the URL
172.0.0.1:43001.
PG; Reviewed:
SPOC 7/25/2017
Solution & Interoperability Test Lab Application Notes
©2017 Avaya Inc. All Rights Reserved.
23 of 33
GTHOSP_IPOR10
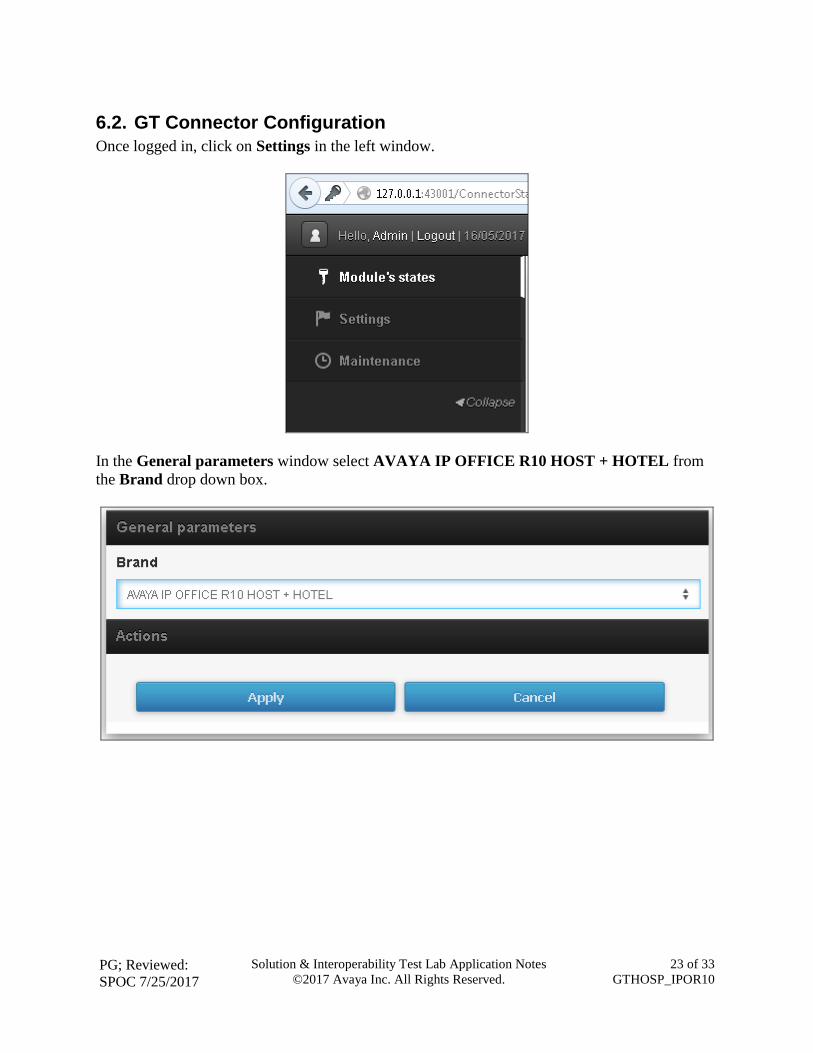
6.2. GT Connector Configuration
Once logged in, click on Settings in the left window.
In the General parameters window select AVAYA IP OFFICE R10 HOST + HOTEL from
the Brand drop down box.
PG; Reviewed:
SPOC 7/25/2017
Solution & Interoperability Test Lab Application Notes
©2017 Avaya Inc. All Rights Reserved.
24 of 33
GTHOSP_IPOR10
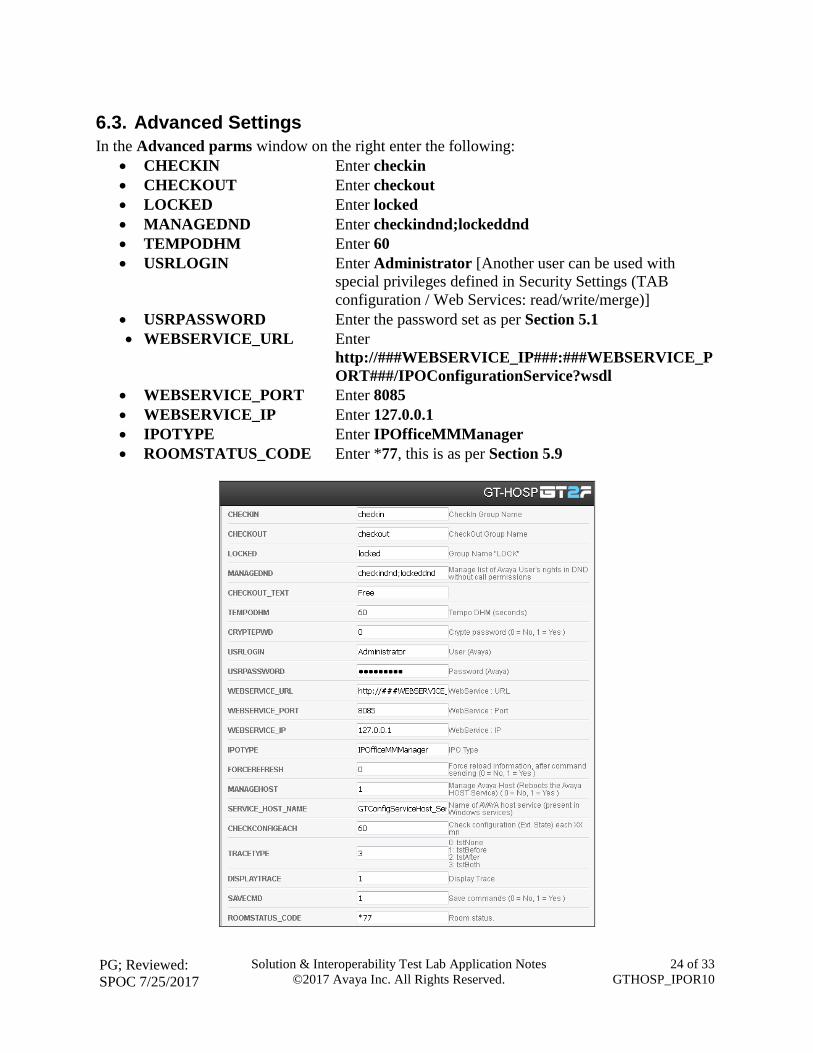
6.3. Advanced Settings
In the Advanced parms window on the right enter the following:
CHECKIN Enter checkin
CHECKOUT Enter checkout
LOCKED Enter locked
MANAGEDND Enter checkindnd;lockeddnd
TEMPODHM Enter 60
USRLOGIN Enter Administrator [Another user can be used with
special privileges defined in Security Settings (TAB
configuration / Web Services: read/write/merge)]
USRPASSWORD Enter the password set as per Section 5.1
WEBSERVICE_URL Enter
http://###WEBSERVICE_IP###:###WEBSERVICE_P
ORT###/IPOConfigurationService?wsdl
WEBSERVICE_PORT Enter 8085
WEBSERVICE_IP Enter 127.0.0.1
IPOTYPE Enter IPOfficeMMManager
ROOMSTATUS_CODE Enter *77, this is as per Section 5.9
PG; Reviewed:
SPOC 7/25/2017
Solution & Interoperability Test Lab Application Notes
©2017 Avaya Inc. All Rights Reserved.
25 of 33
GTHOSP_IPOR10
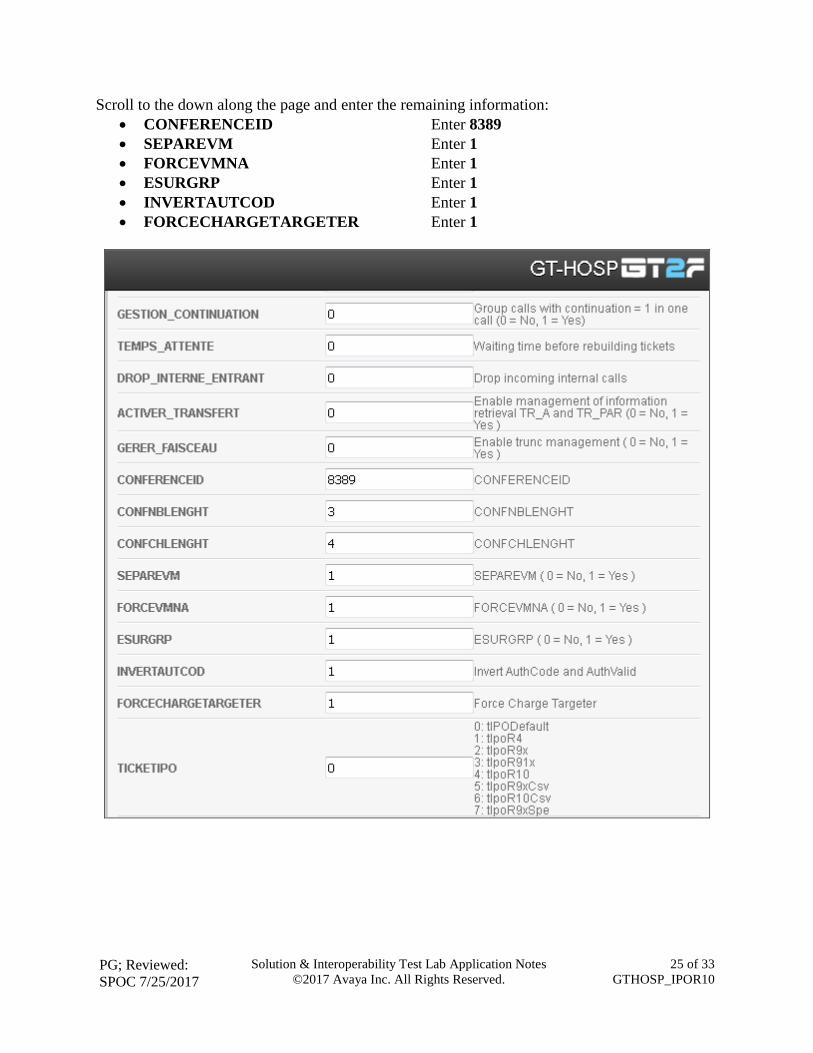
Scroll to the down along the page and enter the remaining information:
CONFERENCEID Enter 8389
SEPAREVM Enter 1
FORCEVMNA Enter 1
ESURGRP Enter 1
INVERTAUTCOD Enter 1
FORCECHARGETARGETER Enter 1

PG; Reviewed:
SPOC 7/25/2017
Solution & Interoperability Test Lab Application Notes
©2017 Avaya Inc. All Rights Reserved.
26 of 33
GTHOSP_IPOR10
6.4. Links Setup
In the DHM Link window enter the following:
IP Adress Enter the IP address of the IP Office
TCP Port Enter 50805
In the CDRs link window enter the IP Address of the IP Office and the TCP Port as configured
in Section 5.3 which is 8000.
PG; Reviewed:
SPOC 7/25/2017
Solution & Interoperability Test Lab Application Notes
©2017 Avaya Inc. All Rights Reserved.
27 of 33
GTHOSP_IPOR10
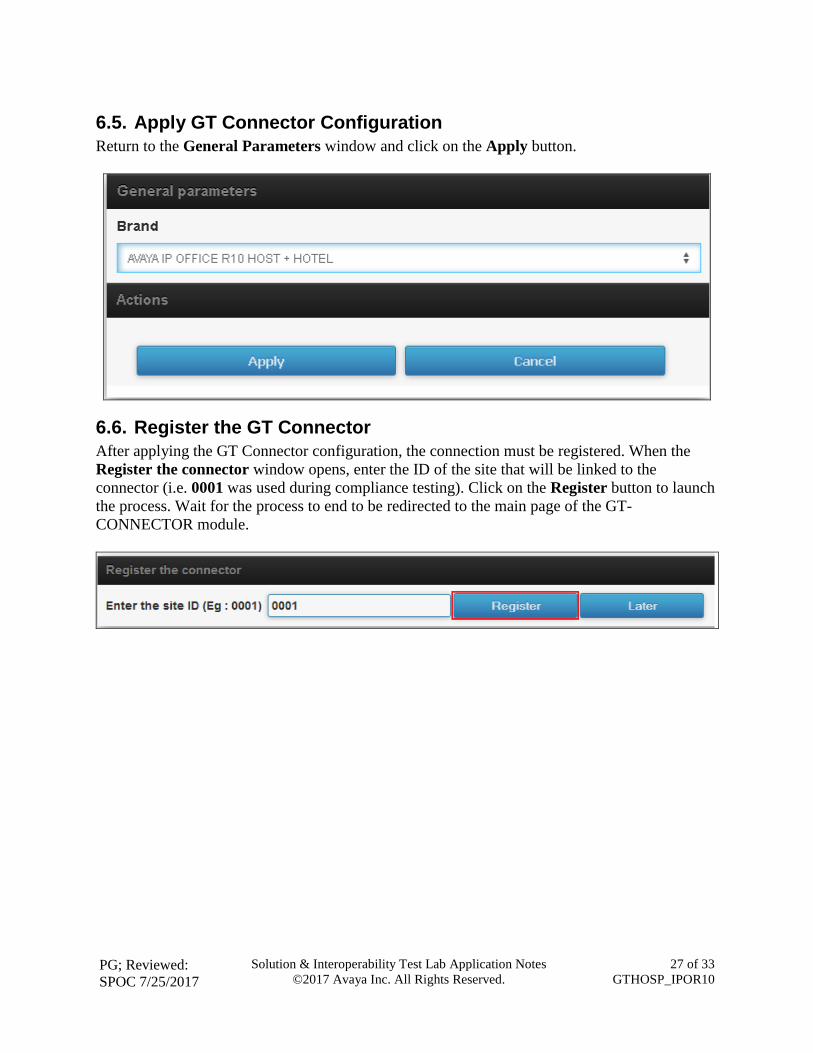
6.5. Apply GT Connector Configuration
Return to the General Parameters window and click on the Apply button.
6.6. Register the GT Connector
After applying the GT Connector configuration, the connection must be registered. When the
Register the connector window opens, enter the ID of the site that will be linked to the
connector (i.e. 0001 was used during compliance testing). Click on the Register button to launch
the process. Wait for the process to end to be redirected to the main page of the GT-
CONNECTOR module.
PG; Reviewed:
SPOC 7/25/2017
Solution & Interoperability Test Lab Application Notes
©2017 Avaya Inc. All Rights Reserved.
28 of 33
GTHOSP_IPOR10
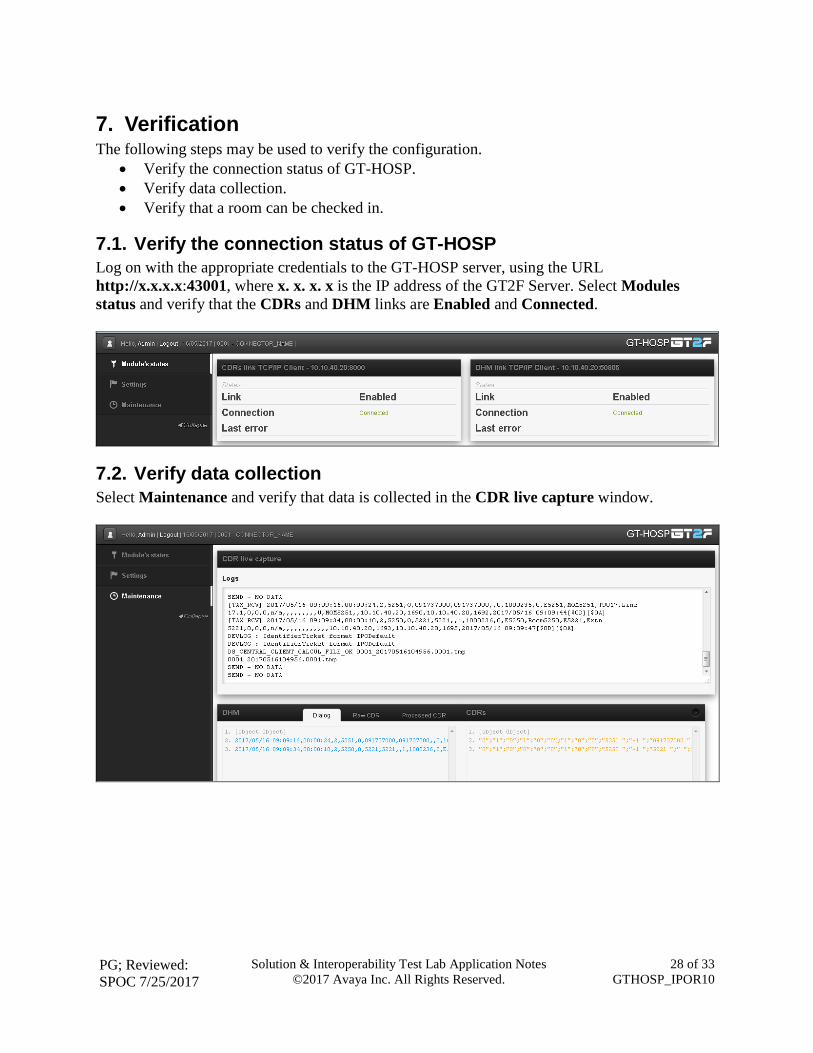
7. Verification The following steps may be used to verify the configuration.
Verify the connection status of GT-HOSP.
Verify data collection.
Verify that a room can be checked in.
7.1. Verify the connection status of GT-HOSP
Log on with the appropriate credentials to the GT-HOSP server, using the URL
http://x.x.x.x:43001, where x. x. x. x is the IP address of the GT2F Server. Select Modules
status and verify that the CDRs and DHM links are Enabled and Connected.
7.2. Verify data collection
Select Maintenance and verify that data is collected in the CDR live capture window.
PG; Reviewed:
SPOC 7/25/2017
Solution & Interoperability Test Lab Application Notes
©2017 Avaya Inc. All Rights Reserved.
29 of 33
GTHOSP_IPOR10
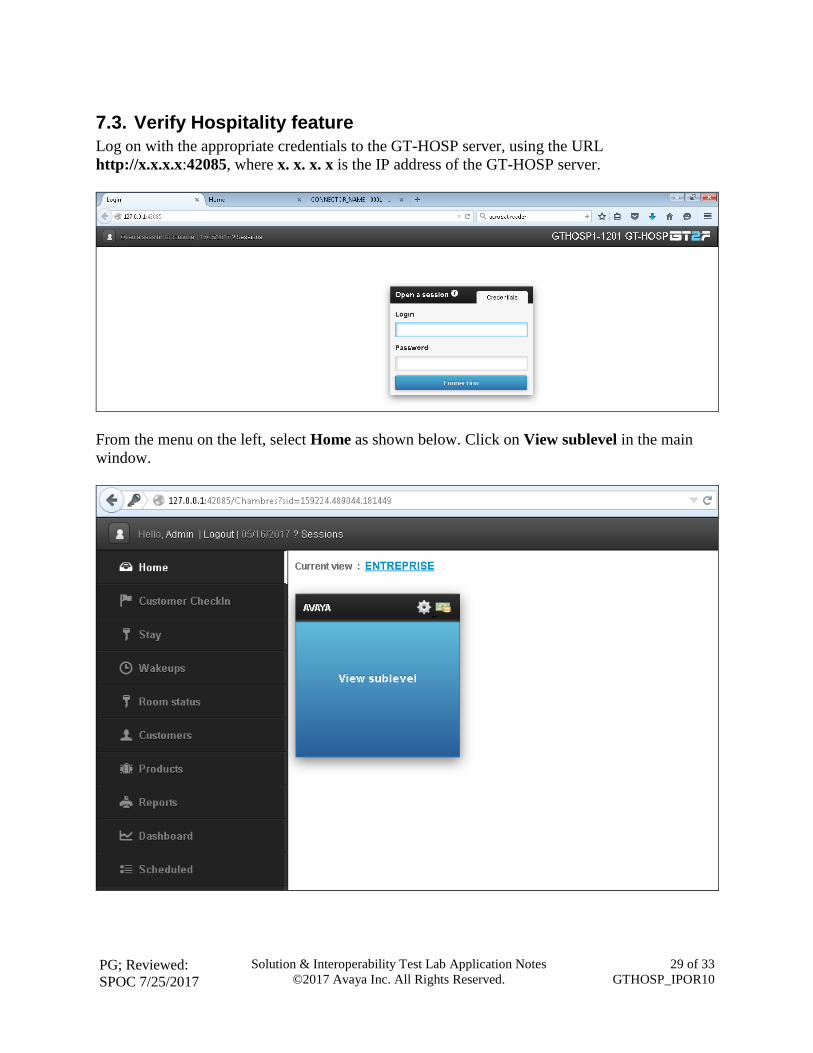
7.3. Verify Hospitality feature
Log on with the appropriate credentials to the GT-HOSP server, using the URL
http://x.x.x.x:42085, where x. x. x. x is the IP address of the GT-HOSP server.
From the menu on the left, select Home as shown below. Click on View sublevel in the main
window.
PG; Reviewed:
SPOC 7/25/2017
Solution & Interoperability Test Lab Application Notes
©2017 Avaya Inc. All Rights Reserved.
30 of 33
GTHOSP_IPOR10
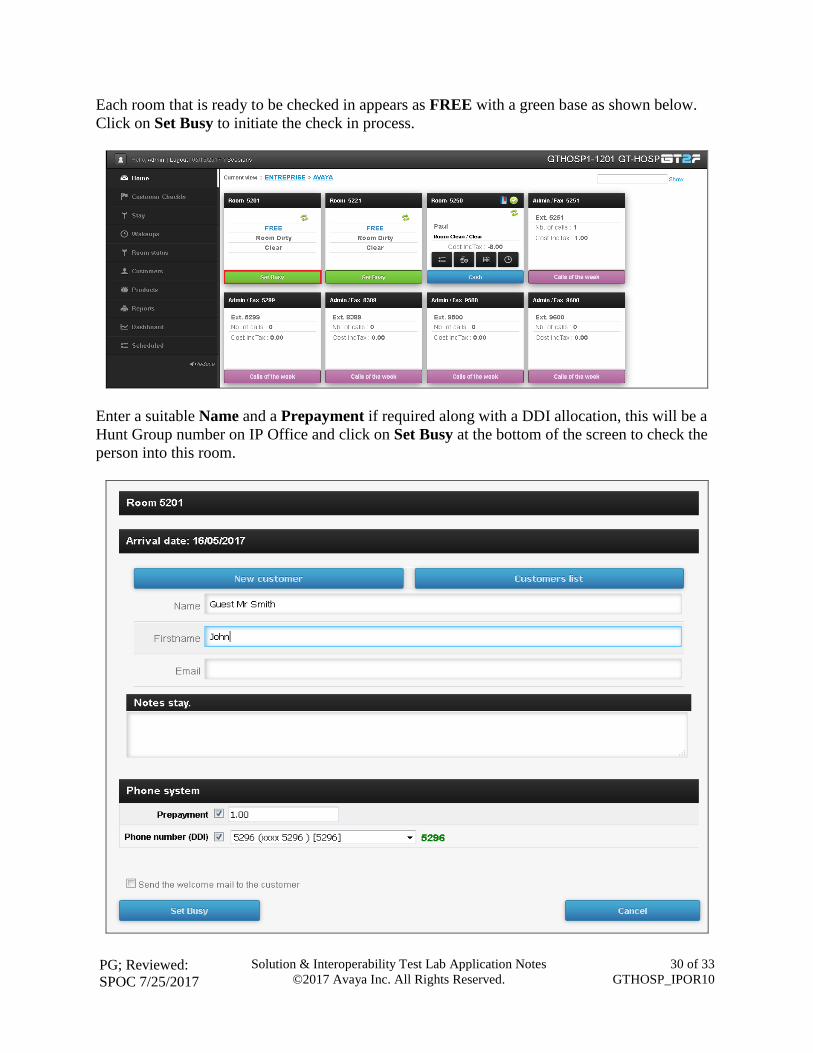
Each room that is ready to be checked in appears as FREE with a green base as shown below.
Click on Set Busy to initiate the check in process.
Enter a suitable Name and a Prepayment if required along with a DDI allocation, this will be a
Hunt Group number on IP Office and click on Set Busy at the bottom of the screen to check the
person into this room.
PG; Reviewed:
SPOC 7/25/2017
Solution & Interoperability Test Lab Application Notes
©2017 Avaya Inc. All Rights Reserved.
31 of 33
GTHOSP_IPOR10
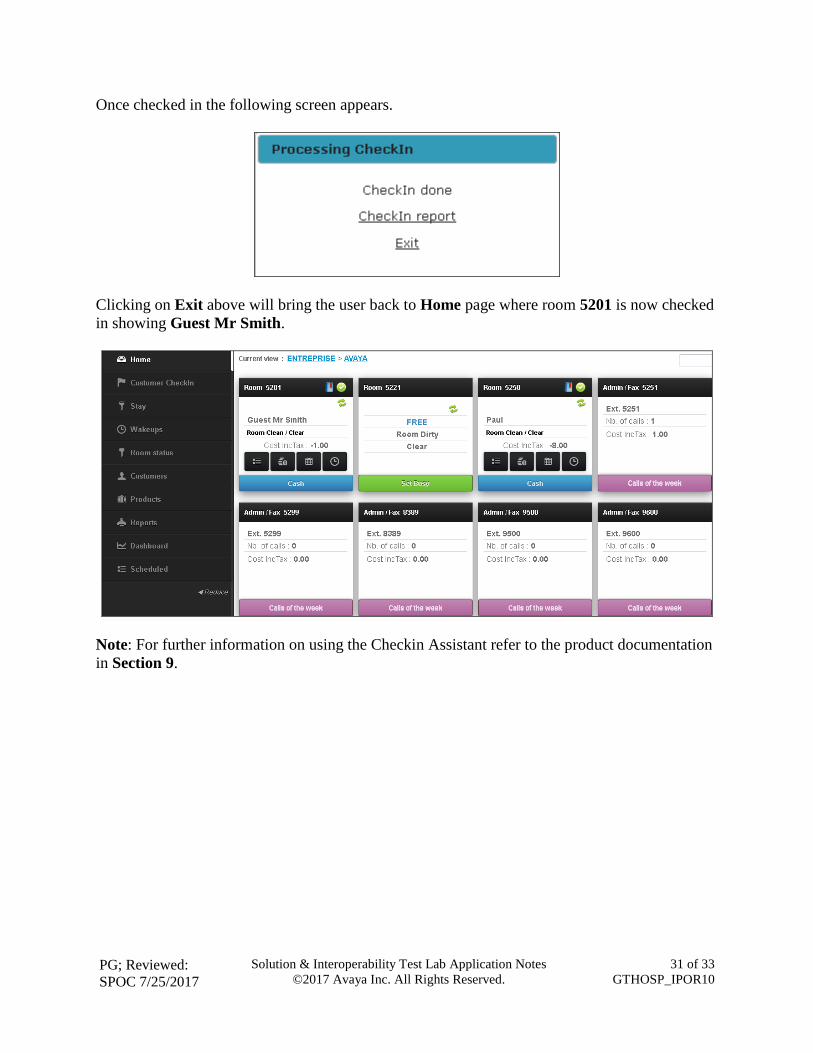
Once checked in the following screen appears.
Clicking on Exit above will bring the user back to Home page where room 5201 is now checked
in showing Guest Mr Smith.
Note: For further information on using the Checkin Assistant refer to the product documentation
in Section 9.
PG; Reviewed:
SPOC 7/25/2017
Solution & Interoperability Test Lab Application Notes
©2017 Avaya Inc. All Rights Reserved.
32 of 33
GTHOSP_IPOR10
8. Conclusion A full and comprehensive set of feature and functional test cases were performed during
compliance testing. GT-HOSP/HOTELIUM from GT2F is considered compliant with Avaya IP
Office IP500 V2 R10.0. All test cases have passed with any issues and observations outlined in
Section 2.2.
9. Additional References These documents form part of the Avaya official technical reference documentation suite.
Further information may be had from http://support.avaya.com or from your Avaya
representative.
[1] Deploying Avaya IP Office™ Platform IP500 V2.
[2] Administering Avaya IP Office™ Platform with Web Manager.
[3] Administering Avaya IP Office™ Platform with Manager.
[4] IP Office System Monitor, Document Number 15-601019, Issue 03c, March 1, 2013.
Product documentation for GT2F can be obtained in the installed software or at: www.gt2f.com
PG; Reviewed:
SPOC 7/25/2017
Solution & Interoperability Test Lab Application Notes
©2017 Avaya Inc. All Rights Reserved.
33 of 33
GTHOSP_IPOR10
©2017 Avaya Inc. All Rights Reserved.
Avaya and the Avaya Logo are trademarks of Avaya Inc. All trademarks identified by ® and
™ are registered trademarks or trademarks, respectively, of Avaya Inc. All other trademarks
are the property of their respective owners. The information provided in these Application
Notes is subject to change without notice. The configurations, technical data, and
recommendations provided in these Application Notes are believed to be accurate and
dependable, but are presented without express or implied warranty. Users are responsible for
their application of any products specified in these Application Notes.
Please e-mail any questions or comments pertaining to these Application Notes along with the
full title name and filename, located in the lower right corner, directly to the Avaya
DevConnect Program at [email protected].