Embed Size (px)
Citation preview
Application Note Omron MX2 Inverter and CX-Drive
This document guides you through the setup of proprietary vendor specific software installed on you PC. Your supervisor may provide you with addi-tional or alternative instructions.
The document consists of standard instructions that may not fit your particu-lar solution. Please visit our support website for latest revisions of documen-tation and firmware:
http://www.secomea.com
Version: 1.0, January 2013

Application note, Omron MX2 Inverter and CX-Drive Page 2 of 18 Version: 1.0, February 13
Table of Contents
Prerequisites for This Guide 3
System Overview 3
1. Ethernet connection 4
2. USB Connection 8
3. USB to serial cable 11
4. Ethernet connection via Windows XP under VMWare 14
5. USB connection via Windows XP under VMWare 16
Notices 18
Application note, Omron MX2 Inverter and CX-Drive Page 3 of 18 Version: 1.0, February 13
Prerequisites for This Guide The following guide will assist you to setup a remote and online connection to the Omron equipment placed on the customer site using your Omron CX Drive software installed on your PC.
Prerequisites for this guide are:
You have an operational LinkManager installed on your PC with a GateManager certificate that allows you to connect to the SiteManager agents.
You have the Omron software installed.
You have the Omron device agent installed and configured on the SiteManager at the remote site, and there is access between the SiteManager and the Omron inverter.
A network attached inverter must be configured with agent device type Omron / Ethernet inverter on the SiteManager.
A USB attached Inverter (such as the MX2 inverter) must be configured with agent device type Omron / USB Inverter on the SiteManager. Note that this connection type requires a SiteManager model with USB support and minimum SiteManager version 12035 and LinkManager version 12081.
If any of these prerequisites are not met, you should contact the person / de-partment responsible within your own company or at the company responsible hereof.
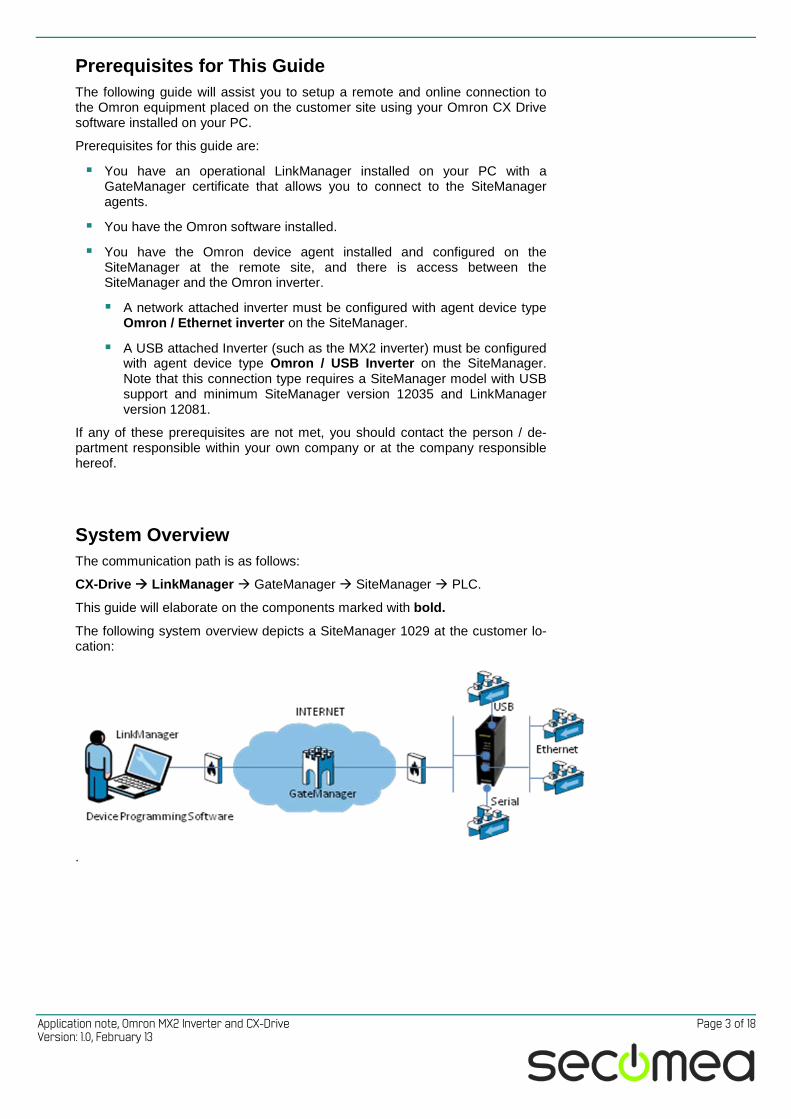
System Overview The communication path is as follows:
CX-Drive LinkManager GateManager SiteManager PLC.
This guide will elaborate on the components marked with bold.
The following system overview depicts a SiteManager 1029 at the customer lo-cation:
.
Application note, Omron MX2 Inverter and CX-Drive Page 4 of 18 Version: 1.0, February 13
1. Ethernet connection To establish an Ethernet connection to the inverter through the LinkMan-ager, you need to have a PLC working as a Gateway for the inverter. This setup is not covered in the guide. For details on how to do this, please con-sult your local Omron support.
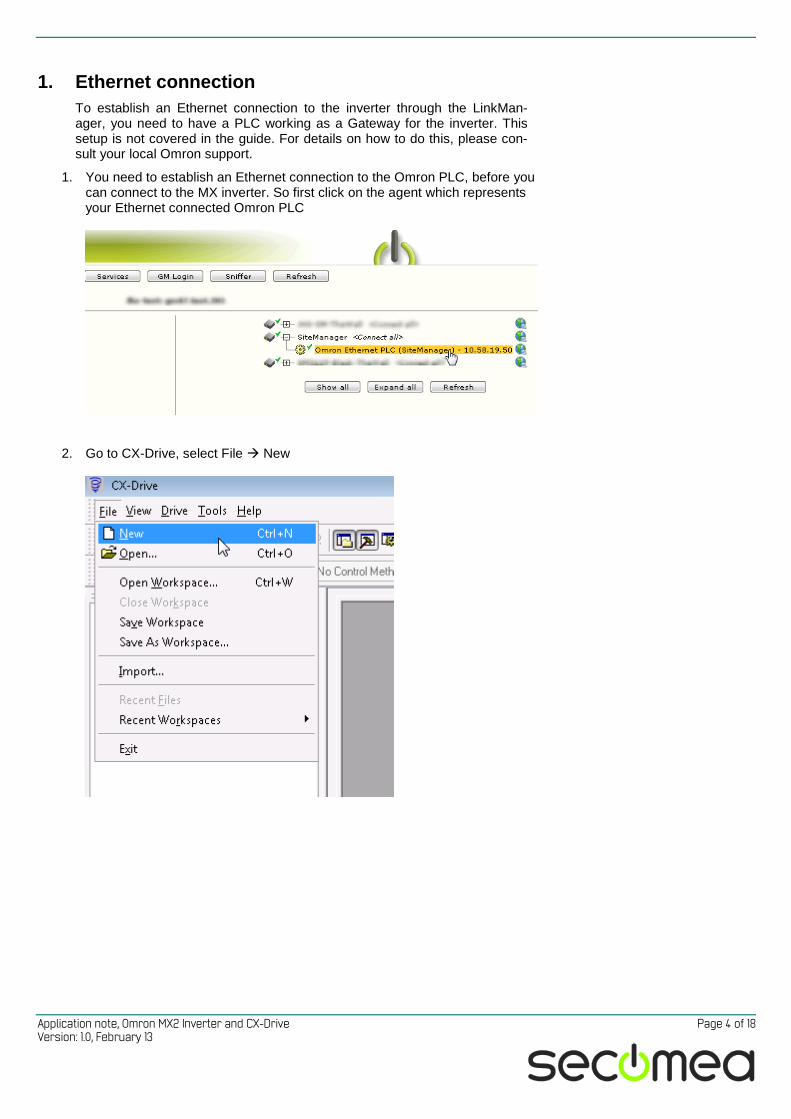
1. You need to establish an Ethernet connection to the Omron PLC, before you can connect to the MX inverter. So first click on the agent which represents your Ethernet connected Omron PLC
2. Go to CX-Drive, select File New
Application note, Omron MX2 Inverter and CX-Drive Page 5 of 18 Version: 1.0, February 13
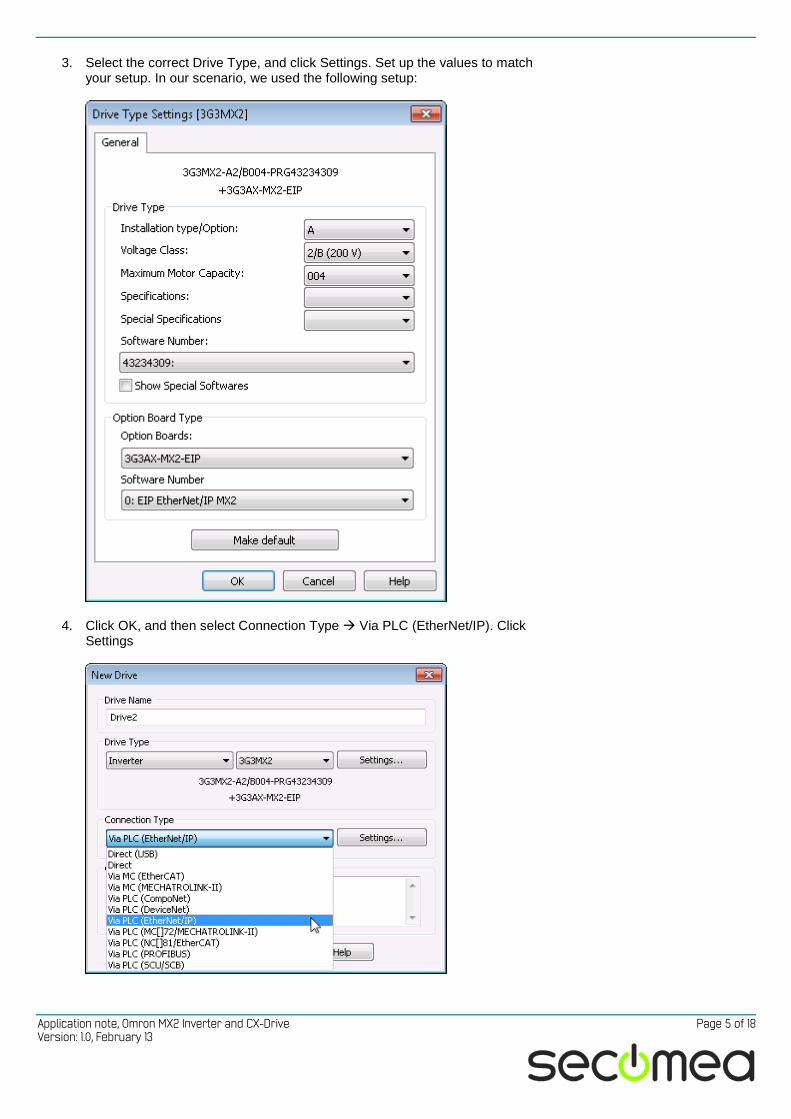
3. Select the correct Drive Type, and click Settings. Set up the values to match your setup. In our scenario, we used the following setup:
4. Click OK, and then select Connection Type Via PLC (EtherNet/IP). Click Settings
Application note, Omron MX2 Inverter and CX-Drive Page 6 of 18 Version: 1.0, February 13
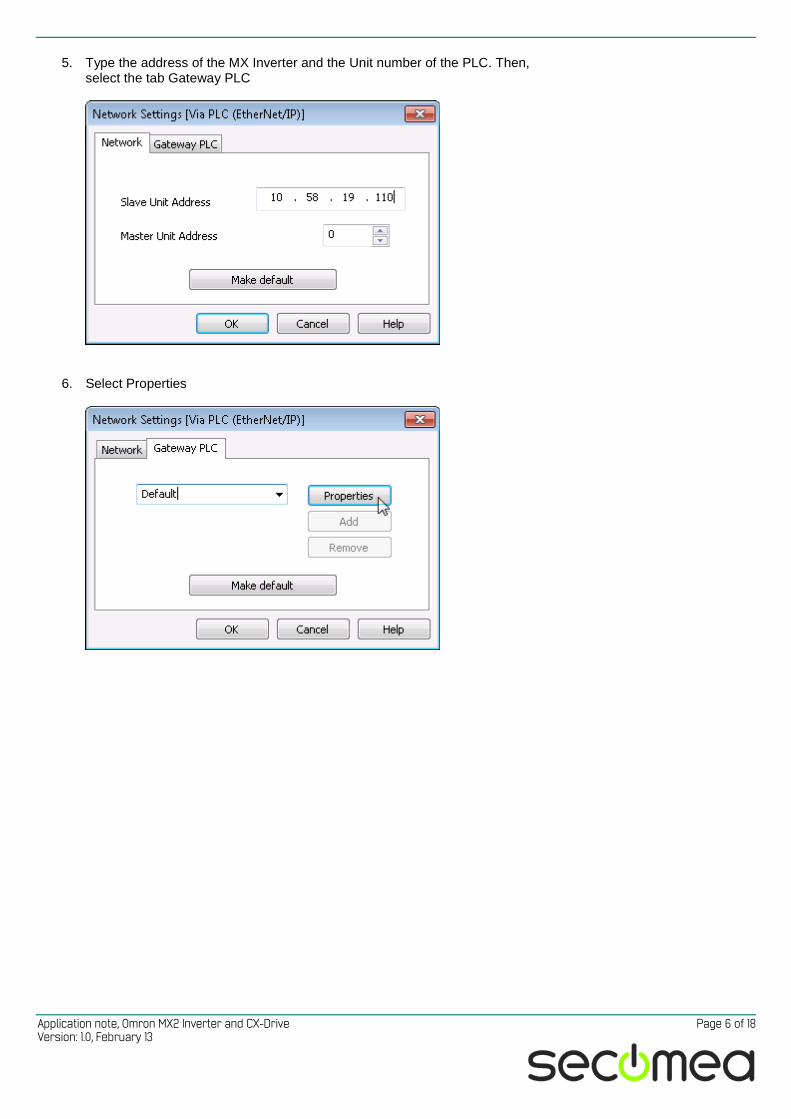
5. Type the address of the MX Inverter and the Unit number of the PLC. Then, select the tab Gateway PLC
6. Select Properties

Application note, Omron MX2 Inverter and CX-Drive Page 7 of 18 Version: 1.0, February 13
7. Choose the PLC type, and click Settings and choose the right CPU (in this scenario, we used a CJ2M-CPU33
8. Click OK, and set the Network Type to EtherNet/IP. Then, click Settings and type in the IP address of the PLC. Click OK four times, and the Drive is cre-ated in CX-Drive.
9. You are now able to go Online with the MX Inverter through the PLC.
Application note, Omron MX2 Inverter and CX-Drive Page 8 of 18 Version: 1.0, February 13
2. USB Connection To establish a USB connection to the inverter through the LinkManager, you will need to upgrade your LinkManager and SiteManager to the latest firm-ware (v13063 or later for LinkManager and v13025 or later for SiteManager).
The following steps have been performed with CX-Drive 2.7.4.2 and USB drivers already installed on the PC.
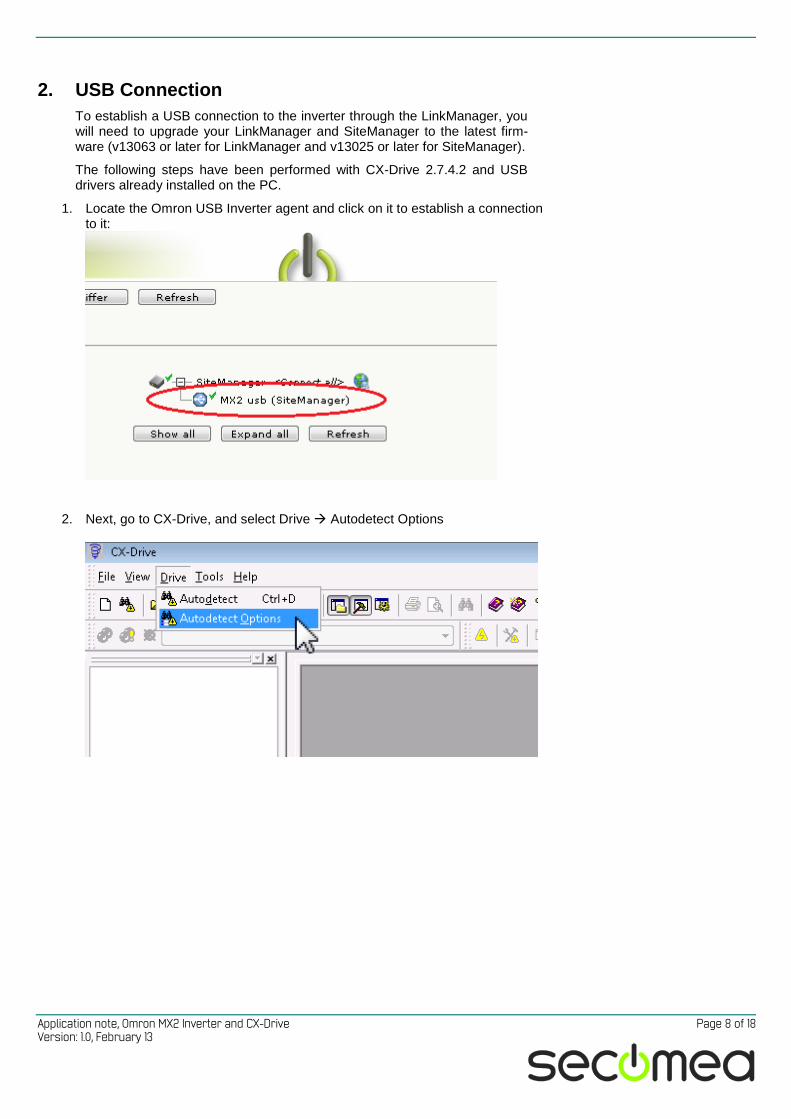
1. Locate the Omron USB Inverter agent and click on it to establish a connection to it:
2. Next, go to CX-Drive, and select Drive Autodetect Options
Application note, Omron MX2 Inverter and CX-Drive Page 9 of 18 Version: 1.0, February 13
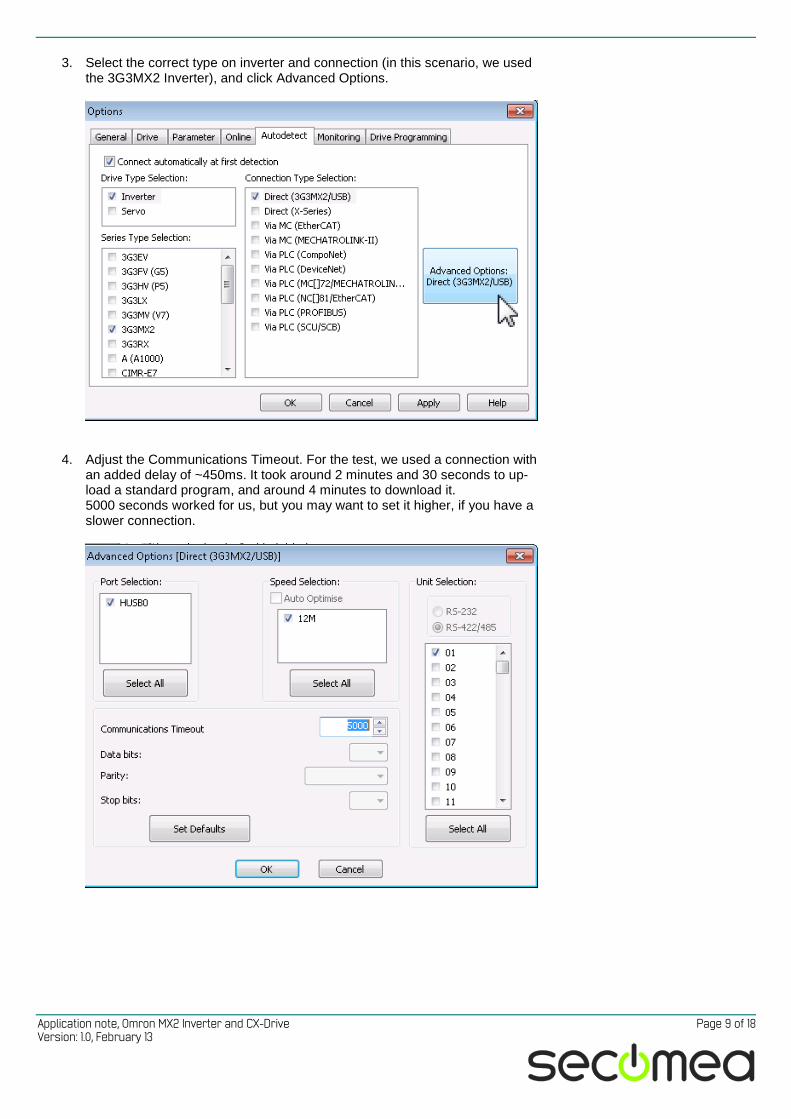
3. Select the correct type on inverter and connection (in this scenario, we used the 3G3MX2 Inverter), and click Advanced Options.
4. Adjust the Communications Timeout. For the test, we used a connection with an added delay of ~450ms. It took around 2 minutes and 30 seconds to up-load a standard program, and around 4 minutes to download it. 5000 seconds worked for us, but you may want to set it higher, if you have a slower connection.
Application note, Omron MX2 Inverter and CX-Drive Page 10 of 18 Version: 1.0, February 13
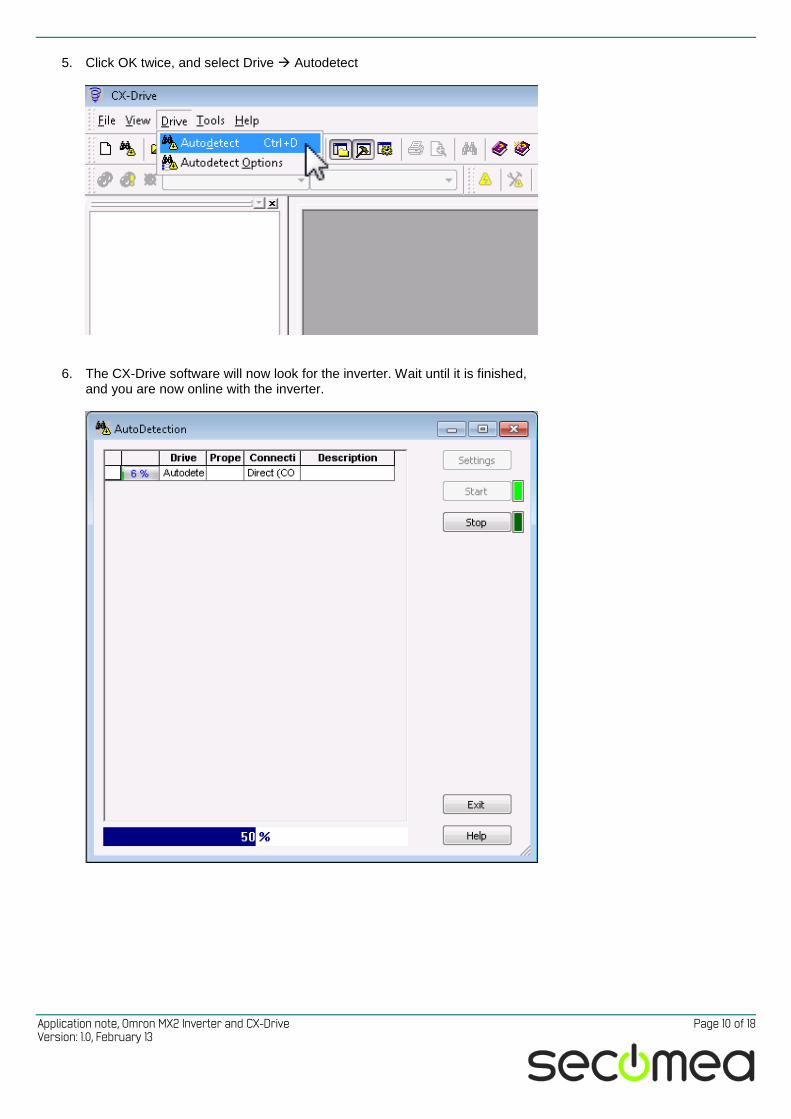
5. Click OK twice, and select Drive Autodetect
6. The CX-Drive software will now look for the inverter. Wait until it is finished, and you are now online with the inverter.
Application note, Omron MX2 Inverter and CX-Drive Page 11 of 18 Version: 1.0, February 13
3. USB to serial cable To establish a USB connection to the inverter through the USB to serial ca-ble via the LinkManager, you will need to upgrade your LinkManager and SiteManager to the latest firmware (v13063 or later for LinkManager and v13025 or later for SiteManager).
The following steps have been performed with CX-Drive 2.7.4.2 and Profilic USB to serial drivers already installed on the PC.
NOTE: This type of connection was very slow during our test. The main rea-son for this is the baud rate. Combined with a high delay, it took nearly xx minutes for download and about 19 minutes to upload. We also experienced that if you have a very slow internetconnection (or a high delay), then the transfer got interrupted, regardsless of the timeout settings.
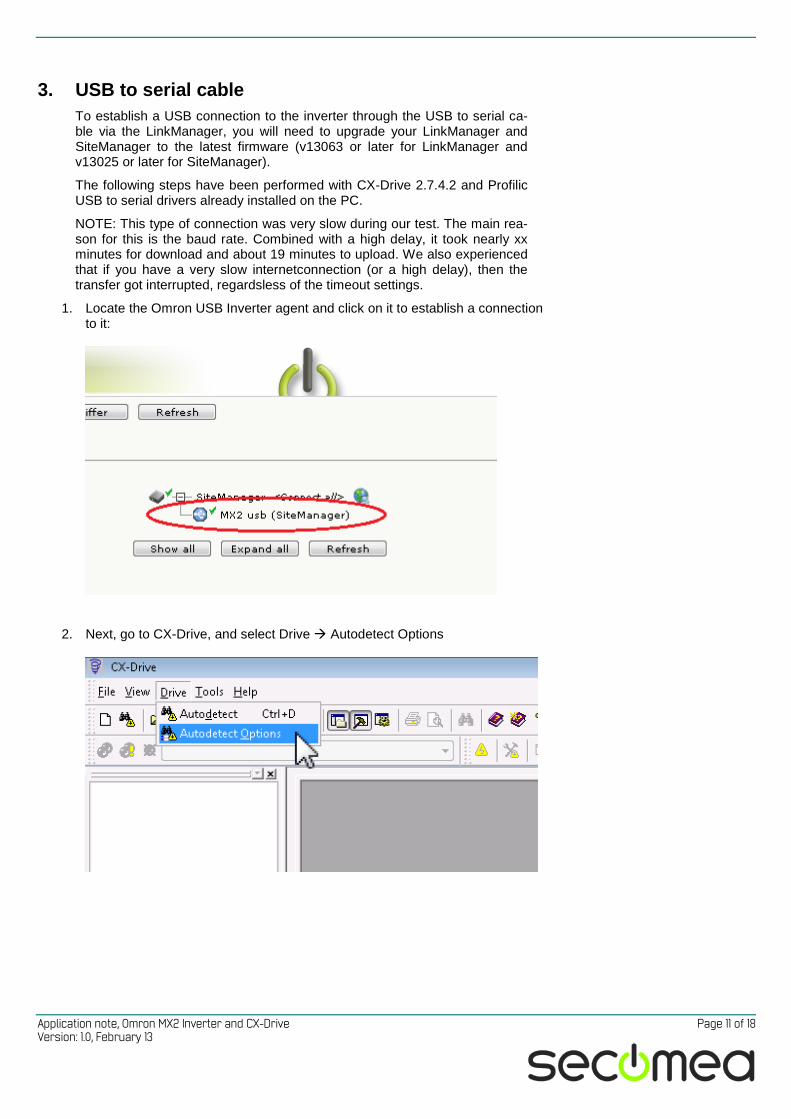
1. Locate the Omron USB Inverter agent and click on it to establish a connection to it:
2. Next, go to CX-Drive, and select Drive Autodetect Options
Application note, Omron MX2 Inverter and CX-Drive Page 12 of 18 Version: 1.0, February 13
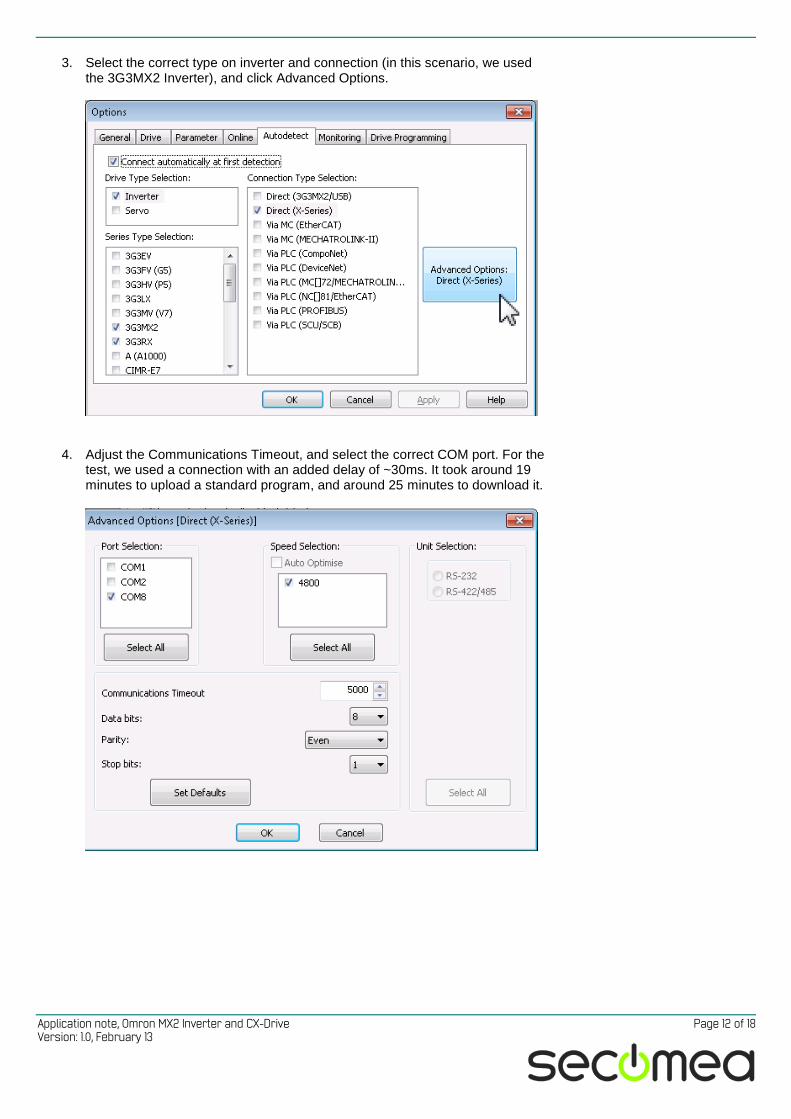
3. Select the correct type on inverter and connection (in this scenario, we used the 3G3MX2 Inverter), and click Advanced Options.
4. Adjust the Communications Timeout, and select the correct COM port. For the test, we used a connection with an added delay of ~30ms. It took around 19 minutes to upload a standard program, and around 25 minutes to download it.

Application note, Omron MX2 Inverter and CX-Drive Page 13 of 18 Version: 1.0, February 13
5. Click OK twice, and select Drive Autodetect
6. The CX-Drive software will now look for the inverter. Wait until it is finished, and you are now online with the inverter.
Application note, Omron MX2 Inverter and CX-Drive Page 14 of 18 Version: 1.0, February 13
4. Ethernet connection via Windows XP under VMWare You can run the Sysmac Studio software inside a VMWare engine, to an Omron PLC that is Ethernet attached to a SiteManager.
You can choose to run the LinkManager inside or outside the virtual machine. Note that LinkManager can only run inside VMWare if the host OS is Windows 7 and the PC’s CPU has support for virtualization.
The following illustrates VMWare Player, which can be downloaded from http://www.vmware.com/support/product-support/player/, and for LinkManager running outside the virtual machine (i.e. on the host OS system)
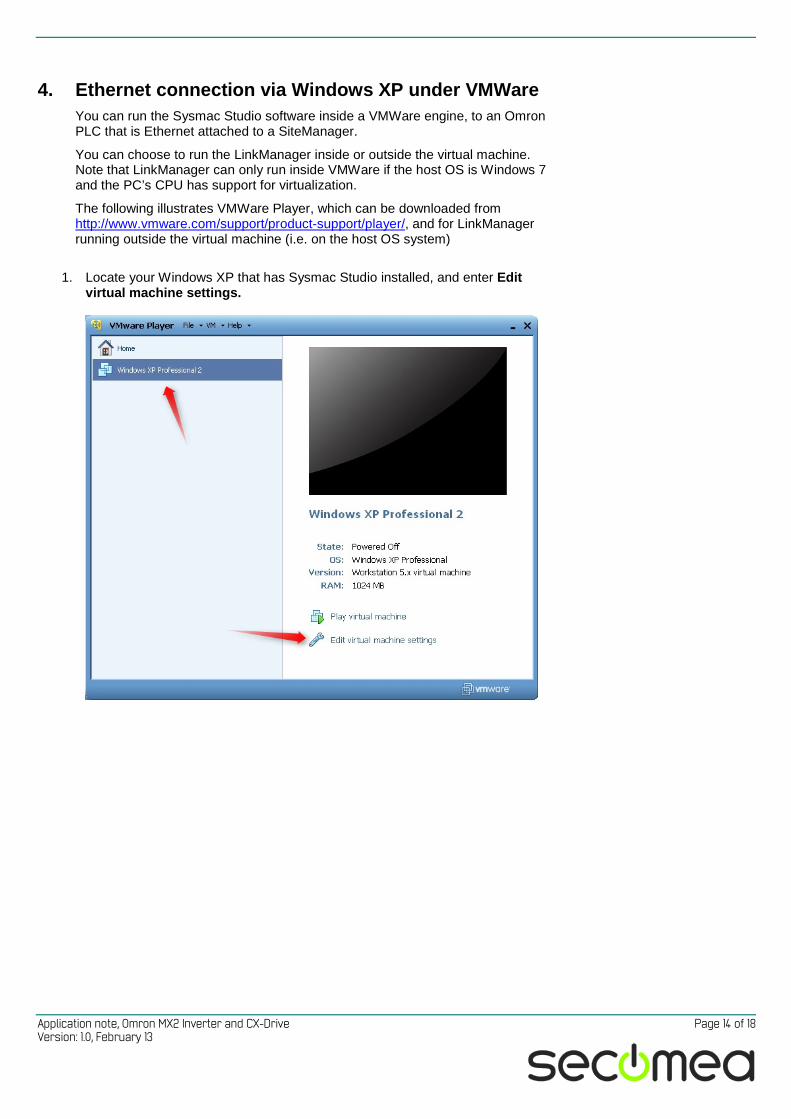
1. Locate your Windows XP that has Sysmac Studio installed, and enter Edit
virtual machine settings.
Application note, Omron MX2 Inverter and CX-Drive Page 15 of 18 Version: 1.0, February 13
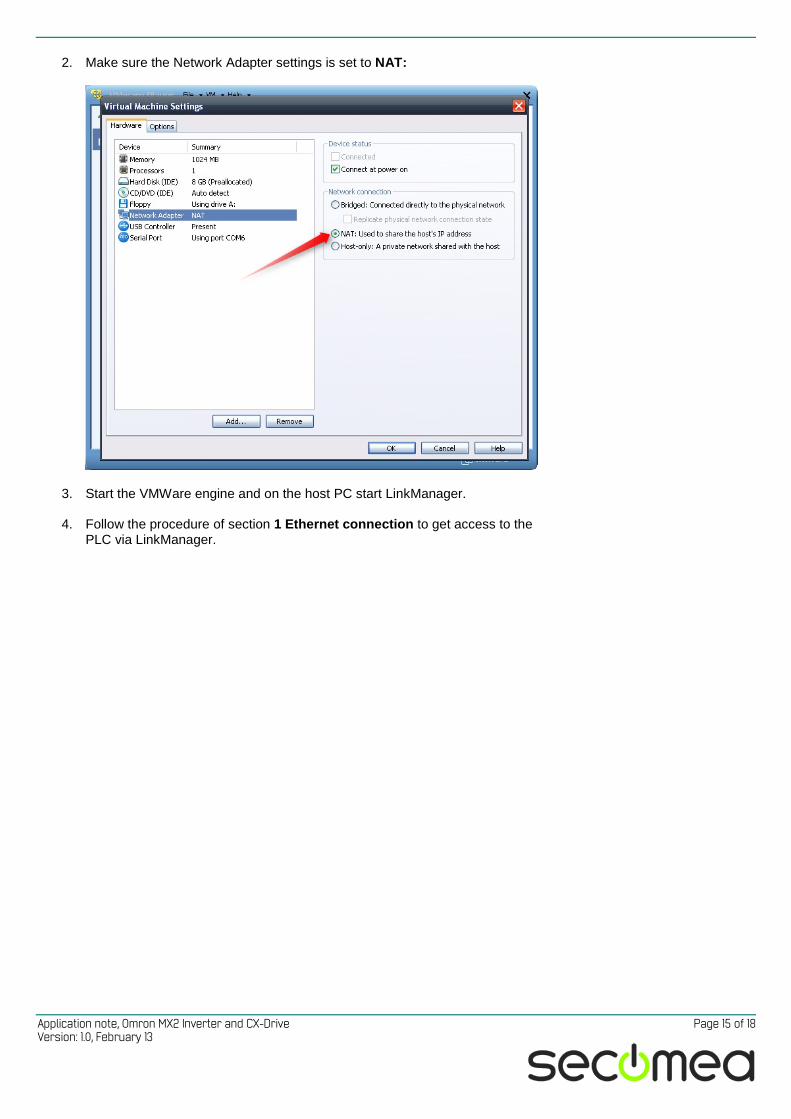
2. Make sure the Network Adapter settings is set to NAT:
3. Start the VMWare engine and on the host PC start LinkManager.
4. Follow the procedure of section 1 Ethernet connection to get access to the PLC via LinkManager.

Application note, Omron MX2 Inverter and CX-Drive Page 16 of 18 Version: 1.0, February 13
5. USB connection via Windows XP under VMWare You can run the Sysmac Studio software inside a VMWare engine, to an Omron PLC that is USB attached to a SiteManager.
Important: LinkManager must run inside the virtual machine also. Note that LinkManager can only run inside VMWare if the host OS is Windows 7 and the PC’s CPU has support for virtualization.
The following illustrates VMWare Player, which can be downloaded from http://www.vmware.com/support/product-support/player/, and for LinkManager running outside the virtual machine (i.e. on the host system)
5. Locate your Windows XP that has Sysmac Studio installed, and enter Edit
virtual machine settings.
Application note, Omron MX2 Inverter and CX-Drive Page 17 of 18 Version: 1.0, February 13
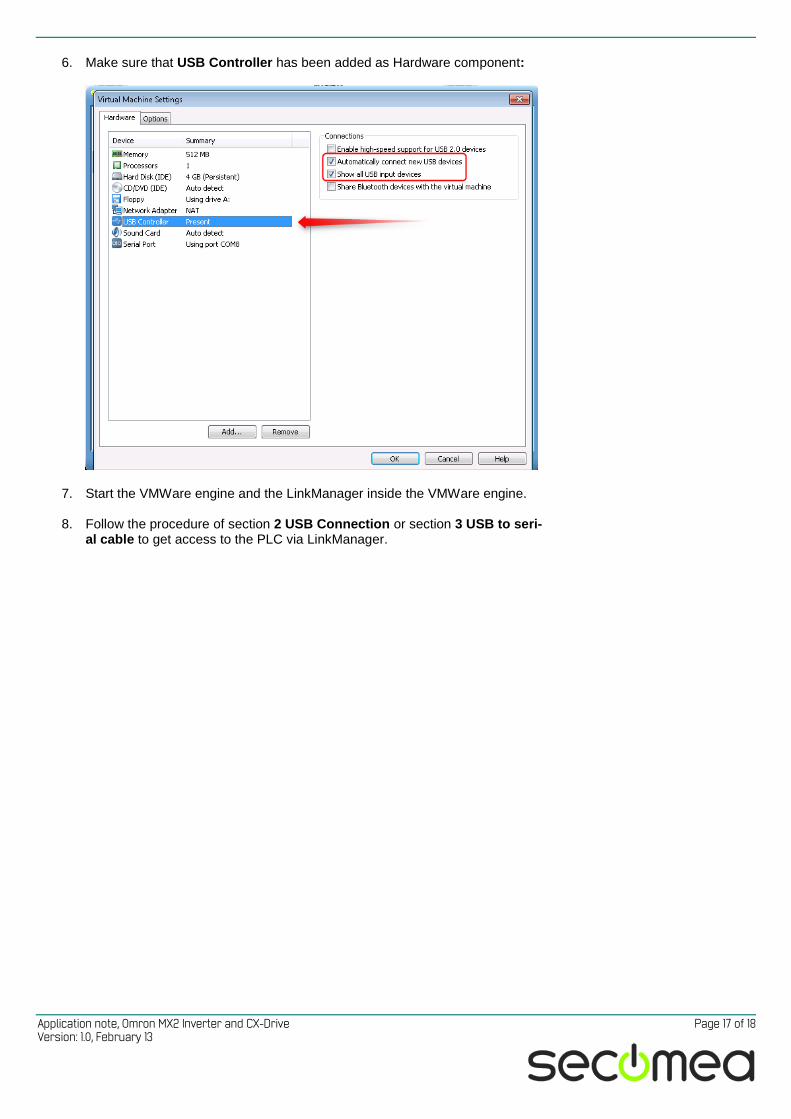
6. Make sure that USB Controller has been added as Hardware component:
7. Start the VMWare engine and the LinkManager inside the VMWare engine.
8. Follow the procedure of section 2 USB Connection or section 3 USB to seri-al cable to get access to the PLC via LinkManager.
Page 18 of 18
Notices
Publication and copyright © Copyright Secomea A/S 2013. All rights reserved. You may download and print a copy for your own use. As a high-level administrator, you may use what-ever you like from contents of this document to create your own instructions for deploying our products. Otherwise, no part of this document may be copied or reproduced in any way, without the written consent of Secomea A/S. We would appreciate getting a copy of the material you produce in order to make our own material better and – if you give us permission – to inspire other users.
Trademarks SiteManager™, LinkManager™ and GateManager™ are trademark of Secomea A/S. Other trademarks are the property of their respective owners.
Disclaimer Secomea A/S reserves the right to make changes to this publication and to the products described herein without notice. The publication of this document does not represent a commitment on the part of Secomea A/S. Considerable effort has been made to ensure that this publication is free of inaccuracies and omis-sions but we cannot guarantee that there are none.
The following paragraph does not apply to any country or state where such pro-visions are inconsistent with local law:
SECOMEA A/S PROVIDES THIS PUBLICATION "AS IS" WITHOUT WARRANTY OF ANY KIND, EITHER EXPRESS OR IMPLIED, INCLUDING, BUT NOT LIMITED TO, THE IMPLIED WARRANTIES OF MERCHANTABILITY OR FITNESS FOR A PARTICULAR PURPOSE
SECOMEA A/S SHALL NOT BE LIABLE FOR ANY DIRECT, INDIRECT, INCIDENTAL, CONSEQUENTIAL, OR OTHER DAMAGE ALLEGED IN CONNECTION WITH THE FURNISHING OR USE OF THIS INFORMATION.
Secomea A/S Denmark CVR No. DK 31 36 60 38 E-mail: [email protected] www.secomea.com