Embed Size (px)
Citation preview
Application Note
VAST How to access VAST via a web
interface
Application Note
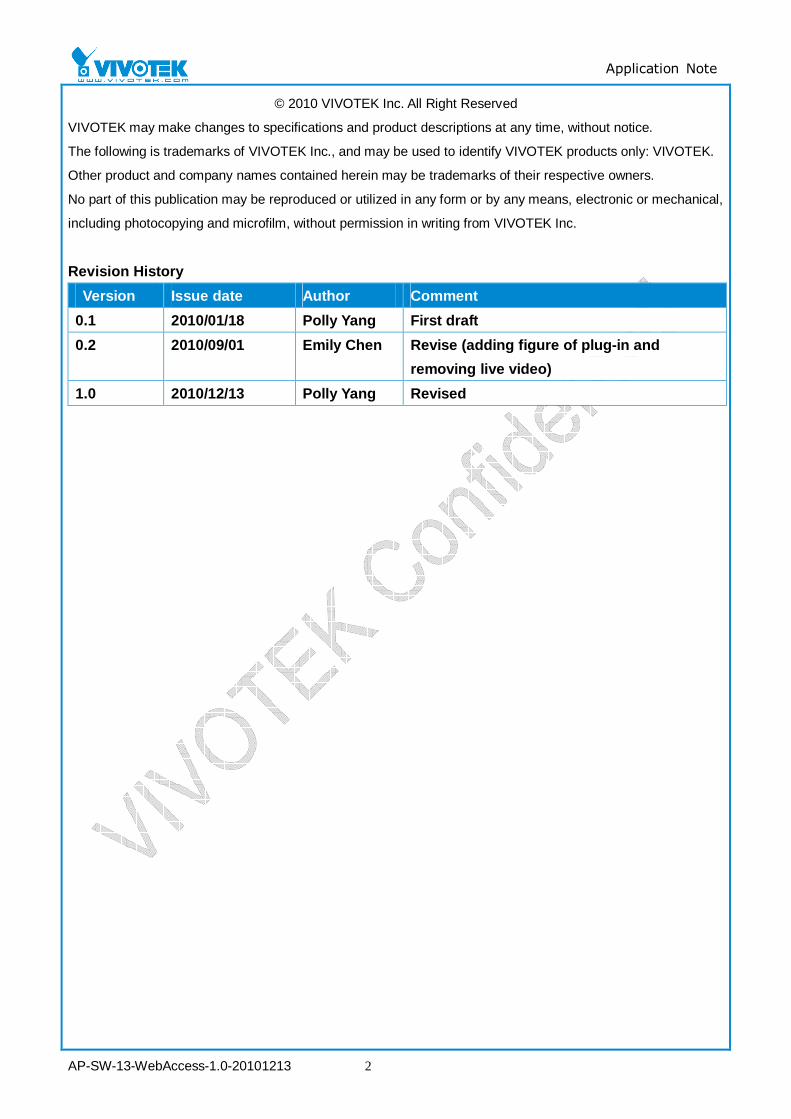
AP-SW-13-WebAccess-1.0-20101213 2
© 2010 VIVOTEK Inc. All Right Reserved
VIVOTEK may make changes to specifications and product descriptions at any time, without notice.
The following is trademarks of VIVOTEK Inc., and may be used to identify VIVOTEK products only: VIVOTEK.
Other product and company names contained herein may be trademarks of their respective owners.
No part of this publication may be reproduced or utilized in any form or by any means, electronic or mechanical,
including photocopying and microfilm, without permission in writing from VIVOTEK Inc.
Revision History
Version Issue date Author Comment
0.1 2010/01/18 Polly Yang First draft
0.2 2010/09/01 Emily Chen Revise (adding figure of plug-in and
removing live video)
1.0 2010/12/13 Polly Yang Revised
Application Note
AP-SW-13-WebAccess-1.0-20101213 3
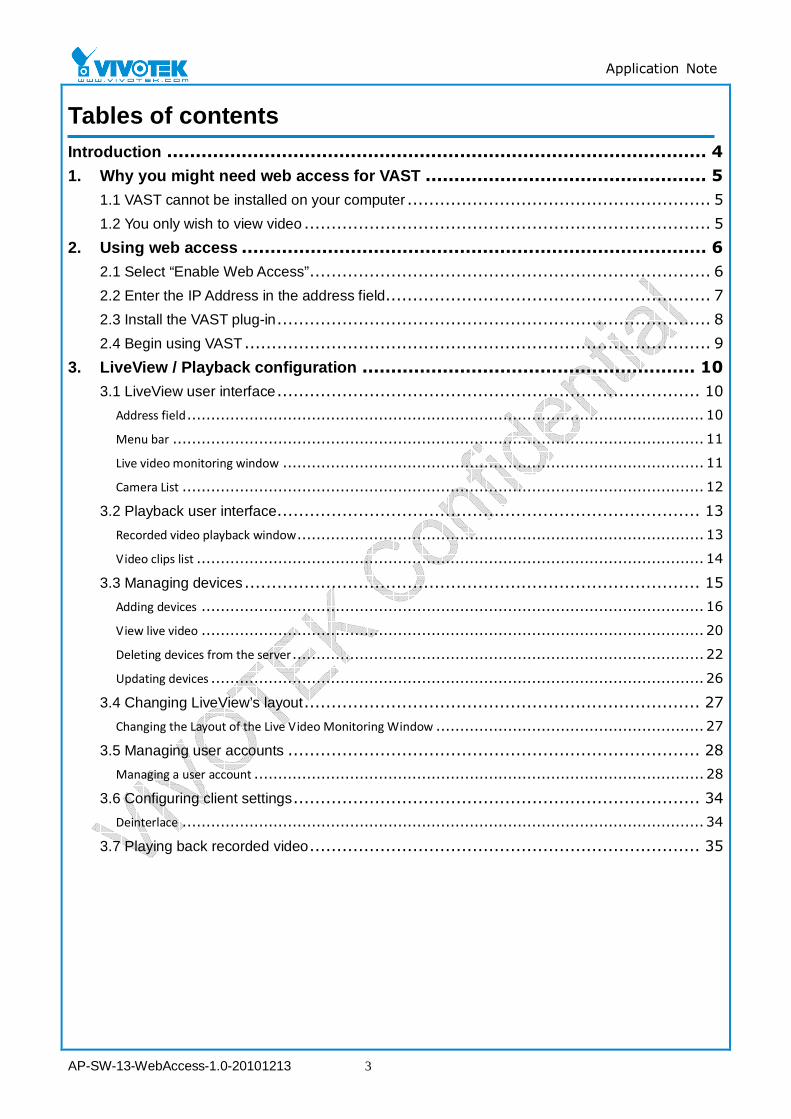
Tables of contents Introduction .............................................................................................. 4
1. Why you might need web access for VAST ................................................. 5
1.1 VAST cannot be installed on your computer ........................................................ 5
1.2 You only wish to view video ........................................................................... 5
2. Using web access ................................................................................. 6
2.1 Select “Enable Web Access”.......................................................................... 6
2.2 Enter the IP Address in the address field............................................................ 7
2.3 Install the VAST plug-in................................................................................ 8
2.4 Begin using VAST ...................................................................................... 9
3. LiveView / Playback configuration .......................................................... 10
3.1 LiveView user interface.............................................................................. 10
Address field............................................................................................................ 10
Menu bar ............................................................................................................... 11
Live video monitoring window ........................................................................................ 11
Camera List ............................................................................................................. 12
3.2 Playback user interface.............................................................................. 13
Recorded video playback window..................................................................................... 13
Video clips list .......................................................................................................... 14
3.3 Managing devices.................................................................................... 15
Adding devices ......................................................................................................... 16
View live video ......................................................................................................... 20
Deleting devices from the server...................................................................................... 22
Updating devices ....................................................................................................... 26
3.4 Changing LiveView’s layout......................................................................... 27
Changing the Layout of the Live Video Monitoring Window ........................................................ 27
3.5 Managing user accounts ............................................................................ 28
Managing a user account .............................................................................................. 28
3.6 Configuring client settings........................................................................... 34
Deinterlace ............................................................................................................. 34
3.7 Playing back recorded video........................................................................ 35
Application Note
AP-SW-13-WebAccess-1.0-20101213 4
Introduction VIVOTEK’s VAST central management software provides reliable recording, easy
system management, and excellent scalability for a diverse range of IP surveillance applications. Through its server/client architecture, users can carry out remote management on a large-scale system and benefit from a robust IP surveillance.
You can enable the web access function in LiveClient, and then you can access VAST LiveView and Playback via Internet web browser. The user-interface is totally different from the program.
LiveClient allows you to access VAST LiveView and Playback via an Internet web browser. This document describes the benefits of using this feature, and explains the browser-based user interface for VAST LiveView and Playback.
Application Note
AP-SW-13-WebAccess-1.0-20101213 5
1. Why you might need web access for VAST 1.1 VAST cannot be installed on your computer
For various reasons, you may not be able to install the VAST LiveClient/Playback
program—for example, lack of sufficient space on the computer’s hard disk.
1.2 You only wish to view video If you only wish to view video—either live streaming or recorded files—but have no need
for other functionality, you can use a web browser for viewing. (i.e. Internet Explorer 6, Firefox
3.5 or above)
Application Note
AP-SW-13-WebAccess-1.0-20101213 6
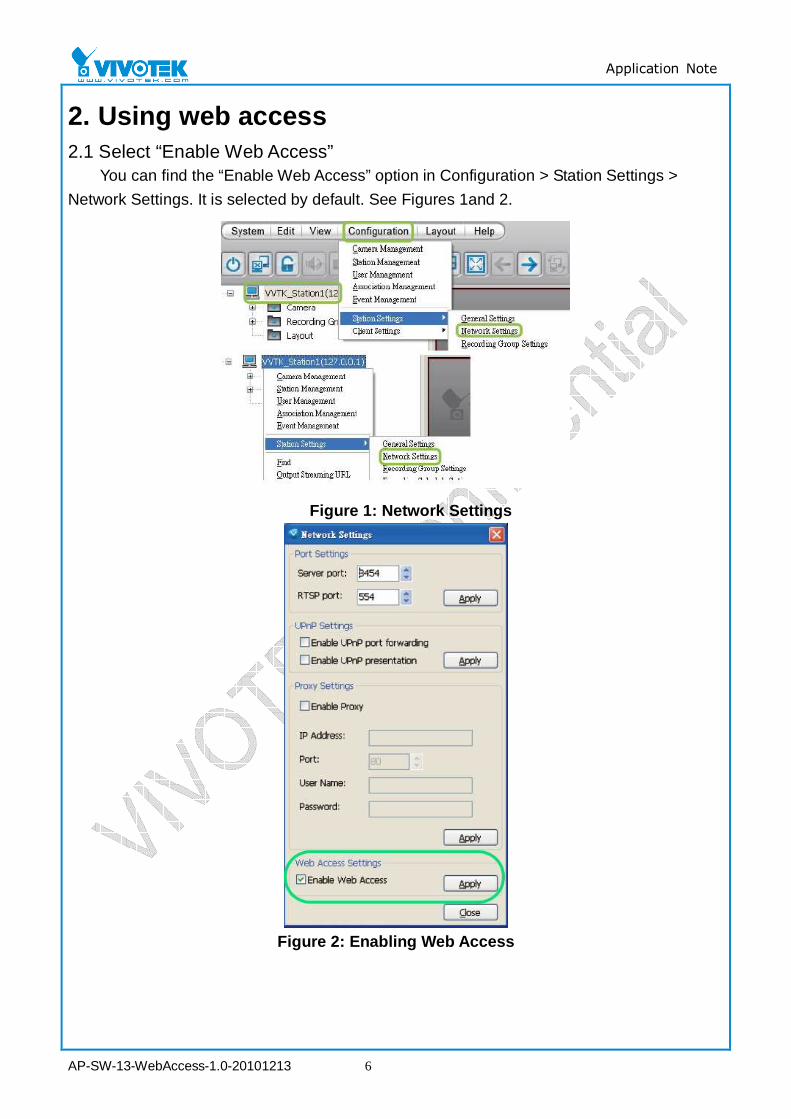
2. Using web access 2.1 Select “Enable Web Access”
You can find the “Enable Web Access” option in Configuration > Station Settings >
Network Settings. It is selected by default. See Figures 1and 2.
Figure 1: Network Settings
Figure 2: Enabling Web Access

Application Note
AP-SW-13-WebAccess-1.0-20101213 7
2.2 Enter the IP Address in the address field (1) Launch your web browser (Microsoft® Internet Explorer 6, Mozilla Firefox 3.5 or
above)
(2) Enter the IP address and station port of the VAST station in the address field.
(http://127.0.0.1:3454 or http://<IP address of the VAST station>:<Station Port>). Press
Enter.
(3) When the authorization window appears, enter the username and password.
Figure 3: The authorized window
(4) The web interface for VAST LiveView will be displayed in your browser.
Application Note
AP-SW-13-WebAccess-1.0-20101213 8
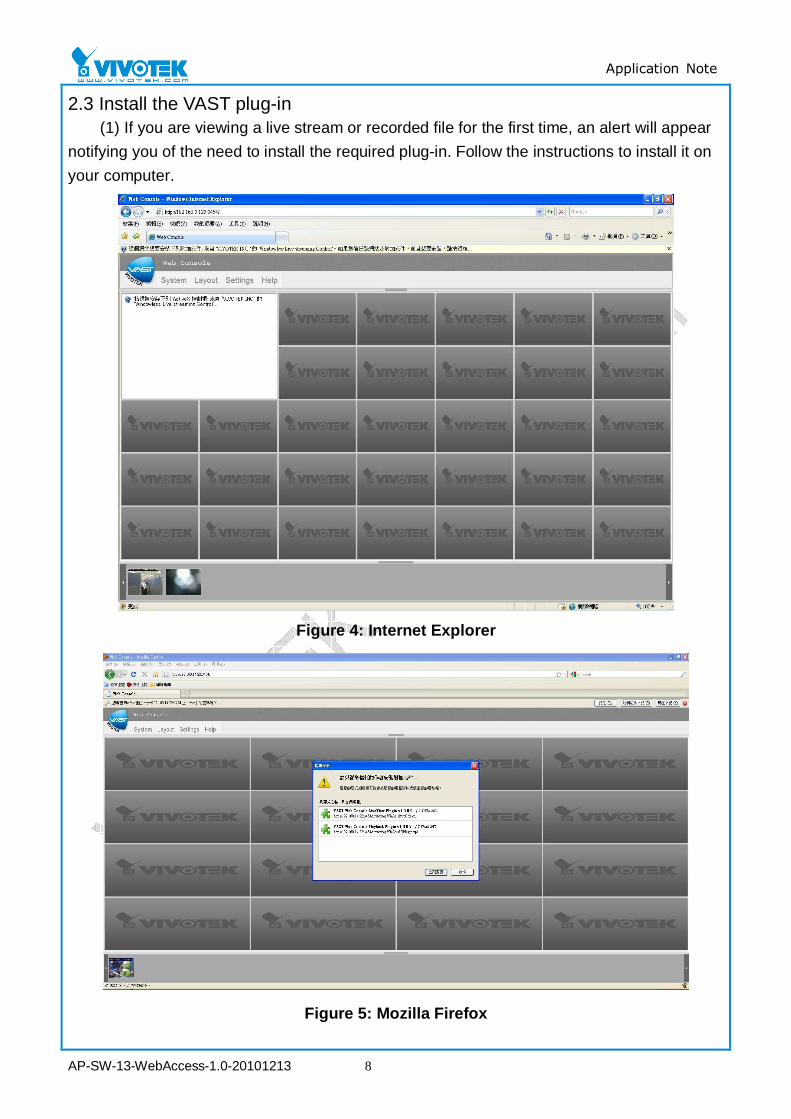
2.3 Install the VAST plug-in (1) If you are viewing a live stream or recorded file for the first time, an alert will appear
notifying you of the need to install the required plug-in. Follow the instructions to install it on
your computer.
Figure 4: Internet Explorer
Figure 5: Mozilla Firefox
Application Note
AP-SW-13-WebAccess-1.0-20101213 9
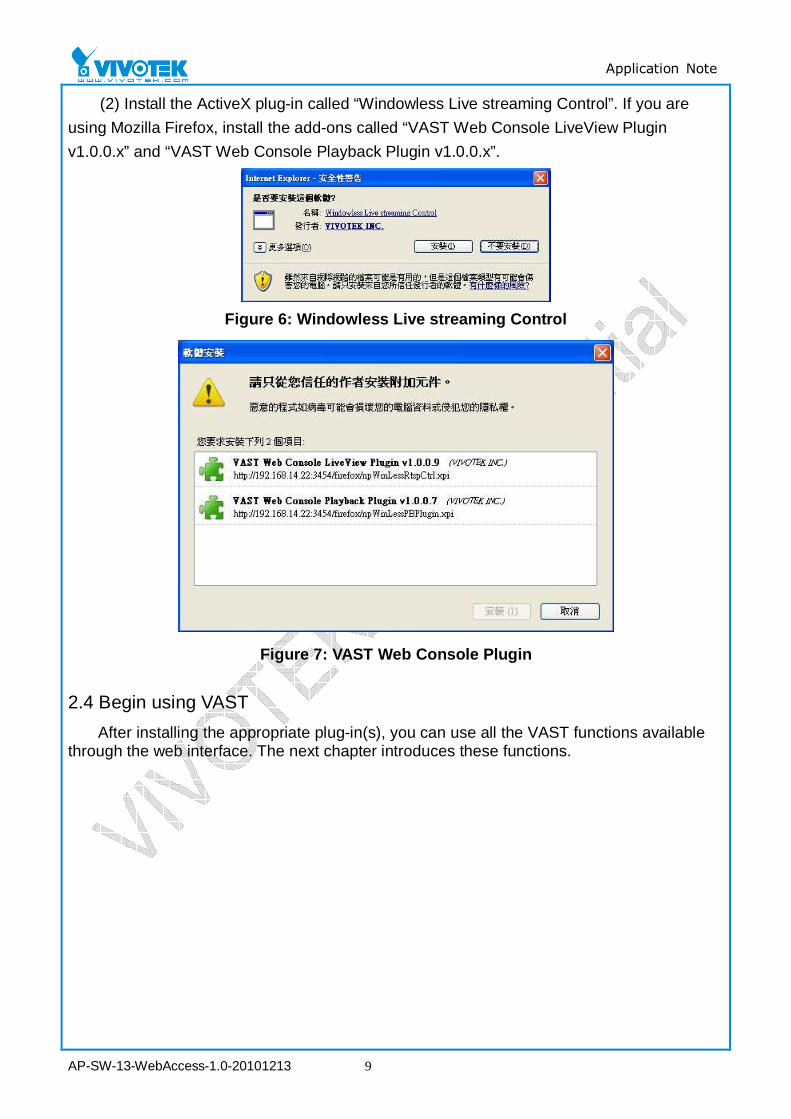
(2) Install the ActiveX plug-in called “Windowless Live streaming Control”. If you are
using Mozilla Firefox, install the add-ons called “VAST Web Console LiveView Plugin
v1.0.0.x” and “VAST Web Console Playback Plugin v1.0.0.x”.
Figure 6: Windowless Live streaming Control
Figure 7: VAST Web Console Plugin
2.4 Begin using VAST
After installing the appropriate plug-in(s), you can use all the VAST functions available through the web interface. The next chapter introduces these functions.
Application Note
AP-SW-13-WebAccess-1.0-20101213 10
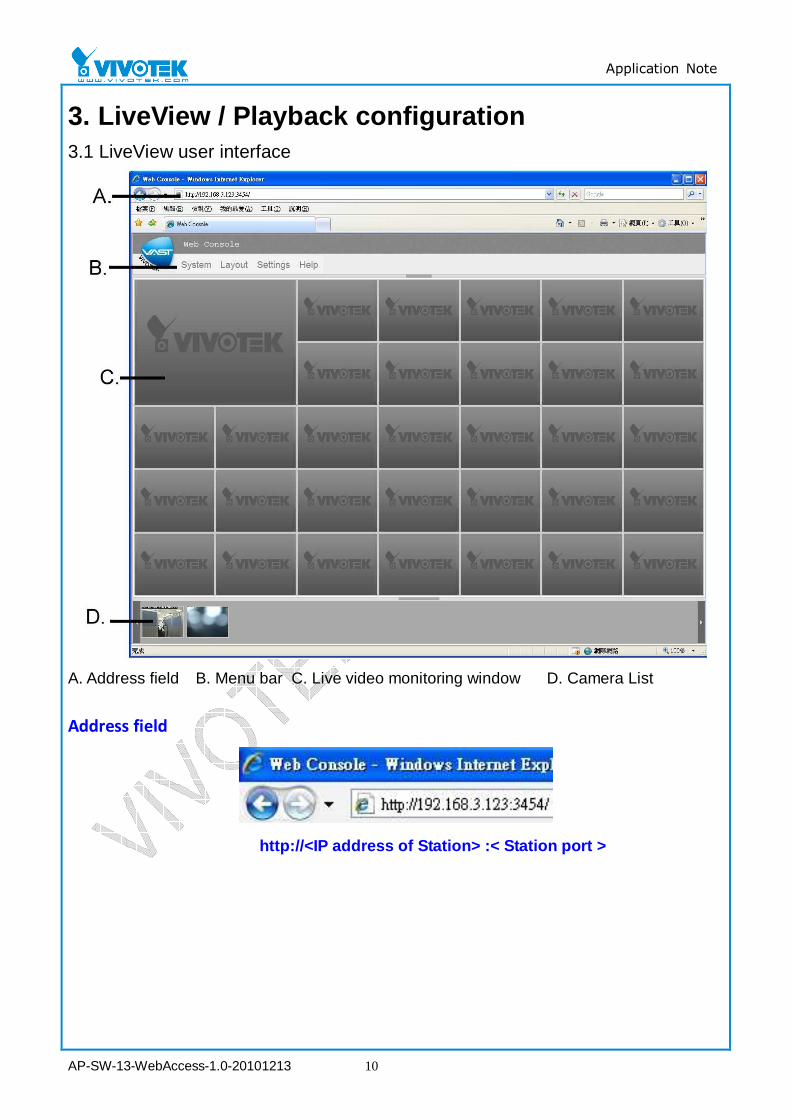
3. LiveView / Playback configuration 3.1 LiveView user interface
A. Address field B. Menu bar C. Live video monitoring window D. Camera List
Address field
http://<IP address of Station> :< Station port >
Application Note
AP-SW-13-WebAccess-1.0-20101213 11
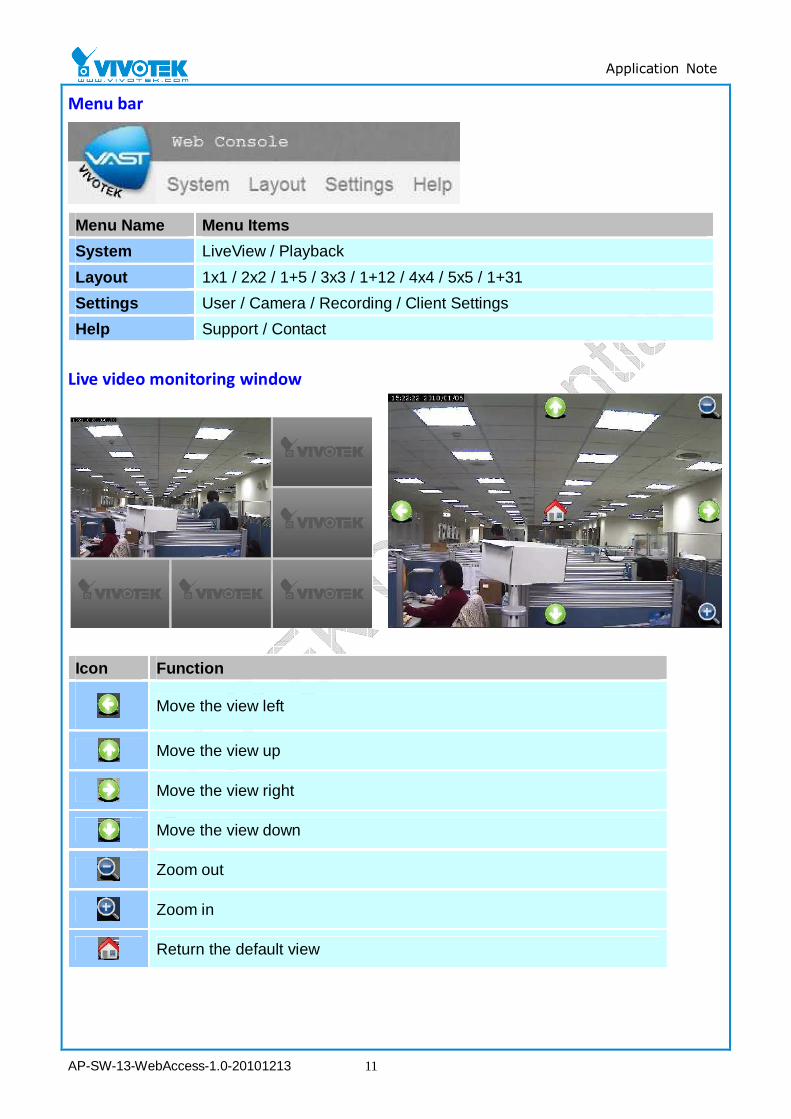
Menu bar
Menu Name Menu Items
System LiveView / Playback
Layout 1x1 / 2x2 / 1+5 / 3x3 / 1+12 / 4x4 / 5x5 / 1+31
Settings User / Camera / Recording / Client Settings
Help Support / Contact
Live video monitoring window
Icon Function
Move the view left
Move the view up
Move the view right
Move the view down
Zoom out
Zoom in
Return the default view
Application Note
AP-SW-13-WebAccess-1.0-20101213 12
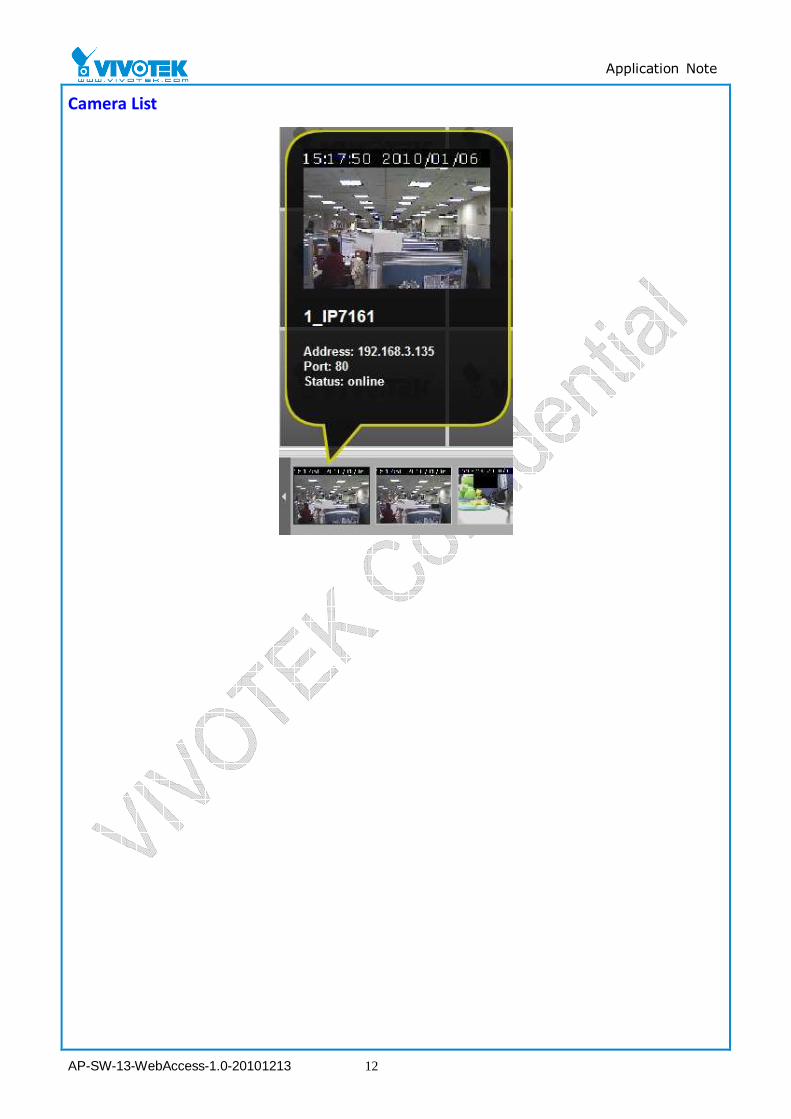
Camera List

Application Note
AP-SW-13-WebAccess-1.0-20101213 13
3.2 Playback user interface
A. Recording Date B. Recording Time C. Camera List
D. Recorded video playback window E. Video clips list
Recorded video playback window
Application Note
AP-SW-13-WebAccess-1.0-20101213 14
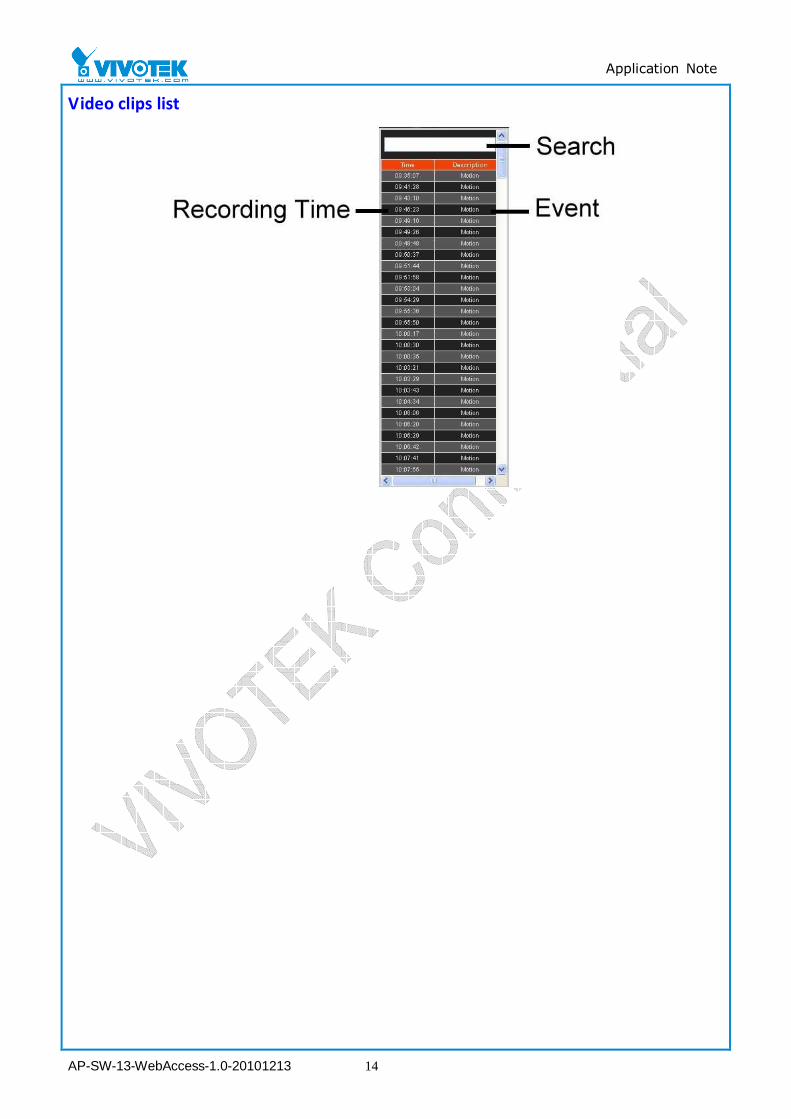
Video clips list
Application Note
AP-SW-13-WebAccess-1.0-20101213 15
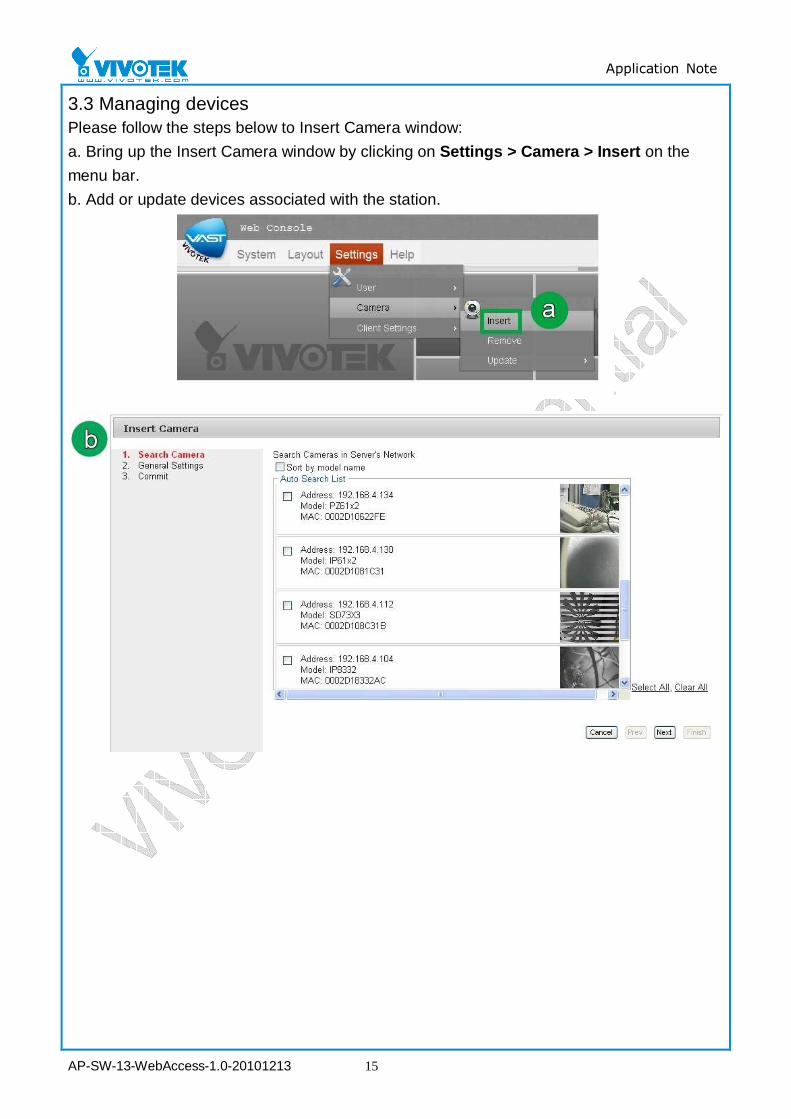
3.3 Managing devices Please follow the steps below to Insert Camera window:
a. Bring up the Insert Camera window by clicking on Settings > Camera > Insert on the
menu bar.
b. Add or update devices associated with the station.
Application Note
AP-SW-13-WebAccess-1.0-20101213 16
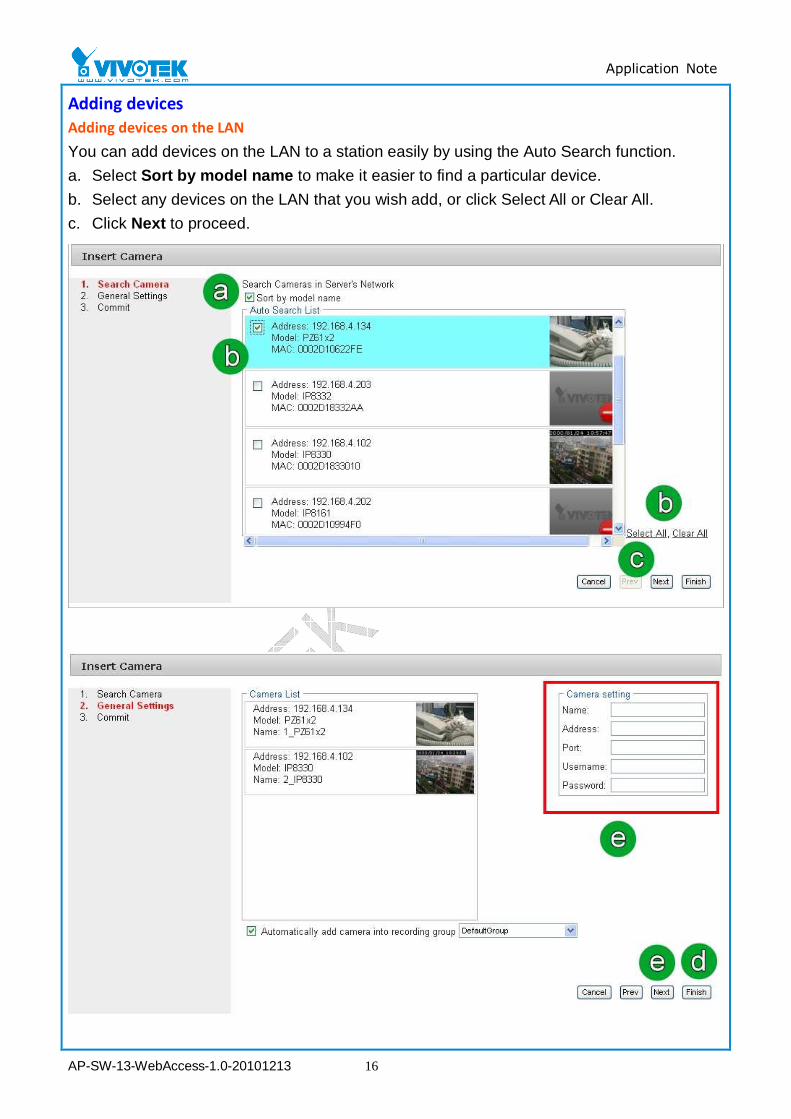
Adding devices
Adding devices on the LAN
You can add devices on the LAN to a station easily by using the Auto Search function.
a. Select Sort by model name to make it easier to find a particular device.
b. Select any devices on the LAN that you wish add, or click Select All or Clear All.
c. Click Next to proceed.
Application Note
AP-SW-13-WebAccess-1.0-20101213 17
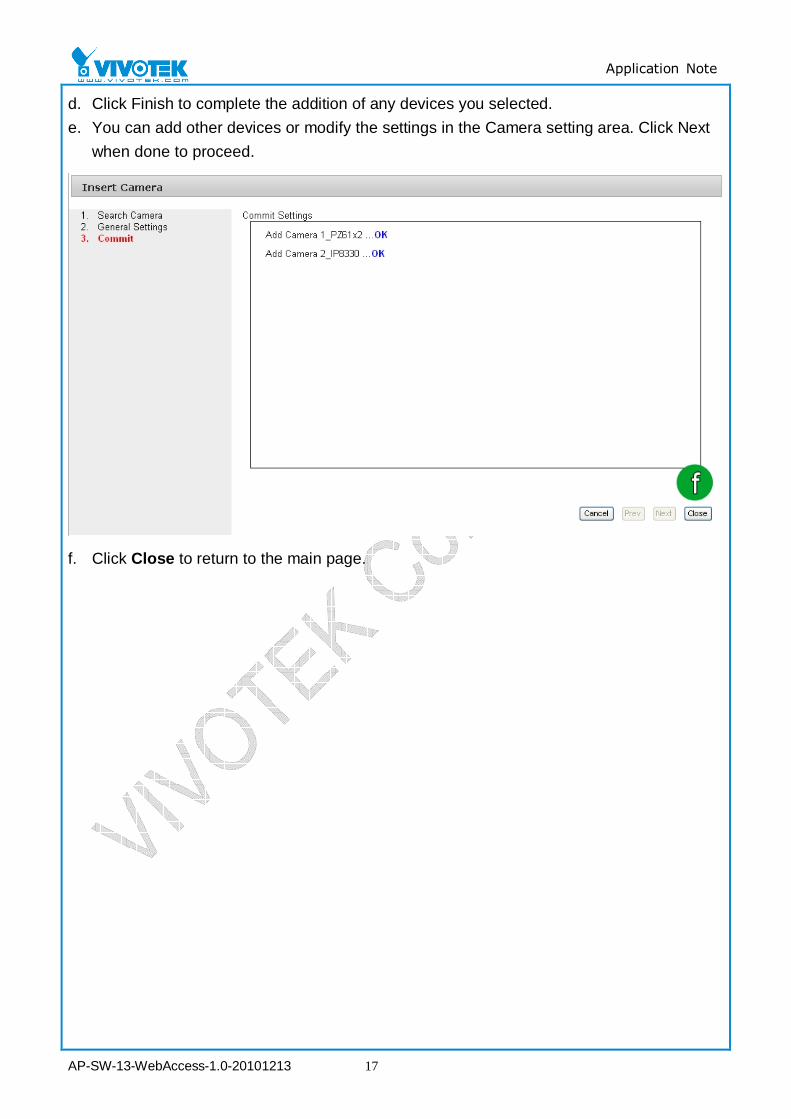
d. Click Finish to complete the addition of any devices you selected.
e. You can add other devices or modify the settings in the Camera setting area. Click Next
when done to proceed.
f. Click Close to return to the main page.
Application Note
AP-SW-13-WebAccess-1.0-20101213 18
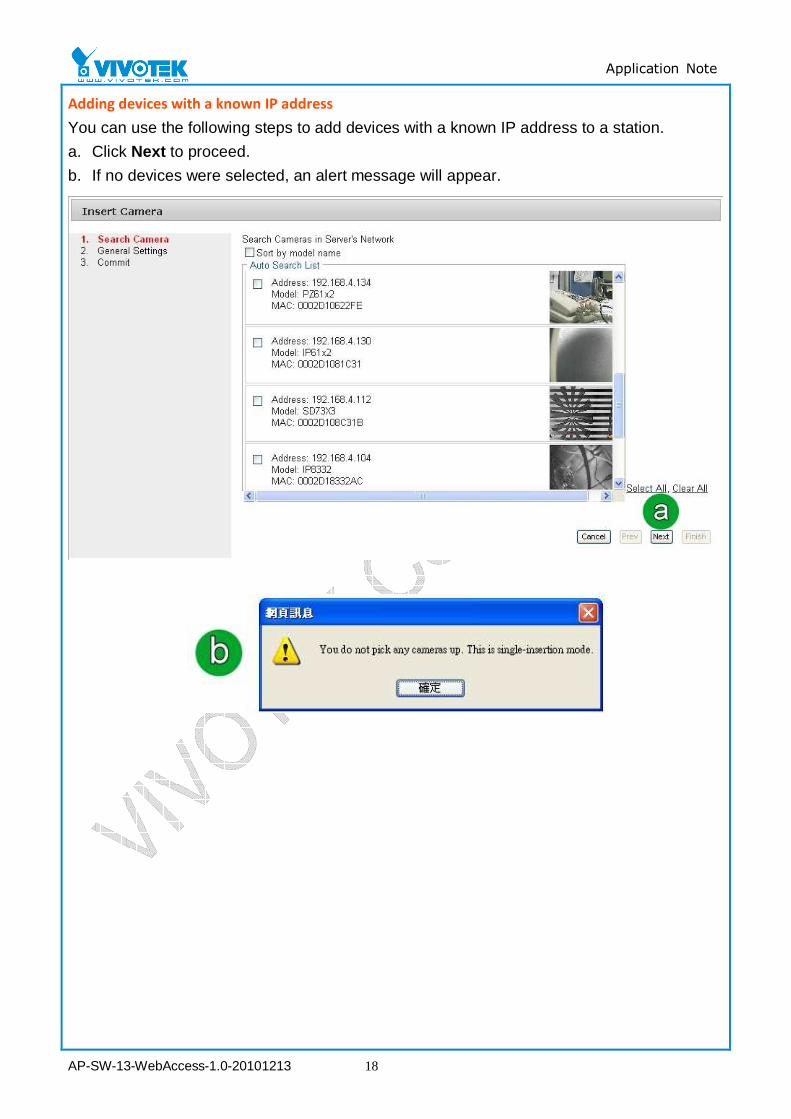
Adding devices with a known IP address
You can use the following steps to add devices with a known IP address to a station.
a. Click Next to proceed.
b. If no devices were selected, an alert message will appear.
Application Note
AP-SW-13-WebAccess-1.0-20101213 19
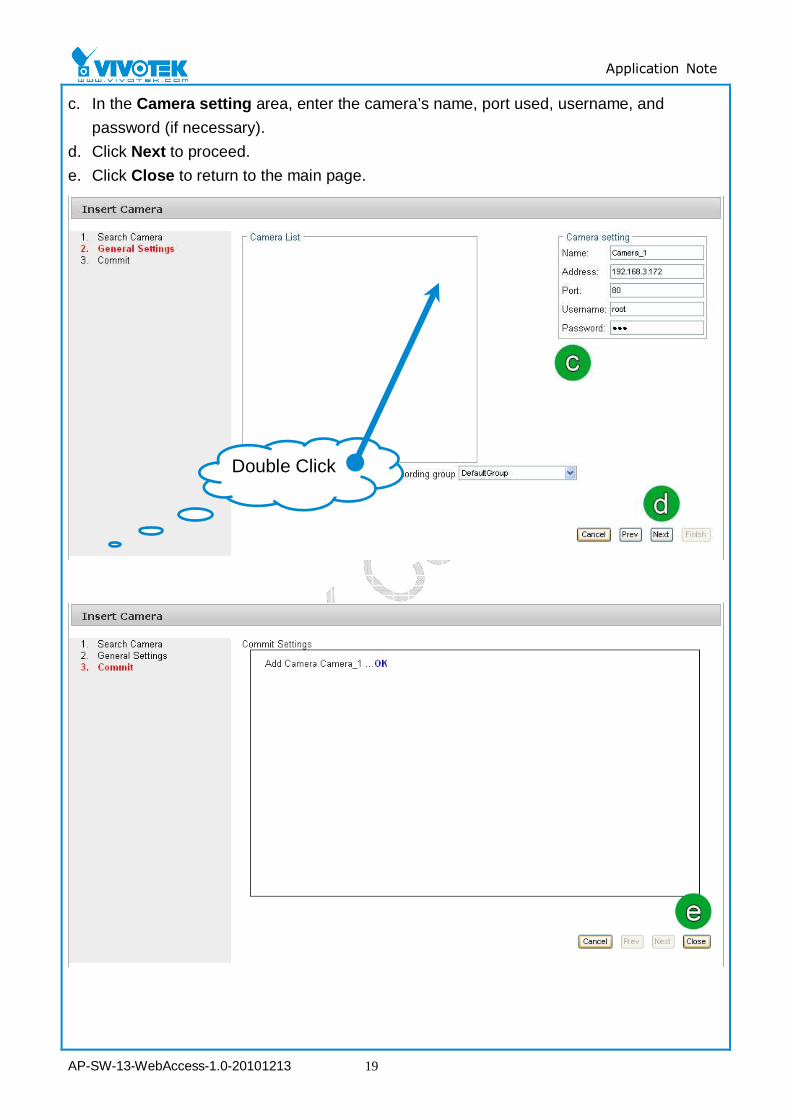
c. In the Camera setting area, enter the camera’s name, port used, username, and
password (if necessary).
d. Click Next to proceed.
e. Click Close to return to the main page.
Double Click
Application Note
AP-SW-13-WebAccess-1.0-20101213 20
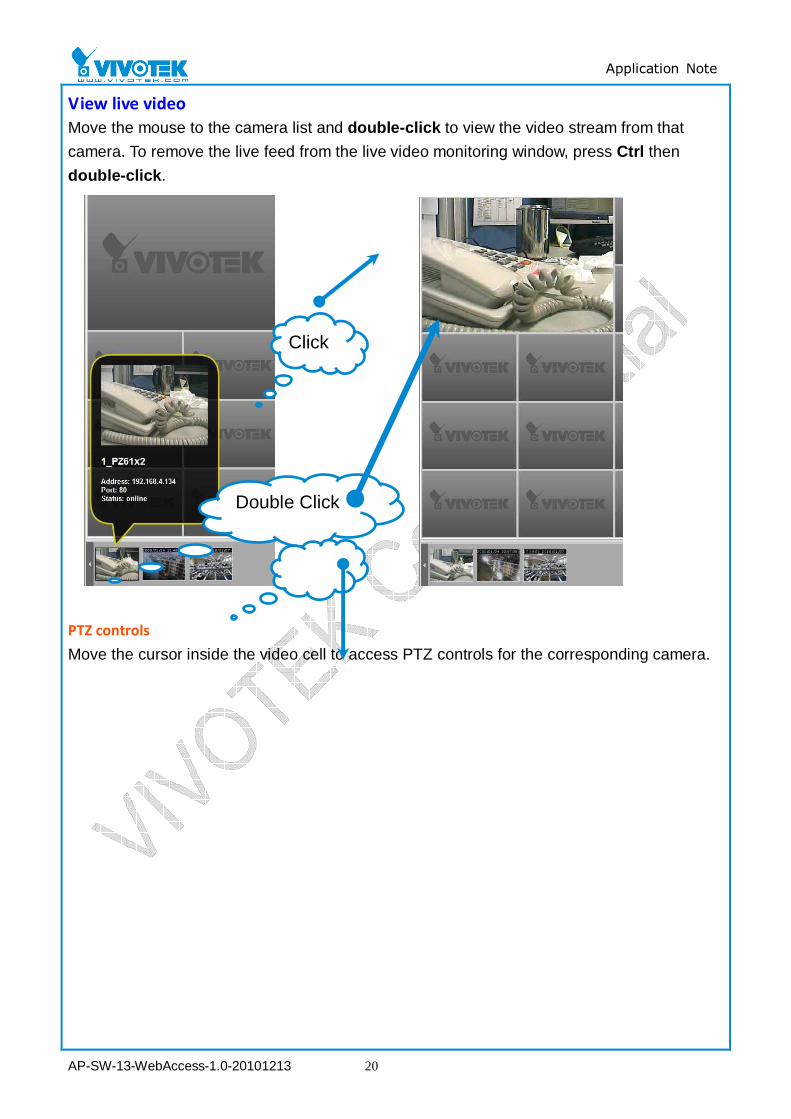
View live video
Move the mouse to the camera list and double-click to view the video stream from that
camera. To remove the live feed from the live video monitoring window, press Ctrl then
double-click.
PTZ controls
Move the cursor inside the video cell to access PTZ controls for the corresponding camera.
Double Click
Click
Double Click
Application Note
AP-SW-13-WebAccess-1.0-20101213 21
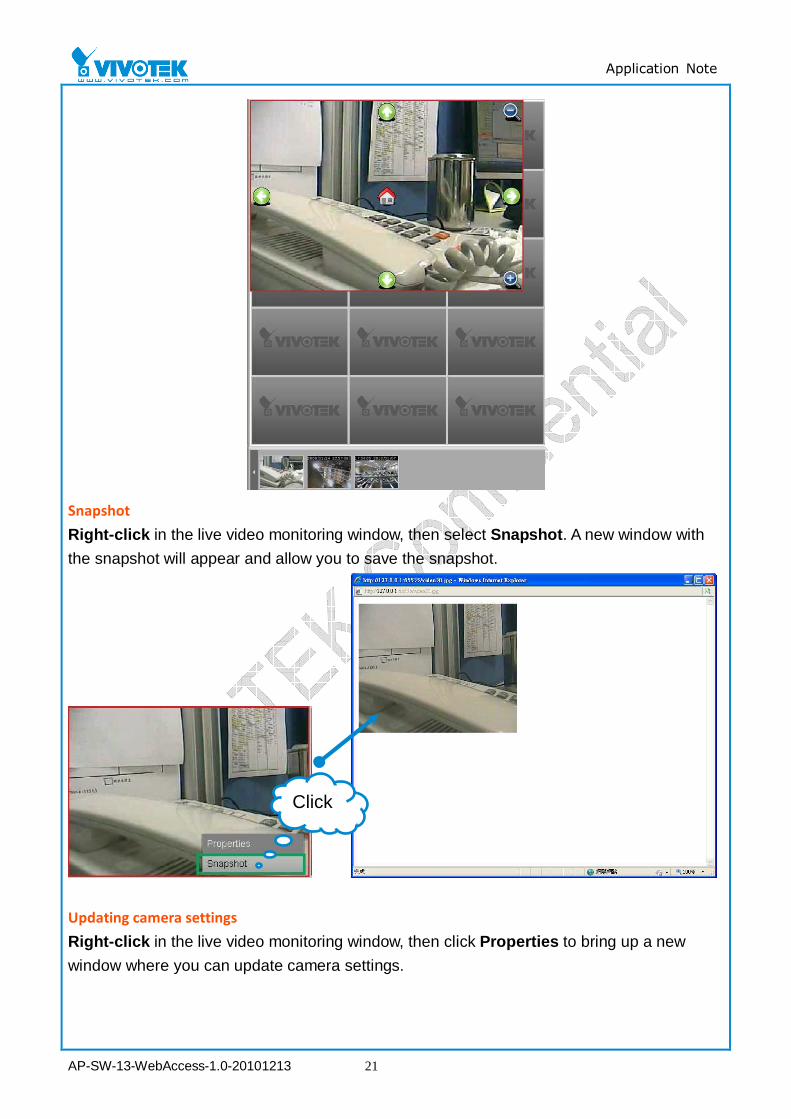
Snapshot
Right-click in the live video monitoring window, then select Snapshot. A new window with
the snapshot will appear and allow you to save the snapshot.
Updating camera settings
Right-click in the live video monitoring window, then click Properties to bring up a new
window where you can update camera settings.
Click

Application Note
AP-SW-13-WebAccess-1.0-20101213 22
Deleting devices from the server
a. Click Settings > Camera > Remove on the menu bar.
Click
Application Note
AP-SW-13-WebAccess-1.0-20101213 23
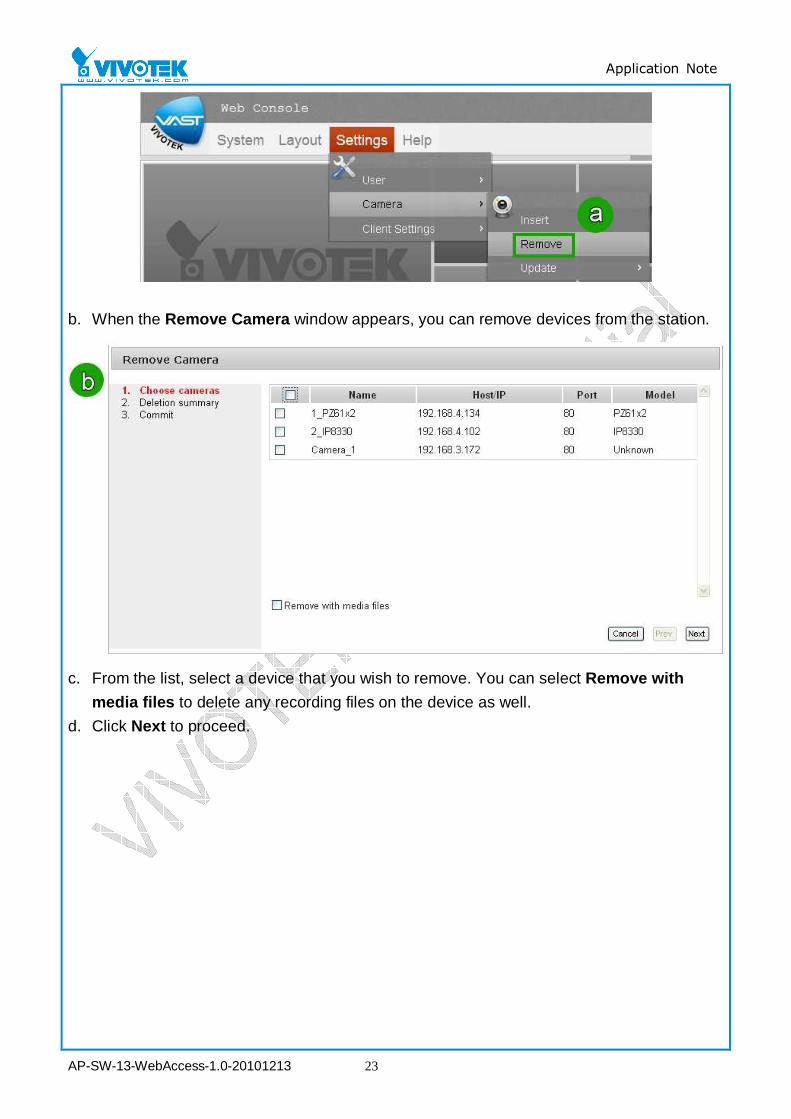
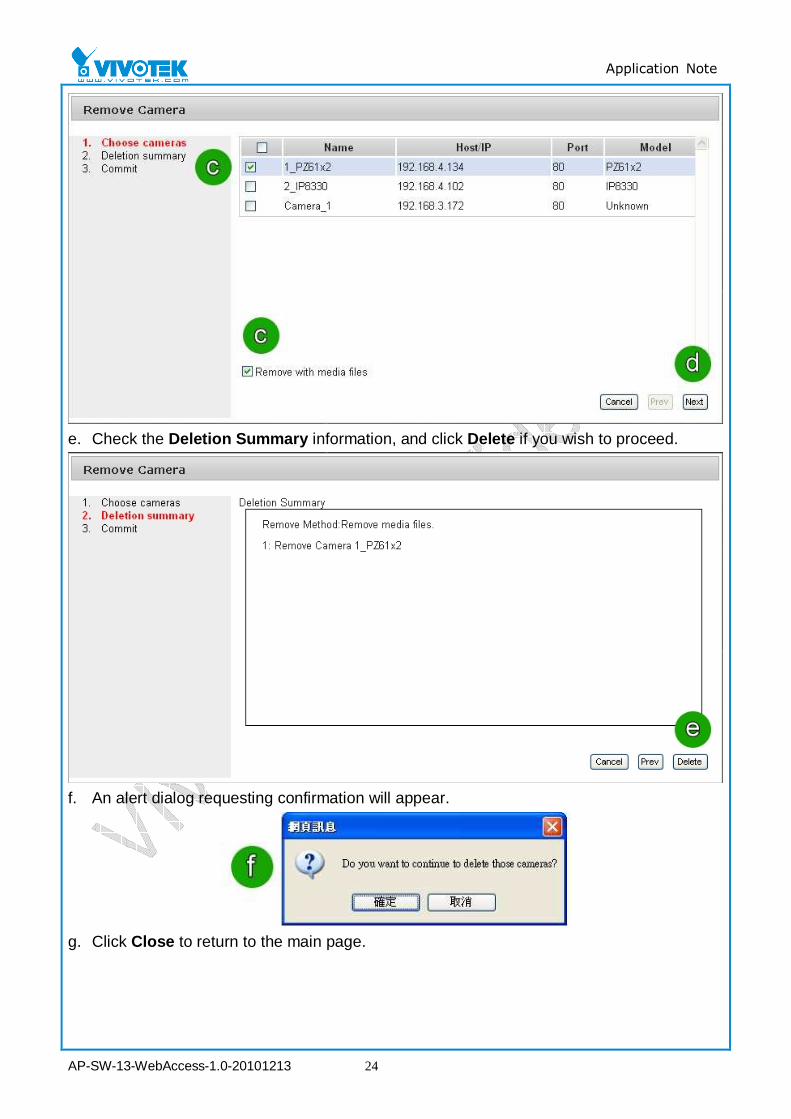
b. When the Remove Camera window appears, you can remove devices from the station.
c. From the list, select a device that you wish to remove. You can select Remove with
media files to delete any recording files on the device as well.
d. Click Next to proceed.
Application Note
AP-SW-13-WebAccess-1.0-20101213 24
e. Check the Deletion Summary information, and click Delete if you wish to proceed.
f. An alert dialog requesting confirmation will appear.
g. Click Close to return to the main page.

Application Note
AP-SW-13-WebAccess-1.0-20101213 25
Application Note
AP-SW-13-WebAccess-1.0-20101213 26
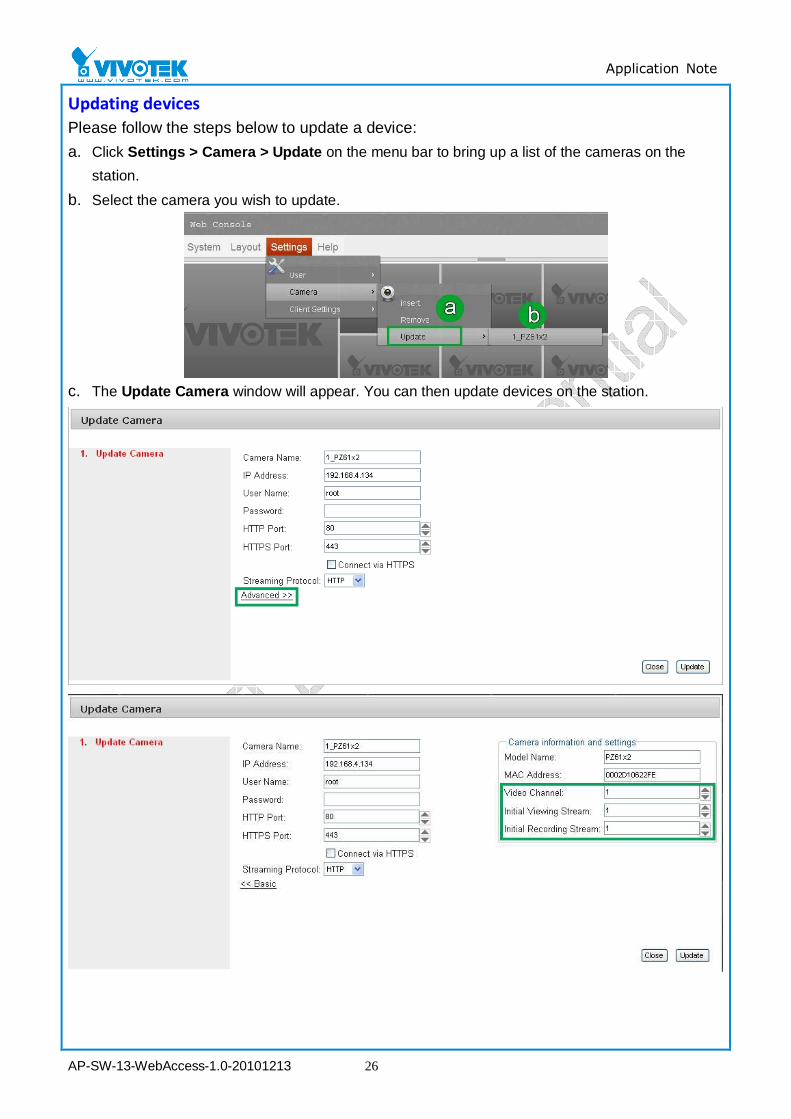
Updating devices
Please follow the steps below to update a device:
a. Click Settings > Camera > Update on the menu bar to bring up a list of the cameras on the
station.
b. Select the camera you wish to update.
c. The Update Camera window will appear. You can then update devices on the station.
Application Note
AP-SW-13-WebAccess-1.0-20101213 27
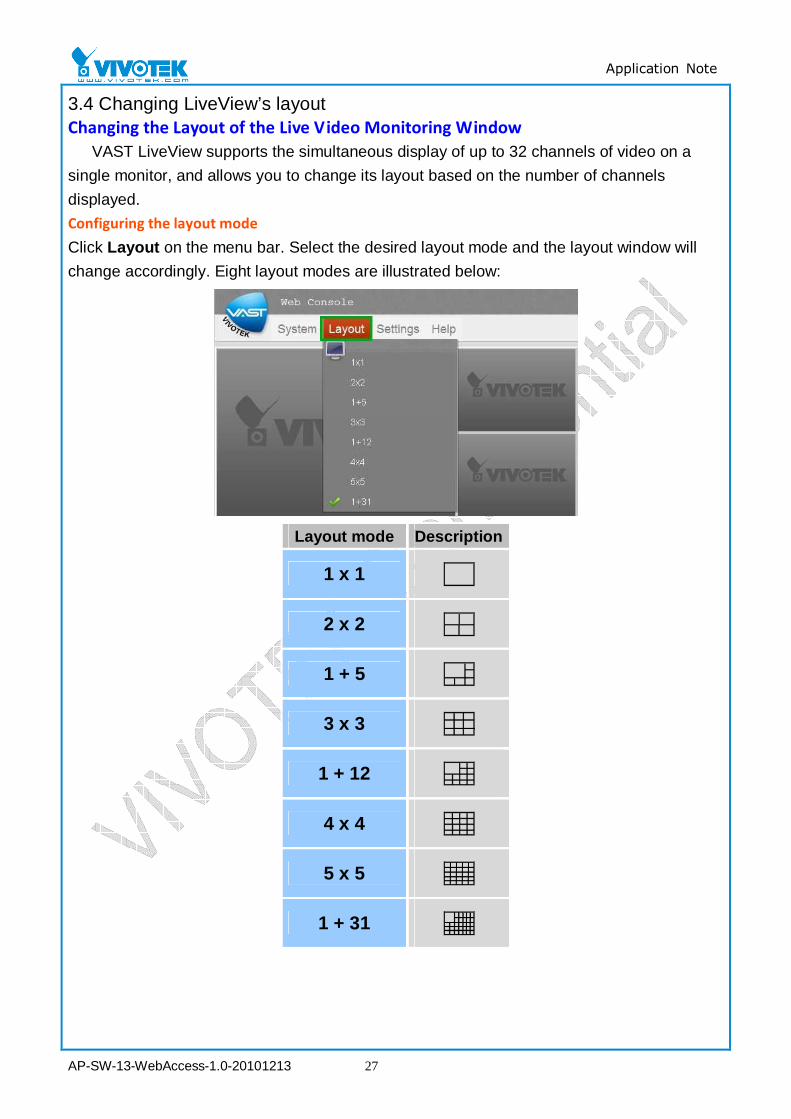
3.4 Changing LiveView’s layout Changing the Layout of the Live Video Monitoring Window
VAST LiveView supports the simultaneous display of up to 32 channels of video on a
single monitor, and allows you to change its layout based on the number of channels
displayed.
Configuring the layout mode
Click Layout on the menu bar. Select the desired layout mode and the layout window will
change accordingly. Eight layout modes are illustrated below:
Layout mode Description
1 x 1
2 x 2
1 + 5
3 x 3
1 + 12
4 x 4
5 x 5
1 + 31
Application Note
AP-SW-13-WebAccess-1.0-20101213 28
3.5 Managing user accounts VAST allows users to add user accounts to a station with five authorization levels with
different sets of permissions: Administrator > Power User > User > Operator > Guest. Briefly,
Administrators have the highest privileges, while Power Users can add/edit users and specify
them as Power Users, Users, Operators, or Guests. For further details, refer to the VAST user
manual.
Managing a user account
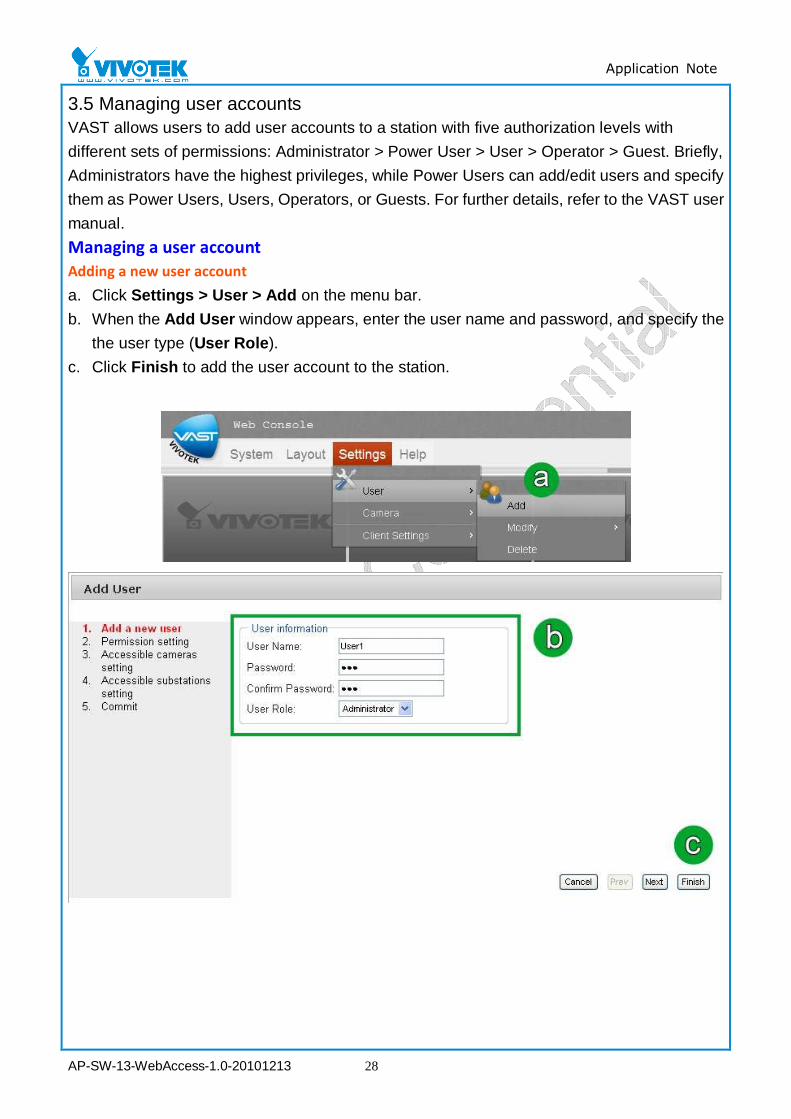
Adding a new user account
a. Click Settings > User > Add on the menu bar.
b. When the Add User window appears, enter the user name and password, and specify the
the user type (User Role).
c. Click Finish to add the user account to the station.
Application Note
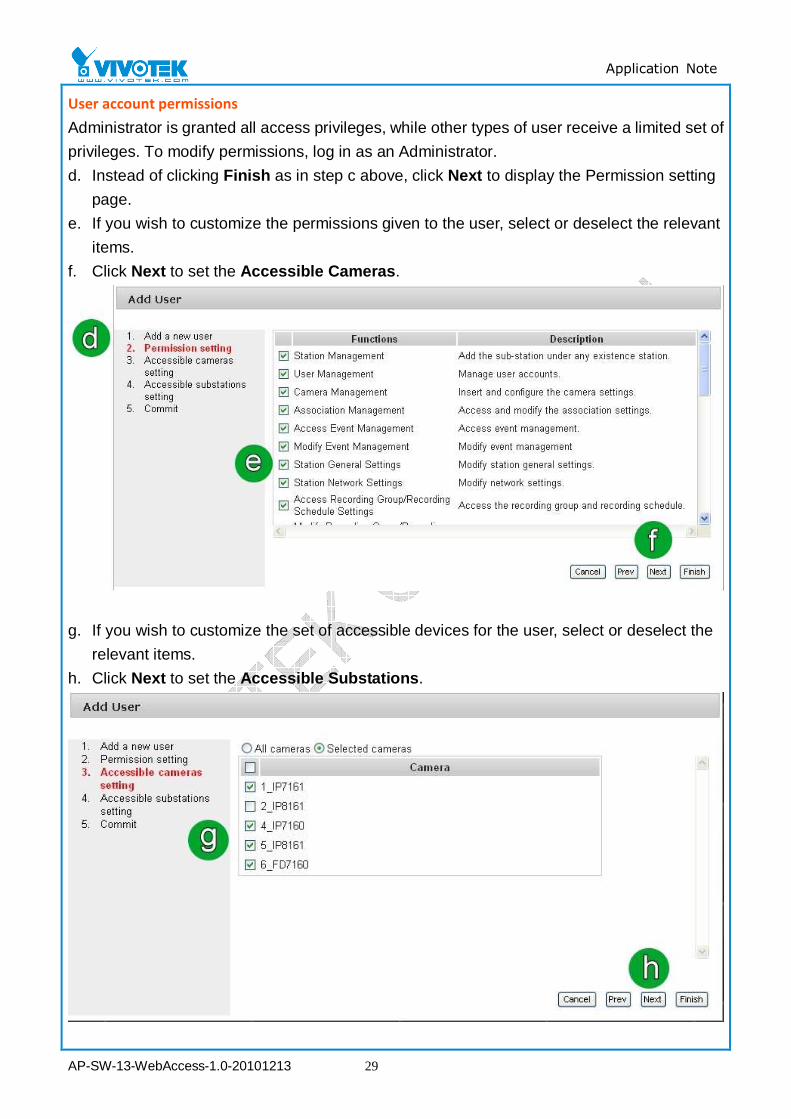
AP-SW-13-WebAccess-1.0-20101213 29
User account permissions
Administrator is granted all access privileges, while other types of user receive a limited set of
privileges. To modify permissions, log in as an Administrator.
d. Instead of clicking Finish as in step c above, click Next to display the Permission setting
page.
e. If you wish to customize the permissions given to the user, select or deselect the relevant
items.
f. Click Next to set the Accessible Cameras.
g. If you wish to customize the set of accessible devices for the user, select or deselect the
relevant items.
h. Click Next to set the Accessible Substations.
Application Note
AP-SW-13-WebAccess-1.0-20101213 30
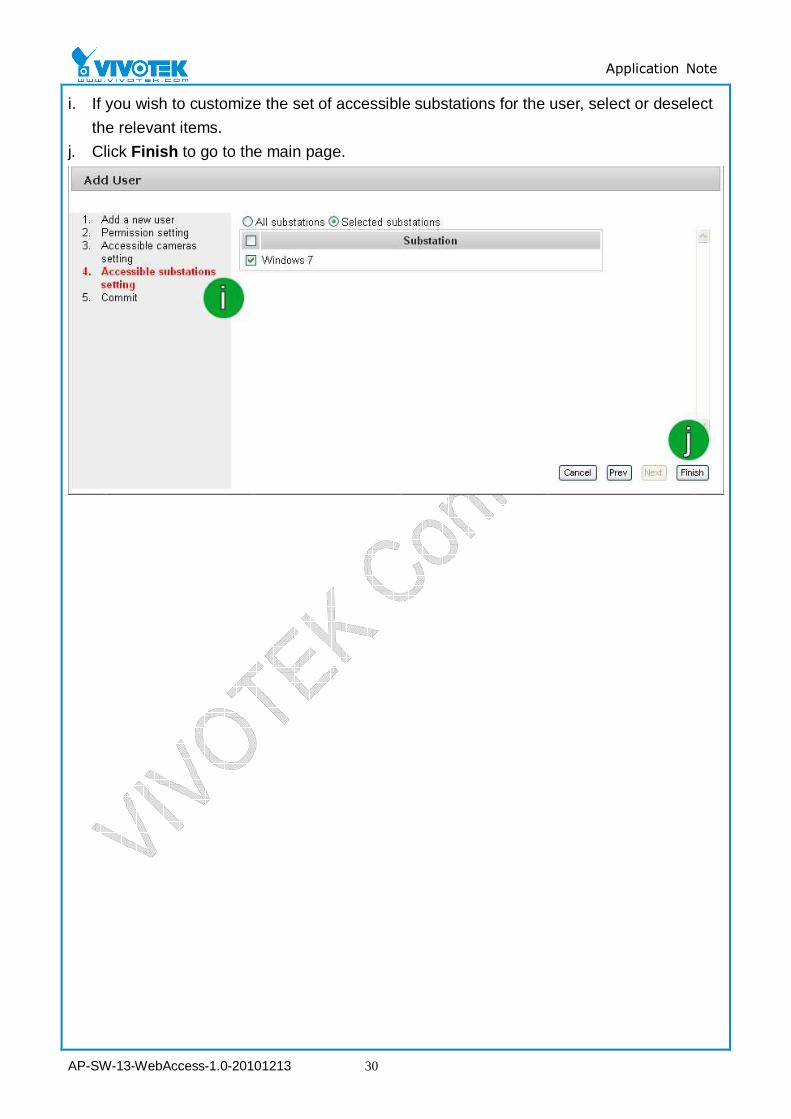
i. If you wish to customize the set of accessible substations for the user, select or deselect
the relevant items.
j. Click Finish to go to the main page.
Application Note
AP-SW-13-WebAccess-1.0-20101213 31
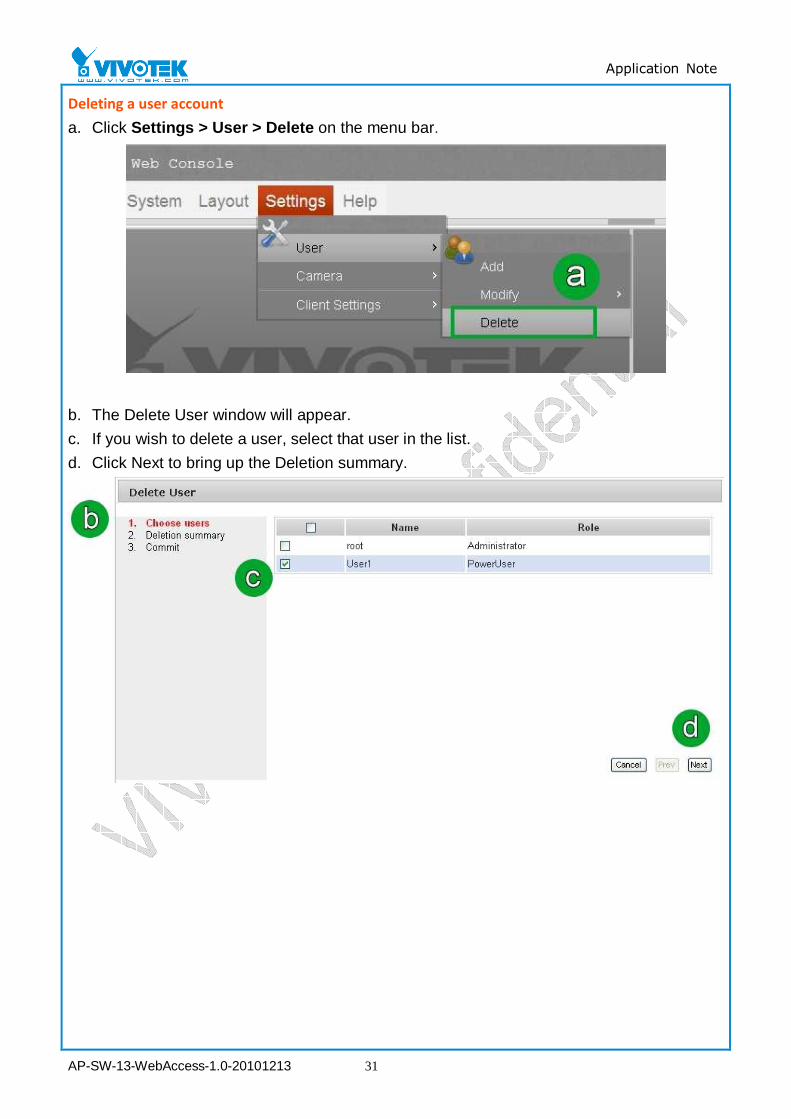
Deleting a user account
a. Click Settings > User > Delete on the menu bar.
b. The Delete User window will appear.
c. If you wish to delete a user, select that user in the list.
d. Click Next to bring up the Deletion summary.
Application Note
AP-SW-13-WebAccess-1.0-20101213 32
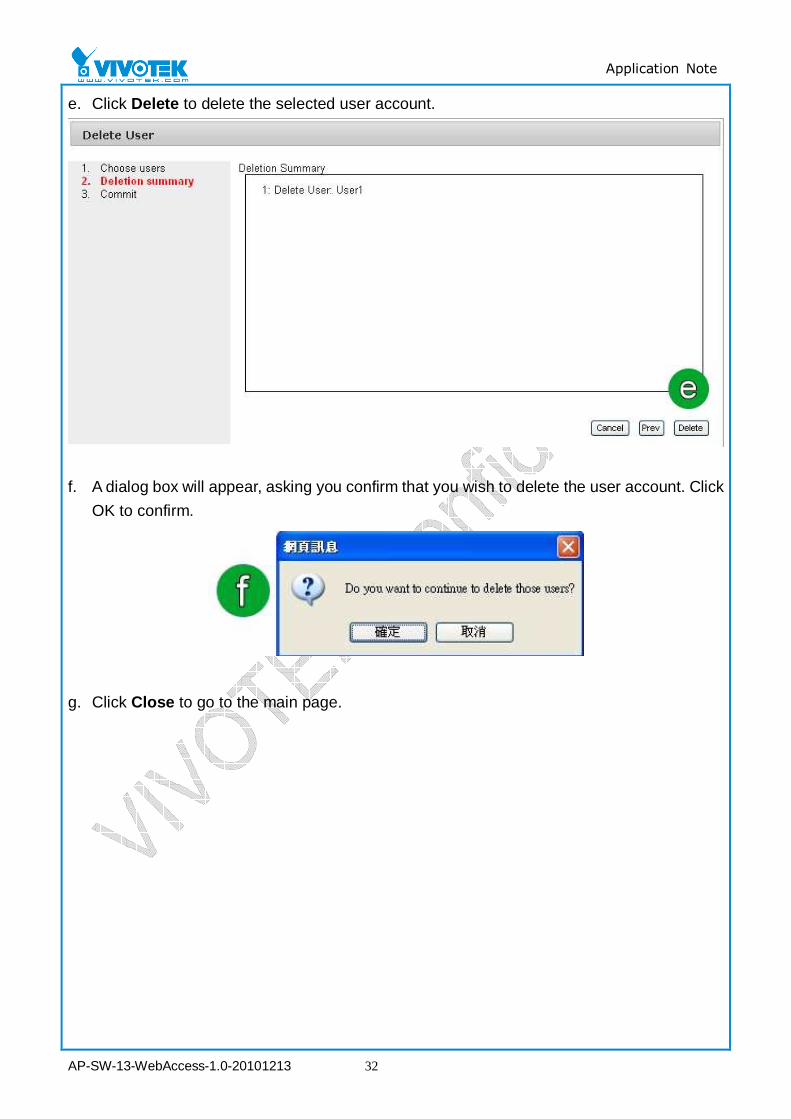
e. Click Delete to delete the selected user account.
f. A dialog box will appear, asking you confirm that you wish to delete the user account. Click
OK to confirm.
g. Click Close to go to the main page.
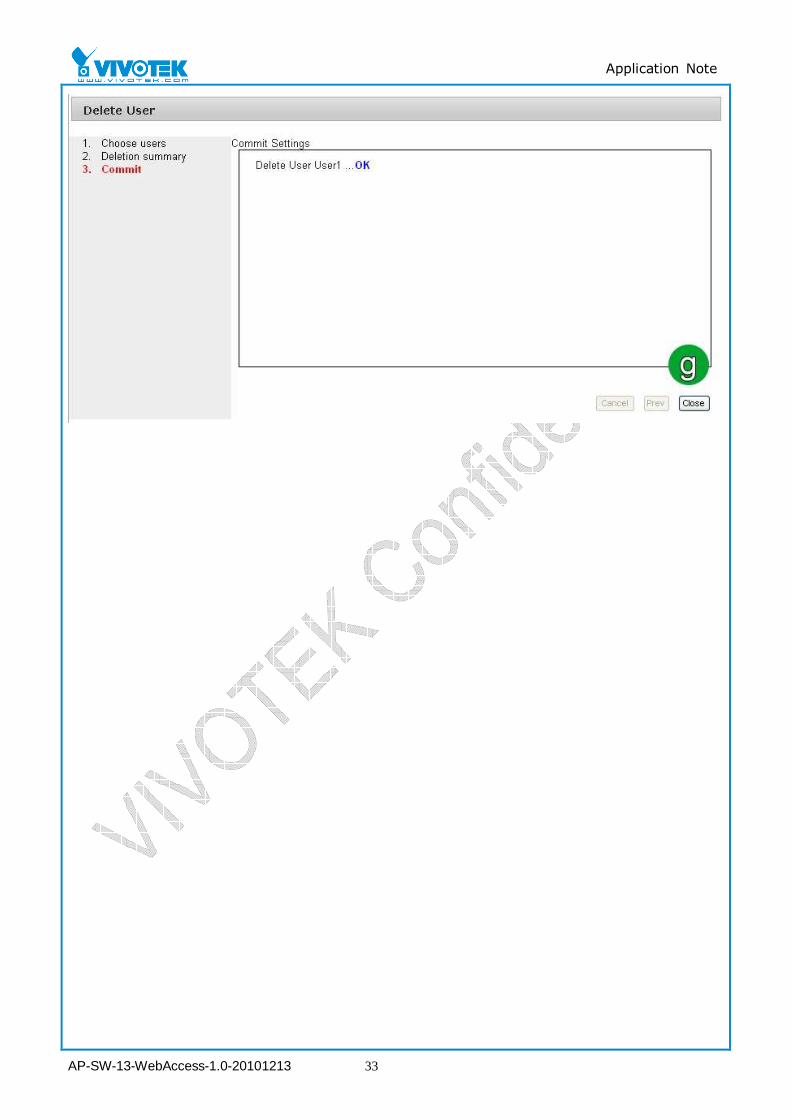
Application Note
AP-SW-13-WebAccess-1.0-20101213 33
Application Note
AP-SW-13-WebAccess-1.0-20101213 34
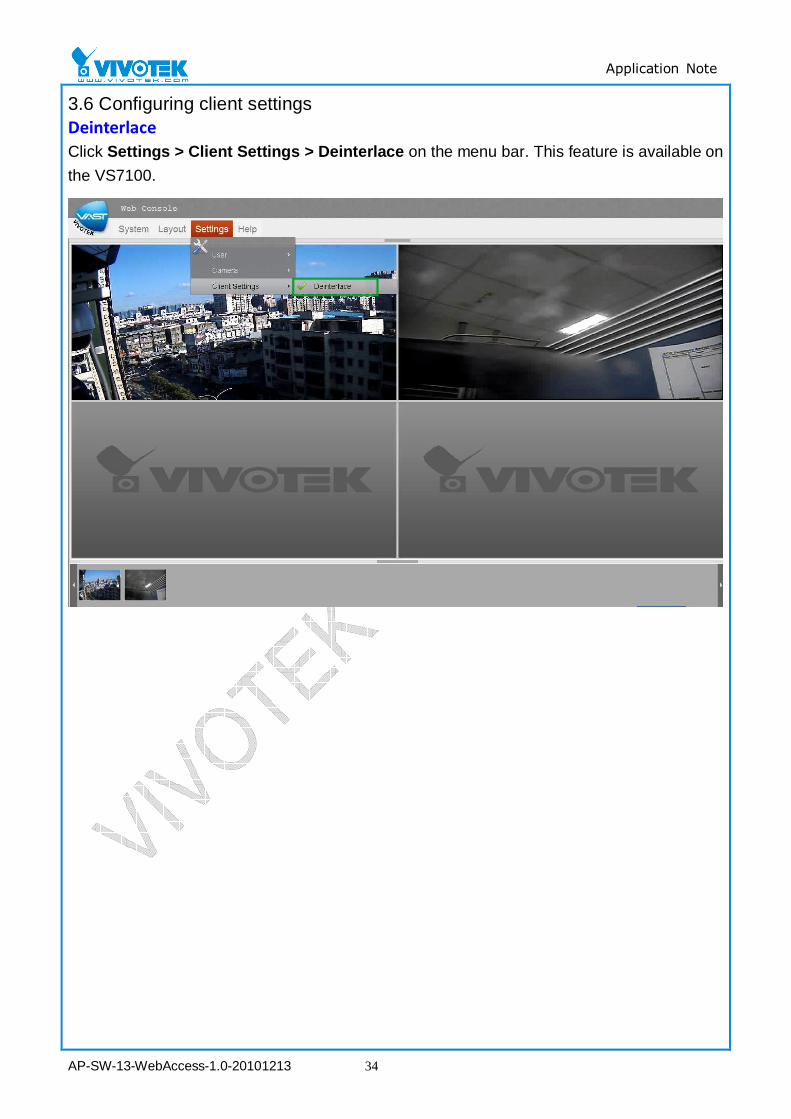
3.6 Configuring client settings Deinterlace
Click Settings > Client Settings > Deinterlace on the menu bar. This feature is available on
the VS7100.
Application Note
AP-SW-13-WebAccess-1.0-20101213 35
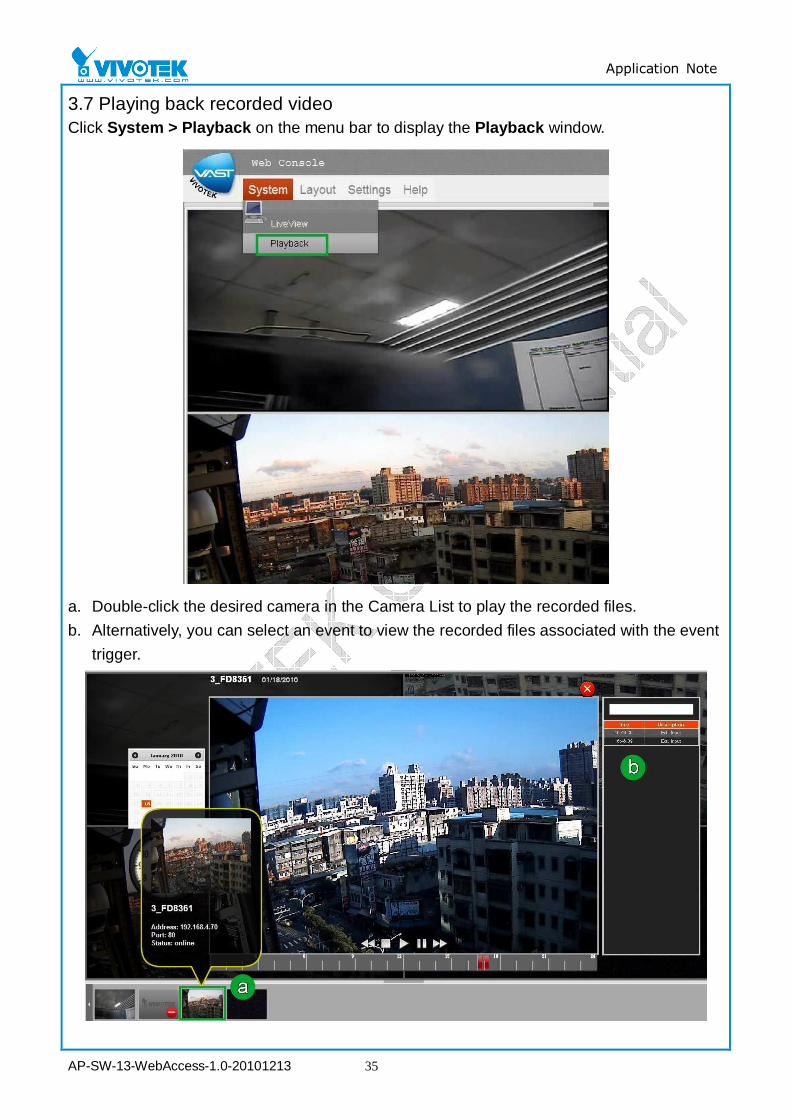
3.7 Playing back recorded video Click System > Playback on the menu bar to display the Playback window.
a. Double-click the desired camera in the Camera List to play the recorded files.
b. Alternatively, you can select an event to view the recorded files associated with the event
trigger.


![Cover [IP8161] Outline - VIVOTEKdownload.vivotek.com/.../quickguides/ip8161guide_en.pdf1 English Contact your distributor in the event of occurrence. Keep the Network Camera away from](https://img.pdfslide.us/doc/110x75/5b0828897f8b9ac90f8c2632/cover-ip8161-outline-english-contact-your-distributor-in-the-event-of-occurrence.jpg)