Embed Size (px)
Citation preview
– 1 –
IntroductionThe Linx SDM-USB-QS-S module requires that device drivers be installed on the host PC before they can interact. The drivers tell the PC how to talk to the module. The CDM drivers for the QS Series module actually install two different drivers at the same time: one for communicating directly with the module from an application via a set of application functions and one that makes the USB module look like an additional COM port to the PC.
The drivers are available for download from the Linx Technologies website, www.linxtechnologies.com.
The functions for accessing the USB module directly are described in detail in the Programmer’s Guide, AN-00200, which is also available for download on the Linx website.
Installing the DriversThe drivers may be downloaded from the Linx website (www.linxtechnologies.com) and should be saved onto the hard drive of a PC or onto a floppy disk. They are also on the CD that is included with Linx master development systems. When the module is attached to the PC for the first time, Windows will automatically detect the device and launch the Found New Hardware Wizard as shown below. Note that the image on the left is from Windows XP and the image on the right is from Windows Vista.
Installing the SDM-USB-QS-S Drivers
Application Note AN-00201
Revised 8/20/12
Figure 1: Found New Hardware Wizard
– 2 – Application Note AN-00201
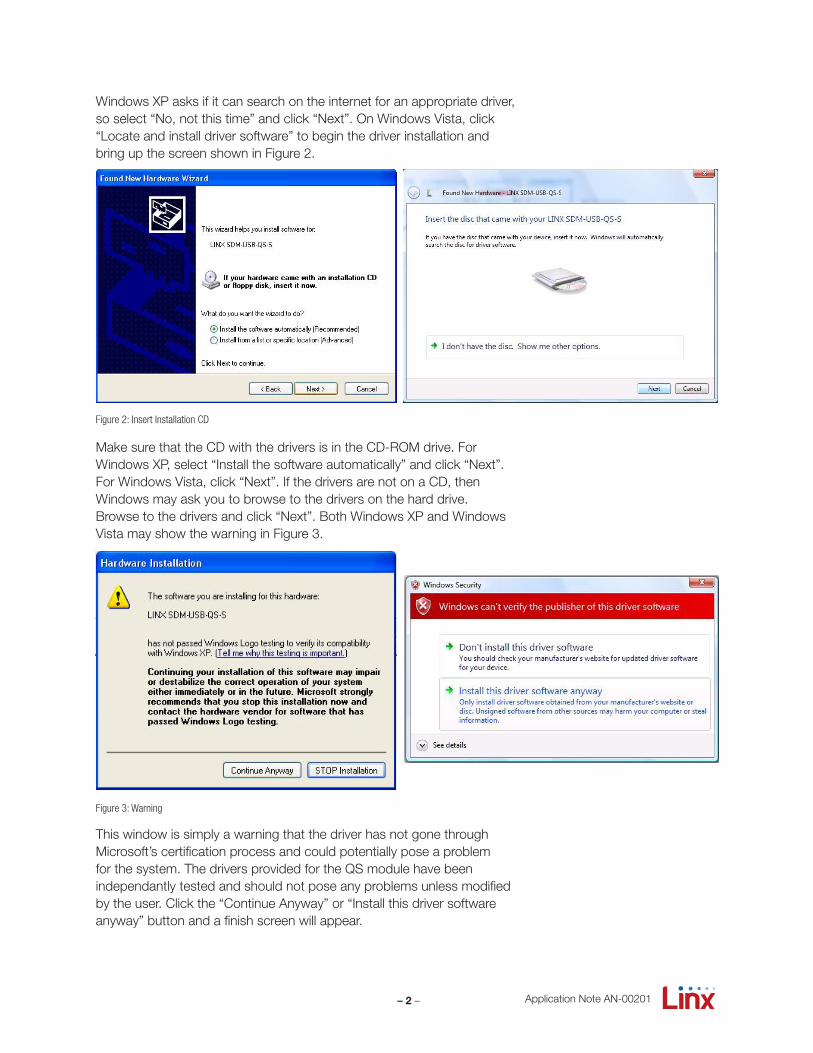
Windows XP asks if it can search on the internet for an appropriate driver, so select “No, not this time” and click “Next”. On Windows Vista, click “Locate and install driver software” to begin the driver installation and bring up the screen shown in Figure 2.
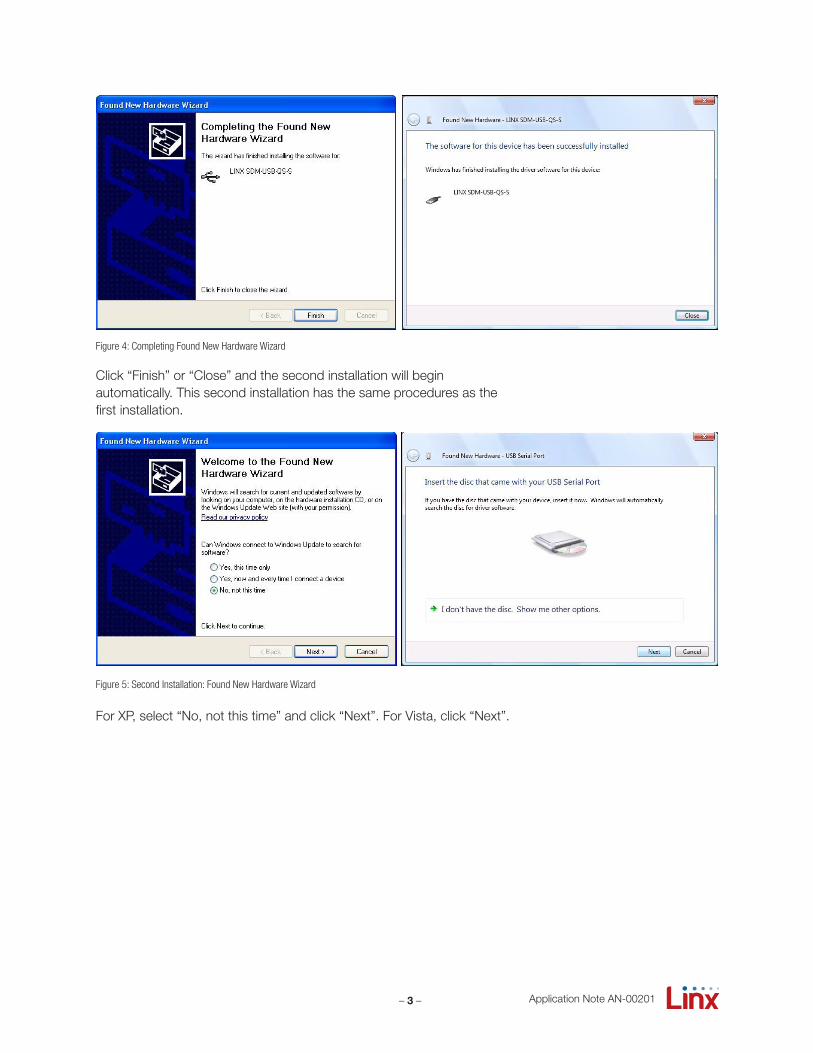
Make sure that the CD with the drivers is in the CD-ROM drive. For Windows XP, select “Install the software automatically” and click “Next”. For Windows Vista, click “Next”. If the drivers are not on a CD, then Windows may ask you to browse to the drivers on the hard drive. Browse to the drivers and click “Next”. Both Windows XP and Windows Vista may show the warning in Figure 3.
This window is simply a warning that the driver has not gone through Microsoft’s certification process and could potentially pose a problem for the system. The drivers provided for the QS module have been independantly tested and should not pose any problems unless modified by the user. Click the “Continue Anyway” or “Install this driver software anyway” button and a finish screen will appear.
Figure 2: Insert Installation CD
Figure 3: Warning
– 3 – Application Note AN-00201
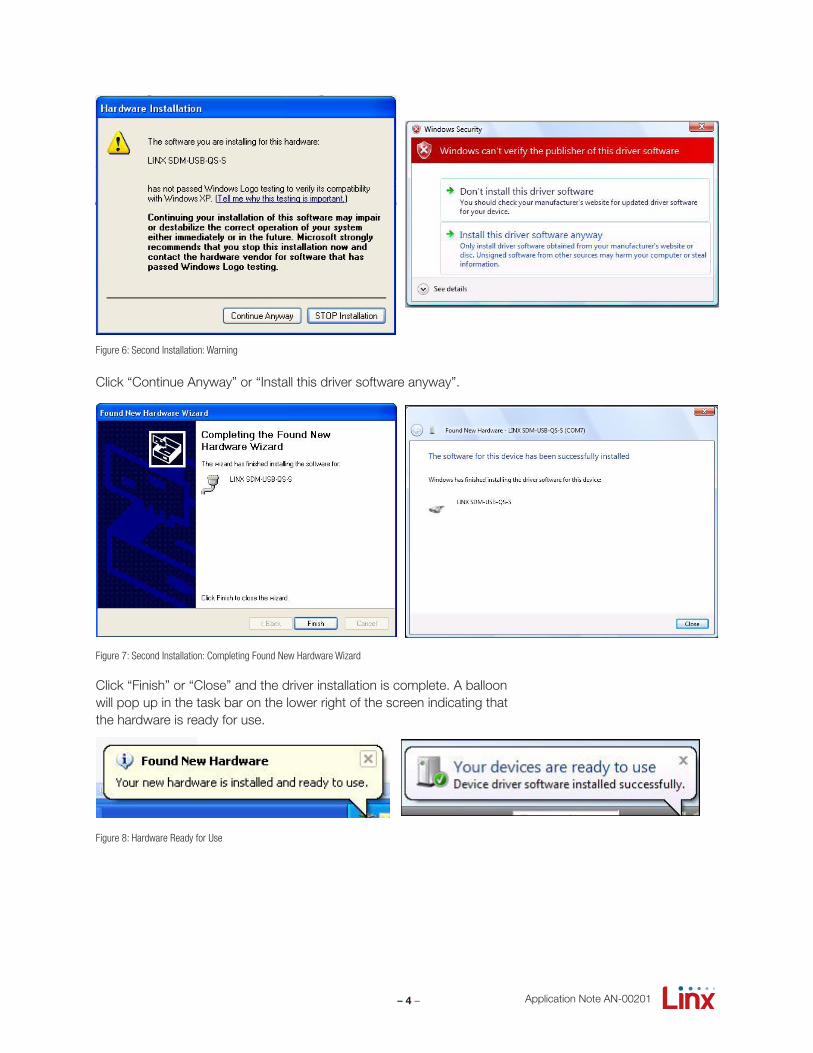
Click “Finish” or “Close” and the second installation will begin automatically. This second installation has the same procedures as the first installation.
For XP, select “No, not this time” and click “Next”. For Vista, click “Next”.
Figure 4: Completing Found New Hardware Wizard
Figure 5: Second Installation: Found New Hardware Wizard
– 4 –
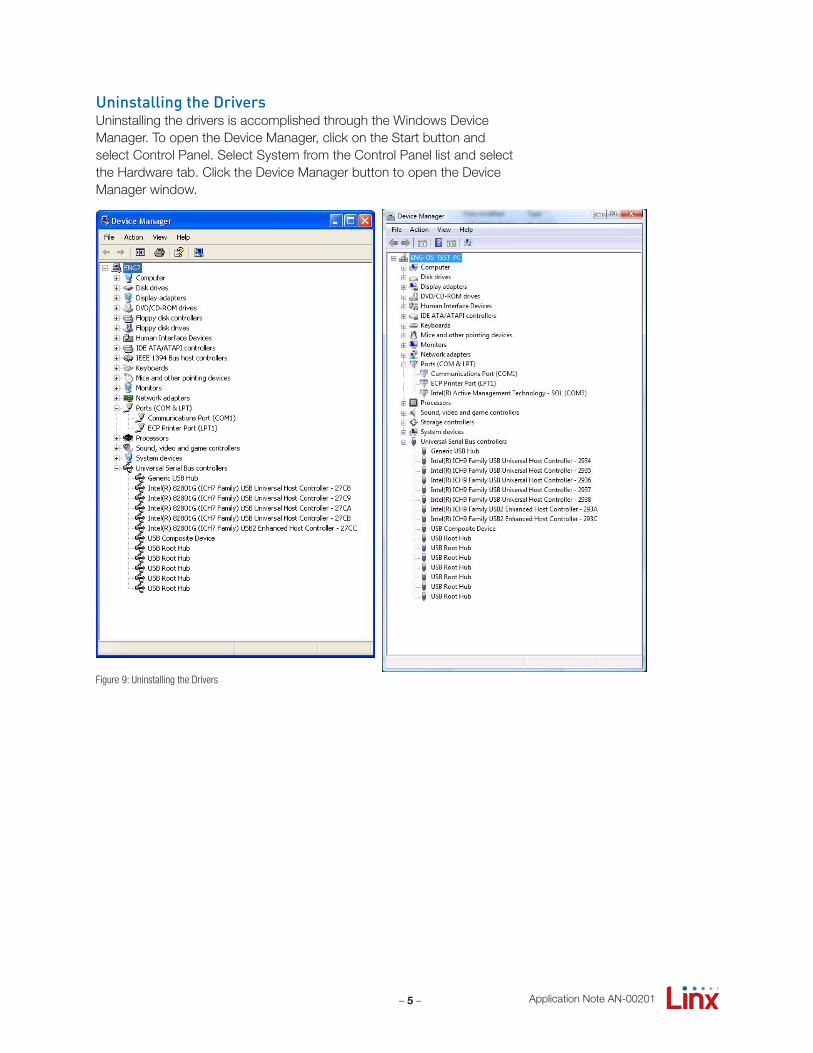
Click “Continue Anyway” or “Install this driver software anyway”.
Click “Finish” or “Close” and the driver installation is complete. A balloon will pop up in the task bar on the lower right of the screen indicating that the hardware is ready for use.
Application Note AN-00201
Figure 6: Second Installation: Warning
Figure 7: Second Installation: Completing Found New Hardware Wizard
Figure 8: Hardware Ready for Use
– 5 – Application Note AN-00201
Uninstalling the DriversUninstalling the drivers is accomplished through the Windows Device Manager. To open the Device Manager, click on the Start button and select Control Panel. Select System from the Control Panel list and select the Hardware tab. Click the Device Manager button to open the Device Manager window.
Figure 9: Uninstalling the Drivers
– 6 –
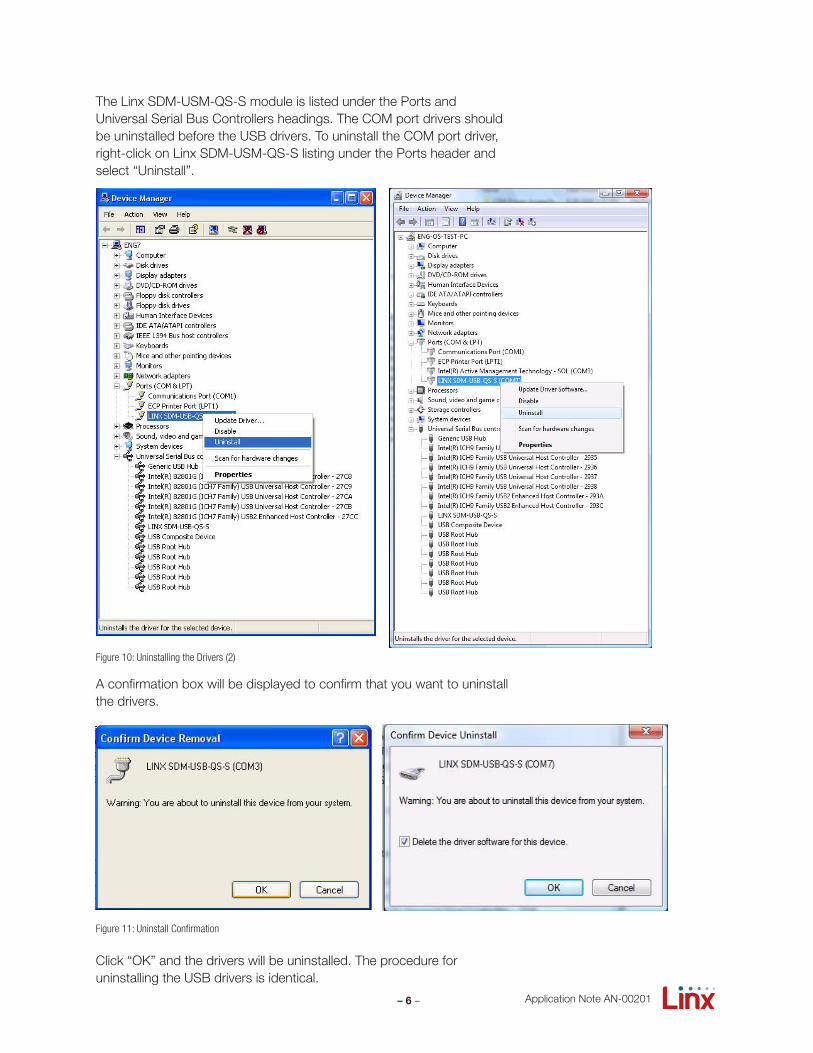
The Linx SDM-USM-QS-S module is listed under the Ports and Universal Serial Bus Controllers headings. The COM port drivers should be uninstalled before the USB drivers. To uninstall the COM port driver, right-click on Linx SDM-USM-QS-S listing under the Ports header and select “Uninstall”.
Application Note AN-00201
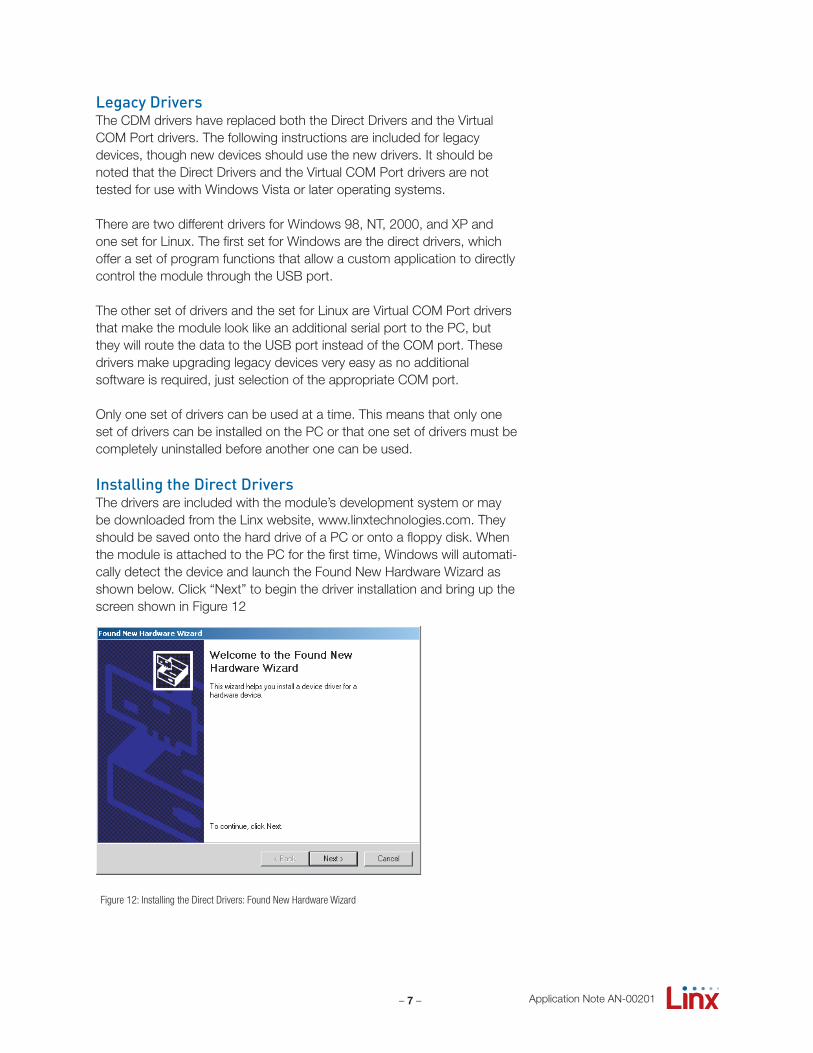
A confirmation box will be displayed to confirm that you want to uninstall the drivers.
Click “OK” and the drivers will be uninstalled. The procedure for uninstalling the USB drivers is identical.
Figure 11: Uninstall Confirmation
Figure 10: Uninstalling the Drivers (2)
– 7 – Application Note AN-00201
Legacy DriversThe CDM drivers have replaced both the Direct Drivers and the Virtual COM Port drivers. The following instructions are included for legacy devices, though new devices should use the new drivers. It should be noted that the Direct Drivers and the Virtual COM Port drivers are not tested for use with Windows Vista or later operating systems.
There are two different drivers for Windows 98, NT, 2000, and XP and one set for Linux. The first set for Windows are the direct drivers, which offer a set of program functions that allow a custom application to directly control the module through the USB port.
The other set of drivers and the set for Linux are Virtual COM Port drivers that make the module look like an additional serial port to the PC, but they will route the data to the USB port instead of the COM port. These drivers make upgrading legacy devices very easy as no additionalsoftware is required, just selection of the appropriate COM port.
Only one set of drivers can be used at a time. This means that only one set of drivers can be installed on the PC or that one set of drivers must be completely uninstalled before another one can be used.
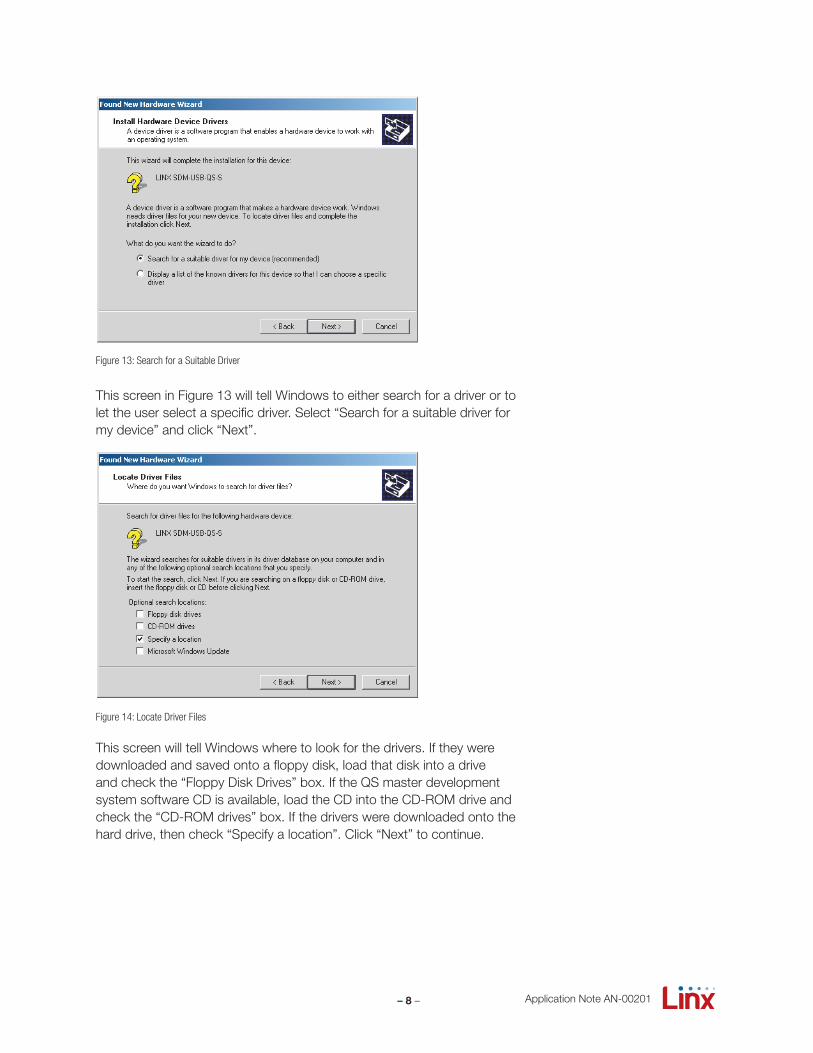
Installing the Direct DriversThe drivers are included with the module’s development system or may be downloaded from the Linx website, www.linxtechnologies.com. They should be saved onto the hard drive of a PC or onto a floppy disk. When the module is attached to the PC for the first time, Windows will automati-cally detect the device and launch the Found New Hardware Wizard as shown below. Click “Next” to begin the driver installation and bring up the screen shown in Figure 12
Figure 12: Installing the Direct Drivers: Found New Hardware Wizard
– 8 – Application Note AN-00201
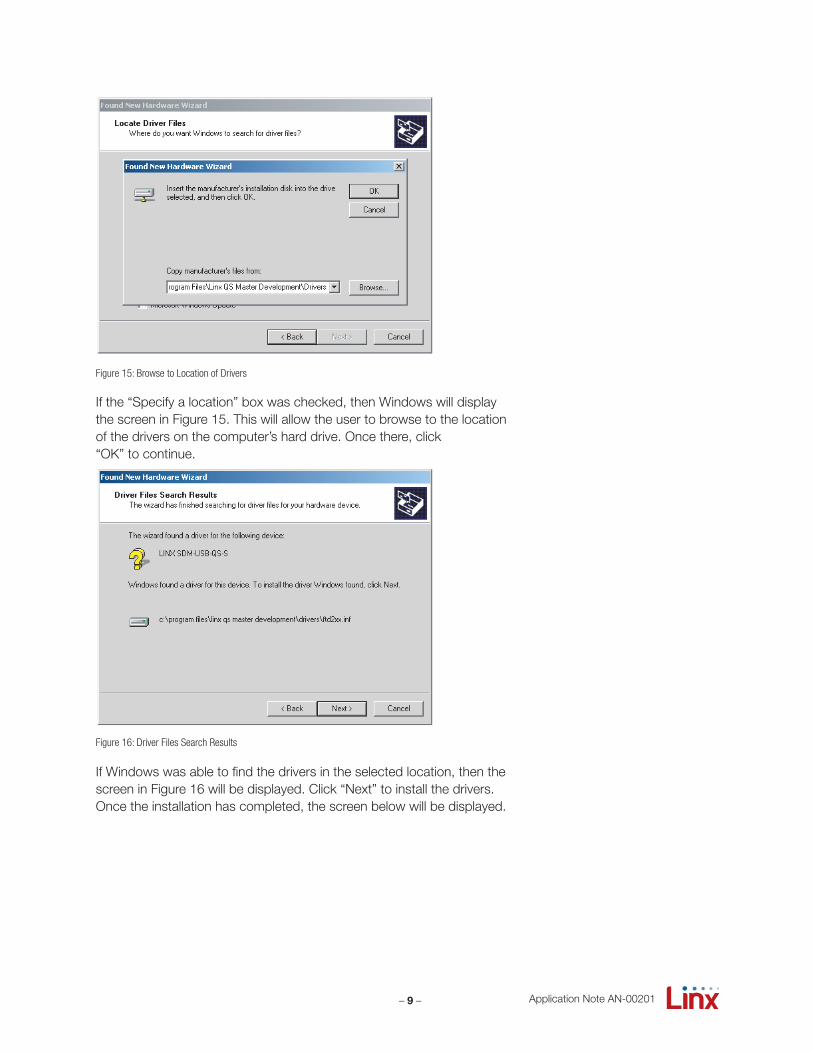
This screen in Figure 13 will tell Windows to either search for a driver or to let the user select a specific driver. Select “Search for a suitable driver for my device” and click “Next”.
This screen will tell Windows where to look for the drivers. If they were downloaded and saved onto a floppy disk, load that disk into a drive and check the “Floppy Disk Drives” box. If the QS master development system software CD is available, load the CD into the CD-ROM drive and check the “CD-ROM drives” box. If the drivers were downloaded onto the hard drive, then check “Specify a location”. Click “Next” to continue.
Figure 13: Search for a Suitable Driver
Figure 14: Locate Driver Files
– 9 – Application Note AN-00201
If the “Specify a location” box was checked, then Windows will display the screen in Figure 15. This will allow the user to browse to the location of the drivers on the computer’s hard drive. Once there, click“OK” to continue.
If Windows was able to find the drivers in the selected location, then the screen in Figure 16 will be displayed. Click “Next” to install the drivers. Once the installation has completed, the screen below will be displayed.
Figure 15: Browse to Location of Drivers
Figure 16: Driver Files Search Results
– 10 – Application Note AN-00201
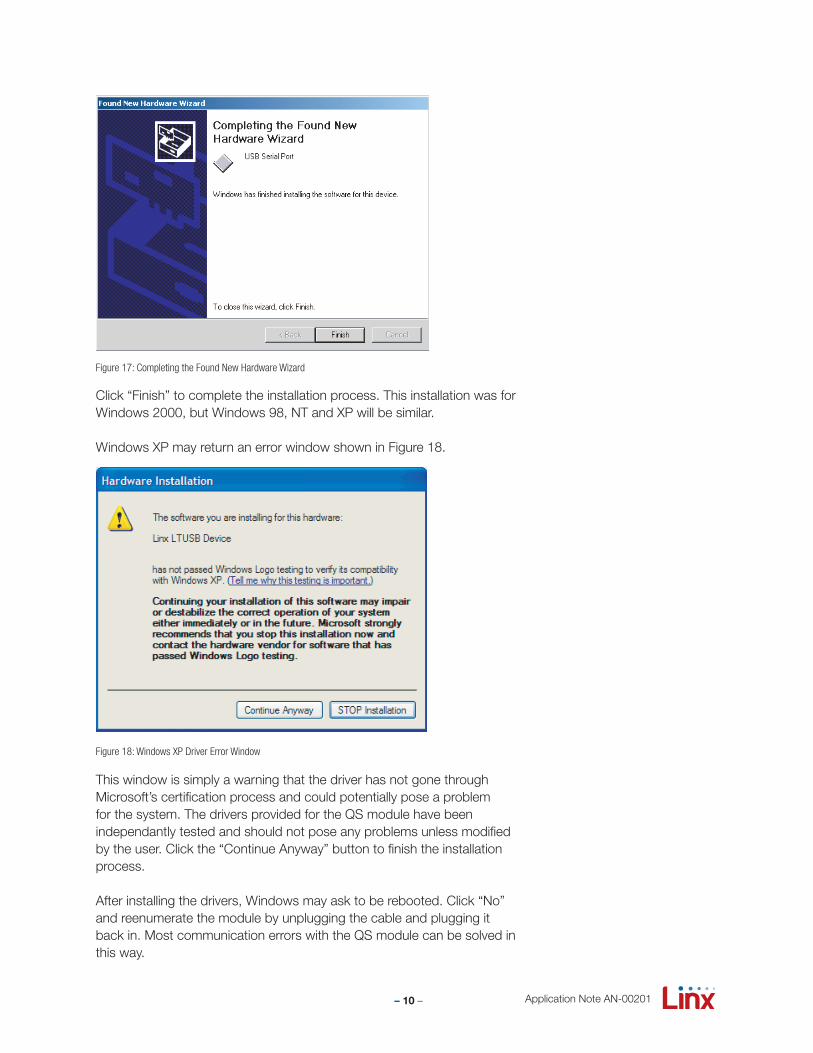
Click “Finish” to complete the installation process. This installation was for Windows 2000, but Windows 98, NT and XP will be similar.
Windows XP may return an error window shown in Figure 18.
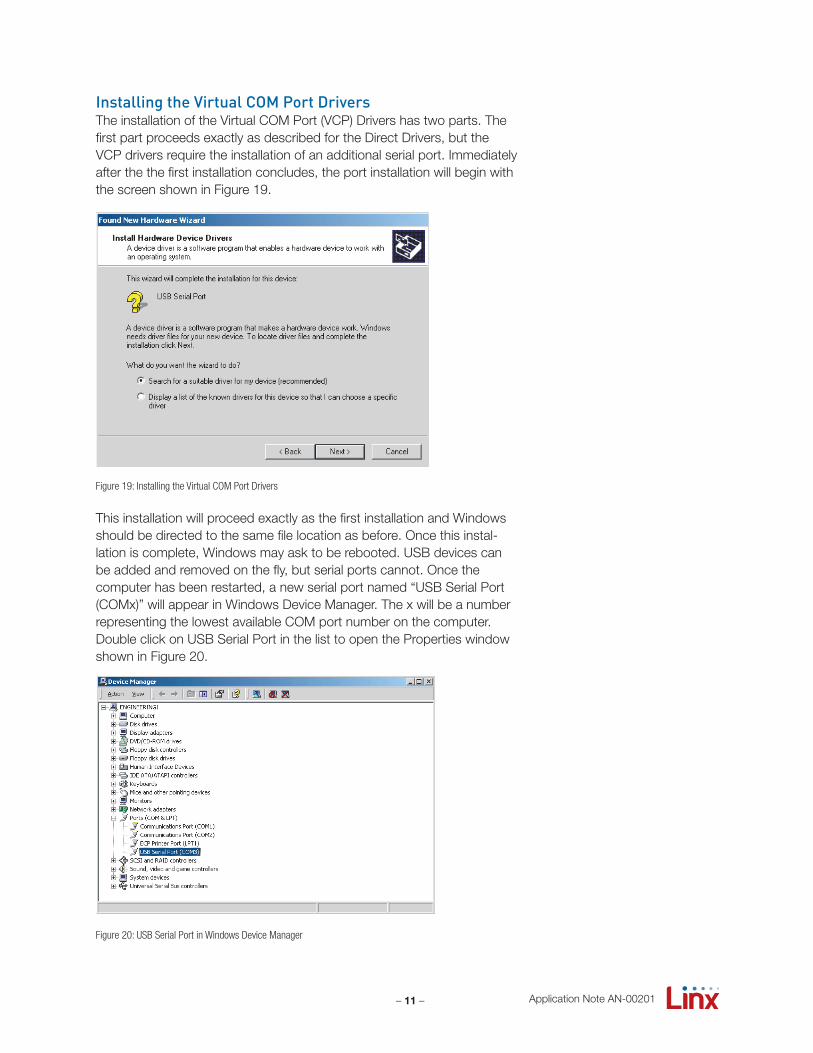
This window is simply a warning that the driver has not gone through Microsoft’s certification process and could potentially pose a problem for the system. The drivers provided for the QS module have been independantly tested and should not pose any problems unless modified by the user. Click the “Continue Anyway” button to finish the installation process.
After installing the drivers, Windows may ask to be rebooted. Click “No” and reenumerate the module by unplugging the cable and plugging it back in. Most communication errors with the QS module can be solved in this way.
Figure 17: Completing the Found New Hardware Wizard
Figure 18: Windows XP Driver Error Window
– 11 – Application Note AN-00201
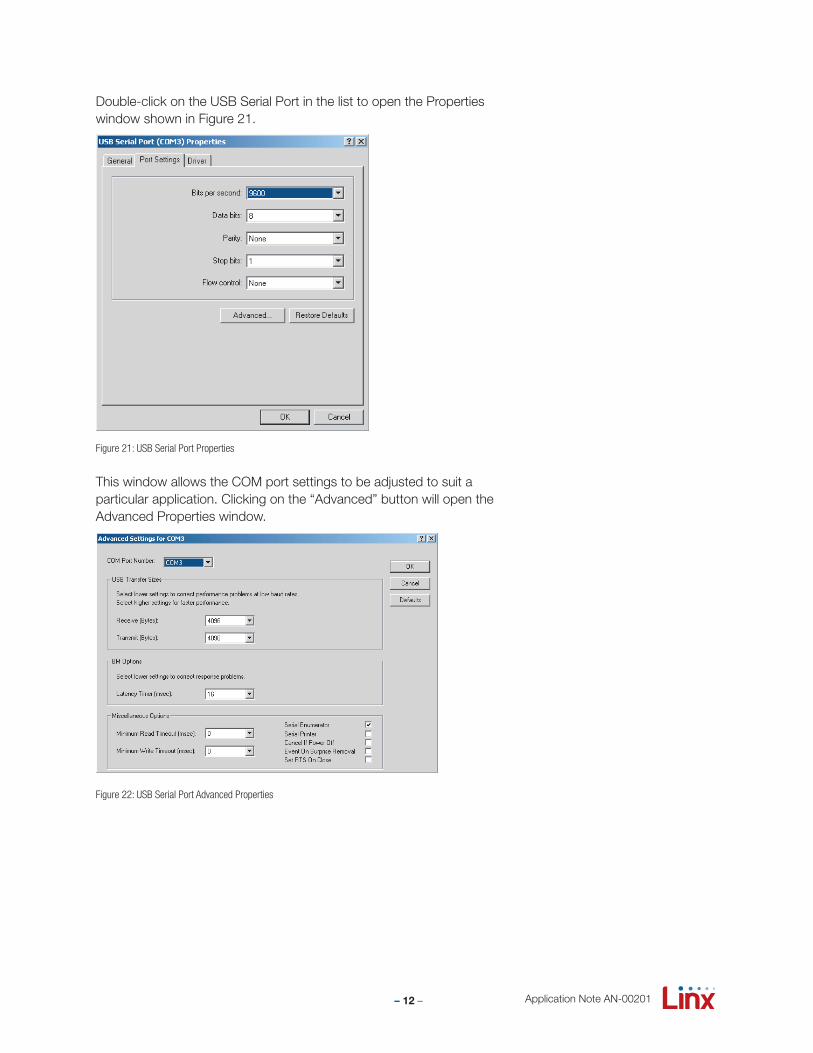
Installing the Virtual COM Port DriversThe installation of the Virtual COM Port (VCP) Drivers has two parts. The first part proceeds exactly as described for the Direct Drivers, but the VCP drivers require the installation of an additional serial port. Immediately after the the first installation concludes, the port installation will begin with the screen shown in Figure 19.
This installation will proceed exactly as the first installation and Windows should be directed to the same file location as before. Once this instal-lation is complete, Windows may ask to be rebooted. USB devices can be added and removed on the fly, but serial ports cannot. Once the computer has been restarted, a new serial port named “USB Serial Port (COMx)” will appear in Windows Device Manager. The x will be a number representing the lowest available COM port number on the computer.Double click on USB Serial Port in the list to open the Properties window shown in Figure 20.
Figure 19: Installing the Virtual COM Port Drivers
Figure 20: USB Serial Port in Windows Device Manager
– 12 – Application Note AN-00201
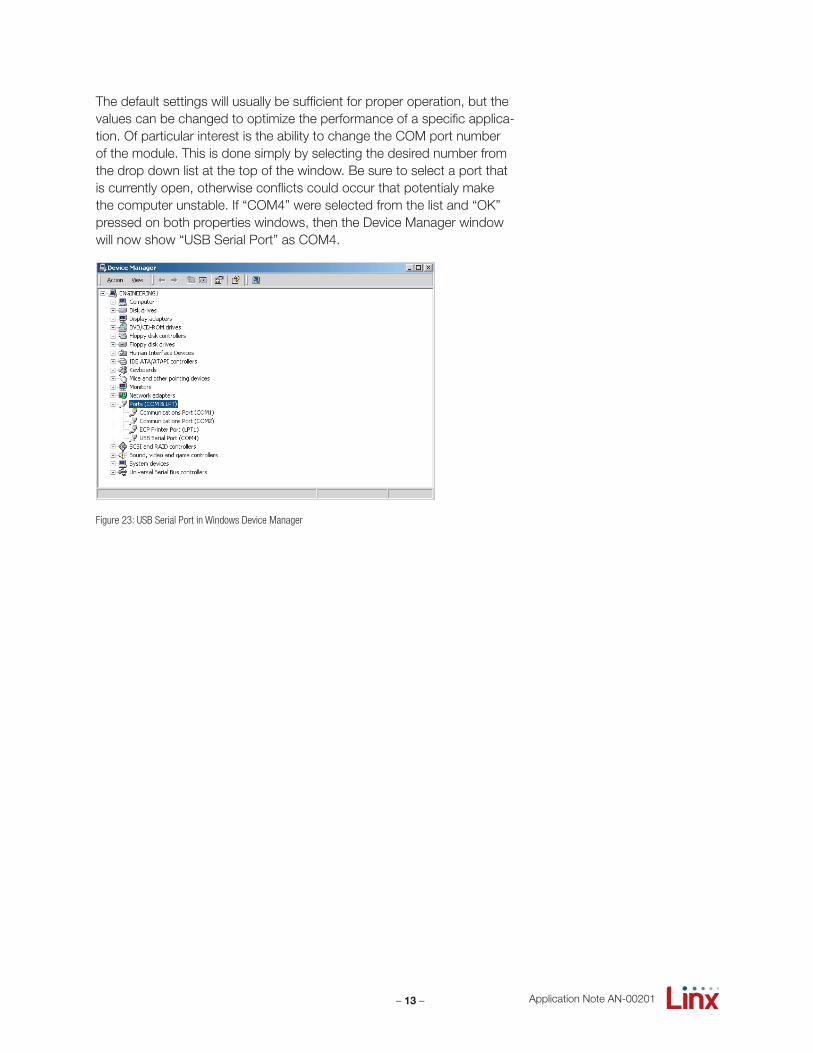
Double-click on the USB Serial Port in the list to open the Properties window shown in Figure 21.
This window allows the COM port settings to be adjusted to suit a particular application. Clicking on the “Advanced” button will open the Advanced Properties window.
Figure 21: USB Serial Port Properties
Figure 22: USB Serial Port Advanced Properties
– 13 – Application Note AN-00201
The default settings will usually be sufficient for proper operation, but the values can be changed to optimize the performance of a specific applica-tion. Of particular interest is the ability to change the COM port number of the module. This is done simply by selecting the desired number from the drop down list at the top of the window. Be sure to select a port that is currently open, otherwise conflicts could occur that potentialy make the computer unstable. If “COM4” were selected from the list and “OK” pressed on both properties windows, then the Device Manager window will now show “USB Serial Port” as COM4.
Figure 23: USB Serial Port in Windows Device Manager
– 14 –
Installing the Linux DriversFirst, download the latest kernel, which at the time of this writing is 2.4.25 from www.kernel.org. It is also included on the master development system CD. Untar the kernel.
$ tar xjf linux-2.4.25.tar.bz2
Patch the ftdi_sio driver.
$ cd linux-2.4.25
$ patch -p1 </mnt/cdrom/linux/2.4.25-patch
Make sure the ftdi_sio driver is enabled in the kernel config. The option is named CONFIG_USB_SERIAL_FTDI_SIO and is located here:
USB Support --> USB Serial Converter Support --> USB FTDI Single Port Serial Driver
Configure, compile and install kernel as documented in the Kernel HOWTO <www.tldp.org/HOWTO/Kernel-HOWTO/> then reboot into the new kernel.
Load the ftdi_sio driver.
# modprobe ftdi_sio
Plug the device into the USB port. The driver will attach the device to the next available USB serial port, e.g. /dev/ttyUSB0 or /dev/ttyUSB1. If you are using devfs this will be /dev/usb/tts/0. The device can now be accessed just like any standard serial port. See the Serial Programming HOWTO for details <www.tldp.org/HOWTO/Serial-Programming-HOW-TO/>.
Application Note AN-00201
– 15 –
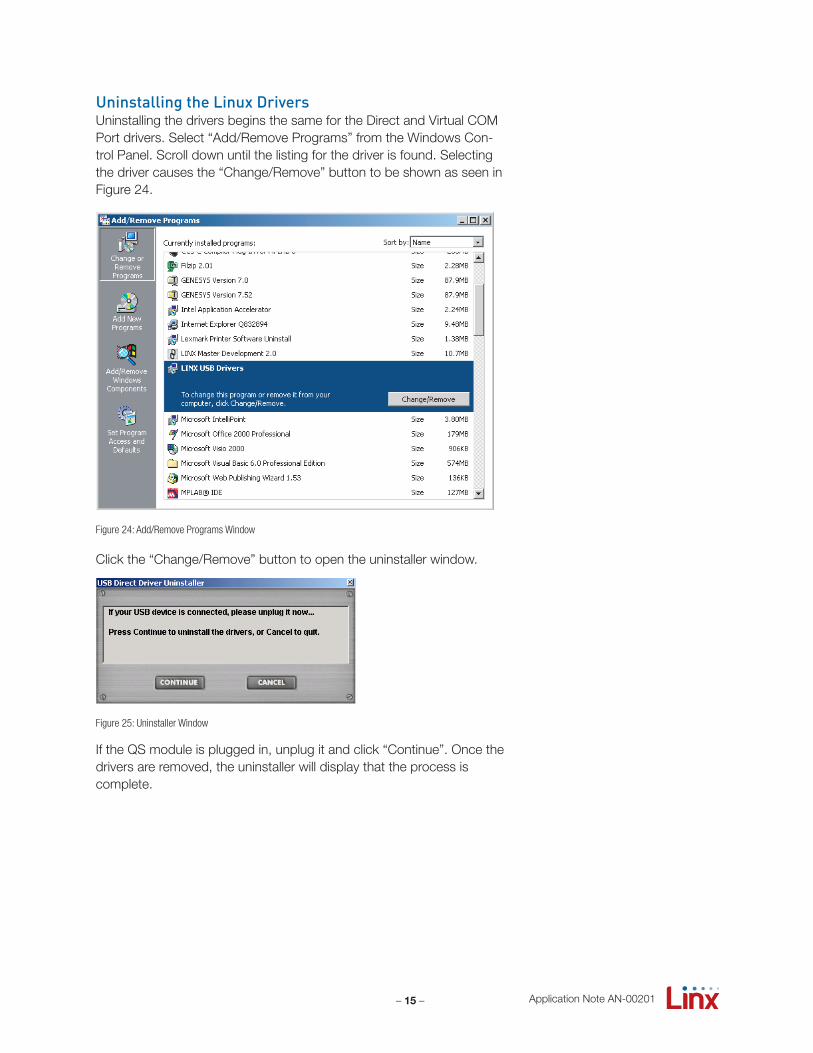
Uninstalling the Linux DriversUninstalling the drivers begins the same for the Direct and Virtual COM Port drivers. Select “Add/Remove Programs” from the Windows Con-trol Panel. Scroll down until the listing for the driver is found. Selecting the driver causes the “Change/Remove” button to be shown as seen in Figure 24.
Click the “Change/Remove” button to open the uninstaller window.
If the QS module is plugged in, unplug it and click “Continue”. Once the drivers are removed, the uninstaller will display that the process is complete.
Figure 24: Add/Remove Programs Window
Figure 25: Uninstaller Window
Application Note AN-00201
– 16 –
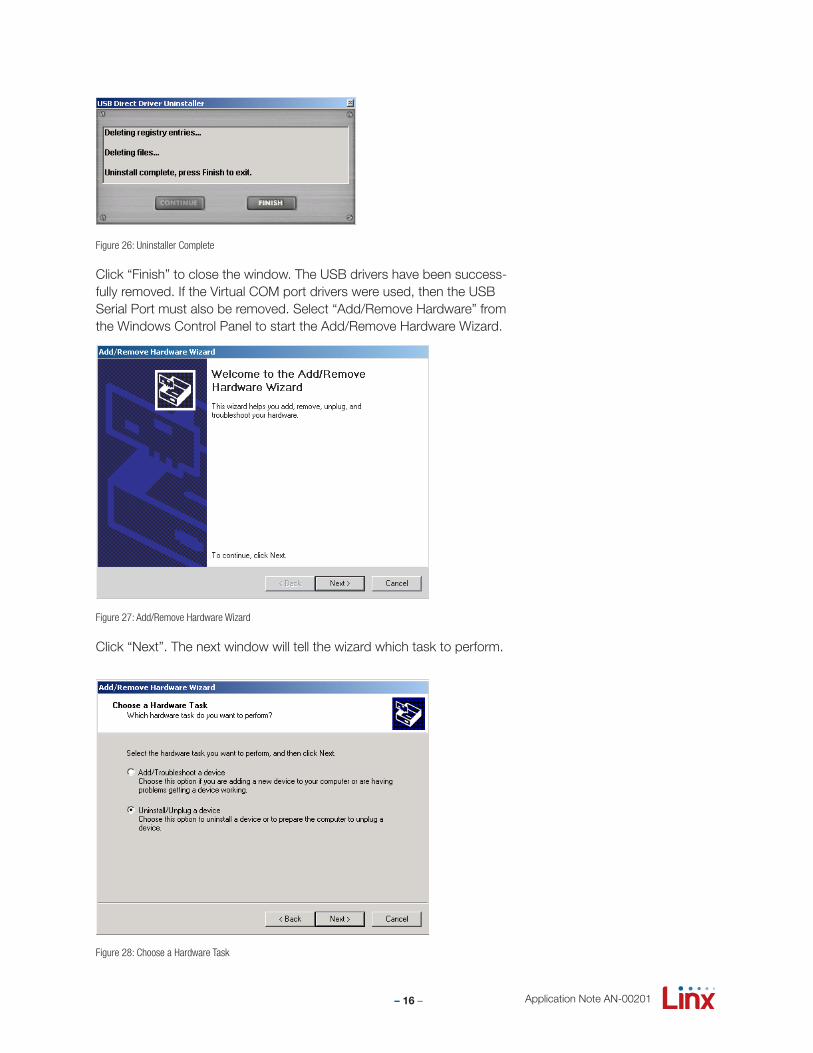
Click “Finish” to close the window. The USB drivers have been success-fully removed. If the Virtual COM port drivers were used, then the USB Serial Port must also be removed. Select “Add/Remove Hardware” from the Windows Control Panel to start the Add/Remove Hardware Wizard.
Click “Next”. The next window will tell the wizard which task to perform.
Figure 26: Uninstaller Complete
Figure 27: Add/Remove Hardware Wizard
Figure 28: Choose a Hardware Task
Application Note AN-00201
– 17 –
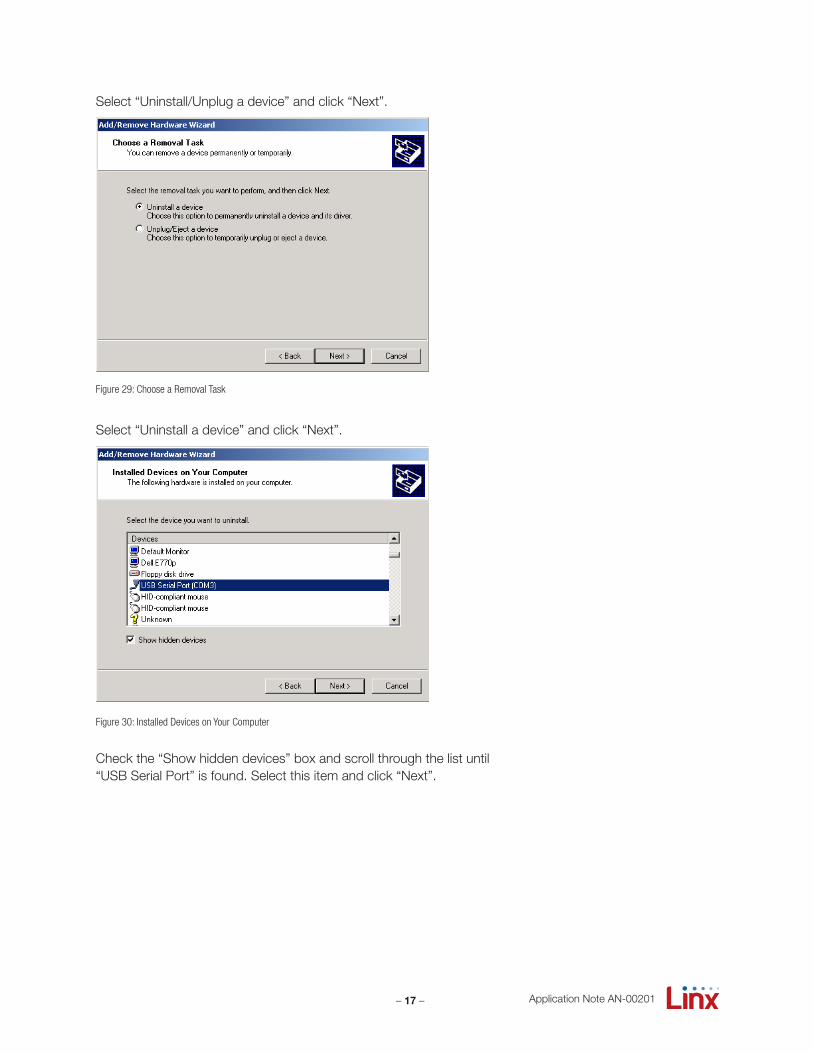
Select “Uninstall/Unplug a device” and click “Next”.
Select “Uninstall a device” and click “Next”.
Check the “Show hidden devices” box and scroll through the list until “USB Serial Port” is found. Select this item and click “Next”.
Figure 30: Installed Devices on Your Computer
Figure 29: Choose a Removal Task
Application Note AN-00201
– 18 –
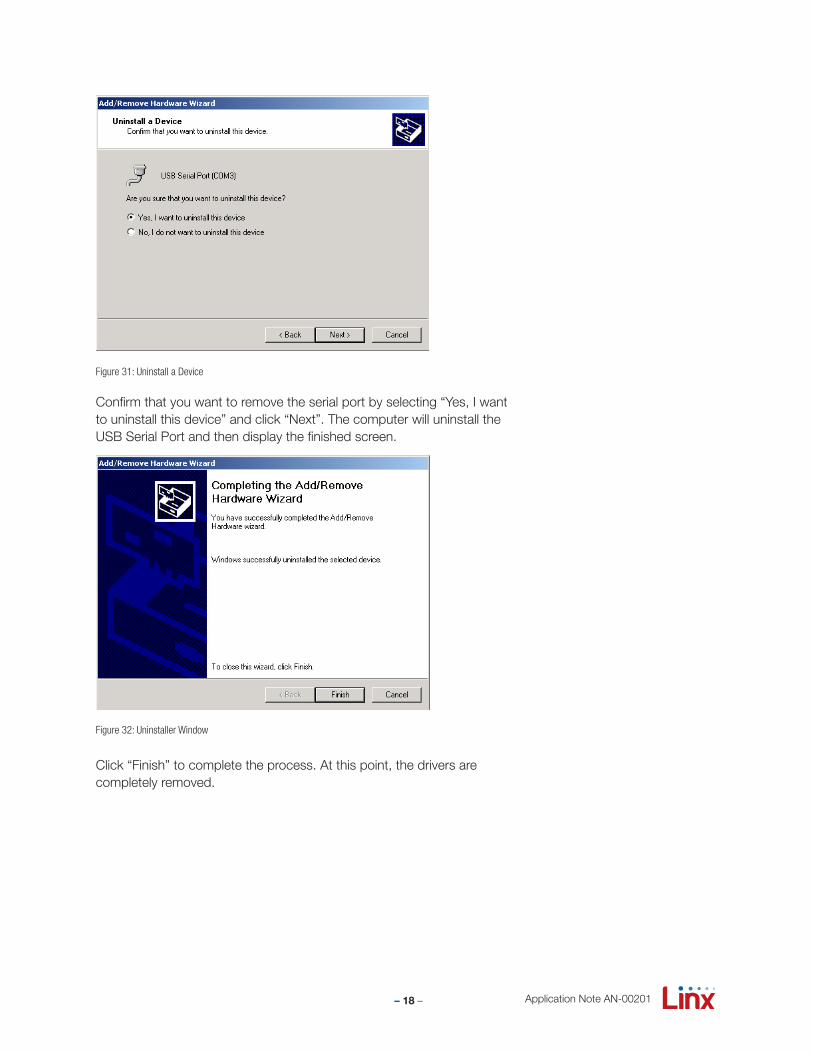
Confirm that you want to remove the serial port by selecting “Yes, I want to uninstall this device” and click “Next”. The computer will uninstall the USB Serial Port and then display the finished screen.
Click “Finish” to complete the process. At this point, the drivers are completely removed.
Figure 32: Uninstaller Window
Figure 31: Uninstall a Device
Application Note AN-00201

– 19 –
Modifying the .inf FilesWindows will use the data in the .inf files to load the drivers and to display the device in the Windows Device Manager screen. This file can be changed so that Device Manager will show the name of the product rather than “LINX SDM-USB-QS-S”. Follow the instructions below for the appropriate drivers.
The Direct DriversOpen the ftd2xx.inf file with any text editor (e.g. Notepad) scroll to the bottom of the page and locate the [Strings] tag. It will look like the list below:
[Strings]Ftdi=”Linx”USB\VID_0403&PID_6001.DeviceDesc=”Linx Blank QS Device”USB\VID_0403&PID_F448.DeviceDesc=”LINX SDM-USB-QS-S”USB\VID_0403&PID_F449.DeviceDesc=”Master Development 2.0”FTD2XX.SvcDesc=”Linx USB Drivers”WINUN=”Software\Microsoft\Windows\CurrentVersion\Uninstall”DriversDisk=”Linx USB Drivers Disk”
The fourth line shown above can be changed from “LINX SDM-USB-QS-S” to the product’s name, which will then be shown in Windows Device Manager. The lines below change the product’s name to “New Widget”:
[Strings]Ftdi=”Linx”USB\VID_0403&PID_6001.DeviceDesc=”Linx Blank QS Device”USB\VID_0403&PID_F448.DeviceDesc=”New Widget”USB\VID_0403&PID_F449.DeviceDesc=”Master Development 2.0”FTD2XX.SvcDesc=”Linx USB Drivers”WINUN=”Software\Microsoft\Windows\CurrentVersion\Uninstall”DriversDisk=”Linx USB Drivers Disk”
Save the files and install the drivers as described above. The new product name should now be shown in Windows Device Manager. Do not make any other changes to the files as it could result in system errors and instability.
The Virtual COM Port DriversThe VCP drivers have two .inf files that need to be modified: FTDIBUS.inf and FTDIPORT.inf. First, open the ftdibus.inf file with a text editor, scroll to the bottom of the page, and locate the [Strings] tag. It will look like the list below:
[Strings]Ftdi=”Linx”DriversDisk=”Linx USB Drivers Disk”USB\VID_0403&PID_8372.DeviceDesc=”USB Serial Converter”USB\VID_0403&PID_6001.DeviceDesc=”Linx Blank QS Device”USB\VID_0403&PID_F448.DeviceDesc=”Linx SDM-USB-QS-S”USB\VID_0403&PID_F449.DeviceDesc=”Master Development 2.0”WINUN=”Software\Microsoft\Windows\CurrentVersion\Uninstall”FtdiBus.SvcDesc=”USB Serial Converter Driver”
Application Note AN-00201

– 20 – Application Note AN-00201
The sixth shown above can be changed from “LINX SDM-USB-QS-S” to the product’s name, which will then be shown in Windows Device Manager. The lines below change the product’s name to “New Widget”:
[Strings]Ftdi=”Linx”DriversDisk=”Linx USB Drivers Disk”USB\VID_0403&PID_8372.DeviceDesc=”USB Serial Converter”USB\VID_0403&PID_6001.DeviceDesc=”Linx Blank QS Device”USB\VID_0403&PID_F448.DeviceDesc=”New Widget”USB\VID_0403&PID_F449.DeviceDesc=”Master Development 2.0”WINUN=”Software\Microsoft\Windows\CurrentVersion\Uninstall”FtdiBus.SvcDesc=”USB Serial Converter Driver”
Next, open the ftdiport.inf file and find the [Strings] tag:
[Strings]FTDI=”Linx”DriversDisk=”Linx USB Drivers Disk”PortsClassName = “Ports (COM & LPT)”VID_0403&PID_8372.DeviceDesc=”USB Serial Port”VID_0403&PID_6001.DeviceDesc=”USB Serial Port”VID_0403&PID_F448.DeviceDesc=”USB Serial Port”VID_0403&PID_F449.DeviceDesc=”USB Serial Port”FtdiPort.SvcDesc=”USB Serial Port Driver”SerEnum.SvcDesc=”Serenum Filter Driver”
The seventh line above can be altered to display the new name. The lines below change the product’s name to “New Widget”:
[Strings]FTDI=”Linx”DriversDisk=”Linx USB Drivers Disk”PortsClassName = “Ports (COM & LPT)”VID_0403&PID_8372.DeviceDesc=”USB Serial Port”VID_0403&PID_6001.DeviceDesc=”USB Serial Port”VID_0403&PID_F448.DeviceDesc=”New Widget”VID_0403&PID_F449.DeviceDesc=”USB Serial Port”FtdiPort.SvcDesc=”USB Serial Port Driver”SerEnum.SvcDesc=”Serenum Filter Driver”
Save the files and install the drivers as described above. The new product name should now be shown in Windows Device Manager. Do not make any other changes to the files as it could result in system errors and instability.
Copyright © 2012 Linx Technologies
159 Ort Lane, Merlin, OR, US 97532Phone: +1 541 471 6256Fax: +1 541 471 6251www.linxtechnologies.com