Embed Size (px)
Citation preview
Application manualRobotWare Add-Ins

Trace back information:Workspace R16-2 version a5Checked in 2016-09-08Skribenta version 4.6.318
Application manualRobotWare Add-Ins
RobotWare 6.04
Document ID: 3HAC051193-001Revision: C
© Copyright 2015-2016 ABB. All rights reserved.

The information in this manual is subject to change without notice and should notbe construed as a commitment by ABB. ABB assumes no responsibility for any errorsthat may appear in this manual.Except as may be expressly stated anywhere in this manual, nothing herein shall beconstrued as any kind of guarantee or warranty by ABB for losses, damages topersons or property, fitness for a specific purpose or the like.In no event shall ABB be liable for incidental or consequential damages arising fromuse of this manual and products described herein.This manual and parts thereof must not be reproduced or copied without ABB'swritten permission.Additional copies of this manual may be obtained from ABB.The original language for this publication is English. Any other languages that aresupplied have been translated from English.
© Copyright 2015-2016 ABB. All rights reserved.ABB AB
Robotics ProductsSe-721 68 Västerås
Sweden
Table of contents7Overview of this manual ...................................................................................................................9Product documentation, IRC5 ..........................................................................................................
11Safety ................................................................................................................................................
131 Introduction131.1 About RobotWare Add-Ins ..................................................................................151.2 The CIRCLEMOVE example ................................................................................
172 RobotWare Add-In functionality172.1 Required files and file structure ...........................................................................192.2 version.xml ......................................................................................................212.3 install.cmd .......................................................................................................212.3.1 Introduction ............................................................................................222.3.2 Commands ............................................................................................302.3.3 Examples of install.cmd files .....................................................................312.4 RAPID code .....................................................................................................332.5 Event log messages ..........................................................................................332.5.1 About event log messages ........................................................................342.5.2 Event log texts ........................................................................................362.5.3 Event log titles ........................................................................................372.5.4 Validating event log .xml files ....................................................................382.6 System parameters ...........................................................................................382.6.1 About cfg files ........................................................................................412.6.2 Topic Controller ......................................................................................442.6.3 Topic I/O System .....................................................................................452.6.4 Topic Man-machine Communication ...........................................................552.6.5 Example cfg files .....................................................................................572.7 Using data from files ..........................................................................................572.7.1 Using text strings from a file ......................................................................582.7.2 Including language files ............................................................................592.8 Hide RAPID content ...........................................................................................612.9 Optional settings for RAPID arguments (RAPID meta data) .......................................622.9.1 Hide arguments in programs .....................................................................642.9.2 Hide optional argument when changing selected instruction ............................662.9.3 Argument filter ........................................................................................682.9.4 Argument value range ..............................................................................692.10 FlexPendant applications ....................................................................................
713 RobotWare Add-In Packaging tool713.1 Introduction ......................................................................................................713.1.1 About RobotWare Add-In Packaging tool .....................................................733.1.2 Options .................................................................................................753.1.3 Files .....................................................................................................763.1.4 Signing with digital certificates ...................................................................803.2 The user interface .............................................................................................803.2.1 The main window ....................................................................................813.2.2 The product manifest view ........................................................................863.2.3 The files and folders view .........................................................................873.2.4 The signing certificate view .......................................................................883.3 Creating a new Add-In ........................................................................................883.3.1 Recommended working procedure .............................................................893.4 Converting an Additional option to an Add-In ..........................................................893.4.1 Introduction ............................................................................................903.4.2 Recommended working procedure .............................................................
Application manual - RobotWare Add-Ins 53HAC051193-001 Revision: C
© Copyright 2015-2016 ABB. All rights reserved.
Table of contents
914 License Generator914.1 Introduction ......................................................................................................924.2 The user interface .............................................................................................924.2.1 The Preferences window ..........................................................................934.2.2 The main window ....................................................................................944.3 Creating the License ..........................................................................................
95Index
6 Application manual - RobotWare Add-Ins3HAC051193-001 Revision: C
© Copyright 2015-2016 ABB. All rights reserved.
Table of contents
Overview of this manualAbout this manual
This manual contains instructions for how to create your own Add-In to use withABB’s robot systems.
UsageWith the help of this manual, you can package functionality into an Add-In andcreate a license that allows access to the Add-In.
Who should read this manual?This manual is intended for:
• line builders that want to implement the same program solution on manyrobots
• ABB’s partners, selling the robot systems with their own functionality added• ABB companies selling robot systems
PrerequisitesThe reader should...
• be experienced in working with ABB robots• be experienced RAPID programmer• be familiar with system parameters
References
Document IDReference
3HAC050948-001Technical reference manual - System parameters
3HAC032104-001Operating manual - RobotStudio
Revisions
DescriptionRevision
Released with RobotWare 6.00.01-First release.
Released with RobotWare 6.02• Added section about I/O signals, see Topic I/O System on page 44.• Updated the path to the utility folders throughout the manual, for example
see Template files on page 33.• Added section Hide RAPID content on page 59.• Added section Optional settings for RAPID arguments (RAPID meta
data) on page 61 and updated section register on page 27.• Updated the section RobotWare Add-In Packaging tool on page 71.• Minor corrections.
A
Continues on next pageApplication manual - RobotWare Add-Ins 73HAC051193-001 Revision: C
© Copyright 2015-2016 ABB. All rights reserved.
Overview of this manual

DescriptionRevision
Released with RobotWare 6.03• Added the tag VersionName to the version.xml file, see version.xml on
page 19.• Updated the section register on page 27.• Added sections Argument filter on page 66 and Argument value range
on page 68.• Updated the section Product details tab on page 81.• Minor corrections.
B
Released with RobotWare 6.04• Added commands for deleting items in the FlexPendant programming
window picklist, see install.cmd on page 21.• Added command direxist, see Commands on page 22.• Minor corrections.
C
8 Application manual - RobotWare Add-Ins3HAC051193-001 Revision: C
© Copyright 2015-2016 ABB. All rights reserved.
Overview of this manualContinued
Product documentation, IRC5Categories for user documentation from ABB Robotics
The user documentation from ABB Robotics is divided into a number of categories.This listing is based on the type of information in the documents, regardless ofwhether the products are standard or optional.All documents listed can be ordered from ABB on a DVD. The documents listedare valid for IRC5 robot systems.
Product manualsManipulators, controllers, DressPack/SpotPack, and most other hardware isdelivered with a Product manual that generally contains:
• Safety information.• Installation and commissioning (descriptions of mechanical installation or
electrical connections).• Maintenance (descriptions of all required preventive maintenance procedures
including intervals and expected life time of parts).• Repair (descriptions of all recommended repair procedures including spare
parts).• Calibration.• Decommissioning.• Reference information (safety standards, unit conversions, screw joints, lists
of tools).• Spare parts list with exploded views (or references to separate spare parts
lists).• Circuit diagrams (or references to circuit diagrams).
Technical reference manualsThe technical reference manuals describe reference information for roboticsproducts.
• Technical reference manual - Lubrication in gearboxes: Description of typesand volumes of lubrication for the manipulator gearboxes.
• Technical reference manual - RAPID overview: An overview of the RAPIDprogramming language.
• Technical referencemanual - RAPID Instructions, Functions and Data types:Description and syntax for all RAPID instructions, functions, and data types.
• Technical reference manual - RAPID kernel: A formal description of theRAPID programming language.
• Technical reference manual - System parameters: Description of systemparameters and configuration workflows.
Continues on next pageApplication manual - RobotWare Add-Ins 93HAC051193-001 Revision: C
© Copyright 2015-2016 ABB. All rights reserved.
Product documentation, IRC5
Application manualsSpecific applications (for example software or hardware options) are described inApplication manuals. An application manual can describe one or severalapplications.An application manual generally contains information about:
• The purpose of the application (what it does and when it is useful).• What is included (for example cables, I/O boards, RAPID instructions, system
parameters, DVD with PC software).• How to install included or required hardware.• How to use the application.• Examples of how to use the application.
Operating manualsThe operating manuals describe hands-on handling of the products. The manualsare aimed at those having first-hand operational contact with the product, that isproduction cell operators, programmers, and trouble shooters.The group of manuals includes (among others):
• Operating manual - Emergency safety information• Operating manual - General safety information• Operating manual - Getting started, IRC5 and RobotStudio• Operating manual - IRC5 Integrator's guide• Operating manual - IRC5 with FlexPendant• Operating manual - RobotStudio• Operating manual - Trouble shooting IRC5
10 Application manual - RobotWare Add-Ins3HAC051193-001 Revision: C
© Copyright 2015-2016 ABB. All rights reserved.
Product documentation, IRC5Continued
SafetySafety of personnel
A robot is heavy and extremely powerful regardless of its speed. A pause or longstop in movement can be followed by a fast hazardous movement. Even if a patternof movement is predicted, a change in operation can be triggered by an externalsignal resulting in an unexpected movement.Therefore, it is important that all safety regulations are followed when enteringsafeguarded space.
Safety regulationsBefore beginning work with the robot, make sure you are familiar with the safetyregulations described in the manualOperatingmanual - General safety information.
Application manual - RobotWare Add-Ins 113HAC051193-001 Revision: C
© Copyright 2015-2016 ABB. All rights reserved.
Safety

This page is intentionally left blank
1 Introduction1.1 About RobotWare Add-Ins
What is an Add-InIn RobotWare 6 the concept of additional options has been replaced with RobotWareAdd-Ins. If you were familiar with the additional option concept, you will see thatfrom a structural point of view, additional options and Add-Ins are handled thesame way on the robot controller. What is new is that the packaging has beenchanged to simplify installation with Installation Manager. For more informationabout the packaging tool and process, see RobotWare Add-In Packaging tool onpage 71.
Using Add-InsAdd-Ins allow to create installable supplemental software packages that extendthe capabilities offered by RobotWare, making ABB's robot controllers even smarterand even more user-friendly. Creating RobotWare Add-Ins is also the recommendedway for 3rd party developers to add new features into RobotWare.An Add-In can include a number of RAPID modules, system modules, or programmodules which hold the basic code for the Add-In. The Add-In also includes somefiles for loading and configuration at start up. The Add-In may also include .xmlfiles with event log messages in different languages.An Add-In can also consist of more advanced coding, such as C# code, forFlexPendant applications. This manual will cover the first case, with coding donein RAPID only. For more advanced coding, use RobotStudio SDK applications.
Unlicensed, open, Add-InsWhat you need from ABB to package your own open Add-In is:
• RobotWare Add-In Packaging tool
Licensed Add-InsWhat you need from ABB to package your own licensed Add-In is:
• RobotWare Add-In Packaging tool• a licence certificate for the RobotWare Add-In Packaging tool for your Add-In
nameTo license the Add-In, you will also need:
• License Generator• a publisher certificate.• a licensing certificate for the License Generator
For more information, see Digital signing on page 76.
Continues on next pageApplication manual - RobotWare Add-Ins 133HAC051193-001 Revision: C
© Copyright 2015-2016 ABB. All rights reserved.
1 Introduction1.1 About RobotWare Add-Ins

Basic approachThese are the major steps for creating an Add-In. More detailed descriptions aregiven later in this manual.
1 Create the RAPID code for the Add-In, see RAPID code on page 31.2 Create the event message files, see Event log messages on page 33.3 Create configuration files for system parameters, see System parameters
on page 38.4 Create the file version.xml, see version.xml on page 19.5 Create the file install.cmd, see install.cmd on page 21.6 Create and package the RobotWare Add-In, seeRobotWare Add-In Packaging
tool on page 71.7 For licensed Add-Ins:
Create a licence file, see License Generator on page 91.8 Use the Installation Manager in RobotStudio to create a system that uses
the Add-In.For more information, see Operating manual - RobotStudio.
Selections within Add-InsAn Add-In can contain selections (that is, optional functionality selectable atinstallation). For more information see getkey on page 24 and Feature Data onpage 83.
14 Application manual - RobotWare Add-Ins3HAC051193-001 Revision: C
© Copyright 2015-2016 ABB. All rights reserved.
1 Introduction1.1 About RobotWare Add-InsContinued
1.2 The CIRCLEMOVE example
IntroductionThroughout this manual, an example Add-In is used to illustrate how to implementan Add-In. This Add-In is called CIRCLEMOVE.Some parts of this manual have detailed reference information for commands andsyntax used in the Add-In files. Looking at the examples can be a way of solvingyour problem without having to read all the reference information.
DescriptionThe Add-In CIRCLEMOVE contains an instruction called MoveCircle that willmove the robot in a complete circle. This instruction is added to a pick list on theFlexPendant and behaves just like one of the original instructions.Error messages are stored in .xml files (in this example only in English), and areused in the RAPID code.
Application manual - RobotWare Add-Ins 153HAC051193-001 Revision: C
© Copyright 2015-2016 ABB. All rights reserved.
1 Introduction1.2 The CIRCLEMOVE example

This page is intentionally left blank
2 RobotWare Add-In functionality2.1 Required files and file structure
Add-In filesAn Add-In consists of a number of files that you need to create in order to makeyour own Add-In.
DescriptionFile type
Name, version number and description of the Add-In, see version.xmlon page 19.
version.xml
Installation script. Specifies for example which .cfg files to load, see in-stall.cmd on page 21.
install.cmd
One or several .cfg files with the configuration of system parameters. Ifthe Add-In includes RAPID, one of the .cfg files should specify whichRAPID module (.sys file) to load, see System parameters on page 38.
.cfg
The RAPID source code, see RAPID code on page 31..sys or .mod
Event log message filesIf the Add-In contains customized event log messages, two XML files for eachlanguage are required. These are placed in a specific folder for each language:
• <Add-In folder>\language\<language code>\<Add-In name>_elogtext.xml• <Add-In folder>\language\<language code>\<Add-In name>_elogtitles.xml
The language codes consist of two letters, for example en, de, or fr, and are definedby the standard ISO 639, see Event log messages on page 33.
Continues on next pageApplication manual - RobotWare Add-Ins 173HAC051193-001 Revision: C
© Copyright 2015-2016 ABB. All rights reserved.
2 RobotWare Add-In functionality2.1 Required files and file structure
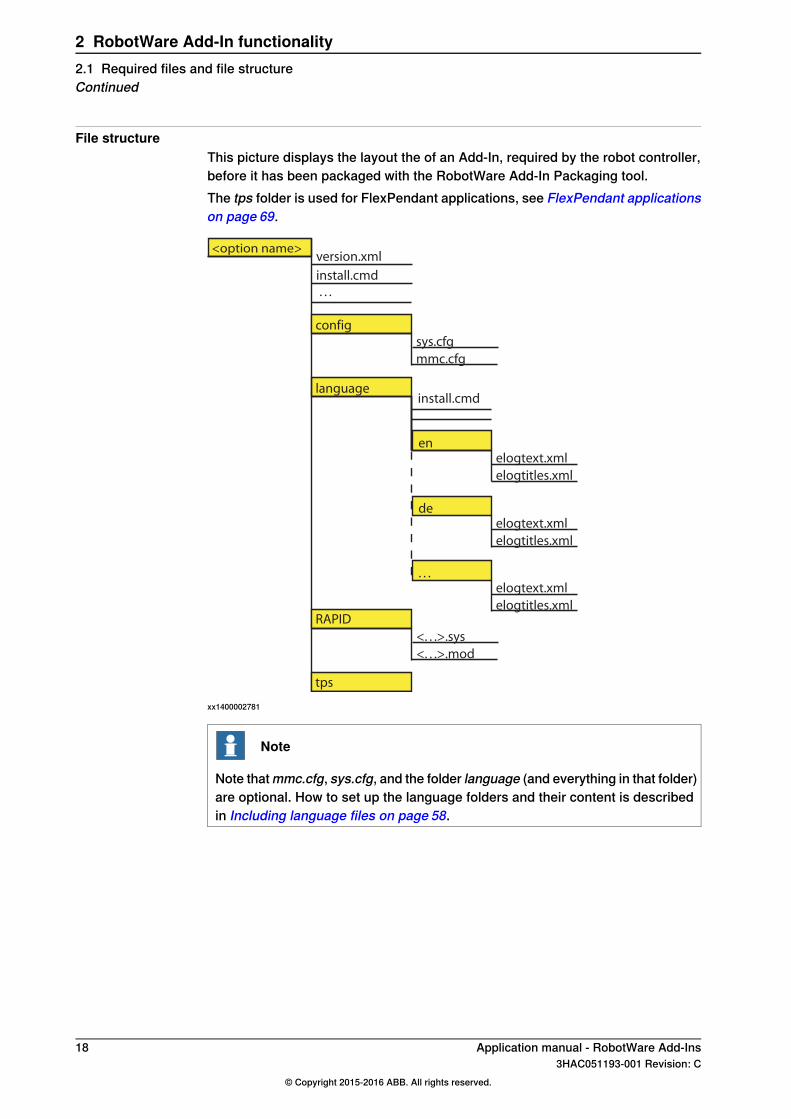
File structureThis picture displays the layout the of an Add-In, required by the robot controller,before it has been packaged with the RobotWare Add-In Packaging tool.The tps folder is used for FlexPendant applications, see FlexPendant applicationson page 69.
<option name>version.xml
install.cmd
install.cmdlanguage
enelogtext.xml
elogtitles.xml
deelogtext.xml
elogtitles.xml
. . .elogtext.xml
elogtitles.xml
. . .
config
sys.cfg
mmc.cfg
<. . .>.sys
<. . .>.mod
RAPID
tps
xx1400002781
Note
Note thatmmc.cfg, sys.cfg, and the folder language (and everything in that folder)are optional. How to set up the language folders and their content is describedin Including language files on page 58.
18 Application manual - RobotWare Add-Ins3HAC051193-001 Revision: C
© Copyright 2015-2016 ABB. All rights reserved.
2 RobotWare Add-In functionality2.1 Required files and file structureContinued
2.2 version.xml
IntroductionA RobotWare 6 Add-In contains a version.xml file that holds the name, version,and description of the Add-In. This is the same as for a RobotWare 5 additionaloption.When converting a RobotWare 5 additional option to a RobotWare 6 Add-In, theinformation in the version.xml file is read by the RobotWare Add-In Packaging tool.
Note
In RobotWare 6, the role of the version.xml file has been largely replaced by theproduct manifest file. However some client applications may still require the fileto be present and the RobotWare Add-In Packaging tool will thereforeautomatically create a version.xml file based on the product manifest information.
XML descriptionThe file version.xml is using the following tags:
DescriptionTag
Major version number. This number is changed every time a newAdd-In version with major changes is released.
Major
Integer between 0 and 65535.
Minor version number. This number is changed every time a newAdd-In version with minor changes is released.
Minor
Integer between 0 and 65535.
Revision number. This number is changed every time a revision ofthe Add-In is released.
Revision
Integer between 0 and 65535.
Build number. To be used internally during developing and testingof the Add-In.
Build
Integer between 0 and 65535.
The complete product version as displayed to the end user.VersionNameThis may include additional identifiers such as "Beta" or "ReleaseCandidate".
The name of the Add-In.Title
A description of what the Add-In is used for.DescriptionMax 255 characters.
The release date for this version of the Add-In.DateFormat: YYYY-MM-DD
Always set to AdditionalOption.Type
Example file<Version>
<Major>1</Major>
<Minor>01</Minor>
<Revision>01</Revision>
<Build>001</Build>
Continues on next pageApplication manual - RobotWare Add-Ins 193HAC051193-001 Revision: C
© Copyright 2015-2016 ABB. All rights reserved.
2 RobotWare Add-In functionality2.2 version.xml
<VersionName>1.01.01 Beta 2</VersionName>
<Title>CircleMove</Title>
<Description>CIRCLEMOVE Add-In (gives access to the instructionMoveCircle)</Description>
<Date>2014-12-31</Date>
<Type>AdditionalOption</Type>
</Version>
20 Application manual - RobotWare Add-Ins3HAC051193-001 Revision: C
© Copyright 2015-2016 ABB. All rights reserved.
2 RobotWare Add-In functionality2.2 version.xmlContinued
2.3 install.cmd
2.3.1 Introduction
DescriptionThe install.cmd file is an installation script that for example define whichconfiguration files and event log messages files to load. One of the configurationfiles (sys.cfg) defines which RAPID program files (.sys) to load.
Application manual - RobotWare Add-Ins 213HAC051193-001 Revision: C
© Copyright 2015-2016 ABB. All rights reserved.
2 RobotWare Add-In functionality2.3.1 Introduction
2.3.2 Commands
OverviewThis section describes the syntax of the commands that can be used in theinstallation script install.cmd.The script install.cmd is executed when using the restart mode Reset system toautomatically install a number of different files, like configuration files or text files.The install.cmd file can contain conditions so that certain actions only are executedif certain conditions are true.
$The command $ defines the name of a string variable.Example:
setstr -strvar $LANG -value "en"
Predefined strings:
Predefined valueString
The folder where install.cmd is executed. For example:$BOOTPATH/hd0a/<system name>/PRODUCTS/<Add-In folder>
/hd0a/<system name>/HOME$HOME
/hd0a/<system name>/SYSPAR$SYSPAR
/hd0a/temp$RWTEMP
#Comment, if # followed by a space.Label, if no space between # and text.Example:
# A comment
#Label1
configDoes one of the following:·
• Load configuration resource files into the configuration database• Erase unprotected instances of the specified configuration domain
DefaultDescriptionParameter
The cfg file name, including file path.filename
The topic of the cfg file. Allowed values are:• SIO - Communication• SYS - Controller• EIO - I/O• MMC - Man-machine communication• MOC - Motion
domain
FALSEErase unprotected instances of the specified configurationdomain.
erase
Continues on next page22 Application manual - RobotWare Add-Ins
3HAC051193-001 Revision: C© Copyright 2015-2016 ABB. All rights reserved.
2 RobotWare Add-In functionality2.3.2 Commands
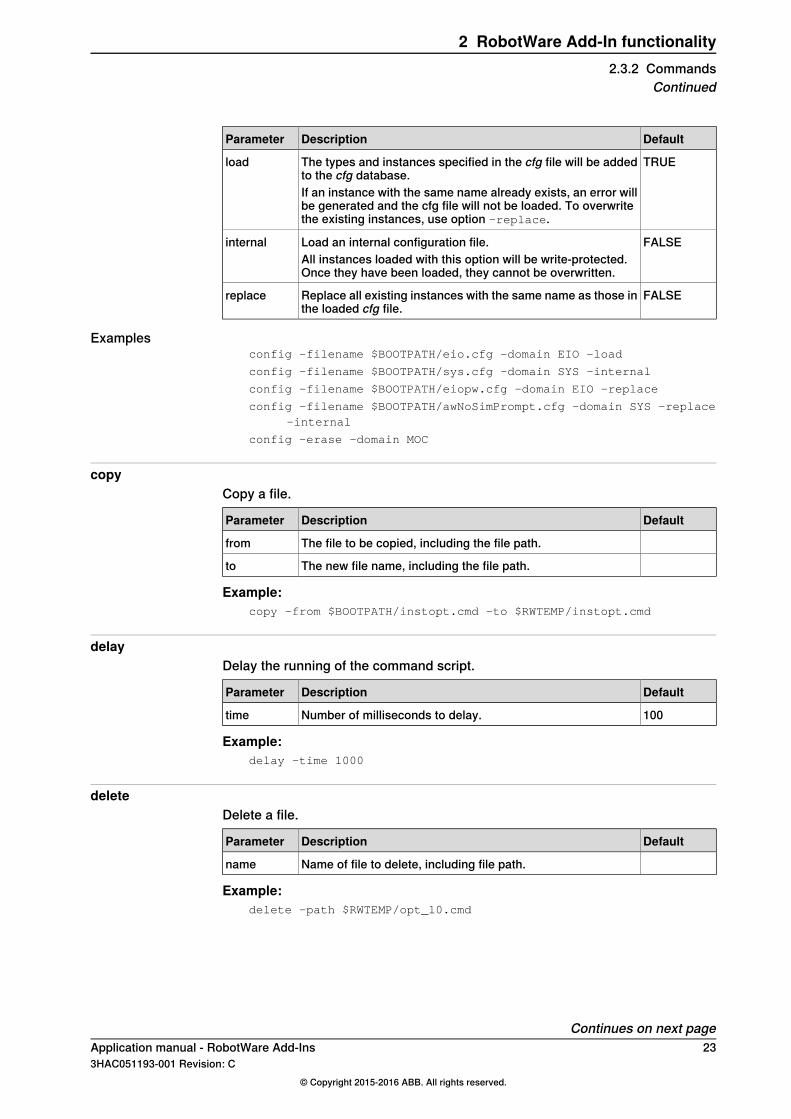
DefaultDescriptionParameter
TRUEThe types and instances specified in the cfg file will be addedto the cfg database.
load
If an instance with the same name already exists, an error willbe generated and the cfg file will not be loaded. To overwritethe existing instances, use option -replace.
FALSELoad an internal configuration file.internalAll instances loaded with this option will be write-protected.Once they have been loaded, they cannot be overwritten.
FALSEReplace all existing instances with the same name as those inthe loaded cfg file.
replace
Examplesconfig -filename $BOOTPATH/eio.cfg -domain EIO -load
config -filename $BOOTPATH/sys.cfg -domain SYS -internal
config -filename $BOOTPATH/eiopw.cfg -domain EIO -replace
config -filename $BOOTPATH/awNoSimPrompt.cfg -domain SYS -replace-internal
config -erase -domain MOC
copyCopy a file.
DefaultDescriptionParameter
The file to be copied, including the file path.from
The new file name, including the file path.to
Example:copy -from $BOOTPATH/instopt.cmd -to $RWTEMP/instopt.cmd
delayDelay the running of the command script.
DefaultDescriptionParameter
100Number of milliseconds to delay.time
Example:delay -time 1000
deleteDelete a file.
DefaultDescriptionParameter
Name of file to delete, including file path.name
Example:delete -path $RWTEMP/opt_l0.cmd
Continues on next pageApplication manual - RobotWare Add-Ins 233HAC051193-001 Revision: C
© Copyright 2015-2016 ABB. All rights reserved.
2 RobotWare Add-In functionality2.3.2 Commands
Continued
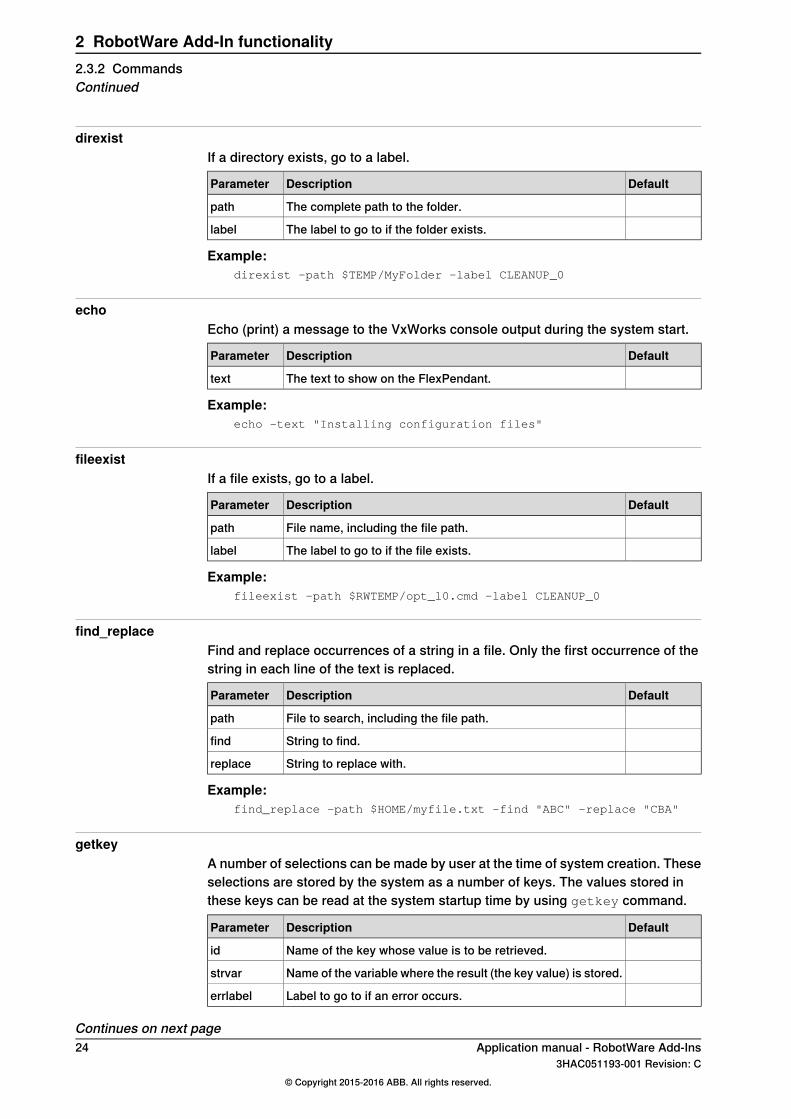
direxistIf a directory exists, go to a label.
DefaultDescriptionParameter
The complete path to the folder.path
The label to go to if the folder exists.label
Example:direxist -path $TEMP/MyFolder -label CLEANUP_0
echoEcho (print) a message to the VxWorks console output during the system start.
DefaultDescriptionParameter
The text to show on the FlexPendant.text
Example:echo -text "Installing configuration files"
fileexistIf a file exists, go to a label.
DefaultDescriptionParameter
File name, including the file path.path
The label to go to if the file exists.label
Example:fileexist -path $RWTEMP/opt_l0.cmd -label CLEANUP_0
find_replaceFind and replace occurrences of a string in a file. Only the first occurrence of thestring in each line of the text is replaced.
DefaultDescriptionParameter
File to search, including the file path.path
String to find.find
String to replace with.replace
Example:find_replace -path $HOME/myfile.txt -find "ABC" -replace "CBA"
getkeyA number of selections can be made by user at the time of system creation. Theseselections are stored by the system as a number of keys. The values stored inthese keys can be read at the system startup time by using getkey command.
DefaultDescriptionParameter
Name of the key whose value is to be retrieved.id
Name of the variable where the result (the key value) is stored.strvar
Label to go to if an error occurs.errlabel
Continues on next page24 Application manual - RobotWare Add-Ins
3HAC051193-001 Revision: C© Copyright 2015-2016 ABB. All rights reserved.
2 RobotWare Add-In functionality2.3.2 CommandsContinued
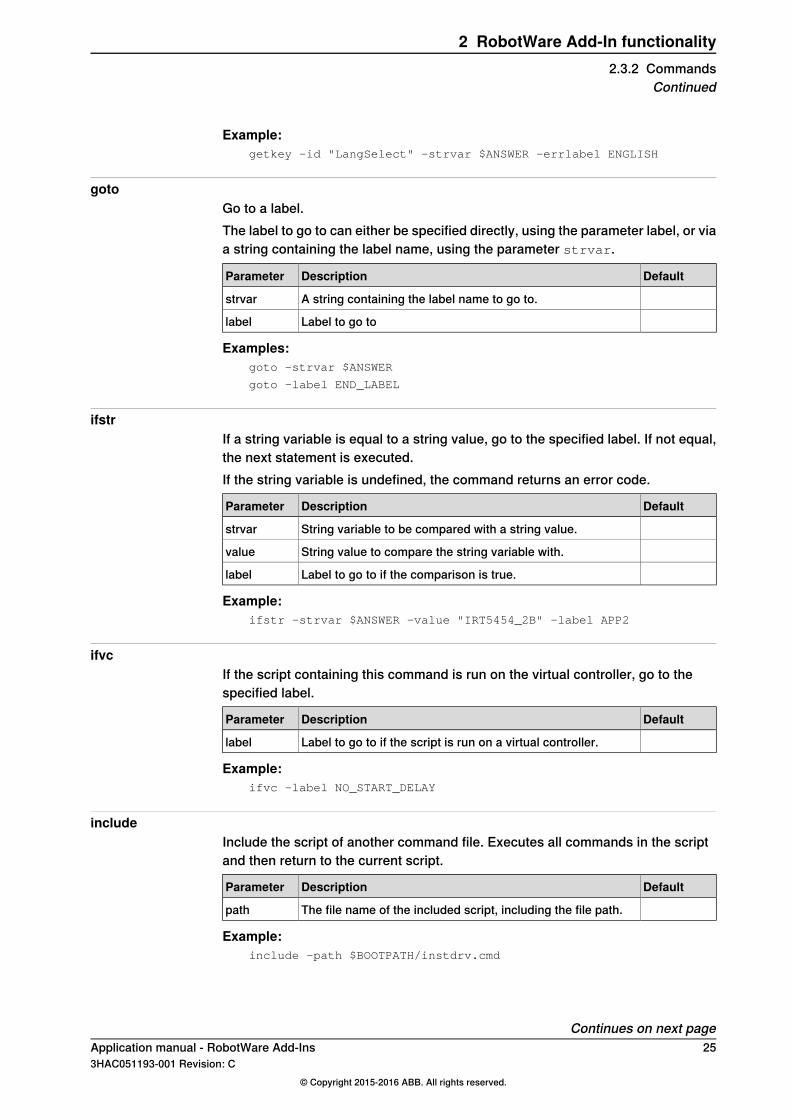
Example:getkey -id "LangSelect" -strvar $ANSWER -errlabel ENGLISH
gotoGo to a label.The label to go to can either be specified directly, using the parameter label, or viaa string containing the label name, using the parameter strvar.
DefaultDescriptionParameter
A string containing the label name to go to.strvar
Label to go tolabel
Examples:goto -strvar $ANSWER
goto -label END_LABEL
ifstrIf a string variable is equal to a string value, go to the specified label. If not equal,the next statement is executed.If the string variable is undefined, the command returns an error code.
DefaultDescriptionParameter
String variable to be compared with a string value.strvar
String value to compare the string variable with.value
Label to go to if the comparison is true.label
Example:ifstr -strvar $ANSWER -value "IRT5454_2B" -label APP2
ifvcIf the script containing this command is run on the virtual controller, go to thespecified label.
DefaultDescriptionParameter
Label to go to if the script is run on a virtual controller.label
Example:ifvc -label NO_START_DELAY
includeInclude the script of another command file. Executes all commands in the scriptand then return to the current script.
DefaultDescriptionParameter
The file name of the included script, including the file path.path
Example:include -path $BOOTPATH/instdrv.cmd
Continues on next pageApplication manual - RobotWare Add-Ins 253HAC051193-001 Revision: C
© Copyright 2015-2016 ABB. All rights reserved.
2 RobotWare Add-In functionality2.3.2 Commands
Continued
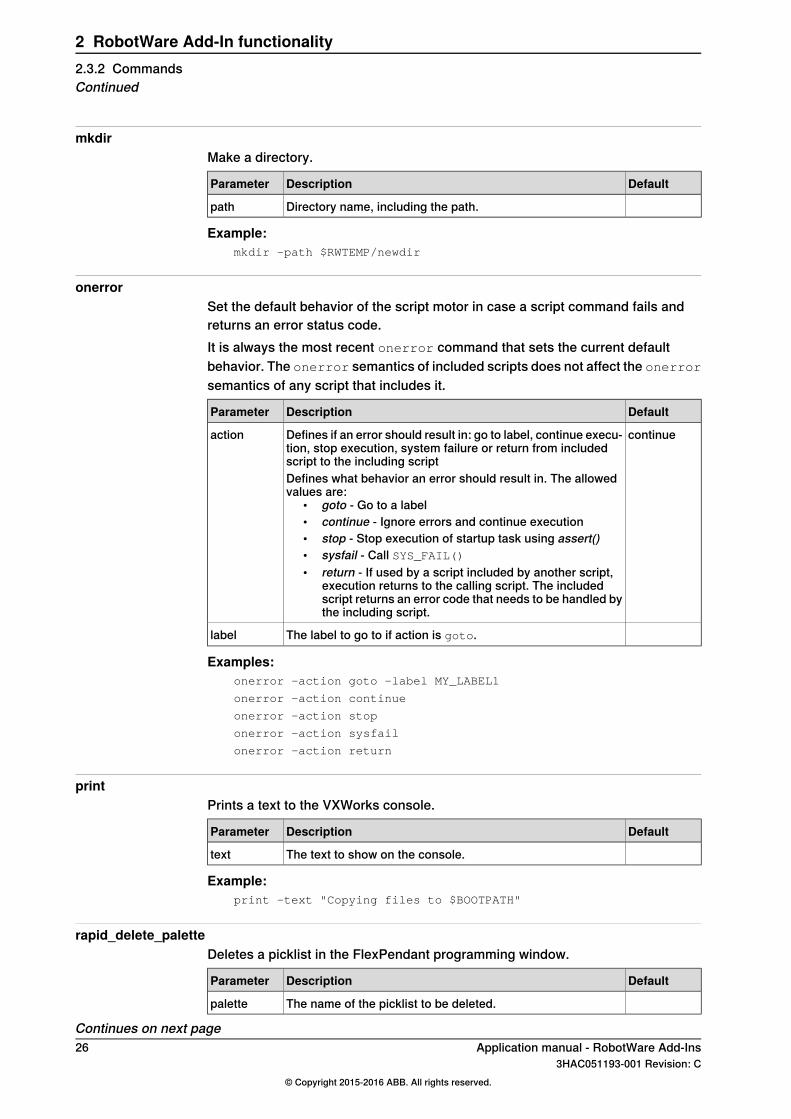
mkdirMake a directory.
DefaultDescriptionParameter
Directory name, including the path.path
Example:mkdir -path $RWTEMP/newdir
onerrorSet the default behavior of the script motor in case a script command fails andreturns an error status code.It is always the most recent onerror command that sets the current defaultbehavior. The onerror semantics of included scripts does not affect the onerrorsemantics of any script that includes it.
DefaultDescriptionParameter
continueDefines if an error should result in: go to label, continue execu-tion, stop execution, system failure or return from includedscript to the including script
action
Defines what behavior an error should result in. The allowedvalues are:
• goto - Go to a label• continue - Ignore errors and continue execution• stop - Stop execution of startup task using assert()• sysfail - Call SYS_FAIL()• return - If used by a script included by another script,
execution returns to the calling script. The includedscript returns an error code that needs to be handled bythe including script.
The label to go to if action is goto.label
Examples:onerror -action goto -label MY_LABEL1
onerror -action continue
onerror -action stop
onerror -action sysfail
onerror -action return
printPrints a text to the VXWorks console.
DefaultDescriptionParameter
The text to show on the console.text
Example:print -text "Copying files to $BOOTPATH"
rapid_delete_paletteDeletes a picklist in the FlexPendant programming window.
DefaultDescriptionParameter
The name of the picklist to be deleted.palette
Continues on next page26 Application manual - RobotWare Add-Ins
3HAC051193-001 Revision: C© Copyright 2015-2016 ABB. All rights reserved.
2 RobotWare Add-In functionality2.3.2 CommandsContinued
Example:rapid_delete_palette -palette "M.C 3"
rapid_delete_palette -palette "Settings"
rapid_delete_palette_instructionDeletes a RAPID instruction in a picklist in the FlexPendant programming window.
DefaultDescriptionParameter
The name of the picklist.palette
The name of the RAPID instruction to be deleted.instruction
Example:rapid_delete_palette_instruction -palette "Common" -instruction
"FOR"
rapid_delete_palette_instruction -palette "Common" -instruction":="
rapid_delete_palette_instruction -palette "Common" -instruction"MoveAbsJ"
rapid_delete_palette_instruction -palette "M.C 1" -instruction"MoveJ"
registerRegisters additional information from an xml to controller registers, depending onthe type parameter. The supported types are:
• Error messages (elogmes) – register the xml-file to the elogtext_registry.xmlfile. Once registered, these messages can be used by the RAPID program.
• Error message titles (elogtitle) – register the xml-file to theelogtext_registry.xml file.
• Options (option) - Registers the option in the option_registry.xml file. Thiswill enable automatic loading of FlexPendant applications from the tps folderfor the Add-In.
• RAPID meta data (rapid_metadata) – Registers additional RAPID argumentsettings to the rapid_meta_data_registry.xml.
Applies totype
DescriptionParameter
Defines which type (for example elogmes, elogtitle, option, orrapid_metadata) that is being registered.
type
elogmes,elogtitle
Error messages are stored in different domains. Which domainto register in is defined by domain_no.
domain_no
For Add-Ins, domain_no should always be 9.
elogmes,elogtitle
The first message number in the file being registered.min
elogmes,elogtitle
The last message number in the file being registered.max
elogmes,elogtitle, rap-id_metadata
The path to the language directory.prepath
Continues on next pageApplication manual - RobotWare Add-Ins 273HAC051193-001 Revision: C
© Copyright 2015-2016 ABB. All rights reserved.
2 RobotWare Add-In functionality2.3.2 Commands
Continued
Applies totype
DescriptionParameter
elogmes,elogtitle, rap-id_metadata
The rest of the path, after the language directory, including thecharacter \ (backslash) and the file name.
postpath
optionA flag indicating that the Add-In is an external Add-In.extopt
optionThe name of the Add-In.description
optionThe path to the Add-In.path
Examples:# Register event log message for Add-In
register -type elogmes -domain_no 11 -min 5001 -max 5001 -prepath$BOOTPATH/language/-postpath /CircleMove_elogtext.xml
-extopt
# Register path for Add-In
register -type option -description MyAddIn -path $BOOTPATH
# Register path for RAPID meta data
register -type rapid_metadata -prepath $HOME/ -postpathmy_rapid_edit_rules.xml
setenvDefine an environment variable and set its value.An environment variable can be used in the RAPID code or in cfg files. If you definethe path to your Add-In folder as an environment variable, this variable can beused in your programs instead of hard coding the path.
DefaultDescriptionParameter
The environment variable to be assigned a new value.name
The string to assign to the environment variable.value
Example:setenv -name CIRCLEMOVE -value $BOOTPATH
System environment variablesThe following environment variables are set up by the system and cannot beoverwritten.
ValueEnvironment variable
/hd0a/<system name>/HOMEHOME
/hd0a/BACKUPBACKUP
/hd0a/<system name>/SYSPARSYSPAR
/hd0a/tempTEMP
/hd0a/<system name>SYSTEM
/hd0a/<system name>/Products/ROBOTWARE_6.XX.XXXXRELEASE
Continues on next page28 Application manual - RobotWare Add-Ins
3HAC051193-001 Revision: C© Copyright 2015-2016 ABB. All rights reserved.
2 RobotWare Add-In functionality2.3.2 CommandsContinued
setstrDefine a string variable and set its value. The string can only be used in theinstallation script.
DefaultDescriptionParameter
The string variable to be assigned a new string.strvar
The string to assign to the string variable.value
Examples:setstr -strvar $LANG -value "en"
setstr -strvar $CFGPATH -value $SYSPAR
textThis command loads a text description file into a text resource of a package. Itaccomplishes the same thing as the RAPID instruction TextTabInstall, but canalso specify different texts for different languages.For more information, read about user message functionality in Applicationmanual - Controller software IRC5.
DefaultDescriptionParameter
Name of the description file, including the file path.filename
"en"Package for building the text resource.package
Example:text -filename $BOOTPATH/language/en/text_file.xml -package "en"
timestampRead the system clock and print number of seconds and milliseconds to thestandard output.No parameters.
Application manual - RobotWare Add-Ins 293HAC051193-001 Revision: C
© Copyright 2015-2016 ABB. All rights reserved.
2 RobotWare Add-In functionality2.3.2 Commands
Continued
2.3.3 Examples of install.cmd files
Example for CIRCLEMOVE# Install.cmd script for Add-In CIRCLEMOVE
echo -text "Installing CIRCLEMOVE Add-In"
# Load configuration files
config -filename $BOOTPATH/CircleMove_sys.cfg -domain SYS -internal
config -filename $BOOTPATH/CircleMove_mmc.cfg -domain MMC
# Define environment variable
setenv -name CIRCLEMOVE -value $BOOTPATH
# Register elog messages
register -type elogmes -domain_no 11 -min 5001 -max 5001 -prepath$BOOTPATH/language/ -postpath /CircleMove_elogtext.xml
register -type elogtitle -prepath $BOOTPATH/language/ -postpath/CircleMove_elogtitles.xml
30 Application manual - RobotWare Add-Ins3HAC051193-001 Revision: C
© Copyright 2015-2016 ABB. All rights reserved.
2 RobotWare Add-In functionality2.3.3 Examples of install.cmd files
2.4 RAPID code
OverviewThe RAPID code, implementing the functionality of your Add-In, is written in asystem module (.sys) file (preferably <Add-In name>.sys).
Tip
By setting the argument NOSTEPIN on the module, stepwise execution of theRAPID program will not step into the module. This makes a routine written in themodule behave like an instruction delivered from ABB.
RAPID code exampleThis is an example of how to create your own move instruction and how to useyour own error messages. An instruction, MoveCircle, is created that moves therobot TCP in a circle around a robtarget, with the radius given as argument. IfMoveCircle is called with a too small radius, a message defined in an .xml file iswritten to the event log, see Event log texts on page 34.
MODULE CIRCLEMOVE(SYSMODULE, NOSTEPIN)
VAR errnum ERR_CIRCLE:= -1;
VAR num errorid := 5001;
PROC MoveCircle(
robtarget pCenter,
num Radius,
speeddata Speed,
zonedata Zone,
PERS tooldata Tool
\PERS wobjdata WObj)
VAR robtarget p1;
VAR robtarget p2;
VAR robtarget p3;
VAR robtarget p4;
BookErrNo ERR_CIRCLE;
IF Radius < 2 THEN
ErrRaise "ERR_CIRCLE", errorid, ERRSTR_TASK, "Radius",NumToStr(Radius,2), "2", ERRSTR_CONTEXT;
ENDIF
p1:=pCenter;
p2:=pCenter;
p3:=pCenter;
p4:=pCenter;
p1.trans:=pCenter.trans+[0,Radius,0];
p2.trans:=pCenter.trans+[Radius,0,0];
Continues on next pageApplication manual - RobotWare Add-Ins 313HAC051193-001 Revision: C
© Copyright 2015-2016 ABB. All rights reserved.
2 RobotWare Add-In functionality2.4 RAPID code
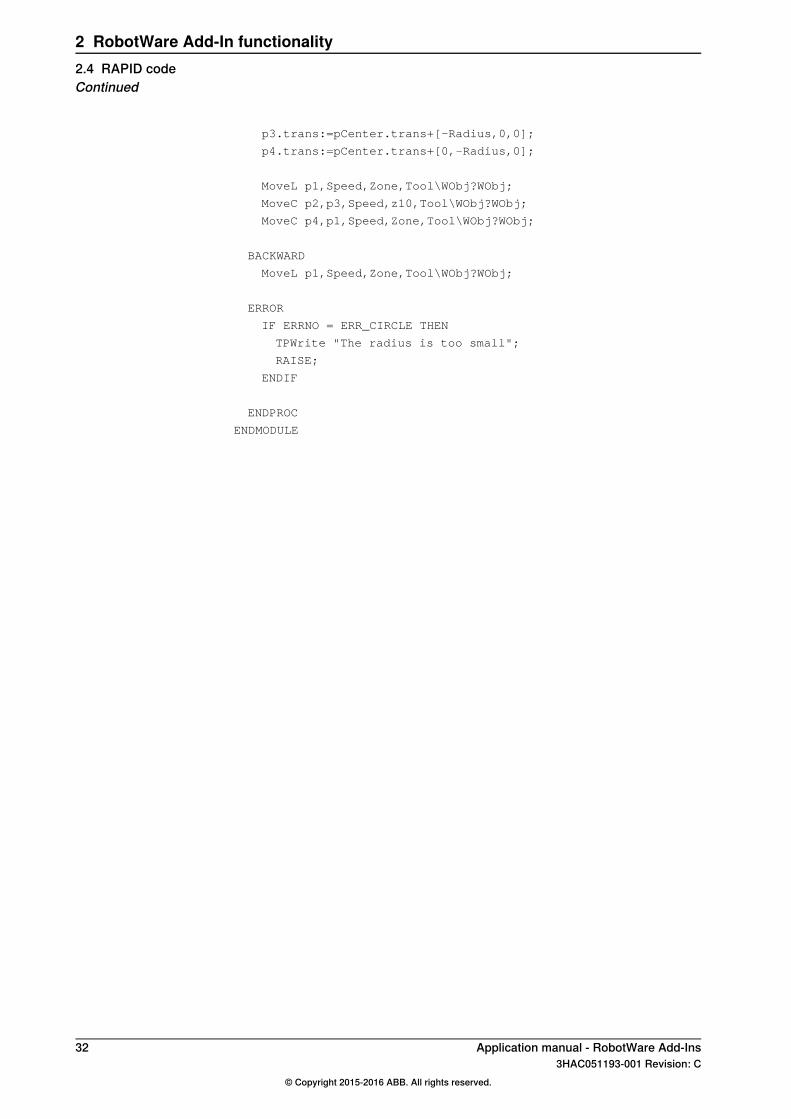
p3.trans:=pCenter.trans+[-Radius,0,0];
p4.trans:=pCenter.trans+[0,-Radius,0];
MoveL p1,Speed,Zone,Tool\WObj?WObj;
MoveC p2,p3,Speed,z10,Tool\WObj?WObj;
MoveC p4,p1,Speed,Zone,Tool\WObj?WObj;
BACKWARD
MoveL p1,Speed,Zone,Tool\WObj?WObj;
ERROR
IF ERRNO = ERR_CIRCLE THEN
TPWrite "The radius is too small";
RAISE;
ENDIF
ENDPROC
ENDMODULE
32 Application manual - RobotWare Add-Ins3HAC051193-001 Revision: C
© Copyright 2015-2016 ABB. All rights reserved.
2 RobotWare Add-In functionality2.4 RAPID codeContinued
2.5 Event log messages
2.5.1 About event log messages
OverviewIt is possible to create your own event log messages. The text of the message isplaced in one .xml file for each language. You can then use the RAPID instructionsErrRaise and ErrLog to raise an error using this message. Language independentstrings can be used as arguments to ErrRaise and ErrLog, and be included inthe message.
Two .xml filesYour event log messages are added to the system via two .xml files. One .xml filecontains all the information about the messages. The other one contains only theirmessage number and title, but is currently required for technical reasons.These files can be given any name, as long as the installation script install.cmdpoints out the correct file names. In order to know what the files are for, it isrecommended to use the following names:
• <Add-In name>_elogtext.xml• <Add-In name>_elogtitles.xml
Template filesTemplate files for the two required .xml files are included in the RobotWareinstallation.
• template_elogtext.xml• template_elogtitles.xml
The template files are located in the following directory in the RobotWareinstallation: ...\RobotPackages\RobotWare_RPK_<version>\utility\Template\Elog.
Note
Navigate to the RobotWare installation folder from the RobotStudio Add-Ins tab,by right-clicking on the installed RobotWare version in the Add-Ins browser andselecting Open Package Folder.
Application manual - RobotWare Add-Ins 333HAC051193-001 Revision: C
© Copyright 2015-2016 ABB. All rights reserved.
2 RobotWare Add-In functionality2.5.1 About event log messages

2.5.2 Event log texts
OverviewAll event log messages you want to add to the system must be written in thefollowing .xml file:
• <Add-In name>_elogtext.xmlThe messages must have unique numbers, within its domain, which are used toreference the message text from the RAPID code.
Explanation of the .xml fileThis is a list of the XML tags and arguments that you need to define. All other tagsand arguments should always look like in the example below. The complete syntaxis also shown in the example below.
DescriptionXML tag orargument
Event log messages are divided into different domains. Domain number 8 iscalled User events and is reserved for non-ABB messages. For Add-Ins, al-ways use domain 8 to avoid conflict with messages defined by ABB.
domainNo
Language code for the text in the messages. The same two-letter code asthe name of the folder where the message .xml files are placed. This codeis defined by the standard ISO 639.
lang
The first message number in this file.min
The last message number in this file.max
Create one instance of Message for each error message.Message
A unique number, between 1 and 9999, identifying the error message.numberMake sure that the systems using this Add-In will not have other Add-Insusing the same message numbers.
A unique name for the message. Keep it short and descriptive.eDefine
The message title that will be shown in the event log.Title
The text describing the error, shown in the event log.Description
A string used as argument in the ErrRaise or ErrLog instruction will beinserted in the message.
arg
The format of the argument sting from ErrRaise or ErrLog. For example%.40s means that the string cannot be longer than 40 characters.
format
Determines which string argument from ErrRaise or ErrLog that shouldbe used in this arg tag. For example 1 means that the first string argumentis used.
ordinal
Continues on next page34 Application manual - RobotWare Add-Ins
3HAC051193-001 Revision: C© Copyright 2015-2016 ABB. All rights reserved.
2 RobotWare Add-In functionality2.5.2 Event log texts
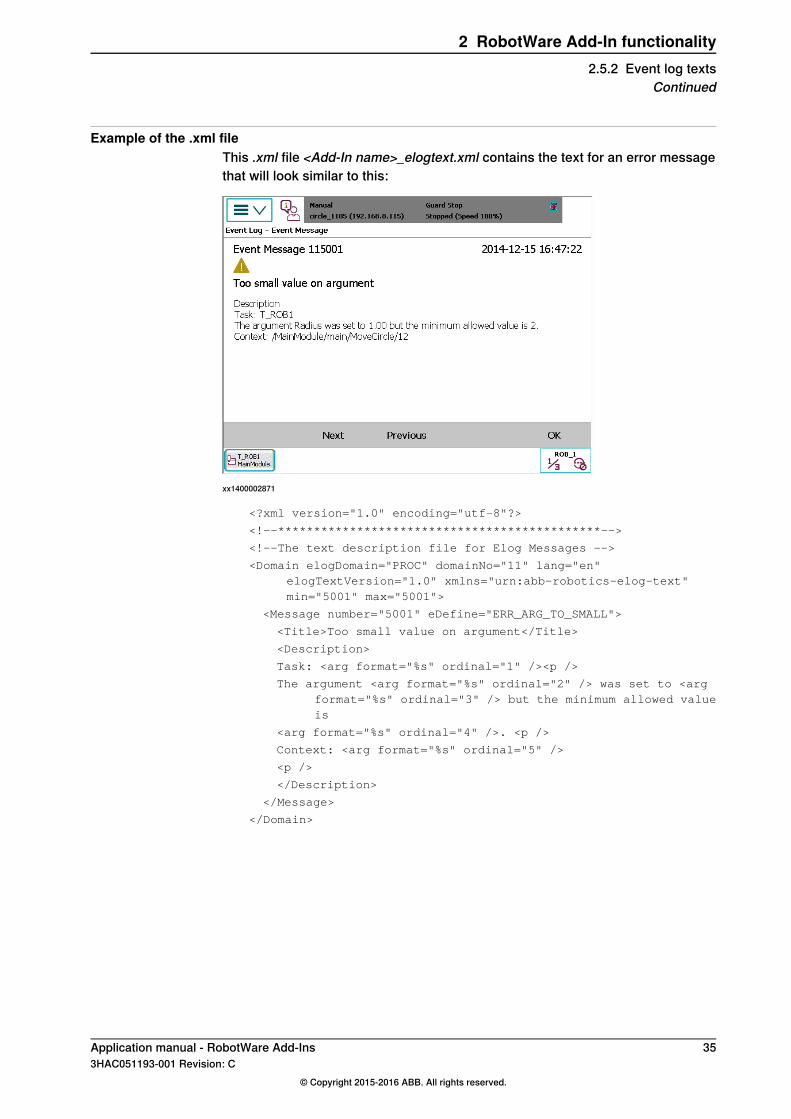
Example of the .xml fileThis .xml file <Add-In name>_elogtext.xml contains the text for an error messagethat will look similar to this:
xx1400002871
<?xml version="1.0" encoding="utf-8"?>
<!--*********************************************-->
<!--The text description file for Elog Messages -->
<Domain elogDomain="PROC" domainNo="11" lang="en"elogTextVersion="1.0" xmlns="urn:abb-robotics-elog-text"min="5001" max="5001">
<Message number="5001" eDefine="ERR_ARG_TO_SMALL">
<Title>Too small value on argument</Title>
<Description>
Task: <arg format="%s" ordinal="1" /><p />
The argument <arg format="%s" ordinal="2" /> was set to <argformat="%s" ordinal="3" /> but the minimum allowed valueis
<arg format="%s" ordinal="4" />. <p />
Context: <arg format="%s" ordinal="5" />
<p />
</Description>
</Message>
</Domain>
Application manual - RobotWare Add-Ins 353HAC051193-001 Revision: C
© Copyright 2015-2016 ABB. All rights reserved.
2 RobotWare Add-In functionality2.5.2 Event log texts
Continued
2.5.3 Event log titles
OverviewFor the internal handling of event log messages, the following .xml file listing themessage numbers and their titles is necessary:
• <Add-In name>_elogtitles.xml
Explanation of the .xml fileThis is a list of the .xml tags and arguments that you need to define. For thecomplete syntax, see the example below.
DescriptionXML tag orargument
Create one instance of Title for each event log message.TitleThe text in the Title tag has to be the same as in the event log text .xmlfile.
The same event log message number as in the event log text .xml file.number
Example of the .xml file<?xml version="1.0" encoding="utf-8"?>
<ExtractTitles>
<Title domain="11" number="5001">Too small value on argument</Title>
</ExtractTitles>
36 Application manual - RobotWare Add-Ins3HAC051193-001 Revision: C
© Copyright 2015-2016 ABB. All rights reserved.
2 RobotWare Add-In functionality2.5.3 Event log titles
2.5.4 Validating event log .xml files
IntroductionValidation checks that the event log .xml file is correctly formatted, using thecorresponding XML schema file, elogtext.xsd.
• The schema file (elogtext.xsd) and the file template_elogtest.xml are availablein the RobotWare installation, see Template files on page 33.
• The command line tool XMLFileValidator can be downloaded from the Robot-Studio Online Community, where it is included in the Tools and Utilitiespackage.
To run the validation, start the tool and use your search paths using the principlebelow:
xmlfilevalidator elogtext.xsd my_elogtext.xml
The result of the validation is displayed in the console. Detailed error informationincluding row- and column references, is displayed for any found formatting errors.
PrerequisitesThe XMLFileValidator is provided as-is.Microsoft .NET framework version 2.0 or later is required.
Application manual - RobotWare Add-Ins 373HAC051193-001 Revision: C
© Copyright 2015-2016 ABB. All rights reserved.
2 RobotWare Add-In functionality2.5.4 Validating event log .xml files
2.6 System parameters
2.6.1 About cfg files
OverviewThe cfg files are used to define instances of system parameter types in a specificdomain. The specified instances are then created by loading the cfg file. Only onedomain can be specified per cfg file.The file shall be formatted according to the rules in the following sections.
Domain specifierA cfg file must start with a name of a domain where the specified instances will becreated.The row must contain the following information, where <version> and <revision>are optional:
<domain name>:CFG_1.0:<version>:<revision>::
Example
Domain EIO without version numberEIO:CFG_1.0::
Domain EIO with version number 5.0EIO:CFG_1.0:5:0::
Domain EIO with version number 6.0EIO:CFG_1.0:6:0::
CommentsA comment row starts with '#'.
Type specifiersThe domain specifier is followed by one or more parameter type specifiers andtheir instances.
• A type specifier should always be preceded by a row containing a singlecharacter '#'. (Not mandatory)
• A type specifier consists of a parameter type name directly followed by a ':'.• There should be an empty row between the type name and the first instance.
(Not mandatory)• There should be no more rows after the last instance row in a cfg file. (Not
mandatory)• Add a description of all attributes in a type directly after the type specifier.
This is helpful for the user to understand the type. (Not mandatory)See cfg file examples later in this section.
Instances and attributesThe type specifier is followed by zero or more instances. Each instance containsone or several attributes defining its properties. Attributes can be mandatory oroptional.
Continues on next page38 Application manual - RobotWare Add-Ins
3HAC051193-001 Revision: C© Copyright 2015-2016 ABB. All rights reserved.
2 RobotWare Add-In functionality2.6.1 About cfg files
Mandatory attributes must be specified explicitly in the cfg file otherwise an errorwill be generated when loading the file. Optional attributes that are not specifiedin the cfg file will be set to the default value for this attribute at loading. If the valueof the optional attribute is specified, then the specified value will be used.Each instance shall start with the Name attribute (if the instance has a name). Eachattribute shall start with '-' (dash) followed by the attribute name, a blank spaceand value. Blank spaces are not allowed in the value except for string values withquotation marks.Example:
-name MoveCircle -param_nr 6
Quotation marks can be used for string values. Note, all characters (includingspaces) inside the quotation marks will be treated as one single string.Example:
-name "M.C 1" -type "MMC_MC1"
Single or multiple rowsAll attributes and their values in an instance can be put in a single row or in multiplerows. Comments or empty rows are not allowed in an instance. Several attributesper row are allowed.For instances with multiple rows, each row in an instance shall end with '\'(backslash), except for the last row. The name and the value of an attribute cannotbe separated by '\', that is, they must be on the same row.For example, the following is not valid:
-name \
"M.C 1"
ArraysIf an attribute is of an array type, then the attribute value may consist of severalcomma separated values. Blank spaces and the multiple row separator '\' cannotbe used inside the array.Example:
-name MoveCircle -default_struct 1,1,1,1,1,0
Attribute of type BooleanIf the attribute is of type Boolean, giving only the attribute name in the cfg file willset the value to true.Example:
-hidden
Example of cfg fileSIO:CFG_1.0::
#
COM_PHY_CHANNEL:
-Name "COM1" -Connector "COM1"
-Name "LAN1" -Connector "LAN"
#
Continues on next pageApplication manual - RobotWare Add-Ins 393HAC051193-001 Revision: C
© Copyright 2015-2016 ABB. All rights reserved.
2 RobotWare Add-In functionality2.6.1 About cfg files
Continued
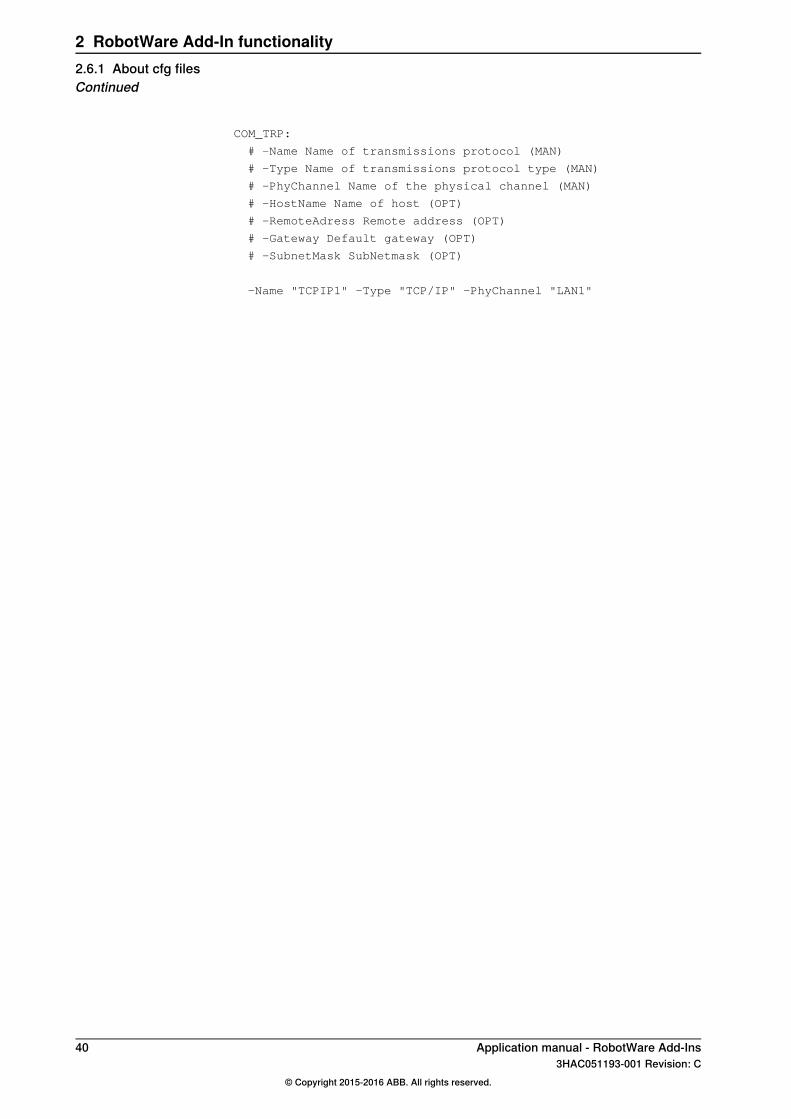
COM_TRP:
# -Name Name of transmissions protocol (MAN)
# -Type Name of transmissions protocol type (MAN)
# -PhyChannel Name of the physical channel (MAN)
# -HostName Name of host (OPT)
# -RemoteAdress Remote address (OPT)
# -Gateway Default gateway (OPT)
# -SubnetMask SubNetmask (OPT)
-Name "TCPIP1" -Type "TCP/IP" -PhyChannel "LAN1"
40 Application manual - RobotWare Add-Ins3HAC051193-001 Revision: C
© Copyright 2015-2016 ABB. All rights reserved.
2 RobotWare Add-In functionality2.6.1 About cfg filesContinued
2.6.2 Topic Controller
About the topic ControllerThis section describes system parameters that must be defined in the topicController (that is, in the configuration file sys.cfg).The configuration of which program modules to load is made in the topic Controller.All files containing the RAPID code for the Add-In must be defined here.For more information about the types and parameters of the Controller topic, seeTechnical reference manual - System parameters.
Automatic loading of modules (CAB_TASK_MODULES)The type CAB_TASK_MODULES is used to define modules to be loaded when thecontroller is started.For more information, see Technical reference manual - System parameters.
DescriptionParameter
The name of the file including the path on the controller.FileAn environment variable can preferably be used. That is, <environ-ment variable>:/<file name>. See setenv on page 28.
Name of a task, if it should only be loaded to one specific task.TaskDefines if the contents of a module should be reachable from alltasks.
SharedAll Tasks
Defines if the module should be loaded into all tasks.All Motion TasksDefines if the module should be loaded into all motion tasks.(These parameters are mutually exclusive.)
A module can be loaded or installed.InstallA loaded module will behave like a module manually loaded fromthe teach pendant.An installed module will behave like a built in module. By default theattributes NOVIEW and NOSTEPIN are set, even if not stated in themodule declaration. Thus it will not be visible from the FlexPendantand can only be removed by using the restart mode Reset system.It will not be possible to step into a routine in such a module withFWD.It is recommended that all application modules are installed as builtin modules, since then they will be handled as part of the controllerand quite separated from the user´s modules.
RAPID routines and data in this module are hidden from the user.Hidden
ExampleCAB_TASK_MODULES:
-File "CIRCLEMOVE:/CircleMove.sys" -Install -AllTask
Continues on next pageApplication manual - RobotWare Add-Ins 413HAC051193-001 Revision: C
© Copyright 2015-2016 ABB. All rights reserved.
2 RobotWare Add-In functionality2.6.2 Topic Controller

Tip
When loading modules automatically, a correct file path must be used.Since the name of the directory for the Add-In can be changed, the files are oftencopied to the HOME directory so the file path is unmistakable for "automaticloading of modules".This can be a problem when doing backup between releases.Since all files in the HOME directory are saved to the backup, new files copiedfrom the Add-In directory will be overwritten by the old files in the backup.Instead of copying the files to the HOME directory, the files can remain in theAdd-In directory and therefor avoid copying the files from the HOME directoryto the backup.To access the files in the Add-In directory an environment variable must be used,therefore use setenv on page 28.
Modules included in a backupTwo things affects what to include when creating a backup:
1 From where the module is loaded.2 How the configuration file is loaded.
Modules not included in the backupA module will not be included in the backup:
• if the module is loaded from $RELEASE. For example:-File "RELEASE:/options/xxx.mod" -Task "T_ROB1"
• if the module is loaded from any user defined environment variable, usingsetenv on page 28.
A module will not be included in the backup and no configuration entries will belisted in the sys.cfg (BACKUP/SYSPAR/SYS.CFG):
• if the module is loaded from $RELEASE, or any user defined environmentvariable, and the loaded configuration file is set to -internal. For example:config -filename $RELEASE/options/xxx.cfg -domain SYS
-internal
Modules included in the backupA module will be included in the backup:
• if the module is loaded, installed, or shared from elsewhere without$RELEASE or any user defined environment variable
A module will be included in the backup but no configuration entries will be listedin the sys.cfg (BACKUP/SYSPAR/SYS.CFG):
• if the module is loaded from elsewhere except $RELEASE or any user definedenvironment variable, and the loaded configuration file is set to -internal.Only loaded modules will be included in the backup, no installed or shared.
Continues on next page42 Application manual - RobotWare Add-Ins
3HAC051193-001 Revision: C© Copyright 2015-2016 ABB. All rights reserved.
2 RobotWare Add-In functionality2.6.2 Topic ControllerContinued
Exclude files and directories at backupBy default all files and directories in the HOME directory are included in the backup.It is possible to exclude HOME directory files and directories from the backup. Itis also possible to include files or directories to the backup that are not located inthe HOME directory.The text must be edited directly in the SYS.CFG file for type BACKUP_RESTORE.
DescriptionParameter
This file in the HOME directory shall not be includedin the backup.
ExcludeFileFromHomeAtBackup
This directory in the HOME directory shall not be in-cluded in the backup.
ExcludeDirFromHomeAtBackup
This file is not located in the HOME directory, but shallbe included in the BACKINFO directory in the backup.
IncludeFileAtBackup
This directory is not located in the HOME directory,but shall be included in the BACKINFO directory inthe backup.
IncludeDirAtBackup
ExampleBACKUP_RESTORE:
-ExcludeDirFromHomeAtBackup "SecretDirectory"
-IncludeFileAtBackup "SYSTEM:/ImportantFile.xml"
Application manual - RobotWare Add-Ins 433HAC051193-001 Revision: C
© Copyright 2015-2016 ABB. All rights reserved.
2 RobotWare Add-In functionality2.6.2 Topic Controller
Continued
2.6.3 Topic I/O System
About the topic I/O SystemThis section describes system parameters that are defined in the topic I/O System(that is, in the configuration file eio.cfg).For more information about the types and parameters of the I/O System topic, seeTechnical reference manual - System parameters.
Hiding I/O signals to the userAdd-Ins can use virtual signals for internal communication, for instance tocommunicate between RAPID tasks. It is possible to hide such signals frombrowsing by setting the Access property, for each signal, to internal.It is possible to modify a hidden signal from RAPID, if the name of the signal isknown and if the category of the signal is set to RAPID.
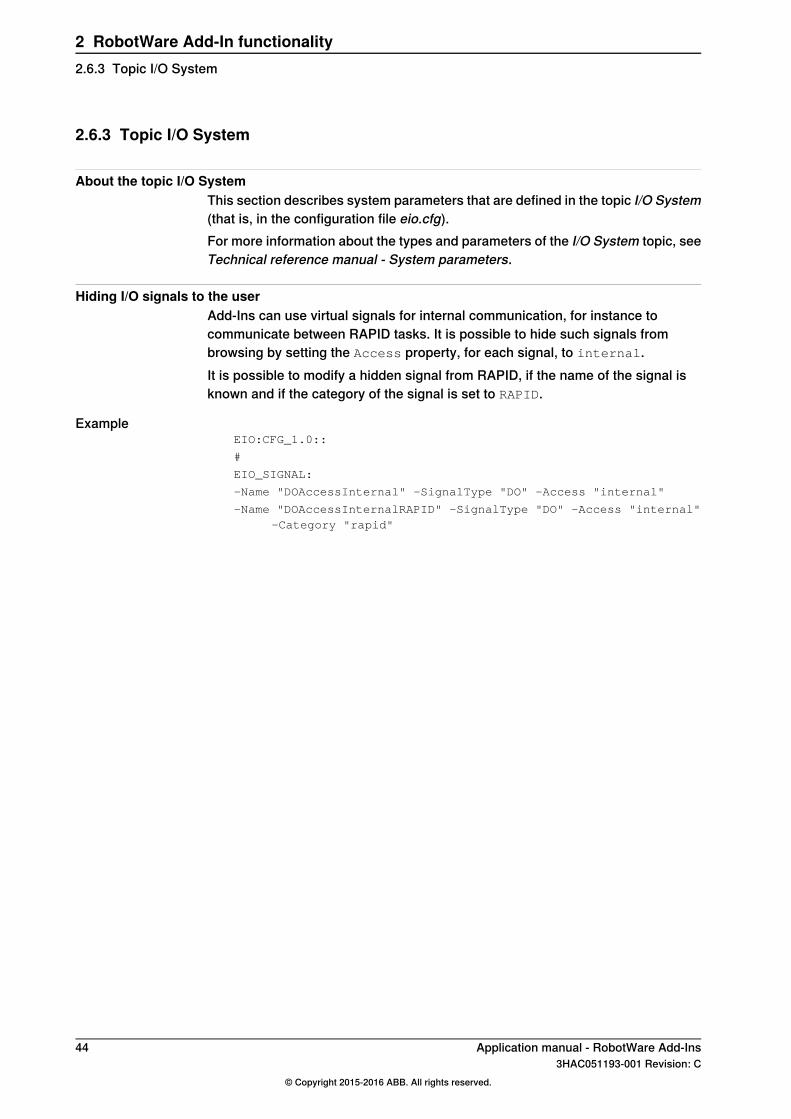
ExampleEIO:CFG_1.0::
#
EIO_SIGNAL:
-Name "DOAccessInternal" -SignalType "DO" -Access "internal"
-Name "DOAccessInternalRAPID" -SignalType "DO" -Access "internal"-Category "rapid"
44 Application manual - RobotWare Add-Ins3HAC051193-001 Revision: C
© Copyright 2015-2016 ABB. All rights reserved.
2 RobotWare Add-In functionality2.6.3 Topic I/O System
2.6.4 Topic Man-machine Communication
About the topic Man-machine CommunicationThis section describes some of the types and system parameters in the topicMan-machine communication (that is, the configuration file mmc.cfg). It is used todefine how a self-developed instruction should be presented on the FlexPendant,for example which menu to select it from (pick lists) and which argument valuesshould be used as default (RAPID rules).A short example is given for each type, and an example of an entire cfg file isshown after the type descriptions.
Pick list titles (MMC_PALETTE_HEAD)It is possible to add custom pick lists alongside with the predefined pick lists thatare included by default. The title for each custom pick list is defined in theMMC_PALETTE_HEAD type.
DescriptionParameter
The title of the custom pick list.name
The type that contains the instruction names of the pick list¨type
ExampleMMC_PALETTE_HEAD:
-name "M.C 1" -type "MMC_MC1"
-name "SpotWelding" -type "MMC_SPOTWELD"
Custom pick lists (MMC_MC1, MMC_MC2, MMC_MC3, etc.)For each custom pick list there shall be an alias type definition to configure whichinstructions will be present in the pick list.
DescriptionParameter
The name of the instruction.name
Note
• The pick list types contains more parameters and more functionality. Formore information about these, see section Most Common Instruction Typesin Technical reference manual - System parameters.
• Note the use of the equal sign to define the alias type, where the type namedefined in MMC_PALETTE_HEAD is defined as an alias of the base typeMMC_PALETTE.
ExampleMMC_MC1 = MMC_PALETTE:
-name MoveCircle
MMC_SPOTWELD = MMC_PALETTE:
-name "SpotL"
-name "SpotJ"
Continues on next pageApplication manual - RobotWare Add-Ins 453HAC051193-001 Revision: C
© Copyright 2015-2016 ABB. All rights reserved.
2 RobotWare Add-In functionality2.6.4 Topic Man-machine Communication
Default arguments (MMC_REAL_ROUTINE)MMC_REAL_ROUTINE is used to define which arguments should have proposedvalues, that is, a default value when the instruction is added on the FlexPendant.
DescriptionParameter
The instruction name.name
Defines which arguments should have proposed values.• 0: No proposed value• 1: A proposed value. If alternative arguments, 1 indicates that the
first alternative argument should be used with a proposed value.• 2: Only for alternative arguments. The second alternative argument
should be used with a proposed value.• 3: Only for alternative arguments. The third alternative argument
should be used with a proposed value.• 4: Only for alternative arguments. The fourth alternative argument
should be used with a proposed value.
default_struct
Defines if the instruction should be hidden when showing RAPID routines.If hidden is set, the instruction will not be shown when choosing an in-stance for ProcCall or Move PP to Routine.
hidden
For changes of the hidden parameter to take effect, the controller mustbe restarted by using the restart mode Reset RAPID or Reset system.A restart is not enough.
Tip
It is not necessary to specify default_struct if there should only be proposedvalues for required arguments.
ExampleThe instruction TriggInt is defined with the following arguments:
TriggInt TriggData Distance [\Start] | [\Time] Interrupt
Argument alternativeArgument numberArgument
01TriggData
02Distance
13Start
23Time
04Interrupt
Note that Start and Time are alternative arguments and therefor have the sameargument number.The following alternatives are examples of how to configure an instance of the typeMMC_REAL_ROUTINE:Proposed values for TriggData, Distance, and Interrupt (the same result asif default_struct is not defined):
-name TriggInt -default_struct 1,1,0,1
Proposed values for TriggData, Distance, Start, and Interrupt:-name TriggInt -default_struct 1,1,1,1
Continues on next page46 Application manual - RobotWare Add-Ins
3HAC051193-001 Revision: C© Copyright 2015-2016 ABB. All rights reserved.
2 RobotWare Add-In functionality2.6.4 Topic Man-machine CommunicationContinued
Proposed values for TriggData, Distance, Time, and Interrupt:-name TriggInt -default_struct 1,1,2,1
Argument reuse (MMC_INST_NOT_REUSING_PREV_OPT_ARG)The proposed value of an instruction argument can be the same as (or in sequencewith) the same argument for a previous instruction. For example, if a work objecthas been used in the previous move instruction, the same work object is proposedwhen a new move instruction is added.If the reusing of argument values is not desired for some arguments, thosearguments are specified in the typeMMC_INST_NOT_REUSING_PREV_OPT_ARG.Even if default_struct in the type MMC_REAL_ROUTINE is set to 0, an argumentused in the previous instruction will be used in the next instruction. To avoid this,these arguments must also be specified inMMC_INST_NOT_REUSING_PREV_OPT_ARG.
DescriptionParameter
Specifies the argument numbers that should not reuse values from pre-vious instruction calls.
param_nr
ExampleThe instruction MoveL is defined with the following arguments:
MoveL [\Conc] ToPoint [\ID] Speed [\V] | [\T] Zone [\Z] [\Inpos]Tool [\WObj] [\Corr] [\TLoad]
As the arguments Conc, V, T, Z, and Inpos should not be reused, the instance ofMMC_INST_NOT_REUSING_PREV_OPT_ARG would look like this:
MMC_INST_NOT_REUSING_PREV_OPT_ARG:
-name MoveL -param_nr 1,5,7,8
Note that both V and T have argument number 5, as they are alternative arguments.
Argument Name Rules (MMC_REAL_PARAM)The type MMC_REAL_PARAM is used to specify how to generate the proposedidentifier for instruction arguments.Even arguments that have default_struct in MMC_REAL_ROUTINE set to 0 andare defined in param_nr in MMC_INST_NOT_REUSING_PREV_OPT_ARG mayneed to be defined in MMC_REAL_PARAM. No argument proposal will be usedwhen the instruction is chosen from a pick list, but if the argument is activelyselected it will use the identifier specified in MMC_REAL_PARAM.
DescriptionParameter
The instruction argument, defined as <instruction name>_<argu-ment name> (for example MoveL_Tool).
name
It is also possible to define a common argument name (com-mon_<argument name>) to be used in the typeMMC_COMMON_PARAM.
Continues on next pageApplication manual - RobotWare Add-Ins 473HAC051193-001 Revision: C
© Copyright 2015-2016 ABB. All rights reserved.
2 RobotWare Add-In functionality2.6.4 Topic Man-machine Communication
Continued
DescriptionParameter
Specifies how the argument proposal should be generated. Thefollowing rules can be used:
• NONE - Unexpanded placeholder. No proposal is gener-ated.
• CUR - The parameter method is used to define the argu-ment proposal. For example used when the tool argumentshould use the current tool.
• DEF - The argument proposal should be a default valuedefined by the parameter def_name.
• SEQ - The argument proposal is based on the previousinstruction with a similar argument. Based on the identifierused in the previous instruction, an increment of the indexis used to create a new identifier. For example, if the rob-target of the previous move instruction is p10, the nextmove instruction will propose p20 (unless p20 is alreadyused, then p30, p40, ... will be tried until an identifier isfound that is not already used). If no similar argument isfound, looking 100 instructions back, a data value is usedinstead of an identifier.
• LAST - The argument proposal gets its value from theprevious instruction with a similar argument. If no similarargument is found, looking 100 instructions back, a defaultvalue specified by def_name is used.
• VAL - No argument identifier is used. A literal value is usedinstead.
name_rule
Method to be called if name_rule is CUR or SEQ. Supportedmethods are:
• hirule_robtarget - robtarget symbol name increment value• hirule_jointtarget - jointtarget symbol name increment
value• hirule_tooldata - current tooldata• hirule_wobjdata - current wobjdata• hirule_tloaddata - current tload
method
Default name needed if name_rule is LAST or DEF.def_name
ExampleThis example shows how some arguments for the MoveL instruction are configured.It also defines the common arguments common_point, common_speed, andcommon_zone, that are used in the type MMC_COMMON_PARAM.
Argument proposalArgument
If V is actively selected it should:1 use the value from the last instruction using V2 use the default value 1000
V
No identifier should be proposed for ID. A numeric value is pro-posed instead. The proposed numeric value is defined inMMC_REAL_DATATYPE.
ID
If T is actively selected it should use the default value 5.T
If Z is actively selected it should:1 use the value from the last instruction using Z2 use the default value 50
Z
The proposal for Tool should be defined by the methodhirule_tooldata.
Tool
Continues on next page48 Application manual - RobotWare Add-Ins
3HAC051193-001 Revision: C© Copyright 2015-2016 ABB. All rights reserved.
2 RobotWare Add-In functionality2.6.4 Topic Man-machine CommunicationContinued
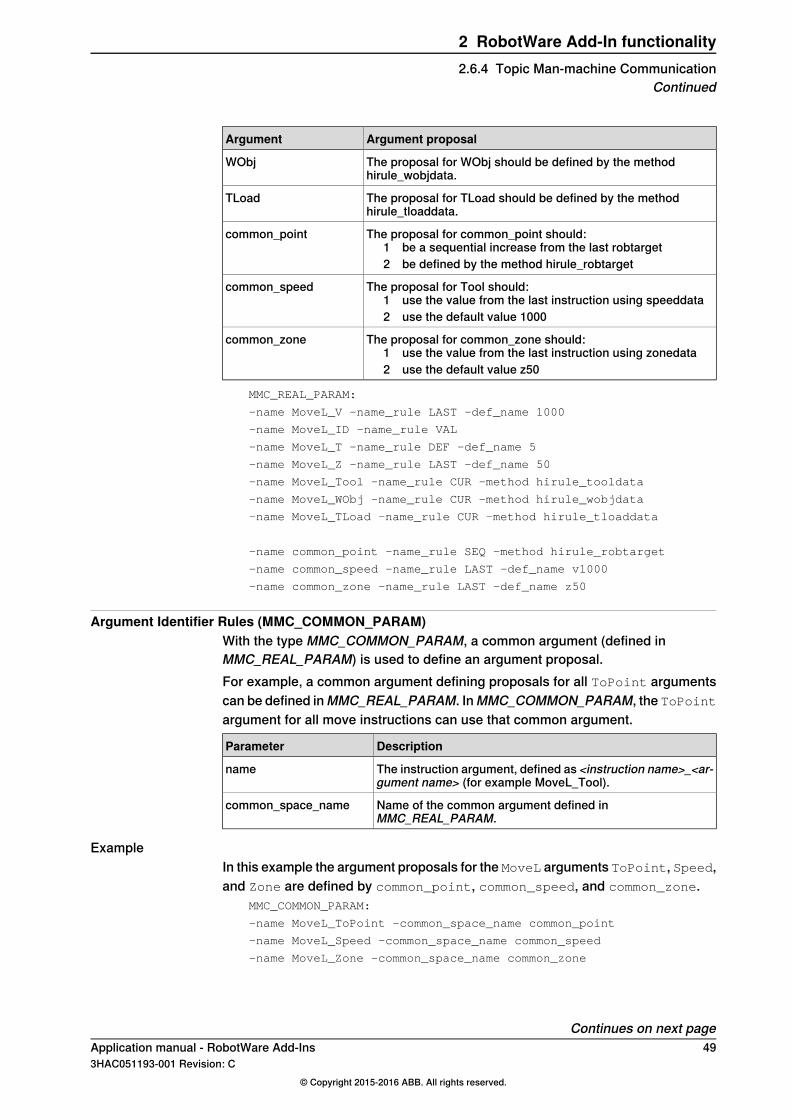
Argument proposalArgument
The proposal for WObj should be defined by the methodhirule_wobjdata.
WObj
The proposal for TLoad should be defined by the methodhirule_tloaddata.
TLoad
The proposal for common_point should:1 be a sequential increase from the last robtarget2 be defined by the method hirule_robtarget
common_point
The proposal for Tool should:1 use the value from the last instruction using speeddata2 use the default value 1000
common_speed
The proposal for common_zone should:1 use the value from the last instruction using zonedata2 use the default value z50
common_zone
MMC_REAL_PARAM:
-name MoveL_V -name_rule LAST -def_name 1000
-name MoveL_ID -name_rule VAL
-name MoveL_T -name_rule DEF -def_name 5
-name MoveL_Z -name_rule LAST -def_name 50
-name MoveL_Tool -name_rule CUR -method hirule_tooldata
-name MoveL_WObj -name_rule CUR -method hirule_wobjdata
-name MoveL_TLoad -name_rule CUR -method hirule_tloaddata
-name common_point -name_rule SEQ -method hirule_robtarget
-name common_speed -name_rule LAST -def_name v1000
-name common_zone -name_rule LAST -def_name z50
Argument Identifier Rules (MMC_COMMON_PARAM)With the type MMC_COMMON_PARAM, a common argument (defined inMMC_REAL_PARAM) is used to define an argument proposal.For example, a common argument defining proposals for all ToPoint argumentscan be defined inMMC_REAL_PARAM. InMMC_COMMON_PARAM, the ToPointargument for all move instructions can use that common argument.
DescriptionParameter
The instruction argument, defined as <instruction name>_<ar-gument name> (for example MoveL_Tool).
name
Name of the common argument defined inMMC_REAL_PARAM.
common_space_name
ExampleIn this example the argument proposals for the MoveL arguments ToPoint, Speed,and Zone are defined by common_point, common_speed, and common_zone.
MMC_COMMON_PARAM:
-name MoveL_ToPoint -common_space_name common_point
-name MoveL_Speed -common_space_name common_speed
-name MoveL_Zone -common_space_name common_zone
Continues on next pageApplication manual - RobotWare Add-Ins 493HAC051193-001 Revision: C
© Copyright 2015-2016 ABB. All rights reserved.
2 RobotWare Add-In functionality2.6.4 Topic Man-machine Communication
Continued
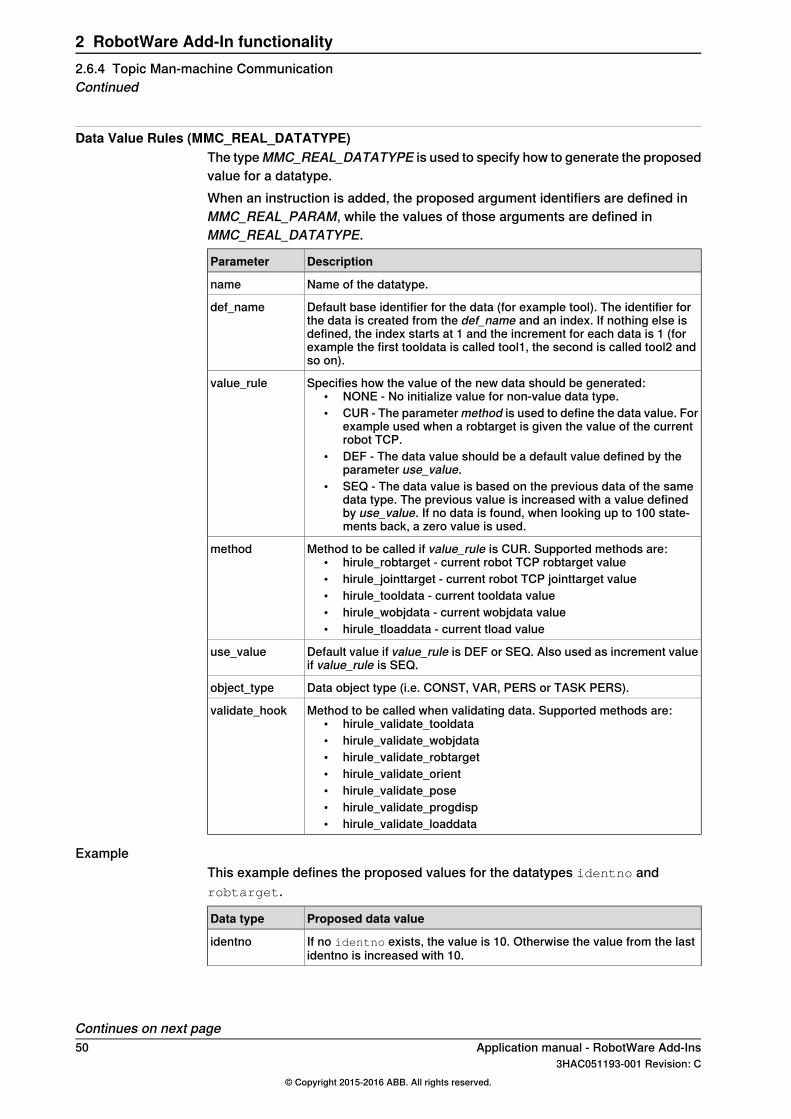
Data Value Rules (MMC_REAL_DATATYPE)The typeMMC_REAL_DATATYPE is used to specify how to generate the proposedvalue for a datatype.When an instruction is added, the proposed argument identifiers are defined inMMC_REAL_PARAM, while the values of those arguments are defined inMMC_REAL_DATATYPE.
DescriptionParameter
Name of the datatype.name
Default base identifier for the data (for example tool). The identifier forthe data is created from the def_name and an index. If nothing else isdefined, the index starts at 1 and the increment for each data is 1 (forexample the first tooldata is called tool1, the second is called tool2 andso on).
def_name
Specifies how the value of the new data should be generated:• NONE - No initialize value for non-value data type.• CUR - The parameter method is used to define the data value. For
example used when a robtarget is given the value of the currentrobot TCP.
• DEF - The data value should be a default value defined by theparameter use_value.
• SEQ - The data value is based on the previous data of the samedata type. The previous value is increased with a value definedby use_value. If no data is found, when looking up to 100 state-ments back, a zero value is used.
value_rule
Method to be called if value_rule is CUR. Supported methods are:• hirule_robtarget - current robot TCP robtarget value• hirule_jointtarget - current robot TCP jointtarget value• hirule_tooldata - current tooldata value• hirule_wobjdata - current wobjdata value• hirule_tloaddata - current tload value
method
Default value if value_rule is DEF or SEQ. Also used as increment valueif value_rule is SEQ.
use_value
Data object type (i.e. CONST, VAR, PERS or TASK PERS).object_type
Method to be called when validating data. Supported methods are:• hirule_validate_tooldata• hirule_validate_wobjdata• hirule_validate_robtarget• hirule_validate_orient• hirule_validate_pose• hirule_validate_progdisp• hirule_validate_loaddata
validate_hook
ExampleThis example defines the proposed values for the datatypes identno androbtarget.
Proposed data valueData type
If no identno exists, the value is 10. Otherwise the value from the lastidentno is increased with 10.
identno
Continues on next page50 Application manual - RobotWare Add-Ins
3HAC051193-001 Revision: C© Copyright 2015-2016 ABB. All rights reserved.
2 RobotWare Add-In functionality2.6.4 Topic Man-machine CommunicationContinued
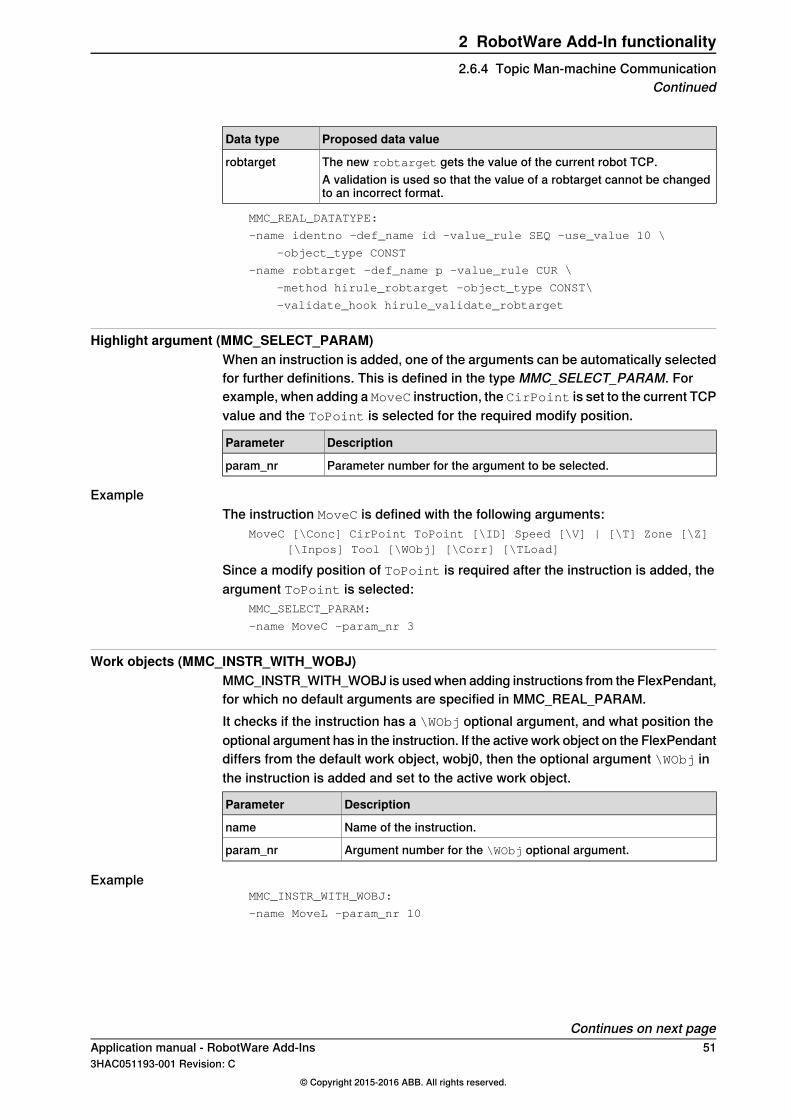
Proposed data valueData type
The new robtarget gets the value of the current robot TCP.robtargetA validation is used so that the value of a robtarget cannot be changedto an incorrect format.
MMC_REAL_DATATYPE:
-name identno -def_name id -value_rule SEQ -use_value 10 \
-object_type CONST
-name robtarget -def_name p -value_rule CUR \
-method hirule_robtarget -object_type CONST\
-validate_hook hirule_validate_robtarget
Highlight argument (MMC_SELECT_PARAM)When an instruction is added, one of the arguments can be automatically selectedfor further definitions. This is defined in the type MMC_SELECT_PARAM. Forexample, when adding a MoveC instruction, the CirPoint is set to the current TCPvalue and the ToPoint is selected for the required modify position.
DescriptionParameter
Parameter number for the argument to be selected.param_nr
ExampleThe instruction MoveC is defined with the following arguments:
MoveC [\Conc] CirPoint ToPoint [\ID] Speed [\V] | [\T] Zone [\Z][\Inpos] Tool [\WObj] [\Corr] [\TLoad]
Since a modify position of ToPoint is required after the instruction is added, theargument ToPoint is selected:
MMC_SELECT_PARAM:
-name MoveC -param_nr 3
Work objects (MMC_INSTR_WITH_WOBJ)MMC_INSTR_WITH_WOBJ is used when adding instructions from the FlexPendant,for which no default arguments are specified in MMC_REAL_PARAM.It checks if the instruction has a \WObj optional argument, and what position theoptional argument has in the instruction. If the active work object on the FlexPendantdiffers from the default work object, wobj0, then the optional argument \WObj inthe instruction is added and set to the active work object.
DescriptionParameter
Name of the instruction.name
Argument number for the \WObj optional argument.param_nr
ExampleMMC_INSTR_WITH_WOBJ:
-name MoveL -param_nr 10
Continues on next pageApplication manual - RobotWare Add-Ins 513HAC051193-001 Revision: C
© Copyright 2015-2016 ABB. All rights reserved.
2 RobotWare Add-In functionality2.6.4 Topic Man-machine Communication
Continued
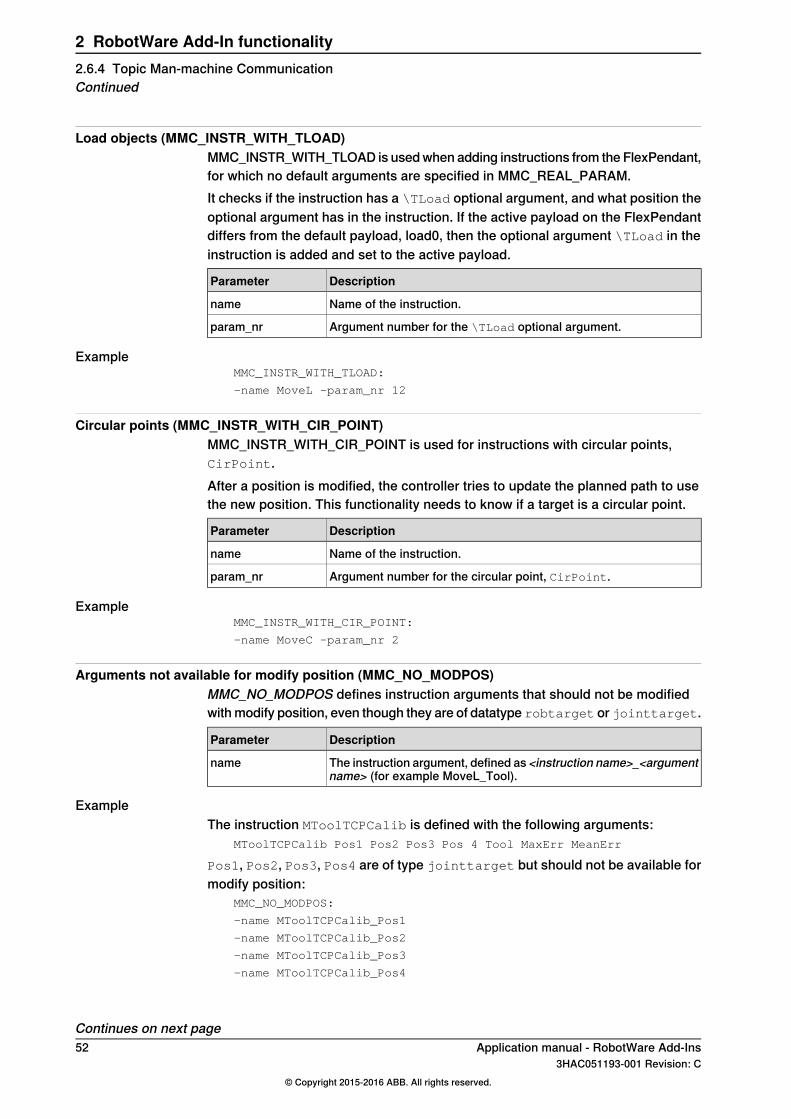
Load objects (MMC_INSTR_WITH_TLOAD)MMC_INSTR_WITH_TLOAD is used when adding instructions from the FlexPendant,for which no default arguments are specified in MMC_REAL_PARAM.It checks if the instruction has a \TLoad optional argument, and what position theoptional argument has in the instruction. If the active payload on the FlexPendantdiffers from the default payload, load0, then the optional argument \TLoad in theinstruction is added and set to the active payload.
DescriptionParameter
Name of the instruction.name
Argument number for the \TLoad optional argument.param_nr
ExampleMMC_INSTR_WITH_TLOAD:
-name MoveL -param_nr 12
Circular points (MMC_INSTR_WITH_CIR_POINT)MMC_INSTR_WITH_CIR_POINT is used for instructions with circular points,CirPoint.After a position is modified, the controller tries to update the planned path to usethe new position. This functionality needs to know if a target is a circular point.
DescriptionParameter
Name of the instruction.name
Argument number for the circular point, CirPoint.param_nr
ExampleMMC_INSTR_WITH_CIR_POINT:
-name MoveC -param_nr 2
Arguments not available for modify position (MMC_NO_MODPOS)MMC_NO_MODPOS defines instruction arguments that should not be modifiedwith modify position, even though they are of datatype robtarget or jointtarget.
DescriptionParameter
The instruction argument, defined as <instruction name>_<argumentname> (for example MoveL_Tool).
name
ExampleThe instruction MToolTCPCalib is defined with the following arguments:
MToolTCPCalib Pos1 Pos2 Pos3 Pos 4 Tool MaxErr MeanErr
Pos1, Pos2, Pos3, Pos4 are of type jointtarget but should not be available formodify position:
MMC_NO_MODPOS:
-name MToolTCPCalib_Pos1
-name MToolTCPCalib_Pos2
-name MToolTCPCalib_Pos3
-name MToolTCPCalib_Pos4
Continues on next page52 Application manual - RobotWare Add-Ins
3HAC051193-001 Revision: C© Copyright 2015-2016 ABB. All rights reserved.
2 RobotWare Add-In functionality2.6.4 Topic Man-machine CommunicationContinued
Targets not available for modify position when additional axes offset is active(MMC_NO_DATA_MODPOS_IF_ACT_EOFFS)
MMC_NO_DATA_MODPOS_IF_ACT_EOFFSdefines data types, targets, that shouldnot be modified with modify position by url (e.g. from Program Data view on theFlexPendant) if an additional axes offset is active.
DescriptionParameter
The name of the data type.name
ExampleMMC_NO_DATA_MODPOS_IF_ACT_EOFFS:
-name jointtarget
Optional argument for considering additional axes offset (MMC_USE_ACT_EOFFS_IN_MODPOS)MMC_USE_ACT_EOFFS_IN_MODPOS is used to define instructions with optionalarguments, that controls if an active additional axes offset shall be considered ornot, when calculating the current position.
DescriptionParameter
The name of the instruction.name
Identifies the optional argument.param_nr
Defines if the offset shall be considered if the argument is present(1) or when it is not present (0).
use_if_present
ExampleMMC_USE_ACT_EOFFS_IN_MODPOS:
-name MoveAbsJ -param_nr 4 -use_if_present 0
Between points (MMC_NO_PC_MOVEMENT)For instructions with between point, such as MoveC, the program pointer shouldnot continue to the next instruction after modify position of the between point. Thetype MMC_NO_PC_MOVEMENT is used to define the between points for which amodify position will not move the program pointer to the next instruction.
DescriptionParameter
The instruction argument, defined as <instruction name>_<argumentname> (for example MoveC_CirPoint).
name
ExampleMMC_NO_PC_MOVEMENT:
-name movec_cirpoint
Continues on next pageApplication manual - RobotWare Add-Ins 533HAC051193-001 Revision: C
© Copyright 2015-2016 ABB. All rights reserved.
2 RobotWare Add-In functionality2.6.4 Topic Man-machine Communication
Continued
Without between point (MMC_NO_PC_MOVEMENT_CLEAR_PATH)For instructions without between point, such as SpotL, the program pointer shouldnot continue to the next instruction and a clear path is performed after modifyposition. The type MMC_NO_PC_MOVEMENT_CLEAR_PATH is used default inSpot systems to avoid disturbing event log messages and regain dialogs aftermodifying position.
DescriptionParameter
The instruction argument, defined as <instruction name>_<argumentname>.
name
ExampleMMC_NO_PC_MOVEMENT_CLEAR_PATH:
-name SpotL_ToPoint
-name SpotJ_ToPoint
-name SpotML_ToPoint
-name SpotMJ_ToPoint
Service routines (MMC_SERV_ROUT_STRUCT)MMC_SERV_ROUT_STRUCT is used to specify instructions that should be definedas service routines.
DescriptionParameter
Instruction name.name
ExampleIn this example the instruction LoadIdentify is defined as a service routine:
MMC_SERV_ROUT_STRUCT:
-name LoadIdentify
Change of motion mode (MMC_CHANGE_MOTION_MODE)For some move instructions it is possible to change motion mode (for examplefrom MoveL and MoveJ). Which instructions allow change of mode and whatinstruction it is changed to is defined in MMC_CHANGE_MOTION_MODE.
DescriptionParameter
Name of the existing instruction.name
Name of the instruction it should be changed to.shift_name
Motion mode of instruction after changing motion mode.shift_mode
Defines an argument number. If this argument is set, change ofmotion is not allowed.
param_restr
ExampleThis example specifies that the instruction MoveL can be changed into a MoveJ
instruction. If the argument Corr is set this change of motion mode cannot bedone.
MMC_CHANGE_MOTION_MODE:
-name MoveL -shift_name MoveJ -shift_mode Joint -param_restr 11
-name MoveJ -shift_name MoveL -shift_mode Linear
54 Application manual - RobotWare Add-Ins3HAC051193-001 Revision: C
© Copyright 2015-2016 ABB. All rights reserved.
2 RobotWare Add-In functionality2.6.4 Topic Man-machine CommunicationContinued
2.6.5 Example cfg files
OverviewThis section contains cfg example files for the Add-In CIRCLEMOVE and theinstruction MoveCircle.
CircleMove_sys.cfgThis example uses the environment variable CIRCLEMOVE that is defined ininstall.cmd, see Examples of install.cmd files on page 30.
SYS:CFG_1.0::
# Installation of RAPID routines for Add-In CircleMove
# $Revision: 1.7 $
#
CAB_TASK_MODULES:
-File "CIRCLEMOVE:/CircleMove.sys" -Install -AllTask
CircleMove_mmc.cfgThe instruction MoveCircle is defined with the following arguments:
MoveCircle pCenter Radius Speed Zone Tool [\WObj]
To define how MoveCircle should behave on the FlexPendant, the followingconfiguration is placed in a file called CircleMove_mmc.cfg, which is added to theCircleMove Add-In.
MMC:CFG_1.0::
# MMC : RAPID PROGRAMMING RULES FOR MODULE CIRCLEMOVE
# $Revision: 1.7 $
#
MMC_MC1 = MMC_PALETTE:
-name MoveCircle
#
MMC_REAL_ROUTINE:
-name MoveCircle -default_struct 1,1,1,1,1,0 -hidden
#
MMC_REAL_PARAM:
-name MoveCircle_pCenter -name_rule SEQ -method hirule_robtarget
-name MoveCircle_Radius -name_rule LAST def_name 10
-name MoveCircle_Speed -name_rule LAST -def_name v1000
-name MoveCircle_Zone -name_rule LAST -def_name z50
-name MoveCircle_Tool -name_rule CUR -method hirule_tooldata
-name MoveCircle_WObj -name_rule CUR -method hirule_wobjdata
#
Continues on next pageApplication manual - RobotWare Add-Ins 553HAC051193-001 Revision: C
© Copyright 2015-2016 ABB. All rights reserved.
2 RobotWare Add-In functionality2.6.5 Example cfg files
MMC_INSTR_WITH_WOBJ:
-name MoveCircle -param_nr 6
56 Application manual - RobotWare Add-Ins3HAC051193-001 Revision: C
© Copyright 2015-2016 ABB. All rights reserved.
2 RobotWare Add-In functionality2.6.5 Example cfg filesContinued
2.7 Using data from files
2.7.1 Using text strings from a file
Using text filesIt is possible to use text strings from a text table file. This is useful, for example,when a message to the user should be displayed in different languages.How to use text table files is described in section Advanced RAPID in Applicationmanual - Controller software IRC5.
Application manual - RobotWare Add-Ins 573HAC051193-001 Revision: C
© Copyright 2015-2016 ABB. All rights reserved.
2 RobotWare Add-In functionality2.7.1 Using text strings from a file
2.7.2 Including language files
OverviewLocalized files can be installed by moving their installation to a separate install.cmdfile and including the file instlang.cmd from the system folder in your maininstallation script.
include -path "$RELEASE/system/instlang.cmd"
For this mechanism to work, the Add-In should contain a subfolder called language,this folder should contain the separate install.cmd file used to install the localizedfiles. The localized files themselves should be placed in language specificsubfolders of the language folder. The subfolders should be named with the 2 letterlanguage code, for example en, de, fr etc. See illustration in section Required filesand file structure on page 17.The file instlang.cmd will call the file install.cmd in the language folder once forevery installed language on the robot controller with the variable $LANG set to thecorresponding language code. After this process has completed the $LANG variablewill always be reset to en.
ExampleExample of how to install a localized file.
fileexist -path $BOOTPATH/language/$LANG/CircleMoveAddIn_text.xml-label INSTALL_FILE
goto -label END
#INSTALL_FILE
text -filename $BOOTPATH/language/$LANG/CircleMoveAddIn_text.xml-package $LANG
#END
58 Application manual - RobotWare Add-Ins3HAC051193-001 Revision: C
© Copyright 2015-2016 ABB. All rights reserved.
2 RobotWare Add-In functionality2.7.2 Including language files
2.8 Hide RAPID content
OverviewIt is possible to hide the implementation of RAPID code on the FlexPendant.Developers of Add-Ins often exposes a public interface to their functionality thatother RAPID programmers and end users can access. In order to not confuse theend user with implementation details they should not need to know anything about,it is possible to hide parts of the implementation.This section describes the two proposed ways, best practice, of hiding the code.
Split the code into two modulesOne way of hiding the code is to split the code into two modules. The first modulecontains the implementation that shall be hidden, and the second module containsthe public interface which is visible. The interface module contents will be visiblebut the code can be encrypted.For more information, see Automatic loading of modules (CAB_TASK_MODULES)on page 41.
Examplesys.cfg
CAB_TASK_MODULES:
-File "CIRCLEMOVE:/CircleMoveImpl.sys" -Hidden -AllTask
-File "CIRCLEMOVE:/CircleMove.sys" -AllTask
CircleMove.sys - InterfaceMODULE CIRCLEMOVE(SYSMODULE, NOSTEPIN)
PROC MoveCircle(
robtarget pCenter,
num Radius,
speeddata Speed,
zonedata Zone,
PERS tooldata Tool
\PERS wobjdata WObj)
MoveCirecleImpl pCenter, Radius, Speed, Zone, Tool \WObj?WObj;
ENDPROC
ENDMODULE
Continues on next pageApplication manual - RobotWare Add-Ins 593HAC051193-001 Revision: C
© Copyright 2015-2016 ABB. All rights reserved.
2 RobotWare Add-In functionality2.8 Hide RAPID content
CircleMoveImpl.sys - ImplementationMODULE CIRCLEMOVEIMPL(SYSMODULE, NOVIEW)
VAR errnum ERR_CIRCLE:= -1;
VAR num errorid := 5001;
PROC MoveCircleImpl(
robtarget pCenter,
num Radius,
speeddata Speed,
zonedata Zone,
PERS tooldata Tool
\PERS wobjdata WObj)
...
ENDPROC
ENDMODULE
Use hidden modules and the picklistAnother method is to place all code in a hidden module and use the pick list to callthe procedures.For more information, see Custom pick lists (MMC_MC1, MMC_MC2, MMC_MC3,etc.) on page 45.
Examplesys.cfg
CAB_TASK_MODULES:
-File "CIRCLEMOVE:/CircleMove.sys" -Hidden -AllTask
mmc.cfgMMC_CIRCLEMOVE_PALETTE = MMC_PALETTE:
-name "MoveCircle"
MMC_PALETTE_HEAD:
-name "Move Circle Palette" -type "MMC_CIRCLEMOVE_PALETTE"
60 Application manual - RobotWare Add-Ins3HAC051193-001 Revision: C
© Copyright 2015-2016 ABB. All rights reserved.
2 RobotWare Add-In functionality2.8 Hide RAPID contentContinued
2.9 Optional settings for RAPID arguments (RAPID meta data)
OverviewIt is possible to specify certain optional settings for arguments in RAPID instructions.For instance it is possible to define if certain arguments shall be hidden whenviewing the RAPID program on the FlexPendant.The optional settings are specified in an .xml file.
XML format<?xml version="1.0" encoding="utf-8"?>
<Rapid>
<Edit>
<Instruction name="Instr1">
<Argument name="Arg1" show="true" showeditor="false" />
</Instruction>
</Edit>
</Rapid>
Tip
Use the template file named rapid_edit_rules.xml located in the following directoryin the RobotWare installation:...\RobotPackages\RobotWare_RPK_<version>\utility\Template\RAPIDOptionalArguments\Navigate to the RobotWare installation folder from the RobotStudio Add-Ins tab,by right-clicking on the installed RobotWare version in the Add-Ins browser andselecting Open Package Folder.
Name and location of the .xml fileThe .xml file shall be registered using the setup script (see register on page 27) orshould be named rapid_edit_rules.xml and installed in the $(HOME) directory ofthe controller.
Continues on next pageApplication manual - RobotWare Add-Ins 613HAC051193-001 Revision: C
© Copyright 2015-2016 ABB. All rights reserved.
2 RobotWare Add-In functionality2.9 Optional settings for RAPID arguments (RAPID meta data)
2.9.1 Hide arguments in programs
OverviewIt is possible to hide any of the arguments listed when displaying a programmedRAPID instruction in the Program Editor and the Production Window on theFlexPendant.Which arguments to be shown in program windows is specified in the .xml fileusing the showeditor attribute. The default value is that arguments shall beshown.
XML format<?xml version="1.0" encoding="utf-8"?>
<Rapid>
<Edit>
<Instruction name="Instr1">
<Argument name="Arg1" showeditor="true" />
<Argument name="Arg2" showeditor="false" />
</Instruction>
</Edit>
</Rapid>
ExampleThis is an example of an .xml file specifying which optional arguments to show forMoveJ.
<?xml version="1.0" encoding="utf-8"?>
<Rapid>
<Edit>
<Instruction name="MoveJ">
<Argument name="Conc" showeditor="true" />
<Argument name="ID" showeditor="true" />
<Argument name="V" showeditor="true" />
<Argument name="T" showeditor="false" />
<Argument name="Z" showeditor="false" />
<Argument name="Inpos" showeditor="false" />
<Argument name="WObj" showeditor="true" />
<Argument name="TLoad" showeditor="false" />
</Instruction>
</Edit>
</Rapid>
Continues on next page62 Application manual - RobotWare Add-Ins
3HAC051193-001 Revision: C© Copyright 2015-2016 ABB. All rights reserved.
2 RobotWare Add-In functionality2.9.1 Hide arguments in programs
The result will be that only the arguments Conc, ID, V and WObj will be shown inthe program windows on the FlexPendant for the instruction MoveJ.
Note
Hiding an argument has priority over other functions such as selection ofargument when adding an instruction, see Highlight argument(MMC_SELECT_PARAM) on page 51, or additional optional argument in picklists, see Pick list titles (MMC_PALETTE_HEAD) on page 45. For the latter casethe argument will be added, but it will not be shown.
Application manual - RobotWare Add-Ins 633HAC051193-001 Revision: C
© Copyright 2015-2016 ABB. All rights reserved.
2 RobotWare Add-In functionality2.9.1 Hide arguments in programs
Continued
2.9.2 Hide optional argument when changing selected instruction
OverviewIt is possible to hide any of the optional arguments listed when a RAPID instructionis changed from the FlexPendant.Which optional arguments to be shown on the FlexPendant is specified in the .xmlfile using the show-attribute. The default value is that arguments shall be shown.
XML format<?xml version="1.0" encoding="utf-8"?>
<Rapid>
<Edit>
<Instruction name="Instr1">
<Argument name="Arg1" show="true" />
<Argument name="Arg2" show="false" />
</Instruction>
</Edit>
</Rapid>
ExampleThis is an example of an .xml file specifying which optional arguments to show forMoveJ.
<?xml version="1.0" encoding="utf-8"?>
<Rapid>
<Edit>
<Instruction name="MoveJ">
<Argument name="Conc" show="true" />
<Argument name="ID" show="true" />
<Argument name="V" show="true" />
<Argument name="T" show="false" />
<Argument name="Z" show="false" />
<Argument name="Inpos" show="false" />
<Argument name="WObj" show="true" />
</Instruction>
</Edit>
</Rapid>
The result will be that only the optional arguments Conc, ID, V, and WObj will beshown when changing the instruction on the FlexPendant for the instruction MoveJ.
Usage
Commentshoweditorshow
Default, same as True, True<not defined><not defined>
Shown everywhere in FPTrueTrue
Hidden in Program Editor and Production WindowFalseTrue
Continues on next page64 Application manual - RobotWare Add-Ins
3HAC051193-001 Revision: C© Copyright 2015-2016 ABB. All rights reserved.
2 RobotWare Add-In functionality2.9.2 Hide optional argument when changing selected instruction
Commentshoweditorshow
Hidden in Argument Window, but shown in ProgramEditor and Production Window.
TrueFalse
Users will not be able to program arguments havingthis combination, thus it is unlikely that users will beexposed to this combination. Which means that inpractice this is more like False/False.
Totally hidden, cannot be edited by Program EditorFalseFalse
Application manual - RobotWare Add-Ins 653HAC051193-001 Revision: C
© Copyright 2015-2016 ABB. All rights reserved.
2 RobotWare Add-In functionality2.9.2 Hide optional argument when changing selected instruction
Continued
2.9.3 Argument filter
OverviewIt is possible to filter the data that is shown as arguments listed on the FlexPendantand in RobotStudio.The filter for a specific parameter is specified in the .xml file using thefilter-attribute. The default value is that no filter is used.
XML format<?xml version="1.0" encoding="utf-8"?>
<Rapid>
<Edit>
<Instruction name="Instr1">
<Argument name="Arg1" filter="PLC_do_.*" />
</Instruction>
</Edit>
</Rapid>
In the example above only data with a name starting with "PLC_do_" will be matchedand shown for the parameter "Arg1" in the instruction "Instr1".
Regular expressionsThe regular expressions are a powerful mechanism when it comes to matching amultitude of names with a single expression.In a regular expression all alphanumeric characters match, for example theexpression "abc" will match the sequence "abc". Regular expressions are casesensitive. Most other characters also match, but a small set is known as themeta-characters. These are:
MeaningExpression
Marks the beginning of the name being matched. Default.^
Marks the end of the name being matched. Default.$
Any single character..
Any character in the non-empty set s, where s is a sequence ofcharacters. Ranges may be specified as c-c.
[s]
Any character not in the set s.[^s]
Zero or more occurrences of the regular expression r.r*
One or more occurrences of the regular expression r.r+
Zero or one occurrence of the regular expression r.r?
The regular expression r. Used to separate a regular expressionfrom another.
(r)
The regular expression r or r'.r | r'
Continues on next page66 Application manual - RobotWare Add-Ins
3HAC051193-001 Revision: C© Copyright 2015-2016 ABB. All rights reserved.
2 RobotWare Add-In functionality2.9.3 Argument filter
ExamplesSome examples:
• The expression "MoveL" (or "^MoveL$") would match the name "MoveL",and nothing else.
• The expression "Move.*" would match "MoveL", "MoveC", "MoveCDO" etc.• The expression ".*Move.*" would match the names "MyMove", "MoveL",
"MoveC" , "MoveCDO" etc.• The expressions "", ".*", or "^.*$", i.e. an empty string, matches anything.
Application manual - RobotWare Add-Ins 673HAC051193-001 Revision: C
© Copyright 2015-2016 ABB. All rights reserved.
2 RobotWare Add-In functionality2.9.3 Argument filter
Continued
2.9.4 Argument value range
OverviewIt is possible to define minimum and maximum allowed value when specifying anumerical value for an argument. The value will be validated by the FlexPendantand RobotStudio when entering such a value.The minimum and maximum allowed values for a specific parameter is specifiedin the .xml file using the minvalue and maxvalue attributes. The default value isthat no minimum and maximum values are used.
XML format<?xml version="1.0" encoding="utf-8"?>
<Rapid>
<Edit>
<Instruction name="Instr1">
<Argument name="Arg1" minvalue="1" maxvalue="16" />
</Instruction>
</Edit>
</Rapid>
In the example above only values between 1 and 16 will be allowed when enteringa numerical value for the parameter "Arg1" in the instruction "Instr1".
Note
The check for valid numerical value will only be performed when entering anumerical value as argument. No validation will be performed if for instance avariable is used as argument.
68 Application manual - RobotWare Add-Ins3HAC051193-001 Revision: C
© Copyright 2015-2016 ABB. All rights reserved.
2 RobotWare Add-In functionality2.9.4 Argument value range

2.10 FlexPendant applications
IntroductionCustomized FlexPendant applications can be included in the RobotWare Add-In,simply by adding the compiled application assemblies and other resources to thefile structure. No additional configuration is needed.For the application to be loaded properly the Add-In must also register itself usingthe register -type option command in the install.cmd file, see register onpage 27.
Note
This section only describes the deployment of FlexPendant applications. Forinformation on creating FlexPendant applications, see the corresponding manualfor the software used to create the FlexPendant application.
File structureWhen adding a FlexPendant application to the Add-In, the application assemblies(.dll) and other resources (.jpg, .gif, .bmp) need to be placed in the tps folder in theAdd-In file structure, see File structure on page 18.
Localized FlexPendant applicationIf the FlexPendant application is localized, i.e. has support for multiple languages,the language specific resources should be placed in tps folders under eachlanguage code folder.For example, english resource files should be placed in the folder \<optionname>\language\en\tps\.
Application manual - RobotWare Add-Ins 693HAC051193-001 Revision: C
© Copyright 2015-2016 ABB. All rights reserved.
2 RobotWare Add-In functionality2.10 FlexPendant applications

This page is intentionally left blank
3 RobotWare Add-In Packaging tool3.1 Introduction
3.1.1 About RobotWare Add-In Packaging tool
GeneralRobotWare Add-In Packaging tool is a PC tool that will help you to pack your Add-Inas a package that can be deployed to the robot controller using the InstallationManager. The output of the RobotWare Add-In Packaging tool is a product manifestfile and a robot package file.The tool will help you to:
• Re-package RobotWare 5 additional options into RobotWare 6 Add-Ins.• Package new RobotWare 6 Add-Ins.• Define how the end-user will see the product in the Installation Manager.• Define rules for how options can be selected in the Installation Manager and
what other products are required for the Add-In to work.The RobotWare Add-In and the RobotWare Add-In license can then be used togetherwith RobotWare to create a system using the Installation Manager in RobotStudio.For more information about the Installation Manager, see Operatingmanual - RobotStudio.
Tip
See also the tutorials on using the RobotWare Add-In Packaging tool availableat ABB Download Center.
Open and licensed Add-InsThere are two major types of Add-Ins that can be created with the RobotWareAdd-In Packaging tool, open Add-Ins and licensed Add-Ins.For open Add-Ins, the product manifest and the robot package file created willcontain everything required for the user to install the product unsigned.For licensed Add-Ins, there is also a signing step involved in the packaging of theAdd-Ins, that will later allow you to generate licenses for the Add-Ins. The licensedAdd-Ins will require the user to add a license file in the Installation Manager to beable to install the Add-In.
Installation procedureBefore installing the software make sure that the certificates are available, for moreinformation see Digital signing on page 76.
Action
Install the RobotWare Add-In Packaging tool.1
Continues on next pageApplication manual - RobotWare Add-Ins 713HAC051193-001 Revision: C
© Copyright 2015-2016 ABB. All rights reserved.
3 RobotWare Add-In Packaging tool3.1.1 About RobotWare Add-In Packaging tool
Action
Install the certificate for the RobotWare Add-In Packaging tool. Use the passwordprovided by ABB.
2
(A certificate is only needed when packaging licensed Add-Ins.)
Install your own publisher certificate.3(A certificate is only needed when packaging licensed Add-Ins.)
Start the RobotWare Add-In Packaging tool.4
72 Application manual - RobotWare Add-Ins3HAC051193-001 Revision: C
© Copyright 2015-2016 ABB. All rights reserved.
3 RobotWare Add-In Packaging tool3.1.1 About RobotWare Add-In Packaging toolContinued
3.1.2 Options
Option identityThe option identity is what uniquely identifies an option in a product.The option identity namespace must start with the product identity and also haveit's own unique part. If the Add-In has many options, the option identity part maybe built up of several parts, to group options logically.For example: open.yourcompany.yourproduct.youroptionWhen you decide what scheme to use for the option identity names, keep in mindthat these option identity names are the identifiers that will be used in settings filesand license files (for licensed Add-Ins). If option identifiers are changed betweentwo releases of an Add-In, compatibility with old settings files and license files willbe broken.
System options and robot optionsIn RobotWare 5, all options and additional options were system options. To beable to have one configuration of equipment for one robot and another configurationof equipment for another robot in a MultiMove system, it was necessary to makespecial arrangements in the relkey.opt file.In RobotWare 6 there is support for both system options and robot options. Typicallyan option is classified as a robot option if its primary use is within the task of arobot. For example, equipment that a robot is dressed with is an example of a robotoption. Or something that is connected to, or set up for, a specific robot in aMultiMove system. A system option is global to the system, for example languages.
DependenciesA dependency specified for an option in an Add-In could be either of type ANDdependency, or of type OR dependency. This will define the dependency rulebetween the options selected.For example, dependencies like the following can be defined: Source option A isdependent on both option B and C. Source option D is dependent on either A, B,or C.
AND dependencyIf an option does not work unless all of its dependent options are also beinginstalled, all these options are mandatory and should go into the AND dependencylist.Example:
813-1 Optical Tracking
<AND dependent on>
624-1 Continuous Application Platform
628-1 Sensor Interface
OR dependencyIf an option does not work unless one of its dependent options are also beinginstalled, all these options should go into the OR dependency list. In this case theoption will work if either of the options in the list are also selected for installation.
Continues on next pageApplication manual - RobotWare Add-Ins 733HAC051193-001 Revision: C
© Copyright 2015-2016 ABB. All rights reserved.
3 RobotWare Add-In Packaging tool3.1.2 Options
For example. PROFIenergy requires that either PROFINET Controller/Device orPROFINET Device is selected for installation:
963-1 PROFIenergy
<OR dependent on>
888-2 PROFINET Controller/Device
888-3 PROFINET Device
74 Application manual - RobotWare Add-Ins3HAC051193-001 Revision: C
© Copyright 2015-2016 ABB. All rights reserved.
3 RobotWare Add-In Packaging tool3.1.2 OptionsContinued
3.1.3 Files
The product manifest fileThe product manifest file (.rmf) is a container of the metadata for the Add-In product.It contains all product and option details.Product details:
• Product name, product id, product version, version name, company name,company url, copyright, and description.
• Any product dependencies to other products, such as RobotWare or Add-Insthat the product may have.
Option details:• Descriptions of all the options that are included in the Add-In, such as option
names, option id's, option type (system or robot) and licensing restrictions,• How the option structure should be displayed to the user in the Installation
Manager.• Any dependencies to other options that the options in the Add-In may have.• Any conflicts to other options that the options in the Add-In may have.
The purpose of the product manifest is to define how the end-user will see theproduct in the Installation Manager. It will display the options in a structure to theuser and define the rules for how options can be selected and what other productsare required for the Add-In to work.
The robot package fileThe robot package file (.rpk) is an archive file that contains the actual contents ofthe Add-In, in a compressed form.The folders and files of the Add-In containing installation and application logics in.cmd, .cfg, and .sys files.This package will be transferred to the controller during installation and will beunpacked on the controller where the .cmd files of the Add-In will be executed toinstall the Add-In on the controller.
Application manual - RobotWare Add-Ins 753HAC051193-001 Revision: C
© Copyright 2015-2016 ABB. All rights reserved.
3 RobotWare Add-In Packaging tool3.1.3 Files
3.1.4 Signing with digital certificates
Digital signingRobotWare 6 uses signing with digital certificates to ensure the integrity of publishedproducts. When creating a RobotWare Add-In that contains licensed options adigital signature is mandatory.To digitally sign a RobotWare Add-In two different types of certificates are required,a publisher certificate and a licensing certificate.The publisher certificate signature has 2 main purposes:
• Identify the publisher of the Add-In to the end user.• Ensure the integrity of the published software. For example, any modifications
to the signed product manifest file will make the signature invalid and causethe robot controller to refuse to install the Add-In.
The publisher certificate is also commonly known as a code-signing certificate.The Add-In packaging tool will accept any x509 v3 certificate issued for this purpose.ABB does not issue publisher certificates, it is the responsibility of the Add-Indeveloper to obtain a suitable certificate for example by purchasing it from a trustedcertificate authority vendor or create their own self-signed certificate.The licensing certificate is issued by ABB. This certificate is tied to the product idyou specify and grants you as the publisher the right to issue licenses for yourAdd-In. In addition to being used to sign your product the licensing certificate isalso used by the License Generator when creating license files for your RobotWareAdd-In.
TimestampingIn addition to the signing certificates the RobotWare Add-In Packaging tool alsoallows you to specify a timestamping server. Timestamping is the process ofapplying a timestamp from a trusted source to your digital signature. This ensuresthat the signature will still remain valid even if the signing certificate expires or isrevoked at a later date.For example, without a timestamp the act of revoking a publisher or licensingcertificate would invalidate all products ever signed with these certificates whereaswith a timestamp products signed up to the revocation date will still remain valid.Although not required it’s considered best practice and recommended to apply atimestamp when signing your product.The RobotWare Add-In Packaging tool supports timestamping services that followsMicrosoft’s Authenticode® standard. If you have purchased a publisher certificatefrom a certificate authority they should be able to recommend a suitabletimestamping service.As an alternative Symantec® operates a public timestamping service at the URLhttp://timestamp.verisign.com/scripts/timstamp.dll. (Note that it is not possible tobrowse to this URL.)
Continues on next page76 Application manual - RobotWare Add-Ins
3HAC051193-001 Revision: C© Copyright 2015-2016 ABB. All rights reserved.
3 RobotWare Add-In Packaging tool3.1.4 Signing with digital certificates
Installation of digital certificatesAll digital certificates (with the exception of self-signed certificates) are signed byan issuer certificate. The issuer certificate in turn can have its own issuer, and soon, until a self-signed root certificate is reached, this forms a so called certificatechain.For example the certificate chain for an ABB issued licensing certificate looks likethis:
ABB RobotWare Licensing Root
|
ABB RobotWare Licensing Issuing CA
|
Licensing for <your product>
The add-in packaging tool requires that all issuer certificates must be installed inthe Windows certificate store to be able to use the end user certificate for signing.In the example above the ABB RobotWare Licensing Root and ABB RobotWareLicensing Issuing CA certificates must be installed in order to be able to use theLicensing for <your product> certificate.In the case of publisher certificates, if you have purchased a certificate from a 3rdparty vendor the necessary certificate chain is usually already preinstalled inWindows and no further installation is necessary.In the case of licensing certificates the complete certificate chain is included in the.pfx file delivered from ABB and the simplest way to install the issuer certificatesis therefore to install the .pfx file. This will also install the end user certificate whichcan be uninstalled afterwards if desired.To install the certificates locate the .pfx file in Windows Explorer, right click on thefile and select the Install PFX option, this will open up theCertificate ImportWizard.
Continues on next pageApplication manual - RobotWare Add-Ins 773HAC051193-001 Revision: C
© Copyright 2015-2016 ABB. All rights reserved.
3 RobotWare Add-In Packaging tool3.1.4 Signing with digital certificates
Continued

Proceed through the wizard (you will need the pfx password provided by ABB)until prompted to choose a certificate store:
xx1500000935
By default the wizard will try to determine the appropriate store based on the typeof certificate. This would cause parts of the certificate chain to be installed as atrusted root certificate which is not recommended in the case of licensing certificatesfor security reasons. Instead it’s recommended to change the default option andplace all the certificates in the personal store. This will not affect the signingoperations but will prevent the certificates from being trusted for operations forwhich they are not intended.
Continues on next page78 Application manual - RobotWare Add-Ins
3HAC051193-001 Revision: C© Copyright 2015-2016 ABB. All rights reserved.
3 RobotWare Add-In Packaging tool3.1.4 Signing with digital certificatesContinued
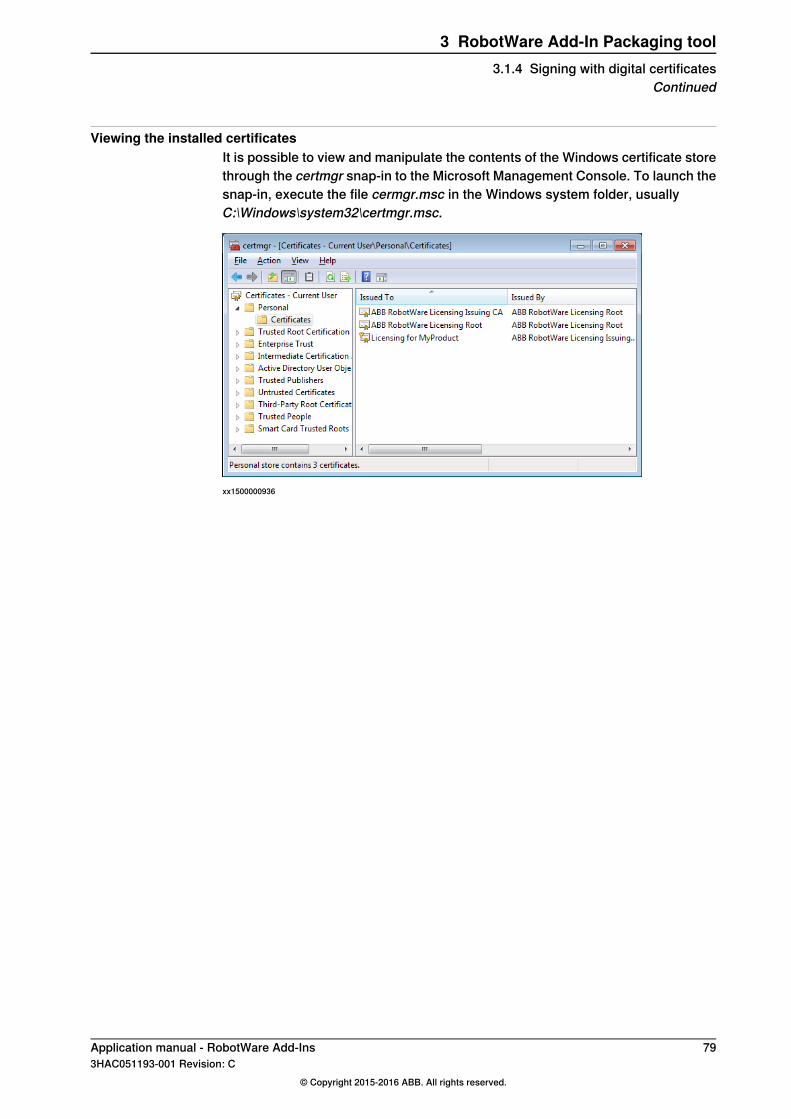
Viewing the installed certificatesIt is possible to view and manipulate the contents of the Windows certificate storethrough the certmgr snap-in to the Microsoft Management Console. To launch thesnap-in, execute the file cermgr.msc in the Windows system folder, usuallyC:\Windows\system32\certmgr.msc.
xx1500000936
Application manual - RobotWare Add-Ins 793HAC051193-001 Revision: C
© Copyright 2015-2016 ABB. All rights reserved.
3 RobotWare Add-In Packaging tool3.1.4 Signing with digital certificates
Continued
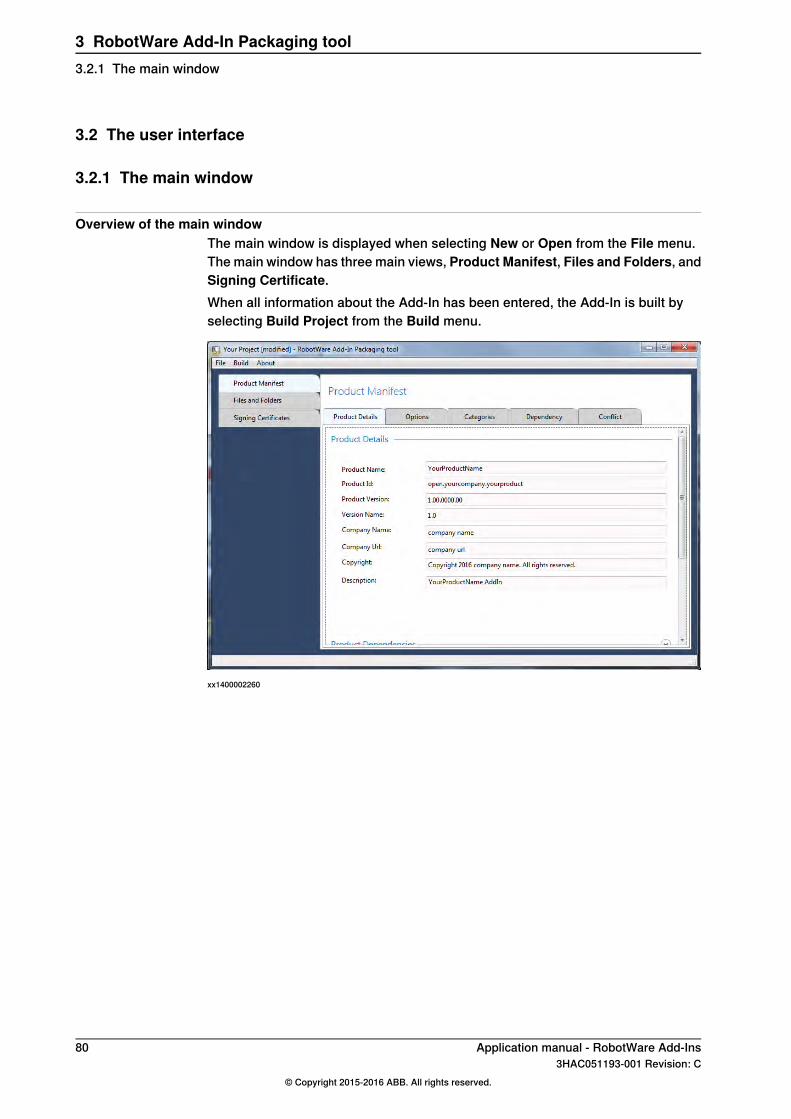
3.2 The user interface
3.2.1 The main window
Overview of the main windowThe main window is displayed when selecting New or Open from the File menu.The main window has three main views, Product Manifest, Files and Folders, andSigning Certificate.When all information about the Add-In has been entered, the Add-In is built byselecting Build Project from the Build menu.
xx1400002260
80 Application manual - RobotWare Add-Ins3HAC051193-001 Revision: C
© Copyright 2015-2016 ABB. All rights reserved.
3 RobotWare Add-In Packaging tool3.2.1 The main window
3.2.2 The product manifest view
IntroductionThe product manifest view is used to fill all product related information that goesinto the product manifest file, for example product name, company name, revision,etc. The product manifest view is also used to structure the Add-In, and to set anydependencies or conflicts with other Add-Ins or RobotWare versions.
Product details tabThe following information is to be defined in the Product details tab.
Product details
DescriptionField name
The name of the product.Product Name
The internal identifier of the product.Product IdThe product id is what uniquely identifies the product.For licensed products the Product Id must start with one of thenamespace strings defined by the licensing certificate. For moreinformation, see Digital signing on page 76.For unlicensed products the Product Id must start with the stringopen, for example:open.yourcompany.yourproduct.
The product version field is used to uniquely identify a specific buildof the product. This information is used by the Installation Managerand other tools to determine the relation between different releasesof a product, i.e. older, equal, or newer.
Product Version
The format of the product version can have maximum four fields:<major version>.<minor version>.<build version>.<revision>
The version name field represents the product version as displayedto the end user. It differs from the Product Version field in that it'sintended for display purposes only and is not restricted to a specificformat. It can for example contain identifiers such as "Beta" or"Release Candidate" in addition to the version.
Version Name
As a comparison RobotWare 6.02.01 has a Product Version of"6.02.1029.01" and a Version Name of "6.02.01.00".
Note
Add-Ins built with version 1.3 or older of the RobotWare Add-InPackaging tool are displayed in the Installation Manager as a com-bination of the Product Name and Product Version fields.From version 1.4 the Version Name is used instead of ProductVersion and it's therefore important that this field contains relevantinformation.
The name of your company.Company NameFree text, for information only.
The website of your company.Company UrlFree text, for information only.
Copyright information.CopyrightFree text, for information only.
Continues on next pageApplication manual - RobotWare Add-Ins 813HAC051193-001 Revision: C
© Copyright 2015-2016 ABB. All rights reserved.
3 RobotWare Add-In Packaging tool3.2.2 The product manifest view
DescriptionField name
Short product description.DescriptionFree text, for information only.
Product dependenciesThe product dependencies settings are used to setup dependencies to otherAdd-Ins and RobotWare versions.Click Import to add a dependent software. The following fields will be filledautomatically.
DescriptionField name
The internal identifier of the product.Identity
The name of the product.Name
The installation target platform, for instance robot controller and/orvirtual controller.
Platform
The company name of the Add-In publisher.Publisher
The minimum product version.MinVersion
The maximum product version (optional).MaxVersion
Product type. Always set to Add-In.Type
Options tabThe Options tab helps the user to create options and to specify their details.
Validate the optionBefore leaving the Options view it is necessary to validate the options by clickingthe Validate button.The following validation is performed:
• The option identity must always begin with product identity text as prefix.
Options and Option details
DescriptionField name
The name of the option as displayed to the end user in the Installa-tion Manager in RobotStudio.
Display Name
The internal identifier of the option.IdentityThe option id is what uniquely identifies an option in a product. Theidentifier must begin with the the internal identifier of the product.For example: open.yourcompany.yourproduct.youroption
For more information, see Options on page 73.
The type of option.• System - Options that are global for the system.• Robot - Options that can be set per robot in the system, for
example when using MultiMove where different robots mayhave different equipment.
Type
Continues on next page82 Application manual - RobotWare Add-Ins
3HAC051193-001 Revision: C© Copyright 2015-2016 ABB. All rights reserved.
3 RobotWare Add-In Packaging tool3.2.2 The product manifest viewContinued
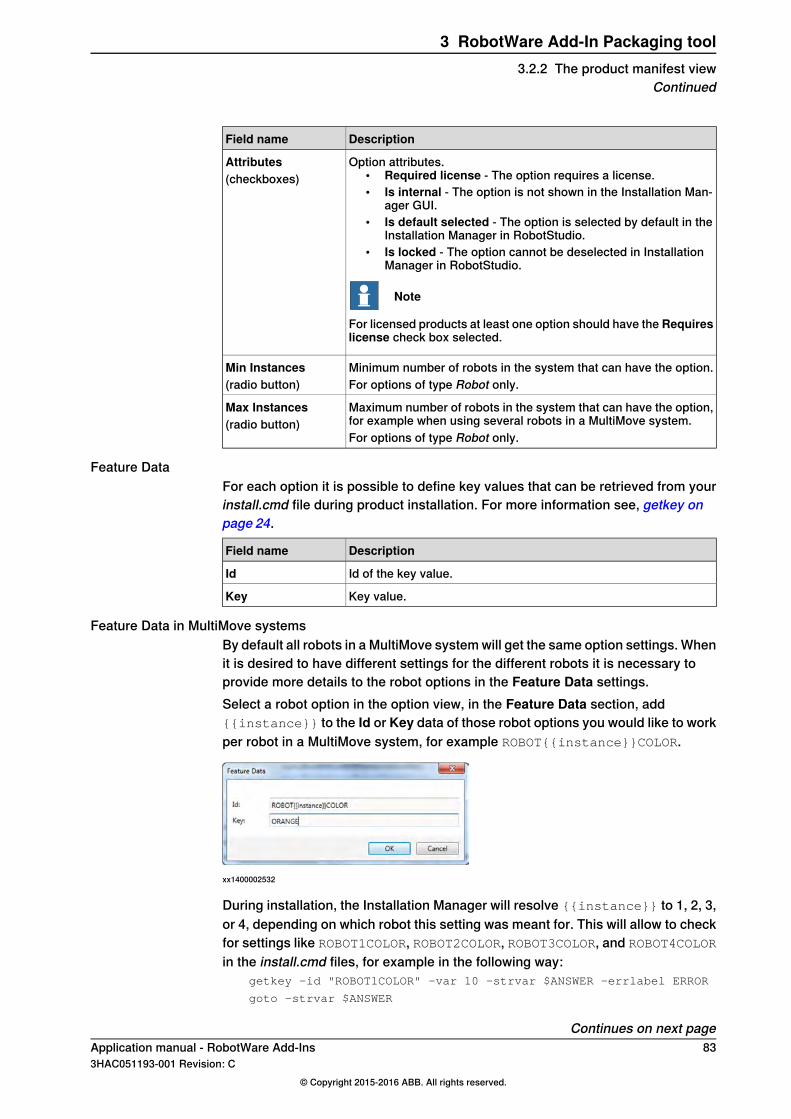
DescriptionField name
Option attributes.• Required license - The option requires a license.• Is internal - The option is not shown in the Installation Man-
ager GUI.• Is default selected - The option is selected by default in the
Installation Manager in RobotStudio.• Is locked - The option cannot be deselected in Installation
Manager in RobotStudio.
Note
For licensed products at least one option should have the Requireslicense check box selected.
Attributes(checkboxes)
Minimum number of robots in the system that can have the option.Min InstancesFor options of type Robot only.(radio button)
Maximum number of robots in the system that can have the option,for example when using several robots in a MultiMove system.
Max Instances(radio button)
For options of type Robot only.
Feature DataFor each option it is possible to define key values that can be retrieved from yourinstall.cmd file during product installation. For more information see, getkey onpage 24.
DescriptionField name
Id of the key value.Id
Key value.Key
Feature Data in MultiMove systemsBy default all robots in a MultiMove system will get the same option settings. Whenit is desired to have different settings for the different robots it is necessary toprovide more details to the robot options in the Feature Data settings.Select a robot option in the option view, in the Feature Data section, add{{instance}} to the Id or Key data of those robot options you would like to workper robot in a MultiMove system, for example ROBOT{{instance}}COLOR.
xx1400002532
During installation, the Installation Manager will resolve {{instance}} to 1, 2, 3,or 4, depending on which robot this setting was meant for. This will allow to checkfor settings like ROBOT1COLOR, ROBOT2COLOR, ROBOT3COLOR, and ROBOT4COLOR
in the install.cmd files, for example in the following way:getkey -id "ROBOT1COLOR" -var 10 -strvar $ANSWER -errlabel ERROR
goto -strvar $ANSWER
Continues on next pageApplication manual - RobotWare Add-Ins 833HAC051193-001 Revision: C
© Copyright 2015-2016 ABB. All rights reserved.
3 RobotWare Add-In Packaging tool3.2.2 The product manifest view
Continued
#ORANGE
config ...
#NEXT
#ERROR
Categories tabThe Categories tab is used to group and structure the options according to howthe Add-In should be displayed in the Installation Manager.It is not allowed to mix system options and robot options within the same category.When there are both system options and robot options in the Add-In, they mustbe put into separate categories.
Installation ManagerCategories tab
xx1400002383
xx1400002382
The following validation is performed:• Only the same option type can be grouped together in a category. I.e. an
option of the type System cannot be in the same category as an option oftype Robot.
Dependency tabThe Dependency tab is used to configure dependencies between options. Adependency specified for an option in an Add-In could be either of type ANDdependency, or of type OR dependency.For more information, see Dependencies on page 73.
Note
Is not supported to combine AND dependencies with OR dependencies in thesame group.
1 Select the source option. The source option is the option that should havea dependency to one or several other options.
2 In the list view select the options that the source option is dependent upon.
Continues on next page84 Application manual - RobotWare Add-Ins
3HAC051193-001 Revision: C© Copyright 2015-2016 ABB. All rights reserved.
3 RobotWare Add-In Packaging tool3.2.2 The product manifest viewContinued
Add the dependencies for the option to either the AND dependency optionslist or to the OR dependency options list.
Note
If you added a product dependency in the Product details tab, the optionsof that product will also be listed as options that the source option candepend upon.
3 Click Add Group to define the dependency.4 When the dependency has been defined it is listed in the dependency group
list. Use the Edit Group and Remove Group buttons to edit or remove adependency rule for an option dependency group.
Conflict tabThe Conflict tab is used to configure conflicts between options. This enables thatconflicting options cannot be selected at the same time in the Installation Manager.Add the conflicting options one by one and group them by clicking Add Group.Create a conflict group for each set of conflicting options.
Note
Sometimes, options specified in an OR dependency list are also in conflict witheach other. In that case they should also be added both to the OR dependencylist and to a conflict group.
Application manual - RobotWare Add-Ins 853HAC051193-001 Revision: C
© Copyright 2015-2016 ABB. All rights reserved.
3 RobotWare Add-In Packaging tool3.2.2 The product manifest view
Continued
3.2.3 The files and folders view
Files and foldersThe Files and Folders tab is used to create the robot package file.Check that all files and folders to be transferred to the controller during installationare in place. Files and folders can be added and removed using the user interface.The name of the installation folder is a combination of the Product Name and theProduct Version, that was filled into the Product Details tab.
Files and folders for converted Add-InsAfter converting an additional option to an Add-In, the Syskey directory can beremoved from the Files and Folders view, since it will no longer be used in theRobotWare 6 installation. It was required for the import of the additional option,since it enables the RobotWare Add-In Packaging tool to auto generate the optiondetails, but now the folder can be removed.The relkey.txt file can also be removed, since it is not used anymore.
86 Application manual - RobotWare Add-Ins3HAC051193-001 Revision: C
© Copyright 2015-2016 ABB. All rights reserved.
3 RobotWare Add-In Packaging tool3.2.3 The files and folders view
3.2.4 The signing certificate view
Signing CertificateThe Signing Certificate tab is used to add the publisher and licensing certificates.This information is mandatory for licensed options and is used during signing ofthe manifest and robot package files. For more information, see Digital signing onpage 76.
DescriptionField name
Choose Select from file to provide your certificates as .pfx filesSelect from fileChoose Select from Windows certificate store if your certificatesare installed on your PC.
Certificates fromWindows certificatestore(radio button)
The publisher certificate or certificate file to use for digital signing.Publisher Certificate
The password for your publisher certificate when specified as a .pfxfile.
Publisher CertificatePassword
The licensing certificate or certificate file for your product as providedby ABB.
Licensing Certificate
The password for your licensing certificate when specified as a .pfxfile.
Licensing CertificatePassword
URL to a timestamp server.Timestamp ServerFor more information, see Timestamping on page 76.
Application manual - RobotWare Add-Ins 873HAC051193-001 Revision: C
© Copyright 2015-2016 ABB. All rights reserved.
3 RobotWare Add-In Packaging tool3.2.4 The signing certificate view
3.3 Creating a new Add-In
3.3.1 Recommended working procedure
Basic stepsUse this procedure to create and package the Add-In.
SeeAction
Create a new empty project by clicking Newand then Project from the File menu.
1
Or:Select Project from an existing folder hier-archy, then the tool will try to generate defaultdata for the Add-In.
The product manifest view on page 81Enter all information about the Add-In in thetabs of the product manifest view.
2
The files and folders view on page 86Add all files and folders.3
The signing certificate view on page87For licensed options, add the publisher andlicensing certificates.
4
Build the Add-In by selecting Build Projectfrom the Build menu.
5
License Generator on page 91Generate a license using the License Generat-or.
6
Operating manual - RobotStudioVerify the Add-In by building a system usingthe Installation Manager in RobotStudio.
7
88 Application manual - RobotWare Add-Ins3HAC051193-001 Revision: C
© Copyright 2015-2016 ABB. All rights reserved.
3 RobotWare Add-In Packaging tool3.3.1 Recommended working procedure
3.4 Converting an Additional option to an Add-In
3.4.1 Introduction
GeneralThis section describes how to package an existing RobotWare 5 additional optionas a RobotWare 6 Add-In.The RobotWare Add-In Packaging tool will add information from the importedadditional option as a template Add-In. It is necessary to go through all the optiondetails one by one to verify that the content is correct.
Limitations• The RobotWare Add-In Packaging tool does not perform any migration of
the additional option to RobotWare 6, it is only a packaging tool. It ismandatory to first migrate the additional option to RobotWare 6, using themigration tool in RobotStudio.
• If the additional option has encrypted relkey.opt and .dat files, the files needsto be decrypted. The RobotWare Add-In Packaging tool will not be able toprocess any encrypted files.
Application manual - RobotWare Add-Ins 893HAC051193-001 Revision: C
© Copyright 2015-2016 ABB. All rights reserved.
3 RobotWare Add-In Packaging tool3.4.1 Introduction
3.4.2 Recommended working procedure
Basic procedureUse this procedure to convert an Additional option to an Add-In.
SeeAction
Convert the project by clicking Project froman existing folder hierarchy from the Filemenu.
1
The product manifest view on page 81Verify and correct all information about theAdd-In in the tabs of the product manifestview.
2
The files and folders view on page 86Verify that all files and folders are present.3
The signing certificate view on page87For licensed options, add the publisher andlicensing certificates.
4
Build the Add-In by selecting Build Projectfrom the Build menu.
5
License Generator on page 91Generate a license using the License Generat-or.
6
Operating manual - RobotStudioVerify the Add-In by building a system usingthe Installation Manager in RobotStudio.
7
90 Application manual - RobotWare Add-Ins3HAC051193-001 Revision: C
© Copyright 2015-2016 ABB. All rights reserved.
3 RobotWare Add-In Packaging tool3.4.2 Recommended working procedure
4 License Generator4.1 Introduction
GeneralThe License Generator generates license files for RobotWare Add-Ins.
Installation procedure
Action
Install the License Generator.1
Install the certificate for the License Generator. Use the password provided by ABB.2
Start the License Generator.3
Application manual - RobotWare Add-Ins 913HAC051193-001 Revision: C
© Copyright 2015-2016 ABB. All rights reserved.
4 License Generator4.1 Introduction
4.2 The user interface
4.2.1 The Preferences window
PreferencesBefore running the License Generator it is necessary to setup the preferences inthe Preferences window.
DescriptionField name
The location of the product manifest files (*.rmf).Product Location
The default location where the created licence files (*.rlf) shouldbe saved.
Default License Location
The authorization file, license file, (*.rlf) for the License Gener-ator provided by ABB.
Authorization File
Install/use the certificate provided by ABB, same certificate asfor the RobotWare Add-In Packaging tool.
• From Certificate Store - Select Certificates from storeif the certificates are already installed.
• From File - Select Certificates from file (*.pfx) to installthe certificates.
Signing Certificate(radio button)
Use the certificate password provided by ABB.Certificate Password
URL to a timestamp server.Timestamp ServerFor more information, see Timestamping on page 76.
92 Application manual - RobotWare Add-Ins3HAC051193-001 Revision: C
© Copyright 2015-2016 ABB. All rights reserved.
4 License Generator4.2.1 The Preferences window
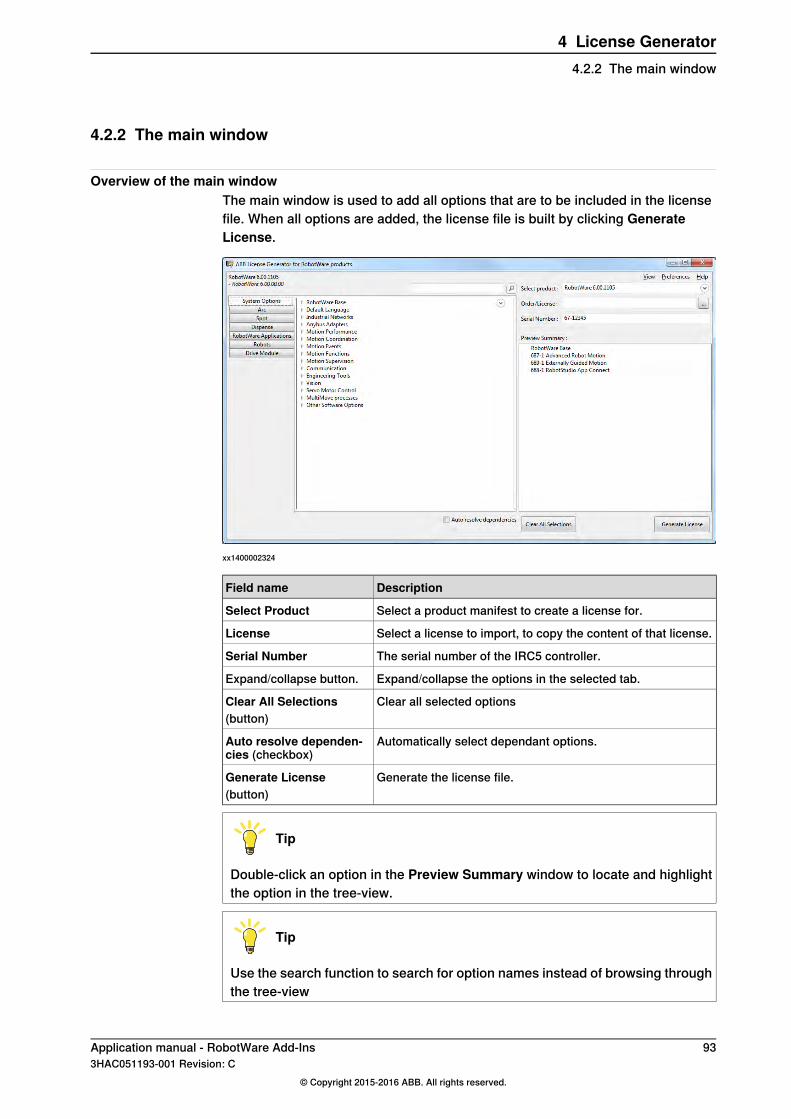
4.2.2 The main window
Overview of the main windowThe main window is used to add all options that are to be included in the licensefile. When all options are added, the license file is built by clicking GenerateLicense.
xx1400002324
DescriptionField name
Select a product manifest to create a license for.Select Product
Select a license to import, to copy the content of that license.License
The serial number of the IRC5 controller.Serial Number
Expand/collapse the options in the selected tab.Expand/collapse button.
Clear all selected optionsClear All Selections(button)
Automatically select dependant options.Auto resolve dependen-cies (checkbox)
Generate the license file.Generate License(button)
Tip
Double-click an option in the Preview Summary window to locate and highlightthe option in the tree-view.
Tip
Use the search function to search for option names instead of browsing throughthe tree-view
Application manual - RobotWare Add-Ins 933HAC051193-001 Revision: C
© Copyright 2015-2016 ABB. All rights reserved.
4 License Generator4.2.2 The main window
4.3 Creating the License
Creating a new licenseBefore creating a license it is necessary to setup the preferences in the Preferenceswindow, see The Preferences window on page 92.Use this procedure to create a new license.
Action
Select a product manifest to create the license for in the Select Product field.1
Type in the serial number of the controller.2
Select all options in the tree-view.3
Generate the license file by clicking the Generate License button.4
Verify the license by building a system using the Installation Manager in RobotStudio.5
Import and modify a licenseBefore creating a license it is necessary to setup the preferences in the Preferenceswindow, see The Preferences window on page 92.Use this procedure to import and modify a license.
Action
Select the product manifest you want to create the license for in the Select Productfield.
1
Select the license to import in the Order/License field.2Click Open to import the license.
Type in the serial number of the controller.3
(Optional)4Add or remove options in the tree-view.
Generate the license file by clicking the Generate License button.5
Verify the license by building a system using the Installation Manager.6
Viewing a licence fileIt is possible to view a license file. The content of the license file is displayed inthe Licence view window.Use this procedure to view a license.
Action
Click View on the main menu.1
Browse to the folder where the license is located.2
Select the license file and click Open.3
The content of the license file is displayed.4
94 Application manual - RobotWare Add-Ins3HAC051193-001 Revision: C
© Copyright 2015-2016 ABB. All rights reserved.
4 License Generator4.3 Creating the License
Index$, 22#, 22
CCAB_TASK_MODULES, 41CIRCLEMOVE, 15config, 22copy, 23
Ddefault argument values, 45delay, 23delete, 23direxist, 24
Eecho, 24eio.cfg, 44event log messages, 33event log texts, 34event log titles, 36example, 15, 19
Ffileexist, 24file structure, 17find_replace, 24
Ggetkey, 24goto, 25
Iifstr, 25ifvc, 25include, 25install.cmd, 22, 30
Lload modules, 41
Mmkdir, 26mmc.cfg, 45module, 31MoveCircle, 31
NNOSTEPIN, 31
Oonerror, 26
Ppick list, 45print, 26
Rrapid_delete_palette, 26rapid_delete_palette_instruction, 27RAPID code, 31RAPID rules, 45register, 27
Ssafety, 11selections, 14setenv, 28setstr, 29sys.cfg, 41system module, 31
Ttemplate files, 33text, 29text table files, 57timestamp, 29
Vvalidating .xml, 37version.xml, 19
Xxml
validating, 37
Application manual - RobotWare Add-Ins 953HAC051193-001 Revision: C
© Copyright 2015-2016 ABB. All rights reserved.
Index


Contact us
ABB ABDiscrete Automation and MotionRoboticsS-721 68 VÄSTERÅS, SwedenTelephone +46 (0) 21 344 400
ABB AS, RoboticsDiscrete Automation and MotionNordlysvegen 7, N-4340 BRYNE, NorwayBox 265, N-4349 BRYNE, NorwayTelephone: +47 51489000
ABB Engineering (Shanghai) Ltd.No. 4528 Kangxin HighwayPuDong DistrictSHANGHAI 201319, ChinaTelephone: +86 21 6105 6666
www.abb.com/robotics
3HAC
0511
93-0
01,R
evC,
en


![Robotware 6 External Presentation.ppt - ABB Ltd · Microsoft PowerPoint - Robotware 6 External Presentation.ppt [Compatibility Mode] Author: SENISAL Created Date: 12/16/2014 11:35:06](https://img.pdfslide.us/doc/110x75/5acb47877f8b9aa3298e4c55/robotware-6-external-abb-ltd-powerpoint-robotware-6-external-compatibility.jpg)