Embed Size (px)
Citation preview

www.deniban.netApplication Manual
Protection Equals Performance

www.deniban.net1-866-995-8122
Table of Contents
Measuring DeniBan 2
Arch Support 3
Ankle Bracing 4-5
Knee Bracing (MCL/ACL) 6-7
Lower Back Limitation 8-9
Shoulder Restriction 10
Quadriceps Support 11
Hamstring Support 12
Calf Support 13
Elbow Restriction 14
Wrist Support 15
Ulnar Deviation Restriction 15
MP Sprain Prevention 16
MP (Thumb) Sprain Prevention 17
www.deniban.netwww.deniban.net
Introduction
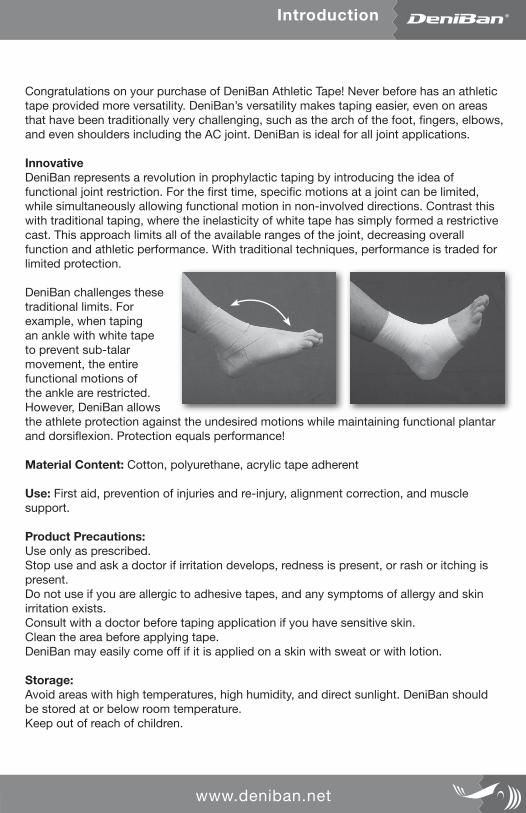
Congratulations on your purchase of DeniBan Athletic Tape! Never before has an athletic tape provided more versatility. DeniBan’s versatility makes taping easier, even on areas that have been traditionally very challenging, such as the arch of the foot, fingers, elbows, and even shoulders including the AC joint. DeniBan is ideal for all joint applications. InnovativeDeniBan represents a revolution in prophylactic taping by introducing the idea of functional joint restriction. For the first time, specific motions at a joint can be limited, while simultaneously allowing functional motion in non-involved directions. Contrast this with traditional taping, where the inelasticity of white tape has simply formed a restrictive cast. This approach limits all of the available ranges of the joint, decreasing overall function and athletic performance. With traditional techniques, performance is traded for limited protection. DeniBan challenges these traditional limits. For example, when taping an ankle with white tape to prevent sub-talar movement, the entire functional motions of the ankle are restricted. However, DeniBan allows the athlete protection against the undesired motions while maintaining functional plantar and dorsiflexion. Protection equals performance! Material Content: Cotton, polyurethane, acrylic tape adherent Use: First aid, prevention of injuries and re-injury, alignment correction, and muscle support. Product Precautions:Use only as prescribed. Stop use and ask a doctor if irritation develops, redness is present, or rash or itching is present. Do not use if you are allergic to adhesive tapes, and any symptoms of allergy and skin irritation exists. Consult with a doctor before taping application if you have sensitive skin. Clean the area before applying tape. DeniBan may easily come off if it is applied on a skin with sweat or with lotion.
Storage: Avoid areas with high temperatures, high humidity, and direct sunlight. DeniBan should be stored at or below room temperature. Keep out of reach of children.

www.deniban.net
Sizes and Styles of DeniBan:DeniBan is available in Original and Light styles. DeniBan Original is best in heavier-duty applications and for major joints of the body. It is available in 2” and 3” widths. These instructions provide the optimal width for each joint application, but with a little creativity you can generally substitute either thickness for a given taping application. DeniBan Light is best for lighter taping jobs such as extremities, and for muscle support functions. It is available in both 2” and 1.25” widths.
Self-Application:In many cases, self-application is easy with DeniBan!
Removal:DeniBan should be removed carefully, and you may want to use an adhesive tape remover on more sensitive skin. Do not pull the tape vertically to the skin. Fold the end of the tape back horizontally and then remove it in a gentle manner, while holding the skin with a finger of the other hand.
Measuring DeniBan:You will want to prepare the strips of DeniBan needed for your specific joint application ahead of time. The length you cut will be determined by the amount of tension at application. Using the specific joint instructions that follow, measure DeniBan in it’s resting state, then decrease the measurement using the following scale: Easy stretch – 90% of the resting length Moderate stretch – 80% of the resting length Firm stretch – 70% of the resting length As an example, if your resting length of DeniBan is 10”, and you will need a firmly stretched application, you would cut your strip of DeniBan at only 7”. As you stretch it upon application, it will reach the desired end length of 10”. This process becomes very quick once you become accustomed to using DeniBan. Remember, DeniBan generally uses much less tape at application then traditional white tape, and measuring it correctly will both minimize loss and maximize your usage per roll!
1-866-995-812202

www.deniban.net 03
Arch Support
03 05
Pull Firmly
01 02
04 06
Pull gently (be sure not to cut off blood supply).
01Apply the bifurcated (split) end of strip 1 (toe strip) around the base of the great toe. This is best done with original 2” Deniban.
02Moderately pull strip 1 posteriorly towards the lateral malleolus, covering the medial aspect of the foot.
03Apply strip 2 on the ball of the foot. Use 3” original Deniban.
05Apply strip 3 on the plantar surface of the 3rd to 5th metatarsal heads and finish by firmly pulling strip 3 posteriorly towards the base of the heel.
04Firmly pull strip 2 posteriorly towards the base of the heel, covering the medial aspect of the plantar of the foot.
06Apply strip 4 (anchor) around the mid-foot portion of the foot to secure strips 2 and 3.
Pull Firmly
Effective for plantar fasciitis and shin splints.
Use: Deniban Original 2” & 3”
1-866-995-8122
Pull Moderately
Flat Foot
* While taping, support of the arch becomes stronger in the plantar flexed position.
*
1-866-995-8122 www.deniban.net
Prevention of Ankle Inversion/Eversion
04
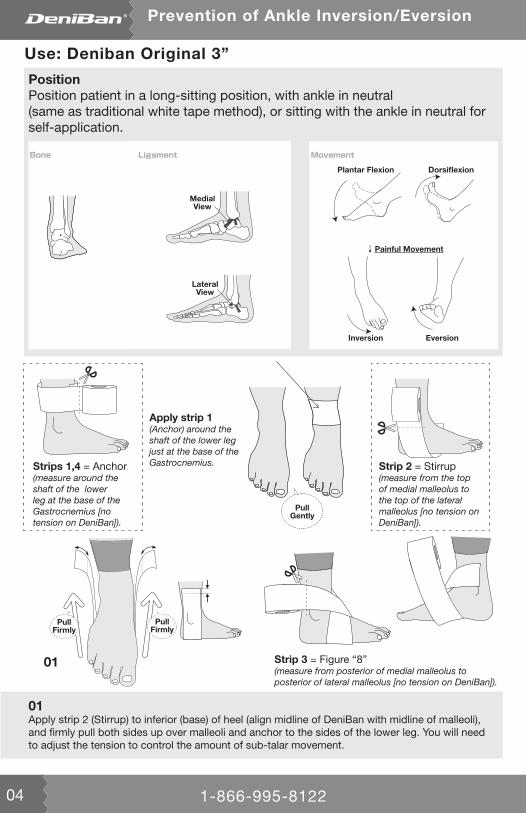
Position Position patient in a long-sitting position, with ankle in neutral (same as traditional white tape method), or sitting with the ankle in neutral for self-application.
01 Apply strip 2 (Stirrup) to inferior (base) of heel (align midline of DeniBan with midline of malleoli), and firmly pull both sides up over malleoli and anchor to the sides of the lower leg. You will need to adjust the tension to control the amount of sub-talar movement.
Strips 1,4 = Anchor (measure around the shaft of the lower leg at the base of the Gastrocnemius [no tension on DeniBan]).
Apply strip 1(Anchor) around the shaft of the lower leg just at the base of the Gastrocnemius.
01
Pull Firmly
Pull Firmly
Pull Gently
Strip 2 = Stirrup(measure from the top of medial malleolus to the top of the lateral malleolus [no tension on DeniBan]).
Strip 3 = Figure “8”(measure from posterior of medial malleolus to posterior of lateral malleolus [no tension on DeniBan]).
Use: Deniban Original 3”
Medial View
LateralView
Plantar Flexion Dorsiflexion
Painful Movement
Inversion Eversion
1-866-995-8122 www.deniban.net
Prevention of Ankle Inversion/Eversion
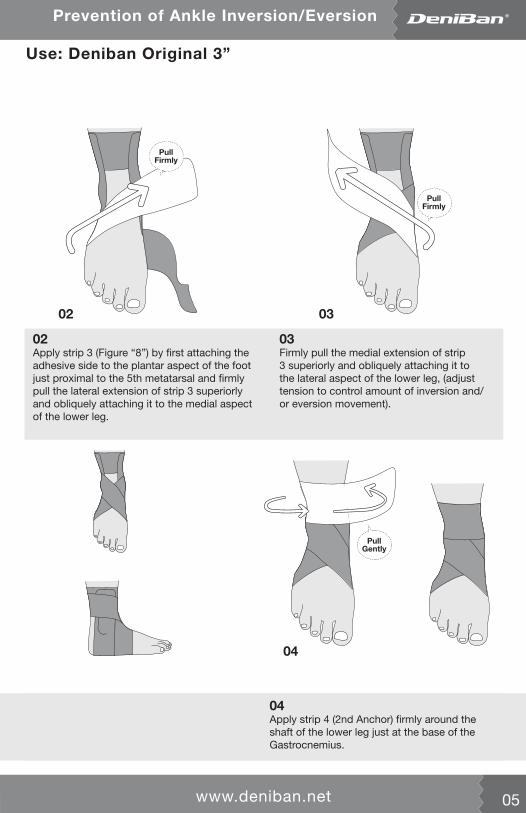
02 Apply strip 3 (Figure “8”) by first attaching the adhesive side to the plantar aspect of the foot just proximal to the 5th metatarsal and firmly pull the lateral extension of strip 3 superiorly and obliquely attaching it to the medial aspect of the lower leg.
02
03 Firmly pull the medial extension of strip 3 superiorly and obliquely attaching it to the lateral aspect of the lower leg, (adjust tension to control amount of inversion and/or eversion movement).
03
04 Apply strip 4 (2nd Anchor) firmly around the shaft of the lower leg just at the base of the Gastrocnemius.
Pull Gently
04
05
Pull Firmly
Use: Deniban Original 3”
Pull Firmly
1-866-995-8122 www.deniban.net
Prevention of MCL/ACL Injury
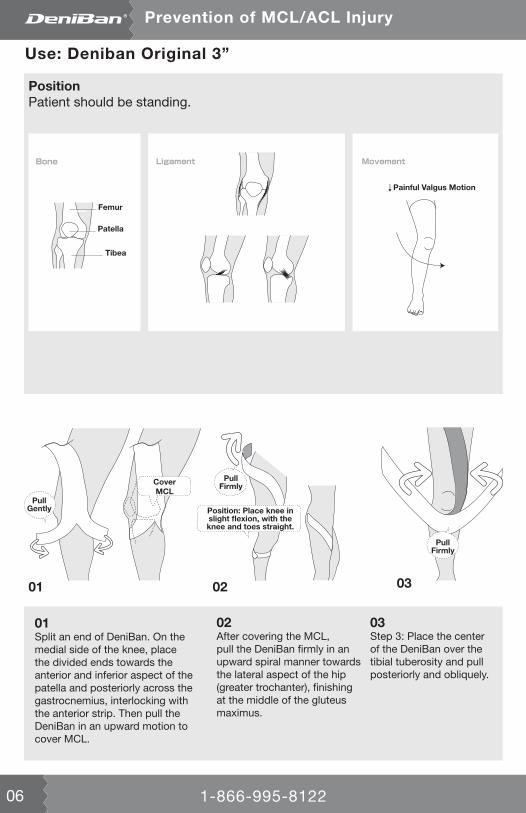
Position Patient should be standing.
01 Split an end of DeniBan. On the medial side of the knee, place the divided ends towards the anterior and inferior aspect of the patella and posteriorly across the gastrocnemius, interlocking with the anterior strip. Then pull the DeniBan in an upward motion to cover MCL.
01 02 03
Pull Gently
CoverMCL
02 After covering the MCL, pull the DeniBan firmly in an upward spiral manner towards the lateral aspect of the hip (greater trochanter), finishing at the middle of the gluteus maximus.
03 Step 3: Place the center of the DeniBan over the tibial tuberosity and pull posteriorly and obliquely.
Pull Firmly
Position: Place knee in slight flexion, with the knee and toes straight.
Pull Firmly
06
Use: Deniban Original 3”
Femur
Patella
Tibea
Painful Valgus Motion

1-866-995-8122 www.deniban.net
Prevention of MCL/ACL Injury
04 05 Continuing with the same strip of DeniBan, cover the biceps femoris tendon laterally and the semitendinosus and semimembranosus tendons medially, pulling posteriorly and superiorly in a diagonal fashion, crossing the popliteal fossa with both strips, and then spiral around the anterior aspect of the thigh, forming an X.
Pull Firmly
04 05 06 07
08 09
06Starting at the anteromedial aspect of the lower leg, spiral up laterally over the popliteal fossa, and then finish at the anterior aspect of the thigh.
07Repeat the same technique as step 6 but spiral up medially, forming an X with the preceding strip at the popliteal fossa.
08 Start with DeniBan covering popliteal fossa of the knee, and then split both ends of DeniBan to be placed around the patella.
09Place split portions of DeniBan around superior and inferior aspects of the Patella.
Pull Firmly
Anterior view of the
knee.
Posterior view of the
knee.
Pull Moderately
Pull Moderately
Pull Moderately
07
Use: Deniban Original 3”
1-866-995-8122 www.deniban.net
Limitation of Lower Back Flexion, Extension & Rotation
01
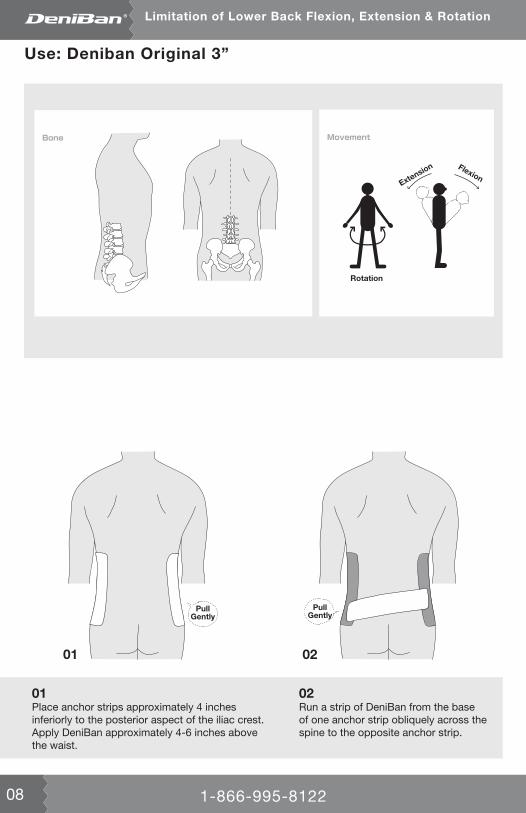
01Place anchor strips approximately 4 inches inferiorly to the posterior aspect of the iliac crest. Apply DeniBan approximately 4-6 inches above the waist.
02
02Run a strip of DeniBan from the base of one anchor strip obliquely across the spine to the opposite anchor strip.
Pull Gently
Pull Gently
08
Use: Deniban Original 3”
Rotation
Extension Flexion
1-866-995-8122 www.deniban.net
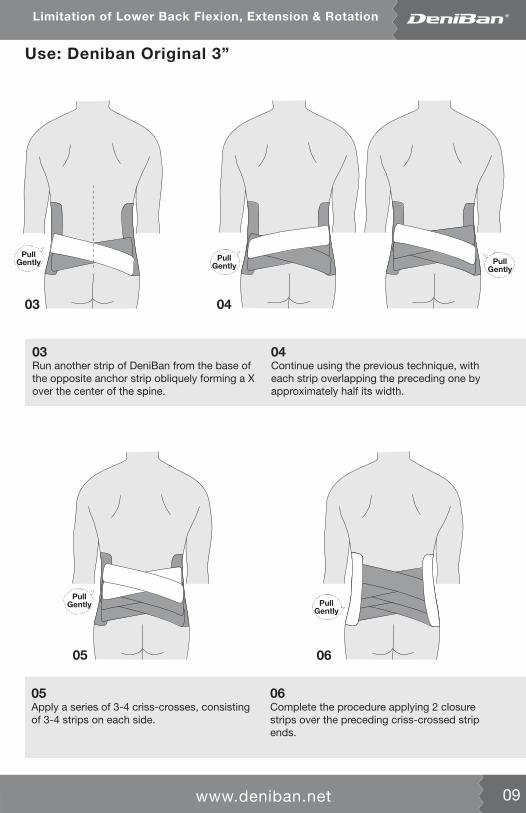
Limitation of Lower Back Flexion, Extension & Rotation
03
03Run another strip of DeniBan from the base of the opposite anchor strip obliquely forming a X over the center of the spine.
Pull Gently Pull
Gently Pull Gently
04
Pull Gently
05
Pull Gently
06
04Continue using the previous technique, with each strip overlapping the preceding one by approximately half its width.
05Apply a series of 3-4 criss-crosses, consisting of 3-4 strips on each side.
06Complete the procedure applying 2 closure strips over the preceding criss-crossed strip ends.
09
Use: Deniban Original 3”

1-866-995-8122 www.deniban.net10
Restriction of Shoulder Abduction and External Rotation
Restriction of Shoulder Abduction and External Rotation
01Start at middle of upper arm on the lateral side, and spiral medially towards the posterior aspect of the upper arm.
02/03Spiral up and run DeniBan just inferior to the acromion process and clavicle, towards the middle of the sternum.
Pull Firmly
Do not compress Brachial Artery!
01 0302
Use: Deniban Original 3”
External Rotation
Abduction
Painful Movement
1-866-995-8122 www.deniban.net
Support of Quadriceps Muscle Group
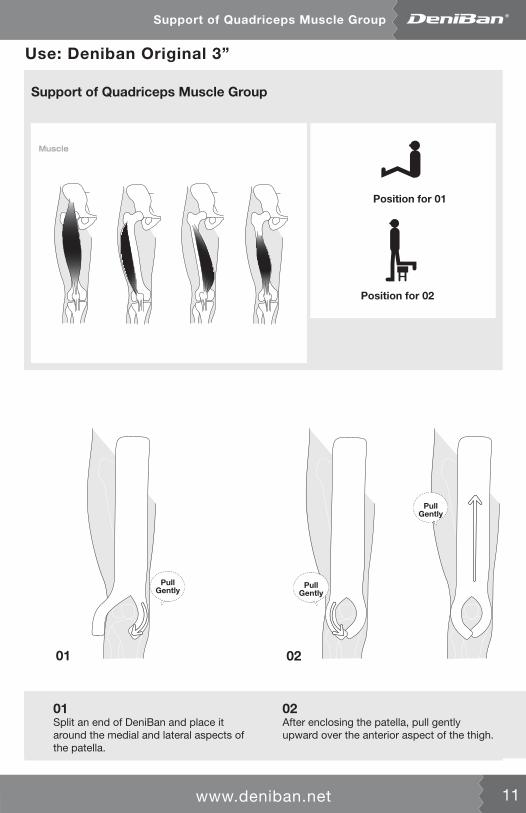
Support of Quadriceps Muscle Group
01Split an end of DeniBan and place it around the medial and lateral aspects of the patella.
01 02
Position for 01
Position for 02
02After enclosing the patella, pull gently upward over the anterior aspect of the thigh.
Pull Gently
Pull Gently
Pull Gently
11
Use: Deniban Original 3”
www.deniban.net1-866-995-812212
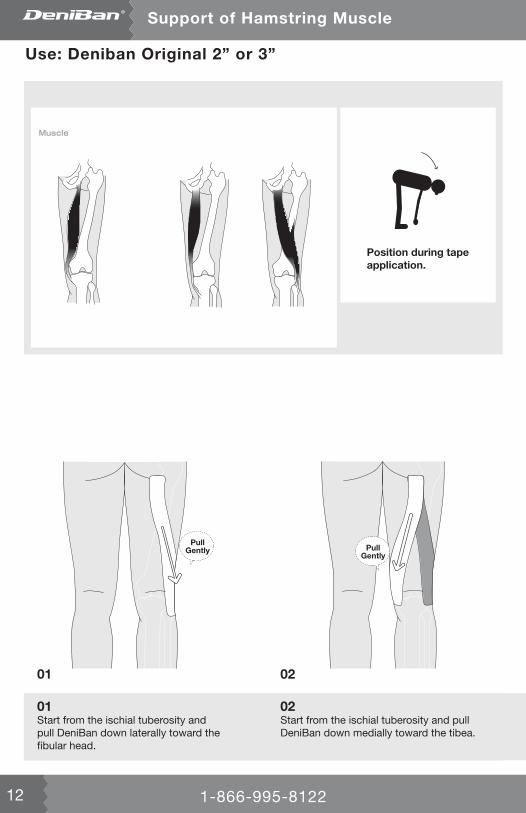
Support of Hamstring Muscle
01Start from the ischial tuberosity and pull DeniBan down laterally toward the fibular head.
01
Position during tape application.
Pull Gently Pull
Gently
02Start from the ischial tuberosity and pull DeniBan down medially toward the tibea.
02
Use: Deniban Original 2” or 3”
www.deniban.net
Use: Deniban Light 2” or Original 2”
13
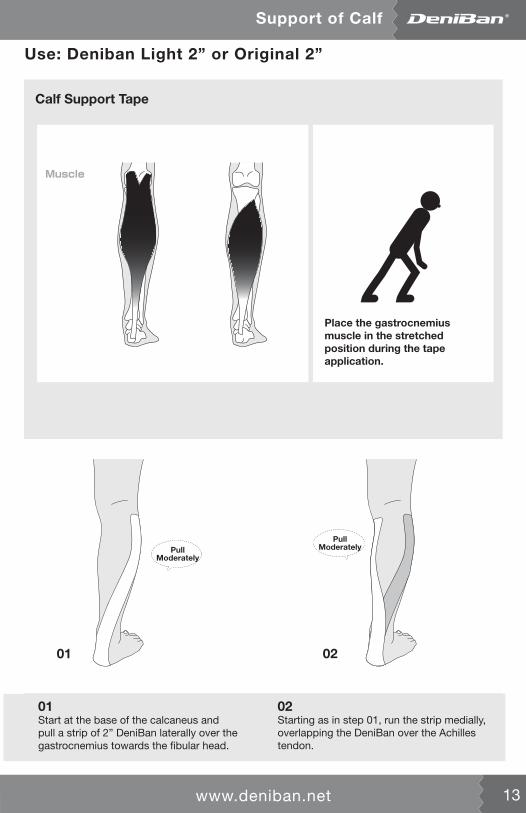
Support of Calf
Calf Support Tape
01
Place the gastrocnemius muscle in the stretched position during the tape application.
01Start at the base of the calcaneus and pull a strip of 2” DeniBan laterally over the gastrocnemius towards the fibular head.
02
02Starting as in step 01, run the strip medially, overlapping the DeniBan over the Achilles tendon.
Pull ModeratelyPull
Moderately
www.deniban.net

www.deniban.net1-866-995-812214
Restriction of Elbow Hyper-Extension
01Position the elbow in slight flexion for the tape application (the same as traditional white taping method).
01
Pull Gently
Restriction of Elbow Hyper-Extension
Pull Gently Pull
Gently
Pull Gently
Pull Gently
02Make appropriate longitudinal cuts at each end of the strip and anchor one end of the strip around the anterior portion of the forearm.
02
Pull Gently
03Firmly pull the strip proximally towards the anterior surface of the biceps brachii, and attach it around the mid-shaft of the arm.
04/05Apply another strip on the medial aspect of the forearm and firmly pull the strip proximally and laterally attaching it on the mid-shaft of the arm. Repeat this but start the strip on the lateral forearm. Firmly pull the strip proximally and medially, attaching it around the mid-shaft of the arm (these strips form an “X” across the anterior elbow joint).
06 07Place anchor strips around the proximal and distal aspects of the arm to secure the first three strips.
Use: Deniban Light 2” or Original 2”
Extension
FlexionAnterior View of the
Right Arm
www.deniban.net
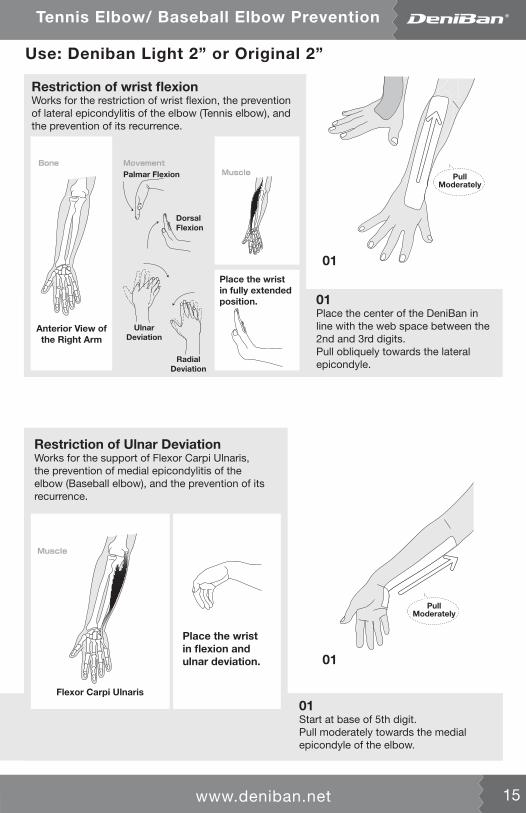
Tennis Elbow/ Baseball Elbow Prevention
Restriction of wrist flexion Works for the restriction of wrist flexion, the prevention of lateral epicondylitis of the elbow (Tennis elbow), and the prevention of its recurrence.
Restriction of Ulnar DeviationWorks for the support of Flexor Carpi Ulnaris, the prevention of medial epicondylitis of the elbow (Baseball elbow), and the prevention of its recurrence.
01Place the center of the DeniBan in line with the web space between the 2nd and 3rd digits. Pull obliquely towards the lateral epicondyle.
01Place the wrist in fully extended position.
01
Pull Moderately
01Start at base of 5th digit. Pull moderately towards the medial epicondyle of the elbow.
Pull Moderately
Place the wrist in flexion and ulnar deviation.
15
Use: Deniban Light 2” or Original 2”
www.deniban.net
Anterior View of the Right Arm
Palmar Flexion
DorsalFlexion
Ulnar Deviation
RadialDeviation
Flexor Carpi Ulnaris
www.deniban.net1-866-995-8122
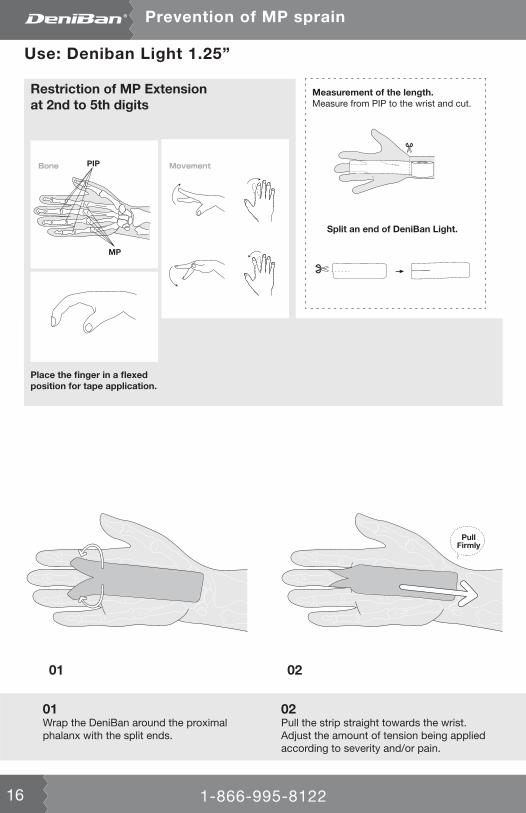
Prevention of MP sprain
01Wrap the DeniBan around the proximal phalanx with the split ends.
01
02Pull the strip straight towards the wrist. Adjust the amount of tension being applied according to severity and/or pain.
02
Pull Firmly
Restriction of MP Extensionat 2nd to 5th digits
Split an end of DeniBan Light.
Measurement of the length.Measure from PIP to the wrist and cut.
16
Place the finger in a flexed position for tape application.
Use: Deniban Light 1.25”
PIP
MP
www.deniban.net
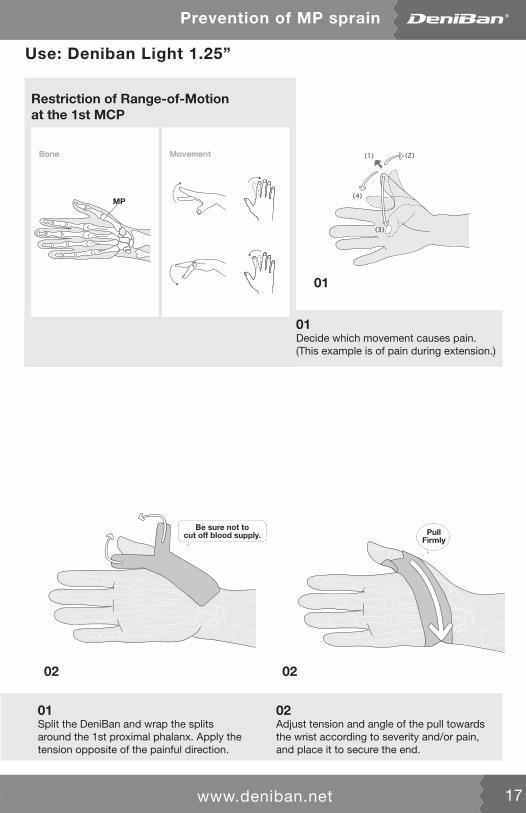
Prevention of MP sprain
17
01Split the DeniBan and wrap the splits around the 1st proximal phalanx. Apply the tension opposite of the painful direction.
02
02Adjust tension and angle of the pull towards the wrist according to severity and/or pain, and place it to secure the end.
02
01Decide which movement causes pain.(This example is of pain during extension.)
01
Restriction of Range-of-Motionat the 1st MCP
Be sure not tocut off blood supply. Pull
Firmly
Use: Deniban Light 1.25”
www.deniban.net
MP

DeniBan, Inc.P.O. Box 229
Harrisburg, OR 97446
Phone: 541-995-8122Fax: 541-995-8050
Toll-free: 866-995-8122e-mail: [email protected]