Embed Size (px)
Citation preview
Apple ProRes RAWWhite Paper April 2018

2Apple ProRes RAW April 2018
Contents
Introduction 3
About Raw Video 4
Data Rate 6
Performance 8
Using ProRes RAW in Final Cut Pro 12
Using Log Conversion with Built-in Camera LUTs 13
Using Log Conversion with Custom LUT Effects 17
Grading Directly Without LUTs 19
Conclusion 20

3Apple ProRes RAW April 2018
Introduction
In 2007, Apple introduced the Apple ProRes codec family, providing an unparalleled combination of real-time, multistream editing performance, impressive image-quality preservation, and reduced storage rates for high-bit-depth 4:2:2 and 4:4:4:4 video.
Apple ProRes RAW is based on the same principles and underlying technology as existing ProRes codecs, but is applied to a camera sensor’s pristine raw image data rather than conventional image pixels. ProRes RAW brings to raw video the same great performance, quality, and ease of use that ProRes has brought to conventional video, in a format ideal for high-dynamic-range (HDR) content creation in Final Cut Pro X.
4Apple ProRes RAW April 2018
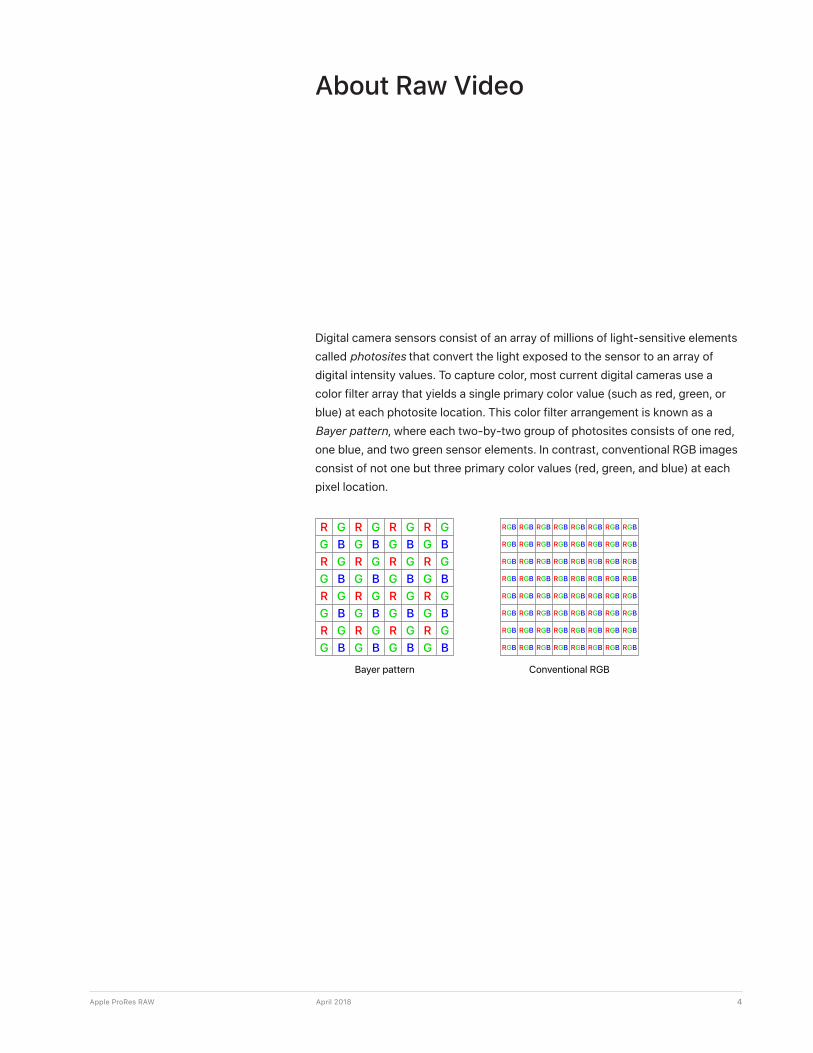
Digital camera sensors consist of an array of millions of light-sensitive elements called photosites that convert the light exposed to the sensor to an array of digital intensity values. To capture color, most current digital cameras use a color filter array that yields a single primary color value (such as red, green, or blue) at each photosite location. This color filter arrangement is known as a Bayer pattern, where each two-by-two group of photosites consists of one red, one blue, and two green sensor elements. In contrast, conventional RGB images consist of not one but three primary color values (red, green, and blue) at each pixel location.
R G R G R G R GG B G B G B G BR G R G R G R GG B G B G B G BR G R G R G R GG B G B G B G BR G R G R G R GG B G B G B G B
RGB RGB RGB RGB RGB RGB RGB RGB
RGB RGB RGB RGB RGB RGB RGB RGB
RGB RGB RGB RGB RGB RGB RGB RGB
RGB RGB RGB RGB RGB RGB RGB RGB
RGB RGB RGB RGB RGB RGB RGB RGB
RGB RGB RGB RGB RGB RGB RGB RGB
RGB RGB RGB RGB RGB RGB RGB RGB
RGB RGB RGB RGB RGB RGB RGB RGB
Bayer pattern Conventional RGB
About Raw Video
5Apple ProRes RAW April 2018
About Raw Video
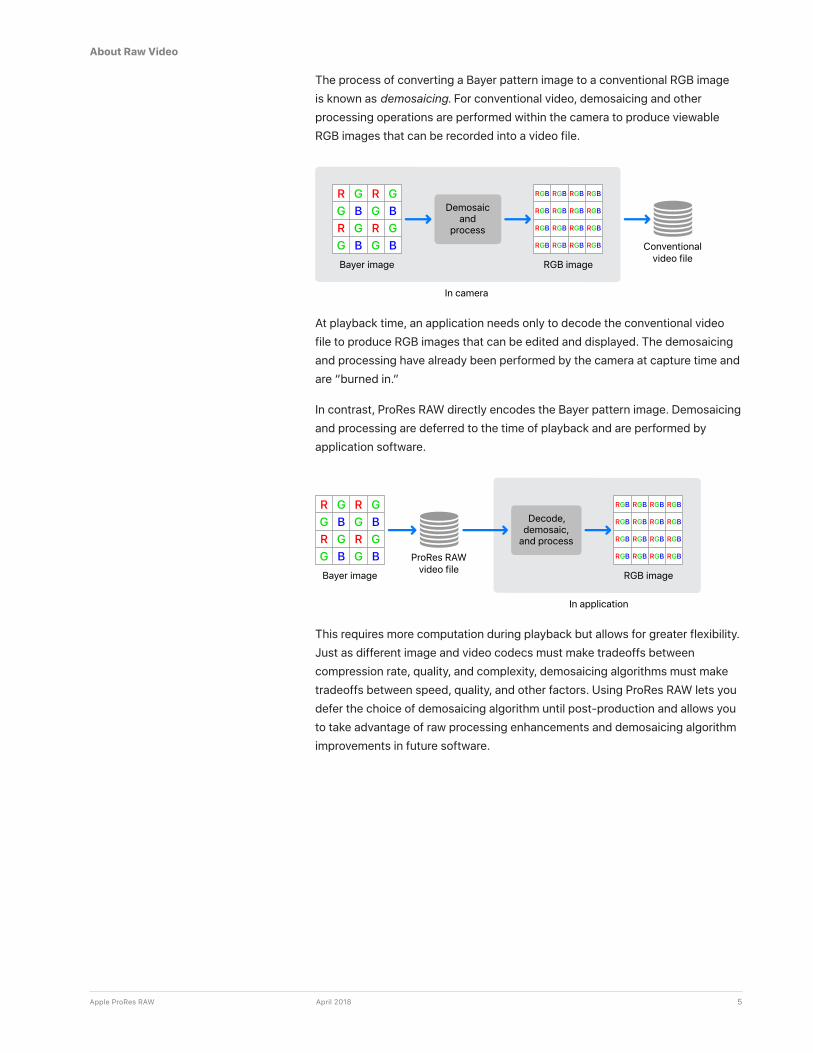
The process of converting a Bayer pattern image to a conventional RGB image is known as demosaicing. For conventional video, demosaicing and other processing operations are performed within the camera to produce viewable RGB images that can be recorded into a video file.
R G R GG B G BR G R GG B G B
RGB RGB RGB RGB
RGB RGB RGB RGB
RGB RGB RGB RGB
RGB RGB RGB RGB
Bayer image RGB image
Conventionalvideo file
Demosaicand
process
In camera
At playback time, an application needs only to decode the conventional video file to produce RGB images that can be edited and displayed. The demosaicing and processing have already been performed by the camera at capture time and are “burned in.”
In contrast, ProRes RAW directly encodes the Bayer pattern image. Demosaicing and processing are deferred to the time of playback and are performed by application software.
RGB RGB RGB RGB
RGB RGB RGB RGB
RGB RGB RGB RGB
RGB RGB RGB RGB
RGB image
Decode,demosaic,
and process
In application
ProRes RAWvideo file
R G R GG B G BR G R GG B G BBayer image
This requires more computation during playback but allows for greater flexibility. Just as different image and video codecs must make tradeoffs between compression rate, quality, and complexity, demosaicing algorithms must make tradeoffs between speed, quality, and other factors. Using ProRes RAW lets you defer the choice of demosaicing algorithm until post-production and allows you to take advantage of raw processing enhancements and demosaicing algorithm improvements in future software.

6Apple ProRes RAW April 2018
Data Rate
ProRes RAW is available at two compression levels: Apple ProRes RAW and Apple ProRes RAW HQ. Both achieve excellent preservation of raw video content, with additional quality available at the higher data rate of Apple ProRes RAW HQ. Compression-related visible artifacts are very unlikely with Apple ProRes RAW, and extremely unlikely with Apple ProRes RAW HQ.
As is the case with existing ProRes codecs, the data rates of ProRes RAW are proportional to frame rate and resolution. ProRes RAW data rates also vary according to image content, but to a greater degree than ProRes data rates.
With most video codecs, including the existing ProRes family, a technique known as rate control is used to dynamically adjust compression to meet a target data rate. This means that, in practice, the amount of compression—hence quality—varies from frame to frame depending on the image content. In contrast, ProRes RAW is designed to maintain constant quality and pristine image fidelity for all frames. As a result, images with greater detail or sensor noise are encoded at higher data rates and produce larger file sizes.
7Apple ProRes RAW April 2018
Data Rate
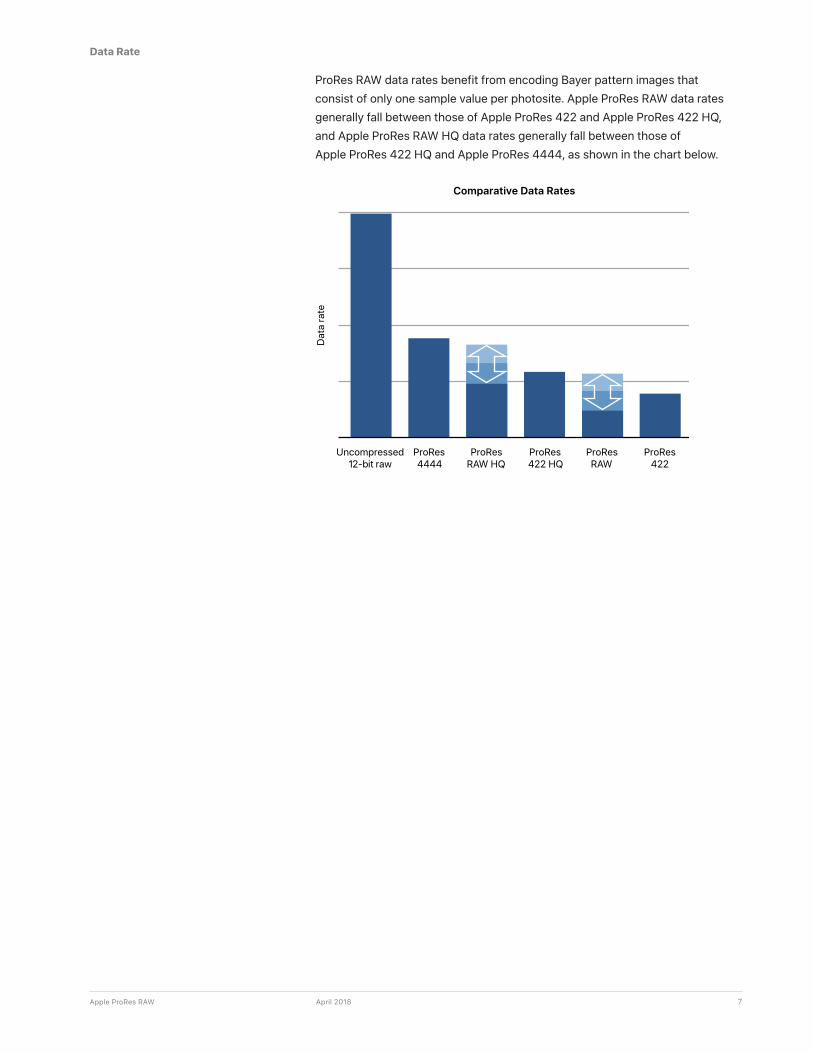
ProRes RAW data rates benefit from encoding Bayer pattern images that consist of only one sample value per photosite. Apple ProRes RAW data rates generally fall between those of Apple ProRes 422 and Apple ProRes 422 HQ, and Apple ProRes RAW HQ data rates generally fall between those of Apple ProRes 422 HQ and Apple ProRes 4444, as shown in the chart below.
Uncompressed12-bit raw
ProRes 422 HQ
ProRes 4444
ProResRAW HQ
ProResRAW
ProRes422
Comparative Data Rates
Dat
a ra
te
8Apple ProRes RAW April 2018
Performance
Like the existing ProRes codec family, ProRes RAW is designed for speed. Despite the additional computational demands of raw video editing, ProRes RAW brings to raw video the same first-rate performance and ease of editing that ProRes has brought to conventional video.
Raw video playback requires not only decoding the video bitstream but also demosaicing the decoded raw image. Final Cut Pro includes a streamlined and GPU-optimized demosaicing algorithm designed to meet the performance demands of real-time, multistream video editing.
9Apple ProRes RAW April 2018
Performance
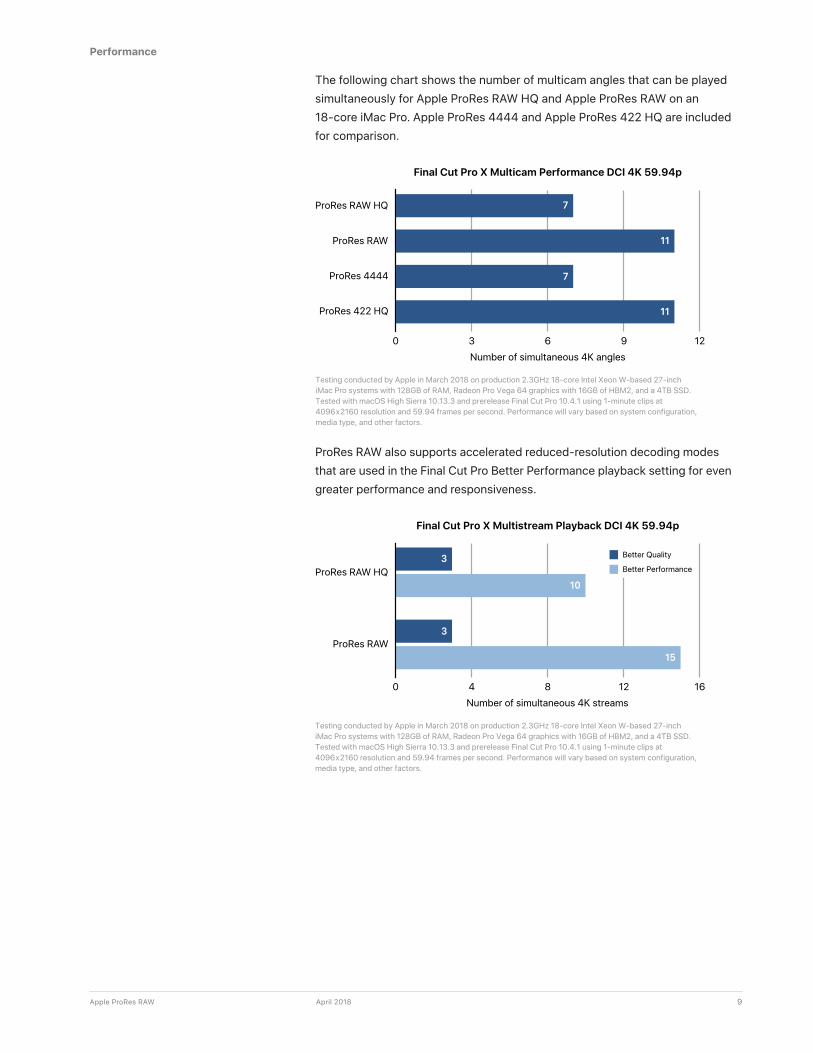
The following chart shows the number of multicam angles that can be played simultaneously for Apple ProRes RAW HQ and Apple ProRes RAW on an 18-core iMac Pro. Apple ProRes 4444 and Apple ProRes 422 HQ are included for comparison.
ProRes RAW HQ
ProRes 4444
ProRes 422 HQ
0 63 9 12
Final Cut Pro X Multicam Performance DCI 4K 59.94p
Number of simultaneous 4K angles
ProRes RAW
7
11
7
11
Testing conducted by Apple in March 2018 on production 2.3GHz 18-core Intel Xeon W-based 27-inchiMac Pro systems with 128GB of RAM, Radeon Pro Vega 64 graphics with 16GB of HBM2, and a 4TB SSD. Tested with macOS High Sierra 10.13.3 and prerelease Final Cut Pro 10.4.1 using 1-minute clips at 4096x2160 resolution and 59.94 frames per second. Performance will vary based on system configuration, media type, and other factors.
ProRes RAW also supports accelerated reduced-resolution decoding modes that are used in the Final Cut Pro Better Performance playback setting for even greater performance and responsiveness.
ProRes RAW HQ
ProRes RAW
0 84 12 16
Final Cut Pro X Multistream Playback DCI 4K 59.94p
Number of simultaneous 4K streams
3
10
3
15
Better Quality
Better Performance
Testing conducted by Apple in March 2018 on production 2.3GHz 18-core Intel Xeon W-based 27-inch iMac Pro systems with 128GB of RAM, Radeon Pro Vega 64 graphics with 16GB of HBM2, and a 4TB SSD. Tested with macOS High Sierra 10.13.3 and prerelease Final Cut Pro 10.4.1 using 1-minute clips at 4096x2160 resolution and 59.94 frames per second. Performance will vary based on system configuration, media type, and other factors.
10Apple ProRes RAW April 2018
Performance
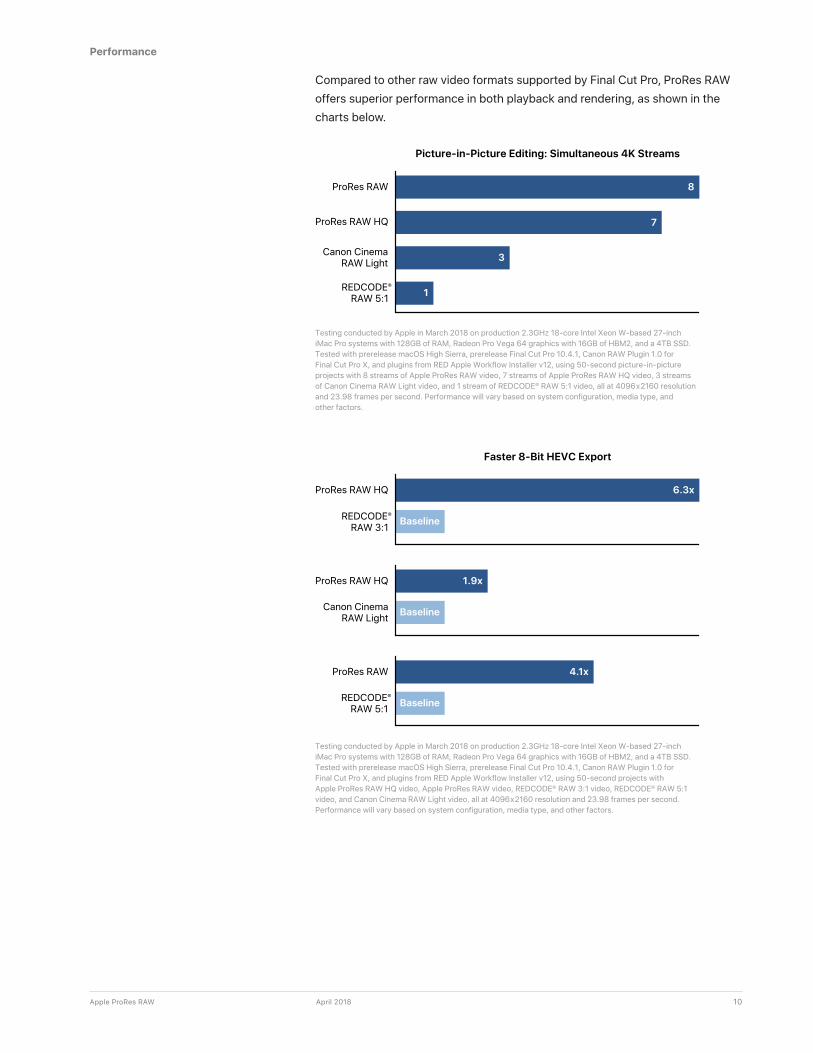
Compared to other raw video formats supported by Final Cut Pro, ProRes RAW offers superior performance in both playback and rendering, as shown in the charts below.
1
3
7
8
REDCODE®
RAW 5:1
ProRes RAW HQ
ProRes RAW
Picture-in-Picture Editing: Simultaneous 4K Streams
Canon CinemaRAW Light
Testing conducted by Apple in March 2018 on production 2.3GHz 18-core Intel Xeon W-based 27-inchiMac Pro systems with 128GB of RAM, Radeon Pro Vega 64 graphics with 16GB of HBM2, and a 4TB SSD. Tested with prerelease macOS High Sierra, prerelease Final Cut Pro 10.4.1, Canon RAW Plugin 1.0 forFinal Cut Pro X, and plugins from RED Apple Workflow Installer v12, using 50-second picture-in-picture projects with 8 streams of Apple ProRes RAW video, 7 streams of Apple ProRes RAW HQ video, 3 streamsof Canon Cinema RAW Light video, and 1 stream of REDCODE® RAW 5:1 video, all at 4096x2160 resolution and 23.98 frames per second. Performance will vary based on system configuration, media type, andother factors.
Baseline
6.3x
REDCODE®
RAW 3:1
ProRes RAW HQ
Faster 8-Bit HEVC Export
Baseline
1.9x
Canon CinemaRAW Light
ProRes RAW HQ
Baseline
4.1x
REDCODE®
RAW 5:1
ProRes RAW
Testing conducted by Apple in March 2018 on production 2.3GHz 18-core Intel Xeon W-based 27-inchiMac Pro systems with 128GB of RAM, Radeon Pro Vega 64 graphics with 16GB of HBM2, and a 4TB SSD. Tested with prerelease macOS High Sierra, prerelease Final Cut Pro 10.4.1, Canon RAW Plugin 1.0 forFinal Cut Pro X, and plugins from RED Apple Workflow Installer v12, using 50-second projects withApple ProRes RAW HQ video, Apple ProRes RAW video, REDCODE® RAW 3:1 video, REDCODE® RAW 5:1 video, and Canon Cinema RAW Light video, all at 4096x2160 resolution and 23.98 frames per second. Performance will vary based on system configuration, media type, and other factors.
11Apple ProRes RAW April 2018
Performance
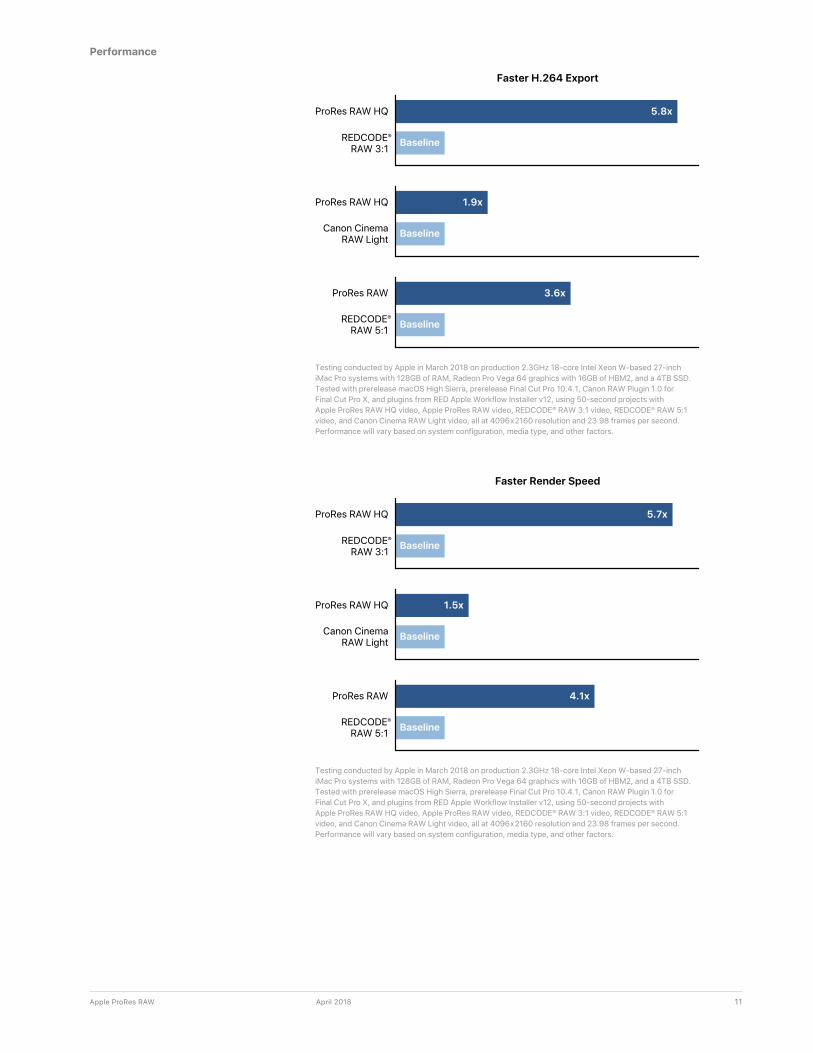
Baseline
5.8x
REDCODE®
RAW 3:1
ProRes RAW HQ
Faster H.264 Export
Baseline
1.9x
Canon CinemaRAW Light
ProRes RAW HQ
Baseline
3.6x
REDCODE®
RAW 5:1
ProRes RAW
Testing conducted by Apple in March 2018 on production 2.3GHz 18-core Intel Xeon W-based 27-inchiMac Pro systems with 128GB of RAM, Radeon Pro Vega 64 graphics with 16GB of HBM2, and a 4TB SSD. Tested with prerelease macOS High Sierra, prerelease Final Cut Pro 10.4.1, Canon RAW Plugin 1.0 forFinal Cut Pro X, and plugins from RED Apple Workflow Installer v12, using 50-second projects withApple ProRes RAW HQ video, Apple ProRes RAW video, REDCODE® RAW 3:1 video, REDCODE® RAW 5:1 video, and Canon Cinema RAW Light video, all at 4096x2160 resolution and 23.98 frames per second. Performance will vary based on system configuration, media type, and other factors.
Baseline
5.7x
REDCODE®
RAW 3:1
ProRes RAW HQ
Faster Render Speed
Baseline
1.5x
Canon CinemaRAW Light
ProRes RAW HQ
Baseline
4.1x
REDCODE®
RAW 5:1
ProRes RAW
Testing conducted by Apple in March 2018 on production 2.3GHz 18-core Intel Xeon W-based 27-inchiMac Pro systems with 128GB of RAM, Radeon Pro Vega 64 graphics with 16GB of HBM2, and a 4TB SSD. Tested with prerelease macOS High Sierra, prerelease Final Cut Pro 10.4.1, Canon RAW Plugin 1.0 forFinal Cut Pro X, and plugins from RED Apple Workflow Installer v12, using 50-second projects withApple ProRes RAW HQ video, Apple ProRes RAW video, REDCODE® RAW 3:1 video, REDCODE® RAW 5:1 video, and Canon Cinema RAW Light video, all at 4096x2160 resolution and 23.98 frames per second. Performance will vary based on system configuration, media type, and other factors.

12Apple ProRes RAW April 2018
ProRes RAW is an ideal format for creating wide-gamut, high-dynamic-range (HDR) content because it captures the full dynamic range and color gamut of the camera sensor. If you want to create standard-dynamic-range (SDR) content, such as high-definition broadcast (Rec. 709) video, the high dynamic range of a ProRes RAW source file must be restricted to a dynamic range suitable for viewing on an SDR display. This process is called tone mapping.
There are three primary ways to use ProRes RAW with Final Cut Pro in your post-production workflow:
• Using Log Conversion with Built-in Camera LUTs
• Using Log Conversion with Custom LUT Effects
• Grading Directly Without LUTs
For more information about working with HDR in Final Cut Pro, see Final Cut Pro X Help and Working with Wide Color Gamut and High Dynamic Range in Final Cut Pro X.
Using ProRes RAW in Final Cut Pro
13Apple ProRes RAW April 2018
Using ProRes RAW in Final Cut Pro
Using Log Conversion with Built-in Camera LUTsMost professional video cameras today support recording in a log format. Using log enables a higher dynamic range of light levels to be represented compared to standard video gamma functions. Because many color-grading workflows are based on working with log video, Final Cut Pro can automatically apply a log conversion setting to ProRes RAW media files during import. With log conversion applied, ProRes RAW files behave just like conventional log video and can be edited the same way.
Using built-in log conversion allows you to color correct ProRes RAW video as if it were SDR or HDR video, depending on your library color-processing setting. When your library is set to Standard color processing, you can color correct ProRes RAW video as if it were SDR video. With your library set to Wide Gamut HDR, you can color correct ProRes RAW video as if it were HDR video.
RAW to Log Conversion Setting
Decoding ProRes RAW directly results in HDR linear values rather than log. The Raw to Log Conversion setting in the Info inspector applies custom log functions created by different camera vendors so that you can color correct your ProRes RAW files as log video. Because ProRes RAW files contain metadata that identifies the camera manufacturer, Final Cut Pro can apply the correct log function (such as Canon Log 2, Panasonic V-Log, or Sony S-Log3) during import.
You can also manually adjust the RAW to Log Conversion setting in the General, Extended, or Settings view of the Info inspector.
14Apple ProRes RAW April 2018
Using ProRes RAW in Final Cut Pro
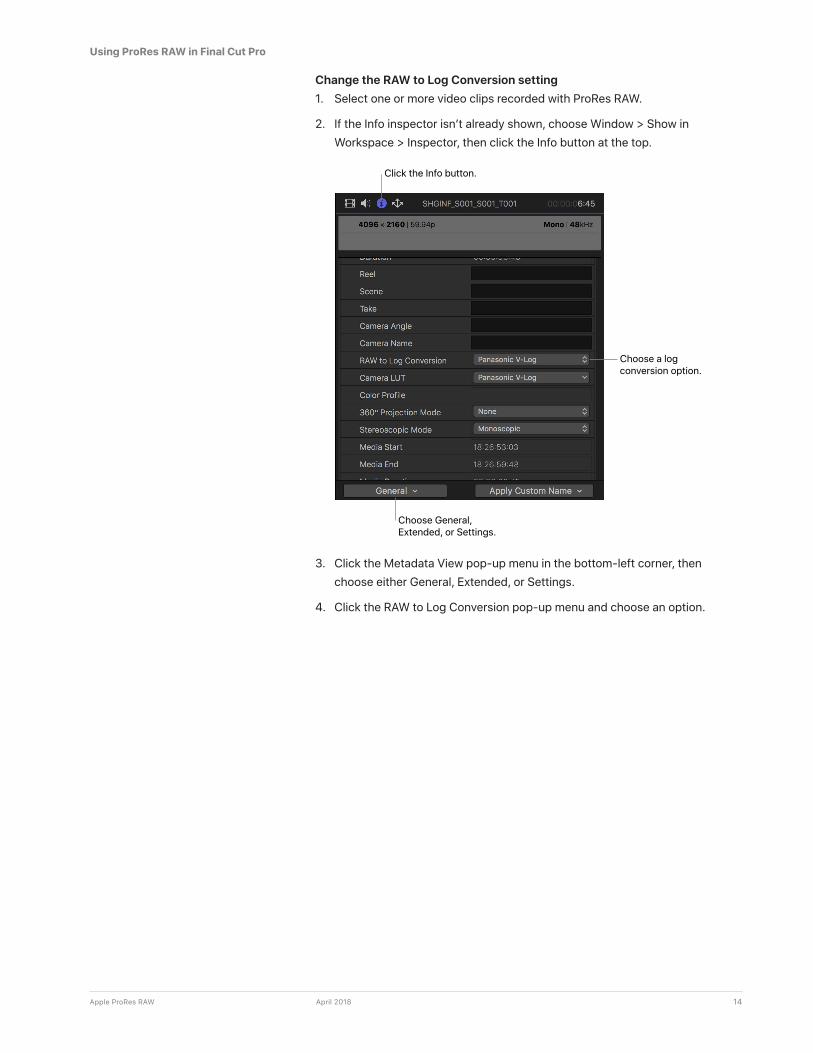
Change the RAW to Log Conversion setting1. Select one or more video clips recorded with ProRes RAW.
2. If the Info inspector isn’t already shown, choose Window > Show in Workspace > Inspector, then click the Info button at the top.
Choose a log conversion option.
Click the Info button.
Choose General, Extended, or Settings.
3. Click the Metadata View pop-up menu in the bottom-left corner, then choose either General, Extended, or Settings.
4. Click the RAW to Log Conversion pop-up menu and choose an option.
15Apple ProRes RAW April 2018
Using ProRes RAW in Final Cut Pro
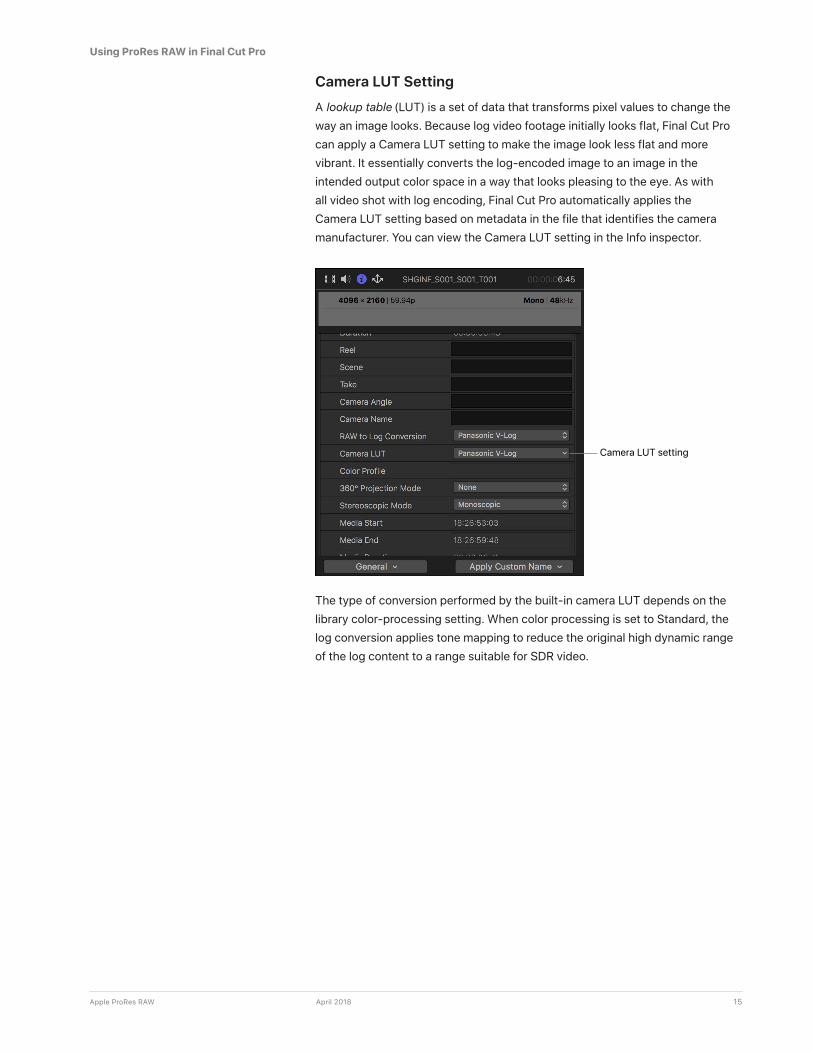
Camera LUT Setting
A lookup table (LUT) is a set of data that transforms pixel values to change the way an image looks. Because log video footage initially looks flat, Final Cut Pro can apply a Camera LUT setting to make the image look less flat and more vibrant. It essentially converts the log-encoded image to an image in the intended output color space in a way that looks pleasing to the eye. As with all video shot with log encoding, Final Cut Pro automatically applies the Camera LUT setting based on metadata in the file that identifies the camera manufacturer. You can view the Camera LUT setting in the Info inspector.
Camera LUT setting
The type of conversion performed by the built-in camera LUT depends on the library color-processing setting. When color processing is set to Standard, the log conversion applies tone mapping to reduce the original high dynamic range of the log content to a range suitable for SDR video.
16Apple ProRes RAW April 2018
Using ProRes RAW in Final Cut Pro
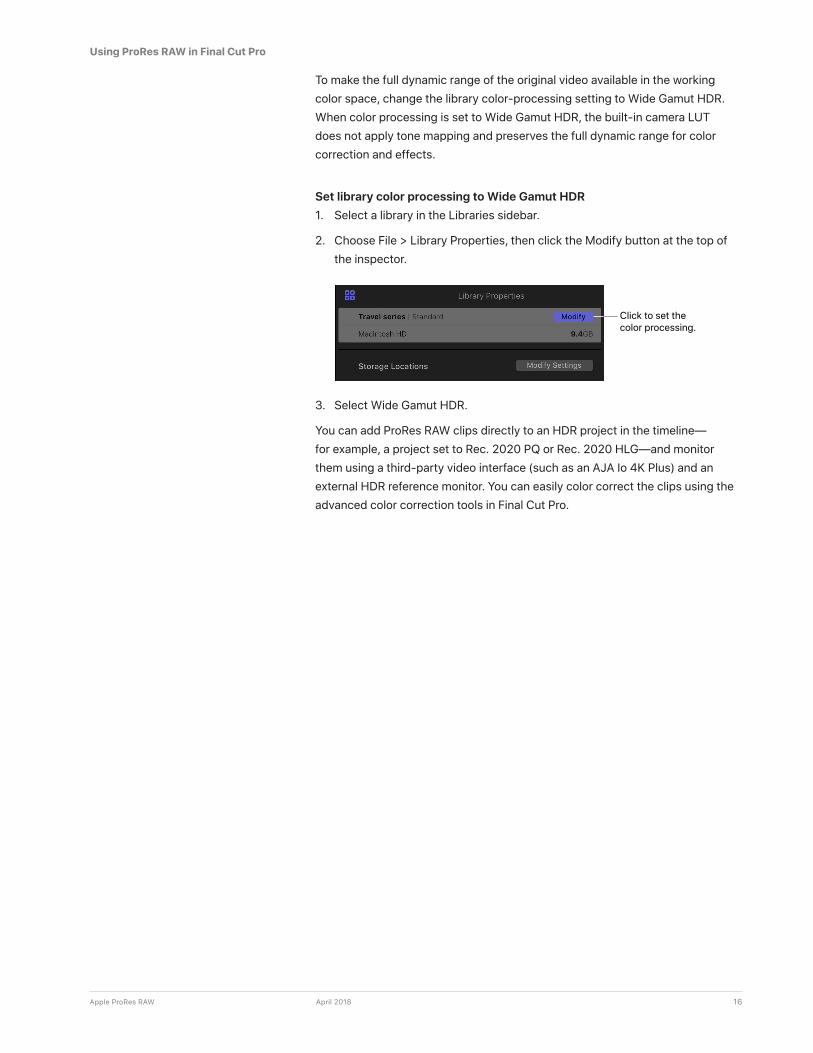
To make the full dynamic range of the original video available in the working color space, change the library color-processing setting to Wide Gamut HDR. When color processing is set to Wide Gamut HDR, the built-in camera LUT does not apply tone mapping and preserves the full dynamic range for color correction and effects.
Set library color processing to Wide Gamut HDR1. Select a library in the Libraries sidebar.
2. Choose File > Library Properties, then click the Modify button at the top of the inspector.
Click to set the color processing.
3. Select Wide Gamut HDR.
You can add ProRes RAW clips directly to an HDR project in the timeline— for example, a project set to Rec. 2020 PQ or Rec. 2020 HLG—and monitor them using a third-party video interface (such as an AJA Io 4K Plus) and an external HDR reference monitor. You can easily color correct the clips using the advanced color correction tools in Final Cut Pro.
17Apple ProRes RAW April 2018
Using ProRes RAW in Final Cut Pro
Using Log Conversion with Custom LUT EffectsThis workflow employs a Custom LUT effect (instead of a built-in camera LUT) and allows you to color correct ProRes RAW video as though it were log video.
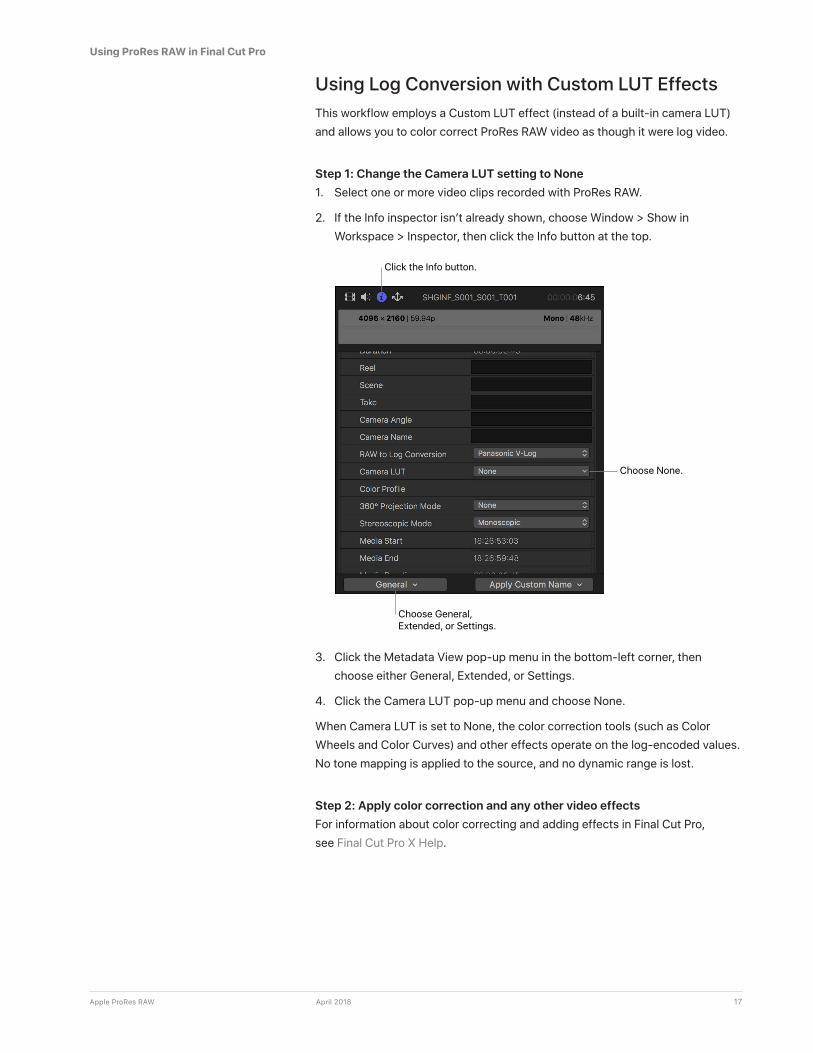
Step 1: Change the Camera LUT setting to None1. Select one or more video clips recorded with ProRes RAW.
2. If the Info inspector isn’t already shown, choose Window > Show in Workspace > Inspector, then click the Info button at the top.
Choose None.
Click the Info button.
Choose General, Extended, or Settings.
3. Click the Metadata View pop-up menu in the bottom-left corner, then choose either General, Extended, or Settings.
4. Click the Camera LUT pop-up menu and choose None.
When Camera LUT is set to None, the color correction tools (such as Color Wheels and Color Curves) and other effects operate on the log-encoded values. No tone mapping is applied to the source, and no dynamic range is lost.
Step 2: Apply color correction and any other video effectsFor information about color correcting and adding effects in Final Cut Pro, see Final Cut Pro X Help.
18Apple ProRes RAW April 2018
Using ProRes RAW in Final Cut Pro
Step 3: Import and apply a Custom LUT effectYou will need to apply a Custom LUT effect (as the last effect in the list) using a 3DLUT file that contains the conversion from log to the output color space. Custom LUT effects can be purchased and downloaded from a variety of sources, or you can create one yourself using inexpensive color-grading software or plug-ins.
1. Select a ProRes RAW clip in the timeline.
2. To open the Effects browser, choose Window > Show in Workspace > Effects.
3. Select the Color category on the left, then double-click Custom LUT to apply the effect to the selected clip.
4. If the Video inspector isn’t already shown, choose Window > Show in Workspace > Inspector, then click the Video button at the top.
5. In the Custom LUT section of the Video inspector, click the LUT pop-up menu and choose “Choose Custom LUT.”
Note: If you previously imported a custom LUT, you can choose Recent and then choose from a list of recently used Custom LUT effects.
6. In the window that appears, navigate to the LUT file you want to import, and select it.
7. Click Open.
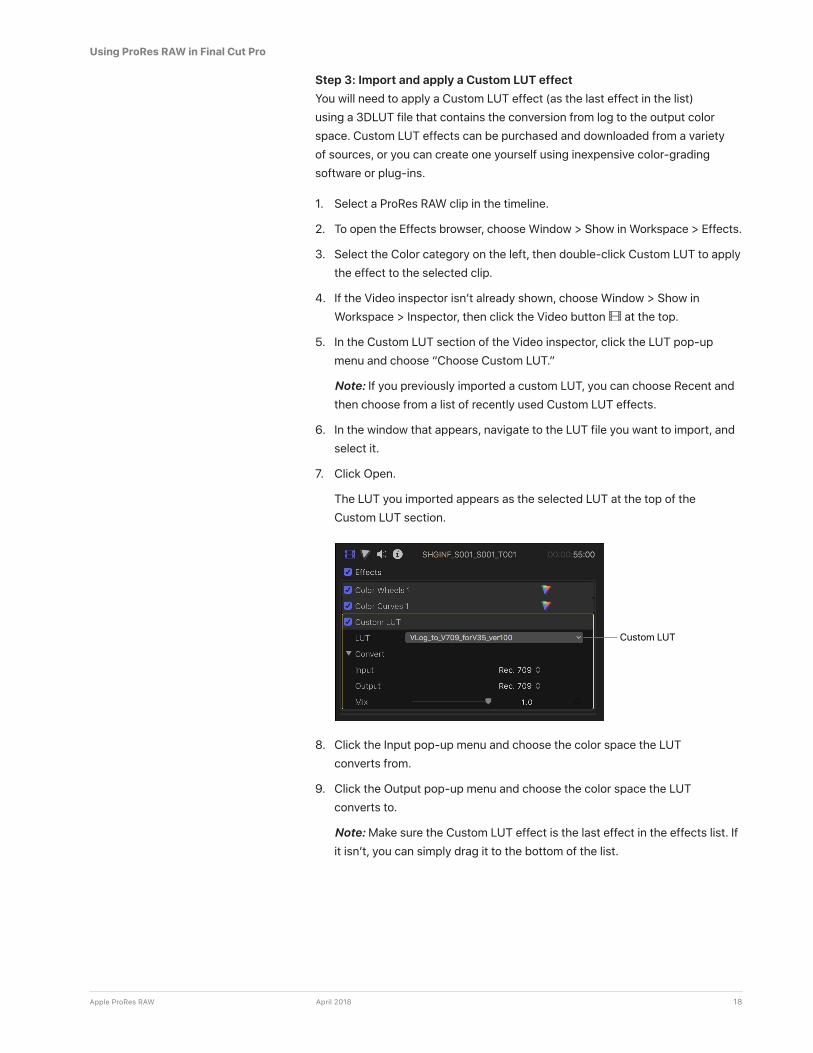
The LUT you imported appears as the selected LUT at the top of the Custom LUT section.
Custom LUT
8. Click the Input pop-up menu and choose the color space the LUT converts from.
9. Click the Output pop-up menu and choose the color space the LUT converts to.
Note: Make sure the Custom LUT effect is the last effect in the effects list. If it isn’t, you can simply drag it to the bottom of the list.
19Apple ProRes RAW April 2018
Using ProRes RAW in Final Cut Pro
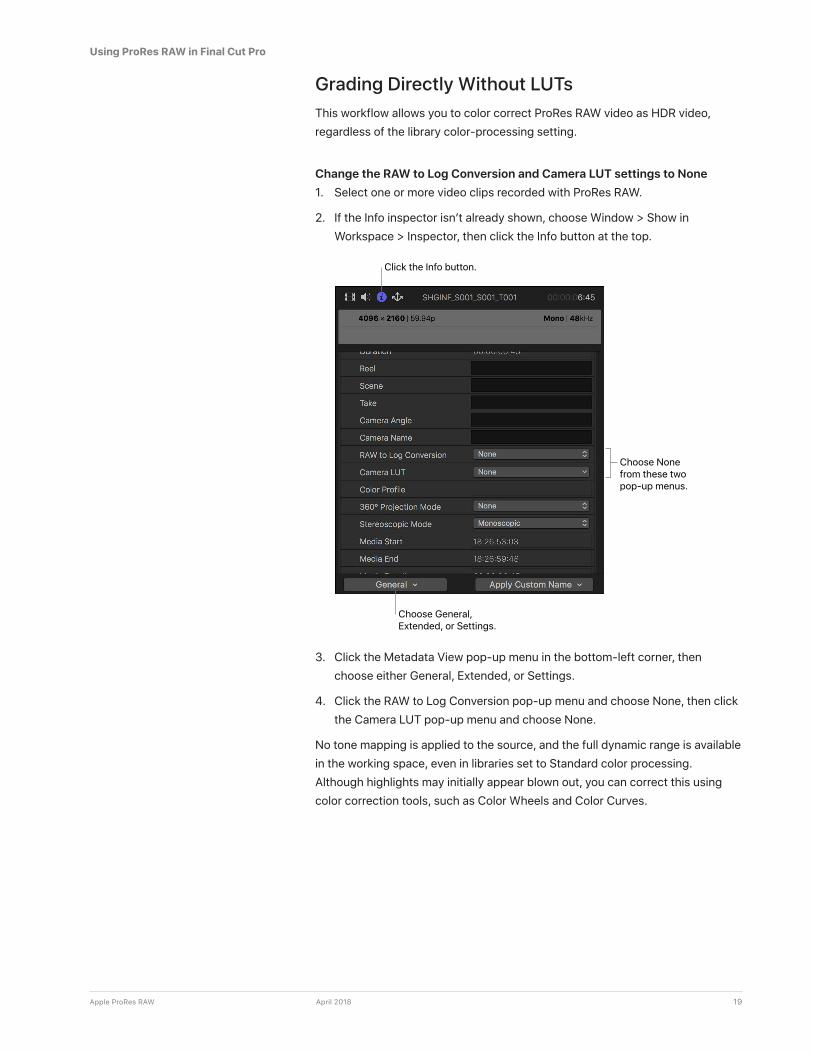
Grading Directly Without LUTsThis workflow allows you to color correct ProRes RAW video as HDR video, regardless of the library color-processing setting.
Change the RAW to Log Conversion and Camera LUT settings to None1. Select one or more video clips recorded with ProRes RAW.
2. If the Info inspector isn’t already shown, choose Window > Show in Workspace > Inspector, then click the Info button at the top.
Click the Info button.
Choose General, Extended, or Settings.
Choose None from these two pop-up menus.
3. Click the Metadata View pop-up menu in the bottom-left corner, then choose either General, Extended, or Settings.
4. Click the RAW to Log Conversion pop-up menu and choose None, then click the Camera LUT pop-up menu and choose None.
No tone mapping is applied to the source, and the full dynamic range is available in the working space, even in libraries set to Standard color processing. Although highlights may initially appear blown out, you can correct this using color correction tools, such as Color Wheels and Color Curves.

20Apple ProRes RAW April 2018
Copyright © 2018 Apple Inc. All rights reserved. Apple, the Apple logo, Final Cut, Final Cut Pro, iMac, and macOS are trademarks of Apple Inc., registered in the U.S. and other countries. iMac Pro is a trademark of Apple Inc. Intel, Intel Core, and Xeon are trademarks of Intel Corp. in the U.S. and other countries. Other product and company names mentioned herein may be trademarks of their respective companies. Product specifications are subject to change without notice. 028-00033-A
Apple ProRes RAW is a powerful new tool for recording and creating stunning images that preserves quality while maintaining performance. Much of the complexity of working with raw is minimized with smart, automatic functions that make it easy for novices and experts alike to achieve excellent results. Being able to use the raw image sensor data directly in Final Cut Pro during post-production gives you more control over the processing of the image, including demosaicing, linear-to-log conversions, and custom LUTs. Working with ProRes RAW in Final Cut Pro with the advanced color correction tools, you can create new looks and compelling images to make your material stand out like never before.
Conclusion