Embed Size (px)
Citation preview


Apple Pro Training Series
Logic Pro 9Advanced Music ProductionDavid Dvorin with Robert Brock

Apple Pro Training Series: Logic Pro 9 Advanced Music ProductionDavid Dvorin with Robert BrockCopyright © 2010 by David Dvorin
Published by Peachpit Press. For information on Peachpit Press books, contact:
Peachpit Press 1249 Eighth Street Berkeley, CA 94710 (510) 524-2178 www.peachpit.com To report errors, please send a note to [email protected]. Peachpit Press is a division of Pearson Education. Apple Series Editor: Serena Herr Project Editor: Nancy Peterson Development Editor: Eric Schumacher-RasmussenProduction Coordinator: Kim Wimpsett, Happenstance Type-O-Rama Technical Editors: Robert Brock, David DvorinTechnical Reviewers: Raymond Barker, Josh HindenCopy Editor: Darren Meiss Media Reviewer: Jay PayneMedia Producer: Eric GeoffroyCompositor: Maureen Forys, Happenstance Type-O-Rama Indexer: Joy Dean Lee Cover Illustrator: Kent Oberheu Cover Producer: Happenstance Type-O-Rama
Notice of RightsAll rights reserved. No part of this book may be reproduced or transmitted in any form by any means, electronic, mechanical, photocopying, recording, or otherwise, without the prior written permission of the publisher. For information on getting permission for reprints and excerpts, contact [email protected].
Footage from Leverage used with permission, ©2008 Leverage Holdings, Inc. All rights reserved. “Georgie the Spider,” “Sintra,” and “The Only Light That’s On” composed, performed, recorded, and produced by David Dvorin. Compositions © 2010 by Re:Beat Music/BMI. “A Blues for Trane” appears courtesy of Grant Levin and Rocky Winslow, ©2007. Originally recorded by Dann Sargent, Brian Randolph, Eric Markow, Nicholas Lowe, Jordan Zizzi, and Dan Phelps. Original producer, chief engineer, and recording and mixing supervisor was Joe Alexander. “I Was Raised” appears courtesy of Tom Langford, ©2003 Bella Vista Records. “Anatomy of a Human Bomb” appears courtesy Caesar Filori and Wide Band Network, ©2009. “Gibsonia” appears courtesy Brandon Jaehne, ©2009.
The projects and footage supplied with this book may only be used for educational purposes in association with the lessons included. Any other use, including but not limited to incorporating footage into another project, dupli-cating, or distributing footage, is expressly forbidden and requires explicit permissions from the copyright holders listed above.
Notice of LiabilityThe information in this book is distributed on an “As Is” basis, without warranty. While every precaution has been taken in the preparation of the book, neither the authors nor Peachpit Press shall have any liability to any person or entity with respect to any loss or damage caused or alleged to be caused directly or indirectly by the instructions contained in this book or by the computer software and hardware products described in it.
TrademarksThroughout this book trademarked names are used. Rather than put a trademark symbol in every occurrence of a trademarked name, we state we are using the names only in an editorial fashion and to the benefit of the trade-mark owner with no intention of infringement of the trademark.
ISBN 13: 978-0-321-64745-0 ISBN 10: 0-321-64745-9 9 8 7 6 5 4 3 2 1 Printed and bound in the United States of America

i i i
Getting Started . . . . . . . . . . . . . . . . . . . . . . . . . . . . . . . . . . . . . . . . . . . . . . . . . . . . 1
Setup and ProductionLesson 1 Speeding Up Your Workflow . . . . . . . . . . . . . . . . . . . . . . . . . . . . 9
Lesson 2 Working with Time and Pitch . . . . . . . . . . . . . . . . . . . . . . . . . . 47
Creating Your Own Sounds with Software InstrumentsLesson 3 Synthesis with the ES2 Synthesizer . . . . . . . . . . . . . . . . . . . . . 105
Lesson 4 Sampling with the EXS24 mkII . . . . . . . . . . . . . . . . . . . . . . . . 133
Lesson 5 Sound Design with Sculpture . . . . . . . . . . . . . . . . . . . . . . . . . . 163
Lesson 6 Building Drum Sounds with Ultrabeat . . . . . . . . . . . . . . . . . . 179
EditingLesson 7 Working with the Arrangement . . . . . . . . . . . . . . . . . . . . . . . . 199
Lesson 8 Advanced Audio Editing . . . . . . . . . . . . . . . . . . . . . . . . . . . . . . 247
Lesson 9 Advanced MIDI Editing . . . . . . . . . . . . . . . . . . . . . . . . . . . . . . 299
MixingLesson 10 Managing the Mix . . . . . . . . . . . . . . . . . . . . . . . . . . . . . . . . . . . 333
Lesson 11 Controlling Signal Flow . . . . . . . . . . . . . . . . . . . . . . . . . . . . . . . 357
Lesson 12 Controlling the Mix . . . . . . . . . . . . . . . . . . . . . . . . . . . . . . . . . . 383
Advanced TopicsLesson 13 Working with Surround . . . . . . . . . . . . . . . . . . . . . . . . . . . . . . 413
Lesson 14 MIDI Processing in the Environment . . . . . . . . . . . . . . . . . . . 443
Lesson 15 Working with Notation . . . . . . . . . . . . . . . . . . . . . . . . . . . . . . . 481
Lesson 16 Working with Picture . . . . . . . . . . . . . . . . . . . . . . . . . . . . . . . . . 535
Lesson 17 Moving Projects Between Logic and Pro Tools . . . . . . . . . . . 561
Index . . . . . . . . . . . . . . . . . . . . . . . . . . . . . . . . . . . . . . . . . . . . . . 576
Contents at a Glance

iv
Table of Contents
Getting Started . . . . . . . . . . . . . . . . . . . . . . . . . . . . . . . . . . 1
Setup and Production
Lesson 1 Speeding Up Your Workflow . . . . . . . . . . . . . . . . . . . . . . 9Creating Your Own Template . . . . . . . . . . . . . . . . . . . . . . . . . . . 10Customizing the Interface . . . . . . . . . . . . . . . . . . . . . . . . . . . . . . 14Using Key Commands . . . . . . . . . . . . . . . . . . . . . . . . . . . . . . . . . 23Accessing the Tool Menu . . . . . . . . . . . . . . . . . . . . . . . . . . . . . . . 29Saving a Project Template . . . . . . . . . . . . . . . . . . . . . . . . . . . . . . 36Opening and Creating Projects Automatically . . . . . . . . . . . . . . 36Backing Up and Transporting Your Setup . . . . . . . . . . . . . . . . . 38Lesson Review . . . . . . . . . . . . . . . . . . . . . . . . . . . . . . . . . . . . . . . . 45
Lesson 2 Working with Time and Pitch . . . . . . . . . . . . . . . . . . . . 47Creating Your Own Apple Loops with the Apple Loops Utility 48Using the Time and Pitch Machine . . . . . . . . . . . . . . . . . . . . . . . 56Using Pitch Correction . . . . . . . . . . . . . . . . . . . . . . . . . . . . . . . . . 63Using Flex Time . . . . . . . . . . . . . . . . . . . . . . . . . . . . . . . . . . . . . . 68Using Speed Fades . . . . . . . . . . . . . . . . . . . . . . . . . . . . . . . . . . . . . 89Making Tempo Adjustments with Varispeed . . . . . . . . . . . . . . . 91Working with Rubato Passages . . . . . . . . . . . . . . . . . . . . . . . . . . 93Lesson Review . . . . . . . . . . . . . . . . . . . . . . . . . . . . . . . . . . . . . . . 102
Creating Your Own Sounds with Software Instruments
Lesson 3 Synthesis with the ES2 Synthesizer . . . . . . . . . . . . . . . 105Understanding the User Interface . . . . . . . . . . . . . . . . . . . . . . . 106Exploring the Oscillator Waveforms . . . . . . . . . . . . . . . . . . . . . 107Using Oscillator Modulation to Create Interesting Sounds . . 111Sculpting Your Sound Using the Filters . . . . . . . . . . . . . . . . . . 114Using Modulation . . . . . . . . . . . . . . . . . . . . . . . . . . . . . . . . . . . . 118Exploring the Output/Processing Section . . . . . . . . . . . . . . . . 130Lesson Review . . . . . . . . . . . . . . . . . . . . . . . . . . . . . . . . . . . . . . . 131
Lesson 4 Sampling with the EXS24 mkII . . . . . . . . . . . . . . . . . . 133Creating Sampler Instruments . . . . . . . . . . . . . . . . . . . . . . . . . 134
Contents v
Using the EXS24 Instrument Editor . . . . . . . . . . . . . . . . . . . . . 136Creating Loop Points . . . . . . . . . . . . . . . . . . . . . . . . . . . . . . . . . 140Using the Parameter Window . . . . . . . . . . . . . . . . . . . . . . . . . . 144Creating Multiple Zones from Region Transients . . . . . . . . . . 147Using Filters and Modulation to Process the Sound . . . . . . . . 150Using Groups . . . . . . . . . . . . . . . . . . . . . . . . . . . . . . . . . . . . . . . . 153Routing Individual Sounds for Processing . . . . . . . . . . . . . . . . 156Lesson Review . . . . . . . . . . . . . . . . . . . . . . . . . . . . . . . . . . . . . . . 160
Lesson 5 Sound Design with Sculpture . . . . . . . . . . . . . . . . . . . . 163Understanding the User Interface . . . . . . . . . . . . . . . . . . . . . . . 164Understanding the String . . . . . . . . . . . . . . . . . . . . . . . . . . . . . . 165Using Objects in Sculpture . . . . . . . . . . . . . . . . . . . . . . . . . . . . 166Adjusting the Pickups . . . . . . . . . . . . . . . . . . . . . . . . . . . . . . . . . 171Processing the Sound . . . . . . . . . . . . . . . . . . . . . . . . . . . . . . . . . 171Using Modulation in Sculpture . . . . . . . . . . . . . . . . . . . . . . . . . 173Saving and Trying Presets . . . . . . . . . . . . . . . . . . . . . . . . . . . . . 175Lesson Review . . . . . . . . . . . . . . . . . . . . . . . . . . . . . . . . . . . . . . . 176
Lesson 6 Building Drum Sounds with Ultrabeat . . . . . . . . . . . . 179Selecting Sounds in the Assignment Section . . . . . . . . . . . . . . 180Exploring the Sound Generators . . . . . . . . . . . . . . . . . . . . . . . . 182Processing with the Filter and Bitcrusher . . . . . . . . . . . . . . . . . 191Automating Parameters in Step Mode . . . . . . . . . . . . . . . . . . . 194Lesson Review . . . . . . . . . . . . . . . . . . . . . . . . . . . . . . . . . . . . . . . 197
Editing
Lesson 7 Working with the Arrangement . . . . . . . . . . . . . . . . . . 199Navigating the Arrangement . . . . . . . . . . . . . . . . . . . . . . . . . . . 200Using Markers . . . . . . . . . . . . . . . . . . . . . . . . . . . . . . . . . . . . . . . 211Using Global Edits . . . . . . . . . . . . . . . . . . . . . . . . . . . . . . . . . . . 221Working with Folders . . . . . . . . . . . . . . . . . . . . . . . . . . . . . . . . . 227Lesson Review . . . . . . . . . . . . . . . . . . . . . . . . . . . . . . . . . . . . . . . 245
Lesson 8 Advanced Audio Editing . . . . . . . . . . . . . . . . . . . . . . . . 247Smoothing Transitions with Crossfades . . . . . . . . . . . . . . . . . . 248Fixing Clicks in the Sample Editor . . . . . . . . . . . . . . . . . . . . . . 253Creating New Parts from Existing Ones . . . . . . . . . . . . . . . . . . 256Editing with Mixer Groups . . . . . . . . . . . . . . . . . . . . . . . . . . . . 263Repairing Drums with Marquee Transient . . . . . . . . . . . . . . . 272Editing Drums in Soundtrack Pro . . . . . . . . . . . . . . . . . . . . . . 275Lesson Review . . . . . . . . . . . . . . . . . . . . . . . . . . . . . . . . . . . . . . . 296

vi Contents
Lesson 9 Advanced MIDI Editing . . . . . . . . . . . . . . . . . . . . . . . . 299Using Aliases . . . . . . . . . . . . . . . . . . . . . . . . . . . . . . . . . . . . . . . . 300Working with Region Parameters . . . . . . . . . . . . . . . . . . . . . . . 303Selecting MIDI Events for Editing . . . . . . . . . . . . . . . . . . . . . . 317Using Transform Functions . . . . . . . . . . . . . . . . . . . . . . . . . . . . 318Separating MIDI Events . . . . . . . . . . . . . . . . . . . . . . . . . . . . . . . 328Lesson Review . . . . . . . . . . . . . . . . . . . . . . . . . . . . . . . . . . . . . . . 330
Mixing
Lesson 10 Managing the Mix . . . . . . . . . . . . . . . . . . . . . . . . . . . . . 333Importing Channel Strips and Data . . . . . . . . . . . . . . . . . . . . . 334Working with the Mixer . . . . . . . . . . . . . . . . . . . . . . . . . . . . . . . 336Creating Production Notes . . . . . . . . . . . . . . . . . . . . . . . . . . . . 342Panning Stereo Tracks . . . . . . . . . . . . . . . . . . . . . . . . . . . . . . . . 344Switching the Contents of the Plug-in Window . . . . . . . . . . . 346Changing Plug-in Locations . . . . . . . . . . . . . . . . . . . . . . . . . . . 348Using a Plug-in’s Extended Parameters . . . . . . . . . . . . . . . . . . 350Using Mixer Groups . . . . . . . . . . . . . . . . . . . . . . . . . . . . . . . . . . 351Lesson Review . . . . . . . . . . . . . . . . . . . . . . . . . . . . . . . . . . . . . . . 355
Lesson 11 Controlling Signal Flow . . . . . . . . . . . . . . . . . . . . . . . . 357Using Aux Channels as Submixes . . . . . . . . . . . . . . . . . . . . . . . 358Applying Send Effects to Submixes . . . . . . . . . . . . . . . . . . . . . . 361Using Side Chain Effects . . . . . . . . . . . . . . . . . . . . . . . . . . . . . . 362Positioning Sends Pre or Post Channel Strip Controls . . . . . . 367Incorporating External Effects Processors . . . . . . . . . . . . . . . . 373Bouncing in Place . . . . . . . . . . . . . . . . . . . . . . . . . . . . . . . . . . . . 376Lesson Review . . . . . . . . . . . . . . . . . . . . . . . . . . . . . . . . . . . . . . . 381
Lesson 12 Controlling the Mix . . . . . . . . . . . . . . . . . . . . . . . . . . . . 383Automating an Aux Channel . . . . . . . . . . . . . . . . . . . . . . . . . . . 384Copying Automation Data Between Tracks . . . . . . . . . . . . . . . 389Scaling Automated Values . . . . . . . . . . . . . . . . . . . . . . . . . . . . . 391Applying Automation to Multiple Tracks at Once . . . . . . . . . 392Using Control Surfaces . . . . . . . . . . . . . . . . . . . . . . . . . . . . . . . . 394Lesson Review . . . . . . . . . . . . . . . . . . . . . . . . . . . . . . . . . . . . . . . 410
Advanced Topics
Lesson 13 Working with Surround . . . . . . . . . . . . . . . . . . . . . . . . 413Configuring Logic for Surround . . . . . . . . . . . . . . . . . . . . . . . . 414

Contents vii
Mixing in Surround . . . . . . . . . . . . . . . . . . . . . . . . . . . . . . . . . . 416Using Surround Effects . . . . . . . . . . . . . . . . . . . . . . . . . . . . . . . 425Checking the Surround Mix . . . . . . . . . . . . . . . . . . . . . . . . . . . 431Down Mixing . . . . . . . . . . . . . . . . . . . . . . . . . . . . . . . . . . . . . . . 434Encoding Surround Projects . . . . . . . . . . . . . . . . . . . . . . . . . . . 435Lesson Review . . . . . . . . . . . . . . . . . . . . . . . . . . . . . . . . . . . . . . . 440
Lesson 14 MIDI Processing in the Environment . . . . . . . . . . . . . 443Navigating Within the Environment . . . . . . . . . . . . . . . . . . . . . 444Creating Environment Objects . . . . . . . . . . . . . . . . . . . . . . . . . 447Creating Signal Chains . . . . . . . . . . . . . . . . . . . . . . . . . . . . . . . . 458Using Touch Tracks Objects . . . . . . . . . . . . . . . . . . . . . . . . . . . . 469Lesson Review . . . . . . . . . . . . . . . . . . . . . . . . . . . . . . . . . . . . . . . 478
Lesson 15 Working with Notation . . . . . . . . . . . . . . . . . . . . . . . . . 481Creating Notation . . . . . . . . . . . . . . . . . . . . . . . . . . . . . . . . . . . . 482Entering Notes Using Graphic Input . . . . . . . . . . . . . . . . . . . . 483Entering Notes Using Step Input . . . . . . . . . . . . . . . . . . . . . . . . 492Working with Guitar Notation . . . . . . . . . . . . . . . . . . . . . . . . . 494Working with Text . . . . . . . . . . . . . . . . . . . . . . . . . . . . . . . . . . . 502Creating Chord Charts . . . . . . . . . . . . . . . . . . . . . . . . . . . . . . . . 505Transcribing a Performance . . . . . . . . . . . . . . . . . . . . . . . . . . . . 513Working with Drum Notation . . . . . . . . . . . . . . . . . . . . . . . . . . 517Creating Scores and Parts . . . . . . . . . . . . . . . . . . . . . . . . . . . . . . 524Lesson Review . . . . . . . . . . . . . . . . . . . . . . . . . . . . . . . . . . . . . . . 532
Lesson 16 Working with Picture . . . . . . . . . . . . . . . . . . . . . . . . . . 535Setting Up Synchronization . . . . . . . . . . . . . . . . . . . . . . . . . . . . 536Using Markers to Spot the Movie . . . . . . . . . . . . . . . . . . . . . . . 543Importing Media . . . . . . . . . . . . . . . . . . . . . . . . . . . . . . . . . . . . . 546Positioning Events on the Timeline . . . . . . . . . . . . . . . . . . . . . 551Delivering the Soundtrack . . . . . . . . . . . . . . . . . . . . . . . . . . . . . 554Lesson Review . . . . . . . . . . . . . . . . . . . . . . . . . . . . . . . . . . . . . . . 558
Lesson 17 Moving Projects Between Logic and Pro Tools . . . . . 561Exporting a Project . . . . . . . . . . . . . . . . . . . . . . . . . . . . . . . . . . . 562Importing Projects into Pro Tools . . . . . . . . . . . . . . . . . . . . . . . 567Importing Audio Files into Logic . . . . . . . . . . . . . . . . . . . . . . . 573Lesson Review . . . . . . . . . . . . . . . . . . . . . . . . . . . . . . . . . . . . . . . 575
Index . . . . . . . . . . . . . . . . . . . . . . . . . . . . . . . . . . . . . . . . 576


1
We are lucky to live during one of the most exciting periods in the music
production industry. Just a few short years ago, you would need a studio
filled with synthesizers, hardware effects processors, mixing consoles,
and expensive multitrack tape machines to accomplish what you can
now do in a small project-based environment with a computer, an audio
interface, and the right software. It’s a good time to be a musician.
Apple Pro Training Series: Logic Pro 9 Advanced Music Production is
intended to show experienced composers, arrangers, and producers
how to enhance their skills by working with real projects in real-world
scenarios. You’ll learn how to increase the efficiency of your produc-
tion workflow and accelerate editing tasks. You’ll work on refining your
mixing techniques, manipulating tempo and pitch, creating notated
parts and scores, mixing for surround sound, and working with video
and film. You’ll unlock the limitless potential of Logic’s groundbreaking
software instruments by creating your own sounds from scratch.
Whether you’re tweaking a song structure, applying effects processing,
or editing audio and MIDI tracks, this book will give you the insider
tips that will make your time with Logic Pro 9 more productive and
more creative.
Getting Started

2 Getting Started
The MethodologyThis book is written for those who already have a working knowledge of Logic Pro.
(Beginning or less-experienced Logic users should read Apple Pro Training Series: Logic
Pro 9 and Logic Express 9 by David Nahmani.) Composers, audio engineers, and music pro-
ducers currently working with Logic Pro will have the most to gain from reading this book.
The book is divided into five sections:
Lesson 1 lays the foundation by helping you customize your Logic workflow. You’ll
create an environment that will increase your efficiency on your own projects as well
as on the exercises in the book. Lesson 2 reveals Logic’s deep feature set for manipu-
lating time and pitch, including the new Flex Time feature.
In Lessons 3 through 6, you’ll create your own sounds on Logic’s most advanced
software instruments: ES2, EXS24 mkII, Sculpture, and Ultrabeat. Gaining an under-
standing of these powerful synthesizers and samplers will bring a wealth of musical
resources to your sessions.
In Lessons 7 through 9, you’ll shape your tracks into an arrangement. With Logic
Studio’s MIDI and audio editing tools, you can refine the sound and structure of
your composition, correcting production problems and making the most of your
best takes.
A composition is only as good as it sounds, which makes mixing and mastering your
arrangement an essential part of the creative process. Lessons 10 through 12 guide
you in taking your composition to the final level, using Logic Pro’s Mixer, automation,
control surface support, and effects processing to bring the highest degree of produc-
tion quality to your creative output.
For many projects, Logic Pro will be an all-inclusive working environment that takes
composers and producers from musical idea to final recording. But there are times
when you need to get your ideas on paper or when you’re using your musical skills to
serve a visual image. Lesson 13 provides a foundation for developing your surround
sound mixing skills by using Logic’s extensive new surround support. In Lesson 14
you’ll create objects in the Environment to process MIDI data in all sorts of interest-
ing ways. Lesson 15 shows you how to use Logic Pro’s extensive notation capabilities
to create musical parts and scores. In Lesson 16 you’ll explore Logic Pro’s power as a
film and video scoring tool. Finally, in Lesson 17 you’ll learn how to best transport
sessions between Logic and other DAWs, enabling you to freely collaborate with stu-
dios running other software applications.

Copying the Logic Lesson Files 3
About the Apple Pro Training SeriesApple Pro Training Series: Logic Pro 9 Advanced Music Production is part of the official
training series for Apple Pro applications developed by experts in the field. The lessons
are designed to let you learn at your own pace. You’ll find that this book explores many
advanced features and offers tips and techniques for using the latest version of Logic.
Although each lesson provides step-by-step instructions for creating a specific project,
there’s room for exploration and experimentation. It is recommended that you follow the
book from start to finish or at least complete the lessons in each part of the book in order.
Each lesson concludes with a review section summarizing what you’ve covered.
System RequirementsBefore beginning to use Apple Pro Training Series: Logic Pro 9 Advanced Music Production,
you should have a working knowledge of your computer and its operating system. Make
sure that you know how to use the mouse, navigate standard menus and commands, and
also open, save, and close files. If you need to review these techniques, see the printed or
online documentation included with your system.
For the basic system requirements for Logic Pro 9, go to www.apple.com/logicstudio/specs.
NOTE If your display resolution is less than 1440 x 900, the included lesson files
will display differently than shown in the book. Even so, you will be able to follow the
lessons as described.
Copying the Logic Lesson FilesThe DVD-ROM provided with this book includes folders that contain the lesson files used
in this course. Each lesson has its own folder. You must have a standard installation of
Logic Pro 9 on your hard disk to perform the exercises in this book.
To install the Logic project files:
1 Insert the APTS_Advanced Logic 9 DVD into your DVD drive.
2 On your desktop, double-click the APTS_Advanced Logic 9 icon to view the disk
contents.
3 Drag the Advanced Logic 9_Files folder from the DVD to the Music folder on your
hard disk.

4 Getting Started
About the Apple Pro Training SeriesApple Pro Training Series: Logic Pro 9 Advanced Music Production is both a self-paced
learning tool and the official curriculum of the Apple Pro Training and Certification
Program.
Developed by experts in the field and certified by Apple, the series is used by Apple
Authorized Training Centers worldwide and offers complete training in all Apple Pro
products. The lessons are designed to let you learn at your own pace. Each lesson con-
cludes with review questions and answers summarizing what you’ve learned, which can be
used to help you prepare for the Apple Pro Certification Exam.
For a complete list of Apple Pro Training Series books, see the ad at the back of this book,
or visit www.peachpit.com/apts.
Apple Pro Certification ProgramThe Apple Pro Training and Certification Programs are designed to keep you at the fore-
front of Apple’s digital media technology while giving you a competitive edge in today’s
ever-changing job market. Whether you’re an editor, graphic designer, sound designer,
special effects artist, or teacher, these training tools are meant to help you expand your
skills.
Upon completing the course material in this book, you can become an Apple Certified
Pro by taking the certification exam at an Apple Authorized Training Center. Certification
is offered in Final Cut Pro, Motion, Color, Soundtrack Pro, DVD Studio Pro, Shake, and
Logic Pro. Certification as an Apple Pro gives you official recognition of your knowledge
of Apple’s professional applications while allowing you to market yourself to employers
and clients as a skilled, pro-level user of Apple products.
For those who prefer to learn in an instructor-led setting, Apple offers training courses at
Apple Authorized Training Centers worldwide. These courses, which use the Apple Pro
Training Series books as their curriculum, are taught by Apple Certified Trainers and bal-
ance concepts and lectures with hands-on labs and exercises. Apple Authorized Training
Centers have been carefully selected and have met Apple’s highest standards in all areas,
including facilities, instructors, course delivery, and infrastructure. The goal of the pro-
gram is to offer Apple customers, from beginners to the most seasoned professionals, the
highest-quality training experience.
For more information, please see the ad at the back of this book, or to find an Authorized
Training Center near you, go to training.apple.com.
Acknowledgments 5
ResourcesApple Pro Training Series: Logic Pro 9 Advanced Music Production is not intended as a com-
prehensive reference manual, nor does it replace the documentation that comes with the
application. For more information about Apple Logic Pro 9, refer to these sources:
Logic Pro 9 User Manual: Accessed through the Logic Pro 9 Help menu, the User
Manual contains a complete description of all the features.
Apple’s website: www.apple.com
AcknowledgmentsThe authors wish to give sincere and humble thanks to all of the talented musicians who
provided material for use in this edition of the book:
Tom Langford for his song “I Was Raised”
Grant Levin for his composition “A Blues for Trane”
Rocky Winslow and Randy McKean for playing on “Georgie the Spider”
Composer Joe LoDuca, engineer Scott Davidson, and the folks of Electric
Entertainment for the use of the score and footage from the Leverage series
Caesar Filori and Wide Band Network for providing “Anatomy of a Human Bomb”
Brandon Jaehne for use of “Gibsonia”

This page intentionally left blank

#
Image here is FPO. Arrangements for purchase and placement of image to follow.
Bleed on all sides s/b 18pts; pages in Quark s/b staggered.
Lesson Files Advanced Logic 9_Files > Lessons > 04_EXS24_Start.logic
Media Advanced Logic 9_Files > Media > EXS24
Time This lesson takes approximately 60 minutes to complete.
Goals Build new sampler instruments from audio regions
Assign pitch mapping and tuning to zones
Create loop points for sustaining sounds
Use groups to assign common parameters to multiple zones
Use filters and modulation to change the character of sampled material
Route output of specific groups for individual processing
4

133
A sampler is an extremely versatile tool. Essentially, it allows you to map
digital audio files, or samples, across pitch ranges for triggering via MIDI.
It does this by dynamically changing the playback speed of the samples
in real time to match the pitch specified by the MIDI note value.
Individual samples are referenced and mapped within a sampler instru-
ment. In this lesson, you will explore the abilities of the EXS24 mkII by
creating unique sampler instruments using specific audio regions from
the Arrange window.
Sampling with the EXS24 mkII
Lesson 4

134 Sampling with the EXS24 mkII
Creating Sampler InstrumentsTraditionally, new sampler instruments are produced by first creating a blank sampler
instrument, and then adding and mapping individual samples one by one, building it
from the ground up. However, one of the new features in Logic Pro 9 is the ability to use
a single command to automatically create a new EXS24 mkII track loaded with a new
sampler instrument wrapped around a selected audio region in the Arrange window. This
makes it especially easy to extend the creative possibilities of audio files, placing under
your fingertips the ability to trigger and process.
1 Choose File > Open.
2 In the file selector dialog, navigate to Music > Advanced Logic 9_Files > Lessons and
open 04_EXS24_Start.logic.
3 Use the Mute tool to unmute the Vox Note region on Track 1.
4 Play the project, listening to the Vox Note audio region.
You will use this recording of a singer holding a single pitch for your first sampler
instrument.
5 Stop playback.
6 Go to the beginning of the project.
7 In the Arrange area, select the Vox Note region, if it’s not already selected.
8 From the local Audio menu, choose Convert Regions to New Sampler Track.
The Convert Regions to New Sampler Track dialog appears.
Here, you can set how the selected audio region will be initially mapped within the
new sampler instrument. Samples are mapped within zones, which contain settings
controlling how the sample will be played back, including key ranges.

Creating Sampler Instruments 135
9 Select Create Zones From Regions, if it’s not selected already.
This will create a single zone that references the Vox Note audio region (as outlined at
the bottom of the dialog).
You can also set the pitch range of the zone that will be created, as specified by the
Trigger Note Range menus (low to high). Since only a single audio region was selected
(you can also select multiple), it will only utilize the lowest trigger note to map the
region.
10 Click the first Trigger Note Range pop-up menu and choose C3 (60).
This will create a new zone at C3, right in the middle of the keyboard.
11 Click OK.
A new EXS24 track (named Vox Note) is created below the original track, along with
a new MIDI region. This new region contains a held C3 note that triggers the newly
mapped audio file for the same duration as the original audio region. Note that the
original region is muted. The new MIDI region in effect replaces the original one in
the arrangement.

136 Sampling with the EXS24 mkII
12 Play the project, listening to the new Vox Note MIDI region played through the
EXS24.
The playback sounds identical to before.
This new zone will be automatically velocity mapped; the harder you strike the key,
the louder the file playback.
13 Press the C3 on your MIDI keyboard at varying velocities, listening to the result.
The Vox Note audio file plays as long as you hold down the key, changing volume
(amplitude) along with your keyboard velocity.
Using the EXS24 Instrument EditorLet’s take a look inside the newly created sampler instrument, with the goal of exploring
the creative potential offered by the EXS24. Sampler instruments are edited within the
EXS24 Instrument Editor, which is accessible from within the EXS24 interface.
1 In the Inspector, double-click the EXS24 in the Arrange channel strip to open the
EXS24 interface.

Using the EXS24 Instrument Editor 137
The EXS24 Parameter window opens, with the newly created sampler instrument, Vox
Note, displayed. You will be working with the parameters in this window later on in
the lesson, but for now, you will use it to quickly access the EXS24 Instrument Editor.
2 Click the Edit button, located at the top right.
The EXS24 Instrument Editor opens.
For now, you can close the window to save some screen real estate.
3 Close the EXS24 Parameter window (not the EXS24 Instrument Editor).
The EXS24 Instrument Editor has two views: Zones and Groups. You are currently
looking at the Zones view (more on Groups later), as indicated by the selected button
at the top left.

138 Sampling with the EXS24 mkII
The top portion of the EXS24 Instrument Editor is called the Parameters area, and it
displays the settings of each sample referenced by the sampler instrument. The bot-
tom portion of the window displays how each sample is mapped to various pitches,
represented by the keyboard at the bottom of the window. As you can see, a new zone,
named Vox Note.1 was created, mapped to C3 on the keyboard.
When you create a sampler instrument with the Convert Regions to New Sampler Track
command, the zone created is without range—that is, only mapped to a single pitch.
You can, of course, extend the zone’s range to map the audio file to multiple pitches.
This is done either by changing settings within the Key Range columns of the
Parameters area, or by dragging directly on the zone in the bottom area.
4 Within the Key Range parameters, double-click the Hi field and enter c4. Press Return.
The zone extends in range to the right, from C3 to C4.
5 In the bottom area of the EXS24 Instrument Editor, drag the zone’s left border to the
left, extending the range to C2.
6 Play the C2 to C4 keys on your MIDI keyboard, listening to the result.
The pitch (and speed) of the sample shifts up and down, mapped in relation to your
MIDI keyboard input.
NOTE You can also create new sampler instruments by choosing New from the
EXS24 Instrument Editor’s Instrument menu, or by clicking the Edit button on
the EXS24 interface when an instrument isn’t currently loaded. This creates a blank
sampler instrument where you can manually add zones by choosing New Zone or
Load Multiple Samples from the Zones menu. You can also create new zones by drag-
ging and dropping audio files from the Logic Bin or Browser, or even the Finder.

Using the EXS24 Instrument Editor 139
If you have perfect pitch, you might have noticed that the sung note is a little flat
compared to standard tuning (A440). This wouldn’t be a problem if this was the only
instrument used in the project, but if other instruments will be played at the same
time, it would sound out of tune. Using the zone’s Pitch parameters in the Instrument
Editor, you can compensate for tuning discrepancies (Coarse equaling semitones, and
Fine equaling cents, or 1/100th of a semitone).
The best way to tune a zone by hand is by inserting a Tuner plug-in on the EXS24
channel, monitoring the results as you adjust parameters.
7 Click the top insert slot of the new Vox Note (EXS24) channel, and select Metering >
Tuner > Stereo.
The Tuner opens.
8 While watching the Tuner readout, hold down the C3 key on your MIDI keyboard
and drag the zone’s Fine parameter upwards to about 28 cents (the Tuner’s readout
should bob around the 12 o’clock position).
The sample plays back in tune in relation to standard tuning.
9 Close the Tuner window.
140 Sampling with the EXS24 mkII
Creating Loop PointsLooping is a technique that stems from the day when samplers had tiny memory stores
(by today’s standards) in which to load samples. Many sounds start off with complex
attacks but soon settle into a more or less steady waveform. By repeating this “settled”
area, a sample can be sustained indefinitely without using valuable memory space. Even
with modern software samplers that have access to gigabytes of memory (like the EXS24),
looping is a useful technique to create sustaining sounds out of material that is otherwise
quite short, like the audio file you are working with in this exercise.
By default, this editor only displays some of the Zone parameters, while hiding others,
including the Loop parameters. You can select the parameters that you want to display
within the View menu.
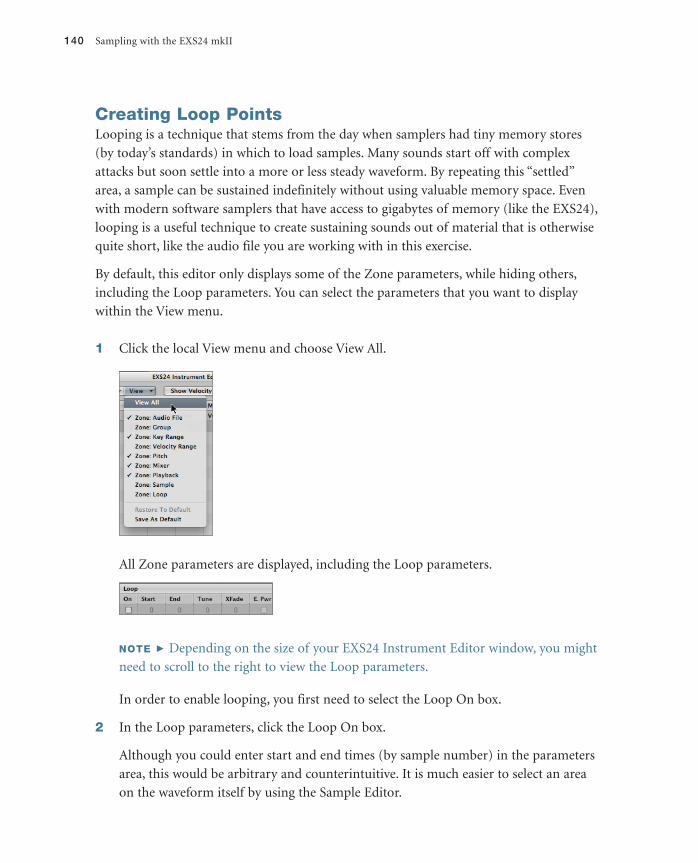
1 Click the local View menu and choose View All.
All Zone parameters are displayed, including the Loop parameters.
NOTE Depending on the size of your EXS24 Instrument Editor window, you might
need to scroll to the right to view the Loop parameters.
In order to enable looping, you first need to select the Loop On box.
2 In the Loop parameters, click the Loop On box.
Although you could enter start and end times (by sample number) in the parameters
area, this would be arbitrary and counterintuitive. It is much easier to select an area
on the waveform itself by using the Sample Editor.
Creating Loop Points 141
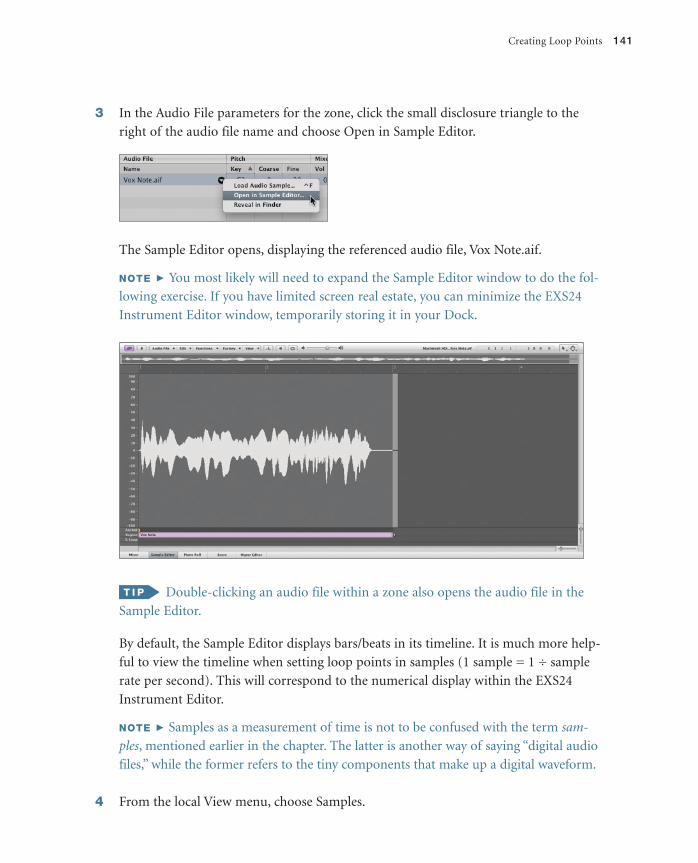
3 In the Audio File parameters for the zone, click the small disclosure triangle to the
right of the audio file name and choose Open in Sample Editor.
The Sample Editor opens, displaying the referenced audio file, Vox Note.aif.
NOTE You most likely will need to expand the Sample Editor window to do the fol-
lowing exercise. If you have limited screen real estate, you can minimize the EXS24
Instrument Editor window, temporarily storing it in your Dock.
Double-clicking an audio file within a zone also opens the audio file in the
Sample Editor.
By default, the Sample Editor displays bars/beats in its timeline. It is much more help-
ful to view the timeline when setting loop points in samples (1 sample = 1 ÷ sample
rate per second). This will correspond to the numerical display within the EXS24
Instrument Editor.
NOTE Samples as a measurement of time is not to be confused with the term sam-
ples, mentioned earlier in the chapter. The latter is another way of saying “digital audio
files,” while the former refers to the tiny components that make up a digital waveform.
4 From the local View menu, choose Samples.

142 Sampling with the EXS24 mkII
The timeline is now displayed in samples.
The trick to setting loop points is to find a sustaining portion within the audio file
that can be repeated without interruption. In order to make smooth edits, it is neces-
sary to make selections that do not interrupt the waveform above or below the zero
axis (thereby creating an audible click). When Snap Edits to Zero Crossings is enabled
within the Sample Editor, all new selections will be justified to the nearest point the
waveform crosses the zero axis.
5 From the local Edit menu, choose Snap Edits to Zero Crossings.
6 Using the help tags, select an area from approximately 28800 to 91900 samples (refer
to the following illustration).
You can audition your selection by selecting the Prelisten and Cycle buttons at the top
of the Sample Editor.

Creating Loop Points 143
7 Click the Prelisten and Cycle buttons to listen to your selection looping.
8 Click the Prelisten button, stopping playback.
Your loop points may sound a bit rough at first, but with further massaging,
you can create a smoother result. This is done by zooming in on the start and end
loop points and fine-tuning the selection while auditioning.
Now that you’ve identified the area you want to be looped, you need to set the start
and end loop points to the zone in the EXS24 Instrument Editor.
9 From the Sample Editor’s local Edit menu, choose Selection > Sample Loop.
The Sample Loop lane within the Sample Editor displays the selected area in green.
10 Close the Sample Editor.
The results of your selection appear within the Loop parameters of the EXS24
Instrument Editor.

144 Sampling with the EXS24 mkII
11 Hold down a C3 on your MIDI keyboard, listening to the result.
The sample plays, now looping the selected area for as long as you hold down the key.
To aid you in helping to smooth out the repeating loop’s start and end points, you can
apply a short crossfade. This is similar to how you smooth region transitions in the
Arrange window.
12 In the Loop parameters, double-click the Xfade field and enter 30. Press Return.
There is also an option to have the crossfade be equal powered, which creates an
exponential curve with a 3 db boost in volume in the middle to compensate for the
dip in volume that normally occurs within a linear crossfade.
13 In the Loop parameters, click the E. Pwr box to enable it.
14 Hold down a C3 on your MIDI keyboard, listening to the result.
The sample plays, smoothly looping the selected area for as long as you hold down
the key.
Using the Parameter WindowAfter a sampler instrument is loaded, the triggered sounds are further refined and pro-
cessed by the global playback parameters located on the interface of the EXS24 mkII itself.
These parameters are nearly identical to the sound processing functionality of a synthe-
sizer, allowing you to further shape your sampler instrument sounds.
1 In the EXS24 Instrument Editor window, click the EXS24 button.

Using the Parameter Window 145
The EXS24 Parameter window (interface) opens. This offers a convenient way to
access the EXS24 playback parameters without having to go back to the channel strip.
2 Close the EXS24 Instrument Editor.
A Save dialog appears.
3 Click Save.
Now look at the EXS24’s interface. Note that the EXS24 shares many interface charac-
teristics with the ES2 synthesizer covered in Lesson 3. It has filter, output, modulation
routing, and modulation source sections in similar places within the interface.
Modulation section
Filter section Output section

146 Sampling with the EXS24 mkII
In this exercise, you will use the amplitude envelope to change the character of the
Vox Note sampler instrument to that of a swelling choir-like pad that decays slowly.
In the EXS24, Envelope 2 is hardwired to amplitude, and it controls the dynamics of
how the sound is shaped over time for each key pressed.
4 In the controls for Envelope 2, drag the Attack slider upwards to about midway
(about 820 ms).
You can split the Attack controls of both Envelopes 1 and 2 to create a range.
This intensity range is modulated via note velocity, wherein high values trigger the
sound more quickly (represented by the lower half of the control), and low values
trigger the sound more slowly (represented by the upper half of the control).
5 In the controls for Envelope 2, drag the Release slider upwards to about midway
(about 820 ms).
6 Hold down a chord between C2 and C4 on your MIDI keyboard, listening to the result.
You should hear a swelling, sustained choir sound, based off of the original audio file,
Vox Note.aif.
7 From the preset menu, choose Save Setting As.
8 In the file selector dialog, name the preset Vox Note and then click Save.
9 Close the EXS24 window
Creating Multiple Zones from Region Transients 147
Creating Multiple Zones from Region TransientsIn the previous exercises, you created a single zone sampler instrument from an audio file in
the Arrange window. Using a similar technique, you can create a sampler instrument with
multiple zones based off of detected transients in the audio file. This is especially useful when
dealing with rhythmic material such as drum and percussion loops that have clear transients.
In the following exercises, you will create a new sampler instrument from a basic drum
loop and explore ways to extend and transform the sound using the EXS24 playback
parameters and routing flexibility.
1 Use the Mute tool to mute the new Vox Note region (Track 2).
2 Select the Basic Drums track (Track 3).
3 Use the Mute tool to unmute the Basic Drums regions on Track 3.
4 Play the project, listening to the Basic Drums region to become familiar with the
material.
5 From the Arrange window’s local Audio menu, choose Convert Regions to New
Sampler Track.
The Convert Regions to New Sampler Track dialog appears.
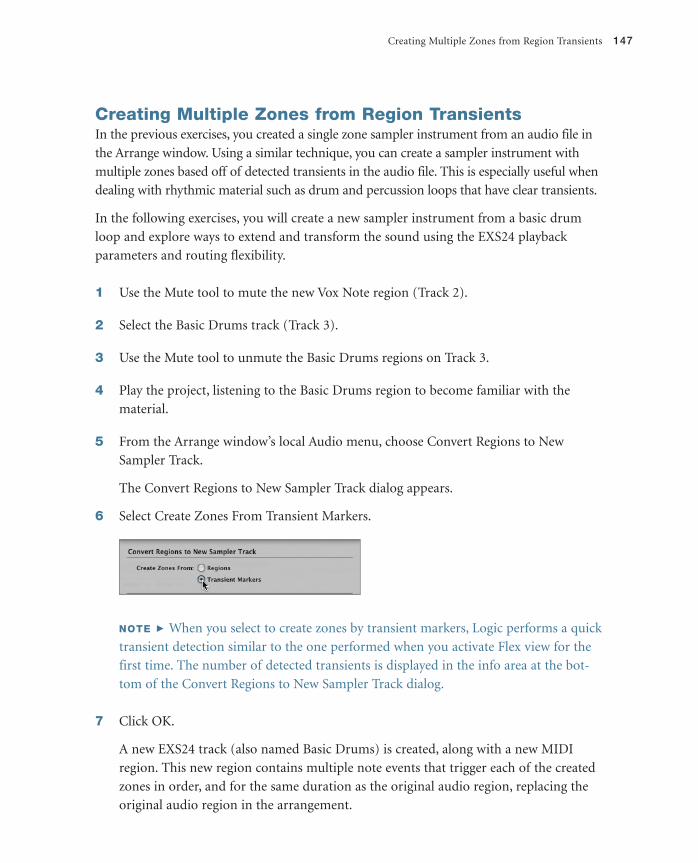
6 Select Create Zones From Transient Markers.
NOTE When you select to create zones by transient markers, Logic performs a quick
transient detection similar to the one performed when you activate Flex view for the
first time. The number of detected transients is displayed in the info area at the bot-
tom of the Convert Regions to New Sampler Track dialog.
7 Click OK.
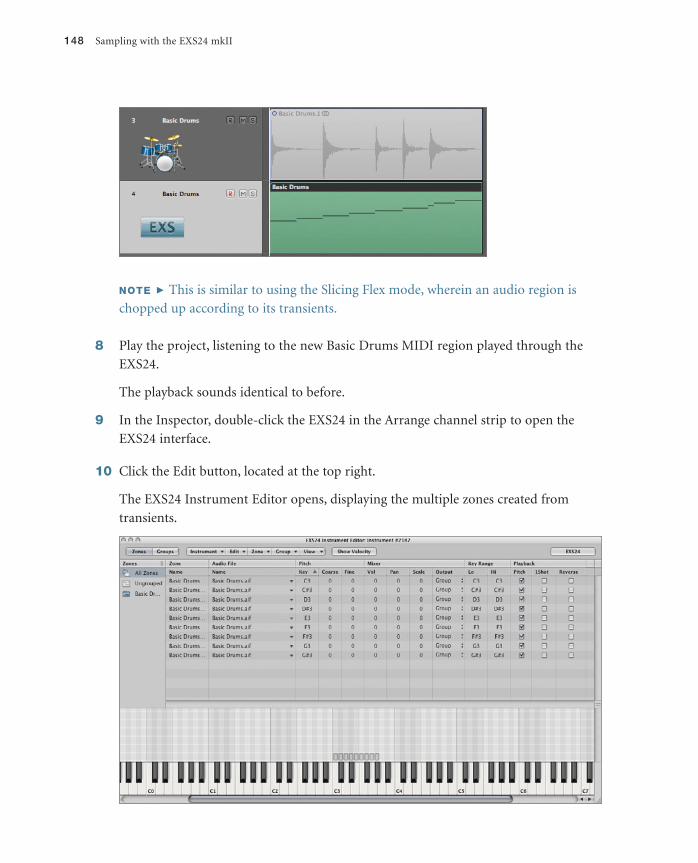
A new EXS24 track (also named Basic Drums) is created, along with a new MIDI
region. This new region contains multiple note events that trigger each of the created
zones in order, and for the same duration as the original audio region, replacing the
original audio region in the arrangement.
148 Sampling with the EXS24 mkII
NOTE This is similar to using the Slicing Flex mode, wherein an audio region is
chopped up according to its transients.
8 Play the project, listening to the new Basic Drums MIDI region played through the
EXS24.
The playback sounds identical to before.
9 In the Inspector, double-click the EXS24 in the Arrange channel strip to open the
EXS24 interface.
10 Click the Edit button, located at the top right.
The EXS24 Instrument Editor opens, displaying the multiple zones created from
transients.

Creating Multiple Zones from Region Transients 149
As you can see within the Parameters area, each transient from the original audio file
is mapped chromatically to MIDI pitches C3 through G#3.
11 Play the C3 through G#3 keys on your MIDI keyboard, listening to the result.
When playing the associated MIDI pitches on the keyboard, you hear each individual
slice. However, the slice only plays for as long as you hold down the key, and it can
sound truncated if you let go before the slice plays out in its entirety. In order for the
sample to play back its complete length irrespective of the key release, you need to
have 1Shot enabled within the Zone parameters.
12 Choose Select All from the EXS24 Instrument Editor’s Edit menu.
13 On any of the selected zones, click the 1Shot box to enable it for all.
14 Play the C3 through G#3 keys on your MIDI keyboard, listening to the result.
The slices play through in their entirety.
Although this provides an effective way to trigger the drums as a performance instru-
ment, let’s explore additional playback parameters within the EXS24 Instrument
Editor to further process the sound.
15 Click in the background of the EXS24 Instrument Editor to deselect all zones.
16 In the Parameters area, Command-click the zones mapped to C#3, D#3, and G#3 to
select them.
To use your MIDI controller to select zones, choose Zone > Select Zone of
Last Played Key.
17 Click the Reverse box for one of the selected zones to enable it for all selected zones.

150 Sampling with the EXS24 mkII
18 Play the C#3, D#3, and G#3 keys on your MIDI keyboard, listening to the result.
The samples play back in reverse.
19 Close the EXS24 Instrument Editor window.
20 Click Save in the Save dialog that appears.
Using Filters and Modulation to Process the SoundJust like you used the ES2 synthesizer to process the oscillators’ signal, you can use
EXS24’s filter and extensive modulation options to process the sampler instrument you
created. In fact, the EXS24’s filter and modulation router directly mirror the ones in the
ES2, with the exception of only offering a single filter, instead of a pair.
The filter in the EXS24 is a multimode filter, offering high-pass, low-pass, and band-
pass modes. In order to take advantage of its sound-shaping properties, you first need to
switch it on.
1 Click the filter on/off button located at the right side of the filter section.
NOTE Having an on/off switch for the filter enables you to quickly audition sounds
with and without the filter’s influence. It also is worth noting that when the filter is
active, it takes up more processor power, so it is a good idea to switch it off when you
don’t need it.
Using Filters and Modulation to Process the Sound 151
Now that the filter is switched on, you can apply filter settings to shape the sound.
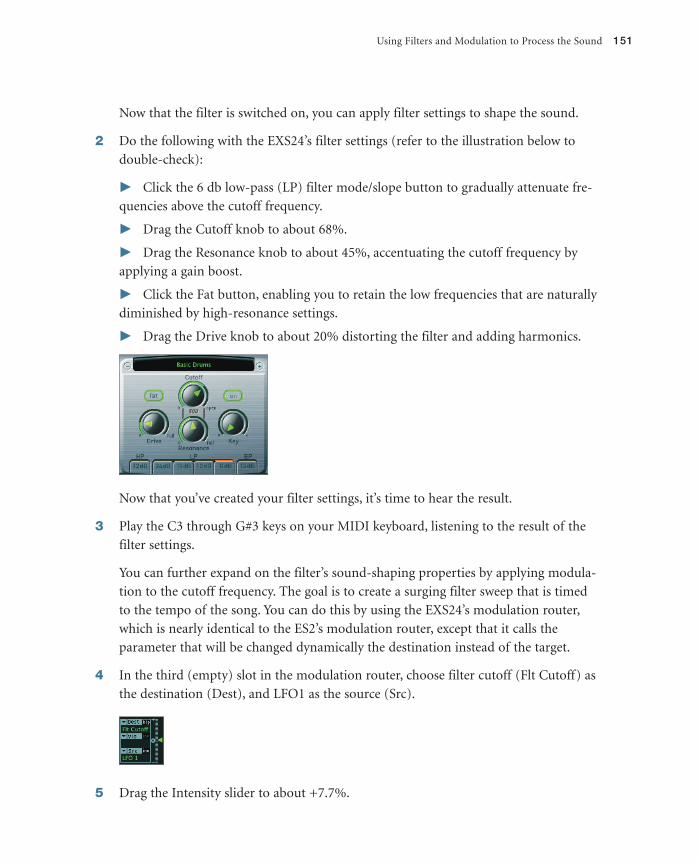
2 Do the following with the EXS24’s filter settings (refer to the illustration below to
double-check):
Click the 6 db low-pass (LP) filter mode/slope button to gradually attenuate fre-
quencies above the cutoff frequency.
Drag the Cutoff knob to about 68%.
Drag the Resonance knob to about 45%, accentuating the cutoff frequency by
applying a gain boost.
Click the Fat button, enabling you to retain the low frequencies that are naturally
diminished by high-resonance settings.
Drag the Drive knob to about 20% distorting the filter and adding harmonics.
Now that you’ve created your filter settings, it’s time to hear the result.
3 Play the C3 through G#3 keys on your MIDI keyboard, listening to the result of the
filter settings.
You can further expand on the filter’s sound-shaping properties by applying modula-
tion to the cutoff frequency. The goal is to create a surging filter sweep that is timed
to the tempo of the song. You can do this by using the EXS24’s modulation router,
which is nearly identical to the ES2’s modulation router, except that it calls the
parameter that will be changed dynamically the destination instead of the target.
4 In the third (empty) slot in the modulation router, choose filter cutoff (Flt Cutoff) as
the destination (Dest), and LFO1 as the source (Src).
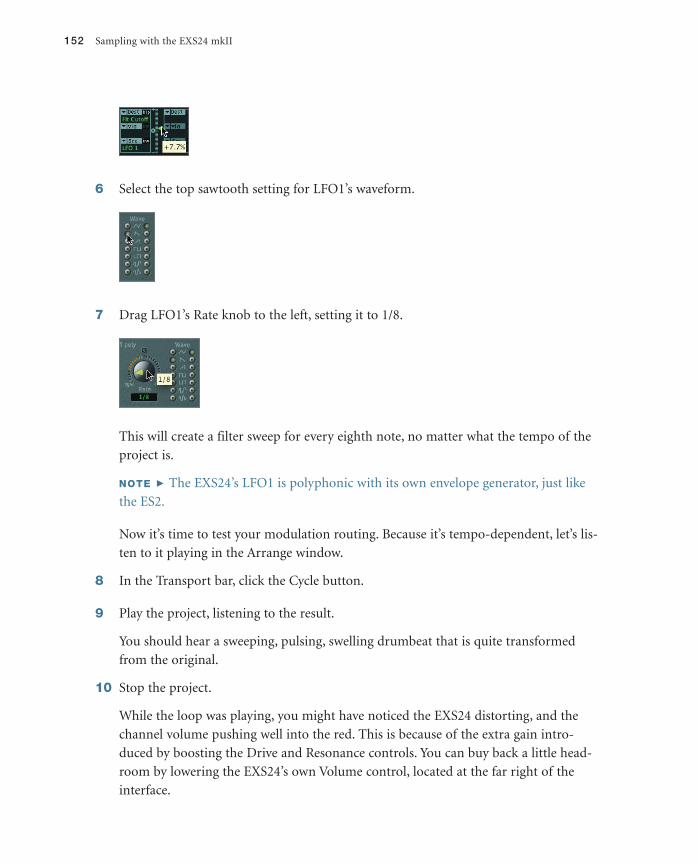
5 Drag the Intensity slider to about +7.7%.
152 Sampling with the EXS24 mkII
6 Select the top sawtooth setting for LFO1’s waveform.
7 Drag LFO1’s Rate knob to the left, setting it to 1/8.
This will create a filter sweep for every eighth note, no matter what the tempo of the
project is.
NOTE The EXS24’s LFO1 is polyphonic with its own envelope generator, just like
the ES2.
Now it’s time to test your modulation routing. Because it’s tempo-dependent, let’s lis-
ten to it playing in the Arrange window.
8 In the Transport bar, click the Cycle button.
9 Play the project, listening to the result.
You should hear a sweeping, pulsing, swelling drumbeat that is quite transformed
from the original.
10 Stop the project.
While the loop was playing, you might have noticed the EXS24 distorting, and the
channel volume pushing well into the red. This is because of the extra gain intro-
duced by boosting the Drive and Resonance controls. You can buy back a little head-
room by lowering the EXS24’s own Volume control, located at the far right of the
interface.

Using Groups 153
11 Drag the Volume knob downwards to a value of –7 db.
Using GroupsIn the EXS24 Instrument Editor, zones can be organized into groups in order to apply
common parameters to multiple zones simultaneously. Groups contain many of the same
parameters used in zones, but they also offer some unique parameters of their own, such
as the ability to offset both the filter settings and the envelopes. This allows you to create,
for example, different cutoff and resonance values for different zones.
In the sampler instrument you created, the low-pass filter cuts out the high frequencies of
all samples. By using groups, you can, in effect, apply a different cutoff frequency for just
the snare hits.
1 On the EXS24 interface, click the Edit button.
The EXS24 Instrument Editor opens.
2 From the local menu, choose Group > New Group.
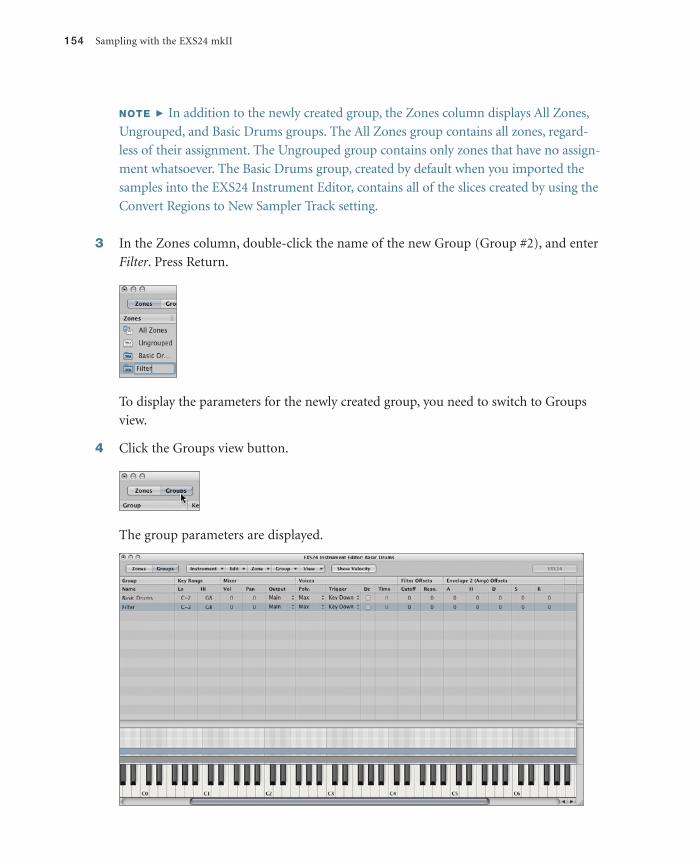
A new group is created, Group #2, which appears within the Zones column.
154 Sampling with the EXS24 mkII
NOTE In addition to the newly created group, the Zones column displays All Zones,
Ungrouped, and Basic Drums groups. The All Zones group contains all zones, regard-
less of their assignment. The Ungrouped group contains only zones that have no assign-
ment whatsoever. The Basic Drums group, created by default when you imported the
samples into the EXS24 Instrument Editor, contains all of the slices created by using the
Convert Regions to New Sampler Track setting.
3 In the Zones column, double-click the name of the new Group (Group #2), and enter
Filter. Press Return.
To display the parameters for the newly created group, you need to switch to Groups
view.
4 Click the Groups view button.
The group parameters are displayed.

Using Groups 155
NOTE By default, the editor only displays some of the group parameters, while hid-
ing others. As you did with zones in an earlier exercise, you can select the parameters
you want displayed within the View menu while in Groups view.
5 In the Filter Offsets parameters, double-click the Cutoff field and enter –5. Press
Return.
This will lower the filter cutoff frequency for any zone assigned to this group.
Now that you created and modified the group, its time to assign the zones to the new
group. This is done back in the Zones view.
6 Click the Zones view button.
You might be asking yourself “where did the zones go?” Not to worry; you are cur-
rently viewing the Filter group, which as of yet does not have any zones assigned to it.
7 Click the All Zones group.
All zones are displayed.
Zones can be easily assigned to groups by dragging and dropping onto the groups
within the Zones column.
8 Command-click the zones mapped to D3 and G3 to select them.
9 Drag the selected zones to the Filter group.
156 Sampling with the EXS24 mkII
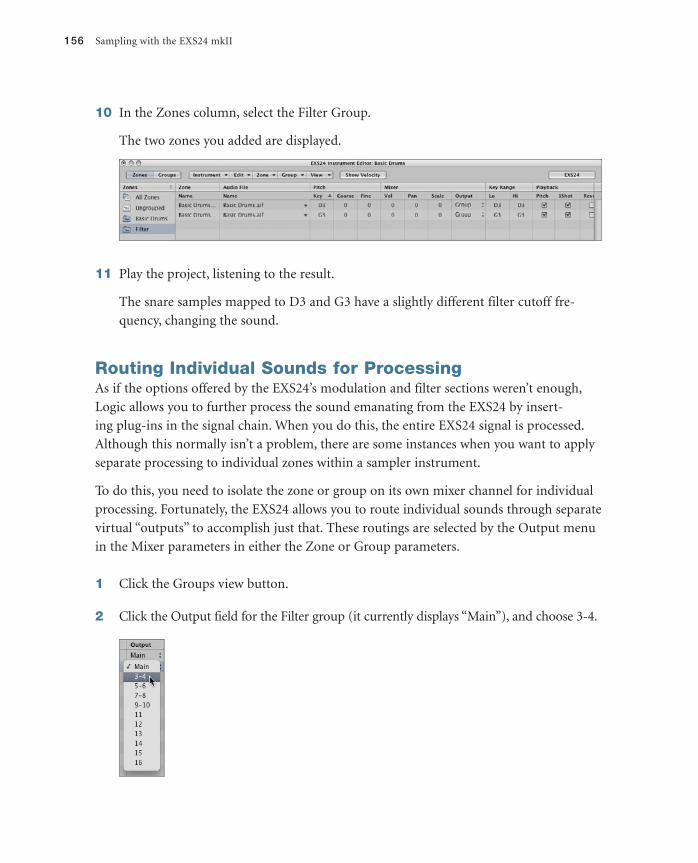
10 In the Zones column, select the Filter Group.
The two zones you added are displayed.
11 Play the project, listening to the result.
The snare samples mapped to D3 and G3 have a slightly different filter cutoff fre-
quency, changing the sound.
Routing Individual Sounds for ProcessingAs if the options offered by the EXS24’s modulation and filter sections weren’t enough,
Logic allows you to further process the sound emanating from the EXS24 by insert-
ing plug-ins in the signal chain. When you do this, the entire EXS24 signal is processed.
Although this normally isn’t a problem, there are some instances when you want to apply
separate processing to individual zones within a sampler instrument.
To do this, you need to isolate the zone or group on its own mixer channel for individual
processing. Fortunately, the EXS24 allows you to route individual sounds through separate
virtual “outputs” to accomplish just that. These routings are selected by the Output menu
in the Mixer parameters in either the Zone or Group parameters.
1 Click the Groups view button.
2 Click the Output field for the Filter group (it currently displays “Main”), and choose 3-4.

Routing Individual Sounds for Processing 157
NOTE The first five selections represent stereo routings, and the last six selections
represent mono.
3 In the local Instrument menu, choose Save.
To use this special function, you need to instantiate the EXS24 as a multi-output instru-
ment. So far you’ve been working with the EXS24 as a stereo instrument and have done
quite a bit of work modifying the zones and groups. Luckily, Logic allows you to keep all
of the current settings when changing from stereo to multi-output instantiations.
NOTE For any software instrument, all settings and content contained in a software
instrument will be transferred when switching modes (mono, stereo, multi-output,
and 5.1).
5 At the bottom of the Arrange window, click the Mixer button to open the Mixer.
6 On the Basic Drums channel strip (Track 4), click-hold the Instrument slot to open
the Instrument Plug-in menu and choose EXS24 (Sampler) > Multi Output (5xSte-
reo, 6xMono).
The EXS24 interface opens after reloading the associated samples and current settings.
7 If necessary, move the EXS24 window so you can see the EXS24 Basic Drums channel
strip (Track 4).
8 Just under the Solo button, click the small plus button (+) on the EXS24 Basic Drums
channel strip (Track 4).
158 Sampling with the EXS24 mkII
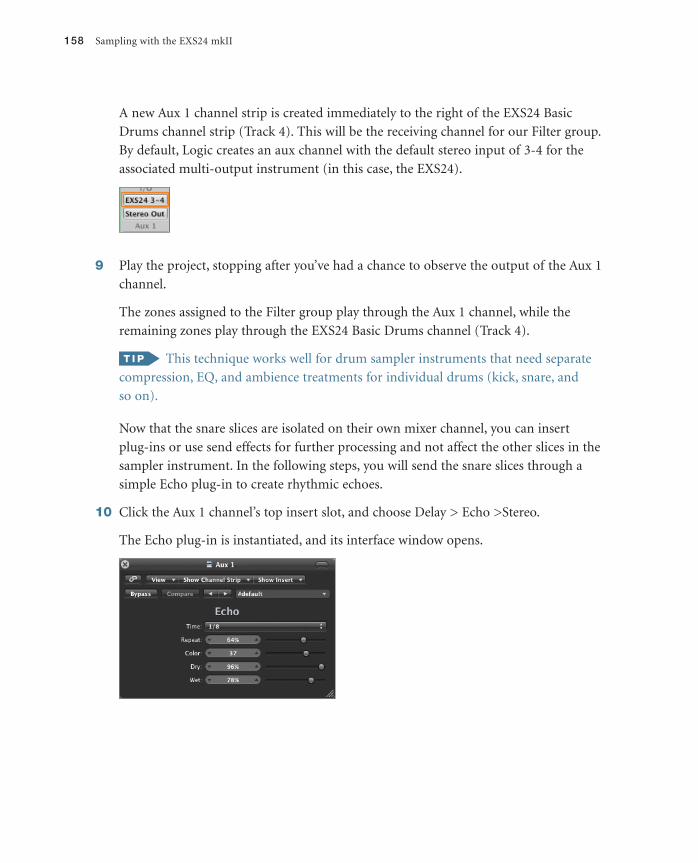
A new Aux 1 channel strip is created immediately to the right of the EXS24 Basic
Drums channel strip (Track 4). This will be the receiving channel for our Filter group.
By default, Logic creates an aux channel with the default stereo input of 3-4 for the
associated multi-output instrument (in this case, the EXS24).
9 Play the project, stopping after you’ve had a chance to observe the output of the Aux 1
channel.
The zones assigned to the Filter group play through the Aux 1 channel, while the
remaining zones play through the EXS24 Basic Drums channel (Track 4).
This technique works well for drum sampler instruments that need separate
compression, EQ, and ambience treatments for individual drums (kick, snare, and
so on).
Now that the snare slices are isolated on their own mixer channel, you can insert
plug-ins or use send effects for further processing and not affect the other slices in the
sampler instrument. In the following steps, you will send the snare slices through a
simple Echo plug-in to create rhythmic echoes.
10 Click the Aux 1 channel’s top insert slot, and choose Delay > Echo >Stereo.
The Echo plug-in is instantiated, and its interface window opens.

Routing Individual Sounds for Processing 159
11 Click the Time menu, and choose 1/8T.
This sets the repeat time to eighth-note triplets.
12 Drag the Wet slider down to 23%.
This will lower the volume level of the repeats so as not to overpower the original
signal.
13 Play the project, listening to the effect of all of the EXS24 programming you’ve done
in the last few exercises.
The result is a surging, shuffling, processed drum loop, quite abstracted from the
original audio file.
14 From the preset menu, choose Save Setting As.
15 In the file selector dialog, name the preset Vox Note and then click Save.
To give perspective on just how much has been changed, let’s finish by listening to the
original loop.
16 Close both the Echo and EXS24 windows.
17 Close the Mixer.
18 Using the Mute tool, select the Basic Drums.1 region on Track 3, unmuting the origi-
nal region.
160 Sampling with the EXS24 mkII
19 In the Transport bar, click the Solo button to enable it.
20 Play the project.
21 While the project is playing, select the original Basic Drums audio track (Track 3) and
EXS24 Basic Drums software instrument track (Track 4) alternatively, soloing them.
22 Stop the project.
23 In the Transport bar, click the Solo button to disable it.
Lesson Review1. Individual samples are referenced and mapped within what?
2. What contains the settings for how a sample will be played back, including key
ranges?
3. Which tuning parameter in the EXS24 Instrument Editor would be used to tune by
cents, Coarse or Fine?
4. Are loop points set within zones or groups?
5. What parameter in the EXS24 Instrument Editor is used to smooth out transitions
between the end points and start points of a loop?
6. How are groups used in the EXS24 Instrument Editor?
7. Are filter and envelope offsets set within zones or groups?
8. What do multi-output instruments do?
Answers
1. Samples are mapped within sampler instruments.
2. Zones contain the settings for how a sample will be played back, including key range.
3. The Fine parameter is used to tune by cents.
4. Loop points are set within zones, as they refer to specific samples.

Lesson Review 161
5. The Xfade parameter allows you to assign a crossfade between the end and start
points of a loop, making it smoother.
6. Groups are used to assign common parameters to multiple zones.
7. Filter and envelope offsets are set within groups.
8. Multi-output instruments (such as Ultrabeat and EXS24 mkII) can route individual
sounds to separate channel strips for isolation or further processing.


Index
577
AAll Objects layer, Environment,
444–445Alternate tool, 30–31
saving to screensets, 31Apple Loops
with Touch Tracks Environment object, 473–477
Apple Loops Utility, 48automatic pitch shifting, 49octave transposition, 53saving Apple Loops, 55–56Sensitivity slider, 54tags, 49–51Tempo slider, 52–53versus Time and Pitch
Machine, 56transients, 51–55
Apple QuickTime, 536arpeggiating chords, 313–314Arpeggiato Environment object,
449–453Arrange area
key focus, 20maximizing workspace, 16–19tool click zones, 34Tool menu, 29
Arrange view, Mixer, 336–339arrangements
global editing, 221–227inserting space, 225–227playback, Cycle mode,
207–211playback, Play From Left
Window Edge, 206–207, 209
playback, prioritizing, 203–205playhead, moving with Bar
ruler, 201
playhead, positioning with Marquee tool, 202–203
playing, 200–203switching between, 241–243
arrangements and foldersfor alternates, 231–234editing regions, 235–237muting/unmuting, 241–243packing, 227–228subdividing, 229–231unpacking, 243–244working inside, 237–241
arrangements and markerscoloring, 217–219creating, 211–212creating, from selected
regions, 215creating, on fly, 213creating, with Pencil tool,
214–215creating, with Period and
Comma keys, 213editing positions, 215–217Marker Lists, 220–222multiple arrangements,
241–243naming, 217navigating with, 219
audio editingclicks, fixing in Sample Editor,
253–256comps with Quick Swipe
Comping, 259–263groups, 264–266groups, activating/
deactivating, 266–267groups, phase-locked, 267–272groups, quantizing audio,
270–272Soundtrack Pro 3, 279–289
Soundtrack Pro 3, file preparation, 275–277
Soundtrack Pro 3, Frequency Spectrum view, 281–285
Soundtrack Pro 3, user interface, 277–279
Soundtrack Pro 3, viewing in Logic, 289–290
take folders, 257–259transients, with Marquee
selections, 272–275transitions, with crossfades,
248–253automation of aux channels
hardware control surfaces, 394–410
scaling values, 391–392snapping data to timeline,
387–389tracks, adding, 384–387tracks, applying automation,
392–394tracks, copying data between,
389–390Automation Quick Access feature,
397Auto-select Channel Strip, 58, 254Auto-Set Locator feature, 210aux channel automation
hardware control surfaces, 394–410
scaling values, 391–392snapping data to timeline,
387–389tracks, adding, 384–387tracks, copying data between,
389–390aux channels
as submixes, 358–361Avid’s Pro Tools 8. See Pro Tools 8

578 Index
Bbackup/restore settings
key commands, 38with MobileMe account,
41–42project templates, 38
Beat Mapping track, 93–95audio regions, 100–101checking, 99markers, 545MIDI regions, 95–99
Body EQ, Sculpture, 171–172Bonjour
network access to settings, 42–43
Bounce in Place feature, 376–381
CCable Switcher Environment object,
464–469Channel EQ plug-in, 347
relocating, 348–359surround sound, 428–431
channel stripsfilters, 339–340importing with project data,
334–336Mixer, All view, 340–341Mixer, Single view, 342networks, settings, accessing, 40networks, settings, sharing,
42–44chord charts, 505–509chord grids, 509–513Chord Memorizer Environment
object, 453–455Click & Ports layer, Environment,
445, 447–448, 453clicks and pops
fixing in Sample Editor, 253–256
fixing with crossfades, 248–250
collections, 10Color window, 258–259Compose collection
Empty Project, 10Compressor plug-in, 347–348
Output Distortion menu, 350relocating, 348–359
Controller Assignments windowExpert view, 399–400, 403
fader banks, changing, 408–410Learn Mode, 398, 401–402modes, adding, 405–406modes, switching, 407–408zones, adding, 405–406
controllers. See hardware control surfaces
Convert Regions to New Sampler Track, 134–135
Copy Value to All Following Events command, 296
Crossfade tool, 250crossfades, 248–250
applying to multiple regions, 251–253
Curve parameter, 253Customize Toolbar dialog, 14–15Customize Transport bar dialog, 15Cycle mode
playback, 207–211Skip Cycle, 235
DDelay Line Environment object,
455–458Direction Mixer, 344–346Display Parameter box
Interpretation, 516New Attributes, 517Quantize, 515–516Style, 495–501
distrubers and exciters, Sculpture, 169
Dolby Digital (AC3) files, 437–439Down Mixer plug-in
surround sound, 434–435Drum Replacement/Doubling
feature, 290–296drums. See also Ultrabeat
mapped instruments, 517–523DVD-Audio discs, 435–437
Eeffects processors, 373–376envelope generators
EZ2 Synthesizer, 122–124Sculpture, 173–175Ultrabeat, 184–185
Environmentlayers, All Objects, 444–445layers, Click & Ports, 445,
447–448, 453
objects, Arpeggiato, 449–453objects, Cable Switcher,
464–469objects, Chord Memorizer,
453–455objects, creating, 447–448objects, Delay Line, 455–458objects, Monitor, 448–449objects, Physical Input cabling
to Sequencer Input, 446–447, 453
objects, Touch Tracks, 469–473
objects, Touch Tracks, with Apple Loops, 473–477
objects, Transformer, 459–464signal chains, 458–459Tool menu, 30
Eraser toolfloating Tool menu, 32
Event Listediting, 294–296Tool menu, 29
Event Parameter box, 490Length, 491Style, 505
Explore collectionEmpty Project, 10
EXS24 Instrument Editor and sampler instruments, 136–139EXS24 Parameter window,
144–146filter and modulation options,
150–153loop points, 140–144routing sounds for processing,
156–160zones, groups of, 153–156zones, multiple, from
transients, 146–150EXS24 tracks
creating, 134–136EZ2 Synthesizer
filters, 114–118oscillator modulation,
envelope generators, 122–124
oscillator modulation, FM, 111–112
oscillator modulation, LFOs, 119, 120–122
oscillator modulation, ring modulation, 112–113

Index 579
oscillator modulation, router, 119
oscillator modulation, synchronization, 113–114
oscillator modulation, vector envelope generators, 125–129
oscillator waveforms, 107–110output/processing section, 130user interface, 106–107
FFade parameters, 249–253Fade Tool Click Zones option, 34filters
EXS24 Instrument Editor, 150–153
EZ2 Synthesizer, 114–118Sculpture, 171Ultrabeat, 191–194
Finger tool, 221flex markers, 73–77Flex Mode menu, 82
Monophonic mode, 70, 86Rhythmic mode, 83Slicing mode, 81Speed mode, 89Tempohone mode, 89
flex time, 68–73groove templates, 85–89quantization, 79–82
Flex view, 72FM (frequency modulation),
111–112formants, 59–60frequency modulation (FM),
111–112Frequency Spectrum view, 281–285
GGo To Position command, 213groove templates, 85–89Group Clutch feature, 266–267, 401Group Settings window, 265,
268–270groups, 264–266
activating/deactivating, 266–267
channels, assigning to, 351–353
channels, post-pan sends, 368disabling, 353–354
phase-locked, 267–270quantizing audio, 270–272of tracks, 13of zones, 153–156
Hhardware control surfaces
channel controls. assigning, 400–402
channel controls. mapping to parameters, 402–404
Controller Assignment window, Expert view, 399–400
fader banks, 408–410modes, creating, 404–406modes, switching, 407–408plug-in parameters, 397–399transport controls. assigning,
395–397zones, creating, 404–406
harmonic correctionTime and Pitch Machine,
59–61Hyper Editor
Tool menu, 29
IImport Audio icon, 14–15Import Project Settings dialog,
38–39Import Settings dialog, 39importing media for
synchronization, 546–547audio, 550–551broadcast WAVE, 548–549XML, 547–548
Inspectorviewing/hiding, 19
I/O plug-in, 373, 375–376
JJunction tool, 218
Kkey commands
assignments, caution, 24assignments, making, 25–28assignments, viewing, 23–25backups, 38key labels, 26–27
key-command-only functions, 28–29
networks, settings, accessing, 40networks, settings, sharing,
42–44key focus, windows and areas, 20–21
LLFOs (low-frequency oscillators)
EZ2 Synthesizer, 119, 120–122Sculpture, 173Ultrabeat, 184, 190–191
Library, 13locators
inserting space between, 225–227
navigating arrangements, 219repeating sections between,
223–225Set Locators by Next or
Previous Marker and Enable Cycle commands, 219, 222, 224
setting, with Cycle mode, 207–211
locking screensets, 21locked versus unlocked, 22–23
Logic Pro 9exporting files to Pro Tools
8, tempo-marker maps, 566–567
importing audio files, 573–574Logic Pro 9,
exporting files to Pro Tools 8, tracks as audio, 562–565
Loop Mode menu, 127loop points, EXS24 Instrument
Editor, 140–144low-frequency oscillators, 120–122.
See LFOs
Mmapped instruments, 517–523Marker List View menu, 544–545markers
coloring, 217–219creating, 211–212creating, from selected
regions, 215creating, on the fly, 213creating, with Pencil tool,
214–215
580 Index
creating, with Period and Comma keys, 213
editing positions, 215–217Marker Lists, 220–222naming, 217navigating with, 219Set Locators by Next or
Previous Marker and Enable Cycle commands, 219, 222, 224
Marquee selections, 78–79isolating selections for editing,
272–275Marquee tool
playhead, positioning, 202–203
Marquee Tool Click Zones option, 34–35
Media areaLibrary, 13
MIDI controllerchannel controls, assigning,
400–402channel controls, mapping to
parameters, 402–404fader banks, 408–410modes, creating, 404–406modes, switching, 407–408zones, creating, 404–406
MIDI editingaliases, 300–302transform sets, 319–321transform sets, applying,
327–328transform sets, creating
functions, 321–327MIDI events
selecting for editing, 317–318separating, 328–330
MIDI regionsaltering articulation, 307–308delays, 306–307gate time, 307–308Marquee selections, 275notation, preparaing for,
513–515notation, viewing data,
515–517rhythm with quantization,
308–313touch track objects, 469–477transposing, 303–304velocities, 304–306
velocities and length, 315–316Mixer
Arrange view, 336–339group feature, 264–272key focus, 20maximizing workspace, 16–19Notes area, 342–344Options, Create New
Auxilliary Channel Strips, 374
plug-ins, changing locations, 348–350
plug-ins, switching in window, 346–348
View, Add Signal Flow Channel Strips, 337
View, Colors, 337Mixer channel strips
All view, 340–341filters, 339–340Single view, 342stereo tracks, 344–346
Mixer groupschannels, assigning to, 351–353disabling, 353–354
MobileMe accountsettings, backing up/restoring,
41–42settings, sharing, 42–44
modulationEXS24 Instrument Editor,
150–153EZ2 Synthesizer routers, 119Sculpture, 173–175
Monitor Environment object, 448–449
Monophonic mode, 70, 86Morph Pad, Sculpture, 173–175, 178Multichannel Gain plug-in
surround sound, 431–434MultiMeter plug-in, 432
Nnavigation
plug-ins, switching in windows, 346–348
networkssettings, accessing, 40settings, sharing, 42–44
New Track dialog, 10–11groups of tracks, 13inputs and outputs, 12
Noise Gate plug in, 364–367notation with Score Editor, 482–483
chord charts, 505–509chord grids, 509–513drums, mapped instruments,
517–523MIDI regions, preparations,
513–515MIDI regions, viewing data,
515–517notes, adjusting length,
490–492notes, dragging, 488–490notes, editing with step input,
492–494score sets, creating, 524–527score sets, creating parts for
printing, 527–532staff styles, 494–496staff styles, polyphonic, 496–502text, 502–505transcribing performances, 513
Notator, 481Note On Random modulators,
Sculpture, 173Notes area, Mixer, 342–344
OObject Parameter box
Direction, 451–452, 463Random, 452Range, 466Repeats, 456Velocity, 452
octave transposition, 53oscillator modulation, EZ2
Synthesizerenvelope generators, 122–124FM, 111–112LFOs, 119, 120–122ring modulation, 112–113router, 119synchronization, 113–114vector envelope generators,
125–129oscillator waveforms, EZ2
Synthesizer, 107–110Output Distortion menu,
Compressor plug-in, 350
Pparallel compression, 367–371

Index 581
parallel routing, 362Pencil tool, 22
alternate tools, 30–31performance transcriptions, 513Phase-Locked Audio checkbox,
266, 269phase-locked groups, 267–270Physical Input Environment object,
446–447, 453Piano Roll Editor
beat mapping, 99MIDI events, 317–321MIDI regions, 302, 310Tool menu, 30
Pickup Clock commannd, 552–553Pitch Correction plug-in, 63–66
automating, 66–68pitch shifting. See also Time and
Pitch MachineApple Loops Utility, 49with harmonic correction,
59–61Time and Pitch Machine,
57–59Play Cycle option, 205, 207Play From Left Window Edge
option, 206–207, 209Play From Selected Region option,
203–205Play Marquee Selection option,
203, 205playback
Cycle mode, 207–211Play From Left Window Edge,
206–207, 209prioritizing, 203–205
playheadsmoving with Bar ruler, 201positioning with Marquee
tool, 202–203prioritizing playback, 203–205
plug-inschanging locations, 348–350extented parameters, 350network settings, accessing, 40network settings, sharing,
42–44switching in window, 346–348
Pointer toolalternate tools, 30–31floating Tool menu, 32
polyphonic staff styles, 496–502
post-pan sendsparallel compression, 367–371
Prelisten button, 254Pro Tools 8
exporting of Logic Pro 9 files to, 562–567
importing Logic Pro 9 projects into, 567–573
Reverse, 287Space Designer, 286
Produce collectionEmpty Project, 10
production notesMixer, 342–344
Project Settings windowAudio settings, 541–542General, Bar Position, 539General, Frame Rate, 539General, Plays at SMPTE, 539Video settings, 540–541, 543
project templates. See also templatesbackups, 38opening automatically, 36–38saving, 36
projectscreating, 36–38opening, 36–38
property tags, 49–51
Qquantization
flex time, 79–82phase-locked editing, 270–272
Quick Swipe comping, 259–263
RRandomize function, EZ2
Synthesizer, 131Region
Bounce Regions in Place, 377Name Regions by Tracks/
Channel Strips, 294, 330Repeat Regions, 301
Region Parameter box, 250Delay, 306–307Dynamics, Fixed, 305Fade type, EqP (Equal Power),
249, 251Gate Time, 307–308Loop, 306Q-Flam, 313–314Q-Length, 315–316
Q-Range, 312–313Q-Strength, 311–314Q-Swing, 311Quantize, 271, 306, 315Q-Velocity, 315–316Transpose, 303–304Velocity, 305
Relative Threshold control, 292Repeat Section command, 223reverbs
plug-ins, 375reverse, 287–289
Rhythmic mode, 83ring modulation, 112–113rubato
beat mapping, 93–101
SSample Editor
clicks and pops, fixing, 253–256
preferences, 61Time and Pitch Machine,
58–59Tool menu, 30transient markers, 82–85
sampler instruments and EXS24 Instrument Editor, 136–139creating sampler instruments,
134–136EXS24 Parameter window,
144–146filter and modulation options,
150–153loop points, 140–144routing sounds for processing,
156–160zones, groups of, 153–156zones, multiple, from
transients, 146–150Scissors tool, 258
floating Tool menu, 32Score Editor
Tool menu, 29Score Editor notation, 482–483
chord charts, 505–509chord grids, 509–513drums, mapped instruments,
517–523MIDI regions, preparations,
513–515

582 Index
MIDI regions, viewing data, 515–517
notes, adjusting length, 490–492
notes, dragging, 488–490notes, editing with step input,
492–494score sets, creating, 524–527score sets, creating parts for
printing, 527–532staff styles, 494–496staff styles, polyphonic,
496–502text, 502–505transcribing performances, 513
score sets, 524–532screensets
Alternate tool, saving to, 31channel strip settings, 341custom, 16–18Environment window, 444importing, 38–39locked versus unlocked, 22–23locking, 21maximizing workspace, 16–21Score Editor, 482screen real estate, 16
Sculpturemodulation, 173–175Morph Pad, 173–175, 178saving sounds as presets,
175–176sound processing, 171–173string, 165–166string, objects, 166–171string, pickups, 171user interface, 164–165
Sensitivity slider, Apple Loops Utility, 54
Sequencer Input object, 446–447, 453
serial processing, 358–361Set Locators and Play command,
207, 210Set Locators by Next or Previous
Marker and Enable Cycle commands, 219, 222, 224
Set Marquee End to Previous Transient command, 274
side chaining, 362–367Ultrabeat, 188
signal chainingEnvironment, 458–459
signal flowBounce in Place feature,
376–381effects processors, 373–376I/O plug-in, 373, 375–376parallel compression, 367–371side chaining, 362–367software instrument tracks,
rendering as audio, 380–381
submixes, applying send effects to, 361–362
submixes, aux channels as, 358–361
signal routing, 363Single view, Mixer, 342Skip Cycle feature, 235Slicing mode, 81SMPTE time code, 538–541
locking, 549–550Pickup Clock command,
552–553positioning events on timeline,
551–552software instrument tracks
rendering as audio, 380–381Sound Settings dialog, 555–556soundtrack delivery, 554–555
dubbing stems, 556–558exportng audio to movie,
555–556Soundtrack Pro 3
editing files, 279–281editing files, multiple, 285–289editing files, viewing in Logic,
289–290file preparation, 275–277Frequency Spectrum view,
281–285Space Designer, 280, 284
surround sound settings, 426–427
speed fades, 89–91Speed mode, 89Split by Playhead button, 14–15staff styles, 494–496
polyphonic, 496–502step input, 492–494Step mode
Ultrabeat, 194–197stereo tracks
Mixer channel strips, 344–346.stmp files versus .stap files, 277
string, Sculpture, 165–166objects, 166–171pickups, 171
submixesaux channels as, 358–361send effects, applying to,
361–362Surround Panner, 418–420
balancing stereo, 421–424center and LFE levels, 420–421
Surround sound, 416–418audio interface output
assignments, 414–415Dolby Digital (AC3) files,
437–439DVD-Audio discs, 435–437effects, multi-channel, 425–428effects, multi-mono insert,
428–431plug-ins, Down Mixer, 434–435plug-ins, Multichannel Gain,
431–434project format, 416
Swap Left and Right Locator command, 235
synchronization, 113–114, 536–537Apple QuickTime, 536audio configuration, 541–542media, importing, 546–547media, importing audio,
550–551media, importing broadcast
WAVE, 548–549media, importing XML,
547–548movies, detecting cuts,
545–546movies, markers for spotting,
543–545movies, opening, 538navigating with video,
542–543SMPTE time code, 538–541SMPTE time code, locking,
549–550SMPTE time code, Pickup
Clock command, 552–553
SMPTE time code, positioning events on timeline, 551–552
soundtrack delivery, 554–555
Index 583
soundtrack delivery, dubbing stems, 556–558
soundtrack delivery, exportng audio to movie, 555–556
sythensis. See ES2Synthesizer
TTab key
key focus, shifting, 20–21tags, 49–51take folders, 257–259
creating comps, 259–263templates. See also groove templates;
project templatescustom, 10premade, 10premade, customizing with
region parameters, 315–316
Templates paneEmpty Project button, 10
tempobeat mapping, 93–99varispeed, 91–93
Tempo Alternative menu, 98, 99–100
Tempo slider, Apple Loops Utility, 52–53
Tempohone mode, 89Test Oscillator plug in, 363–366text in notation, 502–505Time and Pitch Machine. See also
pitch shiftingaccessing, in Arrange area,
61–63versus Apple Loops Utility, 56pitch transposition, 57–59pitch transposition, with
harmonic correction, 59–61
Timing Offset parameter, 293Toggle Group Clutch command, 167tool click zones, 34–35Tool menus
accessing quickly, 31–32alternate tools, 30–31alternate tools, saving to
screensets, 31Arrange area, 29Environment, 30Event List, 29floating Tool menu, 31–32hard-wired commands, 32–33Hyper Editor, 29Piano Roll Editor, 30Sample Editor, 30Score Editor, 29two-button mouse, 35
toolbarcustomizing, 14–15global, 15
Touch Tracks Environment object, 469–473
Touch Tracks Environment object, with Apple Loops, 473–477
Transform window, 322–328Transformer Environment object,
459–464transient markers
Sample Editor, 82–85transients, 51–55
beat mapping, 100–101transitions
clicks and pops, fixing, 253–256crossfades, 248–250crossfades, applying to multiple
regions, 251–253Marquee selections for editing,
272–275Quick Swipe comping, 259–263
Transport barcustomizing, 15–16
Trigger Note assignment, 294
UUltrabeat
Assignment section, 181–182bitcrusher, 191–194filters, multimode, 191–194sample loading, 189–191side chaining, 188sounds, hi-hat, 187–188sounds, kick drum, 182–184sounds, snare drum, 185–186Step mode, 194–197user interface, 180
user preferencestoolbar buttons, adding, 15
Vvarispeed, 91–93vector envelope generators, EZ2
Synthesizer, 125–129Vector Mode menu, 125Voice Separation tool, 501–502
WWaveform Editor, 279, 285Waveshaper, Sculpture, 171
Zzones, EXS24 Instrument Editor
groups of, 153–156multiple, from transients,
146–150
![Index [ptgmedia.pearsoncmg.com]ptgmedia.pearsoncmg.com/.../samplechapter/0321278542_Index.pdf · / character, 1156, 1533 ^ character, ... Accelerometer data, 1297–1303 Accent, 17–18,](https://img.pdfslide.us/doc/110x75/5b4fe1c87f8b9a5a6f8d56a9/index-character-1156-1533-character-accelerometer-data-12971303.jpg)


![PX5 Presets Manager Users Guide - produktinfo.conrad.com · Presets that begin with [PS3] are designed for the PS3. Game presets that begin with [DH] means they’re using Dolby surround](https://img.pdfslide.us/doc/110x75/5d4f426d88c9934c248b68b4/px5-presets-manager-users-guide-presets-that-begin-with-ps3-are-designed.jpg)