Embed Size (px)
Citation preview
7/29/2019 Apple imacg5_17in
http://slidepdf.com/reader/full/apple-imacg517in 1/319© 2004 Apple Computer, Inc. All rights reserved.
Service Source
iMac G5 (17-inch)
Updated 6 May 2005
7/29/2019 Apple imacg5_17in
http://slidepdf.com/reader/full/apple-imacg517in 2/319© 2004 Apple Computer, Inc. All rights reserved.
Service Source
Take ApartiMac G5 (17-inch)

7/29/2019 Apple imacg5_17in
http://slidepdf.com/reader/full/apple-imacg517in 3/319iMac G5, 17-inch Take Apart - 1General Information
General Information
Tools
The following tools are required to service the computer:
• Phillips #2 screwdriver
• Flat-blade screwdriver
• Torx-6 and 8 screwdriver
• Jeweler’s flat-blade screwdriver
• Nylon probe tool (black stick 922-5065)• Needlenose pliers
• Soft cloth (to protect removed parts from scratches)
New Procedures added to Take Apart (May 2005)
• Fans, Upper
• Logic board
• Speakers
• Microphone
• Bluetooth card• Soft modem
• Chassis
• AirPort antenna
• Bluetooth antenna
• LED light pipe

7/29/2019 Apple imacg5_17in
http://slidepdf.com/reader/full/apple-imacg517in 4/3192 - iMac G5, 17-inch Take Apart General Information
Important Things to Know
1. All customer removable screws are brass colored (except for some fan screws
on earlier units which use torx screws). Do not remove screws unless they are
brass colored, or you will void your warranty.
2. Important: Ground yourself when working on the computer. The procedure will show
you how to ground yourself.
3. A magnetized “L”-shaped Phillips screwdriver is included with the replacement part.
4. The midplane is no longer offered as a service part or as a Do-it-Yourself repair. Most
parts on the midplane are now available as individual service parts.
5. Additional items are included with these service parts:
Back Cover
• Two blank labels are included with the replacement back cover. Copy the serial
number and Ethernet number off the bottom of the computer’s foot and attach the
new labels to the bottom of the replacement foot. The back cover take apart
procedure will show you where to attach the labels.
Logic Board
• The LED gasket and light pipe are included
• Syringe with thermal compound
• Alcohol cleaning wipe
• A new pre-printed Ethernet label is included with the midplane. Attach the sticker to
the bottom of the computer’s foot, above the existing label.
• A blank serial number label is included with the midplane. Copy the serial number
off the bottom of the computer’s foot and attach the new label to the midplane. Themidplane take apart procedure will show you where to attach the label.
6. Do not pull on individual wires when disconnecting a part; pull on the connector.
7. A screw chart is attached at the end of this document. Use the chart to identify screw
type and screw locations.
7/29/2019 Apple imacg5_17in
http://slidepdf.com/reader/full/apple-imacg517in 5/319iMac G5, 17-inch Take Apart - 3Removing the Back Cover
Removing the Back Cover
Tools
Use the screwdriver provided, or a Phillips #2 screwdriver
Procedure
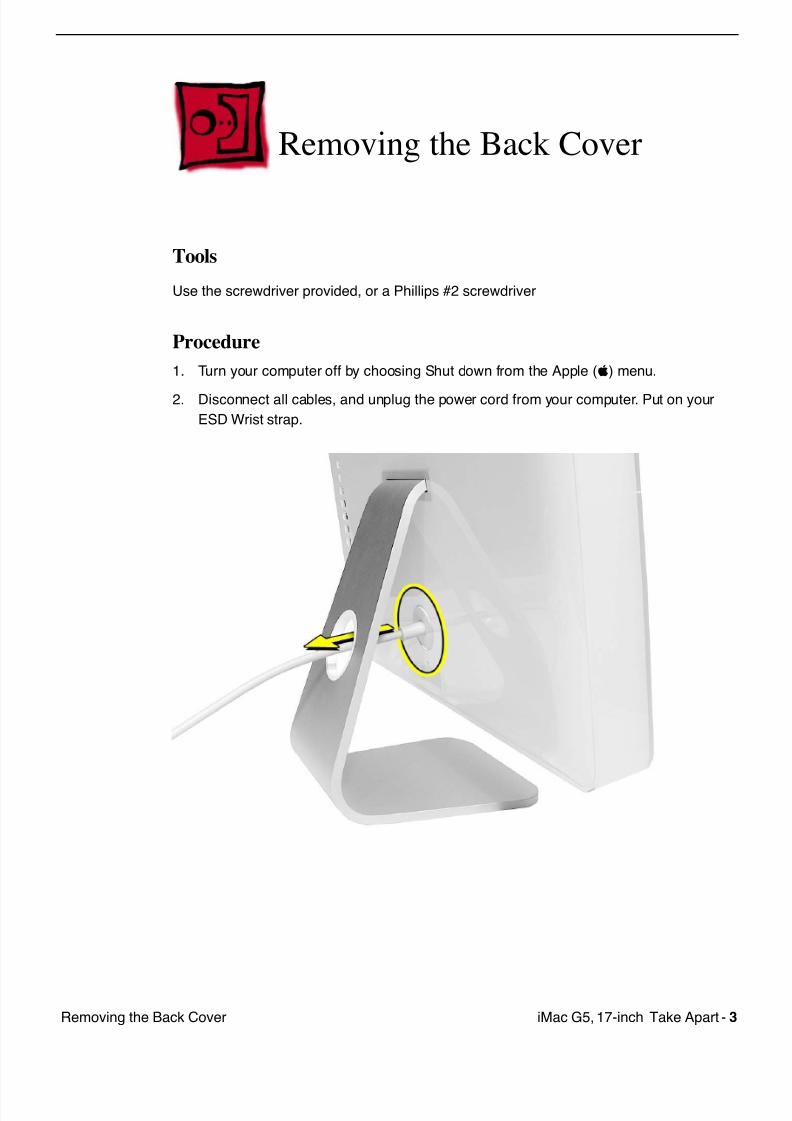
1. Turn your computer off by choosing Shut down from the Apple (K) menu.
2. Disconnect all cables, and unplug the power cord from your computer. Put on your
ESD Wrist strap.
7/29/2019 Apple imacg5_17in
http://slidepdf.com/reader/full/apple-imacg517in 6/3194 - iMac G5, 17-inch Take Apart Removing the Back Cover
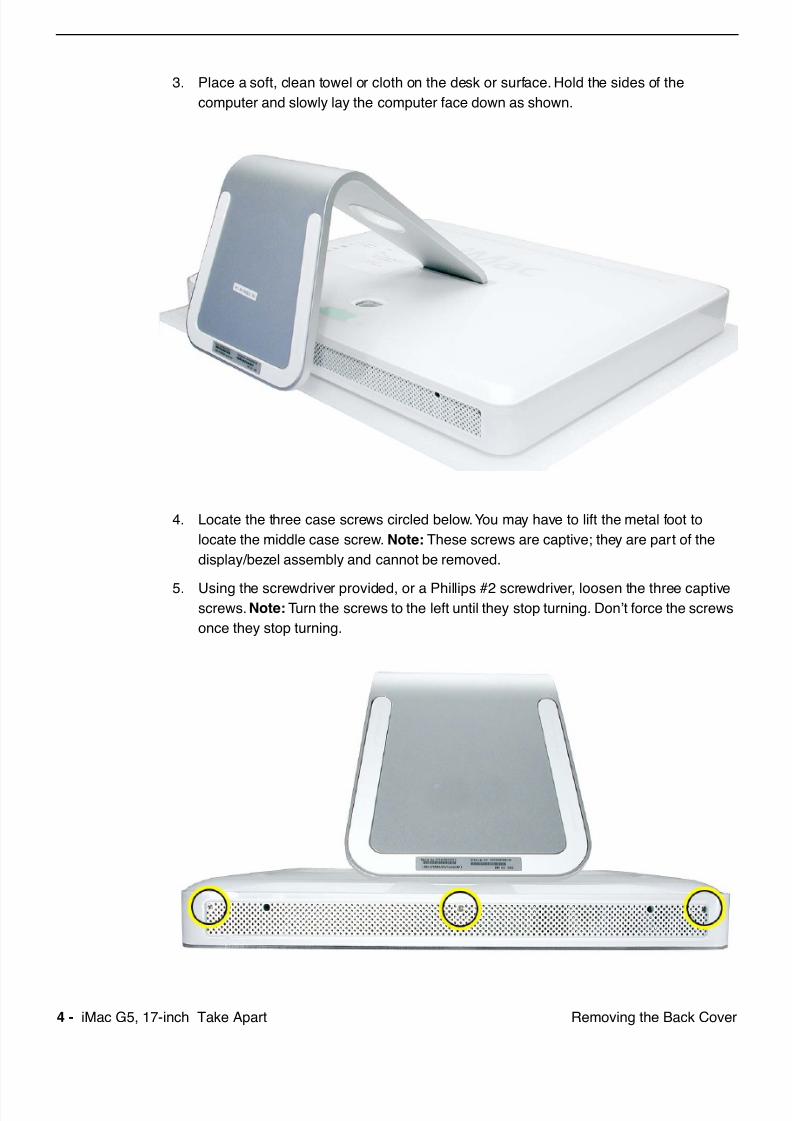
3. Place a soft, clean towel or cloth on the desk or surface. Hold the sides of the
computer and slowly lay the computer face down as shown.
4. Locate the three case screws circled below. You may have to lift the metal foot to
locate the middle case screw. Note: These screws are captive; they are part of the
display/bezel assembly and cannot be removed.
5. Using the screwdriver provided, or a Phillips #2 screwdriver, loosen the three captivescrews. Note: Turn the screws to the left until they stop turning. Don’t force the screws
once they stop turning.
7/29/2019 Apple imacg5_17in
http://slidepdf.com/reader/full/apple-imacg517in 7/319iMac G5, 17-inch Take Apart - 5Removing the Back Cover
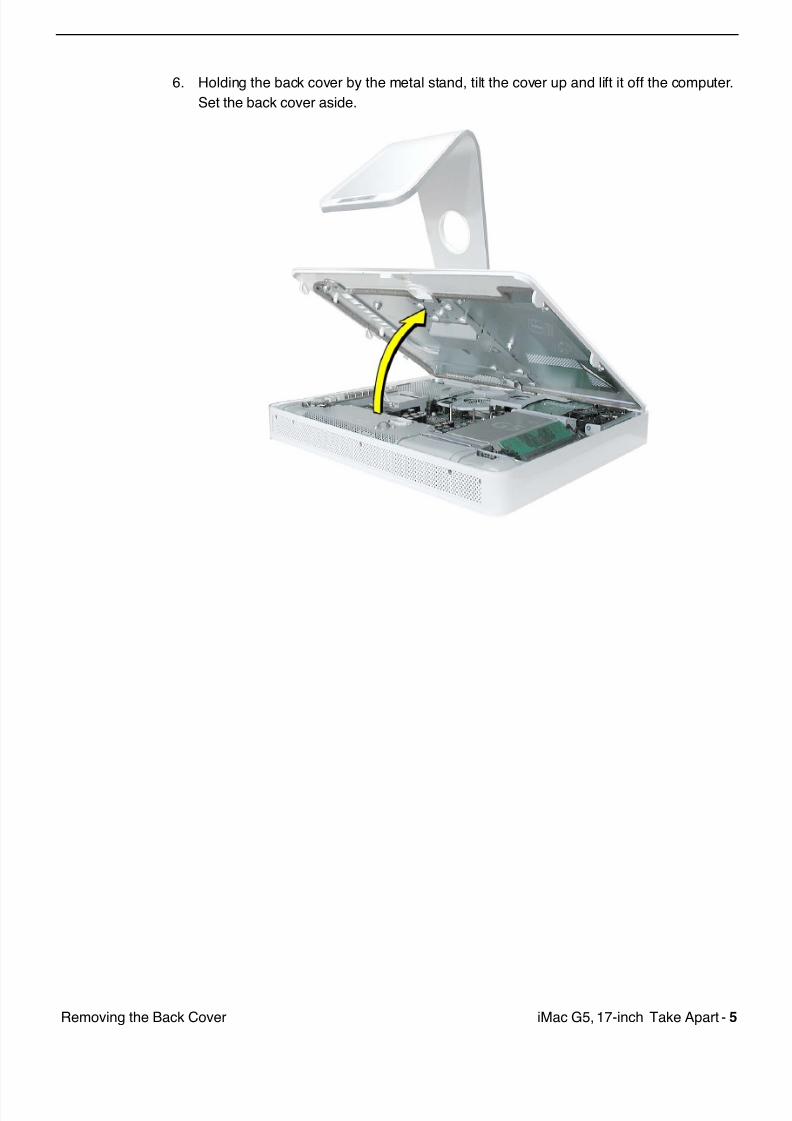
6. Holding the back cover by the metal stand, tilt the cover up and lift it off the computer.
Set the back cover aside.
7/29/2019 Apple imacg5_17in
http://slidepdf.com/reader/full/apple-imacg517in 8/3196 - iMac G5, 17-inch Take Apart Replacing the Back Cover
Replacing the Back Cover
Tools
Use the screwdriver provided, or a Phillips #2 screwdriver
Procedure
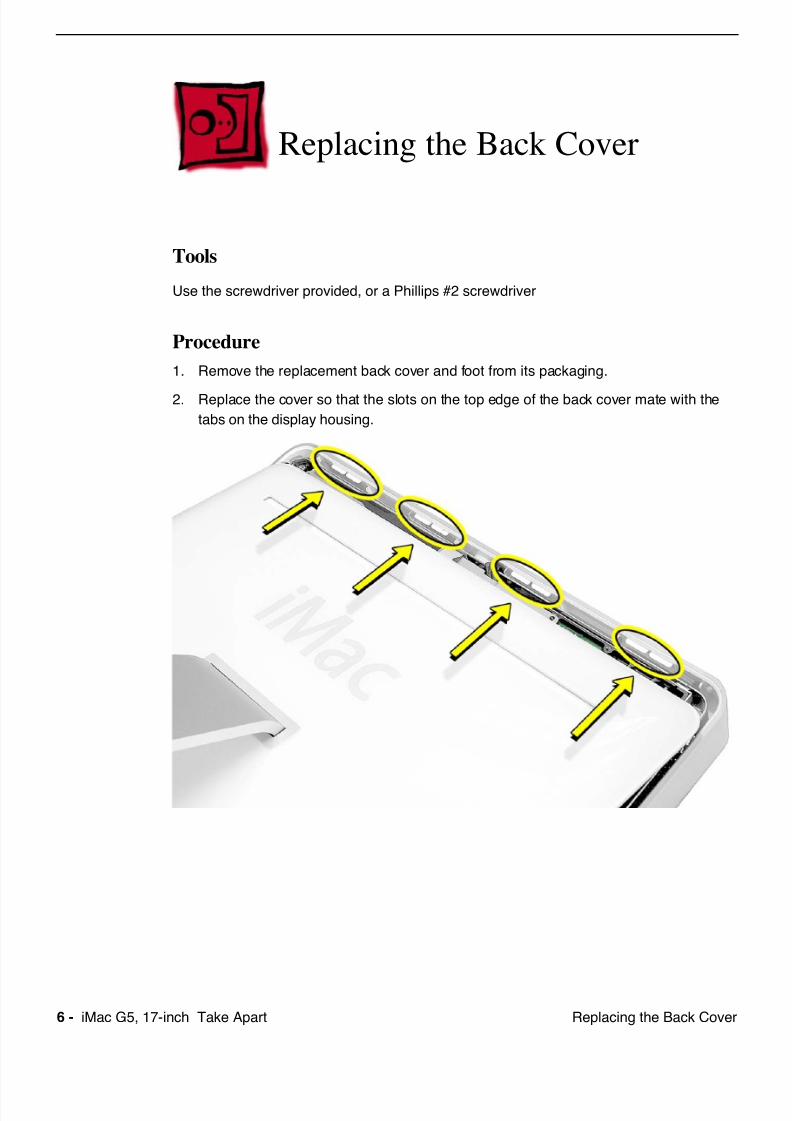
1. Remove the replacement back cover and foot from its packaging.
2. Replace the cover so that the slots on the top edge of the back cover mate with the
tabs on the display housing.
7/29/2019 Apple imacg5_17in
http://slidepdf.com/reader/full/apple-imacg517in 9/319iMac G5, 17-inch Take Apart - 7Replacing the Back Cover
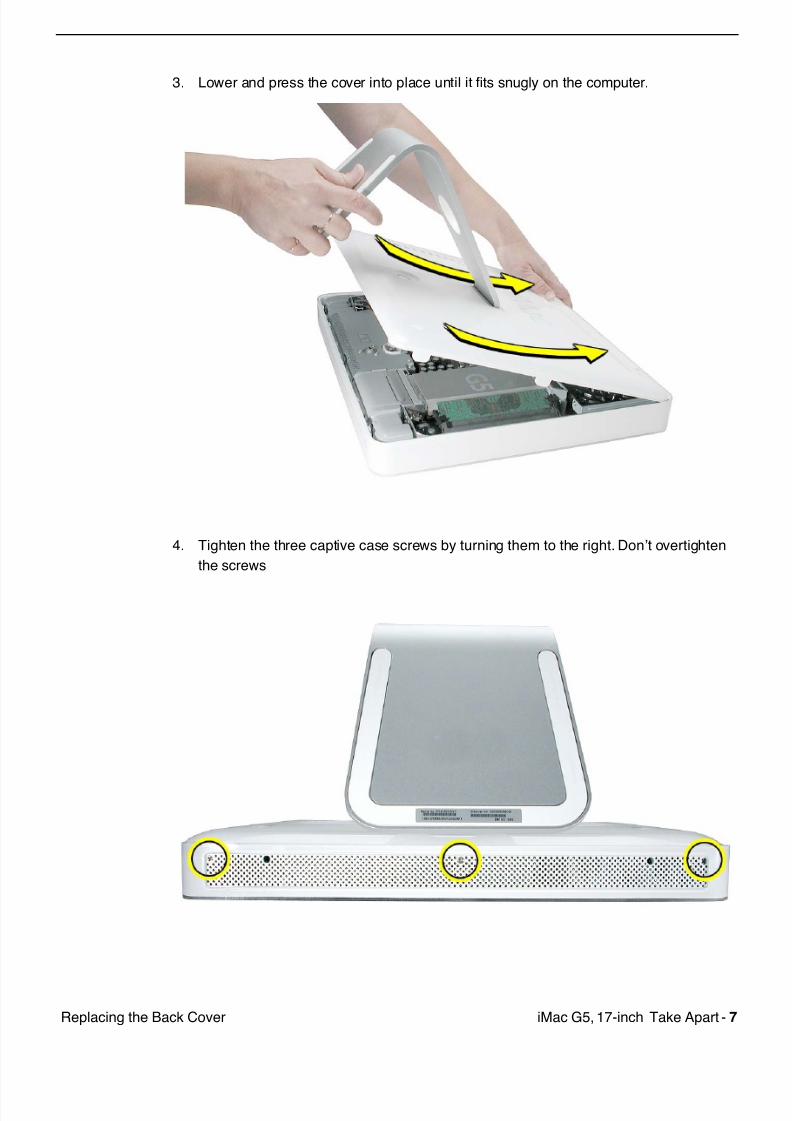
3. Lower and press the cover into place until it fits snugly on the computer.
4. Tighten the three captive case screws by turning them to the right. Don’t overtighten
the screws
7/29/2019 Apple imacg5_17in
http://slidepdf.com/reader/full/apple-imacg517in 10/3198 - iMac G5, 17-inch Take Apart Replacing the Back Cover
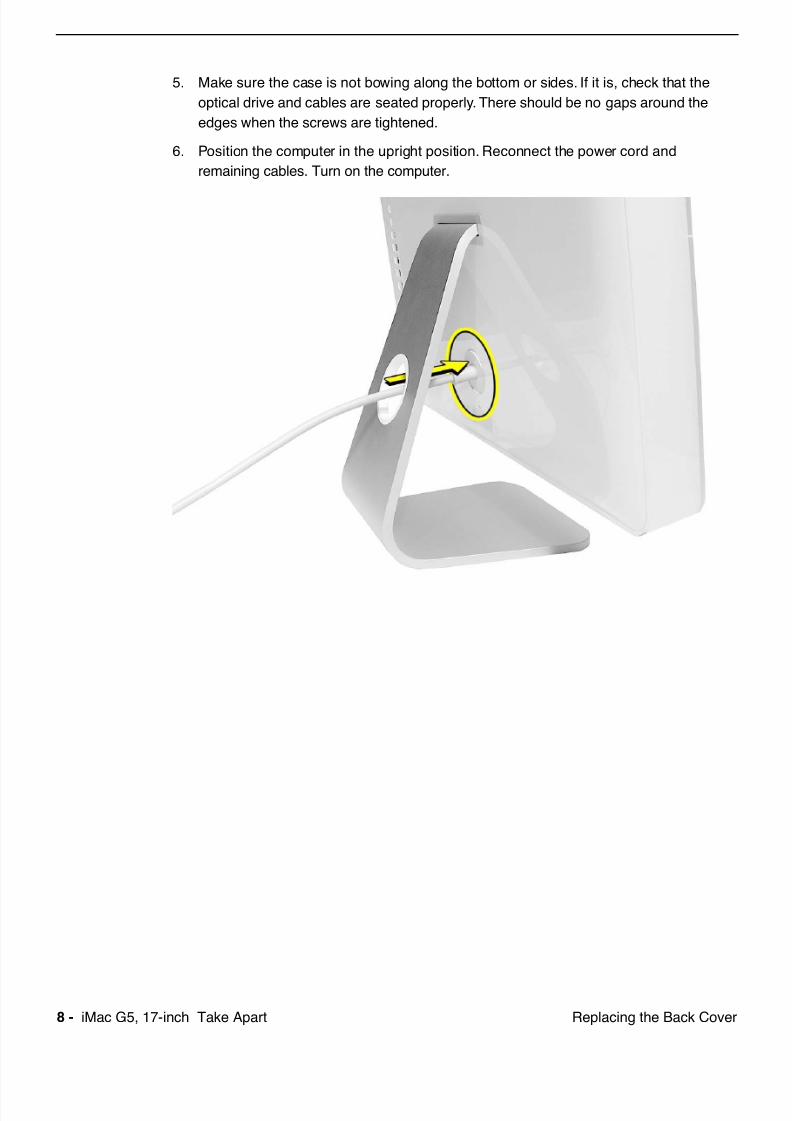
5. Make sure the case is not bowing along the bottom or sides. If it is, check that the
optical drive and cables are seated properly. There should be no gaps around the
edges when the screws are tightened.
6. Position the computer in the upright position. Reconnect the power cord and
remaining cables. Turn on the computer.
7/29/2019 Apple imacg5_17in
http://slidepdf.com/reader/full/apple-imacg517in 11/319iMac G5, 17-inch Take Apart - 9Serial ATA Hard Drive
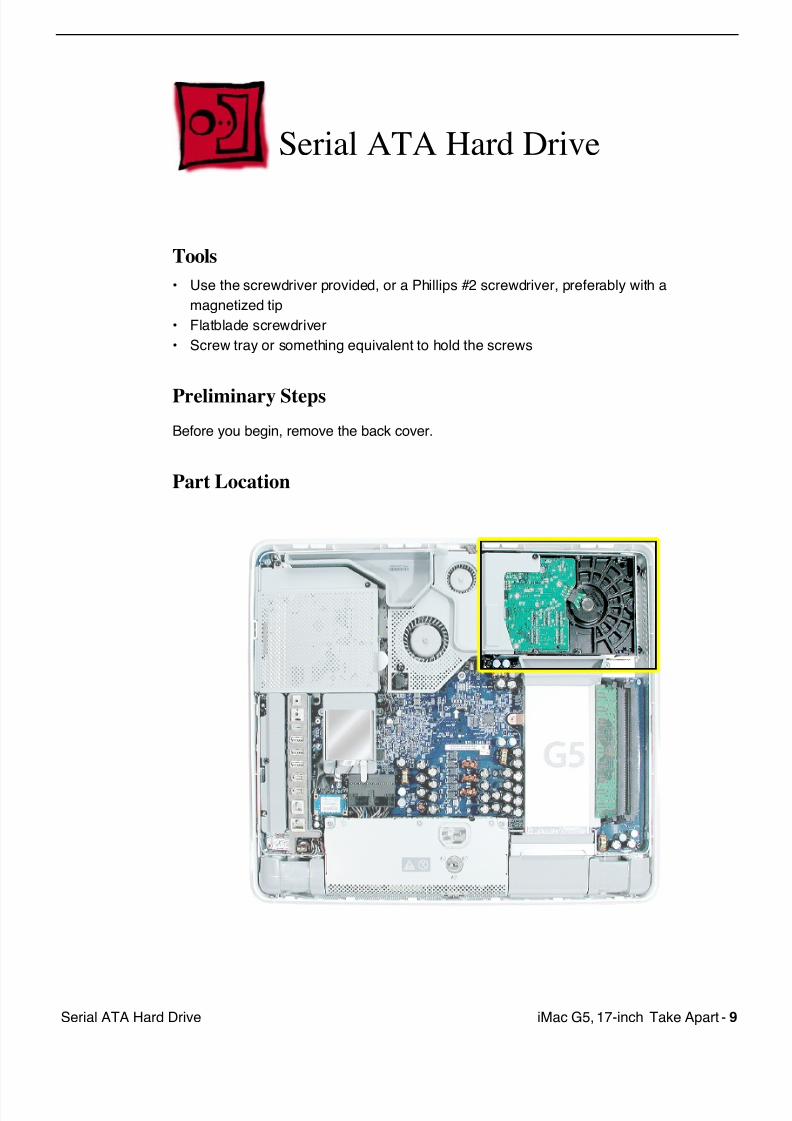
Serial ATA Hard Drive
Tools
• Use the screwdriver provided, or a Phillips #2 screwdriver, preferably with a
magnetized tip
• Flatblade screwdriver
• Screw tray or something equivalent to hold the screws
Preliminary Steps
Before you begin, remove the back cover.
Part Location
7/29/2019 Apple imacg5_17in
http://slidepdf.com/reader/full/apple-imacg517in 12/31910 - iMac G5, 17-inch Take Apart Serial ATA Hard Drive
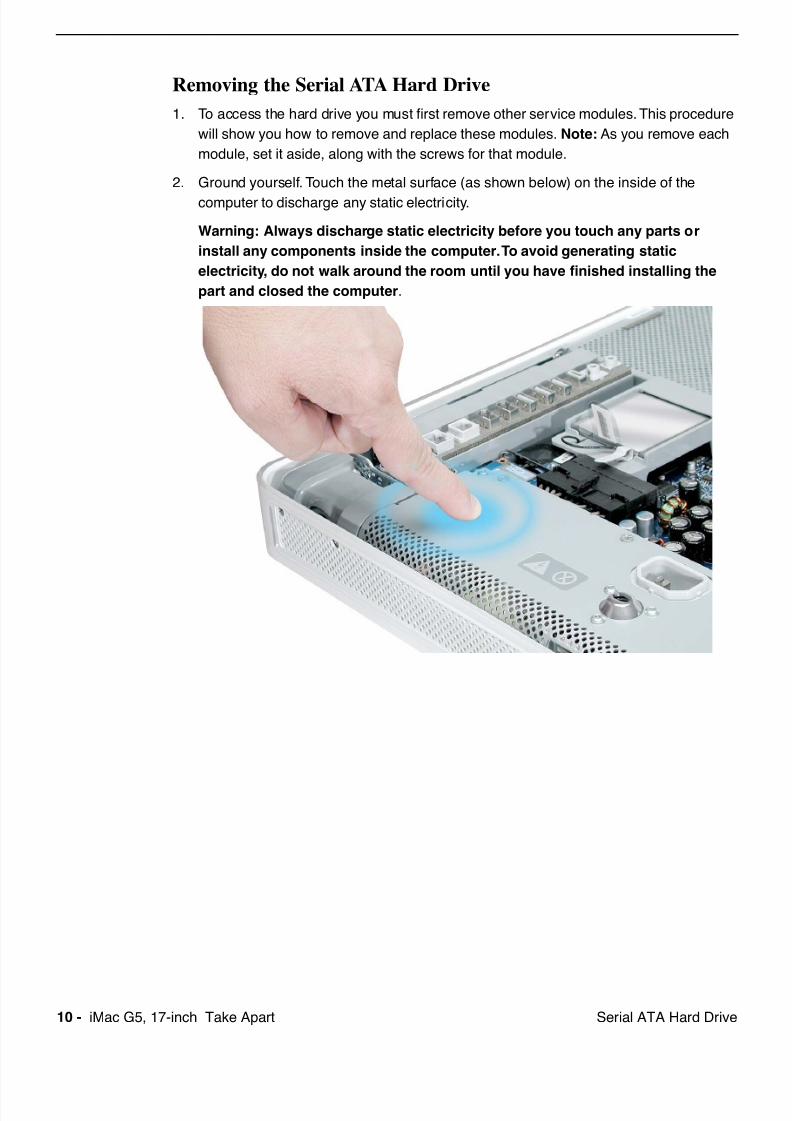
Removing the Serial ATA Hard Drive
1. To access the hard drive you must first remove other service modules. This procedure
will show you how to remove and replace these modules. Note: As you remove each
module, set it aside, along with the screws for that module.
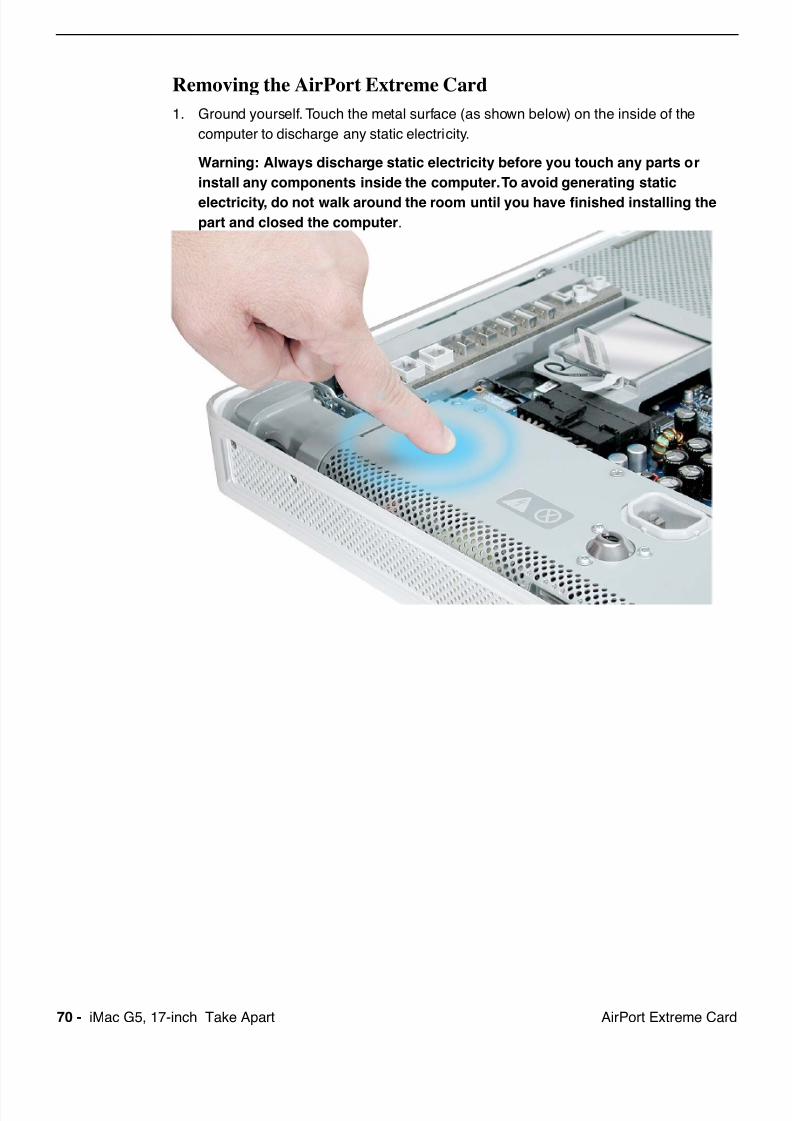
2. Ground yourself. Touch the metal surface (as shown below) on the inside of the
computer to discharge any static electricity.
Warning: Always discharge static electricity before you touch any parts or
install any components inside the computer. To avoid generating static
electricity, do not walk around the room until you have finished installing the
part and closed the computer.

7/29/2019 Apple imacg5_17in
http://slidepdf.com/reader/full/apple-imacg517in 13/319iMac G5, 17-inch Take Apart -Serial ATA Hard Drive
3. Locate the fan cover near the top of the computer.
4. Using the tool provided, or a Phillips #2 screwdriver, remove the two fan cover screws.
Lift the fan cover off the computer. Set the screws and fan cover aside.
7/29/2019 Apple imacg5_17in
http://slidepdf.com/reader/full/apple-imacg517in 14/31912 - iMac G5, 17-inch Take Apart Serial ATA Hard Drive
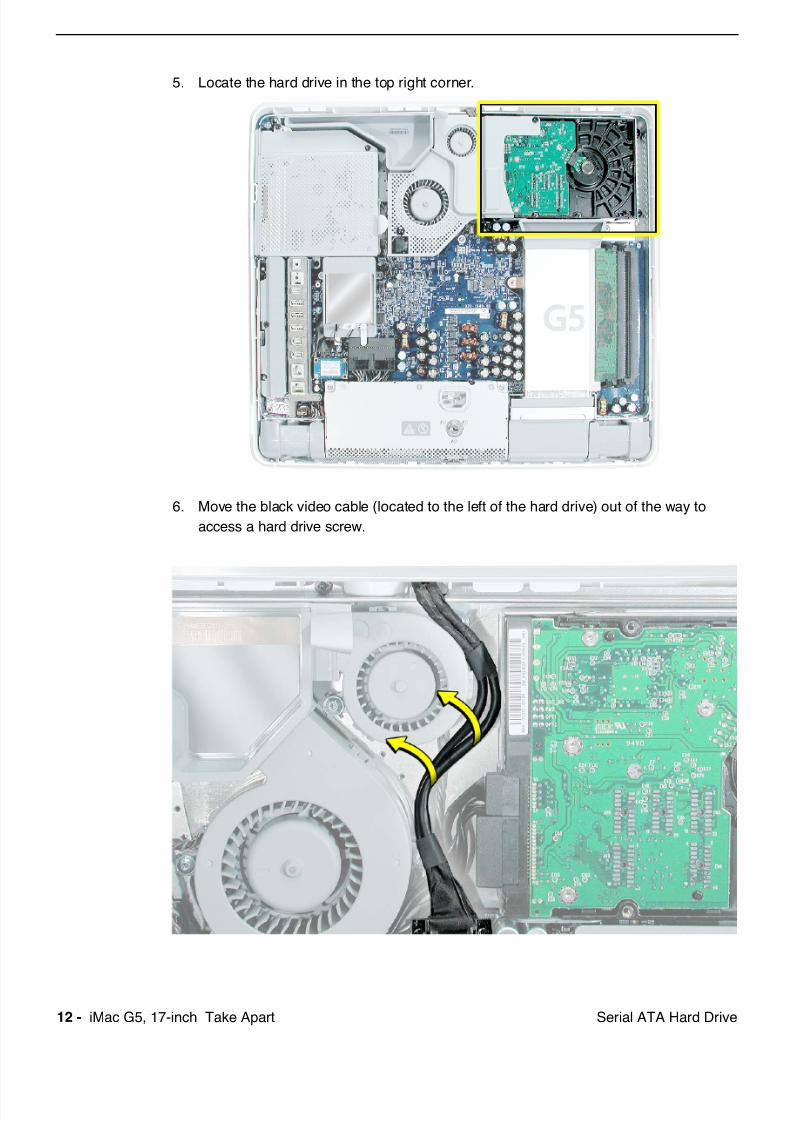
5. Locate the hard drive in the top right corner.
6. Move the black video cable (located to the left of the hard drive) out of the way to
access a hard drive screw.
7/29/2019 Apple imacg5_17in
http://slidepdf.com/reader/full/apple-imacg517in 15/319
7/29/2019 Apple imacg5_17in
http://slidepdf.com/reader/full/apple-imacg517in 16/31914 - iMac G5, 17-inch Take Apart Serial ATA Hard Drive
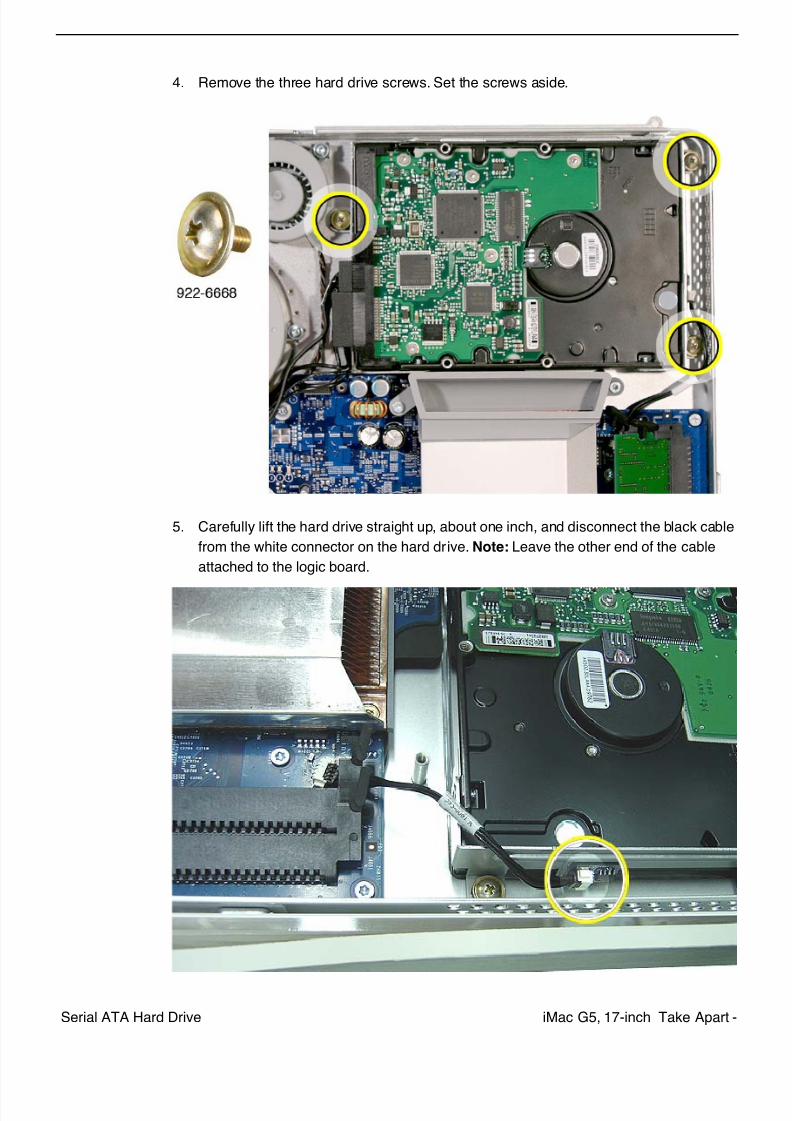
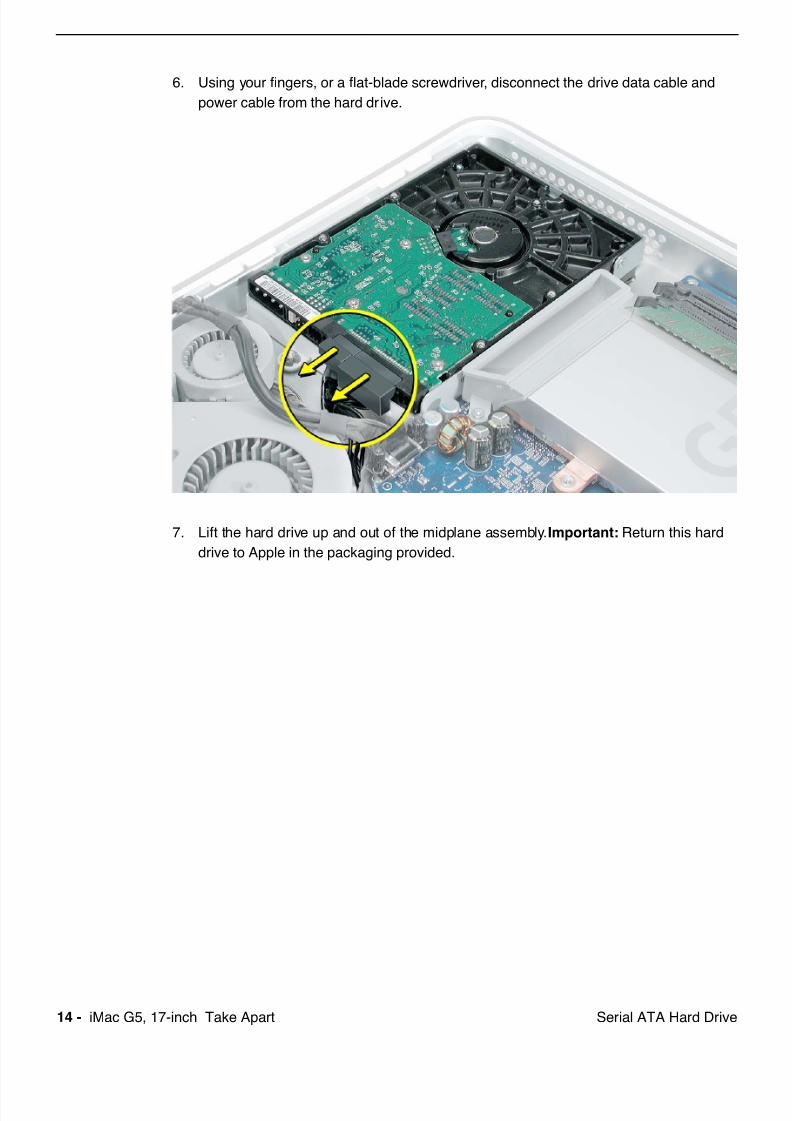
6. Using your fingers, or a flat-blade screwdriver, disconnect the drive data cable and
power cable from the hard drive.
7. Lift the hard drive up and out of the midplane assembly.Important: Return this hard
drive to Apple in the packaging provided.

7/29/2019 Apple imacg5_17in
http://slidepdf.com/reader/full/apple-imacg517in 17/319iMac G5, 17-inch Take Apart -Serial ATA Hard Drive
Replacing the Serial ATA Hard Drive
1. Remove the replacement hard drive from its packaging.
2. Connect the drive data cable and power cable to the hard drive. Lower the hard drive
into place on the midplane.
3. Connect the black cable to the white connector on end of the hard drive.
7/29/2019 Apple imacg5_17in
http://slidepdf.com/reader/full/apple-imacg517in 18/31916 - iMac G5, 17-inch Take Apart Serial ATA Hard Drive
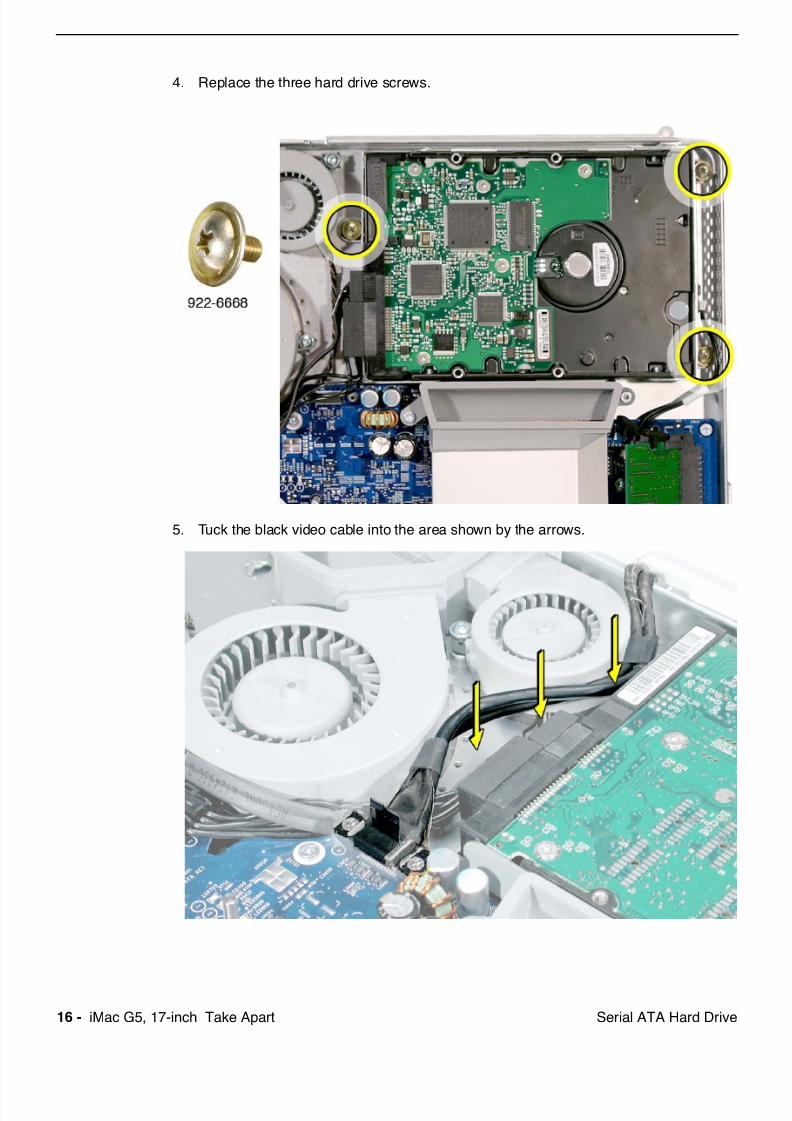
4. Replace the three hard drive screws.
5. Tuck the black video cable into the area shown by the arrows.

7/29/2019 Apple imacg5_17in
http://slidepdf.com/reader/full/apple-imacg517in 19/319iMac G5, 17-inch Take Apart -Serial ATA Hard Drive
6. Press the video cable into the notch on the midplane chassis.
4. Replace the two fan cover screws. The larger screw attaches on the left. Note: Make
sure the pull tab is sticking up as shown
7/29/2019 Apple imacg5_17in
http://slidepdf.com/reader/full/apple-imacg517in 20/31918 - iMac G5, 17-inch Take Apart Parallel ATA Hard Drive
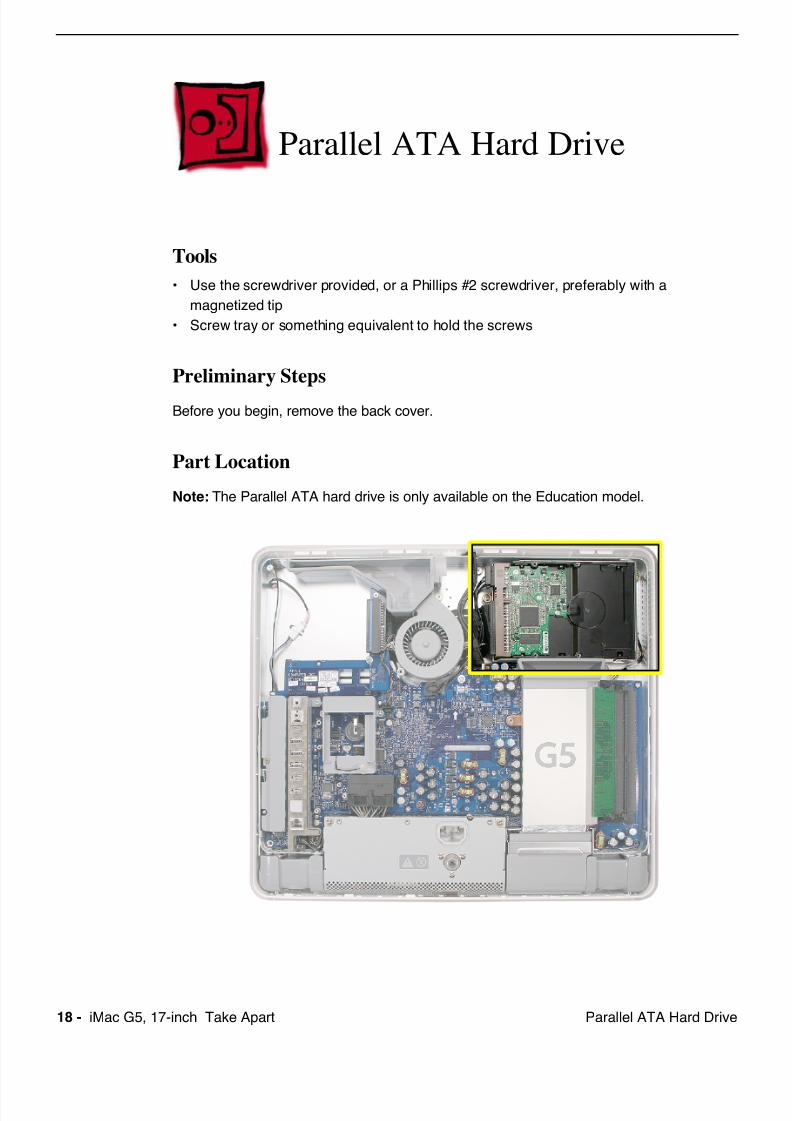
Parallel ATA Hard Drive
Tools
• Use the screwdriver provided, or a Phillips #2 screwdriver, preferably with a
magnetized tip
• Screw tray or something equivalent to hold the screws
Preliminary Steps
Before you begin, remove the back cover.
Part Location
Note: The Parallel ATA hard drive is only available on the Education model.
7/29/2019 Apple imacg5_17in
http://slidepdf.com/reader/full/apple-imacg517in 21/319iMac G5, 17-inch Take Apart -Parallel ATA Hard Drive
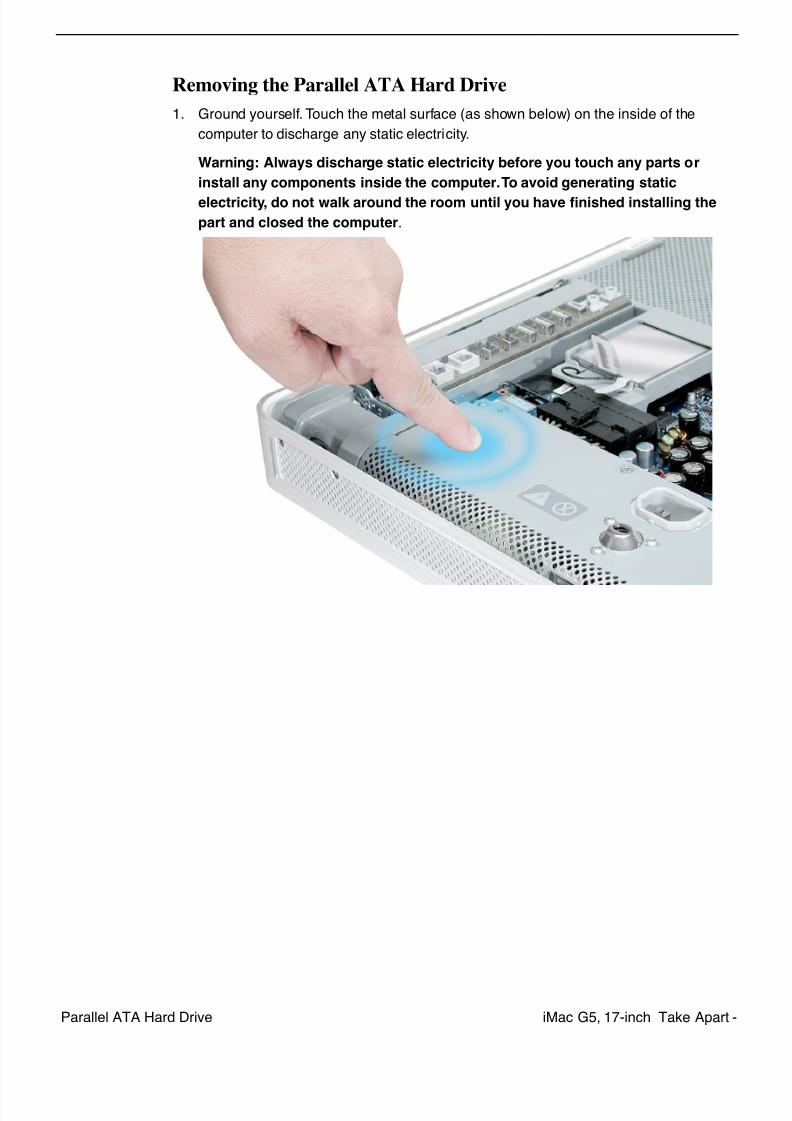
Removing the Parallel ATA Hard Drive
1. Ground yourself. Touch the metal surface (as shown below) on the inside of the
computer to discharge any static electricity.
Warning: Always discharge static electricity before you touch any parts or
install any components inside the computer. To avoid generating static
electricity, do not walk around the room until you have finished installing the
part and closed the computer.
7/29/2019 Apple imacg5_17in
http://slidepdf.com/reader/full/apple-imacg517in 22/31920 - iMac G5, 17-inch Take Apart Parallel ATA Hard Drive
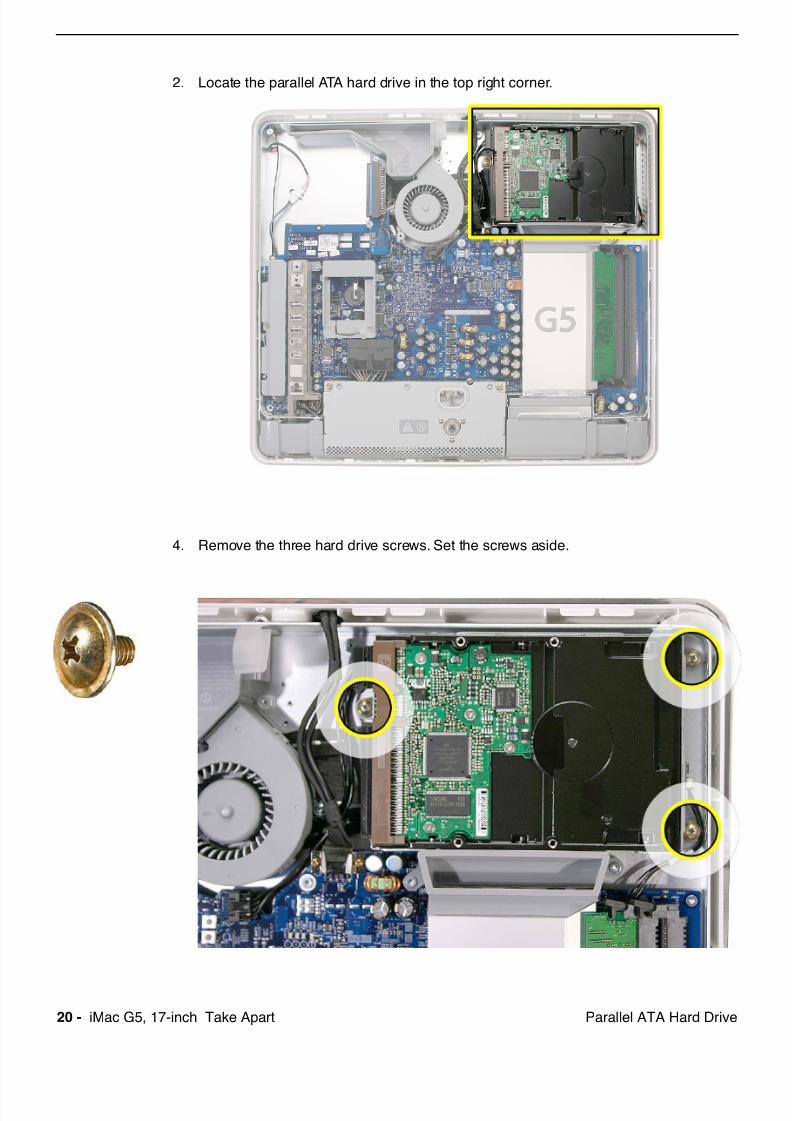
2. Locate the parallel ATA hard drive in the top right corner.
4. Remove the three hard drive screws. Set the screws aside.
7/29/2019 Apple imacg5_17in
http://slidepdf.com/reader/full/apple-imacg517in 23/319iMac G5, 17-inch Take Apart -Parallel ATA Hard Drive
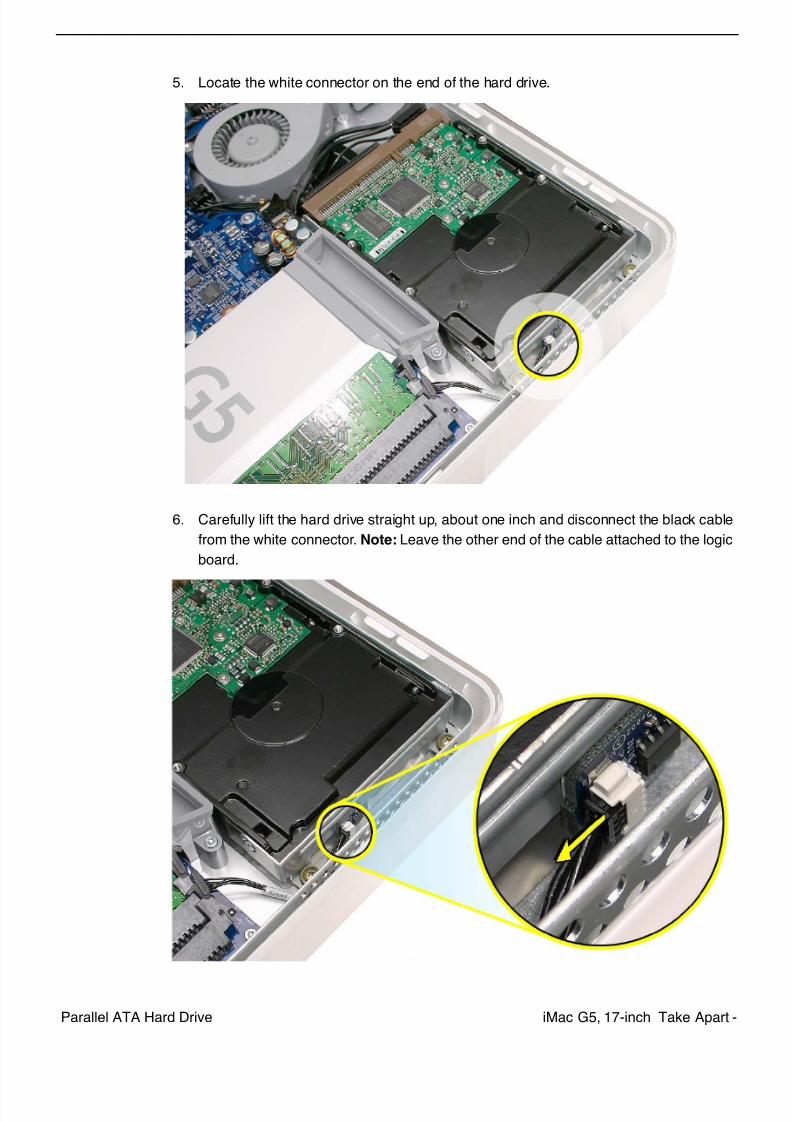
5. Locate the white connector on the end of the hard drive.
6. Carefully lift the hard drive straight up, about one inch and disconnect the black cable
from the white connector. Note: Leave the other end of the cable attached to the logic
board.
7/29/2019 Apple imacg5_17in
http://slidepdf.com/reader/full/apple-imacg517in 24/31922 - iMac G5, 17-inch Take Apart Parallel ATA Hard Drive
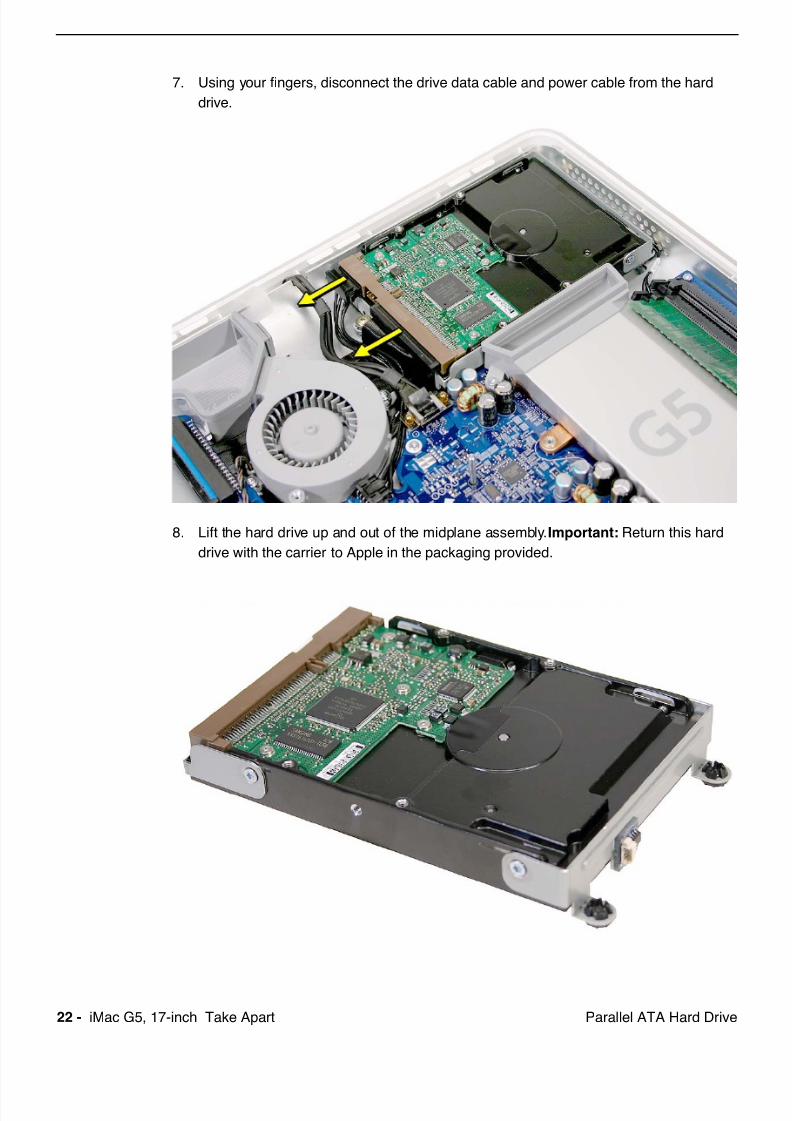
7. Using your fingers, disconnect the drive data cable and power cable from the hard
drive.
8. Lift the hard drive up and out of the midplane assembly.Important: Return this hard
drive with the carrier to Apple in the packaging provided.
7/29/2019 Apple imacg5_17in
http://slidepdf.com/reader/full/apple-imacg517in 25/319iMac G5, 17-inch Take Apart -Parallel ATA Hard Drive
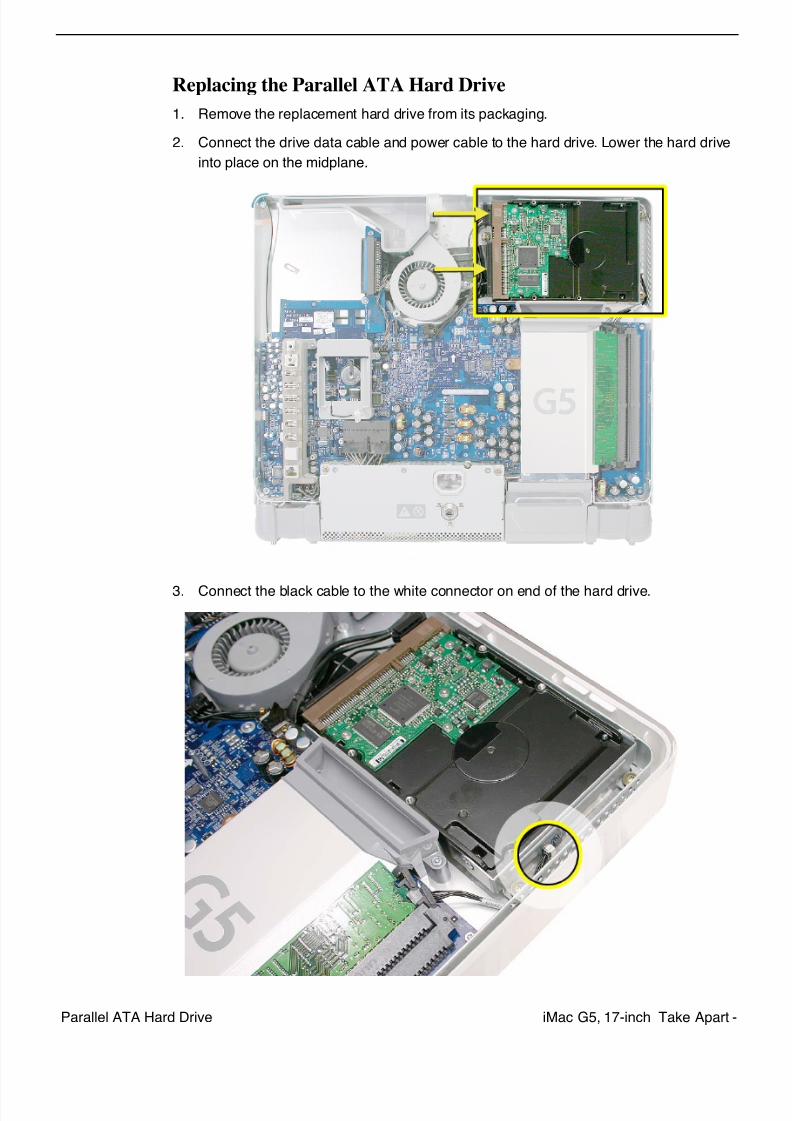
Replacing the Parallel ATA Hard Drive
1. Remove the replacement hard drive from its packaging.
2. Connect the drive data cable and power cable to the hard drive. Lower the hard drive
into place on the midplane.
3. Connect the black cable to the white connector on end of the hard drive.
7/29/2019 Apple imacg5_17in
http://slidepdf.com/reader/full/apple-imacg517in 26/31924 - iMac G5, 17-inch Take Apart Parallel ATA Hard Drive
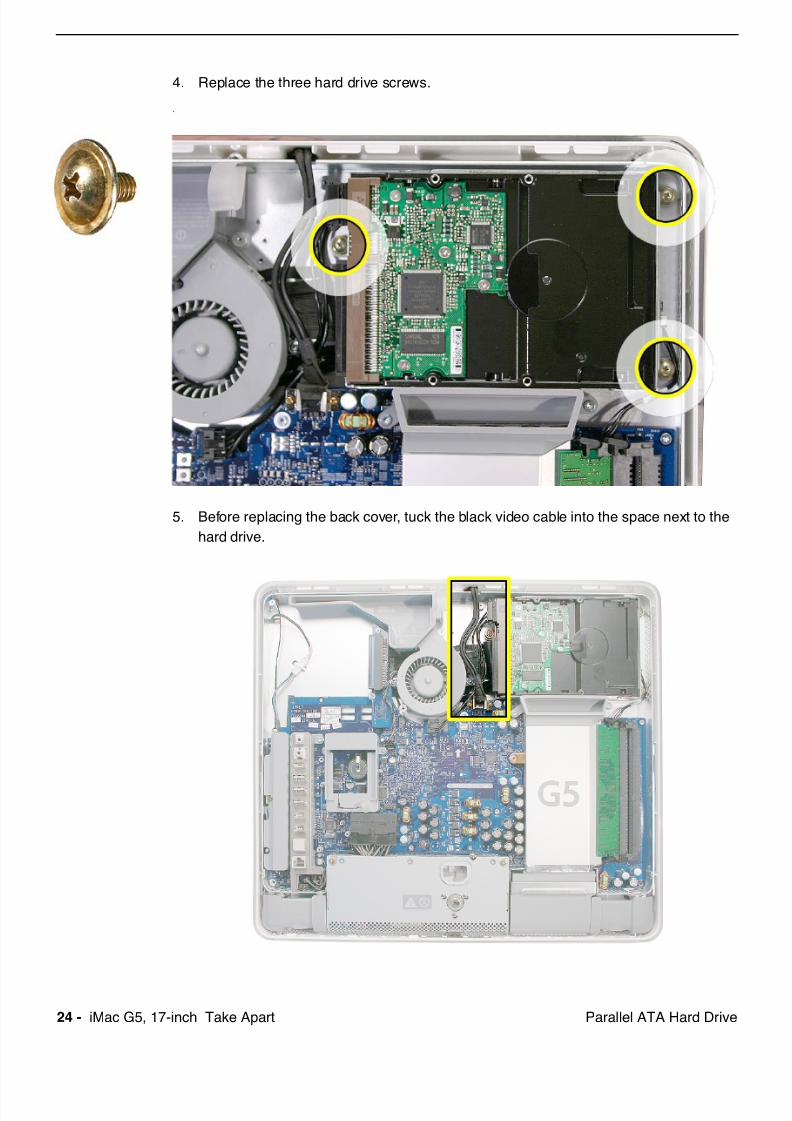
4. Replace the three hard drive screws.
.
5. Before replacing the back cover, tuck the black video cable into the space next to the
hard drive.
7/29/2019 Apple imacg5_17in
http://slidepdf.com/reader/full/apple-imacg517in 27/319iMac G5, 17-inch Take Apart -Optical Drive
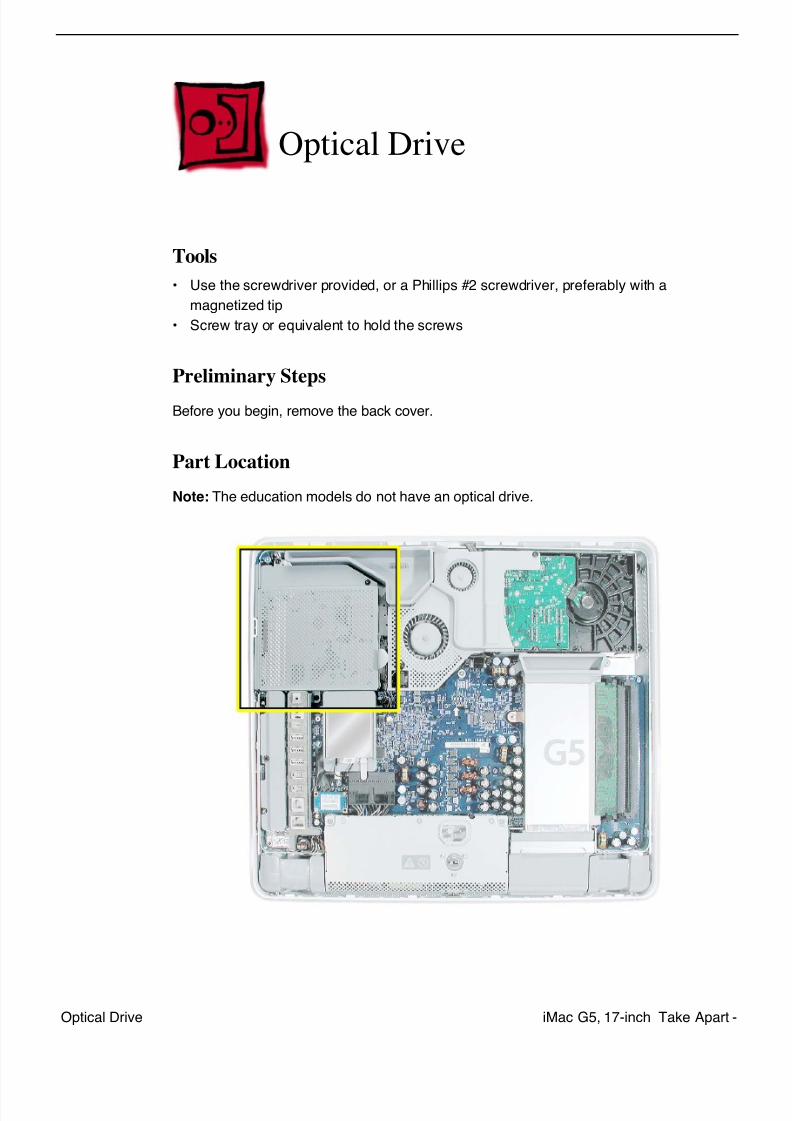
Optical Drive
Tools
• Use the screwdriver provided, or a Phillips #2 screwdriver, preferably with a
magnetized tip
• Screw tray or equivalent to hold the screws
Preliminary Steps
Before you begin, remove the back cover.
Part Location
Note: The education models do not have an optical drive.

7/29/2019 Apple imacg5_17in
http://slidepdf.com/reader/full/apple-imacg517in 28/31926 - iMac G5, 17-inch Take Apart Optical Drive
Removing the Optical Drive
1. Ground yourself. Touch the metal surface (as shown below) on the inside of the
computer to discharge any static electricity.
Warning: Always discharge static electricity before you touch any parts or
install any components inside the computer. To avoid generating static
electricity, do not walk around the room until you have finished installing the
part and closed the computer.
7/29/2019 Apple imacg5_17in
http://slidepdf.com/reader/full/apple-imacg517in 29/319iMac G5, 17-inch Take Apart -Optical Drive
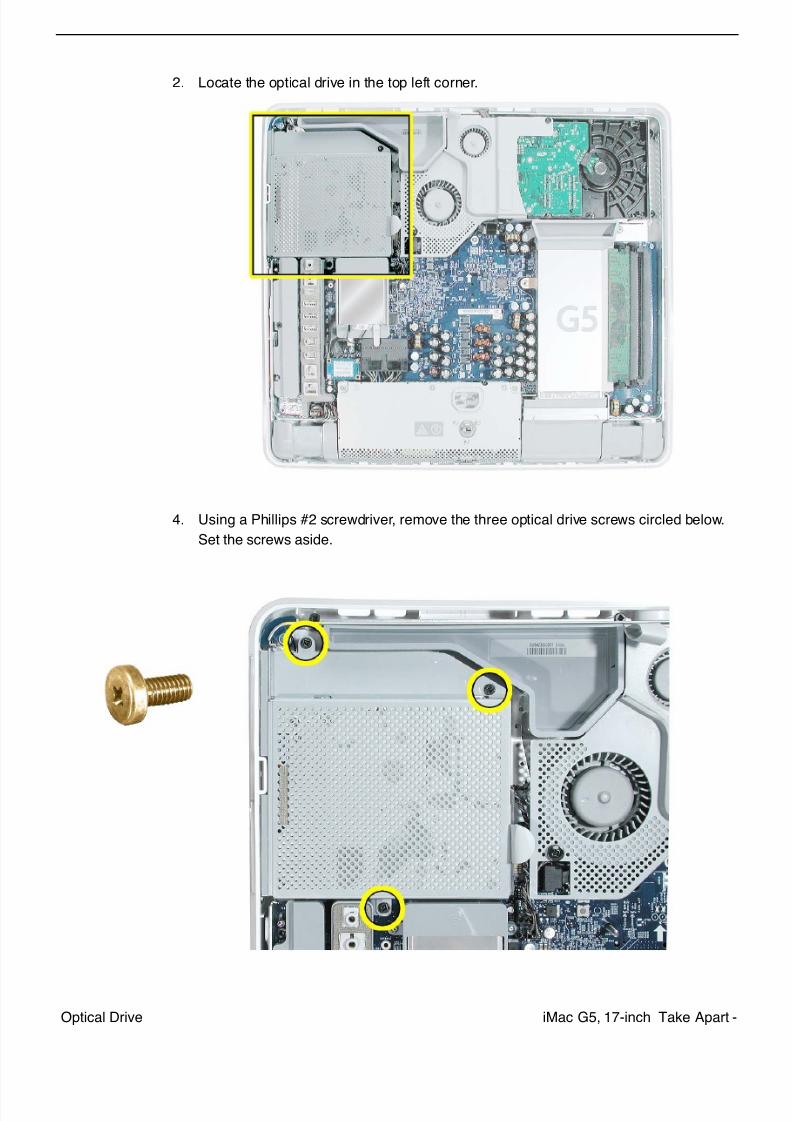
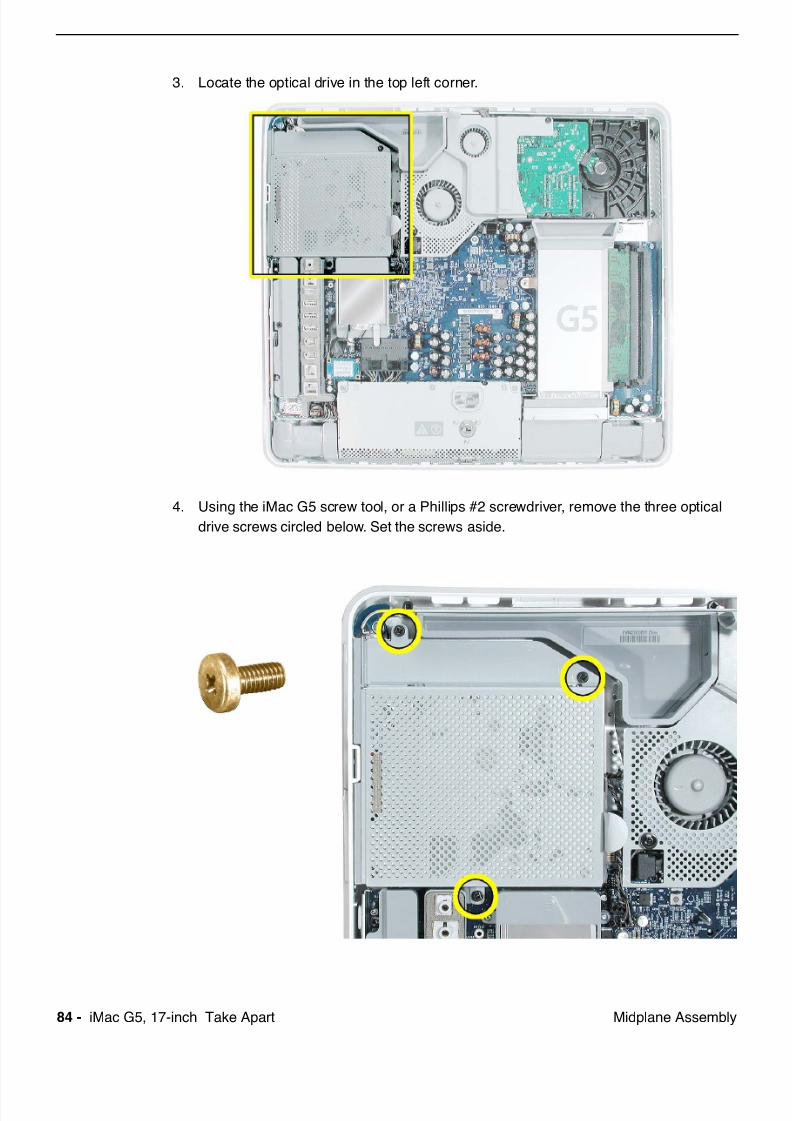
2. Locate the optical drive in the top left corner.
4. Using a Phillips #2 screwdriver, remove the three optical drive screws circled below.
Set the screws aside.

7/29/2019 Apple imacg5_17in
http://slidepdf.com/reader/full/apple-imacg517in 30/31928 - iMac G5, 17-inch Take Apart Optical Drive
5. Pull the optical drive tab straight up and then to the right. Set the optical drive aside.
7/29/2019 Apple imacg5_17in
http://slidepdf.com/reader/full/apple-imacg517in 31/319iMac G5, 17-inch Take Apart -Optical Drive
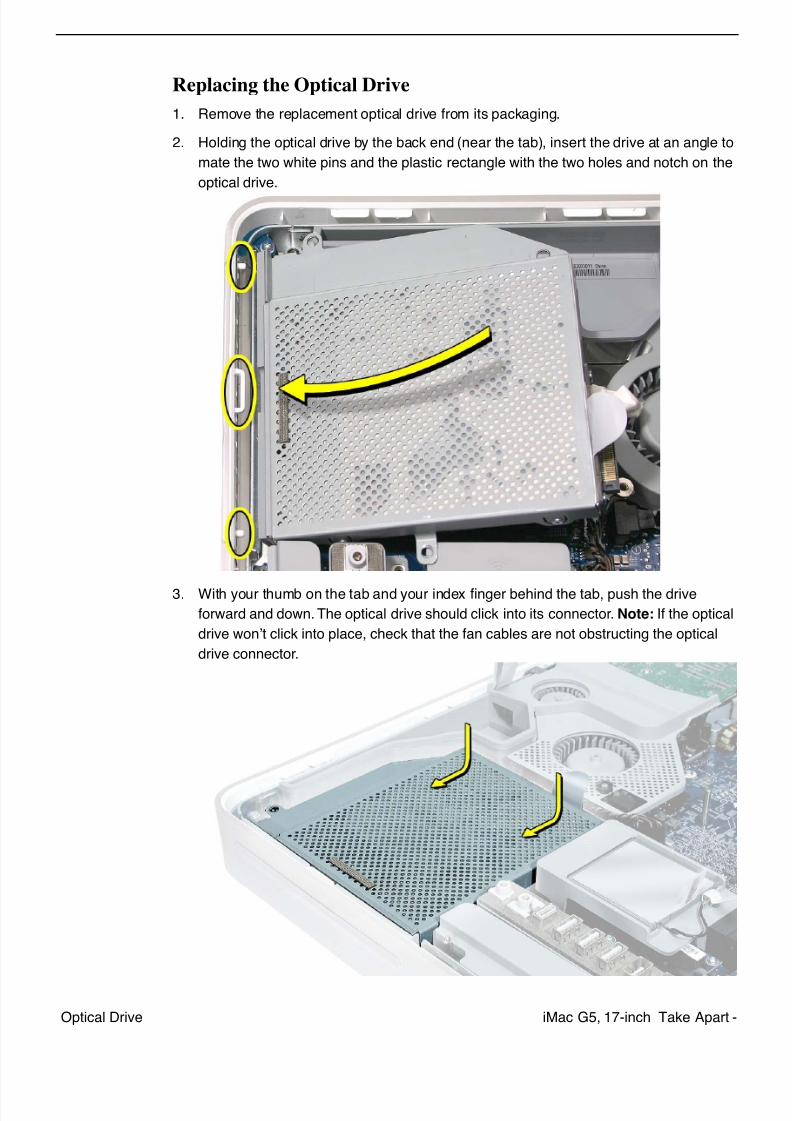
Replacing the Optical Drive
1. Remove the replacement optical drive from its packaging.
2. Holding the optical drive by the back end (near the tab), insert the drive at an angle to
mate the two white pins and the plastic rectangle with the two holes and notch on the
optical drive.
3. With your thumb on the tab and your index finger behind the tab, push the drive
forward and down. The optical drive should click into its connector. Note: If the optical
drive won’t click into place, check that the fan cables are not obstructing the optical
drive connector.
7/29/2019 Apple imacg5_17in
http://slidepdf.com/reader/full/apple-imacg517in 32/31930 - iMac G5, 17-inch Take Apart Optical Drive
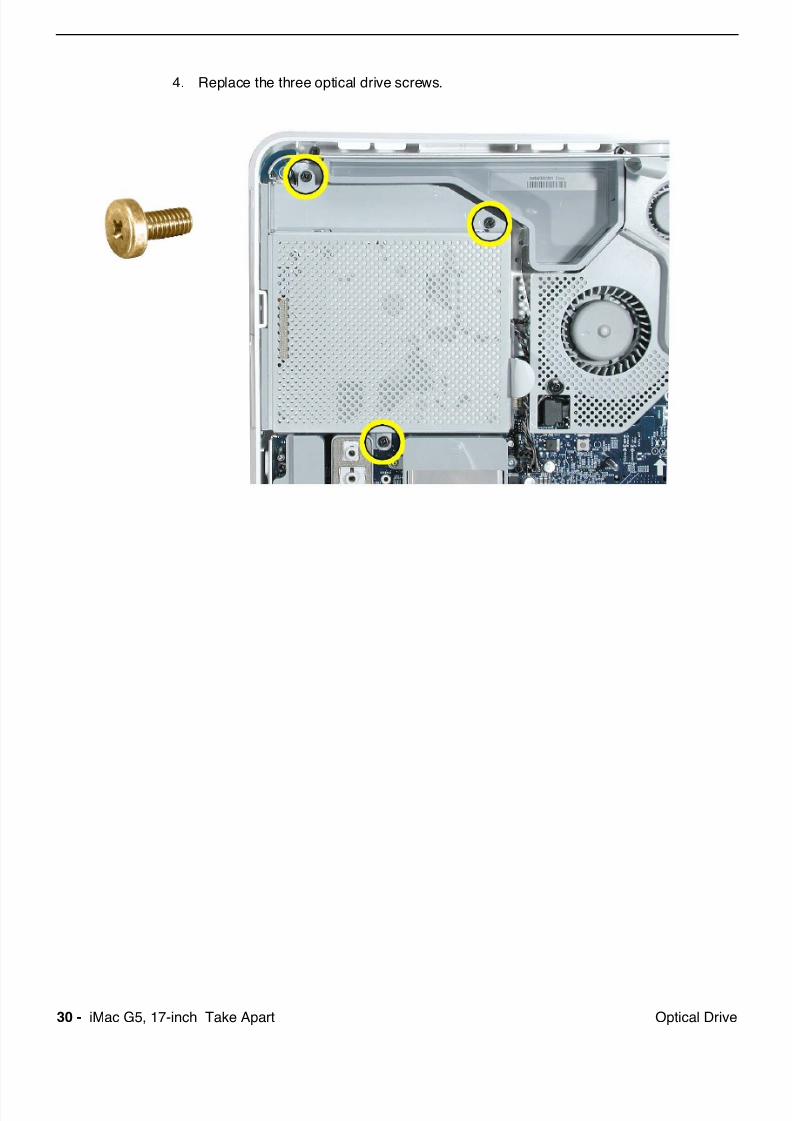
4. Replace the three optical drive screws.
7/29/2019 Apple imacg5_17in
http://slidepdf.com/reader/full/apple-imacg517in 33/319iMac G5, 17-inch Take Apart -Fan Cover
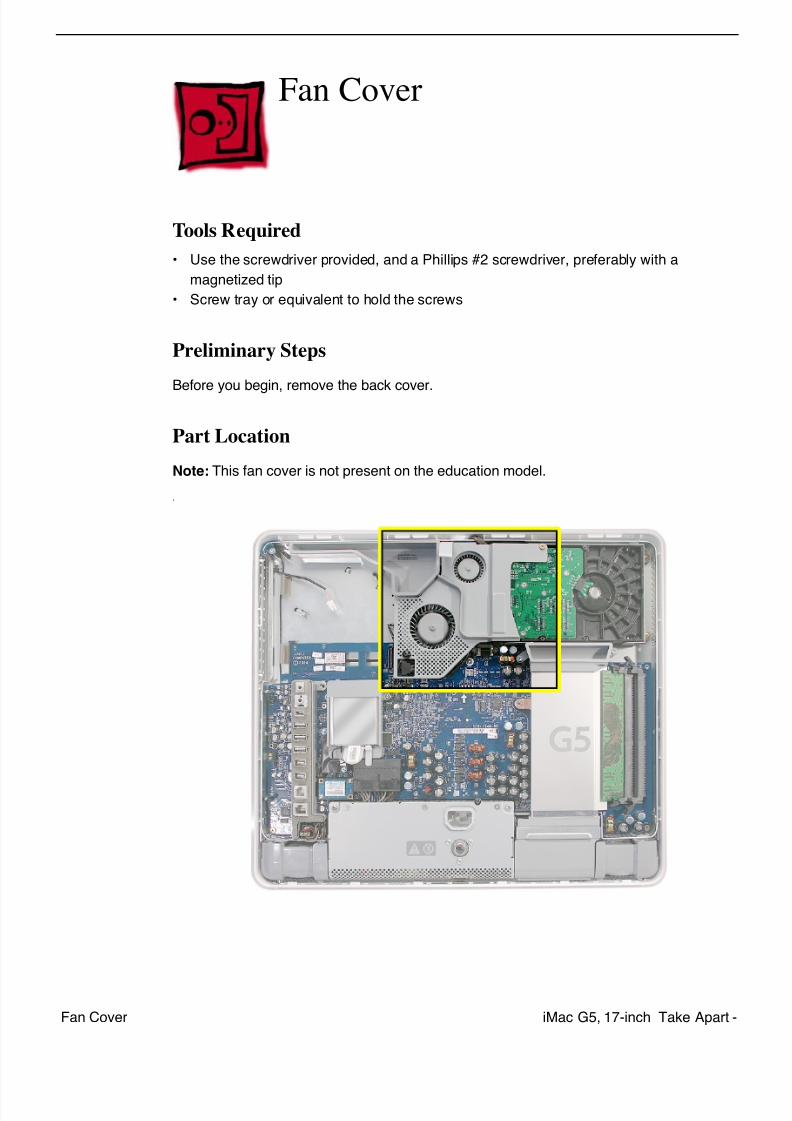
Fan Cover
Tools Required
• Use the screwdriver provided, and a Phillips #2 screwdriver, preferably with a
magnetized tip
• Screw tray or equivalent to hold the screws
Preliminary Steps
Before you begin, remove the back cover.
Part Location
Note: This fan cover is not present on the education model.
.
7/29/2019 Apple imacg5_17in
http://slidepdf.com/reader/full/apple-imacg517in 34/31932 - iMac G5, 17-inch Take Apart Fan Cover
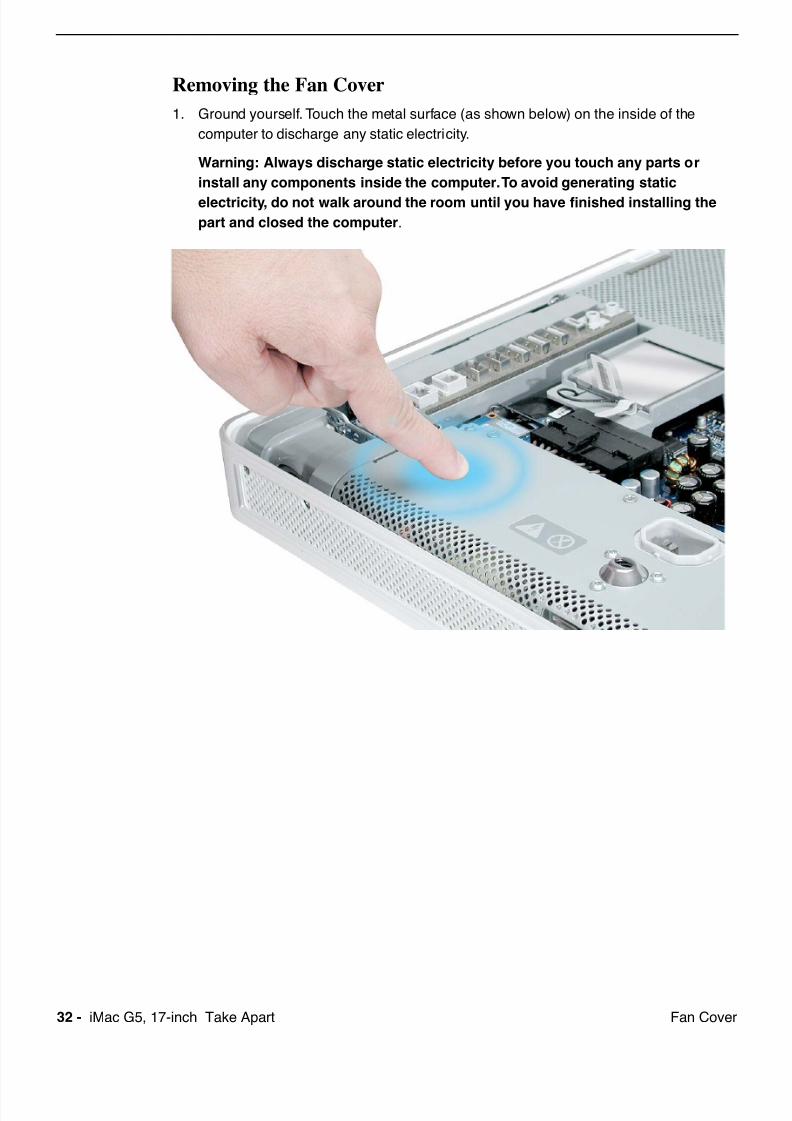
Removing the Fan Cover
1. Ground yourself. Touch the metal surface (as shown below) on the inside of the
computer to discharge any static electricity.
Warning: Always discharge static electricity before you touch any parts or
install any components inside the computer. To avoid generating static
electricity, do not walk around the room until you have finished installing the
part and closed the computer.
7/29/2019 Apple imacg5_17in
http://slidepdf.com/reader/full/apple-imacg517in 35/319iMac G5, 17-inch Take Apart -Fan Cover
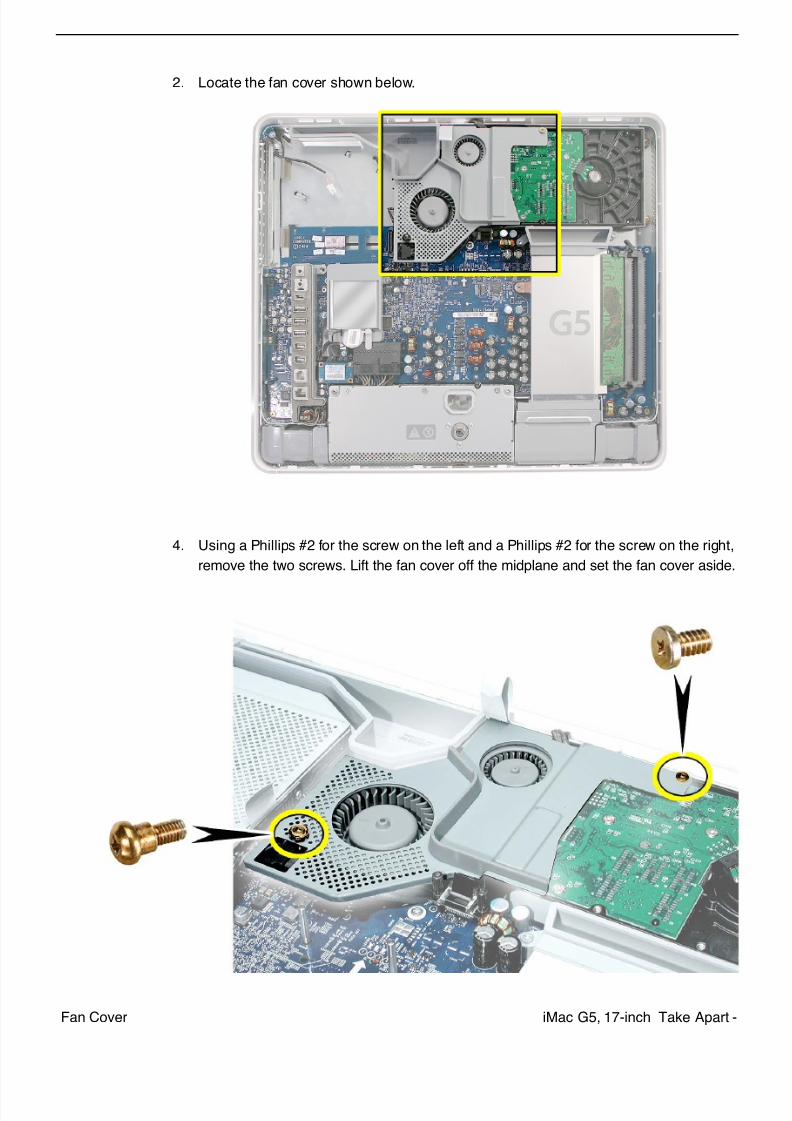
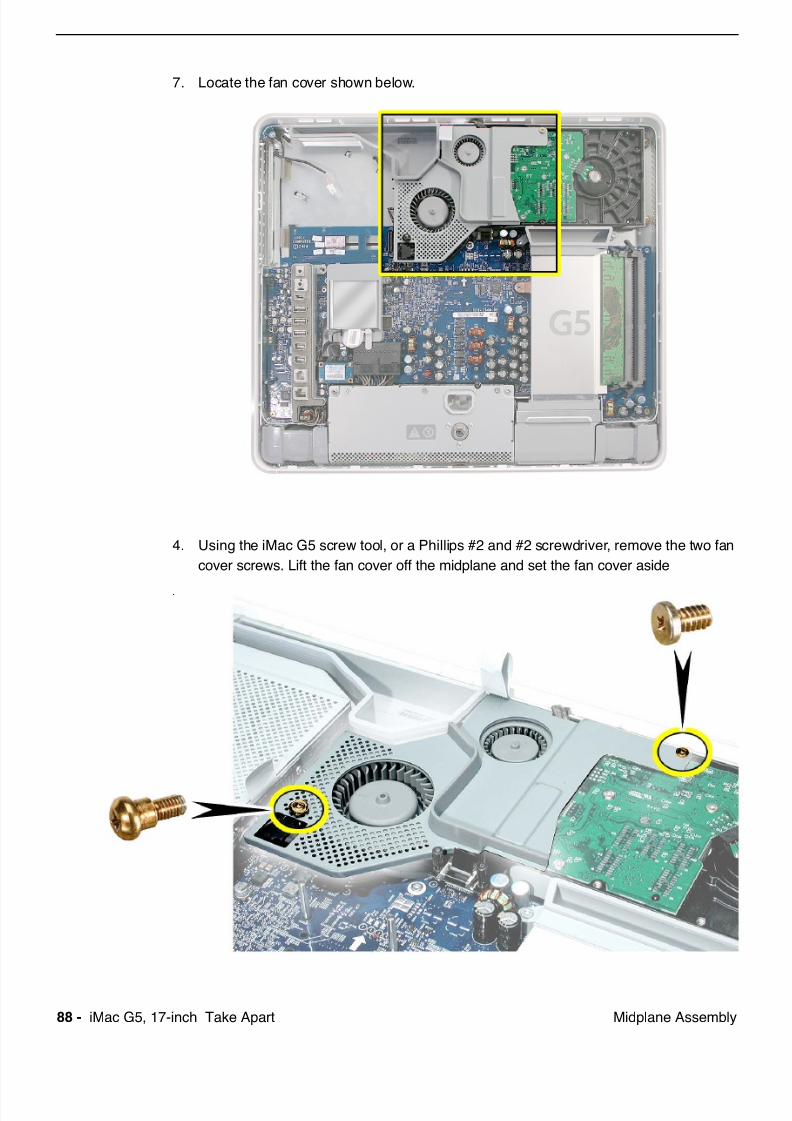
2. Locate the fan cover shown below.
4. Using a Phillips #2 for the screw on the left and a Phillips #2 for the screw on the right,
remove the two screws. Lift the fan cover off the midplane and set the fan cover aside.

7/29/2019 Apple imacg5_17in
http://slidepdf.com/reader/full/apple-imacg517in 36/31934 - iMac G5, 17-inch Take Apart Fan Cover
Replacing the Fan Cover
1. Remove the replacement fan cover from its packaging.
4. Replace the two fan cover screws. The larger screw attaches on the left. Note: Make
sure the pull tab is sticking up as shown.
7/29/2019 Apple imacg5_17in
http://slidepdf.com/reader/full/apple-imacg517in 37/319iMac G5, 17-inch Take Apart -Fans, Upper
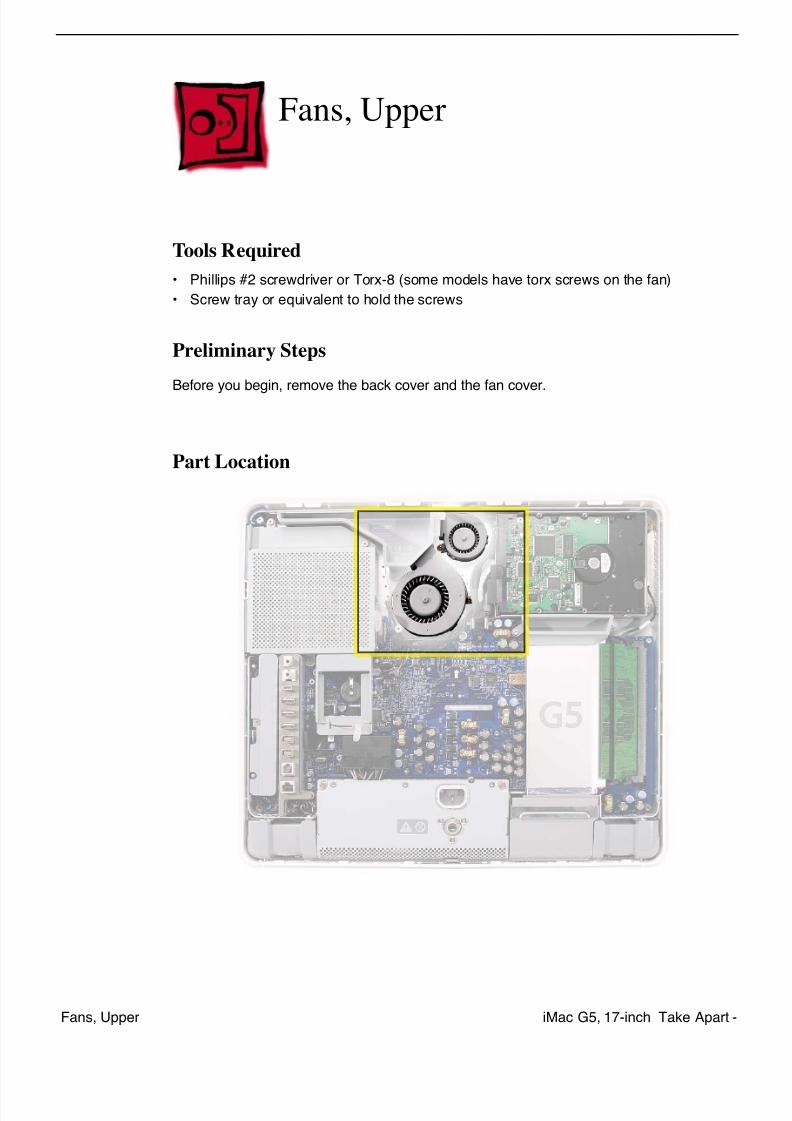
Fans, Upper
Tools Required
• Phillips #2 screwdriver or Torx-8 (some models have torx screws on the fan)
• Screw tray or equivalent to hold the screws
Preliminary Steps
Before you begin, remove the back cover and the fan cover.
Part Location
7/29/2019 Apple imacg5_17in
http://slidepdf.com/reader/full/apple-imacg517in 38/31936 - iMac G5, 17-inch Take Apart Fans, Upper
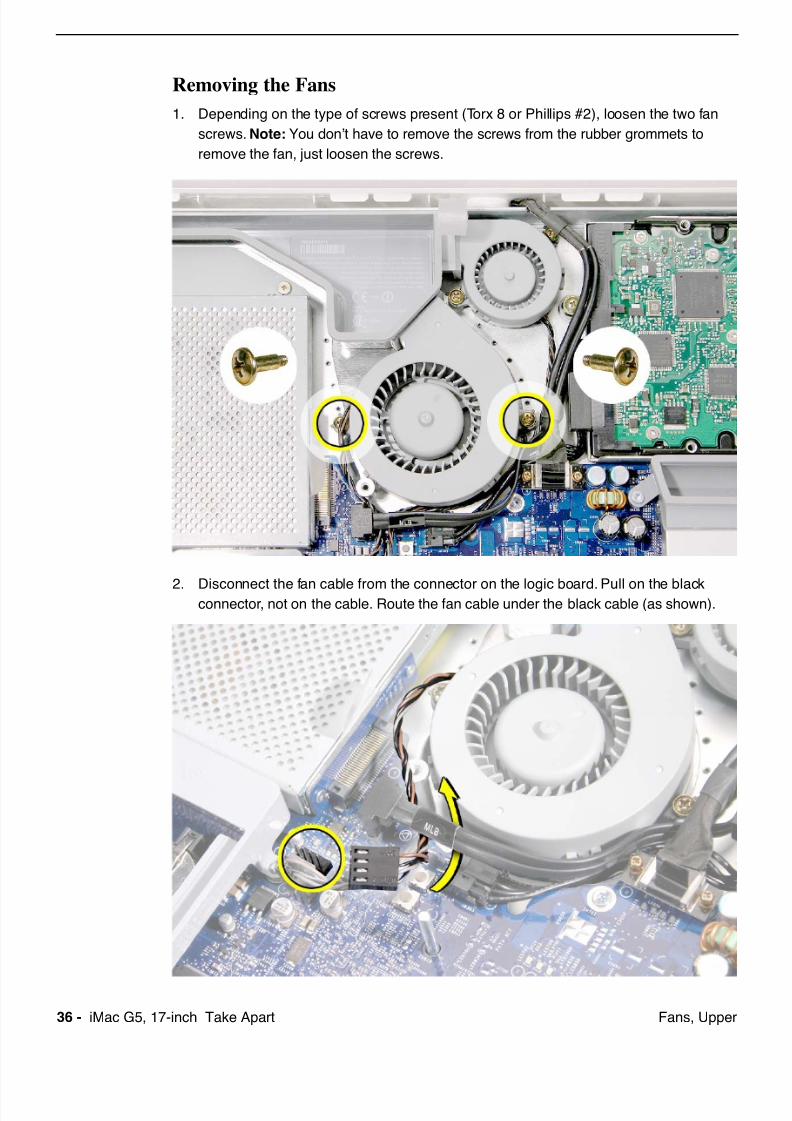
Removing the Fans
1. Depending on the type of screws present (Torx 8 or Phillips #2), loosen the two fan
screws. Note: You don’t have to remove the screws from the rubber grommets to
remove the fan, just loosen the screws.
2. Disconnect the fan cable from the connector on the logic board. Pull on the blackconnector, not on the cable. Route the fan cable under the black cable (as shown).
7/29/2019 Apple imacg5_17in
http://slidepdf.com/reader/full/apple-imacg517in 39/319iMac G5, 17-inch Take Apart -Fans, Upper
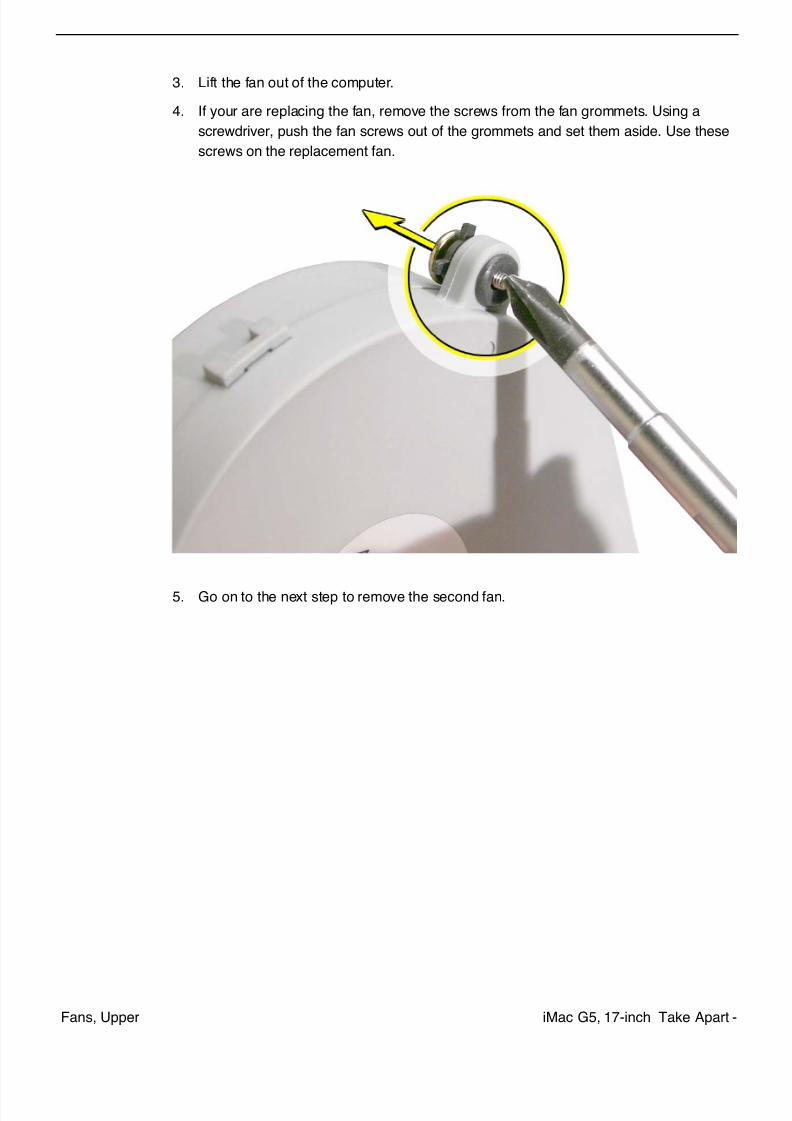
3. Lift the fan out of the computer.
4. If your are replacing the fan, remove the screws from the fan grommets. Using a
screwdriver, push the fan screws out of the grommets and set them aside. Use these
screws on the replacement fan.
5. Go on to the next step to remove the second fan.
7/29/2019 Apple imacg5_17in
http://slidepdf.com/reader/full/apple-imacg517in 40/31938 - iMac G5, 17-inch Take Apart Fans, Upper
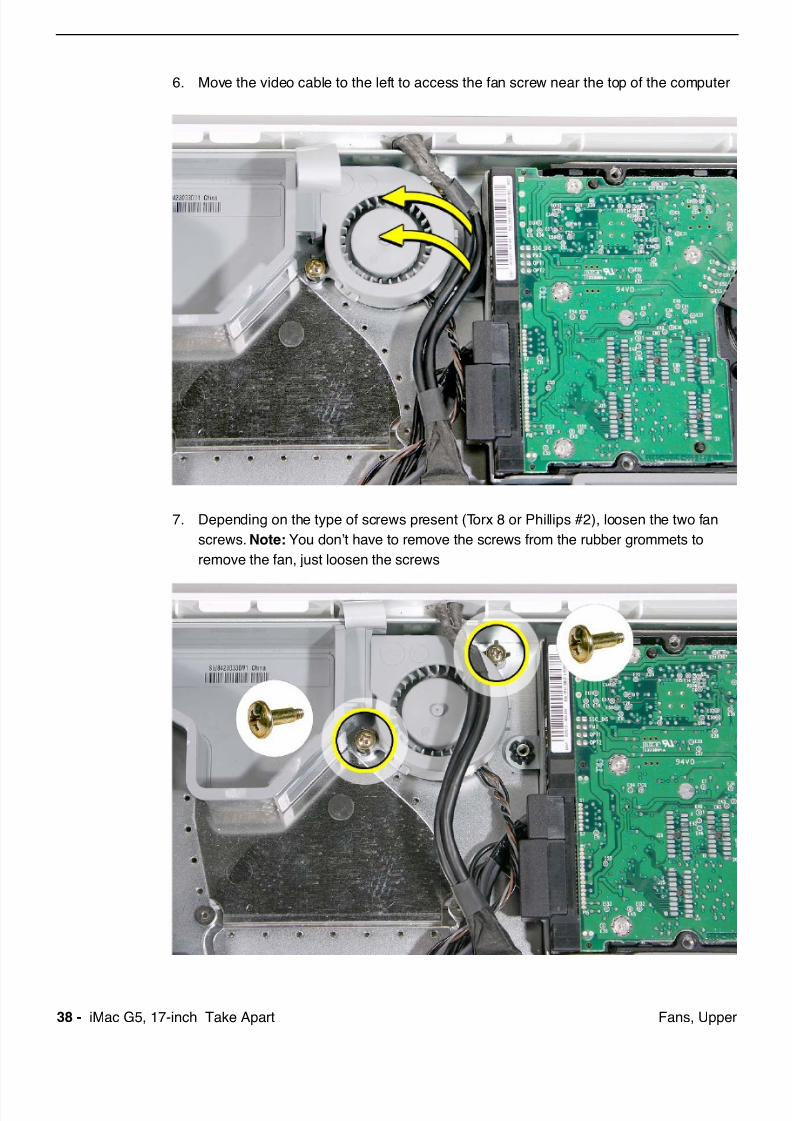
6. Move the video cable to the left to access the fan screw near the top of the computer
7. Depending on the type of screws present (Torx 8 or Phillips #2), loosen the two fan
screws. Note: You don’t have to remove the screws from the rubber grommets to
remove the fan, just loosen the screws
7/29/2019 Apple imacg5_17in
http://slidepdf.com/reader/full/apple-imacg517in 41/319iMac G5, 17-inch Take Apart -Fans, Upper
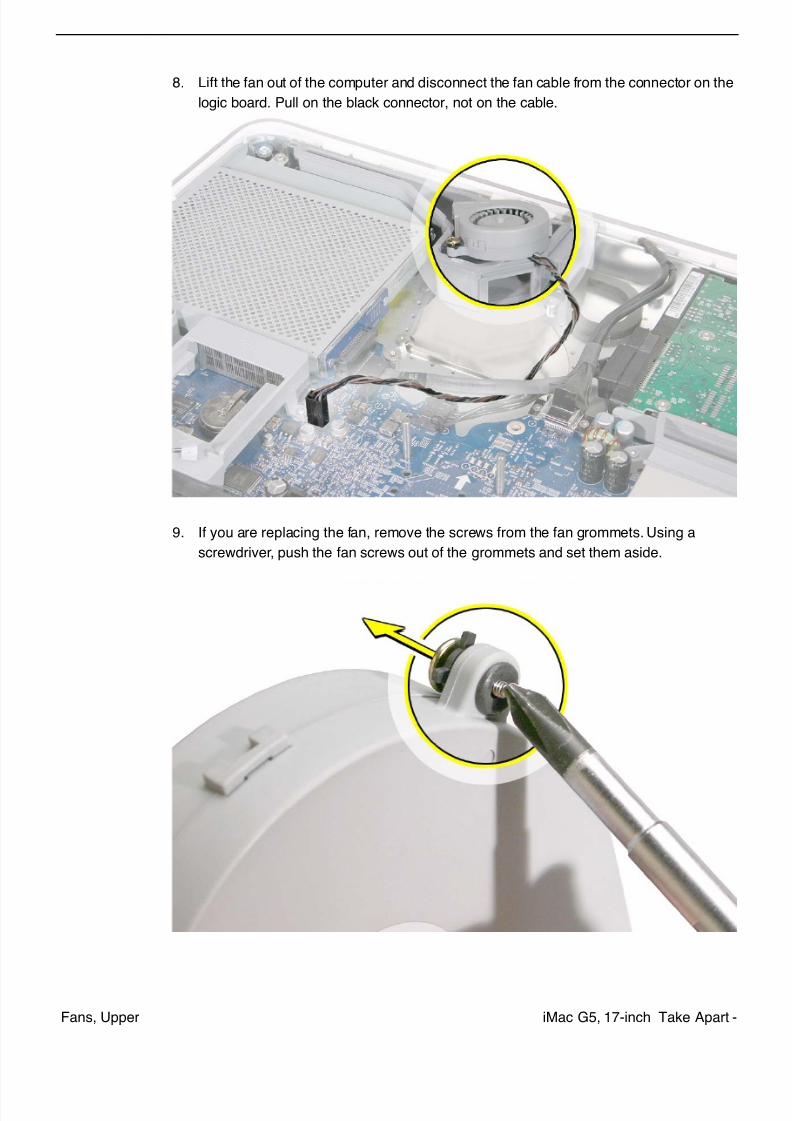
8. Lift the fan out of the computer and disconnect the fan cable from the connector on the
logic board. Pull on the black connector, not on the cable.
9. If you are replacing the fan, remove the screws from the fan grommets. Using a
screwdriver, push the fan screws out of the grommets and set them aside.
7/29/2019 Apple imacg5_17in
http://slidepdf.com/reader/full/apple-imacg517in 42/31940 - iMac G5, 17-inch Take Apart Fans, Upper
Replacing the Fans
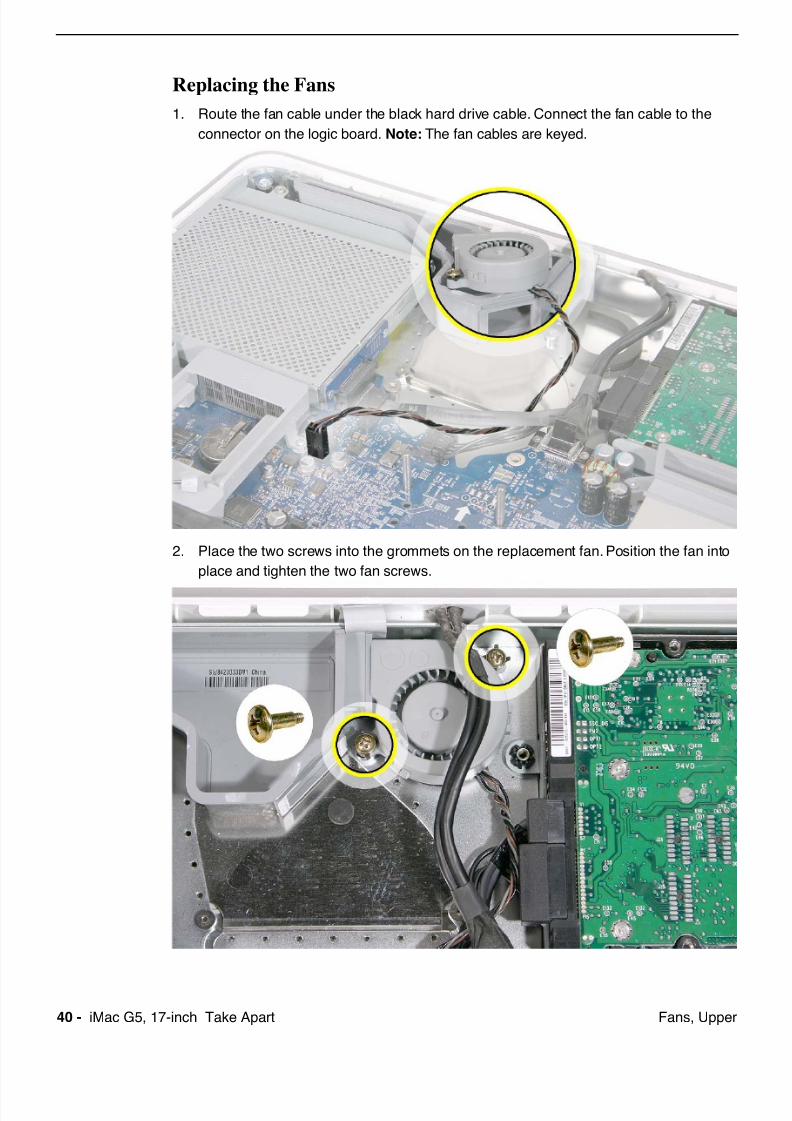
1. Route the fan cable under the black hard drive cable. Connect the fan cable to the
connector on the logic board. Note: The fan cables are keyed.
2. Place the two screws into the grommets on the replacement fan. Position the fan into
place and tighten the two fan screws.
7/29/2019 Apple imacg5_17in
http://slidepdf.com/reader/full/apple-imacg517in 43/319iMac G5, 17-inch Take Apart -Fans, Upper
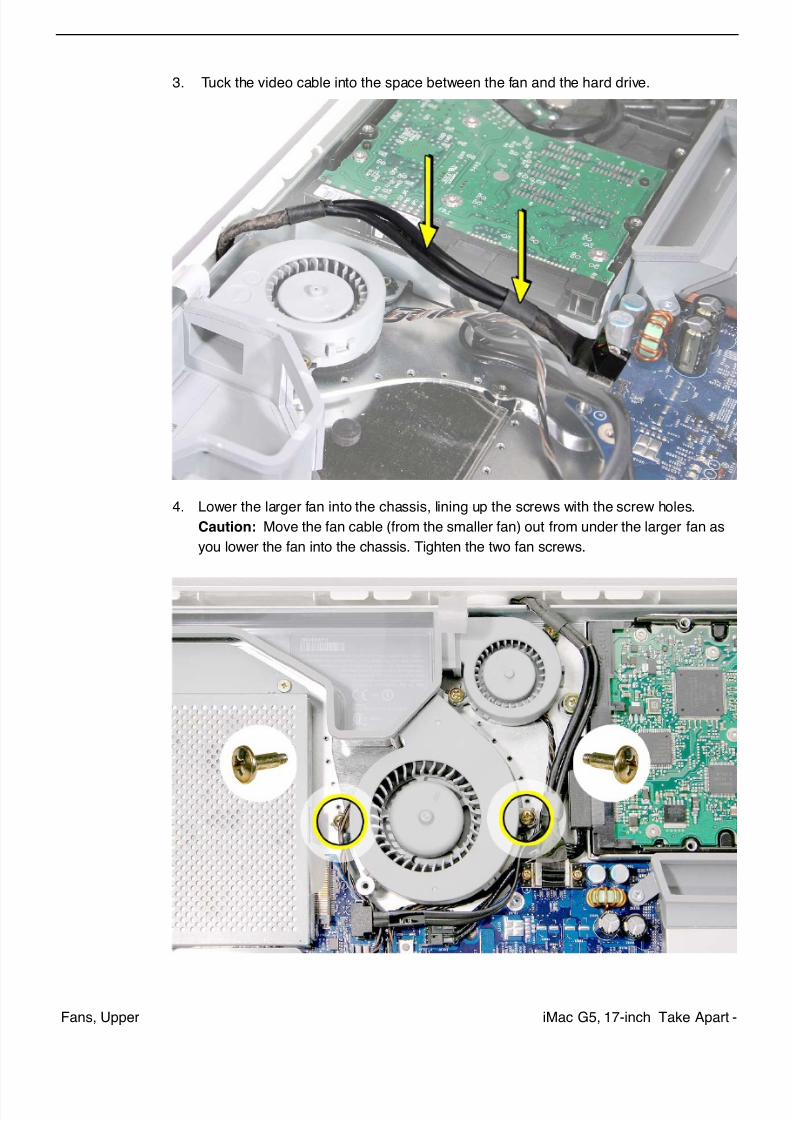
3. Tuck the video cable into the space between the fan and the hard drive.
4. Lower the larger fan into the chassis, lining up the screws with the screw holes.
Caution: Move the fan cable (from the smaller fan) out from under the larger fan as
you lower the fan into the chassis. Tighten the two fan screws.
7/29/2019 Apple imacg5_17in
http://slidepdf.com/reader/full/apple-imacg517in 44/31942 - iMac G5, 17-inch Take Apart Fans, Upper
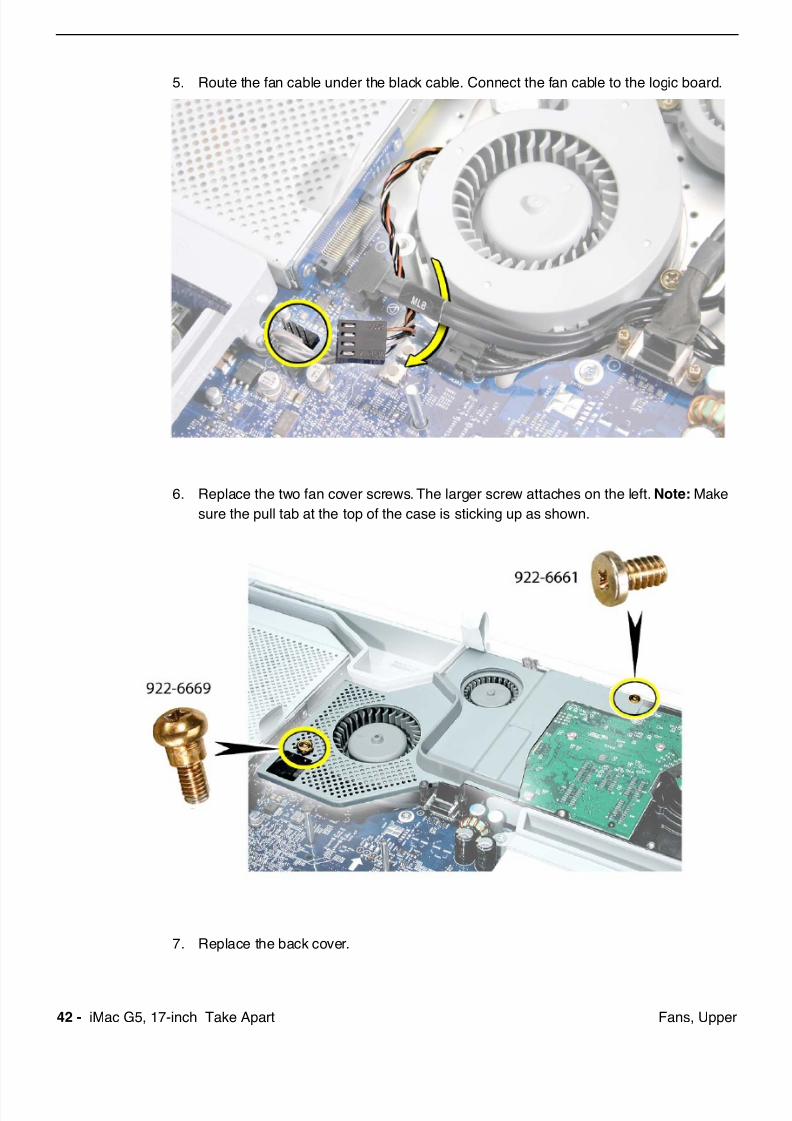
5. Route the fan cable under the black cable. Connect the fan cable to the logic board.
6. Replace the two fan cover screws. The larger screw attaches on the left. Note: Make
sure the pull tab at the top of the case is sticking up as shown.
7. Replace the back cover.
7/29/2019 Apple imacg5_17in
http://slidepdf.com/reader/full/apple-imacg517in 45/319iMac G5, 17-inch Take Apart -Inverter
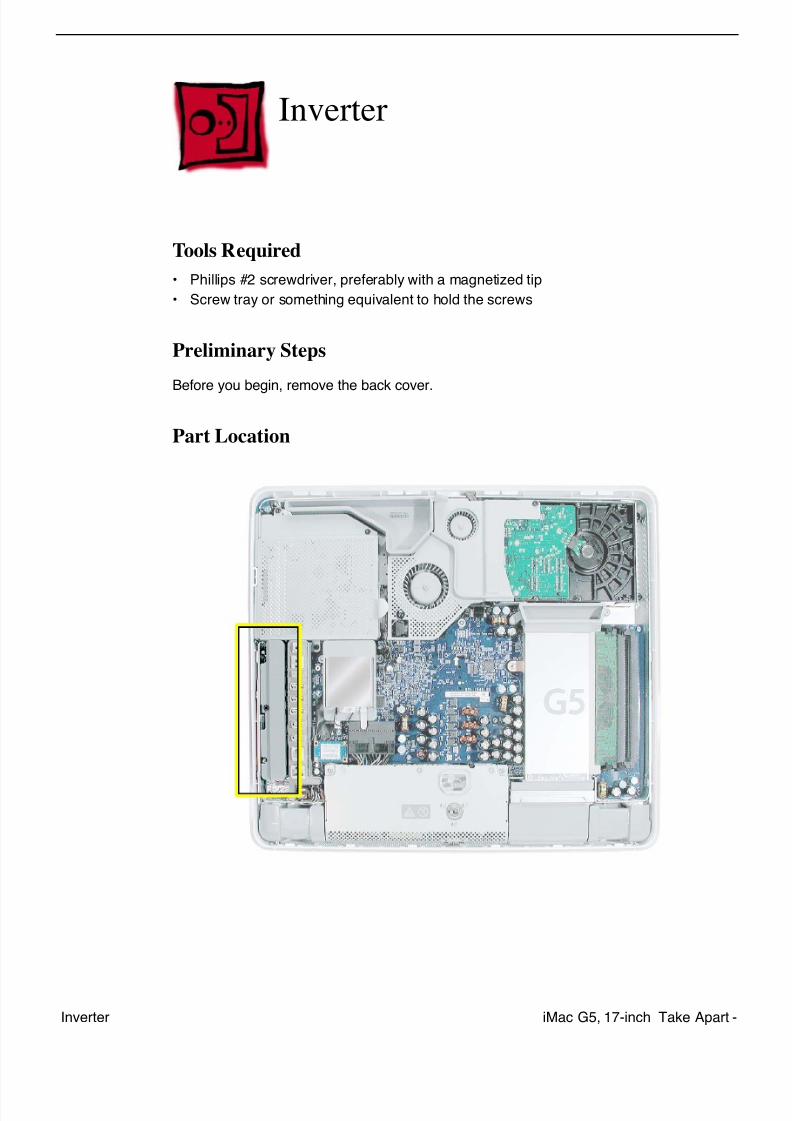
Inverter
Tools Required
• Phillips #2 screwdriver, preferably with a magnetized tip
• Screw tray or something equivalent to hold the screws
Preliminary Steps
Before you begin, remove the back cover.
Part Location

7/29/2019 Apple imacg5_17in
http://slidepdf.com/reader/full/apple-imacg517in 46/31944 - iMac G5, 17-inch Take Apart Inverter
Removing the Inverter
1. To access the inverter assembly other service modules have to be removed. This
procedure will show you how to remove and replace each module. As you remove
each module, set it aside, along with the screws for that module.
2. Important: Ground yourself. Touch the metal surface (as shown below) on the inside
of the computer to discharge any static electricity.
Warning: Always discharge static electricity before you touch any parts or install any
components inside the computer. To avoid generating static electricity, do not walk
around the room until you have finished installing the part and closed the computer.
7/29/2019 Apple imacg5_17in
http://slidepdf.com/reader/full/apple-imacg517in 47/319iMac G5, 17-inch Take Apart -Inverter
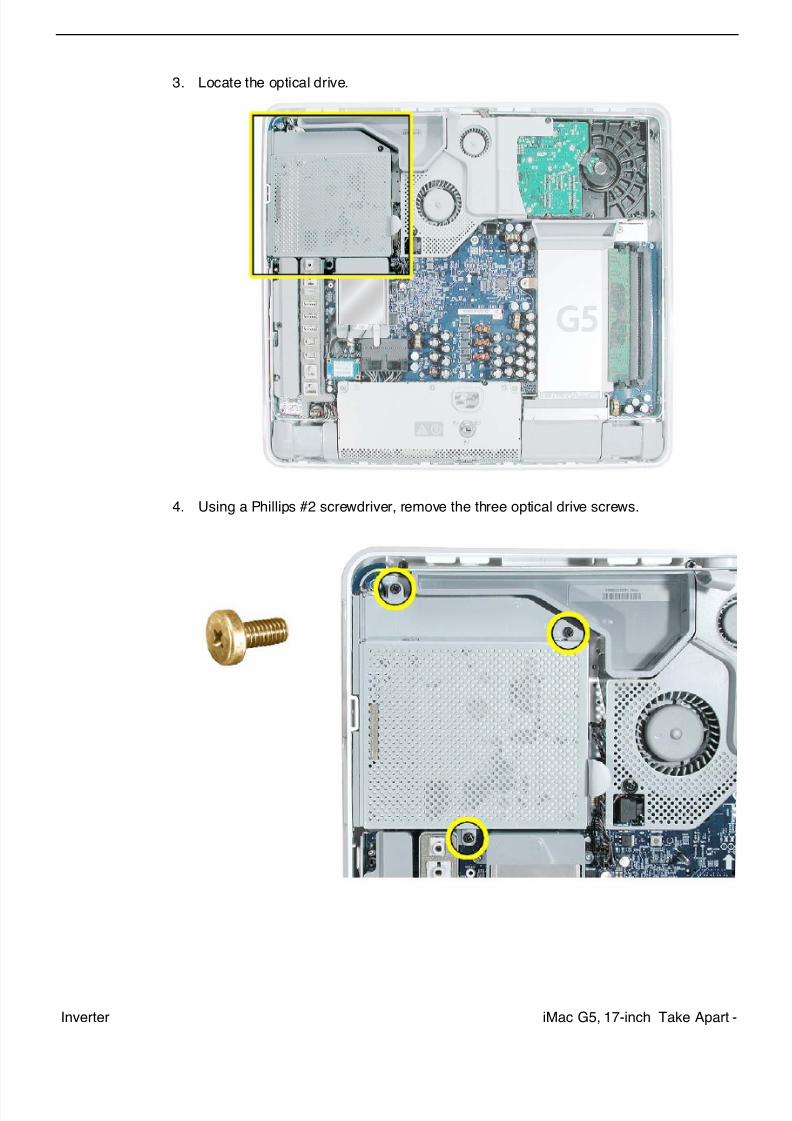
3. Locate the optical drive.
4. Using a Phillips #2 screwdriver, remove the three optical drive screws.
7/29/2019 Apple imacg5_17in
http://slidepdf.com/reader/full/apple-imacg517in 48/31946 - iMac G5, 17-inch Take Apart Inverter
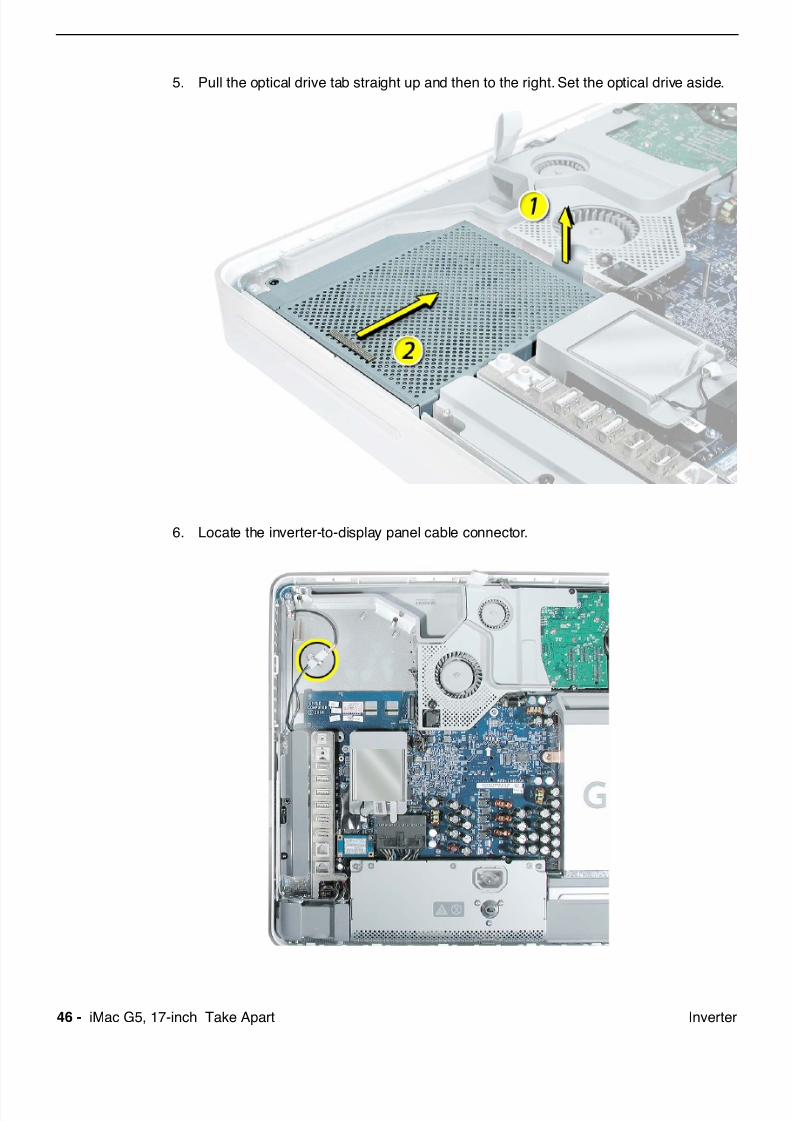
5. Pull the optical drive tab straight up and then to the right. Set the optical drive aside.
6. Locate the inverter-to-display panel cable connector.
7/29/2019 Apple imacg5_17in
http://slidepdf.com/reader/full/apple-imacg517in 49/319iMac G5, 17-inch Take Apart -Inverter
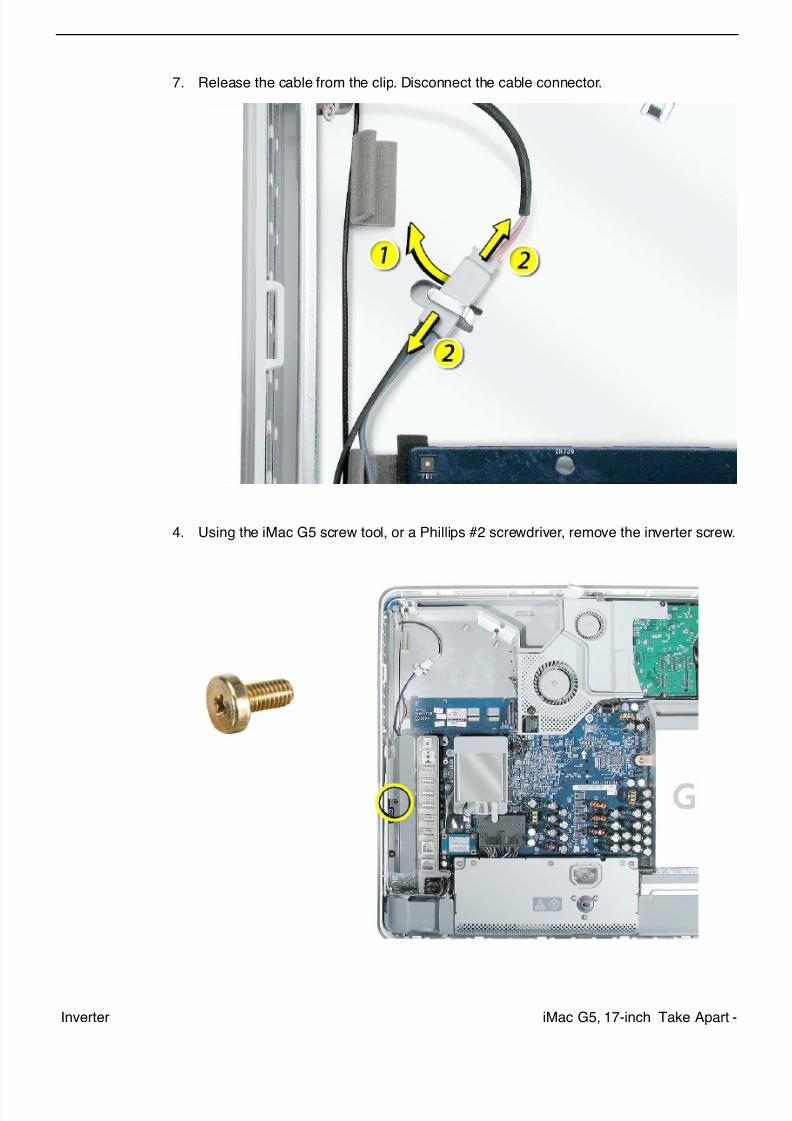
7. Release the cable from the clip. Disconnect the cable connector.
4. Using the iMac G5 screw tool, or a Phillips #2 screwdriver, remove the inverter screw.
7/29/2019 Apple imacg5_17in
http://slidepdf.com/reader/full/apple-imacg517in 50/31948 - iMac G5, 17-inch Take Apart Inverter
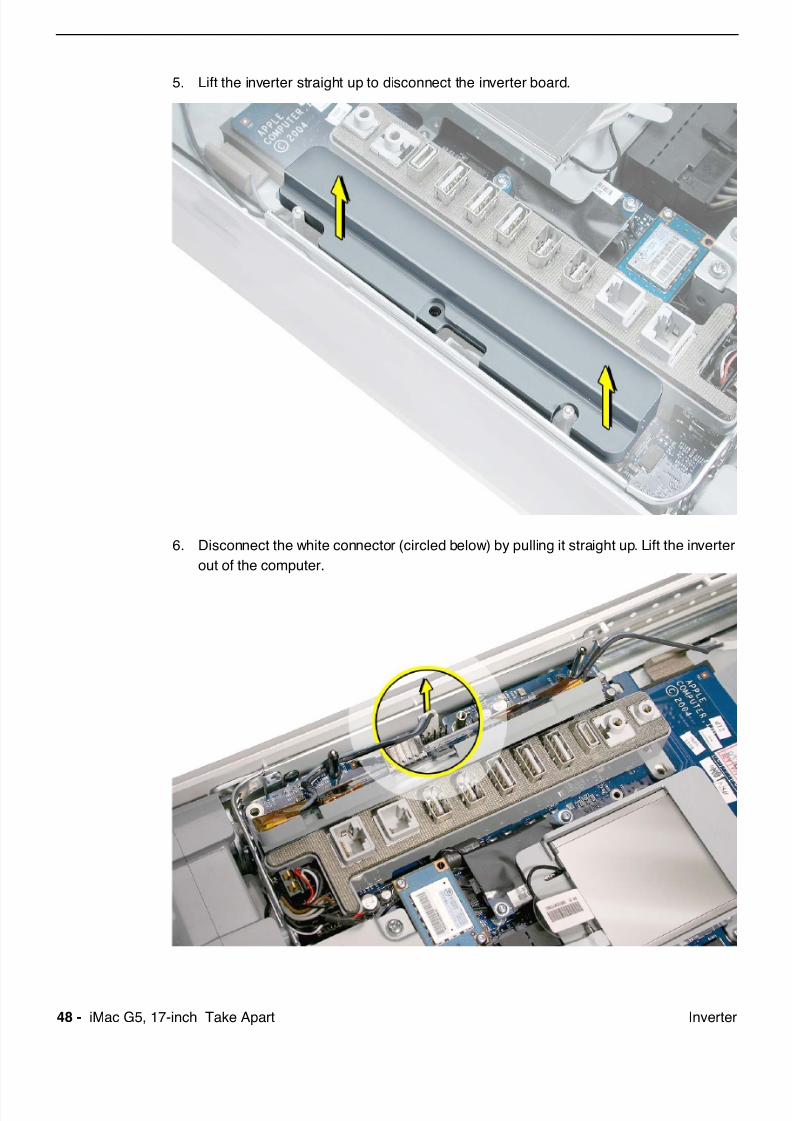
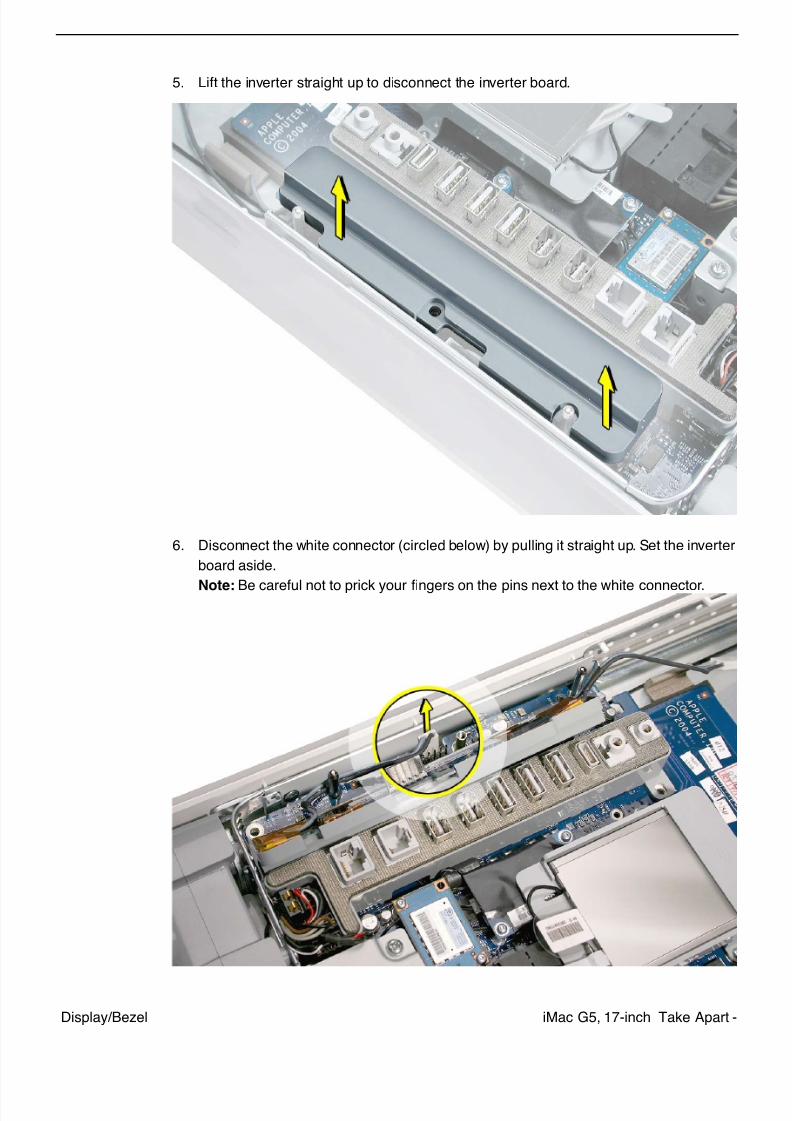
5. Lift the inverter straight up to disconnect the inverter board.
6. Disconnect the white connector (circled below) by pulling it straight up. Lift the inverter
out of the computer.
7/29/2019 Apple imacg5_17in
http://slidepdf.com/reader/full/apple-imacg517in 51/319iMac G5, 17-inch Take Apart -Inverter
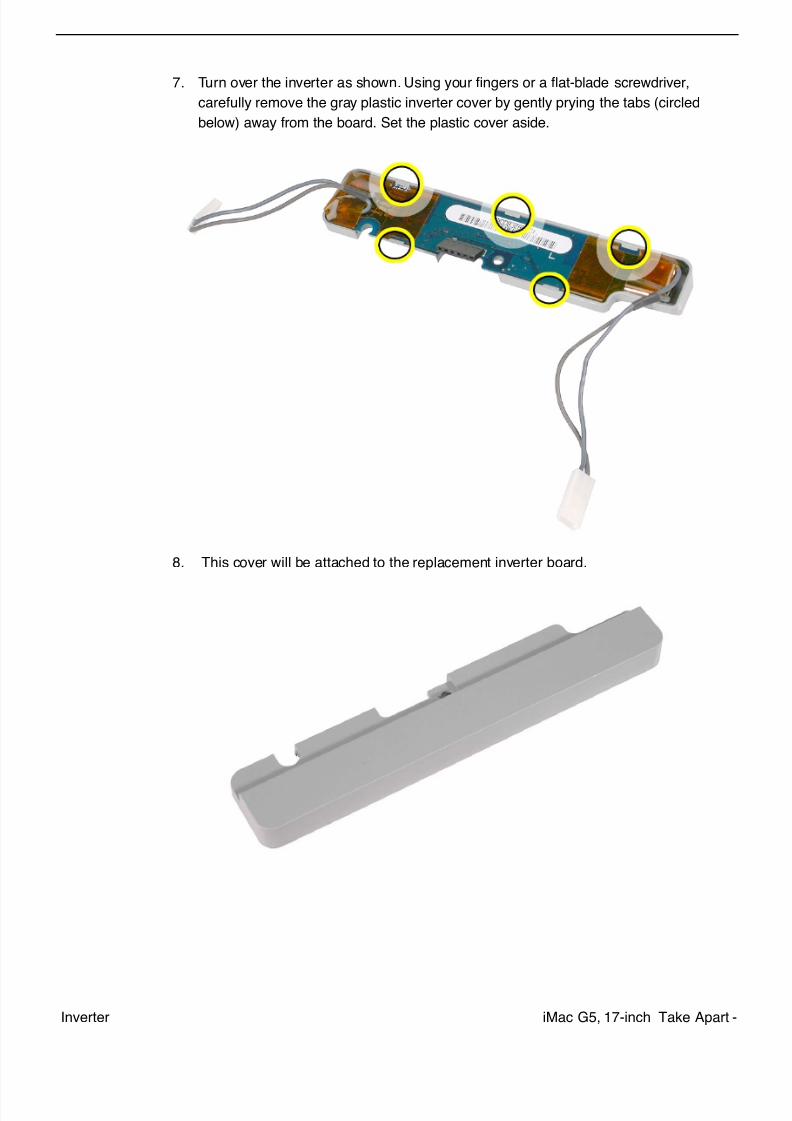
7. Turn over the inverter as shown. Using your fingers or a flat-blade screwdriver,
carefully remove the gray plastic inverter cover by gently prying the tabs (circled
below) away from the board. Set the plastic cover aside.
8. This cover will be attached to the replacement inverter board.
7/29/2019 Apple imacg5_17in
http://slidepdf.com/reader/full/apple-imacg517in 52/31950 - iMac G5, 17-inch Take Apart Inverter
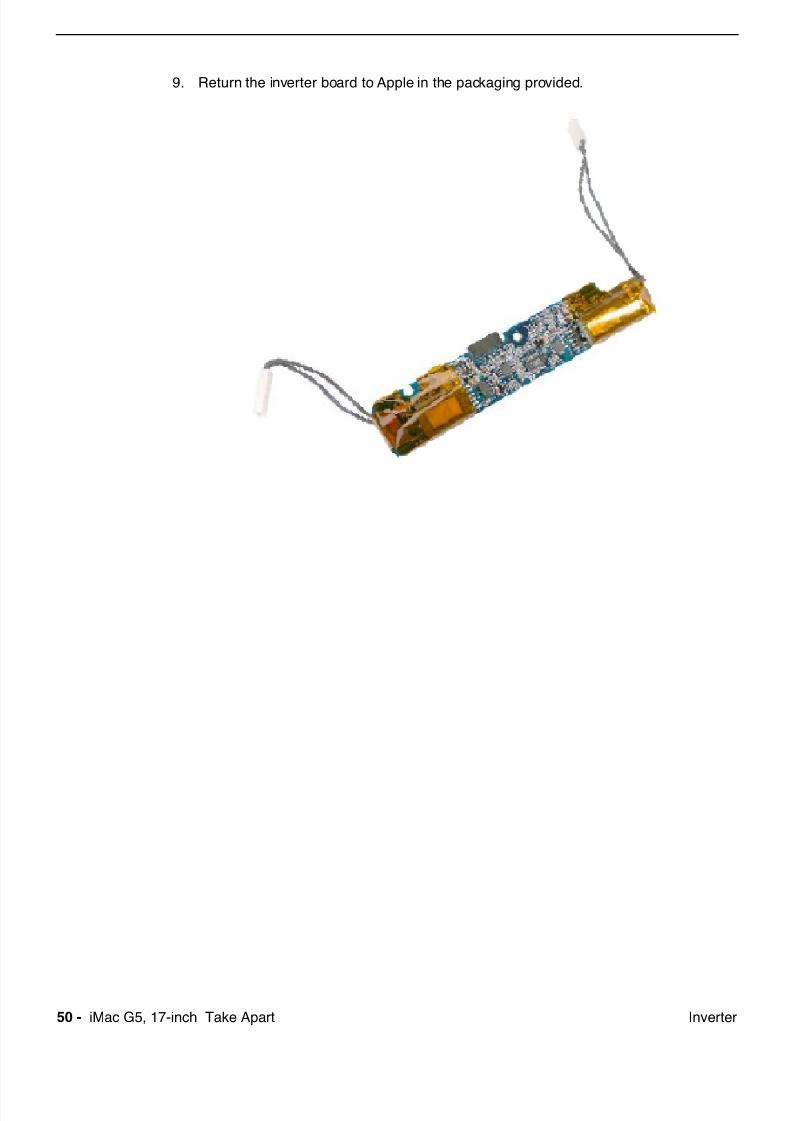
9. Return the inverter board to Apple in the packaging provided.

7/29/2019 Apple imacg5_17in
http://slidepdf.com/reader/full/apple-imacg517in 53/319
iMac G5, 17-inch Take Apart -Inverter
Replacing the Inverter
1. Remove the replacement inverter from its packaging.
2. Locate the gray plastic cover you set aside.
7/29/2019 Apple imacg5_17in
http://slidepdf.com/reader/full/apple-imacg517in 54/319
52 - iMac G5, 17-inch Take Apart Inverter
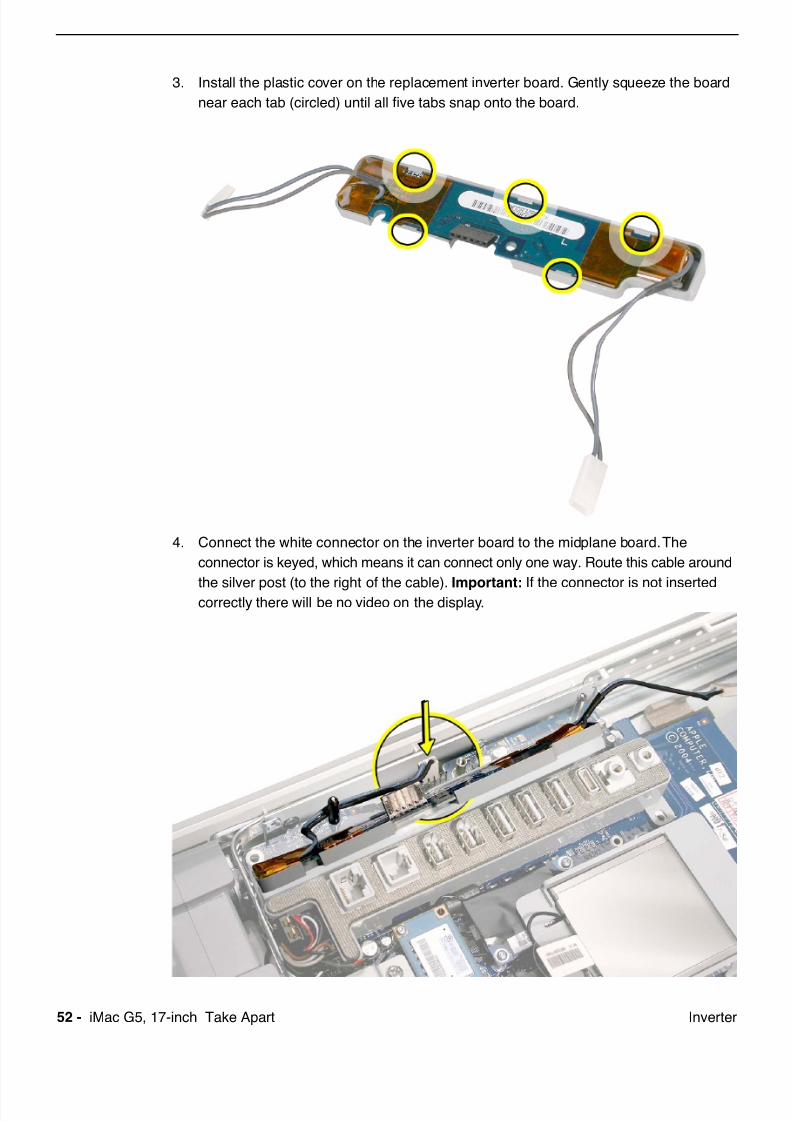
3. Install the plastic cover on the replacement inverter board. Gently squeeze the board
near each tab (circled) until all five tabs snap onto the board.
4. Connect the white connector on the inverter board to the midplane board. The
connector is keyed, which means it can connect only one way. Route this cable around
the silver post (to the right of the cable). Important:
If the connector is not insertedcorrectly there will be no video on the display.
7/29/2019 Apple imacg5_17in
http://slidepdf.com/reader/full/apple-imacg517in 55/319
iMac G5, 17-inch Take Apart -Inverter
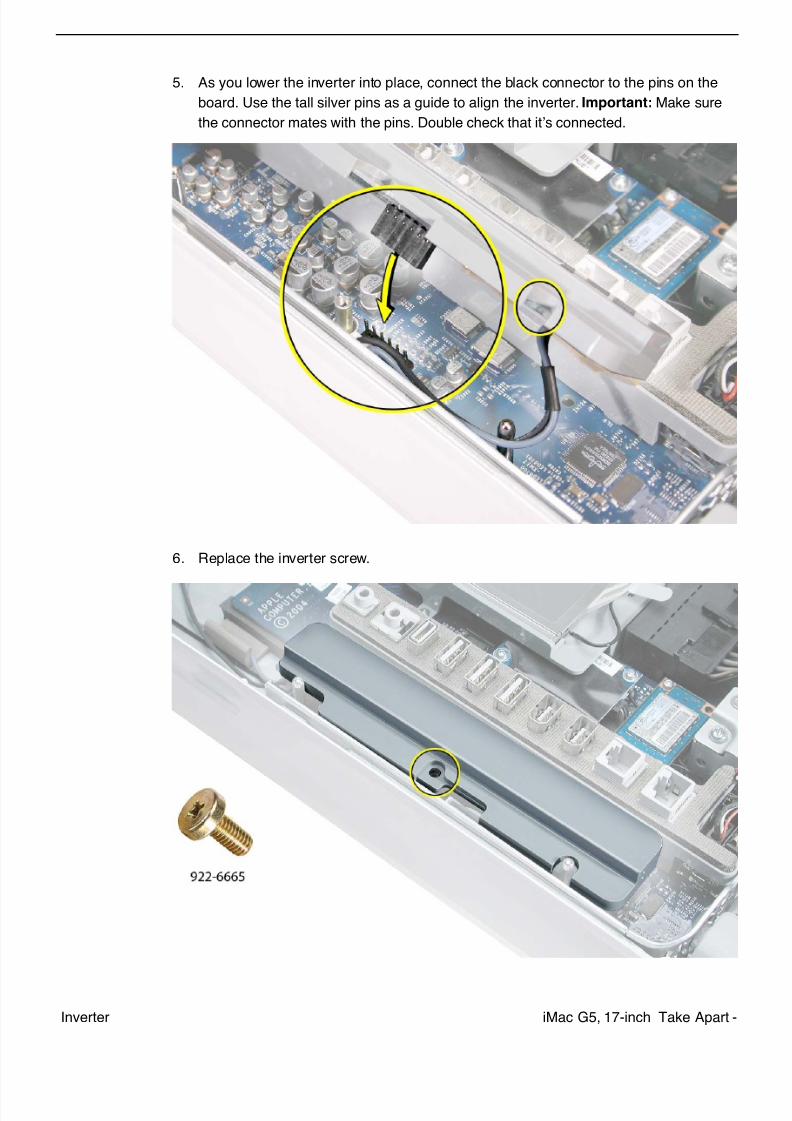
5. As you lower the inverter into place, connect the black connector to the pins on the
board. Use the tall silver pins as a guide to align the inverter. Important:
Make sure
the connector mates with the pins. Double check that it’s connected.
6. Replace the inverter screw.
7/29/2019 Apple imacg5_17in
http://slidepdf.com/reader/full/apple-imacg517in 56/319
54 - iMac G5, 17-inch Take Apart Inverter
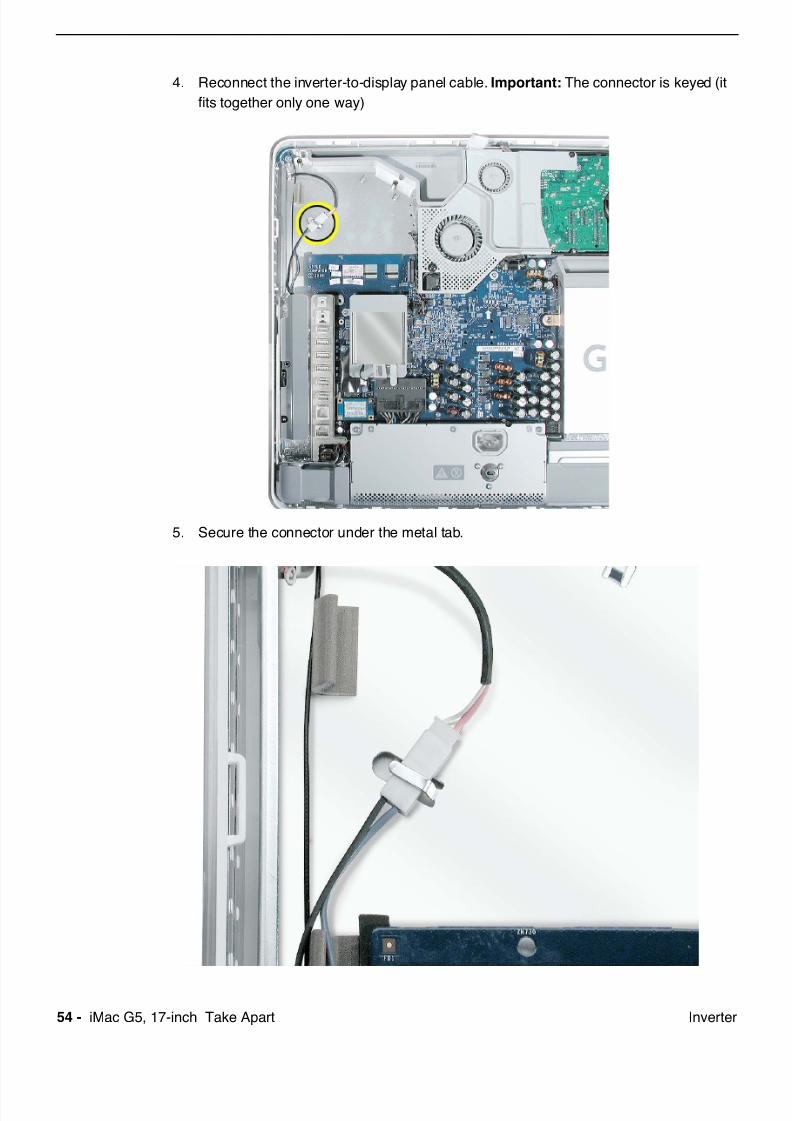
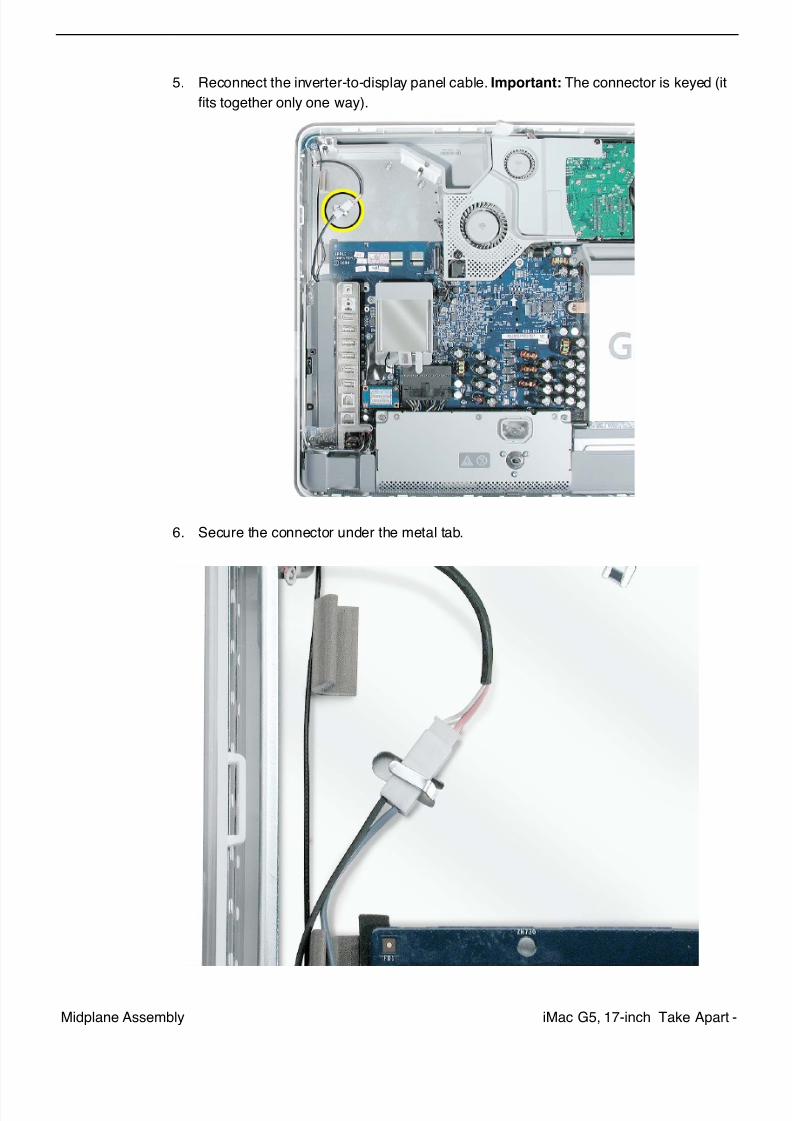
4. Reconnect the inverter-to-display panel cable. Important:
The connector is keyed (it
fits together only one way)
5. Secure the connector under the metal tab.
7/29/2019 Apple imacg5_17in
http://slidepdf.com/reader/full/apple-imacg517in 57/319
iMac G5, 17-inch Take Apart -Inverter
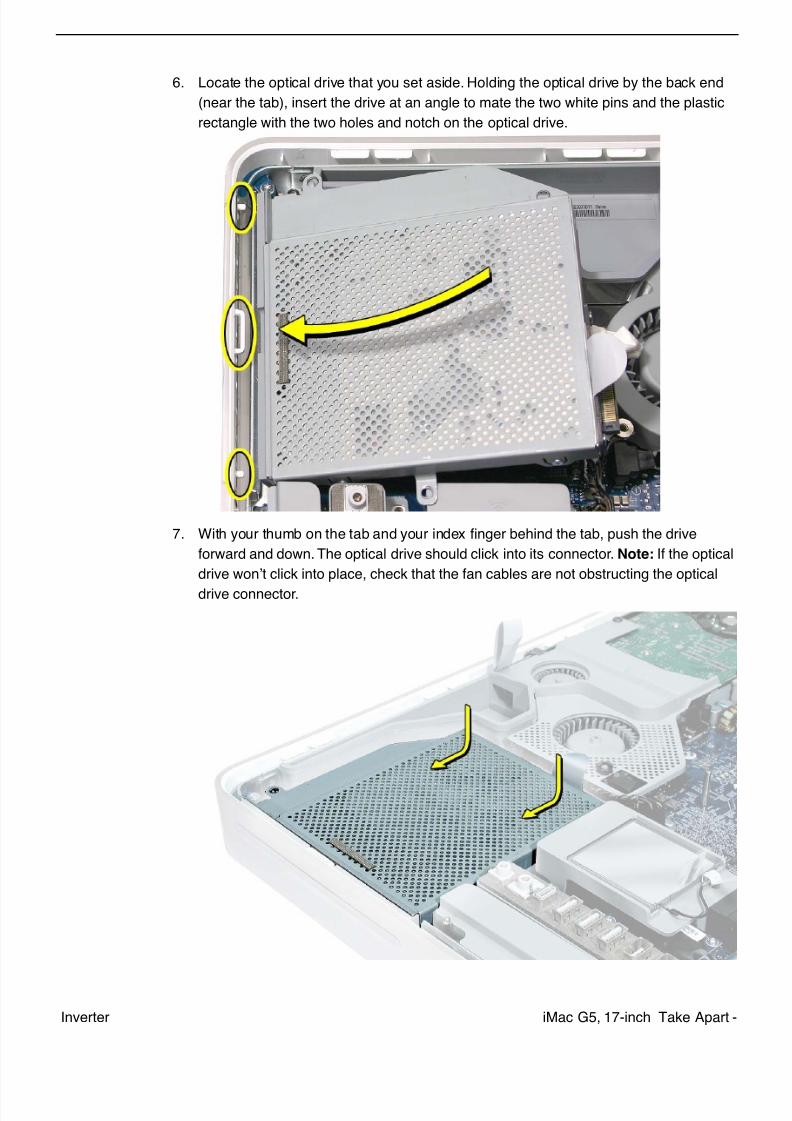
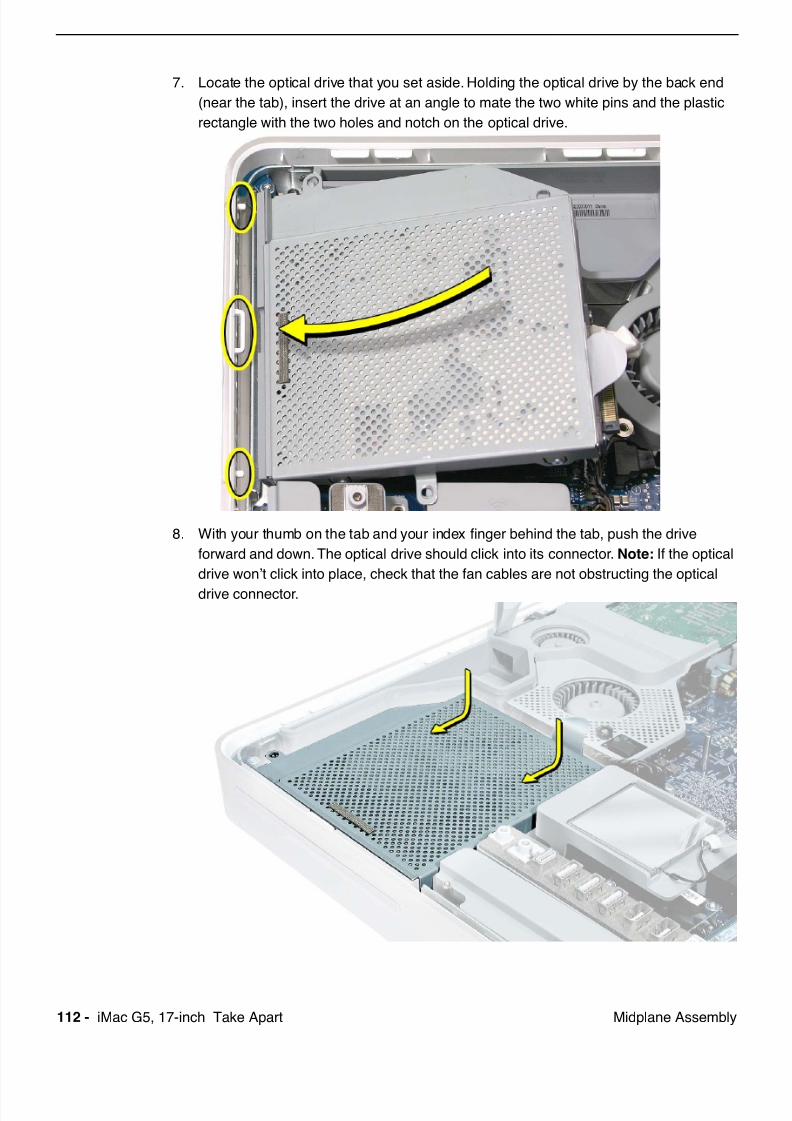
6. Locate the optical drive that you set aside. Holding the optical drive by the back end
(near the tab), insert the drive at an angle to mate the two white pins and the plastic
rectangle with the two holes and notch on the optical drive.
7. With your thumb on the tab and your index finger behind the tab, push the drive
forward and down. The optical drive should click into its connector. Note:
If the optical
drive won’t click into place, check that the fan cables are not obstructing the optical
drive connector.
7/29/2019 Apple imacg5_17in
http://slidepdf.com/reader/full/apple-imacg517in 58/319
56 - iMac G5, 17-inch Take Apart Inverter
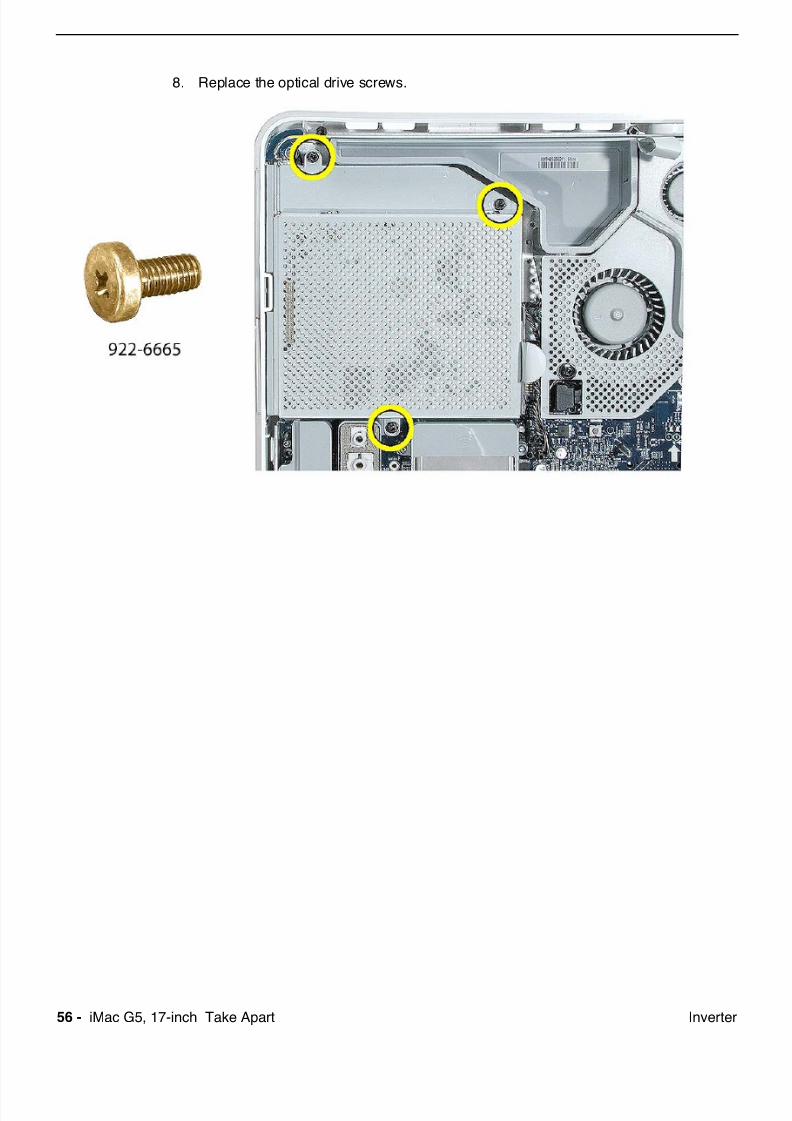
8. Replace the optical drive screws.
7/29/2019 Apple imacg5_17in
http://slidepdf.com/reader/full/apple-imacg517in 59/319
iMac G5, 17-inch Take Apart -Memory (DIMMs)
Memory (DIMMs)
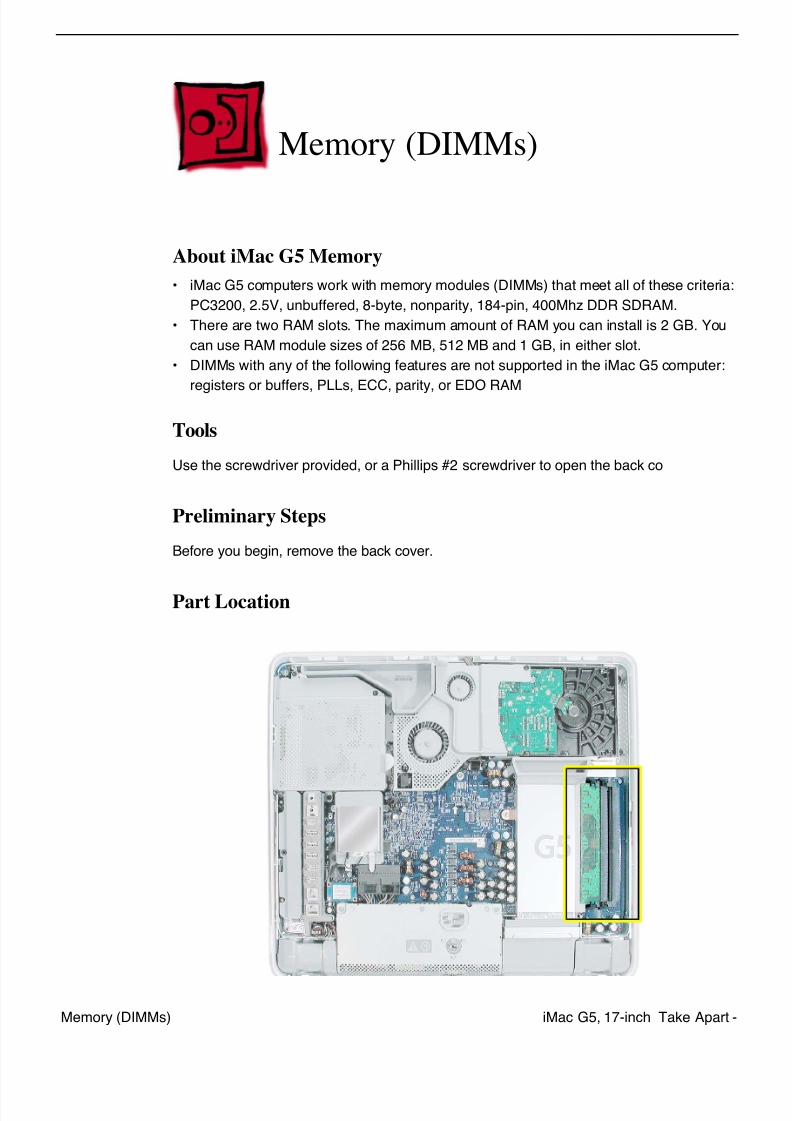
About iMac G5 Memory
• iMac G5 computers work with memory modules (DIMMs) that meet all of these criteria:
PC3200, 2.5V, unbuffered, 8-byte, nonparity, 184-pin, 400Mhz DDR SDRAM.
• There are two RAM slots. The maximum amount of RAM you can install is 2 GB. You
can use RAM module sizes of 256 MB, 512 MB and 1 GB, in either slot.
• DIMMs with any of the following features are not supported in the iMac G5 computer:
registers or buffers, PLLs, ECC, parity, or EDO RAM
Tools
Use the screwdriver provided, or a Phillips #2 screwdriver to open the back co
Preliminary Steps
Before you begin, remove the back cover.
Part Location

7/29/2019 Apple imacg5_17in
http://slidepdf.com/reader/full/apple-imacg517in 60/319
58 - iMac G5, 17-inch Take Apart Memory (DIMMs)
Removing the Memory
1.
Important:
Ground yourself. Touch the metal surface (as shown below) on the inside
of the computer to discharge any static electricity.
Warning:
Always discharge static electricity before you touch any parts or
install any components inside the computer. To avoid generating static
electricity, do not walk around the room until you have finished installing the
part and closed the computer.
7/29/2019 Apple imacg5_17in
http://slidepdf.com/reader/full/apple-imacg517in 61/319
iMac G5, 17-inch Take Apart -Memory (DIMMs)
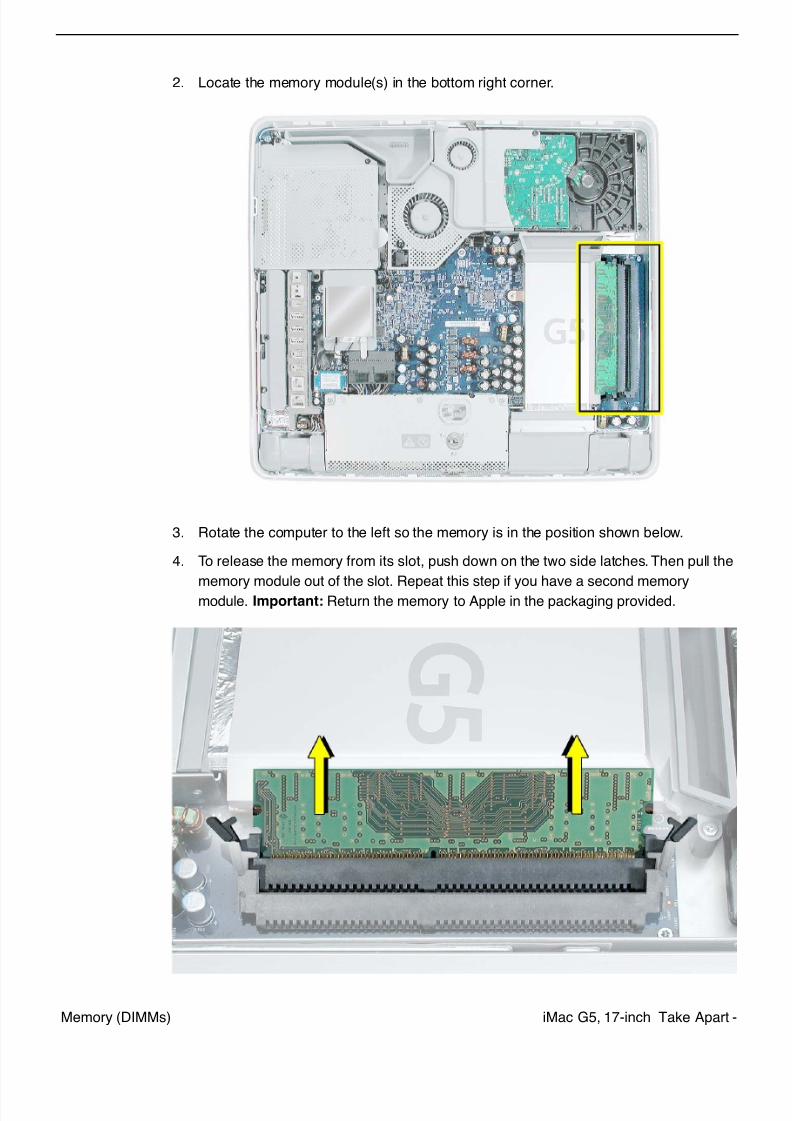
2. Locate the memory module(s) in the bottom right corner.
3. Rotate the computer to the left so the memory is in the position shown below.
4. To release the memory from its slot, push down on the two side latches. Then pull the
memory module out of the slot. Repeat this step if you have a second memorymodule. Important:
Return the memory to Apple in the packaging provided.
7/29/2019 Apple imacg5_17in
http://slidepdf.com/reader/full/apple-imacg517in 62/319
60 - iMac G5, 17-inch Take Apart Memory (DIMMs)
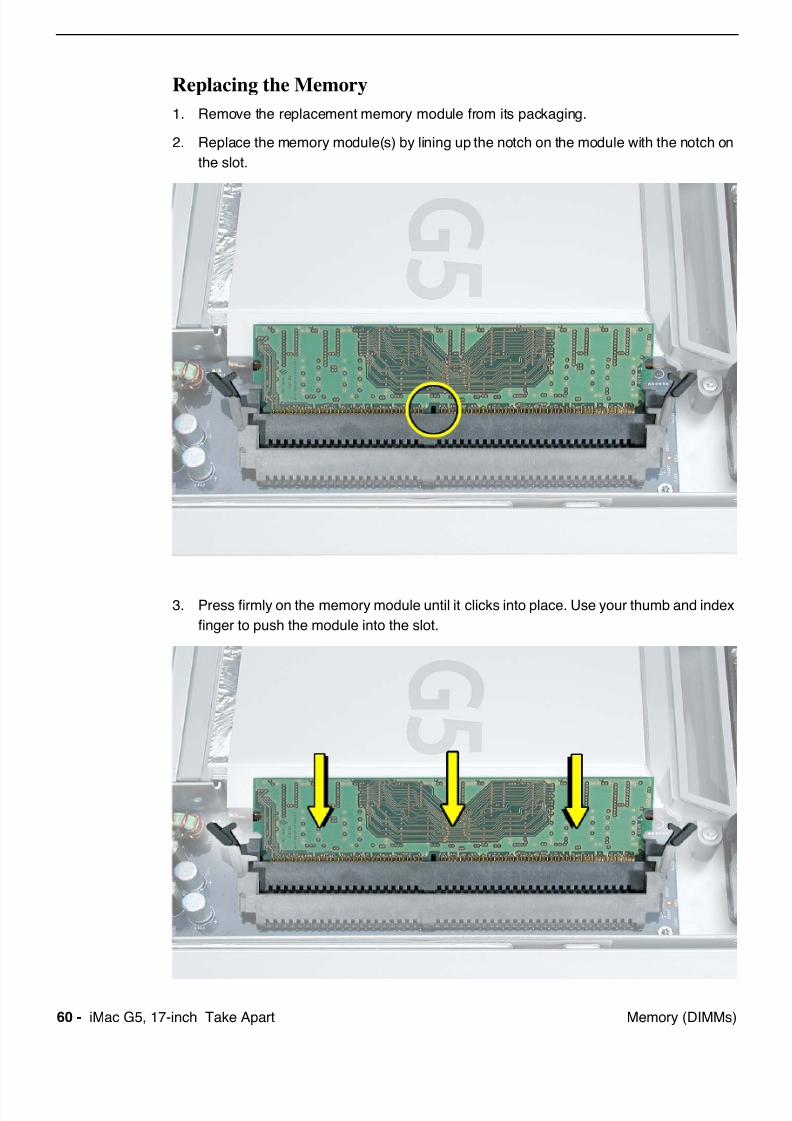
Replacing the Memory
1. Remove the replacement memory module from its packaging.
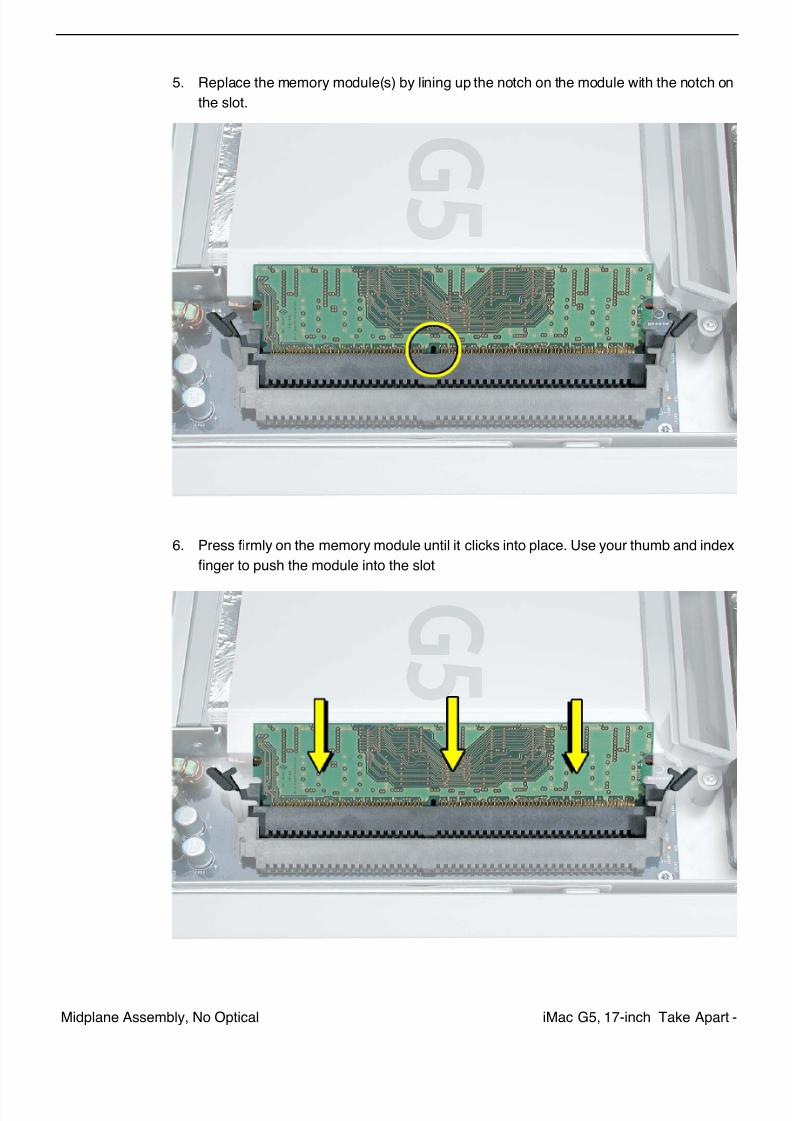
2. Replace the memory module(s) by lining up the notch on the module with the notch on
the slot.
3. Press firmly on the memory module until it clicks into place. Use your thumb and index
finger to push the module into the slot.
7/29/2019 Apple imacg5_17in
http://slidepdf.com/reader/full/apple-imacg517in 63/319
iMac G5, 17-inch Take Apart -Power Supply
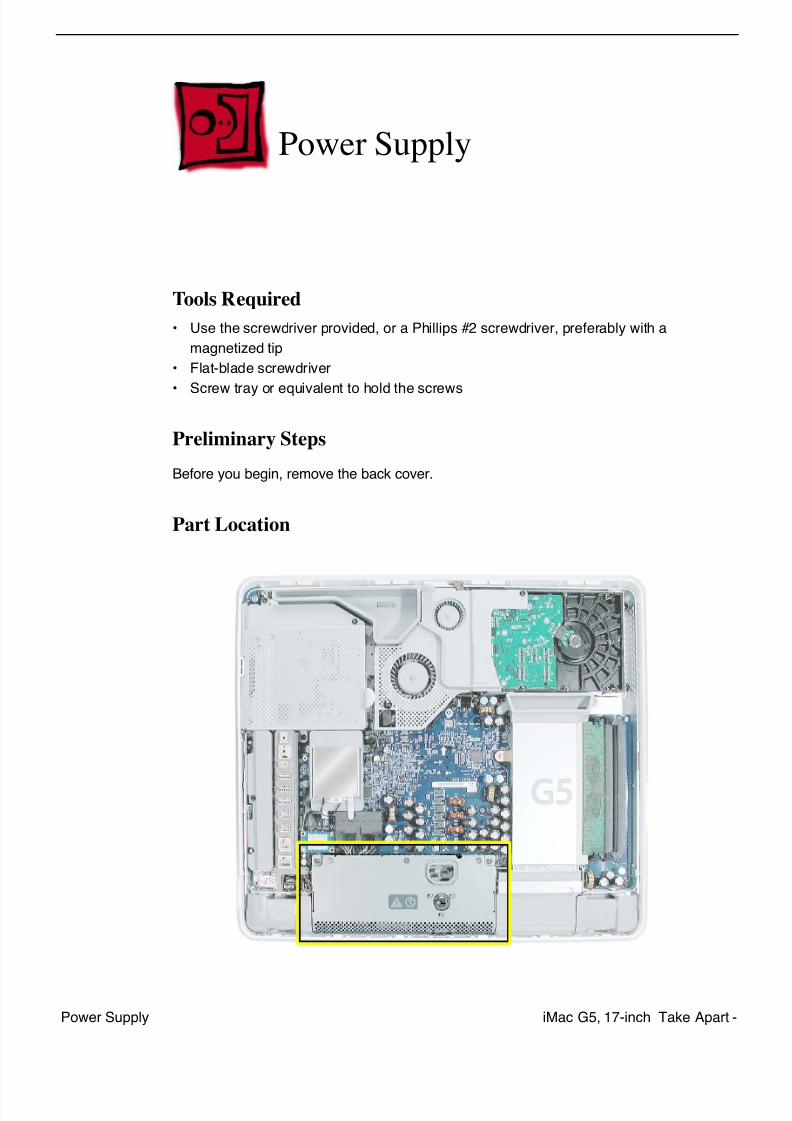
Power Supply
Tools Required
• Use the screwdriver provided, or a Phillips #2 screwdriver, preferably with a
magnetized tip
• Flat-blade screwdriver
• Screw tray or equivalent to hold the screws
Preliminary Steps
Before you begin, remove the back cover.
Part Location

7/29/2019 Apple imacg5_17in
http://slidepdf.com/reader/full/apple-imacg517in 64/319
62 - iMac G5, 17-inch Take Apart Power Supply
Removing the Power Supply
1. Ground yourself. Touch the metal surface (as shown below) on the inside of the
computer to discharge any static electricity.
Warning:
Always discharge static electricity before you touch any parts or
install any components inside the computer. To avoid generating static
electricity, do not walk around the room until you have finished installing the
part and closed the computer
.
7/29/2019 Apple imacg5_17in
http://slidepdf.com/reader/full/apple-imacg517in 65/319
iMac G5, 17-inch Take Apart -Power Supply
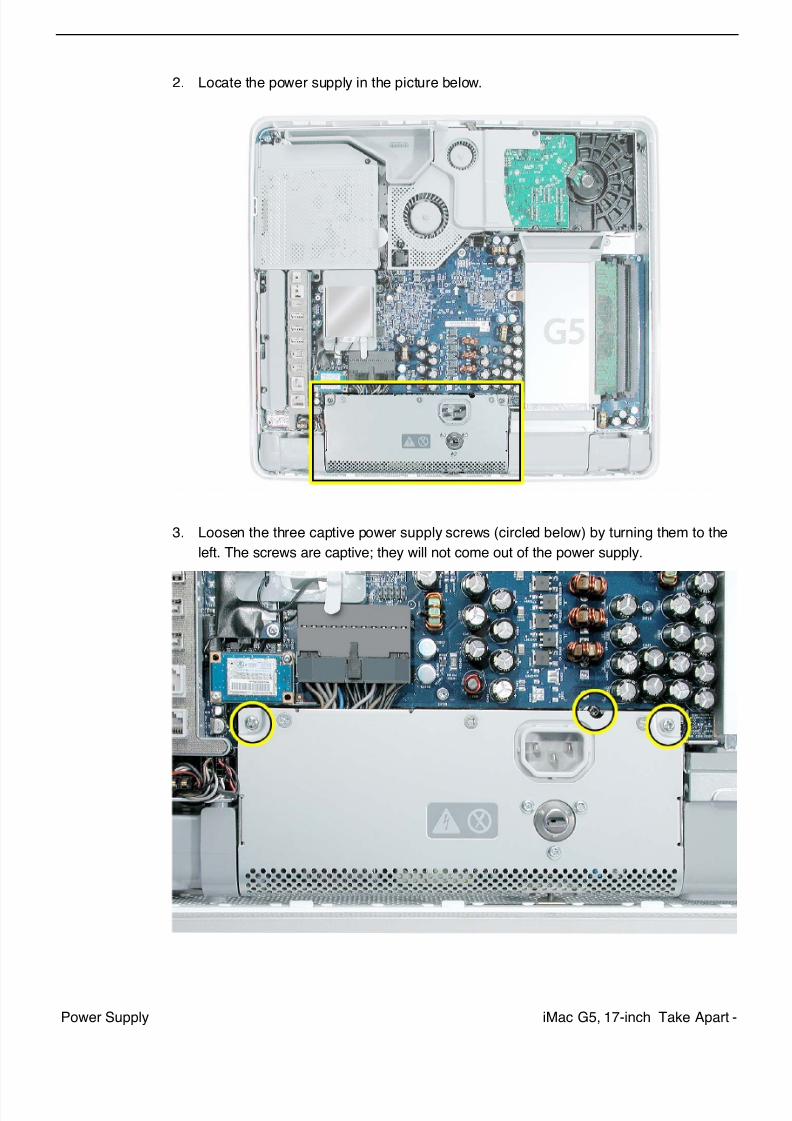
2. Locate the power supply in the picture below.
3. Loosen the three captive power supply screws (circled below) by turning them to the
left. The screws are captive; they will not come out of the power supply.

7/29/2019 Apple imacg5_17in
http://slidepdf.com/reader/full/apple-imacg517in 66/319
64 - iMac G5, 17-inch Take Apart Power Supply
4. Turn the middle case screw to the right about five revolutions. This releases a screw
clamp that holds the power supply in the display/bezel assembly.
5. Disconnect the power supply connector with a flat-blade screwdriver. Loosen the
connector enough so that you can remove it with your fingers.
7/29/2019 Apple imacg5_17in
http://slidepdf.com/reader/full/apple-imacg517in 67/319
iMac G5, 17-inch Take Apart -Power Supply
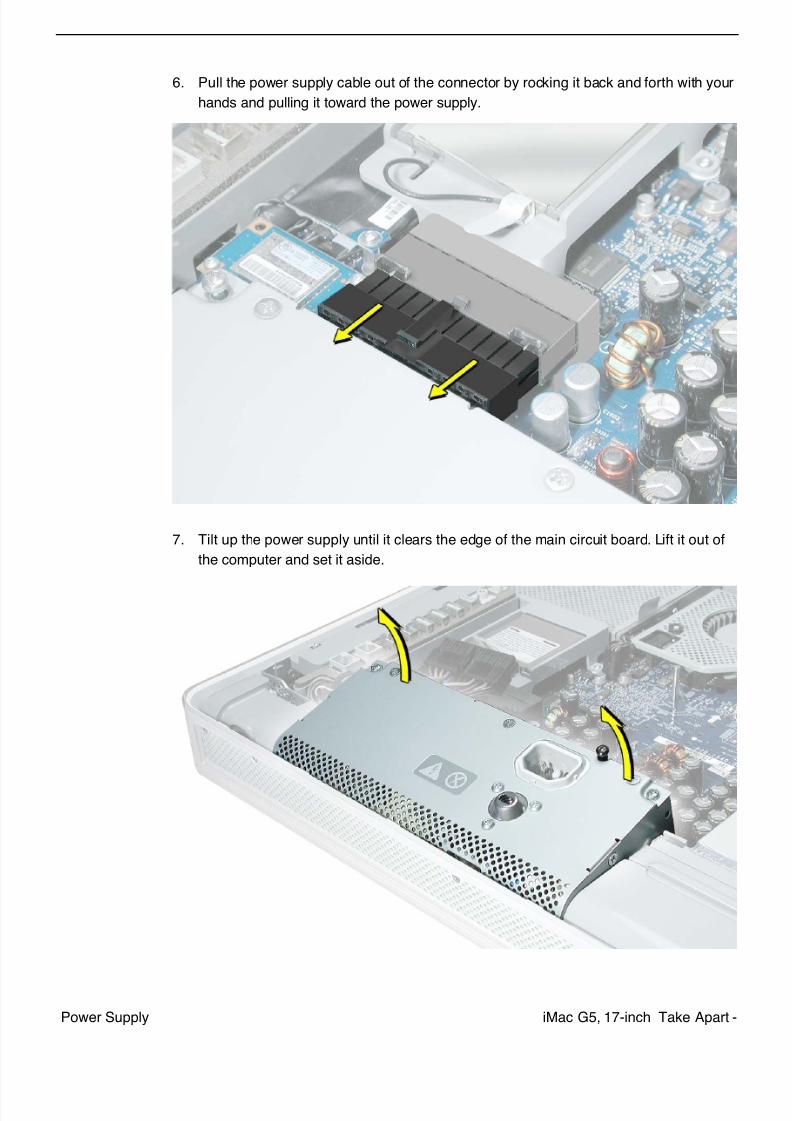
6. Pull the power supply cable out of the connector by rocking it back and forth with your
hands and pulling it toward the power supply.
7. Tilt up the power supply until it clears the edge of the main circuit board. Lift it out of
the computer and set it aside.
7/29/2019 Apple imacg5_17in
http://slidepdf.com/reader/full/apple-imacg517in 68/319
7/29/2019 Apple imacg5_17in
http://slidepdf.com/reader/full/apple-imacg517in 69/319
iMac G5, 17-inch Take Apart -Power Supply
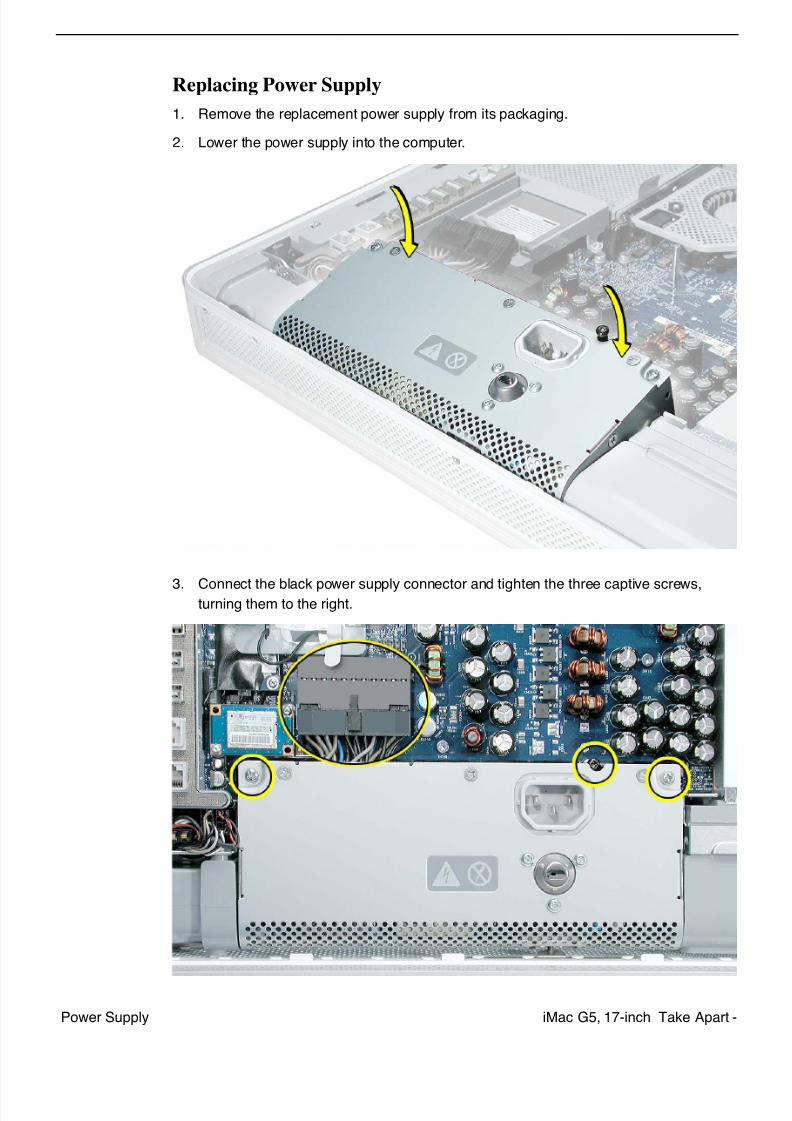
Replacing Power Supply
1. Remove the replacement power supply from its packaging.
2. Lower the power supply into the computer.
3. Connect the black power supply connector and tighten the three captive screws,turning them to the right.
7/29/2019 Apple imacg5_17in
http://slidepdf.com/reader/full/apple-imacg517in 70/319
68 - iMac G5, 17-inch Take Apart Power Supply
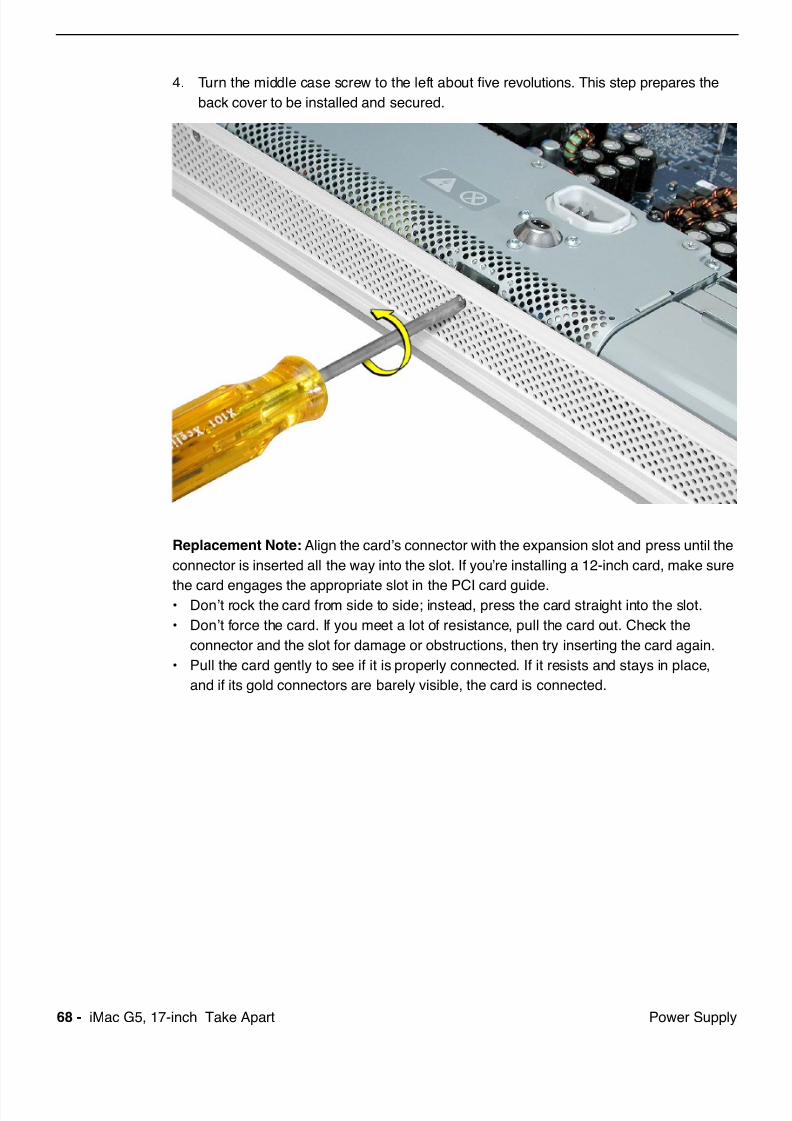
4. Turn the middle case screw to the left about five revolutions. This step prepares the
back cover to be installed and secured.
Replacement Note:
Align the card’s connector with the expansion slot and press until the
connector is inserted all the way into the slot. If you’re installing a 12-inch card, make sure
the card engages the appropriate slot in the PCI card guide.• Don’t rock the card from side to side; instead, press the card straight into the slot.
• Don’t force the card. If you meet a lot of resistance, pull the card out. Check the
connector and the slot for damage or obstructions, then try inserting the card again.
• Pull the card gently to see if it is properly connected. If it resists and stays in place,
and if its gold connectors are barely visible, the card is connected.
7/29/2019 Apple imacg5_17in
http://slidepdf.com/reader/full/apple-imacg517in 71/319
iMac G5, 17-inch Take Apart -AirPort Extreme Card
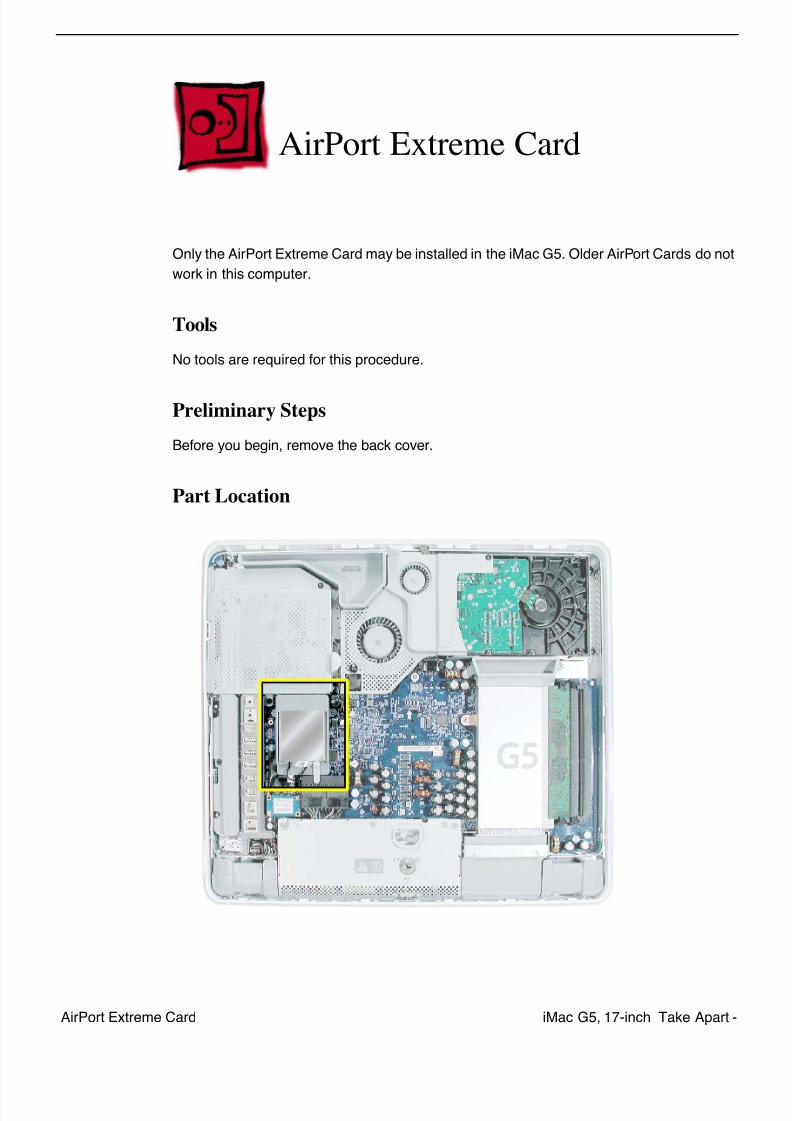
AirPort Extreme Card
Only the AirPort Extreme Card may be installed in the iMac G5. Older AirPort Cards do not
work in this computer.
Tools
No tools are required for this procedure.
Preliminary Steps
Before you begin, remove the back cover.
Part Location
7/29/2019 Apple imacg5_17in
http://slidepdf.com/reader/full/apple-imacg517in 72/319
7/29/2019 Apple imacg5_17in
http://slidepdf.com/reader/full/apple-imacg517in 73/319
iMac G5, 17-inch Take Apart -AirPort Extreme Card
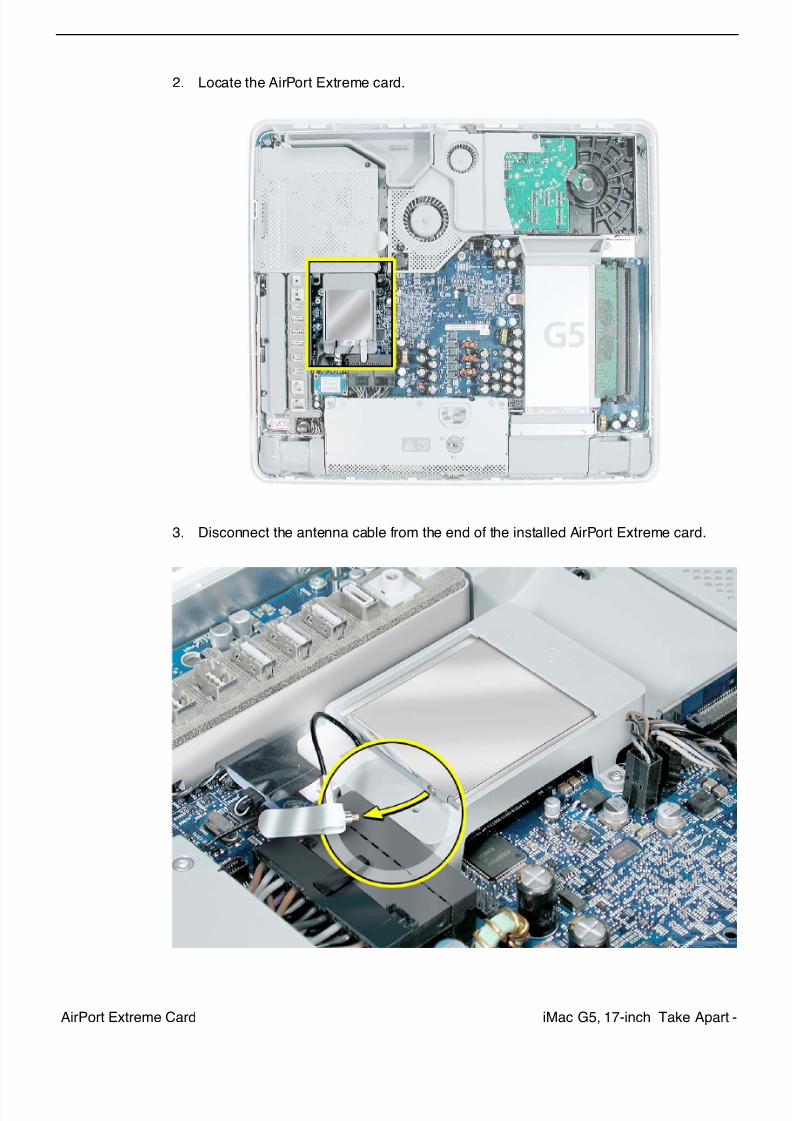
2. Locate the AirPort Extreme card.
3. Disconnect the antenna cable from the end of the installed AirPort Extreme card.
7/29/2019 Apple imacg5_17in
http://slidepdf.com/reader/full/apple-imacg517in 74/319
72 - iMac G5, 17-inch Take Apart AirPort Extreme Card
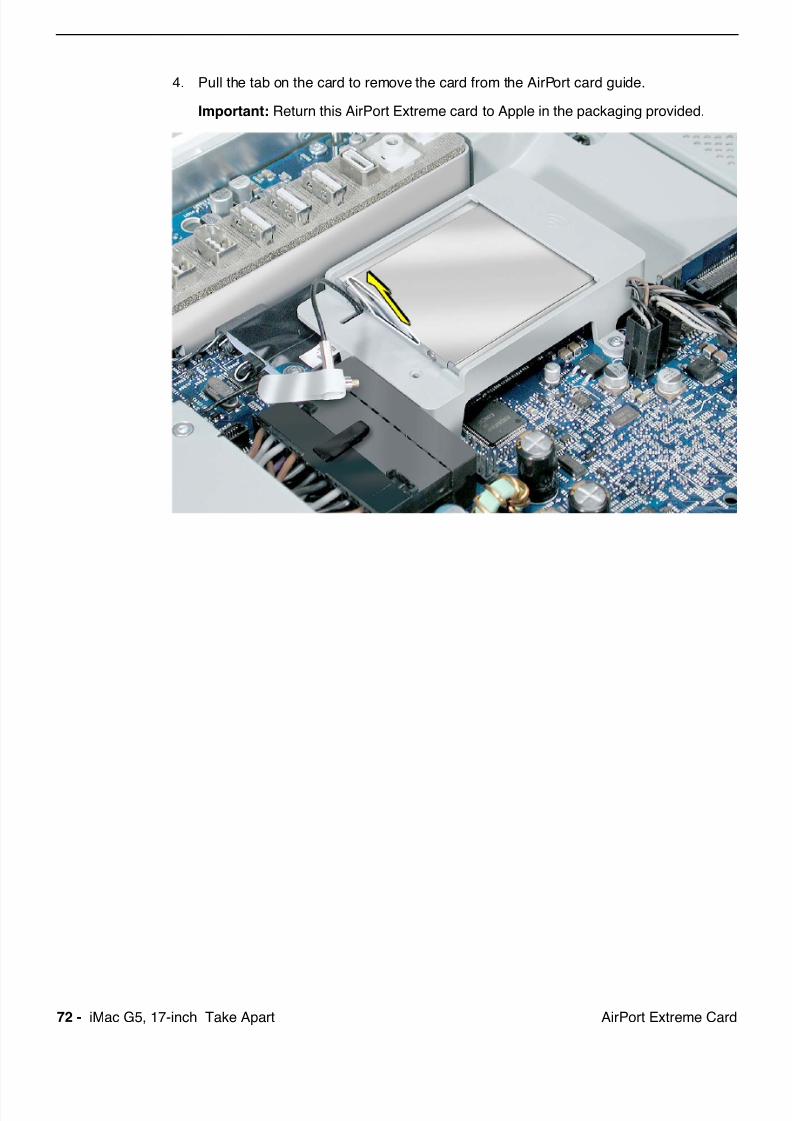
4. Pull the tab on the card to remove the card from the AirPort card guide.
Important:
Return this AirPort Extreme card to Apple in the packaging provided.

7/29/2019 Apple imacg5_17in
http://slidepdf.com/reader/full/apple-imacg517in 75/319
iMac G5, 17-inch Take Apart -AirPort Extreme Card
Replacing the AirPort Extreme Card
1. Remove the replacement AirPort Extreme card from its packaging.
2. Slide the AirPort Extreme card into the AirPort card guide channel until it clicks into
place.
3. Connect the antenna cable to the end of the installed AirPort Extreme card.
7/29/2019 Apple imacg5_17in
http://slidepdf.com/reader/full/apple-imacg517in 76/319
74 - iMac G5, 17-inch Take Apart AirPort Extreme Card
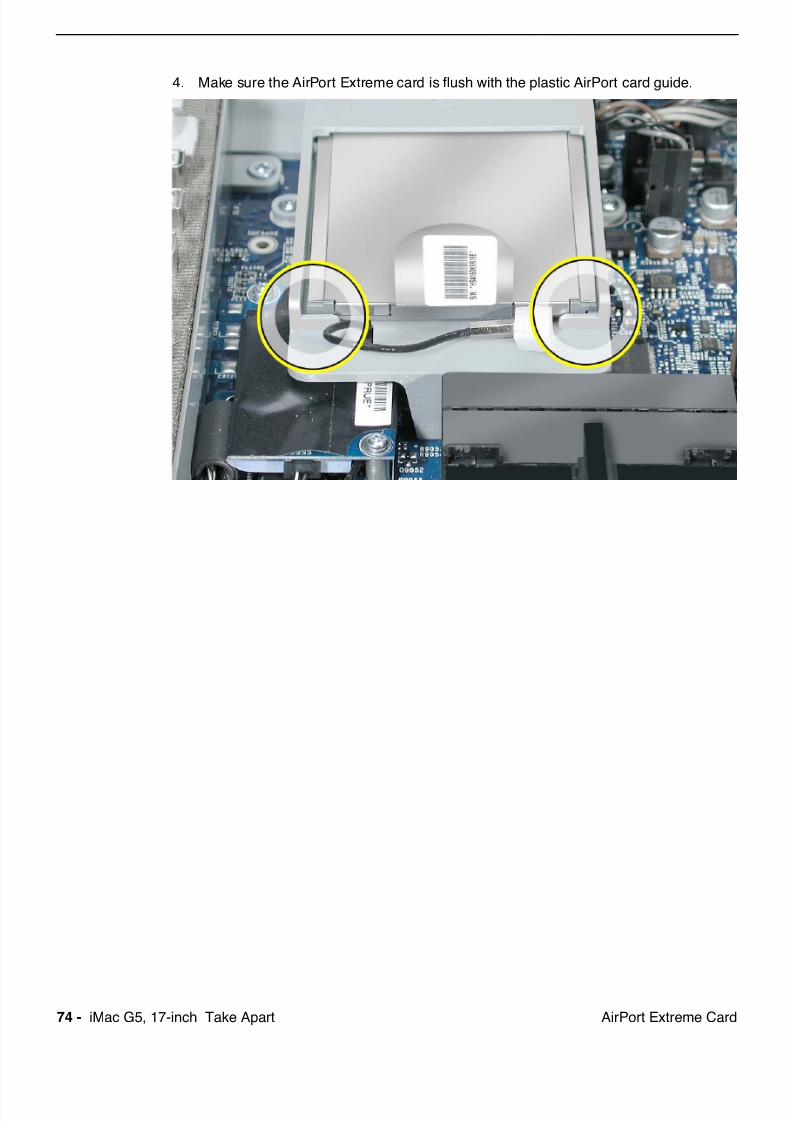
4. Make sure the AirPort Extreme card is flush with the plastic AirPort card guide.
7/29/2019 Apple imacg5_17in
http://slidepdf.com/reader/full/apple-imacg517in 77/319
iMac G5, 17-inch Take Apart -Battery
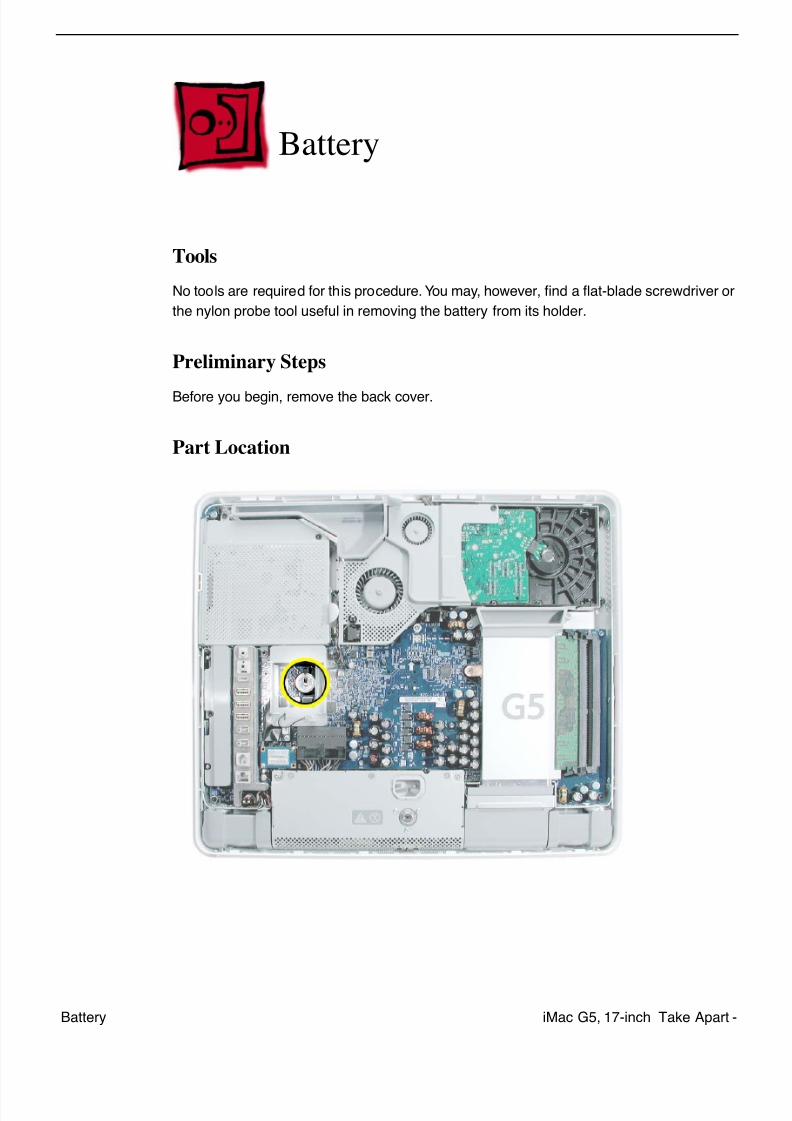
Battery
Tools
No tools are required for this procedure. You may, however, find a flat-blade screwdriver or
the nylon probe tool useful in removing the battery from its holder.
Preliminary Steps
Before you begin, remove the back cover.
Part Location
7/29/2019 Apple imacg5_17in
http://slidepdf.com/reader/full/apple-imacg517in 78/319
76 - iMac G5, 17-inch Take Apart Battery
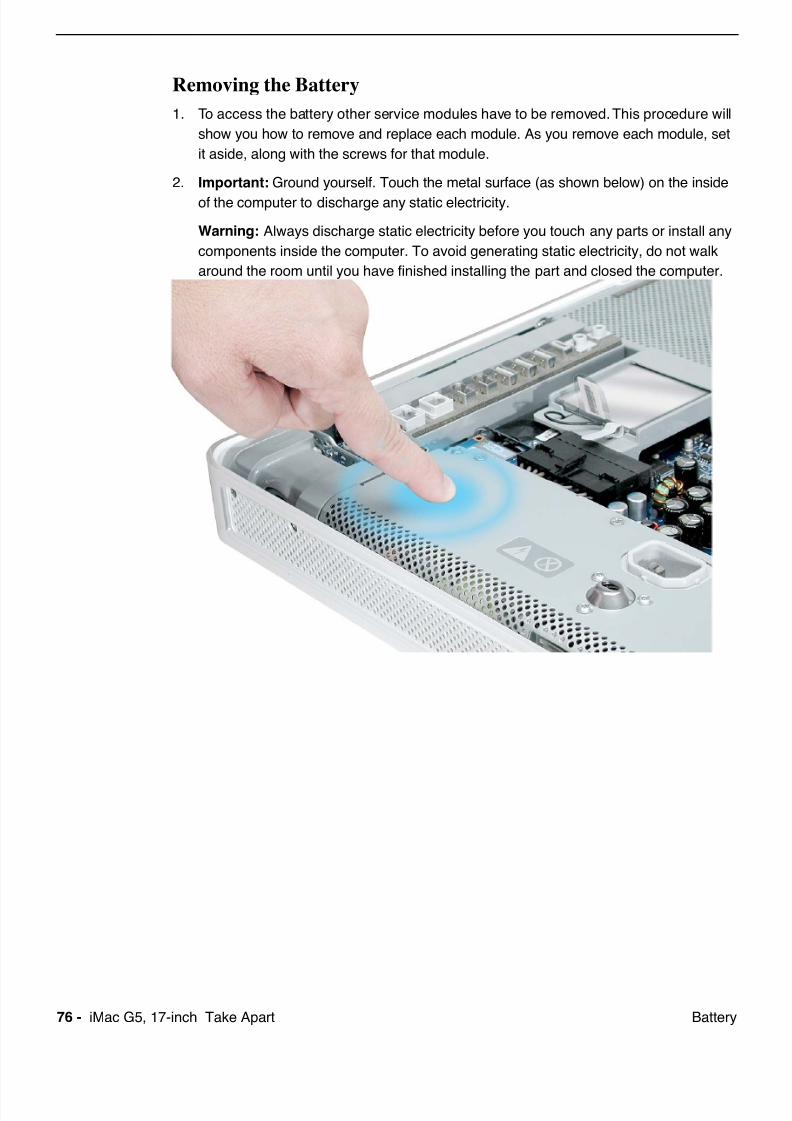
Removing the Battery
1. To access the battery other service modules have to be removed. This procedure will
show you how to remove and replace each module. As you remove each module, set
it aside, along with the screws for that module.
2.
Important:
Ground yourself. Touch the metal surface (as shown below) on the inside
of the computer to discharge any static electricity.
Warning:
Always discharge static electricity before you touch any parts or install any
components inside the computer. To avoid generating static electricity, do not walk
around the room until you have finished installing the part and closed the computer.
7/29/2019 Apple imacg5_17in
http://slidepdf.com/reader/full/apple-imacg517in 79/319
iMac G5, 17-inch Take Apart -Battery
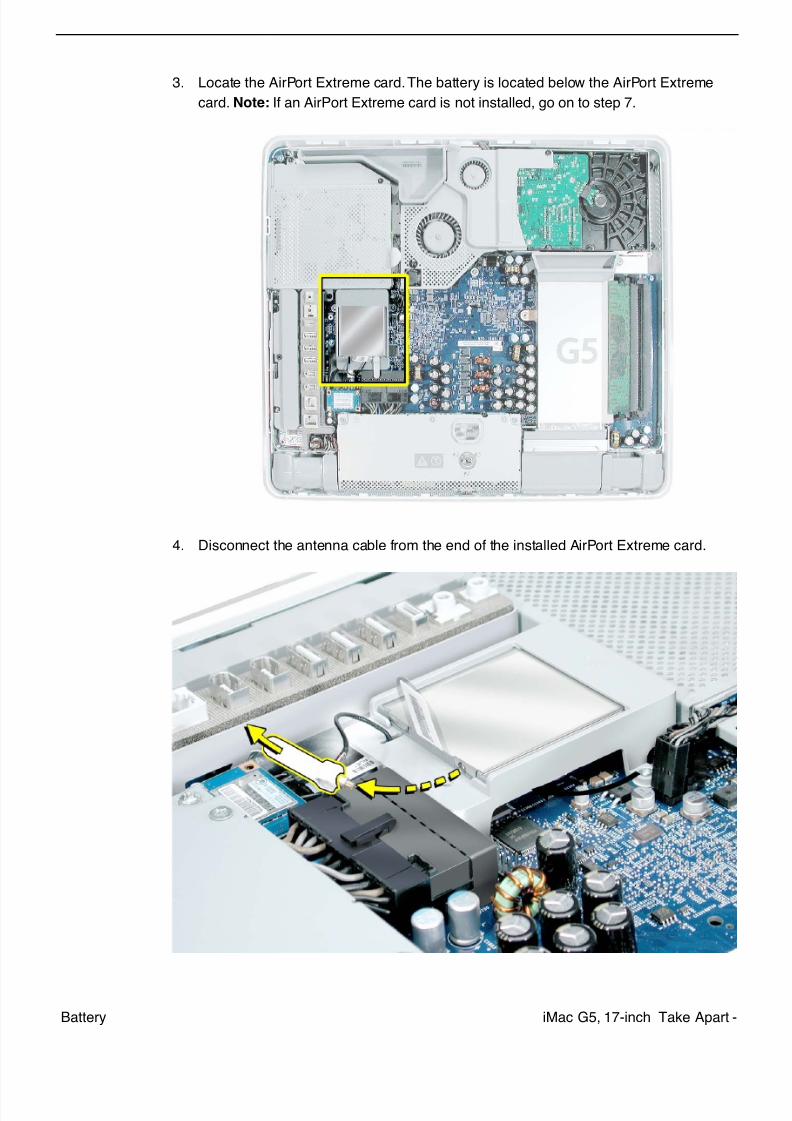
3. Locate the AirPort Extreme card. The battery is located below the AirPort Extreme
card. Note:
If an AirPort Extreme card is not installed, go on to step 7.
4. Disconnect the antenna cable from the end of the installed AirPort Extreme card.
7/29/2019 Apple imacg5_17in
http://slidepdf.com/reader/full/apple-imacg517in 80/319
78 - iMac G5, 17-inch Take Apart Battery
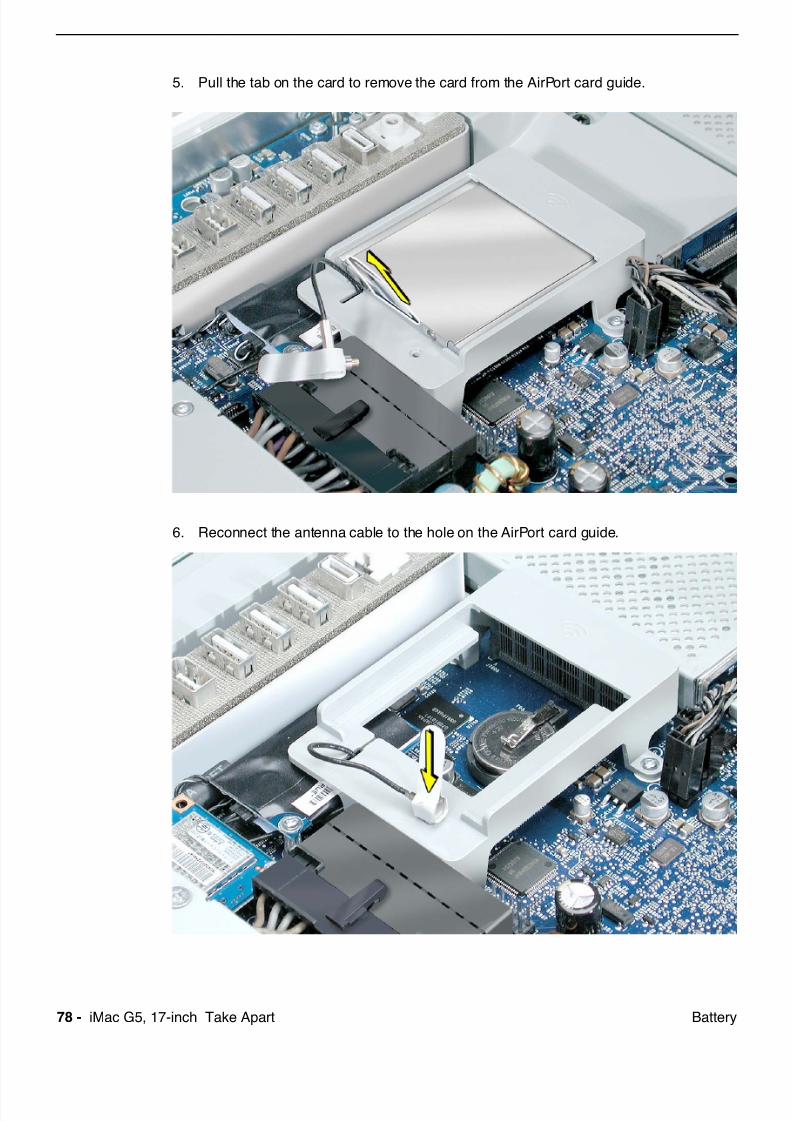
5. Pull the tab on the card to remove the card from the AirPort card guide.
6. Reconnect the antenna cable to the hole on the AirPort card guide.
7/29/2019 Apple imacg5_17in
http://slidepdf.com/reader/full/apple-imacg517in 81/319
iMac G5, 17-inch Take Apart -Battery
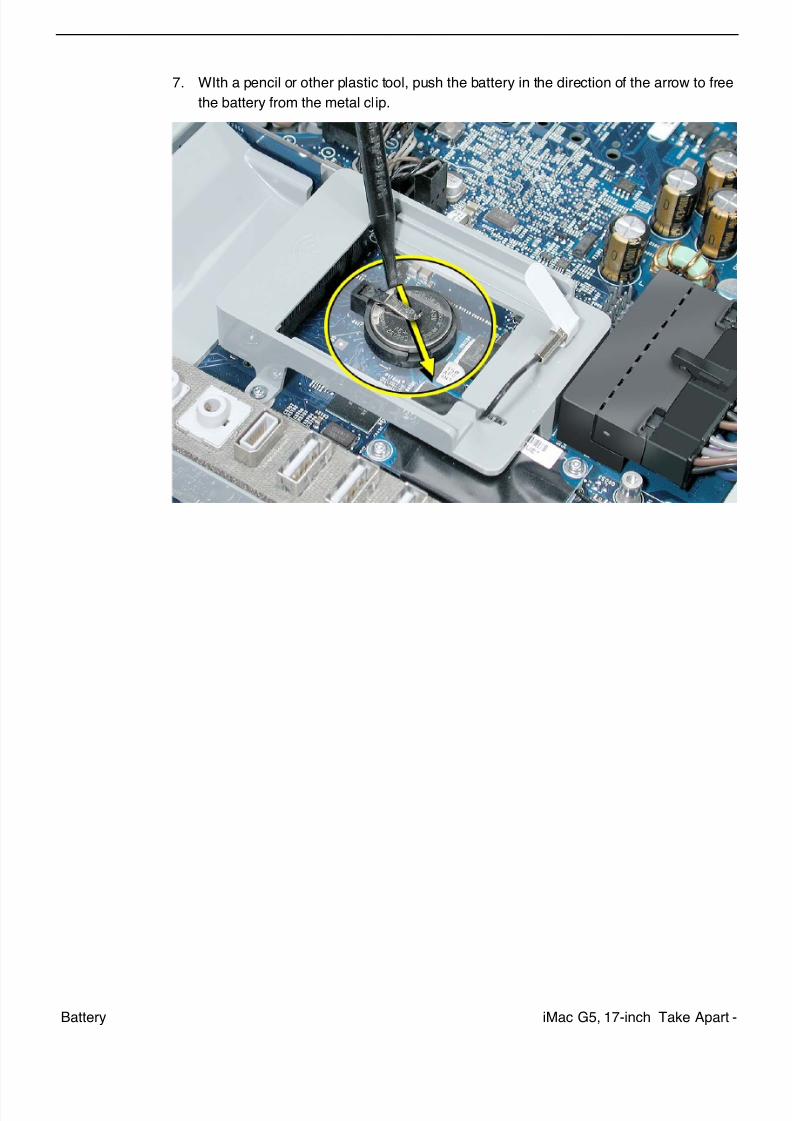
7. WIth a pencil or other plastic tool, push the battery in the direction of the arrow to free
the battery from the metal clip.
7/29/2019 Apple imacg5_17in
http://slidepdf.com/reader/full/apple-imacg517in 82/319
80 - iMac G5, 17-inch Take Apart Battery
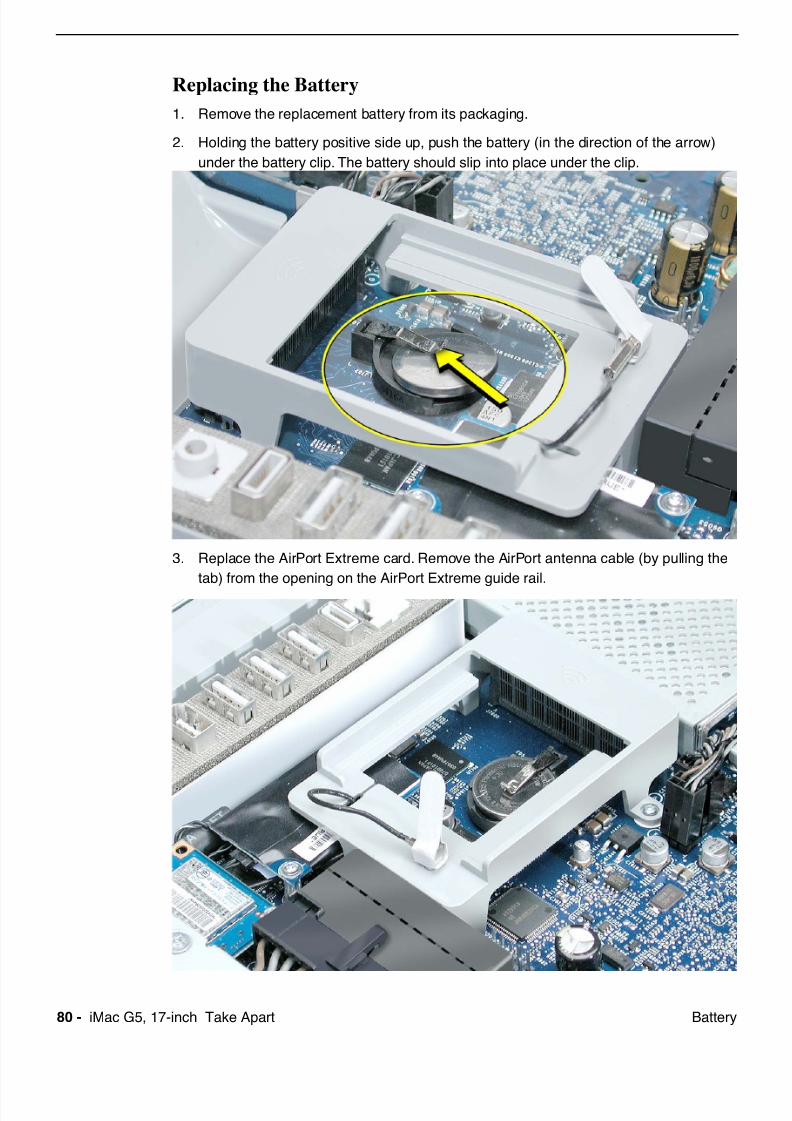
Replacing the Battery
1. Remove the replacement battery from its packaging.
2. Holding the battery positive side up, push the battery (in the direction of the arrow)
under the battery clip. The battery should slip into place under the clip.
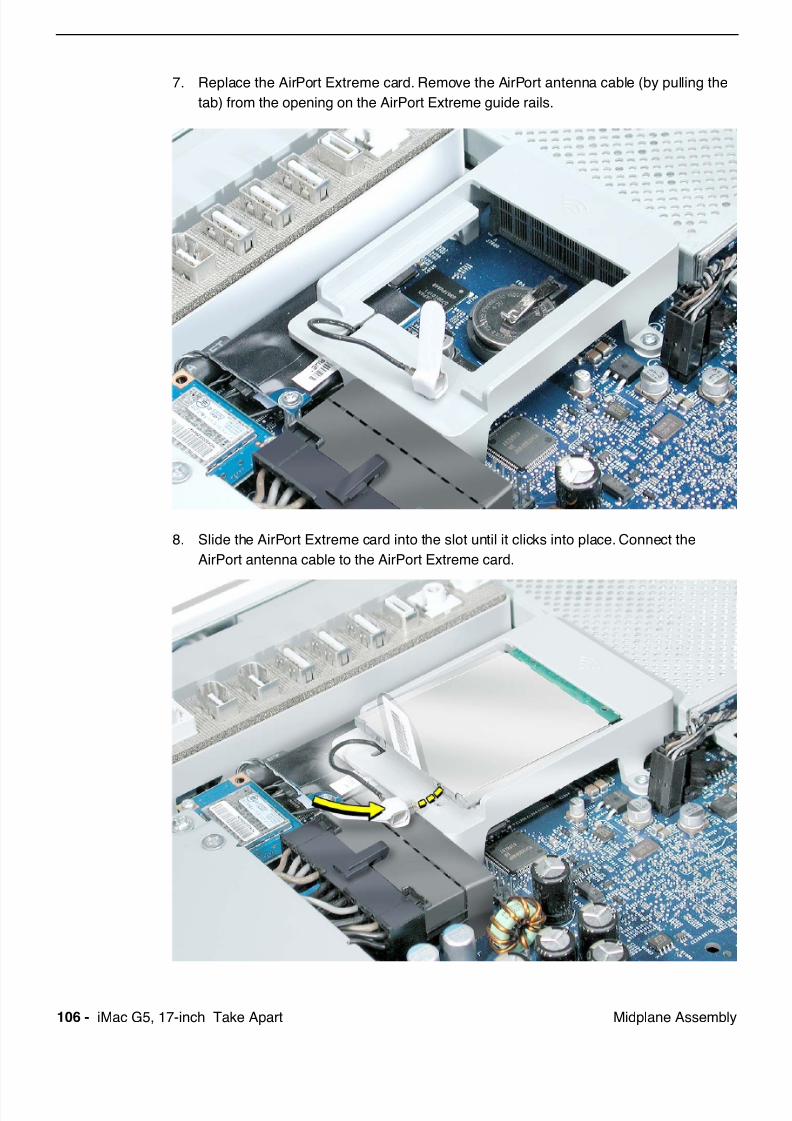
3. Replace the AirPort Extreme card. Remove the AirPort antenna cable (by pulling the
tab) from the opening on the AirPort Extreme guide rail.
7/29/2019 Apple imacg5_17in
http://slidepdf.com/reader/full/apple-imacg517in 83/319
iMac G5, 17-inch Take Apart -Battery
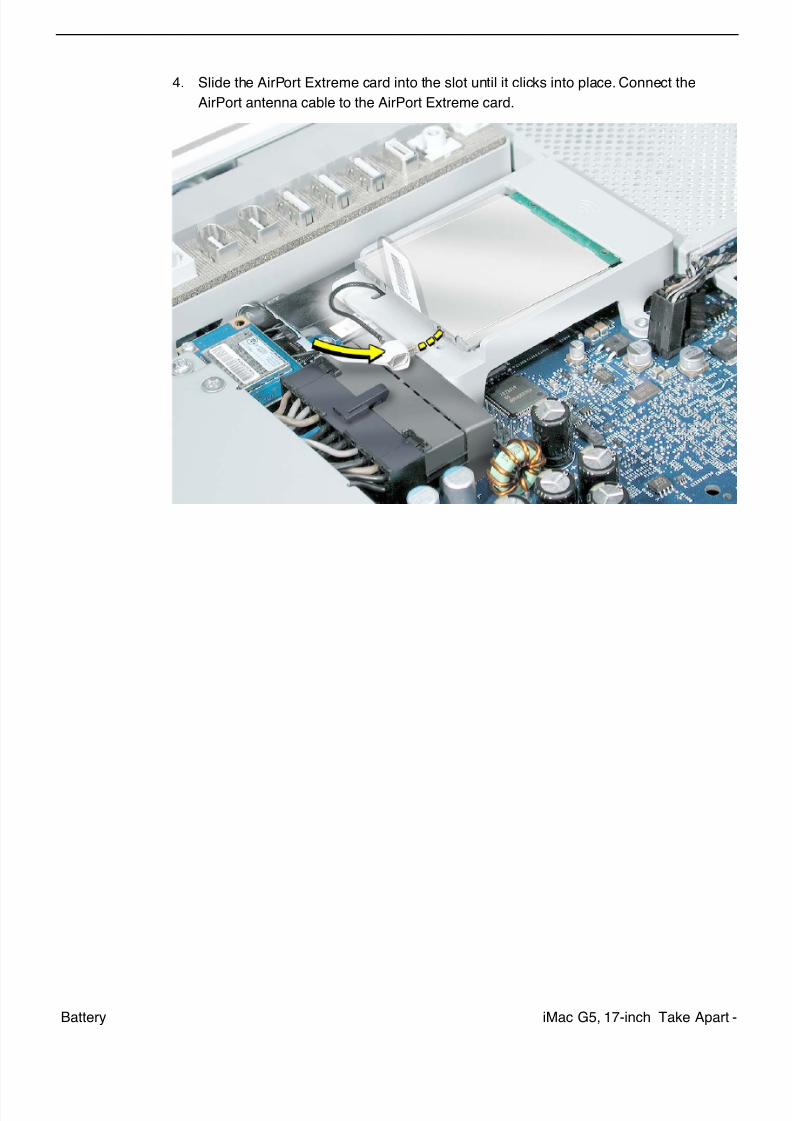
4. Slide the AirPort Extreme card into the slot until it clicks into place. Connect the
AirPort antenna cable to the AirPort Extreme card.
7/29/2019 Apple imacg5_17in
http://slidepdf.com/reader/full/apple-imacg517in 84/319
82 - iMac G5, 17-inch Take Apart Midplane Assembly
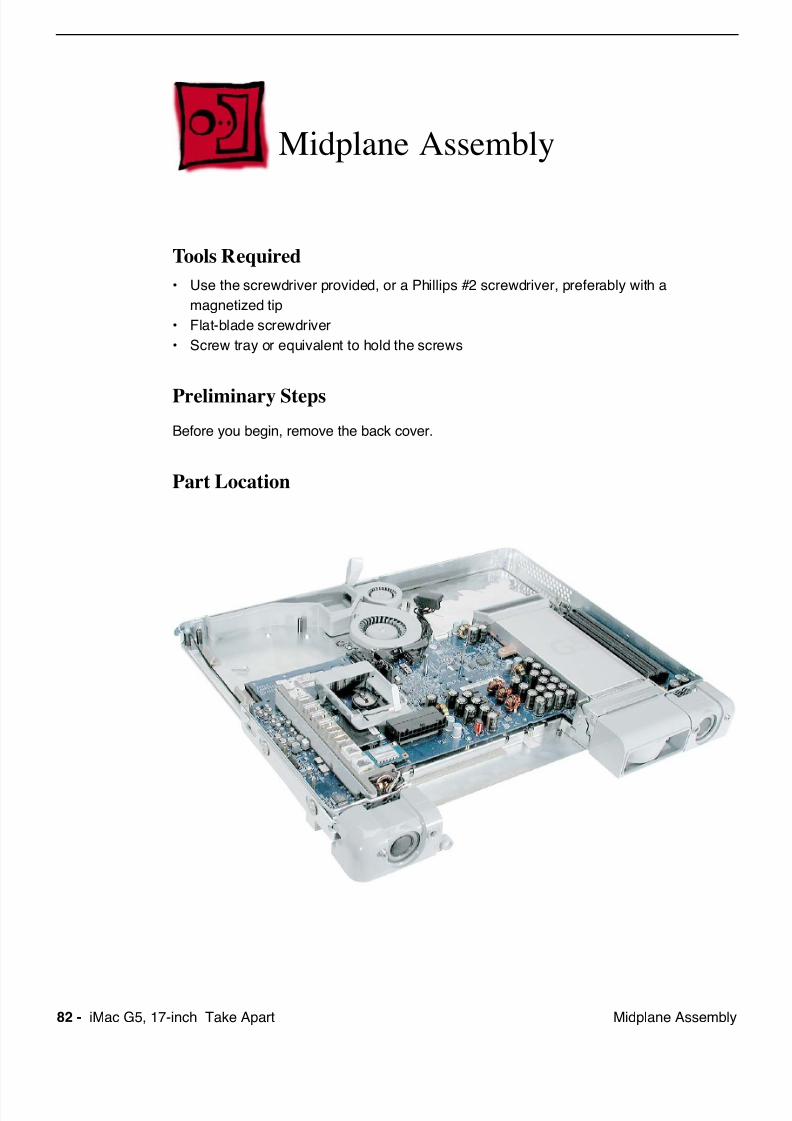
Midplane Assembly
Tools Required
• Use the screwdriver provided, or a Phillips #2 screwdriver, preferably with a
magnetized tip
• Flat-blade screwdriver
• Screw tray or equivalent to hold the screws
Preliminary Steps
Before you begin, remove the back cover.
Part Location

7/29/2019 Apple imacg5_17in
http://slidepdf.com/reader/full/apple-imacg517in 85/319
iMac G5, 17-inch Take Apart -Midplane Assembly
Removing the Midplane Assembly
1. To access the midplane assembly you must first remove other service modules. This
procedure will show you how to remove and replace these modules. Note: As you
remove each module, set it aside, along with the screws for that module.
2. Ground yourself. Touch the metal surface (as shown below) on the inside of the
computer to discharge any static electricity.
Warning: Always discharge static electricity before you touch any parts or
install any components inside the computer. To avoid generating static
electricity, do not walk around the room until you have finished installing the
part and closed the computer.
7/29/2019 Apple imacg5_17in
http://slidepdf.com/reader/full/apple-imacg517in 86/319

7/29/2019 Apple imacg5_17in
http://slidepdf.com/reader/full/apple-imacg517in 87/319iMac G5, 17-inch Take Apart -Midplane Assembly
5. Pull the optical drive tab straight up and then to the right. Set the optical drive aside.
6. Locate the inverter-to-display panel cable connector.
7/29/2019 Apple imacg5_17in
http://slidepdf.com/reader/full/apple-imacg517in 88/31986 - iMac G5, 17-inch Take Apart Midplane Assembly
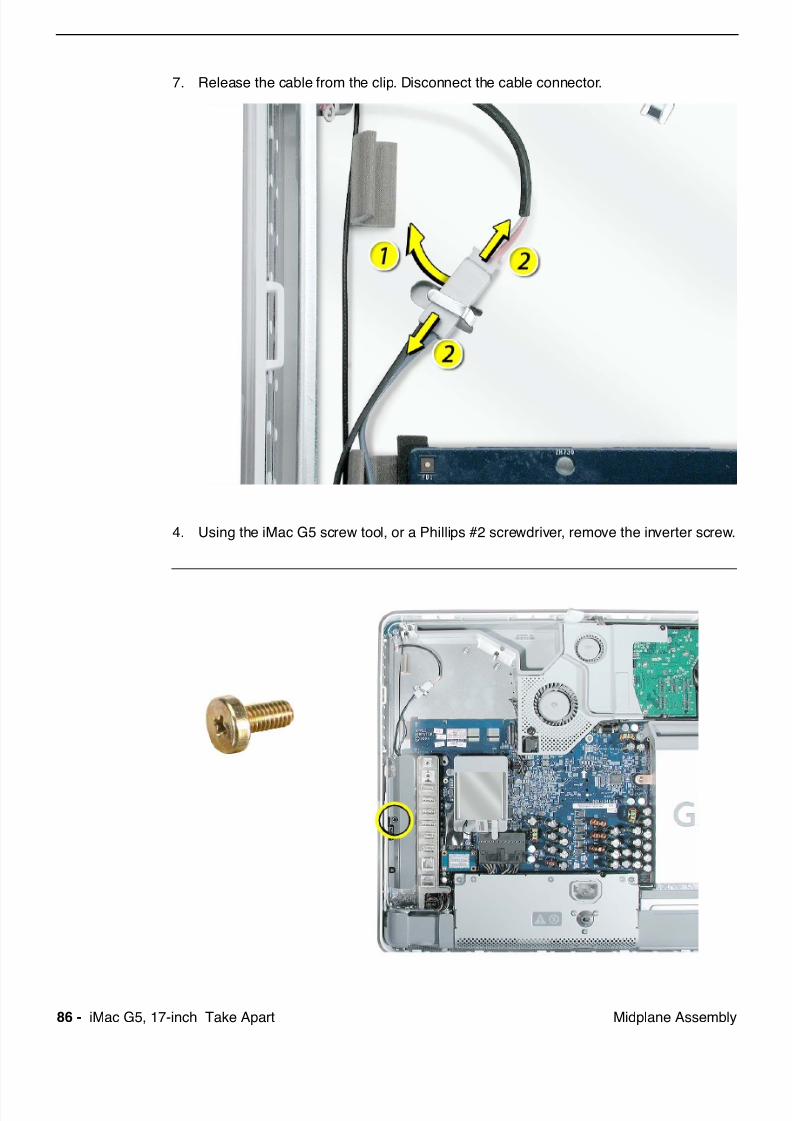
7. Release the cable from the clip. Disconnect the cable connector.
4. Using the iMac G5 screw tool, or a Phillips #2 screwdriver, remove the inverter screw.
7/29/2019 Apple imacg5_17in
http://slidepdf.com/reader/full/apple-imacg517in 89/319iMac G5, 17-inch Take Apart -Midplane Assembly
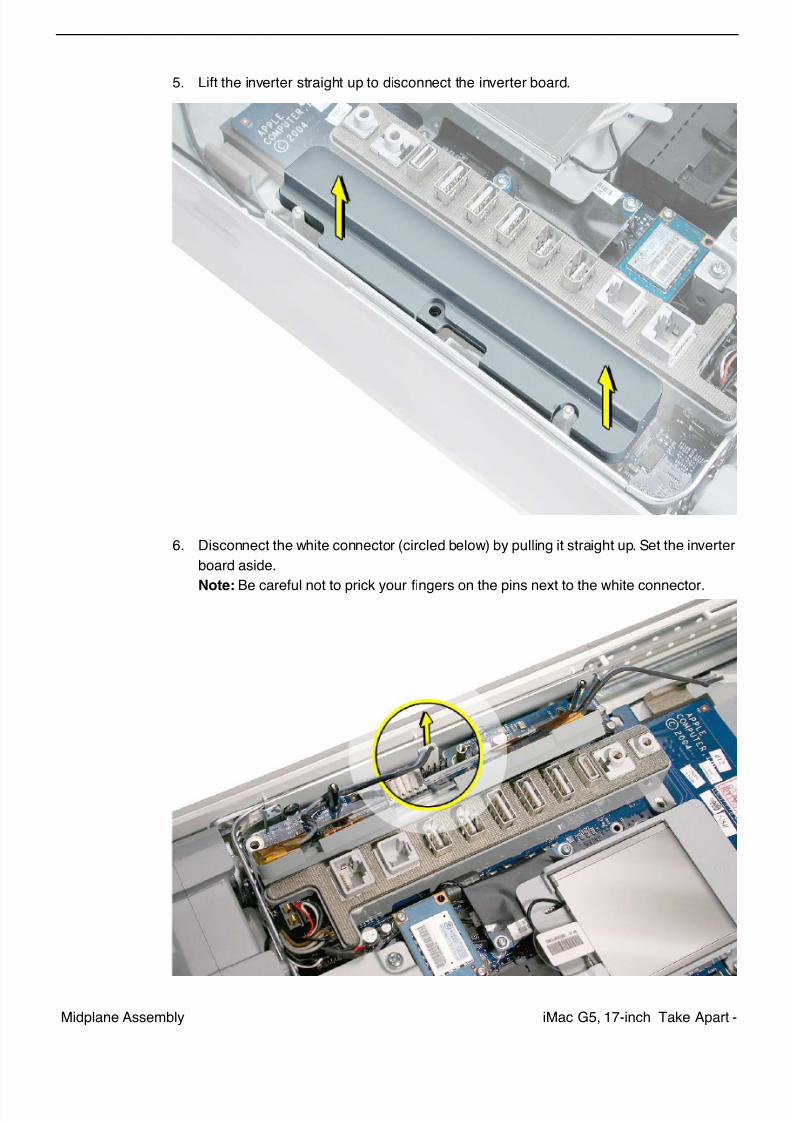
5. Lift the inverter straight up to disconnect the inverter board.
6. Disconnect the white connector (circled below) by pulling it straight up. Set the inverter
board aside.
Note: Be careful not to prick your fingers on the pins next to the white connector.
7/29/2019 Apple imacg5_17in
http://slidepdf.com/reader/full/apple-imacg517in 90/31988 - iMac G5, 17-inch Take Apart Midplane Assembly
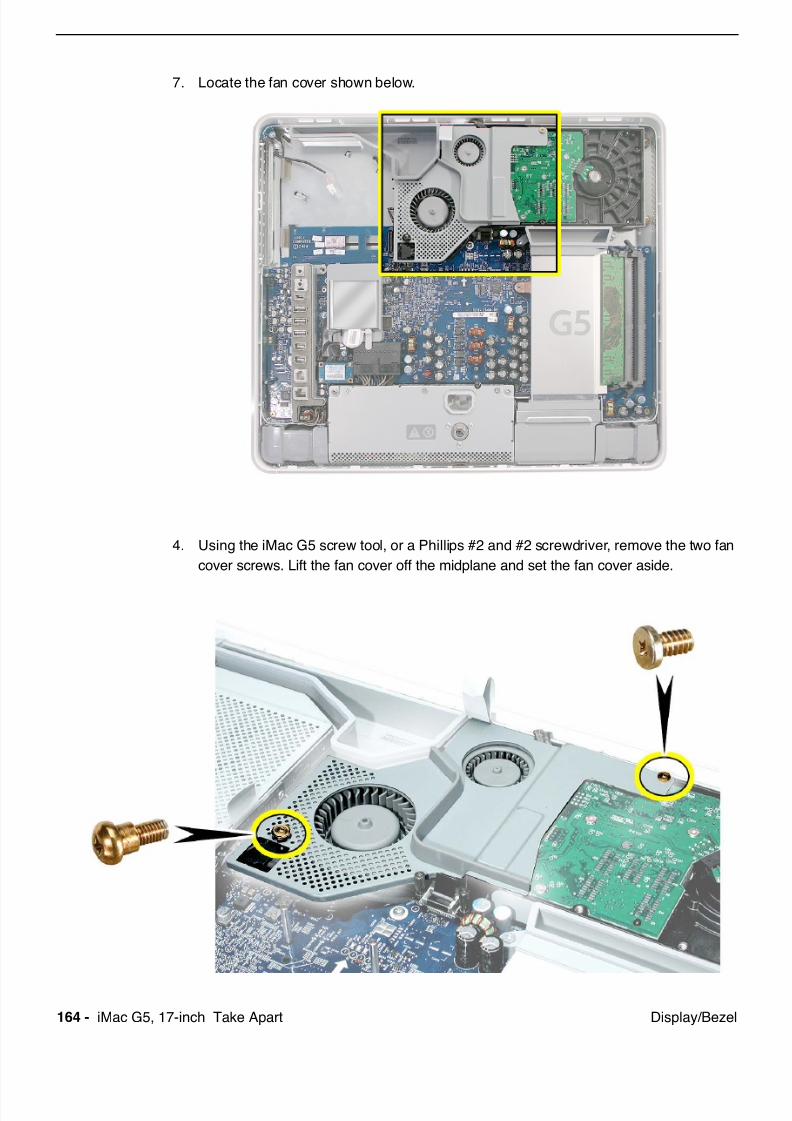
7. Locate the fan cover shown below.
4. Using the iMac G5 screw tool, or a Phillips #2 and #2 screwdriver, remove the two fan
cover screws. Lift the fan cover off the midplane and set the fan cover aside
.
7/29/2019 Apple imacg5_17in
http://slidepdf.com/reader/full/apple-imacg517in 91/319iMac G5, 17-inch Take Apart -Midplane Assembly
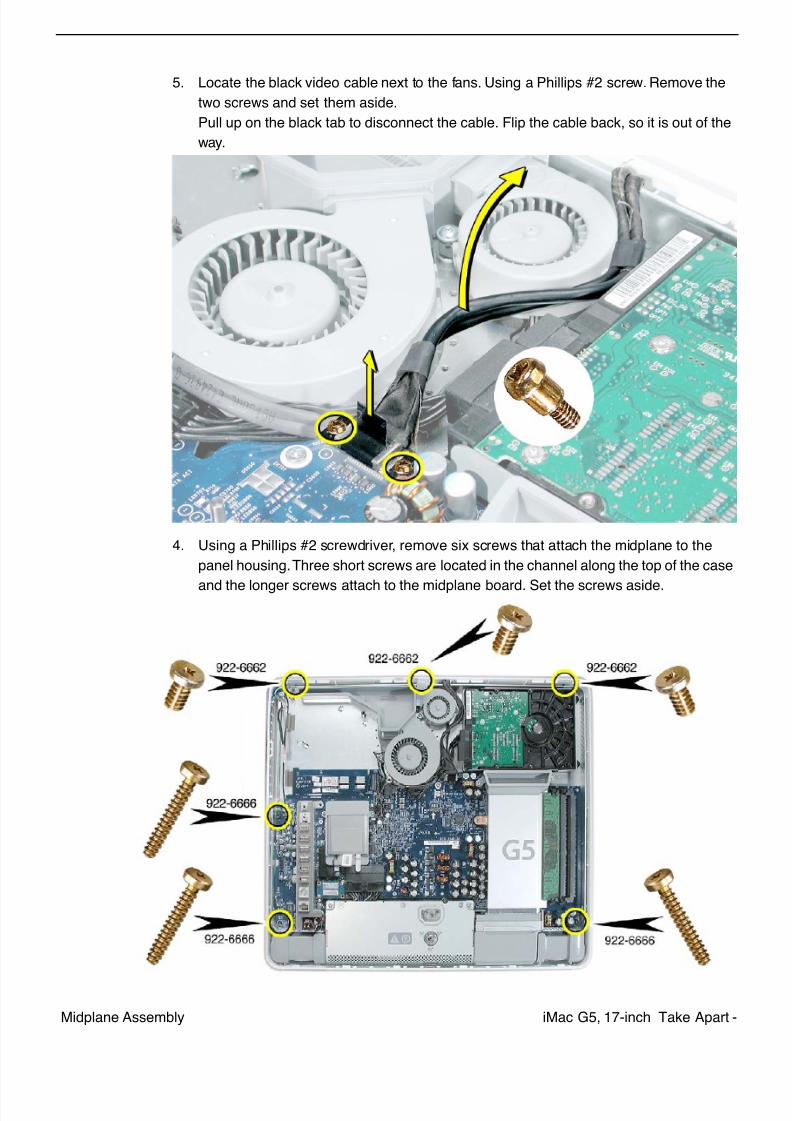
5. Locate the black video cable next to the fans. Using a Phillips #2 screw. Remove the
two screws and set them aside.
Pull up on the black tab to disconnect the cable. Flip the cable back, so it is out of the
way.
4. Using a Phillips #2 screwdriver, remove six screws that attach the midplane to the
panel housing. Three short screws are located in the channel along the top of the case
and the longer screws attach to the midplane board. Set the screws aside.
7/29/2019 Apple imacg5_17in
http://slidepdf.com/reader/full/apple-imacg517in 92/31990 - iMac G5, 17-inch Take Apart Midplane Assembly
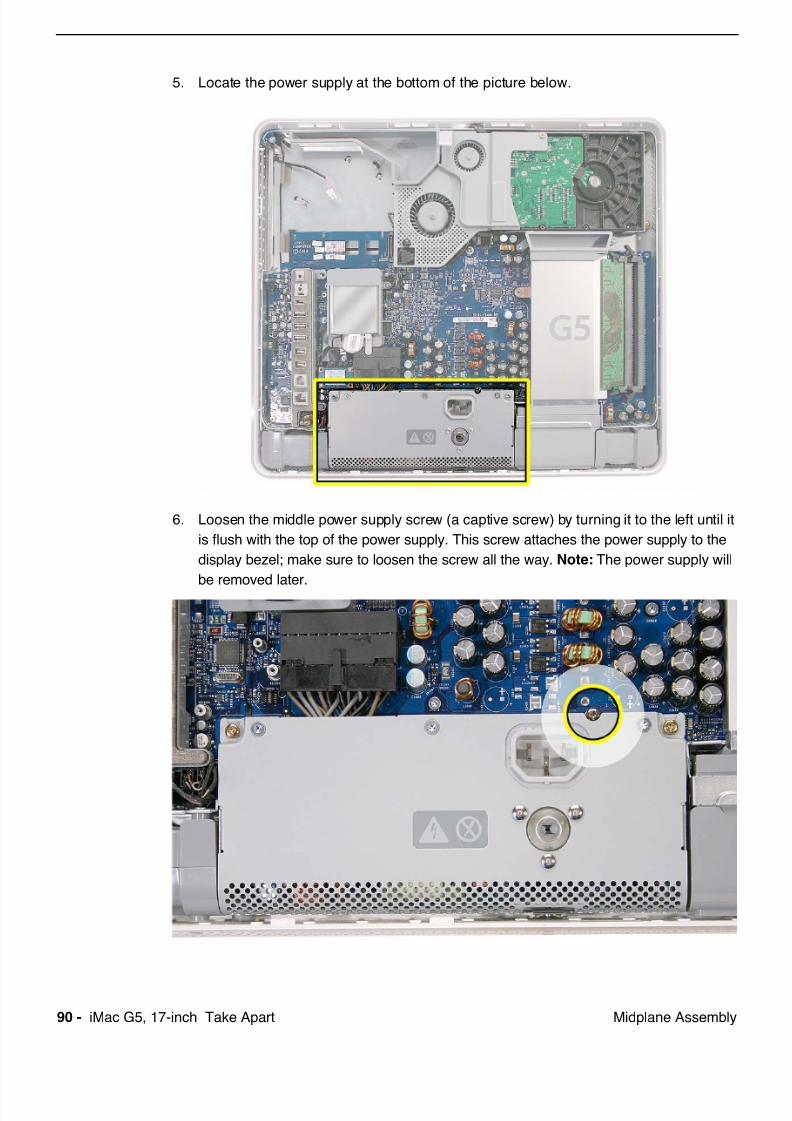
5. Locate the power supply at the bottom of the picture below.
6. Loosen the middle power supply screw (a captive screw) by turning it to the left until it
is flush with the top of the power supply. This screw attaches the power supply to the
display bezel; make sure to loosen the screw all the way. Note: The power supply will
be removed later.
7/29/2019 Apple imacg5_17in
http://slidepdf.com/reader/full/apple-imacg517in 93/319iMac G5, 17-inch Take Apart -Midplane Assembly
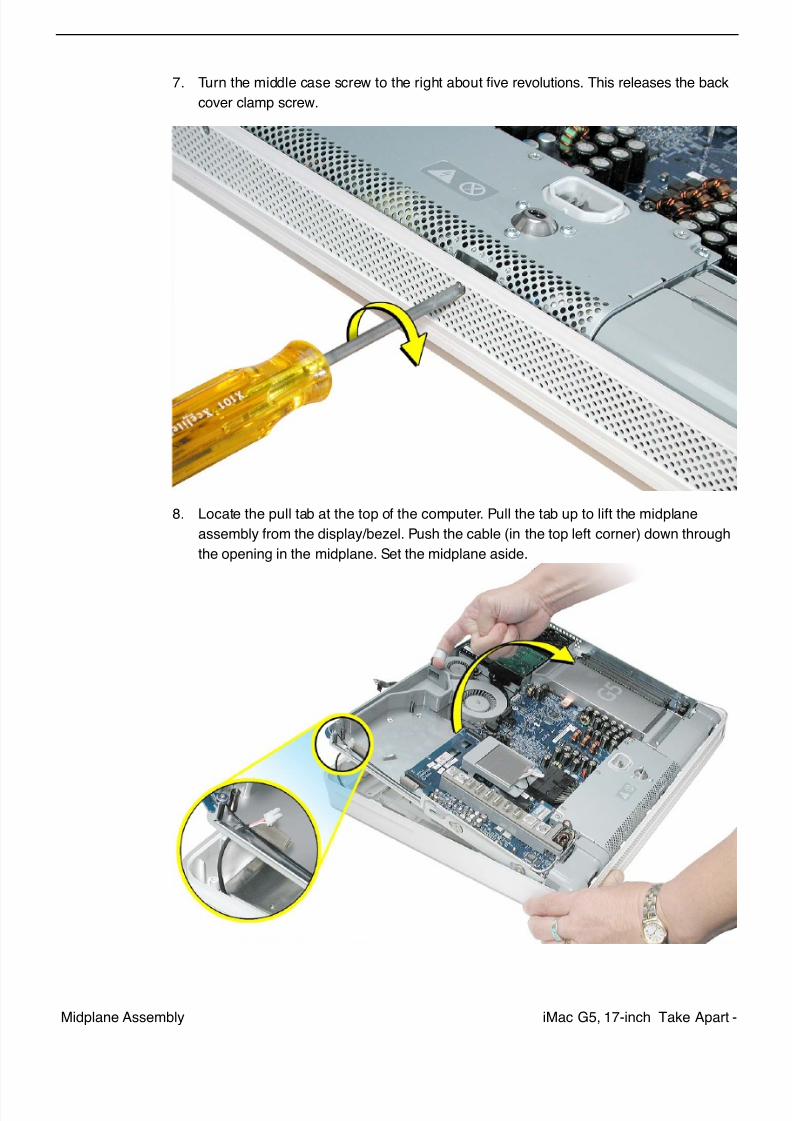
7. Turn the middle case screw to the right about five revolutions. This releases the back
cover clamp screw.
8. Locate the pull tab at the top of the computer. Pull the tab up to lift the midplane
assembly from the display/bezel. Push the cable (in the top left corner) down through
the opening in the midplane. Set the midplane aside.
7/29/2019 Apple imacg5_17in
http://slidepdf.com/reader/full/apple-imacg517in 94/31992 - iMac G5, 17-inch Take Apart Midplane Assembly
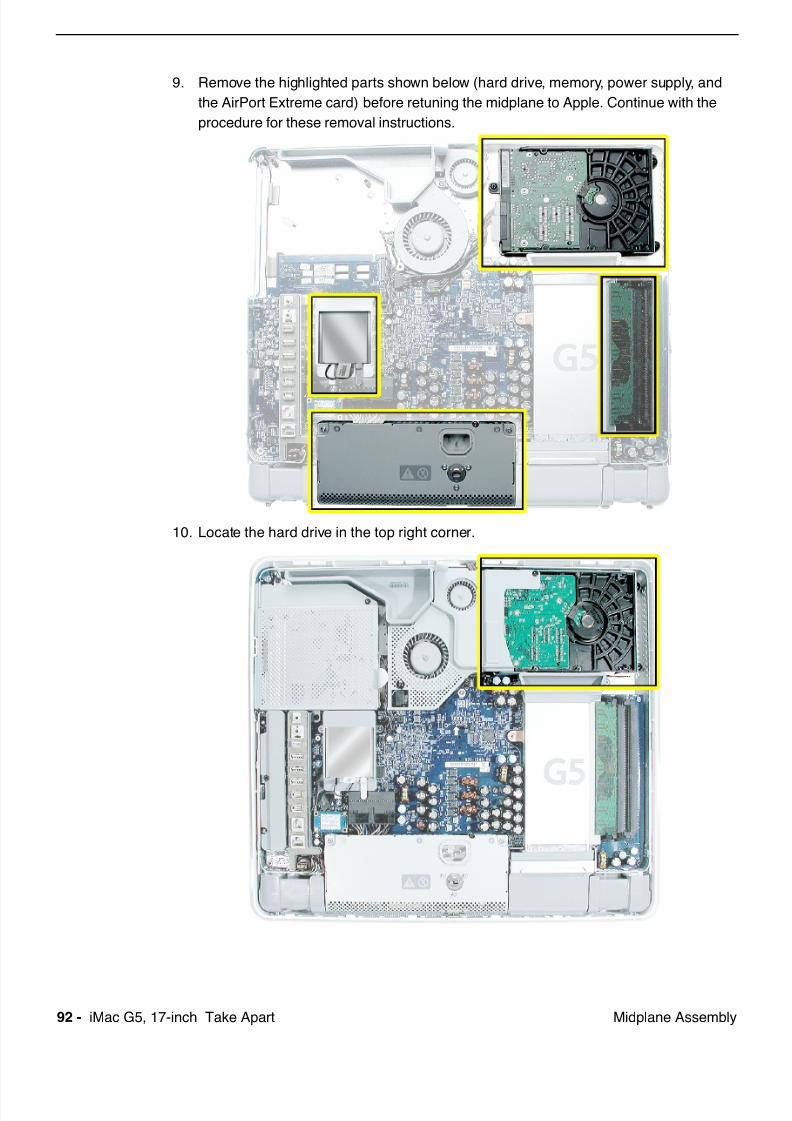
9. Remove the highlighted parts shown below (hard drive, memory, power supply, and
the AirPort Extreme card) before retuning the midplane to Apple. Continue with the
procedure for these removal instructions.
10. Locate the hard drive in the top right corner.
7/29/2019 Apple imacg5_17in
http://slidepdf.com/reader/full/apple-imacg517in 95/319iMac G5, 17-inch Take Apart -Midplane Assembly
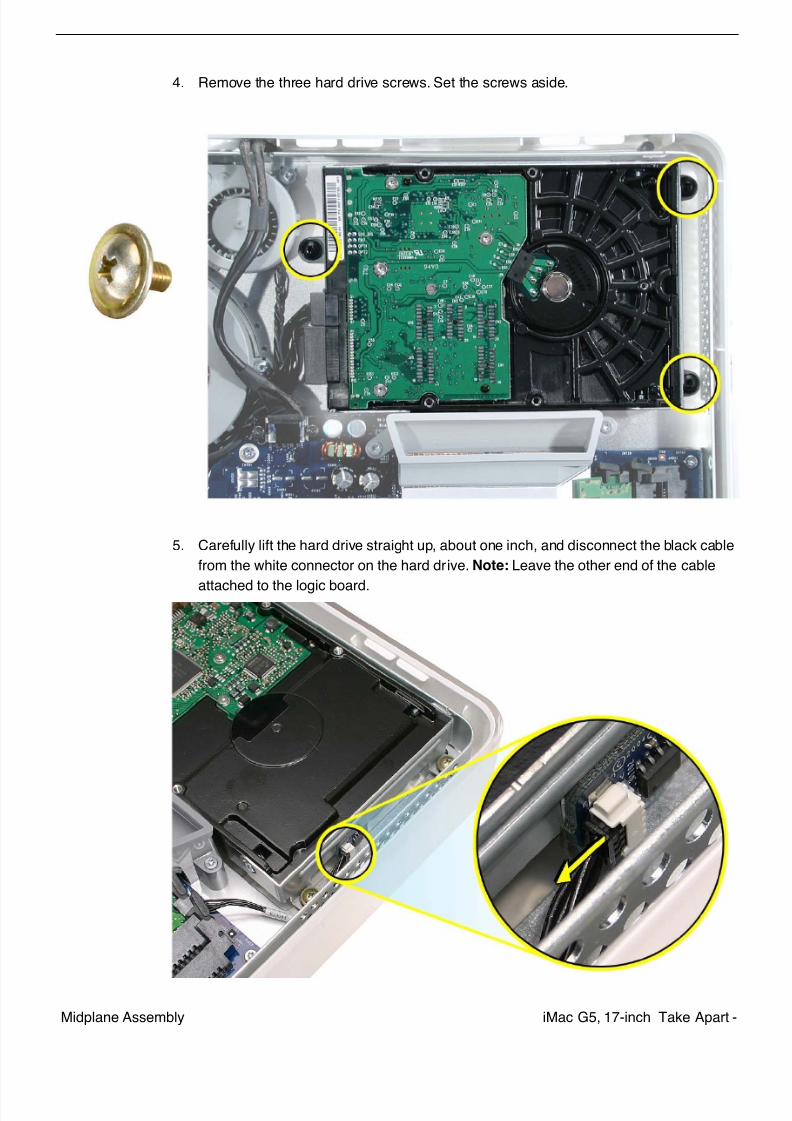
4. Remove the three hard drive screws. Set the screws aside.
5. Carefully lift the hard drive straight up, about one inch, and disconnect the black cable
from the white connector on the hard drive. Note: Leave the other end of the cable
attached to the logic board.
7/29/2019 Apple imacg5_17in
http://slidepdf.com/reader/full/apple-imacg517in 96/31994 - iMac G5, 17-inch Take Apart Midplane Assembly
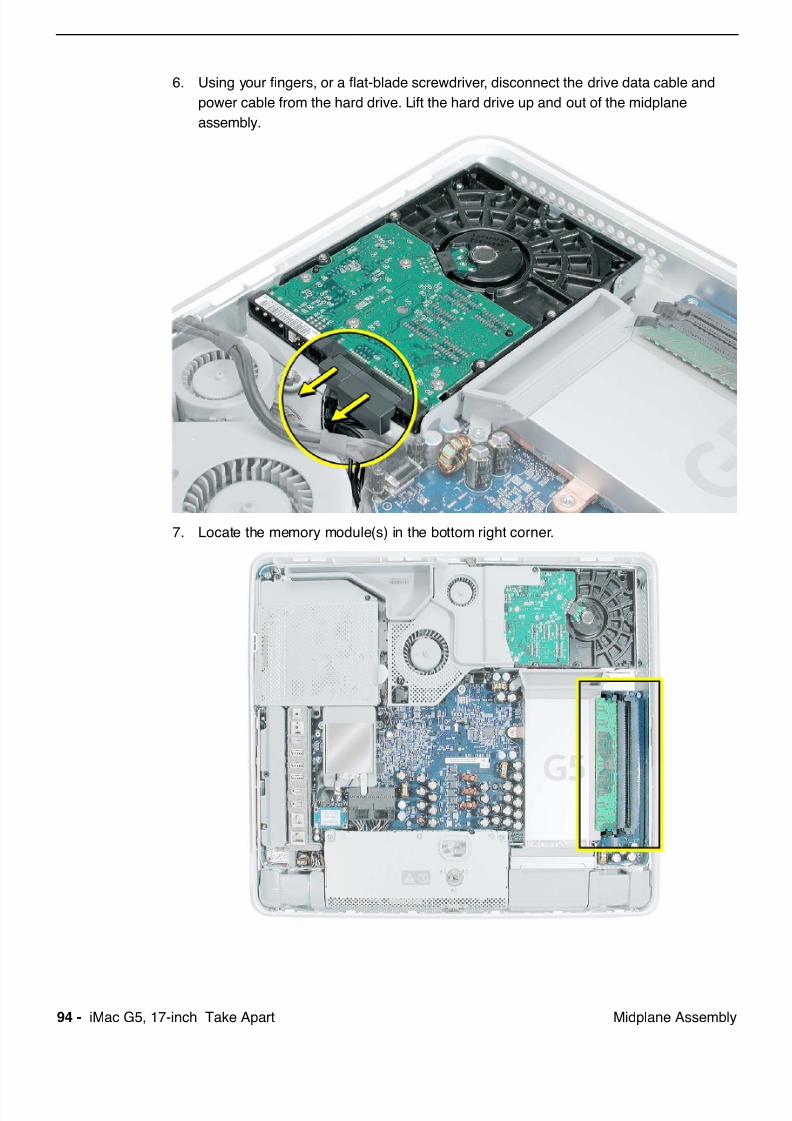
6. Using your fingers, or a flat-blade screwdriver, disconnect the drive data cable and
power cable from the hard drive. Lift the hard drive up and out of the midplane
assembly.
7. Locate the memory module(s) in the bottom right corner.
7/29/2019 Apple imacg5_17in
http://slidepdf.com/reader/full/apple-imacg517in 97/319iMac G5, 17-inch Take Apart -Midplane Assembly
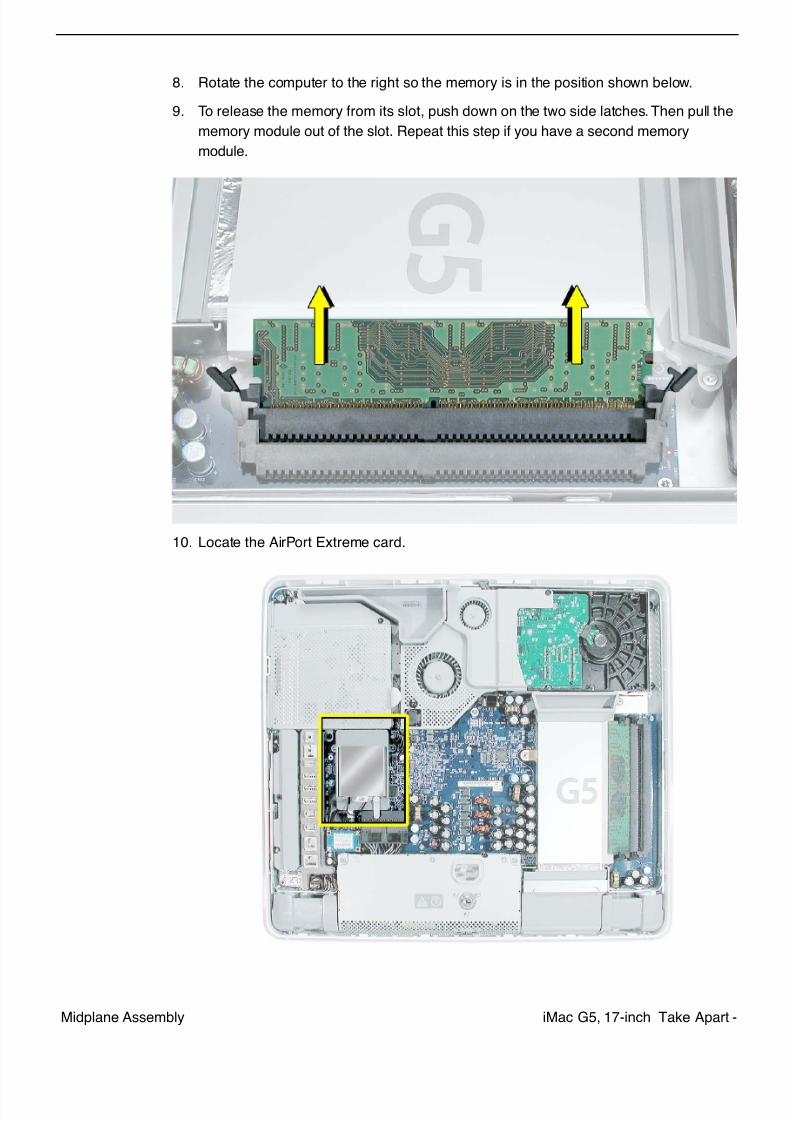
8. Rotate the computer to the right so the memory is in the position shown below.
9. To release the memory from its slot, push down on the two side latches. Then pull the
memory module out of the slot. Repeat this step if you have a second memory
module.
10. Locate the AirPort Extreme card.
7/29/2019 Apple imacg5_17in
http://slidepdf.com/reader/full/apple-imacg517in 98/31996 - iMac G5, 17-inch Take Apart Midplane Assembly
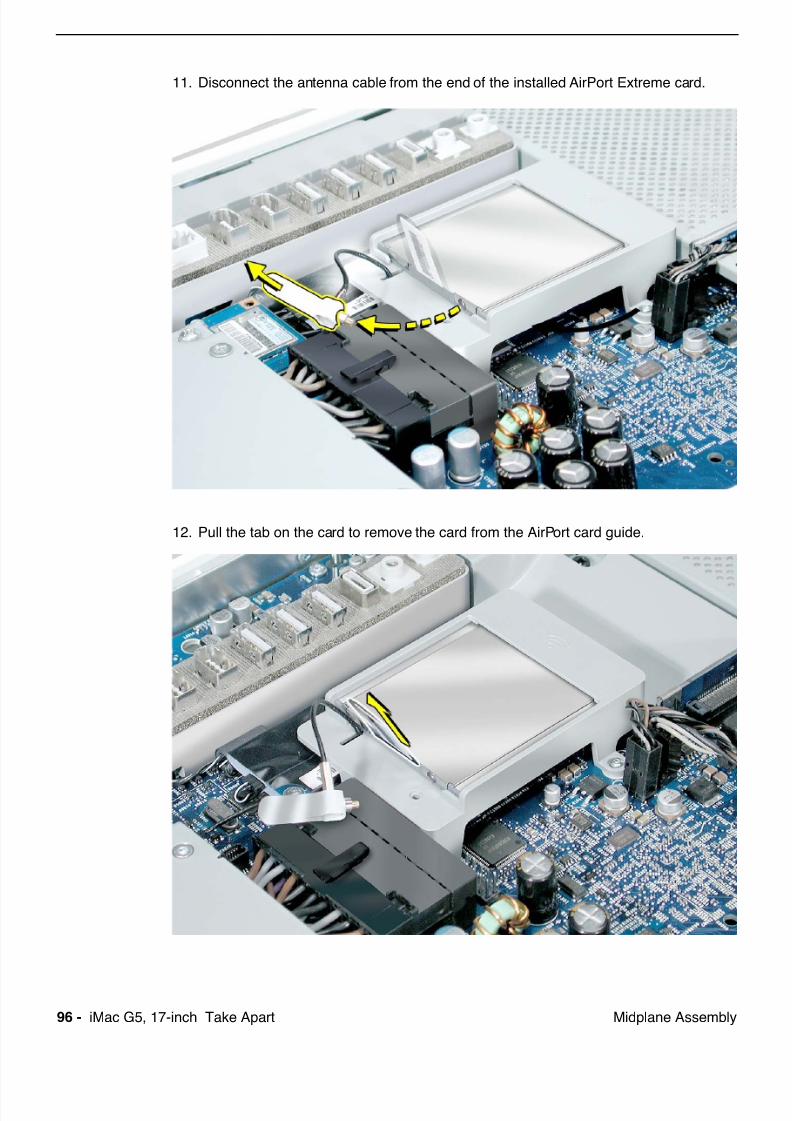
11. Disconnect the antenna cable from the end of the installed AirPort Extreme card.
12. Pull the tab on the card to remove the card from the AirPort card guide.
7/29/2019 Apple imacg5_17in
http://slidepdf.com/reader/full/apple-imacg517in 99/319iMac G5, 17-inch Take Apart -Midplane Assembly
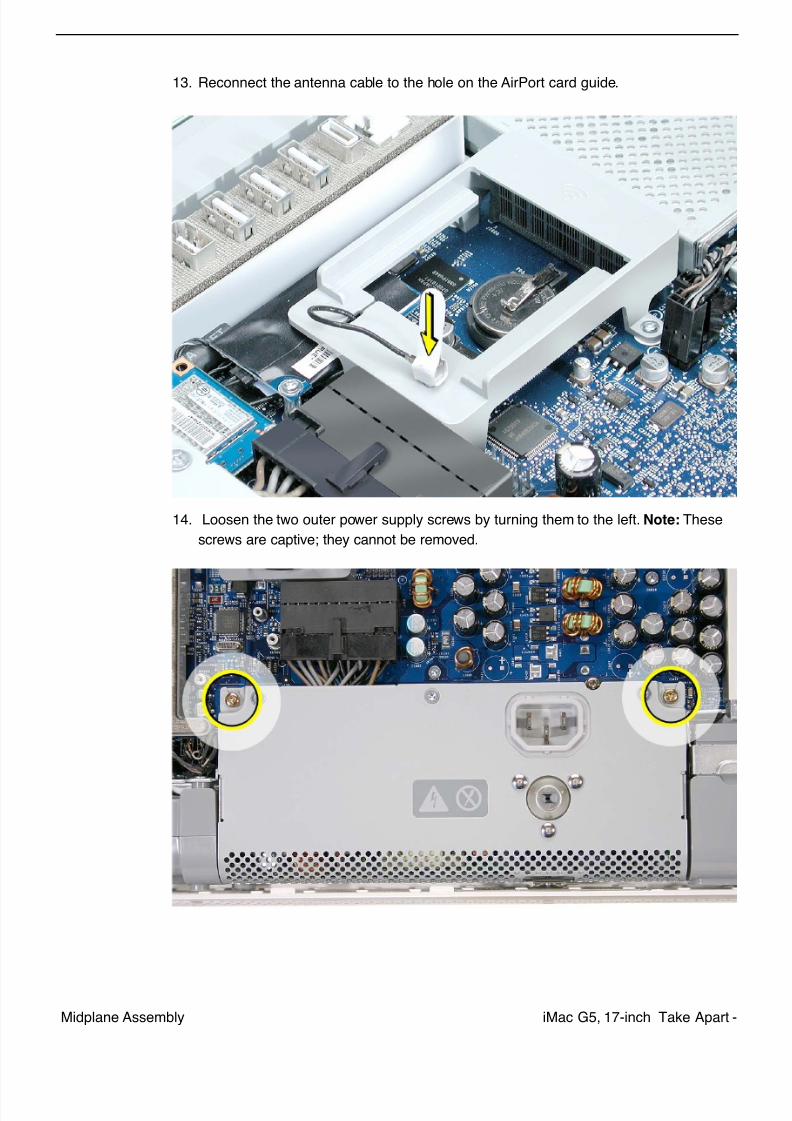
13. Reconnect the antenna cable to the hole on the AirPort card guide.
14. Loosen the two outer power supply screws by turning them to the left. Note: These
screws are captive; they cannot be removed.
7/29/2019 Apple imacg5_17in
http://slidepdf.com/reader/full/apple-imacg517in 100/31998 - iMac G5, 17-inch Take Apart Midplane Assembly
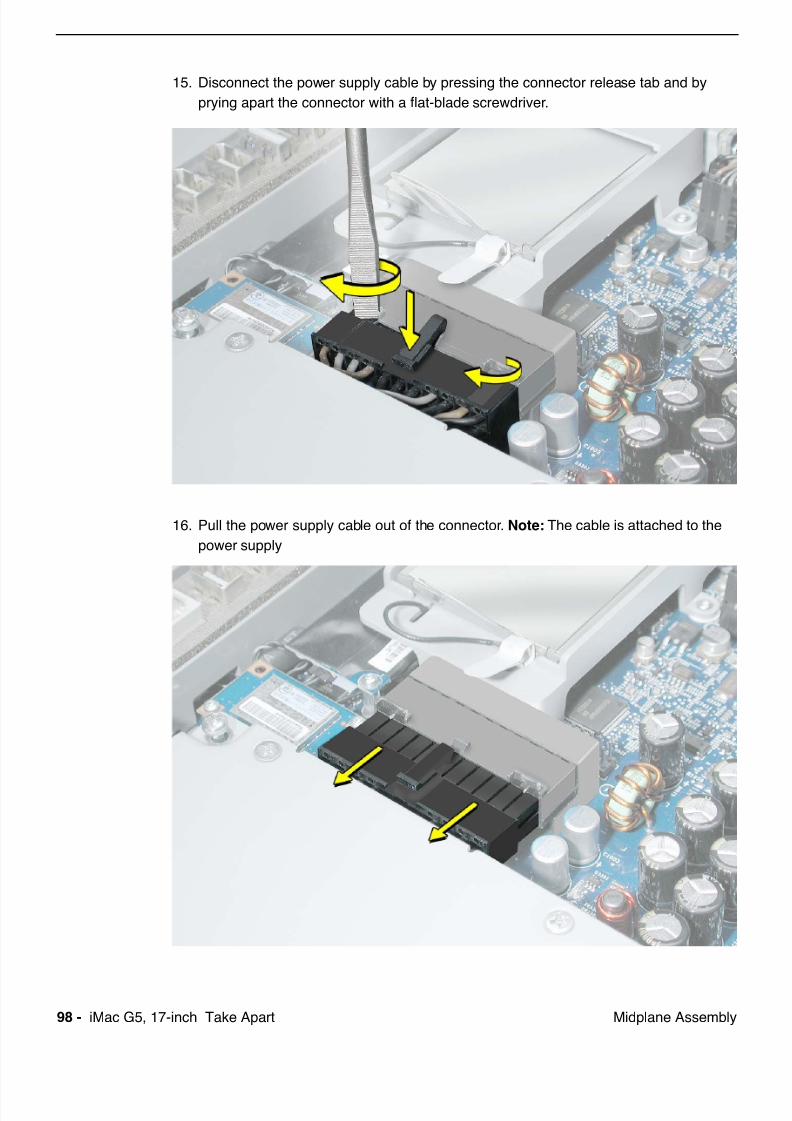
15. Disconnect the power supply cable by pressing the connector release tab and by
prying apart the connector with a flat-blade screwdriver.
16. Pull the power supply cable out of the connector. Note: The cable is attached to the
power supply

7/29/2019 Apple imacg5_17in
http://slidepdf.com/reader/full/apple-imacg517in 101/319iMac G5, 17-inch Take Apart -Midplane Assembly
17. Tilt up the power supply until it clears the edge of the main circuit board. Lift it out of
the midplane and set it aside. Important: Return the midplane to Apple in the
packaging provided.
7/29/2019 Apple imacg5_17in
http://slidepdf.com/reader/full/apple-imacg517in 102/319100 - iMac G5, 17-inch Take Apart Midplane Assembly
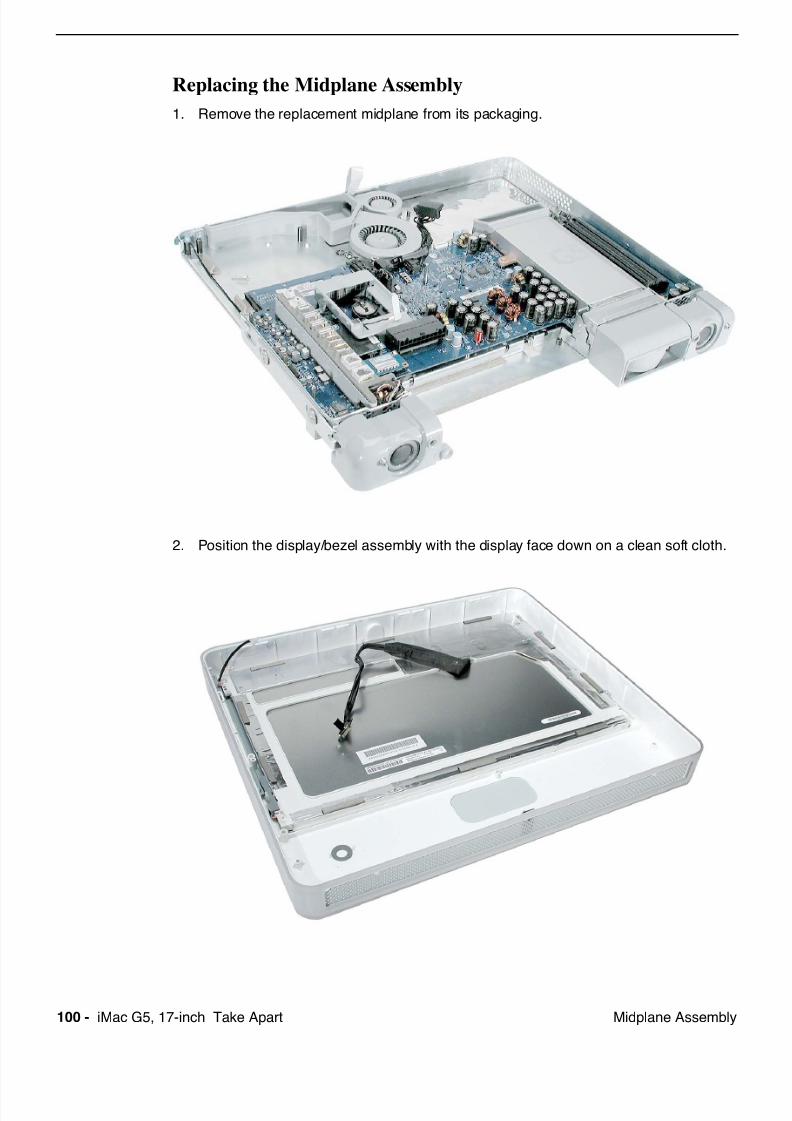
Replacing the Midplane Assembly
1. Remove the replacement midplane from its packaging.
2. Position the display/bezel assembly with the display face down on a clean soft cloth.
7/29/2019 Apple imacg5_17in
http://slidepdf.com/reader/full/apple-imacg517in 103/319iMac G5, 17-inch Take Apart -Midplane Assembly
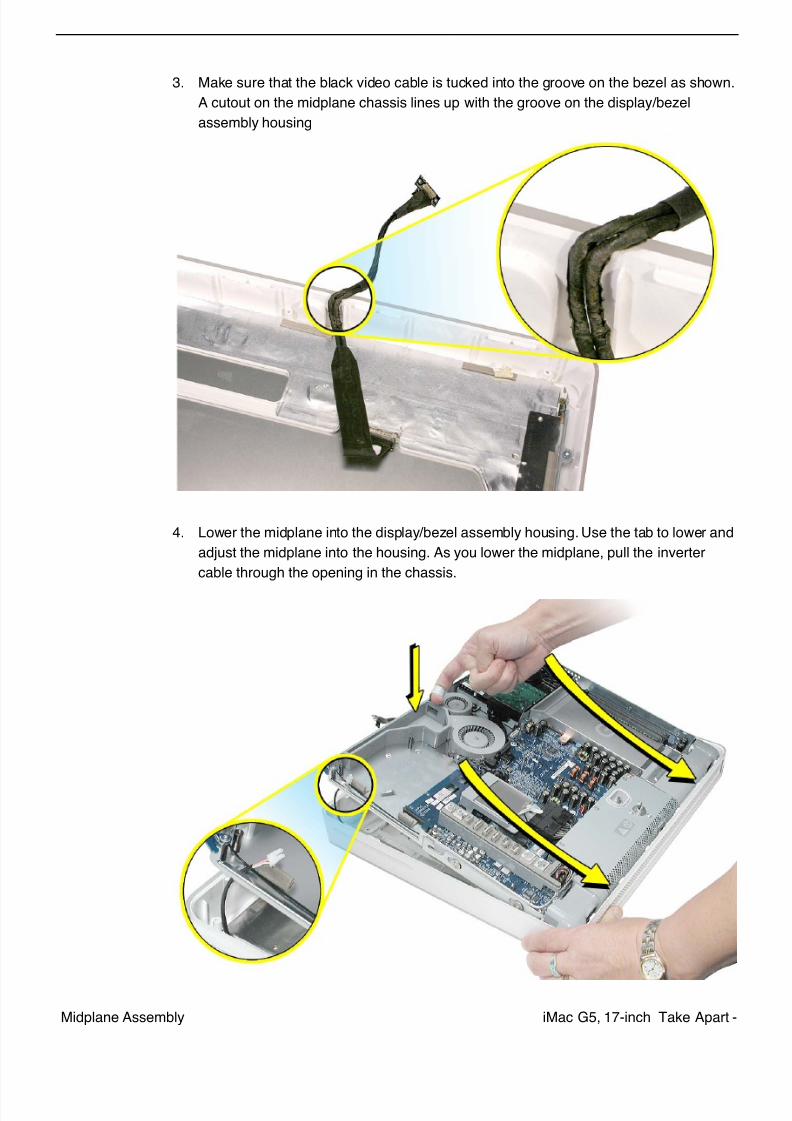
3. Make sure that the black video cable is tucked into the groove on the bezel as shown.
A cutout on the midplane chassis lines up with the groove on the display/bezel
assembly housing
4. Lower the midplane into the display/bezel assembly housing. Use the tab to lower and
adjust the midplane into the housing. As you lower the midplane, pull the inverter
cable through the opening in the chassis.

7/29/2019 Apple imacg5_17in
http://slidepdf.com/reader/full/apple-imacg517in 104/319102 - iMac G5, 17-inch Take Apart Midplane Assembly
5. Locate the hard drive. Before lowering the hard drive into place, connect the drive data
cable and the power cable to the hard drive.
6. Connect the black cable (hard drive thermal sensor) to the white connector on end of
the hard drive.
7/29/2019 Apple imacg5_17in
http://slidepdf.com/reader/full/apple-imacg517in 105/319iMac G5, 17-inch Take Apart -Midplane Assembly
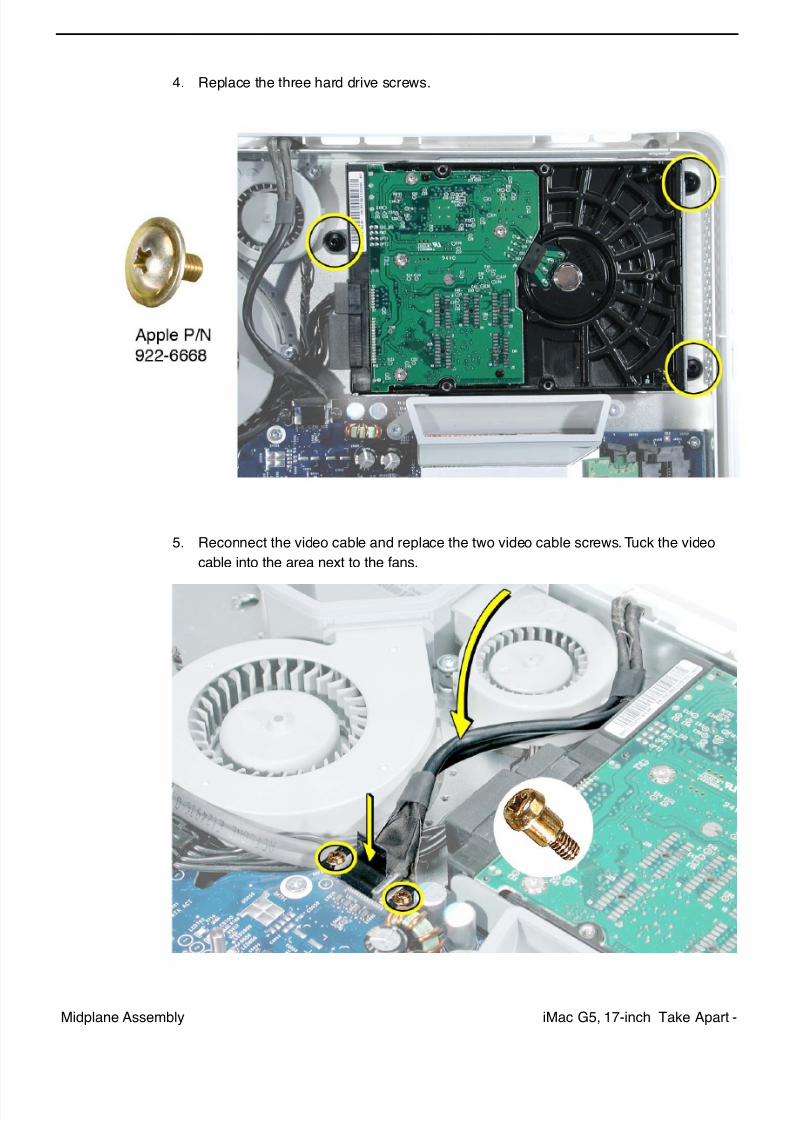
4. Replace the three hard drive screws.
5. Reconnect the video cable and replace the two video cable screws. Tuck the video
cable into the area next to the fans.
7/29/2019 Apple imacg5_17in
http://slidepdf.com/reader/full/apple-imacg517in 106/319104 - iMac G5, 17-inch Take Apart Midplane Assembly
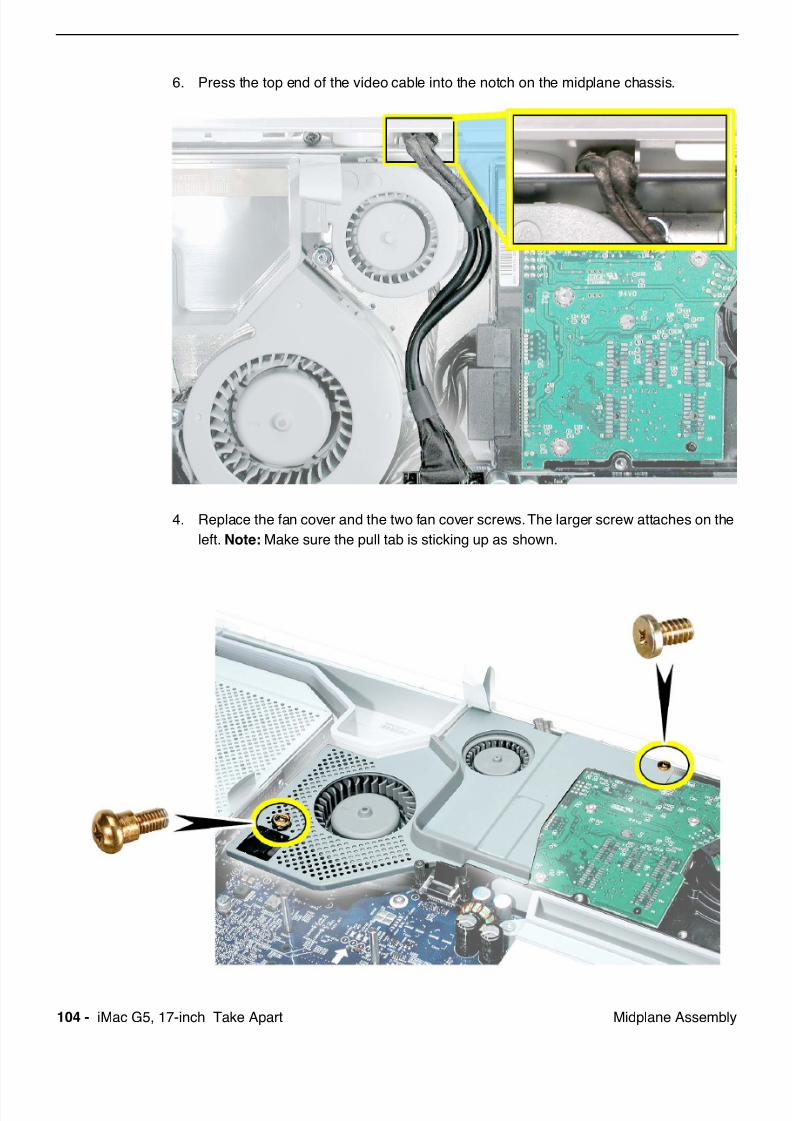
6. Press the top end of the video cable into the notch on the midplane chassis.
4. Replace the fan cover and the two fan cover screws. The larger screw attaches on the
left. Note: Make sure the pull tab is sticking up as shown.
7/29/2019 Apple imacg5_17in
http://slidepdf.com/reader/full/apple-imacg517in 107/319iMac G5, 17-inch Take Apart -Midplane Assembly
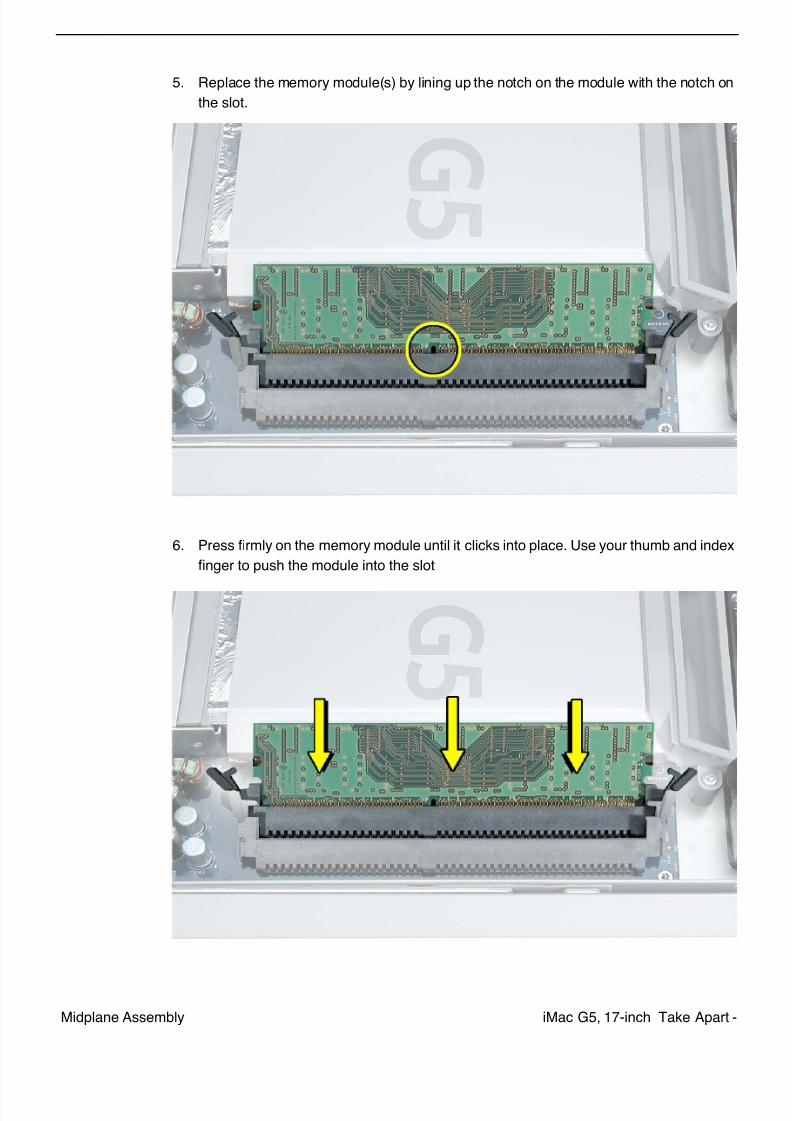
5. Replace the memory module(s) by lining up the notch on the module with the notch on
the slot.
6. Press firmly on the memory module until it clicks into place. Use your thumb and index
finger to push the module into the slot
7/29/2019 Apple imacg5_17in
http://slidepdf.com/reader/full/apple-imacg517in 108/319

7/29/2019 Apple imacg5_17in
http://slidepdf.com/reader/full/apple-imacg517in 109/319iMac G5, 17-inch Take Apart -Midplane Assembly
9. Lower the power supply into the midplane.
10. Connect the black power supply connector and tighten the three captive screws,
turning them to the right.
7/29/2019 Apple imacg5_17in
http://slidepdf.com/reader/full/apple-imacg517in 110/319108 - iMac G5, 17-inch Take Apart Midplane Assembly
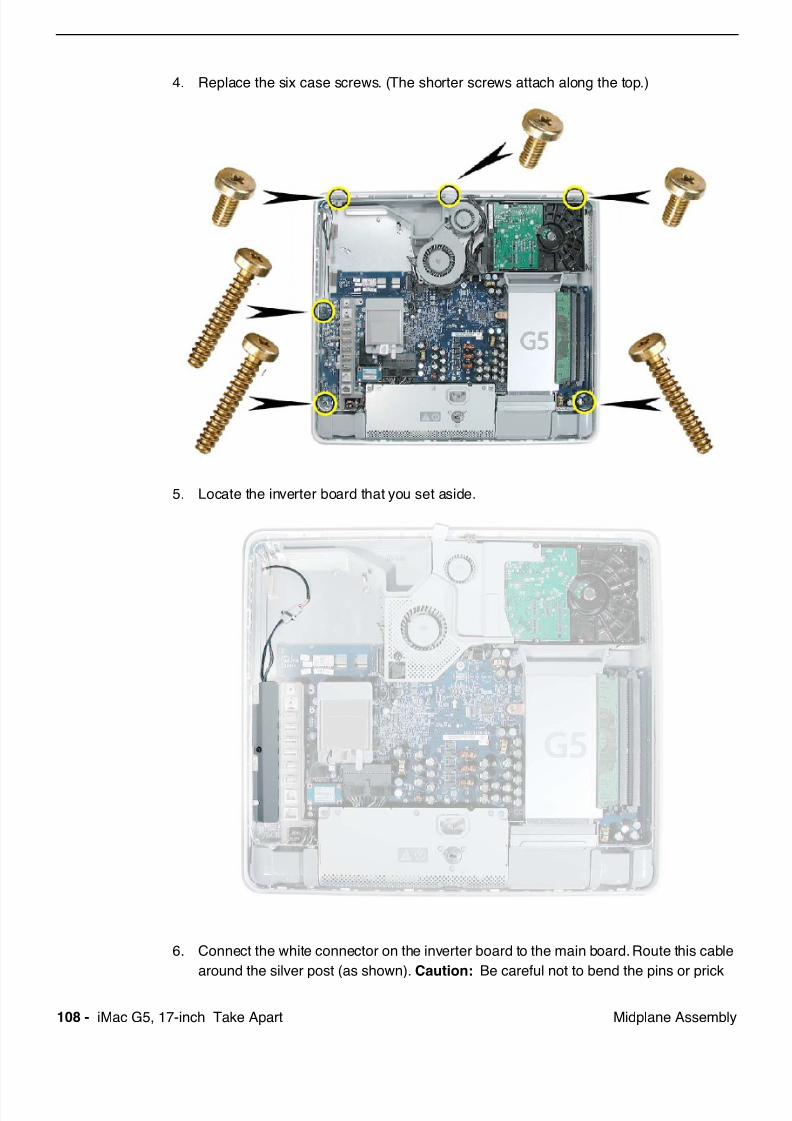
4. Replace the six case screws. (The shorter screws attach along the top.)
5. Locate the inverter board that you set aside.
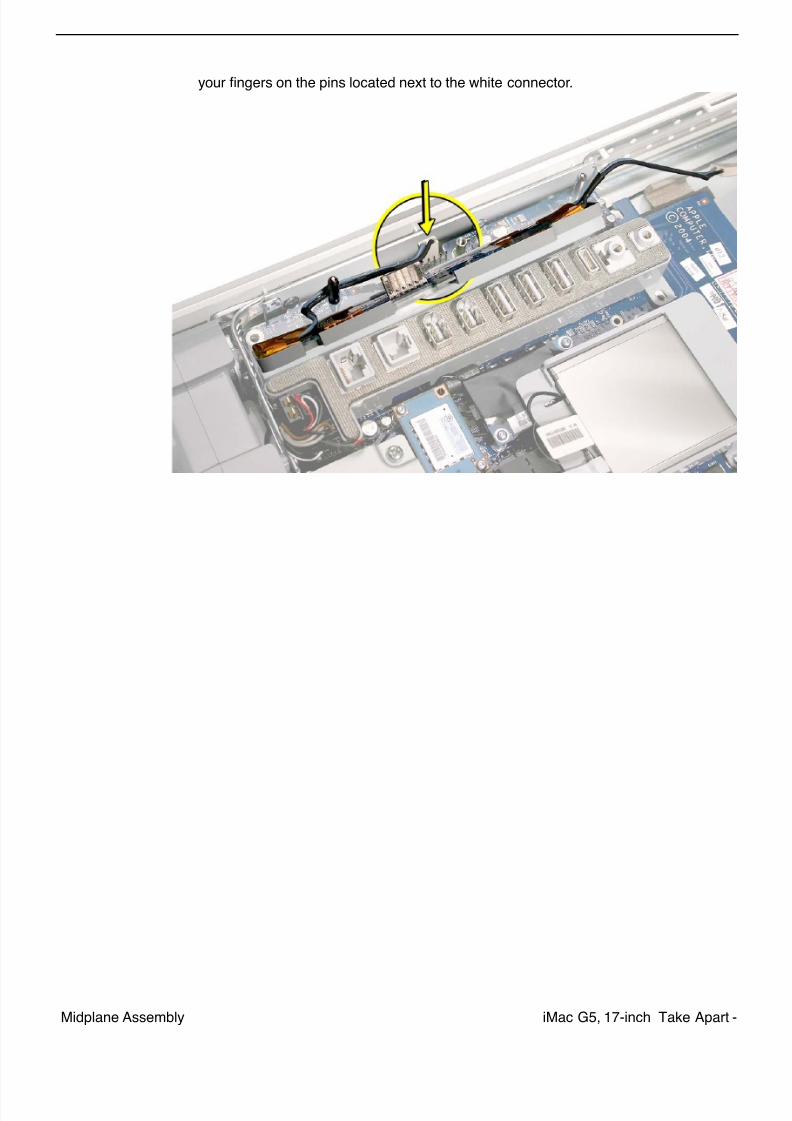
6. Connect the white connector on the inverter board to the main board. Route this cable
around the silver post (as shown). Caution: Be careful not to bend the pins or prick
7/29/2019 Apple imacg5_17in
http://slidepdf.com/reader/full/apple-imacg517in 111/319iMac G5, 17-inch Take Apart -Midplane Assembly
your fingers on the pins located next to the white connector.
7/29/2019 Apple imacg5_17in
http://slidepdf.com/reader/full/apple-imacg517in 112/319110 - iMac G5, 17-inch Take Apart Midplane Assembly
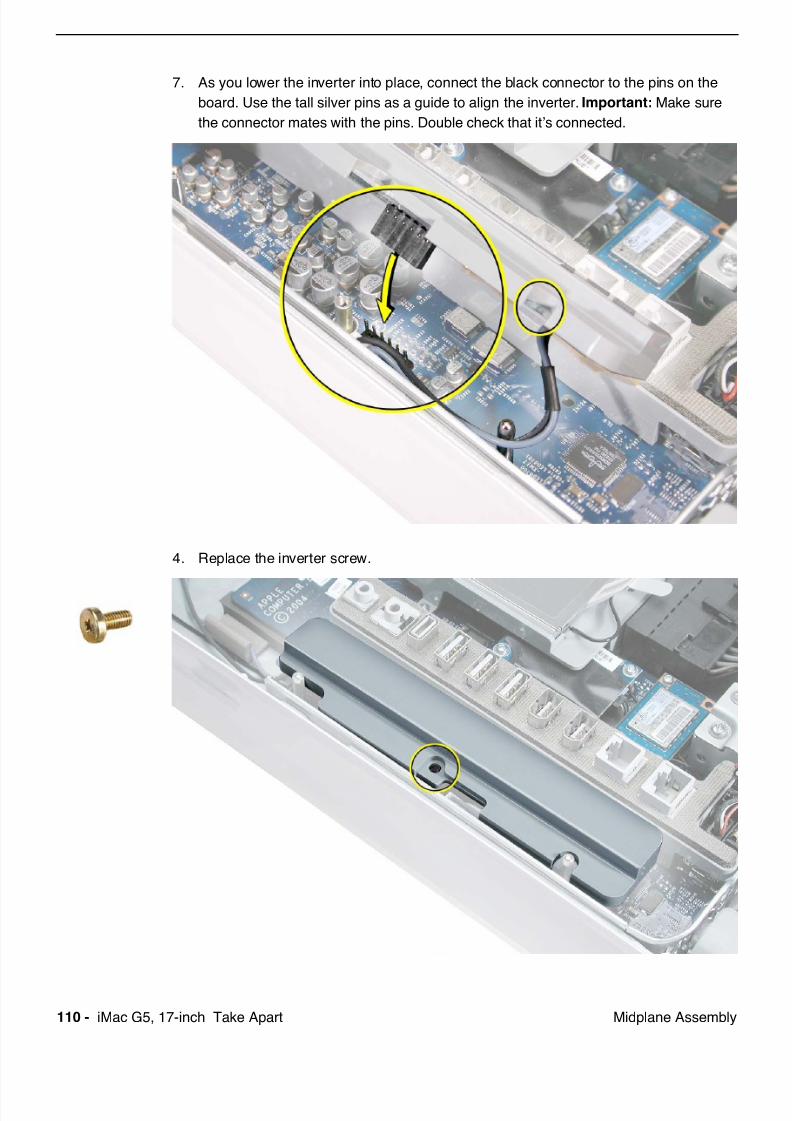
7. As you lower the inverter into place, connect the black connector to the pins on the
board. Use the tall silver pins as a guide to align the inverter. Important: Make sure
the connector mates with the pins. Double check that it’s connected.
4. Replace the inverter screw.
7/29/2019 Apple imacg5_17in
http://slidepdf.com/reader/full/apple-imacg517in 113/319iMac G5, 17-inch Take Apart -Midplane Assembly
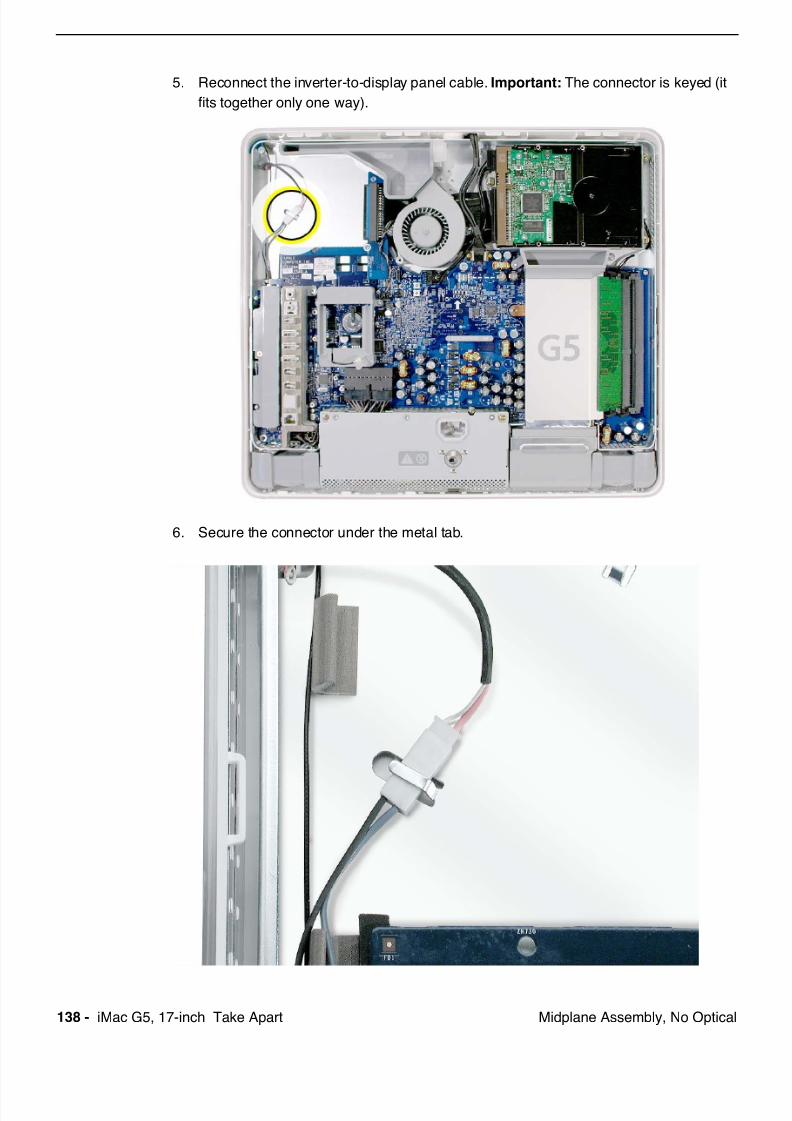
5. Reconnect the inverter-to-display panel cable. Important: The connector is keyed (it
fits together only one way).
6. Secure the connector under the metal tab.
7/29/2019 Apple imacg5_17in
http://slidepdf.com/reader/full/apple-imacg517in 114/319
7/29/2019 Apple imacg5_17in
http://slidepdf.com/reader/full/apple-imacg517in 115/319iMac G5, 17-inch Take Apart -Midplane Assembly
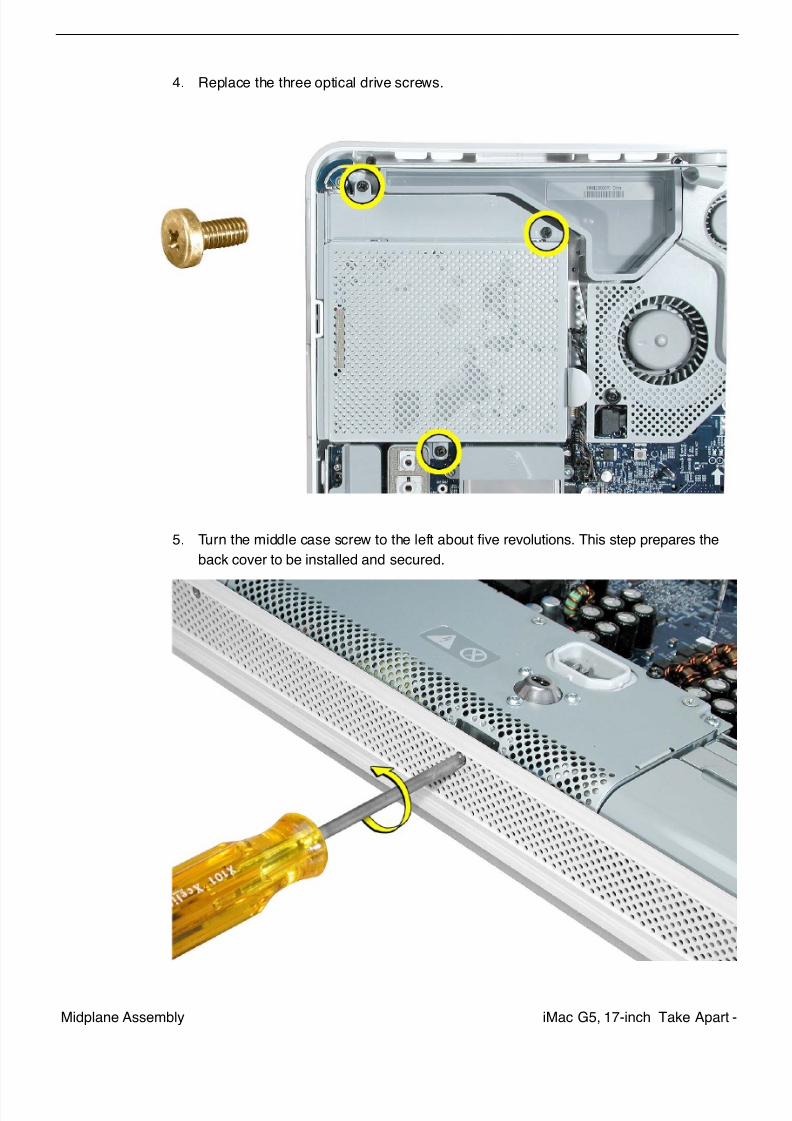
4. Replace the three optical drive screws.
5. Turn the middle case screw to the left about five revolutions. This step prepares the
back cover to be installed and secured.
7/29/2019 Apple imacg5_17in
http://slidepdf.com/reader/full/apple-imacg517in 116/319114 - iMac G5, 17-inch Take Apart Midplane Assembly, No Optical
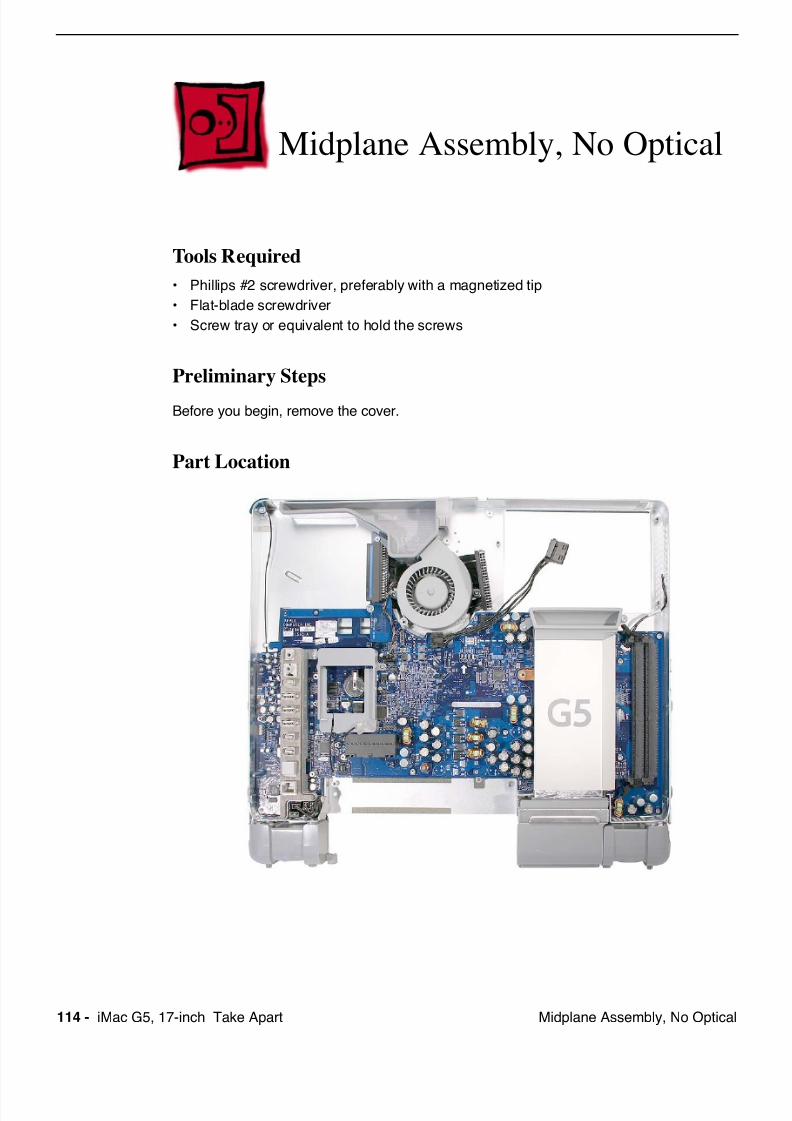
Midplane Assembly, No Optical
Tools Required
• Phillips #2 screwdriver, preferably with a magnetized tip
• Flat-blade screwdriver
• Screw tray or equivalent to hold the screws
Preliminary Steps
Before you begin, remove the cover.
Part Location

7/29/2019 Apple imacg5_17in
http://slidepdf.com/reader/full/apple-imacg517in 117/319iMac G5, 17-inch Take Apart -Midplane Assembly, No Optical
Removing the Midplane, No Optical
1. To access the midplane assembly you must first remove other service modules. This
procedure will show you how to remove and replace these modules. Note: As you
remove each module, set it aside, along with the screws for that module.
2. Ground yourself. Touch the metal surface (as shown below) on the inside of the
computer to discharge any static electricity.
Warning: Always discharge static electricity before you touch any parts or
install any components inside the computer. To avoid generating static
electricity, do not walk around the room until you have finished installing the
part and closed the computer.

7/29/2019 Apple imacg5_17in
http://slidepdf.com/reader/full/apple-imacg517in 118/319116 - iMac G5, 17-inch Take Apart Midplane Assembly, No Optical
3. Locate the inverter on the left side of the computer.
4. Locate the inverter-to-display panel cable connector.
7/29/2019 Apple imacg5_17in
http://slidepdf.com/reader/full/apple-imacg517in 119/319iMac G5, 17-inch Take Apart -Midplane Assembly, No Optical
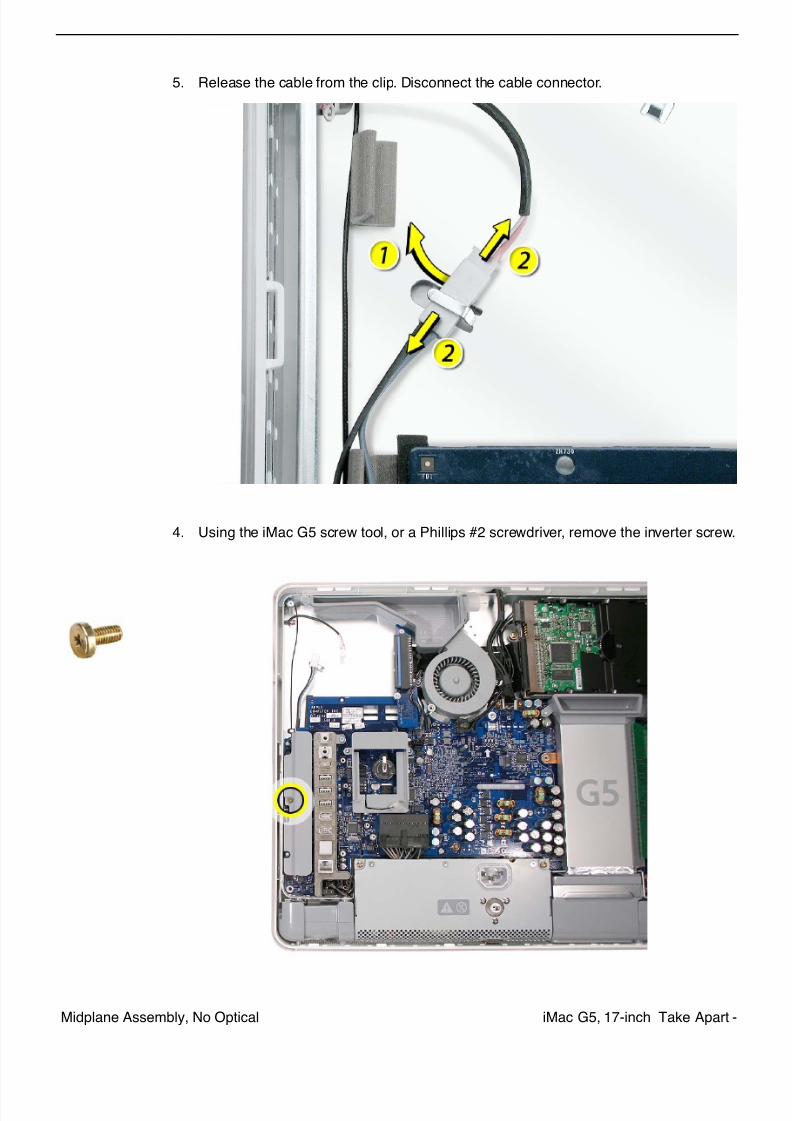
5. Release the cable from the clip. Disconnect the cable connector.
4. Using the iMac G5 screw tool, or a Phillips #2 screwdriver, remove the inverter screw.
7/29/2019 Apple imacg5_17in
http://slidepdf.com/reader/full/apple-imacg517in 120/319118 - iMac G5, 17-inch Take Apart Midplane Assembly, No Optical
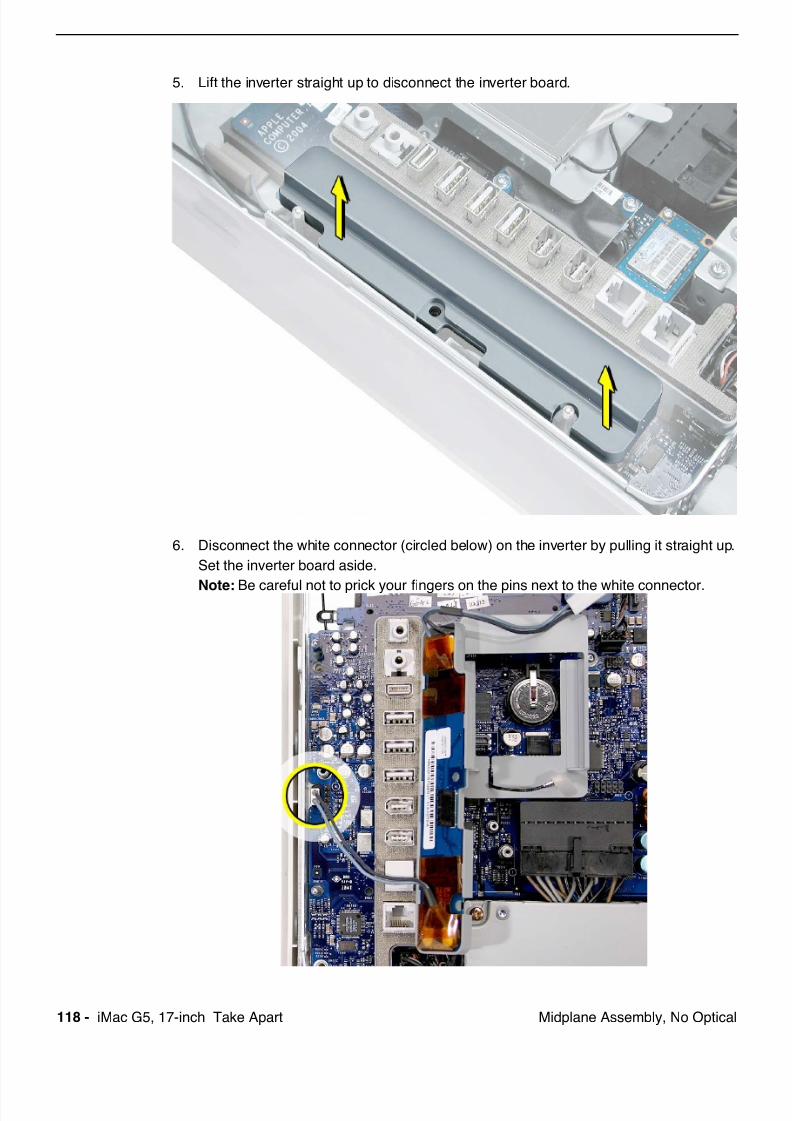
5. Lift the inverter straight up to disconnect the inverter board.
6. Disconnect the white connector (circled below) on the inverter by pulling it straight up.
Set the inverter board aside.
Note: Be careful not to prick your fingers on the pins next to the white connector.

7/29/2019 Apple imacg5_17in
http://slidepdf.com/reader/full/apple-imacg517in 121/319iMac G5, 17-inch Take Apart -Midplane Assembly, No Optical
7. Locate the black video cable at the top of the computer.
4. Remove the two screws on the video cable and set them aside. Pull up on the black
tab to disconnect the cable. Flip the cable back, so it is out of the way.
7/29/2019 Apple imacg5_17in
http://slidepdf.com/reader/full/apple-imacg517in 122/319120 - iMac G5, 17-inch Take Apart Midplane Assembly, No Optical
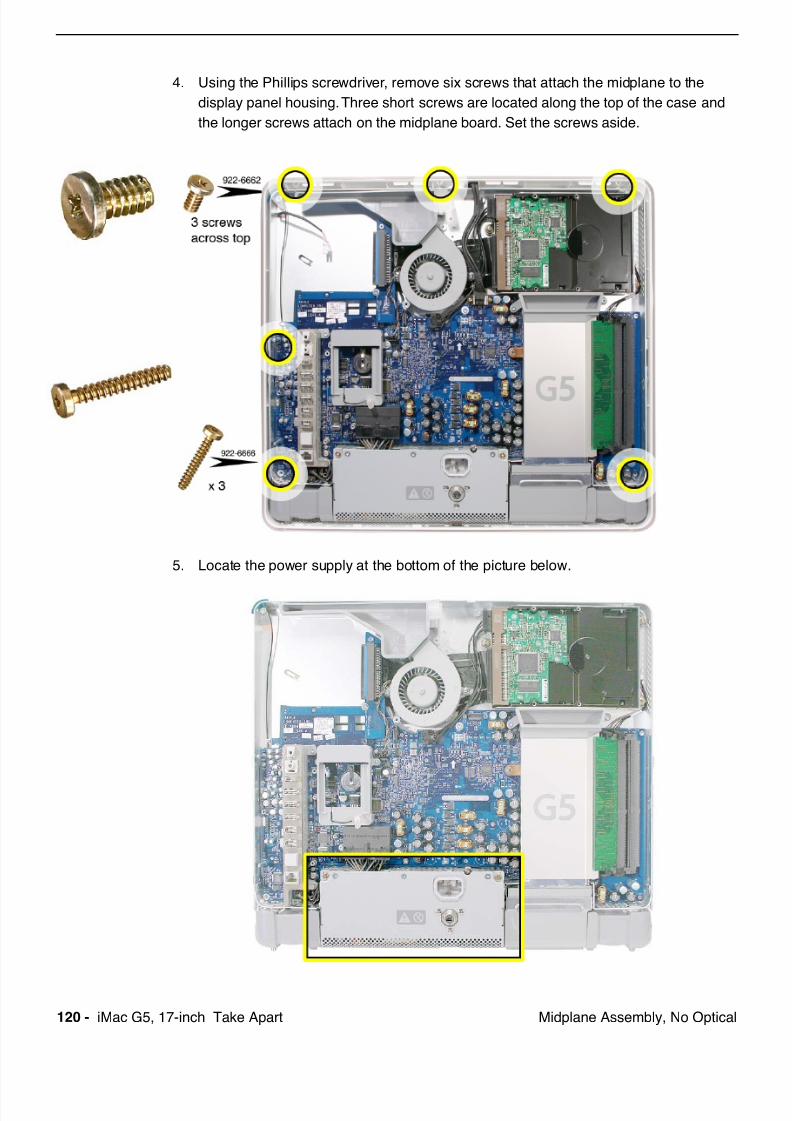
4. Using the Phillips screwdriver, remove six screws that attach the midplane to the
display panel housing. Three short screws are located along the top of the case and
the longer screws attach on the midplane board. Set the screws aside.
5. Locate the power supply at the bottom of the picture below.

7/29/2019 Apple imacg5_17in
http://slidepdf.com/reader/full/apple-imacg517in 123/319iMac G5, 17-inch Take Apart -Midplane Assembly, No Optical
6. Loosen the captive power supply screw (circled below) by turning it to the left. Loosen
the screw until it is flush with the top of the power supply. The screw is captive; it will
not come out. Note: You do not need to remove the power supply yet.
7. Turn the middle case screw to the right about five revolutions. This releases a screw
clamp that holds the power supply in the display/bezel assembly.
7/29/2019 Apple imacg5_17in
http://slidepdf.com/reader/full/apple-imacg517in 124/319122 - iMac G5, 17-inch Take Apart Midplane Assembly, No Optical
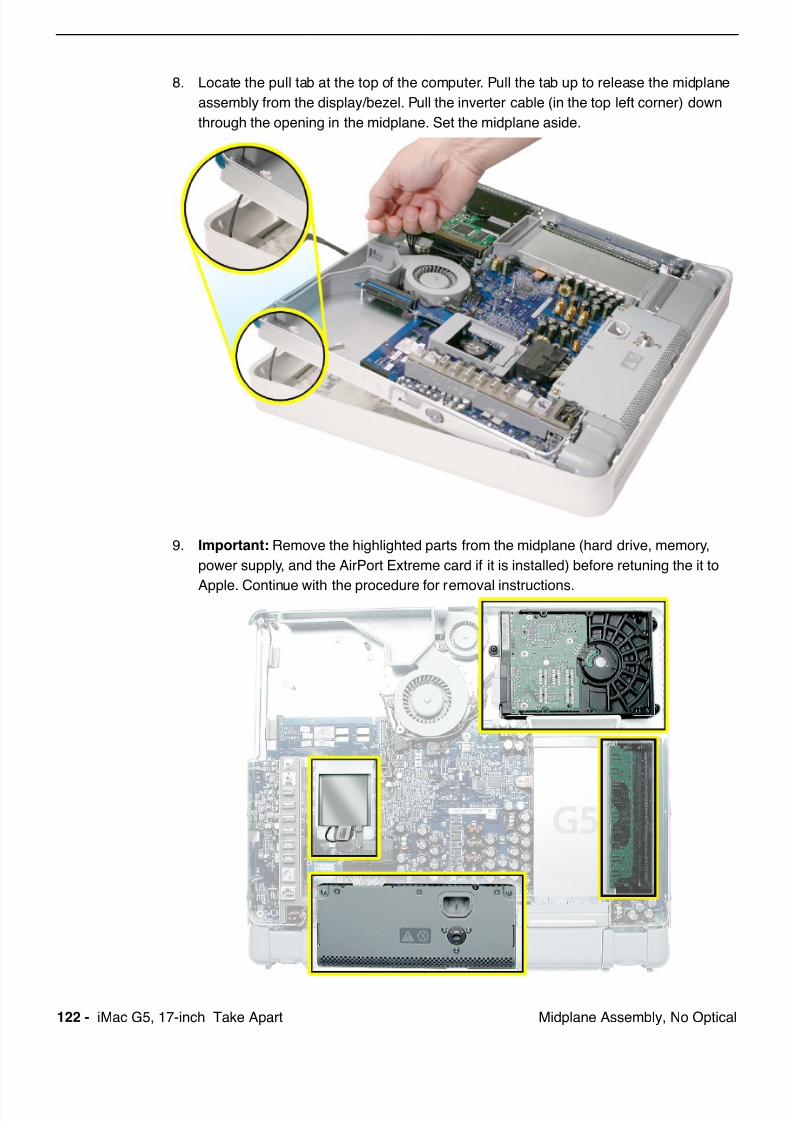
8. Locate the pull tab at the top of the computer. Pull the tab up to release the midplane
assembly from the display/bezel. Pull the inverter cable (in the top left corner) down
through the opening in the midplane. Set the midplane aside.
9. Important: Remove the highlighted parts from the midplane (hard drive, memory,
power supply, and the AirPort Extreme card if it is installed) before retuning the it to
Apple. Continue with the procedure for removal instructions.

7/29/2019 Apple imacg5_17in
http://slidepdf.com/reader/full/apple-imacg517in 125/319iMac G5, 17-inch Take Apart -Midplane Assembly, No Optical
10. Locate the hard drive in the top right corner.
4. Remove the three hard drive screws. Set the screws aside.
7/29/2019 Apple imacg5_17in
http://slidepdf.com/reader/full/apple-imacg517in 126/319124 - iMac G5, 17-inch Take Apart Midplane Assembly, No Optical
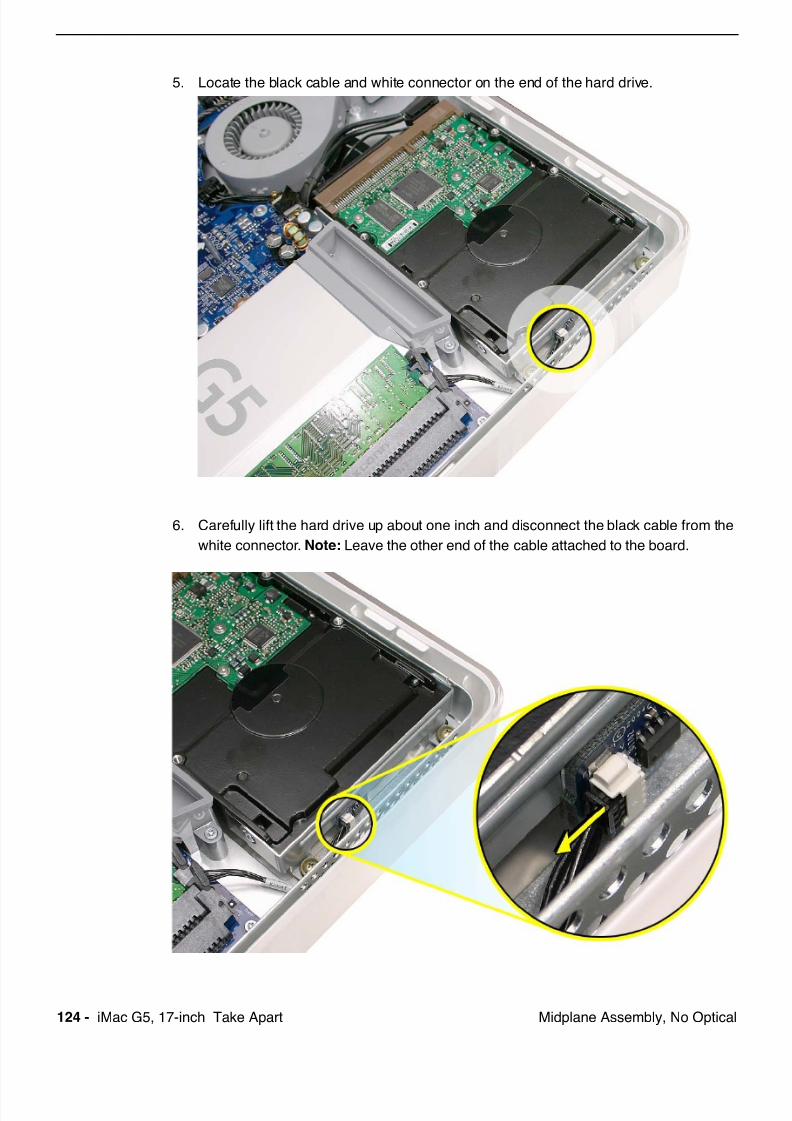
5. Locate the black cable and white connector on the end of the hard drive.
6. Carefully lift the hard drive up about one inch and disconnect the black cable from the
white connector. Note: Leave the other end of the cable attached to the board.
7/29/2019 Apple imacg5_17in
http://slidepdf.com/reader/full/apple-imacg517in 127/319iMac G5, 17-inch Take Apart -Midplane Assembly, No Optical
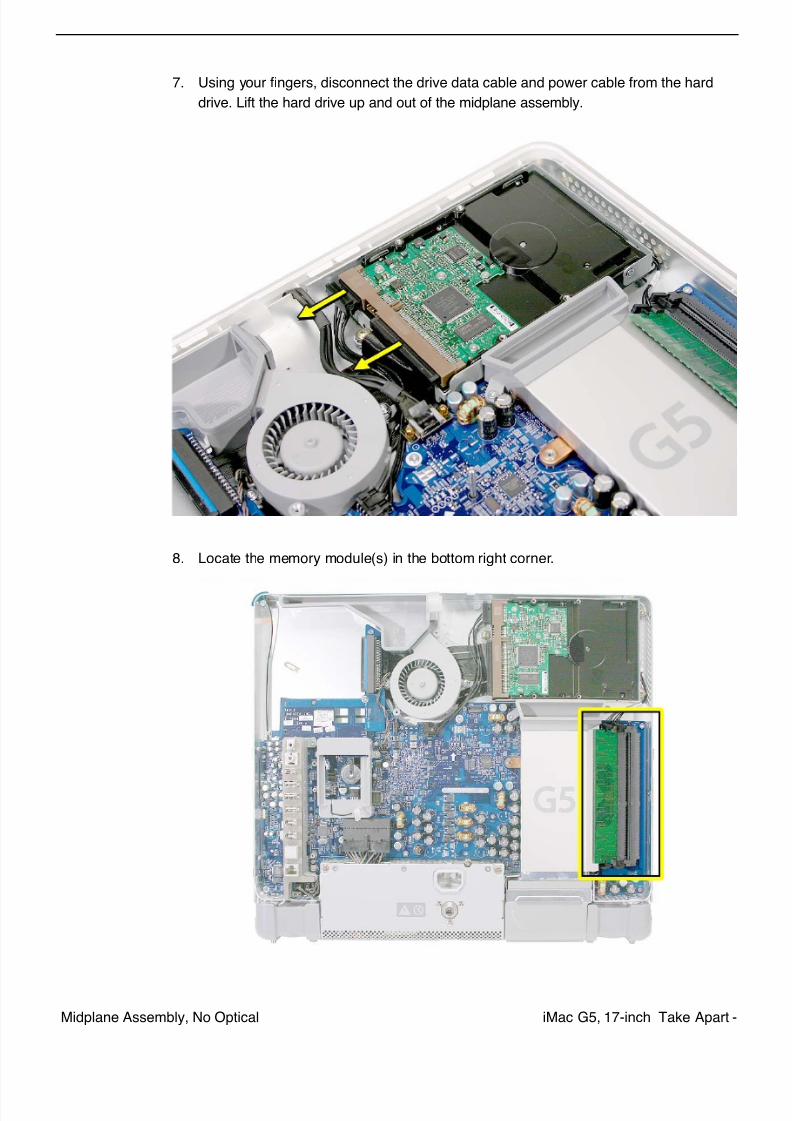
7. Using your fingers, disconnect the drive data cable and power cable from the hard
drive. Lift the hard drive up and out of the midplane assembly.
8. Locate the memory module(s) in the bottom right corner.
7/29/2019 Apple imacg5_17in
http://slidepdf.com/reader/full/apple-imacg517in 128/319126 - iMac G5, 17-inch Take Apart Midplane Assembly, No Optical
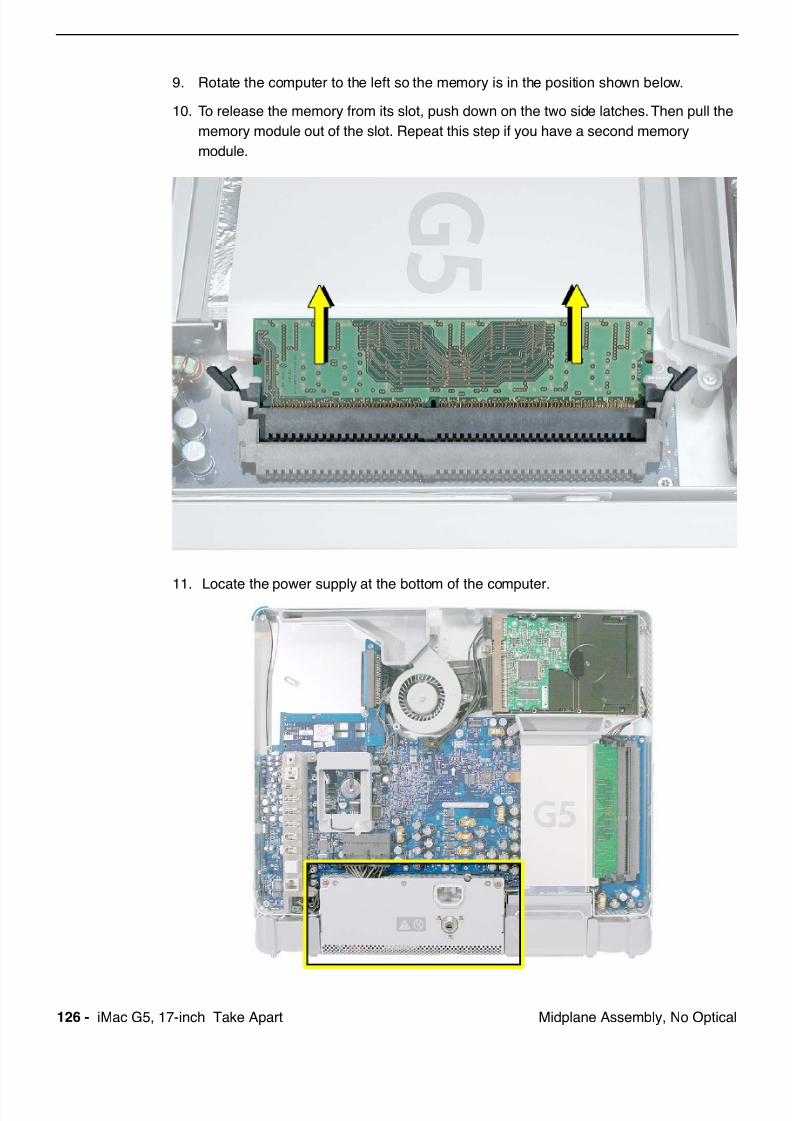
9. Rotate the computer to the left so the memory is in the position shown below.
10. To release the memory from its slot, push down on the two side latches. Then pull the
memory module out of the slot. Repeat this step if you have a second memory
module.
11. Locate the power supply at the bottom of the computer.
7/29/2019 Apple imacg5_17in
http://slidepdf.com/reader/full/apple-imacg517in 129/319iMac G5, 17-inch Take Apart -Midplane Assembly, No Optical
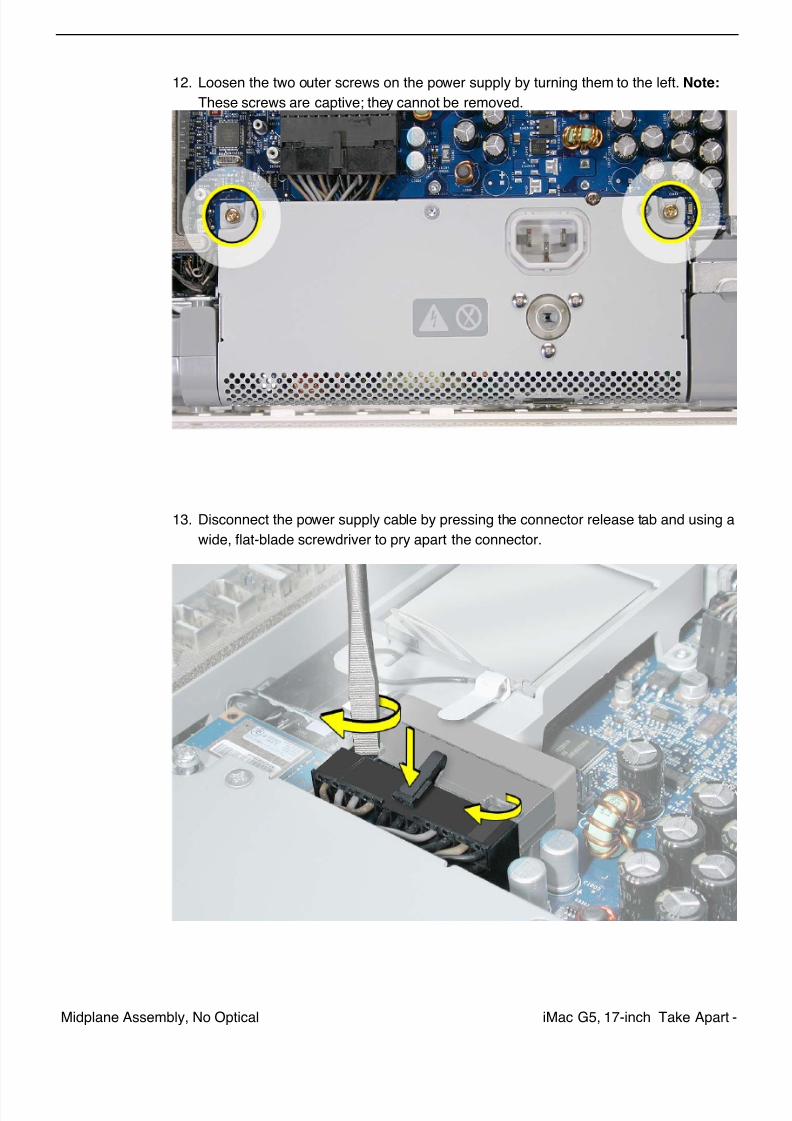
12. Loosen the two outer screws on the power supply by turning them to the left. Note:
These screws are captive; they cannot be removed.
13. Disconnect the power supply cable by pressing the connector release tab and using a
wide, flat-blade screwdriver to pry apart the connector.
7/29/2019 Apple imacg5_17in
http://slidepdf.com/reader/full/apple-imacg517in 130/319128 - iMac G5, 17-inch Take Apart Midplane Assembly, No Optical
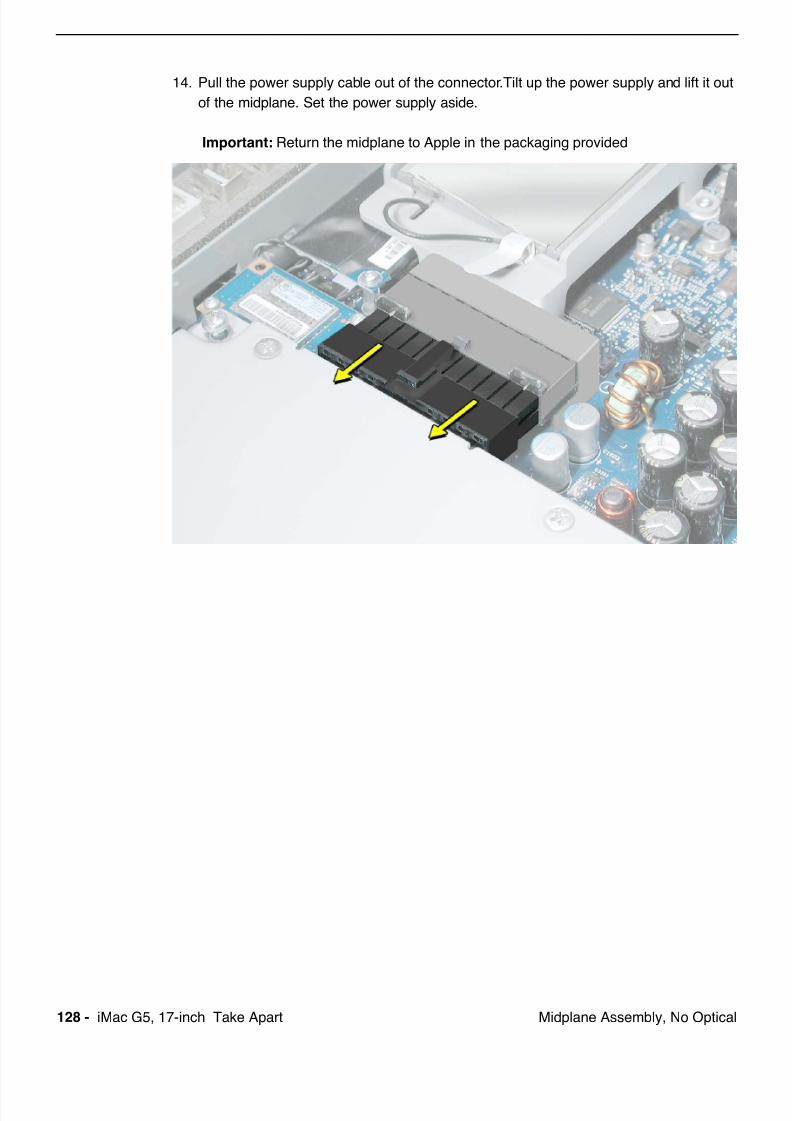
14. Pull the power supply cable out of the connector.Tilt up the power supply and lift it out
of the midplane. Set the power supply aside.
Important: Return the midplane to Apple in the packaging provided
7/29/2019 Apple imacg5_17in
http://slidepdf.com/reader/full/apple-imacg517in 131/319iMac G5, 17-inch Take Apart -Midplane Assembly, No Optical
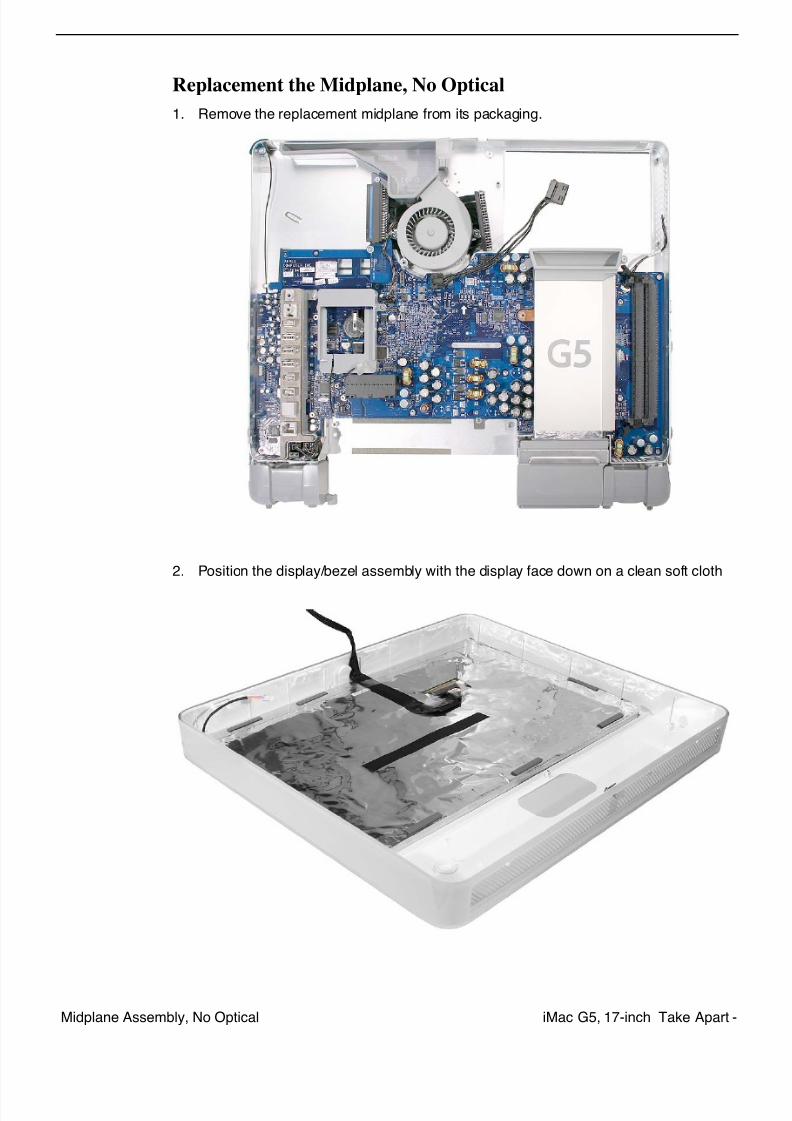
Replacement the Midplane, No Optical
1. Remove the replacement midplane from its packaging.
2. Position the display/bezel assembly with the display face down on a clean soft cloth
7/29/2019 Apple imacg5_17in
http://slidepdf.com/reader/full/apple-imacg517in 132/319130 - iMac G5, 17-inch Take Apart Midplane Assembly, No Optical
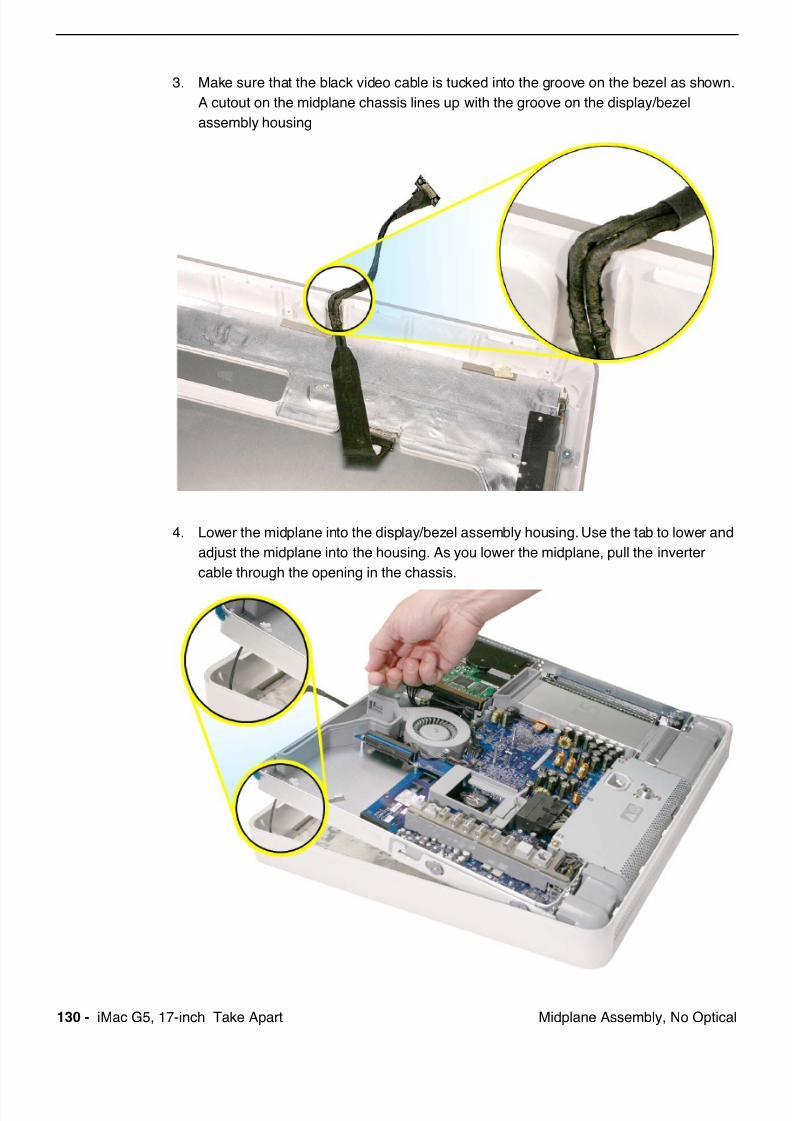
3. Make sure that the black video cable is tucked into the groove on the bezel as shown.
A cutout on the midplane chassis lines up with the groove on the display/bezel
assembly housing
4. Lower the midplane into the display/bezel assembly housing. Use the tab to lower and
adjust the midplane into the housing. As you lower the midplane, pull the inverter
cable through the opening in the chassis.

7/29/2019 Apple imacg5_17in
http://slidepdf.com/reader/full/apple-imacg517in 133/319iMac G5, 17-inch Take Apart -Midplane Assembly, No Optical
5. Locate the hard drive. Connect the drive data cable and power cable to the hard drive.
Lower the hard drive into place on the midplane.
6. Connect the black cable to the white connector on end of the hard drive.
7/29/2019 Apple imacg5_17in
http://slidepdf.com/reader/full/apple-imacg517in 134/319132 - iMac G5, 17-inch Take Apart Midplane Assembly, No Optical
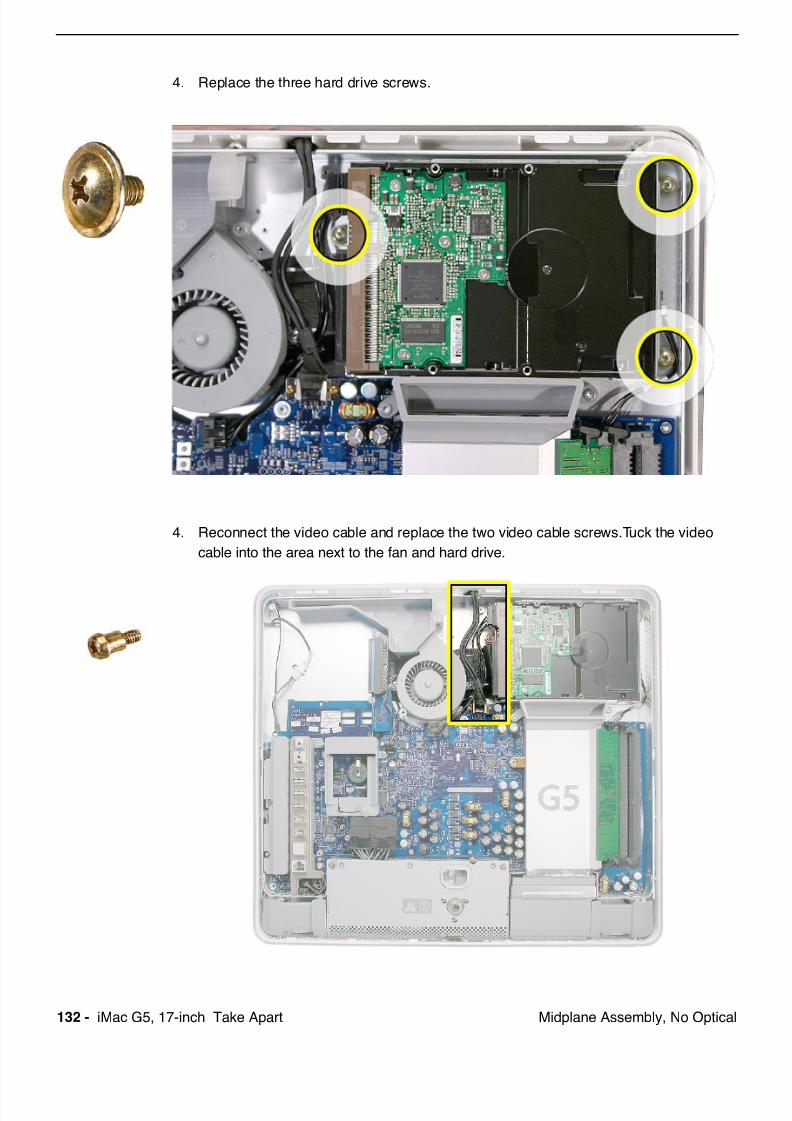
4. Replace the three hard drive screws.
4. Reconnect the video cable and replace the two video cable screws.Tuck the video
cable into the area next to the fan and hard drive.
7/29/2019 Apple imacg5_17in
http://slidepdf.com/reader/full/apple-imacg517in 135/319iMac G5, 17-inch Take Apart -Midplane Assembly, No Optical
5. Replace the memory module(s) by lining up the notch on the module with the notch on
the slot.
6. Press firmly on the memory module until it clicks into place. Use your thumb and index
finger to push the module into the slot
7/29/2019 Apple imacg5_17in
http://slidepdf.com/reader/full/apple-imacg517in 136/319134 - iMac G5, 17-inch Take Apart Midplane Assembly, No Optical
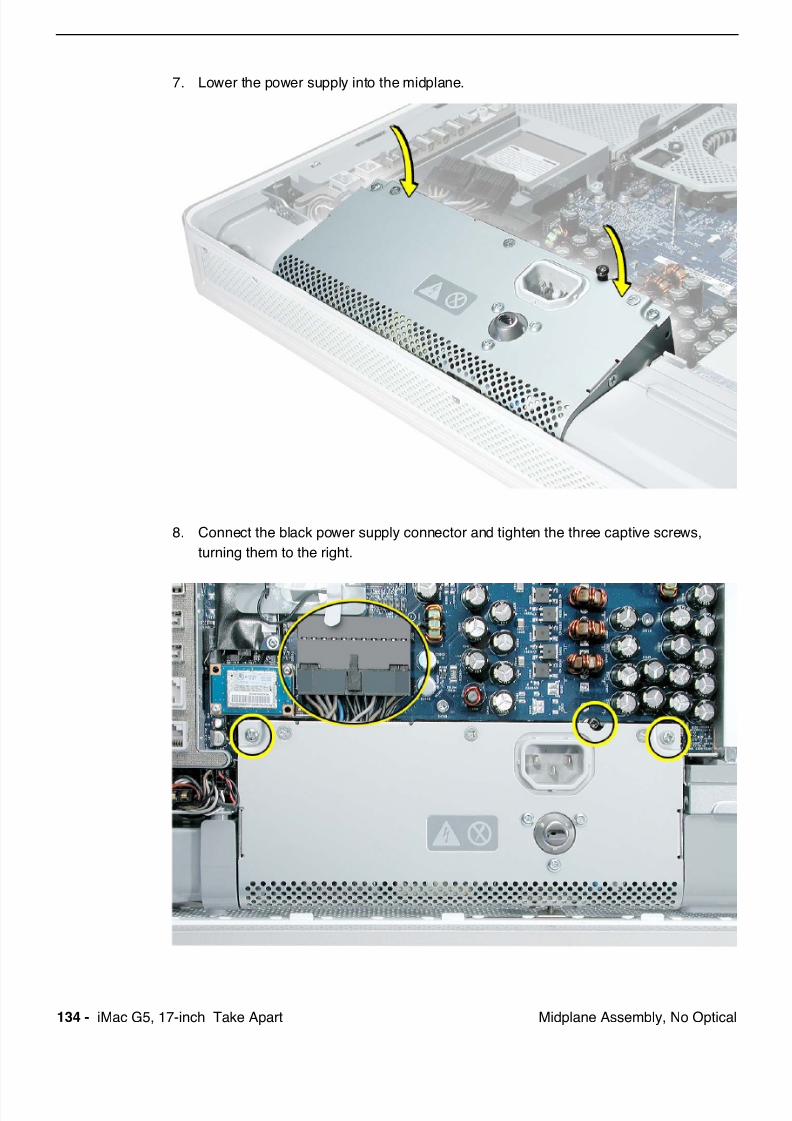
7. Lower the power supply into the midplane.
8. Connect the black power supply connector and tighten the three captive screws,
turning them to the right.

7/29/2019 Apple imacg5_17in
http://slidepdf.com/reader/full/apple-imacg517in 137/319iMac G5, 17-inch Take Apart -Midplane Assembly, No Optical
4. Replace the six case screws.The shorter screws attach along the top.
5. Locate the inverter board that you set aside.
7/29/2019 Apple imacg5_17in
http://slidepdf.com/reader/full/apple-imacg517in 138/319136 - iMac G5, 17-inch Take Apart Midplane Assembly, No Optical
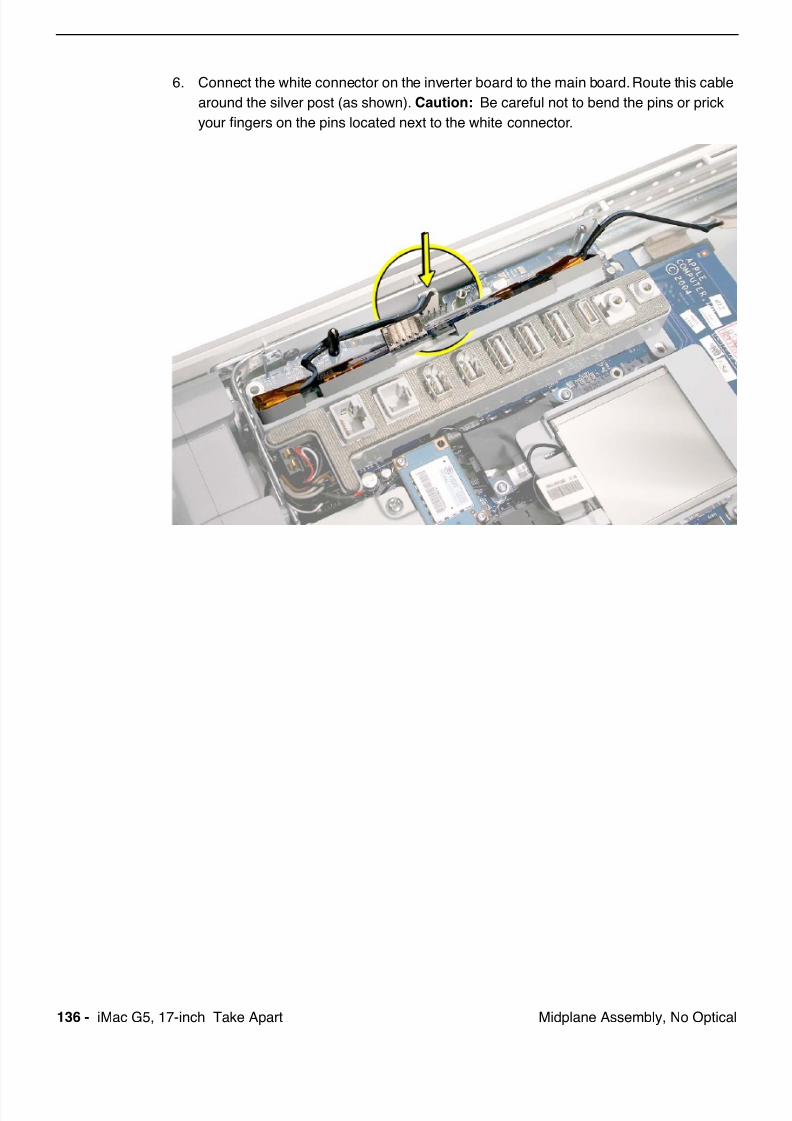
6. Connect the white connector on the inverter board to the main board. Route this cable
around the silver post (as shown). Caution: Be careful not to bend the pins or prick
your fingers on the pins located next to the white connector.

7/29/2019 Apple imacg5_17in
http://slidepdf.com/reader/full/apple-imacg517in 139/319iMac G5, 17-inch Take Apart -Midplane Assembly, No Optical
7. As you lower the inverter into place, connect the black connector to the pins on the
board. Use the tall silver pins as a guide to align the inverter. Important: Make sure
the connector mates with the pins. Double check that it’s connected.
4. Replace the inverter screw.
7/29/2019 Apple imacg5_17in
http://slidepdf.com/reader/full/apple-imacg517in 140/319

7/29/2019 Apple imacg5_17in
http://slidepdf.com/reader/full/apple-imacg517in 141/319iMac G5, 17-inch Take Apart -Midplane Assembly, No Optical
7. Turn the middle case screw to the left about five revolutions. This step prepares the
back cover to be installed and secured.
7/29/2019 Apple imacg5_17in
http://slidepdf.com/reader/full/apple-imacg517in 142/319140 - iMac G5, 17-inch Take Apart Logic Board
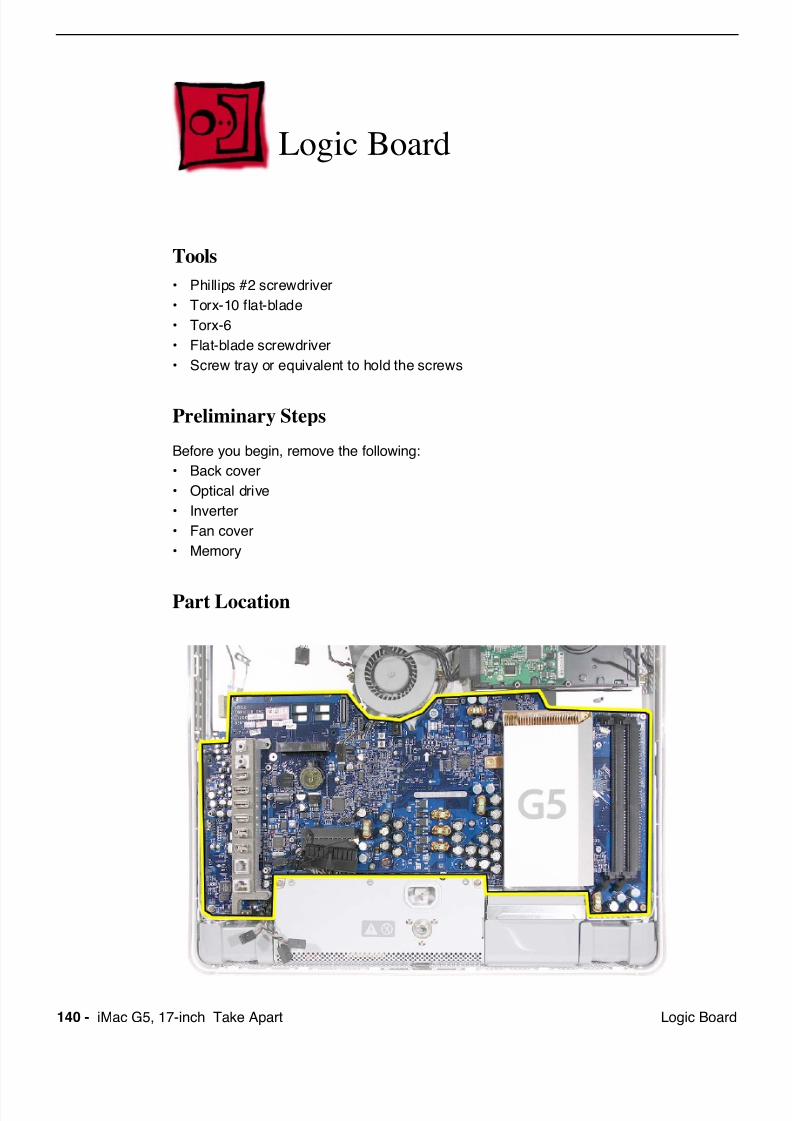
Logic Board
Tools
• Phillips #2 screwdriver
• Torx-10 flat-blade
• Torx-6
• Flat-blade screwdriver
• Screw tray or equivalent to hold the screws
Preliminary Steps
Before you begin, remove the following:
• Back cover
• Optical drive
• Inverter
• Fan cover
• Memory
Part Location
7/29/2019 Apple imacg5_17in
http://slidepdf.com/reader/full/apple-imacg517in 143/319
7/29/2019 Apple imacg5_17in
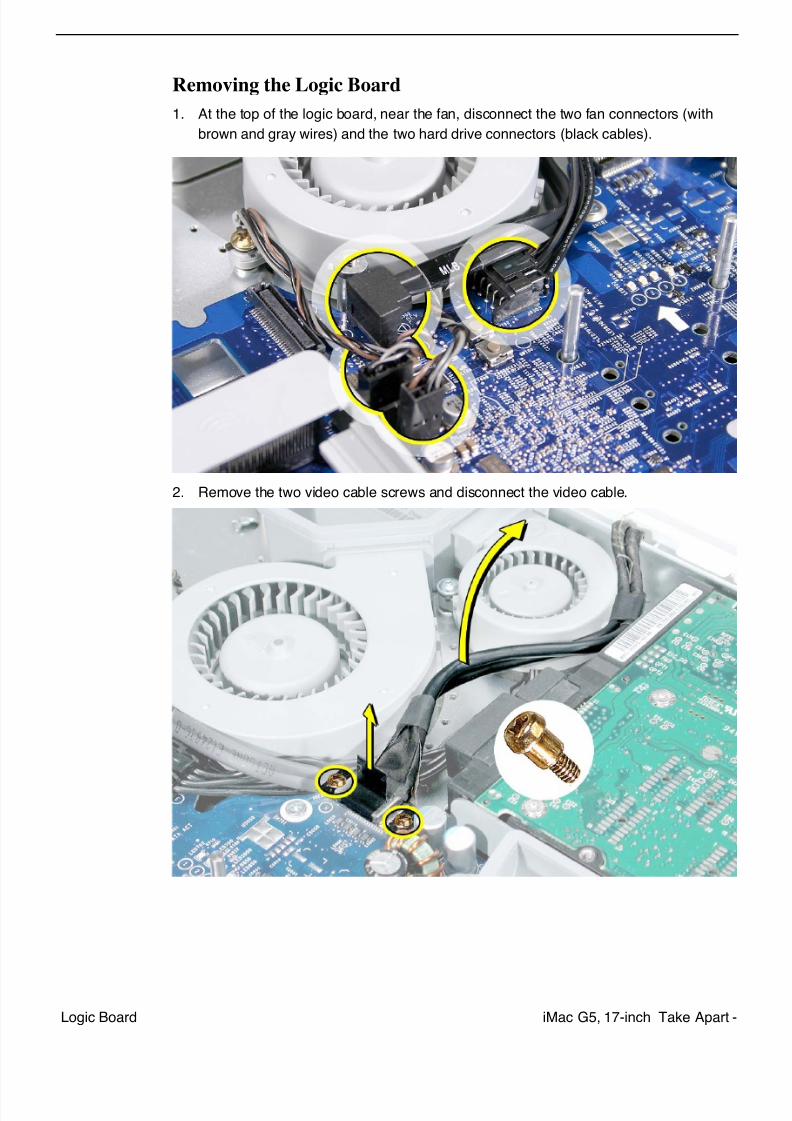
http://slidepdf.com/reader/full/apple-imacg517in 144/319142 - iMac G5, 17-inch Take Apart Logic Board
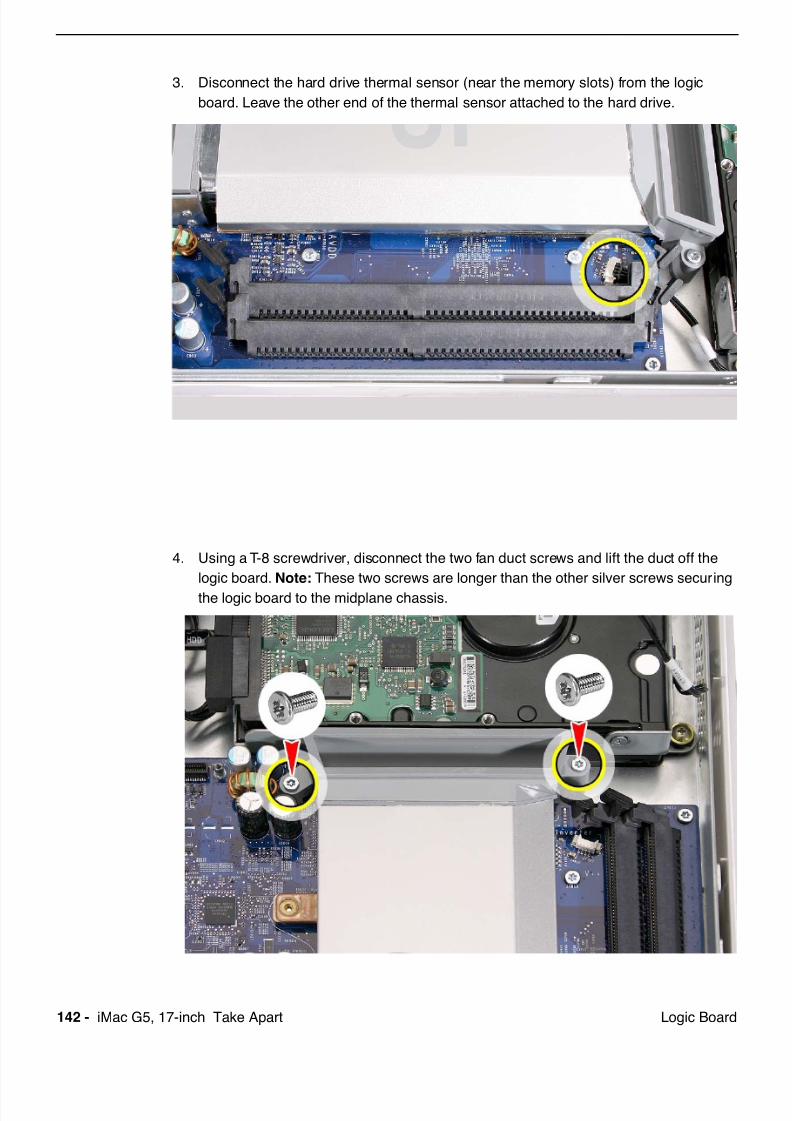
3. Disconnect the hard drive thermal sensor (near the memory slots) from the logic
board. Leave the other end of the thermal sensor attached to the hard drive.
4. Using a T-8 screwdriver, disconnect the two fan duct screws and lift the duct off the
logic board. Note: These two screws are longer than the other silver screws securing
the logic board to the midplane chassis.
7/29/2019 Apple imacg5_17in
http://slidepdf.com/reader/full/apple-imacg517in 145/319iMac G5, 17-inch Take Apart -Logic Board
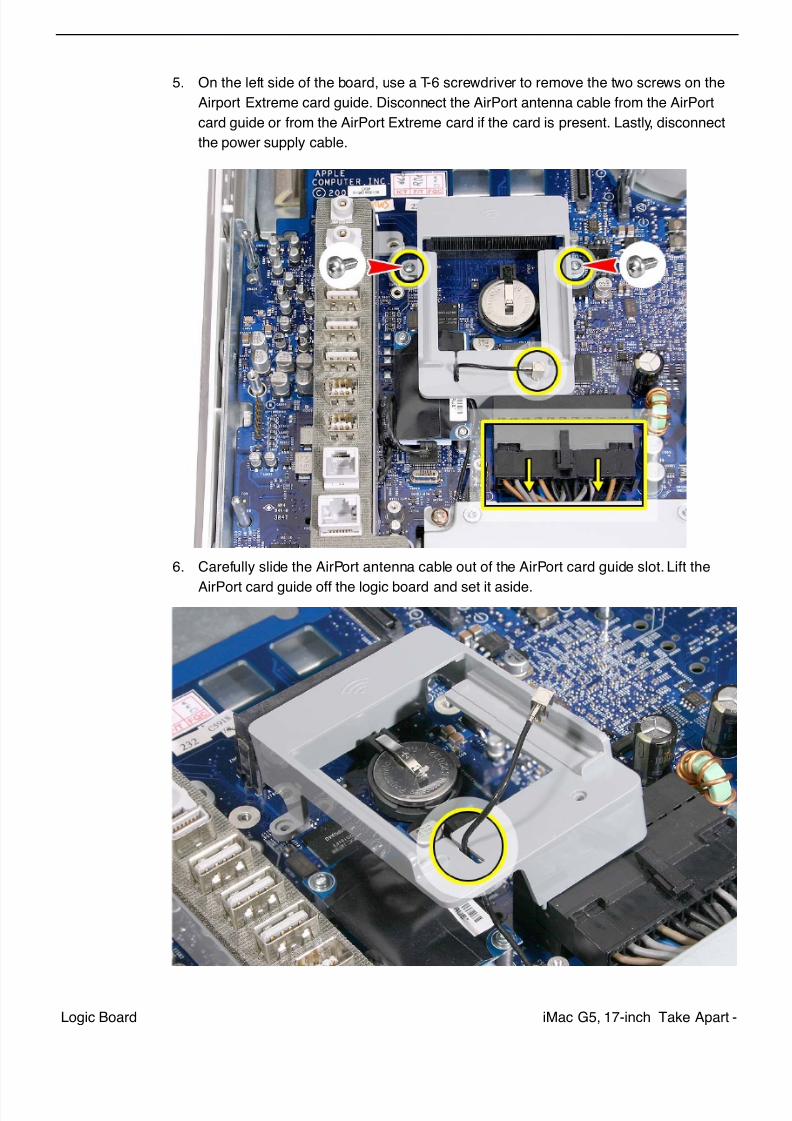
5. On the left side of the board, use a T-6 screwdriver to remove the two screws on the
Airport Extreme card guide. Disconnect the AirPort antenna cable from the AirPort
card guide or from the AirPort Extreme card if the card is present. Lastly, disconnect
the power supply cable.
6. Carefully slide the AirPort antenna cable out of the AirPort card guide slot. Lift the
AirPort card guide off the logic board and set it aside.
7/29/2019 Apple imacg5_17in
http://slidepdf.com/reader/full/apple-imacg517in 146/319144 - iMac G5, 17-inch Take Apart Logic Board
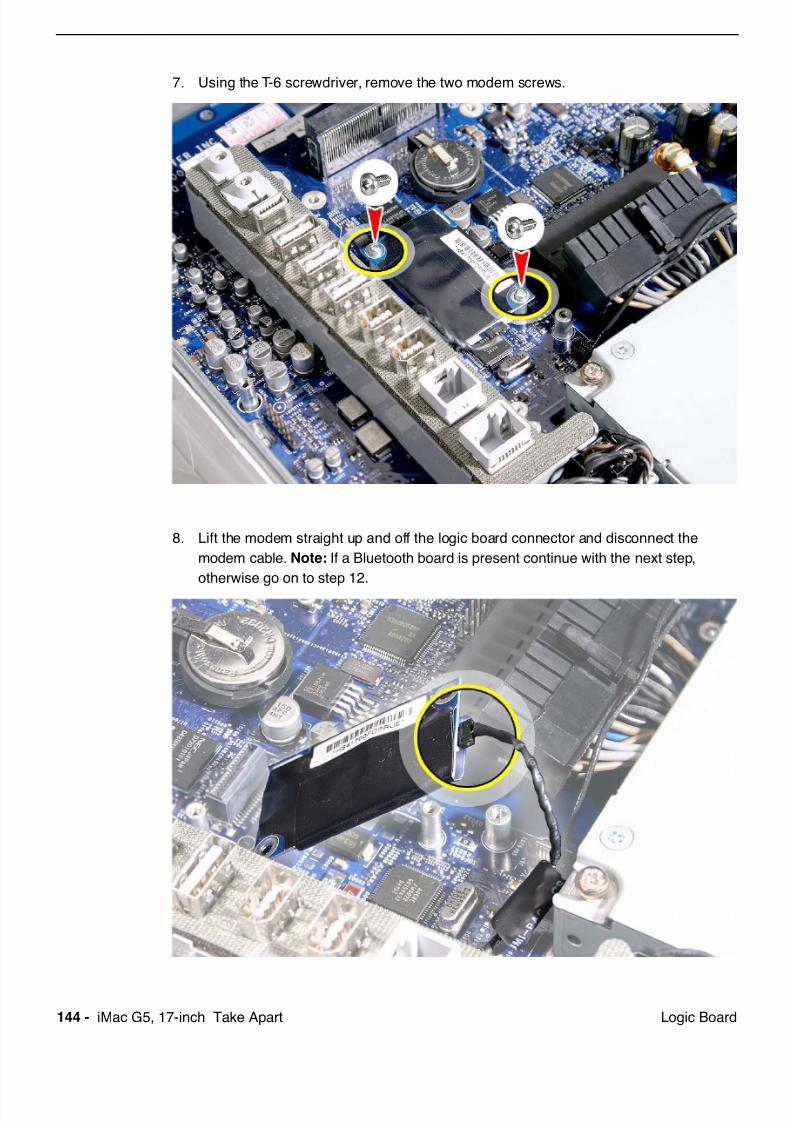
7. Using the T-6 screwdriver, remove the two modem screws.
8. Lift the modem straight up and off the logic board connector and disconnect the
modem cable. Note: If a Bluetooth board is present continue with the next step,
otherwise go on to step 12.
7/29/2019 Apple imacg5_17in
http://slidepdf.com/reader/full/apple-imacg517in 147/319iMac G5, 17-inch Take Apart -Logic Board
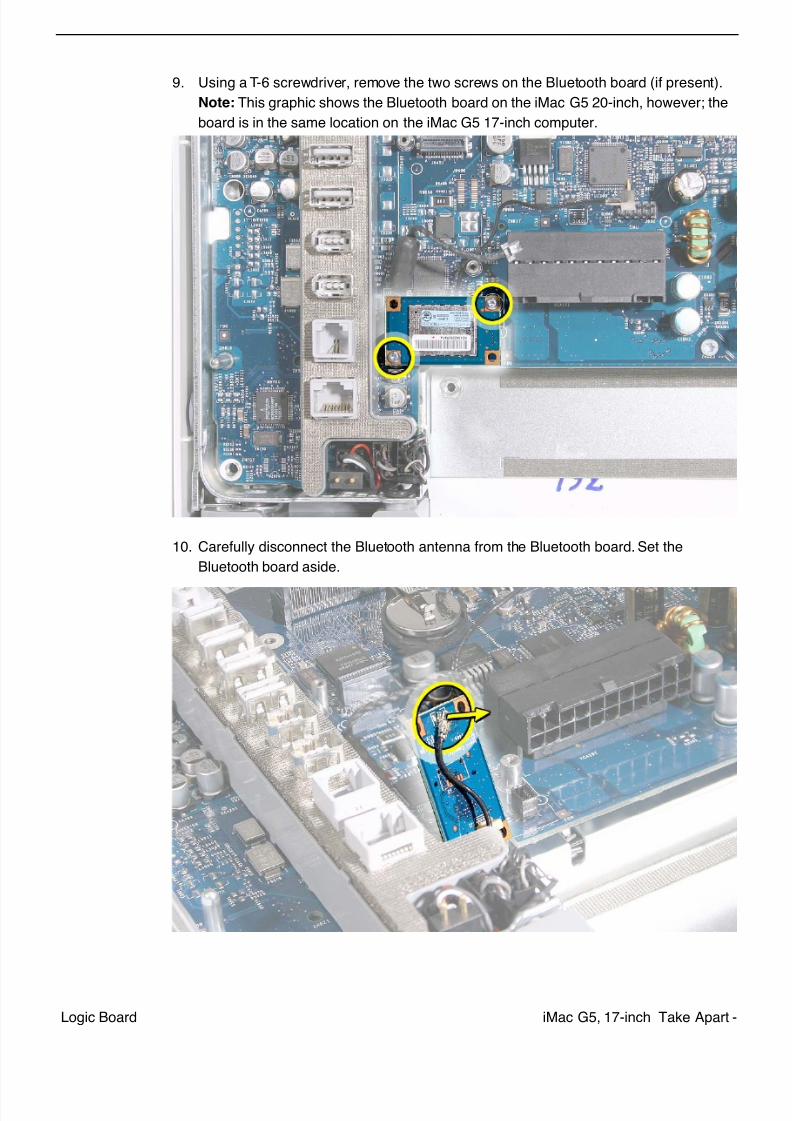
9. Using a T-6 screwdriver, remove the two screws on the Bluetooth board (if present).
Note: This graphic shows the Bluetooth board on the iMac G5 20-inch, however; the
board is in the same location on the iMac G5 17-inch computer.
10. Carefully disconnect the Bluetooth antenna from the Bluetooth board. Set the
Bluetooth board aside.
7/29/2019 Apple imacg5_17in
http://slidepdf.com/reader/full/apple-imacg517in 148/319146 - iMac G5, 17-inch Take Apart Logic Board
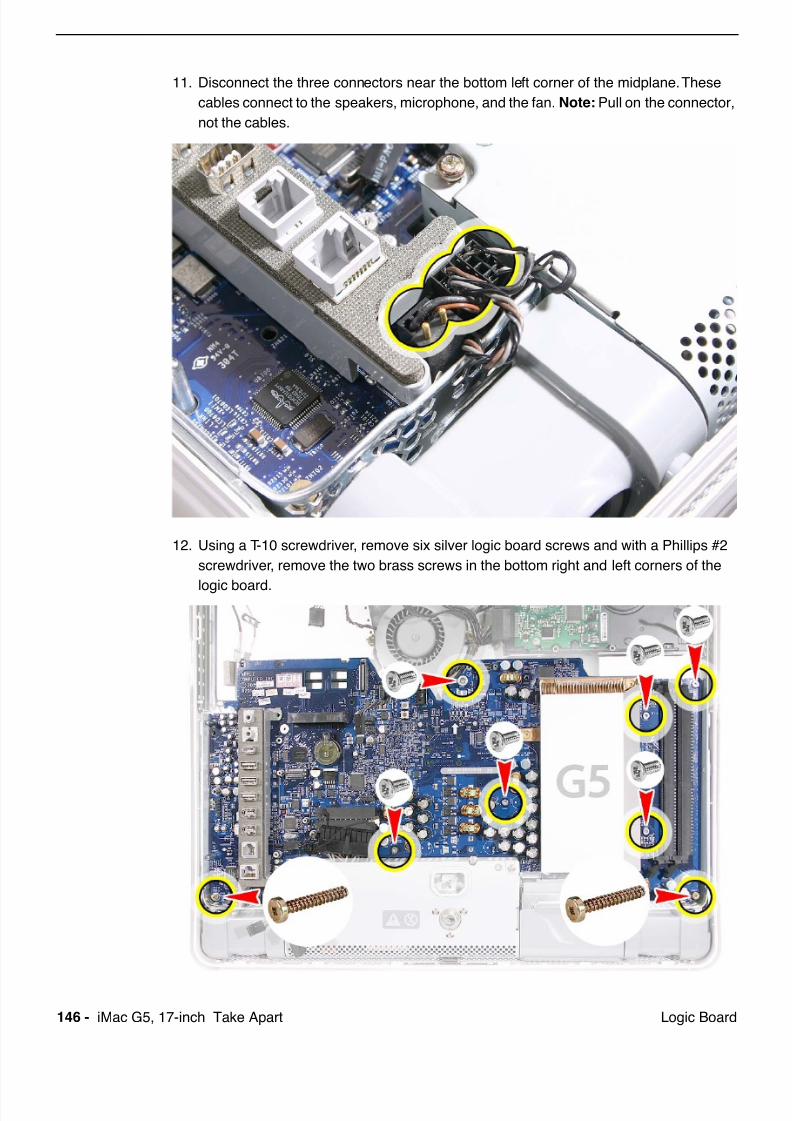
11. Disconnect the three connectors near the bottom left corner of the midplane. These
cables connect to the speakers, microphone, and the fan. Note: Pull on the connector,
not the cables.
12. Using a T-10 screwdriver, remove six silver logic board screws and with a Phillips #2
screwdriver, remove the two brass screws in the bottom right and left corners of the
logic board.

7/29/2019 Apple imacg5_17in
http://slidepdf.com/reader/full/apple-imacg517in 149/319iMac G5, 17-inch Take Apart -Logic Board
13. Carefully lift the logic board out of the midplane chassis.
14. Look on the back of the logic board for the light pipe and light pipe gasket. If you are
replacing the board, remove them.
15. If you don’t see the light pipe on the back of the logic board, it may be stuck in the
chassis (shown below). Use a needlenose pliers to remove the light pipe.
16. Return the logic board to Apple in the packaging provided.
7/29/2019 Apple imacg5_17in
http://slidepdf.com/reader/full/apple-imacg517in 150/319
7/29/2019 Apple imacg5_17in
http://slidepdf.com/reader/full/apple-imacg517in 151/319iMac G5, 17-inch Take Apart -Logic Board
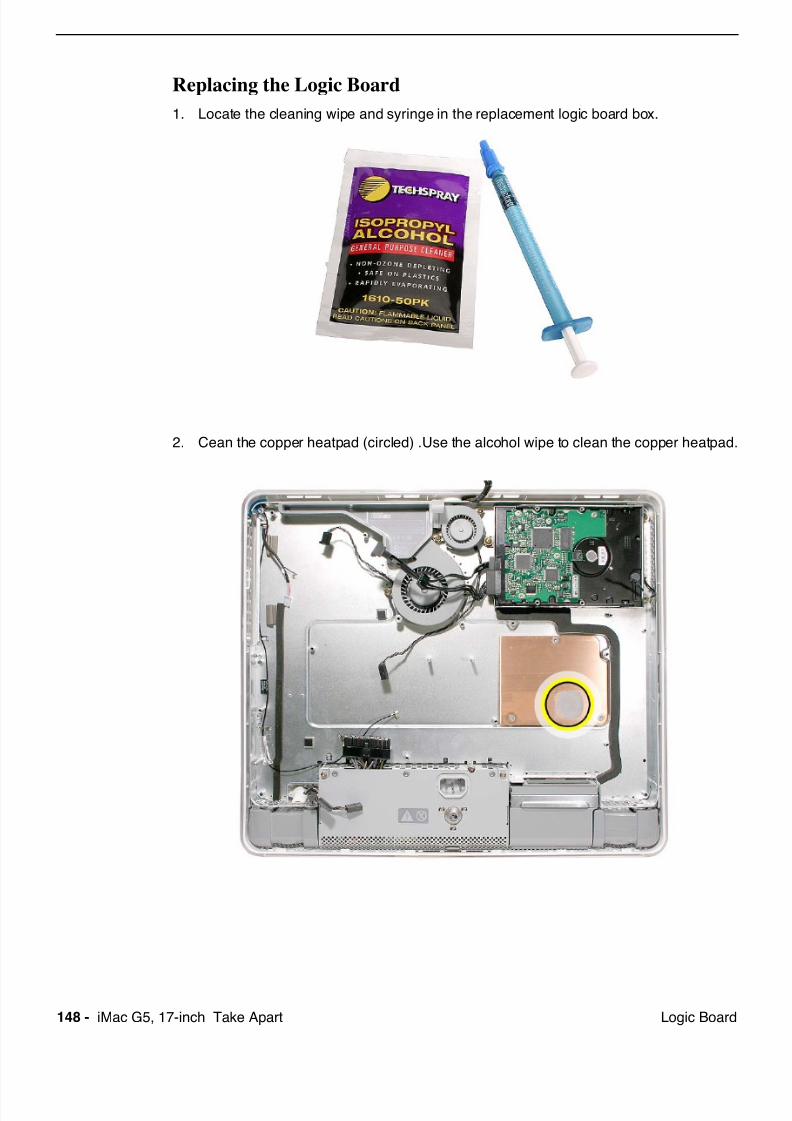
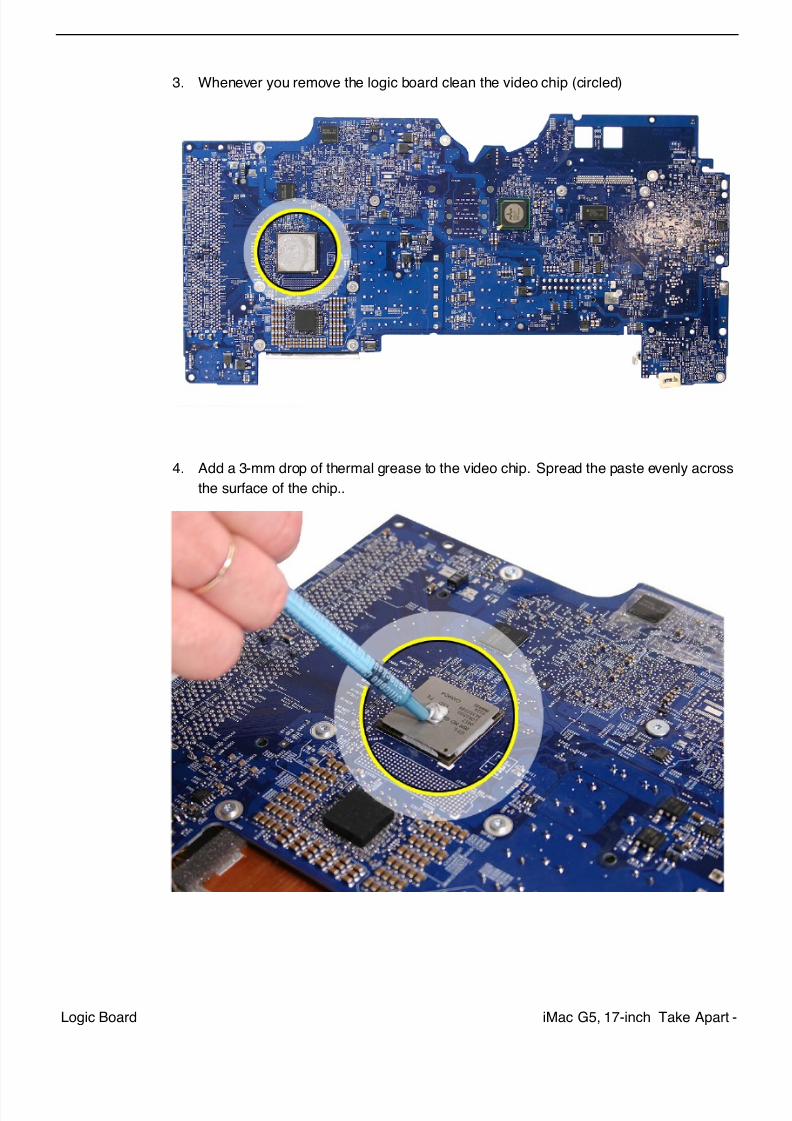
3. Whenever you remove the logic board clean the video chip (circled)
4. Add a 3-mm drop of thermal grease to the video chip. Spread the paste evenly across
the surface of the chip..
7/29/2019 Apple imacg5_17in
http://slidepdf.com/reader/full/apple-imacg517in 152/319150 - iMac G5, 17-inch Take Apart Logic Board
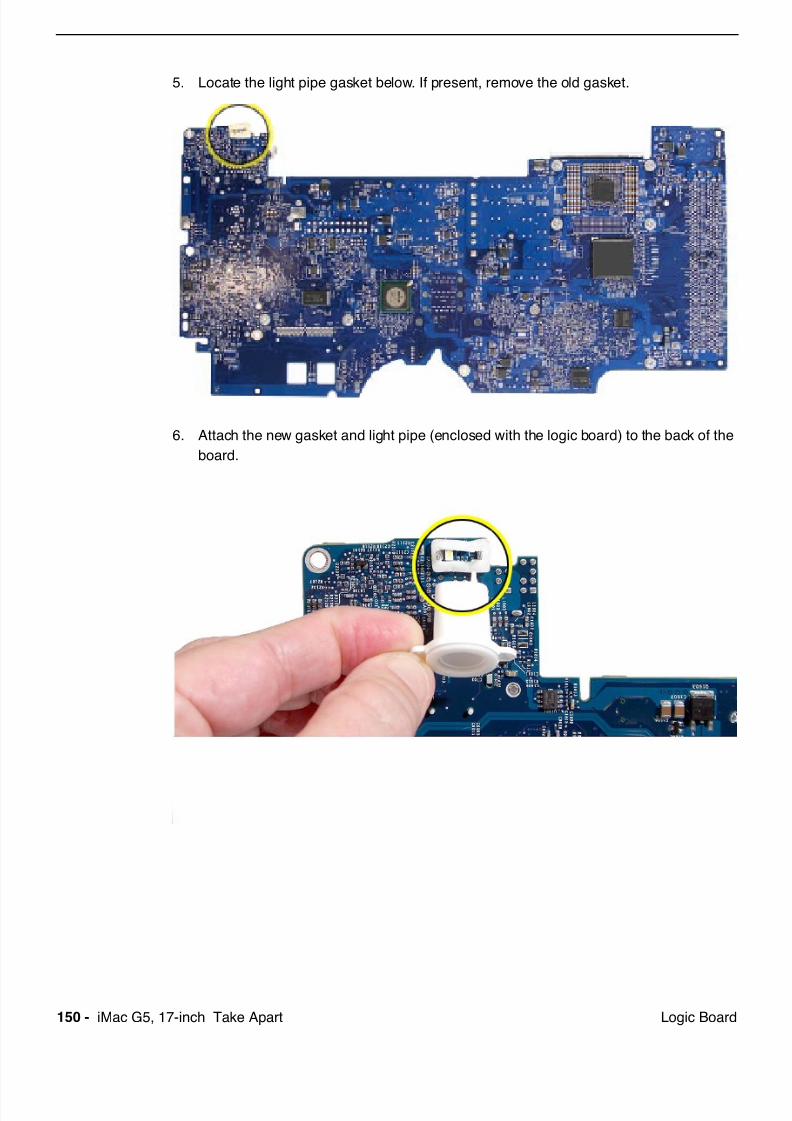
5. Locate the light pipe gasket below. If present, remove the old gasket.
6. Attach the new gasket and light pipe (enclosed with the logic board) to the back of the
board.
7/29/2019 Apple imacg5_17in
http://slidepdf.com/reader/full/apple-imacg517in 153/319
iMac G5, 17-inch Take Apart -Logic Board
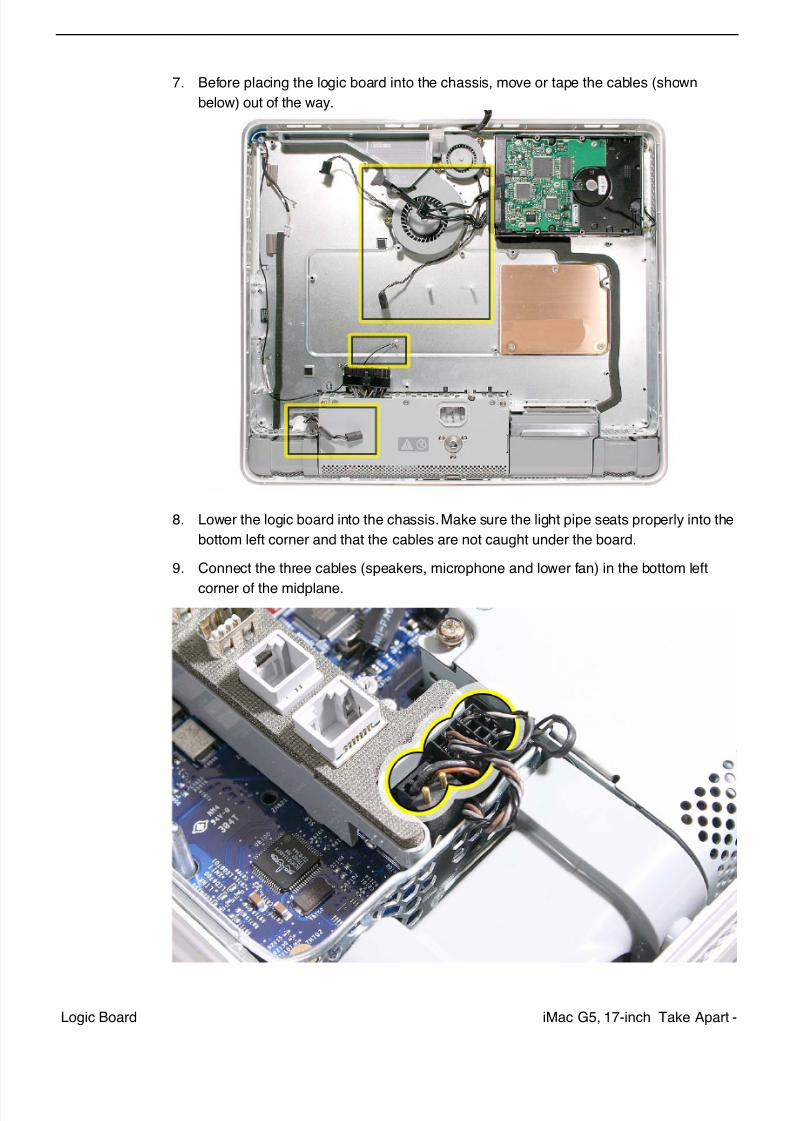
7. Before placing the logic board into the chassis, move or tape the cables (shown
below) out of the way.
8. Lower the logic board into the chassis. Make sure the light pipe seats properly into the
bottom left corner and that the cables are not caught under the board.
9. Connect the three cables (speakers, microphone and lower fan) in the bottom left
corner of the midplane.
7/29/2019 Apple imacg5_17in
http://slidepdf.com/reader/full/apple-imacg517in 154/319
152 - iMac G5, 17-inch Take Apart Logic Board
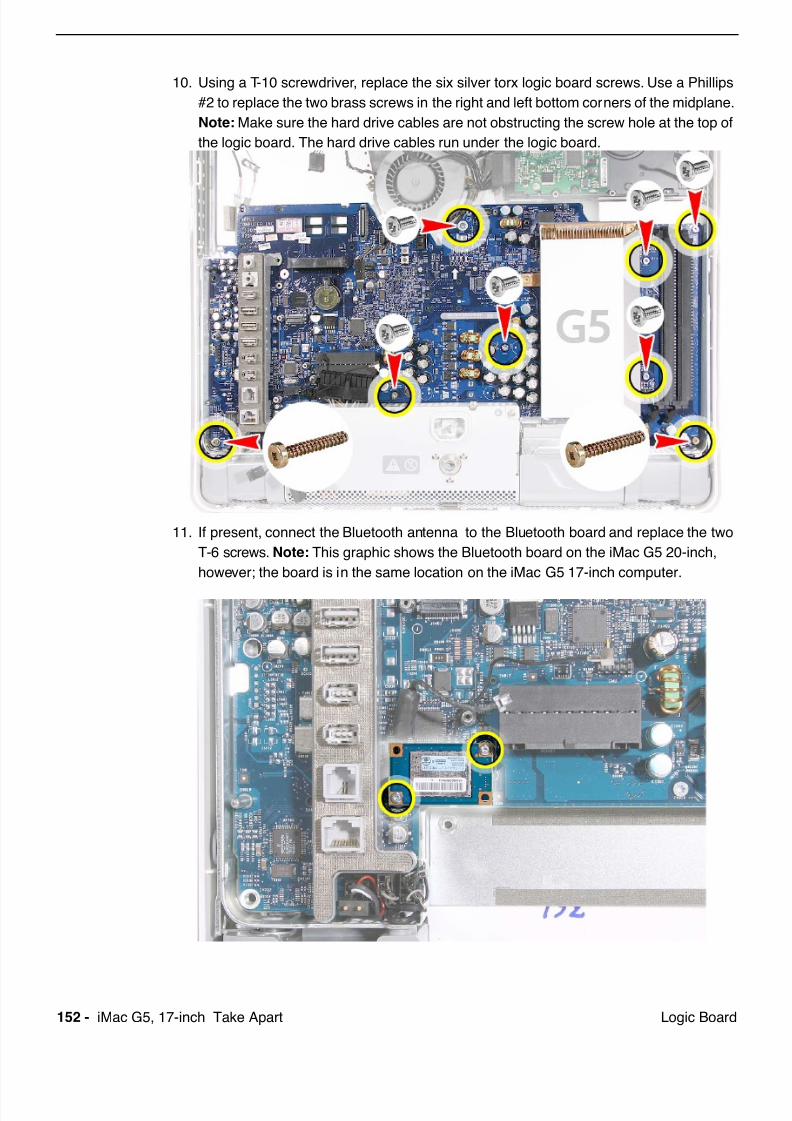
10. Using a T-10 screwdriver, replace the six silver torx logic board screws. Use a Phillips
#2 to replace the two brass screws in the right and left bottom corners of the midplane.
Note:
Make sure the hard drive cables are not obstructing the screw hole at the top of
the logic board. The hard drive cables run under the logic board.
11. If present, connect the Bluetooth antenna to the Bluetooth board and replace the two
T-6 screws. Note: This graphic shows the Bluetooth board on the iMac G5 20-inch,
however; the board is in the same location on the iMac G5 17-inch computer.
7/29/2019 Apple imacg5_17in
http://slidepdf.com/reader/full/apple-imacg517in 155/319iMac G5, 17-inch Take Apart -Logic Board
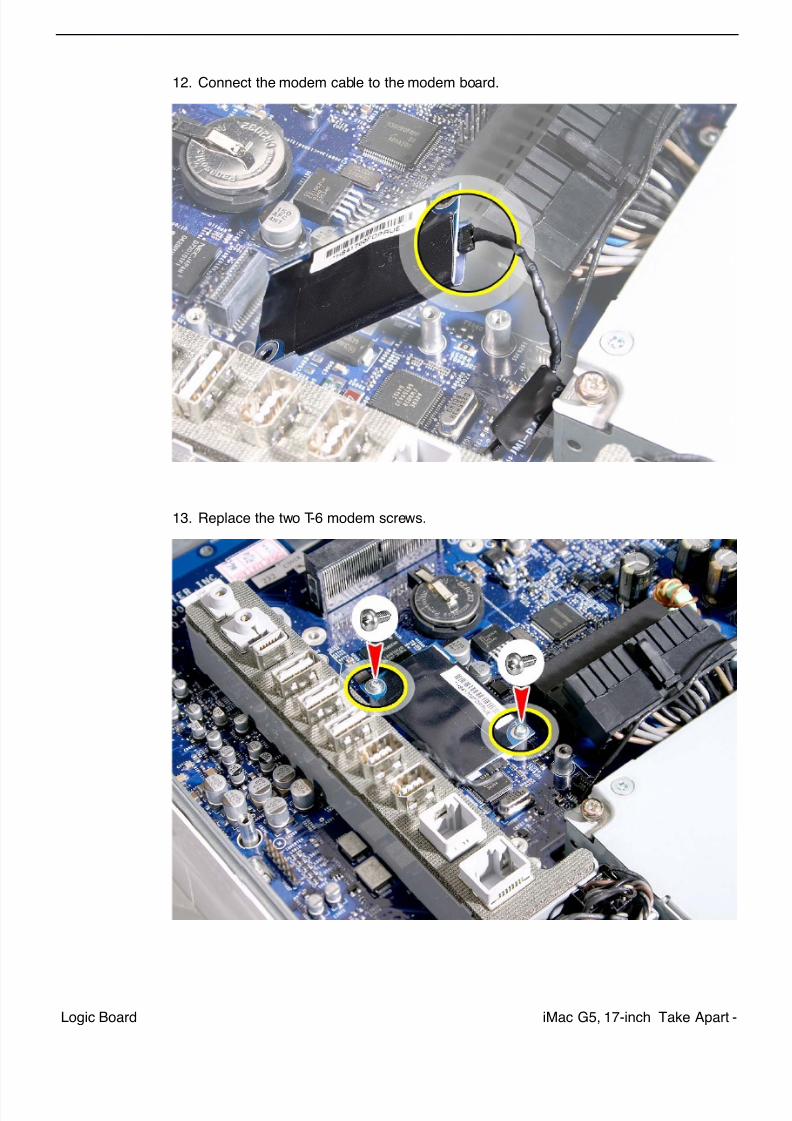
12. Connect the modem cable to the modem board.
13. Replace the two T-6 modem screws.

7/29/2019 Apple imacg5_17in
http://slidepdf.com/reader/full/apple-imacg517in 156/319
7/29/2019 Apple imacg5_17in
http://slidepdf.com/reader/full/apple-imacg517in 157/319
7/29/2019 Apple imacg5_17in
http://slidepdf.com/reader/full/apple-imacg517in 158/319156 - iMac G5, 17-inch Take Apart Logic Board
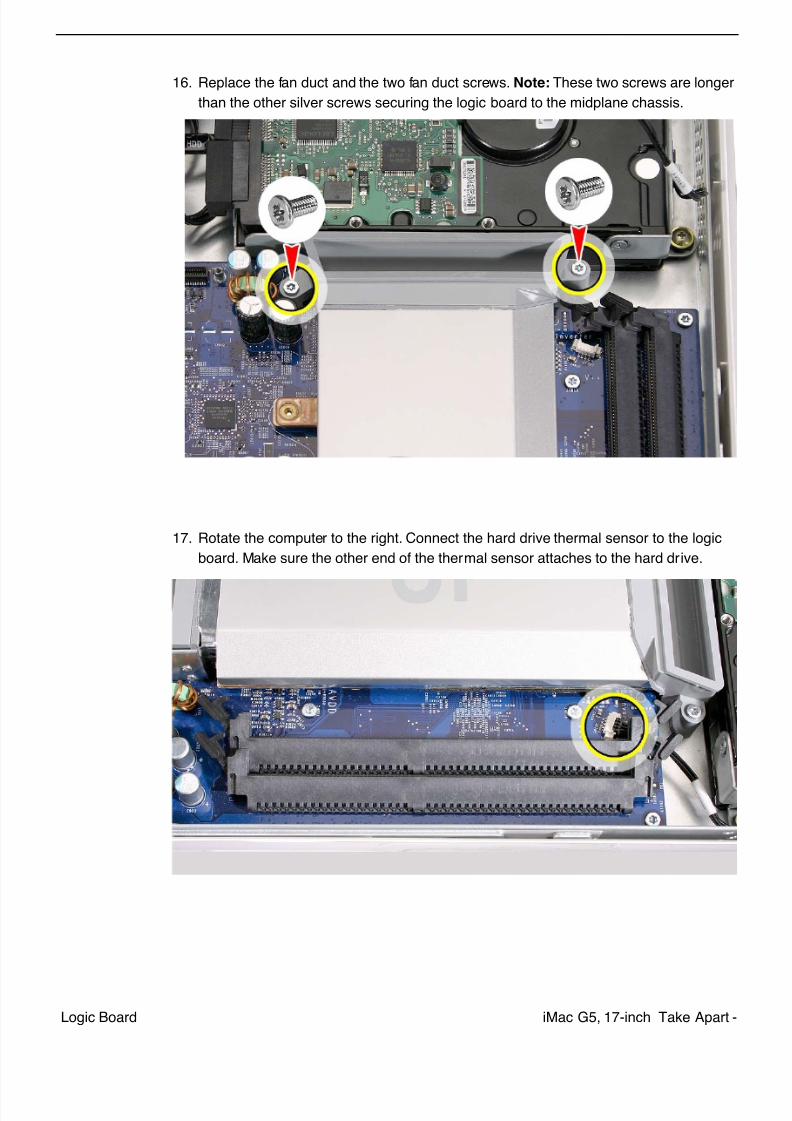
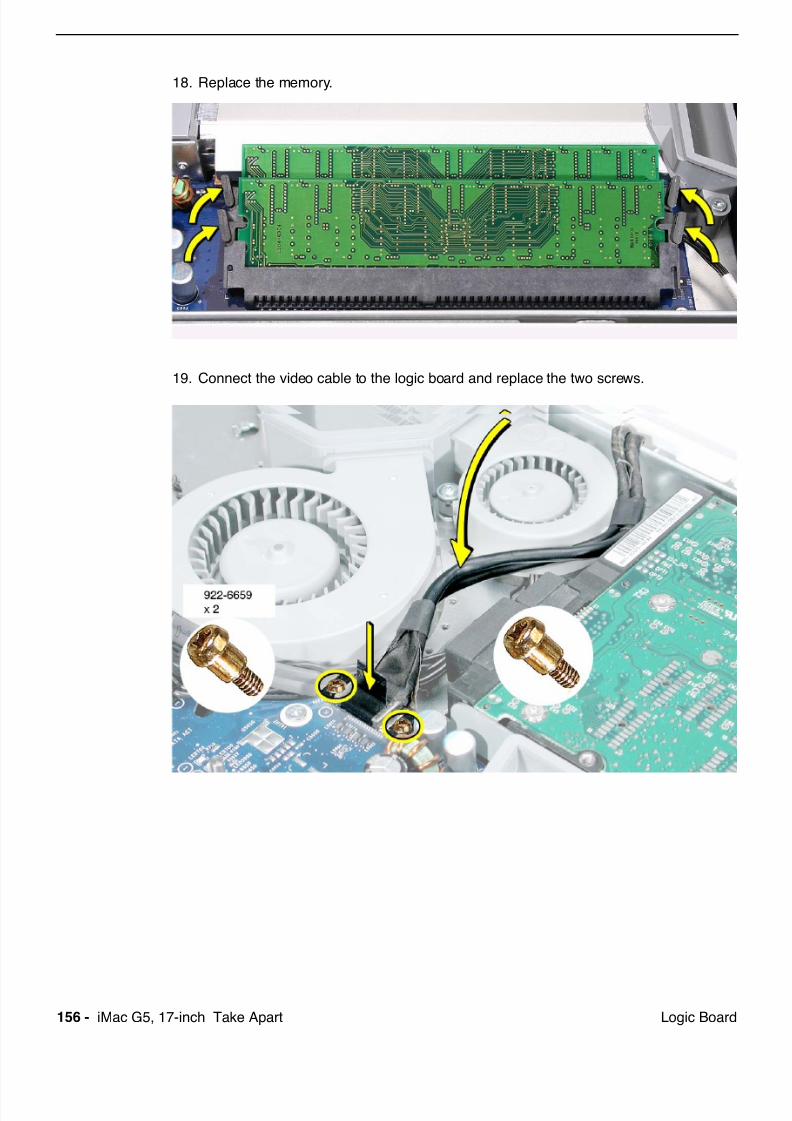
18. Replace the memory.
19. Connect the video cable to the logic board and replace the two screws.
7/29/2019 Apple imacg5_17in
http://slidepdf.com/reader/full/apple-imacg517in 159/319iMac G5, 17-inch Take Apart -Logic Board
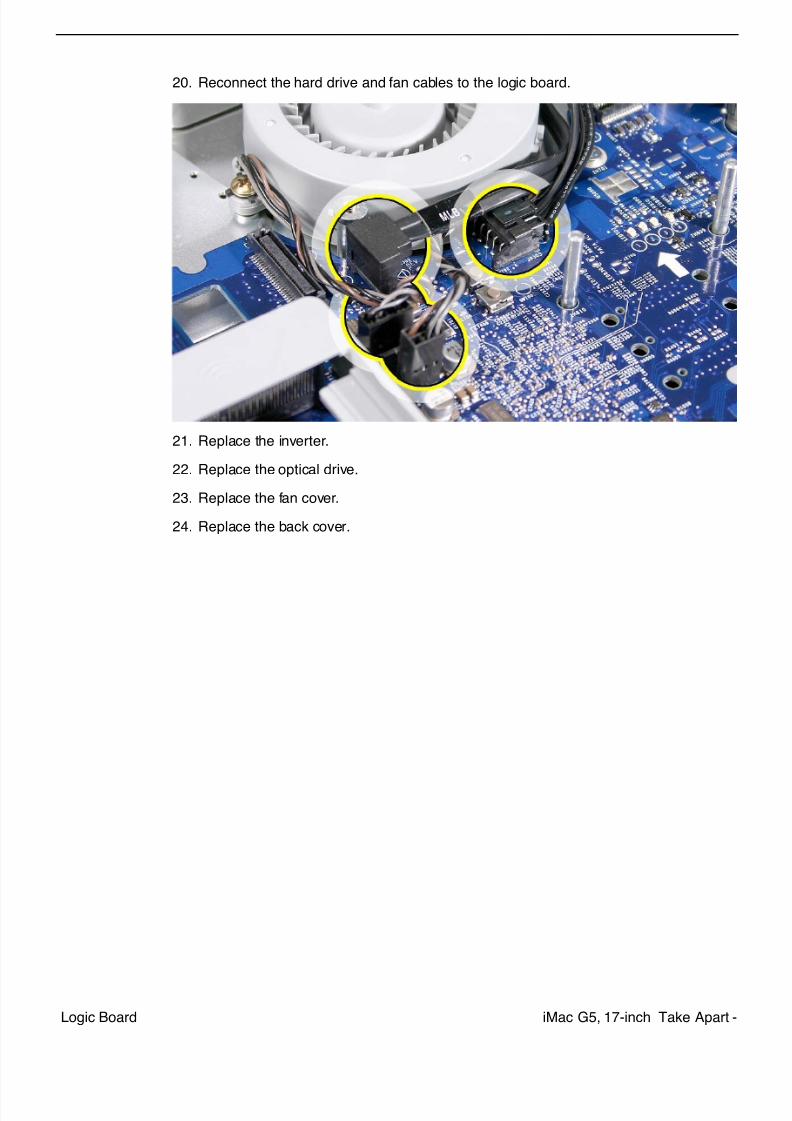
20. Reconnect the hard drive and fan cables to the logic board.
21. Replace the inverter.
22. Replace the optical drive.
23. Replace the fan cover.
24. Replace the back cover.
7/29/2019 Apple imacg5_17in
http://slidepdf.com/reader/full/apple-imacg517in 160/319158 - iMac G5, 17-inch Take Apart
Display/Bezel
Tools Required
• Use the tool provided, or a Phillips #2 screwdriver, preferably with a magnetized tip
• Screw tray or something equivalent to hold the screws
Preliminary Steps
Before you begin, remove the cover.
Part Location

7/29/2019 Apple imacg5_17in
http://slidepdf.com/reader/full/apple-imacg517in 161/319iMac G5, 17-inch Take Apart -Display/Bezel
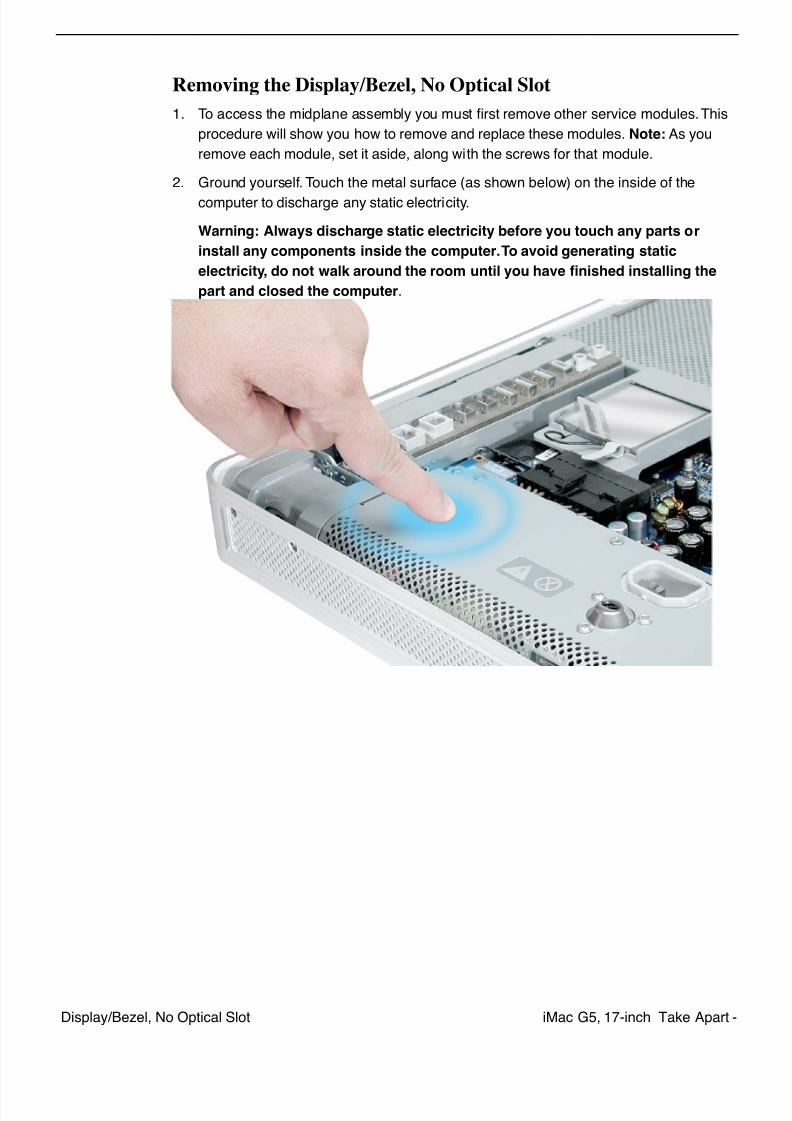
Removing the Display/Bezel
1. To access the display/bezel assembly other service modules have to be removed. This
procedure will show you how to remove and replace each module. As you remove
each module, set it aside, along with the screws for that module.
2. Important: Ground yourself. Touch the metal surface (as shown below) on the inside
of the computer to discharge any static electricity.
Warning: Always discharge static electricity before you touch any parts or install any
components inside the computer. To avoid generating static electricity, do not walk
around the room until you have finished installing the part and closed the computer.
7/29/2019 Apple imacg5_17in
http://slidepdf.com/reader/full/apple-imacg517in 162/319160 - iMac G5, 17-inch Take Apart Display/Bezel
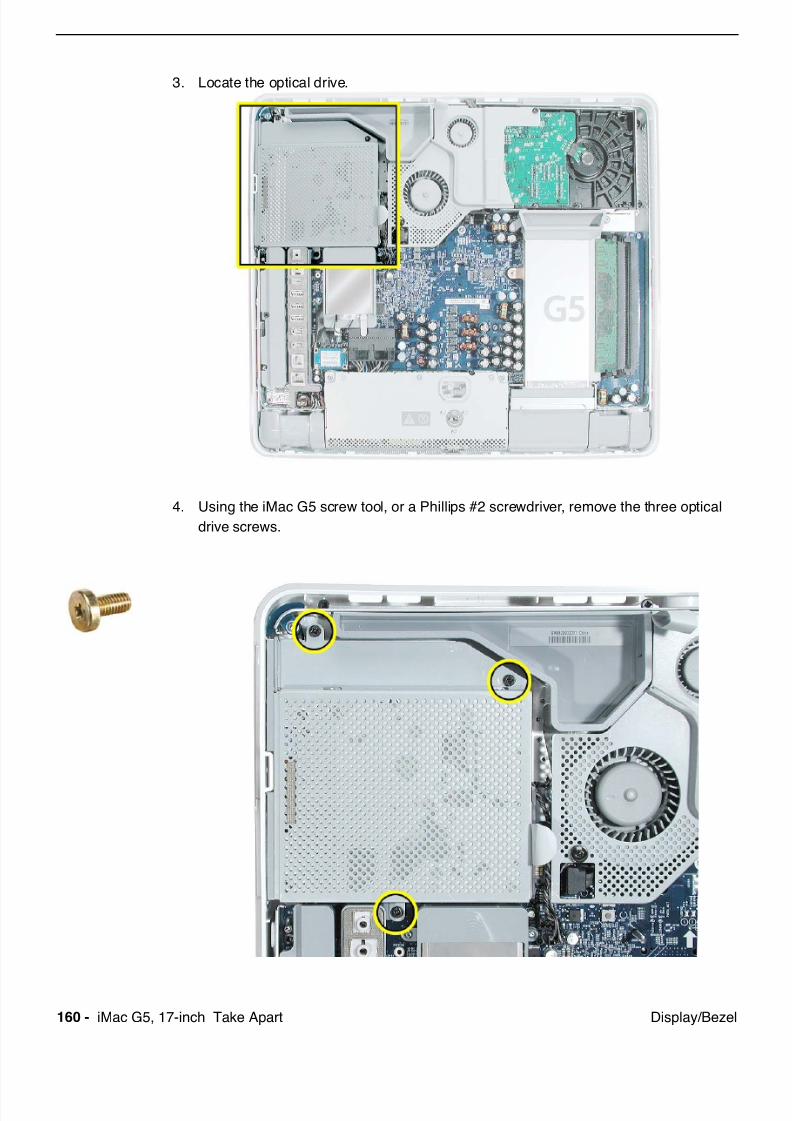
3. Locate the optical drive.
4. Using the iMac G5 screw tool, or a Phillips #2 screwdriver, remove the three optical
drive screws.
7/29/2019 Apple imacg5_17in
http://slidepdf.com/reader/full/apple-imacg517in 163/319iMac G5, 17-inch Take Apart -Display/Bezel
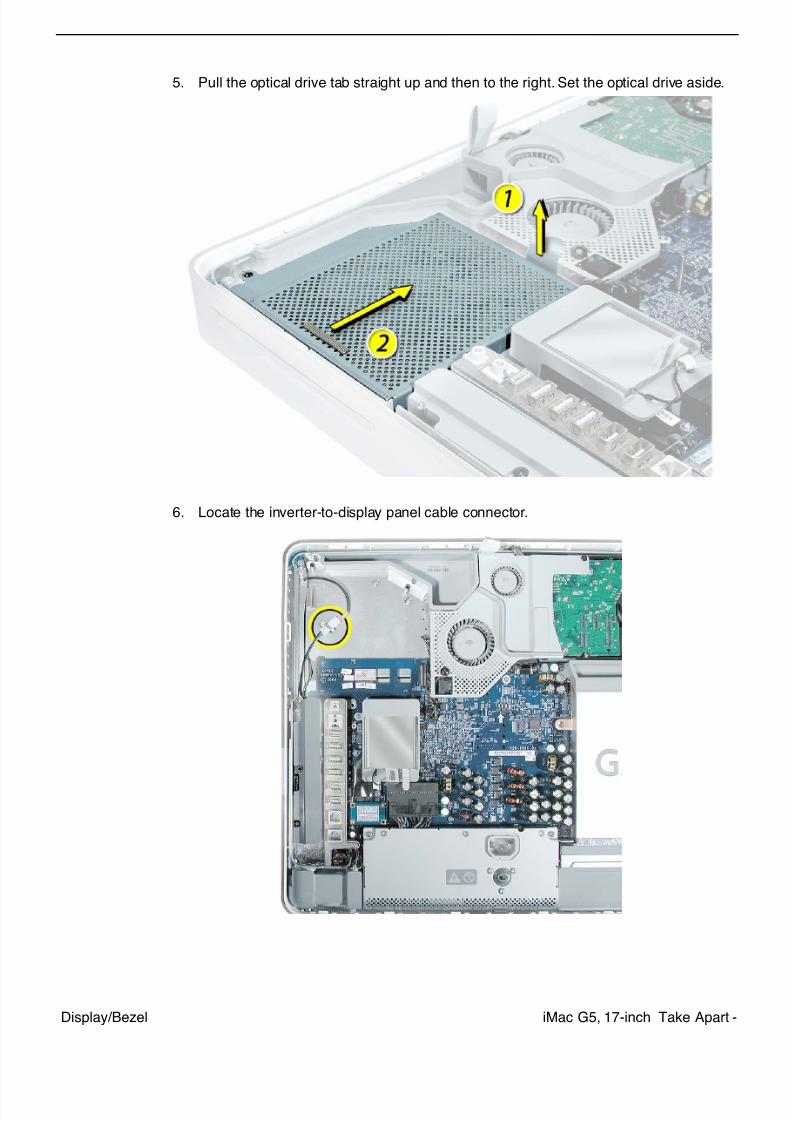
5. Pull the optical drive tab straight up and then to the right. Set the optical drive aside.
6. Locate the inverter-to-display panel cable connector.
7/29/2019 Apple imacg5_17in
http://slidepdf.com/reader/full/apple-imacg517in 164/319
7/29/2019 Apple imacg5_17in
http://slidepdf.com/reader/full/apple-imacg517in 165/319
7/29/2019 Apple imacg5_17in
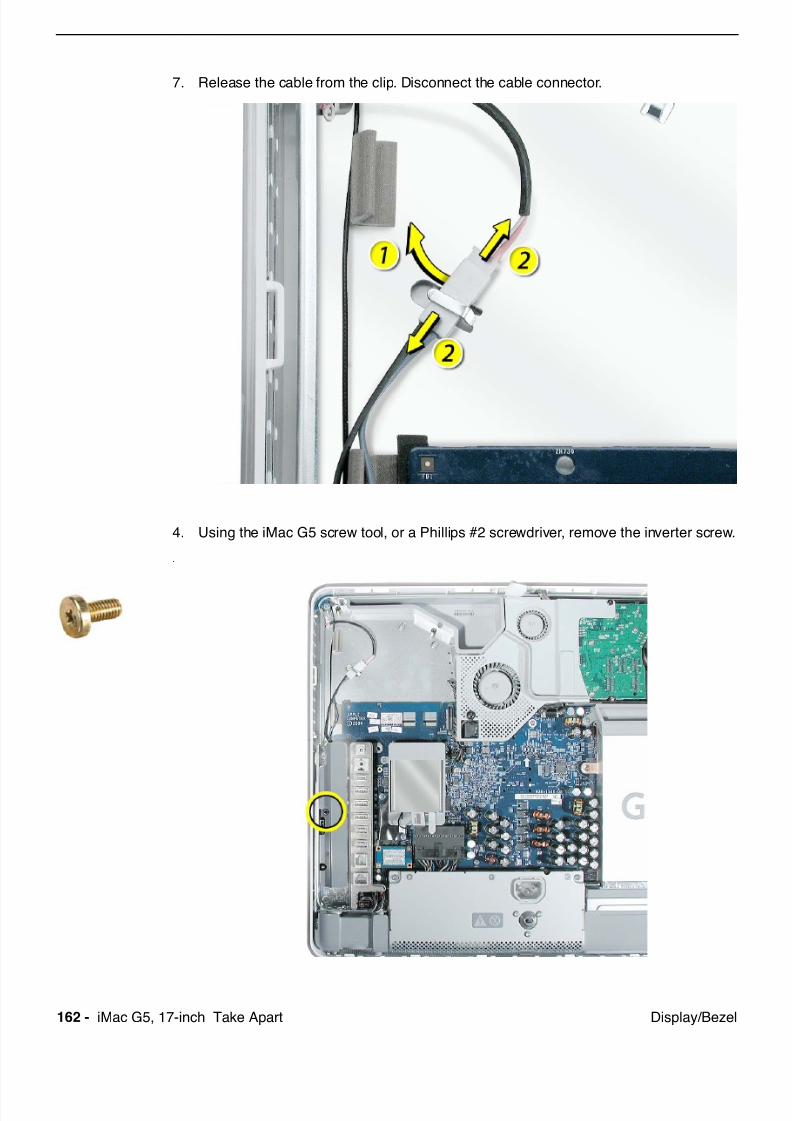
http://slidepdf.com/reader/full/apple-imacg517in 166/319164 - iMac G5, 17-inch Take Apart Display/Bezel
7. Locate the fan cover shown below.
4. Using the iMac G5 screw tool, or a Phillips #2 and #2 screwdriver, remove the two fan
cover screws. Lift the fan cover off the midplane and set the fan cover aside.

7/29/2019 Apple imacg5_17in
http://slidepdf.com/reader/full/apple-imacg517in 167/319
7/29/2019 Apple imacg5_17in
http://slidepdf.com/reader/full/apple-imacg517in 168/319166 - iMac G5, 17-inch Take Apart Display/Bezel
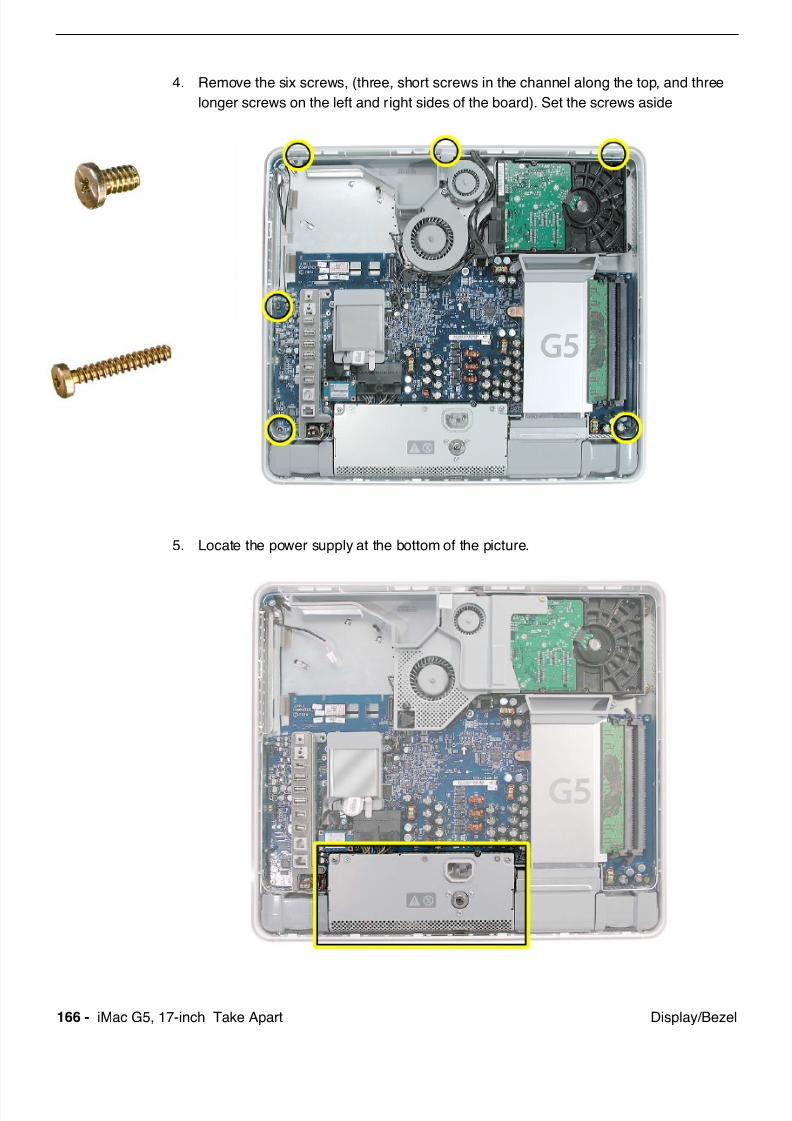
4. Remove the six screws, (three, short screws in the channel along the top, and three
longer screws on the left and right sides of the board). Set the screws aside
5. Locate the power supply at the bottom of the picture.

7/29/2019 Apple imacg5_17in
http://slidepdf.com/reader/full/apple-imacg517in 169/319iMac G5, 17-inch Take Apart -Display/Bezel
6. Loosen the captive power supply screw (circled below) by turning it to the left five to
eight revolutions. The screw is captive; it will not come out. Note: You do not need to
remove the power supply.
7. Turn the middle case screw to the right about five revolutions. This releases a screw
clamp that holds the power supply in the display/bezel assembly.
7/29/2019 Apple imacg5_17in
http://slidepdf.com/reader/full/apple-imacg517in 170/319168 - iMac G5, 17-inch Take Apart Display/Bezel
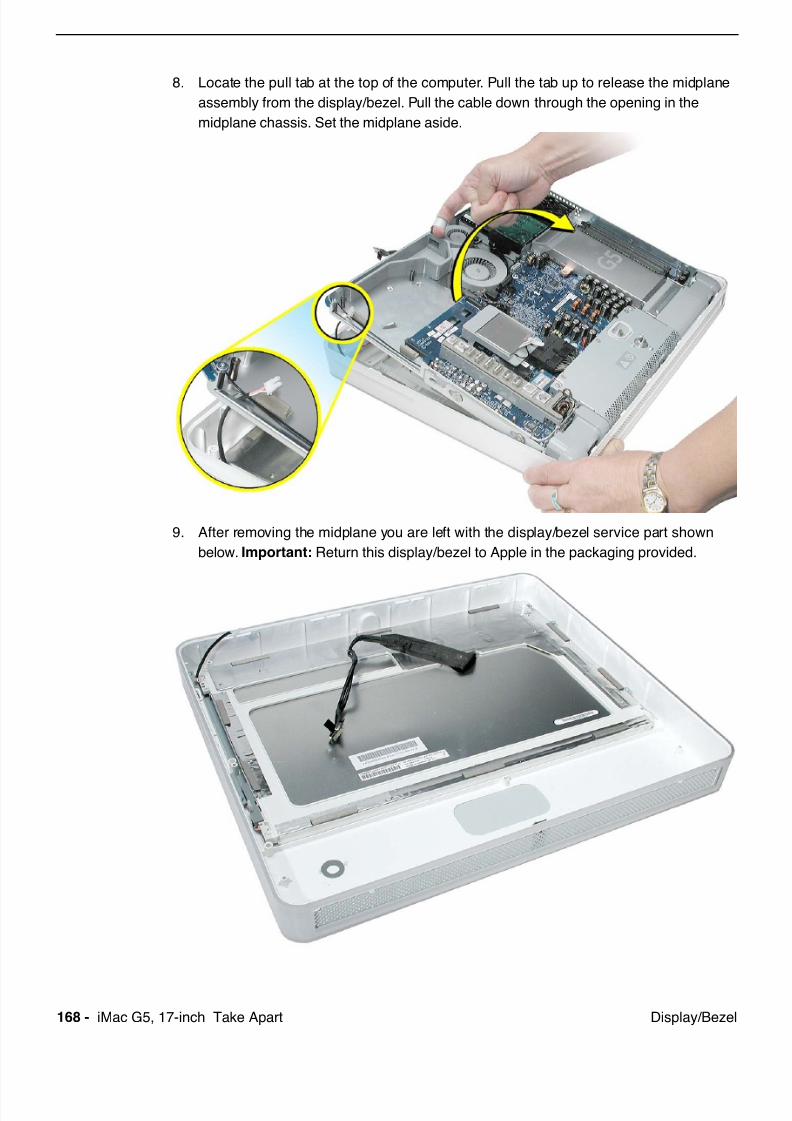
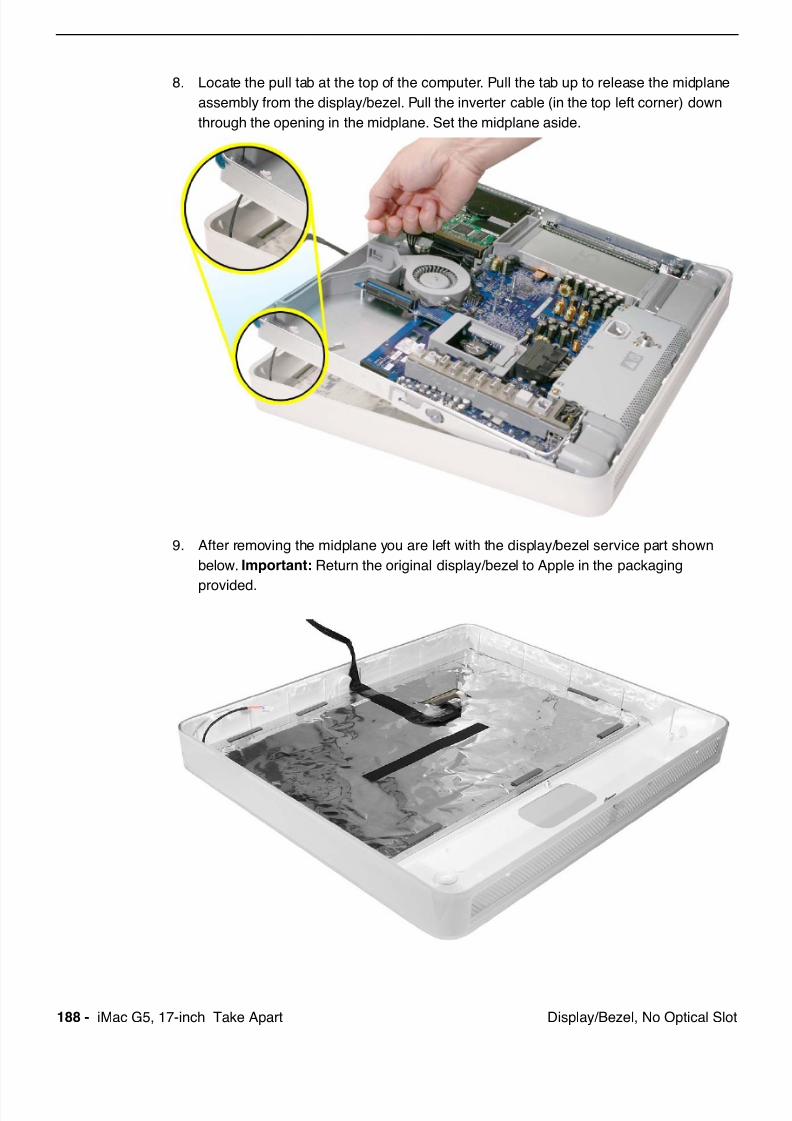
8. Locate the pull tab at the top of the computer. Pull the tab up to release the midplane
assembly from the display/bezel. Pull the cable down through the opening in the
midplane chassis. Set the midplane aside.
9. After removing the midplane you are left with the display/bezel service part shown
below. Important: Return this display/bezel to Apple in the packaging provided.
7/29/2019 Apple imacg5_17in
http://slidepdf.com/reader/full/apple-imacg517in 171/319iMac G5, 17-inch Take Apart -Display/Bezel
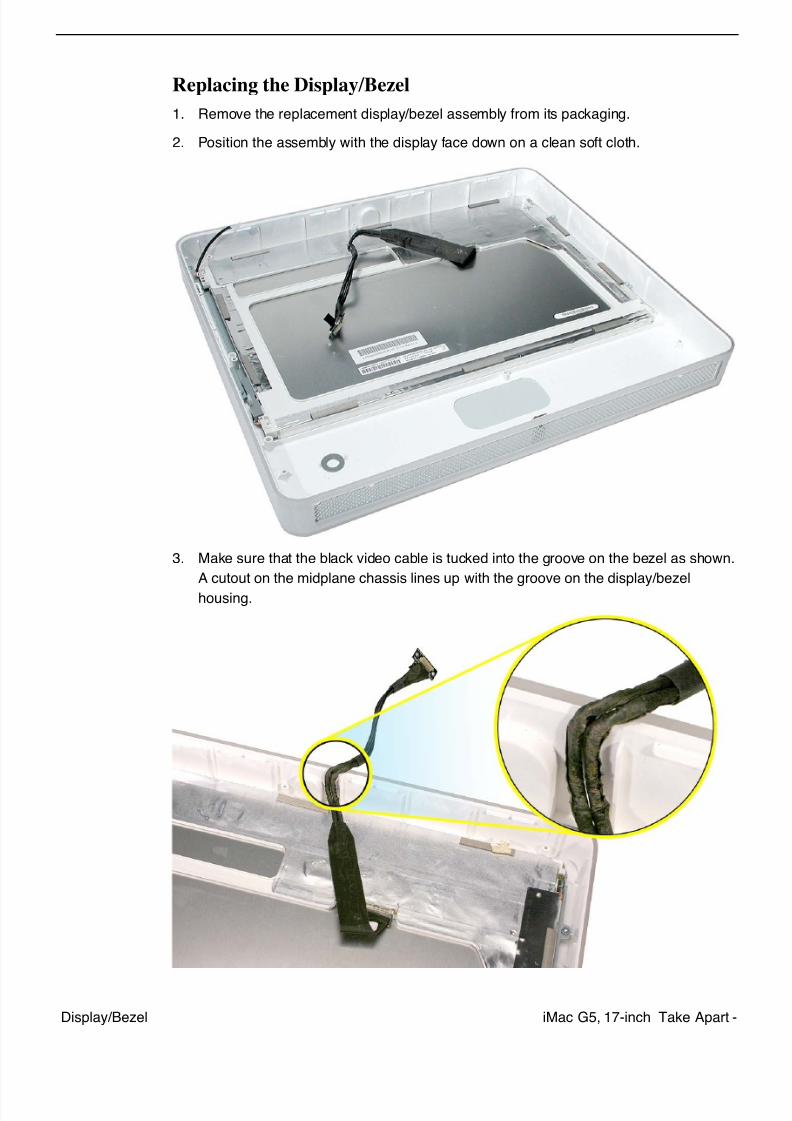
Replacing the Display/Bezel
1. Remove the replacement display/bezel assembly from its packaging.
2. Position the assembly with the display face down on a clean soft cloth.
3. Make sure that the black video cable is tucked into the groove on the bezel as shown.
A cutout on the midplane chassis lines up with the groove on the display/bezel
housing.
7/29/2019 Apple imacg5_17in
http://slidepdf.com/reader/full/apple-imacg517in 172/319170 - iMac G5, 17-inch Take Apart Display/Bezel
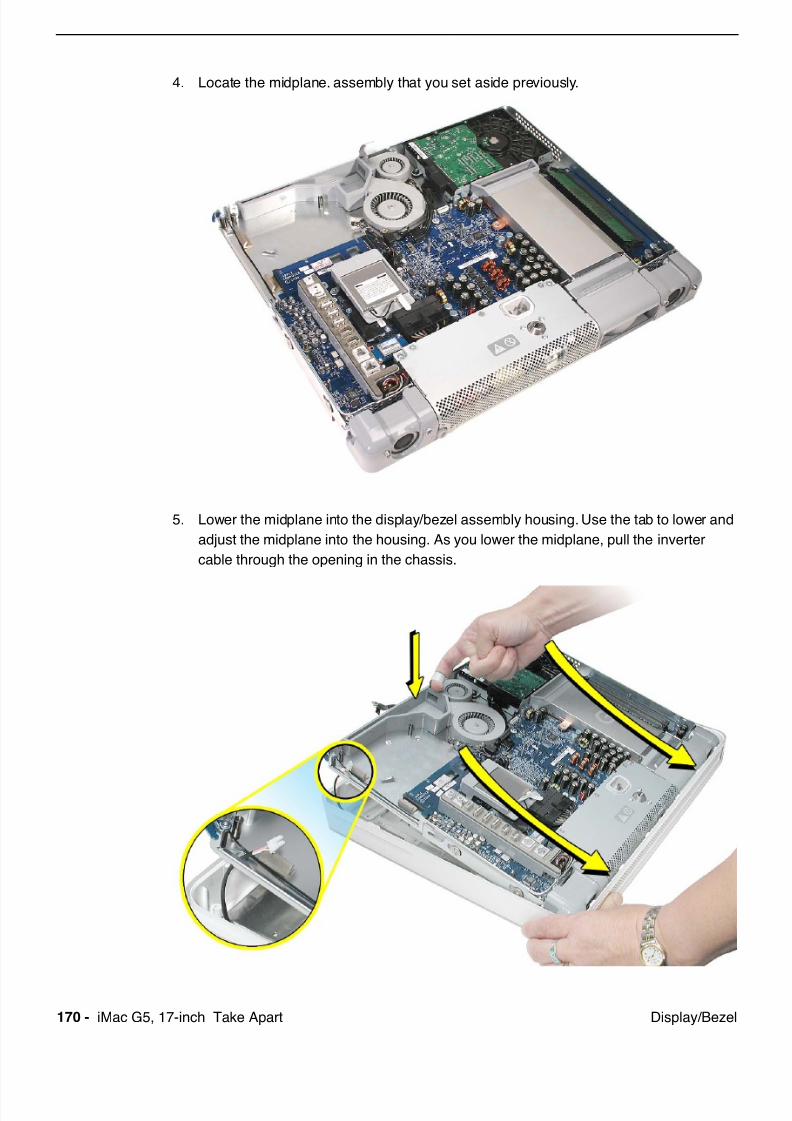
4. Locate the midplane. assembly that you set aside previously.
5. Lower the midplane into the display/bezel assembly housing. Use the tab to lower and
adjust the midplane into the housing. As you lower the midplane, pull the inverter
cable through the opening in the chassis.
7/29/2019 Apple imacg5_17in
http://slidepdf.com/reader/full/apple-imacg517in 173/319iMac G5, 17-inch Take Apart -Display/Bezel
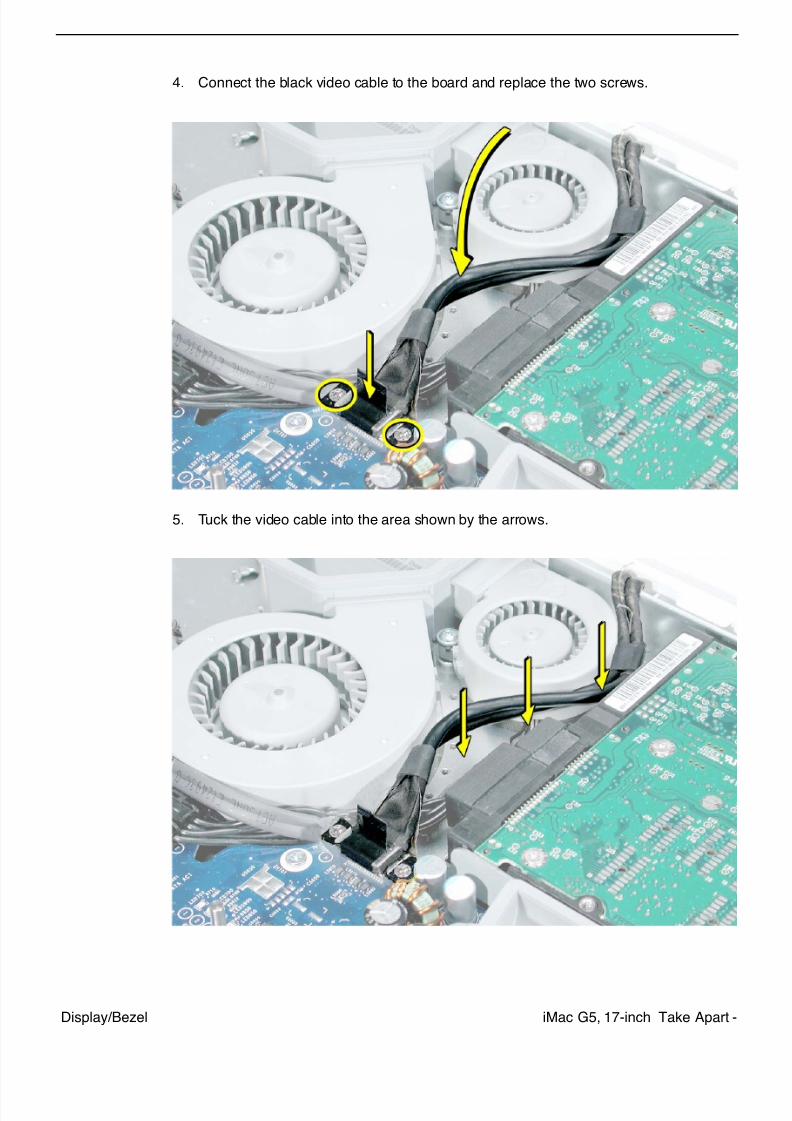
4. Connect the black video cable to the board and replace the two screws.
5. Tuck the video cable into the area shown by the arrows.
7/29/2019 Apple imacg5_17in
http://slidepdf.com/reader/full/apple-imacg517in 174/319172 - iMac G5, 17-inch Take Apart Display/Bezel
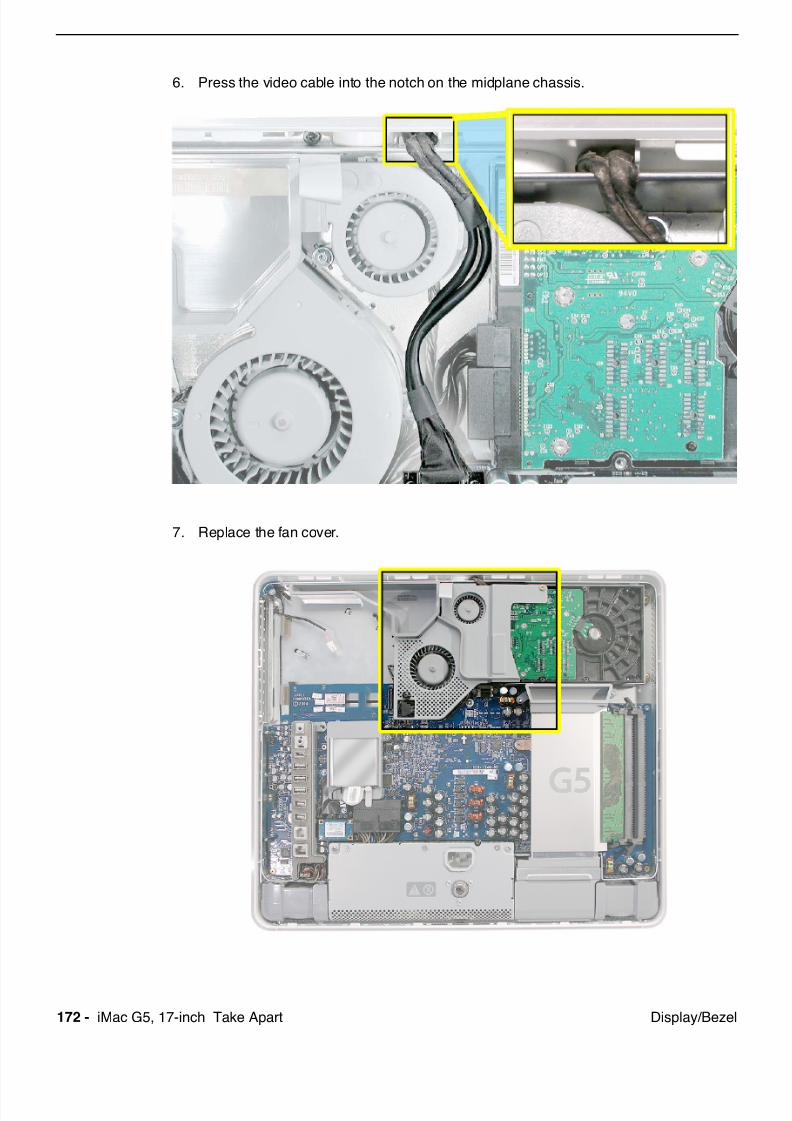
6. Press the video cable into the notch on the midplane chassis.
7. Replace the fan cover.
7/29/2019 Apple imacg5_17in
http://slidepdf.com/reader/full/apple-imacg517in 175/319iMac G5, 17-inch Take Apart -Display/Bezel
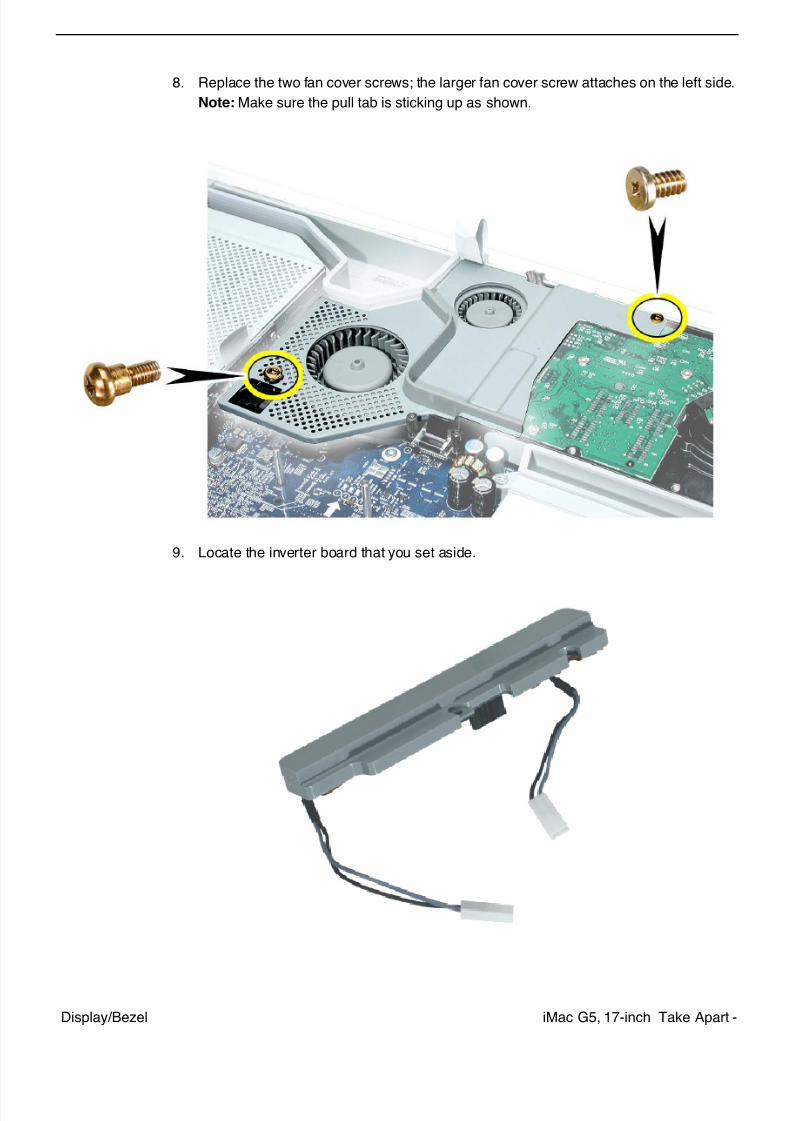
8. Replace the two fan cover screws; the larger fan cover screw attaches on the left side.
Note: Make sure the pull tab is sticking up as shown.
9. Locate the inverter board that you set aside.
7/29/2019 Apple imacg5_17in
http://slidepdf.com/reader/full/apple-imacg517in 176/319174 - iMac G5, 17-inch Take Apart Display/Bezel
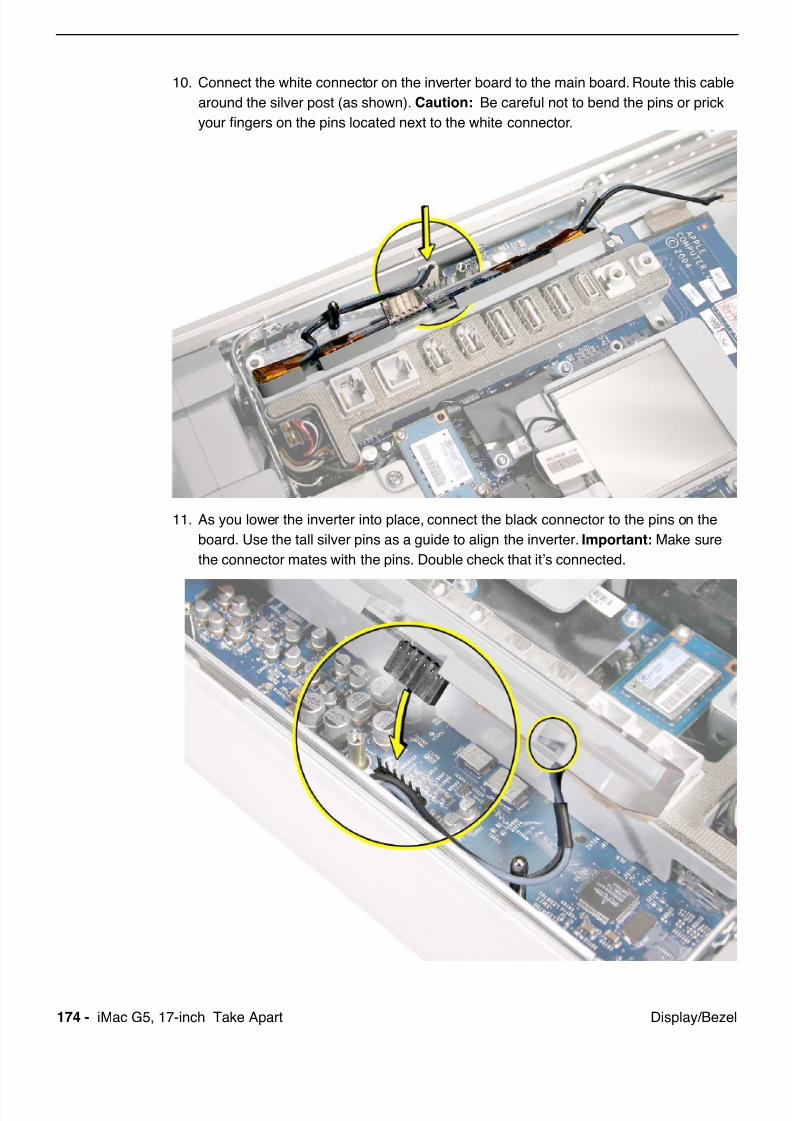
10. Connect the white connector on the inverter board to the main board. Route this cable
around the silver post (as shown). Caution: Be careful not to bend the pins or prick
your fingers on the pins located next to the white connector.
11. As you lower the inverter into place, connect the black connector to the pins on the
board. Use the tall silver pins as a guide to align the inverter. Important: Make sure
the connector mates with the pins. Double check that it’s connected.
7/29/2019 Apple imacg5_17in
http://slidepdf.com/reader/full/apple-imacg517in 177/319iMac G5, 17-inch Take Apart -Display/Bezel
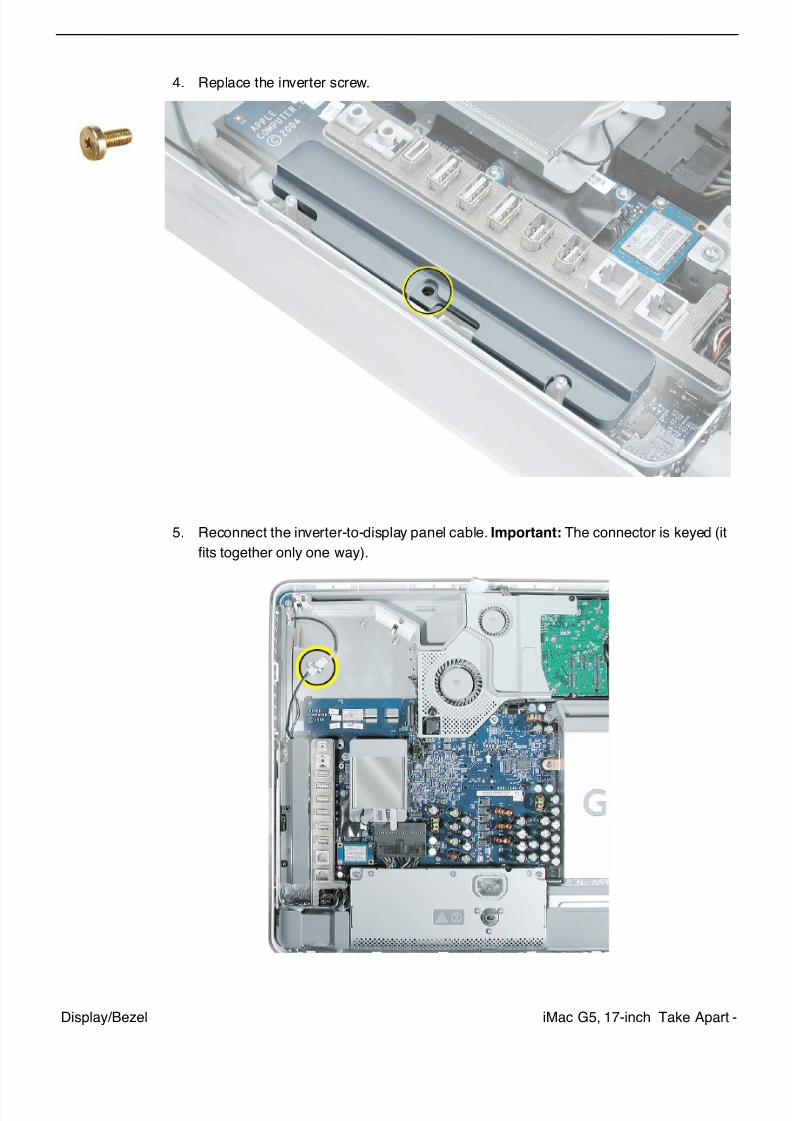
4. Replace the inverter screw.
5. Reconnect the inverter-to-display panel cable. Important: The connector is keyed (it
fits together only one way).
7/29/2019 Apple imacg5_17in
http://slidepdf.com/reader/full/apple-imacg517in 178/319176 - iMac G5, 17-inch Take Apart Display/Bezel
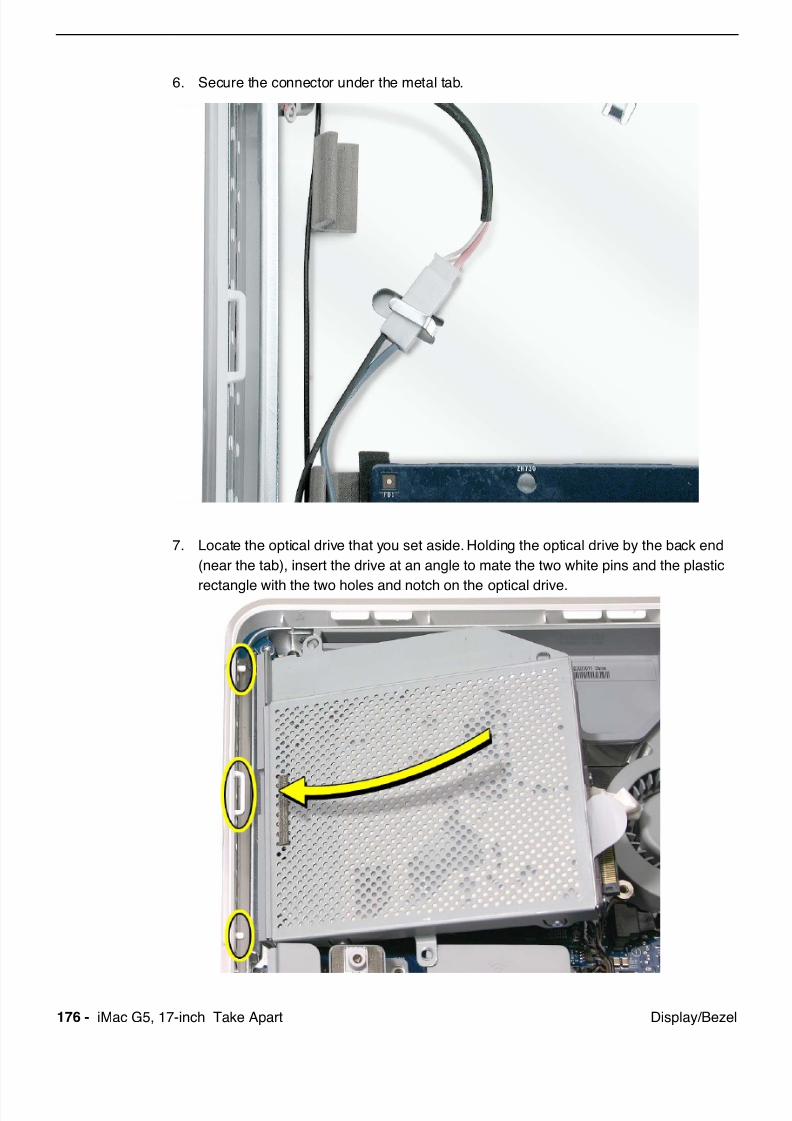
6. Secure the connector under the metal tab.
7. Locate the optical drive that you set aside. Holding the optical drive by the back end
(near the tab), insert the drive at an angle to mate the two white pins and the plastic
rectangle with the two holes and notch on the optical drive.

7/29/2019 Apple imacg5_17in
http://slidepdf.com/reader/full/apple-imacg517in 179/319iMac G5, 17-inch Take Apart -Display/Bezel
8. With your thumb on the tab and your index finger behind the tab, push the drive
forward and down. The optical drive should click into its connector. Note: If the optical
drive won’t click into place, check that the fan cables are not obstructing the optical
drive connector.
9. Replace the three optical drive screws.
7/29/2019 Apple imacg5_17in
http://slidepdf.com/reader/full/apple-imacg517in 180/319178 - iMac G5, 17-inch Take Apart Display/Bezel
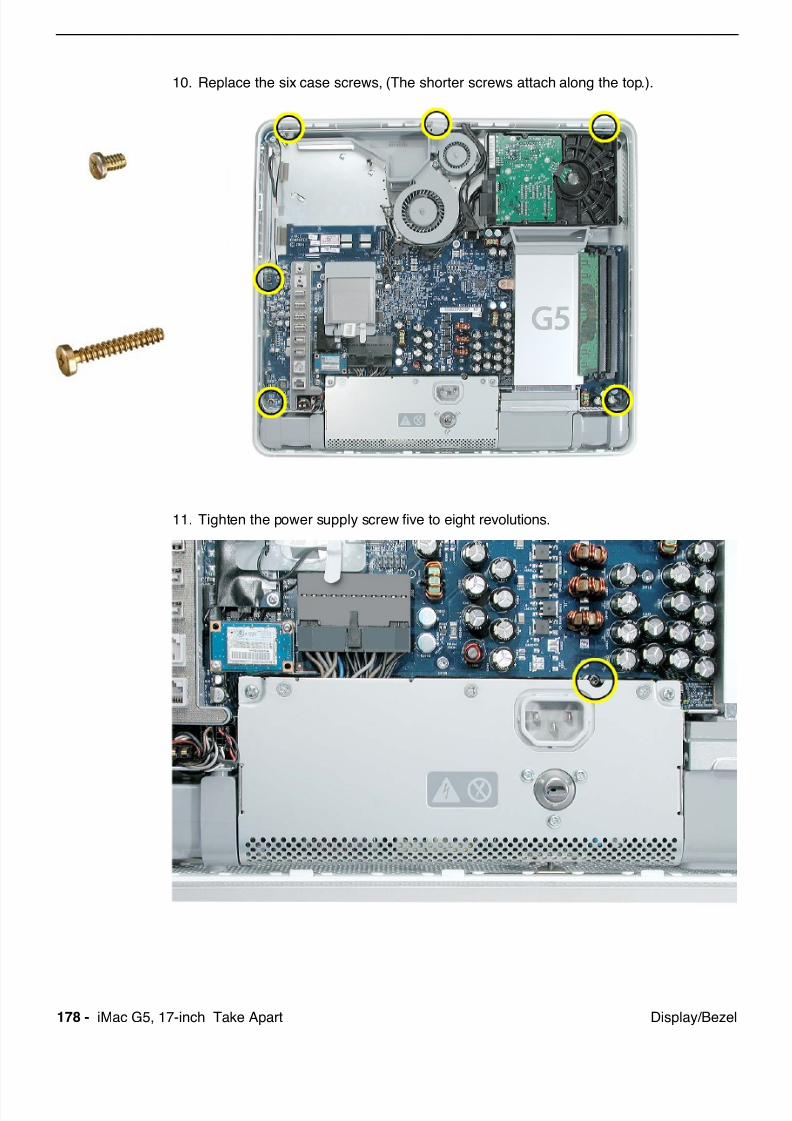
10. Replace the six case screws, (The shorter screws attach along the top.).
11. Tighten the power supply screw five to eight revolutions.

7/29/2019 Apple imacg5_17in
http://slidepdf.com/reader/full/apple-imacg517in 181/319iMac G5, 17-inch Take Apart -Display/Bezel
12. Turn the middle case screw to the left about five revolutions. This step prepares the
back cover to be installed and secured
7/29/2019 Apple imacg5_17in
http://slidepdf.com/reader/full/apple-imacg517in 182/319180 - iMac G5, 17-inch Take Apart Display/Bezel, No Optical Slot
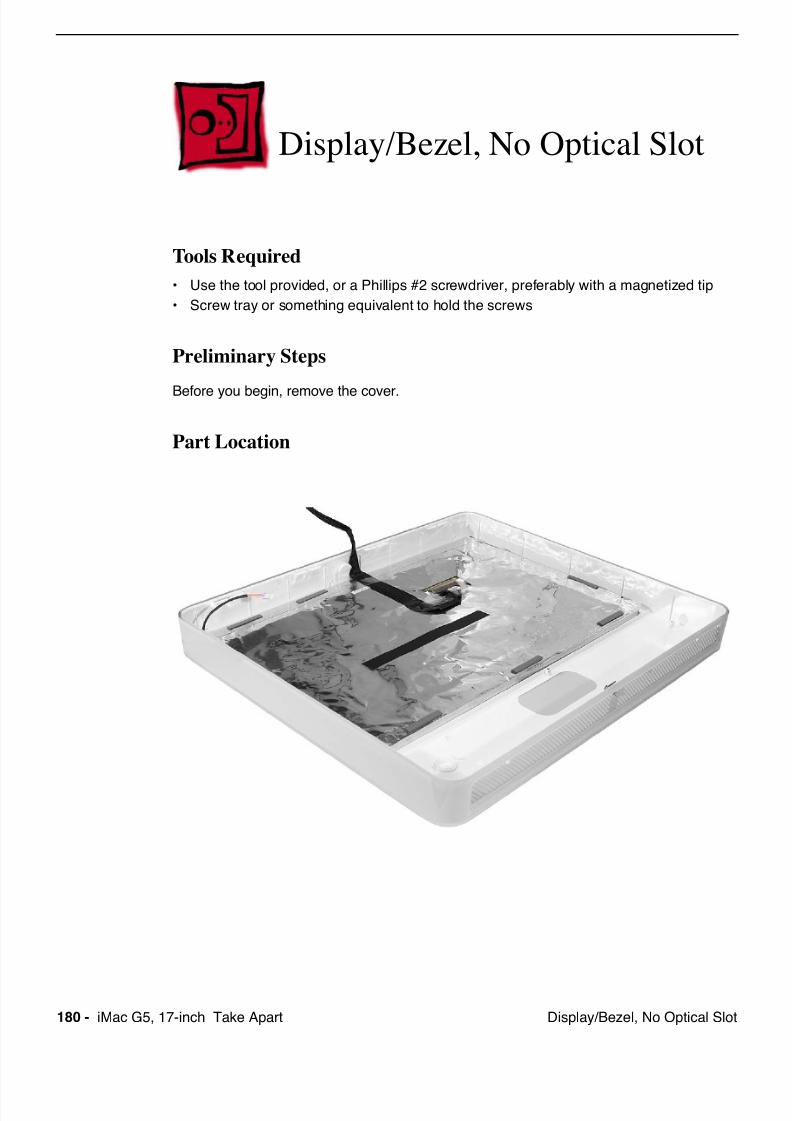
Display/Bezel, No Optical Slot
Tools Required
• Use the tool provided, or a Phillips #2 screwdriver, preferably with a magnetized tip
• Screw tray or something equivalent to hold the screws
Preliminary Steps
Before you begin, remove the cover.
Part Location
7/29/2019 Apple imacg5_17in
http://slidepdf.com/reader/full/apple-imacg517in 183/319
7/29/2019 Apple imacg5_17in
http://slidepdf.com/reader/full/apple-imacg517in 184/319182 - iMac G5, 17-inch Take Apart Display/Bezel, No Optical Slot
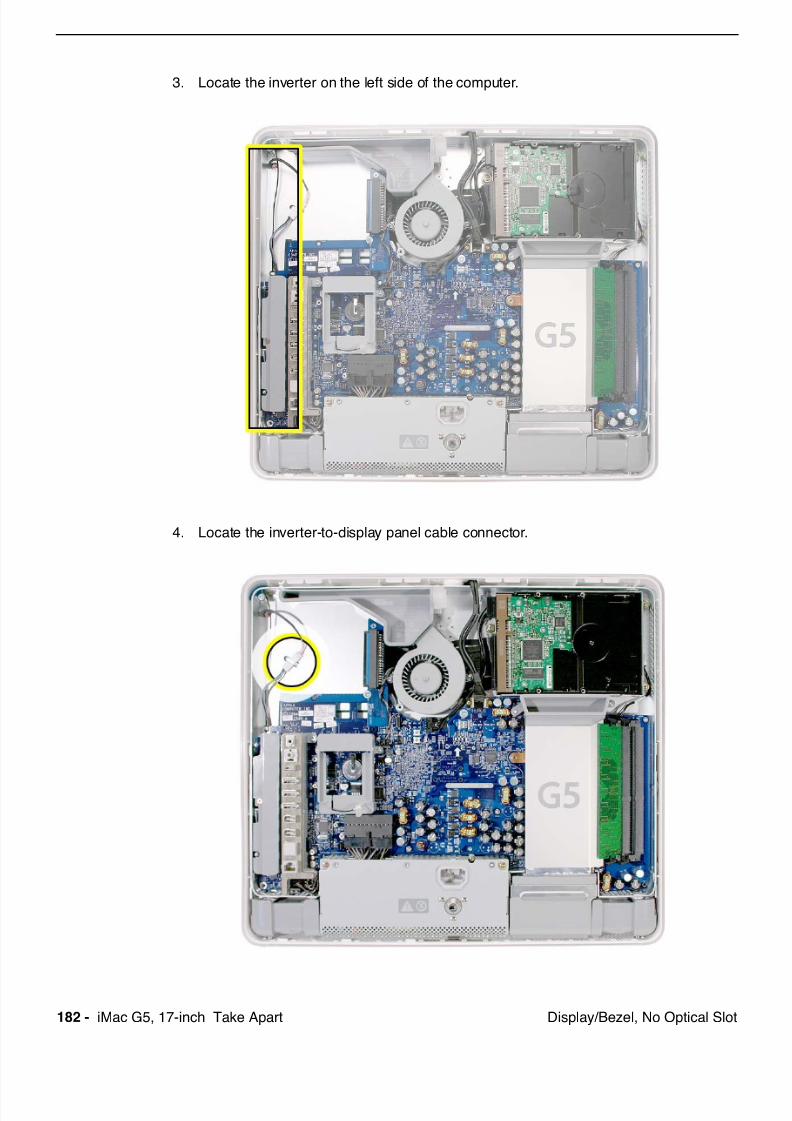
3. Locate the inverter on the left side of the computer.
4. Locate the inverter-to-display panel cable connector.
7/29/2019 Apple imacg5_17in
http://slidepdf.com/reader/full/apple-imacg517in 185/319

7/29/2019 Apple imacg5_17in
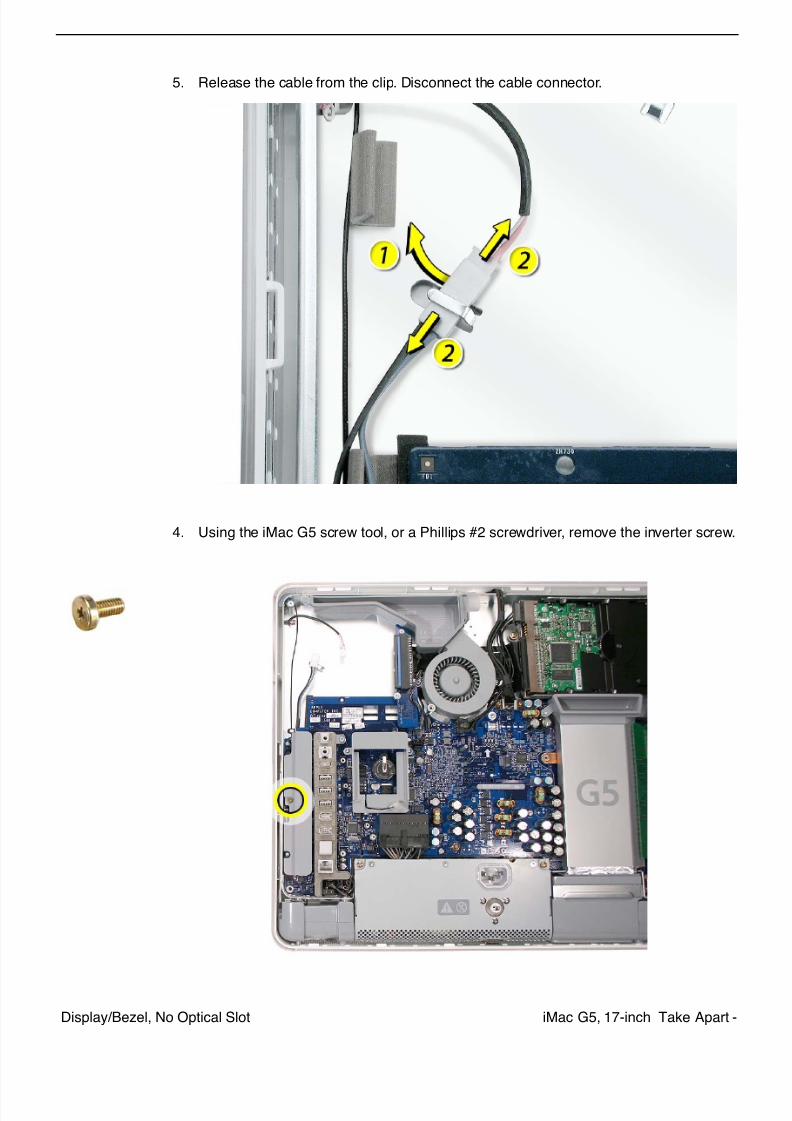
http://slidepdf.com/reader/full/apple-imacg517in 186/319184 - iMac G5, 17-inch Take Apart Display/Bezel, No Optical Slot
5. Lift the inverter straight up to disconnect the inverter board.
6. Disconnect the white connector (circled below) on the inverter by pulling it straight up.
Set the inverter board aside.
Note: Be careful not to prick your fingers on the pins next to the white connector.
7/29/2019 Apple imacg5_17in
http://slidepdf.com/reader/full/apple-imacg517in 187/319iMac G5, 17-inch Take Apart -Display/Bezel, No Optical Slot
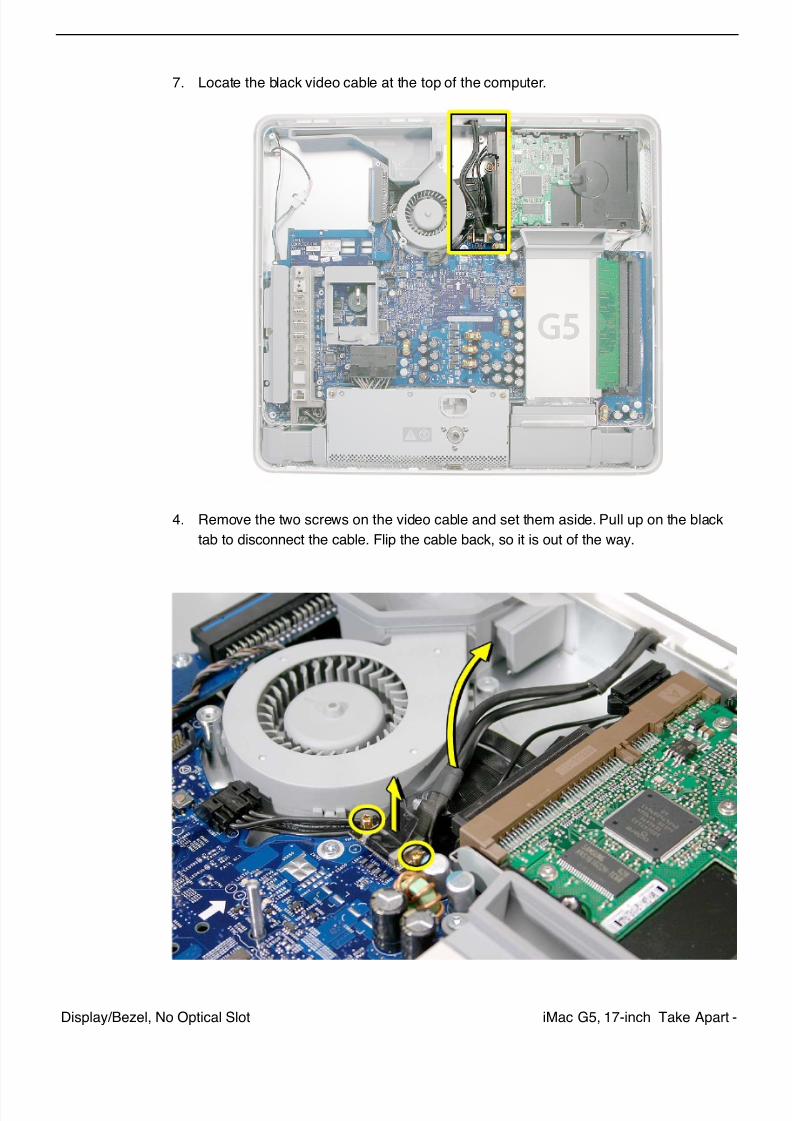
7. Locate the black video cable at the top of the computer.
4. Remove the two screws on the video cable and set them aside. Pull up on the black
tab to disconnect the cable. Flip the cable back, so it is out of the way.
7/29/2019 Apple imacg5_17in
http://slidepdf.com/reader/full/apple-imacg517in 188/319186 - iMac G5, 17-inch Take Apart Display/Bezel, No Optical Slot
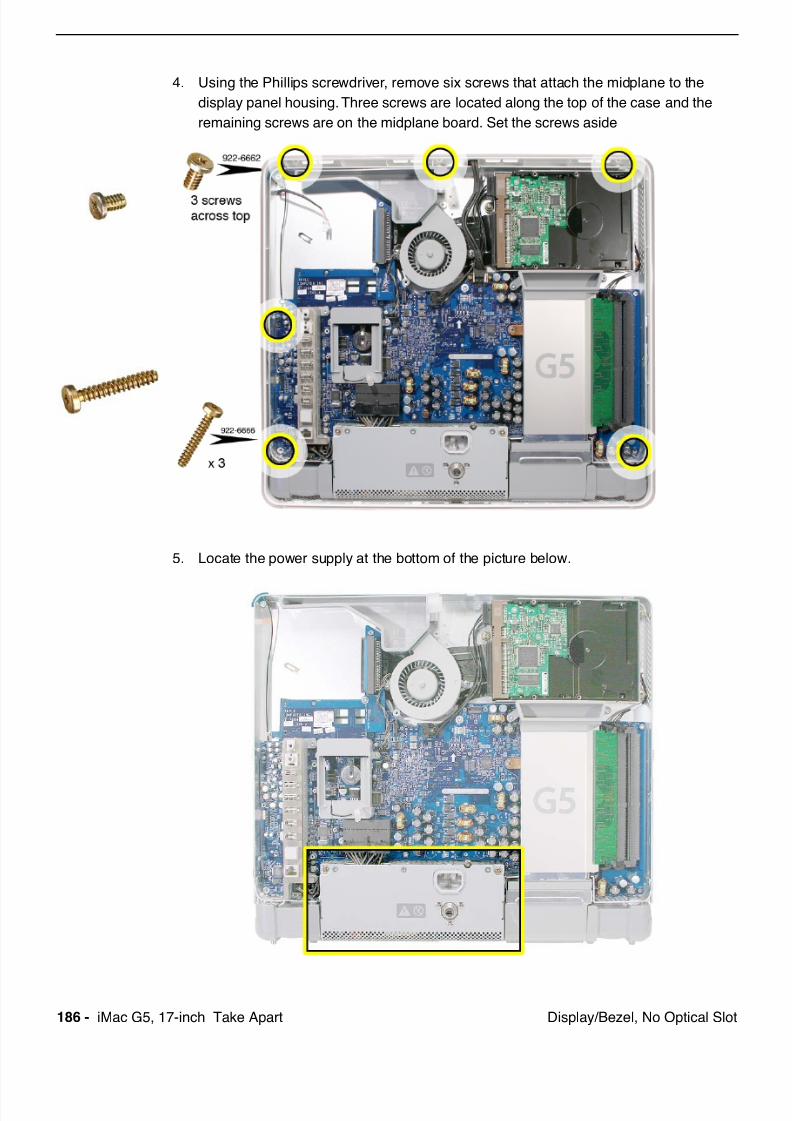
4. Using the Phillips screwdriver, remove six screws that attach the midplane to the
display panel housing. Three screws are located along the top of the case and the
remaining screws are on the midplane board. Set the screws aside
5. Locate the power supply at the bottom of the picture below.
7/29/2019 Apple imacg5_17in
http://slidepdf.com/reader/full/apple-imacg517in 189/319iMac G5, 17-inch Take Apart -Display/Bezel, No Optical Slot
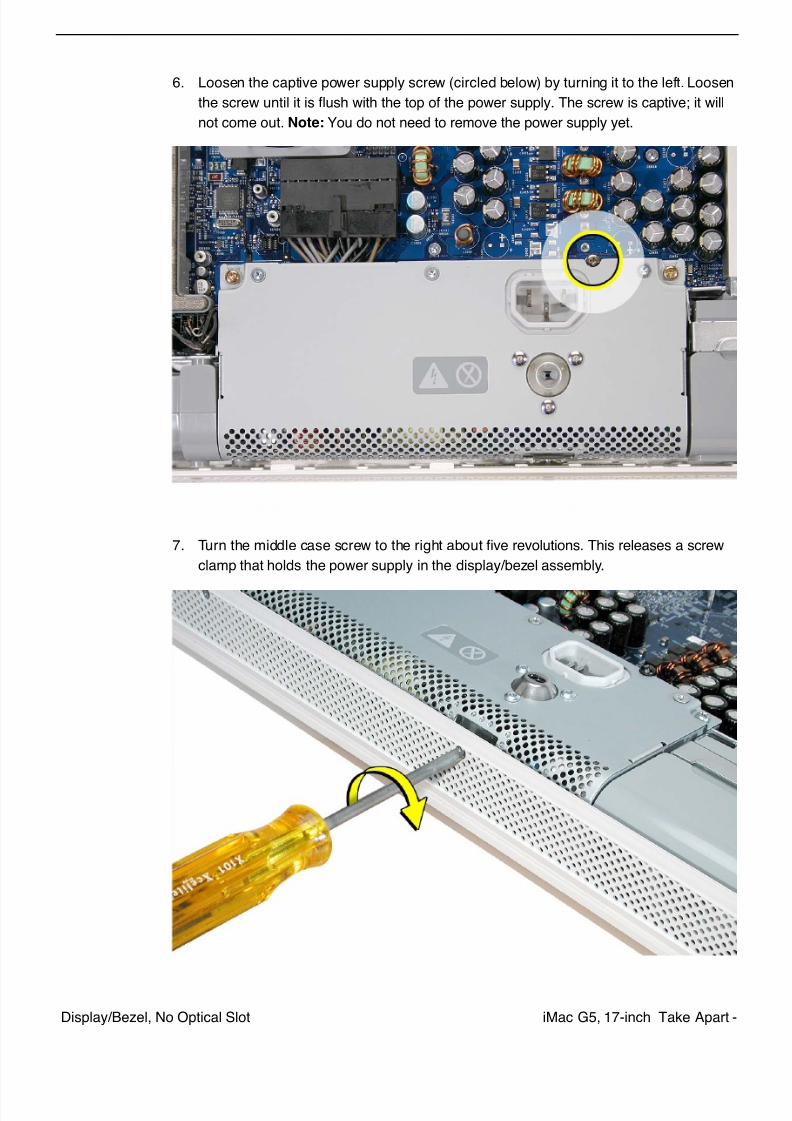
6. Loosen the captive power supply screw (circled below) by turning it to the left. Loosen
the screw until it is flush with the top of the power supply. The screw is captive; it will
not come out. Note: You do not need to remove the power supply yet.
7. Turn the middle case screw to the right about five revolutions. This releases a screw
clamp that holds the power supply in the display/bezel assembly.
7/29/2019 Apple imacg5_17in
http://slidepdf.com/reader/full/apple-imacg517in 190/319
7/29/2019 Apple imacg5_17in
http://slidepdf.com/reader/full/apple-imacg517in 191/319iMac G5, 17-inch Take Apart -Display/Bezel, No Optical Slot
Replacing the Display/Bezel, No Optical Slot
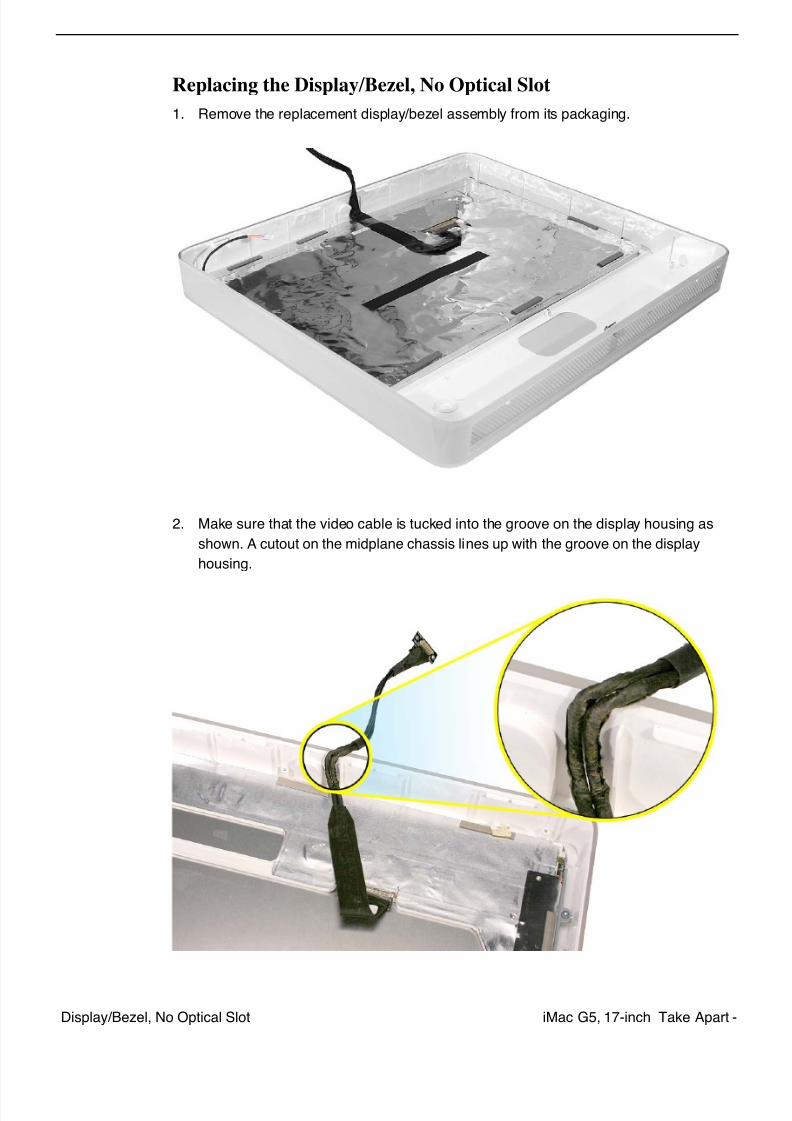
1. Remove the replacement display/bezel assembly from its packaging.
2. Make sure that the video cable is tucked into the groove on the display housing as
shown. A cutout on the midplane chassis lines up with the groove on the display
housing.

7/29/2019 Apple imacg5_17in
http://slidepdf.com/reader/full/apple-imacg517in 192/319190 - iMac G5, 17-inch Take Apart Display/Bezel, No Optical Slot
3. Locate the midplane. assembly that you set aside previously.
4. Hold the midplane by the sides and position it over the replacement display/bezel
housing. Lower the midplane into the replacement display/bezel housing. As you
lower the midplane, pull the inverter cable through the hole in the midplane.
5. Reconnect the video cable and replace the two video cable screws. Tuck the video
cable into the area next to the fan and hard drive.
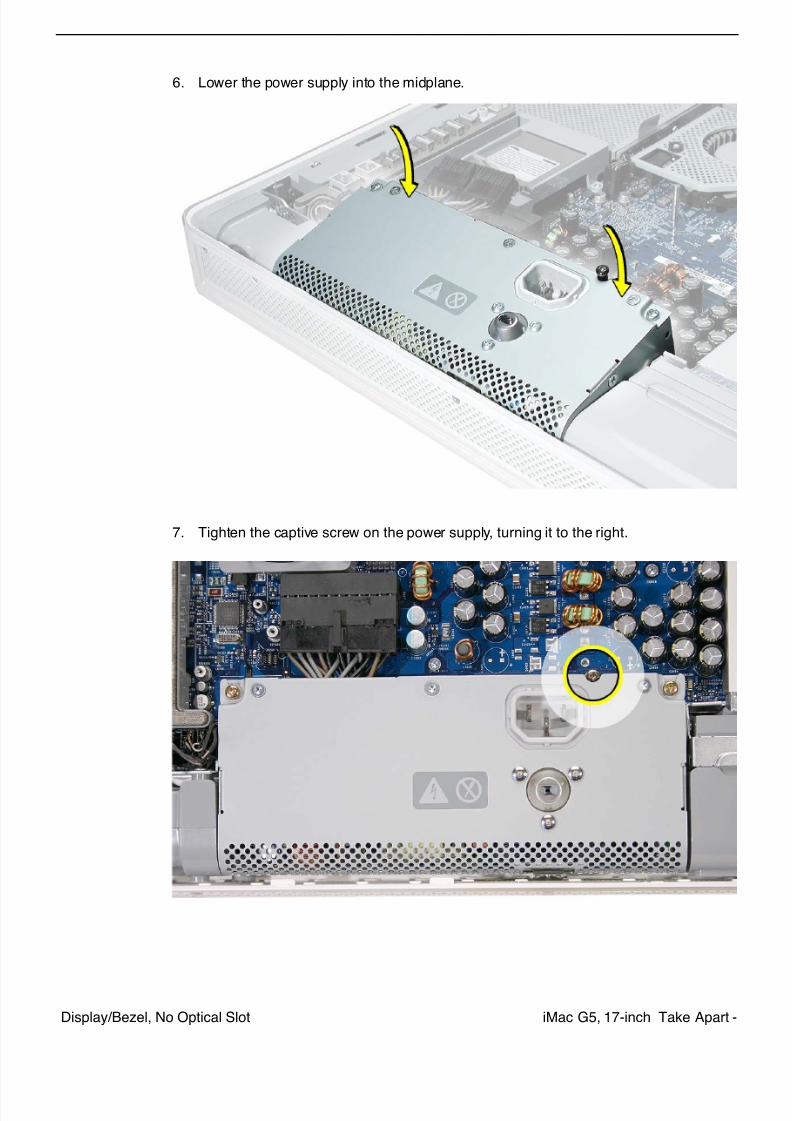
7/29/2019 Apple imacg5_17in
http://slidepdf.com/reader/full/apple-imacg517in 193/319iMac G5, 17-inch Take Apart -Display/Bezel, No Optical Slot
6. Lower the power supply into the midplane.
7. Tighten the captive screw on the power supply, turning it to the right.

7/29/2019 Apple imacg5_17in
http://slidepdf.com/reader/full/apple-imacg517in 194/319192 - iMac G5, 17-inch Take Apart Display/Bezel, No Optical Slot
4. Replace the six case screws. The shorter screws attach along the top.
5. Locate the inverter board that you set aside.
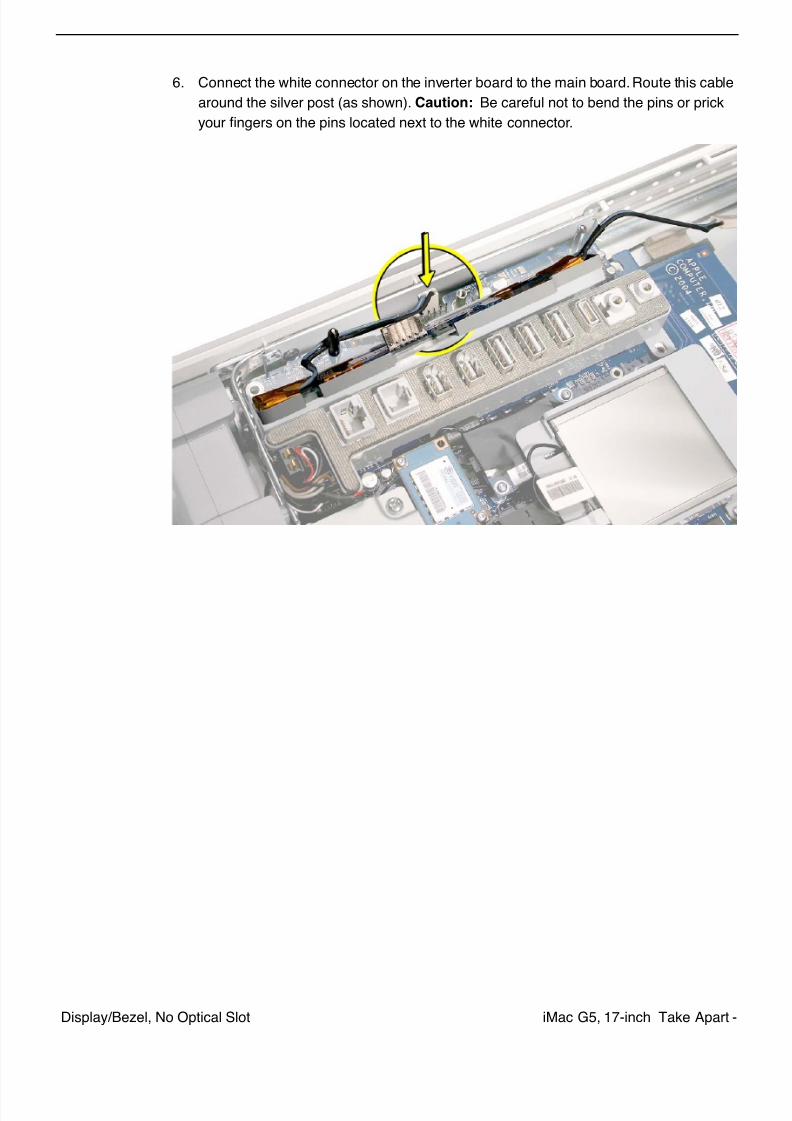
7/29/2019 Apple imacg5_17in
http://slidepdf.com/reader/full/apple-imacg517in 195/319iMac G5, 17-inch Take Apart -Display/Bezel, No Optical Slot
6. Connect the white connector on the inverter board to the main board. Route this cable
around the silver post (as shown). Caution: Be careful not to bend the pins or prick
your fingers on the pins located next to the white connector.

7/29/2019 Apple imacg5_17in
http://slidepdf.com/reader/full/apple-imacg517in 196/319194 - iMac G5, 17-inch Take Apart Display/Bezel, No Optical Slot
7. As you lower the inverter into place, connect the black connector to the pins on the
board. Use the tall silver pins as a guide to align the inverter. Important: Make sure
the connector mates with the pins. Double check that it’s connected.
8. Replace the inverter screw.

7/29/2019 Apple imacg5_17in
http://slidepdf.com/reader/full/apple-imacg517in 197/319iMac G5, 17-inch Take Apart -Display/Bezel, No Optical Slot
9. Reconnect the inverter-to-display panel cable. Important: The connector is keyed (it
fits together only one way).
10. Secure the connector under the metal tab.
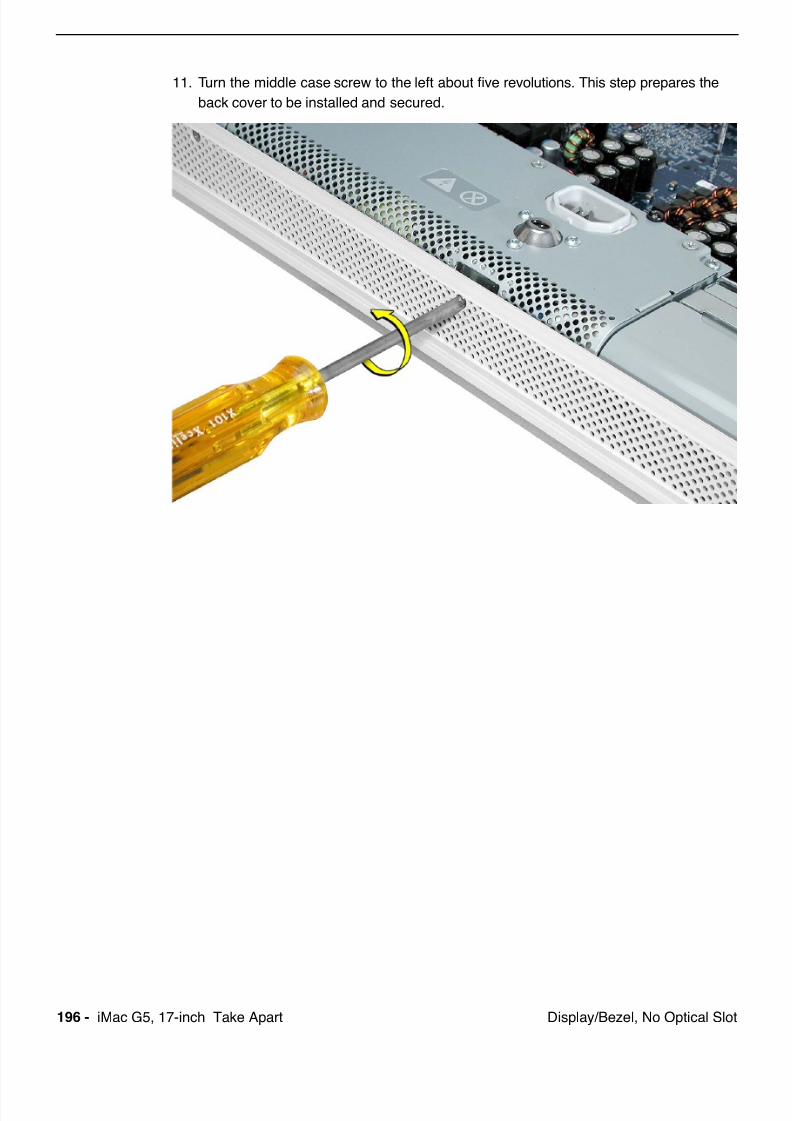
7/29/2019 Apple imacg5_17in
http://slidepdf.com/reader/full/apple-imacg517in 198/319196 - iMac G5, 17-inch Take Apart Display/Bezel, No Optical Slot
11. Turn the middle case screw to the left about five revolutions. This step prepares the
back cover to be installed and secured.
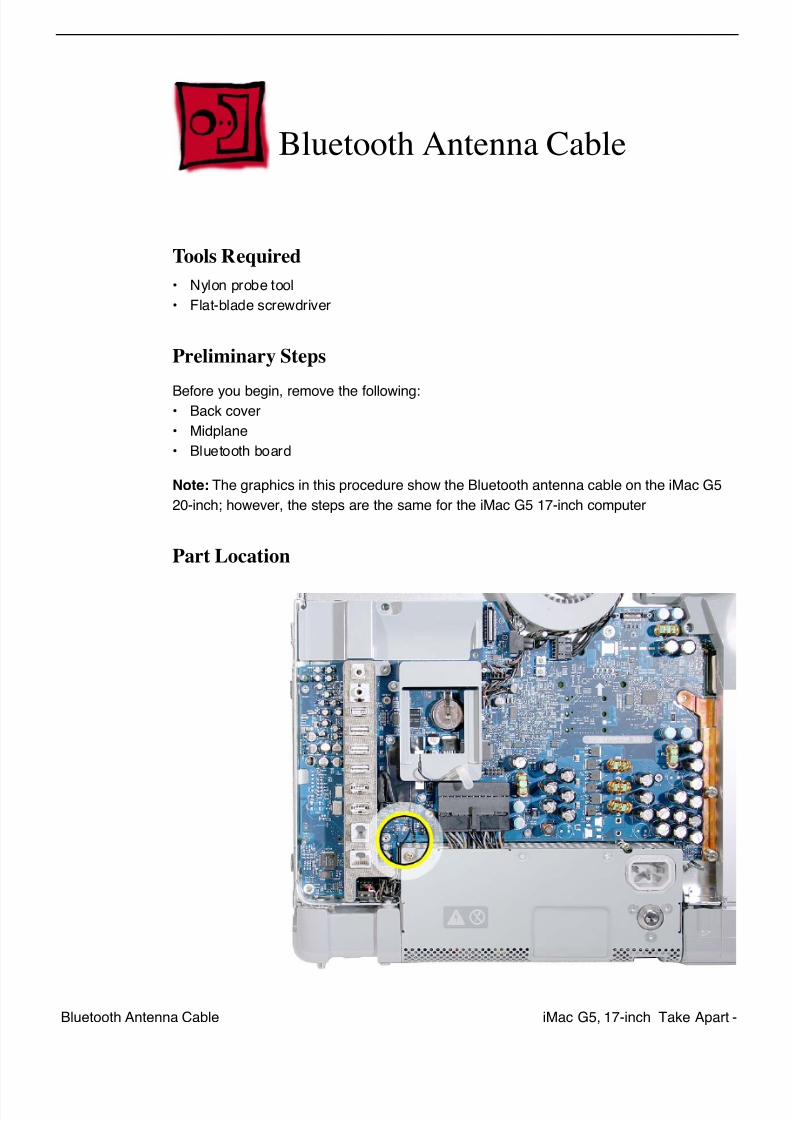
7/29/2019 Apple imacg5_17in
http://slidepdf.com/reader/full/apple-imacg517in 199/319iMac G5, 17-inch Take Apart -Bluetooth Antenna Cable
Bluetooth Antenna Cable
Tools Required
• Nylon probe tool
• Flat-blade screwdriver
Preliminary Steps
Before you begin, remove the following:• Back cover
• Midplane
• Bluetooth board
Note: The graphics in this procedure show the Bluetooth antenna cable on the iMac G5
20-inch; however, the steps are the same for the iMac G5 17-inch computer
Part Location
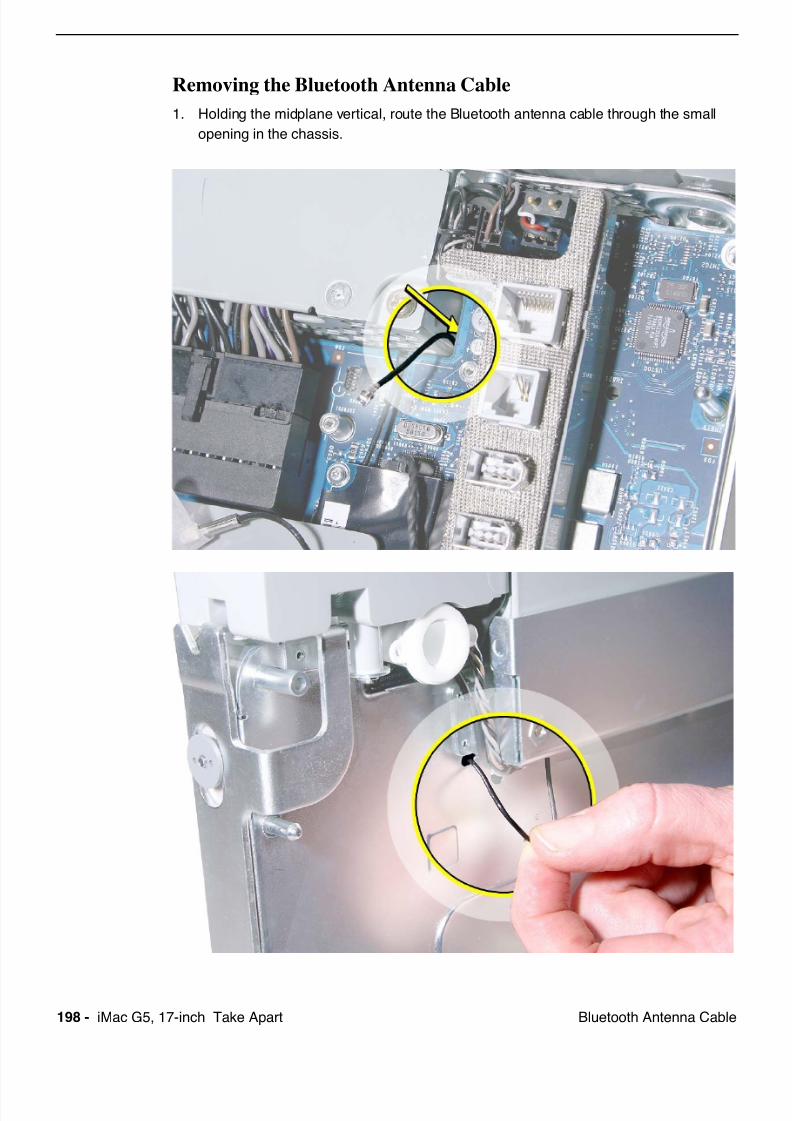
7/29/2019 Apple imacg5_17in
http://slidepdf.com/reader/full/apple-imacg517in 200/319198 - iMac G5, 17-inch Take Apart Bluetooth Antenna Cable
Removing the Bluetooth Antenna Cable
1. Holding the midplane vertical, route the Bluetooth antenna cable through the small
opening in the chassis.
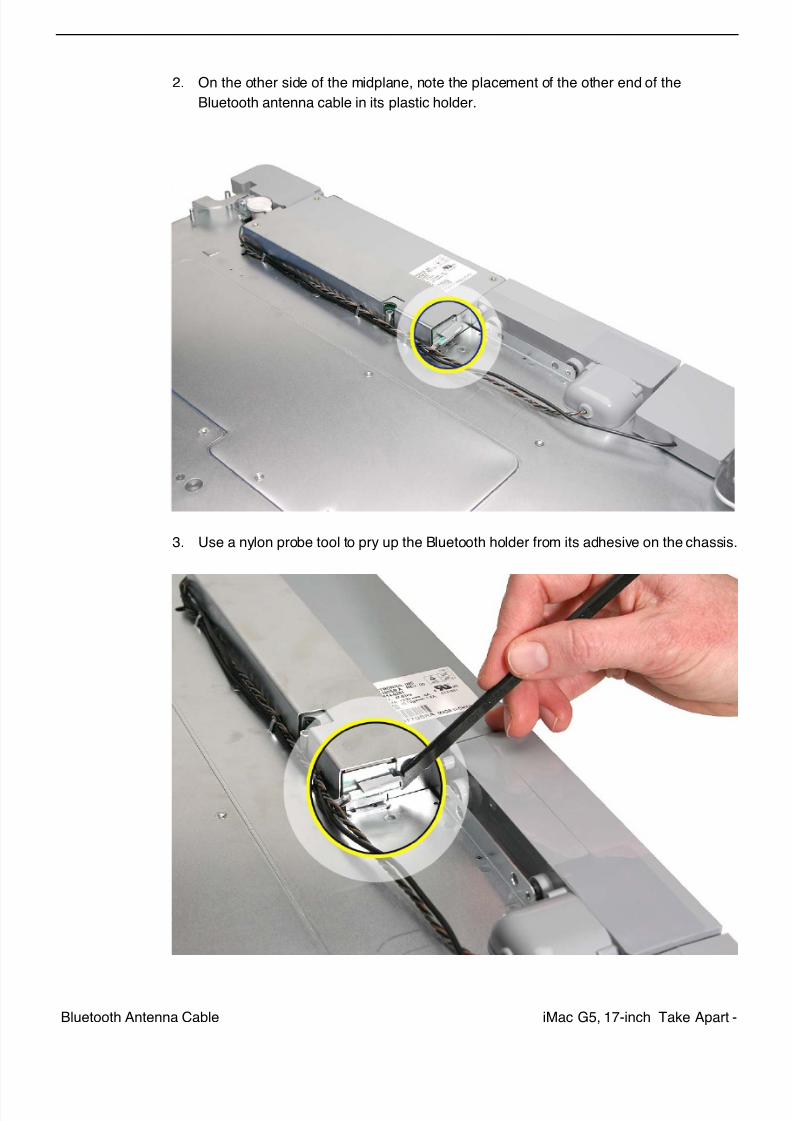
7/29/2019 Apple imacg5_17in
http://slidepdf.com/reader/full/apple-imacg517in 201/319iMac G5, 17-inch Take Apart -Bluetooth Antenna Cable
2. On the other side of the midplane, note the placement of the other end of the
Bluetooth antenna cable in its plastic holder.
3. Use a nylon probe tool to pry up the Bluetooth holder from its adhesive on the chassis.
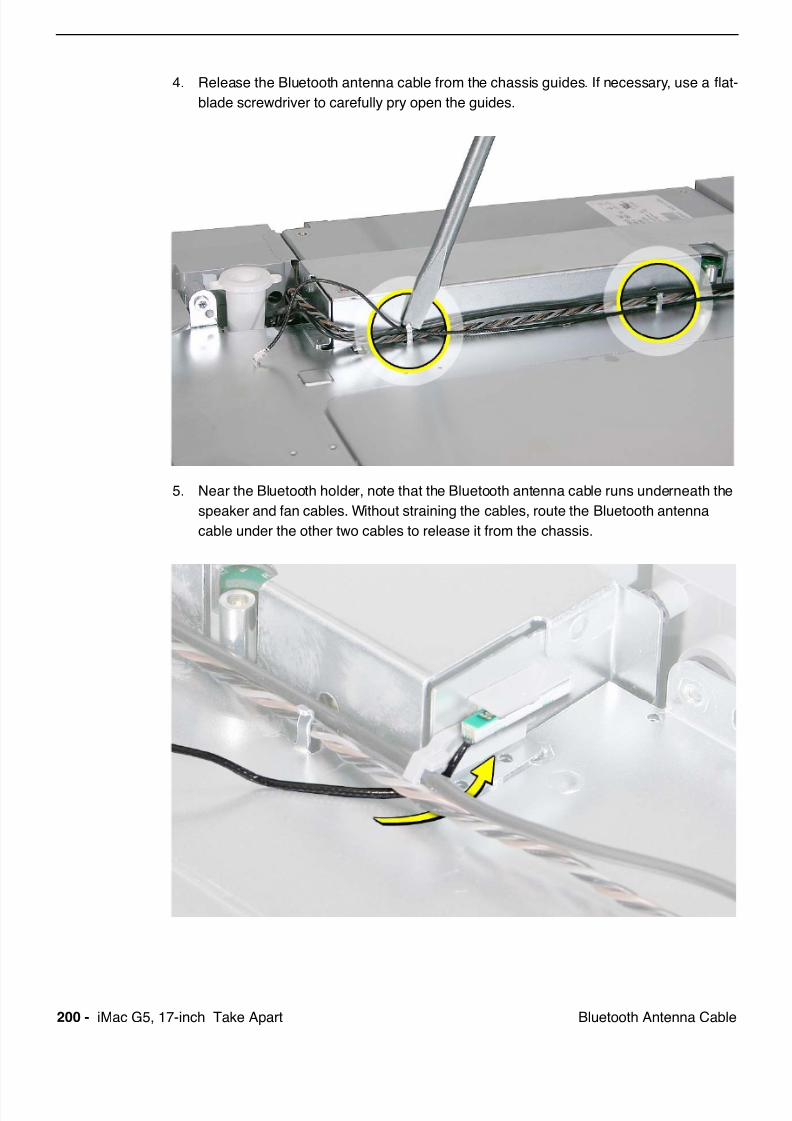
7/29/2019 Apple imacg5_17in
http://slidepdf.com/reader/full/apple-imacg517in 202/319200 - iMac G5, 17-inch Take Apart Bluetooth Antenna Cable
4. Release the Bluetooth antenna cable from the chassis guides. If necessary, use a flat-
blade screwdriver to carefully pry open the guides.
5. Near the Bluetooth holder, note that the Bluetooth antenna cable runs underneath the
speaker and fan cables. Without straining the cables, route the Bluetooth antenna
cable under the other two cables to release it from the chassis.
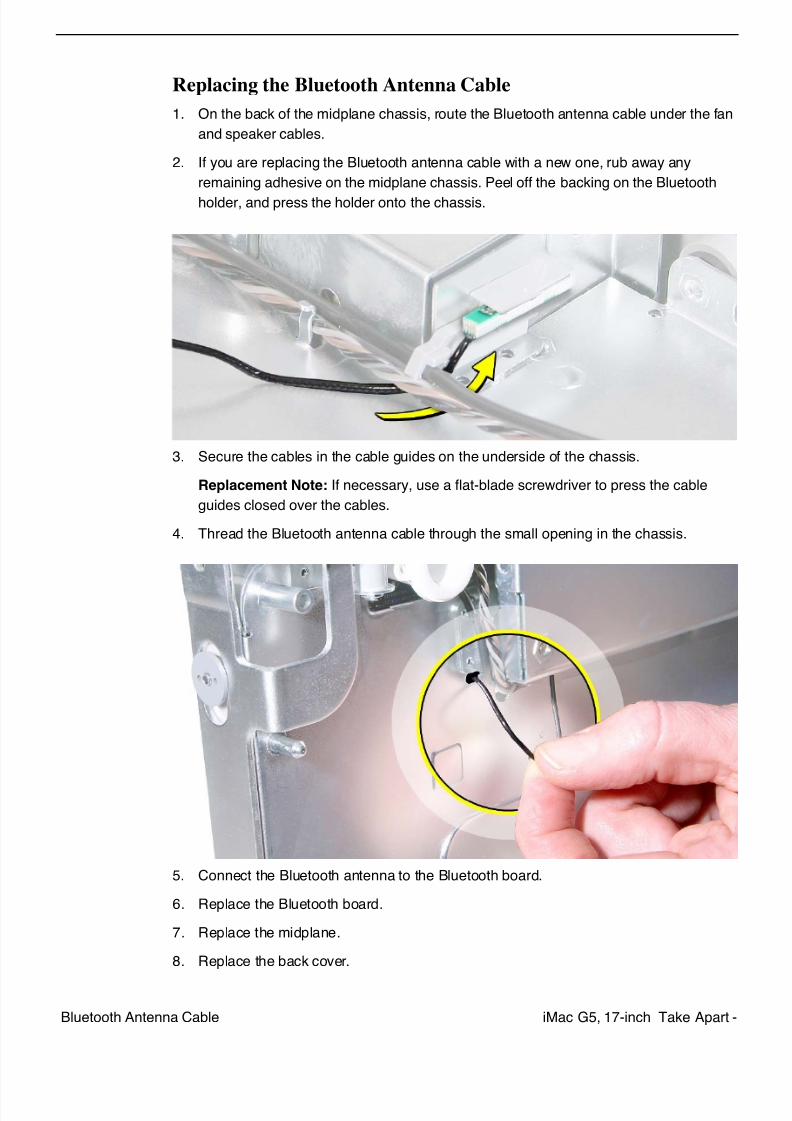
7/29/2019 Apple imacg5_17in
http://slidepdf.com/reader/full/apple-imacg517in 203/319iMac G5, 17-inch Take Apart -Bluetooth Antenna Cable
Replacing the Bluetooth Antenna Cable
1. On the back of the midplane chassis, route the Bluetooth antenna cable under the fan
and speaker cables.
2. If you are replacing the Bluetooth antenna cable with a new one, rub away any
remaining adhesive on the midplane chassis. Peel off the backing on the Bluetooth
holder, and press the holder onto the chassis.
3. Secure the cables in the cable guides on the underside of the chassis.
Replacement Note: If necessary, use a flat-blade screwdriver to press the cable
guides closed over the cables.
4. Thread the Bluetooth antenna cable through the small opening in the chassis.
5. Connect the Bluetooth antenna to the Bluetooth board.
6. Replace the Bluetooth board.
7. Replace the midplane.
8. Replace the back cover.
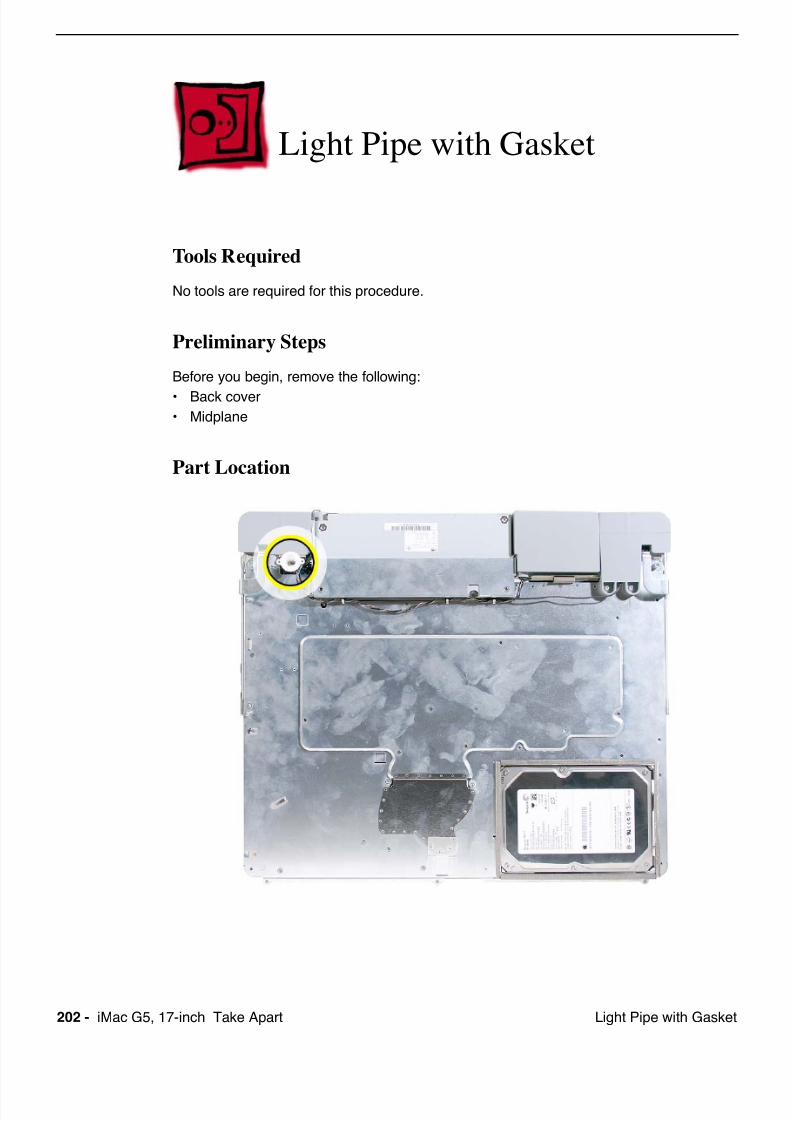
7/29/2019 Apple imacg5_17in
http://slidepdf.com/reader/full/apple-imacg517in 204/319202 - iMac G5, 17-inch Take Apart Light Pipe with Gasket
Light Pipe with Gasket
Tools Required
No tools are required for this procedure.
Preliminary Steps
Before you begin, remove the following:
• Back cover
• Midplane
Part Location
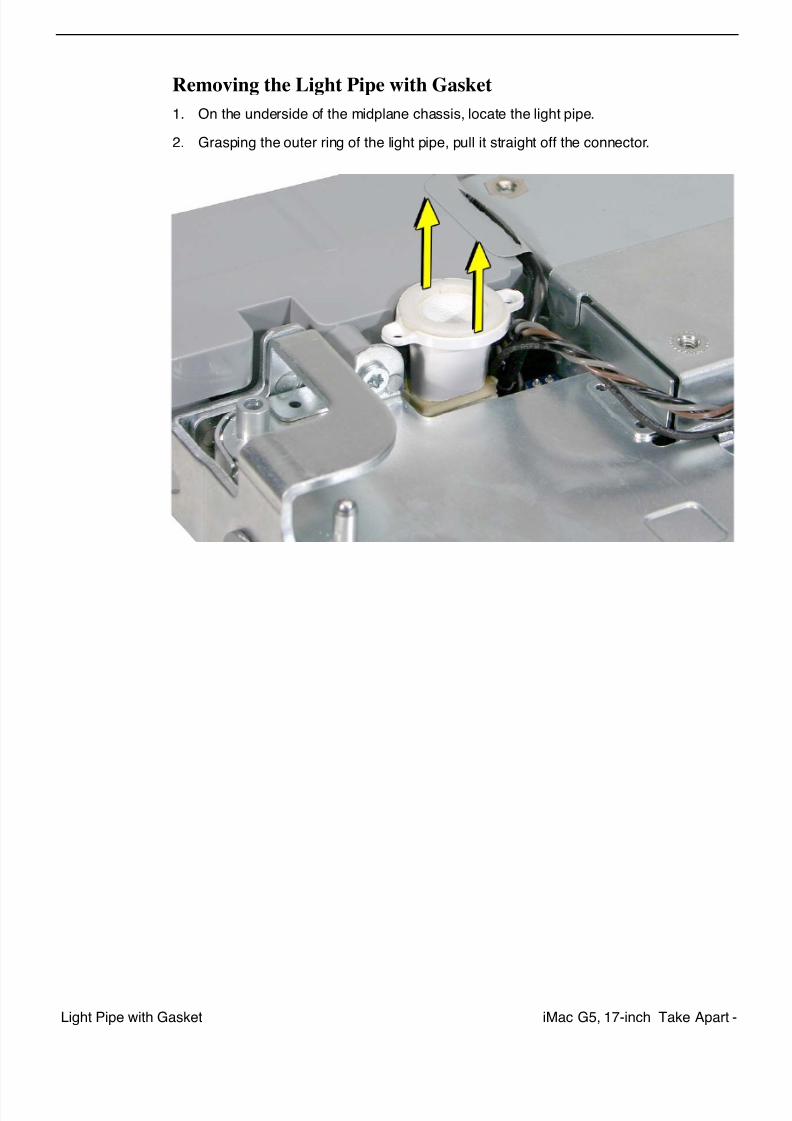
7/29/2019 Apple imacg5_17in
http://slidepdf.com/reader/full/apple-imacg517in 205/319iMac G5, 17-inch Take Apart -Light Pipe with Gasket
Removing the Light Pipe with Gasket
1. On the underside of the midplane chassis, locate the light pipe.
2. Grasping the outer ring of the light pipe, pull it straight off the connector.
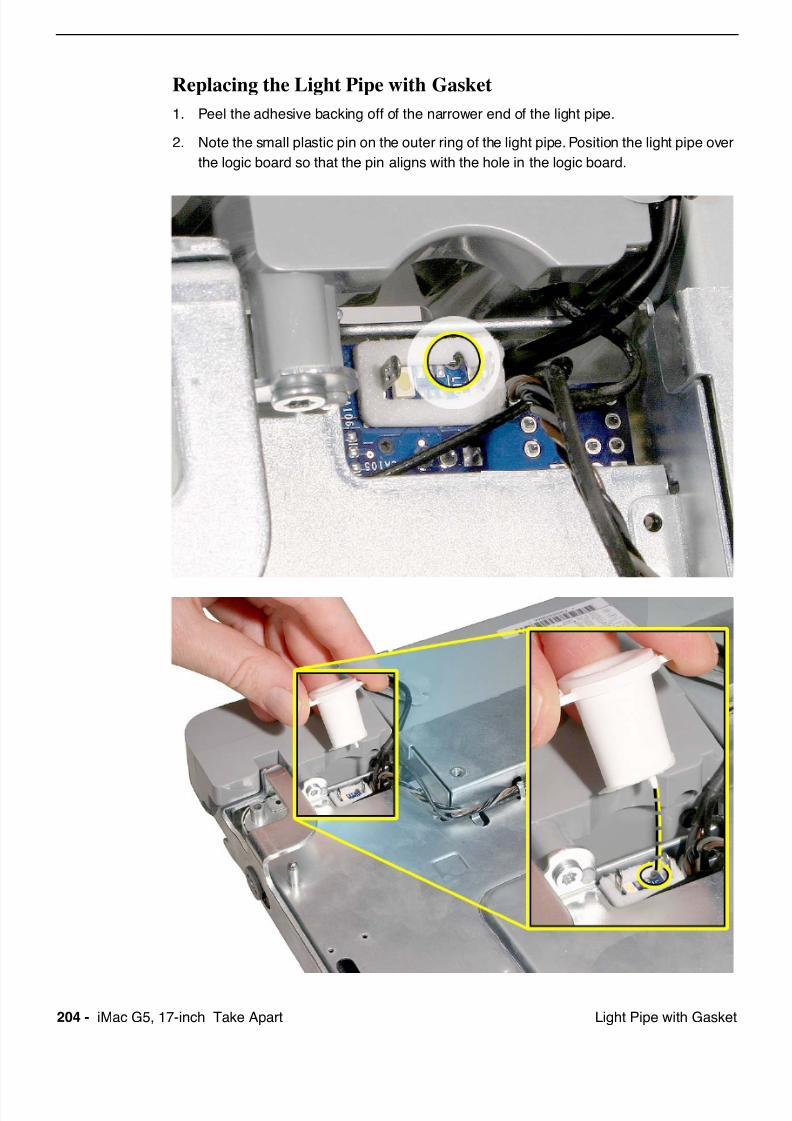
7/29/2019 Apple imacg5_17in
http://slidepdf.com/reader/full/apple-imacg517in 206/319204 - iMac G5, 17-inch Take Apart Light Pipe with Gasket
Replacing the Light Pipe with Gasket
1. Peel the adhesive backing off of the narrower end of the light pipe.
2. Note the small plastic pin on the outer ring of the light pipe. Position the light pipe over
the logic board so that the pin aligns with the hole in the logic board.
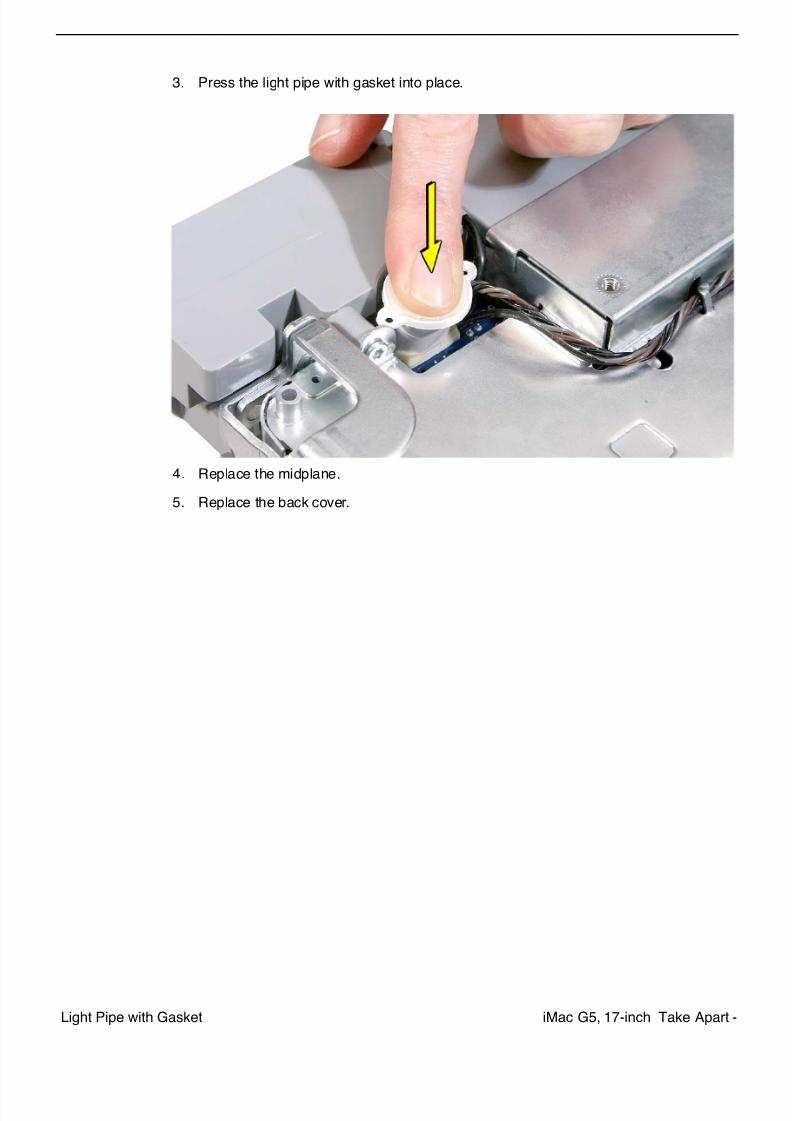
7/29/2019 Apple imacg5_17in
http://slidepdf.com/reader/full/apple-imacg517in 207/319iMac G5, 17-inch Take Apart -Light Pipe with Gasket
3. Press the light pipe with gasket into place.
4. Replace the midplane.
5. Replace the back cover.

7/29/2019 Apple imacg5_17in
http://slidepdf.com/reader/full/apple-imacg517in 208/319206 - iMac G5, 17-inch Take Apart Microphone Cable
Microphone Cable
Tools Required
• Needlenose pliers
Preliminary Steps
Before you begin, remove the following:
• Back cover• Midplane
• Light pipe
Part Location

7/29/2019 Apple imacg5_17in
http://slidepdf.com/reader/full/apple-imacg517in 209/319iMac G5, 17-inch Take Apart -Microphone Cable
Removing the Microphone Cable
1. From the top of the logic board at the bottom of the port bank, use a needlenose pliers
to disconnect the two narrowest cable connectors: fan and microphone.
2. Locate the longer (fan) connector.
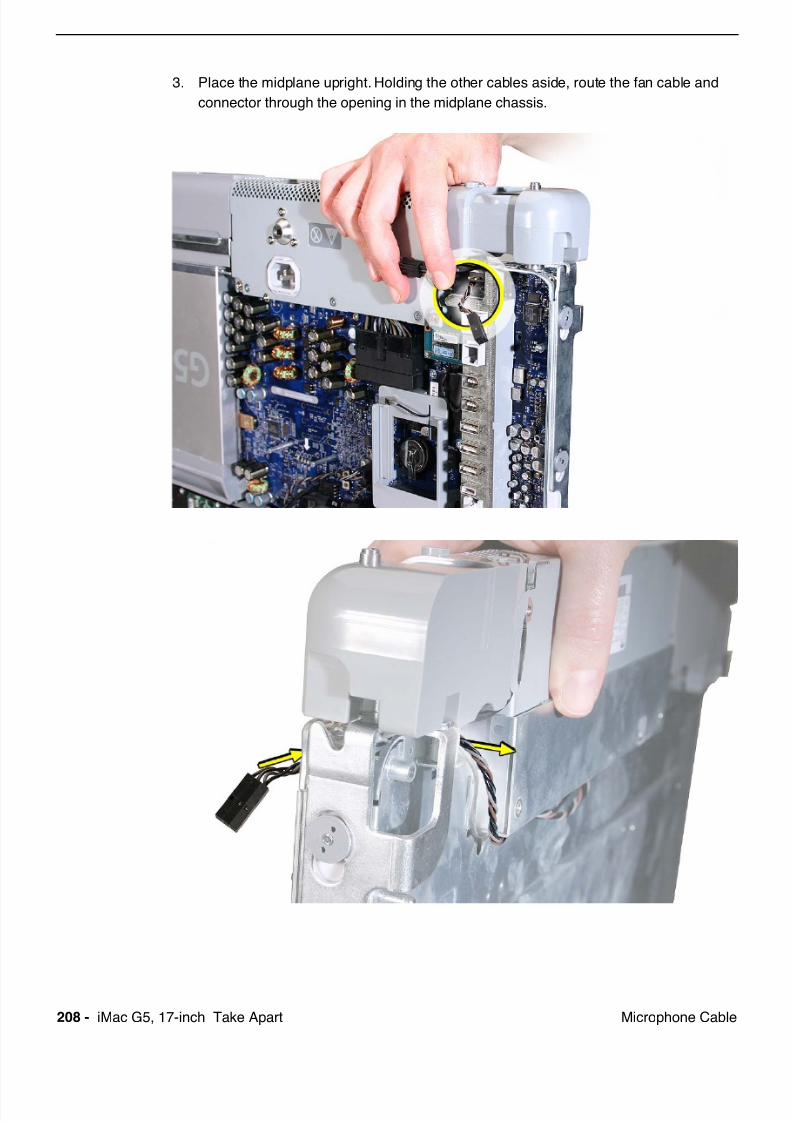
7/29/2019 Apple imacg5_17in
http://slidepdf.com/reader/full/apple-imacg517in 210/319208 - iMac G5, 17-inch Take Apart Microphone Cable
3. Place the midplane upright. Holding the other cables aside, route the fan cable and
connector through the opening in the midplane chassis.
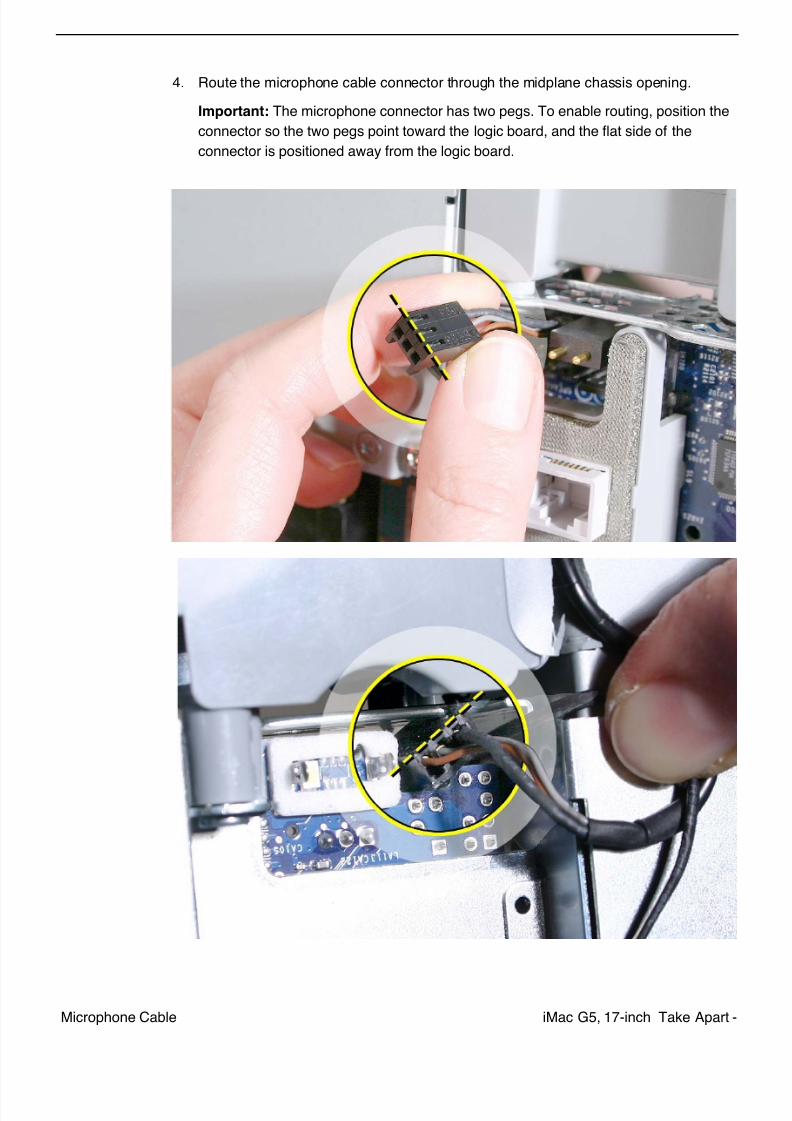
7/29/2019 Apple imacg5_17in
http://slidepdf.com/reader/full/apple-imacg517in 211/319iMac G5, 17-inch Take Apart -Microphone Cable
4. Route the microphone cable connector through the midplane chassis opening.
Important: The microphone connector has two pegs. To enable routing, position the
connector so the two pegs point toward the logic board, and the flat side of the
connector is positioned away from the logic board.
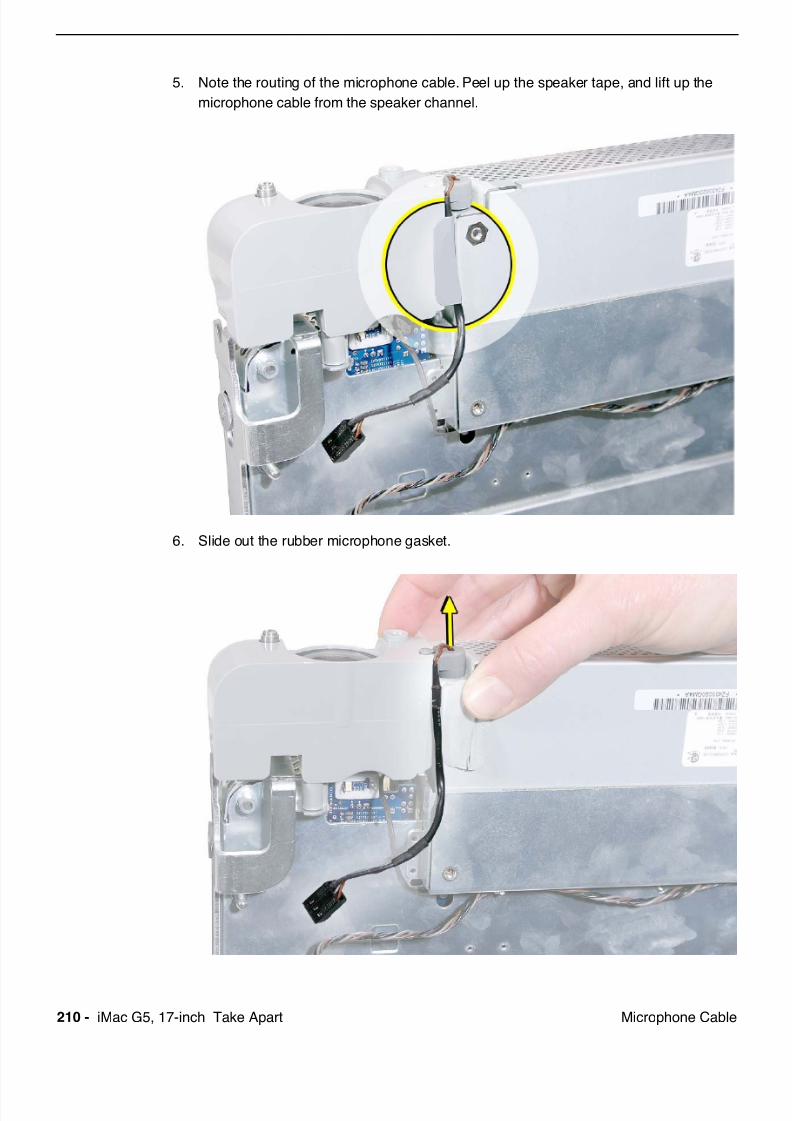
7/29/2019 Apple imacg5_17in
http://slidepdf.com/reader/full/apple-imacg517in 212/319210 - iMac G5, 17-inch Take Apart Microphone Cable
5. Note the routing of the microphone cable. Peel up the speaker tape, and lift up the
microphone cable from the speaker channel.
6. Slide out the rubber microphone gasket.
7/29/2019 Apple imacg5_17in
http://slidepdf.com/reader/full/apple-imacg517in 213/319iMac G5, 17-inch Take Apart -Microphone Cable
Replacing the Microphone Cable
1. Secure the microphone cable to the speaker, and apply new tape.
Note: A strip of new tape comes with both a replacement microphone cable and a
replacement speaker set.
2. Route the cable connectors through the chassis opening as follows:• microphone cable connector first
• narrowest fan cable connector last
3. Connect the connectors to the logic board.
4. Replace the light pipe.
5. Replace the midplane.
6. Replace the back cover.
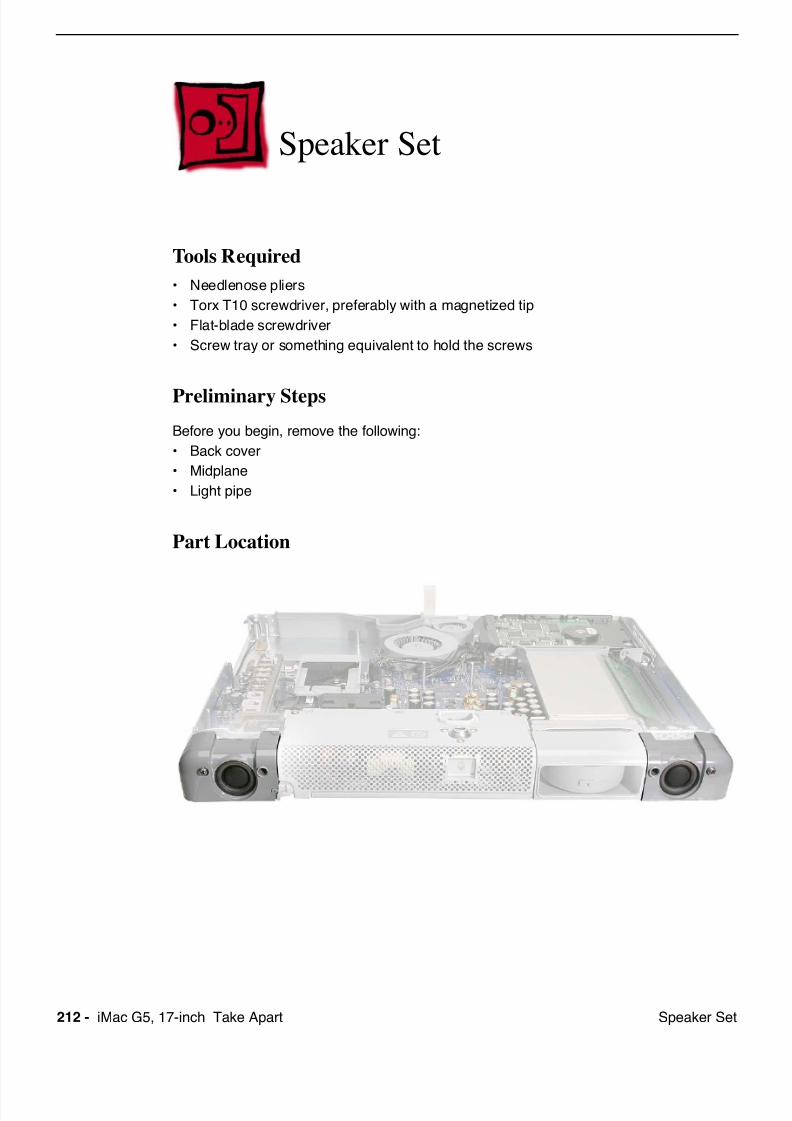
7/29/2019 Apple imacg5_17in
http://slidepdf.com/reader/full/apple-imacg517in 214/319212 - iMac G5, 17-inch Take Apart Speaker Set
Speaker Set
Tools Required
• Needlenose pliers
• Torx T10 screwdriver, preferably with a magnetized tip
• Flat-blade screwdriver
• Screw tray or something equivalent to hold the screws
Preliminary Steps
Before you begin, remove the following:
• Back cover
• Midplane
• Light pipe
Part Location
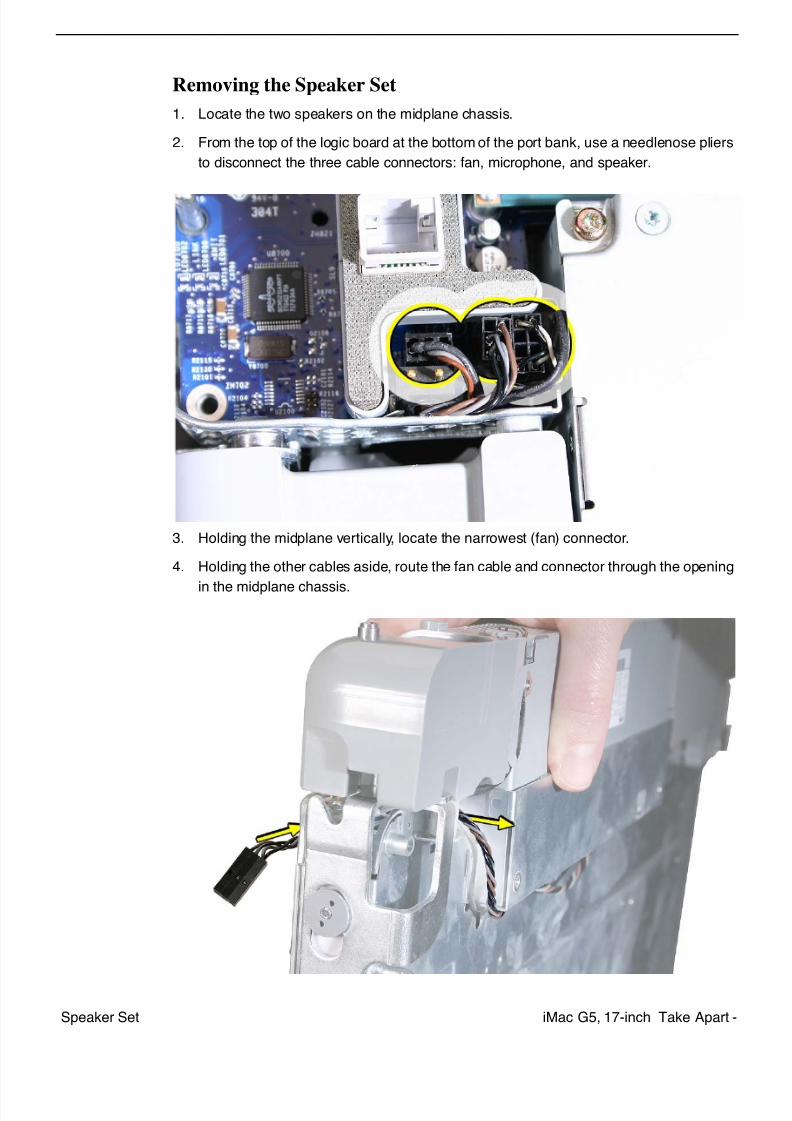
7/29/2019 Apple imacg5_17in
http://slidepdf.com/reader/full/apple-imacg517in 215/319iMac G5, 17-inch Take Apart -Speaker Set
Removing the Speaker Set
1. Locate the two speakers on the midplane chassis.
2. From the top of the logic board at the bottom of the port bank, use a needlenose pliers
to disconnect the three cable connectors: fan, microphone, and speaker.
3. Holding the midplane vertically, locate the narrowest (fan) connector.
4. Holding the other cables aside, route the fan cable and connector through the opening
in the midplane chassis.
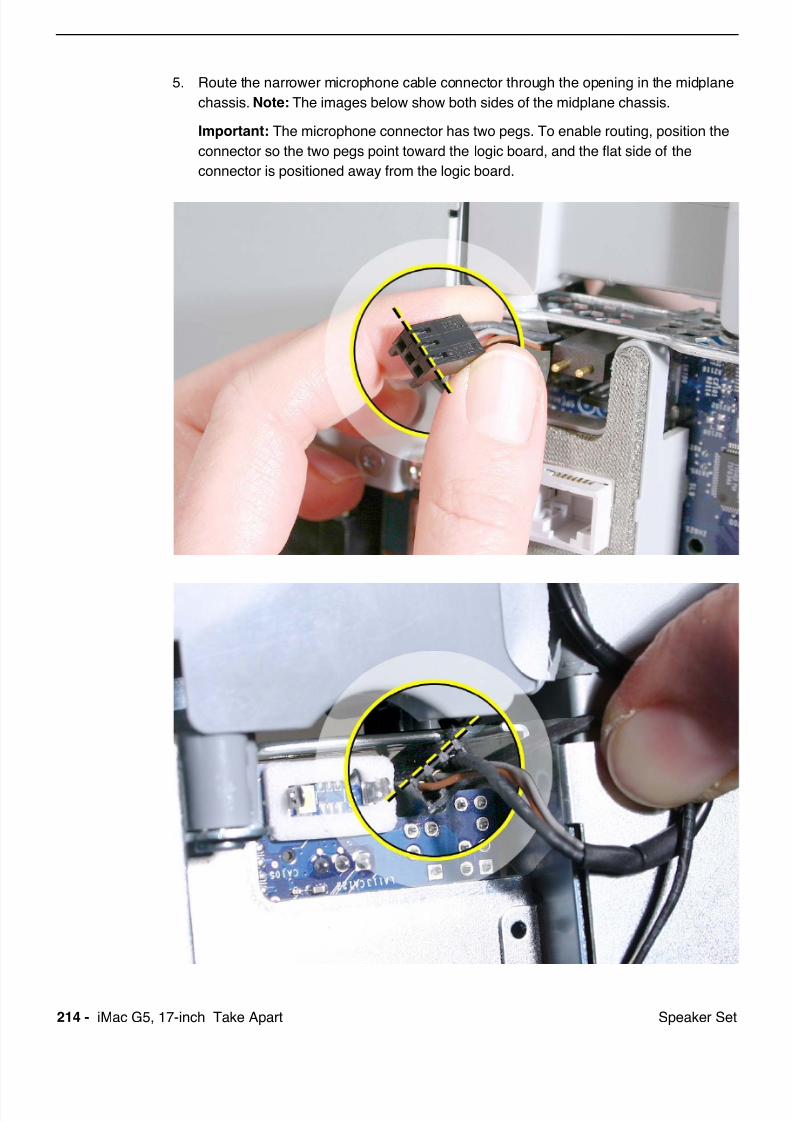
7/29/2019 Apple imacg5_17in
http://slidepdf.com/reader/full/apple-imacg517in 216/319214 - iMac G5, 17-inch Take Apart Speaker Set
5. Route the narrower microphone cable connector through the opening in the midplane
chassis. Note: The images below show both sides of the midplane chassis.
Important: The microphone connector has two pegs. To enable routing, position the
connector so the two pegs point toward the logic board, and the flat side of the
connector is positioned away from the logic board.
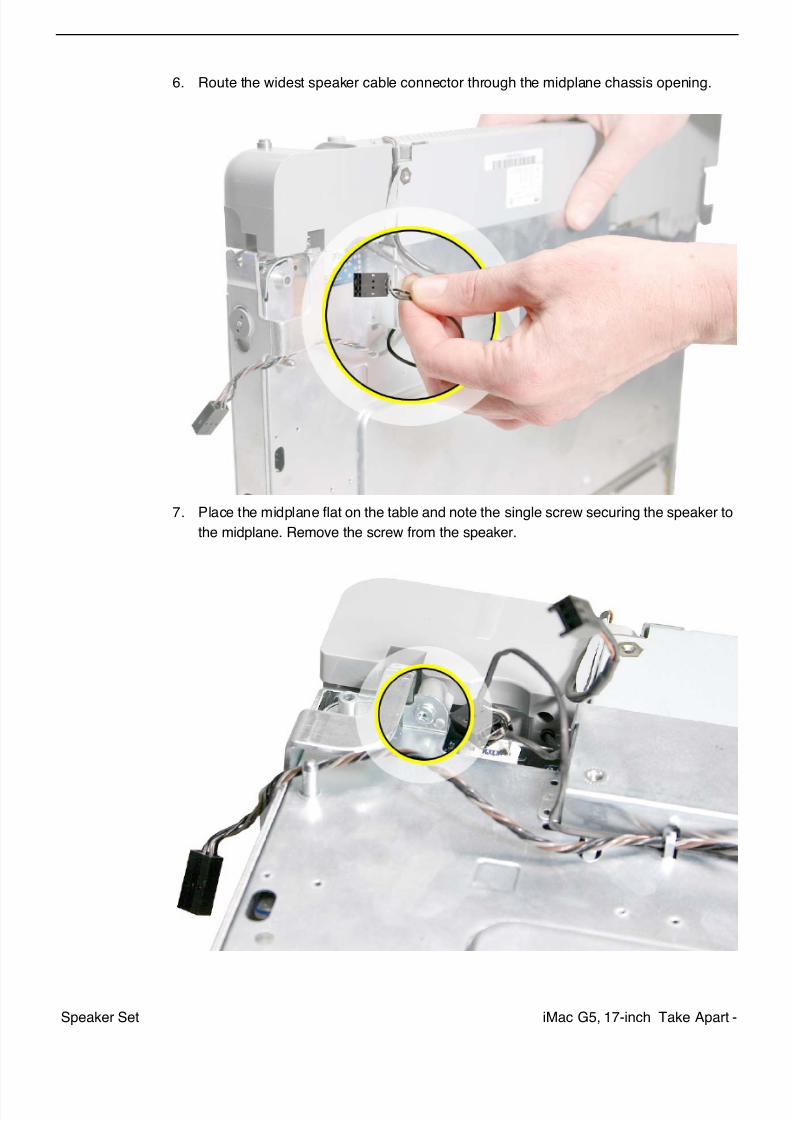
7/29/2019 Apple imacg5_17in
http://slidepdf.com/reader/full/apple-imacg517in 217/319iMac G5, 17-inch Take Apart -Speaker Set
6. Route the widest speaker cable connector through the midplane chassis opening.
7. Place the midplane flat on the table and note the single screw securing the speaker to
the midplane. Remove the screw from the speaker.
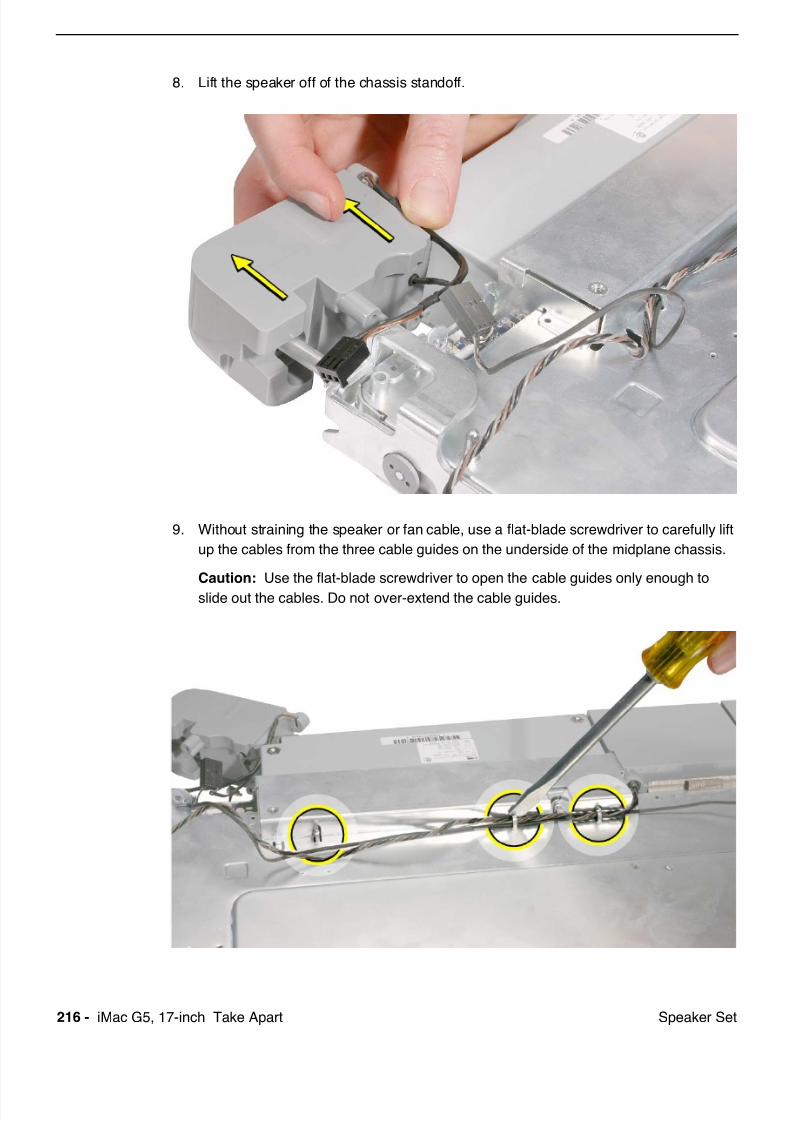
7/29/2019 Apple imacg5_17in
http://slidepdf.com/reader/full/apple-imacg517in 218/319216 - iMac G5, 17-inch Take Apart Speaker Set
8. Lift the speaker off of the chassis standoff.
9. Without straining the speaker or fan cable, use a flat-blade screwdriver to carefully lift
up the cables from the three cable guides on the underside of the midplane chassis.
Caution: Use the flat-blade screwdriver to open the cable guides only enough to
slide out the cables. Do not over-extend the cable guides.
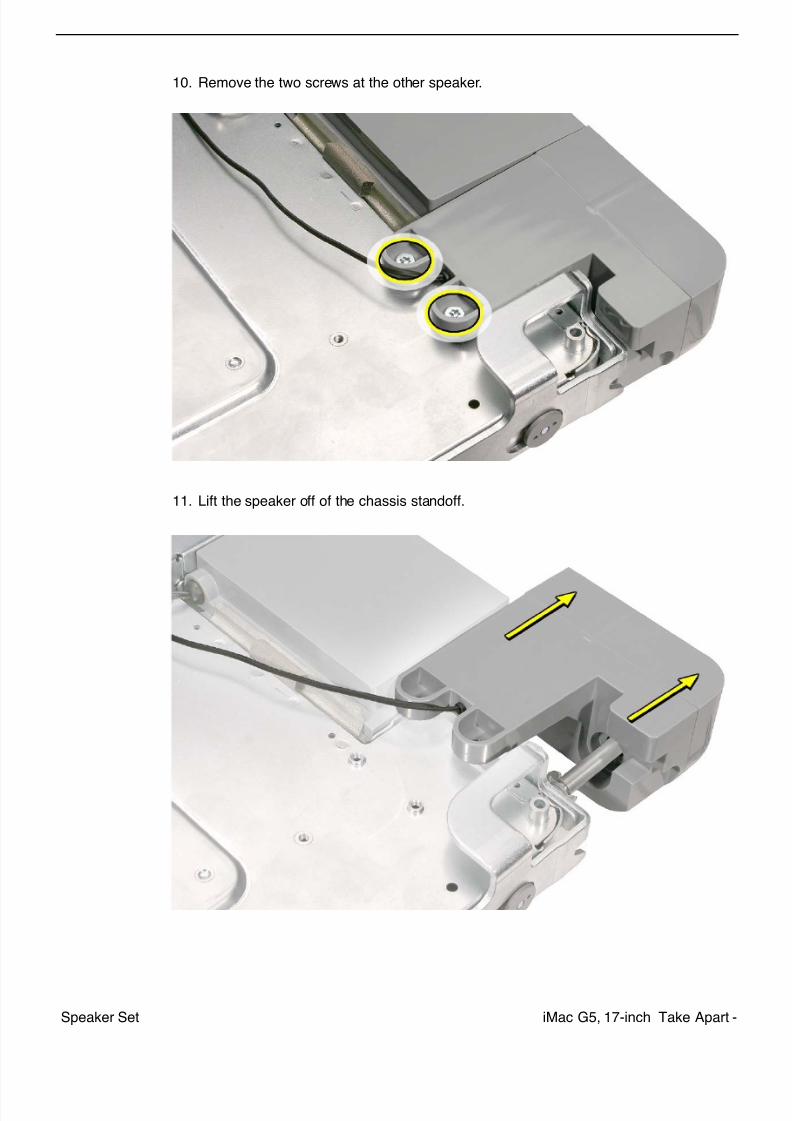
7/29/2019 Apple imacg5_17in
http://slidepdf.com/reader/full/apple-imacg517in 219/319iMac G5, 17-inch Take Apart -Speaker Set
10. Remove the two screws at the other speaker.
11. Lift the speaker off of the chassis standoff.
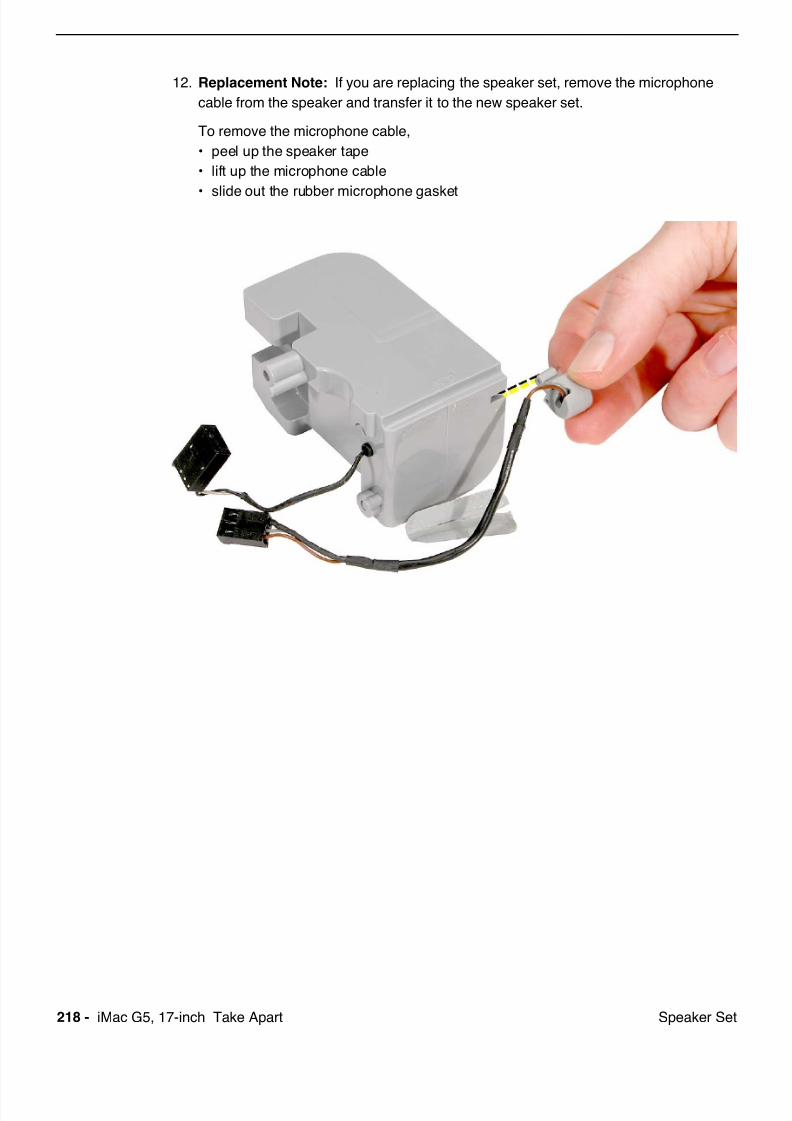
7/29/2019 Apple imacg5_17in
http://slidepdf.com/reader/full/apple-imacg517in 220/319218 - iMac G5, 17-inch Take Apart Speaker Set
12. Replacement Note: If you are replacing the speaker set, remove the microphone
cable from the speaker and transfer it to the new speaker set.
To remove the microphone cable,
• peel up the speaker tape
• lift up the microphone cable
• slide out the rubber microphone gasket

7/29/2019 Apple imacg5_17in
http://slidepdf.com/reader/full/apple-imacg517in 221/319iMac G5, 17-inch Take Apart -Speaker Set
Replacing the Speaker Set
1. Note: The speaker set includes the two speakers, speaker housing, and attached
cable and connector.
2. Secure the microphone cable to the speaker, and apply new tape.Note: A strip of new tape comes with both a replacement speaker set and a
replacement microphone cable.
3. Attach the speaker that is closest to the lower fan on the chassis. Replace the two
screws.
4. Route the speaker cable into the cable guides. Then route the fan cable on top of it.
5. Gently press on the cable guides to ensure that the cables cannot become loose.
6. Install the remaining speaker to the chassis. Replace the single screw.
7. Route the three cable connectors through the chassis opening as follows:
• thick speaker connector first
• narrow microphone cable connector next
• narrowest fan cable connector last
8. Connect the three connectors.
9. Replace the light pipe.
10. Replace the midplane.
11. Replace the back cover.
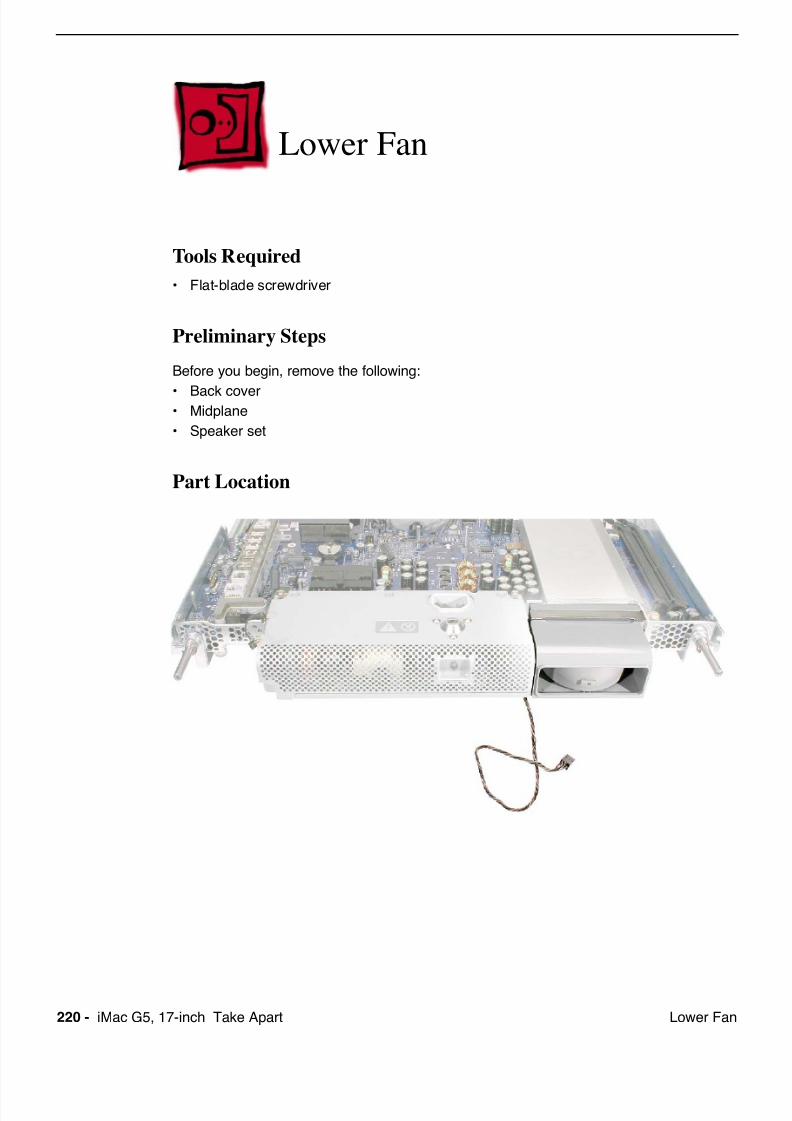
7/29/2019 Apple imacg5_17in
http://slidepdf.com/reader/full/apple-imacg517in 222/319220 - iMac G5, 17-inch Take Apart Lower Fan
Lower Fan
Tools Required
• Flat-blade screwdriver
Preliminary Steps
Before you begin, remove the following:
• Back cover• Midplane
• Speaker set
Part Location

7/29/2019 Apple imacg5_17in
http://slidepdf.com/reader/full/apple-imacg517in 223/319
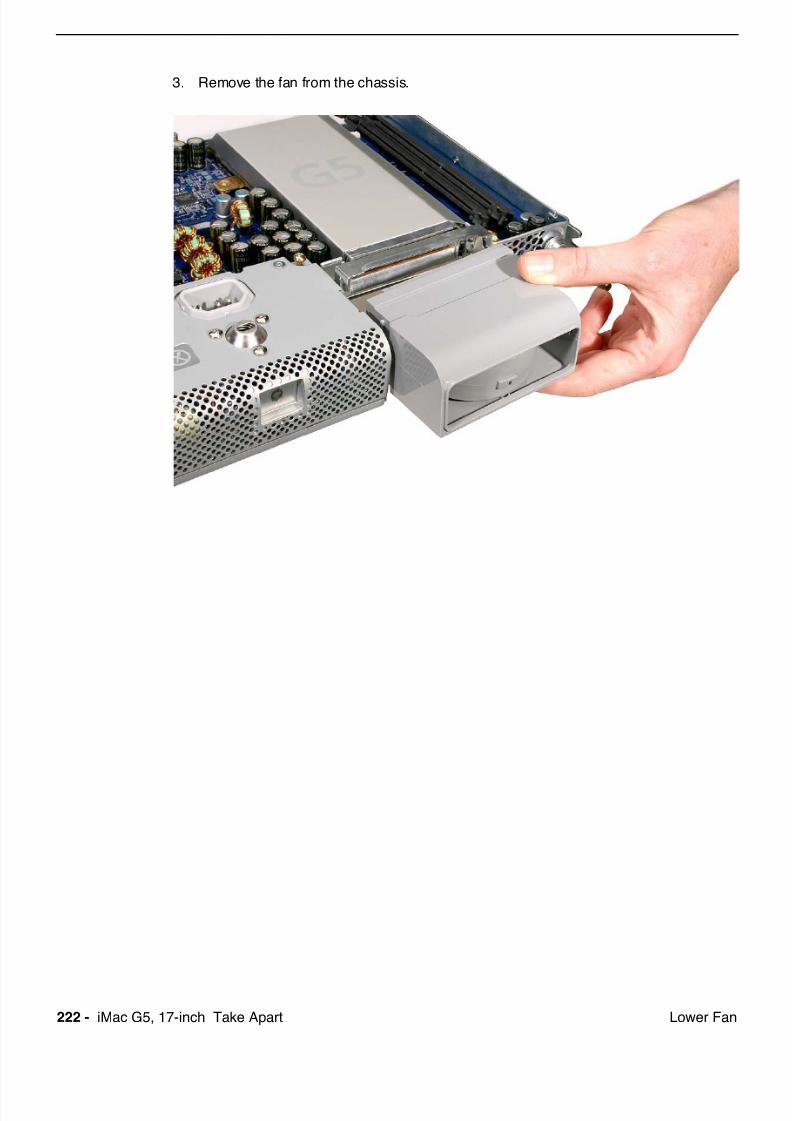
7/29/2019 Apple imacg5_17in
http://slidepdf.com/reader/full/apple-imacg517in 224/319222 - iMac G5, 17-inch Take Apart Lower Fan
3. Remove the fan from the chassis.
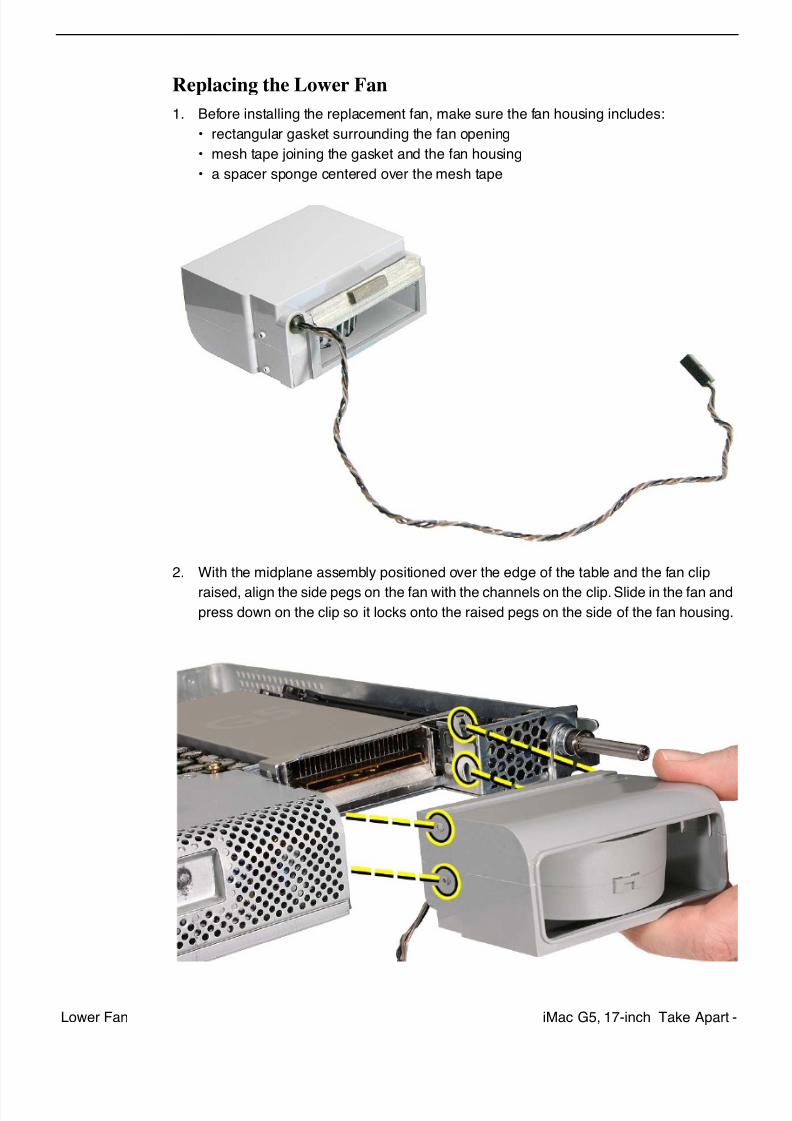
7/29/2019 Apple imacg5_17in
http://slidepdf.com/reader/full/apple-imacg517in 225/319iMac G5, 17-inch Take Apart -Lower Fan
Replacing the Lower Fan
1. Before installing the replacement fan, make sure the fan housing includes:
• rectangular gasket surrounding the fan opening
• mesh tape joining the gasket and the fan housing
• a spacer sponge centered over the mesh tape
2. With the midplane assembly positioned over the edge of the table and the fan clip
raised, align the side pegs on the fan with the channels on the clip. Slide in the fan and
press down on the clip so it locks onto the raised pegs on the side of the fan housing.

7/29/2019 Apple imacg5_17in
http://slidepdf.com/reader/full/apple-imacg517in 226/319224 - iMac G5, 17-inch Take Apart Lower Fan
3. Replace the speaker set.
4. Replace the midplane.
5. Replace the back cover.
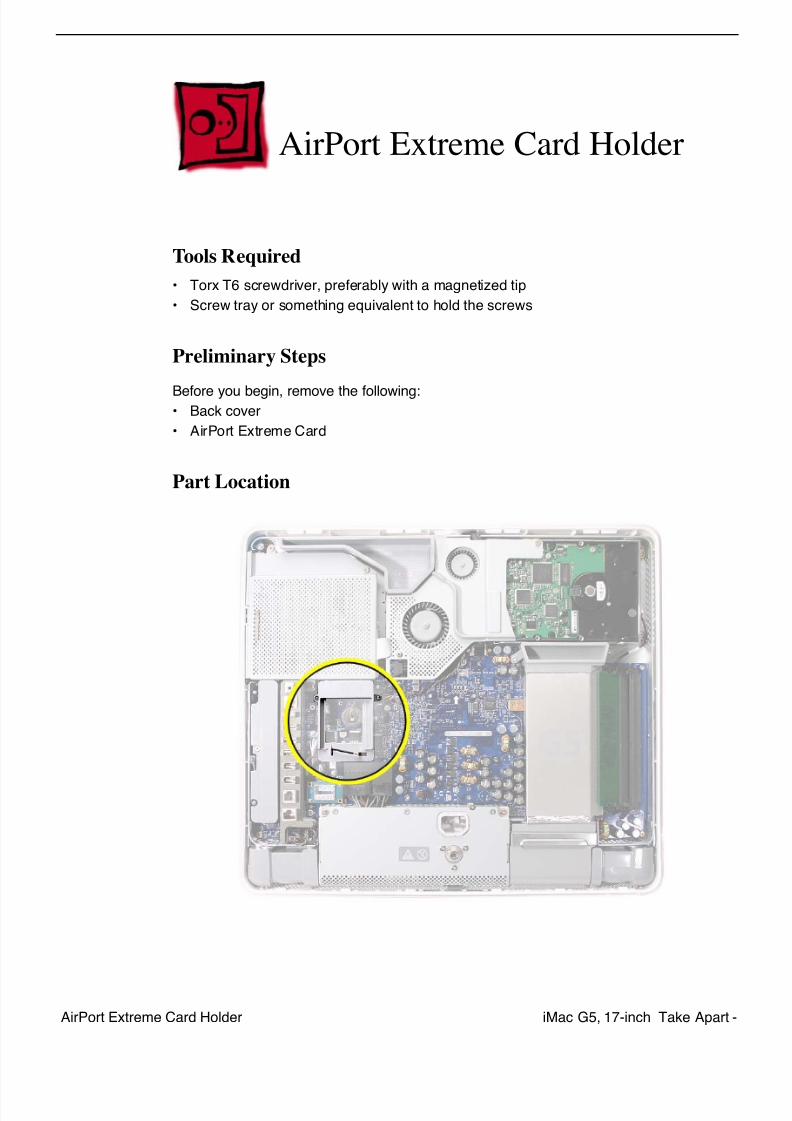
7/29/2019 Apple imacg5_17in
http://slidepdf.com/reader/full/apple-imacg517in 227/319
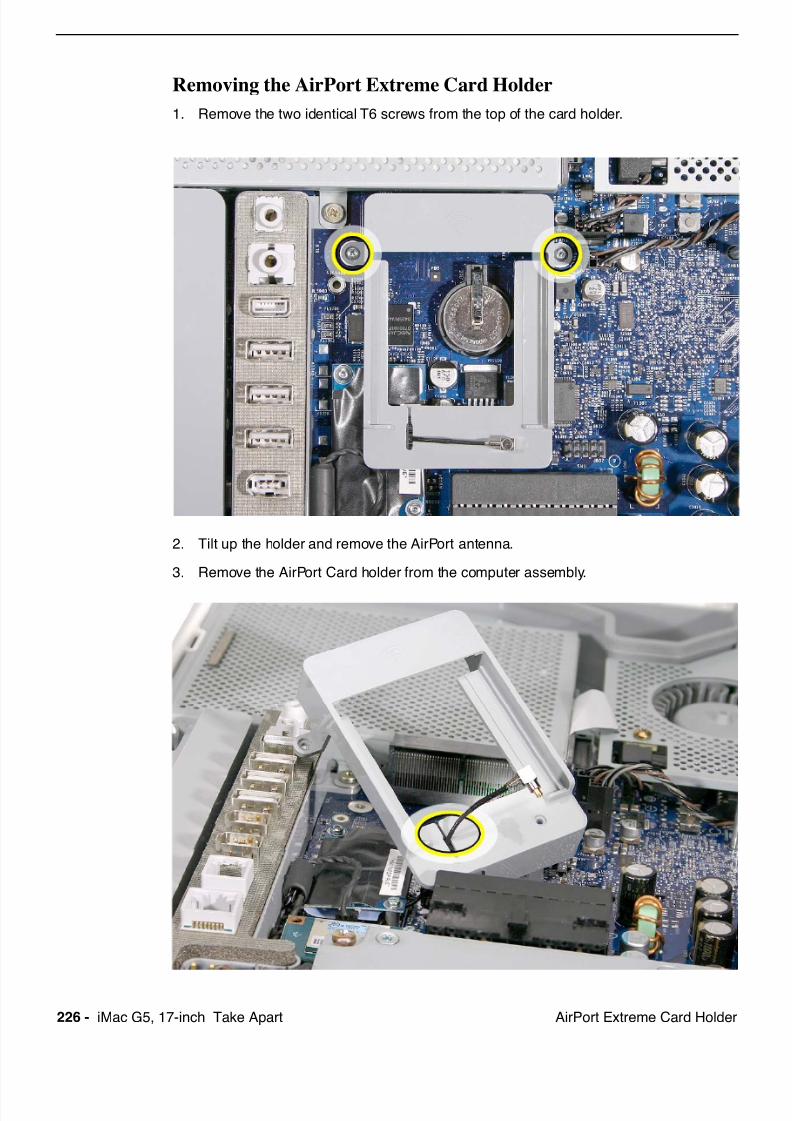
7/29/2019 Apple imacg5_17in
http://slidepdf.com/reader/full/apple-imacg517in 228/319226 - iMac G5, 17-inch Take Apart AirPort Extreme Card Holder
Removing the AirPort Extreme Card Holder
1. Remove the two identical T6 screws from the top of the card holder.
2. Tilt up the holder and remove the AirPort antenna.
3. Remove the AirPort Card holder from the computer assembly.
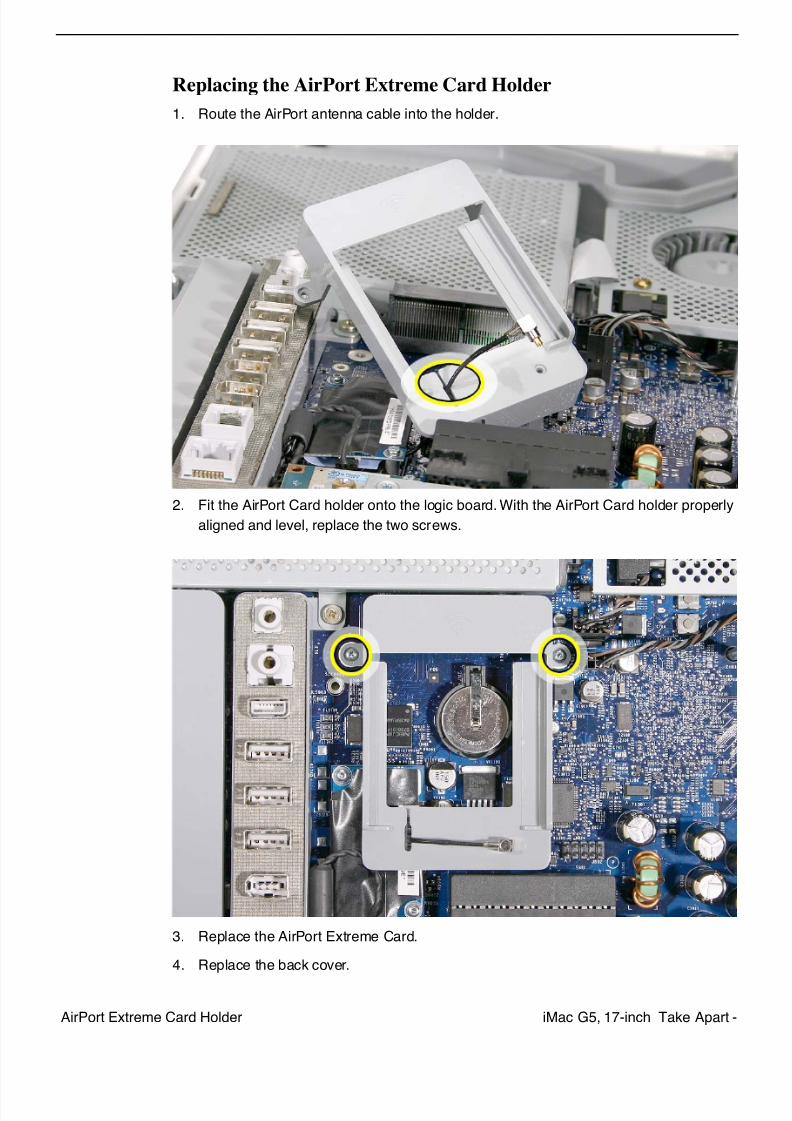
7/29/2019 Apple imacg5_17in
http://slidepdf.com/reader/full/apple-imacg517in 229/319iMac G5, 17-inch Take Apart -AirPort Extreme Card Holder
Replacing the AirPort Extreme Card Holder
1. Route the AirPort antenna cable into the holder.
2. Fit the AirPort Card holder onto the logic board. With the AirPort Card holder properly
aligned and level, replace the two screws.
3. Replace the AirPort Extreme Card.
4. Replace the back cover.
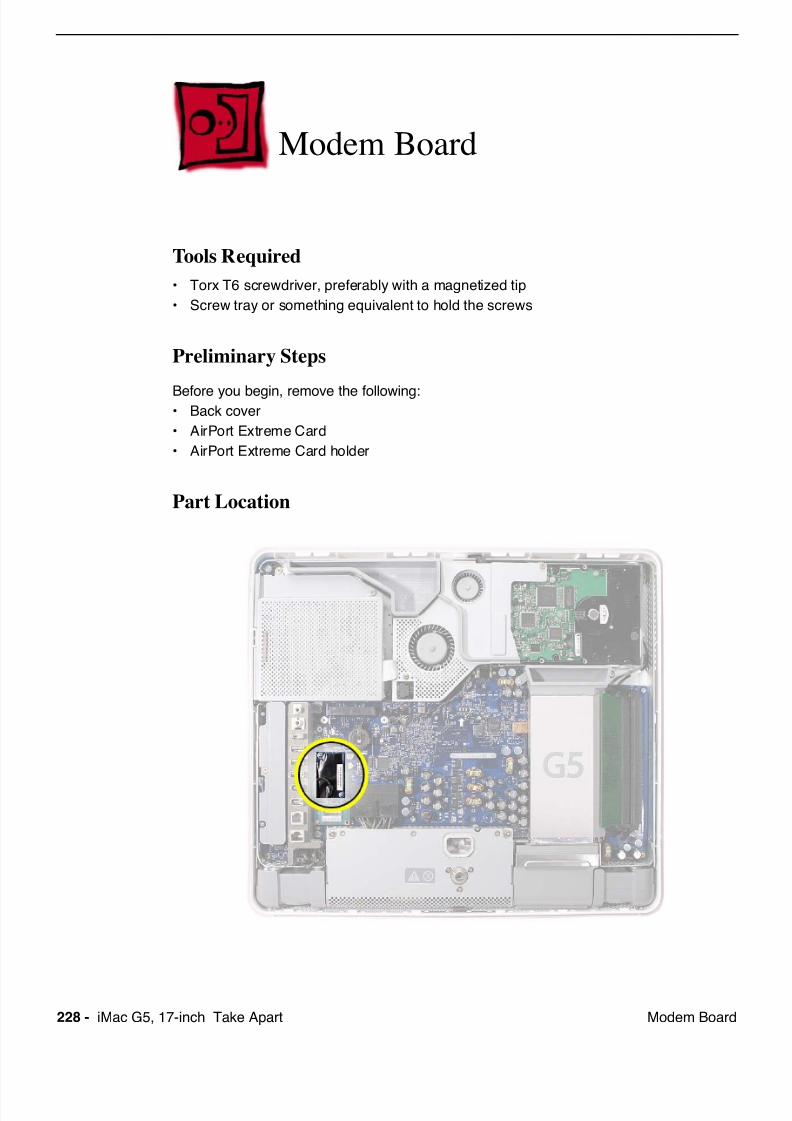
7/29/2019 Apple imacg5_17in
http://slidepdf.com/reader/full/apple-imacg517in 230/319228 - iMac G5, 17-inch Take Apart Modem Board
Modem Board
Tools Required
• Torx T6 screwdriver, preferably with a magnetized tip
• Screw tray or something equivalent to hold the screws
Preliminary Steps
Before you begin, remove the following:• Back cover
• AirPort Extreme Card
• AirPort Extreme Card holder
Part Location
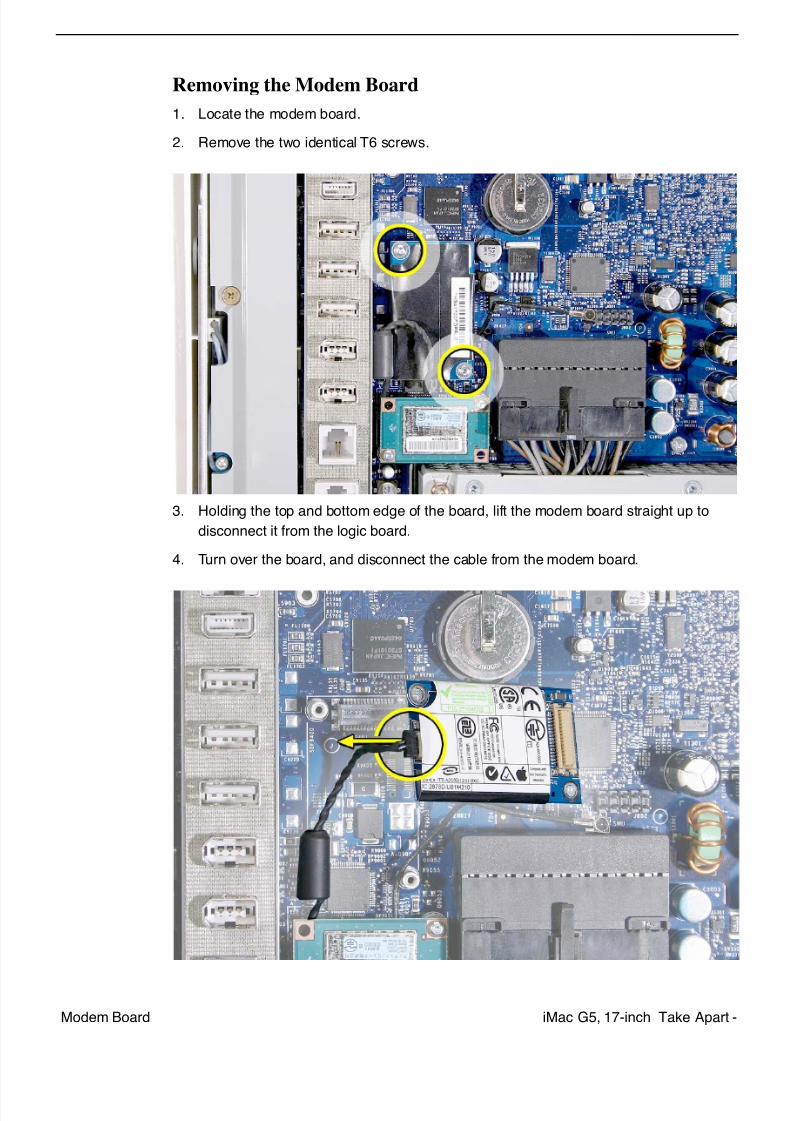
7/29/2019 Apple imacg5_17in
http://slidepdf.com/reader/full/apple-imacg517in 231/319iMac G5, 17-inch Take Apart -Modem Board
Removing the Modem Board
1. Locate the modem board.
2. Remove the two identical T6 screws.
3. Holding the top and bottom edge of the board, lift the modem board straight up to
disconnect it from the logic board.
4. Turn over the board, and disconnect the cable from the modem board.
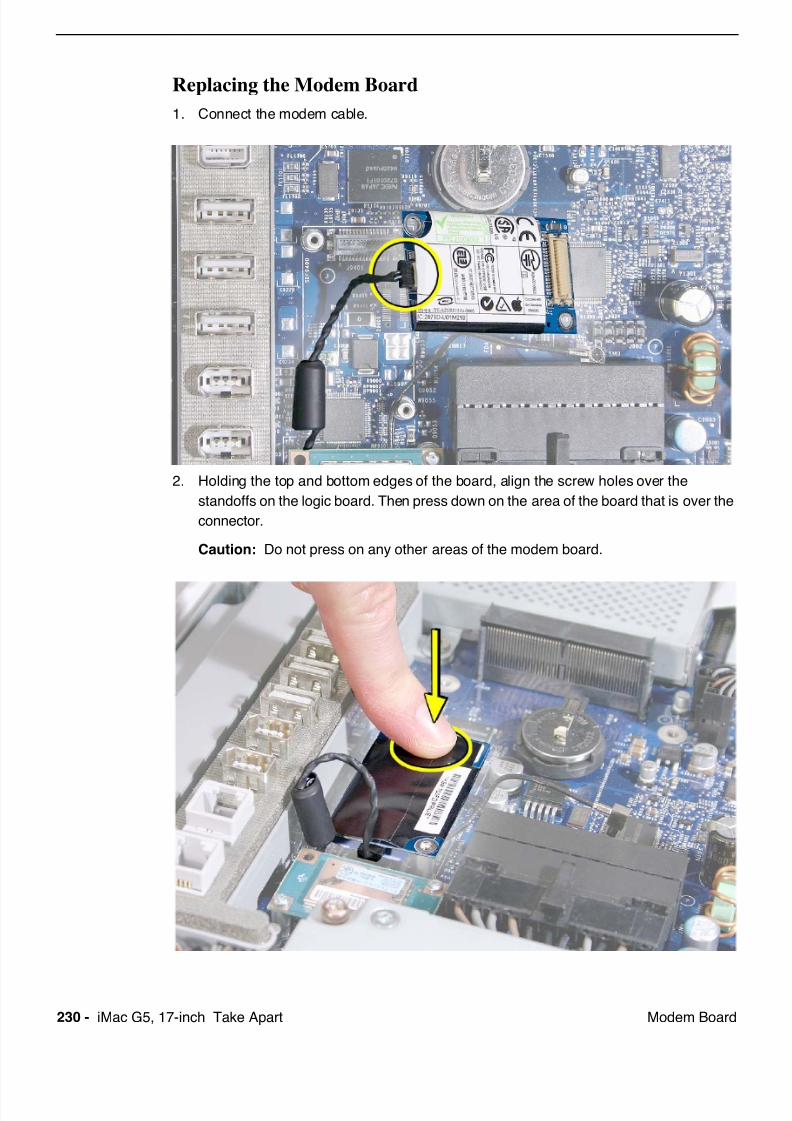
7/29/2019 Apple imacg5_17in
http://slidepdf.com/reader/full/apple-imacg517in 232/319230 - iMac G5, 17-inch Take Apart Modem Board
Replacing the Modem Board
1. Connect the modem cable.
2. Holding the top and bottom edges of the board, align the screw holes over the
standoffs on the logic board. Then press down on the area of the board that is over the
connector.
Caution: Do not press on any other areas of the modem board.

7/29/2019 Apple imacg5_17in
http://slidepdf.com/reader/full/apple-imacg517in 233/319iMac G5, 17-inch Take Apart -Modem Board
3. Replace the two screws.
4. Replace the AirPort Extreme Card holder.
5. Replace the AirPort Extreme Card.
6. Replace the back cover.
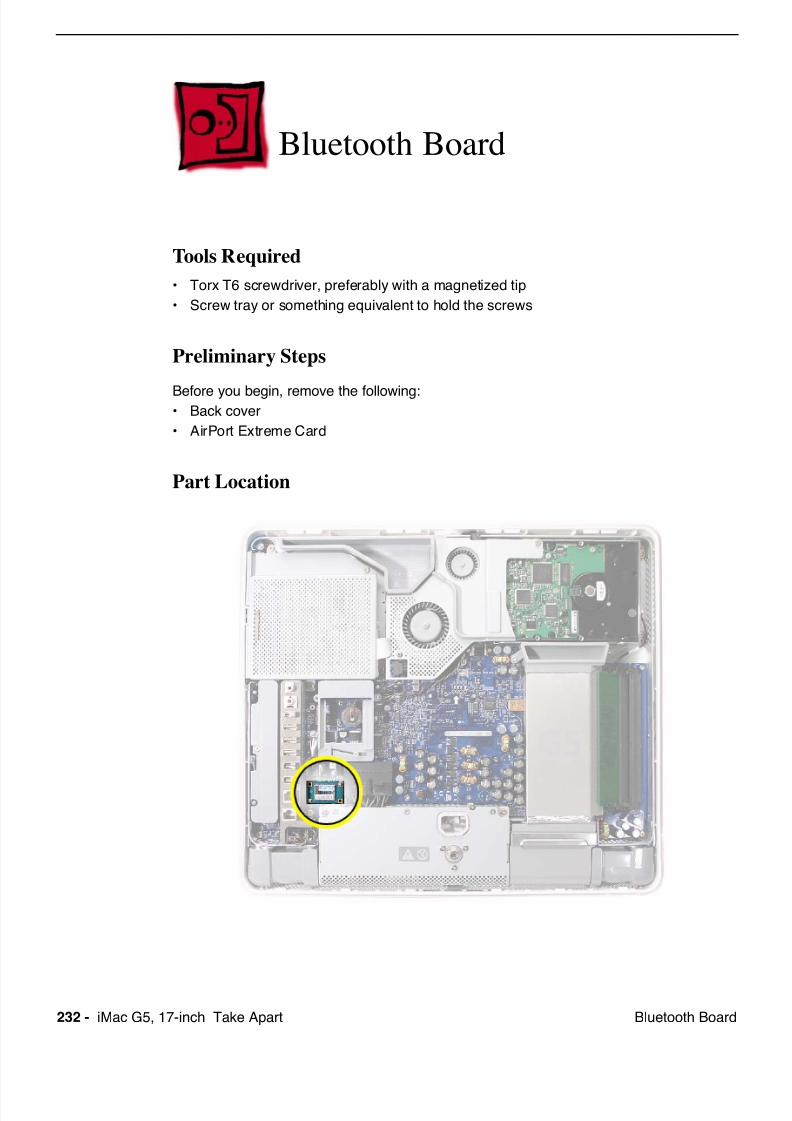
7/29/2019 Apple imacg5_17in
http://slidepdf.com/reader/full/apple-imacg517in 234/319232 - iMac G5, 17-inch Take Apart Bluetooth Board
Bluetooth Board
Tools Required
• Torx T6 screwdriver, preferably with a magnetized tip
• Screw tray or something equivalent to hold the screws
Preliminary Steps
Before you begin, remove the following:• Back cover
• AirPort Extreme Card
Part Location
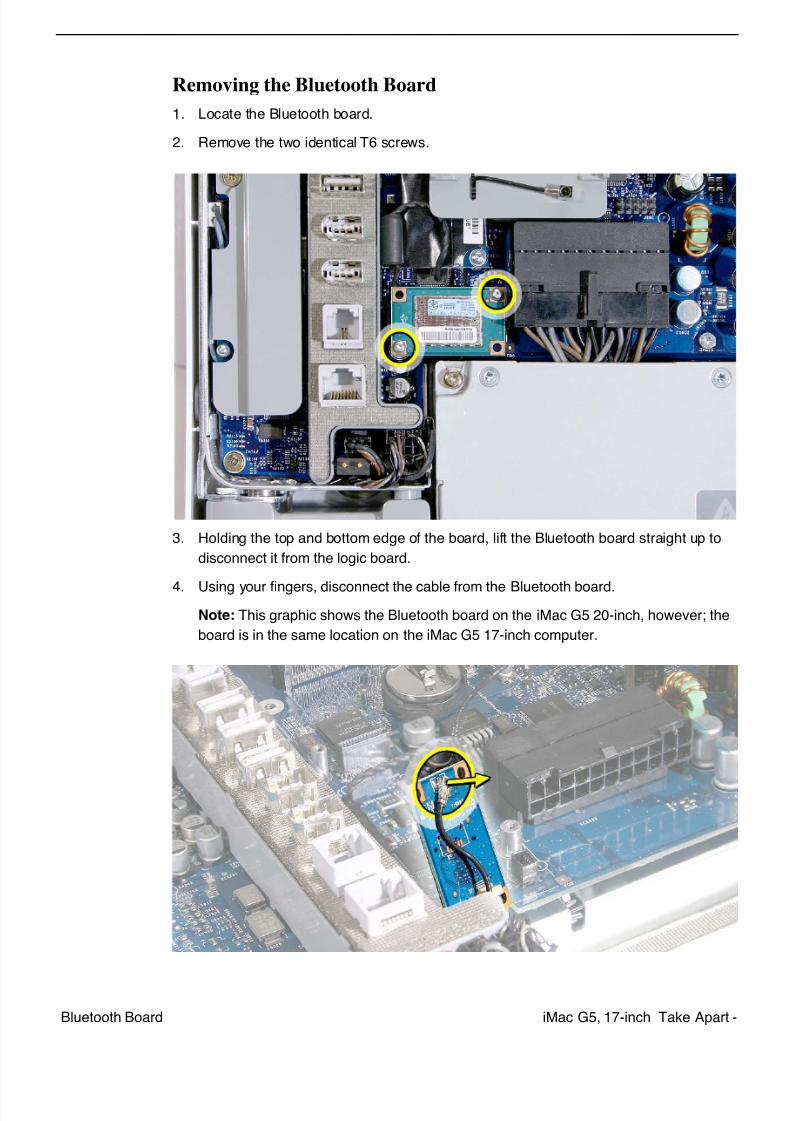
7/29/2019 Apple imacg5_17in
http://slidepdf.com/reader/full/apple-imacg517in 235/319iMac G5, 17-inch Take Apart -Bluetooth Board
Removing the Bluetooth Board
1. Locate the Bluetooth board.
2. Remove the two identical T6 screws.
3. Holding the top and bottom edge of the board, lift the Bluetooth board straight up to
disconnect it from the logic board.
4. Using your fingers, disconnect the cable from the Bluetooth board.
Note: This graphic shows the Bluetooth board on the iMac G5 20-inch, however; the
board is in the same location on the iMac G5 17-inch computer.
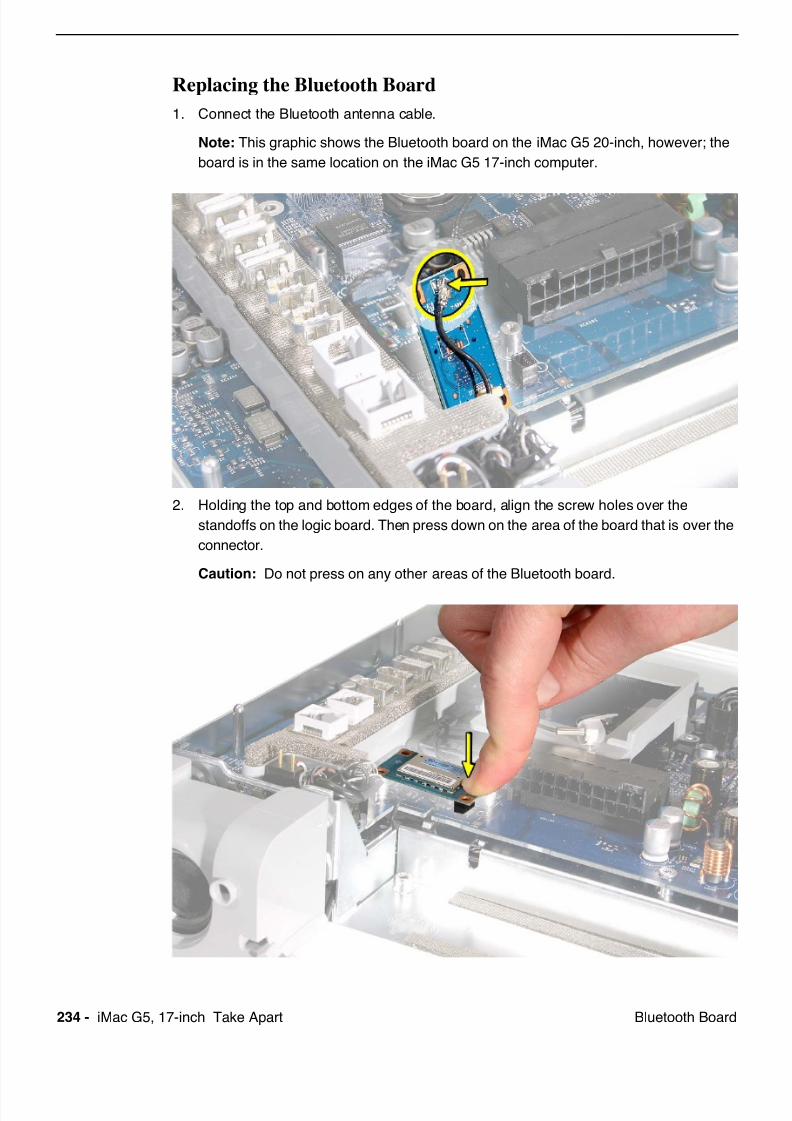
7/29/2019 Apple imacg5_17in
http://slidepdf.com/reader/full/apple-imacg517in 236/319234 - iMac G5, 17-inch Take Apart Bluetooth Board
Replacing the Bluetooth Board
1. Connect the Bluetooth antenna cable.
Note: This graphic shows the Bluetooth board on the iMac G5 20-inch, however; the
board is in the same location on the iMac G5 17-inch computer.
2. Holding the top and bottom edges of the board, align the screw holes over the
standoffs on the logic board. Then press down on the area of the board that is over the
connector.
Caution: Do not press on any other areas of the Bluetooth board.
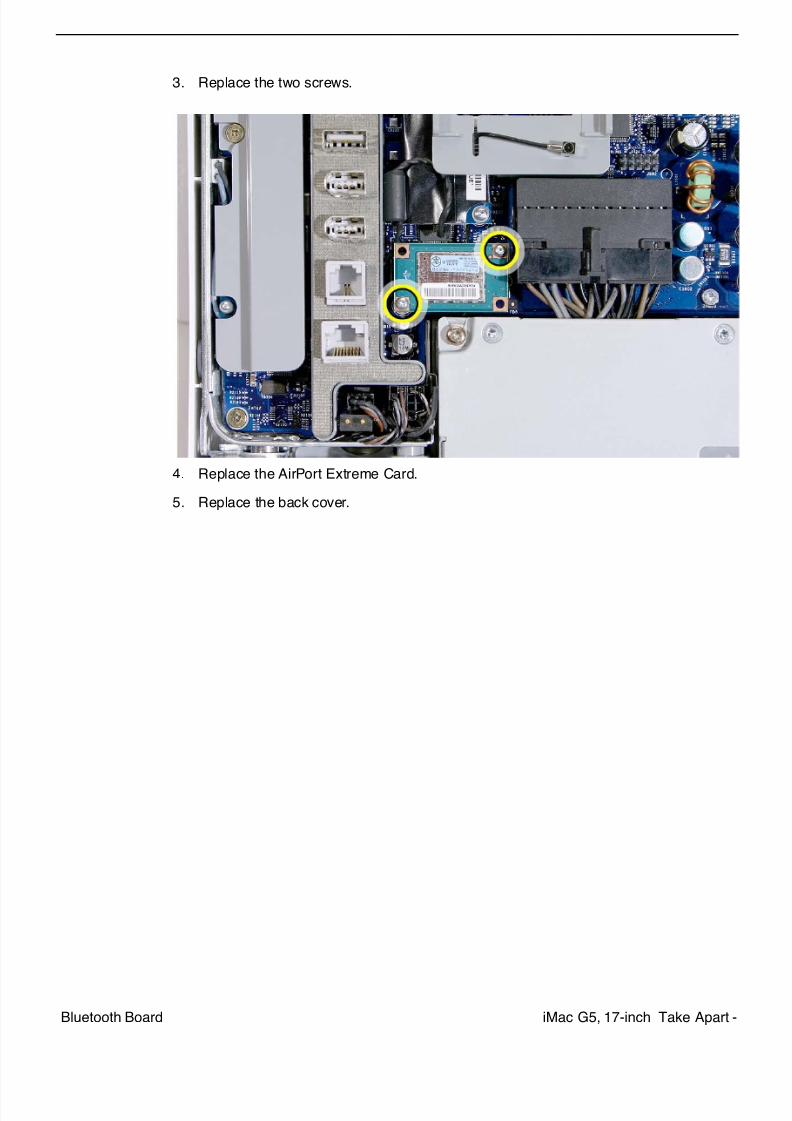
7/29/2019 Apple imacg5_17in
http://slidepdf.com/reader/full/apple-imacg517in 237/319iMac G5, 17-inch Take Apart -Bluetooth Board
3. Replace the two screws.
4. Replace the AirPort Extreme Card.
5. Replace the back cover.
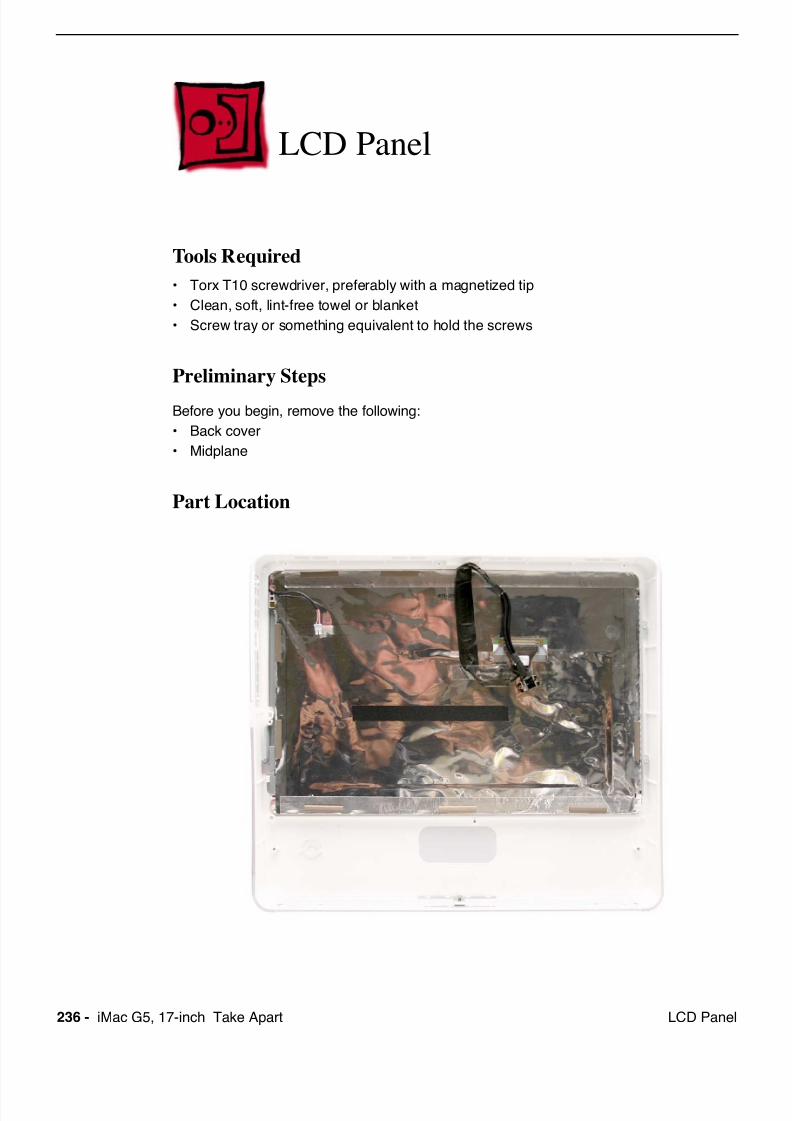
7/29/2019 Apple imacg5_17in
http://slidepdf.com/reader/full/apple-imacg517in 238/319236 - iMac G5, 17-inch Take Apart LCD Panel
LCD Panel
Tools Required
• Torx T10 screwdriver, preferably with a magnetized tip
• Clean, soft, lint-free towel or blanket
• Screw tray or something equivalent to hold the screws
Preliminary Steps
Before you begin, remove the following:
• Back cover
• Midplane
Part Location
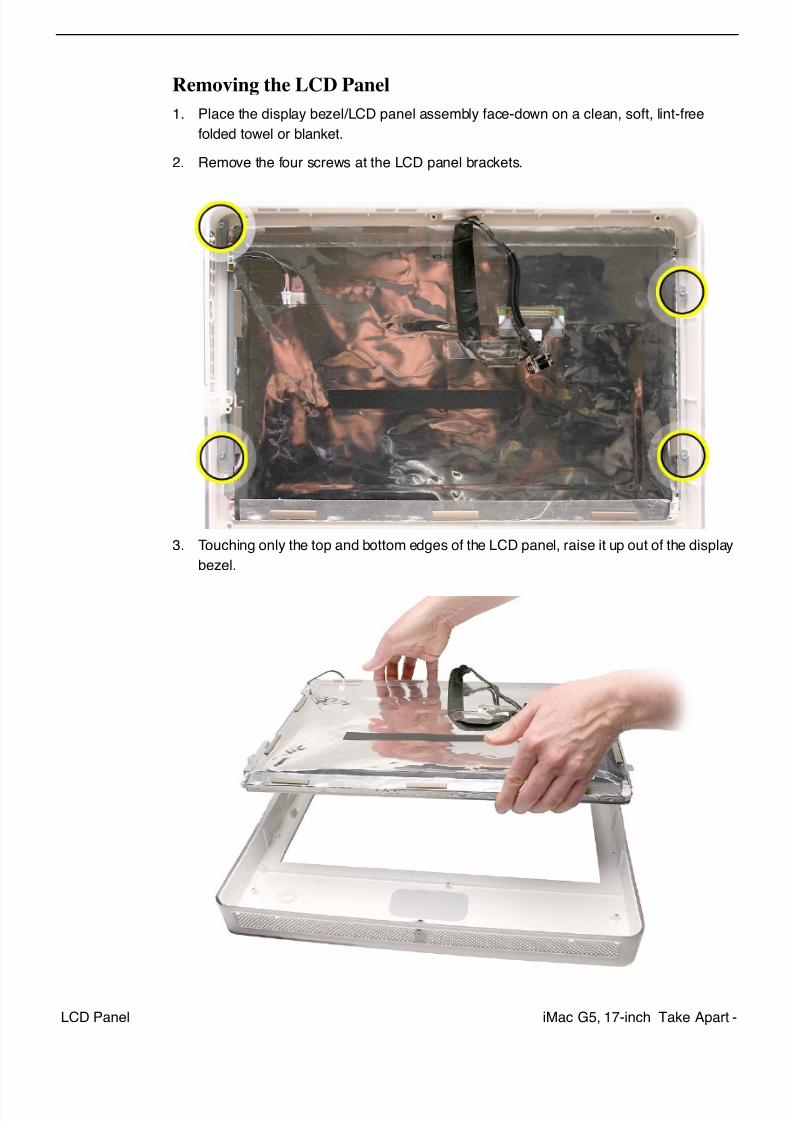
7/29/2019 Apple imacg5_17in
http://slidepdf.com/reader/full/apple-imacg517in 239/319iMac G5, 17-inch Take Apart -LCD Panel
Removing the LCD Panel
1. Place the display bezel/LCD panel assembly face-down on a clean, soft, lint-free
folded towel or blanket.
2. Remove the four screws at the LCD panel brackets.
3. Touching only the top and bottom edges of the LCD panel, raise it up out of the display
bezel.
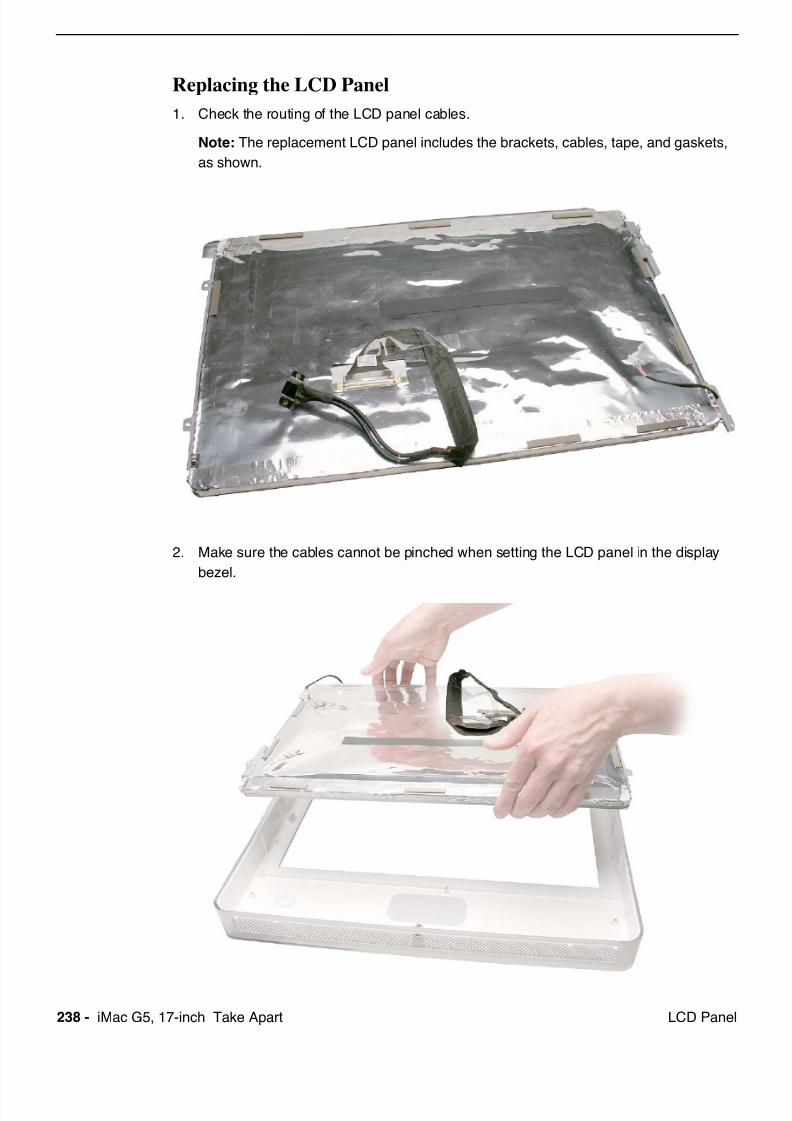
7/29/2019 Apple imacg5_17in
http://slidepdf.com/reader/full/apple-imacg517in 240/319238 - iMac G5, 17-inch Take Apart LCD Panel
Replacing the LCD Panel
1. Check the routing of the LCD panel cables.
Note: The replacement LCD panel includes the brackets, cables, tape, and gaskets,
as shown.
2. Make sure the cables cannot be pinched when setting the LCD panel in the display
bezel.
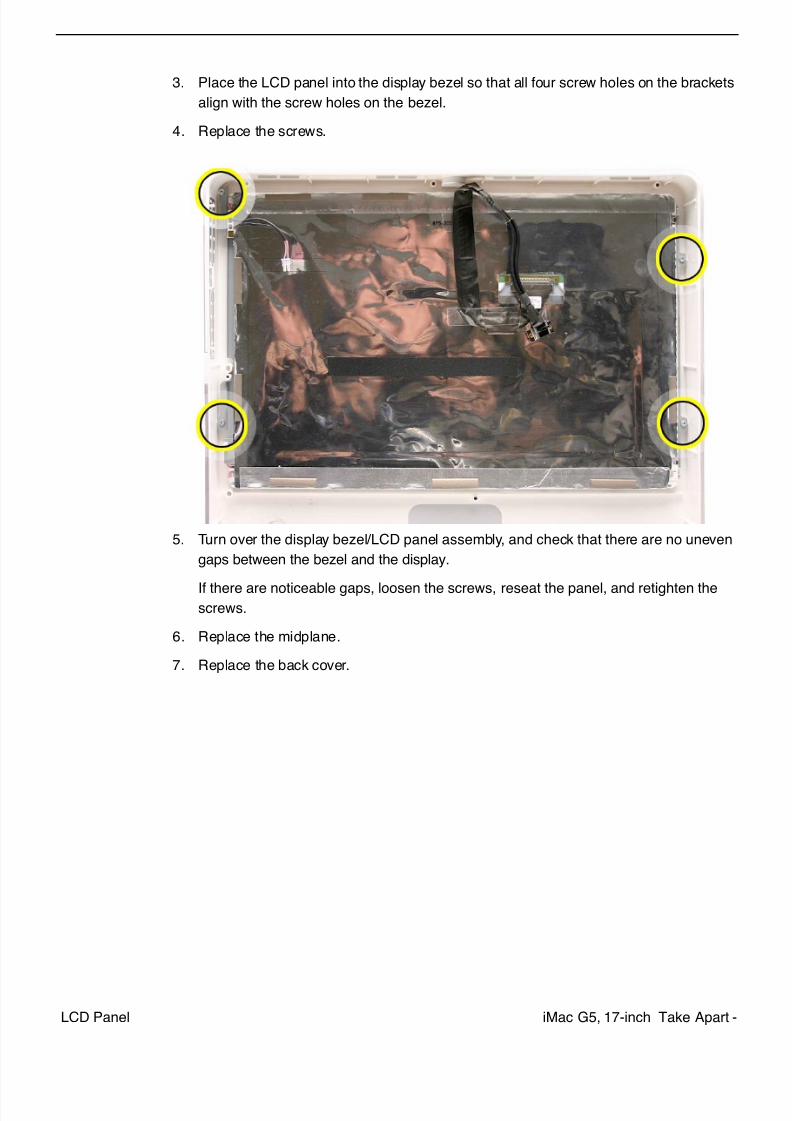
7/29/2019 Apple imacg5_17in
http://slidepdf.com/reader/full/apple-imacg517in 241/319iMac G5, 17-inch Take Apart -LCD Panel
3. Place the LCD panel into the display bezel so that all four screw holes on the brackets
align with the screw holes on the bezel.
4. Replace the screws.
5. Turn over the display bezel/LCD panel assembly, and check that there are no uneven
gaps between the bezel and the display.
If there are noticeable gaps, loosen the screws, reseat the panel, and retighten thescrews.
6. Replace the midplane.
7. Replace the back cover.
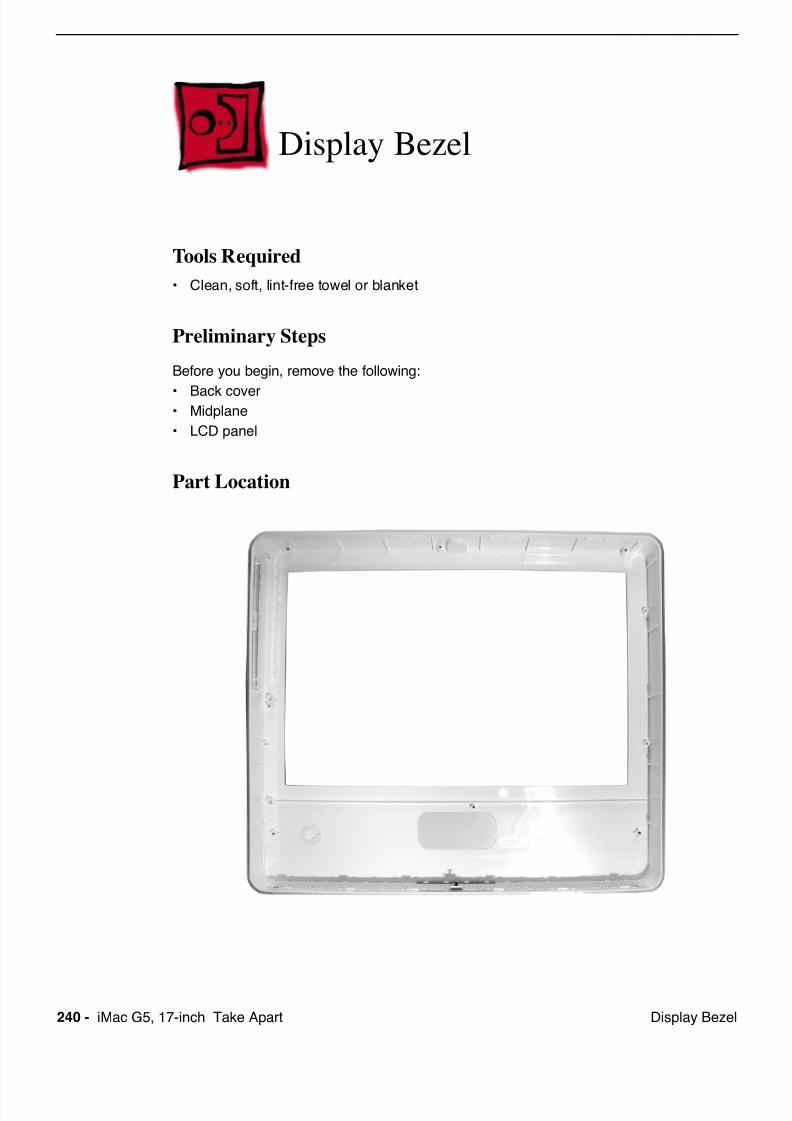
7/29/2019 Apple imacg5_17in
http://slidepdf.com/reader/full/apple-imacg517in 242/319240 - iMac G5, 17-inch Take Apart Display Bezel
Display Bezel
Tools Required
• Clean, soft, lint-free towel or blanket
Preliminary Steps
Before you begin, remove the following:
• Back cover• Midplane
• LCD panel
Part Location
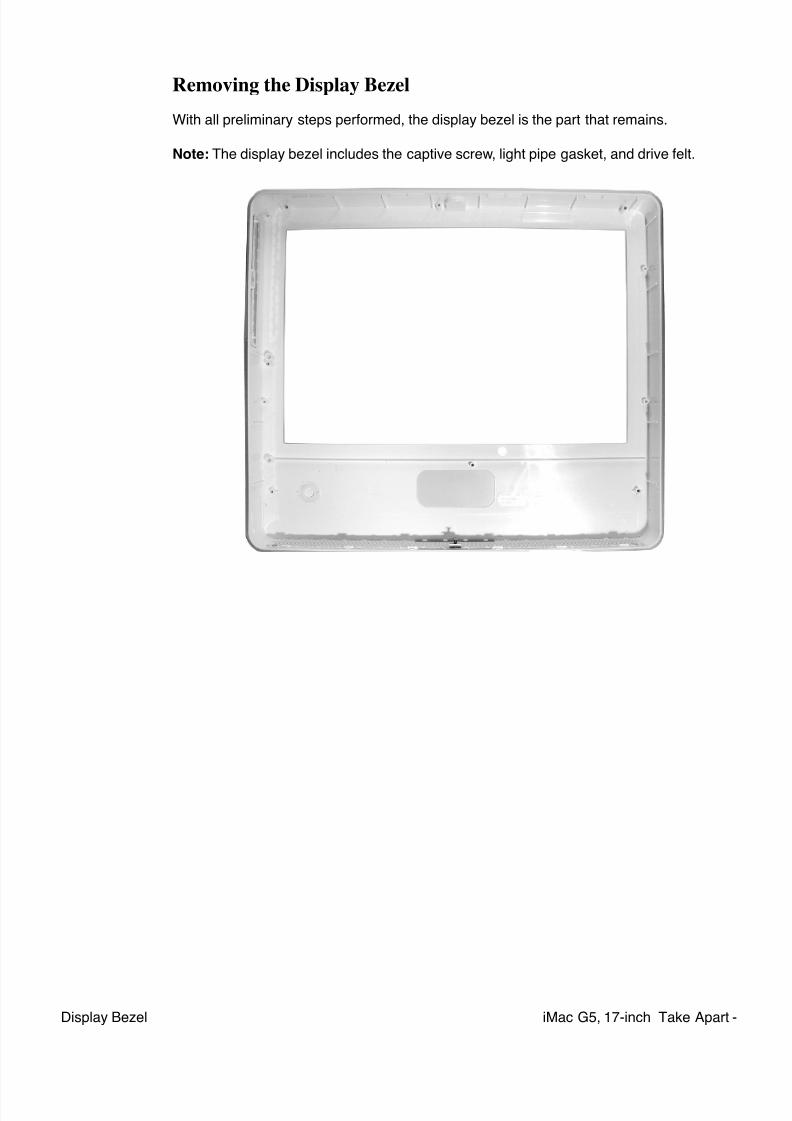
7/29/2019 Apple imacg5_17in
http://slidepdf.com/reader/full/apple-imacg517in 243/319
7/29/2019 Apple imacg5_17in
http://slidepdf.com/reader/full/apple-imacg517in 244/319242 - iMac G5, 17-inch Take Apart Display Bezel
Replacing the Display Bezel
1. Before installing the LCD panel and reassembling the computer, make sure the
display bezel is clean and free of dust and any foreign matter.
2. Replace the LCD panel.
3. Replace the midplane.
4. Replace the back cover.
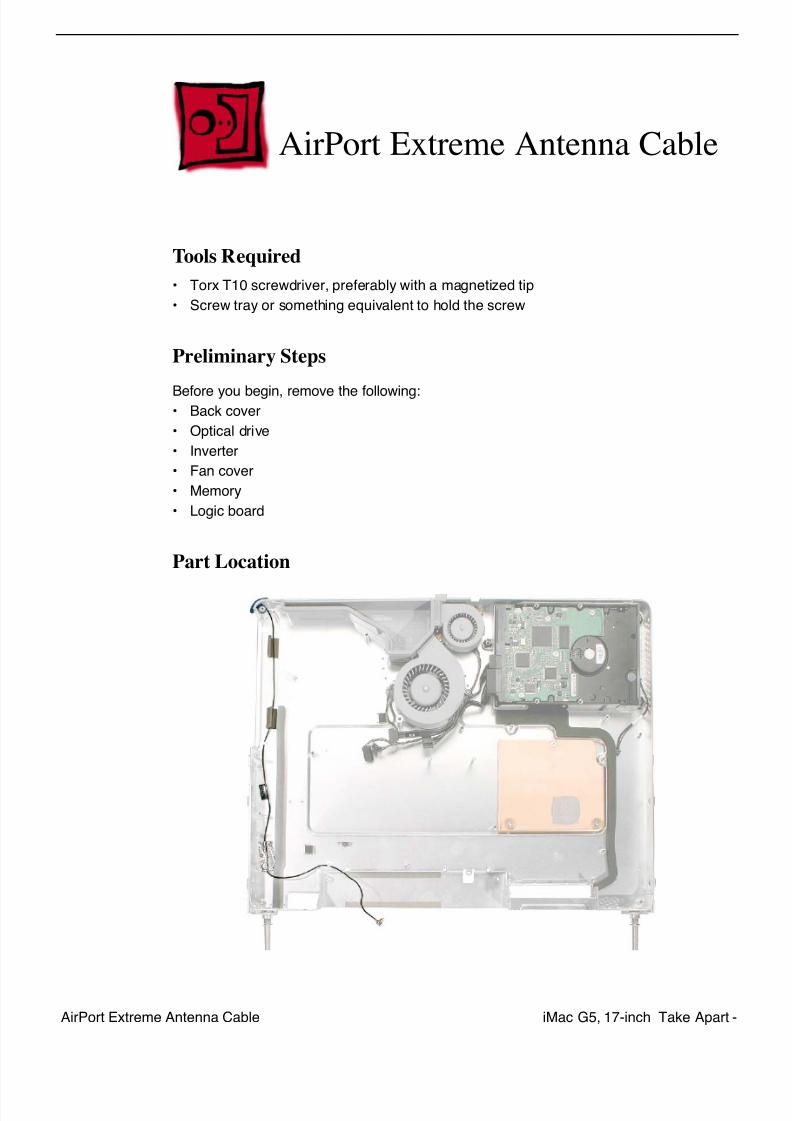
7/29/2019 Apple imacg5_17in
http://slidepdf.com/reader/full/apple-imacg517in 245/319iMac G5, 17-inch Take Apart -AirPort Extreme Antenna Cable
AirPort Extreme Antenna Cable
Tools Required
• Torx T10 screwdriver, preferably with a magnetized tip
• Screw tray or something equivalent to hold the screw
Preliminary Steps
Before you begin, remove the following:• Back cover
• Optical drive
• Inverter
• Fan cover
• Memory
• Logic board
Part Location
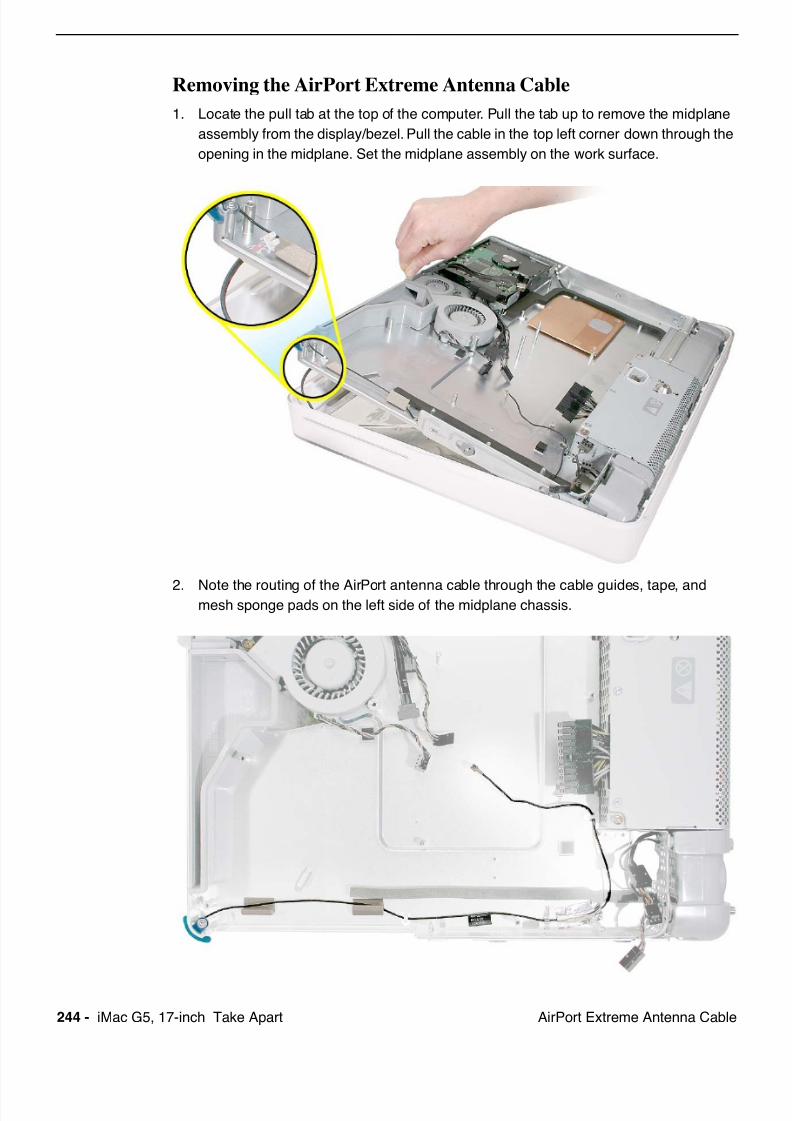
7/29/2019 Apple imacg5_17in
http://slidepdf.com/reader/full/apple-imacg517in 246/319244 - iMac G5, 17-inch Take Apart AirPort Extreme Antenna Cable
Removing the AirPort Extreme Antenna Cable
1. Locate the pull tab at the top of the computer. Pull the tab up to remove the midplane
assembly from the display/bezel. Pull the cable in the top left corner down through the
opening in the midplane. Set the midplane assembly on the work surface.
2. Note the routing of the AirPort antenna cable through the cable guides, tape, andmesh sponge pads on the left side of the midplane chassis.

7/29/2019 Apple imacg5_17in
http://slidepdf.com/reader/full/apple-imacg517in 247/319iMac G5, 17-inch Take Apart -AirPort Extreme Antenna Cable
3. Starting at the plug end of the AirPort antenna, release the cable from the cable
guides and tape.
4. Release the cable from the remaining cable guide and from where it is sandwiched
between the mesh sponge pads. Remove the T10 screw.

7/29/2019 Apple imacg5_17in
http://slidepdf.com/reader/full/apple-imacg517in 248/319246 - iMac G5, 17-inch Take Apart AirPort Extreme Antenna Cable
5. Route the cable through the corner opening in the midplane chassis.
6. Note that the AirPort antenna cable includes the attached board.
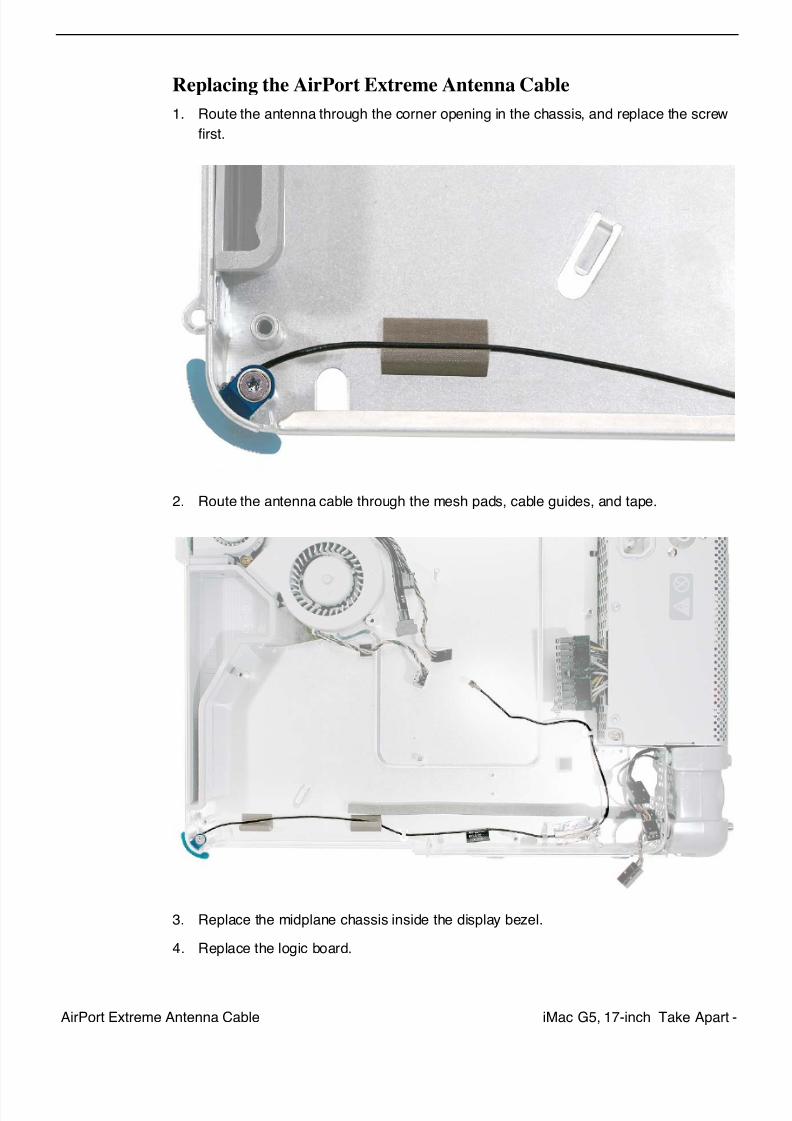
7/29/2019 Apple imacg5_17in
http://slidepdf.com/reader/full/apple-imacg517in 249/319iMac G5, 17-inch Take Apart -AirPort Extreme Antenna Cable
Replacing the AirPort Extreme Antenna Cable
1. Route the antenna through the corner opening in the chassis, and replace the screw
first.
2. Route the antenna cable through the mesh pads, cable guides, and tape.
3. Replace the midplane chassis inside the display bezel.
4. Replace the logic board.

7/29/2019 Apple imacg5_17in
http://slidepdf.com/reader/full/apple-imacg517in 250/319248 - iMac G5, 17-inch Take Apart AirPort Extreme Antenna Cable
5. Replace the memory.
6. Replace the fan cover.
7. Replace the inverter.
8. Replace the optical drive.
9. Replace the back cover.
7/29/2019 Apple imacg5_17in
http://slidepdf.com/reader/full/apple-imacg517in 251/319iMac G5, 17-inch Take Apart -Midplane Chassis
Midplane Chassis
Tools Required
• Torx T10 screwdriver, preferably with a magnetized tip
• Screw tray or something equivalent to hold the screws
Preliminary Steps
Before you begin, remove the following:• Back cover
• Midplane assembly
• Upper fans
• Logic board
• AirPort Extreme antenna cable
• Microphone cable
• Speaker set
• Lower fan
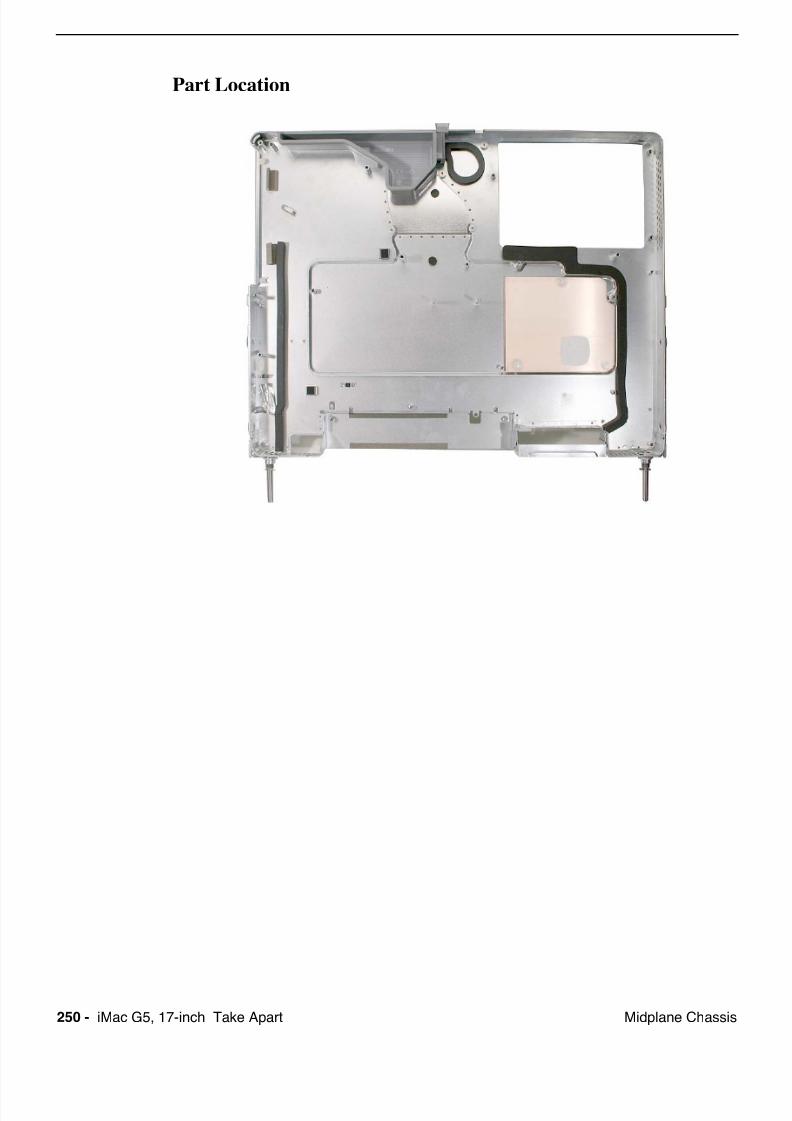
7/29/2019 Apple imacg5_17in
http://slidepdf.com/reader/full/apple-imacg517in 252/319250 - iMac G5, 17-inch Take Apart Midplane Chassis
Part Location
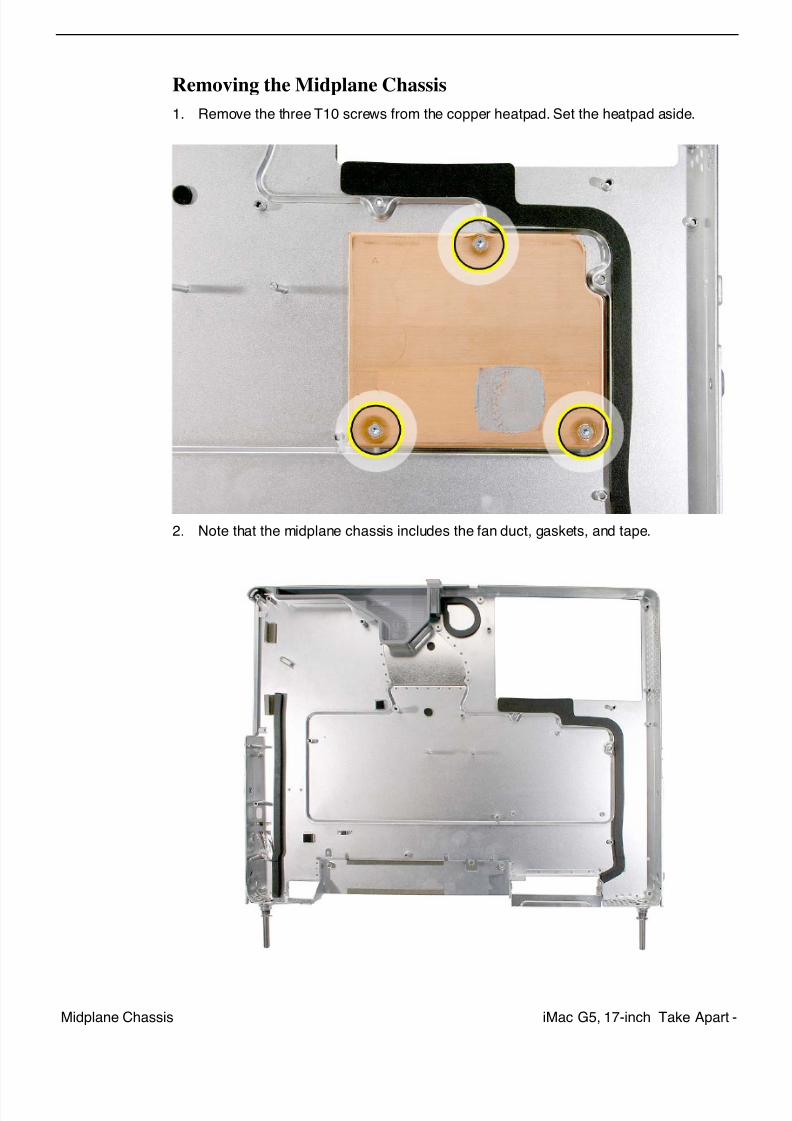
7/29/2019 Apple imacg5_17in
http://slidepdf.com/reader/full/apple-imacg517in 253/319iMac G5, 17-inch Take Apart -Midplane Chassis
Removing the Midplane Chassis
1. Remove the three T10 screws from the copper heatpad. Set the heatpad aside.
2. Note that the midplane chassis includes the fan duct, gaskets, and tape.
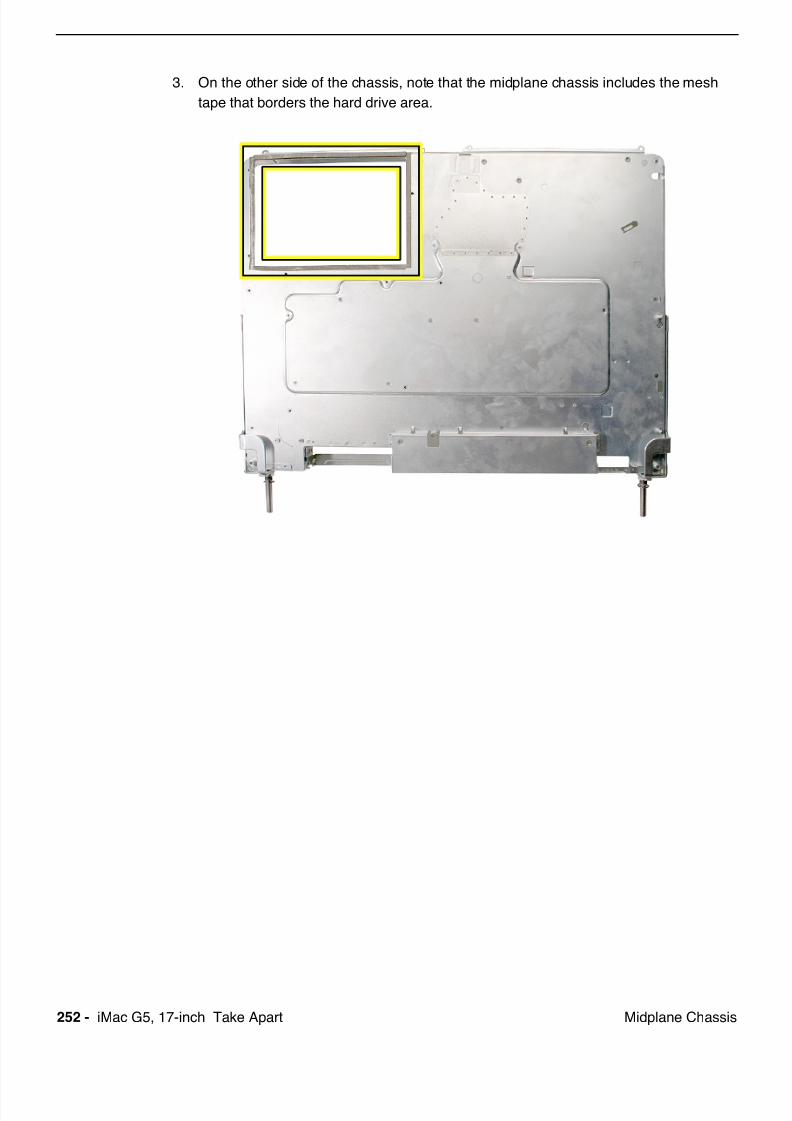
7/29/2019 Apple imacg5_17in
http://slidepdf.com/reader/full/apple-imacg517in 254/319252 - iMac G5, 17-inch Take Apart Midplane Chassis
3. On the other side of the chassis, note that the midplane chassis includes the mesh
tape that borders the hard drive area.
7/29/2019 Apple imacg5_17in
http://slidepdf.com/reader/full/apple-imacg517in 255/319
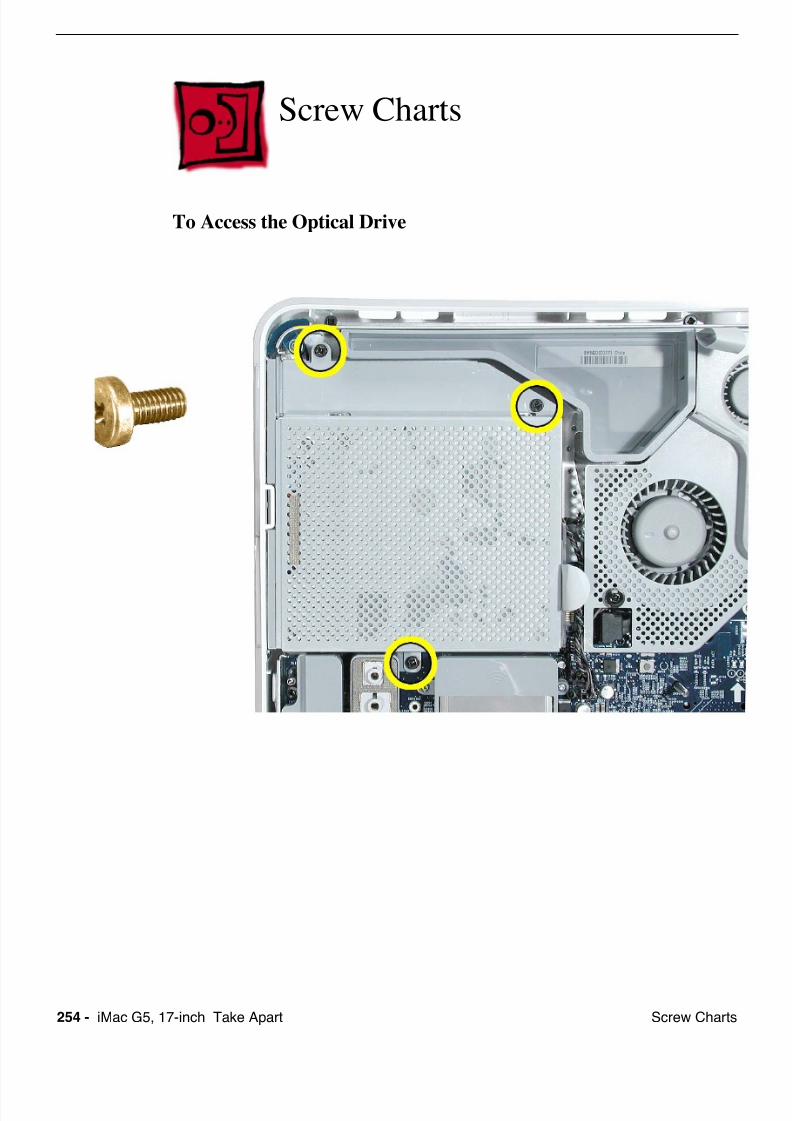
7/29/2019 Apple imacg5_17in
http://slidepdf.com/reader/full/apple-imacg517in 256/319254 - iMac G5, 17-inch Take Apart Screw Charts
Screw Charts
To Access the Optical Drive

7/29/2019 Apple imacg5_17in
http://slidepdf.com/reader/full/apple-imacg517in 257/319iMac G5, 17-inch Take Apart -Screw Charts
To Access the Inverter
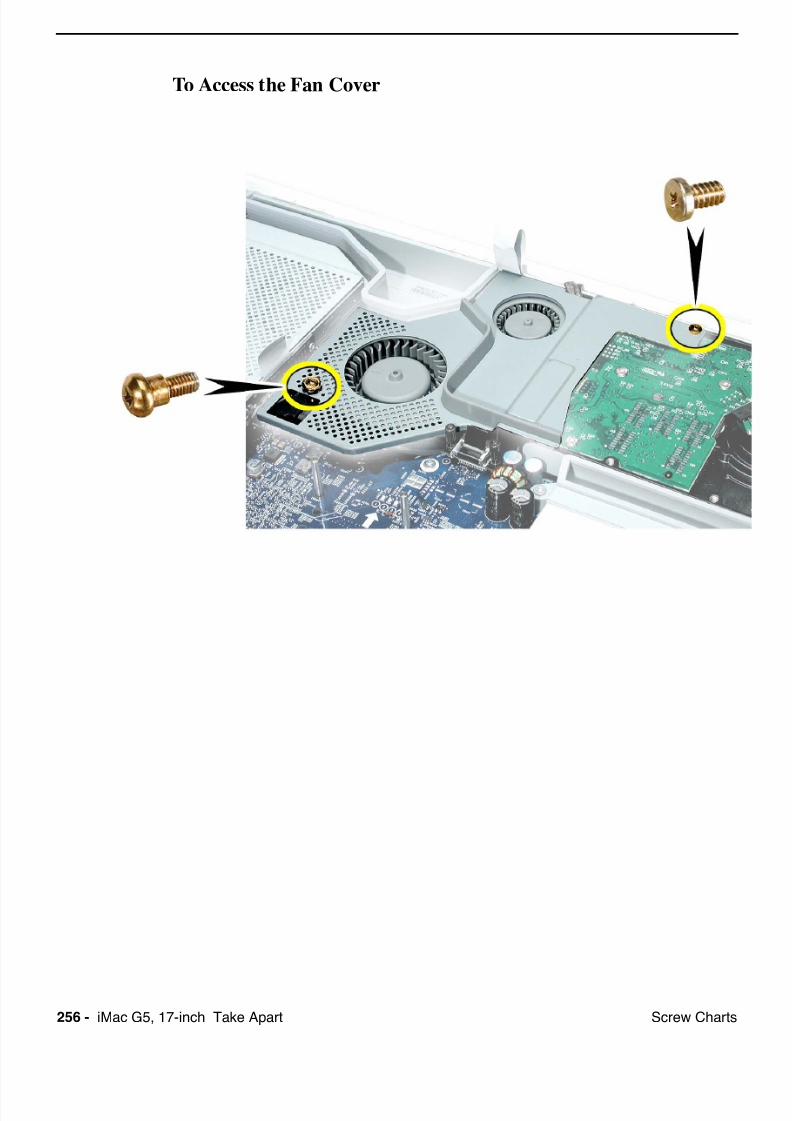
7/29/2019 Apple imacg5_17in
http://slidepdf.com/reader/full/apple-imacg517in 258/319256 - iMac G5, 17-inch Take Apart Screw Charts
To Access the Fan Cover
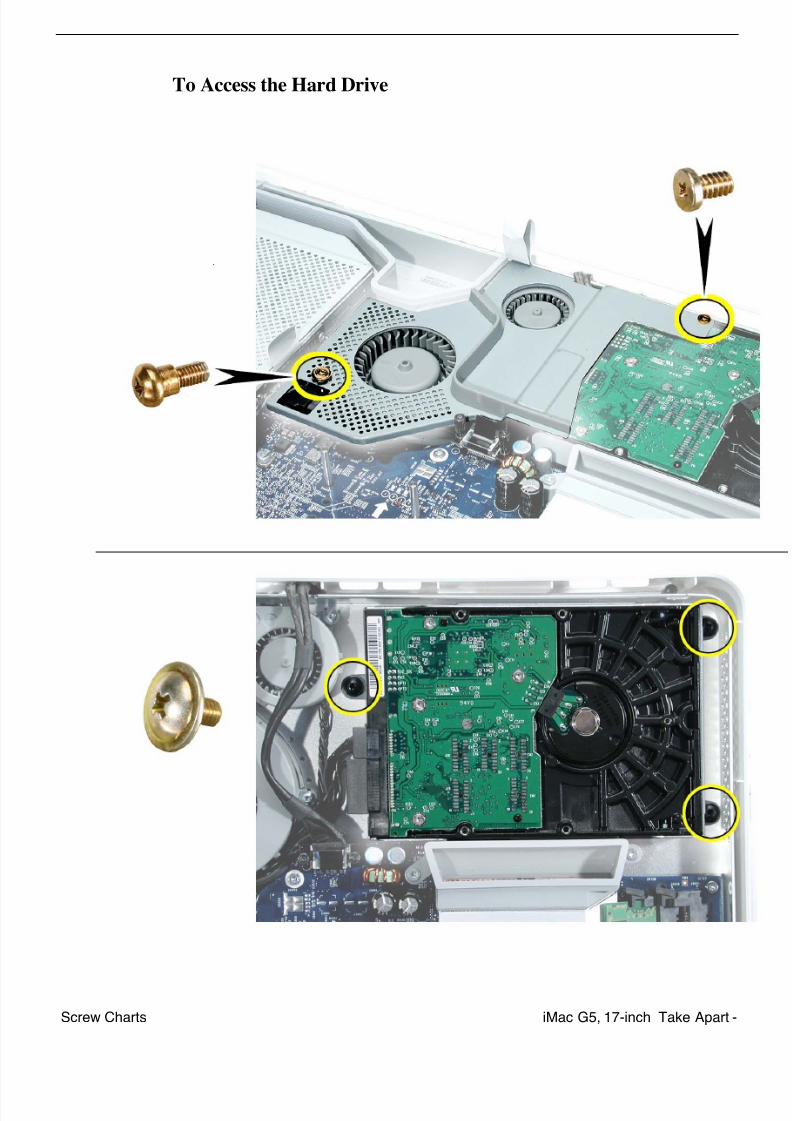
7/29/2019 Apple imacg5_17in
http://slidepdf.com/reader/full/apple-imacg517in 259/319iMac G5, 17-inch Take Apart -Screw Charts
To Access the Hard Drive
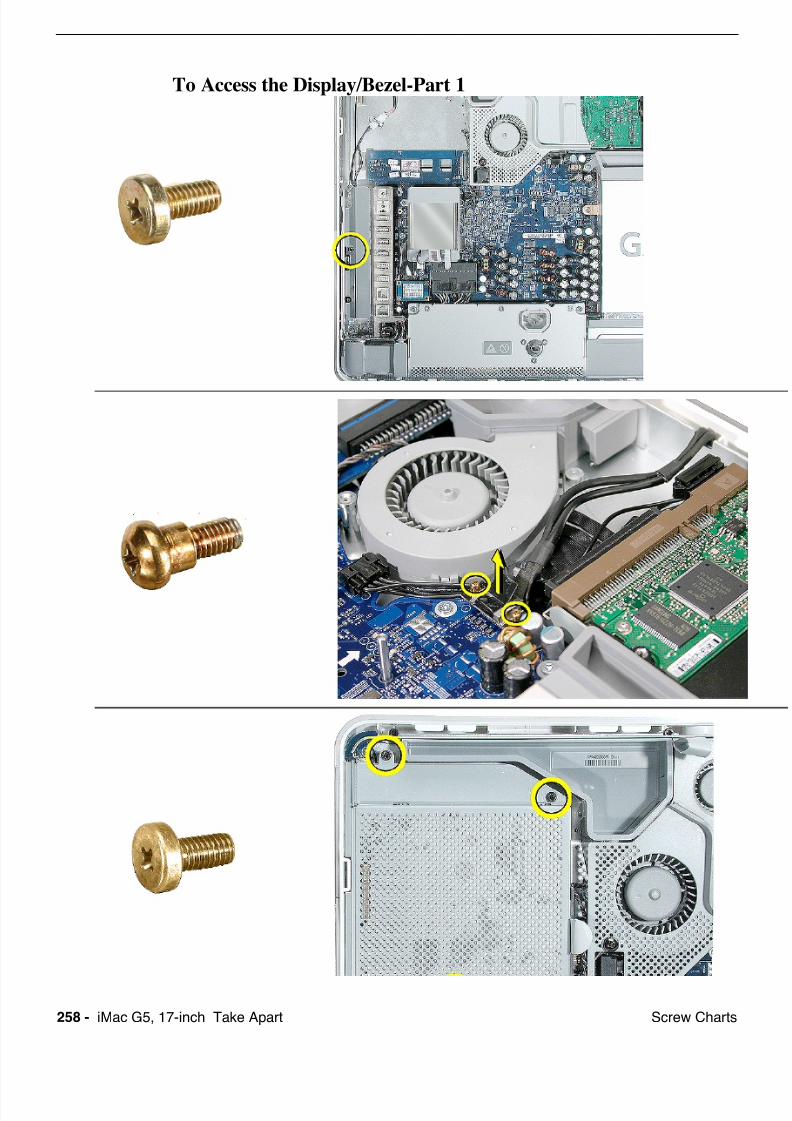
7/29/2019 Apple imacg5_17in
http://slidepdf.com/reader/full/apple-imacg517in 260/319258 - iMac G5, 17-inch Take Apart Screw Charts
To Access the Display/Bezel-Part 1
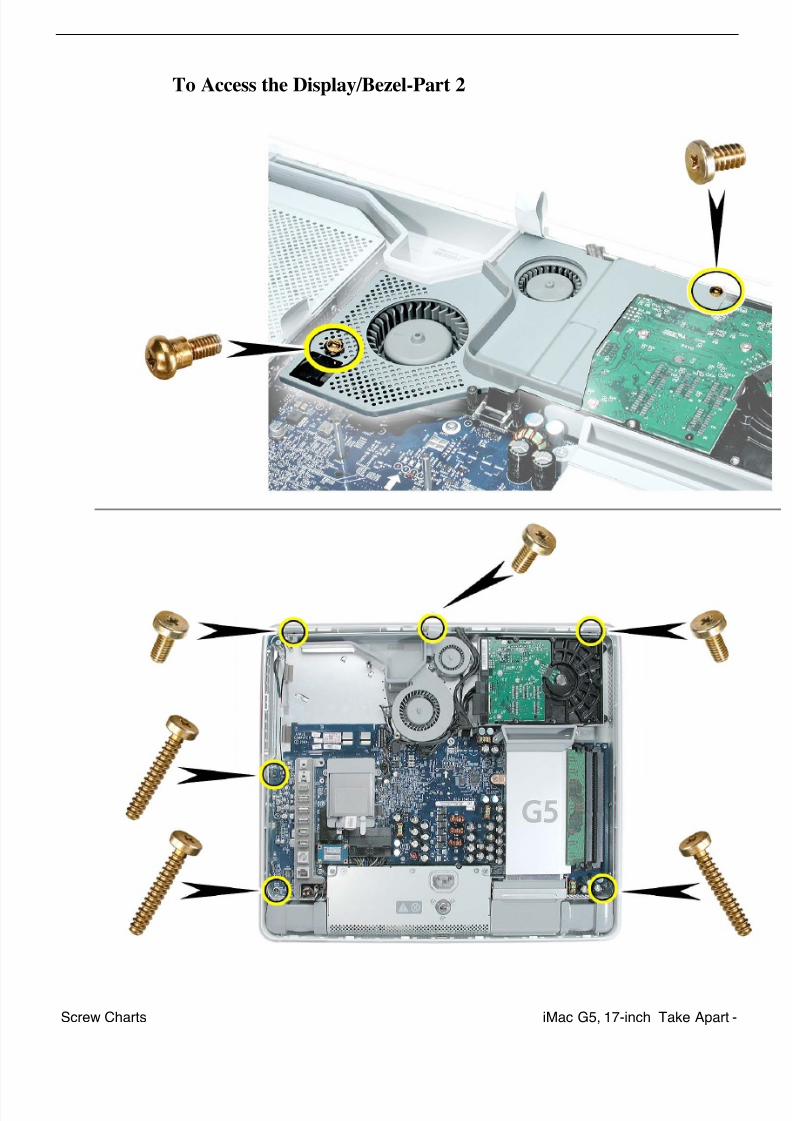
7/29/2019 Apple imacg5_17in
http://slidepdf.com/reader/full/apple-imacg517in 261/319iMac G5, 17-inch Take Apart -Screw Charts
To Access the Display/Bezel-Part 2
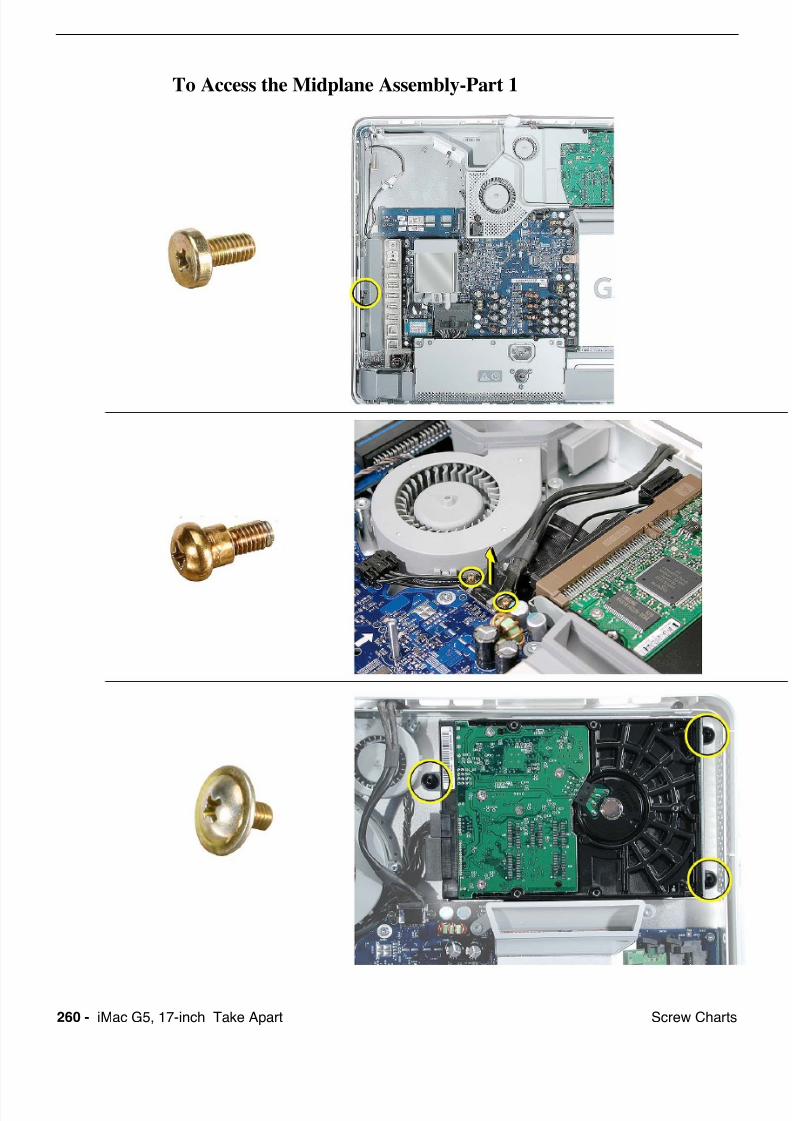
7/29/2019 Apple imacg5_17in
http://slidepdf.com/reader/full/apple-imacg517in 262/319260 - iMac G5, 17-inch Take Apart Screw Charts
To Access the Midplane Assembly-Part 1

7/29/2019 Apple imacg5_17in
http://slidepdf.com/reader/full/apple-imacg517in 263/319iMac G5, 17-inch Take Apart -Screw Charts
To Access the Midplane Assembly-Part 2

7/29/2019 Apple imacg5_17in
http://slidepdf.com/reader/full/apple-imacg517in 264/319iMac G5 (17-inch) - 1iMac G5 (17-inch)
7/29/2019 Apple imacg5_17in
http://slidepdf.com/reader/full/apple-imacg517in 265/319© 2004 Apple Computer, Inc. All rights reserved.
Service Source
Troubleshooting
iMac G5 (17-inch)
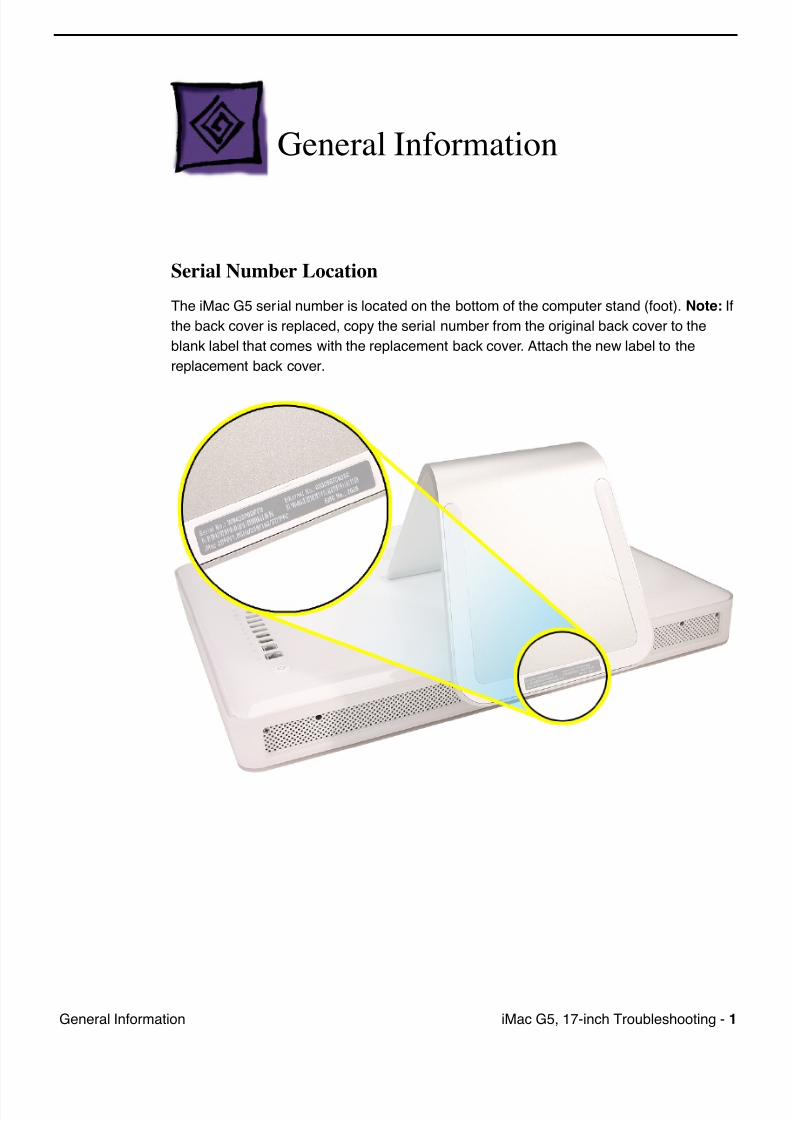
7/29/2019 Apple imacg5_17in
http://slidepdf.com/reader/full/apple-imacg517in 266/319iMac G5, 17-inch Troubleshooting - 1General Information
General Information
Serial Number Location
The iMac G5 serial number is located on the bottom of the computer stand (foot). Note: If
the back cover is replaced, copy the serial number from the original back cover to the
blank label that comes with the replacement back cover. Attach the new label to the
replacement back cover.
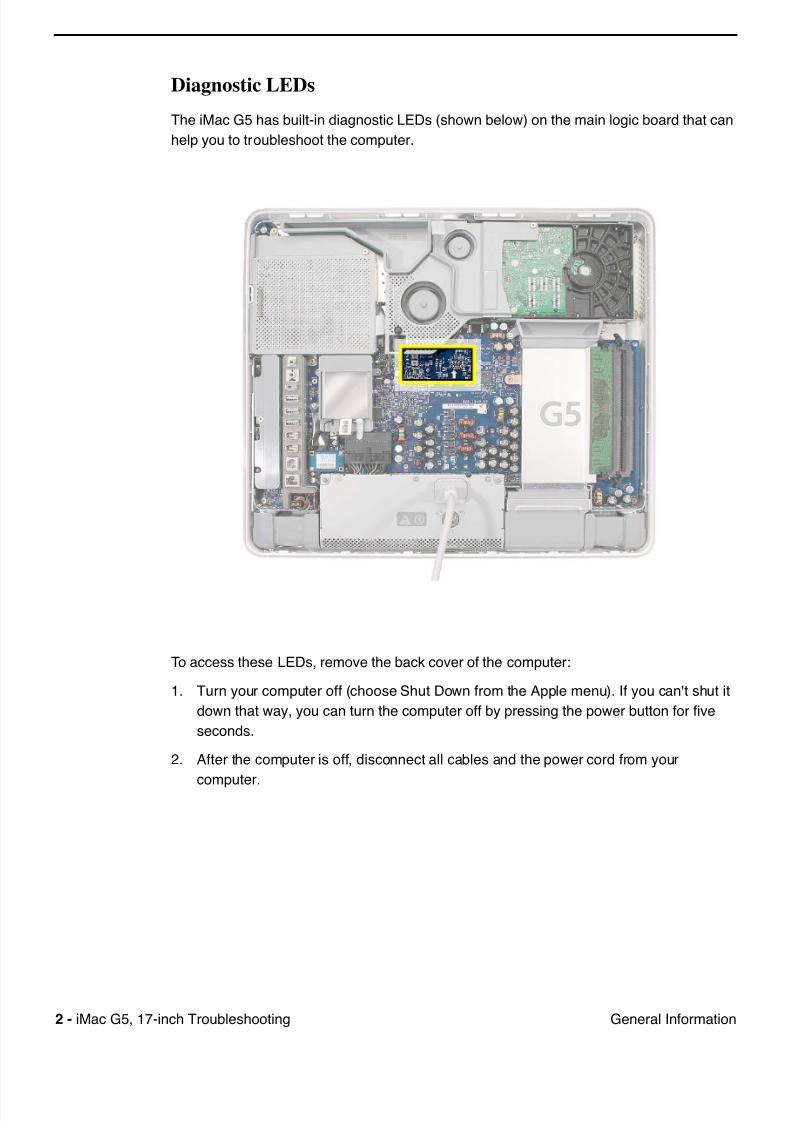
7/29/2019 Apple imacg5_17in
http://slidepdf.com/reader/full/apple-imacg517in 267/3192 - iMac G5, 17-inch Troubleshooting General Information
Diagnostic LEDs
The iMac G5 has built-in diagnostic LEDs (shown below) on the main logic board that can
help you to troubleshoot the computer.
To access these LEDs, remove the back cover of the computer:
1. Turn your computer off (choose Shut Down from the Apple menu). If you can't shut it
down that way, you can turn the computer off by pressing the power button for five
seconds.
2. After the computer is off, disconnect all cables and the power cord from your
computer.
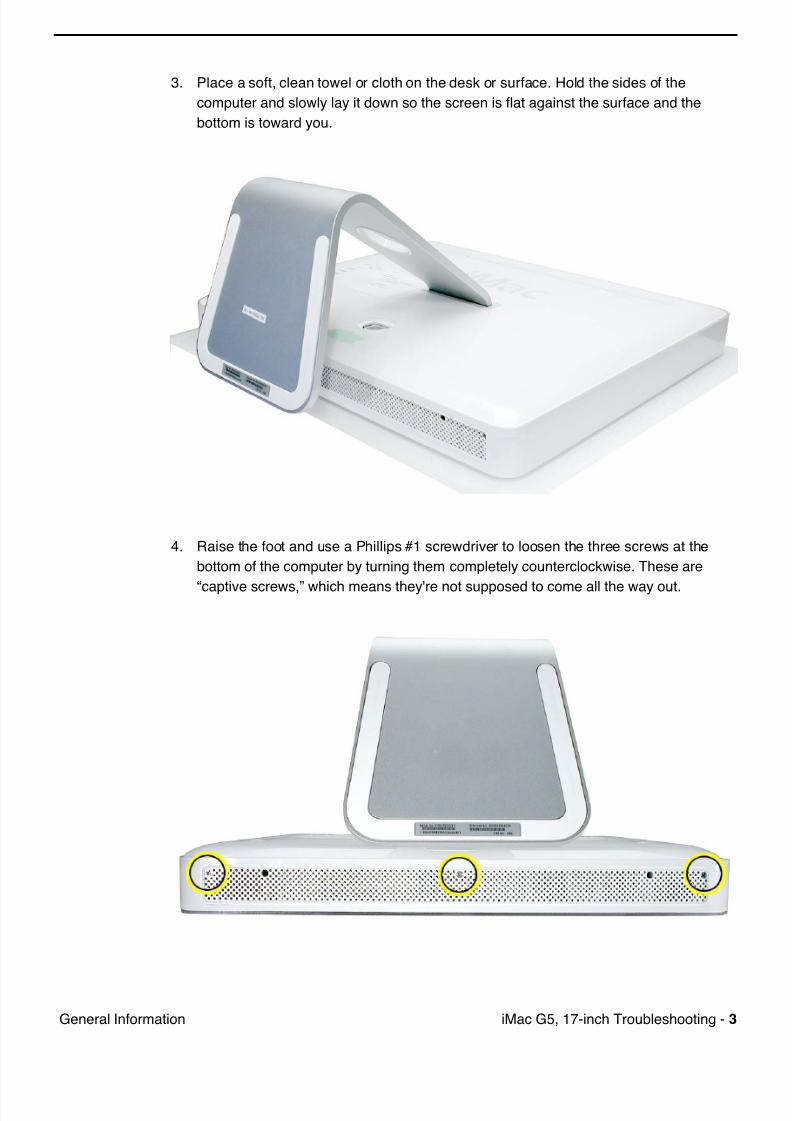
7/29/2019 Apple imacg5_17in
http://slidepdf.com/reader/full/apple-imacg517in 268/319iMac G5, 17-inch Troubleshooting - 3General Information
3. Place a soft, clean towel or cloth on the desk or surface. Hold the sides of the
computer and slowly lay it down so the screen is flat against the surface and the
bottom is toward you.
4. Raise the foot and use a Phillips #1 screwdriver to loosen the three screws at the
bottom of the computer by turning them completely counterclockwise. These are
“captive screws,” which means they're not supposed to come all the way out.
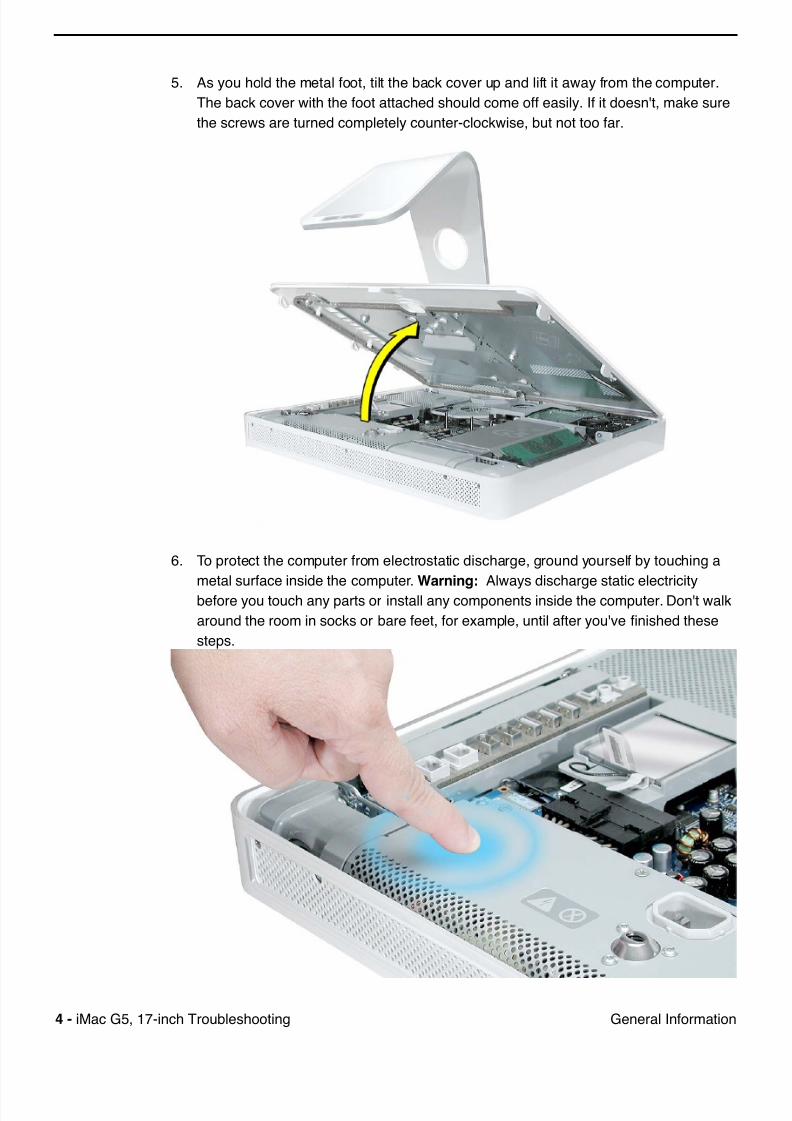
7/29/2019 Apple imacg5_17in
http://slidepdf.com/reader/full/apple-imacg517in 269/3194 - iMac G5, 17-inch Troubleshooting General Information
5. As you hold the metal foot, tilt the back cover up and lift it away from the computer.
The back cover with the foot attached should come off easily. If it doesn't, make sure
the screws are turned completely counter-clockwise, but not too far.
6. To protect the computer from electrostatic discharge, ground yourself by touching a
metal surface inside the computer. Warning: Always discharge static electricitybefore you touch any parts or install any components inside the computer. Don't walk
around the room in socks or bare feet, for example, until after you've finished these
steps.
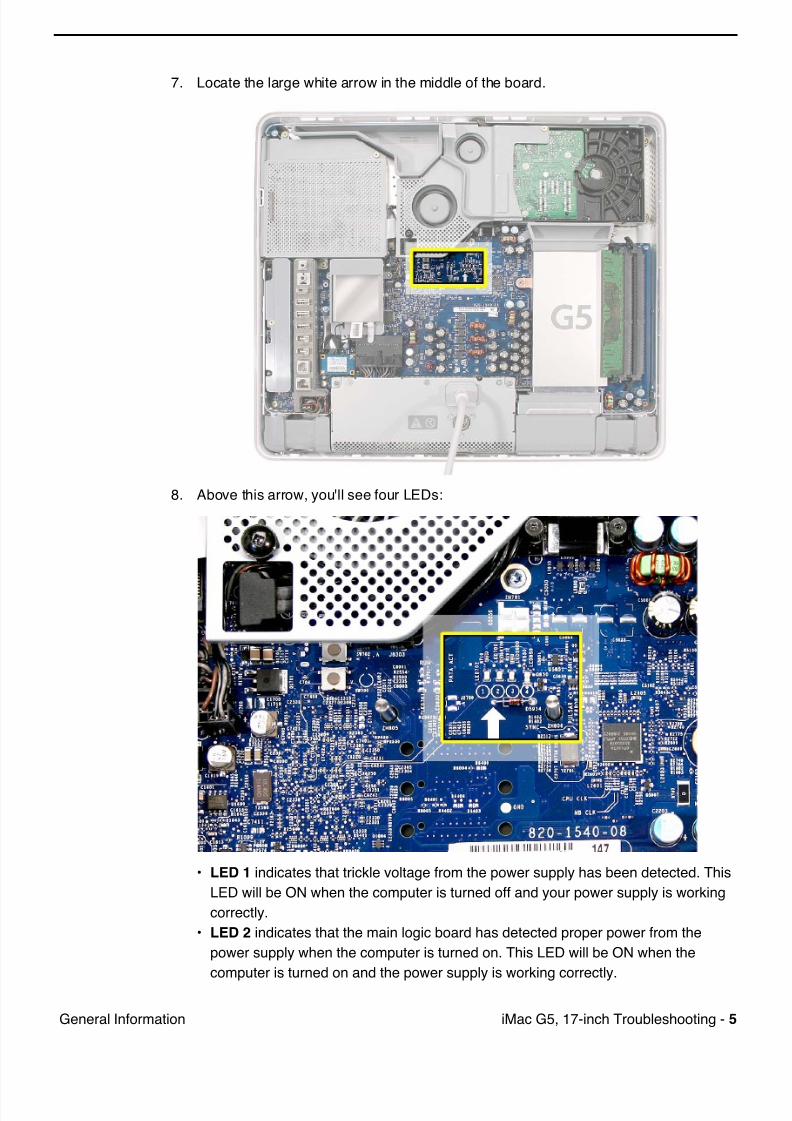
7/29/2019 Apple imacg5_17in
http://slidepdf.com/reader/full/apple-imacg517in 270/319iMac G5, 17-inch Troubleshooting - 5General Information
7. Locate the large white arrow in the middle of the board.
8. Above this arrow, you'll see four LEDs:
• LED 1 indicates that trickle voltage from the power supply has been detected. This
LED will be ON when the computer is turned off and your power supply is working
correctly.
• LED 2 indicates that the main logic board has detected proper power from the
power supply when the computer is turned on. This LED will be ON when the
computer is turned on and the power supply is working correctly.
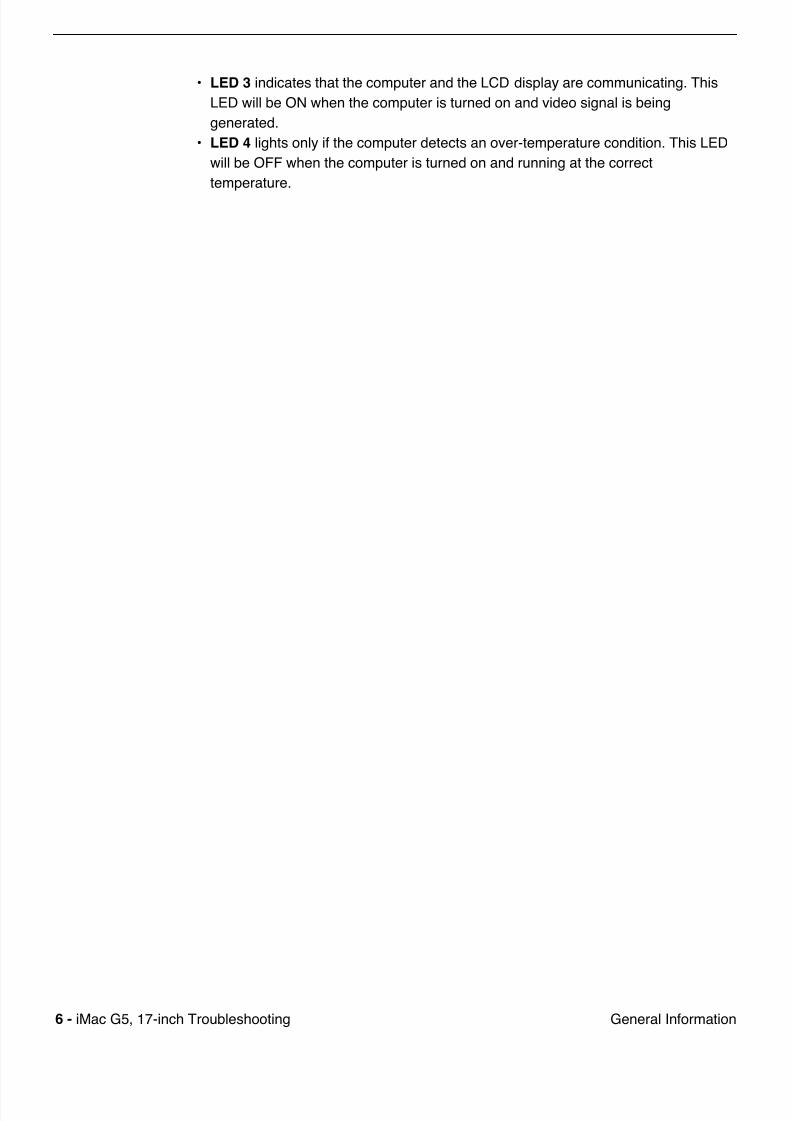
7/29/2019 Apple imacg5_17in
http://slidepdf.com/reader/full/apple-imacg517in 271/3196 - iMac G5, 17-inch Troubleshooting General Information
• LED 3 indicates that the computer and the LCD display are communicating. This
LED will be ON when the computer is turned on and video signal is being
generated.
• LED 4 lights only if the computer detects an over-temperature condition. This LED
will be OFF when the computer is turned on and running at the correct
temperature.
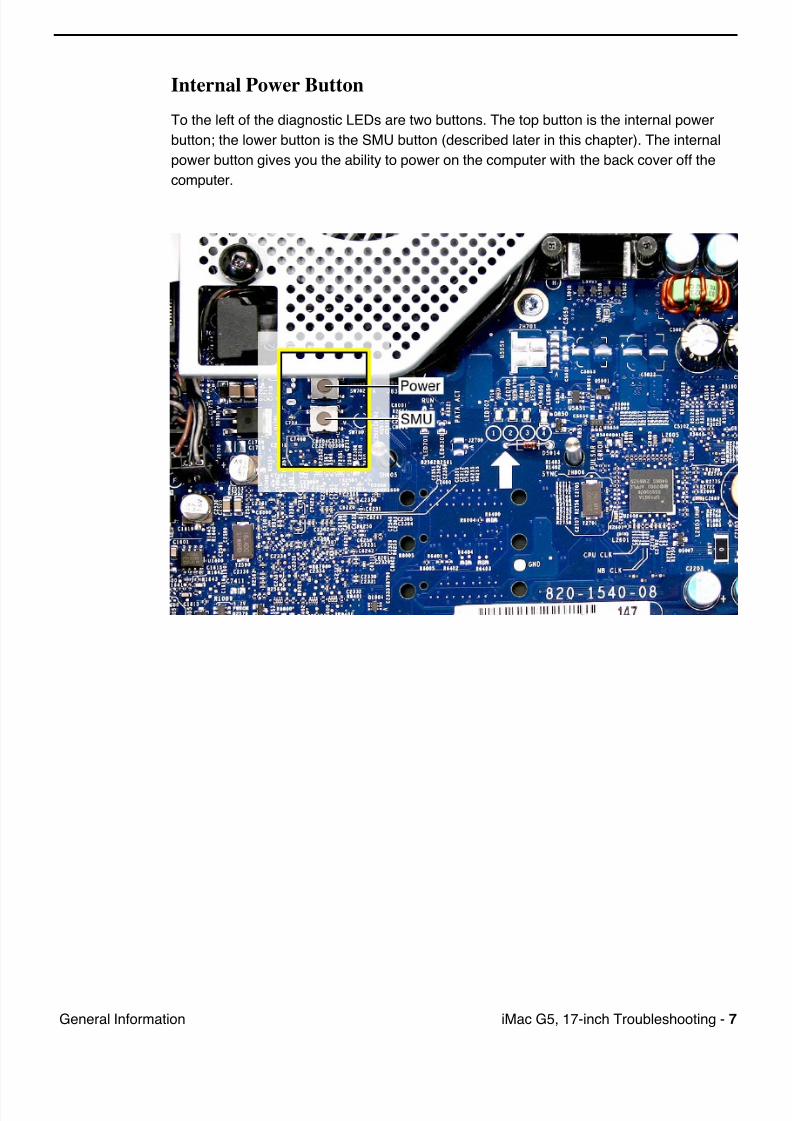
7/29/2019 Apple imacg5_17in
http://slidepdf.com/reader/full/apple-imacg517in 272/319iMac G5, 17-inch Troubleshooting - 7General Information
Internal Power Button
To the left of the diagnostic LEDs are two buttons. The top button is the internal power
button; the lower button is the SMU button (described later in this chapter). The internal
power button gives you the ability to power on the computer with the back cover off the
computer.
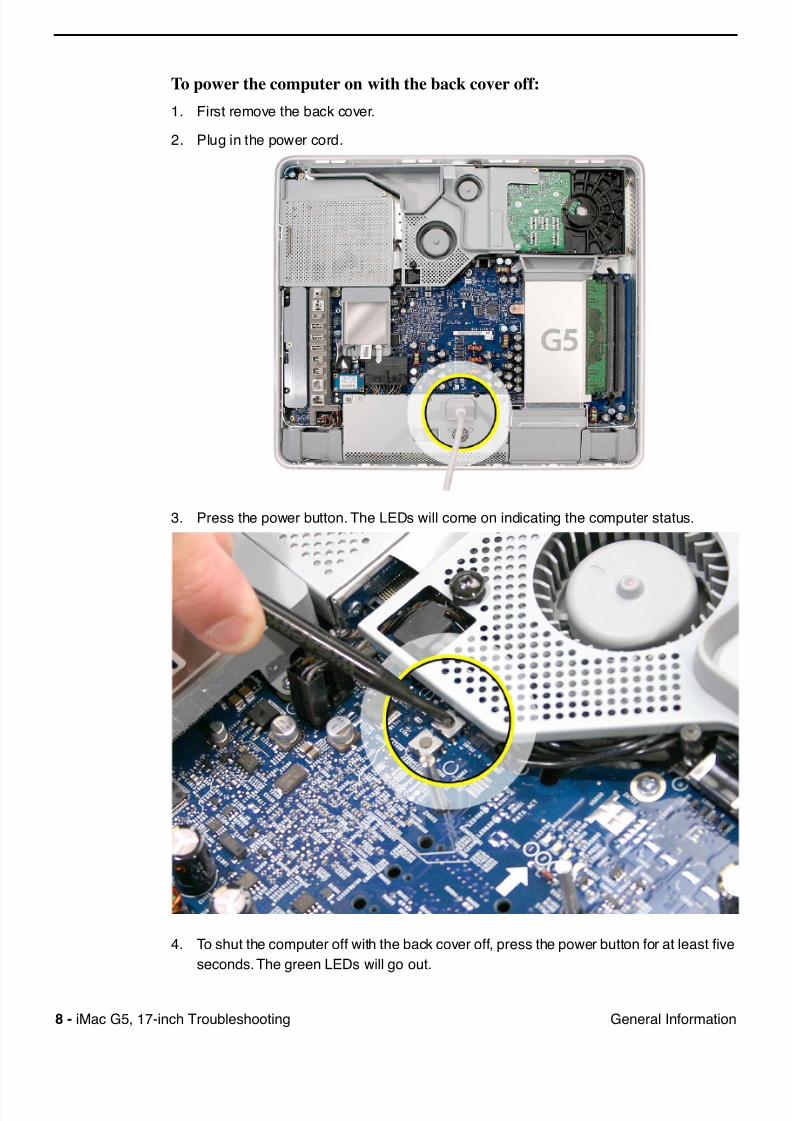
7/29/2019 Apple imacg5_17in
http://slidepdf.com/reader/full/apple-imacg517in 273/3198 - iMac G5, 17-inch Troubleshooting General Information
To power the computer on with the back cover off:
1. First remove the back cover.
2. Plug in the power cord.
3. Press the power button. The LEDs will come on indicating the computer status.
4. To shut the computer off with the back cover off, press the power button for at least five
seconds. The green LEDs will go out.

7/29/2019 Apple imacg5_17in
http://slidepdf.com/reader/full/apple-imacg517in 274/319iMac G5, 17-inch Troubleshooting - 9General Information
SMU Button on the Logic Board
The iMac G5 uses an advanced system management unit (SMU) to manage the thermal
and wattage conditions, while keeping the acoustic noise to a minimum. The SMU controls
the fans and regulates the speeds to run each fan.
The SMU reset button (shown below) is similar to the PMU button on previous iMaccomputers.
The SMU supports the following functions:
• provides initial configuration of system clocks
• automatically initiates and sequences voltage and frequency slews when the OS
requests a transition to a new run level
• handles all power button and environmental user events
• controls RPM fans
• provides processor Mode Ring and thermal data store
• monitors processor temperature and power consumption
• monitors VRD10-compliant processor power supply digital interface.
The iMac G5 system employs advanced thermal and wattage management to keep
acoustic noise to a minimum. The enclosure is divided into discrete zones, each with
independently controlled fans bringing in cool air from the front of the enclosure, directing
it over system components and exhausting it out the rear. Temperature and power
consumption are monitored by the operating system which communicates with the SMU,
which in turn controls and monitors fan operation. If Mac OS X is not booted, thermal
management must be provided by the alternate development operating system.
7/29/2019 Apple imacg5_17in
http://slidepdf.com/reader/full/apple-imacg517in 275/31910 - iMac G5, 17-inch Troubleshooting General Information
Note: If Mac OS X is not booted and the alternate development operating system does not
manage the fans, the fans go into an unmanaged state and run at full speed.
The SMU controls the fans and regulates the speeds to run each fan. The SMU derives
fan speed from sensors in each thermal zone. Some of these sensors monitor thermal
only, while others monitor both thermal and power.
If the SMU does not receive an update from the operating system within two minutes, it
begins to ramp up the speed of the fans to full speed.
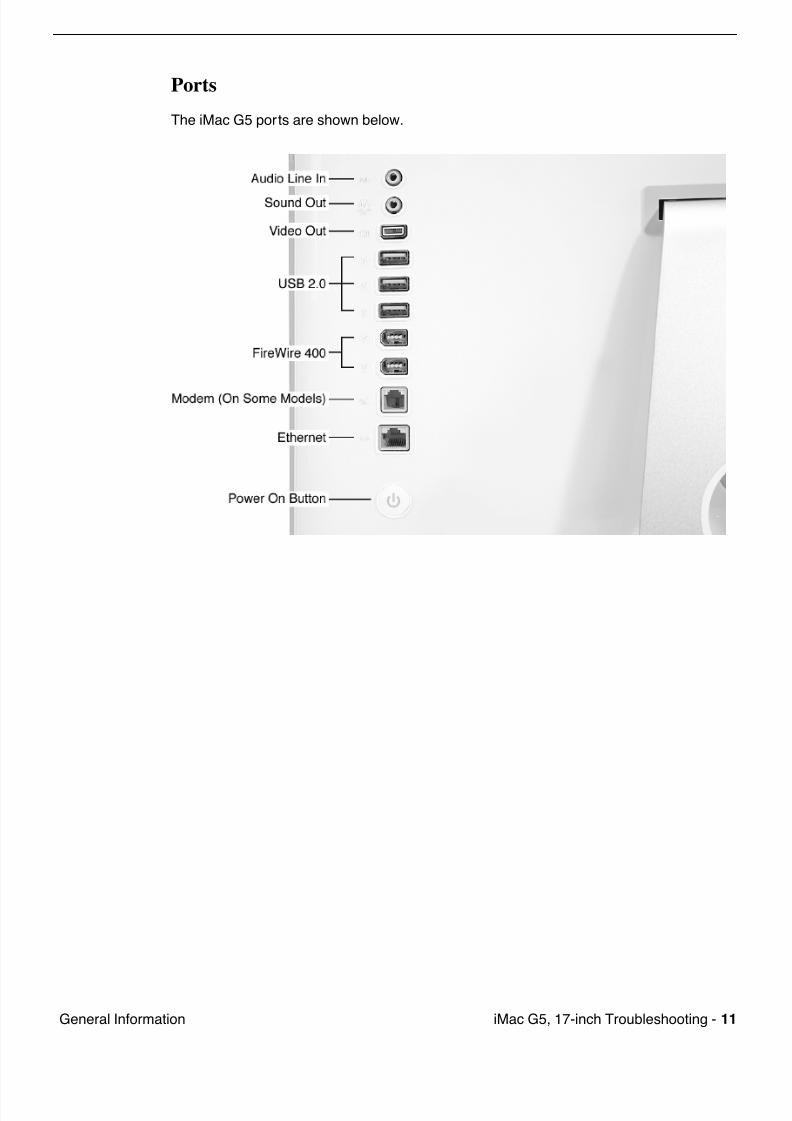
7/29/2019 Apple imacg5_17in
http://slidepdf.com/reader/full/apple-imacg517in 276/319iMac G5, 17-inch Troubleshooting - 11General Information
Ports
The iMac G5 ports are shown below.
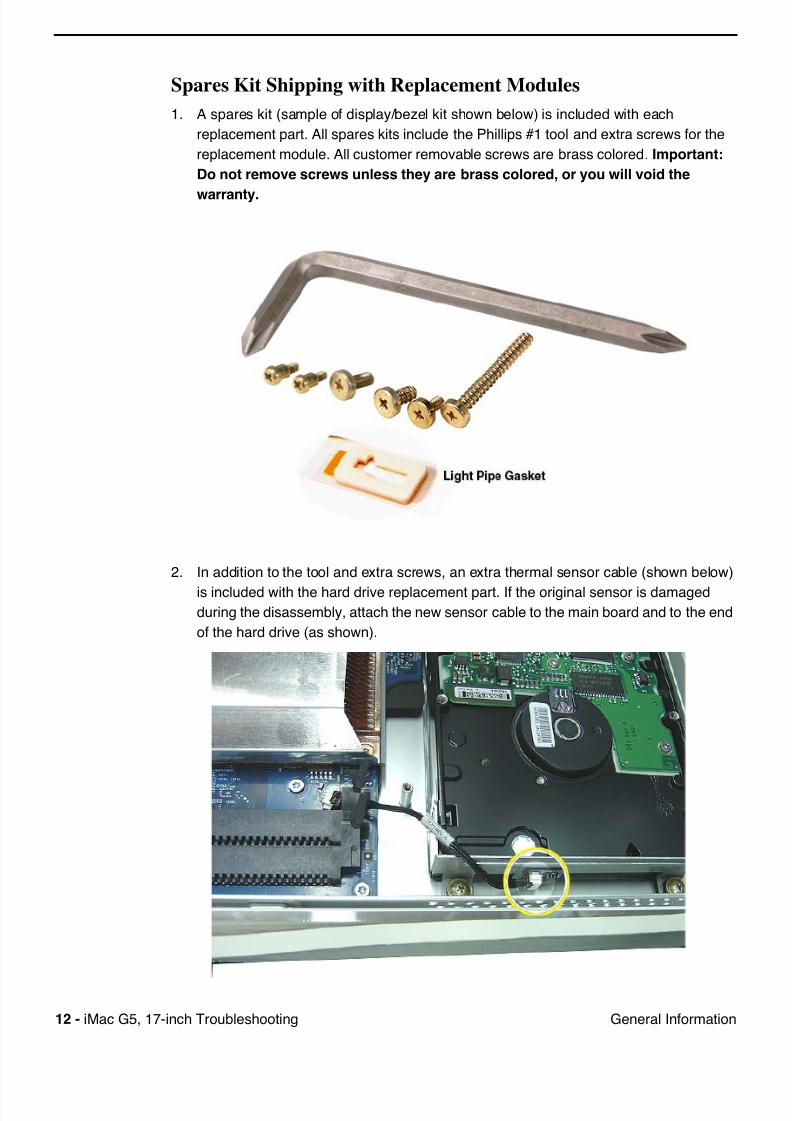
7/29/2019 Apple imacg5_17in
http://slidepdf.com/reader/full/apple-imacg517in 277/31912 - iMac G5, 17-inch Troubleshooting General Information
Spares Kit Shipping with Replacement Modules
1. A spares kit (sample of display/bezel kit shown below) is included with each
replacement part. All spares kits include the Phillips #1 tool and extra screws for the
replacement module. All customer removable screws are brass colored. Important:
Do not remove screws unless they are brass colored, or you will void the
warranty.
2. In addition to the tool and extra screws, an extra thermal sensor cable (shown below)
is included with the hard drive replacement part. If the original sensor is damaged
during the disassembly, attach the new sensor cable to the main board and to the end
of the hard drive (as shown).

7/29/2019 Apple imacg5_17in
http://slidepdf.com/reader/full/apple-imacg517in 278/319iMac G5, 17-inch Troubleshooting - 13General Information
3. The light pipe gasket (called out in step 1) secures the light pipe to the underside of
the logic board. If the light pipe falls off the logic board, secure the light pipe with the
gasket enclosed in the spares kit.
7/29/2019 Apple imacg5_17in
http://slidepdf.com/reader/full/apple-imacg517in 279/31914 - iMac G5, 17-inch Troubleshooting General Information
Service modules
• Midplane assembly (available with or without Bluetooth)
• Display and Bezel assembly
• Hard drive, with carrier
• Power supply
• Optical drive• Backup battery
• AirPort Extreme card
• Memory DIMMs, DDR 400
• Inverter
• Modem
• Bluetooth
• Back Cover and Stand (Foot)
• Fan Cover (only on 17-inch with Serial ATA drive)
• Fan(s)
• Logic board• Midplane chassis
• Logic board cables
• Speakers
• Flat panel display
• Display bezel housing (white case)
Display Replacement
The following items are not separate, orderable parts. To replace them, you must replacethe flat panel display.
• TMDS video cable
• Inverter-to-display cable
7/29/2019 Apple imacg5_17in
http://slidepdf.com/reader/full/apple-imacg517in 280/319iMac G5, 17-inch Troubleshooting - 15General Information
DDR Memory
iMac G5 computers work with memory modules (DIMMs) that meet all of these criteria:
PC3200, 2.5V, unbuffered, 8-byte, nonparity, 184-pin, 400Mhz DDR SDRAM.
There are two RAM slots. The maximum amount of RAM you can install is 2 GB. You can
use RAM module sizes of 256 MB, 512 MB and 1 GB, in either slot.
DIMMs with any of the following features are not supported in the iMac G5 computer:
registers or buffers, PLLs, ECC, parity, or EDO RAM.
7/29/2019 Apple imacg5_17in
http://slidepdf.com/reader/full/apple-imacg517in 281/31916 - iMac G5, 17-inch Troubleshooting Symptom Charts
Symptom Charts
How to Use the Symptom Charts
The Symptom Charts included in this chapter will help you diagnose specific symptoms
related to the product. Because cures are listed on the charts in the order of most likely
solution, try the cures in the order presented. Verify whether or not the product continues
to exhibit the symptom. If the symptom persists, try the next cure.
Note: If a cure instructs you to replace a module, reinstall the original module before you
proceed to the next cure.
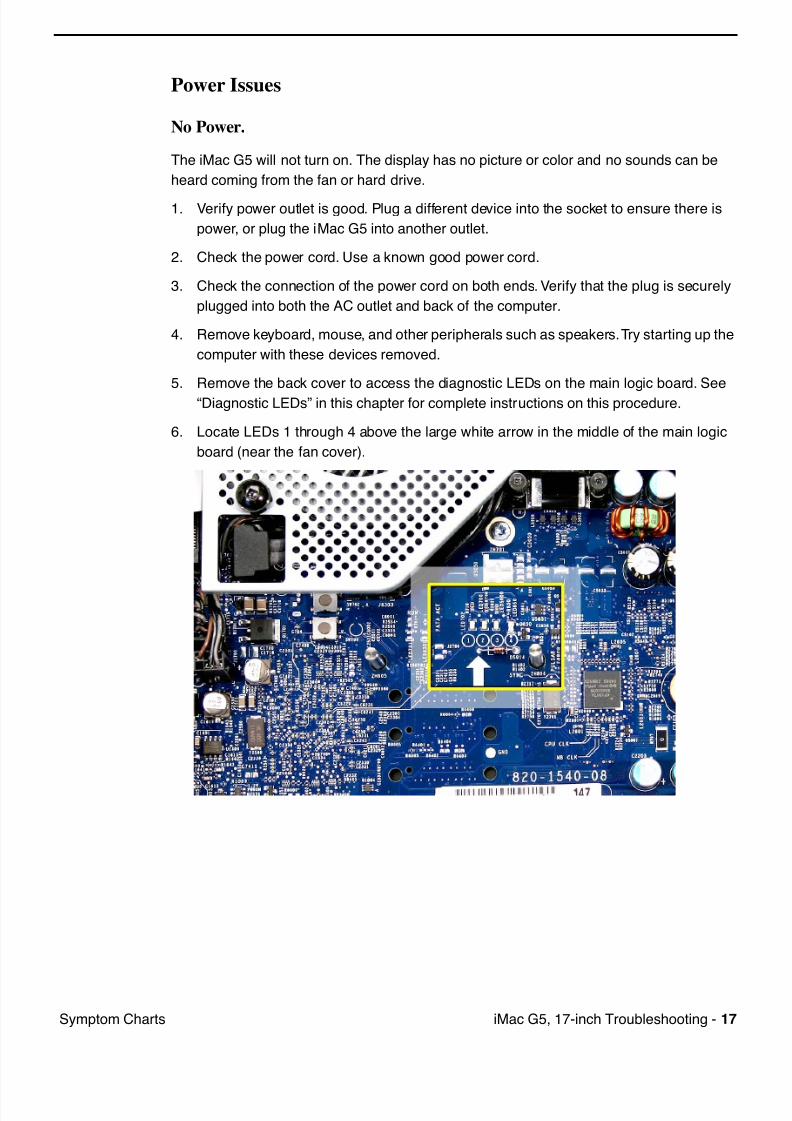
7/29/2019 Apple imacg5_17in
http://slidepdf.com/reader/full/apple-imacg517in 282/319iMac G5, 17-inch Troubleshooting - 17Symptom Charts
Power Issues
No Power.
The iMac G5 will not turn on. The display has no picture or color and no sounds can be
heard coming from the fan or hard drive.
1. Verify power outlet is good. Plug a different device into the socket to ensure there is
power, or plug the iMac G5 into another outlet.
2. Check the power cord. Use a known good power cord.
3. Check the connection of the power cord on both ends. Verify that the plug is securely
plugged into both the AC outlet and back of the computer.
4. Remove keyboard, mouse, and other peripherals such as speakers. Try starting up the
computer with these devices removed.
5. Remove the back cover to access the diagnostic LEDs on the main logic board. See
“Diagnostic LEDs” in this chapter for complete instructions on this procedure.
6. Locate LEDs 1 through 4 above the large white arrow in the middle of the main logic
board (near the fan cover).
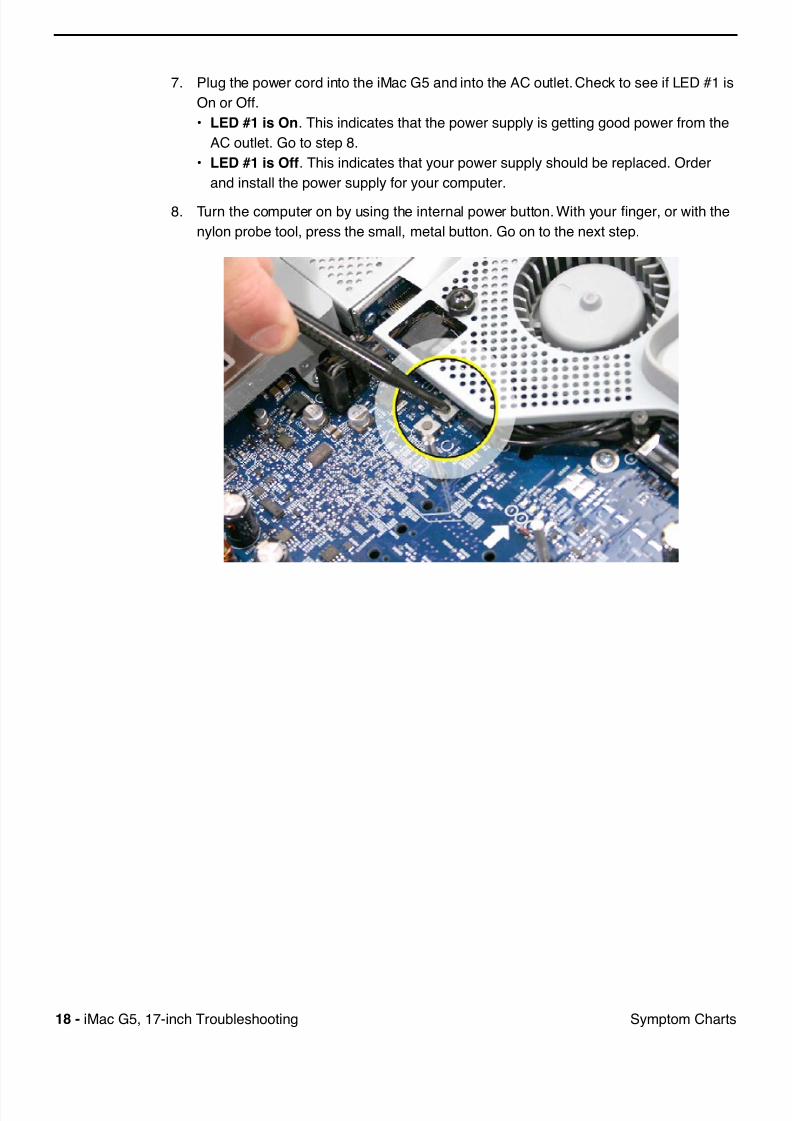
7/29/2019 Apple imacg5_17in
http://slidepdf.com/reader/full/apple-imacg517in 283/31918 - iMac G5, 17-inch Troubleshooting Symptom Charts
7. Plug the power cord into the iMac G5 and into the AC outlet. Check to see if LED #1 is
On or Off.
• LED #1 is On. This indicates that the power supply is getting good power from the
AC outlet. Go to step 8.
• LED #1 is Off. This indicates that your power supply should be replaced. Order
and install the power supply for your computer.
8. Turn the computer on by using the internal power button. With your finger, or with the
nylon probe tool, press the small, metal button. Go on to the next step.
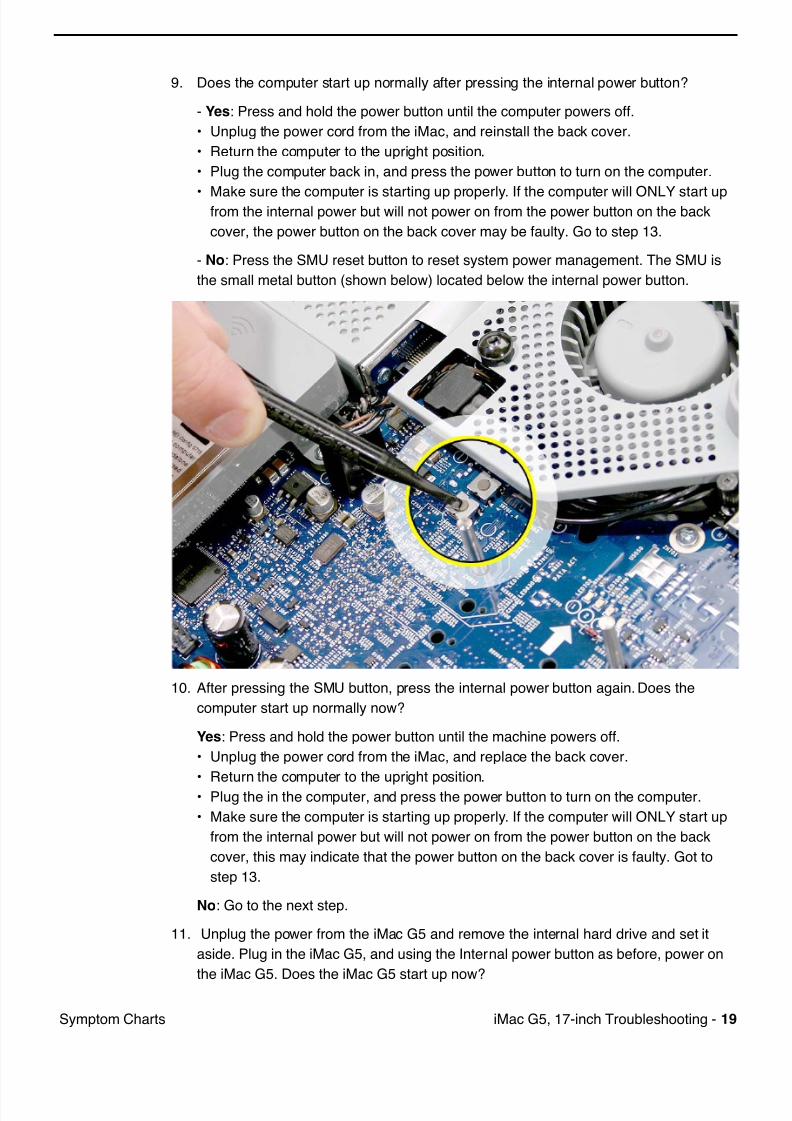
7/29/2019 Apple imacg5_17in
http://slidepdf.com/reader/full/apple-imacg517in 284/319iMac G5, 17-inch Troubleshooting - 19Symptom Charts
9. Does the computer start up normally after pressing the internal power button?
- Yes: Press and hold the power button until the computer powers off.
• Unplug the power cord from the iMac, and reinstall the back cover.
• Return the computer to the upright position.
• Plug the computer back in, and press the power button to turn on the computer.
• Make sure the computer is starting up properly. If the computer will ONLY start upfrom the internal power but will not power on from the power button on the back
cover, the power button on the back cover may be faulty. Go to step 13.
- No: Press the SMU reset button to reset system power management. The SMU is
the small metal button (shown below) located below the internal power button.
10. After pressing the SMU button, press the internal power button again. Does the
computer start up normally now?
Yes: Press and hold the power button until the machine powers off.
• Unplug the power cord from the iMac, and replace the back cover.
• Return the computer to the upright position.• Plug the in the computer, and press the power button to turn on the computer.
• Make sure the computer is starting up properly. If the computer will ONLY start up
from the internal power but will not power on from the power button on the back
cover, this may indicate that the power button on the back cover is faulty. Got to
step 13.
No: Go to the next step.
11. Unplug the power from the iMac G5 and remove the internal hard drive and set it
aside. Plug in the iMac G5, and using the Internal power button as before, power on
the iMac G5. Does the iMac G5 start up now?
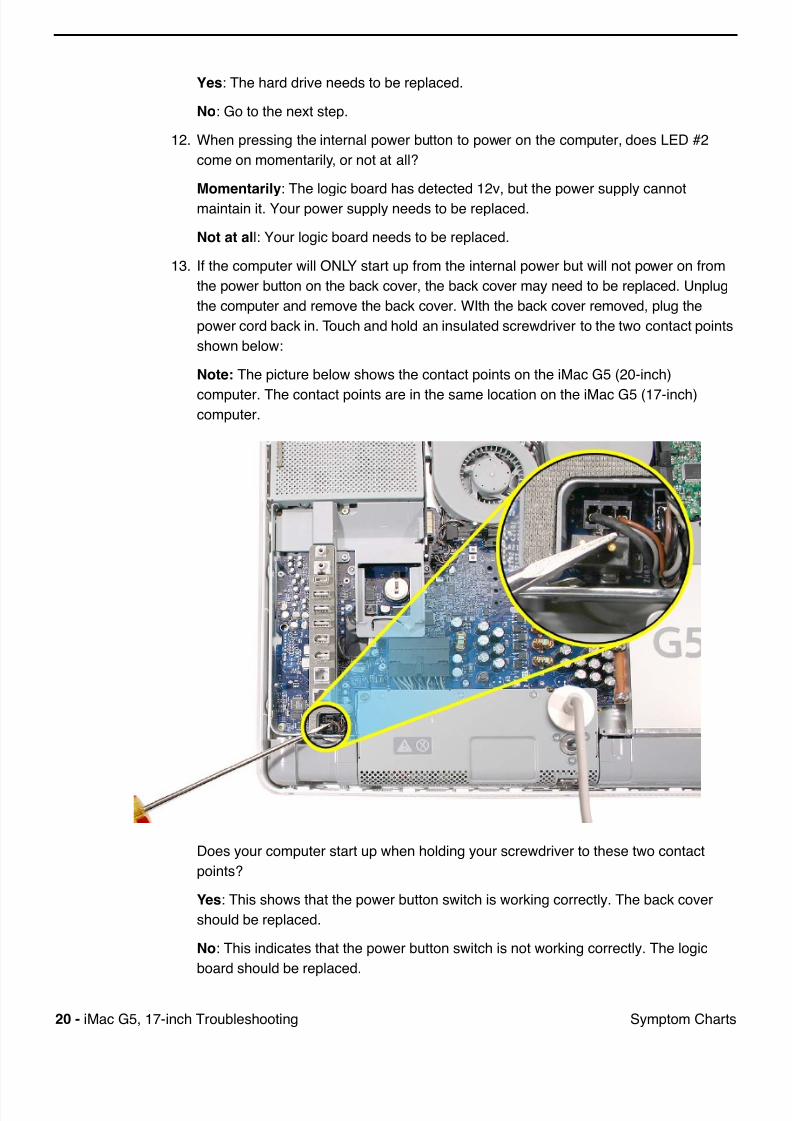
7/29/2019 Apple imacg5_17in
http://slidepdf.com/reader/full/apple-imacg517in 285/31920 - iMac G5, 17-inch Troubleshooting Symptom Charts
Yes: The hard drive needs to be replaced.
No: Go to the next step.
12. When pressing the internal power button to power on the computer, does LED #2
come on momentarily, or not at all?
Momentarily: The logic board has detected 12v, but the power supply cannotmaintain it. Your power supply needs to be replaced.
Not at all: Your logic board needs to be replaced.
13. If the computer will ONLY start up from the internal power but will not power on from
the power button on the back cover, the back cover may need to be replaced. Unplug
the computer and remove the back cover. WIth the back cover removed, plug the
power cord back in. Touch and hold an insulated screwdriver to the two contact points
shown below:
Note: The picture below shows the contact points on the iMac G5 (20-inch)
computer. The contact points are in the same location on the iMac G5 (17-inch)computer.
Does your computer start up when holding your screwdriver to these two contact
points?
Yes: This shows that the power button switch is working correctly. The back cover
should be replaced.
No: This indicates that the power button switch is not working correctly. The logic
board should be replaced.
7/29/2019 Apple imacg5_17in
http://slidepdf.com/reader/full/apple-imacg517in 286/319iMac G5, 17-inch Troubleshooting - 21Symptom Charts
Loud buzzing, ticking, or whining noise
The computer may make a loud buzzing, ticking, or whining noise when it’s on. The sound
may vary depending upon screen brightness or processor load.
1. Determine that this noise is related to the computer by removing and shutting down all
other devices in the vicinity of the computer that could be causing a sound.
2. Determine if this is a power supply noise. With the iMac G5 on and running, adjust the
screen brightness by pressing the F14 and F15 keys on the keyboard. Does the noise
change in loudness when adjusting the brightness?
Yes: The volume changes when the brightness changes, the noise may be related to
the power supply. Replace the power supply.
No: If the volume does not change when the brightness changes, the noise is not a
power supply issue. Go on to step 3.
3. Quit all applications and test the computer again.
4. Check the volume settings under Sound in System Preferences.
5. Reboot the computer and check the computer again.
6. If the noise still doesn’t go away, contact Apple Technical Support.
7/29/2019 Apple imacg5_17in
http://slidepdf.com/reader/full/apple-imacg517in 287/31922 - iMac G5, 17-inch Troubleshooting Symptom Charts
No Video
The computer will turn on, but the display has no picture or color. The boot
chime, the fan, and hard drive activity can be heard.
1. Check if the computer is sleeping. Press the space bar to wake the computer from
sleep mode.
2. Did the computer wake from sleep?
Yes: Put the computer to sleep from the Apple menu and wake the computer again to
test the settings. Check Energy Saver setting to see when the computer has been
designated to sleep.
No: Continue to the next step.
3. Reset your computer's PRAM (Parameter RAM).
• If your iMac is on, turn it off by pressing the power button in until the computer
powers off. You should hear the drives and fans go quiet.• Wait for a few seconds.
• While the computer is off, with your left hand, hold down the Apple key, the option
key next to it, and the letter R. When you have them all pressed push the power
button with your right hand and then quickly move that hand to hold down the letter
P. Keep the four keys pressed while the computer starts up.
• Make sure you hold down the four keys (P-R-Command-Option) while the
computer starts up. When you keep all the keys held down, you will hear the
startup chime over and over again (about every ten seconds) until you let go. After
you hear the second chime, you can let go of the keys.
• If you didn't hear at least two startup chimes, go to step one on this page and tryagain. It's important that you two startup chimes when performing this procedure.
This indicates that you have successfully reset the computer's PRAM (Parameter
RAM).
4. Does the computer display video after successfully resetting the computer's PRAM?
Yes: Problem resolved. Restart the computer from the Apple menu and make sure
the computer is starting up properly.
No: Continue to the next step.
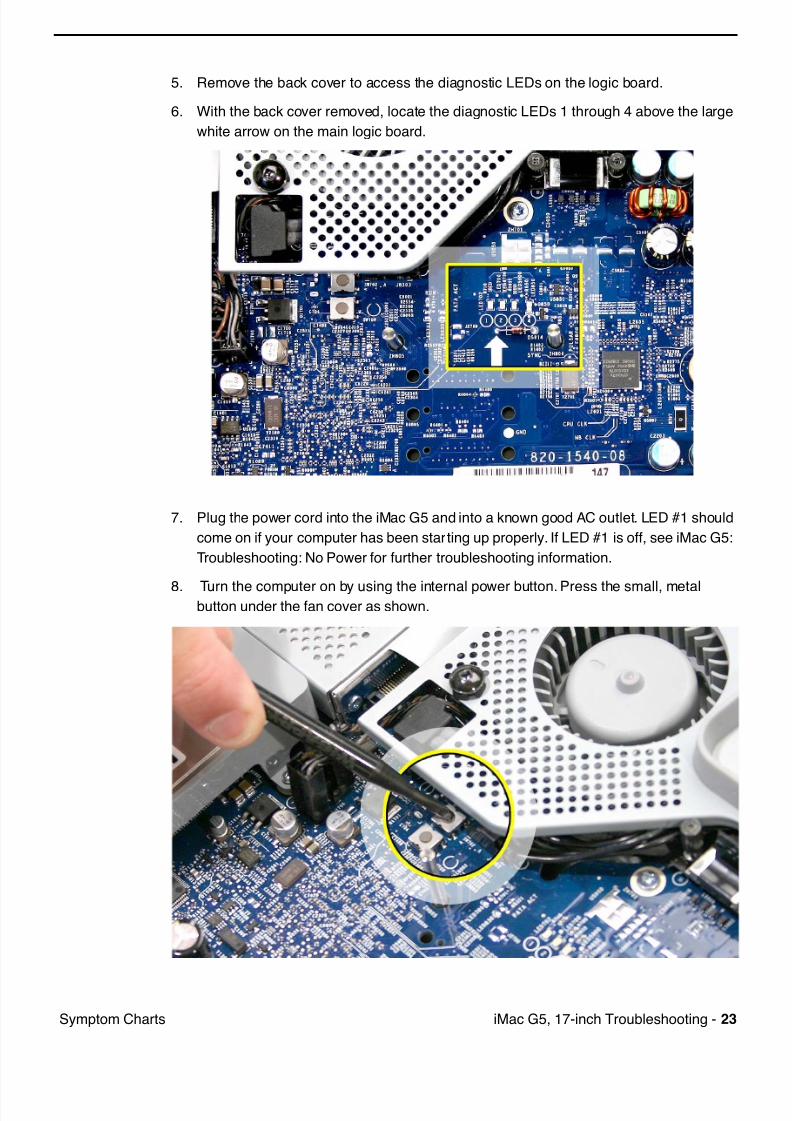
7/29/2019 Apple imacg5_17in
http://slidepdf.com/reader/full/apple-imacg517in 288/319iMac G5, 17-inch Troubleshooting - 23Symptom Charts
5. Remove the back cover to access the diagnostic LEDs on the logic board.
6. With the back cover removed, locate the diagnostic LEDs 1 through 4 above the large
white arrow on the main logic board.
7. Plug the power cord into the iMac G5 and into a known good AC outlet. LED #1 should
come on if your computer has been starting up properly. If LED #1 is off, see iMac G5:
Troubleshooting: No Power for further troubleshooting information.
8. Turn the computer on by using the internal power button. Press the small, metalbutton under the fan cover as shown.
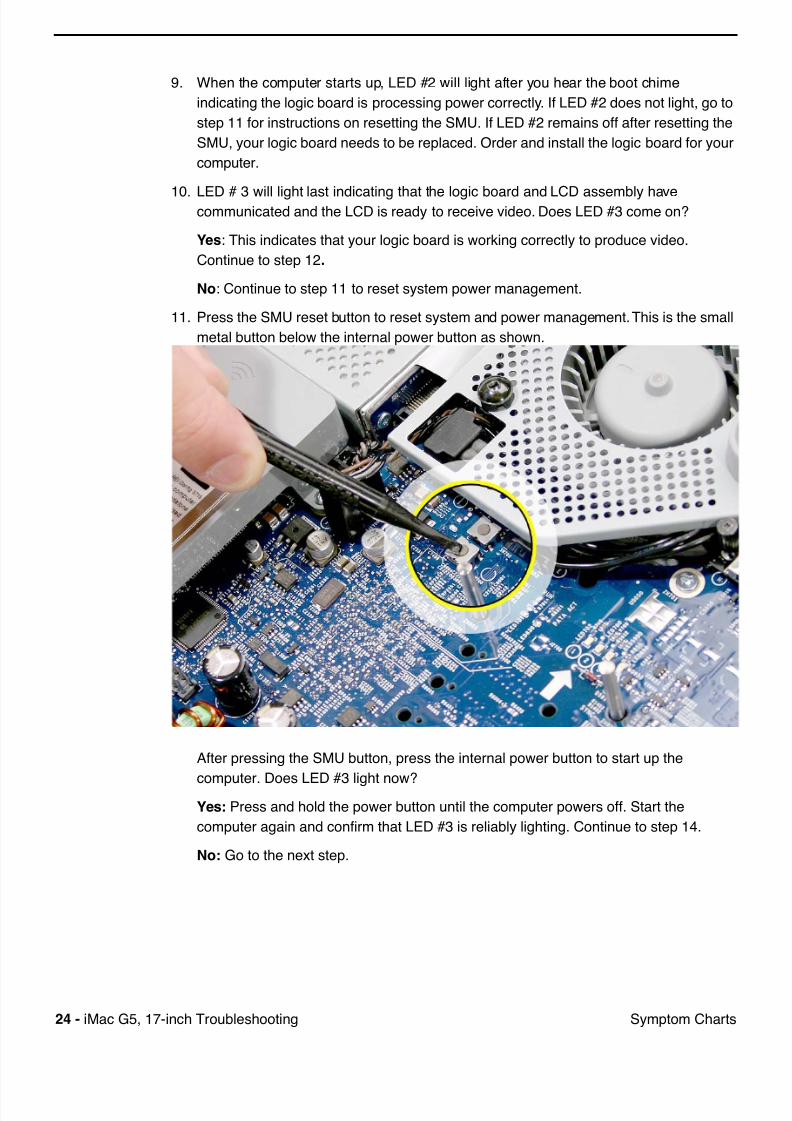
7/29/2019 Apple imacg5_17in
http://slidepdf.com/reader/full/apple-imacg517in 289/31924 - iMac G5, 17-inch Troubleshooting Symptom Charts
9. When the computer starts up, LED #2 will light after you hear the boot chime
indicating the logic board is processing power correctly. If LED #2 does not light, go to
step 11 for instructions on resetting the SMU. If LED #2 remains off after resetting the
SMU, your logic board needs to be replaced. Order and install the logic board for your
computer.
10. LED # 3 will light last indicating that the logic board and LCD assembly havecommunicated and the LCD is ready to receive video. Does LED #3 come on?
Yes: This indicates that your logic board is working correctly to produce video.
Continue to step 12.
No: Continue to step 11 to reset system power management.
11. Press the SMU reset button to reset system and power management. This is the small
metal button below the internal power button as shown.
After pressing the SMU button, press the internal power button to start up the
computer. Does LED #3 light now?Yes: Press and hold the power button until the computer powers off. Start the
computer again and confirm that LED #3 is reliably lighting. Continue to step 14.
No: Go to the next step.
7/29/2019 Apple imacg5_17in
http://slidepdf.com/reader/full/apple-imacg517in 290/319iMac G5, 17-inch Troubleshooting - 25Symptom Charts
12. Unplug the iMac G5 and remove the SDRAM. Replace with known good SDRAM.
Plug the iMac G5 back in and start the unit by pressing the two internal power pins.
Does LED #3 light now?
Yes: Replace the original SDRAM and test again. If LED #3 does not light with the
original SDRAM, replace the SDRAM.
No: Continue to next step.
13. Unplug the iMac G5 and remove the optical drive. Plug the iMac G5 back in and start
the unit up from the internal power button. Does LED #3 light now?
– Yes This indicates the optical drive has failed. Replace the optical drive.
– No Replace the logic board.
14. WIth LED #3 on, turn the machine off by holding the internal power button until the unit
powers off. Unplug the computer and reinstall the back cover. Return the computer to
the upright position. Plug in the computer again and power on the computer. Does the
computer have video now?
– Yes Restart the computer and make sure that the computer is operating properly.
– No Continue to the next step.
15. Turn the display at an angle to you and look closely at the display. Is the display
completely black or can you see a dim light or glow to the display?
– Completely black: Replace the inverter.
– DIm or light glow: Replace the LCD panel.
Display is tinted another color
1. Reset the parameter RAM. Press Command-Option-P-R keys. When you keep all the
keys held down, you will hear the startup chime over and over again (about every ten
seconds) until you let go. After you hear the second chime, you can let go of the keys.
2. Does the computer display video after successfully resetting the computer's PRAM?
Yes: Problem resolved. Restart the computer from the Apple menu and make sure
the computer is starting up properly.
No: Continue to the next step.
3. Check for external video. Connect an external monitor to the mini-VGA port. Do you
have external video now?
Yes: Replace the display/panel and then go on to step 4.
No: Replace the logic board.
4. After replacing the display/bezel? Do you have video now?
Yes: Problem solved.
No: Replace the logic board.
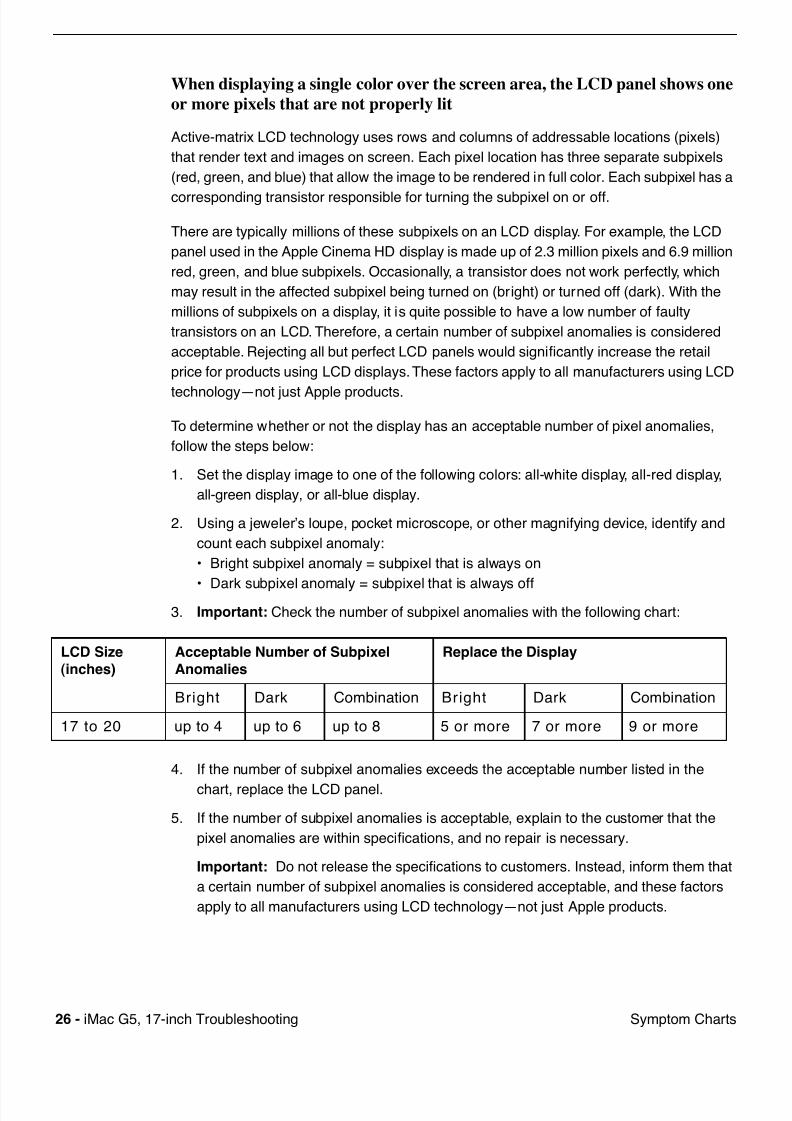
7/29/2019 Apple imacg5_17in
http://slidepdf.com/reader/full/apple-imacg517in 291/31926 - iMac G5, 17-inch Troubleshooting Symptom Charts
When displaying a single color over the screen area, the LCD panel shows one
or more pixels that are not properly lit
Active-matrix LCD technology uses rows and columns of addressable locations (pixels)
that render text and images on screen. Each pixel location has three separate subpixels
(red, green, and blue) that allow the image to be rendered in full color. Each subpixel has a
corresponding transistor responsible for turning the subpixel on or off.
There are typically millions of these subpixels on an LCD display. For example, the LCD
panel used in the Apple Cinema HD display is made up of 2.3 million pixels and 6.9 million
red, green, and blue subpixels. Occasionally, a transistor does not work perfectly, which
may result in the affected subpixel being turned on (bright) or turned off (dark). With the
millions of subpixels on a display, it is quite possible to have a low number of faulty
transistors on an LCD. Therefore, a certain number of subpixel anomalies is considered
acceptable. Rejecting all but perfect LCD panels would significantly increase the retail
price for products using LCD displays. These factors apply to all manufacturers using LCD
technology—not just Apple products.
To determine whether or not the display has an acceptable number of pixel anomalies,
follow the steps below:
1. Set the display image to one of the following colors: all-white display, all-red display,
all-green display, or all-blue display.
2. Using a jeweler’s loupe, pocket microscope, or other magnifying device, identify and
count each subpixel anomaly:
• Bright subpixel anomaly = subpixel that is always on
• Dark subpixel anomaly = subpixel that is always off
3. Important: Check the number of subpixel anomalies with the following chart:
4. If the number of subpixel anomalies exceeds the acceptable number listed in the
chart, replace the LCD panel.
5. If the number of subpixel anomalies is acceptable, explain to the customer that the
pixel anomalies are within specifications, and no repair is necessary.
Important: Do not release the specifications to customers. Instead, inform them that
a certain number of subpixel anomalies is considered acceptable, and these factors
apply to all manufacturers using LCD technology—not just Apple products.
LCD Size
(inches)
Acceptable Number of Subpixel
Anomalies
Replace the Display
Bright Dark Combination Bright Dark Combination
17 to 20 up to 4 up to 6 up to 8 5 or more 7 or more 9 or more
7/29/2019 Apple imacg5_17in
http://slidepdf.com/reader/full/apple-imacg517in 292/319iMac G5, 17-inch Troubleshooting - 27Symptom Charts
Hard Drive
In a hard drive failure, the computer fails to boot to the desktop and may
display a flashing question mark, or an alternating question mark and Mac
OS (face o a folder)
1. Restart the computer with the Apple Hardware Test (AHT) disc that came with thecomputer. Run the Quick/Extended test.
2. Does the Apple Hardware Test test pass?
Yes: Run Disk repair from the Install CD that came with the computer.
No: Replace the component indicated by Apple Hardware Test, go on to the next
step.
3. Does the computer start up properly now?
Yes: Problem resolved.
No: Reinstall system software. Go on to the next step.
4. Does the computer start up properly now?
Yes: Problem resolved.
No: Replace the hard drive. Does the computer work now?
– Yes: Problem resolved.
– No: Replace the logic board.
System hangs during normal startup process
1. Boot from the system CD that came with the computer and see if the hard drive
mounts on the desktop.
2. Using Drive Setup, reinstall the system software drivers for the hard drive.
3. Using Drive Setup, reinitiation the hard drive.
4. Check all cable connections to and from the hard drive.
5. Replace the hard drive.
6. Replace the logic board.
7/29/2019 Apple imacg5_17in
http://slidepdf.com/reader/full/apple-imacg517in 293/31928 - iMac G5, 17-inch Troubleshooting Symptom Charts
Flashing question mark appears on the screen
1. Boot from the system CD that came with the computer and see if the hard drive
mounts on the desktop.
2. Launch Drive Setup. Reinstall the system software drivers for the hard drive.
3. If no hard drive is found in Drive Setup, verify the hard drive cable connections.4. Reinstall system software. Backup the data first.
5. Reinitialize the hard drive.
6. Replace the hard drive.
7. Replace the logic board.
Optical Drive
CDs or DVDs don't show up on my desktop.
1. The first thing we should check is whether your drive can read discs normally. Try
inserting an audio CD and check whether it shows up on your desktop or launches
iTunes. Then eject it and insert the iMac Software Install and Restore disc that came
with your computer. Are either of these discs recognized by the computer?
Yes: It seems that some discs will show up on your Desktop, so the drive is OK - the
problem is the individual discs that don't appear. Try cleaning these discs, and make
sure they're in a format that can be read by your computer.
No: So no disc will show up on your desktop. Go ahead and leave the iMac SoftwareInstall and Restore disc in your drive, and we're going to try a process that involves
restarting your computer. Follow the instructions, below.
– 1. Leave the iMac Install and Restore disc in the drive.
– 2. Go to the Apple menu and choose Shut Down.
– 3. Once the computer has shut down, hold down the OPTION button and press
the power button to start the computer up again.
– 4. You will see a blue background, a curly arrow and a right arrow, and between
them is a button with the name of your hard drive. Wait about thirty seconds to see
if another button comes up with the name iMac Software Install and Restore.
– 5. After waiting about thirty seconds, choose the button with your hard drive'sname, and click the right arrow button.
– 6. The computer will start up normally. Open your browser and go back to the
Apple support page at: www.apple.com/support”
2. When you were looking at the button with your hard drive's name on it, did a button
with the iMac Software Install and Restore ever appear?
Yes: The fact that the disc appeared there means your drive does know that a disc is
in it. Let's check some system settings to see if they're the reason the discs don't
appear.
7/29/2019 Apple imacg5_17in
http://slidepdf.com/reader/full/apple-imacg517in 294/319iMac G5, 17-inch Troubleshooting - 29Symptom Charts
No: The next thing to check to make sure the computer realizes the drive is there.
From the Apple menu, choose About This Mac. From the window that pops up, click
on More Info. An application called System Profiler should open.
In System Profiler, in the column on the left, look under Hardware for a line called S-
ATA.
In the section on the right, you should see a header saying “S-ATA” and below it, two
items. The first is your hard drive. The second is your optical drive. Do you see two
items here?
– Yes: Even after checking for the drive in the startup manager, discs won't show
up. This indicates that your optical drive needs to be replaced.
– No: Reseat the optical drive and check System Profiler again. Does the optical
drive appear this time? If no, go on to the next step. If yes, it looks like the drive
connection may not have been too great, but you've got it plugged in properly
now.
3. Replace the optical drive.
4. Replace the logic board.
The computer won’t burn discs.
1. The first thing we should check is whether your drive can read discs normally. Try
inserting an audio CD and check whether it shows up on your desktop or launches
iTunes. Then eject it and insert the iMac Software Install and Restore disc that came
with your computer. Are either of these discs recognized by the computer?
Yes: This is a good sign. So do you get a specific error message or error code when
you try to burn a disc? Go on to step 2.
No: So no disc will show up on your desktop. Go ahead and leave the iMac Software
Install and Restore disc in your drive, and we're going to try a process that involves
restarting your computer. Follow the instructions, below.
– 1. Leave the iMac Install and Restore disc in the drive.
– 2. Go to the Apple menu and choose Shut Down.
– 3. Once the computer has shut down, hold down the OPTION button and press
the power button to start the computer up again.
– 4. You will see a blue background, a curly arrow and a right arrow, and between
them is a button with the name of your hard drive. Wait about thirty seconds to seeif another button comes up with the name iMac Software Install and Restore.
– 5. After waiting about thirty seconds, choose the button with your hard drive's
name, and click the right arrow button.
– 6. The computer will start up normally. Open your browser and go back to the
Apple support page at: www.apple.com/support”
2. Which of these error messages do you see?
• Unknown Error -2147352480: See Knowledge Base article 25480 and 25750 for
more information.
• Buffer underrun error: See Knowledge Base article 25480 and 25750 for more
7/29/2019 Apple imacg5_17in
http://slidepdf.com/reader/full/apple-imacg517in 295/31930 - iMac G5, 17-inch Troubleshooting Symptom Charts
information.
• Unknown Error: If you see “Unknown Error”, without “-2147352480”, you will want
to see Knowledge Base article 152224 for more information.
• None of these alert messages: Is your disc drive the one inside the iMac, or is it
attached to the iMac by a USB or FireWire cable?
– Inside the Mac: Go on to step 3.
– Attached by a cable: Go on to step 4.
3. So you can see other discs, it's just that they don't burn. Have you tried discs of other
brands? Sometimes certain discs won't burn, either because of quality or because
they're damaged or old. Try purchasing a different brand of discs and test to see
whether these discs will burn. Do the new discs burn correctly?
Yes: Great! It looks like the issue can be isolated to the old discs you were using. For
whatever reason, they don't seem to be working, so you'll want to use the new discs
from now on.
No: So your new discs didn't work either. What sort of disc are you trying to burn - isit a CD or a DVD?
– CD: You said you're having problems burning CDs. Let's try an easy question first.
In your Finder, open a window and select your hard drive. At the bottom of the
window, does it say you have at least a gigabyte (1 GB) free? If no, go to step 5.
– DVD: The first thing we should check is whether your drive can read DVDs
normally. Try inserting the iMac Software Install and Restore disc that came with
your computer. If you still have problems, go to step 6.
4. We don't have the capacity to troubleshoot an external drive - if you are having
problems with a drive other than the internal one, you will need to talk to the
manufacturer of that drive.
5. When the computer burns a CD, it needs some free space on the hard drive for it to do
what it needs to do when it burns a disc. Try freeing up some space by emptying trash
and deleting unneeded items. Once you have at least one gigabyte free and you've
emptied the trash, try burning a disc again. Does it burn correctly now?
Yes: Problem solved.
No: When you try to burn a CD, are you burning a disc from the Finder, from iTunes,
or from a different application? Refer to Knowledge Base articles 151904,
150293,151701, and 153426 for disc burning issues. Does it burn a disc now? – Yes: Problem solved.
– No: Go on to the next step.
6. Reinstall the system software. Print Knowledge Base article 151641 and follow the
steps. Try burning a disc again. Did the disc burn correctly?
Yes: Problem solved.
No: Replace the optical drive. Does it burn correctly now?
– Yes: Problem solved.
– No: Replace the logic board.
7/29/2019 Apple imacg5_17in
http://slidepdf.com/reader/full/apple-imacg517in 296/319iMac G5, 17-inch Troubleshooting - 31Symptom Charts
Inserting Discs Issue
1. Is there a disc already in the drive? Refer to Knowledge Base article 106752,
“Macintosh: How to Eject a Disc When Other Options Do Not Work”.
2. Check System Profiler. In System Profiler, in the column on the left, look under
Hardware for a line called S-ATA.
In the section on the right, you should see a header saying “S-ATA” and below it, two
items. The first is your hard drive. The second is your optical drive. Do you see two
items here?
Yes: Problem solved. Run diagnostics and trying inserting a disc again.
No: Remove the back cover and reseat the optical drive. Can you insert a disc now?
– Yes: Problem solved.
– No: Replace the optical drive. If this doesn’t solve the problem, go on to the next
step.
3. Replace the logic board.
Optical disc constantly ejects
1. Disconnect all peripheral devices, especially the mouse in cases where the disc is
constantly ejecting.
2. Try cleaning the disc. If it is dirty or scratched, it may not mount.
3. Try a different disc.
4. Boot from Apple Hardware Test (hold down the “C” key at startup) or boot from the
system install CD (use Startup Manager, hold down the Option key at startup).
5. Perform a clean install with the CD that came with the computer.
6. Reseat the optical drive.
7. Replace the optical drive.
8. Replace the miplane assembly.

7/29/2019 Apple imacg5_17in
http://slidepdf.com/reader/full/apple-imacg517in 297/31932 - iMac G5, 17-inch Troubleshooting Symptom Charts
Fan Sound
Loud fan noise coming from inside the computer
The grill on the bottom of the iMac G5 lets a trio of fans draw cool air into the system.
Advanced thermal software spins the fans fast or slow as needed, passing the heated air
through a slit on the back cover. As the system usage increases, the fans will adjust their
speed using advanced thermal software to meet the cooling needs of the system.
Under normal conditions, rotating fans will make a slight hum that varies in relationship
with their rotational speed and the amount of air that they are moving. In addition, the
normal functioning of the hard drive and optical drive will generate additional whirring and
scratching sounds that may be audible. All of these sounds are normal and do not indicate
a failure with your computer.
To begin troubleshooting a possible fan issue, we need to qualify the sound that you’re
experiencing.
1. Does the sound occur only under specific light/heavy usage conditions?
Yes: CPU intensive applications such as iTunes, Garage Band, DVD Player, etc., or
two or more applications open at once will cause the fans to run at an increased rate
making them more noticeable. If the sound only occurs when one or more of these
applications is running, this is normal.
No: If the sound isn’t affected by CPU intensive application it may be due to other
factors. Go on to the next step.
2. Is the sound always present, or does the sound vary?
The sound is always present: The normal functioning of the hard drive and optical
drive will generate additional whirring and scratching noises that may be audible.
Let’s see if this sound is related to one of the components. Go to step 4.
The sound varies: Under normal conditions rotating blowers will make a slight hum
that varies in relationship with their rotational speed and the amount of air that they
are moving. Let's see if this is indeed the case. Go to Next Step.
3. Are the fans making a normal humming sound that increases/decreases in relation to
processor usage? As the fans increase their speed to cool the system the sound level
will increase.
Launch the Activity Monitor application included with Mac OS X in the Utilities folder
to determine whether the noise corresponds with heavy usage of the CPU. Does fan
activity increase / decrease with the CPU Usage graph in Activity Monitor?
Yes: As the system CPU usage increases, the fans will adjust their speed using
advanced thermal software to meet the cooling needs of the system. As the fans
increase their speed to cool the system the sound level will increase. This is normal
operation and none of your fans require replacement.
7/29/2019 Apple imacg5_17in
http://slidepdf.com/reader/full/apple-imacg517in 298/319iMac G5, 17-inch Troubleshooting - 33Symptom Charts
No: If the fan activity does not coincide with CPU usage, the sound you're hearing
may not be fan activity. Go to the Next Step.
4. The normal functioning of the hard drive and optical drive will generate additional
whirring and scratching noises that may be audible. We can isolate these noises by
booting the computer to the iMac G5 Install Mac OS X Install Disc 1.
- Place the disc in the drive, and restart your machine, holding down the “C” key as
the machine starts up.
- Once at the Installer window, choose Open Disk Utility from the Installer Menu.
- Once Disk Utility is open, select your Macintosh HD and on the toolbar choose
Unmount. Note: if you have multiple partitions, you should unmount each of these
partitions.
This will spin down the hard drive. The optical drive will also be busy at this time; wait
a moment for the optical drive to spin down also and then listen to the machine.
Is the sound that you've been experiencing still present?
Yes: With the hard drive and optical drive inactive, all you should be hearing are the
fans in the machine. While booted to the CD, these fans should be running at a lower
level since the CPU is under very little task with both drives inactive. Fan sound that
includes objectionable ticking, whistling, or squealing may require further
investigation and/or replacement of the particular fan. Go on to the Next Step.
No: The normal functioning of the hard drive and optical drive will generate additional
whirring and scratching sounds that may be audible. All of these sounds are normal
and do not indicate a failure with your machine. If you wish to check the health of
your hard drive, see article 152349 - Replacing a disk before it fails.
5. Power off your computer, remove the power cord and any other cables that are
connected to your computer and remove the back cover.
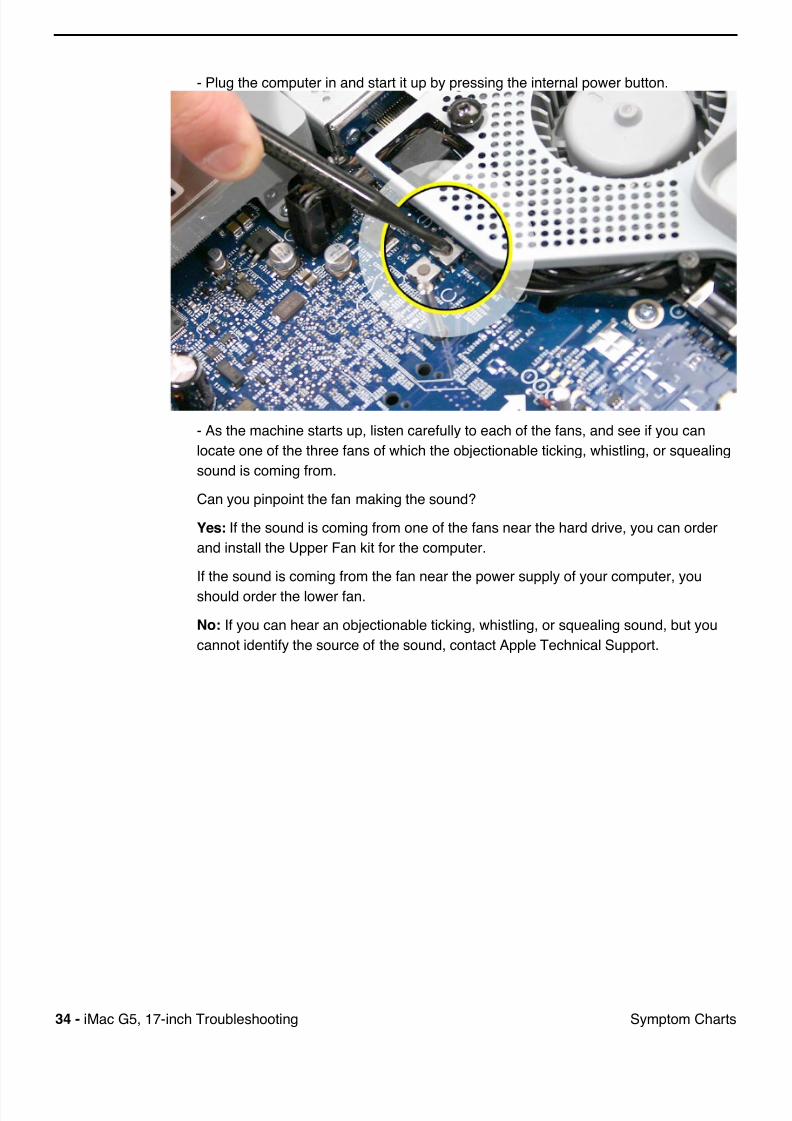
7/29/2019 Apple imacg5_17in
http://slidepdf.com/reader/full/apple-imacg517in 299/31934 - iMac G5, 17-inch Troubleshooting Symptom Charts
- Plug the computer in and start it up by pressing the internal power button.
- As the machine starts up, listen carefully to each of the fans, and see if you can
locate one of the three fans of which the objectionable ticking, whistling, or squealing
sound is coming from.
Can you pinpoint the fan making the sound?
Yes: If the sound is coming from one of the fans near the hard drive, you can order
and install the Upper Fan kit for the computer.
If the sound is coming from the fan near the power supply of your computer, you
should order the lower fan.
No: If you can hear an objectionable ticking, whistling, or squealing sound, but you
cannot identify the source of the sound, contact Apple Technical Support.

7/29/2019 Apple imacg5_17in
http://slidepdf.com/reader/full/apple-imacg517in 300/319iMac G5, 17-inch Troubleshooting - 35Symptom Charts
Fans are running at a constant high speed
If the fans on the system are running at a constant high speed, or ramp very quickly to
high speed and do not vary this speed once reached, the fans are most likely receiving
incorrect thermal input. In these cases you should use the following steps to resolve:
1. Reset the SMU (refer to “Resetting the SMU” mentioned earlier in this chapter) and
then test to see if the fans still exhibit the issue.
2. Boot from the iMac G5 Install DVD or another iMac G5 of the same type in FireWire
Target disc mode and see if the issue persists. If the fans run normally here, reinstall
the system software. Be sure to give the system enough time to recreate the issue
when booted to these other volumes.
3. Verify that the hard drive sensor cable is plugged in correctly. If necessary, replace the
hard drive sensor cable.
4. Replace the hard drive (the hard drive includes the sensor on the hard drive carrier.
5. Replace the main logic board.

7/29/2019 Apple imacg5_17in
http://slidepdf.com/reader/full/apple-imacg517in 301/31936 - iMac G5, 17-inch Troubleshooting Symptom Charts
AirPort
Not able to connect wirelessly with AirPort
1. From the Apple menu, choose About this Mac.
2. Click on More Info. System Profiler should open.
3. In System Profiler, in the column on the left, look under Hardware for a line called
“AirPort Card”. Select that line.
4. Does the section to the right say “No Information Found”?
Yes: It looks like your computer doesn't realize it has an AirPort card installed. Go on
to step. 5
No: It looks like your iMac recognizes that it has an AirPort Card installed. Go on to
step 6.
5. Remove the back cover and reseat the AirPort Extreme card. Check System Profileragain to see if the computer sees the AirPort card. Does it recognize the card now?
Yes: Problem solved.
No: Replace the AirPort Extreme card.
6. Now that we know your iMac recognizes your AirPort card, check your antenna. If the
AirPort antenna is not plugged in all the way, you may have very short AirPort range.
7. Remove the back cover. Reconnect the antenna cable to the AirPort card. Press the
antenna connector firmly, to make sure it's fully connected to the iMac. You should be
ready to go wireless now.8. If your antenna is plugged in properly and your AirPort card is recognized there are a
number of other things that could cause issues with wireless networking. Refer to
Knowledge Base document 106858 for more networking information.
9. Replace the AirPort card.
10. Replace the AirPort antenna.
11. Replace the logic board.
7/29/2019 Apple imacg5_17in
http://slidepdf.com/reader/full/apple-imacg517in 302/319iMac G5, 17-inch Troubleshooting - 37Symptom Charts
My AirPort signal seems to be very week
1. Check your antenna. If the AirPort antenna is not plugged in all the way, you may
have very short AirPort range.
2. Remove the back cover. Reconnect the antenna cable to the AirPort card. Press the
antenna connector firmly, to make sure it's fully connected to the iMac. Replace the
cover and reconnect the power cord.
3. Try connecting to your wireless access point now. Did your reception improve?
Yes: It looks like the AirPort antenna had not been plugged in all the way. You should
be ready to go wireless now.
No: It continues like your antenna is plugged in properly and your AirPort card is
recognized. However, there are a number of other things that could cause issues with
wireless networking. Refer to Knowledge Base document 106858 for more
networking information.
4. Replace the AirPort card.
5. Replace the AirPort antenna.
6. Replace the logic board.
7/29/2019 Apple imacg5_17in
http://slidepdf.com/reader/full/apple-imacg517in 303/31938 - iMac G5, 17-inch Troubleshooting Symptom Charts
Speakers
I don’t hear sound from the speakers.
1. Press the F5 button on your keyboard. It has a sound icon on it. Do you hear sound
now?
Yes: It looks like your volume was muted. When this happens again, just press the
F4 and F5 keys to regulate your volume.
No: Are there any external microphones, speakers or headphones plugged into the
iMac? If yes, go on to step 2. If no, go on to step 3.
2. Disconnect your external microphones, speakers, or headphones. Do you hear sound
now?
Yes: It looks like the built-in speakers are working properly. Now try plugging in a
different set of speakers or headphones. Go on to step 4.
No: Unplug any USB devices you have plugged into your iMac except the mouse and
keyboard. Do you hear sound now? Go on to step 3.
3. Unplug any USB devices you have plugged into your iMac except the mouse and
keyboard. Do you hear sound now?
Yes: It sounds like you may have a USB Audio device plugged into your iMac such
as a USB microphone adapter or USB speakers. Please work with the manufacturer
to troubleshoot this issue.
No: Reset your computer's PRAM (Parameter RAM), which stores settings for sound
and go to step 5.
4. With new speakers or headphones plugged in, do you have audio?
Yes: It appears that the issue may be with the external microphone, speakers or
headphones that were plugged into your iMac originally. Work with the manufacturer
to troubleshoot the speakers or headphones
No: It looks like there may be something wrong with the audio output port on your
iMac. Replace the logic board.
5. After resetting the PRAM, do you hear sound now?
Yes: Test the audio again. Open System Preferences and check the Sound icon.Make sure the preferences are set correctly. Problem resolved.
No: Replace the logic board
7/29/2019 Apple imacg5_17in
http://slidepdf.com/reader/full/apple-imacg517in 304/319iMac G5, 17-inch Troubleshooting - 39Symptom Charts
I hear sound out of only one speaker.
1. Are there any external microphones, speakers or headphones plugged into the iMac?
Yes: Disconnect any external microphones, speakers, or headphones. Do you hear
audio from both of the built in speakers on your iMac?
– Yes: Good. It looks like the built-in speakers are working properly. This may be an
issue with the microphone, speakers or headphones that were plugged into your
iMac. Please work with the manufacturer to troubleshoot this issue.
– No: Go to step 2.
No: Check your speaker balance. If your balance setting was set to the left or right
speaker, you would only hear sound from one speaker. Go to step 2.
2. Open System Preferences. (System Preferences can be found under the Apple
menu.)
3. Click once on the sound icon.
4. Click once on the Output tab.
5. Make sure your balance setting is in the middle. After adjusting the audio balance, do
you have audio from both speakers now?
Yes: It looks like the issue was the balance was not set properly.
No: Replace the logic board.
Mouse
My mouse doesn’t work at all.
1. Try using the mouse on another surface. Non-reflective, opaque surfaces without
repetitive patterns work best. The surface should be clean, but not shiny.
2. Unplug any USB devices plugged into your computer, other than the Apple Mouse and
Apple Keyboard.
3. Try another known good USB mouse.
4. Replace the mouse.
5. Replace the logic board.
My mouse works intermittently (the cursor freezes randomly).
1. Unplug any USB devices plugged into your computer, other than the Apple Mouse and
Apple Keyboard.
2. Reconnect the USB devices one by one and test your mouse after each to figure out
which device is causing the issue. Once you have isolated the “problem child” that isn't
playing well with others, you will want to contact the manufacturer of that device to see
if they have any suggestions or assistance.
7/29/2019 Apple imacg5_17in
http://slidepdf.com/reader/full/apple-imacg517in 305/31940 - iMac G5, 17-inch Troubleshooting Symptom Charts
3. Try a known good USB mouse.
4. Replace the mouse.
5. Replace the logic board.
The mouse is slow to respond.
1. Try putting the mouse on a different surface - an opaque surface with no patterns is
best.
2. Adjust the settings on the mouse.
– Choose Apple menu > System Preferences and click Keyboard & Mouse.
– Click Mouse.
– Drag the Tracking Speed slider to select how fast the pointer moves. Drag the
Double-Click Speed slider to set how fast you have to double-click.
3. If the mouse still doesn’t work, insert the iMac Software Install and Restore disc that
came with your computer. Shut the computer down and then start it up while holdingdown the letter “c” on the keyboard. Does the mouse work when the computer is
started up from this disc?
4. Try a known good USB mouse.
5. Replace the mouse.
6. Replace the logic board.
Keyboard
None of the keys on my keyboard work.
1. Unplug all devices from your computer, including your mouse and keyboard as well as
printer, scanner, external hard drives, and hubs. (Warning: Some devices may require
you to perform steps before it is safe to unplug them, e.g, external storage devices.)
Be sure to unplug your hub, if you have one.
2. Plug your keyboard into the back of your computer firmly and securely. Plug your
mouse into the back of your computer firmly and securely. Take special care to make
sure the connector is completely in the socket. Go on to step 3.
3. Does your keyboard work now?
Yes: Problem solved.
No: Unplug your keyboard and plug it into another USB slot on the back of your iMac
Does it work now?
– Yes: Replace the logic board.
– No: Unplug your keyboard and plug your mouse into the port the keyboard just
occupied. Go on to step 4.
4. Does your mouse work now?
Yes: Replace the keyboard.
7/29/2019 Apple imacg5_17in
http://slidepdf.com/reader/full/apple-imacg517in 306/319iMac G5, 17-inch Troubleshooting - 41Symptom Charts
No: Replace the logic board.
Certain keys don't work.
1. Unplug all devices from your computer, including your mouse and keyboard as well as
printer, scanner, external hard drives, and hubs. (Warning: Some devices may require
you to perform steps before it is safe to unplug them, e.g, external storage devices.)Be sure to unplug your hub, if you have one.
2. Plug your keyboard into the back of your computer firmly and securely. Plug your
mouse into the back of your computer firmly and securely. Take special care to make
sure the connector is completely in the socket. (Note that USB plugs can only work
one way up, and if you try them upside-down they won't slide together properly.) Go on
to the next step.
3. Does your keyboard work now?
Yes: Problem solved.
No: Unplug your keyboard and plug it into another USB slot on the back of your iMac
Does it work now?
– Yes: Replace the logic board.
– No: Unplug your keyboard and plug your mouse into the port the keyboard just
occupied. Go on to step 4.
4. Does your mouse work now?
Yes: Replace the keyboard.
No: Replace the logic board.
My keys are sticky or slow to respond.
1. Try a known good keyboard.
2. Open System Preferences. Click on the keyboard and mouse icon. Adjust the “key
repeat speed and delay until repeat” rate.
3. Replace the keyboard.
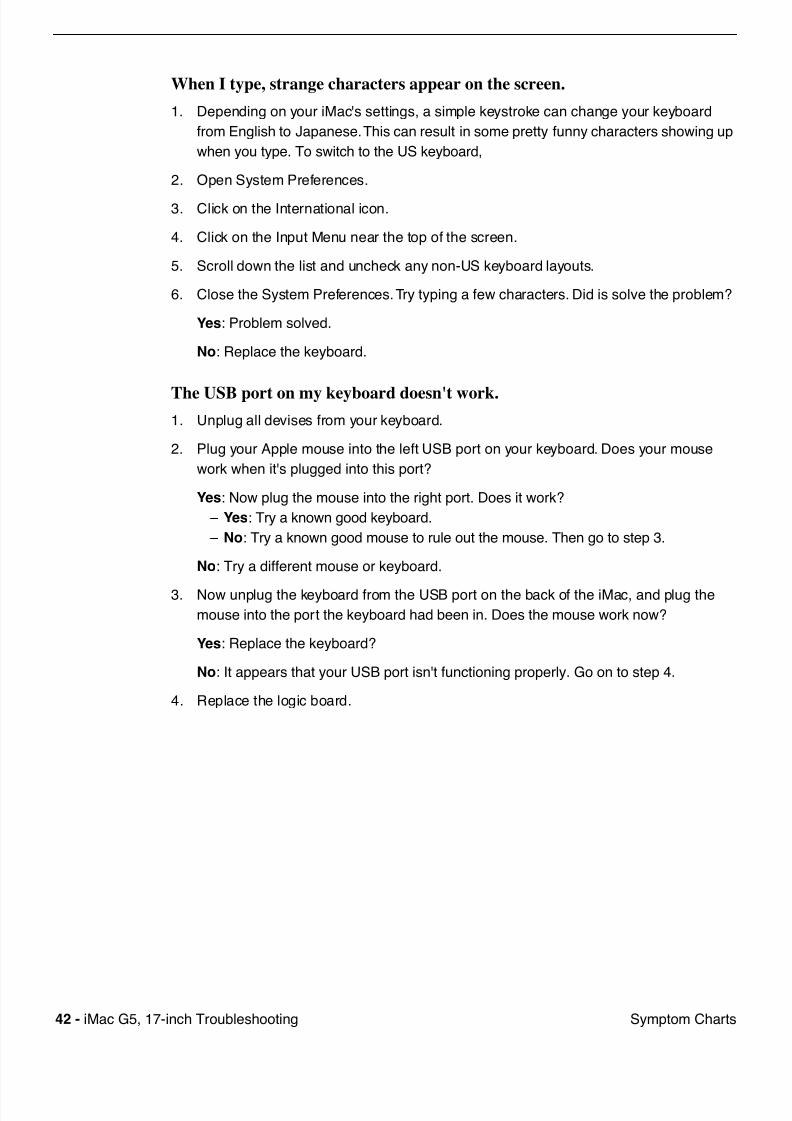
7/29/2019 Apple imacg5_17in
http://slidepdf.com/reader/full/apple-imacg517in 307/31942 - iMac G5, 17-inch Troubleshooting Symptom Charts
When I type, strange characters appear on the screen.
1. Depending on your iMac's settings, a simple keystroke can change your keyboard
from English to Japanese. This can result in some pretty funny characters showing up
when you type. To switch to the US keyboard,
2. Open System Preferences.
3. Click on the International icon.
4. Click on the Input Menu near the top of the screen.
5. Scroll down the list and uncheck any non-US keyboard layouts.
6. Close the System Preferences. Try typing a few characters. Did is solve the problem?
Yes: Problem solved.
No: Replace the keyboard.
The USB port on my keyboard doesn't work.
1. Unplug all devises from your keyboard.
2. Plug your Apple mouse into the left USB port on your keyboard. Does your mouse
work when it's plugged into this port?
Yes: Now plug the mouse into the right port. Does it work?
– Yes: Try a known good keyboard.
– No: Try a known good mouse to rule out the mouse. Then go to step 3.
No: Try a different mouse or keyboard.
3. Now unplug the keyboard from the USB port on the back of the iMac, and plug the
mouse into the port the keyboard had been in. Does the mouse work now?
Yes: Replace the keyboard?
No: It appears that your USB port isn't functioning properly. Go on to step 4.
4. Replace the logic board.
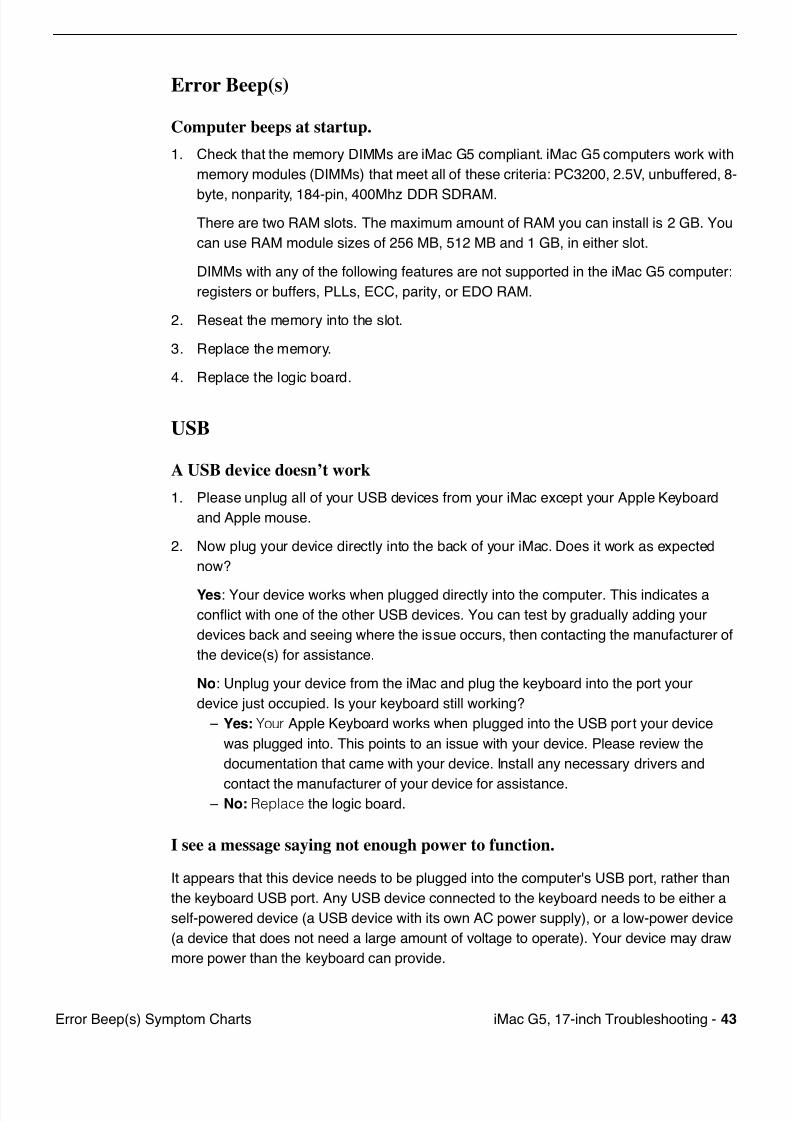
7/29/2019 Apple imacg5_17in
http://slidepdf.com/reader/full/apple-imacg517in 308/319iMac G5, 17-inch Troubleshooting - 43Error Beep(s) Symptom Charts
Error Beep(s)
Computer beeps at startup.
1. Check that the memory DIMMs are iMac G5 compliant. iMac G5 computers work with
memory modules (DIMMs) that meet all of these criteria: PC3200, 2.5V, unbuffered, 8-
byte, nonparity, 184-pin, 400Mhz DDR SDRAM.
There are two RAM slots. The maximum amount of RAM you can install is 2 GB. You
can use RAM module sizes of 256 MB, 512 MB and 1 GB, in either slot.
DIMMs with any of the following features are not supported in the iMac G5 computer:
registers or buffers, PLLs, ECC, parity, or EDO RAM.
2. Reseat the memory into the slot.
3. Replace the memory.
4. Replace the logic board.
USB
A USB device doesn’t work
1. Please unplug all of your USB devices from your iMac except your Apple Keyboard
and Apple mouse.
2. Now plug your device directly into the back of your iMac. Does it work as expected
now?
Yes: Your device works when plugged directly into the computer. This indicates a
conflict with one of the other USB devices. You can test by gradually adding your
devices back and seeing where the issue occurs, then contacting the manufacturer of
the device(s) for assistance.
No: Unplug your device from the iMac and plug the keyboard into the port your
device just occupied. Is your keyboard still working?
– Yes: Your Apple Keyboard works when plugged into the USB port your device
was plugged into. This points to an issue with your device. Please review the
documentation that came with your device. Install any necessary drivers and
contact the manufacturer of your device for assistance. – No: Replace the logic board.
I see a message saying not enough power to function.
It appears that this device needs to be plugged into the computer's USB port, rather than
the keyboard USB port. Any USB device connected to the keyboard needs to be either a
self-powered device (a USB device with its own AC power supply), or a low-power device
(a device that does not need a large amount of voltage to operate). Your device may draw
more power than the keyboard can provide.
7/29/2019 Apple imacg5_17in
http://slidepdf.com/reader/full/apple-imacg517in 309/319© 2005 Apple Computer, Inc. All rights reserved.
Service Source
Views
iMac G5, 17-inch
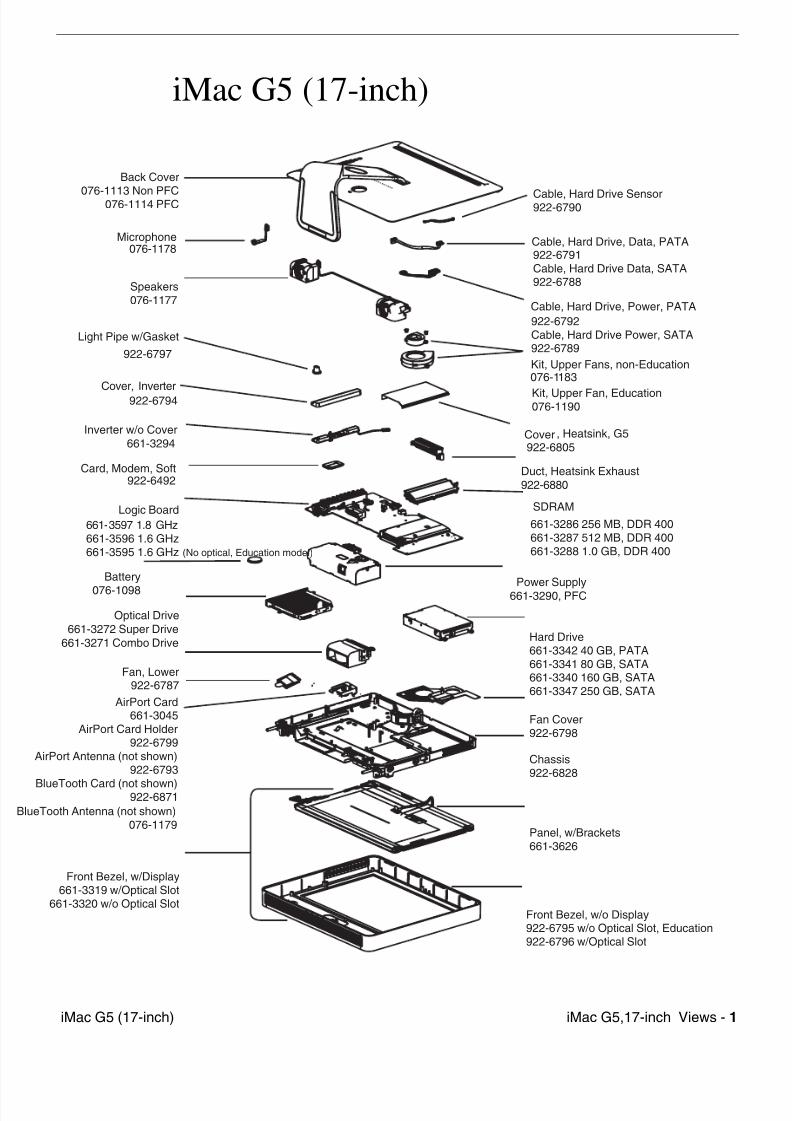
7/29/2019 Apple imacg5_17in
http://slidepdf.com/reader/full/apple-imacg517in 310/319iMac G5,17-inch Views - 1iMac G5 (17-inch)
Cable, Hard Drive Sensor922-6790
Cable, Hard Drive, Data, PATA922-6791Cable, Hard Drive Data, SATA922-6788
Cable, Hard Drive, Power, PATA
922-6792Cable, Hard Drive Power, SATA922-6789
Kit, Upper Fans, non-Education076-1183
Cover , Heatsink, G5
922-6805
Duct, Heatsink Exhaust
922-6880
Microphone076-1178
SDRAM
661-3286 256 MB, DDR 400661-3287 512 MB, DDR 400661-3288 1.0 GB, DDR 400
Back Cover
076-1113 Non PFC076-1114 PFC
Light Pipe w/Gasket
922-6797
Inverter w/o Cover
661-3294
Power Supply661-3290, PFC
Speakers076-1177
Cover, Inverter922-6794
Card, Modem, Soft922-6492
Logic Board
661-3597 1.8 GHz661-3596 1.6 GHz661-3595 1.6 GHz (No optical, Education model)
Optical Drive
661-3272 Super Drive
661-3271 Combo Drive
Fan Cover922-6798
Hard Drive661-3342 40 GB, PATA661-3341 80 GB, SATA661-3340 160 GB, SATA661-3347 250 GB, SATA
Chassis922-6828
Panel, w/Brackets661-3626
Fan, Lower922-6787
Front Bezel, w/Display661-3319 w/Optical Slot
661-3320 w/o Optical SlotFront Bezel, w/o Display922-6795 w/o Optical Slot, Education922-6796 w/Optical Slot
eTooth Antenna (not shown)076-1179
AirPort Card661-3045
AirPort Card Holder922-6799
AirPort Antenna (not shown)922-6793
BlueTooth Card (not shown)922-6871
Kit, Upper Fan, Education076-1190
Battery
076-1098
iMac G5 (17-inch)
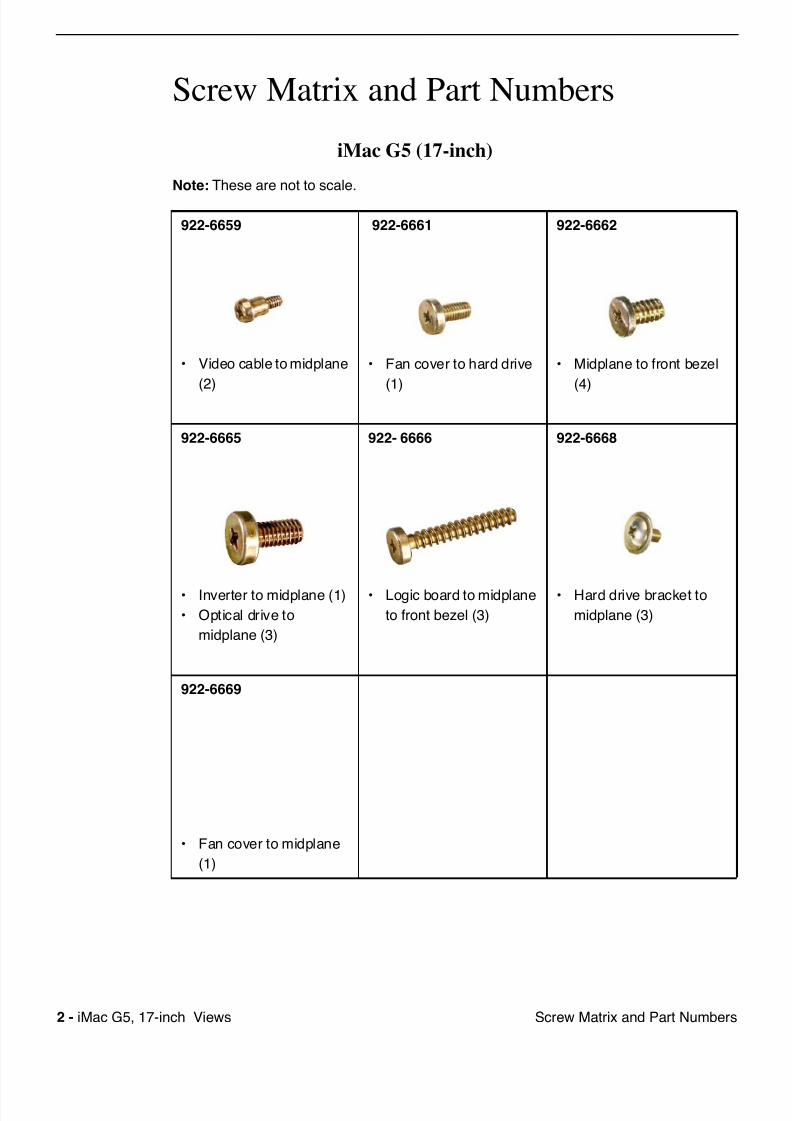
7/29/2019 Apple imacg5_17in
http://slidepdf.com/reader/full/apple-imacg517in 311/3192 - iMac G5, 17-inch Views Screw Matrix and Part Numbers
Screw Matrix and Part Numbers
iMac G5 (17-inch)
Note: These are not to scale.
922-6659
• Video cable to midplane
(2)
922-6661
• Fan cover to hard drive
(1)
922-6662
• Midplane to front bezel
(4)
922-6665
• Inverter to midplane (1)
• Optical drive to
midplane (3)
922- 6666
• Logic board to midplane
to front bezel (3)
922-6668
• Hard drive bracket to
midplane (3)
922-6669
• Fan cover to midplane
(1)
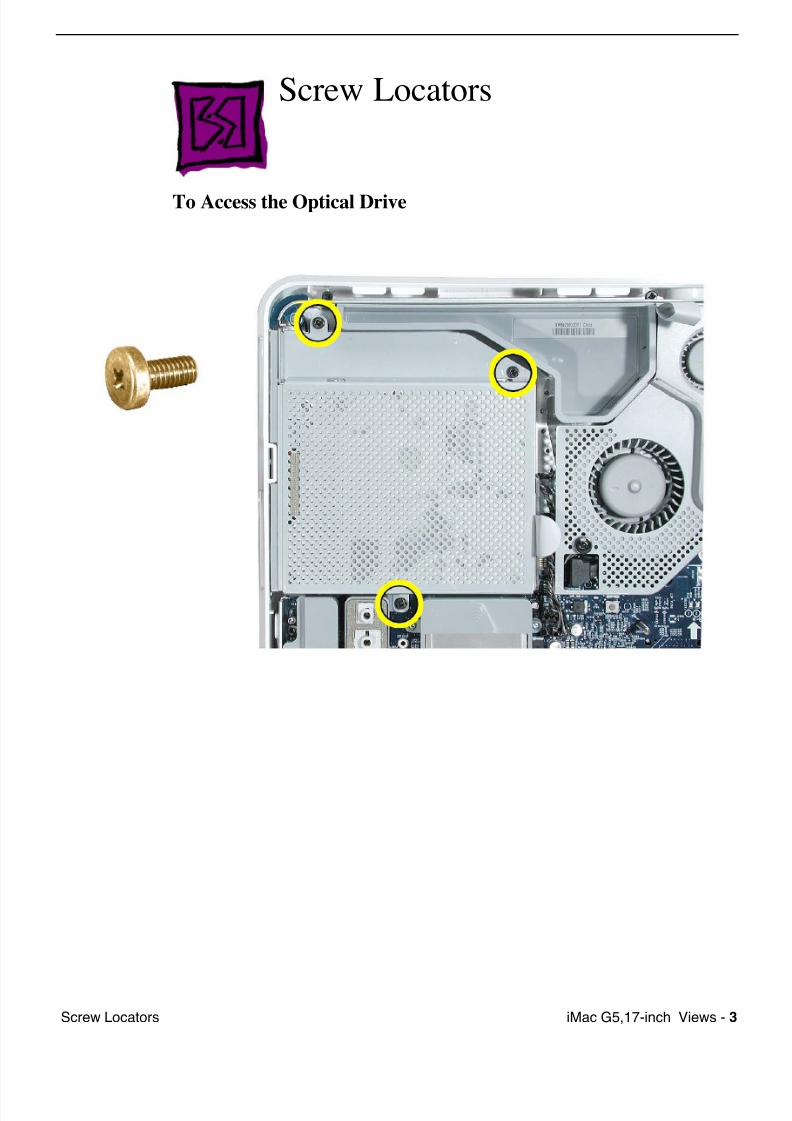
7/29/2019 Apple imacg5_17in
http://slidepdf.com/reader/full/apple-imacg517in 312/319iMac G5,17-inch Views - 3Screw Locators
Screw Locators
To Access the Optical Drive

7/29/2019 Apple imacg5_17in
http://slidepdf.com/reader/full/apple-imacg517in 313/3194 - iMac G5, 17-inch Views Screw Locators
To Access the Inverter
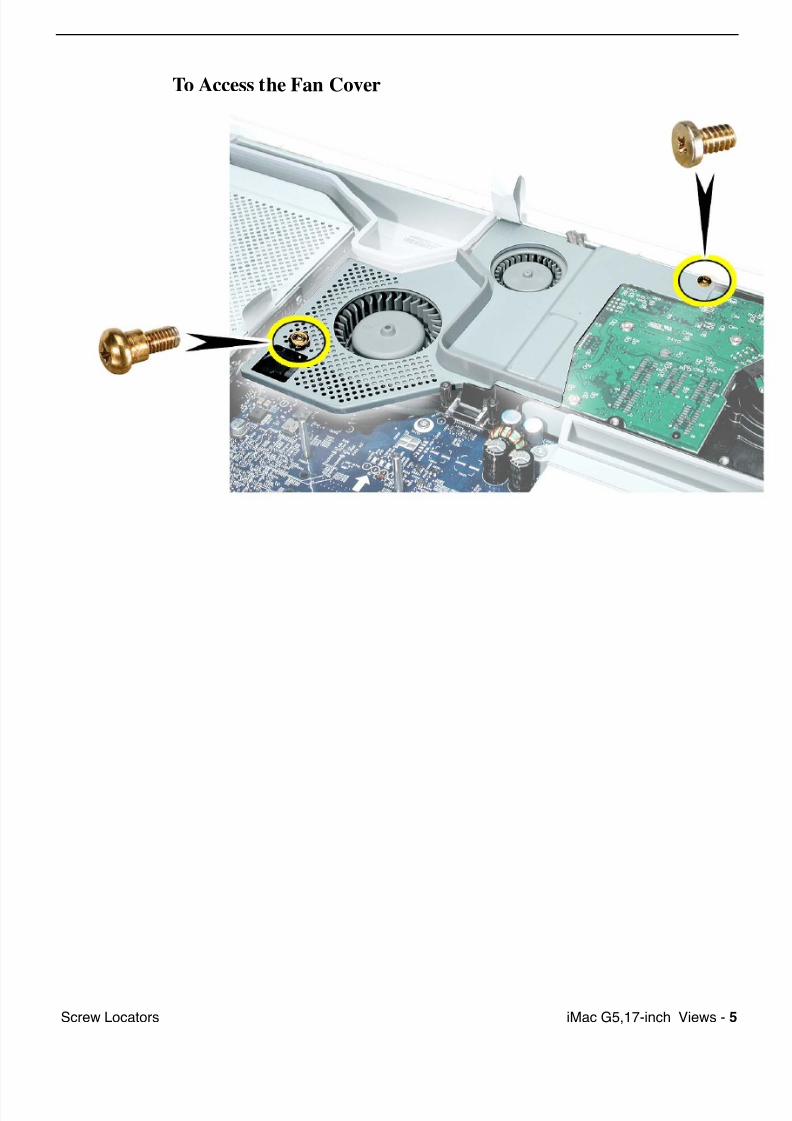
7/29/2019 Apple imacg5_17in
http://slidepdf.com/reader/full/apple-imacg517in 314/319iMac G5,17-inch Views - 5Screw Locators
To Access the Fan Cover
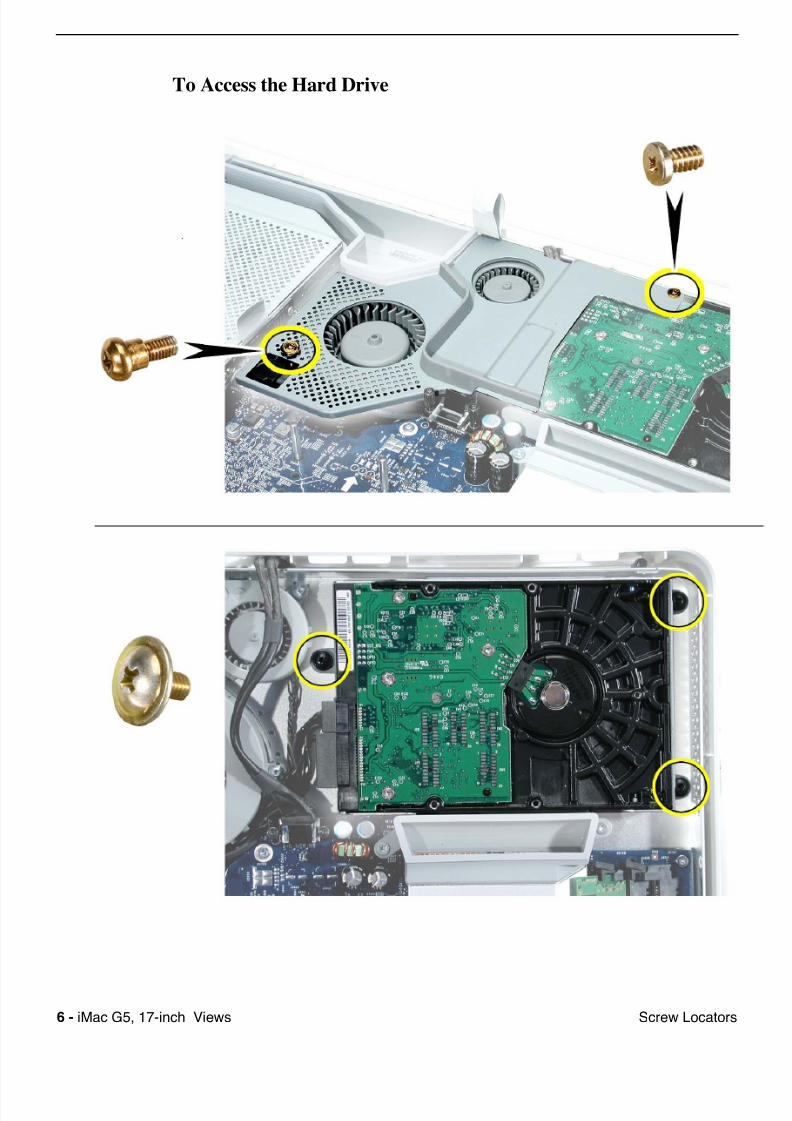
7/29/2019 Apple imacg5_17in
http://slidepdf.com/reader/full/apple-imacg517in 315/3196 - iMac G5, 17-inch Views Screw Locators
To Access the Hard Drive
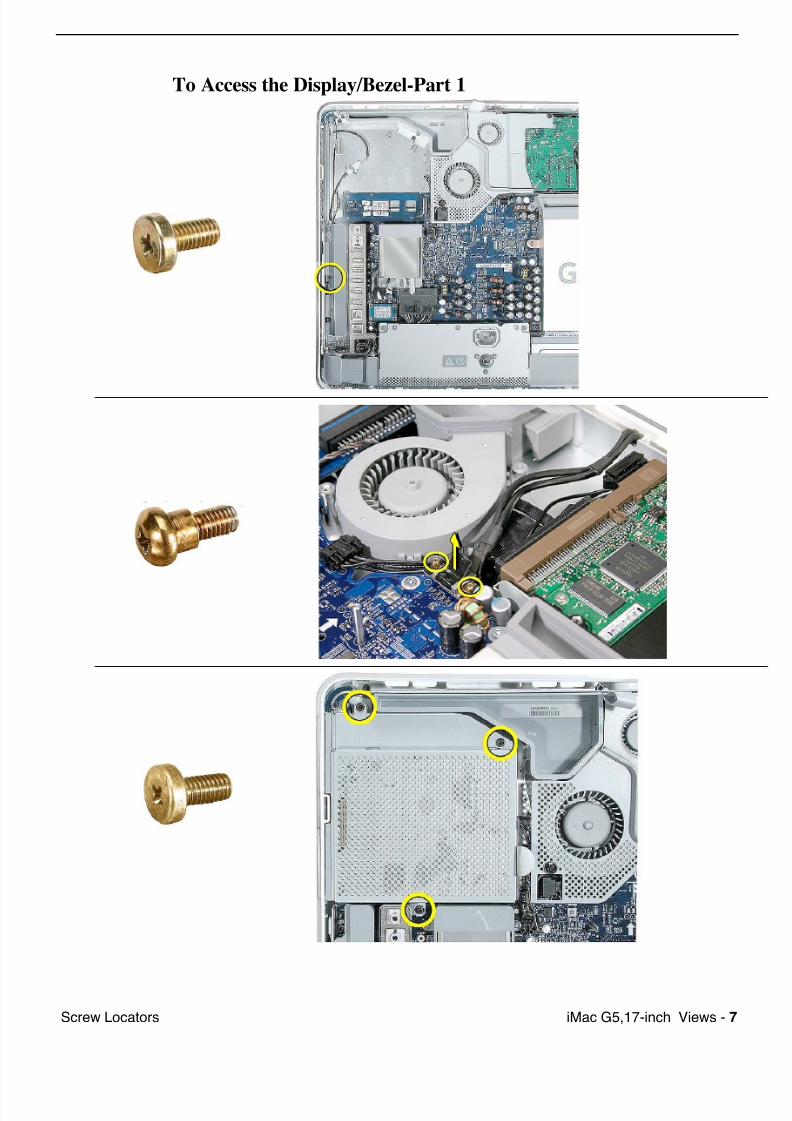
7/29/2019 Apple imacg5_17in
http://slidepdf.com/reader/full/apple-imacg517in 316/319iMac G5,17-inch Views - 7Screw Locators
To Access the Display/Bezel-Part 1
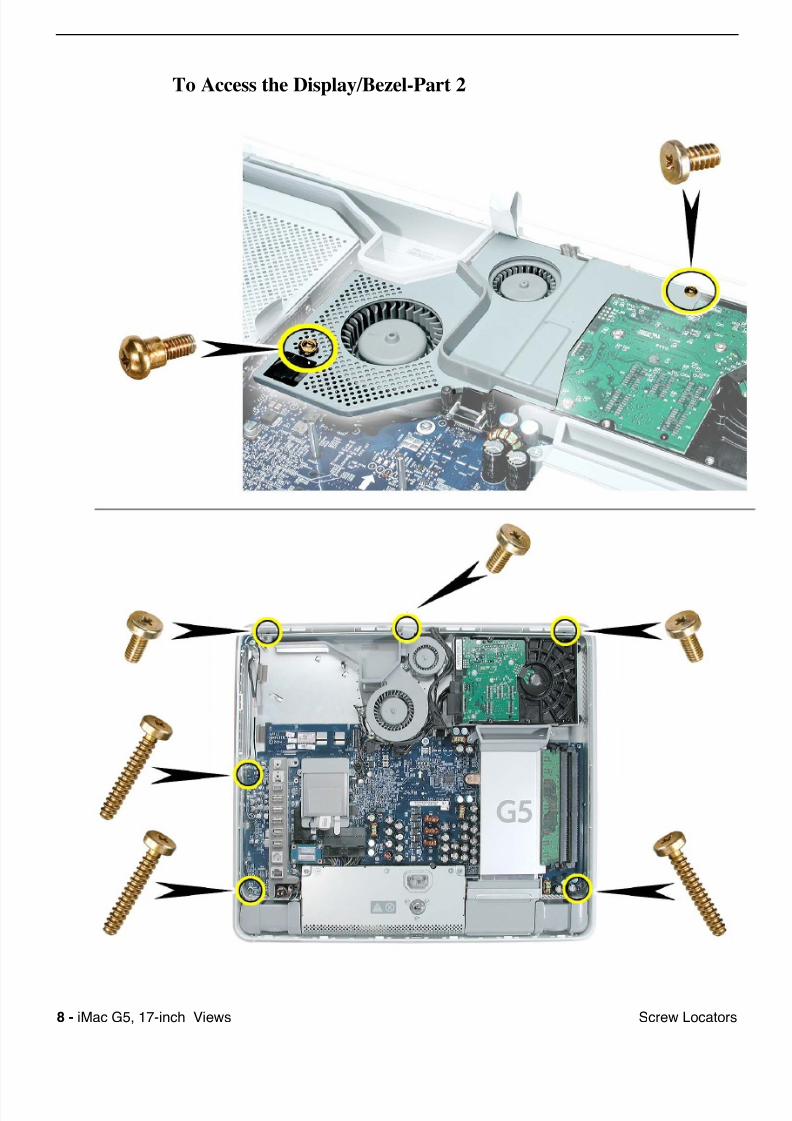
7/29/2019 Apple imacg5_17in
http://slidepdf.com/reader/full/apple-imacg517in 317/3198 - iMac G5, 17-inch Views Screw Locators
To Access the Display/Bezel-Part 2
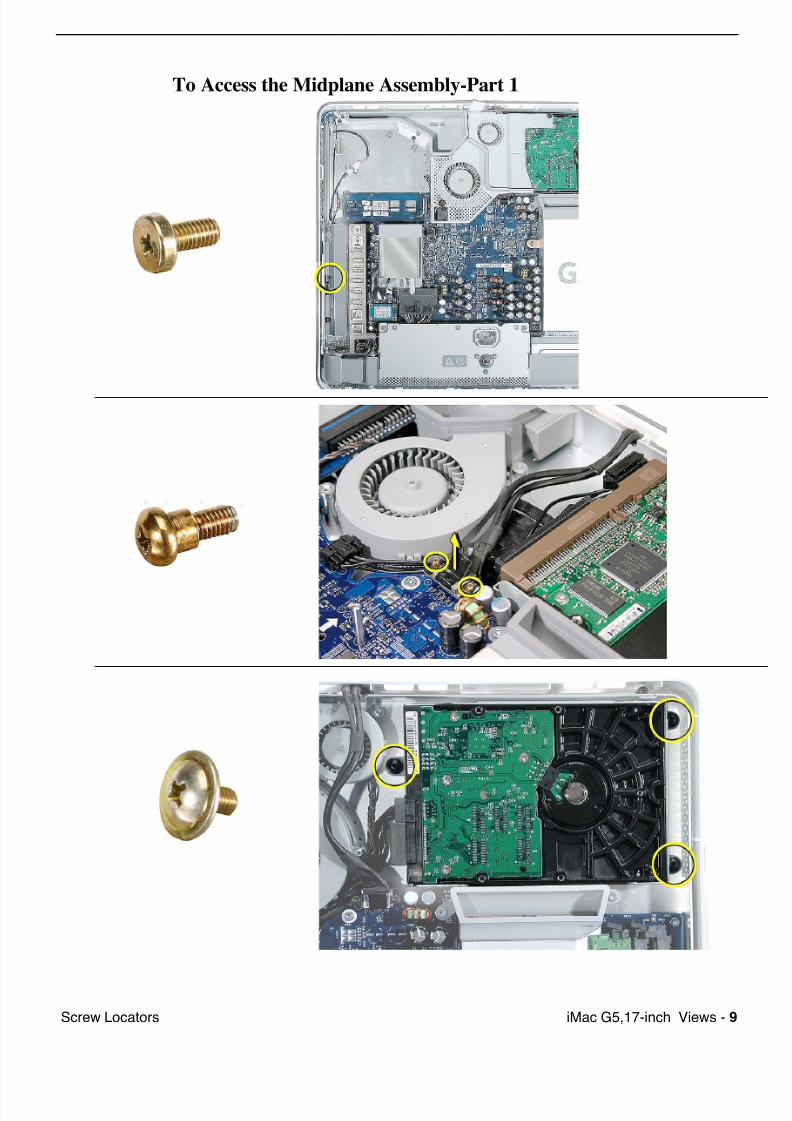
7/29/2019 Apple imacg5_17in
http://slidepdf.com/reader/full/apple-imacg517in 318/319iMac G5,17-inch Views - 9Screw Locators
To Access the Midplane Assembly-Part 1
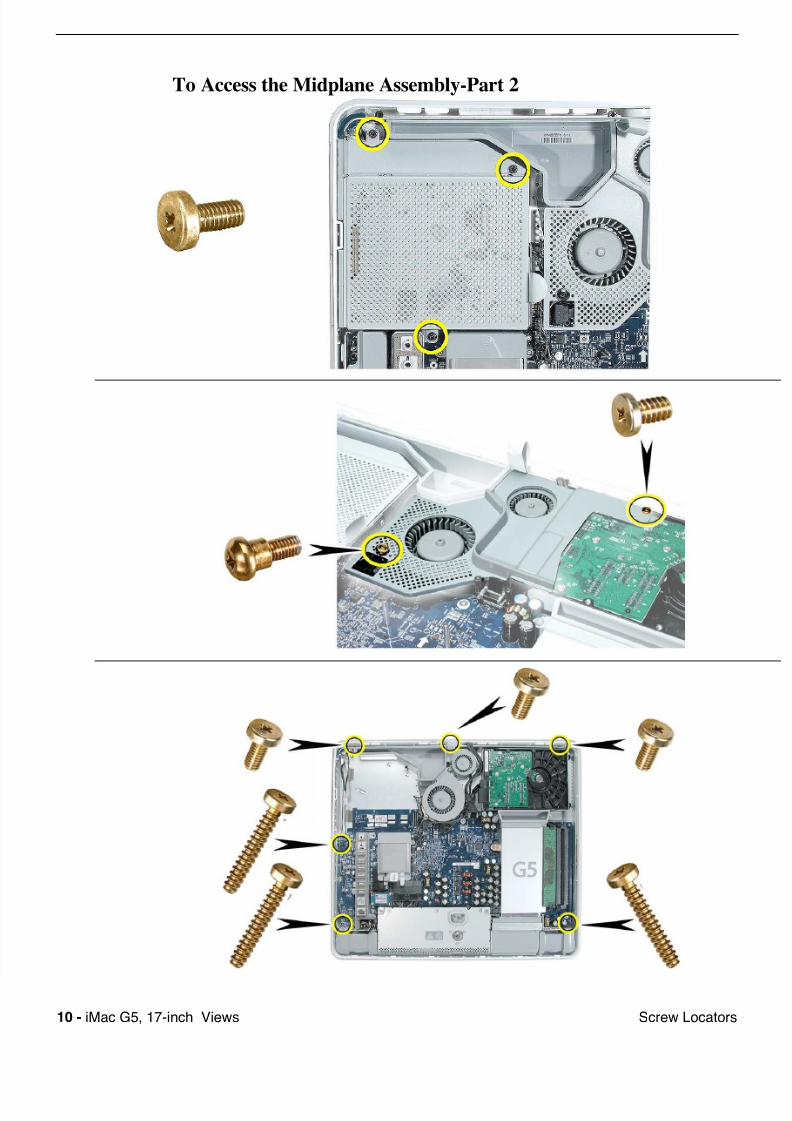
7/29/2019 Apple imacg5_17in
http://slidepdf.com/reader/full/apple-imacg517in 319/319


![Apple ][ Family Diagnostic Information –––mirrors.apple2.org.za/Apple II Documentation Project/Reference/Artic… · Apple ][ Computer Technical Information _____ Apple ][ Family](https://img.pdfslide.us/doc/110x75/6028cccd8801543f352f4163/apple-family-diagnostic-information-aaa-ii-documentation-projectreferenceartic.jpg)