Embed Size (px)
Citation preview
Basic Citrix Manual
Apple Computers and Laptops
Version 1.3
Created by Joshua Lindemann
Table of Contents Technology Services Help Desk ..................................................................................................................... 3
Background ................................................................................................................................................... 4
Citrix Virtual Environment ........................................................................................................................ 4
Wireless Access ......................................................................................................................................... 4
Security ..................................................................................................................................................... 4
Configuring Student@UofL WiFi (Lethbridge\Calgary Students) ................................................................. 5
Configuring Student@UofL WiFi (Edmonton Students) ............................................................................... 5
Cisco VPN Client ............................................................................................................................................ 6
Setup UofL Cisco VPN Client (Mac) ........................................................................................................... 6
Connecting to the UofL VPN (Mac) ........................................................................................................... 8
Citrix Virtual Environment ............................................................................................................................ 9
Setup Citrix Receiver (Windows, Mac, Linux) ........................................................................................... 9
Launching Virtual Environment Applications .......................................................................................... 12
Method 1 – via Web Browser ............................................................................................................. 12
Method 2 – via Citrix Application ........................................................................................................ 14
Accessing Files within Citrix .................................................................................................................... 15
Printing with Citrix .................................................................................................................................. 16
2 | P a g e Apple Computers and Laptops

Technology Services Help Desk The Faculty of Management – Technology Services department has a help desk service to be the single point of contact (SPOC) for all incidents, service requests and help regarding technology used within the Faculty of Management. The following methods of requesting assistance are available:
- Phone: 403.394.3999 (with voicemail option available) - Email: [email protected] - Walk‐in: M2100
Hours of operation:
- Hours: 9:00am – 4:00pm - Days: Monday through Friday, except University holidays - Location: M2100
Please be sure to contact us with any of your technology questions or issues.
3 | P a g e Apple Computers and Laptops
Background
Citrix Virtual Environment The Faculty of Management has created an environment that can be accessed using a Windows computer, an Apple computer, a tablet device (iPad\Android) or smartphone. This environment allows the user to access University owned software, have printer access, and access personal storage (ie: personal P:\ drive). Access to printers and personal storage will used through any of the virtual applications. The user will also have access to their local hard drive (desktop/laptop) or local USB storage to access or save files. This environment enables the user to access an anytime, anywhere lab environment.
Wireless Access Students attending the Lethbridge Campus or Calgary Campus will be required to access the Wireless network in order to connect to the Citrix Virtual Environment while they are at the campus. Otherwise they will be required to access the VPN (virtual private network) software to gain access from home or any other location with internet access. (see Cisco VPN client section )
Security Please ensure that the computer or device you are using is secure. Make sure that your Antivirus is up to date and actively scanning your computer. For a free alternative for AntiVirus please download Avast! http://www.avast.com/en-ca/index
4 | P a g e Apple Computers and Laptops
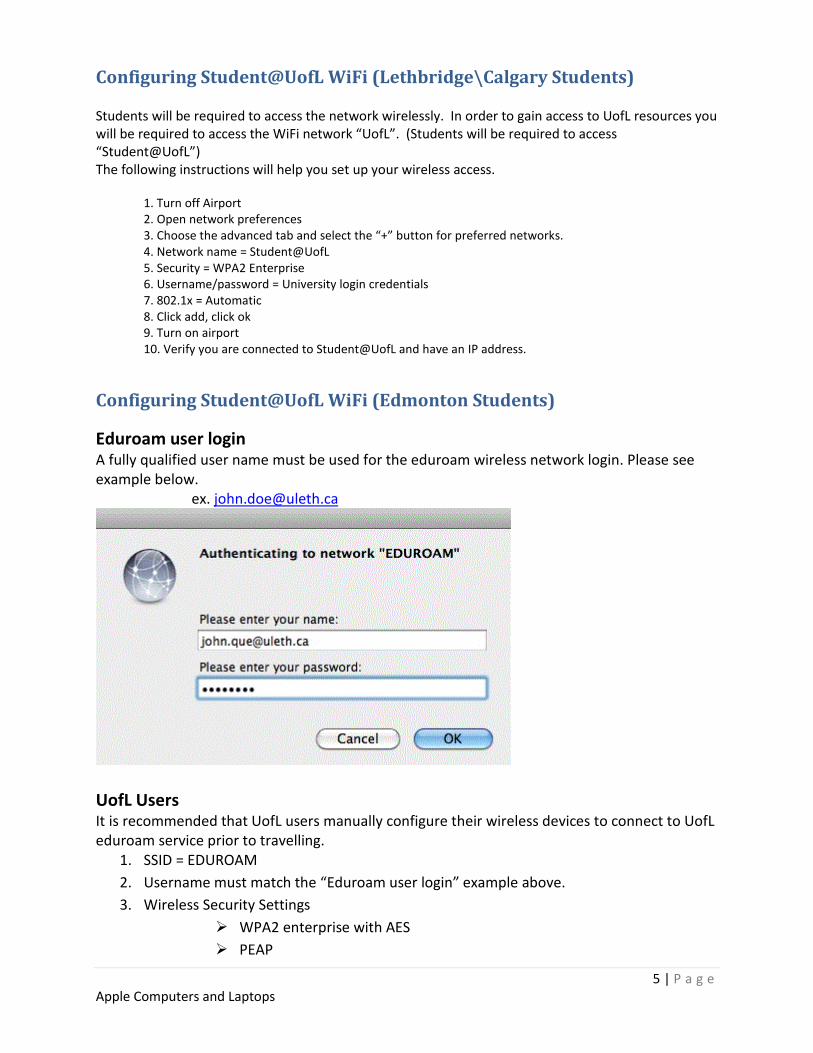
Configuring Student@UofL WiFi (Lethbridge\Calgary Students) Students will be required to access the network wirelessly. In order to gain access to UofL resources you will be required to access the WiFi network “UofL”. (Students will be required to access “Student@UofL”) The following instructions will help you set up your wireless access.
1. Turn off Airport 2. Open network preferences 3. Choose the advanced tab and select the “+” button for preferred networks. 4. Network name = Student@UofL 5. Security = WPA2 Enterprise 6. Username/password = University login credentials 7. 802.1x = Automatic 8. Click add, click ok 9. Turn on airport 10. Verify you are connected to Student@UofL and have an IP address.
Configuring Student@UofL WiFi (Edmonton Students)
Eduroam user login A fully qualified user name must be used for the eduroam wireless network login. Please see example below. ex. [email protected]
UofL Users It is recommended that UofL users manually configure their wireless devices to connect to UofL eduroam service prior to travelling.
1. SSID = EDUROAM 2. Username must match the “Eduroam user login” example above. 3. Wireless Security Settings
WPA2 enterprise with AES PEAP
5 | P a g e Apple Computers and Laptops
Cisco VPN Client The Cisco VPN Client allows a user to access the UofL network from off campus. This means that from home, hotel, or coffee shop you can remotely access UofL resources. The resources include (but not limited to) personal P:\ drive storage, printing, and the Citrix Virtual Environment. The Cisco VPN Client is not to be used when on campus.
Setup UofL Cisco VPN Client (Mac) 1) Open a web browser and go to http://www.uleth.ca/management/resources
2) Enter your username and password
3) Download the VPN Client associated to your operating system
4) After the file has downloaded, click the file anyconnect-macosx-3.1.05152.dmg to see the
file vpn.pkg. Click this file to begin the installation.
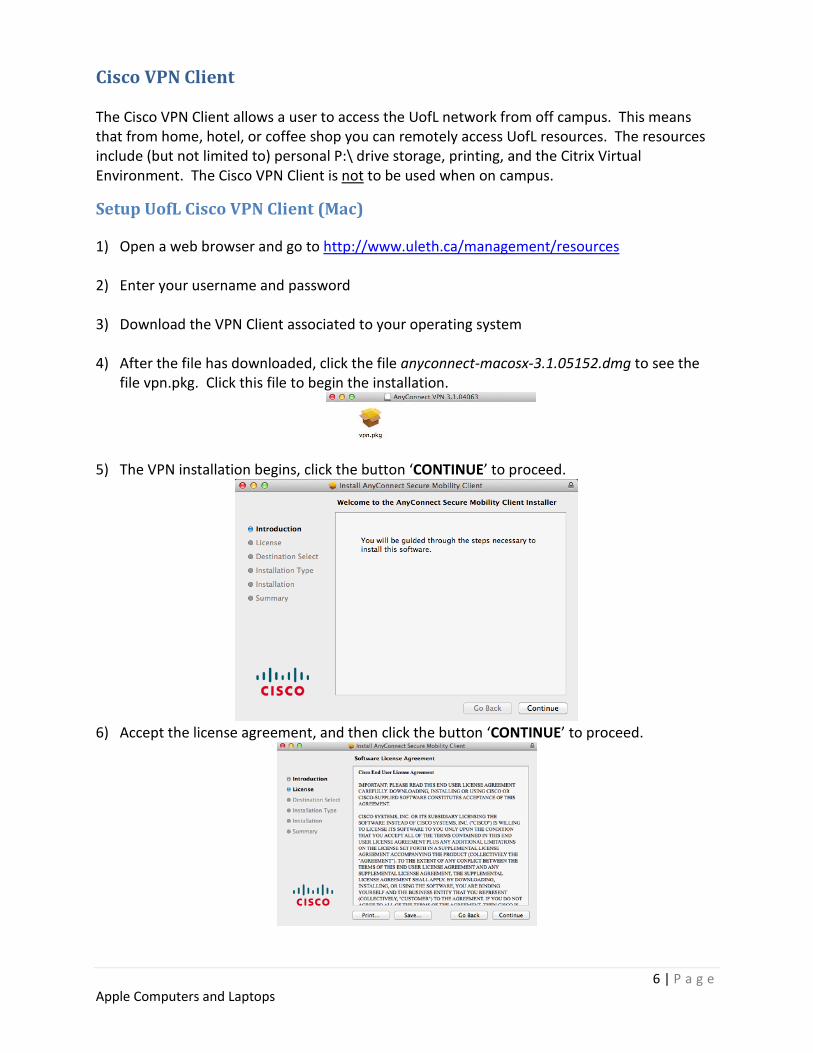
5) The VPN installation begins, click the button ‘CONTINUE’ to proceed.
6) Accept the license agreement, and then click the button ‘CONTINUE’ to proceed.
6 | P a g e Apple Computers and Laptops
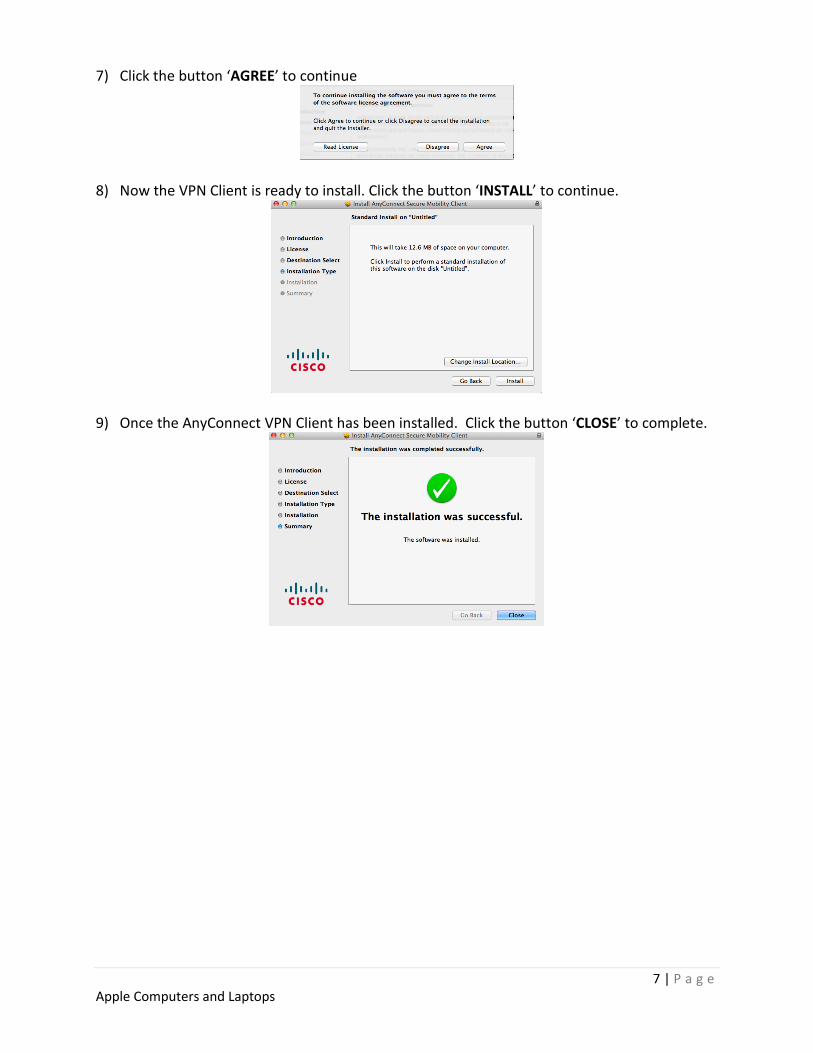
7) Click the button ‘AGREE’ to continue
8) Now the VPN Client is ready to install. Click the button ‘INSTALL’ to continue.
9) Once the AnyConnect VPN Client has been installed. Click the button ‘CLOSE’ to complete.
7 | P a g e Apple Computers and Laptops
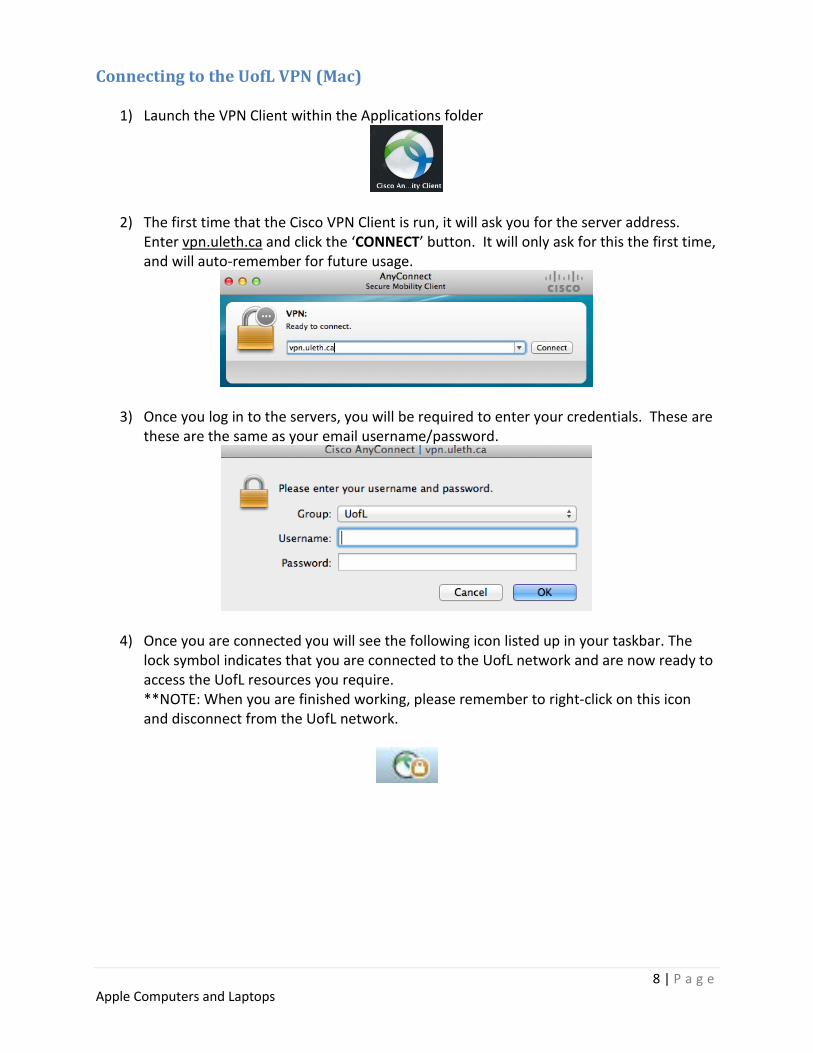
Connecting to the UofL VPN (Mac) 1) Launch the VPN Client within the Applications folder
2) The first time that the Cisco VPN Client is run, it will ask you for the server address. Enter vpn.uleth.ca and click the ‘CONNECT’ button. It will only ask for this the first time, and will auto-remember for future usage.
3) Once you log in to the servers, you will be required to enter your credentials. These are these are the same as your email username/password.
4) Once you are connected you will see the following icon listed up in your taskbar. The lock symbol indicates that you are connected to the UofL network and are now ready to access the UofL resources you require. **NOTE: When you are finished working, please remember to right-click on this icon and disconnect from the UofL network.
8 | P a g e Apple Computers and Laptops
Citrix Virtual Environment The Citrix Virtual Environment allows a user to run software from the UofL, but will appear to be running local on your device. Before you can access the Citrix Virtual Environment, you will first be required to install the Citrix Receiver. The Citrix Receiver allows you to run\access the programs.
Setup Citrix Receiver (Windows, Mac, Linux)
1) Open a web browser and go to http://www.uleth.ca/management/resources
2) Enter your username and password
3) Download the Citrix Receiver associated to your operating system
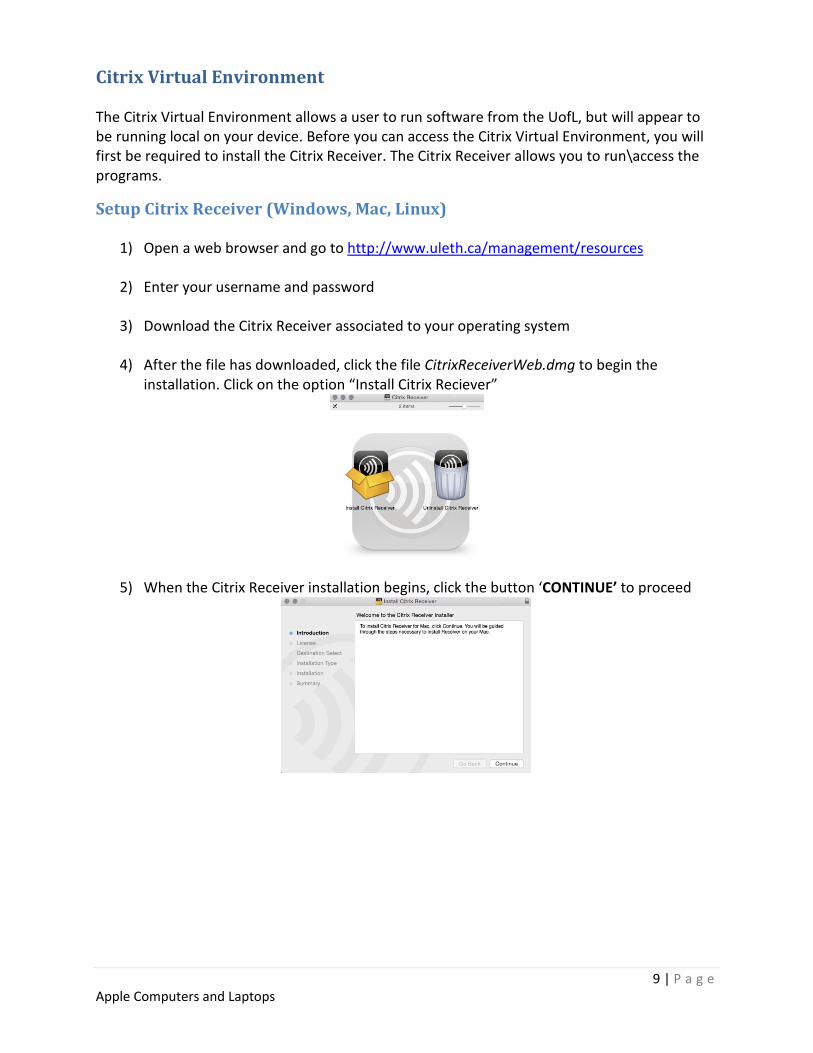
4) After the file has downloaded, click the file CitrixReceiverWeb.dmg to begin the installation. Click on the option “Install Citrix Reciever”
5) When the Citrix Receiver installation begins, click the button ‘CONTINUE’ to proceed
9 | P a g e Apple Computers and Laptops
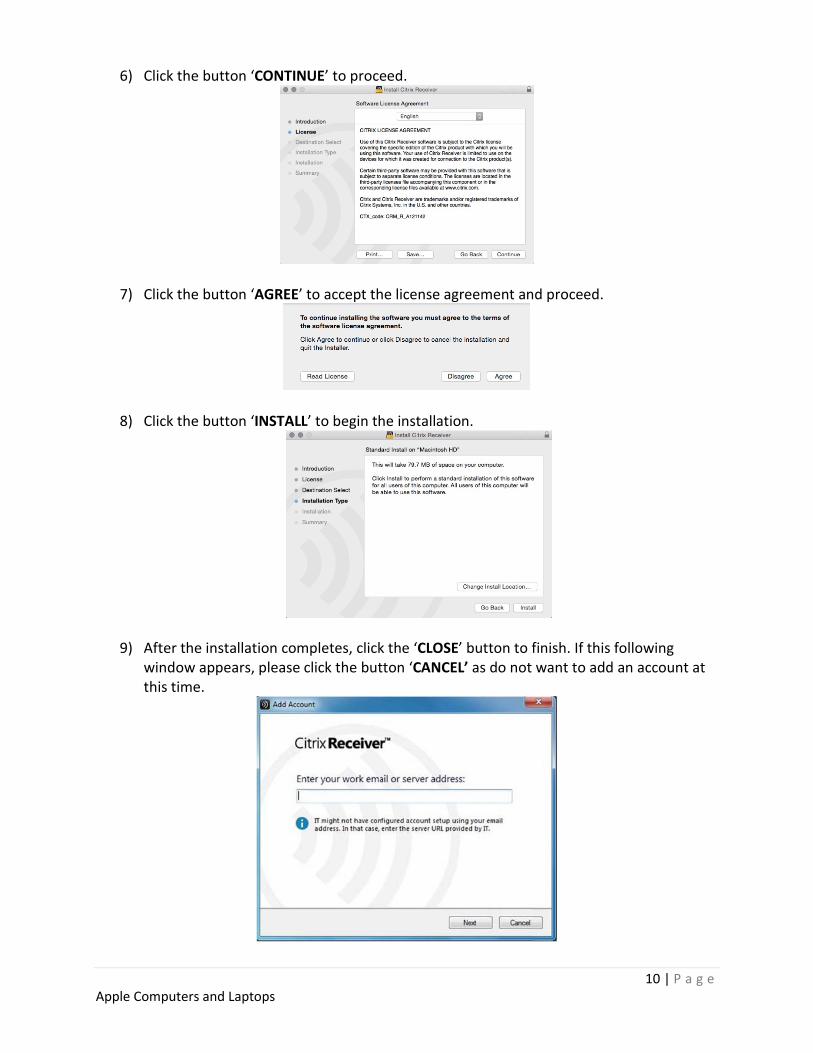
6) Click the button ‘CONTINUE’ to proceed.
7) Click the button ‘AGREE’ to accept the license agreement and proceed.
8) Click the button ‘INSTALL’ to begin the installation.
9) After the installation completes, click the ‘CLOSE’ button to finish. If this following window appears, please click the button ‘CANCEL’ as do not want to add an account at this time.
10 | P a g e Apple Computers and Laptops
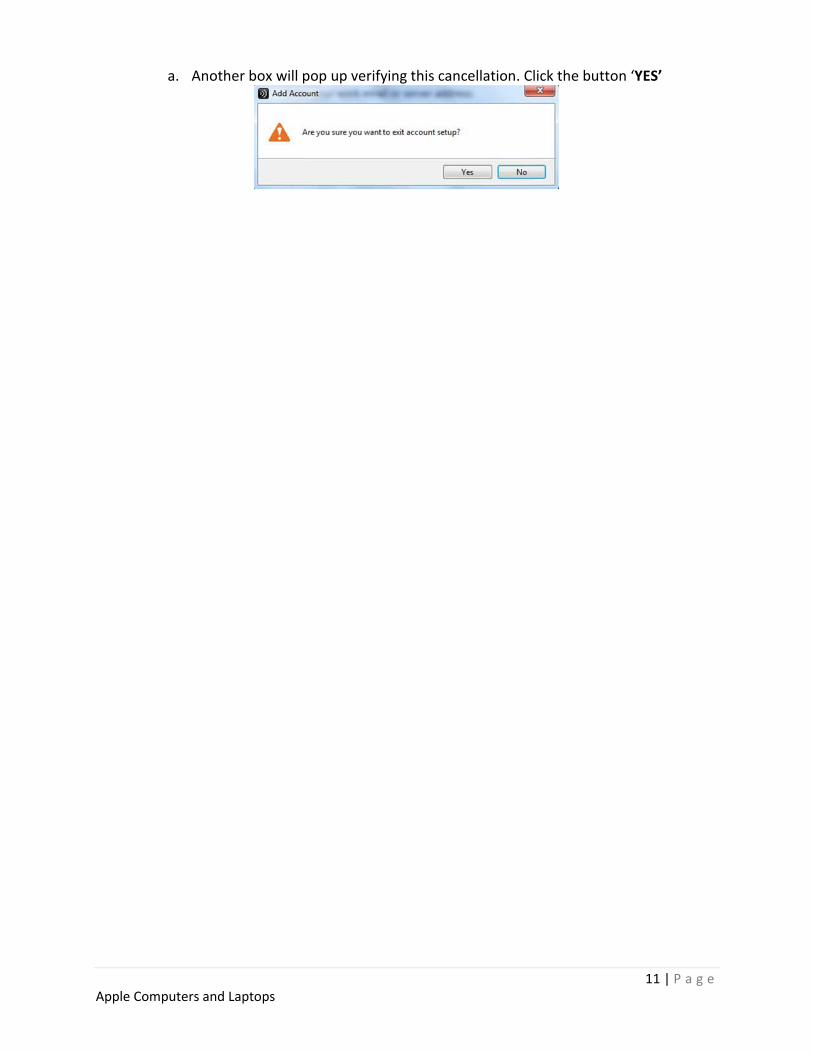
a. Another box will pop up verifying this cancellation. Click the button ‘YES’
11 | P a g e Apple Computers and Laptops
Launching Virtual Environment Applications Once the Citrix Receiver has been installed, you will have the ability to run the applications within the Citrix Environment. (**NOTE: Firefox is typically the preferred app, but it does works well in IE, Chrome, or Safari.) There are (2) different methods to access the Citrix environment from your computer.
Method 1 – via Web Browser
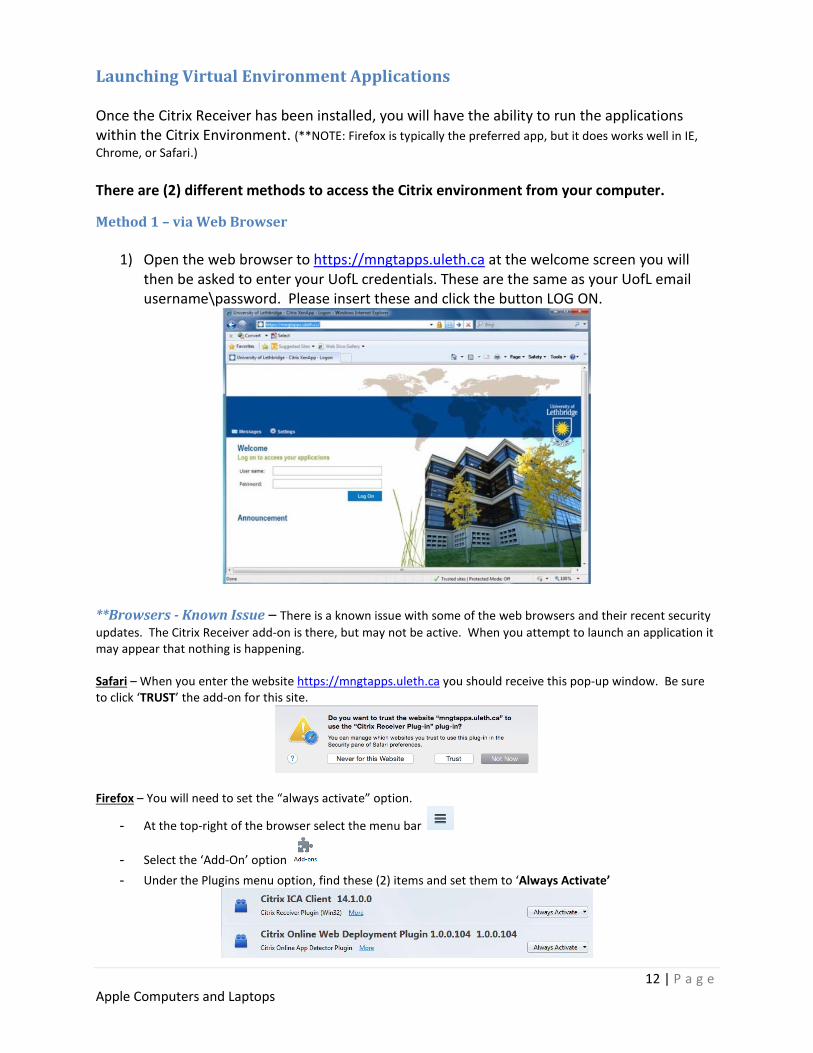
1) Open the web browser to https://mngtapps.uleth.ca at the welcome screen you will then be asked to enter your UofL credentials. These are the same as your UofL email username\password. Please insert these and click the button LOG ON.
**Browsers - Known Issue – There is a known issue with some of the web browsers and their recent security updates. The Citrix Receiver add-on is there, but may not be active. When you attempt to launch an application it may appear that nothing is happening. Safari – When you enter the website https://mngtapps.uleth.ca you should receive this pop-up window. Be sure to click ‘TRUST’ the add-on for this site.
Firefox – You will need to set the “always activate” option.
- At the top-right of the browser select the menu bar
- Select the ‘Add-On’ option - Under the Plugins menu option, find these (2) items and set them to ‘Always Activate’
12 | P a g e Apple Computers and Laptops
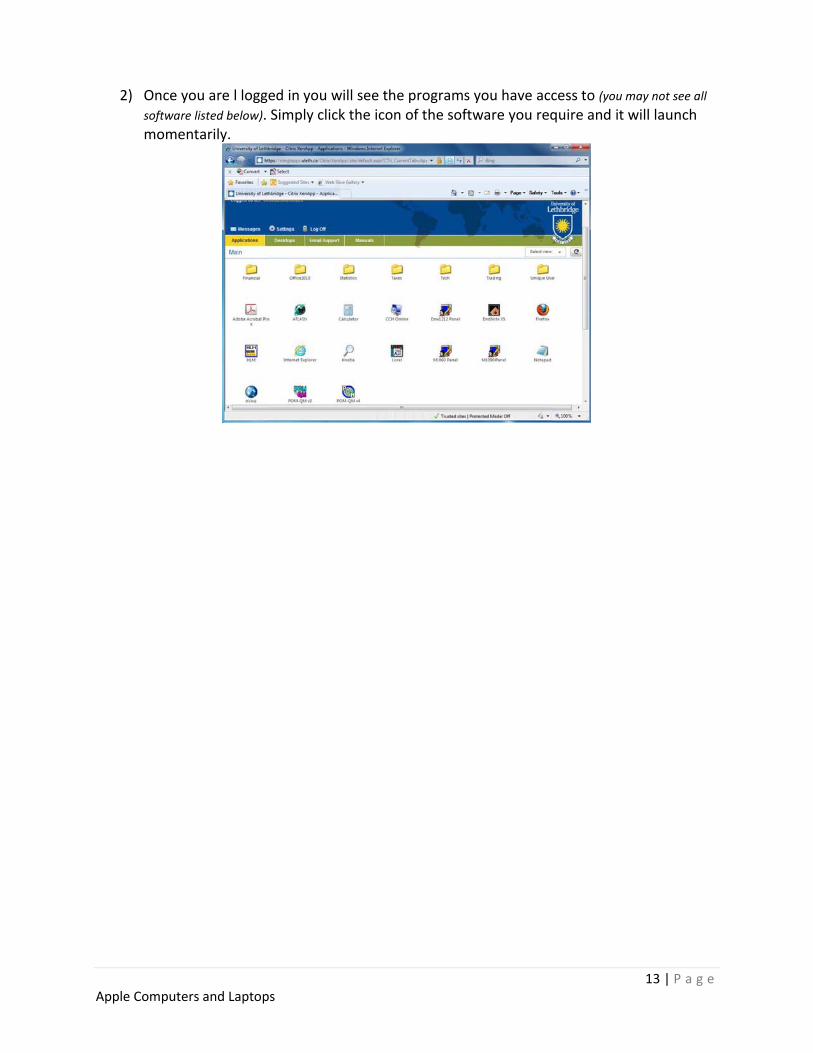
2) Once you are l logged in you will see the programs you have access to (you may not see all
software listed below). Simply click the icon of the software you require and it will launch momentarily.
13 | P a g e Apple Computers and Laptops
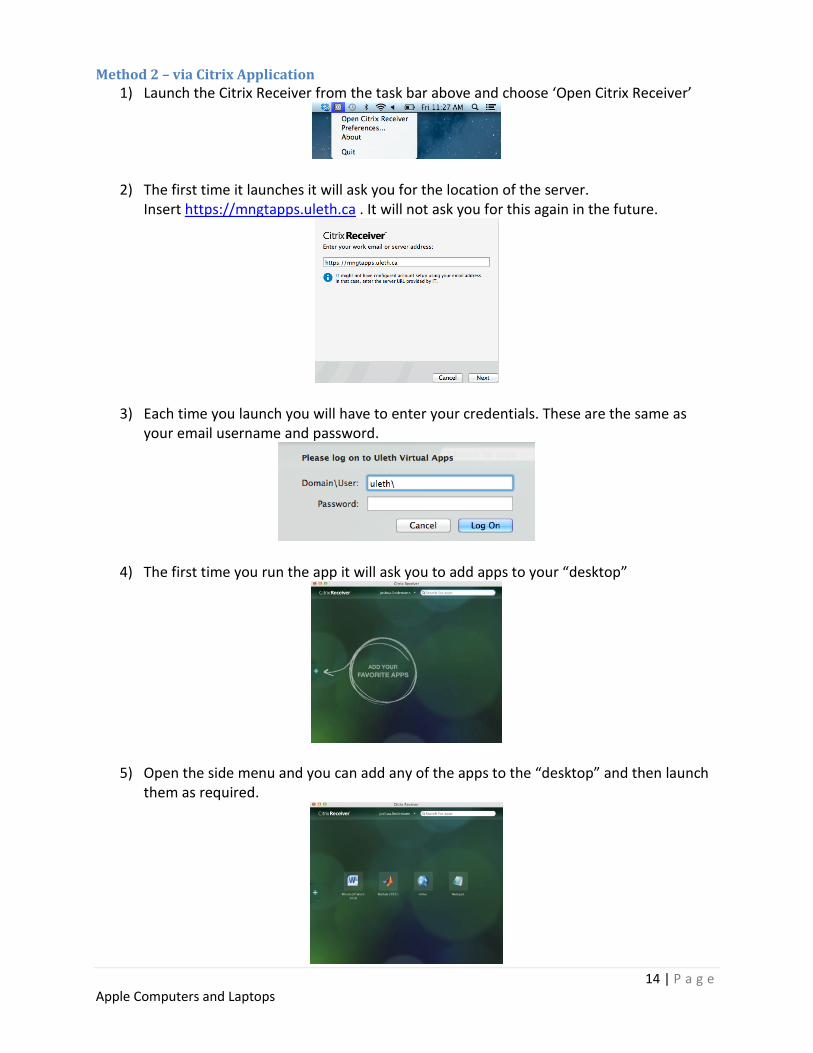
Method 2 – via Citrix Application 1) Launch the Citrix Receiver from the task bar above and choose ‘Open Citrix Receiver’
2) The first time it launches it will ask you for the location of the server. Insert https://mngtapps.uleth.ca . It will not ask you for this again in the future.
3) Each time you launch you will have to enter your credentials. These are the same as your email username and password.
4) The first time you run the app it will ask you to add apps to your “desktop”
5) Open the side menu and you can add any of the apps to the “desktop” and then launch them as required.
14 | P a g e
Apple Computers and Laptops
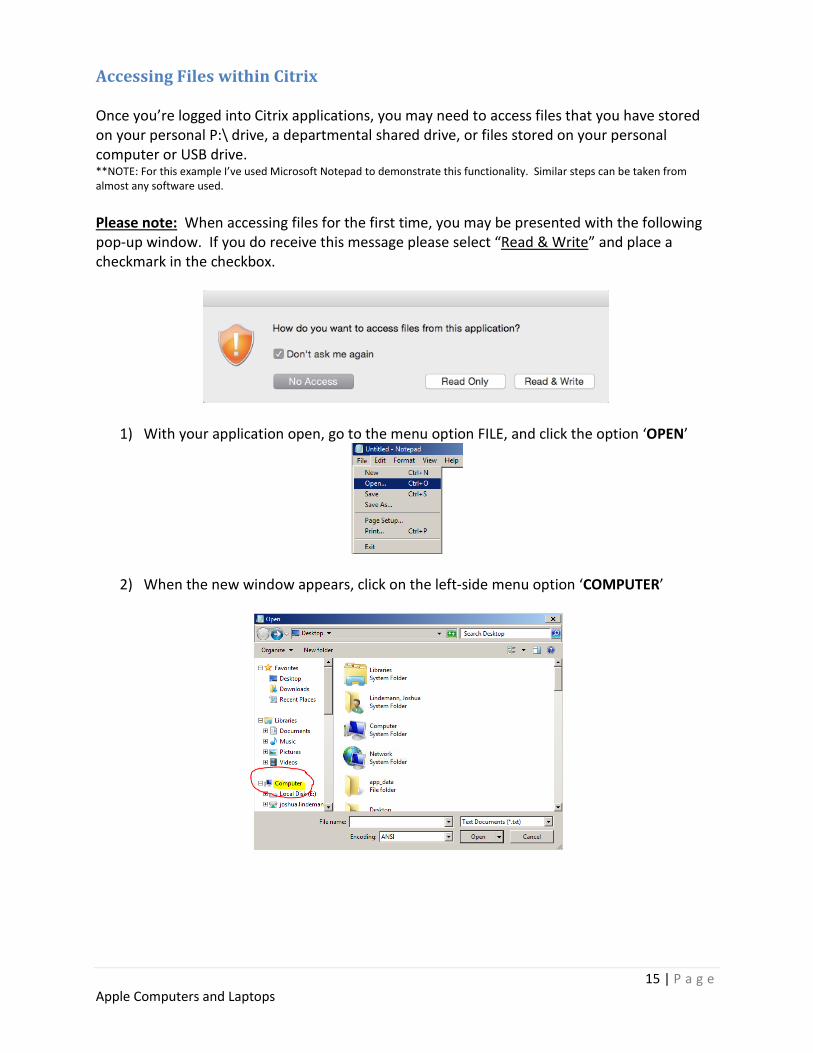
Accessing Files within Citrix Once you’re logged into Citrix applications, you may need to access files that you have stored on your personal P:\ drive, a departmental shared drive, or files stored on your personal computer or USB drive. **NOTE: For this example I’ve used Microsoft Notepad to demonstrate this functionality. Similar steps can be taken from almost any software used. Please note: When accessing files for the first time, you may be presented with the following pop-up window. If you do receive this message please select “Read & Write” and place a checkmark in the checkbox.
1) With your application open, go to the menu option FILE, and click the option ‘OPEN’
2) When the new window appears, click on the left-side menu option ‘COMPUTER’
15 | P a g e Apple Computers and Laptops
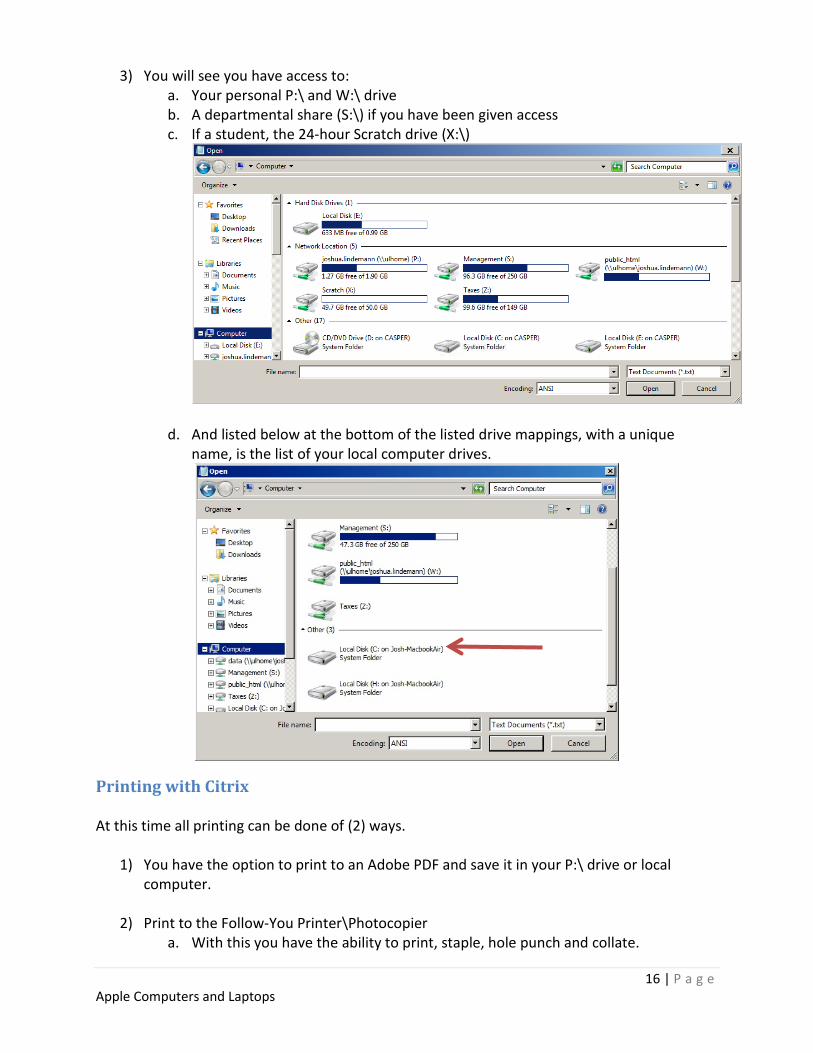
3) You will see you have access to: a. Your personal P:\ and W:\ drive b. A departmental share (S:\) if you have been given access c. If a student, the 24-hour Scratch drive (X:\)
d. And listed below at the bottom of the listed drive mappings, with a unique name, is the list of your local computer drives.
Printing with Citrix At this time all printing can be done of (2) ways.
1) You have the option to print to an Adobe PDF and save it in your P:\ drive or local computer.
2) Print to the Follow-You Printer\Photocopier a. With this you have the ability to print, staple, hole punch and collate.
16 | P a g e Apple Computers and Laptops