Embed Size (px)
Citation preview
APPFIELD UC Admin Guide
Version 3.1
© Netfarmers GmbH
INHALT
1 Appfield UC ..................................................................................................................................................... 3
1.1 Requirements ........................................................................................................................................ 3
1.1.1 Hardware ........................................................................................................................................... 3
1.1.2 Cisco Unified Communication Manager ............................................................................................ 3
1.1.3 Cisco IP Phones / Cisco Jabber .......................................................................................................... 4
1.1.4 Port Usage ......................................................................................................................................... 4
1.1.5 Browser ............................................................................................................................................. 5
1.2 Command Line Access ........................................................................................................................... 5
1.2.1 Network Configuration ...................................................................................................................... 6
1.2.2 DNS Configuration ............................................................................................................................. 6
1.2.3 Services and Restart Options ............................................................................................................ 7
1.2.4 Other Options .................................................................................................................................... 7
1.3 Web Frontend ........................................................................................................................................ 8
1.3.1 Services.............................................................................................................................................. 9
1.3.2 Configuration ................................................................................................................................... 10
1.3.3 License ............................................................................................................................................. 13
1.3.4 Certificates ...................................................................................................................................... 15
1.3.5 Backup and Recovery ...................................................................................................................... 20
1.3.6 System ............................................................................................................................................. 21
1.3.7 Troubleshooting .............................................................................................................................. 23
1.3.8 User ................................................................................................................................................. 24
2 NFChefSek ..................................................................................................................................................... 25
2.1 CUCM Configuration ............................................................................................................................ 27
2.1.1 BLF Feature Configuration ............................................................................................................... 27
2.1.2 External Call Control Profile ............................................................................................................ 31
2.1.3 XML Service ..................................................................................................................................... 32
2.1.4 MultiSek Feature ............................................................................................................................. 33
2.1.5 Device Configuration ....................................................................................................................... 34
2.2 NFChefSek Configuration ..................................................................................................................... 38
2.2.1 Base Configuration .......................................................................................................................... 38
2.2.2 Secretary Configuration .................................................................................................................. 40
3 NFBusyTrigger ............................................................................................................................................... 42
3.1 CUCM Configuration ............................................................................................................................ 42
3.1.1 XML Service ..................................................................................................................................... 42
3.2 NFBusyTrigger Configuration ............................................................................................................... 43
4 NFCallForwarder ........................................................................................................................................... 45
4.1 CUCM Configuration ............................................................................................................................ 45
4.1.1 XML Service ..................................................................................................................................... 45
4.2 NFCallForwarder Configuration ........................................................................................................... 46
5 NFCompanyDirectory .................................................................................................................................... 48
5.1 CUCM Configuration ............................................................................................................................ 48
5.1.1 XML Service ..................................................................................................................................... 48
5.2 NFCompanyDirectory Configuration ................................................................................................... 50
6 NFOffice-UC ................................................................................................................................................... 52
6.1 CUCM Configuration ............................................................................................................................ 52
6.1.1 Custom Jabber Tab .......................................................................................................................... 52
6.1.2 Mobile Remote Access (MRA) Support ........................................................................................... 54
6.1.3 Mobile Device Integration ............................................................................................................... 54
6.2 NFOffice UC Configuration .................................................................................................................. 55
1 APPFIELD UC
The Appfield UC appliance is a unified solution for easy and quick administration of the NF Apps. All NF Apps
are seamlessly integrated into the appliance and you can use the web interface to administrate, configure
and maintain the apps.
1.1 REQUIREMENTS
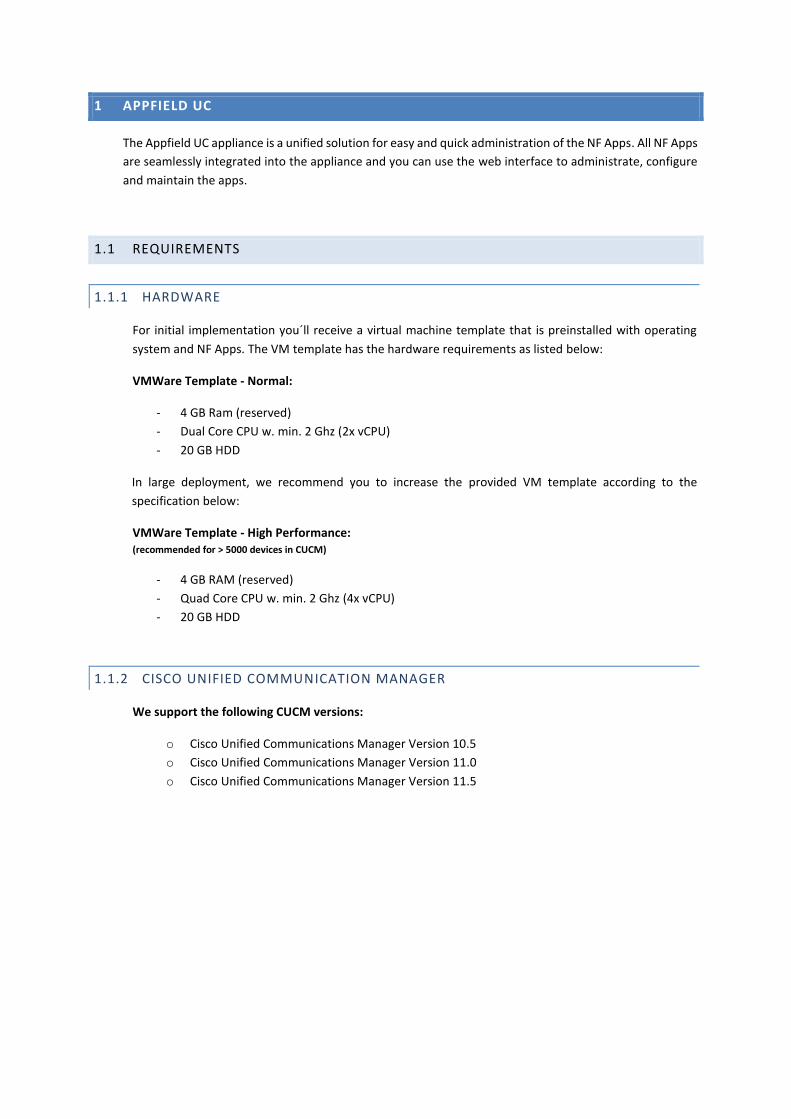
1.1.1 HARDWARE
For initial implementation you´ll receive a virtual machine template that is preinstalled with operating
system and NF Apps. The VM template has the hardware requirements as listed below:
VMWare Template - Normal:
- 4 GB Ram (reserved)
- Dual Core CPU w. min. 2 Ghz (2x vCPU)
- 20 GB HDD
In large deployment, we recommend you to increase the provided VM template according to the
specification below:
VMWare Template - High Performance: (recommended for > 5000 devices in CUCM)
- 4 GB RAM (reserved)
- Quad Core CPU w. min. 2 Ghz (4x vCPU)
- 20 GB HDD
1.1.2 CISCO UNIFIED COMMUNICATION MANAGER
We support the following CUCM versions:
o Cisco Unified Communications Manager Version 10.5
o Cisco Unified Communications Manager Version 11.0
o Cisco Unified Communications Manager Version 11.5
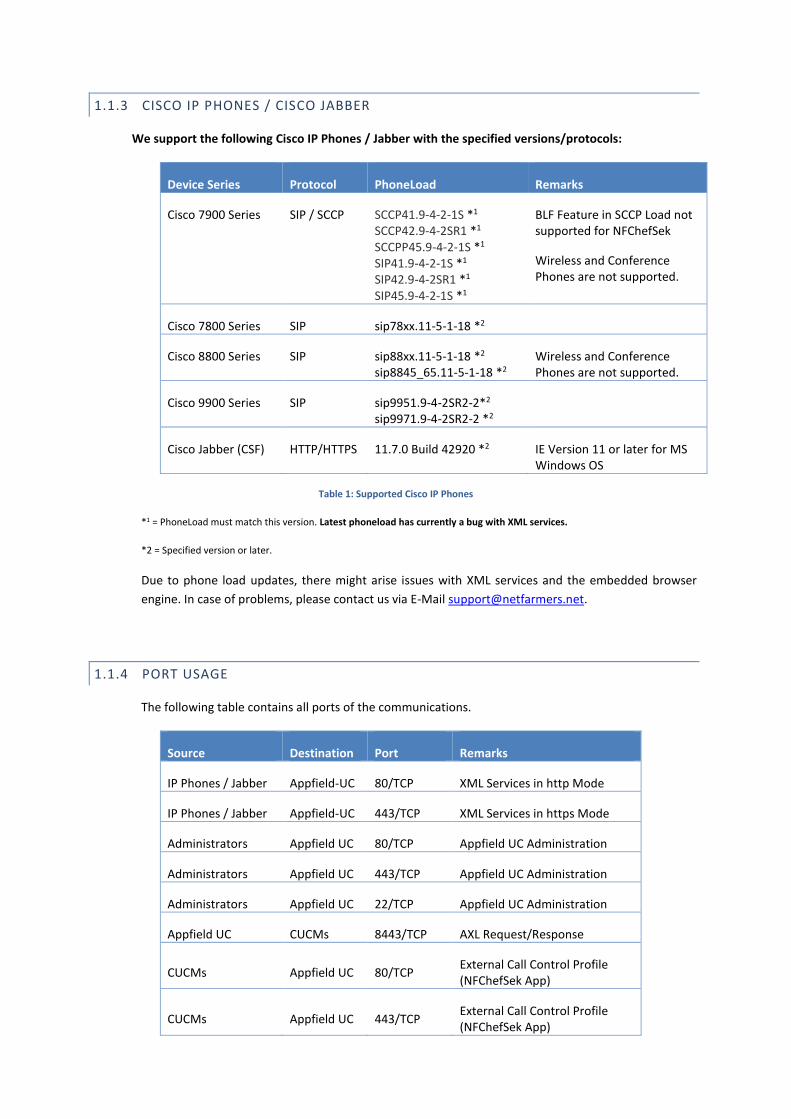
1.1.3 CISCO IP PHONES / CISCO JABBER
We support the following Cisco IP Phones / Jabber with the specified versions/protocols:
Device Series Protocol PhoneLoad Remarks
Cisco 7900 Series SIP / SCCP SCCP41.9-4-2-1S *1 SCCP42.9-4-2SR1 *1 SCCPP45.9-4-2-1S *1
SIP41.9-4-2-1S *1 SIP42.9-4-2SR1 *1 SIP45.9-4-2-1S *1
BLF Feature in SCCP Load not supported for NFChefSek
Wireless and Conference Phones are not supported.
Cisco 7800 Series SIP sip78xx.11-5-1-18 *2
Cisco 8800 Series SIP sip88xx.11-5-1-18 *2 sip8845_65.11-5-1-18 *2
Wireless and Conference Phones are not supported.
Cisco 9900 Series SIP sip9951.9-4-2SR2-2*2
sip9971.9-4-2SR2-2 *2
Cisco Jabber (CSF) HTTP/HTTPS 11.7.0 Build 42920 *2 IE Version 11 or later for MS Windows OS
Table 1: Supported Cisco IP Phones
*1 = PhoneLoad must match this version. Latest phoneload has currently a bug with XML services.
*2 = Specified version or later.
Due to phone load updates, there might arise issues with XML services and the embedded browser
engine. In case of problems, please contact us via E-Mail [email protected].
1.1.4 PORT USAGE
The following table contains all ports of the communications.
Source Destination Port Remarks
IP Phones / Jabber Appfield-UC 80/TCP XML Services in http Mode
IP Phones / Jabber Appfield-UC 443/TCP XML Services in https Mode
Administrators Appfield UC 80/TCP Appfield UC Administration
Administrators Appfield UC 443/TCP Appfield UC Administration
Administrators Appfield UC 22/TCP Appfield UC Administration
Appfield UC CUCMs 8443/TCP AXL Request/Response
CUCMs Appfield UC 80/TCP External Call Control Profile (NFChefSek App)
CUCMs Appfield UC 443/TCP External Call Control Profile (NFChefSek App)
Appfield UC CUCMs 5060/TCP SIP BLF Subscribe/Notify (NFChefSek App)
CUCMs Appfield UC 5060/TCP SIP BLF Subscribe/Notify (NFChefSek App)
Appfield UC LDAP Server 389/TCP LDAP Directory Queries (NFCompanyDirectory App)
Table 2: List of TCP ports
When “Disable http Access” is enabled HTTP is no more available NF Apps, however you need to make
sure to set up certificate trust relationship between Appfield UC and TLS peer.
1.1.5 BROWSER
In general we try to make sure that latest Browser versions (Chrome, Firefox, Microsoft Edge) are
compatible.
We do not recommend not to use old Internet Explorer versions, as problems
have been identified with file and license uploads.
1.2 COMMAND LINE ACCESS
Appfield UC provides a Command Line Interface (CLI) for basic configuration settings. We recommend to
perform initial configuration of VM using the CLI to provide IP access in customer network.
When IP configuration is complete you can also use SSH (e.g. putty) to connect to Appfield UC.
Default credentials:
Username: admin
Password: admin
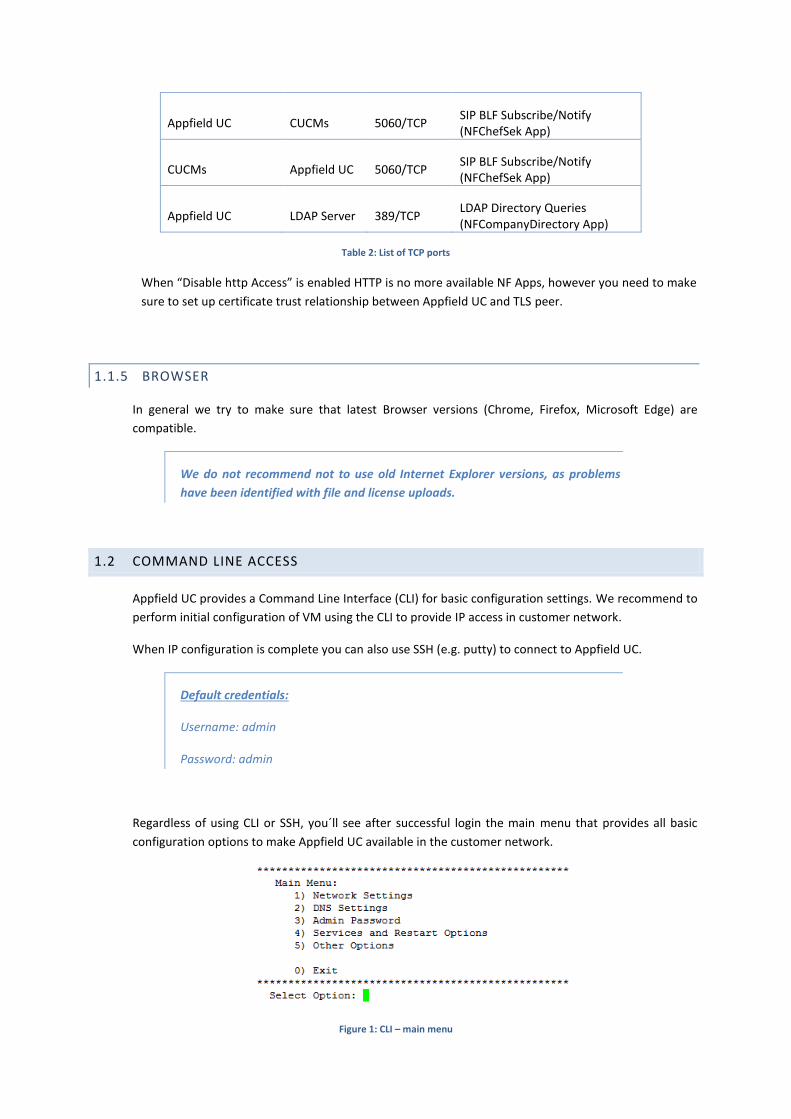
Regardless of using CLI or SSH, you´ll see after successful login the main menu that provides all basic
configuration options to make Appfield UC available in the customer network.
Figure 1: CLI – main menu
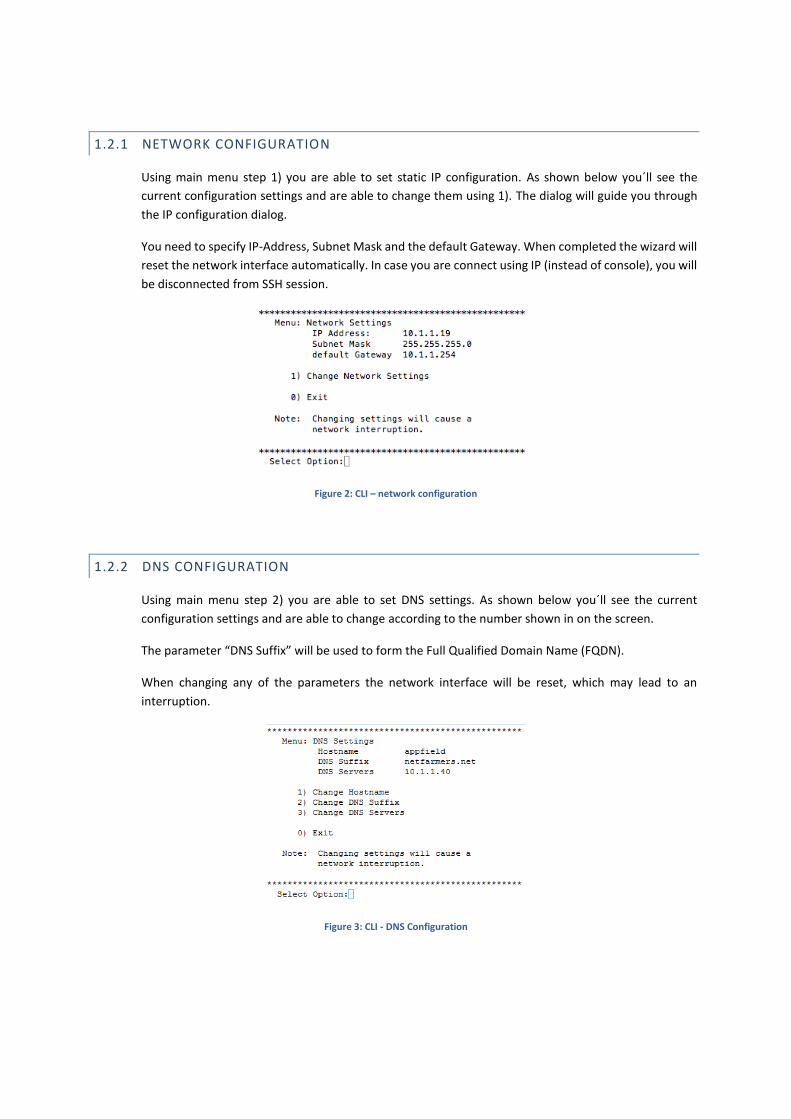
1.2.1 NETWORK CONFIGURATION
Using main menu step 1) you are able to set static IP configuration. As shown below you´ll see the
current configuration settings and are able to change them using 1). The dialog will guide you through
the IP configuration dialog.
You need to specify IP-Address, Subnet Mask and the default Gateway. When completed the wizard will
reset the network interface automatically. In case you are connect using IP (instead of console), you will
be disconnected from SSH session.
Figure 2: CLI – network configuration
1.2.2 DNS CONFIGURATION
Using main menu step 2) you are able to set DNS settings. As shown below you´ll see the current
configuration settings and are able to change according to the number shown in on the screen.
The parameter “DNS Suffix” will be used to form the Full Qualified Domain Name (FQDN).
When changing any of the parameters the network interface will be reset, which may lead to an
interruption.
Figure 3: CLI - DNS Configuration
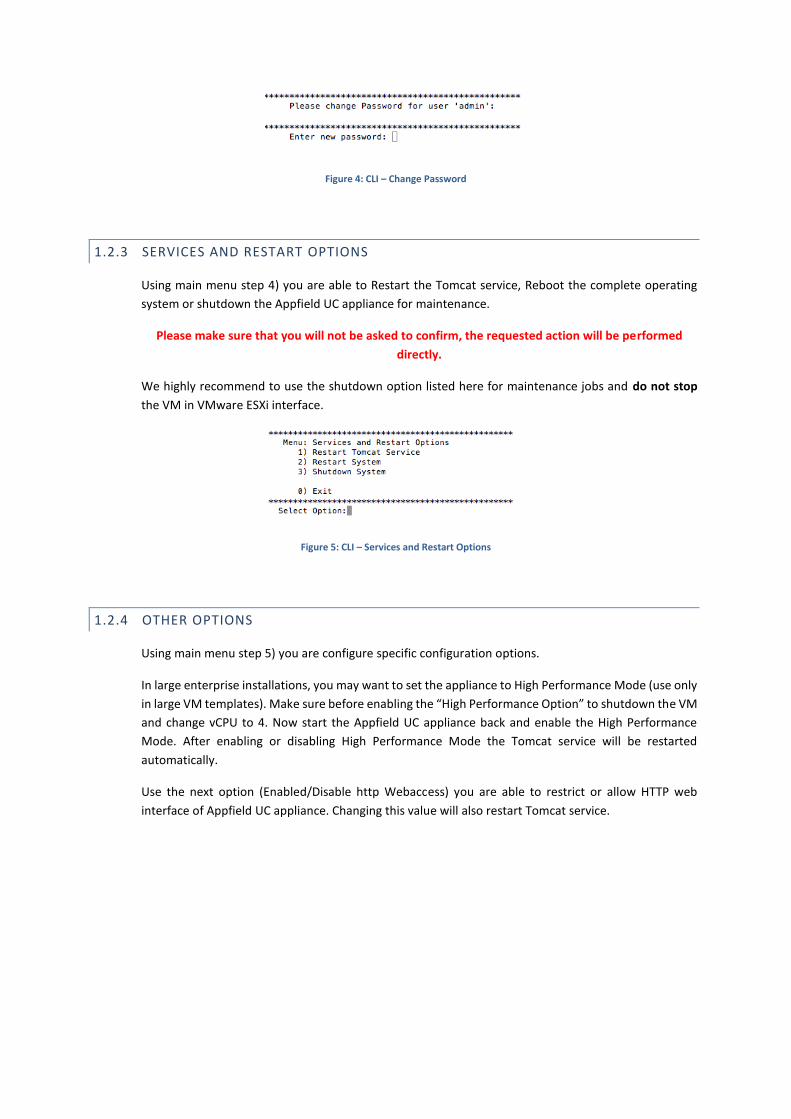
Figure 4: CLI – Change Password
1.2.3 SERVICES AND RESTART OPTIONS
Using main menu step 4) you are able to Restart the Tomcat service, Reboot the complete operating
system or shutdown the Appfield UC appliance for maintenance.
Please make sure that you will not be asked to confirm, the requested action will be performed
directly.
We highly recommend to use the shutdown option listed here for maintenance jobs and do not stop
the VM in VMware ESXi interface.
Figure 5: CLI – Services and Restart Options
1.2.4 OTHER OPTIONS
Using main menu step 5) you are configure specific configuration options.
In large enterprise installations, you may want to set the appliance to High Performance Mode (use only
in large VM templates). Make sure before enabling the “High Performance Option” to shutdown the VM
and change vCPU to 4. Now start the Appfield UC appliance back and enable the High Performance
Mode. After enabling or disabling High Performance Mode the Tomcat service will be restarted
automatically.
Use the next option (Enabled/Disable http Webaccess) you are able to restrict or allow HTTP web
interface of Appfield UC appliance. Changing this value will also restart Tomcat service.
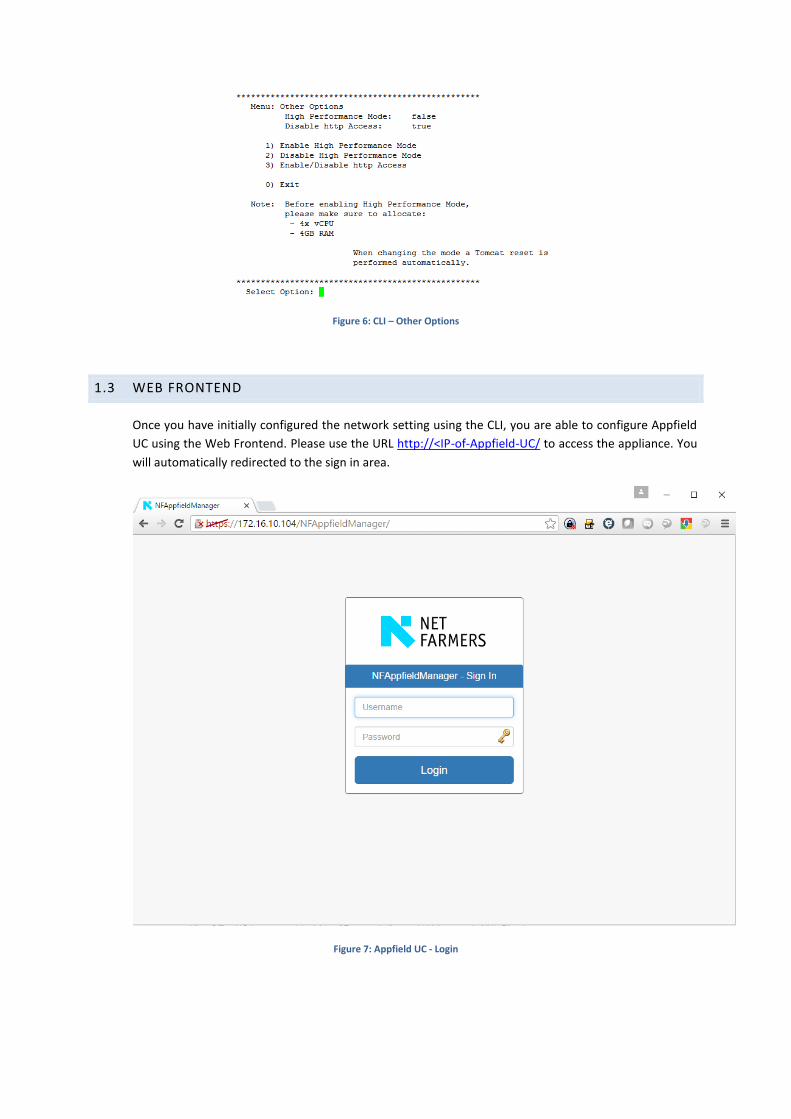
Figure 6: CLI – Other Options
1.3 WEB FRONTEND
Once you have initially configured the network setting using the CLI, you are able to configure Appfield
UC using the Web Frontend. Please use the URL http://<IP-of-Appfield-UC/ to access the appliance. You
will automatically redirected to the sign in area.
Figure 7: Appfield UC - Login
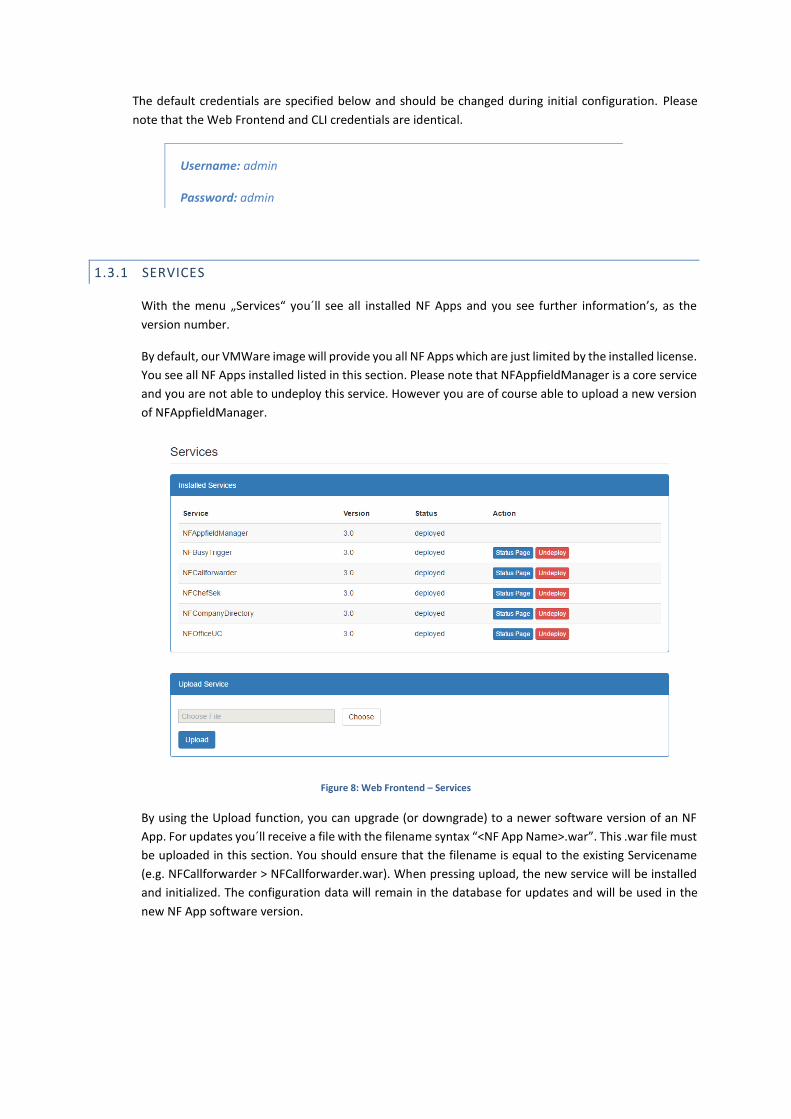
The default credentials are specified below and should be changed during initial configuration. Please
note that the Web Frontend and CLI credentials are identical.
Username: admin
Password: admin
1.3.1 SERVICES
With the menu „Services“ you´ll see all installed NF Apps and you see further information’s, as the
version number.
By default, our VMWare image will provide you all NF Apps which are just limited by the installed license.
You see all NF Apps installed listed in this section. Please note that NFAppfieldManager is a core service
and you are not able to undeploy this service. However you are of course able to upload a new version
of NFAppfieldManager.
Figure 8: Web Frontend – Services
By using the Upload function, you can upgrade (or downgrade) to a newer software version of an NF
App. For updates you´ll receive a file with the filename syntax “<NF App Name>.war”. This .war file must
be uploaded in this section. You should ensure that the filename is equal to the existing Servicename
(e.g. NFCallforwarder > NFCallforwarder.war). When pressing upload, the new service will be installed
and initialized. The configuration data will remain in the database for updates and will be used in the
new NF App software version.

Figure 9: Web Frontend – Upload Services
Please note that upload and installation procedure may take a while, so do not refresh or change the
browser window. Upload procedure shouldn´t take more than 30 minutes, otherwise a failure may have
occurred.
To remove NF App, use the “Undeploy” button. However the configuration data of this app will remain
in database, so in case you re-deploy the NF App all configuration data will show up.
Figure 10: Services – Status page
Using the button „Status Page“, you´ll get a new windows and are able to verify that the NF App is
running and licensing is okay.
1.3.2 CONFIGURATION
All NF Apps have individual configuration parameters to setup the service to your requirements. This
section will show you the configuration settings of the main NFAppfieldManager service. This service
will hold all configuration settings to connect with Cisco Unified Communications Manager Cluster. It
will also provide High Availability functions and check for availability of configured CUCM nodes.
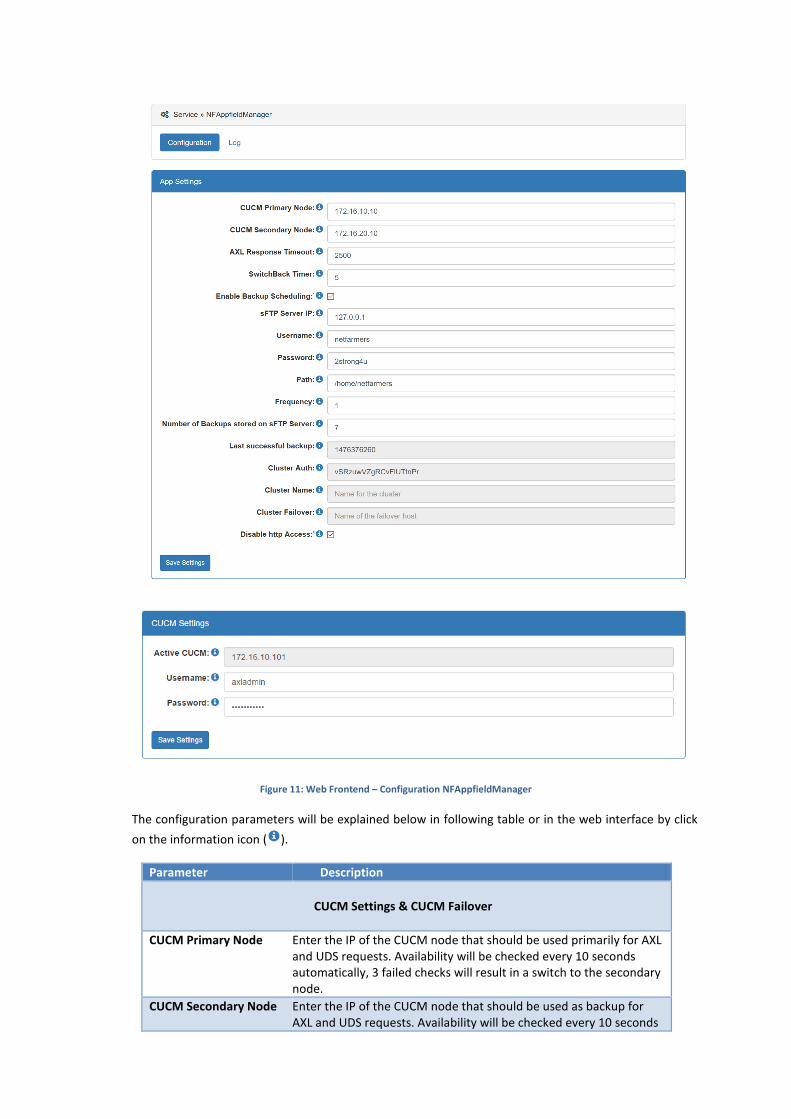
Figure 11: Web Frontend – Configuration NFAppfieldManager
The configuration parameters will be explained below in following table or in the web interface by click
on the information icon ( ).
Parameter Description
CUCM Settings & CUCM Failover
CUCM Primary Node Enter the IP of the CUCM node that should be used primarily for AXL and UDS requests. Availability will be checked every 10 seconds automatically, 3 failed checks will result in a switch to the secondary node.
CUCM Secondary Node Enter the IP of the CUCM node that should be used as backup for AXL and UDS requests. Availability will be checked every 10 seconds
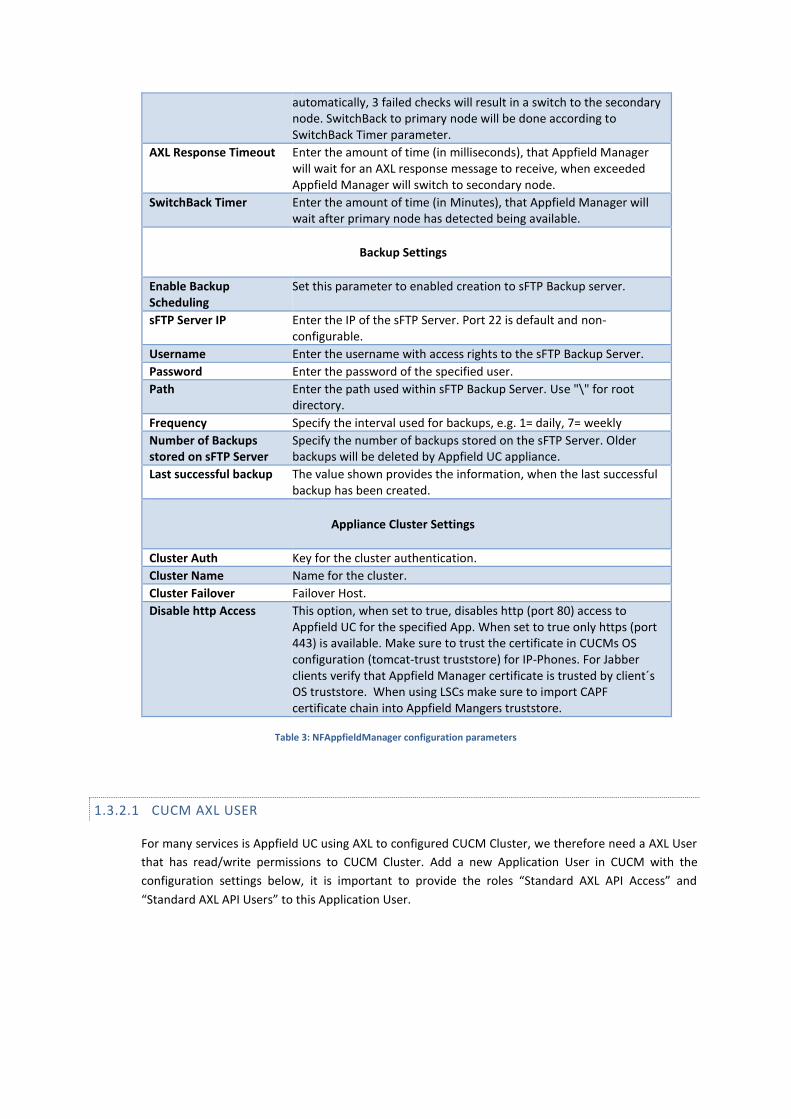
automatically, 3 failed checks will result in a switch to the secondary node. SwitchBack to primary node will be done according to SwitchBack Timer parameter.
AXL Response Timeout Enter the amount of time (in milliseconds), that Appfield Manager will wait for an AXL response message to receive, when exceeded Appfield Manager will switch to secondary node.
SwitchBack Timer Enter the amount of time (in Minutes), that Appfield Manager will wait after primary node has detected being available.
Backup Settings
Enable Backup Scheduling
Set this parameter to enabled creation to sFTP Backup server.
sFTP Server IP Enter the IP of the sFTP Server. Port 22 is default and non-configurable.
Username Enter the username with access rights to the sFTP Backup Server.
Password Enter the password of the specified user.
Path Enter the path used within sFTP Backup Server. Use "\" for root directory.
Frequency Specify the interval used for backups, e.g. 1= daily, 7= weekly
Number of Backups stored on sFTP Server
Specify the number of backups stored on the sFTP Server. Older backups will be deleted by Appfield UC appliance.
Last successful backup The value shown provides the information, when the last successful backup has been created.
Appliance Cluster Settings
Cluster Auth Key for the cluster authentication.
Cluster Name Name for the cluster.
Cluster Failover Failover Host.
Disable http Access This option, when set to true, disables http (port 80) access to Appfield UC for the specified App. When set to true only https (port 443) is available. Make sure to trust the certificate in CUCMs OS configuration (tomcat-trust truststore) for IP-Phones. For Jabber clients verify that Appfield Manager certificate is trusted by client´s OS truststore. When using LSCs make sure to import CAPF certificate chain into Appfield Mangers truststore.
Table 3: NFAppfieldManager configuration parameters
1.3.2.1 CUCM AXL USER
For many services is Appfield UC using AXL to configured CUCM Cluster, we therefore need a AXL User
that has read/write permissions to CUCM Cluster. Add a new Application User in CUCM with the
configuration settings below, it is important to provide the roles “Standard AXL API Access” and
“Standard AXL API Users” to this Application User.
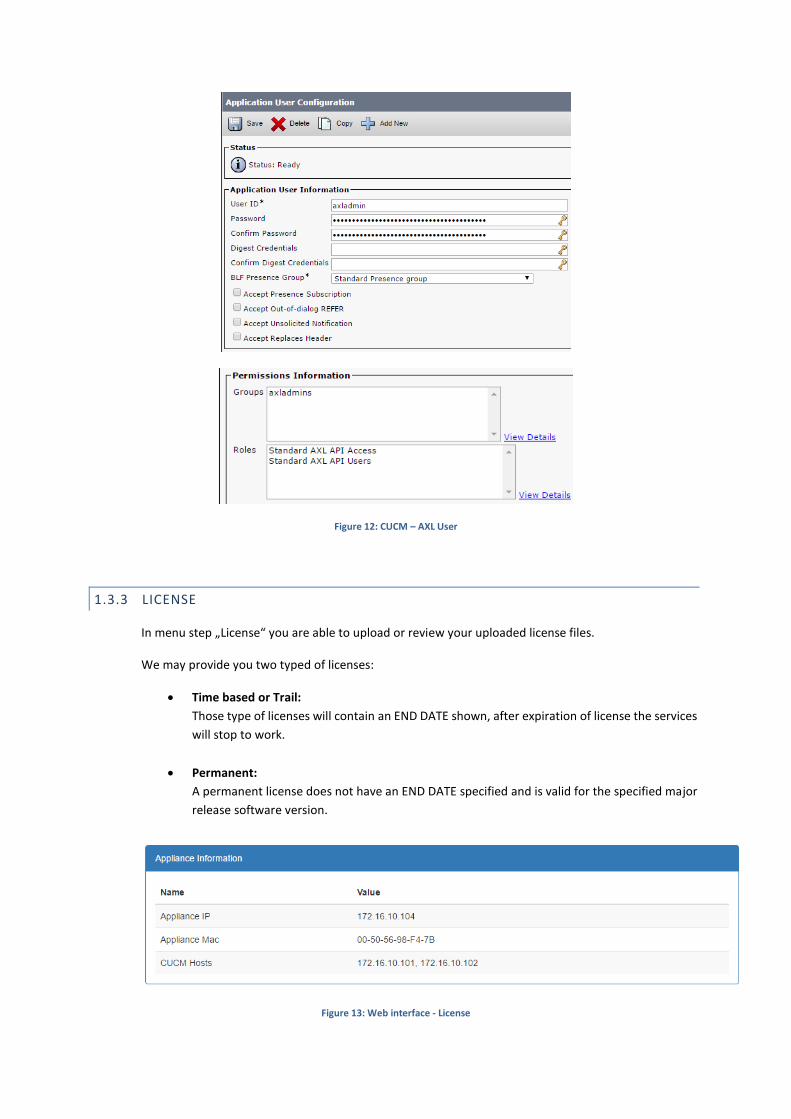
Figure 12: CUCM – AXL User
1.3.3 LICENSE
In menu step „License“ you are able to upload or review your uploaded license files.
We may provide you two typed of licenses:
Time based or Trail:
Those type of licenses will contain an END DATE shown, after expiration of license the services
will stop to work.
Permanent:
A permanent license does not have an END DATE specified and is valid for the specified major
release software version.
Figure 13: Web interface - License
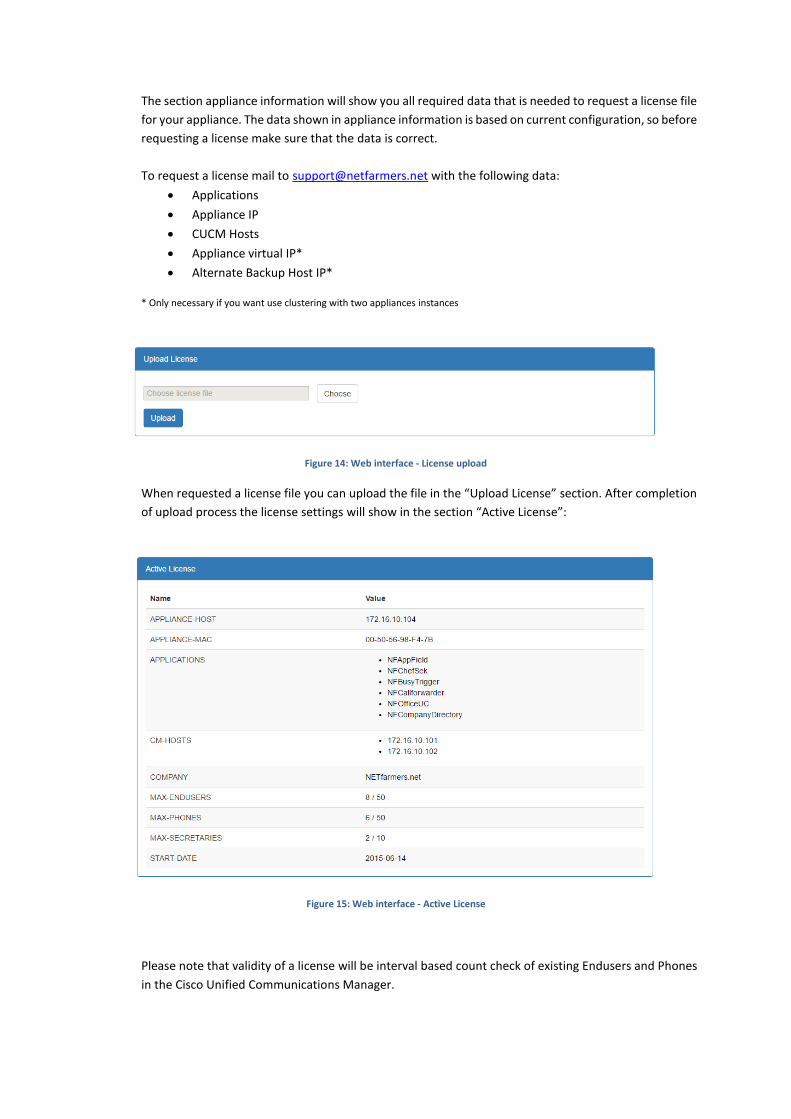
The section appliance information will show you all required data that is needed to request a license file
for your appliance. The data shown in appliance information is based on current configuration, so before
requesting a license make sure that the data is correct.
To request a license mail to [email protected] with the following data:
Applications
Appliance IP
CUCM Hosts
Appliance virtual IP*
Alternate Backup Host IP*
* Only necessary if you want use clustering with two appliances instances
Figure 14: Web interface - License upload
When requested a license file you can upload the file in the “Upload License” section. After completion
of upload process the license settings will show in the section “Active License”:
Figure 15: Web interface - Active License
Please note that validity of a license will be interval based count check of existing Endusers and Phones
in the Cisco Unified Communications Manager.
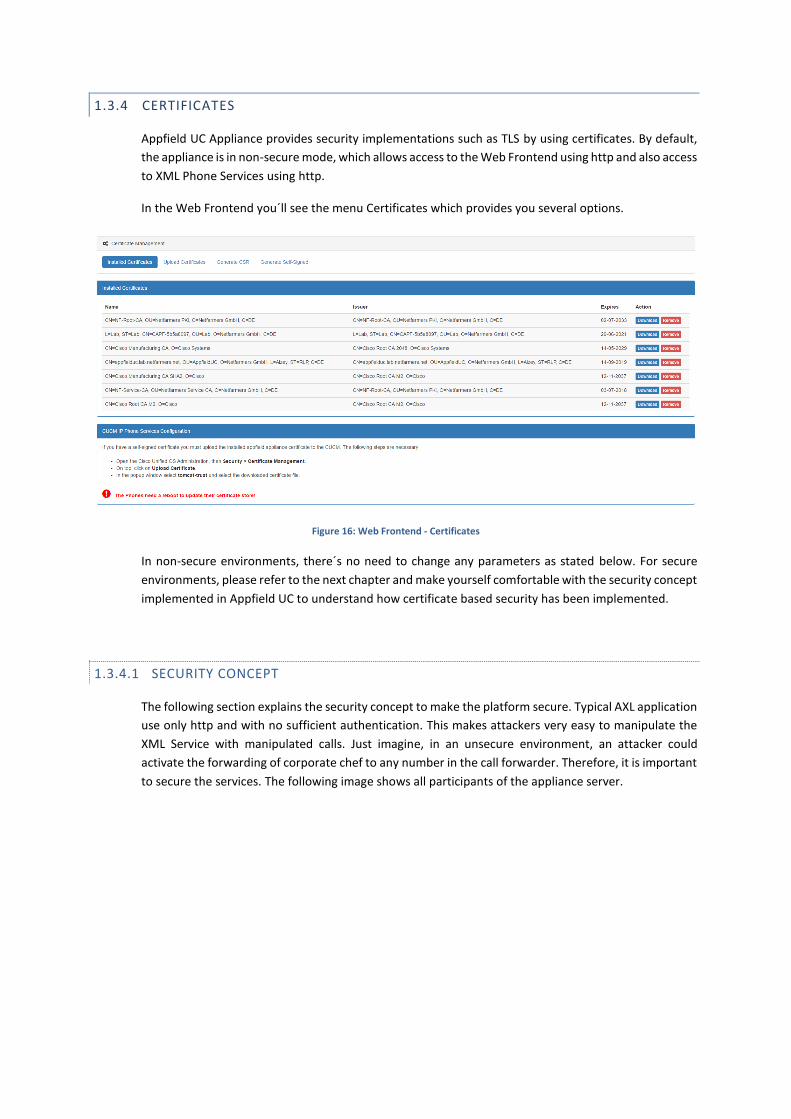
1.3.4 CERTIFICATES
Appfield UC Appliance provides security implementations such as TLS by using certificates. By default,
the appliance is in non-secure mode, which allows access to the Web Frontend using http and also access
to XML Phone Services using http.
In the Web Frontend you´ll see the menu Certificates which provides you several options.
Figure 16: Web Frontend - Certificates
In non-secure environments, there´s no need to change any parameters as stated below. For secure
environments, please refer to the next chapter and make yourself comfortable with the security concept
implemented in Appfield UC to understand how certificate based security has been implemented.
1.3.4.1 SECURITY CONCEPT
The following section explains the security concept to make the platform secure. Typical AXL application
use only http and with no sufficient authentication. This makes attackers very easy to manipulate the
XML Service with manipulated calls. Just imagine, in an unsecure environment, an attacker could
activate the forwarding of corporate chef to any number in the call forwarder. Therefore, it is important
to secure the services. The following image shows all participants of the appliance server.
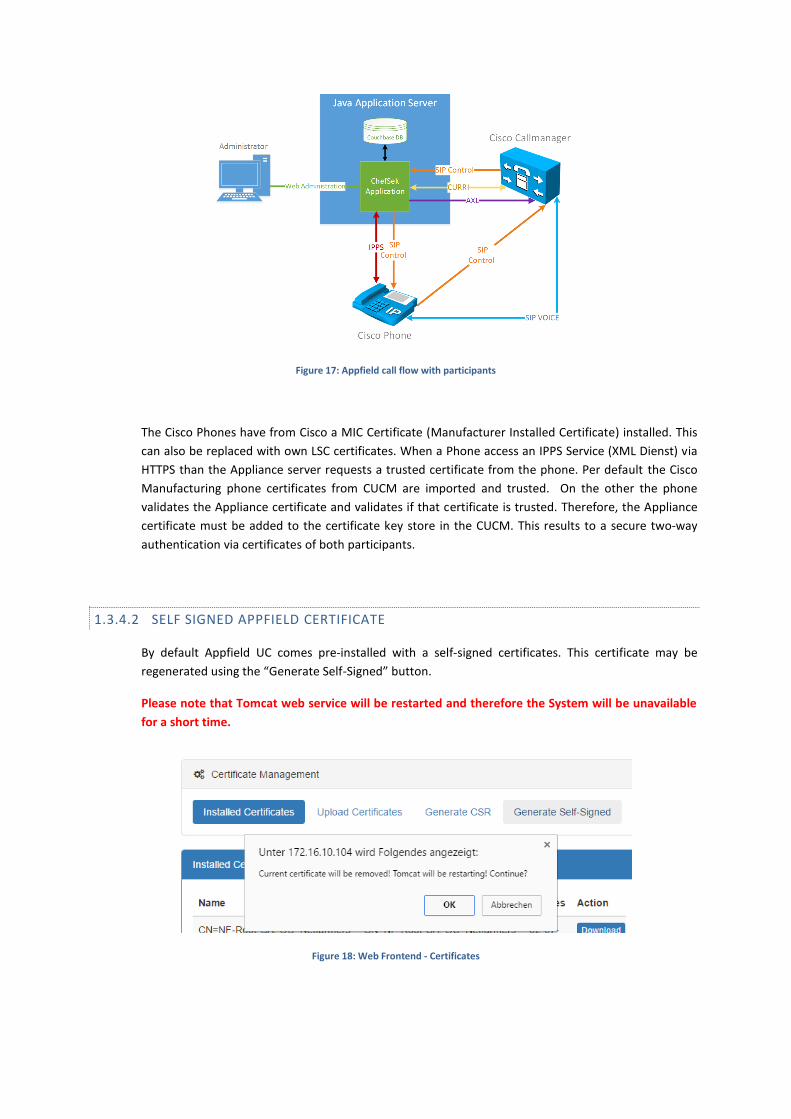
Figure 17: Appfield call flow with participants
The Cisco Phones have from Cisco a MIC Certificate (Manufacturer Installed Certificate) installed. This
can also be replaced with own LSC certificates. When a Phone access an IPPS Service (XML Dienst) via
HTTPS than the Appliance server requests a trusted certificate from the phone. Per default the Cisco
Manufacturing phone certificates from CUCM are imported and trusted. On the other the phone
validates the Appliance certificate and validates if that certificate is trusted. Therefore, the Appliance
certificate must be added to the certificate key store in the CUCM. This results to a secure two-way
authentication via certificates of both participants.
1.3.4.2 SELF SIGNED APPFIELD CERTIFICATE
By default Appfield UC comes pre-installed with a self-signed certificates. This certificate may be
regenerated using the “Generate Self-Signed” button.
Please note that Tomcat web service will be restarted and therefore the System will be unavailable
for a short time.
Figure 18: Web Frontend - Certificates
Generation of the self-signed certificate will be done based on the current network configuration (IP,
Hostname, DNS Suffix). When changing network settings you should make sure to regenerate the self-
signed certificate.
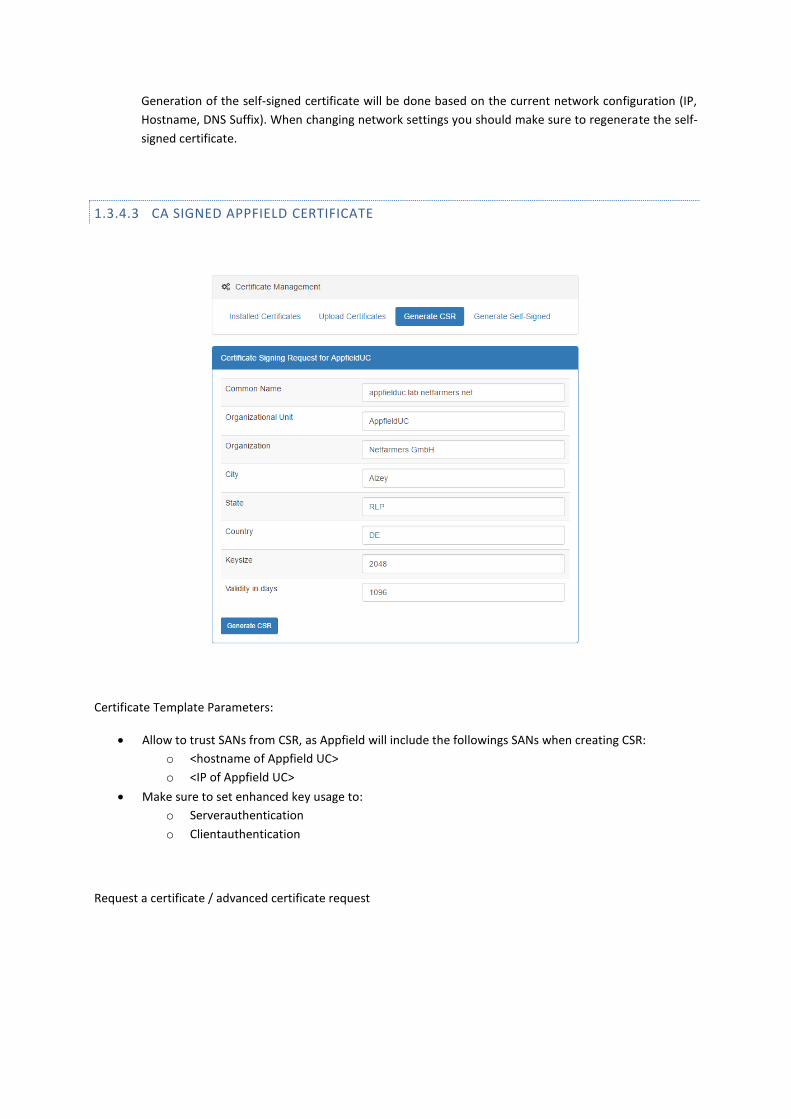
1.3.4.3 CA SIGNED APPFIELD CERTIFICATE
Certificate Template Parameters:
Allow to trust SANs from CSR, as Appfield will include the followings SANs when creating CSR:
o <hostname of Appfield UC>
o <IP of Appfield UC>
Make sure to set enhanced key usage to:
o Serverauthentication
o Clientauthentication
Request a certificate / advanced certificate request
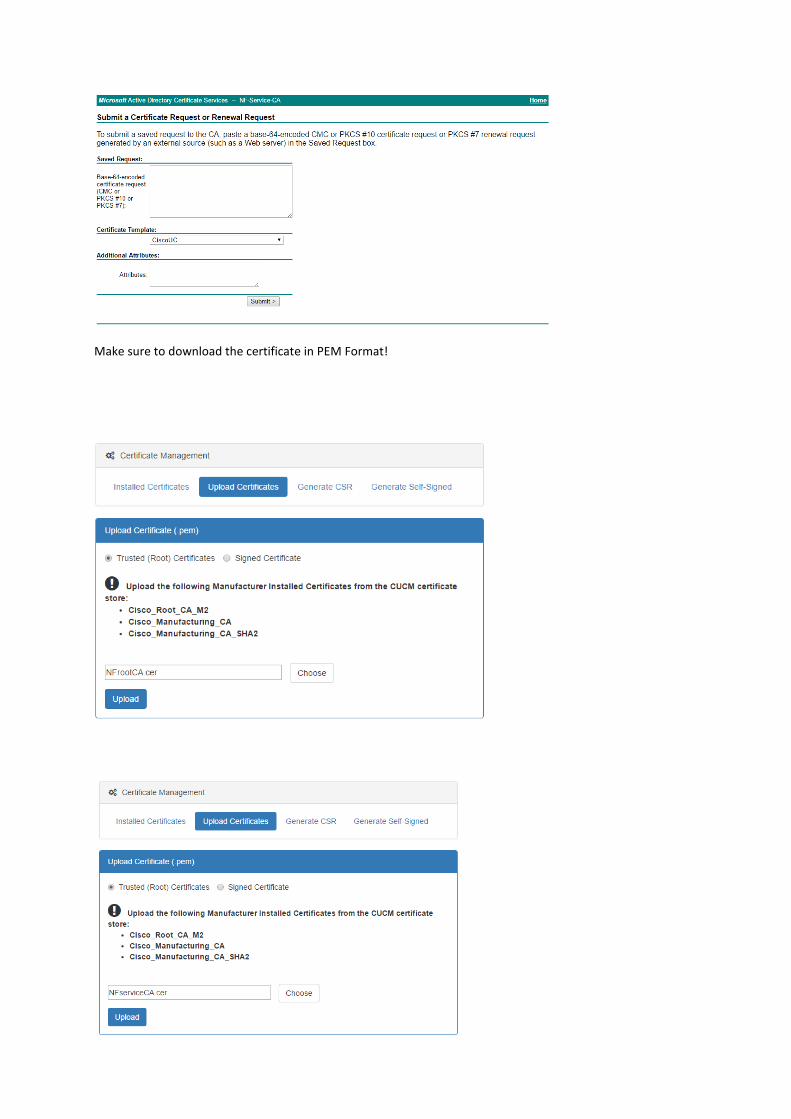
Make sure to download the certificate in PEM Format!
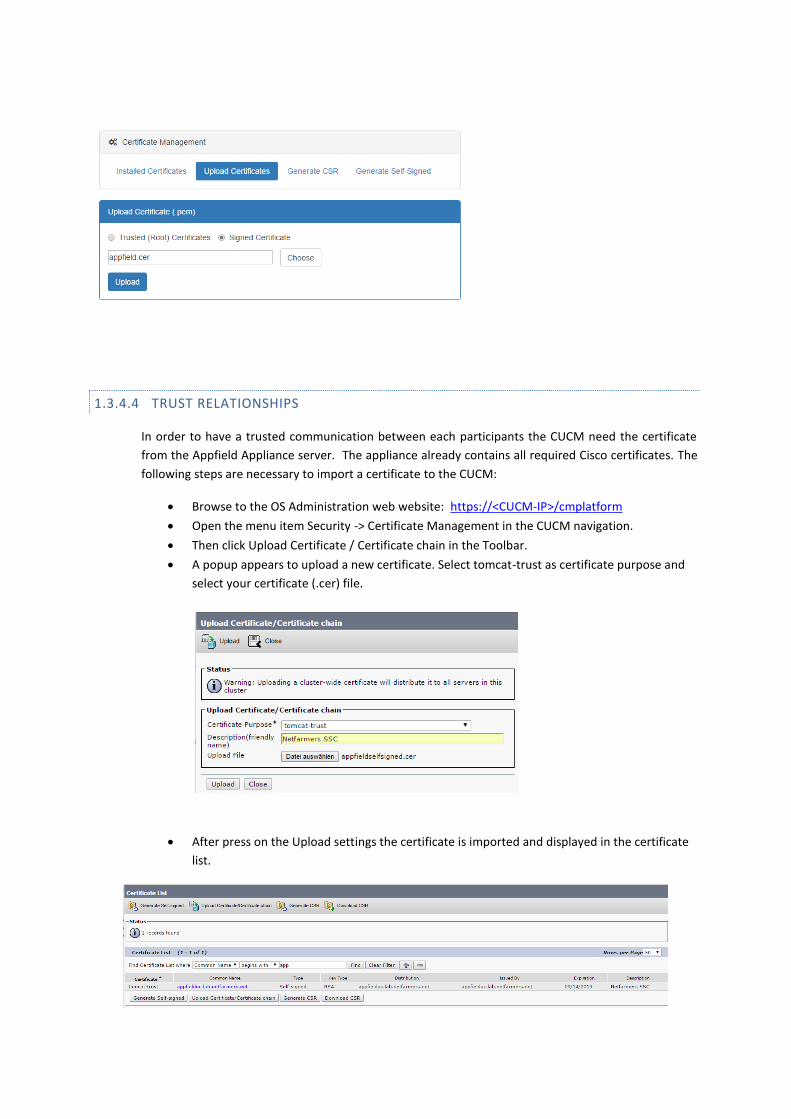
1.3.4.4 TRUST RELATIONSHIPS
In order to have a trusted communication between each participants the CUCM need the certificate
from the Appfield Appliance server. The appliance already contains all required Cisco certificates. The
following steps are necessary to import a certificate to the CUCM:
Browse to the OS Administration web website: https://<CUCM-IP>/cmplatform
Open the menu item Security -> Certificate Management in the CUCM navigation.
Then click Upload Certificate / Certificate chain in the Toolbar.
A popup appears to upload a new certificate. Select tomcat-trust as certificate purpose and
select your certificate (.cer) file.
After press on the Upload settings the certificate is imported and displayed in the certificate
list.
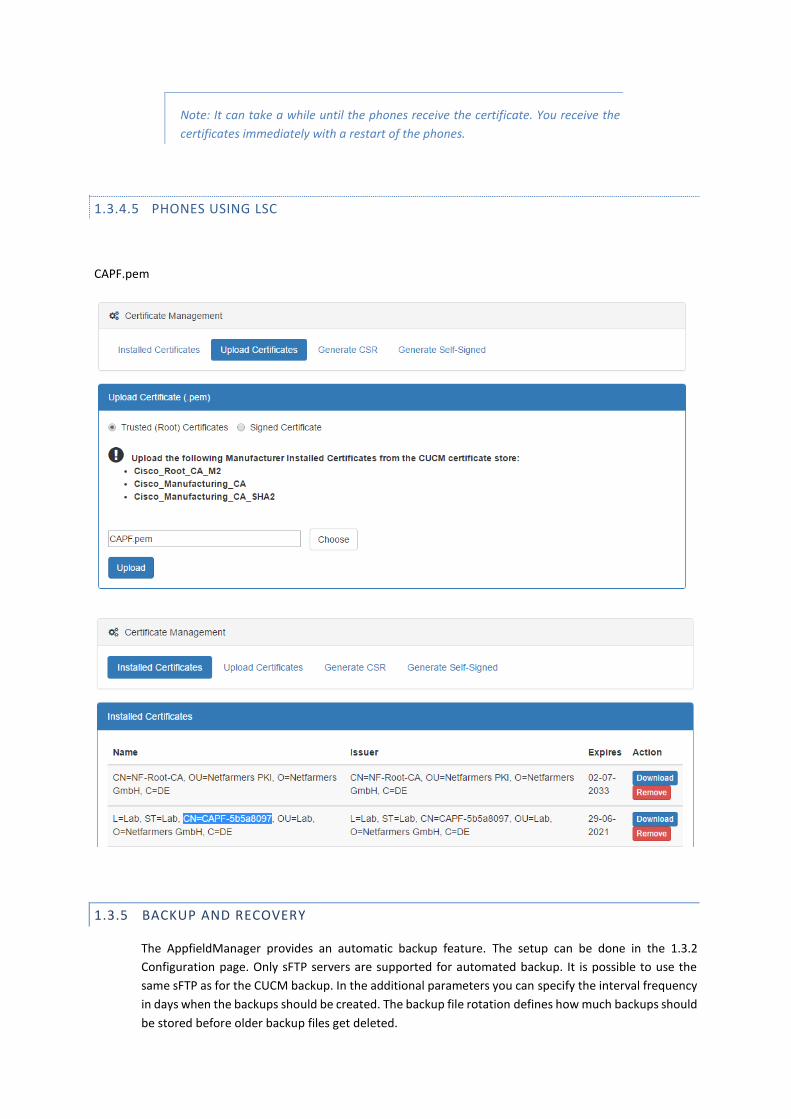
Note: It can take a while until the phones receive the certificate. You receive the
certificates immediately with a restart of the phones.
1.3.4.5 PHONES USING LSC
CAPF.pem
1.3.5 BACKUP AND RECOVERY
The AppfieldManager provides an automatic backup feature. The setup can be done in the 1.3.2
Configuration page. Only sFTP servers are supported for automated backup. It is possible to use the
same sFTP as for the CUCM backup. In the additional parameters you can specify the interval frequency
in days when the backups should be created. The backup file rotation defines how much backups should
be stored before older backup files get deleted.
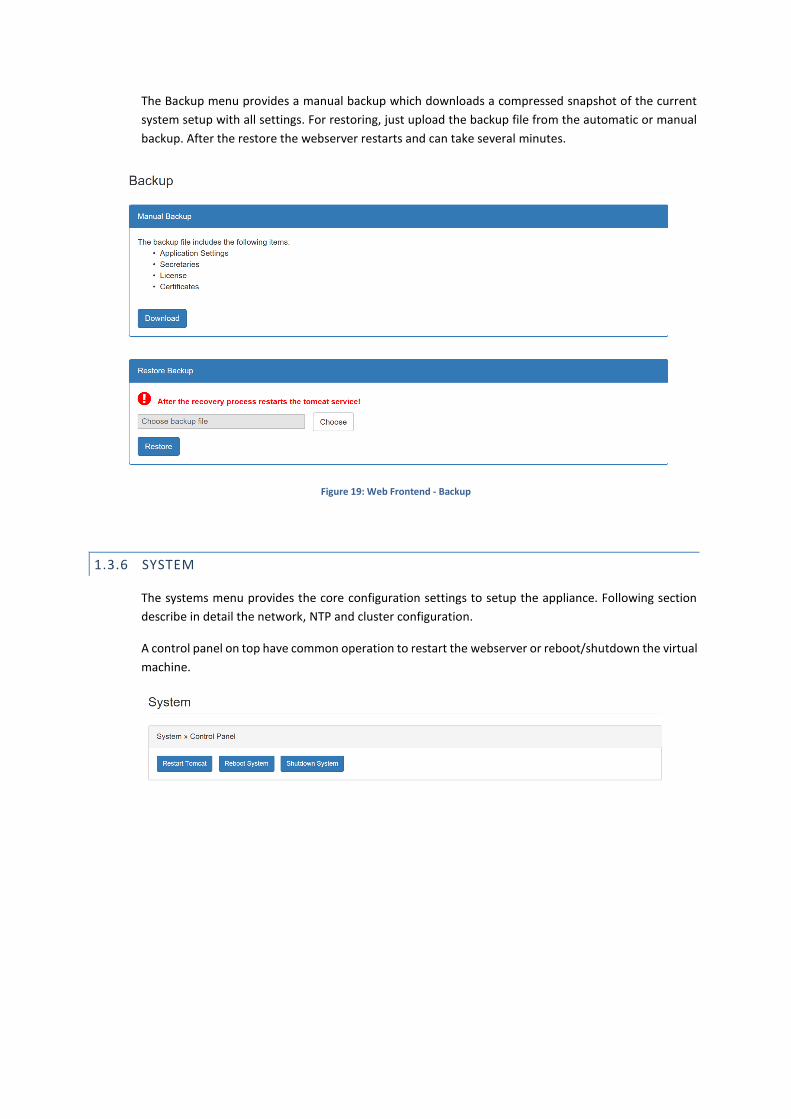
The Backup menu provides a manual backup which downloads a compressed snapshot of the current
system setup with all settings. For restoring, just upload the backup file from the automatic or manual
backup. After the restore the webserver restarts and can take several minutes.
Figure 19: Web Frontend - Backup
1.3.6 SYSTEM
The systems menu provides the core configuration settings to setup the appliance. Following section
describe in detail the network, NTP and cluster configuration.
A control panel on top have common operation to restart the webserver or reboot/shutdown the virtual
machine.
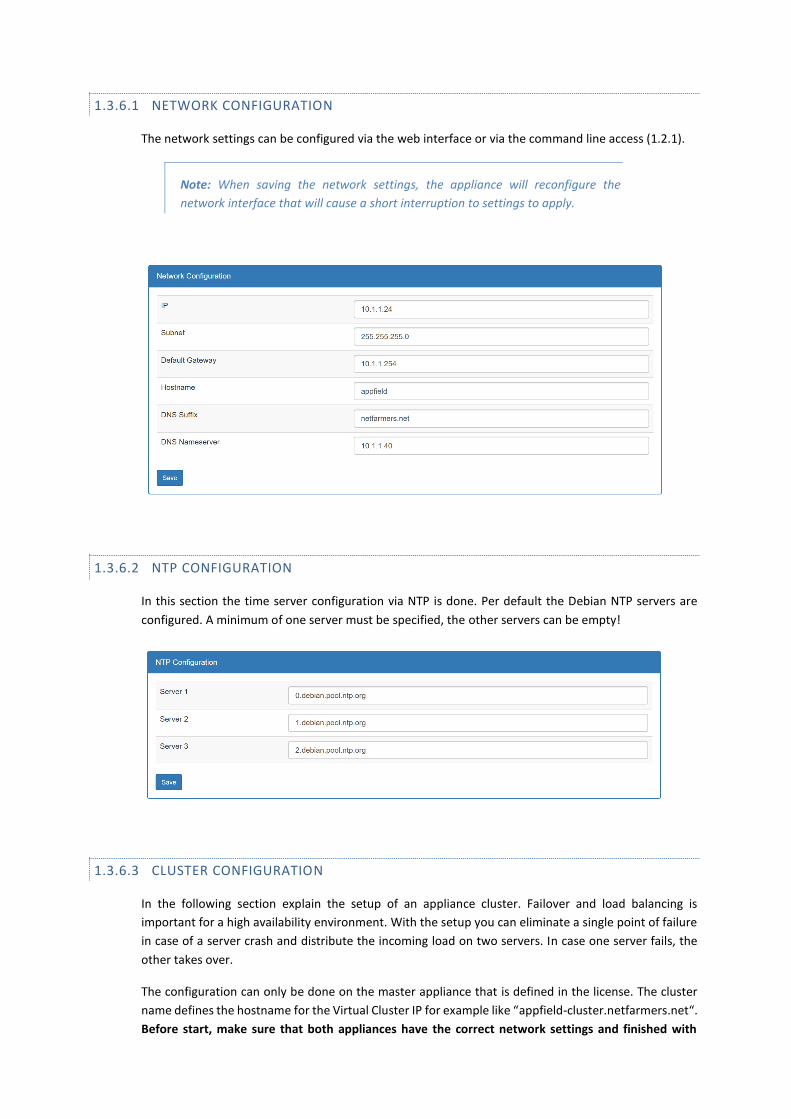
1.3.6.1 NETWORK CONFIGURATION
The network settings can be configured via the web interface or via the command line access (1.2.1).
Note: When saving the network settings, the appliance will reconfigure the
network interface that will cause a short interruption to settings to apply.
1.3.6.2 NTP CONFIGURATION
In this section the time server configuration via NTP is done. Per default the Debian NTP servers are
configured. A minimum of one server must be specified, the other servers can be empty!
1.3.6.3 CLUSTER CONFIGURATION
In the following section explain the setup of an appliance cluster. Failover and load balancing is
important for a high availability environment. With the setup you can eliminate a single point of failure
in case of a server crash and distribute the incoming load on two servers. In case one server fails, the
other takes over.
The configuration can only be done on the master appliance that is defined in the license. The cluster
name defines the hostname for the Virtual Cluster IP for example like “appfield-cluster.netfarmers.net“.
Before start, make sure that both appliances have the correct network settings and finished with
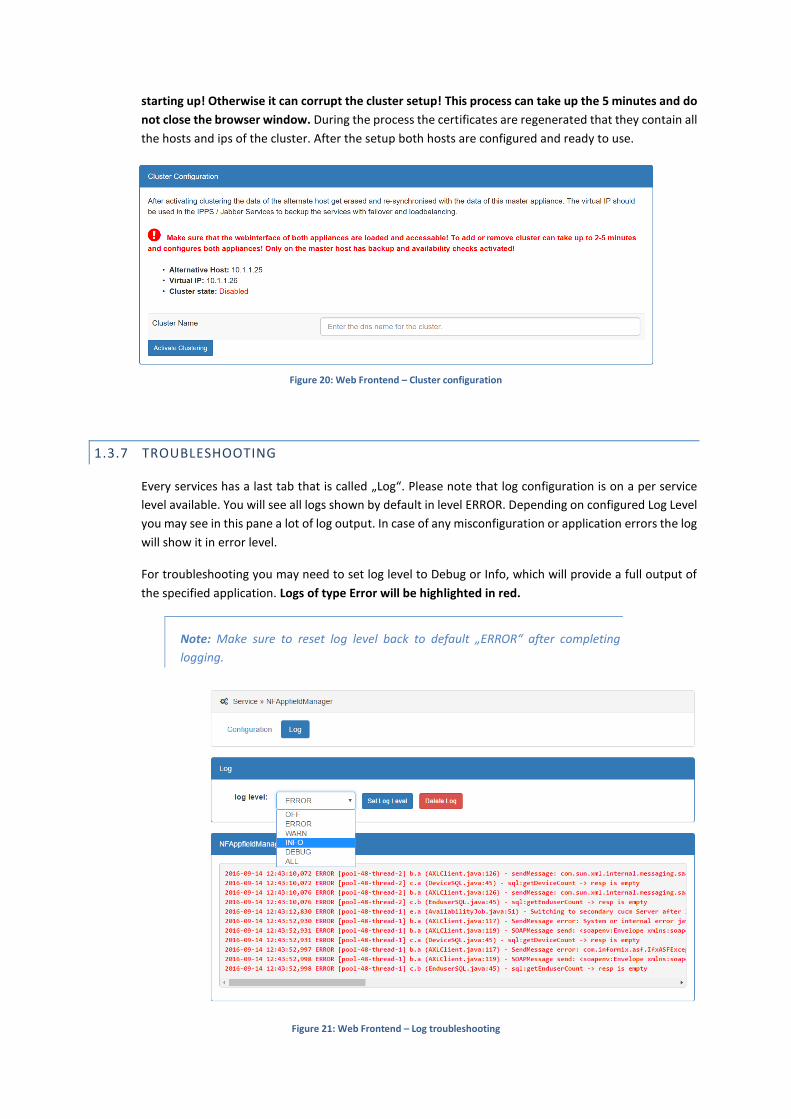
starting up! Otherwise it can corrupt the cluster setup! This process can take up the 5 minutes and do
not close the browser window. During the process the certificates are regenerated that they contain all
the hosts and ips of the cluster. After the setup both hosts are configured and ready to use.
Figure 20: Web Frontend – Cluster configuration
1.3.7 TROUBLESHOOTING
Every services has a last tab that is called „Log“. Please note that log configuration is on a per service
level available. You will see all logs shown by default in level ERROR. Depending on configured Log Level
you may see in this pane a lot of log output. In case of any misconfiguration or application errors the log
will show it in error level.
For troubleshooting you may need to set log level to Debug or Info, which will provide a full output of
the specified application. Logs of type Error will be highlighted in red.
Note: Make sure to reset log level back to default „ERROR“ after completing
logging.
Figure 21: Web Frontend – Log troubleshooting
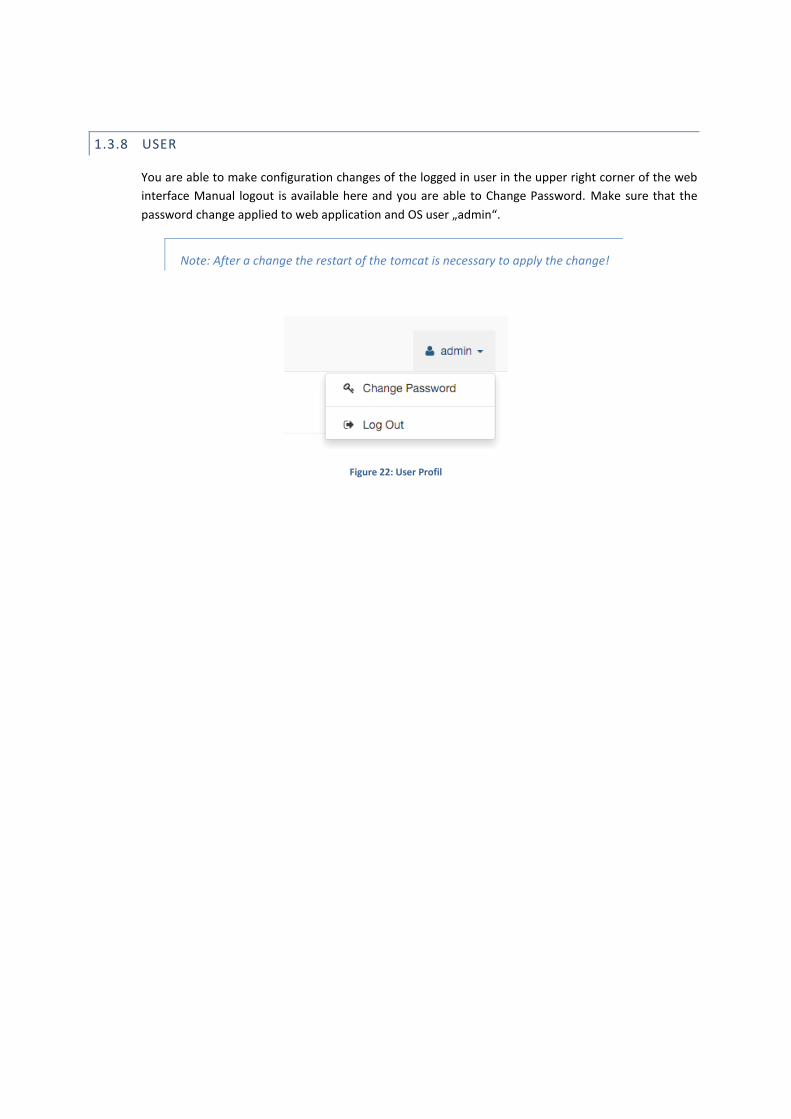
1.3.8 USER
You are able to make configuration changes of the logged in user in the upper right corner of the web
interface Manual logout is available here and you are able to Change Password. Make sure that the
password change applied to web application and OS user „admin“.
Note: After a change the restart of the tomcat is necessary to apply the change!
Figure 22: User Profil
2 NFCHEFSEK
Our NFChefSek App is a simple and intuitive Manager Assistant solution that provide the following features:
Intuitive handling
Flexible groups of Managers and Assistants
Using BLFs for Status- and Control of ChefSek functions.
Integration into Cisco Jabber (NFOfficeUC)
Black- & Whitelists
Flexible Proxy feature
By using BLFs for Status and Control of chefsec functions, the secretary or manager is able to quickly change
settings with a single button.
The following functions may be controlled by a dedicated BLF:
Diversion to Secretary (Umleitung Sekretariat), which means that all calls will be routed to configured secretaries.
Diversion to Proxy (Vertretung) provides the ability to route calls to another colleague which is then allowed to transfer calls back to the manager.
Pause (or Logout) is useful in environments with multiple secretaries.
Manager-Forwarding, provides a forwarding to the configured destination instead of directly to the Manager´s IP Phone. This forwarding is set in Appfield UC application logic and not a CUCM call forwarding, so it will not appear on the Managers phone display.
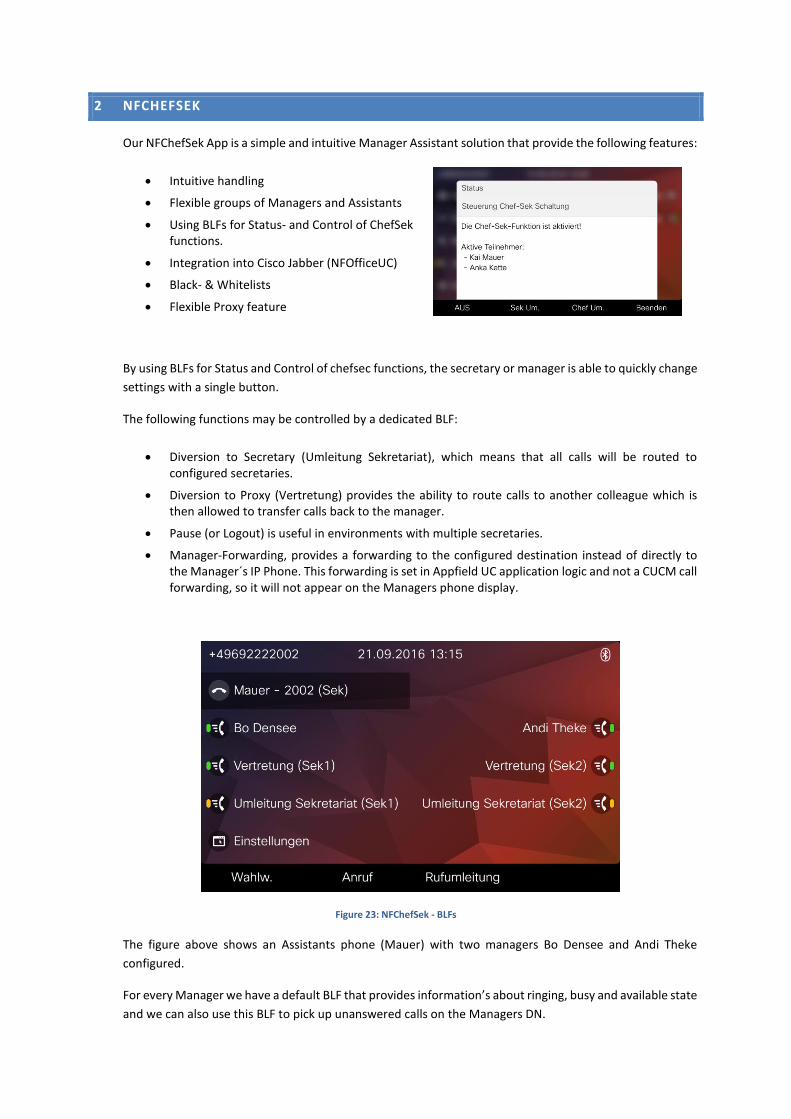
Figure 23: NFChefSek - BLFs
The figure above shows an Assistants phone (Mauer) with two managers Bo Densee and Andi Theke
configured.
For every Manager we have a default BLF that provides information’s about ringing, busy and available state
and we can also use this BLF to pick up unanswered calls on the Managers DN.
We have also configured dedicated BLFs for Diversion to Proxy (Vertretung) and Diversion to Secretary
(Umleitung Sekretariat).
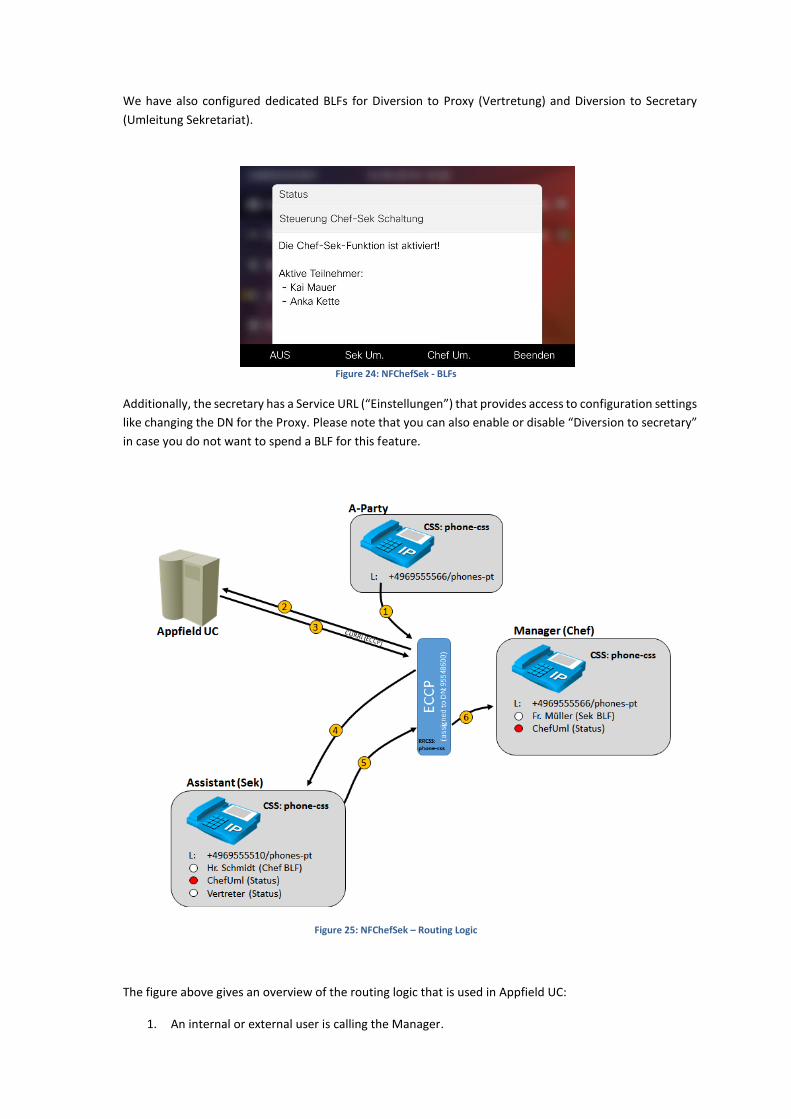
Figure 24: NFChefSek - BLFs
Additionally, the secretary has a Service URL (“Einstellungen”) that provides access to configuration settings
like changing the DN for the Proxy. Please note that you can also enable or disable “Diversion to secretary”
in case you do not want to spend a BLF for this feature.
Figure 25: NFChefSek – Routing Logic
The figure above gives an overview of the routing logic that is used in Appfield UC:
1. An internal or external user is calling the Manager.
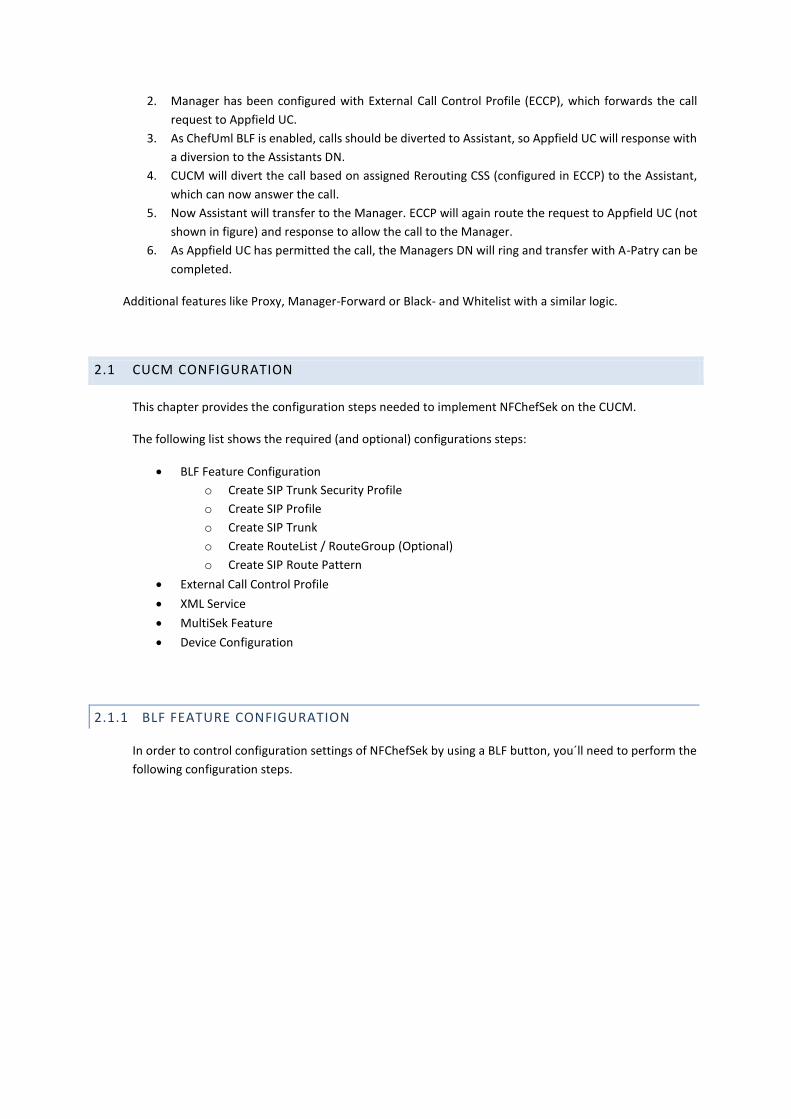
2. Manager has been configured with External Call Control Profile (ECCP), which forwards the call
request to Appfield UC.
3. As ChefUml BLF is enabled, calls should be diverted to Assistant, so Appfield UC will response with
a diversion to the Assistants DN.
4. CUCM will divert the call based on assigned Rerouting CSS (configured in ECCP) to the Assistant,
which can now answer the call.
5. Now Assistant will transfer to the Manager. ECCP will again route the request to Appfield UC (not
shown in figure) and response to allow the call to the Manager.
6. As Appfield UC has permitted the call, the Managers DN will ring and transfer with A-Patry can be
completed.
Additional features like Proxy, Manager-Forward or Black- and Whitelist with a similar logic.
2.1 CUCM CONFIGURATION
This chapter provides the configuration steps needed to implement NFChefSek on the CUCM.
The following list shows the required (and optional) configurations steps:
BLF Feature Configuration
o Create SIP Trunk Security Profile
o Create SIP Profile
o Create SIP Trunk
o Create RouteList / RouteGroup (Optional)
o Create SIP Route Pattern
External Call Control Profile
XML Service
MultiSek Feature
Device Configuration
2.1.1 BLF FEATURE CONFIGURATION
In order to control configuration settings of NFChefSek by using a BLF button, you´ll need to perform the
following configuration steps.
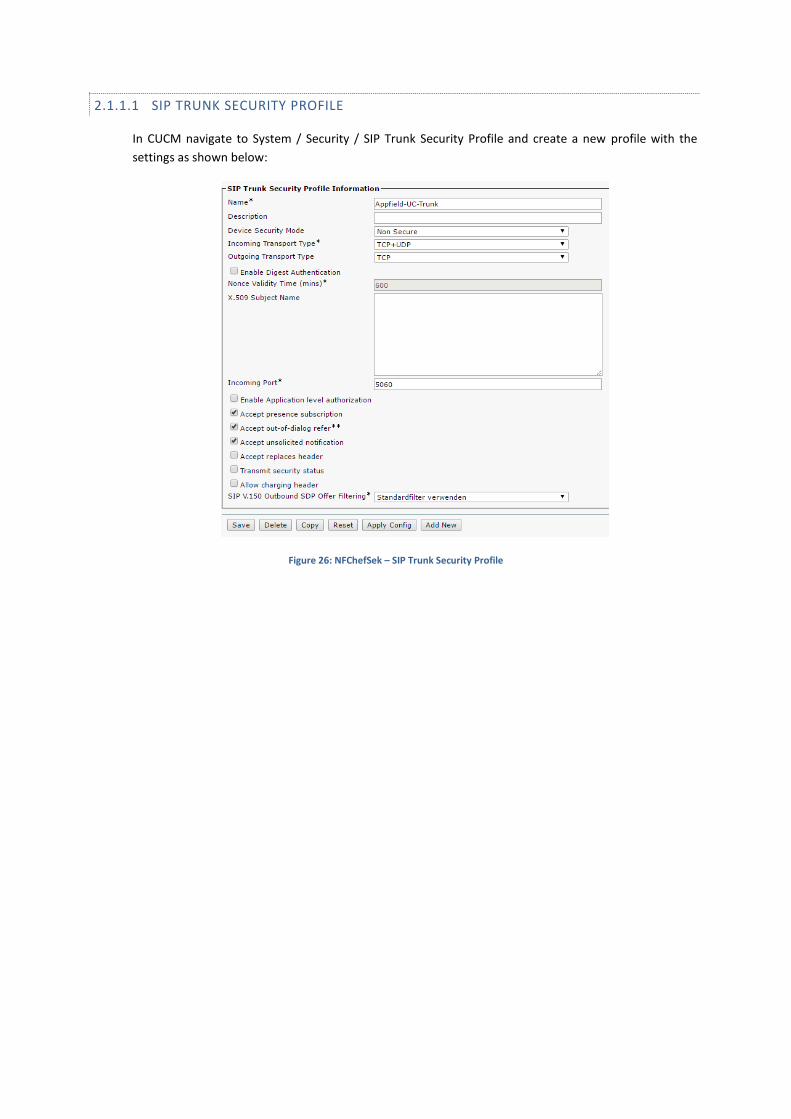
2.1.1.1 SIP TRUNK SECURITY PROFILE
In CUCM navigate to System / Security / SIP Trunk Security Profile and create a new profile with the
settings as shown below:
Figure 26: NFChefSek – SIP Trunk Security Profile
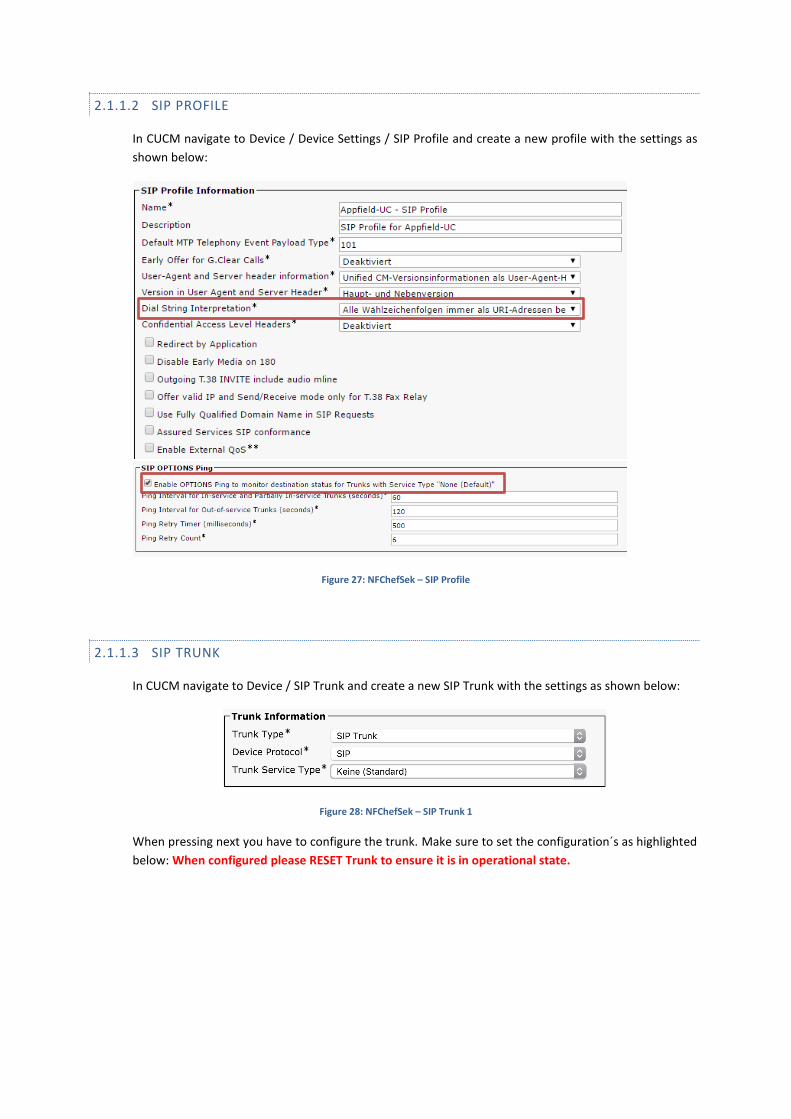
2.1.1.2 SIP PROFILE
In CUCM navigate to Device / Device Settings / SIP Profile and create a new profile with the settings as
shown below:
Figure 27: NFChefSek – SIP Profile
2.1.1.3 SIP TRUNK
In CUCM navigate to Device / SIP Trunk and create a new SIP Trunk with the settings as shown below:
Figure 28: NFChefSek – SIP Trunk 1
When pressing next you have to configure the trunk. Make sure to set the configuration´s as highlighted
below: When configured please RESET Trunk to ensure it is in operational state.
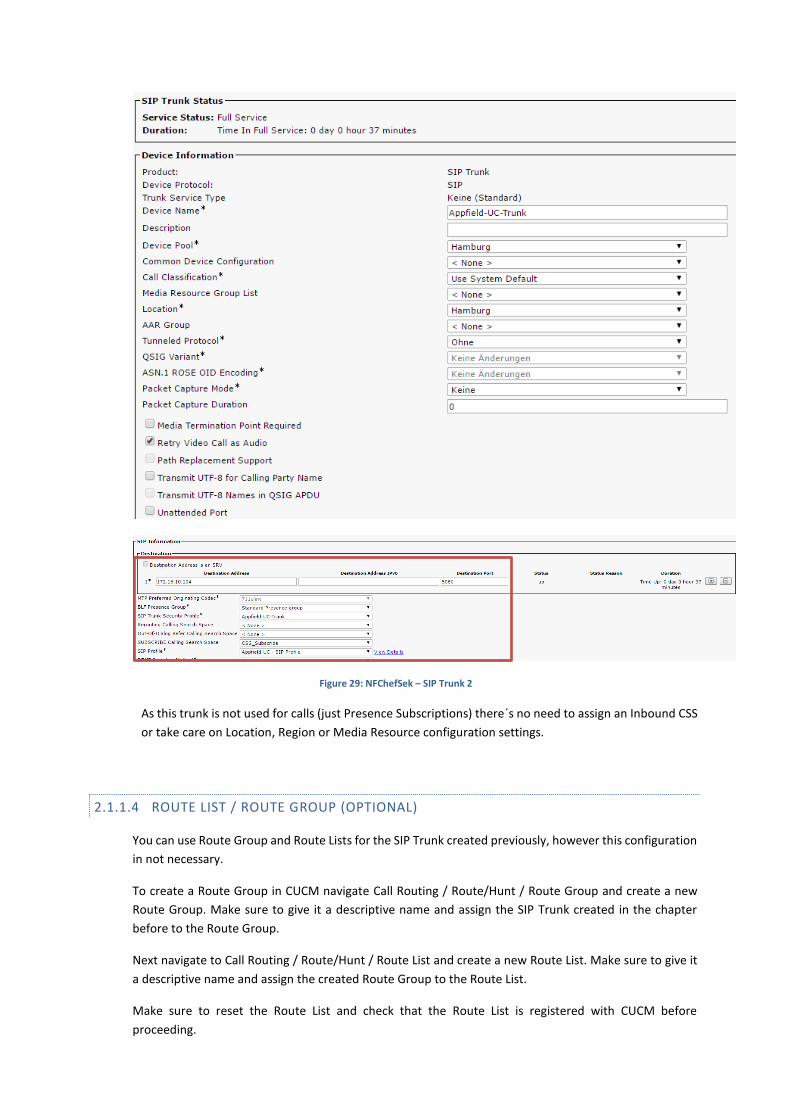
Figure 29: NFChefSek – SIP Trunk 2
As this trunk is not used for calls (just Presence Subscriptions) there´s no need to assign an Inbound CSS
or take care on Location, Region or Media Resource configuration settings.
2.1.1.4 ROUTE LIST / ROUTE GROUP (OPTIONAL)
You can use Route Group and Route Lists for the SIP Trunk created previously, however this configuration
in not necessary.
To create a Route Group in CUCM navigate Call Routing / Route/Hunt / Route Group and create a new
Route Group. Make sure to give it a descriptive name and assign the SIP Trunk created in the chapter
before to the Route Group.
Next navigate to Call Routing / Route/Hunt / Route List and create a new Route List. Make sure to give it
a descriptive name and assign the created Route Group to the Route List.
Make sure to reset the Route List and check that the Route List is registered with CUCM before
proceeding.
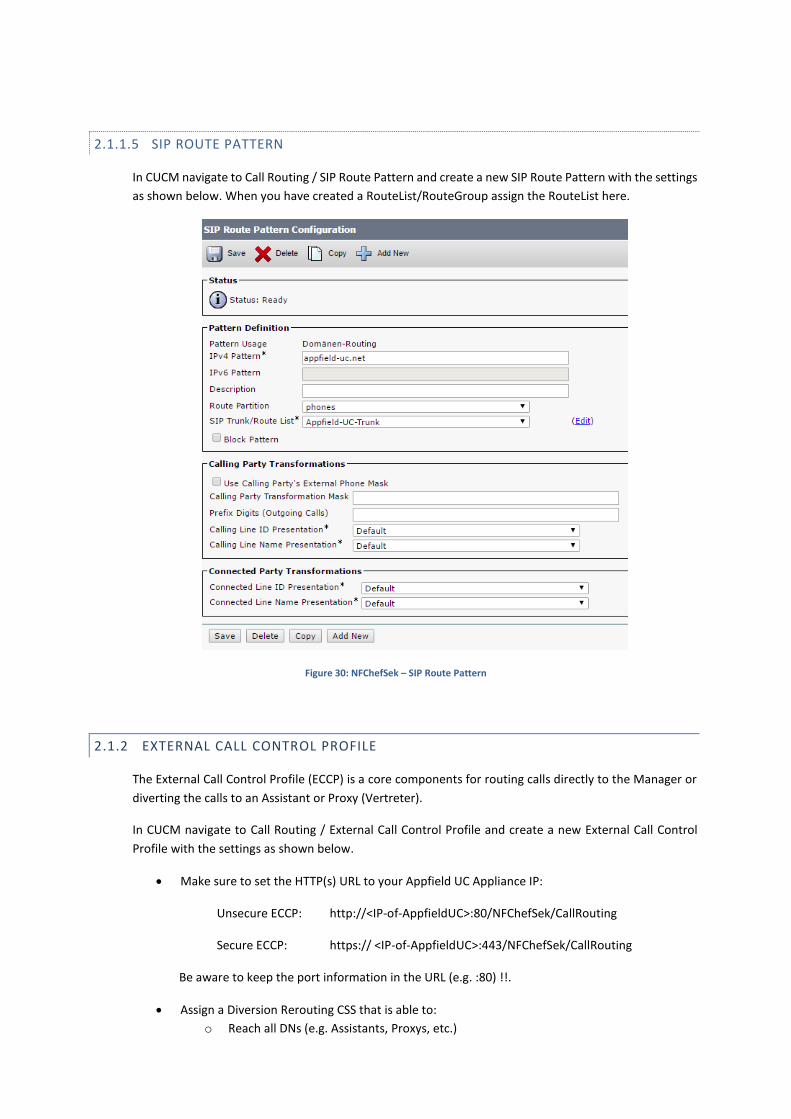
2.1.1.5 SIP ROUTE PATTERN
In CUCM navigate to Call Routing / SIP Route Pattern and create a new SIP Route Pattern with the settings
as shown below. When you have created a RouteList/RouteGroup assign the RouteList here.
Figure 30: NFChefSek – SIP Route Pattern
2.1.2 EXTERNAL CALL CONTROL PROFILE
The External Call Control Profile (ECCP) is a core components for routing calls directly to the Manager or
diverting the calls to an Assistant or Proxy (Vertreter).
In CUCM navigate to Call Routing / External Call Control Profile and create a new External Call Control
Profile with the settings as shown below.
Make sure to set the HTTP(s) URL to your Appfield UC Appliance IP:
Unsecure ECCP: http://<IP-of-AppfieldUC>:80/NFChefSek/CallRouting
Secure ECCP: https:// <IP-of-AppfieldUC>:443/NFChefSek/CallRouting
Be aware to keep the port information in the URL (e.g. :80) !!.
Assign a Diversion Rerouting CSS that is able to:
o Reach all DNs (e.g. Assistants, Proxys, etc.)
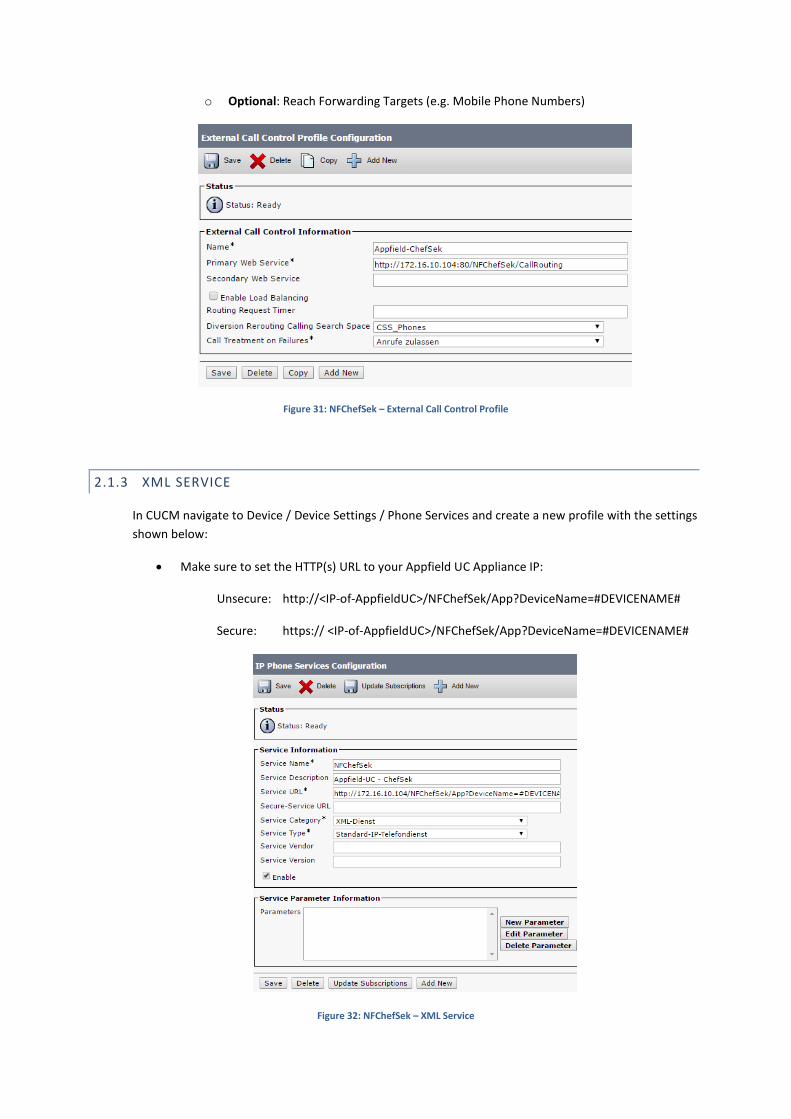
o Optional: Reach Forwarding Targets (e.g. Mobile Phone Numbers)
Figure 31: NFChefSek – External Call Control Profile
2.1.3 XML SERVICE
In CUCM navigate to Device / Device Settings / Phone Services and create a new profile with the settings
shown below:
Make sure to set the HTTP(s) URL to your Appfield UC Appliance IP:
Unsecure: http://<IP-of-AppfieldUC>/NFChefSek/App?DeviceName=#DEVICENAME#
Secure: https:// <IP-of-AppfieldUC>/NFChefSek/App?DeviceName=#DEVICENAME#
Figure 32: NFChefSek – XML Service
2.1.4 MULTISEK FEATURE
Our Multisek Feature is required when a group of Assistants should receive calls from a single Manager
DN. By default an Assistant receives the call from a manager and can transfer the call back to the Manager.
In a MultiSek environment, we have multiple active Assistants that receive the call from a Manager
depending on the call distribution algorithm, e.g. Broadcast or Longest Idle.
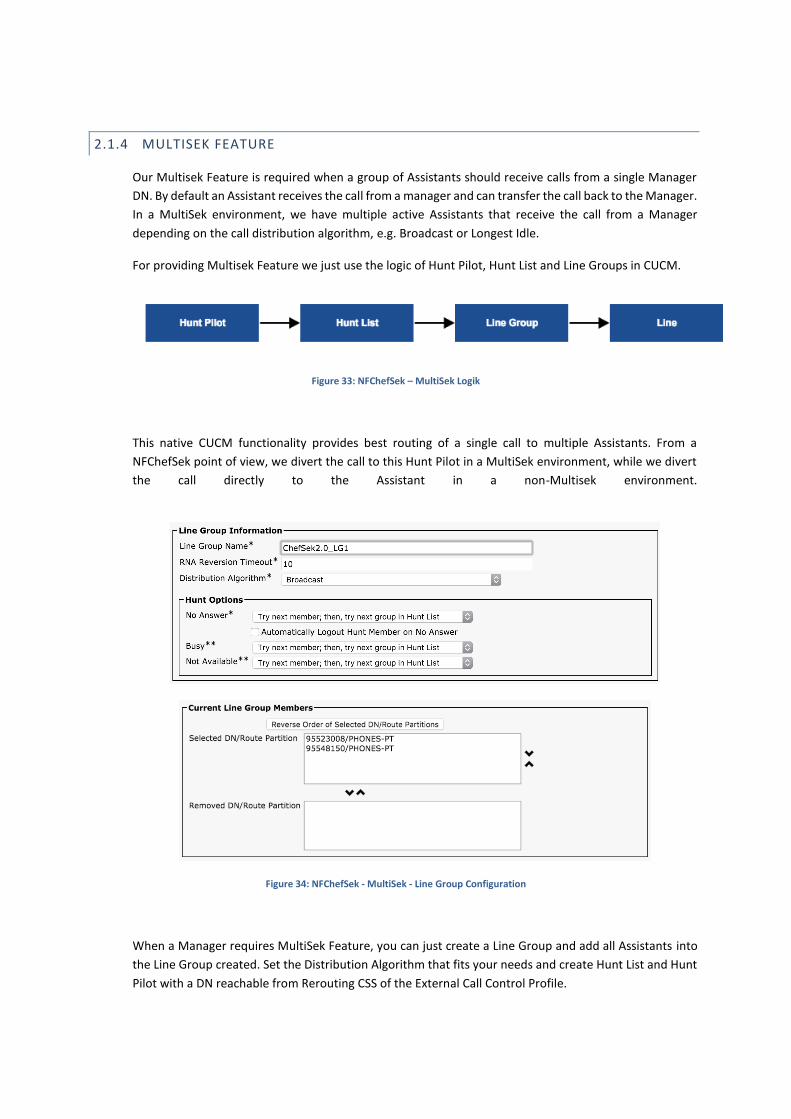
For providing Multisek Feature we just use the logic of Hunt Pilot, Hunt List and Line Groups in CUCM.
Figure 33: NFChefSek – MultiSek Logik
This native CUCM functionality provides best routing of a single call to multiple Assistants. From a
NFChefSek point of view, we divert the call to this Hunt Pilot in a MultiSek environment, while we divert
the call directly to the Assistant in a non-Multisek environment.
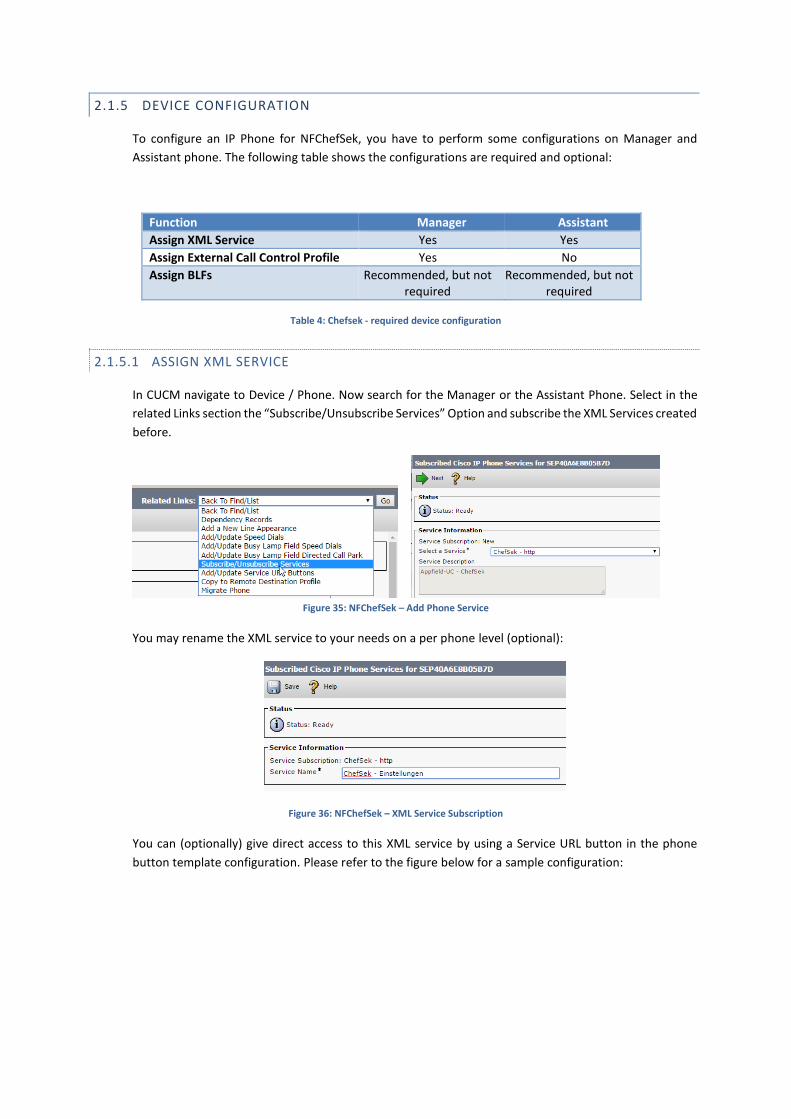
Figure 34: NFChefSek - MultiSek - Line Group Configuration
When a Manager requires MultiSek Feature, you can just create a Line Group and add all Assistants into
the Line Group created. Set the Distribution Algorithm that fits your needs and create Hunt List and Hunt
Pilot with a DN reachable from Rerouting CSS of the External Call Control Profile.
2.1.5 DEVICE CONFIGURATION
To configure an IP Phone for NFChefSek, you have to perform some configurations on Manager and
Assistant phone. The following table shows the configurations are required and optional:
Function Manager Assistant
Assign XML Service Yes Yes
Assign External Call Control Profile Yes No
Assign BLFs Recommended, but not required
Recommended, but not required
Table 4: Chefsek - required device configuration
2.1.5.1 ASSIGN XML SERVICE
In CUCM navigate to Device / Phone. Now search for the Manager or the Assistant Phone. Select in the
related Links section the “Subscribe/Unsubscribe Services” Option and subscribe the XML Services created
before.
Figure 35: NFChefSek – Add Phone Service
You may rename the XML service to your needs on a per phone level (optional):
Figure 36: NFChefSek – XML Service Subscription
You can (optionally) give direct access to this XML service by using a Service URL button in the phone
button template configuration. Please refer to the figure below for a sample configuration:
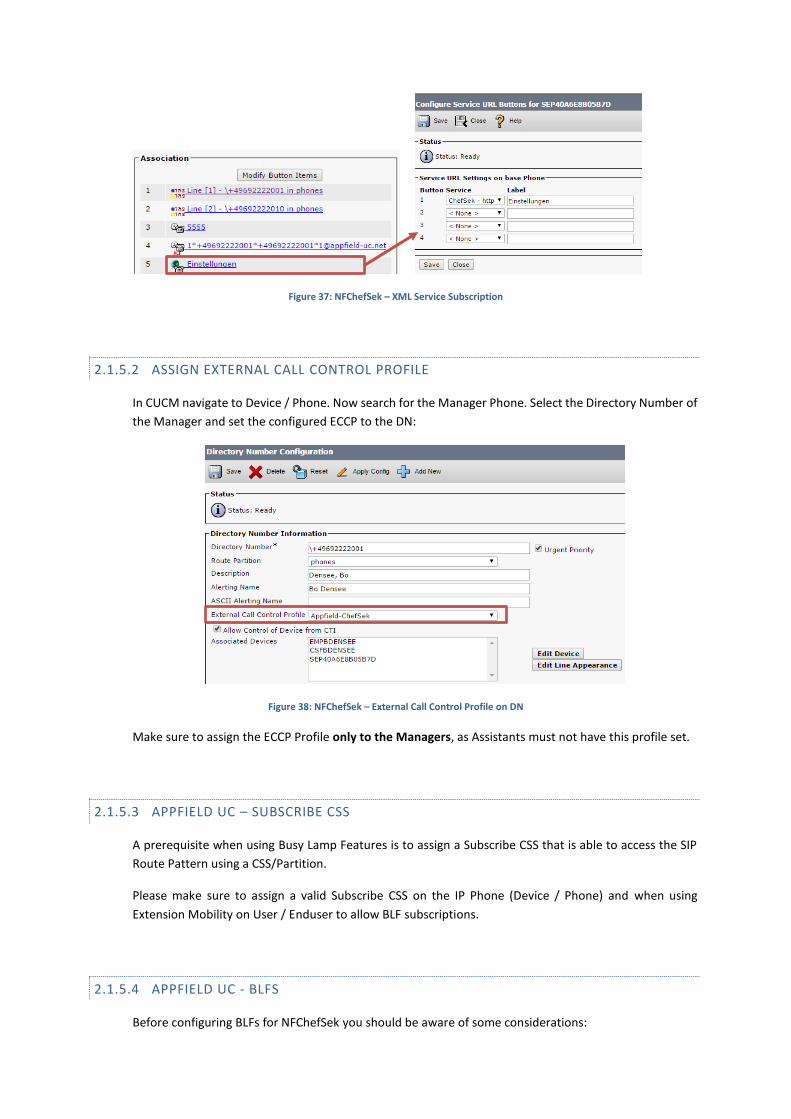
Figure 37: NFChefSek – XML Service Subscription
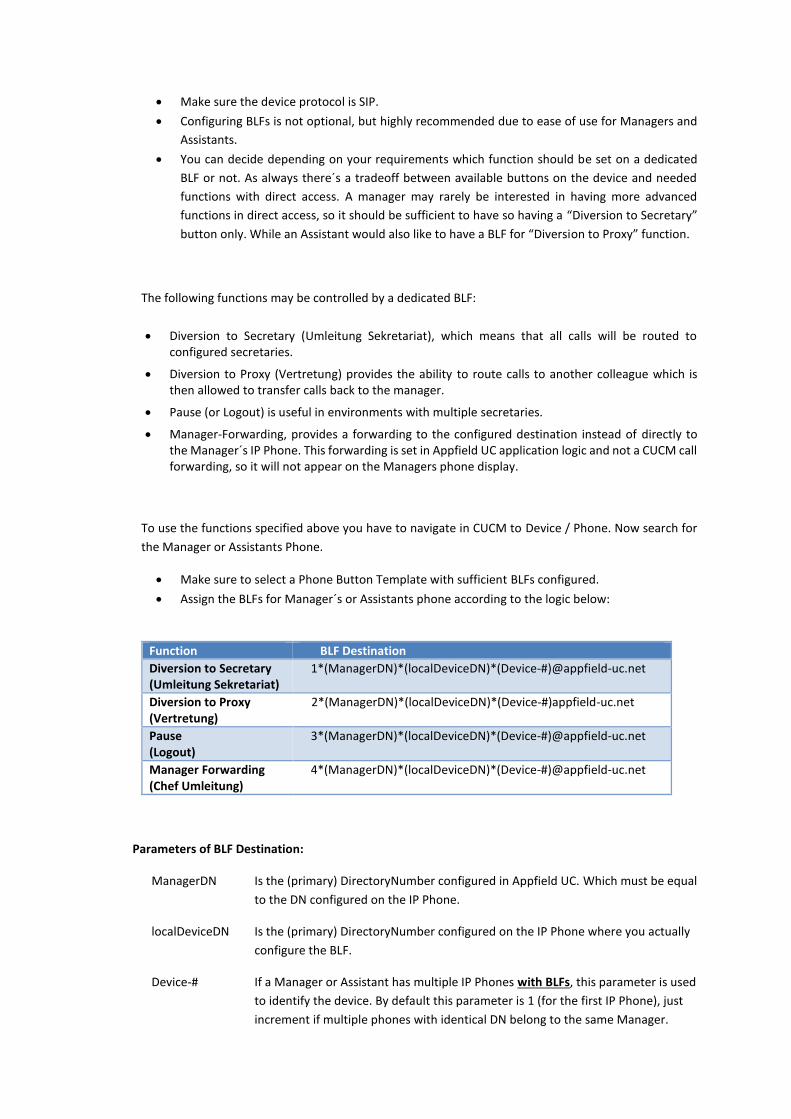
2.1.5.2 ASSIGN EXTERNAL CALL CONTROL PROFILE
In CUCM navigate to Device / Phone. Now search for the Manager Phone. Select the Directory Number of
the Manager and set the configured ECCP to the DN:
Figure 38: NFChefSek – External Call Control Profile on DN
Make sure to assign the ECCP Profile only to the Managers, as Assistants must not have this profile set.
2.1.5.3 APPFIELD UC – SUBSCRIBE CSS
A prerequisite when using Busy Lamp Features is to assign a Subscribe CSS that is able to access the SIP
Route Pattern using a CSS/Partition.
Please make sure to assign a valid Subscribe CSS on the IP Phone (Device / Phone) and when using
Extension Mobility on User / Enduser to allow BLF subscriptions.
2.1.5.4 APPFIELD UC - BLFS
Before configuring BLFs for NFChefSek you should be aware of some considerations:
Make sure the device protocol is SIP.
Configuring BLFs is not optional, but highly recommended due to ease of use for Managers and
Assistants.
You can decide depending on your requirements which function should be set on a dedicated
BLF or not. As always there´s a tradeoff between available buttons on the device and needed
functions with direct access. A manager may rarely be interested in having more advanced
functions in direct access, so it should be sufficient to have so having a “Diversion to Secretary”
button only. While an Assistant would also like to have a BLF for “Diversion to Proxy” function.
The following functions may be controlled by a dedicated BLF:
Diversion to Secretary (Umleitung Sekretariat), which means that all calls will be routed to configured secretaries.
Diversion to Proxy (Vertretung) provides the ability to route calls to another colleague which is then allowed to transfer calls back to the manager.
Pause (or Logout) is useful in environments with multiple secretaries.
Manager-Forwarding, provides a forwarding to the configured destination instead of directly to the Manager´s IP Phone. This forwarding is set in Appfield UC application logic and not a CUCM call forwarding, so it will not appear on the Managers phone display.
To use the functions specified above you have to navigate in CUCM to Device / Phone. Now search for
the Manager or Assistants Phone.
Make sure to select a Phone Button Template with sufficient BLFs configured.
Assign the BLFs for Manager´s or Assistants phone according to the logic below:
Function BLF Destination
Diversion to Secretary (Umleitung Sekretariat)
1*(ManagerDN)*(localDeviceDN)*(Device-#)@appfield-uc.net
Diversion to Proxy (Vertretung)
2*(ManagerDN)*(localDeviceDN)*(Device-#)appfield-uc.net
Pause (Logout)
3*(ManagerDN)*(localDeviceDN)*(Device-#)@appfield-uc.net
Manager Forwarding (Chef Umleitung)
4*(ManagerDN)*(localDeviceDN)*(Device-#)@appfield-uc.net
Parameters of BLF Destination:
ManagerDN Is the (primary) DirectoryNumber configured in Appfield UC. Which must be equal
to the DN configured on the IP Phone.
localDeviceDN Is the (primary) DirectoryNumber configured on the IP Phone where you actually
configure the BLF.
Device-# If a Manager or Assistant has multiple IP Phones with BLFs, this parameter is used
to identify the device. By default this parameter is 1 (for the first IP Phone), just
increment if multiple phones with identical DN belong to the same Manager.
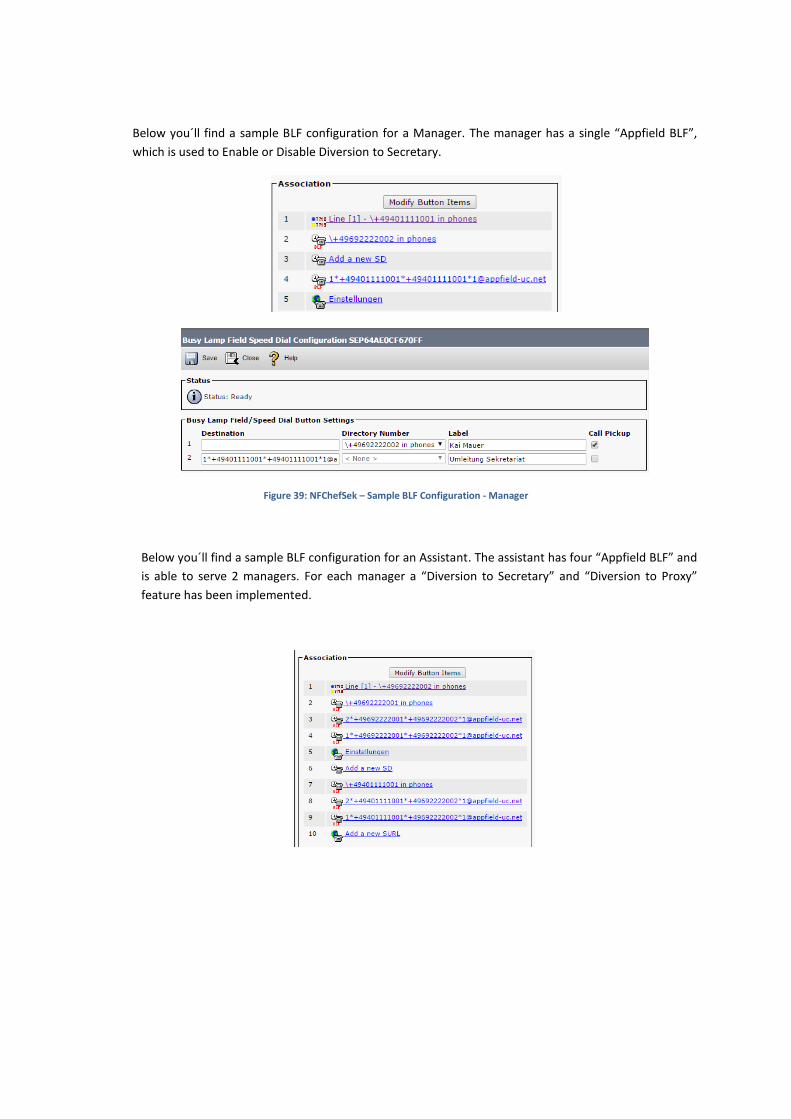
Below you´ll find a sample BLF configuration for a Manager. The manager has a single “Appfield BLF”,
which is used to Enable or Disable Diversion to Secretary.
Figure 39: NFChefSek – Sample BLF Configuration - Manager
Below you´ll find a sample BLF configuration for an Assistant. The assistant has four “Appfield BLF” and
is able to serve 2 managers. For each manager a “Diversion to Secretary” and “Diversion to Proxy”
feature has been implemented.

Figure 40: NFChefSek – Sample BLF Configuration - Assistant
2.2 NFCHEFSEK CONFIGURATION
To configure NFChefSek App, please follow the instructions below. Before proceeding make sure that
you have completed configurations in chapter 2.1.
2.2.1 BASE CONFIGURATION
In this chapter we are able to set general configuration settings.
Figure 41: NFChefSek – Base Configuration
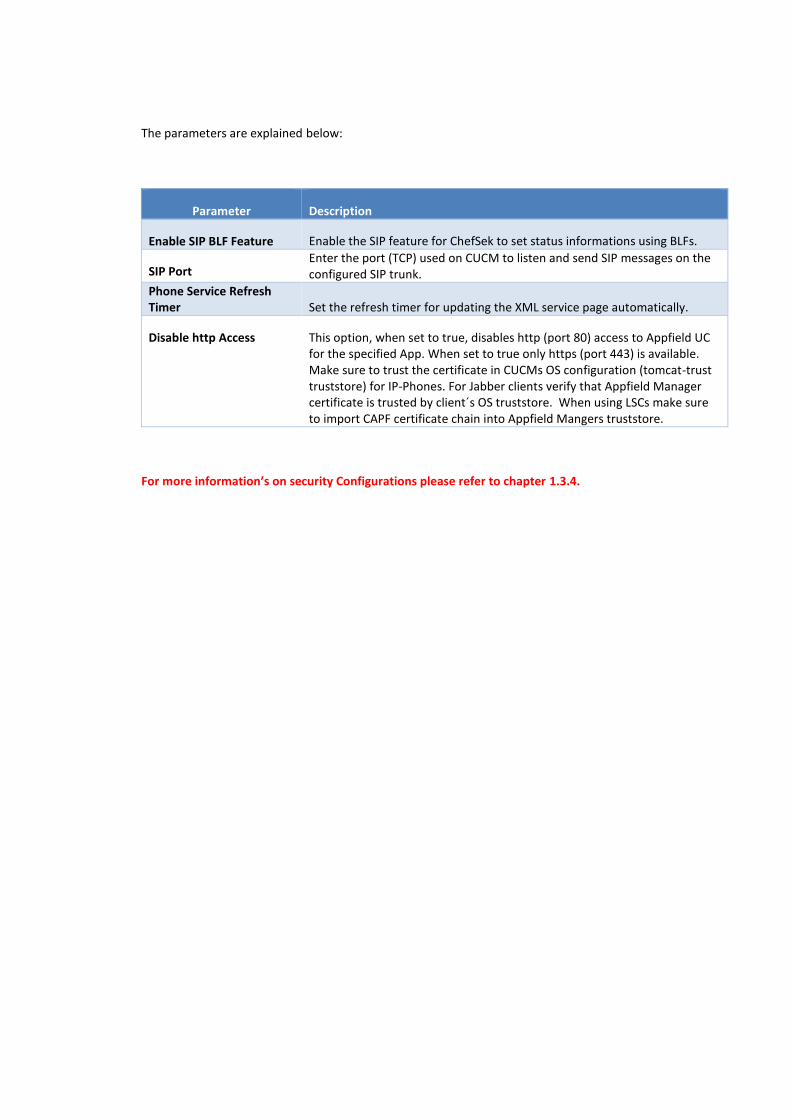
The parameters are explained below:
Parameter Description
Enable SIP BLF Feature Enable the SIP feature for ChefSek to set status informations using BLFs.
SIP Port Enter the port (TCP) used on CUCM to listen and send SIP messages on the configured SIP trunk.
Phone Service Refresh Timer Set the refresh timer for updating the XML service page automatically.
Disable http Access This option, when set to true, disables http (port 80) access to Appfield UC for the specified App. When set to true only https (port 443) is available. Make sure to trust the certificate in CUCMs OS configuration (tomcat-trust truststore) for IP-Phones. For Jabber clients verify that Appfield Manager certificate is trusted by client´s OS truststore. When using LSCs make sure to import CAPF certificate chain into Appfield Mangers truststore.
For more information’s on security Configurations please refer to chapter 1.3.4.
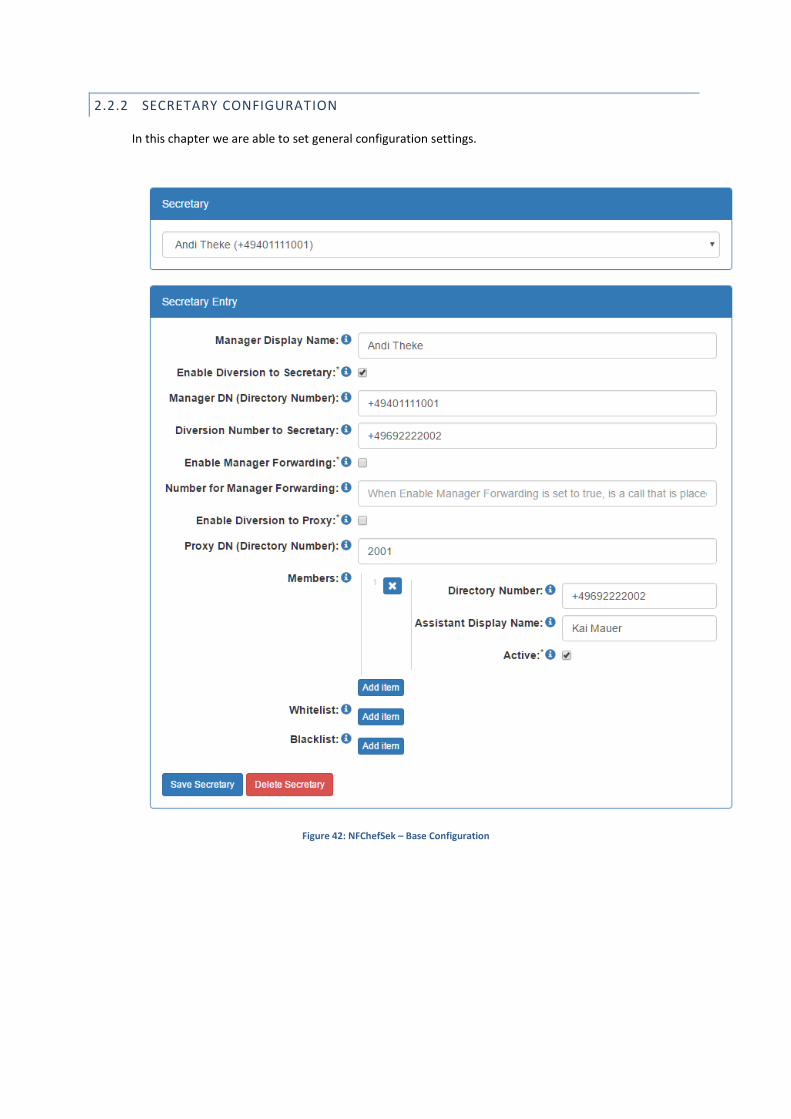
2.2.2 SECRETARY CONFIGURATION
In this chapter we are able to set general configuration settings.
Figure 42: NFChefSek – Base Configuration
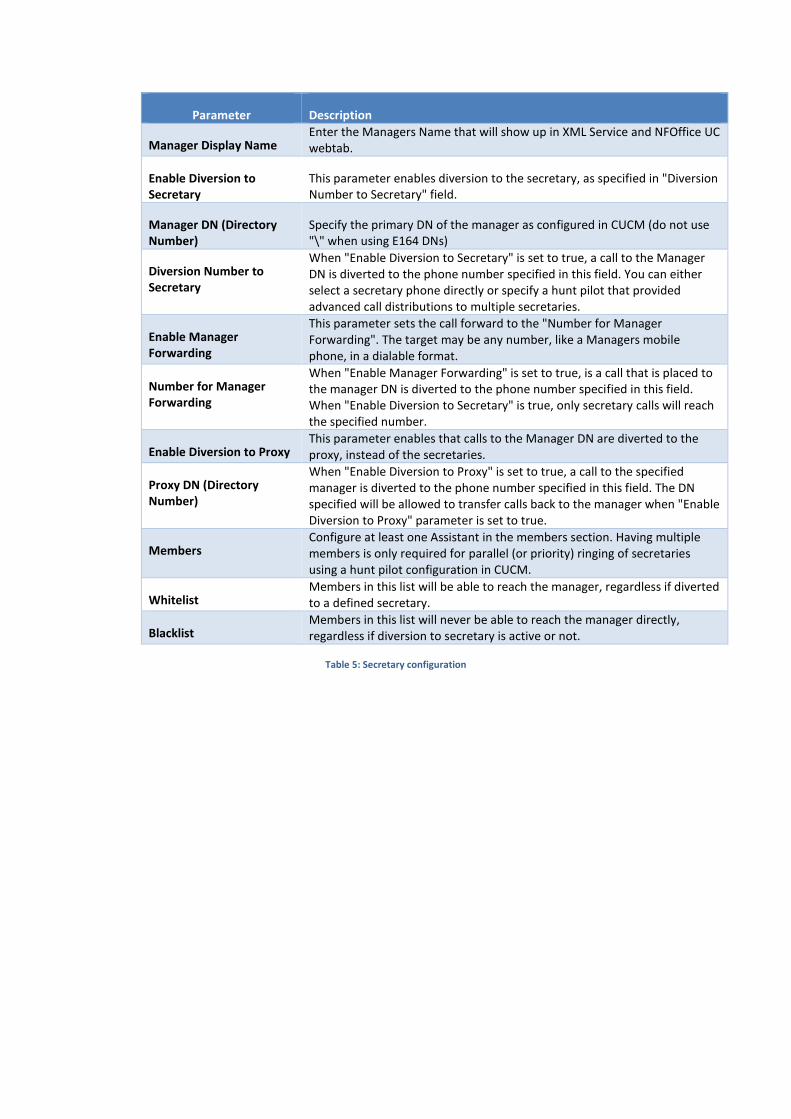
Parameter Description
Manager Display Name Enter the Managers Name that will show up in XML Service and NFOffice UC webtab.
Enable Diversion to Secretary
This parameter enables diversion to the secretary, as specified in "Diversion Number to Secretary" field.
Manager DN (Directory Number)
Specify the primary DN of the manager as configured in CUCM (do not use "\" when using E164 DNs)
Diversion Number to Secretary
When "Enable Diversion to Secretary" is set to true, a call to the Manager DN is diverted to the phone number specified in this field. You can either select a secretary phone directly or specify a hunt pilot that provided advanced call distributions to multiple secretaries.
Enable Manager Forwarding
This parameter sets the call forward to the "Number for Manager Forwarding". The target may be any number, like a Managers mobile phone, in a dialable format.
Number for Manager Forwarding
When "Enable Manager Forwarding" is set to true, is a call that is placed to the manager DN is diverted to the phone number specified in this field. When "Enable Diversion to Secretary" is true, only secretary calls will reach the specified number.
Enable Diversion to Proxy This parameter enables that calls to the Manager DN are diverted to the proxy, instead of the secretaries.
Proxy DN (Directory Number)
When "Enable Diversion to Proxy" is set to true, a call to the specified manager is diverted to the phone number specified in this field. The DN specified will be allowed to transfer calls back to the manager when "Enable Diversion to Proxy" parameter is set to true.
Members Configure at least one Assistant in the members section. Having multiple members is only required for parallel (or priority) ringing of secretaries using a hunt pilot configuration in CUCM.
Whitelist Members in this list will be able to reach the manager, regardless if diverted to a defined secretary.
Blacklist Members in this list will never be able to reach the manager directly, regardless if diversion to secretary is active or not.
Table 5: Secretary configuration
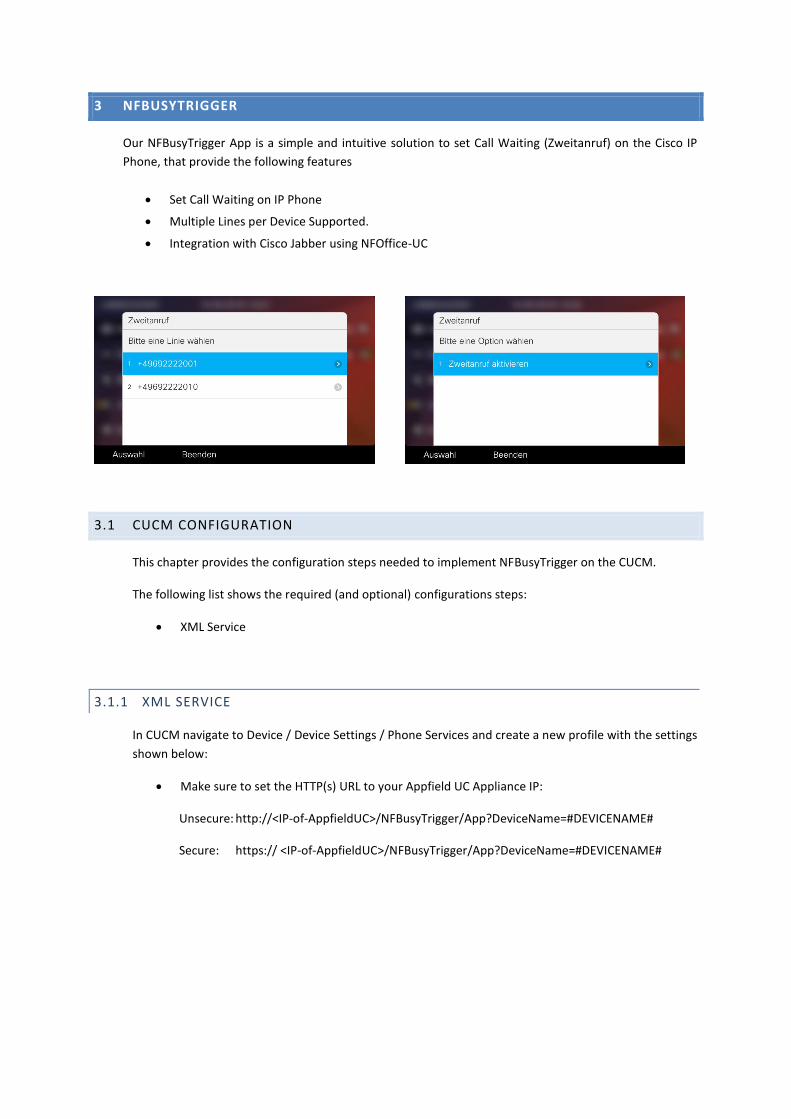
3 NFBUSYTRIGGER
Our NFBusyTrigger App is a simple and intuitive solution to set Call Waiting (Zweitanruf) on the Cisco IP
Phone, that provide the following features
Set Call Waiting on IP Phone
Multiple Lines per Device Supported.
Integration with Cisco Jabber using NFOffice-UC
3.1 CUCM CONFIGURATION
This chapter provides the configuration steps needed to implement NFBusyTrigger on the CUCM.
The following list shows the required (and optional) configurations steps:
XML Service
3.1.1 XML SERVICE
In CUCM navigate to Device / Device Settings / Phone Services and create a new profile with the settings
shown below:
Make sure to set the HTTP(s) URL to your Appfield UC Appliance IP:
Unsecure: http://<IP-of-AppfieldUC>/NFBusyTrigger/App?DeviceName=#DEVICENAME#
Secure: https:// <IP-of-AppfieldUC>/NFBusyTrigger/App?DeviceName=#DEVICENAME#
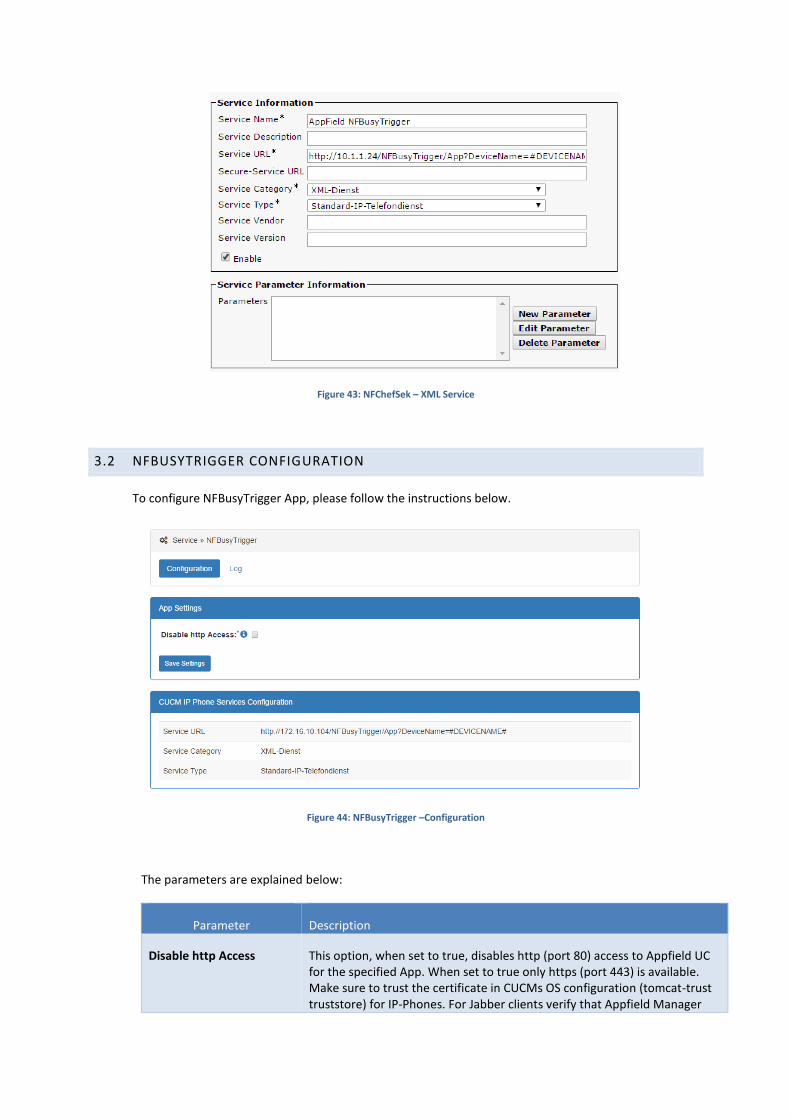
Figure 43: NFChefSek – XML Service
3.2 NFBUSYTRIGGER CONFIGURATION
To configure NFBusyTrigger App, please follow the instructions below.
Figure 44: NFBusyTrigger –Configuration
The parameters are explained below:
Parameter Description
Disable http Access This option, when set to true, disables http (port 80) access to Appfield UC for the specified App. When set to true only https (port 443) is available. Make sure to trust the certificate in CUCMs OS configuration (tomcat-trust truststore) for IP-Phones. For Jabber clients verify that Appfield Manager

certificate is trusted by client´s OS truststore. When using LSCs make sure to import CAPF certificate chain into Appfield Mangers truststore.
For more information’s on security Configurations please refer to chapter 1.3.4.
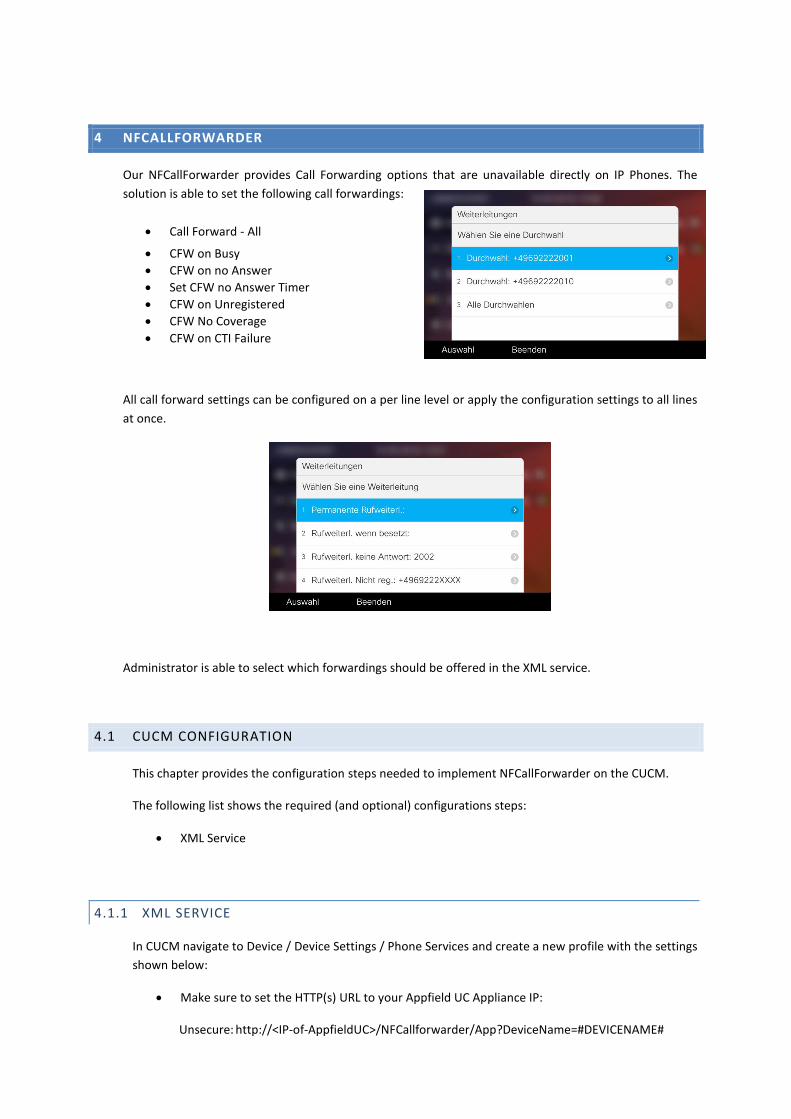
4 NFCALLFORWARDER
Our NFCallForwarder provides Call Forwarding options that are unavailable directly on IP Phones. The
solution is able to set the following call forwardings:
Call Forward - All
CFW on Busy
CFW on no Answer
Set CFW no Answer Timer
CFW on Unregistered
CFW No Coverage
CFW on CTI Failure
All call forward settings can be configured on a per line level or apply the configuration settings to all lines
at once.
Administrator is able to select which forwardings should be offered in the XML service.
4.1 CUCM CONFIGURATION
This chapter provides the configuration steps needed to implement NFCallForwarder on the CUCM.
The following list shows the required (and optional) configurations steps:
XML Service
4.1.1 XML SERVICE
In CUCM navigate to Device / Device Settings / Phone Services and create a new profile with the settings
shown below:
Make sure to set the HTTP(s) URL to your Appfield UC Appliance IP:
Unsecure: http://<IP-of-AppfieldUC>/NFCallforwarder/App?DeviceName=#DEVICENAME#
Secure: https:// <IP-of-AppfieldUC>/ NFCallforwarder/App?DeviceName=#DEVICENAME#
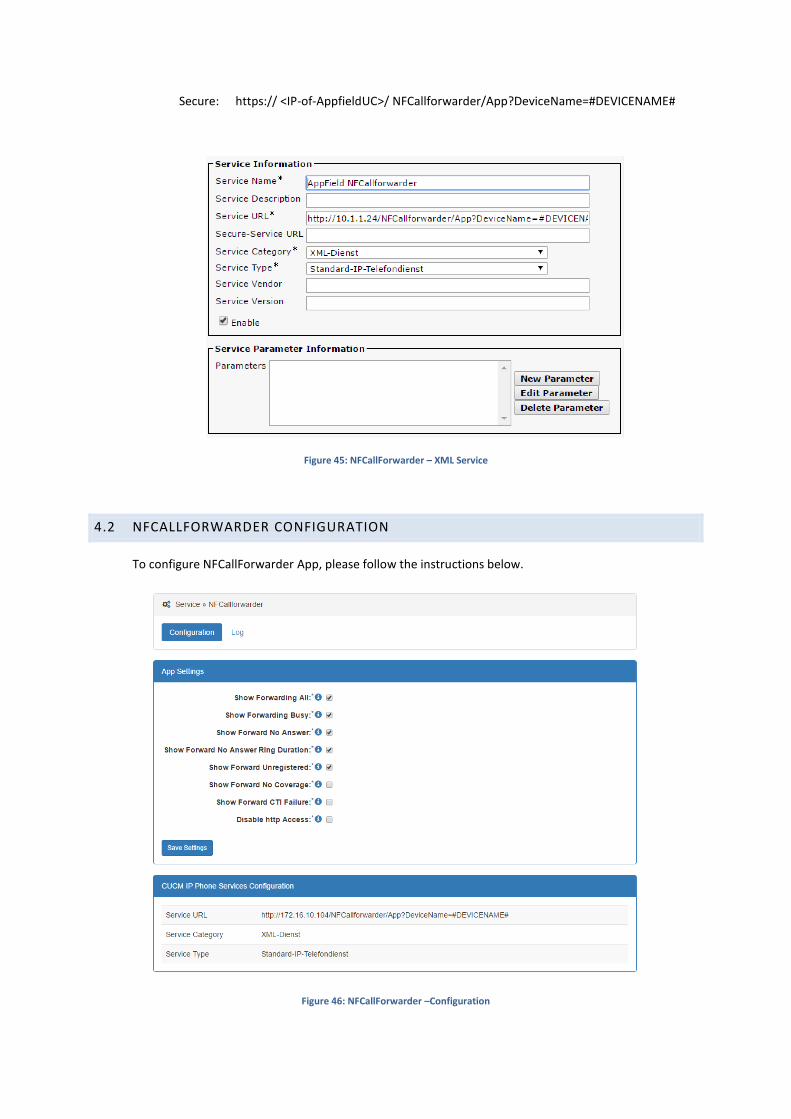
Figure 45: NFCallForwarder – XML Service
4.2 NFCALLFORWARDER CONFIGURATION
To configure NFCallForwarder App, please follow the instructions below.
Figure 46: NFCallForwarder –Configuration
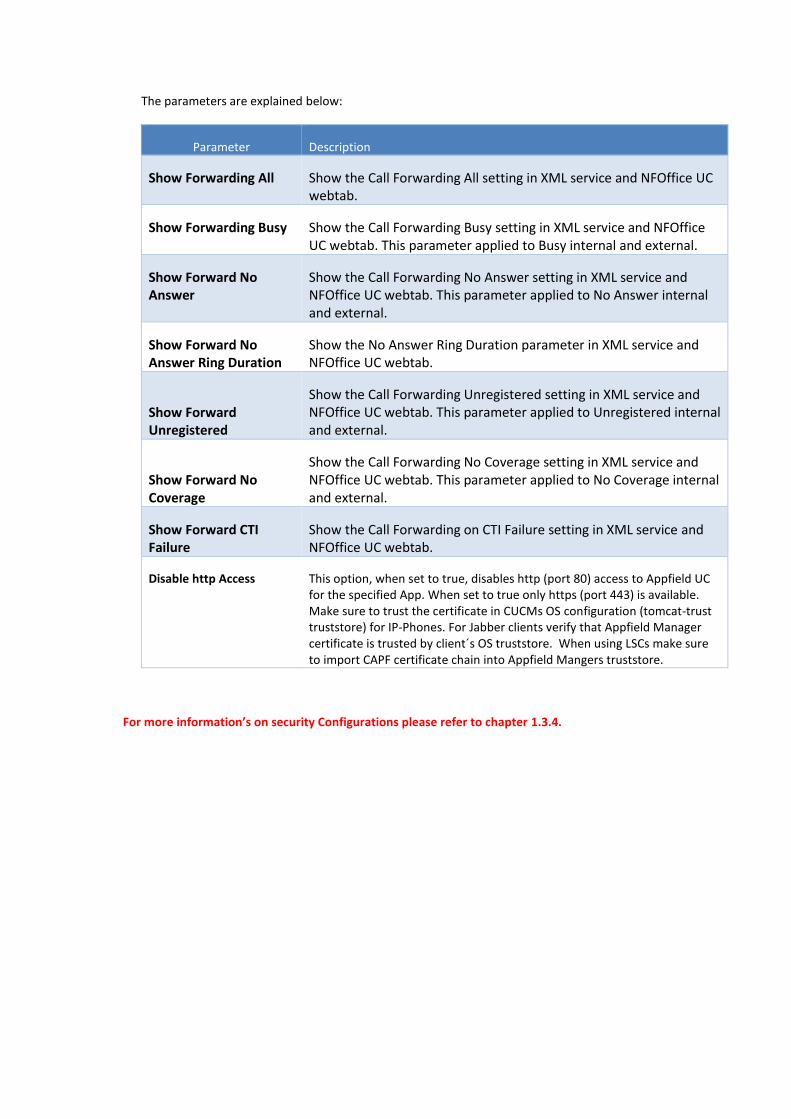
The parameters are explained below:
Parameter Description
Show Forwarding All Show the Call Forwarding All setting in XML service and NFOffice UC webtab.
Show Forwarding Busy Show the Call Forwarding Busy setting in XML service and NFOffice UC webtab. This parameter applied to Busy internal and external.
Show Forward No Answer
Show the Call Forwarding No Answer setting in XML service and NFOffice UC webtab. This parameter applied to No Answer internal and external.
Show Forward No Answer Ring Duration
Show the No Answer Ring Duration parameter in XML service and NFOffice UC webtab.
Show Forward Unregistered
Show the Call Forwarding Unregistered setting in XML service and NFOffice UC webtab. This parameter applied to Unregistered internal and external.
Show Forward No Coverage
Show the Call Forwarding No Coverage setting in XML service and NFOffice UC webtab. This parameter applied to No Coverage internal and external.
Show Forward CTI Failure
Show the Call Forwarding on CTI Failure setting in XML service and NFOffice UC webtab.
Disable http Access This option, when set to true, disables http (port 80) access to Appfield UC for the specified App. When set to true only https (port 443) is available. Make sure to trust the certificate in CUCMs OS configuration (tomcat-trust truststore) for IP-Phones. For Jabber clients verify that Appfield Manager certificate is trusted by client´s OS truststore. When using LSCs make sure to import CAPF certificate chain into Appfield Mangers truststore.
For more information’s on security Configurations please refer to chapter 1.3.4.
5 NFCOMPANYDIRECTORY
Our NFCompanyDirectory provides a very customizable Phonebook that fits your customer needs.
NFCompanyDirectory provides the following
features:
Create a Phonebook based on LDAP using:
o MS Active Directory
o OpenLDAP
Define search parameters in accordance with customer requirements.
Set search results and their layout presented on Cisco IP Phone.
Show any LDAP parameters like Mobile, eMail, Departments, etc.
Make a parameter dialable, whatever LDAP field it is.
Set filter criteria on LDAP to ensure no System Users are presented in the phone book.
You may have the requirement to create multiple Directories, no problem just upload another LDAP
Directory WAR File to Appfield UC and configure it.
5.1 CUCM CONFIGURATION
This chapter provides the configuration steps needed to implement NFCallForwarder on the CUCM.
The following list shows the required (and optional) configurations steps:
XML Service
5.1.1 XML SERVICE
In CUCM navigate to Device / Device Settings / Phone Services and create a new profile with the settings
shown below:
Make sure to set the HTTP(s) URL to your Appfield UC Appliance IP:
Unsecure: http://<IP-of-AppfieldUC>/NFCompanyDirectory/App?DeviceName=#DEVICENAME#
Secure: https:// <IP-of-AppfieldUC>/ NFCompanyDirectory /App?DeviceName=#DEVICENAME#
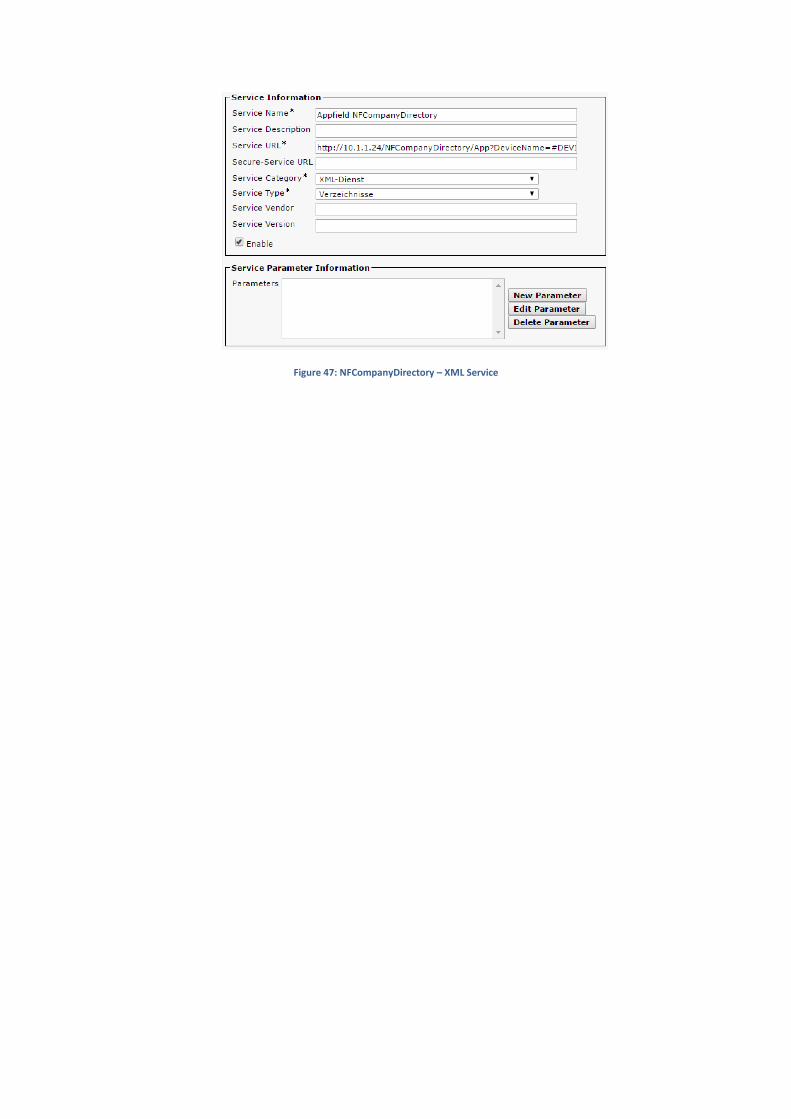
Figure 47: NFCompanyDirectory – XML Service
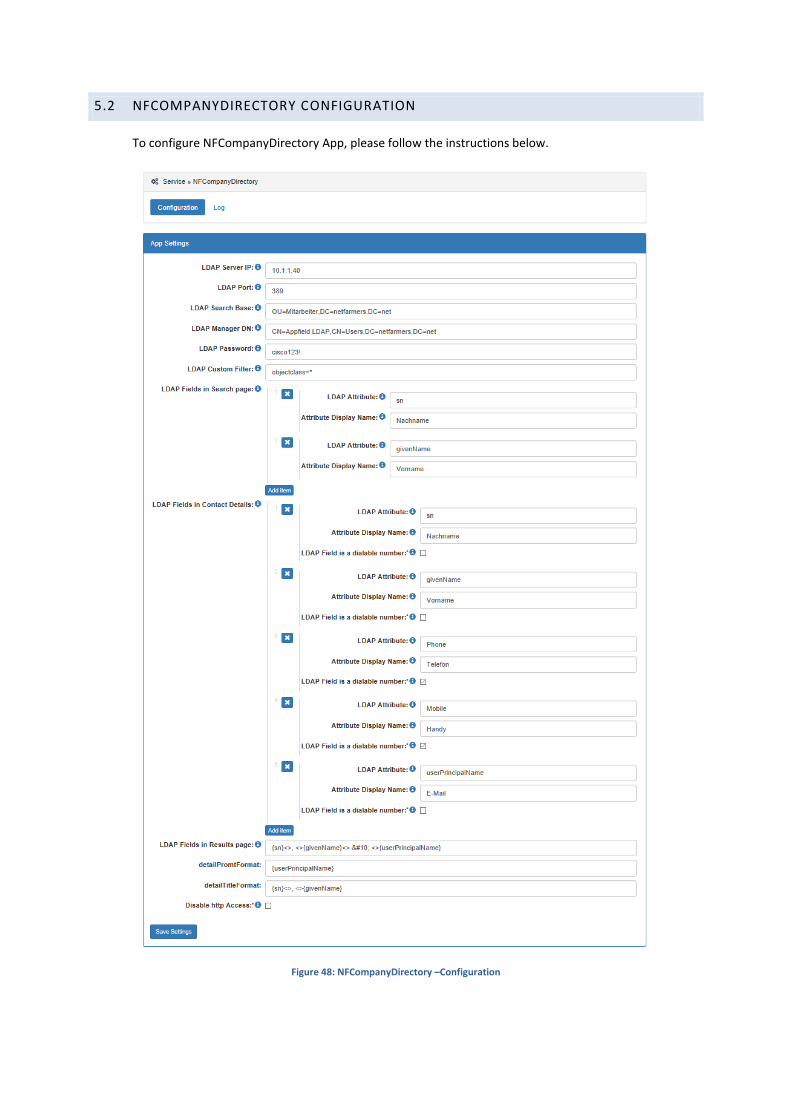
5.2 NFCOMPANYDIRECTORY CONFIGURATION
To configure NFCompanyDirectory App, please follow the instructions below.
Figure 48: NFCompanyDirectory –Configuration
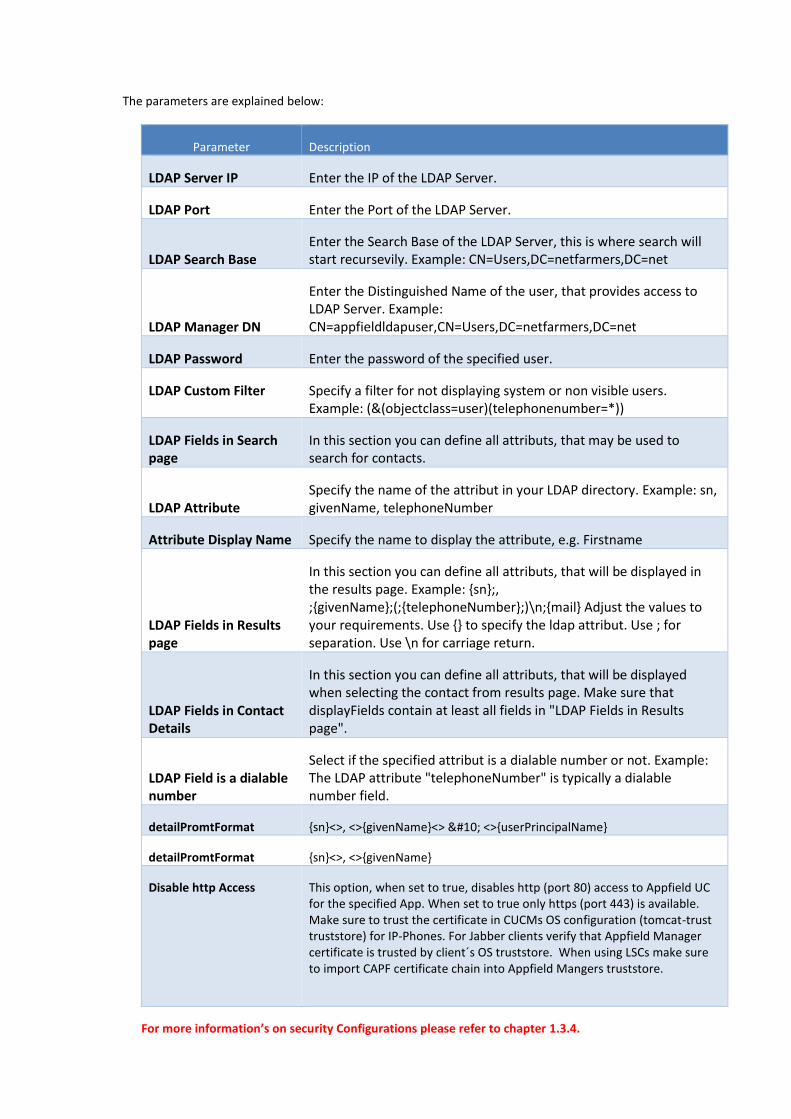
The parameters are explained below:
Parameter Description
LDAP Server IP Enter the IP of the LDAP Server.
LDAP Port Enter the Port of the LDAP Server.
LDAP Search Base
Enter the Search Base of the LDAP Server, this is where search will start recursevily. Example: CN=Users,DC=netfarmers,DC=net
LDAP Manager DN
Enter the Distinguished Name of the user, that provides access to LDAP Server. Example: CN=appfieldldapuser,CN=Users,DC=netfarmers,DC=net
LDAP Password Enter the password of the specified user.
LDAP Custom Filter Specify a filter for not displaying system or non visible users. Example: (&(objectclass=user)(telephonenumber=*))
LDAP Fields in Search page
In this section you can define all attributs, that may be used to search for contacts.
LDAP Attribute Specify the name of the attribut in your LDAP directory. Example: sn, givenName, telephoneNumber
Attribute Display Name Specify the name to display the attribute, e.g. Firstname
LDAP Fields in Results page
In this section you can define all attributs, that will be displayed in the results page. Example: {sn};, ;{givenName};(;{telephoneNumber};)\n;{mail} Adjust the values to your requirements. Use {} to specify the ldap attribut. Use ; for separation. Use \n for carriage return.
LDAP Fields in Contact Details
In this section you can define all attributs, that will be displayed when selecting the contact from results page. Make sure that displayFields contain at least all fields in "LDAP Fields in Results page".
LDAP Field is a dialable number
Select if the specified attribut is a dialable number or not. Example: The LDAP attribute "telephoneNumber" is typically a dialable number field.
detailPromtFormat {sn}<>, <>{givenName}<> <>{userPrincipalName}
detailPromtFormat {sn}<>, <>{givenName}
Disable http Access This option, when set to true, disables http (port 80) access to Appfield UC for the specified App. When set to true only https (port 443) is available. Make sure to trust the certificate in CUCMs OS configuration (tomcat-trust truststore) for IP-Phones. For Jabber clients verify that Appfield Manager certificate is trusted by client´s OS truststore. When using LSCs make sure to import CAPF certificate chain into Appfield Mangers truststore.
For more information’s on security Configurations please refer to chapter 1.3.4.

6 NFOFFICE-UC
Our NFOffice UC is our interface to Cisco Jabber application. We use Webtabs in Cisco Jabber to provide
access to our NF Apps.
The following NF Apps can be controlled by the user
using NFOffice UC:
NFChefSek
NFBusyTrigger
NFCallForwarder
6.1 CUCM CONFIGURATION
This chapter provides the configuration steps needed to implement NFOffice UC on the CUCM.
The following list shows the required (and optional) configurations steps:
Custom Jabber Tab
6.1.1 CUSTOM JABBER TAB
WebTabs in Cisco Jabber are defined in the configuration file jabber-config.xml. If you would like to
provide NFOffice UC to your users, you can distribute the NFOffice UC webtab to your Cisco Jabber
application.
The following snippet is a configuration sample for NFOffice UC webtab, please insert the section into
your jabber-config.xml:
<?xml version="1.0" encoding="utf-8"?>
<config version="1.0">
<Client>
<jabber-plugin-config>
<browser-plugin>
<page refresh="true" preload="true">
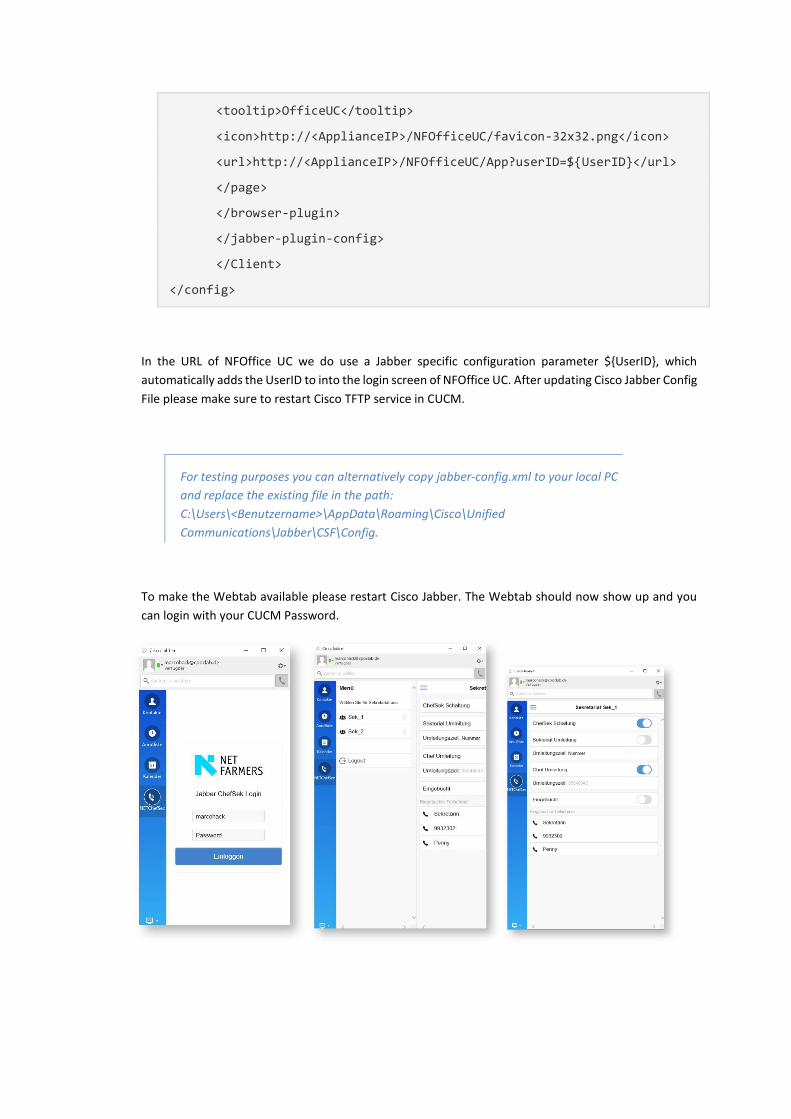
<tooltip>OfficeUC</tooltip>
<icon>http://<ApplianceIP>/NFOfficeUC/favicon-32x32.png</icon>
<url>http://<ApplianceIP>/NFOfficeUC/App?userID=${UserID}</url>
</page>
</browser-plugin>
</jabber-plugin-config>
</Client>
</config>
In the URL of NFOffice UC we do use a Jabber specific configuration parameter ${UserID}, which
automatically adds the UserID to into the login screen of NFOffice UC. After updating Cisco Jabber Config
File please make sure to restart Cisco TFTP service in CUCM.
For testing purposes you can alternatively copy jabber-config.xml to your local PC
and replace the existing file in the path:
C:\Users\<Benutzername>\AppData\Roaming\Cisco\Unified
Communications\Jabber\CSF\Config.
To make the Webtab available please restart Cisco Jabber. The Webtab should now show up and you
can login with your CUCM Password.
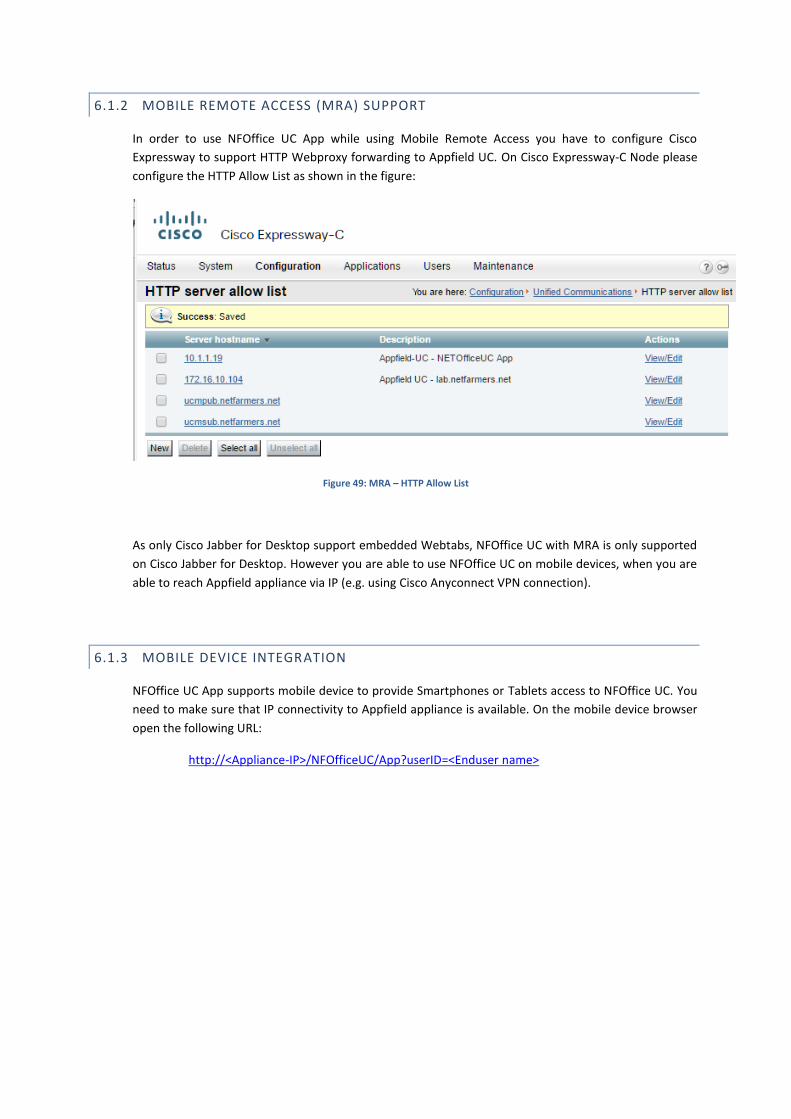
6.1.2 MOBILE REMOTE ACCESS (MRA) SUPPORT
In order to use NFOffice UC App while using Mobile Remote Access you have to configure Cisco
Expressway to support HTTP Webproxy forwarding to Appfield UC. On Cisco Expressway-C Node please
configure the HTTP Allow List as shown in the figure:
Figure 49: MRA – HTTP Allow List
As only Cisco Jabber for Desktop support embedded Webtabs, NFOffice UC with MRA is only supported
on Cisco Jabber for Desktop. However you are able to use NFOffice UC on mobile devices, when you are
able to reach Appfield appliance via IP (e.g. using Cisco Anyconnect VPN connection).
6.1.3 MOBILE DEVICE INTEGRATION
NFOffice UC App supports mobile device to provide Smartphones or Tablets access to NFOffice UC. You
need to make sure that IP connectivity to Appfield appliance is available. On the mobile device browser
open the following URL:
http://<Appliance-IP>/NFOfficeUC/App?userID=<Enduser name>

Next you´ll find online configuration guidelines on how to add the NFOffice UC to the Home Screen on
the Smartphone or Tablet device.
o iOS: http://www.apple.com/chde/ios/add-to-home-screen/
o Android: http://mobile-pixels.com/pin-webapp-website-android-homescreen/
6.2 NFOFFICE UC CONFIGURATION
To configure NFOffice UC App, please set the Service Names as configured in
Appfield UC appliance. If the Service Name is leaved blank then the feature is
disabled in NFOffice. Otherwise the active services are shown in the
navigation sidebar.
The parameters are explained below:
Parameter Description
Service Name for ChefSek
Enter the service name for ChefSek, as shown on Services page (column Service) to enable this service in NFOffice UC webtab.
Service Name for BusyTrigger
Enter the service name for BusyTrigger as shown on Services page (column Service) to enable this service in NFOffice UC webtab.
Service Name for Callforwarder
Enter the service name for CallForwarder as shown on Services page (column Service) to enable this service in NFOffice UC webtab.

Disable http Access This option, when set to true, disables http (port 80) access to Appfield UC for the specified App. When set to true only https (port 443) is available. Make sure to trust the certificate in CUCMs OS configuration (tomcat-trust truststore) for IP-Phones. For Jabber clients verify that Appfield Manager certificate is trusted by client´s OS truststore. When using LSCs make sure to import CAPF certificate chain into Appfield Mangers truststore.
Table 6: NFOffice configuration
For more information’s on security Configurations please refer to chapter 1.3.4.