Embed Size (px)
Citation preview

API Documentation
Rev 1/5/17
Contents:
Integration Considerations 1 Data Mapping 1 Middleware 2 Synchronization 2 Step 1: Determine the Business Requirements of your Integration 3 Step 2: Decide What Data to Synchronize 3 Step 3: Create the Synchronization Script 3
Getting Started with the API 5 360Alumni provides the following REST endpoints and methods: 5 The API URLs 5 Get Your API Key 5 Requesting Data 5
Filtering Responses 12 Filtering Campaign Results 12 Filtering Donation Results 15 Filtering User Results 18
Creating and Updating Users 21 Create a New User with POST /api/users/ 21 Get an Array of User Records with GET /api/users/ 22 Get a Specific User's Record with GET /api/users/{id} 23 Update a User Record with PUT /api/users/{id} 27
API Documentation, Page 1 of 28

Integration Considerations
Data Mapping
You'll need to create a plan for how to keep your data models synchronized. Data must be pulled from 360Alumni's API rather than pushed via an event-driven integration model. So your integration needs to periodically scan the data and provide a change log to act upon. Once you have decided upon your synchronization model, you need to identify which fields you are going to keep synchronized between the two systems. Use the User Object reference page to help with your mapping. You can also download a copy of the following spreadsheet to use for your mapping:
1. Open the 360Alumni User Data Mapping Template. 2. Select File > Download as >, from the open template. 3. Select your preferred format to save the spreadsheet:
○ Excel ○ OpenDocument ○ Comma separated values (CSV) ○ Tab separated values (TSV)
4. The template is sorted by JSON field column. You might find it useful to do your mapping by resorting your spreadsheet by the Preferred Order column.
Middleware
Another consideration is the middleware that provides the "bridge" between 360Alumni and your database. Middleware provides enforcement of business logic such as conversion of the data format or structures. Another example of middleware tasks is adding a layer of protection so bad data or glitches can not create chaos in the destination system. An example of middleware is Zapier, which is a middleware "clearinghouse" - offering prepackaged middleware "scripts" for thousands of software applications. 360Alumni has a privately available "Zap" which can be used by our clients who run Salesforce.
API Documentation, Page 2 of 28
Synchronization
One method of integrating your application with 360Alumni is via a polling and synchronization method. This involves checking the database periodically for changes and then updating records accordingly. A polling and sync integration works by running a script that checks for updates and then will update a target based on changes. You can make these integrations two-way by simply applying the business logic you create to both checks. The following integration example uses a CRM to show how a sync integration can work. Awesome University has a CRM that they use to keep track of their alumni and ensure they can keep track of their donations. They have recently become a partner with 360Alumni and would like to ensure that their alumni database in their CRM and 360Alumni remains in sync. In order to accomplish this they will be setting up a sync with 360Alumni using the "Users" endpoint of the API.
● Step 1: Determine the Business Requirements of your Integration ● Step 2: Decide What Data to Synchronize ● Step 3: Create the Synchronization Script
Step 1: Determine the Business Requirements of your Integration
For Awesome University's integration they have determined they want to perform a two way sync with 360Alumni and the contacts in their CRM system. They determined this by finding out the business requirements by talking with stakeholders in their organization. This involved a short series of meetings where they discussed what data they wanted to keep in sync with 360Alumni. They decided upon a two way sync because it would allow them to maintain their alumni directory both organically and still be able to manage it through their CRM.
Step 2: Decide What Data to Synchronize
API Documentation, Page 3 of 28
Awesome University had to decide what parts of their contact data they wanted to keep in sync, so they referred to 360Alumni's field list and settled upon the first name, last name, email, and phone number fields only. They did this because they had only maintained these pieces of contact information in their CRM so they wanted to get them updated as users provided updates. They could have included additional fields but chose a lean approach for phase 1 of their integration.
Step 3: Create the Synchronization Script
Awesome University maintains a couple of in house servers so they decided their script will be written in node.js and run once a day at 1 AM on one of their linux environments. Their script will simply look at records that were changed in each system and then update or create records on each of the respective environments. This also allows Awesome University to put in any transformations they need.
API Documentation, Page 4 of 28
Getting Started with the API
360Alumni provides the following REST endpoints and methods:
● /api/campaigns/ ● GET method ● /api/campaigns/{id} ● GET method ● /api/donations/ ● GET method ● /api/users/ ● GET and POST methods ● /api/users/{id} ● GET and PUT methods
The API URLs
Use one of the following URLs to open the API reference.
Test system https://demo.s.360alumni.com/api/documentation
Your system https://<<your-system>>.360alumni.com/api/documentation
Get Your API Key
Before you can use the API you'll need to get your API key, which you use to authenticate with the API. Your account manager at 360Alumni will coordinate with our Client Integrations Team to create an API key for your organization. Once you have the key, connecting to the 360Alumni API is easy. For each API request, simply include your API key as the value in an HTTP header named x-api-key. See the examples for details.
API Documentation, Page 5 of 28
Requesting Data
The following steps walk you through the basics to get started using the API.
1. Click an API method to display it's reference documentation. For example, click GET /api/campaigns/.
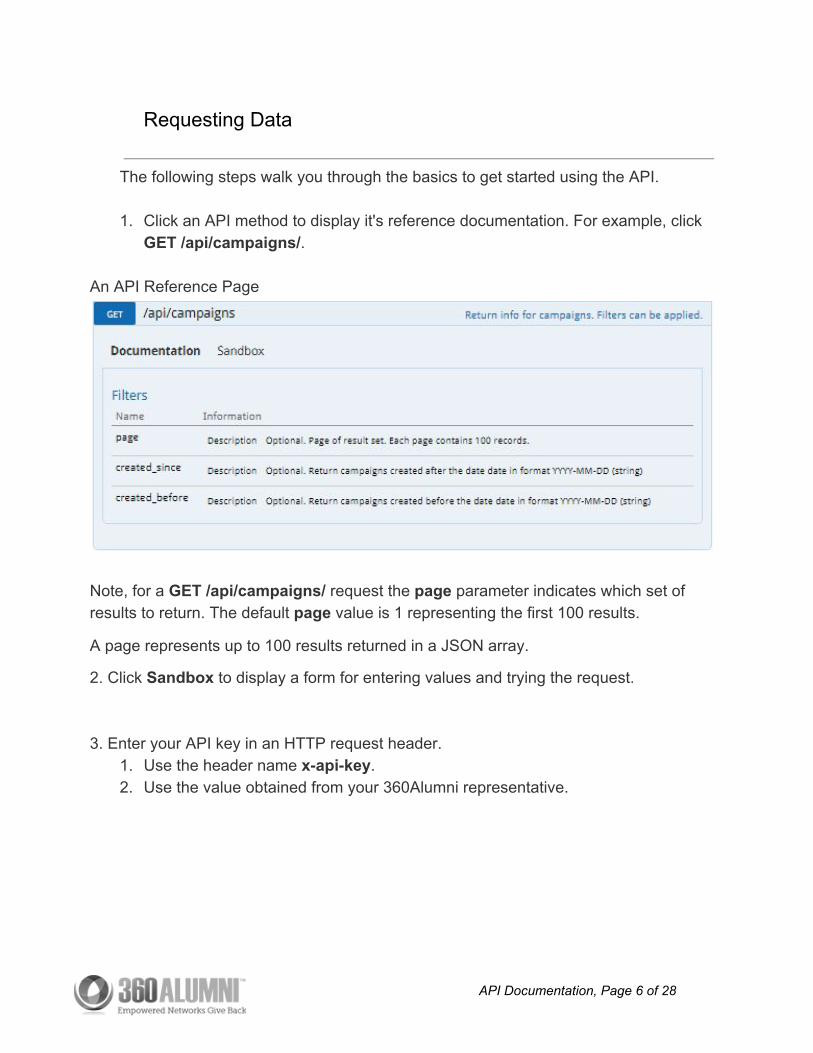
An API Reference Page
Note, for a GET /api/campaigns/ request the page parameter indicates which set of results to return. The default page value is 1 representing the first 100 results.
A page represents up to 100 results returned in a JSON array.
2. Click Sandbox to display a form for entering values and trying the request. 3. Enter your API key in an HTTP request header.
1. Use the header name x-api-key. 2. Use the value obtained from your 360Alumni representative.
API Documentation, Page 6 of 28
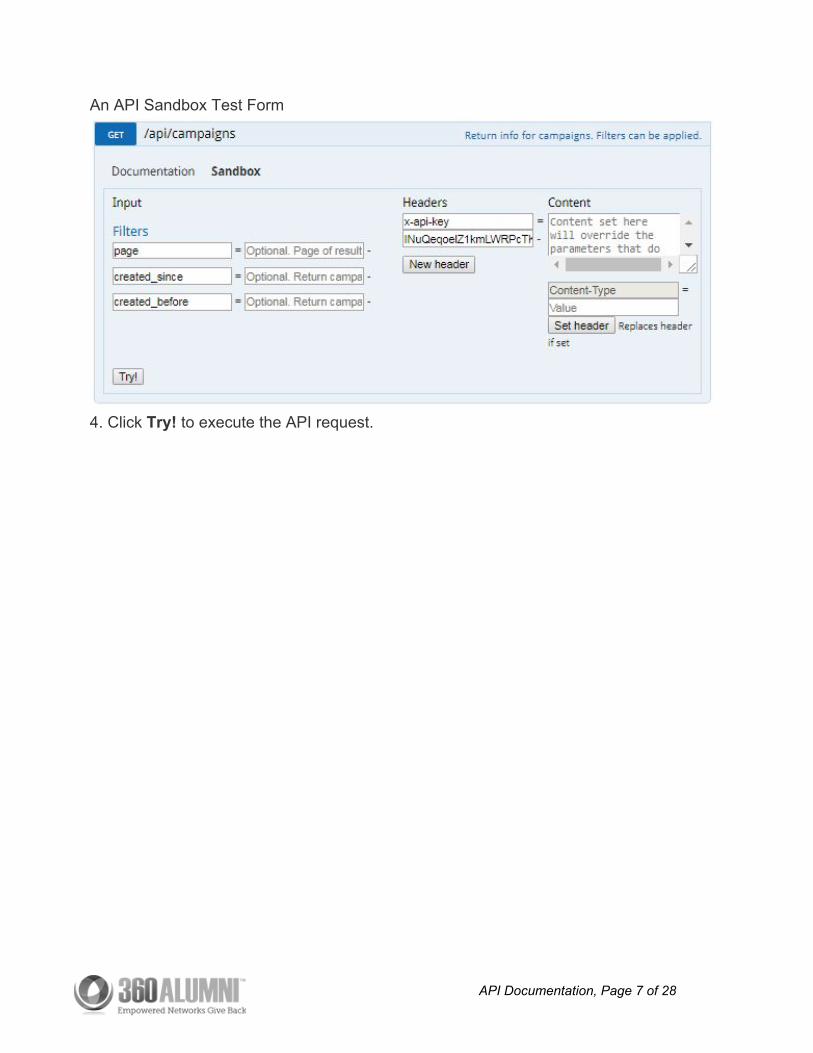
An API Sandbox Test Form
4. Click Try! to execute the API request.
API Documentation, Page 7 of 28
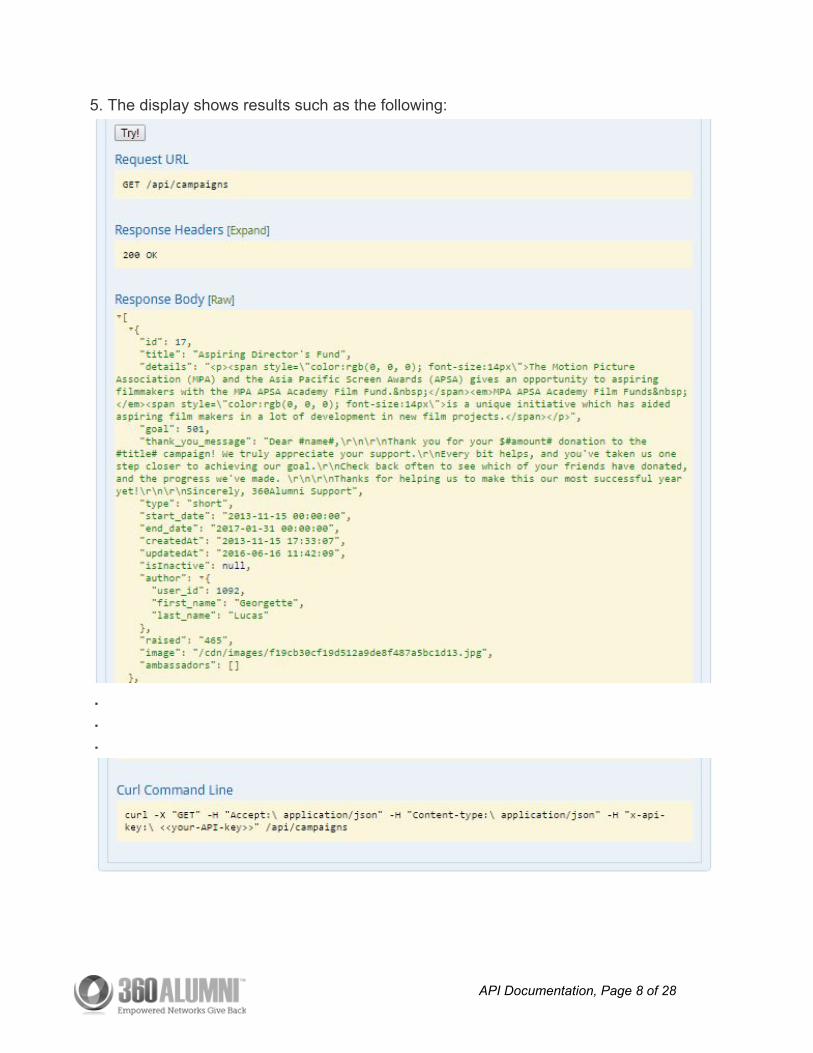
5. The display shows results such as the following:
. . .
API Documentation, Page 8 of 28

Note the following about the results:
● Request URL: Shows what executed. ● Response Headers: Contains messages about the success or failure of the
request. ● Response Body: Contains a JSON array of the results, in this case an array of
Campaign Objects. Other API requests use the Donation Object or the User Object.
● Curl Command Line: Contains a form of the request that you can copy and paste to execute at the command line or in scripts.
curl -X "GET" -H "Accept:\ application/json" -H "Content-type:\ application/json" -H "x-api-key:\ <<your-API-key>>" /api/campaigns
6. Each campaign object in the returned array is identified with an id value. Note the first object in the array above contains the id value 17.
7. To get a single campaign object, click GET /api/campaigns/{id}. This API request requires an integer id parameter that represents the compaign
identifier. The Reference Page for GET /api/campaigns/{id}
8. Click Sandbox and enter the following to execute the API request:
A. Enter your API key in an HTTP request header. B. Enter an id parameter value representing the campaign you want to get.
API Documentation, Page 9 of 28
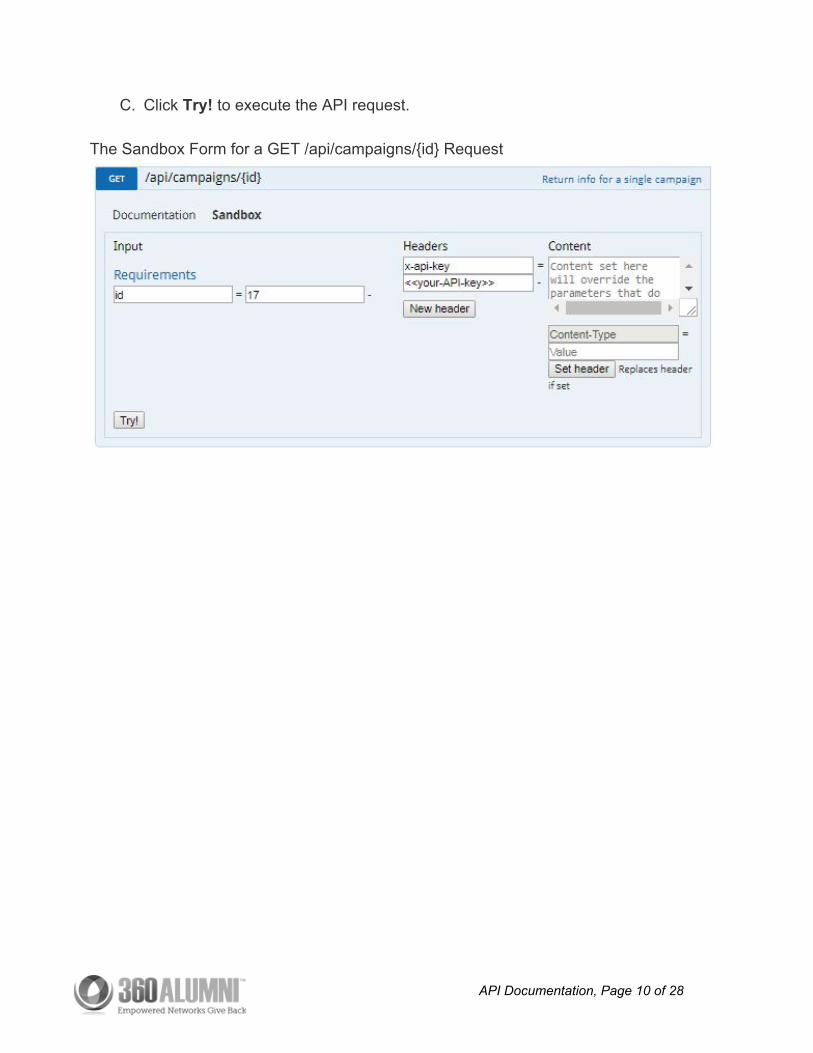
C. Click Try! to execute the API request. The Sandbox Form for a GET /api/campaigns/{id} Request
API Documentation, Page 10 of 28
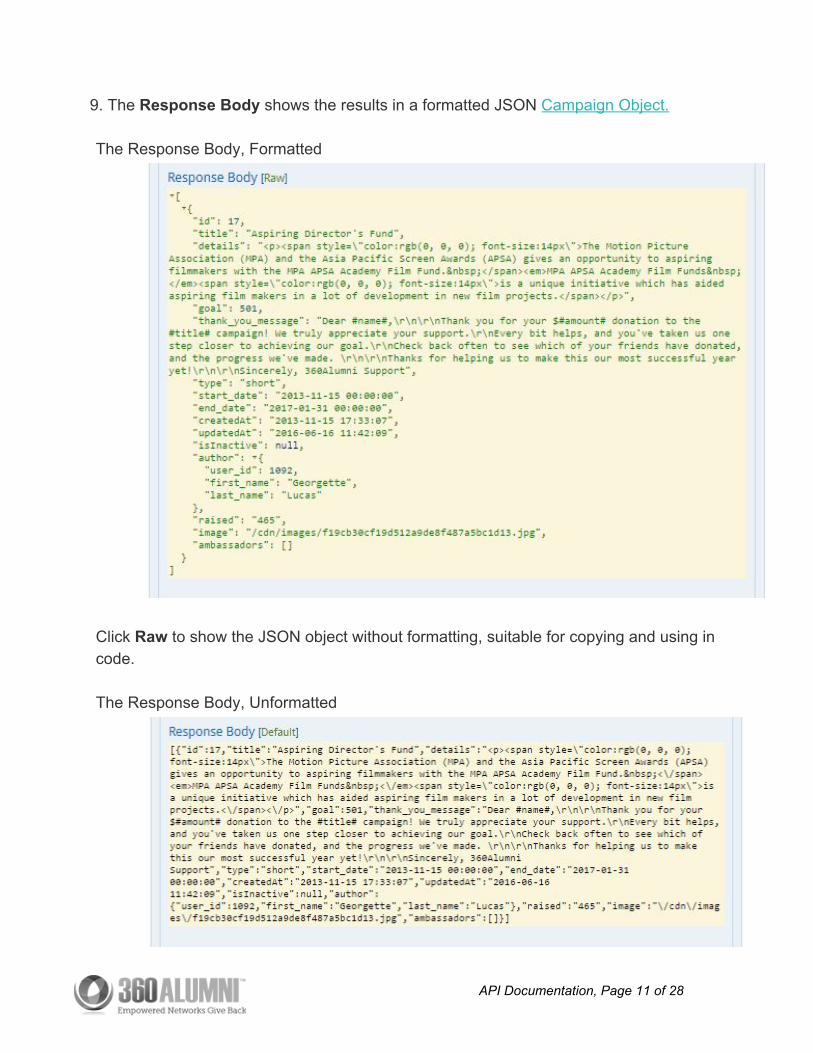
9. The Response Body shows the results in a formatted JSON Campaign Object. The Response Body, Formatted
Click Raw to show the JSON object without formatting, suitable for copying and using in code.
The Response Body, Unformatted
API Documentation, Page 11 of 28
Filtering Responses
Some GET methods provide optional filter parameters you can include to narrow API results based on various criteria. The following sections show how to use some filter parameters to get data on campaigns, donations, and users. This page contains the following topics:
● Filtering Campaign Results ● Filtering Donation Results ● Filtering User Results
Use one of the following URLs to open the API reference.
Test system
https://demo.s.360alumni.com/api/documentation
Your system
https://<<your-system>>.360alumni.com/api/documentation
Filtering Campaign Results
The following steps walk you through using a filter parameter to get data on campaigns.
1. Click the GET /api/campaigns/ method. Optional filter parameters include created_since and created_before. Use these parameters to narrow the campaigns returned to within a specific time frame.
API Documentation, Page 12 of 28
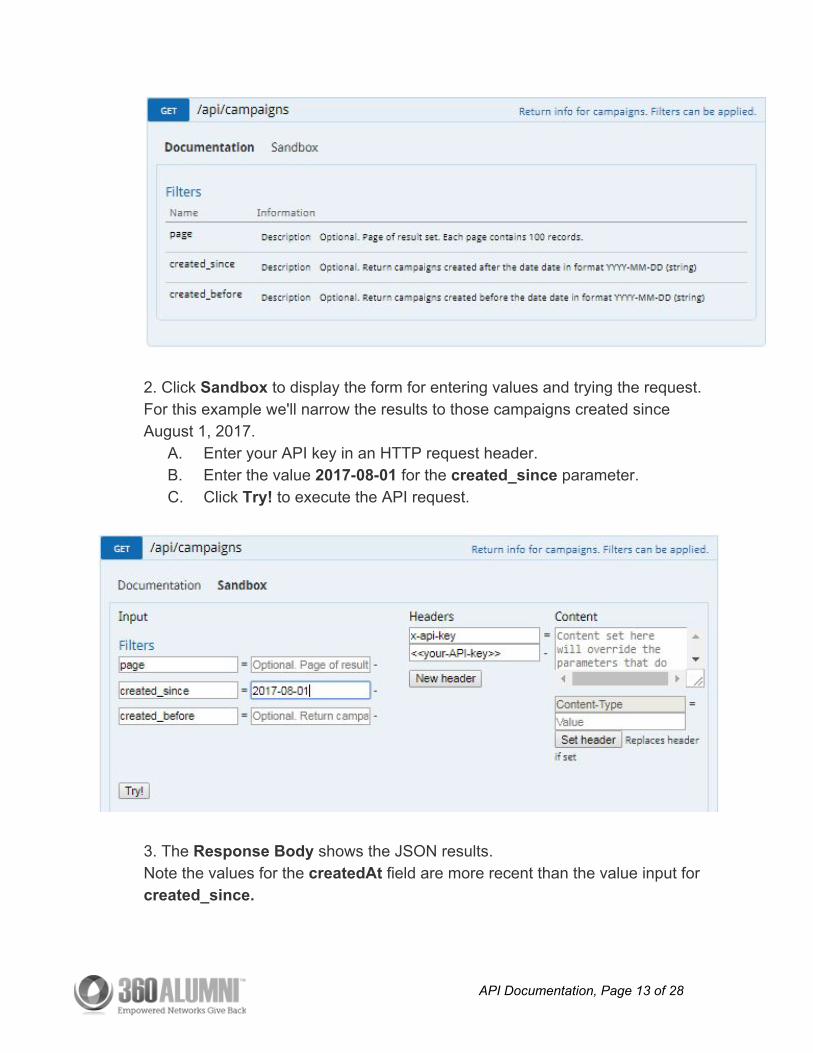
2. Click Sandbox to display the form for entering values and trying the request. For this example we'll narrow the results to those campaigns created since August 1, 2017.
A. Enter your API key in an HTTP request header. B. Enter the value 2017-08-01 for the created_since parameter. C. Click Try! to execute the API request.
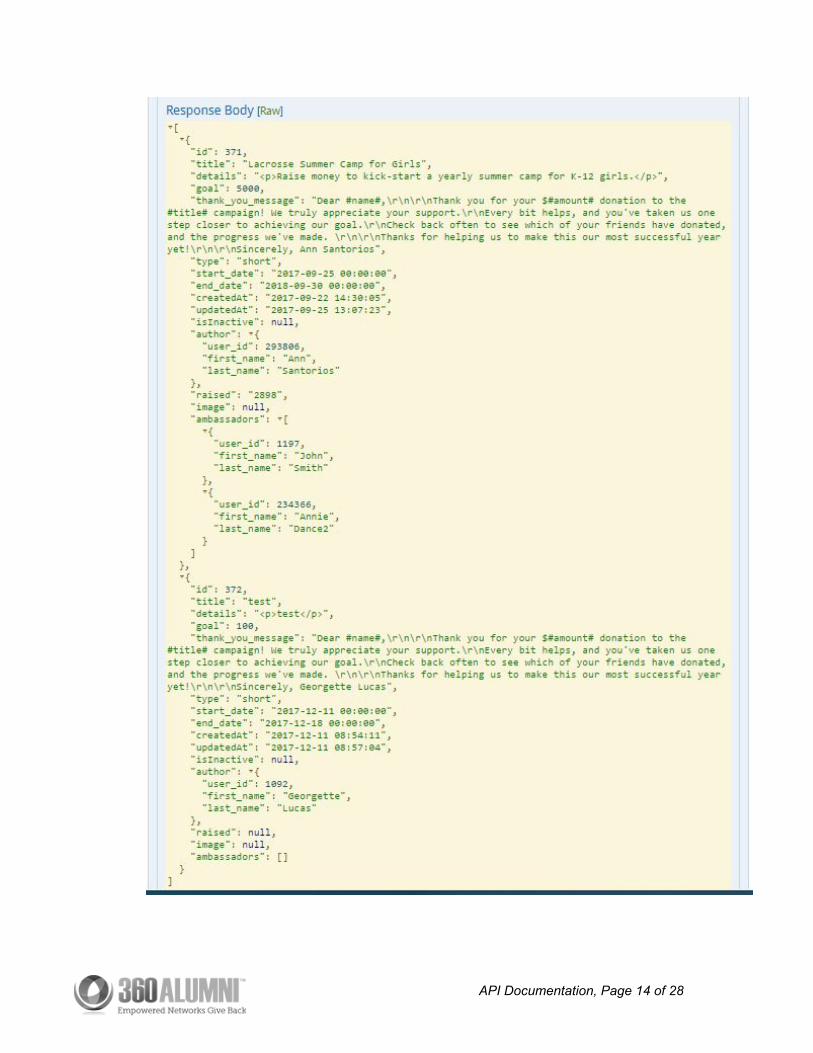
3. The Response Body shows the JSON results. Note the values for the createdAt field are more recent than the value input for created_since.
API Documentation, Page 13 of 28
API Documentation, Page 14 of 28
Filtering Donation Results
The following steps walk you through using filter parameters to get data on donations.
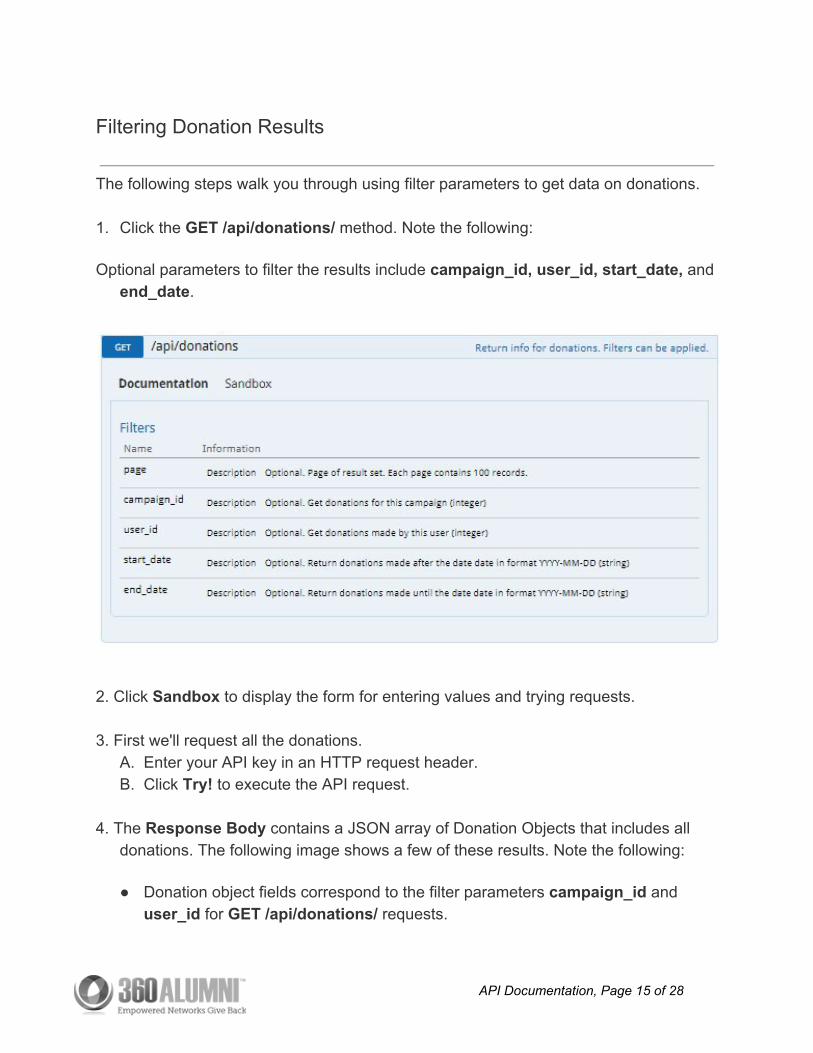
1. Click the GET /api/donations/ method. Note the following:
Optional parameters to filter the results include campaign_id, user_id, start_date, and end_date.
2. Click Sandbox to display the form for entering values and trying requests. 3. First we'll request all the donations.
A. Enter your API key in an HTTP request header. B. Click Try! to execute the API request.
4. The Response Body contains a JSON array of Donation Objects that includes all
donations. The following image shows a few of these results. Note the following:
● Donation object fields correspond to the filter parameters campaign_id and user_id for GET /api/donations/ requests.
API Documentation, Page 15 of 28
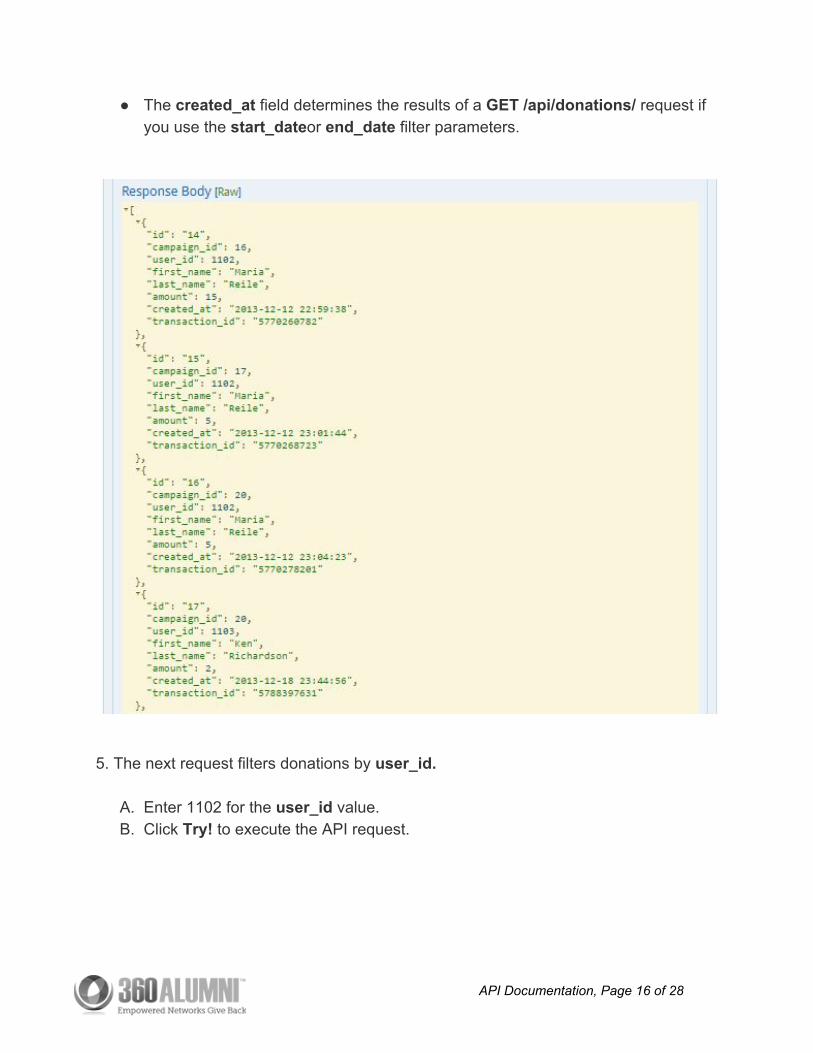
● The created_at field determines the results of a GET /api/donations/ request if you use the start_dateor end_date filter parameters.
5. The next request filters donations by user_id.
A. Enter 1102 for the user_id value. B. Click Try! to execute the API request.
API Documentation, Page 16 of 28
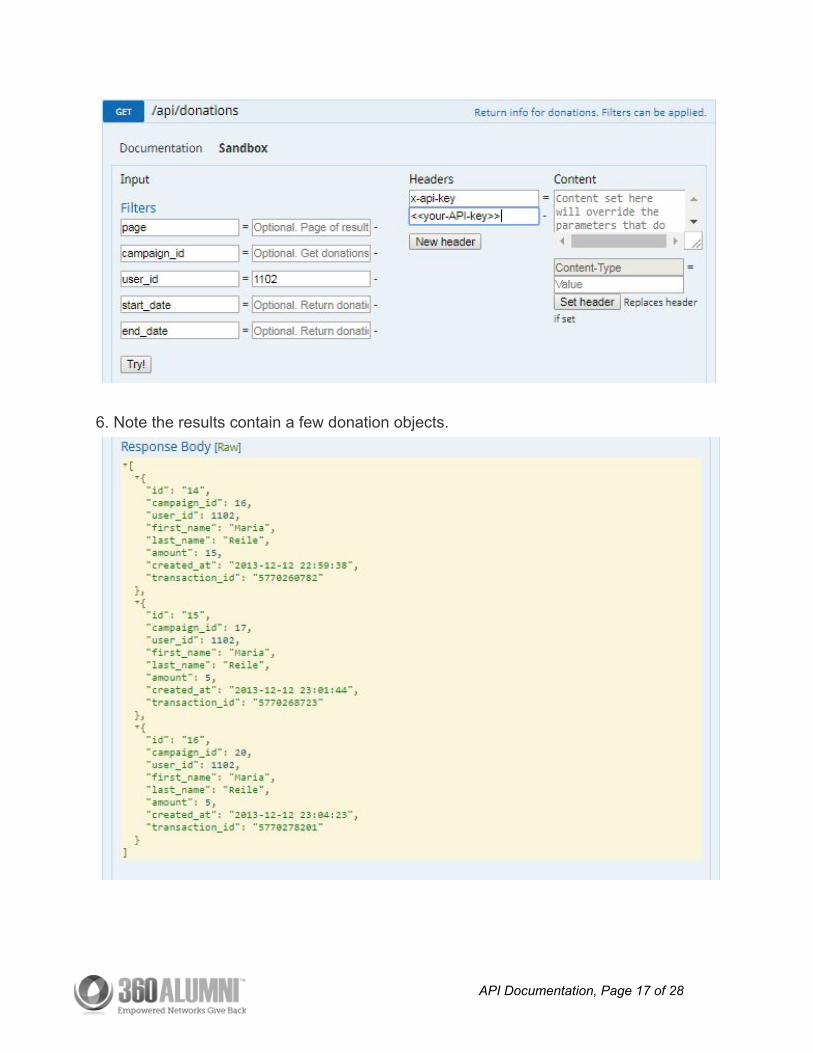
6. Note the results contain a few donation objects.
API Documentation, Page 17 of 28
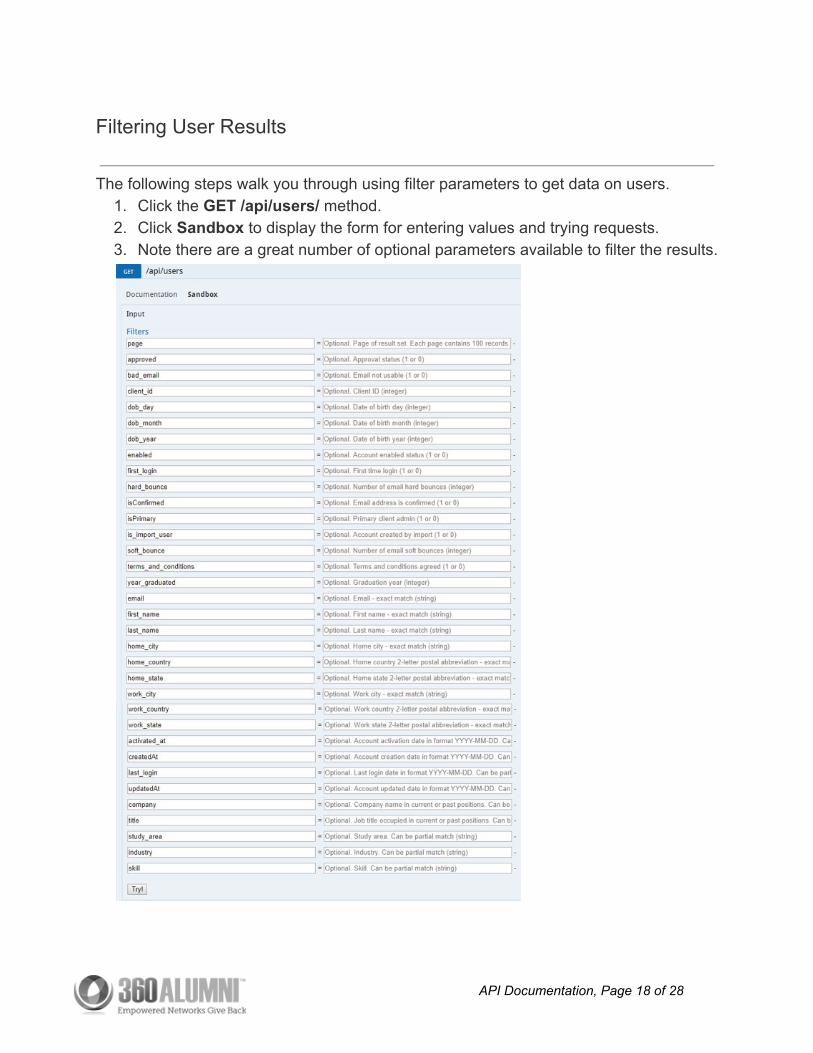
Filtering User Results
The following steps walk you through using filter parameters to get data on users. 1. Click the GET /api/users/ method. 2. Click Sandbox to display the form for entering values and trying requests. 3. Note there are a great number of optional parameters available to filter the results.
API Documentation, Page 18 of 28
4. First we'll request all users that are not yet approved. A. Enter your API key in an HTTP request header. B. Enter the value 0 for the approved field. A 1 represents approved and a 0
represents not approved. C. Click Try! to execute the API request.
5. The Response Body contains a JSON array of user objects where the approved field value is 0. 6. The next request filters for all approved users that are not enabled.
A. Enter the value 1 for the approved field. B. Enter the value 0 for the enabled field. A 1 represents enabled accounts and a 0
represents accounts that are not enabled. C. Click Try! to execute the API request.
Note the results contain fewer user records.
API Documentation, Page 19 of 28
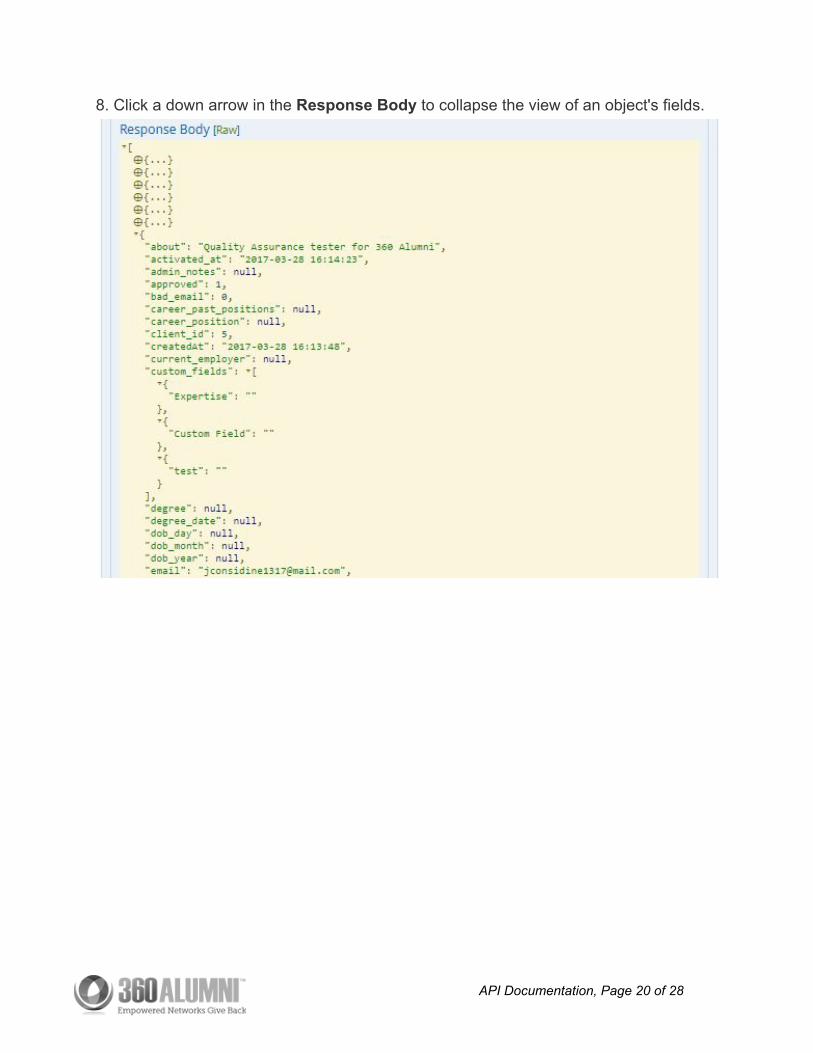
8. Click a down arrow in the Response Body to collapse the view of an object's fields.
API Documentation, Page 20 of 28
Creating and Updating Users You can create new users in the system and give them the appropriate access. This is because you have access to more than just the information provided by the 360Alumni GUI and you can perform complex operations such as approving users when they are created.
1. Create a New User with POST /api/users/ 2. Get an Array of User Records with GET /api/users/ 3. Get a Specific User's Record with GET /api/users/{id} 4. Update a User Record with PUT /api/users/{id}
Use one of the following URLs to open the API reference.
Test system https://demo.s.360alumni.com/api/documentation
Your system https://your-system.360alumni.com/api/documentation
Create a New User with POST /api/users/
Follow these steps to create a user.
1. Click the POST /api/users/ method. Required parameters to create a new user include email, first_name and last_name. These parameters as well as all the optional parameters are described in the User Object reference.
2. Click Sandbox to display the form for entering values and trying the request. a. Enter your API key in an HTTP request header. b. Enter a string email address for the email parameter. c. Enter a name for the first_name parameter. d. Enter a name for the last_name parameter. e. Enter 0 | 1 for the enabled parameter. f. Enter an array ["admin" | "user"] for the groups parameter. g. Click Try! to execute the API request.
API Documentation, Page 21 of 28
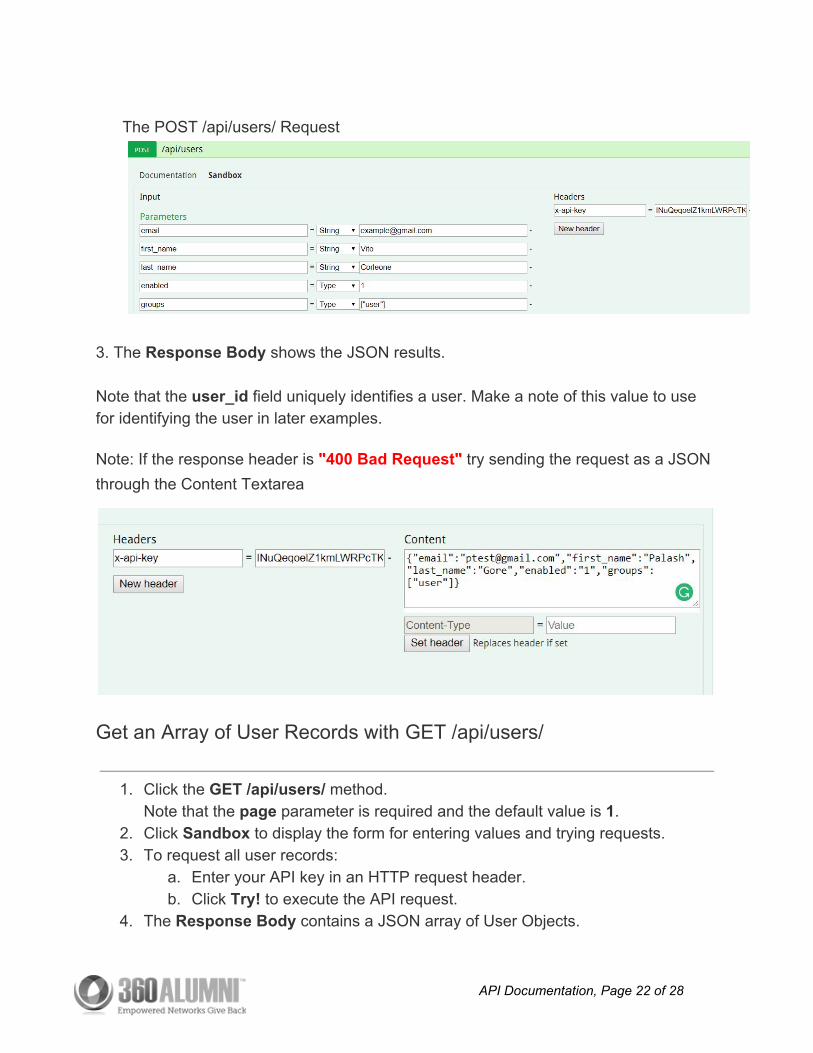
The POST /api/users/ Request
3. The Response Body shows the JSON results. Note that the user_id field uniquely identifies a user. Make a note of this value to use for identifying the user in later examples.
Note: If the response header is "400 Bad Request" try sending the request as a JSON through the Content Textarea
Get an Array of User Records with GET /api/users/
1. Click the GET /api/users/ method. Note that the page parameter is required and the default value is 1.
2. Click Sandbox to display the form for entering values and trying requests. 3. To request all user records:
a. Enter your API key in an HTTP request header. b. Click Try! to execute the API request.
4. The Response Body contains a JSON array of User Objects.
API Documentation, Page 22 of 28
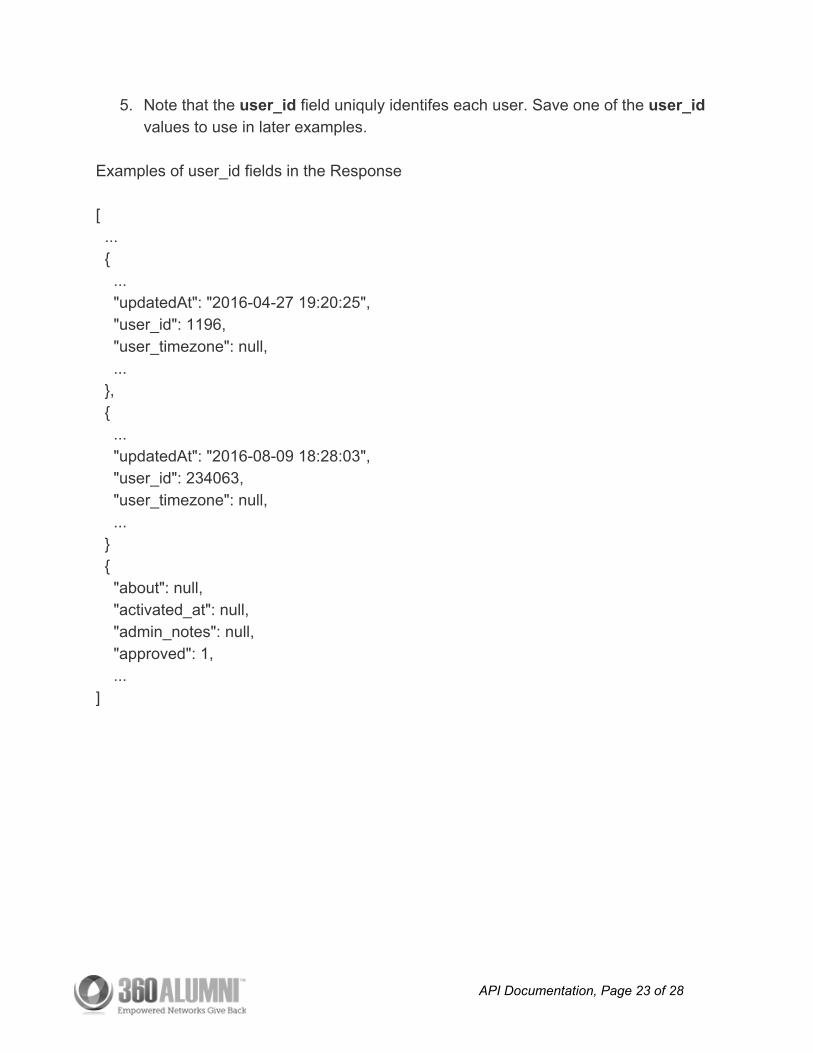
5. Note that the user_id field uniquly identifes each user. Save one of the user_id values to use in later examples.
Examples of user_id fields in the Response [ ... { ... "updatedAt": "2016-04-27 19:20:25", "user_id": 1196, "user_timezone": null, ... }, { ... "updatedAt": "2016-08-09 18:28:03", "user_id": 234063, "user_timezone": null, ... } { "about": null, "activated_at": null, "admin_notes": null, "approved": 1, ... ]
API Documentation, Page 23 of 28
Get a Specific User's Record with GET /api/users/{id}
1. Click the GET /api/users/{id} method. The single required parameter is the user_id.
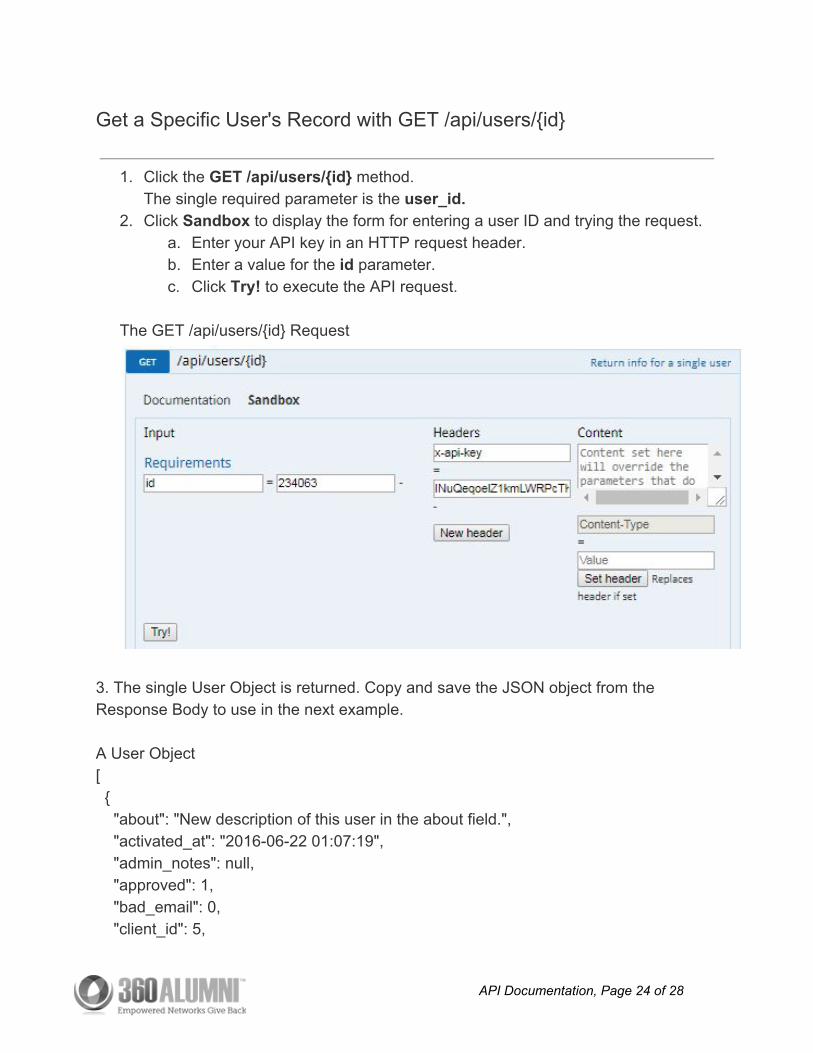
2. Click Sandbox to display the form for entering a user ID and trying the request. a. Enter your API key in an HTTP request header. b. Enter a value for the id parameter. c. Click Try! to execute the API request.
The GET /api/users/{id} Request
3. The single User Object is returned. Copy and save the JSON object from the Response Body to use in the next example. A User Object [ { "about": "New description of this user in the about field.", "activated_at": "2016-06-22 01:07:19", "admin_notes": null, "approved": 1, "bad_email": 0, "client_id": 5,
API Documentation, Page 24 of 28

"createdAt": "2016-06-22 01:07:19", "custom_fields": [], "dob_day": null, "dob_month": null, "dob_year": null, "email": null, "emma_member_id": null, "enabled": 0, "facebook_link": null, "first_login": null, "first_name": "Christina", "gender": null, "groups": [ "user" ], "hard_bounce": 0, "home_address1": null, "home_address2": null, "home_city": null, "home_country": null, "home_geohash": null, "home_geohash_l1": null, "home_geohash_l2": null, "home_geohash_l3": null, "home_geohash_l4": null, "home_geohash_l5": null, "home_geohash_l6": null, "home_lat": null, "home_lng": null, "home_phone": null, "home_state": null, "home_zipcode": null, "image": null, "inst_id": null, "instagram_link": null, "isConfirmed": 0, "isPrimary": null, "is_import_user": 0, "last_activity_at": "2016-06-22 01:07:26",
API Documentation, Page 25 of 28
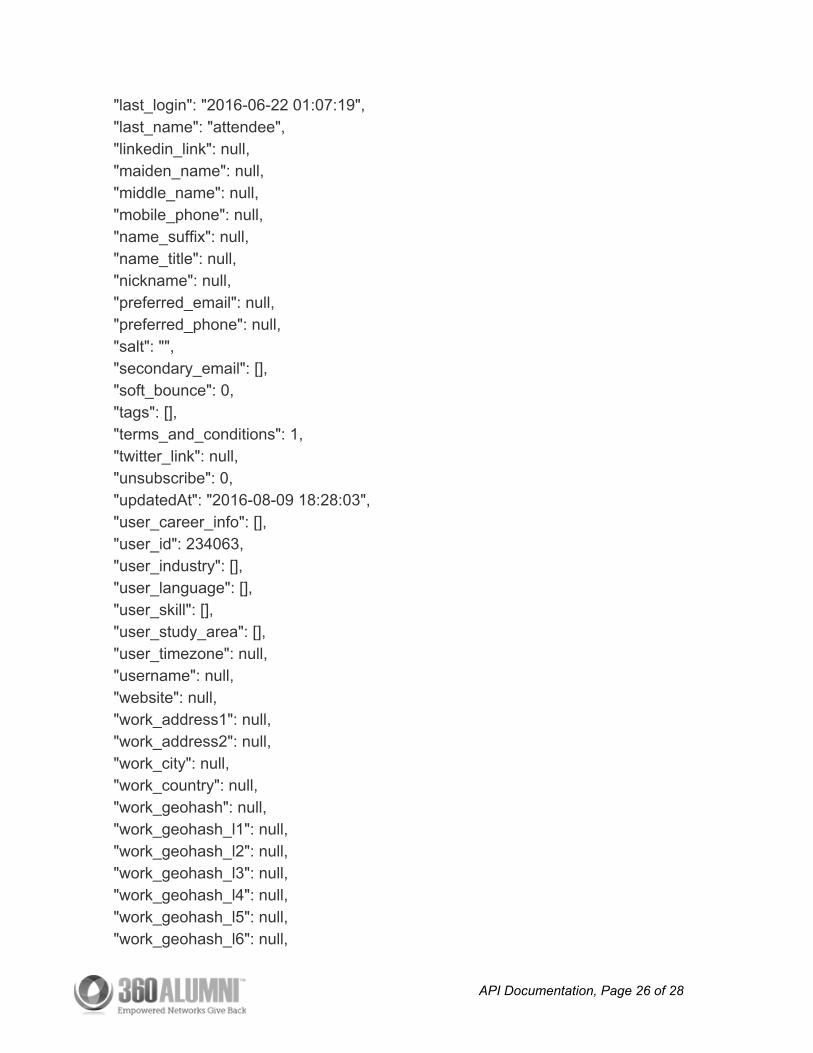
"last_login": "2016-06-22 01:07:19", "last_name": "attendee", "linkedin_link": null, "maiden_name": null, "middle_name": null, "mobile_phone": null, "name_suffix": null, "name_title": null, "nickname": null, "preferred_email": null, "preferred_phone": null, "salt": "", "secondary_email": [], "soft_bounce": 0, "tags": [], "terms_and_conditions": 1, "twitter_link": null, "unsubscribe": 0, "updatedAt": "2016-08-09 18:28:03", "user_career_info": [], "user_id": 234063, "user_industry": [], "user_language": [], "user_skill": [], "user_study_area": [], "user_timezone": null, "username": null, "website": null, "work_address1": null, "work_address2": null, "work_city": null, "work_country": null, "work_geohash": null, "work_geohash_l1": null, "work_geohash_l2": null, "work_geohash_l3": null, "work_geohash_l4": null, "work_geohash_l5": null, "work_geohash_l6": null,
API Documentation, Page 26 of 28
"work_lat": null, "work_lng": null, "work_phone": null, "work_state": null, "work_zipcode": null, "year_graduated": null } ]
Update a User Record with PUT /api/users/{id}
1. Copy the JSON user object from the response in the previous example into an editor and change a few field values.
2. Click the PUT /api/users/{id} method. The required parameter is the user_id. 3. Click Sandbox to display the form for entering information and trying the request.
a. A JSON user object is required for the content. Copy your changed JSON user object into the Contentfield on the form.
b. Set the content type. c. Enter the Content-Type as application/json and click Set header. d. Enter your API key in another HTTP request header. e. Click New header and enter x-api-key and your API key value. f. Enter a value for the id parameter. g. Click Try! to execute the API request.
API Documentation, Page 27 of 28
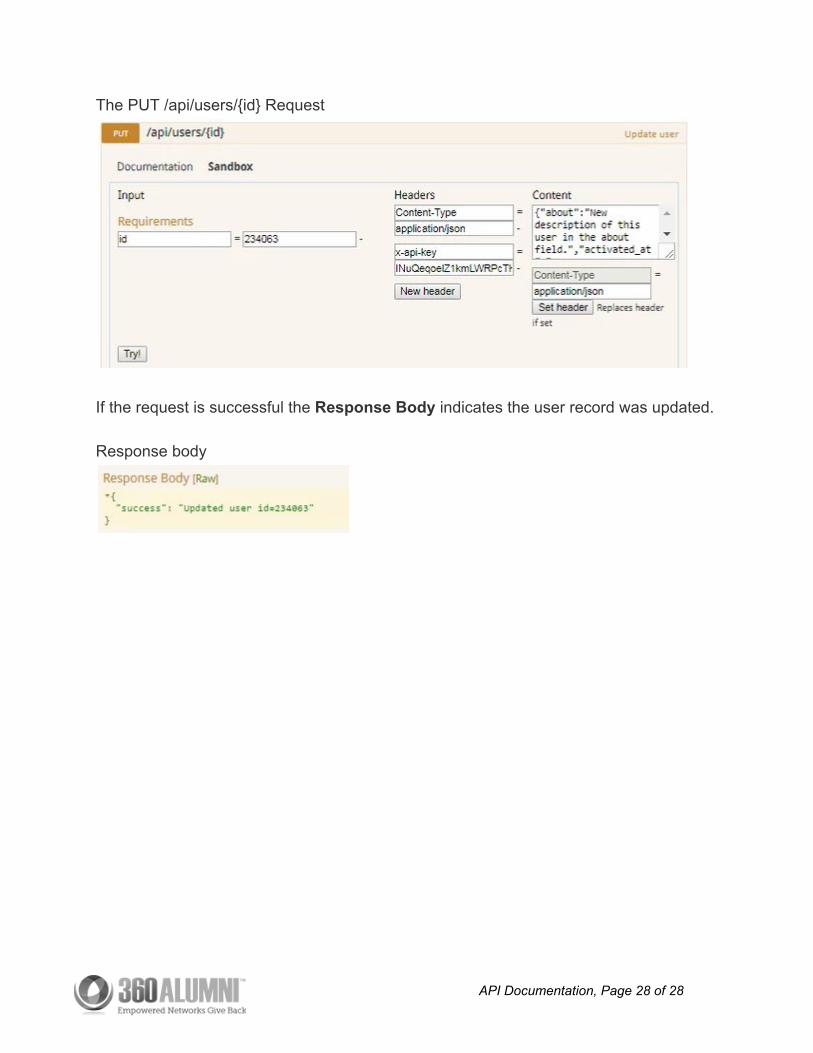
The PUT /api/users/{id} Request
If the request is successful the Response Body indicates the user record was updated. Response body
API Documentation, Page 28 of 28


![m^á»n= ŸÍÿ° Á= }áé API Function Parametre Hijackingarabic]-api-function...ﻝﺍﻭﺪﻟﺍ ﺾﻌﺑﻭ ﺎﻬﻴﻟﺇ ﺔﻣﺪﻘﻤﻟﺍ ... lpPrevWndFunc=ﺔﻴﻠﺻﻷﺍ](https://img.pdfslide.us/doc/110x75/5af3dbda7f8b9a8d1c8b5466/mn-y-api-function-parametre-hijacking-arabic-api-function.jpg)


![api-fellowships.orgapi-fellowships.org/body/apinews/newsclipping/Thai NGO-11june2012.… · 2555 uanannu anwvl-lt-ru an]u n-lî1Jani-n (mm (API Fellowships Program) (Nippon Foundation)](https://img.pdfslide.us/doc/110x75/5a793e8d7f8b9aee3b8bec66/api-ngo-11june20122555-uanannu-anwvl-lt-ru-anu-n-l1jani-n-mm-api-fellowships.jpg)