Embed Size (px)
Citation preview

Apelon, Inc. Suite 202, 100 Danbury Road Ridgefield, CT 06877
Phone: (203) 431-2530Fax: (203) 431-2523
www.apelon.com
Apelon Distributed Terminology System (DTS)
Knowledgebase Administrators Guide
© 1999-2009 Apelon, Inc. All Rights Reserved.
Page 2 of 71
Table of Contents
Introduction...................................................................................................................... 5
Publish Your Local Vocabulary Content...................................................................... 5
Knowledgebase Silos and Selectors & Extractors Overview....................................... 5
Purpose of This Guide .................................................................................................. 6
Audience for This Guide .............................................................................................. 6
Create DTS Schema......................................................................................................... 7
Overview ...................................................................................................................... 7
Create Oracle Database User and Tablespace........................................................... 7
Create SQL Server Database File................................................................................. 9
Create DTS Knowledgebase Schema......................................................................... 10
SQL Server Internet Connection to a Database with a Named Instance................. 13
Populate DTS Tables Through Data Migration ............................................................. 14
Knowledgebase Load Procedures ........................................................................... 14
Source and Target Connection Files ....................................................................... 18
Miscellaneous Tables Migration ................................................................................ 19
Delete Namespaces from Your Knowledgebase............................................................ 20
Overview .................................................................................................................... 20
Configure Namespace(s) for Deletion........................................................................ 20
Delete Unwanted Namespaces ................................................................................... 22
Knowledgebase Admin Utility ...................................................................................... 23
Overview .................................................................................................................... 23
Knowledgebase Admin Procedures............................................................................ 23
Various Configurations ........................................................................................... 27
Configure Word Match Search................................................................................... 29
Knowledgebase Silos and Selectors & Extractors ......................................................... 31
Selectors & Extractors ................................................................................................ 32
Starting Selectors & Extractors ............................................................................... 32
© 1999-2009 Apelon, Inc. All Rights Reserved.
Page 3 of 71
MatchPack .................................................................................................................. 35
MatchPack Matching Options................................................................................. 35
filterSpec.dtd File........................................................................................................... 38
Installed filterSpec.xml file............................................................................................ 41
Configure the filterSpec.xml File Parameters................................................................ 43
SearchSpec Action (for entire filterSpec.xml file).................................................. 44
SiloSpec Spec Action (for individual spec) ............................................................ 44
namespace type ....................................................................................................... 45
namespaceAction .................................................................................................... 46
Spec Name............................................................................................................... 46
Spec ID.................................................................................................................... 46
Spec Code................................................................................................................ 47
namespace type and hasSemanticTypes Indicators................................................. 47
Configure Select Parameters ...................................................................................... 47
Select Semantic Types ............................................................................................ 48
Select Properties...................................................................................................... 49
Select Ontylog Root Concept(s).............................................................................. 51
Configure Extract Parameters..................................................................................... 52
Extract Concept Names........................................................................................... 53
Extract Synonymous Terms .................................................................................... 53
Extract Concept Synonyms with Specific Property Names .................................... 54
Extract Concept Synonyms with Specific Property Values .................................... 55
Appendix A - Publish Client’s Local Namespace ......................................................... 56
Overview .................................................................................................................... 56
Apelon Client Publishing Processes ........................................................................... 56
Generate Import Integrity Verification File ............................................................ 61
Creating License Files............................................................................................. 66
Knowledgebase Administrator Glossary ....................................................................... 69
© 1999-2009 Apelon, Inc. All Rights Reserved.
Page 4 of 71
DTS Knowledgebase............................................................................................... 69
Extension Namespace ............................................................................................. 69
“Extract” Parameter................................................................................................. 69
filterSpec.dtd File .................................................................................................... 69
filterSpec.xml File................................................................................................... 69
Namespace .............................................................................................................. 69
Ontylog.................................................................................................................... 70
Property Name......................................................................................................... 70
Property Value......................................................................................................... 70
Root ......................................................................................................................... 70
Selectors & Extractors............................................................................................. 70
“Select” Parameter .................................................................................................. 70
Semantic Type......................................................................................................... 70
Silos......................................................................................................................... 71
Spec ......................................................................................................................... 71
Spec Code................................................................................................................ 71
Spec ID.................................................................................................................... 71
Spec Name............................................................................................................... 71
UMLS Metathesaurus ............................................................................................. 71
© 1999-2009 Apelon, Inc. All Rights Reserved.
Page 5 of 71
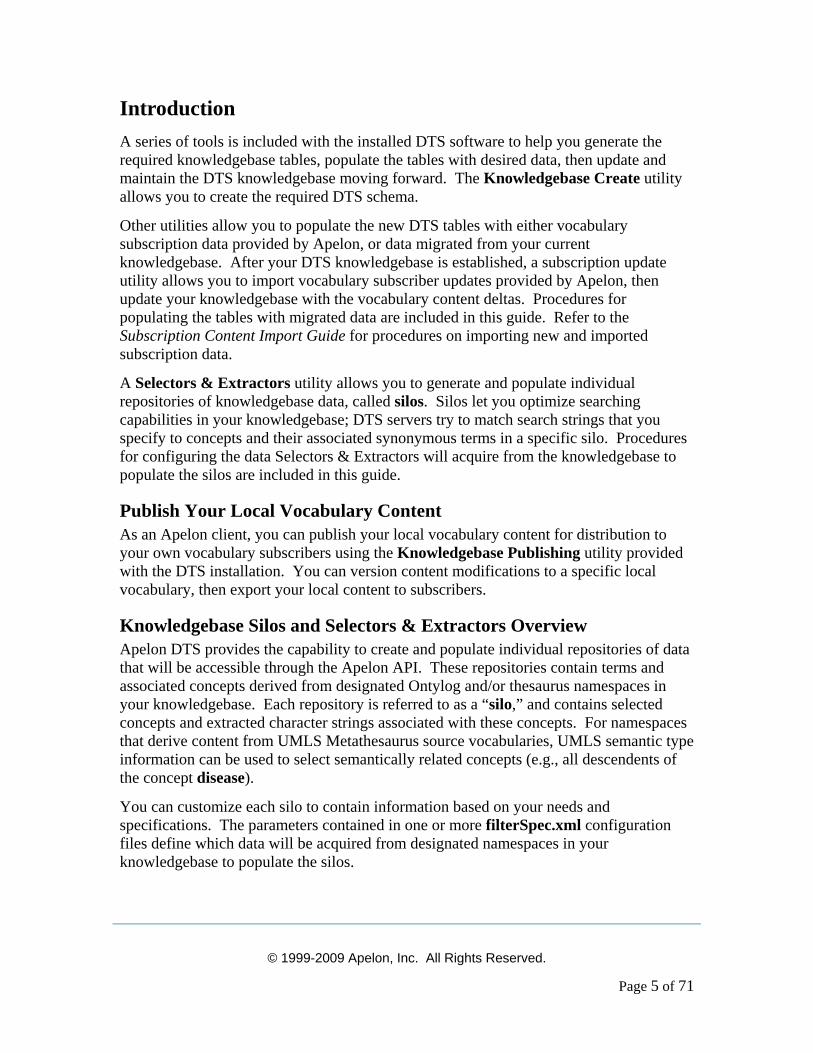
Introduction A series of tools is included with the installed DTS software to help you generate the required knowledgebase tables, populate the tables with desired data, then update and maintain the DTS knowledgebase moving forward. The Knowledgebase Create utility allows you to create the required DTS schema.
Other utilities allow you to populate the new DTS tables with either vocabulary subscription data provided by Apelon, or data migrated from your current knowledgebase. After your DTS knowledgebase is established, a subscription update utility allows you to import vocabulary subscriber updates provided by Apelon, then update your knowledgebase with the vocabulary content deltas. Procedures for populating the tables with migrated data are included in this guide. Refer to the Subscription Content Import Guide for procedures on importing new and imported subscription data.
A Selectors & Extractors utility allows you to generate and populate individual repositories of knowledgebase data, called silos. Silos let you optimize searching capabilities in your knowledgebase; DTS servers try to match search strings that you specify to concepts and their associated synonymous terms in a specific silo. Procedures for configuring the data Selectors & Extractors will acquire from the knowledgebase to populate the silos are included in this guide.
Publish Your Local Vocabulary Content As an Apelon client, you can publish your local vocabulary content for distribution to your own vocabulary subscribers using the Knowledgebase Publishing utility provided with the DTS installation. You can version content modifications to a specific local vocabulary, then export your local content to subscribers.
Knowledgebase Silos and Selectors & Extractors Overview Apelon DTS provides the capability to create and populate individual repositories of data that will be accessible through the Apelon API. These repositories contain terms and associated concepts derived from designated Ontylog and/or thesaurus namespaces in your knowledgebase. Each repository is referred to as a “silo,” and contains selected concepts and extracted character strings associated with these concepts. For namespaces that derive content from UMLS Metathesaurus source vocabularies, UMLS semantic type information can be used to select semantically related concepts (e.g., all descendents of the concept disease).
You can customize each silo to contain information based on your needs and specifications. The parameters contained in one or more filterSpec.xml configuration files define which data will be acquired from designated namespaces in your knowledgebase to populate the silos.
© 1999-2009 Apelon, Inc. All Rights Reserved.
Page 6 of 71
The Selectors & Extractors utility, included with Apelon DTS, creates and populates these silos of terms and associated concepts based on the configurations in the filterSpec.xml files. Using silos allows you to optimize searching capabilities when you use Apelon DTS to perform searches of your knowledgebase. The Apelon DTS servers try to match search strings that you specify to concepts and their associated terms in a specific silo.
Purpose of This Guide This guide provides instructions for creating the DTS schema, and for migrating desired data to the DTS tables. Instructions for publishing and exporting local vocabulary content to your own subscribers are provided as well.
This guide also provides instructions for configuring the filterSpec.xml configuration files that define which knowledgebase data the Selectors & Extractors utility will acquire to populate generated knowledgebase silos. The filterSpec.dtd file and sample filterSpec.xml files provided with the Apelon DTS installation are included in this guide for your reference.
Audience for This Guide The Knowledgebase Administrators Guide was written as a reference for individuals who deal with the creation, maintenance, and use of terminology knowledgebases. This audience may also include database developers, and other personnel who install and administer the databases that integrate with Apelon products such as Apelon DTS. These personnel may also need to coordinate with DTS application developers who need to provide matching capabilities against specific data in their applications. This guide was not written for end users of applications.
© 1999-2009 Apelon, Inc. All Rights Reserved.
Page 7 of 71
Create DTS Schema
Overview Regardless of where you will obtain data to populate the DTS 3.5 tables (by migrating data from existing databases, or performing a complete import of new subscription data) you first must run the Knowledgebase Create utility. This utility generates the DTS schema, creating the tables (for Oracle users) or the database (for SQL Server users) that will be populated with your imported subscription data or migrated data.
Prior to running Knowledgebase Create you must create a user and tablespace (for Oracle) or a user and database (for Microsoft SQL Server). Procedures for running these utilities are provided in the discussions that follow. The procedures for creating the DTS 3.5 Knowledgebase then are provided for both Oracle and Microsoft SQL users.
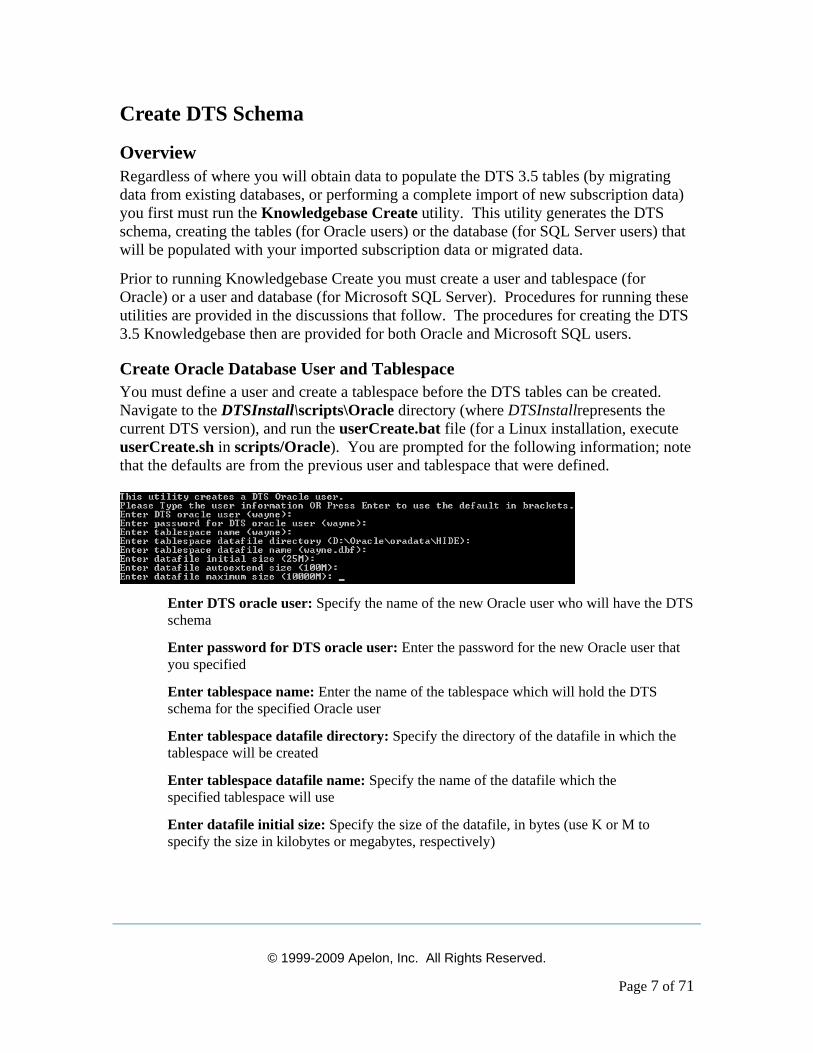
Create Oracle Database User and Tablespace You must define a user and create a tablespace before the DTS tables can be created. Navigate to the DTSInstall\scripts\Oracle directory (where DTSInstallrepresents the current DTS version), and run the userCreate.bat file (for a Linux installation, execute userCreate.sh in scripts/Oracle). You are prompted for the following information; note that the defaults are from the previous user and tablespace that were defined.
Enter DTS oracle user: Specify the name of the new Oracle user who will have the DTS schema
Enter password for DTS oracle user: Enter the password for the new Oracle user that you specified
Enter tablespace name: Enter the name of the tablespace which will hold the DTS schema for the specified Oracle user
Enter tablespace datafile directory: Specify the directory of the datafile in which the tablespace will be created
Enter tablespace datafile name: Specify the name of the datafile which the specified tablespace will use
Enter datafile initial size: Specify the size of the datafile, in bytes (use K or M to specify the size in kilobytes or megabytes, respectively)
© 1999-2009 Apelon, Inc. All Rights Reserved.
Page 8 of 71
Enter datafile autoextend size: Specify the size, in bytes, of the next increment of disk space to be allocated automatically to the datafile (use K or M to specify this size in kilobytes or megabytes, respectively)
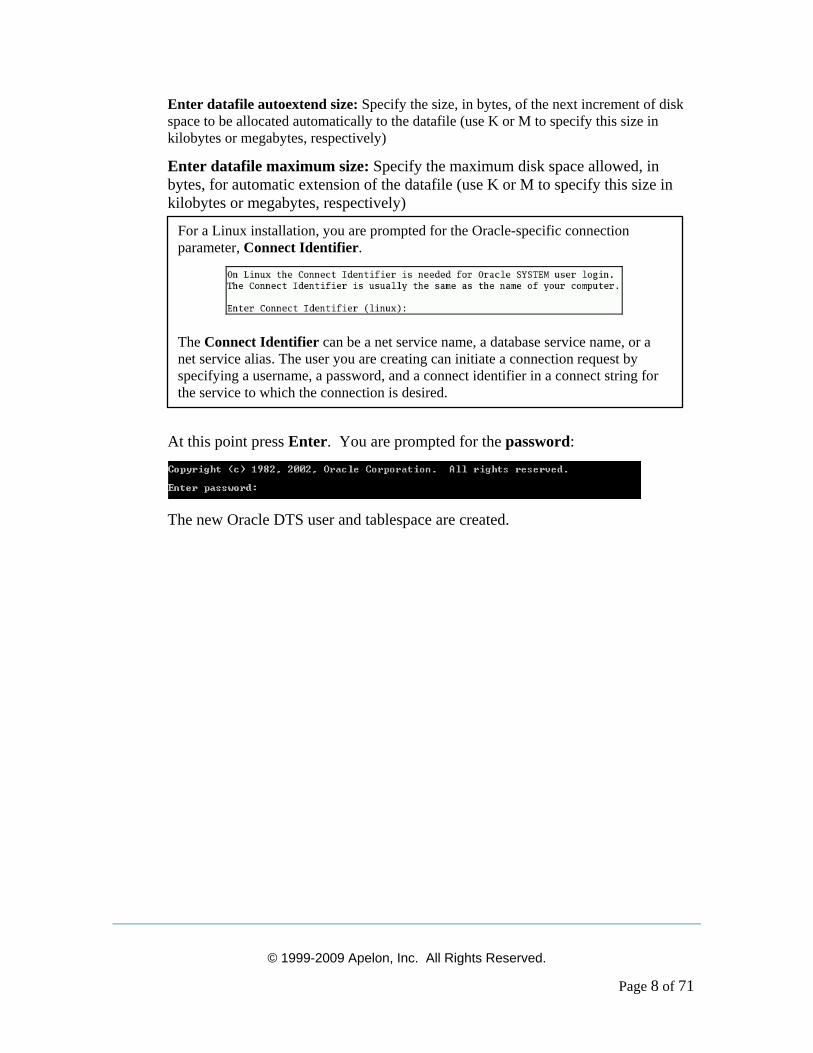
Enter datafile maximum size: Specify the maximum disk space allowed, in bytes, for automatic extension of the datafile (use K or M to specify this size in kilobytes or megabytes, respectively) At this point press Enter. You are prompted for the password:
The new Oracle DTS user and tablespace are created.
For a Linux installation, you are prompted for the Oracle-specific connection parameter, Connect Identifier.
The Connect Identifier can be a net service name, a database service name, or a net service alias. The user you are creating can initiate a connection request by specifying a username, a password, and a connect identifier in a connect string for the service to which the connection is desired.
© 1999-2009 Apelon, Inc. All Rights Reserved.
Page 9 of 71
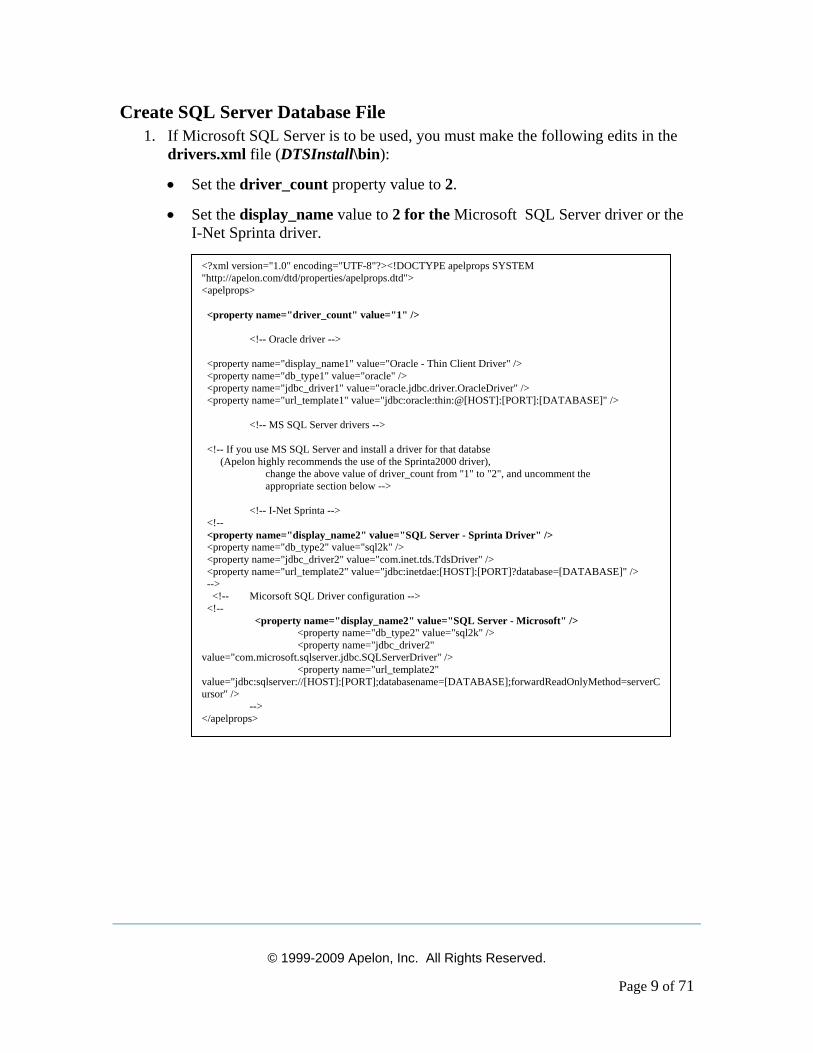
Create SQL Server Database File 1. If Microsoft SQL Server is to be used, you must make the following edits in the
drivers.xml file (DTSInstall\bin):
• Set the driver_count property value to 2.
• Set the display_name value to 2 for the Microsoft SQL Server driver or the I-Net Sprinta driver.
<?xml version="1.0" encoding="UTF-8"?><!DOCTYPE apelprops SYSTEM "http://apelon.com/dtd/properties/apelprops.dtd"> <apelprops> <property name="driver_count" value="1" /> <!-- Oracle driver --> <property name="display_name1" value="Oracle - Thin Client Driver" /> <property name="db_type1" value="oracle" /> <property name="jdbc_driver1" value="oracle.jdbc.driver.OracleDriver" /> <property name="url_template1" value="jdbc:oracle:thin:@[HOST]:[PORT]:[DATABASE]" /> <!-- MS SQL Server drivers --> <!-- If you use MS SQL Server and install a driver for that databse (Apelon highly recommends the use of the Sprinta2000 driver), change the above value of driver_count from "1" to "2", and uncomment the appropriate section below --> <!-- I-Net Sprinta --> <!-- <property name="display_name2" value="SQL Server - Sprinta Driver" /> <property name="db_type2" value="sql2k" /> <property name="jdbc_driver2" value="com.inet.tds.TdsDriver" /> <property name="url_template2" value="jdbc:inetdae:[HOST]:[PORT]?database=[DATABASE]" /> --> <!-- Micorsoft SQL Driver configuration --> <!-- <property name="display_name2" value="SQL Server - Microsoft" /> <property name="db_type2" value="sql2k" /> <property name="jdbc_driver2" value="com.microsoft.sqlserver.jdbc.SQLServerDriver" /> <property name="url_template2" value="jdbc:sqlserver://[HOST]:[PORT];databasename=[DATABASE];forwardReadOnlyMethod=serverCursor" /> --> </apelprops>
© 1999-2009 Apelon, Inc. All Rights Reserved.
Page 10 of 71
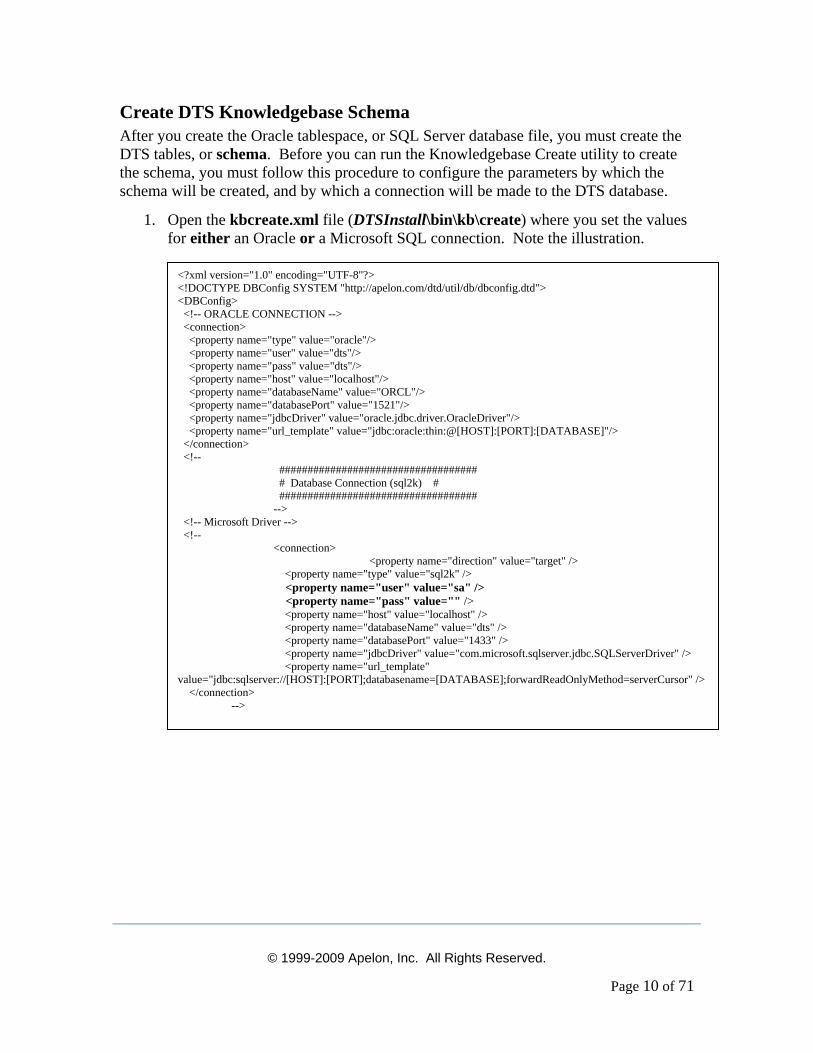
Create DTS Knowledgebase Schema After you create the Oracle tablespace, or SQL Server database file, you must create the DTS tables, or schema. Before you can run the Knowledgebase Create utility to create the schema, you must follow this procedure to configure the parameters by which the schema will be created, and by which a connection will be made to the DTS database.
1. Open the kbcreate.xml file (DTSInstall\bin\kb\create) where you set the values for either an Oracle or a Microsoft SQL connection. Note the illustration.
<?xml version="1.0" encoding="UTF-8"?> <!DOCTYPE DBConfig SYSTEM "http://apelon.com/dtd/util/db/dbconfig.dtd"> <DBConfig> <!-- ORACLE CONNECTION --> <connection> <property name="type" value="oracle"/> <property name="user" value="dts"/> <property name="pass" value="dts"/> <property name="host" value="localhost"/> <property name="databaseName" value="ORCL"/> <property name="databasePort" value="1521"/> <property name="jdbcDriver" value="oracle.jdbc.driver.OracleDriver"/> <property name="url_template" value="jdbc:oracle:thin:@[HOST]:[PORT]:[DATABASE]"/> </connection> <!-- ################################### # Database Connection (sql2k) # ################################### --> <!-- Microsoft Driver --> <!-- <connection> <property name="direction" value="target" /> <property name="type" value="sql2k" /> <property name="user" value="sa" /> <property name="pass" value="" /> <property name="host" value="localhost" /> <property name="databaseName" value="dts" /> <property name="databasePort" value="1433" /> <property name="jdbcDriver" value="com.microsoft.sqlserver.jdbc.SQLServerDriver" /> <property name="url_template" value="jdbc:sqlserver://[HOST]:[PORT];databasename=[DATABASE];forwardReadOnlyMethod=serverCursor" /> </connection> -->
© 1999-2009 Apelon, Inc. All Rights Reserved.
Page 11 of 71
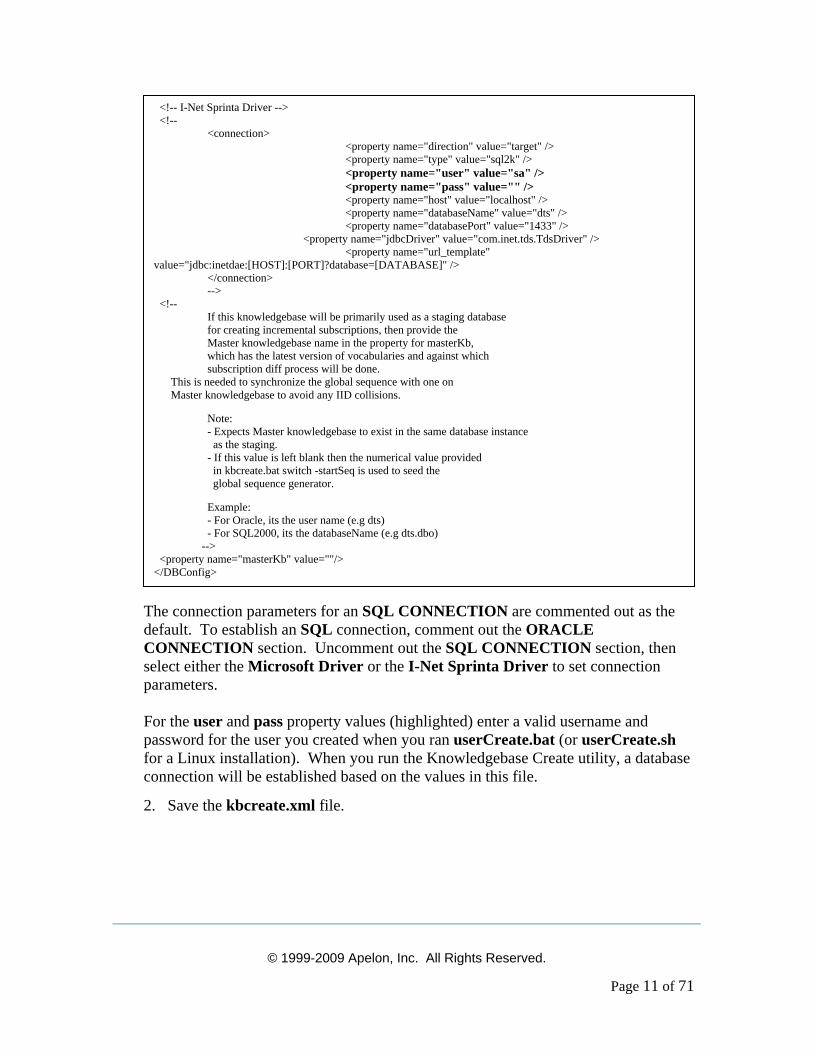
The connection parameters for an SQL CONNECTION are commented out as the default. To establish an SQL connection, comment out the ORACLE CONNECTION section. Uncomment out the SQL CONNECTION section, then select either the Microsoft Driver or the I-Net Sprinta Driver to set connection parameters. For the user and pass property values (highlighted) enter a valid username and password for the user you created when you ran userCreate.bat (or userCreate.sh for a Linux installation). When you run the Knowledgebase Create utility, a database connection will be established based on the values in this file.
2. Save the kbcreate.xml file.
<!-- I-Net Sprinta Driver --> <!-- <connection> <property name="direction" value="target" /> <property name="type" value="sql2k" /> <property name="user" value="sa" /> <property name="pass" value="" /> <property name="host" value="localhost" /> <property name="databaseName" value="dts" /> <property name="databasePort" value="1433" /> <property name="jdbcDriver" value="com.inet.tds.TdsDriver" /> <property name="url_template" value="jdbc:inetdae:[HOST]:[PORT]?database=[DATABASE]" /> </connection> --> <!-- If this knowledgebase will be primarily used as a staging database for creating incremental subscriptions, then provide the Master knowledgebase name in the property for masterKb, which has the latest version of vocabularies and against which subscription diff process will be done. This is needed to synchronize the global sequence with one on Master knowledgebase to avoid any IID collisions.
Note: - Expects Master knowledgebase to exist in the same database instance as the staging. - If this value is left blank then the numerical value provided in kbcreate.bat switch -startSeq is used to seed the global sequence generator.
Example: - For Oracle, its the user name (e.g dts) - For SQL2000, its the databaseName (e.g dts.dbo) --> <property name="masterKb" value=""/> </DBConfig>
© 1999-2009 Apelon, Inc. All Rights Reserved.
Page 12 of 71
3. Run the file kbcreate.bat (DTSInstall\bin\kb\create) to start the Knowledgebase Create utility. If this is the first time kbcreate.bat is being run, the utility creates all of the tables required to load data into the knowledgebase. (For a Linux installation, execute kbcreate.sh in bin/kb/create to start Knowledgebase Create.) If kbcreate.bat (or kbcreate.sh) was run previously, the Knowledgebase Create utility checks for existing tables. Important Note: If one or more tables are missing from an existing set, the utility automatically drops all existing tables, then recreates them all (without displaying any user prompts). If all the tables exist, the utility prompts you to drop, or not drop, existing tables. All the tables exist. Do you want to drop all tables (y/n)? If you type y, the utility drops all existing tables, then recreates them all. Type n to bypass the drop of existing tables and creation of new ones, and to exit the utility.
The results of running the Knowledgebase Create utility are written to the log file (the default log file is kbcreate.log in DTSInstall\bin\logs. If a different log file name and location are specified in the log configuration file kbcreatelog.xml (DTSInstall\bin\kb\ create) the results are written to that file.
If an error occurs in the knowledgebase creation process, the utility stops and updates the log file to reflect the error.
After generation of the DTS tables, you must load data into those tables using one of two methods. Using the first method, you populate the tables by performing a full subscription import of initial DTS content from a file that is exported to you from Apelon. This file contains data from the source vocabularies to which you subscribe. For procedures on performing a full subscription import, refer to the Subscription Content Import Guide.
The second method for populating the new tables is through migration of your existing data into DTS. For migration procedures, refer to the Populate New Tables Through Data Migration discussion that follows this section.
Note: If your intent is to subsequently publish this database, or use it to generate a subscription for local namespaces, you must “seed” the sequence generator differently on this database (publishers) and, in turn, the subscriber database. The numbers 1 – 20,000,000,000 are reserved for Apelon’s subscription content. As an example, the publisher sequence should start with 20000000001; the subscriber (i.e., the imported of your local content) should start with 40000000001). Refer to Appendix A - Publish Client’s Local Namespace for local namespace content publishing procedures.
© 1999-2009 Apelon, Inc. All Rights Reserved.
Page 13 of 71
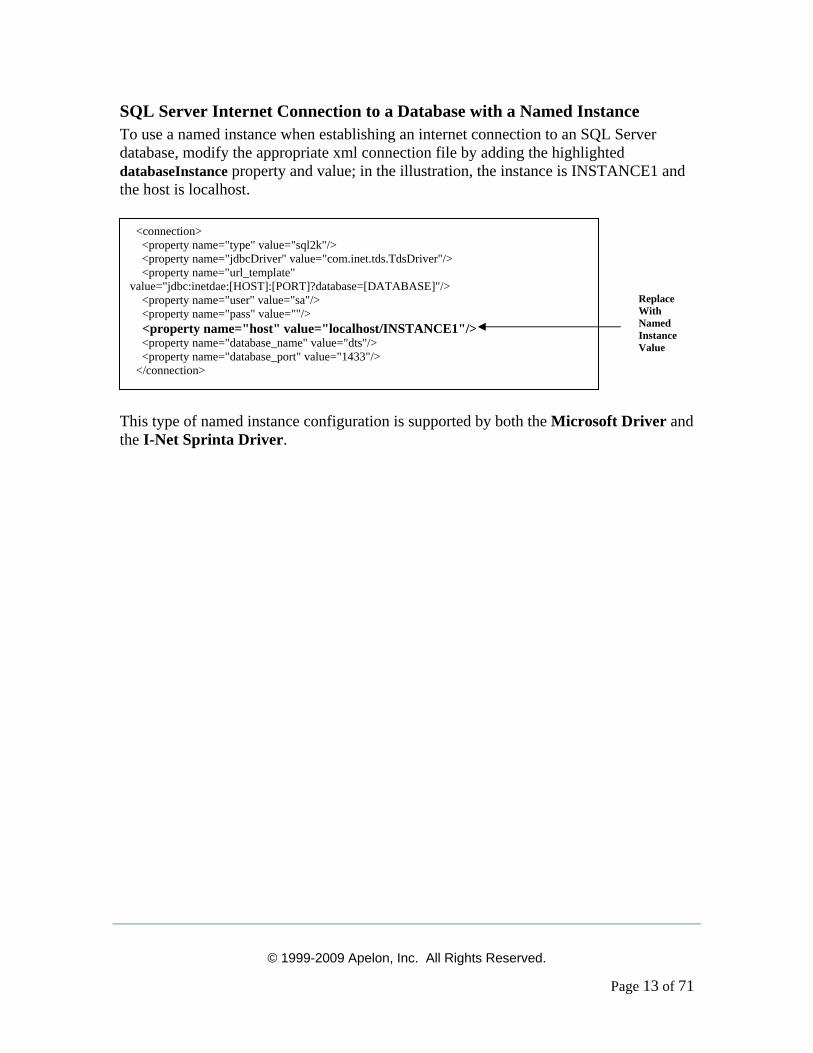
SQL Server Internet Connection to a Database with a Named Instance To use a named instance when establishing an internet connection to an SQL Server database, modify the appropriate xml connection file by adding the highlighted databaseInstance property and value; in the illustration, the instance is INSTANCE1 and the host is localhost.
This type of named instance configuration is supported by both the Microsoft Driver and the I-Net Sprinta Driver.
<connection> <property name="type" value="sql2k"/> <property name="jdbcDriver" value="com.inet.tds.TdsDriver"/> <property name="url_template" value="jdbc:inetdae:[HOST]:[PORT]?database=[DATABASE]"/> <property name="user" value="sa"/> <property name="pass" value=""/> <property name="host" value="localhost/INSTANCE1"/> <property name="database_name" value="dts"/> <property name="database_port" value="1433"/> </connection>
Replace With Named Instance Value
© 1999-2009 Apelon, Inc. All Rights Reserved.
Page 14 of 71
Populate DTS Tables Through Data Migration After you create the DTS tables using the Knowledgebase Create utility, you can populate the new tables with data. If you intend to populate the tables with migrated data from your existing knowledgebase, you must run the Knowledgebase Load utility to migrate knowledgebase data from DTS 2.x or TDE data sources. The procedures referenced in this discussion represent a “standard migration” of TDE or DTS 2.x data into DTS 3.x schema.
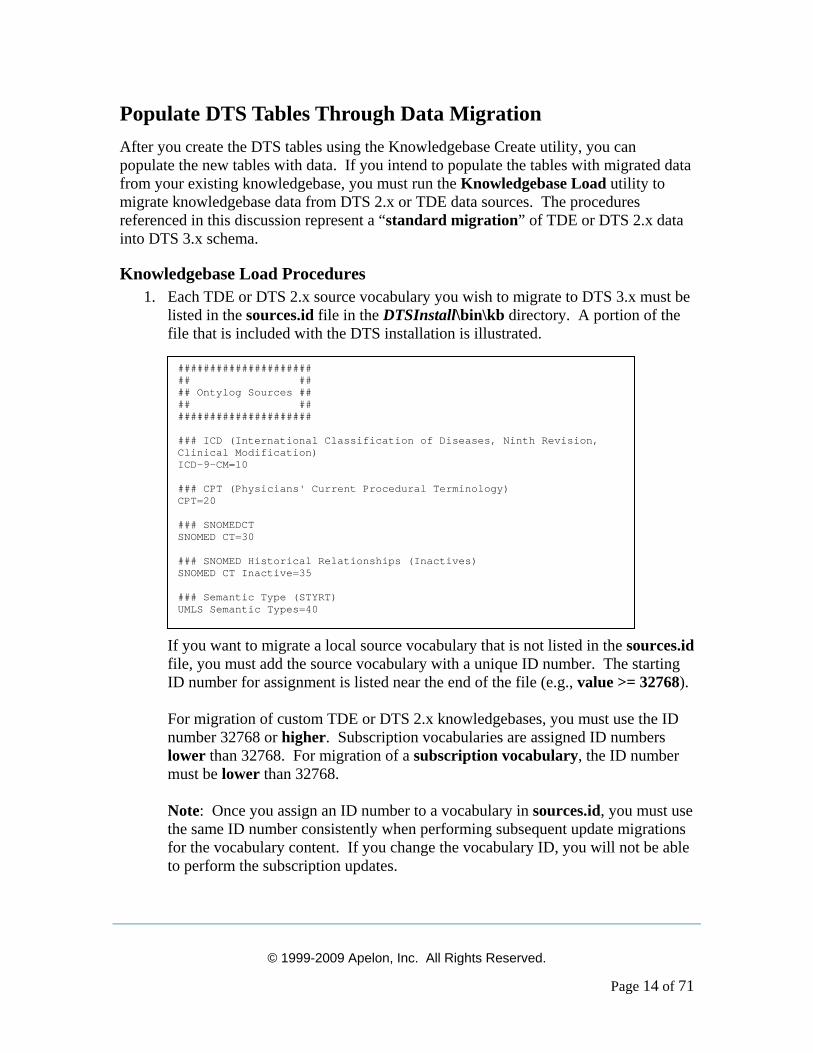
Knowledgebase Load Procedures 1. Each TDE or DTS 2.x source vocabulary you wish to migrate to DTS 3.x must be
listed in the sources.id file in the DTSInstall\bin\kb directory. A portion of the file that is included with the DTS installation is illustrated. If you want to migrate a local source vocabulary that is not listed in the sources.id file, you must add the source vocabulary with a unique ID number. The starting ID number for assignment is listed near the end of the file (e.g., value >= 32768). For migration of custom TDE or DTS 2.x knowledgebases, you must use the ID number 32768 or higher. Subscription vocabularies are assigned ID numbers lower than 32768. For migration of a subscription vocabulary, the ID number must be lower than 32768. Note: Once you assign an ID number to a vocabulary in sources.id, you must use the same ID number consistently when performing subsequent update migrations for the vocabulary content. If you change the vocabulary ID, you will not be able to perform the subscription updates.
##################### ## ## ## Ontylog Sources ## ## ## ##################### ### ICD (International Classification of Diseases, Ninth Revision, Clinical Modification) ICD-9-CM=10 ### CPT (Physicians' Current Procedural Terminology) CPT=20 ### SNOMEDCT SNOMED CT=30 ### SNOMED Historical Relationships (Inactives) SNOMED CT Inactive=35 ### Semantic Type (STYRT) UMLS Semantic Types=40
© 1999-2009 Apelon, Inc. All Rights Reserved.
Page 15 of 71
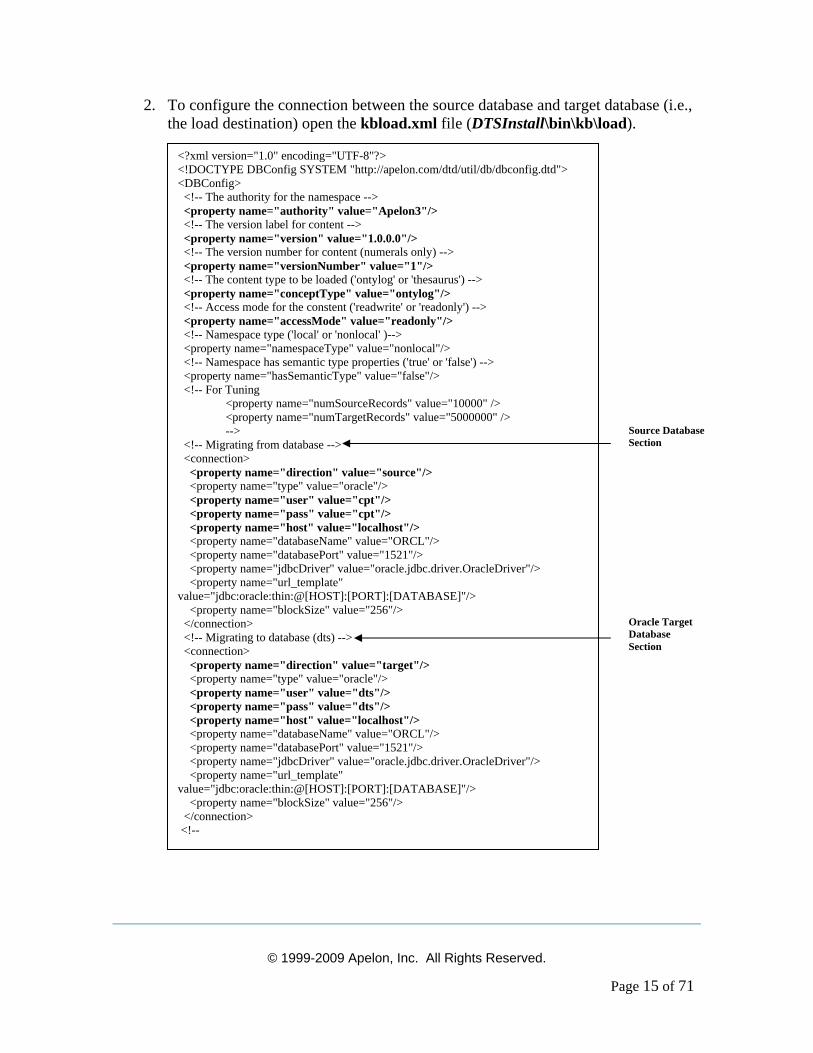
2. To configure the connection between the source database and target database (i.e., the load destination) open the kbload.xml file (DTSInstall\bin\kb\load).
<?xml version="1.0" encoding="UTF-8"?> <!DOCTYPE DBConfig SYSTEM "http://apelon.com/dtd/util/db/dbconfig.dtd"> <DBConfig> <!-- The authority for the namespace --> <property name="authority" value="Apelon3"/> <!-- The version label for content --> <property name="version" value="1.0.0.0"/> <!-- The version number for content (numerals only) --> <property name="versionNumber" value="1"/> <!-- The content type to be loaded ('ontylog' or 'thesaurus') --> <property name="conceptType" value="ontylog"/> <!-- Access mode for the constent ('readwrite' or 'readonly') --> <property name="accessMode" value="readonly"/> <!-- Namespace type ('local' or 'nonlocal' )--> <property name="namespaceType" value="nonlocal"/> <!-- Namespace has semantic type properties ('true' or 'false') --> <property name="hasSemanticType" value="false"/> <!-- For Tuning <property name="numSourceRecords" value="10000" /> <property name="numTargetRecords" value="5000000" /> --> <!-- Migrating from database --> <connection> <property name="direction" value="source"/> <property name="type" value="oracle"/> <property name="user" value="cpt"/> <property name="pass" value="cpt"/> <property name="host" value="localhost"/> <property name="databaseName" value="ORCL"/> <property name="databasePort" value="1521"/> <property name="jdbcDriver" value="oracle.jdbc.driver.OracleDriver"/> <property name="url_template" value="jdbc:oracle:thin:@[HOST]:[PORT]:[DATABASE]"/> <property name="blockSize" value="256"/> </connection> <!-- Migrating to database (dts) --> <connection> <property name="direction" value="target"/> <property name="type" value="oracle"/> <property name="user" value="dts"/> <property name="pass" value="dts"/> <property name="host" value="localhost"/> <property name="databaseName" value="ORCL"/> <property name="databasePort" value="1521"/> <property name="jdbcDriver" value="oracle.jdbc.driver.OracleDriver"/> <property name="url_template" value="jdbc:oracle:thin:@[HOST]:[PORT]:[DATABASE]"/> <property name="blockSize" value="256"/> </connection> <!--
Source Database Section
Oracle Target Database Section
© 1999-2009 Apelon, Inc. All Rights Reserved.
Page 16 of 71
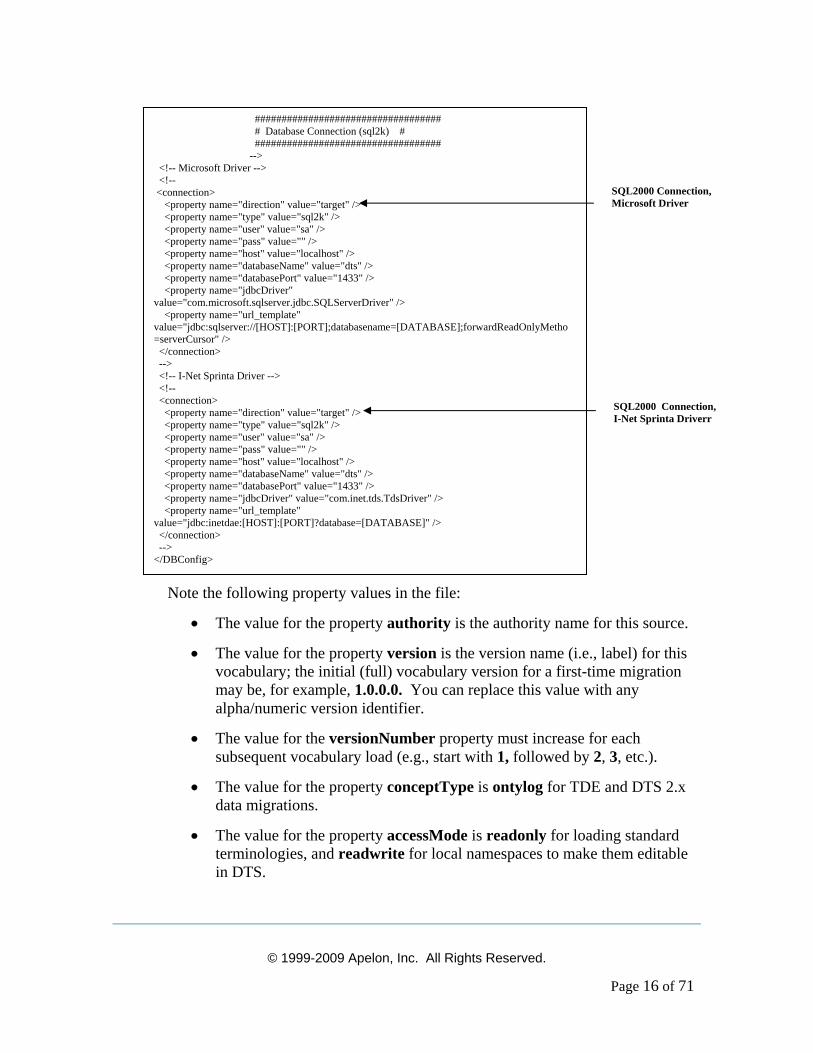
Note the following property values in the file:
• The value for the property authority is the authority name for this source.
• The value for the property version is the version name (i.e., label) for this vocabulary; the initial (full) vocabulary version for a first-time migration may be, for example, 1.0.0.0. You can replace this value with any alpha/numeric version identifier.
• The value for the versionNumber property must increase for each subsequent vocabulary load (e.g., start with 1, followed by 2, 3, etc.).
• The value for the property conceptType is ontylog for TDE and DTS 2.x data migrations.
• The value for the property accessMode is readonly for loading standard terminologies, and readwrite for local namespaces to make them editable in DTS.
################################### # Database Connection (sql2k) # ################################### --> <!-- Microsoft Driver --> <!-- <connection> <property name="direction" value="target" /> <property name="type" value="sql2k" /> <property name="user" value="sa" /> <property name="pass" value="" /> <property name="host" value="localhost" /> <property name="databaseName" value="dts" /> <property name="databasePort" value="1433" /> <property name="jdbcDriver" value="com.microsoft.sqlserver.jdbc.SQLServerDriver" /> <property name="url_template" value="jdbc:sqlserver://[HOST]:[PORT];databasename=[DATABASE];forwardReadOnlyMetho =serverCursor" /> </connection> --> <!-- I-Net Sprinta Driver --> <!-- <connection> <property name="direction" value="target" /> <property name="type" value="sql2k" /> <property name="user" value="sa" /> <property name="pass" value="" /> <property name="host" value="localhost" /> <property name="databaseName" value="dts" /> <property name="databasePort" value="1433" /> <property name="jdbcDriver" value="com.inet.tds.TdsDriver" /> <property name="url_template" value="jdbc:inetdae:[HOST]:[PORT]?database=[DATABASE]" /> </connection> --> </DBConfig>
SQL2000 Connection, Microsoft Driver
SQL2000 Connection, I-Net Sprinta Driverr
© 1999-2009 Apelon, Inc. All Rights Reserved.
Page 17 of 71
• The value for the property namespaceType is nonlocal for subscription vocabularies. For non-subscription vocabularies and custom TDE migrations, the value is local.
• The value for the property hasSemanticType is true for UMLS sources only.
3. In the database source parameters in the upper portion of the file, modify the source property values (e.g., user, pass, host, etc.) for either the DTS 2.x or TDE knowledgebase, as necessary.
4. In the database target parameters in the lower portion of the file, modify the target property values (e.g., user, pass, host, etc.) for the DTS knowledgebase, as necessary.
5. Save the kbload.xml file.
6. Run the file kbload.bat (DTSInstall\bin\kb\load) to start the Knowledgebase Load utility. (For a Linux installation, execute kbload.sh in bin/kb/load to start the Knowledgebase Load utility.) The utility opens the source and target database connections specified in the kbload.xml file, and migrates data from the source to the target database.
• The results of running the Knowledgebase Load utility are written to the log file (the level of logging is INFO). The default log file is kbload.log in DTSInstall\bin\logs. If a different log file name and location are specified in the log configuration file kbloadlog.xml (DTSInstall\bin\ kb\load) the results are written there. If an error occurs in the load process, the utility stops and updates the log file to reflect the error.
• Since TDE source database does not have any constraints in the table, DTS will generate errors if the migrated TDE data violates the constraints of the DTS schema. When duplication of data occurs, the INFO level indicates duplication of data in the table only once. In the DEBUG level, duplicate information is recorded in the log file.
Apelon suggests that you set the accessMode to readonly for the load of a TDE (i.e., Ontylog) terminology, and then use the DTS Editor to create a separate (editable) local namespace to which new and modified content can be written. This approach prevents the inadvertent overwrite of any new local data (entered using the DTS Editor) if updated TDE content is migrated into the DTS knowledgebase at a later time.
© 1999-2009 Apelon, Inc. All Rights Reserved.
Page 18 of 71
Source and Target Connection Files You have the option of creating one or more custom connection configuration files, each of which can define customized source and/or target database connections. You can then edit the kbload.bat file in DTSInstall\bin\kb\load (or kbload.sh, for Linux) to reference a custom connection configuration file.
Those custom connections will override the connection parameters specified in the kbload.xml file. The template connection files source-connection.xml and target-connection. xml (in DTSInstall\bin\kb) allow you to define custom source and target connections, respectively, for the KB Load utility.
You can create multiple versions of each of these connection files (each with a unique name), with each file reflecting a custom connection from, or to, a data source. Apelon recommends that you rename each custom connection file to reflect its purpose.
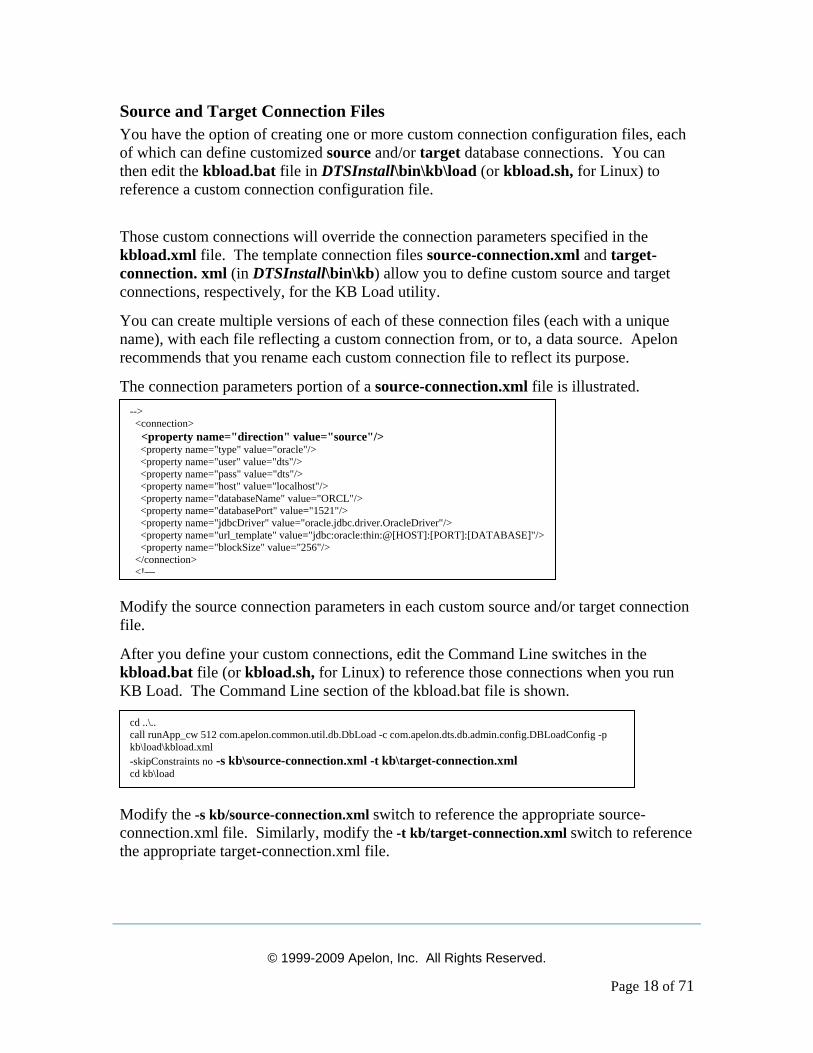
The connection parameters portion of a source-connection.xml file is illustrated. Modify the source connection parameters in each custom source and/or target connection file.
After you define your custom connections, edit the Command Line switches in the kbload.bat file (or kbload.sh, for Linux) to reference those connections when you run KB Load. The Command Line section of the kbload.bat file is shown.
Modify the -s kb/source-connection.xml switch to reference the appropriate source-connection.xml file. Similarly, modify the -t kb/target-connection.xml switch to reference the appropriate target-connection.xml file.
cd ..\.. call runApp_cw 512 com.apelon.common.util.db.DbLoad -c com.apelon.dts.db.admin.config.DBLoadConfig -p kb\load\kbload.xml -skipConstraints no -s kb\source-connection.xml -t kb\target-connection.xml cd kb\load
--> <connection> <property name="direction" value="source"/> <property name="type" value="oracle"/> <property name="user" value="dts"/> <property name="pass" value="dts"/> <property name="host" value="localhost"/> <property name="databaseName" value="ORCL"/> <property name="databasePort" value="1521"/> <property name="jdbcDriver" value="oracle.jdbc.driver.OracleDriver"/> <property name="url_template" value="jdbc:oracle:thin:@[HOST]:[PORT]:[DATABASE]"/> <property name="blockSize" value="256"/> </connection> <!—
© 1999-2009 Apelon, Inc. All Rights Reserved.
Page 19 of 71
Miscellaneous Tables Migration The Knowledgebase Load utility also will copy DTS2.x specific tables such as "SEARCH_INDEX_SPEC". The utility also transfers any “CONTENT_LICENSE” table data if it is present in the source database.

© 1999-2009 Apelon, Inc. All Rights Reserved.
Page 20 of 71
Delete Namespaces from Your Knowledgebase
Overview Apelon DTS provides a utility that allows you to delete unwanted or obsolete namespaces from your knowledgebase. You first designate the unwanted namespace(s) in the configuration file provided, then run kbcontent-delete.bat to delete those namespaces (for a Linux installation, you can execute kbcontent-delete.sh).
Configure Namespace(s) for Deletion Follow this procedure to specify the desired namespace(s) for deletion.
1. Open the kbcontent-delete.xml file (DTSInstall\bin\kb\content\delete). The kbcontent-delete.xml file is illustrated.
<?xml version="1.0" encoding="UTF-8"?> <!-- ####################################################################### # This is a configuration file used for deleting a given namespace # # from the DTS KB # ####################################################################### --> <!DOCTYPE DBConfig SYSTEM "http://apelon.com/dtd/util/db/dbconfig.dtd"> <DBConfig> <!-- Namespace(s) to delete --> <namespace name="CPT" > <property name="delete" value="true" /> </namespace> <namespace name="ICD-9-CM" > <property name="delete" value="true" /> </namespace> <!-- ################################################################ # DTS30 KB Database Connection # ################################################################ --> <!-- Oracle Connection Parameters --> <connection> <property name="direction" value="target" /> <property name="type" value="oracle" /> <property name="user" value="dts" /> <property name="pass" value="dts" /> <property name="host" value="localhost" /> <property name="databaseName" value="ORCL" /> <property name="databasePort" value="1521" /> <property name="jdbcDriver" value="oracle.jdbc.driver.OracleDriver" /> <property name="url_template" value="jdbc:oracle:thin:@[HOST]:[PORT]:[DATABASE]" /> <property name="blockSize" value="512" /> </connection> <!--

© 1999-2009 Apelon, Inc. All Rights Reserved.
Page 21 of 71
2. Note the <!-- Namespace(s) to delete --> section that is highlighted. Replace the namespace name values with those namespaces you want to delete, and add additional namespaces for deletion, as necessary. Note the examples.
################################### # Database Connection (sql2k) # ################################### --> <!-- Microsoft Driver --> <!-- <connection> <property name="direction" value="target" /> <property name="type" value="sql2k" /> <property name="user" value="sa" /> <property name="pass" value="" /> <property name="host" value="localhost" /> <property name="databaseName" value="dts" /> <property name="databasePort" value="1433" /> <property name="jdbcDriver" value="com.microsoft.sqlserver.jdbc.SQLServerDriver" /> <property name="url_template" value="jdbc:sqlserver://[HOST]:[PORT];databasename=[DATABASE];forwardReadOnlyMetho =serverCursor" /> </connection> --> <!-- I-Net Sprinta Driver --> <!-- <connection> <property name="direction" value="target" / <property name="type" value="sql2k" /> <property name="user" value="sa" /> <property name="pass" value="" /> <property name="host" value="localhost" /> <property name="databaseName" value="dts" /> <property name="databasePort" value="1433" /> <property name="jdbcDriver" value="com.inet.tds.TdsDriver" /> <property name="url_template" value="jdbc:inetdae:[HOST]:[PORT]?database=[DATABASE]" />
</connection> --></DBConfig>
<!-- Namespace(s) to delete --> <namespace name="CPT" > <property name="delete" value="true" /> </namespace> <namespace name="ICD-9-CM" > <property name="delete" value="true" /> </namespace>
<!-- Namespace(s) to delete --> <namespace name="SNOMED-CT EXTENSION" > <property name="delete" value="true" /> </namespace> <namespace name="SNOMED-CT" > <property name="delete" value="true" /> </namespace> </namespace> <namespace name="CPT" > <property name="delete" value="true" /> </namespace>
© 1999-2009 Apelon, Inc. All Rights Reserved.
Page 22 of 71
3. Ensure that the appropriate Database Connection section (Oracle or Microsoft SQL) of the file reflects the server location where the namespaces you want to delete are located.
4. Save the kbcontent-delete.xml file parameters.
Delete Unwanted Namespaces 1. After you specify the namespaces for deletion in the kbcontent-delete.xml file,
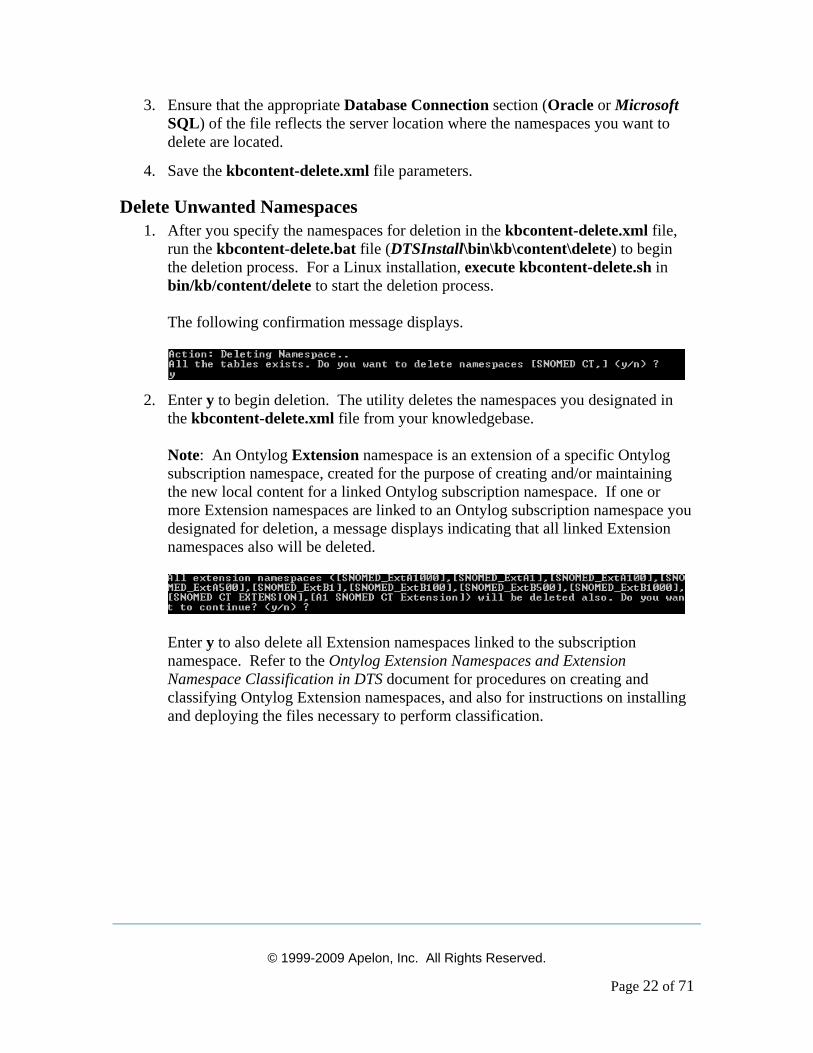
run the kbcontent-delete.bat file (DTSInstall\bin\kb\content\delete) to begin the deletion process. For a Linux installation, execute kbcontent-delete.sh in bin/kb/content/delete to start the deletion process. The following confirmation message displays.
2. Enter y to begin deletion. The utility deletes the namespaces you designated in
the kbcontent-delete.xml file from your knowledgebase. Note: An Ontylog Extension namespace is an extension of a specific Ontylog subscription namespace, created for the purpose of creating and/or maintaining the new local content for a linked Ontylog subscription namespace. If one or more Extension namespaces are linked to an Ontylog subscription namespace you designated for deletion, a message displays indicating that all linked Extension namespaces also will be deleted.
Enter y to also delete all Extension namespaces linked to the subscription namespace. Refer to the Ontylog Extension Namespaces and Extension Namespace Classification in DTS document for procedures on creating and classifying Ontylog Extension namespaces, and also for instructions on installing and deploying the files necessary to perform classification.
© 1999-2009 Apelon, Inc. All Rights Reserved.
Page 23 of 71
Knowledgebase Admin Utility
Overview If you are migrating local namespace content from a DTS 2.x or TDE database to DTS 3.x using the Knowledgebase Load utility (see Knowledgebase Load Procedures) you must run the Knowledgebase Admin utility to prepare the namespace in the DTS 3.x knowledgebase for access by the DTS server and clients. If you imported only subscription namespace content by performing the full subscription import procedure (refer to the Subscription Content Import Guide) there is no need to run the Knowledgebase Admin utility.
The Knowledgebase Admin utility also allows you to create synonymous terms, and generate mappings between concepts with corresponding property values in any two namespaces. The utility creates database entries that are used in Ontylog class queries and Word Match searches (which work in conjunction with property searches). Mappings (associations) are generated based on the configuration you specify.
Note: The Search feature in the DTS Editor and DTS Browser includes a Word Match capability that works in conjunction with the property search. This feature lets you search for a concept based on property when you do not know the property’s exact search string value. Refer to the Configure Word Match Search discussion later in this section to determine if database configurations are needed prior to performing the Knowledgebase Admin procedures.
Knowledgebase Admin Procedures 1. In order to run the Knowledgebase Admin utility, you must establish the
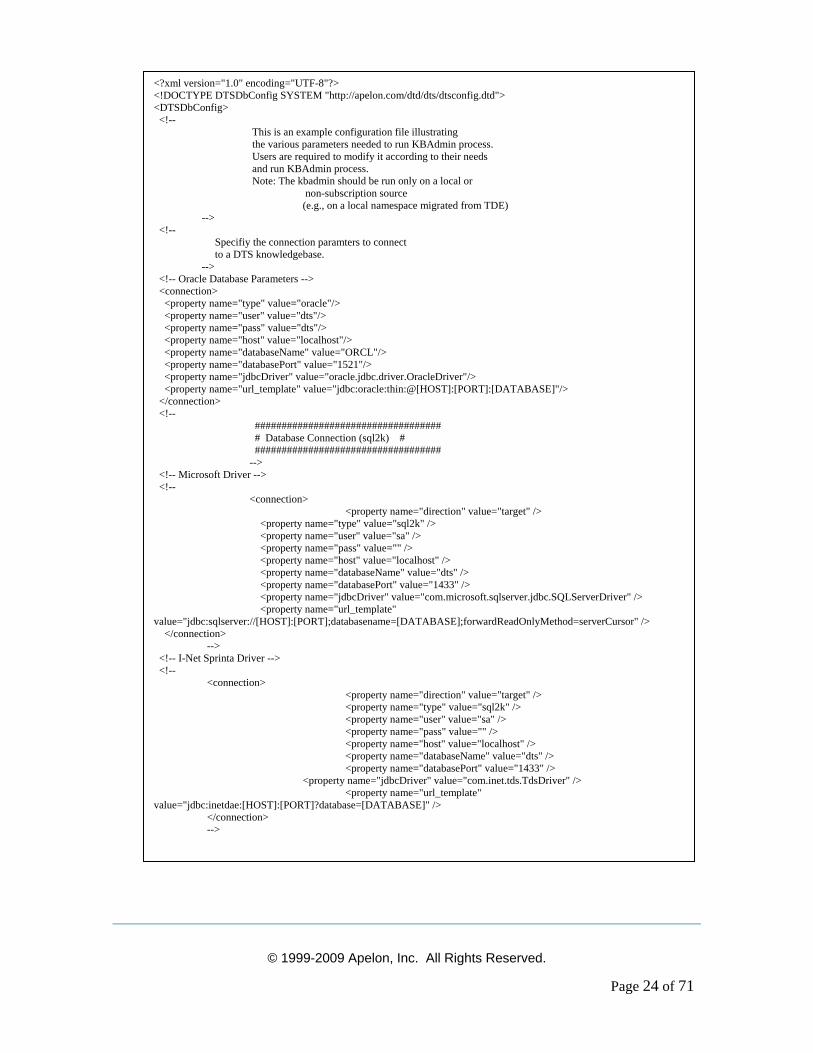
connection against which the utility will run in the kbadmin.xml file. This file needs to be edited to run against local namespaces. The process should not be run against subscription namespaces (it has been run already by Apelon). A sample kbadmin.xml file is provided in DTSInstall\bin\kb\admin as a template for the creation of synonymous terms and associations. Note the kbadmin.xml file illustration.
© 1999-2009 Apelon, Inc. All Rights Reserved.
Page 24 of 71
<?xml version="1.0" encoding="UTF-8"?> <!DOCTYPE DTSDbConfig SYSTEM "http://apelon.com/dtd/dts/dtsconfig.dtd"> <DTSDbConfig> <!-- This is an example configuration file illustrating the various parameters needed to run KBAdmin process. Users are required to modify it according to their needs and run KBAdmin process. Note: The kbadmin should be run only on a local or non-subscription source (e.g., on a local namespace migrated from TDE) --> <!-- Specifiy the connection paramters to connect to a DTS knowledgebase. --> <!-- Oracle Database Parameters --> <connection> <property name="type" value="oracle"/> <property name="user" value="dts"/> <property name="pass" value="dts"/> <property name="host" value="localhost"/> <property name="databaseName" value="ORCL"/> <property name="databasePort" value="1521"/> <property name="jdbcDriver" value="oracle.jdbc.driver.OracleDriver"/> <property name="url_template" value="jdbc:oracle:thin:@[HOST]:[PORT]:[DATABASE]"/> </connection> <!-- ################################### # Database Connection (sql2k) # ################################### --> <!-- Microsoft Driver --> <!-- <connection> <property name="direction" value="target" /> <property name="type" value="sql2k" /> <property name="user" value="sa" /> <property name="pass" value="" /> <property name="host" value="localhost" /> <property name="databaseName" value="dts" /> <property name="databasePort" value="1433" /> <property name="jdbcDriver" value="com.microsoft.sqlserver.jdbc.SQLServerDriver" /> <property name="url_template" value="jdbc:sqlserver://[HOST]:[PORT];databasename=[DATABASE];forwardReadOnlyMethod=serverCursor" /> </connection> --> <!-- I-Net Sprinta Driver --> <!-- <connection> <property name="direction" value="target" /> <property name="type" value="sql2k" /> <property name="user" value="sa" /> <property name="pass" value="" /> <property name="host" value="localhost" /> <property name="databaseName" value="dts" /> <property name="databasePort" value="1433" /> <property name="jdbcDriver" value="com.inet.tds.TdsDriver" /> <property name="url_template" value="jdbc:inetdae:[HOST]:[PORT]?database=[DATABASE]" /> </connection> -->
© 1999-2009 Apelon, Inc. All Rights Reserved.
Page 25 of 71
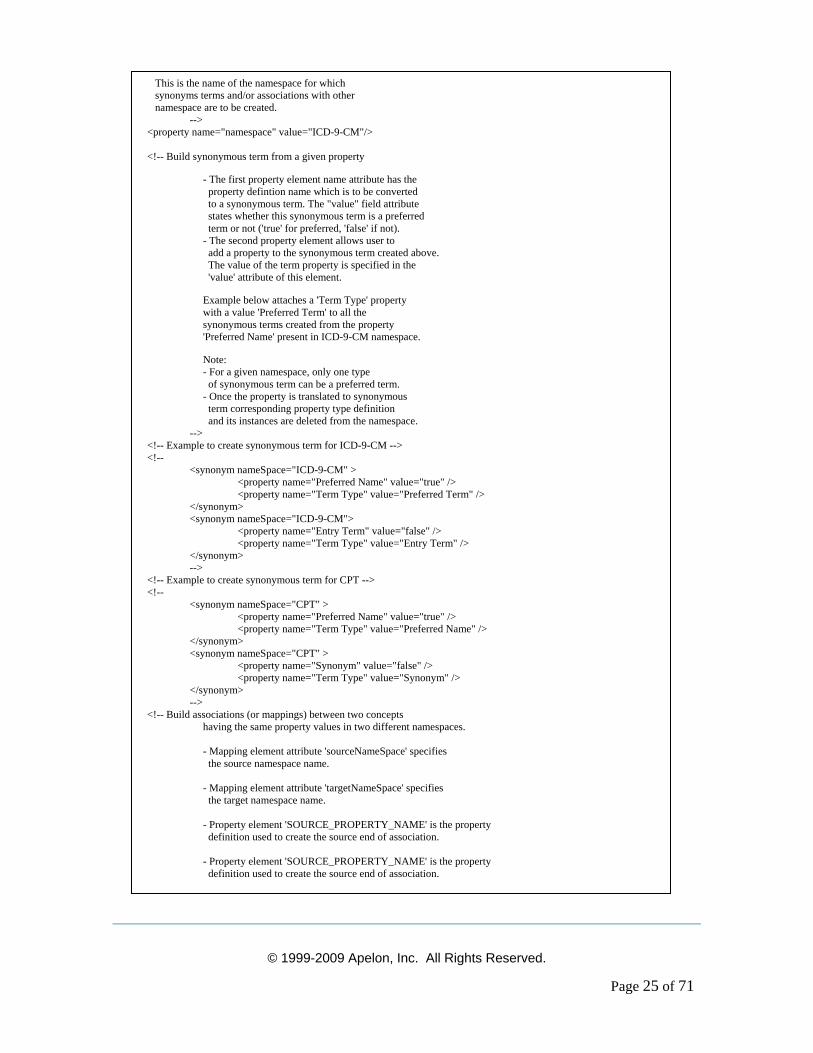
This is the name of the namespace for which synonyms terms and/or associations with other namespace are to be created. --> <property name="namespace" value="ICD-9-CM"/> <!-- Build synonymous term from a given property
- The first property element name attribute has the property defintion name which is to be converted to a synonymous term. The "value" field attribute states whether this synonymous term is a preferred term or not ('true' for preferred, 'false' if not). - The second property element allows user to add a property to the synonymous term created above. The value of the term property is specified in the 'value' attribute of this element.
Example below attaches a 'Term Type' property with a value 'Preferred Term' to all the synonymous terms created from the property 'Preferred Name' present in ICD-9-CM namespace.
Note: - For a given namespace, only one type of synonymous term can be a preferred term. - Once the property is translated to synonymous term corresponding property type definition and its instances are deleted from the namespace. --> <!-- Example to create synonymous term for ICD-9-CM --> <!-- <synonym nameSpace="ICD-9-CM" > <property name="Preferred Name" value="true" /> <property name="Term Type" value="Preferred Term" /> </synonym> <synonym nameSpace="ICD-9-CM"> <property name="Entry Term" value="false" /> <property name="Term Type" value="Entry Term" /> </synonym> --> <!-- Example to create synonymous term for CPT --> <!-- <synonym nameSpace="CPT" > <property name="Preferred Name" value="true" /> <property name="Term Type" value="Preferred Name" /> </synonym> <synonym nameSpace="CPT" > <property name="Synonym" value="false" /> <property name="Term Type" value="Synonym" /> </synonym> --> <!-- Build associations (or mappings) between two concepts having the same property values in two different namespaces. - Mapping element attribute 'sourceNameSpace' specifies the source namespace name. - Mapping element attribute 'targetNameSpace' specifies the target namespace name. - Property element 'SOURCE_PROPERTY_NAME' is the property definition used to create the source end of association. - Property element 'SOURCE_PROPERTY_NAME' is the property definition used to create the source end of association.
© 1999-2009 Apelon, Inc. All Rights Reserved.
Page 26 of 71
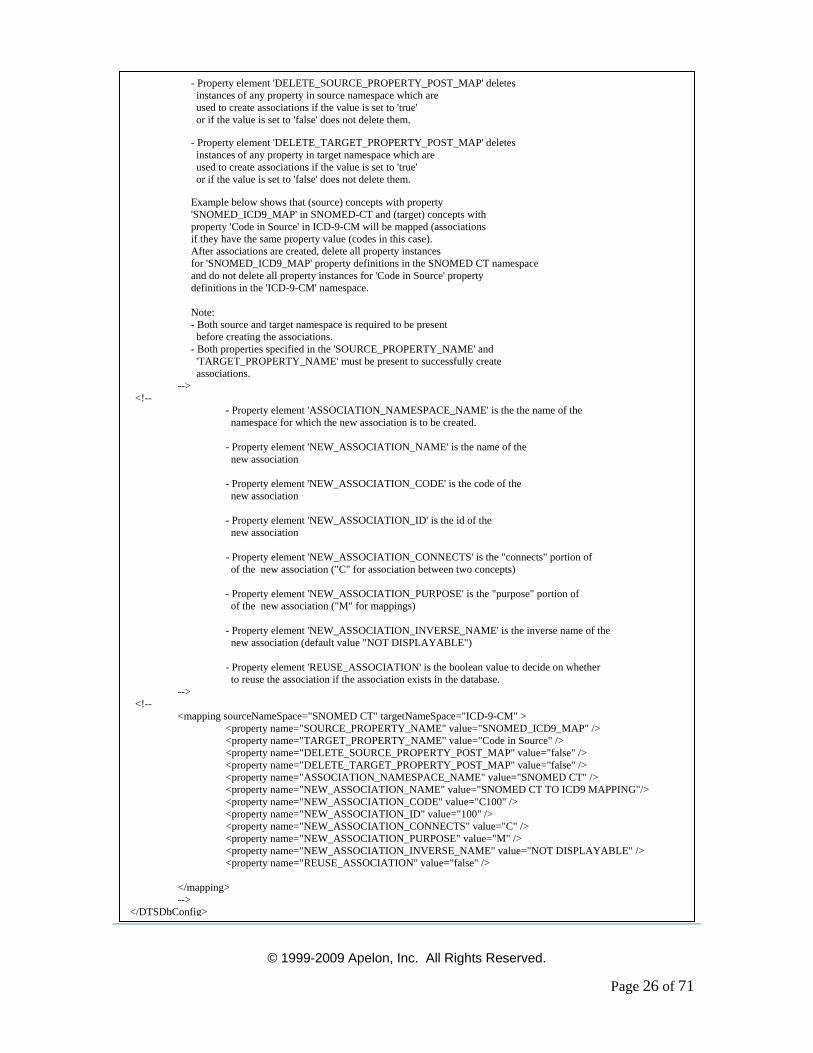
- Property element 'DELETE_SOURCE_PROPERTY_POST_MAP' deletes instances of any property in source namespace which are used to create associations if the value is set to 'true' or if the value is set to 'false' does not delete them.
- Property element 'DELETE_TARGET_PROPERTY_POST_MAP' deletes instances of any property in target namespace which are used to create associations if the value is set to 'true' or if the value is set to 'false' does not delete them.
Example below shows that (source) concepts with property 'SNOMED_ICD9_MAP' in SNOMED-CT and (target) concepts with property 'Code in Source' in ICD-9-CM will be mapped (associations if they have the same property value (codes in this case). After associations are created, delete all property instances for 'SNOMED_ICD9_MAP' property definitions in the SNOMED CT namespace and do not delete all property instances for 'Code in Source' property definitions in the 'ICD-9-CM' namespace. Note: - Both source and target namespace is required to be present before creating the associations. - Both properties specified in the 'SOURCE_PROPERTY_NAME' and 'TARGET_PROPERTY_NAME' must be present to successfully create associations. --> <!-- - Property element 'ASSOCIATION_NAMESPACE_NAME' is the the name of the namespace for which the new association is to be created. - Property element 'NEW_ASSOCIATION_NAME' is the name of the new association - Property element 'NEW_ASSOCIATION_CODE' is the code of the new association - Property element 'NEW_ASSOCIATION_ID' is the id of the new association - Property element 'NEW_ASSOCIATION_CONNECTS' is the "connects" portion of of the new association ("C" for association between two concepts) - Property element 'NEW_ASSOCIATION_PURPOSE' is the "purpose" portion of of the new association ("M" for mappings) - Property element 'NEW_ASSOCIATION_INVERSE_NAME' is the inverse name of the new association (default value "NOT DISPLAYABLE") - Property element 'REUSE_ASSOCIATION' is the boolean value to decide on whether to reuse the association if the association exists in the database. --> <!-- <mapping sourceNameSpace="SNOMED CT" targetNameSpace="ICD-9-CM" > <property name="SOURCE_PROPERTY_NAME" value="SNOMED_ICD9_MAP" /> <property name="TARGET_PROPERTY_NAME" value="Code in Source" /> <property name="DELETE_SOURCE_PROPERTY_POST_MAP" value="false" /> <property name="DELETE_TARGET_PROPERTY_POST_MAP" value="false" /> <property name="ASSOCIATION_NAMESPACE_NAME" value="SNOMED CT" /> <property name="NEW_ASSOCIATION_NAME" value="SNOMED CT TO ICD9 MAPPING"/> <property name="NEW_ASSOCIATION_CODE" value="C100" /> <property name="NEW_ASSOCIATION_ID" value="100" /> <property name="NEW_ASSOCIATION_CONNECTS" value="C" /> <property name="NEW_ASSOCIATION_PURPOSE" value="M" /> <property name="NEW_ASSOCIATION_INVERSE_NAME" value="NOT DISPLAYABLE" /> <property name="REUSE_ASSOCIATION" value="false" /> </mapping> --> </DTSDbConfig>
© 1999-2009 Apelon, Inc. All Rights Reserved.
Page 27 of 71
2. Modify the connection property values (e.g., user, pass, host, etc.) as necessary. The source databaseName value is case-sensitive. The name you specify must be an exact match with the namespace name in the sources.id file (DTSInstall\bin\kb); in this file you specify each vocabulary migrated using the KB Load utility. If there is not an exact namespace name match (case included), an error message will be written to the log after you run the KB Admin utility. Refer to the sources.id discussion earlier in the guide. By default, the Synonymous Term block in the kbadmin.xml file is commented out. To convert properties into synonymous terms, uncomment out that block, then modify the elements appropriately. Note that after converting to synonymous terms, the property definition is deleted from the knowledgebase. The Mappings block in the kbadmin.xml file also is commented out. To map similar property values, uncomment out that block, then modify the elements appropriately.
3. Save the kbadmin.xml file.
4. Run the file kbadmin.bat (DTSInstall\bin\kb\admin) to start the Knowledgebase Admin utility. (For a Linux installation, execute kbadmin.sh in bin/kb/admin to start Knowledgebase Admin.) The utility checks if the specified synonym names, namespaces, and mapping names and namespaces exist. If they do not, Knowledgebase Admin logs the error and stops.
5. Refer to the comments in the kbadmin.xml file for additional information regarding the synonymous terms and mappings procedures.
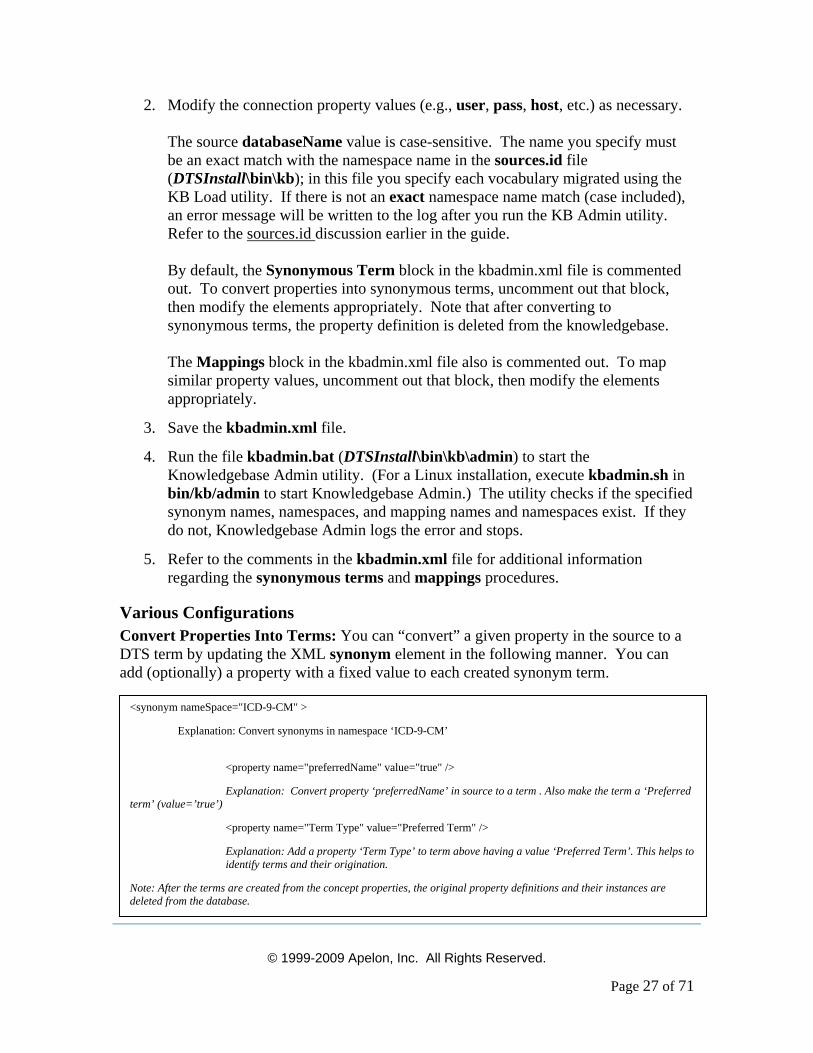
Various Configurations Convert Properties Into Terms: You can “convert” a given property in the source to a DTS term by updating the XML synonym element in the following manner. You can add (optionally) a property with a fixed value to each created synonym term.
<synonym nameSpace="ICD-9-CM" >
Explanation: Convert synonyms in namespace ‘ICD-9-CM’
<property name="preferredName" value="true" />
Explanation: Convert property ‘preferredName’ in source to a term . Also make the term a ‘Preferred term’ (value=’true’)
<property name="Term Type" value="Preferred Term" />
Explanation: Add a property ‘Term Type’ to term above having a value ‘Preferred Term’. This helps to identify terms and their origination.
Note: After the terms are created from the concept properties, the original property definitions and their instances are deleted from the database.
© 1999-2009 Apelon, Inc. All Rights Reserved.
Page 28 of 71
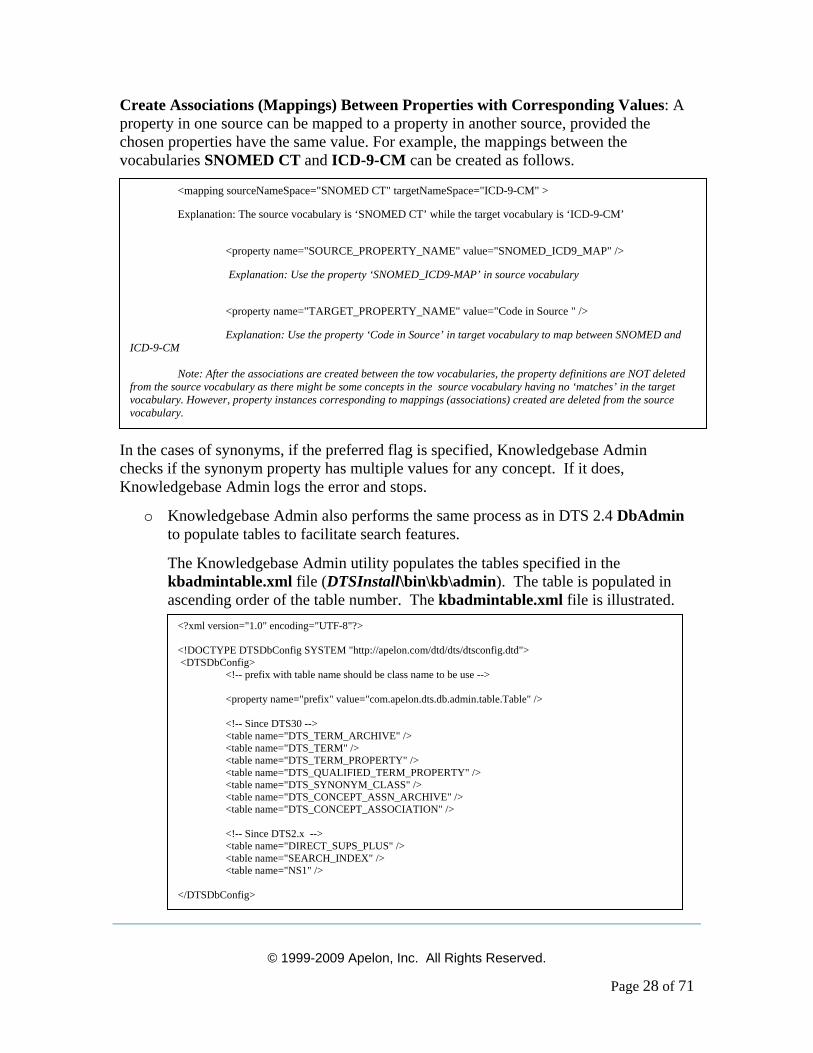
Create Associations (Mappings) Between Properties with Corresponding Values: A property in one source can be mapped to a property in another source, provided the chosen properties have the same value. For example, the mappings between the vocabularies SNOMED CT and ICD-9-CM can be created as follows.
In the cases of synonyms, if the preferred flag is specified, Knowledgebase Admin checks if the synonym property has multiple values for any concept. If it does, Knowledgebase Admin logs the error and stops.
o Knowledgebase Admin also performs the same process as in DTS 2.4 DbAdmin to populate tables to facilitate search features.
The Knowledgebase Admin utility populates the tables specified in the kbadmintable.xml file (DTSInstall\bin\kb\admin). The table is populated in ascending order of the table number. The kbadmintable.xml file is illustrated.
<?xml version="1.0" encoding="UTF-8"?> <!DOCTYPE DTSDbConfig SYSTEM "http://apelon.com/dtd/dts/dtsconfig.dtd"> <DTSDbConfig> <!-- prefix with table name should be class name to be use --> <property name="prefix" value="com.apelon.dts.db.admin.table.Table" /> <!-- Since DTS30 --> <table name="DTS_TERM_ARCHIVE" /> <table name="DTS_TERM" /> <table name="DTS_TERM_PROPERTY" /> <table name="DTS_QUALIFIED_TERM_PROPERTY" /> <table name="DTS_SYNONYM_CLASS" /> <table name="DTS_CONCEPT_ASSN_ARCHIVE" /> <table name="DTS_CONCEPT_ASSOCIATION" /> <!-- Since DTS2.x --> <table name="DIRECT_SUPS_PLUS" /> <table name="SEARCH_INDEX" /> <table name="NS1" /> </DTSDbConfig>
<mapping sourceNameSpace="SNOMED CT" targetNameSpace="ICD-9-CM" >
Explanation: The source vocabulary is ‘SNOMED CT’ while the target vocabulary is ‘ICD-9-CM’
<property name="SOURCE_PROPERTY_NAME" value="SNOMED_ICD9_MAP" />
Explanation: Use the property ‘SNOMED_ICD9-MAP’ in source vocabulary
<property name="TARGET_PROPERTY_NAME" value="Code in Source " />
Explanation: Use the property ‘Code in Source’ in target vocabulary to map between SNOMED and ICD-9-CM Note: After the associations are created between the tow vocabularies, the property definitions are NOT deleted from the source vocabulary as there might be some concepts in the source vocabulary having no ‘matches’ in the target vocabulary. However, property instances corresponding to mappings (associations) created are deleted from the source vocabulary.
© 1999-2009 Apelon, Inc. All Rights Reserved.
Page 29 of 71
The Knowledgebase Admin utility populates following DTS tables:
DTS_TERM DTS_SYNONYM_CLASS DTS_CON_ASSOCIATION_ARCHIVE DTS_CONCEPT_ASSOCIATION DIRECT_SUPS_PLUS SEARCH_INDEX NS1
The results of running the Knowledgebase Admin utility are written to the log file (the level of logging is INFO). The default log file is kbadmin.log in DTSInstall\bin\logs. If a different log file name and location are specified in the log configuration file kbadminlog.xml (DTSInstall\bin\kb\admin) the results are written there. If an error occurs in the admin process, the utility stops and updates the log file to reflect the error.
Since a TDE source database does not have any constraints in the table, DTS will generate errors if the migrated TDE data violates DTS schema constraints. When duplication of data occurs, the INFO level indicates duplication of data in the table only once. In the DEBUG level, duplicate information is recorded in the log file.
Configure Word Match Search The Word Match search feature in DTS Browser and DTS Editor works in conjunction with the property search. It lets you search for a concept based on a property when you do not know the property’s exact (search string) value. If you specify as the search string those words you believe apply to the property value, the search will retrieve all concepts that contain those words, in any order, as part of the selected property. Refer to the DTS Editor User Guide and DTS Browser Users Guide for more on using this search feature. Each Word Match search is restricted to those concepts with property definitions that have been assigned the <containsIndex/> tag in the TDE database XML file. You can use the Knowledgebase Type Editor to assign the tag to desired property definitions. If the <containsIndex/> tags were never set in the database XML file, you must follow this procedure to prepare the database prior to running the Knowledgebase Admin utility.
1. Review the available properties that are in the database and decide which ones will be configured to permit a word search.
2. Navigate to DTSInstall\scripts\Oracle.
3. Locate the file setContains.sql, then open it in a text editor such as Notepad. The setContain.sql file contains sets of three-line groups like this: UPDATE dts_property_type -- set CONTAINS_INDEX = 'T' -- WHERE NAME = ‘<Enter Property Name>’; -- AND NAMESPACE_ID = <Enter Namespace ID>

© 1999-2009 Apelon, Inc. All Rights Reserved.
Page 30 of 71
Each of these groups will set one property in the namespace.
4. The first group is an example of what a correct group looks like. To prepare the setContains.sql script, modify each group as follows:
a. Change the value of set CONTAINS_INDEX to T if this property is to be enabled for searches, and to F if it is not. Be sure to include the single quotes ( ‘ ‘ ).
b. Change the value of ’<Enter Property Name>’ to the name of the property as it is spelled in the database table. Be sure to include the single quotes ( ‘ ‘ ).
c. Change the value of <Enter Namespace ID> to the ID of the namespace in which the indexed property is located.
d. Add as many groups as needed to configure all of the properties that are in the database. If the sample setContains.sql file contains too many groups, delete the unused ones.
e. If the table contains a large number of properties that need to be configured all the same way, set CONTAINS_INDEX to either T or F, as required, in the first group below the example. Delete the “Where Name” line entirely and then delete all other groups up to the “COMMIT” line. -- UPDATE dts_property_type -- set CONTAINS_INDEX = 'T'
–WHERE NAMESPACE_ID = <Namespace ID>
When executed, this will set all CONTAINS_INDEX fields to the specified value for all property types in the specified namespace. CAUTION: Do not delete any of the lines from the “COMMIT” line down. The COMMIT line and all that follow are control codes necessary for the script to run properly.
5. When you complete modifying the script, save it to the same folder where loadContains.bat resides (DTSInstall\scripts\Oracle). (For a Linux installation, the script is loadContains.sh located in scripts/Oracle.)
6. Double-click the loadContains.bat file to run the script (or, for Linux, execute loadContains.sh). The information in setContains.sql will be used to modify the database properties table. Note: You will need to edit loadContains.bat (or loadContains.sh for Linux) if your database is on a different machine from “localhost.”
© 1999-2009 Apelon, Inc. All Rights Reserved.
Page 31 of 71
Knowledgebase Silos and Selectors & Extractors Apelon DTS allows you to search a specific knowledgebase silo for concepts and related terms that match the search strings you specify. You can configure a single silo or multiple silos to be populated with knowledgebase data. The Apelon DTS servers attempt to match the search strings that you submit against the clinical terms and associated concepts in a specific silo.
Each unique concept in a silo is associated with a set of alternative terms. A search string must match a term in the knowledgebase (or its lexical variant[s]) in order to be identified and matched by the server.
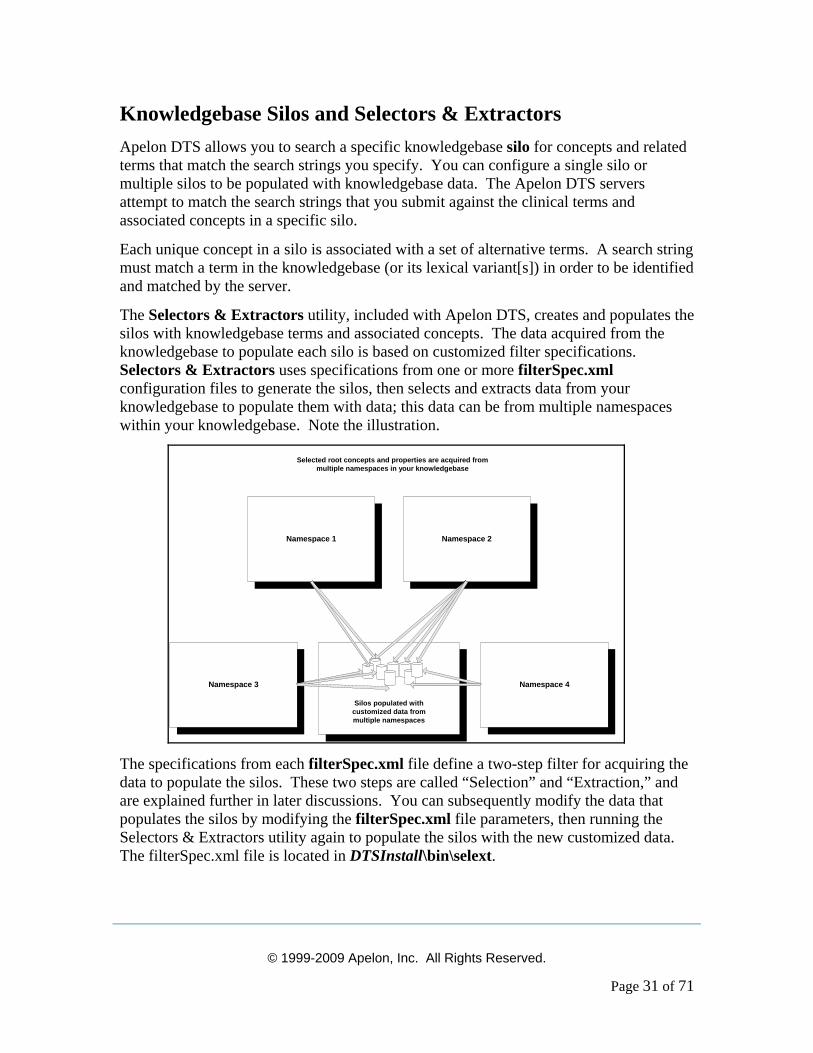
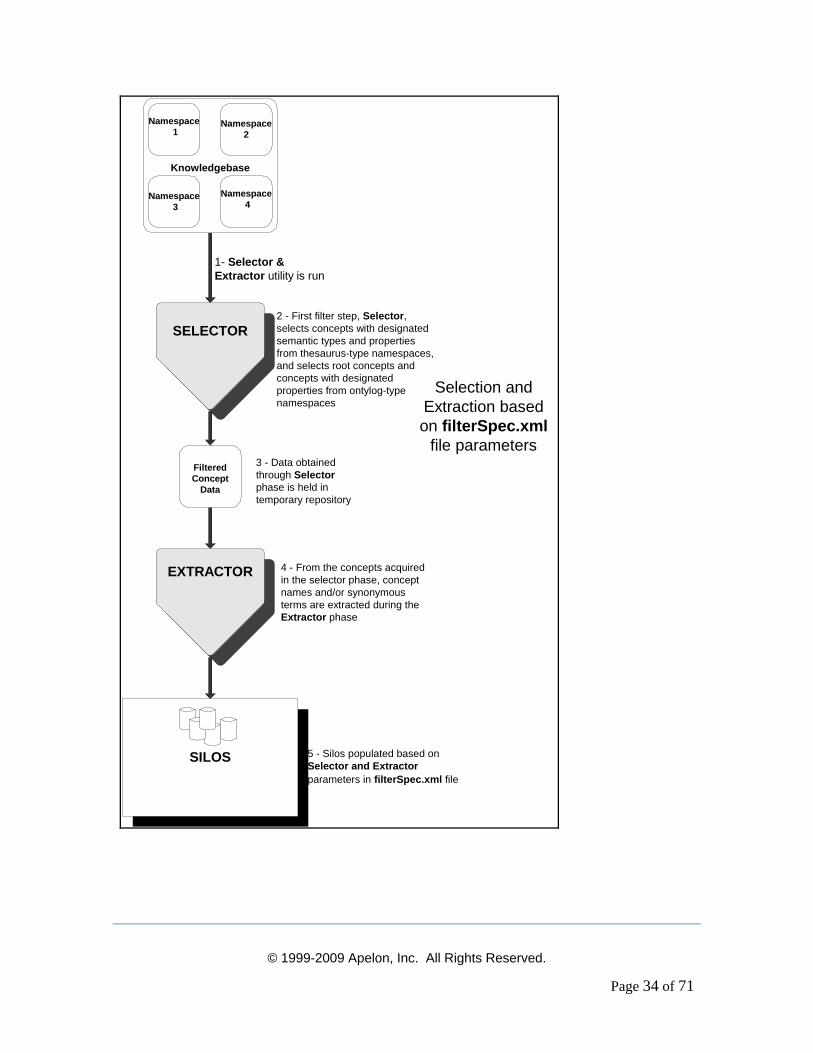
The Selectors & Extractors utility, included with Apelon DTS, creates and populates the silos with knowledgebase terms and associated concepts. The data acquired from the knowledgebase to populate each silo is based on customized filter specifications. Selectors & Extractors uses specifications from one or more filterSpec.xml configuration files to generate the silos, then selects and extracts data from your knowledgebase to populate them with data; this data can be from multiple namespaces within your knowledgebase. Note the illustration.
Selected root concepts and properties are acquired frommultiple namespaces in your knowledgebase
Namespace 1
Silos populated withcustomized data frommultiple namespaces
Namespace 3
Namespace 2
Namespace 4
The specifications from each filterSpec.xml file define a two-step filter for acquiring the data to populate the silos. These two steps are called “Selection” and “Extraction,” and are explained further in later discussions. You can subsequently modify the data that populates the silos by modifying the filterSpec.xml file parameters, then running the Selectors & Extractors utility again to populate the silos with the new customized data. The filterSpec.xml file is located in DTSInstall\bin\selext.
© 1999-2009 Apelon, Inc. All Rights Reserved.
Page 32 of 71
Selectors & Extractors To customize the silos with data from your own knowledgebase, first you must configure the specifications in the filterSpec.xml file to reflect the data to be acquired from your knowledgebase. You then must run the Selectors & Extractors utility provided with Apelon DTS. Selectors & Extractors is a Java program that uses the specifications from the filterSpec.xml file to select and extract the desired concept data from designated namespaces in your knowledgebase. Selectors & Extractors then generates the silos and populates them with the customized data.
If subsequently you require that one or more existing silos contain additional or alternate terminology, you can modify the filterSpec.xml file specifications. You can also add new specifications to the filterSpec.xml file to generate and populate one or more new silos.
You also have the option of creating multiple filterSpec.xml files, each with a unique name. Whenever you add a new filterSpec.xml file, or modify the specifications in an existing filterSpec.xml file, you must rerun the Selectors & Extractors utility to populate the silos with the new customized data.
Starting Selectors & Extractors You run the Selectors & Extractors utility by executing selext.bat on the Command Line (the selext.bat file is located in the installed DTSInstall\bin\selext directory). For a Linux installation, you execute selext.sh in bin/selext to run the Selectors & Extractors utility.
You must execute selext.bat (or selext.sh for Linux) for each new filterspec.xml file, or each filterspec.xml file that has been modified.
For example, if you modified the specifications in the existing file filterspec.xml, and created the new files filterspec2.xml and filterspec3, xml, you would have to run Selectors & Extractors 3 separate times (one each for the selext filterspec.xml, selext filterspec2.xml , and selext filterspec3.xml files) to populate the silos correctly. Run Selectors & Extractors only after you have completed modifications to all filterSpec.xml file specifications.
Note the following Command Line entry examples.
selext -cf selext/filterspec.xml
selext -cf selext/filterspec2.xml
selext -cf selext/filterspec3.xml
Note the -cf prefix that precedes the filterspec name on each line. If you enter this prefix, you will be prompted for server connection parameters for each individual run of Selectors & Extractors.
© 1999-2009 Apelon, Inc. All Rights Reserved.
Page 33 of 71
You have the option of defining server connection values to serve as defaults whenever you start Selectors & Extractors. You define these defaults in the selextconnection. xml configuration file, located in DTSInstall\bin\selext. Note the illustration.
The default connection parameters allow you to schedule Selectors & Extractors to run during off hours (you will not be required to define connection parameters when you start the utility).
To start the utility using the selextconnection.xml file connection configuration, enter the following on the Command Line.
selext -cp selext/selextconnection.xml -cf selext/filterspec.xml
The -cp selextconnection.xml indicates that you want to run Selectors & Extractors using the default connection parameters. You will not be prompted for connection parameters.
To start the utility with a connection configuration other than that defined in the selextconnection.xml file, enter the following on the Command Line.
selext -cf selext/filterspec.xml
You will be prompted for the appropriate connection parameters.
<?xml version="1.0" ?> <!DOCTYPE SELEXTConfig SYSTEM "http://apelon.com/dtd/selext/selextconfig.dtd"> <SELEXTConfig> <connection> <property name="type" value="oracle" /> <property name="user" value="dts" /> <property name="pass" value="dts" /> <property name="host" value="localhost" /> <property name="databaseName" value="orcl"/> <property name="databasePort" value="1521" /> </connection> </SELEXTConfig>
© 1999-2009 Apelon, Inc. All Rights Reserved.
Page 34 of 71
SELECTOR
4 - From the concepts acquiredin the selector phase, conceptnames and/or synonymousterms are extracted during theExtractor phase
EXTRACTOR
5 - Silos populated based onSelector and Extractorparameters in filterSpec.xml file
3 - Data obtainedthrough Selectorphase is held intemporary repository
2 - First filter step, Selector,selects concepts with designatedsemantic types and propertiesfrom thesaurus-type namespaces,and selects root concepts andconcepts with designatedproperties from ontylog-typenamespaces
Selection andExtraction basedon filterSpec.xml
file parameters
Knowledgebase
FilteredConcept
Data
1- Selector &Extractor utility is run
SILOS
Namespace2
Namespace 1
Namespace 4
Namespace 3
© 1999-2009 Apelon, Inc. All Rights Reserved.
Page 35 of 71
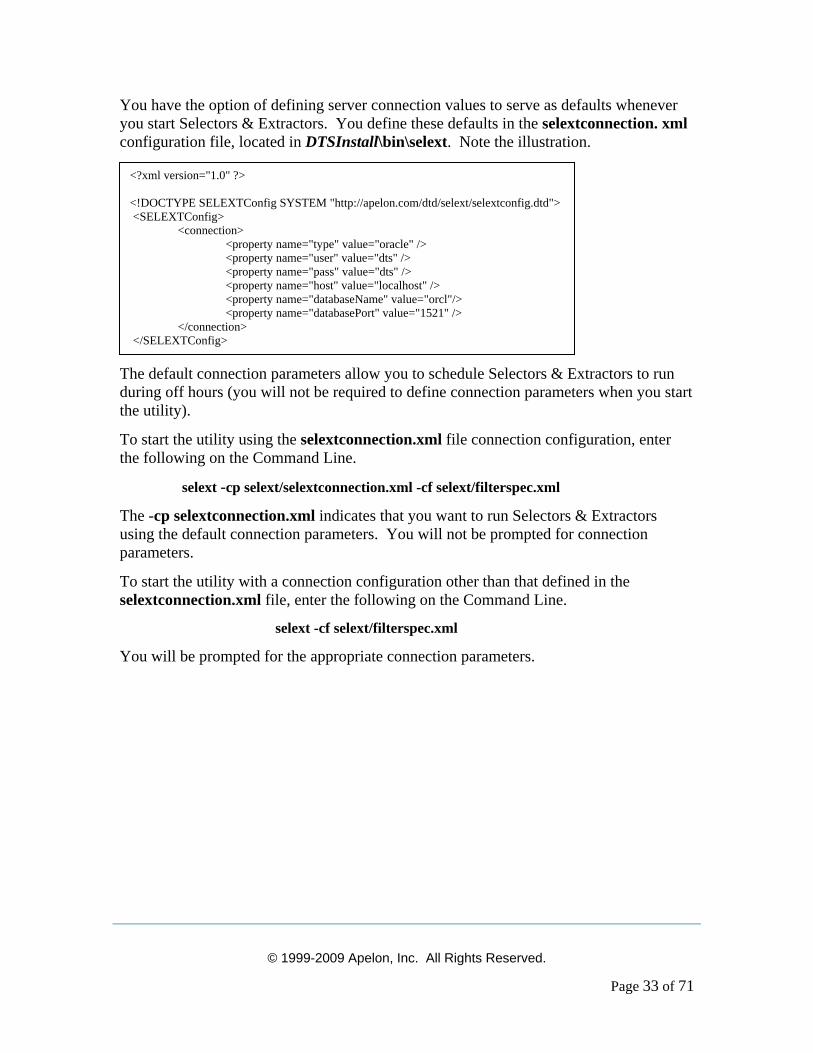
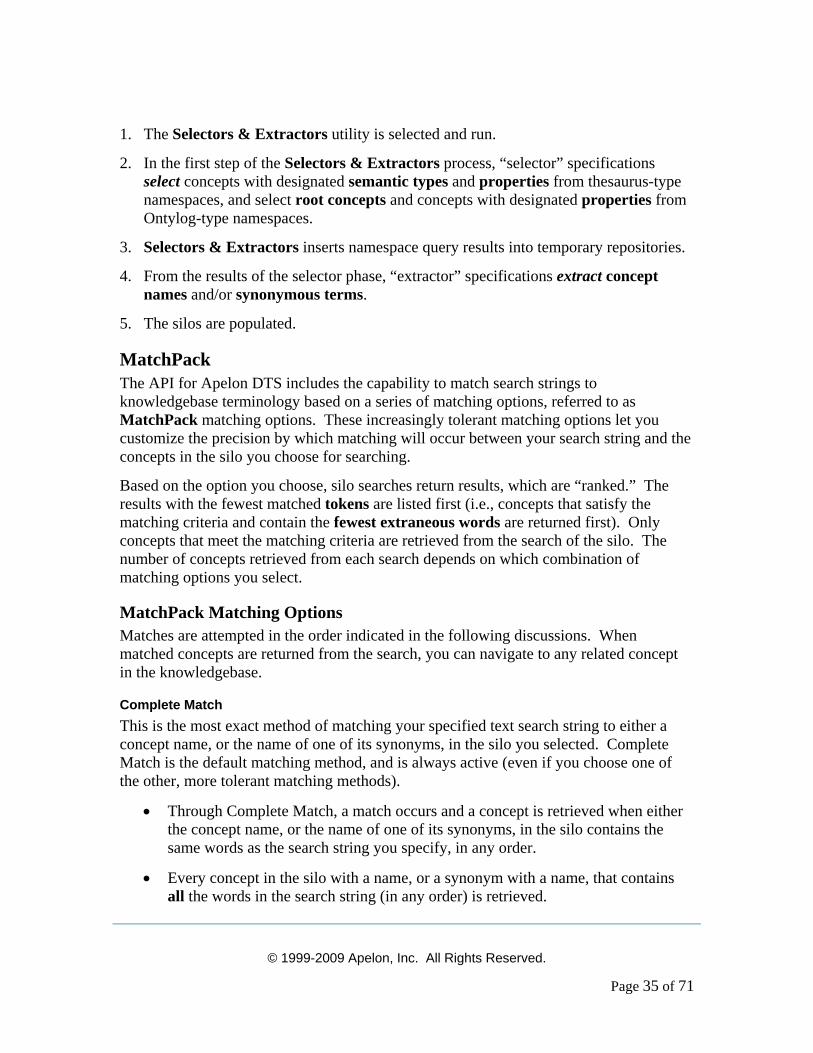
1. The Selectors & Extractors utility is selected and run.
2. In the first step of the Selectors & Extractors process, “selector” specifications select concepts with designated semantic types and properties from thesaurus-type namespaces, and select root concepts and concepts with designated properties from Ontylog-type namespaces.
3. Selectors & Extractors inserts namespace query results into temporary repositories.
4. From the results of the selector phase, “extractor” specifications extract concept names and/or synonymous terms.
5. The silos are populated.
MatchPack The API for Apelon DTS includes the capability to match search strings to knowledgebase terminology based on a series of matching options, referred to as MatchPack matching options. These increasingly tolerant matching options let you customize the precision by which matching will occur between your search string and the concepts in the silo you choose for searching.
Based on the option you choose, silo searches return results, which are “ranked.” The results with the fewest matched tokens are listed first (i.e., concepts that satisfy the matching criteria and contain the fewest extraneous words are returned first). Only concepts that meet the matching criteria are retrieved from the search of the silo. The number of concepts retrieved from each search depends on which combination of matching options you select.
MatchPack Matching Options Matches are attempted in the order indicated in the following discussions. When matched concepts are returned from the search, you can navigate to any related concept in the knowledgebase.
Complete Match This is the most exact method of matching your specified text search string to either a concept name, or the name of one of its synonyms, in the silo you selected. Complete Match is the default matching method, and is always active (even if you choose one of the other, more tolerant matching methods).
• Through Complete Match, a match occurs and a concept is retrieved when either the concept name, or the name of one of its synonyms, in the silo contains the same words as the search string you specify, in any order.
• Every concept in the silo with a name, or a synonym with a name, that contains all the words in the search string (in any order) is retrieved.
© 1999-2009 Apelon, Inc. All Rights Reserved.
Page 36 of 71
Under Match If Under Match is activated, a match occurs and a concept is retrieved if the concept name, or the name of one of its synonyms, in the silo matches the search string words (in any order) and the concept or synonym name in the silo contains words in addition to those in the search string.
• When Under Match is selected, the order of the words in the search string is not considered in the search (e.g., the identical results are returned for the search strings myocardial infarction and infarction myocardial).
• You can use the Best Match Only option in conjunction with Under Match.
o If Best Match Only also is active, Complete Match is performed first (i.e., if the concept name, or the name of one of its synonyms, in the specified silo contains every word in the search string, in any order, a match occurs).
o If one or more complete matches are found, only these (complete) matches are returned, and no further matching attempt is made.
o If no concept matches occur from the Complete Match, Under Match is attempted; if under matches are found, only these matches are returned.
o If Under Match is activated, and Best Match Only is inactive, under matches will be returned in addition to the complete matches.
Partial Under Match
If Partial Under Match is activated, a match occurs and a concept is retrieved if the concept name, or the name of one of its synonyms, in the specified silo contains all remaining words (in any order) after all stopwords have been removed. The following stopwords are those words that are considered as unnecessary for the search:
A and by for in NOS of on the to with
© 1999-2009 Apelon, Inc. All Rights Reserved.
Page 37 of 71
• Example: For the search string attack in the heart and brain, the string becomes attack heart brain because the stopwords in, the, and and are discarded. If the words in the modified search string match a concept name, or the name of one of its synonyms, in the silo (in any order) a match is returned.
• You can use the Best Match Only option in conjunction with Partial Under Match.
o If Best Match Only also is active, Complete Match is performed first (i.e., if the concept name, or the name of one of its synonyms, in the specified silo contains every word in the search string, in any order, a match occurs).
o If one or more complete matches are found, only these (complete) matches are returned and no further matching attempt is made.
o If no concept matches occur from the Complete Match, Under Match is attempted; if under matches are found, only these matches are returned.
o If no matches occur from Under Match, matches are attempted through Partial Under Match.
o If Partial Under Match is activated, and Best Match Only is inactive, partial under matches will be returned in addition to the complete matches and under matches.
Spell Checking Spell Checking is one of the MatchPack options you can use to search a specified silo. In the event a misspelled search string is entered, spell checking generates suggested spelling variants against which matches can be attempted. Spelling correction will occur when MatchPack attempts to match a concept name, or the name of a concept synonym, with the search string you specify.
• You can use spell checking regardless of the matching option you select (Complete Match, Under Match, or Partial Under Match).
• The number of matched concepts retrieved from the search is dependent on the matching method you select.
© 1999-2009 Apelon, Inc. All Rights Reserved.
Page 38 of 71
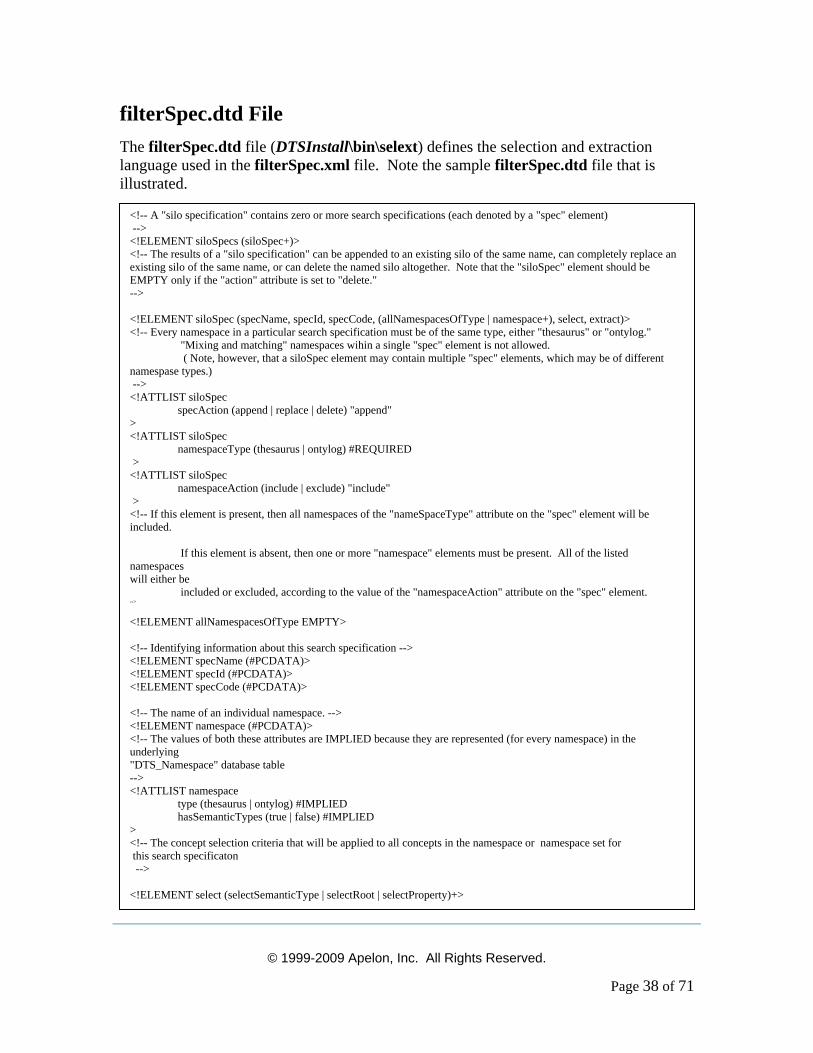
filterSpec.dtd File The filterSpec.dtd file (DTSInstall\bin\selext) defines the selection and extraction language used in the filterSpec.xml file. Note the sample filterSpec.dtd file that is illustrated.
<!-- A "silo specification" contains zero or more search specifications (each denoted by a "spec" element) --> <!ELEMENT siloSpecs (siloSpec+)> <!-- The results of a "silo specification" can be appended to an existing silo of the same name, can completely replace an existing silo of the same name, or can delete the named silo altogether. Note that the "siloSpec" element should be EMPTY only if the "action" attribute is set to "delete." --> <!ELEMENT siloSpec (specName, specId, specCode, (allNamespacesOfType | namespace+), select, extract)> <!-- Every namespace in a particular search specification must be of the same type, either "thesaurus" or "ontylog." "Mixing and matching" namespaces wihin a single "spec" element is not allowed. ( Note, however, that a siloSpec element may contain multiple "spec" elements, which may be of different namespase types.) --> <!ATTLIST siloSpec specAction (append | replace | delete) "append" > <!ATTLIST siloSpec namespaceType (thesaurus | ontylog) #REQUIRED > <!ATTLIST siloSpec namespaceAction (include | exclude) "include" > <!-- If this element is present, then all namespaces of the "nameSpaceType" attribute on the "spec" element will be included. If this element is absent, then one or more "namespace" elements must be present. All of the listed namespaces will either be included or excluded, according to the value of the "namespaceAction" attribute on the "spec" element. -->
<!ELEMENT allNamespacesOfType EMPTY> <!-- Identifying information about this search specification --> <!ELEMENT specName (#PCDATA)> <!ELEMENT specId (#PCDATA)> <!ELEMENT specCode (#PCDATA)> <!-- The name of an individual namespace. --> <!ELEMENT namespace (#PCDATA)> <!-- The values of both these attributes are IMPLIED because they are represented (for every namespace) in the underlying "DTS_Namespace" database table --> <!ATTLIST namespace type (thesaurus | ontylog) #IMPLIED hasSemanticTypes (true | false) #IMPLIED > <!-- The concept selection criteria that will be applied to all concepts in the namespace or namespace set for this search specificaton --> <!ELEMENT select (selectSemanticType | selectRoot | selectProperty)+>
© 1999-2009 Apelon, Inc. All Rights Reserved.
Page 39 of 71
filterSpec.dtd File, continued <!-- The name of a Semantic Type from the UMLS Semantic Network --> <!ELEMENT selectSemanticType (#PCDATA)> <!-- Indicates whether to: (1) include all Semantic Types in the UMLS Semantic Network, (2) include this specific Semantic Type and all of its descendants, or (3) exclude this specific Semantic Type and all of its descendants Note that the "selectSemanticType" element will be EMPTY if the "all" attribute value is specified. Note that concepts in either Ontylog or thesaurus namespaces may have Semantic Types. --> <!ATTLIST selectSemanticType selectSemanticTypeAction (all | include | exclude) "include" requiredNamespaceType (ontylog | thesaurus | either) #FIXED "either" > <!-- The "selectRoot" element should only be used in Ontylog namespaces. --> <!ELEMENT selectRoot (#PCDATA)> <!ATTLIST selectRoot selectRootAction CDATA #FIXED "include" requiredNamespaceType (ontylog | thesaurus | either) #FIXED "ontylog" > <!ELEMENT selectProperty (selectPropertyName, selectPropertyValue)> <!-- Note that concepts in either Ontylog or thesaurus namespaces may have Semantic Types.--> <!ATTLIST selectProperty requiredNamespaceType (ontylog | thesaurus | either) #FIXED "either" > <!-- The name of a Property Type --> <!ELEMENT selectPropertyName (#PCDATA)> <!ATTLIST selectPropertyName selectPropertyNameAction CDATA #FIXED "include" > <!ELEMENT selectPropertyValue (#PCDATA)> <!ATTLIST selectPropertyValue selectPropertyValueAction CDATA #FIXED "include" > <!-- After all the concepts satisfying the selection criteria for this search specification have been identified, then the concept names and/or the names of their synonymous terms will be extracted. -->
<!ELEMENT extract (extractConceptName | extractSynonymousTerms)> <!-- If the "extractConceptName" element is present, then the name of the concept will be extracted. If it is absent, then the name of the concept will NOT be extracted. --> <!ELEMENT extractConceptName EMPTY> <!-- Indicates which of a concept's the synonymous terms will be extracted. --> <!ELEMENT extractSynonymousTerms (allSynonymousTerms | extractTermProperty+)>
<!-- If the "allSynonymousTerms" element is present, the names of all of a concept's synonomous terms will be extracted. If it is absent, then only the terms that meet the "extractTermProperty" criteria will be selected. -->
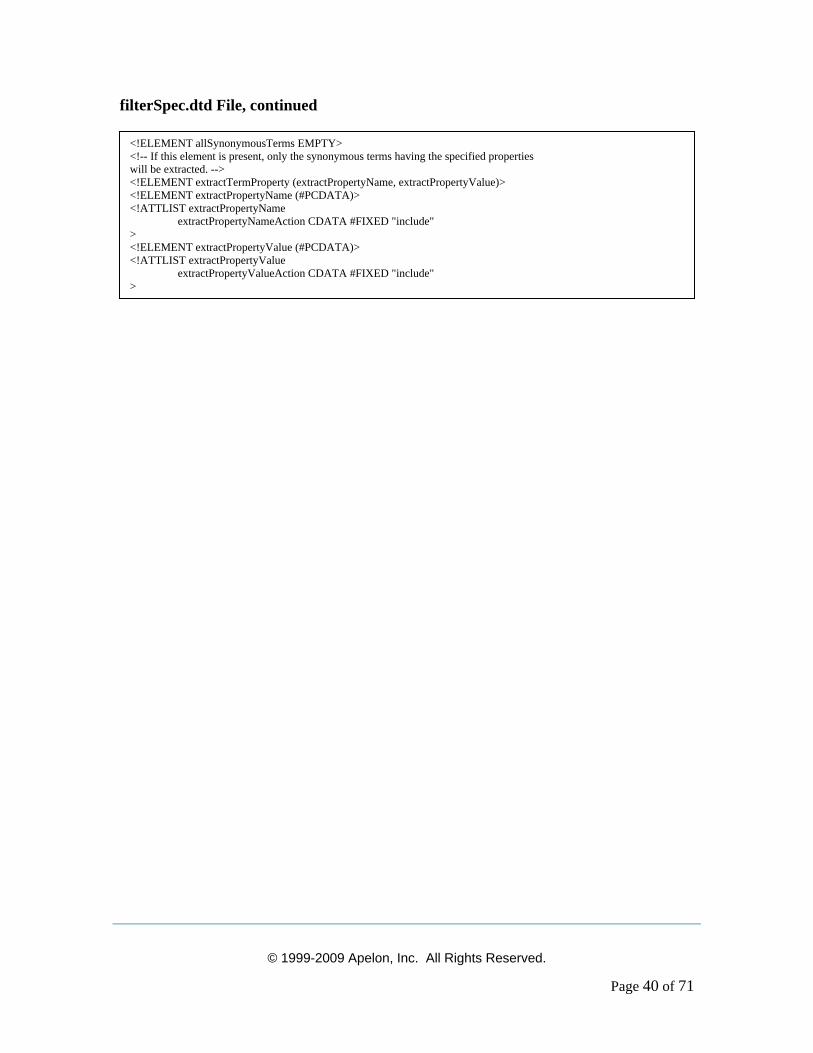
© 1999-2009 Apelon, Inc. All Rights Reserved.
Page 40 of 71
filterSpec.dtd File, continued
<!ELEMENT allSynonymousTerms EMPTY> <!-- If this element is present, only the synonymous terms having the specified properties will be extracted. --> <!ELEMENT extractTermProperty (extractPropertyName, extractPropertyValue)> <!ELEMENT extractPropertyName (#PCDATA)> <!ATTLIST extractPropertyName extractPropertyNameAction CDATA #FIXED "include" > <!ELEMENT extractPropertyValue (#PCDATA)> <!ATTLIST extractPropertyValue extractPropertyValueAction CDATA #FIXED "include" >
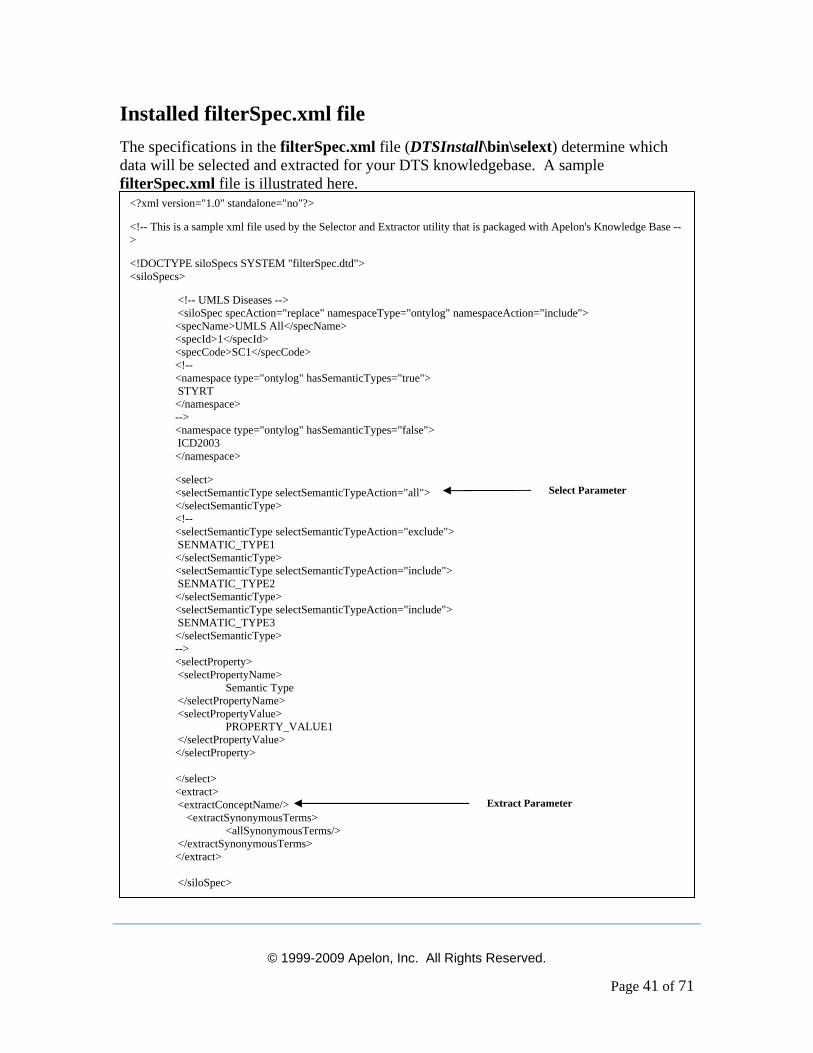
© 1999-2009 Apelon, Inc. All Rights Reserved.
Page 41 of 71
Installed filterSpec.xml file The specifications in the filterSpec.xml file (DTSInstall\bin\selext) determine which data will be selected and extracted for your DTS knowledgebase. A sample filterSpec.xml file is illustrated here.
<?xml version="1.0" standalone="no"?>
<!-- This is a sample xml file used by the Selector and Extractor utility that is packaged with Apelon's Knowledge Base -->
<!DOCTYPE siloSpecs SYSTEM "filterSpec.dtd"> <siloSpecs>
<!-- UMLS Diseases --> <siloSpec specAction="replace" namespaceType="ontylog" namespaceAction="include"> <specName>UMLS All</specName> <specId>1</specId> <specCode>SC1</specCode> <!-- <namespace type="ontylog" hasSemanticTypes="true"> STYRT </namespace> --> <namespace type="ontylog" hasSemanticTypes="false"> ICD2003 </namespace>
<select> <selectSemanticType selectSemanticTypeAction="all"> </selectSemanticType> <!-- <selectSemanticType selectSemanticTypeAction="exclude"> SENMATIC_TYPE1 </selectSemanticType> <selectSemanticType selectSemanticTypeAction="include"> SENMATIC_TYPE2 </selectSemanticType> <selectSemanticType selectSemanticTypeAction="include"> SENMATIC_TYPE3 </selectSemanticType> --> <selectProperty> <selectPropertyName> Semantic Type </selectPropertyName> <selectPropertyValue> PROPERTY_VALUE1 </selectPropertyValue> </selectProperty> </select> <extract> <extractConceptName/> <extractSynonymousTerms> <allSynonymousTerms/> </extractSynonymousTerms> </extract> </siloSpec>
Select Parameter
Extract Parameter
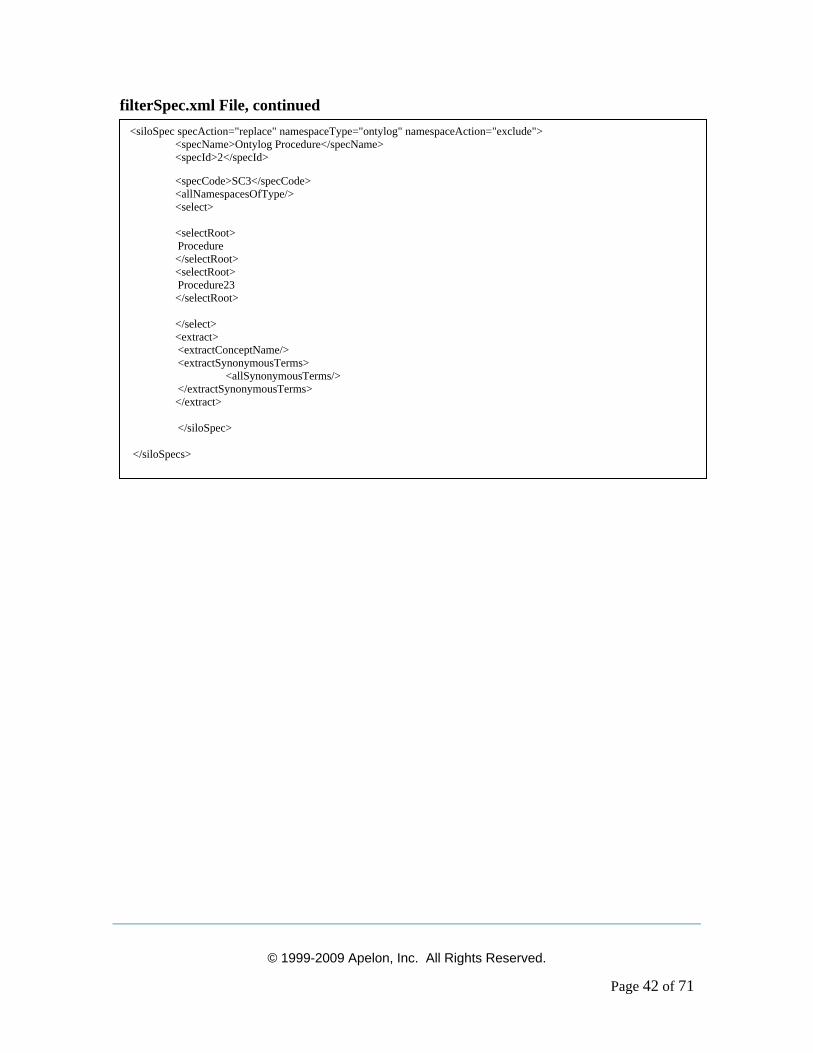
© 1999-2009 Apelon, Inc. All Rights Reserved.
Page 42 of 71
filterSpec.xml File, continued
<siloSpec specAction="replace" namespaceType="ontylog" namespaceAction="exclude"> <specName>Ontylog Procedure</specName> <specId>2</specId>
<specCode>SC3</specCode> <allNamespacesOfType/> <select> <selectRoot> Procedure </selectRoot> <selectRoot> Procedure23 </selectRoot> </select> <extract> <extractConceptName/> <extractSynonymousTerms> <allSynonymousTerms/> </extractSynonymousTerms> </extract> </siloSpec> </siloSpecs>
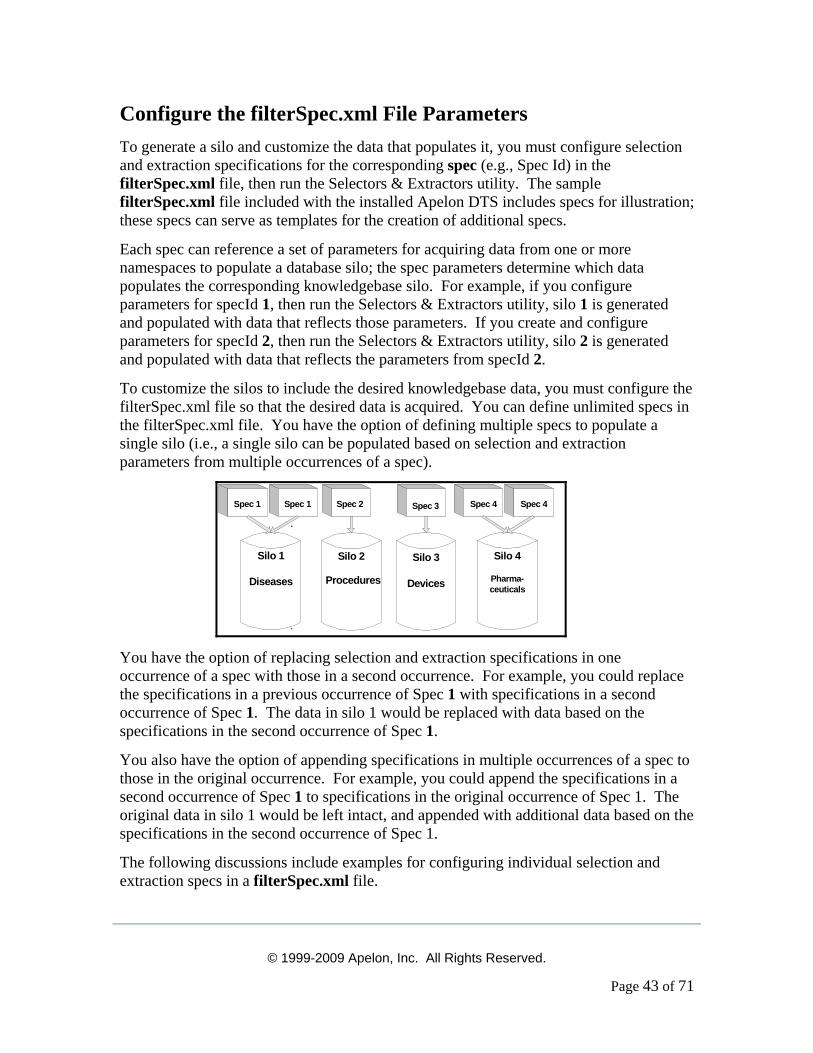
© 1999-2009 Apelon, Inc. All Rights Reserved.
Page 43 of 71
Configure the filterSpec.xml File Parameters To generate a silo and customize the data that populates it, you must configure selection and extraction specifications for the corresponding spec (e.g., Spec Id) in the filterSpec.xml file, then run the Selectors & Extractors utility. The sample filterSpec.xml file included with the installed Apelon DTS includes specs for illustration; these specs can serve as templates for the creation of additional specs.
Each spec can reference a set of parameters for acquiring data from one or more namespaces to populate a database silo; the spec parameters determine which data populates the corresponding knowledgebase silo. For example, if you configure parameters for specId 1, then run the Selectors & Extractors utility, silo 1 is generated and populated with data that reflects those parameters. If you create and configure parameters for specId 2, then run the Selectors & Extractors utility, silo 2 is generated and populated with data that reflects the parameters from specId 2.
To customize the silos to include the desired knowledgebase data, you must configure the filterSpec.xml file so that the desired data is acquired. You can define unlimited specs in the filterSpec.xml file. You have the option of defining multiple specs to populate a single silo (i.e., a single silo can be populated based on selection and extraction parameters from multiple occurrences of a spec).
···········
Procedures
Silo 2 Silo 4
Pharma-ceuticals
Spec 1Spec 1
Diseases
Silo 1
Spec 2 Spec 4 Spec 4
Silo 3
Devices
Spec 3
You have the option of replacing selection and extraction specifications in one occurrence of a spec with those in a second occurrence. For example, you could replace the specifications in a previous occurrence of Spec 1 with specifications in a second occurrence of Spec 1. The data in silo 1 would be replaced with data based on the specifications in the second occurrence of Spec 1.
You also have the option of appending specifications in multiple occurrences of a spec to those in the original occurrence. For example, you could append the specifications in a second occurrence of Spec 1 to specifications in the original occurrence of Spec 1. The original data in silo 1 would be left intact, and appended with additional data based on the specifications in the second occurrence of Spec 1.
The following discussions include examples for configuring individual selection and extraction specs in a filterSpec.xml file.
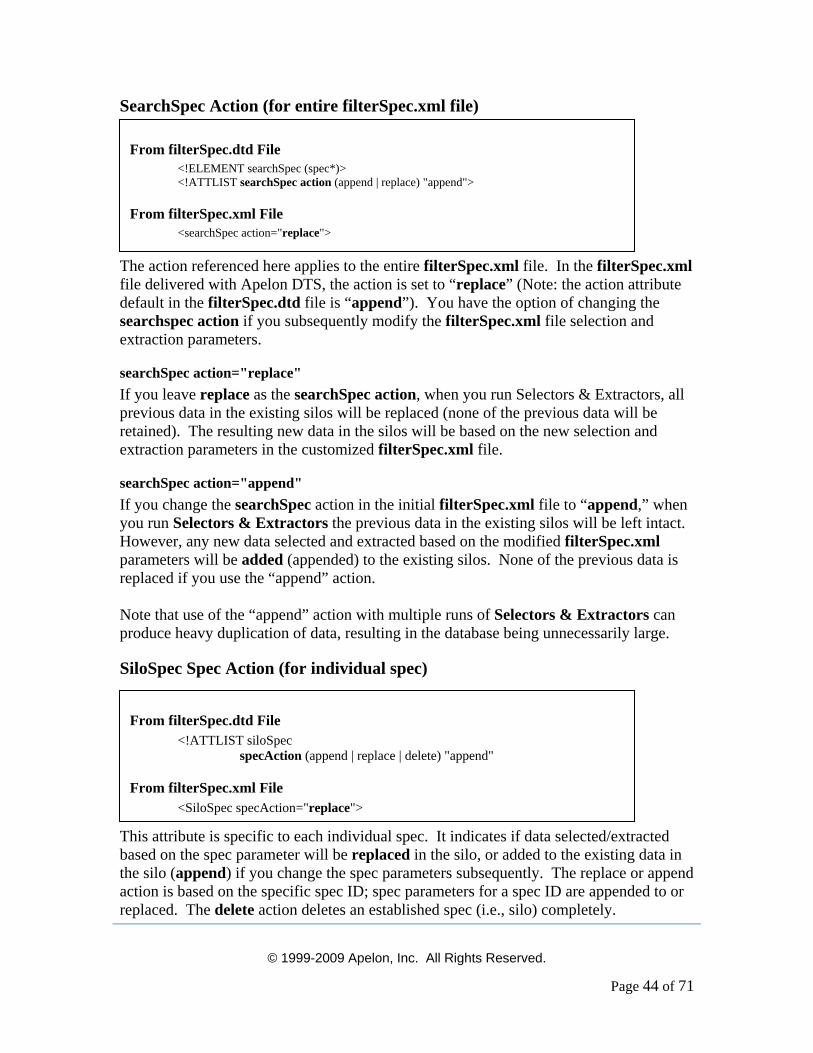
© 1999-2009 Apelon, Inc. All Rights Reserved.
Page 44 of 71
SearchSpec Action (for entire filterSpec.xml file)
The action referenced here applies to the entire filterSpec.xml file. In the filterSpec.xml file delivered with Apelon DTS, the action is set to “replace” (Note: the action attribute default in the filterSpec.dtd file is “append”). You have the option of changing the searchspec action if you subsequently modify the filterSpec.xml file selection and extraction parameters.
searchSpec action="replace" If you leave replace as the searchSpec action, when you run Selectors & Extractors, all previous data in the existing silos will be replaced (none of the previous data will be retained). The resulting new data in the silos will be based on the new selection and extraction parameters in the customized filterSpec.xml file.
searchSpec action="append" If you change the searchSpec action in the initial filterSpec.xml file to “append,” when you run Selectors & Extractors the previous data in the existing silos will be left intact. However, any new data selected and extracted based on the modified filterSpec.xml parameters will be added (appended) to the existing silos. None of the previous data is replaced if you use the “append” action. Note that use of the “append” action with multiple runs of Selectors & Extractors can produce heavy duplication of data, resulting in the database being unnecessarily large.
SiloSpec Spec Action (for individual spec)
This attribute is specific to each individual spec. It indicates if data selected/extracted based on the spec parameter will be replaced in the silo, or added to the existing data in the silo (append) if you change the spec parameters subsequently. The replace or append action is based on the specific spec ID; spec parameters for a spec ID are appended to or replaced. The delete action deletes an established spec (i.e., silo) completely.
From filterSpec.dtd File <!ELEMENT searchSpec (spec*)> <!ATTLIST searchSpec action (append | replace) "append">
From filterSpec.xml File <searchSpec action="replace">
From filterSpec.dtd File <!ATTLIST siloSpec
specAction (append | replace | delete) "append"
From filterSpec.xml File <SiloSpec specAction="replace">
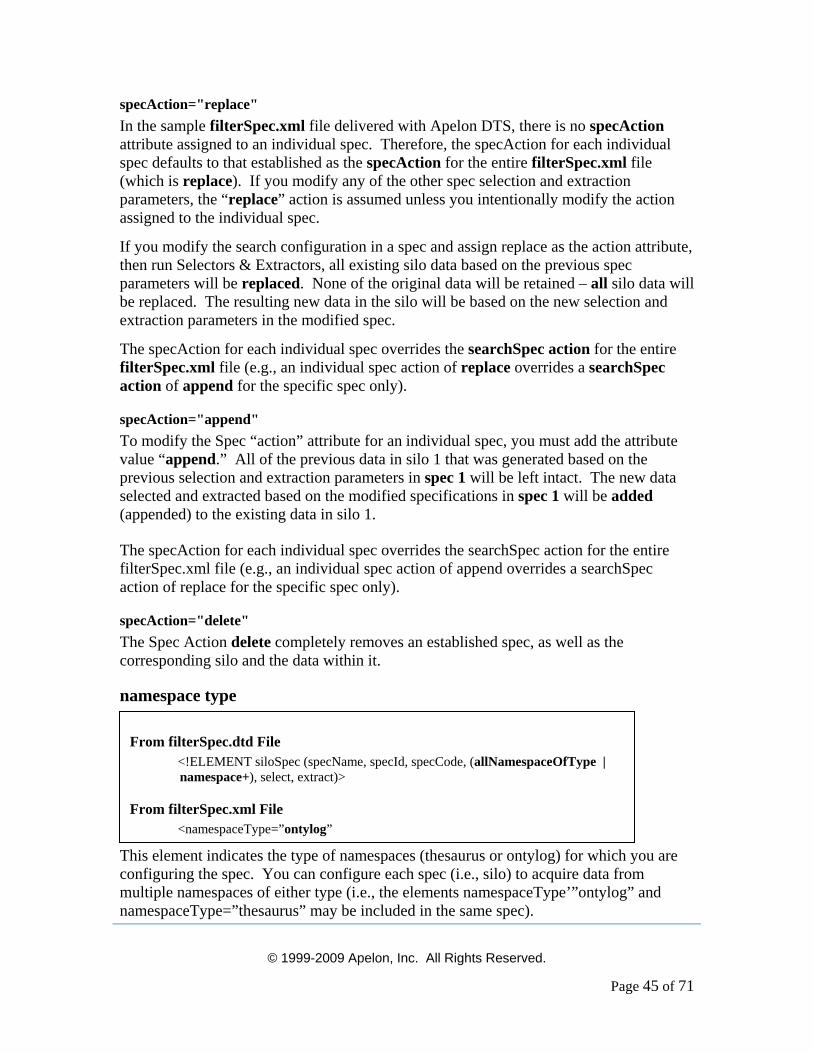
© 1999-2009 Apelon, Inc. All Rights Reserved.
Page 45 of 71
specAction="replace" In the sample filterSpec.xml file delivered with Apelon DTS, there is no specAction attribute assigned to an individual spec. Therefore, the specAction for each individual spec defaults to that established as the specAction for the entire filterSpec.xml file (which is replace). If you modify any of the other spec selection and extraction parameters, the “replace” action is assumed unless you intentionally modify the action assigned to the individual spec.
If you modify the search configuration in a spec and assign replace as the action attribute, then run Selectors & Extractors, all existing silo data based on the previous spec parameters will be replaced. None of the original data will be retained – all silo data will be replaced. The resulting new data in the silo will be based on the new selection and extraction parameters in the modified spec.
The specAction for each individual spec overrides the searchSpec action for the entire filterSpec.xml file (e.g., an individual spec action of replace overrides a searchSpec action of append for the specific spec only).
specAction="append" To modify the Spec “action” attribute for an individual spec, you must add the attribute value “append.” All of the previous data in silo 1 that was generated based on the previous selection and extraction parameters in spec 1 will be left intact. The new data selected and extracted based on the modified specifications in spec 1 will be added (appended) to the existing data in silo 1. The specAction for each individual spec overrides the searchSpec action for the entire filterSpec.xml file (e.g., an individual spec action of append overrides a searchSpec action of replace for the specific spec only).
specAction="delete" The Spec Action delete completely removes an established spec, as well as the corresponding silo and the data within it.
namespace type
This element indicates the type of namespaces (thesaurus or ontylog) for which you are configuring the spec. You can configure each spec (i.e., silo) to acquire data from multiple namespaces of either type (i.e., the elements namespaceType’”ontylog” and namespaceType=”thesaurus” may be included in the same spec).
From filterSpec.dtd File <!ELEMENT siloSpec (specName, specId, specCode, (allNamespaceOfType |
namespace+), select, extract)>
From filterSpec.xml File <namespaceType=”ontylog”
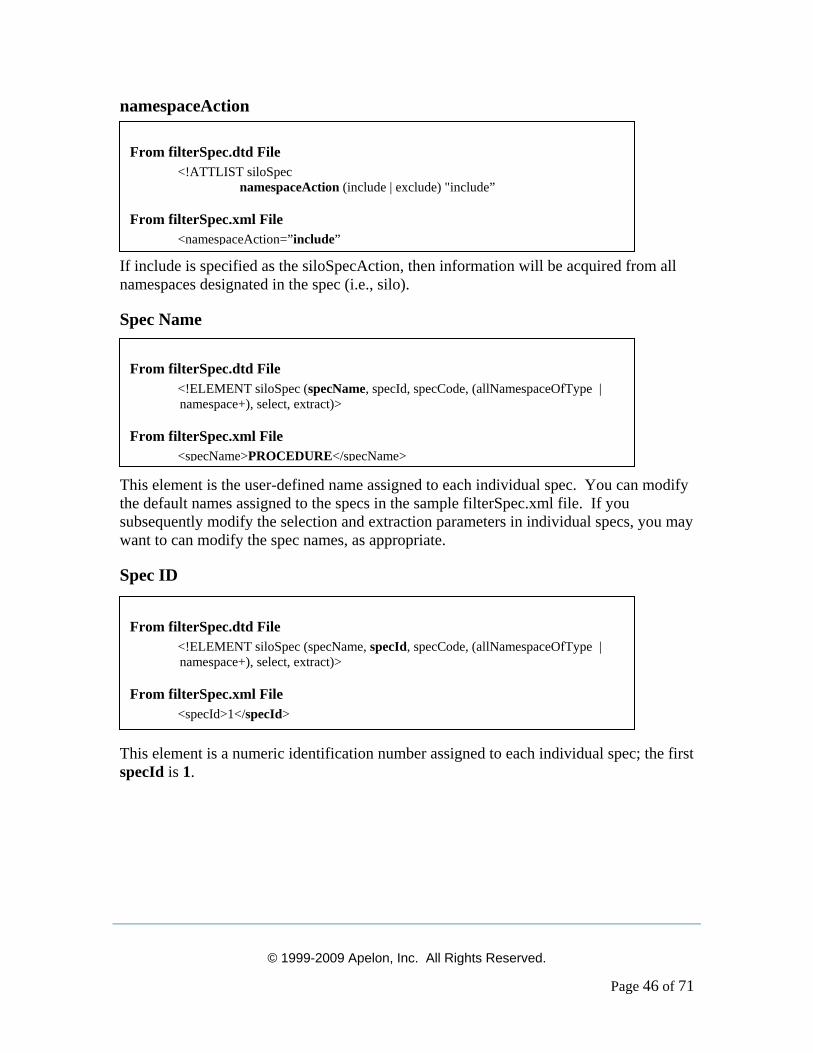
© 1999-2009 Apelon, Inc. All Rights Reserved.
Page 46 of 71
namespaceAction
If include is specified as the siloSpecAction, then information will be acquired from all namespaces designated in the spec (i.e., silo).
Spec Name
This element is the user-defined name assigned to each individual spec. You can modify the default names assigned to the specs in the sample filterSpec.xml file. If you subsequently modify the selection and extraction parameters in individual specs, you may want to can modify the spec names, as appropriate.
Spec ID
This element is a numeric identification number assigned to each individual spec; the first specId is 1.
From filterSpec.dtd File <!ELEMENT siloSpec (specName, specId, specCode, (allNamespaceOfType |
namespace+), select, extract)>
From filterSpec.xml File <specName>PROCEDURE</specName>
From filterSpec.dtd File <!ELEMENT siloSpec (specName, specId, specCode, (allNamespaceOfType |
namespace+), select, extract)>
From filterSpec.xml File <specId>1</specId>
From filterSpec.dtd File <!ATTLIST siloSpec
namespaceAction (include | exclude) "include”
From filterSpec.xml File <namespaceAction=”include”
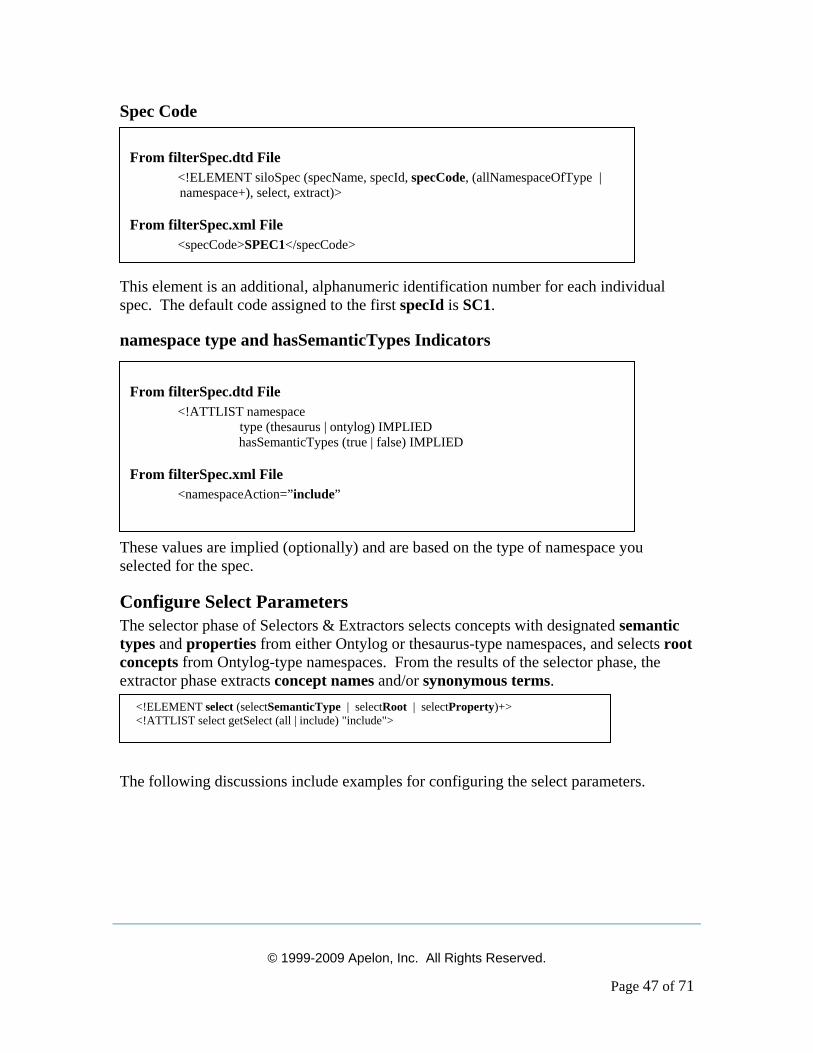
© 1999-2009 Apelon, Inc. All Rights Reserved.
Page 47 of 71
Spec Code
This element is an additional, alphanumeric identification number for each individual spec. The default code assigned to the first specId is SC1.
namespace type and hasSemanticTypes Indicators
These values are implied (optionally) and are based on the type of namespace you selected for the spec.
Configure Select Parameters The selector phase of Selectors & Extractors selects concepts with designated semantic types and properties from either Ontylog or thesaurus-type namespaces, and selects root concepts from Ontylog-type namespaces. From the results of the selector phase, the extractor phase extracts concept names and/or synonymous terms.
The following discussions include examples for configuring the select parameters.
From filterSpec.dtd File <!ELEMENT siloSpec (specName, specId, specCode, (allNamespaceOfType |
namespace+), select, extract)>
From filterSpec.xml File <specCode>SPEC1</specCode>
<!ELEMENT select (selectSemanticType | selectRoot | selectProperty)+> <!ATTLIST select getSelect (all | include) "include">
From filterSpec.dtd File <!ATTLIST namespace
type (thesaurus | ontylog) IMPLIED hasSemanticTypes (true | false) IMPLIED
From filterSpec.xml File <namespaceAction=”include”
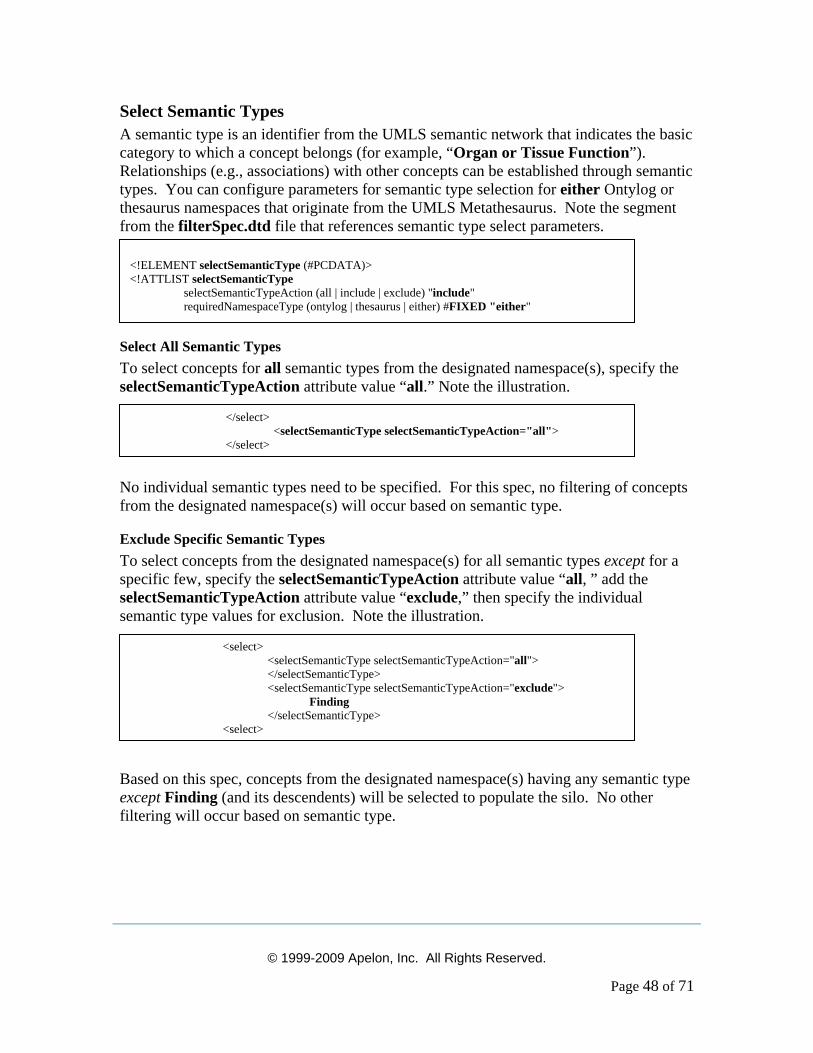
© 1999-2009 Apelon, Inc. All Rights Reserved.
Page 48 of 71
Select Semantic Types A semantic type is an identifier from the UMLS semantic network that indicates the basic category to which a concept belongs (for example, “Organ or Tissue Function”). Relationships (e.g., associations) with other concepts can be established through semantic types. You can configure parameters for semantic type selection for either Ontylog or thesaurus namespaces that originate from the UMLS Metathesaurus. Note the segment from the filterSpec.dtd file that references semantic type select parameters.
Select All Semantic Types To select concepts for all semantic types from the designated namespace(s), specify the selectSemanticTypeAction attribute value “all.” Note the illustration.
No individual semantic types need to be specified. For this spec, no filtering of concepts from the designated namespace(s) will occur based on semantic type.
Exclude Specific Semantic Types To select concepts from the designated namespace(s) for all semantic types except for a specific few, specify the selectSemanticTypeAction attribute value “all, ” add the selectSemanticTypeAction attribute value “exclude,” then specify the individual semantic type values for exclusion. Note the illustration.
Based on this spec, concepts from the designated namespace(s) having any semantic type except Finding (and its descendents) will be selected to populate the silo. No other filtering will occur based on semantic type.
<!ELEMENT selectSemanticType (#PCDATA)> <!ATTLIST selectSemanticType selectSemanticTypeAction (all | include | exclude) "include" requiredNamespaceType (ontylog | thesaurus | either) #FIXED "either"
</select> <selectSemanticType selectSemanticTypeAction="all"> </select>
<select> <selectSemanticType selectSemanticTypeAction="all"> </selectSemanticType> <selectSemanticType selectSemanticTypeAction="exclude"> Finding </selectSemanticType> <select>

© 1999-2009 Apelon, Inc. All Rights Reserved.
Page 49 of 71
Select Specific Semantic Types Only In the filterSpec.xml file, the default selection action (as established in the filterSpec.dtd file) is to “include” concepts from the designated namespace(s) having the specific semantic type(s) referenced in the individual spec, or a descendent semantic type. Note the highlighted selectSemanticType attribute values in the following illustration.
In the example, concepts from the designated namespace(s) that have the semantic types Finding, Anatomical Abnormality, Pathological Function, and Injury or Poisoning, as well as their descendent semantic types, will be selected to populate the silo. For example, concepts with a semantic type of Laboratory or Test Result would be included if those semantic types were subconcepts of Finding.
Select Properties A property is a piece of user-defined information attached to a concept. Each property can reference anything (documentation strings, numeric codes, etc.). Properties can be selected from Ontylog-type namespaces (Subscription or Ontylog Extension) and thesaurus-type namespaces.
Each property is assigned a name; each property assigned to a concept can have a property value that may, or may not, be unique. For example, the property name Medical Code can be assigned to unlimited concepts. The value of the property assigned to each of these concepts can be unique. For example, HAZARDOUS may be the Medical Code property value for one concept; for another concept, NON-TOXIC may be the value for the property Medical Code.
The following segment from the filterSpec.dtd file references property select parameters.
The highlighted line indicates that a selected property must consist of a property name and property value combination. There are selectProperty and selectPropertyValue parameters included in the sample filterSpec.xml file that is installed with Apelon DTS. “include” is the FIXED selection attribute value defined for “selectProperty” and “selectPropertyValue.” There are no attribute values for “all” or “exclude.”
<!ELEMENT selectProperty (selectPropertyName, selectPropertyValue)><! ATTLIST selectProperty requiredNamespaceType (ontylog | thesaurus | either) #FIXED "either" <!ELEMENT selectPropertyName (#PCDATA)> <!ATTLIST selectPropertyName selectPropertyNameAction CDATA #FIXED "include"> <!ELEMENT selectPropertyValue (#PCDATA)> <!ATTLIST selectPropertyValue selectPropertyValueAction CDATA #FIXED "include">
<select> <selectSemanticType>Finding</selectSemanticType> <selectSemanticType>Anatomical Abnormality</selectSemanticType> <selectSemanticType>Pathologic Function</selectSemanticType> <selectSemanticType>Injury or Poisoning</selectSemanticType> </select>
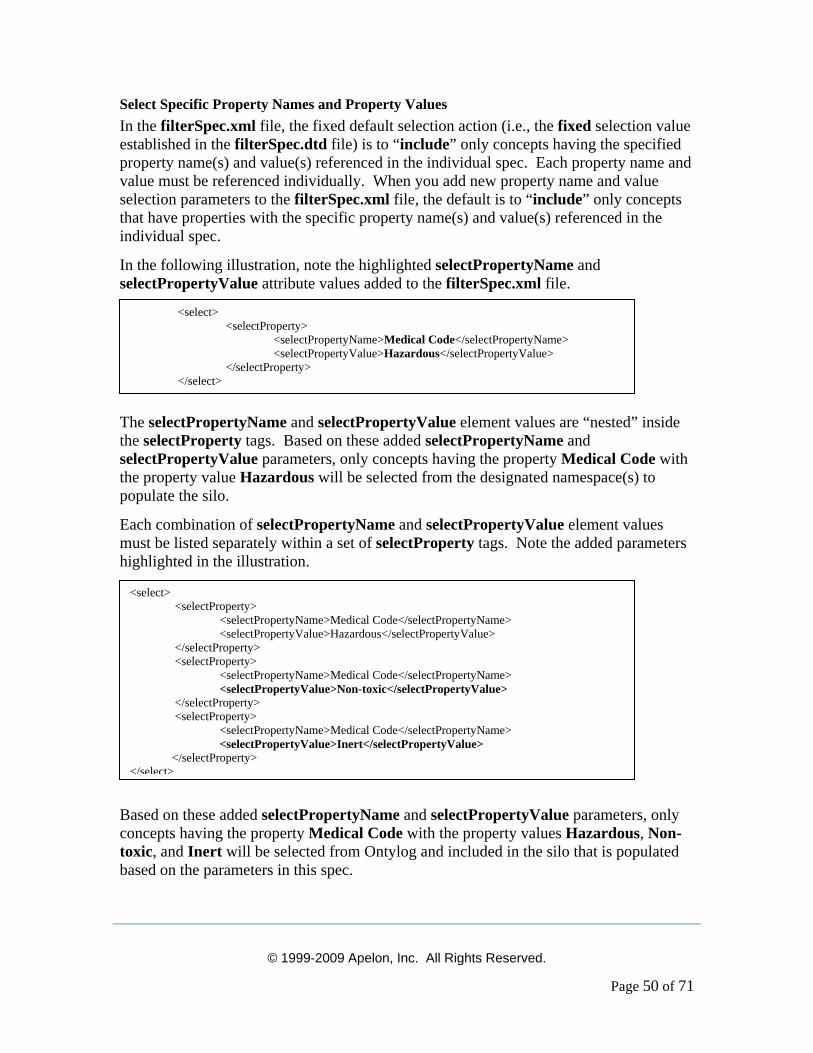
© 1999-2009 Apelon, Inc. All Rights Reserved.
Page 50 of 71
Select Specific Property Names and Property Values In the filterSpec.xml file, the fixed default selection action (i.e., the fixed selection value established in the filterSpec.dtd file) is to “include” only concepts having the specified property name(s) and value(s) referenced in the individual spec. Each property name and value must be referenced individually. When you add new property name and value selection parameters to the filterSpec.xml file, the default is to “include” only concepts that have properties with the specific property name(s) and value(s) referenced in the individual spec.
In the following illustration, note the highlighted selectPropertyName and selectPropertyValue attribute values added to the filterSpec.xml file.
The selectPropertyName and selectPropertyValue element values are “nested” inside the selectProperty tags. Based on these added selectPropertyName and selectPropertyValue parameters, only concepts having the property Medical Code with the property value Hazardous will be selected from the designated namespace(s) to populate the silo.
Each combination of selectPropertyName and selectPropertyValue element values must be listed separately within a set of selectProperty tags. Note the added parameters highlighted in the illustration.
Based on these added selectPropertyName and selectPropertyValue parameters, only concepts having the property Medical Code with the property values Hazardous, Non-toxic, and Inert will be selected from Ontylog and included in the silo that is populated based on the parameters in this spec.
<select> <selectProperty> <selectPropertyName>Medical Code</selectPropertyName> <selectPropertyValue>Hazardous</selectPropertyValue> </selectProperty> </select>
<select> <selectProperty> <selectPropertyName>Medical Code</selectPropertyName> <selectPropertyValue>Hazardous</selectPropertyValue> </selectProperty> <selectProperty> <selectPropertyName>Medical Code</selectPropertyName> <selectPropertyValue>Non-toxic</selectPropertyValue> </selectProperty> <selectProperty> <selectPropertyName>Medical Code</selectPropertyName> <selectPropertyValue>Inert</selectPropertyValue> </selectProperty> </select>
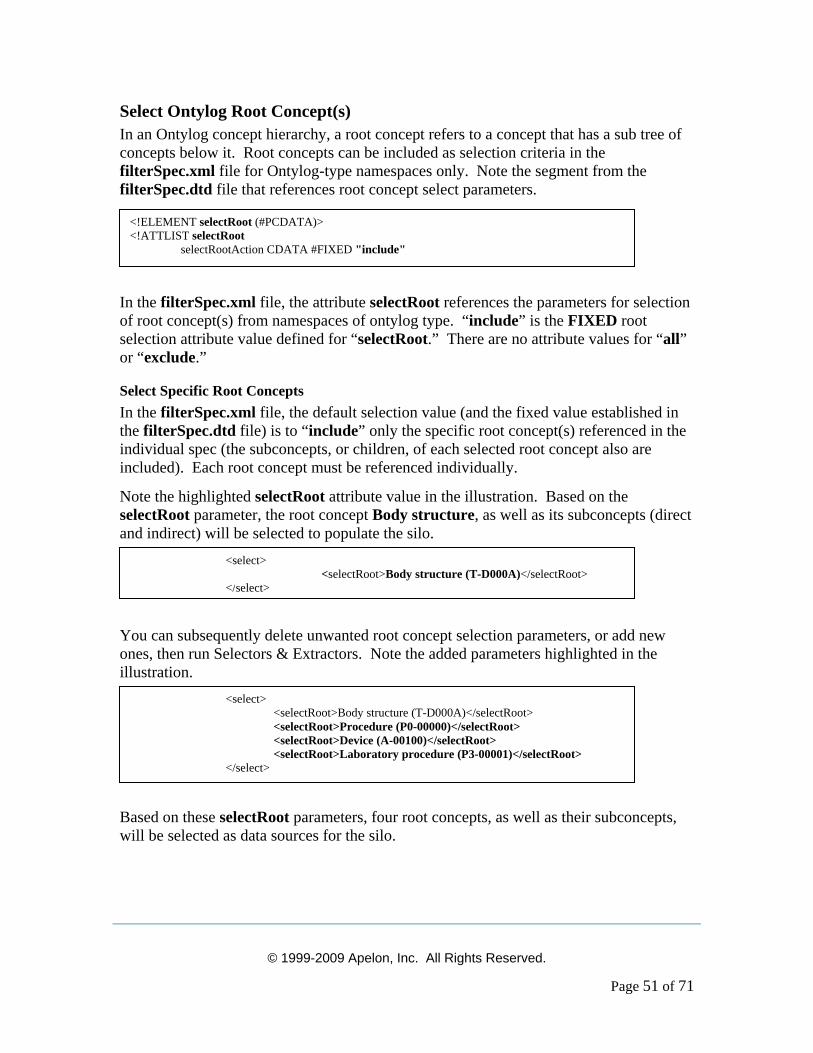
© 1999-2009 Apelon, Inc. All Rights Reserved.
Page 51 of 71
Select Ontylog Root Concept(s) In an Ontylog concept hierarchy, a root concept refers to a concept that has a sub tree of concepts below it. Root concepts can be included as selection criteria in the filterSpec.xml file for Ontylog-type namespaces only. Note the segment from the filterSpec.dtd file that references root concept select parameters.
In the filterSpec.xml file, the attribute selectRoot references the parameters for selection of root concept(s) from namespaces of ontylog type. “include” is the FIXED root selection attribute value defined for “selectRoot.” There are no attribute values for “all” or “exclude.”
Select Specific Root Concepts In the filterSpec.xml file, the default selection value (and the fixed value established in the filterSpec.dtd file) is to “include” only the specific root concept(s) referenced in the individual spec (the subconcepts, or children, of each selected root concept also are included). Each root concept must be referenced individually.
Note the highlighted selectRoot attribute value in the illustration. Based on the selectRoot parameter, the root concept Body structure, as well as its subconcepts (direct and indirect) will be selected to populate the silo.
You can subsequently delete unwanted root concept selection parameters, or add new ones, then run Selectors & Extractors. Note the added parameters highlighted in the illustration.
Based on these selectRoot parameters, four root concepts, as well as their subconcepts, will be selected as data sources for the silo.
<!ELEMENT selectRoot (#PCDATA)> <!ATTLIST selectRoot selectRootAction CDATA #FIXED "include"
<select> <selectRoot>Body structure (T-D000A)</selectRoot> </select>
<select> <selectRoot>Body structure (T-D000A)</selectRoot> <selectRoot>Procedure (P0-00000)</selectRoot> <selectRoot>Device (A-00100)</selectRoot> <selectRoot>Laboratory procedure (P3-00001)</selectRoot> </select>
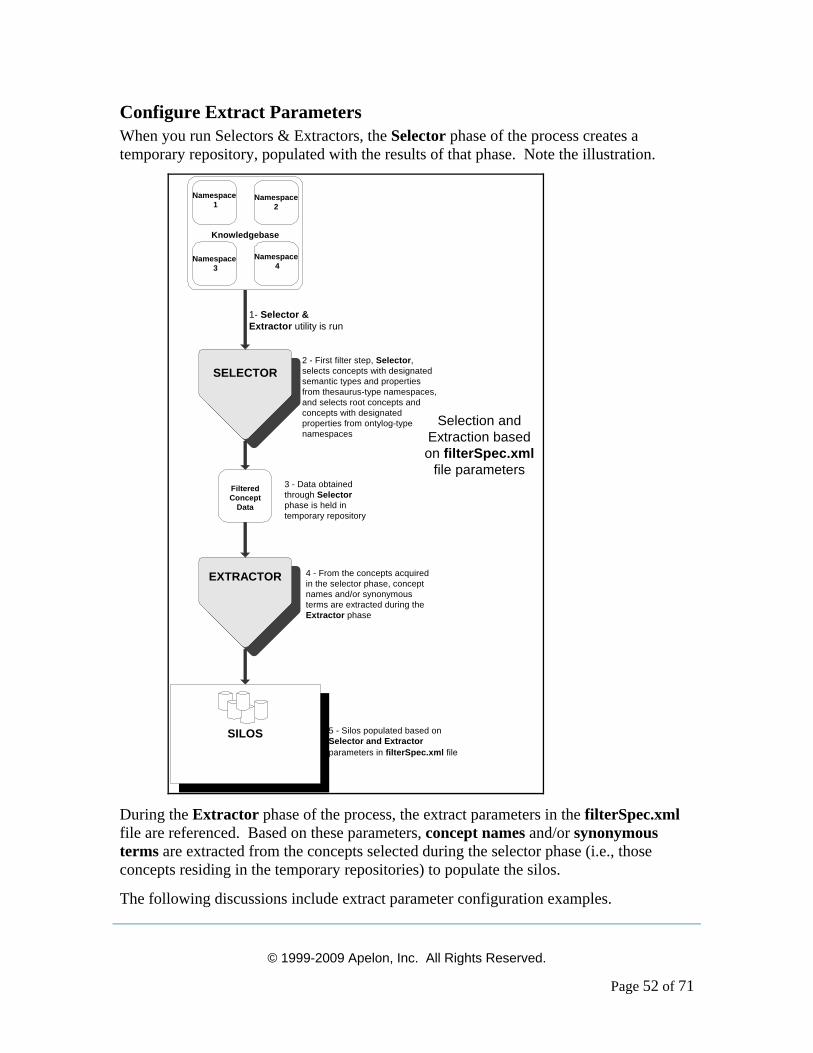
© 1999-2009 Apelon, Inc. All Rights Reserved.
Page 52 of 71
Configure Extract Parameters When you run Selectors & Extractors, the Selector phase of the process creates a temporary repository, populated with the results of that phase. Note the illustration.
SELECTOR
4 - From the concepts acquiredin the selector phase, conceptnames and/or synonymousterms are extracted during theExtractor phase
EXTRACTOR
5 - Silos populated based onSelector and Extractorparameters in filterSpec.xml file
3 - Data obtainedthrough Selectorphase is held intemporary repository
2 - First filter step, Selector,selects concepts with designatedsemantic types and propertiesfrom thesaurus-type namespaces,and selects root concepts andconcepts with designatedproperties from ontylog-typenamespaces
Selection andExtraction basedon filterSpec.xml
file parameters
Knowledgebase
FilteredConcept
Data
1- Selector &Extractor utility is run
SILOS
Namespace2
Namespace 1
Namespace 4
Namespace 3
During the Extractor phase of the process, the extract parameters in the filterSpec.xml file are referenced. Based on these parameters, concept names and/or synonymous terms are extracted from the concepts selected during the selector phase (i.e., those concepts residing in the temporary repositories) to populate the silos.
The following discussions include extract parameter configuration examples.
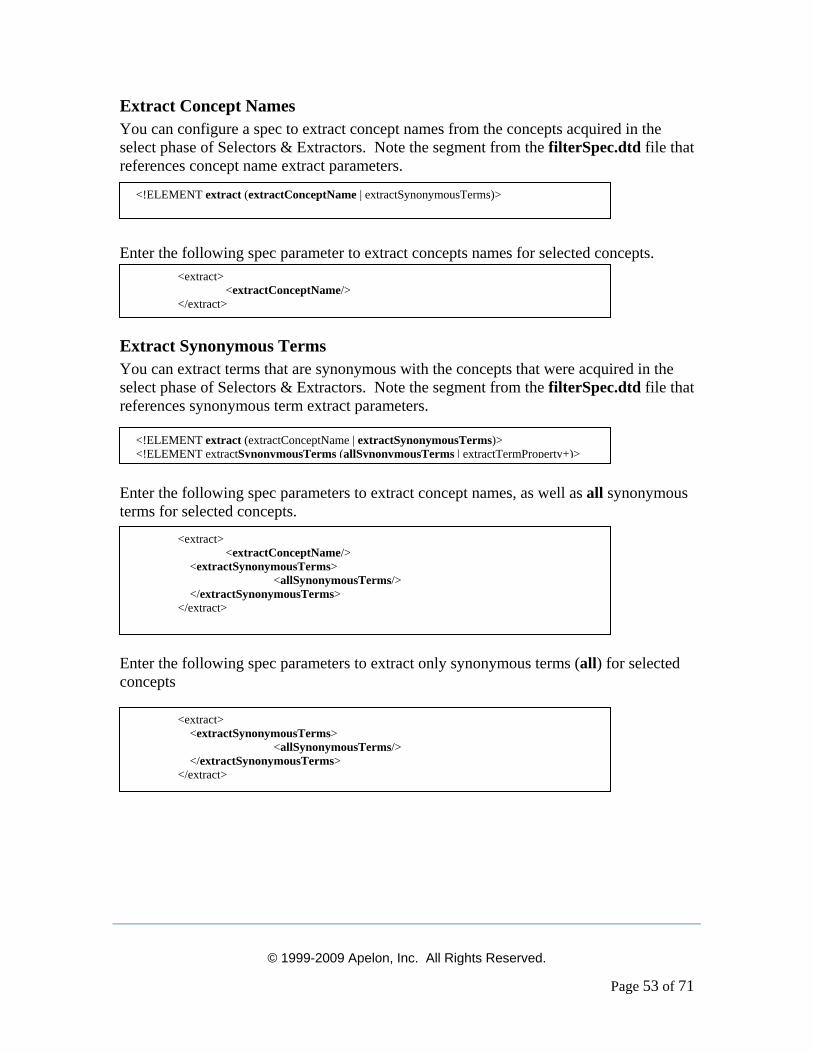
© 1999-2009 Apelon, Inc. All Rights Reserved.
Page 53 of 71
Extract Concept Names You can configure a spec to extract concept names from the concepts acquired in the select phase of Selectors & Extractors. Note the segment from the filterSpec.dtd file that references concept name extract parameters.
Enter the following spec parameter to extract concepts names for selected concepts.
Extract Synonymous Terms You can extract terms that are synonymous with the concepts that were acquired in the select phase of Selectors & Extractors. Note the segment from the filterSpec.dtd file that references synonymous term extract parameters.
Enter the following spec parameters to extract concept names, as well as all synonymous terms for selected concepts.
Enter the following spec parameters to extract only synonymous terms (all) for selected concepts
<!ELEMENT extract (extractConceptName | extractSynonymousTerms)>
<extract> <extractConceptName/> </extract>
<extract> <extractConceptName/> <extractSynonymousTerms> <allSynonymousTerms/> </extractSynonymousTerms> </extract>
<!ELEMENT extract (extractConceptName | extractSynonymousTerms)> <!ELEMENT extractSynonymousTerms (allSynonymousTerms | extractTermProperty+)>
<extract> <extractSynonymousTerms> <allSynonymousTerms/> </extractSynonymousTerms> </extract>
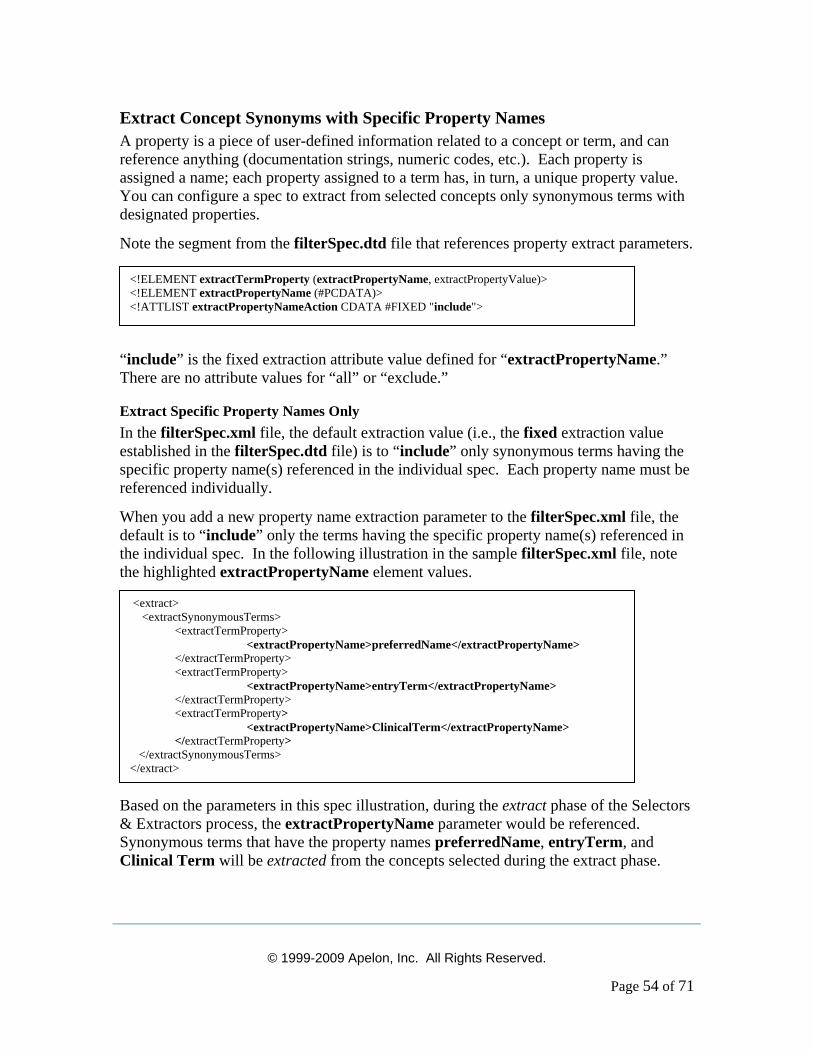
© 1999-2009 Apelon, Inc. All Rights Reserved.
Page 54 of 71
Extract Concept Synonyms with Specific Property Names A property is a piece of user-defined information related to a concept or term, and can reference anything (documentation strings, numeric codes, etc.). Each property is assigned a name; each property assigned to a term has, in turn, a unique property value. You can configure a spec to extract from selected concepts only synonymous terms with designated properties.
Note the segment from the filterSpec.dtd file that references property extract parameters.
“include” is the fixed extraction attribute value defined for “extractPropertyName.” There are no attribute values for “all” or “exclude.”
Extract Specific Property Names Only In the filterSpec.xml file, the default extraction value (i.e., the fixed extraction value established in the filterSpec.dtd file) is to “include” only synonymous terms having the specific property name(s) referenced in the individual spec. Each property name must be referenced individually.
When you add a new property name extraction parameter to the filterSpec.xml file, the default is to “include” only the terms having the specific property name(s) referenced in the individual spec. In the following illustration in the sample filterSpec.xml file, note the highlighted extractPropertyName element values.
Based on the parameters in this spec illustration, during the extract phase of the Selectors & Extractors process, the extractPropertyName parameter would be referenced. Synonymous terms that have the property names preferredName, entryTerm, and Clinical Term will be extracted from the concepts selected during the extract phase.
<!ELEMENT extractTermProperty (extractPropertyName, extractPropertyValue)> <!ELEMENT extractPropertyName (#PCDATA)> <!ATTLIST extractPropertyNameAction CDATA #FIXED "include">
<extract> <extractSynonymousTerms> <extractTermProperty> <extractPropertyName>preferredName</extractPropertyName> </extractTermProperty> <extractTermProperty> <extractPropertyName>entryTerm</extractPropertyName> </extractTermProperty> <extractTermProperty> <extractPropertyName>ClinicalTerm</extractPropertyName> </extractTermProperty> </extractSynonymousTerms> </extract>
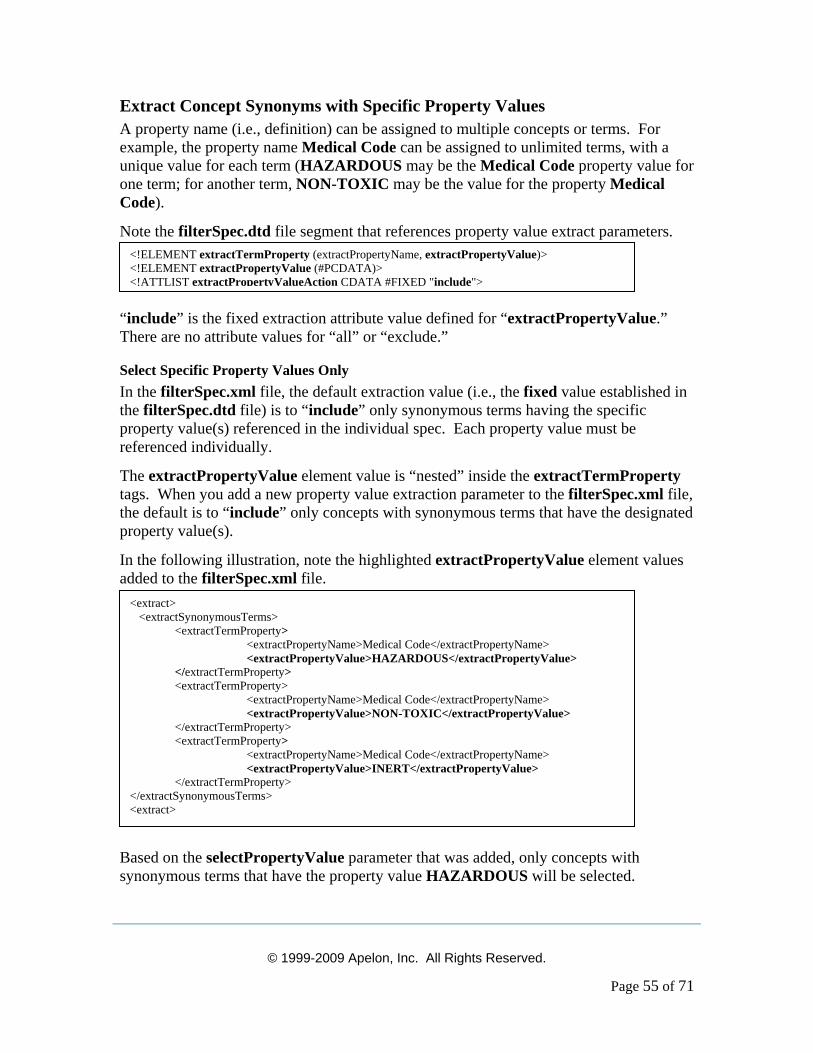
© 1999-2009 Apelon, Inc. All Rights Reserved.
Page 55 of 71
Extract Concept Synonyms with Specific Property Values A property name (i.e., definition) can be assigned to multiple concepts or terms. For example, the property name Medical Code can be assigned to unlimited terms, with a unique value for each term (HAZARDOUS may be the Medical Code property value for one term; for another term, NON-TOXIC may be the value for the property Medical Code).
Note the filterSpec.dtd file segment that references property value extract parameters.
“include” is the fixed extraction attribute value defined for “extractPropertyValue.” There are no attribute values for “all” or “exclude.”
Select Specific Property Values Only In the filterSpec.xml file, the default extraction value (i.e., the fixed value established in the filterSpec.dtd file) is to “include” only synonymous terms having the specific property value(s) referenced in the individual spec. Each property value must be referenced individually.
The extractPropertyValue element value is “nested” inside the extractTermProperty tags. When you add a new property value extraction parameter to the filterSpec.xml file, the default is to “include” only concepts with synonymous terms that have the designated property value(s).
In the following illustration, note the highlighted extractPropertyValue element values added to the filterSpec.xml file.
Based on the selectPropertyValue parameter that was added, only concepts with synonymous terms that have the property value HAZARDOUS will be selected.
<!ELEMENT extractTermProperty (extractPropertyName, extractPropertyValue)> <!ELEMENT extractPropertyValue (#PCDATA)> <!ATTLIST extractPropertyValueAction CDATA #FIXED "include">
<extract> <extractSynonymousTerms> <extractTermProperty> <extractPropertyName>Medical Code</extractPropertyName> <extractPropertyValue>HAZARDOUS</extractPropertyValue> </extractTermProperty> <extractTermProperty> <extractPropertyName>Medical Code</extractPropertyName> <extractPropertyValue>NON-TOXIC</extractPropertyValue> </extractTermProperty> <extractTermProperty> <extractPropertyName>Medical Code</extractPropertyName> <extractPropertyValue>INERT</extractPropertyValue> </extractTermProperty> </extractSynonymousTerms> <extract>

© 1999-2009 Apelon, Inc. All Rights Reserved.
Page 56 of 71
Appendix A - Publish Client’s Local Namespace
Overview As an Apelon client, you can publish your local namespace content on a regular basis using the Knowledgebase Publishing utility provided with the DTS installation (kbcontent-publish.bat in DTSInstall\bin\kb\content\publish). For a Linux installation, you execute kbcontent-publish.sh in bin/kb/content/publish. You can assign version numbers to the content modifications to a specific local namespace, then export this local content for subsequent import by your own vocabulary subscribers.
Apelon Client Publishing Processes Follow these procedures to publish your local content.
1. Configure the kbcontent-publish.xml file (in DTSInstall\bin\kb\content\publish). The file is illustrated.
Note: To avoid primary key (or ID) collisions between the publisher and subscriber, “seed” the global sequence differently on the subscriber and publisher ends. For example, the publisher can seed the sequence generator (using the –startSeq option in kbcreate.bat or kbcreate.sh) with a value of 2000000000001(two trillion and one) while the subscriber can use a seed with a value of 4000000000001 (four trillion and one). The sequence numbers 1-2000000000000 are reserved for subscription content from Apelon.
<?xml version="1.0" encoding="UTF-8"?> <!-- ################################################ # Publishing tool for client local namespaces # ################################################ --> <!DOCTYPE DBConfig SYSTEM "http://apelon.com/dtd/util/db/dbconfig.dtd"> <DBConfig> <!-- Local namespace to publish --> <namespace name="[Your local namespace name here]" > <property name="add" value="true" /> </namespace> <!-- Content Type to publish 'full' for first time publishing 'diff' for subsequent (incremental) publishing --> <property name="contentType" value="full" /> <!-- Publising Version Label --> <property name="versionIn" value="1.0.0.0" /> <!-- Publising Version Number (numerals only) Note: Increment this number by 1 for each new version published. --> <property name="versionNumber" value="1" /> <!-- Version assigned for all non-retired entries --> <property name="versionOut" value="NOT_RETIRED" /> <!--
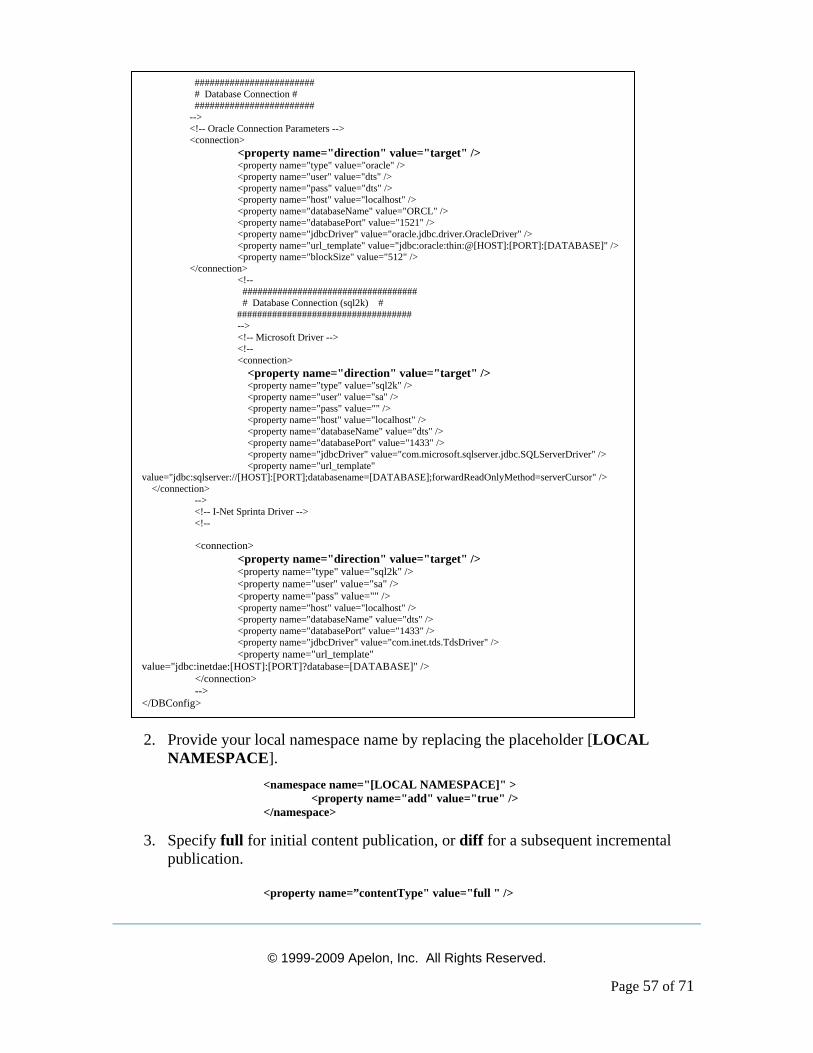
© 1999-2009 Apelon, Inc. All Rights Reserved.
Page 57 of 71
2. Provide your local namespace name by replacing the placeholder [LOCAL NAMESPACE].
<namespace name="[LOCAL NAMESPACE]" > <property name="add" value="true" /> </namespace>
3. Specify full for initial content publication, or diff for a subsequent incremental publication.
<property name=”contentType" value="full " />
######################## # Database Connection # ######################## --> <!-- Oracle Connection Parameters --> <connection> <property name="direction" value="target" /> <property name="type" value="oracle" /> <property name="user" value="dts" /> <property name="pass" value="dts" /> <property name="host" value="localhost" /> <property name="databaseName" value="ORCL" /> <property name="databasePort" value="1521" /> <property name="jdbcDriver" value="oracle.jdbc.driver.OracleDriver" /> <property name="url_template" value="jdbc:oracle:thin:@[HOST]:[PORT]:[DATABASE]" /> <property name="blockSize" value="512" /> </connection> <!-- ################################### # Database Connection (sql2k) # ################################### --> <!-- Microsoft Driver --> <!-- <connection> <property name="direction" value="target" /> <property name="type" value="sql2k" /> <property name="user" value="sa" /> <property name="pass" value="" /> <property name="host" value="localhost" /> <property name="databaseName" value="dts" /> <property name="databasePort" value="1433" /> <property name="jdbcDriver" value="com.microsoft.sqlserver.jdbc.SQLServerDriver" /> <property name="url_template" value="jdbc:sqlserver://[HOST]:[PORT];databasename=[DATABASE];forwardReadOnlyMethod=serverCursor" /> </connection> --> <!-- I-Net Sprinta Driver --> <!--
<connection> <property name="direction" value="target" /> <property name="type" value="sql2k" /> <property name="user" value="sa" /> <property name="pass" value="" /> <property name="host" value="localhost" /> <property name="databaseName" value="dts" /> <property name="databasePort" value="1433" /> <property name="jdbcDriver" value="com.inet.tds.TdsDriver" /> <property name="url_template" value="jdbc:inetdae:[HOST]:[PORT]?database=[DATABASE]" /> </connection> --> </DBConfig>
© 1999-2009 Apelon, Inc. All Rights Reserved.
Page 58 of 71
4. Provide the version for the content to be published. <property name="versionIn" value="1.0.0.0" /> <property name="versionNumber" value="1" />
5. The value for the property versionNumber is the version number for the published content; the initial (full) version number for a first-time publication is 1.0.0.0. You can replace this number with any alpha/numeric version identifier. <property name="versionNumber" value="1" /> The value for the versionNumber property must increment by 1 for each subsequent publication (starting with 1, followed by 2, 3, etc.).
6. In the kbcontent-publish.xml file, provide the not retired version string for the content to be published. Note that the not retired version string in most cases is NOT_RETIRED.
<property name="versionOut" value="NOT_RETIRED" />
7. Save the kbcontent-publish.xml file.
8. A template connection file, target-connection.xml (in DTSInstall\bin\kb), allows you to define a custom connection based on the target connection parameters. To establish a target connection in the target-connection.xml file, the value of the direction property should be target. Note the illustration.
<property name="direction" value="target" />
(Note that in the kbcontent-publish.xml file, the value of the direction property also is target.) You can create multiple versions of the target-connection.xml files, each with its own specific name, and each reflecting a specific connection to a data source.
After you establish your custom publishing connection parameters in the target-connection.xml file, you must insert a Command Line switch in the kbcontent-publish.bat file (in DTSInstall\bin\kb\content\publish) that references the appropriate custom configuration file. (For a Linux installation, you insert the Command Line switch in kbcontent-publish.sh in bin/kb/content/publish.) Apelon recommends that you rename each modified kbcontent-publish.bat batch file to reflect its purpose (e.g., kbcontent-publish-test.bat, kbcontent-publish-production.bat, etc.). Note the highlighted Command Line switch parameter in kbcontent-publish.bat.

© 1999-2009 Apelon, Inc. All Rights Reserved.
Page 59 of 71
To use the target connection established in a target-connection.xml file (rather than the connection from the kbcontent-publish.xml file) modify the Command Line switch parameter in kbcontent-publish.bat (or kbcontent-publish.sh, for Linux) by specifying the target-connection.xml file name.
9. Update the sources.id in DTSInstall\bin\kb to provide an entry for the local namespace to be published. The local namespace name should match the namespace name as it appears in the database (including case). Data files for the local namespace will be published here.
@echo off REM REM Process Arguments : -p <properties-file.xml> -c <configuration full-class name> REM If no properties-file is specified, default configuration file used -> kbcontent.xml REM REM REM Process arguments overriding the properties file configuration variables: REM (i.e., connection params from a separate file overrides one in the property file): REM Usage: -c <system configuration class name> which is mandatory REM -action [export, import, export_mappings, import_mappings, content_change_report, publish_namespace] REM export -> exporting content from DTS REM import -> importing content into DTS REM export_mappings -> exporting inter-source mappings (associations) from DTS knowledgebase REM import_mappings -> importing inter-source mappings (associations) into DTS knowledgebase REM content_change_report -> to generate reports showing concept associations affected by subscription content update REM publish_namespace -> publish a local namespace REM -p <user property file name> REM file having the properties needed to run this process REM -skipConstraints (yes/no) REM If yes, the process does not disable/enable constraints and drop/add indexes while updating DTS knowledgebase REM -t <target connection config file> REM file with the target connection params. REM The application loads connection params from this file, not from kbcontent-publish.xml REM If user wants to use connection params in kbcontent-publish.xml, "-t kb/target connection.xml" should be taken out from "call runApp_cw ..." REM -d <data extract directory> REM path to folder where subscription content is to be read from/written to. REM -pre <pre processes file name> REM -post <post processes file name> REM REM -- Publishes a given namespace
cd ..\..\..
call runApp_cw 512 com.apelon.dts.db.admin.DbContentMgr -c com.apelon.dts.db.admin.config.DBContentMgrConfig -p kb/content/publish/kbcontent-publish.xml -action publish_namespace -t kb/target-connection.xml
cd kb\content\publish
Custom Publishing Target Configuration File
© 1999-2009 Apelon, Inc. All Rights Reserved.
Page 60 of 71
10. If a directory for the namespace does not exist already, the Publish utility creates a directory with an appropriate namespace ID. For example, if the namespace has an ID of 40000, the folder 40000 is added under DTSInstall\bin\data. Ensure that any existing subscription data in that directory is backed up, as the publish process overrides the existing data files
11. Run kbcontent-publish.bat to publish the selected local namespace with the specified version information. For a Linux installation, execute kbcontent-publish.sh in bin/kb/content/publish to publish the selected local namespace.
12. If you are publishing the local namespace for the first time (contentType=full), the publishing tool generates .full files in the DTSInstall\bin\data\[LOCAL-NAMESPACE-ID] directory. If you are publishing the local namespace for incremental data (contentType=diff) the publishing tool generates .new and .del files in the DTSInstall\bin\data\ [LOCAL-NAMESPACE-ID] directory. The versionIn value must be different from the existing version in the database for the vocabulary. For example, if you are publishing the second time, the versionIn can be 2.0.0.0, replacing an existing source database with a versionIn of 1.0.0.0.
For each namespace that you publish, the publishing tool also generates a configuration file that includes information on the version of the namespace being published.
kbcontent-import-full.xml for FULL content
kbmap-import-full-[source_nsp_id]-[target_nsp_id].xml for FULL mapping
kbcontent-import-diff.xml for DIFF content
kbmap-import-diff-[source_nsp_id]-[target_nsp_id].xml for DIFF mapping
Using the information in the configuration file, the DTS Subscription Import process can perform integrity checks to verify that the published namespace content is compatible with the namespace version to be imported by a client. The import of a published namespace is prevented if the Subsciption Import process detects a version incompatibility between the published namespace content and the content in the client’s target database. Refer to the Subscription Content Import Guide for subscription namespace import procedures.
Note: If you are publishing DIFF or FULL subscription content from DTS Version 3.3 (or older) you must generate a valid Import Integrity Verification configuration file, and package that file with that older subscription content. Refer to the Generate Import Integrity Verification File discussion later in this section.
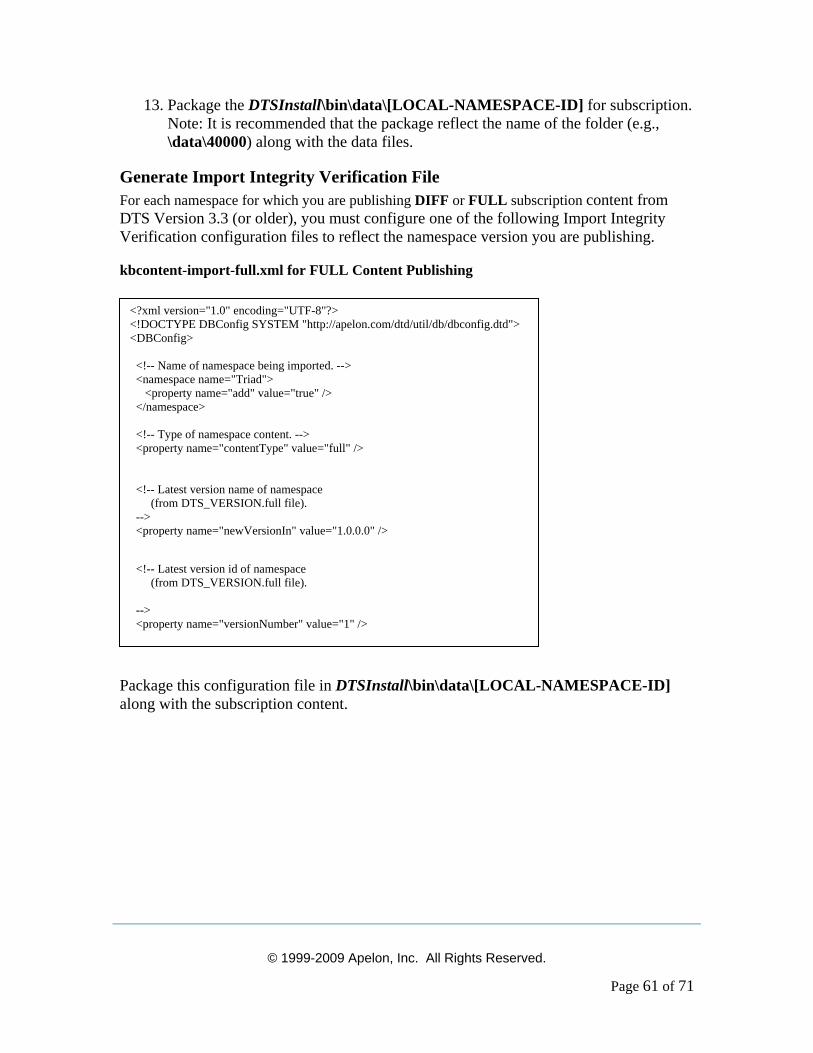
© 1999-2009 Apelon, Inc. All Rights Reserved.
Page 61 of 71
13. Package the DTSInstall\bin\data\[LOCAL-NAMESPACE-ID] for subscription. Note: It is recommended that the package reflect the name of the folder (e.g., \data\40000) along with the data files.
Generate Import Integrity Verification File For each namespace for which you are publishing DIFF or FULL subscription content from DTS Version 3.3 (or older), you must configure one of the following Import Integrity Verification configuration files to reflect the namespace version you are publishing.
kbcontent-import-full.xml for FULL Content Publishing
Package this configuration file in DTSInstall\bin\data\[LOCAL-NAMESPACE-ID] along with the subscription content.
<?xml version="1.0" encoding="UTF-8"?> <!DOCTYPE DBConfig SYSTEM "http://apelon.com/dtd/util/db/dbconfig.dtd"> <DBConfig> <!-- Name of namespace being imported. --> <namespace name="Triad"> <property name="add" value="true" /> </namespace> <!-- Type of namespace content. --> <property name="contentType" value="full" /> <!-- Latest version name of namespace (from DTS_VERSION.full file). --> <property name="newVersionIn" value="1.0.0.0" />
<!-- Latest version id of namespace (from DTS_VERSION.full file). --> <property name="versionNumber" value="1" />
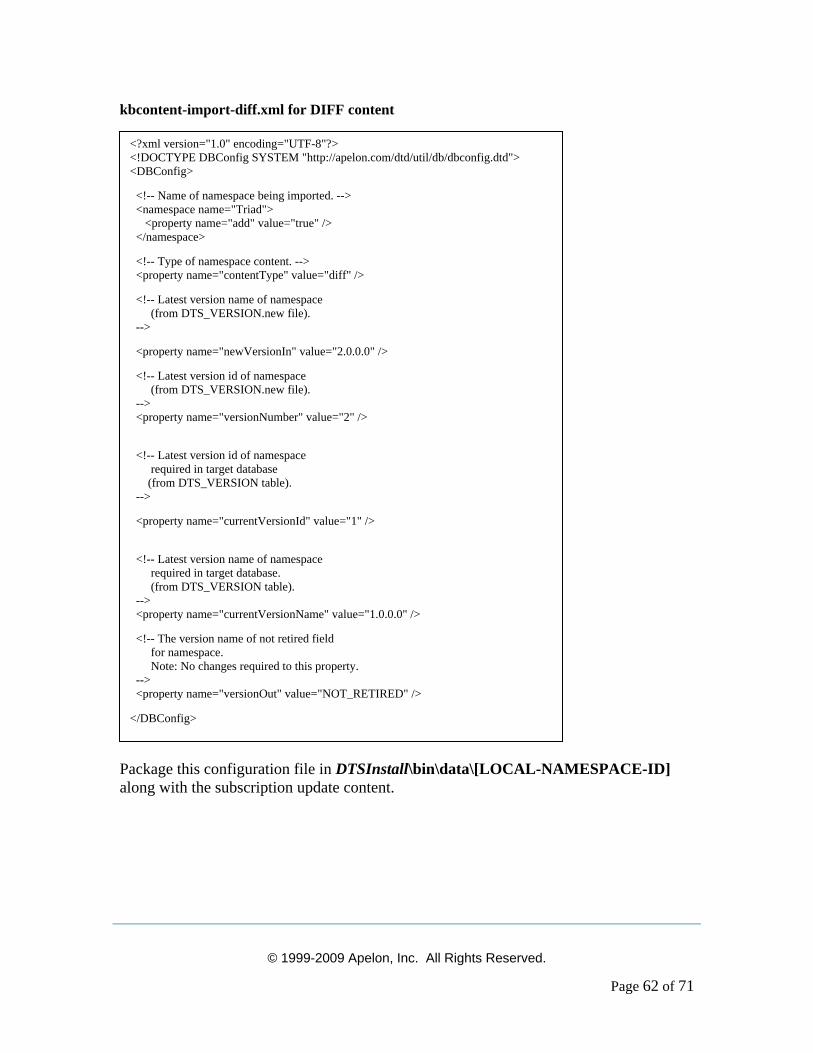
© 1999-2009 Apelon, Inc. All Rights Reserved.
Page 62 of 71
kbcontent-import-diff.xml for DIFF content
Package this configuration file in DTSInstall\bin\data\[LOCAL-NAMESPACE-ID] along with the subscription update content.
<?xml version="1.0" encoding="UTF-8"?> <!DOCTYPE DBConfig SYSTEM "http://apelon.com/dtd/util/db/dbconfig.dtd"> <DBConfig>
<!-- Name of namespace being imported. --> <namespace name="Triad"> <property name="add" value="true" /> </namespace>
<!-- Type of namespace content. --> <property name="contentType" value="diff" />
<!-- Latest version name of namespace (from DTS_VERSION.new file). -->
<property name="newVersionIn" value="2.0.0.0" />
<!-- Latest version id of namespace (from DTS_VERSION.new file). --> <property name="versionNumber" value="2" />
<!-- Latest version id of namespace required in target database (from DTS_VERSION table). -->
<property name="currentVersionId" value="1" />
<!-- Latest version name of namespace required in target database. (from DTS_VERSION table). --> <property name="currentVersionName" value="1.0.0.0" />
<!-- The version name of not retired field for namespace. Note: No changes required to this property. --> <property name="versionOut" value="NOT_RETIRED" />
</DBConfig>
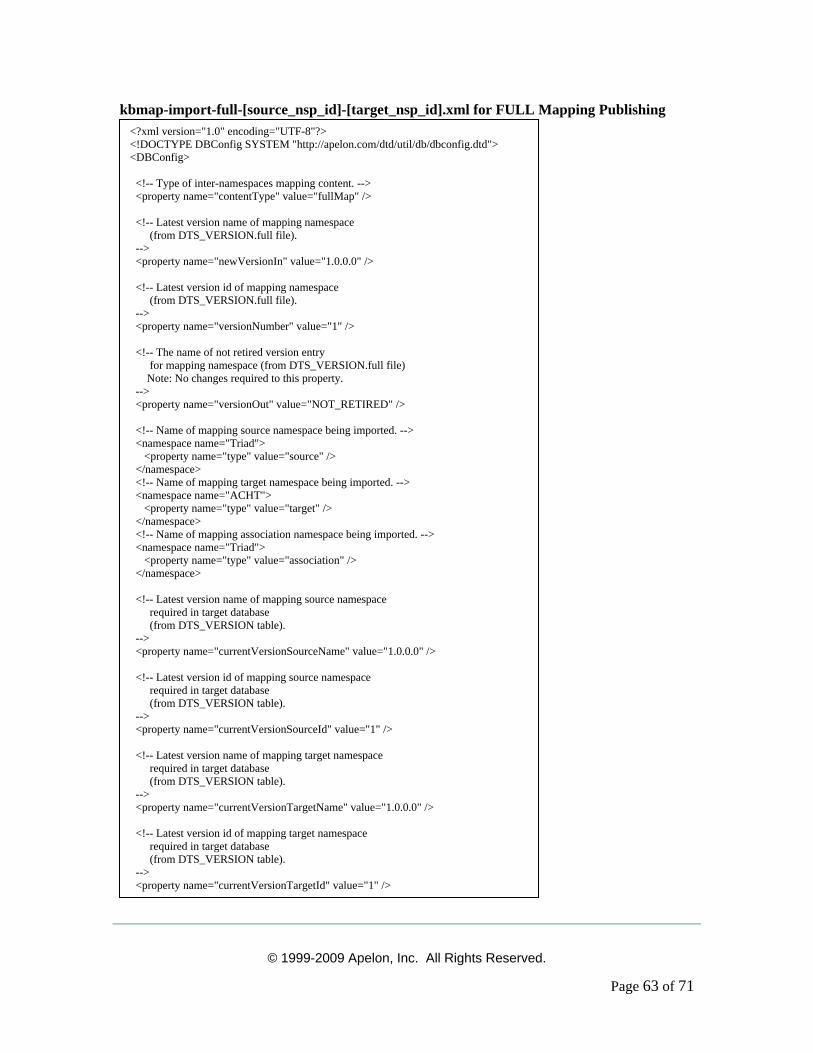
© 1999-2009 Apelon, Inc. All Rights Reserved.
Page 63 of 71
kbmap-import-full-[source_nsp_id]-[target_nsp_id].xml for FULL Mapping Publishing
<?xml version="1.0" encoding="UTF-8"?> <!DOCTYPE DBConfig SYSTEM "http://apelon.com/dtd/util/db/dbconfig.dtd"> <DBConfig> <!-- Type of inter-namespaces mapping content. --> <property name="contentType" value="fullMap" /> <!-- Latest version name of mapping namespace (from DTS_VERSION.full file). --> <property name="newVersionIn" value="1.0.0.0" /> <!-- Latest version id of mapping namespace (from DTS_VERSION.full file). --> <property name="versionNumber" value="1" /> <!-- The name of not retired version entry for mapping namespace (from DTS_VERSION.full file) Note: No changes required to this property. --> <property name="versionOut" value="NOT_RETIRED" /> <!-- Name of mapping source namespace being imported. --> <namespace name="Triad"> <property name="type" value="source" /> </namespace> <!-- Name of mapping target namespace being imported. --> <namespace name="ACHT"> <property name="type" value="target" /> </namespace> <!-- Name of mapping association namespace being imported. --> <namespace name="Triad"> <property name="type" value="association" /> </namespace> <!-- Latest version name of mapping source namespace required in target database (from DTS_VERSION table). --> <property name="currentVersionSourceName" value="1.0.0.0" /> <!-- Latest version id of mapping source namespace required in target database (from DTS_VERSION table). --> <property name="currentVersionSourceId" value="1" /> <!-- Latest version name of mapping target namespace required in target database (from DTS_VERSION table). --> <property name="currentVersionTargetName" value="1.0.0.0" /> <!-- Latest version id of mapping target namespace required in target database (from DTS_VERSION table). --> <property name="currentVersionTargetId" value="1" />

© 1999-2009 Apelon, Inc. All Rights Reserved.
Page 64 of 71
xml for FULL Mapping Publishing, Continued
Package this configuration file in DTSInstall\bin\data\[LOCAL-NAMESPACE-ID]\mapping.
<!-- Latest version name of mapping association namespace required in target database (from DTS_VERSION table). -->
<property name="currentVersionAssociationName" value="1.0.0.0" />
<!-- Latest version id of mapping association namespace required in target database
(from DTS_VERSION table).
-->
<property name="currentVersionAssociationId" value="1" />
</DBConfig>
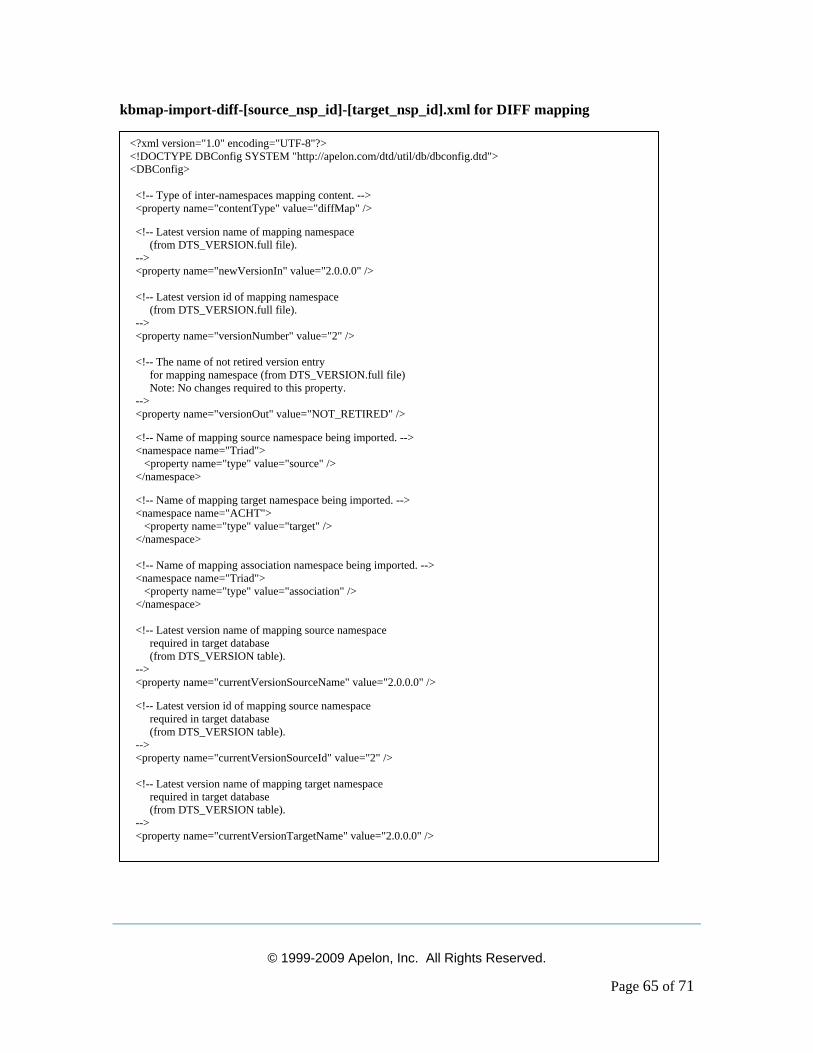
© 1999-2009 Apelon, Inc. All Rights Reserved.
Page 65 of 71
kbmap-import-diff-[source_nsp_id]-[target_nsp_id].xml for DIFF mapping
<?xml version="1.0" encoding="UTF-8"?> <!DOCTYPE DBConfig SYSTEM "http://apelon.com/dtd/util/db/dbconfig.dtd"> <DBConfig> <!-- Type of inter-namespaces mapping content. --> <property name="contentType" value="diffMap" />
<!-- Latest version name of mapping namespace (from DTS_VERSION.full file). --> <property name="newVersionIn" value="2.0.0.0" /> <!-- Latest version id of mapping namespace (from DTS_VERSION.full file). --> <property name="versionNumber" value="2" /> <!-- The name of not retired version entry for mapping namespace (from DTS_VERSION.full file) Note: No changes required to this property. --> <property name="versionOut" value="NOT_RETIRED" />
<!-- Name of mapping source namespace being imported. --> <namespace name="Triad"> <property name="type" value="source" /> </namespace>
<!-- Name of mapping target namespace being imported. --> <namespace name="ACHT"> <property name="type" value="target" /> </namespace> <!-- Name of mapping association namespace being imported. --> <namespace name="Triad"> <property name="type" value="association" /> </namespace> <!-- Latest version name of mapping source namespace required in target database (from DTS_VERSION table). --> <property name="currentVersionSourceName" value="2.0.0.0" />
<!-- Latest version id of mapping source namespace required in target database (from DTS_VERSION table). --> <property name="currentVersionSourceId" value="2" /> <!-- Latest version name of mapping target namespace required in target database (from DTS_VERSION table). --> <property name="currentVersionTargetName" value="2.0.0.0" />
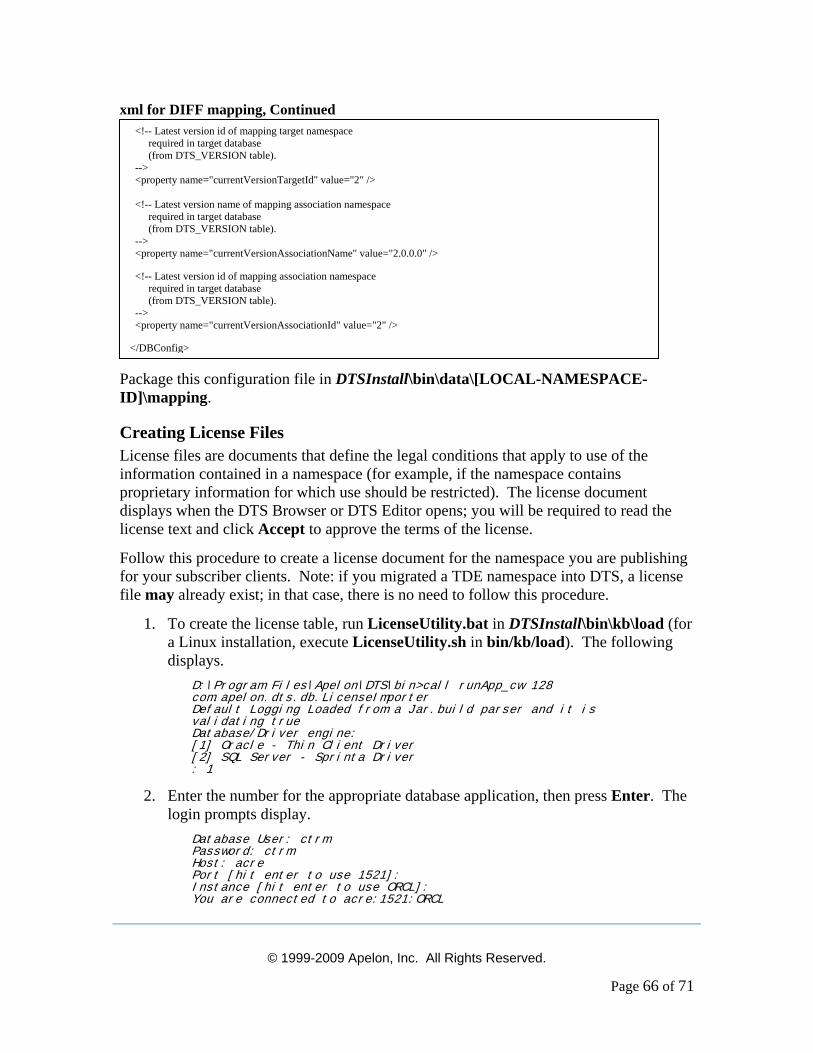
© 1999-2009 Apelon, Inc. All Rights Reserved.
Page 66 of 71
xml for DIFF mapping, Continued
Package this configuration file in DTSInstall\bin\data\[LOCAL-NAMESPACE-ID]\mapping.
Creating License Files License files are documents that define the legal conditions that apply to use of the information contained in a namespace (for example, if the namespace contains proprietary information for which use should be restricted). The license document displays when the DTS Browser or DTS Editor opens; you will be required to read the license text and click Accept to approve the terms of the license.
Follow this procedure to create a license document for the namespace you are publishing for your subscriber clients. Note: if you migrated a TDE namespace into DTS, a license file may already exist; in that case, there is no need to follow this procedure.
1. To create the license table, run LicenseUtility.bat in DTSInstall\bin\kb\load (for a Linux installation, execute LicenseUtility.sh in bin/kb/load). The following displays.
D:\Program Files\Apelon\DTS\bin>call runApp_cw 128 com.apelon.dts.db.LicenseImporter Default Logging Loaded from a Jar.build parser and it is validating true Database/Driver engine: [1] Oracle - Thin Client Driver [2] SQL Server - Sprinta Driver : 1
2. Enter the number for the appropriate database application, then press Enter. The login prompts display.
Database User: ctrm Password: ctrm Host: acre Port [hit enter to use 1521]: Instance [hit enter to use ORCL]: You are connected to acre:1521:ORCL
<!-- Latest version id of mapping target namespace required in target database (from DTS_VERSION table). --> <property name="currentVersionTargetId" value="2" /> <!-- Latest version name of mapping association namespace required in target database (from DTS_VERSION table). --> <property name="currentVersionAssociationName" value="2.0.0.0" />
<!-- Latest version id of mapping association namespace required in target database (from DTS_VERSION table). --> <property name="currentVersionAssociationId" value="2" />
</DBConfig>
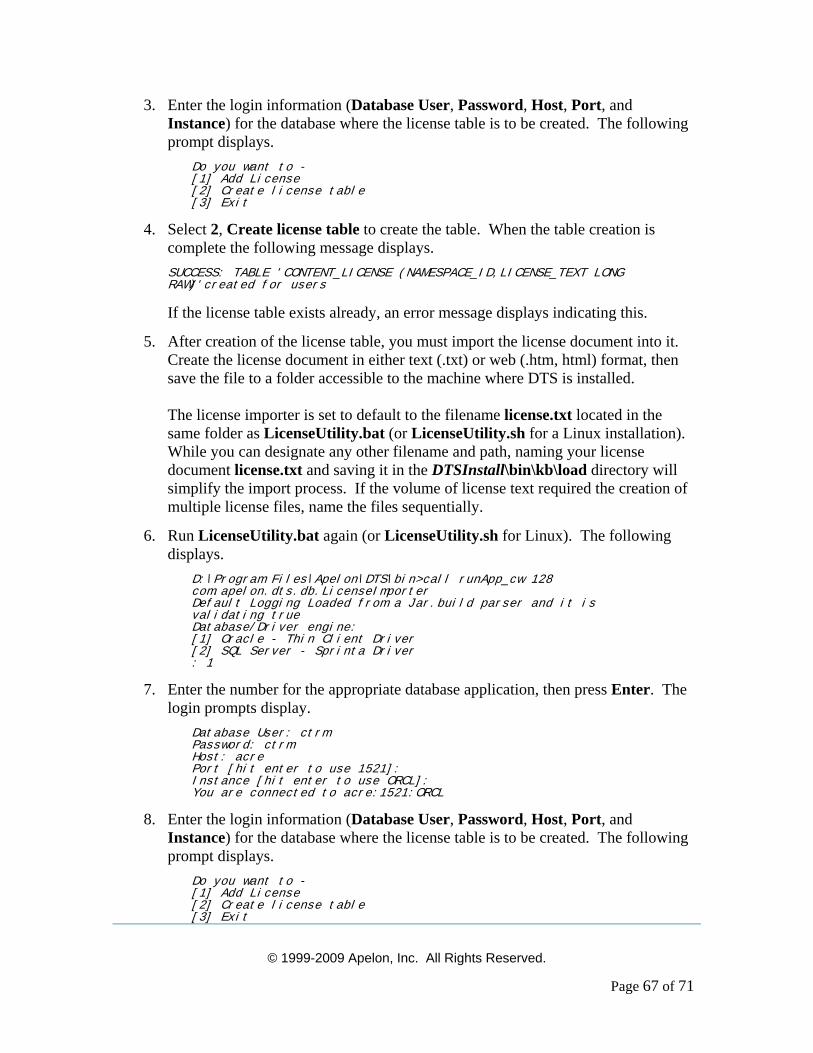
© 1999-2009 Apelon, Inc. All Rights Reserved.
Page 67 of 71
3. Enter the login information (Database User, Password, Host, Port, and Instance) for the database where the license table is to be created. The following prompt displays.
Do you want to - [1] Add License [2] Create license table [3] Exit
4. Select 2, Create license table to create the table. When the table creation is complete the following message displays. SUCCESS: TABLE 'CONTENT_LICENSE (NAMESPACE_ID,LICENSE_TEXT LONG RAW)'created for users
If the license table exists already, an error message displays indicating this.
5. After creation of the license table, you must import the license document into it. Create the license document in either text (.txt) or web (.htm, html) format, then save the file to a folder accessible to the machine where DTS is installed. The license importer is set to default to the filename license.txt located in the same folder as LicenseUtility.bat (or LicenseUtility.sh for a Linux installation). While you can designate any other filename and path, naming your license document license.txt and saving it in the DTSInstall\bin\kb\load directory will simplify the import process. If the volume of license text required the creation of multiple license files, name the files sequentially.
6. Run LicenseUtility.bat again (or LicenseUtility.sh for Linux). The following displays.
D:\Program Files\Apelon\DTS\bin>call runApp_cw 128 com.apelon.dts.db.LicenseImporter Default Logging Loaded from a Jar.build parser and it is validating true Database/Driver engine: [1] Oracle - Thin Client Driver [2] SQL Server - Sprinta Driver : 1
7. Enter the number for the appropriate database application, then press Enter. The login prompts display.
Database User: ctrm Password: ctrm Host: acre Port [hit enter to use 1521]: Instance [hit enter to use ORCL]: You are connected to acre:1521:ORCL
8. Enter the login information (Database User, Password, Host, Port, and Instance) for the database where the license table is to be created. The following prompt displays.
Do you want to - [1] Add License [2] Create license table [3] Exit
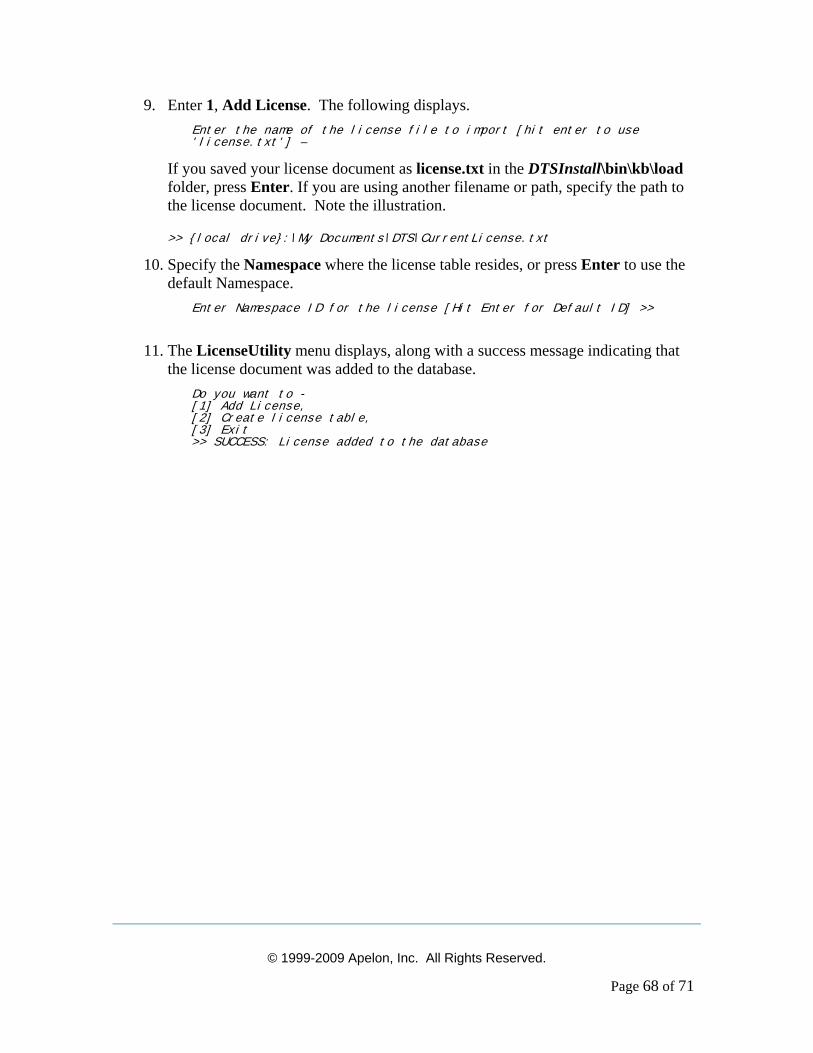
© 1999-2009 Apelon, Inc. All Rights Reserved.
Page 68 of 71
9. Enter 1, Add License. The following displays. Enter the name of the license file to import [hit enter to use 'license.txt'] –
If you saved your license document as license.txt in the DTSInstall\bin\kb\load folder, press Enter. If you are using another filename or path, specify the path to the license document. Note the illustration. >> {local drive}:\My Documents\DTS\CurrentLicense.txt
10. Specify the Namespace where the license table resides, or press Enter to use the default Namespace.
Enter Namespace ID for the license [Hit Enter for Default ID] >>
11. The LicenseUtility menu displays, along with a success message indicating that the license document was added to the database.
Do you want to - [1] Add License, [2] Create license table, [3] Exit >> SUCCESS: License added to the database
© 1999-2009 Apelon, Inc. All Rights Reserved.
Page 69 of 71
Knowledgebase Administrator Glossary The glossary provides brief definitions of the terms used with and throughout the DTS Knowledgebase.
DTS Knowledgebase An integrated knowledgebase of healthcare terminology that supports clinical application development and deployment, and also provides the components for creating a customized database of terminology. A DTS Knowledgebase may include repositories of terminology called “silos,” each containing terminology acquired from one or more namespaces.
Extension Namespace An Ontylog Extension namespace is an extension of a specific Ontylog subscription namespace, created for the purpose of creating and maintaining new local content for the linked Ontylog subscription namespace. The Extension namespace is comprised of supplemental content that you create locally. In an Ontylog namespace, concepts can be organized into a hierarchy through the classification process; DTS allows you to classify each Extension namespace. Classification produces a namespace’s inferred view from the defined view. The inferred Extension namespace view takes defined concept and role relationships into account, then, if necessary, positions concepts in the namespace hierarchy based on these inferred relationships.
“Extract” Parameter In the filterSpec.xml file, the second of two types of parameters (the “select” parameter being the other), you can specify for each spec which concepts and terms are acquired to populate a specific silo in the DTS Knowledgebase. As a result of running the Selectors & Extractors utility, the extract parameter extracts concept names and synonymous terms from the designated namespace(s).
filterSpec.dtd File Defines the selection and extraction language for the filterSpec.xml file, referenced when you run the Selection and Extraction utility.
filterSpec.xml File Contains the specifications by which data will be selected and extracted (when you run the Selectors & Extractors utility) from the designated namespace(s) to populate the silos in the DTS Knowledgebase. A default filterSpec.xml file is packaged with DTS.
Namespace Refers to an individual source vocabulary contained in your knowledgebase.
© 1999-2009 Apelon, Inc. All Rights Reserved.
Page 70 of 71
Ontylog Refers to a language and data model used to create and maintain terminology databases through the use of Apelon’s Terminology Development Environment (TDE) suite of tools.
Property Name In the DTS Knowledgebase, a piece of user-defined information of any kind (documentation strings, numeric codes, etc.) related to a concept or term. Each property is assigned a name, and each property can, in turn, have a unique property value. Through filterSpec.xml file specifications, concepts with specific property names can be selected from designated namespaces to populate the silos in the DTS Knowledgebase.
Property Value The user-defined value assigned to an established property name in the knowledgebase. Through filterSpec.xml file specifications, concepts having specific property values can be selected from designated namespaces to populate the silos in the DTS Knowledgebase.
Root In the Ontylog concept hierarchy, refers to a concept that has a sub tree of concepts below it. Based on filterSpec.xml file specifications, data from one or more root concepts can be selected from designated namespaces to populate the silos in the DTS Knowledgebase.
Selectors & Extractors A Java program that reads the filtering specifications in the filterSpec.xml file. Based on these specifications, Selectors & Extractors creates SQL queries for designated namespaces. Retrieved query results are returned to Selectors & Extractors, which inserts the results into the silos in the DTS Knowledgebase.
“Select” Parameter In the filterSpec.xml file, the first of two types of parameters (the “extract” parameter being the other) you can specify for each spec which data are acquired from designated namespaces to populate a specific silo in the DTS Knowledgebase. As a result of running Selectors & Extractors, the selected parameter acquires concepts with designated semantic types and properties, and acquires root concepts and descendent concept’s Ontylog-type namespaces.
Semantic Type In the DTS Knowledgebase, a semantic type indicates the basic category or categories to which a concept belongs (for example, “Organ or Tissue Function”). Grouping with other concepts can be established through semantic types. Through filterSpec.xml file specifications, data can be selected and extracted from designated namespaces based on semantic type to populate the silos in the DTS Knowledgebase.
© 1999-2009 Apelon, Inc. All Rights Reserved.
Page 71 of 71
Silos Repositories of terminology, each containing data based on the selection and extraction parameters in the corresponding spec in the filterSpec.xml file (i.e., silo 1 is populated based on the parameters in specs with an ID number of 1, silo 2 is populated based on the parameters in specs with an ID number of 2, etc.).
Spec In the filterSpec.xml file, a spec refers to a specific set of parameters for selection and/or extraction of data from designated namespaces in the DTS Knowledgebase. As subsequent data selection and extraction requirements occur, you can modify any spec in the filterSpec.xml file, or add new specs (the filterSpec.xml file can have unlimited specs).
Spec Code In the filterSpec.xml file, an alphanumeric identification number assigned to each individual spec.
Spec ID In the filterSpec.xml file, a numeric identification number assigned to each individual spec. The number of the DTS Knowledgebase silo that is populated based on the selection and extraction parameters in the spec corresponds with the Spec ID number. You can define multiple specs to populate a single silo. For example, you can define multiple specs with Spec ID 1, all containing specifications to populate silo 1.
Spec Name In the filterSpec.xml file, a name assigned to each individual spec (e.g., Diseases).
UMLS Metathesaurus The source of many subscription namespaces in the DTS Knowledgebase. The UMLS Metathesaurus consists of semantic information about medical concepts, and the relationships between the various names that identify those concepts. It contains information from many medical vocabularies.
Back to Top