Embed Size (px)
Citation preview
ANSYS ACT App Builder (Beta)
ANSYS ACT App Builder (Beta)
ii
Copyright and Trademark Information
© 2017 ANSYS, Inc. Unauthorized use, distribution or duplication is prohibited.
ANSYS, ANSYS Workbench, AUTODYN, CFX, FLUENT and any and all ANSYS, Inc. brand, product, service and feature names, logos and slogans are registered trademarks or trademarks of ANSYS, Inc. or its subsidiaries located in the United States or other countries. ICEM CFD is a trademark used by ANSYS, Inc. under license. CFX is a trademark of Sony Corporation in Japan. All other brand, product, service and feature names or trademarks are the property of their respective owners. FLEMlm and FLEXnet are trademarks of Flexera swoftware LLC.
Disclaimer Notice
THIS ANSYS SOFTWARE PRODUCT AND PROGRAM DOCUMENTATION INCLUDE TRADE SECRETS AND ARE CONFIDENTIAL AND PROPRIETARY PRODUCTS OF ANSYS, INC., ITS SUBSIDIARIES, OR LICENSORS. The software products and documentation are furnished by ANSYS, Inc., its subsidiaries, or affiliates under a software license agreement that contains provisions concerning non-disclosure, copying, length and nature of use, compliance with exporting laws, warranties, disclaimers, limitations of liability, and remedies, and other provisions. The software products and documentation may be used, disclosed, transferred, or copied only in accordance with the terms and conditions of that software license agreement.
ANSYS, Inc. and ANSYS Europe, Ltd. are UL registered ISO 9001: 2008 companies.
U.S. Government Rights
For U.S. Government users, except as specifically granted by the ANSYS, Inc. software license agreement, the use, duplication, or disclosure by the United States Government is subject to restrictions stated in the ANSYS, Inc. software license agreement and FAR 12.212 (for non-DOD licenses).
Third-Party Software
See the legal information in the product help files for the complete Legal Notice for ANSYS proprietary software and third-party software. If you are unable to access the Legal Notice, contact ANSYS, Inc.
Published in the U.S.A.
ANSYS ACT App Builder (Beta)
iii
Contents
Beta Features ................................................................................................................................................ 1 Getting Started .............................................................................................................................................. 1 App Builder Overview ................................................................................................................................... 2
App Builder Toolbar .................................................................................................................................. 2 App Builder Navigation Menu .................................................................................................................. 4 App Builder Sort and Search Options ....................................................................................................... 4
Opening an App Builder Project .................................................................................................................... 4 Creating an App Builder Project .................................................................................................................... 5 Adding an ANSYS Product ............................................................................................................................. 5 Adding a Wizard ............................................................................................................................................ 5
Defining Properties for a Step .................................................................................................................. 7 Defining Callbacks for a Step .................................................................................................................... 9
Editing an App Entity ..................................................................................................................................... 9 Testing an Extension ................................................................................................................................... 10 Importing an Extension ............................................................................................................................... 10 Exporting an Extension ............................................................................................................................... 12 Using the XML Editor .................................................................................................................................. 13 Using the Resource Manager ...................................................................................................................... 16
Adding New Files and Folders ................................................................................................................ 17 Importing Existing Files and Folders ....................................................................................................... 18 Editing Files and Folders ......................................................................................................................... 18 Exporting a Selected File or Folder ......................................................................................................... 19
ANSYS ACT App Builder (Beta)
1
Beta Features Beta features have not been fully tested and validated. ANSYS, Inc. may, at its discretion, fully release, change, or withdraw beta features in future revisions. It makes no commitment to doing so on any particular schedule. ANSYS, Inc. makes no commitment to resolve defects reported against beta features. However, your feedback will help us improve the quality of the product.
Beta features are not subject to the ANSYS Class 3 error reporting system. ANSYS, Inc. does not guarantee that input files used with beta features will run successfully from version to version of the software, nor with the final released version of the features. You may need to modify the input files before running them on other versions.
To enable beta features in Workbench, select Tools > Options > Appearance and then select the Beta Options check box.
Getting Started This document provides information about using the beta release of the ANSYS ACT App Builder.
The App Builder is a stand-alone tool for creating ACT extensions in a visual environment, saving you from having to create or modify your XML extension definition files and IronPython scripts directly.
To use the App Builder in ANSYS 19.0, you must enable beta options in the Options dialog box.
● To open this dialog box from AIM, click Home and then select Tools > Options. ● To open this dialog box from Workbench, select Tools > Options.
On the Appearance page in this dialog box, select the Beta Options check box under the Display heading to enable beta options.
Once beta options are enabled, you can start the App Builder from either the AIM menu or the ACT Start page in AIM or Workbench.
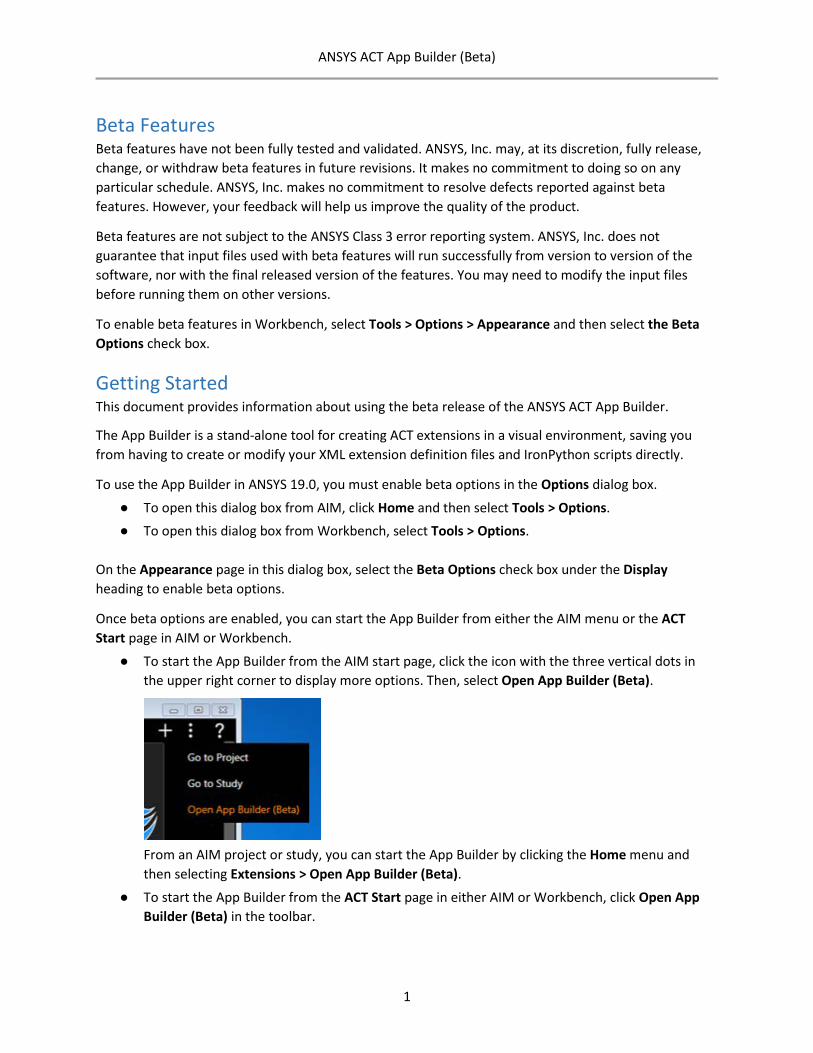
● To start the App Builder from the AIM start page, click the icon with the three vertical dots in the upper right corner to display more options. Then, select Open App Builder (Beta).
From an AIM project or study, you can start the App Builder by clicking the Home menu and then selecting Extensions > Open App Builder (Beta).
● To start the App Builder from the ACT Start page in either AIM or Workbench, click Open App Builder (Beta) in the toolbar.
ANSYS ACT App Builder (Beta)
2
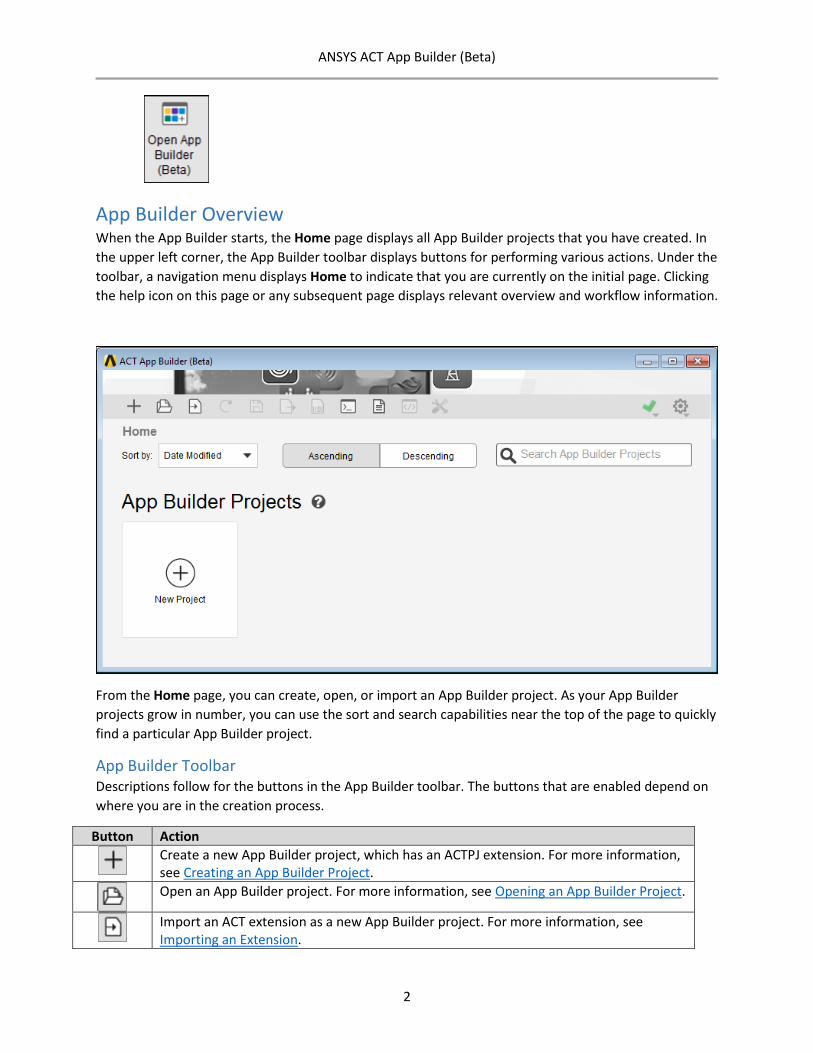
App Builder Overview When the App Builder starts, the Home page displays all App Builder projects that you have created. In the upper left corner, the App Builder toolbar displays buttons for performing various actions. Under the toolbar, a navigation menu displays Home to indicate that you are currently on the initial page. Clicking the help icon on this page or any subsequent page displays relevant overview and workflow information.
From the Home page, you can create, open, or import an App Builder project. As your App Builder projects grow in number, you can use the sort and search capabilities near the top of the page to quickly find a particular App Builder project.
App Builder Toolbar Descriptions follow for the buttons in the App Builder toolbar. The buttons that are enabled depend on where you are in the creation process.
Button Action
Create a new App Builder project, which has an ACTPJ extension. For more information, see Creating an App Builder Project.
Open an App Builder project. For more information, see Opening an App Builder Project.
Import an ACT extension as a new App Builder project. For more information, see Importing an Extension.
ANSYS ACT App Builder (Beta)
3
Button Action
Reload the temporary extension for the active App Builder project into the ANSYS product. For example, you might want to reload the temporary extension in AIM or Workbench to access the wizard and test what you have created so far. For more information, see Testing an Extension.
Save the App Builder project to a specified folder to which you can write. Changes that you make in the App Builder are saved to the ACTPJ file only when you click this button. If you take an action that might result in losing changes, the App Builder warns that you did not save your changes. You can then choose whether to save or discard changes.
Export an App Builder project to the XML extension definition file and IronPython scripts that make up an ACT extension. For more information, see Exporting an Extension.
Open the binary extension builder so that you can save the App Builder project as an extension in the binary format (WBEX file). For more information, see “Building a Binary Extension” in the ACT Developer’s Guide.
Open the ACT Console in the active ANSYS product so that you can test and debug commands in your IronPython scripts. For more information, see “ACT Console” in the ACT Developer’s Guide.
Open the Extensions Log File window so that you can see all information that has been written to this file. For more information, see “Extensions Log File” in the ACT Developer’s Guide.
or
Toggles between showing the XML Editor and App Builder. In the XML Editor, you can view and modify all XML elements rather than just the basic elements displayed in the App Builder. For more information, see Using the XML Editor.
Opens the resource manager, where you can view and manage the files in your extension. For more information, see Using the Resource Manager.
Two additional buttons appear to the right of the App Builder toolbar.
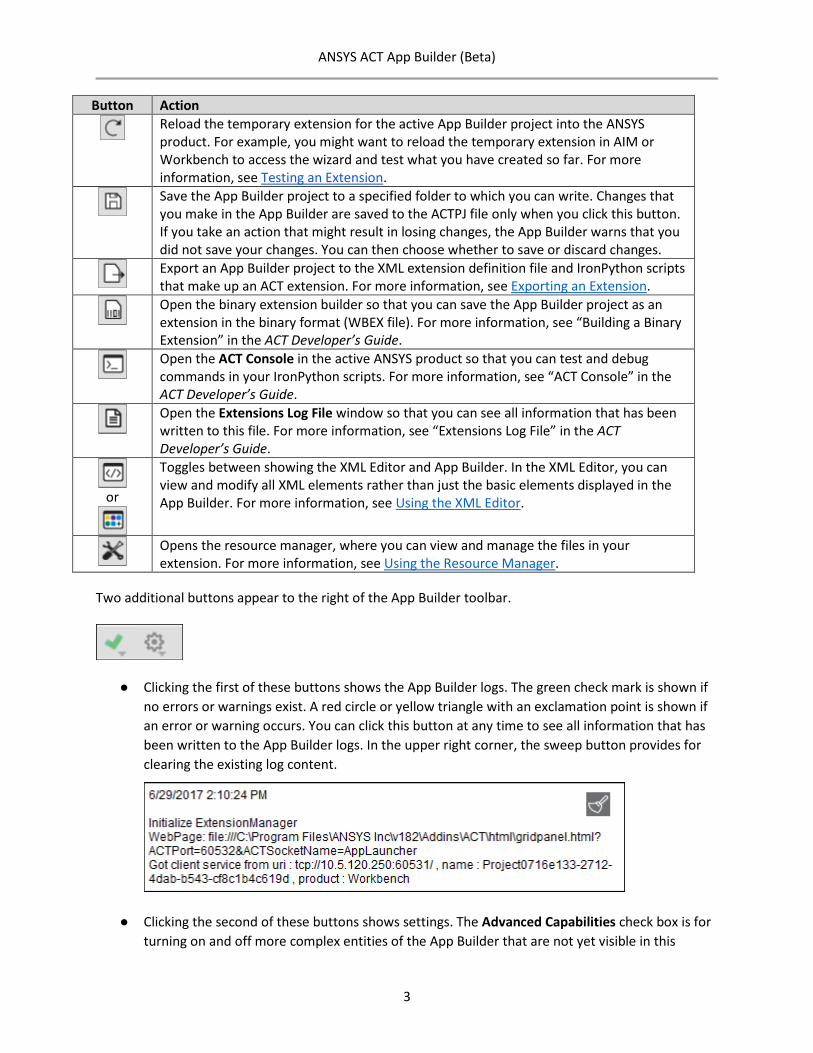
● Clicking the first of these buttons shows the App Builder logs. The green check mark is shown if no errors or warnings exist. A red circle or yellow triangle with an exclamation point is shown if an error or warning occurs. You can click this button at any time to see all information that has been written to the App Builder logs. In the upper right corner, the sweep button provides for clearing the existing log content.
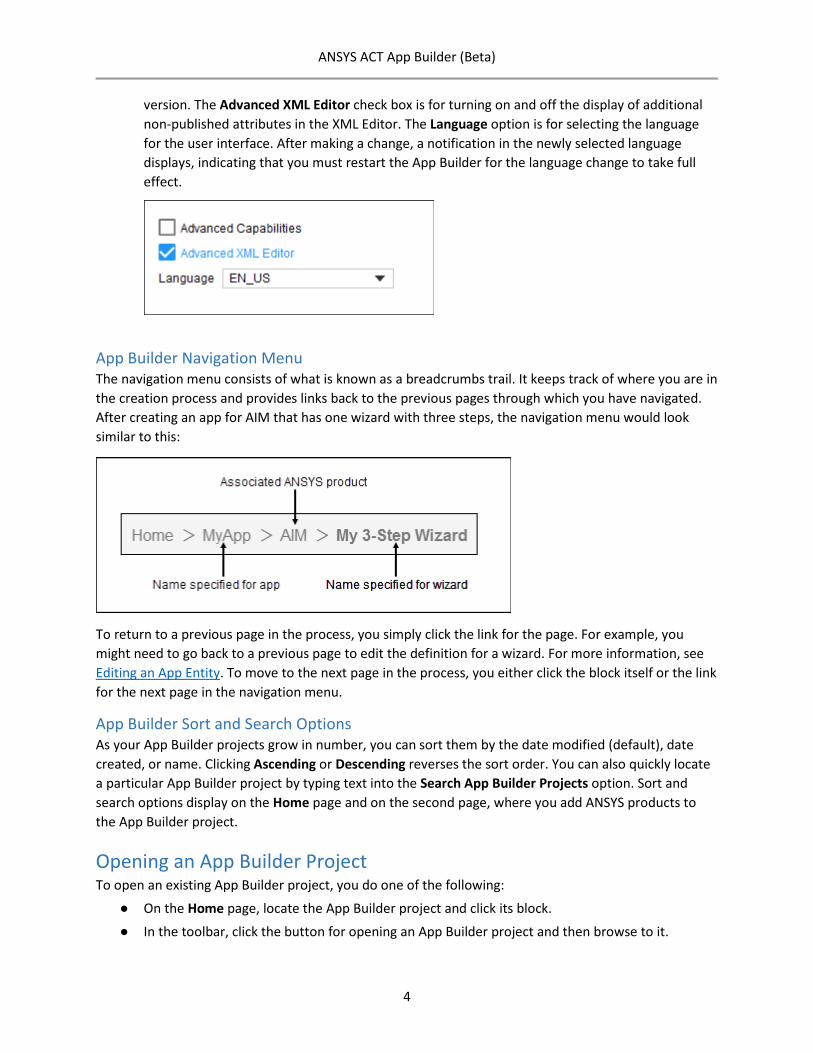
● Clicking the second of these buttons shows settings. The Advanced Capabilities check box is for turning on and off more complex entities of the App Builder that are not yet visible in this
ANSYS ACT App Builder (Beta)
4
version. The Advanced XML Editor check box is for turning on and off the display of additional non-published attributes in the XML Editor. The Language option is for selecting the language for the user interface. After making a change, a notification in the newly selected language displays, indicating that you must restart the App Builder for the language change to take full effect.
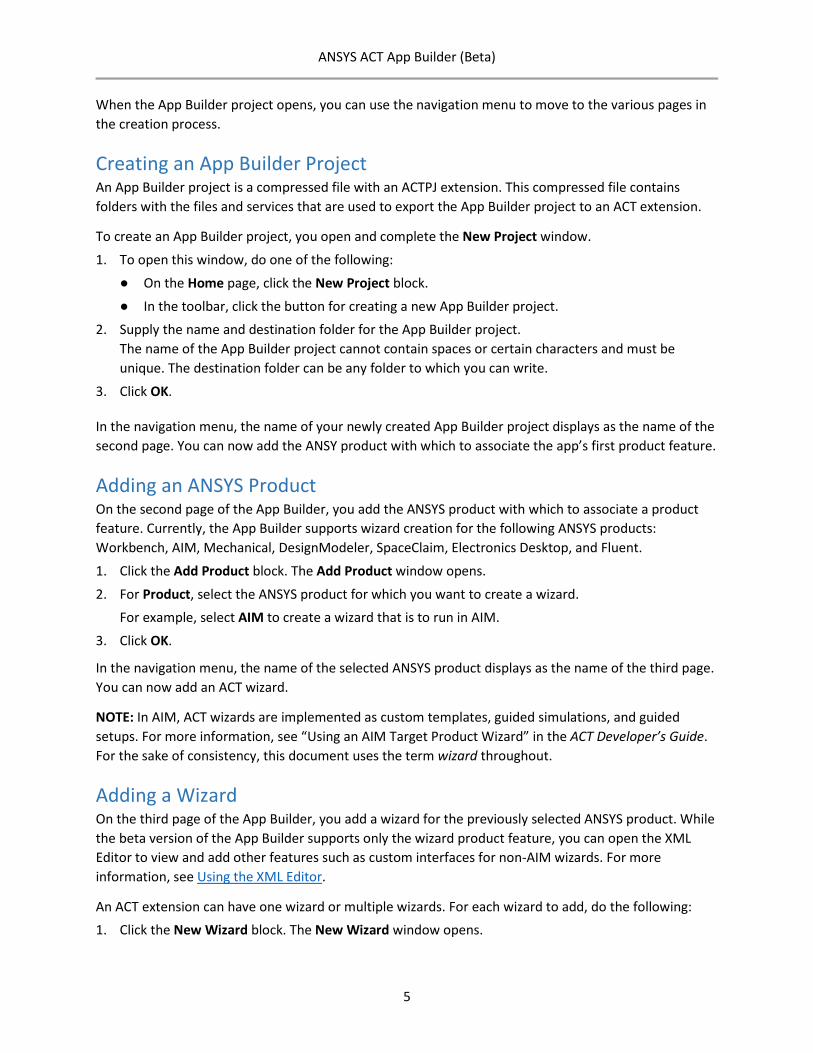
App Builder Navigation Menu The navigation menu consists of what is known as a breadcrumbs trail. It keeps track of where you are in the creation process and provides links back to the previous pages through which you have navigated. After creating an app for AIM that has one wizard with three steps, the navigation menu would look similar to this:
To return to a previous page in the process, you simply click the link for the page. For example, you might need to go back to a previous page to edit the definition for a wizard. For more information, see Editing an App Entity. To move to the next page in the process, you either click the block itself or the link for the next page in the navigation menu.
App Builder Sort and Search Options As your App Builder projects grow in number, you can sort them by the date modified (default), date created, or name. Clicking Ascending or Descending reverses the sort order. You can also quickly locate a particular App Builder project by typing text into the Search App Builder Projects option. Sort and search options display on the Home page and on the second page, where you add ANSYS products to the App Builder project.
Opening an App Builder Project To open an existing App Builder project, you do one of the following:
● On the Home page, locate the App Builder project and click its block.
● In the toolbar, click the button for opening an App Builder project and then browse to it.
ANSYS ACT App Builder (Beta)
5
When the App Builder project opens, you can use the navigation menu to move to the various pages in the creation process.
Creating an App Builder Project An App Builder project is a compressed file with an ACTPJ extension. This compressed file contains folders with the files and services that are used to export the App Builder project to an ACT extension.
To create an App Builder project, you open and complete the New Project window.
1. To open this window, do one of the following:
● On the Home page, click the New Project block.
● In the toolbar, click the button for creating a new App Builder project. 2. Supply the name and destination folder for the App Builder project.
The name of the App Builder project cannot contain spaces or certain characters and must be unique. The destination folder can be any folder to which you can write.
3. Click OK.
In the navigation menu, the name of your newly created App Builder project displays as the name of the second page. You can now add the ANSY product with which to associate the app’s first product feature.
Adding an ANSYS Product On the second page of the App Builder, you add the ANSYS product with which to associate a product feature. Currently, the App Builder supports wizard creation for the following ANSYS products: Workbench, AIM, Mechanical, DesignModeler, SpaceClaim, Electronics Desktop, and Fluent.
1. Click the Add Product block. The Add Product window opens.
2. For Product, select the ANSYS product for which you want to create a wizard. For example, select AIM to create a wizard that is to run in AIM.
3. Click OK.
In the navigation menu, the name of the selected ANSYS product displays as the name of the third page. You can now add an ACT wizard.
NOTE: In AIM, ACT wizards are implemented as custom templates, guided simulations, and guided setups. For more information, see “Using an AIM Target Product Wizard” in the ACT Developer’s Guide. For the sake of consistency, this document uses the term wizard throughout.
Adding a Wizard On the third page of the App Builder, you add a wizard for the previously selected ANSYS product. While the beta version of the App Builder supports only the wizard product feature, you can open the XML Editor to view and add other features such as custom interfaces for non-AIM wizards. For more information, see Using the XML Editor.
An ACT extension can have one wizard or multiple wizards. For each wizard to add, do the following: 1. Click the New Wizard block. The New Wizard window opens.
ANSYS ACT App Builder (Beta)
6
2. Supply the name, label, number of steps, and the icon to display.
By default, the label is the name that you specify for the wizard.
3. If this wizard is for AIM and you want it to be a guided simulation, select the Guided simulation check box.
All data supplied in a guided simulation is saved and restored each time the guided simulation is started. For more information, see “Creating a Guided Simulation” in the ACT Developer’s Guide.
4. Click OK.
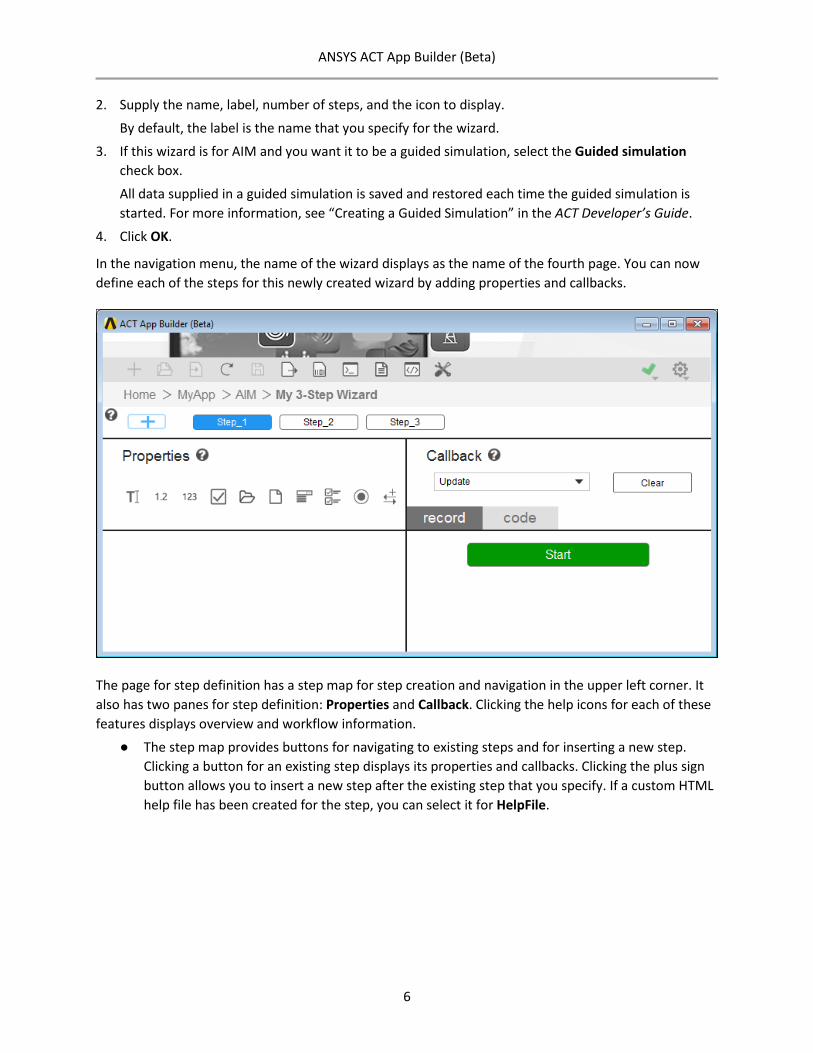
In the navigation menu, the name of the wizard displays as the name of the fourth page. You can now define each of the steps for this newly created wizard by adding properties and callbacks.
The page for step definition has a step map for step creation and navigation in the upper left corner. It also has two panes for step definition: Properties and Callback. Clicking the help icons for each of these features displays overview and workflow information.
● The step map provides buttons for navigating to existing steps and for inserting a new step. Clicking a button for an existing step displays its properties and callbacks. Clicking the plus sign button allows you to insert a new step after the existing step that you specify. If a custom HTML help file has been created for the step, you can select it for HelpFile.
ANSYS ACT App Builder (Beta)
7
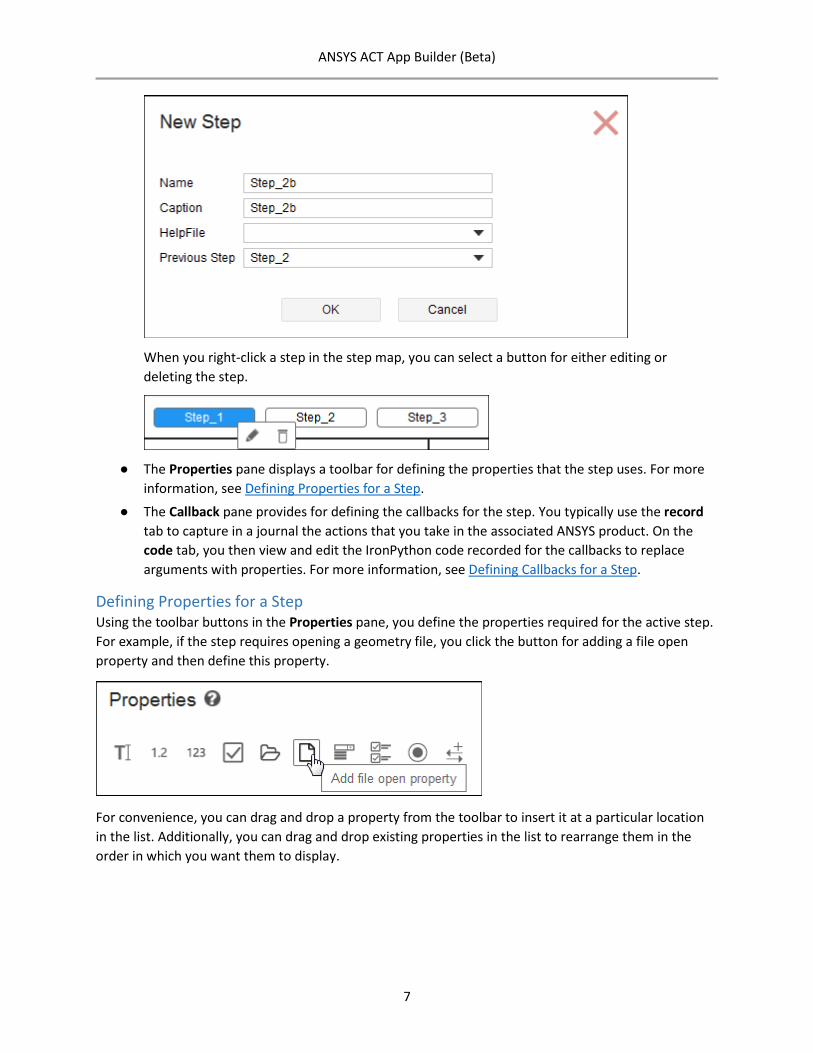
When you right-click a step in the step map, you can select a button for either editing or deleting the step.
● The Properties pane displays a toolbar for defining the properties that the step uses. For more
information, see Defining Properties for a Step.
● The Callback pane provides for defining the callbacks for the step. You typically use the record tab to capture in a journal the actions that you take in the associated ANSYS product. On the code tab, you then view and edit the IronPython code recorded for the callbacks to replace arguments with properties. For more information, see Defining Callbacks for a Step.
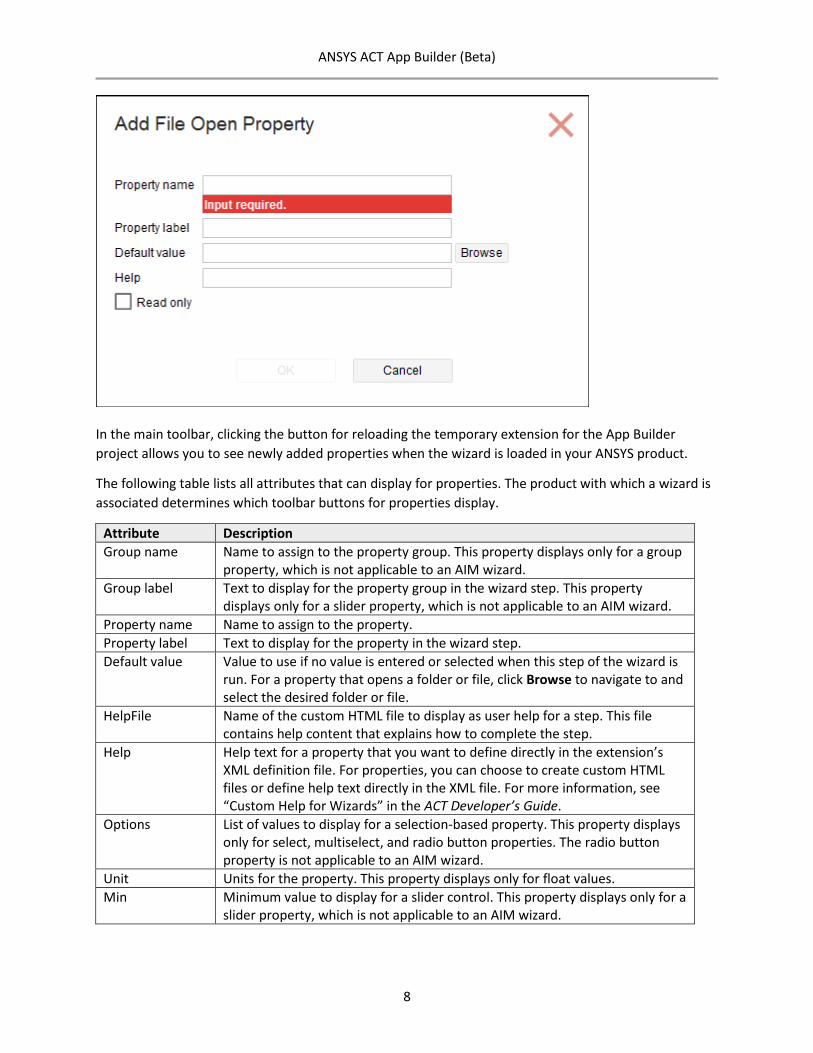
Defining Properties for a Step Using the toolbar buttons in the Properties pane, you define the properties required for the active step. For example, if the step requires opening a geometry file, you click the button for adding a file open property and then define this property.
For convenience, you can drag and drop a property from the toolbar to insert it at a particular location in the list. Additionally, you can drag and drop existing properties in the list to rearrange them in the order in which you want them to display.
ANSYS ACT App Builder (Beta)
8
In the main toolbar, clicking the button for reloading the temporary extension for the App Builder project allows you to see newly added properties when the wizard is loaded in your ANSYS product.
The following table lists all attributes that can display for properties. The product with which a wizard is associated determines which toolbar buttons for properties display.
Attribute Description Group name Name to assign to the property group. This property displays only for a group
property, which is not applicable to an AIM wizard. Group label Text to display for the property group in the wizard step. This property
displays only for a slider property, which is not applicable to an AIM wizard. Property name Name to assign to the property. Property label Text to display for the property in the wizard step. Default value Value to use if no value is entered or selected when this step of the wizard is
run. For a property that opens a folder or file, click Browse to navigate to and select the desired folder or file.
HelpFile Name of the custom HTML file to display as user help for a step. This file contains help content that explains how to complete the step.
Help Help text for a property that you want to define directly in the extension’s XML definition file. For properties, you can choose to create custom HTML files or define help text directly in the XML file. For more information, see “Custom Help for Wizards” in the ACT Developer’s Guide.
Options List of values to display for a selection-based property. This property displays only for select, multiselect, and radio button properties. The radio button property is not applicable to an AIM wizard.
Unit Units for the property. This property displays only for float values. Min Minimum value to display for a slider control. This property displays only for a
slider property, which is not applicable to an AIM wizard.
ANSYS ACT App Builder (Beta)
9
Max Maximum value to display for a slider control. This property displays only for a slider property, which is not applicable to an AIM wizard.
Read only Indicates whether the property is read-only.
Defining Callbacks for a Step A callback invokes an IronPython function. For each step, you define the callbacks that can be invoked from this step in the Callback pane. For example, when creating an AIM wizard for a custom simulation template, the callback <onupdate> specifies the function to invoke when Next is clicked to move to the next step. Similarly, the callback <onreset> specifies the function to invoke when Previous is clicked to return to the previous step to reset it if the step has not been completed correctly.
NOTE: Wizards for AIM support only three callbacks: <onupdate>, <onrefresh>, and <onreset>.
You use the record and code tabs in the Callback pane to define callbacks.
● On the record tab, you click Start to record in a journal the actions that you take to change project data in the interface of the associated ANSYS product. Once you finish, you return to the record tab and click Stop. To easily change the value of a journal entry, you can click it and then link the entry to a property that you have defined.
● On the code tab, you can view and modify the journal, which is recorded as an IronPython script. For example, you might need to replace arguments with properties. For information on using journaling and scripting, as well as a complete list of all available data containers, namespace commands, and data types, see the ANSYS AIM and Workbench Scripting Guide.
When you click the toolbar button for saving the App Builder project, the IronPython code for the callback is saved.
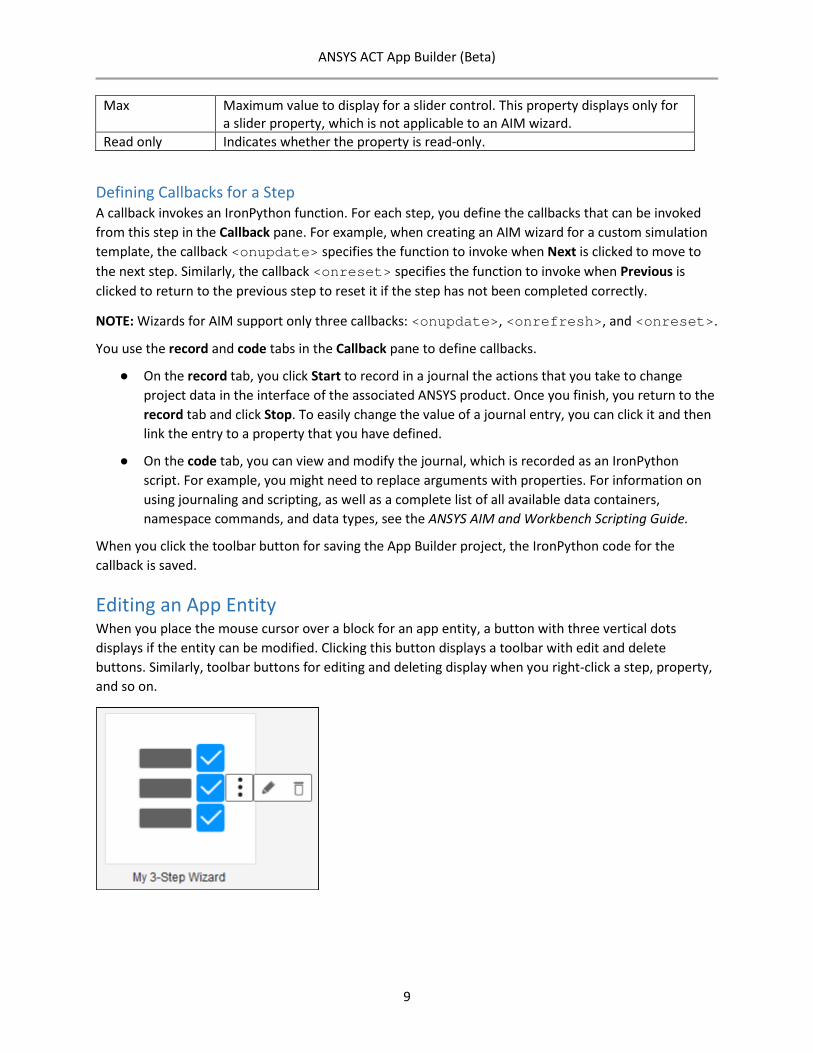
Editing an App Entity When you place the mouse cursor over a block for an app entity, a button with three vertical dots displays if the entity can be modified. Clicking this button displays a toolbar with edit and delete buttons. Similarly, toolbar buttons for editing and deleting display when you right-click a step, property, and so on.
ANSYS ACT App Builder (Beta)
10
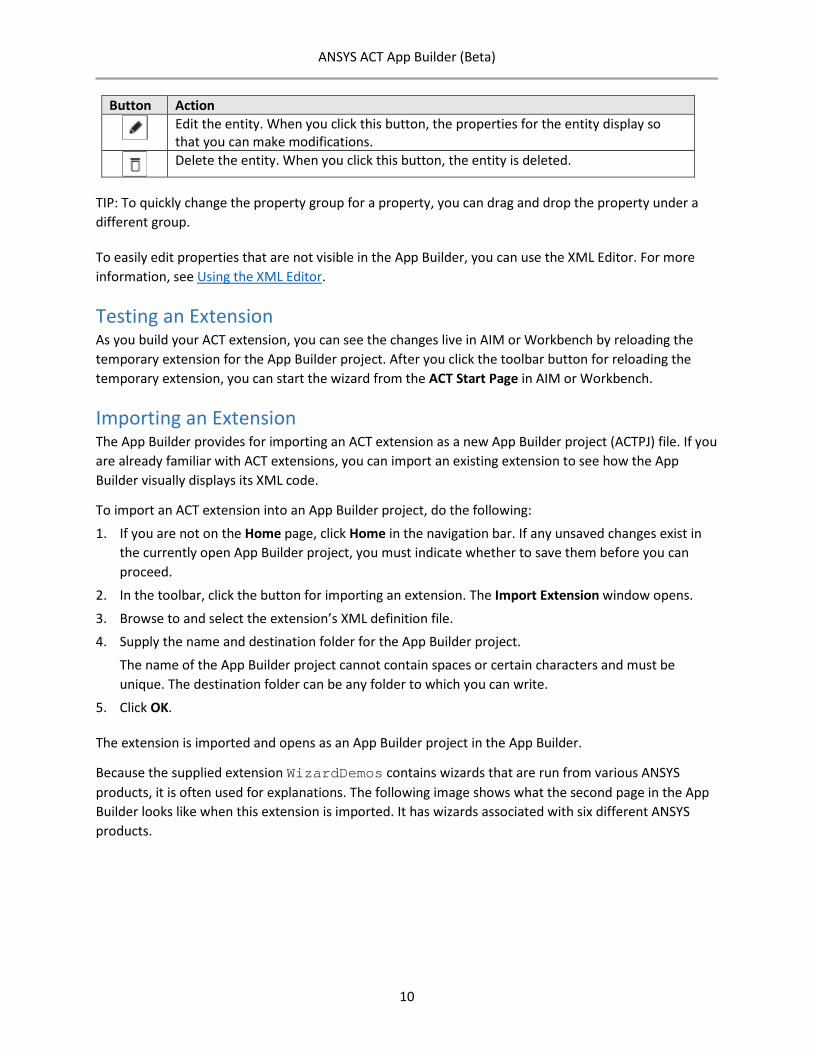
Button Action
Edit the entity. When you click this button, the properties for the entity display so that you can make modifications.
Delete the entity. When you click this button, the entity is deleted.
TIP: To quickly change the property group for a property, you can drag and drop the property under a different group.
To easily edit properties that are not visible in the App Builder, you can use the XML Editor. For more information, see Using the XML Editor.
Testing an Extension As you build your ACT extension, you can see the changes live in AIM or Workbench by reloading the temporary extension for the App Builder project. After you click the toolbar button for reloading the temporary extension, you can start the wizard from the ACT Start Page in AIM or Workbench.
Importing an Extension The App Builder provides for importing an ACT extension as a new App Builder project (ACTPJ) file. If you are already familiar with ACT extensions, you can import an existing extension to see how the App Builder visually displays its XML code.
To import an ACT extension into an App Builder project, do the following:
1. If you are not on the Home page, click Home in the navigation bar. If any unsaved changes exist in the currently open App Builder project, you must indicate whether to save them before you can proceed.
2. In the toolbar, click the button for importing an extension. The Import Extension window opens.
3. Browse to and select the extension’s XML definition file. 4. Supply the name and destination folder for the App Builder project.
The name of the App Builder project cannot contain spaces or certain characters and must be unique. The destination folder can be any folder to which you can write.
5. Click OK.
The extension is imported and opens as an App Builder project in the App Builder.
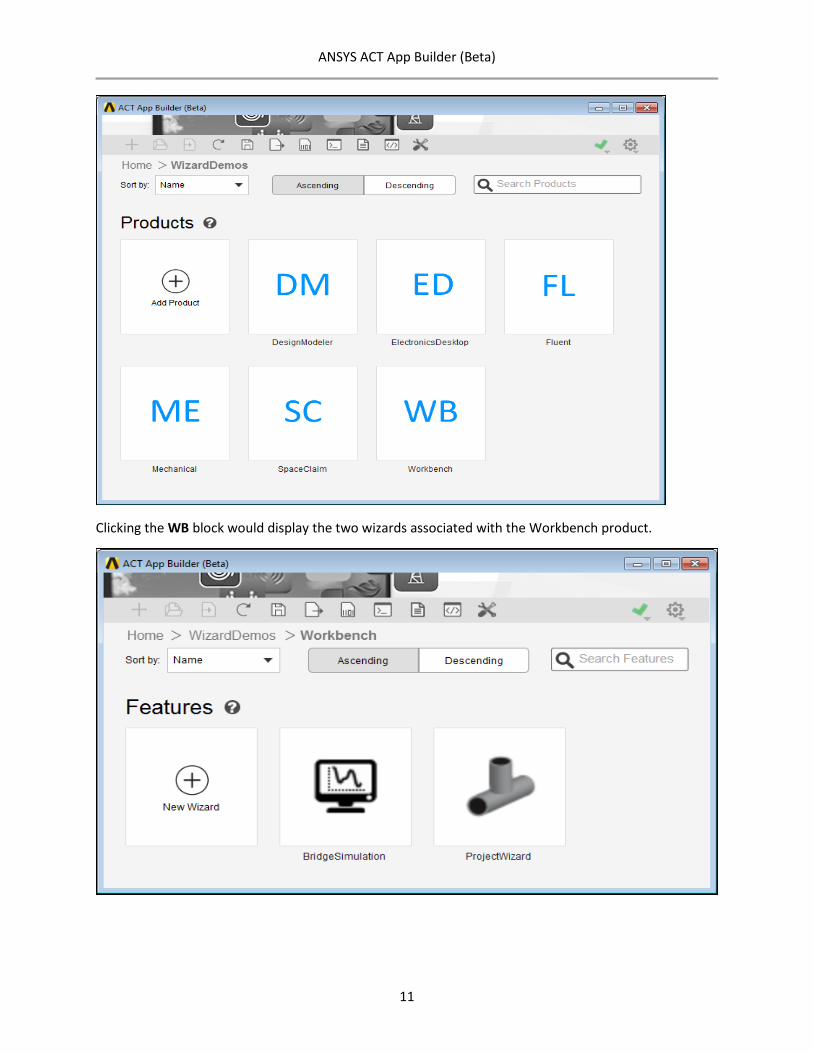
Because the supplied extension WizardDemos contains wizards that are run from various ANSYS products, it is often used for explanations. The following image shows what the second page in the App Builder looks like when this extension is imported. It has wizards associated with six different ANSYS products.
ANSYS ACT App Builder (Beta)
11
Clicking the WB block would display the two wizards associated with the Workbench product.
ANSYS ACT App Builder (Beta)
12
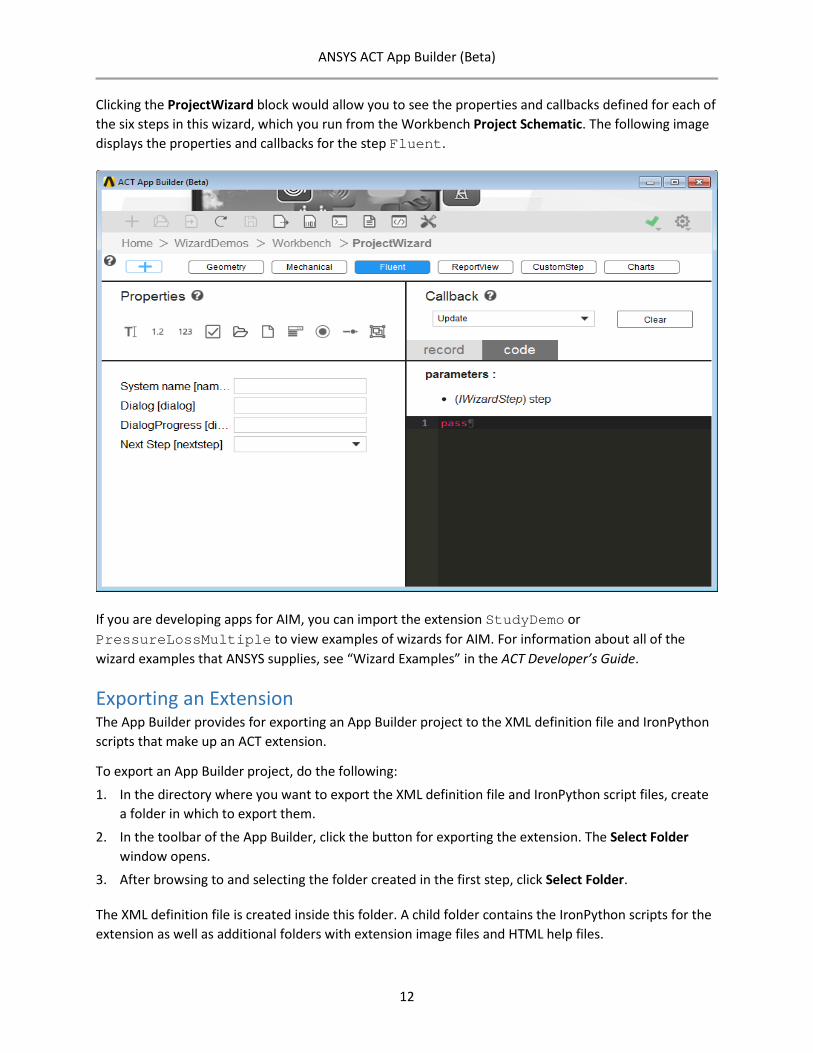
Clicking the ProjectWizard block would allow you to see the properties and callbacks defined for each of the six steps in this wizard, which you run from the Workbench Project Schematic. The following image displays the properties and callbacks for the step Fluent.
If you are developing apps for AIM, you can import the extension StudyDemo or PressureLossMultiple to view examples of wizards for AIM. For information about all of the wizard examples that ANSYS supplies, see “Wizard Examples” in the ACT Developer’s Guide.
Exporting an Extension The App Builder provides for exporting an App Builder project to the XML definition file and IronPython scripts that make up an ACT extension.
To export an App Builder project, do the following:
1. In the directory where you want to export the XML definition file and IronPython script files, create a folder in which to export them.
2. In the toolbar of the App Builder, click the button for exporting the extension. The Select Folder window opens.
3. After browsing to and selecting the folder created in the first step, click Select Folder.
The XML definition file is created inside this folder. A child folder contains the IronPython scripts for the extension as well as additional folders with extension image files and HTML help files.
ANSYS ACT App Builder (Beta)
13
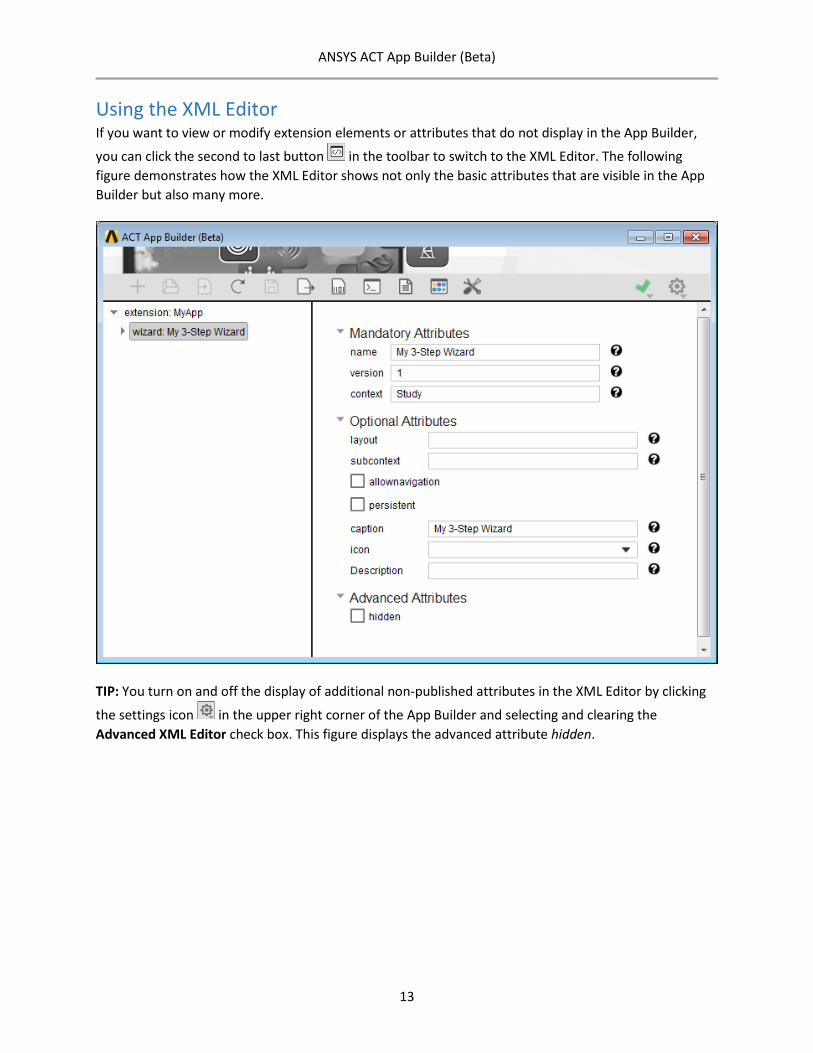
Using the XML Editor If you want to view or modify extension elements or attributes that do not display in the App Builder,
you can click the second to last button in the toolbar to switch to the XML Editor. The following figure demonstrates how the XML Editor shows not only the basic attributes that are visible in the App Builder but also many more.
TIP: You turn on and off the display of additional non-published attributes in the XML Editor by clicking
the settings icon in the upper right corner of the App Builder and selecting and clearing the Advanced XML Editor check box. This figure displays the advanced attribute hidden.
ANSYS ACT App Builder (Beta)
14
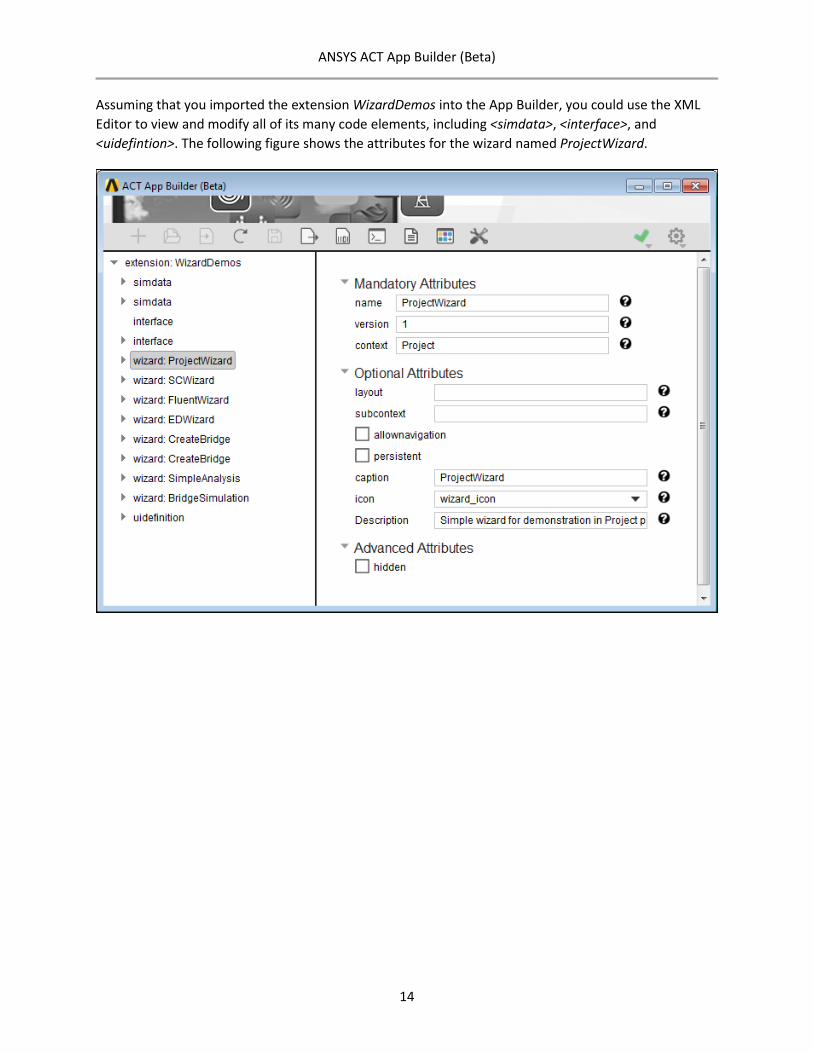
Assuming that you imported the extension WizardDemos into the App Builder, you could use the XML Editor to view and modify all of its many code elements, including <simdata>, <interface>, and <uidefintion>. The following figure shows the attributes for the wizard named ProjectWizard.
ANSYS ACT App Builder (Beta)
15
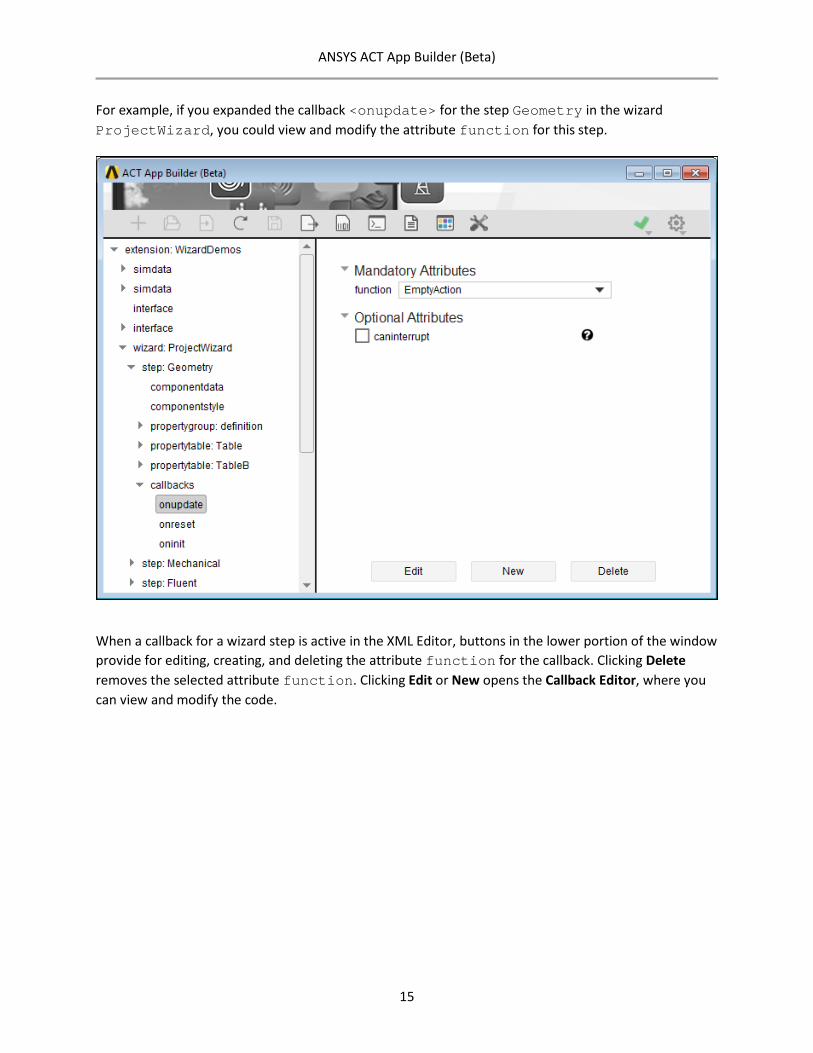
For example, if you expanded the callback <onupdate> for the step Geometry in the wizard ProjectWizard, you could view and modify the attribute function for this step.
When a callback for a wizard step is active in the XML Editor, buttons in the lower portion of the window provide for editing, creating, and deleting the attribute function for the callback. Clicking Delete removes the selected attribute function. Clicking Edit or New opens the Callback Editor, where you can view and modify the code.
ANSYS ACT App Builder (Beta)
16
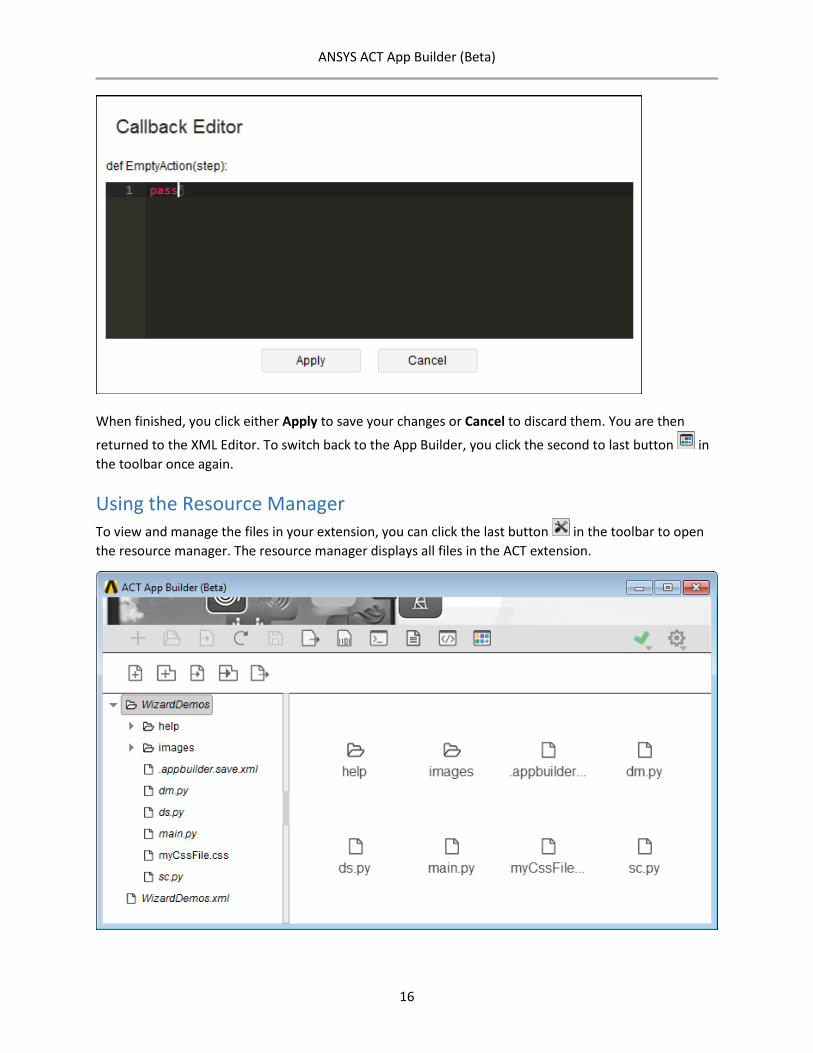
When finished, you click either Apply to save your changes or Cancel to discard them. You are then
returned to the XML Editor. To switch back to the App Builder, you click the second to last button in the toolbar once again.
Using the Resource Manager To view and manage the files in your extension, you can click the last button in the toolbar to open the resource manager. The resource manager displays all files in the ACT extension.
ANSYS ACT App Builder (Beta)
17
Folders and files managed by the App Builder display in italics to indicate that they are in use and are read-only. You cannot edit the name of the extension folder. You also cannot edit the saved App Builder project XML file or the extension’s XML definition file or IronPython scripts.
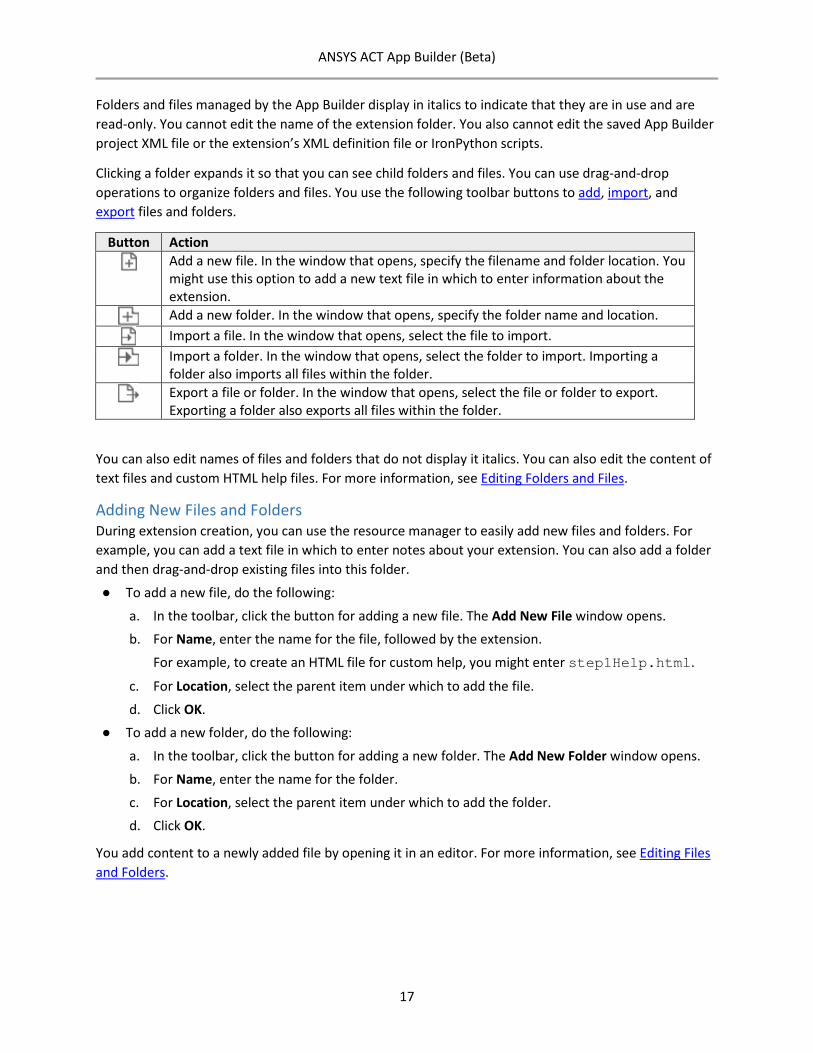
Clicking a folder expands it so that you can see child folders and files. You can use drag-and-drop operations to organize folders and files. You use the following toolbar buttons to add, import, and export files and folders.
Button Action
Add a new file. In the window that opens, specify the filename and folder location. You might use this option to add a new text file in which to enter information about the extension.
Add a new folder. In the window that opens, specify the folder name and location.
Import a file. In the window that opens, select the file to import.
Import a folder. In the window that opens, select the folder to import. Importing a folder also imports all files within the folder.
Export a file or folder. In the window that opens, select the file or folder to export. Exporting a folder also exports all files within the folder.
You can also edit names of files and folders that do not display it italics. You can also edit the content of text files and custom HTML help files. For more information, see Editing Folders and Files.
Adding New Files and Folders During extension creation, you can use the resource manager to easily add new files and folders. For example, you can add a text file in which to enter notes about your extension. You can also add a folder and then drag-and-drop existing files into this folder.
● To add a new file, do the following:
a. In the toolbar, click the button for adding a new file. The Add New File window opens. b. For Name, enter the name for the file, followed by the extension.
For example, to create an HTML file for custom help, you might enter step1Help.html.
c. For Location, select the parent item under which to add the file.
d. Click OK. ● To add a new folder, do the following:
a. In the toolbar, click the button for adding a new folder. The Add New Folder window opens.
b. For Name, enter the name for the folder.
c. For Location, select the parent item under which to add the folder. d. Click OK.
You add content to a newly added file by opening it in an editor. For more information, see Editing Files and Folders.
ANSYS ACT App Builder (Beta)
18
Importing Existing Files and Folders If files and folders for an extension exist elsewhere, you can use the resource manager to import them. For example, you can import a single image or a folder full of images in an existing extension in the current extension.
● To import a file, do the following:
a. In the toolbar, click the button for importing a file. The Import Existing File window opens. b. For Path, click Browse to navigate to and select the file that you want to import. The name of
the selected file appears for Name. You can give this file a new name if you want.
c. For Location, select the parent item under which to add the file.
d. Click OK. The file displays in the left pane after it is imported.
● To import a folder and all the files within it, do the following: a. In the toolbar, click the button for importing a folder. The Import Existing Folder window
opens.
b. For Path, click Browse to navigate to and select the folder that you want to import. The name of the selected folder appears for Name. You can give this folder a new name if you want.
c. For Location, select the parent item under which to add the folder.
d. Click OK. The folder and its files display in the left pane as they are imported.
You can edit the names of imported files and folders and edit content in certain files by opening them in an editor. For more information, see Editing Folders and Files.
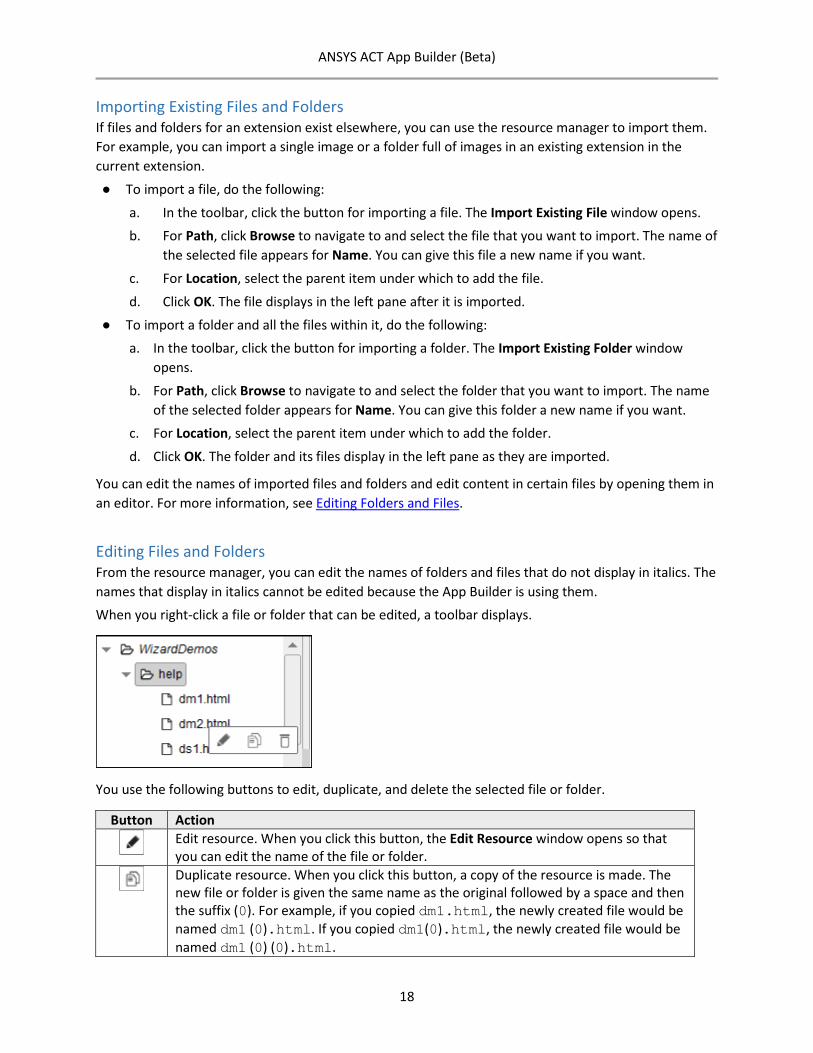
Editing Files and Folders From the resource manager, you can edit the names of folders and files that do not display in italics. The names that display in italics cannot be edited because the App Builder is using them. When you right-click a file or folder that can be edited, a toolbar displays.
You use the following buttons to edit, duplicate, and delete the selected file or folder.
Button Action
Edit resource. When you click this button, the Edit Resource window opens so that you can edit the name of the file or folder.
Duplicate resource. When you click this button, a copy of the resource is made. The new file or folder is given the same name as the original followed by a space and then the suffix (0). For example, if you copied dm1.html, the newly created file would be named dm1 (0).html. If you copied dm1(0).html, the newly created file would be named dm1 (0) (0).html.

ANSYS ACT App Builder (Beta)
19
Button Action
Delete resource. When you click this button, the Delete Resource window opens. You then confirm or cancel the deletion by clicking Yes or No.
If you select a text or HTML file, it opens in an editor in the right pane. You can then make modify the content as desired.
Exporting a Selected File or Folder From the resource manager, you can export the currently selected file or a folder. Exporting a folder exports all files in the folder.
To export the selected file or folder, do the following:
1. In the directory where you want to export a folder or file, optionally create a new destination folder.
2. Select the file or folder to export.
3. In the toolbar, click the button for exporting the selected file or folder. The Export Selected File or Folder window opens.
4. For Path, click Browse to navigate to and select the destination folder.
The name of the selected file or folder appears for Name. You can give this file or folder a new name if you want.
5. Click OK. The selected folder or file is exported to the destination directory. A message briefly appears at the top of the window once the export completes.