Embed Size (px)
Citation preview
Ansible Tower on the AWS Cloud
Quick Start Reference Deployment
Tony Vattathil
Solutions Architect, AWS Quick Start Reference Team
April 2016
Last update: November 2017 (revisions)
This guide is also available in HTML format at
https://docs.aws.amazon.com/quickstart/latest/ansible-tower/.
Amazon Web Services – Ansible Tower on the AWS Cloud November 2017
Page 2 of 35
Contents
About This Guide ................................................................................................................... 3
Quick Links ............................................................................................................................ 3
About Quick Starts ................................................................................................................. 3
Overview .................................................................................................................................... 4
Ansible Tower on AWS .......................................................................................................... 4
Cost and Licenses ................................................................................................................... 4
AWS Services.......................................................................................................................... 4
Architecture ............................................................................................................................... 5
Ansible Tower Installation ..................................................................................................... 6
Deployment Options ................................................................................................................. 7
Deployment Steps ..................................................................................................................... 7
Step 1. Prepare Your AWS Account .......................................................................................8
Step 2. Subscribe to the CentOS or RHEL AMI .................................................................. 10
Subscribing to the CentOS AMI ....................................................................................... 10
Subscribing to the RHEL AMI .......................................................................................... 11
Step 3. Launch the Quick Start ............................................................................................ 12
Step 4. Create a User Account for Ansible Tower ............................................................... 17
Step 5. Get a Trial License for Ansible Tower .................................................................... 20
Step 6. Configure and Manage EC2 Instances in Tower ..................................................... 25
Configuring Ansible Tower with EC2 Integration ........................................................... 25
Discovering and Managing EC2 Instances in Ansible Tower .......................................... 27
Adding Other Managed Instances.................................................................................... 31
Troubleshooting ...................................................................................................................... 32
Security .................................................................................................................................... 33
Additional Resources .............................................................................................................. 33
GitHub Repository .................................................................................................................. 34
Document Revisions................................................................................................................ 34

Amazon Web Services – Ansible Tower on the AWS Cloud November 2017
Page 3 of 35
About This Guide This Quick Start reference deployment guide discusses the steps for deploying and testing
Ansible Tower on the Amazon Web Services (AWS) Cloud. It provides links for viewing and
launching the AWS CloudFormation templates that automate the Ansible Tower
deployment, and creates Ansible-aware Amazon Elastic Compute Cloud (Amazon EC2)
instances. The guide also explains how you can configure Ansible Tower to pull EC2
instances and their metadata into the Ansible Tower dashboard.
The Quick Start is for IT infrastructure architects, administrators, and DevOps
professionals who are planning to implement Ansible Tower to manage their AWS compute
resources. It supports Ansible Tower version 3.x.
Quick Links The links in this section are for your convenience. Before you launch the Quick Start, please
review the architecture, configuration, and other considerations discussed in this guide.
If you have an AWS account, and you’re already familiar with AWS services and Ansible
Tower, you can launch the Quick Start to deploy Ansible into a new or existing virtual
private cloud (VPC) in your AWS account. The deployment takes approximately 20
minutes. If you’re new to AWS or Ansible Tower, please review the implementation
details and follow the step-by-step instructions provided later in this guide. Launch art
If you want to take a look under the covers, you can view the AWS CloudFormation
templates that automate the deployment. You can customize each template during
launch, or download and extend it for other projects.
About Quick Starts Quick Starts are automated reference deployments for key workloads on the AWS Cloud.
Each Quick Start launches, configures, and runs the AWS compute, network, storage, and
other services required to deploy a specific workload on AWS, using AWS best practices for
security and availability.
View template (for new VPC)
Launch (for new VPC)
Launch (for existing VPC)
View template (for existing VPC)
Amazon Web Services – Ansible Tower on the AWS Cloud November 2017
Page 4 of 35
Overview
Ansible Tower on AWS Ansible is an IT DevOps tool that automates provisioning, configuration management,
application deployment, intra-service orchestration, continuous delivery, and many other
IT processes.
Ansible is designed for multi-tier deployments. Instead of managing systems individually, it
models your IT infrastructure by describing the inter-relationships among all your systems.
Ansible Tower is a web-based user interface for Ansible. Its visual dashboard lets you
schedule and deploy Ansible playbooks, and provides centralized logging, auditing, and
system tracking.
A key advantage to Ansible over other automation engines is that it uses no agents and no
additional custom security infrastructure, which simplifies deployment. Ansible uses a very
simple, human-readable language called YAML for Ansible playbooks, to manage
configuration, deployment, and orchestration tasks. Ansible works by connecting to your
nodes and running small programs, called Ansible modules, to configure the resource for
your system. Ansible executes these modules over Secure Shell (SSH) by default, and
removes them when finished.
Cost and Licenses You are responsible for the cost of the AWS services used while running this Quick Start
reference deployment. There is no additional cost for using the Quick Start. See the pricing
pages for each AWS service you will be using for full details.
This Quick Start deploys Ansible Tower on the AWS Cloud along with the Linux Ansible
client. Ansible Tower is subject to the Ansible Software Subscription and Services
Agreement. A free trial of Ansible Tower is available for managing up to 10 hosts. After you
deploy the Quick Start, you can follow the step-by-step instructions in this guide to acquire
the 10-host trial license.
Ansible is installed as part of the Ansible Tower installation and is licensed under the GNU
General Public License version 3.
AWS Services The core AWS components used by this Quick Start include the following AWS services. (If
you are new to AWS, see Getting Started with AWS.)

Amazon Web Services – Ansible Tower on the AWS Cloud November 2017
Page 5 of 35
Amazon EC2 – The Amazon Elastic Compute Cloud (Amazon EC2) service enables you
to launch virtual machine instances with a variety of operating systems. You can choose
from existing Amazon Machine Images (AMIs) or import your own virtual machine
images.
Amazon VPC – The Amazon Virtual Private Cloud (Amazon VPC) service lets you
provision a private, isolated section of the AWS Cloud where you can launch AWS
services and other resources in a virtual network that you define. You have complete
control over your virtual networking environment, including selection of your own IP
address range, creation of subnets, and configuration of route tables and network
gateways.
AWS CloudFormation – AWS CloudFormation gives you an easy way to create and
manage a collection of related AWS resources, and provision and update them in an
orderly and predictable way. You use a template to describe all the AWS resources (for
example, EC2 instances) that you want. You don't have to individually create and
configure the resources or figure out dependencies—AWS CloudFormation handles all
of that.
IAM – AWS Identity and Access Management (IAM) enables you to securely control
access to AWS services and resources for your users. With IAM, you can centrally
manage users, security credentials such as access keys, and permissions that control
which AWS resources users can access.
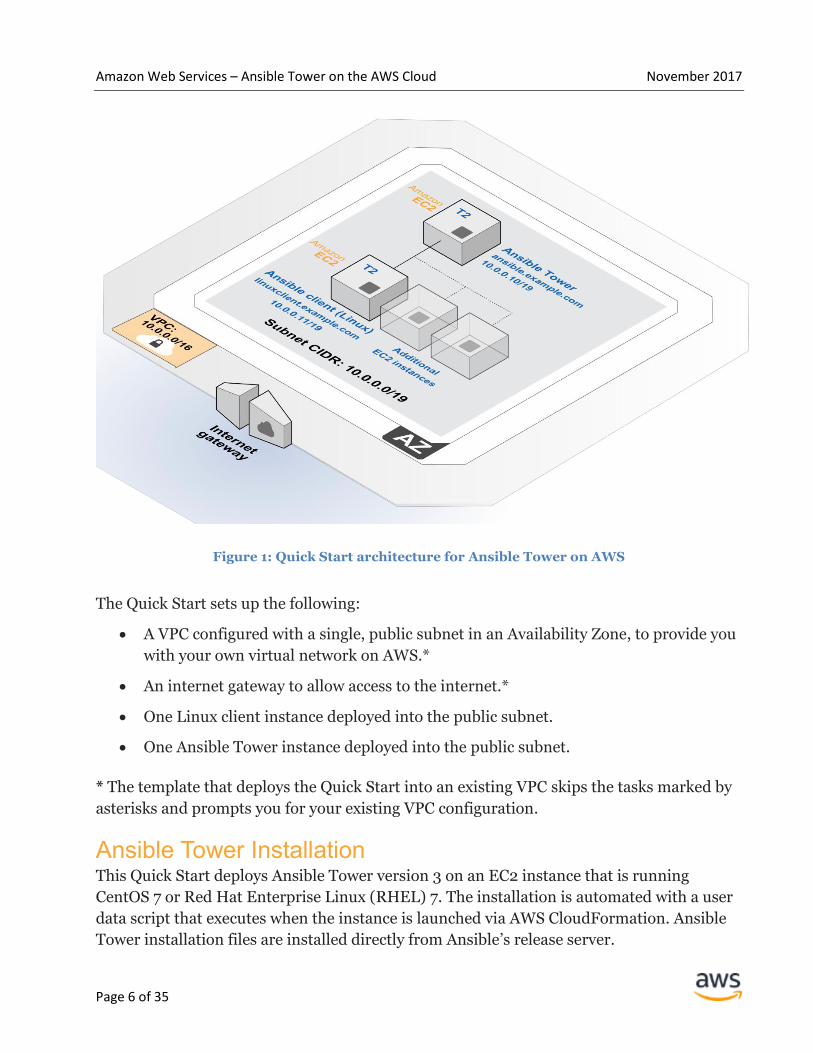
Architecture Deploying this Quick Start for a new VPC with the default parameters builds the
following environment in the AWS Cloud.
Amazon Web Services – Ansible Tower on the AWS Cloud November 2017
Page 6 of 35
Figure 1: Quick Start architecture for Ansible Tower on AWS
The Quick Start sets up the following:
A VPC configured with a single, public subnet in an Availability Zone, to provide you
with your own virtual network on AWS.*
An internet gateway to allow access to the internet.*
One Linux client instance deployed into the public subnet.
One Ansible Tower instance deployed into the public subnet.
* The template that deploys the Quick Start into an existing VPC skips the tasks marked by
asterisks and prompts you for your existing VPC configuration.
Ansible Tower Installation This Quick Start deploys Ansible Tower version 3 on an EC2 instance that is running
CentOS 7 or Red Hat Enterprise Linux (RHEL) 7. The installation is automated with a user
data script that executes when the instance is launched via AWS CloudFormation. Ansible
Tower installation files are installed directly from Ansible’s release server.
Amazon Web Services – Ansible Tower on the AWS Cloud November 2017
Page 7 of 35
In addition to installing Ansible Tower, the Quick Start also deploys a Linux client into the
VPC. The client is tagged with the key Tower. After you deploy the Quick Start, you’ll use
this key to identify and manage the client in Ansible Tower. We’ll provide step-by-step
instructions for doing that in step 6 of the deployment section.
Deployment Options This Quick Start provides two deployment options:
Deploy Ansible Tower into a new VPC (end-to-end deployment). This option
builds a new AWS environment consisting of the VPC, subnets, NAT gateways,
security groups, and other infrastructure components, and then deploys Ansible
Tower into that new VPC.
Deploy Ansible Tower into an existing VPC. This option provisions Ansible
Tower in your existing AWS infrastructure.
The Quick Start provides separate templates for these options. It also lets you configure
additional settings such as CIDR blocks and instance types, as discussed later in this guide.
Deployment Steps The procedure for deploying and testing Ansible Tower on AWS consists of the following
steps. For detailed instructions, follow the links for each step.
Step 1. Prepare an AWS account
This involves signing up for an AWS account, choosing a region, creating a key pair, and
requesting increases for account limits, if necessary.
Step 2. Subscribe to the CentOS or RHEL AMI
You’ll need to subscribe to the CentOS or RHEL AMI from the AWS Marketplace before
you launch the Quick Start.
Step 3. Launch the Quick Start
In this step, you’ll launch the AWS CloudFormation template into your AWS account,
specify parameter values, and create the stack. The Quick Start provides separate
templates for end-to-end deployment and deployment into an existing VPC.
Step 4. Create a user account
Create a user account for Ansible Tower, and assign it the IAM PowerUserAccess
policy. Alternatively, you can use an existing administrator account.

Amazon Web Services – Ansible Tower on the AWS Cloud November 2017
Page 8 of 35
Step 5. Get an Ansible Tower trial license
Connect to your Ansible Tower via a web browser and follow the steps to license Ansible
Tower.
Step 6. Configure and manage EC2 instances in Ansible Tower
Configure Ansible Tower with EC2 integration, integrate AWS compute resources into
the Ansible Tower inventory, and add other managed instances that you can view and
configure in Ansible Tower.
Step 1. Prepare Your AWS Account
1. If you don’t already have an AWS account, create one at https://aws.amazon.com by
following the on-screen instructions. Part of the sign-up process involves receiving a
phone call and entering a PIN using the phone keypad.
2. Use the region selector in the navigation bar to choose the AWS Region where you want
to deploy Ansible Tower on AWS.
Amazon EC2 locations are composed of Regions and Availability Zones. Regions are
dispersed and located in separate geographic areas. We recommend that you check the
availability of AWS services before you choose a region. Otherwise, deployment will fail.
Figure 2: Choosing an AWS Region
Tip Consider choosing a region closest to your data center or corporate network to
reduce network latency between systems running on AWS and the systems and users
on your corporate network.
Amazon Web Services – Ansible Tower on the AWS Cloud November 2017
Page 9 of 35
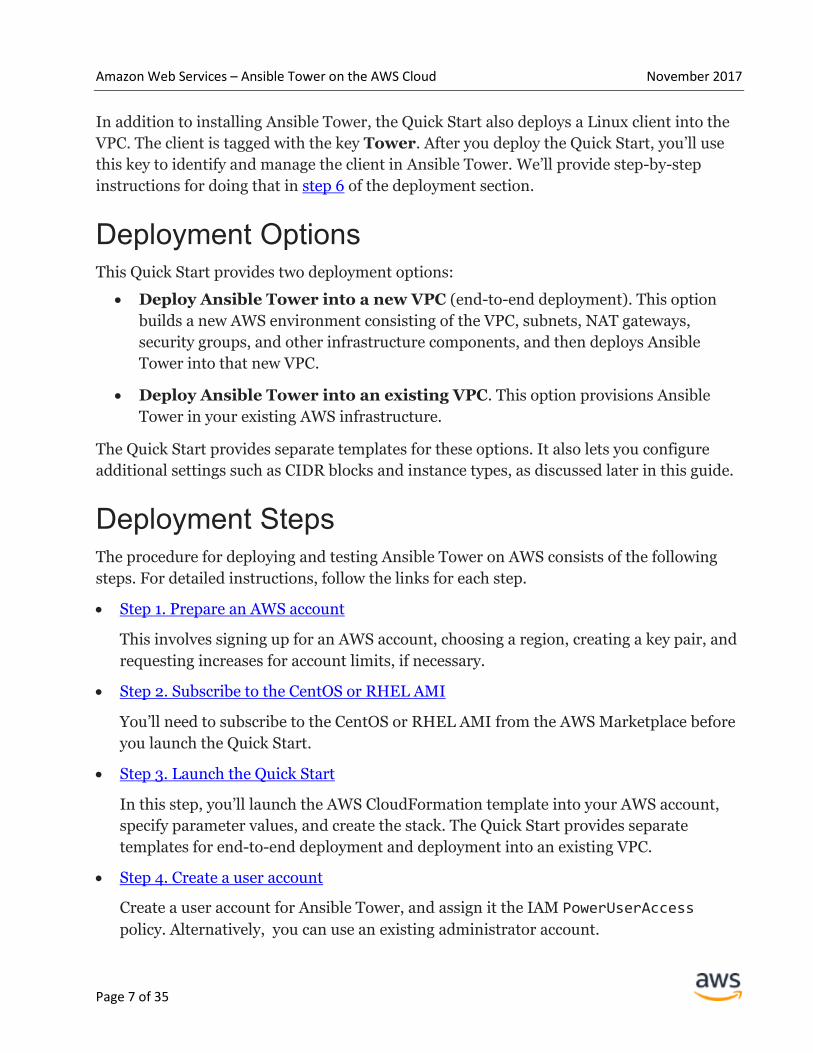
3. Create a key pair in your preferred region. To do this, in the navigation pane of the
Amazon EC2 console, choose Key Pairs, Create Key Pair, type a name, and then
choose Create.
Figure 3: Creating a key pair
Amazon EC2 uses public-key cryptography to encrypt and decrypt login information. To
be able to log in to your instances, you must create a key pair. On Linux, we use the key
pair to authenticate SSH login.
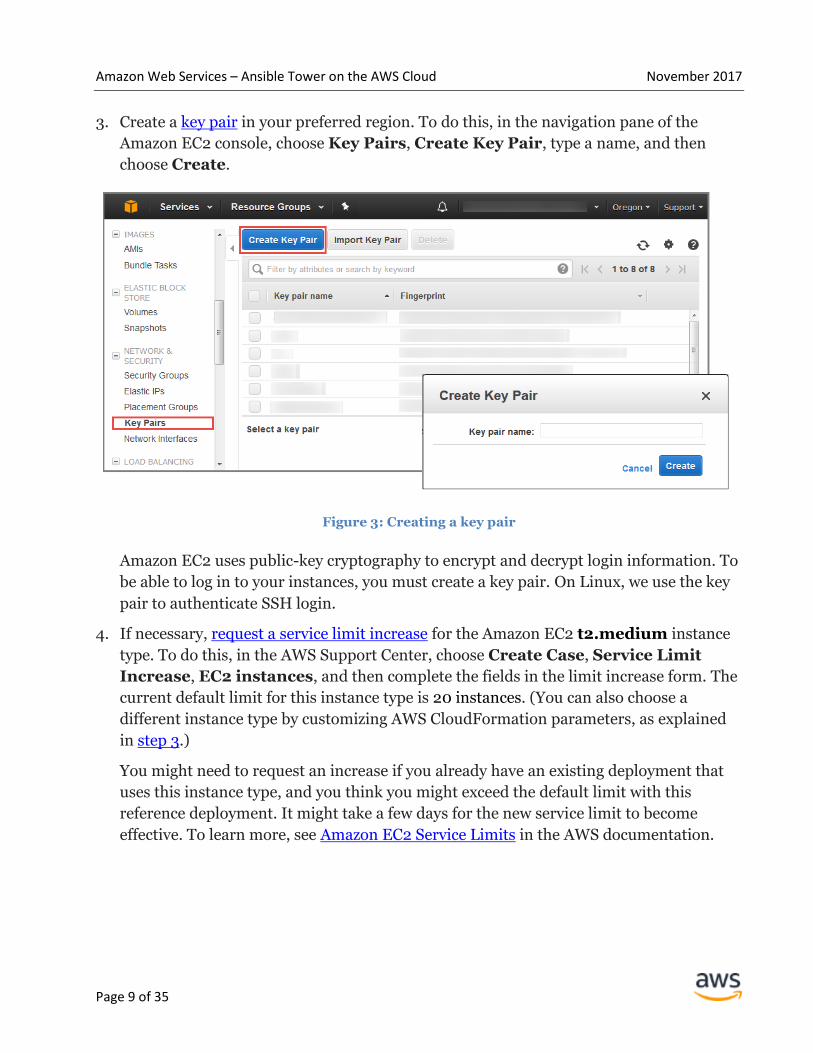
4. If necessary, request a service limit increase for the Amazon EC2 t2.medium instance
type. To do this, in the AWS Support Center, choose Create Case, Service Limit
Increase, EC2 instances, and then complete the fields in the limit increase form. The
current default limit for this instance type is 20 instances. (You can also choose a
different instance type by customizing AWS CloudFormation parameters, as explained
in step 3.)
You might need to request an increase if you already have an existing deployment that
uses this instance type, and you think you might exceed the default limit with this
reference deployment. It might take a few days for the new service limit to become
effective. To learn more, see Amazon EC2 Service Limits in the AWS documentation.
Amazon Web Services – Ansible Tower on the AWS Cloud November 2017
Page 10 of 35
Figure 4: Requesting a service limit increase
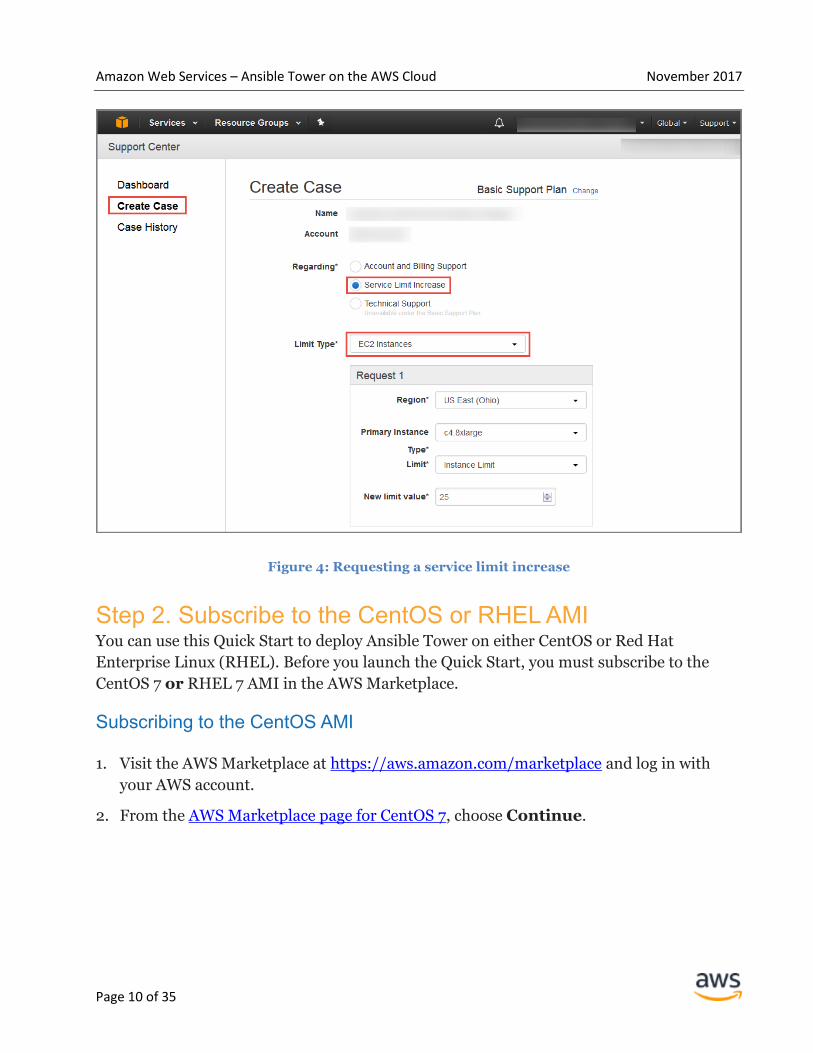
Step 2. Subscribe to the CentOS or RHEL AMI You can use this Quick Start to deploy Ansible Tower on either CentOS or Red Hat
Enterprise Linux (RHEL). Before you launch the Quick Start, you must subscribe to the
CentOS 7 or RHEL 7 AMI in the AWS Marketplace.
Subscribing to the CentOS AMI
1. Visit the AWS Marketplace at https://aws.amazon.com/marketplace and log in with
your AWS account.
2. From the AWS Marketplace page for CentOS 7, choose Continue.
Amazon Web Services – Ansible Tower on the AWS Cloud November 2017
Page 11 of 35
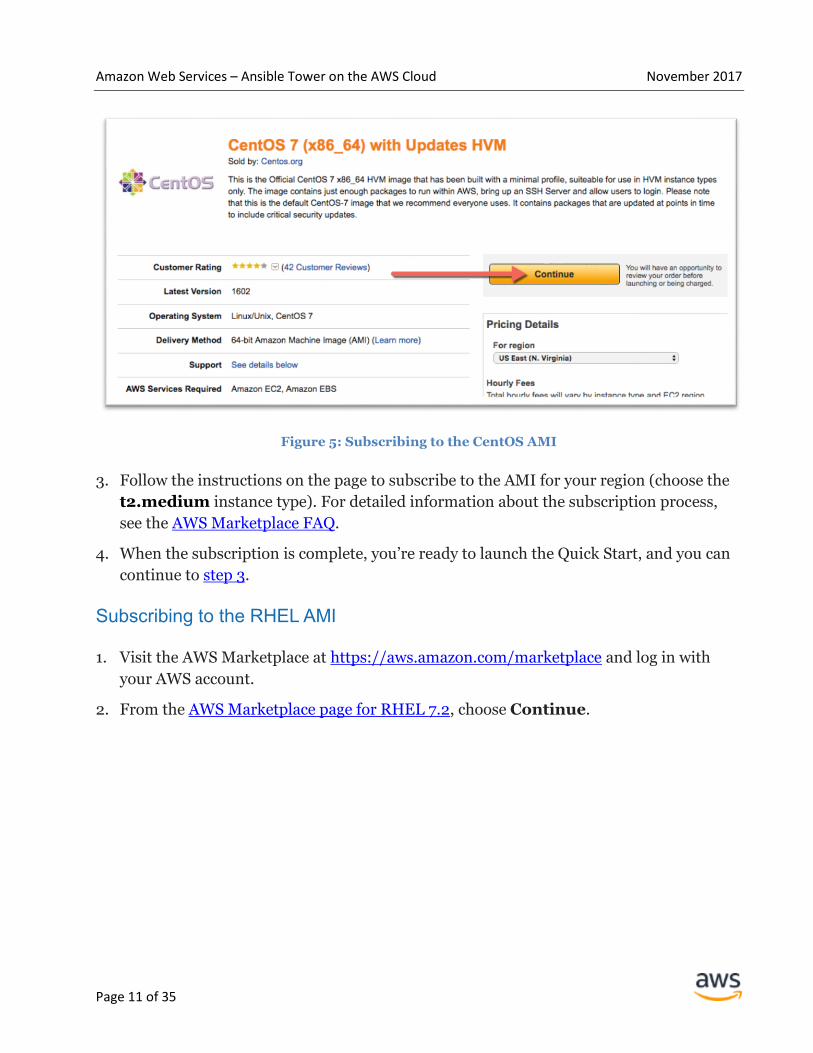
Figure 5: Subscribing to the CentOS AMI
3. Follow the instructions on the page to subscribe to the AMI for your region (choose the
t2.medium instance type). For detailed information about the subscription process,
see the AWS Marketplace FAQ.
4. When the subscription is complete, you’re ready to launch the Quick Start, and you can
continue to step 3.
Subscribing to the RHEL AMI
1. Visit the AWS Marketplace at https://aws.amazon.com/marketplace and log in with
your AWS account.
2. From the AWS Marketplace page for RHEL 7.2, choose Continue.
Amazon Web Services – Ansible Tower on the AWS Cloud November 2017
Page 12 of 35
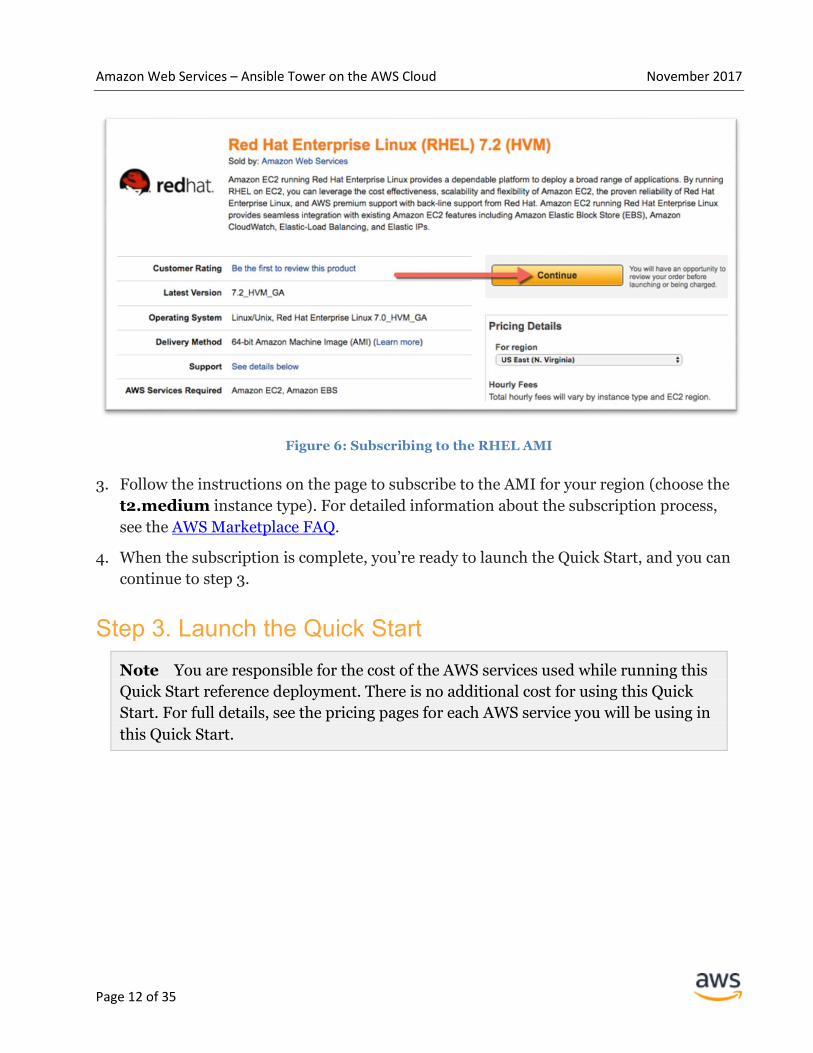
Figure 6: Subscribing to the RHEL AMI
3. Follow the instructions on the page to subscribe to the AMI for your region (choose the
t2.medium instance type). For detailed information about the subscription process,
see the AWS Marketplace FAQ.
4. When the subscription is complete, you’re ready to launch the Quick Start, and you can
continue to step 3.
Step 3. Launch the Quick Start
Note You are responsible for the cost of the AWS services used while running this
Quick Start reference deployment. There is no additional cost for using this Quick
Start. For full details, see the pricing pages for each AWS service you will be using in
this Quick Start.
Amazon Web Services – Ansible Tower on the AWS Cloud November 2017
Page 13 of 35
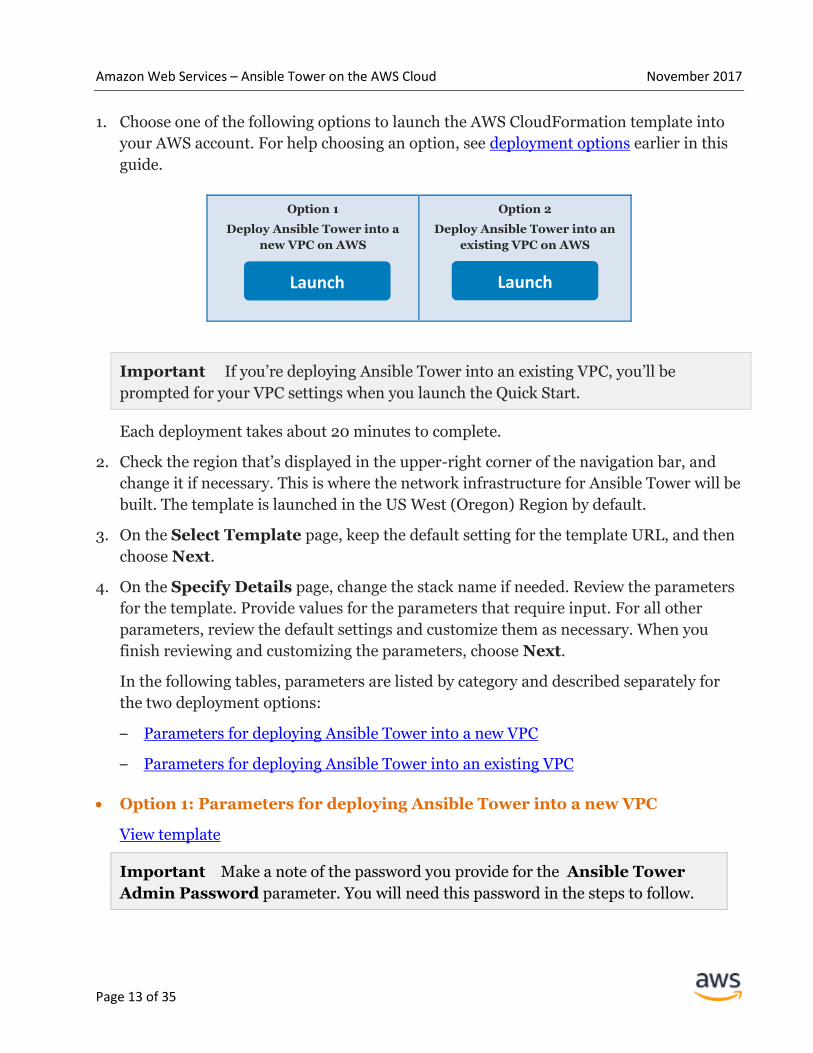
1. Choose one of the following options to launch the AWS CloudFormation template into
your AWS account. For help choosing an option, see deployment options earlier in this
guide.
Option 1
Deploy Ansible Tower into a
new VPC on AWS
Option 2
Deploy Ansible Tower into an
existing VPC on AWS
Important If you’re deploying Ansible Tower into an existing VPC, you’ll be
prompted for your VPC settings when you launch the Quick Start.
Each deployment takes about 20 minutes to complete.
2. Check the region that’s displayed in the upper-right corner of the navigation bar, and
change it if necessary. This is where the network infrastructure for Ansible Tower will be
built. The template is launched in the US West (Oregon) Region by default.
3. On the Select Template page, keep the default setting for the template URL, and then
choose Next.
4. On the Specify Details page, change the stack name if needed. Review the parameters
for the template. Provide values for the parameters that require input. For all other
parameters, review the default settings and customize them as necessary. When you
finish reviewing and customizing the parameters, choose Next.
In the following tables, parameters are listed by category and described separately for
the two deployment options:
– Parameters for deploying Ansible Tower into a new VPC
– Parameters for deploying Ansible Tower into an existing VPC
Option 1: Parameters for deploying Ansible Tower into a new VPC
View template
Important Make a note of the password you provide for the Ansible Tower
Admin Password parameter. You will need this password in the steps to follow.
Launch Launch
Amazon Web Services – Ansible Tower on the AWS Cloud November 2017
Page 14 of 35
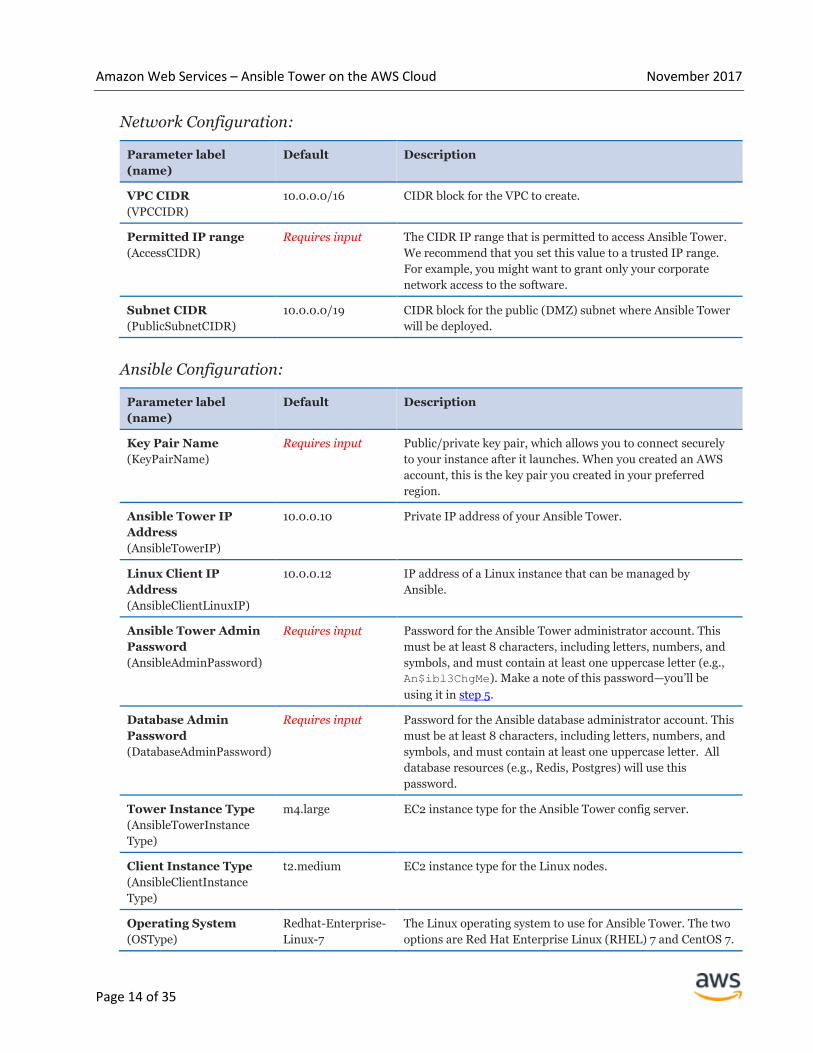
Network Configuration:
Parameter label
(name)
Default Description
VPC CIDR
(VPCCIDR)
10.0.0.0/16 CIDR block for the VPC to create.
Permitted IP range
(AccessCIDR)
Requires input The CIDR IP range that is permitted to access Ansible Tower.
We recommend that you set this value to a trusted IP range.
For example, you might want to grant only your corporate
network access to the software.
Subnet CIDR
(PublicSubnetCIDR)
10.0.0.0/19 CIDR block for the public (DMZ) subnet where Ansible Tower
will be deployed.
Ansible Configuration:
Parameter label
(name)
Default Description
Key Pair Name
(KeyPairName)
Requires input Public/private key pair, which allows you to connect securely
to your instance after it launches. When you created an AWS
account, this is the key pair you created in your preferred
region.
Ansible Tower IP
Address
(AnsibleTowerIP)
10.0.0.10 Private IP address of your Ansible Tower.
Linux Client IP
Address
(AnsibleClientLinuxIP)
10.0.0.12 IP address of a Linux instance that can be managed by
Ansible.
Ansible Tower Admin
Password
(AnsibleAdminPassword)
Requires input Password for the Ansible Tower administrator account. This
must be at least 8 characters, including letters, numbers, and
symbols, and must contain at least one uppercase letter (e.g.,
An$ibl3ChgMe). Make a note of this password—you’ll be
using it in step 5.
Database Admin
Password
(DatabaseAdminPassword)
Requires input Password for the Ansible database administrator account. This
must be at least 8 characters, including letters, numbers, and
symbols, and must contain at least one uppercase letter. All
database resources (e.g., Redis, Postgres) will use this
password.
Tower Instance Type
(AnsibleTowerInstance
Type)
m4.large EC2 instance type for the Ansible Tower config server.
Client Instance Type
(AnsibleClientInstance
Type)
t2.medium EC2 instance type for the Linux nodes.
Operating System
(OSType)
Redhat-Enterprise-
Linux-7
The Linux operating system to use for Ansible Tower. The two
options are Red Hat Enterprise Linux (RHEL) 7 and CentOS 7.
Amazon Web Services – Ansible Tower on the AWS Cloud November 2017
Page 15 of 35
AWS Quick Start Configuration:
Parameter label
(name)
Default Description
Quick Start S3 Bucket
Name
(QSS3BucketName)
aws-quickstart S3 bucket where the Quick Start templates and scripts are
installed. Use this parameter to specify the S3 bucket name
you’ve created for your copy of Quick Start assets, if you decide
to customize or extend the Quick Start for your own use. The
bucket name can include numbers, lowercase letters,
uppercase letters, and hyphens, but should not start or end
with a hyphen.
Quick Start S3 Key
Prefix
(QSS3KeyPrefix)
quickstart-redhat-
ansible/
The S3 key name prefix used to simulate a folder for your copy
of Quick Start assets, if you decide to customize or extend the
Quick Start for your own use. This prefix can include numbers,
lowercase letters, uppercase letters, hyphens, and forward
slashes, but should not start or end with a forward slash
(which is automatically added).
Option 2: Parameters for deploying Ansible Tower into an existing VPC
View template
Network Configuration:
Parameter label
(name)
Default Description
VPC CIDR
(VPCCIDR)
172.31.0.0/16 The CIDR block for your existing VPC (e.g., 10.0.0.0/16).
Permitted IP range
(AccessCIDR)
Requires input The CIDR IP range that is permitted to access Ansible Tower.
We recommend that you set this value to a trusted IP range.
For example, you might want to grant only your corporate
network access to the software.
Subnet ID
(SubnetID)
Requires input ID of the public subnet in your existing VPC where Ansible
Tower will be deployed (e.g., subnet-b58c3d67).
VPC ID
(VPCID)
Requires input ID of your existing VPC where Ansible Tower will be
deployed (e.g., vpc-0343606e).
Ansible Configuration:
Parameter label
(name)
Default Description
Key Pair Name
(KeyPairName)
Requires input Public/private key pair, which allows you to connect securely
to your instance after it launches. When you created an AWS
account, this is the key pair you created in your preferred
region.
Amazon Web Services – Ansible Tower on the AWS Cloud November 2017
Page 16 of 35
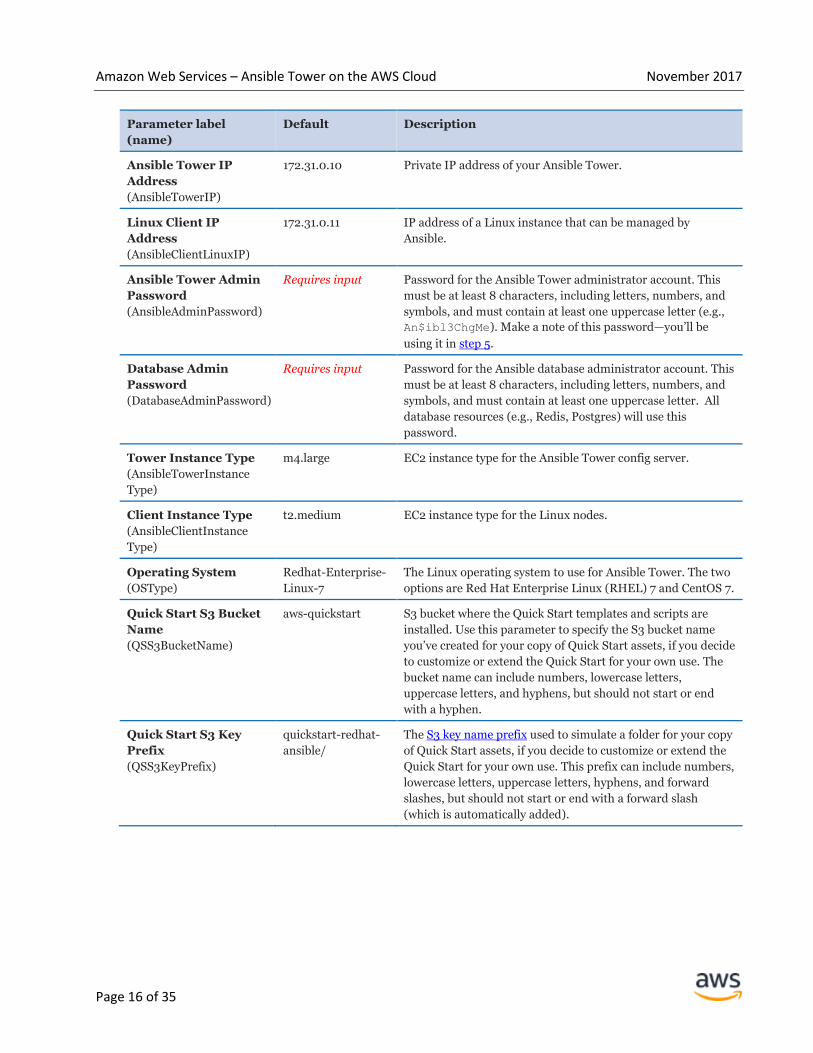
Parameter label
(name)
Default Description
Ansible Tower IP
Address
(AnsibleTowerIP)
172.31.0.10 Private IP address of your Ansible Tower.
Linux Client IP
Address
(AnsibleClientLinuxIP)
172.31.0.11 IP address of a Linux instance that can be managed by
Ansible.
Ansible Tower Admin
Password
(AnsibleAdminPassword)
Requires input Password for the Ansible Tower administrator account. This
must be at least 8 characters, including letters, numbers, and
symbols, and must contain at least one uppercase letter (e.g.,
An$ibl3ChgMe). Make a note of this password—you’ll be
using it in step 5.
Database Admin
Password
(DatabaseAdminPassword)
Requires input Password for the Ansible database administrator account. This
must be at least 8 characters, including letters, numbers, and
symbols, and must contain at least one uppercase letter. All
database resources (e.g., Redis, Postgres) will use this
password.
Tower Instance Type
(AnsibleTowerInstance
Type)
m4.large EC2 instance type for the Ansible Tower config server.
Client Instance Type
(AnsibleClientInstance
Type)
t2.medium EC2 instance type for the Linux nodes.
Operating System
(OSType)
Redhat-Enterprise-
Linux-7
The Linux operating system to use for Ansible Tower. The two
options are Red Hat Enterprise Linux (RHEL) 7 and CentOS 7.
Quick Start S3 Bucket
Name
(QSS3BucketName)
aws-quickstart S3 bucket where the Quick Start templates and scripts are
installed. Use this parameter to specify the S3 bucket name
you’ve created for your copy of Quick Start assets, if you decide
to customize or extend the Quick Start for your own use. The
bucket name can include numbers, lowercase letters,
uppercase letters, and hyphens, but should not start or end
with a hyphen.
Quick Start S3 Key
Prefix
(QSS3KeyPrefix)
quickstart-redhat-
ansible/
The S3 key name prefix used to simulate a folder for your copy
of Quick Start assets, if you decide to customize or extend the
Quick Start for your own use. This prefix can include numbers,
lowercase letters, uppercase letters, hyphens, and forward
slashes, but should not start or end with a forward slash
(which is automatically added).

Amazon Web Services – Ansible Tower on the AWS Cloud November 2017
Page 17 of 35
5. On the Options page, you can specify tags (key-value pairs) for resources in your stack
and set additional options. When you’re done, choose Next.
6. On the Review page, review and confirm the settings. Under Capabilities, select the
check box to acknowledge that the template will create IAM resources.
7. Choose Create to deploy the stack.
8. Monitor the status of the stack. When the status is CREATE_COMPLETE, the Ansible
Tower stack is ready. The IP address is displayed in the Outputs tab for the stack, as
shown later in Figure 11.
Important We recommend that you update the passwords for the administrator
and database administrator accounts in accordance with your IT standards after
stack creation is complete.
Step 4. Create a User Account for Ansible Tower
Let’s create a new user called ansibleadm for Ansible Tower. This is an optional step—you
can use an existing user account instead, if that account has the proper privileges. (At a
minimum, you’ll need read-only access to EC2 instances to pull in metadata.)
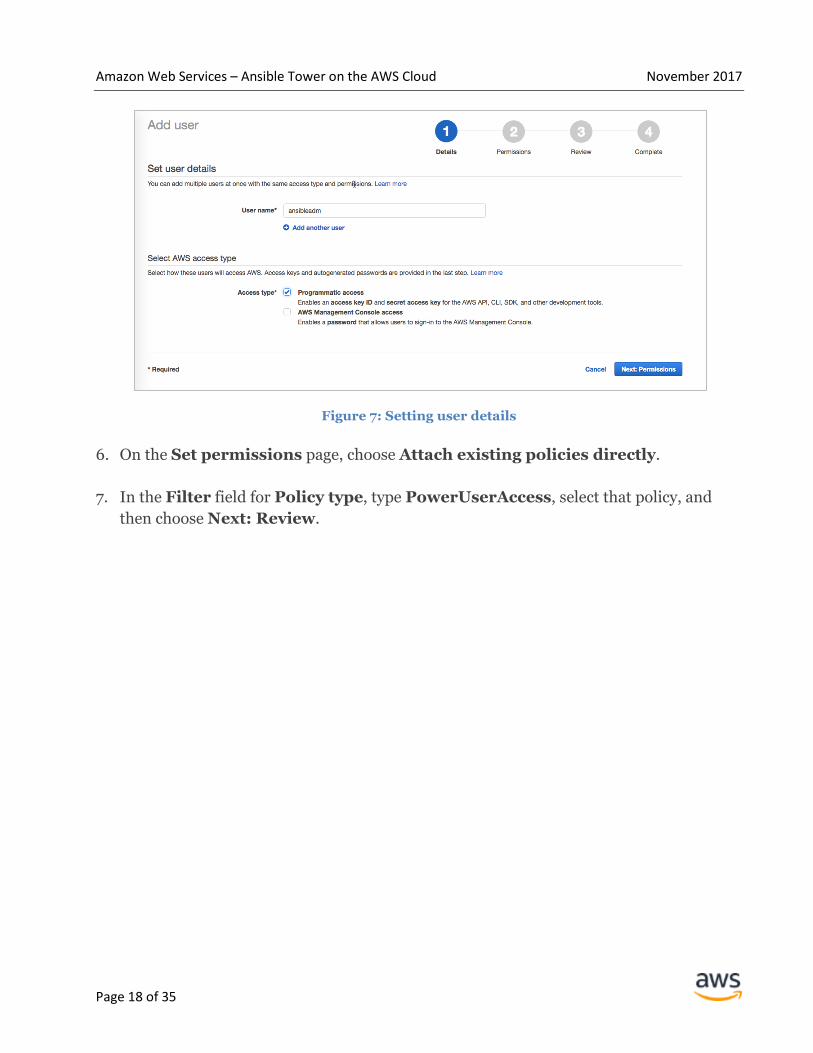
1. Open the IAM console at https://console.aws.amazon.com/iam/.
2. In the navigation pane, choose Users, and then choose Add user.
3. For the user name, type ansibleadmin.
4. For Access type, select Programmatic access.
5. Choose Next: Permissions.
Amazon Web Services – Ansible Tower on the AWS Cloud November 2017
Page 18 of 35
Figure 7: Setting user details
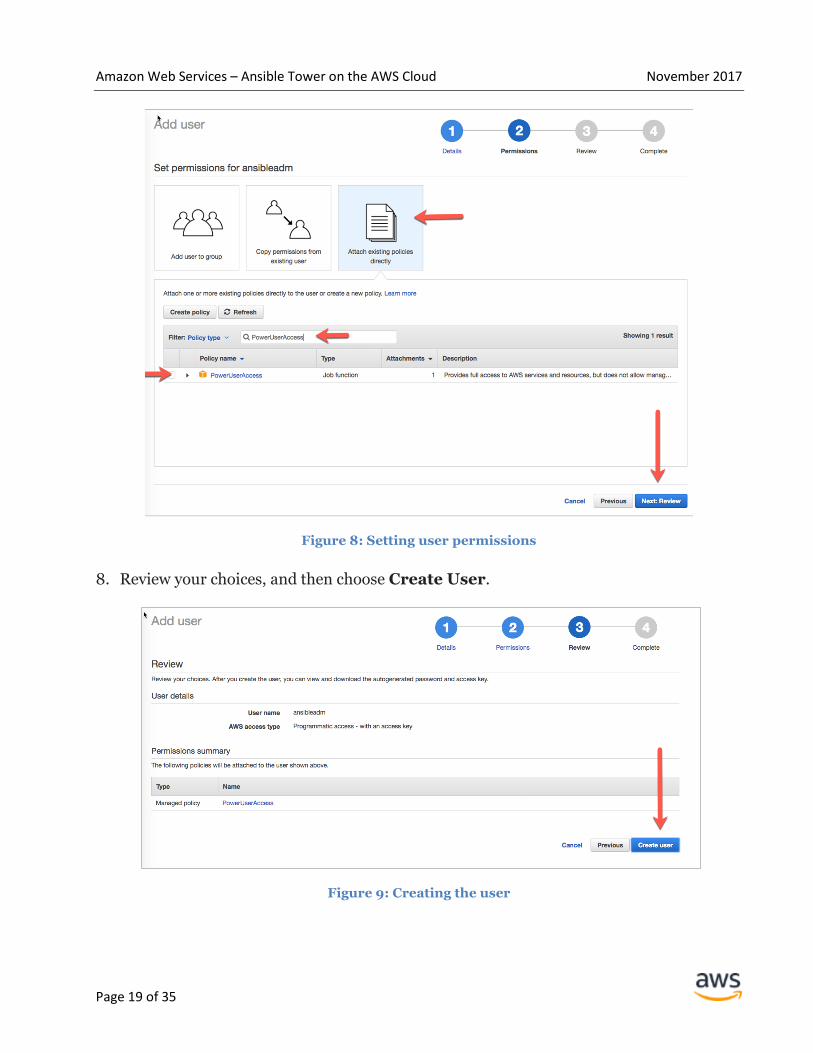
6. On the Set permissions page, choose Attach existing policies directly.
7. In the Filter field for Policy type, type PowerUserAccess, select that policy, and
then choose Next: Review.
Amazon Web Services – Ansible Tower on the AWS Cloud November 2017
Page 19 of 35
Figure 8: Setting user permissions
8. Review your choices, and then choose Create User.
Figure 9: Creating the user
Amazon Web Services – Ansible Tower on the AWS Cloud November 2017
Page 20 of 35
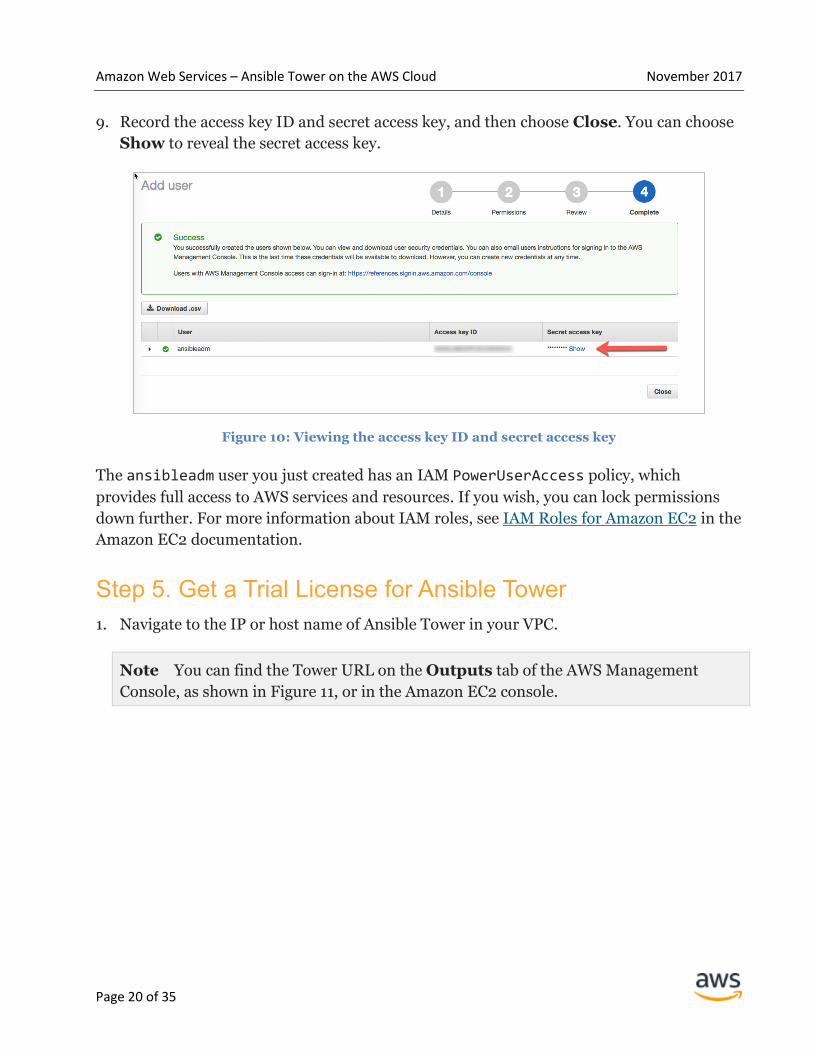
9. Record the access key ID and secret access key, and then choose Close. You can choose
Show to reveal the secret access key.
Figure 10: Viewing the access key ID and secret access key
The ansibleadm user you just created has an IAM PowerUserAccess policy, which
provides full access to AWS services and resources. If you wish, you can lock permissions
down further. For more information about IAM roles, see IAM Roles for Amazon EC2 in the
Amazon EC2 documentation.
Step 5. Get a Trial License for Ansible Tower
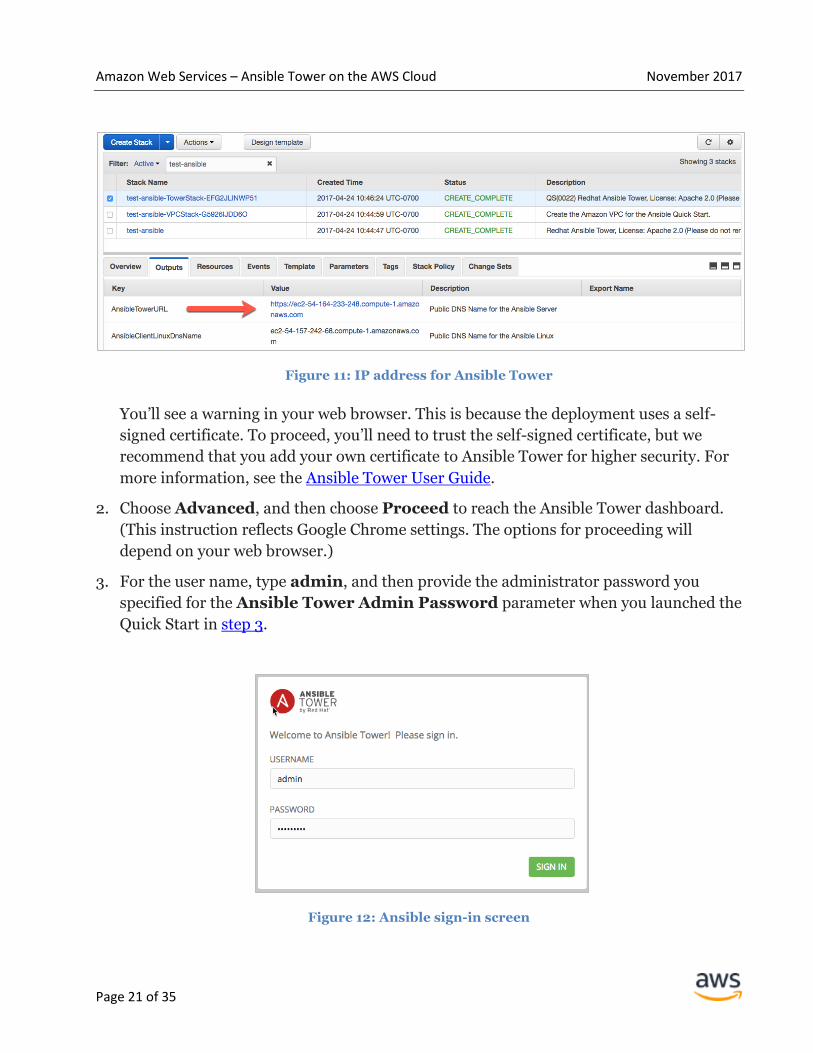
1. Navigate to the IP or host name of Ansible Tower in your VPC.
Note You can find the Tower URL on the Outputs tab of the AWS Management
Console, as shown in Figure 11, or in the Amazon EC2 console.
Amazon Web Services – Ansible Tower on the AWS Cloud November 2017
Page 21 of 35
Figure 11: IP address for Ansible Tower
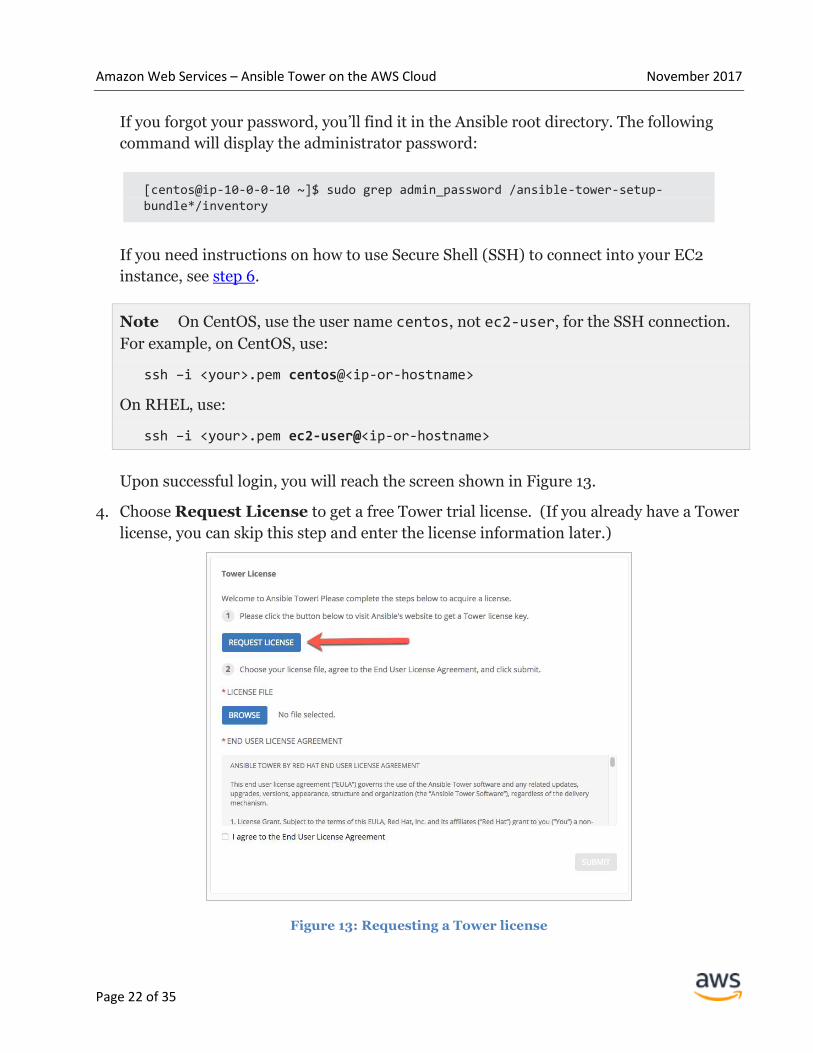
You’ll see a warning in your web browser. This is because the deployment uses a self-
signed certificate. To proceed, you’ll need to trust the self-signed certificate, but we
recommend that you add your own certificate to Ansible Tower for higher security. For
more information, see the Ansible Tower User Guide.
2. Choose Advanced, and then choose Proceed to reach the Ansible Tower dashboard.
(This instruction reflects Google Chrome settings. The options for proceeding will
depend on your web browser.)
3. For the user name, type admin, and then provide the administrator password you
specified for the Ansible Tower Admin Password parameter when you launched the
Quick Start in step 3.
Figure 12: Ansible sign-in screen
Amazon Web Services – Ansible Tower on the AWS Cloud November 2017
Page 22 of 35
If you forgot your password, you’ll find it in the Ansible root directory. The following
command will display the administrator password:
[centos@ip-10-0-0-10 ~]$ sudo grep admin_password /ansible-tower-setup-bundle*/inventory
If you need instructions on how to use Secure Shell (SSH) to connect into your EC2
instance, see step 6.
Note On CentOS, use the user name centos, not ec2-user, for the SSH connection.
For example, on CentOS, use:
ssh –i <your>.pem centos@<ip-or-hostname>
On RHEL, use:
ssh –i <your>.pem ec2-user@<ip-or-hostname>
Upon successful login, you will reach the screen shown in Figure 13.
4. Choose Request License to get a free Tower trial license. (If you already have a Tower
license, you can skip this step and enter the license information later.)
Figure 13: Requesting a Tower license

Amazon Web Services – Ansible Tower on the AWS Cloud November 2017
Page 23 of 35
5. Choose the (10-node) free trial option, enter the information requested, and then choose
Submit.
Figure 14: Selecting the free trial for Ansible Tower
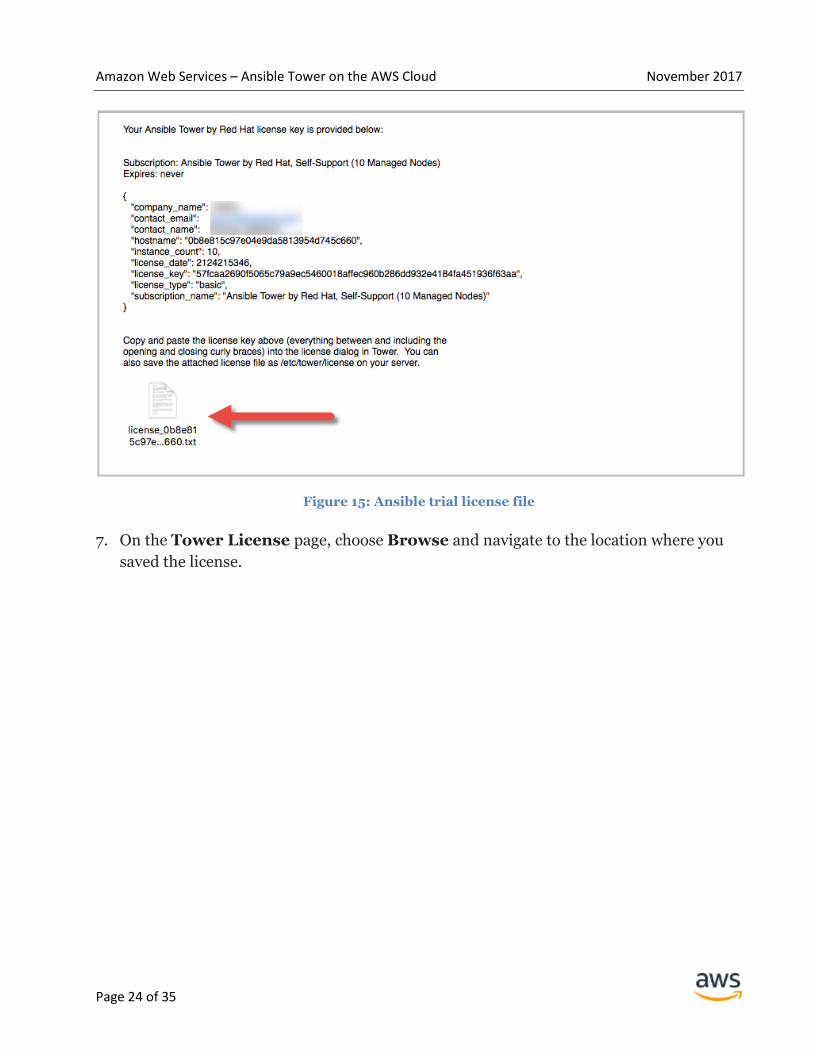
Ansible will send a trial license file similar to that shown in Figure 15 to your email
account.
6. Save the license file to your workstation.
Amazon Web Services – Ansible Tower on the AWS Cloud November 2017
Page 24 of 35
Figure 15: Ansible trial license file
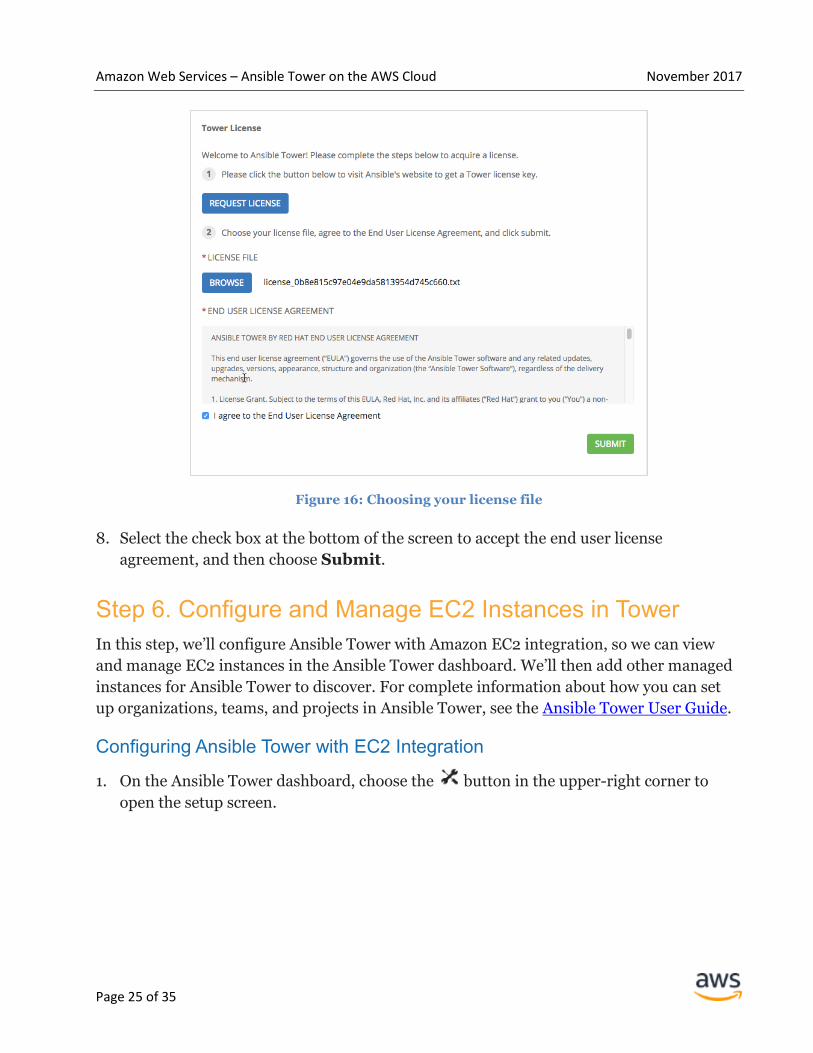
7. On the Tower License page, choose Browse and navigate to the location where you
saved the license.
Amazon Web Services – Ansible Tower on the AWS Cloud November 2017
Page 25 of 35
Figure 16: Choosing your license file
8. Select the check box at the bottom of the screen to accept the end user license
agreement, and then choose Submit.
Step 6. Configure and Manage EC2 Instances in Tower
In this step, we’ll configure Ansible Tower with Amazon EC2 integration, so we can view
and manage EC2 instances in the Ansible Tower dashboard. We’ll then add other managed
instances for Ansible Tower to discover. For complete information about how you can set
up organizations, teams, and projects in Ansible Tower, see the Ansible Tower User Guide.
Configuring Ansible Tower with EC2 Integration
1. On the Ansible Tower dashboard, choose the button in the upper-right corner to
open the setup screen.

Amazon Web Services – Ansible Tower on the AWS Cloud November 2017
Page 26 of 35
Figure 17: Ansible Tower dashboard
2. In the upper right, choose the gear icon, and then choose Credentials. Choose Add.
3. Enter the credential details as shown in Figure 18:
a. Provide a Name and Description.
b. Select your organization.
c. For Type, select Amazon Web Services.
d. Enter your Access Key and Secret Key.
e. Choose Save.

Amazon Web Services – Ansible Tower on the AWS Cloud November 2017
Page 27 of 35
Figure 18: Creating a credential in Ansible Tower
Discovering and Managing EC2 Instances in Ansible Tower
In Ansible, a collection of hosts that you can launch tasks against is called an inventory.
Inventories consist of sources, which contain specific hosts (systems, nodes, or instances).
For detailed information about these concepts, see the Ansible Tower User Guide.
1. On the Ansible Tower navigation bar, chooose Inventories.
2. On the New Inventory screen, provide a name (for example, AWS INVENTORY) and a
description for the inventory, and then choose Save.
Figure 19: Creating an inventory
Amazon Web Services – Ansible Tower on the AWS Cloud November 2017
Page 28 of 35
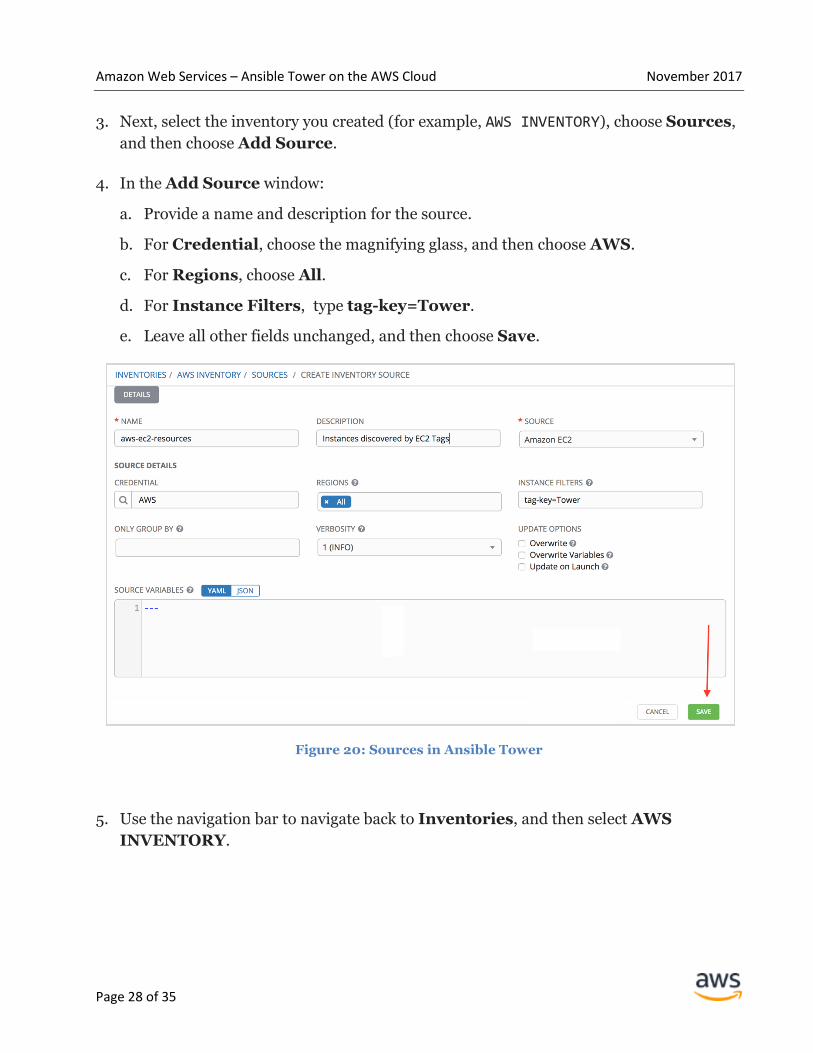
3. Next, select the inventory you created (for example, AWS INVENTORY), choose Sources,
and then choose Add Source.
4. In the Add Source window:
a. Provide a name and description for the source.
b. For Credential, choose the magnifying glass, and then choose AWS.
c. For Regions, choose All.
d. For Instance Filters, type tag-key=Tower.
e. Leave all other fields unchanged, and then choose Save.
Figure 20: Sources in Ansible Tower
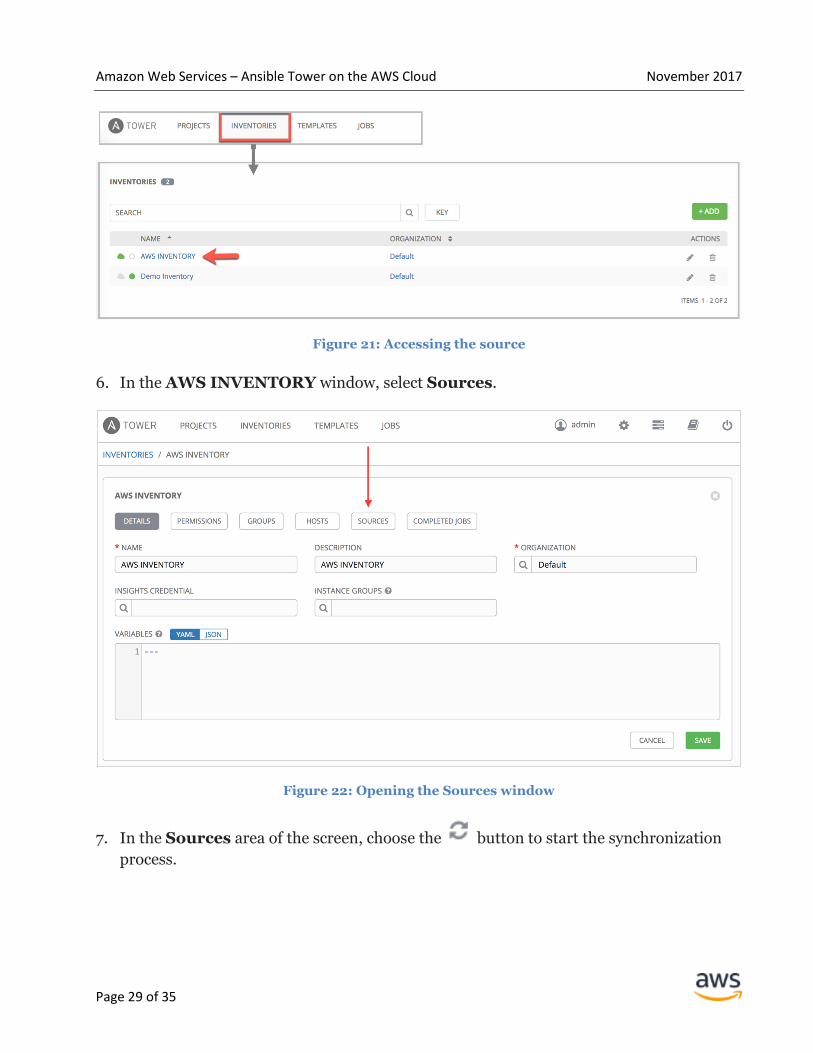
5. Use the navigation bar to navigate back to Inventories, and then select AWS
INVENTORY.
Amazon Web Services – Ansible Tower on the AWS Cloud November 2017
Page 29 of 35
Figure 21: Accessing the source
6. In the AWS INVENTORY window, select Sources.
Figure 22: Opening the Sources window
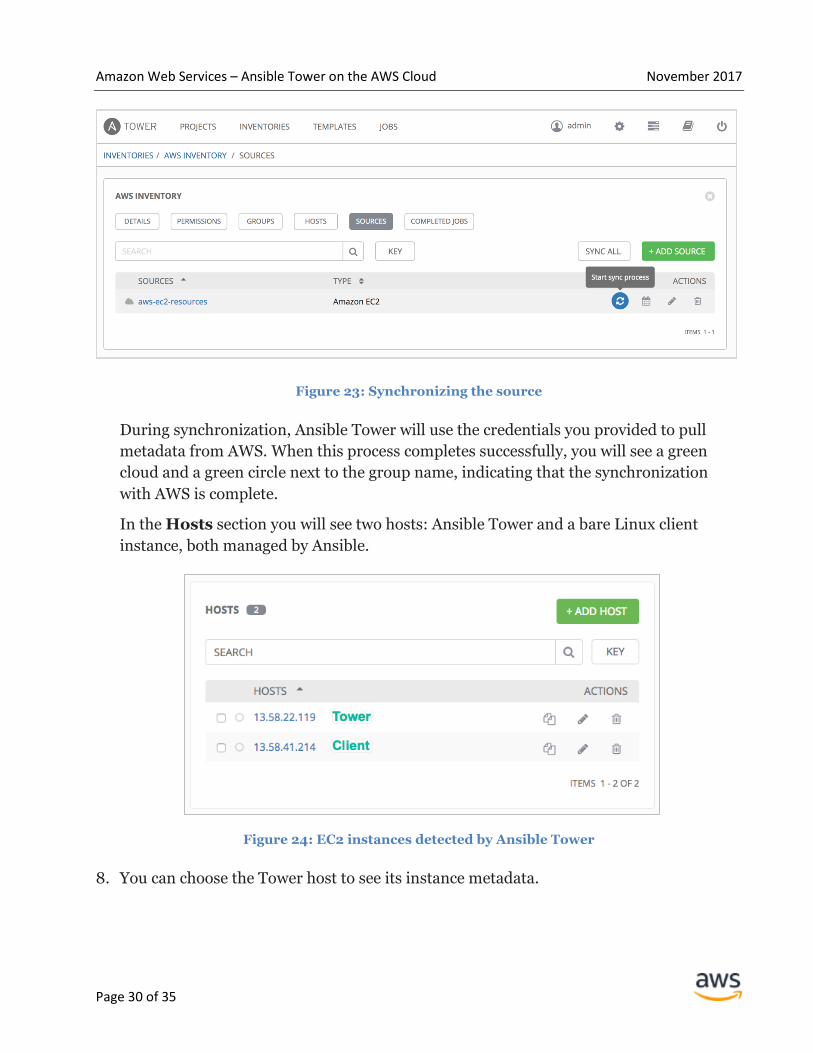
7. In the Sources area of the screen, choose the button to start the synchronization
process.
Amazon Web Services – Ansible Tower on the AWS Cloud November 2017
Page 30 of 35
Figure 23: Synchronizing the source
During synchronization, Ansible Tower will use the credentials you provided to pull
metadata from AWS. When this process completes successfully, you will see a green
cloud and a green circle next to the group name, indicating that the synchronization
with AWS is complete.
In the Hosts section you will see two hosts: Ansible Tower and a bare Linux client
instance, both managed by Ansible.
Figure 24: EC2 instances detected by Ansible Tower
8. You can choose the Tower host to see its instance metadata.
Amazon Web Services – Ansible Tower on the AWS Cloud November 2017
Page 31 of 35
Figure 25: Properties for the Ansible Tower instance
Adding Other Managed Instances
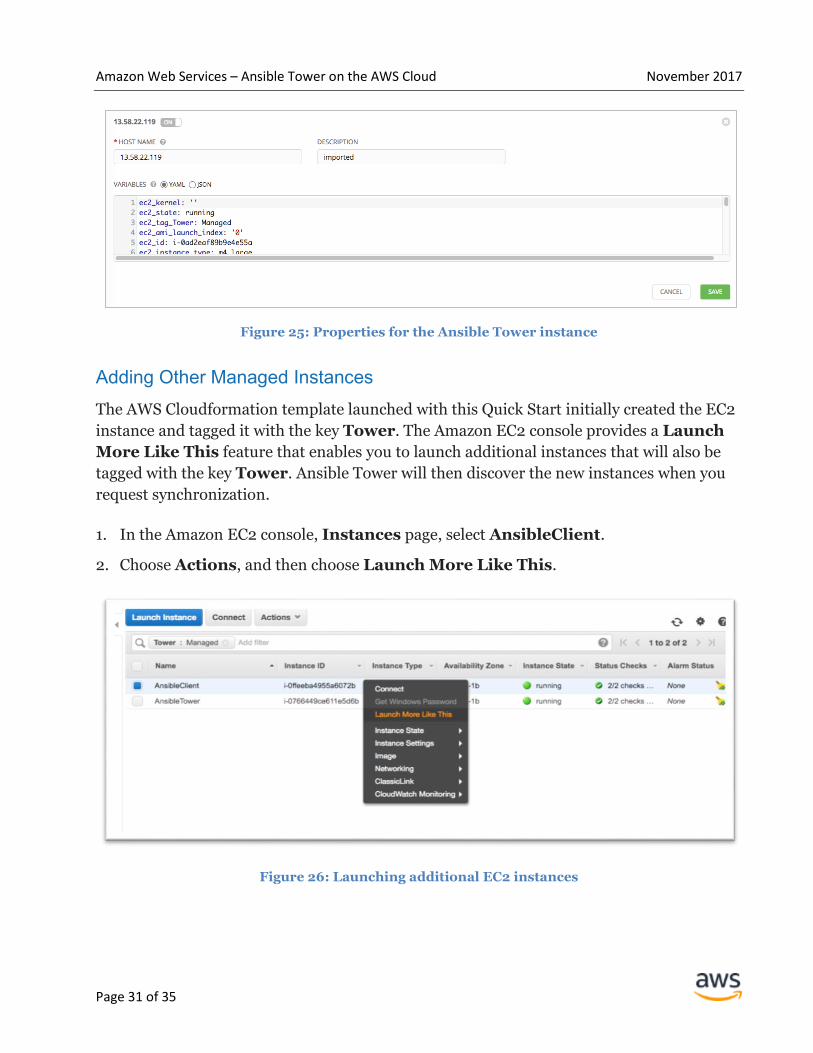
The AWS Cloudformation template launched with this Quick Start initially created the EC2
instance and tagged it with the key Tower. The Amazon EC2 console provides a Launch
More Like This feature that enables you to launch additional instances that will also be
tagged with the key Tower. Ansible Tower will then discover the new instances when you
request synchronization.
1. In the Amazon EC2 console, Instances page, select AnsibleClient.
2. Choose Actions, and then choose Launch More Like This.
Figure 26: Launching additional EC2 instances
Amazon Web Services – Ansible Tower on the AWS Cloud November 2017
Page 32 of 35
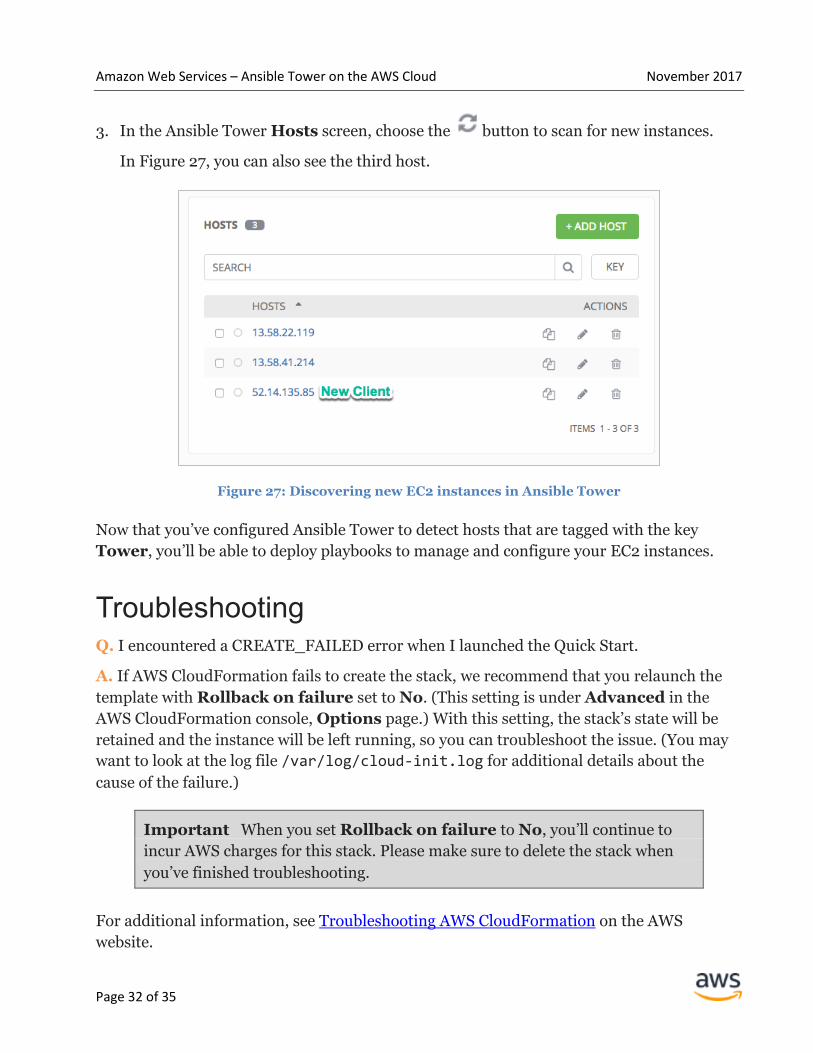
3. In the Ansible Tower Hosts screen, choose the button to scan for new instances.
In Figure 27, you can also see the third host.
Figure 27: Discovering new EC2 instances in Ansible Tower
Now that you’ve configured Ansible Tower to detect hosts that are tagged with the key
Tower, you’ll be able to deploy playbooks to manage and configure your EC2 instances.
Troubleshooting Q. I encountered a CREATE_FAILED error when I launched the Quick Start.
A. If AWS CloudFormation fails to create the stack, we recommend that you relaunch the
template with Rollback on failure set to No. (This setting is under Advanced in the
AWS CloudFormation console, Options page.) With this setting, the stack’s state will be
retained and the instance will be left running, so you can troubleshoot the issue. (You may
want to look at the log file /var/log/cloud-init.log for additional details about the
cause of the failure.)
Important When you set Rollback on failure to No, you’ll continue to
incur AWS charges for this stack. Please make sure to delete the stack when
you’ve finished troubleshooting.
For additional information, see Troubleshooting AWS CloudFormation on the AWS
website.
Amazon Web Services – Ansible Tower on the AWS Cloud November 2017
Page 33 of 35
Q. I encountered a size limitation error when I deployed the AWS Cloudformation
templates.
A. We recommend that you launch the Quick Start templates from the location we’ve
provided or from another S3 bucket. If you deploy the templates from a local copy on your
computer or from a non-S3 location, you might encounter template size limitations when
you create the stack. For more information about AWS CloudFormation limits, see the AWS
documentation.
Security A security group acts as a firewall that controls the traffic for one or more instances. When
you launch an instance, you associate one or more security groups with the instance. You
add rules to each security group that allow traffic to or from its associated instances. You
can modify the rules for a security group at any time. The new rules are automatically
applied to all instances that are associated with the security group.
The security groups created and assigned to the individual instances as part of this solution
are restricted as much as possible while allowing access to the various functions needed by
Ansible Tower. We recommend that you review security groups and further restrict access
as needed once Ansible is up and running.
We highly recommend that you update the passwords for the administrator and database
administrator accounts in accordance with your IT standards after you deploy the Quick
Start.
Additional Resources
AWS services
AWS CloudFormation
https://aws.amazon.com/documentation/cloudformation/
Amazon EC2
https://aws.amazon.com/documentation/ec2/
IAM
https://aws.amazon.com/documentation/iam/
AWS OpsWorks
https://aws.amazon.com/documentation/opsworks/
Amazon Web Services – Ansible Tower on the AWS Cloud November 2017
Page 34 of 35
Amazon VPC
https://aws.amazon.com/documentation/vpc/
Ansible resources
Ansible Tower User Guide
https://docs.ansible.com/ansible-tower/latest/html/administration/index.html
Quick Start Reference Deployments
AWS Quick Start home page
https://aws.amazon.com/quickstart/
GitHub Repository You can visit our GitHub repository to download the templates and scripts for this Quick
Start, to post your comments, and to share your customizations with others.
Document Revisions Date Change In sections
November 2017 Updated instructions for working in Ansible
Tower
Discovering and Managing EC2
Instances in Ansible Tower
June 2017 Removed the use of the tower_setup_conf.yml
file for storing administrative credentials
Step 5
May 2017 Updated for Ansible Tower version 3 Changes in templates and
throughout guide
April 2016 Initial publication —
Amazon Web Services – Ansible Tower on the AWS Cloud November 2017
Page 35 of 35
© 2017, Amazon Web Services, Inc. or its affiliates. All rights reserved.
Notices
This document is provided for informational purposes only. It represents AWS’s current product offerings
and practices as of the date of issue of this document, which are subject to change without notice. Customers
are responsible for making their own independent assessment of the information in this document and any
use of AWS’s products or services, each of which is provided “as is” without warranty of any kind, whether
express or implied. This document does not create any warranties, representations, contractual
commitments, conditions or assurances from AWS, its affiliates, suppliers or licensors. The responsibilities
and liabilities of AWS to its customers are controlled by AWS agreements, and this document is not part of,
nor does it modify, any agreement between AWS and its customers.
The software included with this paper is licensed under the Apache License, Version 2.0 (the "License"). You
may not use this file except in compliance with the License. A copy of the License is located at
http://aws.amazon.com/apache2.0/ or in the "license" file accompanying this file. This code is distributed on
an "AS IS" BASIS, WITHOUT WARRANTIES OR CONDITIONS OF ANY KIND, either express or implied.
See the License for the specific language governing permissions and limitations under the License.