Embed Size (px)
Citation preview

AAAAnnniiimmmmaaaattttiioooonn PPrrriiinncccciippppleeesssAAAAAAnnnniiiimmmaaaatttttiiiiooonn PPPPrrriiiinnccciiiippplllleeessssAAAn mmattt on PP inc p es
8
1 Open staging_start.ma, and set one of your panels to look through
“renderCam”. Yikes. This scene has a lot of staging problems. The camera is in a position where it cannot see any of the action, the ball has been positioned very oddly, and the light is casting a shadow on the entire main action. Let’s make some adjustments.
S TAGING IS A FUNDAMENTAL that encompasses a mass of artistic sensibilities. Staging involves framing the camera in a way to best capture the action. It involves making sure your animation has been planned to best
communicate the motion, the character arc, the story. Simply put, staging is how you create the scene. Ideally staging starts with your planning phase. Thumbnailing your poses is the best way to make strong pose choices at the start of a shot. If you are not a strong drawer, then perhaps you rely more on photo or video reference to give you cues to begin your work. At this very early phase, staging means you are thinking about how your posing and the layout of the scene is going to clearly show the motion. As you begin your scene, staging becomes more complex. How are you going to maintain the high level of communication throughout the life of the shot? Will you be able to hit all of the poses that you’d like, or are the poses going to have to be changed to work when the character is in motion? Staging means that you are thinking about the entire action at this point. Adjusting the camera, making tweaks to the layout, and finding just the right balance in the composition all improve your staging of the scene. When you are finished blocking, generally the major staging decisions are decided. This does not mean that staging is over! As you finish the animation, there are still staging considerations you must be aware of. Where is the audience’s eye going to be looking at every moment of the shot? If you’ve animated the scene correctly, you have a very good idea of what the audience should be paying attention to at every second. As your shot is finished and moves through the rest of the pipeline, other decisions that hone in the audience’s focus are going to come into play: lighting, effects, and editing. As animators, our staging choices have far-reaching impact on the success of a shot in communicating an idea. We’ll practice these staging concepts by repositioning a bouncing ball animation, the camera, and some lights to find the greatest impact.
Staging
HHHHHHHHooooooooowwwwwwwwww ttttttttttooooooooo CCCCCCCCCChhhhhhhhhheeeeeeeeeeaaaaaaaaaaatttttttttt iiiiiiiiinnnnnnnn MMMMMMMMMaaaaaaaayyyyyyyyaaaaaaaa
9
HOT TIPIt’s easy to forget that staging is more than just the camera angle. If you’re working on a production, you may not have any control over the camera angle chosen for a shot. If this is the case, you must design your staging within the camera you’ve been given. This might entail “cheating” poses so they look their best in a particular camera.
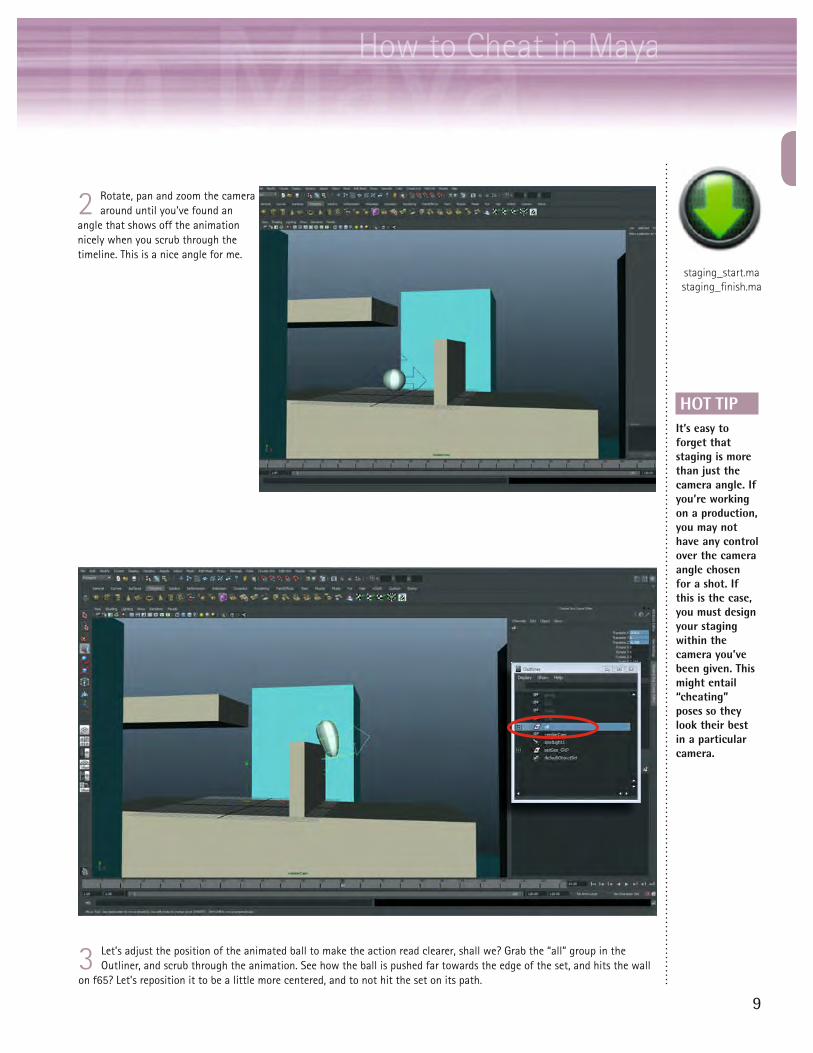
2 Rotate, pan and zoom the camera around until you’ve found an
angle that shows off the animation nicely when you scrub through the timeline. This is a nice angle for me.
3 Let’s adjust the position of the animated ball to make the action read clearer, shall we? Grab the “all” group in the Outliner, and scrub through the animation. See how the ball is pushed far towards the edge of the set, and hits the wall
on f65? Let’s reposition it to be a little more centered, and to not hit the set on its path.
staging_start.mastaging_finish.ma

AAAAnnniiimmmmaaaattttiioooonn PPrrriiinncccciippppleeesssAAAAAAnnnniiiimmmaaaatttttiiiiooonn PPPPrrriiiinnccciiiippplllleeessssAAAn mmattt on PP inc p es
10
4 Much better. I moved the group back to the world origin, and the animation is working much better to camera.
6 In a perspective panel, press the 7 key to enable the lighting, and make sure Show > Lights is enabled in the viewport menu. Select the light and transform and rotate it until it gives a nice ! lighting angle. The action should be lit so that
we get a fully lit view of the scene, but also so that the shadows are angled so they show the detail and depth of the set.
Staging (cont’d)
HHHHHHHHooooooooowwwwwwwwww ttttttttttooooooooo CCCCCCCCCChhhhhhhhhheeeeeeeeeeaaaaaaaaaaatttttttttt iiiiiiiiinnnnnnnn MMMMMMMMMaaaaaaaayyyyyyyyaaaaaaaa
11
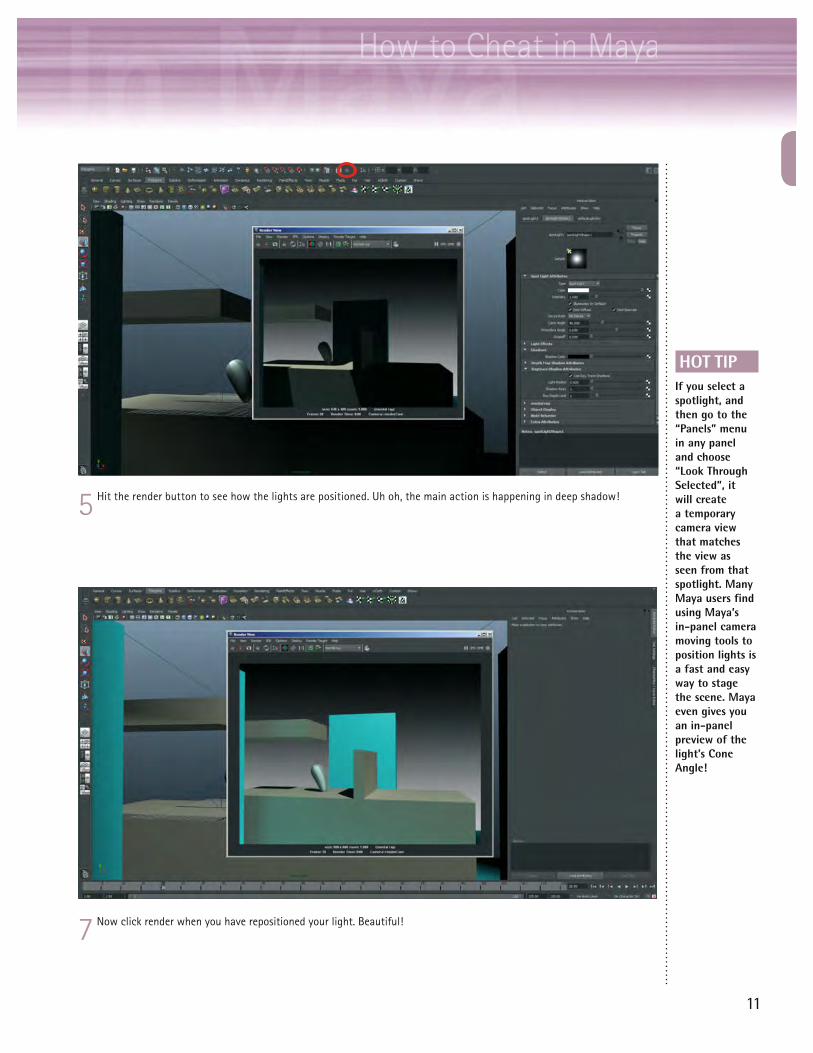
5 Hit the render button to see how the lights are positioned. Uh oh, the main action is happening in deep shadow!
7 Now click render when you have repositioned your light. Beautiful!
HOT TIPIf you select a spotlight, and then go to the “Panels” menu in any panel and choose “Look Through Selected”, it will create a temporary camera view that matches the view as seen from that spotlight. Many Maya users find using Maya’s in-panel camera moving tools to position lights is a fast and easy way to stage the scene. Maya even gives you an in-panel preview of the light’s Cone Angle!

![[PPT]What is t,n,m staging and summary staging? Staging for... · Web viewWhat are we discussing? What is AJCC Staging Purpose of staging General rules for clinical and pathological](https://img.pdfslide.us/doc/110x75/5b1cc7cc7f8b9a8c5a8ba42e/pptwhat-is-tnm-staging-and-summary-staging-staging-for-web-viewwhat.jpg)