Embed Size (px)
Citation preview
Android Programming Basic
( Part 1 )
Date : Sept 2011 Rev 2.x
Nov 2011
Topic covered :
Basic Activity
User Interface (UI)
Layout
TextView / EditText / Button / Chechbox
RadioBUtton / ToggleButton / ImageButton
Intents
Moving from one activity to another
Passing items between activities
Get item from activity
Basic Activity Demo Project
myActivity
UI Demo projects
myActivity
simLinearUI
simBasicIO
simMoreGUI
Intents Demo Projects
simMultipleActivities
simPassItemsBetweenActivities
simGetItemFromActivity
Name : HK Sim
Contact : [email protected]
Contents
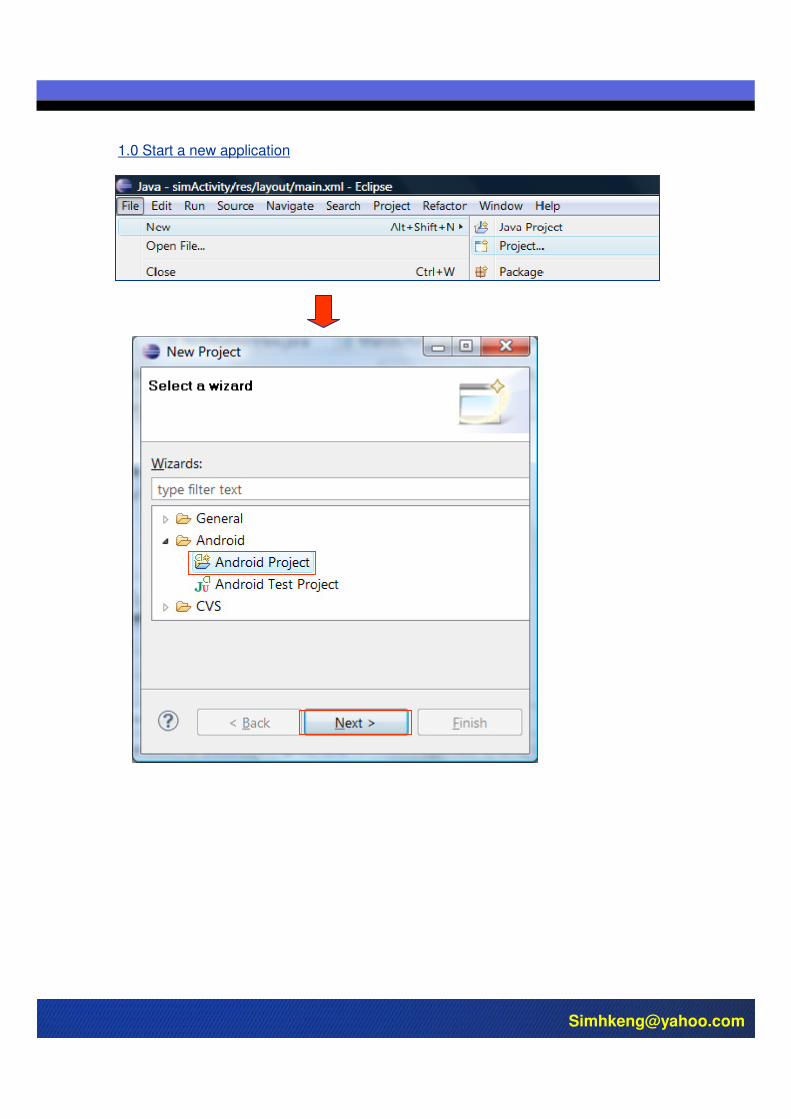
1.0 Start a new application
2.0 Activity
2.1 Create an activity
2.2 User Interface
2.3 AndroidMainfest.xml
2.4 Activity Chart
2.5 Events in an activity
2.6 Create more than one activity in an application
2.6.1 Add new layout XML file ( for multiple activities )
2.6.2 Add new class program file ( xxx.java )
2.7 Program structure
3.0 User Interface (UI)
3.1 Layout
3.1.1 Linear Layout
3.1.2 TableRow
3.1.3 TableLayout
3.1.4 Dimension setting in TableRow
3.2 Basic User Interface ( UI )
3.2.1 TextView
3.2.1.1 Declare TextView variable
3.2.1.2 Associate with a UI element
3.2.1.3 Action
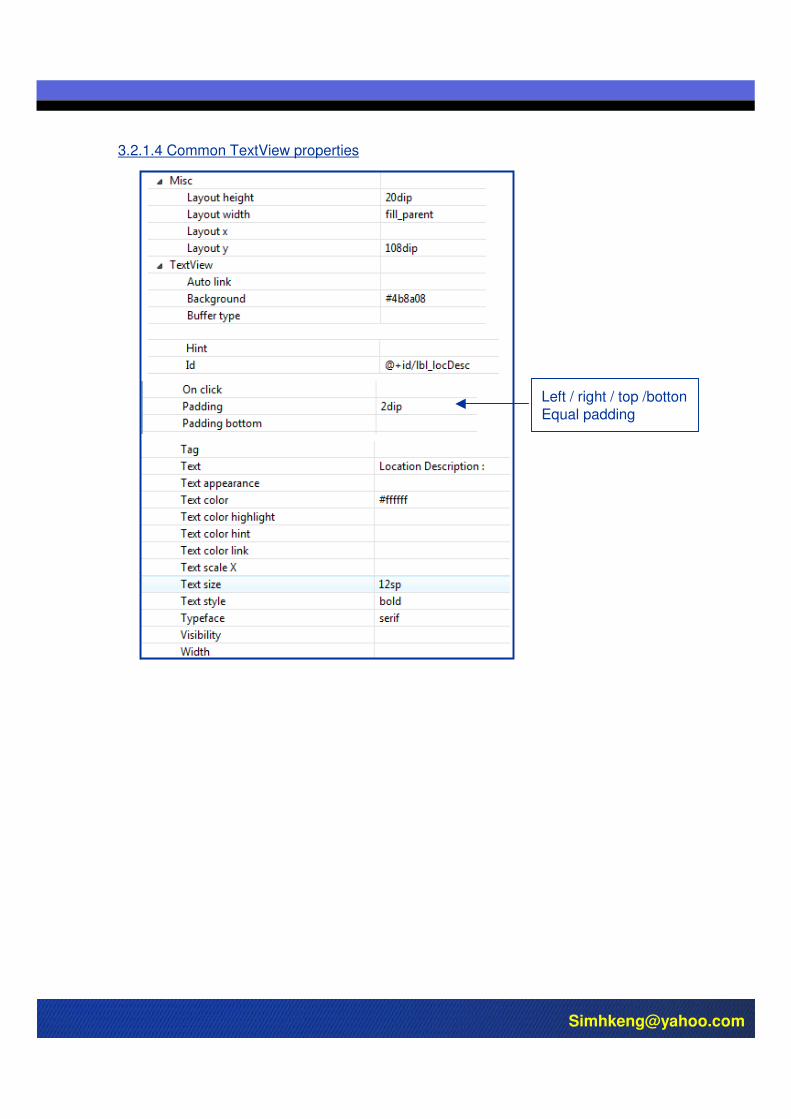
3.2.1.4 Common TextView properties
3.2.2 EditText
3.2.2.1 Declare EditText variable
3.2.2.2 Associate with a UI element
3.2.2.3 Action
3.2.2.4 EditText Common properties
3.2,2.5 EditText Special input type
3.2.2.5.1 Phone number input
3.2.2.5.2 Name ( text ) input
3.2.2.5.3 Number input
3.2.2.5.4 List of input type selection
3.2.3 Button
3.2.3.1 Declare button variable
3.2.3.2 Associate with a UI element
3.2.3.3 Action
3.2.3.3.1 set Listener for normal click and long click
3.2.3.3.2 define action to be done when click
3.2.3.4 software to simulate click action
3.2.3.5 Button Common properties
3.3 More UI
3.3.1 CheckBox
3.3.1.1 Declare CheckBox variable
3.3.1.2 Associate with a UI element
3.3.1.3 Action
3.3.1.3.1 set Listener for normal click
3.3.1.3.2 define action to be done when click
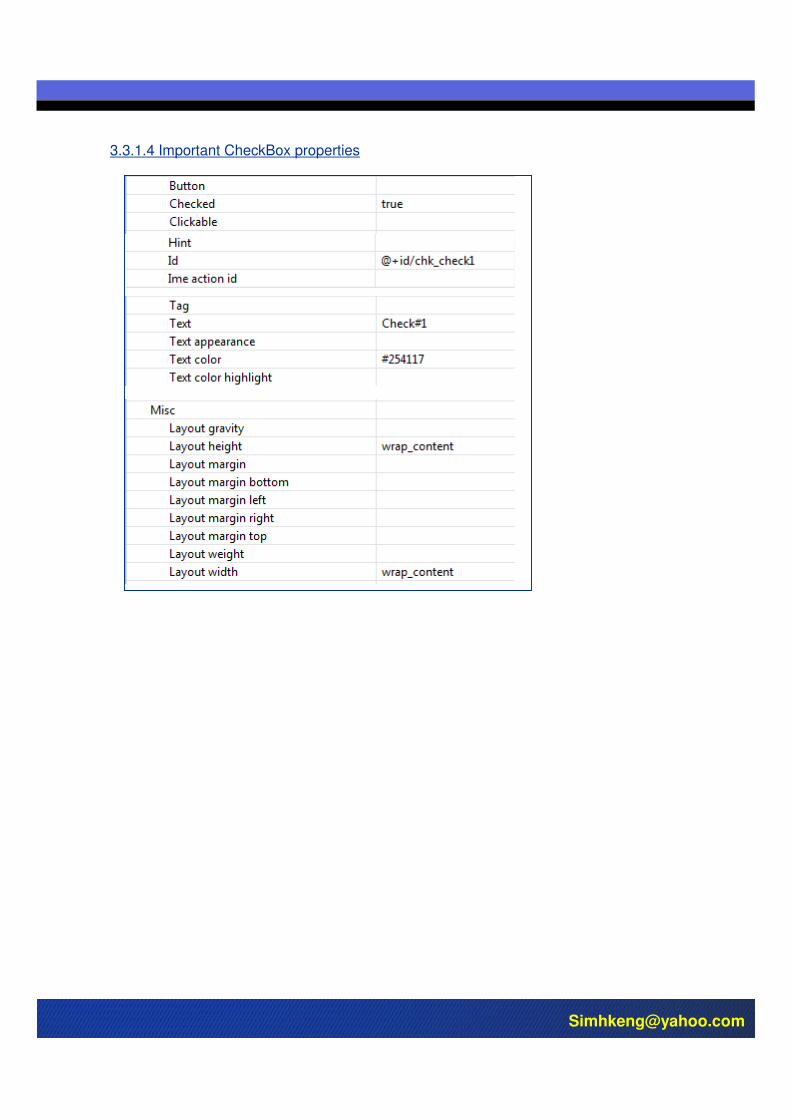
3.3.1.4 Important CheckBox properties
3.3.2 Radio Button
3.3.2.1 Declare radio group and radio button
3.3.2.2 Associate with a UI element
3.3.2.3 Action
3.3.2.3.1 set Listener for normal click
3.3.2.3.2 define action to be done when click
3.3.2.4 Important radio button properties
3.3.3 Toogle Button
3.3.3.1 Declare Toogle button
3.3.3.2 Associate with a UI element
3.3.3.3 Action
3.3.3.3.1 set listener
3.3.3.3.2 Define action when click
3.3.4 Image Button
3.3.4.1 Declare Toogle button
3.3.4.2 Associate with a UI element
3.3.4.3 Action
3.3.4.3.1 set listener
3.3.4.3.2 Define action when click

3.4 Useful tips for User Interface ( UI )
3.4.1 Hide the Activity title
3.4.2Fix the application position
3.4.3 Phone hardware independent dimension
3.4.4 Add Webview
4.0 Intent
4.1 Build-in intent
4.2 Private intent
4.2.1 Request information from new activity using intent
4.2.3 Passing information to a new activity using intent
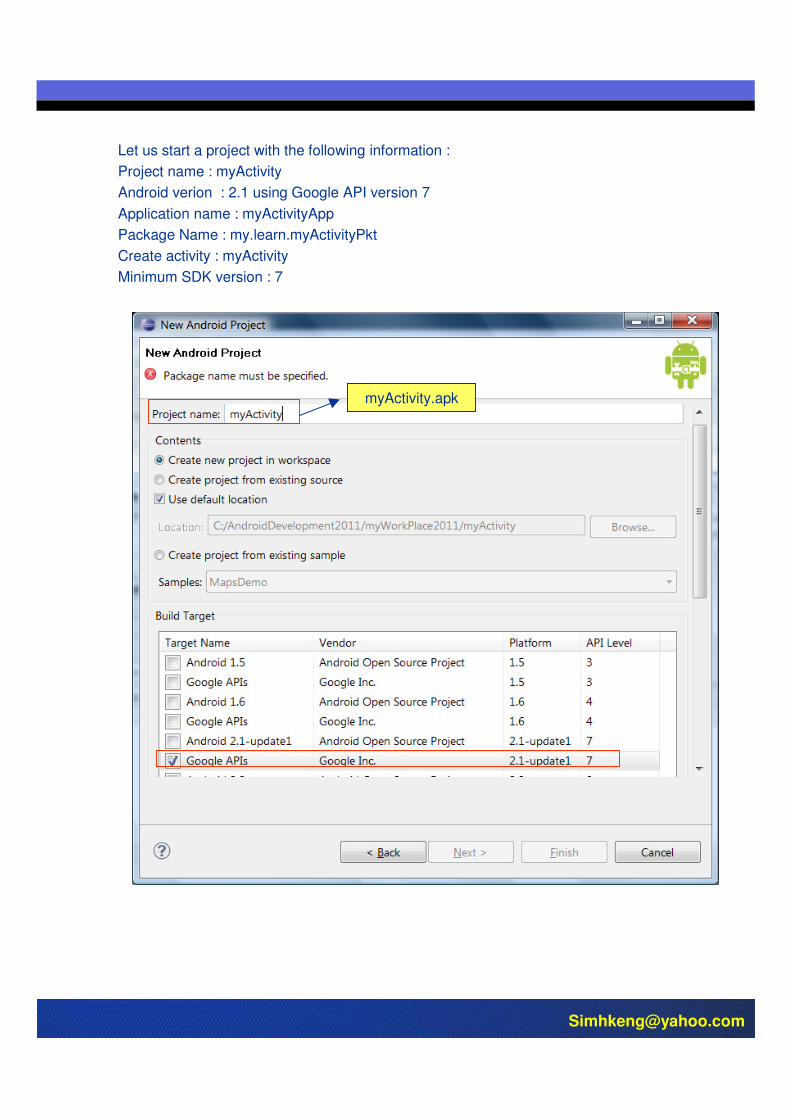
Let us start a project with the following information :
Project name : myActivity
Android verion : 2.1 using Google API version 7
Application name : myActivityApp
Package Name : my.learn.myActivityPkt
Create activity : myActivity
Minimum SDK version : 7
myActivity.apk
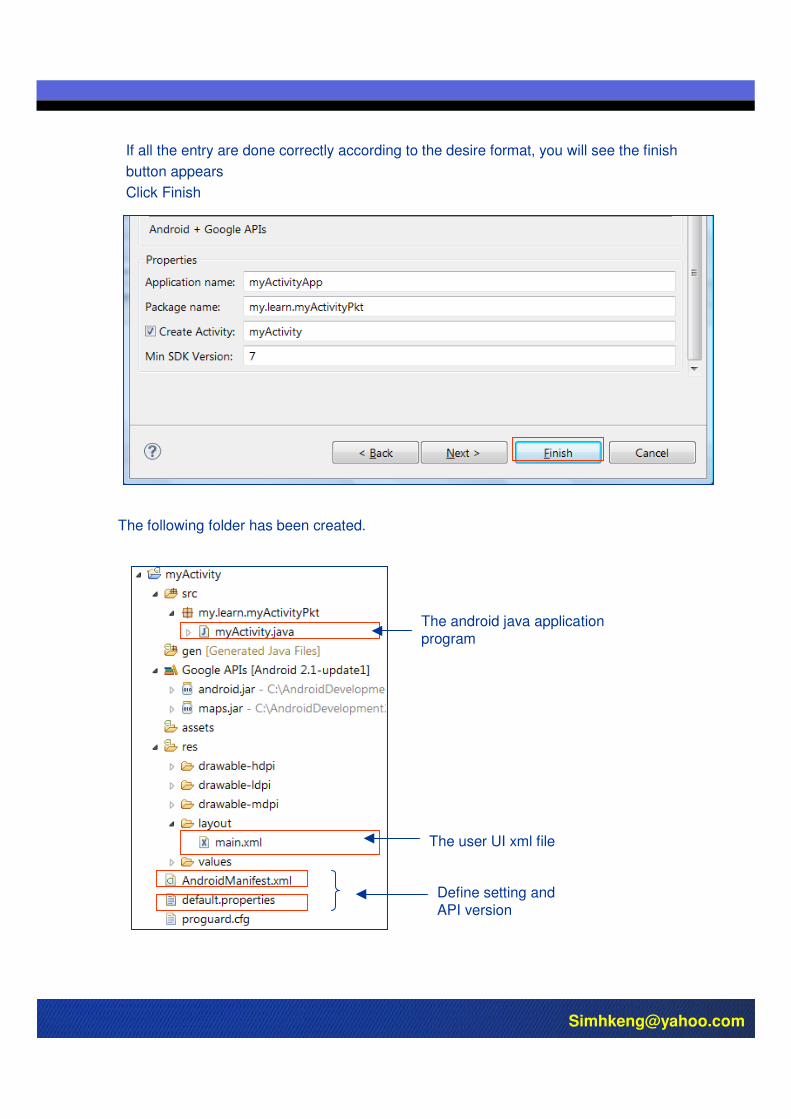
If all the entry are done correctly according to the desire format, you will see the finish
button appears
Click Finish
The following folder has been created.
The android java application program
The user UI xml file
Define setting and API version
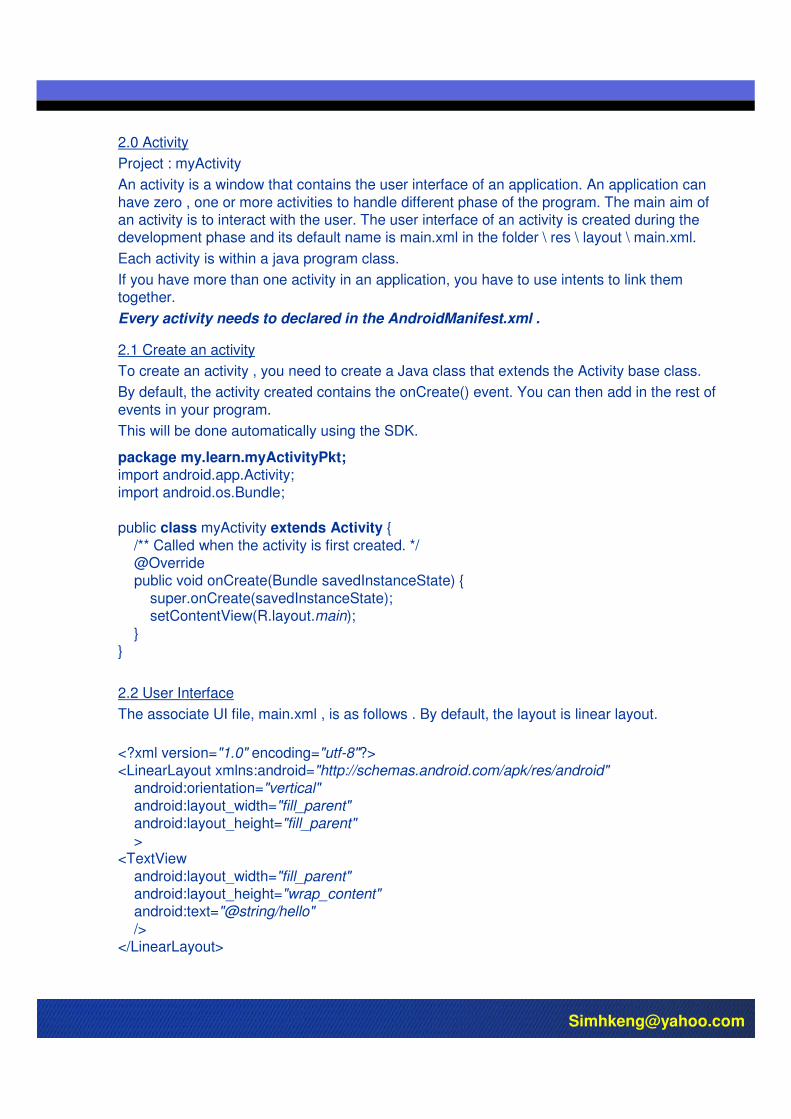
2.0 Activity
Project : myActivity
An activity is a window that contains the user interface of an application. An application can
have zero , one or more activities to handle different phase of the program. The main aim of an activity is to interact with the user. The user interface of an activity is created during the development phase and its default name is main.xml in the folder \ res \ layout \ main.xml.
Each activity is within a java program class.
If you have more than one activity in an application, you have to use intents to link them together.
Every activity needs to declared in the AndroidManifest.xml .
2.1 Create an activity
To create an activity , you need to create a Java class that extends the Activity base class.
By default, the activity created contains the onCreate() event. You can then add in the rest of
events in your program.
This will be done automatically using the SDK.
package my.learn.myActivityPkt;import android.app.Activity;import android.os.Bundle;
public class myActivity extends Activity {
/** Called when the activity is first created. */@Overridepublic void onCreate(Bundle savedInstanceState) {
super.onCreate(savedInstanceState);setContentView(R.layout.main);
}}
2.2 User Interface
The associate UI file, main.xml , is as follows . By default, the layout is linear layout.
<?xml version="1.0" encoding="utf-8"?><LinearLayout xmlns:android="http://schemas.android.com/apk/res/android"
android:orientation="vertical"
android:layout_width="fill_parent"android:layout_height="fill_parent"
><TextView
android:layout_width="fill_parent"android:layout_height="wrap_content"android:text="@string/hello"
/></LinearLayout>

2.3 AndroidMainfest.xml
For Android Operating System to access an application, each application must declare its variable components in the AndroidMainfest.xml file. The AndroidMainfest.xml file also
contain the required permissions and the behaviour for the application to run.
This file also contain the SDK version number.
If you have more than one activities in your application, you have to add in the additional
activities.
The basic AndroidMainfest.xml file is show below :
<?xml version="1.0" encoding="utf-8"?><manifest xmlns:android="http://schemas.android.com/apk/res/android"
package="my.learn.myActivityPkt"android:versionCode="1"android:versionName="1.0">
<application android:icon="@drawable/icon" android:label="@string/app_name">
<activity android:name=".myActivity"android:label="@string/app_name">
<intent-filter><action android:name="android.intent.action.MAIN" /><category android:name="android.intent.category.LAUNCHER" />
</intent-filter></activity>
<activity android:name="configuration"></activity> <activity android:name="viewLog"></activity>
</application>
<uses-sdk android:minSdkVersion="7" />
</manifest>
Additional activitesneed to be declared.
Activity
Start
onCreate()
onStart()
onResume
Activity running
onPause()
onStop()
onDestroy()
Activity
Shutdown
onRestart()
Activity comes to
foreground
Activity comes to
foreground
Another activityComes infront
Of the activity
Acttivity no longer
visuible
Other application
Need memory
Process is killed
User navigatgeBack to the
activity
onStop()
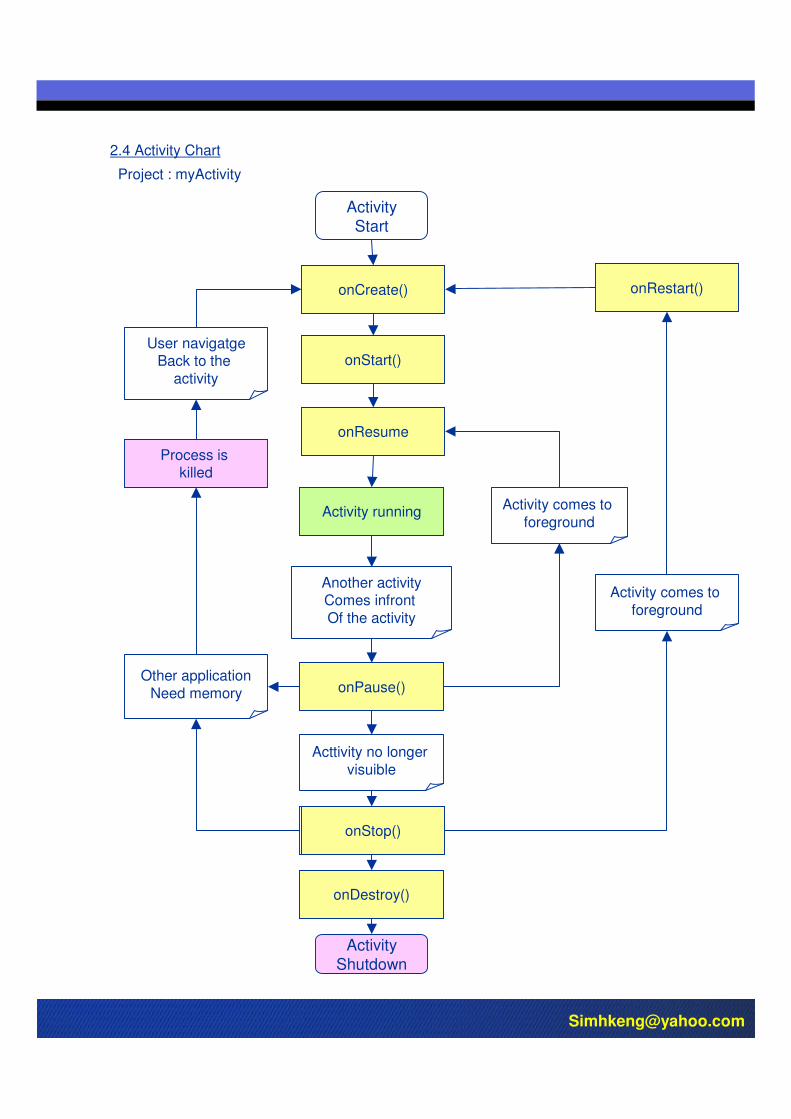
2.4 Activity Chart
Project : myActivity
2.5 Events in an activity
onCreate() – when the activity is first created
onStart() - when the activity becomes visible to user
onResume() – when the activity starts interacting with the user
onPause() – when the current activity is being paused and the previous activity is being resumed. This happens in the case of more than one activity in an application.
onStop() – when the activity is no longer visible to user.
onDestroy() – called before the activity is destroyed by the system. This happens manually or by system to conserve memory.
onRestart() – when the activity restart again
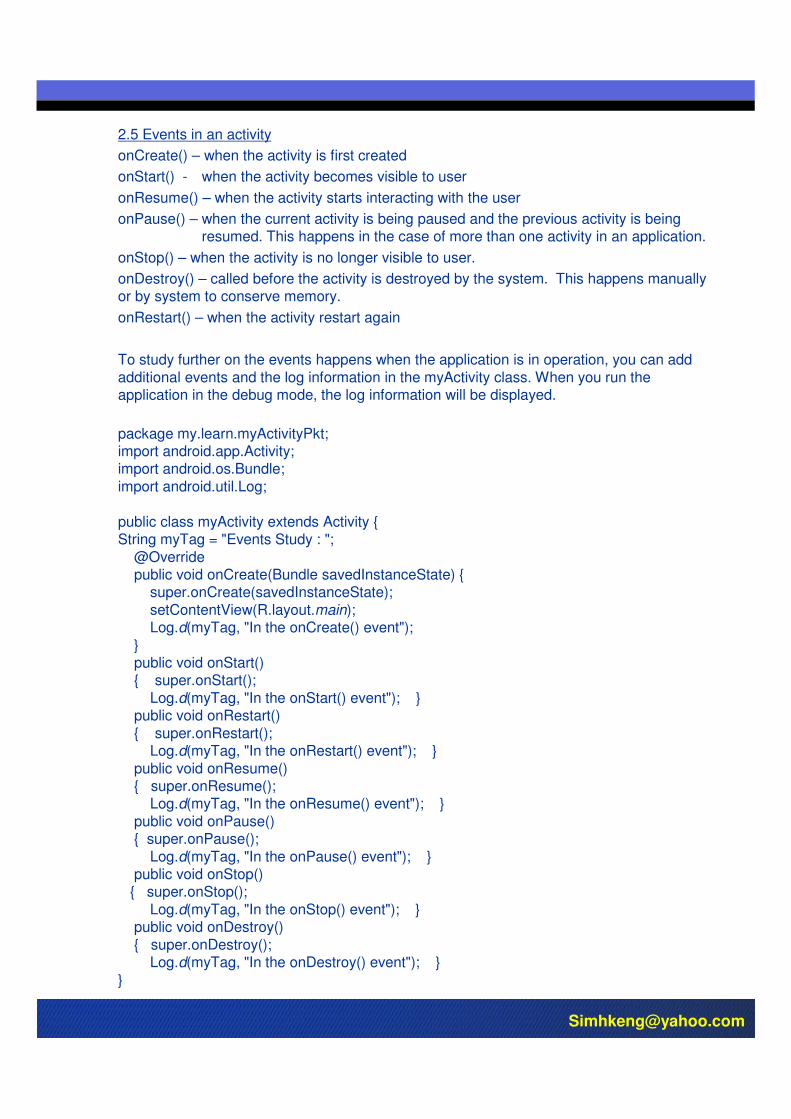
To study further on the events happens when the application is in operation, you can add
additional events and the log information in the myActivity class. When you run the application in the debug mode, the log information will be displayed.
package my.learn.myActivityPkt;import android.app.Activity;import android.os.Bundle;
import android.util.Log;
public class myActivity extends Activity {String myTag = "Events Study : ";
@Overridepublic void onCreate(Bundle savedInstanceState) {
super.onCreate(savedInstanceState);
setContentView(R.layout.main); Log.d(myTag, "In the onCreate() event");
} public void onStart(){ super.onStart();
Log.d(myTag, "In the onStart() event"); } public void onRestart()
{ super.onRestart();Log.d(myTag, "In the onRestart() event"); }
public void onResume(){ super.onResume();
Log.d(myTag, "In the onResume() event"); }
public void onPause(){ super.onPause();
Log.d(myTag, "In the onPause() event"); } public void onStop()
{ super.onStop();
Log.d(myTag, "In the onStop() event"); } public void onDestroy()
{ super.onDestroy();Log.d(myTag, "In the onDestroy() event"); }
}

When you run the application under debug mode and switch to DDMS . In the LogCat, you will see the activation of each event involve. You can then add information like error message so that you know where the error comes from.
2.6 Create more than one activity in an application
Project : simMultipleActivities
When you want to add new activity in an application, you need to basically do 3 things :
- Add a layout ( xxx . xml file )
- Add an activity class ( xxx . java file )
- Put the new activity in the AndroidManifest.xml file
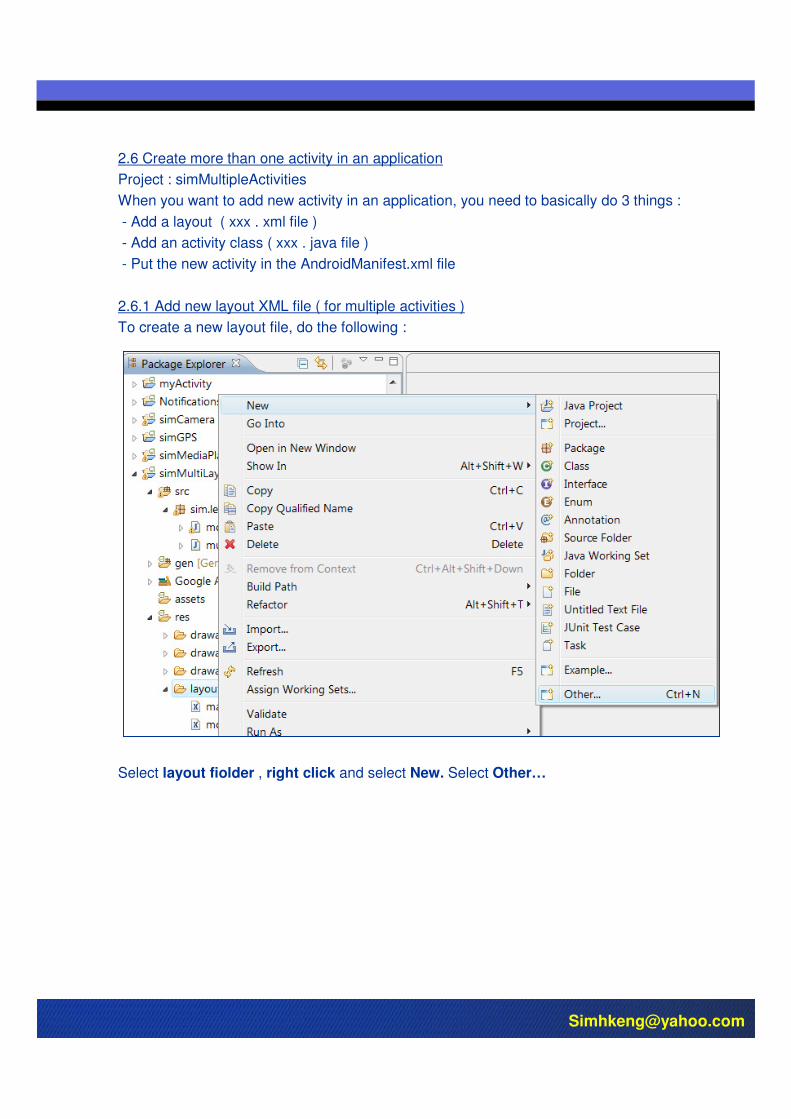
2.6.1 Add new layout XML file ( for multiple activities )
To create a new layout file, do the following :
Select layout fiolder , right click and select New. Select Other…
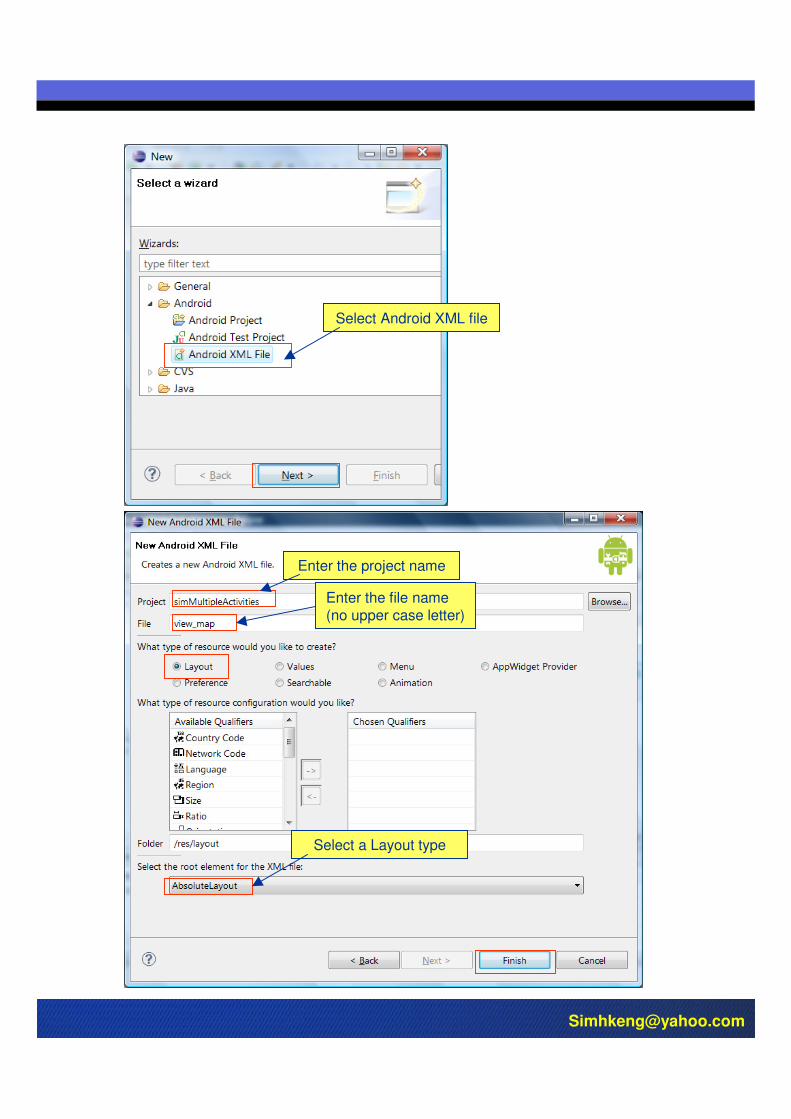
ssdsdSelect Android XML file
Enter the project name
Enter the file name(no upper case letter)
Select a Layout type
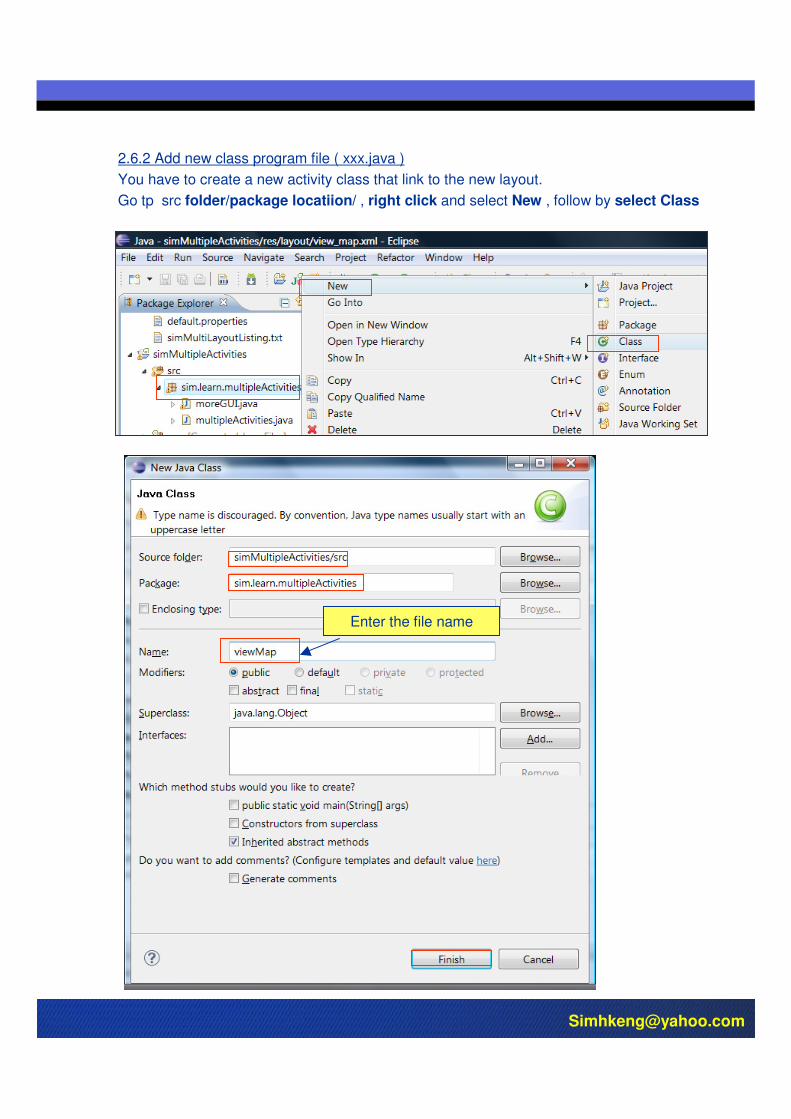
2.6.2 Add new class program file ( xxx.java )
You have to create a new activity class that link to the new layout.
Go tp src folder/package locatiion/ , right click and select New , follow by select Class
Enter the file name
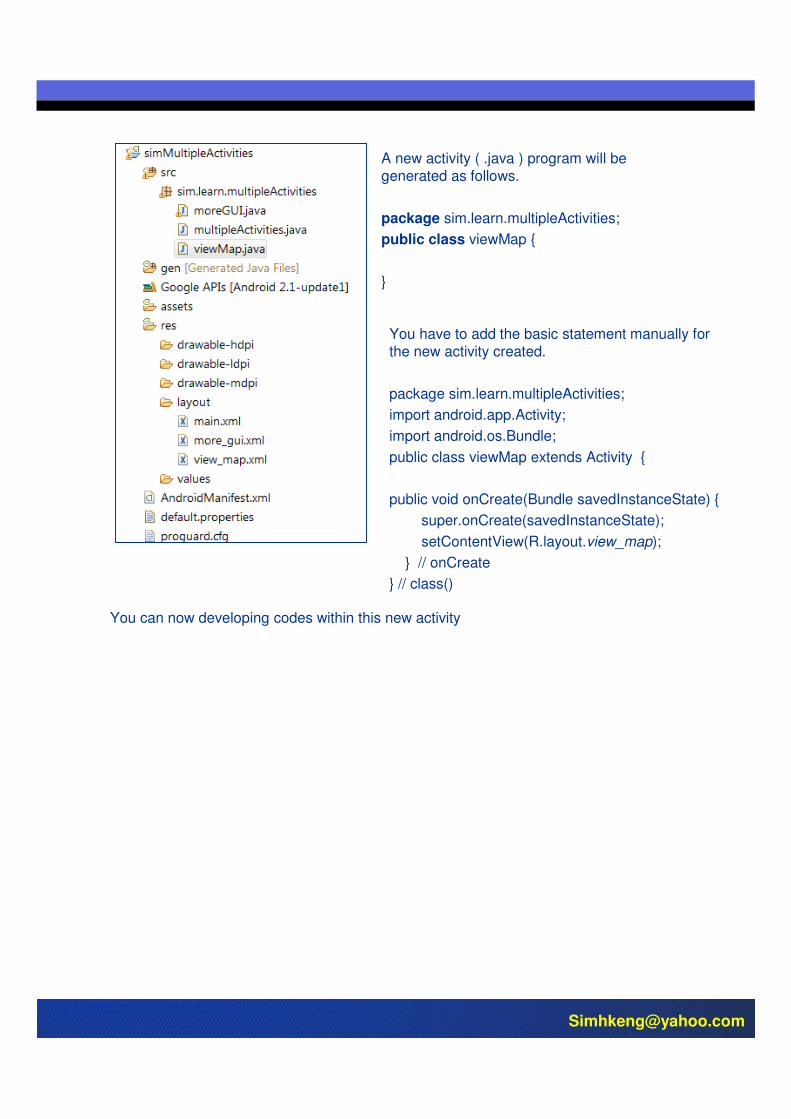
A new activity ( .java ) program will be generated as follows.
package sim.learn.multipleActivities;
public class viewMap {
}
You have to add the basic statement manually for the new activity created.
package sim.learn.multipleActivities;
import android.app.Activity;
import android.os.Bundle;
public class viewMap extends Activity {
public void onCreate(Bundle savedInstanceState) {
super.onCreate(savedInstanceState);
setContentView(R.layout.view_map);
} // onCreate
} // class()
You can now developing codes within this new activity
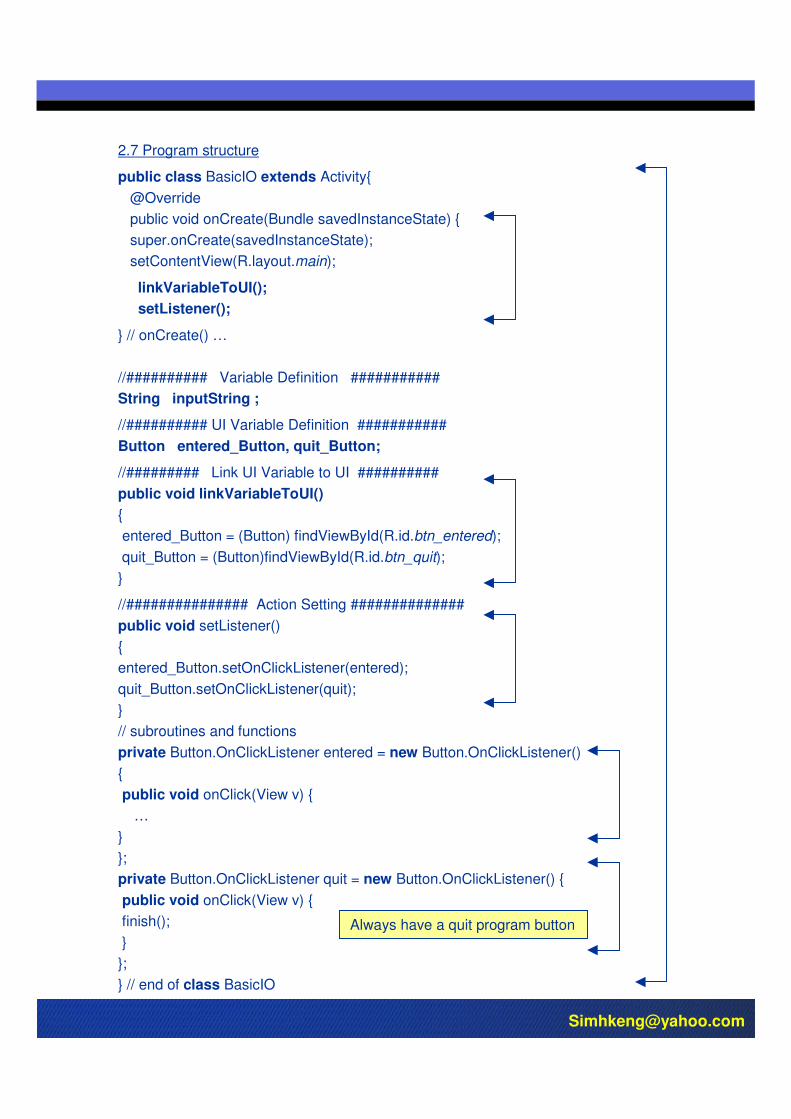
2.7 Program structure
public class BasicIO extends Activity{
@Override
public void onCreate(Bundle savedInstanceState) {
super.onCreate(savedInstanceState);
setContentView(R.layout.main);
linkVariableToUI();
setListener();
} // onCreate() …
//########## Variable Definition ###########
String inputString ;
//########## UI Variable Definition ###########
Button entered_Button, quit_Button;
//######### Link UI Variable to UI ##########
public void linkVariableToUI()
{
entered_Button = (Button) findViewById(R.id.btn_entered);
quit_Button = (Button)findViewById(R.id.btn_quit);
}
//############### Action Setting ##############
public void setListener()
{
entered_Button.setOnClickListener(entered);
quit_Button.setOnClickListener(quit);
}
// subroutines and functions
private Button.OnClickListener entered = new Button.OnClickListener()
{
public void onClick(View v) {
…
}
};
private Button.OnClickListener quit = new Button.OnClickListener() {
public void onClick(View v) {
finish();
}
};
} // end of class BasicIO
Always have a quit program button
3.0 User Interface (UI)
The commonly used user interface object can be classified into the following groups :
Layout
this is the container of all the User Interface (UI) objects such as text box, button … e tc . Commonly use is linear layout. Linear layout arrange UI object either vertically or horizontally and therefore it has to work with table object or table row object for a more pleasant UI .
Absolute Layout , although is a more user friendly layout, should not be use as it may not be support in the future Android SDK version.
basic objects
This include the TextView, EditView, Button, ImageButton , CheckBox, ToggleButton, RadioButton and Radiogroup, ScrowView, ProgressBar
List View objects
Views that display a long list of items such as ListView and SpinnerView . Normally need to work with ScrowView object.
Picker Views
Use to select the time and date such as TimePicker and DatePicker objects.
3.1 Layout
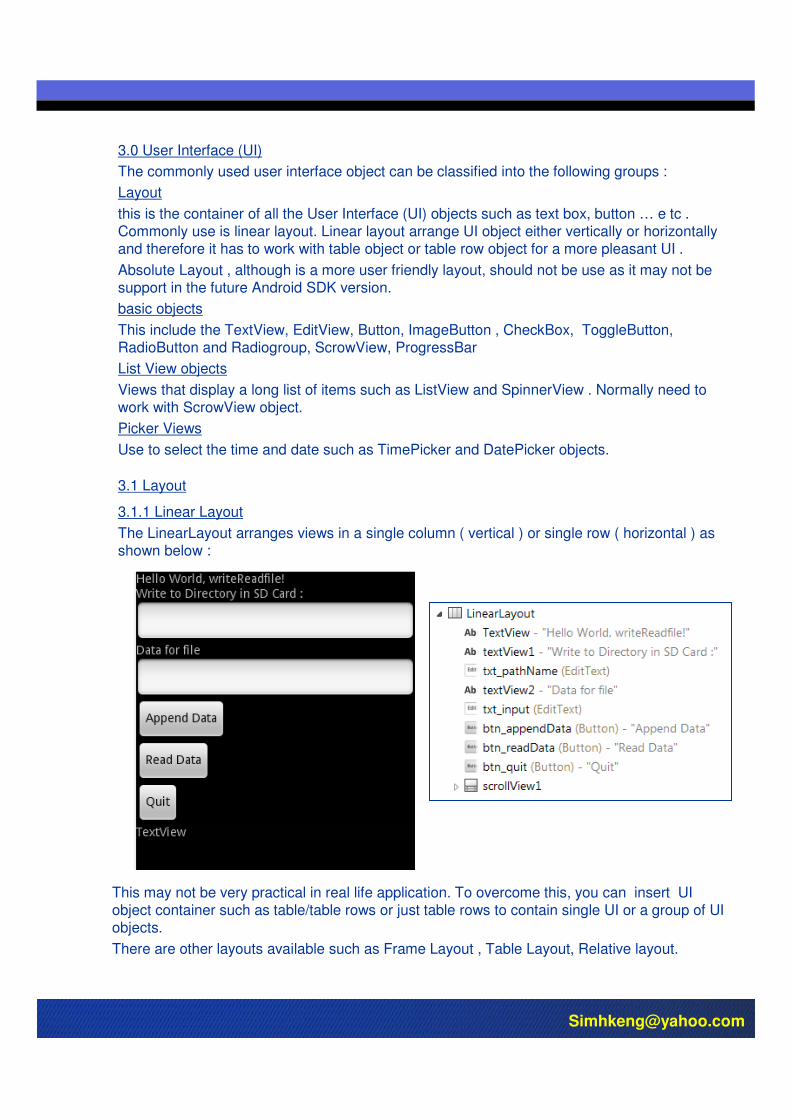
3.1.1 Linear Layout
The LinearLayout arranges views in a single column ( vertical ) or single row ( horizontal ) as shown below :
This may not be very practical in real life application. To overcome this, you can insert UI object container such as table/table rows or just table rows to contain single UI or a group of UI objects.
There are other layouts available such as Frame Layout , Table Layout, Relative layout.
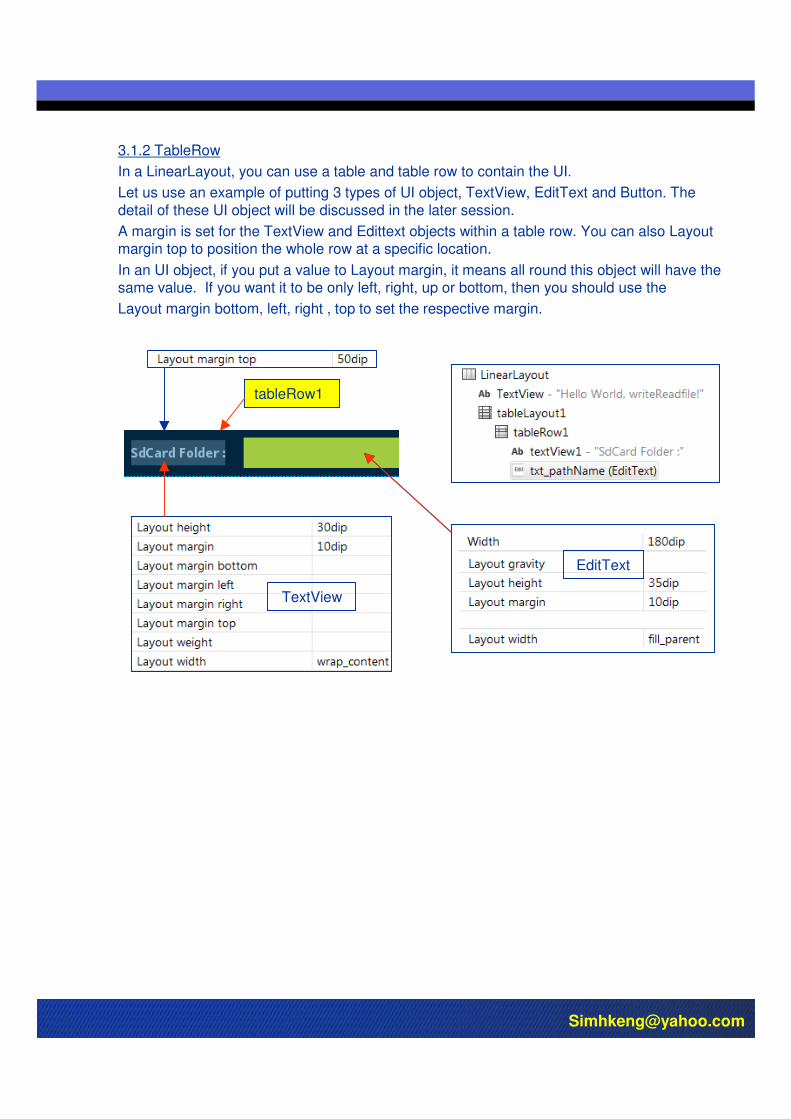
3.1.2 TableRow
In a LinearLayout, you can use a table and table row to contain the UI.
Let us use an example of putting 3 types of UI object, TextView, EditText and Button. The
detail of these UI object will be discussed in the later session.
A margin is set for the TextView and Edittext objects within a table row. You can also Layout margin top to position the whole row at a specific location.
In an UI object, if you put a value to Layout margin, it means all round this object will have the same value. If you want it to be only left, right, up or bottom, then you should use the
Layout margin bottom, left, right , top to set the respective margin.
tableRow1
TextView
EditText
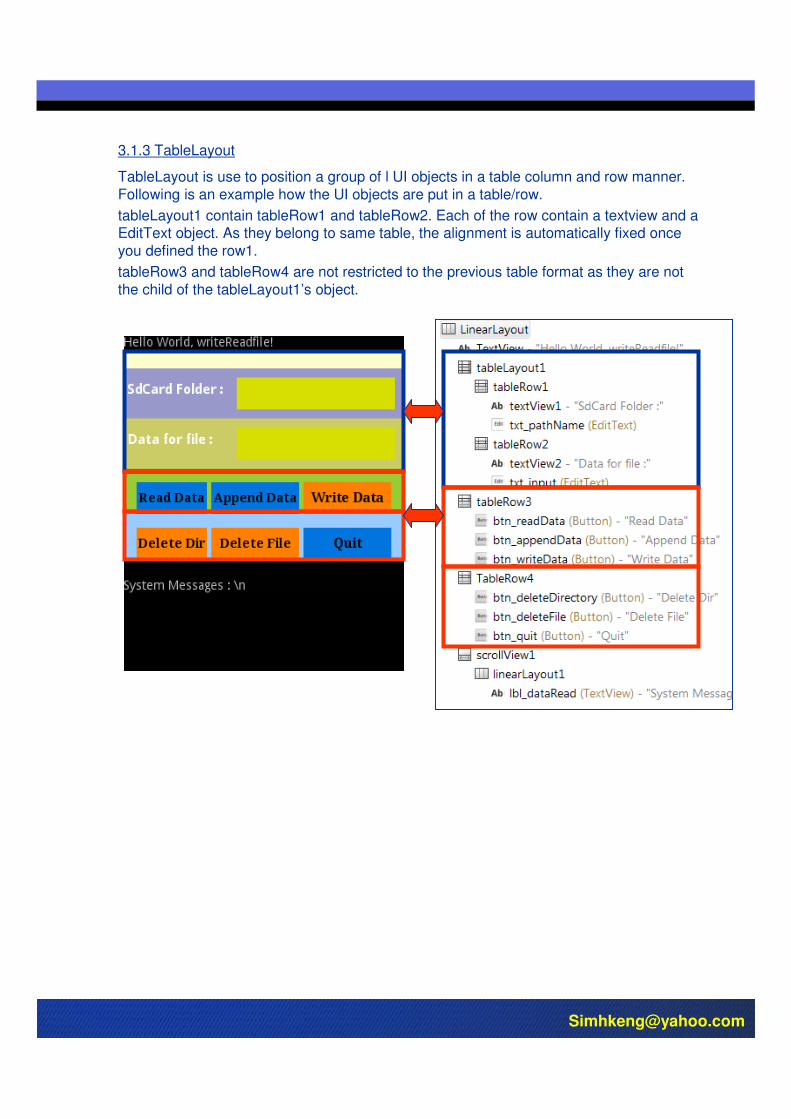
3.1.3 TableLayout
TableLayout is use to position a group of l UI objects in a table column and row manner.
Following is an example how the UI objects are put in a table/row.
tableLayout1 contain tableRow1 and tableRow2. Each of the row contain a textview and a EditText object. As they belong to same table, the alignment is automatically fixed once
you defined the row1.
tableRow3 and tableRow4 are not restricted to the previous table format as they are not
the child of the tableLayout1’s object.
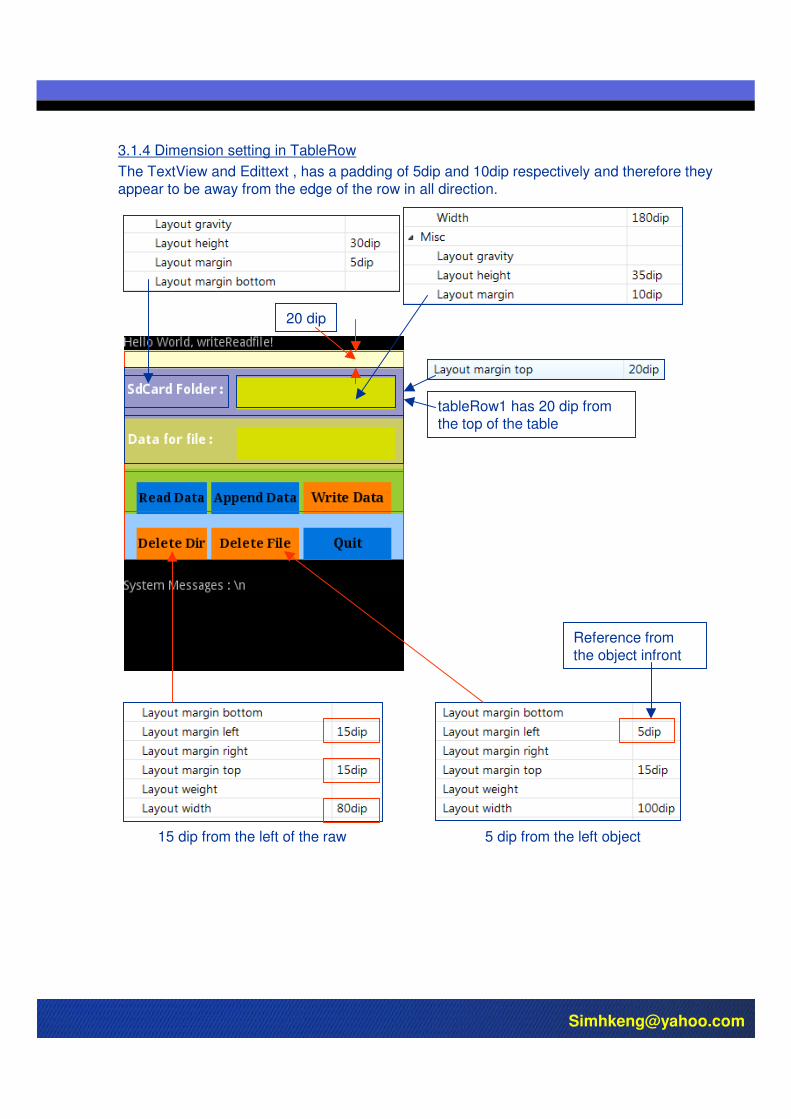
3.1.4 Dimension setting in TableRow
The TextView and Edittext , has a padding of 5dip and 10dip respectively and therefore they appear to be away from the edge of the row in all direction.
5 dip from the left object15 dip from the left of the raw
tableRow1 has 20 dip from the top of the table
20 dip
Reference fromthe object infront
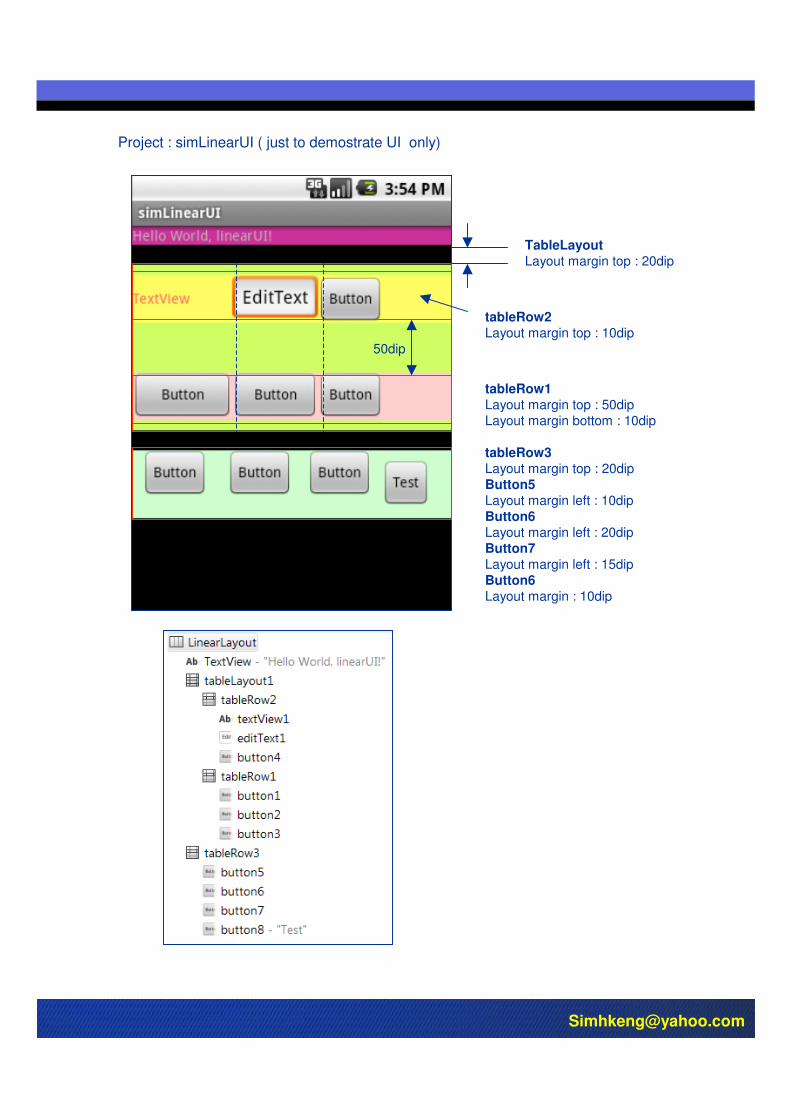
TableLayout Layout margin top : 20dip
tableRow2Layout margin top : 10dip
tableRow1Layout margin top : 50dip
Layout margin bottom : 10dip
50dip
tableRow3Layout margin top : 20dip
Button5 Layout margin left : 10dip
Button6 Layout margin left : 20dip
Button7 Layout margin left : 15dip
Button6 Layout margin : 10dip
Project : simLinearUI ( just to demostrate UI only)
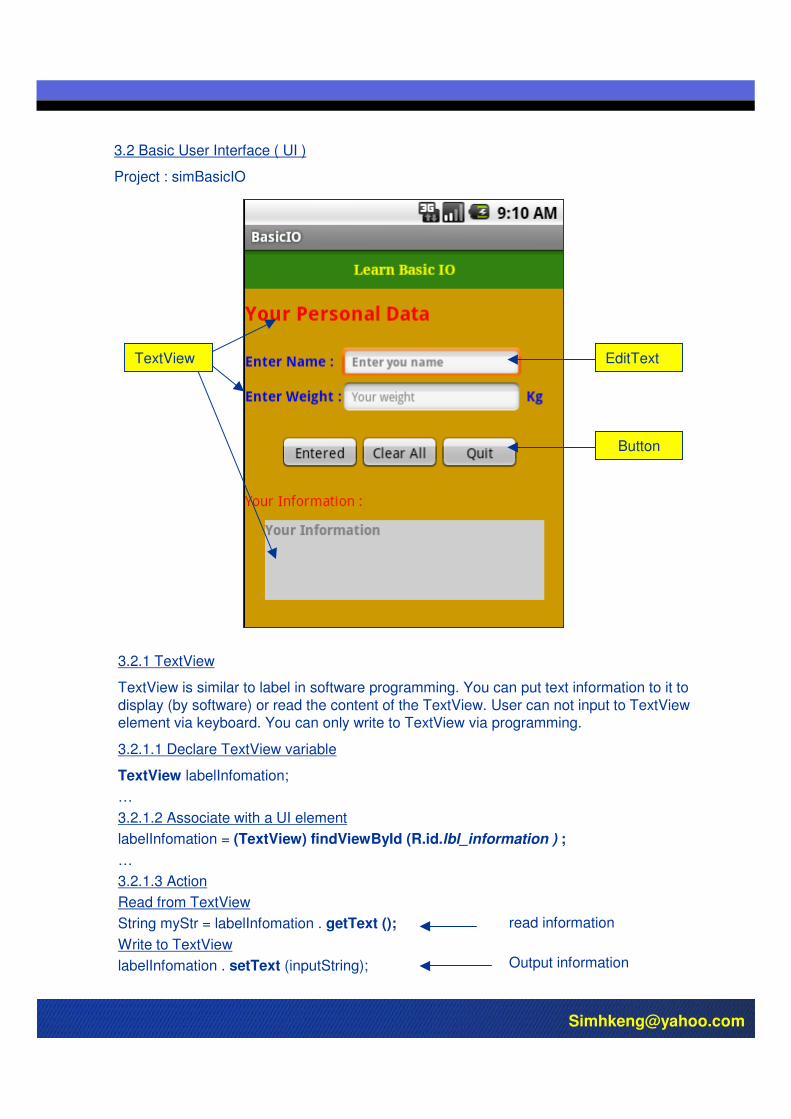
3.2.1 TextView
TextView is similar to label in software programming. You can put text information to it to
display (by software) or read the content of the TextView. User can not input to TextViewelement via keyboard. You can only write to TextView via programming.
3.2.1.1 Declare TextView variable
TextView labelInfomation;
…
3.2.1.2 Associate with a UI element
labelInfomation = (TextView) findViewById (R.id.lbl_information ) ;
…
3.2.1.3 Action
Read from TextView
String myStr = labelInfomation . getText ();
Write to TextView
labelInfomation . setText (inputString); Output information
read information
3.2 Basic User Interface ( UI )
Project : simBasicIO
EditText
Button
TextView
3.2.2 EditText
EditText is the element that user can enter information and software can read/write to EditText
element.
You can also display some guide lines for user input using the Hint property.
3.2.2.1 Declare EditText variable
EditText enterInformation_TextBox ;
. . .
3.2.2.2 Associate with a UI element
enterInformation_TextBox = (EditText) findViewById (R.id.txt_enterInformation);
. . .
3.2.2.3 Action
Read user input from EditText
If ( enterInformation_TextBox . getText() . toString() . equals(“ ") ) {
. . . } else
{ tempStr=tempStr + enterInformation_TextBox.getText().toString()+"\n" ; } Read information
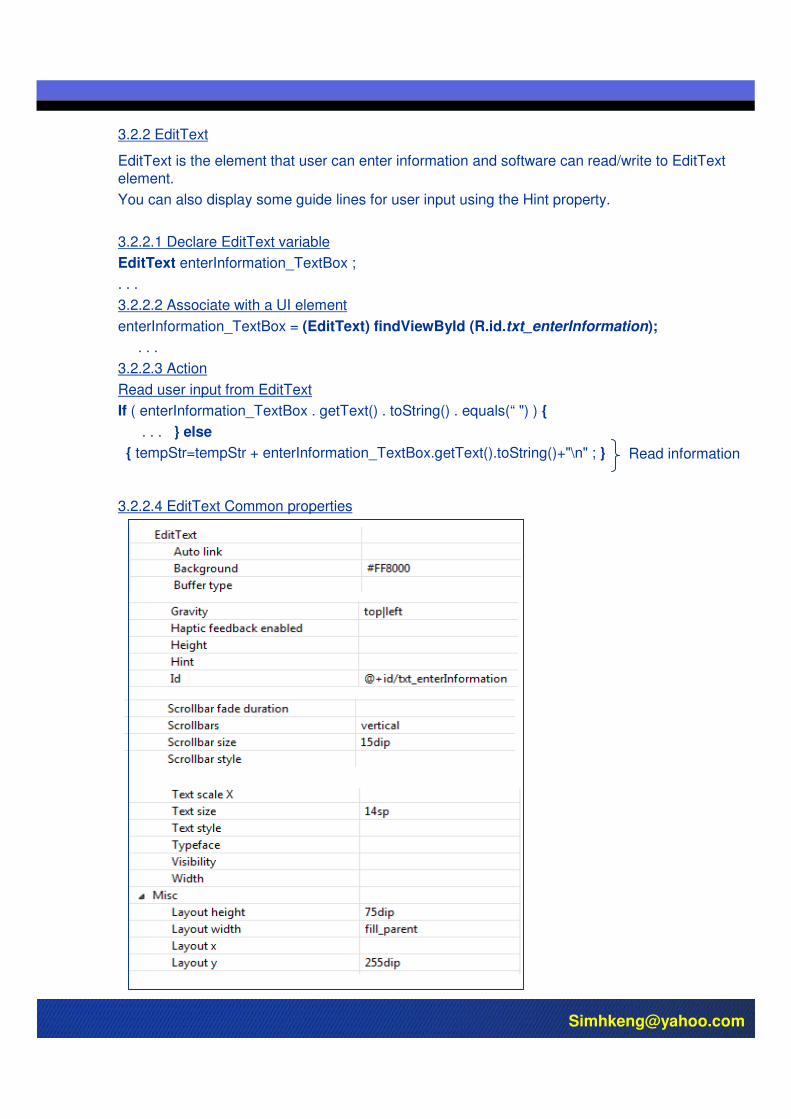
3.2.2.4 EditText Common properties
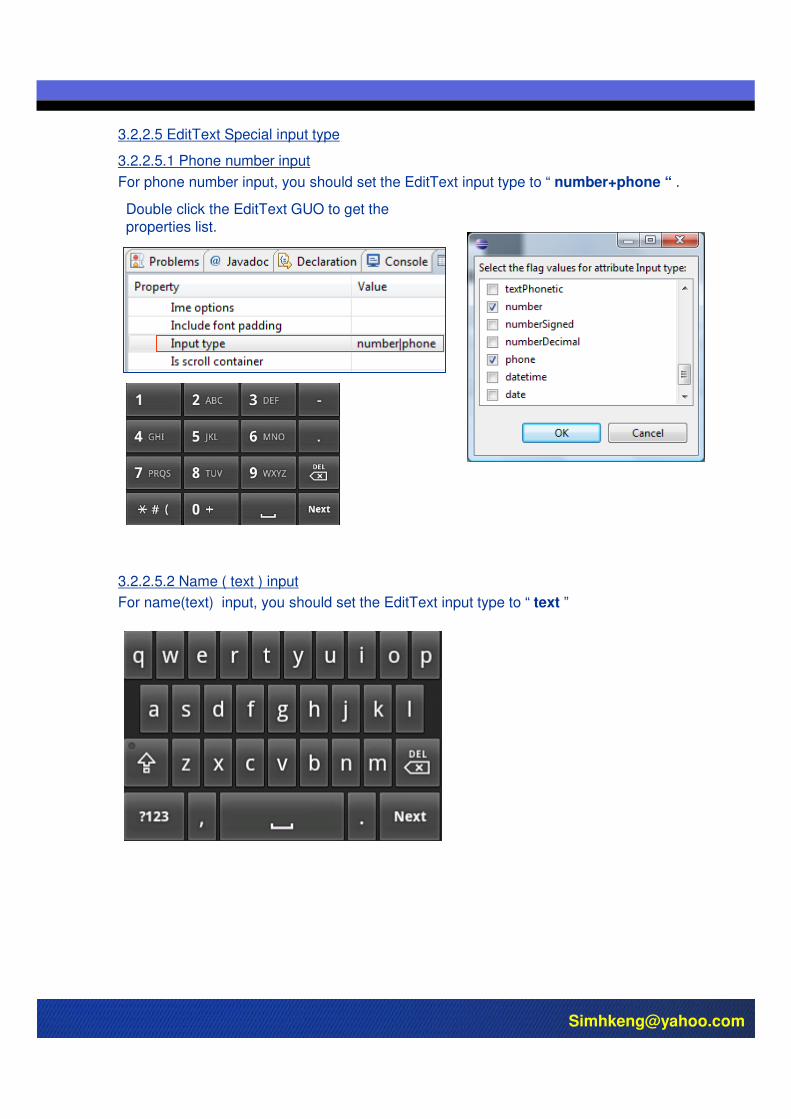
3.2,2.5 EditText Special input type
3.2.2.5.1 Phone number input
For phone number input, you should set the EditText input type to “ number+phone “ .
Double click the EditText GUO to get the
properties list.
3.2.2.5.2 Name ( text ) input
For name(text) input, you should set the EditText input type to “ text ”
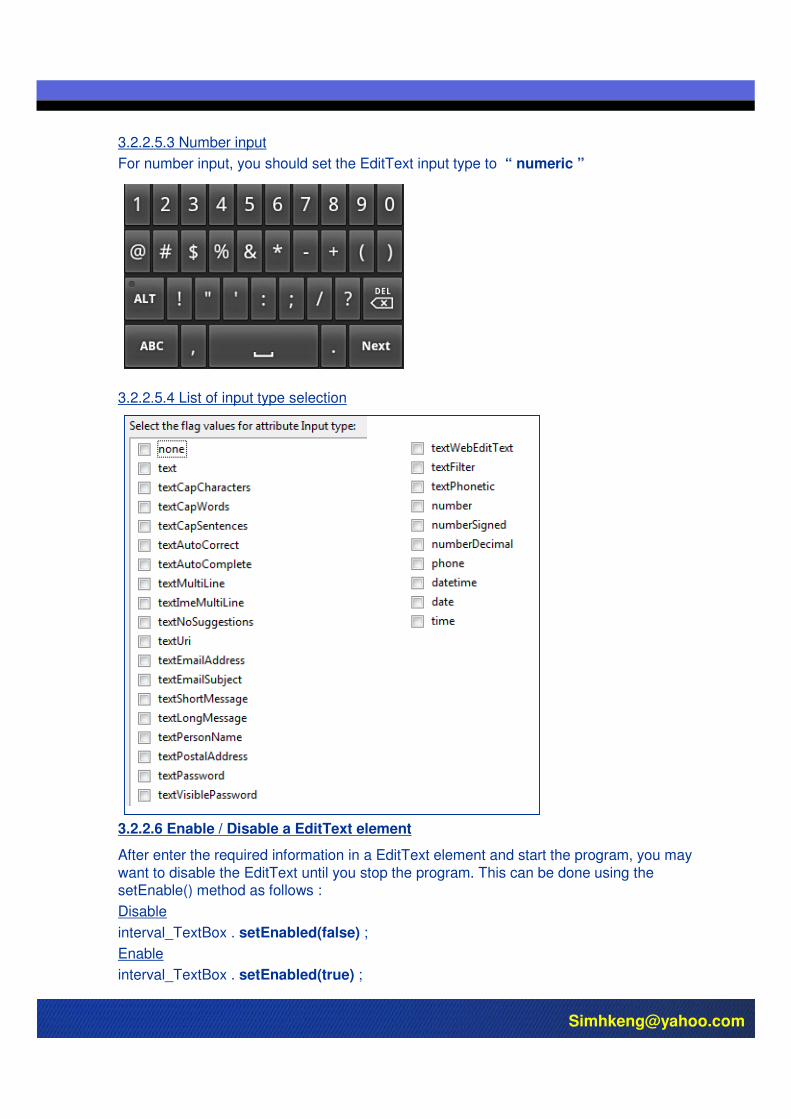
3.2.2.5.4 List of input type selection
3.2.2.5.3 Number input
For number input, you should set the EditText input type to “ numeric ”
3.2.2.6 Enable / Disable a EditText element
After enter the required information in a EditText element and start the program, you may
want to disable the EditText until you stop the program. This can be done using the setEnable() method as follows :
Disable
interval_TextBox . setEnabled(false) ;
Enable
interval_TextBox . setEnabled(true) ;
3.2.3 Button
A button element requires the following :
- Define an element variable
- Link the element variable to the physical element in the layout
-Define the element’s action such as things to do when a button element is clicked
- write the action to be done when the button is clicked
-The click can be normal click or long click. This involve in the action statements .
3.2.3.1 Declare button variable
Button Button entered_Button, quit_Button ;
. . .
3.2.3.2 Associate with a UI element
entered_Button = (Button) findViewById (R.id.btn_entered ) ;
quit_Button = (Button) findViewById (R.id.btn_quit ) ;
3.2.3.3 Action
3.2.3.3.1 set Listener for normal click and long click
Normal click
entered_Button . setOnClickListener( entered ) ;
quit_Button . setOnClickListener( quitProgram ) ;
Long click
quit_Button . setOnLongClickListener( quitProgram ) ;
3.2.3.3.2 define action to be done when click
Normal click
private Button.OnClickListener entered = new Button.OnClickListener() {
public void onClick(View v) {
…. things to do …
}
};
Long click
Long click is used when you want user to be sure he is clicking a important button such as button to close an application.
For long click , the return is boolean instead of void and therefore you need to add a return a true statement
private Button.OnClickListener quitProgram = new Button.OnClickListener() {
public void onLongClick(View v) {
finish();
return true;
}
};
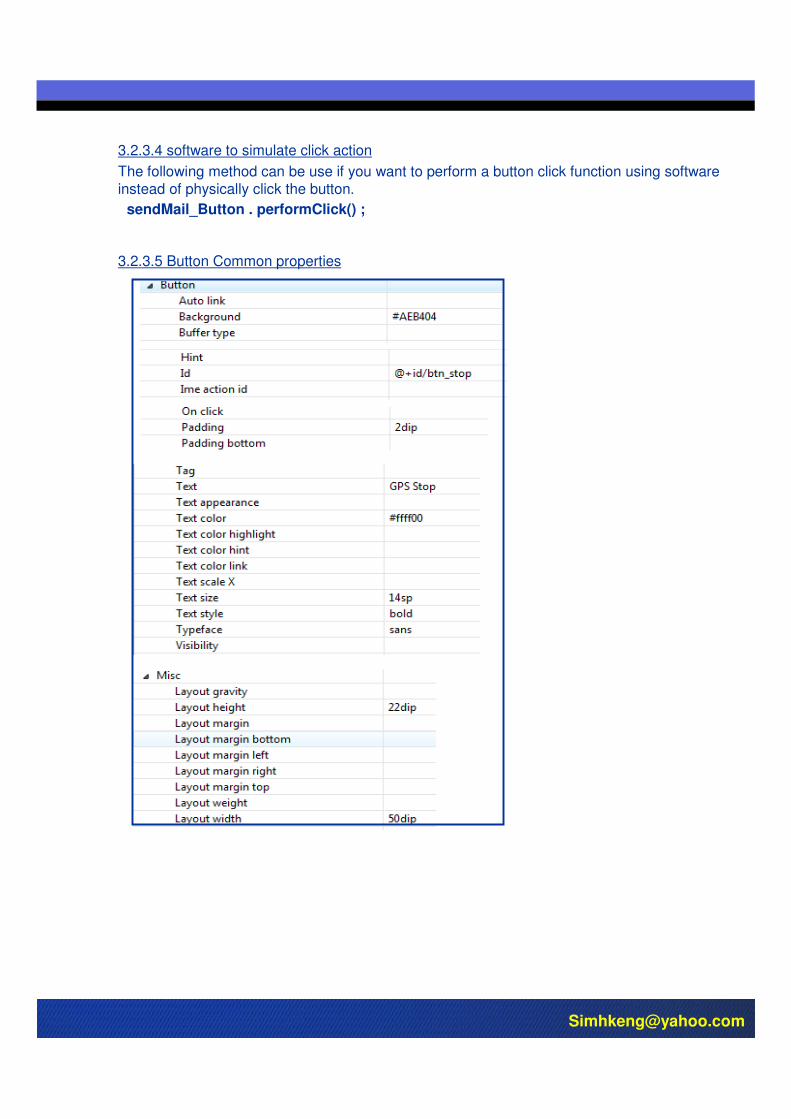
3.2.3.5 Button Common properties
3.2.3.4 software to simulate click action
The following method can be use if you want to perform a button click function using software instead of physically click the button.
sendMail_Button . performClick() ;
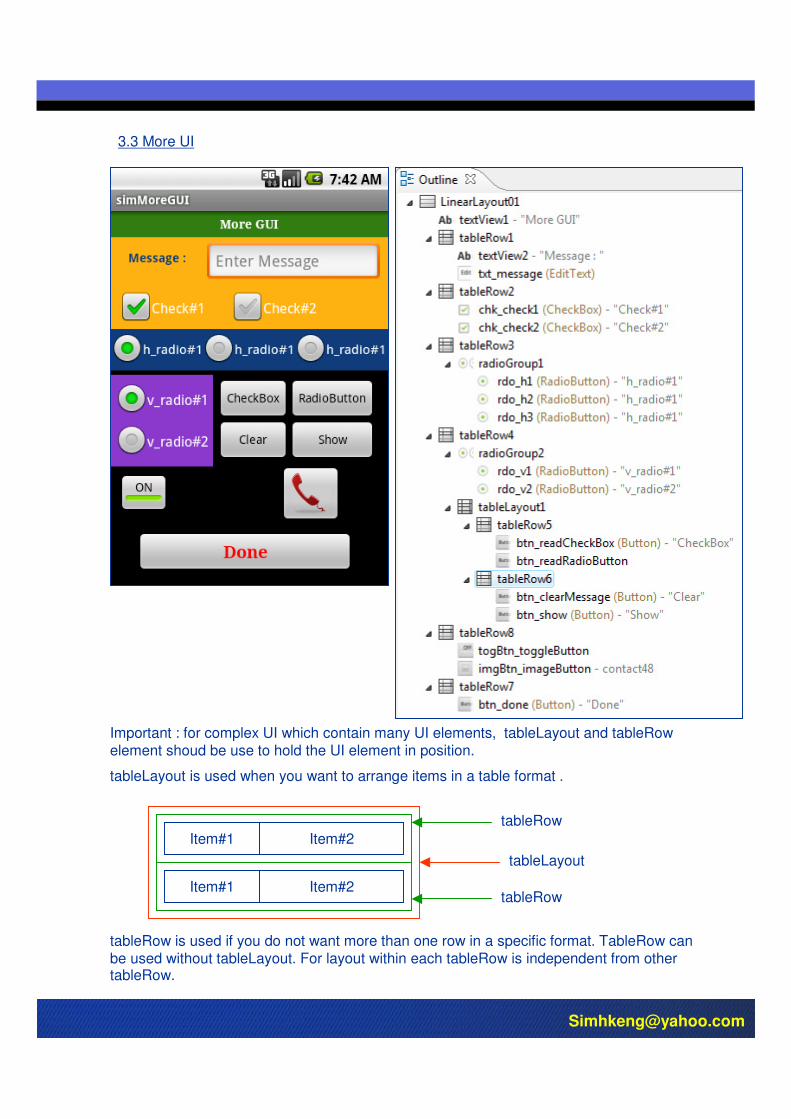
Important : for complex UI which contain many UI elements, tableLayout and tableRowelement shoud be use to hold the UI element in position.
tableLayout is used when you want to arrange items in a table format .
Item#1 Item#2
Item#1 Item#2
tableRow
tableRow
tableLayout
tableRow is used if you do not want more than one row in a specific format. TableRow can be used without tableLayout. For layout within each tableRow is independent from other tableRow.
3.3 More UI
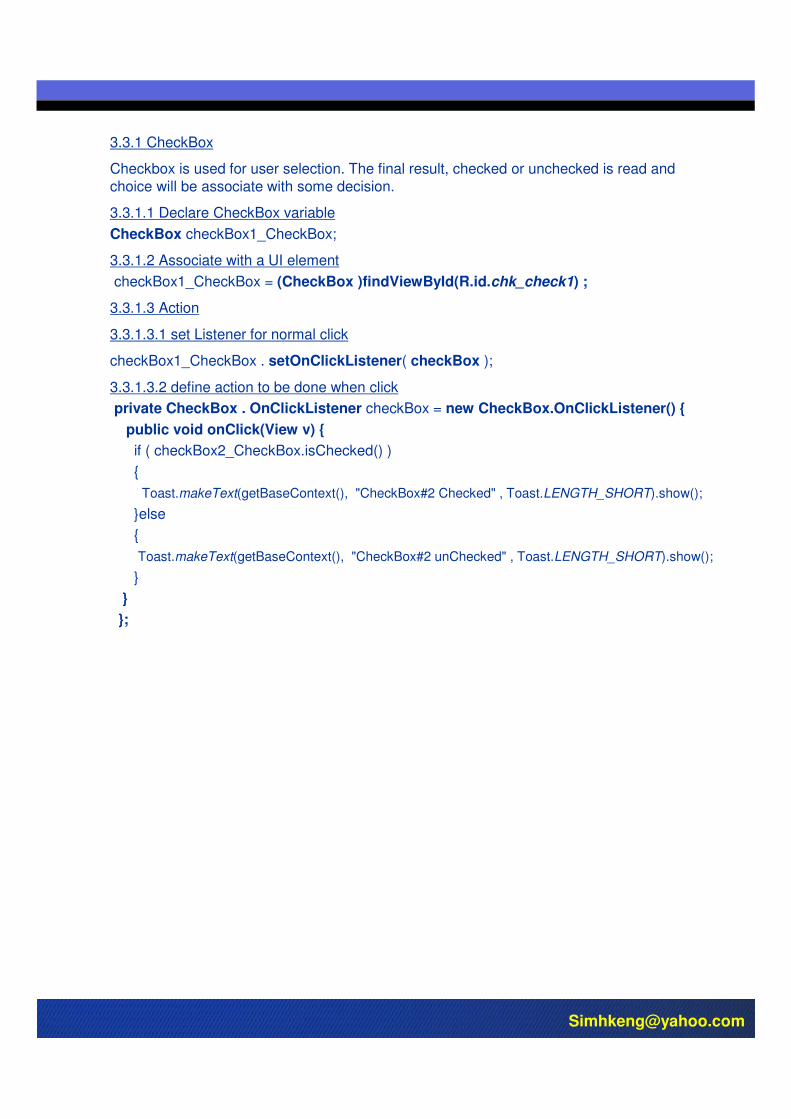
3.3.1 CheckBox
Checkbox is used for user selection. The final result, checked or unchecked is read and
choice will be associate with some decision.
3.3.1.1 Declare CheckBox variable
CheckBox checkBox1_CheckBox;
3.3.1.2 Associate with a UI element
checkBox1_CheckBox = (CheckBox )findViewById(R.id.chk_check1) ;
3.3.1.3 Action
3.3.1.3.1 set Listener for normal click
checkBox1_CheckBox . setOnClickListener( checkBox );
3.3.1.3.2 define action to be done when click
private CheckBox . OnClickListener checkBox = new CheckBox.OnClickListener() {
public void onClick(View v) {
if ( checkBox2_CheckBox.isChecked() )
{
Toast.makeText(getBaseContext(), "CheckBox#2 Checked" , Toast.LENGTH_SHORT).show();
}else
{
Toast.makeText(getBaseContext(), "CheckBox#2 unChecked" , Toast.LENGTH_SHORT).show();
}
}
};
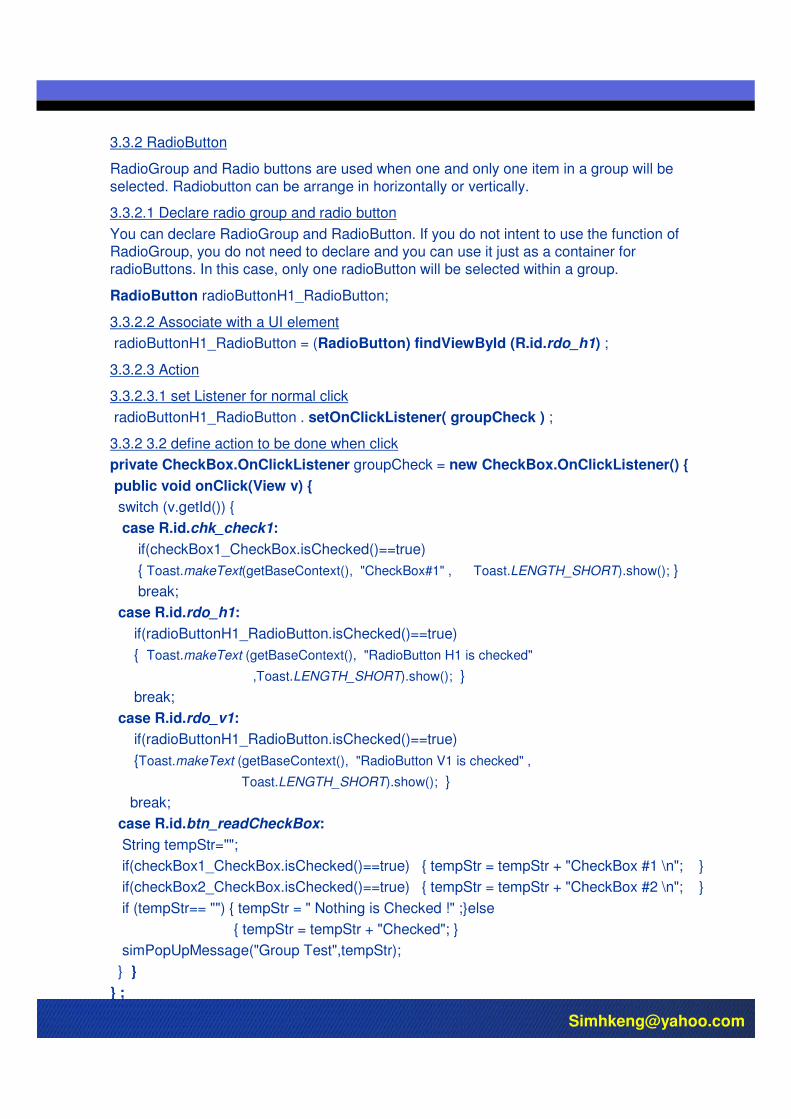
3.3.2 RadioButton
RadioGroup and Radio buttons are used when one and only one item in a group will be
selected. Radiobutton can be arrange in horizontally or vertically.
3.3.2.1 Declare radio group and radio button
You can declare RadioGroup and RadioButton. If you do not intent to use the function of RadioGroup, you do not need to declare and you can use it just as a container for radioButtons. In this case, only one radioButton will be selected within a group.
RadioButton radioButtonH1_RadioButton;
3.3.2.2 Associate with a UI element
radioButtonH1_RadioButton = (RadioButton) findViewById (R.id.rdo_h1) ;
3.3.2.3 Action
3.3.2.3.1 set Listener for normal click
radioButtonH1_RadioButton . setOnClickListener( groupCheck ) ;
3.3.2 3.2 define action to be done when click
private CheckBox.OnClickListener groupCheck = new CheckBox.OnClickListener() {
public void onClick(View v) {
switch (v.getId()) {
case R.id.chk_check1:
if(checkBox1_CheckBox.isChecked()==true)
{ Toast.makeText(getBaseContext(), "CheckBox#1" , Toast.LENGTH_SHORT).show(); }
break;
case R.id.rdo_h1:
if(radioButtonH1_RadioButton.isChecked()==true)
{ Toast.makeText (getBaseContext(), "RadioButton H1 is checked"
,Toast.LENGTH_SHORT).show(); }
break;
case R.id.rdo_v1:
if(radioButtonH1_RadioButton.isChecked()==true)
{Toast.makeText (getBaseContext(), "RadioButton V1 is checked" ,
Toast.LENGTH_SHORT).show(); }
break;
case R.id.btn_readCheckBox:
String tempStr="";
if(checkBox1_CheckBox.isChecked()==true) { tempStr = tempStr + "CheckBox #1 \n"; }
if(checkBox2_CheckBox.isChecked()==true) { tempStr = tempStr + "CheckBox #2 \n"; }
if (tempStr== "") { tempStr = " Nothing is Checked !" ;}else
{ tempStr = tempStr + "Checked"; }
simPopUpMessage("Group Test",tempStr);
} }
} ;
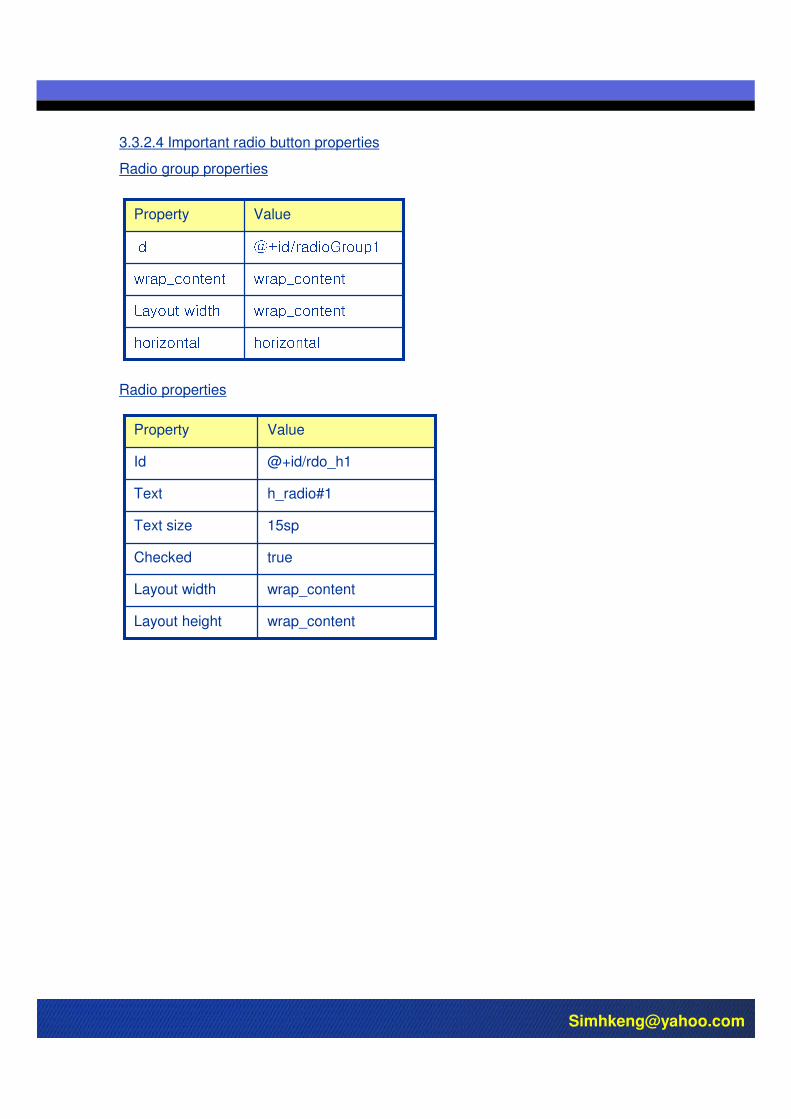
3.3.2.4 Important radio button properties
Radio group properties
ValueProperty
horizontalhorizontal wrap_contentLayout width wrap_contentwrap_content @+id/radioGroup1IdValueProperty
wrap_contentLayout height
wrap_contentLayout width
trueChecked
15spText size
h_radio#1Text
@+id/rdo_h1Id
Radio properties
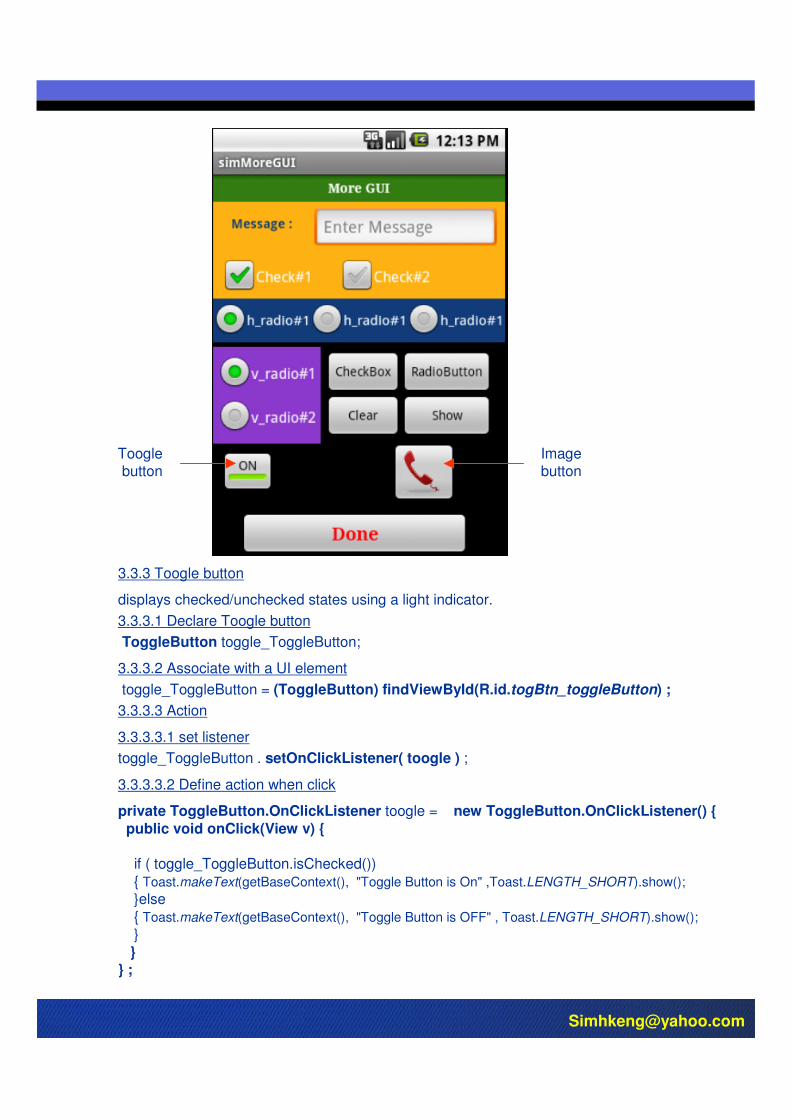
3.3.3 Toogle button
displays checked/unchecked states using a light indicator.
3.3.3.1 Declare Toogle button
ToggleButton toggle_ToggleButton;
3.3.3.2 Associate with a UI element
toggle_ToggleButton = (ToggleButton) findViewById(R.id.togBtn_toggleButton) ;
3.3.3.3 Action
3.3.3.3.1 set listener
toggle_ToggleButton . setOnClickListener( toogle ) ;
3.3.3.3.2 Define action when click
private ToggleButton.OnClickListener toogle = new ToggleButton.OnClickListener() {
public void onClick(View v) {
if ( toggle_ToggleButton.isChecked())
{ Toast.makeText(getBaseContext(), "Toggle Button is On" ,Toast.LENGTH_SHORT).show();
}else
{ Toast.makeText(getBaseContext(), "Toggle Button is OFF" , Toast.LENGTH_SHORT).show();
}
}} ;
Toogle button
Image button
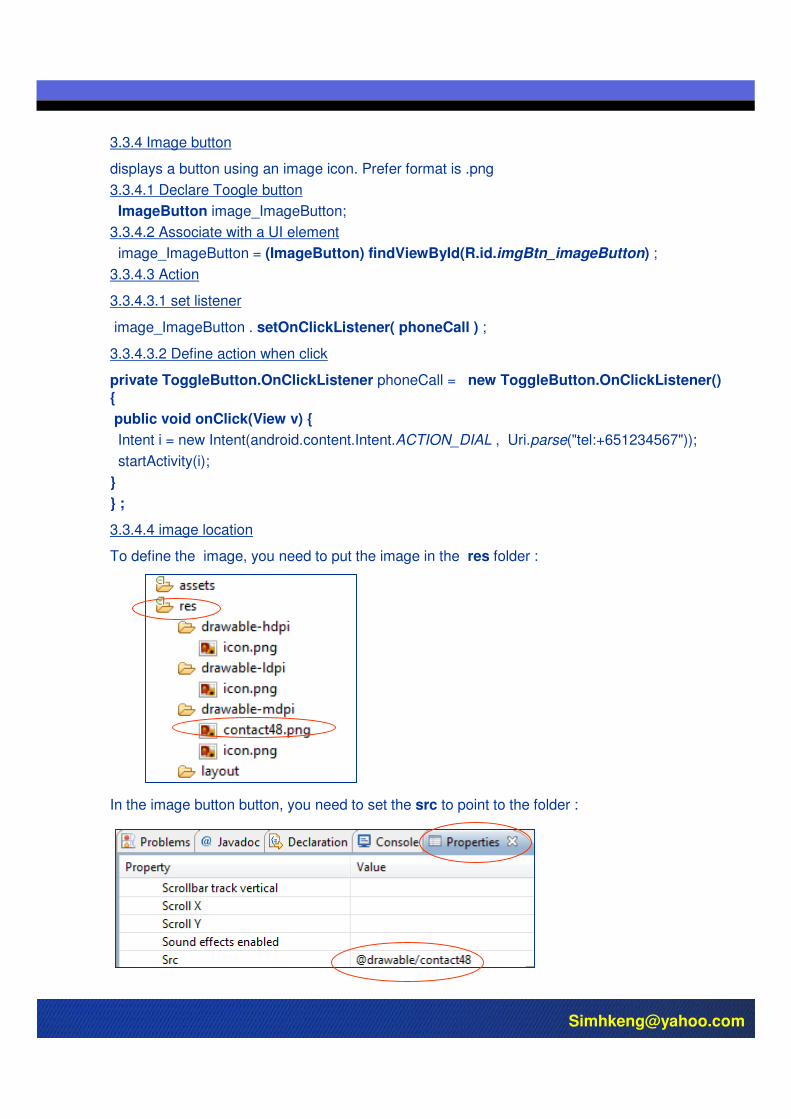
3.3.4 Image button
displays a button using an image icon. Prefer format is .png
3.3.4.1 Declare Toogle button
ImageButton image_ImageButton;
3.3.4.2 Associate with a UI element
image_ImageButton = (ImageButton) findViewById(R.id.imgBtn_imageButton) ;
3.3.4.3 Action
3.3.4.3.1 set listener
image_ImageButton . setOnClickListener( phoneCall ) ;
3.3.4.3.2 Define action when click
private ToggleButton.OnClickListener phoneCall = new ToggleButton.OnClickListener()
{
public void onClick(View v) {
Intent i = new Intent(android.content.Intent.ACTION_DIAL , Uri.parse("tel:+651234567"));
startActivity(i);
}
} ;
3.3.4.4 image location
To define the image, you need to put the image in the res folder :
In the image button button, you need to set the src to point to the folder :
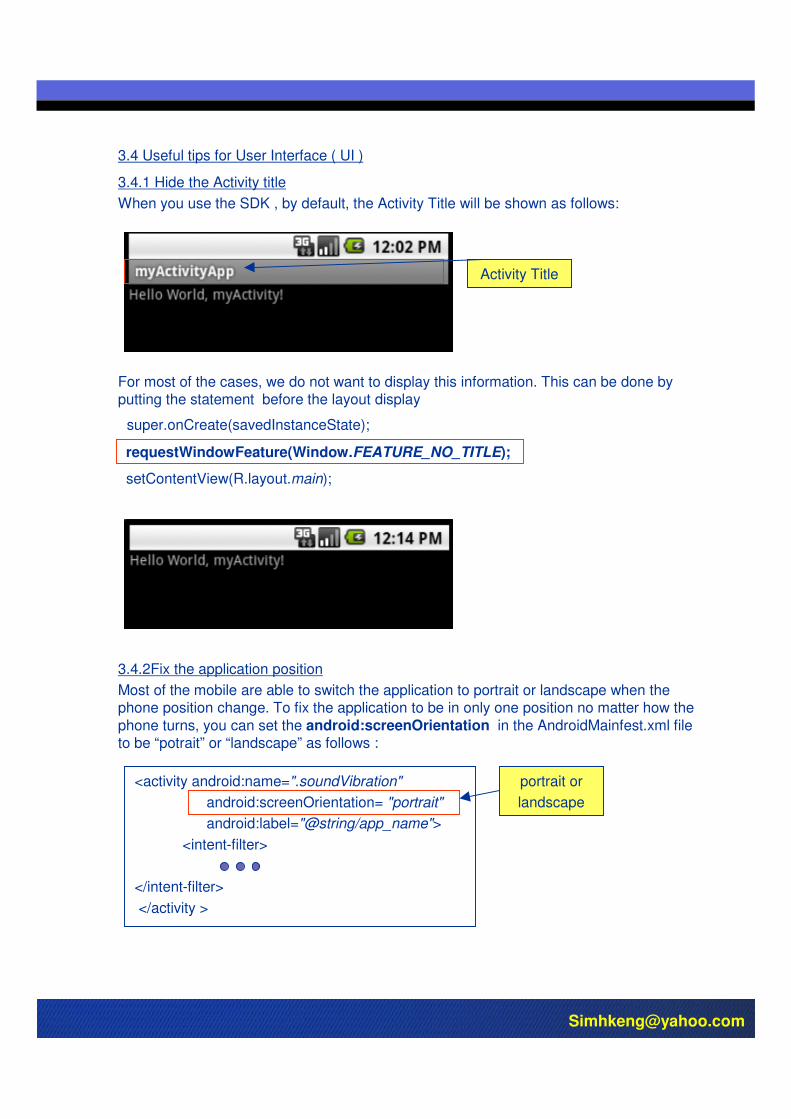
3.4.1 Hide the Activity title
When you use the SDK , by default, the Activity Title will be shown as follows:
Activity Title
For most of the cases, we do not want to display this information. This can be done by putting the statement before the layout display
super.onCreate(savedInstanceState);
requestWindowFeature(Window.FEATURE_NO_TITLE);
setContentView(R.layout.main);
3.4.2Fix the application position
Most of the mobile are able to switch the application to portrait or landscape when the phone position change. To fix the application to be in only one position no matter how the
phone turns, you can set the android:screenOrientation in the AndroidMainfest.xml file to be “potrait” or “landscape” as follows :
<activity android:name=".soundVibration"
android:screenOrientation= "portrait"
android:label="@string/app_name">
<intent-filter>
</intent-filter>
</activity >
portrait or
landscape
3.4 Useful tips for User Interface ( UI )
3.4.3 Phone hardware independent dimension
Dimension for user interface normally in term of pixel. But there are many different kind of mobile devices which has different dimension in the display. If you run an application on a
device with dots per inch ( dpi ), the user interface appear smaller and smaller. To solve this problem, it is recommended that you should use the resolution Independent measurement .
In Android, use the following units for dimension :
dp - density-independent pixel . An extract unit based on the density of the screen. On a
display with 160 dot per inch, 1 dp = 1 px ( pixel )
dip – synonym for dp, use more often in Google .
sp – scale-independent pixels. Similar to dp but also scaled by user’s font size preference.
recommendation:
use sp for text size
Use dip for the rest.
3.4.4 Add Webview
To add a Webview object, place the following code in the layout .xml file ( NO GUI ? )
<WebView android:id="@+id/WebView01"android:layout_width="wrap_content"
android:layout_height="wrap_content“/>
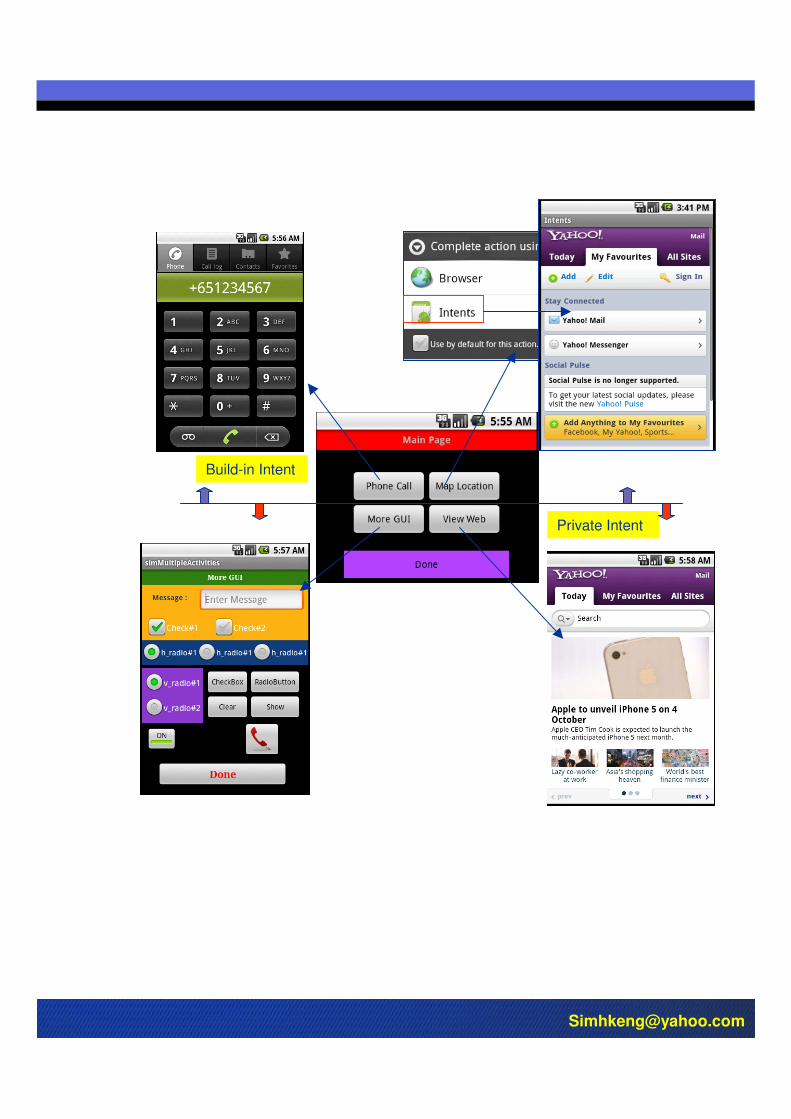
4.0 Intent
Project : simMultipleActivities
When your application has more than one activity, to navigate from one activity to another,
you have to use intent. An intent is a mechanism for describing a specific action. It is basically a message that you pass to the Android OS saying that you want to do something.
To start a new activity in Android, we need to create an instance of the intent class. There are two kinds of intents :
Build-in intent
Registered with the system and can be called from any application
Private (anonymous) intent
Used within a single application . We will discuss more for the private intent.
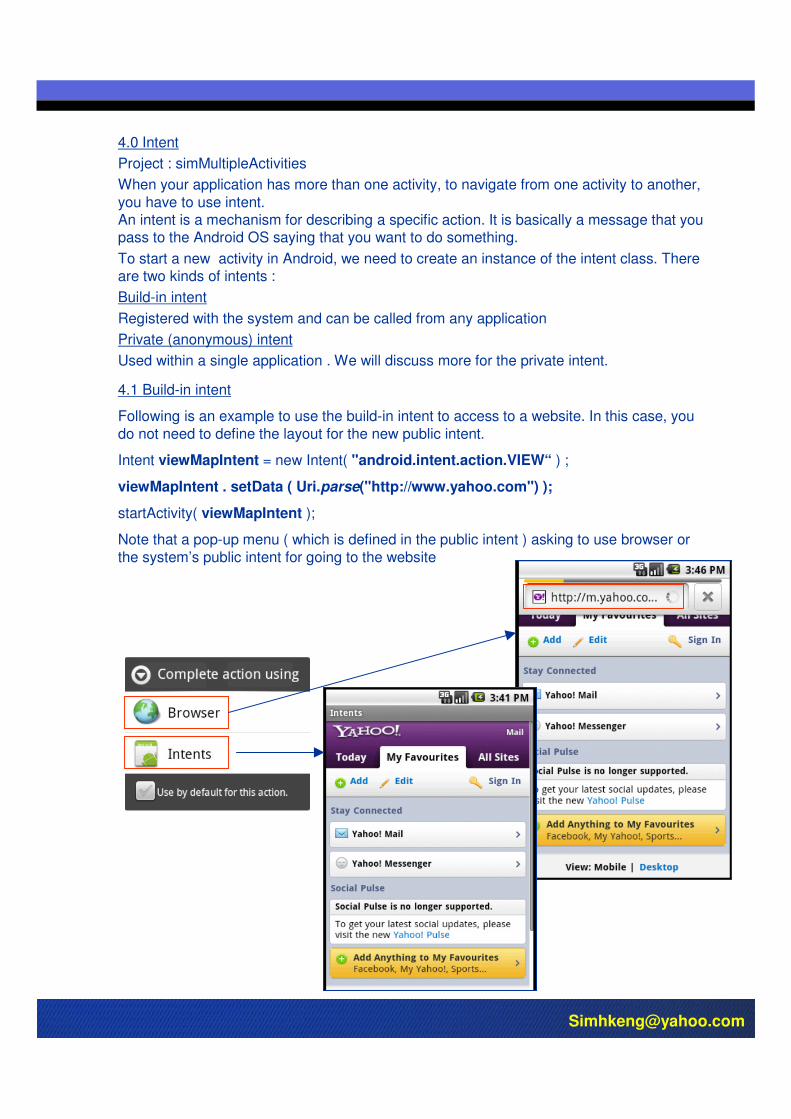
4.1 Build-in intent
Following is an example to use the build-in intent to access to a website. In this case, you
do not need to define the layout for the new public intent.
Intent viewMapIntent = new Intent( "android.intent.action.VIEW“ ) ;
viewMapIntent . setData ( Uri.parse("http://www.yahoo.com") );
startActivity( viewMapIntent );
Note that a pop-up menu ( which is defined in the public intent ) asking to use browser or
the system’s public intent for going to the website
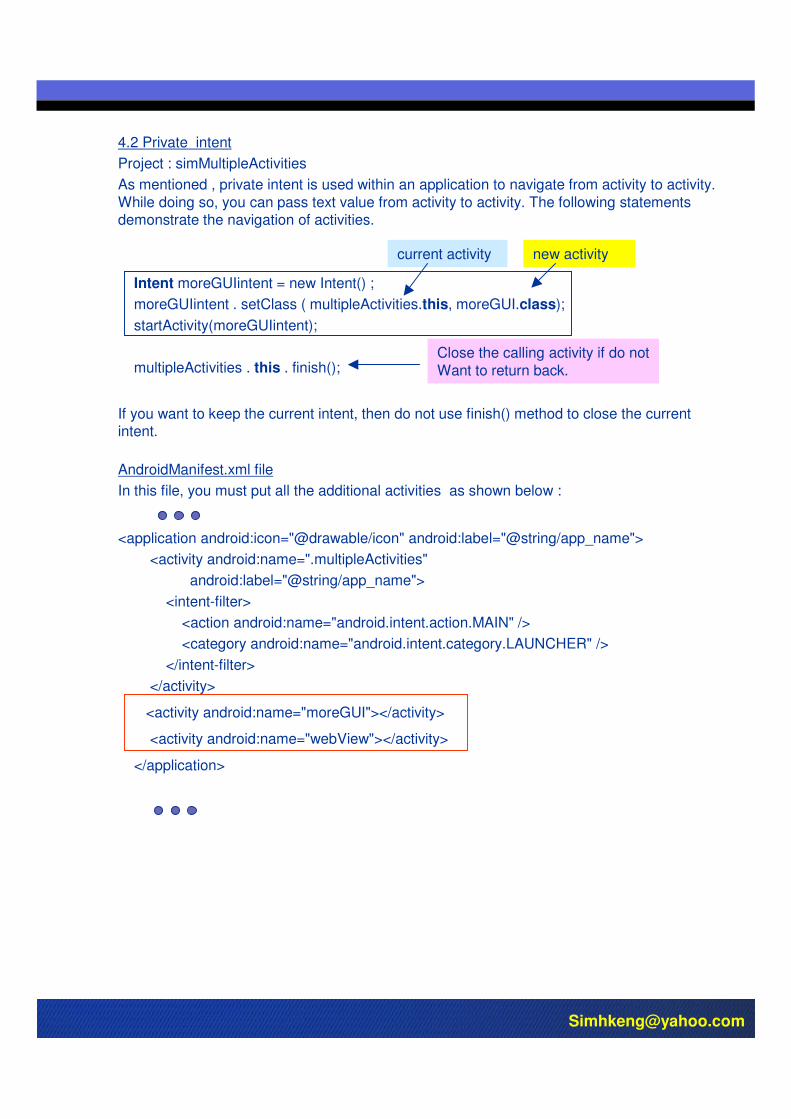
If you want to keep the current intent, then do not use finish() method to close the current intent.
current activity new activity
Intent moreGUIintent = new Intent() ;
moreGUIintent . setClass ( multipleActivities.this, moreGUI.class);
startActivity(moreGUIintent);
multipleActivities . this . finish(); Close the calling activity if do not
Want to return back.
4.2 Private intent
Project : simMultipleActivities
As mentioned , private intent is used within an application to navigate from activity to activity.
While doing so, you can pass text value from activity to activity. The following statements demonstrate the navigation of activities.
AndroidManifest.xml file
In this file, you must put all the additional activities as shown below :
<application android:icon="@drawable/icon" android:label="@string/app_name">
<activity android:name=".multipleActivities"
android:label="@string/app_name">
<intent-filter>
<action android:name="android.intent.action.MAIN" />
<category android:name="android.intent.category.LAUNCHER" />
</intent-filter>
</activity>
<activity android:name="moreGUI"></activity>
<activity android:name="webView"></activity>
</application>
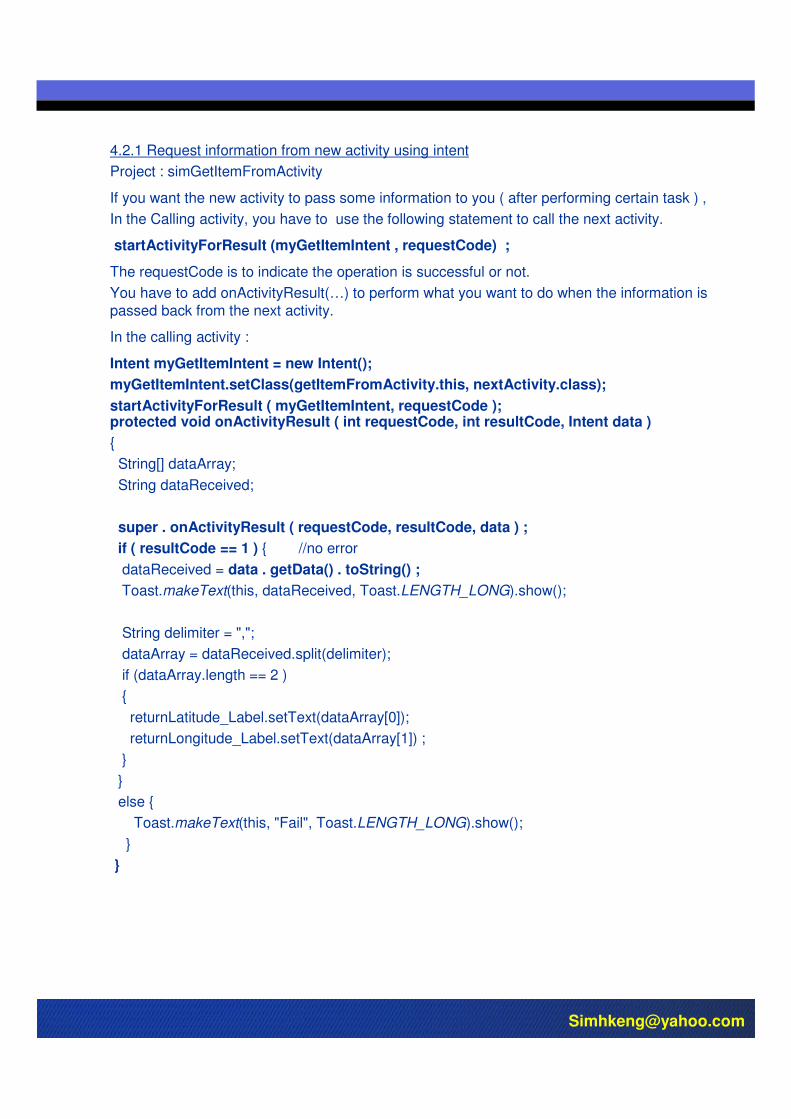
protected void onActivityResult ( int requestCode, int resultCode, Intent data )
{
String[] dataArray;
String dataReceived;
super . onActivityResult ( requestCode, resultCode, data ) ;
if ( resultCode == 1 ) { //no error
dataReceived = data . getData() . toString() ;
Toast.makeText(this, dataReceived, Toast.LENGTH_LONG).show();
String delimiter = ",";
dataArray = dataReceived.split(delimiter);
if (dataArray.length == 2 )
{
returnLatitude_Label.setText(dataArray[0]);
returnLongitude_Label.setText(dataArray[1]) ;
}
}
else {
Toast.makeText(this, "Fail", Toast.LENGTH_LONG).show();
}
}
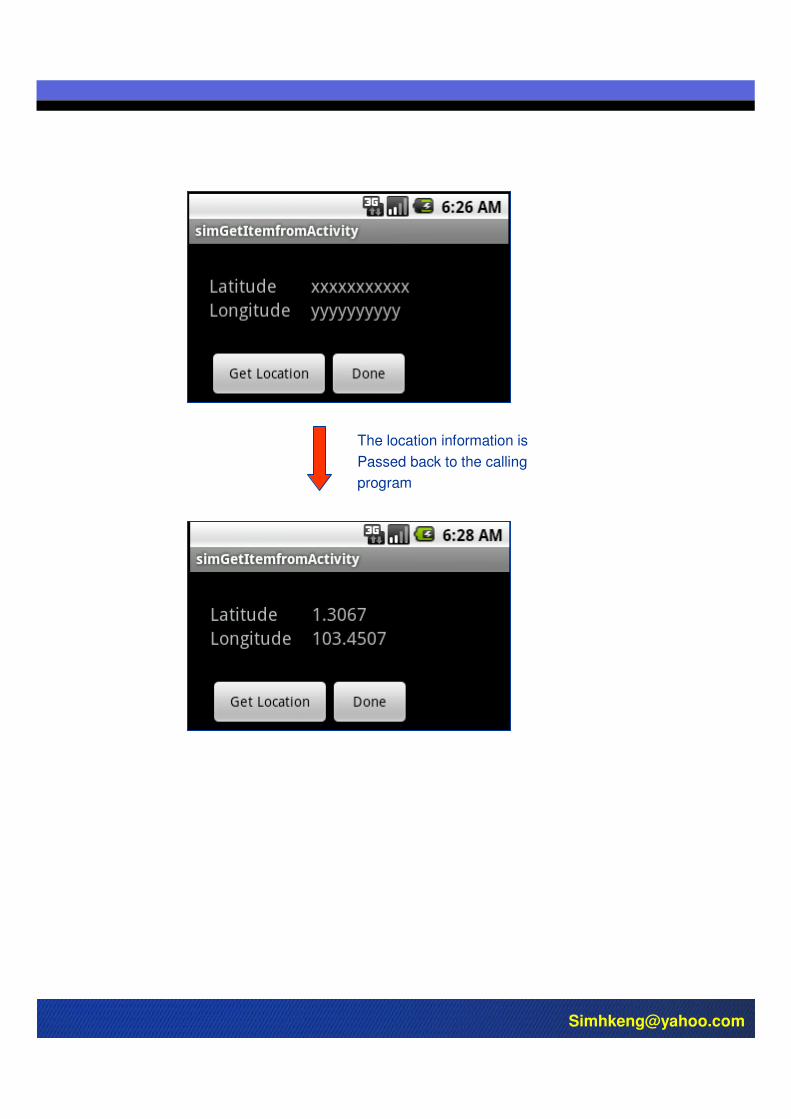
4.2.1 Request information from new activity using intent
Project : simGetItemFromActivity
If you want the new activity to pass some information to you ( after performing certain task ) ,
In the Calling activity, you have to use the following statement to call the next activity.
startActivityForResult (myGetItemIntent , requestCode) ;
The requestCode is to indicate the operation is successful or not.
You have to add onActivityResult(…) to perform what you want to do when the information is
passed back from the next activity.
In the calling activity :
Intent myGetItemIntent = new Intent();
myGetItemIntent.setClass(getItemFromActivity.this, nextActivity.class);
startActivityForResult ( myGetItemIntent, requestCode );
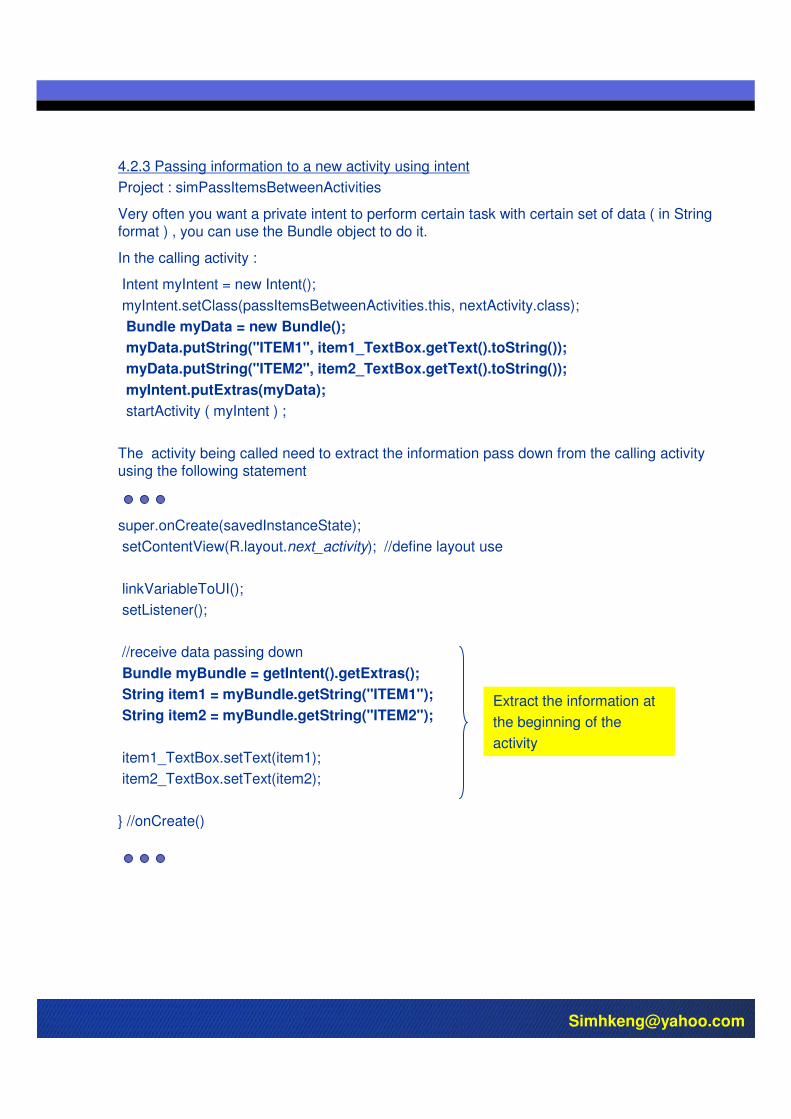
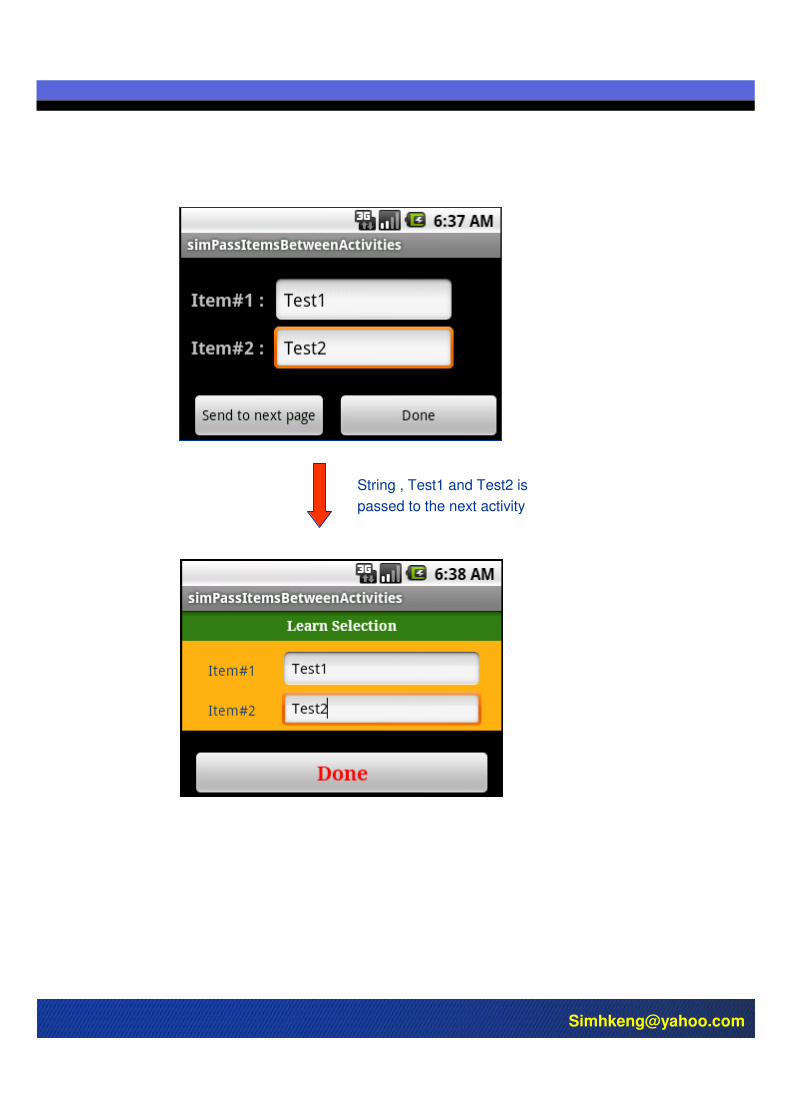
4.2.3 Passing information to a new activity using intent
Project : simPassItemsBetweenActivities
Very often you want a private intent to perform certain task with certain set of data ( in String format ) , you can use the Bundle object to do it.
In the calling activity :
Intent myIntent = new Intent();
myIntent.setClass(passItemsBetweenActivities.this, nextActivity.class);
Bundle myData = new Bundle();
myData.putString("ITEM1", item1_TextBox.getText().toString());
myData.putString("ITEM2", item2_TextBox.getText().toString());
myIntent.putExtras(myData);
startActivity ( myIntent ) ;
The activity being called need to extract the information pass down from the calling activity using the following statement
super.onCreate(savedInstanceState);
setContentView(R.layout.next_activity); //define layout use
linkVariableToUI();
setListener();
//receive data passing down
Bundle myBundle = getIntent().getExtras();
String item1 = myBundle.getString("ITEM1");
String item2 = myBundle.getString("ITEM2");
item1_TextBox.setText(item1);
item2_TextBox.setText(item2);
} //onCreate()
Extract the information at
the beginning of the
activity
Android Programming Basic
( Part 2 )
If you need part 2, please email to
Name : HK Sim
Contact : [email protected]